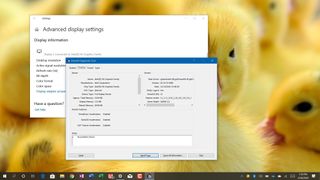
(Image credit: Windows Central)
On computers, the graphics card is an essential component that makes it possible to render every pixel you see on the screen when you’re navigating the Windows 10 desktop, running an app, playing a game, etc. Usually, devices have a graphics card from one of the three leading manufacturers, including NVIDIA, AMD, or Intel. Check out our very best graphics cards roundup for tons of options.
Although for the most part, if you’re a regular user, you don’t need to worry about the graphics specifications on your device, it might be something important for users who work with graphics-intensive applications or play games. Typically, because if you don’t have a card with a powerful graphics processing unit (GPU), it may not be possible for an application to perform correctly. Or, if you’re a gamer, you may not be able to play games, or you may need to determine the hardware to adjust the settings accordingly to prevent affecting performance.
Whatever your reasons might be, Windows 10 includes multiple ways to quickly find out the graphics card specifications using Settings, Device Manager, System Information, DirectX Diagnostic Tool, and Task Manager, and, of course, using the card’s control panel software.
In this Windows 10 guide, we’ll walk you through the steps to check which graphics card is currently installed on your computer.
- How to find out graphics card details using Settings
- How to find out graphics card details using Device Manager
- How to find out graphics card details using System Information
- How to find out graphics card details using DirectX Diagnostic Tool
- How to find out graphics card details using Task Manager
- How to find out graphics card details using control panel
How to find out graphics card details using Settings
To find out the graphics card manufacturer and model using the Settings app, use these steps:
- Open Settings.
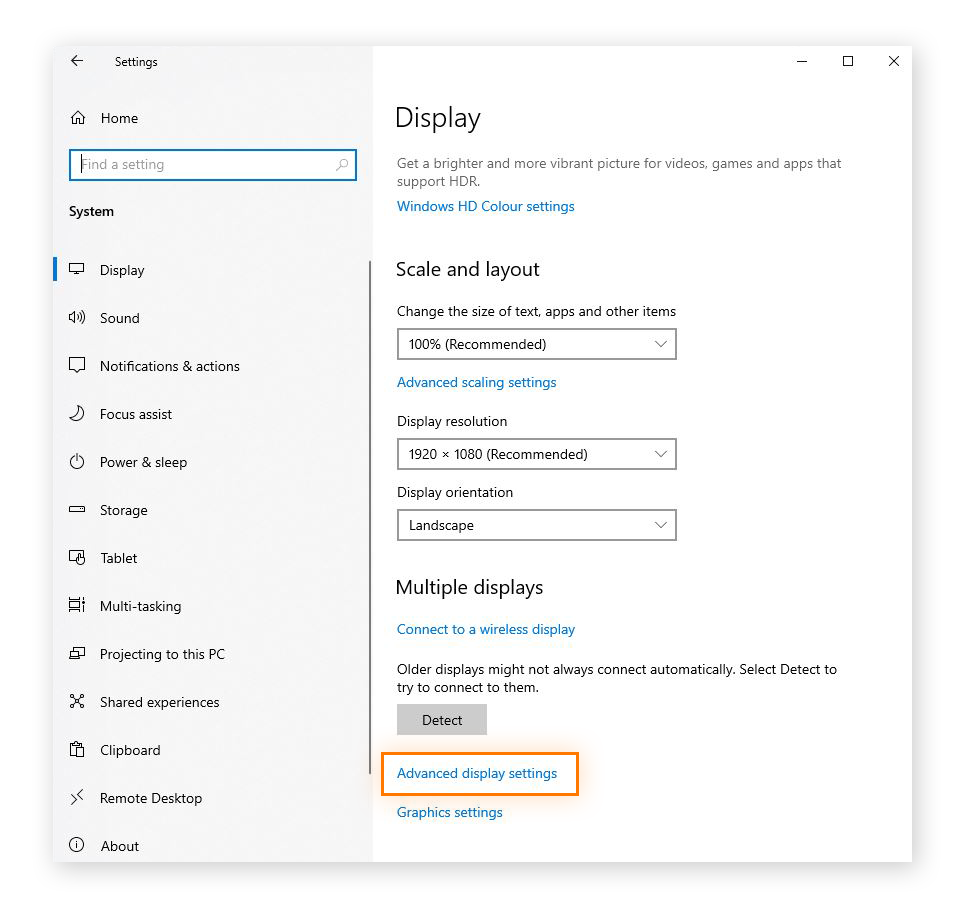
- Click on System.
- Click on Display.
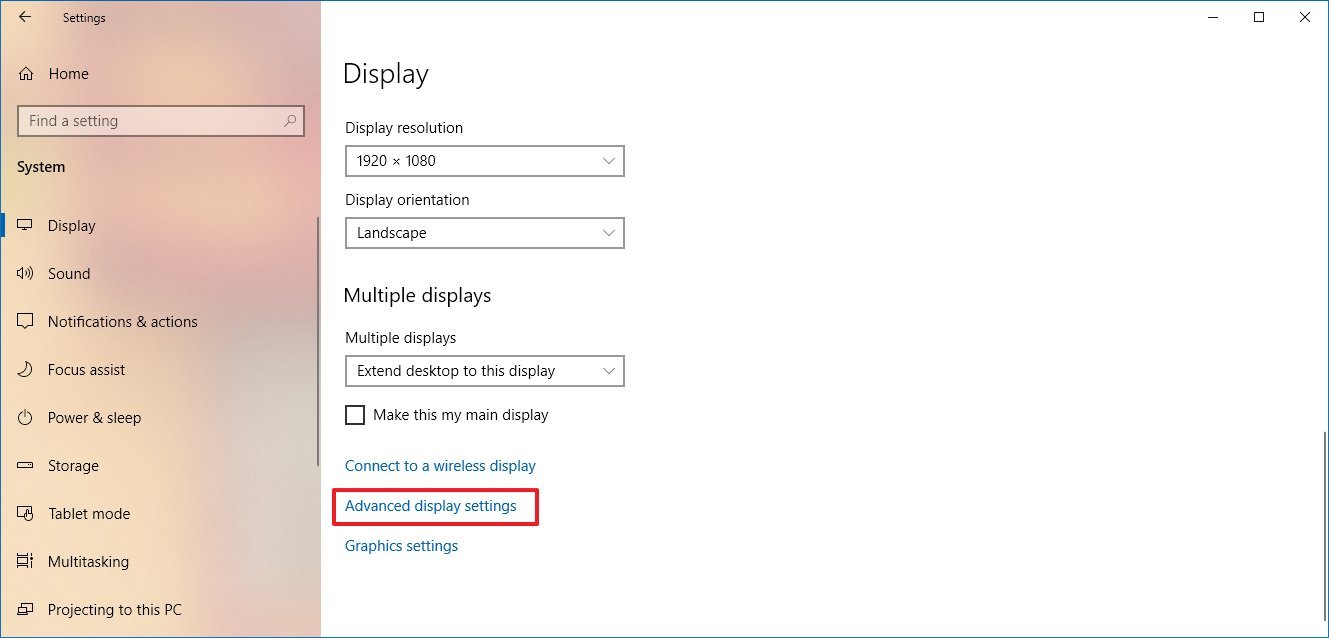
- Under the «Multiple displays» section, click the Advanced display settings option.
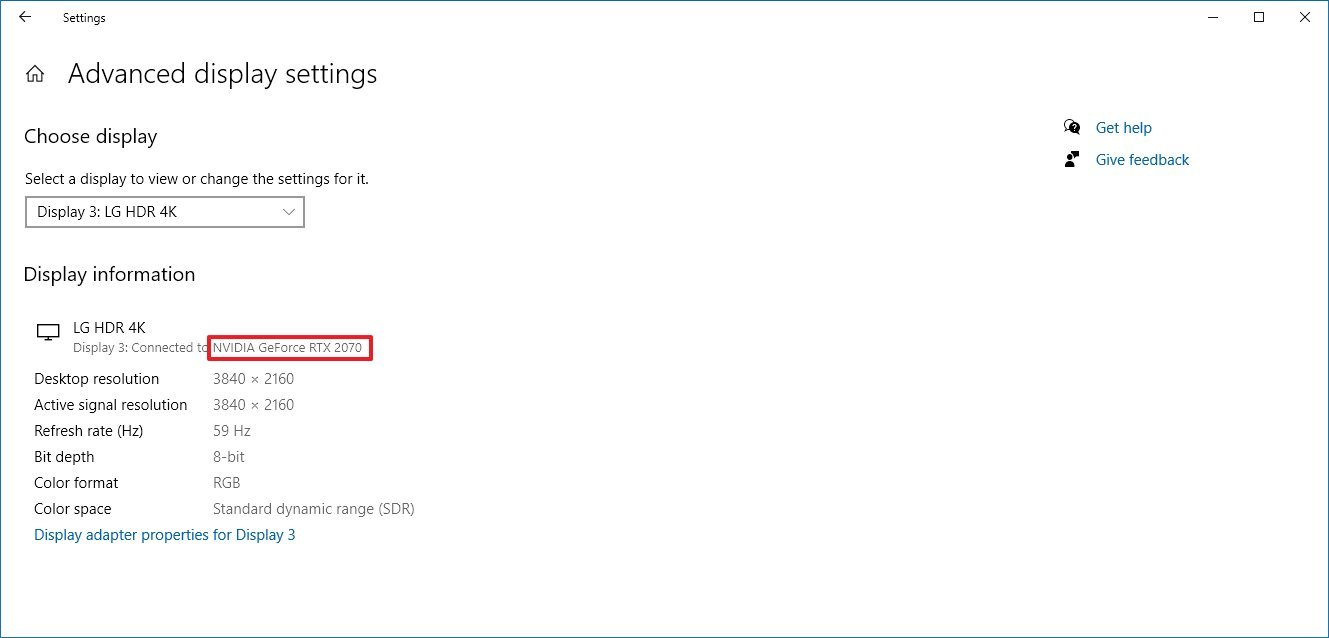
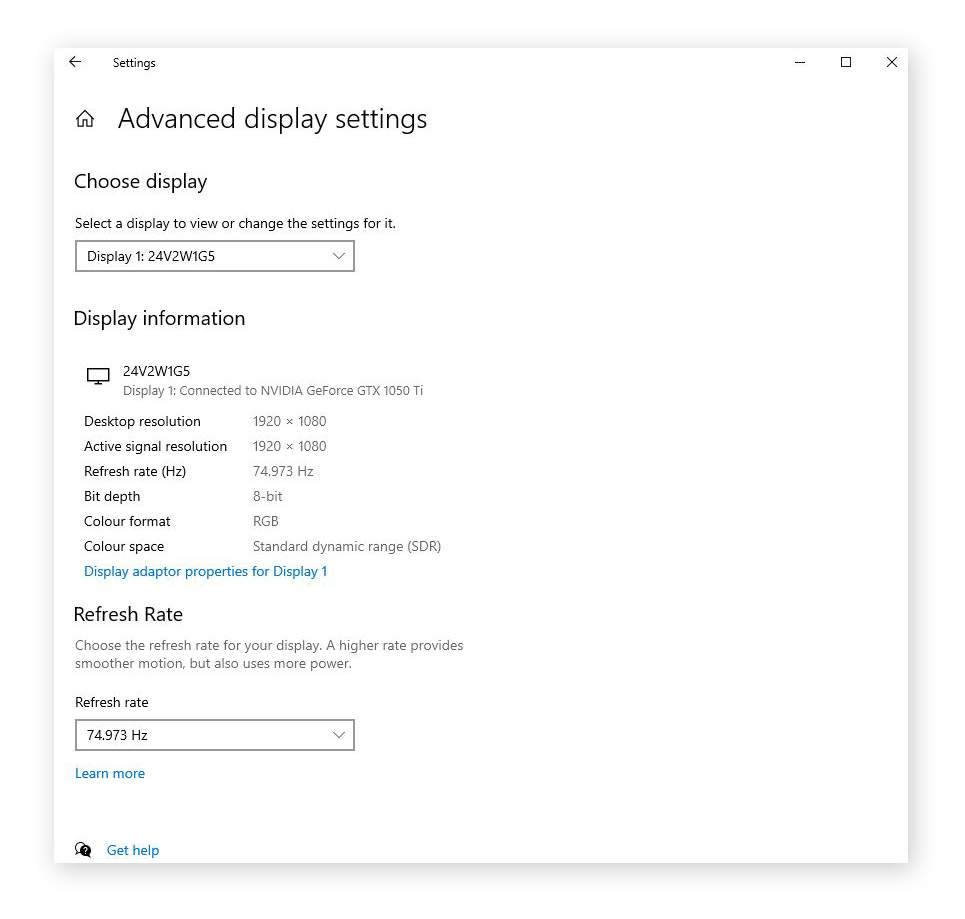
- Under the «Display information» section, confirm the graphics card vendor and model.
Once you complete the steps, you will now have an understanding of the video card installed on your device.
How to find out graphics card details using Device Manager
To determine the graphics card installed on your computer with Device Manager, use these steps:
- Open Start.
- Search for Device Manager and click the top result to open the tool.
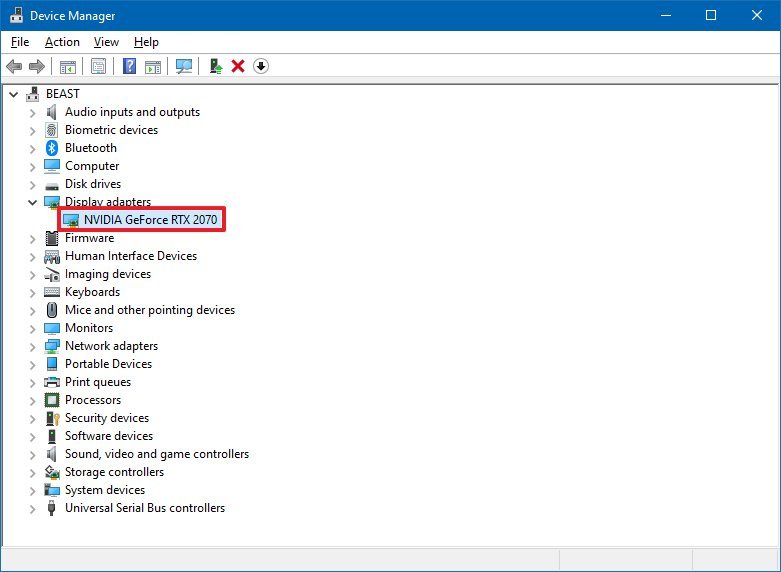
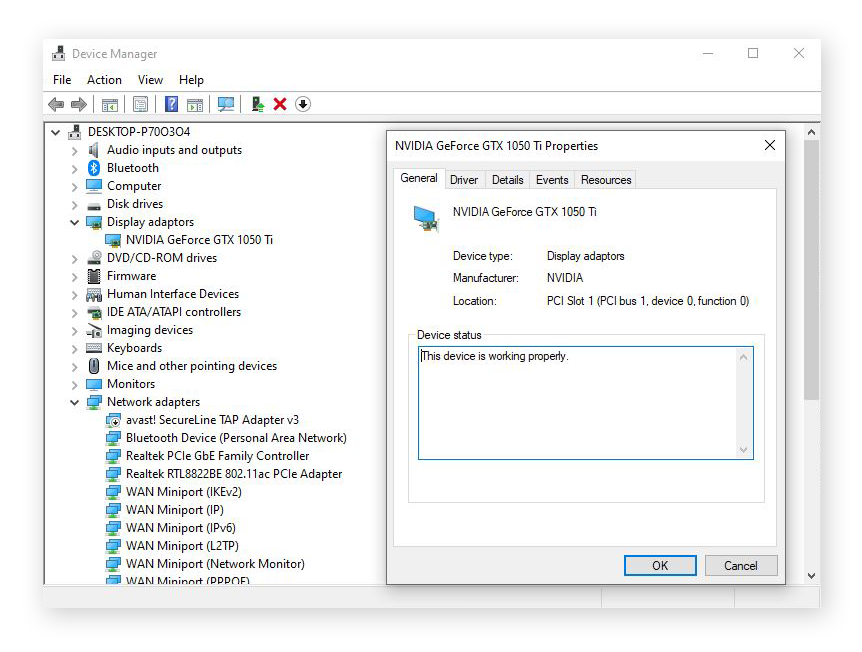
- Expand the Display adapters branch.
- Confirm the manufacturer and model of the video card.
After you complete the steps, the graphics card information will be revealed.
How to find out graphics card details using System Information
To check the graphics card on Windows 10 with System Information, use these steps:
- Open Start.
- Search for System Information and click the top result to open the tool.
- Expand the Components branch.
- Click on Display.
- Under the «Adapter Description» field, determine the graphics card installed on your device.
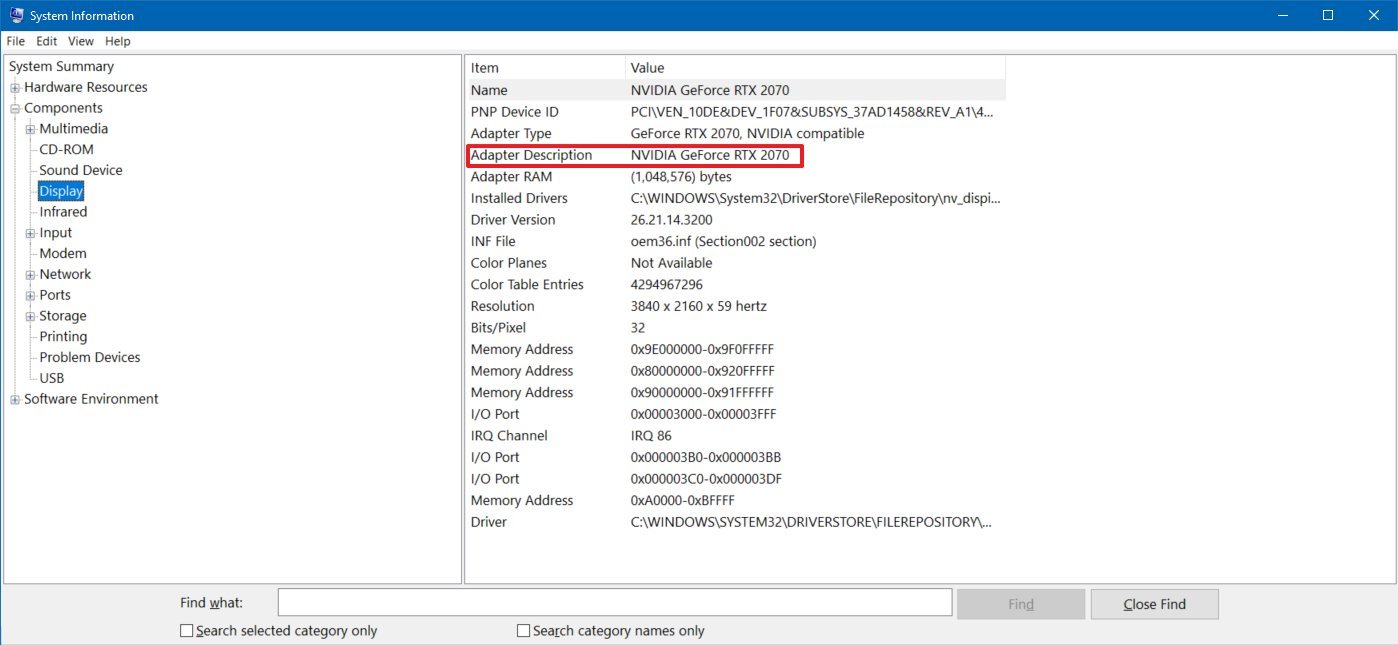
Once you complete the steps, you’ll know the graphics card make and model, as well as driver information and more.
To find out the video card installed on your PC using DirectX Diagnostic Tool, use these steps:
- Open Start.
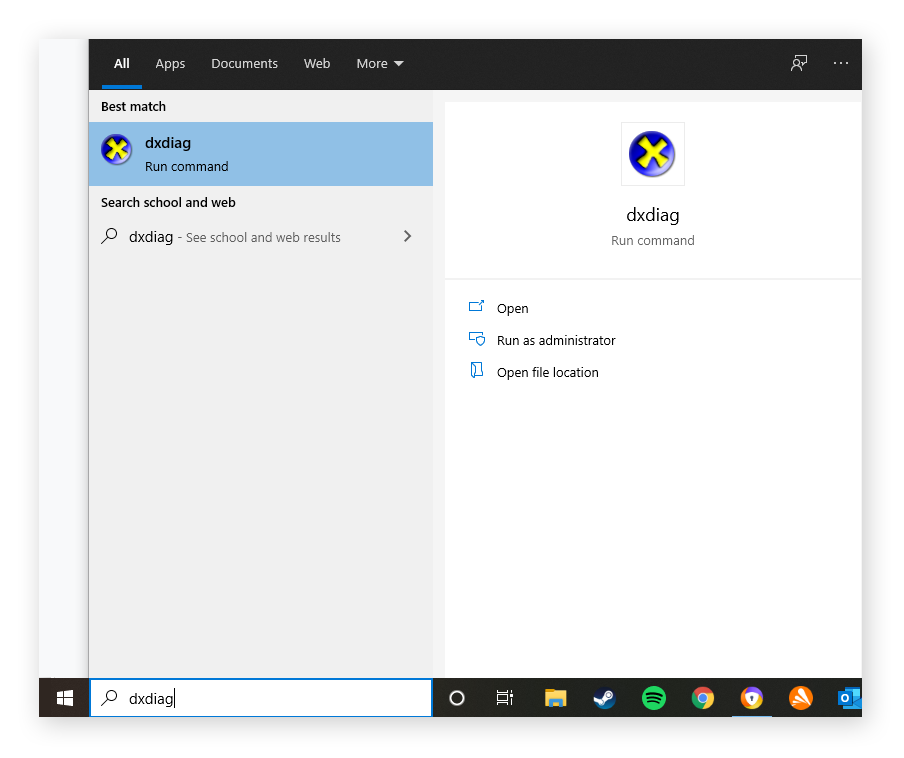
- Search for dxdiag and click the top result to open the tool.
- Click the Yes button (if applicable).
- Click the Display tab.
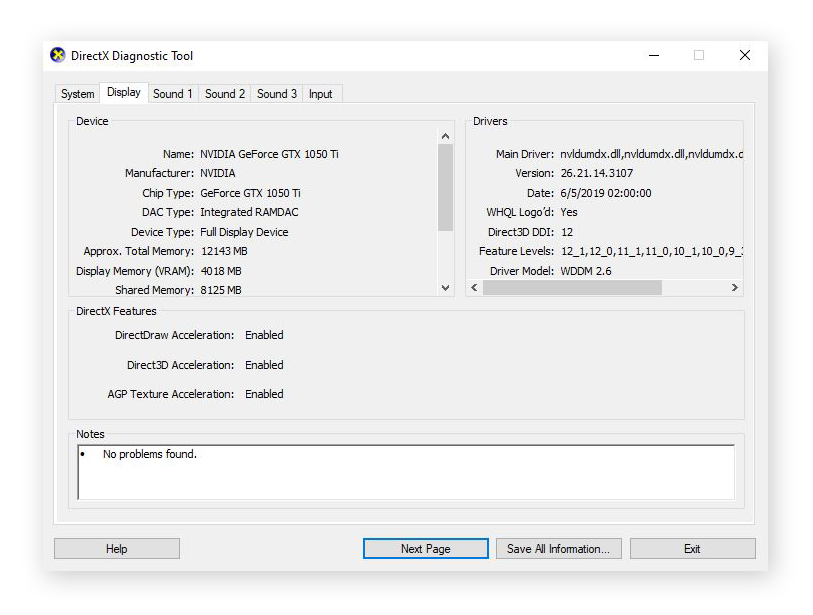
- Under the «Device» section, check the manufacturer and processor type of the graphics card.
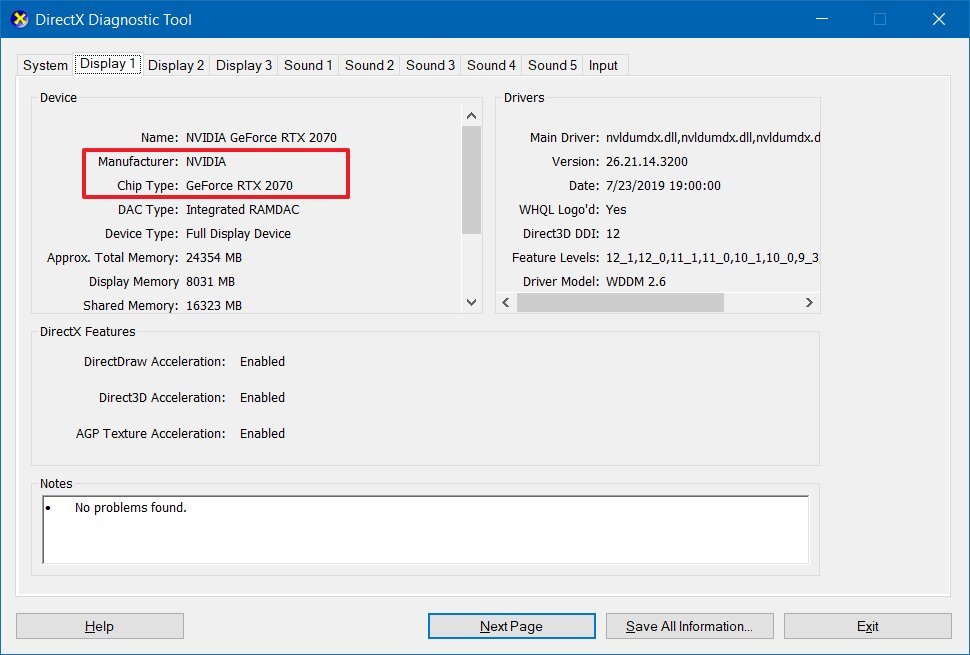
After you complete the steps, you’ll be not only able to understand the basic information about the video card, but also other details, such as the amount of memory built into the device and driver information.
How to find out graphics card details using Task Manager
To figure out the graphics card available on Windows 10 with Task Manager, use these steps:
- Open Start.
- Search for Task Manager and select the top result to open the tool.Quick tip: You can also use the Ctrl + Shift + Esc keyboard shortcut to open Task Manager.
- Click the Performance tab.
- Click on GPU.
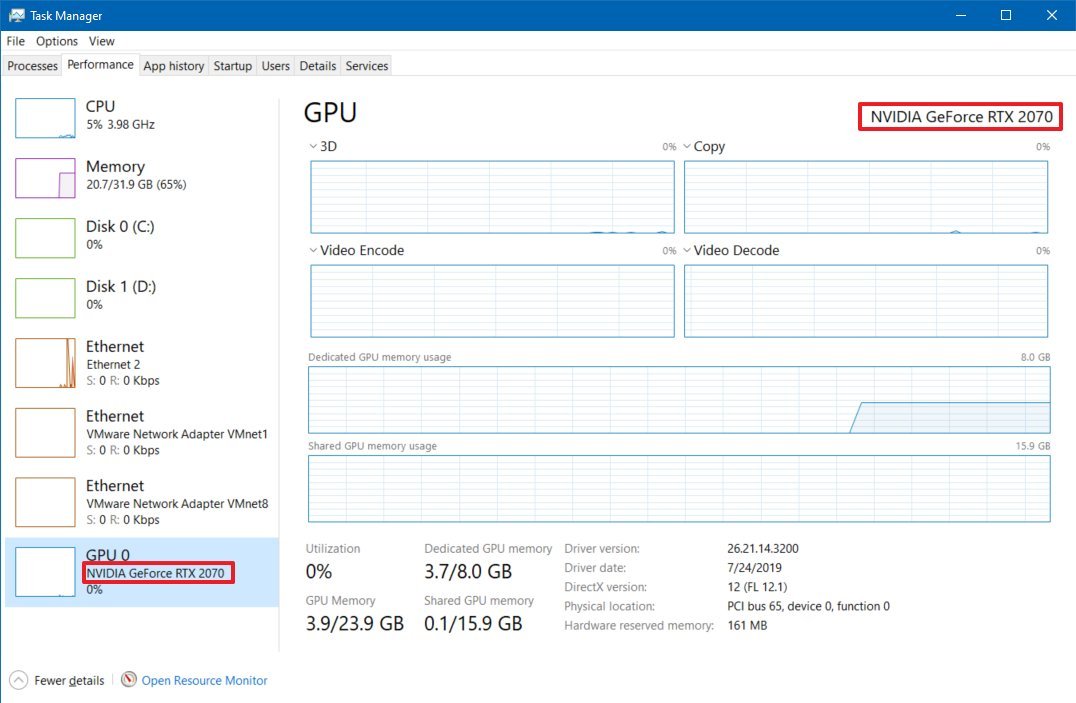
- Confirm the brand and model of the graphics card on the top-right corner.
Once you complete the steps, the Task Manager will display the manufacturer name and model, as well as a dedicated amount of memory, DirectX version, physical location in the motherboard, and current utilization details.
How to find out graphics card details using control panel
Alternatively, if you have a GPU from Intel, NVIDIA, or AMD, you can also use their control panel software that allows you to check the graphics card specifications, including settings to adjust many preferences.
To check the specifications using the NVIDIA Control Panel, use these steps:
- Open Control Panel.
- Click on Hardware and Sound.
- Click on NVIDIA Control Panel.
- Click the System Information option from the bottom-left corner.
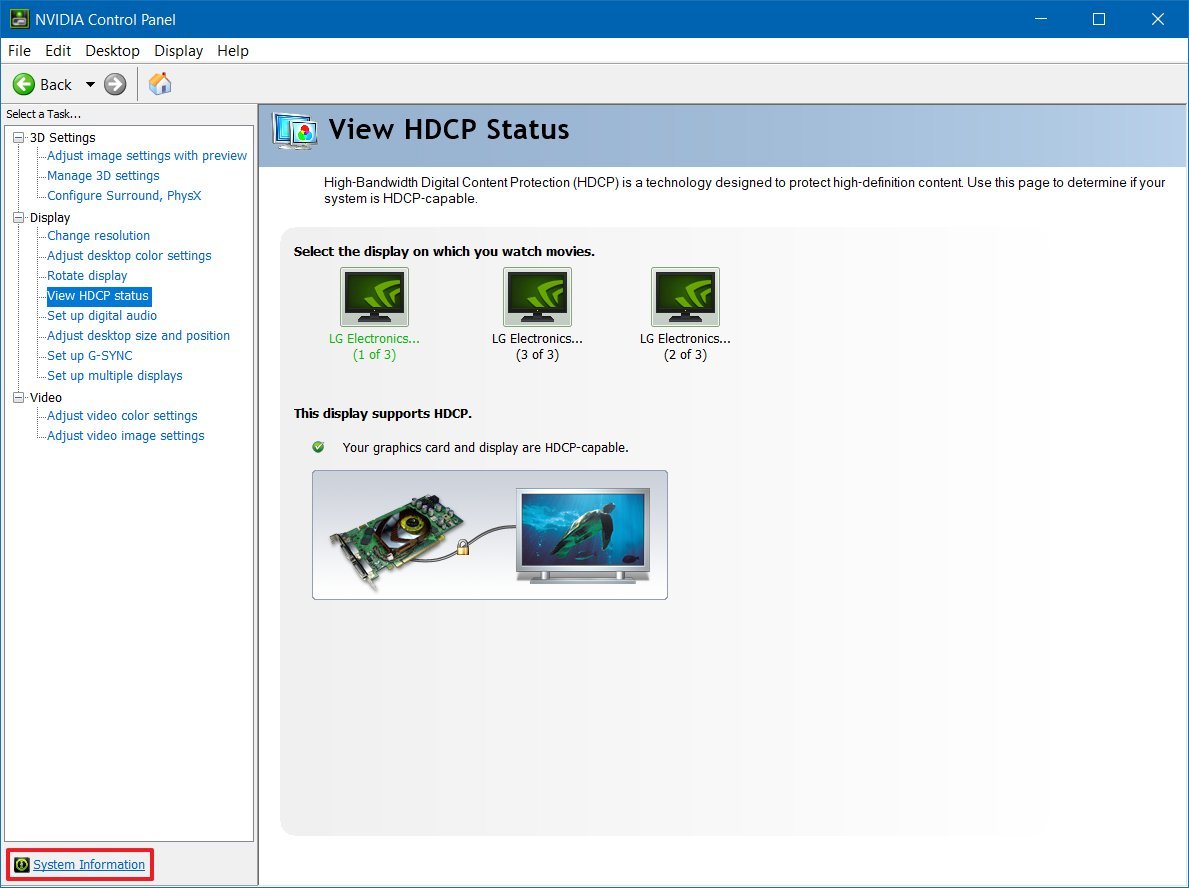
- Click the Display tab.
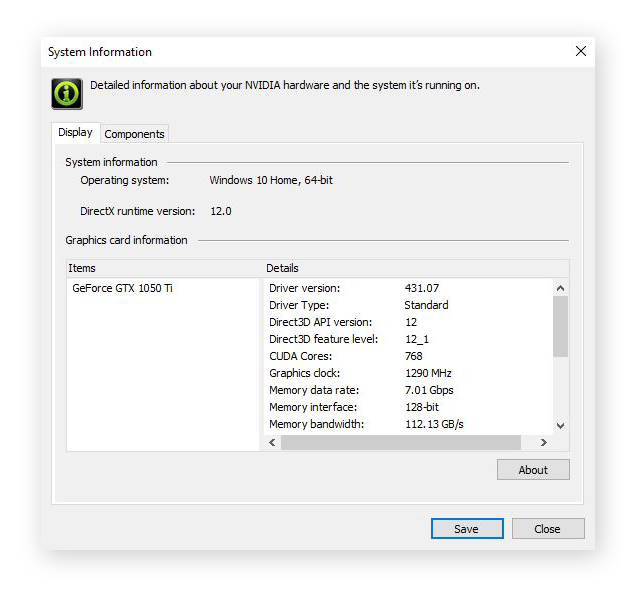
- Under the «Graphics card information» section, confirm the graphics model on the left side.
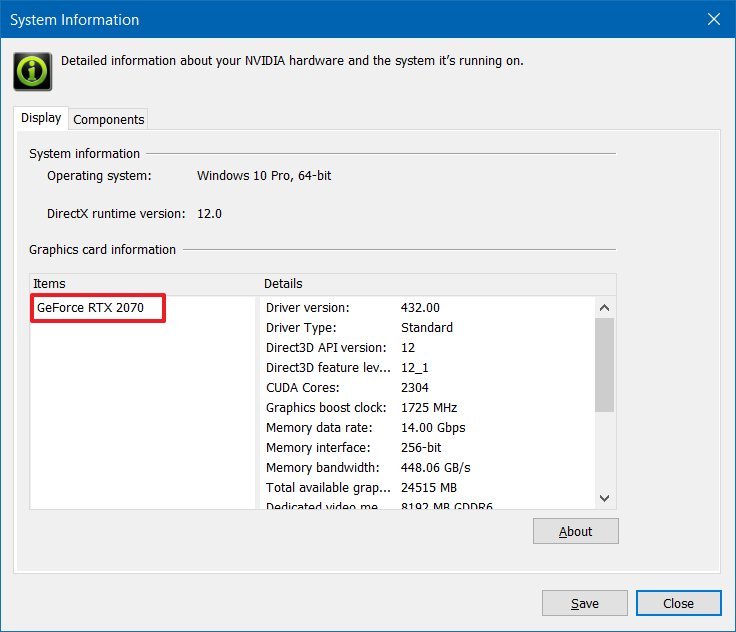
Once you complete the steps, you’ll know the exact graphics card model. On the right side, you’ll also find various other details, such as the number of CUDA cores, clock speed of the processor, memory data rate, bandwidth, type, amount, and the video BIOS version.
Get the best of Windows Central in in your inbox, every day!
Mauro Huculak is technical writer for WindowsCentral.com. His primary focus is to write comprehensive how-tos to help users get the most out of Windows 10 and its many related technologies. He has an IT background with professional certifications from Microsoft, Cisco, and CompTIA, and he’s a recognized member of the Microsoft MVP community.
![]()
Download Article
A user-friendly guide to know your graphics card on PC, Mac, or Linux
![]()
Download Article
- Using Windows
- Using macOS Ventura
- Using macOS Monterey and Earlier
- Using Linux
- Q&A
- Tips
|
|
|
|
|
Do you want to check what graphics card you have on your computer? You can easily see your Graphics processing unit (GPU) using the Device Manager on Windows or your «About» menu on Mac. For Linux, you’ll need to use the Terminal to find out what video card you have. This wikiHow will show you how to locate your computer’s graphics card information on a Windows, Mac, and Linux computer.
Things You Should Know
- On Windows, open the Device Manager and double-click the «Display adapters» heading. The graphics card(s) will be listed underneath.
- On Mac, click the Apple menu, then «About This Mac». Click «System Report», «Graphics/Displays». The card will be listed in the right panel.
- On Linux, use the Terminal to look up the list of PCI items. Find the ID number, then enter it in a new Terminal.
-

1
Open the Start menu
. Click the Windows logo in the bottom-left corner of the screen or press the Windows key on your keyboard.
- You can also right-click the Start icon to open the Advanced Options menu.
- Knowing your current graphics card can help if you need to fix or change a graphics card.
-
2
Open the Device Manager. Type «Device Manager» into the Start menu, then click Device Manager at the top of the search results.
- If you opened Start with a right-click, click Device Manager in the pop-up menu.
- A new window will open.
Advertisement
-
3
Locate the «Display adapters» heading. This looks like a monitor icon with a small chip-like icon. You may need to scroll down to find it.
- The options in the Device Manager window are organized in alphabetical order, so you’ll find the «Display adapters» heading in the «D» section.
- If you see indented options below the «Display adapters» heading, skip the next step.
-
4
Double-click the «Display adapters» heading. Doing so expands it to show your installed graphics card(s).
- You can also click the right-facing arrow to the left of Display adapters.
-
5
Review your graphics card(s). Your installed graphics card’s name will appear under the Display adapters heading. If you see more than one name there, it means you have both a built-in graphics card and an installed graphics card.
- If you want to install a new graphics card, be sure to research for your specific needs before choosing one.


Advertisement
-
1
Open the Apple menu
. Click the Apple logo in the top-left corner of the screen. A drop-down menu will appear.[1]
-
2
Click System Settings. This will be near the top of the menu.
-
3
Click General. This will be next to the grey cog icon.
- You may need to scroll down to find this.
-
4
Click About. This will be located in the right panel.
-
5
Click System Report. A new page will open.
-
6
Click Graphics/Displays. This can be found underneath the Hardware header. If the header isn’t expanded, click the arrow to the left of Hardware.
-
7
Look for your graphics card’s name. It will appear at the top of the right-hand pane.
- Select your graphics card to view its specifications listed below.


Advertisement
-
1
Open the Apple menu
. Click the Apple logo in the top-left corner of the screen. A drop-down menu will appear.[2]
-
2
Click About This Mac. This option is at the top of the drop-down menu.
- You may find your graphics card listed next to Graphics. If you don’t see it, proceed to the next step.
-
3
Click System Report…. It’s at the bottom of the About This Mac window.
-
4
Click ▼ to the left of Hardware. This option is in the left-hand pane of the System Report window.
-
5
Click Graphics/Displays. It’s about halfway down the group of options that appear below the Hardware heading in the left-hand pane.
-
6
Look for your graphics card’s name. It will appear at the top of the right-hand pane.
- You can view your graphics card’s specifications listed below the card’s name, or check other computer specifications.


Advertisement
-
1
Open the Terminal app. Click the Terminal app icon, which resembles a black box, or press CTRL + ALT + T at the same time to open a new Terminal window.
-
2
Update your computer’s list of PCI items. Type the following command into Terminal, then press Enter.
-
3
Enter your password. Type in the password that you use to log into your computer, then press Enter. Doing so will confirm your command and update your computer’s PCI list.
- The password’s characters will not appear when you type in Terminal.
-
4
Look up your computer’s list of PCI items. Type in the following command and press Enter to bring up a list of installed and built-in PCI items (including graphics cards):
-
5
Find your graphics card. Scroll up in the Terminal window until you find the «Video controller», «VGA compatible», «3D», or «Integrated graphics» heading. Your graphics card’s name will be listed next to this heading.
-
6
Note the graphics card’s ID number. This number is to the left of the graphics card’s heading, and will usually be in the following format: 00:00.0
-
7
Open a new Terminal window. Press CTRL + ALT + T again, or right-click the Terminal app icon and click New Terminal Window (or similar).
-
8
Look up your graphics card’s information. Type the following command into Terminal—making sure to replace «00:02.0» with your graphics card’s actual ID number—and press Enter to see your graphics card’s specific information:[3]


Advertisement
Add New Question
-
Question
Can I play games using Intel HD Graphics only?

You can play games like Minecraft, CS:GO, and other very light games on graphics with Intel HD Graphics. If you want to play more graphic intensive games though, you will need a graphics card.
-
Question
What if mine only says Intel HD graphics??
This means you have an integrated graphics controller and not a separate graphics card.
-
Question
How can I tell which graphics card is being used?
Click right on the home screen, the cpu will pop up and you can use it to chose which one you need to use.
See more answers
Ask a Question
200 characters left
Include your email address to get a message when this question is answered.
Submit
Advertisement
-
The graphics card is also known as the «video» card.
-
Most computers prioritize the fastest or highest-quality graphics card over the built-in one where possible.
Thanks for submitting a tip for review!
Advertisement
About This Article
Article SummaryX
1. Open Device Manager.
2. Double-click the «Display adapters» heading.
3. View the graphics card(s) listed in the expanded «Display adapters» heading.
Did this summary help you?
Thanks to all authors for creating a page that has been read 2,648,844 times.
Is this article up to date?
What graphics card do I have?
To find out what graphics card you have, open the Start menu or desktop search bar on your PC, start typing Device Manager, and select it when the option appears. You’ll see an entry near the top for Display adapters. Click the drop-down arrow and the name and model of your GPU will appear right below.
If you double-click the icon next to the name of the driver, you can view device properties, inspect the details of your driver, and identify any driver updates available.
5 ways to check your GPU on Windows
Ensuring you’ve got the right graphics specs is critical, especially when it comes to gaming, video editing, and running other graphics-intensive applications. Thankfully, there are a number of easy ways to detect graphics hardware on Windows.
Settings
System settings let you check your graphics card status and inspect its range of properties and compatibilities. In Windows 10, video card status and other information relating to your display can easily be found in the Settings app. You can also update Windows drivers or update audio drivers through a similar process.
Here’s how to check your GPU through Windows System Settings:
-
Open Settings through the Start menu and click System.

-
Select Display from the System settings menu and click Advanced display settings.

-
Under Display information you can see which graphics card is installed on your PC, as well as other important metrics impacting your computer graphics, like your desktop resolution and refresh rate.


System information
The System information app is a great tool for looking under the hood of your machine to examine your graphics card and accompanying drivers. It’s also a great tool to check your RAM.
Open the Start menu or go to the desktop search bar, start typing System information, and select it when the option appears. Click the + symbol next to Components in the upper left, and then click Display on the expanded list.
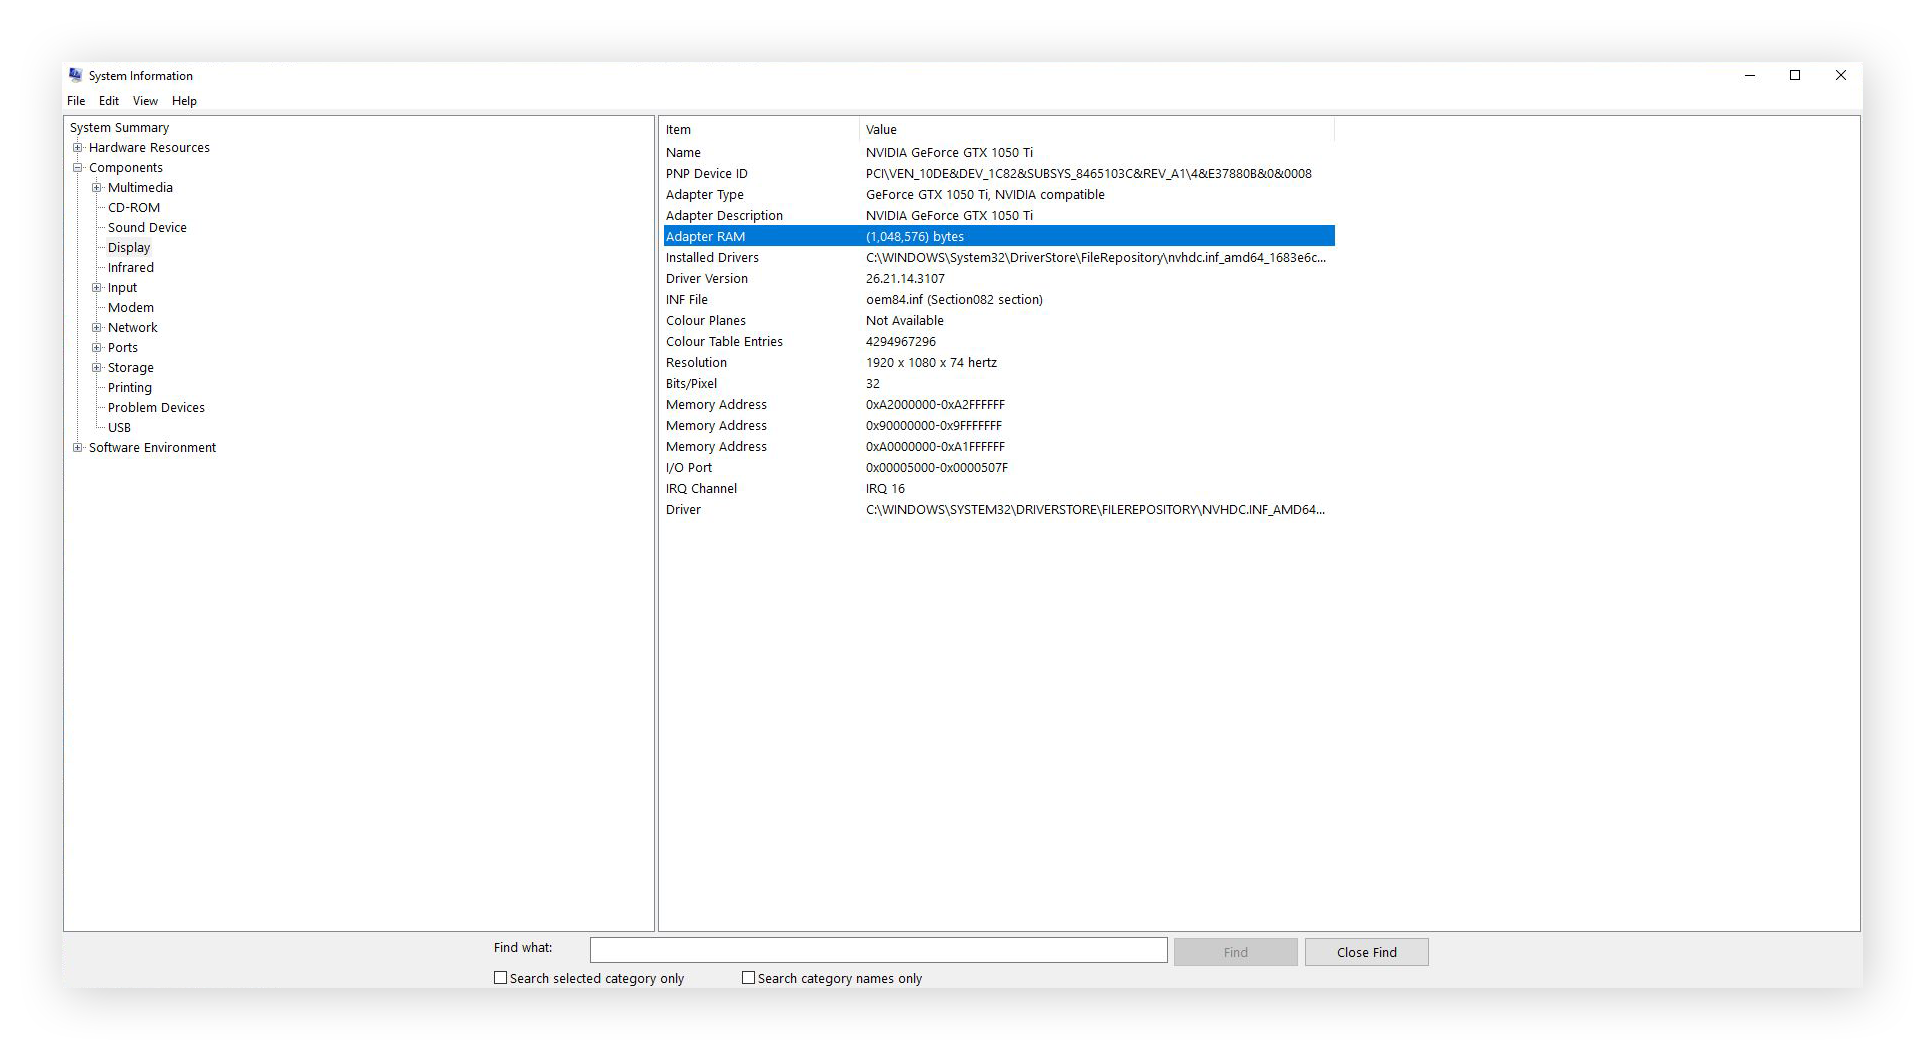
You’ll see the name of your graphics card, its type, and device ID. You’ll also see details about your driver installation and how much RAM your GPU has to call upon.
Windows Task Manager
While a graphics card refers to the graphics hardware extension as a whole, the graphics processing unit (GPU) is the specific component that actually processes graphics. You can use Windows Task Manager to inspect your GPU chip in detail.
To launch Device Manager, open the Start menu or the desktop search bar, start typing Device Manager, and select it when the option appears. You can also press Ctrl + Alt + Del on your keyboard and click Task Manager on the list that appears.
On the Task Manager window, click the Performance tab and select GPU from the list.
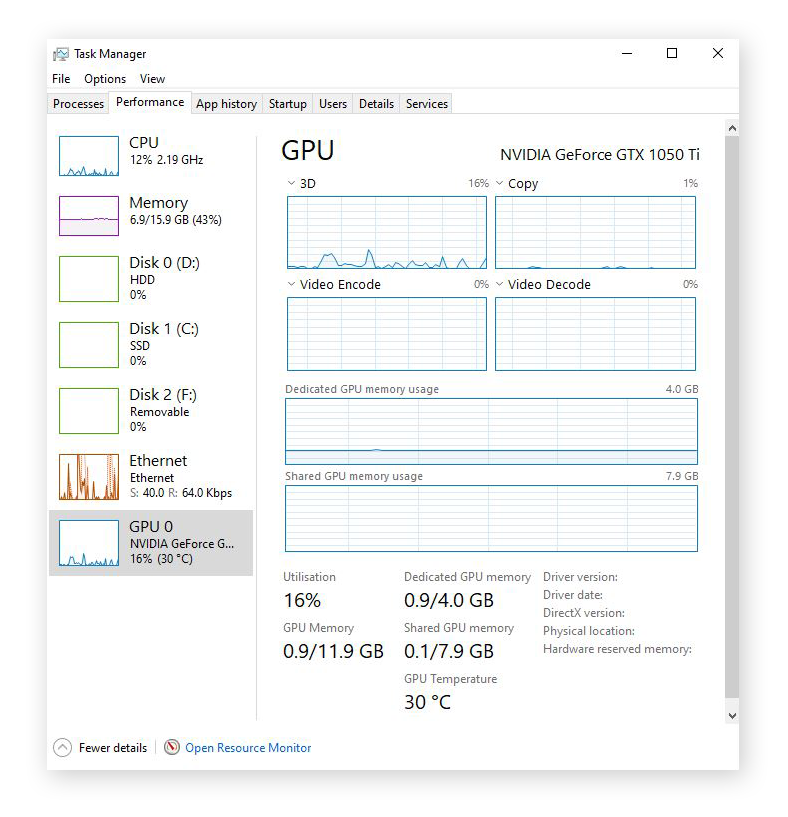
Along with displaying the graphics card that houses your GPU, Task Manager will show other details like GPU utilization (how hard your GPU is working at the moment) and GPU temperature. If you want to get more power out of your graphics chip, check out our guide to overclocking your GPU.
DirectX Diagnostic Tool
To check your video card, you can also use Windows’ built-in DirectX Diagnostic Tool, which troubleshoots video and sound-related hardware problems.
To launch the DirectX Diagnostic Tool, type dxdiag into the desktop search bar and hit Enter to run the command.
Click the Display tab for a full rundown of your graphics devices, as well as the graphics drivers that run them.
 Any problems discovered by the tool will be detailed in the Notes box at the bottom of the window.
Control Panel
On the Windows Control Panel, you find out which graphics card is installed on your PC. And if you’re using an NVIDIA display driver, you can also use the Windows Control Panel to launch the NVIDIA Control Panel to inspect system information and configure settings.
Here’s how to launch the NVIDIA Control Panel via the Windows Control Panel:
-
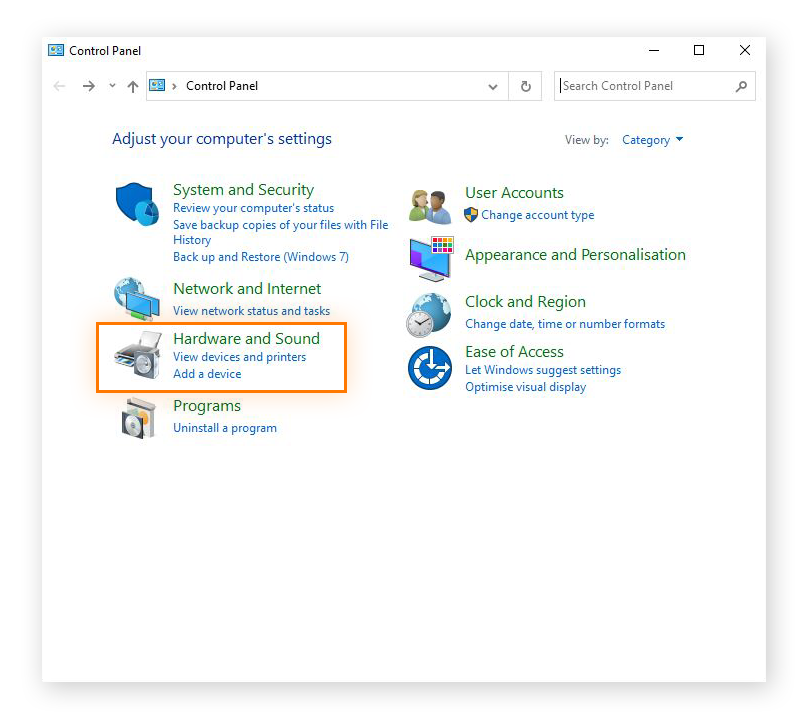
Type Control Panel into the desktop search bar and click the option when it appears. Then, click Hardware and Sound.

-
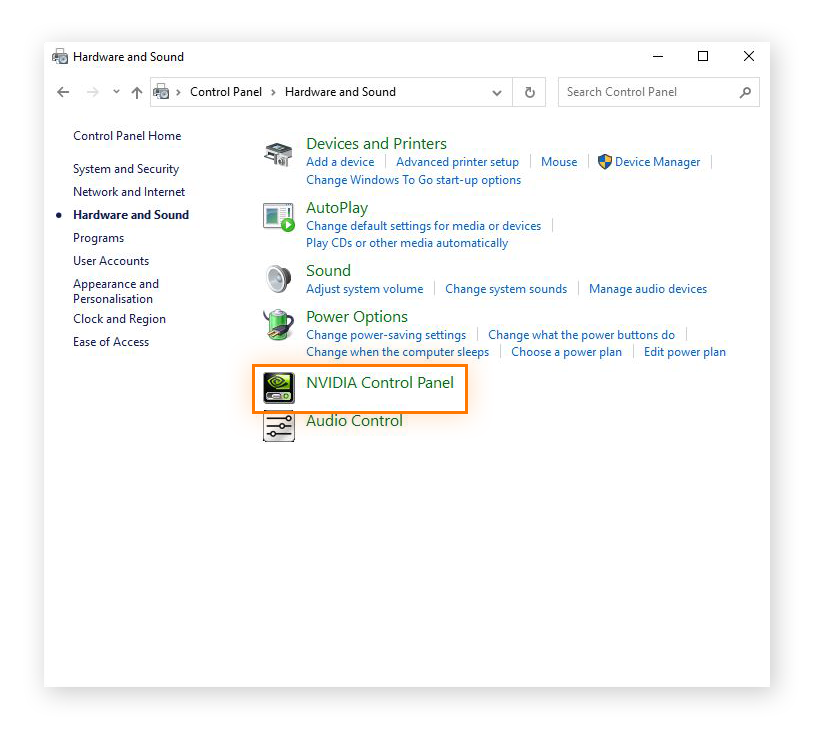
Select NVIDIA Control Panel from the list of options.

-
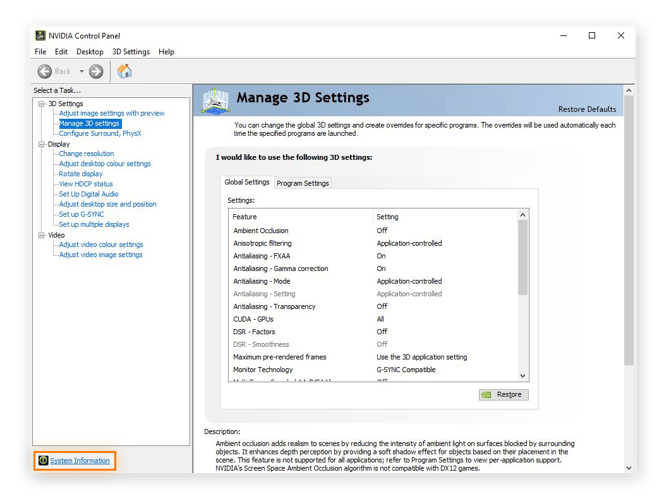
When the NVIDIA graphics card control panel pops up, click System Information in the bottom-left corner.

The System Information window will appear, auto-detecting NVIDIA drivers, RAM memory, and displaying other details related to your graphics hardware.
What is a graphics card (GPU)?
Although often used interchangeably, GPUs and graphics cards are not the same. Also called video cards, display adapters, or graphics adapters, graphics cards generate and feed images to a computer’s display or monitor. To do so, graphics cards contain various components, including a GPU, or graphics processing unit.
The GPU is the nerve center of the graphics card, where the necessary processing to display images takes place.
The GPU is the nerve center of the graphics card, where the necessary processing to display images takes place . Having fetched texture data from the graphics card memory, the GPU performs rapid calculations to process the data. Once processed, the data is sent back to the RAM before being sent on to your screen where it appears as an image or a frame in a video or computer game.
Get sharper graphics with Avast Driver Updater
No matter how powerful your GPU or how much video RAM you’ve got to spare, your graphics card is only as good as the drivers running it. Outdated or buggy software can result in crashes, laggy gameplay, reduced FPS, and low-quality graphics textures.
That’s why keeping your drivers fully optimized with a world-class driver updater is vital for ensuring optimal performance.
With Avast Driver Updater, it’s not just your graphics drivers that benefit from automatic detection, repairs, and updates — it’s all of them. Along with crystal clear images and silky smooth video rendering, Driver Updater unlocks peak performance across your entire PC. Get fewer freezes, richer audio, and faster browsing.
Introduction
A graphics card, which is also known as a video card, display card, or graphics adapter, is a piece of hardware that is installed in a computer. It is responsible for generating all the text and pictures that are displayed on your screen. Nowadays, every processor has a built-in onboard graphics card.
All computers have a Graphics Card that handles everything from drawing your desktop and decoding videos to rendering demanding PC/laptop games. Most modern PCs have Graphics Processing Units (GPUs) made by Intel and NVIDIA.
The GPU is usually the most critical component when it comes to playing PC games. If you don’t have a powerful enough GPU, you can’t play newer PC games or you may have to play them with lower graphical settings. Some computers have low-power “onboard” or “integrated” graphics, while others have powerful “dedicated” or “discrete” graphics cards and if you want to know what Graphics Card you are using in Windows 10 then you have to follow certain steps:
There are 4 ways to help you check Windows 10 Computer Graphics Card Information easily and quickly.
Method 1 — By using DirectX Diagnostic Tool
Step 1
From the Start menu, open the Run dialog box or you can Press the «Window + R» key to open the RUN window.
Step 2
Then type «dxdiag» and press Enter to open «DirectX Diagnostic» Tool.
Step 3
Click on «Display» tab, then you can check the detailed information of the Graphics Card on your Windows 10, including graphics card name, manufacturer, its driver model/version, and more.
Method 2 — Through Device Manager
You can also easily check graphics cards Information through Device Manager. Follow the below instructions to proceed.
Step 1
You can click Start and type Device Manager. Then click Device Manager to open Windows Device Manager. (Alternatively, you can press the «Windows + X» key, and click Device Manager to open it).
Step 2
Click on «Display adapters», then you will see the installed graphics card(s) on your Windows 10 PC.

Step 3
Right-click on graphic card and select Properties. Then it will pop-up a window, which includes all the detailed Computer Graphics Card Information.

Method 3 — Through Display Settings
You can also easily check the graphics card Information from the Display Settings.
Step 1
You can right-click the blank space on the computer screen and choose «Display» Settings.
Step 2
Click on «Advanced Display Settings».
Step 3
Then you can scroll down and click on «Display adapter properties» option, then you will see the installed graphics card(s) on your Windows 10.
Method 4 — Through System Information
Step 1
From the Start menu, open the Run dialog box or you can Press the «Window + R» key to open the RUN window.
Step 2
Type «msinfo32» and press Enter to open «System Information».
Step 3
Click on System Summary -> Components -> Display, then you will see the installed graphics card(s) and its information on your Windows 10.

Conclusion
By following any of the above methods, you can check the Graphics Card Information in Windows 10.
I hope you enjoyed this article. Follow C# Corner to learn more new and amazing things about Windows 10.
Thanks for reading this article.