В жизни каждого пользователя Windows наступает такой момент, когда нужно масштабно почистить операционную систему от различного мусора. Бесполезные временные файлы могут храниться на компьютере годами, а установка крупных обновлений Windows приводит к созданию резервных файлов на целые гигабайты — и самое интересное, что с большой долей вероятности они тоже никогда не понадобятся вам по прямому назначению. В этом списке ещё много типов данных, удаление которых поможет освободить значительный объём пространства на жёстком диске.
Собрал основные варианты, на что стоит обратить внимание, если нужно быстро и без заморочек вернуть заполненную память. Никакие сторонние инструменты не потребуются.
Используйте встроенную в ОС утилиту для очистки диска
Для масштабной очистки лучше использовать одноимённую системную утилиту «Очистка диска»: в Windows 10 она доступна в приложении «Параметры» («Система» → «Память»), в более ранних версиях Windows — через меню «Свойства» при нажатии правой кнопкой мыши на используемый диск в «Проводнике». Самые объёмные файлы находятся в категории «Временные файлы». Это предыдущие установки Windows, файлы журнала обновления, файлы оптимизации доставки, интернет-файлы, диагностические данные и прочее. В совокупности их удаление поможет освободить десятки гигабайт, поэтому рекомендуется чаще проверять, сколько всего накопилось за последние несколько месяцев, и своевременно удалять весь мусор.
Удалите историю, кэши и другие данные в браузере
Любой посещённый веб-сайт сохраняется в истории, а его элементы (изображения, видео, звуки и так далее) — в кэше для более быстрой загрузки в дальнейшем. Это однозначно удобно в контексте закладок, так как избранные веб-сайты открываются десятки раз каждый день. Но для одноразовых посещений случайных страниц такая «забота» браузера превращается в огромный журнал данных, способный занимать немалый кусочек в общей памяти компьютера. Смотрите, как дела обстоят у вас, и чистите то, что считаете лишним. Точно освободите несколько сотен мегабайт, как минимум. И приятный плюс: сегодня большинством браузеров поддерживается удаление данных при закрытии. Приложение само почистит выбранные элементы.
Удалите неиспользуемые учётные записи и их данные
Помимо основного владельца, компьютером также могут пользоваться члены семьи и друзья. Естественно, у каждого отдельный рабочий стол, свой набор файлов и разные задачи. Для этого обычно создаются дополнительные учётные записи, каждая из которых соответственно хранит собственные данные. Если вы в настоящее время уже не предоставляете доступ другим пользователям, то удалите их учётные записи. Под удаление попадут все личные файлы, в том числе документы, фотографии, музыка и загрузки.
Как удалить учётные записи и данные семьи:
- Откройте приложение «Параметры».
- Перейдите в раздел «Учётные записи».
- В боковом меню нажмите «Семья и другие пользователи».
- Выберите учётную запись, которая больше не используется, и нажмите кнопку «Удалить».
- Подтвердите выбор нажатием кнопки «Удалить учётную запись и данные».
Переместите часть локальных файлов в облако
Бесплатный тариф в сервисе OneDrive от Microsoft предлагает 5 ГБ облачного хранилища. Базовый объём в аналогичном «Google Диске» составляет 15 ГБ. Первый уже встроен в Windows 10 для всех пользователей, второй можно просто интегрировать, превратив в папку в «Проводнике». Получается 20 ГБ дополнительной памяти — почему бы не найти им практическое применение? Сейчас у многих быстрый и стабильный интернет, можно конвертировать часть локальных файлов в облако и открывать их в режиме онлайн. Наверняка найдутся какие-то непостоянные файлы, которые требуются в определённый момент — облако для них является идеальным вариантом.
Как включить файлы OneDrive по запросу:
- Нажмите на значок OneDrive в правом нижнем углу панели задач.
- Нажмите «Справка и параметры» и перейдите в «Параметры».
- В разделе «Файлы по запросу» установите галочку «Экономьте место и скачивайте файлы по мере их использования».
- Нажмите «OK» для сохранения настроек.
После этого переместите файлы в папку OneDrive и сделайте их доступными только в режиме онлайн, то есть с подключением к интернету. Выполните следующие действия:
- Откройте «Проводник».
- Перейдите в папку OneDrive в боковой панели.
- Выберите файлы и папки.
- Щелкните правой кнопкой мыши и нажмите «Освободить место».
Отключите режим гибернации, если он вам не нужен
Windows 10 сохраняет массив данных на жёстком диске перед каждым завершением работы, чтобы сохранить текущий сеанс. Когда вы запускаете компьютер снова, кэш гибернации позволяет продолжить с того места, где работа остановилась в прошлом. Хотя это очень удобная функция, пригождается она далеко не всем и для сохранения информации в файле hiberfil.sys требуется много гигабайт пространства. Если у вашего компьютера заканчивается память, удаление кэша гибернации освободит место для более значительных файлов.
Как отключить кэш гибернации:
- Откройте «Командную строку», обязательно в режиме администратора.
- Введите команду «powercfg /hibernate off» и нажмите Enter.
- Готово! Кэш гибернации перестал работать и больше не будет хранить файлы.
Если ваш компьютер работает от сети и вы не пользуетесь спящим режимом, то:
- Откройте приложение «Параметры».
- Перейдите в раздел «Система».
- В боковом меню нажмите «Питание и спящий режим».
- Под заголовком «Спящий режим» в раскрывающихся списках выберите «Никогда» и сохраните изменения.
- Откройте утилиту «Выполнить» (сочетание клавиш Windows + R).
- Введите команду «powercfg -h off».
- Нажмите «OK» для сохранения настроек.
После выполнения вышеописанного спящий режим будет отключен, а файл hiberfil.sys — удалён.
Удалите автономные карты, лишние языки и компоненты
Проверьте, установлены ли на вашем компьютере автономные карты (городов или стран) для приложения «Карты Windows», лишние пакеты локализации (языки интерфейса или системы) и дополнительные компоненты (проигрыватель Windows Media Player, распознавание лиц Windows Hello, дополнительные шрифты, средства удалённого администрирования, распознаватель математических знаков и тому подобное). Смело удаляйте неиспользуемые и остальные вещи, которые вы, вероятно, даже видите в первый раз.
Как удалить автономные карты: «Параметры» → «Приложения» → «Автономные карты» → Удалить все карты».
Как удалить пакеты локализации: «Параметры» → «Время и язык» → «Язык» → «Предпочитаемые языки» → «Удалить».
Как удалить дополнительные компоненты: «Параметры» → «Приложения» → Приложения и возможности» → «Приложения и возможности» → «Дополнительные компоненты» → «Удалить».
Очищайте корзину и удаляйте старые файлы загрузок
Конечно, самый очевидный, однако не менее эффективный способ — регулярно чистить корзину и следить за папкой «Загрузки». Чтобы упростить процедуру, советую включить «Контроль памяти», тогда процесс автоматизируется. Компьютер будет автоматически освобождать пространство только в нужный момент, когда на диске становится недостаточно места. Функция удаляет ненужные временные файлы, содержимое корзины и папку загрузок. Очистку также можно настроить по заданному вами расписанию: например, не конкретно в момент, когда заканчивается память, а ежедневно или каждый месяц, при этом файлы из корзины и загрузок могут удаляться ещё чаще — через день или две недели (крайние сроки включают 30 и 60 дней).
Попробуйте сторонние программы для очистки Windows
Эффективно чистить Windows от мусора умеют специализированные программы с соответствующим инструментарием. Они обеспечивают более расширенную диагностику операционной системы и выявляют не только нежелательные файлы. Помимо стандартных методов, в большинстве случаев сканирование ещё включает в себя обнаружение проблем, влияющих на скорость работы, ошибок, приводящих к сбоям программного обеспечения, удаление повреждённых ключей, недействительных записей из реестра и дубликатов. Среди дополнительных функций — проверка расширений браузеров и корректное сжатие системного каталога WinSxS.
Рекомендуемые программы:
- Piriform СCleaner. Чистка системных каталогов и аварийных дампов памяти, временных файлов, реестра, старых файлов и журналов, корзины, данных приложений и браузеров, проверка расширений браузеров, управление объектами в автозагрузке, контроль процессов Windows, удаление приложений.
- Wise Disk Cleaner. Сканирование диска на наличие мусорных файлов, чистка системных каталогов и аварийных дампов памяти, компонентов Windows, временных файлов, устаревших резервных копий, реестра, старых файлов и журналов, корзины, данных приложений и браузеров.
- Dism++. Создание и управление системными образами, управление объектами в автозагрузке, настройка Windows, чистка системных каталогов и аварийных дампов памяти, временных файлов, истории поиска и установки обновлений, служебных данных Microsoft Store.
- Auslogic BoostSpeed. Чистка временных файлов, реестра, старых файлов и журналов, корзины, данных приложений и браузеров, кэшей Microsoft Office, диагностика системы и сканирование диска на наличие мусорных файлов, удаление приложений, управление объектами в автозагрузке, уменьшение размера Windows, дефрагментация дисков, оптимизация системных настроек.
- Стандартные курсоры в Windows надоели — нашла 15 альтернатив. Рассказываю, как их установить
- Windows 7 мертва. Как стала лучшей и почему осталась такой до сих пор
- 10 приложений, которые нужно сразу установить на новый компьютер
- Эта скрытая опция Windows ощутимо ускоряет компьютер. Даже очень старый
- Как изменить значок пустой и полной корзины в Windows. Хоть на мемы
![]()
Download Article
![]()
Download Article
Though it may seem dreary and even difficult to wash windows, with a little effort, you can make your windows look so clean, your friends will think they’ve been professionally washed!
-

1
Gather your supplies and tools. There are a few things you will need to perform a basic cleaning job on your windows, including a:
- Sponge or brush (or a squeegee)
- Rubber squeegee for drying
- Absorbent microfiber or lint-free cloth
- Clean cloth or rag
- Bucket filled with cleaning solution
- Large towel to protect inside floors
-
2
Make your cleaning solution. There are a few different cleaners you can try for your windows, but most experts recommend a basic water and dish soap mixture. Using a spray bottle and paper towel or newspaper will just move dirt and cleaning solution around, leaving windows streaky and murky.[1]
To make your window cleaner, you can mix:- Two gallons (7.6 liters) of water with one teaspoon (6 ml) of dishwashing liquid. [2]
- Equal parts water and white vinegar.
- ¼ cup (60 ml) each of isopropyl (rubbing) alcohol and vinegar, plus 1 tablespoon (15 g) cornstarch (to prevent streaks),[3]
and 2 cups (480 ml) water.[4]
EXPERT TIP
Susan Stocker runs and owns Susan’s Green Cleaning, the #1 Green Cleaning Company in Seattle. She is well known in the region for outstanding customer service protocols — winning the 2017 Better Business Torch Award for Ethics & Integrity —and her energetic support of green cleaning practices.

Our Expert Agrees: When you’re cleaning windows, you only need water mixed with a dash of vinegar or a few drops of dishwashing soap. Apply the cleaner with a clean cloth, then dry the window with a squeegee.
Advertisement
- Two gallons (7.6 liters) of water with one teaspoon (6 ml) of dishwashing liquid. [2]
-
3
Clean the windows. You can use a sponge for windows that have multiple small panes, and a squeegee for larger picture windows. Dip your sponge into the bucket of cleaner. Wring out the excess water and wipe down the entire window, being sure to get into all the corners.[5]
- To clean high outside windows without a ladder, attach a squeegee or brush to an extension pole or broom handle.[6]
You can also use a special window cleaner that will spray up to the second floor from the ground. - Once you clean a window, make sure you dry it before moving on to the next. If the squeegee squeaks a lot when you are washing or drying the windows, add a little more soap to the water.
- To clean high outside windows without a ladder, attach a squeegee or brush to an extension pole or broom handle.[6]
-
4
Wipe the windows dry. For small-paned windows, use the rubber blade on the squeegee to wipe away the water vertically, working from top to bottom. For a picture window, use horizontal strokes. Start at the top and work down the window. Overlap each stroke by a couple inches (a few centimeters), and wipe the blade dry with a lint-free cloth between each stroke.[7]
- Make sure the rubber blade is always in contact with the window.
- One of the easiest ways to get streak-free windows is to buy a good quality squeegee, and to make sure the rubber blade on it is sharp.[8]
Make sure you also have a streak-free window cleaning solution. Replace the rubber blade when it gets dull, because it will stop sealing properly and start leaving streaks.
-
5
Clean the inside of the windows and wipe up excess water. Anywhere that water spilled, dripped, or ran down the window, wipe the area dry with an absorbent, lint-free cloth. This will prevent streaks on the window.
- To prevent damage to the frame, use a separate cloth or rag to dry water from the window sill.

Advertisement
-
1
Clean stubborn stains. Outside windows are especially prone to stubborn stains because they are exposed to hard water runoff, minerals, bird droppings, and elements that can cake on dirt and grime. There are a few methods you can try to remove marks on inside or outside windows:
- Use a mineral deposit removing cleaner, such as CLR. Dampen a sponge with cleaner and rub at the stains on the windows. Rinse the area with water and proceed with regular cleaning.[9]
- Spray the affected area with pure vinegar and let it sit for at least five minutes. Use a sponge or cloth to rub the stain, and proceed with regular cleaning.[10]
- Make a paste with water and a cleaner that contains oxalic acid, such as Zud or Bar Keepers Friend.[11]
Apply the paste to the affected area with a clean cloth and give it a good rub. Rinse away the paste and clean normally. - You may be able to get off crusty or gritty stains by gently using a razor to scrape them off.
- Use a mineral deposit removing cleaner, such as CLR. Dampen a sponge with cleaner and rub at the stains on the windows. Rinse the area with water and proceed with regular cleaning.[9]
-
2
Remove stickers and decals. Whether you have children who love to decorate with stickers or applied decals to your windows to prevent birds from flying into them, removing sticky substances from windows can be difficult. However, all you really need is a spray bottle filled with water and a plastic scraper with a good edge.
- Spray the stickers with water and let it sit for a couple minutes.
- Hold the scraper against the window at a 45-degree angle and apply gentle pressure. Start below the stickers and scrape upwards to get underneath the stickers. Use a towel to wipe away the water.[12]
-
3
Remove and clean the screens. For inside and outside windows, clean the screens every time you clean the windows, which should be twice a year. Remove the screens and vacuum them to remove dust and dirt.
- Use a hose or a spray bottle filled with water to lightly spray the screen both before and after you wipe it down.
- With a clean cloth or sponge, wipe them down with warm water mixed with a splash of vinegar or dish soap. Allow the screens to air dry fully before replacing them.[13]
-
4
Rinse away dirt and grime from outside windows. Outside windows are exposed to all manner of grease, dirt, pollutants, and other materials. For really dirty windows, start the cleaning process by using a garden hose to rinse away the top layer of grime from the windows and panes.[14]
- If you don’t have a hose, use a lint-free cloth and water to wipe away some of the dirt. You can also use a pressure washer as long as it is on a low setting.
-
5
Vacuum or dust inside windows. Make sure you get all the windows, frames, and corners. This will prevent you from just spreading dirt around when you are cleaning.[15]
- Before you start cleaning inside windows, lay a large towel down in front of the window to catch spills.


Advertisement
Add New Question
-
Question
What kind of vacuum do I use?

A hand vacuum works well, or for more power you can use the attachments on a standard vacuum cleaner.
-
Question
Will using newspaper or paper towels to clean damage the windows?
No.
-
Question
I have windows that are behind fly screens, and I have plantation shutters on the inside. Therefore I cannot remove window to clean. Is there just a spray I can use to dissolve the dirt from the outside?
A «soft» power wash would do the trick. Best to hire a professional if you have never done power washing before.
See more answers
Ask a Question
200 characters left
Include your email address to get a message when this question is answered.
Submit
Advertisement
Video
-
Unfortunately, it isn’t possible to clean inside a double paned window without ruining the airtight seal between the panes. However, dirt build-up or cobwebs in between the windows indicates the seal has already been breached, so you may want to consider replacing the windows.[16]
-
When I am really pressed for time, which is most of the time, I have one of my sons hold a large towel inside the closed windows as I hose off all the screen and window. We then dry the window with towels and squeegees. In a large percentage of the windows, we do not have to remove the screens nor clean with soap nor Windex, saving a lot of time. Hosing off the windows and screens prevents getting a lot of dust on us and is healthier, as you breathe less dust (even though we are using dust masks).
Advertisement
References
About This Article
Article SummaryX
You can create a window washing solution by mixing 2 gallons of water with 1 teaspoon of dishwashing soap. If you don’t have dishwashing soap, you can also mix equal parts water and white vinegar for the same cleaning effect. Apply the solution with a sponge or paper towel, then wipe the windows dry with an absorbent cloth. For tips from our general contractor reviewer on how to clean and dry your windows so they’re streak free, read on!
Did this summary help you?
Thanks to all authors for creating a page that has been read 902,288 times.
Reader Success Stories
-

Sally Henning
Sep 26, 2016
«I’ve had problems cleaning water spots from my windows. This method took them away without any work at all.»
Did this article help you?
Join our newsletter
Thank you for signing up to Realhomes. You will receive a verification email shortly.
There was a problem. Please refresh the page and try again.
Learning how to clean windows is all about that covetable streak-free finish. We all want windows that are so clean that they’re completely transparent. If despite putting in your best efforts, you’re still seeing grime or streaks, it may be time to turn to expert advice and investigate lesser-known window-cleaning hacks alongside traditional methods (hello, vinegar).
We’ll be honest and say that even the best window cleaning products won’t do the job if you’re using the wrong tools or haven’t yet mastered the proper technique for getting your windows clean. Don’t worry, though: learning is easy and you soon will notice a difference while needing to put in less effort (yes, that really is possible).
Armed with our top tips and all the necessary paraphernalia, your windows will rival those cleaned by a professional.
How often should you clean your windows?
We spoke to the Thames Valley Window Company (opens in new tab) about the best way to clean your windows inside and out, and how often we should be doing it.
Ryan Schofield, Managing Director says, ‘In order to maintain the aesthetics and practicality of your windows it’s important to clean the frames once or twice a year, although you may need to do this a little more if you live near the sea where salt exposure is high, or if you live in a busy city and are close to major roads or industrial sites.’
‘Water marks, dust and dirt will soon build up if you don’t regularly clean window glass. We suggest using warm, soapy water, but don’t use too much washing up liquid, as too many bubbles will leave residue marks on your windows. Use a clean lint-free microfibre cloth and change the water regularly so you’re not smearing on dirt! Use a soft, clean cloth to remove any drips. Finish by using a glass cleaner, or one part distilled vinegar with one part warm water if you’d like to make your own solution. Spray this directly onto the glass and use a soft paper towel to rub it off.’

(Image credit: Thames Valley Window Company)
The best way to clean windows
There are a few different routes to go down when cleaning windows, depending on how dirty yours are, how big they are, how much time you have and whether you prefer to use natural cleaning agents like vinegar or not. This is the best course of action:
1. Pick the right day for streak-free clean windows
Is it a sunny day? If it is, hold off washing windows until a cloudy day – it might be easier to see smears on a sunny day, but the sun drying the windows too quickly is usually the cause of any streaks in the first place.
2. Remove dust from dirty windows
Have you brushed, swept or vacuumed the window? Your success rate will be far higher on windows that are free of dust, so vacuum the sash, frames and sills first. Plus, doing so will ensure there’s no muddy, soupy mess on the floor afterwards. Thomas recommends »To clean window frames, start by opening your windows wide. Using a soft paintbrush, loosen any cobwebs, dirt and grime around the edges and hard to reach areas, then use a hoover with a soft nozzle brush to hoover around the frames.’
The tools you use depends on the buildup of dirt and your preference too. For every day wiping down, you may not even need any product whereas neglected windows will need more elbow grease for sparkling results.
Quickly cleaning windows
If your windows are given a regular wipe over and aren’t hideously dirty, you can simply use a damp microfibre cloth (opens in new tab) to wet them, and a dry cloth (or a series of dry ones) to dry them off and achieve a streak-free finish.
Ryan advises to ‘Mix up some mild detergent with warm water and use a soft cloth to clean away any dirt. Make sure you don’t use anything with harsh chemicals as they may damage the frame finish. Wipe the window with fresh water to rise off any suds before wiping dry.’
The upside to using microfibre cloths is that they can be simply popped in the washing machine, ready for use next time, making them a fairly eco-friendly way of cleaning windows. Plus, you can use a squeegee before you dry off the windows with your microfibre cloth to cut down on the cloths you use and get the job done even faster.
Deep cleaning windows
If microfibre cloths aren’t coping with the dirt on your window – maybe it’s not stubborn, but it’s definitely copious – you might need to take a solution of washing up liquid and warm water to it.
Start by wiping the soapy water on with an abrasive sponge, then rinse the windows with clean water; use a squeegee to get any further soapy deposits off; then use the microfibre cloths for a streak-free finish.
What not to do: Make the water too bubbly – soapy suds will be left as filmy streaks on your windows and you’ll wish you’d never started.
If you’re set on using a chemical cleaner to wash windows, we’d recommend a product that professional window cleaners use (and that we’ve tried out): HG Window Cleaner (opens in new tab).
It does not contain ammonia or methylated spirits and complies with all professional requirements, as it is pH-neutral and does not damage paint, varnish or plastic. Follow the manufacturer’s instructions for best results.
To squeegee or not to squeegee?
We absolutely swear by squeegees (opens in new tab) at Real Homes . There’s one by the shower to clean the glass shower screen, and one under the sink to wash windows. We simply use the sponge mentioned in tip 2 then take a squeegee to the soapy suds to leave a streak-free shine. Finish it off with a clean, dry, e-cloth and you’re done.
What not to do: Clean the outside of an upstairs window from a ladder – leave that to the pros.
4. How to clean windows with vinegar
Vinegar is probably what your grandparents used to wash their windows – and it’s still seen as a really effective way to remove stubborn dirt. Better still, it’s non-toxic and anti-bacterial. To make your own vinegar (opens in new tab)-based window cleaning solution, simply add two tablespoons of it to a small bucket of warm water. Then follow the steps for using soapy water (but be sure to wear rubber gloves).
If dirt is really, really ground on, put the vinegar solution in a spray bottle and apply to the panes, then leave for a few minutes before tackling with your sponge.
What not to do: Use a vinegar solution on any windows that have matt-painted or undercoated-only frames – you might find the frames stain.
5. Clean big windows with a Kärcher
If your house has a large glazed extension or if you’re lucky enough to have lots of large windows all around the house PLUS your home is somewhere that’s prone to dirt build-up on windows, a window vac like Kärcher can help you get the window cleaning job done quickly – and with good results.
Choose a cordless model with decent battery life, and bear in mind that these cleaning appliances do tend to do the job best with a cleaning fluid, so if you’re looking for a natural solution that doesn’t involve chemicals, you may like to keep reading.
What not to do: Invest in one of these for small window panes; these appliances are best suited to expanses of glass. If you’re not sure if you need one, reading our Kärcher Window Vac review should help make up your mind.
More ways to clean windows naturally, or not
Clean windows with lemon
This is a simple alternative to window cleaners that both cleans and has a mild abrasive action. Simply cut a lemon in half, taking care to remove all pips, and rub the lemon half all over your window, finishing with a lint-free cloth. This method will work best on smaller windows as it’s quite labour- (and lemon-) intensive.
Clean windows with rubbing alcohol
Don’t have or don’t want to use vinegar or lemon? Reach for your first-aid kit: rubbing alcohol is great at cleaning windows and disinfecting them, cutting through even stubborn dirt. The trick is to always mix it with distilled water rather than just your regular tap water. Distilled water doesn’t have any mineral content that could show up on your windows as streaks once the alcohol has evaporated. Use a couple of tablespoons per 500ml of water.
Still struggling to find out how to clean windows without streaks? You may have to rethink what you’re using to clean your windows rather than the cleaning solutions you’re using. Alicia Johnson, the owner of West Covina-based Cleaning Green LLC (opens in new tab), told us that for ‘ensuring it’s absolutely spotless and no streaks are left behind, the tool you are using carries more importance than the cleaning solution.’
It doesn’t so much matter if you’re using good old vinegar or a fancy window cleaning spray – if you’re using ‘an ordinary cloth that isn’t even designed for cleaning windows’, you likely will find that it ‘leaves messy streaks and marks behind.’
So, ‘if you want your windows to be appropriately cleaned, we highly recommend you invest in a professional cleaning tool. Nowadays, you can get your hands on a window vacuum that cleans your window spotless and leaves ZERO streaks behind. There are even magnetic window cleaners available in the market! Both are clamped against the window in between; as you move one across the window to clean, the one on the other side follows, and you can clean both sides simultaneously.’
That’s definitely food for thought. A robot window vacuum cleaner from Amazon (opens in new tab) will cost you around $150 – not cheap, but it will do a perfect, streak-free job without you needing to lift a finger.
How to clean windows from the outside
If you like buying specialist window-cleaning sprays, save these for cleaning windows from the inside. If you want to know how to clean a window from outside, Ray Brosnan of Brosnan Property Solutions (opens in new tab), advises no wasting time on ‘fancy chemicals or detergents. Less is most definitely more here. Washing up liquid/detergent and warm water is more than enough to get the job done.’
Again, ‘the real trick here is equipping yourself with the right tools to ensure you get a good result. Plastic T-bars (opens in new tab) are essential for getting your windows wet firstly, these are quite cheap and can be purchased in most online stores, they’re also quite durable when used correctly.’
Next, ‘you’ll need a good-quality squeegee to get the water back off the window. Finally, the secret weapon, the “scrim (opens in new tab)” – this is the cloth used to wipe the edge of the windows. It leaves a smudge-free finish every time and is quite cheap.’ These are readily available online also. Scrim is made from linen; you can use synthetic alternatives, so long as they’re labeled suitable for window cleaning.
When It comes to the technique, Brosnan recommends ‘the S-Shape method’ – ‘and be sure to cover the entire pane/section of glass. Be sure to not take the blade of your squeegee when cleaning the glass or you’ll be left with water marks.’
More window cleaning tips
- Avoid direct sun: Remember that you shouldn’t clean windows when the sun is shining directly on them, as the heat can cause the water to dry into spots or streaks.
- Remove window dressings: This isn’t a must, but if you’re doing an annual, thorough window clean, it makes sense, especially if your window dressings are a) in the way and b) likely to be dirtied easily by drips and splashes. Plus, you can use this as a good opportunity to have curtains and blinds cleaned or freshened.
- Frames first: Make sure the frames and sills are clean before you start.
- Newspaper on streaks: Did your grandparents buff the windows with newspaper? It does work if you haven’t got a microfibre cloth handy.
- Avoid flimsy kitchen roll: Some can disintegrate when they get wet and they will leave lint deposits on the window panes.
- Air the room: Especially if you’ve been using vinegar as it’s not the smell you want hanging around.
Best window-cleaning cloths
The Marigold Crystal Clear Window Cloth (opens in new tab) is a machine washable microfibre cloth that you wet and use to wipe the surface.
We wanted to know the quickest and most efficient way to clean mirrors, shower screens and windows, so we tested various cleaners to see how easy they were to use, how well they cleaned, and how easy they are to keep clean themselves.
When you’re in a hurry (and when are we not?), you don’t want to be faffing around with loads of bottles, so we tested with plain old water. The Marigold Crystal Clear Window Cloth is designed to be used with either water or a spray-on detergent for more thorough window cleaning. In our test, it was the easiest to use – it’s just a single cloth that you dip in water and then use to wipe away marks.
How effective is it at cleaning? If you want to quickly whizz around the inside of your windows, a window vac is undoubtedly speedy, but if you’re on a low budget, don’t have the storage space for one, or are tackling smaller surfaces, such as mirrors, the Marigold cloth gets your surfaces sparkling with minimal effort – simply wet and wipe.
Is it easy to keep it clean? Yup, the Marigold cloths can simply be popped in a 60ºC wash, which makes them simple to keep clean. Job done.
You can see clearly now! 🏡
How easy would it be if there was some magic trick to make your windows gleam with just the snap of your fingers? Sadly, we don’t live in an alternate universe of fairy tales. We need to do some work in order to get the shiny look back to our windows.
Perhaps you’re wondering how often to clean your windows. Or maybe you want to know what the best way to wash windows is. Either way, the professional window cleaners at Fantastic Services have the answers.
So, here you will find the best practical window cleaning tips and tricks – from eco-friendly methods to advice on how to save yourself from making mistakes.
Table of Contents:
- How to clean windows
- Outside windows
- Pre-cleaning your windows
- Cleaning window frames and sills
- Common window cleaning mistakes
- Professional window cleaning
If you:
- Are thinking of cleaning your windows;
- Want to know what common mistakes to avoid;
- Are interested in the benefits of professional window cleaning,
Then keep reading! This article is for you.
How to clean your windows
Let’s start with the tools you’ll need:
- White vinegar
- Water
- Spray bottle
- Small bucket
- Microfibre cloth
- Mop/window scrubber
- Sponge
- Squeegee
- Clean towel
Cleaning windows doesn’t have to be a tough job. Follow these simple steps to a clearer view:
- Choose the right time.
Pick a time when the sun isn’t falling directly onto the windows. Otherwise, the solution will dry out quickly, leaving unpleasant streaks. - Remove curtains, blinds and window screens.
You’ll clean them separately later. - Prepare a cleaning solution.
Mix an eco-friendly window cleaning solution of equal parts warm water and white vinegar. Fill up one spray bottle and a small bucket with the mixture. The only disadvantage of this homemade window cleaner is you may not like the smell of vinegar. For more eco-friendly recipes, read our post on how to make a homemade window cleaner. There you will find 5 alternative recipes. - Spray.
Spray down the window from top to bottom. Make sure it’s soaking wet. - Wipe the frame.
Wipe down the frame first. Don’t skip this step, otherwise, all the dust and grime from the frame will get across the spotless glass. - Scrub the glass.
Scrub the window gently with a mop or a window scrubber. That’s how you agitate all dust, dirt and stubborn stains and make them easier to remove. - Rinse.
Soak up the sponge in the bucket and rinse the window thoroughly. - Scrape.
Use a squeegee to scrape the solution off the glass with a fluid motion. You can either squeegee the window from top to bottom or you can use the professional “S” technique. - Wipe.
Grab a clean towel and wipe the edges of the window frame and sills so there’s no water dripping. Wipe the blade of the squeegee from time to time to avoid streaks on the glass.
Dry.
Dry up the window with a microfibre cloth for a gleaming appearance before moving to the next one.
There are some important steps you need to consider when cleaning your windows on the inside and on the outside. You can add the following advice to your window cleaning to-do list.
How often should you clean your windows?
Experts recommend that you clean your windows every four to eight weeks.
How to clean windows outside
Now, cleaning your windows inside your home is usually a breeze, right? Everyone has done it at some point in their life. However, we can’t say the same about washing the exterior side of the glass pane, especially if you live high up in an apartment block, for instance. So, below, we’ll look at several proven methods of how to clean outside windows you can’t reach.
Get a magnetic window cleaner
There are different manual and robotic magnetic window cleaners on the market that use a similar principle. Each type is designed to clean windows of different thicknesses.
Here, we’ll talk about a manual glider-type of a magnetic cleaning device. This gadget is so much fun to use and is perfect for washing “high-up” windows. The tool has been created to solve the conundrum of people, who wonder how to clean exterior windows from inside. After all, no one wants to climb up a precarious ladder or wobble on their window ledge.
If you’ve never heard of this gizmo, this is how it works:
The device is made of two parts, which use microfibre cloths to clean both sides of the window at the same time. How? You put one part on the outside of the glass and the other – on the inside. Magnets hold both pieces together in place. For extra security and control, the device has a string with a ring that you can put on your finger.
The cleaning process involves spraying both sides of the glass with a window cleaning solution and moving the glider at a moderate pace across the interior pane, using the S-technique. Note that pushing the tool too quickly may cause the magnets to disconnect. You can also check out how it works in this video.
Use your good old mop
The mop window cleaning method can be used for exterior windows that can be reached from the ground. With some precautions, you can also apply the technique and clean your upstairs exterior windows from the inside. However, never try to lean dangerously out of your window or climb up on its ledge when performing the task.
Here’s how to clean exterior windows with a mop:
- Prepare a cleaning solution.
Mix equal parts water and white vinegar in a bucket. - Wash.
Dip the mop into the mixture, squeeze out the excess liquid and wash the glass. - Change the mop head.
Once most of the grime has been removed, replace the mop head with a microfibre sponge mop head. - Spray.
Spray a streak-free window cleaning product onto the microfibre sponge/cloth. - Wipe.
Wipe the outside window again with your device. - Dry.
Additional drying of the glass usually isn’t necessary. Still, if you like, you can attach a dry microfibre cloth to the head and wipe the glass dry as a finishing touch.
Wash the windows with a hose
The hose window cleaning technique is a quick fix for washing dirty exterior windows, both from the inside and outside. Note that the method is not suitable if you live in a flat unless it’s located on the ground floor. Attach the hose to an outside or inside tap and spray down your exterior window, be it upstairs or downstairs. This way, you can wash a window that is out of reach from the inside.
Unfortunately, a hose would most definitely leave water streaks or marks on the glass. So, apply the drying technique with a mop handle we mentioned in our previous cleaning method.
Pre-cleaning your windows
Sometimes, when your windows have been neglected for a long time, you may need to pretreat them before washing them properly. If this is the case, here are some pre-cleaning tips and tricks that can help:
Clean stubborn stains
Exterior windows tend to get covered in all sorts of marks and stains on top of dirt accumulation, caused by dust, salt and hard minerals, mixed with acidic rainwater. Not to mention the regular instances of bird droppings that can cake the glass in an unsightly pattern.
So, check out the methods below on how to remove stubborn stains from your outside windows. Note that these tips are also applicable to eliminating all those sticky stains and fingerprint marks from your interior windows, too.
- CLR
A calcium, lime and rust remover (CLR) can save the day anytime if you have mineral deposit-based stains on your window. Apply the product on a sponge and rub the marks gently before rinsing the surface afterwards with water. - White vinegar
Put some vinegar in a spray bottle and apply on the stains. Leave the acidic substance to sit for 5 – 10 minutes. Then, remove the stains with a sponge. - Oxalic acids
Make a paste from an oxalic acid-based cleaner, mixed with some water (Zud or Bar Keepers Friend are both a good choice). Use a cloth after applying the paste on the stains and rub the affected areas gently with it. Rinse well. - Scraping
To remove encrustations or dry matter stuck on your window, try using a razor to very carefully scrape them off.
Then, wash the windows by applying your favourite cleaning method.
How to remove stickers from windows
Colourful stickers or decals that your kids have stuck on your windows are not that hard to remove. The same goes for any type of glue residue on the glass, left behind from wrongly scraped-off stickers. Here are some of the solutions you can use to remove a sticker from glass:
- Water
Get a spray bottle filled with water, spray it over the stickers and then gently remove the softened-up paper with a good quality plastic scraper. - Rubbing alcohol
Rubbing alcohol also dissolves adhesives, paint and oil-based products so it will work on the stickers just fine. Dampen a cloth in the spirit and rub the sticker or glue residue. Gently scrape any remnants with a scraper, if need be. Then, wipe the area with a microfibre cloth. - Goo Gone
Goo Gone cleaning liquid is another safe adhesive remover that you can give a try. Just follow the manufacturer’s instructions.
How to clean window screens
If you have window screens installed, they should be cleaned every time you decide to wash your windows.
- Remove.
First, remove the screens from the window. - Vacuum.
Give the screens a good vacuuming to clean off any dust, cobwebs and other hard particles. - Spray.
Spray the screens with a mixture of water and vinegar, or water and a mild dishwashing liquid. - Wipe.
Wipe them down with a clean cloth. - Rinse.
Thoroughly rinse the screens with clean water. - Dry.
Air-dry the screens before putting them back on the windows.
Vacuum or dust inside windows
Cleaning inside windows with a vacuum cleaner before washing them will make the latter task much easier. Use an appropriate attachment to remove any cobwebs from the corners and the soft brush to clean up all the dust from the glass panel. You can do the same with ground-floor or balcony exterior windows if you wish.
How to clean window frames and sills
One of the most common types of frames nowadays is uPVC. Their colour alternatives differentiate but one of the most preferred options is white uPVC. Even though this colour variation makes the spots of dirt more visible, you can get rid of them very quickly, no matter how stubborn they are.
Read our full guide on how to clean uPVC window frames and sills and find for yourself the easiest method for maintaining the look of your windows. Follow the step-by-step process for impeccable results. You’ll see that the job is not that difficult and it will even help you save some time when doing your seasonal house cleaning.
How to clean wooden window frames
Wooden window frames should be cleaned a bit differently from uPVC ones. If they are very old, they might require additional maintenance such as painting, window frame staining and oiling. Here are some tips on how to clean wooden window frames.
What you need
- Clean bucket
- Lukewarm water
- Soft brush
- Scouring pad
- Soft cloth
- Vinegar
Best method to clean wooden window frames
- Sweep.
Use a soft brush or polishing pad and mix it with some washing liquid of your choice. - Rinse.
Take a clean bucket and lukewarm water. Dip the scouring pad into the bucket and wash off all the grime and dirt. - Wipe.
Use a soft cloth to absorb the water and dry the frames.
Wooden frame cleaning tips
- Use more powerful solutions for stubborn stains.
You can add a teaspoon of sodium bicarbonate to the water. It’s a bit stronger but it’s ideal for stains that are difficult to remove, such as traces of insects and birds. - Don’t soak the wood too much.
Make sure you don’t drench the sponge or the pad, try to wring out the excess water. Make sure the equipment you use is damp and it’s not leaking with water. Otherwise, you may damage the wood. - Get rid of mould and mildew.
The easiest way to do it is to mix equal parts of water and vinegar. You need to wet the spots and leave them for several minutes. After that, use the same methods mentioned above to clean the frames.
How to avoid the most common window cleaning mistakes
There are several things that might go wrong while cleaning windows. To avoid the most common window cleaning mistakes, you should:
- Refrain from using chemical cleaning solutions;
- Avoid the use of hazardous equipment;
- Forget about newspapers;
- Stop cleaning with the wrong tools;
- Take extra care when cleaning tinted windows. To avoid any damage, follow our useful tips and tricks on how to safely clean tinted windows.
How professional window cleaning can help you live a better life
You can save time and improve your life by hiring a professional window cleaner. Here’s why a specialist will get you better results:
- Expert window cleaners are trained.
They know the nuts and bolts of window cleaning as they’ve passed rigorous training. - They use the proper equipment.
Buckets, squeegees, water-fed poles, window vacs, e-cloths… All these cost a lot, take up precious storage space in your home and you need to learn how to use them the right way, too. You can save yourself from all that trouble by hiring well-equipped window cleaners. - They provide professional results.
Cooking for yourself and having a meal at a quality restaurant are different experiences (unless you’re a chef). The same goes for professional and DIY window cleaning. - They are experienced in avoiding property damage.
If you damage your windows by scratching or breaking them while you are cleaning the glass, you have to pay for the replacement out of your own pocket. Professionals know how to avoid issues and in the rare case of something going wrong, they have insurance to cover the damage. - By delegating the job to a professional, you don’t have to worry about safety.
You don’t have to climb ladders and risk your own safety just to get streak-free windows. Also, using chemicals can negatively affect your health. You can easily avoid these dangers because these days, most of the window cleaners work from the ground by using water-fed poles and purified water. - You get more free time for yourself or your family while someone else is doing the hard work.
With so many things on your to-do list, it’s obvious that the currency of the 21st century is time. What might take you a day or two, the professionals can complete in less than two hours. - Regular cleaning prevents your glass windows from corrosion.
Acid rain, polluted air and other artificial corrosion agents can damage the surface of your precious window glazing. Your maintenance costs, in the long run, will be lowered by preserving what you already have.
Expert window cleaning by Fantastic Services
With all that said, there’s nothing more convenient than entrusting your window cleaning needs to the professional technicians at Fantastic Services. They are all equipped with the latest industry-grade tools and supplies to provide you with outstanding results. The local pros are experienced, trained and fully insured to perform our window cleaning services all week round. Just contact us through the contact form on this website or get the GoFantastic app for an even easier booking experience.
Learn more about our window cleaning performed by technicians, which are certified by the Federation of Window Cleaners.
Takeaways
- You should aim to clean your windows once every four to eight weeks.
- You can make a DIY cleaning solution using equal parts warm water and white vinegar.
- Magnetic window cleaners are a fun and effective way to clean the exterior of your windows.
- If your windows are especially dirty, you may need to pre-treat them.
- When cleaning wooden window frames, make sure you don’t drench the wood and soak up any excess water.
- Avoid using harsh chemicals, newspapers and hazardous equipment.
- There are many benefits to professional window cleaning, including safety, guaranteed results and the use of proper equipment.
***
So there you have it, your extensive guide on how to clean windows at home. Please, do leave a comment below if you have any feedback or other clever ways to leave windows spotless!
Image source: shutterstock / Wstockstudio
Over time, every Windows installation builds up junk that takes up space and wastes resources. It’s easy to neglect regular maintenance, so often the problem comes from old files and programs.
If you don’t clean your computer, before long you’ll encounter low disk space warnings and notice it slowing down. Let’s walk through how to clean Windows 10 (and Windows 11) using a variety of tools for different situations.
Step 1: Erase Temporary Junk
Windows 10 and 11 include a pair of similar tools for clearing out old temporary files from your disk, meaning you don’t need a dedicated Windows cleaner app. They’re a great first stop on your Windows cleanup journey.
Disk Cleanup
If you don’t mind an old-school interface, the classic Disk Cleanup tool gets the cleaning job done. Access it by typing Disk Cleanup into the Start menu and selecting the disk you want to clean.
After a moment, you’ll see a list of unnecessary files that Windows can clean up. Assuming you’re an administrator, you should first click the Clean up system files button to scan again for additional types of data.
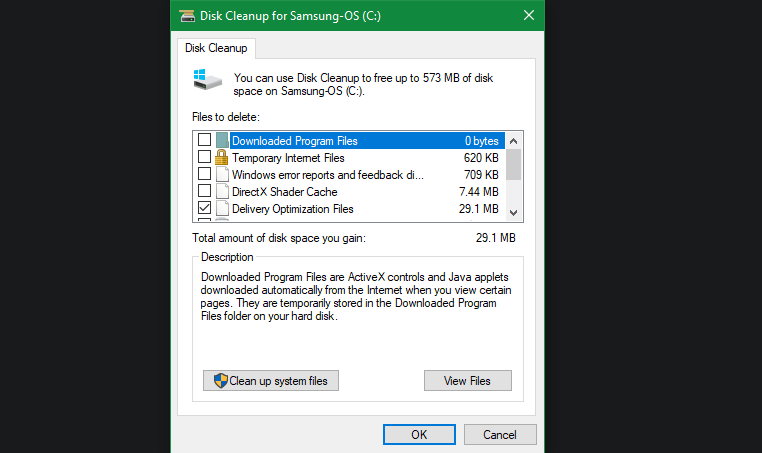
Feel free to delete pretty much every category of data available here, with a few exceptions. On older versions of Windows 10, watch out for Downloads, which will delete everything in that folder. You may also want to avoid cleaning the Recycle Bin unless you’re sure that you won’t need to restore anything from it.
If you’ve recently updated to a new major version of Windows, you’ll see a Previous Windows installation(s) entry. Deleting this will remove the old files Windows keeps for 10 days—those allow you to easily go back to an earlier version. You should also avoid removing the Windows ESD installation files option, as this is used for resetting your PC via Settings.
Check out Windows folders you can delete to save space for more info on the specific items you can remove with disk Cleanup.
Storage Sense
Windows 10 and Windows 11 both include much of this same functionality of Disk Cleanup, with a nicer interface, at Settings > System > Storage. You can use the Storage Sense feature found there to automatically clean up files when your disk space is low, or every so often. Click Configure Storage Sense or run it now to change these options.
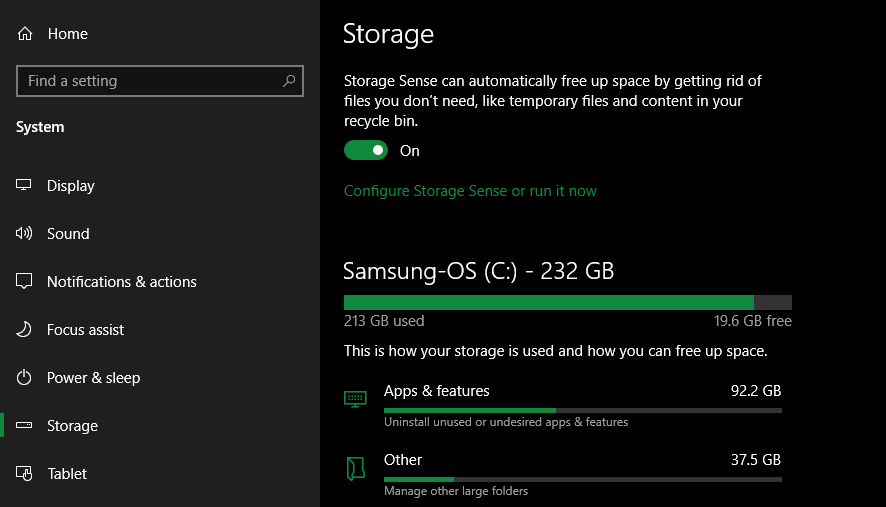
In the list of what’s using space on your PC, click Temporary files and you can delete the same types of data as in Disk Cleanup. Show more categories provides more info about types of data that aren’t using as much space.
Step 2: Delete Large Files
You’ve removed unnecessary files; the next step to cleaning up Windows 10 is to find old data taking up a lot of space on your computer. To help with this, download TreeSize Free, which will scan your storage and show you where the biggest files are.
Once installed, search for TreeSize on the Start Menu and launch it using the (Administrator) link so you can scan everywhere. To start, choose Select Directory in the top-left and select your main storage disk.
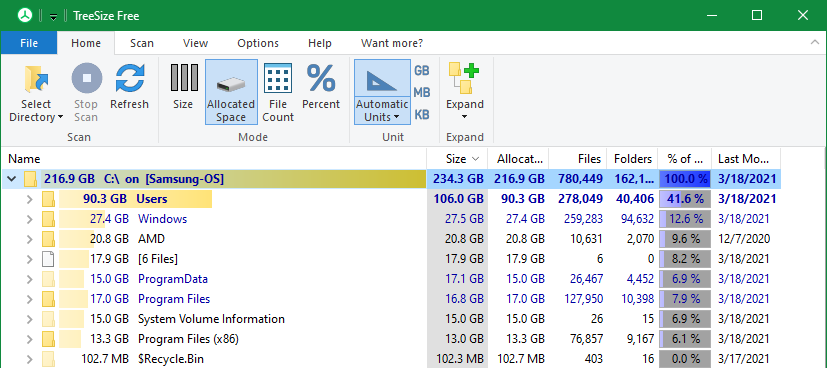
After a few moments, you’ll see a visual breakdown of your PC’s storage, with the largest files at the top. Click the dropdown arrow on any folder to expand by one level.
The largest folders will probably be Users, Windows, and Program Files (or Program Files (x86)). There’s not much you can do in the Windows directory without causing issues (be aware of Windows folders you should never touch), so let’s look at the others.
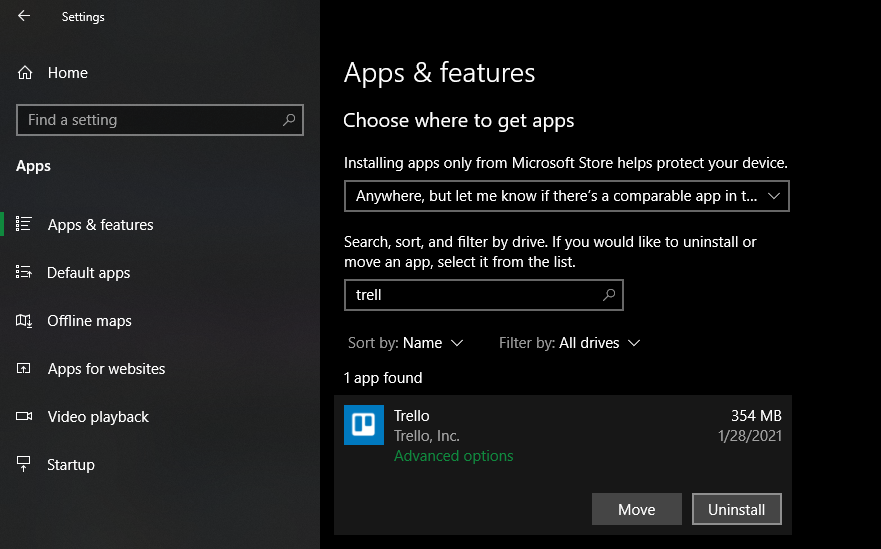
Uninstall Big Programs
Under Program Files (and/or Program Files (x86) on 64-bit Windows), you’ll find files for most of the apps you have installed. If you don’t use some of these anymore, head to Settings > Apps > Apps & features to uninstall them.
Eliminate Large Items From Your User Folder
The majority of space-hogging files will likely be in your account folder under Users. This contains your documents, pictures, videos, and similar.
You’ll probably see a lot of space taken in the AppData folder, which is where many apps store information and preferences. For instance, Chrome and Spotify’s caches can take up several gigabytes here.
Have a look at these files and see if anything is low-hanging fruit. You can delete files you no longer use or move some data to an external hard drive. If you have lots of files in Dropbox or other cloud storage, use their preference panels to de-sync cloud files you don’t need. You can always access them through the web interface.
You might see some other enormous files in TreeSize, such as WinSxS. See our guide to managing a large WinSxS folder if you have this issue.
Step 3: Clean Windows 10 Bloatware
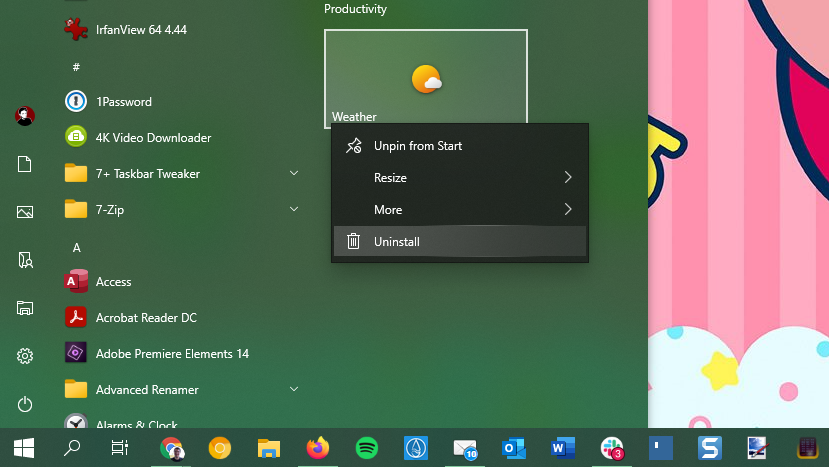
Most store-bought computers come loaded with worthless manufacturer bloatware that wastes space and duplicates functionality already in Windows. In addition, Windows 10 itself includes some junk apps you probably never use.
If you haven’t taken the time to remove bloatware from your system, you should. It’s an important part of Windows 10 cleanup. See our guide to removing bloatware from Windows 10 for instructions.
Step 4: Tidy Your Desktop
Even after you’ve cleaned up your computer’s files and apps, a messy desktop can still confuse you and make it harder to work efficiently. Many people use their desktop as a temporary storage space, leading to all sorts of files getting scattered across it.
You should try «resetting» your desktop to a clean state to make it neater. Start by moving all the files from your desktop to another location. Next, you can create shortcuts to files you need all the time on your desktop.
If you have so many files that you don’t think this will work, the Fences app is definitely worth a look. It includes powerful tools that let you automatically combine similar desktop icons, hide or show all icons with a few clicks, and much more.
After you’ve cleaned up Windows 10 and your desktop, you’ll feel like you have a whole new machine. We have a deeper guide on cleaning up your Windows desktop if you’re interested.
If Necessary: Refresh Windows 10
Maybe you’ve concluded your PC is such a mess that you don’t want to take the effort to clean up Windows 10. In that case, you can use a built-in option to reinstall a fresh copy of Windows.
You might know about the Reset this PC option available in the Recovery settings. However, using this with certain options will restore your PC to how it was out of the box, including the preinstalled manufacturer bloatware. To avoid this, you can use another method.

To use it, hit the same Get started button in the Recovery menu. Pick Keep my files, choose whether to download or reinstall locally, pick settings, and then make sure you pick No for Restore preinstalled apps?
This is equivalent to the Fresh Start option found in the Device performance & health section of the Windows Security app in older Windows 10 versions. It reinstalls Windows 10 and updates it to the latest version, plus it removes all installed apps. Only your personal files and «some Windows settings» are kept.
Even though Windows promises to keep them safe, make sure you back up your files before doing this, in case something goes wrong. You should also make a note of any license keys you’ll need to reactivate software after the refresh.
Having to reinstall all your programs by hand will take some time. But if your computer is a mess, it might still be worth it to get a clean system.
Avoid Fake Cleaning Apps
While we’re discussing Windows 10 and 11 cleanups, it bears mentioning that you should be careful what cleaning software you download. While the above tools are all legitimate ways to clean your PC, you’ll find many scammy «PC cleaners» online that are totally worthless (such as the one in the above video).
These tools provide a «free scan» that finds thousands of «issues,» which absurdly count every cookie on your computer as a «privacy risk.» Then they demand you pay a good amount of money to actually «clean» anything up.
Don’t bother with this nonsense. The above tools should be plenty to clean up unnecessary files. If you feel the need to do more, follow our ultimate Windows cleaning checklist.
Now Windows 10 Is Cleaner Than Ever!
That’s how to clean your computer without any frills. You now know the big steps to clean up large and unnecessary files in Windows 10. These methods should be sufficient to clean up a good chunk of space on your computer and make it feel fresh. Keep up with them every so often, and you shouldn’t have to worry about low disk space warnings any longer.
Just make sure you don’t go overboard and make common Windows maintenance mistakes.
Over time, pollution and grime accumulate slowly but surely on your windows, both inside and out, obstructing your views and blocking precious sunlight. The only thing worse? Thick streaks left behind by improper cleaning.
To keep your vista streak-free (and your light-loving houseplants happy), follow this expert cleaning advice from Carolyn Forte, Director of the Good Housekeeping Institute Cleaning Lab. With the right window-cleaning products and techniques, your windows will have never looked better.
This content is imported from poll. You may be able to find the same content in another format, or you may be able to find more information, at their web site.
Mistake #1: Choosing a sunny day to clean your windows.
«Do this job in the blazing sun and the cleaner will dry onto the hot windows before you get to wipe it off, leaving hard-to-remove streaks,» Forte says. If the weather won’t cooperate, start on the shady side of the house.
Mistake #2: Spraying cleaner on top of dirt and dust.
Before you get started, sweep dirt from the window frame with a brush, or suck it up with a handheld vacuum or your machine’s dust attachment. This will prevent dirt from turning into a muddy mess when mixed with a cleaner. If your window screen looks especially grimy, pop it out and wash with hot, sudsy water and a soft brush, then rinse and let dry before putting it back.
For quickly dusting shades and blinds, Forte recommends going over both sides with a microfiber duster, or opening the slats and going over each one with a damp cloth followed with a dry one.
LAB TIP: You can also refresh your curtains at the same time by putting them in the dryer for 15 minutes on an «air-only» cycle and rehanging quickly to prevent wrinkles.
Mistake #3: Skimping on window cleaner.
Don’t hold back on the spray, especially if your windows look extra dirty. «You need plenty of cleaner to dissolve and suspend the dirt so it can be completely wiped away — skimp and you’ll be seeing streaks,» Forte says.
She recommends Invisible Glass Cleaner With EZ Grip. The fine mist from the bottle stays where you spray until you wipe it, meaning less drips and mess. Check out more of our top-tested cleaners, depending on the job:
Top Lab Pick

Invisible Glass Cleaner
Greasy Windows

Spic & Span Cinch Glass Cleaner
Car Windows

Hope’s Perfect Glass Cleaner
Speed Cleaning

Windex Windex Original Glass Wipes
Outside

Windex Outdoor Cleaning Tool
If you would rather go the DIY route, try whipping up this homemade vinegar cleaner:
Homemade Glass Cleaner
- 2 cups water
- 1/2 cup white or cider vinegar
- 1/4 cup rubbing alcohol 70% concentration
Combine the ingredients and pour them in a spray bottle. If you have kids or pets, write the ingredients on the outside of the bottle for safety.
If you live in an area with hard water, consider using distilled water to make your glass cleaner. BTW, the vinegar in this DIY cleaner will also help with those stubborn stains. The U.S. Geological Survey says it’s the acidity of vinegar that allows the minerals left behind from hard water to be washed away.
Mistake #4: Using an old cotton rag to dry your windows.
Casabella Microfiber Glass Cloths

Casabella Microfiber Glass Cloths
Some folks like drying panes with newspaper, but you’re better off reusable microfiber cloths. «They are super absorbent, washable and leave the glass shiny and streak-free,» Forte says.
Try Casabella Microfiber Glass Cloths, which have a special honeycomb texture to nab water spots, smudges and dirt from mirrors and glass without scratching.
If you would rather use paper towels, choose a brand that’s up to the task. Weak paper towels can shred and leave lint behind. In our most recent test of the best paper towels you can buy, Bounty Regular held up the best when wet.
Mistake #5: Wiping with a squeegee.
«Professional window cleaners swear by them, but you have to know how to use them correctly,» Forte says. «You squeegee down and where does the water go? On the floor.»
Because of the potential mess and drip factor, she avoids using squeegees, especially for small panes, but they can be more helpful on bigger, picture windows.
Mistake #6: Cleaning all your windows in one day.
You only need to clean your windows once or twice a year, Forte says, but it’s even easier if you divide the job up and do it room by room. When you’re cleaning, wipe one side of the window horizontally and the other vertically. If any streaks do form, you’ll easily know whether they’re on the outside or the inside.

Using a microfiber cloth will keep your windows streak-free.
How to Clean Windows, Step by Step
Now that you know common mistakes to avoid, read on for our step-by-step guide on the best way to clean your windows, both inside and out, without streaks.
- Start by removing dust from the window frame, tracks and sill with a vacuum, duster or cloth. Do the same with your blinds or shades. If you have curtains, this is a good time to remove and wash them, following the care instructions.
- To clean your screens, remove them and vacuum or brush them to get rid of dust. If you think they need a deeper clean, wash with a warm, sudsy mix, then rinse and allow them to dry completely.
- Spray your windows with a generous amount of glass cleaner.
- Using a lint-free paper towel or microfiber cloth, wipe your windows from top to bottom. If you see any streaks, give them another wipe until the glass is clear.
- While your screens are drying, wipe the outside of your windows and frames with a soft brush or disposable cloth to remove loose dirt and dust.
- Repeat steps 3 and 4 on the outside window glass. You’ll probably have to use a little more elbow grease (or just a few extra rounds of spraying and wiping) to get rid of all the grime from outside. Depending on the design of your windows, you may be able to clean both sides from inside the house, or if you have removable storm windows, take them off completely for cleaning.
- Pop your screen back in, hang your curtains and step back to marvel at the shine!


Home Care & Cleaning Lab Reviews Analyst
Jodhaira (she/her) is a product reviews analyst at the Good Housekeeping Institute’s Home Care & Cleaning Lab, where she tests and writes about home appliances, cleaning products and cleaning tips. Prior to joining GH in 2021, she graduated from Hofstra University with a bachelor’s degree in forensic science and spent two years as an analyst in an environmental lab in Queens.

Contributing Writer
Caroline is a writer and editor with almost a decade of experience. From 2015 to 2019, she held various editorial positions at Good Housekeeping, including as health editor, covering nutrition, fitness, wellness, and other lifestyle news. She’s a graduate of the Medill School of Journalism and dreams of the day Northwestern will go back to the Rose Bowl.
To delete temporary files:
-
In the search box on the taskbar, type disk cleanup, and select Disk Cleanup from the list of results.
-
Select the drive you want to clean up, and then select OK.
-
Under Files to delete, select the file types to get rid of. To get a description of the file type, select it.
-
Select OK.
If you need to free up more space, you can also delete system files:
-
In Disk Cleanup, select Clean up system files.
-
Select the file types to get rid of. To get a description of the file type, select it.
-
Select OK.
Note: If you notice that the Temp folder fills up quickly after running Disk Cleanup, see Low Disk Space error due to a full Temp folder.
For more on freeing up space on your PC, see Free up drive space in Windows.
Need more help?
Nothing will brighten up your home quite like giving your windows a good clean. There are a myriad of tips out there for how to clean windows, from making your own window cleaning solution with vinegar to the old newspaper trick.
Over time windows naturally get dirty from dust in the air, birds flying by and bugs taking refuge. They should usually be cleaned at least once every month, inside and out. However, while cleaning windows is a relatively easy cleaning job, it is also a bit of an art form when it comes to trying to achieve a streak-free finish.
Nothing will ruin the effect of your beautiful window treatment ideas quite like smeared glass. Unlike dusting shelves or cleaning kitchen counters, with the wrong cleaning technique it can often feel like you’ve made your windows worse, not better.
Crystal clear windows indoors and out are the best way to create a good and lasting impression, so we’ve rounded up the best expert tips to give your windows a professional clean. Make smudged, slightly blurry windows a thing of the past.

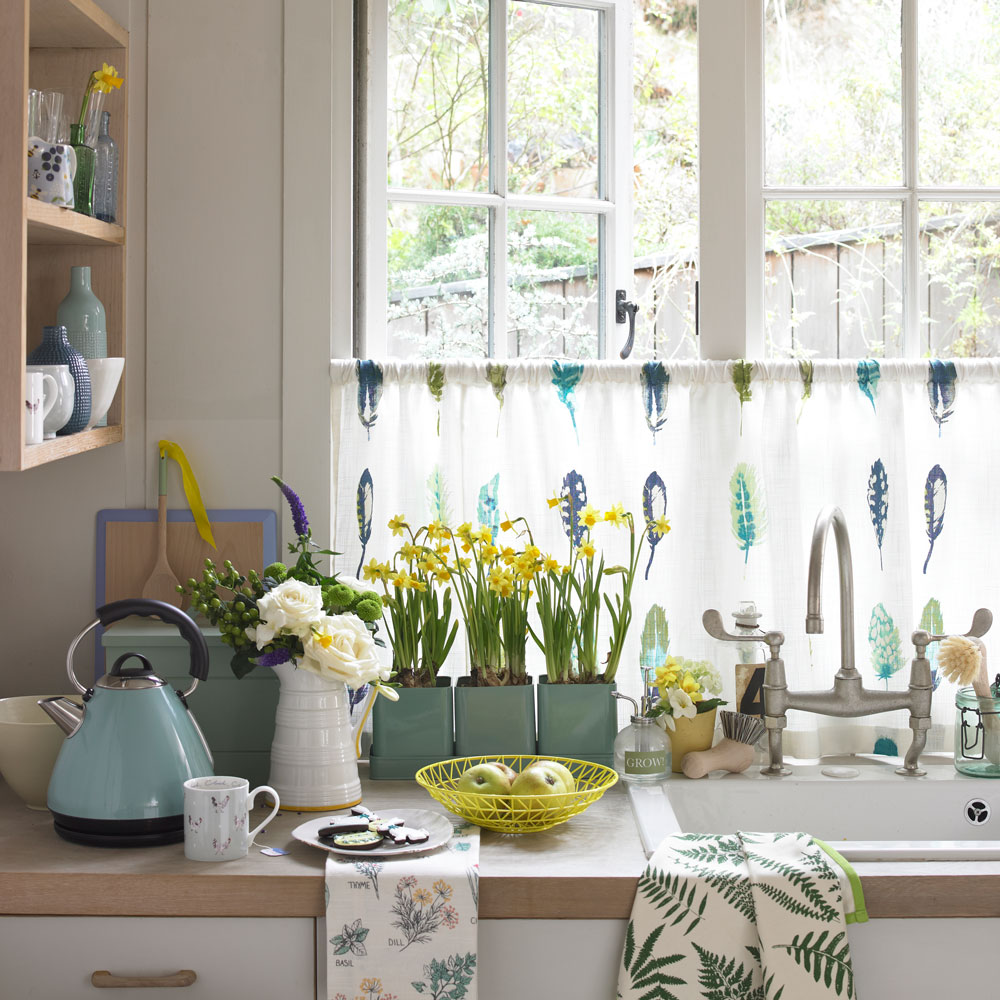
(Image credit: Future PLC /James French)
You can easily freshen up slightly dirty windows — ones that have the odd smudge or smear — using a cleaning spray and a microfibre cloth. Our Digital Deputy Editor Rebecca Knight swears by the Deft Advanced Window & Glass Cleaner, available at Lakeland (opens in new tab), as one of the best cleaning products for a sparkling finish.
However, every three months it is a good idea to get a squeegee out and do a proper clean. Here’s what you’ll need for cleaning windows in order to get a professional finish:
- Large dry brush or broom handle for removing cobwebs and dust
- Bucket
- Sponge
- Squeegee
- Purpose made window cleaning solutions or vinegar
- Brown paper or newspaper
- Microfibre cloth
- Dry lint free cloth or drying pad
1. Remove curtains and blinds before cleaning

(Image credit: Future PLC/ Damian Russell)
Start by taking down curtains and blinds. If you can, take the opportunity to give drapes a thorough wash or spritz with a fabric freshener like Febreze. Use a dry brush or dusting attachment on your vacuum cleaner to sweep away any dust or cobwebs from around the corners of the windows and the windowsills.
2. Make homemade cleaning solutions
If you prefer making your own cleaning solutions, add two tablespoons of white vinegar to a small bucket of warm water (this won’t kill bacteria, though).
‘White Vinegar is a fantastic natural option for cleaning your windows. Unlike chemical sprays it doesn’t fill your home with fumes or pollute the environment,’ says Laura Harnett, founder of Seep (opens in new tab).
(Image credit: Future PLC/ Polly Eltes)
You can also wash your windows with soapy water. Fill a bucket with a simple solution of washing-up liquid and warm water, but avoid creating too many soap suds as these will leave further marks if allowed to dry. Start washing windows using a non-abrasive sponge.
Laura also recommends taking care with the water you use when cleaning, and opting for purified water if possible. ‘So many people use a damp cloth and water to clean windows, but most tap water contains minerals like calcium and sodium which will leave ugly marks on your window,’ she explains.
‘If you need to use water to tackle a particularly dirty window make sure it’s purified so your windows are left streak-free.
Top tip: One to try, as seen shared on cleaning group forums is the quirky teabag cleaning hack. Apparently cold tea is the secret to gleaming, streak-free windows and glass. To try the teabag cleaning hack at home, use kitchen towel dipped into a mug of cold black tea. Wipe the tea over the surface and buff dry with a clean soft cloth.
3. Start with the frames
Start with the frames first, so you don’t drip dirty water on clean panes. A wipe with a wet sponge should do the trick, but if they’re very grubby, use mild detergent on wood or specialist cleaner on uPVC.
‘Wash your frames with plenty of clean, warm soapy water (washing up liquid is suitable) and wipe dry with a clean, soft cloth,’ recommends Rachael Munby from Anglian Home Improvements. She adds that you will have to take care depending on the what type of windows you have.
‘Be careful when cleaning uPVC products with decorative finishes such as Dark Woodgrain, Golden Oak, White Foil, Anthracite Grey, and Dual products as they could cause damage to decorative surface.’
4. Use an S-shaped motion when cleaning the glass panes

(Image credit: Future Plc / David Giles)
Clean the panes of glass by sponging them down with warm soapy water. Dip a sponge or the foam part of a squeegee into the water, squeeze out the excess, then rub gently on the glass. To clean the window thoroughly work in an S-shape advises Cleaning expert Lynsey Crombie. ‘With your microfibre cloth work in the shape of an S so you will get into every bit and that will stop the smears.’
5. Wipe off any excess cleaner to prevent streaks
You can use a squeegee for a streak free finish. Also work in an S-shape. Periodically wipe the squeegee blade on a clean rag to avoid smearing dirt around. Remove remaining water with a damp chamois or microfibre cloth and dry the windowsill.
Avoid paper towels or cloths that might leave lint on the glass. For exterior upper-floor panes, it’s worth investing in a gadget with a U-shaped pole to avoid reaching out of top-floor windows!
Top tip: Picked up from years of working in a hairdressers filled with mirrors, use scrunched-up newspaper to wipe the glass clean. Buffing your windows with crumpled newspaper gives windows a sparkling finish. The paper helps to absorb any leftover cleaning fluid, leaving the surface streak free.
Rub in a circular pattern to wipe off dirt, then switch to a vertical, then horizontal, stroke until the liquid has disappeared.
6. Clean the window edges
(Image credit: Future PLC /David Brittain)
Finish by wiping off excess water or suds from the edges and windowsill using an absorbent cloth. Repeat the process on the inside of your windows.
Most window edges will be left gleaming after washing with soapy water. However, if you have white PVC Lynsey recommends using a cream based cleaner or a whitening product to keep them looking new. ‘You could use a white toothpaste. Leave it to do its work and that will whiten the frame,’ advises Lynsey.
7. Get the timing right
You might think washing windows on a sunny day is the ideal time, as the light makes it easier to spot smears. In reality, it’s best to aim for a cloudy day. Sunshine will create glare on the glass, making it harder to see how clean they are. It could also dry the cleaning solution before you have a chance to wipe it off, leaving unsightly streaks.
What is the best thing to clean a window?
There are loads of gadgets out there to help you cleaning windows easily. For example cleaning sensation Mrs Hinch swears by the Vileda Windomatic, available on Amazon (opens in new tab), a window vacuum cleaner which acts like a supped up squidgee to ensure a streak-free finish. However, while gadgets like this are effective, at £70 they are also expensive.
According to the experts you can still achieve effective results on a budget with soapy water, a squidgee and clean microfibre cloth.
‘There are lots of options when it comes to cleaning your windows,’ says Dean Williams, Window Expert at MD Windows. ‘If you’re looking for an at-home remedy, I’d recommend the simple, old fashioned way of using warm soapy water.’
‘Ensure you’re using a squeegee so you can remove the streaks straight after giving the glass a clean. White wine vinegar is another at-home remedy, or you can simply buy a glass cleaner product to use if you need a quick fix.’
How do you remove stubborn marks on windows?
If you’re struggling to get your windows clean using soapy water or a window cleaner, Leo Pyrah at Pilkington UK (opens in new tab) recommends trying something a bit stronger. ‘Use a mild acid (e.g. vinegar) or a mild solvent (e.g. methylated spirit), taking care not to spill any of these on other surfaces of materials.’
However, never use and abrasive or harsh cleaning agent like bleach advises Rachael Munby from Anglian Home Improvements, as they can cause lasting damage to the window itself.
Table of Contents
- 10 DIY Tips to Clean Windows at Home
- Magnetic Window Cleaner
- Get Creative And Use A Mop
- Cleaning Kits
- Using Vinegar
- Using Lemon Juice
- Using Ammonia and Cornstarch
- DIY All-Purpose Window Cleaner
- Robots
- Steel Wool
- Power Tools
- Wrapping Up
Clean windows not only make your home look good; they also help give a good feeling. It may appear to be a difficult task, but cleaning windows at home is easy and quick to do. That too without doing anything that may risk your life. Here are the best ways to clean windows that you can try at your home. ~ Ed.
Many people don’t really pay attention to the benefits of a clean window.
Actually, it’s your ‘other’ door to the outside world!
Yes, a pane of glass between you and the world around you, through which you can take in everything from the comfort of your room.
It regulates sunlight, protects you from harsh weather, and is generally an ‘upper’ in all ways. That’s why unclean windows might be a reason why you have been feeling down lately.
This house chore may seem difficult to finesse, but it doesn’t have to be that way with these ten easy ways to clean your windows.
You can make window cleaning an easy task by following tips and ways mentioned below.
Magnetic Window Cleaner
This is the best way to use for the exterior side of the windows.
Cleaning the exterior is impossible for windows that can’t be unfastened except if you are willing to risk your life and lean outside on the ledge.
Instead, you can go for these lifesavers – literally – and make it easy for yourself without having to sacrifice a limb. Not just that, but these tools are usually made to clean both sides at once, which could save you a lot of time and effort.
Getting the hang of this tool can be a bit hard at first, but it’s definitely worth it in the long run.
Get Creative And Use A Mop
You can use your mop to clean your windows as well.
The hand of the mop helps a lot in reaching the windows easily while still maintaining control. You will be able to really dig in the dirt, debris, and dust and wipe it easily.
However, using a mop to clean the outside of your windows forces you to climb out of a window on the ledge, which is not very safe.
Instead, it’s best to call in a commercial window cleaning professional to help you out. Opt for the experts who use the most efficient, eco-friendly and safest ways in cleaning.
Cleaning Kits
Power your window cleaning kit with a U-shaped telescopic pole so you will be able to clean the exterior of your windows without risking the unnecessary accidents.
Cleaning kits also usually include a squeegee, circular sponge, and some cleaning cloths.
Using Vinegar
You can make a window cleaner using very simple household items that will cost you close to nothing. The ingredients of the cleaner are going to be distilled water and white vinegar.
You’ll want to use good-concentration vinegar. You can fill a spray bottle with your mix and shake it to make sure it’s all mixed up, then proceed to spray and then wipe with a lint-free cloth.
It’s advisable to wash the windows with soapy water to remove any excess dirt or filth to ensure a smooth operation with water and vinegar.
Using Lemon Juice
Similar to vinegar, lemon juice is also a common household item that can do the job of commercial window cleaners.
The acids in the lemon juice can disintegrate grease in no time. It will help you get that polished look without any problems. It’s recommended to mix a tablespoon of lemon juice with a quart of warm water and then mix it by shaking it in a spray bottle.
A couple of sprays and a wipe of soft cloth can get the job done easily. If you’d like to transform this into a grout cleaner, you can add baking soda to the mix.
Using Ammonia and Cornstarch
This is a bit more of an advanced mix compared to vinegar or lemon juice, yet it’s quite easy to create it.
Ammonia is a low-cost ingredient that can be found easily in many stores. It’s known for its strong ability to break the fine particles of dirt, prints, and difficult water spots. It’s recommended to use a newspaper to minimize streaks from forming.
Half a cup of ammonia, and two tablespoons cornstarch, and 2 quarts of warm water are the ingredients you need to mix and pour into a spray bottle.
DIY All-Purpose Window Cleaner
This mix is a circus compared to the simple ones we’ve mentioned so far. You’ll notice that the main complaint people make regarding commercial cleaners is about those harsh chemicals used in it.
A quarter of distilled vinegar, a quarter of rubbing alcohol, one spoonful of cornstarch, 2 cups of water, and 5-10 drops of essential oil are all the ingredients of this mix. The essential oil in the cleaner is going to leave a good smell that lasts for hours.
The only difficulty is in making sure that the recipe is mixed very well as unthorough mixes can clog the spray bottle constantly.
Robots
This may sound too sci-fi for this article, but it’s true. People who hate cleaning their windows are finally embarking on a journey towards robotics. It can come equipped with a high-speed fan motor which can clean better than any regular manual work.
Using suction dynamics, they can remain stable while operating such high-speed fans. It doesn’t cause a lot of noise and scans the windows intelligently to find the best routes to navigate.
Steel Wool
Some stains are way too tough for chemicals or commercial cleaners to handle.
Solidified tree sap, adhesive, and other difficult stains can give you a hard time if you try to remove them with a soft cloth as you usually do.
It’s recommended to try removing these stains with fine steel wool after spraying your window with a window cleaner to ensure maximum effectiveness.
Power Tools
This may sound hardcore or a bit overboard, but it’s actually quite innovative to use power tools. Attaching a little buffer wheel and using a very soft abrasive can make cleaning the windows an effortless job.
Make sure to protect the edges of the windows and the window sash by using masking tape.
Wrapping Up
Our homes are the only places where we can truly feel comfortable and relaxed. The only problem here is that turning a house into a home requires so much attention to every little detail.
These play a vital role in living in a cozy home, and how we take care of our cleaning and tidying is just one stop short of reaching that goal!
Over to you
Have you ever tried to clean windows yourself at home? Share your thoughts and experiences in the comments.
Disclaimer: Though the views expressed are of the author’s own, this article has been checked for its authenticity of information and resource links provided for a better and deeper understanding of the subject matter. However, you’re suggested to make your diligent research and consult subject experts to decide what is best for you. If you spot any factual errors, spelling, or grammatical mistakes in the article, please report at [email protected] Thanks.