 Одно из частых действий, необходимых при решении проблем с работой Интернета (таких как ошибка ERR_NAME_NOT_RESOLVED и других) или при смене адресов DNS серверов в Windows 10, 8 или Windows 7 — очистка кэша DNS (кэш DNS содержит соответствия между адресами сайтов в «человеческом формате» и их фактическим IP-адресом в интернете).
В этой инструкции подробно о том, как очистить (сбросить) кэш DNS в Windows, а также некоторые дополнительные сведения по очистке данных DNS, которые могут оказаться полезными.
Очистка (сброс) кэша DNS в командной строке
Стандартный и очень простой способ сброса кэша DNS в Windows — использовать соответствующие команды в командной строке.
Шаги, чтобы очистить кэш DNS при этом будут следующими.
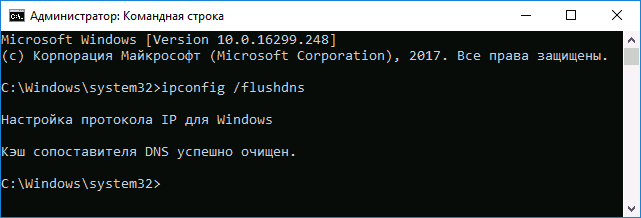
- Запустите командную строку от имени администратора (в Windows 10 для этого можно начать набирать «Командная строка» в поиске на панели задач, затем нажать правой кнопкой мыши по найденному результату и выбрать «Запуск от имени администратора» в контекстном меню (см. Как запустить командную строку от имени администратора в Windows).
- Введите простую команду ipconfig /flushdns и нажмите Enter.
- Если всё прошло успешно, в результате вы увидите сообщение о том, что «Кэш сопоставителя DNS успешно очищен».

- В Windows 7 дополнительно можно выполнить перезапуск службы DNS-клиент, для этого там же в командной строке по порядку выполните следующие команды
- net stop dnscache
- net start dnscache
После выполнения описанных действий сброс кэша DNS Windows будет завершена, однако в некоторых случаях могут возникнуть проблемы, вызванные тем, что и у браузеров есть собственная база данных соответствий адресов, которую также можно очистить.
Очистка внутреннего кэша DNS Google Chrome, Яндекс Браузера, Opera
В браузерах на базе Chromium — Google Chrome, Opera, Яндекс Браузер присутствует собственный кэш DNS, который также можно очистить.
Для этого в браузере введите в адресную строку:
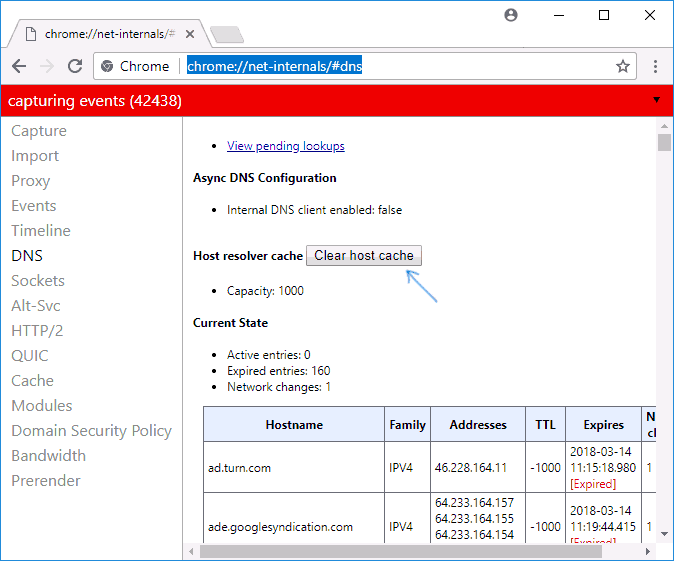
- chrome://net-internals/#dns — для Google Chrome
- browser://net-internals/#dns — для Яндекс Браузера
- opera://net-internals/#dns — для Оперы
На открывшейся странице вы можете посмотреть содержимое кэша DNS браузера и очистить его, нажав кнопку «Clear host cache».
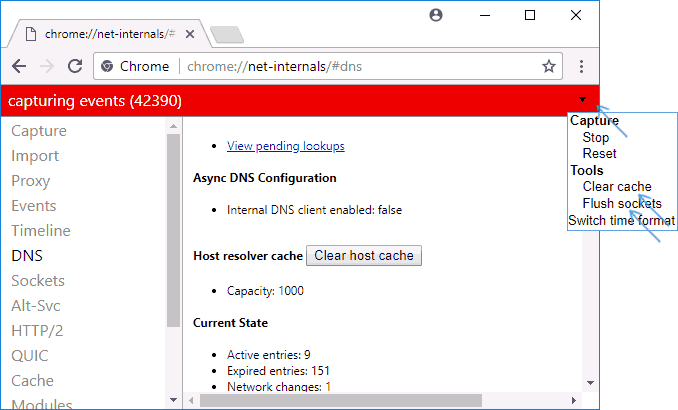
Дополнительно (при проблемах с соединениями в конкретном браузере) может помочь очистка сокетов в разделе Sockets (кнопка Flush socket pools).
Также, оба этих действия — сброс кэша DNS и очистку сокетов можно быстро выполнить, открыв меню действий в правом верхнем углу страницы, как на скриншоте ниже.
Дополнительная информация
Существуют и дополнительные способы сброса кэша DNS в Windows, например,
- В Windows 10 присутствует опция автоматического сброса всех параметров подключений, см. Как сбросить настройки сети и Интернета в Windows 10.
- Многие программы для исправления ошибок Windows имеют встроенные функции для очистки кэша DNS, одна из таких программ, направленная именно на решение проблем с сетевыми подключениями — NetAdapter Repair All In One (в программе присутствует отдельная кнопка Flush DNS Cache для сброса кэша DNS).


Если простая очистка не срабатывает в вашем случае, при этом вы уверены, что сайт, к которому вы пробуете получить доступ работает, попробуйте описать ситуацию в комментариях, возможно, у меня получится вам помочь.

Contents
- 1 How to Flush the DNS Cache in Windows 11 or Windows 10 in Command Prompt
- 2 How to Clear the DNS Cache in Windows 11 or Windows 10 in PowerShell
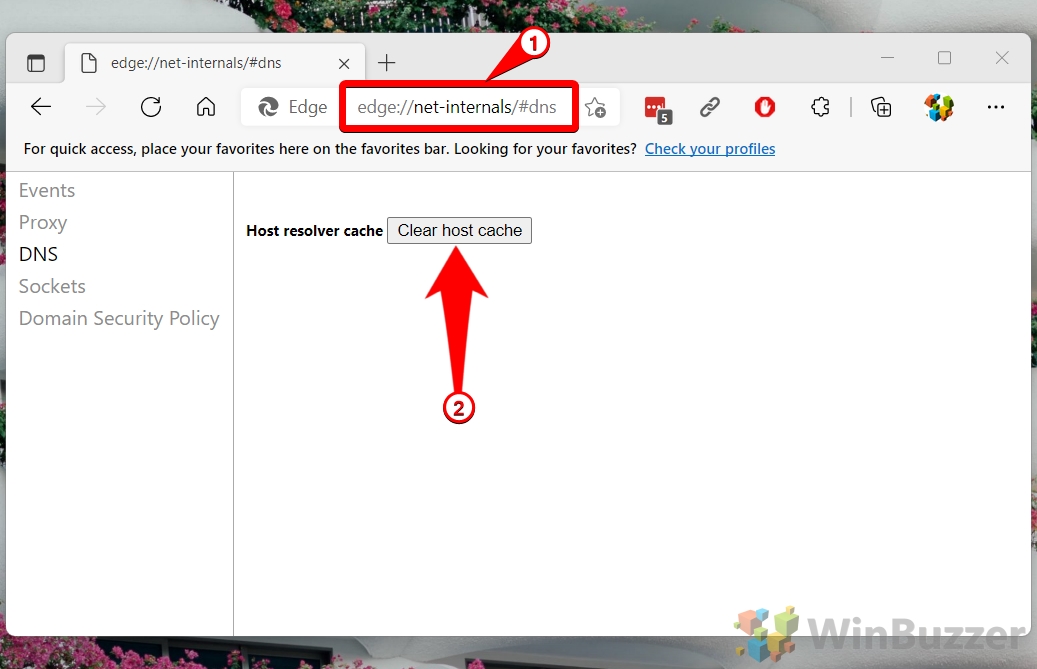
- 3 How to Reset DNS in Windows 11 or Windows 10 via Microsoft Edge
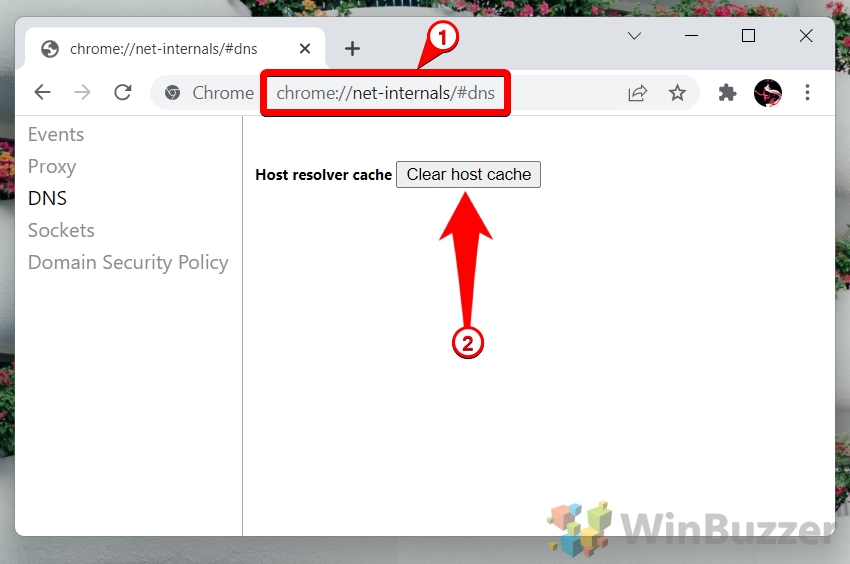
- 4 How to Flush the DNS Resolver Cache in Google Chrome
- 5 Extra: How to Clear Browser History in Chrome, Edge, and Firefox
- 6 Extra: How to Reset your Network
This guide will show you how to flush DNS in Windows 11 or Windows 10 using four different methods: CMD, PowerShell, Microsoft Edge, and Google Chrome.
The primary goal is to resolve issues that result in “Page Not Found” errors, but you can also use it to improve your security or privacy.
What does flushing DNS do?
To understand what flushing the DNS resolver cache is, you first need to understand what DNS does and the purpose of the cache. DNS stands for domain name system, the mechanism by which the internet translates the URL you type into your browser (winbuzzer.com) into an IP address a computer can understand (92.204.43.156).
The DNS cache helps with this domain name resolution process by storing a temporary database of your recent website visits and their associated IP addresses. This way, name resolution can be handled locally on your PC rather than having to send a request to a server and wait for the response.
Flushing the DNS cache removes the database of sites and IP addresses on your PC. This is useful in cases where the website or service has changed its IP address and your cache has not updated, causing your browser to direct you to the wrong place.
It can also help to protect you against a type of attack called DNS spoofing, where an attacker modifies your DNS cache to direct you to malicious sites. Finally, it removes records about the sites you have visited from your PC.
⚠️ Please note: The process described below is the same in Windows 11 as it is in Windows 10. However, bear in mind that we’ll be using screenshots from Windows 11, so your UI may look a little different. We’ll point out any changes you need to be aware of as they come up.
How to Flush the DNS Cache in Windows 11 or Windows 10 in Command Prompt
Command Prompt is the most popular method to clear DNS in Windows, and it’s easy to understand why. The flush dns command is short, sweet, and easy to remember:
- Press Start and type “Command Prompt”, then click the top result

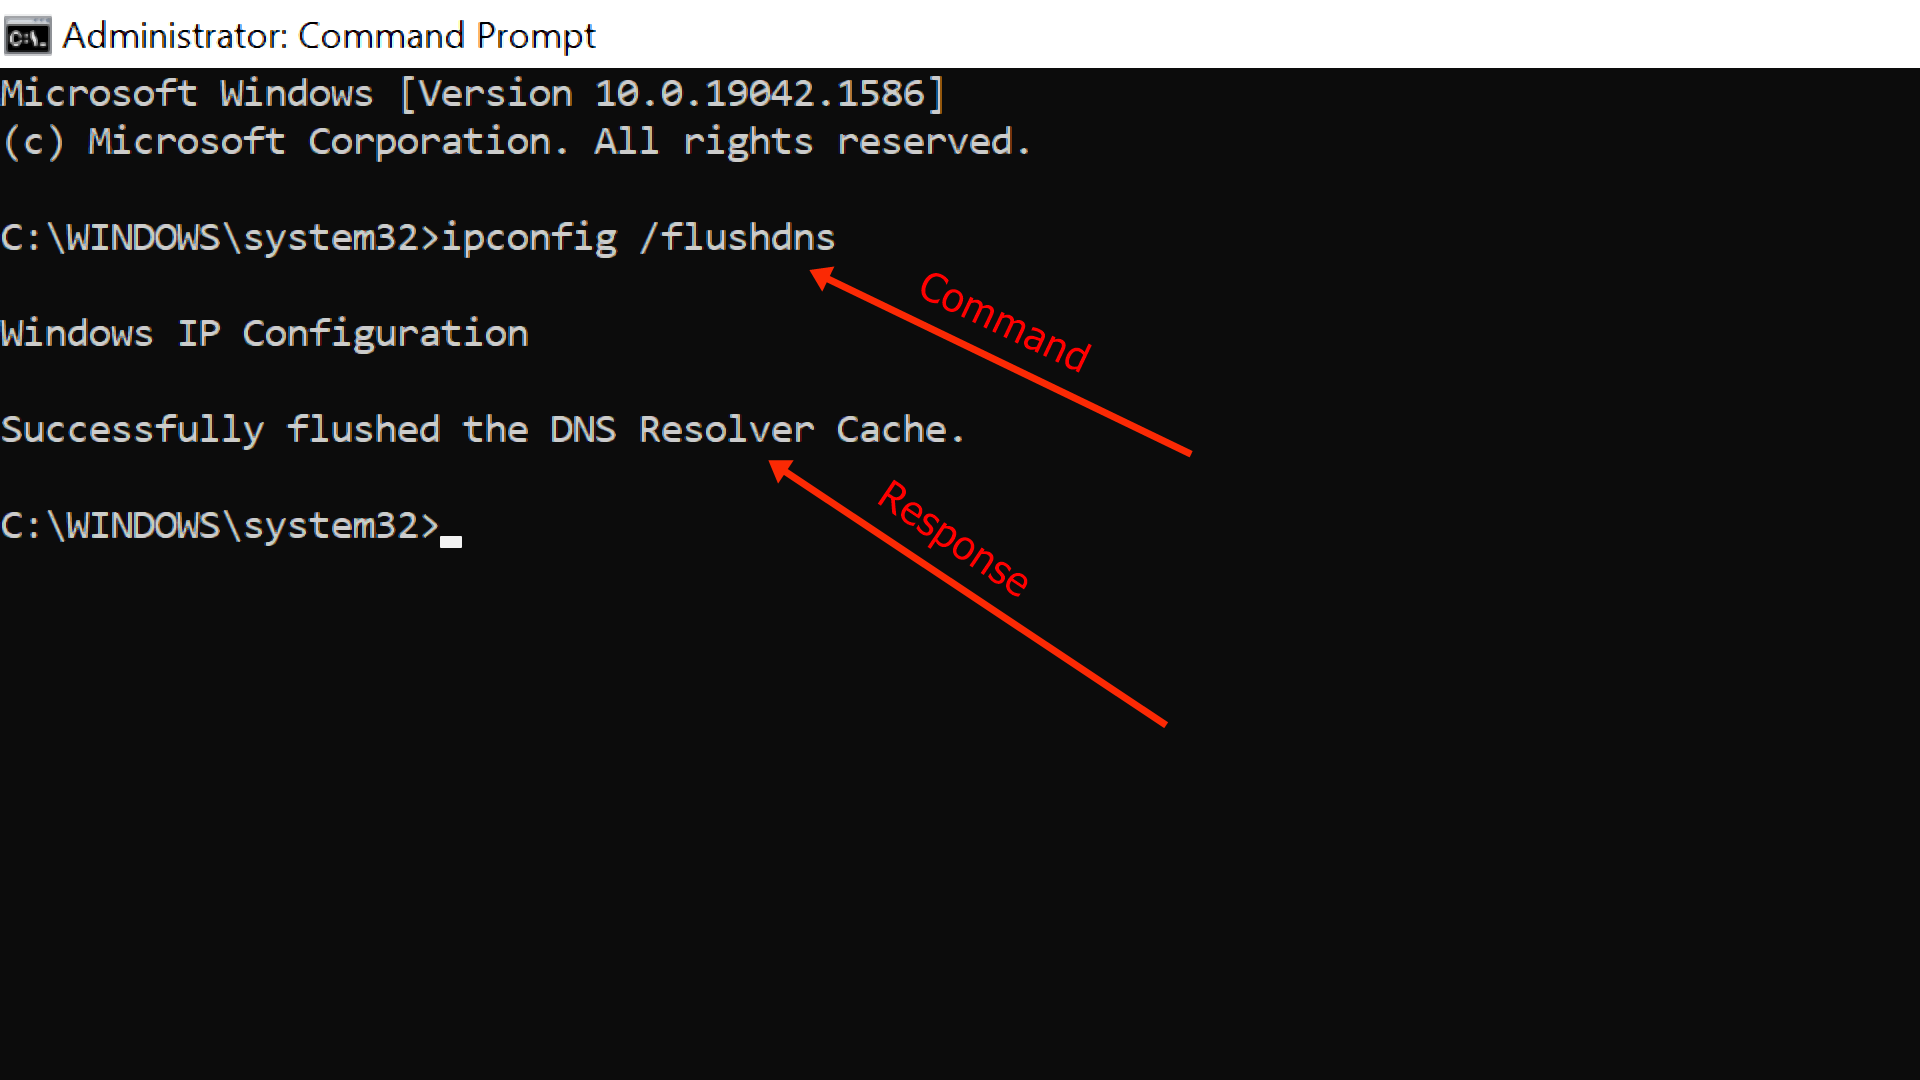
- Type “ipconfig /flushdns” in Command Prompt and press Enter
Once complete, you’ll see the message:
Windows IP Configuration
Successfully flushed the DNS Resolver Cache
Try loading your website again to see if flushing the DNS cache solved the issue.


How to Clear the DNS Cache in Windows 11 or Windows 10 in PowerShell
If you prefer to use PowerShell as your command line, no worries! The command is even more intuitive there:
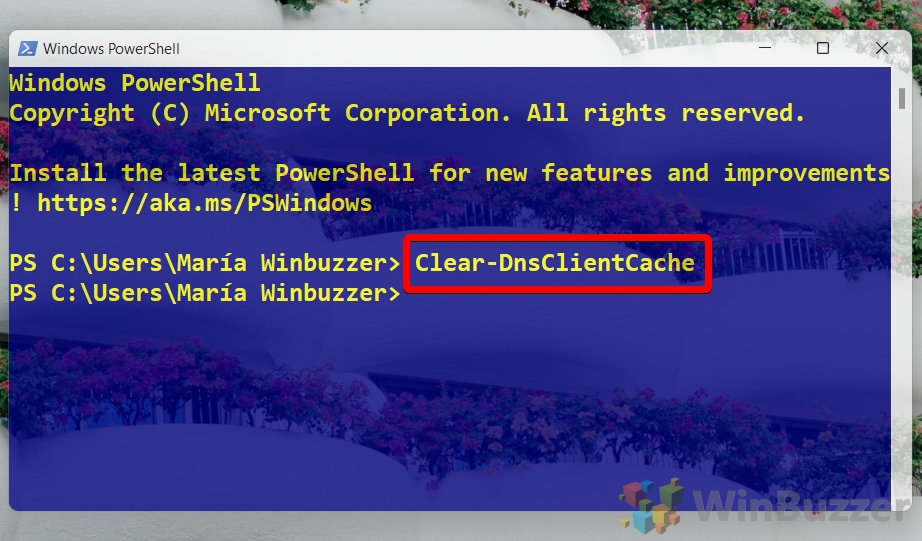
- Press Start and type “PowerShell”, then click the top result

- Type “Clear-DnsClientCache” in PowerShell and press Enter
Do note that this command won’t work unless you have the correct capitalization. It also won’t give an output, so you’ll just have to take its word that it worked.


How to Reset DNS in Windows 11 or Windows 10 via Microsoft Edge
If you don’t like using the command line then you can use your Edge browser to flush DNS in Windows instead. The first we’ll be looking at is the Chromium version of Microsoft’s Edge browser:
- Open your browser and enter “edge://net-internals/#dns” in the address bar
Click “Clear host cache” to flush DNS in Windows 11 or Windows 10.

How to Flush the DNS Resolver Cache in Google Chrome
Google Chrome works identically to Microsoft Edge due them being based on the same browser engine:
- Open Chrome and enter “chrome://net-internals/#dns” in the address bar
Click “Clear host cache” to reset your DNS in Windows 10 or Windows 11.

Extra: How to Clear Browser History in Chrome, Edge, and Firefox
If it’s the privacy aspect of the DNS cache you’re worried about, you’ll probably want to follow our guide on clearing your browser history, too. Your browser history provides a much more accessible way to see the sites you’ve visited.
![]()
If your pages still aren’t loading, following our tutorial on how to perform a network reset might help. It’s designed for Windows 10 but will work on Windows 11, too.

Troubleshooting your website can be an intimidating responsibility. When it comes to tasks like flushing your Domain Name Server (DNS) cache, it’s easy to get overwhelmed and confused before you’re even started.
Fortunately, you can perform this particular duty quickly and easily, even with little to no technical experience. In two short steps, your DNS cache will be clear, and you can continue working to resolve whatever issue you happen to be facing.
In this post, we’ll explain what a DNS cache is and in what situations you might need to clear yours. We’ll then share a real-world example from our direct experience, and explain how to carry out this troubleshooting step no matter what hardware you’re using.
Prefer to watch the video version?
An Introduction to DNS Caching
In order to understand why you may need to flush your DNS cache, there are several components we need to break down.
First, the Domain Name System (DNS) is an index of all the websites on the internet and their IP addresses. You can think of it as a directory or phone book for websites. As for ‘caching’, it’s the process of saving a snapshot of something (such as a web page) so it can be reloaded faster in the future.
So, DNS caching involves your Operating System (OS) or browser capturing recently-visited IP addresses and saving them in a database. This enables your browser to reload sites you’ve visited in the past more quickly than if it had to reference the DNS again each time.
Unfortunately, your DNS cache may become corrupted, leading you into phishing schemes. It can also simply become outdated or create internet connectivity issues. In any of these situations, clearing your DNS cache can often help you resolve the problem and get back online.
A DNS Cache Case Study
To illustrate the point further, let’s look at an example that actually happened to a Kinsta client’s website.
The client reached out to us because their images, CSS, and JavaScript weren’t loading correctly on their website.
The site appeared to be loading just fine for us, however, and the client hadn’t made any recent changes. Upon inspecting their site with Chrome Devtools, we could see that everything coming from their CDN subdomain (cdn.domain.com) wasn’t loading correctly, and instead was reporting 404 errors.
The first thing we did was ping the CDN subdomain to see if we could access it. It returned a response just as expected. We then ran the client’s CDN URL through the free whatsmydns tool.
This tool enables users to quickly check the resolution on DNS records (such as the CDN CNAME) from multiple geographical locations. We wanted to ensure that the site was loading fine everywhere, beyond just our physical location, and that it was resolving back to the client’s CDN provider.
The results showed that it was:
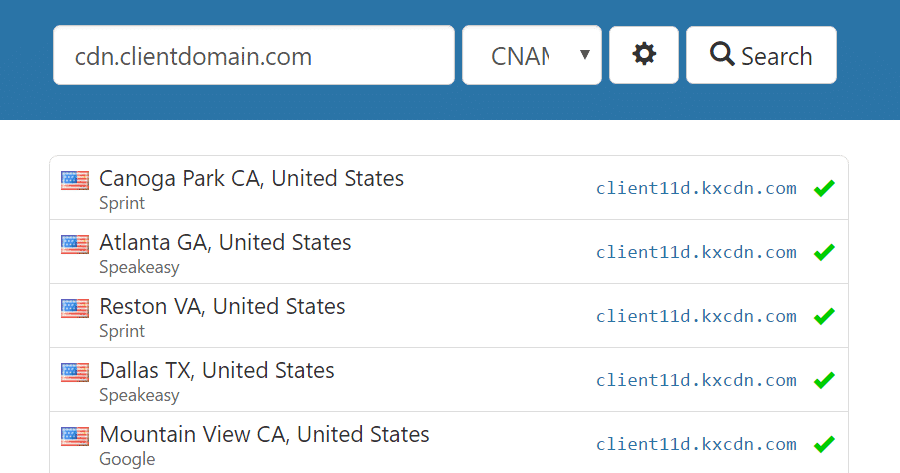
After all this digging, we confirmed that there was a small change with the client’s DNS provider that was still cached on their end. We asked them to clear their DNS cache locally on their computer and refresh the page.
At that point, everything started loading normally on their WordPress site again.
Knowing how to clear your DNS cache could help you in many similar situations, it can fix errors like 304. Let’s take a look at how it’s done.
What Is Cache? Learn This Common and Complex Technology
How to Flush Your DNS Cache on Mac, Windows, Linux, and Chrome
Clearing your DNS cache is a relatively simple process, but it varies depending on your OS. It also matters whether you need to flush it from your computer or your browser. Below, we’ve explained how to carry out this task for the macOS, Windows, and Linux Operating Systems (OSs), as well as on the Google Chrome browser.
- macOS
- Windows
- Linux
- Chrome
1. How to Clear DNS Cache on macOS
In order to clear the DNS cache on a Mac, you’ll need to open the native command-line interface known as Terminal and run the appropriate command. This process varies based on which version of macOS you’re running.
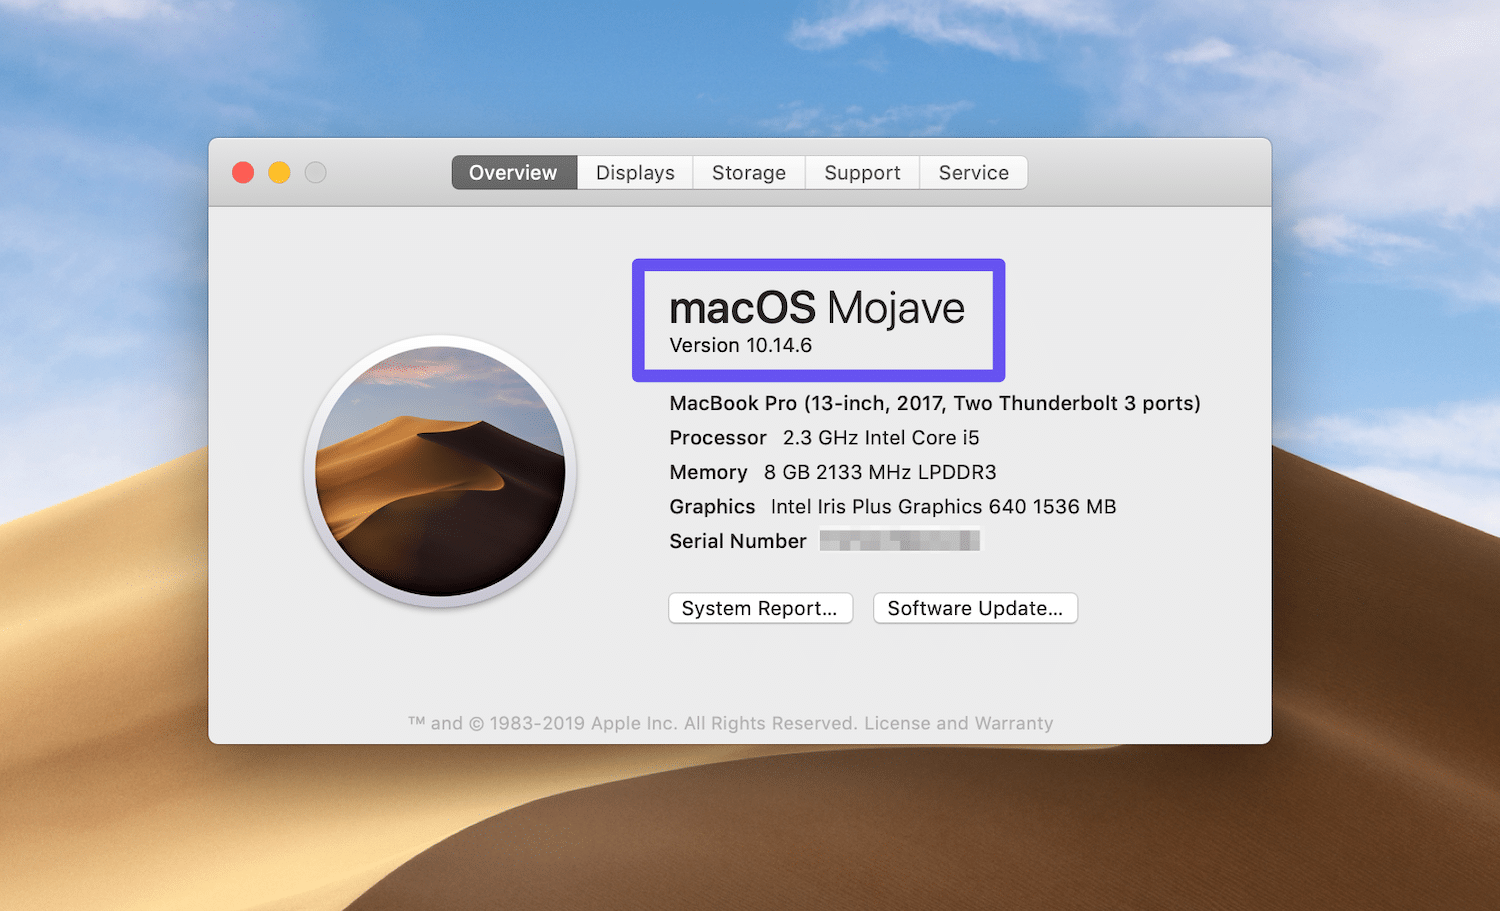
If you’re not sure what version you’re working with, click on the ‘apple’ icon in the top-left corner of your desktop, and select About This Mac:
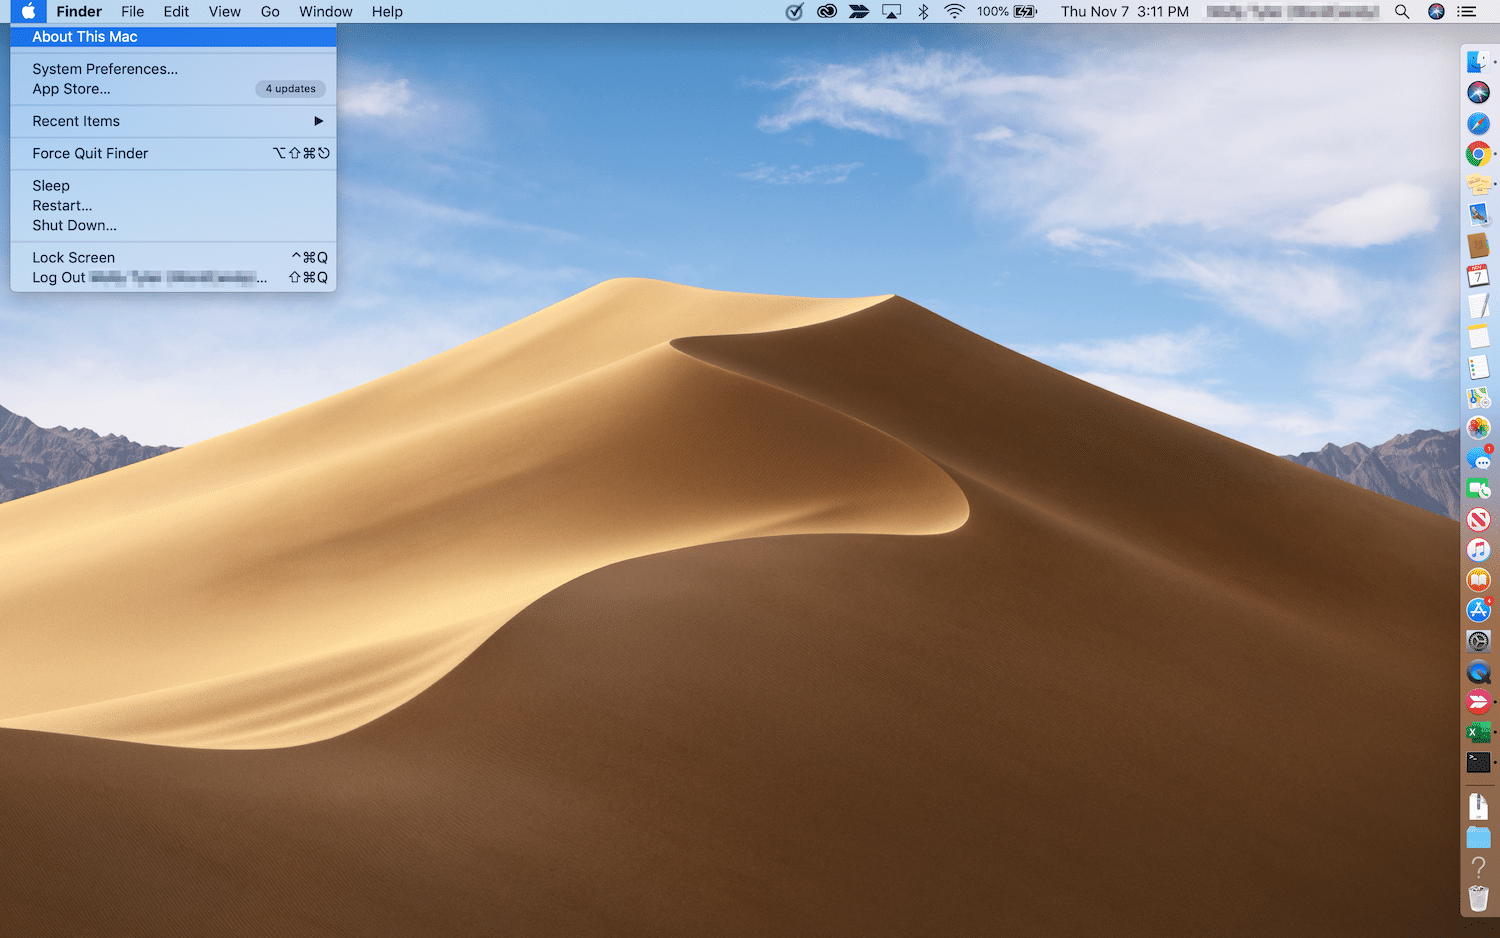
Your current version will be the first piece of information listed:
Once you know this information, you can follow the relevant steps below.
macOS El Capitan (10.11), Sierra (10.12), High Sierra (10.13), Mojave (10.14), and Catalina (10.15)
If you’re working on macOS version 10.11 or above, open the command line interface by clicking on Go > Utilities:
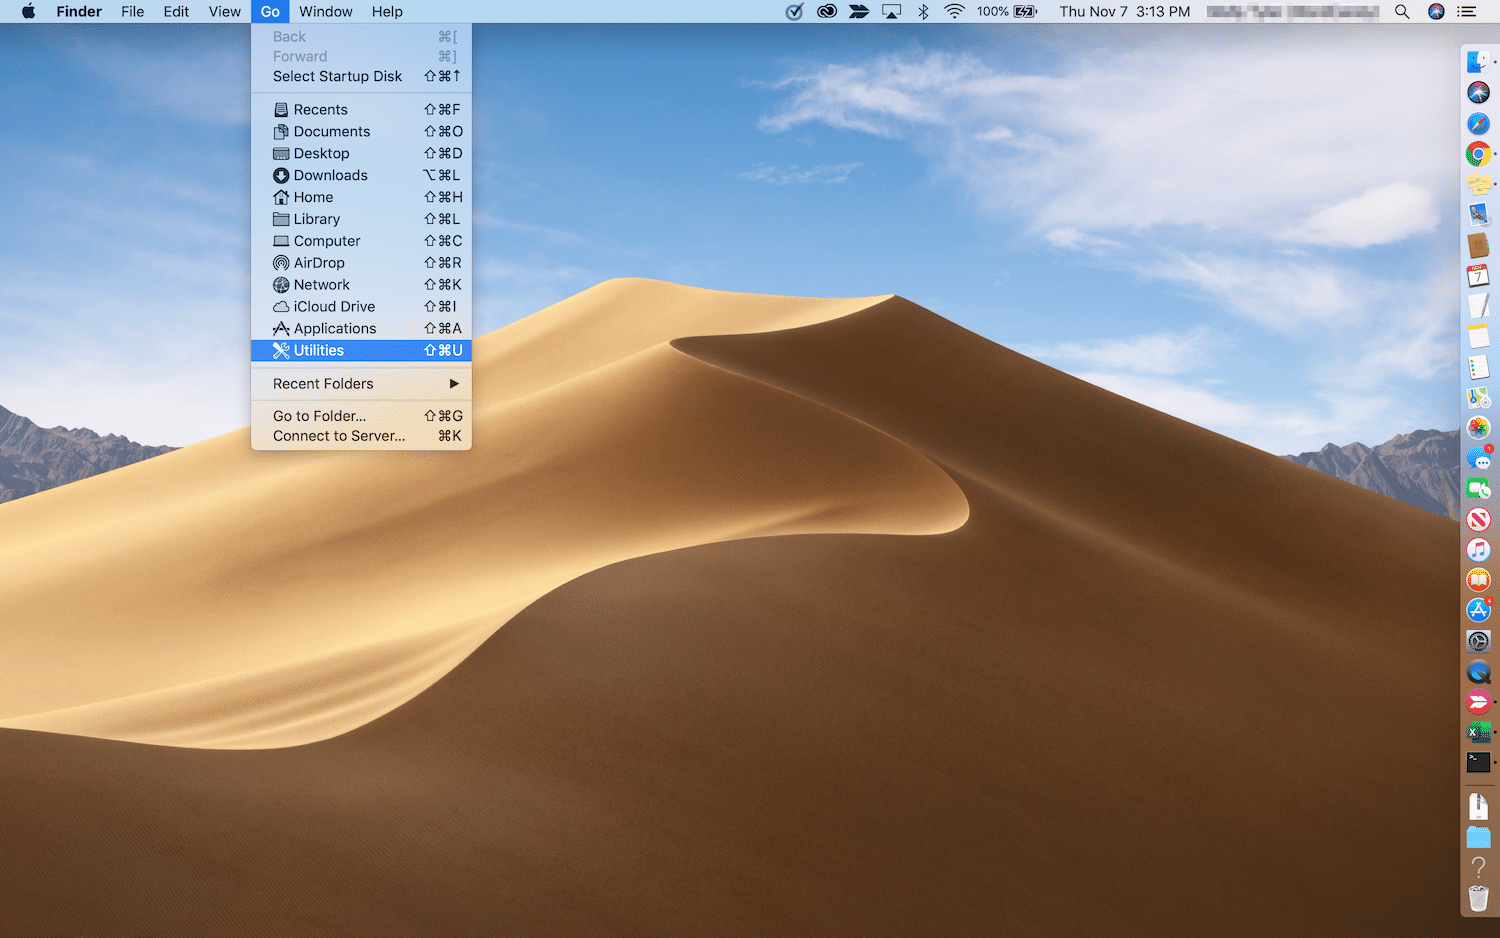
Then select Terminal. Once it opens, run the following command:
sudo killall -HUP mDNSResponder
You’ll be prompted to enter your computer password:
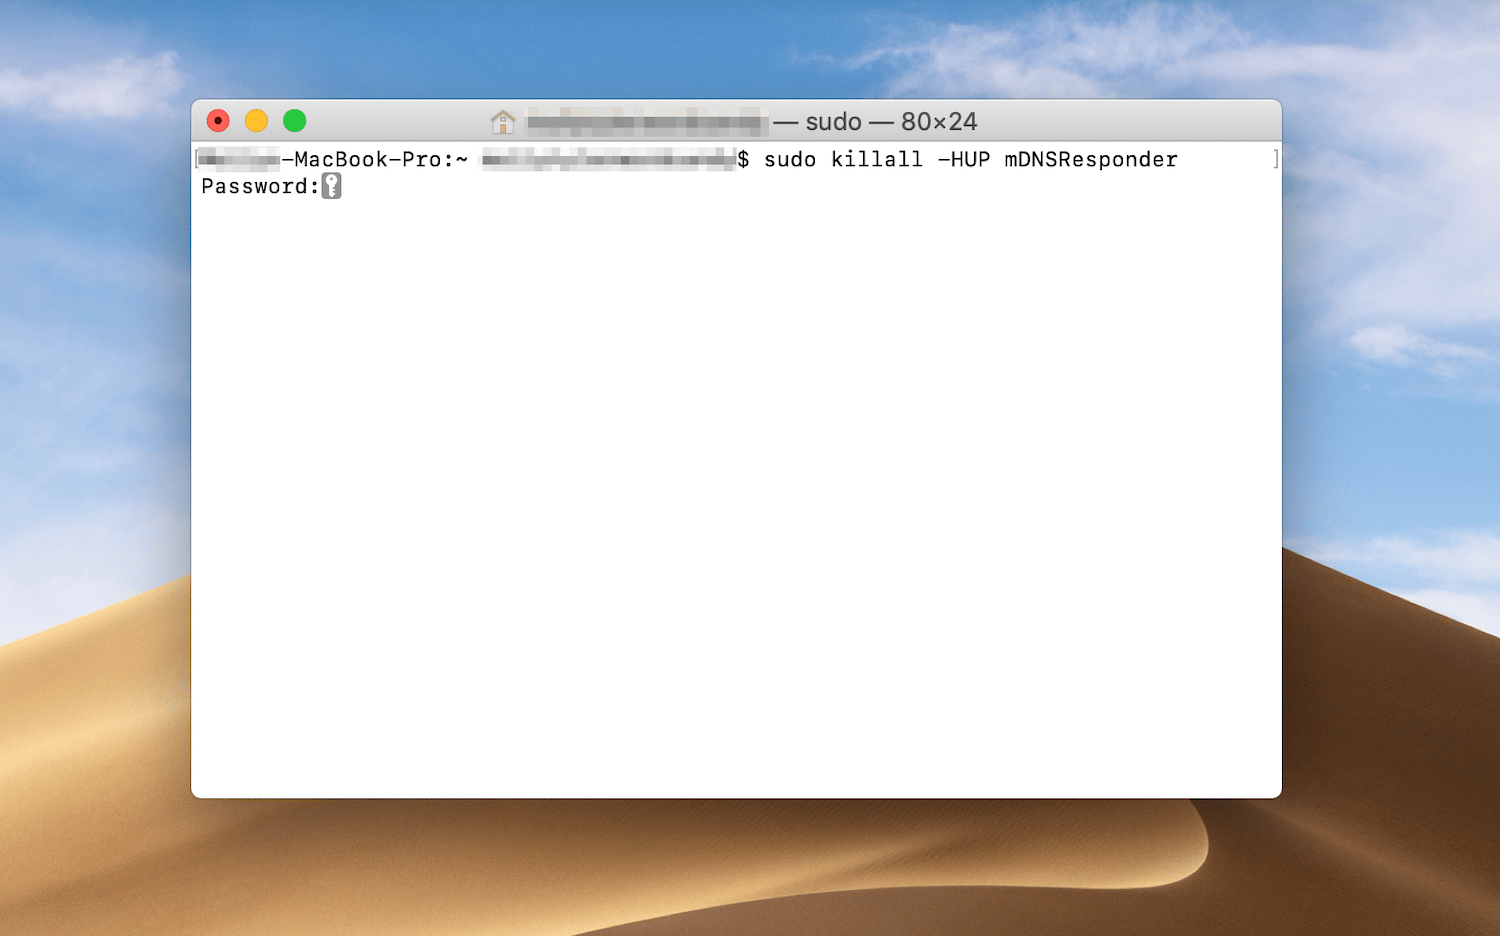
After you’ve done so, your DNS cache should be clear.
macOS Yosemite (10.10)
You can access Terminal by the same method described above for any macOS version. In Yosemite (10.10), once the window opens you’ll need to run the following command:
sudo discoveryutil udnsflushcaches
Enter your computer’s password and the DNS cache should successfully flush.
macOS Lion (10.7), Mountain Lion (10.8), and Mavericks (10.9)
For macOS versions 10.7 to 10.9, open up Terminal and run the following command to clear your DNS cache:
sudo killall -HUP mDNSResponder
You may notice that this is the same command used by versions 10.11 and above. Enter your password to execute it.
macOS Snow Leopard (10.6)
If you’re running macOS Snow Leopard (10.6), open Terminal and input this command:
sudo dscacheutil -flushcache
Then, enter your password to finish clearing the DNS cache.
macOS Leopard (10.5)
Finally, macOS Leopard (10.5) users should run the following command in Terminal:
sudo lookupd -flushcache
Once you enter your password, the DNS cache should be flushed.
Clearing your DNS cache is also the solution for fixing the ERR_SPDY_PROTOCOL_ERROR.
2. How to Clear DNS Cache on Windows
Flushing your DNS cache on a Windows computer is fairly simple. Here’s how to accomplish this task on Windows 10, 8, 7, and XP.
Windows 10
To clear your DNS cache on a Windows OS, you’ll need to open Command Prompt, the system’s command line interface. You can access this program in Windows 10 by clicking on the Start button. Then navigate to Windows Systems > Command Prompt:
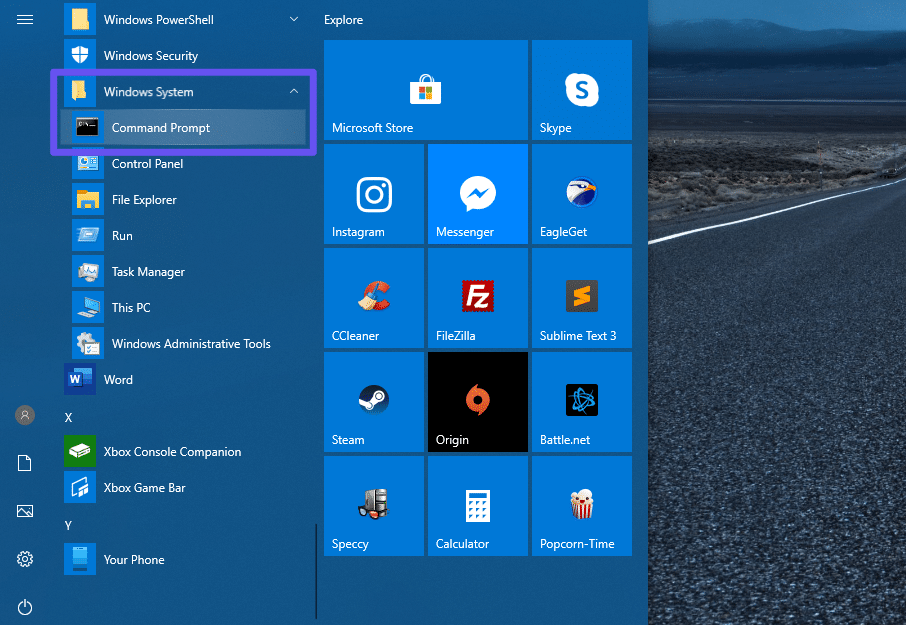
Once the command line interface is open, enter the following line:
ipconfig /flushdns
This command should return a confirmation that the DNS cache has been successfully flushed:
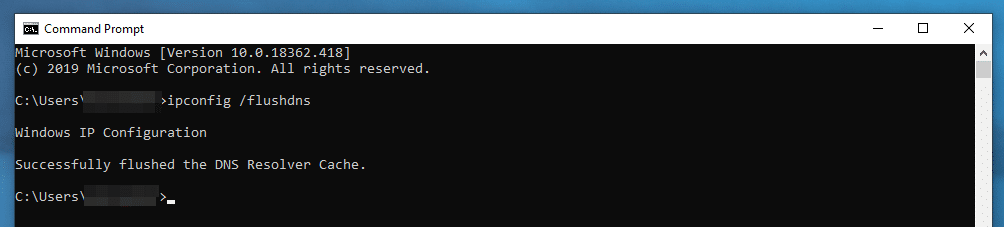
You can then close the Command Prompt window.
Windows 8
Clearing your DNS cache in older versions of Windows requires the same command ipconfig /flushdns. However, the steps for accessing Command Prompt are slightly different between versions.
In Windows 8, open the Apps screen. On the far right side, find Windows Systems and select Command Prompt.
Once the program opens, run ipconfig /flushdns. You should receive a confirmation once the DNS cache has been cleared successfully.
Windows 7 and Windows XP
In Windows 7 or Windows XP, click on the Start button. Navigate to All Programs > Accessories and select Command Prompt.
In the command line interface, run ipconfig /flushdns. You should receive a confirmation message once the DNS cache is flushed.
3. How to Clear DNS Cache on Linux
Flushing your DNS cache on Linux machines is fairly similar to the process of doing so on a Mac or Windows computer. Here’s how.
Ubuntu
Linux uses Terminal as its command line interface, just like macOS. To open it, click on Activities in the top-left corner of your desktop This will provide you with a search bar, where you can enter “terminal” to find and launch the program.
Once the command line interface is open, execute this command:
sudo systemd-resolve --flush-caches
Terminal will then prompt you for your password. Enter it to finish executing the command and flushing your DNS cache.
Other Distributions
If you’re using a Linux distribution other than Ubuntu, you can flush your DNS cache by opening your command line interface and running this command:
sudo /etc/init.d/dns-clean start
Once the command is executed, your cache should be clear.
4. How to Clear DNS Cache on Google Chrome
Finally, as we mentioned at the beginning of this post, you may have cause to clear your browser’s DNS cache rather than your OS’s. In Google Chrome, you can do so by entering the following into the address bar:
chrome://net-internals/#dns
Then click on the Clear host cache button:

This should flush Chrome’s DNS cache for you.
Need to clear your browser’s cache? Make sure to check out: How to Clear Browser Cache for All Major Browsers.
Clearing your DNS cache is a simple process that varies depending on your OS and browser. Learn how to flush DNS cache on Mac, Windows, Linux, and Chrome with this in-depth tutorial! 🧹🖥Click to Tweet
Summary
The prospect of clearing your DNS cache may sound daunting, especially if you’re new to troubleshooting internet connectivity or other website issues. Fortunately, the actual process is fairly straightforward.
Flushing your DNS cache only requires a few steps. First, you need to know what OS and version you’re using. Then, you can follow the relevant steps above and clear the DNS cache by entering one or two simple commands.
Get all your applications, databases and WordPress sites online and under one roof. Our feature-packed, high-performance cloud platform includes:
- Easy setup and management in the MyKinsta dashboard
- 24/7 expert support
- The best Google Cloud Platform hardware and network, powered by Kubernetes for maximum scalability
- An enterprise-level Cloudflare integration for speed and security
- Global audience reach with up to 35 data centers and 275+ PoPs worldwide
Test it yourself with $20 off your first month of Application Hosting or Database Hosting. Explore our plans or talk to sales to find your best fit.

You’ve probably noticed that, after visiting a website for the first time, the website loads much quicker the next time you visit.
This is because your operating system, or browser in the case of Google Chrome, cache IP addresses and DNS (Domain Name System) information of any website you visit. The DNS cache contains:
- the website address or hostname, technically called the resource data (rdata)
- the domain name of the website
- record type (IPv4 or IPv6)
- the validity of the cache or TTL (time to live)
When the TTL expires, the cache will be cleared, and the DNS is flushed for you automatically. But there are times when you don’t want to wait hours or days for the TTL to expire, and want to flush your DNS manually.
In this article, I’ll go over why you should flush your DNS, and how to do that in Windows 10 and Chrome.
So, Why Should You Flush (or Clear) Your DNS?
Flushing your DNS has several advantages, such as:
- hiding your search behavior from data collectors who might show you ads based on your search history
- requesting that an updated version of a website or web app is loaded. This can help resolve 404 issues if a website or web app was migrated to a new domain
- preventing DNS cache poisoning – a security situation in which black hat hackers gain maliciously gain access to your DNS cache and alter them so you get redirected to a website where sensitive information might be collected from you
To flush your DNS records on Windows 10, follow the steps below:
Step 1: Click on Start or hit the Windows [logo] key on your keyboard
Step 2: Type «cmd», then select «Run as Administrator» on the right
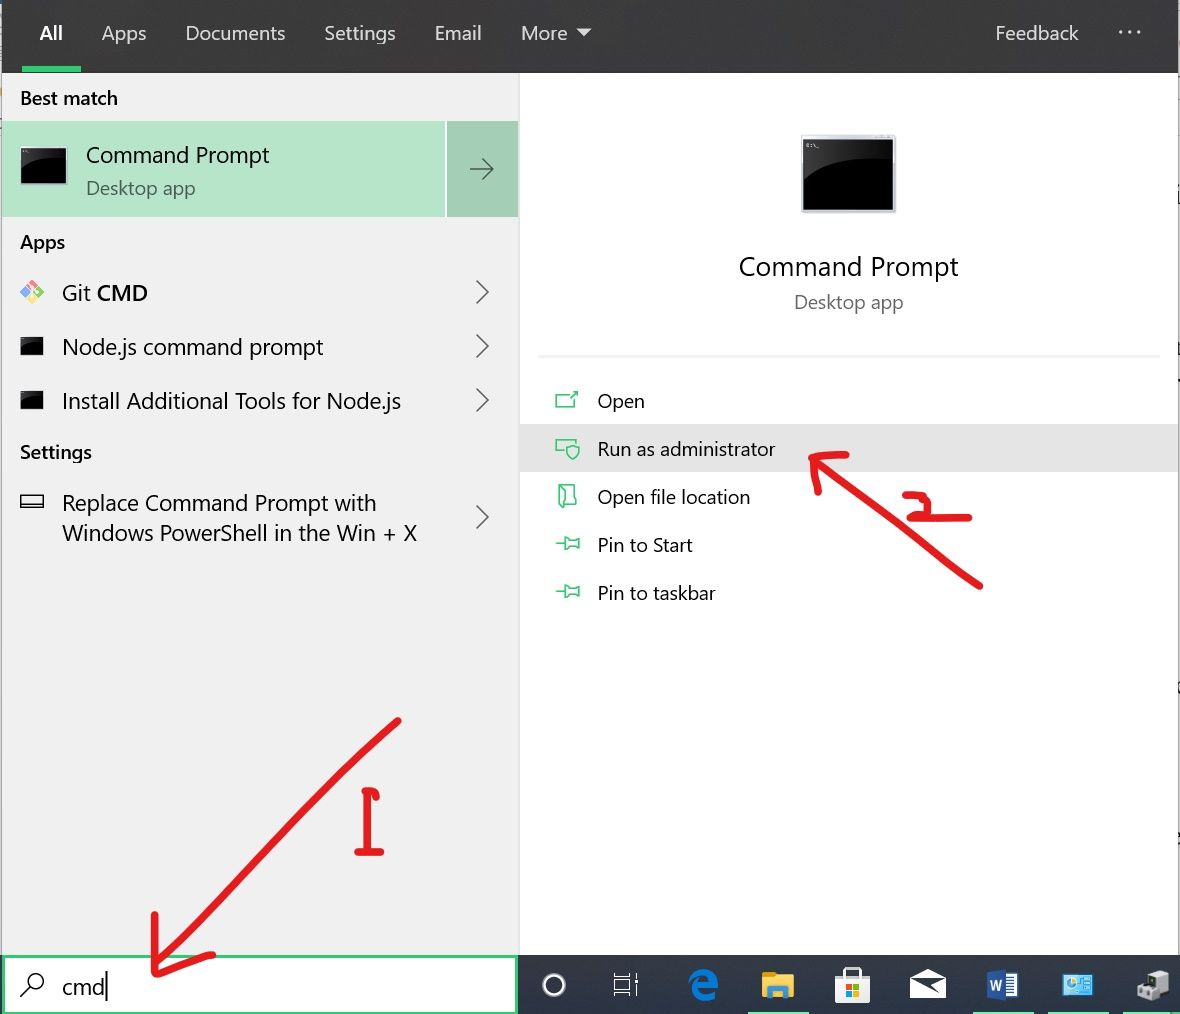
Step 3: Type in «ipconfig /flushdns» and hit ENTER
You should get a response that the DNS cache has been flushed like the one below:
This means that your cache has been completely cleared, and fresh versions of any website you visit will be loaded.
How to Clear the DNS Cache on Google Chrome
Despite not being an operating system, Chrome keeps a DNS cache of its own to help personalize your browsing experience.
To flush Chrome’s DNS, all you need to do is type chrome://net-internals/#dns in the address bar and hit ENTER.
Then click “Clear host cache”:

Conclusion
As you’ve learned in this article, flushing your DNS gives you a lot of advantages that can make your internet experience safer.
Even though the cache gets cleared after the TTL expires, you should flush your DNS as often as possible so you can get these advantages.
Thank you for reading!
Learn to code for free. freeCodeCamp’s open source curriculum has helped more than 40,000 people get jobs as developers. Get started

List of content you will read in this article:
- 1. What is DNS
- 2. How does DNS Work?
- 3. How to Clear DNS in Windows 10, 8, 7
- 4. What is DNS Cache?
- 5. Types of DNS Caching
- 6. What Information is Stored in the DNS Cache?
- 7. How does Clearing DNS Cache Regularly Help?
- 8. DNS Cache- How-to-Check
- 9. DNS Cache- How-to-Clear
- 10. Conclusion
We all face internet problems now and then, and something that we all come across is websites not loading properly and visiting certain web pages becomes difficult. This usually happens when the websites change servers and are no longer associated with the cached address. Another factor that might be a factor is malware injection by cyber hackers who try to redirect you to fake websites containing malicious links.
The only solution for removing all such problems is to clear your DNS cache. A Domain Name System (DNS) is like a phonebook or directory used for identifying web addresses from recent visits. The data collected from search activity is stored in a DNS cache and helps retrieve websites without using many resources.
DNS caching is an excellent way to increase user web experience because it doesn’t waste time in the server’s lookup process. Users can directly go to their desired web page if their OS has visited it before. With the help of DNS, the operating system also gets to experience less load in dealing with redundant searches.
The latency goes down, and access speed goes up after using DNS cache to your advantage. However, there are some negative effects if the DNS cache is stored for too long, and if it impacts the web performance, one should consider clearing the local storage of the DNS server. This article will take a deep look at DNS caching’s different aspects and learn how to clear DNS cache on different OS platforms.
What is DNS
We all access websites by typing a domain name in the address bar of the web browser, but the domain name is directly not linked to the Internet, so we must need an intermediary to convert domain names to IP addresses. That is where DNS comes in and facilitates web browsers in using internet resources. The server does all the work in checking if the domain exists, and if it does, it converts into complex and unique IP addresses that can be loaded using the Internet.
How does DNS Work?
Loading web pages for users and giving them access is done by DNS, and it involves four main servers in the process. They are DNS precursor, nameserver, TLD nameserver, and Authoritative nameserver. Each of them fulfills a specific requirement in translating domain names to IP addresses, and loading user desired web pages. The information entered in the address bar is sent to the Internet Service Provider (ISP) in the DNS query. There will be multiple servers and databases storing DNS names and what their IP addresses represent at the end of the service provider. If there is a perfect match with any option present in the database, the user’s computer gets an answer from the authoritative nameserver to connect to the respective website.
If the service provider’s directory has no match for the DNS query, the system proceeds to check the server cache. If the user’s query is found in the cache, it is called a non-authoritative answer, and it is coming from a third=party, not your ISP. The last scenario you can is your DNS query is not present in an authoritative nameserver and system cache. In this situation, you have to the DNS precursor to control the information present in other servers in contact. This will narrow down the search and form a stable connection with the website.
How to Clear DNS in Windows 10, 8, 7
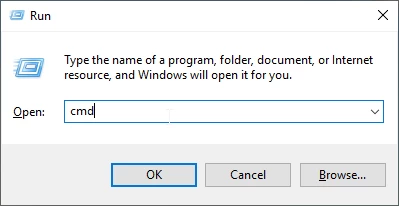
- Press the Windows Key + R in order to open the run box.
- Write CMD inside the box and press enter.
- Write the following command in the CMD and press enter.
ipconfig /flushdns
- You should receive the following message:

Successfully flushed the DNS Resolver Cache.
What is DNS Cache?
We now know that DNS helps users load websites, and it is responsible for the lookup process in its server. The websites that users visit are put inside local storage called DNS cache. This is used for faster retrieval and loading of sites that users previously visited. The one problem with DNS cache is that it doesn’t update its storage data when the webserver changes the IP addresses, so users keep facing HTML 404 error code when trying to access the same domain name present in the DNS cache. If this repeats multiple times when browsing, it is a clear indication to remove the DNS cache from your system. When the DNS cache is cleared, the computer will use query nameservers to store new DNS information.
Types of DNS Caching
Performance and website reliability will increase when DNS caching is implemented. The data requests sent by the user are instantly solved when the server stores previously visited domain names. Even the placement of storage matters to resolve DNS queries. The local storage is deployed closer to the requesting client, and in this way, they can avoid DNS lookup chains. The locations in which DNS data is stored also vary, and it is fixed for a set amount of time. Some of the main locations are as follows:
Browser DNS caching
Every modern web browser is designed so that the DNS caching is run on default for a fixed amount of time. The concept attached to browser DNS caching is simple- if DNS caching is done near the web browser, the steps required to fulfil data requests and find the right IP addresses will decrease.
Operating System-Based DNS Caching
If the data request makes its way to the operating system DNS resolver, it is the last stop to solve the query before leaving the machine. Stub Resolver handles this process. It is also called a DNS client, and the way it operates is that it first sends the data request to its cache and checks if there is a match or not. If there is no match for the IP address, the DNS query is combined with a recursive flag set and is sent out of the local network. The resolver continues to check with the Internet Service Provider to complete the request.
Recursive Resolver DNS Caching
The recursive resolver is responsible for determining the presence of host-to-IP address translation inside the local layer. The functionality is also dependent on the type of records the resolver stores in its cache. If the resolver contains NS records, it will clear the DNS query by directly looking up the nameservers. Similarly, if the resolver does not come with NS records, the DNS query is sent to the TLD servers. If there is no match concerning TLD servers, the next step to fulfil the query will be root servers.
What Information is Stored in the DNS Cache?
If there is an entry made in the DNS cache, the information or units are called resource records (RR). These records are usually displayed using the ASCII code or in compressed format. The components included in the code are as follows:
- Resource data provides resource Data- Description of a record. It can be the address or even the hostname.
- Record Type- The entries are also of different types: «A» is given an IPv4 address, whereas «AAAA» is given an IPv6 address.
- Record Name- While recording an entry, the name is optional for the object on which the access was created.
- Time to Live- Another optional component used to extend or limit a resource record’s validity period.
- Class- This is a protocol group for DNS cache.
- Data length- The length represents the value assigned to resource data.
How does Clearing DNS Cache Regularly Help?
It makes sense to clear the DNS cache every day, but it is impossible until TTL expires. However, it can be done when you set the register value to zero, and the validity period will not be prioritized anymore. Some benefits for clearing DNS cache regularly:
No more Data Tracking
We know that the primary trackers of our data and user behaviour are cookies and JavaScript, but DNS cache can also behave in the same way and give data collectors a chance to exploit user web experience. By clearing your DNS cache regularly, you are not allowing the trackers to get hold of large sample sizes of cached addresses. If you do it periodically, like once in a month, you reveal yourself more to the Internet and the chance of being the next victim increases.
Improves Security
One of the most important reasons you delete DNS cache regularly is to increase your computer security. Suppose. In that case, someone outside of your network accesses your local storage. They will be in a perfect position to hijack everything on your system, and manipulation becomes relatively easy. In technical terms, this is called DNS poisoning, and one of the examples in real-life is online banking.
Eliminates Technical Issues
If the cache gets overloaded, it can create several technical problems for your server. Outdated entries are one common technical problem that almost every user faces while web browsing. The IP addresses change for the domain names, so if the cache does not have the updated version, then browsers will keep showing error messages.
DNS Cache- How-to-Check
To check your local store for DNS cache, you must sequence steps, which again depends on the operating system you are working on every day. The process, however, remains the same across every mainstream developer. You would also need administrative access to have a look at the entries, and if you have access, you can follow the instructions below:
For Windows
In this operating system, it is relatively easy to display the records, and all it takes is one step. Enter the command «ipconfig /displaydns» in the command prompt, and a window pops up displaying your entries in the DNS cache.
For MAC
In MAC OS, the user must first open the Terminal app and enter the command «sudo discoveryutil udnscachestats«. After entering the command in the terminal app, you will have to input your password. The system immediately displays the records present in the Unicast DNS cache. If you want to know Multicast DNS results, you must enter the command «sudo discoveryutil mdnscachestats«.
For Linux
Generally, the OS doesn’t create any DNS cache to store resource records, but the applications are present to provide this service. To display NSCD status, you have to enter the command «service nscd status«.
DNS Cache- How-to-Clear
At this point, we believe you got a clear idea of how important it is to clear DNS cache to improve performance and safety. Now, let’s take a look at different methods used to clear DNS cache.
For Windows
If you are using a machine that runs on Windows operating system, it is very simple for you to clear cache memory. It takes only a single command to be entered into the command prompt window. So, once you have opened the command prompt, make sure to copy the following command and press enter:
ipconfig /flushdns
If the system cleared the memory, it would display a message- «Successfully flushed the DNS Resolver Cache.» After the DNS cache is cleared, you can go back to the website and see if it’s responsive or not. If clearing cache doesn’t resolve the problem, then your Internet connection might be unstable.
For MAC
The command used for MAC OS is- «sudo dscacheutil -flushcache;sudo killall -HUP mDNSResponder.» This needs to be entered in the Terminal app, and the difference between clearing cache in MAC and windows is that the command keeps changing for MAC OS. The command mentioned above is for modern Apple products that run OS X lion or macOS Big Sur. If you are using an Apple machine that runs on OS X 10.10.1 and later, you need to use the following command:
«sudo discoveryutil udnsflushcaches;sudo discoveryutil mdnsflushcaches.» The success message will not be reported for MAC, and you need to check if the problem is fixed or not.
Conclusion
Even though the DNS cache is not the whole part of DNS services, it is still imperative to reduce loading time and enhance the user web experience. It is an integral part of web browsers and OSs because it facilitates fast and reliable searches. In some cases, the cache memory’s resource records can cause some security problems and a significant performance drop.
That is why it is recommended to flush your DNS cache regularly, if possible. Clearing cache memory helps you avoid DNS spoofing and restricts data collectors from targeting your system. Make sure to check the commands given above and follow the steps for your specific OS.
MonoVM provides high-quality cheap windows VPS you can trust.
People are also reading:
- What is DNS_PROBE_FINISHED_XDOMAIN Error in ubuntu?
![]()
Download Article
Fix «Page not found» and other website errors by clearing the DNS cache
![]()
Download Article
- Windows
- Mac
- Linux
- Chromebook
- Q&A
- Tips
|
|
|
|
|
Are you having trouble accessing certain websites? Try flushing your DNS cache! If the IP address of a website you’ve recently visited has changed since the last time you accessed it in your browser, you might see a «Page not found» error until your DNS resolver cache is cleared. While this cache (which is different from your web browser’s cache) also clears automatically, doing a manual DNS flush will instantly clear those old stored addresses, which may restore your access to your favorite website. This wikiHow guide will show you the easiest ways to flush your DNS cache on a Windows or Linux PC, Mac, and Chromebook.
Things You Should Know
- If you can’t access a particular website or recently made some network changes, flushing your DNS can be a helpful troubleshooting step.
- If you’re using Windows, flush your DNS using the command ipconfig /flushdns.
- On the latest versions of macOS, run sudo dscacheutil -flushcache; sudo killall -HUP mDNSResponder to clear the cache.
- Rebooting your computer will also flush the DNS cache automatically.
-

1
Open a Command Prompt window as an administrator. The easiest way to open Command Prompt with elevated access is:
- Press the Windows key on your keyboard and type cmd.
- Right-click Command Prompt in the search results.
- Click Run as administrator.
- Click Yes to confirm.
-
2
Type ipconfig /flushdns at the prompt and press ↵ Enter. This immediately flushes your PC’s DNS cache.
- If you just want to see the contents of your DNS cache without flushing it, run the command ipconfig /displaydns instead. This command also displays entries from your hosts file.
- If your PC is a part of an Active Directory network, you may also need to run the command ipconfig /registerdns if you can’t resolve other hostnames on your network.
- If you’re still having trouble accessing websites after clearing your DNS cache, you may also need to clear your browser cache.


Advertisement
-
1
Open a Terminal window. There are two easy ways to open Terminal on your Mac:
- Open Finder, click the Go menu, select Utilities, and then select Terminal.
- Click the Spotlight icon (the magnifying glass) at the top-right corner of your desktop, type terminal, and then double-click Terminal.
- You can also press ⌘ Command+Space to open Spotlight.
-
2
Type the DNS flush command for your version of macOS. The command you’ll need to type depends on your version of macOS:
-
Big Sur (macOS 11) and later:
- sudo dscacheutil -flushcache; sudo killall -HUP mDNSResponder
-
El Capitan, Sierra, High Sierra, Mojave, & Catalina:
- sudo killall -HUP mDNSResponder
-
Yosemite:
- sudo discoveryutil udnsflushcaches
-
Lion, Mountain Lion, & Mavericks:
- sudo killall -HUP mDNSResponder
-
Big Sur (macOS 11) and later:
-
3
Press ⏎ Return to run the command. This clears your Mac’s DNS cache.
- If prompted, enter your password to run the command. This will be the password you enter when logging in to your Mac. Terminal won’t show your keystrokes as you type, but it will detect them.
- If you’re still having trouble accessing websites, check out our guide to fixing common computer network issues. You can also try resetting your network.


Advertisement
-
1
Open a new Terminal window. If you’re logged in on your Linux desktop, you can press Ctrl + Alt + T to open a new Terminal quickly.
-
2
Run the DNS flush command for your Linux variant. The command you’ll use will be different depending on which version of Linux you’re using:
-
Ubuntu & Debian:
- Type sudo systemd-resolve --flush-caches and press Enter. In newer version of Ubuntu you may have to use command sudo resolvectl flush-caches instead.
- To make sure the command worked, run the command sudo systemd-resolve --statistics to make sure the cache is empty. In newer version of Ubuntu you may have to use command sudo resolvectl statistics instead.
-
RedHat & CentOS:
- Type systemctl restart dnsmasq.service and press Enter. You won’t see any confirmation or errors, so don’t worry if you don’t get any feedback.
-
Ubuntu & Debian:


Advertisement
-
1
Open a new browser tab or window. To flush your DNS on a Chromebook, you’ll need to use the hidden Net-Internals feature in Chrome.[1]
-
2
Go to chrome://net-internals in your browser. This opens a page where you can access a few handy network troubleshooting tools.
-
3
Click DNS in the left panel. Now you’ll see the DNS Lookup page, where you can look up any domain or host name. You’ll also see a button below this option to clear your host cache.
-
4
Click Clear host cache. This flushes the DNS cache in Chrome (or on your Chromebook).
- Don’t be alarmed if you don’t see a prompt or confirmation, as everything happens quietly in the background.
- If you’re still having trouble accessing websites, you can also try clearing your browser cache,


Advertisement
Add New Question
-
Question
In Windows I entered the «ipconfig /flushdns» command and received the following: «The requested operation requires elevation.» What does this mean?

It is because you don’t have administrative access. Open your cmd using administrator access (usually known as «Run As Administrator»).
-
Question
Why do some websites work and others cannot be found?
Your wifi firewall or the country may have some have censorship. Change your VPN to see if that works.
-
Question
How can I flush a D.N.S. PC laptop or mobile device?
On Windows, open Command Prompt and after the prompt, without the quotes, type in «ipconfig/flushdns».
See more answers
Ask a Question
200 characters left
Include your email address to get a message when this question is answered.
Submit
Advertisement
-
All devices clear their DNS caches regularly without any human intervention, so you shouldn’t have to flush your DNS cache often.
-
Websites may take a bit longer to load the first time you access them after flushing the DNS cache.
Show More Tips
Thanks for submitting a tip for review!
Advertisement
References
About This Article
Article SummaryX
To flush your Windows computer’s DNS, start by clicking the Windows logo in the bottom left corner of your screen. Then, type “command prompt” into the search box, and select the Command Prompt app, which should be the top icon in the Start window. Next, enter «ipconfig /flushdns,» and press Enter. Finish by restarting your web browser. For tips on how to flush your DNS on a Mac, read on!
Did this summary help you?
Thanks to all authors for creating a page that has been read 1,954,639 times.
Reader Success Stories
-

Jill Whiting
Oct 14, 2017
«I believe it got rid of the errors. I still have to turn the computer off and start again.»
Is this article up to date?
Ways to flush DNS in Windows 10
Updated on November 5, 2021
What to Know
- Clear your DNS with the ipconfig /flushdns command in the Run dialog box.
- The ipconfig /flushdns command also works via Command Prompt.
- You can also clear DNS via PowerShell with the Clear-DnsClientCache command.
This article explains how to flush and clear Windows DNS cache, including methods that utilize the Run dialog box, Command Prompt, and Windows PowerShell. If you aren’t sure which one to use, start with the Run dialog box method.
The instructions included in this article apply to Windows 10.
How to Flush and Clear Your Windows DNS Cache
The easiest way to clear your DNS cache is to use the Run dialog box, a Windows tool that allows you to quickly run commands, launch apps, and open files if you know what to type.
-
Press and hold the Windows key + R to open the Run dialog box.
-
Type ipconfig /flushdns into the text field, and click OK.
-
Check to see if your problem has been resolved.
How to Use Command Prompt to Clear Your DNS Cache
The Run dialog box is quick and easy, but it doesn’t provide much feedback or options. If you aren’t sure whether the Run dialog box method worked or prefer some more feedback about whether the process is complete, you can use the same command in the Windows Command Prompt.
-
Click the Start button or Taskbar search field, and type command.
-
Click Run as Administrator.
-
Type ipconfig /flushdns and press the enter key.
-
Wait for the process to finish.
-
Check to see if your problem has been resolved.
How to Use Windows PowerShell to Clear DNS in Windows 10
The last method you can use to clear and flush your DNS in Windows 10 is slightly different. It uses Windows PowerShell instead of the Command Prompt, so it uses an entirely different command.
-
Right click the Start button, and select Windows PowerShell (Admin).
-
If prompted for permission from User Account Control, click Yes.
-
Type Clear-DnsClientCache and then press the enter key.
-
Wait for the process to finish.
-
Check to see if your problem has been resolved.
Why Flush Your DNS Cache?
The purpose of DNS is to let you visit websites by typing a URL instead of an IP address. The point of a DNS cache is to speed up website access by making it so that your computer doesn’t have to wait for a DNS lookup every time you visit a website that you’ve already been to in the past. If this local record ends up getting corrupted, it’s out of date, or you connected to a DNS server that provided incorrect information, you may have trouble accessing websites. By clearing or flushing your DNS cache, you force your computer to check a DNS server when visiting sites because there is no longer a local record.
While Windows 10 maintains a local DNS cache that you can flush with the methods found in this article, your router may also keep a cache. If you find that flushing your DNS in Windows 10 doesn’t fix your internet connectivity problem, then rebooting your router may help.
Thanks for letting us know!
Get the Latest Tech News Delivered Every Day
Subscribe
Кэш DNS — это временная база данных, в которой хранится информация о предыдущих поисках DNS. Другими словами, всякий раз, когда вы посещаете веб-сайт, ваша ОС и веб-браузер будут вести учет домена и соответствующего IP-адреса. Это исключает необходимость повторяющихся запросов к удаленным DNS-серверам и позволяет вашей ОС или браузеру быстро разрешать URL-адреса веб-сайта.
Однако в некоторых ситуациях, таких как устранение неполадок в сети или после смены преобразователей DNS, вам необходимо очистить кэш DNS. Это очистит кэшированные записи DNS и выполнит последующий поиск для разрешения домена на основе вновь настроенных параметров DNS.
Очистить / очистить кэш DNS в Windows
Процесс очистки DNS-кэша одинаков для всех версий Windows. Вам нужно открыть командную строку с правами администратора и запустить ipconfig /flushdns .
Windows 10 и Windows 8
Чтобы очистить кэш DNS в Windows 10 и 8, выполните следующие действия:
-
Введите cmd в строке поиска Windows.
-
Щелкните правой кнопкой мыши командную строку и выберите «Запуск от имени администратора». Это откроет окно командной строки.
-
В командной строке введите следующую строку и нажмите Enter:
В случае успеха система вернет следующее сообщение:
Windows IP Configuration

Successfully flushed the DNS Resolver Cache.


Windows 7
Чтобы очистить кэш DNS в Windows 7, выполните следующие действия:
-
Нажмите на кнопку Пуск.
-
Введите cmd в текстовое поле поиска меню «Пуск».
-
Щелкните правой кнопкой мыши командную строку и выберите «Запуск от имени администратора». Это откроет окно командной строки.
-
В командной строке введите следующую строку и нажмите Enter:
В случае успеха система вернет следующее сообщение:
Windows IP Configuration

Successfully flushed the DNS Resolver Cache.
Очистить / очистить кэш DNS в Linux
В Linux отсутствует кэширование DNS на уровне ОС, если не установлена и не запущена служба кэширования, такая как Systemd-Resolved, DNSMasq или Nscd. Процесс очистки DNS-кэша отличается в зависимости от дистрибутива Linux и используемой вами службы кэширования.
Systemd Resolved
В большинстве современных дистрибутивов Linux, таких как Ubuntu 18.04, используется системный разрешенный сервис для кэширования записей DNS.
Чтобы узнать, запущена ли служба, используйте следующую команду:
sudo systemctl is-active systemd-resolved.service
Если служба работает, команда напечатает active . В противном случае вы увидите inactive .
Чтобы очистить кэш DNS Systemd Resolved, введите:
sudo systemd-resolve --flush-caches
В случае успеха команда не возвращает никакого сообщения.
Dnsmasq
Dnsmasq — это облегченный кеширующий сервер имен DHCP и DNS.
Если ваша система использует DNSMasq в качестве сервера кеширования, для очистки кеша DNS вам необходимо перезапустить службу Dnsmasq:
sudo systemctl restart dnsmasq.service
Или
sudo service dnsmasq restart
Nscd
Nscd — это демон кэширования, и он является предпочтительной системой кэширования DNS для большинства дистрибутивов на основе RedHat.
Если ваша система использует Nscd, для очистки кэша DNS вам необходимо перезапустить службу Nscd:
sudo systemctl restart nscd.service
Или
sudo service nscd restart
Очистить / очистить кэш DNS на macOS
Команда для очистки кэша в macOS немного отличается в зависимости от используемой версии. Команда должна выполняться как пользователь с правами системного администратора (пользователь sudo).
Чтобы очистить кэш DNS в macOS, выполните следующие действия:
-
Откройте Finder.
-
Перейдите в Приложения> Утилиты> Терминал. Это откроет окно терминала.
-
В командной строке введите следующую строку и нажмите Enter:
sudo killall -HUP mDNSResponderВведите свой пароль sudo и снова нажмите Enter. В случае успеха система не возвращает никаких сообщений.
Для более ранних версий macOS команда очистки кэша отличается.
macOS версии 10.11 и 10.9
sudo dscacheutil -flushcache
sudo killall -HUP mDNSResponder
macOS версия 10.10
sudo discoveryutil mdnsflushcache
sudo discoveryutil udnsflushcaches
macOS версии 10.6 и 10.5
sudo dscacheutil -flushcache
Очистить / очистить кэш DNS браузера
Большинство современных веб-браузеров имеют встроенный DNS-клиент для предотвращения повторяющихся запросов при каждом посещении веб-сайта.
Google Chrome
Чтобы очистить DNS-кеш Google Chrome , выполните следующие действия:
- Откройте новую вкладку и введите
chrome://net-internals/#dnsадресную строку Chrome. - Нажмите кнопку «Очистить кэш хоста».
Если это не работает для вас, попробуйте очистить кэш и куки.
- Откройте диалоговое окно «Очистить данные браузера» с помощью
CTRL+Shift+Del. - Выберите диапазон времени. Выберите «Все время», чтобы удалить все.
- Установите флажки «Файлы cookie и другие данные сайта» и «Кэшированные изображения и файлы».
- Нажмите кнопку «Очистить данные».
Этот метод должен работать для всех браузеров на основе Chrome, включая Chromium , Vivaldi и Opera .
Firefox
Чтобы очистить DNS-кэш Firefox, выполните следующие действия:
- В верхнем правом углу щелкните значок гамбургера,
☰чтобы открыть меню Firefox: - Нажмите на
⚙ Options (Preferences)ссылку. - Нажмите на вкладку «Конфиденциальность и безопасность» или «Конфиденциальность» слева.
- Прокрутите вниз до
Historyраздела и нажмите наClear History...кнопку. - Выберите временной диапазон, чтобы очистить. Выберите «Все», чтобы удалить все.
- Выберите все поля и нажмите «Очистить сейчас».
Если это не работает для вас, попробуйте следующий метод и временно отключите кэш DNS.
- Откройте новую вкладку и введите
about:configв адресную строку Firefox. - Найдите
network.dnsCacheExpiration, временно установите значение 0 и нажмите ОК. После этого измените значение по умолчанию и нажмите ОК. - Найдите
network.dnsCacheEntries, временно установите значение 0 и нажмите ОК. После этого измените значение по умолчанию и нажмите ОК.
Вывод
Вы узнали, как очистить или очистить кэш DNS в операционных системах Windows, Linux и macOS.
Пользователи Linux и macOS могут использовать команду dig для запроса и устранения проблем с DNS.