Содержание
- Шаг 1: Приостановка «Центра обновления» Windows 10
- Шаг 2: Удаление кеша обновлений
- Вопросы и ответы
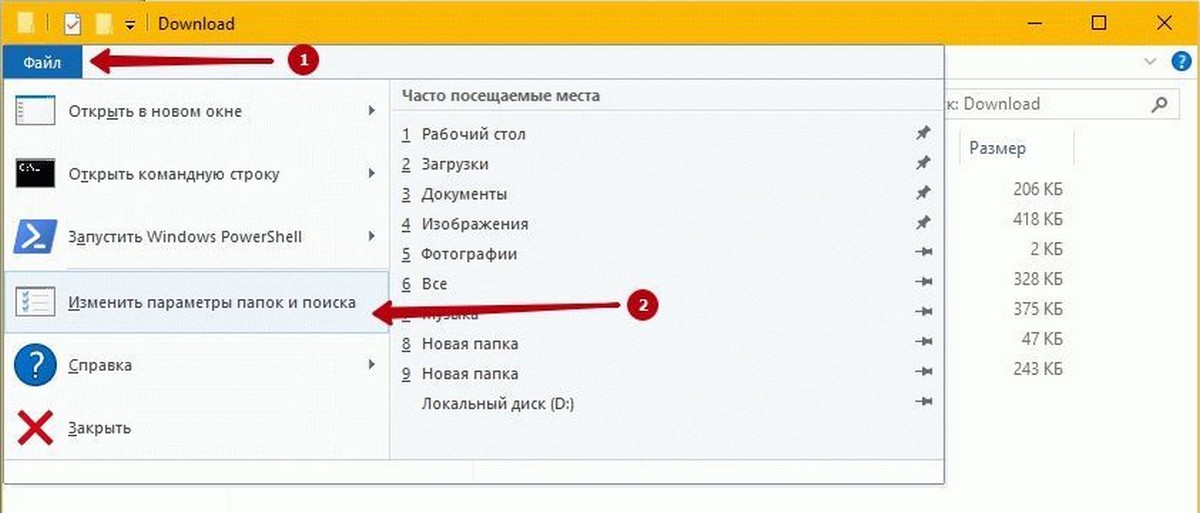
Для начала нужно приостановить работу «Центра обновлений» Windows 10, чтобы проблем с удалением кеша не возникло:
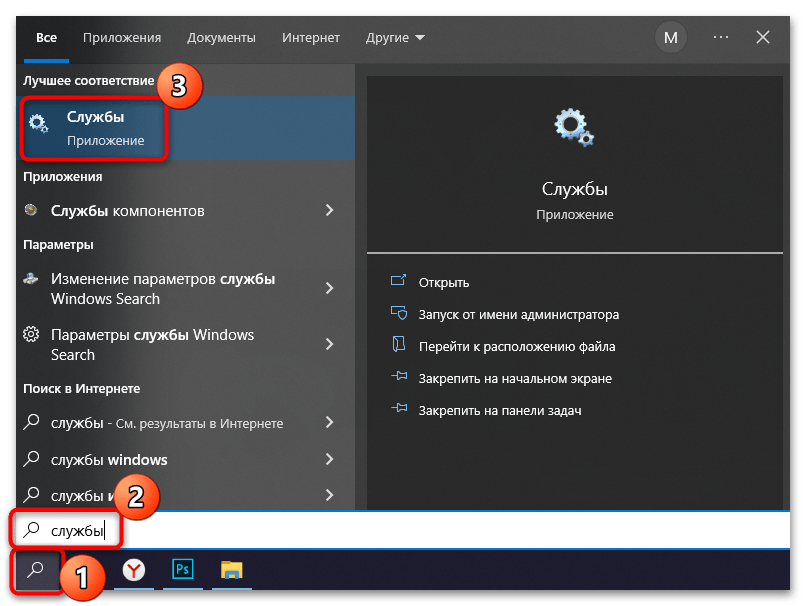
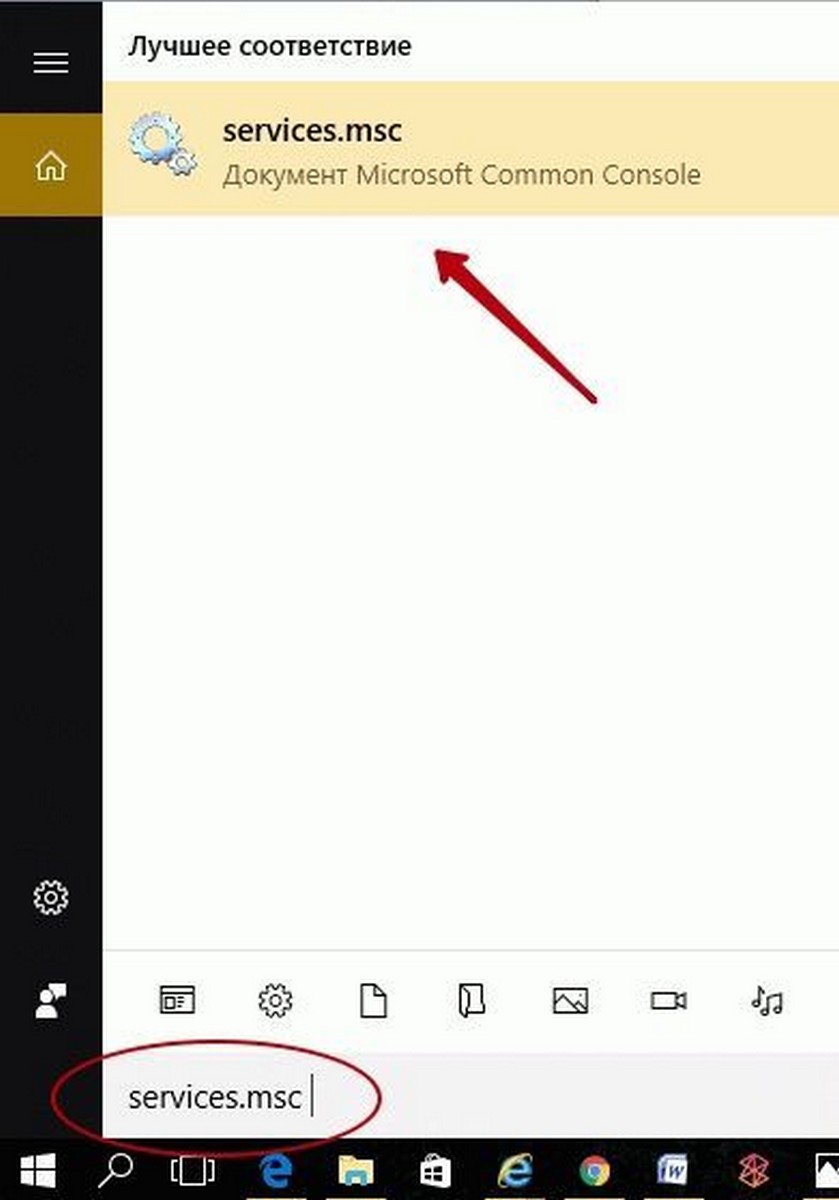
- Откройте окно системного приложения «Службы». Сделать это можно несколькими способами, но самый простой – поисковая строка «Пуска».
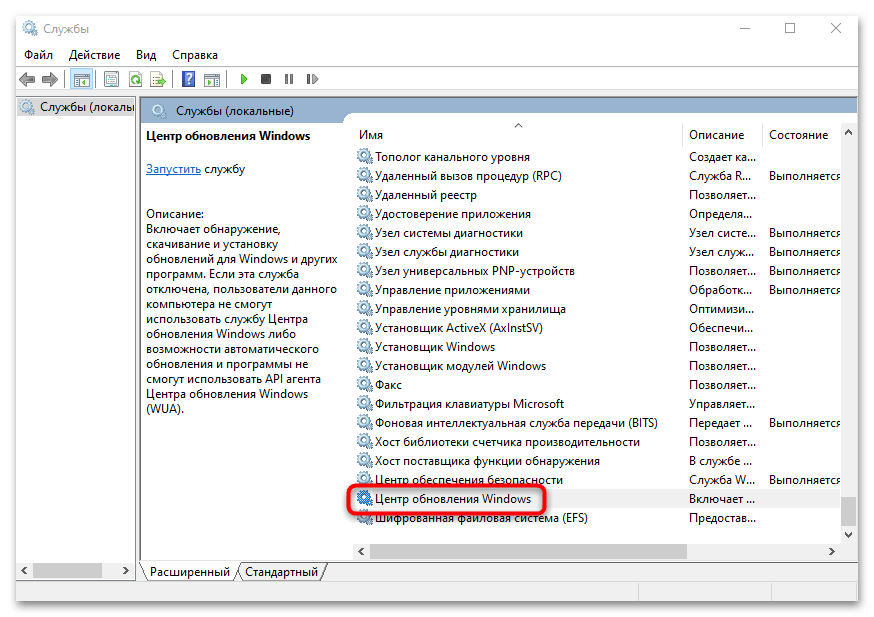
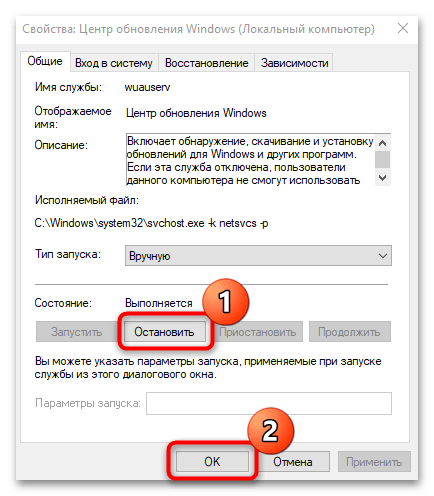
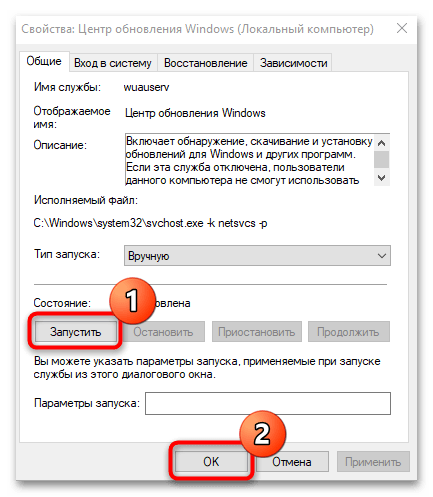
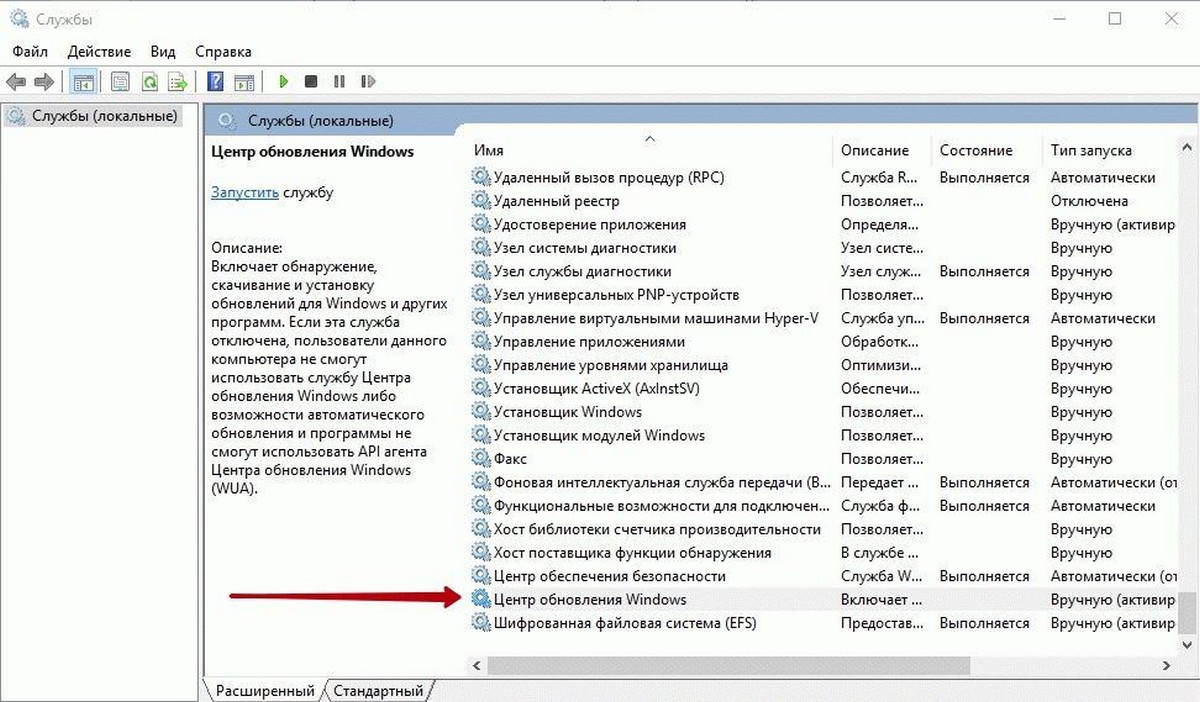
- В списке отыщите службу под названием «Центр обновления Windows». Она находится внизу, если отсортировать службы по алфавиту. Дважды щелкните по службе левой кнопкой мыши.
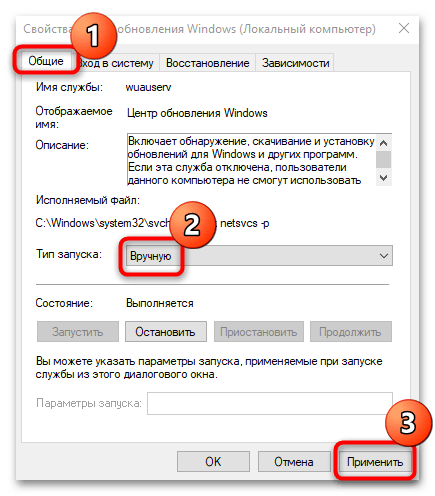
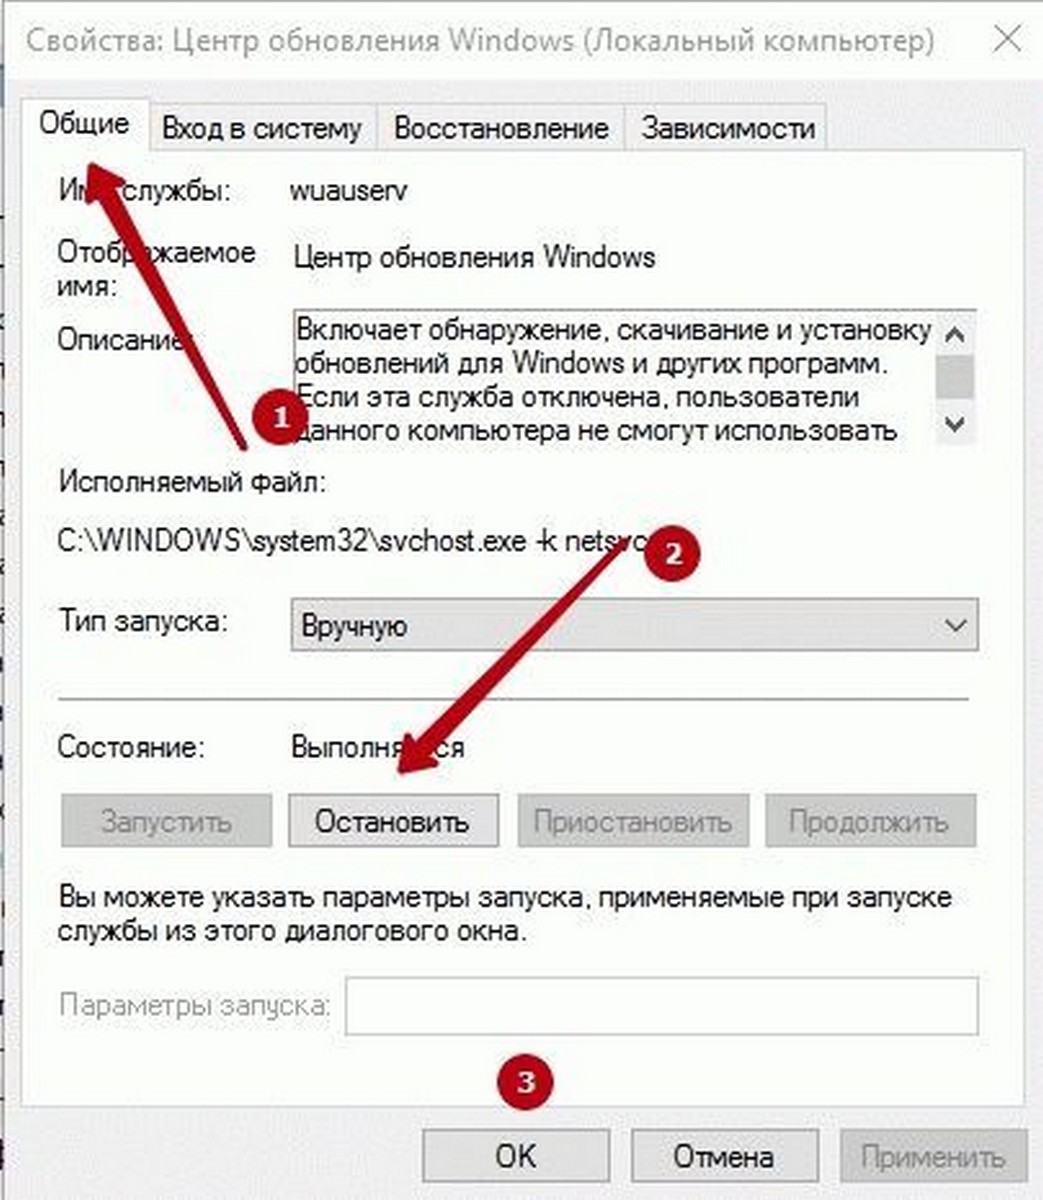
- В новом окне на вкладке «Общие» выберите тип запуска «Вручную» и нажмите на кнопку «Применить».
- Затем нажмите на «Остановить» и на «ОК», чтобы подтвердить настройку.
После того как работа службы обновлений остановлена, можно приступать к непосредственной очистке кеша апдейтов Windows 10.
Шаг 2: Удаление кеша обновлений
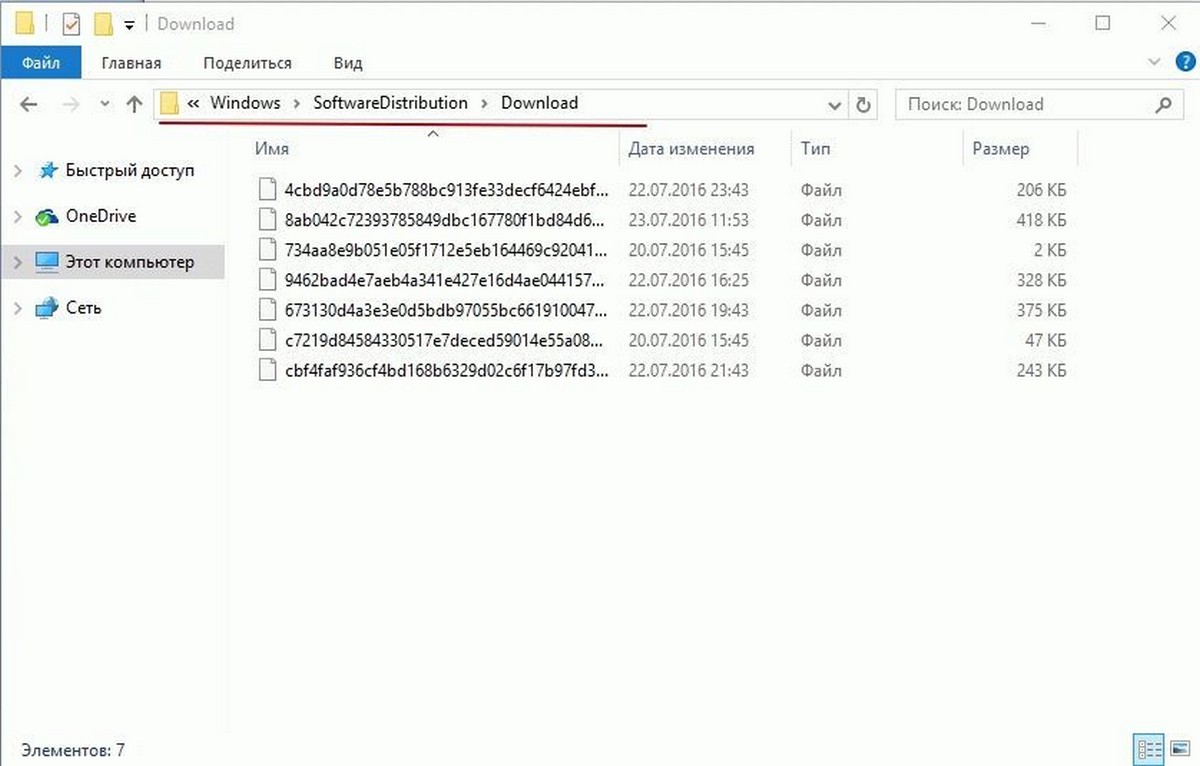
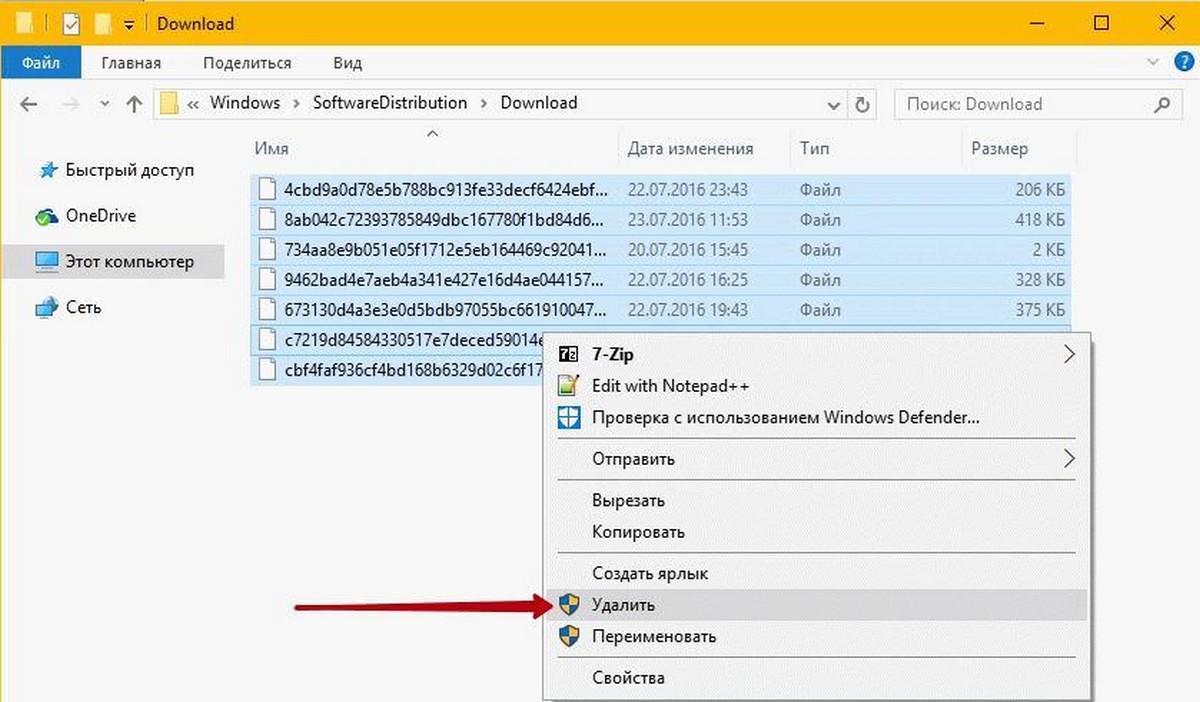
Следующий этап – это удаление кеша с накопителя. Искомые данные временно хранятся в специальной папке системного тома:
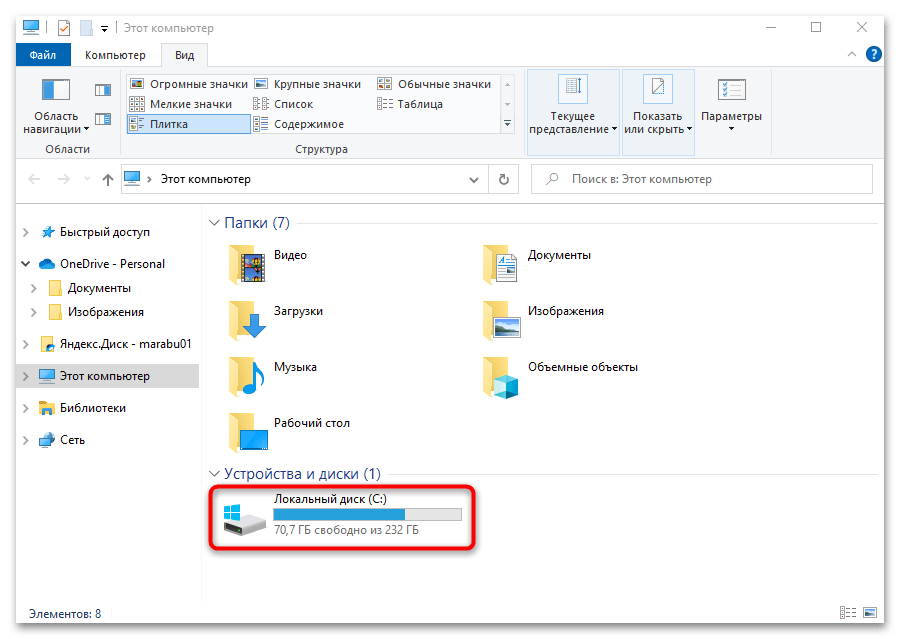
- Запустите «Проводник» или откройте «Этот компьютер» на рабочем столе. Перейдите в содержимое системного диска. Обычно это «Локальный диск (C:)».
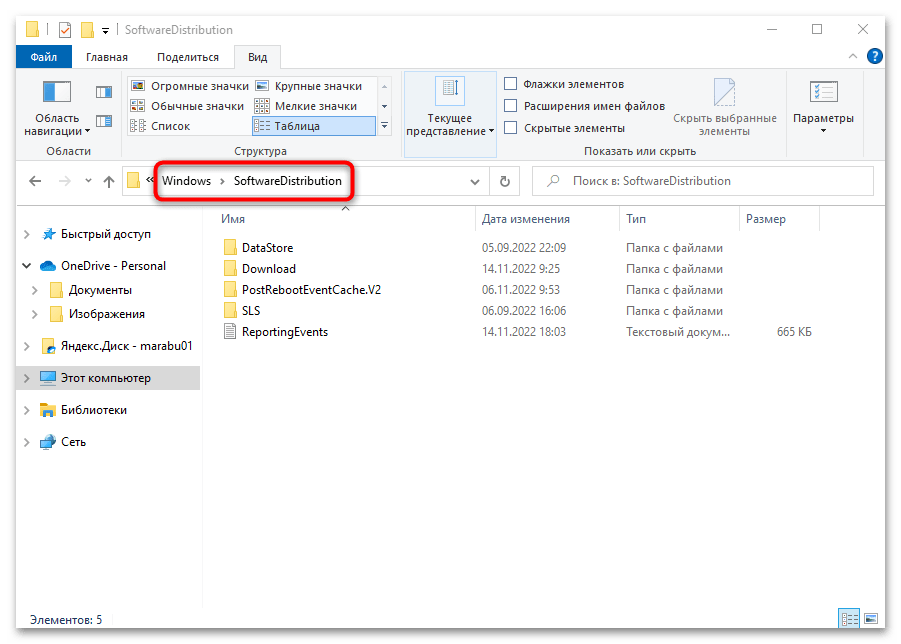
- Затем откройте папку «Windows», а потом «SoftwareDistribution».
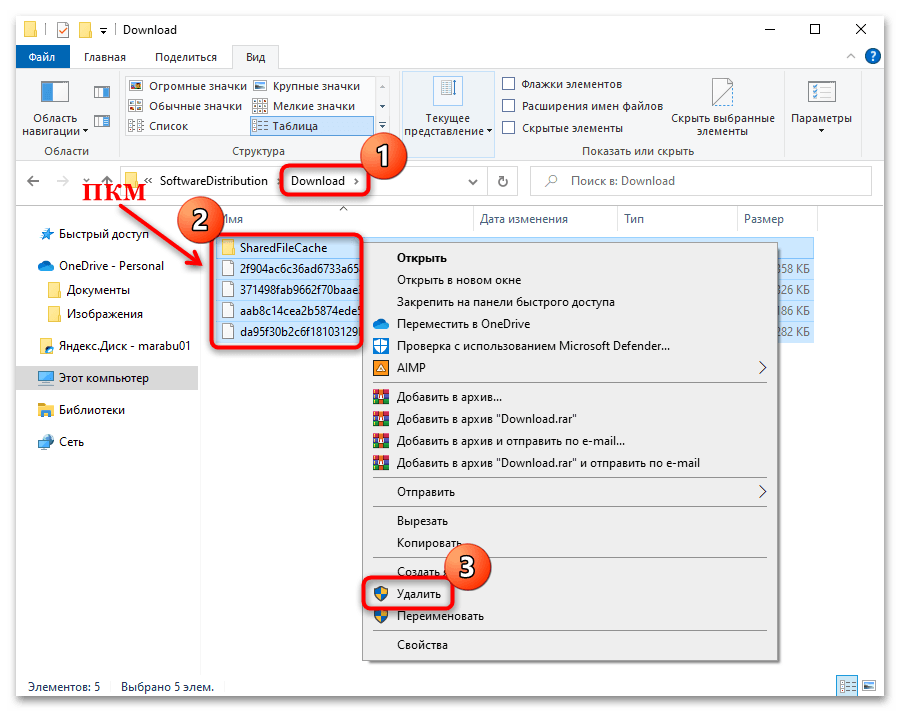
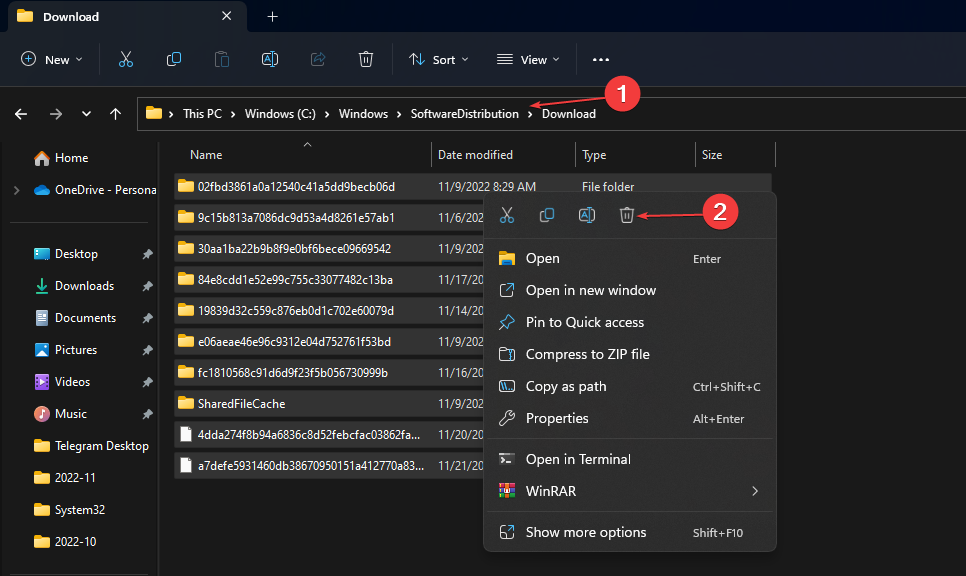
- Очистите содержимое каталога «Downloads» любым способом: выделите все файлы и папки, затем вызовите контекстное меню нажатием правой кнопкой мыши или используйте клавишу «Delete».
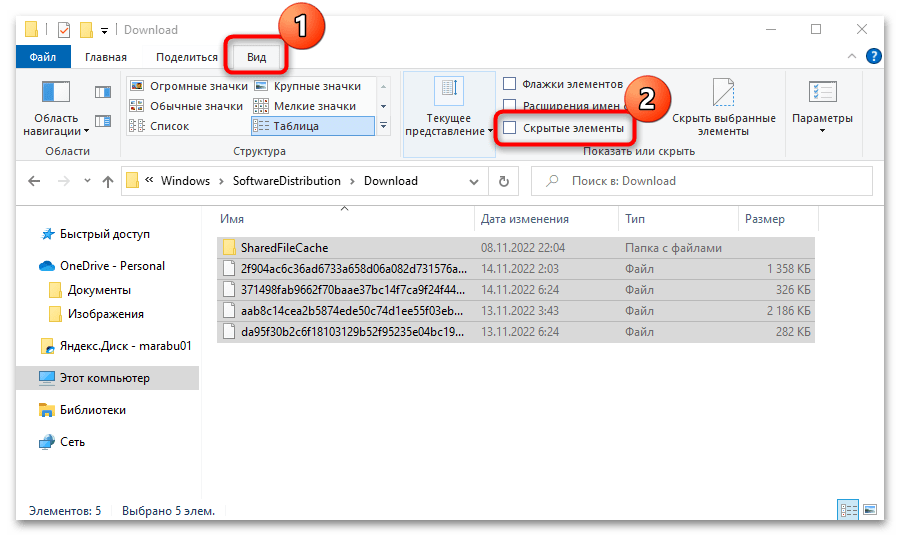
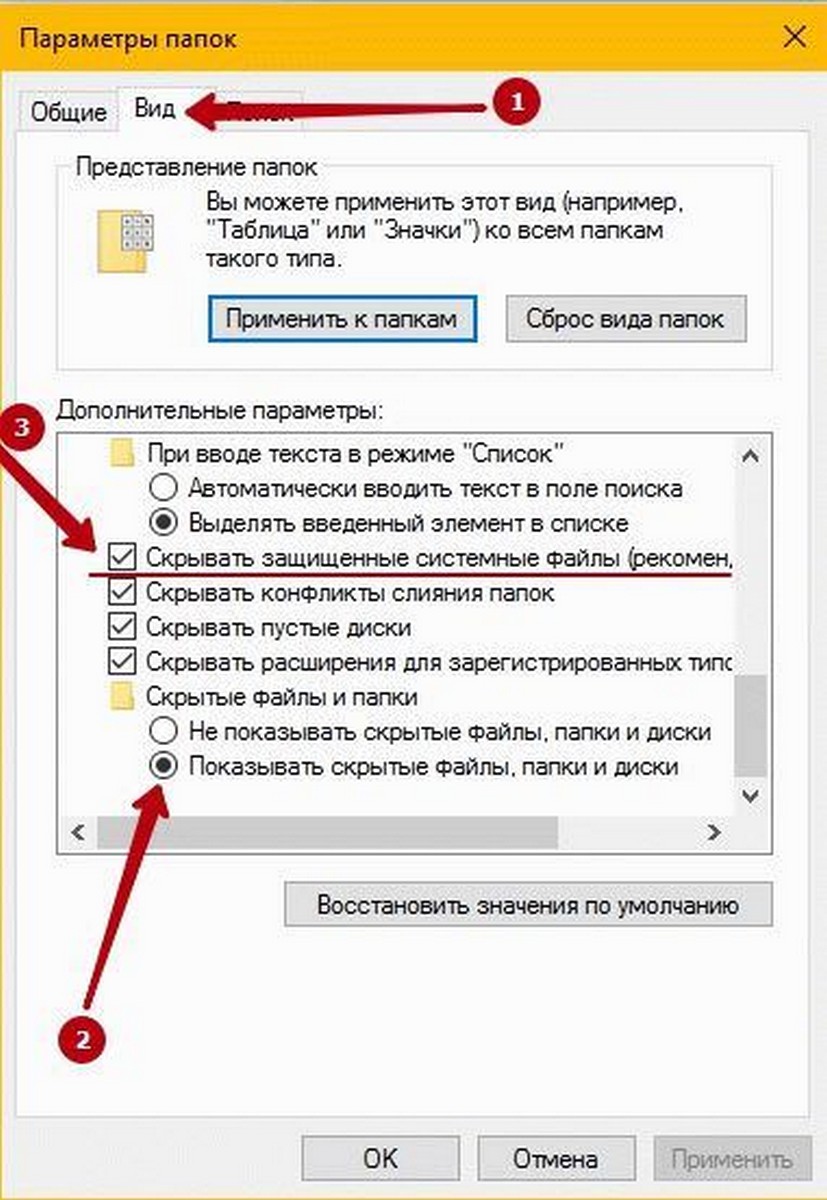
Может потребоваться отображение скрытых элементов в папке. Для этого в окне «Проводника» перейдите на вкладку «Вид», и отметьте галочкой пункт «Скрытые элементы».
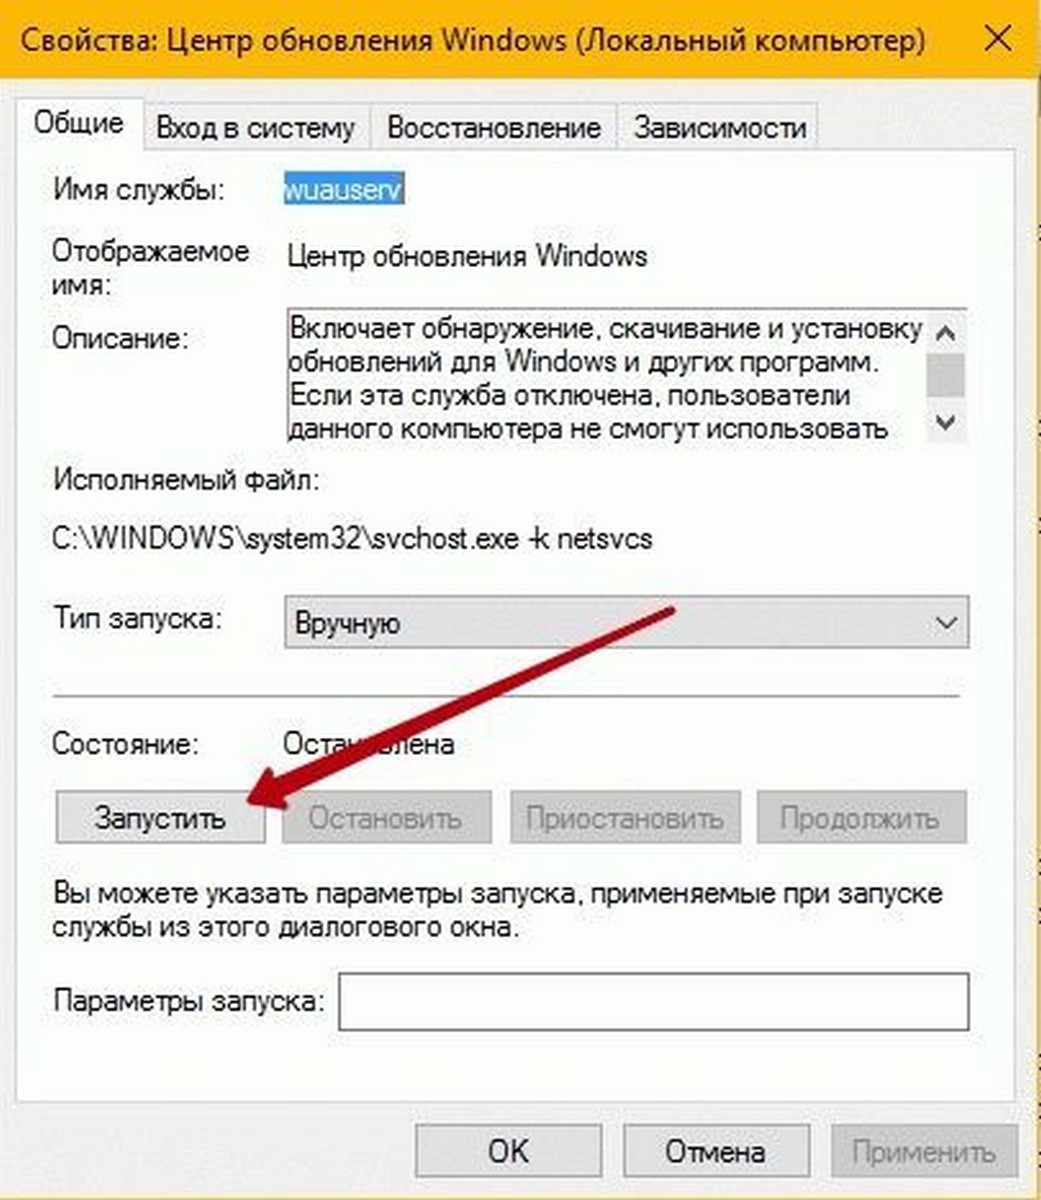
Когда все будет готово, останется вновь запустить работу службы «Центр обновления Windows». Проделайте то же самое, что показано в Шаге 1, только на конечном этапе выберите вариант «Запустить».
Еще статьи по данной теме:
Помогла ли Вам статья?
-
MiniTool
-
MiniTool News Center
- How to Clear Windows Update Cache (3 Ways for You)
By Daisy | Follow |
Last Updated August 22, 2022
![]()
Clearing the Windows 10 update cache manually will solve most of the problems you may have installed the latest Windows 10 update on your computer. This post from MiniTool introduces how to clear Windows update cache.
If you have trouble running Windows Update, it is likely that there is a problem with the update file, or the file is not completely cleared for download or is damaged. Windows update cache location is C:WindowsSoftwareDistributionDownload. All installation files for Windows updates are stored here.
How to Clear Windows Update Cache
There are 3 ways for you. You can choose one based on your needs. Here is how to do that:
Way 1: Clear Windows Update Cache via File Explorer
First, let’s see how to clear Windows update cache via File Explorer.
Step 1: Type File Explorer in the Search box to open it.
Step 2: Find and right-click Local Disk (C) to choose Properties.
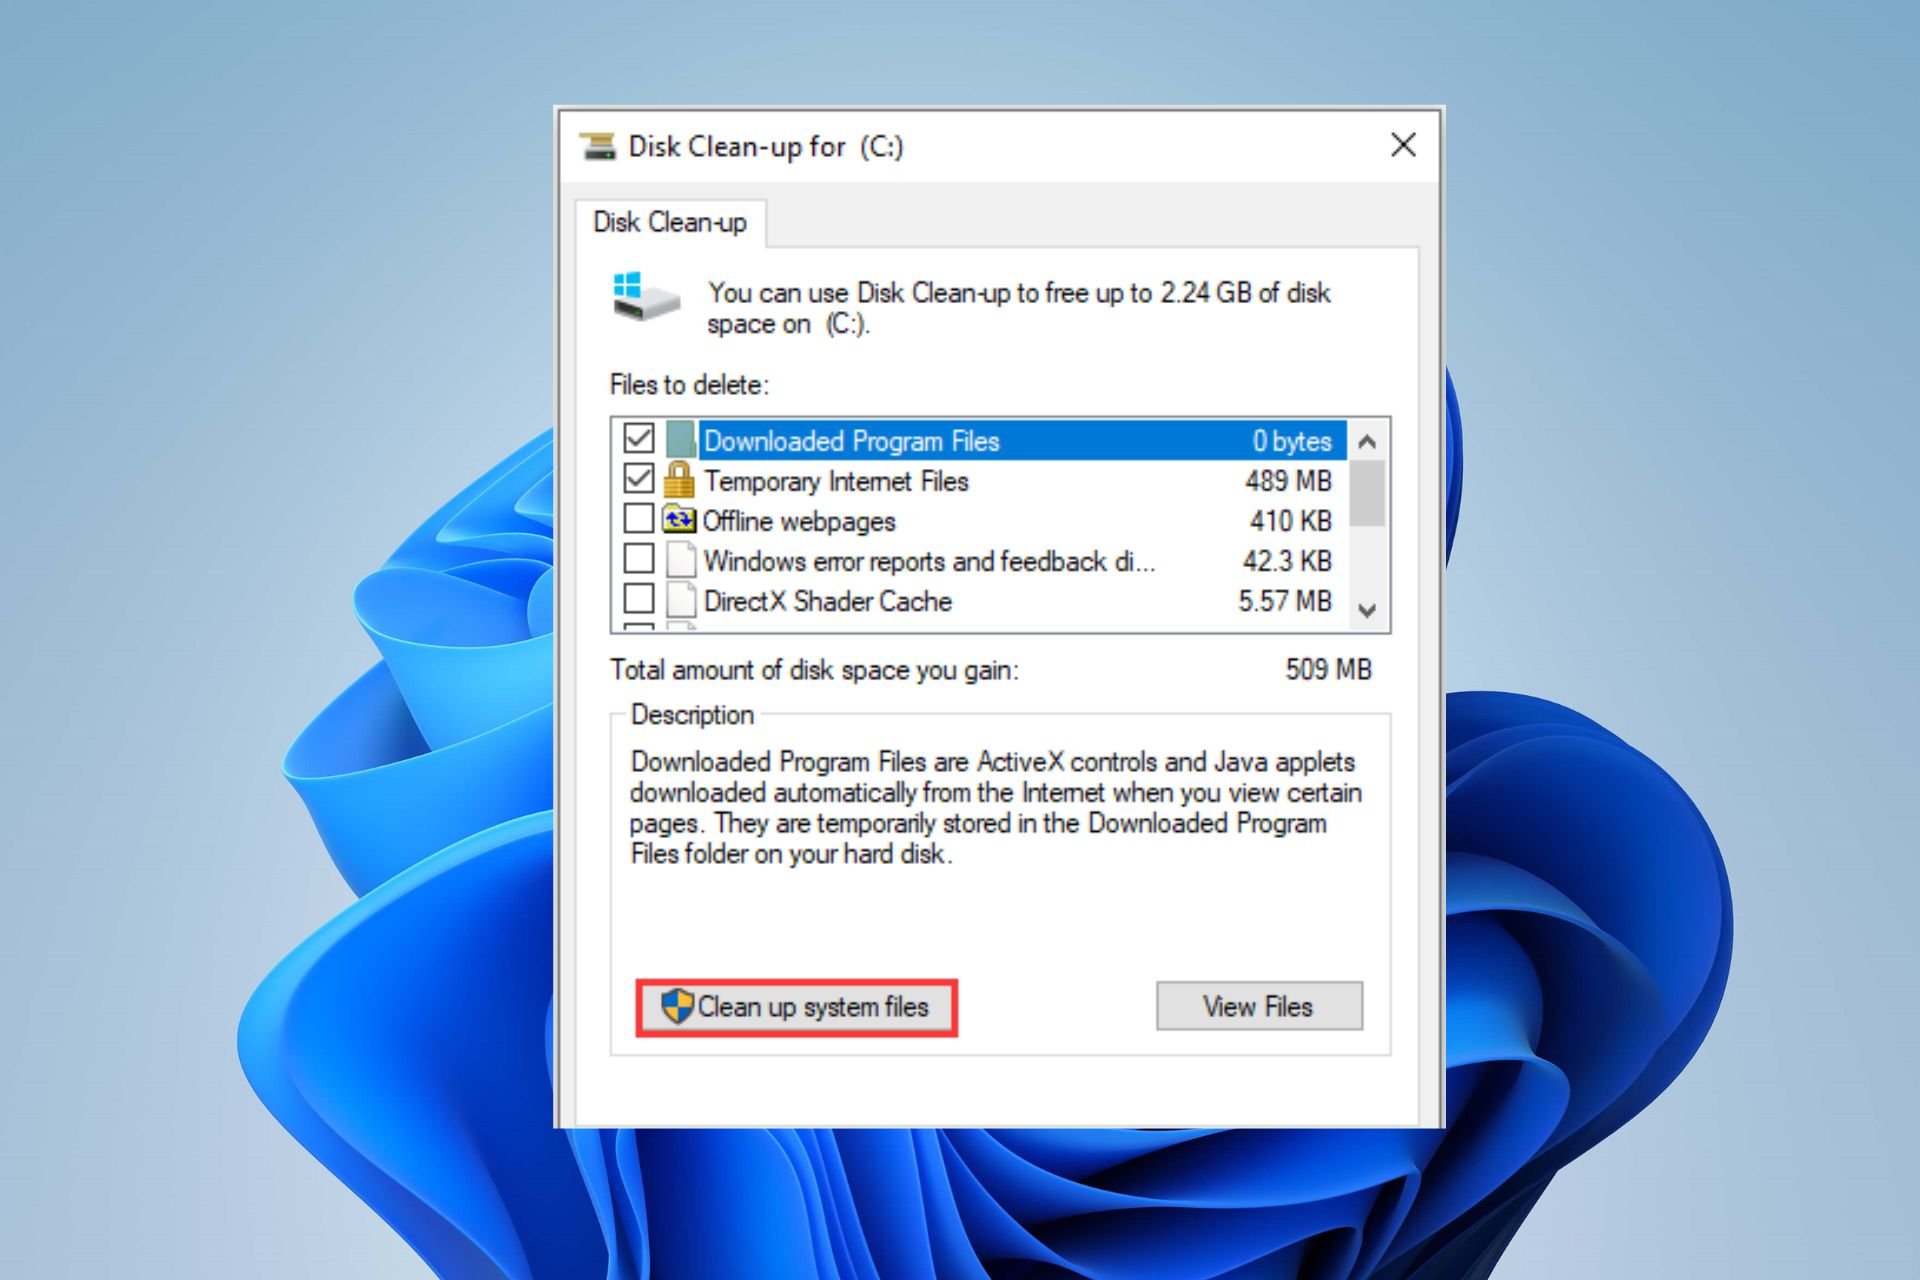
Step 3: Then, click Disk Clean-up. After that, click the Clean up system files option.
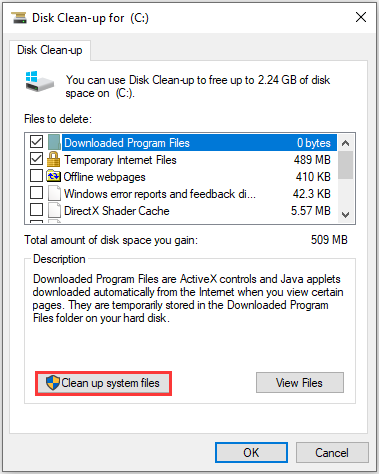
Step 4: Then, check the Windows upgrade log files and Temporary Windows Installation files boxes and click OK.
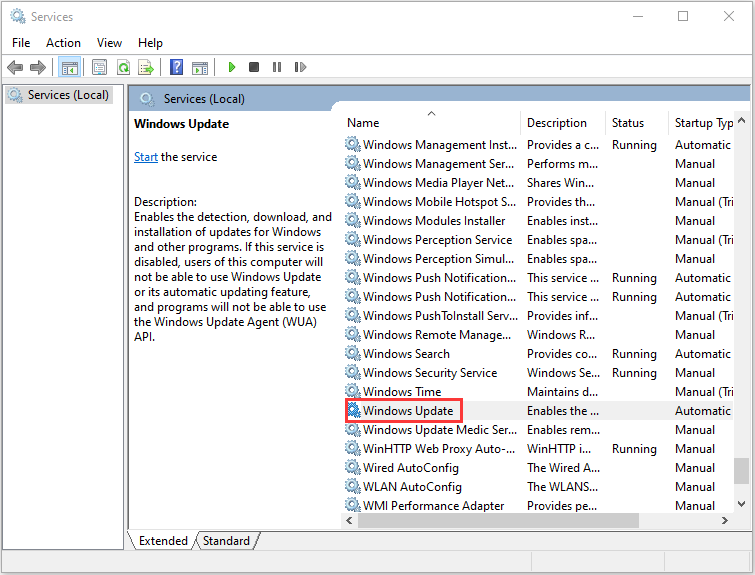
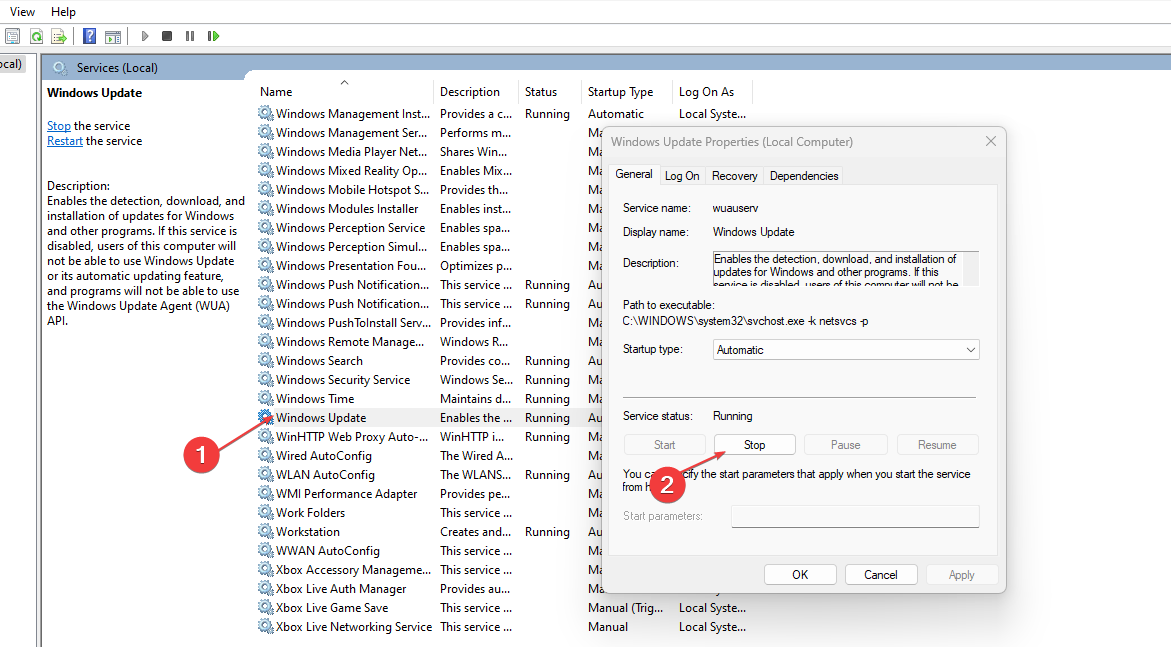
Step 5: Press the Windows and R keys at the same time to open the Run dialogue box. Type services.msc and click OK to open the Services application.
Step 6: From the list of applications, right-click Windows Update to select Stop.
Step 7: Next, open File Explorer and go to C: > Windows > SoftwareDistribution. Remove all the files in the folder.
Then, you have cleared the Windows update cache successfully.
Way 2: Clear Windows Update Cache via Command Prompt
The second method for you to reset Windows updates cache is via Command Prompt. The detailed steps are as follows:
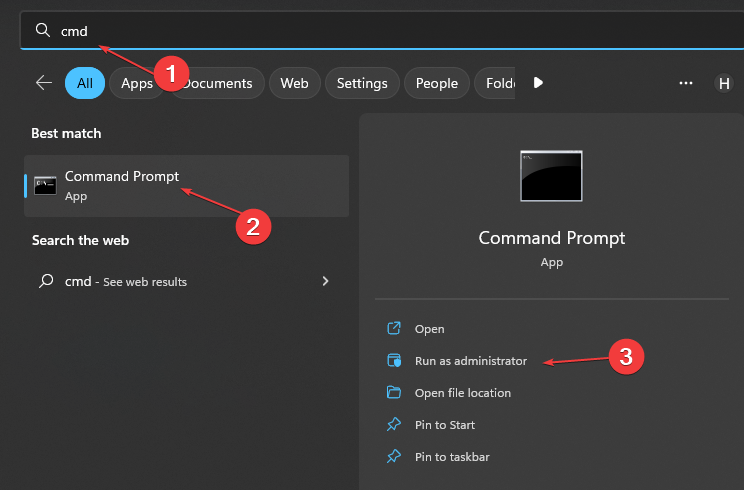
Step 1: Type Command Prompt in the Search menu. Then right-click it to choose Run as administrator to open it.
Step 2: Type net stop wuauserv and press the Enter key in the Command Prompt window.
Step 3: Type C: and press Enter. Type cd %Windir%SoftwareDistribution and press Enter. Type del /f /s /q Download and press Enter.
Then, all of the windows 10 cache files on your machine will now be deleted.
Way 3: Clear Windows Update Cache via Script
You can also try to clear Windows Update Cache via Script. Follow the instructions below:
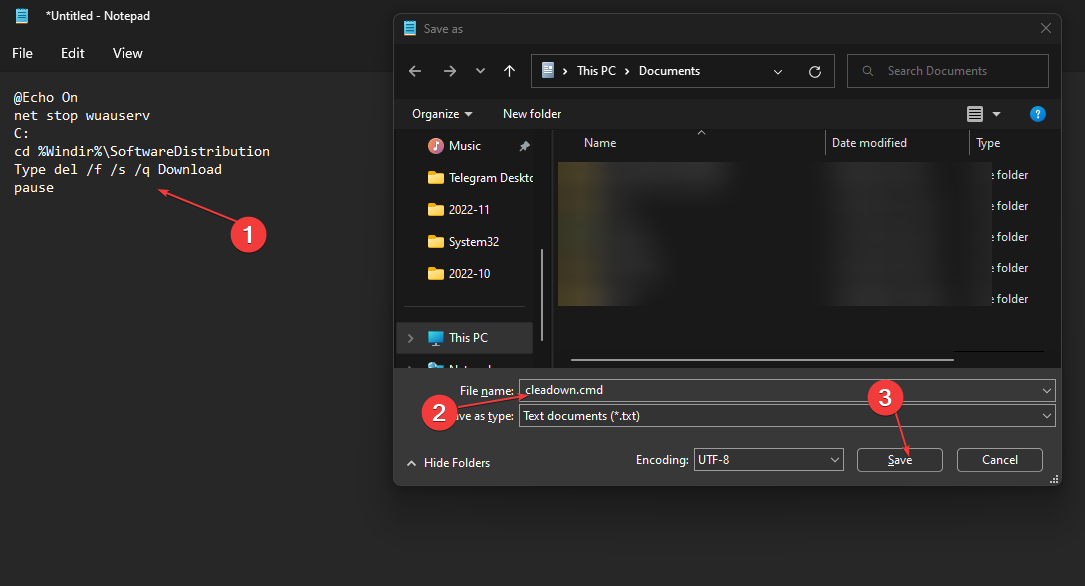
Step 1: Open Notepad and Insert the below code in bold
@Echo On
net stop wuauserv
C:
cd %Windir%SoftwareDistribution
Type del /f /s /q Download
pause
Step 2: Save the file as Cleardown.cmd on your desktop.
Step 3: Right-click the Cleardown.cmd file and select run as administrator.
Step 4: When the Script has finished it will pause so you can see the output of what it has done.
How to Reset Windows Update Cache
You may also wonder how to reset Windows update cache. Here are the steps:
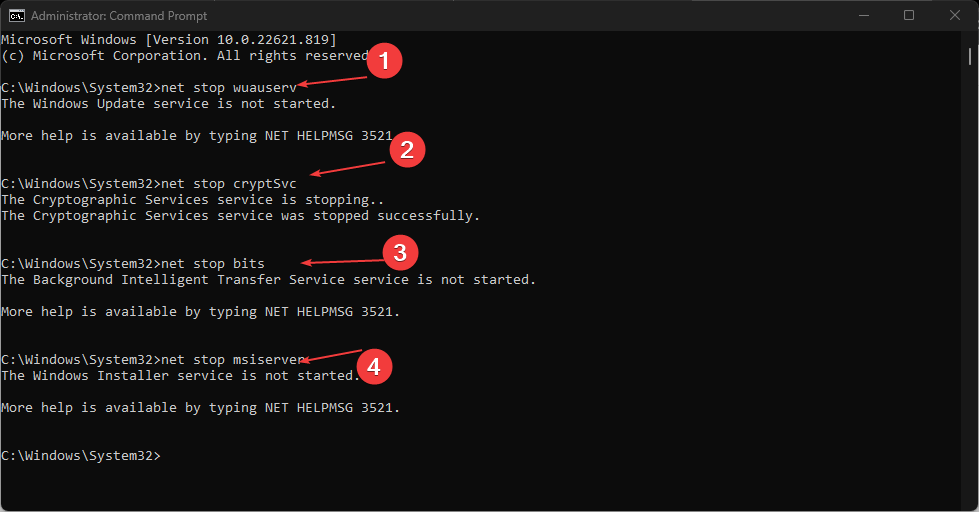
Step 1: Type Command Prompt in the Search menu. Then right-click it to choose Run as administrator to open it.
Step 2: Type the following command one by one:
net stop wuauserv
net stop cryptSvc
net stop bits
net stop msiserver
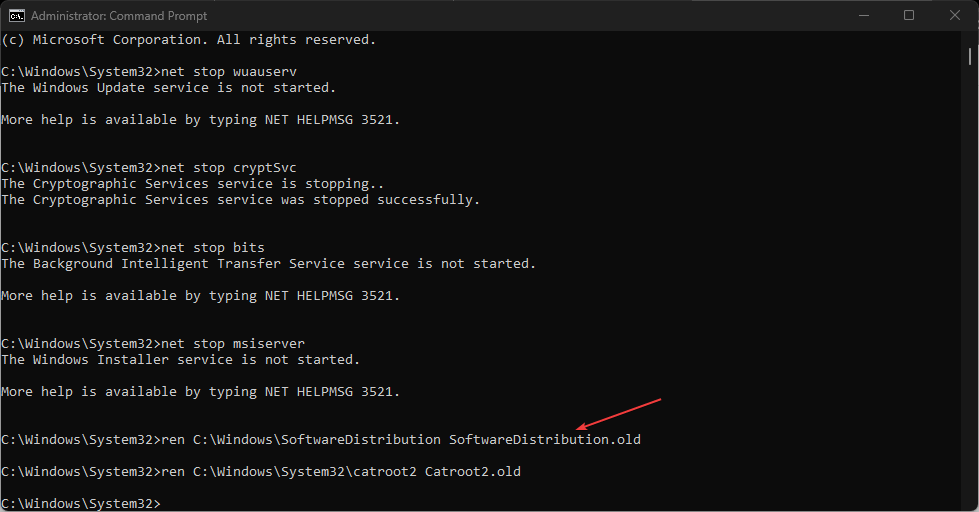
Step 3: Next, run the following command one by one.
ren C:WindowsSoftwareDistribution SoftwareDistribution.old
ren C:WindowsSystem32catroot2 Catroot2.old
Final Words
This post has introduced how to clear Windows update cache and how to reset Windows update cache. I hope that this post can be helpful to you.
About The Author

Position: Columnist
She was graduated from the major in English. She has been the MiniTool editor since she was graduated from university. She specializes in writing articles about backing up data & systems, cloning disks, and syncing files, etc. She is also good at writing articles about computer knowledge and computer issues. In daily life, she likes running and going to the amusement park with friends to play some exciting items.
Choose the best method for that works for you
by Henderson Jayden Harper
Passionate about technology, Crypto, software, Windows, and everything computer-related, he spends most of his time developing new skills and learning more about the tech world. He also enjoys… read more
Published on December 7, 2022
Reviewed by
Alex Serban

After moving away from the corporate work-style, Alex has found rewards in a lifestyle of constant analysis, team coordination and pestering his colleagues. Holding an MCSA Windows Server… read more
- The Windows Update cache can affect the update service on your device.
- It is perfectly safe to delete your Windows Update cache, and it should even boost your PC’s performance.
- Clearing caches can free up memory storage.
- Users can delete the Windows Update cache via Script.
XINSTALL BY CLICKING THE DOWNLOAD FILE
This software will repair common computer errors, protect you from file loss, malware, hardware failure and optimize your PC for maximum performance. Fix PC issues and remove viruses now in 3 easy steps:
- Download Restoro PC Repair Tool that comes with Patented Technologies (patent available here).
- Click Start Scan to find Windows issues that could be causing PC problems.
- Click Repair All to fix issues affecting your computer’s security and performance
- Restoro has been downloaded by 0 readers this month.
Windows keeps caches of its update service in a file on the computer over time. These caches can become old and corrupt, causing issues with the PC and its services.
So, users need to know how to clear the Windows Update cache to avoid problems.
What is the Windows Update cache?
Windows cache is data stored on the computer from your activities on apps and services. It aids easy and quick access to improve the user experience on the app or program.
Is it good to clear the cache?
Keeping cache files on Windows for a long can cause problems with your services. So, deleting the Windows cache file on your computer offers a couple of advantages. Some are:
- Accumulating caches for a while can amount to large files that consume space. So, deleting the Windows cache can free up the space the files take up on your computer.
- Deleting Windows cache files will increase your system speed and performance.
- The longer cache files stay on your PC, the more corrupt they can become, and interfere with your computer. Hence, it is good to delete cache files on Windows as it reduces the chance of having corrupt files on your PC.
There are more benefits to deleting the Windows cache from your computer. Hence, this article will take you through the methods to safely clear the Windows Update cache on your PC.
What should I do before clearing my Windows Update cache?
There are a couple of ways to clear the Windows update cache on your PC, but we recommend you observe these preliminary checks first:
- Turn off background apps running on your computer.
- Disconnect any remote connection on your PC.
- Create a Restore Point in case of any casualties.
The above checks will prepare your computer for the cache deletion process. Proceed with the following steps afterward:
How do I clear the Windows update cache?
- What is the Windows Update cache?
- Is it good to clear the cache?
- What should I do before clearing my Windows Update cache?
- How do I clear the Windows update cache?
- 1. Clear Windows Update cache via File Explorer
- 2. Clear Windows Update cache via Run
- 3. Clear Windows Update cache via Command Prompt
- 4. Reset Windows Update Cache
- 5. Clear Windows Update cache via Script
1. Clear Windows Update cache via File Explorer
- Click the File Explorer icon on your taskbar to open the app.
- Right-click the Local Disk (C) and select Properties from the drop-down.

- Click on Disk Clean-up, then click the Cleanup system files button.

- Check the boxes for Windows upgrade log files and Temporary Windows Installation files, then click OK.


Read what to do if File Explorer keeps crashing on your PC.
2. Clear Windows Update cache via Run
- Press Windows + R key to open the Run dialogue box, type services.msc and click OK to open Services.
- Double-click Windows Update and select Stop.

- Open the File Explorer, and navigate using this:
C:WindowsSoftwareDistributionDownload folder - Press Ctrl + A to highlight every file, right-click and select delete.

- Press Windows + R key, and type services.msc, then press Enter.

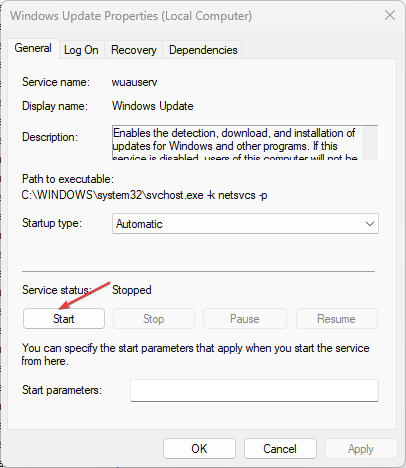
- Find and double-click on Windows Update, then click Start.
Some PC issues are hard to tackle, especially when it comes to corrupted repositories or missing Windows files. If you are having troubles fixing an error, your system may be partially broken.
We recommend installing Restoro, a tool that will scan your machine and identify what the fault is.
Click here to download and start repairing.
Disabling Windows Update services before clearing the distribution directory will fully clear the cache without any issues.
- Failed to Determine Source Edition Type: 5 Ways to Fix It
- Best Windows Settings For DAC To Optimize Your System
3. Clear Windows Update cache via Command Prompt
- Left-click the Start button, type cmd in the search space, and select Run as Administrator.

- Type the following, then press Enter:
net stop wuauserv
- Type the following commands and press Enter after each:
C:cd %Windir%SoftwareDistributiondel /f /s /q Download

These commands will delete the cache files on your PC.
4. Reset Windows Update Cache
- Left-click the Start button, type cmd in the search space, and select Run as Administrator.
- Type the following commands and press Enter:
net stop wuauservnet stop cryptSvcnet stop bitsnet stop msiserver - Run the following command one after the other:
ren C:WindowsSoftwareDistribution SoftwareDistribution.oldren C:WindowsSystem32catroot2 Catroot2.old - Type the following commands and press Enter after each one:
net start wuauservnet start cryptSvcnet start bitsnet start msiserver - Close the Command Prompt and restart your computer.

Resetting the Windows update cache can also clear the previous cache from your computer.
5. Clear Windows Update cache via Script
- Press Windows + R key to open the Run window, type notepad and click OK.
- Copy and paste the following codes:
@Echo On net stop wuauserv C: cd %Windir%SoftwareDistribution Type del /f /s /q Download pause - Save the file as Cleardown.cmd on your computer.

- Right-click the Cleardown.cmd file and select Run as administrator.
The steps above are also practical for clearing the Windows update cache.
In conclusion, our readers may be interested in our article about fixing a damaged Microsoft Store cache that may affect their PCs.
Moreover, do check out our article on clearing caches on Windows 11.
Also, you can check how to fix the Cache Manager error on Windows 10/11.
Please leave your questions and suggestions regarding the “how to clear Windows Update cache” subject in the comments section below.
Still having issues? Fix them with this tool:
SPONSORED
If the advices above haven’t solved your issue, your PC may experience deeper Windows problems. We recommend downloading this PC Repair tool (rated Great on TrustPilot.com) to easily address them. After installation, simply click the Start Scan button and then press on Repair All.
![]()
Newsletter
В Windows 10 процесс установки накопительных обновлений иногда может вызывать проблемы. Например, обновления не могут быть установлены в результате повреждения файлов, совместимости или неизвестных ошибок.
Независимо от причины, если у вас возникли проблемы с установкой обновления, или проблема с конкретным патчем, вы можете просто удалить обновления ожидающие установки, чтобы повторно загрузить файлы или пропустить обновление. Проблема может быть исправлена путем очистки кэша обновления Windows. После чего, Центр обновления Windows 10 загружает новую копию обновления и устанавливает ее.
Если вы не отключили службу обновления Windows, вручную или с помощью инструмента стороннего разработчика, то обновление системы, работает без проблем для большинства пользователей. Тем не менее, есть пользователи, сталкивающиеся с проблемой во время загрузки или установки обновления в Windows 10.
Если Центр обновления Windows не работает должным образом, хорошая мысль запустить Средство устранения неполадок Центра обновления Windows. Перейдите в приложение «Параметры» → «Обновление и безопасность» → «Устранение неполадок» → кликните один раз на «Центр обновления Windows» и нажмите кнопку «Запустить средство устранения неполадок».
Иногда запустив средство устранения неполадок Центра обновления Windows не может помочь устранить проблемы обновления Windows.
Очистка кэша обновлений Windows может исправить проблемы. В этом руководстве, мы увидим, как очистить кэш обновления Windows (удалить файлы обновлений ожидающих установки) в операционной системе Windows 10.
Как очистить кэш обновления Windows в Windows 10
Это можно сделать, удалив содержимое папки SoftwareDistribution, содержащей файлы, которые Windows Update использует для применения новых обновлений.
Прежде чем мы сможем удалить кэш обновлений, нам необходимо остановить службу Центра обновления Windows.
Шаг 1: В меню «Пуск» или в диалоговом окне «Выполнить» введите services.msc, а затем нажмите Enter, чтобы открыть окно Служб.
Шаг 2: Найдите запись службы «Центр обновления Windows» и дважды кликните на ней, чтобы открыть диалоговое окно свойств.
Шаг 3: Во вкладке «Общие», нажмите кнопку «Остановить», и нажмите кнопку «Ок», для остановки службы обновления Windows.
Шаг 4: Откройте диск, на котором установлена ОС Windows 10.
Например, если Windows 10 установлена на диске «C«, откройте его. Перейдите к папке WindowsSoftwareDistributionDownload.
Шаг 5: В папке «Download», кликните меню «Файл» и нажмите кнопку «Изменить параметры папок и поиска». На вкладке «Вид», установите чекбокс напротив надписи «Показывать скрытые файлы и папки и диски». Затем снимите флажок перед опцией «Скрывать защищенные системные файлы» и нажмите кнопку «Применить» (см. картинки ниже).
Шаг 6: Теперь в директории C:WindowsSoftwareDistributionDownload — Выберите все файлы и папки, а затем Удалите их..
Вы только что очистили кэш обновления Windows. Выполните следующие два шага, для запуска службы Центра обновления Windows (Windows Update), которая была остановлена в первые три этапа.
Шаг 7: Введите Services.msc в меню «Пуск» или в «Поиск» на панели задач и нажмите клавишу Enter.
Шаг 8: Дважды кликните на службу «Центр обновления Windows», а затем нажмите кнопку «Запуск», чтобы запустить службу и нажмите «OK».
Вы успешно очистили кэш обновления Windows в ОС Windows 10. Надеемся, что это позволит вам решить проблему обновления Windows.
The Update Cache is a special folder that stores update installation files. Continue reading to discover how to purge the Windows Update Cache.
There are several reasons why you would want to purge the Windows Update cache. Doing so will allow you to instantly reclaim valuable storage space by deleting obsolete update installation files. (This maintenance routine is usually managed by Windows, but you may also do it manually.) You may also wish to purge the update cache if you’re experiencing installation errors. Deleting and re-downloading corrupt update installation files may solve your issue.
How to manually purge the Update cache?
First, you need to temporarily turn off the Windows Update service (to stop background downloads). Open the Command Prompt, type the:
net stop wuauserv
command, and press Enter.
Open File Explorer, and go to View > Folder Options. Select the Show hidden files, folder, and drives radio button, and click Apply to enable the display of hidden files on your computer.
Once done, navigate to C:WindowsSoftwareDistributionDownload and delete the content of the Download folder.
Open a new Command prompt window, and run the:
net start wuauserv
command to restart the Windows Update service.
How to purge the Update cache with a batch file?
You can create a batch file and use it as a shortcut to instantly clear the content of the Windows Update cache.
Open Notepad, and copy/paste the following code:
net stop wuauserv
CD %Windir%
CD SoftwareDistribution
DEL /F /S /Q Download
net start wuauserv
Click File > Save As, and choose a location to save the file. Click the Save as type drop-down menu, and select All Files. Rename the file Erase_Cache.bat, and click Save.
Your batch file is now ready for use. Right-click the Erase_Cache.bat file, then click Run As Administrator. In doing so, you will automatically delete the content of the Update cache folder.
do you have more questions about windows? check out our forum!
Did you know by clear windows update cache you can fix most of Windows update download and installation problems such as Windows 10 update stuck downloading, fail to install with different errors and more? When you check for Windows updates, your system automatically caches all the Windows update installation files, which can come in handy when you need to re-apply the update. But sometimes buggy updates or corruption on the cache folder hit the entire process and results Windows updates stuck downloading for hours or fails to install with different errors.
If you are also having trouble with some updates not loading or installing on windows 10 laptop clear Windows update cache is probably a good solution for you. Clearing the Windows update cache removes old update files and downloads fresh update files from the Microsoft server. And fix if windows update fails to install because of the buggy update file. Here in this post we have three different ways to clear the Windows update cache.
Clear Windows update cache not only fixes various windows 10 update installation problems also free up a huge amount of disk space as well.
Where is the Windows Update cache folder?
The Update Cache is a special folder that stores update installation files. It is located at the root of your system drive, in C:WindowsSoftwareDistributionDownload.
Delete Windows update files windows 10
It’s pretty easy to delete all cached update files on all supported versions of Windows, including Windows 7, Windows 8.1 and Windows 10. Here in this post, we have three different ways to clear the windows update cache or you can say reset Windows update components easily.
Delete downloaded Windows Update files
- Press Windows + R keyboard shortcut to open Run
- Type services.msc and click ok to open the Windows services console,
- Scroll down and locate the Windows update service, Right-click on it select stop,
- Again locate Background Intelligent Transfer Service, Right-click and stop the service.

- Now open Windows Explorer using the keyboard shortcut Windows + E,
- Then Go to C:WINDOWSSoftwareDistributionDownload
- Select all files inside the download folder, (you can do the same using the keyboard shortcut Windows + A)
- And Hit the Delete key on the computer keyboard.

- Again back to the Windows services console,
- Locate the Windows Update service, right-click, and select start the service,
- Do the same with the BITS service as well.
That’s all, Restart your PC, Next time when Windows check for updates this will download fresh update files from the Microsoft server. That is most probably error-free, download and install without any problem.
Clear Windows Update cache from the command line
You may also clear the Windows Update cache from the command line as well.
- Open the command prompt as administrator,
- Accept the UAC prompt that Windows displays.
- Run the following commands and hit enter after each line:
- net stop wuauserv (This stops the Windows Update service)
- cd %Windir%SoftwareDistribution (performing this command Switches to the SoftwareDistribution directory of the Windows installation)
- del /f /s /q Download (Deletes the Download folder of the SoftwareDistribution directory with /f — force the removal of read-only files, /s — include files in subdirectories and /q — in quiet mode to surpress prompts.
- net start wuauserv — (Starts the Windows Update service.)

Reset Windows Update components
Also, you can reset Windows Update components fix Windows Update and get security patches, drivers, and features downloading again on your computer.
- Open the command prompt as administrator,
- Next, we need to Stop the BITS, Cryptographic, MSI Installer and Windows Update Services. To do this, type the following commands at a command prompt. Press the “ENTER” key after you type each command.
- net stop wuauserv
- net stop cryptSvc
- net stop bits
- net stop msiserver
- Now rename the SoftwareDistribution and Catroot2 folder. You can do this by typing the following commands in the Command Prompt. Press the “ENTER” key after you type each command.
- ren C:WindowsSoftwareDistribution SoftwareDistribution.old
- ren C:WindowsSystem32catroot2 Catroot2.old
Now, let’s restart the BITS, Cryptographic, MSI Installer and the Windows Update Services. Type the following commands in the Command Prompt for this. Press the ENTER key after you type each command.
- net start wuauserv
- net start cryptSvc
- net start bits
- net start msiserver
Type Exit in the Command Prompt to close it and then restart the computer. That’s all next time when you check for windows update this will download fresh update files from the Microsoft server.
Also read:
- Fix Service Registration Is Missing Or Corrupt In Windows 10, 8.1 and 7
- How to Fix ntoskrnl.exe High Memory Usage In Windows 10
- Microsoft Edge Crashes or Not Working after Windows 10 1909 update !!!
- Solved: Windows 10 Automatic Repair Loop “Your PC Did Not Start Correctly”
- Solved: Unknown Hard Error on Windows 10 / 8 / 7 (5 Working Solutions)