-

1
Go to https://cygwin.com/install.html. Cygwin is a free Windows tool that allows you to use the GCC C compiler from a Unix command line.
-
2
Click the setup-x86.exe file for your Windows version. If you’re using the 64-bit version of Windows, download setup-x86_64.exe. If you have the 32-bit version, download setup-x86.exe.
Advertisement
-
3
Run the installer. Double-click the downloaded file to open the setup wizard. Downloaded files usually save to the Downloads folder.
- If prompted to give permission for the installer to run, click Yes.
-
4
Click Next on the first screen.
-
5
Select Install from Internet and click Next.
-
6
Choose where to install the app and click Next.
-
7
Select local package directory and click Next. This is where packages you download will be saved.
-
8
Choose your internet settings and click Next. The installer will connect to the internet and then display a list of download sites.
-
9
Select a download site and click Next. These sites all host the same files. This downloads the installation files to your computer.
- If there’s a problem with one site, try another on the list.
-
10
Select packages to install. Follow these steps to ensure the C compiler is installed:
- Click the + next to «Devel» to expand the options.
- Scroll down and click the down-arrow next to gcc core.
- Click the most recent (highest) version number.
-
11
Click Next. It’s at the bottom-right corner. A confirmation message will appear.
-
12
Click Next to start the installation. Cygwin will now download all selected tools and install them on your computer. Follow the on-screen instructions to complete the installation.
-
13
Open Cygwin. It’ll be in the Start menu (called either Cygwin64 or Cygwin32, depending on your version).
-
14
Use the cd command to navigate to the location of your C code. You’re looking for the file you coded with «.c» at the end. For example, if your code is located in your Documents folder, you would type cd c:Users(yourusername)Documents and press ↵ Enter.[1]
- A quick way to find the full path to your file: Press ⊞ Win+E to open the File Explorer, go to the folder that contains your file, click the file once to select it, then click Copy Path at the top of the screen. Now you can right-click the Cygwin command line and select Paste.
-
15
Type gcc yourcode.c –o yourcode.exe and press ↵ Enter. Replace «yourcode.c» with the name of the file, and «yourcode.exe» with the name of your program.[2]
Your code is now compiled.


Advertisement
-
1
Open Developer Command Prompt for VS. This app is separate than the main Visual Studio app. To find it, click the Start menu, expand the Visual Studio 2017 folder, then click Developer Command Prompt for VS 2017 (or your version number).[3]
-
2
Use the cd command to navigate to the location of your C code. You’re looking for the file you coded with «.c» at the end. For example, if your code is located in your Documents folder, you would type cd c:Users(yourusername)Documents and press ↵ Enter
- Your code must be in a file that ends with the «.c» extension to use this method.
-
3
Type cl yourcode.c and press ↵ Enter. Replace «yourcode.c» with the name of your file. This creates a file called yourcode.exe from your code file.


Advertisement
-
1
Install Xcode on your Mac.[4]
-
Mavericks (10.9) and later: Open the App Store
and search for xcode. Click GET to install, and follow any on-screen instructions.
- Lion and Mountain Lion (10.7 and 10.8): Follow the instructions for Mavericks and later. Once installed, open the app (it’s in the Applications folder), click the File menu and then Preferences. Click the Downloads tab, then click Install next to «Command Line Tools.»
-
Mavericks (10.9) and later: Open the App Store
-
2
Open Xcode. Now that it’s installed, you’ll find it in the Applications folder.
-
3
Click the File and select Open.
-
4
Select your code file and click Open. The contents of your code will appear.[5]
-
5
Click the Product menu. It’s at the top of the screen.
-
6
Click Archive. This compiles and links your C code. When it’s ready to be exported, a window containing options will appear.
-
7
Select Export as an Xcode Archive and click Next. Xcode will create a new folder (inside the folder where your code is saved) and place the executable file inside.


Advertisement
Ask a Question
200 characters left
Include your email address to get a message when this question is answered.
Submit
Advertisement
Thanks for submitting a tip for review!
References
About This Article
Thanks to all authors for creating a page that has been read 19,359 times.
Is this article up to date?
| title | description | ms.custom | ms.date | helpviewer_keywords | ms.assetid | ||||
|---|---|---|---|---|---|---|---|---|---|
|
Walkthrough: Compile a C program on the command line |
Walkthrough that shows how to create a Hello World C program. |
conceptual |
05/09/2022 |
|
7e74cc2d-54b1-49de-b7ad-d3ae6b39ab8d |
Walkthrough: Compile a C program on the command line
The Visual Studio build tools include a C compiler that you can use to create everything from basic console programs to full Windows Desktop applications, mobile apps, and more. Microsoft C/C++ (MSVC) is a C and C++ compiler that, in its latest versions, conforms to some of the latest C language standards, including C11 and C17.
This walkthrough shows how to create a basic, «Hello, World»-style C program by using a text editor, and then compile it on the command line. If you’d rather work in C++ on the command line, see Walkthrough: Compiling a Native C++ Program on the Command Line. If you’d like to try the Visual Studio IDE instead of using the command line, see Walkthrough: Working with Projects and Solutions (C++) or Using the Visual Studio IDE for C++ Desktop Development.
Prerequisites
To complete this walkthrough, you must have installed either Visual Studio or the Build Tools for Visual Studio and the optional Desktop development with C++ workload.
Visual Studio is a powerful integrated development environment that supports a full-featured editor, resource managers, debuggers, and compilers for many languages and platforms. For information on these features and how to download and install Visual Studio, including the free Visual Studio Community edition, see Install Visual Studio.
The Build Tools for Visual Studio version of Visual Studio installs only the command-line toolset, the compilers, tools, and libraries you need to build C and C++ programs. It’s perfect for build labs or classroom exercises and installs relatively quickly. To install only the command-line toolset, download Build Tools for Visual Studio from the Visual Studio downloads page and run the installer. In the Visual Studio installer, select the Desktop development with C++ workload (in older versions of Visual Studio, select the C++ build tools workload), and choose Install.
When you’ve installed the tools, there’s another tool you’ll use to build a C or C++ program on the command line. MSVC has complex requirements for the command-line environment to find the tools, headers, and libraries it uses. You can’t use MSVC in a plain command prompt window without some preparation. You need a developer command prompt window, which is a regular command prompt window that has all the required environment variables set. Fortunately, Visual Studio installs shortcuts for you to launch developer command prompts that have the environment set up for command line builds. Unfortunately, the names of the developer command prompt shortcuts and where they’re located are different in almost every version of Visual Studio and on different versions of Windows. Your first walkthrough task is to find the right shortcut to use.
[!NOTE]
A developer command prompt shortcut automatically sets the correct paths for the compiler and tools, and for any required headers and libraries. Some of these values are different for each build configuration. You must set these environment values yourself if you don’t use one of the shortcuts. For more information, see Use the MSVC toolset from the command line. Because the build environment is complex, we strongly recommend you use a developer command prompt shortcut instead of building your own.
These instructions vary depending on which version of Visual Studio you’re using. To see the documentation for your preferred version of Visual Studio, use the Version selector control. It’s found at the top of the table of contents on this page.
::: moniker range=»msvc-170″
Open a developer command prompt in Visual Studio 2022
If you’ve installed Visual Studio 2022 on Windows 10 or later, open the Start menu, and choose All apps. Then, scroll down and open the Visual Studio 2022 folder (not the Visual Studio 2022 app). Choose Developer Command Prompt for VS 2022 to open the command prompt window.
::: moniker-end
::: moniker range=»msvc-160″
Open a developer command prompt in Visual Studio 2019
If you’ve installed Visual Studio 2019 on Windows 10 or later, open the Start menu, and choose All apps. Then, scroll down and open the Visual Studio 2019 folder (not the Visual Studio 2019 app). Choose Developer Command Prompt for VS 2019 to open the command prompt window.
::: moniker-end
::: moniker range=»msvc-150″
Open a developer command prompt in Visual Studio 2017
If you’ve installed Visual Studio 2017 on Windows 10 or later, open the Start menu, and choose All apps. Then, scroll down and open the Visual Studio 2017 folder (not the Visual Studio 2017 app). Choose Developer Command Prompt for VS 2017 to open the command prompt window.
::: moniker-end
::: moniker range=»msvc-140″
Open a developer command prompt in Visual Studio 2015
If you’ve installed Microsoft Visual C++ Build Tools 2015 on Windows 10 or later, open the Start menu, and choose All apps. Then, scroll down and open the Visual C++ Build Tools folder. Choose Visual C++ 2015 x86 Native Tools Command Prompt to open the command prompt window.
::: moniker-end
If you’re using a different version of Windows, look in your Start menu or Start page for a Visual Studio tools folder that contains a developer command prompt shortcut. You can also use the Windows search function to search for «developer command prompt» and choose one that matches your installed version of Visual Studio. Use the shortcut to open the command prompt window.
Next, verify that the developer command prompt is set up correctly. In the command prompt window, enter cl (or CL, case doesn’t matter for the compiler name, but it does matter for compiler options). The output should look something like this:
C:Program Files (x86)Microsoft Visual Studio2017Enterprise>cl
Microsoft (R) C/C++ Optimizing Compiler Version 19.10.25017 for x86
Copyright (C) Microsoft Corporation.  All rights reserved.

usage: cl [ option... ] filename... [ /link linkoption... ]
There may be differences in the current directory or version numbers, depending on the version of Visual Studio and any updates installed. If the above output is similar to what you see, then you’re ready to build C or C++ programs at the command line.
[!NOTE]
If you get an error such as «‘cl’ is not recognized as an internal or external command, operable program or batch file,» error C1034, or error LNK1104 when you run the cl command, then either you are not using a developer command prompt, or something is wrong with your installation of Visual Studio. You must fix this issue before you can continue.
If you can’t find the developer command prompt shortcut, or if you get an error message when you enter cl, then your Visual Studio installation may have a problem. If you’re using Visual Studio 2017 or later, try reinstalling the Desktop development with C++ workload in the Visual Studio installer. For details, see Install C++ support in Visual Studio. Or, reinstall the Build Tools from the Visual Studio downloads page. Don’t go on to the next section until the cl command works. For more information about installing and troubleshooting Visual Studio, see Install Visual Studio.
[!NOTE]
Depending on the version of Windows on the computer and the system security configuration, you might have to right-click to open the shortcut menu for the developer command prompt shortcut and then choose Run as Administrator to successfully build and run the program that you create by following this walkthrough.
Create a C source file and compile it on the command line
-
In the developer command prompt window, enter
cd c:to change the current working directory to the root of your C: drive. Next, entermd c:helloto create a directory, and then entercd c:helloto change to that directory. This directory will hold your source file and the compiled program. -
Enter
notepad hello.cat the developer command prompt. In the Notepad alert dialog that pops up, choose Yes to create a newhello.cfile in your working directory. -
In Notepad, enter the following lines of code:
#include <stdio.h>

int main()
{
    printf("Hello, World! This is a native C program compiled on the command line.n");
    return 0;
}
-
On the Notepad menu bar, choose File > Save to save
hello.cin your working directory. -
Switch back to the developer command prompt window. Enter
dirat the command prompt to list the contents of thec:hellodirectory. You should see the source filehello.cin the directory listing, which looks something like:C:hello>dir Volume in drive C has no label. Volume Serial Number is CC62-6545 Directory of C:hello 10/02/2017 03:46 PM <DIR> . 10/02/2017 03:46 PM <DIR> .. 10/02/2017 03:36 PM 143 hello.c 1 File(s) 143 bytes 2 Dir(s) 514,900,566,016 bytes freeThe dates and other details will differ on your computer. If you don’t see your source code file,
hello.c, make sure you’ve changed to thec:hellodirectory you created, and in Notepad, make sure that you saved your source file in this directory. Also make sure that you saved the source code with a.cfile name extension, not a.txtextension. -
To compile your program, enter
cl hello.cat the developer command prompt.You can see the executable program name, hello.exe, in the lines of output information that the compiler displays:
c:hello>cl hello.c
Microsoft (R) C/C++ Optimizing Compiler Version 19.10.25017 for x86
Copyright (C) Microsoft Corporation.  All rights reserved.

hello.c
Microsoft (R) Incremental Linker Version 14.10.25017.0
Copyright (C) Microsoft Corporation.  All rights reserved.

/out:hello.exe
hello.obj
[!NOTE]
If you get an error such as «‘cl’ is not recognized as an internal or external command, operable program or batch file,» error C1034, or error LNK1104, your developer command prompt is not set up correctly. For information on how to fix this issue, go back to the Open a developer command prompt section.If you get a different compiler or linker error or warning, review your source code to correct any errors, then save it and run the compiler again. For information about specific errors, use the search box at the top of this page to look for the error number.
-
To run your program, enter
helloat the command prompt.The program displays this text and then exits:
Hello, World! This is a native C program compiled on the command line.Congratulations, you’ve compiled and run a C program by using the command line.
Next steps
This «Hello, World» example is about as basic as a C program can get. Real world programs have header files and more source files, link in libraries, and do useful work.
You can use the steps in this walkthrough to build your own C code instead of typing the sample code shown. You can also build many C code sample programs that you find elsewhere. To compile a program that has more source code files, enter them all on the command line:
cl file1.c file2.c file3.c
The compiler outputs a program called file1.exe. To change the name to program1.exe, add an /out linker option:
cl file1.c file2.c file3.c /link /out:program1.exe
And to catch more programming mistakes automatically, we recommend you compile by using either the /W3 or /W4 warning level option:
cl /W4 file1.c file2.c file3.c /link /out:program1.exe
The compiler, cl.exe, has many more options you can apply to build, optimize, debug, and analyze your code. For a quick list, enter cl /? at the developer command prompt. You can also compile and link separately and apply linker options in more complex build scenarios. For more information on compiler and linker options and usage, see C/C++ Building Reference.
You can use NMAKE and makefiles, or MSBuild and project files to configure and build more complex projects on the command line. For more information on using these tools, see NMAKE Reference and MSBuild.
The C and C++ languages are similar, but not the same. The Microsoft C/C++ compiler (MSVC) uses a basic rule to determine which language to use when it compiles your code. By default, the MSVC compiler treats all files that end in .c as C source code, and all files that end in .cpp as C++ source code. To force the compiler to treat all files as C no matter the file name extension, use the /TC compiler option.
By default, MSVC is compatible with the ANSI C89 and ISO C99 standards, but not strictly conforming. In most cases, portable C code will compile and run as expected. The compiler provides optional support for the changes in ISO C11/C17. To compile with C11/C17 support, use the compiler flag /std:c11 or /std:c17. C11/C17 support requires Windows SDK 10.0.20201.0 or later. Windows SDK 10.0.22000.0 or later is recommended. You can download the latest SDK from the Windows SDK page. For more information, and instructions on how to install and use this SDK for C development, see Install C11 and C17 support in Visual Studio.
Certain library functions and POSIX function names are deprecated by MSVC. The functions are supported, but the preferred names have changed. For more information, see Security Features in the CRT and Compiler Warning (level 3) C4996.
See also
Walkthrough: Creating a Standard C++ Program (C++)
C Language Reference
Projects and build systems
Compatibility
What command does one have to enter at the command line in Windows 7 to compile a basic C program?
Like I am literally wondering what you type in the command prompt, to compile a .c file.
I tried:
> gcc foo.c
But it says:
'gcc' is not recognized as an internal or external command,
 operable program or batch file.
I also tried:
> minGW foo.c
But I got back:
 'minGW' is not recognized as an internal or external command,
  operable program or batch file.
I have a path environment variable set to where MinGW is installed:
C:Program Files (x86)CodeBlocksMinGWbin
I can’t really find any information on where I’m going wrong, and can’t find anything in the official MinGW documentation, as it seems like this is something so simple, sort of an embarrassing question, that it’s figured people know what to do?
![]()
asked May 19, 2012 at 1:48
![]()
2
It indicates it couldn’t find gcc.exe.
I have a path environment variable set to where MinGW is installed
Maybe you haven’t set the path correctly?
echo %path%
shows the path to gcc.exe? Otherwise, compilation is similar to Unix:
gcc filename.c -o filename
![]()
answered May 19, 2012 at 2:09
![]()
8
I’ve had this problem and couldn’t find why it kept happening. The reason is simple: Once you have set up the environment paths, you have to close the CMD window, and open it again for it be aware of new environment paths.
![]()
answered Feb 24, 2014 at 11:32
![]()
Herz3hHerz3h
1011 silver badge2 bronze badges
1
First:
Add your minGW’s bin folder directory ( ex: Cmingw64bin ) in System variables => Path. visual example
Compile:
.c: gcc filename.c -o desire
.cpp: g++ filename.cpp -o desire
Run:
desire/ or ./desire
answered Jan 10, 2019 at 3:52
![]()
AharrFarisAharrFaris
911 silver badge5 bronze badges
0
Just set the environment variable to the EXACT path to gcc.exe like this:
C:Program Files (x86)CodeBlocksMinGWbingcc.exe
![]()
pb2q
57.6k18 gold badges145 silver badges146 bronze badges
answered Sep 11, 2012 at 7:44
![]()
makmak
1,3441 gold badge13 silver badges20 bronze badges
1
I encountered the same error message after unpacking MinGW archives to C:MinGW and setting the path to environment variable as C:MinGWbin;.
When I try to compile I get this error!
gcc: error: CreateProcess: No such file or directory
I finally figured out that some of the downloaded archives were reported broken while unpaking them to C:MinGW (yet I ignored this initially).
Once I deleted the broken files and re-downloaded the whole archives again from SourceForge, unpacked them to C:MinGW successfully the error was gone, and the compiler worked fine and output my desired hello.exe.
I ran this:
gcc hello.c -o hello
The result result was this (a blinking underscore):
_
![]()
answered Oct 9, 2012 at 2:54
![]()
KunleKunle
111 bronze badge
I had the same problem with .c files that contained functions (not main() of my program). For example, my header files were «fact.h» and «fact.c», and my main program was «main.c» so my commands were like this:
E:proj> gcc -c fact.c
Now I had an object file of fact.c (fact.o). after that:
E:proj>gcc -o prog.exe fact.o main.c
Then my program (prog.exe) was ready to use and worked properly. I think that -c after gcc was important, because it makes object files that can attach to make the program we need. Without using -c, gcc ties to find main in your program and when it doesn’t find it, it gives you this error.
![]()
answered Jan 19, 2015 at 10:48
![]()
You can permanently include the directory of the MinGW file, by clicking on My Computer, Properties, Advanced system settings, Environment variables, then edit and paste your directory.
![]()
jgillich
68.5k6 gold badges55 silver badges83 bronze badges
answered Apr 7, 2015 at 21:32
![]()
Instead of setting the %PATH% you may enter your msys shell. In standard msys and mingw installation gcc is in path, so you can run gcc or which gcc.
I have a batch file sh.bat on my Windows 7, in %PATH%:
C:langmsysbinsh.exe --login %*
Whenever I want to use gcc I enter cmd, then sh, then gcc. I find it very convenient.
When working with linux originated software avoid spaced directories like Program Files. Install them rather to Program_Files. The same regards to tools that you may want to run from msys environment.
answered Sep 20, 2012 at 8:58
![]()
JarekczekJarekczek
7,2763 gold badges44 silver badges66 bronze badges
If you pasted your text into the path variable and added a whitespace before the semicolon, you should delete that and add a backslash at the end of the directory (;C:Program Files (x86)CodeBlocksMinGWbin
answered Jan 4, 2013 at 17:49
![]()
I once had this kind of problem installing MinGW to work in Windows, even after I added the right System PATH in my Environment Variables.
After days of misery, I finally stumbled on a thread that recommended uninstalling the original MinGW compiler and deleting the C:MinGW folder and installing TDM-GCC MinGW compiler which can be found here.
You have options of choosing a 64/32-bit installer from the download page, and it creates the environment path variables for you too.
answered Oct 7, 2014 at 13:54
![]()
Feyisayo SonubiFeyisayo Sonubi
1,0425 gold badges15 silver badges27 bronze badges
Where is your gcc?
My gcc is in «C:Program FilesCodeBlocksMinGWbin».
"C:Program FilesCodeBlocksMinGWbingcc" -c "foo.c"
"C:Program FilesCodeBlocksMinGWbingcc" "foo.o" -o "foo 01.exe"
![]()
answered Jul 10, 2015 at 19:53
![]()
AmirAmir
1,57017 silver badges24 bronze badges
I am quite late answering this question (5 years to be exact) but I hope this helps someone.
I suspect that this error is because of the environment variables instead of GCC. When you set a new environment variable you need to open a new Command Prompt! This is the issue 90% of the time (when I first downloaded GCC I was stuck with this for 3 hours!) If this isn’t the case, you probably haven’t set the environment variables properly or you are in a folder with spaces in the name.
Once you have GCC working, it can be a hassle to compile and delete every time. If you don’t want to install a full ide and already have python installed, try this github project: https://github.com/sophiadm/notepad-is-effort
It is a small IDE written with tkinter in python. You can just copy the source code and save it as a .py file
answered May 21, 2017 at 18:37
![]()
dwmyfrienddwmyfriend
2341 silver badge10 bronze badges
In Windows 10, similar steps can be followed in other versions of windows.
Right Click on «My Computer» select Properties, Goto Advanced System Settings -> Advanced -> Select «Environment Variables..» .
Find «Path» select it and choose edit option -> Click on New and add «C:MinGWbin» (or the location of gcc.exe, if you have installed at some other location) -> Save and restart command prompt. Gcc should work.
answered Jan 18, 2018 at 5:15
![]()
Last update on August 19 2022 21:50:38 (UTC/GMT +8 hours)
Introduction
In this document, we will see how we can compile and execute C program in Linux and Windows. The document also contains a list of C compilers available.
We will see how to compile using Visual C++ 2008 Express Edition, Turbo C++, wxDev-C++ in Windows. For Linux and Unix operating systems, we will be using GNU Gcc to compile C program. Both of these are free.
Contents:
- Install, compile and execute C program with Visual C++ 2008 Express Edition with SP1 in Windows
- Install, compile and execute C program with Turbo C++ in Windows
- Write, Compile and Run C program using wxDev-C++ in windows
- Install, compile and execute C program in Linux
- List of the C Compilers
Install, compile and execute C program with Visual C++ 2008 Express Edition with SP1 in Windows
Download and install
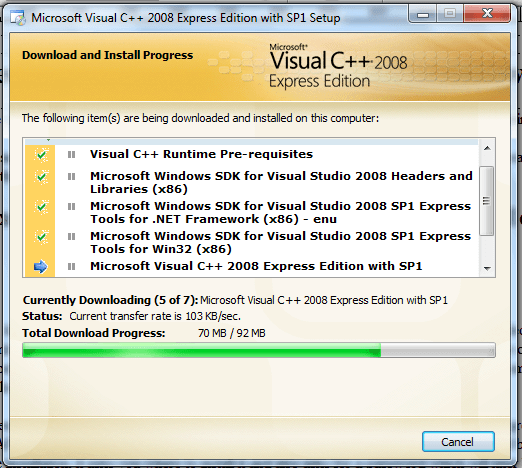
To download, point your browser to http://www.microsoft.com/visualstudio/en-us/products/2008-editions/express and select Language and click on Free Download. After you complete download, run the executable file, it will ask you to select whether you want to install some other optional products, uncheck those options so that you can install only the product required. The installation process will start downloading other files from the Microsoft site and depending upon your connection speed it will take a while to complete the installation.
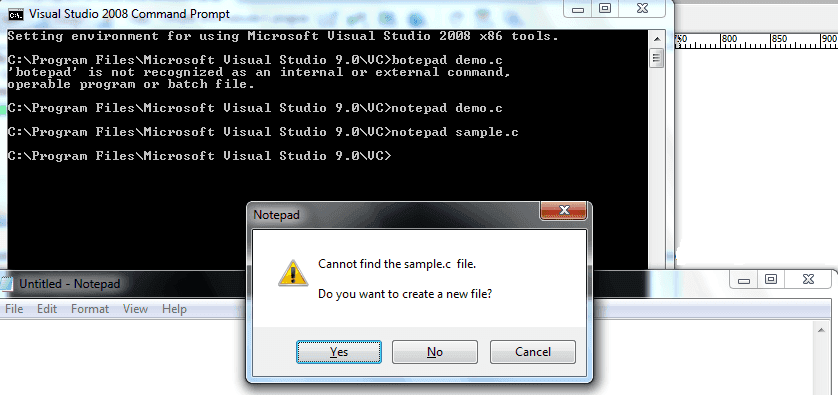
Once the installation is complete, in Windows 7, start the Visual Studio 2008 Command Prompt from All Programs > Microsoft Visual C++ 2008 Express Edition > Visual Studio Tools > Visual Studio 2008 Command Prompt.

Write, compile and execute your first program
Step 1 : type notepad demo.c (you can replace the filename with your own) and press Enter, when asked if you want to create a new file, say yes.
Step 2 : type the following code and click File > Save . When asked where to save the file, select the location suitable.
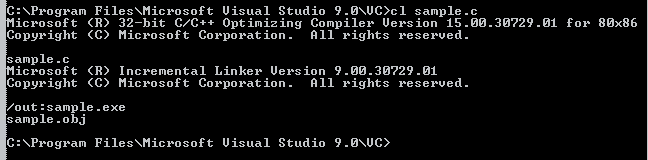
Step 3 : Type cl sample.c and press enter now. This will compile the program to create an executable file (.exe).
Step 4 : Now simply type the name of the file sample and enter. That will show you the output.
Install, compile and execute C program with Turbo C++ in Windows
Obtain and install
Turbo C++ is very popular C compiler and IDE. The problem is, Borland, the creator organization of the compiler and IDE does not provide any option to download the compiler and IDE. But if you google with «turbo c++ download», you will get plenty of sites to download the compiler and IDE. There are three files to download — TC.exe, tc.r00 and tc.r01. After downloading, run TC.exe file it will create a folder TC at the end the installation process. To run turbo C++, enter bin directory within TC and look for tc.exe. Double click the tc.exe file and turbo C++ IDE will open.
Run Turbo C++ in full screen in Windows 7
Those who are running Turbo C++ is Windows 7, when the IDE is opened, click on «Ignore» in the popup window saying that it does not support full-screen mode. Now, click on the top left corner of the Turbo C++ window and select «Properties» . Select «Font» tab and change the font to «Lucidia Console» from default «Raster fonts». Also, change the font size to «28». Now select «Layout» tab and set «width» as 80 and «Height» as 25 under «Screen Buffer Size». Under «Window Size», change «Width» as 60 and «Height» as 25. Under «Window Position», set the value of «Left» and «Top» both as -4. Make sure «Left System Position Window» is unchecked. Click «Ok» to close the properties window. Now you can see the Turbo C++ IDE in full screen.
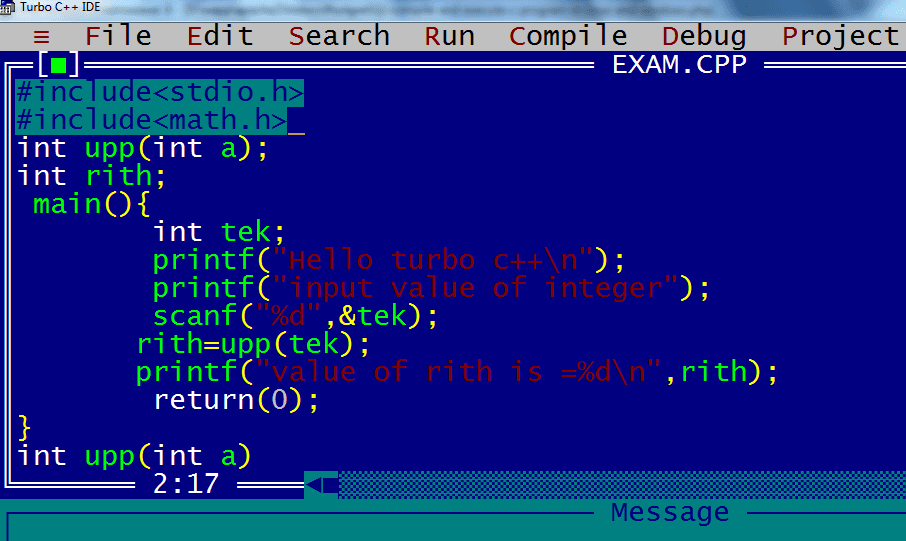
Write, Compile and Run C program
Open a new file from File > New in the Turbo C++ IDE. Write a small program in the IDE.
Now go to File > Save As and save the program with the filename of your choice (make sure extension of the filename is .c).
Click on Options and go to Directories. Click on Directories and set Output Directory as you want and Source Directory as where you have saved the C program file.
Now go to compile and click on Compile. And then Click on Run. You will see the output of your C program.
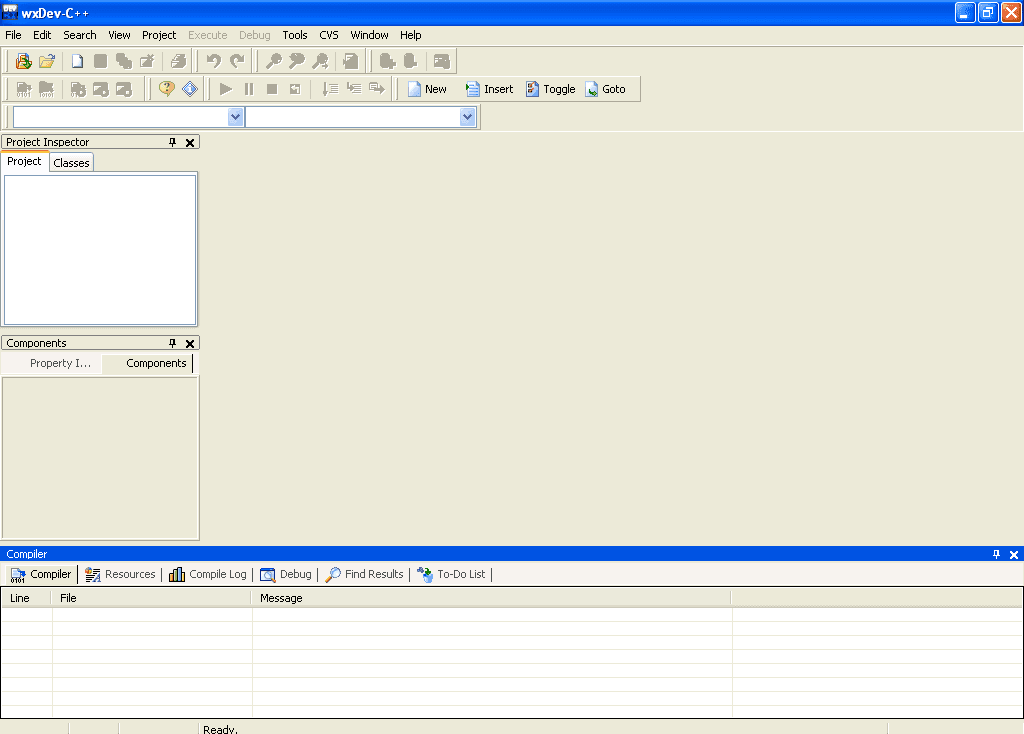
Write, Compile and Run C program using wxDev-C++ in windows
wxDev-C++ is easy to use IDE which you may opt for to write C Program. You may download the installer from wxdsgn.sourceforge.net.
We found it working perfectly on Windows 7 and Windows XP. It also installs MinGW along with and you don’t need to set any environment variables. The default compiler for this IDE is gcc.
After downloading the installer, run the exe file by double clicking on it and an installation wizard will guide you to install. Once you finish the installation, you start it from Programs and the first time when you run it, it takes a while for parsing header files. The IDe window looks like following:
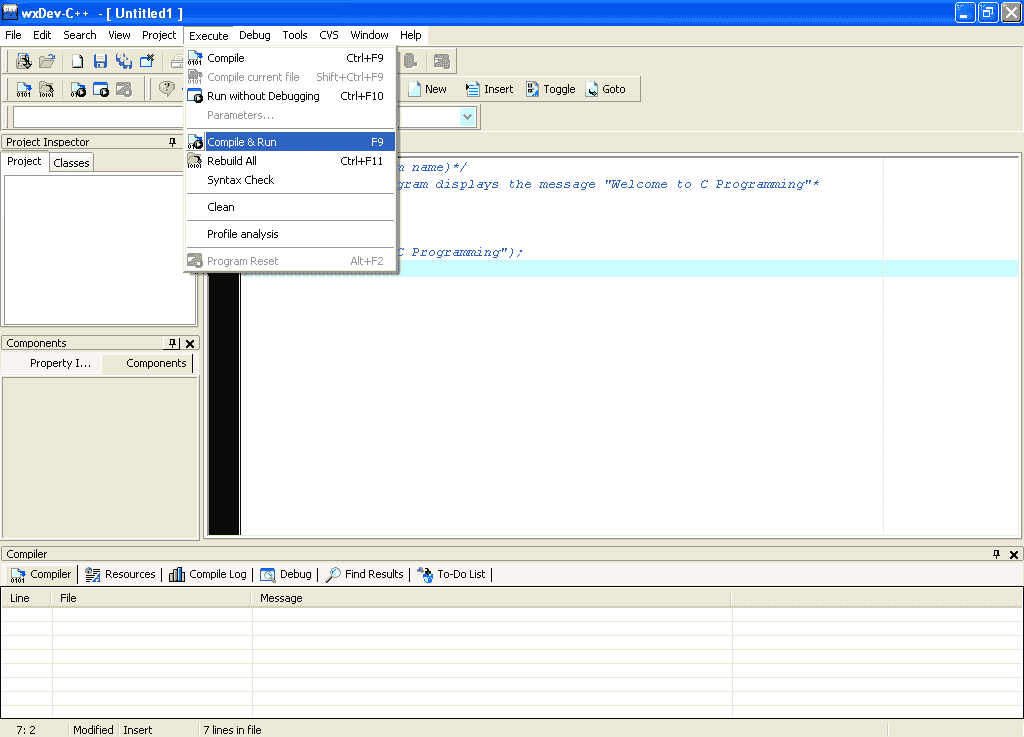
You may start programming by clicking on File > New > Source File in the window. Note that while saving the file, you must select file type as C as this IDE supports C++ also.

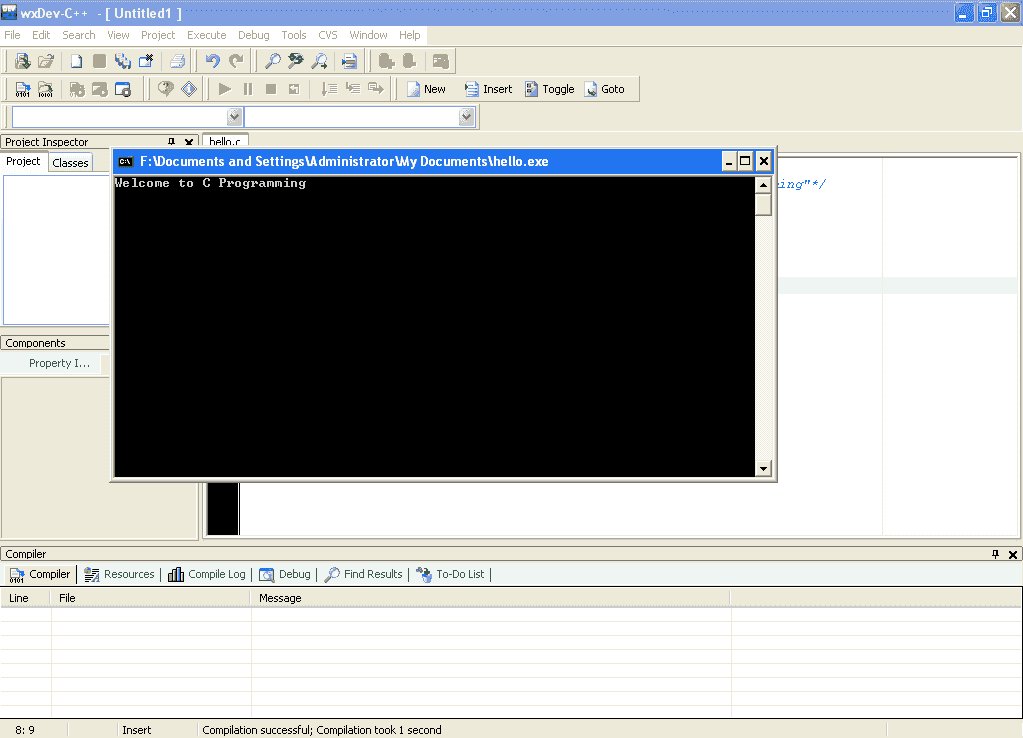
You may use F9 or as shown below to Compile and Run program.
When compilation is done, it opens a new window to show you output.
If you have errors, it shows you in the pane below like following.

Though slightly dated, we find wxDev-C++ an excellent IDE for programming C. You may try it if you are using Windows.
Install, compile and execute C program in Linux
Most of the time, when you are installing Linux, GNU Gcc compiler is already installed. If not, run the following command (our system is Ubuntu Linux):
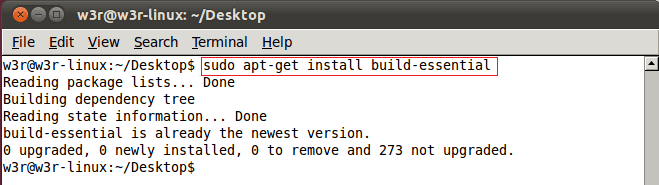
If C compiler is already installed, it will show you a message like above. If not, it will install all the necessary packages.
Now open a text editor and write a small C program like following and save it as demo.c :
 #include <stdio.h>
main()
{
printf("Welcome to C Programming");
}
Now run the command as shown below to compile and execute the file :
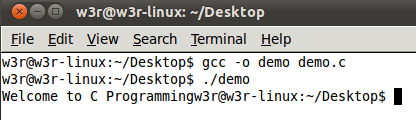
This how you can install GNU Gcc compiler, write a C program and run it under Linux.
List of the C Compilers
The following table is a list of the C compilers available. This is not a complete list but this will give you a fair idea about various C compilers, which OS / Platform they support and whether it has a programming environment.
| Compiler | Author | Operating System | IDE? | License type |
|---|---|---|---|---|
| AMPC | Axiomatic Solutions Sdn Bhd | Windows,Unix & Other | Yes | Proprietary |
| Amsterdam Compiler Kit | Andrew Tanenbaum and Ceriel Jacobs | Unix & Other | No | BSD |
| CCS C Compiler | CCS, Inc. | Windows,Unix & Other | Yes | Proprietary |
| Clang | Low-Level Virtual Machine | Windows,Unix & Other | No | BSD |
| DMS Software Reengineering Toolkit | Semantic Designs | Windows,Unix & Other | No | Proprietary |
| GCC C | GNU Project | Windows,Unix,IBM mainframe, AmigaOS, VAX/VMS, RTEMS | No | GPL |
| RCC (RCOR C Compiler) | Rodrigo Caetano (rcor) | Windows,Unix | No | GPL |
| Interactive C | KISS Institute for Practical Robotics | Windows, Unix, Mac, Linux, IRIX, Solaris, SunOS | No | Freeware |
| LabWindows/CVI | National Instruments | Windows,Unix & Other | Yes | Proprietary |
| lcc | Chris Fraser and David Hanson | Windows,Unix & Other | Windows only | Freeware (source code available for non-commercial use) |
| Mark Williams C | Mark Williams Company | Windows,Other | Yes | Proprietary |
| Microsoft C | Microsoft | Windows | Yes | Proprietary |
| Nwcc | Nils Weller | Windows,Unix,Other | No | BSD |
| Open64 | SGI Google HP Intel Nvidia PathScale Tsinghua University and others | Unix,Other | No | GPL |
| Pelles C | Pelle Orinius | Windows | Yes | Freeware |
| PGCC | The Portland Group | Windows,Unix,Other— Mac OS X | Yes — Visual Studio on Windows | Proprietary |
| Portable C Compiler | Anders Magnusson and others | Windows,Unix,Other | No | BSD |
| Power C | Mix Software | Other | No | Proprietary |
| QuickC | Microsoft | Windows | Yes | Proprietary |
| SAS/C | SAS Institute | Windows,Unix,Other-IBM mainframe, AmigaOS, 68K, 88K, Unix | Yes | Proprietary |
| Tiny C Compiler | Fabrice Bellard | Windows,Unix | No | LGPL |
| Turbo C | Embarcadero | Other | No | Proprietary — V 2.01 freely available |
| CCS C Compiler | CCS, Inc. | Windows,Unix,Other | Yes | Proprietary |
| MikroC Compiler | MikroElektronika, Inc. | Windows,Unix,Other | Yes | Proprietary |
| ups debugger[1] (includes C interpreter) | Tom Hughes, Ian Edwards, and others | Unix,Other-Solaris, SunOS | Yes | GPL |
| VBCC | Dr. Volker Barthelmann | Windows,Unix,Other | No | Freeware (source code available, modification not allowed) |
| XL C | IBM | Unix-AIX | Eclipse | Proprietary |
Previous: C Tutorial
Next: C Basic
Using GCC with MinGW
In this tutorial, you configure Visual Studio Code to use the GCC C++ compiler (g++) and GDB debugger from mingw-w64 to create programs that run on Windows.
After configuring VS Code, you will compile and debug a simple Hello World program in VS Code. This tutorial does not teach you about GCC, GDB, Mingw-w64, or the C++ language. For those subjects, there are many good resources available on the Web.
If you have any problems, feel free to file an issue for this tutorial in the VS Code documentation repository.
Prerequisites
To successfully complete this tutorial, you must do the following steps:
-
Install Visual Studio Code.
-
Install the C/C++ extension for VS Code. You can install the C/C++ extension by searching for ‘c++’ in the Extensions view (⇧⌘X (Windows, Linux Ctrl+Shift+X)).
-
Get the latest version of Mingw-w64 via MSYS2, which provides up-to-date native builds of GCC, Mingw-w64, and other helpful C++ tools and libraries. You can download the latest installer from the MSYS2 page or use this link to the installer.
-
Follow the Installation instructions on the MSYS2 website to install Mingw-w64. Take care to run each required Start menu and
pacmancommand. -
Install the Mingw-w64 toolchain (
pacman -S --needed base-devel mingw-w64-x86_64-toolchain). Run thepacmancommand in a MSYS2 terminal. Accept the default to install all the members in thetoolchaingroup. -
Add the path to your Mingw-w64
binfolder to the WindowsPATHenvironment variable by using the following steps:- In the Windows search bar, type ‘settings’ to open your Windows Settings.
- Search for Edit environment variables for your account.
- Choose the
Pathvariable in your User variables and then select Edit. - Select New and add the Mingw-w64 destination folder path to the system path. The exact path depends on which version of Mingw-w64 you have installed and where you installed it. If you used the settings above to install Mingw-w64, then add this to the path:
C:msys64mingw64bin. - Select OK to save the updated PATH. You will need to reopen any console windows for the new PATH location to be available.

Check your MinGW installation
To check that your Mingw-w64 tools are correctly installed and available, open a new Command Prompt and type:
gcc --version
g++ --version
gdb --version
- If you don’t see the expected output or
g++orgdbis not a recognized command, make sure your PATH entry matches the Mingw-w64 binary location where the compilers are located. If the compilers do not exist at that PATH entry, make sure you followed the instructions on the MSYS2 website to install Mingw-w64. - If
gcchas the correct output but notgdb, then you need to install the packages you are missing from the Mingw-w64 toolset.- Missing the
mingw-w64-gdbpackage is one cause of the «The value of miDebuggerPath is invalid.» message upon attempted compilation if your PATH is correct.
- Missing the
Create Hello World
From a Windows command prompt, create an empty folder called projects where you can place all your VS Code projects. Then create a sub-folder called helloworld, navigate into it, and open VS Code in that folder by entering the following commands:
mkdir projects
cd projects
mkdir helloworld
cd helloworld
code .
The «code .» command opens VS Code in the current working folder, which becomes your «workspace». Accept the Workspace Trust dialog by selecting Yes, I trust the authors since this is a folder you created.
As you go through the tutorial, you will see three files created in a .vscode folder in the workspace:
tasks.json(build instructions)launch.json(debugger settings)c_cpp_properties.json(compiler path and IntelliSense settings)
Add a source code file
In the File Explorer title bar, select the New File button and name the file helloworld.cpp.

Add hello world source code
Now paste in this source code:
#include <iostream>
#include <vector>
#include <string>
using namespace std;
int main()
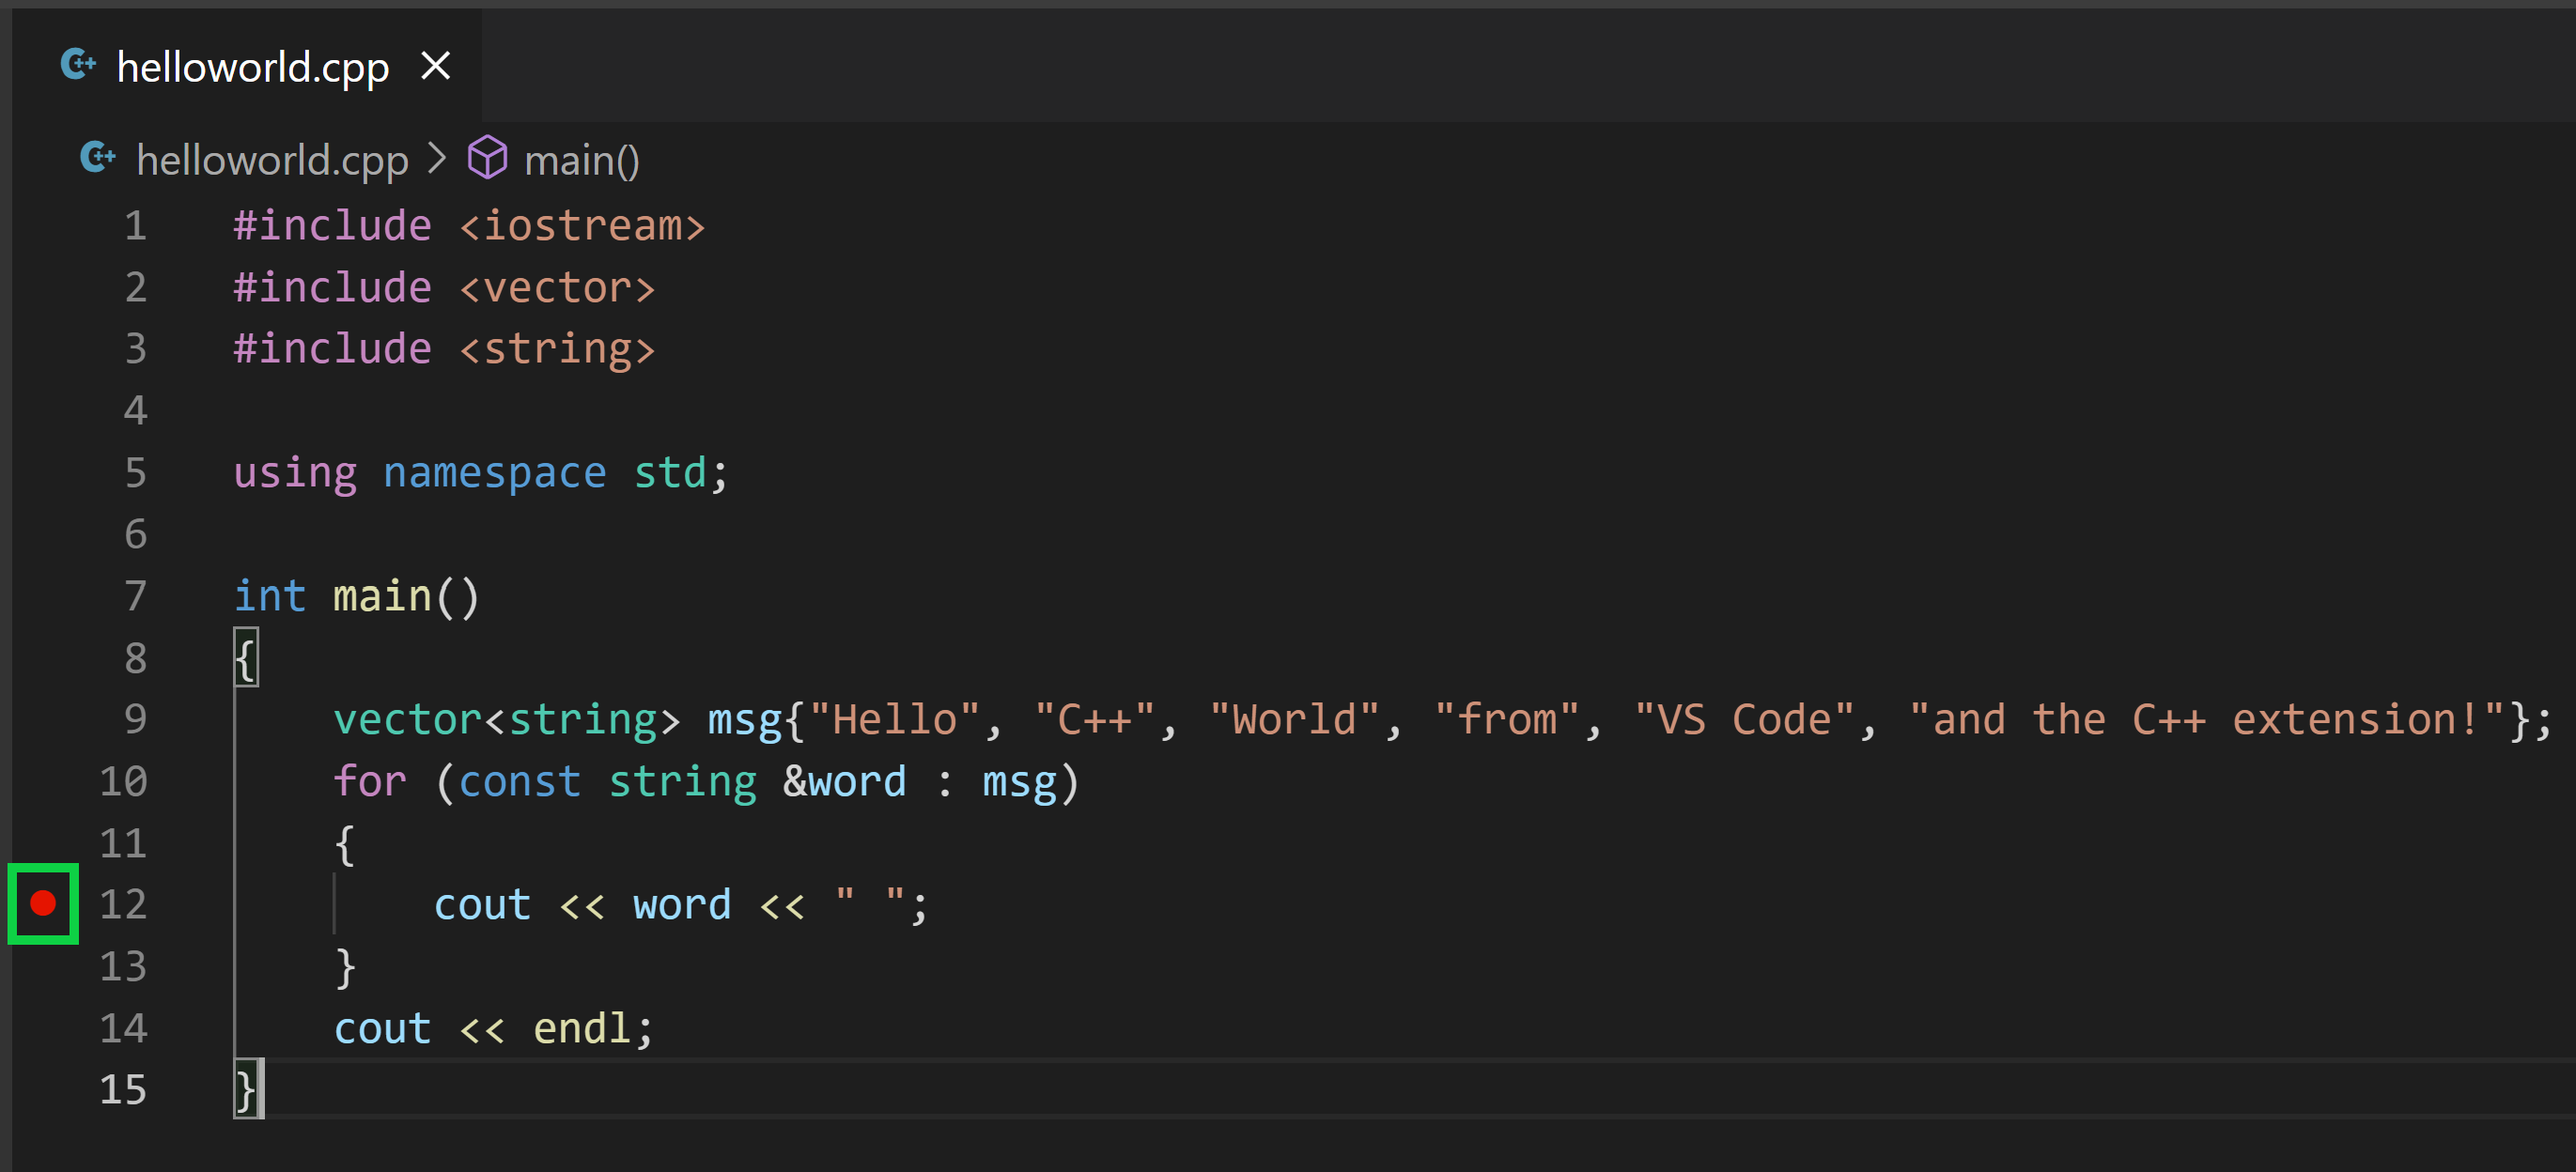
{
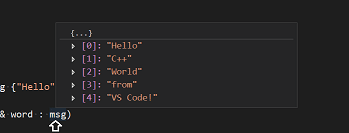
vector<string> msg {"Hello", "C++", "World", "from", "VS Code", "and the C++ extension!"};
for (const string& word : msg)
{
cout << word << " ";
}
cout << endl;
}
Now press ⌘S (Windows, Linux Ctrl+S) to save the file. Notice how the file you just added appears in the File Explorer view (⇧⌘E (Windows, Linux Ctrl+Shift+E)) in the side bar of VS Code:

You can also enable Auto Save to automatically save your file changes, by checking Auto Save in the main File menu.
The Activity Bar on the far left lets you open different views such as Search, Source Control, and Run. You’ll look at the Run view later in this tutorial. You can find out more about the other views in the VS Code User Interface documentation.
Note: When you save or open a C++ file, you may see a notification from the C/C++ extension about the availability of an Insiders version, which lets you test new features and fixes. You can ignore this notification by selecting the
X(Clear Notification).
Explore IntelliSense
In your new helloworld.cpp file, hover over vector or string to see type information. After the declaration of the msg variable, start typing msg. as you would when calling a member function. You should immediately see a completion list that shows all the member functions, and a window that shows the type information for the msg object:
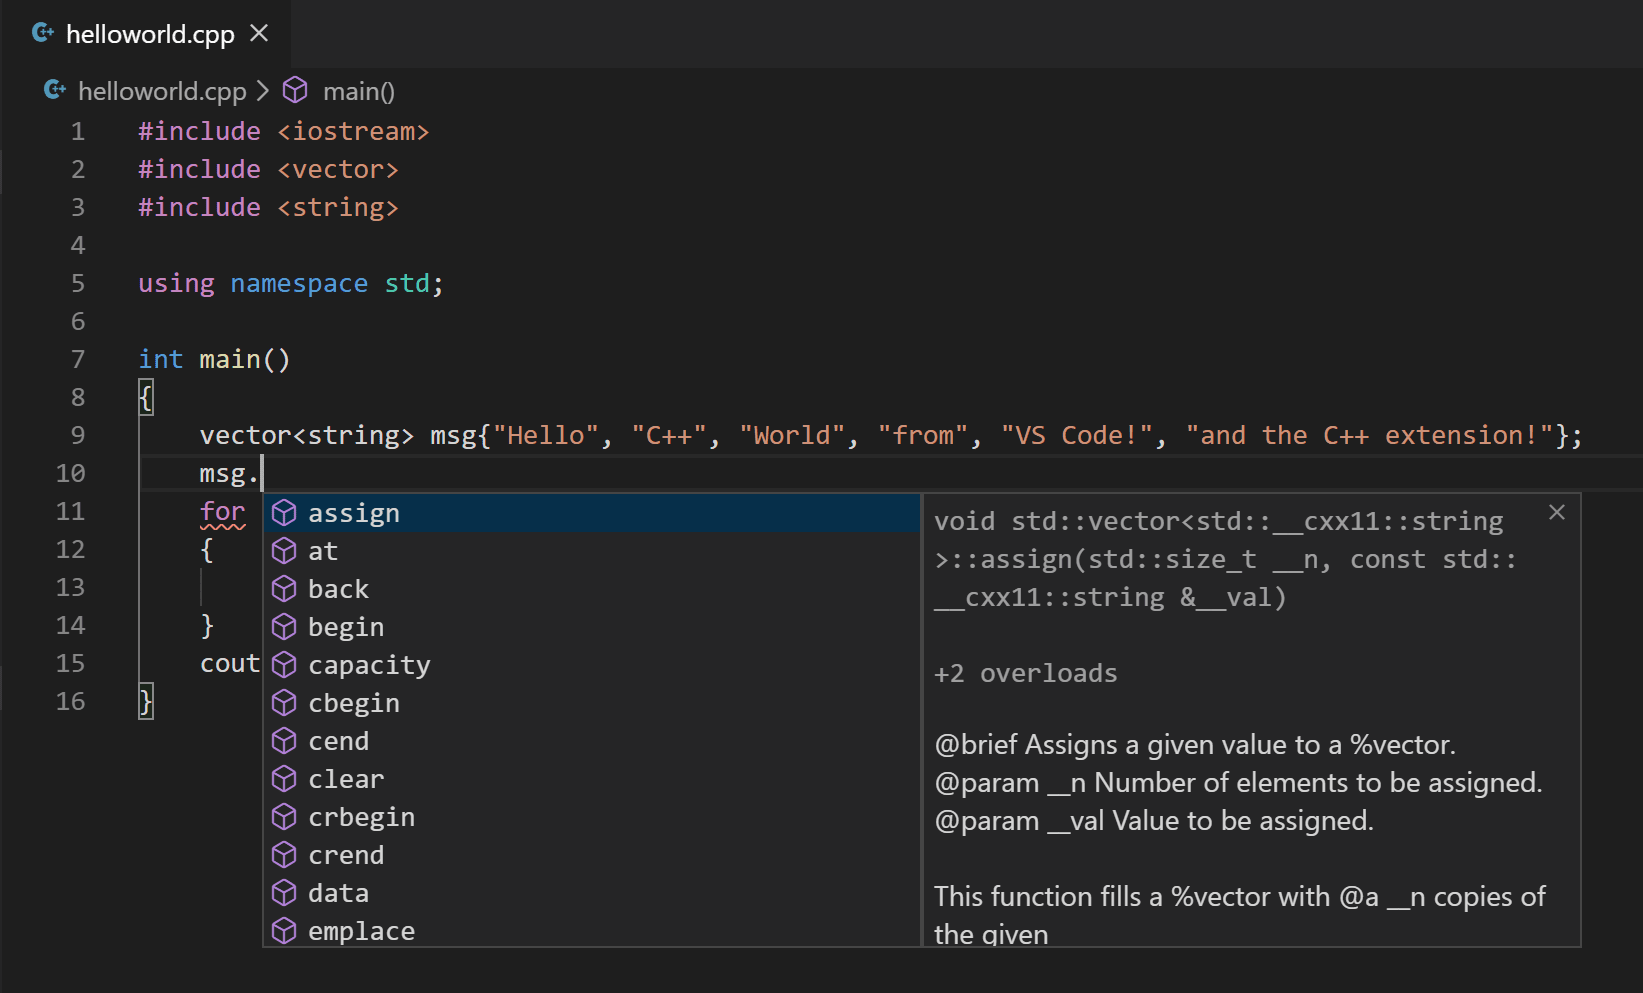
You can press the Tab key to insert the selected member; then, when you add the opening parenthesis, you will see information about any arguments that the function requires.
Run helloworld.cpp
Remember, the C++ extension uses the C++ compiler you have installed on your machine to build your program. Make sure you have a C++ compiler installed before attempting to run and debug helloworld.cpp in VS Code.
-
Open
helloworld.cppso that it is the active file. -
Press the play button in the top right corner of the editor.
-
Choose C/C++: g++.exe build and debug active file from the list of detected compilers on your system.
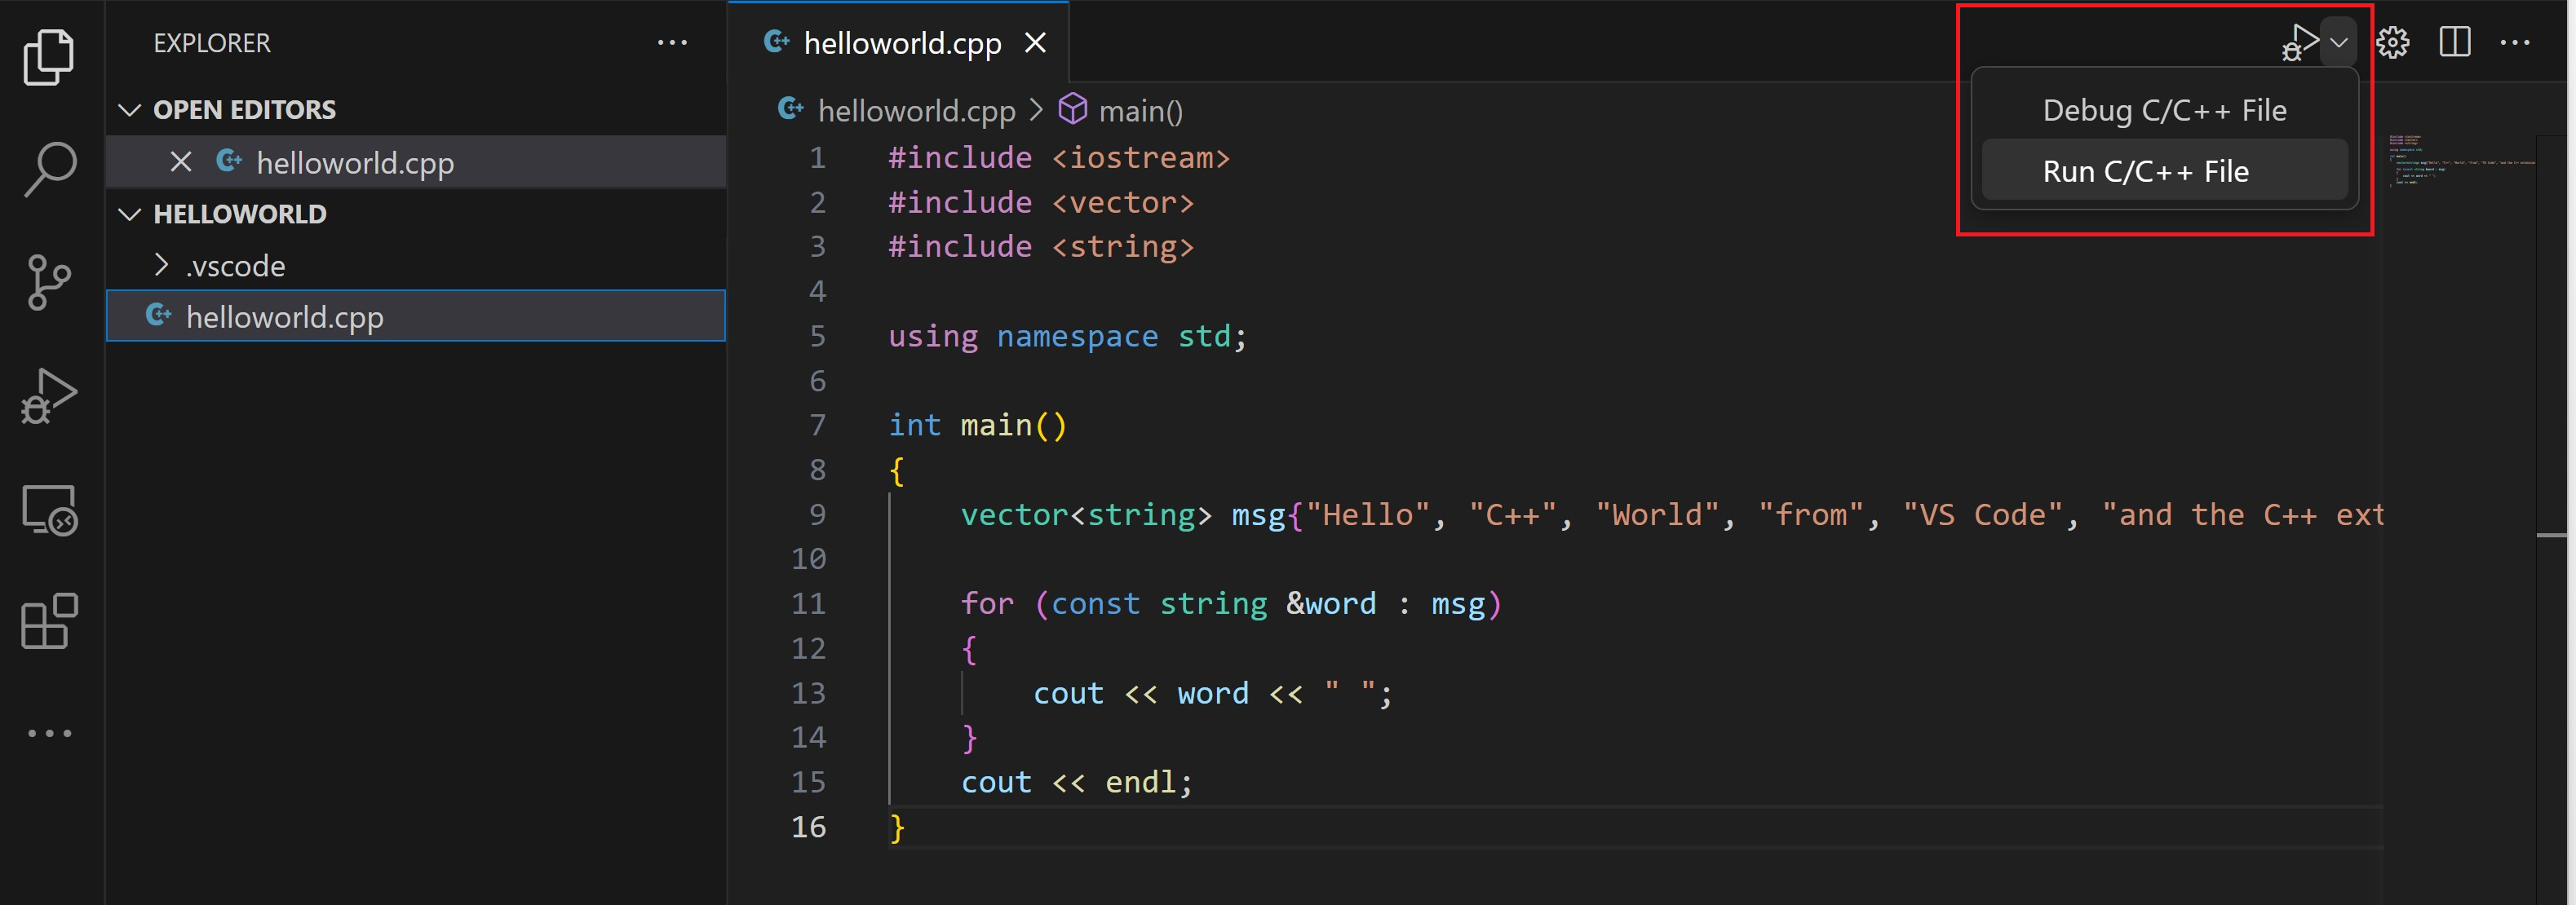
You’ll only be asked to choose a compiler the first time you run helloworld.cpp. This compiler will be set as the «default» compiler in tasks.json file.
-
After the build succeeds, your program’s output will appear in the integrated Terminal.

The first time you run your program, the C++ extension creates tasks.json, which you’ll find in your project’s .vscode folder. tasks.json stores build configurations.
Your new tasks.json file should look similar to the JSON below:
{
  "tasks": [
    {
      "type": "cppbuild",
      "label": "C/C++: g++.exe build active file",
      "command": "C:\msys64\mingw64\bin\g++.exe",
      "args": [
        "-fdiagnostics-color=always",
        "-g",
        "${file}",
        "-o",
        "${fileDirname}\${fileBasenameNoExtension}.exe"
      ],
      "options": {
        "cwd": "${fileDirname}"
      },
      "problemMatcher": ["$gcc"],
      "group": {
        "kind": "build",
        "isDefault": true
      },
      "detail": "Task generated by Debugger."
    }
  ],
  "version": "2.0.0"
}
Note: You can learn more about
tasks.jsonvariables in the variables reference.
The command setting specifies the program to run; in this case that is g++.
The args array specifies the command-line arguments that will be passed to g++. These arguments must be specified in the order expected by the compiler.
This task tells g++ to take the active file (${file}), compile it, and create an executable file in the current directory (${fileDirname}) with the same name as the active file but with the .exe extension (${fileBasenameNoExtension}.exe), resulting in helloworld.exe for our example.
The label value is what you will see in the tasks list; you can name this whatever you like.
The detail value is what you will as the description of the task in the tasks list. It’s highly recommended to rename this value to differentiate it from similar tasks.
From now on, the play button will read from tasks.json to figure out how to build and run your program. You can define multiple build tasks in tasks.json, and whichever task is marked as the default will be used by the play button. In case you need to change the default compiler, you can run Tasks: Configure default build task. Alternatively you can modify the tasks.json file and remove the default by replacing this segment:
    "group": {
        "kind": "build",
        "isDefault": true
    },
with this:
"group": "build",
Modifying tasks.json
You can modify your tasks.json to build multiple C++ files by using an argument like "${workspaceFolder}/*.cpp" instead of ${file}.This will build all .cpp files in your current folder. You can also modify the output filename by replacing "${fileDirname}\${fileBasenameNoExtension}.exe" with a hard-coded filename (for example "${workspaceFolder}\myProgram.exe").
Debug helloworld.cpp
- Go back to
helloworld.cppso that it is the active file. - Set a breakpoint by clicking on the editor margin or using F9 on the current line.
- From the drop-down next to the play button, select Debug C/C++ File.
- Choose C/C++: g++ build and debug active file from the list of detected compilers on your system (you’ll only be asked to choose a compiler the first time you run/debug
helloworld.cpp).
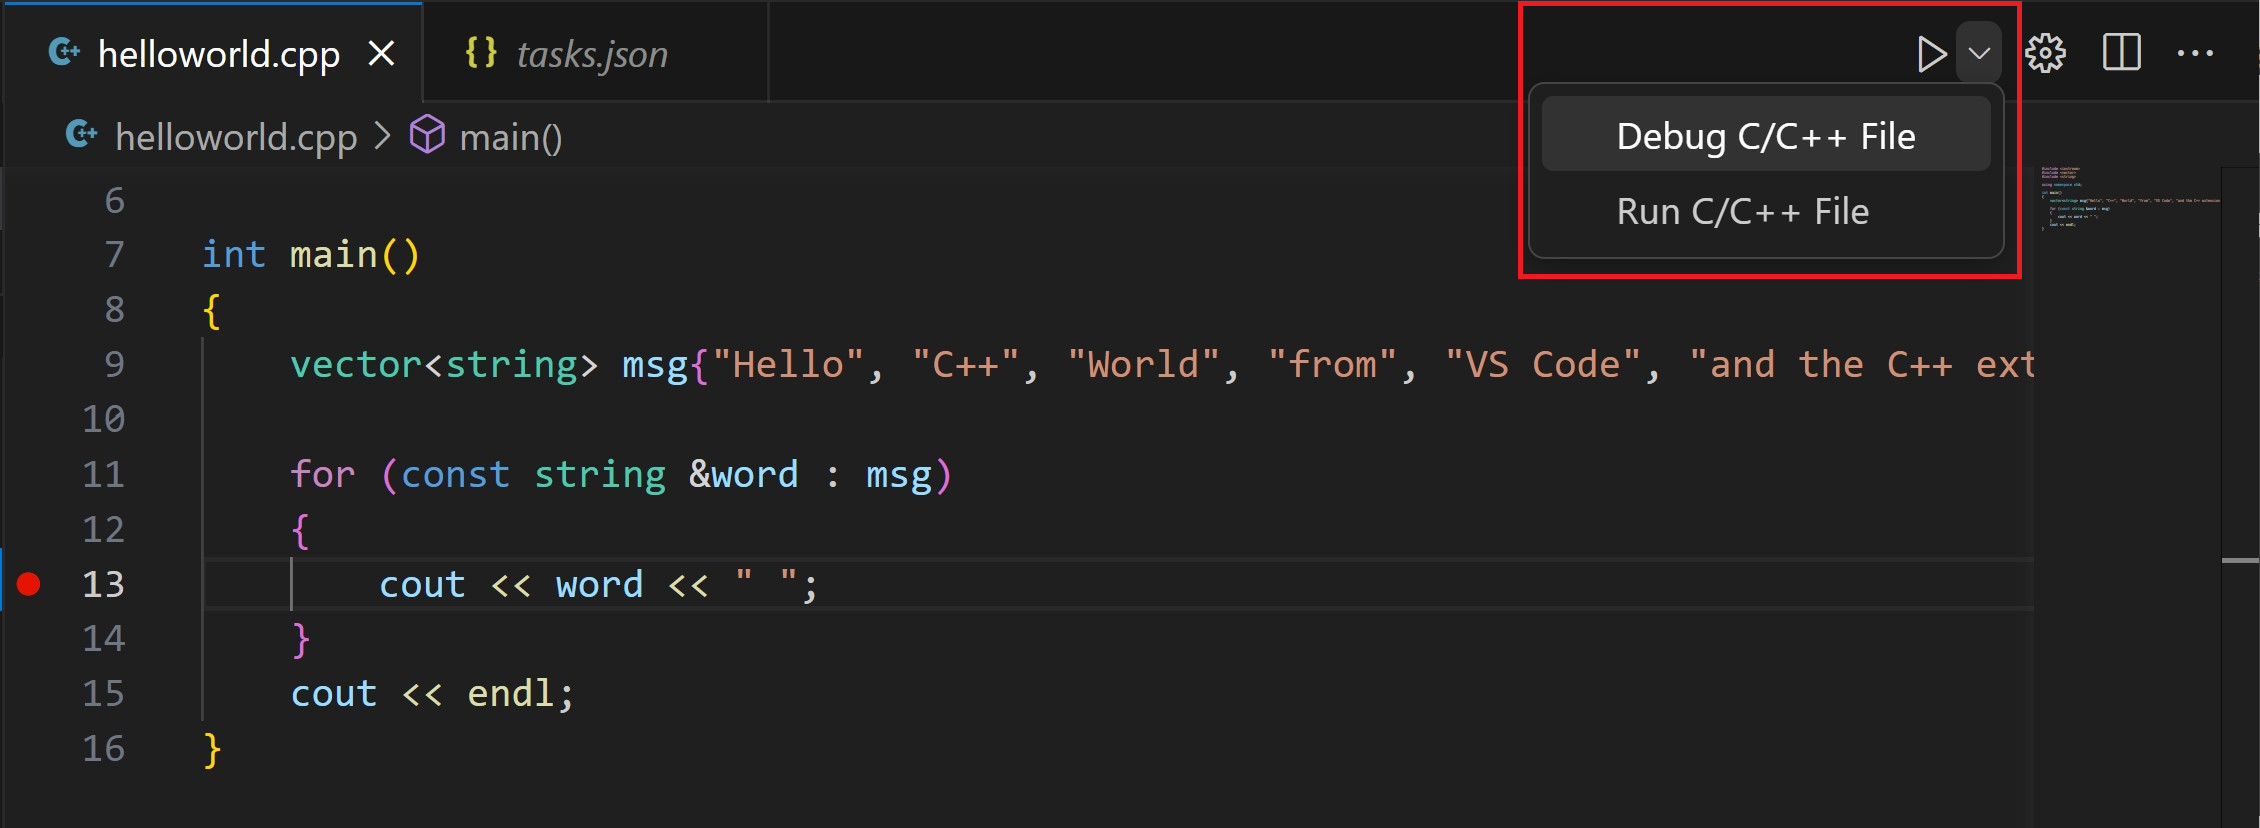
The play button has two modes: Run C/C++ File and Debug C/C++ File. It will default to the last-used mode. If you see the debug icon in the play button, you can just click the play button to debug, instead of using the drop-down.

Explore the debugger
Before you start stepping through the code, let’s take a moment to notice several changes in the user interface:
-
The Integrated Terminal appears at the bottom of the source code editor. In the Debug Output tab, you see output that indicates the debugger is up and running.
-
The editor highlights the line where you set a breakpoint before starting the debugger:
-
The Run and Debug view on the left shows debugging information. You’ll see an example later in the tutorial.
-
At the top of the code editor, a debugging control panel appears. You can move this around the screen by grabbing the dots on the left side.

Step through the code
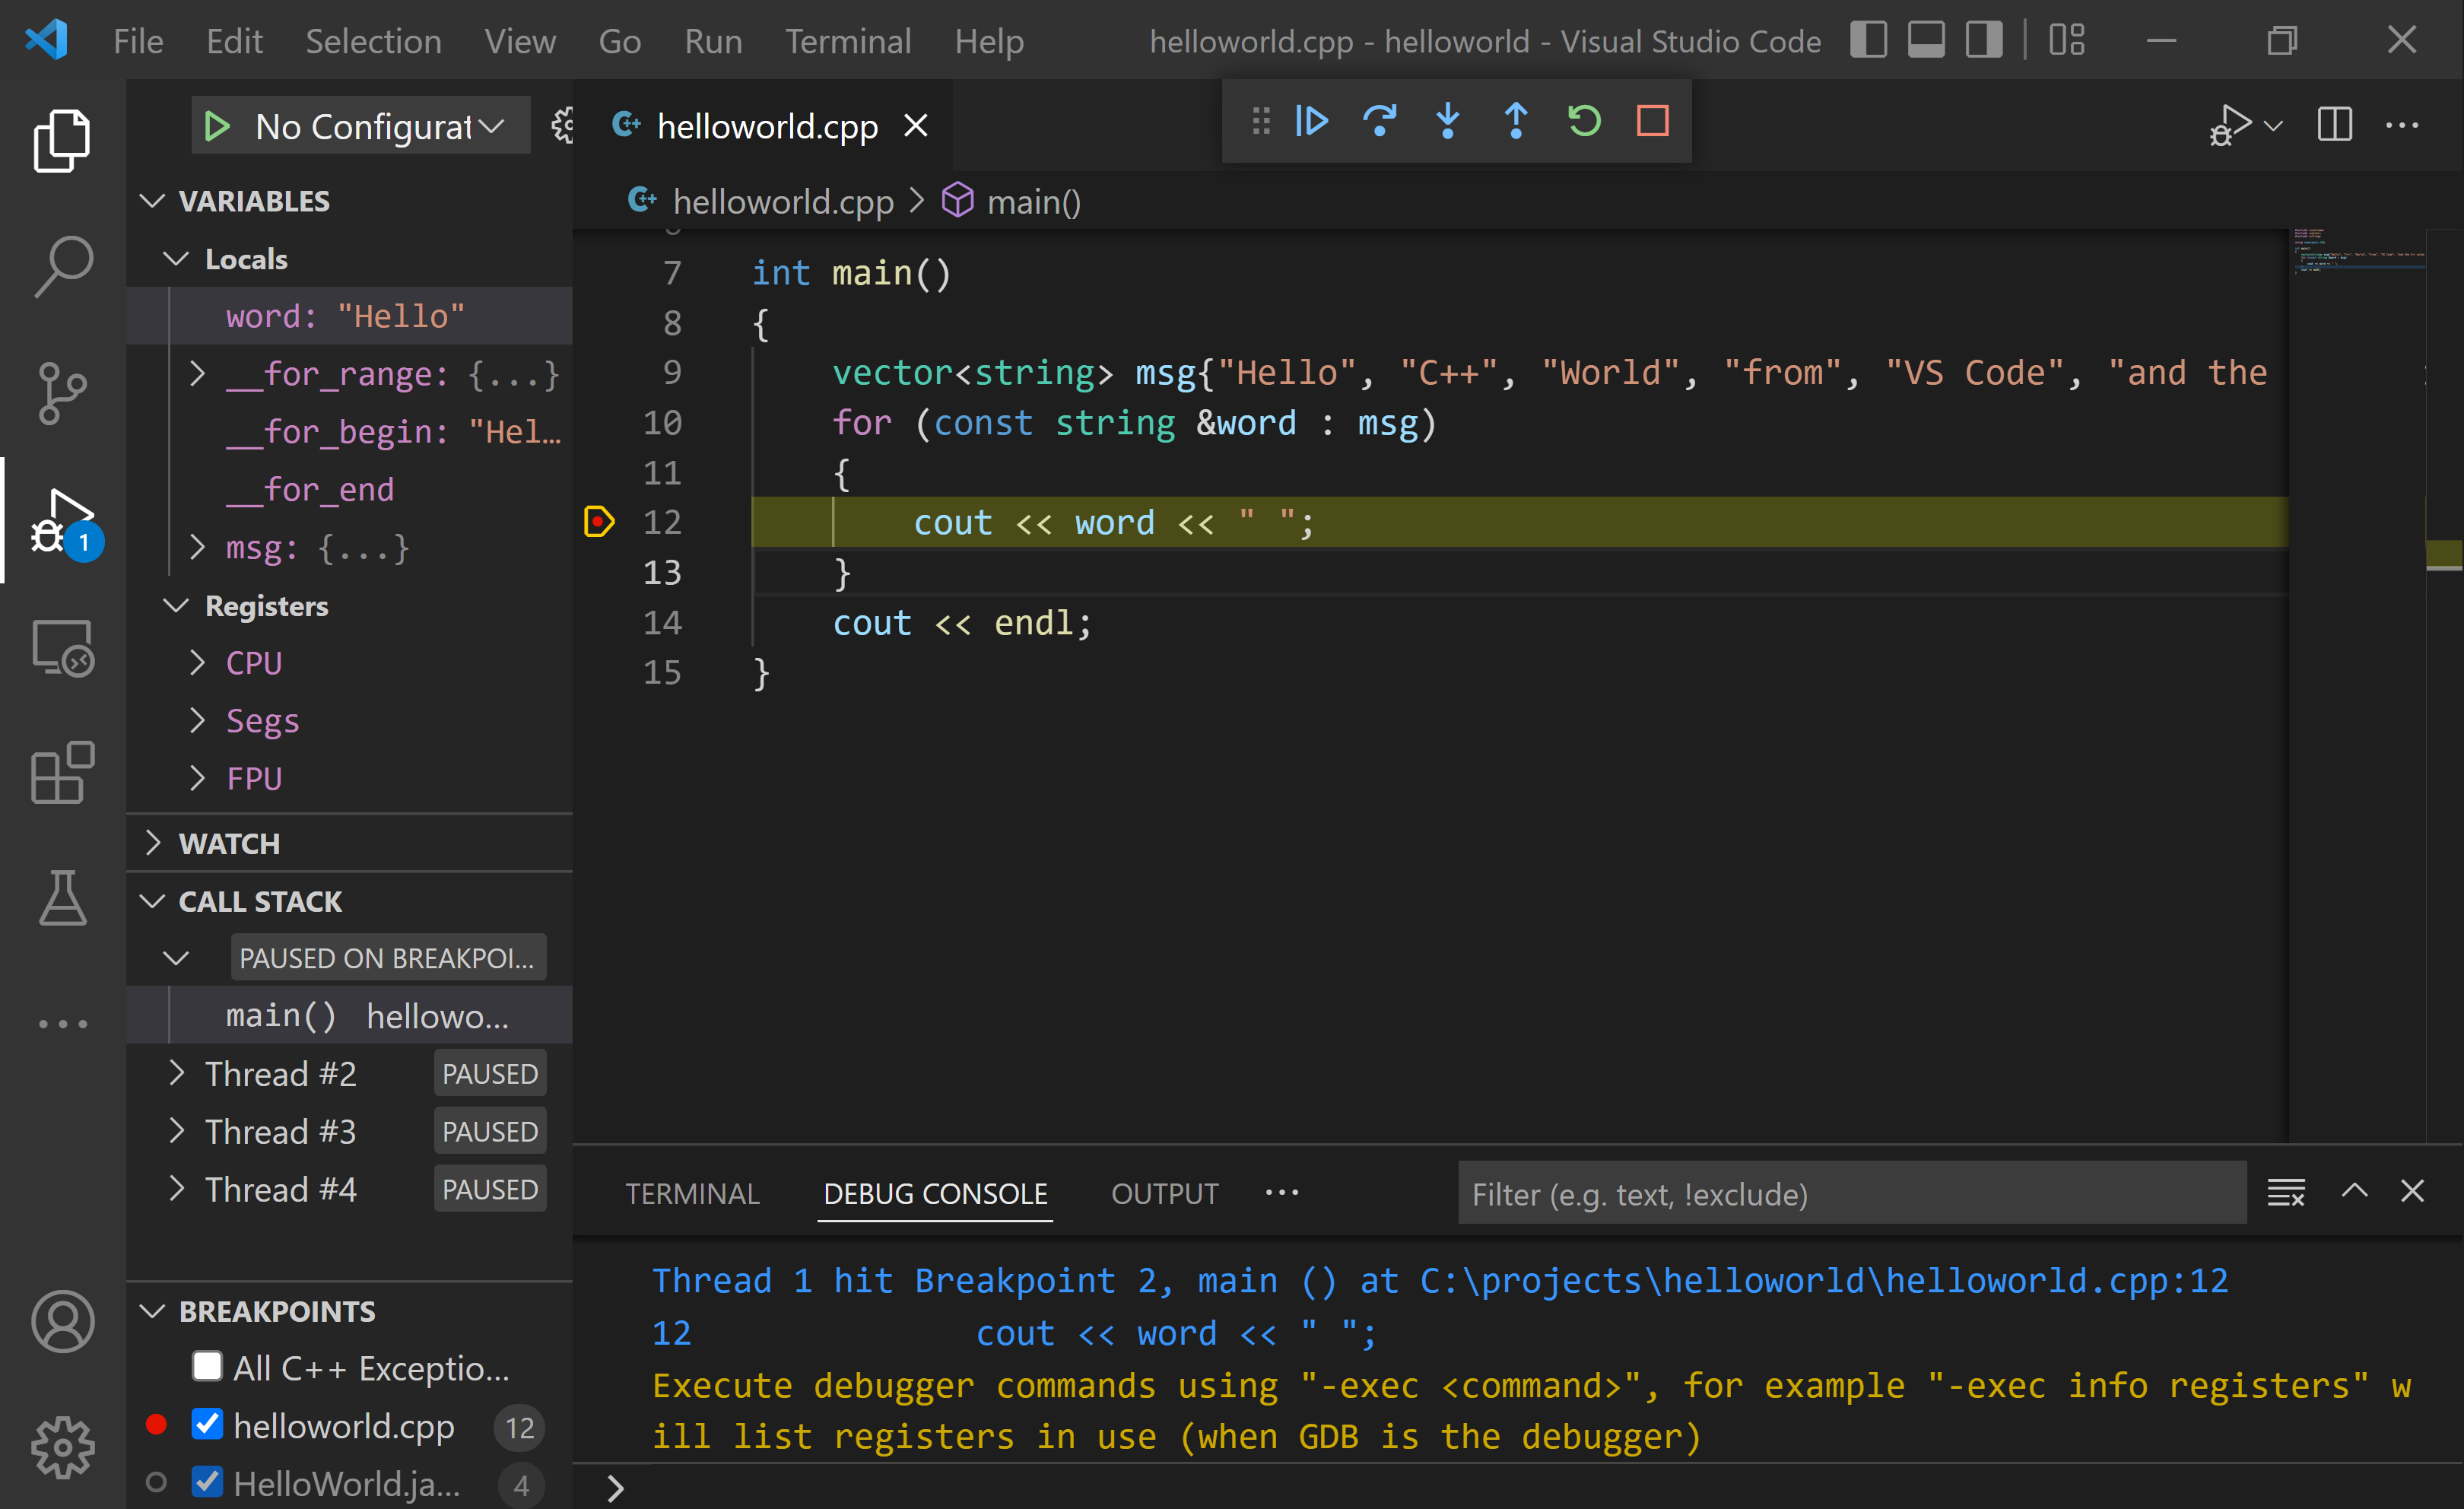
Now you’re ready to start stepping through the code.
-
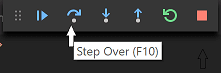
Click or press the Step over icon in the debugging control panel.
This will advance program execution to the first line of the for loop, and skip over all the internal function calls within the
vectorandstringclasses that are invoked when themsgvariable is created and initialized. Notice the change in the Variables window on the left.In this case, the errors are expected because, although the variable names for the loop are now visible to the debugger, the statement has not executed yet, so there is nothing to read at this point. The contents of
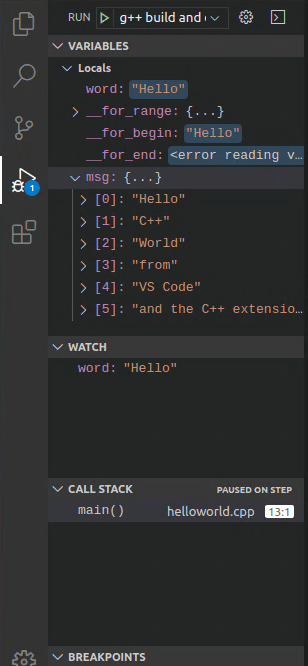
msgare visible, however, because that statement has completed. -
Press Step over again to advance to the next statement in this program (skipping over all the internal code that is executed to initialize the loop). Now, the Variables window shows information about the loop variables.
-
Press Step over again to execute the
coutstatement. (Note that as of the March 2019 release, the C++ extension does not print any output to the Debug Console until the loop exits.) -
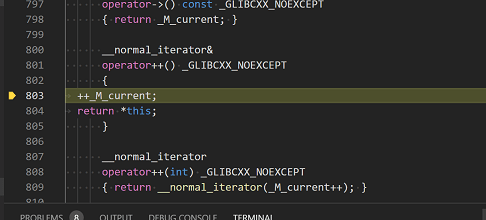
If you like, you can keep pressing Step over until all the words in the vector have been printed to the console. But if you are curious, try pressing the Step Into button to step through source code in the C++ standard library!
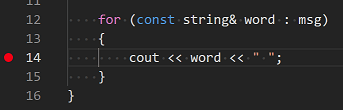
To return to your own code, one way is to keep pressing Step over. Another way is to set a breakpoint in your code by switching to the
helloworld.cpptab in the code editor, putting the insertion point somewhere on thecoutstatement inside the loop, and pressing F9. A red dot appears in the gutter on the left to indicate that a breakpoint has been set on this line.Then press F5 to start execution from the current line in the standard library header. Execution will break on
cout. If you like, you can press F9 again to toggle off the breakpoint.When the loop has completed, you can see the output in the Integrated Terminal, along with some other diagnostic information that is output by GDB.

Set a watch
Sometimes you might want to keep track of the value of a variable as your program executes. You can do this by setting a watch on the variable.
-
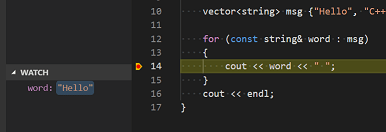
Place the insertion point inside the loop. In the Watch window, click the plus sign and in the text box, type
word, which is the name of the loop variable. Now view the Watch window as you step through the loop. -
Add another watch by adding this statement before the loop:
int i = 0;. Then, inside the loop, add this statement:++i;. Now add a watch forias you did in the previous step. -
To quickly view the value of any variable while execution is paused on a breakpoint, you can hover over it with the mouse pointer.
Customize debugging with launch.json
When you debug with the play button or F5, the C++ extension creates a dynamic debug configuration on the fly.
There are cases where you’d want to customize your debug configuration, such as specifying arguments to pass to the program at runtime. You can define custom debug configurations in a launch.json file.
To create launch.json, choose Add Debug Configuration from the play button drop-down menu.

You’ll then see a dropdown for various predefined debugging configurations. Choose C/C++: g++.exe build and debug active file.
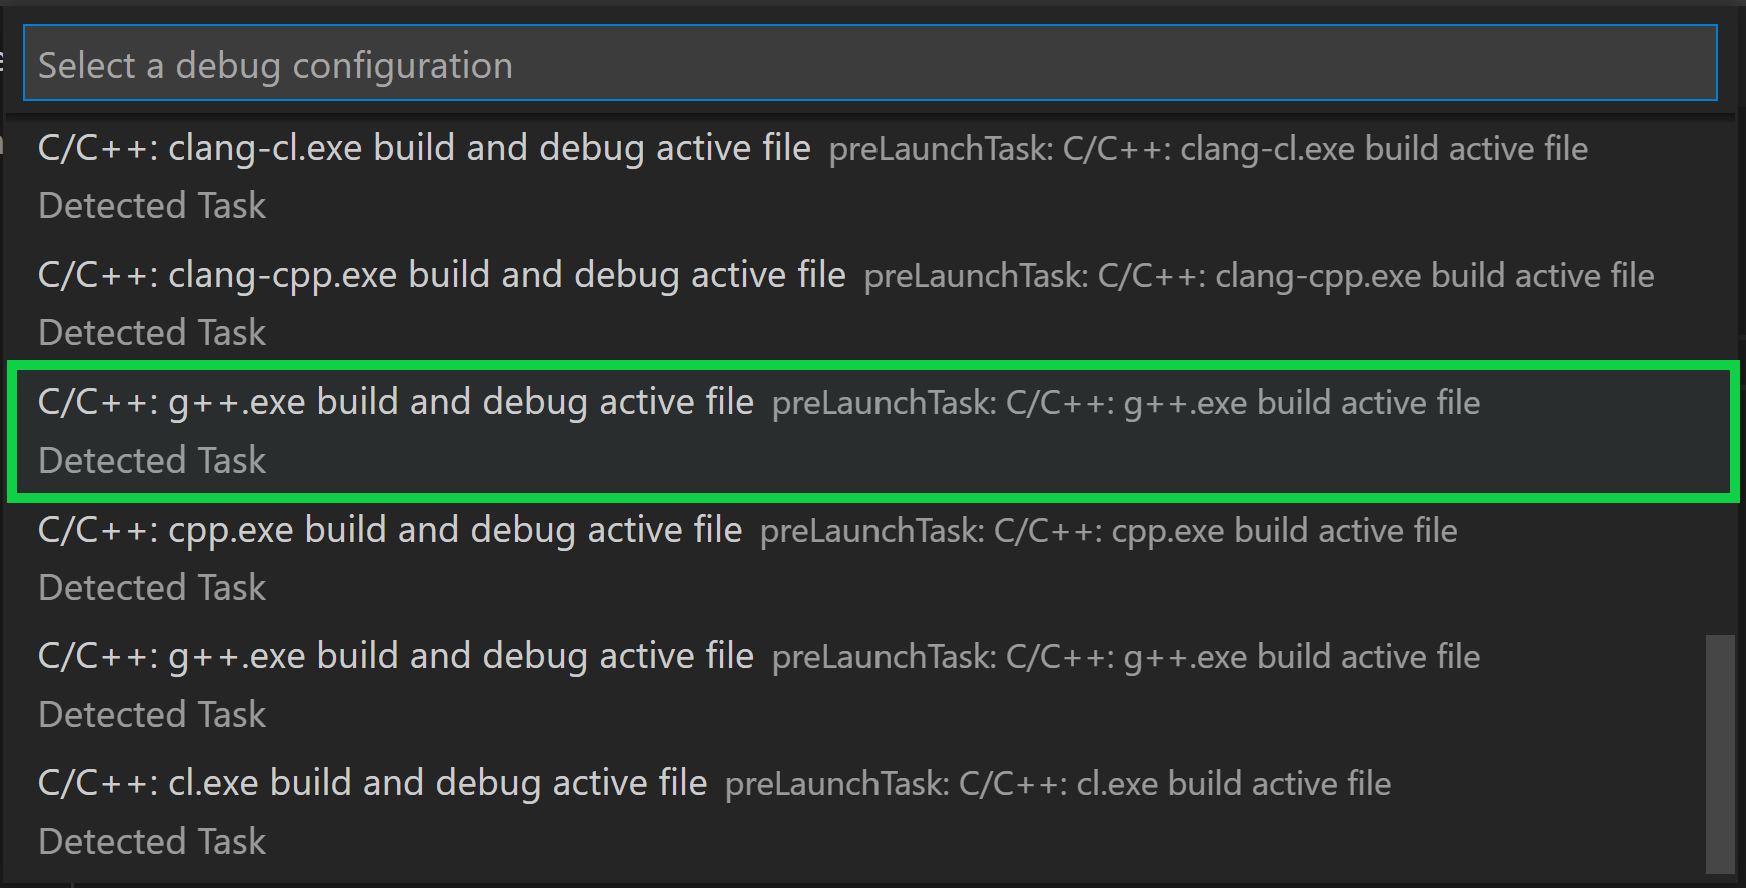
VS Code creates a launch.json file, which looks something like this:
{
  "version": "0.2.0",
  "configurations": [
    {
      "name": "C/C++: g++.exe build and debug active file",
      "type": "cppdbg",
      "request": "launch",
      "program": "${fileDirname}\${fileBasenameNoExtension}.exe",
      "args": [],
      "stopAtEntry": false,
      "cwd": "${fileDirname}",
      "environment": [],
      "externalConsole": false,
      "MIMode": "gdb",
      "miDebuggerPath": "C:\msys64\mingw64\bin\gdb.exe",
      "setupCommands": [
        {
          "description": "Enable pretty-printing for gdb",
          "text": "-enable-pretty-printing",
          "ignoreFailures": true
        }
      ],
      "preLaunchTask": "C/C++: g++.exe build active file"
    }
  ]
}
In the JSON above, program specifies the program you want to debug. Here it is set to the active file folder (${fileDirname}) and active filename with the .exe extension (${fileBasenameNoExtension}.exe), which if helloworld.cpp is the active file will be helloworld.exe. The args property is an array of arguments to pass to the program at runtime.
By default, the C++ extension won’t add any breakpoints to your source code and the stopAtEntry value is set to false.
Change the stopAtEntry value to true to cause the debugger to stop on the main method when you start debugging.
From now on, the play button and F5 will read from your
launch.jsonfile when launching your program for debugging.
C/C++ configurations
If you want more control over the C/C++ extension, you can create a c_cpp_properties.json file, which will allow you to change settings such as the path to the compiler, include paths, C++ standard (default is C++17), and more.
You can view the C/C++ configuration UI by running the command C/C++: Edit Configurations (UI) from the Command Palette (⇧⌘P (Windows, Linux Ctrl+Shift+P)).

This opens the C/C++ Configurations page. When you make changes here, VS Code writes them to a file called c_cpp_properties.json in the .vscode folder.
Here, we’ve changed the Configuration name to GCC, set the Compiler path dropdown to the g++ compiler, and the IntelliSense mode to match the compiler (gcc-x64).

Visual Studio Code places these settings in .vscodec_cpp_properties.json. If you open that file directly, it should look something like this:
{
  "configurations": [
    {
      "name": "GCC",
      "includePath": ["${workspaceFolder}/**"],
      "defines": ["_DEBUG", "UNICODE", "_UNICODE"],
      "windowsSdkVersion": "10.0.18362.0",
      "compilerPath": "C:/msys64/mingw64/bin/g++.exe",
      "cStandard": "c17",
      "cppStandard": "c++17",
      "intelliSenseMode": "windows-gcc-x64"
    }
  ],
  "version": 4
}
You only need to add to the Include path array setting if your program includes header files that are not in your workspace or in the standard library path.
Compiler path
The extension uses the compilerPath setting to infer the path to the C++ standard library header files. When the extension knows where to find those files, it can provide features like smart completions and Go to Definition navigation.
The C/C++ extension attempts to populate compilerPath with the default compiler location based on what it finds on your system. The extension looks in several common compiler locations.
The compilerPath search order is:
- First check for the Microsoft Visual C++ compiler
- Then look for g++ on Windows Subsystem for Linux (WSL)
- Then g++ for Mingw-w64.
If you have Visual Studio or WSL installed, you may need to change compilerPath to match the preferred compiler for your project. For example, if you installed Mingw-w64 version 8.1.0 using the i686 architecture, Win32 threading, and sjlj exception handling install options, the path would look like this: C:Program Files (x86)mingw-w64i686-8.1.0-win32-sjlj-rt_v6-rev0mingw64bing++.exe.
Troubleshooting
MSYS2 is installed, but g++ and gdb are still not found
You must follow the steps on the MSYS2 website and use the MSYS CLI to install Mingw-w64, which contains those tools. You will also need to install the full Mingw-w64 toolchain (pacman -S --needed base-devel mingw-w64-x86_64-toolchain) to get the gdb debugger.
MinGW 32-bit
If you need a 32-bit version of the MinGW toolset, consult the Downloading section on the MSYS2 wiki. It includes links to both 32-bit and 64-bit installation options.
Next steps
- Explore the VS Code User Guide.
- Review the Overview of the C++ extension.
- Create a new workspace, copy your
.vscodeJSON files to it, adjust the necessary settings for the new workspace path, program name, and so on, and start coding!
5/13/2022
Overview
Compilers are used to convert the source code into machine-readable code so that the computer can understand it. For every programming language, we have to set up a compiler.
In C language, there are two ways to set up a compiler. The first one is installing the C/GCC compiler manually, and the second is installing Code::Blocks or any IDE(Integrated Development Environment) and within that, including the GCC compiler during installation.
After installing the compiler, we need to set its path to environment path variables because it allows the C program to compile from any directory on your computer.
Before reading this article, read these C Programming articles:
- History of C Language
- Importance of C Programming Language
Scope
- The article explains the step-by-step installation of the C/GCC compiler for Windows.
- The article gives an idea about the different types of source code editors used by the developers and the download link.
- The article also explains the installation of Code::Blocks IDE with MinGW, a C compiler, and a step-by-step guide to setting the path of the compiler to the environment path variable.
Source Code Editors
The source code editor is a text editor tool designed specially to edit or write the source code of any programming language. There is a basic source code editor present in Windows, i.e., Notepad, but it has limited features; therefore, for better formatting and features like multiple tabs, and plugins, you can use other editors like:
-
TextPad (for Windows only): It is a powerful, general-purpose editor for plain text files. We can easily type the C program in TextPad.
You can open Project folders inside the textpad so that you don’t have to open files again and again, like in notepad. -
Notepad++ (for Windows only): It is a text editor for Microsoft Windows. Unlike notepad, it supports multiple tabs.
-
VS Code: (for Windows, Mac, and Linux) Visual Studio Code gives you suggestions to auto-complete the words. It has an inbuilt debugger to trace each line of code.
-
ATOM: (for Windows, Mac, and Linux): Atom helps you write code faster with a smart and flexible autocomplete.
-
Sublime Text: Sublime text is a free source code editor with expandable functionality using plugins. It supports almost all programming languages, is community-built, and is maintained under a free license.
Installing C/GCC Compiler for Windows
C/GCC Compiler
Following are the steps to download and install the MinGW GCC Compiler for windows.
Step 1: Search MinGW C Compiler on the Web
To download the MinGW compiler, go to your favorite browser and search MinGW C Compiler or click on the sourceforge.net link.

Step 2: Download MinGW.
After clicking on the green-colored download button on the website, the MinGW setup file will start downloading.
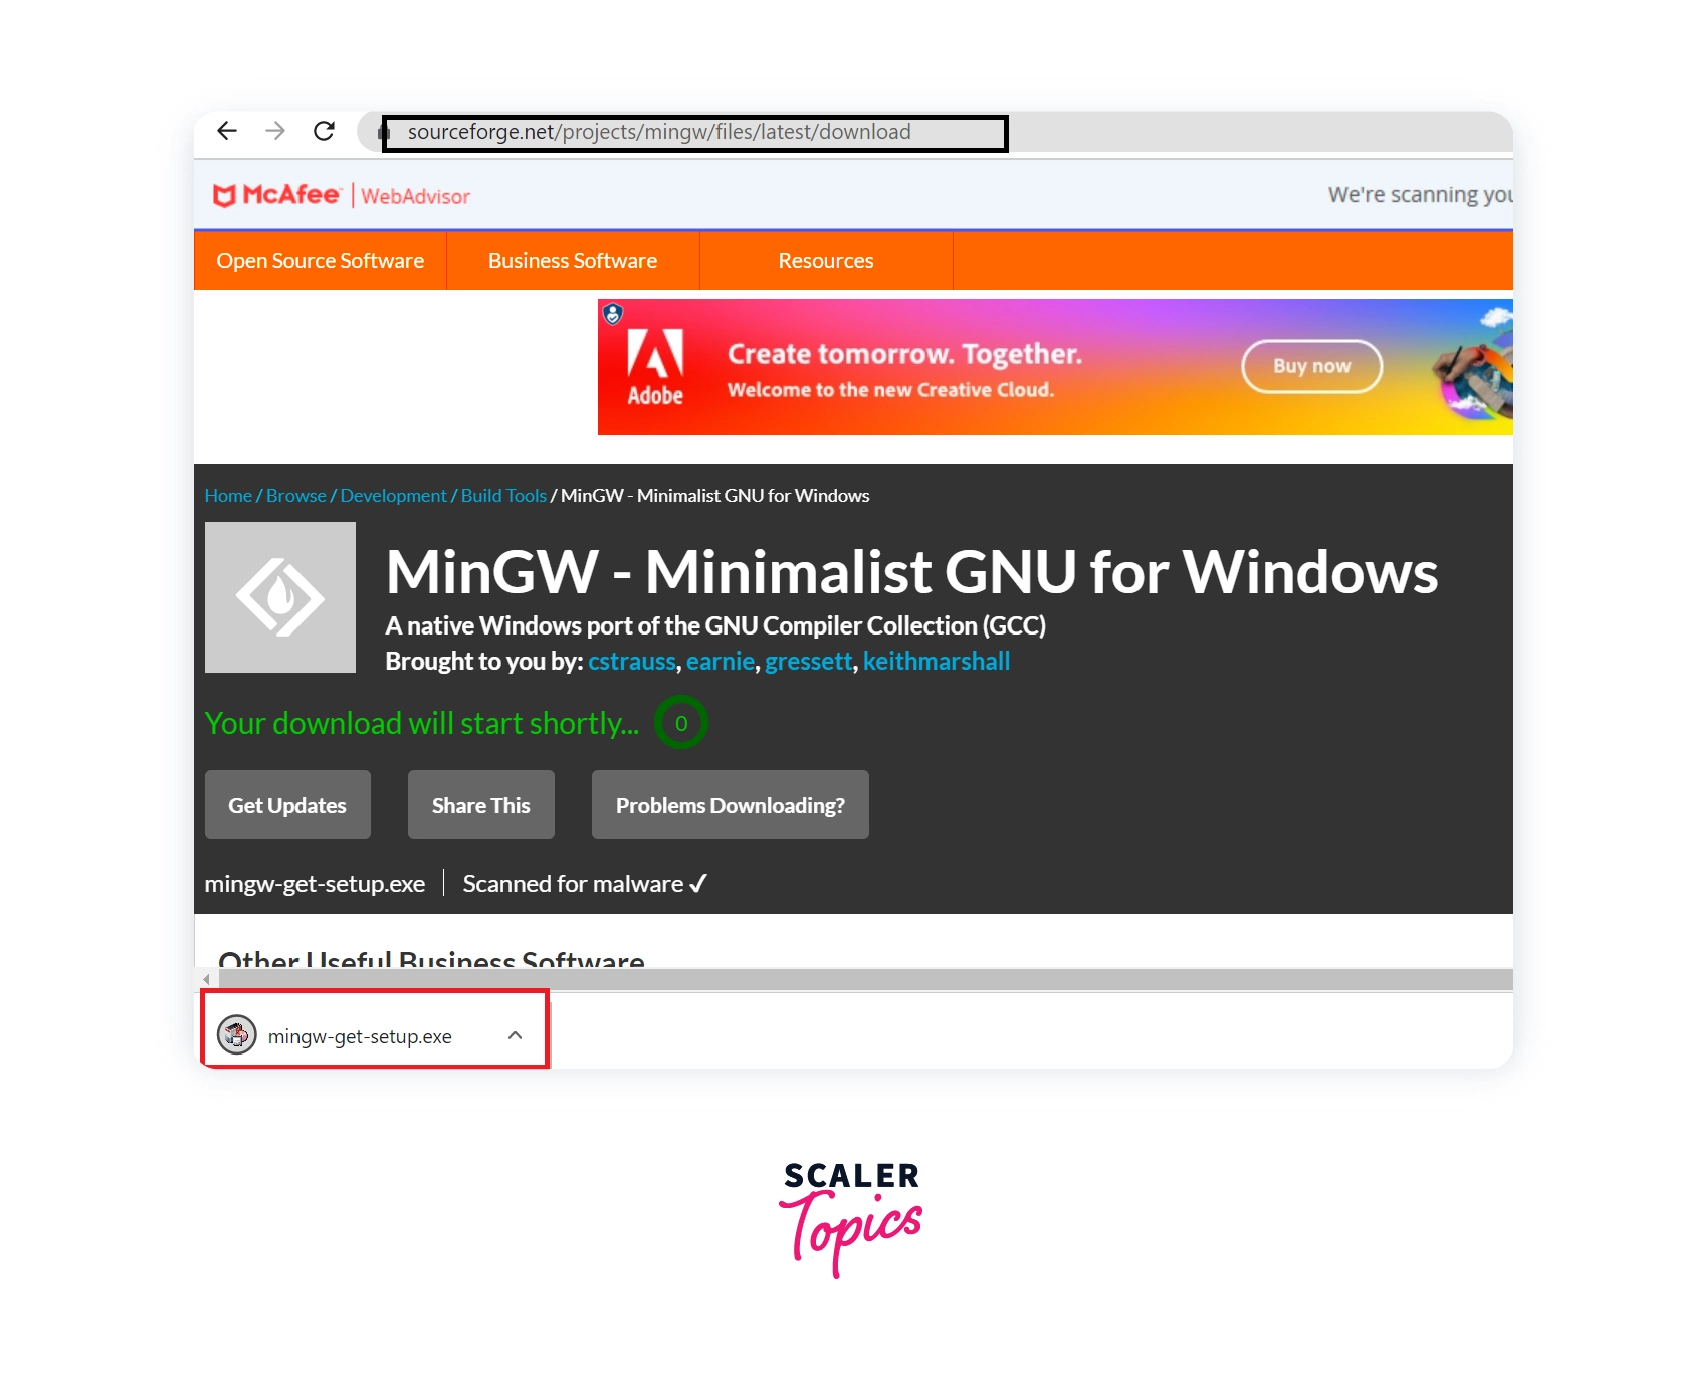
Step 3: Locate the MinGW-get-setup.exe File and Start Installation.
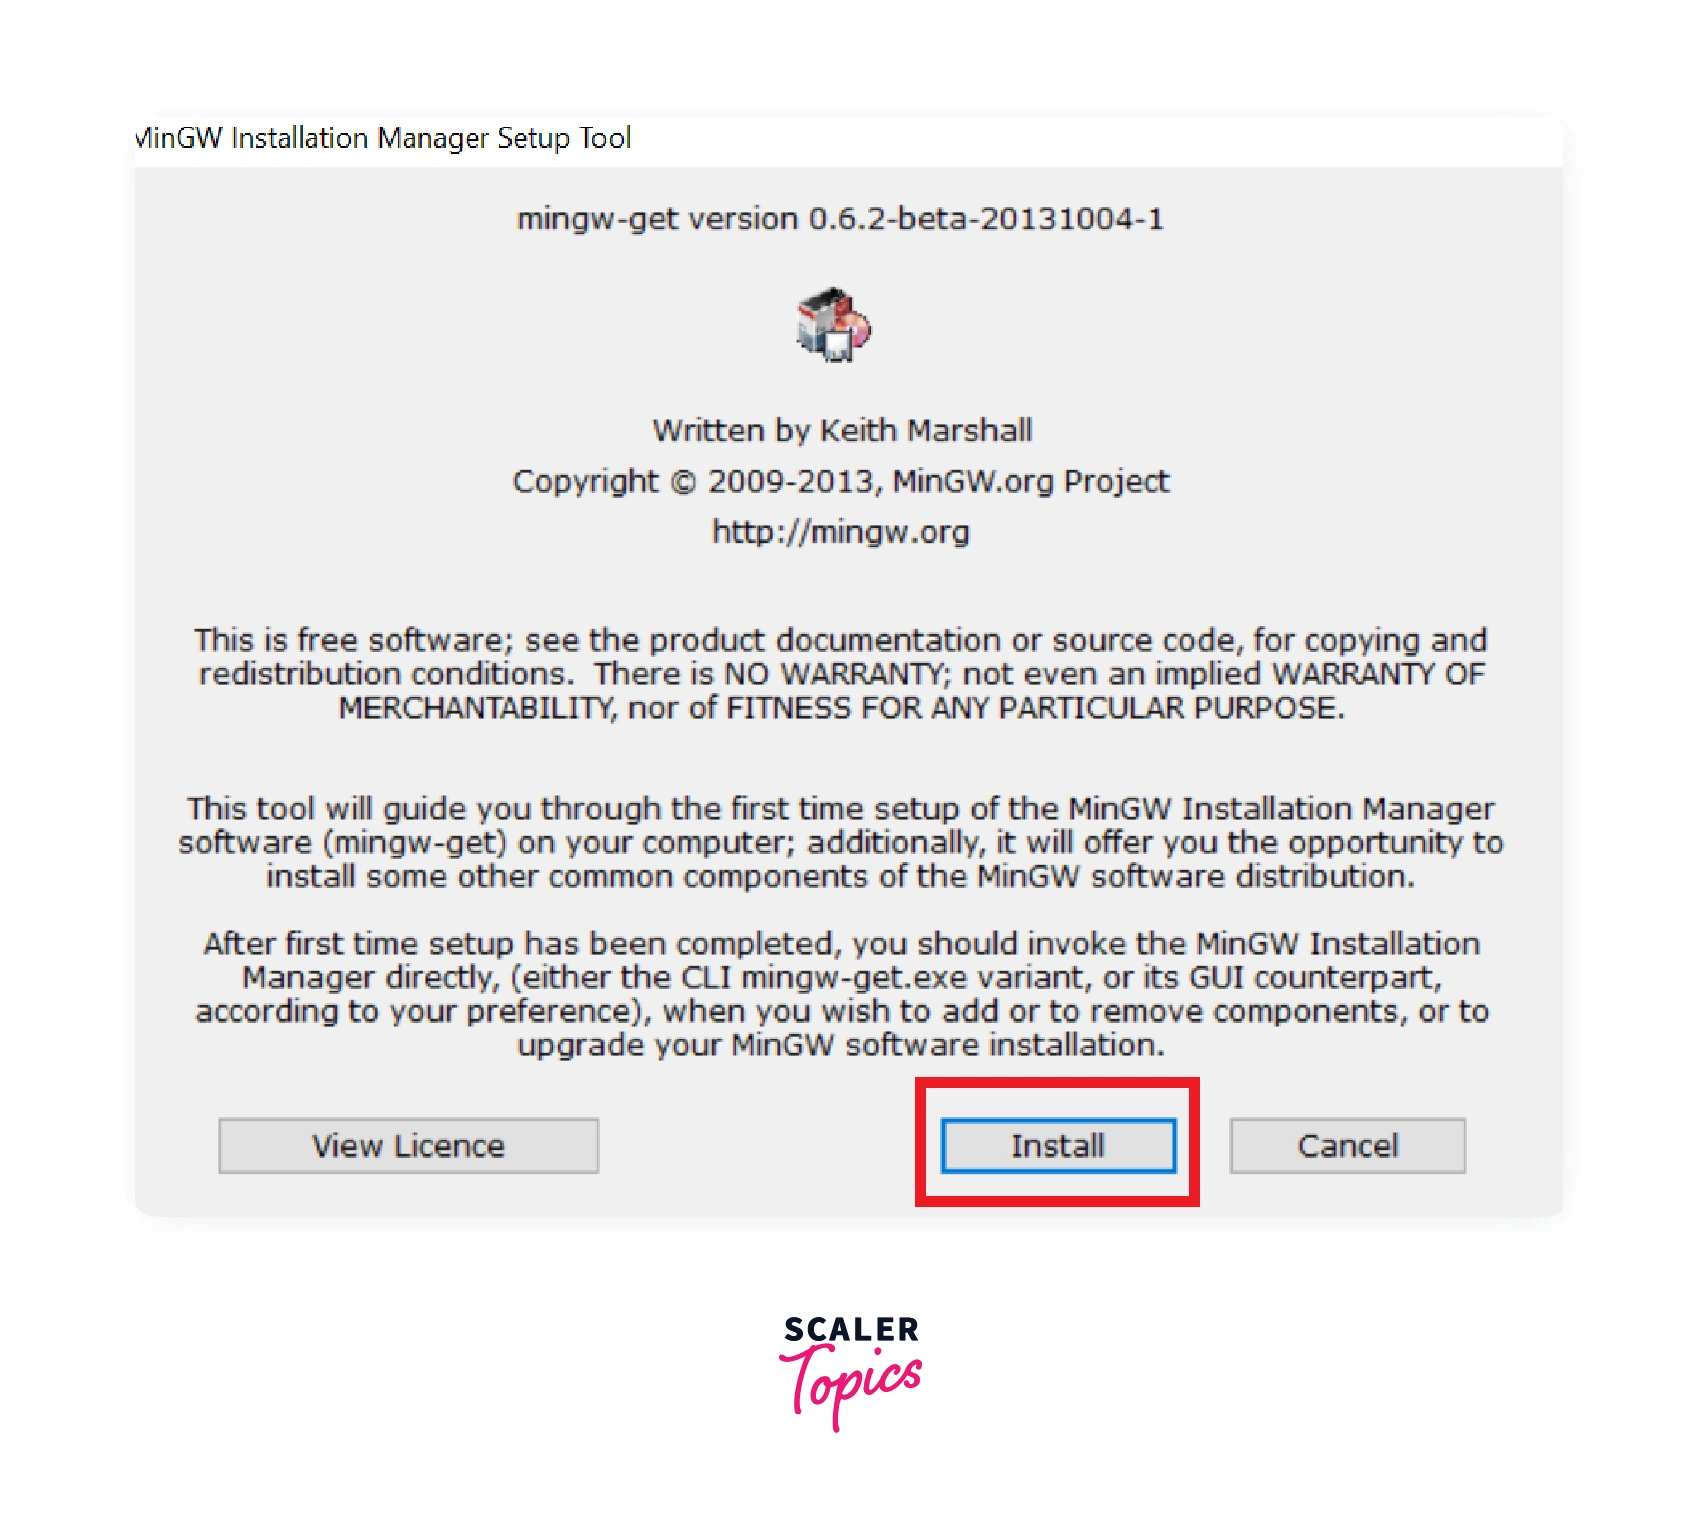
Locate the setup.exe file on your Downloads folder and double-click on it.
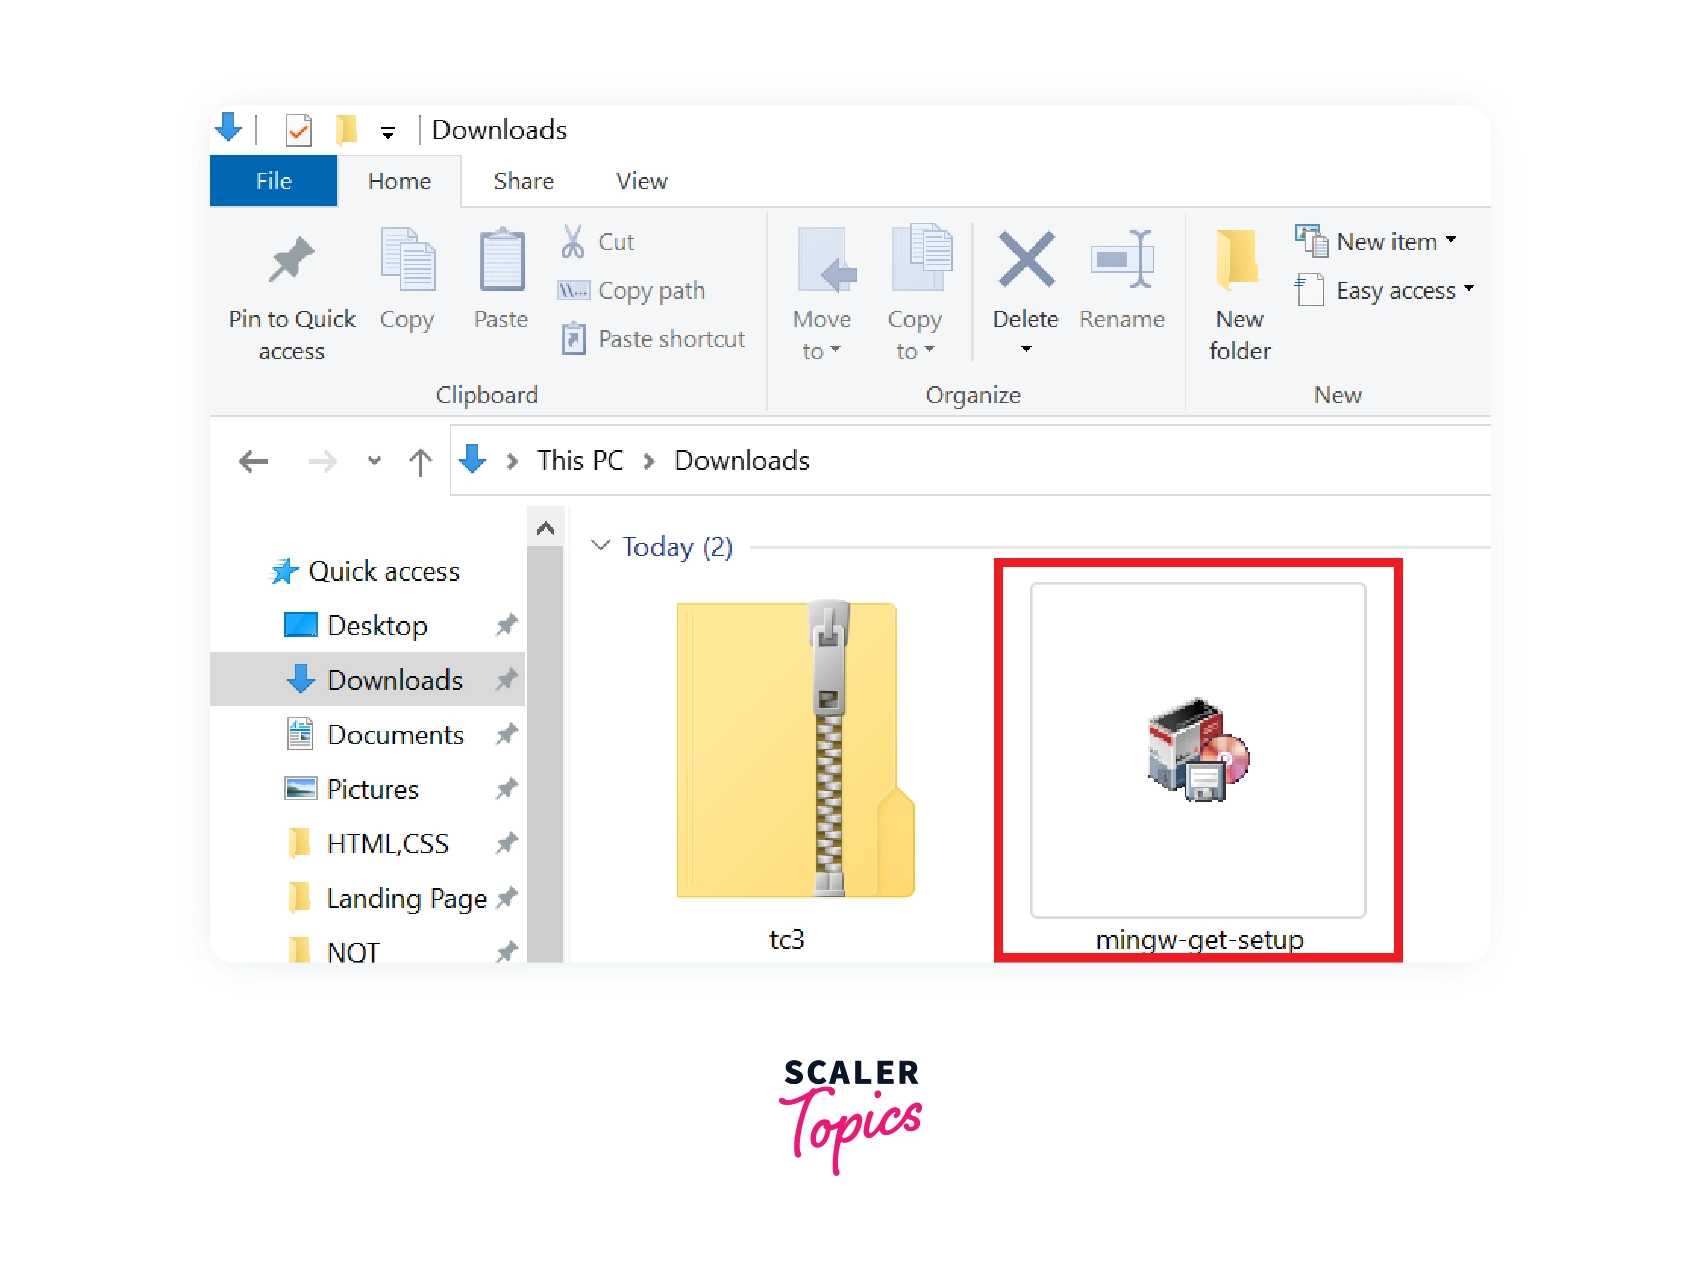
After double-clicking on the setup file, MinGW Installation Manager Setup Tool will now open. It will show the information like version, name, etc. Click on the Install button and proceed to start the installation.
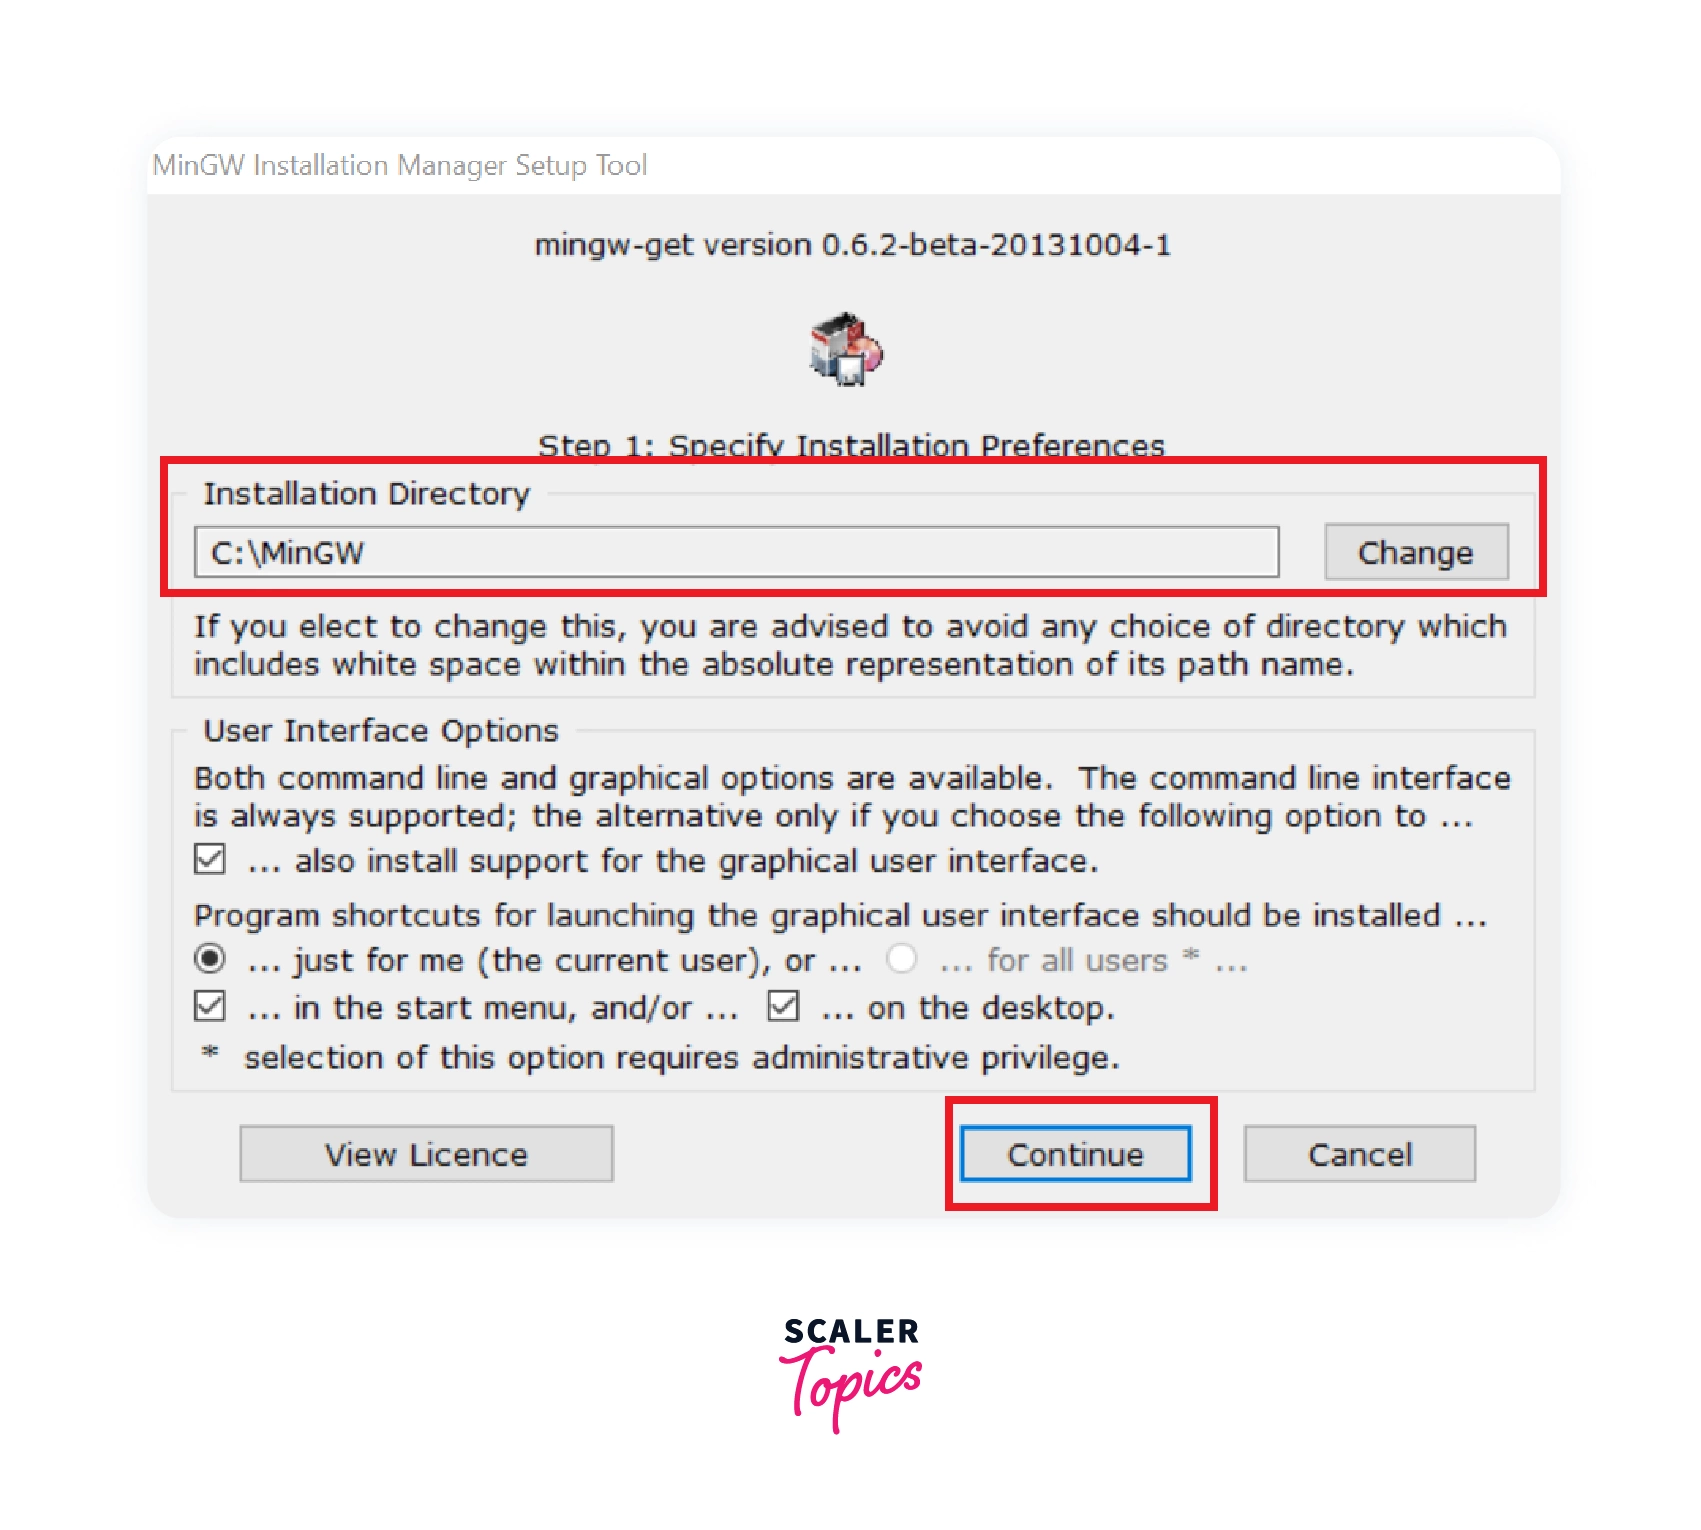
Step 4: Specify Installation Preferences.
Now the installation manager will ask you to specify the installation preferences. For that, you will be asked to choose the installation directory. If you wish to change it, you can browse the explorer and specify the location as per your requirement. After that, click on continue to proceed further.
It is recommended to install it in the default location
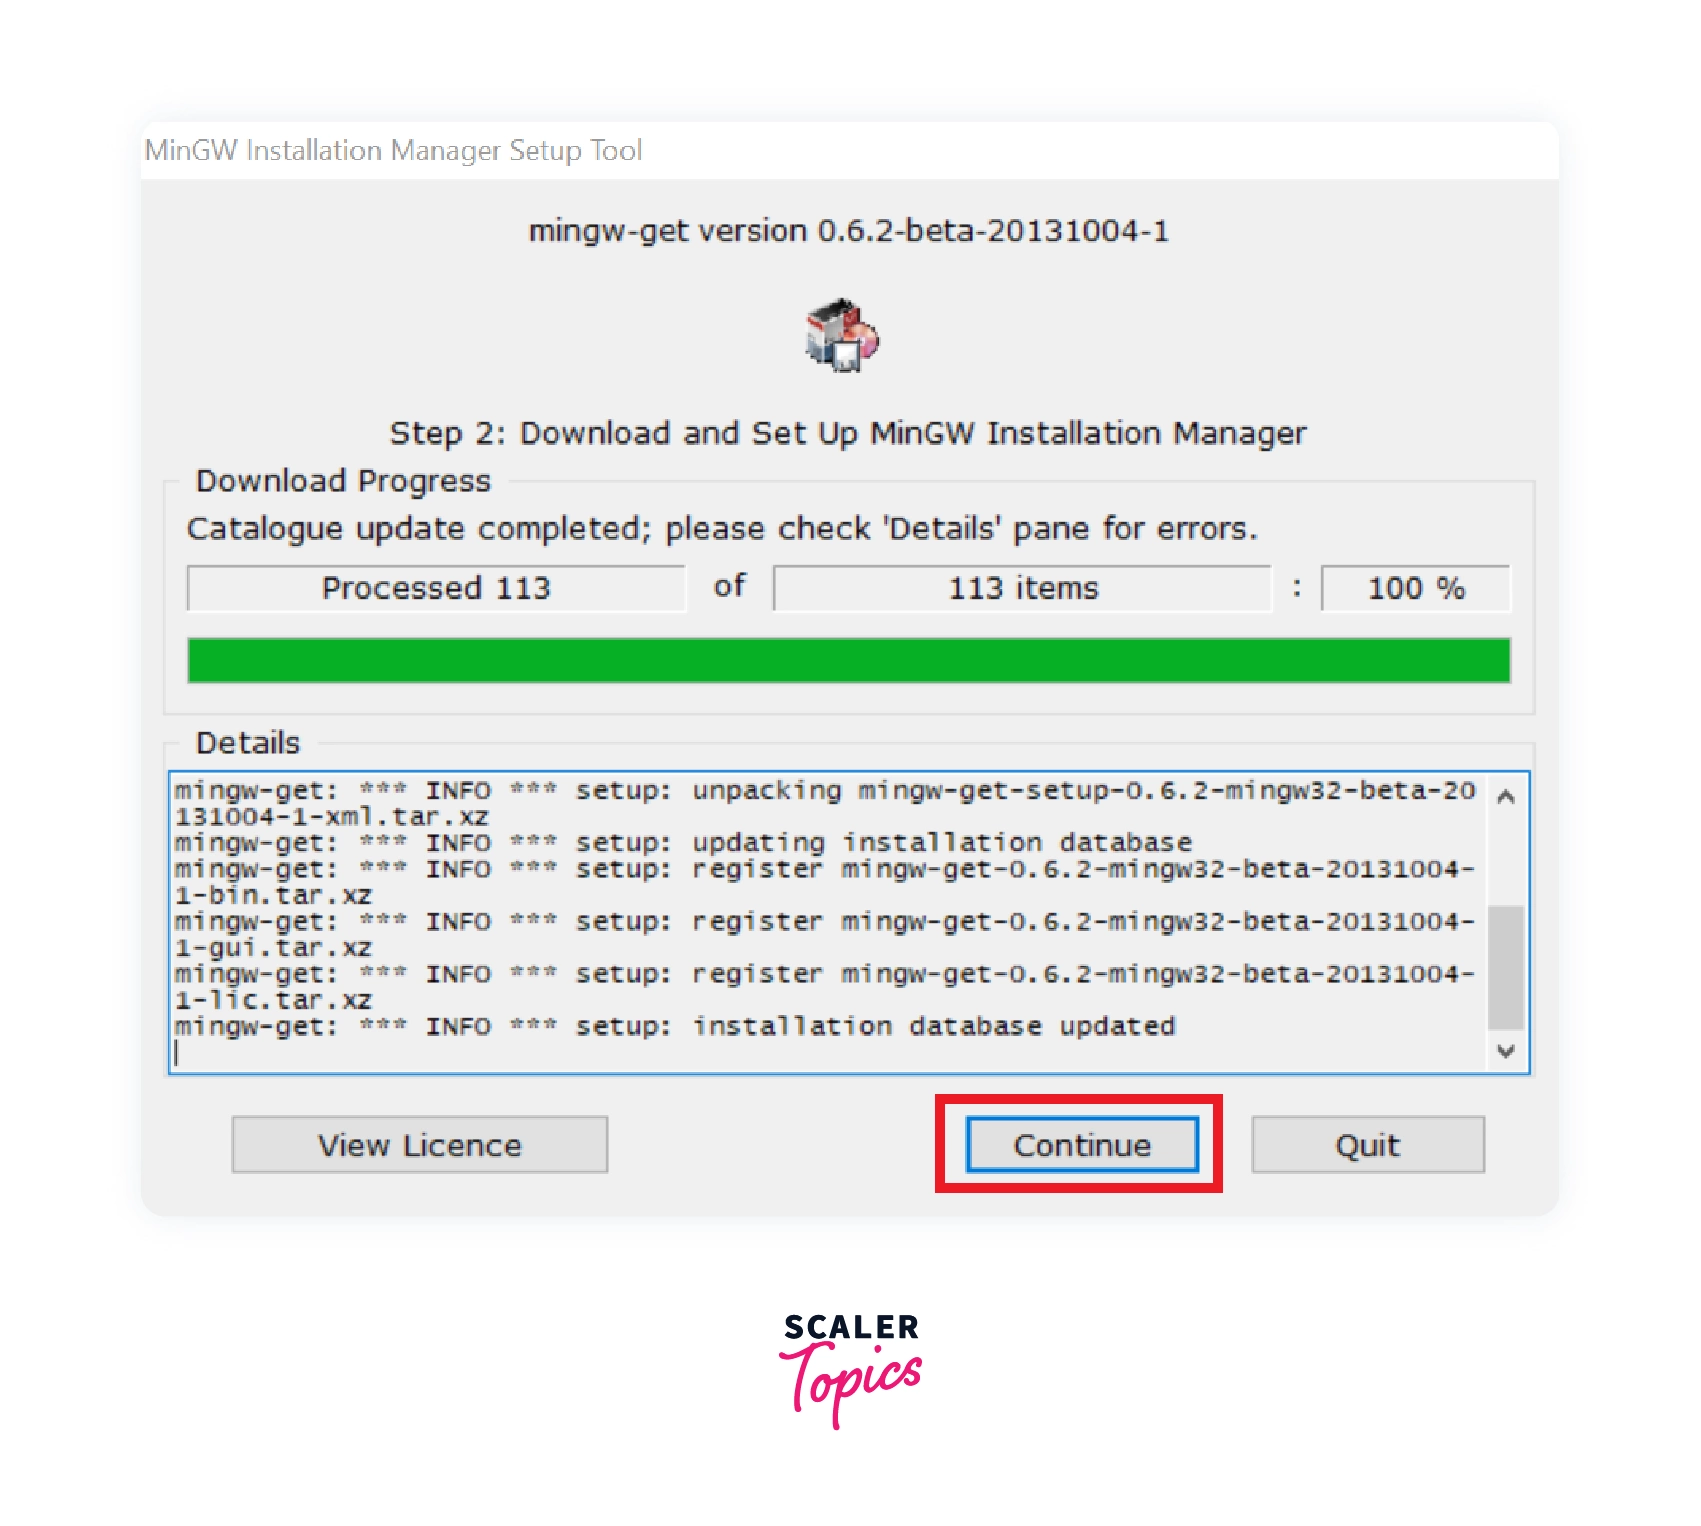
Step 5: Download and Set up MinGW Installation Manager.
The installer will now automatically download the required files for MinGW to install on your Windows system. Grab a cup of coffee and wait patiently till the installation manager finishes downloading all the files. When it is done, click on continue to proceed ahead.
Note: Active internet is required throughout the installation process.
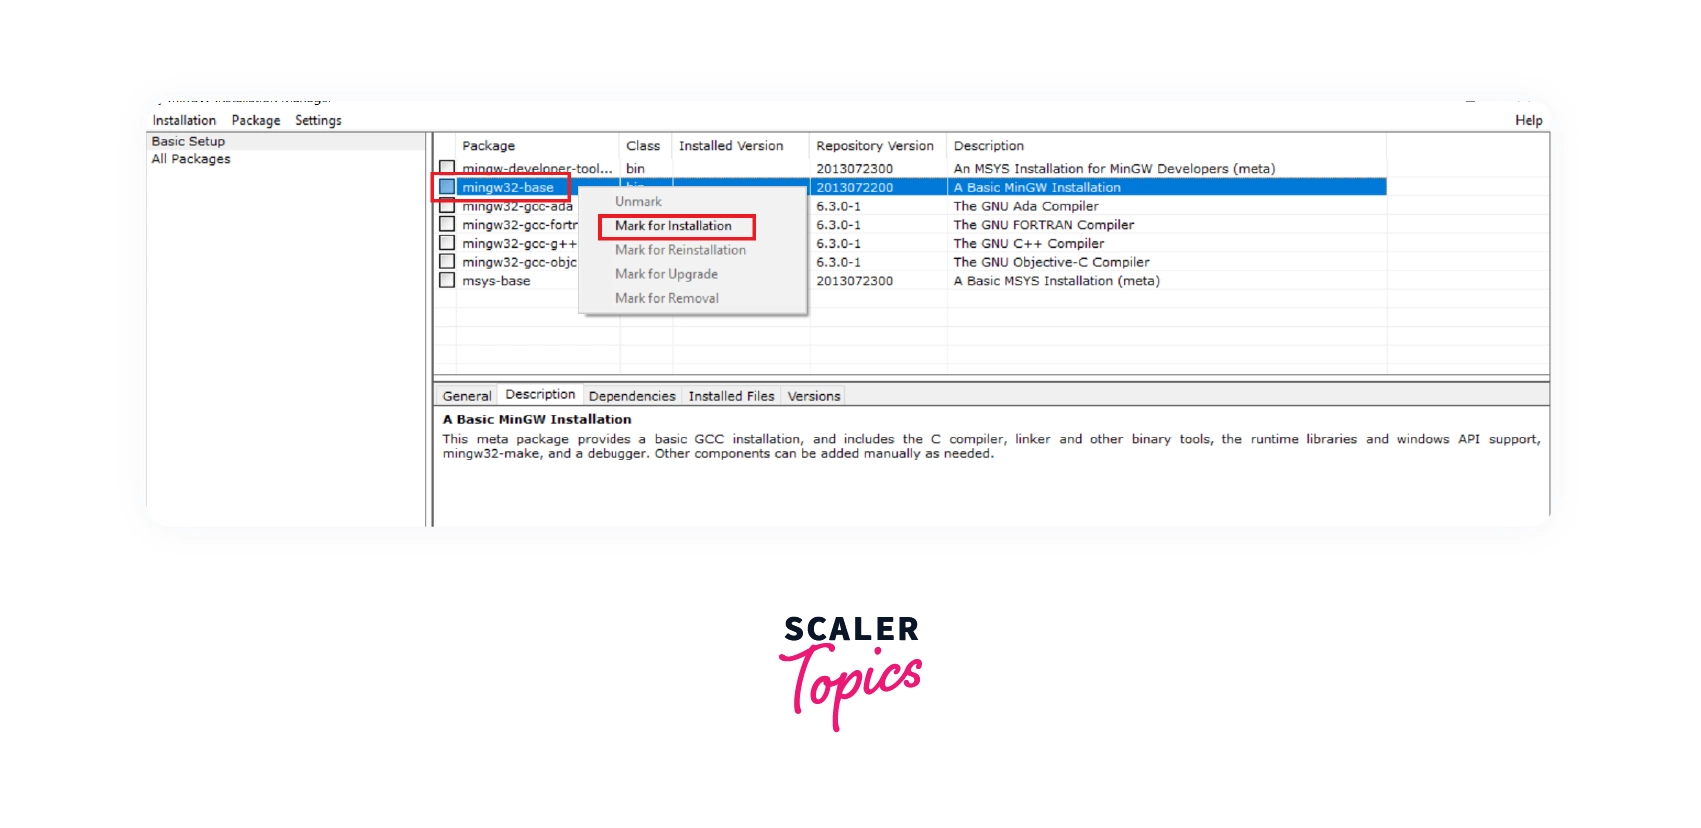
Step 6: Select Packages Required for the Compiler.
There are three packages required for the basic MinGW setup that you have to choose from the MinGW Installation Manager.
1. MinGW32-base Package.
First, you have to install the MinGW32-base package. This package is used to compile the C program, including linker and other binary tools. Right-click on the MinGW32-base option and select Mark for Installation.
2. MinGW32-gcc-g++ Package.
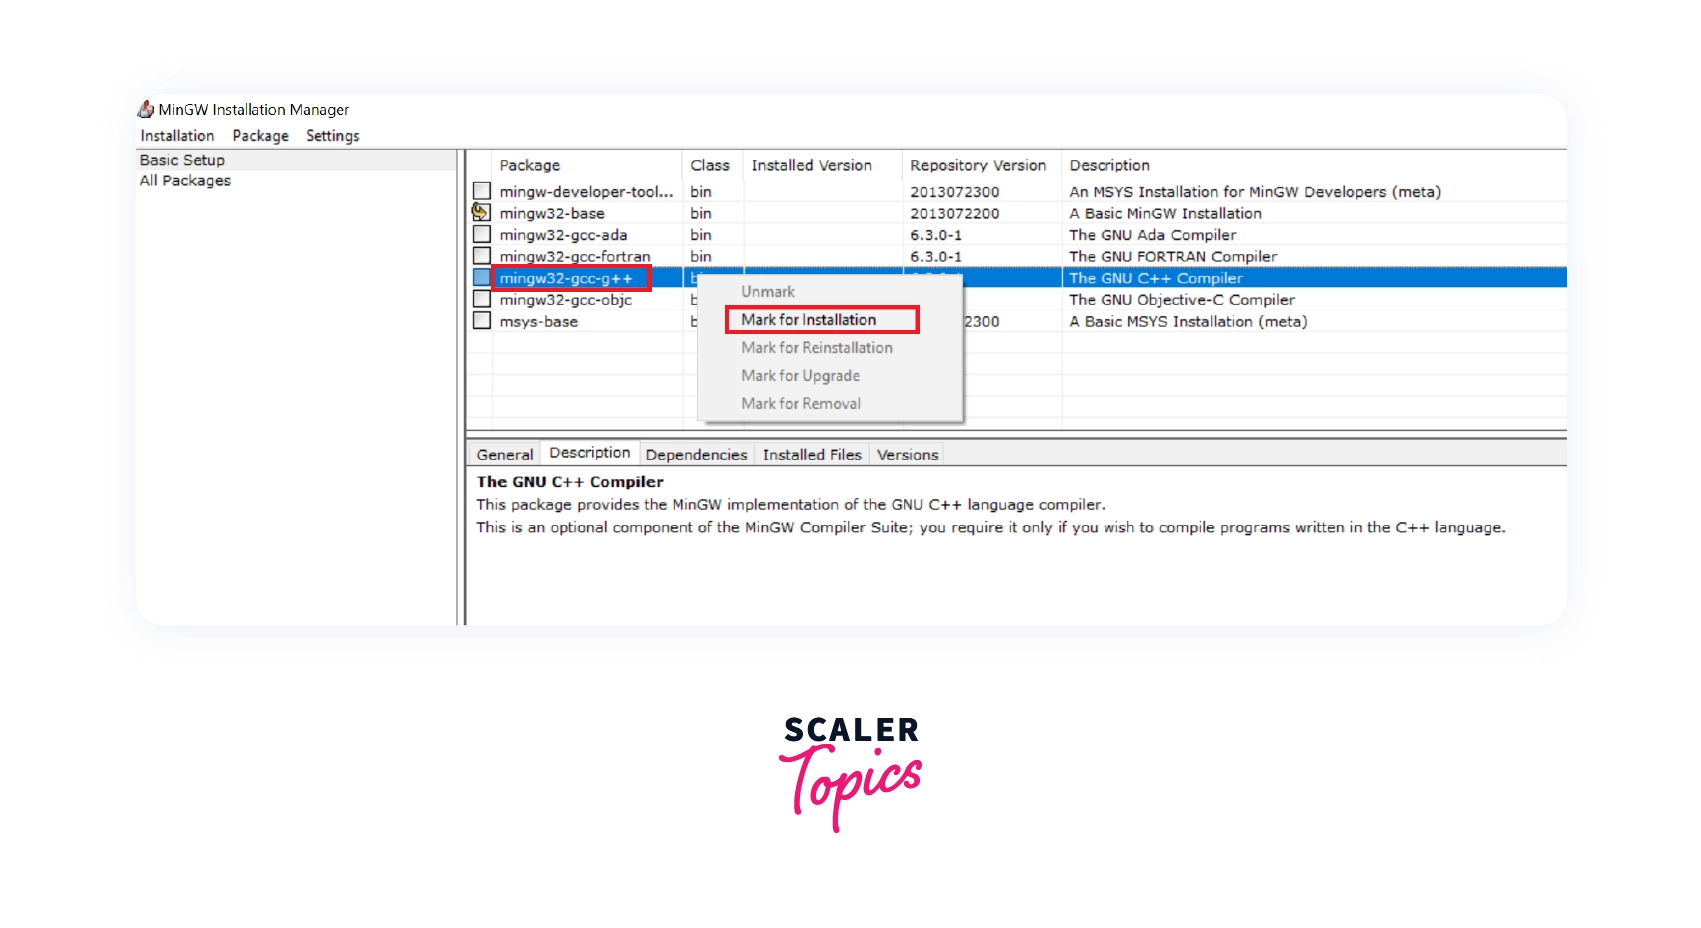
Now you have to install the MinGW32-gcc-g++ package. This package is used to compile C++ source code. This is an optional component of the MinGW Compiler. It is only required if you are going to program in C++ language only. To select the MinGW32-gcc-g++ right-click on it and select Mark for Installation.
3. MinGW32-gcc-objc package.
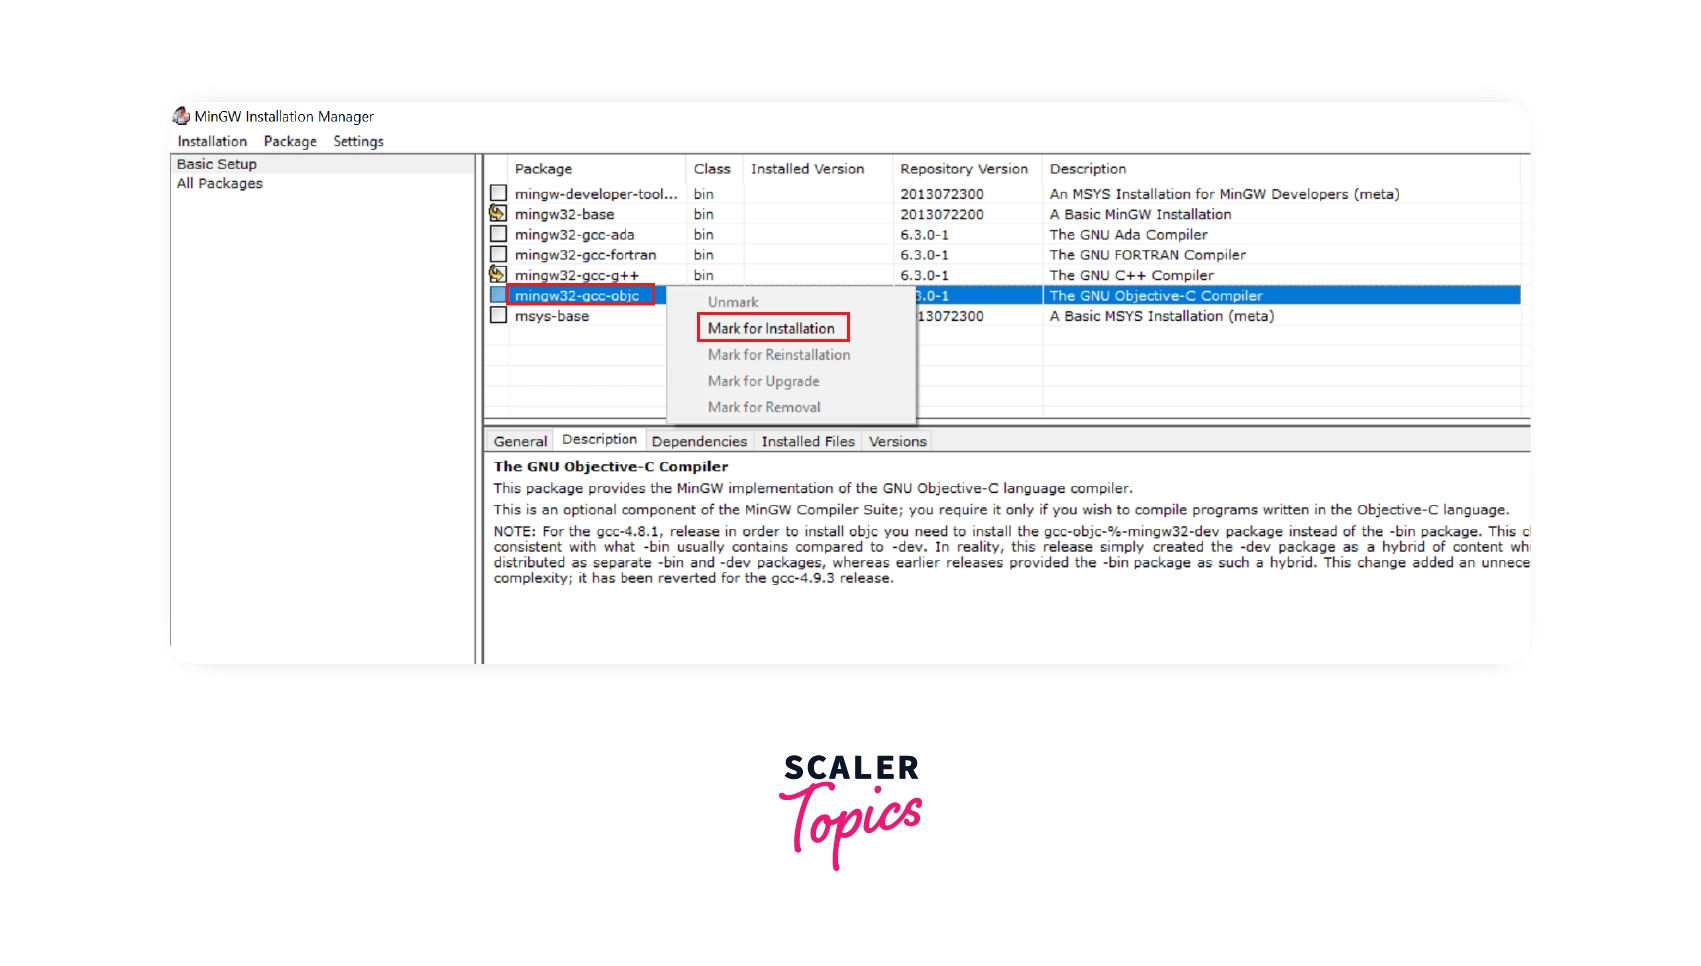
At last, you have to install the MinGW32-gcc-objc package. This package is used to compile objective C language. It is an optional component. It is only required if you are going to program in objective C. To select the MinGW32-gcc-objc package, right-click on it and select Mark for Installation.
Step 7: Apply the Changes
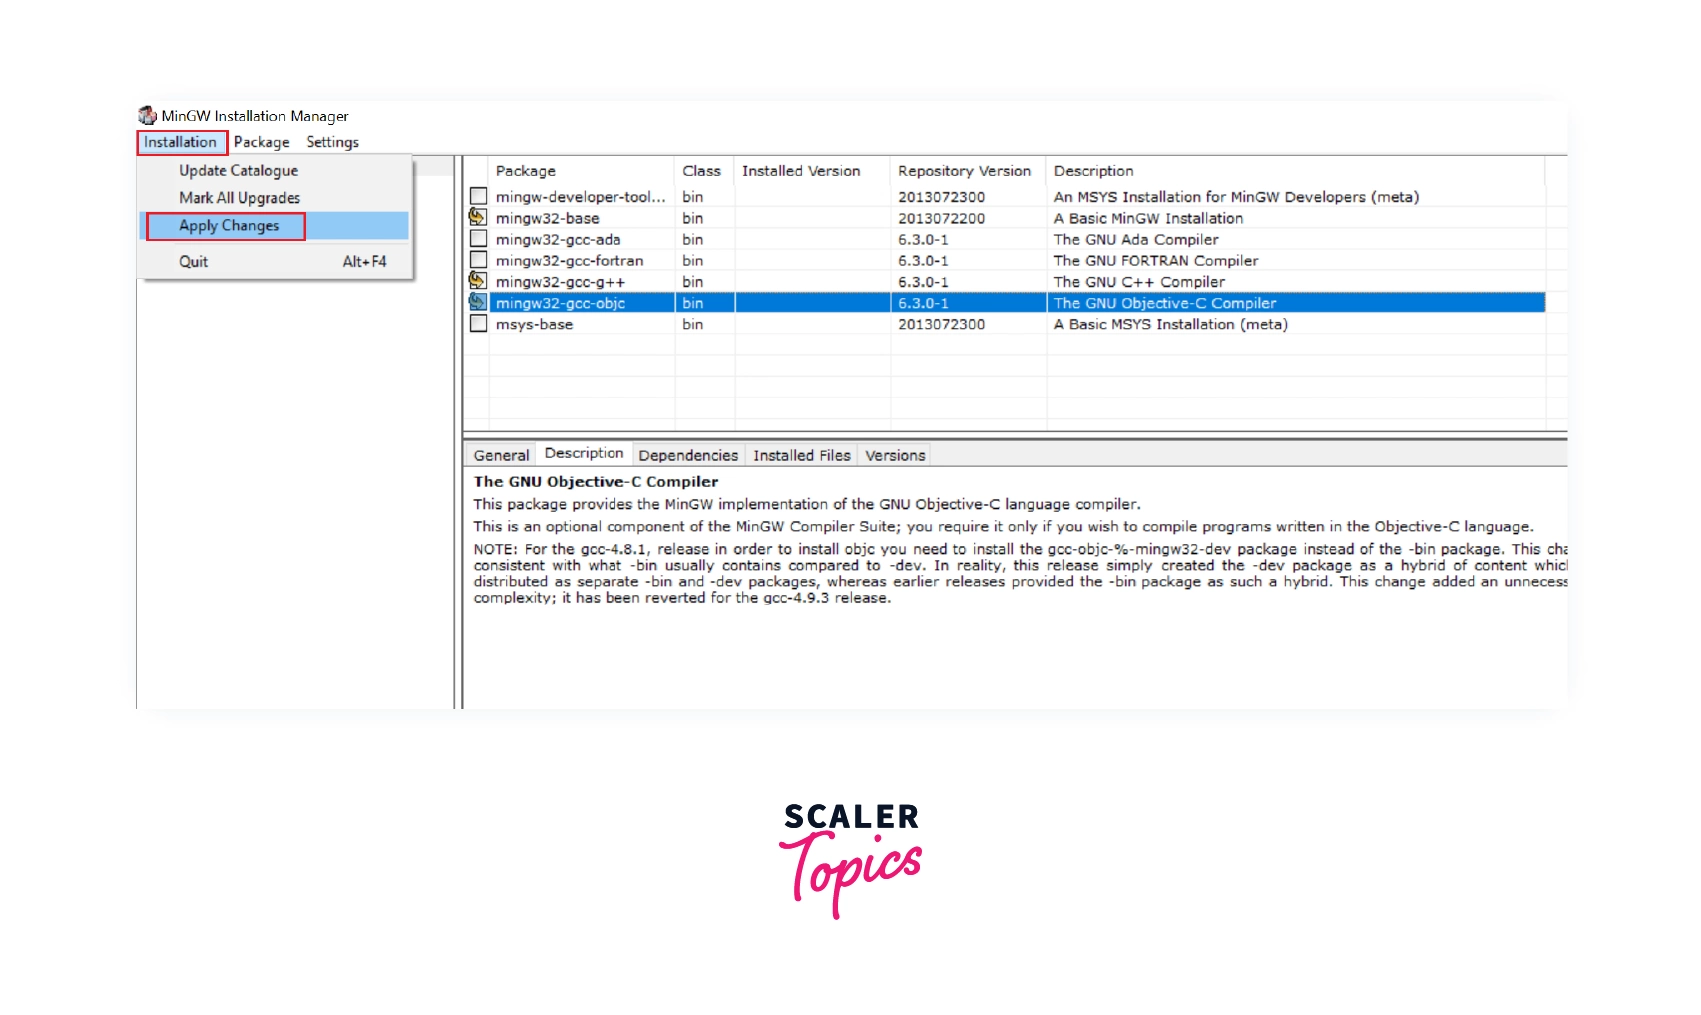
After selecting all the required packages, go to Installation>>Apply Changes and click on Apply Changes.
Step 8: Download the Changes.
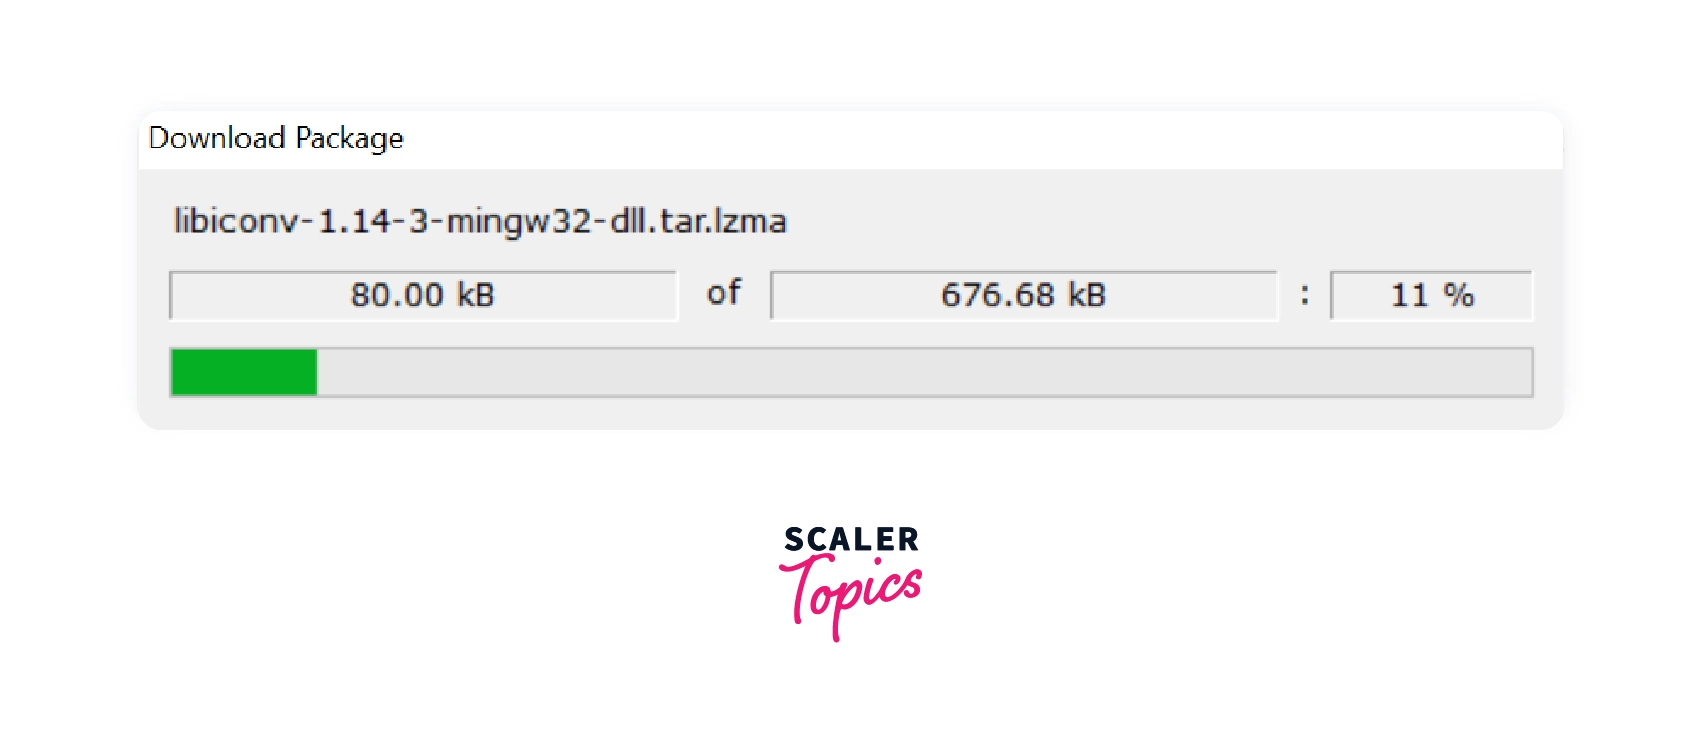
Now it is time to download all the packages you selected in the previous step. Click on Apply and proceed further to download and install them.
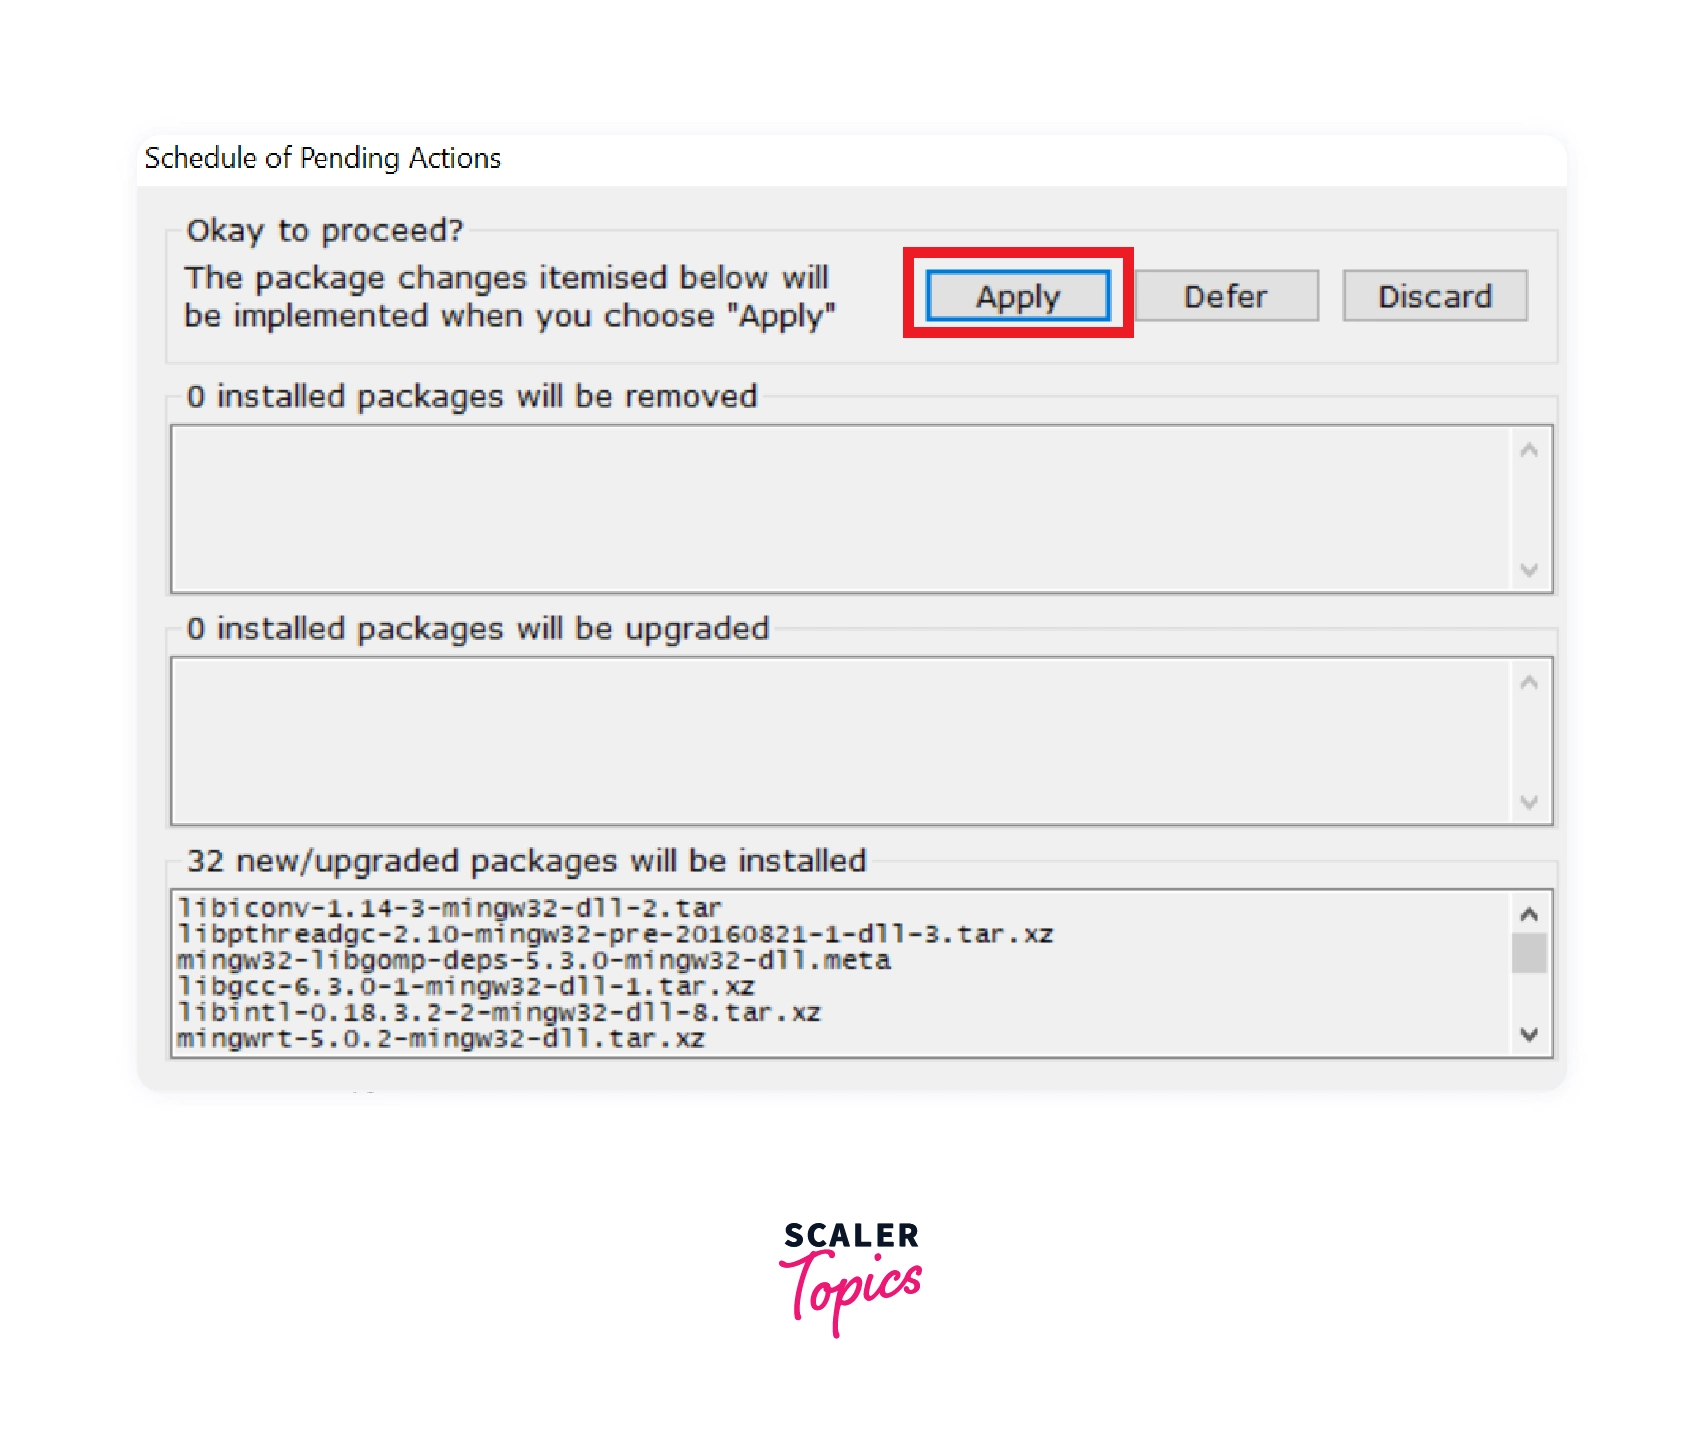
The download for the packages will now begin, as shown in the window below. Wait for a few minutes until the download completes.
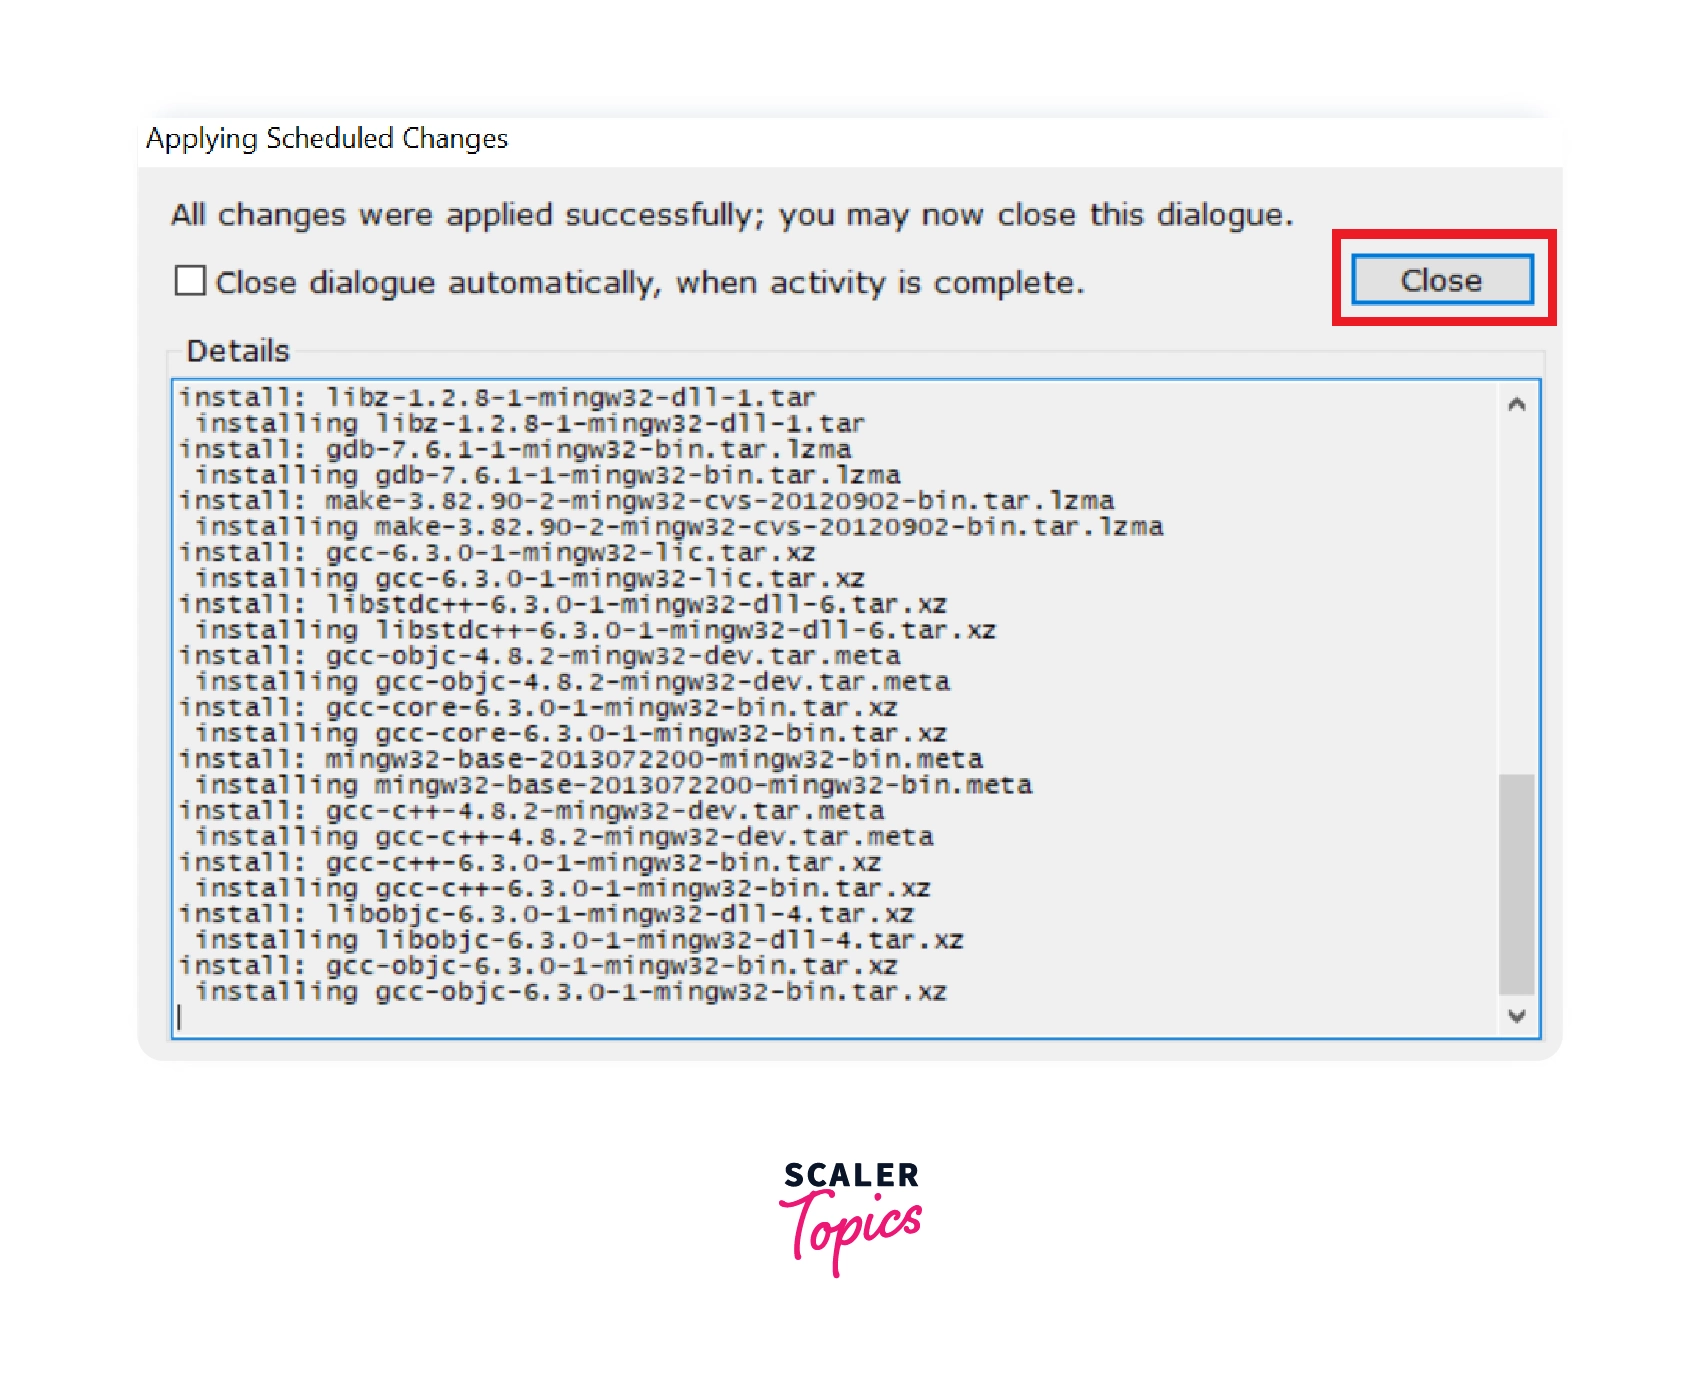
Step 9: Installation Completed.
Now the installation has been completed, click on Close to close the Installation manager.
Now the installation of MinGW is finished. To check if it is installed or not, open Command Prompt and type g++ —version.
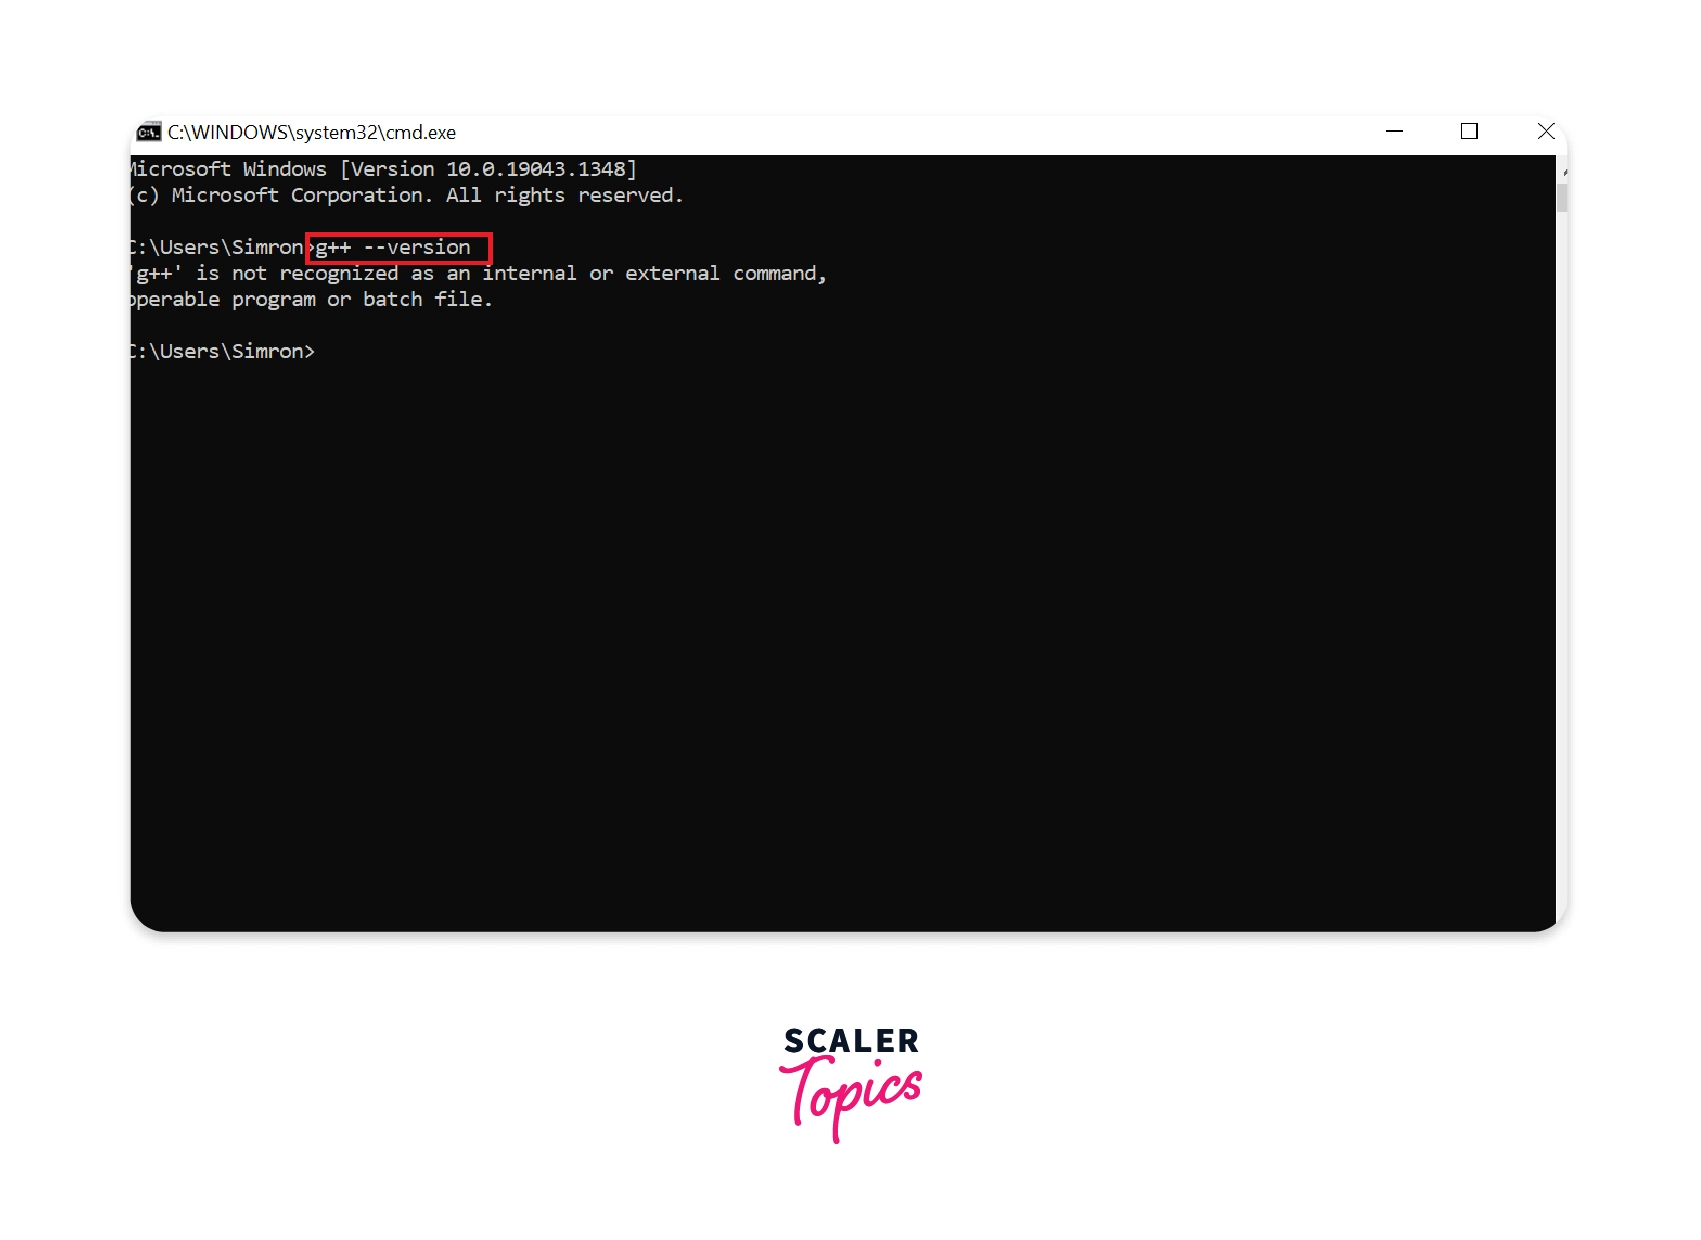
Currently, the command prompt cannot detect the MinGW compiler (GCC) because the environment path variable has not been set. The environment path variable helps to detect the compiler in your whole system. It makes the alias name for the compiler, which denotes the path. Follow the steps below to set the environment path variable for MinGW on the Windows system.
Setting up Path Variable
To set up the path for the C compiler for windows, follows the below steps :
Step 1: Copy the path of the MinGW bin.
When you install the MinGW, it creates a folder named MinGW in C: Drive.
To set the compiler’s path, we need the path to the bin directory of MinGW. So, first,
- Go to C:>MinGW>bin.
- Now, inside the bin folder, click on the address bar and copy the address.
- We require this address to be set as the path in the environment variable.
- If your install location was somewhere else, you may go to that location where you have installed MinGW.

Note: If you open command prompt directly in the bin path, the g++ —version command will work properly, but the command should work on all the directories in the computer. That is the main reason to set the environment path variable.
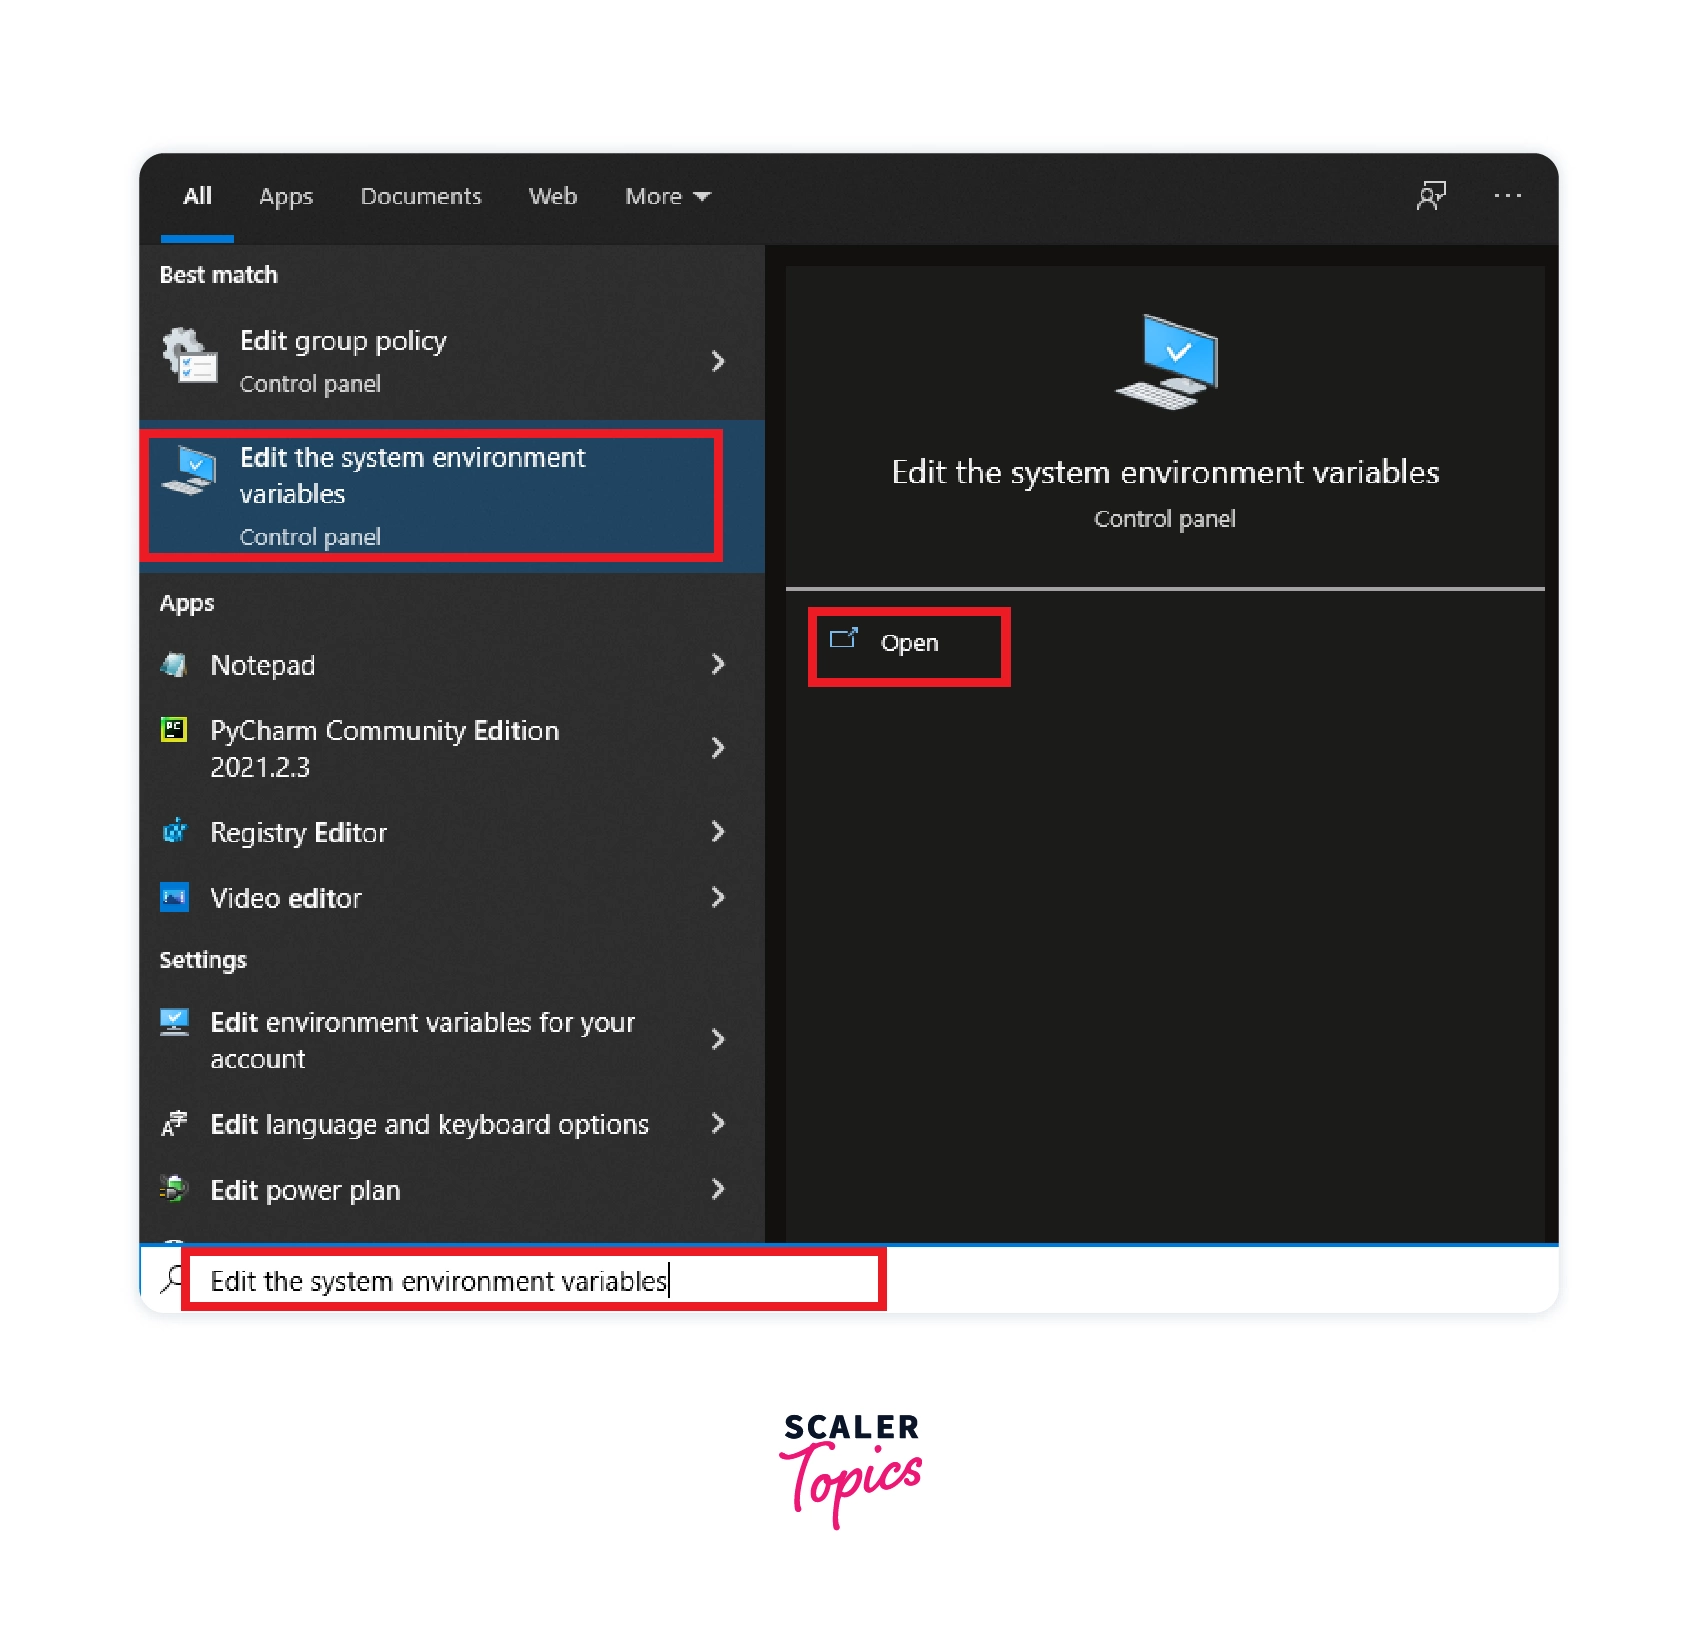
Step 2: Open Edit System Variables.
Navigate to the search bar and type Edit the system environment variables and click on open to continue to edit system environment variables.
Step 3: Edit the Path.
In the User variables for the User section, select the path and click on the Edit button.
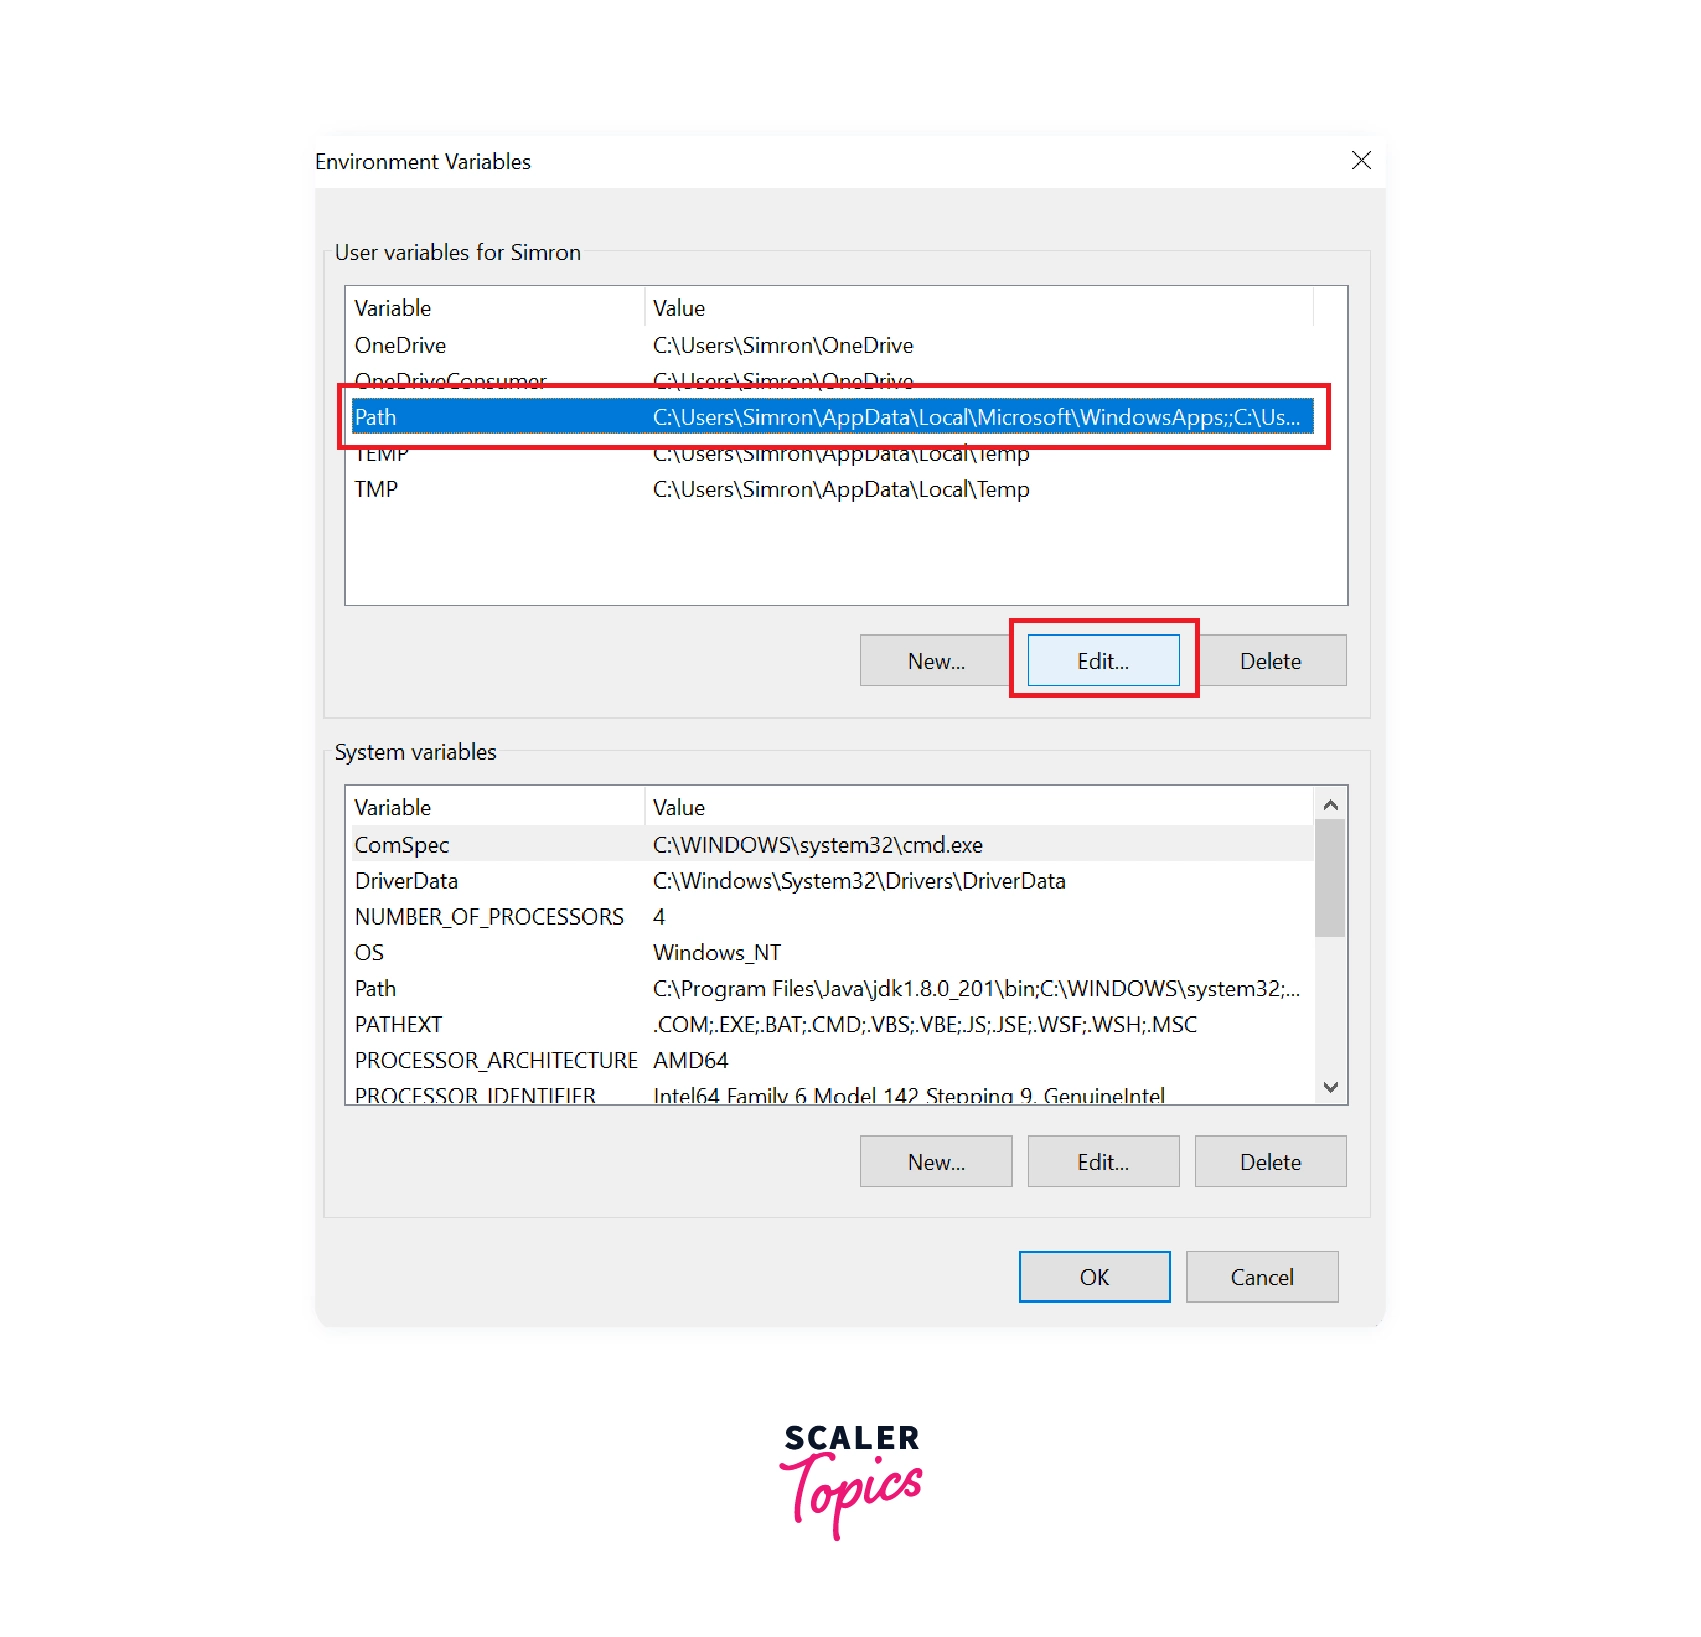
Step 4: Setup a New Path.
- After clicking on the Edit button, a new window, Edit environment variable will open. This window allows us to add the path as per our requirements.
- Since we want to add a new path, click on the New button. A new window, Edit environment variable, will open. This window allows us to add the path as per our requirements. Click on the ‘ New ‘ button since we want to add a new path.
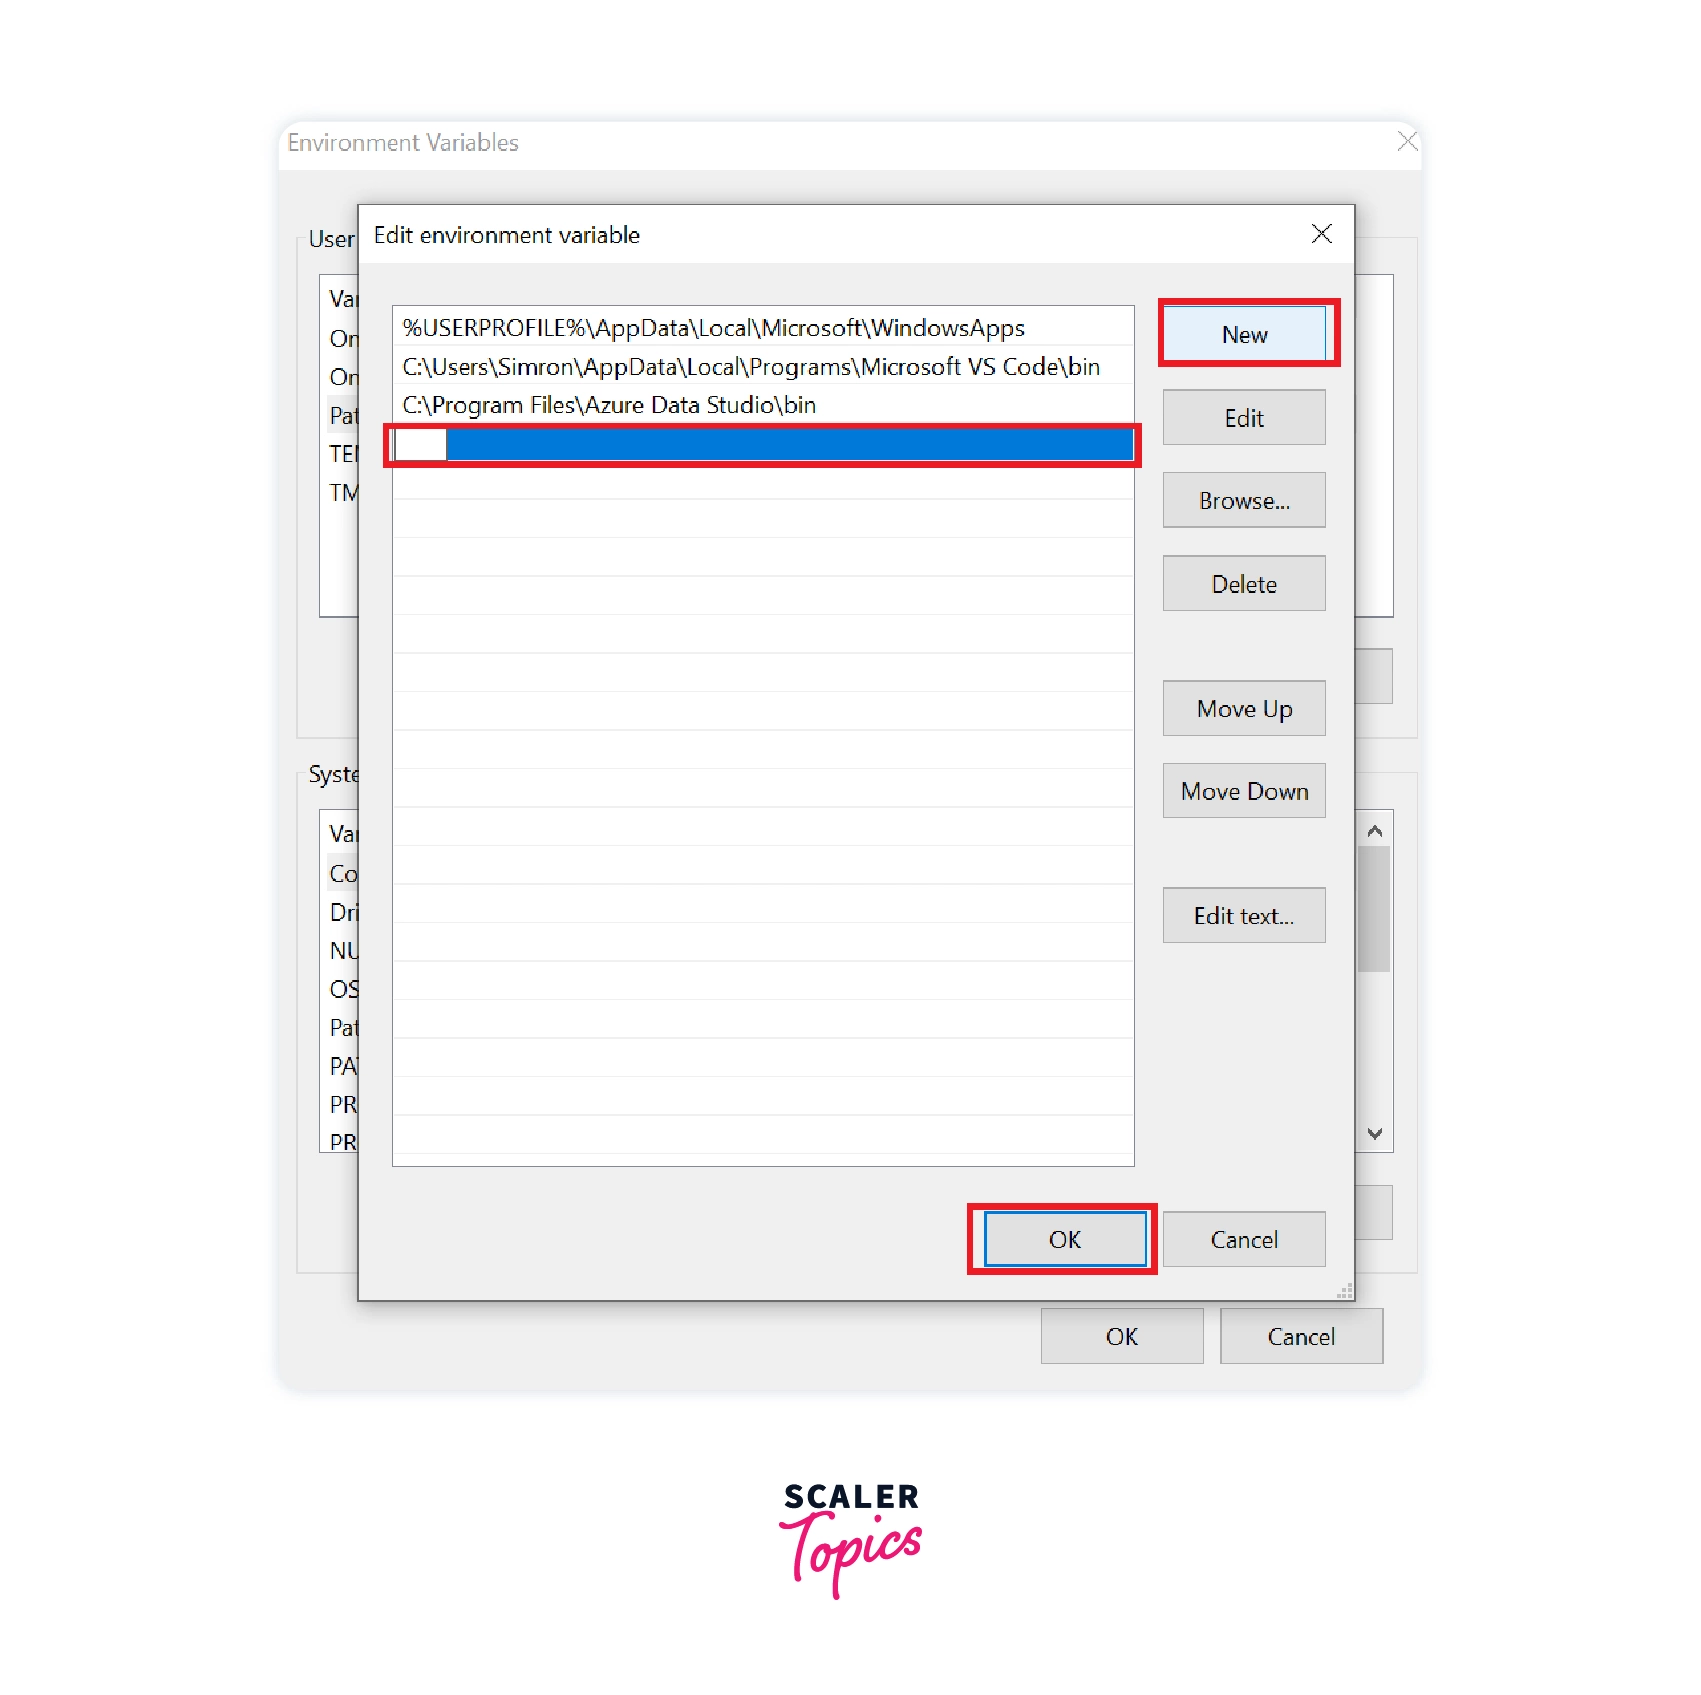
Step 5: Paste the Path.
Paste the path of the MinGW bin that was copied earlier and click on Ok.
Creating and Running a C program
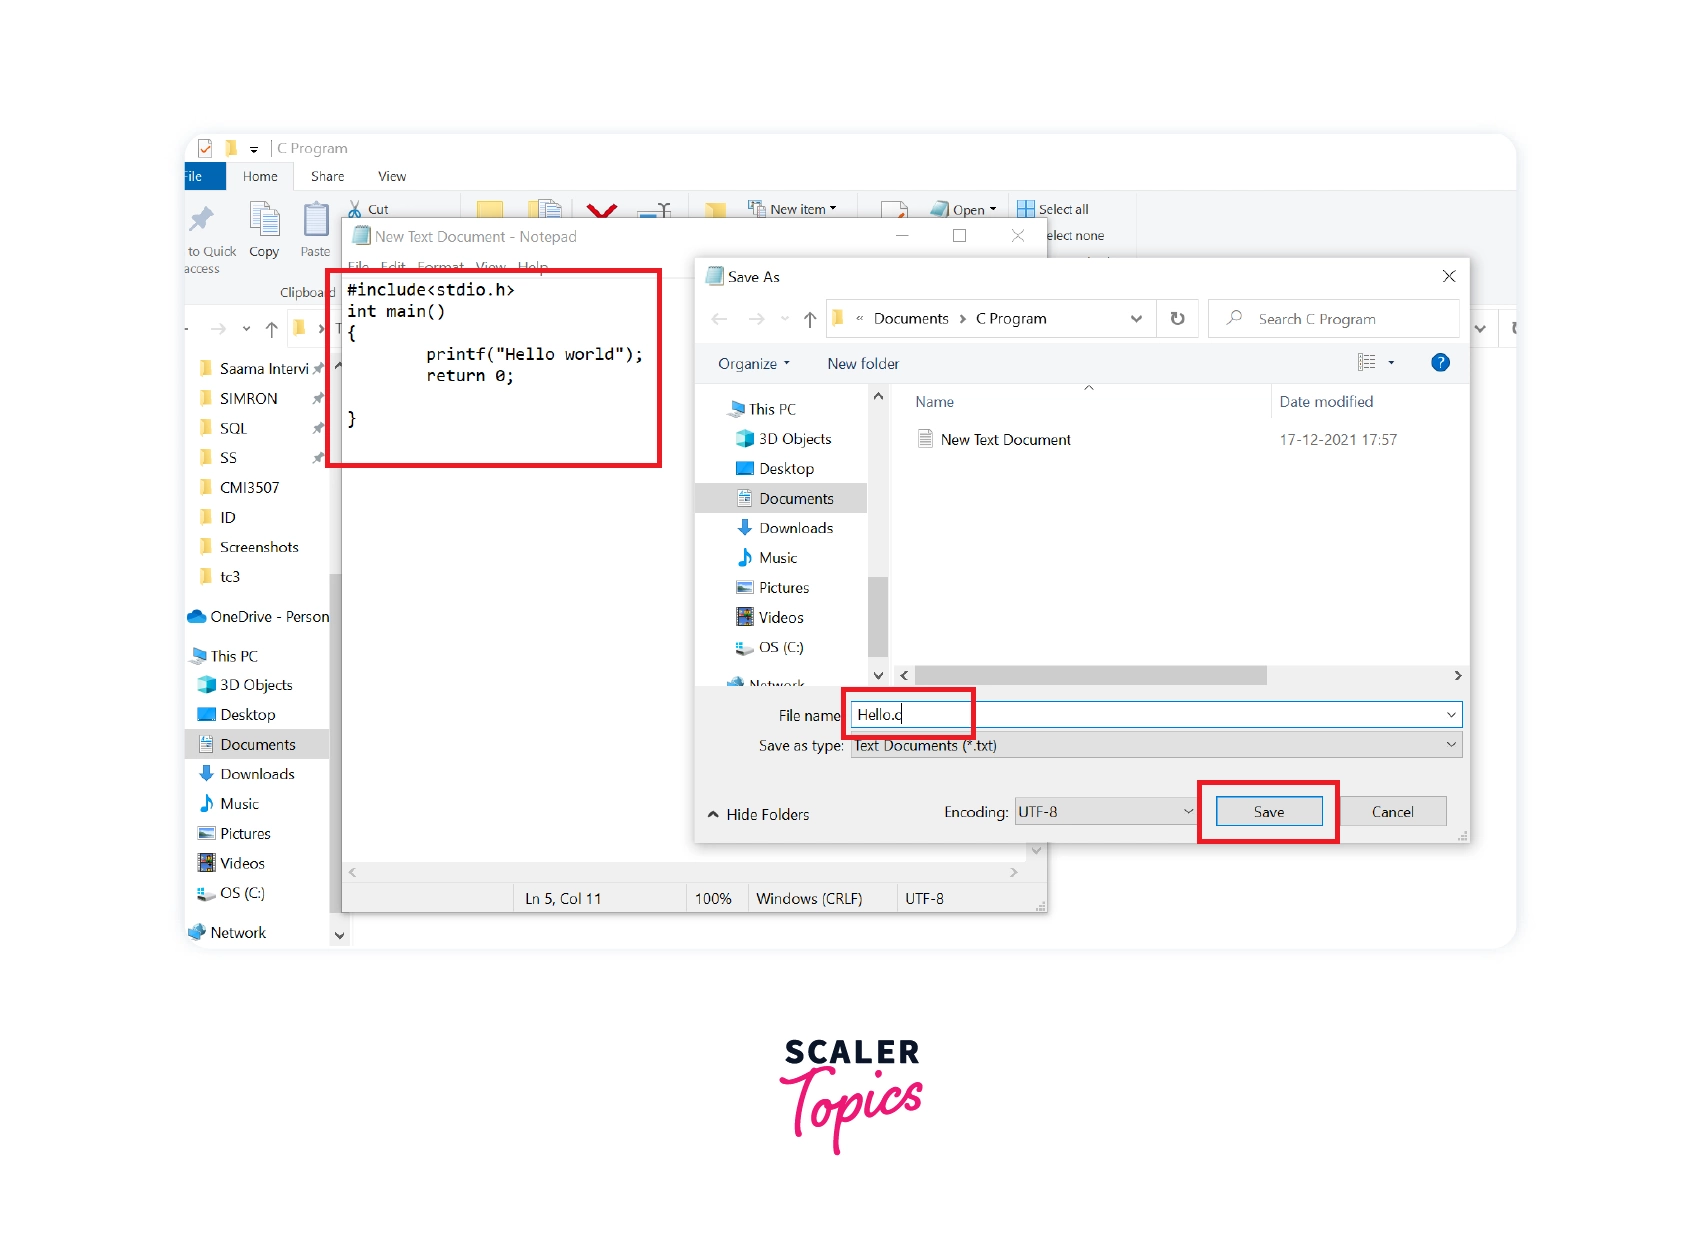
Step 1: Hello World in C.
To execute a C program, create a text file in any directory of your choice.
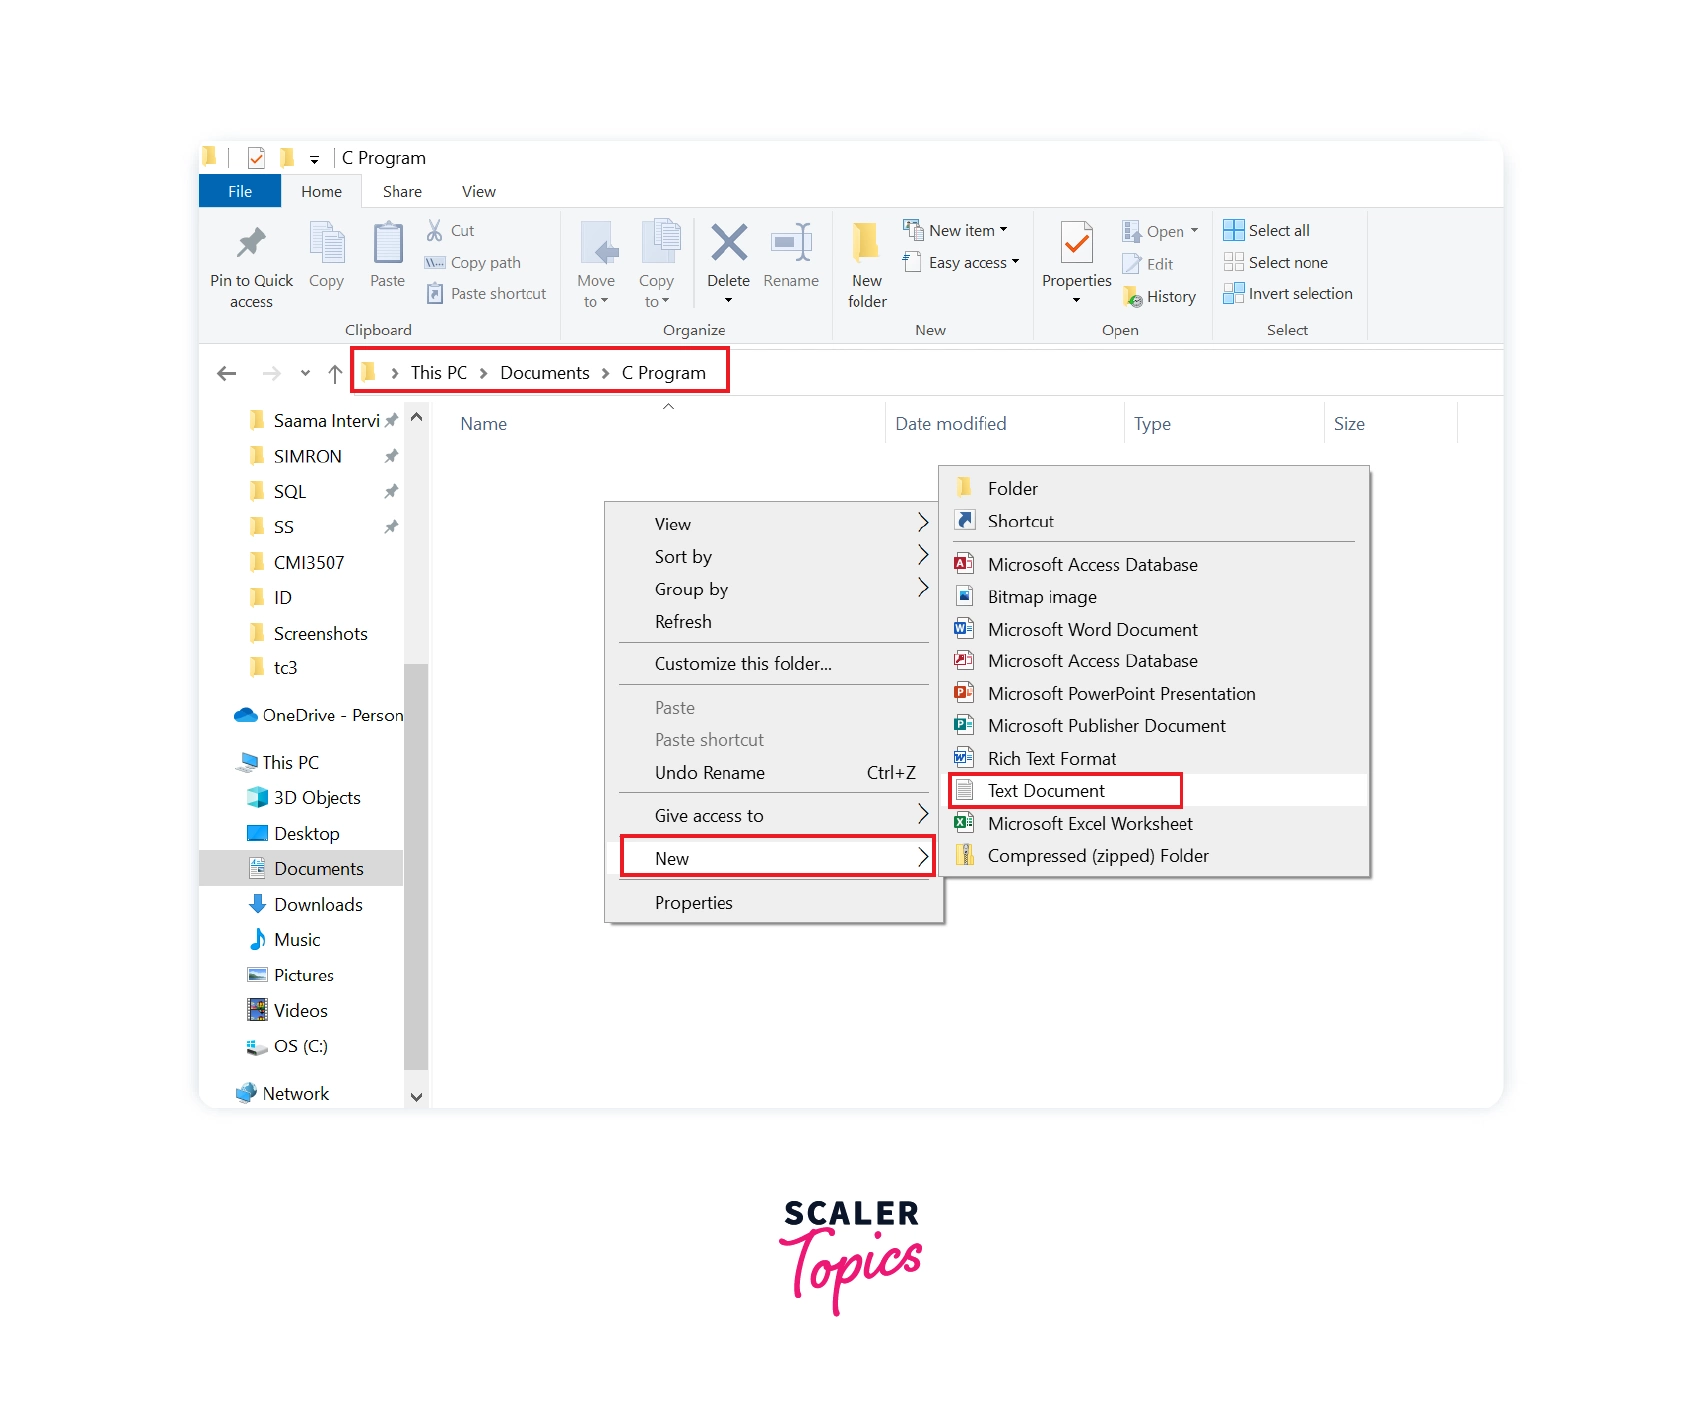
Step 2: Type the C code and Save the file.
Type the code in the notepad and save the file with the .c extension. Here we write a program to print hello world to demonstrate this step and save the file as Hello.c.
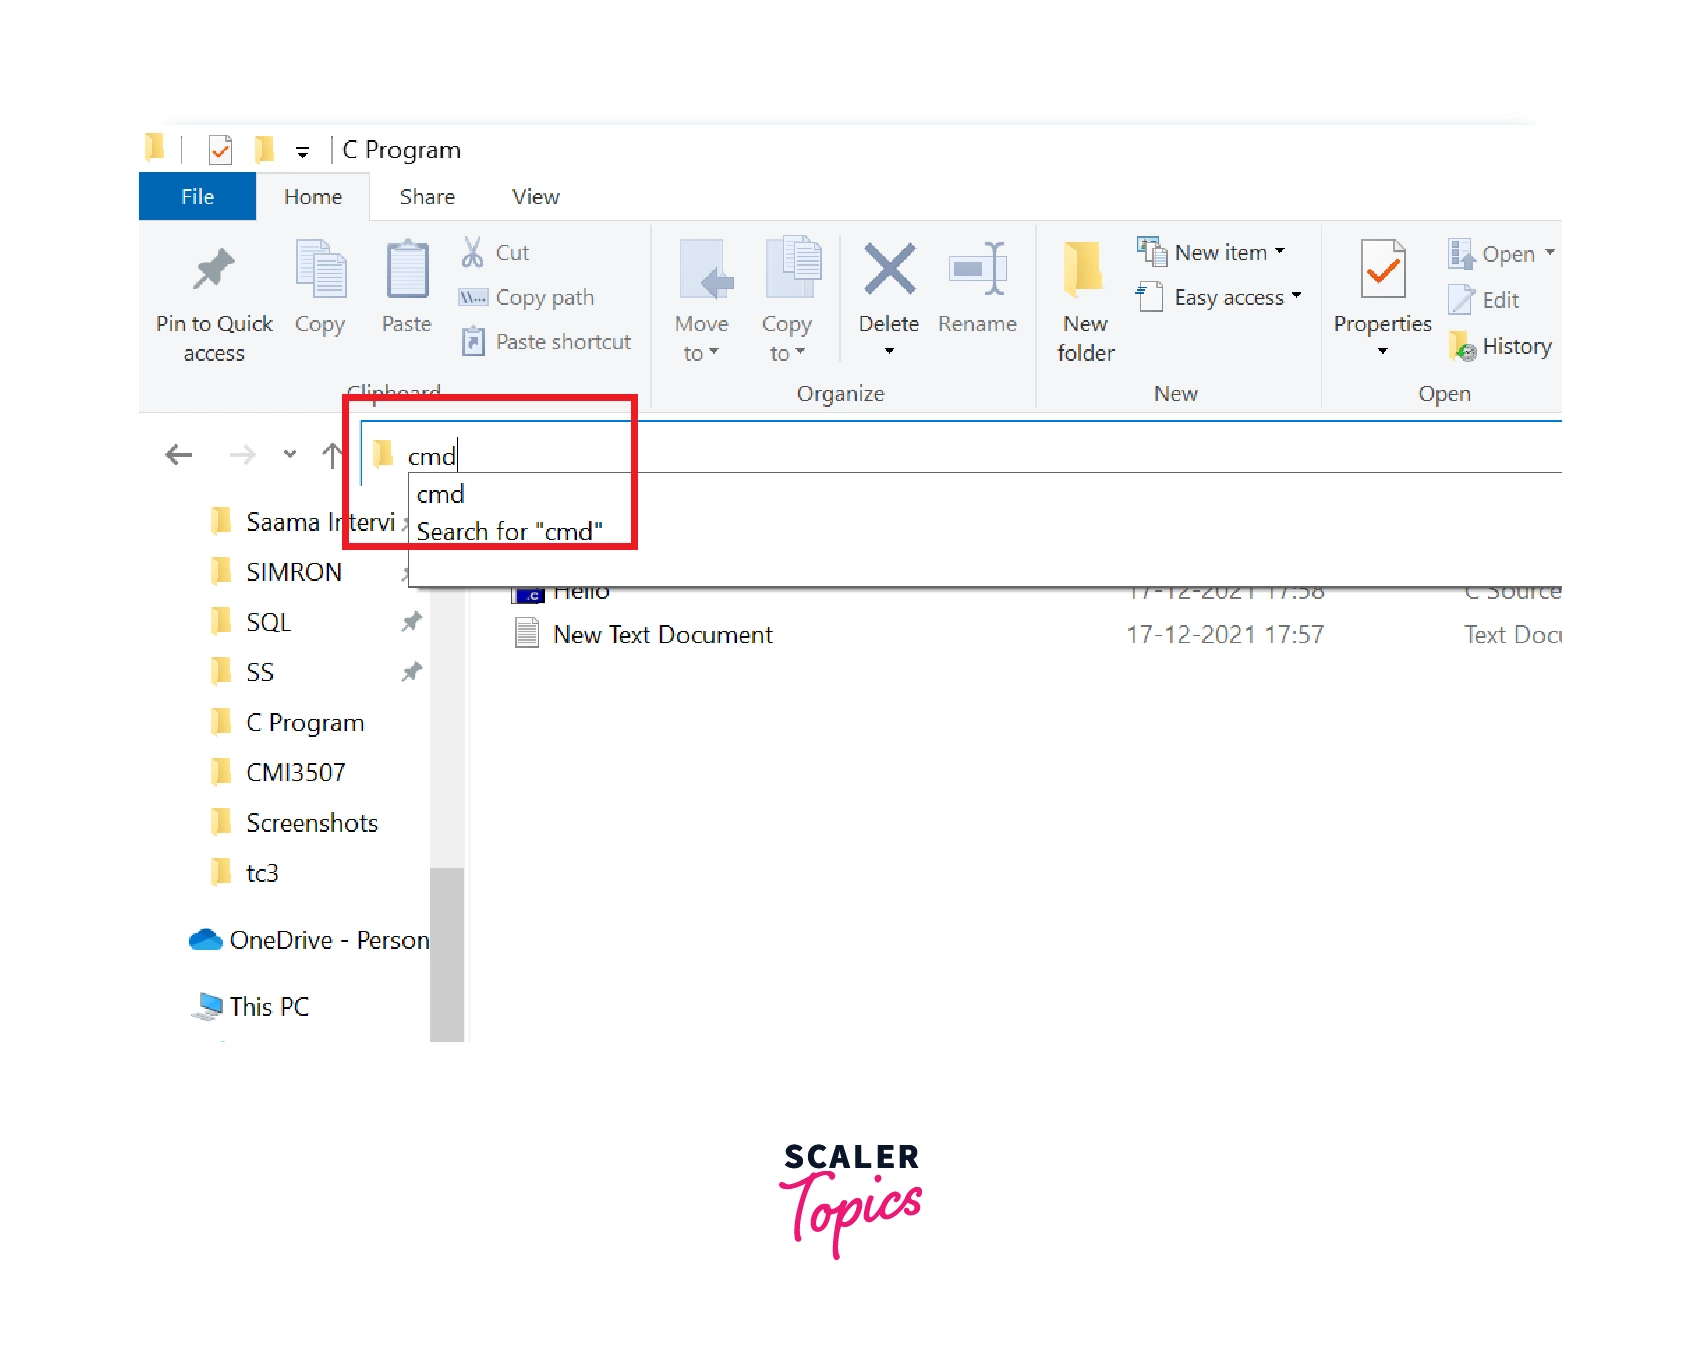
Step 3: Open Command Prompt.
Now, click on the address bar in the C program’s directory, type cmd, and press Enter.
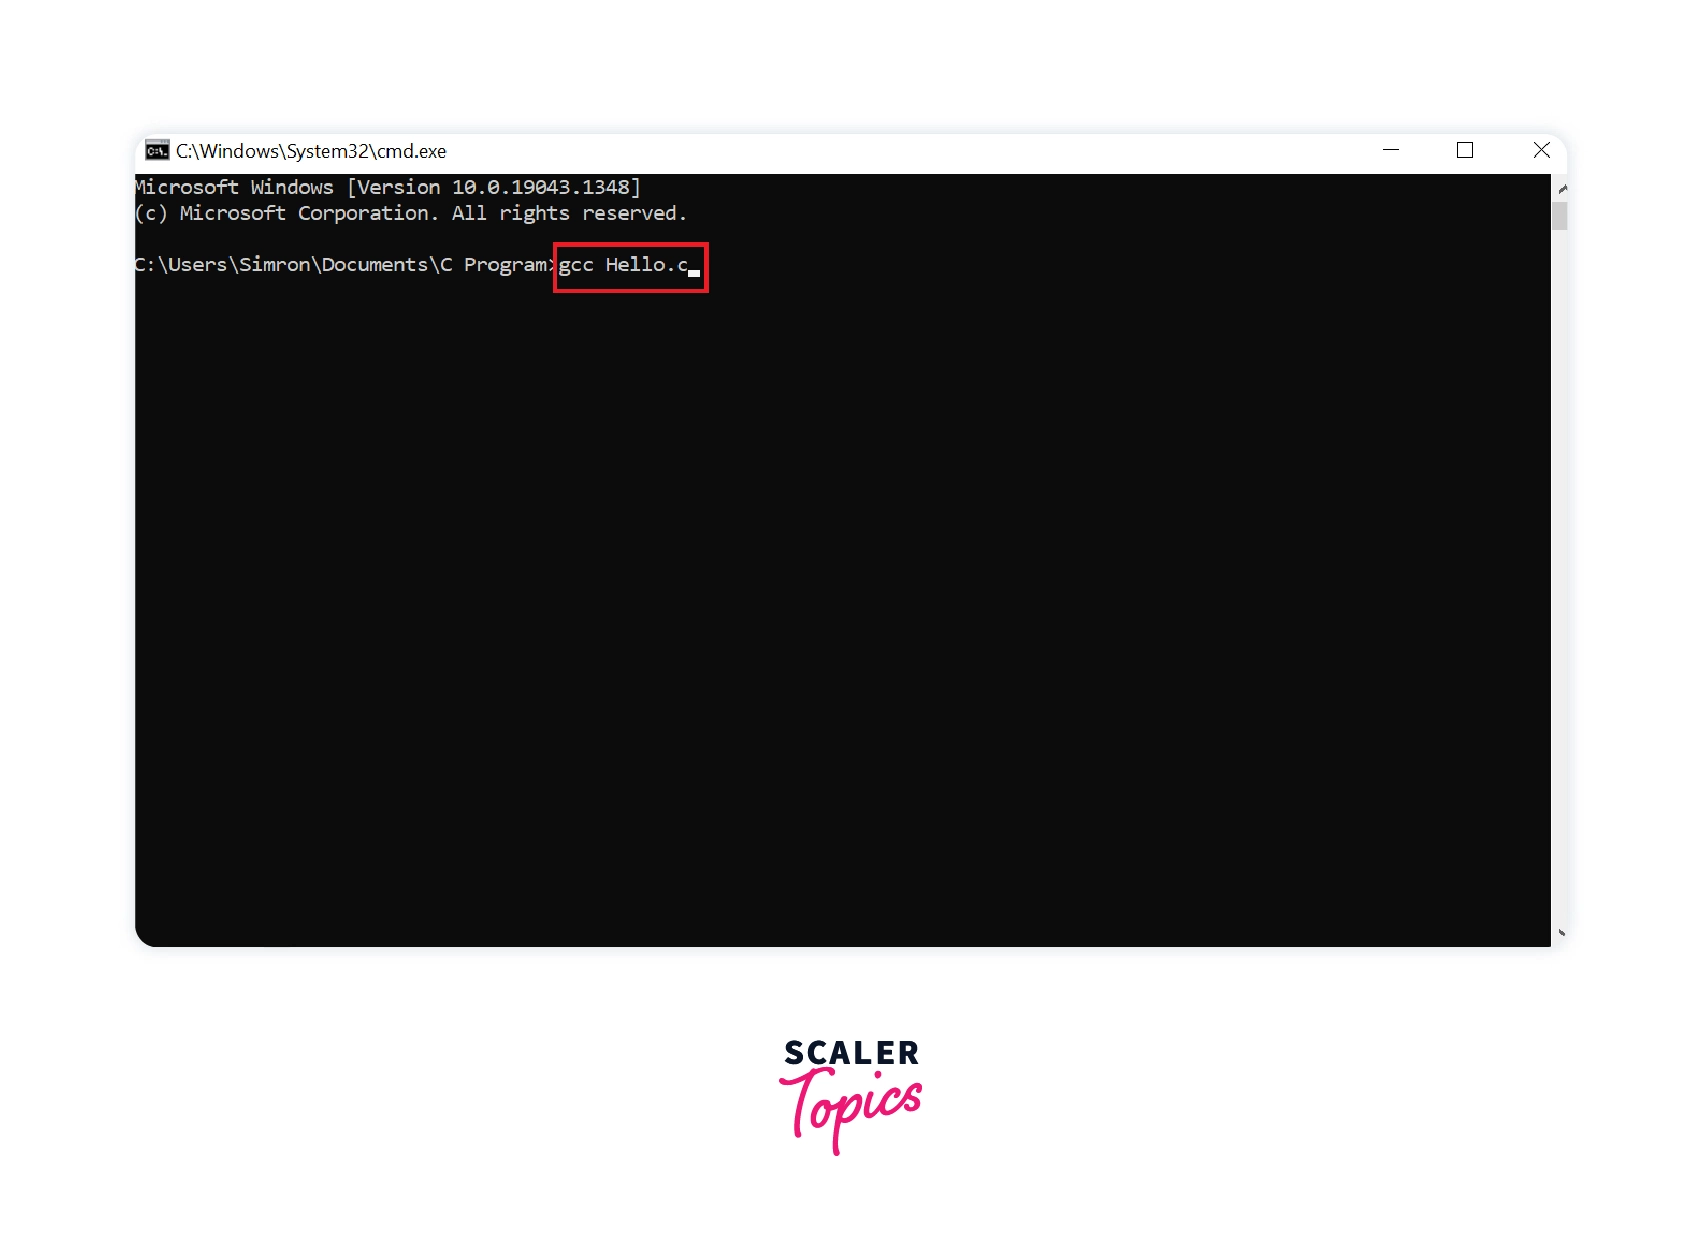
Step 4: Compile the C program.
To compile the Hello World code that we wrote earlier, type gcc Hello.c (or the name by which you will save the program) and press enter. Writing gcc will invoke the C compiler for windows.
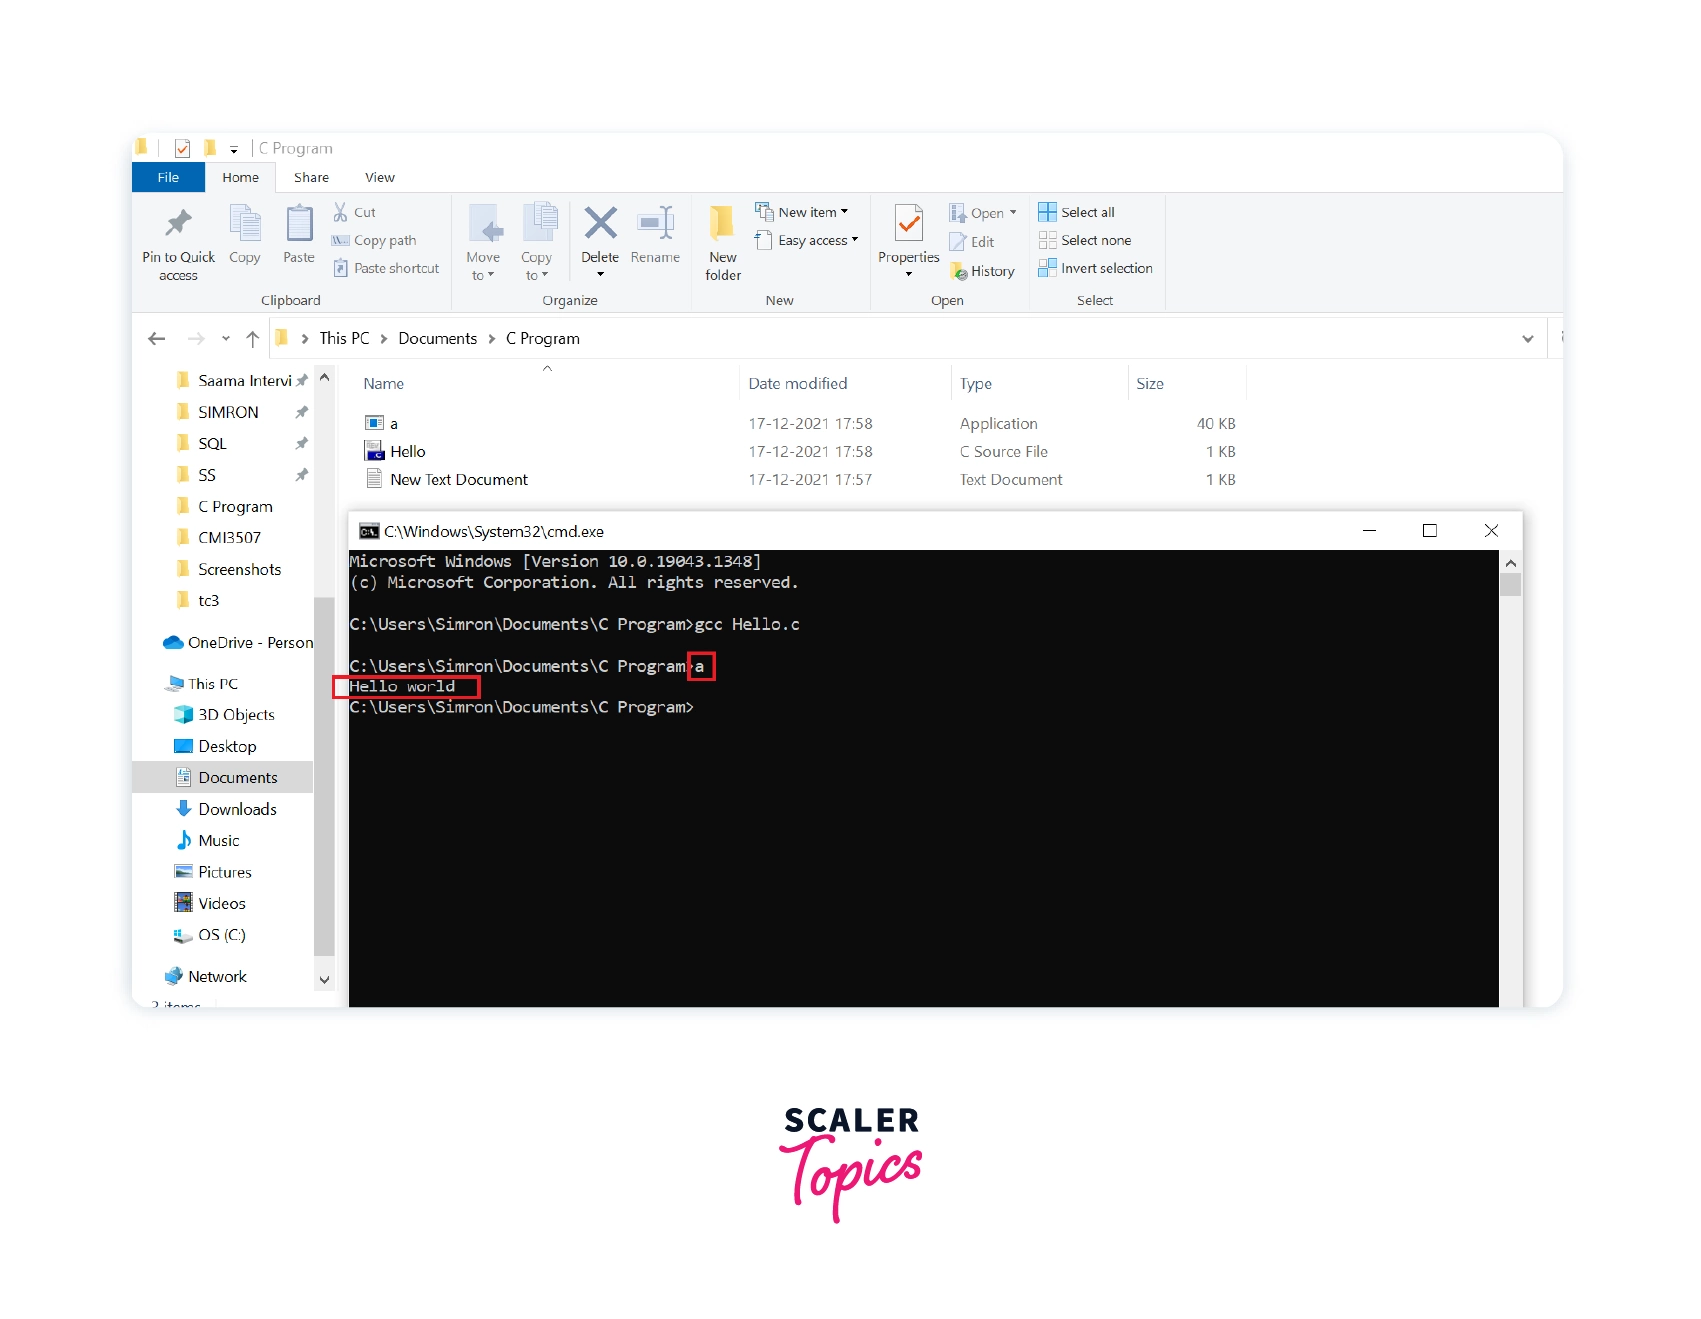
Step 5: Compilation completed.
The compiled file will be saved in the same directory with the name a (the name can be different for you).
The type of the file will be Application.

Step 6: Running the C Program.
To run the compiled file, write the name of the compiled file, i.e., a, as shown in the screenshot below.
Finally, the output will be printed in the command prompt.
There are alternate methods to install C Compilers. One of them is by installing Code::Blocks IDE.
Let’s see the step-by-step process to install Code::Blocks IDE with C Compiler.
Alternate Method:
Installation using CodeBlocks IDE Binary release
Code::Blocks
Code::Blocks is a C/C++ IDE. It comes with plugins which are external additions to any software for customization. Any kind of functionality can be added by installing a plugin. Plugins like debugger, text formatter, etc. can be added to the IDE.
Below are the steps to download and install the Code::Blocks IDE.
Step 1: Go to Code::Blocks Website.
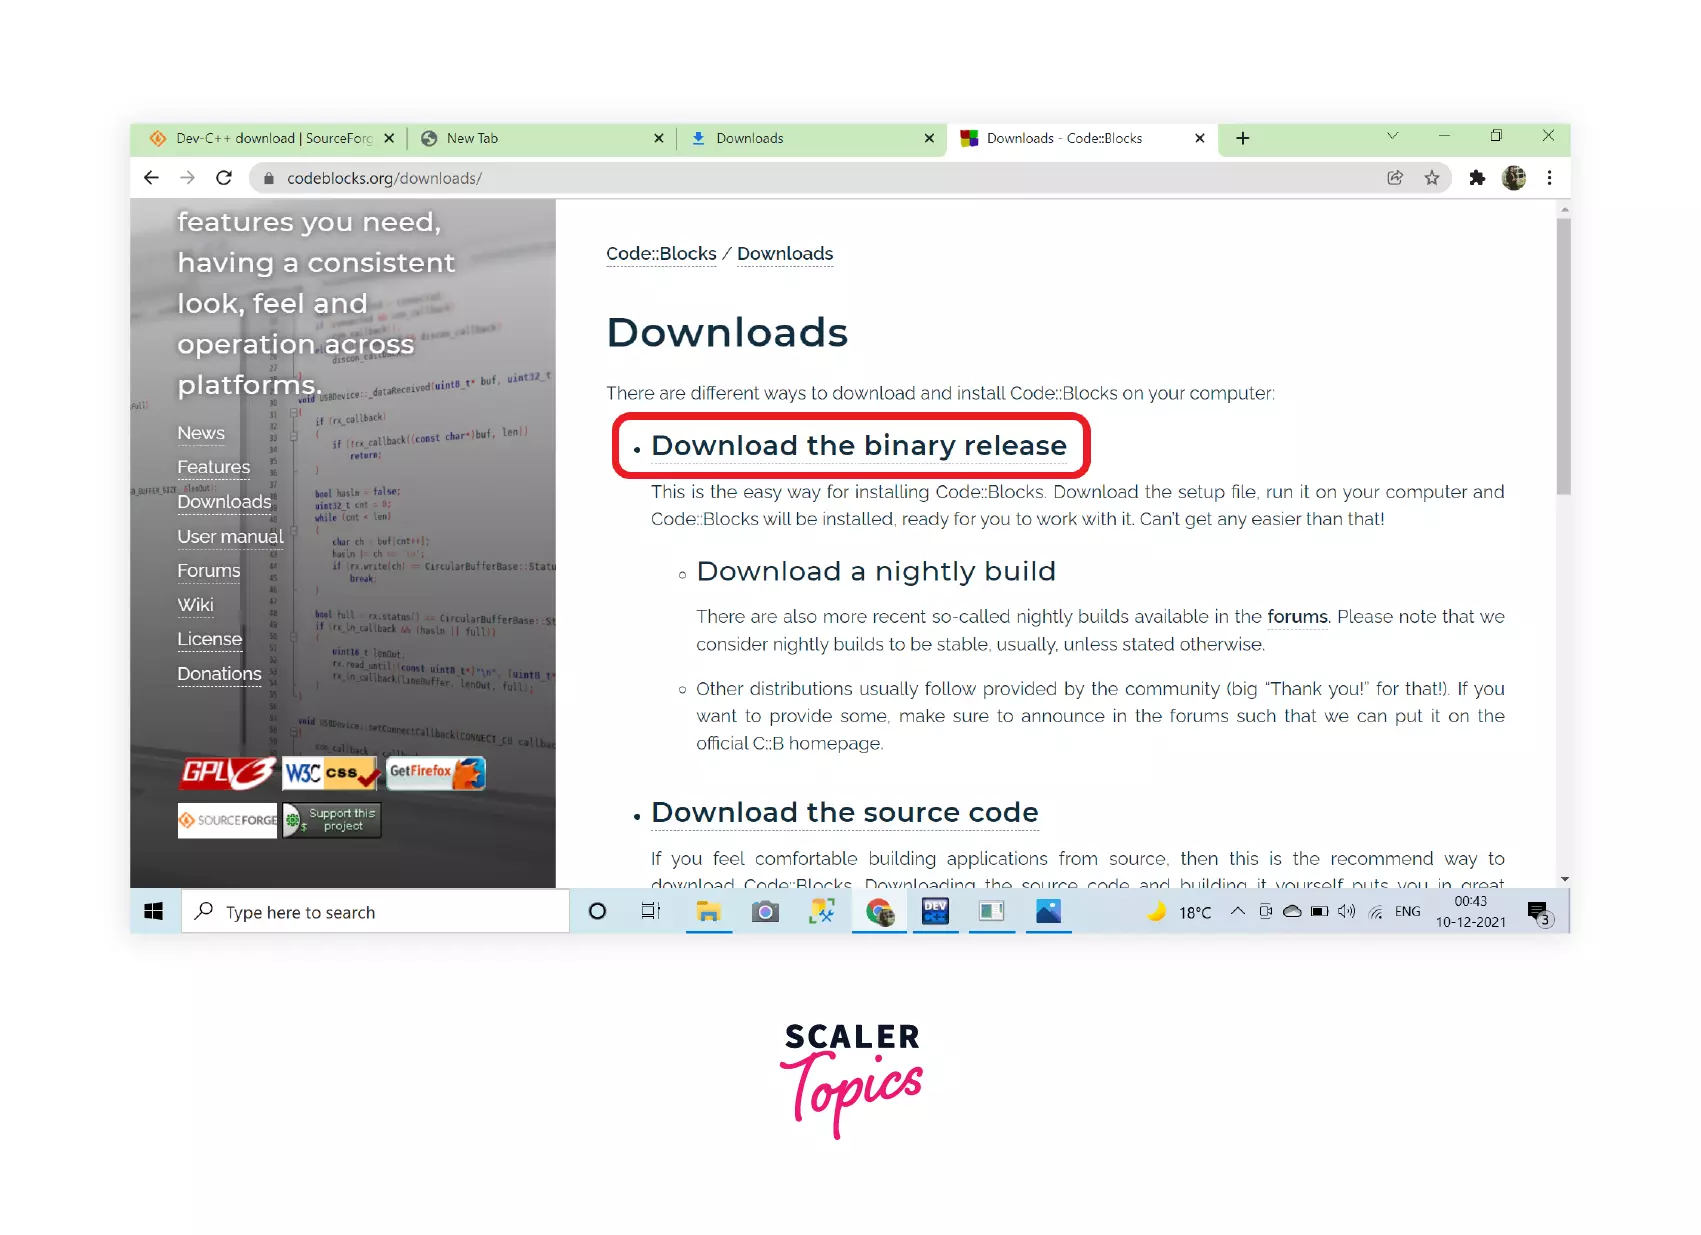
The first step is to install the Code blocks IDE. Go to any of the browsers and open codeblocks.org. The below web page will appear on your screen. On its left side, click on the Downloads.

Step 2: Choose the way to download.
After clicking on the downloads on the download’s page, it will redirect you to the next page. Here click on the
Download the binary release, as we will use binary release for this tutorial.
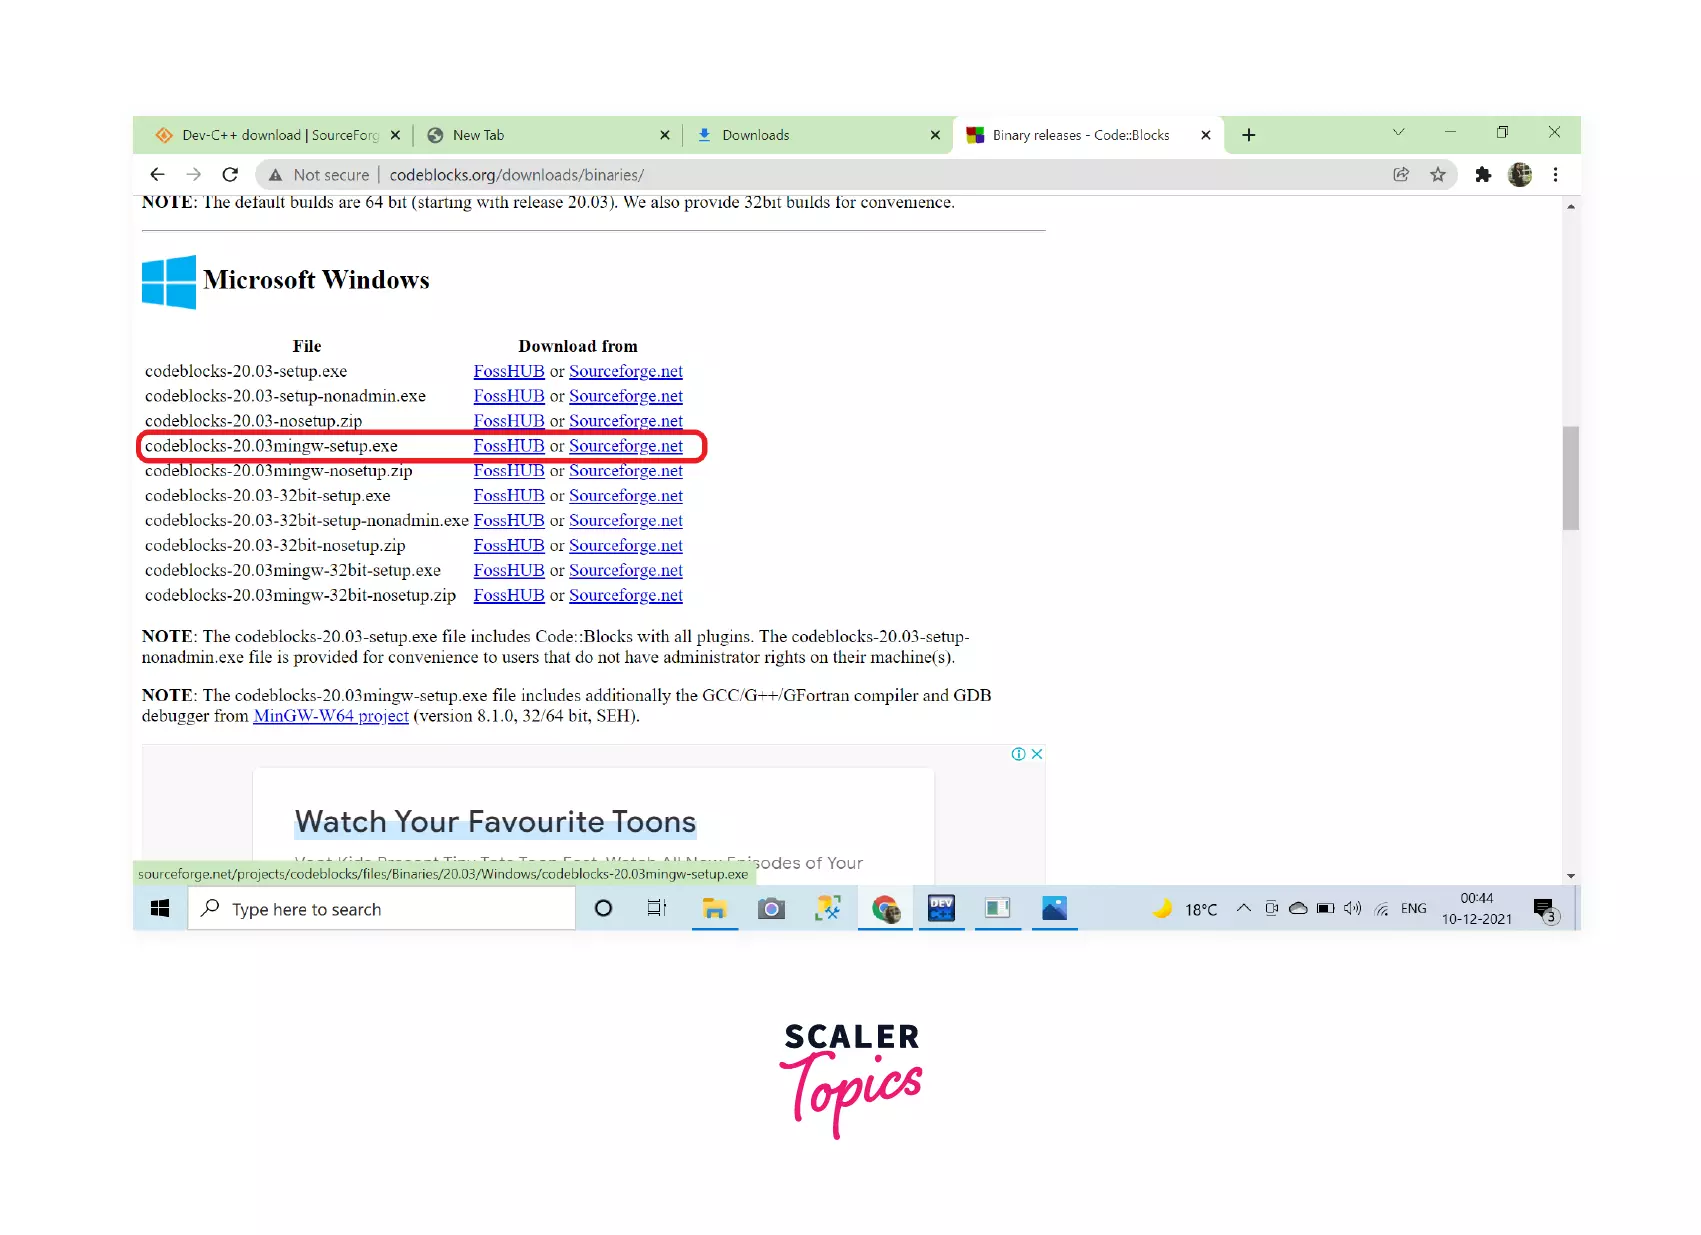
Step 3: Choose the version for download
In the Windows section, click on the codeblocks-20.03mingw-setup.exe (for the 64-bit version).
The codeblocks-20.03mingw-setup.exe comes with the MinGW, including the GCC/G++/GFortan compiler and GDB debugger.
To download the 32-bit version, choose the codeblocks-20.03mingw-32bit-setup.exe
Download the file from the link in front of the selected version, as highlighted in the screenshot below.
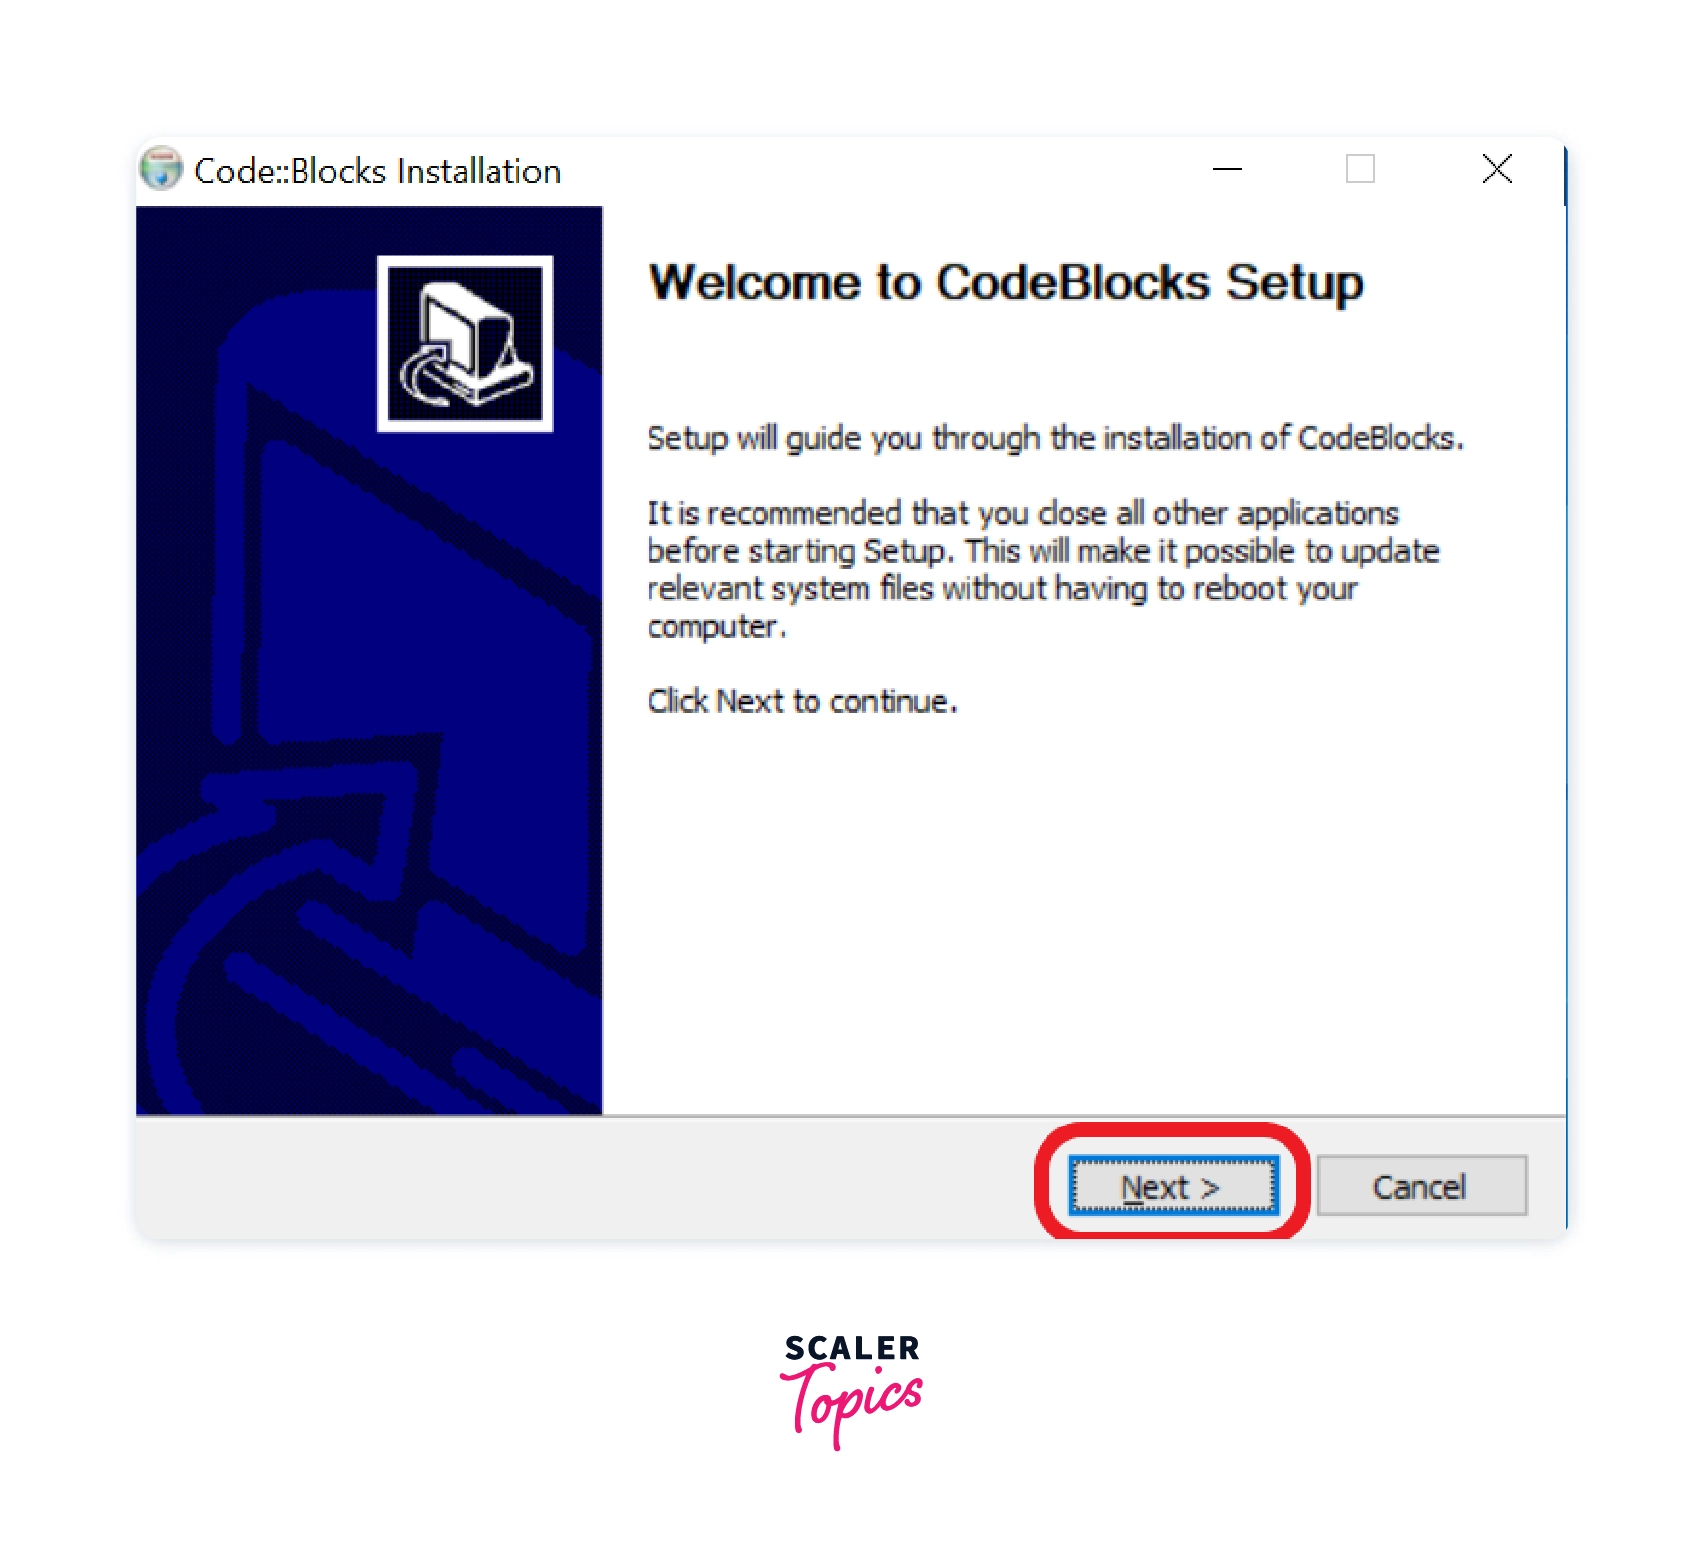
Step 4: Start the installation
Now, the installation file has been downloaded. Double-click on the file and the setup window will appear on the screen. Click on the Next> button and proceed further.
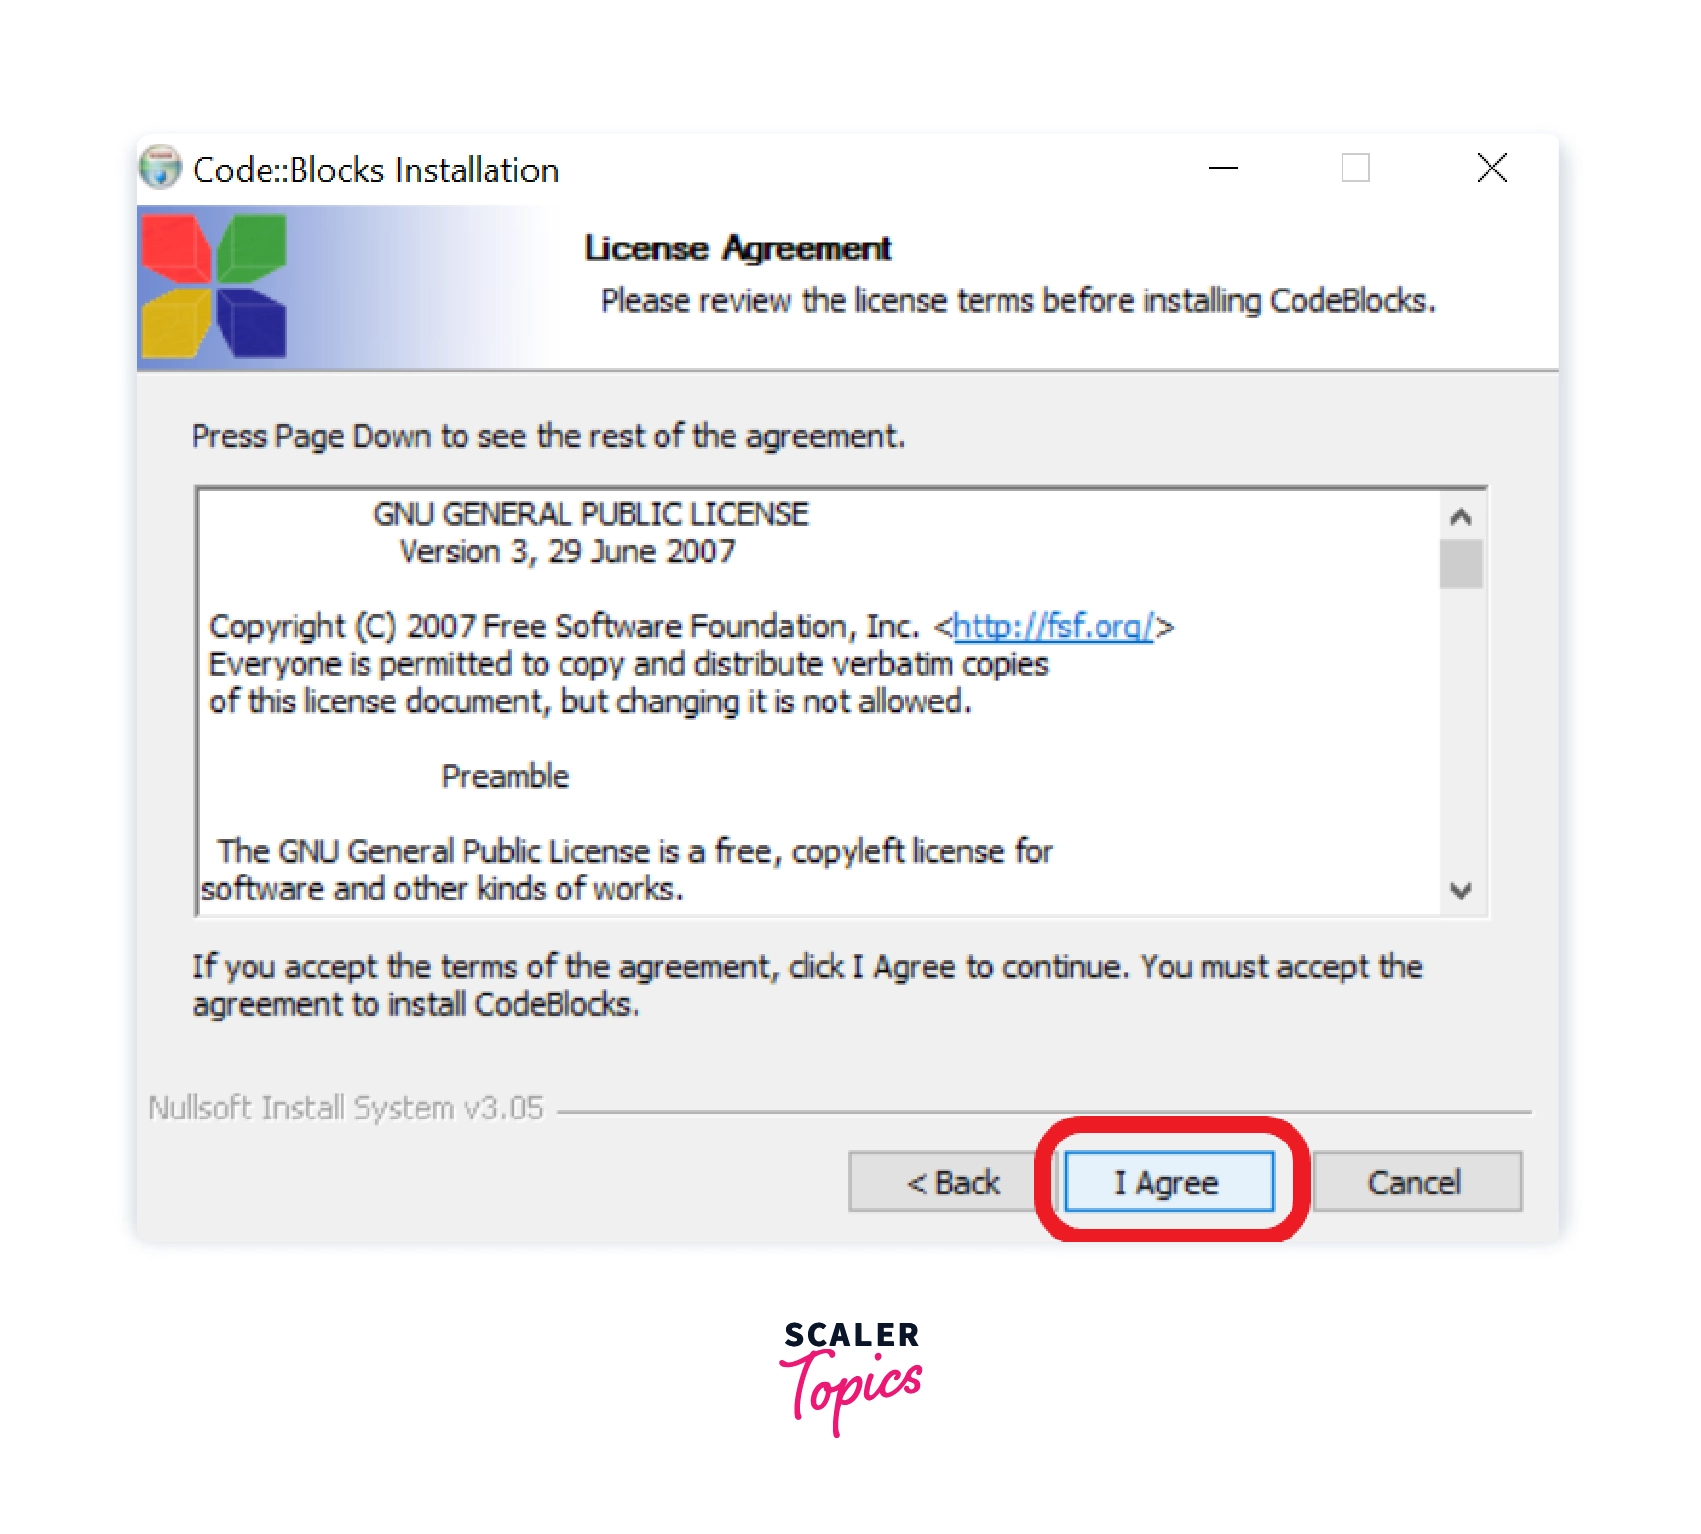
Step 5: Accept the License Agreement
The license agreement for terms and conditions will appear on the screen. Read the license agreement, click on the I Agree button, and proceed further.
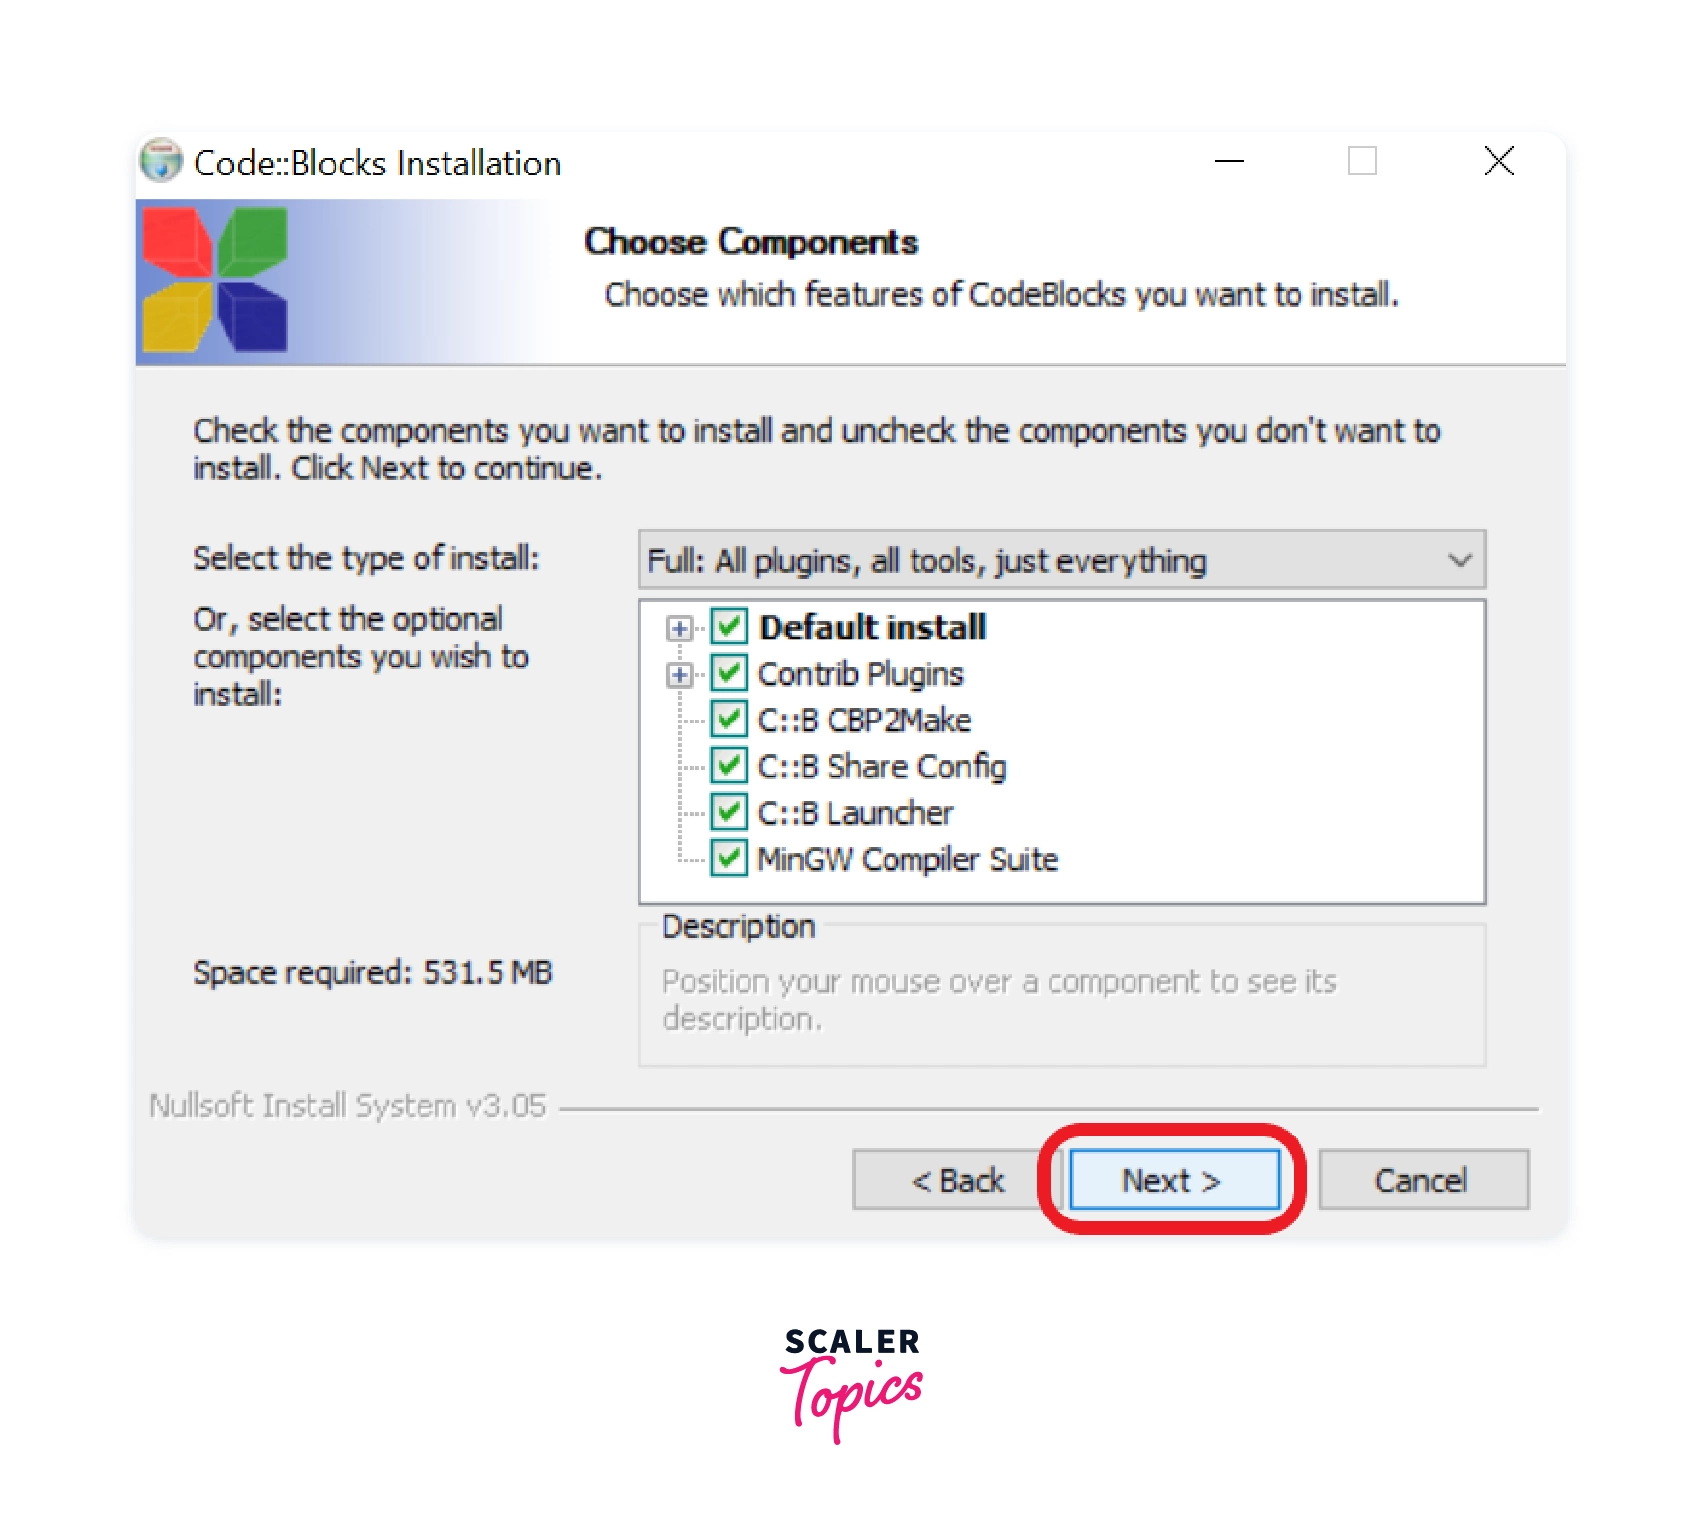
Step 6: Choose Components.
In this step, check whether all the checkboxes are checked or not. For smooth installation, all components should be selected. After that, click on Next to continue.
Step 7: Choose the install location and start installing.
Choose the location on the drive where the application is to be installed. It automatically takes the C: Drive location. To change it, click on browse, choose the location, and click on Next to proceed further.
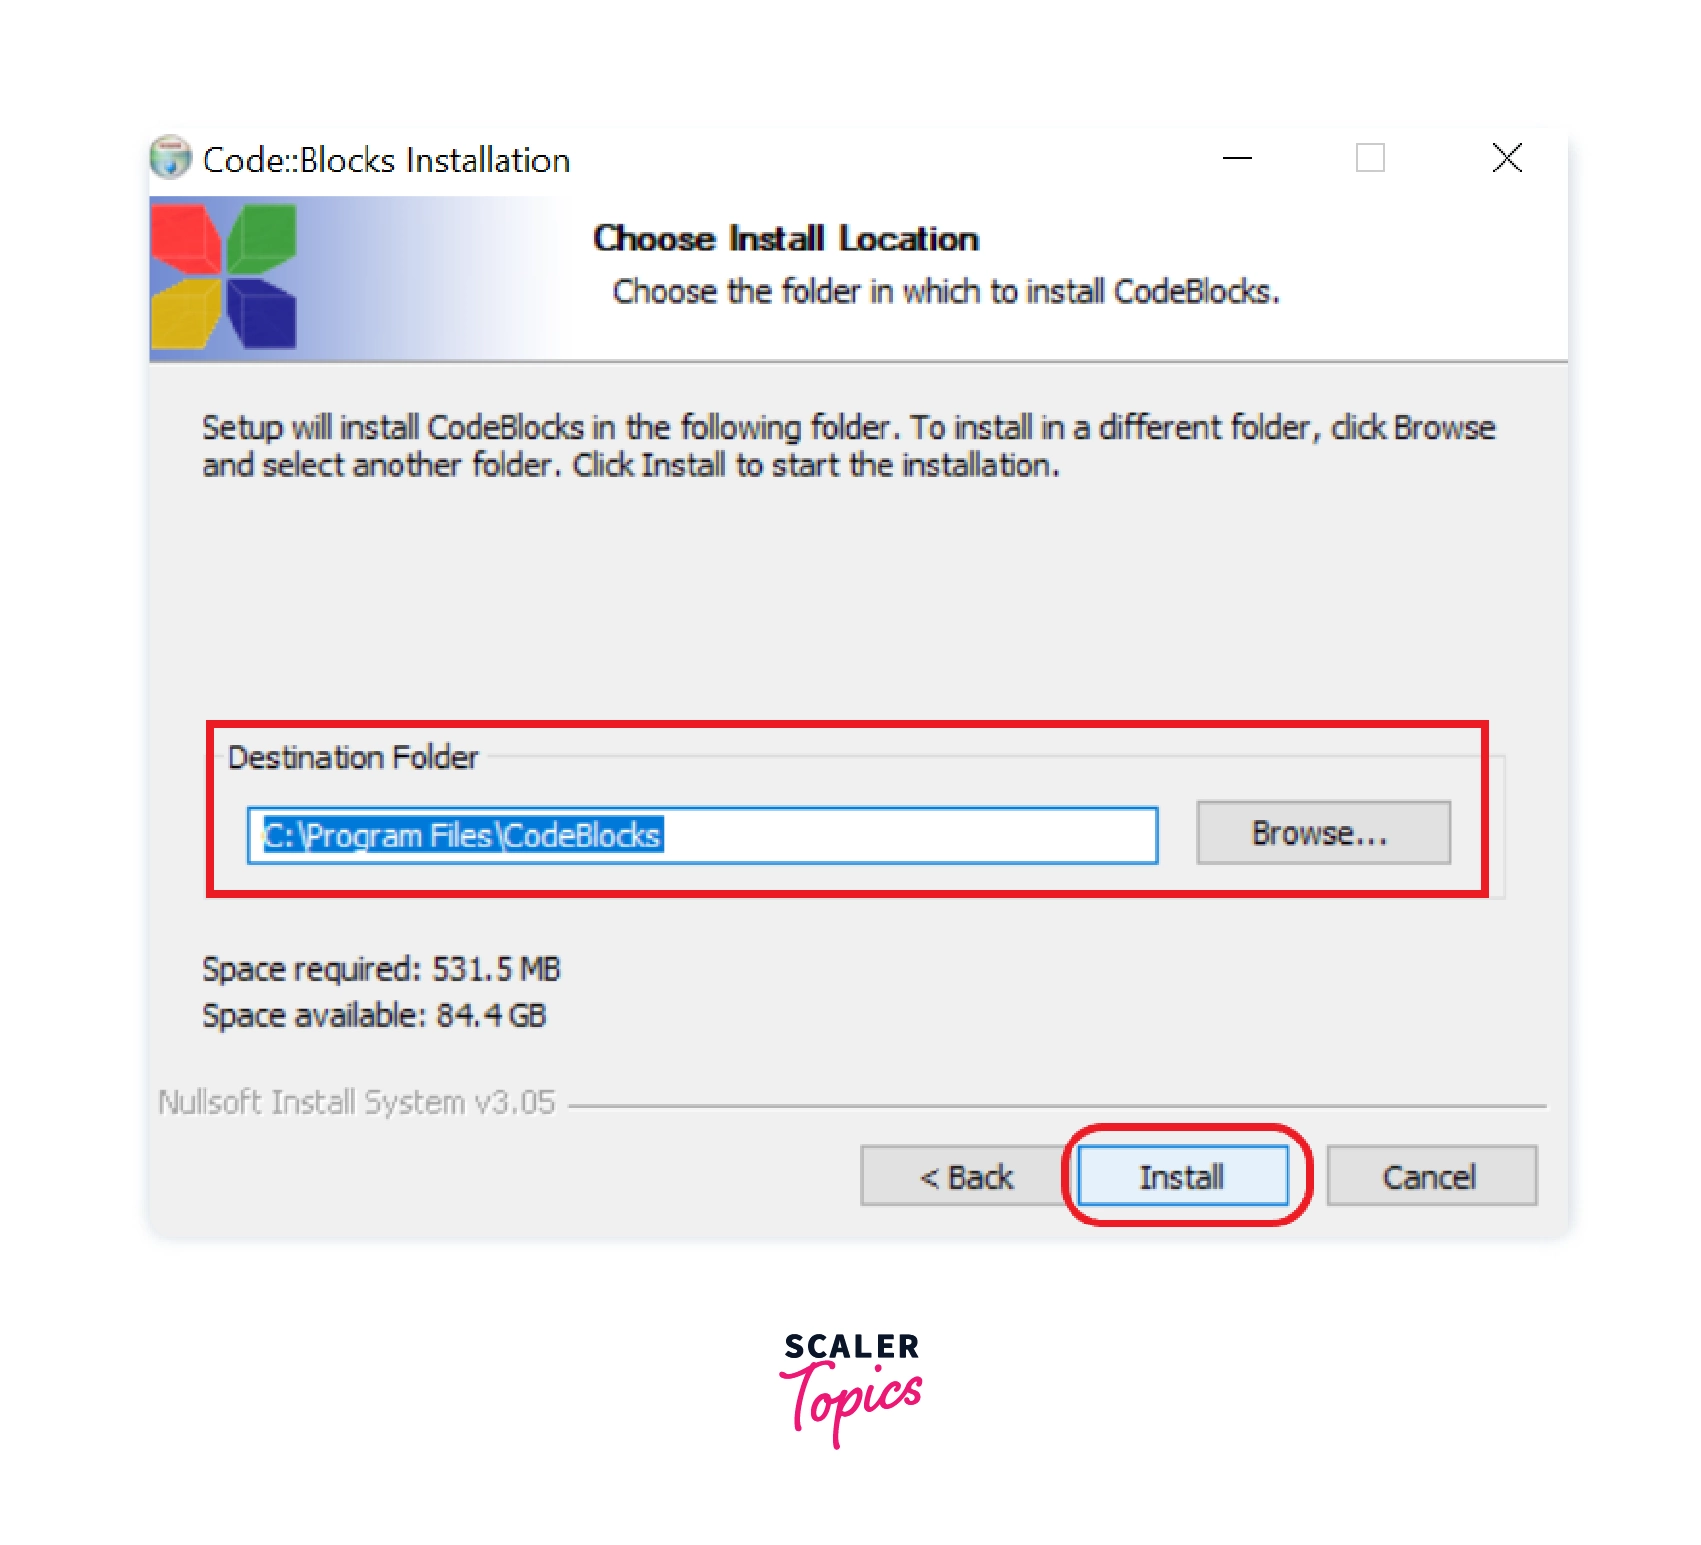
The installer will start to extract the files on the destination folder you chose in the previous step, and installation will begin.
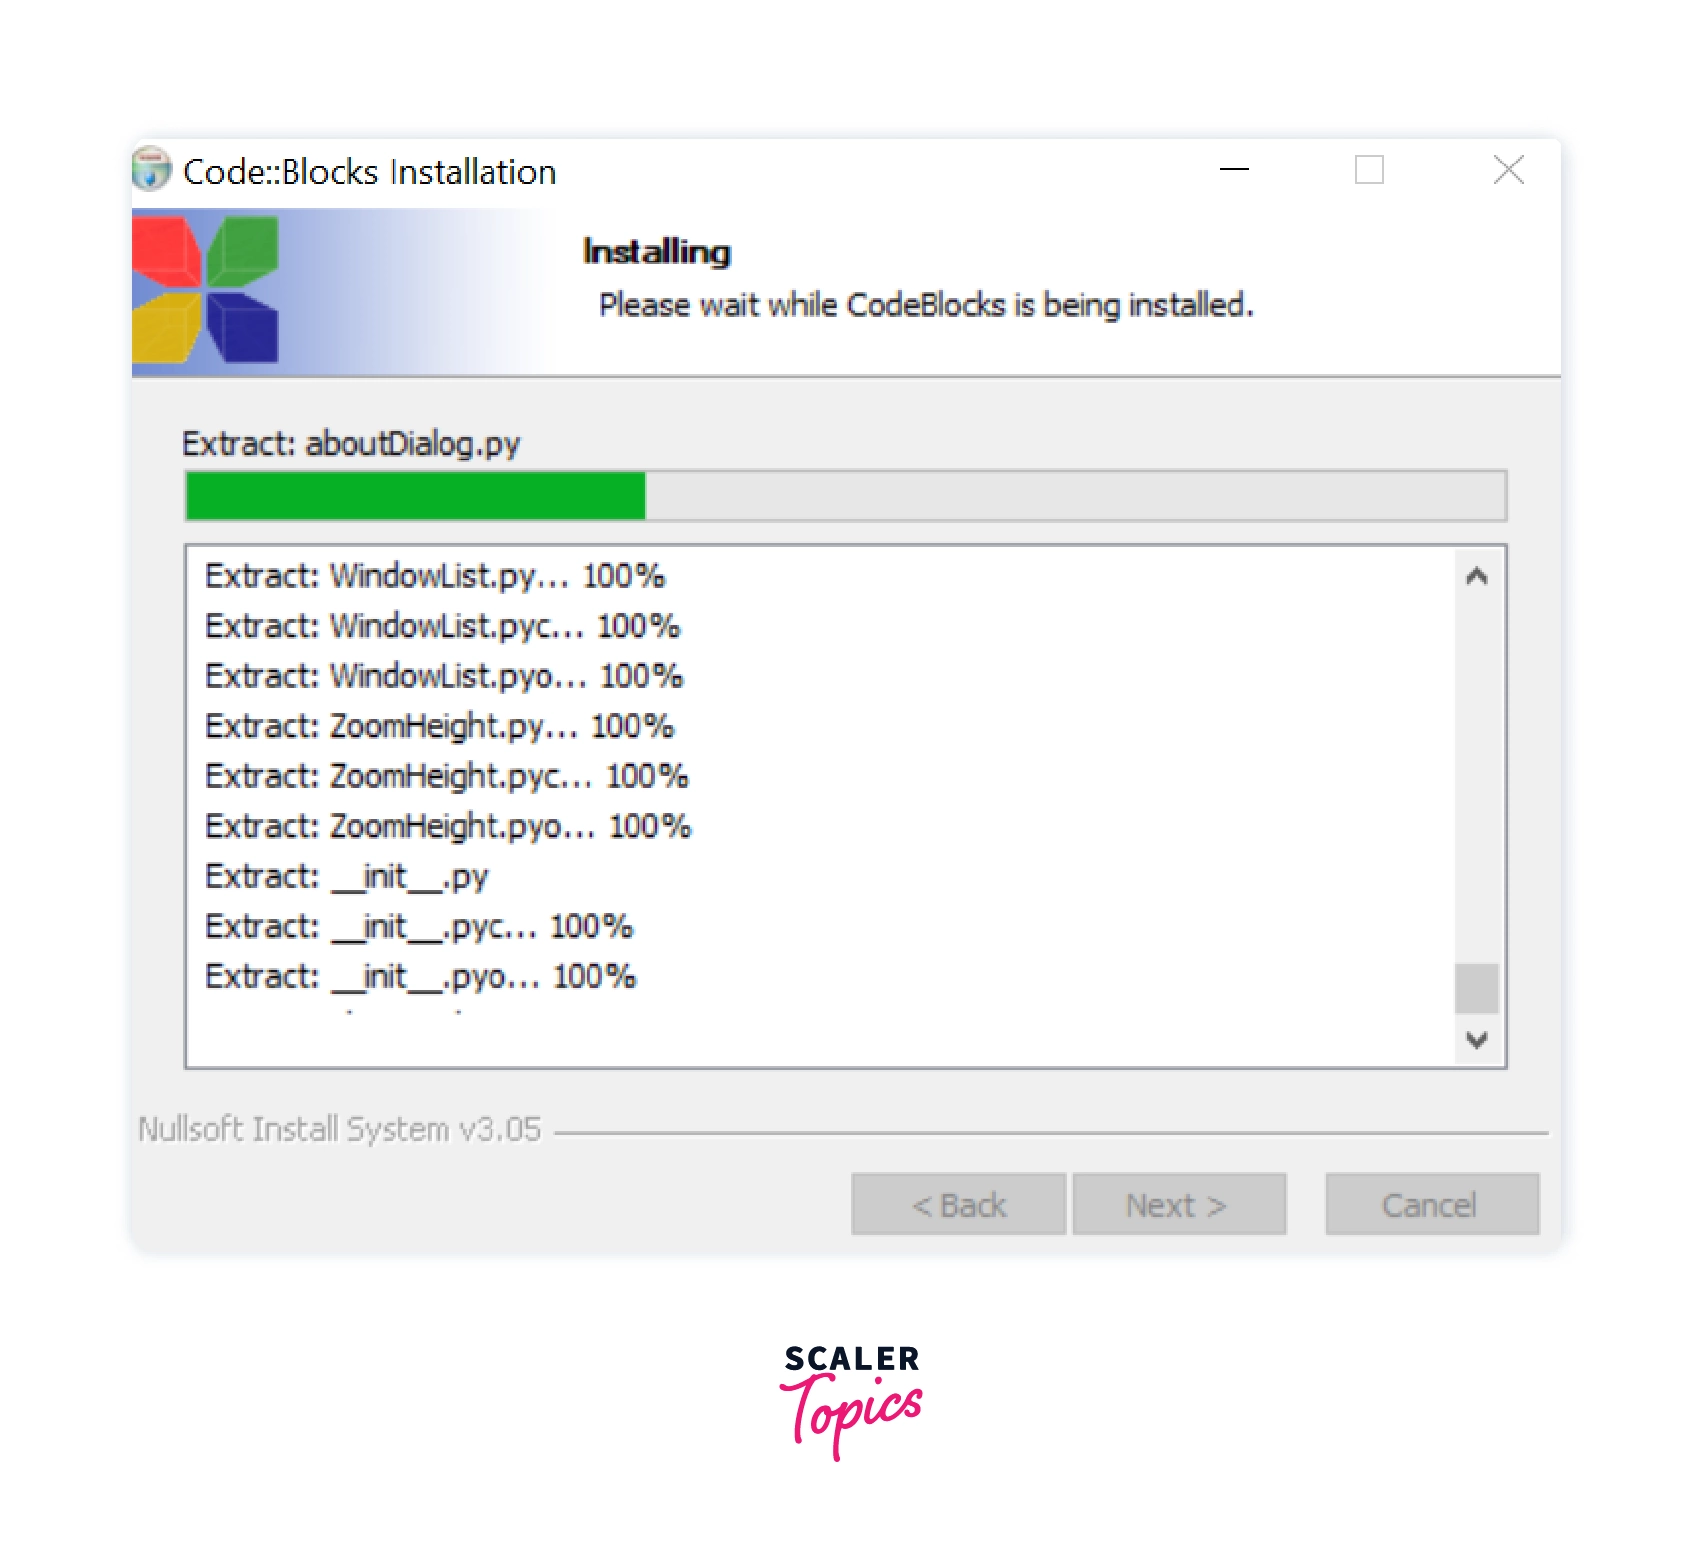
Step 8: Installation complete.
The installation is completed successfully. Once the installation is finished, a pop message saying — Do you want to run Code::Blocks now? Will appear. You may click on the Yes button to start the Code::Blocks IDE.
Now make sure the IDE detects the C compiler for Windows. To do that, follow the steps below.
Step 9: Setting up MinGW to PATH.
Go to the Folder of the MinGW on your computer C:Program FilesCodeBlocksMinGwbin.
The following folder will open on your computer. Just copy the path on the address bar.
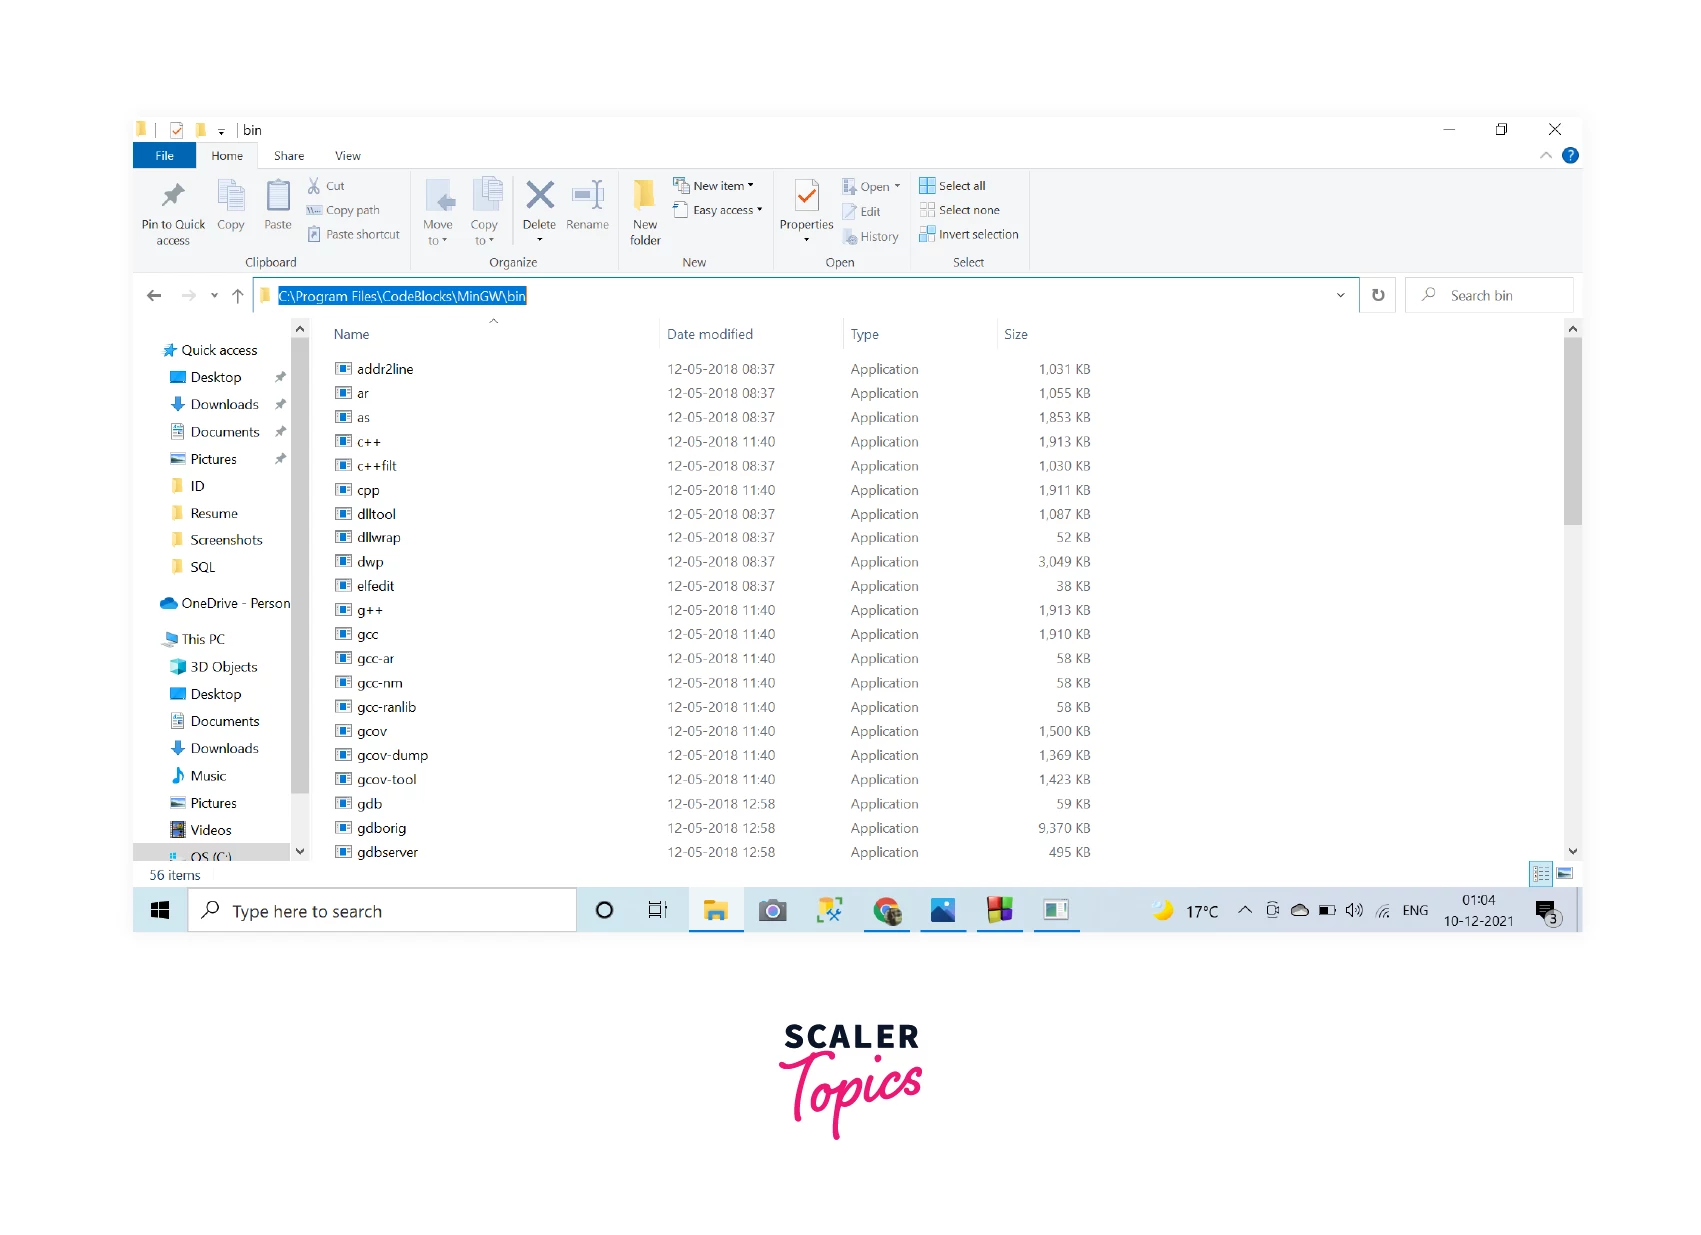
Now refer to the steps mentioned in the Setting up PATH Variable in the previous section. After setting up the Environment path variable, proceed with the next steps.
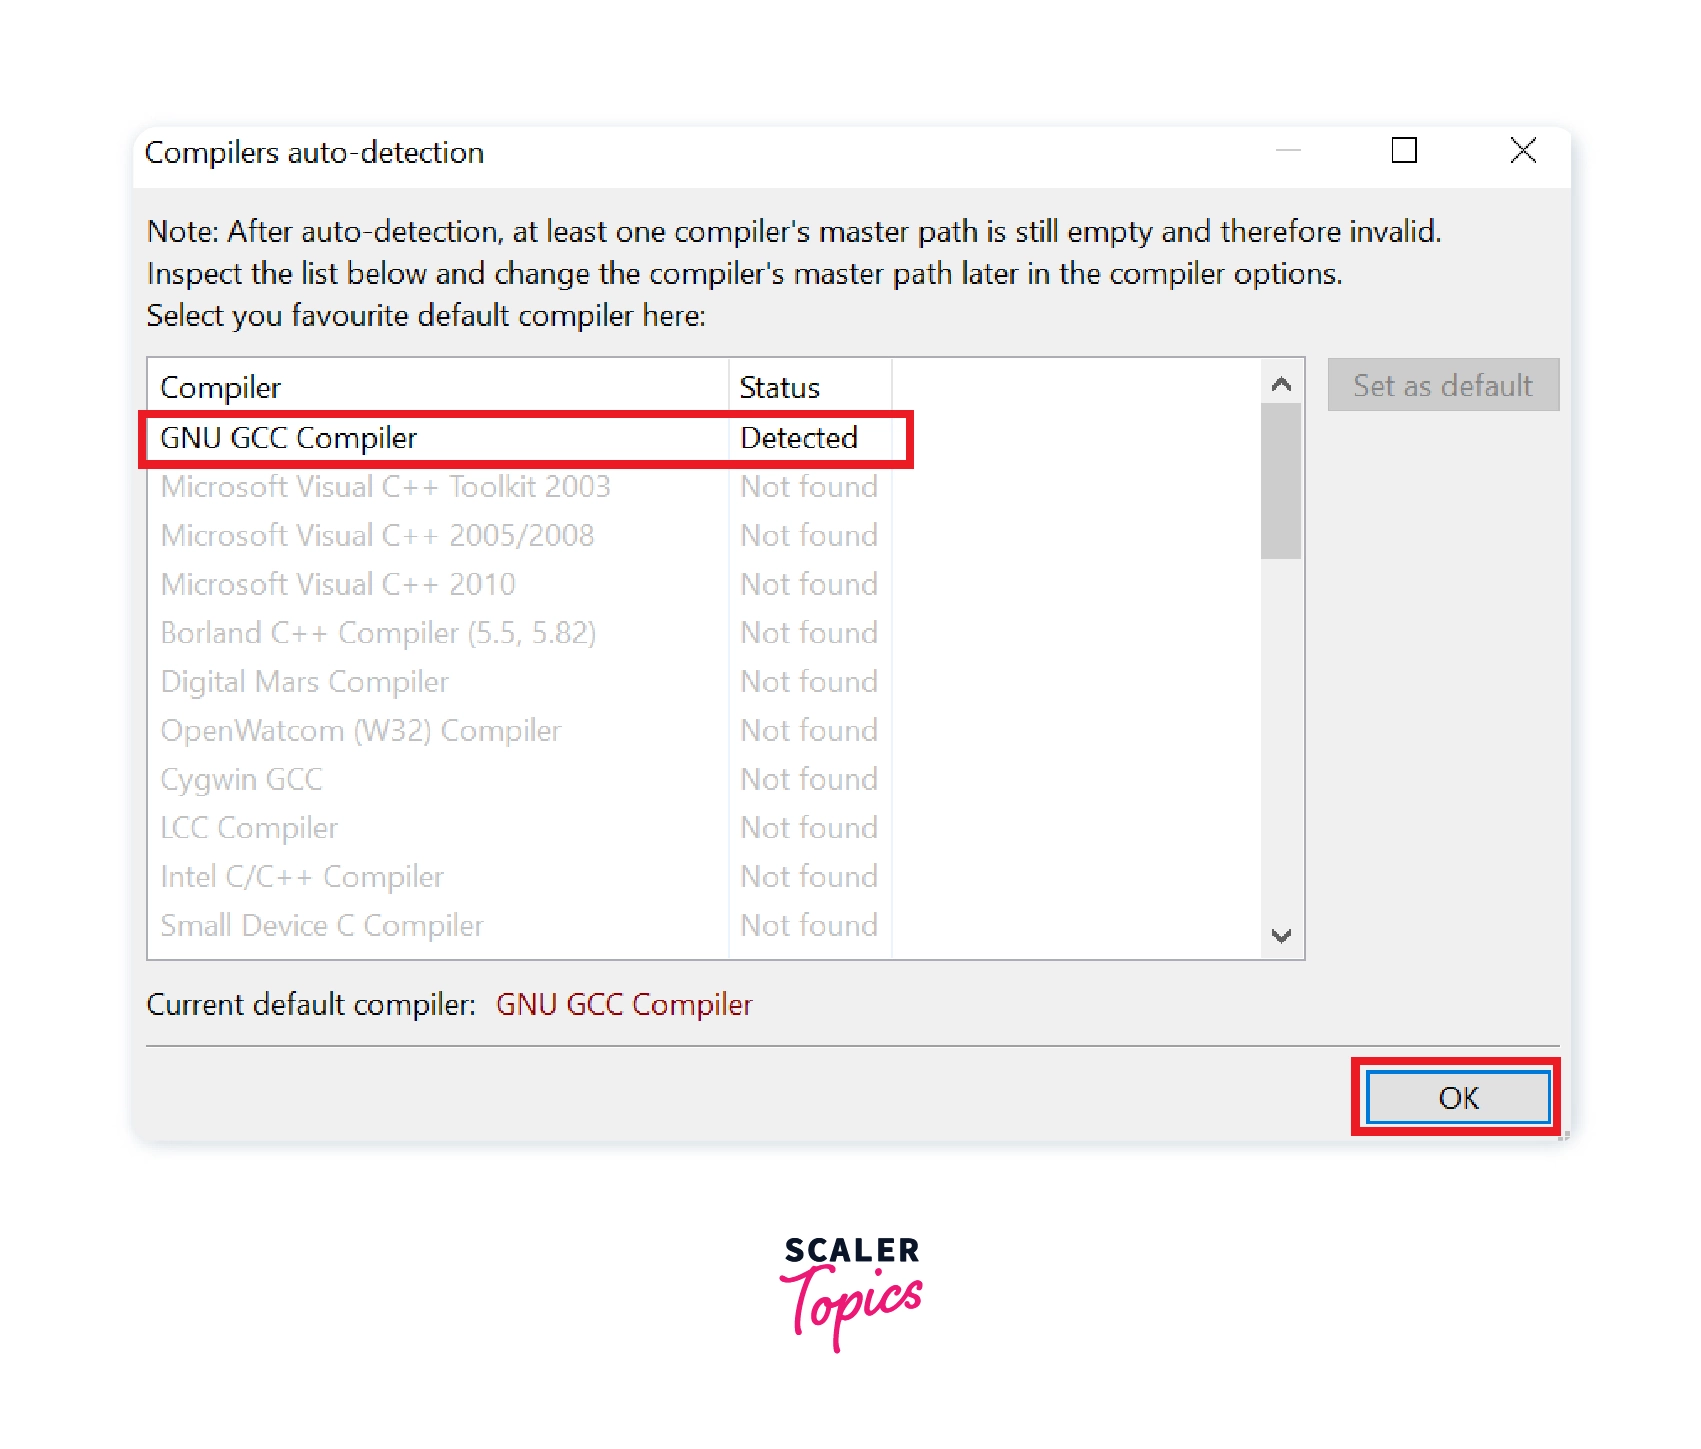
Step 10: Compiler auto-detection.
As soon as you open up the Code::Blocks IDE, the Compilers auto-detection window will appear with the GNU GCC compiler status shown as Detected.
Creating and Running a C Program in Code::Blocks.
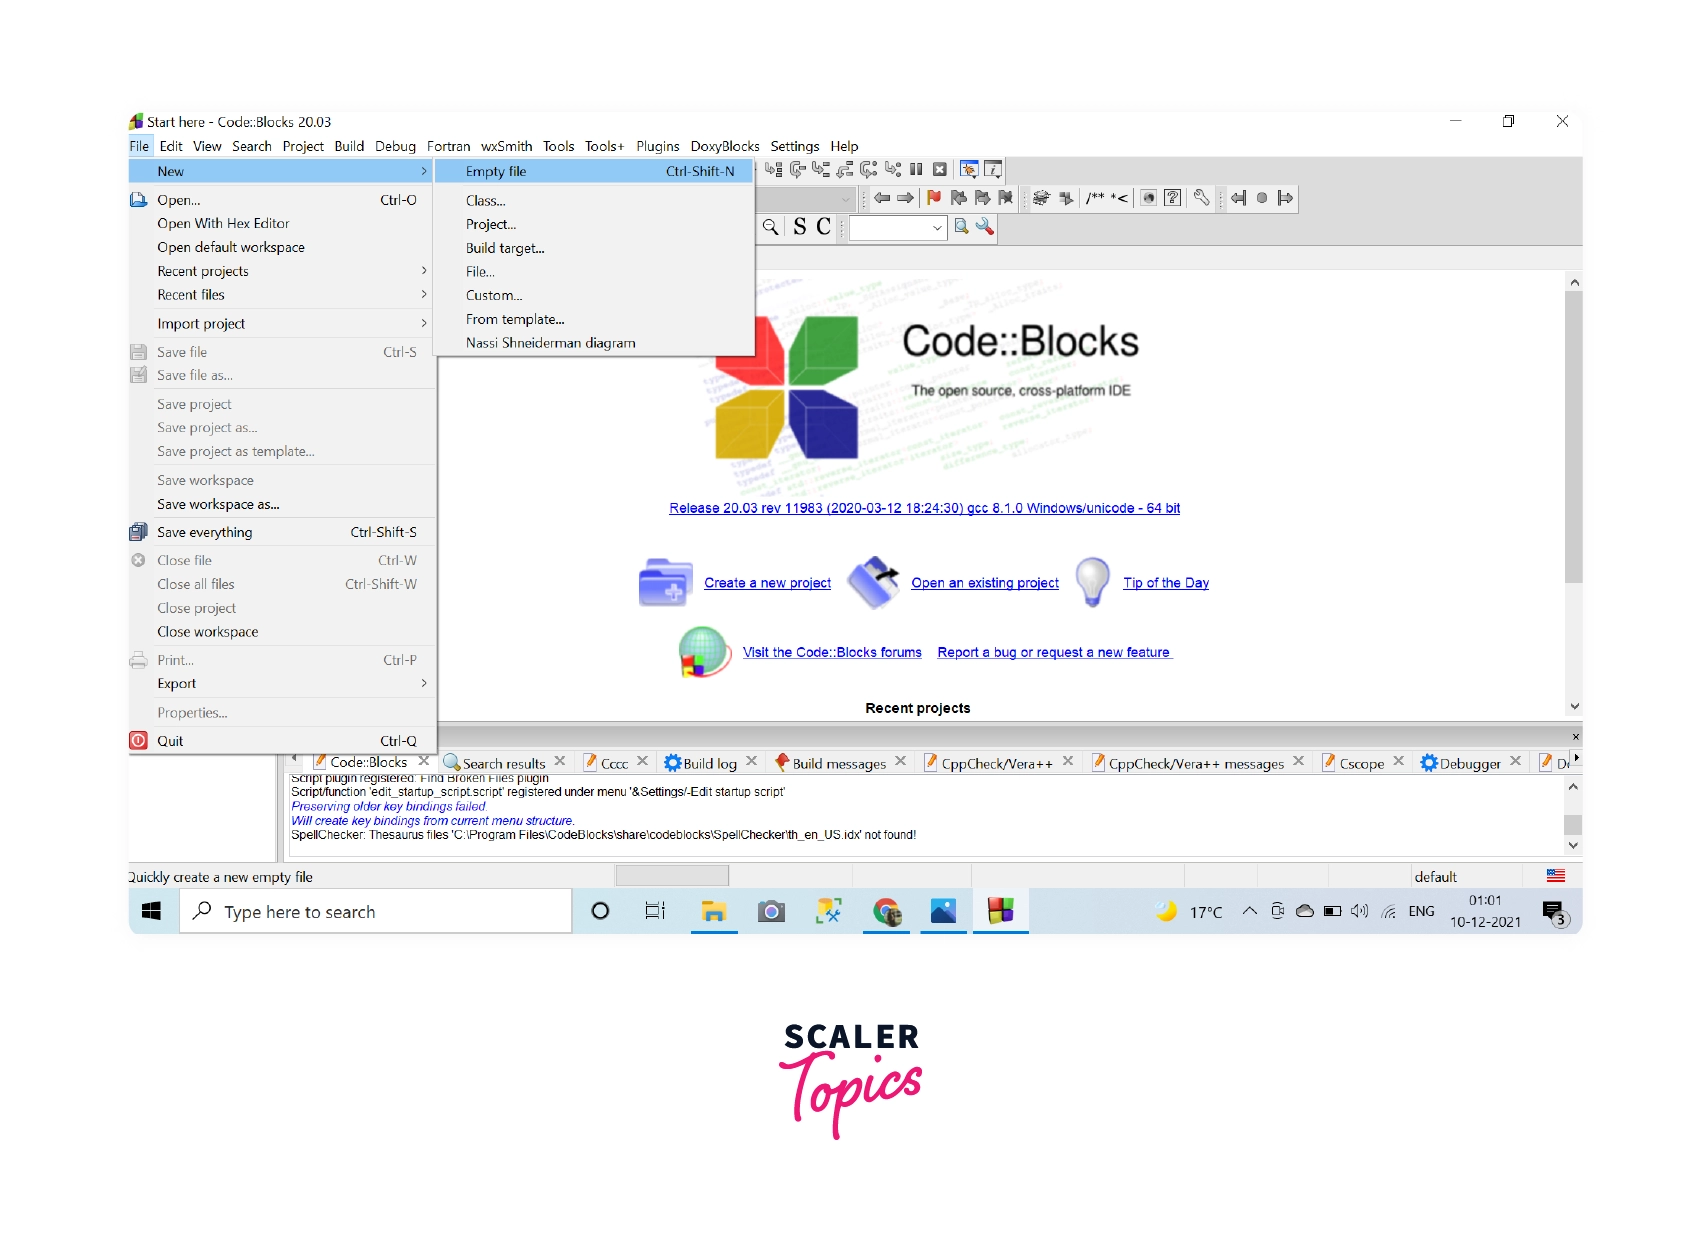
Step 1: Open a New File in Code::Blocks.
Select File>>New>>Empty File and click on it to check whether the IDE is working properly.

Step 2: Write a Hello World program in C.
Make a hello world program in C. Save it with the .c extension.

Step 3: Output of C Program.
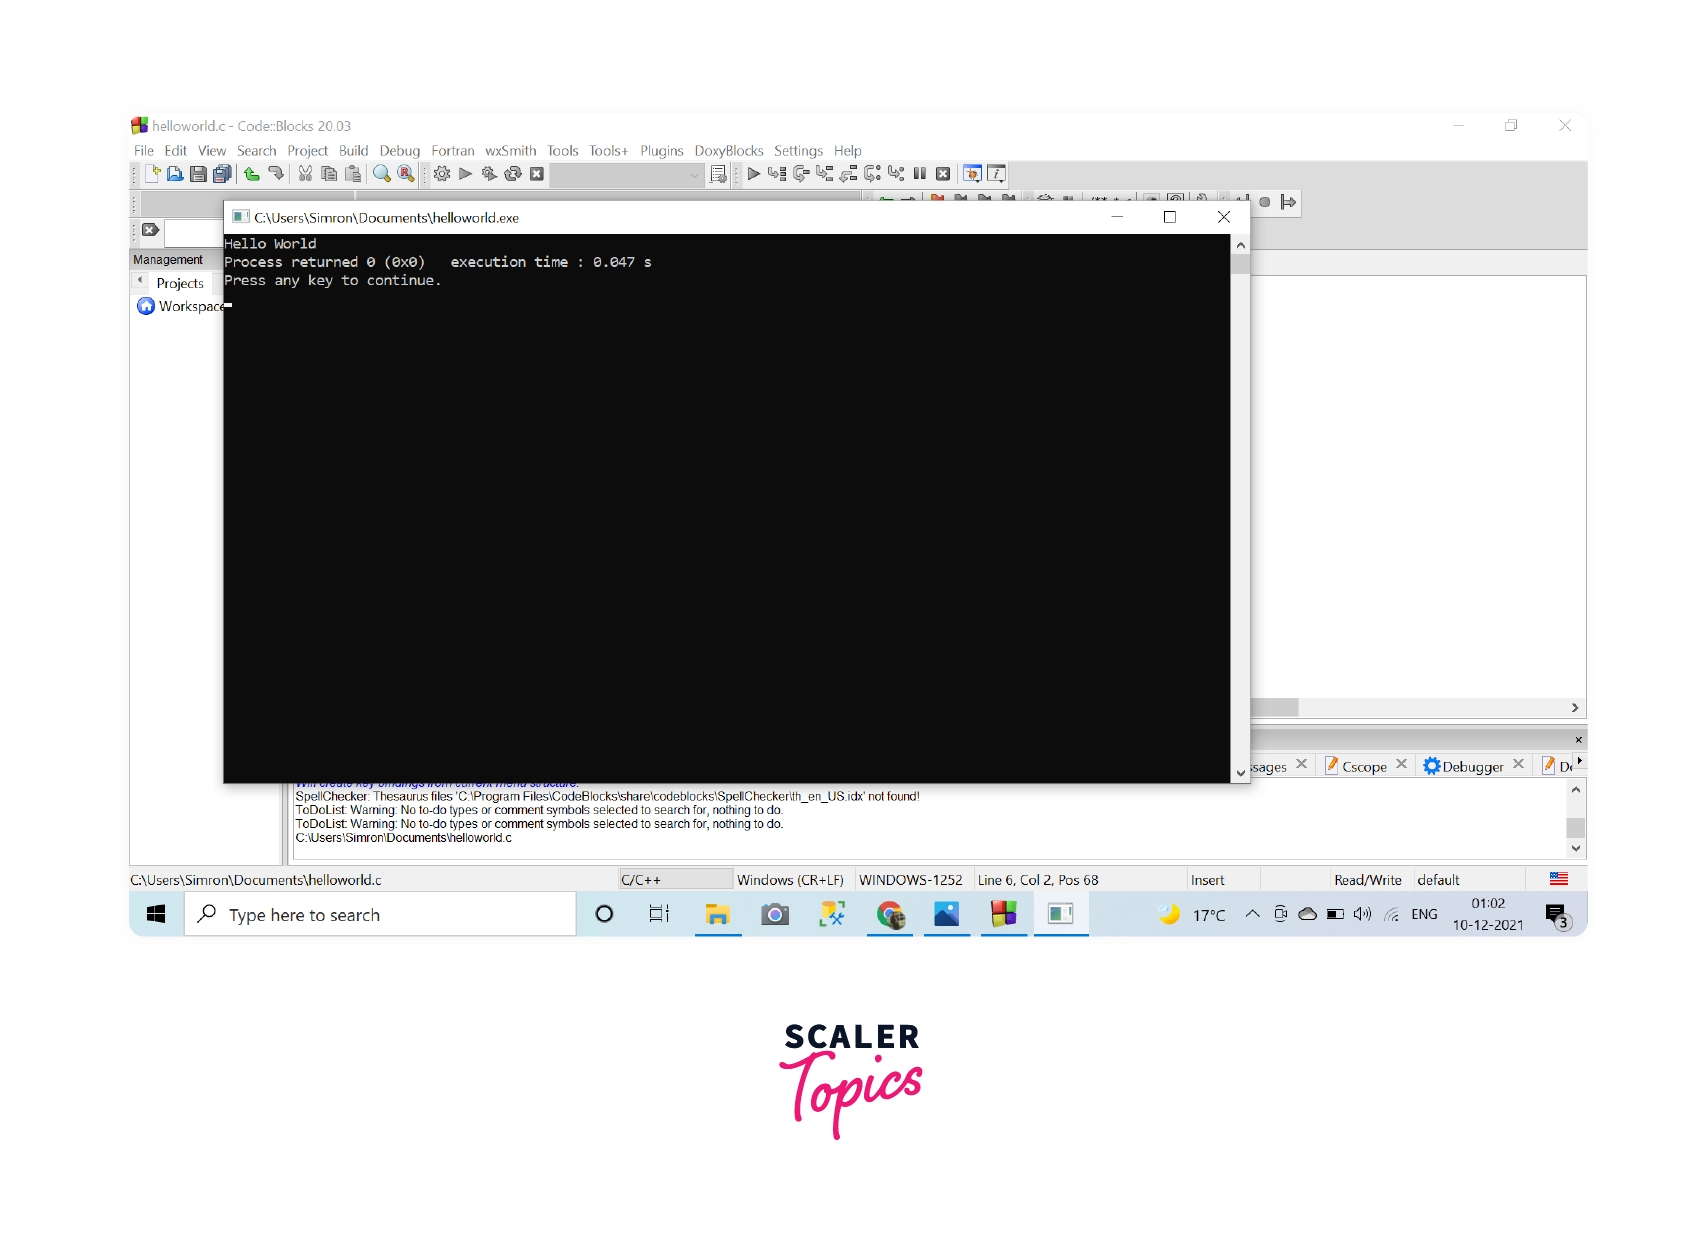
Once you save, go to Build>>Run and the program will compile and run.
If the command prompt with hello world written on it appears on the screen below, then the code blocks have been successfully installed!
Conclusion
- The source code is compiled using a C compiler for Windows to be understood by the machine (computer).
- The C Compiler for Windows can be installed on a Windows system, first by only installing the compiler and second by installing a compiler with IDE as a plugin.
- The C/GCC is the compiler used by the C language.
- We have to set the path of the compiler in the Environment path variable so that it can be used in any directory.
- To use C Compiler, the program must be saved with .C extension.