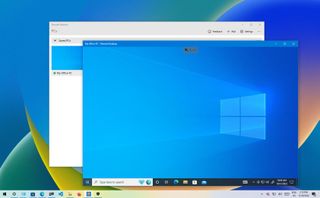
Используйте удаленный рабочий стол на устройстве с Windows, Android или iOS, чтобы дистанционно подключиться к компьютеру с Windows 10. Вот как настроить компьютер для разрешения удаленных подключений, а затем подключиться к настроенному компьютеру.
Примечание: В то время как сервер удаленного рабочего стола (например, компьютер, к которому вы подключаетесь) должен работать под управлением версии Windows Pro, клиентский компьютер (устройство, с которым вы подключаетесь) может работать под управлением любой версии Windows (Pro или Home). или даже другой операционной системы.
-
Включите удаленные подключения на компьютере, к которому требуется подключиться.
-
Убедитесь, что у вас установлена Windows 11 Pro. Чтобы проверить это, выберитеПуск и откройте Параметры . Затем в разделе Система , выберите О системе и в разделе Характеристики Windows найдите Выпуск. Сведения о том, как получить Windows 11 Pro, см. в статьеОбновление Windows Home до Windows Pro.
-
Когда будете готовы, нажмитеПуск и откройтеПараметры . Затем в разделе Система выберите Удаленный рабочий стол, установите для параметра Удаленный рабочий стол значение Включить, затем выберитеПодтвердить.
-
Запишите имя этого компьютера в поле Имя компьютера. Оно понадобится позже.
-
-
Используйте удаленный рабочий стол для подключения к настроенному компьютеру.
-
На локальном компьютере с Windows: В поле поиска на панели задач введите Подключение к удаленному рабочему столу и выберите Подключение к удаленному рабочему столу. В окне «Подключение к удаленному рабочему столу» введите имя компьютера, к которому необходимо подключиться (из шага 1), а затем нажмите кнопку Подключиться.
-
На устройстве с Windows, Android или iOS: Откройте приложение «Удаленный рабочий стол» (можно скачать бесплатно в Microsoft Store, Google Play и Mac App Store) и добавьте имя компьютера, к которому вы хотите подключиться (см. шаг 1). Выберите имя удаленного компьютера, которое вы добавили, и дождитесь завершения подключения.
-
-
Включите удаленные подключения на компьютере, к которому требуется подключиться.
-
Убедитесь, что у вас установлена Windows 10 Pro. Чтобы это проверить, перейдите в Пуск > Параметры > Система > О системе и найдите Выпуск. Сведения о том, как получить Windows 10 Pro, см. в статье Обновление Windows 10 Домашняя до Windows 10 Pro.
-
Когда будете готовы, выберите Пуск > Параметры > Система > Удаленный рабочий стол, и выберите Включить удаленный рабочий стол.
-
Запомните имя компьютера в разделе Как подключиться к этому ПК. Оно понадобится позже.
-
-
Используйте удаленный рабочий стол для подключения к настроенному компьютеру.
-
На локальном компьютере с Windows: В поле поиска на панели задач введите Подключение к удаленному рабочему столу и выберите Подключение к удаленному рабочему столу. В окне «Подключение к удаленному рабочему столу» введите имя компьютера, к которому необходимо подключиться (из шага 1), а затем нажмите кнопку Подключиться.
-
На устройстве с Windows, Android или iOS Откройте приложение «Удаленный рабочий стол» (можно скачать бесплатно в Microsoft Store, Google Play и Mac App Store) и добавьте имя компьютера, к которому вы хотите подключиться (см. шаг 1). Выберите имя удаленного компьютера, которое вы добавили, и дождитесь завершения подключения.
-
Включить удаленный рабочий стол
Нужна дополнительная помощь?
Содержание
- Способ 1: Через список доступных сетей
- Способ 2: Подключение по Ethernet
- Подключение к другим устройствам в сети
- Вопросы и ответы
Способ 1: Через список доступных сетей
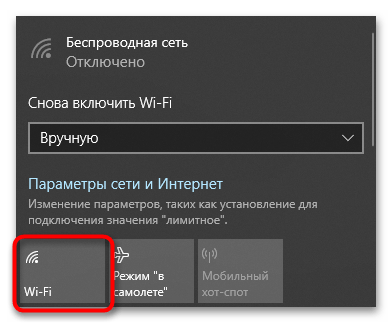
Если локальная сеть, к которой вы хотите подключить компьютер, – беспроводная, проще всего подключиться к ней с панели со списком доступных сетей Wi-Fi.
- Чтобы открыть список доступных сетей, кликните по значку сетевого подключения в системном трее.
- Если статус беспроводной сети будет «Отключена», скорее всего, у вас отключено обнаружение Wi-Fi. Включите его, для чего тут же нажмите плитку «Wi-Fi».
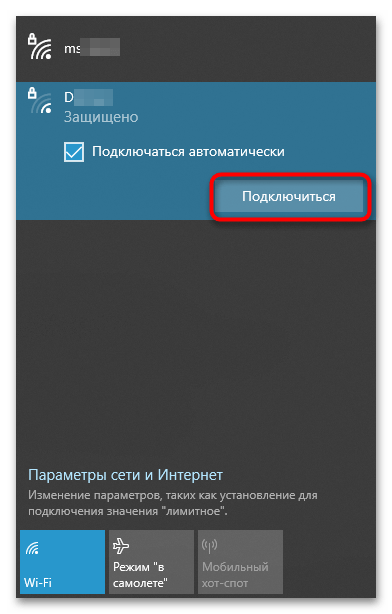
- Сетевой адаптер автоматически обнаружит доступные беспроводные сети, выберите из них нужную и нажмите кнопку «Подключиться». Также вы можете отметить опцию «Подключаться автоматически», чтобы следующий раз включенный компьютер сам подсоединялся к данной сети.
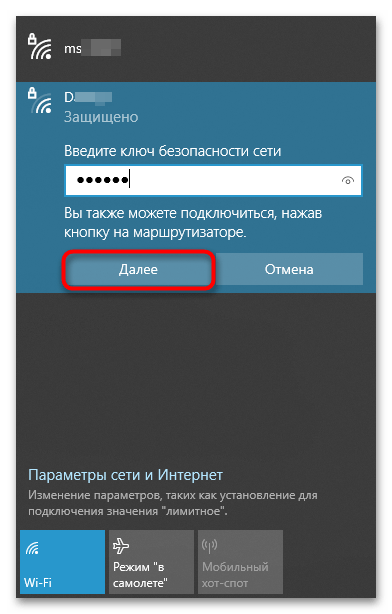
- Если сеть защищена паролем, вам будет предложено его ввести, после чего произойдет подключение.

Способ 2: Подключение по Ethernet
Для подключения к локальной сети без ввода логина и пароля можно использовать интерфейс Ethernet. Для этого вам понадобиться сетевой кабель с коннекторами RJ45 на обоих концах.
- Соедините роутер и ваш компьютер сетевым кабелем. Подключение к сети должно быть выполнено автоматически, если же этого не произойдет, выполните указанные ниже действия.
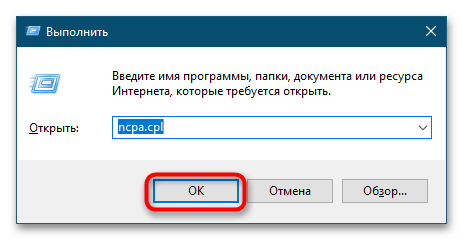
- Откройте «Сетевые подключения», для чего нажмите Win + R и выполните в открывшемся диалоговом окошке команду ncpa.cpl.
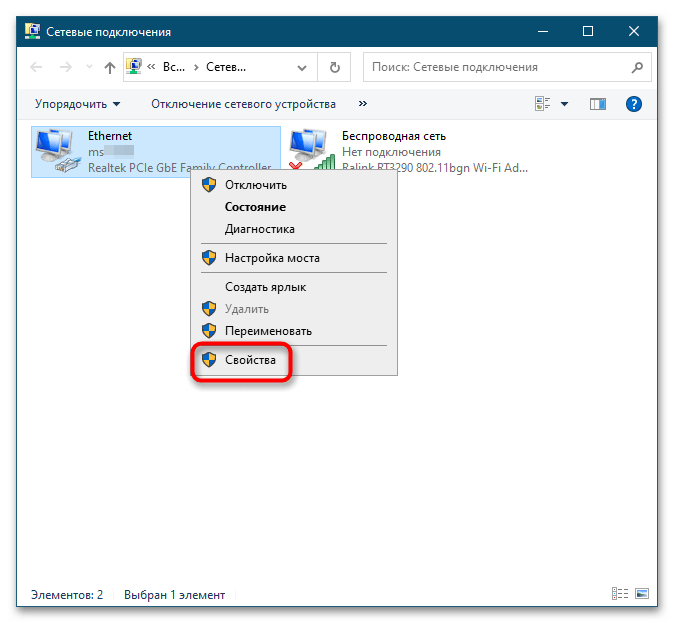
- Откройте свойства используемого сетевого адаптера Ethernet двойным по нему кликом или из его контекстного меню.
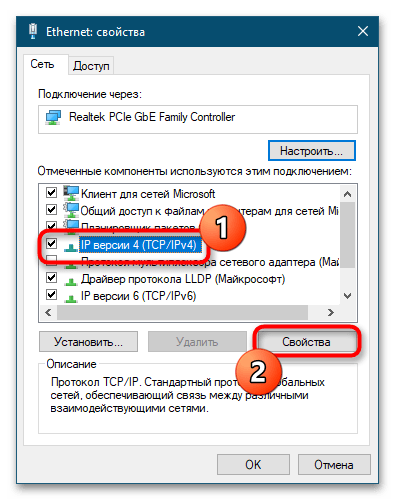
- В открывшемся окошке свойств найдите пункт «IP версии 4 (TCP/IPv4)», выделите его и нажмите кнопку «Свойства».
- В окне свойств включите опции «Получить IP-адрес автоматически» и «Получить адрес DNS-сервера автоматически». Сохраните настройки.

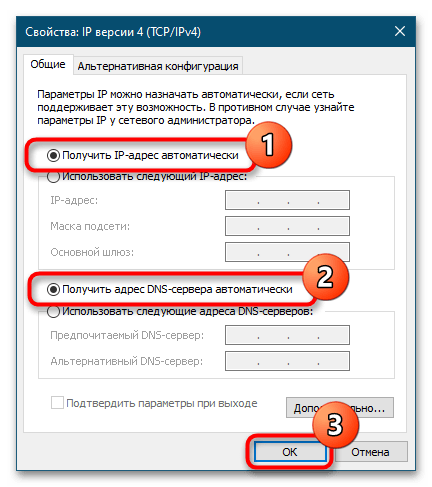
После этого сетевой адаптер станет получать IP-адрес непосредственно из роутера.
Подключение к другим устройствам в сети
Если вы хотите, чтобы компьютер смог взаимодействовать с другими устройствами в локальной сети, необходимо будет изменить тип сетевого профиля и проверить корректность параметров общего доступа.
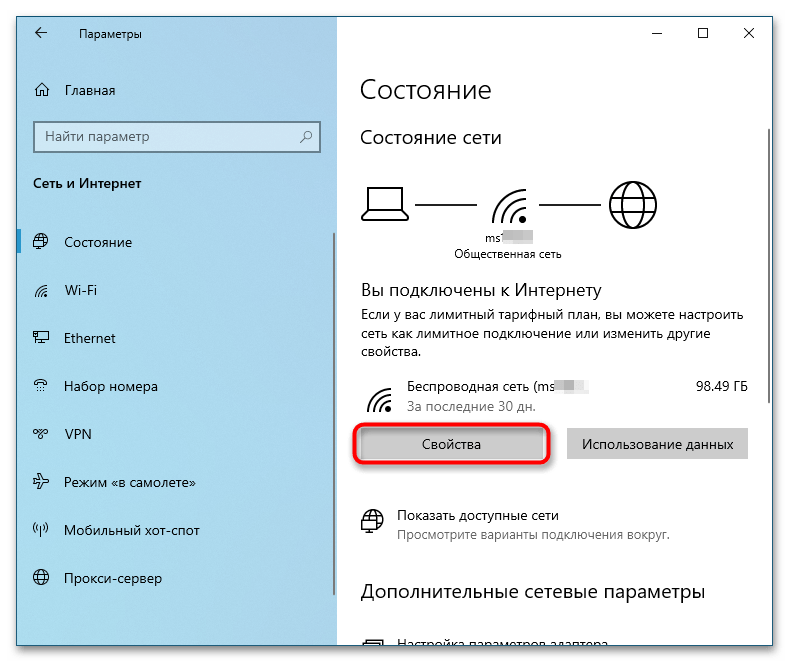
- Откройте приложение «Параметры», перейдите в раздел «Сеть и Интернет» → «Состояние» и нажмите кнопку «Свойства».
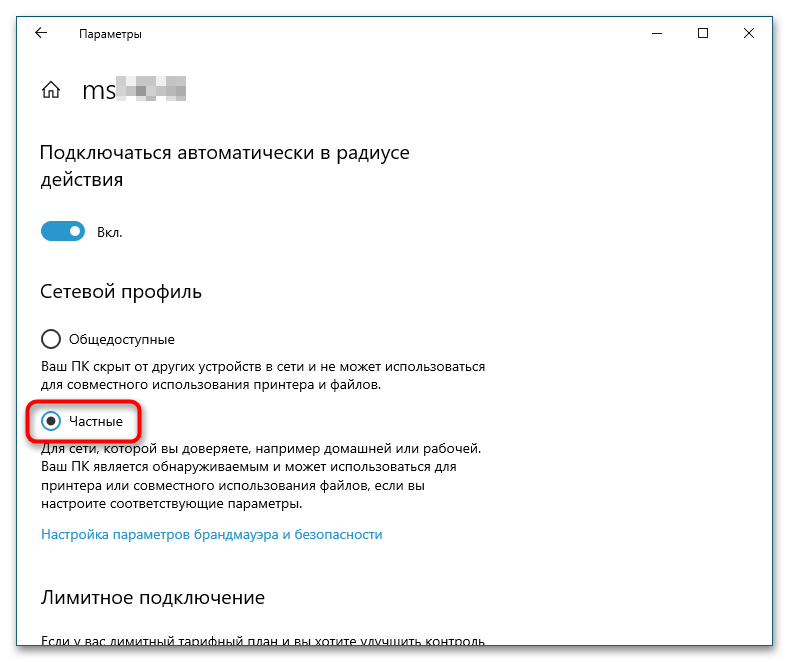
- В окне «Сетевой профиль» выберите «Частные».
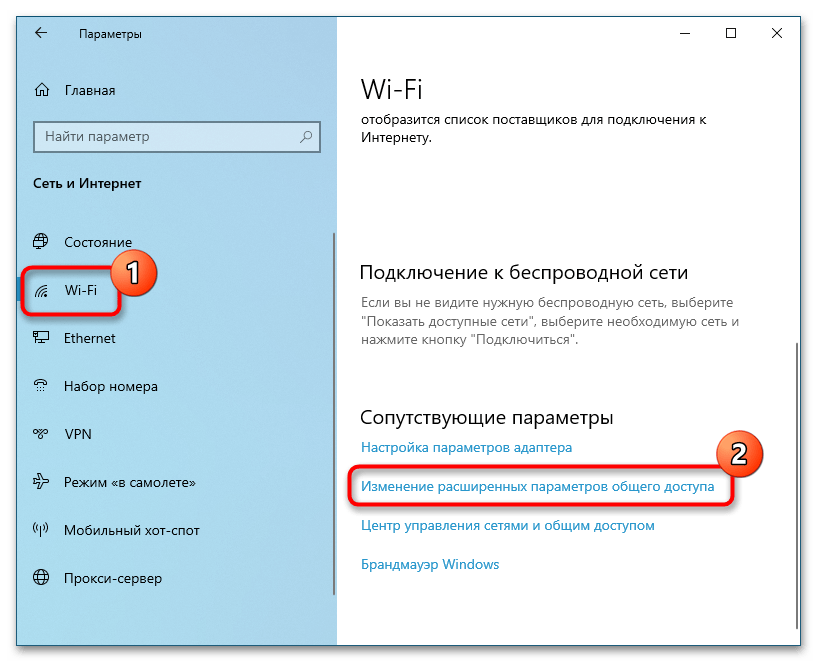
- В разделе «Сеть и Интернет» переключитесь на вкладку «Wi-Fi» или «Ethernet» (в зависимости от типа подключения) и нажмите ссылку «Изменение расширенных параметров общего доступа».
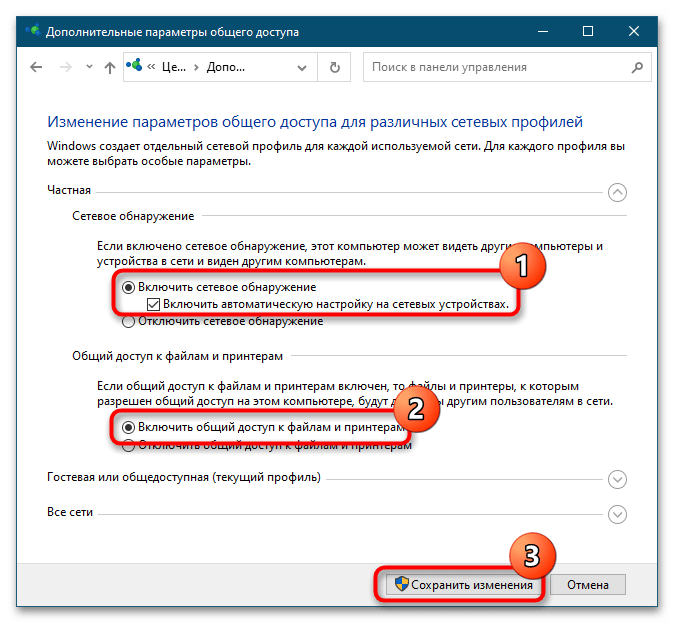
- Убедитесь, что для выбранного профиля сети «Частные» задействованы опции «Включить сетевое обнаружение» и «Включить общий доступ к файлам и принтерам».

После сохранения настроек вы сможете подключаться не только к точке доступа локальной сети, но и к другим компьютерам, которые в этой сети находятся при условии, что на них также включено сетевое обнаружение.
Еще статьи по данной теме:
Помогла ли Вам статья?
(Image credit: Future)
On Windows 10, the «Remote Desktop» app makes connecting to other computers easy over the local network and internet. It’s also the experience that replaces the built-in legacy «Remote Desktop Connection» program, which is still available.
The app is user-friendly, but depending on the computer you need to establish a connection, the app is only one of the steps since you may have to configure additional settings, including forwarding the appropriate port in the router to connect to another device. Also, there’s a small problem. You can install the Remote Desktop app on any edition of Windows 10. However, the remote desktop protocol (RDP) that makes the connection possible is only available on the «Pro» edition and business variants of the operating system. (Windows 10 Home doesn’t allow remote connections.)
This guide will walk you through the steps to allow remote connections from within the local network or internet and how to use the Remote Desktop app to start a remote session.
How to allow remote connections on Windows 10
Remote Desktop makes it easy to connect to other computers. However, the configuration will depend on whether the connection happens over the local network or through the internet.
Enable remote connections
In a local area network (LAN), you only need to enable the option to allow remote desktop connections on your computer. You can complete this task from the Settings app or Control Panel.
Settings app
To enable the Remote Desktop feature using the Settings app, use these steps:
- Open Settings.
- Click on System.
- Click on Remote Desktop.
- Turn on the «Enable Remote Desktop» toggle switch.
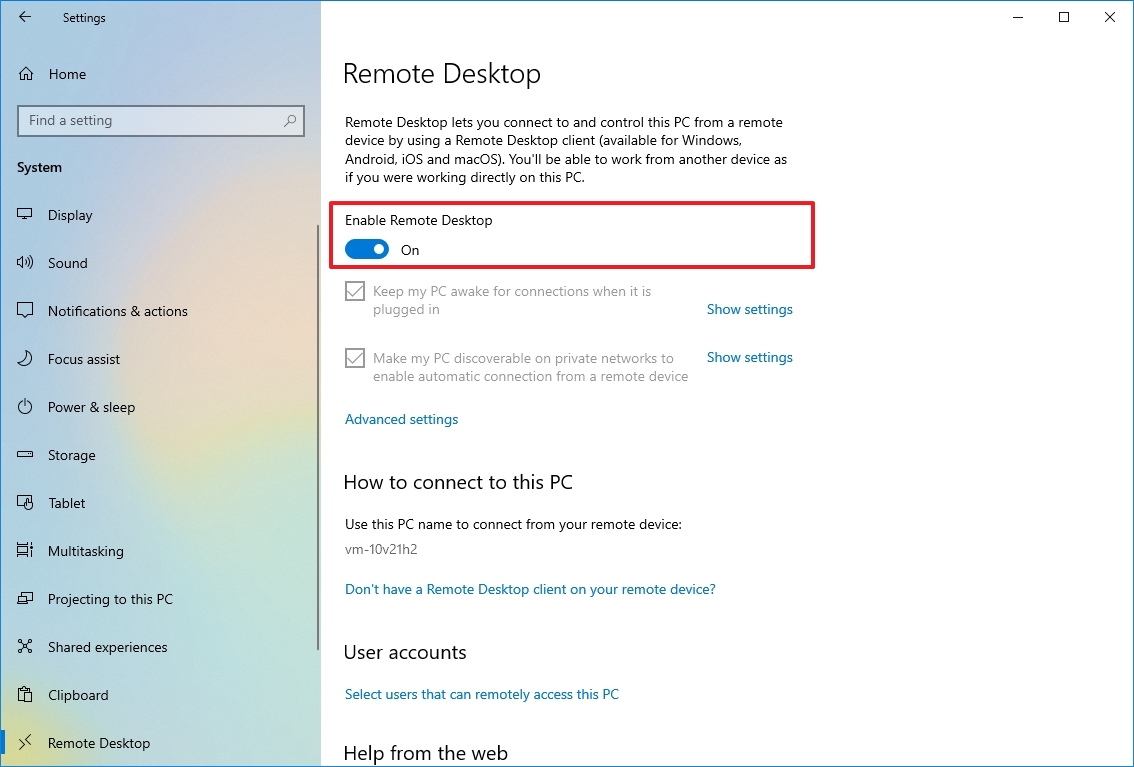
- Click the Confirm button.
Once you complete the steps, remote desktop connections will be allowed on the device. Windows 10 will also add the necessary rules in the built-in Microsoft Defender Firewall. However, you may need to configure the rules manually if you have a third-party security solution.
Control Panel
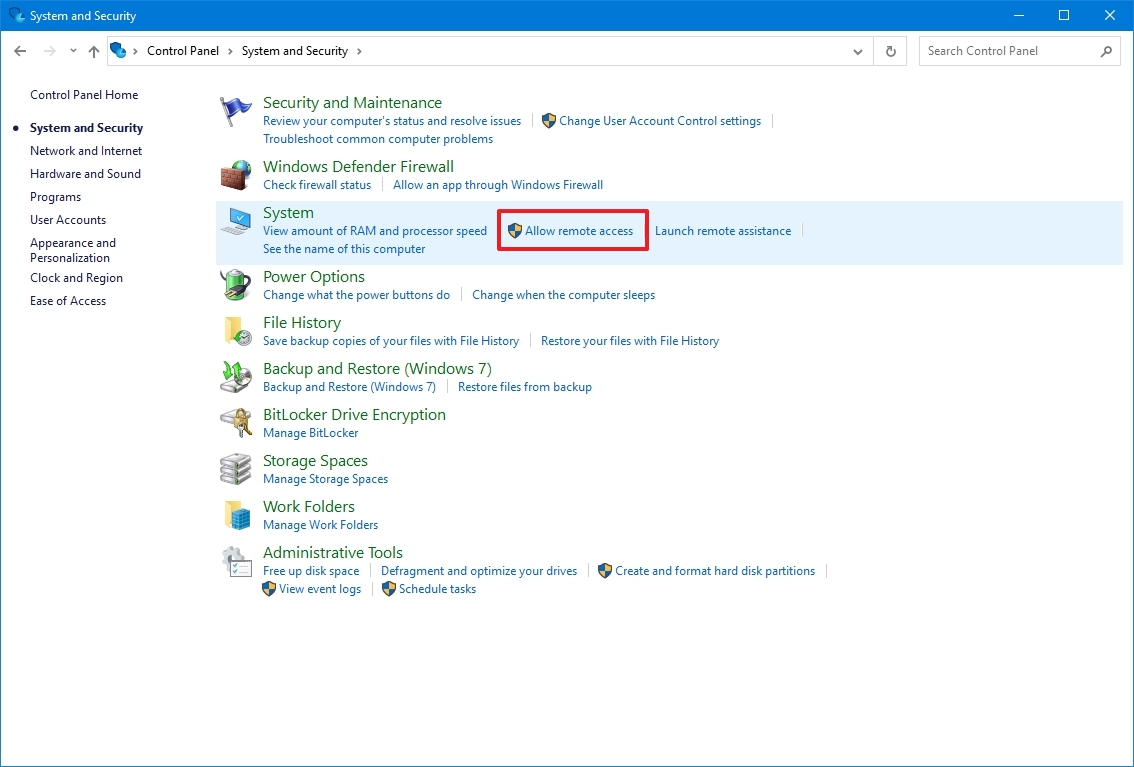
To enable remote connections on Windows 10, use these steps:
- Open Control Panel.
- Click on System and Security.
- Under the «System» section, click the «Allow remote access» option.
- Click the Remote tab.
- Under the «Remote Desktop» section, check the «Allow remote connections to this computer» option.
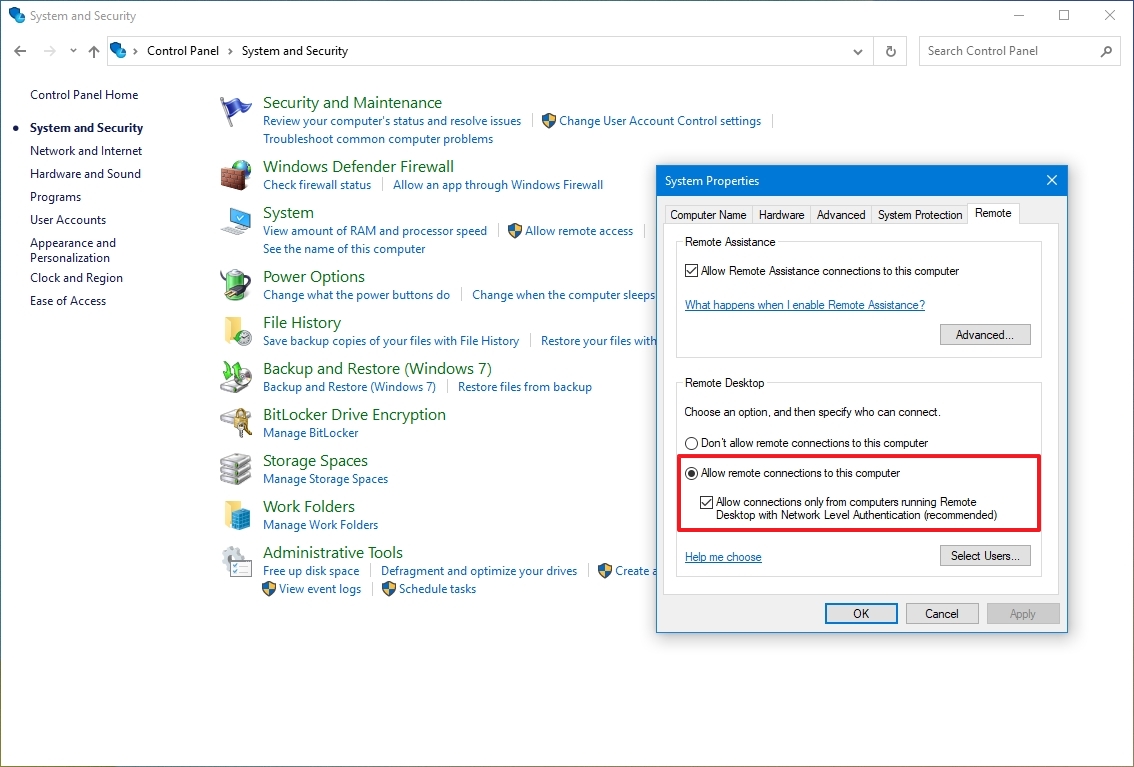
- Check the «Allow connections only from computers running Remote Desktop with Network Level Authentication» option.
- Click the OK button.
- Click the Apply button.
- Click the OK button.
Continue with the steps below if you need to configure a remote desktop using an internet connection. If you have to connect to another device within the local network, skip to the steps below, and continue with the start a remote desktop connection instructions.
Enable remote connections on router
If the remote connection happens over an internet connection, you will also have to configure the router to allow the remote connection. In addition, you will need to know the public address to contact the remote computer.
Configure static IP address
A computer usually receives a dynamic IP address from the DHCP server (router), which means it can change. If you plan to use the remote desktop feature for some time, you may want to configure a static IP address to avoid reconfiguring port forwarding on the router when the device changes the network configuration.
Control Panel
To configure a permanent network configuration, use these steps:
- Open Control Panel.
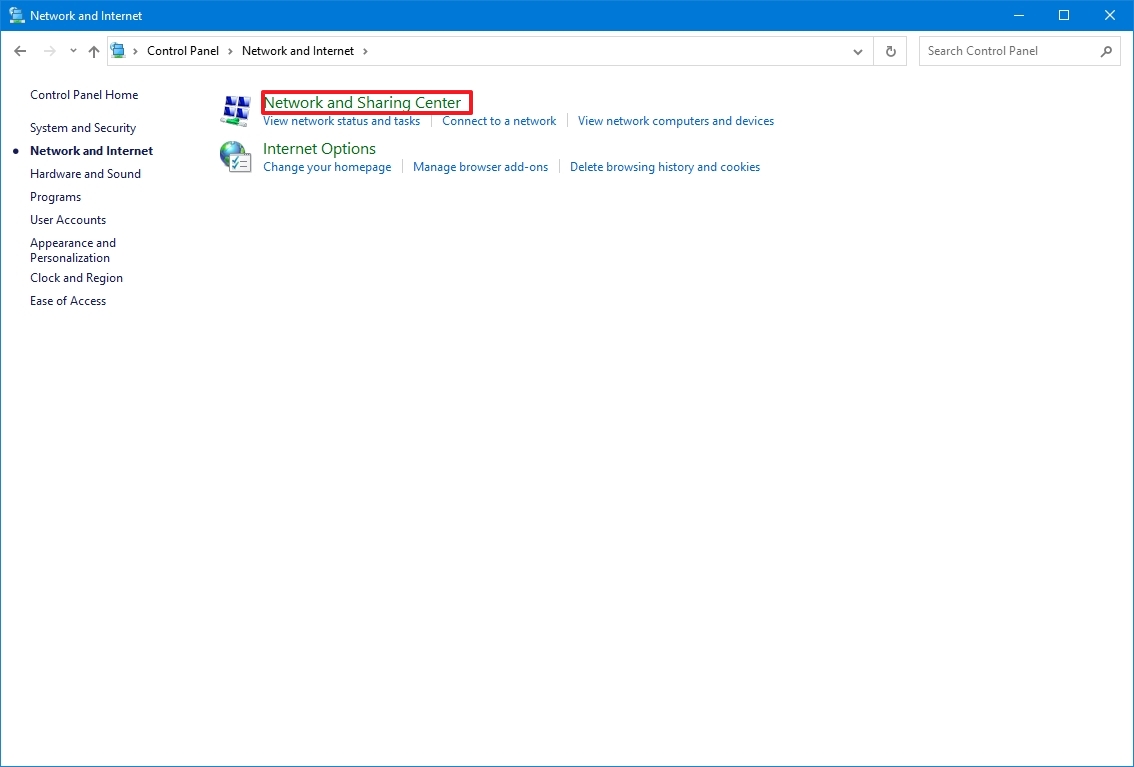
- Click on Network and Internet.
- Click on Network and Sharing Center.
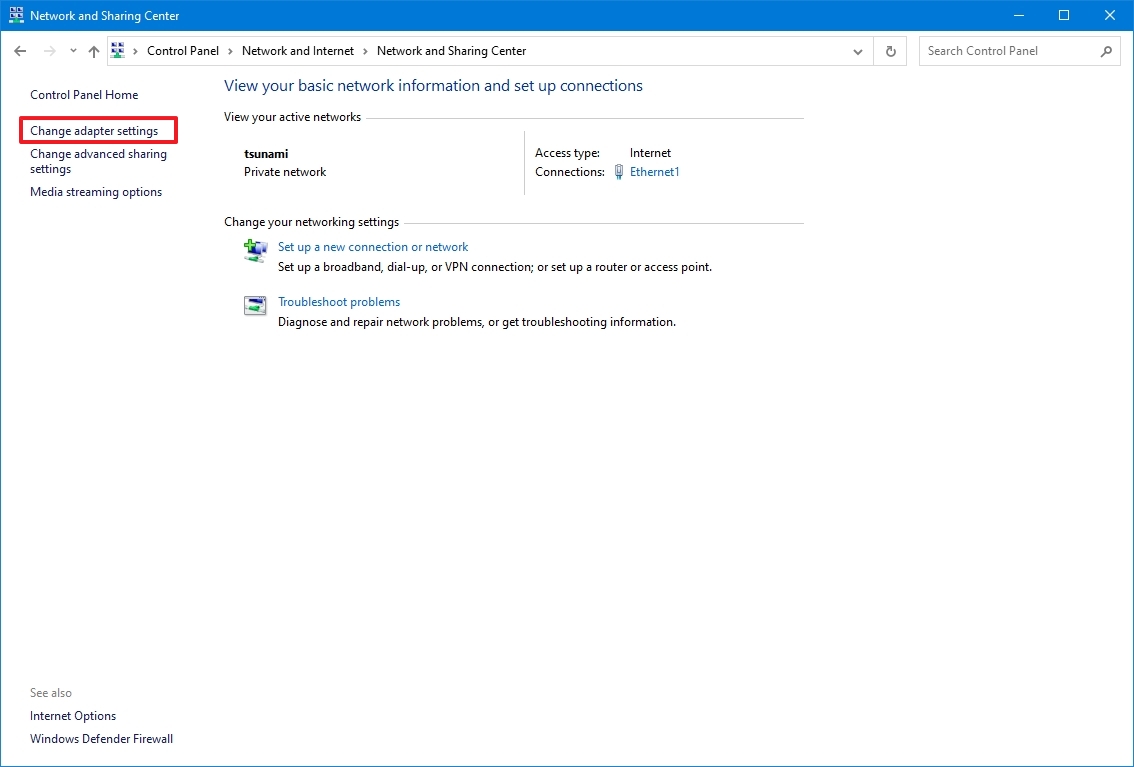
- Click the «Change adapter settings» option from the left navigation pane.
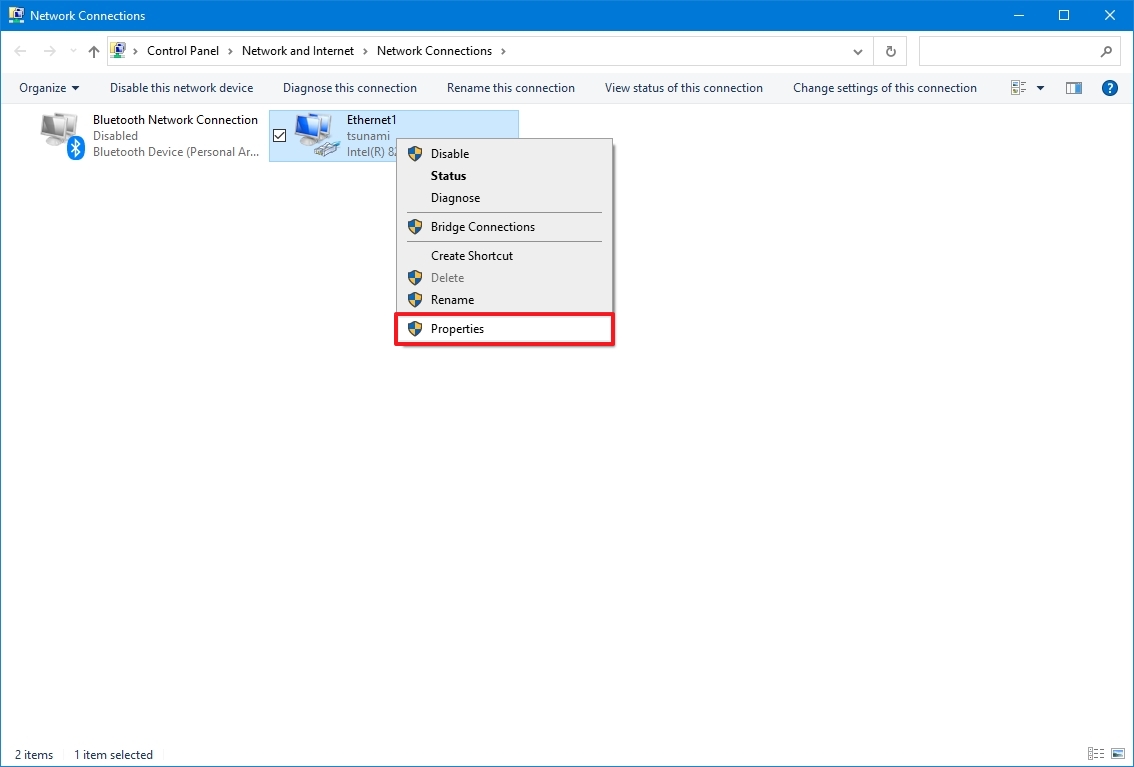
- Right-click the active network adapter and select the Properties option.
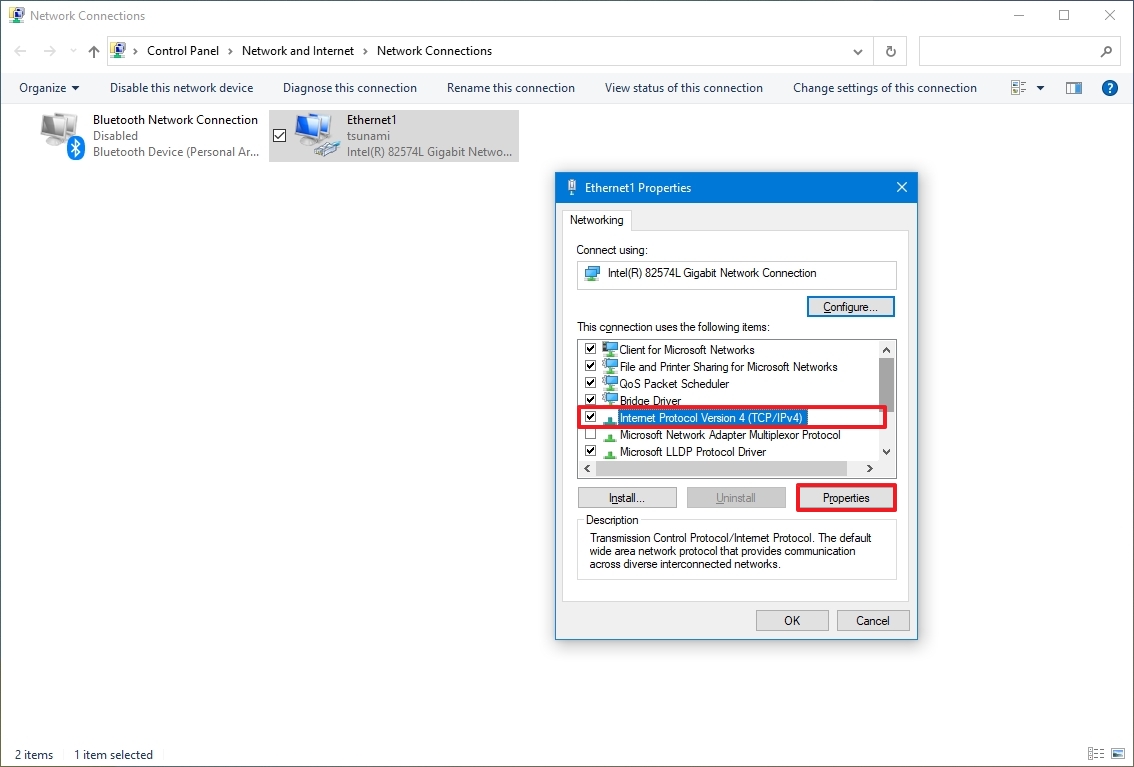
- Select the «Internet Protocol Version 4 (TCP/IPv4)» option.
- Click the Properties button.
- Click the General tab.
- Select the «Use the following IP address» option.
- Specify a local IP address outside the local DHCP scope to prevent address conflicts – for example, 10.1.4.201.
- Quick tip: Usually, you’ll find this information inside the DHCP settings section on the router. Since not every router is created equal, you may need to consult your manufacturer support website for more specific details to find this information. If you’re unsure of the configuration you have to use, use your current TCP/IP configuration as a reference, which you can review with the ipconfig /all command in Command Prompt.
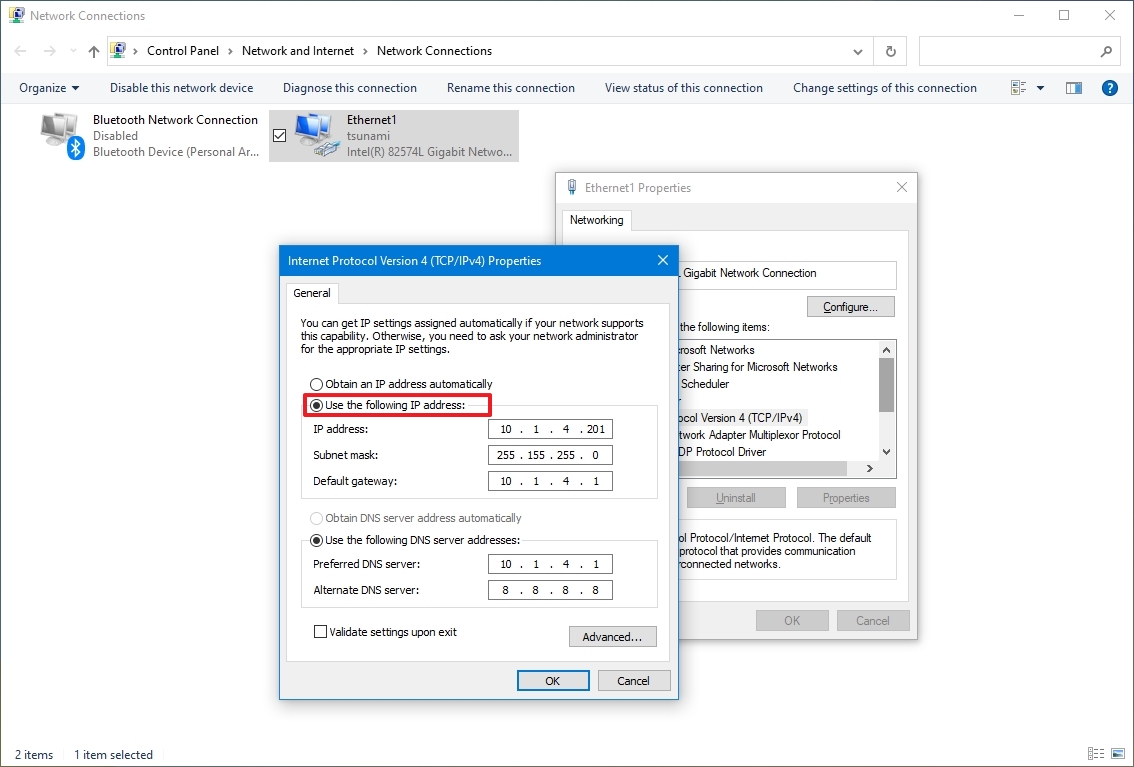
- Specify a subnet mask for the network (255.255.255.0), but the system usually fills this information from you based on the «IP address.»
- Specify the default gateway address, which should be the router’s address — for example, 10.1.4.1.
- Under the «Use the following DNS server addresses» section, in the «Preferred DNS server» field, specify the IP address of your DNS server, which in most cases is also the router’s address — for example, 10.1.4.1.
- Quick tip: If you can’t connect to the internet, try using one of the Google Public DNS addresses (such as 8.8.8.8) for the «Alternate DNS server» option.
- Click the OK button.
- Click the Close button.
After you complete the steps, the network configuration will apply, and the IP settings will never change.
Some routers include a feature to make the current TCP/IP configuration static. If you want to use this option, consult your manufacturer support website for specific steps to complete this task.
Identify network public IP address
You will also need the remote network’s public IP address to contact the device over the internet.
To determine the IP address assigned by the Internet Service Provider (ISP), use these steps:
- Open the web browser.
- Visit Bing.com or Google.com.
- Search for «What’s my IP.»
- Confirm the public IP address in the first result.
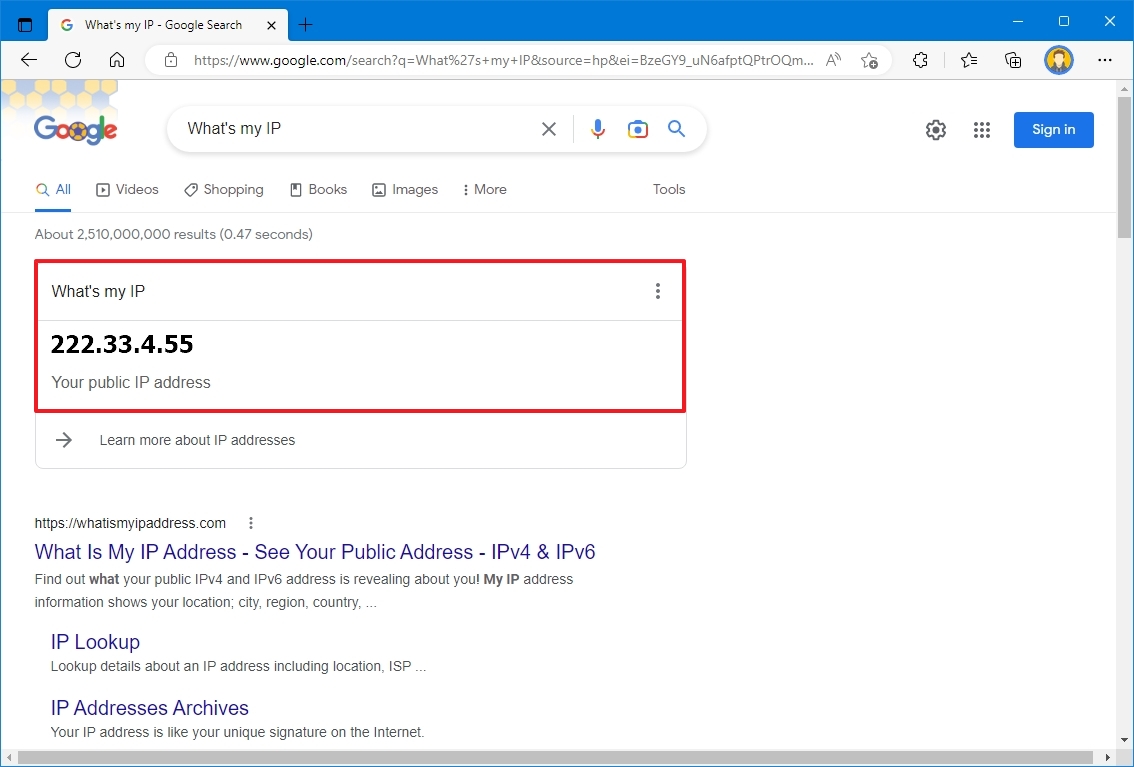
Typically, internet providers also offer dynamic public IP addresses for residential customers, which means that your public IP address may change from time to time.
If you need a more reliable solution, you may want to look into «Dynamic Domain Name System» (DDNS) services (such as DynDNS, OpenDNS, No-IP, or Asus.com for Asus routers), which can track public IP changes. Alternatively, you can also contact your ISP to request a static IP address, which might cost you extra since this is typically a feature reserved for businesses.
Configure port forwarding
You must also forward the TCP port 3389 on the router to allow connections through the internet to the computer in the local network.
Quick note: The router interface experience can vary depending on the manufacturer. However, you can use these instructions as a reference to configure your router. You can always check the manufacturer support website for more specific details.
To forward a port on your router, use these steps:
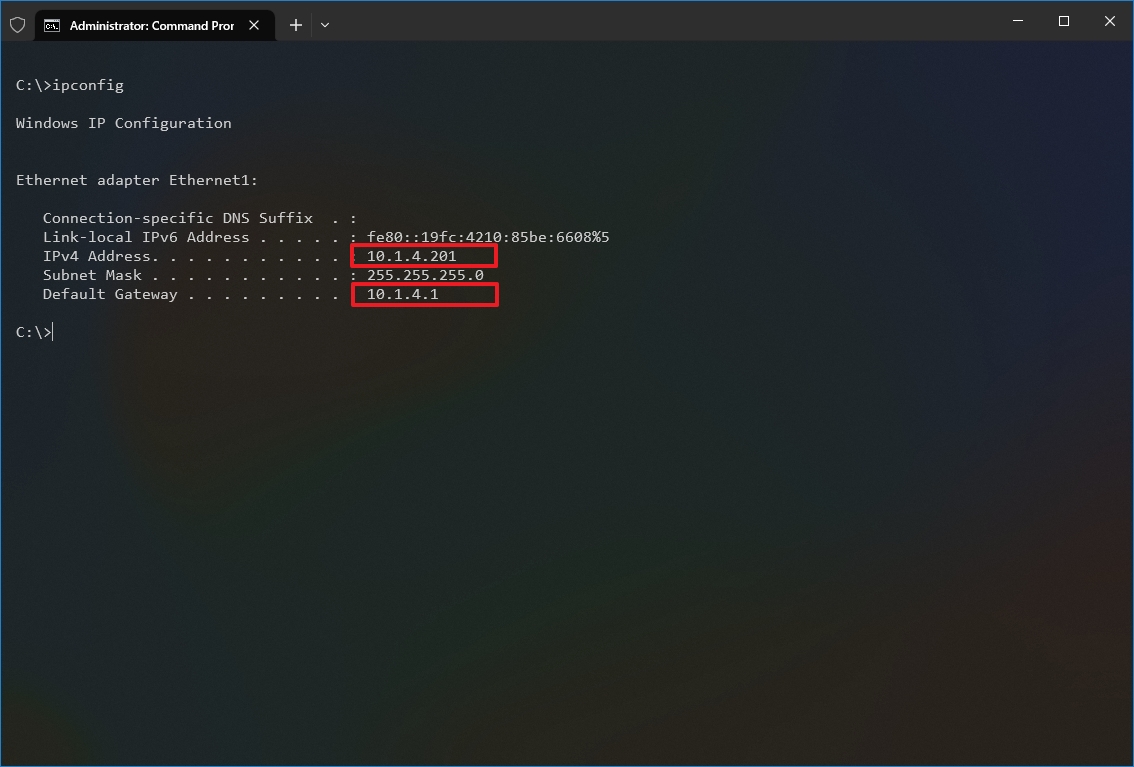
- Open Start.
- Search for Command Prompt and click the top result to open the app.
- Type the following command to check the current TCP/IP configuration and press Enter: ipconfig
- Under the «IPv4 Address» field, confirm the device address — for example, 10.1.4.201.
- Under the «Default Gateway» field, confirm the device gateway address (the router address) — for example, 10.1.4.1.
- Open your preferred browser.
- Type the router’s IP address (default gateway) in the address bar and press Enter.
- Sign in to the router using the correct username and password.
- Quick tip: If you have never done this, and you are using the router provided by the ISP, you may be able to find the information on a sticker attached to the device.
- Open the Port Forwarding settings page.
- Confirm that the Port Forwarding service is enabled (if applicable).
- Under the port forwarding list, click (in this case) the Add profile button.
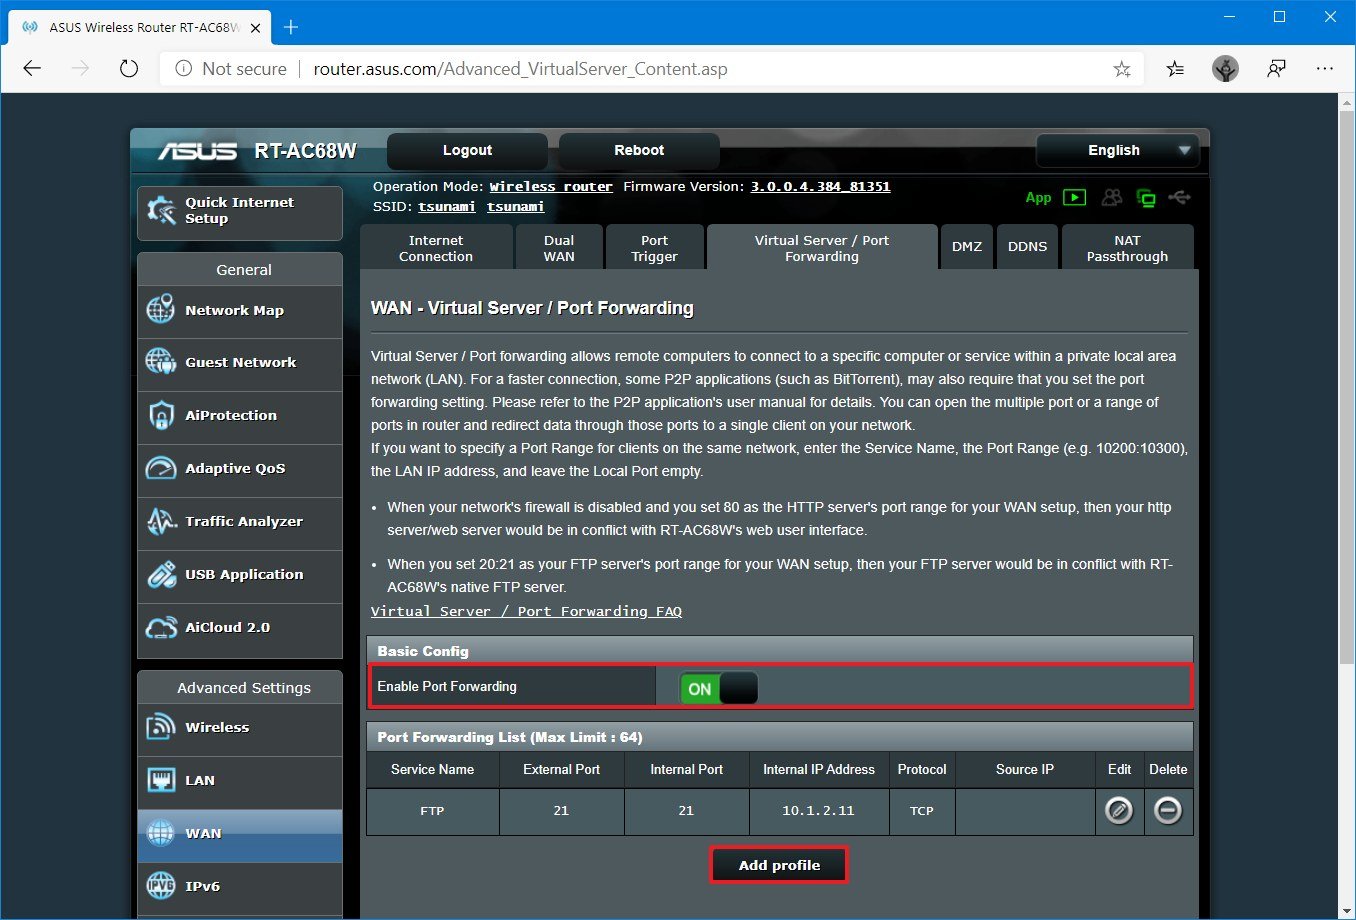
- Create a new port forward with the required information — for example:
- Service name: (optional) Specify the reference name for the service.
- Protocol: TCP.
- External Port: 3389.
- Internal Port: 3389.
- Internal IP Address: Specify the IP address of the computer you’re trying to connect — for instance, 10.1.4.100.
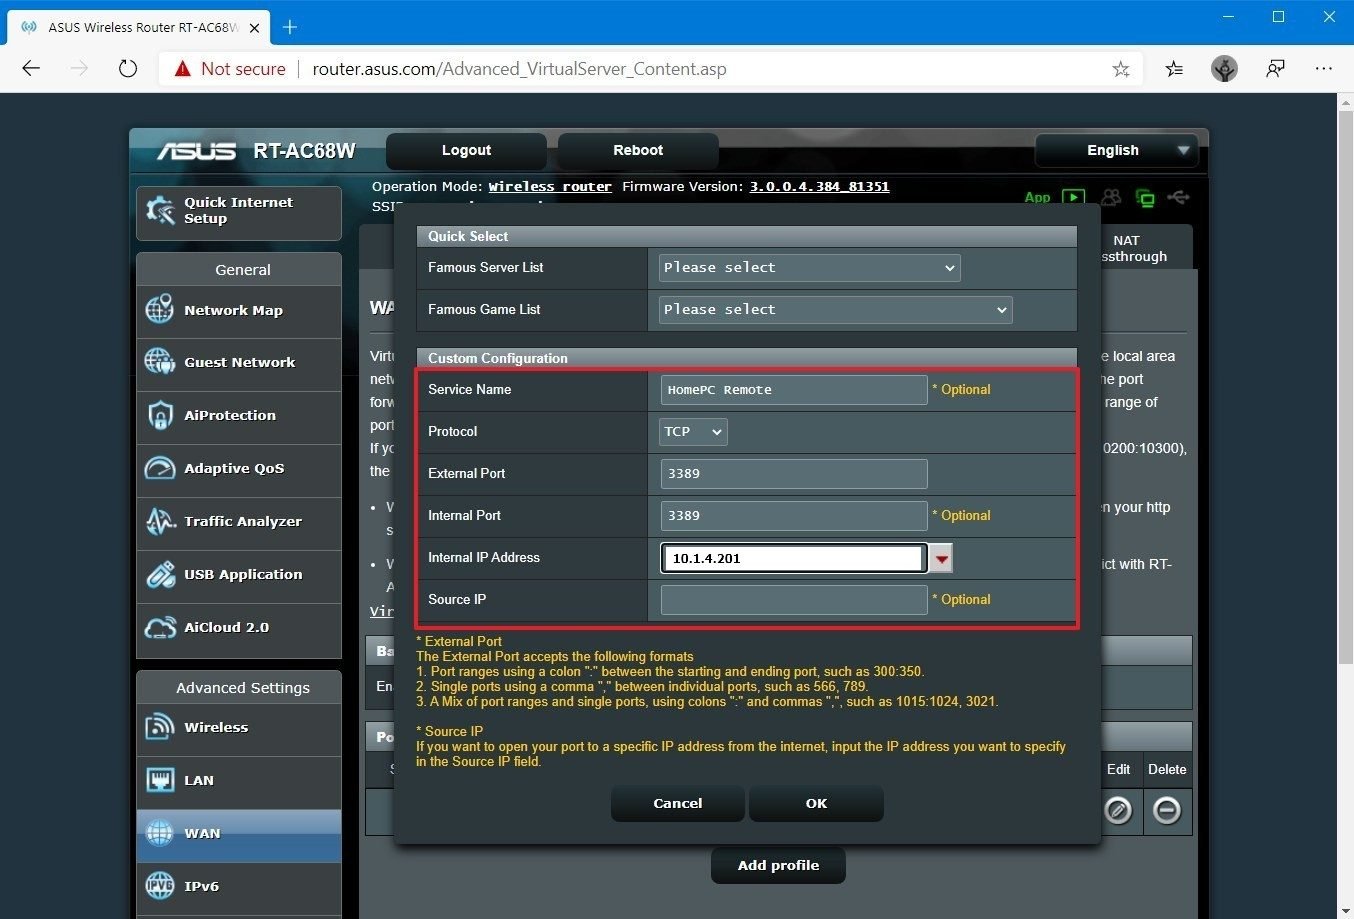
- Click the OK button.
Once you complete the steps, the port will open on the router, allowing remote desktop connections through the internet to that specific device.
How to establish remote desktop connection on Windows 10
After setting up the computer and router, you can initiate a remote connection using the Remote Desktop app on Windows 10.
Install Remote Desktop app
The Remote Desktop app should already be available on Windows 10, but you can always install it from the Microsoft Store.
To install the Remote Desktop app on Windows 10, use these steps:
- Open Microsoft Remote Desktop app page (opens in new tab).
- Click the Get (or Install) button.
- Click the Open Microsoft Store button.
- Click the Get (or Install) button.
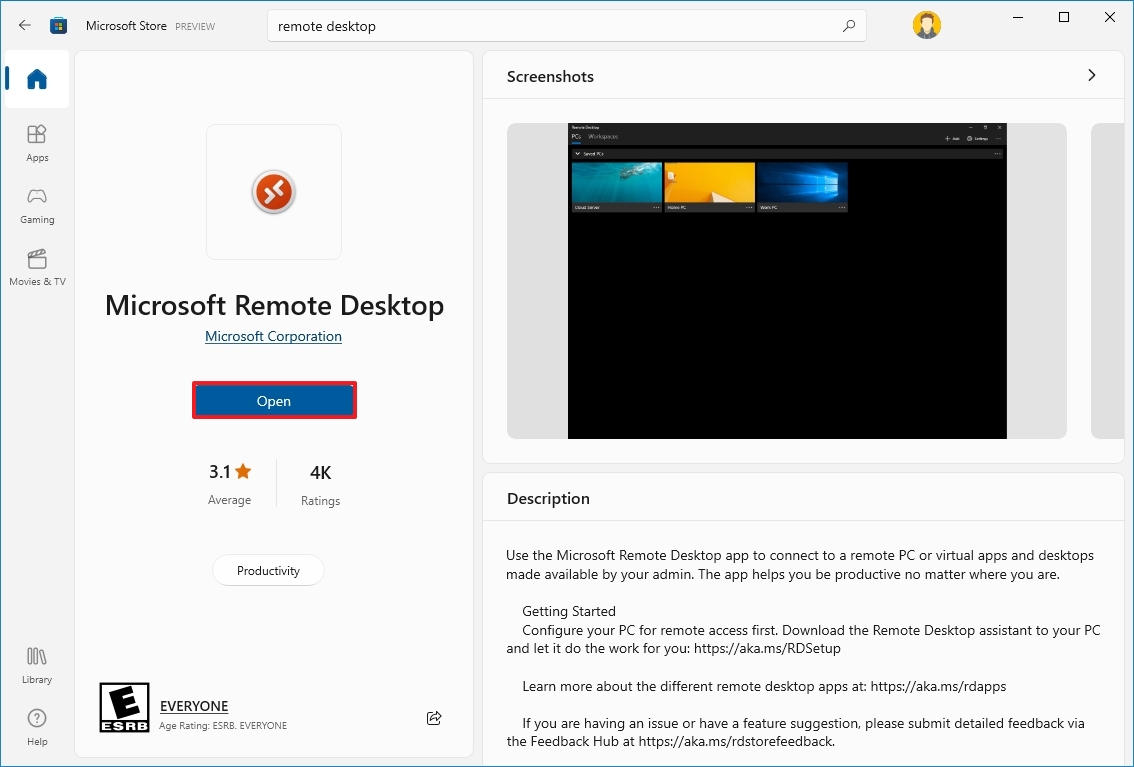
Once you complete the steps, open the app from within the Microsoft Store or Start menu.
Start remote desktop connection
To connect to a computer remotely on Windows 10, use these steps:
- Open the Remote Desktop app.
- Click the + Add button in the top right.
- Click the PCs option.
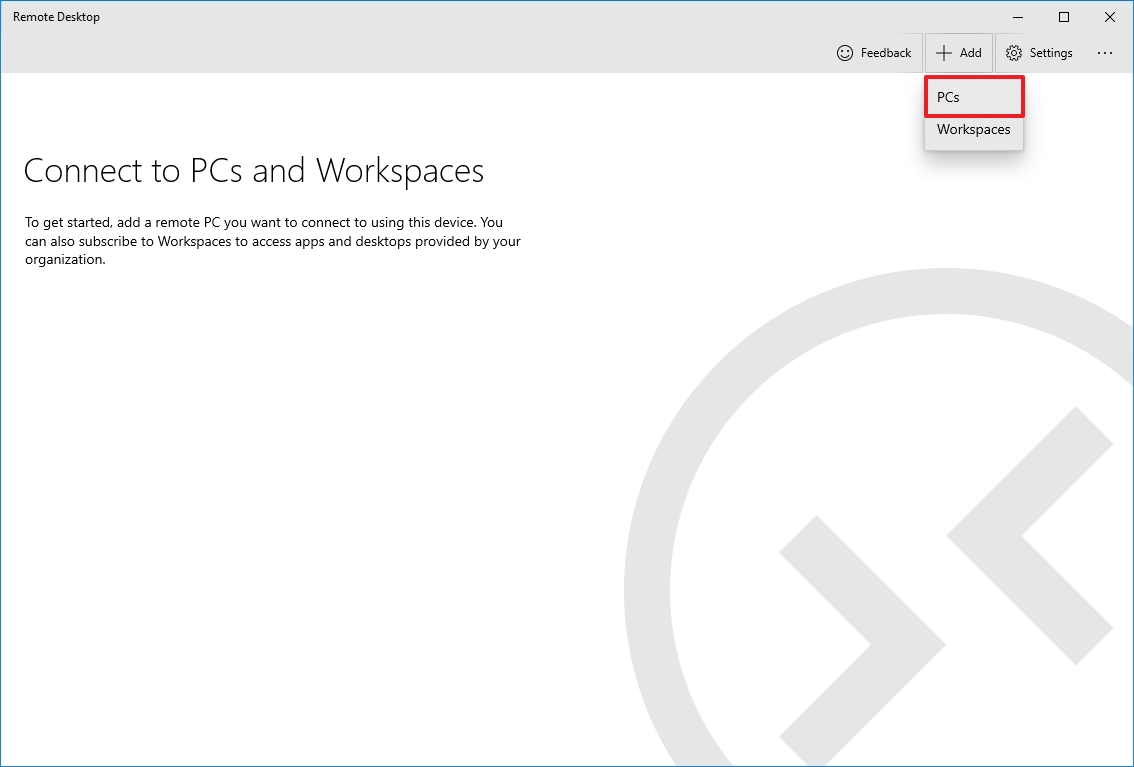
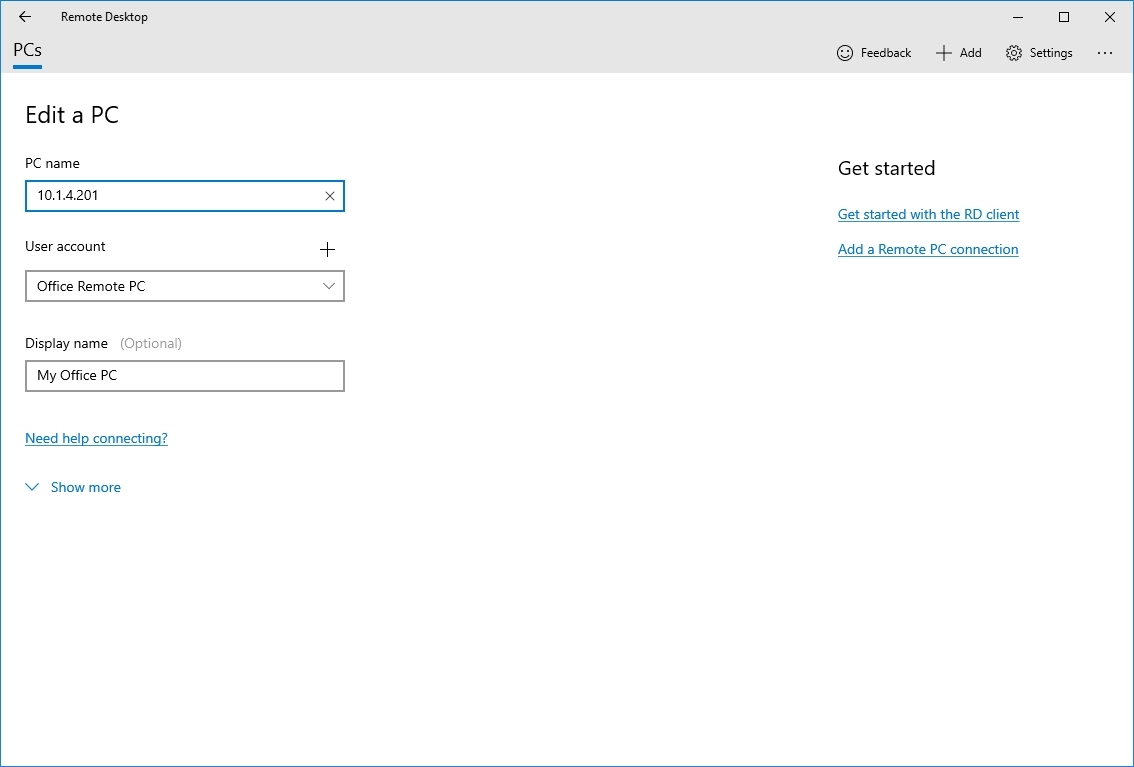
- Under the «PC name» section, specify the TCP/IP address of the remote computer:
- If the device is inside a private network, enter the local IP address.
- If the device is in a remote network (via the internet), enter the public IP address.
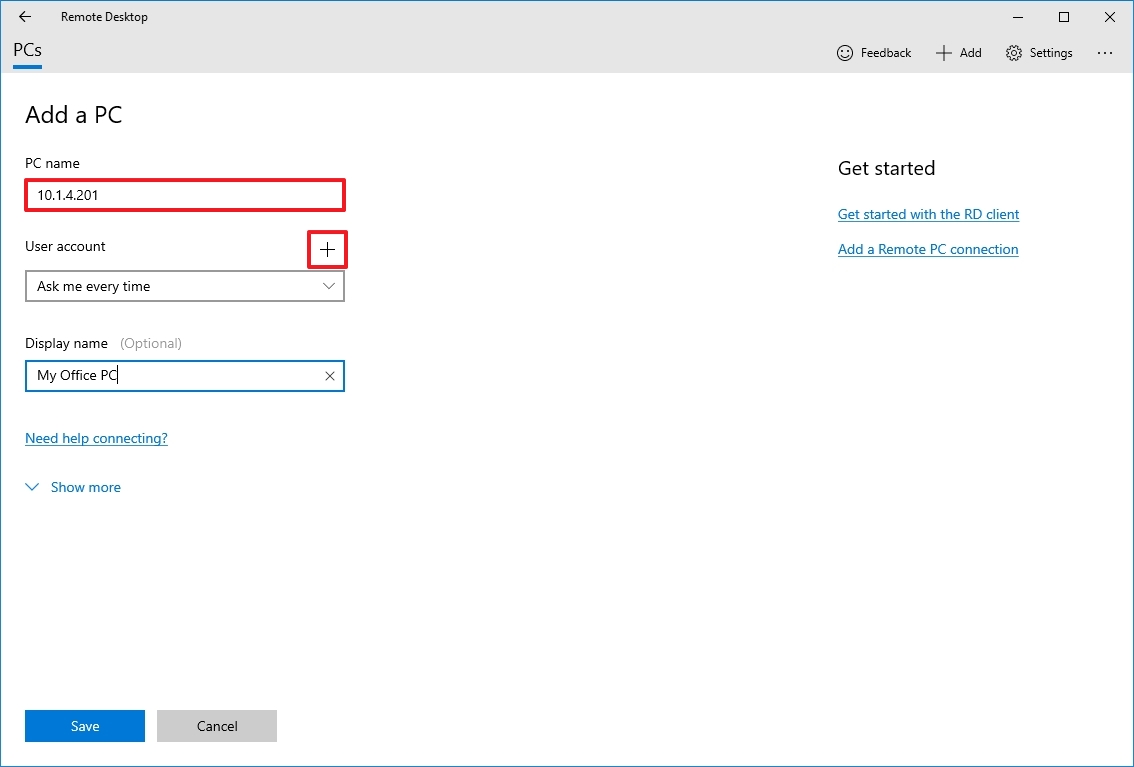
- Under the «User account» section, click the + (plus) button in the top right.
- Confirm the account information to sign in to the remote computer:
- If the remote device is using a Microsoft account, enter that Microsoft account sign-in information.
- If the remote device uses a local account, enter the local username and password to sign in.
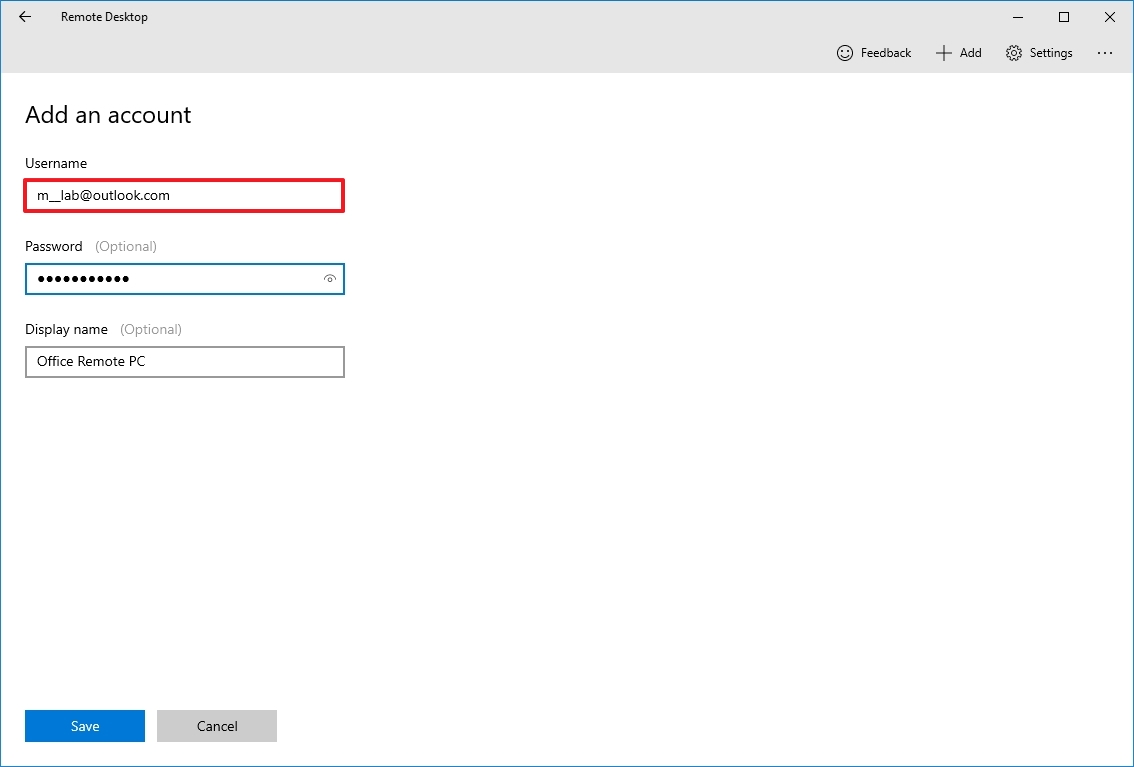
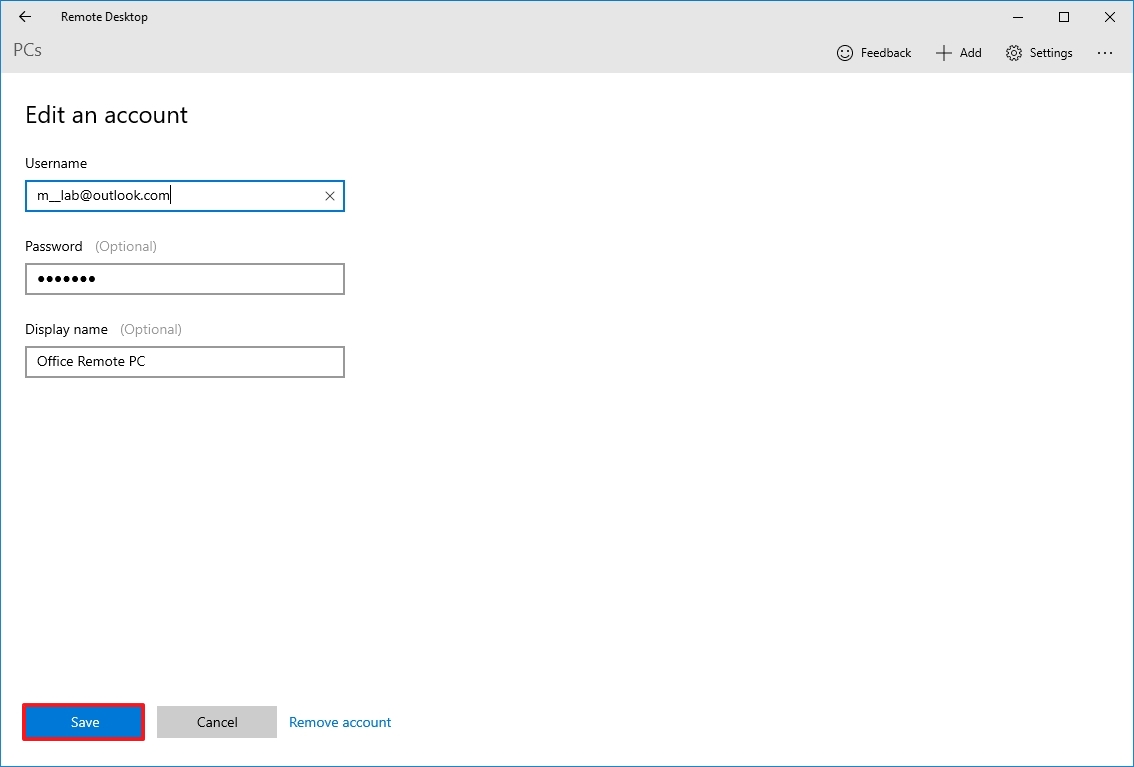
- (Optional) Under the «Display name» section, specify the account settings’ name.
- Click the Save button.
- (Optional) Under the «Display name» section, specify the connection’s name — for example, Office Remote PC.
- Click the Show more option.
- (Optional) Select additional settings as necessary.
- Quick tip: The additional settings include the option to connect using an admin session, set the remote session resolution, and clipboard, among others. Typically, you don’t need to configure these options, and you should only use them depending on the scenario.
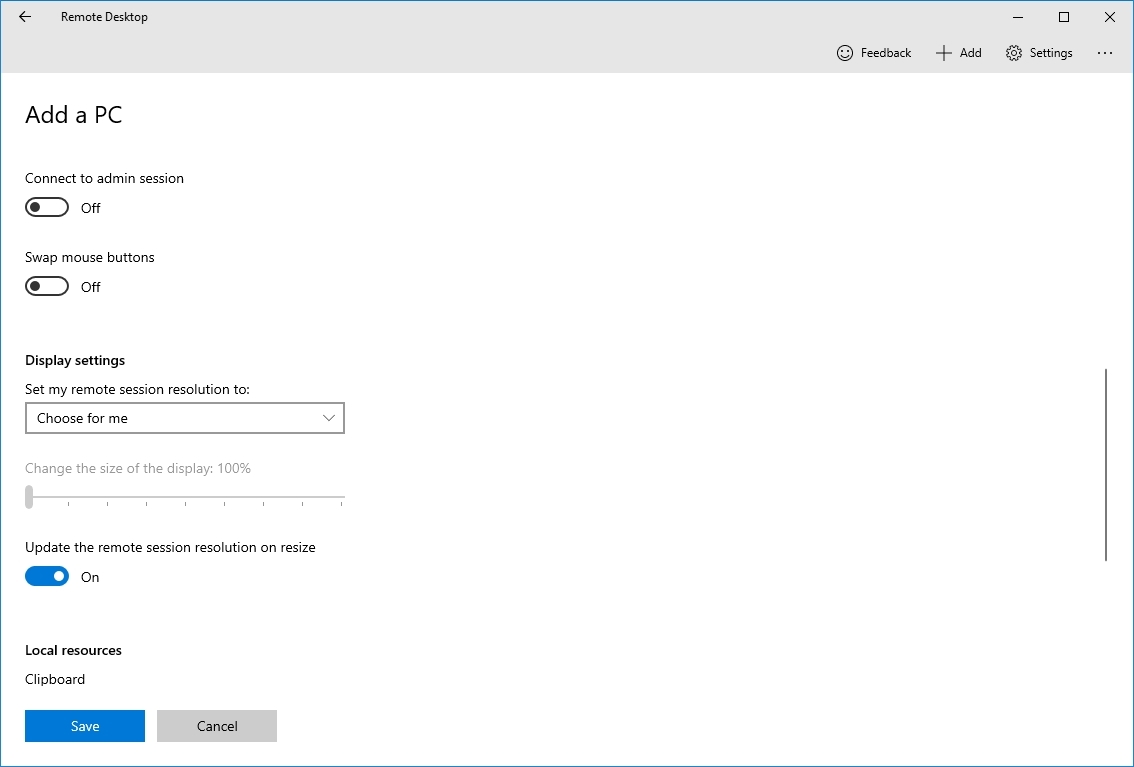
- Click the Save button.
- Under the «Saved Desktops» section, click the connection to start a remote session.
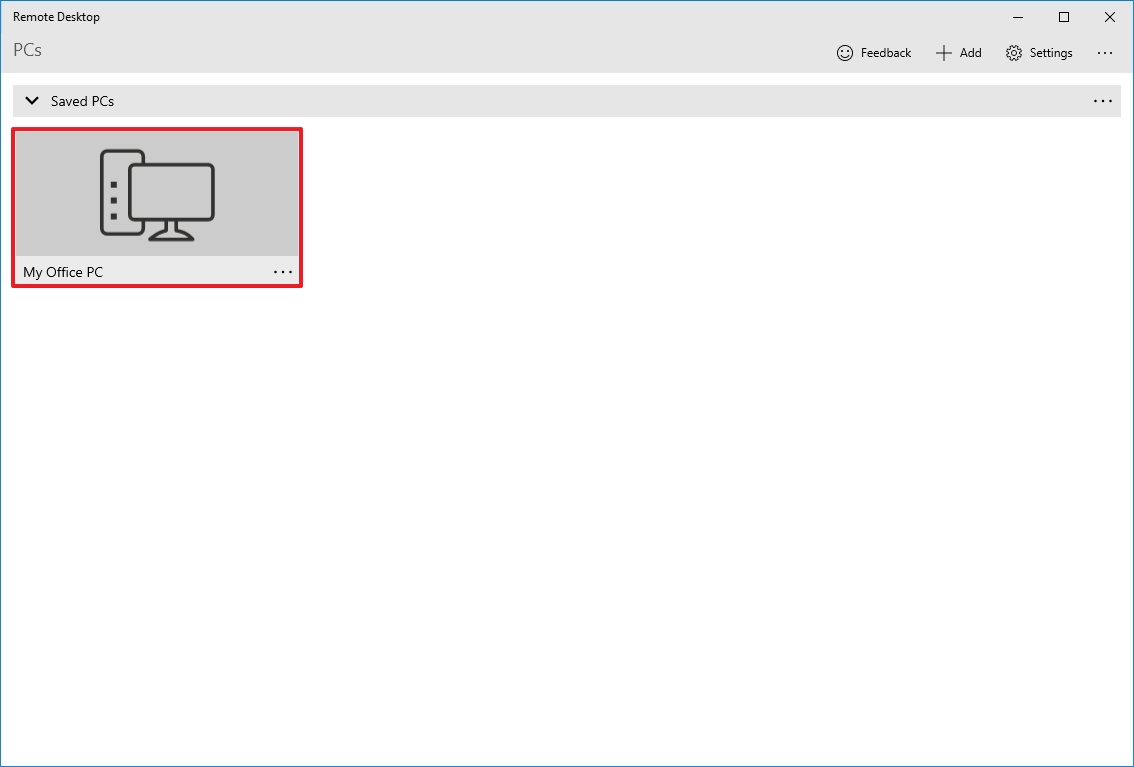
- Check the «Don’t ask about this certificate again» option (if applicable).
- Click the Connect button.
After you complete the steps, the remote connection should establish without problems if everything has been configured correctly.
If you want to terminate the session, you can close the window, click the three-dotted menu button from the top-middle and then click the Disconnect button.
Change app and connection settings
On Windows 10, the Remote Desktop app allows you to customize various settings, including additional configuration options, and modify existing settings.
Change general settings
To change general settings in the Remote Desktop app, use these steps:
- Open the Remote Desktop app.
- Click the Settings button in the top right.
- Select the user account from the list.
- Click the Edit (pen) button to adjust the settings.
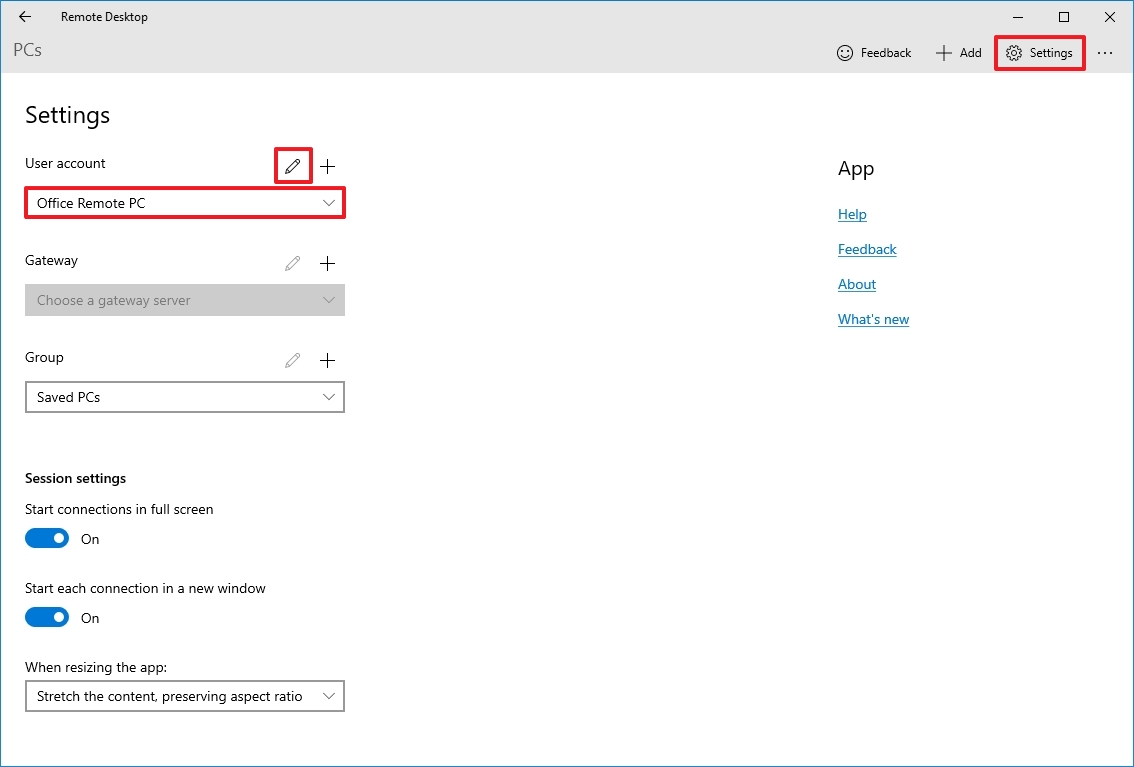
- Click the Save button.
You can also pre-add additional user accounts (with the plus + button) that you can use later to connect to other devices or as a different user.
The Gateway option allows you to set a gateway server, but you’ll rarely need to use this option. Also, the Group option enables you to organize connections into different and more manageable groups.
Change session settings
To change the session settings for Remote Desktop on Windows 10, use these steps:
- Open the Remote Desktop app.
- Click the Settings button in the top right.
- Turn on or off the «Start connections in full screen» toggle switch.
- Turn on or off the «Start each connection in a new window» toggle switch.
- Use the «When resizing the app» drop-down menu to choose how the remote desktop session will look as you resize the app:
- Stretch the content, preserving aspect ratio (recommended).
- Stretch the content.
- Show scroll bars.

- Use the «Use keyboard command with a» drop-down menu to choose whether shortcuts (such as «Ctrl + C» and «Ctrl + V») work only locally or on the remote desktop. Options available include.
- My local PC only.
- My remote session when it’s in full screen (recommended).
- My remote session when it’s in use.
- (Optional) Turn on the «Prevent the screen from timing out» toggle switch.
Alongside editing the account and session settings, you can also enable the option to show a preview of the remote desktop in the connection, which adds a visual queue to make it easier to find the connection in the app.
Change connection settings
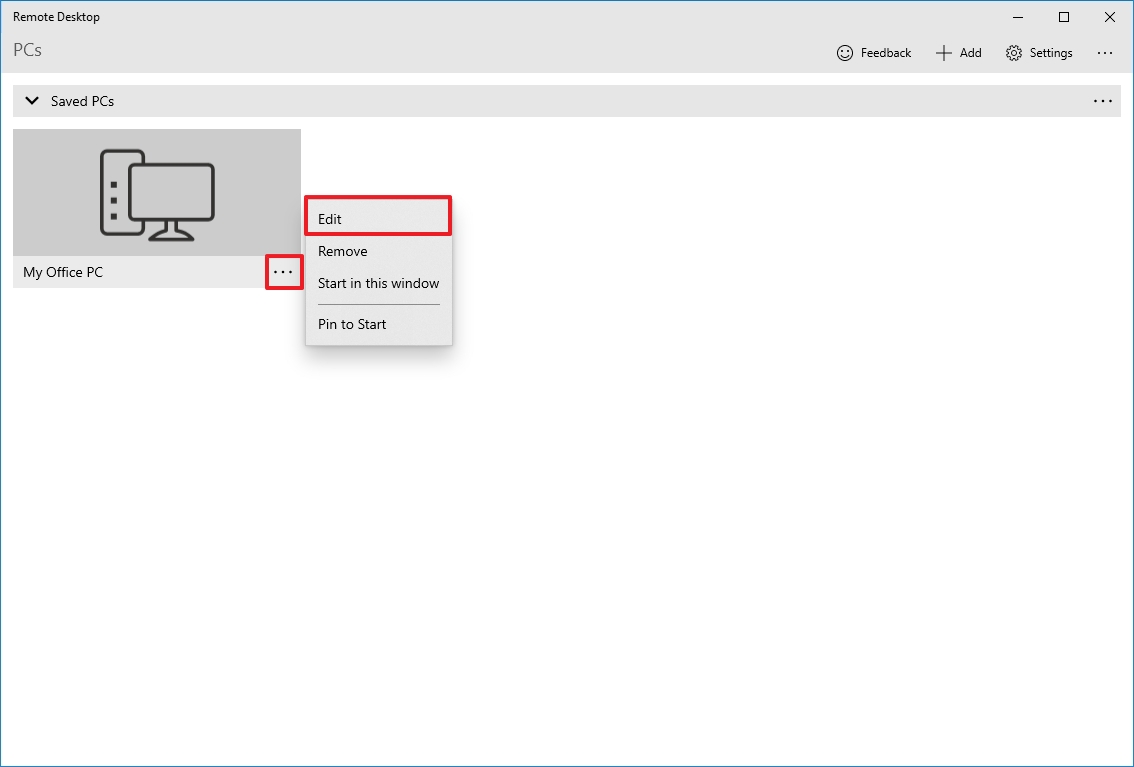
To edit the settings of a remote connection, use these steps:
- Open the Remote Desktop app.
- Click the menu (three-dotted) button in the connection and select the Edit option.
- Change the device name, account, and settings as needed.
- Click the menu (three-dotted) button in the connection and choose the Remove option to delete it.
- Click the menu (three-dotted) button in the connection, and choose the Pin to Start option to quickly access the remote computer from the Start menu.
Once you complete the steps, the settings will save and apply automatically in the connection.
How to troubleshoot remote desktop connection on Windows 10
Typically, you won’t find issues using the Remote Desktop app, but if you cannot connect to a device, you will need to troubleshoot the problem.
Confirm firewall settings
Windows 10 opens the required firewall ports automatically when you configure Remote Desktop, but it might not always be the case. If the connection fails, check the firewall to ensure it’s allowing the Remote Desktop service.
To enable remote connections through the firewall on Windows 10, use these steps:
- Open the Windows Security app.
- Click on Firewall & network protection.
- Click the «Allow an app through firewall» option.
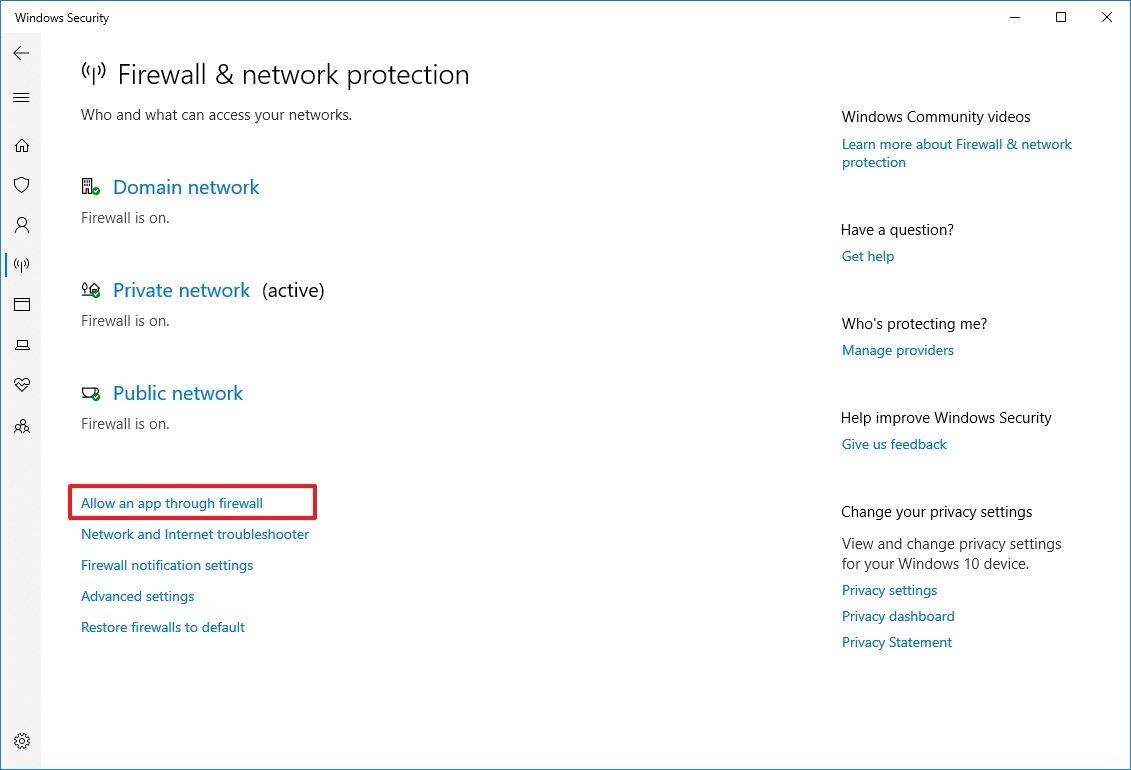
- Click the Change settings button.
- Check the Remote Desktop option and check the options for Private and Public.
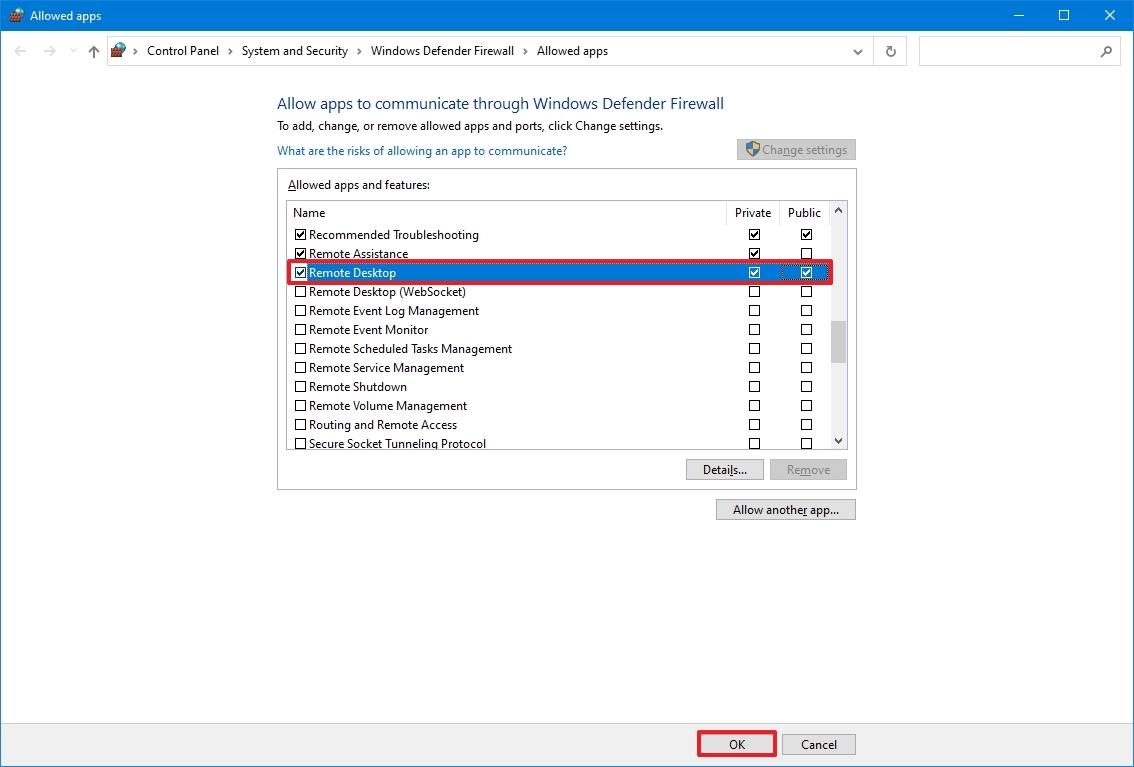
- Click the OK button.
If you have a third-party firewall or antivirus, you may want to disable these security applications to check if you can connect. You may need to check the software support website for more specific details to complete this task.
Unblock the remote connection port
If the settings are correct, and you still can’t connect, there’s a chance the internet provider is blocking the remote desktop port for security reasons. In this case, you may want to contact the ISP directly to resolve the issue.
Use the computer IP address (not the name)
When using the Remote Desktop app, it’s better to use the device’s IP address instead of the computer name. Otherwise, you may stumble upon some resolution issues.
Also, when adding a new computer, remember to enter the appropriate IP address. For example, use the local IP address to connect remotely from within the private network and use the correct public IP address to connect over the internet.
Confirm remote desktop service
You may also be unable to connect because the required remote desktop services are not running on Windows 10.
To determine whether the remote desktop service is running on your device, use these steps:
- Open Start.
- Search for Services and click the top result to open the app.
- Select the «Remote Desktop Service» and check that the «Status» column reads Running.
- If it’s not running, right-click the service and select the Start option.
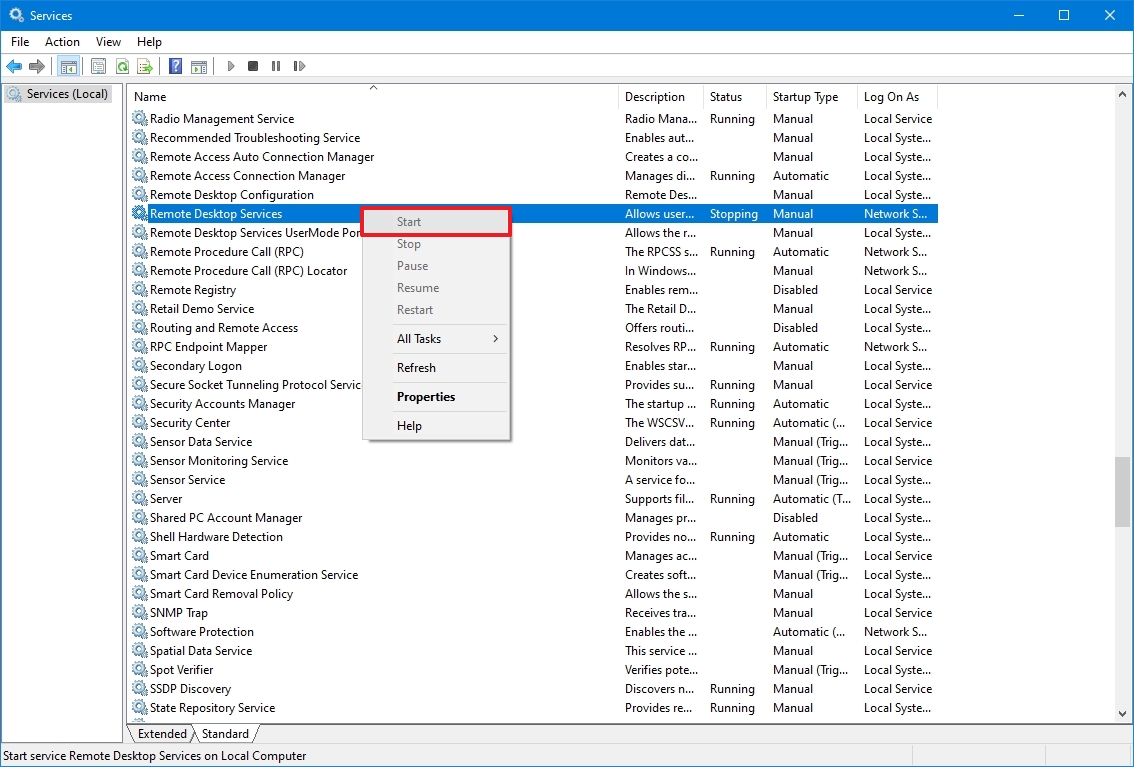
After you complete the steps, you should be able to establish a remote session on Windows 10.
Switch to Internet Protocol Version 4 (TCP/IPv4)
Windows 10 can use both networking stacks, IP version 4 (IPv4) and version 6 (IPv6) — also known as dual-stack — but sometimes, it’ll choose version 6 for the connection, which may cause problems with the remote desktop protocol (RDP).
To set IPv4 as the default networking stack on Windows 10, use these steps:
- Open Control Panel.
- Click on Network and Internet.
- Click on «Network and Sharing Center.»
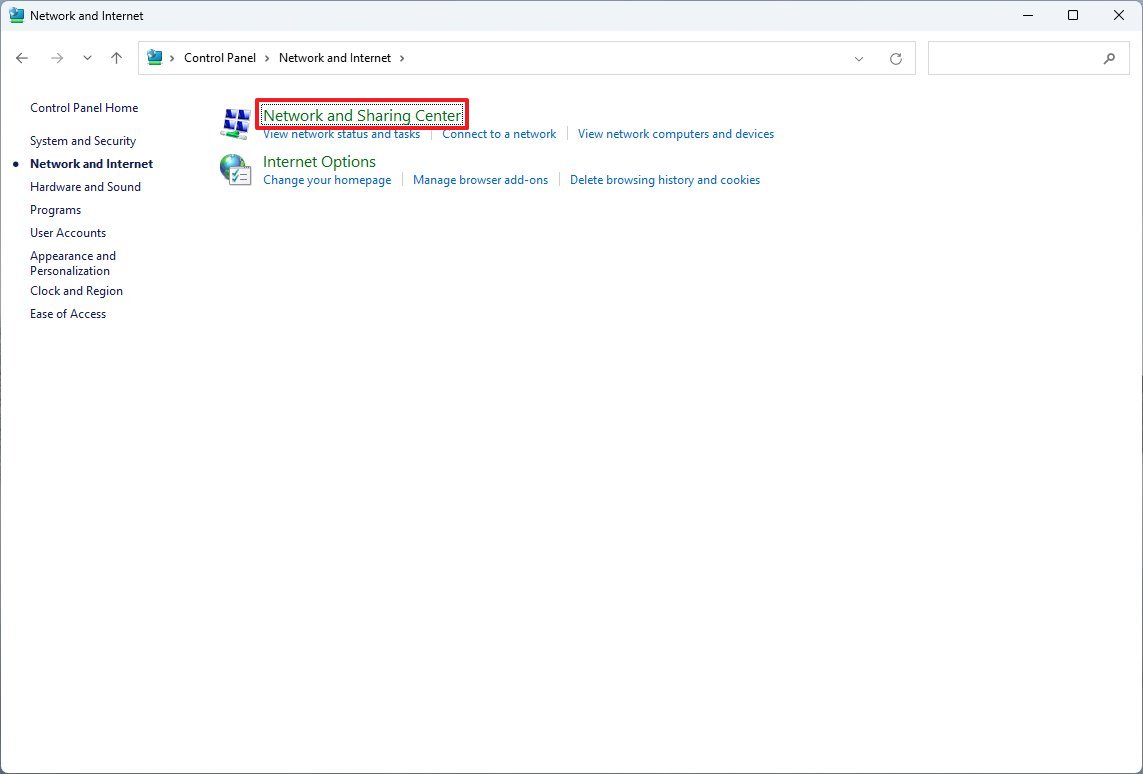
- Click the «Change adapter settings» option from the left navigation pane.
- Right-click the active adapter and select the Properties option.
- Clear the «Internet Protocol Version 6 (TCP/IPv6)» option.

- Click the OK button.
- Restart the computer.
Once you complete the steps, you should now be able to connect using a remote connection.
Use local account instead of Microsoft account
If you try to connect, but the authentication fails, and you are using a Microsoft account, it’s probably a problem with the authentication method. For instance, you may encounter issues if the Microsoft account has the two-step verification or passwordless security feature enabled. You may consider creating and using a local account for remote access if this is the case.
To create a local administrator account on Windows 11, use these steps:
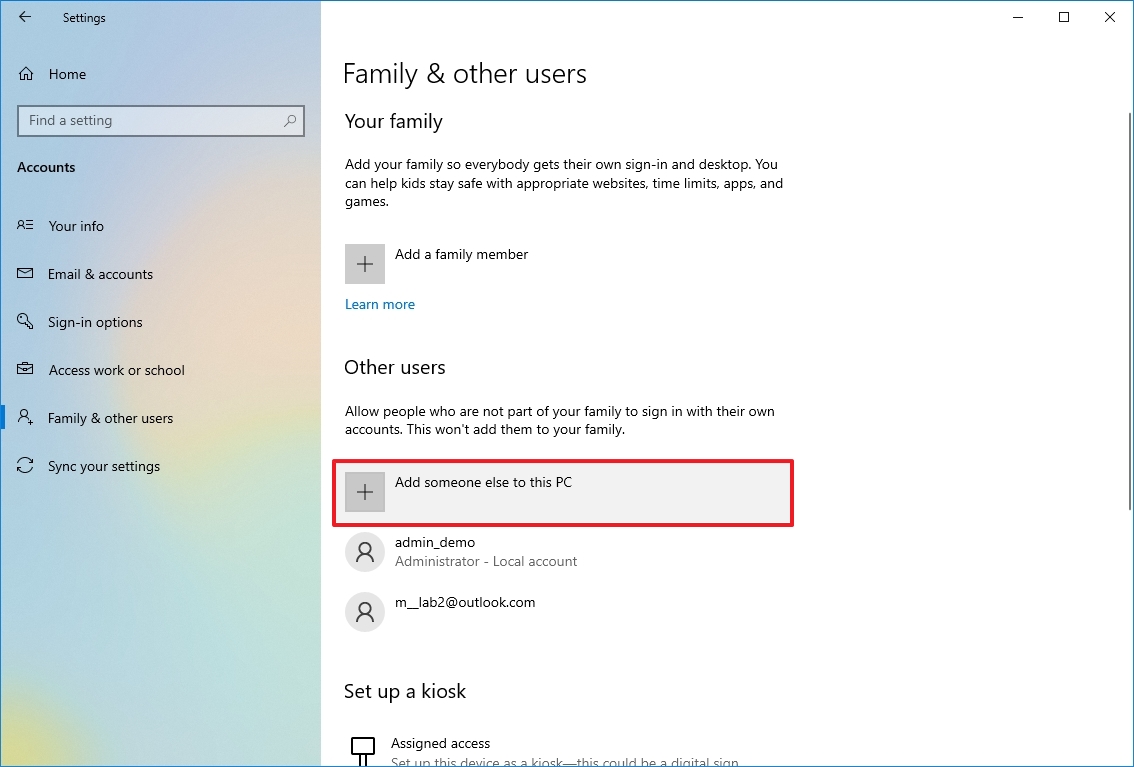
- Open Settings.
- Click on Accounts.
- Click on Family & other users.
- Under the «Other users» section, click the «Add someone else to this PC» option.
- Click the «I don’t have this person’s sign-in information» option.
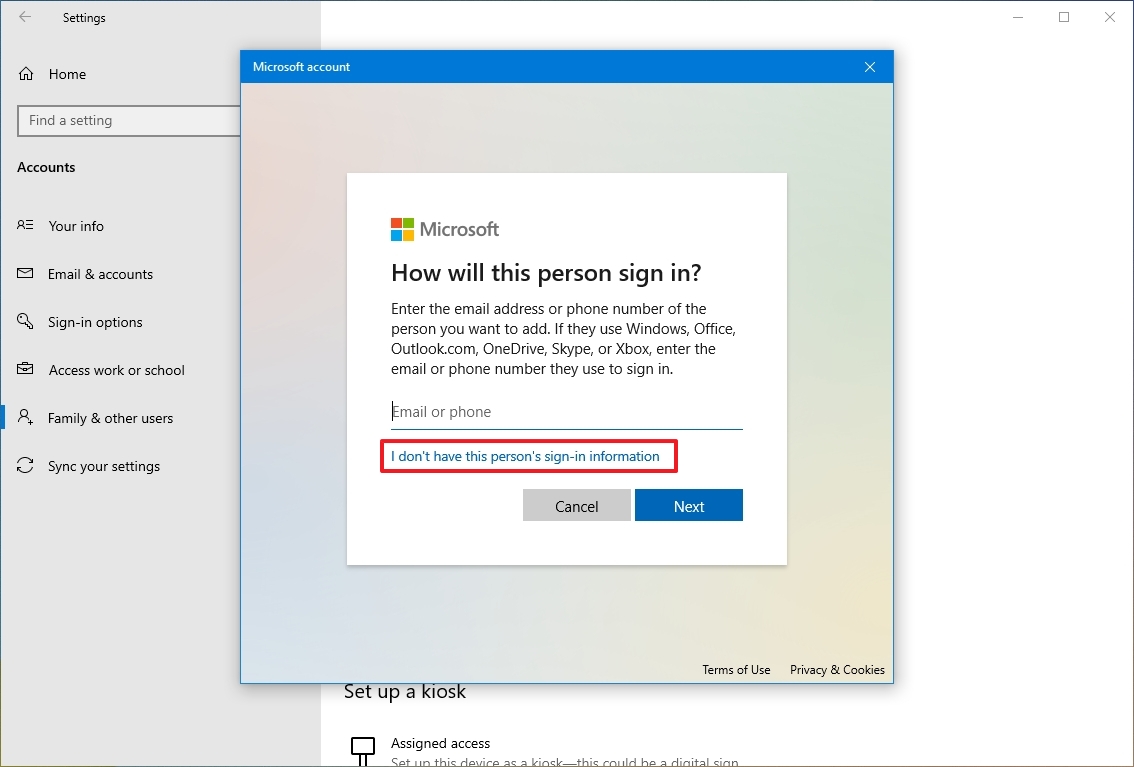
- Click the «Add a user without a Microsoft account» option.
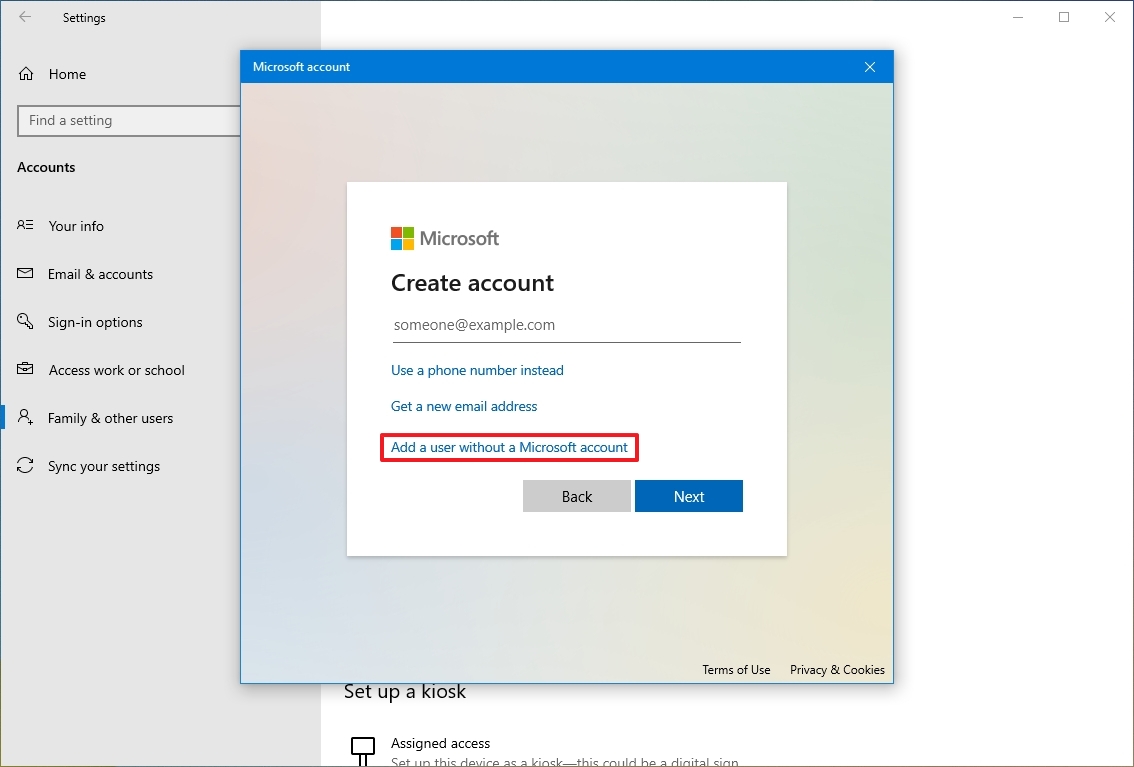
- Confirm the username.
- Create a strong password.
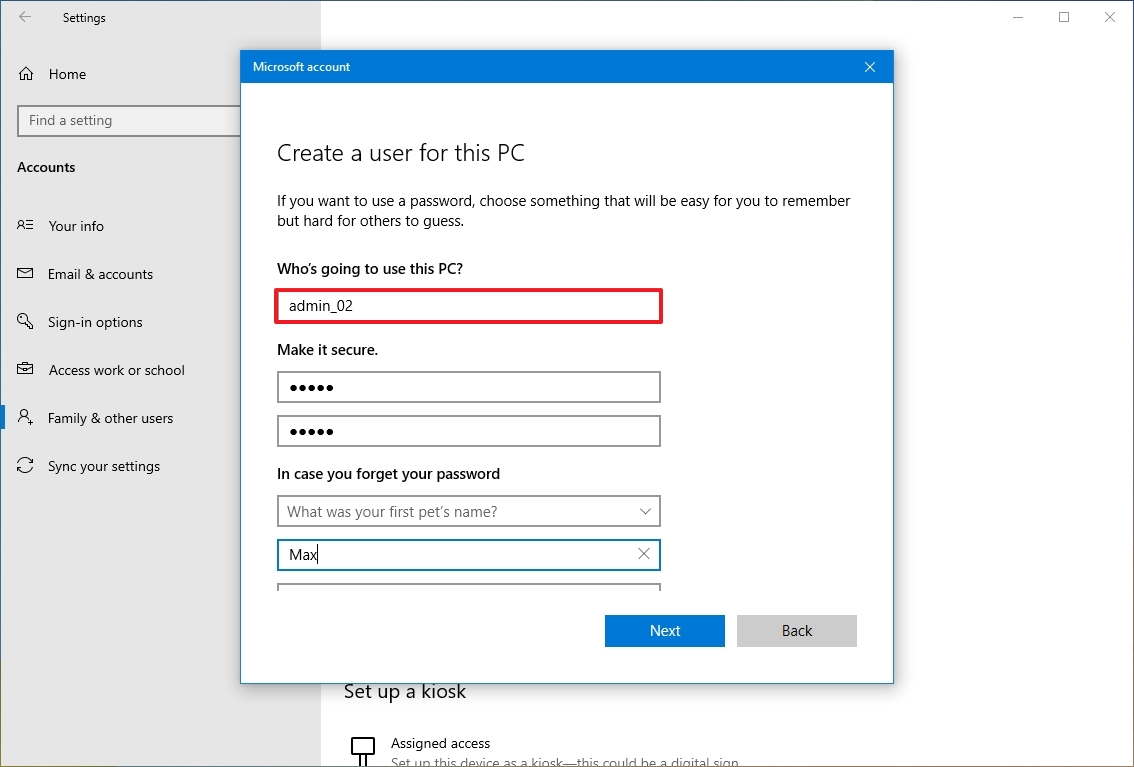
- Complete the security questions to allow password reset from the Sign-in screen.
- Click the Next button.
- Select the newly created account and click the «Change account type» button.
- Choose the Administrator option.
- Click the OK button.
After you complete the steps, you can use the local account information instead of the Microsoft account to connect to a remote desktop session.
We outlined the steps to connect to a device inside a private network and through the internet. However, allowing remote desktop connections (mainly through the internet) could be a security risk.
Remember that having the remote desktop protocol enabled and opening ports could allow malicious individuals to gain unauthorized access to the computer. If you need to use this feature, use a strong password, disable the remote desktop service and remove the port forwarding settings from the router when they are no longer needed.
More resources
For more helpful articles, coverage, and answers to common questions about Windows 10 and Windows 11, visit the following resources:
- Windows 11 on Windows Central — All you need to know
- Windows 10 on Windows Central — All you need to know
Get the best of Windows Central in in your inbox, every day!
Mauro Huculak is technical writer for WindowsCentral.com. His primary focus is to write comprehensive how-tos to help users get the most out of Windows 10 and its many related technologies. He has an IT background with professional certifications from Microsoft, Cisco, and CompTIA, and he’s a recognized member of the Microsoft MVP community.
Sometimes computers connecting is necessary for you since you may need to share files from one computer to another. But some of you don’t know how to connect two computers together in Windows 10 for file sharing? Right now, you can get 2 common ways from this post from MiniTool.
If your friend has some resources that you are interested in, you may choose to transfer them from the computer to your computer. In your office, sometimes you also need to share files and other resources with another PC.
Well then, how can you share data between two computers? The premise is connecting to computers, that is, you need to connect these two computers together. In the following part, we will show you how to do computers connecting.
How to Connect Two Computers Windows 10
The following are 2 common methods to connect two computers including using LAN cable and setting up a wireless ad hoc network. Now, let’s see some details.
How to Connect Two Computers Using LAN Cable in Windows 10
Prepare an Ethernet cable and then follow these instructions now to finish settings:
Step 1: Navigate to Control Panel > Network and Internet > Network and Sharing Center.
Step 2: Click Change adapter settings and you can see some types of connection options.
Step 3: Choose a connection for your LAN. Generally, the connection is called Ethernet with the description network cable unplugged.
Step 4: Right-click it and choose Properties.
Step 5: In the Networking tab, choose Internet Protocol Version 4 (TCP/IPv4) and click Properties.
Step 6: In the pop-up window, set the IP address and subnet masks of the first computer to:
- IP – 192.168.0.1
- Subnet Mask – 225.225.225.0
Also, do the same thing for the second computer and set the IP address and subnet masks to:
- IP – 192.168.0.2
- Subnet Mask – 225.225.225.0
Note: The IP value of two computers should be different.
Step 7: Connect the crossover cable to the two computers’ network ports.
Step 8: Right-click on This PC to choose Properties and go to Change settings > Change and you can get a window with the name of the workgroup. By default, the workgroup name will be WORKGROUP.
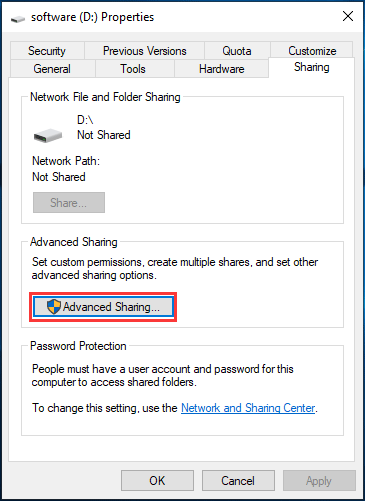
Step 9: Right-click the drive that you want to share, go to Give access to > Advanced Sharing.
Step 10: In the Sharing tab, click Advanced Sharing.
Step 11: Check the box of Share this folder and click Apply.
To share files, you need to do some other things:
Step 1: Right-click the specific folder and choose Give access to > Specific people.
Step 2: Choose Everyone to share.
Step 3: Go to the second computer’s Network Panel and you can find the first PC is ADMIN-HP. Just double-click it to show all the shared files and you can move the desired content by copy & paste.
How to Connect Two Computers Wirelessly
If two computers have wireless cards, you can use the cards to make a wireless connection between these two computers. How to network computers wirelessly? Just follow these steps below:
Step 1: Go to Control Panel > Network and Sharing Center.
Step 2: Click the Setup a new connection or network link.

Step 3: Choose Set up a wireless ad hoc (computer-to-computer) network from the new window.
Step 4: You need to name the network, choose a security type and set a security key. It is recommended to choose Save this network since it may disappear if you disconnect the ad hoc network.
Step 5: Then, go to the list of wireless networks and you can see the newly created one. If you connect it, you can see the information Waiting for users next to the network name. Just connect another computer to the network.
Now, you can share data between the computers. If your PC is running Windows 10, another computer is running Windows 7 or higher, the HomeGroup feature is helpful for you to share music, pictures, videos, documents, and printers easily.
Step 1: Input HomeGroup to the search box and click the result.
Step 2: Click Create a homegroup.
Step 3: Choose what to share.

Step 4: After a while, a homegroup password is given to you. Click Finish.
Then, you need to let another computer join the homegroup. Do the same thing as shown above, but to join the existing homegroup instead of creating a new one. Go to Windows Explorer, click HomeGroup and shared folders will appear there.
Bottom Line
Here is all the information on how to connect 2 computers for file sharing. Which one to choose — use an Ethernet cable or set up a wireless ad hoc network, it’s up to you.
With many advancements in technology, it is getting more leisurely day by day to connect two devices and perform file sharing. If you intend to connect two computers running on Windows operating system to transfer files, you can easily do that. You can make use of one of the native features of Windows 10, which lets two computers connect over Wi-Fi and share files. This not only makes file transfer simple but also very fast. This is a step forward from conventional modes of file transfer between two computers. It not just saves time but also utilizes lesser resources.
In this article, we look at the method to connect two computers using a wireless network and transfer files from one computer to another.
But before we proceed with the process, we would like you to look at the advantages of connecting two computers over WiFi to share files.
Advantages of Connecting two Windows PC over WiFi to Transfer Files
Speedy Transfer of Data
When two computers establish a connection over WiFi, the data transfer speed inherently becomes faster. Compared to conventional modes of data transfer, through a USB data device, the speed of transfer is multiple times more quickly. Moreover, the action of copying data to the external device and then pasting it on the other device is entirely redundant. All these actions are eliminated with the help of a wireless connection between two computers.
No Need of External Data Drives
To transfer data from one PC to another, you no longer need an external data drive, such as a USB Flash Drive or a USB Hard Drive. All you need is to establish a WiFi connection between two Windows PCs.
Wireless Transfer is Secure
File Transfer through the WiFi network is highly secure. The data goes where it is meant to go. No one can breach the connection. Moreover, this eliminates the probability of the data or your PC getting infected by any virus or malware present in external flash drives or hard drives.
Method to Connect Two Computers using WiFi for File Transfer
Now that you know how good a WiFi network connection between two Windows PCs, lets us know about the method you can use to establish a connection. The primary approach that you can use is the native feature of Windows 10 called Nearby Sharing. Let us check it out.
Connect Windows Computers through Nearby Sharing
One of the most impressive features of Windows to connect computers using a WiFi network is the Nearby Sharing feature. It uses wireless communication to establish a connection between two Windows 10 devices. Just make sure that both the computers run on Windows 10 operating system. Once the connection has been made, you can very quickly transfer files and more between two PCs.
Note: It is advised to keep both the PCs that you want to share files connected to the same local network. The local network could be the same WiFi network connection or same Ethernet connection.
Following are the settings you must carry out on both the Windows computers you want to connect:
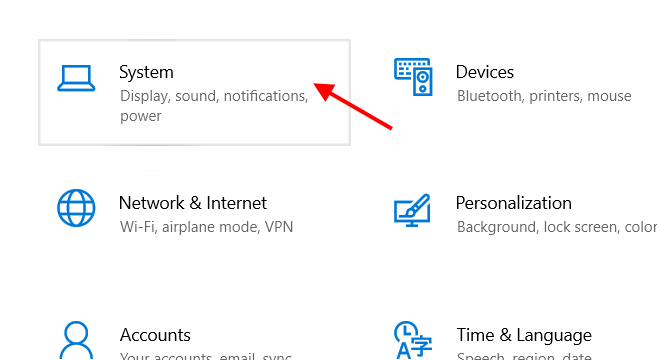
Step 1: Press the Win + I keys on the keyboard simultaneously. As the Settings app opens, select the option that says System.
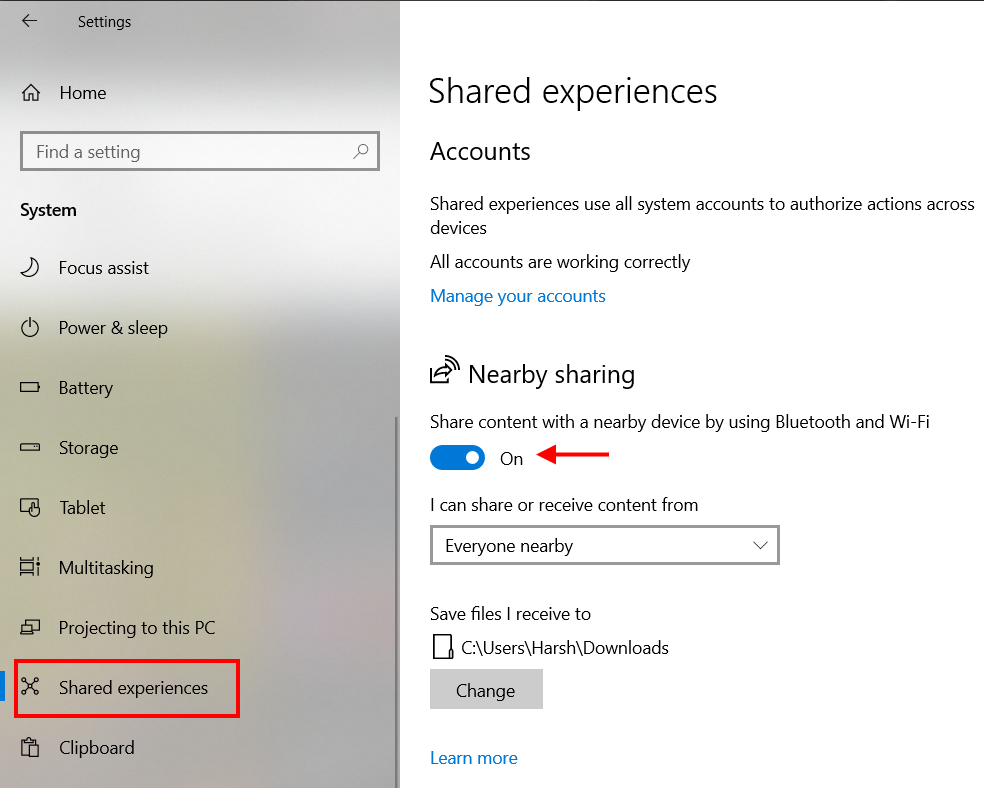
Step 2: A new Settings window will open with a bunch of options. Here, navigate to the panel available on the left side and click on the Shared experiences option. Next, navigate to the panel on the right side of the window and go to the Nearby sharing section. Here, you will find a toggle switch. Click on it to turn Nearby sharing on.
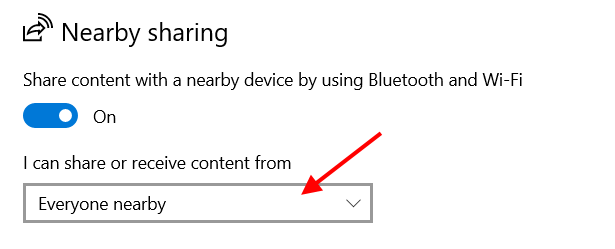
Step 3: Scroll down a bit and click on the dropdown menu available below the “I can share or receive content from” section. From the menu, make sure to select the option that says Everyone nearby.
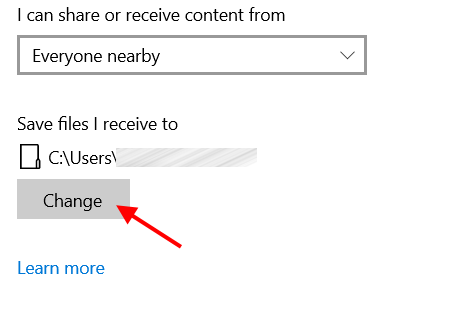
Step 4: Set the folder where you wish the shared content or files to be stored by clicking on the Change button.
Step 5: Now, scroll down on the same window to navigate the Share across devices section. Click on the toggle switch below this section to turn it On, then click on the dropdown menu and make sure to select the Everyone nearby option.
That is it—this way, you have set up Nearby sharing to connect to other Windows 10 PCs in the vicinity. Once you have made the same changes in the Settings menu of both the PCs you want to connect, it’s time to transfer files between them.
How to Share Files Between Computers using Nearby Sharing
Unlike any other file sharing feature or application that you may have come across in the past, this one is quite simple. We find out in the steps below:
Step 1: Open File Explorer on the Windows 10 PC from which you need to share file(s). In the File Explorer, navigate to the folder containing the file(s) to share. Now, you can select a single file or multiple files in a folder to share at once. After making the selection of the files, you want to share, make a right-click. A context menu will open. Here, click on the Share option.
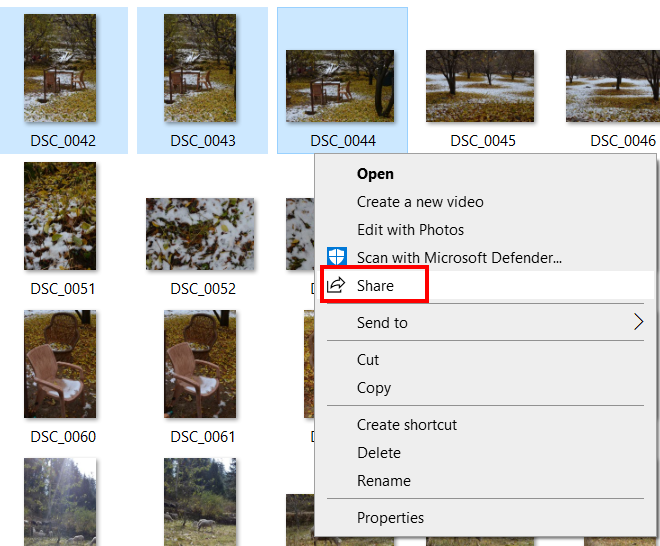
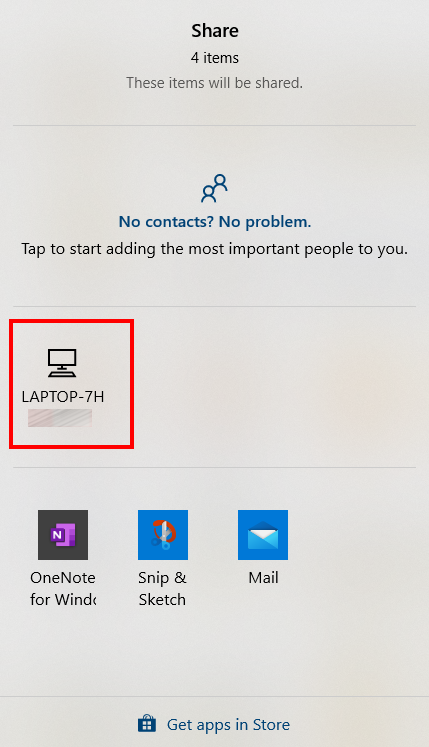
Step 2: This will open a new Sharing dialog box with a couple of sharing options. Among these options, you will be able to locate the icon with the other computer’s name on which you enabled Nearby sharing. Click on it.
Note: You will only see other computers in the sharing menu if you have enabled Nearby sharing on them.
Once you have selected the Windows 10 PC on which you want to transfer files, you will get a prompt on the other PC. The prompt will be a notification about the file transfer. Here, you get three options: Decline, Save, and Save & View. You can select any of the options according to your preference.
Now, to access the file(s) that you transferred, you will need to go to the folder that you set while setting up Nearby sharing on the PC.
Now that you know how to connect two computers using WiFi, you can transfer all the files you want to share to and fro the computers. The only requirement would be that the Nearby sharing must be enabled on both the Windows 10 PCs.
How to Quickly Enable/Disable Nearby Sharing in Windows 10
If you must, you can also disable Nearby sharing on a Windows 10 computer. The process is quite simple and involves only a couple of steps. Of course, you can use the Settings app for the same, but the process is quite lengthy. Here, we tell you about a quick way to disable or enable Nearby sharing.
Open the Action Center interface on your PC. To do so, you will need to press the Win + A keys together. The Action Center interface will open on the right side of the screen.
Whenever you need to enable or disable Nearby sharing, click on the respective button as shown in the screenshot below.

When the button is highlighted, it means that the Nearby sharing is enabled. When it’s not highlighted, Nearby sharing is disabled.
Connect Two Computers Using WiFi through Third-Party Software
Although the only method I would prefer to connect two computers is by using the Nearby Sharing method, I would like to mention one alternate method that works fine.
You can make use of third-party file transfer software to connect two computers and transfer files.
One of the best options available out there is the SHAREit app. It makes use of WiFi to establish a connection between two computers. Once the connection has been made, you can send files over Wi-Fi between two computers.
The best part of using SHAREit is that you can use it to transfer files no just between two computers but across Android mobile phones, tablets, iOS phones, MAC computers, and more.
Begin with downloading the SHAREit software on both the PC among which you want to make a connection.
You can download SHAREit for Windows 10 from here.
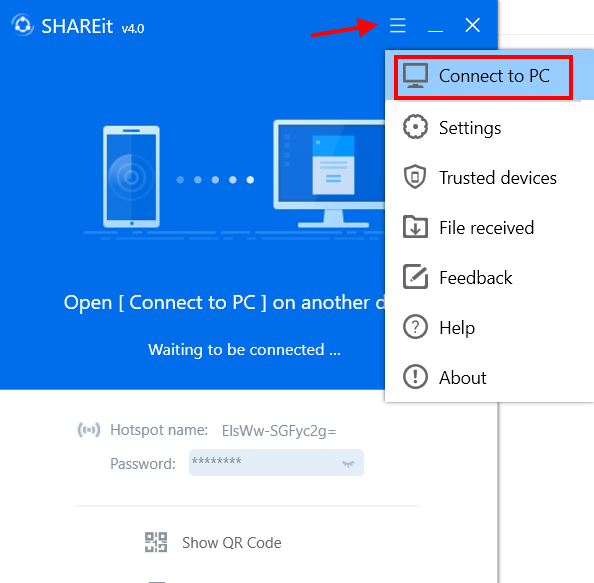
After the download, launch SHAREit on both PCs.
In the SHAREit menu, click on the option that says Connect to PC.
The other PC will show up on the SHAREit interface, just like in the screenshot provided below. Click on it.
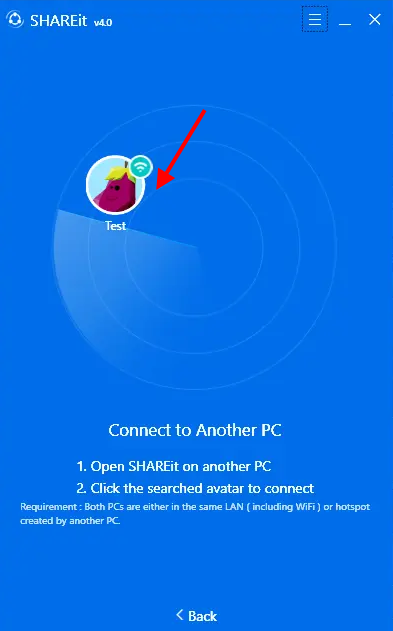
You will get a prompt on the other PC to accept the connection. Select the Accept option.
When both the computers are connected through a wireless network, a new interface will open using which you can transfer files from one PC to another.
All you need to do is drag and drop the files you want to transfer or use the file explorer to select the files you have to share.
SHAREit also gives you the option to change the folder where you would want to save the files that are being transferred. This option is similar to that of Nearby sharing and can be accessed from the SHAREit menu. In the SHAREit menu, click on the Settings option. On the Settings page, you will see many options, among which you will find the option to change the transferred file storage location.
One of the SHAREit menu options that I liked is the option to view the files received on a PC through SHAREit instantly. Go to the SHAREit menu and click on the option that says File Received. You will be able to access all the files received through SHAREit instantly.
Wrapping It Up
The past times to connect two computers using WiFi or other means used to be too time-taking and redundant. All thanks go to Microsoft for introducing the Nearby Sharing option in Windows 10, using which we can now share files between two computers almost instantly and that too without the use of an external device.
Recommended for You:
How to Share Internet From Laptop to Mobile via WiFi in Windows 7
How to Transfer Files Between Two Laptops Using WiFi in Windows 10
How To Share WiFi Over Ethernet on Windows 10
Connection and transfer of data are some of the invaluable uses of a computer. A lot of technology has arisen from this dire need. Between computers, one effective method is via the use of Ethernet or LAN cables. Here we walk you through all the steps to establish a LAN cable connection between two Windows 10 PCs for file-sharing or data transfer.
Advantages of LAN Cable Connection
One of the main advantages with connecting two Windows 10 laptops or computers is that it provides a medium to share files when you don’t have access to a wireless network.

If you do not trust the available Wi-Fi network, then you can make use of a LAN cable to connect the Windows 10 PCs and share files between them. The process is simple, and you only need to connect both the PCs with LAN cable and tweak a few network settings. It is a nice way to share files locally.
Choosing Between Straight or Crossover Cables
To know which cables will get the work done, you should first determine which devices you want to connect: are they the same kind of devices (two computers, for example) or different kinds of devices (a computer to a network switch or Ethernet hub, for example).
When two like systems share files, one outputs the data while the other receives it as input. Intentionally crossed wiring in the crossover cable connects the transmit signals at one end to the receiver signals at the other end. This makes crossover cables more ideal for an Ethernet connection between similar systems, like two computers.
With a crossover cable in hand, connect both the PCs. Once done, follow the steps below.
1. Go to “Control Panel -> Network and Internet -> Network and Sharing Center -> Change Adapter Settings.”

2. Click on “Change Adapter Settings.” This will reveal different connections. Select the appropriate connection for your LAN. Usually, but not necessarily, the connection will be called Ethernet.

3. Right-click on the connection and select “Properties.” The local area’s connection properties window will appear.
4. Under the network tab, select “Internet protocol version 4 (TCP/IPv4),” then click on “Properties.”

In the Properties menu, set the IP address and subnet masks of the first computer to:
- IP – 192.168.0.1
- Subnet Mask – 225.225.225.0
Repeat all the above steps for the second computer and set the IP address and subnet Mask as follows:
- IP – 192.168.0.2
- Subnet Mask – 225.225.225.0

Note: if you want the local network and Internet to work simultaneously, then ensure that under Adapter Settings you have de-selected IP Ver 6 for all devices. Also reset the IP Address to “discover automatically.”
5. After assigning the IP addresses, you need to head back to Network and Sharing Center and click on the “Change advanced sharing settings” option.
6. In the advanced sharing settings menu, you need to enable the “Turn on network discovery” and “Turn on automatic setup of network-connected devices” options.

You can also tick the File and printer sharing option. This would allow the other Windows 10 PC to access the files and printers shared on the network.
7. Right-click on “This PC” and choose “Properties.” Click on “Change settings -> Change.” This reveals a window with the name of the workgroup. The value for the workgroup name should be the same for both PCs. By default, the workgroup name will be WORKGROUP, but you can change it to any name you like.

8. Right-click on the drive you want to share. Scroll to the “Give access to” option and click “Advanced Sharing.” Under the sharing tab, click the “Advanced Sharing” button.

This reveals the advanced sharing window. Check the “Share this folder” checkbox and click “Apply -> OK.”

At this stage, you will have successfully connected the two Windows 10 PCs to share your drives between them.
Transferring Files
You can now transfer specific folders or files between the two connected Windows 10 PCs. To share specific folders or files from Computer A (ADMIN-HP) with Computer B, follow the steps below:
1. Right-click the desired folder or file in Computer A. Scroll to the “Give access to” option and click “Specific People.”

2. In the newly opened Network Access windows, select “Everyone” from the drop-down menu. Next, click “Add” and click “Share.”

3. Similarly on Computer B, you need to open This PC and click on the Network option in the left pane. Here you will see the names of connected computers, part of the network. In this case, Computer A is ADMIN-HP. Double-click on it and all files shared will be displayed. At this stage, you can use the normal copy and paste to move the desired content.

4. If you wish to copy files from Computer B to Computer A, you have to perform the same steps, but this time the steps previously performed on Computer A needs to be performed on Computer B and vice versa.
Wrapping Up
The above method will allow you to connect two Windows 10 PCs with a LAN cable to transfer files. For more sharing options, learn how to share files between Android and Windows 10 on your network.

Sagar Naresh
My work has been published on Android Authority, Android Police, Android Central, BGR, Gadgets360, GSMArena, and more. A Six Sigma and Google Certified Digital Marketer who is covering tech-related content for the past 2 years.
Subscribe to our newsletter!
Our latest tutorials delivered straight to your inbox
Step 1: Go to Control Panel > Network and Sharing Center. Step 2: Click the Setup a new connection or network link. Step 3: Choose Set up a wireless ad hoc (computer-to-computer) network from the new window. Step 4: You need to name the network, choose a security type and set a security key.
Use the Windows network setup wizard to add computers and devices to the network.
- In Windows, right-click the network connection icon in the system tray.
- Click Open Network and Internet Settings.
- In the network status page, scroll down and click Network and Sharing Center.
- Click Set up a new connection or network.
File sharing over a network in Windows 10
- Right-click or press a file, select Give access to > Specific people.
- Select a file, select the Share tab at the top of File Explorer, and then in the Share with section select Specific people.
Can you use Windows 10 on 2 computers?
You can only install it on one computer. If you need to upgrade an additional computer to Windows 10 Pro, you need an additional license. … You won’t get a product key, you get a digital license, which is attached to your Microsoft Account used to make the purchase.
Can I connect two computers together?
To connect just two computers all you need is a CAT5 “crossover” cable directly connected between your two computer’s network sockets. If you are connecting more than two computers you will need a network hub and normal CAT5 cables between each computer and the hub.
What’s the fastest way to transfer files between two computers?
Here are the five most common methods you can try for yourself.
- Cloud storage or web data transfers. …
- SSD and HDD drives via SATA cables. …
- Basic cable transfer. …
- Use software to speed up your data transfer. …
- Transfer your data over WiFi or LAN. …
- Using an external storage device or flash drives.
21 февр. 2019 г.
Can I connect two computers to transfer files?
A very easy way to connect two PCs is to use a USB-USB cable. By connecting two PCs with a cable like this, you can transfer files from one PC to another, and even build a small network and share your Internet connection with a second PC.
What replaced HomeGroup in Windows 10?
Microsoft recommends two company features to replace HomeGroup on devices running Windows 10:
- OneDrive for file storage.
- The Share functionality to share folders and printers without using the cloud.
- Using Microsoft Accounts to share data between apps that support syncing (e.g. Mail app).
20 дек. 2017 г.
Can I use same product key for 2 computers?
The answer is no, you can’t. Windows can only be installed on one machine. … [1] When you enter the product key during the installation process, Windows locks that license key to said PC. Except, if you’re purchase volume license[2]—usually for enterprise— like what Mihir Patel said, which have different agreement .
How many devices can I put Windows 10 on?
A single Windows 10 license can only be used on one device at a time. Retail licenses, the type you bought at the Microsoft Store, can be transferred to another PC if needed.
If you have purchased the license key or product key of Windows 10, you can transfer it to another computer. … If you have purchased a laptop or desktop computer and the Windows 10 operating system came as a pre-installed OEM OS, you cannot transfer that license to another Windows 10 computer.
What happens if you connect 2 computers with USB?
Connecting two computers with a specific type of Universal Serial Bus (USB) cable allows you to transfer files or other data directly from one machine to another. … USB 3.0 is many times faster than the older specifications, but all versions of USB will work for creating a simple peer-to-peer network.
What cable do I need to connect two laptops?
Connecting Two Connected Laptops to the Same Network. Obtain a network crossover cable. This is a type of Ethernet cable used for connecting two computers to one another. If you have an older computer, you must use a crossover cable.
Can you use a USB cable to transfer data from one computer to another?
The USB cable can be used to transfer data from one computer to another using Microsoft operating system. It saves you time since you do not need an external device to first upload the data in order to transfer to a different computer. USB data transfer is also faster than data transfer via wireless network.
Although most homes and businesses have some sort of network switching and wireless equipment to connect multiple Windows 10 computers together, there are still scenarios when you may need to connect two devices directly using an Ethernet cable.
For example, when you have to transfer files from an old to a new computer, or you want to connect to a file server (such as TrueNAS or unRAID) using a 10 Gigabit Ethernet connection directly, when you do not have a 10 Gigabit switch in the network.
Whatever the reason it might be, you can configure Windows 10 to communicate with another computer without the need of a switch or Wi-Fi connection.
In this guide, you will learn two methods to connect two devices and share data using one Ethernet cable on Windows 10.
- How to connect two devices using Ethernet cable with network configuration
- How to connect two devices using Ethernet cable without network configuration
How to connect two devices using Ethernet cable with network configuration
If you need to transfer files between computers without the use of a switch, you will need to connect both devices using a straight through or crossover cable.
The straight through cable is the conventional Ethernet cable that has the same wire color alignment on each end. On the other hand, the crossover cable has different wire alignment of colors on each end.
On most modern computers using a Gigabit Ethernet network adapter, the system will sense and switch orientation automatically to allow communication without a switch in the middle, but some computers (especially those with an older card) will still need a crossover cable.
After connecting both devices with an Ethernet cable, you need to configure the network settings to connect both devices running Windows 10.
On the first computer, use these steps:
-
Open Control Panel.
-
Click on Network and Internet.
-
Click on Network and Share Center.
-
Click the Change adapter settings from the left navigation pane.

Change adapter settings -
Right-click the network adapter and select the Properties option.
Network adapter properties -
Select the Internet Protocol Version 4 (TCP/IPv4) option.
-
Click the Properties button.

Ethernet properties -
Select the Use this following IP address option.

Connect two computers static IP address -
In the IP address field specify an address for the device. For example, 192.168.7.25.
Quick tip: If you are trying to connect to another computer with a direct cable connection using a second network adapter, make sure the IP address is on a different network. For example, if the network uses the 192.168.1.x network, then to make the connection work, use a different network, for example, 192.168.2.x.
-
In the Subnet mask field specify the subnet address for the network. For example, 255.255.255.0.
-
Click the OK button.


Once you complete the steps, you will need to configure the second device with a similar configuration to allow the communication.
In the second computer, use these steps:
-
Open Control Panel.
-
Click on Network and Internet.
-
Click on Network and Share Center.
-
Click the Change adapter settings from the left navigation pane.
Change adapter settings -
Right-click the network adapter and select the Properties option.
Network adapter properties -
Select the Internet Protocol Version 4 (TCP/IPv4) option.
-
Click the Properties button.
Ethernet properties -
Select the Use this following IP address option.
Second computer static IP address -
In the IP address field specify a unique IP address for the device that is in the same network as the first computer. For example, 192.168.7.24.
-
In the Subnet mask field specify the subnet address for the network. For example, 255.255.255.0.
-
Click the OK button.

After you complete the steps, you can share a folder or service that will be accessible from the other device. You can refer to steps belows to complete the task or you can use these instructions to share folder with another computer.
How to connect two devices using Ethernet cable without network configuration
While the proper method is to use a network configuration to connect two computers directly, Windows 10 can also automatically assign an IP address using the 169.254.x.x network range, which is known as the Automatic Private Internet Protocol Addressing (APIPA).
If you do not want to go through the process of configuring the network, you can connect both devices and let them configure themself automatically, then you only need to share the data or service you are intending to access from another computer.
In the case that you are trying to transfer some files, you will need to share a folder to then access it from the other device.
On the first computer, use these steps:
-
Open File Explorer.
-
Browse to the folder with the data you want to share.
-
Right-click the folder, select the Give access to submenu, and choose the Specific people option.

Give access to specific people -
Use the drop-down menu and select the user or group with access to share folder.
-
Click the Add button.

Share folder between two computers -
Under the “Permission Level” section, select the Read/Write option.
-
Click the Share button.


After you complete the steps, the files will be accessible from the second computer.
On the second computer, use these steps:
-
Open File Explorer.
-
Click on Network from the left navigation pane.
-
Double-click the computer you are trying to access the files.

File Explorer Network section -
Sign-in using the user information you shared the folder on the first computer.

After you complete the steps, you can transfer the files to the new destination.