FTP (File Transfer Protocol) представляет собой протокол удаленной передачи файлов. С его помощью можно загрузить на сервер и скачивать с него же данные любого типа и размера, создавать или удалять файлы и папки.
В Windows, Linux и macOS подключиться к FTP-серверу можно с помощью встроенных средств и сторонних программ разного назначения. Полноценная работа со всеми средствами возможна только через специальные приложения, называемые FTP-клиентами. Теперь подробнее расскажем обо всех этих способах.
Данные для доступа к FTP-серверу
При подключении к FTP-серверу очень важно вводить правильные данные. Возьмем в качестве примера Timeweb. После регистрации на почту приходят два письма. Письмо с данными выглядит вот так:

Теперь о том, какие данные необходимо иметь под рукой:
- логин,
- пароль,
- ссылка на FTP-сервер (указывается в том же письме),
- порт (по умолчанию устанавливается значение 21).

Комьюнити теперь в Телеграм
Подпишитесь и будьте в курсе последних IT-новостей
Подписаться
Как подключится к FTP через Проводник Windows
Сначала рассмотрим, как подключиться к FTP-серверу через программу «Проводник» в Windows 10. Здесь ничего дополнительно устанавливать не надо, просто открываем системный файловый менеджер. В левой панели находим значок «Этот компьютер» и жмем по нему правой кнопкой мыши для вывода контекстного меню. В списке выбираем элемент «Добавить новый элемент в сетевое окружение».

В результате откроется окно мастера добавления сетевого расположения. В начальном окне просто нажимаем «Далее».

Следом надо выбрать его дальнейшее местоположение, но в этом окне нам доступен только один вариант. Для продолжения снова нажимаем на кнопку «Далее».

В этом окне понадобится указать ссылку на сетевой ресурс, к которому планируется провести подсоединение. Важно соблюдать предписанный формат (чуть ниже есть несколько примеров). В поле вводим адрес/ссылку и вновь идем дальше.

Теперь понадобится ввести в поле имя пользователя. Пароль заранее вводить не нужно, он будет запрашиваться только при подключении. Если на вашем хосте есть такая возможность, вход можно осуществить анонимно, отметив соответствующую галочку.

В самом конце даем название новому сетевому окружению.

На этом настройка завершена. При необходимости можно поставить галочку, чтобы сразу после нажатия на кнопку «Готово» открыть указанный сервер и приступить к работе.

Новое подключение теперь находится в «Сетевых расположениях» в разделе «Этот компьютер».

Теперь подключаемся – открываем только что созданное соединение. Открывается маленькое окошко, где мы вводим пароль, затем жмем на кнопку «Вход».

Если все данные введены успешно, откроется папка сервера. Можно приступать к работе.

Читайте также


Подключение через командную строку Windows
Теперь расскажу, как подключиться к FTP-серверу в Windows с помощью командной строки. Этот способ многим может показаться не очень удобным, потому что вручную придется вбивать команды на загрузку документов, открытие папок и их скачивание. А для входа следуем указанной ниже последовательности.
- Вводим команду ftp и жмем на клавишу Enter для подтверждения.
- Задаем команду open наименование_ftp_хоста.
- Вводим логин пользователя. Можно осуществить анонимный вход, просто введя Anonymous.
- Вбиваем пароль. В случае с анонимом оставляем это поле пустым и жмем снова Enter.
 Теперь подробнее по командам:
- dir – просмотр содержимого сервера.
- cd «имя_папки» – открытие указанной папки.
- put «путь_к_файлу» – загрузка этого документа с компьютера на сервер.
- get «наименование_файла.формат» – скачивание с хоста на компьютер.
- quit – отключение от FTP-сервера.
FTP-подключение через любой браузер
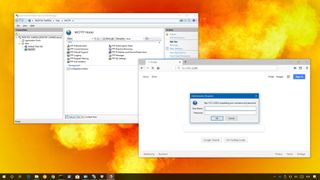
Подключиться к FTP-серверу можно и через браузер на любых операционных системах. В таком случае будет доступна лишь часть функций. Необходимо ввести в адресной строке IP-адрес хоста, только с добавлением приставки «ftp://». Нажимаем на клавишу Enter. Дальше потребуется ввести имя пользователя и пароль, а потом нажать на кнопку «Вход».

Как подключиться к FTP с помощью FileZilla
FileZilla – наиболее востребованный и рекомендуемый FTP-клиент, бесплатный и простой в использовании. Подключиться к FTP-серверу через FileZilla можно вне зависимости от операционной системы, установленной на компьютере.
Сперва потребуется скачать приложение на официальном сайте. Есть версии для Linux, Windows (портативная и установочная) и macOS. Просто выбираем нужный вариант и жмем по нему для начала закачки.

Устанавливаем приложение и открываем его. В верхней панели вводим следующую информацию:
- Хост. Это может быть IP-адрес или ссылка.
- Логин пользователя, предварительно высланный на почту сервисом.
- Пароль.
- Порт. Оставляем пустым или устанавливаем значение 21.
После того как все нужные поля будут заполнены, нажимаем на кнопку «Быстрое соединение».
 После открытия каталога можно приступать к загрузке и скачиванию необходимых данных. Чтобы не вводить каждый раз данные для подключения, следует воспользоваться менеджером сайтов, который доступен в меню «Файл».
Подключаемся с помощью Total Commander
Вам потребуется скачать и установить приложение Total Commander. Рекомендуем делать это с официального сайта. После завершения установки открываем приложение. Переходим во вкладку «Сеть» и выбираем там пункт «Соединиться с FTP-сервером». Для этого действия, кстати, предусмотрена комбинация горячих клавиш – Ctrl + F.

В новом окне нажимаем на кнопку «Добавить». Дальше вводим имя нового соединения, адрес хоста, учетную запись и пароль. Нажимаем на кнопку ОК, чтобы сохранить всю введенную информацию.

Новое подключение отразится в списке. Остается только соединиться с сервером, нажав на соответствующую кнопку.

Как подключиться к FTP-серверу через терминал Linux
В Linux к FTP можно подключиться через системное приложение «Терминал». Это очень похоже на использование командной строки в Windows. Последовательность абсолютно та же – набираем команду ftp и активируем ее нажатием на кнопку Enter. Потом пишем open ссылка_на_хост. Не забываем, что затем надо указать логин и пароль.
Вот примеры доступных опций:
- Is – отображение списка файлов и папок.
- get – скачивание файла.
- mget – скачивание документов определенного формата. Например, mget * – все данные в каталоге, mget *, php – файлы формата php.
- put – загрузка файла на ресурс.
- mput – загрузка нескольких документов единого формата.
- mkdir – создание нового каталога.
- rmdir – удаление каталога.
- delete – удаление файла.
- bye – завершение работы.
- close – выход из текущего сеанса и возврат в контекст командной строки FTP.
- status – отображение статуса FTP клиента.
В Linux предусмотрен и другой вариант подключения к FTP. Сначала надо установить нужный пакет, дав вот такой запрос:
sudo apt-get install curlftpfs
Следом нужно предоставить права на определенную папку:
sudo chmod 777 ~/ftp
Теперь производится монтирование ftp-директории:
sudo curlftpfs -o allow_other ftp://user: password@server.ru /home/virtdiver/ftp/
Если работать необходимо от имени пользователя, то вводится вот такая опция:
-o allow_other
Для размонтирования FTP-папки используем такую команду:
sudo umount ~/ftp
Подключение к FTP через сайт хостинга
В этом случае достаточно лишь войти на сайт хостинга и перейти в соответствующий раздел. Покажу на примере Timeweb.
В правой части окна есть панель управления. Находим в ней пункт «Файловый менеджер» и жмем по нему. Перед нами предстанет веб-интерфейс FTP-сервера. Работать с ним очень просто, переносить файлы можно посредством drag-n-drop.

Заключение
Подключиться к FTP-серверу очень просто, и сделать это можно несколькими способами. Многие из них актуальны для всех популярных операционных систем. Но все зависит от цели, ведь функционал некоторых программ весьма ограничен.
Windows offer an easy way to connect to an FTP Server and its FTP Shared folders, by using the Add Network Location wizard. After running the wizard, you ‘ll be able to easily manage (copy, move, delete, create, rename, etc.) all the contents hosted on the FTP server from Windows Explorer.

The ‘Add Network Location’ wizard, helps you to add a shortcut to FTP Shares in Windows Explorer, without having to install a third party FTP Client program to access and manage the FTP Server’s Shared files.
Keep in mind that, the «Add Network Location» creates only a shortcut to FTP in Windows Explorer and doesn’t map assign a drive letter to FTP. In the case that you want to map an FTP Share to a drive letter and make the FTP mapping permanent, then read this guide: How to Assign/Map an FTP Share to a drive letter.
In this tutorial you ‘ll learn how you can access an FTP Server via Windows Explorer.
How to connect/access FTP by using Windows Explorer.
Before connecting to an FTP server you must know it’s hostname (URL or IP address) and of course the required login credentials (if any) to access the shared FTP contents.
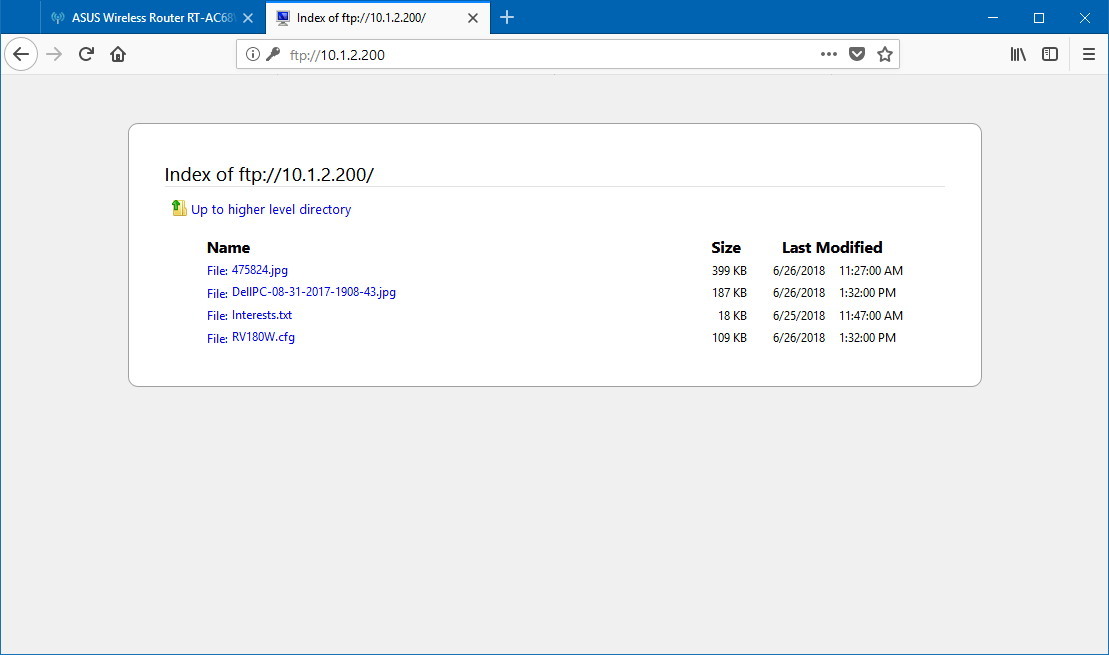
To access the shared contents on an FTP Server via Windows Explorer (file explorer), type in the Address bar ftp:// followed by the hostname (or the URL or the IP address) of the FTP Server.
Example: If the FTP Server’s IP Address is: «192.168.1.200» and the FTP port number is the «54557» then type:
-
ftp://192.168.1.200:54557

When asked, type your credentials (FTP Login name and Password) to connect to the FTP Server. After that you ‘ll be able to work with the FTP contents as if it was stored locally on your computer.

After completing your work, then close the Explorer window to disconnect from the FTP Server.
The above method is useful if you access the FTP contents rarely, but for everyday usage it is unhandy, because you have to apply the same steps, every time you want to access the FTP server. In that case, it is better to use the Add a Network Location wizard, which is offered by Windows, to add a shortcut to the FTP Shared folder in Windows Explorer (file Explorer). *
* Note: If you want to assign a drive letter to the FTP shared folder and make your life easier, then read this article: How to Assign/Map an FTP Share to a drive letter.
How to Add a Shortcut to an FTP Share in Windows Explorer:
1. Open Windows Explorer.
2. Right click on a blank area and choose Add network location.

3. Click Next twice and at the following screen type the IP Address and the port number of your FTP Server. Click Next when done.

4. Uncheck the Log on anonymously checkbox and then type your FTP User name. Press Next.

5. Leave the default name (or type a different one) for the new connection and press Next.

6. Click Finish to close the wizard.

7. Finally you will be asked to type your credentials.

8. After entering your credentials, the new FTP network location will appear (as a shortcut) in Windows Explorer. *
- Related article: How to Assign/Map an FTP Share to a drive letter..

That’s it! Let me know if this guide has helped you by leaving your comment about your experience. Please like and share this guide to help others.
If this article was useful for you, please consider supporting us by making a donation. Even $1 can a make a huge difference for us in our effort to continue to help others while keeping this site free:

If you want to stay constantly protected from malware threats, existing and future ones, we recommend that you install Malwarebytes Anti-Malware PRO by clicking below (we
do earn a commision from sales generated from this link, but at no additional cost to you. We have experience with this software and we recommend it because it is helpful and useful):
Full household PC Protection — Protect up to 3 PCs with NEW Malwarebytes Anti-Malware Premium!

If you need to access an FTP server, you can install dedicated FTP clients with lots of features –but you don’t necessarily have to. Windows itself offers several ways for connecting to an FTP server, allowing you to download and upload files in a pinch.
How to Access FTP Servers in Windows 10 File Explorer
The Windows file manager–known as File Explorer on Windows 10, and Windows Explorer on Windows 7–allows you to connect to FTP servers.
To connect to an FTP server, open a File Explorer or Windows Explorer window, click the “This PC” or “Computer”. Right-click in the right pane and select “Add a network location”.

Go through the wizard that appears and select “Choose a custom network location”.
In the “Specify the location of your website” dialog, enter the address of the ftp server in the form ftp://server.com .
For example, Microsoft’s FTP server used to be ftp.microsoft.com, so we’d enter ftp://ftp.microsoft.com here if we wanted to connect to that particular server. It doesn’t actually work anymore, but since there are essentially no trustworthy public FTP servers out there anymore, we’re going to still use it as our example here.
If you don’t have a username and password, you can often check the “Log on anonymously” box and sign into the server without a username and password. This gives you limited access to the server–you can generally download publicly available files but not upload files, for example.
If you do have a username and password, enter your username here. The first time you connect to the FTP server, you’ll be prompted to enter your password.
You’ll now be asked to enter a name for the network location. Enter whatever name you like–the FTP site will appear with this name so you can easily remember which is which.
When you’re done, the FTP site will appear under “Network locations” in the This PC or Computer pane. Download files and upload files by copying and pasting them to and from this folder.
RELATED: How to Host an FTP Server on Windows with FileZilla
How to Access FTP Servers from Windows 11 File Explorer
To access an FTP server from Windows 11’s File Explorer, you’ll need to right-click on the “This PC” icon and choose Add a Network Location from the popup dialog.
You’ll be presented with the Add Network Location wizard. You’ll want to select the “Choose a custom network location” option, which is the only option to choose from anyway. Once you do, you will be able to click the Next button.
On the next screen you’ll put the location of your FTP server, which should generally be in the format of:
ftp://<domain>
On the next screen you’ll put your user name and password, or you can leave the “Log on anonymously” option checked if it’s a public FTP server for some reason. Do those still exist?
On the last screen you’ll be asked to give a name to your location, which could be literally anything you feel like.
Once you’re all done with creating the network location, you can find it by browsing to “This PC” in File Explorer, and you’ll see a brand-new location to choose.
It’s worth noting that Microsoft’s FTP server doesn’t seem to work anonymously anymore, so if you follow along with these instructions you won’t actually be able to access anything.
RELATED: How to Set Up a Linux FTP Server for Quick File Transfers
How to Access FTP Servers in the Command Prompt
You can also do this with the ftp command in a Command Prompt window. This command is comes built into Windows.
To do this, open a Command Prompt window. On Windows 10, right-click the Start button or press Windows+X on your keyboard and select “Command Prompt”. On Windows 7, search the Start menu for “Command Prompt”.
If you’re using Windows 11, you can search for “Command Prompt” in the Start Menu, or you can use the Terminal, which is PowerShell, but FTP will work fine there as well.
Type ftp at the prompt and press Enter. The prompt will change to an ftp> prompt.
To connect to a server, type open followed by the address of the FTP server. For example, to connect to Microsoft’s FTP server, you used to be able to type:
open ftp.microsoft.com
You’ll then be prompted for a username. Enter the username and password to connect to the site. If you don’t have one, you can enter “Anonymous” followed by a blank password to see if the FTP server allows anonymous access.
Note: Microsoft doesn’t have an FTP server anymore, but these screenshots were taken back when they did. Since there aren’t a lot of trustworthy public FTP servers out there, we’re leaving the screenshots alone for illustration purposes.
Once you’re connected, you can navigate the FTP server with the dir and cd commands. To view the contents of the current directory, type:
dir
To change to another directory, type the cd command followed by the name of the directory. For example, you’d type the following command to change to a directory named “example”:
cd example
To upload or download files, use the get and push commands.
For example, to download a file named example.txt in the current FTP folder, you’d type:
get example.txt
To upload a file stored on your desktop named example.txt to the FTP server, you’d type:
put "C:UsersYOURNAMEDesktopexample.txt"
When you’re done, just type the following command and press Enter to close the connection:
quit
While apps like Cyberduck or FileZilla offer plenty of advanced features that Windows’ built-in options don’t, the above are great options for basic FTP browsing, uploading, and downloading. If you want to get more complicated, you can even automate FTP from the command line.
RELATED: How to Use the FTP Command on Linux
READ NEXT
- › Chrome and Firefox Killed FTP Support: Here’s an Easy Alternative
- › How to Change Your Age on TikTok
- › What Is a Condenser Microphone, and How Do They Work?
- › Get PC Power With Tablet Portability in the Surface Pro 9 for $200 Off
- › How to Screen Record on iPhone
- › The New HP Pro x360 Fortis Is a 2-In-1 Laptop Under $500
- › This Huge Curved Ultrawide Monitor From LG Is $337 Today
Quick Guide
This guide gives you a short overview on how to use FileZilla client.
By default you don’t have to configure FileZilla, so you can start directly working with the program.
Connecting to an FTP server
Using the Quick Connect bar
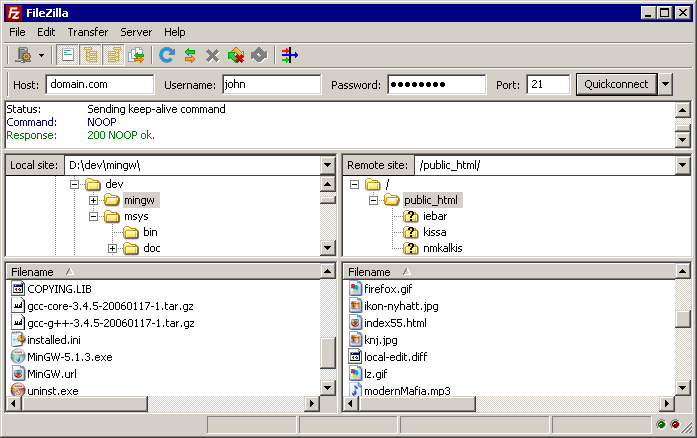
To connect to an FTP server, enter the address of the server into the host field of the Quickconnect bar (e.g. example.com — see image below). If it is a special server type like an SFTP server, add the protocol in front of the address. In case of an SFTP server, start the address with ‘sftp://’ (e.g. sftp://example.com). Enter the port of the server into the port field if it is not the default port (21 for FTP, 22 for SFTP). If a username / password is required, enter it in the corresponding fields, otherwise the default anonymous logon will be used. Click on Quickconnect or press Enter to connect to the server.

Please notice that the Quick Connect is for… quick connections — so there is no way to edit the quick connections list which stores the last 10 entries. To store FTP server names you should use the Site Manager, instead.
Quick Connect is good for testing the login info before making a site manager entry. Once you connect, you can choose File -> «Copy current connection to Site Manager…» to make a permanent entry. It is usually best to check your login info with Quick Connect before making a permanent entry.
Using Site Manager
You can use the FileZilla Site Manager to specify specific site parameters and connect to the targeted FTP site. The Site Manager allows you to store entries and configure more parameters than the Quick Connect allows.
Special case: Servers in LAN
If the server you are connecting to is in your home LAN, then there is not an address (domain name) as you may know from the Internet. In LAN, you simply use the internal IP address of the server PC. In most cases the network name (computer name) will do, too. If the server is on the same PC as Filezilla, you can even use localhost or 127.0.0.1 as hostname.
NOTE: If you connect from the outside of your LAN this does not apply, you have to use the external (WAN) IP instead.
Navigating on the server
After a successful connection attempt, a list of files and directories appears on the right side of the main window. The name of the current remote directory is listed in the edit field on the top. Below that you will see the remote directory tree. Under the remote directory is a list of the contents of the current remote directory.
To change the current remote directory:
- Type a directory name into the edit field and press enter, or
- Click a directory in the directory tree, or
- Double-click a directory in the list of the current directory contents
You will notice a directory called «..» listed in virtually all directories. Selecting this directory allows you to go up to the parent directory of the current directory.
Question marks («?») appear on directories you haven’t accessed yet, indicating that the FileZilla Client can’t tell if there are subdirectories within those directories. If you access the directory the question mark will vanish.
Navigating on your machine
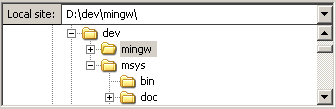
Navigating on your machine works almost like navigating on the server. The current local directory and the local directory tree are displayed on the left side of the main window by default.
Synchronized Browsing
If you have an identical directory structure on the local machine and the server, you can enable synchronized browsing. This means that any directory navigation on one machine is duplicated on the other.
To enable synchronized browsing, create an entry in the Site Manager, and on the Advanced tab, ensure that the Default local directory and the Default remote directory have the same structure. Then check «use synchronized browsing,» save your settings, and connect.
Directory Comparison
To quickly see differences between files on the local machine and the server, choose View > Directory Comparison, and choose either «compare file size» or «compare modification time.» (You also hide identical files by checking that option.) Then choose «Enable.»
You will now see color-coded differences between copies of the same file on the different machines. See their meanings here.
Transferring files
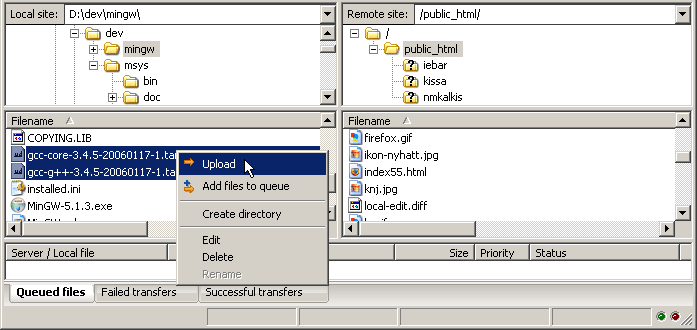
You can upload or download a file by double-clicking on it. It will be added to the transfer queue and the transfer starts automatically. To transfer directories and/or multiple files, select them and right-click the selection. Then you can click on Upload/Download in the popup menu.
You can also drag the files from one side and drop them on the other side. To add files to the queue so that they will be transferred later, select them and click Add to Queue from the popup menu. You may also drag the files directly into the queue. Click on the ![]() button on the toolbar to start the transfer.
button on the toolbar to start the transfer.
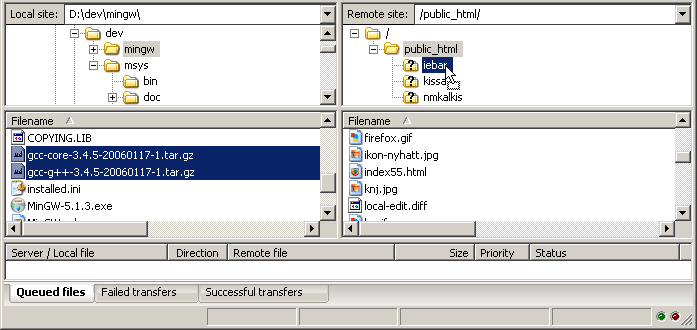
Or, you can click on a file, then drag the file (a box is added to the arrow cursor) to the directory where you want to move it. The directory will be highlighted when you are over it. Let go of the mouse button and the file will be moved to the directory.
Detailed Information Pages
Detailed information on other aspects of the FileZilla client can be found on the following pages:
- Filename Filters
- Other features
File Transfer Notes
FileZilla uses multiple FTP sessions. One session gets used purely to browse the server. The other sessions get used to do the file transfers. That way, you can always browse the server even during transfers.
For example, here is a simple car analogy: You order a pizza using your telephone (aka the browsing connection), then you hang up the telephone. Then the delivery man drives the pizza in his car to your location (the transfer connection). While the pizza is transferring, you can phone somebody else, like for example your garage because your own car is broken 
Reducing simultaneous connections for incorrectly configured servers
If you get a 421 Too many connections from this IP (<number>) error, the FTP server is restricting your number of connections. There are even servers restricting it to one connection at a time.
The preferred solution would be to contact the server administrator and encourage him/her to configure the server correctly (FTP uses more than one connection by design!). But if you need access immediately, there is a workaround:
1. Open the Site Manager (File — Site Manager… or the first toolbar button)
2. Create an entry for that server, enter all details you know, the more precise, the better
3. Open the ‘Transfer Settings’ tab
4. Tick the ‘Limit number of simultaneous connections’ checkbox
5. Enter the desired limit into the ‘Maximum number of connections’ field
Now, if you connect using the Site Manager entry, connections will be limited.
Note:
If you limit connections to 1 only, there is a major drawback: You cannot browse the server anymore while a transfer is in progress!
Troubleshooting
Re-registering the shell extension (Windows only)
Especially on Vista or Windows 7 it can happen that Drag&Drop fails and you get an error message stating the shell extension doesn’t work. In this case you may need to re-register it. Here’s how:
1. Open a command prompt as administrator. This is important!
Start Menu — All Programs — Accessories: Right Click ‘Command Prompt’, select ‘Run as administrator’
2. Navigate to the Filezilla program directory.
Example (32bit): cd «Program FilesFilezilla FTP Client»
Example (64bit): cd «Program Files (x86)FileZilla FTP Client»
3. Re-register the shell extension.
Type ‘regsvr32 fzshellext.dll’ (without quotes of course)
4. If you have 64bit OS, you need to perform an additional step.
Type ‘regsvr32 fzshellext_64.dll’ (no quotes as well)
If you get the reply ‘DllRegisterServer in … succeeded.’, you’ve done it (though you probably still need to reboot your computer).
Setting up a File Transfer Protocol (FTP) server on Windows 10 is perhaps one of the most convenient solutions to upload and download files from virtually anywhere to your computer without the limitations typically found with cloud storage services.
Using an FTP server, you’re basically creating a private cloud that you have absolute control. You don’t have monthly transfers caps and speeds can be fast (depending on your internet subscription).
Also, there not file type or size restrictions, which means that you can transfer a 1KB text file as well as 1TB backup file, and you can create as many accounts as you want to let family and friends store and share files with each other.
There are plenty third-party solutions to set up a file server of this kind, but even though it may sound complicated, the FTP feature bundled on Windows 10 isn’t difficult to set up.
In this Windows 10 guide, we’ll walk you through the steps to set up and manage an FTP server on your computer to transfer files within your home network or remotely over the internet.
- How to install the FTP server components on Windows 10
- How to configure an FTP server site on Windows 10
- How to set up multiple FTP accounts on Windows 10
- How to connect to an FTP server remotely on Windows 10
How to install the FTP server components on Windows 10
Although Windows 10 includes support to set up an FTP server, you need to add the required components manually.
To install the FTP server components, do the following:
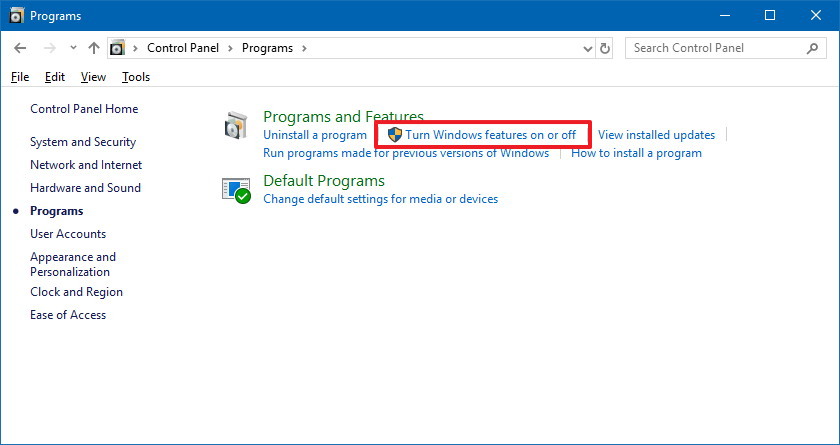
- Open Control Panel.
- Click on Programs.
- Under «Programs and Features,» click the Turn Windows features on or off link.
- Expand the «Internet Information Services» feature, and expand the FTP server option.
- Check the FTP Extensibility and FTP Service options.
- Check the Web Management Tools option with the default selections, but making sure that the IIS Management Console option is checked.
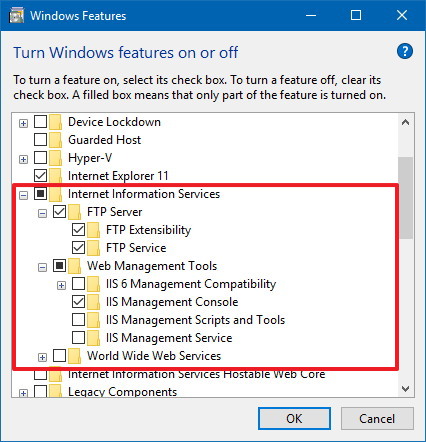
- Click the OK button.
- Click the Close button.
Once you’ve completed the steps, the components to set up an FTP server will be installed on your device.
How to configure an FTP server site on Windows 10
After installing the required components, you can proceed to configure an FTP server on the computer, which involves creating a new FTP site, setting up firewall rules, and allowing external connections.
Setting up an FTP site
To set up an FTP site, do the following:
- Open Control Panel.
- Click on System and Security.
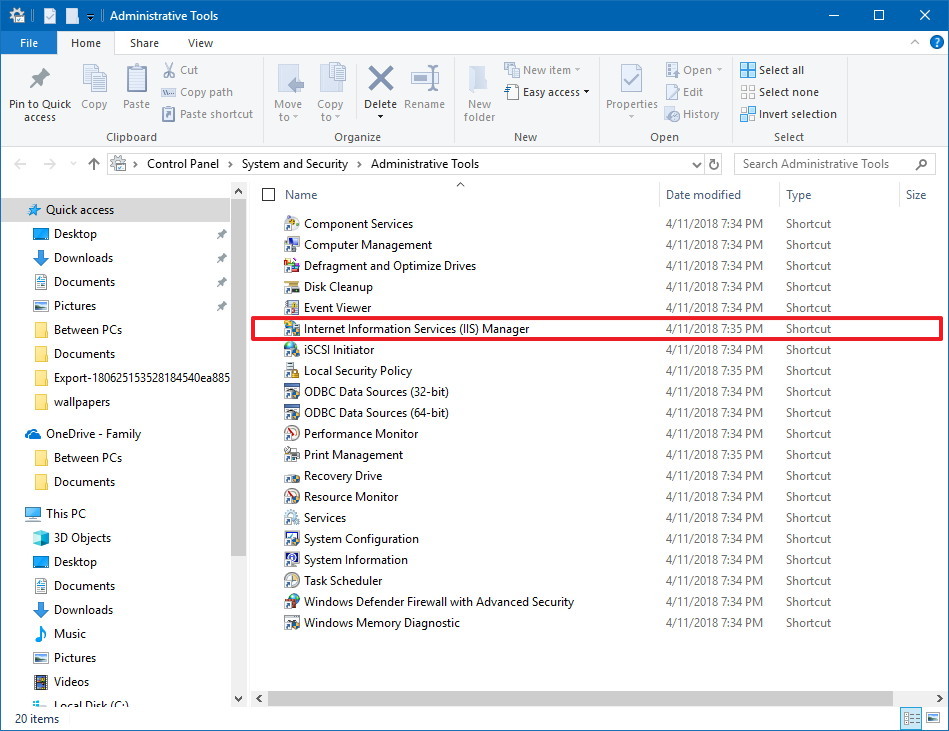
- Click on Administrative Tools.
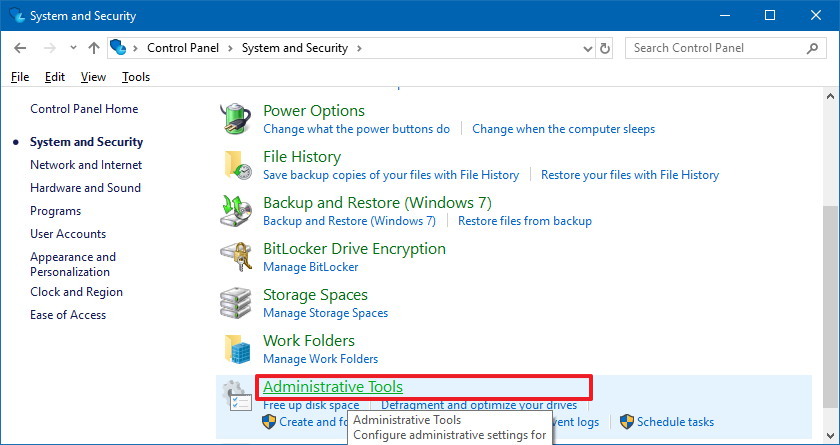
- Double-click the Internet Information Services (IIS) Manager shortcut.
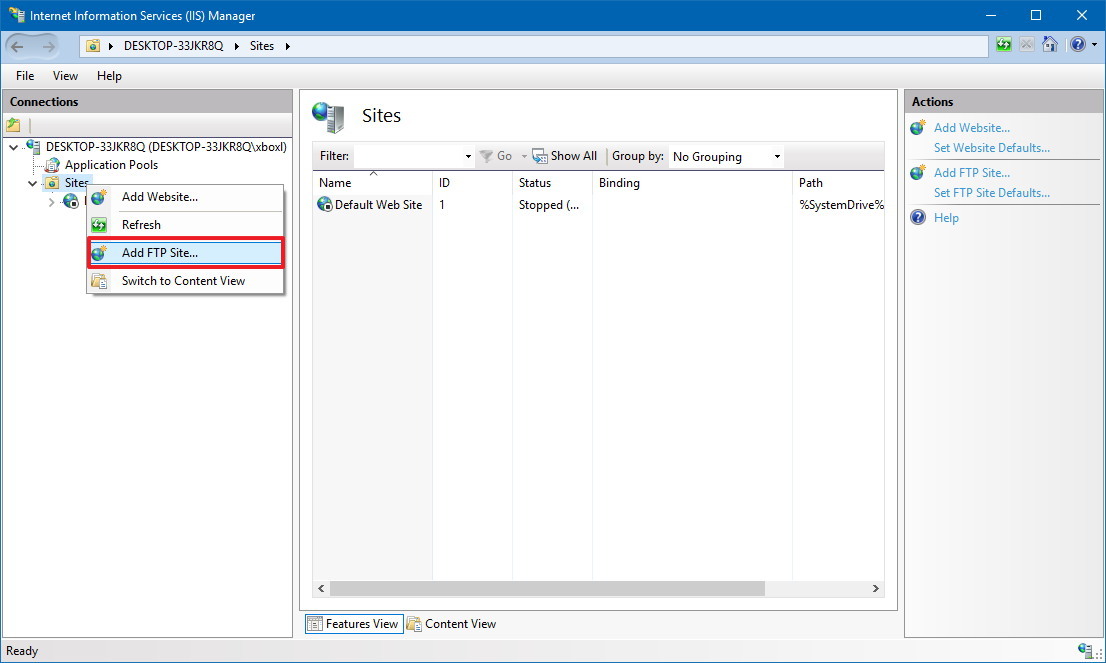
- On the «Connections» pane, right-click Sites, and select the Add FTP Site option.
- In the FTP site name, type a short descriptive name for the server.
- In the «Content Directory» section, under «Physical path,» click the button on the right to locate the folder you want to use to store your FTP files.Quick Tip: It’s recommended to create a folder in the root of the main system drive, or on an entirely different hard drive. Otherwise, if you set the home folder in one of your default folders when adding multiple accounts, users won’t have permission to access the folder. (You can adjust folder permissions, but it’s not recommended.)
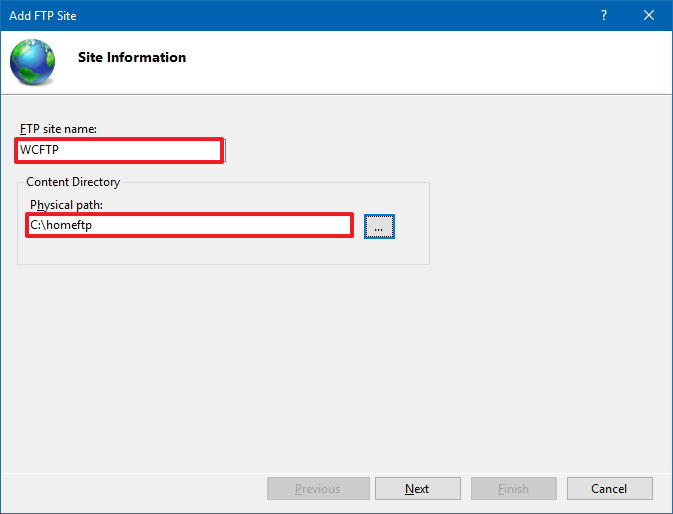
- Click the Next button.
- Use the default Binding settings selections.
- Check the Start FTP site automatically option.
- In the «SSL» section, check the No SSL option.Important: In a business environment or on an FTP server that will host sensitive data, it’s best practice to configure the site to require SSL to prevent transmitting data in clear text.
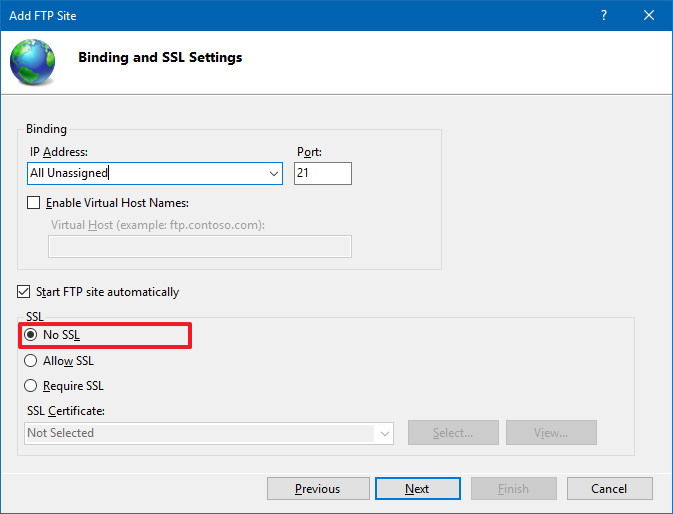
- Click the Next button.
- In the «Authentication» section, check the Basic option.
- In the «Authorization» section, use the drop-down menu, and select Specified users option.
- Type the email address of your Windows 10 account or local account name to allow yourself access to the FTP server.
- Check the Read and Write options.
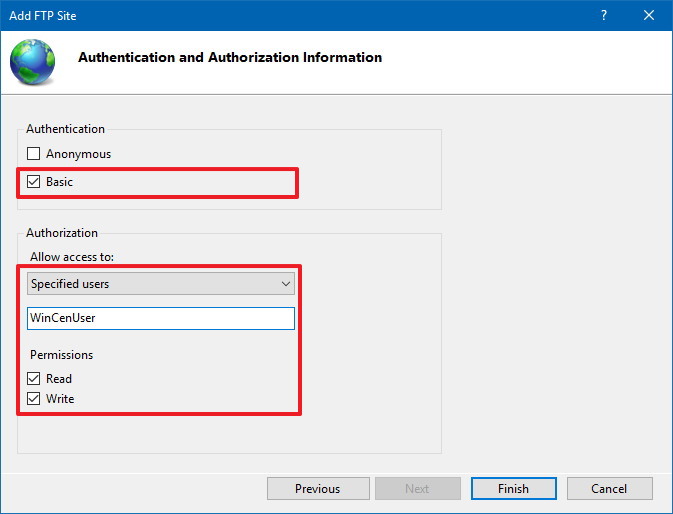
- Click the Finish button.
After completing the steps, the FTP site should now be operational on your computer.
Configuring firewall rules
If you’re running the built-in firewall on Windows 10, connections to the FTP server will be blocked by default until you manually allow the service through, using these steps:
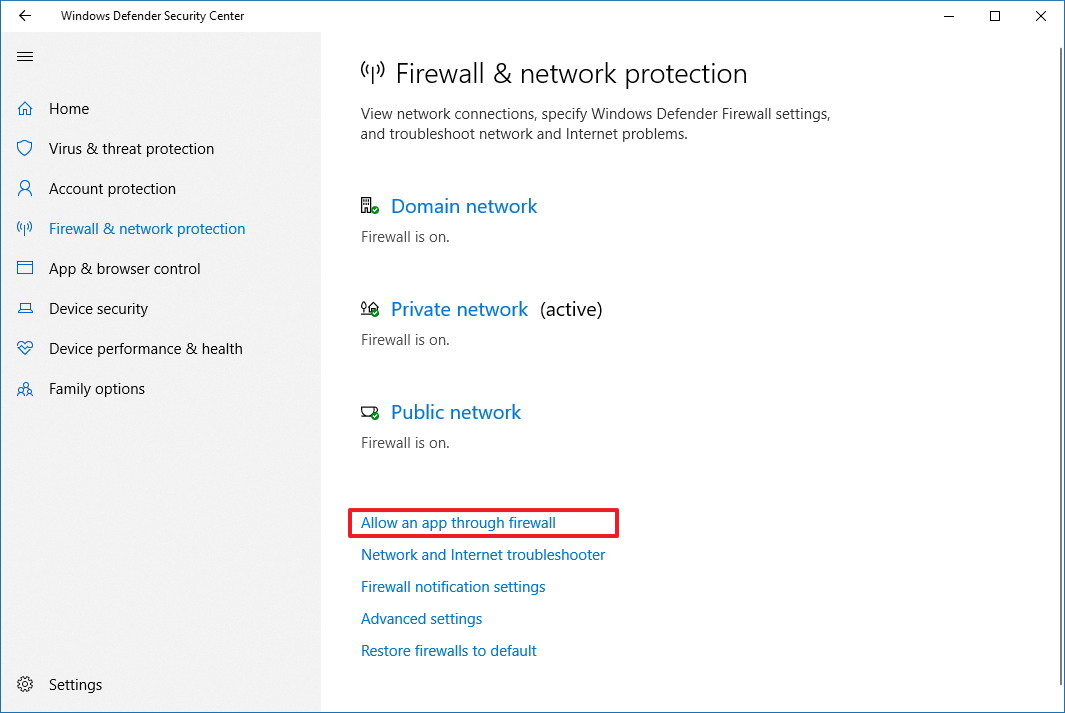
- Open Windows Defender Security Center.
- Click on Firewall & network protection.
- Click the Allow an app through firewall option.
- Click the Change settings button.
- Check the FTP Server option, as well as the options to allow Private and Public access.
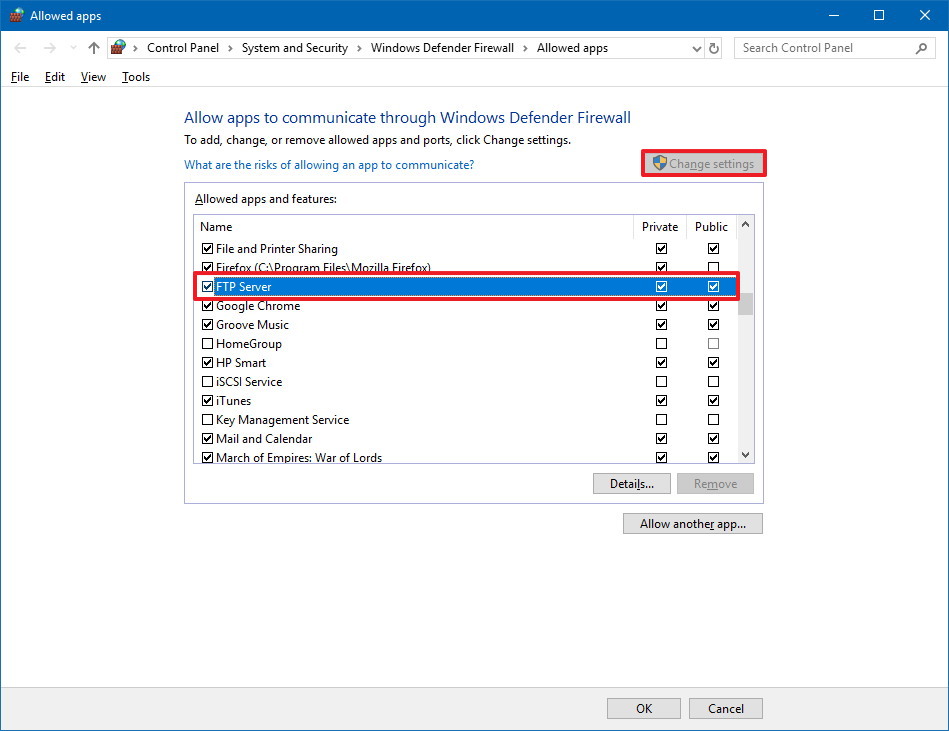
Once you’ve completed the steps, the FTP server should now be accessible from the local network.
In the case that you’re running third-party security software, make sure to check your vendor support website for more specific details on adding firewall rules.
Allowing external connections
To make your FTP server reachable from the internet, you also need to open the Transmission Control Protocol/Internet Protocol (TCP/IP) port number 21 on your router.
The instructions to forward a port will be different depending on the router, and even depending on the firmware version. In the steps below, we’ll outline the general steps, but you may need to consult your manufacturer support website for specific details.
To forward port 21 to allow FTP connections outside of the local network, do the following:
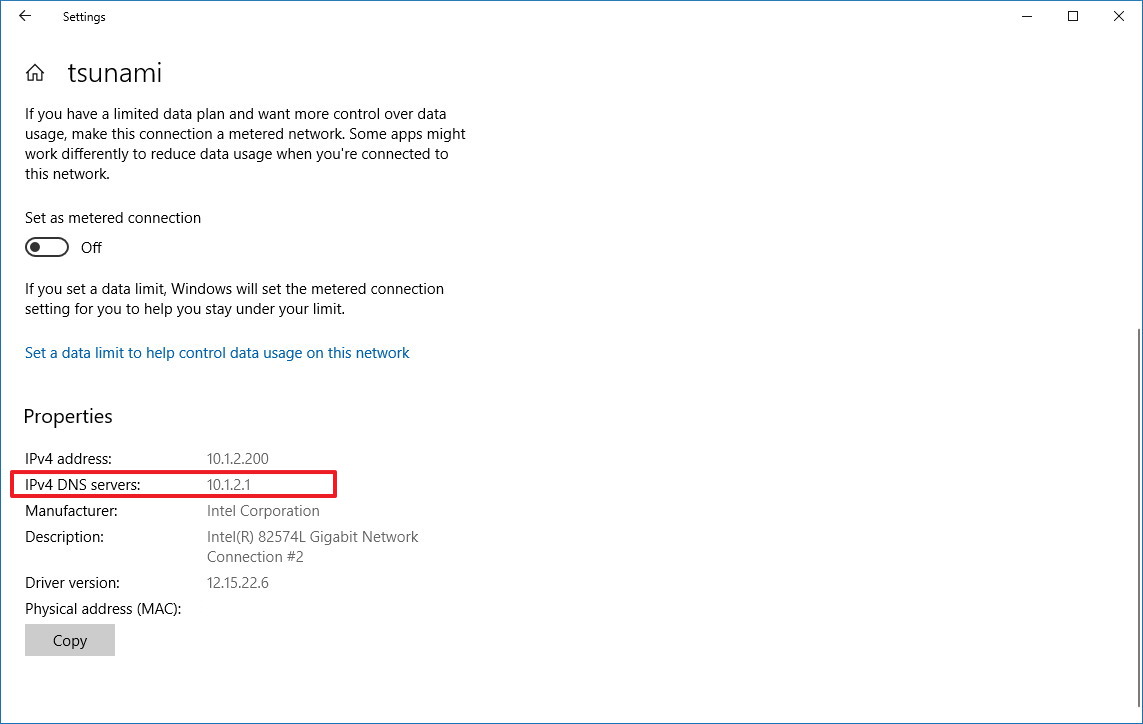
- Open Settings.
- Click on Network & Internet.
- Click on Status.
- Click the Change connections properties option.
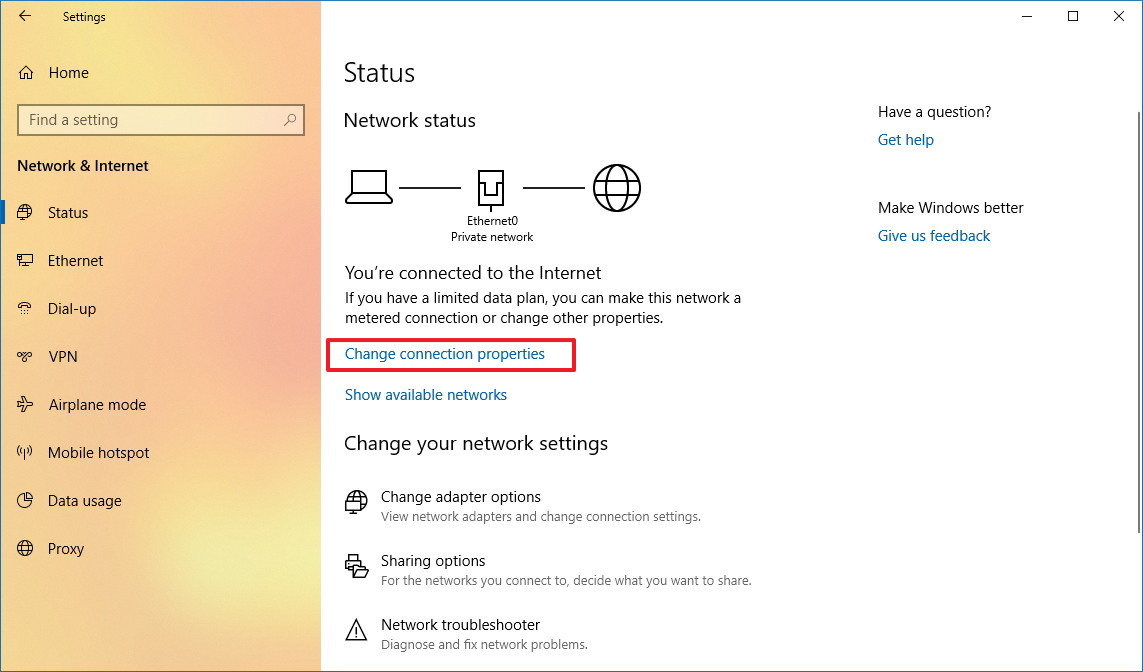
- Make a note of the IPv4 DNS server address, which is the address of your router. Usually, it’s private address in the 192.168.x.x range. For instance, 192.168.1.1 or 192.168.2.1.
- Open your default web browser.
- On the address bar enter the router’s IP address (for example, 192.168.1.1) and press Enter.
- Sign-in with your router credentials.
- Open the Port Forwarding page. (Usually, these settings can be found under the WAN, NAT, or Advanced settings pages.)
- Add a new rule to forward incoming connections to the FTP server from the internet by including this information:
- Service name: Type a descriptive name for the port forwarding rule.
- Port range: 21.
- Local IP: This is the FTP server IP address that the router will forward incoming connections. (This is your IPv4 address. See step No. 5.)
- Local port: 21.
- Protocol: TCP.
- Click the add button.
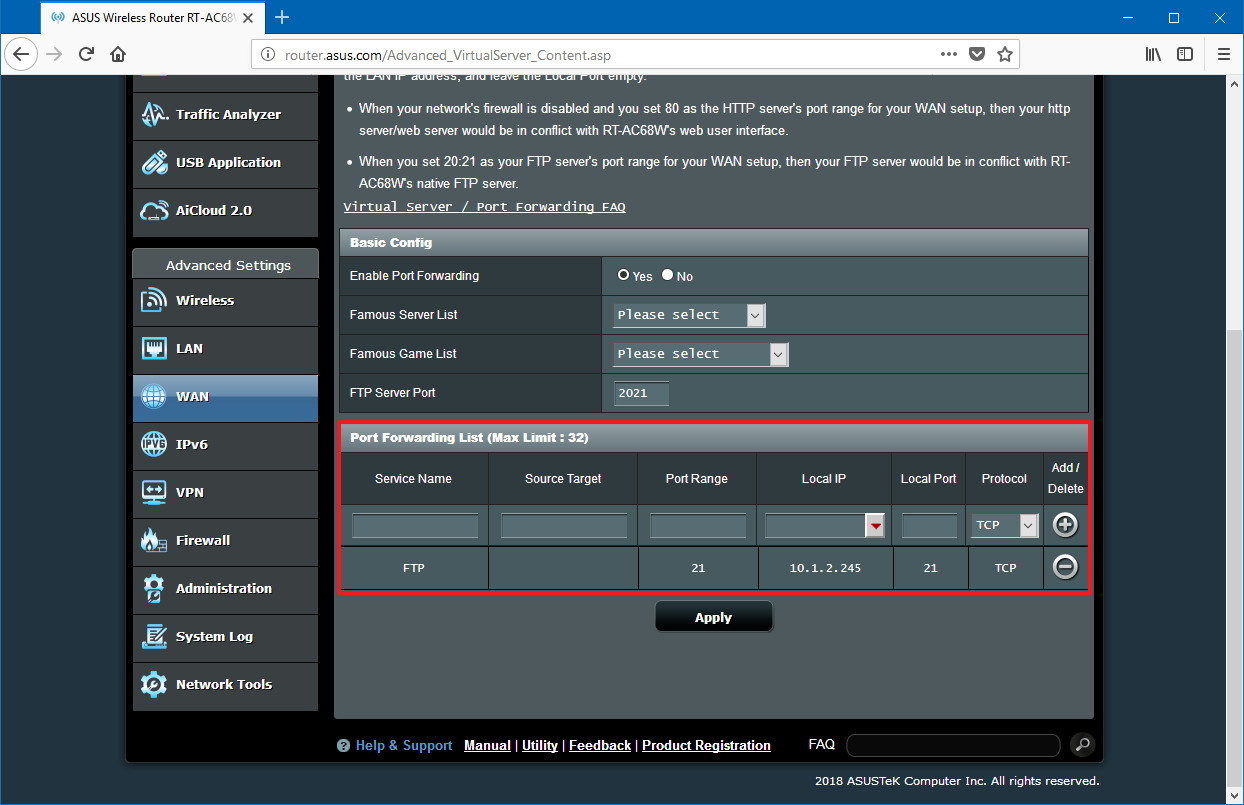
- Click the Apply button to save the changes.
After completing the steps, any incoming connection on port 21 will be forwarded to the FTP server to establish a networking session.
Setting up a static IP address
If you’re planning to transfer files over the internet in the regular basis, then it’s recommended to configure a static IP address to prevent having to reconfigure your router in the future if your device’s IP changes.
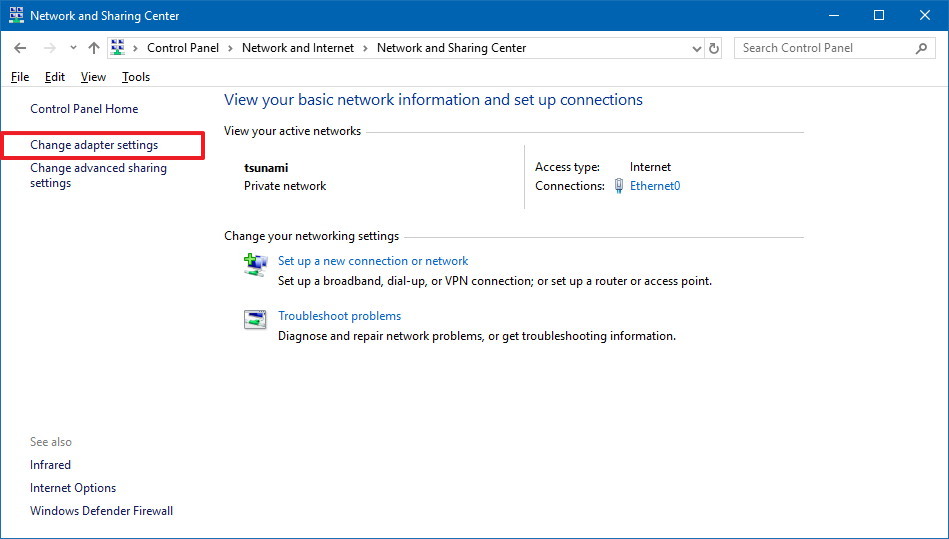
- Open Control Panel.
- Click on Network and Internet.
- Click on Network and Sharing Center.
- In the left pane, click the Change adapter settings option.
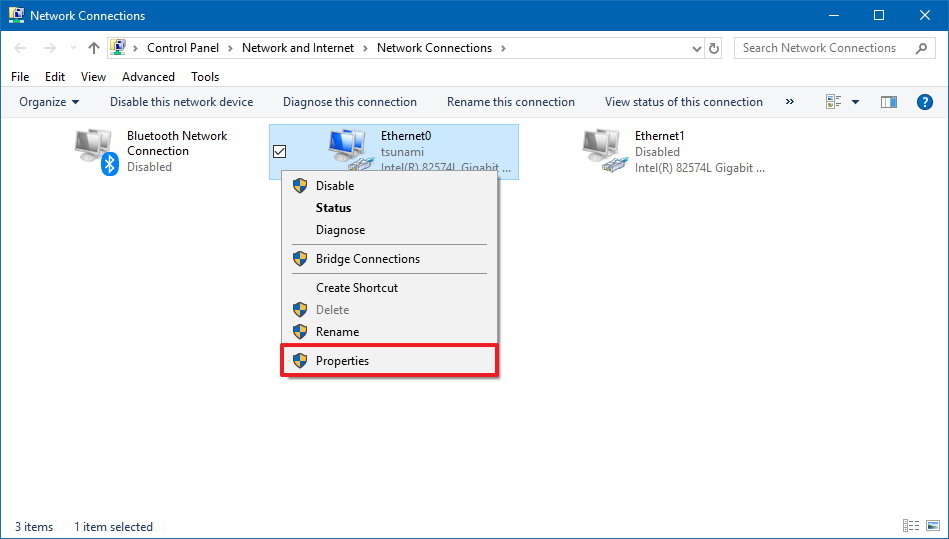
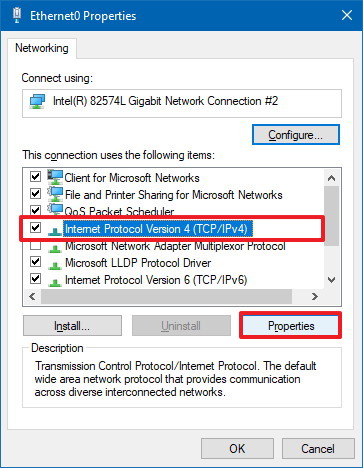
- Right-click the network adapter, and select the Properties option.
- Select the Internet Protocol Version 4 (TCP/IPv4) option.
- Click the Properties button.
- Select the Use the following IP address option.
- Specify the IP settings:
- IP address: Specify a static network address for the computer. You should use an address outside of the DHCP server scope configured in your router to prevent conflicts. For instance, 192.168.1.200.
- Subnet mask: In a home network, the address usually is 255.255.255.0.
- Default gateway: This is usually the IP address of the router. For example, 192.168.1.1.
- Preferred DNS server: Typically, this is also the IP address of your router.
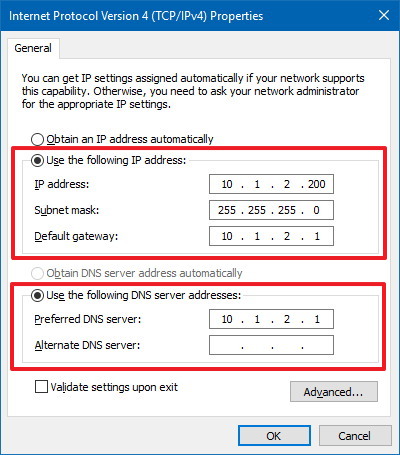
- Click the OK button.
- Click the Close button.
Once you’ve completed the steps, the IP configuration will no longer change, and it’ll prevent potential connection problems in the future.
How to set up multiple FTP accounts on Windows 10
If you want to allow multiple people to download and upload files to the FTP server simultaneously, you need to set up multiple accounts with specific permissions.
This process is done by creating new standard Windows 10 accounts and configuring the correct settings.
Creating new user accounts
To add multiple accounts to an FTP server, do the following:
- Open Settings.
- Click on Accounts.
- Click on Family & other people.
- Click the Add someone else to this PC button.
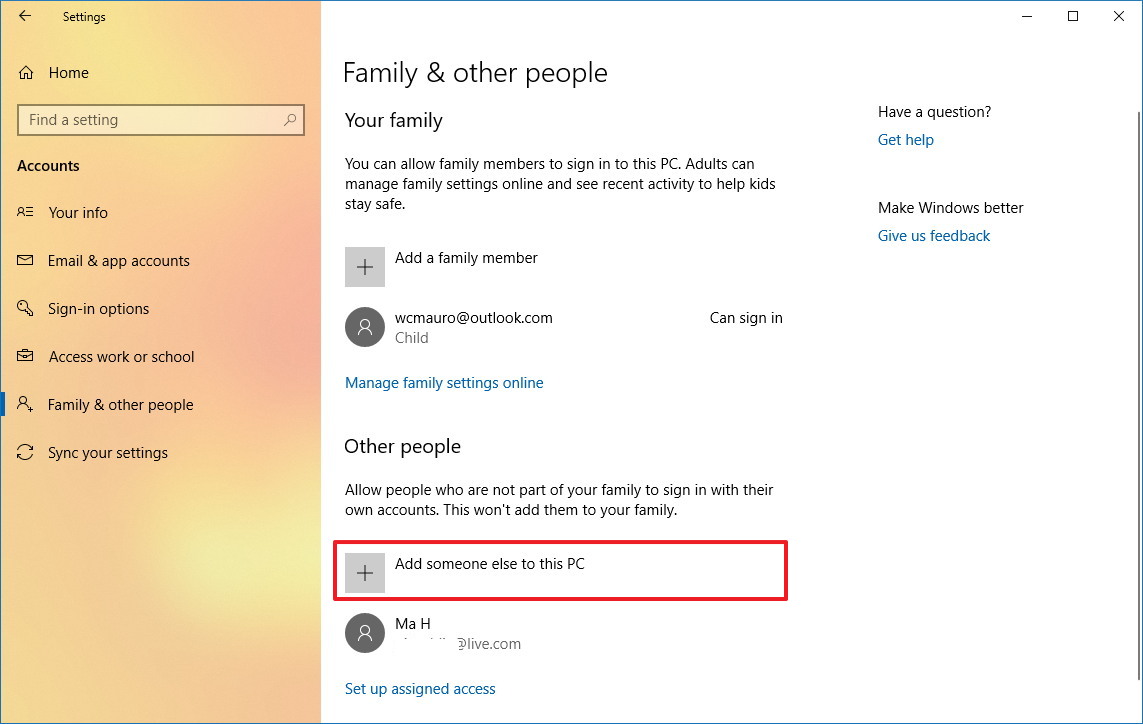
- Type the Microsoft account address for the user you want to allow access to the FTP server.Quick Tip: If you want users to access the server using local accounts, then click the I don’t have this person sign-in information option, click the Add a user without a Microsoft account option, and follow the on-screen direction to create the account.
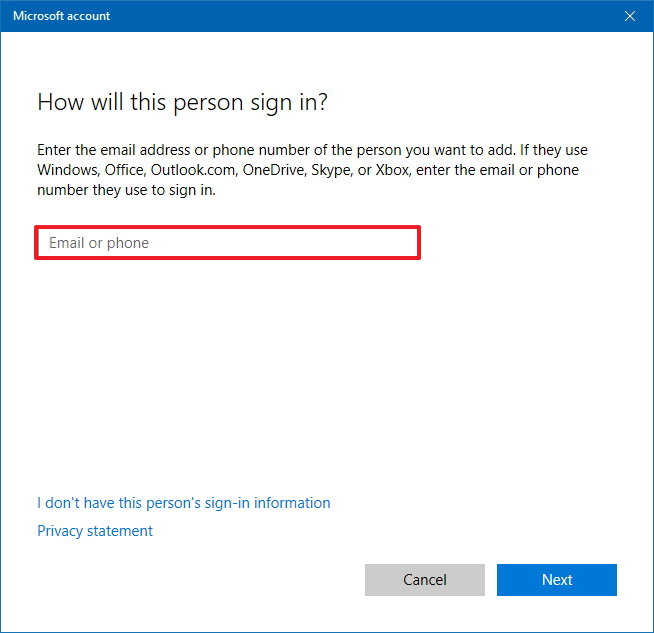
- Click the Next button.
Once you’ve completed the steps, you may need to repeat the steps to create additional accounts.
Configuring user accounts to FTP server
If you want multiple users to access the FTP server at the same time, you need to modify the server settings using these steps:
- Open Control Panel.
- Click on System and Security.
- Click on Administrative Tools.
- Double-click the Internet Information Services (IIS) Manager shortcut.
- On the left pane, expand «Sites,» and select the site you created earlier.
- Double-click the FTP Authorization Rules option.
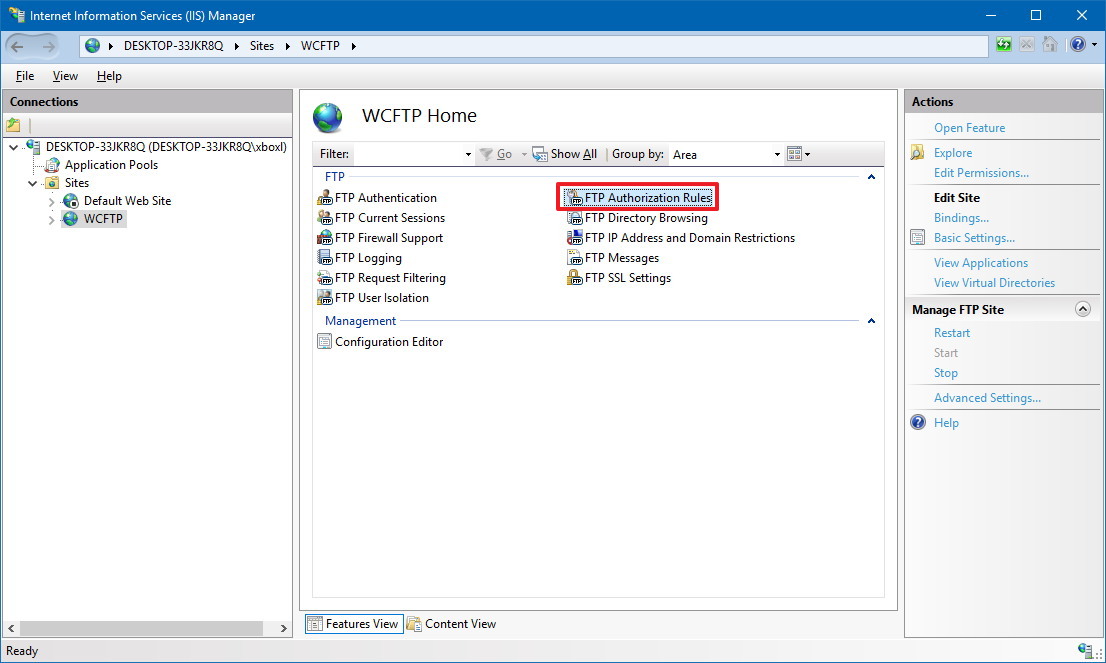
- On the right pane, click the Add Allow Rule option.
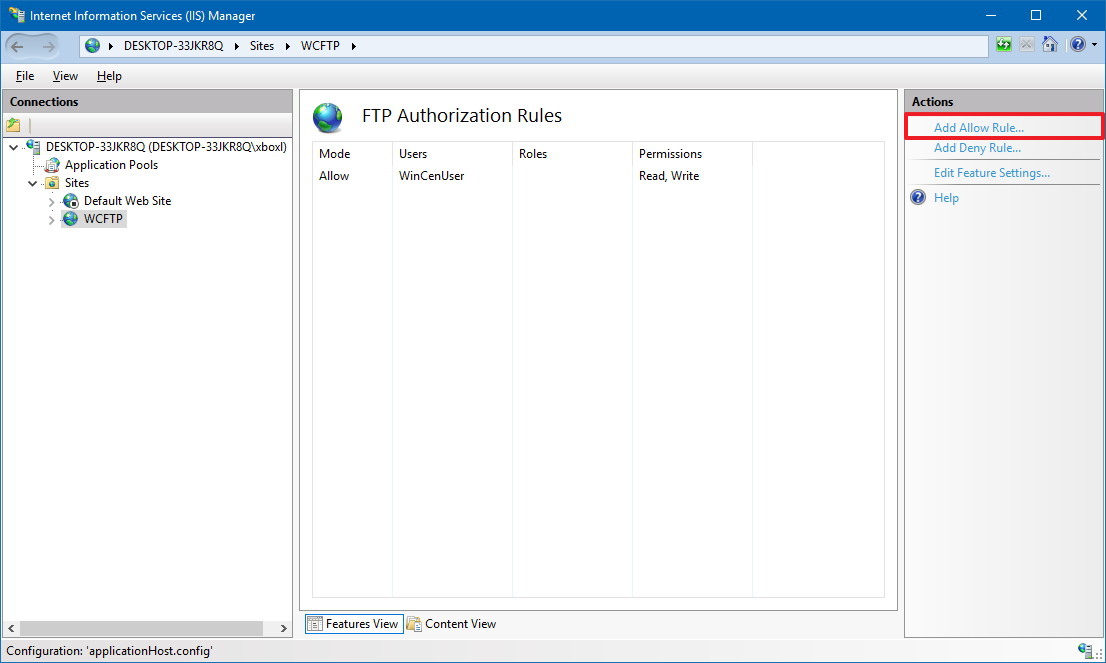
- Select one of these two options:
- All Users: Allows every user configured on your Windows 10 device to access the FTP server.
- Specified users: You can use this option to specify all the users you want to access the FTP server. (You must separate each user using a comma.)
- Check the Read and Write options.
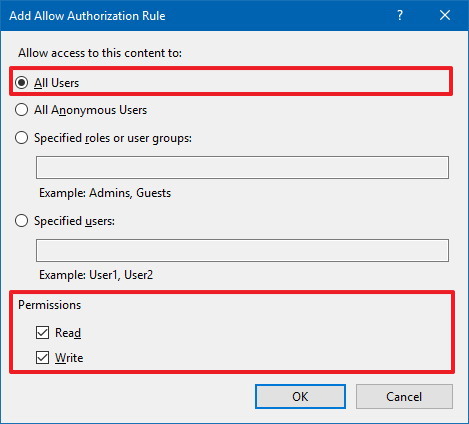
- Click the OK button.
After completing the steps, all the users you specified should now be able to access the FTP server to download and upload files remotely.
How to connect to an FTP server remotely on Windows 10
Once you’ve created and configured your FTP server, there are many ways to view, download, and upload files.
Viewing and downloading files
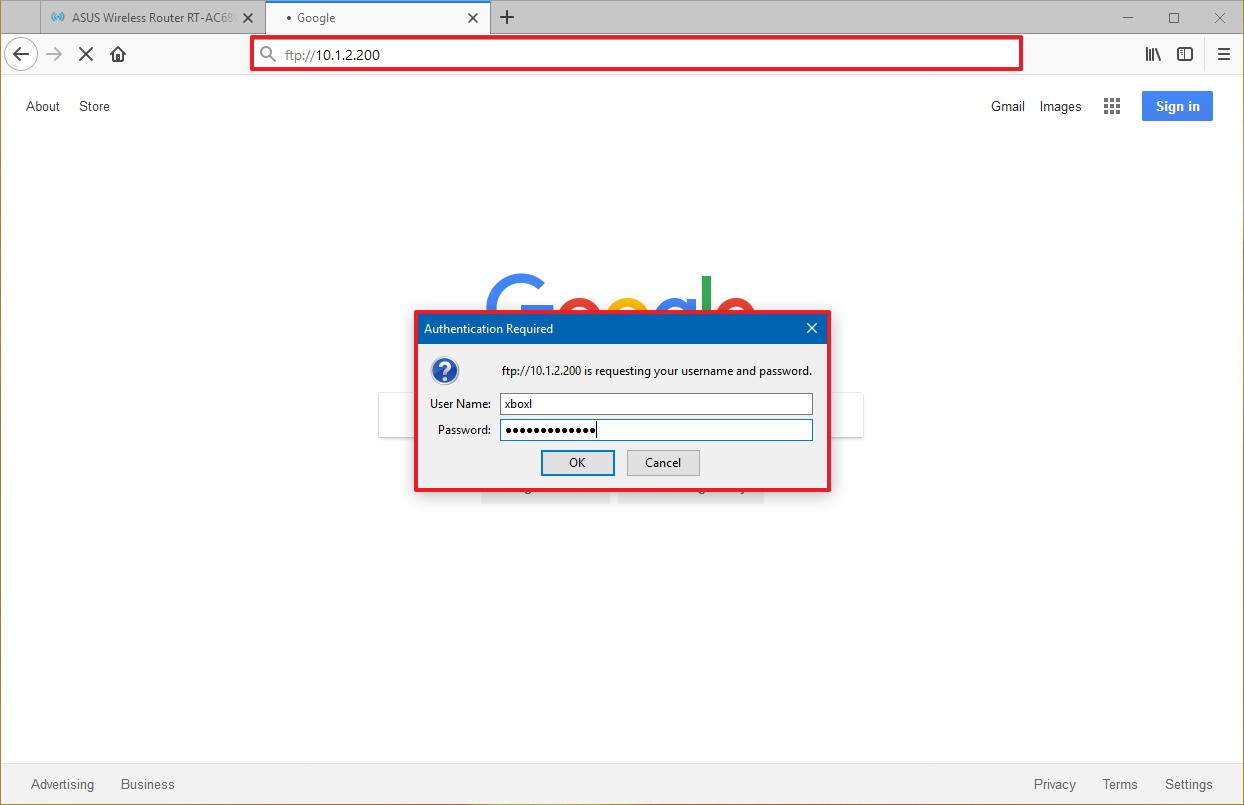
If you want to browse and download files, you can do this using Internet Explorer, Firefox, or Chrome:
- Open a web browser.
- In the address bar, type the server IP address using ftp://, and press Enter. For example, ftp://192.168.1.100.
- Type your account credentials.
- Click the Log on button.
After completing the steps, you should be able to navigate and download files and folders from the server.
In the case that you’re trying to connect from the internet, you have to specify the public (internet) IP address of the network hosting the FTP server.
The easiest way to find out is to search for «What’s my IP» in Google or Bing within the network before trying to connect from a remote connection. Also, unless you have an static IP address from your internet provider, or you’re not using DDNS service, you may need to check your public IP regularly in order to connect, in case it changes.
Viewing, downloading, and uploading files
The easiest way to browse, download and upload files is to use File Explorer with these steps.
- Open File Explorer.
- In the address bar, type the server address using ftp://, and press Enter. For example, ftp://192.168.1.100.
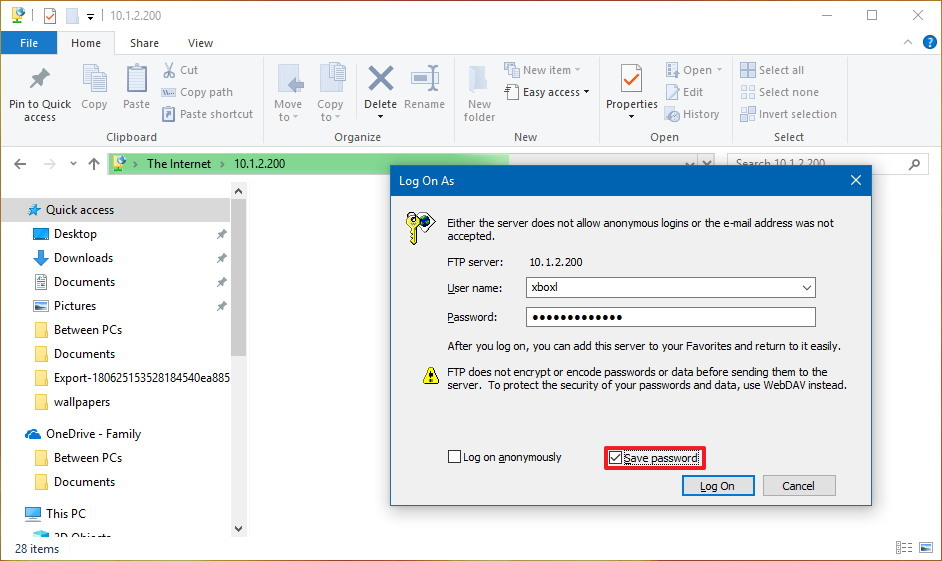
- Type your account credentials.
- Check the Save password option.
- Click the Log on button.
After completing the steps, you’ll be able to browse folders and files, as well as download and upload files as if they’re locally stored on your device.
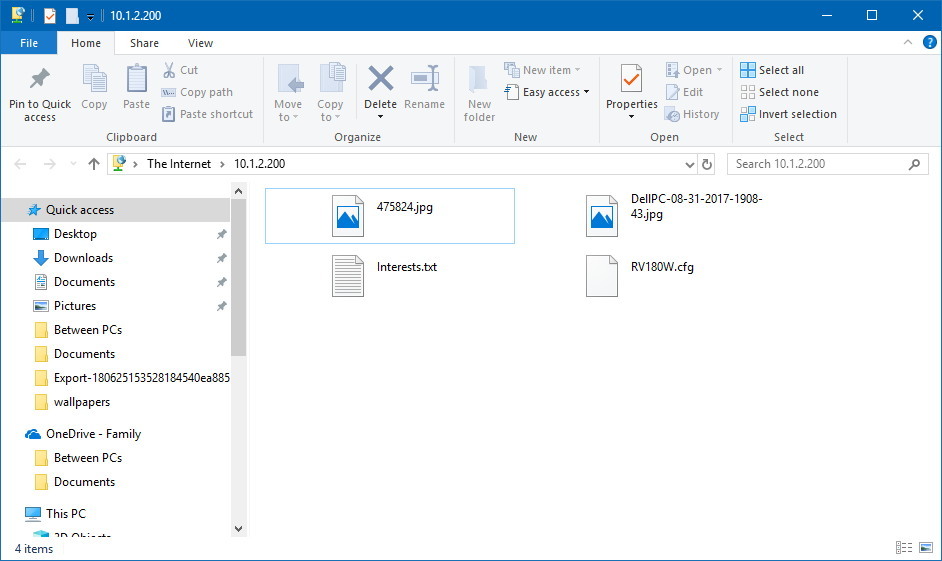
You can avoid going through the steps to reconnect to the FTP server by right-clicking Quick Access in the left pane, and selecting the Pin current folder to Quick Access option.
Of course, you’re not limited to use File Explorer as there are plenty of FTP clients, such as FileZilla that you can use to transfer files.
Wrapping things up
In this guide, we outlined the steps to get started with the FTP server feature available on Windows 10, and the steps to view, download, and upload files. However, bear in mind that you can only establish a connection as long as the device hosting the service is turned on. You won’t be able to access your files when the computer is asleep or hibernating.
The FTP Server component is available on Windows 10 Pro as well as on Windows 10 Home, and older versions of the OS, including Windows 8.1 and Windows 7.
More Windows 10 resources
For more helpful articles, coverage, and answers to common questions about Windows 10, visit the following resources:
- Windows 10 on Windows Central – All you need to know
- Windows 10 help, tips, and tricks
- Windows 10 forums on Windows Central
Get the best of Windows Central in in your inbox, every day!
Mauro Huculak is technical writer for WindowsCentral.com. His primary focus is to write comprehensive how-tos to help users get the most out of Windows 10 and its many related technologies. He has an IT background with professional certifications from Microsoft, Cisco, and CompTIA, and he’s a recognized member of the Microsoft MVP community.
![]()
Download Article
![]()
Download Article
This wikiHow teaches you how to understand and use File Transfer Protocol (FTP) to move files from your computer to a web server and vice versa.
-

1
Learn how FTP differs from HTTP. FTP stands for File Transfer Protocol, and is a connection method designed for transferring files from a remote server to local computer, and vice versa. FTP is often used in corporate and academic settings, and is the primary way of managing webpage servers.
- While HTTP (Hypertext Transfer Protocol) allows for file transfers, it is not as robust as FTP transfers.
-
2
Understand the parts of an FTP address. When you come across FTP addresses on a webpage, they are usually denoted in the same way as a usual webpage address—with a couple of exceptions:
- For example, you might see ftp.example.com:21. This means that the address is ftp.example.com and the port used is 21. You will need both of these when connecting to the FTP server.
- If the FTP requires a username, it may be written as username@ftp.example.com:21 where «username» is the required name.
- If no username is specified, then you will usually need to enter «anonymous» as the username when you connect. Note that you are not actually anonymous when you connect to a public FTP; the host can see your IP address.
Advertisement
-
3
Determine how you prefer to connect. There are three main ways to connect to FTP servers: via visual clients, via browser-based clients, or through the command line. Downloading and installing a visual client is the most widely used and easiest way to connect to an FTP, and also affords you the most power and control over the process. The majority of this guide will focus on using an FTP client.
- A visual client is essentially just a program which allows you to enter the necessary FTP address and port; the program does all of the hard work from there.
- To connect to an FTP through a web browser, simply enter the FTP address into the address bar just like any other website. You may be asked for login credentials, and then you can browse the directories. Using a browser is usually much slower and less reliable than using a designated client.
- If you’re interested in how to connect to an FTP using the command line, see the final section of this guide.


Advertisement
-
1
Download FileZilla. Using a client to connect will often lead to faster uploads and downloads to the FTP server, and FileZilla is one of the most popular FTP servers available. To download it, go to https://filezilla-project.org in your computer’s web browser, then do the following:
- Click Download FileZilla Client
- Click Download FileZilla Client on the subsequent page.
- Click the green Download button below the «FileZilla» heading.
- FileZilla is the example for this article, but you can use virtually any FTP client in the same way.
-
2
Install FileZilla. This process will vary depending on your computer’s operating system:
- Windows — Double-click the downloaded FileZilla setup file, click Yes when prompted, click I agree, click Next four times, uncheck the box on the Driver Update page, click Next, uncheck the box on the WinZIP page, and click Next.
- Mac — Double-click the downloaded FileZilla DMG file, click and drag the FileZilla app icon onto the «Applications» folder icon, and follow any on-screen instructions until FileZilla begins installing.
-
3
Open FileZilla. Once FileZilla is installed, click Finish with the «Start FileZilla now» box checked, or double-click the FileZilla app icon on the desktop (Windows) or in the Applications folder (Mac) to open it.
-
4
Enter your FTP server’s information. At the top of the FileZilla window, fill out the following fields:
- Host — This is where the FTP address goes.
- Username — You’ll enter the login username here (if there is no username, enter anonymous).
- Password — The password to log into the FTP server goes here (leave blank if there isn’t a password).
- Port — The FTP server’s port number goes here.
-
5
Click Quickconnect. It’s near the upper-right corner of the FileZilla window. FileZilla will begin connecting to your server.
-
6
Review the FTP server’s contents. Once you are connected, you will see the FTP directory tree on the right side of the window. The top frame shows the tree structure, while the bottom frame shows the contents of each folder. At this point, you’re ready to begin uploading and downloading files.
- Each time you change folders, a small command is sent to the server. This means there will be a slight delay when moving between folders.
- You can enter in an exact location in the bar at the top of the right side.
- If you don’t have permission for certain directories, you will receive an error when you try to access them.


Advertisement
-
1
Consider using your computer’s built-in FTP software. Both Windows and Mac computers have built-in options which allow you to upload and download FTP files. This isn’t necessary if you already downloaded and installed FileZilla, but it provides a quick way to upload and download files if you don’t need to connect to or run your own FTP server.
-
2
Navigate your local directories. On the left side of the window, you will see two frames for navigating through your local folders. This will allow you to choose files to upload or locations for downloads.
- You can type in an exact location in the bar at the top of the right side.
-
3
Download a file from the FTP server to your computer. Find the file or folder that you want to download on the right side of the window, find the folder to which you want to save it in the left window, and then click and drag the file from the bottom frame on the right to the bottom frame on the left. Your file or folder will start transferring automatically.
- You can see the size of the file in bytes in the «Filesize» column.
- You can select multiple files to download in the same session by holding Ctrl and clicking on each one you want. Files will be transferred one at a time.
- You can add files to your download queue by right-clicking on them and selecting «Add files to queue»
-
4
Upload a file to the server. Navigate to the file or folder that you want to upload on the left side of the window, then find a folder to which you’ll upload it on the right side of the window. If you have permissions to upload a file to the FTP server, you can click and drag the file from the left side to the right side to begin uploading.
- Most public FTPs will not allow anonymous users to upload files.
- Uploads will typically take longer than downloads of the same size.
-
5
Track your transfers. You can watch your transfers in the bottom frame of the window. You will see a list of files you are transferring and have queued, along with their size, priority, and percent completion. You can also see your failed and completed transfers by using the Failed transfers and Successful transfers tabs at the bottom of the window.
-
6
Create your own server. You can use Windows to create your own FTP server to which other users can connect and upload files (or download files from).


Advertisement
-
1
Open your command line or terminal. Windows, Mac OS X, and most Linux distributions have a command-based FTP client available from the Command Prompt or Terminal:
- To open the Windows Command Prompt, press ⊞ Win+R, type in cmd, and press ↵ Enter.
- To open Terminal in macOS, click Spotlight
, type in terminal, and double-click Terminal.
- To open the Terminal in most Linux distributions, press Ctrl+Alt+T.
-
2
Connect to an FTP server. The commands are the same for all command line FTP clients regardless of operating system. To connect to the server, type ftp ftp.example.com. After the connection is made, you will be prompted for the username. If you are connecting to a public FTP, type anonymous and press Enter when prompted for the password. Otherwise, enter in your assigned username and password.[1]
-
3
View the FTP server’s files. Type in dir /p and press ↵ Enter to see a list of the server’s directories and files.
-
4
Switch to your preferred directory. Type in cd directory (where «directory» is the folder or path to the folder that you want to open) and press ↵ Enter.
-
5
Switch to binary mode. By default, the FTP will connect in ASCII mode, which is designed for transferring text files. To switch to binary mode, type in binary and press ↵ Enter.
- Binary mode is best suited for downloading media files or whole folders.
-
6
Download a file. Use the get command to download a file from the remote server to your local computer. Follow the «get» command with the file you want to download.
- For example, type get example.jpg to download the «example.jpg» from the current location on the FTP.
-
7
Upload a file. Use the put command to upload a file from your local machine onto the remote FTP server. Follow the «put» command with the location of the file that you want to upload.
- For example, type put c:documentshomemoviesexample2.avi to copy the «example2.avi» movie file from its home location to the FTP server.
-
8
Close the connection. Type close to end the connection with the FTP client. Any transfers currently in progress will be canceled.[2]


Advertisement
Add New Question
-
Question
Where does the downloaded file go when it’s complete?

If you’re using a client, this will be specified in the software settings. In command line, it downloads to the directory you were in before you ran ftp.
Ask a Question
200 characters left
Include your email address to get a message when this question is answered.
Submit
Advertisement
Video
-
Many FTP commands and uses are available from the command line or your computer’s system-level operations, but FTP software simplifies the process of connecting to and using an FTP without changing the process itself.
Thanks for submitting a tip for review!
Advertisement
-
Running your own FTP server requires a constant, hard-wired Internet connection in order to be efficient. Make sure that your Internet Service Provider doesn’t forbid this, and check your plan’s upload/download caps before setting up your FTP server.
Advertisement
References
About This Article
Article SummaryX
1. Install FileZilla.
2. Open FileZilla.
3. Enter your FTP server info.
4. Enter your username and password.
5. Click Quickconnect.
6. Browse the folders on the right to see what’s on the server.
7. Browse the folders on the left to see what’s on the local drive.
8. Right-click a file and select Upload or Download.
Did this summary help you?
Thanks to all authors for creating a page that has been read 373,517 times.
Reader Success Stories
-

«Whole article is very helpful.»
Is this article up to date?
Generally speaking people use a FTP client to upload files from computer to remote website or FTP server, or download files and data from web server to local computer. Check out this guide to connect to FTP server using FileZilla, the best free FTP client tool. However the latest computer and mobile phones allow us to directly connect to a web server through FTP without a FTP client or software. For example you can use Samsung phone to connect to FTP server and then download files from web server to mobile phone or upload files from our cell phone to FTP server. On Windows computers, you can also do the same thing. Windows OS has support FTP server connection for very long time. You can add FTP server or website to the Windows Explorer or File Explorer in Windows XP, Vista, Windows 7, Windows 8, Windows 8.1 and now the Windows 10. In this article, we will show you how to connect to FTP site or web server using the File Explorer for Windows 10. After that you will be able to open your website files and pages via the default file explorer on Windows PC. You can access FTP server just like you open any other folders on local hard drive. You can copy files from your computer hard drive to FTP server or the other way around easily.

Open the File Explorer on Windows 10 computer. Click on “This PC” from the left navigation panel in Windows explorer, then click on Computer from the top, after that you will open the ribbon menu, choose ‘Add a network location‘. You can also quickly right click on “This PC“, then choose ‘Add a network location‘ from the jump-down context menu.

To add FTP server to Windows 10 file explorer, you will firstly have to input your website address or FTP server address in the “Specify the location of your website” >> “Internet or network address” box. It could be your FTP server address or domain name. If you do not have a FTP server or FTP account, you can refer to this tutorial to create a FTP account in cPanel hosting here. Click Next button.

Then you need to specify a username and password if required. Most FTP servers allow users to log on anonymously with limited access to the server. We recommend you to create a normal FTP account in your hosting control panel and access the FTP server with the username and password. Uncheck the “Log on anonymously” option, then input your FTP username, and click Next button to proceed.

Now you need to give the FTP server, website or network location a name. It could be your domain name, server IP, site name or else. Click Next button and follow on-screen tips to finish adding FTP server to file explorer in Windows 10.

Now you can open the File Explorer on PC to quickly open your website directory or FTP server just like you open local hard drives or folder on your computer. You can then copy files from your computer hard disk to your web server or the other way around. By doing so, you can easily upload files to FTP server or download website files from FTP server to your computer through File Manager on Windows PC. No FTP client required any more!

Update Jan 2018: added ftp connection method through free FTP client FileZilla.