Introduction
Connecting to a Linux server for the first time may seem confusing, especially if you have a strong Windows background. SSH allows you to establish a secure connection between your computer and the Linux server and manage it remotely.
This article explains how to use PuTTY and OpenSSH client on Windows to connect to a Linux server.
In the end of this tutorial, you know:
- How to install PuTTY and OpenSSH client on Windows
- How to connect to the server using password authentication
- How to create public and private key pairs
- How to connect to the server using public key authentication
- How to enhance the security of your Linux server
Prerequisites
- A Windows workstation
- A Linux server instance
Get Your Linux Server Credentials
- Navigate to your Customer Portal
- Click «Products»
- Click your instance.
- Copy your credentials
- IP Address
- Username
- Password
Install PuTTY
PuTTY is an open-source SSH and Telnet client for Windows which is available for all versions of Windows.
- Download PuTTY from the official website.
- Run the PuTTY installer to install PuTTY.
Connect to The Server with PuTTY Using Password
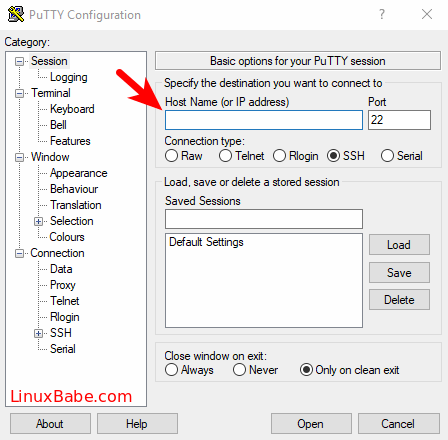
- Open up the Windows Start menu, search for «PuTTY» and launch the application.
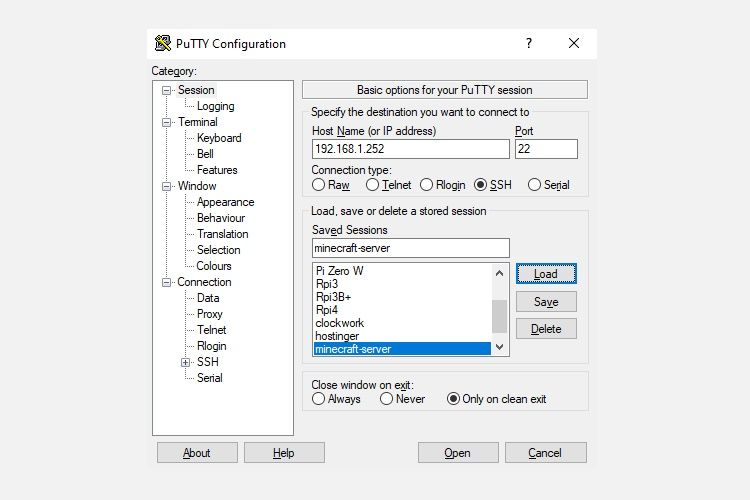
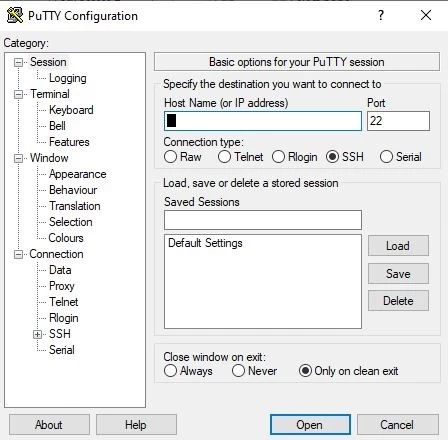
- Enter the following information into the window named «PuTTY Configuration»
- Host Name (or IP address) — this is the IP address of your Vultr server
- Port — the default port for SSH is 22. See the «Server hardening» section if you want to change the default port.
- Click «Open» to start the connection
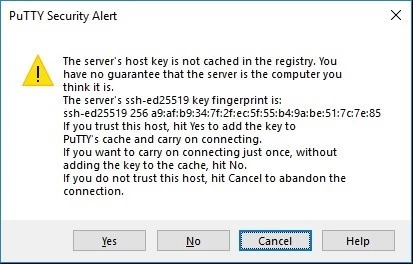
- In the «PuTTY Security Alert» dialog, choose «Accept». You can check the message in the dialog for more information about the security alert.
-
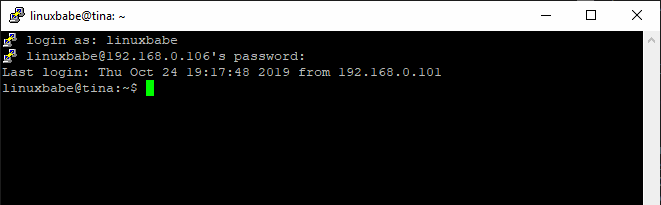
Enter your username from the previous step. Here is an example result
login as: root -
Copy the password from the previous step. Paste the password by clicking the right mouse on the terminal. Here is an example result. The password is not visible.
root@149.28.148.36's password: -
You are now logged into your server. Here is an example result with a Ubuntu 22.04 server.
login as: root root@149.28.148.36's password: Welcome to Ubuntu 22.04 LTS (GNU/Linux 5.15.0-25-generic x86_64) * Documentation: https://help.ubuntu.com * Management: https://landscape.canonical.com * Support: https://ubuntu.com/advantage System information as of Sat Apr 23 09:49:11 AM UTC 2022 System load: 0.0 Processes: 134 Usage of /: 27.0% of 24.41GB Users logged in: 0 Memory usage: 23% IPv4 address for enp1s0: 149.28.148.36 Swap usage: 0% 0 updates can be applied immediately. root@vultr:~# -
Type
exitthen pressEnterto log out of your server.
Install OpenSSH Client on Windows
OpenSSH Client is another option to connect to your server through SSH included in Windows 10 and Windows Server 2019.
- Open up the Windows Start menu, search and open «Manage optional features».
- Check the list «Installed features» to see if «OpenSSH client» is already installed.
- Click «Add a feature». Find «OpenSSH Client», then click «Install».
- Open Command Prompt
-
Check OpenSSH version:
$ ssh -V
The result should be like:
OpenSSH_for_Windows_8.1p1, LibreSSL 3.0.2
Connect to The Server with OpenSSH Using Password
- Open Command Prompt or Windows PowerShell
-
Run the following command to connect to your server. Replace
rootwith your server username. Replaceservernamewith the IP address of your server.$ ssh root@servername -
After connected, answer
yeswhen you get a message like:The authenticity of host '149.28.148.36 (149.28.148.36)' can't be established. ECDSA key fingerprint is SHA256:ZbS/36vzv0lEzwkSkFGwA8A7gh/GWGFaQFeeC7fPAcY. Are you sure you want to continue connecting (yes/no/[fingerprint])? -
Copy the password from the previous step. Paste the password by clicking the right mouse on the terminal. Here is an example result. The password is not visible.
root@149.28.148.36's password: -
You are now logged into your server. Here is an example result with a Ubuntu 22.04 server.
login as: root root@149.28.148.36's password: Welcome to Ubuntu 22.04 LTS (GNU/Linux 5.15.0-25-generic x86_64) * Documentation: https://help.ubuntu.com * Management: https://landscape.canonical.com * Support: https://ubuntu.com/advantage System information as of Sat Apr 23 09:51:22 AM UTC 2022 System load: 0.0 Processes: 134 Usage of /: 27.0% of 24.41GB Users logged in: 0 Memory usage: 23% IPv4 address for enp1s0: 149.28.148.36 Swap usage: 0% 0 updates can be applied immediately. root@vultr:~# -
Type
exitthen pressEnterto log out of your server.
Benefits of Public & Private SSH Keys
Public key authentication provides a reliable and secure alternative to the password authentication. It frees the users from remembering complicated passwords.
Public key authentication also allows secured, automated login in countless automation tools.
In public key authentication, the SSH key pairs includes two keys:
- A public key is on the SSH server. Anyone can encrypt the data using the public key. Using the private key is the only way to decrypt the data.
- A private key remains with the user. The user can use a passphrase to protect the private key files from unauthorized access.
In this article, you generate an ED25519 format keypair. Here are some advantages of ED25519 format compared to other formats:
- Small public and private key length for the same level of security.
- Fast key generation and verification.
Create an ED25519 format keypair with PuTTY

- Open up the Windows Start menu, search for «PuTTYgen» and launch the application.
- Under the «Parameters» section, select «EdDSA». Make sure that the selection box is «Ed25519 (255 bits)»
- Click «Generate».
- Move the mouse over the blank area to generate the keys.
- Click «Save private key» to save the private key. You can set a passphrase to protect the private key from unauthorized access.
- Copy the content of under «Public key for pasting into OpenSSH authorized_keys» file.
The public key is a string as follows:
ssh-ed25519 AAAAC3NzaC1lZDI1NTE5AAAAIAWT7d2UKNJJ6jurMml+6tCktL4dWuWtvTOomJ1rQv12 eddsa-key-20220424
The private key is a file with extension .ppk that you need to login to the server.
Here is the content of the generated private key
PuTTY-User-Key-File-3: ssh-ed25519
Encryption: none
Comment: eddsa-key-20220424
Public-Lines: 2
AAAAC3NzaC1lZDI1NTE5AAAAIAWT7d2UKNJJ6jurMml+6tCktL4dWuWtvTOomJ1r
Qv12
Private-Lines: 1
AAAAIGb7S+9kgp96L9HUUY04rgE7laU86BO1scZv8WBSAoo4
Private-MAC: f956dd2563aeb14132be4ea22d22a29ac16733b3285fd07876049226e6774ca5
Create an ED25519 format keypair with OpenSSH on Windows 10 & 11
- Open Command Prompt or Windows PowerShell.
-
Run the following command to generate an ED25519 format key pair. Replace
<comments>with your own comment to organize the keys easier.$ ssh-keygen -t ed25519 -C "<comment>" - (Optional) Enter the name of the private key when asked «Enter file in which to save the key».
- (Optional) Enter the passphrase to protect the private key from unauthorized access. Leave empty for no passphrase.
Here is an example output
Generating public/private ed25519 key pair.
Enter file in which to save the key (C:Usersquanh/.ssh/id_ed25519):
Enter passphrase (empty for no passphrase):
Enter same passphrase again:
Your identification has been saved in my-vultr-key.
Your public key has been saved in my-vultr-key.pub.
The key fingerprint is:
SHA256:tmAS/9vfH6prgMC3sZkd2yGxUKW6zN7jgrx2oaX1jmg <comment>
The key's randomart image is:
+--[ED25519 256]--+
|        ....     |
|       . ..      |
|    o   ..o      |
|     = o.+ .     |
|    . *.S = .    |
|     oo&.= .     |
|    . *+= .    . |
|     Eooo= . .. .|
|    oooo=++++....|
+----[SHA256]-----+
Here is the content of the Public key named my-vultr-key.pub:
ssh-ed25519 AAAAC3NzaC1lZDI1NTE5AAAAILuIiHMAsxs5KEfZp6JTp+qP2oqRLqryI0Yc8Ksan9Ft my-vultr-key
Here is the content of the Private key named my-vultr-key:
-----BEGIN OPENSSH PRIVATE KEY-----
b3BlbnNzaC1rZXktdjEAAAAABG5vbmUAAAAEbm9uZQAAAAAAAAABAAAAMwAAAAtzc2gtZW
QyNTUxOQAAACA1qB9J7bfq9x9uxn+y1jmUY6m8h774k6oq1IyRC4nudAAAAJD16Q3I9ekN
yAAAAAtzc2gtZWQyNTUxOQAAACA1qB9J7bfq9x9uxn+y1jmUY6m8h774k6oq1IyRC4nudA
AAAEA/gZuKIFDh6iYkEXYS8N9bl/9w98B6DrpzzHlG8T67EzWoH0ntt+r3H27Gf7LWOZRj
qbyHvviTqirUjJELie50AAAADG15IHZ1bHRyIGtleQE=
-----END OPENSSH PRIVATE KEY-----
Install the Public Key on an Existing Server
- Log in to your server using password by following the step at the beginning of this article using PuTTY or OpenSSH Client.
-
Edit the
~/ssh/authorized_keyswith your favorite text editor. Paste your public key into a new line.nano ~/.ssh/authorized_keys -
Type
exitthen pressEnterto log out of your server.
Install the Public Key on a Server Through the Customer Portal when Deploying
Follow this article to deploy a new server with your SSH key.
Connect to the Server with PuTTY Using SSH Key

- Open up the Windows Start menu, search for «PuTTY» and launch the application.
- Enter the following information into the window named «PuTTY Configuration»
- Host Name (or IP address) — this is the IP address of your Vultr server
- Port — the default port for SSH is 22.
- On the left sidebar, select «Connection» > «SSH» > «Auth».
- Click the «Browser» button and select your private key from PuTTYgen
- Click «Open» to start the connection
-
Enter your username from the previous step. Here is an example result
login as: root -
You are now logged into your server. Here is an example result with a Ubuntu 22.04 server.
login as: root
Authenticating with public key "eddsa-key-20220424"
Welcome to Ubuntu 22.04 LTS (GNU/Linux 5.15.0-25-generic x86_64)

 * Documentation:  https://help.ubuntu.com
 * Management:     https://landscape.canonical.com
 * Support:        https://ubuntu.com/advantage

  System information as of Sun Apr 24 07:33:03 AM UTC 2022

  System load:  0.0                Processes:               134
  Usage of /:   27.2% of 24.41GB   Users logged in:         0
  Memory usage: 23%                IPv4 address for enp1s0: 149.28.148.36
  Swap usage:   0%

 * Super-optimized for small spaces - read how we shrank the memory
   footprint of MicroK8s to make it the smallest full K8s around.

   https://ubuntu.com/blog/microk8s-memory-optimisation

0 updates can be applied immediately.

root@vultr:~#
Connect to the Server with OpenSSH Using SSH Key
- Open Command Prompt or Windows PowerShell.
-
If your private key is in the default location (
~/.ssh/id_ed25519) then run the following command to connect to the server. Replacerootwith your server username. Replaceservernamewith the IP address of your server.$ ssh root@servername -
If your private key is in not the default location. Run the following command to connect to the server. Replace
rootwith your server username. Replaceservernamewith the IP address of your server. Replaceprivate_key_pathwith your private key path.$ ssh root@servername -i private_key_path -
(Optional) Set your private key as default for all servers. Replace
private_key_pathwith your private key path.$ cp private_key_path ~/.ssh/id_ed25519 -
You are now logged into your server. Here is an example result with a Ubuntu 22.04 server.
Welcome to Ubuntu 22.04 LTS (GNU/Linux 5.15.0-25-generic x86_64)

 * Documentation:  https://help.ubuntu.com
 * Management:     https://landscape.canonical.com
 * Support:        https://ubuntu.com/advantage

  System information as of Sun Apr 24 07:35:01 AM UTC 2022

  System load:  0.0                Processes:               134
  Usage of /:   27.2% of 24.41GB   Users logged in:         0
  Memory usage: 23%                IPv4 address for enp1s0: 149.28.148.36
  Swap usage:   0%

 * Super-optimized for small spaces - read how we shrank the memory
   footprint of MicroK8s to make it the smallest full K8s around.

   https://ubuntu.com/blog/microk8s-memory-optimisation

0 updates can be applied immediately.

root@vultr:~#
Server Hardening
Create a sudo User
A best practice for security is to perform server administration as a non-root user.
-
Follow one of the following article to create a sudo user on your Linux server:
- Ubuntu
- Debian
- CentOS
- Fedora
- OpenBSD
- Arch Linux
- Alma Linux
- VzLinux
- Rocky Linux
-
Create a
.sshfolder in the home directory$ mkdir -p ~/.ssh -
Edit the
~/ssh/authorized_keyswith your favorite text editor. Paste your public key into a new line.$ nano ~/.ssh/authorized_keys
Disable Empty Password
Some Linux distributions allow to create users without passwords.
Set the value of PermitEmptyPasswords to no in /etc/ssh/sshd_config file to disable SSH connections with empty passwords.
PermitEmptyPasswords no
Limit Users Login Access Using SSH
SSH server allows all users to access remotely. Following below steps to override the default setting and limit users access using SSH
-
To allow specific users to access using SSH, set the value of
AllowUsersin/etc/ssh/sshd_configfile as follows. Replaceuser1,user2, andubuntuwith your selected usernames.AllowUsers user1 user2 ubuntu -
To prevent specific users to access using SSH, set the value of
DenyUsersin/etc/ssh/sshd_configfile as follows. Replaceuser3, anduser4with your selected username.DenyUsers user3 user4
Disable SSH Password Authentication
Follow below steps to disable password authentication to your server.
- Make sure you can login using SSH keys
-
Set the value of
PasswordAuthenticationtonoin/etc/ssh/sshd_configfile to disable password authentication.PasswordAuthentication no
Disable SSH Login for root User
Disabling access for the root user is a good security practice.
Set the value of PermitRootLogin to no in /etc/ssh/sshd_config file to disable log in with root
PermitRootLogin no
Change Idle Timeout Interval
Users often keep their SSH connection idle for a long period of time. Setting a timeout after a period of inactivity is a good practice.
Set the value of ClientAliveInterval to your desirable idle timeout in /etc/ssh/sshd_config file. For example, change the timeout value to 360 seconds.
ClientAliveInterval 360
Disable Tunneling and Port Forwarding
To disable tunneling and port forwarding, set the following values in /etc/ssh/sshd_config file.
AllowAgentForwarding no
AllowTcpForwarding no
PermitTunnel no
Apply the New SSH Configuration
-
Check if there is any error in the configuration
$ sudo sshd -t -
Restart the
sshdservice$ sudo systemctl restart sshd
(Optional) How to Change SSH Default Port 22
Changing the default SSH port is a good practice to avoid unusual traffic to open ports. Before changing the port, you may need to configure the SELinux and the firewall on your system.
Port 2233 is the custom port in this article.
Check if your desirable unused port number is in use
$ sudo lsof -i -P -n | grep LISTEN
Configure SELinux to allow the Custom Port for Incoming SSH traffic
Some Linux distributions such as CentOS, RHEL, Alma Linux and Rocky Linux uses SELinux, a built-in security mechanism.
Follow the below steps to configure SELinux to allow your custom port for incoming SSH traffic.
-
Run the following command to check if your server is using SELinux. Skip this section if you are not using SELinux.
$ sestatus -
Change to 2233
$ sudo semanage port -a -t ssh_port_t -p tcp 2233 -
Check if SELinux allows the custom port for incoming SSH traffic
$ sudo semanage port -l | grep ssh
The result should looks like:
ssh_port_t tcp 2233, 22
How to Open A Port with firewalld
Some Linux distributions use firewalld as the default firewall. You need to open the custom port on firewall.
-
Check if you are using
firewalld$ sudo systemctl status firewalld -
Open the custom port with
firewalld. Replace2233with your custom port.$ sudo firewall-cmd --add-port=2233/tcp --permanent -
Reload the settings
$ sudo firewall-cmd --reload
How to Open A Port with ufw
Some Linux distributions use ufw as the default firewall. You need to open the custom port on firewall.
-
Check if you are using
ufw$ sudo systemctl status ufw -
Check the
ufwstatus$ sudo ufw status -
Open the custom port with
ufw. Replace2233with your custom port.$ sudo ufw allow 2233 comment 'SSH' -
Enable
ufwif it is not running$ sudo ufw enable
Add a custom Port to the SSH Configuration
-
Set the value of
Portto your desirable unused port number in/etc/ssh/sshd_configfile. For example, change SSH port to2233Port 2233 -
Restart the
sshdservice$ sudo systemctl restart sshd
Connect to the Server with OpenSSH Using SSH Key on a Custom Port
Add -p port to your ssh command to connect to the server on a custom port. Replace port with your custom port.
$ ssh root@servername -p port
More Information
- PuTTY Documentation
This tutorial is going to show you 3 ways to log into Linux server on Windows via SSH.
What’s SSH?
SSH stands for Secure Shell, which was invented in 1995 to replace the insecure Telnet (Telecommunication Network). It’s now the primary way for system administrators to securely log into remote Linux servers over the public Internet. Although it looks and acts the same as Telnet, all communications over the SSH protocol is encrypted to prevent packet sniffing.
If you are running a Linux or Mac computer, SSH client is installed by default. You can open up a terminal window and run the ssh command like below to connect to a remote Linux server.
ssh [email protected]
Now let’s discuss how to use SSH on Windows.
Method 1: Windows 10’s Built-in SSH Client
The Microsoft PowerShell team decided to port OpenSSH (both the client and the server) to Windows in 2015. It finally arrived in Windows 10’s Fall Creator Update in 2017 and is enabled by default in the April 2018 Update.
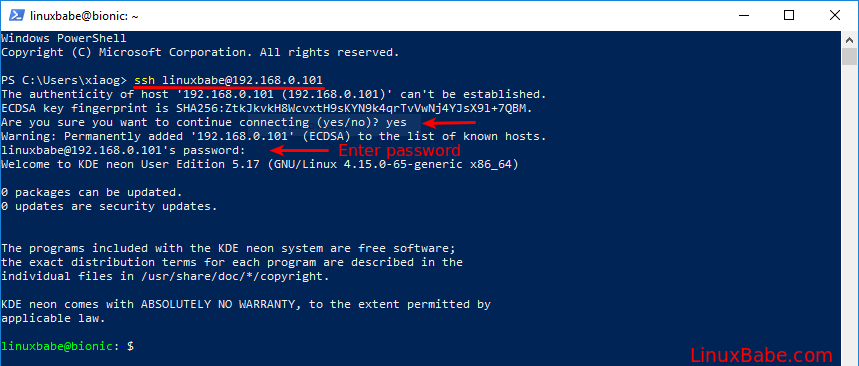
To use the OpenSSH client on Windows 10, simply open a PowerShell window or a command prompt window and run the ssh command. For example, if I want to connect to my Ubuntu desktop in the LAN, I would run
ssh [email protected]
linuxbabe is the username on my Ubuntu desktop and 192.168.0.101 is the private IP address for my Ubuntu desktop. The first time you connect to a Linux computer, you will be prompted to accept the host key. Then enter your password to login. After login, you can run Linux commands to do administrative tasks.
Note that if you want to paste a password into the PowerShell window, you need to right-click the mouse and press Enter.
To log out from the Linux box, run the exit command or press Ctrl+D.
The default font size in PowerShell Window is very small. To change it, right-click the titlebar and select properties, then you can change the font size, and the background color.

Method 2: Use SSH in Windows Subsystem for Linux
Windows Subsystem for Linux (WSL) enables you to run native Linux command-line tools directly on Windows 10. If you are a system administrator, WSL is probably an overkill for just using SSH because it would install and run a Linux distro (without graphical user interface) on your Windows 10 desktop. WSL is created for web developers or those who need to work on open-source projects. You can use not only SSH but also other Linux command line tools (Bash, sed, awk, etc).
Open the Microsoft Store and enter WSL in the search box. Select Run Linux on Windows and install a Linux distro of your choice.
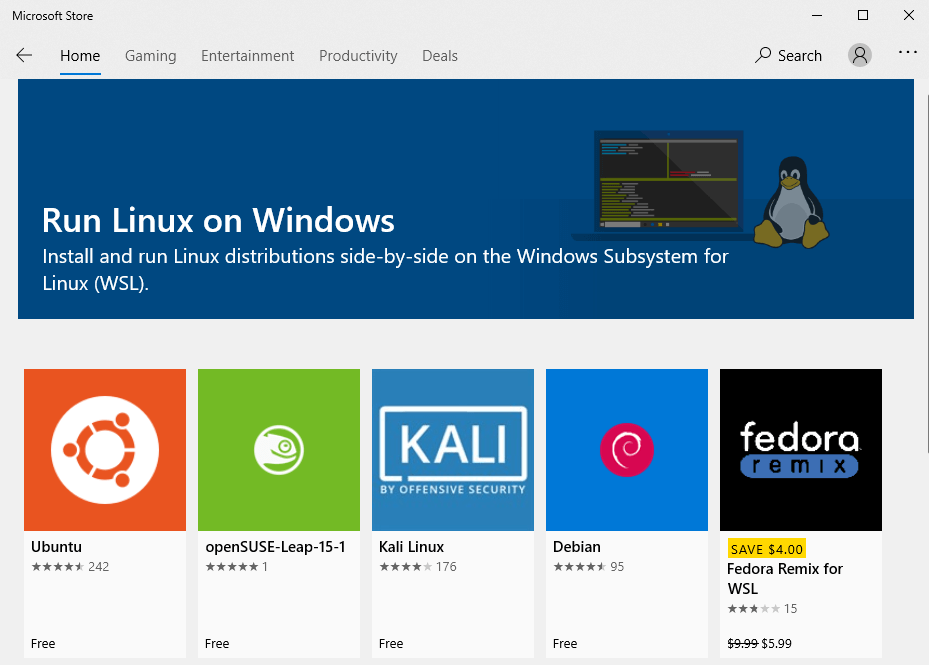
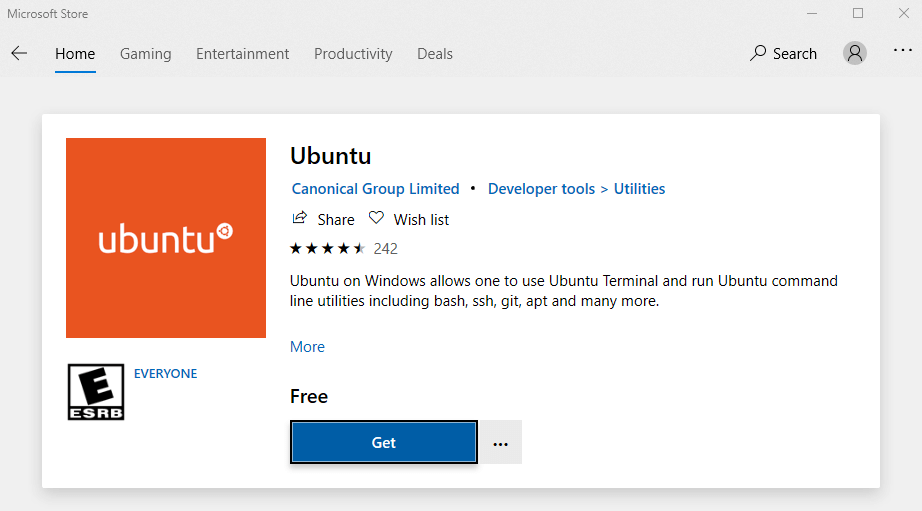
For example, I choose Ubuntu and click the Get button to install it.
Once your Linux distro is installed, open the Control Panel and select Programs -> Turn Windows features on or off. Tick on the checkbox of Windows Subsystem for Linux to enable this feature. (You may need to reboot your Windows PC for this change to take effect.)
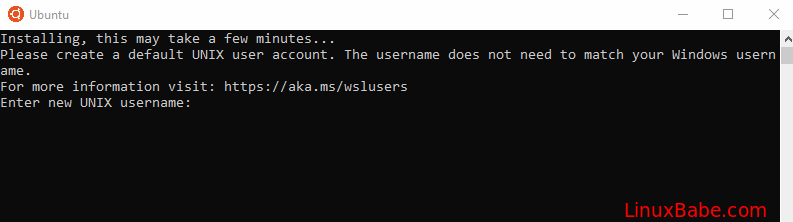
Next, you can launch the Linux distro from the start menu by search the distro’s name. The first time you launch it, you need to create a user and set a password.
After that, you can use the ssh command like below to connect to a Linux server or PC that runs a SSH server.
ssh [email protected]
Method 3: Use Putty
Putty is a well-known and the most popular SSH client on Windows before the arrival of Windows OpenSSH client and Windows Subsystem for Linux. To use SSH with Putty, you need to download the Putty program from the official website and install it.
Launch Putty from the Start menu. Then enter the IP address or hostname of the Linux box and click the Open button to connect to it.
Accept the host key and you will be prompted to enter the username and password.
Please note that when you type in your password, the cursor doesn’t move, but it’s actually accepting your password. To paste text into Putty, first press Ctrl+C to copy the text, then go to Putty window and press the right button of your mouse.
How to Set Up SSH Key on Windows 10 (Optional)
There’re mainly two ways of authenticating user login with OpenSSH server:
- password authentication
- public-key authentication: also known as passwordless SSH login because you don’t need to enter your password.
To set up public-key authentication on Windows 10, follow the instructions below.
Open Windows Powershell, and run the following command to generate SSH keypair.
ssh-keygen -t rsa -b 4096
Where:
-tstands fortype. The above command generates an RSA type keypair. RSA is the default type.-bstands forbits. By default, the key is 3072 bits long. We use a 4096 bits key for stronger security.
When asked which file to save the key, you can simply press Enter to use the default file. Next, you can enter a passphrase to encrypt the private key, but you will need to enter this passphrase every time when you log into the Linux server. If you don’t want it, you can press Enter, so it will have no passphrase.

- The private key (your identification) will be saved in the .ssh/id_rsa file under your user directory.
- The public key will be saved in the .ssh/id_rsa.pub file.
Now we need to upload the public key to remote Linux server. You can display the public key in the Powershell with the following command.
cat .ssh/id_rsa.pub
Then log in to your server via password authentication, and run the following command to create a .ssh directory under your home directory.
sudo mkdir ~/.ssh
Create the authorized_hosts file
sudo nano ~/.ssh/authorized_keys
Copy your SSH public key and paste it to this file. Save and close the file. To save a file in Nano text editor, press Ctrl+O, then press Enter to confirm. To close a file, press Ctrl+X.
Next, change the permission of this file.
sudo chmod 600 ~/.ssh/authorized_keys
Log out of your Linux server.
exit
Now you can SSH into your server without entering a password.
Next Step
I hope this article helped you use SSH on Windows. You might also want to protect SSH service from hacking, I recommend setting up public-key authentication or two-factor authentication.
- 2 Simple Steps to Set up Passwordless SSH Login on Ubuntu
- Set Up SSH Two-Factor Authentication (2FA) on Ubuntu Server
Also, you can enable automatic security updates on your Linux server to patch vulnerabilities.
- Set Up Automatic Security Update (Unattended Upgrades) on Ubuntu
If you want FTP access to the Ubuntu server, you can set up pure-FTPd server.
- How to Set Up a Secure FTP Server with Pure-FTPd on Ubuntu
As always, if you found this post useful, then subscribe to our free newsletter to get more tips and tricks. Take care 🙂
Remote access to virtual servers is one of the requirements for their use, and without it, control and management of virtual servers will be difficult. Therefore, depending on what operating system you are using, as well as what operating system the destination virtual server has, there are several ways to connect remotely to your virtual server. This article teaches you how to access Linux VPS from windows and How to connect from Windows to Windows VPS server using RDP.
Software corresponding to the relevant protocol is used to communicate. These tools allow you to remotely manage your vps servers, transfer files, and perform any action you can physically perform remotely. This article teaches you how to use the Putty and RDP to communicate with a Linux vps server.
Prerequisites to access Linux VPS from windows
Before you start communicating remotely with a vps server, you need to provide a few basic requirements:
1. The vps server must be turned on, and connected to the Internet.
2. The required software must be installed on the source computer (the required software will be introduced below).
3. IP address (your vps server) must be available.
4. The firewall settings should be such that the desired port can be accessed.
How to connect from Windows to Linux vps server using PuTTY
If you are running a Windows-based operating system, you will need to install software such as user-side SSH to connect to your VPS server. In this tutorial we will use PuTTY software.
PuTTY is an open source terminal that we use to access the vps server. PuTTY has several components. But the two components we are dealing with are PuTTY and PuTTYGen. We use PuTTY to access the vps server and PuttyGen to create SSH keys. The steps for making SSH keys by PuTTY are as follows:
1. Download and install Putty
Go to the PuTTY website and in the Package files section at the top of the page, download the msi file and install it on your system.
Then, after installing the programs, you will be able to run the PuTTYgen program through the Start menu or the Windows key and type the word puttygen.
The program to create the key is similar to the following image:
2. Create a Public Key
You can change the desired parameters to your liking. The default settings are often considered optimal.
After applying the changes, click on the Generate option.
You may be asked to generate a random key by moving the mouse over an empty area.
The public key will now be visible to you. You can copy it to your servers or leading account.
3. Create a private key
Now click on the Save private key option and select a safe space to store it. It should be noted that you can change the name of your key to your liking. The ppk plugin will also be added automatically. You can now connect to your vps servers in the PuTTY application using the built-in private key.
If you created your public key in the leading panel when building a virtual machine, you no longer need to create a public key with the PuTTY program. Load only the downloaded public key with the suffix .pem in PuTTYGen and then click Save Private Key. This will save your private key with the .ppk extension.
Note: PuTTY does not recognize the .pem extension.
4. Working with public key in PuTTY format
You now have the key to login to your vps server. You can also click save public key. Note that the PuTTYGen format is incompatible with the authorized_keys files used to authenticate the SSH key on OpenSSH Linux servers when saving the public key.
After saving the private key, if you want to see the public key in its correct format, click on the Load option. Then navigate to the private key and open it. After these steps, the public key will be displayed again.
Steps to use PuTTY to connect to a Linux vps server
To connect to a vps server, you must first introduce the private key of your vps server to the PuTTY software. For this purpose, after opening the PuTTY software:
– Go to Connection → SSH → Auth.
– Click the Browse… key under Authentication parameters / Private key file for authentication.
Finally, find your private key file and click the Open key.
Then do the following to connect to the vps server:
In the (Session → Host Name or IP address) field, enter the username and IP address of your virtual server as [email protected]_public_ip. (For example [email protected])
The default port is connection number 22, which you can change if needed.
Make sure the connection type is set to SSH.
Finally, press the Open key to connect to the vps server.
How to connect from Windows to Windows VPS server using RDP
RDP, or Remote Desktop Protocol, is a protocol designed and developed by Microsoft to connect, control, and manage Windows-based machines remotely.
Unlike the SSH protocol, RDP user-side software provides a graphical user interface. Therefore, using Remote Desktop services allows users and server administrators to access and manage the destination machine more easily. In contrast, one of the disadvantages of this protocol over the SSH protocol is the lack of encryption, which reduces its security. Because the relevant port is publicly available on the Internet.
There are automated scripts that constantly monitor various ports of global public IPs and look for hotspots. Therefore, using a firewall and choosing a strong and appropriate password has a great impact on the security of this protocol.
How does the RDP protocol work?
This protocol, like ssh, uses a user / server architecture. By default, the server of this protocol, which is active on your virtual server, uses port 3389 and waits for answers to requests on this port. When you want to connect to a Windows server, you will need a username and public IP address of that server. Once you have access to the server, you can manage it, transfer files between two computers, and perform all the operations remotely.
No matter what version of Windows you are using, you can use the RDP user-side software installed on it by default to connect to your Windows VPS server.
Also, if you want to connect to your Windows vps server for the first time, you need to set the vps server password inside it. for this purpose:
– After creating a vps server in the panel, click on it to open its admin page.
– In the Console section, click on Open Console in new tab.
– In the upper-right corner of the screen, click the send CtrlAltDel key.
– Click on the Administrator username.
– A message prompting to change the password for this username will appear, click OK to continue.
– Enter the new password exactly in both boxes.
– The password entered was set.
How to use Remote Desktop Connection software
Using Remote Desktop Client software is not very complicated and does not require any settings.
Step 1: Run the Remote Desktop Connection software
There are several ways to run this software on your system:
From the Start menu, type Remote Desktop Connection and click on it.
*
Press the Windows Logo + R key combination simultaneously to open the Run window. Then type mstsc in the open box and press Enter.
Step 2: Enter the public IP address of the vps server
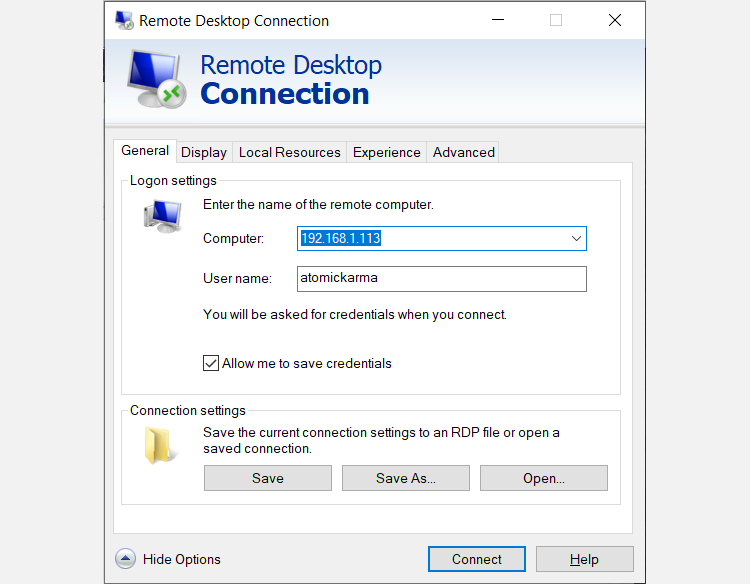
Once the Remote Desktop Connection software is running, a window will open allowing you to enter the domain address or Public IP of your vps server.
In the Computer field, enter the IP address of your vps server and click Connect.
Note: If you have already connected to the server and changed the default port of the protocol, in this section you must enter the relevant port as IP: Port.
For example: 174. 163.152.141: 6200
Step 3: Enter your username and password to complete the login process
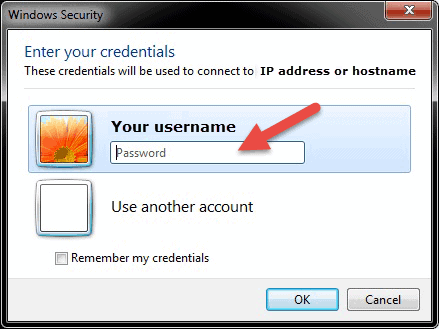
After clicking Connect in the previous step, another window will be displayed as below to enter the corresponding username and password.
As explained earlier, by default the Administrator username and password set via the console in the user panel will be used at this stage.
After entering this information, click OK and finally click Yes.
Note that you can connect to the vps server at any one time by having a username and password of only one user, and if another user connects with the same information, the previous connections will be disconnected.
Conclusion
We tried to fully learn how to connect to a Linux vps server from Windows using Putty and also how to connect to a Windows vps server from Windows using RDP.
This post will show you how to access linux server remotely from windows.
SSH is the network protocol works on Port 22 that helps us to take the remote connection over the network either from linux to linux or windows to linux.
But anyway linux would be your target server and windows server would be your source server from which you try to connect your target linux server.
So Target Linux server must have running SSH service and also it should allow port 22 in firewall if firewall is running else firewall will block us to take the remote.

By default, SSH Command is available in Linux server, So we can use SSH command directly to take remote from Linux to Linux Machine. But If you want to take remote connection from Windows server to Linux server, You have to install PuTTY on Windows server. PuTTY is available for installation also it is available as a executable file which can be used without installation.
Step 2: Install PuTTY on Windows
Once PuTTY software is downloaded, double click and run the software for installation.

Click Next.

Click Next.

Click Install.

Installation will finish quickly. At the final screen, untick «View README file» and Click «Finish».
Step 3: Start Putty Software
Once installation is completed, Open your installed Putty software from your Programs.

Enter the IP Address of your target linux server you wish to connect from windows machine over the network. Make sure port number «22» and connection type «SSH» are specified in the box. Click «Open».

If everything is ok, you will be asked to enter the correct username and password. Provide your details and start accessing your linux server remotely from windows server.
Hope this post helps you to access linux server from windows remotely by installing putty software.
Also Request you to go through the below recommended tutorial, if you are interested in learning.
Set up a Linux server? Perhaps you’ve configured it as the solution to network storage. Or maybe you have a Linux work PC, media center, or simply keep a secondary PC in another room. Whatever the case, at some point, you’ll need to remotely access the Linux device from a Windows PC or laptop. So, what is the solution?
Windows users have several tools that enable simple remote desktop from Windows to Linux. Want to know how remote desktop from Windows to Linux? Read on!
You’ll Need the Linux Device’s IP Address
Before you can remote into Linux from Windows, you’ll need the device’s IP address. It’s useful for all remote connection options, although in some cases, the hostname (the device’s network name) will do.
The simplest way to check the IP address is to log in to you your Linux device and open the terminal. Enter:
hostname -I
The IP address of the device will be displayed. For more details, you can also use:
ip address
If your Linux system has multiple connections, these will be listed with prefixes. For example, an Ethernet connection will be listed alongside eth0. If it’s connected wirelessly, look for the IP address listed against wlan0.
If this isn’t easy or convenient, there is another method that is almost as simple. In your browser window, connect to your router. This is usually an address like 192.168.0.1 or 192.168.0.100. Check this by looking at the router itself or the documentation that came with it.
Once signed in to the router, look for an option that lists connected devices. Browse through the IP addresses to find your Linux device by hostname. Some routers can even display the device’s operating system. You’ll find the IP address listed alongside, which you should note down for later.
How to RDP From Windows to Linux
The first and easiest option is RDP, Remote Desktop Protocol, which is built into Windows.
Before starting, you’ll need to install the xrdp software on your Linux box. You can do this in person or using SSH (see below) with a single command:
sudo apt install xrdp
To RDP to Linux, run the Remote Desktop software on your Windows machine. In Windows 8 and later, you can find it via Search simply by inputting the letters «rdp».
With the Remote Desktop Connection window open:
- Input the IP address
- Use Show Options for any advanced connection requirements
- Click Connect
It’s as simple as that.
Benefits of RDP: while it might take a bit longer to set up, using RDP provides great reliability and remote desktop access to Linux. This makes it an ideal tool for remote working with Linux machines.
If you use plan to use RDP regularly, you can save some time by creating these custom configurations for Windows RDP.
Connect to Linux From Windows With VNC
A Virtual Network Connection (VNC) also affords remote access to your Linux desktop. As with RDP, however, you’ll need to install some dedicated software. On the Linux box, the VNC server software is required; on Windows, a client app.
One of the most popular options for connecting to Linux over VNC is TightVNC. You’ll find the Windows client software on the website, but make sure you choose the right version.
Download: VNC for Windows
Once you’ve done that, install tightvncserver on your Linux box. This might be via SSH (see the next section) or with physical access to the computer.
First, in Linux, check for updates:
sudo apt update
Next, install TightVNC Server:
sudo apt install tightvncserver
Once installed, run tightvncserver, and set a password when prompted.
sudo tightvncserver
There is an eight-character limit for passwords. With tightvncserver now running, you’ll see a notification displaying the port number—make a note of it.
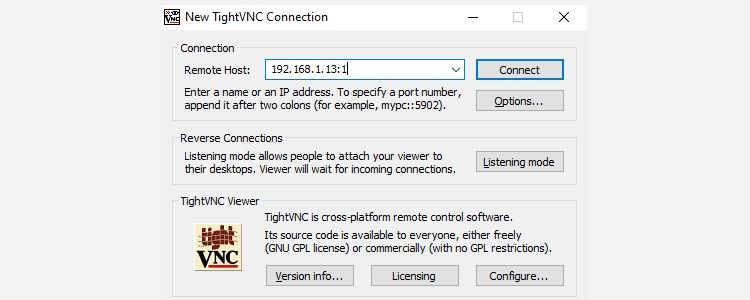
Once you’ve done that, here’s how to connect to the Linux machine from Windows:
- Run the TightVNC Viewer app on Windows
- Input the IP address and port number
- Click Connect
- Input the password you set when prompted
The remote desktop will then open, and you can start using the app of your choice—within reason. Certain applications with heavy graphical demands are unlikely to run reliably, if at all.
Benefits of VNC: offering fast access to the remote PC, TightVNC has its limits. You can perform standard computing tasks, but media-related activities are severely limited.
Remote Into Linux via SSH
SSH (Secure Shell) is a great way to gain remote access to your Linux device. You’re not limited to Windows with this option, either, as SSH can be used from almost any device. It’s also very secure.
You have two options for SSH on Windows:
- SSH in Windows PowerShell
- Download the PuTTY SSH tool
Let’s look at both.
Remote Access Linux With SSH in Windows PowerShell
Windows PowerShell is the new command line tool in Windows 10 and 11, replacing the old Command Prompt app. Find it by right-clicking Start to access the Power Menu and selecting Windows PowerShell. To SSH, enter:
ssh [IP_ADDRESS]
So if the Linux device has an IP address of 192.168.13.123, enter:
- ssh 192.168.13.123
- When prompted, accept the certificate.
- Input the username and password.
You now have remote SSH access to Linux.
Connect to Linux Remotely Using SSH in PuTTY
Although not natively available in Windows, you can easily download the PuTTY application. You don’t need to install PuTTY, however. Instead, you simply run the downloaded EXE file.
Download: PuTTY (Free)
For convenience, it’s a good idea to create a desktop shortcut.
To use PuTTY for SSH:
- Select Session > Host Name
- Input the Linux computer’s network name, or enter the IP address you noted earlier.
- Select SSH, then Open.
- When prompted to accept the certificate for the connection, do so.
- Enter the username and password to sign in to your Linux device.
Benefits of SSH: using this method lets you make quick changes to Linux without getting your hands dirty. Particularly suited to software installation and admin changes. It’s also useful for setting up the previous option, VNC! SSH is also perfect for servers without a desktop environment installed.
However, if you need a remote connection to the Linux desktop from Windows, try VNC or RDP.
Three Windows Remote Desktop Methods for Connecting to Linux
Whatever your purpose, there is a suitable option to connect to a Linux machine from Windows. These methods work whether the device is a server, desktop PC at work, media center, or even a Raspberry Pi.
So, if you are wondering which of the following tools you can use to get a remote session on a UNIX/Linux system, here they are from easiest to toughest:
- RDP (Remote Desktop Protocol)
- VNC (Virtual Network Connection)
- SSH (Secure Shell)
If your Linux distro happens to be Ubuntu, you already have a built-in VNC-compatible remote desktop tool with which you can easily create a Linux remote desktop server, or Linux RDP, for short.
Introduction
Accessing machines remotely became a necessity a long time ago and we can barely imagine how it would be if we couldn’t control computers from remote locations. There are many ways to establish a connection with a remote machine depending on the operating system you are running, but the two most used protocols are:
- Secure Shell (SSH) for Linux-based machines
- Remote Desktop Protocol (RDP) for Windows-based machines
The two protocols use the client and server applications to establish a remote connection. These tools allow you to gain access and remotely manage other computers, transfer files, and do virtually anything you can do while physically sitting in front of the machine.
Prerequisites
Before you can establish a secure remote desktop protocol with a remote machine, there are a few basic requirements to meet:
- The remote computer must be turned on at all times and have a network connection.
- The client and server applications need to be installed and enabled.
- You need the IP address or the name of the remote machine you want to connect to.
- You need to have the necessary permissions to access the remote computer.
- Firewall settings need to allow the remote connection.
What is SSH?
Secure Shell, sometimes referred to as Secure Socket Shell, is a protocol which allows you to connect securely to a remote computer or a server by using a text-based interface.
When a secure SSH connection is established, a shell session will be started, and you will be able to manipulate the server by typing commands within the client on your local computer.
System and network administrators use this protocol the most, as well as anyone who needs to manage a computer remotely in a highly secure manner.
How Does SSH Work?
In order to establish an SSH connection, you need two components: a client and the corresponding server-side component. An SSH client is an application you install on the computer which you will use to connect to another computer or a server. The client uses the provided remote host information to initiate the connection and if the credentials are verified, establishes the encrypted connection.
On the server’s side, there is a component called an SSH daemon that is constantly listening to a specific TCP/IP port for possible client connection requests. Once a client initiates a connection, the SSH daemon will respond with the software and the protocol versions it supports and the two will exchange their identification data. If the provided credentials are correct, SSH creates a new session for the appropriate environment.
The default SSH protocol version for SSH server and SSH client communication is version 2.
How to Enable an SSH Connection
Since creating an SSH connection requires both a client and a server component, you need to make sure they are installed on the local and the remote machine, respectively. An open source SSH tool—widely used for Linux distributions— is OpenSSH. Installing OpenSSH is relatively easy. It requires access to the terminal on the server and the computer that you use for connecting. Note that Ubuntu does not have SSH server installed by default.
How to Install an OpenSSH Client
Before you proceed with installing an SSH client, make sure it is not already installed. Many Linux distributions already have an SSH client. For Windows machines, you can install PuTTY or any other client of your choice to gain access to a server.
To check if the client is available on your Linux-based system, you will need to:
- Load an SSH terminal. You can either search for “terminal” or press CTRL + ALT + T on your keyboard.
- Type in
sshand press Enter in the terminal. - If the client is installed, you will receive a response that looks like this:
[email protected]:~$ ssh

usage: ssh [-1246AaCfGgKkMNnqsTtVvXxYy] [-b bind_address] [-c cipher_spec]
[-D [bind_address:]port] [-E log_file] [-e escape_char]
[-F configfile] [-I pkcs11] [-i identity_file]
[-J [[email protected]]host[:port]] [-L address] [-l login_name] [-m mac_spec] [-O ctl_cmd] [-o option] [-p port] [-Q query_option] [-R address] [-S ctl_path] [-W host:port] [-w local_tun[:remote_tun]]
[[email protected]]hostname [command]

[email protected]:~$
This means that you are ready to remotely connect to a physical or virtual machine. Otherwise, you will have to install the OpenSSH client:
- Run the following command to install the OpenSSH client on your computer:
sudo apt-get install openssh-client - Type in your superuser password when asked.
- Hit Enter to complete the installation.
You are now able to SSH into any machine with the server-side application on it, provided that you have the necessary privileges to gain access, as well as the hostname or IP address.
How to Install an OpenSSH Server
In order to accept SSH connections, a machine needs to have the server-side part of the SSH software toolkit.
If you first want to check if OpenSSH server is available on the Ubuntu system of the remote computer that needs to accept SSH connections, you can try to connect to the local host:
- Open the terminal on the server machine. You can either search for “terminal” or press CTRL + ALT + T on your keyboard.
- Type in
ssh localhostand hit enter. - For the systems without the SSH server installed the response will look similar to this:
[email protected]:~$ ssh localhost
ssh: connect to host localhost port 22: Connection refused [email protected]:~$
If the above is the case, you will need to install the OpenSSH server. Leave the terminal open and:
- Run the following command to install the SSH server:
sudo apt-get install openssh-server ii.- Type in your superuser password when asked.
- Enter and Y to allow the installation to continue after the disk space prompt.
The required support files will be installed, and then you can check if the SSH server is running on the machine by typing this command:
sudo service ssh statusThe response in the terminal should look similar to this if the SSH service is now running properly:
[email protected]:-$ sudo service ssh status
• ssh.service - OpenBSD Secure Shell server
Loaded: loaded (/lib/systemd/system/ssh.service; enabled; vendor preset: enab
Active: active (running) since Fr 2018-03-12 10:53:44 CET; 1min 22s ago Process: 1174 ExecReload=/bin/kill -HUP $MAINPID (code=exited, status=0/SUCCES

Main PID: 3165 (sshd)
Another way to test if the OpenSSH server is installed properly and will accept connections is to try running the ssh localhost command again in your terminal prompt. The response will look similar to this screen when you run the command for the first time:
[email protected]:~$ ssh localhost

The authenticity of host 'localhost (127.0.0.1)' can't be established. ECDSA key fingerprint is SHA256:9jqmhko9Yo1EQAS1QeNy9xKceHFG5F8W6kp7EX9U3Rs. Are you sure you want to continue connecting (yes/no)? yes
Warning: Permanently added 'localhost' (ECDSA) to the list of known hosts.

[email protected]:~$
Enter yes or y to continue.
Congratulations! You have set up your server to accept SSH connection requests from a different
computer using an SSH client.
TIP
You can now edit the SSH daemon configuration file, for example, you can change the default port for SSH connections. In the terminal prompt, run this command:
sudo nano /etc/ssh/sshd_configThe configuration file will open in the editor of your choice. In this case, we used Nano.
If you need to install Nano, run this command:
sudo apt-get install nanoPlease note that you need to restart SSH service every time you make any changes to the sshd_config file by running this command:
sudo service ssh restartNow that you have the OpenSSH client and server installed on every machine you need, you can establish a secure remote connection with your servers. To do so:
- Open the SSH terminal on your machine and run the following command:
ssh [email protected]_ip_addressIf the username on your local machine matches the one on the server you are trying to connect to, you can just type:
ssh host_ip_addressAnd hit Enter. - Type in your password and hit Enter. Note that you will not get any feedback on the screen while typing. If you are pasting your password, make sure it is stored safely and not in a text file.
- When you are connecting to a server for the very first time, it will ask you if you want to continue connecting. Just type yes and hit Enter. This message appears only this time since the remote server is not identified on your local machine.
- An ECDSA key fingerprint is now added and you are connected to the remote server.
If the computer you are trying to remotely connect to is on the same network, then it is best to use the private IP address instead of the public IP address. Otherwise, you will have to use the public IP address only. Additionally, make sure that you know the correct TCP port OpenSSH is listening to for connection requests and that the port forwarding settings are correct. The default port is 22 if nobody changed configuration in the sshd_config file. You may also just append the port number after the host IP address.
Here is the example of a connection request using the OpenSSH client. We will specify the port number as well:
[email protected]:~$ ssh [email protected] –p7654 [email protected]’s password:

The authenticity of host '185.52.53.222 (185.52.53.222)' can't be established. ECDSA key fingerprint is SHA256:9lyrpzo5Yo1EQAS2QeHy9xKceHFH8F8W6kp7EX2O3Ps. Are you sure you want to continue connecting (yes/no)? yes
Warning: Permanently added ' 185.52.53.222' (ECDSA) to the list of known hosts.

[email protected]:~$
You are now able to manage and control a remote machine using your terminal. If you have trouble connecting to a remote server, make sure that:
- The IP address of the remote machine is correct.
- The port SSH daemon is listening to is not blocked by a firewall or forwarded incorrectly.
- Your username and password are correct.
- The SSH software is installed properly.
SSH Further Steps
Now that you are able to establish a connection to your server using SSH, we highly recommend a few further steps to improve SSH security. When you leave the setup with the default values, it is more likely to be hacked and your server can easily become a target of scripted attacks.
Some of the suggestions for hardening SSH by editing the sshd configuration file include:
- Change the default TCP port where SSH daemon is listening. Change it from 22 to something much higher, for example 24596. Make sure you do not use a port number that is easy to guess, such as 222, 2222 or 22222.
- Use SSH key pairs for authentication for passwordless SSH login. They are both safer and also allow logging in without the need to use your password (which is faster and more convenient).
- Disable password-based logins on your server. If your password gets cracked, this will eliminate the possibility of using it to log into your servers. Before you disable the option to log in using passwords, it is important to make sure that authentication using key pairs is working properly.
- Disable root access to your server and use a regular account with the su – command to switch to a root user.
You can also use TCP wrappers to restrict access to certain IP addresses or hostnames. Configure which host can connect using TCP wrappers by editing the /etc/hosts.allow and etc/hosts.deny files.
Note that allowed hosts supersede the denied hosts. For example, to allow SSH access to a single host you will first deny all hosts by adding these two lines in the etc/hosts.deny:
sshd : ALLALL : ALL
Then, in the etc/hosts.allow add a line with the allowed hosts for the SSH service. That can be a single IP address, an IP range, or a hostname: sshd : 10.10.0.5, LOCAL.
Make sure to keep your log in information secure at all times and to apply security at multiple layers. Use different methods to limit SSH access to your servers, or use services that will block anyone who tries to use brute force to gain access to your servers. Fail2ban is one example of such service.
VNC Over SSH
For users who are used to working in a graphical desktop environment with Virtual Network Computing (VNC), it is possible to completely encrypt connections using SSH tunneling. In order to tunnel VNC connections over SSH, you will need to run this command in the terminal on your Linux or UNIX machine:
$ ssh -L 5901:localhost:5901 -N -f -l username hostname_or_IPHere is the breakdown of the command above:
- ssh : this starts the SSH client program on your local machine and enables secure connection to the SSH server on a remote computer.
- -L 5901:localhost:5901 : states that the local port for the client on the local machine is to be forwarded to the specified host and port of the remote machine. In this case, local port 5901 on the local client is being forwarded to the same port of the given remote server.
- -N : instructs to only forward ports, and not to execute a remote command.
- -f : sends SSH to background after the password is provided, just before the command is executed. Then, you can freely use the terminal to type commands on the local machine.
- -l username : the username you insert here will be used for logging in to the remote server you specified.
- hostname_or_IP : this is the remote system with a VNC server. An example of an IP address would be 172.16.0.5 and the example of a hostname would be myserver.somedomain.com.
You can also connect to a remote server via SSH tunnel from a Windows machine by using PuTTY. In the PuTTY configuration window:
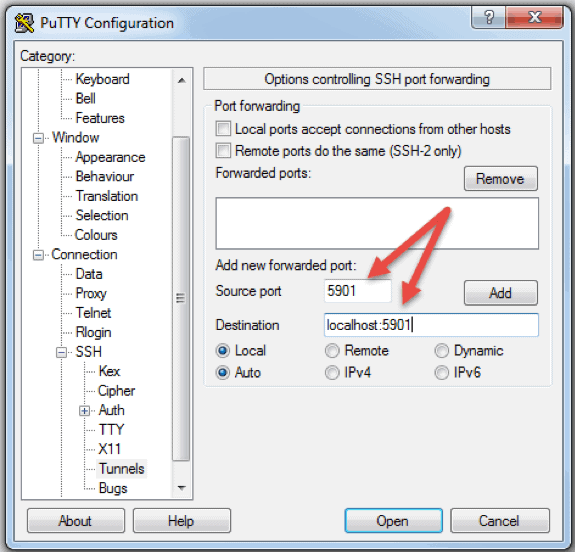
- Go to Connection -> SSH -> Tunnels
- In the Source port field type in 5901
- In the Destination field type in localhost:5901
- Start the SSH session as you normally would.
- Connect to your server with a VNC client of your choice.
What is RDP?
Remote Desktop Protocol (RDP) is a protocol developed by Microsoft. It is used to control and manage machines with a Windows operating system remotely.
Unlike Secure Shell, connections established using an RDP client provide a user with a graphical interface through which they can gain access to a remote computer and control it in the same manner as their local computer.
Using Remote Desktop services, formerly known as terminal services, allows network and system engineers to easily manipulate remote computers connected to a local network or the Internet.
This comes with a price. If you do not use a virtual private network (VPN), connecting via RDP is far less secure than SSH because you are directly exposed to the internet. There are many automated scripts constantly looking for weaknesses in your connection, especially for open ports that Windows Remote Desktop connections use. In that case, it is highly recommended to have strong, secure passwords and change them regularly. This does not make RDP connections safe, but less vulnerable.
How Does Remote Desktop Protocol Work?
Windows Remote Desktop connection is based on a rather simple client-server model using Remote Desktop Protocol (RDP). After you enable it, the Windows Remote Desktop server-side service starts listening for connection requests on port 3389. Whenever you try to connect to a Windows server, you will need to provide a valid username for the account you are using to gain access remotely. Once you gain access to the server, you will be able to manage applications, transfer files between the two computers, and virtually perform any task you can perform locally with the account in question.
No matter what version of the Windows operating system you have, you will be able to establish a secure remote connection to another computer since the Remote Desktop client is available by default. On the other hand, a computer can be remotely accessible only if it runs on a Pro, Enterprise, or Server edition of a Windows operating system. So, we can conclude that RDP connections are possible only between computers with a Windows OS on them.
How to Enable an RDP Connection
Establishing a Remote Desktop connection to another computer over network requires you to enable the Windows Remote Desktop server service. The Remote Desktop client is integrated into Windows systems, ready out of the box, and does not need any special setup before you can connect to another Windows-based machine. However, accepting Remote Desktop connections from another machines is disabled by default on all version of Windows OS.
If you want to remotely connect to a server over the Internet and not through the local network, you need to take a few things into consideration before you enable this service:
- Port forwarding. If you are not using a VPN you need to make sure the ports are forwarded properly to the remote host’s IP address. Check the router settings to see if the traffic on the default TCP port for Remote Desktop Protocol (port 3389) is going to the IP of the server with which you want to establish a Remote Desktop connection. Note that your Windows server is in this case directly exposed to the Internet and vulnerable.
- Using a VPN. This is a much safer option for Remote Desktop connection. When you create a virtual private network on a client computer, you will be able to access all services that are available only when you use local connection.
- Firewall settings. Make sure that the firewall you are using for the remote machine is not blocking Remote Desktop connection. You need to open the local port for RDP, whether it is the default or custom port number.
Enabling Remote Access in Windows 7, 8, 10 and Windows Server Versions
The procedure to configure remote desktop and allow secure remote connections to a server or a PC from a different computer is similar for all versions of Windows operating systems. I will list the basic steps to enable remote access to a desired machine. Before you begin, please make sure that you have taken into consideration the notes listed above concerning port forwarding, VPN, and firewall settings.
Step 1: Allow Remote Connections
Go to the computer information on the machine where you want to allow remote connections:
- Right Click on Computer or This PC depending on the Windows OS version.
- Click on Properties.
- Click on Remote settings on the left side of the window.
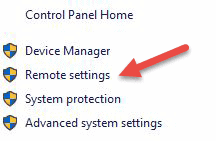
- Click on Allow remote connections to this computer. This should automatically add Remote Desktop Firewall exception. Additionally, you can check off the box that says “Allow connections only from computers running Remote Desktop with Network Level Authentication (recommended)” for additional security of your RDP sessions.
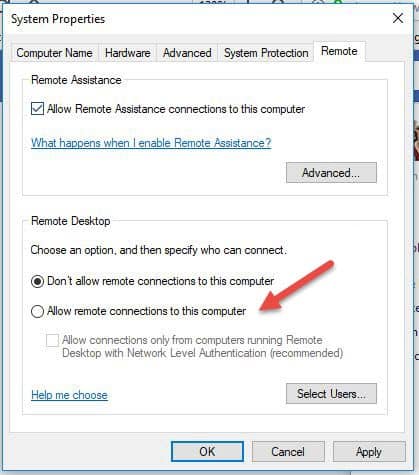
- Click Apply if you want to stay in the tab or OK to close it.
Step 2: Add Users to the List of Remote Users
You need to perform this step only if you want to allow users other than administrators to access the machine in question. If you are an administrator, your account is automatically included in the list of allowed users but you will not see it. To select more users:
- On the Remote settings screen shown above, click Select Users…
- Click on Add in the Remote Desktop Users box.
- The Select Users box will appear. You can select the location you want to search by clicking on Locations.
- In the Enter the Object Names to Select field, type a name of a user and click on Check Names.
- When you find a match, select the user account and click OK.
- Close the System Properties window by clicking OK again.
There are not many other options to change in order to configure Remote Desktop. Provided that other settings do not interfere with your Remote Desktop connection, you are now able to remotely connect and control this computer.
How to Use the Remove Desktop Connection Client
Using the Remote Desktop client is straightforward and you do not need to specifically configure Remote Desktop on the local computer. The steps below will work for all versions of Windows starting from Windows 7.
Step 1: Launch the Destkop Connection Unit
On your local Windows computer, locate the Remote Desktop Connection application. You can find it in a couple of different ways:
- For Windows 7, click on Start -> All Programs, go to the ‘Accessories’ folder and click on Remote Desktop Connection. For Windows 10, Click on Start and locate the ‘Windows Accessories’ folder where you can also find the Remote Desktop Connection app.
- Click on Start and type in Remote Desktop Connection in the search bar. You will receive search results as soon as you start typing. Click on the application when it shows up on the list.

- Press Windows + R keys on your keyboard to get the “Run” box. Type in mstsc and hit Enter in the ‘Open:’ field to run the Remote Desktop client.

Step 2: Enter the Remote Hosts IP Address or Name
Once you launch the Remote Desktop Connection application, you will get a window where you can enter the name or the IP address of a remote machine you want to access.
In the Computer field, type in the corresponding name or IP address and click Connect.
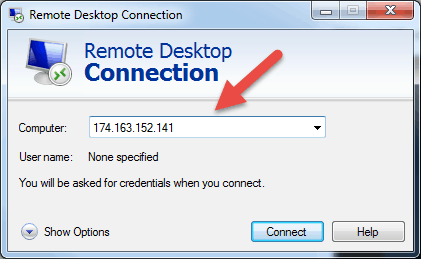
Note: If the default listening port for Remote Desktop connection (port 3389) has been changed on the remote host to a different value, you will have to specify it after the IP address.
Example: 174.163.152.141:6200
Depending on your circumstances, you will either need to enter the private or public IP address of the remote host. Here are the possible scenarios:
- If the client computer and the remote host connect to the same Local Area Network, you will use the host’s private IP address for Remote Desktop Connection.
- If you are using a virtual private network (VPN) on the client computer to access the remote host, you will use the host’s private IP address for Remote Desktop Connection.
- If the client computer is connecting to the remote host from another network over the Internet without a VPN, you will use the public IP address.
How to Find the IP Address and Host Name
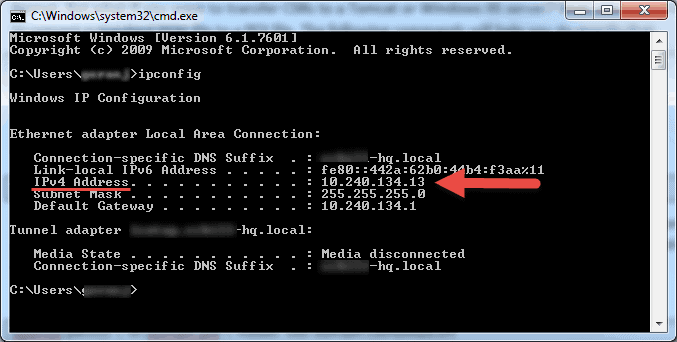
There are many ways to locate the name, public or private IP address of a computer where you want to configure Remote Desktop service. Here are the quickest and easiest methods:
To determine a computer’s private IP address:
- Search for CMD from the start menu or press Windows + R on your keyboard, type in CMD and hit Enter to run the command prompt.
- Type ipconfig in the command prompt and hit Enter.
- Your will see your computer’s private IP address under the IPv4 Address line.
To determine which public IP address a computer is using:
- From your web browser, go to com or use its search bar.
- Type in “what is my IP” or simply “my IP” and hit Enter.
- At the top of the page, Google will show you the public IP address your computer is using. If this is not working for your region, you can visit the first webpage in the search results and it will show you the IP address. Some websites such as www.whatismyip.com will even show you your private (local) IP address.
To find a computer’s name:
- Right Click on Computer, or This PC, depending on the Windows OS version you are using.
- Click on
- You will find your full computer name under the “Computer name, domain, and workgroup settings” section.
Step 3: Entering the RDP Credentials and Finalizing the Connection
After you hit connect, the loading bar will appear. When it finishes initiating and configuring the remote session you will get a pop-up window that will look similar to this:
- Enter the password for the selected username. You can use another account, if needed, and provide a different username and password.
- Click OK when ready and you will get the security certificate warning.
- Click Yes to continue.
Note: Only one user can be logged in at the same time on a Windows computer. If someone else is using the machine you are trying to remotely access, that user has to disconnect. The warning logon message will appear in such cases.
You will not see the desktop of the remote machine. Depending on the user account permission settings, you can now perform any operation that you can while working directly in front of it.
Remote Desktop Protocol Further Steps
When setting up your remote server or machine to accept remote desktop connections, it is important to take precautions concerning securing RDP. Your server is especially vulnerable if you are accessing it over the Internet.
Here are a few pieces of advice to keep in mind if you are using remote desktop protocol to remotely connect to your machines:
- Use the built in VPN server on your Windows machine to additionally secure your traffic. This will provide more secure access to your Windows server and services.
- Set client connection encryption level. This option is set to “Not configured” by default. You can enable it and force high encryption level settings for all communications between clients and Remote Desktop Session Host servers. We do not recommended using the “Client Compatible” encryption level setting. Leaving the default “High” encryption level setting will force strong 128-bit encryption for data sent from the client to server and vice versa. You can edit this configuration using the Local Group Policy editor.
- Employ two-factor authentication using a third-party tool, such as Duo Security. By installing Duo Authentication for Windows Logon, you can add two-factor authentication to all Windows login attempts, or only for RDP sessions.
- Enforce firewall rules to limit exposure of open RDP ports to the Internet, especially if you are using the default RDP TCP port 3389. Windows has a built-in firewall which you can access from Control Panel and further configure it to restrict traffic to specific ports and IP addresses
These best practices for additionally securing RDP will help you tighten down remote desktop access. You will avoid most of the unauthorized login attempts without spending too much time making configuration changes to your machines.
Note: Learn how to use SSHFS to mount remote file systems over SSH.
Conclusion
The steps and processes listed in this guide will work for most users and most versions of Linux and Windows operating systems.
You should now be able to Connect to a Remote Server with Linux or Windows.
There are of course many other methods to establish a connection between two remote computers, but the ones covered here are most common.

List of content you will read in this article:
- 1. What is a Linux?
- 2. What is SSH?
- 3. What is PuTTY?
- 4. How to connect to a Linux server from Windows
- 5. How to connect to a Linux server from Linux
- 6. How to connect to a Linux from macOS
- 7. Conclusion
Dealing with servers could be quite a complex task, and we are not even talking about being a server administrator. Something as simple as just connecting to a remote server could be difficult for complete beginners. While servers running Windows Server OS could be remotely controlled using Microsoft’s proprietary remote desktop protocol, the majority of the servers on the entire world wide web run on Linux distributions.
Connecting to a Linux server or VPS is not something that requires a lot of technical knowledge; however, it is not as self-explanatory as connecting their Windows counterparts. Therefore, without someone showing how to accomplish it, most novice users will see it as a roadblock. This article is intended to help you figure out how to connect to your remote Linux server or VPS, however, let us cover some bases first.
What is a Linux?
VPS stands for a virtual private server. It is a service provided by web hosts that splits up a bare-metal server into smaller virtual machines. These VMs are then rented out for a fraction of the price of a dedicated server and each one acts as a standalone server with its own operating system and dedicated resources.
A Linux VPS, as you might have already guessed by now, is just a virtual private server that is running a Linux distribution such as Debian, Ubuntu, CentOS, RHEL, etc. If you want to find out more about VPS servers and what they can be used for, check out our detailed blog on what is a VPS.
What is SSH?
SSH (i.e., Secure Shell) is a very secure and powerful network protocol that allows users to directly access the command line of a Linux server. This will give you the ability to execute Linux commands that control your VPS server and manipulate files & applications from the comfort of your home (or office). By default, the secure shell uses port 22. We do, however, recommend that you change the port for security purposes as in case of an attack, this is the first port that potential hackers will try.
SSH is already automatically built-in to macOS and Linux operating systems but not into Windows. Therefore, you must first install an SSH client such as PuTTY before attempting to connect to a Linux server from a Windows system. In fact, PuTTY is the SSH client we are using for this article and we recommend you do the same.
What is PuTTY?
![]()
PuTTY is a free software application for Microsoft Windows operating systems that can be used to make an SSH connection to your server. PuTTY is an SSH and telnet client, developed originally by Simon Tatham for the Windows platform. PuTTY is open-source software that is developed and supported by a group of volunteers.
Please note that the IP addresses and usernames used in the following sections of this article, are purely meant to serve as an example and do not represent any actual servers owned by Monovm or any other entity (as far as we know).
How to connect to a Linux server from Windows
As mentioned previously, in order to log in to the Linux server from a Windows device, we will be using a third-party software named PuTTY. If you don’t already have it installed, you can download the application here.
Step 1: Open PuTTY Terminal client. You will be greeted with the following window:
Step 2: Enter your connection settings:
- Host Name: enter the IP of your server here
- Port: 22 (leave as default)
- Connection Type: SSH (leave as default)
Step 3: Click «Open» to start the SSH session.
If this is your first time connecting to the server from your computer, you will see the following output. Accept the connection by clicking «Yes».
Once the SSH Connection is open, you should see a terminal prompt asking for your username.
Step 4: Enter your server’s root username as «root».
Step 5: Next, enter your password. You can find it in the Clients Portal. After you typed it in, hit “Enter”.
Please note that you will not see your cursor moving, or any characters typed, when typing your password. Do not worry, this is a standard PuTTY security feature.
How to connect to a Linux server from Linux
Step 1: Open Terminal. To do so, press Ctrl+Alt+T at the same time or type in Terminal into the search function.
Step 2: Type in the following command ssh username@serveripaddress where the username is the user you are connecting to (use root if you wish to have root access) and serveripaddress is the IP address of the server you are connecting to. Then press “Enter”.
For Example: Considering a user ID of “user1” and a URL of server1.com(82.149.65.12), the following syntax should be entered to connect to the server:
ssh user1@server1.com
OR
ssh user1@82.149.65.12
Step 3: Enter the password for the selected user and press “Enter”.
How to connect to a Linux from macOS
Step 1: Open Terminal. To do so, go to Applications > Utilities, and then open Terminal.
Step 2: Type in the following command ssh username@serveripaddress where username is the user you are connecting to (use root if you wish to have root access) and serveripaddress is the IP address of the server you are connecting to. Then press “Enter”.
For Example: Considering a user ID of “user1” and a URL of server1.com(82.149.65.12), the following syntax should be entered to connect to the server:
ssh user1@server1.com
OR
ssh user1@82.149.65.12
Step 3: Enter the password for the selected user and press “Enter”.
Conclusion
Linux server management can be quite a handful to inexperienced users. We hope that today’s article gave you some insights into what a virtual server and SSH are. We also wish that this detailed guide helped you take the first step in learning how to connect to and take control of your Linux. If you have any questions or suggestions, please leave them in the comment section down below.

Having reliable remote access is a vital tool for a wide array of business needs- whether that be facilitating remote work options for employees, or providing more efficient customer support.
Remote desktop access has even become a daily necessity for numerous IT professionals who need control over remote devices, or the ability to troubleshoot from afar. Here we will talk about connecting remote desktop Linux to Windows machines and vice versa. Keep reading to get all possible options.
Connect To Linux From Windows
A remote connection is more commonly defined by using software that allows someone to remotely control another machine (like a remote desktop to Linux from Windows, or a remote desktop from Linux to Windows). Remote connections also allow users to access software, applications, and files, as well as to conduct system maintenance and troubleshooting resolution.
The methods outlined below work well for all Linux systems other than Ubuntu- which already has a built-in remote desktop tool that supports both RDP and VNC.
For the initial connection, ensure this feature is set up on the physical Ubuntu machine. After following the installation steps for the built-in Ubuntu-compatible remote desktop option, further installation of any additional software won’t be necessary.
Linux Remote Desktop
We are going to focus on the specifics of using Remote Desktop Protocol (RDP) on Linux-based servers, i.a., client apps you get to choose from, and some nuances of using remote access tools for Linux in cross-platform environments.
Every user of Debian-derived Linux distribution knows that setting up Kali Linux remote access and successful use of remote desktop clients like TeamViewer or AnyDesk can be tricky at times. Mind that, for starters, you’ll need to download and install all the packages required to enable remote desktop Kali capabilities and update the ones you already have to the latest versions.
After that, you can either use a script to enable XFCE and RDP or do it manually (that takes more time but gives you much more control over the process). This will be enough to access your Kali machine from any other device connected to your local network.
Accessing a remote desktop from Linux Mint machines, especially the configuration of the protocols, may seem overly complicated, but in reality, it’s nothing to be stressed about. For one, Linux Mint has a built-in desktop sharing tool available from the Main Menu. Enable remote access to a machine, and it will be available for connections via SSH terminal for everyone who knows this machine’s IP address. If the toolset provided by a standard remote access client isn’t enough, you can install a third-party client tool, like Vinagre or others, and enjoy localized GUIs, SSH tunneling, request listening option, and many more.
Accessing a remote Linux desktop from a Windows machine sharing a network can be done with just a few simple commands, or by installing easy-to-use software like RDP, Xrdp, Xfce4, TeamViewer, Gnome, Remmina, etc.
Note: Some remote access tools even allow you to access a remote printer or scanner.
Here’re some options to access a remote Linux desktop from a local Windows machine:
- • The “Obtain the IP Address” Method
- • The “RDP” Method
- • The “VNC” Method
- • The “SSH” Method
For those using devices that function over the same network, there are multiple open-source options that help users with remote desktop from Windows to Linux access.
The IP Address Method
Before initiating a Windows to Linux remote desktop connection, users will need to obtain the host machine’s IP address before doing anything else.
To find the IP address of the Linux host, log into the Linux machine, open Terminal, and type the following:
ifconfig
This command will display the Linux machine’s IP address. Users can also locate the IP address by connecting to the network’s router, then browsing the devices by their hostname. Use this information while operating your Windows computer to establish a remote connection.
The “RDP” Method
The simplest option to enable remote connections to Linux desktops is by using the remote access tool built directly into the Windows OS: Remote Desktop Protocol (RDP).
Users must install Xrdp software on their Linux machine to use RDP. Complete installation in person, or with the SSH command. Enter the command as shown below:
sudo apt install xrdp
After that, type “rdp” into the search function, then run the Remote Desktop software on the Windows computer.
From within the Remote Desktop Connection pop-up window, type the Linux computer’s IP address, then click connect.
Note: to manage advanced parameters configuration, click “Show Options”.
The “VNC” Method
Another remote desktop option to try is VNC (Virtual Network Connection). Access a remote device using VNC by installing the dedicated software on both computers. One of the most beloved VNC remote access tools is TightVNC, which is also open-source.
How to use TightVNC to access Linux from Windows
Installing TightVNC can also be done in person or by using the SSH command.
-
Step 1: Enter the following command:
sudo apt install tightvncserver -
Step 2: Users should then run using the command:
sudo tightvncserver - Step 3: Users must then set the desired password.
- Step 4: Once the above steps are complete, start the client app on Windows (which can be downloaded from the TightVNC website).
- Step 5: Type the IP address and port number in the TightVNC window on the Windows OS device.
- Step 6: Hit “Connect”, then enter the password that was defined in the SSH command section above.
Use SSH
Even though Secure Shell won’t permit remote desktop connections, it’s still an excellent option for remotely installing the software needed to access a Linux desktop remotely. See below to learn how to do it.
Step 1: From the Windows computer, open the Power Menu.
Step 2: Choose “Windows PowerShell”.
Step 3: Type the following command:
ssh [IP_ADDRESS]
Step 4: After accepting the certificate, enter the appropriate username and password.
The connection is now established.
The options described above are excellent for small businesses, anyone working on a smaller network, or those who don’t need frequent access to a remote device.
Using RDP Clients To Create A Linux to Windows Remote Desktop Connection
This section will help anyone interested in protocols to connect a remote desktop to Windows from Linux.
To start, we’ll begin with using the Windows app, Remote Desktop Connection.
Utilizing the Remote Desktop Protocol (RDP), the Remote Desktop Connection app is included with all Windows OS. RDC allows users to access a Windows PC, or Windows Server remotely.
This is very convenient and cost-effective because organizations can install apps onto one central server, instead of multiple computer systems. Employees can then use those programs by accessing the remote server. This centralization also ensures that maintenance and troubleshooting are much easier processes.
This technology was originally called Terminal Services (TS). In modern times, web systems are far more commonplace- but situations remain where Windows remote applications are still required.
During those instances, Linux users can access Windows computers and servers remotely from their preferred system via RDP client.
There are numerous linux remote desktop clients, and we’ll cover three of them below:
- • Remmina
- • FreeRDP & rdesktop
After reading the features below, users can select the option that suits their unique needs.
Note: there are some instances where users may prefer to use a VPN for their remote access needs, but this article will solely focus on dedicated remote access software.
Enabling remote desktop on Windows
Users must first set up the machine that they wish to connect with remotely.
While operating the Windows computer that will be remotely connected to, follow the steps below:
Step 1: Login as Administrator;
Step 2: Open the Start menu;
Step 3: Click Settings;
Step 4: When the Settings window opens, open the System category > Remote Desktop;
Step 5: Now enable it;

Please note: users can’t connect with computers running Windows Home edition (like Windows 10 Home). This screen details the information, if that is the case:

Remmina
Remmina supports numerous remote access protocols like RDP, VNC, NX, XDMCP, and SSH. Remmina’s main goal is to help system administrators and travelers that work with multiple remote desktops and/or servers. Remmina is included in the Ubuntu Linux distribution as a default remote desktop client.
FreeRDP and rdesktop
Not only was rdesktop the very first Linux RDP client, but it was also the most popular for many years. However, as of November 2019, the project is searching for a new maintainer.
Alternatively, FreeRDP was initially released in 2009 as a fork of rdesktop. This occurred when Microsoft opened the RDP specifications. As time went on, and FreeRDP grew, it became the standard RDP client on systems lacking native Microsoft clients.
Simply double-click on the computer you want remote access to from the list.
Following the Microsoft Open Specifications, FreeRDP is a free implementation of Remote Desktop Protocol. Said implementation offers the server and client applications, as well as a library that permits other applications to utilize RDP protocol. FreeRDP is both an app and a library, providing reusable features for alternative applications. Aside from rdesktop, the clients listed above utilize FreeRDP’s library.
Please note: The inclusion of rdesktop on this list was intended for informational purposes only, and unless users have a specific scenario in mind, we advise another client that is compatible with the FreeRDP library.