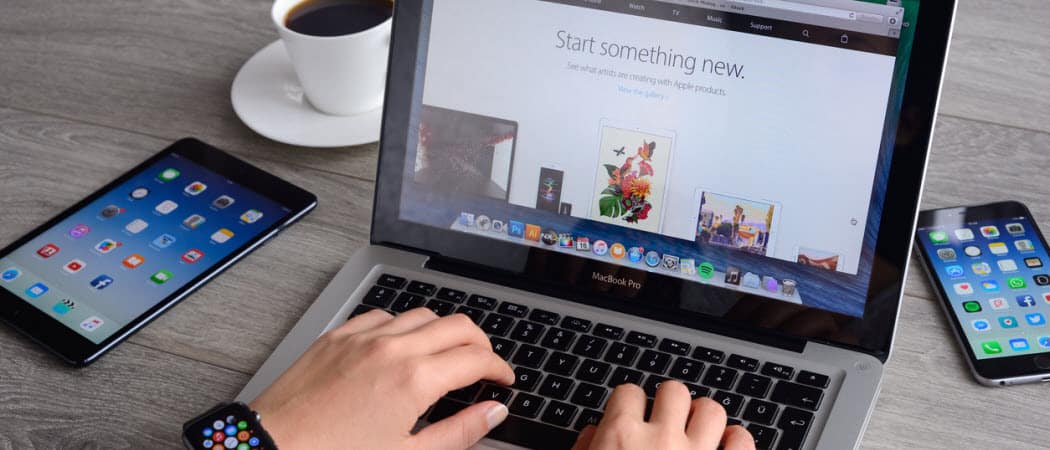
If you have a network environment with both Windows and macOS, there will be times you need to connect to the Mac from Windows.
Note: In this example, I’m connecting a Windows 7 system to my Mac running OS X Lion over my home network.
Remote Access a Mac from Windows
First, download and install the most recent stable version of the free utility TightVNC to your Windows computer.
During installation, uncheck TightVNC Server unless you’re using it for other remote access situations. For connecting your Windows system to a Mac, the server isn’t required.

On your Mac, click the Apple icon and select System Preferences.

System Preferences opens. Click Sharing under Internet & Wireless.

Now, in the Sharing window, check Screen Sharing. Then click the Computer Settings button. Note the IP address is shown above the Computer Settings button. You’ll need it to connect with TightVNC.

Next, check VNC Viewers Macy Control Screen with Password. Type in a password and click OK.

Then type in the password for your Mac system and click OK.

Go back to your Windows computer and click Start > All Programs > TightVNC > TightVNC Viewer.

Enter in the IP address for the Mac computer. The IP address is displayed on the Screen Sharing window on the Mac. Click Connect.

Next, type in the password you created for the VNC connection earlier. This is NOT your Mac system password.

Wait a few seconds for the connection to be established. Tight VNC brings up the remote connection screen. Select the user account you want to use to log in on your Mac.

Enter the user account password.

There you go! You can control your Mac remotely from your Windows PC just as if you were sitting in front of it. I have my Mac set to a large display resolution, so the first thing I did is turn it down to 1024×768.
This setting is up to you. You can run it at full resolution if your Windows display is capable.

In fact, TightVNC provides several cool options you can explore to get the remote session to work how you like.

If you use the remote connection a lot, create a shortcut on your desktop. On the TightVNC toolbar, click the Save icon.
![]()
Then give the connection shortcut a name, save it to desktop, and click Save.

Next, it asks if you want to save the password. If you’re the only user on the Windows PC, it’s easier to save it, but again it’s up to you.

The TightVNC remote connection to your Mac icon displays on your desktop. Just double-click it anytime you want to connect remotely to your Mac. Simple and nice!
![]()
There’s a bit of lag time while controlling your Mac from Windows via TightVNC, based on your network speed or over a Wi-Fi connection. Your mileage will vary. Overall, though, this is an easy and efficient way to remotely control your Mac from your Windows system on the same network.
![]()
Привет, Хабр! Меня зовут Холодаев Алексей, я младший системный администратор в Cloud4Y. Сегодня хочу поделиться способом подключения стандартного RDP-клиента Windows к MacOS. Если интересно, ныряйте под кат.
Вы наверняка знаете, что в MacOS есть встроенный VNC сервер, к которому можно подключаться через VNC клиента. Однажды я задумался: а почему бы не использовать стандартный RDP client Windows для подключения к яблочной операционной системе? Немного погуглив, я обнаружил, что существует бесплатный RDP сервер на MacOS — xRDP. Данный сервер легко устанавливается на ОС Linux/Unix. Об установке и настройке этого сервера расскажу далее.
Установку я производил на свой макбук с MacOS Big Sur.
Для начала необходимо установить инструменты командной строки Xcode. Для этого выполняем команду в ПО терминала.
xcode-select --installДалее установим менеджер сторонних пакетов Homebrew командой
$ /usr/bin/ruby -e "$(curl -fsSL https://raw.githubusercontent.com/Homebrew/install/master/install)"Установим библиотеку OpenSSL командой
brew install opensslПосле установки OpenSSL присвоим переменной CPPFLAGS путь к библиотеке, чтобы компилятор смог данную библиотеку найти. Выполним команду
export CPPFLAGS="-I/usr/local/opt/openssl/include"Установим необходимые пакеты командами
brew install automakebrew install libtoolbrew install pkgconfigbrew install nasmУстановим XQuartz – программное средство системы X Window System. Скачать программу можно с официального сайта. После установки необходимо перезайти в систему.
Для удобства работы создадим отдельную папку: mkdir /Users/admin/Documents/xrdp/
Теперь включим встроенный VNC сервер. Для этого перейдём в «Системные настройки»
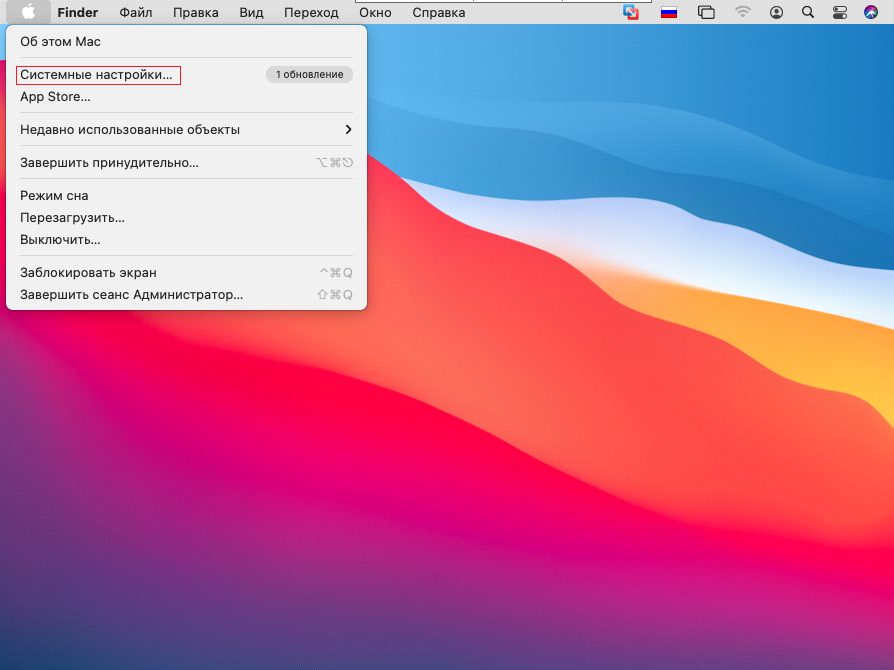
Далее выбираем общий доступ:
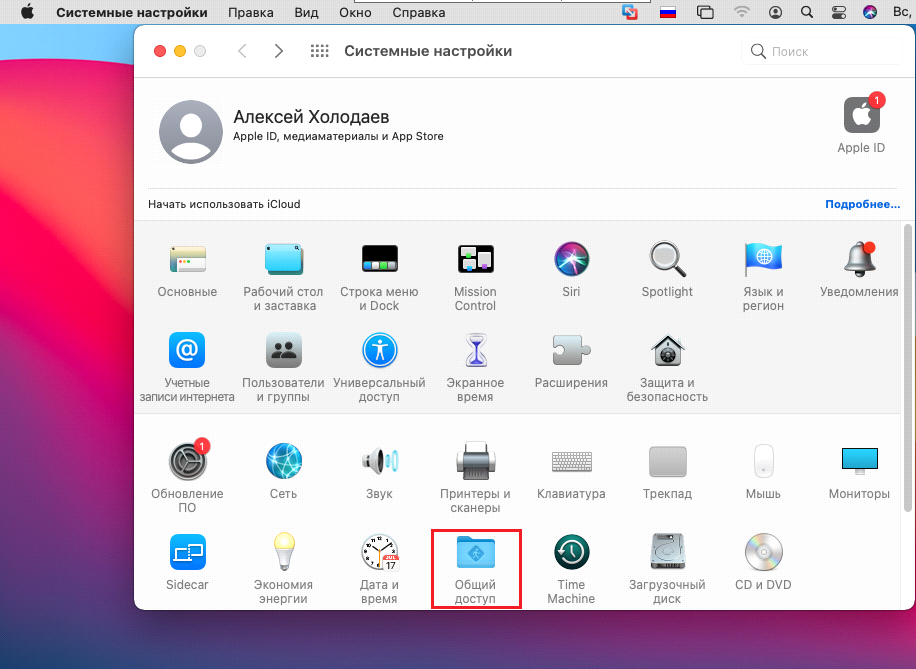
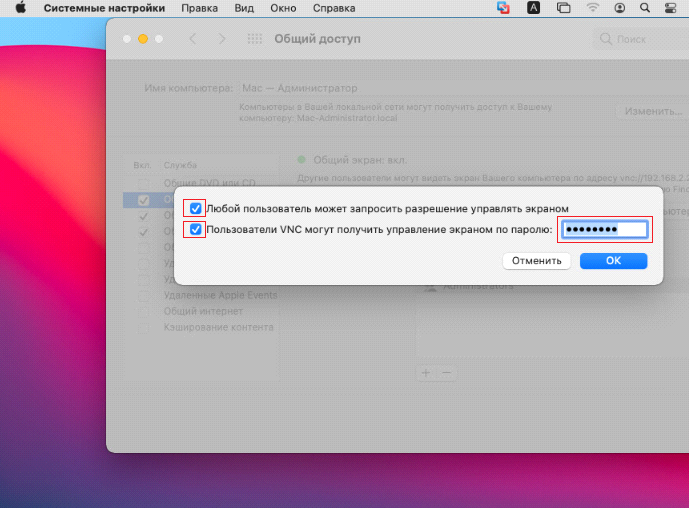
Включаем функцию «Общий экран» и переходим в настройки компьютера

Включаем опцию “любой пользователь может запросить разрешение управлять экраном” и задаём пароль в пункте “Пользователи VNC могут получить управление экраном по паролю”
Теперь загрузим необходимые пакеты.
Нам требуются xRDP и xOrgRDP в формате исходного кода.
Загрузить их можно отсюда (tar.gz архивы). После загрузки переместим данные архивы в папку, которую мы ранее создали, и извлечём их.
cp /Users/admin/Downloads/xrdp-0.9.11.tar /Users/admin/Documents/xrdp/
tar -xvf xrdp-0.9.11.tar
rm xrdp-0.9.11.tar

cp /Users/admin/Downloads/xorgxrdp-0.2.11.tar /Users/admin/Documents/xrdp/
tar -xvf xorgxrdp-0.2.11.tar
rm xorgxrdp-0.2.11.tar
Сборка xRDP
Запустим Bootstrapper и сконфигурируем сборку с помощью OpenSSL. Затем запустим make установщик.
Если вы получаете ошибку на этом шаге, то скорей всего это связано с неправильным экспортом OpenSSL CPPFLAGS.
Сборка xOrgRDP
Запустим Bootstrapper и сконфигурируем сборку так, чтоб она происходила при помощи OpenSSL. Затем запустим make установщик.
cd ../xorgxrdp-0.2.11/
./bootstrap
./configure PKG_CONFIG_PATH=/opt/X11/lib/pkgconfig
make
sudo make install
Если вы столкнулись с ошибкой, убедитесь, что вы перезапустили сессию после установки сервера xQuartz X11. Если вы получаете ошибку /opt/X11/include/xorg/dixfontstr.h:30:10:fatal error ‘X11/fonts/libxfont2.h’ file not found, необходимо поправить файл dixfontstr.h, прописав #include “/opt/X11/fonts/libxfont2.h” вместо #include “/X11/fonts/libxfont2.h”.
xRDP сервер почти готов. Теперь необходимо настроить его. Давайте откроем файл xrdp.ini.
sudo vi /etc/xrdp/xrdp.iniНайдём секцию в файле со всеми типами сессий.
[Xorg]
name=Xorg
lib=libxup.so
username=ask
password=ask
ip=127.0.0.1
port=-1
code=20

[Xvnc]
name=Xvnc
lib=libvnc.so
username=ask
password=ask
ip=127.0.0.1
port=-1
#xserverbpp=24
#delay_ms=2000

[vnc-any]
name=vnc-any
lib=libvnc.so
ip=ask
port=ask5900
username=na
password=ask
#pamusername=asksame
#pampassword=asksame
#pamsessionmng=127.0.0.1
#delay_ms=2000

[neutrinordp-any]
name=neutrinordp-any
lib=libxrdpneutrinordp.so
ip=ask
port=ask3389
username=ask
password=ask
Я буду подключаться через модуль Xvnc. Используем библиотеку libvnc.dylib вместо libvnc.so. Я закомментирую все модули, которые не буду использовать. Вот так будет выглядеть изменённая секция с типами сессий в файле xrdp.ini.
#[Xorg]
#name=Xorg
#lib=libxup.so
#username=ask
#password=ask
#ip=127.0.0.1
#port=-1
#code=20

[Xvnc]
name=Xvnc
lib=libvnc.dylib
username=ask
password=ask
ip=127.0.0.1
port=5900
xserverbpp=24
#delay_ms=2000

#[vnc-any]
#name=RDP to VNC Connector
#lib=libvnc.so
#ip=127.0.0.1
#port=5900
#username=ask
#password=ask
#xserverbpp=24
#pamusername=asksame
#pampassword=asksame
#pamsessionmng=127.0.0.1
#delay_ms=2000

#[neutrinordp-any]
#name=neutrinordp-any
#lib=libxrdpneutrinordp.so
#ip=ask
#port=ask3389
#username=ask
#password=askПримечание: В редакторе vi нажмите клавишу «i», чтобы войти в режим редактирования. Чтобы сохранить и выйти, нажмите «ESC» и введите :wq!
Теперь запустим демоны xRDP и xRDP-sesman. Они находятся по пути /usr/local/sbin/.
Выполним следующие команды:
sudo /usr/local/sbin/xrdpsudo /usr/local/sbin/xrdp-sesmanПробуем подключиться по RDP. Вводим логин и пароль, нажимаем ENTER.
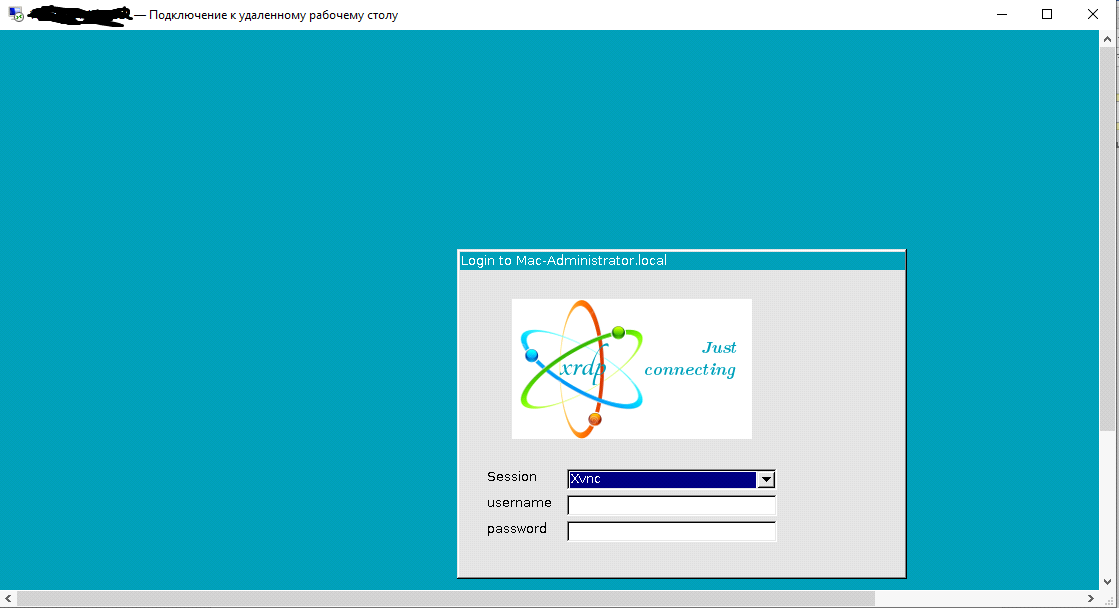
Если у вас появилось окно авторизации MacOS, значит, всё работает правильно.

Если у вас возникают какие-либо ошибки, смотрите логи. Они находятся по пути:
/var/logs/xrdp.log

/var/logs/xrdp-sesman.log
Вот таким способом можно предоставить доступ на MAC OS по протоколу RDP. Спасибо за внимание!
Что ещё интересного есть в блоге Cloud4Y
→ История Game Genie — чит-устройства, которое всколыхнуло мир
→ Как я случайно заблокировал 10 000 телефонов в Южной Америке
→ Странные продукты Apple
→ WD-40: средство, которое может почти всё
→ Как ИИ учится рисовать аниме
Подписывайтесь на наш Telegram-канал, чтобы не пропустить очередную статью. Пишем не чаще двух раз в неделю и только по делу.
There are many ways to remotely control a Windows computer software such as using third party software or the built-in Remote Desktop feature. However, the choices of remotely controlling another computer that is running a different operating system can be quite limited. Although Windows dominates the computer market, but you can still find a lot of people using Macs that runs on OS X.
Apple has their own remote access software called Apple Remote Desktop (ARD) which is a shareware that cost $79.99. It comes with some powerful features such as software distribution and automation to perform repetitive tasks on remote computers, but unfortunately it is meant for Mac to Mac and not cross platform.
In this article, we will be sharing a few methods on how you can remotely access Apple Mac computers from another computer running Windows for free.
1. TeamViewer

TeamViewer is one of the most popular remote access software that is commonly used to provide remote support because it is easy to use and comes with really powerful features such as file transfer, switch sides, conference call, VoIP, screen recording and etc. Other than that, TeamViewer also works on multiple operating systems where it allows you to control a Mac OS X system from a Windows computer.
You will need to download and install the “HOST” version of TeamViewer on the Mac computer that you want to remotely control. As for the Windows computer that will be controlling the Mac computer, simply download the TeamViewer full version, install and run it. Enter the ID followed by the password and you’re able to connect to the OS X machine. The ID will not change and always stay the same on the machine.

The TeamViewer Host options can be accessed by clicking on the TeamViewer icon at the menu bar and select Preferences. You can change your password, configure the voice, microphone and phone conferencing, access control and etc.
Download TeamViewer Host for Mac
2. LogMeIn Free

LogMeIn Free allows you to conveniently remotely control a Mac computer running OS X from Windows through its web interface or the Firefox plugin. First you will need to create a free account, then login from the Mac computer and click the Add Computer button to download the LogMeIn Installer. After installation, you are able to access that computer from any other computer by logging in to LogMeIn. Do take note that the file transfer feature is disabled in the free version.
Download LogMeIn Free
3. RealVNC

Although there are many versions of VNC which are mostly free, RealVNC targets the enterprise users by offering shareware version and cross platform support to Windows, Mac OS X, Linux, Solaris, HP-UX and AIX. Similarly to LogMeIn, the free version of RealVNC provides a very basic remote access feature without file transfer, chat, session encryption, optimized performance, printing and deployment tool. You can use other VNC viewer such as TightVNC and UltraVNC to access the RealVNC server.
Download RealVNC
Home
How To
How To Connect Remotely To Mac From Windows Effectively
Did you know that you can connect remotely to Mac from your Windows computer? If not, then here is an article to allow the remote computer to access your Apple. This guide is an additional way for Apple users to learn how to connect remotely to Mac. The first guide we’ve shared was accessing remotely your Mac computer from your iPhone.
Allowing remote login would entail the usage of Secure Shell (SSH) to log in to your Mac from another PC. If you are using Windows, this can be very helpful. Telnet cannot be used to log in to your Mac.

Credits: Pixabay
Connect Remotely to Mac via Setting Up Remote Login
To setup remote login in order to connect remotely to Mac, what you need to do is to Open Sharing preferences by going to the Apple menu (System Preferences > Sharing).
Next, what you should do is to select the Remote Login. By doing this, it enables the secure FTP service (sftp). Now, the next step is to identify which users can log in. There are two options:
All Users – any of the users of the PC and anyone on the network will be able to log in.
Only These Users – specify only the users permitted to log in remotely. Do this by clicking Add then choosing the users. Users & Groups include all the users of your Mac; Network Users and Network Groups include people on your network.
Connect Remotely to Mac from Windows
From another PC, log in by opening the Terminal (or the SSH applicaton) and type:
ssh [email protected]
Thus, if your username is anthony with an IP address 10.1.3.2… what you need to do is open the SSH app or Terminal from the other PC and type:
ssh [email protected]
If you do not know the Mac IP address and the username. You can find it easily, open the Remote Login panel from the Sharing preferences. The user name and IP add shall be displayed below the “Remote Login:On” Indicator.
Note:
Enabling remote login from Windows entails security issues.
There are other ways to enable connecting remotely to Mac from Windows such as the following:
Screensharing. A built-in feature of your Mac is ScreenSharing – which has VNC server with additional features. This implies that VNC clients can control your Mac and this will be the key to remote access.
Enable it by clicking the Apple > System Preferences > Sharing and then, check the Screen Sharing box. A control panel will be displayed on how to connect. You can connect using the VNC client via the IP address displayed. Take note that the IP address shown can be similar to the internal IP address where your Mac is placed under the local network. This implies that without forwarding ports, you will not be able to access the Internet.
Set a password at the Computer Settings button. If you do not set up one, you will encounter confirmation dialog box every time you log in via remote access.
Chrome Remote Desktop. Similar to Windows, install this as a plugin to your Chrome on Mac. Click the Share button to get a temporary access code. Use this to connect to your Mac from the extension. Such can be downloaded in iPhone, Android and other gadgets.
Well folks, there you have it. This article is another Apple tips we can share like the article we’ve previously posted such as the recommended best antivirus for Mac.
Enjoy and please feel free to share.
Многие начинающие пользователи Mac задаются вопросом, реально ли каким-то образом получить удаленный доступ к другому компьютеру Mac или использовать специальную функцию, которая позволит устранить проблемы на другом Mac? Признаться честно, я не представлял, что магия Apple способна на такое: функции уже встроены в Mac, а настроить их не составит труда при помощи стандартных элементов macOS. Сегодня я расскажу вам, как настроить удаленный доступ на macOS.

Совет для новичков: как подключиться к Mac и управлять им?
Содержание
- 1 Общий доступ к экрану Mac
- 2 Как пользоваться iCloud Drive
- 3 Apple Remote Desktop Mac
- 4 Google Chrome Remote Desktop
Общий доступ к экрану Mac

Управлять вторым Mac очень просто
Если на Mac включен общий доступ к экрану, то изображение можно передать на любой другой Mac, который находится в одной сети. Другие пользователи могут открывать, перемещать и закрывать файлы, пользоваться приложениями и даже перезагружать Mac. Как это сделать?
- Зайдите в Системные настройки и нажмите «Общий доступ».
- Уберите флажок «Удаленное управление», если он установлен.
- Установите флажок «Общий доступ к экрану».
Пользователям не понравились AirPods 3. Что с ними не так
Выберите, кому будет доступен ваш экран в общем доступе.
- Всем пользователям. Если хотите, чтобы любой из пользователей мог открыть общий доступ к экрану. Будет работать, если Mac подключен к серверу учетных записей, из которых любоей пользователь может открыть доступ к экрану с помощью имени и пароля.
- Только этим пользователям: доступ только для определенных пользователей, которых можно добавить внизу списка.
Еще можно задать дополнительные параметры общего доступа к экрану. Нажмите «Настройки компьютера» и выберите нужные варианты:
- Любой пользователь может запросить разрешение управлять экраном. Пользователи могут попросить разрешения вместо ввода данных учетной записи.
- Пользователи VNC могут получить управление экраном по паролю. Другие пользователи могут получить доступ к экрану Mac при помощи iPad или ПК через VNC-клиент. Для этого им нужно ввести пароль, который вы указали в этом поле.
Странные товары Apple, о которых вы могли не знать
Как пользоваться iCloud Drive

Вам понадобится минимум Windows 7
С помощью iCloud Drive можно получать доступ к файлам и папкам, которые в нем сохранены. Все изменения будут отображаться на ваших устройствах, среди которых iPhone, iPad и даже устройства на Windows. Рассказываем, как все настроить.
- Обновите iPhone или iPad до последней версии iOS или iPadOS, а компьютер Mac — до последней macOS.
- Войдите на всех устройствах в одну учетную запись iCloud.
- Если используете ПК на Windows, то обновитесь до Windows 7 или более поздней версии. Установите iCloud для Windows.
- На устройстве с iOS зайдите в Настройки iCloud и выберите функцию iCloud Drive.
- На Mac зайдите в Системные настройки и нажмите идентификатор Apple ID.
- Выберите iCloud, затем iCloud Drive.
Ответы на вопросы: умные очки Apple, объём памяти, подделка AirPods
Кроме того, можно войти в iCloud через компьютер на Windows.
- Зайдите в Microsoft Store, найдите iCloud для Windows и установите программу на свой ПК.
- Откройте программу через «Пуск» — Приложения или программы.
- Войдите, используя Apple ID.
Выберите iCloud Drive и нажмите Применить.
Я использую iCloud Drive на Windows 10 и меня абсолютно устраивает такой удобный вариант синхронизации iPhone и ноутбука. Еще есть OneDrive, он вполне сопоставим по функциям, но синхронизация все же проходит чуть сложнее.
Наш Telegram-чат никогда не спит: не забудьте подписаться!
Apple Remote Desktop Mac
Если вы не обновлялись до macOS Monterey, то на Big Sur можно запустить аналог TeamViewer — Apple Remote Desktop. Приложение бесплатное, но до определенного момента. Можно, конечно, найти бесплатную версию на просторах интернета, чтобы ни в чем себя не ограничивать. Программа позволяет устанавливать или настраивать приложения, помогать удаленным пользователям, а также участвовать в образовательных целях. Скачать ее можно здесь.
Написали в нашем Яндекс.Дзен о самых недооцененных фишках iPhone
Google Chrome Remote Desktop

Chrome Remote — еще один инструмент управления Mac
Еще один бесплатный вариант удобного управления. Удаленный рабочий стол Chrome позволяет получить удаленный доступ к Mac через браузер Chrome на любом компьютере. Скачать Chrome Remote можно здесь.
- Откройте Google Chrome
- Найдите Chrome Remote Desktop в Интернет-магазине Chrome
- Добавьте его в Chrome
- Установите Chrome Remote Desktop на свой Mac
- Войдите в приложение Remote на другом устройстве.
Мой коллега, журналист AppleInsider.ru Артем Рахматуллин собрал небольшой гайд по советам для новичков в Mac. Обязательно прочтите!
macOS MontereyОбзоры приложений для iOS и Mac

Remotely connecting to macOS computers via PC desktops, laptops, iOS devices (like a MacBook, iPhone, or iPad), and more allows users to access and control their Mac workstation from anywhere. In this article, we’re going to teach you how to access a Mac remotely from a variety of devices in the best way.
Solution 1: Screen Sharing
Firstly we’ll discuss how to control another Mac remotely with screen sharing. For users with Macs running OS X 10.5 (Leopard) and up, their machines will include the Screen Sharing feature by default.
This built-in free option is exactly how IT professionals, Administrators, and personal users can access a Mac from another Mac on the same network. It also gives users access to files, apps and folders on another macOS device.
How to access Mac via screen sharing
-
Step 1: While operating your Mac, navigate as follows: Preferences > Sharing;

-
Step 2: Click the appropriate checkbox (shown below) to enable “Screen sharing”;
-
Step 3: As shown below, you can specify who can and cannot access your Mac under the “Allow access for” section;

-
Step 4: Memorize or write down your Mac’s IP address;

-
Step 5: While operating the other Mac, navigate as follows: Finder > Go > Connect to Server;
- Step 6: Type the IP address into the respective text box;
-
Step 7: Click the “Connect” button;

- Step 8: Request the connection to initiate via the Permissions.


Now you should be able to remotely login to Mac computers using the Screen Sharing app on the secondary computer.
How to remote connect to a Mac from a non-Mac device over your local network
In the following section, we’ll teach you how to remotely connect to another Mac with a non-Mac device. While the process is still very simple, there are some steps users will need to handle differently.
On your macOS device:
Step 1: Navigate as follows: System Preferences > Sharing > Computer Settings;

Step 2: To allow VNC Viewer to control the screen, enter a password (as shown below);
Step 3: Once the password is entered, hit “OK”;

Step 4: Specify user access privileged from the “Allow access for” section;
Step 5: Memorize or write down the IP address of your Mac;
On the other device:
Step 1: Type the IP address of your Mac into the VNC app on the remote device;

Please note: The screenshot shown above is from VNC Viewer for iOS. However, VNC apps are available for virtually every operating system. This means users can remotely access their Macs from iPads, iPhones, Windows, or Linux computers as long as the app is installed.
Step 2: Enter the password you created in step 2 to log in;
Step 3: Type in the password you’ve already created;

Step 4: Hit “Connect” (as shown below).

Solution 2: Using 3rd-party applications
In this section, we’ll explain how to connect remotely to a Mac with 3rd-party apps. Using 3rd-party apps is usually the simplest method for how to remote login on Mac devices (regardless of what OS you’re using.)
These tools (like Microsoft Remote Desktop, Splashtop, Zoho Assist, TeamViewer, AnyDesk, BeyondTrust formerly Bomgar (to name just a few.) allow users to remotely control Mac devices over internet or network connections. While feature suites can vary, the fundamental remote access procedure is fairly consistent, and breaks down into this basic series of steps:
Step 1: Install the 3rd-party remote access app (like TeamViewer) on the computers participating in the remote connection;
Step 2: Create an account by choosing a username and password;
Step 3: Once the app is installed and running on both computers, login with the details you created in the previous step on your Mac;
Step 4: Connect with the Mac.
HelpWire: Top third-party apps solution
Our favorite pick when it comes to remote access software is HelpWire. This software offers advanced remote support that permits a Mac device to forward macOS across a limitless distance. This convenience allows IT and customer support specialists to troubleshoot and repair a remote device quickly and easily.
HelpWire offers:
- • An ultra-secure connection;
- • Top-notch customer service;
- • Flexible software customization;
- • And more;
Microsoft Remote Desktop Connection for Mac
Microsoft Remote Desktop is a completely free cross-compatible solution, which means it enables remote access software Mac to PC capabilities. We’ll walk you through another easy step-by-step guide on how to configure a Windows computer for remote desktop connection from Mac to PC to help you implement this application. If the error code: 0x204 has appeared while establishing a Remote Desktop Connection with a PC from macOS, you can easily solve it with the help of our guide.
Solution 3: Remote Management
For those needing complete access and control over another remotely located Mac, implementing Remote Management is a great solution. Remote Management is a macOS feature allowing users to grant total remote access to another Mac.
Conveniently, the Remote Management configuration is much like setting up Screen Sharing and Remote Login.
Step 1: Navigate as follows: Apple Menu > System Preferences > Sharing > Remote Management;
Step 2: Specify the level of access allowed in the authorized remote access section;
Step 3: Choose from the following options: “All Users” or “Add a specific User”.

Solution 4: Remote Login
To many Mac-users’ dismay, Apple removed the feature “Back to My Mac” from macOS versions Mojave and newer. Back to My Mac used to make connecting two Mac devices remotely very easy and fast, so this discontinuation was quite frustrating initially.
Thankfully, Back to My Mac was replaced with Remote Login—a feature that allows a Mac to initiate and receive remote connections from different Mac devices.
Step 1: Navigate as follows: Apple Menu > System Preferences > Sharing > Remote Login;
A message will appear reading: “To log into this computer remotely type: “ssh yourusername@youripaddress”

Step 2: Save the IP address and username because it will allow other users to access the Mac via Terminal;
Note: Users can also manage access volume by selecting the “All Users” option (allowing anyone sharing the network to connect to your Mac), or the “+” (which allows you to add one user at a time.)
Step 3: Once you are done with these settings on your Mac, you can use the built-in Mac Screen Sharing app or the Terminal command tool to access the Mac remotely from the secondary computer;
Solution 5: Chrome Remote Desktop
The Chrome Remote Desktop app is a simple and fast method to access a desktop computer for on-the-go PC, smartphone, and tablet users. CRD can even be used for no other reason than displaying a desktop’s screen on a smartphone or tablet.
Chrome Remote Desktop is totally free, but users must have a Google account and Chrome browser to use it.

From the user’s side:
Step 1: Enter “remotedesktop.google.com/support” into the address bar in Google Chrome;
Step 2: Hit “Download” (which is located under the Remote Support section) and install Chrome Remote Desktop by following the onscreen directions;
Step 3: Choose “Generate Code” from the “Share this screen” section;

Step 4: Copy the code and send it to the support team (via support ticket, email, or phone) — this gives the support team access to the computer;
Step 5: Allow the support rep to gain total access to the computer by choosing “Share”;
Step 6: Click “Stop Sharing” to end the sharing session.
On the support team’s side:
Step 1: Enter “remotedesktop.google.com/support” into the address bar in Chrome and download the app;
Step 2: Enter the code provided by the end-user;
What is Mac remote access?
“Remote access” is a term that has more than one meaning—quite a few, in fact. Before we move on to how to enable remote access on Mac, we’ve outlined a few of the most common meanings when people say “remote access:”
- • Browsing and accessing folders and files using a shared folder — or FTP (File Transfer Protocol);
- • Utilizing mobile devices (like iOS or Android smartphones and tablets) to remotely control a Mac;
- • Using screen sharing capabilities to view Mac screens (but the remote viewer can’t actually control the Mac);
- • Complete access and control over a remote Mac desktop, allowing users to see and manage whatever is displayed on the remote Mac.
When Do You Need Mac Remote Access Software
There are a plethora of scenarios where deployment of remote access software for Mac computers comes in handy. Implementing remote access software for Windows and Mac, Linux (and even platforms like iOS) improves a remote team’s ability to function efficiently, and communicate.
The best remote access software for Mac (as well as for Windows, Linux, and iOS), can support a surprising variety of industries, and offers innovative solutions for the post-COVID work evolution. Below, we’ll cover three common use cases for RDP Mac software, and why it’s important.
Classroom Management
Remote access software for Mac (free or otherwise) provides many opportunities for interactive classroom management. For example, allowing instructors to oversee their students’ project work with screen sharing, helping educators ensure their students utilize the proper tools. Additionally, presenters can also lock all screens simultaneously, allowing them to regain the attention of their class.
Network Maintenance
Administrators have the ability to perform maintenance on multiple computers at once, as well as configure scheduled network shutdowns during the holidays. Additionally, Mac client startup disks can be configured for diagnostic or troubleshooting situations while the deployment of software throughout the entire network is conducted.
Virtual Support
Support departments have the ability to answer colleague or customer inquiries simply by using remote access software for Mac to log into computers on their network. They can see exactly what they’re dealing with, resolve the problem, or provide advice on how to move forward. Host computers can even share their screens, send messages- or communicate via chat tools.
FAQ
Screen Sharing allows users of other computers to remotely view and control this computer. It is based on the VNC (Virtual Network Computing) protocol.
Remote Management gives other users full access to the computer using Apple Remote Desktop.
Remote Login lets users of other computers access this computer using SSH and SFTP.
Yes, using VNC to access your Mac over the internet is possible. However, it requires a more extensive setup process than VNC on a local network (or an internet-based remote desktop app.) Users must have a static IP address, which isn’t offered by many home internet connections.
Is it possible to make VNC work with a dynamic IP address? Yes, but it isn’t really worth it when so many free remote desktop apps for Mac exist.
Similar to Windows and Linux PCs, Mac computers can be awakened or turned on remotely. Mac computers have multiple sleep modes that can be configured to accept Wake On Lan (WOL). Users can even make this work over the internet.
For those without a WOL set up, they can’t remotely access a Mac unless it’s already on/awake.
I have found the solution, finally connected with TightVNC. Follow these links, but with my added notes:
http://forums.macrumors.com/showpost.php?p=7221295&postcount=20
When you go to edit com.apple.RemoteManagement.plist with vi, and you notice that there is content already in the file, place the code supplied BELOW/AFTER the content, on a new line.
As well when you go to try and edit com.apple.ScreenSharing.launchd wuth vi, it may be helpful to unhide the file from an ls command with this:
echo -n enabled > com.apple.ScreenSharing.launchd
FINALLY, after your system reboots, before trying to remote administer with VNC, go into the System Preferences panel, click Sharing, then go to the Remote Management item. Click the Computer Settings button, and from the drop-down, select ‘VNC viewers may control screen with password:’ and enter your new password.
(as Arjan said above, deselect «Anyone may request permission to control screen»)
Hit OK.
I suggest a reboot one more time, and then try logging in with VNC.
Works for me now!
![]()
Download Article
![]()
Download Article
Although the two machines have different operating systems, you can still connect a Windows PC and Mac to each other and share files. You don’t need any expensive equipment. All you need is an Ethernet cable.
-

1
Get an Ethernet/LAN Cable.
-
2
Plug the cable to the Ethernet port on both of the machines.


Advertisement
-
1
Open a window on your PC.
-
2
Go to Homegroup. On the directory panel at the left side of the window, click on “Homegroup.”
-
3
Click on “Create a Homegroup” button.
-
4
Check all the type of files you want to share (documents, images, etc.) and click on “Next.”
-
5
Remember the password. On the following page, you’ll be given a password. Take note of the password. You’ll be using that later once you try to connect your Mac to your PC.
-
6
Click on “Finish” once you’re done.


Advertisement
-
1
Click on “Go” on the menu bar at the upper left of the desktop.
-
2
Select “Connect to Server.”
-
3
Type in your PC’s network address on the Server Address field. Use the following format:
- smb://username@computername/sharename – i.e.: smb://johnny@mypc/users.
- If the above format won’t work, you can use the Windows PC’s IP address: smb://IPaddress/sharename.
-
4
Click on the Plus (+) button to add it to the server list.
-
5
Click on the Server Address you’ve just added, and click on “Connect.”
-
6
Type in the password that you got from the Windows PC. Click on “Connect.”
-
7
Open your Mac’s Finder. The Windows PC’s name should now appear on the left panel under the Shared section.


Advertisement
Ask a Question
200 characters left
Include your email address to get a message when this question is answered.
Submit
Advertisement
-
To get your Windows PC’s name, right-click on the My Computer icon on your desktop and select “Properties.”
-
You can’t create a Homegroup if you’re connected to the Internet.
-
If your Mac doesn’t have an Ethernet port, you can use a USB-to-Ethernet cable and connect it to a Windows PC using the same method.
Show More Tips
Thanks for submitting a tip for review!
Advertisement
About This Article
Thanks to all authors for creating a page that has been read 43,543 times.
Is this article up to date?
to state the obvious,so we are on the same page. the LAN is your Local Area Network, and the parameters of your LAN are defined by the Coverage area of your Modem’s Wifi Range and the amount of Ethernet Hard Wire Connections, if you are trying to connect to a Mac on your LAN From a Windows Machine on the same LAN, That is not referred to as REMOTE CONNECTION, That is referred to as LOCAL NETWORKING, Connecting Remotely, or Remote Connection is when you connect From a Remote LAN or one that is not Your Personal LAN, and you use that LAN to Connect to a Computer on your LAN, that’s remote connection, Hence, your connecting remotely, so.. Are you using Your LAN to achieve this and your having lag issues, or a you trying to do it remotely, if your trying to Remote Connect and your having trouble with Software, because i know it can be a pain, You should have mentioned what you have already tried, But.. Windows Remote Desktop Connection is buggy, i wouldn’t recommend it, the way to go use to be TeamViewer as a free solution, then they Stopped the Free thing and started charging, Other Options were CrossLoop, it’s good, but sometimes slow, Try if you haven’t already, Most of the Good option are Paid, i rate Bomgar to be the highest, because your accessing Remotely via way of a Remote Box that is not technically inside the parameters of your LAN, hence more secure. LogMeIn is a good one
but as far as free is concerned, and to get the results you want, there is not much out there, obviously the idea is that they want you to buy the full versions, i’ll do some research for you, but.. is it possible for you to provide a list of what you have already experimented with thus far, so i don’t double handle. thanks
answered Jun 20, 2014 at 9:38
![]()