Безлимитные тарифы интернета с высокой скоростью соединения упростили администрирование компьютеров. Сегодня все чаще помощь пользователям оказывается удаленно. Это удобно, ведь не надо тратить время на поездки и возможность подключиться есть практически круглосуточно.
Сегодня поговорим об удаленном подключении к Ubuntu из ОС Windows.
Зачем удаленно подключаться из Windows к Ubuntu
Не так важно, где находится удаленный компьютер – в соседней комнате или в другом регионе. Интернет убирает подобные ограничения, главное – чтобы связь оставалась стабильной на все время настройки. Это одинаково относится к машинам, работающим хоть на операционной системе Windows, хоть на Ubuntu. Последние используются, например, для развертывания сервера CS или Minecraft.
Причины, по которым требуется удаленное подключение:
- ручной запуск обновлений на компьютере с Ubuntu;
- настройка системы без подключения локального монитора, клавиатуры;
- работа с машиной, расположенной по другому адресу.
Пользователю доступно три варианта коннекта с компьютеров, работающих на ОС Windows. Выбор зависит от удобства и предпочтений: SSH через приложение PuTTY, встроенная поддержка RDP и виртуальная сеть VNC (понадобится предварительная настройка клиента). В любом случае перед работами понадобится выяснить IP-адрес компьютера, к которому предстоит подключаться.
Комьюнити теперь в Телеграм
Подпишитесь и будьте в курсе последних IT-новостей
Подписаться
Как выяснить IP-адрес компьютера с установленной ОС Ubuntu
Если есть физический доступ к компьютеру с установленной Ubuntu, на нем открывается терминал (комбинация клавиш Ctrl+Alt+T) и вводится команда ifconfig. В отображенном перечне данных имеет значение строка, начинающаяся с inet addr. Если используется подключение через Wi-Fi, то рядом будет его маркер в виде «wlan0». При проводном соединении фраза будет заменена на «eth0». Рядом отображается актуальный IP-адрес машины.
Второй способ заключается в применении функций графического интерфейса. Последовательность действий: найти значок подключения на панели, кликнуть правой кнопкой мышки, выбрать пункт «Сведения о подключении». Там и указан постоянный IP-адрес компьютера. Если доступа к нему нет, то можно выяснить данные через маршрутизатор. В панели управления отображаются активные пользователи вместе с их «контактами».
Подключение к Linux через SSH
Перед подключением на компьютер с Windows устанавливается приложение PuTTY. Это популярный инструмент для организации SSH-соединения, которое предоставит удаленный доступ к командной строке Ubuntu. Важно понимать, что этот режим требует определенного опыта в управлении, ведь здесь нет привычной мыши и «окошек», а все команды передаются в текстовом виде. Отчеты предоставляются в таком же виде.
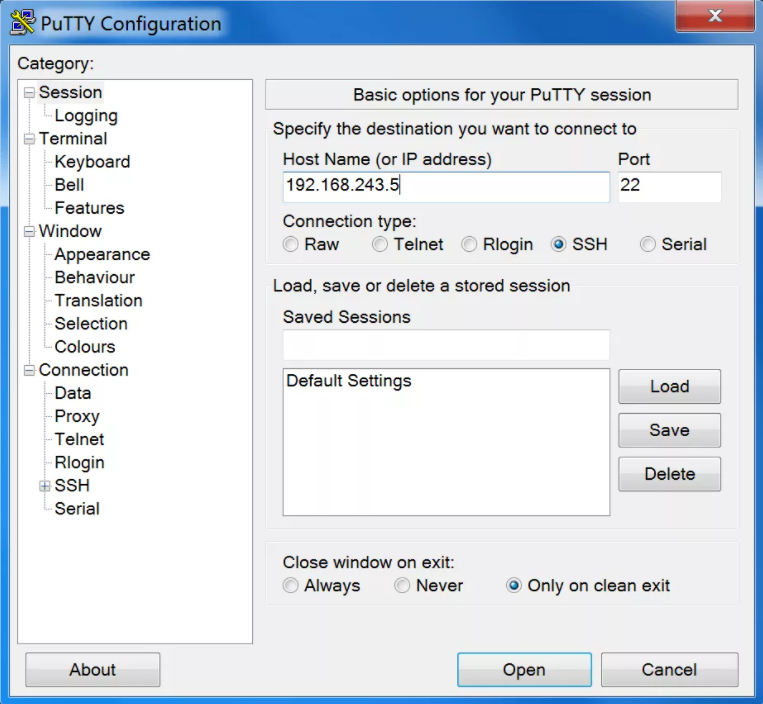
По умолчанию возможность коннекта через SSH в Ubuntu отключена. Так что предварительно эту систему требуется настроить. Активация функции выполняется вводом команды sudo apt install openssh-server (в той же консоли, где ранее был взят IP-адрес). Логин и пароль подключения будут те же, что используются при входе в операционную систему.
Из-за неудобства управления в текстовой среде этот вариант востребован для удаленной активации более удобных инструментов. Например, тех же протоколов RDP или VNC. В них также пригодится IP-адрес, поэтому получить минимальные навыки работы в консоли все равно рекомендуется. Это упростит решаемые задачи, если по каким-то причинам не удается соединение в других режимах.
Подключение из Windows через RDP
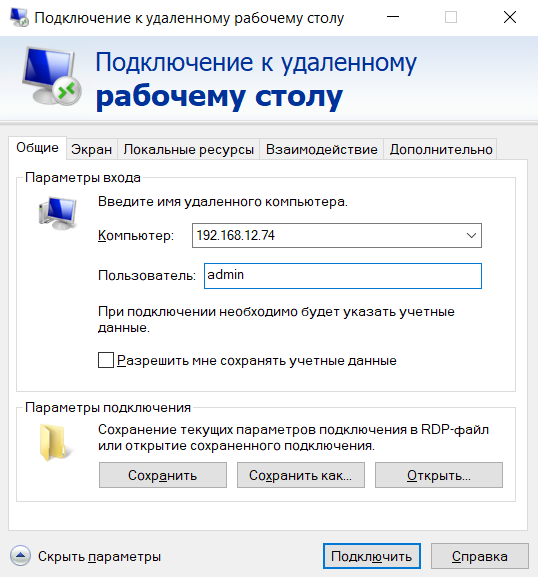
Способ подключения через службу Remote Desktop Protocol (RDP) распространен при работе с машинами на платформе Windows. Популярность инструмента объясняется просто – его поддержка встроена во все виды и версии операционных систем. Все, что понадобится для подключения, уже известно: это IP-адрес, логин и пароль от Ubuntu. Запускается утилита через поиск, называется она «Подключение к рабочему столу».
На компьютере-клиенте требуется установка приложения xrdp.
- Необходимо открыть окно термина нажатием комбинации клавиш Ctrl+Alt+T.
- Ввести текстовую команду sudo apt install xrdp и нажать «Ввод».
- Провести активацию программы командой sudo systemctl enable xrdp.
После установки надо ввести на компьютере-сервере данные доступа и нажать кнопку «Подключить». Если поставить галочку «Разрешить мне сохранять учетные данные», последующие входы будут выполняться без дополнительных вопросов. Но в первый раз пароль всегда вводится вручную. При желании создается отдельный конфигурационный файл (востребовано, когда много компьютеров с удаленным управлением).
После подключения пользователь видит рабочий стол компьютера на Ubuntu. Работа с его окнами не отличается от локального управления – функционируют все настроенные горячие клавиши, перетаскивание мышью. В некоторых версиях Ubuntu, например, 18.04 LTS, RDP не работает, пока не выйдешь из текущего пользователя. Подобные фишки обычно известны системным администраторам.
Подключение через VNC
Есть другой вариант удаленного рабочего стола – сеть Virtual Network Computing (VNC). Она тоже требует предварительной настройки обеих машин. Так, на компьютер с Ubuntu инсталлируется ПО, открывающее доступ к управлению.
Последовательность действий:
- Открыть окно терминала.
- Ввести команду sudo apt update.
- Установить сервер: sudo apt install tightvncserver.
- Активировать его: sudo tightvncserver.
Система предложит ввести пароль для подключения. Он понадобится при активации удаленного соединения, поэтому стоит записать (запомнить) внесенные данные.
На этом все! TightVNC Server готов к работе, остается следом настроить компьютер на Windows. Программа доступна на официальном сайте разработчика в двух версиях: 32 и 64-бит.
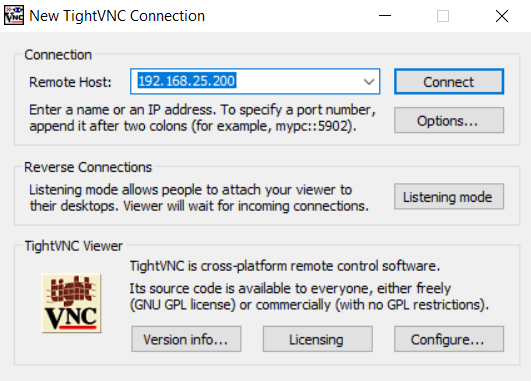
После инсталляции и запуска достаточно ввести IP-адрес хоста и пароль доступа, введенный после активации сервера на Ubuntu. Схема работы VNC аналогична предыдущему примеру: пользователь видит перед собой удаленный рабочий стол и управляет функциями операционной системы, как будто сидит за компьютером локально.
Создавая виртуальный сервер на VPS.house, вы получаете полностью 100% готовую к использованию операционную систему Windows Server, к которому сразу же можно подключаться по сети с любого внешнего устройства по протолку RDP.
RDP (Remote Desktop Protocol) – специальный протокол, разработанный компанией Microsoft для удаленного управления ОС Windows (протокол удалённого рабочего стола). Изначально, разумеется, как и многие вещи под Windows, этот протокол разработали другие люди, но в настоящее время поддерживает его и развивает Microsoft.
Согласно условиям лицензирования, ОС Windows Server допускает по умолчанию не более 2-х одновременных подключений по RDP к серверу, если нужно больше, то понимается терминальный сервер и лицензируется либо количество пользователей, либо количество подключаемых устройств. Но, подключившись к серверу по RDP, вы также можете поставить любое удобное вам решение для удалённого управления рабочим столом: TeamViewer, RAdmin и прочие.
Данная статья описывает процесс подключения к серверу Windows по RDP с многих популярных операционных систем. Ввиду этого получилась она довольно длинной. Моментально перейти к нужному вам разделу вы можете по этому меню:


Подключение в VPS серверу из десктопной Windows
 Данная инструкция проверена и работает успешно на всех популярных версиях Windows для персональных компьютеров: XP, Vista, Windows 7, 8, 8.1 и 10.
В каждой операционной системе Windows есть встроенное приложение для подключения по RDP – это программа «Подключение к удалённому рабочему столу» (Remote Desktop Connection в англоязычных ОС).
Для запуска ее зайдите по пути:
Пуск -> Программы -> Стандартные -> Подключение к удалённому рабочему столу
Если вы используете Windows 8, тогда:
Пуск -> Приложения -> Подключение к удалённому рабочему столу
Если вы используете Windows 10, тогда:
Пуск -> Все приложения (может этого пункта не быть!) -> Стандартные Windows -> Подключение к удалённому рабочему столу
Или же просто нажмите комбинацию клавиш Win+R и в открывшемся окне наберите mstsc

В открывшемся окне наберите IP-адрес вашего виртуального сервера и нажмите кнопку «Подключить». IP-адрес сервера вы можете видеть в вашем личном кабинете в разделе «Мои серверы»:


Если вы заказали сервер с 2-я или большим количеством IP-адресов, то для подключения к серверу вы можете использовать любой из них – это ни на что не влияет.
Те, кто впервые стакиваются с созданием удалённого рабочего стола, часто задаются вопросом «Зачем нужны эти IP-адреса и сколько нужно именно им», часто также путают количество IP-адресов с количеством рабочих столов или учётных записей, или полагают, что если зайти на сервер по одному адресу, то открывая браузер именно этот адрес будет браузер использовать. Нас самом же деле это всего лишь список внешних адресов, по которому можно подключиться к серверу, сама работа на сервере уже после подключения никаким образом не меняется.
Чаща всего при подключении по умолчанию настроена автоматическая передача данных из буфера обмена, а также подключаются к серверу и становятся на нём видны локальные диски устройства, с которого вы подключаетесь. При сразу после нажатия на кнопку «Подключить» вы можете увидеть уведомление о возможном вреде, который может нанести как удалённый компьютер вашему, так и ваш удалённому. Такое вполне возможно если вы подключаетесь к чужому серверу, на котором могут быть вирусы или вы подключаетесь к своему проведенному серверу с чужого заражённого ПК.
Подключаясь к только что созданному и чистому серверу можно смело отключить дальнейшие уведомления и продолжить процесс подключения.
Далее вы увидите окно с вводом авторизационных данных:
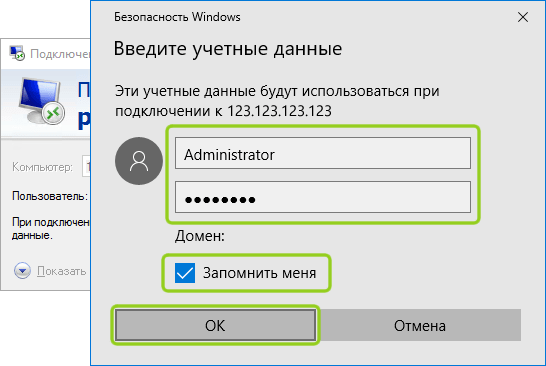
При создании каждого нового сервера система VPS.house автоматически генерирует новый уникальный пароль для него, при этом на всех серверах Windows по умолчанию остаётся имя пользователя Administrator. Пароль от сервера отображается также в личном кабинете возле вашего сервера на странице «Мои серверы»:

В целях безопасности, по умолчанию пароль от сервера скрыт и отображается только по нажатию на ссылку «Показать пароль», при этом сайт попросит вас ввести пароль от вашей учётной записи на VPS.house.
Обратите, пожалуйста, внимание на то, что очень часто при попытке подключения с Windows 7 если копировать и вставлять пароль, система показывает ошибку о неверно введённых учетных данных, тоже самое может возникать и в других версиях. Если вы с этим столкнулись, просто
введите пароль вручную
и обязательно с учётом регистра (заглавные буквы вводите заглавными, а строчные строчными и строго в английской раскладке клавиатуры).
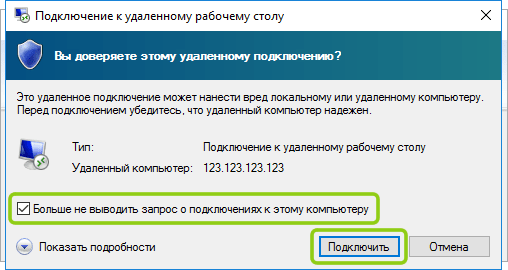
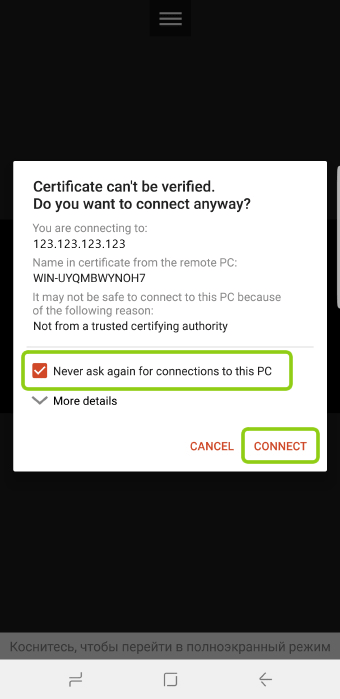
После успешной авторизации перед началом сессии вы получите уведомление о неуспешной проверке подлинности удаленного компьютера. Причина этого уведомления в том, что сессия на стороне сервера шифруется по умолчанию с помощью SSL-сертификата, который сгенерировал сам же сервер, а не тем, что мог быть выдан авторизованным центром сертификации.

Данное уведомление не говорит о проблемах безопасности, и вы смело можете отключить его для будущих подключений к этому же серверу, отметив галочкой «Больше не выводить запрос о подключениях к этому компьютеру».
Если вы используете для работы Windows XP и при подключении система выдает ошибку с текстом «Удаленный компьютер требует проверку подлинности на уровне сети, которую данный компьютер не поддерживает», значит на ваш ПК очень сильно устарел и нужно дополнительно установить небольшое обновление, где его взять и как установить
мы подробно расписали здесь
.
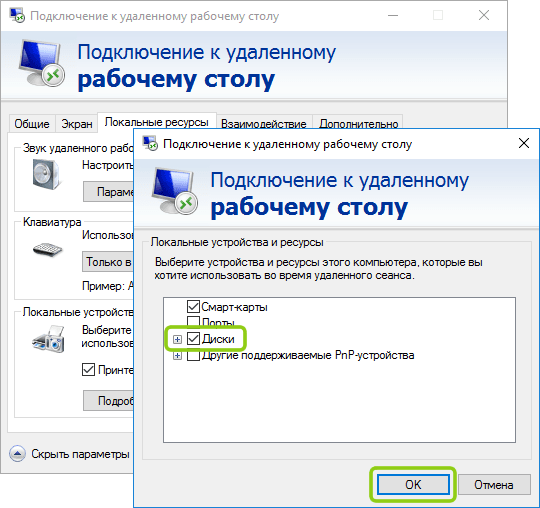
Встроенная программа подключения к удалённому рабочему столу позволяет с лёгкостью передавать файлы на сервер, копируя их на вашем ПК и вставляя в любую папку уже на самом сервере и наоборот. Помимо этого, можно включить передачу на сервер практически любых USB-устройств и сетевых принтеров и сканеров.
Для включения этих возможностей перед подключением к серверу нажмите на кнопку «Показать параметры»:

Откроется режим расширенных настроек подключения к вашему VDS серверу. Перейдите на вкладку «Локальные ресурсы» и отметьте галочкой требуемые для вас устройства:

Еще одна очень полезная и популярная функция – это возможность создать готовый файл подключения (так называемый «ярлык»), в котором уже сохранены все нужные вам настройки и данные авторизации на сервере. Это особенно удобно если вы хотите дать доступ сотруднику, который не является опытным пользователем ПК.
Для этого также в расширенных настройках подключения на вкладке «Общие» введите имя пользователя (на серверах VPS.house это всегда по умолчанию Administrator), отметьте галочкой «Разрешить мне сохранять учетные данные», чтобы не приходилось вводить пароль каждый раз и, по завершению внесения всех нужных вам остальных параметров подключения (если таковые есть), нажиме кнопку «Сохранить как»:

В итоге вы получите готовый файл с подключением, который вы можете отправить вашему коллеге и тот в свою очередь подключится к серверу 2-я простыми кликами по нему мышкой.
В целях безопасности по умолчанию в данный файл не будет добавлен пароль от учётной записи, он будет запрошен при первом подключении.
Как подключиться к серверу по RDP если вы работаете с Ubuntu
 Протокол подключения к уделённому рабочему столу Windows (RDP) – это закрытый протокол компании Microsoft, официальных служб под операционные системы Linux Microsoft не выпускает, но так или иначе уже давно существуют стабильно работающие решения, которые в последних редакциях Ubuntu даже включены в изначальную сборку.
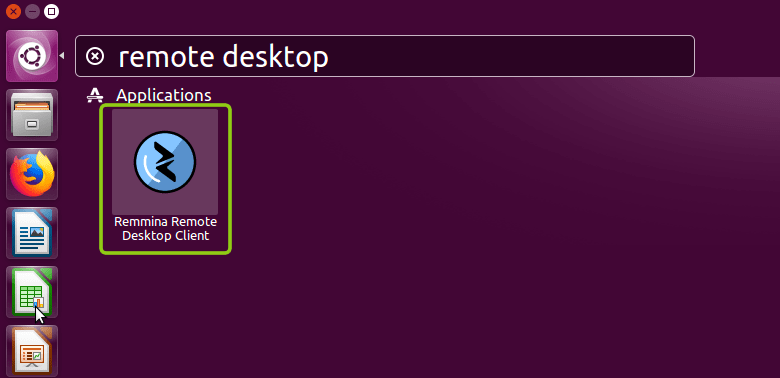
Речи идет о клиенте под названием Remmina
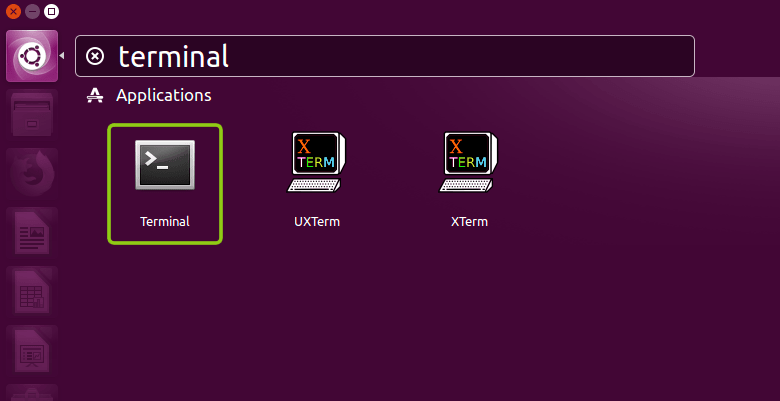
По умолчанию если Remmina включена в вашу сборку, вы можете найти ее в Поиске по запросу «Remote Desktop Client», если ее нет, то установите ее при помощи следующих команд в Терминале.
- Устанавливаем пакет Remmina
sudo apt-add-repository ppa:remmina-ppa-team/remmina-next - Устанавливаем обновления
sudo apt-get update - Устанавливаем плагин протокола RDP
sudo apt-get install remmina remmina-plugin-rdp libfreerdp-plugins-standard - Если ранее у вас уже была установлена какая-либо версия Remmina или была запущена до установки, то ее необходимо перезапустить. Это лучше всего сделать перезагрузкой компьютера или с помощью команды:
udo killall remminaЕсли после её выполнения вы получили сообщение об ошибке типа «процесс не найден», значит и так все хорошо и можно было команду и не выполнять.
В меню поиска наберите «remote desktop» или «remmina», чтобы найти установленное приложение:
Remmina позволяет добавлять и сохранять список подключений для быстрого доступа к тому или иному серверу. Для сознания нового нажмите на «+», как показано на изображении:

Заполните поля авторизационными данными, которые
указаны в вашем личном кабинете
:
На вкладке «Advanced» вы можете также указать качество подключения к серверу и детализации при передаче изображений:
После сохранения данных вы всегда сможете найти ваш сервер в списке подключений Remmina. Для подключения к серверу теперь достаточно просто кликнуть дважды мышкой по строке сервера:

Если вы подключаетесь к серверу впервые с этого приложения, то оно может показать информацию о ошибке в сертификате безопасности. Почему это происходит
мы описали выше в блоке подключения к серверу из десктопной Windows
.
Достаточно нажать «ОК» и программа продолжит подключение к вашему серверу:

Как подключиться к серверу по RDP если вы работаете с Debian
 Протокол RDP (Remote Desktop Protocol) – это закрытый протокол удалённого рабочего стола Microsoft. К сожалению, они не выпускают официальных клиентов для работы подключения к серверам Windows с операционных систем, работающих на базе Linux. Однако уже довольно давно существуют стабильно работающие решения.
Одно из самых популярных – это клиент для всевозможных удалённых Remmina, именно его мы и рекомендуем использовать для включения к серверам VPS.house или любым другим под управлением ОС Windows.

- Указываем путь к установочным файлам
echo 'deb http://ftp.debian.org/debian stretch-backports main' | sudo tee --append /etc/apt/sources.list.d/stretch-backports.list >> /dev/null - Запускаем процесс установки
sudo apt update - Устанавливаем плагин протокола RDP
sudo apt install -t stretch-backports remmina remmina-plugin-rdp remmina-plugin-secret libfreerdp-plugins-standard
Сразу после установки приложение можно найти через поиск программ:

В отличие стандартного от RDP-клиента ОС Windows, Remmina позволяет сохранять в список все свои подключения к различным серверам и осуществлять моментальный доступ к ним. Для добавления первого сервера в список нажмите «+» в левом верхнем углу:

В открывшемся окне задайте параметры подключения к вашему серверу и введите удобное для запоминания имя сервера. Все необходимые для подключения данных указаны в вашем личном кабинете:

На вкладке «Advanced» («Дополнительные») вы можете задать параметры передачи звука с сервера на ваш ПК, а также качество передаваемого изображения при подключении:

После сохранения я настроек вы увидите новую строку в списке подключений. Для начала работы с сервером достаточно просто дважды кликнуть по нему мышкой:
В момент первого подключения к серверу Remmina покажет уведомление у недоверенном сертификате шифрования. Это не является какой-либо ошибкой или проблемой безопасности. Причину этого сообщения мы описали выше. Просто нажмите «ОК» и вы увидите рабочий стол вашего сервера, при условии, разумеется, что все данные для подключения ранее были введены корректно.


Подключение серверу по RDP из Mac OS
 Для подключения к удалённому рабочему столу для Mac OS компания Microsoft разработала и поддерживает официальный RDP-клиент. Он стабильно работает с любыми версиями ОС Windows.
Для загрузки его перейдите на сайт iTunes: https://itunes.apple.com/gb/app/id715768417
Программа обладает интуитивно понятным интерфейсом и позволяет создавать список серверов для дальнейшего моментального подключения к ним.
Для добавления нового сервера в список нажмите «New», как показано на скриншоте:


В открывшемся окне укажите авторизационные данные, как указано
в вашем личном кабинете
(IP-адрес сервера, логин Administrator и его пароль), и укажите произвольное название для нового подключения (Connection Name).
По завершению ввода нажмите на кнопку закрытия окна – все данных сохранятся и появится строчка с вашим сервером в списке подключений:

Кликните на эту строчку дважды мышкой, и вы подключитесь к серверу.
При попытке подключения к вашему VPS серверу если он работает на Windows Server 2008 или более новой версии, программа покажет уведомление о том, что не удалось проверить сертификат шифрования. Это не является проблемой безопасности, а всего лишь говорит о том, что сертификат выдан не сертифицированным центром, а сгенерирован самим же сервером.
Для того, чтобы это сообщение в будущем не возникало для этого сервера, нажмите «Показать сертификат».
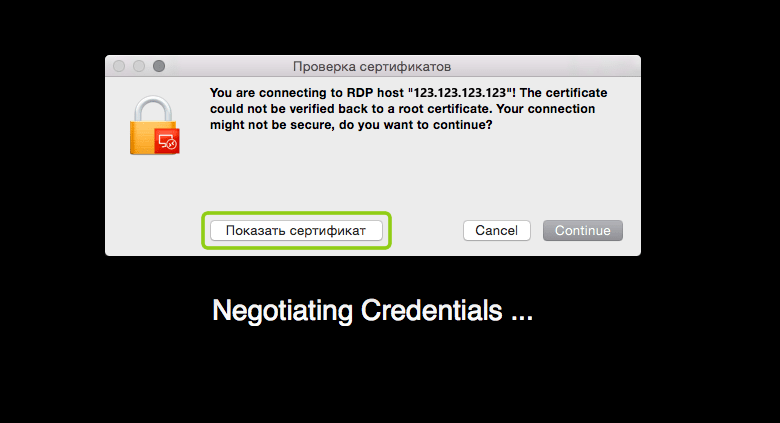
Отметьте галочкой «Всегда доверять…» и нажмите «Continue».

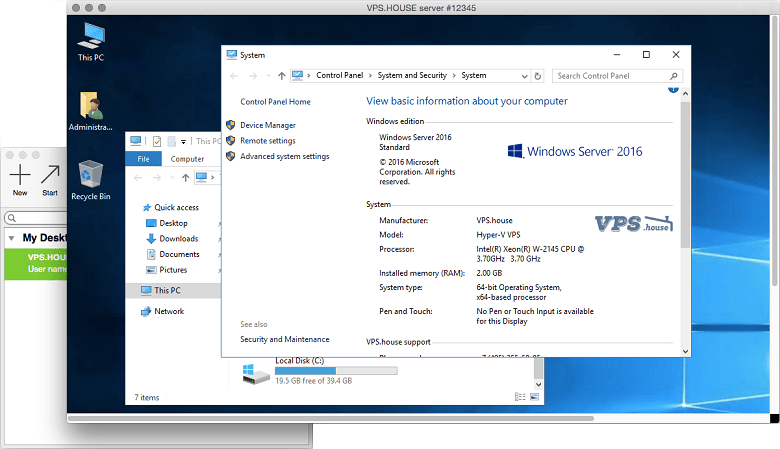
Если в настройках подключения все параметры были введены без ошибок (IP-адрес, логин и пароль), то вы сразу же увидите рабочий стол вашего Windows Server:
Подключение к VDS серверу со смартфона или планшета на iOS (с iPhone или iPad)
 Для iOS копания Microsoft выпускает полноценный официальный RDP-клиент комфортного и стабильного подключения к удалённому рабочему столу. Приложение называется Microsoft Remote Desktop или Удаленный рабочий стол: https://itunes.apple.com/ru/app/id714464092

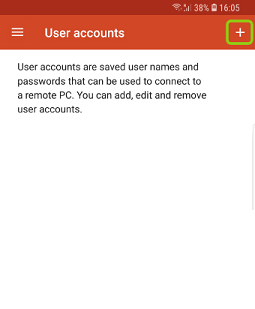
Microsoft Remote Desktop позволяет заранее настроить целый список используемых вами для частого подключения серверов.
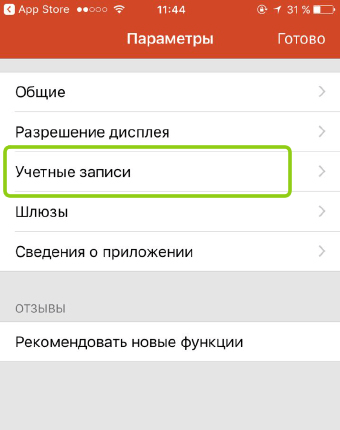
Специфика его работы заключается в том, что информация об учётных записях создаётся и хранится отдельно от самого списка серверов. Соответственно, для начала нам требуется добавить учётную запись пользователя Administrator. Для этого нажмите на кнопку настроек (иконка шестерёнок в верхнем левом углу) и выберите «Учётные записи»:

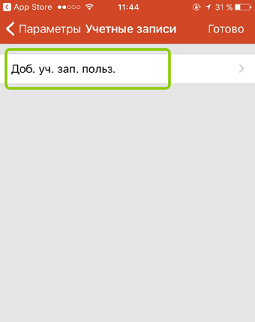
В открывшемся окне нажмите на «Добавление учётной записи пользователя» и введите логин Administrator и его пароль, как отображается
в вашем личном кабинете
:
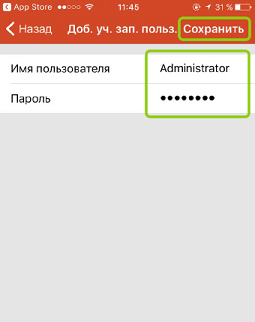

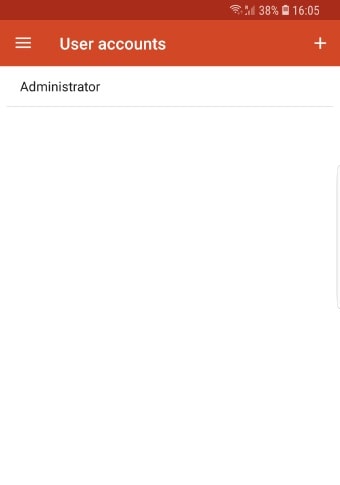
По завершению вы увидите, что учётная запись Administrator добавлена в список, далее нажмите кнопку «Готово» и вы вернетесь на стартовый экран.
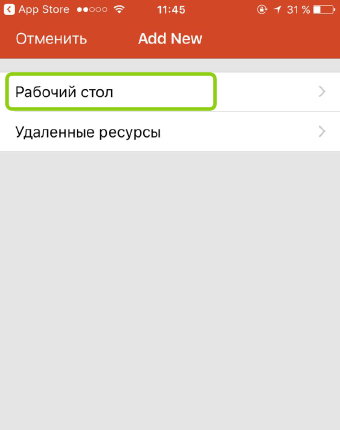
Следующим шагом добавляется непосредственно информация о самом сервере. Нажмите кнопку «+» в правом верхнем углу приложения и в открывшемся меню выберите «Рабочий стол»:

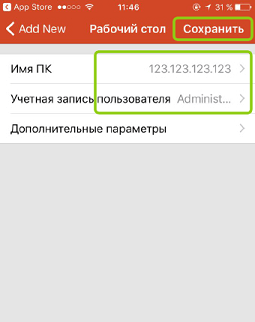
В окне добавления нового подключения укажите IP-адрес вашего сервера и выдерите учётную запись Administrator, добавленную на прошлом шаге:

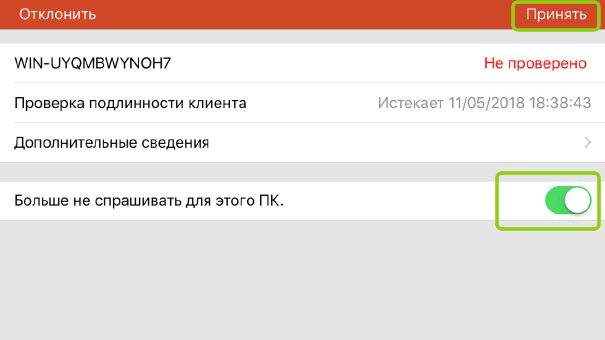
В момент первого подключения вы увидите уведомление вы увидите уведомление о недоверенном сертификате безопасности. Причину этого
мы описали выше
. Выдерите «Больше не спрашивать для этого ПК» и нажмите «Принять».
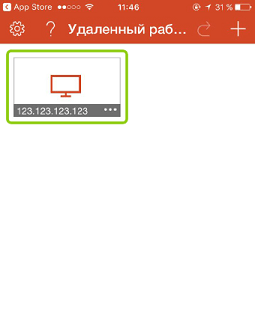
В случае если IP-адрес и авторотационные данные указаны без ошибки, вы успешно подключитесь к вашему виртуальному серверу:

Как подключиться к VPS серверу со смартфона или планшета на Android
 Для устройств под управлением Android компания Microsoft выпускает полноценное приложение для работы с удалённым рабочим столом – Microsoft Remote Desktop. Скачайте его как любое другое приложение в
Google Play
.

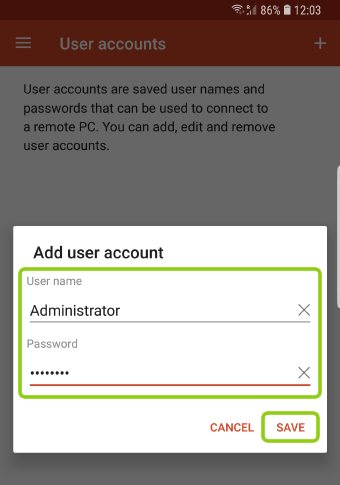
В отличие от всех описанных выше приложений для подключений с ПК, мобильное приложение Microsoft Remote Desktop разделяет учётные записи и сам список подключений. Поэтому сначала нужно добавить в список учётную запись пользователя Administrator с его паролем, который показан
в вашем личном кабинете
:


После добавления учётной записи возвращайтесь на главный экран приложения для добавления самого подключения (адреса вашего VDS сервера):


В открывшемся окне укажите IP-адрес вашего сервера (указан в
личном кабинете
), выберите добавленную ранее учётную запись Administrator и нажмите «Сохранить» («Save»):
На главном экране в списке подключений появится ваш сервер, просто нажмите на него, и программа начтёт подключение. Если вы подключаетесь с этого приложения к серверу впервые, то увидите информационное сообщение о том, что приложению не удалось проверить сертификат шифрования. Почему так происходит
описано в начале статьи
.
Достаточно отметить галочкой «Never ask again for connections to this PC» и данное уведомление больше появляться не будет. Далее нажмите «Connect» и если все авторотационные данные и IP-адрес сервера указан без ошибок, вы успешно к нему подключитесь:

P.S.: У клиентов нашего VPS-хостинга часто возникает вопрос, как подключиться к серверу с того или иного устройства. В поисковиках можно найти все эти инструкции в том числе и с картинками, и с видео. Надеюсь, данная статья, будет полезной и здесь, как содержащая в одном месте инструкции по подключению со всех самых популярных устройств и операционных систем.
Follow these steps :
- Step 1 – Install xRDP.
- Step 2 – Install XFCE4 ( Unity doesn’t seem to support xRDP in Ubuntu 14.04; although, in Ubuntu 12.04 it was supported ). That’s why we install Xfce4.
- Step 3 – Configure xRDP.
- Step 4 – Restart xRDP.
- Testing your xRDP connection.
- (note: this is a capital “i”)
- You are done,enjoy.
How do I access remote desktop from Ubuntu?
If you’re using a standard desktop, use these steps to use RDP to connect to Ubuntu.
- Ubuntu/Linux: Launch Remmina and select RDP in the drop-down box. Enter the remote PC’s IP address and tap Enter.
- Windows: Click Start and type rdp. Look for the Remote Desktop Connection app and click Open.
Does Microsoft remote desktop work with Ubuntu?
In order to connect to remote desktop session on an Ubuntu machine you need to install XRDP server on Ubuntu first. You can refer the article Installing XRDP from Ubuntu to install the XRDP server and connect to a Windows PC.
How do I RDP from Linux to Windows command line?
Remote Desktop from a Linux Computer with RDesktop
- Open a command shell using xterm.
- Type ‘rdesktop’ at the command prompt to see if you have rdesktop installed.
- If rdesktop is installed, then proceed. …
- Type ‘rdesktop’ followed by your server’s IP address. …
- You will see the Windows login prompt.
Can I use Windows Remote Desktop to connect to Linux?
2. The RDP Method. The easiest way to set up a remote connection to a Linux desktop is to use Remote Desktop Protocol, which is built into Windows. … In the Remote Desktop Connection window, enter the IP address of the Linux machine and click connect.
How do I connect Ubuntu to Windows 10?
Ubuntu can be installed from the Microsoft Store:
- Use the Start menu to launch the Microsoft Store application or click here.
- Search for Ubuntu and select the first result, ‘Ubuntu’, published by Canonical Group Limited.
- Click on the Install button.
How do I enable Remote Desktop on Linux?
To enable remote desktop sharing, in File Explorer right-click on My Computer → Properties → Remote Settings and, in the pop-up that opens, check Allow remote connections to this computer, then select Apply.
How do I connect to a Linux server remotely?
Connect to Linux Remotely Using SSH in PuTTY
- Select Session > Host Name.
- Input the Linux computer’s network name, or enter the IP address you noted earlier.
- Select SSH, then Open.
- When prompted to accept the certificate for the connection, do so.
- Enter the username and password to sign into your Linux device.
How do I install Remote Desktop?
Set up remote access to your computer
- On your computer, open Chrome.
- In the address bar, enter remotedesktop.google.com/access .
- Under “Set up Remote Access,” click Download .
- Follow the onscreen directions to download and install Chrome Remote Desktop.
How do I know my IP address Ubuntu?
Find your IP address
- Open the Activities overview and start typing Settings.
- Click on Settings.
- Click on Network in the sidebar to open the panel.
- The IP address for a Wired connection will be displayed on the right along with some information. Click the. button for more details on your connection.
How do I enable remote desktop in Windows 10?
Windows 10 Fall Creator Update (1709) or later
- On the device you want to connect to, select Start and then click the Settings icon on the left.
- Select the System group followed by the Remote Desktop item.
- Use the slider to enable Remote Desktop.
1. Overview
Windows Subsystem for Linux (WSL) allows you to leverage the benefits of Linux package management and command-line tools to streamline your development workflow.
Some tools used during the development process are only available or are performed best on one platform and transferring data from one system to another to visualise or share can be tedious. WSL solves this problem with a feature called interoperability.
Interoperability is the ability to transparently execute commands and applications, share files, network and environment variables across Windows and Ubuntu.
We’ll illustrate all these notions by generating data from your Ubuntu WSL instance using your Windows user profile directory, perform some transformations via PowerShell scripts, and finally, visualise those on Windows. We are going to cross the chasm between the two worlds not just once, but many times, seamlessly!
In this tutorial, you will learn:
- How to access a service provided by a web server running on your Ubuntu WSL instance from Windows.
- Share environment variables between Windows and Ubuntu, back and forth.
- Access files across filesystems, and discover where they are located on both sides.
- Run Windows commands (command line and graphical) from your WSL instance and chain them.
What you will need:
- Know how to use command line tools on Windows or Linux.
- A PC with Windows 10 or 11.
- Optional: LibreOffice or MS Excel to visualise and manipulate generated data from Ubuntu.
2. Install Ubuntu on WSL2
This tutorial assumes that you already have WSL2 installed with the latest LTS release of Ubuntu.
If not, check out our getting started tutorial for Windows 10 and Windows 11:
- Install Ubuntu on WSL2 on Windows 10 and Windows 11 with GUI support
For this tutorial, we will assume that you have installed the Ubuntu main WSL application.
Once you have completed the relevant tutorial, the following steps will work on either Windows 10 or 11.
Note: in this tutorial, we consider that interoperability is turned on in WSL.conf, which is the default behaviour. If you have disabled it, you can either use the ubuntu reconfiguration tool on Ubuntu 22.04+, or, for earlier versions, directly modify back wsl.conf yourself as described on wsl.conf documentation. The settings you are interested in are [Interop]: enabled and appendWindowsPath both set to true (or not being present, which defaults to true).
3. Share ports between WSL and Windows
Install Jupyter notebook on WSL.
Let’s install Jupyter notebook, a web-based interactive computing platform where we will generate some statistics.
- Start our WSL instance, on a terminal, using Ubuntu:
$ ubuntu.exe
- Install the python package manager pip:
$ sudo apt update

$ sudo apt install python3-pip
- Get Jupyter notebook installed via pip:
$ pip install notebook
Executing Jupyter notebook.
Finally, let’s start Jupyter, by adding it to the user PATH first:
$ export PATH=$PATH:~/.local/bin

$ jupyter notebook --no-browser

[I 10:52:23.760 NotebookApp] Writing notebook server cookie secret to /home/u/.local/share/jupyter/runtime/notebook_cookie_secret

[I 10:52:24.205 NotebookApp] Serving notebooks from local directory: /home/u

[I 10:52:24.205 NotebookApp] Jupyter Notebook 6.4.10 is running at:

[I 10:52:24.205 NotebookApp] http://localhost:8888/?token=1d80ee69da6238f22bb683a4acd00025d32d15dde91cbdf4

[I 10:52:24.205 NotebookApp] or http://127.0.0.1:8888/?token=1d80ee69da6238f22bb683a4acd00025d32d15dde91cbdf4

[I 10:52:24.205 NotebookApp] Use Control-C to stop this server and shut down all kernels (twice to skip confirmation).

[C 10:52:24.209 NotebookApp]

To access the notebook, open this file in a browser:

file:///home/u/.local/share/jupyter/runtime/nbserver-5744-open.html

Or copy and paste one of these URLs:

http://localhost:8888/?token=1d80ee69da6238f22bb683a4acd00025d32d15dde91cbdf4

or http://127.0.0.1:8888/?token=1d80ee69da6238f22bb683a4acd00025d32d15dde91cbdf4

[I 10:53:03.628 NotebookApp] 302 GET / (127.0.0.1) 0.600000ms

[I 10:53:03.633 NotebookApp] 302 GET /tree? (127.0.0.1) 1.040000ms
If you look closely at the output, you will see that the Jupyter notebook is now running, and its interface is exposed via its internal web server on localhost, port 8888.
Accessing port 8888
This port can be accessed directly from our Ubuntu WSL instance via curl, lynx (a command line web browser), or any GUI web browser executed in WSL.
However, this tutorial is not about running Linux GUI applications from WSL (which you can do), or visualising data in the command line, but interoperability! So, as you can guess, any network port exposed locally is also available from Windows directly, if no conflict occurs.
Let’s try this right away: from Windows, launch a web browser and enter the url printed above with the corresponding token, for example: http://localhost:8888/?token=1d80ee69da6238f22bb683a4acd00025d32d15dde91cbdf4.

And it works! You can thus easily expose and share any services that are using network ports between your Windows machine and WSL instances!
Note: you need to keep this command line Window opened to have your Jupyter instance running. If you close it, the service will shut down and you won’t have access to it anymore. Other command-line operations in the same WSL instance should be done on another terminal.
4. Get access to windows env variable on WSL
Our next step is to be able to generate some statistics on our Windows user personal directory. For Jupyter to access those, we need to know how to get access from our Ubuntu instance to the Windows partition(s). You may already know about it by reading documentation or blog posts, but let’s do something even cooler: let’s discover it by using environment variables!
On another terminal, under powershell, let’s first check our Windows user profile directory:
PS C:Usersmyuser> echo $env:USERPROFILE

C:Usersmyuser
Let’s share it with Ubuntu by setting WSLENV:
PS C:Usersmyuser> $env:WSLENV="USERPROFILE"

PS C:Usersmyuser> ubuntu.exe

$ echo $USERPROFILE

C:Usersmyuser
Awesome! Setting WSLENV=”ENVVAR1:ENVVAR2:…” allows us to share multiple environment variables from Windows to our Ubuntu instance. We can then retrieve the value under Ubuntu.
However, you may notice that the environment variable value was shared as is, which is fine in most cases but not for path related content. Let’s check:
$ ls 'C:Usersmyuser'

ls: cannot access 'C:Usersmyuser': No such file or directory
Indeed, C:Usersmyuser is not a compatible Linux-path where the Windows file system is located under WSL.
But we haven’t done all that for nothing! WSLENV variable declaration can be suffixed with /p, which then translates any paths between Windows and your Linux instance.
Let’s try again:
$ exit

PS C:Usersmyuser> $env:WSLENV="USERPROFILE/p"

PS C:Usersmyuser> ubuntu.exe

$ echo $USERPROFILE

/mnt/c/Users/myuser

$ ls /mnt/c/Users/myuser

AppData

'Application Data'

Contacts

Cookies

Desktop

[…]
And here we go! We now know where our user profile data is accessible on WSL thanks to environment variables sharing. But more generally, environment variables could be used in your scripts, or any services in your WSL instance, where parameters are controlled from Windows.
Going further:
- There are many other flags available for environment variables sharing via WSLENV. Check out the reference section to have a look at some handy links explaining each of them.
- The place where your windows filesystems are mounted can vary depending on your configuration. This can be changed with our configuration tool on Ubuntu 22.04+ or by modifying the
automountsection in wsl.conf.
With this, we are now ready to generate some statistics on your Windows user profile directory from our WSL instance!
5. Accessing Windows file from Ubuntu to run our script
After this little detour into the command line world to discover which path to use, let’s go back to our Jupyter interface in our browser running on Windows.
We are going to create a stats-raw.csv file, containing statistics about our user profile directory.
Some preliminary warnings: accessing Windows filesystem from Ubuntu is using the 9P protocol, which might mean slower access and indexing of files than native performance. So that this section doesn’t take too long to complete, we are advising you to choose a subdirectory or your Windows user profile directory, with fewer files and directories to run over. We will call it here /mnt/c/Users/mysuser/path/my/subdirectory.
From the Jupyter main screen, create a new notebook to start developing an interactive Python solution. You can do this by clicking on the New button, and then clicking on the Python 3 option, as we can see below.
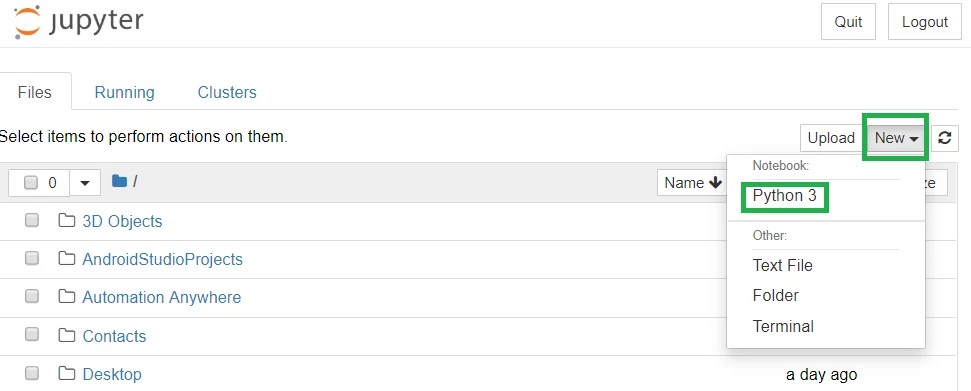
Copy this to the first cell, adapting the input directory:
import os

import mimetypes

import csv

data = {}

for root, dirs, files in os.walk("/mnt/c/Users/mysuser/path/my/subdirectory"):

for f in files:

mime_type, encoding = mimetypes.guess_type(os.path.join(root, f))

if not mime_type:

continue

if mime_type not in data:

data[mime_type] = 0

data[mime_type] += 1

csv_cols = ["mime_type", "count"]

with open("stats-raw.csv", "w") as f:

writer = csv.writer(f)

writer.writerow(csv_cols)

for mime_type, count in data.items():

writer.writerow([mime_type, count])

print(data)
This script will enumerate all files under “/mnt/c/Users/mysuser/path/my/subdirectory”, get the mime types of each entry, and count them. It will write the result in your Ubuntu user home directory as a Comma-separated Values (csv) file named “stats-raw.csv” and print it as well for your viewing pleasure. 
Let’s execute it by clicking on the “Run” button in the web interface.

Note that while the entry is running, you will have a In [*] with the star marker. This will be replaced by In [1]: when completed. Once done and the results are printed, let’s ensure that the CSV file is present on disk using an Ubuntu terminal:
$ cat stats-raw.csv

mime_type,count

text/plain,468

chemical/x-cerius,3

application/x-pkcs12,5

application/zip,27

text/x-chdr,522

text/markdown,840

text/x-c++src,235

application/json,1199

application/xml,305

application/javascript,250

text/css,49

image/png,3459

image/svg+xml,534

application/vnd.ms-pki.seccat,2

application/x-msdos-program,583

chemical/x-pdb,20

chemical/x-cache,13

chemical/x-ncbi-asn1-binary,3

image/vnd.microsoft.icon,91

[…]
6. Accessing Ubuntu files from Windows
So, we now have a stat file on Ubuntu, which is the result of computation on files stored on the Windows partition. We now want to analyse this file using Windows tools, but first, can we access it from Windows?
Of course, interoperability goes both ways, and we already know exactly how to discover where those are available on Windows: introducing sharing env variable round 2!
Start powershell from Ubuntu and share HOME directory
Similarly to USERPROFILE, we want, this time, to share the user HOME variable with Windows, and let interoperability translate it to a Windows compatible path. Let’s do this right away from an Ubuntu terminal:
$ export WSLENV=HOME/p

$ cmd.exe

C:Windows> set HOME

HOME=\wsl.localhostUbuntuhomeu

C:Windows> exit
First, we are able to export the HOME variable to subprocess, telling us that we want to translate the path back to Windows compatible paths by appending /p as we previously saw. But this is not all: we are running cmd.exe from an Ubuntu terminal (which is itself running inside a powershell terminal), and get the corresponding Windows path! Even if that sounds a little bit like inception, using this feature is just seamless: you are launching any process, Linux or Windows, from your Ubuntu terminal. Inputs and outputs are connected and this complex machinery works flawlessly!
Accessing Linux files from Windows
Open Windows Explorer and navigate to that path to confirm they are visible there:

Let’s now create a powershell script, from Windows, on this Ubuntu filesystem and save it there:
You can open any editor, from notepad to a full-fledged IDE. Create a file named filter-less-than-five.ps1 under \wsl.localhostUbuntuhome<youruser> (with the following content:
$csvImport = $input | ConvertFrom-CSV

# Create Array for Exporting out data

$csvArray = [System.Collections.ArrayList]@()

# Filter lines where count less than 5

Foreach ($csvImportedItem in $csvImport){

if([int]$csvImportedItem.count -ge 5){

$csvArray += $csvImportedItem

}

}

$csvArray | convertTo-CSV -NoTypeInformation
This script will take a CSV-formatted content as input, filter any item which has less than 5 occurrences and will export it to the standard output as another CVS-formatted content.
After saving, let’s check it’s available on the WSL side:
$ cat filter-less-than-five.ps1
You should see the file content there.
This powershell script, written from Windows on your Linux instance will be quite handy to create a pipeline between applications.
7. Execute and connect Linux and Windows executables.
This is all very impressive, we have been able to share network, env variables, paths, and files, execute processes interchangeably between Ubuntu and Windows. Let’s go one step further by chaining all of this together in a single, but effective line:
$ cat stats-raw.csv | powershell.exe -ExecutionPolicy Bypass -File $HOME/filter-less-than-five.ps1 | tee stats.csv

"mime_type","count"

"text/plain","468"

"application/x-pkcs12","5"

"application/zip","27"

"text/x-chdr","522"

"text/markdown","840"

"text/x-c++src","235"

"application/json","1199"

"application/xml","305"

[…]
Let’s figure out what happens here:
-
We are executing a Linux application
catto display file content, hosted on Ubuntu. -
We are then executing
powershell.exefrom Ubuntu which: -
Takes as input the content piped from Ubuntu.
-
This powershell application is using a script, hosted on Ubuntu (that we wrote from Windows in the previous section), converted transparently to a windows path for powershell to be able to consume it.
-
Then, the script proceeds some operations on the content and prints on stdout the filtered csv data.
-
This is then piped back to Ubuntu, to be processed by the
teecommand, which writesstats.csvto the Ubuntu filesystem, and displays the resulting output.
This simple command is exercising many concepts of interoperability we saw in previous sections. However, as you can see, this is completely transparent to us!
This deep integration for back and forth access between systems allows users to create awesome pipelines, taking the best tool that is available, independent of their host operating system. To make that easy, WSL transparently converts any paths and does the heavy lifting for you so that you don’t need to do the manual conversion!
And finally, we can even run the default associated GUI Windows application associated with those files, from Ubuntu:
$ explorer.exe stats.csv
Note: You can’t deny it’s really amazing to be able to execute explorer.exe from Ubuntu.
This will open LibreOffice, Microsoft Excel, or any other tool you may have associated with csv files. From there, you will be able to draw beautiful charts, make further analyses, and so on. But that’s another story…

8. Enjoy Ubuntu on WSL!
That’s all folks! In this tutorial, we’ve shown you many aspects of interoperability on WSL. To sum it up, we can:
- Run Ubuntu commands from a Windows PowerShell prompt such as cut, grep, or awk
- Run Windows commands from an Ubuntu Terminal such as explorer.exe or notepad.exe
- Share network ports between Ubuntu and Windows systems.
- Share environment variables between Ubuntu and Windows systems.
- Open files on the Windows file system from Ubuntu.
- Browse the Ubuntu file system from Windows Explorer.
- Pipe and connect any commands or applications between Ubuntu and Windows systems.
We hope you enjoy using Ubuntu inside WSL. Don’t forget to check out our other tutorials for tips on how to optimise your WSL experience.
Further Reading
- WSL ENV documentation
- WSL.conf documentation
- Jupyter notebook
- Install Ubuntu on WSL2 on Windows 10 and Windows 11 with GUI Support
- Microsoft WSL Documentation
- WSL on Ubuntu Wiki
- Ask Ubuntu
Was this tutorial useful?
Thank you for your feedback.
Содержание
- Digital Citizen
- Connect to a Windows PC from Ubuntu using Remote Desktop Connection
- Step 1: Enable Remote Desktop Connections on your Windows PC
- Step 2: Launch the Remmina Remote Desktop Client
- Step 3: Configure and establish the Ubuntu remote desktop session to Windows
- Do you use Ubuntu to remote control Windows PCs?
- Install and configure xrdp to use Remote Desktop with Ubuntu
- Prerequisites
- Install a desktop environment on your Linux VM
- Install and configure a remote desktop server
- Set a local user account password
- Create a Network Security Group rule for Remote Desktop traffic
- Connect your Linux VM with a Remote Desktop client
- Troubleshoot
- Next steps
- Как из Linux подключиться к удалённому столу Windows по RDP
- Как подключиться командой freerdp
- Опции xfreerdp
- Как в freerdp создать общие папки
- Как вывести удалённый рабочий стол на другой монитор
- Как установить размер окна удалённого рабочего стола
- Ethical hacking and penetration testing
- InfoSec, IT, Kali Linux, BlackArch
- How to connect to Windows remote desktop from Linux
- How to use freerdp
- How to connect with freerdp command
- Xfreerdp options
- How to create shared folders in freerdp
- How to bring remote desktop to another monitor
- How to set the size of the remote desktop window
- How to use rdesktop
- How to connect to remote desktop with rdesktop
- How to connect from Linux to another Linux via RDP
- RDP клиенты удаленного доступа для Linux
- Для чего нужны RDP клиенты?
- Популярные Linux RDP клиенты
- Remmina
- Установка Remmina
- Обновление Remmina
- Настройка Remmina
- Подключение по RDP к удаленной машине
- Apache Guacamole
- Установка Apache Guacamole
- Настройка Apache Guacamole
- FreeRDP
- Установка FreeRDP
- Настройка FreeRDP
- TigerVNC
- Установка TigerVNC
- Настройка TigerVNC
- rdesktop
- Установка rdesktop
- Настройка rdesktop
- Vinagre
- Установка Vinagre
- NoMachine NX Client
- Установка NoMachine NX Client
- Установка Krdc
- TeamViewer
- Установка TeamViewer
- Заключение
Digital Citizen

Connect to a Windows PC from Ubuntu using Remote Desktop Connection
One useful feature of Windows is that you can connect to your desktop from another location to remotely manage your computer. Fortunately, major Linux distributions also offer this feature and Ubuntu is one of them. If you want to connect to your Windows computers from Ubuntu remotely, you can use the default RDP client found in it, called Remmina. Here is how to create, configure and establish a remote desktop connection from Ubuntu to Windows:
NOTE: This tutorial was created on Ubuntu 18.04 LTS (Bionic Beaver). However, it works in other versions of Linux too.
Step 1: Enable Remote Desktop Connections on your Windows PC
If you want to allow other computers to connect remotely to your Windows PC, you must first configure it to accept remote desktop connections. To learn how to do it, read this tutorial: How to enable Remote Desktop Connections in all versions of Windows.
Step 2: Launch the Remmina Remote Desktop Client
By default, Ubuntu comes with a remote desktop client app that supports the Remote Desktop Protocol (RDP) used by Windows operating systems for remote connections. You can find it in Ubuntu’s Apps list.
If you prefer to search, you can find the default Ubuntu RDP client by using the RDP search term.
Step 3: Configure and establish the Ubuntu remote desktop session to Windows
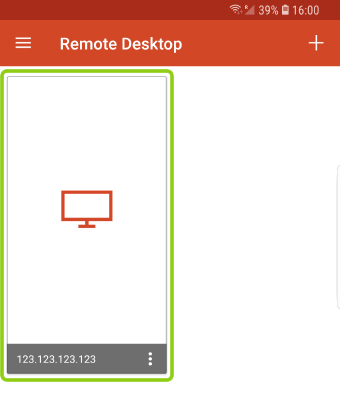
Once you open the Remmina Remote Desktop Client, you should see something like this:
Click the «Create a new connection profile» button.
Its icon is a green plus sign which is easy to spot in the top-left corner of the window.
The previous action opens a window called Remote Desktop Preference. Here you can configure the remote desktop Ubuntu to Windows connection that you are going to establish.
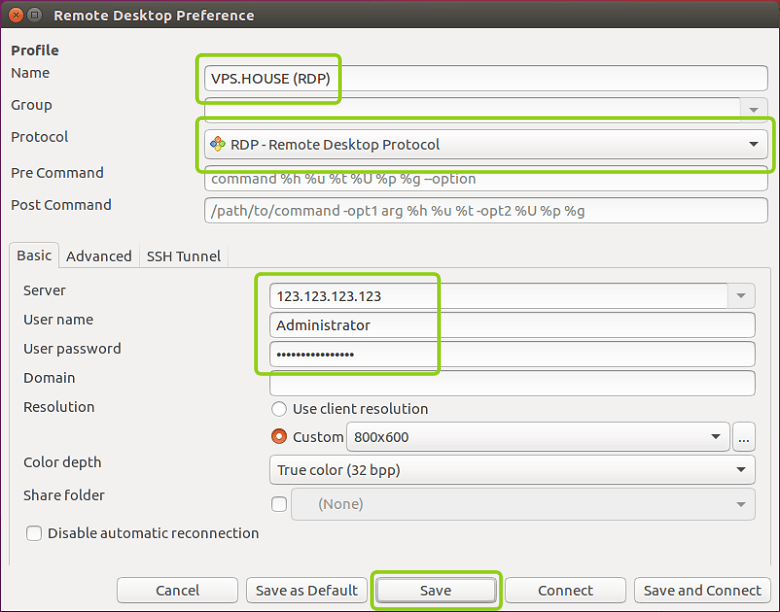
In the Profile section, type the Name that you want to use for the connection. It can be anything you wish. Leave the other settings from the Profile section set to their defaults.
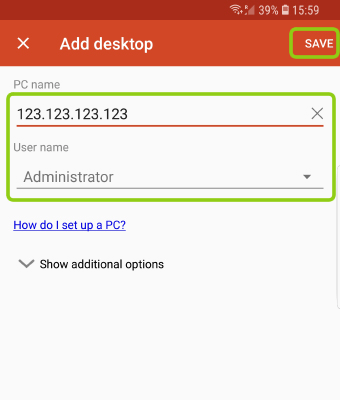
In the Server field from the Basic tab, type the IP address of the Windows PC to which you will connect. Enter the User name and User password for the user account that you want to use on the remote Windows PC. That user account needs to exist on the Windows PC.
If you are using a Microsoft account on your Windows PC, it is OK to fill in your email address and password. If your Windows PC is part of a domain, enter it in the Domain field, otherwise, leave this field empty.
Next, you can set the Resolution and the Color depth that you want to use for your remote desktop connection. By default, the remote desktop profile is set to use the «Use client resolution» which means that the connection uses the same resolution as the Windows computer to which you connect. The Color depth is also set at the highest quality possible. However, selecting a smaller desktop resolution and color depth can improve the performance of your Linux to Windows remote desktop session. If you experience lag when connected to the remote Windows desktop, try reducing the color depth or resolution.
If you want to share a folder from your Ubuntu computer with the Windows PC, check the Share folder box and select it.
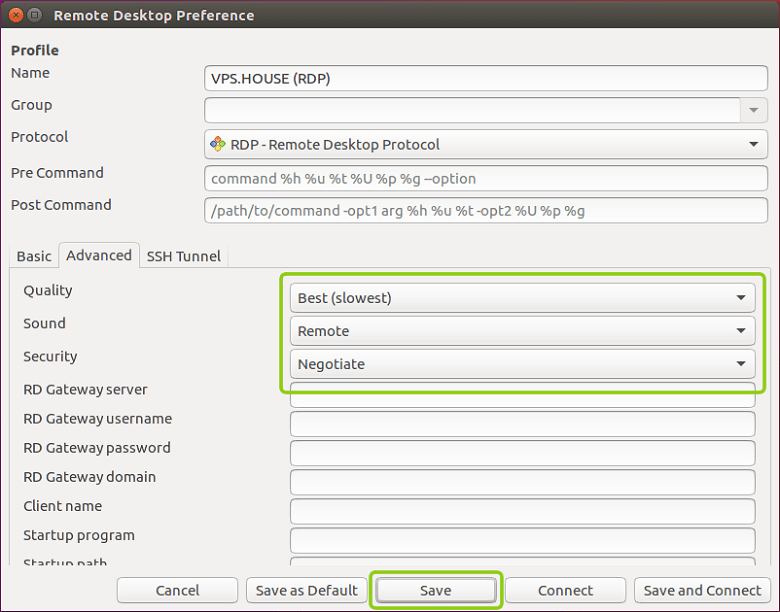
Also, for more advanced settings, go to the Advanced tab. There you can turn the sound on or off, share printers, disable clipboard synchronization, and so on.
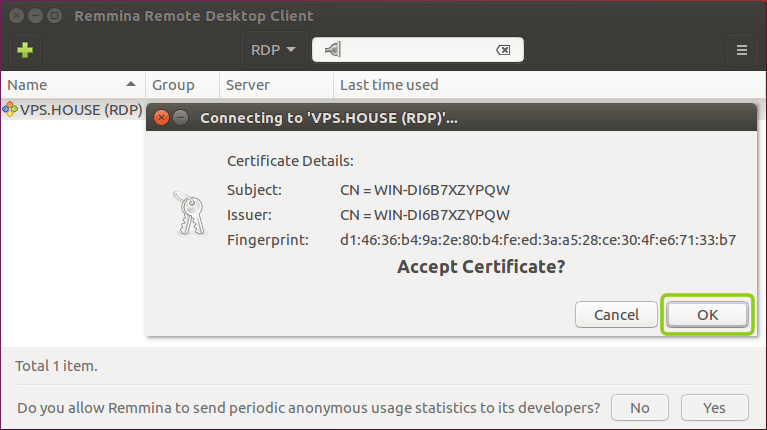
Once you finish configuring all the details, click Save and Connect. This saves your connection profile and then initiates an RDP connection to the Windows PC.
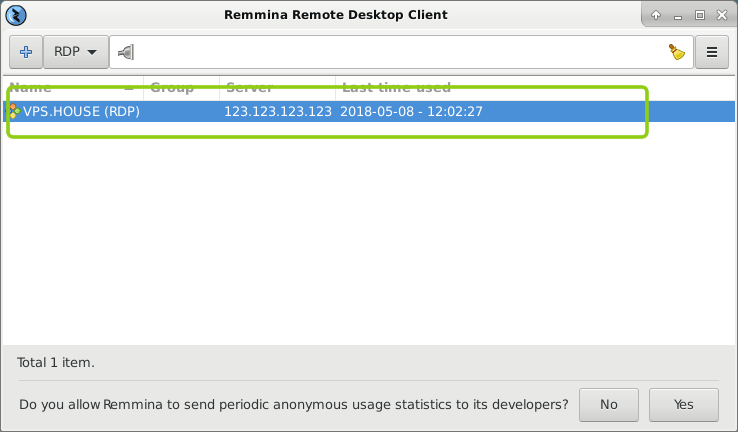
In a matter of seconds, you should have a running remote desktop connection established to your Windows PC.
You could also Connect to the remote Windows PC, without all the personalization steps shared earlier. However, that means that you have to reconfigure the remote desktop connection profile the next time you want to remote control your Windows PC.
Do you use Ubuntu to remote control Windows PCs?
As you can see, it is easy to establish a remote desktop connection from Linux to Windows. The Remmina Remote Desktop Client is available by default in Ubuntu, and it supports the RDP protocol, so connecting remotely to a Windows desktop is almost a trivial task. Did you use it? How did it work for you? Also, if you have any questions or if you need help, feel free to leave a comment below.
Источник
Install and configure xrdp to use Remote Desktop with Ubuntu
Applies to: вњ”пёЏ Linux VMs вњ”пёЏ Flexible scale sets
Linux virtual machines (VMs) in Azure are usually managed from the command line using a secure shell (SSH) connection. When new to Linux, or for quick troubleshooting scenarios, the use of remote desktop may be easier. This article details how to install and configure a desktop environment (xfce) and remote desktop (xrdp) for your Linux VM running Ubuntu.
The article was writen and tested using an Ubuntu 18.04 VM.
Prerequisites
This article requires an existing Ubuntu 18.04 LTS VM in Azure. If you need to create a VM, use one of the following methods:
Install a desktop environment on your Linux VM
Most Linux VMs in Azure do not have a desktop environment installed by default. Linux VMs are commonly managed using SSH connections rather than a desktop environment. There are various desktop environments in Linux that you can choose. Depending on your choice of desktop environment, it may consume one to 2 GB of disk space, and take 5 to 10 minutes to install and configure all the required packages.
The following example installs the lightweight xfce4 desktop environment on an Ubuntu 18.04 LTS VM. Commands for other distributions vary slightly (use yum to install on Red Hat Enterprise Linux and configure appropriate selinux rules, or use zypper to install on SUSE, for example).
First, SSH to your VM. The following example connects to the VM named myvm.westus.cloudapp.azure.com with the username of azureuser. Use your own values:
If you are using Windows and need more information on using SSH, see How to use SSH keys with Windows.
Next, install xfce using apt as follows:
Install and configure a remote desktop server
Now that you have a desktop environment installed, configure a remote desktop service to listen for incoming connections. xrdp is an open source Remote Desktop Protocol (RDP) server that is available on most Linux distributions, and works well with xfce. Install xrdp on your Ubuntu VM as follows:
Tell xrdp what desktop environment to use when you start your session. Configure xrdp to use xfce as your desktop environment as follows:
Restart the xrdp service for the changes to take effect as follows:
Set a local user account password
If you created a password for your user account when you created your VM, skip this step. If you only use SSH key authentication and do not have a local account password set, specify a password before you use xrdp to log in to your VM. xrdp cannot accept SSH keys for authentication. The following example specifies a password for the user account azureuser:
Specifying a password does not update your SSHD configuration to permit password logins if it currently does not. From a security perspective, you may wish to connect to your VM with an SSH tunnel using key-based authentication and then connect to xrdp. If so, skip the following step on creating a network security group rule to allow remote desktop traffic.
Create a Network Security Group rule for Remote Desktop traffic
To allow Remote Desktop traffic to reach your Linux VM, a network security group rule needs to be created that allows TCP on port 3389 to reach your VM. For more information about network security group rules, see What is a network security group? You can also use the Azure portal to create a network security group rule.
The following example creates a network security group rule with az vm open-port on port 3389. From the Azure CLI, not the SSH session to your VM, open the following network security group rule:
Connect your Linux VM with a Remote Desktop client
Open your local remote desktop client and connect to the IP address or DNS name of your Linux VM.

Enter the username and password for the user account on your VM as follows:

After authenticating, the xfce desktop environment will load and look similar to the following example:

If your local RDP client uses network level authentication (NLA), you may need to disable that connection setting. XRDP does not currently support NLA. You can also look at alternative RDP solutions that do support NLA, such as FreeRDP.
Troubleshoot
If you cannot connect to your Linux VM using a Remote Desktop client, use netstat on your Linux VM to verify that your VM is listening for RDP connections as follows:
The following example shows the VM listening on TCP port 3389 as expected:
If the xrdp-sesman service is not listening, on an Ubuntu VM restart the service as follows:
Review logs in /var/log on your Ubuntu VM for indications as to why the service may not be responding. You can also monitor the syslog during a remote desktop connection attempt to view any errors:
Other Linux distributions such as Red Hat Enterprise Linux and SUSE may have different ways to restart services and alternate log file locations to review.
If you do not receive any response in your remote desktop client and do not see any events in the system log, this behavior indicates that remote desktop traffic cannot reach the VM. Review your network security group rules to ensure that you have a rule to permit TCP on port 3389. For more information, see Troubleshoot application connectivity issues.
Next steps
For more information about creating and using SSH keys with Linux VMs, see Create SSH keys for Linux VMs in Azure.
For information on using SSH from Windows, see How to use SSH keys with Windows.
Источник
Как из Linux подключиться к удалённому столу Windows по RDP
freerdp — это клиент RDP для подключения к удалённому рабочему столу из Linux.
Для установки freerdp в Debian, Kali Linux, Linux Mint, Ubuntu и производные выполните команду:
Если пакеты freerdp2-x11 и freerdp2-shadow-x11 не найдены, то поищите пакет с именем freerdp.
Для установки freerdp в Arch Linux и производные выполните команду:
Как подключиться командой freerdp
Для подключения к удалённому рабочему столу с помощью xfreerdp, запустите команду вида:
Например, я хочу открыть удалённый стол компьютера с IP адресом 192.168.0.101, на котором имеется пользователь Tester с паролем 1234, причём я хочу открыть удалённый рабочий столк в полноэкранном режиме, тогда команда следующая:
Для переключения между полноэкранным режимом и оконным, используется сочетание клавиш Ctrl+Alt+Enter.
При первом подключении появляется следующее сообщение о проблеме с сертификатом:

Поскольку используются самоподписанные сертификаты без добавленного в хранилище приватного CA (центра аутентификации, удостоверяющего центра), то единственный выбор, это согласиться доверять указанному сертификату, для этого введите Y.
В полноэкранном режиме вы можете отключиться от удалённого рабочего стола двумя способами:

Для запуска в оконном режиме не используйте опцию /f:

Опции xfreerdp
У программы xfreerdp множество опций, далее выбраны самые интересные из них:
Как в freerdp создать общие папки
С удалённым рабочим столом, подключённым по RDP, можно иметь совместные папки. Рассмотрим несколько примеров.
Чтобы подключить все точки монтирования в текущей системе как совместные папки на удалённом рабочем столе используйте опцию +drives, например:
На скриншоте показан удалённый стол Windows, в котором доступны папки Linux системы, из которой сделано подключение по RDP:

Чтобы подключить только домашнюю папку текущего пользователя Linux в качестве сетевой папки к компьютеру по RDP укажите опцию +home-drive:
В этом случае домашняя папка смонтирована в систему, подключённую по протоколу удалённый рабочий стол:

С опцией /drive:ИМЯ,/ПУТЬ/В/LINUX можно подключить любую папку с любым именем. В качестве /ПУТЬ/В/LINUX должен быть указан путь в текущей системе, а ИМЯ это то имя, которое будет иметь шара в удалённой системе. Например, чтобы подключить корневую папку текущей системы (/) к удалённой с именем root:
Как вывести удалённый рабочий стол на другой монитор
Если у вас несколько мониторов, то вы можете выбрать, какой из них использовать для удалённой системы. Чтобы вывести список мониторов запустите команду:
Выбранный идентификатор монитора (или нескольких мониторов) укажите с помощью опции /monitors: [, [,…]].
Как установить размер окна удалённого рабочего стола
В следующем примере выполняется подключение к хосту rdp.contoso.com с именем USER и размером 50 процентов от высоты.
Если вместо высоты (h) установлена ширина (w), примерно как /size:50%w, то будет использоваться 50 процентов ширины.
Источник
Ethical hacking and penetration testing
InfoSec, IT, Kali Linux, BlackArch
How to connect to Windows remote desktop from Linux
RDP (Remote Desktop Protocol) clients exist for many platforms, even for mobile phones, of course, there are RDP clients for Linux as well
We will look at 2 RDP clients for Linux
How to use freerdp
To install freerdp on Debian, Kali Linux, Linux Mint, Ubuntu and derivatives, run the command:
If the freerdp2-x11 and freerdp2-shadow-x11 packages are not found, look for a package named freerdp.
To install freerdp on Arch Linux and derivatives, run the command:
How to connect with freerdp command
To connect to the remote desktop using xfreerdp, run a command of the form:
For example, I want to open a remote computer desktop with IP address 192.168.0.101, on which there is a Tester user with a password of 1234, and I want to open a remote working collision in full screen mode, then the command is as follows:
To toggle between full-screen and windowed modes, use the keyboard shortcut Ctrl+Alt+Enter.
When connecting for the first time, the following message about the problem with the certificate appears:

Since self-signed certificates are used without a private CA (authentication center, certification authority) added to the store, the only choice is to agree to trust the specified certificate, enter Y for this.
In full screen mode, you can disconnect from the remote desktop in two ways:

To run in windowed mode, do not use the /f option:

Xfreerdp options
The xfreerdp program has many options,I picked up the most interesting of them:
How to create shared folders in freerdp
With remote desktop connected via RDP, you can have shared folders. Let’s look at a few examples.
To connect all mount points in the current system as shared folders on the remote desktop, use the +drives option, for example:
The screenshot shows the remote Windows desktop, in which the Linux system folders are accessible:

To connect only the home folder of the current Linux user as a network folder to the computer via RDP, specify the +home-drive option:
In this case, the home folder is mounted on a system connected via the remote desktop protocol:

With the option /drive:NAME,/PATH/IN/LINUX, you can connect any folder with any name. The path in the current system must be specified as /PATH/IN/LINUX, and NAME is the name that will have the share in the remote system. For example, to connect the root folder of the current system (/) to the remote folder with the root name:
How to bring remote desktop to another monitor
If you have several monitors, then you can choose which one to use for the remote system. To list the monitors, run the command:
Select the monitor (or multiple monitors) identifier using the /monitors: [,[,…]] option.
How to set the size of the remote desktop window
The following example connects to the rdp.contoso.com host with the name USER and is 50 percent of the height.
If width (w) is set instead of height (h), something like /size:50%w, then 50 percent of the width will be used.
How to use rdesktop
To install rdesktop on Debian, Kali Linux, Linux Mint, Ubuntu and derivatives, run the command:
To install rdesktop on Arch Linux and derivatives, run the command:
How to connect to remote desktop with rdesktop
To connect to RDP with rdesktop, use a command of the form:
As usual, at the very beginning there will be a problem with the certificate:

We type yes.
Then an error will occur:
This is because network-level authentication (Kerberos TGT) is not configured. Setup instructions at: https://github.com/rdesktop/rdesktop/wiki/Network-Level-Authentication-(NLA)
Another option that allows you to connect to Windows via RDP using rdesktop without setting up Network Level Authentication (NLA) is to disable network-level authentication in Windows. It is clear that this will weaken the security of RDP, therefore it is not recommended. But as a “quick dirty fix” this can be done as follows: Start menu → Settings → System → Remote Desktop → Advanced settings → Uncheck “Require computers to use Network Level Authentication at the to connect (recommended)”:

After that, rdesktop connection passes without errors:

In the Windows settings, you could see the link “Why allow connections with Network Level Authentication?”, It says the following:
If you want to restrict who can access your PC, choose to allow access only with Network Level Authentication (NLA). When you enable this option, users have to authenticate themselves to the network before they can connect to your PC. Allowing connections only from computers running Remote Desktop with NLA is a more secure authentication method that can help protect your computer from malicious users and software. To learn more about NLA and Remote Desktop, check out Configure NLA for RDS Connections. If you’re remotely connecting to a PC on your home network from outside of that network, don’t select this option.
How to connect from Linux to another Linux via RDP
There are no special features when connecting using the xfreerdp program, it is enough to start the RDP server, and if you use freerdp-shadow, then the /sam-file:SAM /sec:nla options are also needed:
Or run xrdp-sesman and xrdp as an RDP server.
And then the connection to Linux via RDP is the same as to Windows:
As for rdesktop, it could not be forced to work with any of the RDP servers under consideration under Linux – if you know how to do this, then write in the comments.
Источник
RDP клиенты удаленного доступа для Linux


RDP (Remote Desktop Protocol) — протокол доступа к удаленному рабочему столу, созданный Microsoft. Он поддерживается почти любой современной ОС. В этой статье предлагаем взглянуть на несколько популярных клиентов удаленного доступа для Linux.
Проприетарный RDP — не единственный протокол удаленного доступа. Есть, например, открытый протокол VNC или защищенный протокол SSH. Все протоколы поддерживаются большинством операционных систем, включая различные дистрибутивы Linux, а иногда и мобильные ОС.
Для чего нужны RDP клиенты?
Клиенты доступа к удаленному рабочему столу имеют гораздо более широкие возможности, чем просмотр сессии удаленной машины с локальной. Через RDP клиент осуществляется доступ к удаленному рабочему столу с полноценной поддержкой клавиатуры, мыши, а также с поддержкой аудио и возможностью передачи файлов. В некоторых случаях RDP клиент может быть уже установлен в системе, например, на Ubuntu Desktop обычно предустанавливается клиент Remmina.
Популярные Linux RDP клиенты
Remmina
Remmina идет под лицензией GNU GPL и имеет открытый исходный код.
Установка Remmina
Remmina устанавливается через терминал:
В дистрибутивах Ubuntu, как правило, уже имеется клиент Remmina, однако, версия обычно устаревшая поэтому рекомендуется ее обновить.

Обновление Remmina
В терминале нужно ввести команду:

Затем запросите обновление списка системных хранилищ:

Следующий шаг — установка или обновление плагина протокола RDP:

Чтобы завершить установку Remmina Linux RDP client, закройте активные сеансы приложения из терминала: sudo killall remmina. Затем откройте обновленный клиент заново и перейдите к конфигурации соединения.
Настройка Remmina

Если нужны настройки Remmina Remote Desktop Client, откройте меню Preferences (параметры) нажатием на иконку в правой верхней части окна.
Подключение по RDP к удаленной машине
Давайте рассмотрим как работает подключение по RDP к удаленной машине на примере Remmina.

Нажмите кнопку Add a new connection profile (Добавить новый профиль соединения), чтобы создать новое соединение.

Поддерживаются соединения с Linux, Windows или macOS. Главное, что вам нужно знать — это IP-адрес машины, с которой устанавливается подключение, имя пользователя и пароль.
После конфигурации нового подключения, можно просто нажать Connect для подключения, а можно сохранить подключение и установить его в качестве подключения по умолчанию. Сохранив текущую конфигурацию, вы сможете соединиться с удаленным компьютером буквально в два клика.

Также есть возможность управлять соединениями, копируя, редактируя и удаляя их прямо из основного окна.

Помимо RDP, клиент Remmina также обладает поддержкой других протоколов удаленного соединения, включая безопасный SSH и открытый VNC.
Apache Guacamole
Еще один интересный RDP клиент для Linux — Apache Guacamole. Этот RDP клиент с открытым исходным кодом, распространяется по лицензии Apache v. 2.0. У Apache Guacamole есть интересная особенность — разработчики называют его «шлюз для удаленного рабочего стола без клиента» (clientless remote desktop gateway). Все благодаря тому, что Apache Guacamole работает напрямую из браузера, необходимости устанавливать дополнительное ПО или плагины нет.
Установка Apache Guacamole
Apache Guacamole может быть предустановлен в некоторых Linux Debian и Debian-based дистрибутивах. Ручная установка Apache Guacamole из терминала производится командой:

Поскольку Apache Guacamole — серверный клиент, требуется установить Tomcat Server на вашу машину, после чего программа установки попросит его перезапустить.
По умолчанию Apache Guacamole устанавливается с поддержкой только протокола VNC. Чтобы иметь возможность подключаться по SSH или RDP, необходимо установить дополнительно клиент для желаемого протокола. Сделать это можно следующей командой:
В более новые версии дистрибутивов Linux клиенты, необходимые для подключения по протоколу RDP, могут быть уже включены.
Настройка Apache Guacamole
После установки Apache Guacamole автоматически применяет минимально необходимые для запуска настройки. Основным файлом конфигурации Apache Guacamole является guacamole.properties.
Все подробности об установке, настройке и управлении Apache Guacamole детально описаны в руководстве на официальном сайте.
Клиент Apache Guacamole максимально прост в использовании. Для запуска шлюза доступа к удаленному рабочему столу без клиента требуется иметь только браузер с поддержкой HTML5. Сама работа показана в коротком видео.
FreeRDP
Еще один бесплатный RDP клиент для Linux — FreeRDP. FreeRDP имеет лицензию Apache и открытый исходный код. Его можно встретить включенным в некоторые дистрибутивы Linux.
Установка FreeRDP
Актуальную на момент написания статьи версию FreeRDP можно установить командой из терминала:
Настройка FreeRDP
FreeRDP — терминальный клиент, поэтому все настройки для подключения вводятся одной командой:
Полный синтаксис можно найти в интернете.
Чтобы не вводить команду заново каждый раз, вы можете создать ярлык подключения со всеми необходимыми параметрами. Для этого, после установки FreeRDP, откройте окно терминала, запустите редактор nano: sudo nano
/rdp.sh. В появившемся окне введите следующие строки и сохраните файл:
Первая строка — это директория для ярлыка, а вторая строка — команда запуска FreeRDP со всеми требуемыми параметрами. FreeRDP также можно использовать совместно с клиентом Remmina в качестве графического интерфейса.
TigerVNC
TigerVNC — это полностью бесплатный клиент, он имеет открытый исходный код. Он отличается от предыдущих клиентов удаленного доступа тем, что он работает только по протоколу VNC.
Установка TigerVNC
Для работы TigerVNC требуется окружение рабочего стола. Мы выбрали окружение Gnome, установили его следующими командами:
Затем, чтобы установить компоненты TigerVNC, введите в окне терминала:
Если установка прошла успешно, запустите VNC-сервер: vncserver. Создастся дефолтная конфигурация, а от вас потребуется задать пароль для TigerVNC длиной от 6 до 8 символов.

Настройка TigerVNC
Затем введите команду vi
/.vnc/xstartup, чтобы добавить файл xstartup в каталог конфигурации рабочего стола, откроется редактор.
В редакторе пропишите пять строк:
Эти строки будут выполняться при каждом запуске TigerVNC сервера. Сохраните файл, задайте ему разрешения:
Возобновите работу сервера, введя в терминале:
TigerVNC — быстрый клиент удаленного доступа к компьютеру, однако, его функционал ограничивается VNC протоколом, и его установка чуть более требовательна, чем у аналогов.
rdesktop
Следующий клиент — rdesktop — поддерживается на платформах Linux, Microsoft Windows, имеет открытый исходный код. Выгодно отличает rdesktop от других клиентов поддержка протокола RDP 4.0, используемого в версиях Windows NT 4.0 Terminal Server Edition и Windows 2000 Server.
Установка rdesktop
Рекомендуем сперва проверить наличие rdesktop в дистрибутиве. Если rdesktop уже включен в систему, то он запустится командой rdesktop. Если rdesktop в дистрибутиве отсутствует, то установить его можно командой:
Настройка rdesktop
Подключение к удаленному рабочему столу производится из терминала командой:
Команда использует следующий синтаксис:
Это только некоторые из доступных команд, полный список легко находится в интернете.
Если вы в поиске простого и надежного клиента, который поддерживал бы также функции RDP4, то rdesktop будет оптимальным выбором.
Vinagre
Vinagre входит в стандартное окружение Gnome и по сути является официальным RDP клиентом Gnome. Это значит, что клиент Vinagre уже должен быть включен в ваш дистрибутив Linux с окружением Gnome, и его установка не потребуется.
Установка Vinagre
Если по какой-то причине клиент Vinagre отсутствует у вас в системе, вы можете его инсталлировать, введя в консоли:

Преимущества Vinagre это:
Если вы работаете с Gnome, то вам стоит обратить внимание на Vinagre, ознакомиться с этим клиентом поближе.
NoMachine NX Client
Утилита NX Client, разрабатывается компанией NoMachine. Программа работает по проприетарному протоколу NX, который разработан компанией NoMachine. NoMachine NX Client доступен для Windows, Linux, macOS, Android, iOS, Raspberry Pi, а также из браузера.
Установка NoMachine NX Client
Вам потребуется скачать установщик в любом формате (RPM, DEB, TAR.GZ) открыть и установить его на обе машины — локальную и удаленную. То же можно сделать и командой из терминала, но иметь копию пакета установки все равно потребуется.

NoMachine NX Client обладает впечатляющим набором функций, который расширяется с каждым обновлением.

Но, во-первых, для корпоративных клиентов NoMachine продает свои продукты по подписке (44,50 долларов в год за сервер или пакет 10 пользователей, подробнее). Это совсем не выгодно отличает NX Client от рассмотренных ранее полностью бесплатных клиентов. Во-вторых, большое число функций и вкладок с различными настройками и параметрами может помешать сосредоточиться на работе. Кроме того, NoMachine NX Client не поддерживает открытие нескольких сеансов во вкладках — каждый новый сеанс нужно открыть в новом окно программы. Зато вся документация и справка на официальном сайте NoMachine переведена на русский.
NoMachine NX Client — хороший выбор, если ваши основные требования это:
Krdc — бесплатный RDP клиент с открытым исходным кодом, идущий под лицензией GPL v.3. Krdc может работать по VNC и по RDP, клиент является официальным проектом окружения KDE для удаленного доступа.
Установка Krdc
Установить Krdc на дистрибутив Linux можно, введя в терминале:

Чтобы подключиться к удаленной машине, введите адрес в основную строку приложения, появится окно параметров подключения.

Если у вас есть потребность в простом клиенте удаленного доступа, то Krdc отлично подойдет. Дополнительным плюсом будет возможность выбора протокола подключения: RDP или VNC, по умолчанию поддержка SSH в Krdc отсутствует.
TeamViewer
TeamViewer — широко известный клиент для удаленного доступа, он является бесплатным только для частного использования. Стоимость корпоративного решения от 2 до 7 тысяч рублей в месяц за одно рабочее место, подробности можно узнать на сайте TeamViewer.
Одно из преимуществ TeamViewer — кроссплатформенность. После установки приложение позволяет подключаться к удаленному рабочему столу с Linux, Windows, macOS, Android, iOS, Blackberry и даже ChromeOS.
Установка TeamViewer
Для установки TeamViewer разработчики рекомендуют скачать пакет установки с официального сайта, после чего установить его через графический интерфейс на обе машины — локальную и удаленную. Установить TeamViewer через терминал можно соответствующими командами для соответствующего пакета, например DEB:

TeamViewer поддерживает функцию передачи данных по удаленному соединению, через него можно осуществлять доступ к заблокированному устройству, в приложении есть чат. TeamViewer способен работать даже если система не поддерживает SSH или на машине установлен корпоративный файервол. Однако, многие не готовы отдать ему предпочтение из-за закрытого исходного кода и широкого охвата пользователей.
Заключение
В статье мы разобрали популярные клиенты удаленного доступа для Linux. Каждый из названых программных продуктов обладает своими уникальными отличиями, что делает выбор интересным. Сам выбор остается за вами.
Источник
Windows has a very useful feature that is capable of connecting the computer that you are currently using right now with another one that is found in a different location. We’ve talked about this feature in our previous tutorials but there are still some aspects to it that needs to be discussed and one of them is going to be the meat of this tutorial.
Now, let’s say for instance that you are using a computer that has a different operating system installed to it and not Windows? What will you do? Can you still connect to your host computer that runs on Windows while the client computer is of a different operating system?
Connecting the Windows Remote Desktop Connection is actually possible even from other operating system platforms such as certain Linux OS distributions like Ubuntu. Since the Remote Desktop Connection feature does not work in OS platforms like this, you must be willing to download a third party app that will allow you to connect to your host computer and the steps that are involved in doing this are going to be demonstrated in this tutorial.
IMPORTANT:
This tutorial was performed using Ubuntu version 13.04 aka Raring Ringtail.
Step 1: Enable/Turn On the Windows Remote Desktop Connection Feature on Your Windows Host Computer
Remote Desktop Connection will not work if you did not enable it on your host computer. This tutorial assumes that your host computer (the computer that you are going to connect remotely into) runs on Windows and in order to allow other computers to connect to it remotely, you will first need to enable the Remote Desktop Connection tool in it. If you don’t know yet how it is done, you can follow the steps that are found in this tutorial.
Step 2: Download and Install a Remote Client Software from Ubuntu Software Center
The next step that you need to do will now involve downloading a Remote Client Software from Ubuntu’s Software Center so you can install it on your Linux computer. The software which we are going to use in this tutorial is called the Remmina Remote Desktop Client since it is the best one we found so far and it works seamlessly with the Windows Remote Desktop software tool.

Next, you will simply need to type in the words “remote desktop” into the search box that is located at the top-right portion of the Ubuntu Software Center screen as you can see being highlighted on the screenshot above. Once the search results appear, just click on the one that is labeled Remmina Remote Desktop Client in order to show the “More Info” and “Install” buttons as shown below.
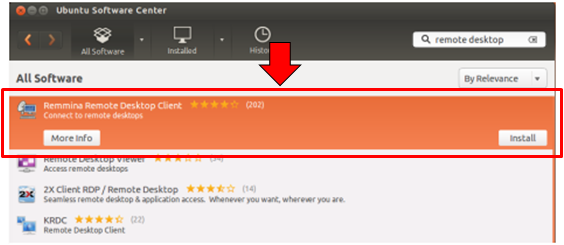
In order to have the software installed into your host computer that runs on Ubuntu, all you need to do is click on the “Install” button that has appeared at the bottom-right area when you selected the Remmina Remote Desktop Client software and a prompt that is labeled “Authenticate” will then appear which asks for your “Password”. From here, just enter your Ubuntu login password then hit the “Authenticate” button that is found at the bottom-right portion as highlighted on the screenshot below.

Take note that in order to install any software in Ubuntu such as the Remmina Remote Desktop Client tool, you will need to be logged in as an administrator or the account that you are using should have administrative permissions and privileges. If you are just using a standard account then you can’t install any software into your Ubuntu machine.
In case you were able to pass through the authentication process and the software is currently installing, just wait for a few minutes until installation process is complete.
Step 3: Configuring the Remote Desktop Session to be Established
Now that the Reminna Remote Desktop Client Software is installed, it is time to fire it up so you can start using it in establishing connection. First, you will need to search your Ubuntu computer by typing in “reminna”. The search result will then show the software shortcut which you will simply need to click in order to get the software started.

Once Remmina opens, just click on the “Create a new remote desktop file” button that is found on the top-left portion of the software screen itself as shown below. This is the time where you can start entering the needed credentials in order to establish Remote Desktop Connection with a Windows machine.

Right after hitting the “Create a new remote desktop file” as we have shown on the screenshot above, you will now be able to open the Remote Desktop Preference screen and from here, you can start configuring the Remote Desktop Connection credentials that you want to establish with another computer which runs on as Windows operating system.

Now, under the “Profile” section, you will need to type in the name that you want to assign to the Remote Desktop Connection that you want to set up and under the “Protocol” section, you will need to choose “RDP- Remote Desktop Protocol”. Afterwards, you will need to click on the “Basic” tab that is found just below the “Profile” section then enter the IP address of the Windows computer that you want to remotely connect to in the “Server” field.
Next, you will also need to type in the Username and the Password for the user account in the Windows computer to which Remote Desktop Connections is enabled. Remember to let any user on the Windows computer to exit before initiating the connection so you won’t encounter errors. If you are going to connect to a Windows 8.1 or Windows 10 computer and the user account to which Remote Desktop Connections is enabled uses a Microsoft account as logins then you can simply use the Microsoft email in the Username then enter the Microsoft account password into the Password field.
Beware of Larger Desktop Screen Resolution
After entering the IP address, Username, Password and other credentials needed, you will now be encountering the section which will allow you to choose and tweak the Resolution options. It is important to note that choosing high Resolution and Color Depth can affect the performance of the Remote Desktop Session that you want to initiate so it is best to just leave it untouched. In case the current setting causes you to experience lags during the session then feel free to adjust these two aspects to your most comfortable values.

You can also share folders that are found on the Ubuntu computer that you are using towards the Windows computer which serves as the host machine and in order to do this, simply click on the “Basic” tab found below the Profile section and on its bottom-most portion, simply click inside the tick box beside the “Share folder” option then browse towards the folder that you want to share as highlighted on the screenshot above.

If you want to see even more advanced settings and options for the Remote Desktop session that you want to set up then you will simply need to click on the “Advanced” tab that is found just beside (to the right) of the “Basic” tab. Under this section, you can choose to turn sounds on or off, share printers to boost productivity in the office or anywhere else or even disable clipboard sync and many others as show on the screenshot above but we recommend that you only tweak this if you know what each one does.
After making all the changes that you want, just hit the “Connect” button found on the bottom-right portion of the screen as highlighted below. If you plan to establish the Remote Desktop Connection at a later time, you can simply click on the “Save” button and just close the software. If you chose to do the former then you will see a notification screen that looks like the one shown below.

From this prompt, all you need to do is click on the “OK” button found on its bottom-right portion then just wait until the Remote Desktop Connection is established. Just make sure that the Windows computer which you want to remotely connect to is also on the same network and is turned on. If you close the connection, Remmina Remote Desktop Client will save it for future reconnection so you won’t need to be setting up everything again if ever you need to remotely connect to the same Windows computer.
As you can see, setting up a Remote Desktop connection between a Ubuntu computer as client and Windows computer as host is not that complicated. It doesn’t even require any technical knowledge and if you followed the steps that we have show above then you should be enjoying your remote desktop connection now. Let us know if you have any questions by posting them on the comments section below.
MobaXterm
http://mobaxterm.mobatek.net/
Freeware implementation the X server on Windows.
This method qequires minimal setup, and is very reliable.
You must first install the SSH server on Ubuntu e.g. by physically accessing a keyboard on the machine:
sudo apt install openssh-server
Then, on Windows within MobaXterm, you go:
- Sessions
- New session
- SSH
which gives you an SSH shell.
Now, if you start a program from that shell, e.g.:
sudo apt install x11-apps
xeyes
xeyes opens as a separate native Windows window.
One annoyance is that if you opened the window at work, and then you get home, you have to start a new instance of the app, and you can’t see the already opened window. This is made further annoying by applications that work in single window mode, e.g. browsers: you will have to search for how to force a new instance, and then you will have two instances running.
Tested in Windows 10 and Ubuntu 19.10 on a local network with MobaXterm v12.4:
- xeyes 7.7: move pretty fast, but you have to be hovering the window itself
- Firefox 74.0: page scrolls were pretty sluggish nearing unsability, I would not be a happy user
- Eclipse 2020-03: works surprisingly well, I can see a bit of lag, but pretty small, even when scrolling, and trying to watch a video on YouTube makes it unresponsive
- Chromium 79: can’t open it, error message: «MoTTY X11 proxy: Unsupported authorisation protocol» asked at: https://superuser.com/questions/1111900/how-to-fix-mobaxterm-x11-proxy-unsupported-authorisation-protocol
Here is a Windows screenshot showing MobaXterm running on top left, and two program (xeyes and firefox) running on the Ubuntu remote but showing as separate native Windows windows!

MobaXterm X server alternatives
I haven’t tried those yet, but behavior should be similar to MoabXterm? Hopefully we can find a good open source one then:
- Cygwin/X https://x.cygwin.com/ demo video: https://youtu.be/ENkOEknSLv4?t=105
- Xephyr: https://en.wikipedia.org/wiki/Xephyr MIT licensed. I can’t find out how to download a prebuilt in 5 minutes.
- Xming: https://en.wikipedia.org/wiki/Xming another proprietary one
xrdp
Mentioned at: https://askubuntu.com/a/592544/52975
I just want to confirm that it does not work without touching some configuration files as mentioned in that answer from Windows 10 into Ubuntu 19.10, you just get a black screen in that case: Blank desktop when logging in via xrdp
Also RDP is a proprietary Microsoft protocol which is saddening: https://en.wikipedia.org/wiki/Remote_Desktop_Protocol But it does appear to send only minimal information unlike VNC which sends images: https://superuser.com/questions/32495/whats-the-difference-between-rdp-vs-vnc
VNC
I’ve tried the following programs, but they were sending the desktop as video, which incurred unacceptable screen resolution loss / mouse inaccuracy / network bandwidth if you are offsite.
Servers (run on Ubuntu):
- Vino. Ships pre-installed, but there are compatibility issues with some available Windows clients: Gnome 3.10 sharing desktop — how to configure the security type for VNC?
Clients (run on Windows):
- TigerVNC
PuTTY
https://www.chiark.greenend.org.uk/~sgtatham/putty/
The go-to solution if all you want is a text terminal via SSH.
First you have to install PuTTY on Windows, usually by downloading it from its website.
On Ubuntu, install the SSH server:
sudo apt install openssh-server
and then you just open PuTTY, tell it the Ubuntu IP and connect via SSH, and that gives you a terminal inside Ubuntu.
PuTTY is very convenient as it integrates both an xterm emulator and SSH / telnet and other protocols in a single package.
Then you also want to install and use tmux on Ubuntu and use tmux attach when connecting from Windows from within PuTTY as mentioned at https://unix.stackexchange.com/questions/22781/how-to-recover-a-shell-after-a-disconnection, this way you can:
- use the exact same terminals on work and at home. Yes, terminal windows get updated in real time on both machines if you type anything in either! The magic of servers!
- not lose any sessions if the connection breaks
which is amazing!!! There are however some annoying glitches with environment variables, particularly DISPLAY: https://unix.stackexchange.com/questions/75681/why-do-i-have-to-re-set-env-vars-in-tmux-when-i-re-attach
You will also want to reduce the default huge default font size: Increase font size of putty
How to copy paste in PuTTY: https://superuser.com/questions/180043/how-do-i-paste-the-windows-clipboard-into-my-putty-session-using-only-the-keybo
Then, you can just open webpages you need directly on the native Windows browser. If all you need to get your work done is Vim and and a browser, PuTTY is definitely the way to go. The only thing I miss on my development day-to-day with this setup is Eclipse.