Introduction
Accessing machines remotely became a necessity a long time ago and we can barely imagine how it would be if we couldn’t control computers from remote locations. There are many ways to establish a connection with a remote machine depending on the operating system you are running, but the two most used protocols are:
- Secure Shell (SSH) for Linux-based machines
- Remote Desktop Protocol (RDP) for Windows-based machines
The two protocols use the client and server applications to establish a remote connection. These tools allow you to gain access and remotely manage other computers, transfer files, and do virtually anything you can do while physically sitting in front of the machine.
Prerequisites
Before you can establish a secure remote desktop protocol with a remote machine, there are a few basic requirements to meet:
- The remote computer must be turned on at all times and have a network connection.
- The client and server applications need to be installed and enabled.
- You need the IP address or the name of the remote machine you want to connect to.
- You need to have the necessary permissions to access the remote computer.
- Firewall settings need to allow the remote connection.
What is SSH?
Secure Shell, sometimes referred to as Secure Socket Shell, is a protocol which allows you to connect securely to a remote computer or a server by using a text-based interface.
When a secure SSH connection is established, a shell session will be started, and you will be able to manipulate the server by typing commands within the client on your local computer.
System and network administrators use this protocol the most, as well as anyone who needs to manage a computer remotely in a highly secure manner.
How Does SSH Work?
In order to establish an SSH connection, you need two components: a client and the corresponding server-side component. An SSH client is an application you install on the computer which you will use to connect to another computer or a server. The client uses the provided remote host information to initiate the connection and if the credentials are verified, establishes the encrypted connection.
On the server’s side, there is a component called an SSH daemon that is constantly listening to a specific TCP/IP port for possible client connection requests. Once a client initiates a connection, the SSH daemon will respond with the software and the protocol versions it supports and the two will exchange their identification data. If the provided credentials are correct, SSH creates a new session for the appropriate environment.
The default SSH protocol version for SSH server and SSH client communication is version 2.
How to Enable an SSH Connection
Since creating an SSH connection requires both a client and a server component, you need to make sure they are installed on the local and the remote machine, respectively. An open source SSH tool—widely used for Linux distributions— is OpenSSH. Installing OpenSSH is relatively easy. It requires access to the terminal on the server and the computer that you use for connecting. Note that Ubuntu does not have SSH server installed by default.
How to Install an OpenSSH Client
Before you proceed with installing an SSH client, make sure it is not already installed. Many Linux distributions already have an SSH client. For Windows machines, you can install PuTTY or any other client of your choice to gain access to a server.
To check if the client is available on your Linux-based system, you will need to:
- Load an SSH terminal. You can either search for “terminal” or press CTRL + ALT + T on your keyboard.
- Type in
sshand press Enter in the terminal. - If the client is installed, you will receive a response that looks like this:
[email protected]:~$ ssh

usage: ssh [-1246AaCfGgKkMNnqsTtVvXxYy] [-b bind_address] [-c cipher_spec]
[-D [bind_address:]port] [-E log_file] [-e escape_char]
[-F configfile] [-I pkcs11] [-i identity_file]
[-J [[email protected]]host[:port]] [-L address] [-l login_name] [-m mac_spec] [-O ctl_cmd] [-o option] [-p port] [-Q query_option] [-R address] [-S ctl_path] [-W host:port] [-w local_tun[:remote_tun]]
[[email protected]]hostname [command]

[email protected]:~$
This means that you are ready to remotely connect to a physical or virtual machine. Otherwise, you will have to install the OpenSSH client:
- Run the following command to install the OpenSSH client on your computer:
sudo apt-get install openssh-client - Type in your superuser password when asked.
- Hit Enter to complete the installation.
You are now able to SSH into any machine with the server-side application on it, provided that you have the necessary privileges to gain access, as well as the hostname or IP address.
How to Install an OpenSSH Server
In order to accept SSH connections, a machine needs to have the server-side part of the SSH software toolkit.
If you first want to check if OpenSSH server is available on the Ubuntu system of the remote computer that needs to accept SSH connections, you can try to connect to the local host:
- Open the terminal on the server machine. You can either search for “terminal” or press CTRL + ALT + T on your keyboard.
- Type in
ssh localhostand hit enter. - For the systems without the SSH server installed the response will look similar to this:
[email protected]:~$ ssh localhost
ssh: connect to host localhost port 22: Connection refused [email protected]:~$
If the above is the case, you will need to install the OpenSSH server. Leave the terminal open and:
- Run the following command to install the SSH server:
sudo apt-get install openssh-server ii.- Type in your superuser password when asked.
- Enter and Y to allow the installation to continue after the disk space prompt.
The required support files will be installed, and then you can check if the SSH server is running on the machine by typing this command:
sudo service ssh statusThe response in the terminal should look similar to this if the SSH service is now running properly:
[email protected]:-$ sudo service ssh status
• ssh.service - OpenBSD Secure Shell server
Loaded: loaded (/lib/systemd/system/ssh.service; enabled; vendor preset: enab
Active: active (running) since Fr 2018-03-12 10:53:44 CET; 1min 22s ago Process: 1174 ExecReload=/bin/kill -HUP $MAINPID (code=exited, status=0/SUCCES

Main PID: 3165 (sshd)
Another way to test if the OpenSSH server is installed properly and will accept connections is to try running the ssh localhost command again in your terminal prompt. The response will look similar to this screen when you run the command for the first time:
[email protected]:~$ ssh localhost

The authenticity of host 'localhost (127.0.0.1)' can't be established. ECDSA key fingerprint is SHA256:9jqmhko9Yo1EQAS1QeNy9xKceHFG5F8W6kp7EX9U3Rs. Are you sure you want to continue connecting (yes/no)? yes
Warning: Permanently added 'localhost' (ECDSA) to the list of known hosts.

[email protected]:~$
Enter yes or y to continue.
Congratulations! You have set up your server to accept SSH connection requests from a different
computer using an SSH client.
TIP
You can now edit the SSH daemon configuration file, for example, you can change the default port for SSH connections. In the terminal prompt, run this command:
sudo nano /etc/ssh/sshd_configThe configuration file will open in the editor of your choice. In this case, we used Nano.
If you need to install Nano, run this command:
sudo apt-get install nanoPlease note that you need to restart SSH service every time you make any changes to the sshd_config file by running this command:
sudo service ssh restartNow that you have the OpenSSH client and server installed on every machine you need, you can establish a secure remote connection with your servers. To do so:
- Open the SSH terminal on your machine and run the following command:
ssh [email protected]_ip_addressIf the username on your local machine matches the one on the server you are trying to connect to, you can just type:
ssh host_ip_addressAnd hit Enter. - Type in your password and hit Enter. Note that you will not get any feedback on the screen while typing. If you are pasting your password, make sure it is stored safely and not in a text file.
- When you are connecting to a server for the very first time, it will ask you if you want to continue connecting. Just type yes and hit Enter. This message appears only this time since the remote server is not identified on your local machine.
- An ECDSA key fingerprint is now added and you are connected to the remote server.
If the computer you are trying to remotely connect to is on the same network, then it is best to use the private IP address instead of the public IP address. Otherwise, you will have to use the public IP address only. Additionally, make sure that you know the correct TCP port OpenSSH is listening to for connection requests and that the port forwarding settings are correct. The default port is 22 if nobody changed configuration in the sshd_config file. You may also just append the port number after the host IP address.
Here is the example of a connection request using the OpenSSH client. We will specify the port number as well:
[email protected]:~$ ssh [email protected] –p7654 [email protected]’s password:

The authenticity of host '185.52.53.222 (185.52.53.222)' can't be established. ECDSA key fingerprint is SHA256:9lyrpzo5Yo1EQAS2QeHy9xKceHFH8F8W6kp7EX2O3Ps. Are you sure you want to continue connecting (yes/no)? yes
Warning: Permanently added ' 185.52.53.222' (ECDSA) to the list of known hosts.

[email protected]:~$
You are now able to manage and control a remote machine using your terminal. If you have trouble connecting to a remote server, make sure that:
- The IP address of the remote machine is correct.
- The port SSH daemon is listening to is not blocked by a firewall or forwarded incorrectly.
- Your username and password are correct.
- The SSH software is installed properly.
SSH Further Steps
Now that you are able to establish a connection to your server using SSH, we highly recommend a few further steps to improve SSH security. When you leave the setup with the default values, it is more likely to be hacked and your server can easily become a target of scripted attacks.
Some of the suggestions for hardening SSH by editing the sshd configuration file include:
- Change the default TCP port where SSH daemon is listening. Change it from 22 to something much higher, for example 24596. Make sure you do not use a port number that is easy to guess, such as 222, 2222 or 22222.
- Use SSH key pairs for authentication for passwordless SSH login. They are both safer and also allow logging in without the need to use your password (which is faster and more convenient).
- Disable password-based logins on your server. If your password gets cracked, this will eliminate the possibility of using it to log into your servers. Before you disable the option to log in using passwords, it is important to make sure that authentication using key pairs is working properly.
- Disable root access to your server and use a regular account with the su – command to switch to a root user.
You can also use TCP wrappers to restrict access to certain IP addresses or hostnames. Configure which host can connect using TCP wrappers by editing the /etc/hosts.allow and etc/hosts.deny files.
Note that allowed hosts supersede the denied hosts. For example, to allow SSH access to a single host you will first deny all hosts by adding these two lines in the etc/hosts.deny:
sshd : ALLALL : ALL
Then, in the etc/hosts.allow add a line with the allowed hosts for the SSH service. That can be a single IP address, an IP range, or a hostname: sshd : 10.10.0.5, LOCAL.
Make sure to keep your log in information secure at all times and to apply security at multiple layers. Use different methods to limit SSH access to your servers, or use services that will block anyone who tries to use brute force to gain access to your servers. Fail2ban is one example of such service.
VNC Over SSH
For users who are used to working in a graphical desktop environment with Virtual Network Computing (VNC), it is possible to completely encrypt connections using SSH tunneling. In order to tunnel VNC connections over SSH, you will need to run this command in the terminal on your Linux or UNIX machine:
$ ssh -L 5901:localhost:5901 -N -f -l username hostname_or_IPHere is the breakdown of the command above:
- ssh : this starts the SSH client program on your local machine and enables secure connection to the SSH server on a remote computer.
- -L 5901:localhost:5901 : states that the local port for the client on the local machine is to be forwarded to the specified host and port of the remote machine. In this case, local port 5901 on the local client is being forwarded to the same port of the given remote server.
- -N : instructs to only forward ports, and not to execute a remote command.
- -f : sends SSH to background after the password is provided, just before the command is executed. Then, you can freely use the terminal to type commands on the local machine.
- -l username : the username you insert here will be used for logging in to the remote server you specified.
- hostname_or_IP : this is the remote system with a VNC server. An example of an IP address would be 172.16.0.5 and the example of a hostname would be myserver.somedomain.com.
You can also connect to a remote server via SSH tunnel from a Windows machine by using PuTTY. In the PuTTY configuration window:
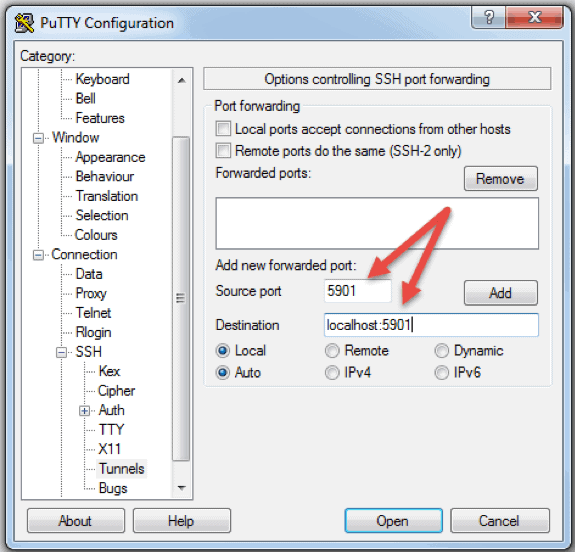
- Go to Connection -> SSH -> Tunnels
- In the Source port field type in 5901
- In the Destination field type in localhost:5901
- Start the SSH session as you normally would.
- Connect to your server with a VNC client of your choice.
What is RDP?
Remote Desktop Protocol (RDP) is a protocol developed by Microsoft. It is used to control and manage machines with a Windows operating system remotely.
Unlike Secure Shell, connections established using an RDP client provide a user with a graphical interface through which they can gain access to a remote computer and control it in the same manner as their local computer.
Using Remote Desktop services, formerly known as terminal services, allows network and system engineers to easily manipulate remote computers connected to a local network or the Internet.
This comes with a price. If you do not use a virtual private network (VPN), connecting via RDP is far less secure than SSH because you are directly exposed to the internet. There are many automated scripts constantly looking for weaknesses in your connection, especially for open ports that Windows Remote Desktop connections use. In that case, it is highly recommended to have strong, secure passwords and change them regularly. This does not make RDP connections safe, but less vulnerable.
How Does Remote Desktop Protocol Work?
Windows Remote Desktop connection is based on a rather simple client-server model using Remote Desktop Protocol (RDP). After you enable it, the Windows Remote Desktop server-side service starts listening for connection requests on port 3389. Whenever you try to connect to a Windows server, you will need to provide a valid username for the account you are using to gain access remotely. Once you gain access to the server, you will be able to manage applications, transfer files between the two computers, and virtually perform any task you can perform locally with the account in question.
No matter what version of the Windows operating system you have, you will be able to establish a secure remote connection to another computer since the Remote Desktop client is available by default. On the other hand, a computer can be remotely accessible only if it runs on a Pro, Enterprise, or Server edition of a Windows operating system. So, we can conclude that RDP connections are possible only between computers with a Windows OS on them.
How to Enable an RDP Connection
Establishing a Remote Desktop connection to another computer over network requires you to enable the Windows Remote Desktop server service. The Remote Desktop client is integrated into Windows systems, ready out of the box, and does not need any special setup before you can connect to another Windows-based machine. However, accepting Remote Desktop connections from another machines is disabled by default on all version of Windows OS.
If you want to remotely connect to a server over the Internet and not through the local network, you need to take a few things into consideration before you enable this service:
- Port forwarding. If you are not using a VPN you need to make sure the ports are forwarded properly to the remote host’s IP address. Check the router settings to see if the traffic on the default TCP port for Remote Desktop Protocol (port 3389) is going to the IP of the server with which you want to establish a Remote Desktop connection. Note that your Windows server is in this case directly exposed to the Internet and vulnerable.
- Using a VPN. This is a much safer option for Remote Desktop connection. When you create a virtual private network on a client computer, you will be able to access all services that are available only when you use local connection.
- Firewall settings. Make sure that the firewall you are using for the remote machine is not blocking Remote Desktop connection. You need to open the local port for RDP, whether it is the default or custom port number.
Enabling Remote Access in Windows 7, 8, 10 and Windows Server Versions
The procedure to configure remote desktop and allow secure remote connections to a server or a PC from a different computer is similar for all versions of Windows operating systems. I will list the basic steps to enable remote access to a desired machine. Before you begin, please make sure that you have taken into consideration the notes listed above concerning port forwarding, VPN, and firewall settings.
Step 1: Allow Remote Connections
Go to the computer information on the machine where you want to allow remote connections:
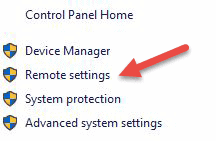
- Right Click on Computer or This PC depending on the Windows OS version.
- Click on Properties.
- Click on Remote settings on the left side of the window.
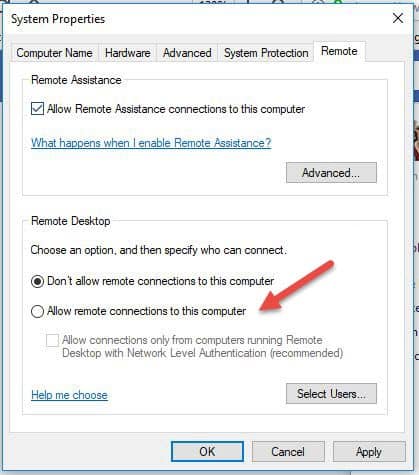
- Click on Allow remote connections to this computer. This should automatically add Remote Desktop Firewall exception. Additionally, you can check off the box that says “Allow connections only from computers running Remote Desktop with Network Level Authentication (recommended)” for additional security of your RDP sessions.
- Click Apply if you want to stay in the tab or OK to close it.
Step 2: Add Users to the List of Remote Users
You need to perform this step only if you want to allow users other than administrators to access the machine in question. If you are an administrator, your account is automatically included in the list of allowed users but you will not see it. To select more users:
- On the Remote settings screen shown above, click Select Users…
- Click on Add in the Remote Desktop Users box.
- The Select Users box will appear. You can select the location you want to search by clicking on Locations.
- In the Enter the Object Names to Select field, type a name of a user and click on Check Names.
- When you find a match, select the user account and click OK.
- Close the System Properties window by clicking OK again.
There are not many other options to change in order to configure Remote Desktop. Provided that other settings do not interfere with your Remote Desktop connection, you are now able to remotely connect and control this computer.
How to Use the Remove Desktop Connection Client
Using the Remote Desktop client is straightforward and you do not need to specifically configure Remote Desktop on the local computer. The steps below will work for all versions of Windows starting from Windows 7.
Step 1: Launch the Destkop Connection Unit
On your local Windows computer, locate the Remote Desktop Connection application. You can find it in a couple of different ways:
- For Windows 7, click on Start -> All Programs, go to the ‘Accessories’ folder and click on Remote Desktop Connection. For Windows 10, Click on Start and locate the ‘Windows Accessories’ folder where you can also find the Remote Desktop Connection app.
- Click on Start and type in Remote Desktop Connection in the search bar. You will receive search results as soon as you start typing. Click on the application when it shows up on the list.

- Press Windows + R keys on your keyboard to get the “Run” box. Type in mstsc and hit Enter in the ‘Open:’ field to run the Remote Desktop client.

Step 2: Enter the Remote Hosts IP Address or Name
Once you launch the Remote Desktop Connection application, you will get a window where you can enter the name or the IP address of a remote machine you want to access.
In the Computer field, type in the corresponding name or IP address and click Connect.
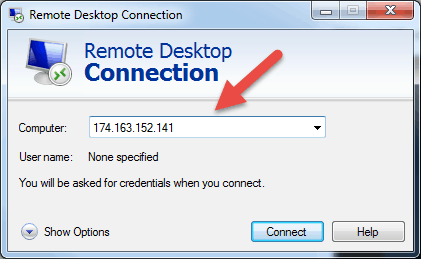
Note: If the default listening port for Remote Desktop connection (port 3389) has been changed on the remote host to a different value, you will have to specify it after the IP address.
Example: 174.163.152.141:6200
Depending on your circumstances, you will either need to enter the private or public IP address of the remote host. Here are the possible scenarios:
- If the client computer and the remote host connect to the same Local Area Network, you will use the host’s private IP address for Remote Desktop Connection.
- If you are using a virtual private network (VPN) on the client computer to access the remote host, you will use the host’s private IP address for Remote Desktop Connection.
- If the client computer is connecting to the remote host from another network over the Internet without a VPN, you will use the public IP address.
How to Find the IP Address and Host Name
There are many ways to locate the name, public or private IP address of a computer where you want to configure Remote Desktop service. Here are the quickest and easiest methods:
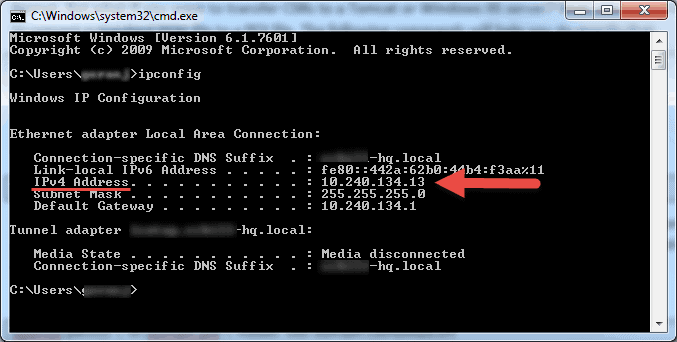
To determine a computer’s private IP address:
- Search for CMD from the start menu or press Windows + R on your keyboard, type in CMD and hit Enter to run the command prompt.
- Type ipconfig in the command prompt and hit Enter.
- Your will see your computer’s private IP address under the IPv4 Address line.
To determine which public IP address a computer is using:
- From your web browser, go to com or use its search bar.
- Type in “what is my IP” or simply “my IP” and hit Enter.
- At the top of the page, Google will show you the public IP address your computer is using. If this is not working for your region, you can visit the first webpage in the search results and it will show you the IP address. Some websites such as www.whatismyip.com will even show you your private (local) IP address.
To find a computer’s name:
- Right Click on Computer, or This PC, depending on the Windows OS version you are using.
- Click on
- You will find your full computer name under the “Computer name, domain, and workgroup settings” section.
Step 3: Entering the RDP Credentials and Finalizing the Connection
After you hit connect, the loading bar will appear. When it finishes initiating and configuring the remote session you will get a pop-up window that will look similar to this:
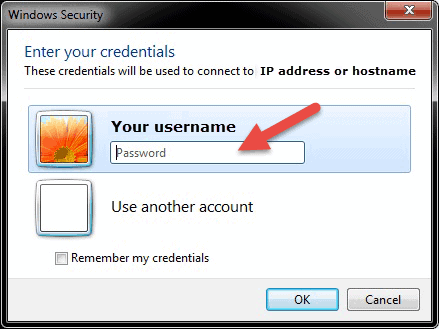
- Enter the password for the selected username. You can use another account, if needed, and provide a different username and password.
- Click OK when ready and you will get the security certificate warning.
- Click Yes to continue.
Note: Only one user can be logged in at the same time on a Windows computer. If someone else is using the machine you are trying to remotely access, that user has to disconnect. The warning logon message will appear in such cases.
You will not see the desktop of the remote machine. Depending on the user account permission settings, you can now perform any operation that you can while working directly in front of it.
Remote Desktop Protocol Further Steps
When setting up your remote server or machine to accept remote desktop connections, it is important to take precautions concerning securing RDP. Your server is especially vulnerable if you are accessing it over the Internet.
Here are a few pieces of advice to keep in mind if you are using remote desktop protocol to remotely connect to your machines:
- Use the built in VPN server on your Windows machine to additionally secure your traffic. This will provide more secure access to your Windows server and services.
- Set client connection encryption level. This option is set to “Not configured” by default. You can enable it and force high encryption level settings for all communications between clients and Remote Desktop Session Host servers. We do not recommended using the “Client Compatible” encryption level setting. Leaving the default “High” encryption level setting will force strong 128-bit encryption for data sent from the client to server and vice versa. You can edit this configuration using the Local Group Policy editor.
- Employ two-factor authentication using a third-party tool, such as Duo Security. By installing Duo Authentication for Windows Logon, you can add two-factor authentication to all Windows login attempts, or only for RDP sessions.
- Enforce firewall rules to limit exposure of open RDP ports to the Internet, especially if you are using the default RDP TCP port 3389. Windows has a built-in firewall which you can access from Control Panel and further configure it to restrict traffic to specific ports and IP addresses
These best practices for additionally securing RDP will help you tighten down remote desktop access. You will avoid most of the unauthorized login attempts without spending too much time making configuration changes to your machines.
Note: Learn how to use SSHFS to mount remote file systems over SSH.
Conclusion
The steps and processes listed in this guide will work for most users and most versions of Linux and Windows operating systems.
You should now be able to Connect to a Remote Server with Linux or Windows.
There are of course many other methods to establish a connection between two remote computers, but the ones covered here are most common.
The latest builds of Windows 10 and Windows 11 include a built-in server and client that are based on OpenSSH. This means now you can remotely connect to Windows 10/11 or Windows Server 2019 using any SSH client, similar to Linux distros. In this article, we’ll show you how to configure OpenSSH on Windows 10 and Windows 11, and connect to it using Putty or any other SSH client.
OpenSSH is an open-source, cross-platform version of Secure Shell (SSH) that is used by Linux users for a long time. This project is currently ported to Windows and can be used as an SSH server on almost any version of Windows. OpenSSH is built-in into the operating system image in the latest versions of Windows Server 2022/2019 and Windows 11.
How to Enable SSH Server on Windows 10?
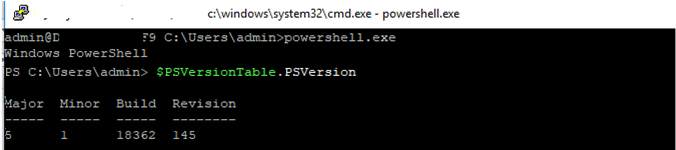
Make sure your build of Windows 10 is 1809 or newer. The easiest way to do this is by running the command:
winver

Note. If you have an older Windows 10 build installed, you can update it through Windows Update or using an ISO image with a newer Windows 10 build (you can create an image using the Media Creation Tool). If you don’t want to update your Windows 10 build, you can manually install the Win32-OpenSSH port for Windows from GitHub.
You can enable the OpenSSH server in Windows 10 through the graphical Settings panel:
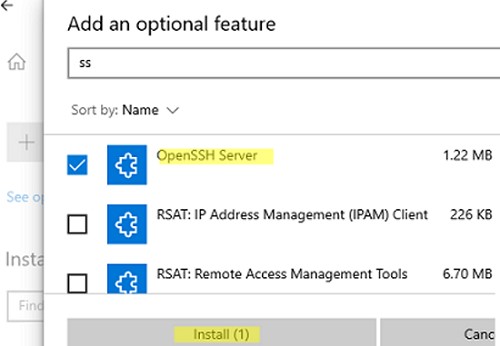
- Go to Settings > Apps > Apps and features > Optional features (or run the command ms-settings:appsfeatures);

- Click Add a feature, select OpenSSH Server (OpenSSH-based secure shell (SSH) server, for secure key management and access from remote machines), and click Install.


You can also install the sshd server using PowerShell:
Add-WindowsCapability -Online -Name OpenSSH.Server*

Or using DISM:
dism /Online /Add-Capability /CapabilityName:OpenSSH.Server~~~~0.0.1.0
If you want to make sure the OpenSSH server is installed, run the following PS command:
Get-WindowsCapability -Online | ? Name -like 'OpenSSH.Server*'

Name : OpenSSH.Server~~~~0.0.1.0

State : Installed

Use the following PowerShell command to uninstall the SSH server:
Remove-WindowsCapability -Online -Name OpenSSH.Server~~~~0.0.1.0
How to Install SSH Server on Windows 11?
Also, you can add the OpenSSH Server on Windows 11.
- Go to Settings > Apps > Optional features;
- Click View Features;

- Select OpenSSH Server from the list and click Next > Install;

- Wait for the installation to complete.


The OpenSSH binaries are located in the C:WindowsSystem32OpenSSH folder.

Configuring SSH Service on Windows 10 and 11
Check the status of ssh-agent and sshd services using the PowerShell Get-Service command:
Get-Service -Name *ssh*

As you can see, both services are in a Stopped state and not added to the automatic startup list. To start services and configure autostart for them, run the following commands:
Start-Service sshd

Set-Service -Name sshd -StartupType 'Automatic'

Start-Service ‘ssh-agent’

Set-Service -Name ‘ssh-agent’ -StartupType 'Automatic'

You also need to allow incoming connections to TCP port 22 in the Windows Defender firewall settings. You can open the port using netsh:
netsh advfirewall firewall add rule name=”SSHD service” dir=in action=allow protocol=TCP localport=22
Or you can add a firewall rule to allow SSH traffic using PowerShell:
New-NetFirewallRule -Name sshd -DisplayName 'OpenSSH Server (sshd)' -Enabled True -Direction Inbound -Protocol TCP -Action Allow -LocalPort 22
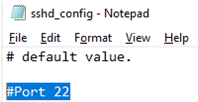
You can configure various OpenSSH server settings in Windows using the %programdata%sshsshd_config configuration file.

For example, you can disable password authentication and leave only key-based auth with:
PubkeyAuthentication yes

PasswordAuthentication no
Here you can also specify a new TCP port (instead of the default TCP 22 port) on which the SSHD will accept connections. For example:
Port 2222
Using the directives AllowGroups, AllowUsers, DenyGroups, DenyUsers, you can specify users and groups who are allowed or denied to connect to Windows via SSH:
- DenyUsers theitbrosjbrown@192.168.1.15 — denies connections to username jbrown from 192.168.1.15 host;
- DenyUsers theitbros* — prevent all users from theitbros domain to connect host using ssh;
- AllowGroups theitbrosssh_allow — only allow users from theitbrosssh_allow to connect host.
The allow and deny rules of sshd are processed in the following order: DenyUsers, AllowUsers, DenyGroups, and AllowGroups.
For example, to allow to connect to SSH under mylocaluser1 account from 192.168.31.100 host, add the following directive:
AllowUsers mylocaluser1@192.168.31.100
After making changes to the sshd_config file, you need to restart the sshd service:
Get-Service sshd| Restart-Service –force

Connect to Windows via SSH
Now you can connect to Windows 10 using any SSH client. To connect from Linux, use the command:
ssh -p 22 admin@192.168.1.90
Here, the admin is a local Windows user under which you want to connect. This account must be a member of the built-in Administrators group. 192.168.1.90 is an IP address of your Windows 10 computer.

After that, a Windows command prompt window will open in the SSH session.
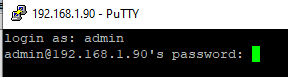
You can use the Putty client to connect to a Windows computer via SSH:
- Download and run putty.exe;
- Enter the hostname or IP address of the remote Windows host you want to connect over SSH;
- Select the Connection type: SSH and make sure port 22 is specified;

- Click Open;
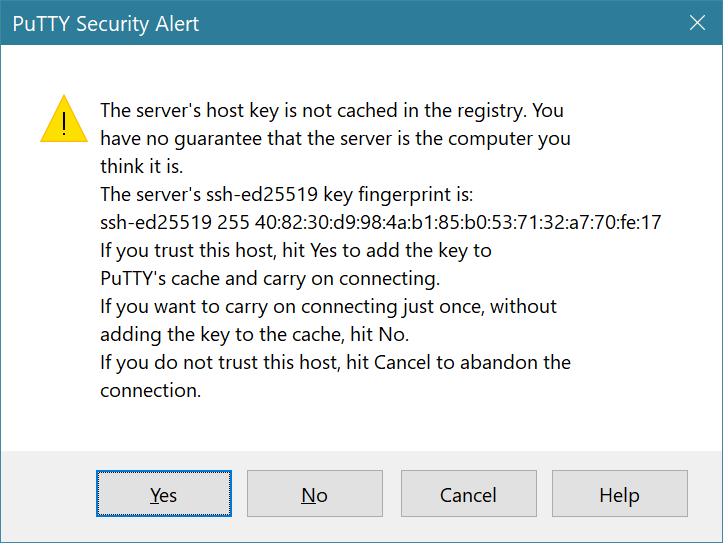
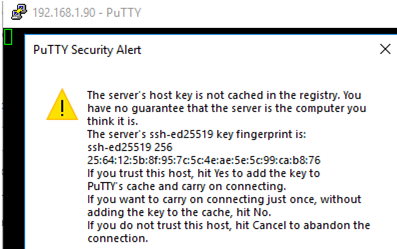
- The first time you connect to a Windows host via SSH, a Security Alert will appear asking you to confirm that you want to add the ssh-ed25519 key fingerprint of the remote machine to your local cache. If you trust this host, click the Accept button. This will add that server to the list of known SSH hosts;

Note. OpenSSH server fingerprint stored in a file C:ProgramDatasshssh_host_ecdsa_key.pub. You can determine the current ECDSA key fingerprint on a Windows 10 host with the command:ssh-keygen -lf C:ProgramDatasshssh_host_ed25519_key.pub

- A Putty window will appear. Here you need to specify the Windows username and password that you want to use to connect to SSH;

- Once logged in, the command line of the remote Windows host will open;
- You can now interactively run commands on the remote host.


You can also use the built-in Windows SSH client to connect to another Windows host. Install the ssh.exe client on Windows using the command:
Add-WindowsCapability -Online -Name OpenSSH.Client*
Now you can connect to a remote SSH host directly from the Windows command prompt. Use the following command:
ssh root@192.168.13.202
The first time you connect, you will also need to add the fingerprint of the SSH server’s ECDSA key to the list of known hosts. To do this, type “yes” > “enter”.

Enter the user’s password. The command line C:Windowssystem32conhost.exe should appear: 
You can now use the OpenSSH.Client tools (scp.exe, sftp.exe) to copy a file between hosts using the SSH protocol. The following command will copy the local test1.log file to a remote Windows SSH host:
scp.exe D:PStest1.log root@192.168.13.202:c:temp
![]()
If you prefer to use Windows Terminal, you can add the required SSH host profiles to it for quick connection:
- Run Windows Terminal and go to its Settings;
- Click the Add a new profile button in the Profiles section;

- Specify that you want to create a duplicate of Windows PowerShell profile;

- Specify a profile name (“SSH Windows 10 DEVPC” in this example);
- In the Command line parameter, specify the connection string to your SSH host. For example: %SystemRoot%System32WindowsPowerShellv1.0powershell.exe ssh root@192.168.13.202

- Save the profile;
- Now in the Windows Terminal menu you will have a separate option for a quick SSH connection to a Windows host.


Hint. In some scenarios, you will need to run the PowerShell.exe cli instead of the cmd.exe shell when logging in via SSH on Windows 10. You can do this by running the following command in Windows 10 (under the admin account):
New-ItemProperty -Path "HKLM:SOFTWAREOpenSSH" -Name DefaultShell -Value "C:WindowsSystem32WindowsPowerShellv1.0powershell.exe" -PropertyType String -Force
Now, you change the default OpenSSH shell. From here, when connecting to Windows via SSH, you will immediately see PowerShell prompt instead of cmd.exe.

If you want to use key-based ssh authentication instead of password authentication, you need to generate a key using ssh-keygen on your client. In such a case, the contents of the id_rsa.pub file must be copied to the c:usersadmin.sshauthorized_keys file in Windows 10.
After that, you can connect from your Linux client to Windows 10 without a password. Use the command:
ssh -l admin@192.168.1.90
In previous versions of OpenSSH on Windows, all of the sshd service logs were written to the text file C:ProgramDatasshlogssshd.log by default.
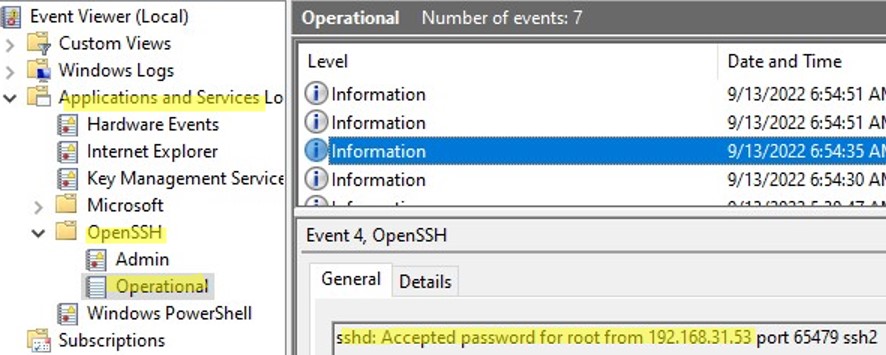
On Windows 11, SSH logs can be viewed using the Event Viewer console (eventvwr.msc). All SSH events are available in a separate section Application and Services Logs > OpenSSH > Operational.
For example, the screenshot shows an example of an event with a successful connection to the computer via SSH. You can see the ssh client’s IP address (hostname) and the username used to connect.
Sshd: Accepted password for jbrown from 192.168.14.14. port 49833 ssh2

- About
- Latest Posts

I enjoy technology and developing websites. Since 2012 I’m running a few of my own websites, and share useful content on gadgets, PC administration and website promotion.
If you ever need to securely connect to a remote machine and reach a command-line interface, SSH is the tool for the job. The Secure Shell Protocol (SSH) has been used for decades as a means to remotely interface with Unix / Linux / BSD machines over insecure connections.
SSH operates on a traditional client — server principle where a remote user (client) can connect to a server and run commands as if they were sitting at the machine. SSH is particularly useful if you have a server (perhaps on one of the best cheap web hosts) or Raspberry Pi you need to control remotely. As these systems primarily use Linux, it’s easy to do things like edit scripts, change key configuration files or even install software remotely.
In this how to, we will cover how to create basic SSH connections coming from Windows, macOS and Linux machines.
Before You Open SSH: Credentials and Access
To initiate an SSH connection coming from any operating system, you first need proper access to the remote device and you need its address, in the form of either an IP address or a valid hostname. You will need to enter the address to establish your connection and then you will be hit with a request for a username and password.
If you have a web hosting account with SSH enabled, you will likely be able to use the domain name as the address and then the same username and password you employ for reaching FTP or cPanel to log in. If those don’t work, check the instructions on the host’s site. If you are logging into a server on your local network, you will need the computer name / IP address and to make sure that the remote device has an account for you on it.
Using SSH in Windows
Though you can invoke SSH from the command line, most folks much prefer to use PuTTY, a free GUI app that makes connecting easy.
1. Download and install PuTTY. Windows does have its own command prompt, which can be used with SSH, but PuTTY is by far the most accessible means to open an SSH connection.
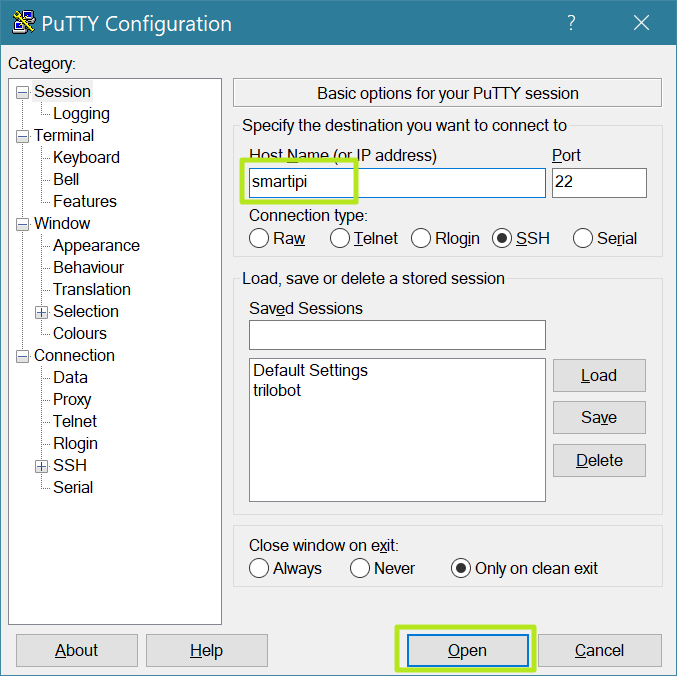
2. Open PuTTY. PuTTY’s user interface has a Host Name / IP address section which is where we would type in the details of the machine that we wish to SSH into.
3. Enter the appropriate address into the Hostname or IP address field and click Open.
4. Answer Yes if prompted to confirm your connection. If this is the first time connecting to that system, you will be asked.
You will now be connected to the remote system.
5. Enter your username and password as prompted. The password is not echoed to the screen, this is normal behavior and is a security feature.
You are now in control of the remote machine, any commands will be executed using the remote machine.
6. When finished with the SSH session, type exit and press Enter or simply close the window. It is important to close an SSH session when not in use so you don’t accidentally send commands to it or leave it open should your computer be hacked.
Using SSH in Linux
In all major versions of Linux, SSH is built into the command line and easy to access that way. Note that we used Ubuntu for this tutorial but these instructions would work with almost any Linux flavor.
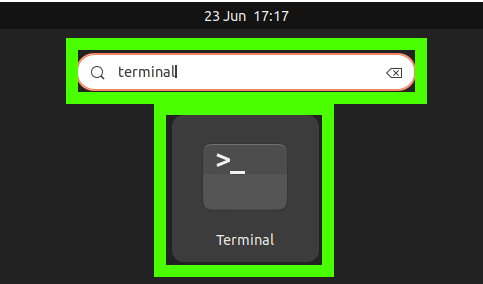
1. Open the terminal if you’re not already at the command line. Hitting CTRL + ALT + T does this or you can go to the apps menu and search for “terminal” to find its app.
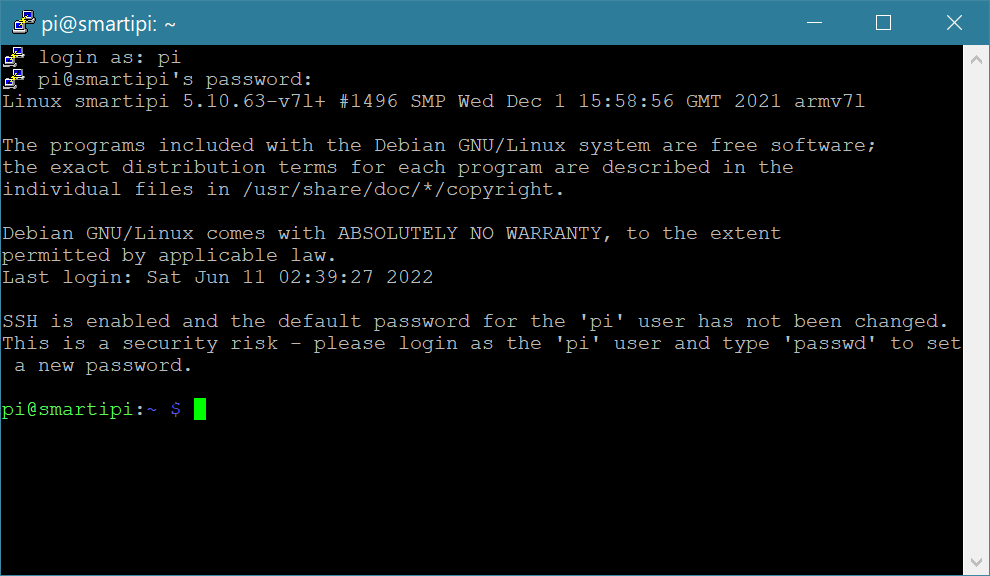
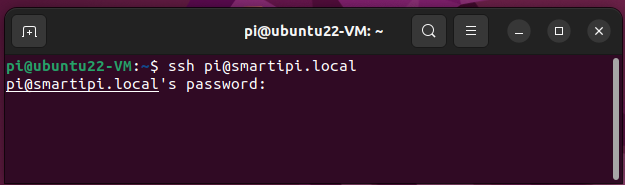
2. Use SSH to log in to the remote machine using your username, and the IP address / hostname. For example our user was “pi” and the hostname was “smartipi,” this is what we’d use:
ssh pi@smartipi.local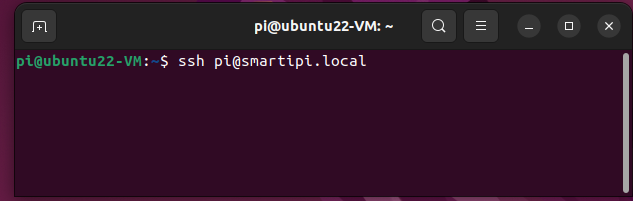
3. Type yes if you are given a warning that the SSH connection’s key is not known. This may happen on first connection and you may need to reconnect after entering it.

4. Enter your password if prompted. You won’t see the characters as you type them.
5. Press CTRL + D or type “logout” to finish your session.
Using SSH in macOS
1. Launch the terminal by clicking the terminal icon in the dock.

The terminal is ready for use.
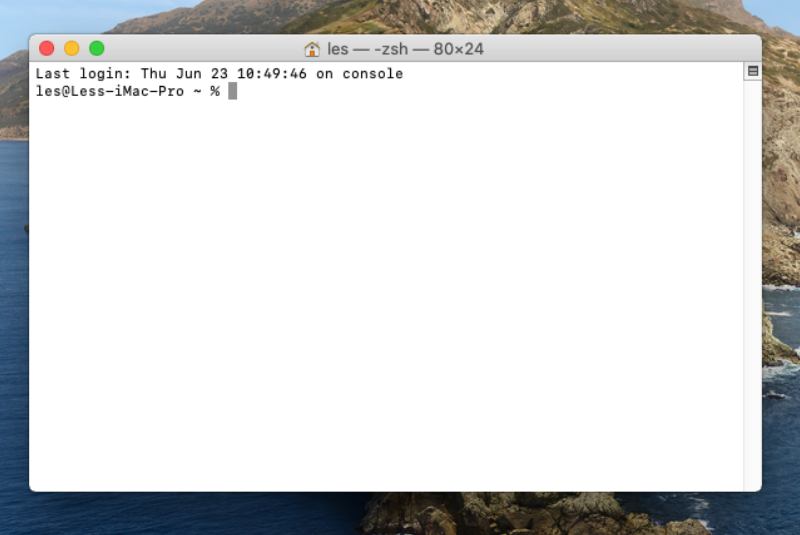
2. Enter the SSH command followed by username@server. In the example below, our user was “pi” and the hostname was “raspberrypi.local”.
ssh pi@raspberrypi.local3. Type Yes if prompted to confirm the connection for the first time.
4. Enter your password when prompted.
5. When finished with the SSH session, exit using CTRL+D or type exit and press Enter. It is important to close an SSH session when not in use so you don’t accidentally send commands to it or leave it open should your computer be hacked.
How to run a command and close an SSH connection
Sometimes we just need to run a single command on a remote machine. For example this could be a Raspberry Pi that we need to shutdown. Using the -t argument we can log in, run a command, wait for the output and then logout.
1. Open a terminal / command prompt.
2. Use SSH to log in to the remote machine, add “-t” to the end of the command, then insert the command that you wish to run and press Enter. In our example we will login to a Raspberry Pi then run the poweroff command to power down the Pi.
ssh pi@raspberrypi.local -t "sudo poweroff"3. Enter a password as needed

The remote computer should now log your off and then perform the task.
Get instant access to breaking news, in-depth reviews and helpful tips.
SSH-server based on the OpenSSH package is part of the operating system in all modern versions of Windows. In this article, we’ll show you how to install and configure the OpenSSH server on Windows 10/11 and Windows Server 2022/2019 and connect to it remotely via a secure SSH connection (just like in Linux 🙂).
Contents:
- How to Install OpenSSH Server on Windows?
- Configuring SSH Server on Windows
- Sshd_config: OpenSSH Server Configuration File
- How to Connect to a Remote Windows Computer via SSH?
- Checking SSH Connection Logs in Windows
How to Install OpenSSH Server on Windows?
The OpenSSH Server package is a part of all modern versions of Windows 10 (starting with 1803), Windows 11, and Windows Server 2022/2019 as a Feature on Demand (FoD). To install the OpenSSH server, open the elevated PowerShell prompt and run the command:
Get-WindowsCapability -Online | Where-Object Name -like ‘OpenSSH.Server*’ | Add-WindowsCapability –Online
Or using DISM:
dism /Online /Add-Capability /CapabilityName:OpenSSH.Server~~~~0.0.1.0
If your computer is directly connected to the Internet, the OpenSSH.Server package will be downloaded and installed on Windows.
You can also install OpenSSH on Windows 10/11 through the modern Settings panel (Settings -> Apps and features -> Optional features -> Add a feature). Find Open SSH Server in the list and click Install.
On computers in disconnected (offline) environments, you can install the OpenSSH Server from the Feature on Demand ISO image (available in your account on the Microsoft websites: MSDN or my.visualstudio.com). Download the ISO and extract its contents to the E:FOD folder (you can only extract the file OpenSSH-Server-Package~31bf3856ad364e35~amd64~~.cab) and install the Windows feature from the local repository:
Add-WindowsCapability -Name OpenSSH.Server~~~~0.0.1.0 -Online -Source E:FOD
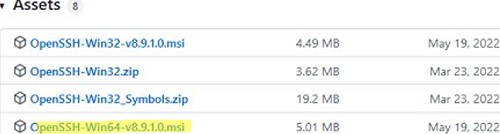
An MSI installer for OpenSSH for Windows is also available in the official Microsoft repository on GitHub (https://github.com/PowerShell/Win32-OpenSSH/releases/). For example, for Windows 10 x64, you need to download and install the OpenSSH-Win64-v8.9.1.0.msi package. The following PowerShell command will download the MSI file and install the OpenSSH client and server on your computer:
Invoke-WebRequest https://github.com/PowerShell/Win32-OpenSSH/releases/download/v8.9.1.0p1-Beta/OpenSSH-Win64-v8.9.1.0.msi -OutFile $HOMEDownloadsOpenSSH-Win64-v8.9.1.0.msi -UseBasicParsing

msiexec /i $HOMEDownloadsOpenSSH-Win64-v8.9.1.0.msi
You can install an OpenSSH server in previous Windows versions as well (Windows 8.1, Windows Server 2016/2012R2/2012). Check the example on how to install and configure Win32-OpenSSH in the article “How to Configure SFTP Server (SSH FTP) on Windows?”.
To make sure the OpenSSH server has been installed, run the command:
Get-WindowsCapability -Online | ? Name -like 'OpenSSH.Ser*'
State : Installed

Configuring SSH Server on Windows
After installing the OpenSSH server on Windows, two services are added:
- ssh-agent (OpenSSH Authentication Agent) – can be used to manage private keys if you have configured SSH key authentication;
- sshd (OpenSSH SSH Server).
You need to change the startup type of the sshd service to automatic and start the service using PowerShell:
Set-Service -Name sshd -StartupType 'Automatic'

Start-Service sshd

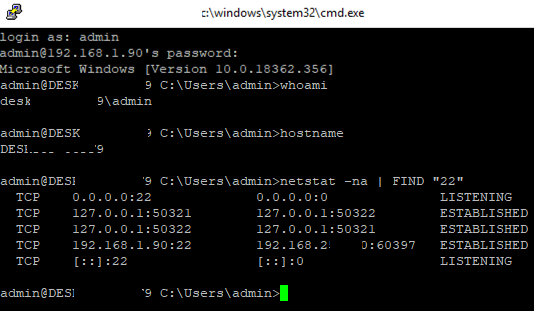
Use the netstat command to make sure that the SSH server is running and waiting for the connections on TCP port 22:
netstat -na| find ":22"

Make sure that Windows Defender Firewall allows inbound connections to Windows through TCP port 22:
Get-NetFirewallRule -Name *OpenSSH-Server* |select Name, DisplayName, Description, Enabled
Name DisplayName Description Enabled
---- ----------- ----------- -------
OpenSSH-Server-In-TCP OpenSSH SSH Server (sshd) Inbound rule for OpenSSH SSH Server (sshd) True

If the rule is disabled (Enabled=False) or missing, you can create a new inbound rule using the New-NetFirewallRule cmdlet:
New-NetFirewallRule -Name sshd -DisplayName 'OpenSSH Server (sshd)' -Enabled True -Direction Inbound -Protocol TCP -Action Allow -LocalPort 22
By default, key OpenSSH components are located in these folders:
- OpenSSH Server executables:
C:WindowsSystem32OpenSSH(sshd.exe, ssh.exe, ssh-keygen.exe, sftp.exe, etc.) - The sshd_config file (created after the first service start of the service):
C:ProgramDatassh - The authorized_keys file and keys can be stored in the user profile folder:
%USERPROFILE%.ssh
Sshd_config: OpenSSH Server Configuration File
You can change your OpenSSH server settings in the config file: %programdata%sshsshd_config. This is a plain text file with a set of directives. You can use any text editor for editing:
start-process notepad C:Programdatasshsshd_config
For example, to deny SSH connection for a specific domain user account (or all users in the specified domain), add these directives to the end of the file:
DenyUsers woshubadmin@192.168.1.10
DenyUsers corp*
To allow SSH connection to the specific domain security group only:
AllowGroups woshubsshadmins
You can allow access to a local user group:
AllowGroups sshadmins
By default, all Windows users can connect to OpenSSH. Directives in the sshd_config files are processed in the following order: DenyUsers, AllowUsers, DenyGroups, AllowGroups.
You can deny SSH login for the accounts with administrator privileges. In this case, if you need to perform any privileged actions in your SSH session, you will have to use runas.
DenyGroups Administrators
The following directives allow you to access Windows using SSH private keys or a password.
PubkeyAuthentication yes
PasswordAuthentication yes
You can change the default TCP/22 port on which OpenSSH Server connections are accepted in the sshd_config configuration file using the Port directive.
After making any changes to the sshd_config file, you need to restart the sshd service
restart-service sshd
How to Connect to a Remote Windows Computer via SSH?
Now you can try to connect to your Windows 10 computer using the SSH client (I’m using putty in this example).
You can use the built-in Windows SSH client to connect to a remote host. To do this, open the command prompt and run the following command:
ssh max@192.168.13.12
In this example, max is the username on the remote Windows computer, and 192.168.13.12 is the IP address or DNS name of the computer.
Note that you can use the following username formats when connecting to Windows via SSH:
max@server1– local Windows usermax@woshub.com@server1– Active Directory user or Microsoft/Azure account (use the UserPrincipalName format)woshubmax@server1– NetBIOS name format
In an Active Directory domain, you can use Kerberos authentication in SSH. To do this, you need to enable the following directive in sshd_config:
GSSAPIAuthentication yes
You can now transparently connect to an SSH server from a domain-joined Windows machine with a domain user session. In this case, the user’s password will not be requested, and SSO authentication via Kerberos will be performed:
ssh -K server1
The first time you connect, you will be prompted to add the host to the list of known SSH hosts (C:Usersyour_user.sshknown_hosts).
Click Yes, and login under your Windows user account.
If the SSH connection is successful, you will see the cmd.exe shell prompt.
admin@win10pc C:Usersadmin>

You can run different commands, scripts, and apps in the SSH command prompt.
I prefer working in the PowerShell console. To start it, run:
powershell.exe
In order to change the default cmd.exe shell in OpenSSH to PowerShell, make changes to the registry using the following PowerShell command:
New-ItemProperty -Path "HKLM:SOFTWAREOpenSSH" -Name DefaultShell -Value "C:WindowsSystem32WindowsPowerShellv1.0powershell.exe" -PropertyType String –Force

Restart your SSH connection and make sure that PowerShell is now used as a default SSH shell (this is indicated by the prompt PS C:Usersadmin>).

The PowerShell prompt has been started in my SSH session, where the usual functions work: tab autocomplete, PSReadLine syntax highlighting, command history, etc. If the current user is a member of the local administrators’ group, all session commands are executed elevated even if UAC is enabled.
OpenSSH server on Windows can be used in various SSH tunneling scenarios.
Checking SSH Connection Logs in Windows
By default in Windows SSH server connection logs are written not to text files, but to a separate event log via Event Tracing for Windows (ETW). Open the Event Viewer console (eventvwr.msc ) and navigate to Application and services logs -> OpenSSH -> Operational.
If you successfully connect to the SSH server using a password, an event will appear in the log:
EventID: 4
sshd: Accepted password for root from 192.168.1.53 port 65749 ssh2
If SSH key authentication was performed, you will see the following event:
sshd: Accepted publickey for locadm from 192.168.1.53 port 61426
ssh2: ED25519 SHA256:FEHDEC/G42FS23209C2KMb4335923pigN31s3qMK322lGibD
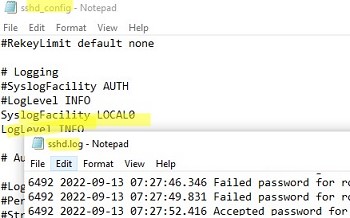
If you want the SSH connection logs to be written to a local text file, you need to enable the following parameters in the sshd_config file:
SyslogFacility LOCAL0
LogLevel INFO
Restart the sshd service and make sure that the SSH server logs are now written to a plain text file C:ProgramDatasshlogssshd.log
This tutorial is going to show you 3 ways to log into Linux server on Windows via SSH.
What’s SSH?
SSH stands for Secure Shell, which was invented in 1995 to replace the insecure Telnet (Telecommunication Network). It’s now the primary way for system administrators to securely log into remote Linux servers over the public Internet. Although it looks and acts the same as Telnet, all communications over the SSH protocol is encrypted to prevent packet sniffing.
If you are running a Linux or Mac computer, SSH client is installed by default. You can open up a terminal window and run the ssh command like below to connect to a remote Linux server.
ssh [email protected]
Now let’s discuss how to use SSH on Windows.
Method 1: Windows 10’s Built-in SSH Client
The Microsoft PowerShell team decided to port OpenSSH (both the client and the server) to Windows in 2015. It finally arrived in Windows 10’s Fall Creator Update in 2017 and is enabled by default in the April 2018 Update.
To use the OpenSSH client on Windows 10, simply open a PowerShell window or a command prompt window and run the ssh command. For example, if I want to connect to my Ubuntu desktop in the LAN, I would run
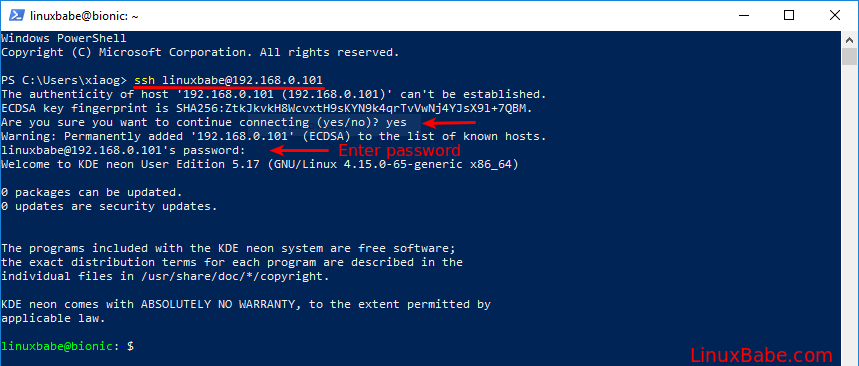
ssh [email protected]
linuxbabe is the username on my Ubuntu desktop and 192.168.0.101 is the private IP address for my Ubuntu desktop. The first time you connect to a Linux computer, you will be prompted to accept the host key. Then enter your password to login. After login, you can run Linux commands to do administrative tasks.
Note that if you want to paste a password into the PowerShell window, you need to right-click the mouse and press Enter.
To log out from the Linux box, run the exit command or press Ctrl+D.
The default font size in PowerShell Window is very small. To change it, right-click the titlebar and select properties, then you can change the font size, and the background color.

Method 2: Use SSH in Windows Subsystem for Linux
Windows Subsystem for Linux (WSL) enables you to run native Linux command-line tools directly on Windows 10. If you are a system administrator, WSL is probably an overkill for just using SSH because it would install and run a Linux distro (without graphical user interface) on your Windows 10 desktop. WSL is created for web developers or those who need to work on open-source projects. You can use not only SSH but also other Linux command line tools (Bash, sed, awk, etc).
Open the Microsoft Store and enter WSL in the search box. Select Run Linux on Windows and install a Linux distro of your choice.
For example, I choose Ubuntu and click the Get button to install it.

Once your Linux distro is installed, open the Control Panel and select Programs -> Turn Windows features on or off. Tick on the checkbox of Windows Subsystem for Linux to enable this feature. (You may need to reboot your Windows PC for this change to take effect.)
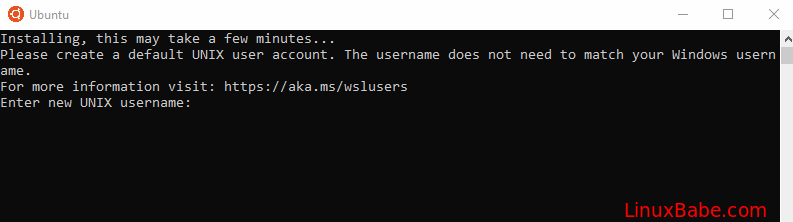
Next, you can launch the Linux distro from the start menu by search the distro’s name. The first time you launch it, you need to create a user and set a password.
After that, you can use the ssh command like below to connect to a Linux server or PC that runs a SSH server.
ssh [email protected]
Method 3: Use Putty
Putty is a well-known and the most popular SSH client on Windows before the arrival of Windows OpenSSH client and Windows Subsystem for Linux. To use SSH with Putty, you need to download the Putty program from the official website and install it.
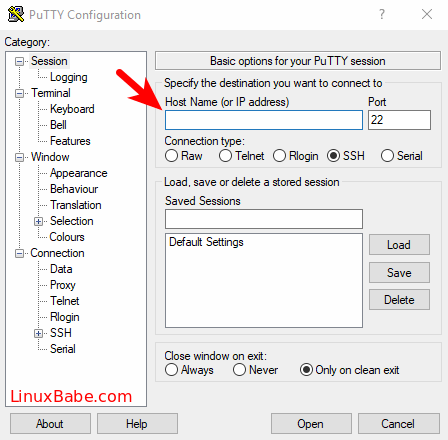
Launch Putty from the Start menu. Then enter the IP address or hostname of the Linux box and click the Open button to connect to it.
Accept the host key and you will be prompted to enter the username and password.
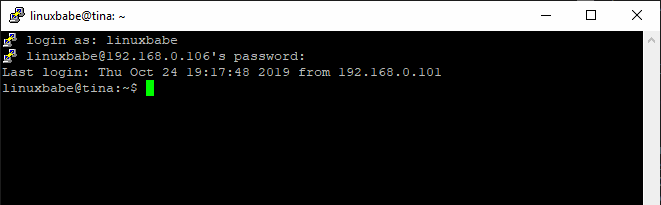
Please note that when you type in your password, the cursor doesn’t move, but it’s actually accepting your password. To paste text into Putty, first press Ctrl+C to copy the text, then go to Putty window and press the right button of your mouse.
How to Set Up SSH Key on Windows 10 (Optional)
There’re mainly two ways of authenticating user login with OpenSSH server:
- password authentication
- public-key authentication: also known as passwordless SSH login because you don’t need to enter your password.
To set up public-key authentication on Windows 10, follow the instructions below.
Open Windows Powershell, and run the following command to generate SSH keypair.
ssh-keygen -t rsa -b 4096
Where:
-tstands fortype. The above command generates an RSA type keypair. RSA is the default type.-bstands forbits. By default, the key is 3072 bits long. We use a 4096 bits key for stronger security.
When asked which file to save the key, you can simply press Enter to use the default file. Next, you can enter a passphrase to encrypt the private key, but you will need to enter this passphrase every time when you log into the Linux server. If you don’t want it, you can press Enter, so it will have no passphrase.

- The private key (your identification) will be saved in the .ssh/id_rsa file under your user directory.
- The public key will be saved in the .ssh/id_rsa.pub file.
Now we need to upload the public key to remote Linux server. You can display the public key in the Powershell with the following command.
cat .ssh/id_rsa.pub
Then log in to your server via password authentication, and run the following command to create a .ssh directory under your home directory.
sudo mkdir ~/.ssh
Create the authorized_hosts file
sudo nano ~/.ssh/authorized_keys
Copy your SSH public key and paste it to this file. Save and close the file. To save a file in Nano text editor, press Ctrl+O, then press Enter to confirm. To close a file, press Ctrl+X.
Next, change the permission of this file.
sudo chmod 600 ~/.ssh/authorized_keys
Log out of your Linux server.
exit
Now you can SSH into your server without entering a password.
Next Step
I hope this article helped you use SSH on Windows. You might also want to protect SSH service from hacking, I recommend setting up public-key authentication or two-factor authentication.
- 2 Simple Steps to Set up Passwordless SSH Login on Ubuntu
- Set Up SSH Two-Factor Authentication (2FA) on Ubuntu Server
Also, you can enable automatic security updates on your Linux server to patch vulnerabilities.
- Set Up Automatic Security Update (Unattended Upgrades) on Ubuntu
If you want FTP access to the Ubuntu server, you can set up pure-FTPd server.
- How to Set Up a Secure FTP Server with Pure-FTPd on Ubuntu
As always, if you found this post useful, then subscribe to our free newsletter to get more tips and tricks. Take care 🙂
SSH-протокол (англ. Secure Shell ) используется для безопасного удалённого управления операционной системой. По SSH можно подключиться к любому серверу с операционной системой семейства Linux.
Если на вашем сервере установлена ОС Windows Server — используйте подключение по RDP.
- Где найти доступы к серверу
- Как подключиться к серверу по SSH с компьютера на ОС Windows
- Как подключиться к серверу по SSH с компьютера на Linux/MacOS
Где найти доступы к серверу
Для подключения по SSH потребуется указать IP-адрес, пароль и логин администратора сервера. Эти данные можно найти на почте, привязанной к аккаунту (после активации VDS приходит письмо с инструкцией) или в Личном кабинете — в разделе «Товары» откройте подраздел «Виртуальные серверы» — выберите сервер в списке, сверху «Инструкция».

В новой вкладке откроется страница с необходимой информацией.

Как подключиться по SSH с компьютера на ОС Windows
Если на вашем компьютере установлена ОС Windows, а на сервере — UNIX-подобная система (например, Ubuntu, Debian, CentOS и др.), то для установки SSH-соединения можно использовать PuTTY. Это бесплатная программа под Windows состоит из одного запускаемого файла и не требует установки.
Чтобы установить соединение при помощи PuTTY, необходимо проделать следующие действия:
0. Скачайте нужную версию PuTTY по ссылке.
1. Запустите файл putty.exe. Откроется окно программы:
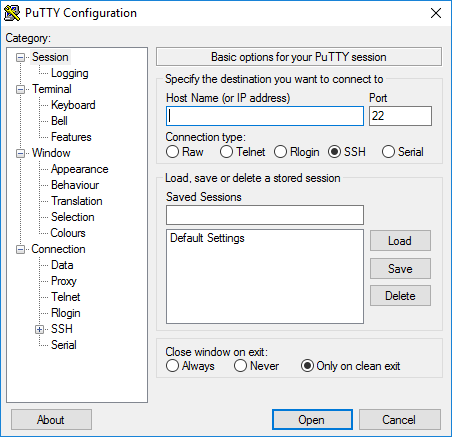
По умолчанию никаких настроек программы менять не нужно. Достаточно убедиться, что указан порт Port 22 и тип соединения Connection type — SSH.
2. В поле Host Name (or IP address) введите IP-адрес сервера. Нажмите кнопку Open.
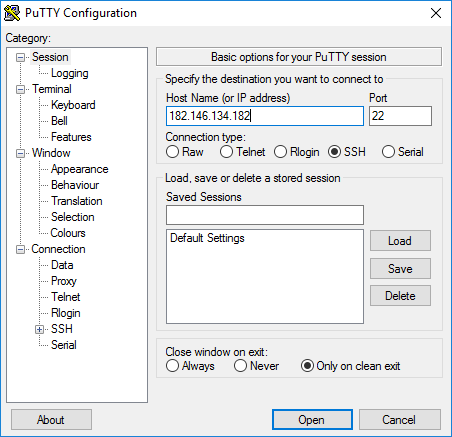
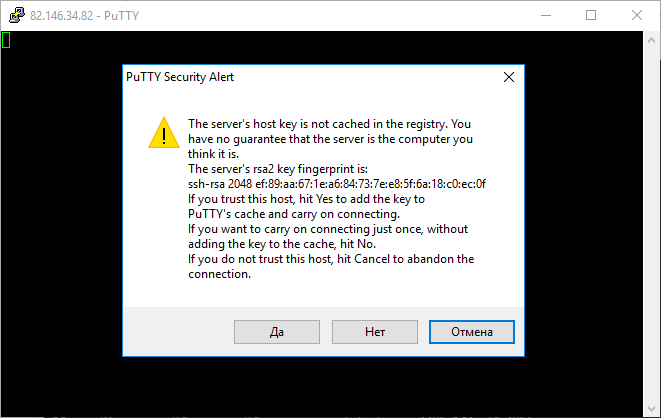
Может появиться предупреждение системы безопасности PuTTY — оно срабатывает при подключении к новому серверу. Нажмите Да — и соединение продолжится.
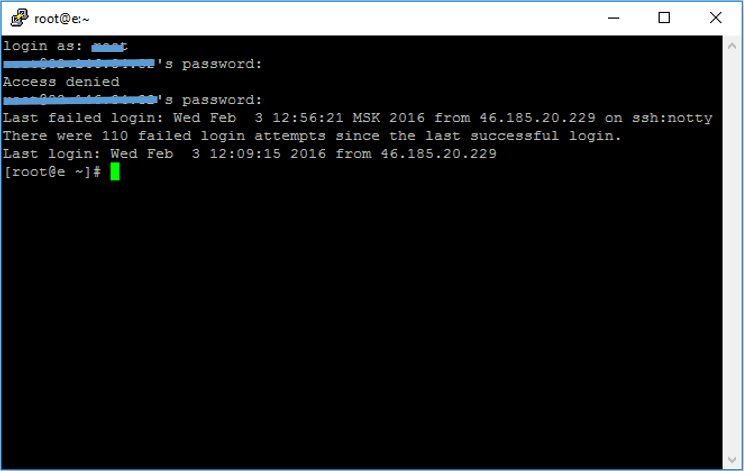
3. В появившейся командной строке введите имя пользователя, под которым будет выполнен вход на сервер. Для первого подключения к серверу или подключения в режиме администратора используется логин root.
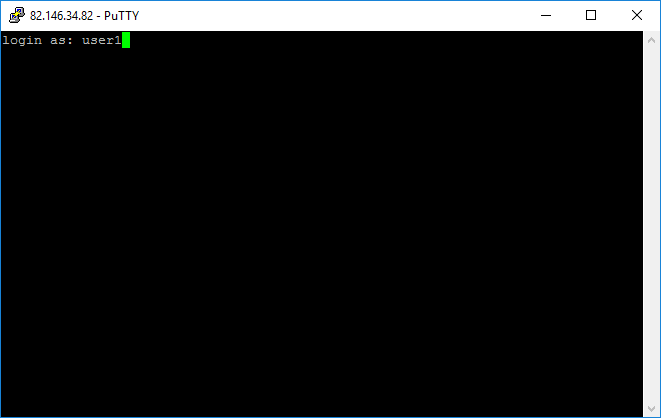
4. В следующей строке введите пароль пользователя. При вводе пароля символы в командной строке не отображаются: можно набрать пароль вслепую или вставить кликом правой кнопки мыши, предварительно скопировав (Ctrl+C) его из инструкции. После ввода нажмите клавишу Enter. Если имя пользователя или пароль указаны неправильно, выведется ошибка «Access denied». В случае успешного подключения откроется командная строка виртуального сервера.
Как подключиться к серверу по SSH с компьютера на Linux/MacOS
Подключиться по SSH к виртуальному серверу можно через терминал — в обоих случаях это приложение предустановлено.
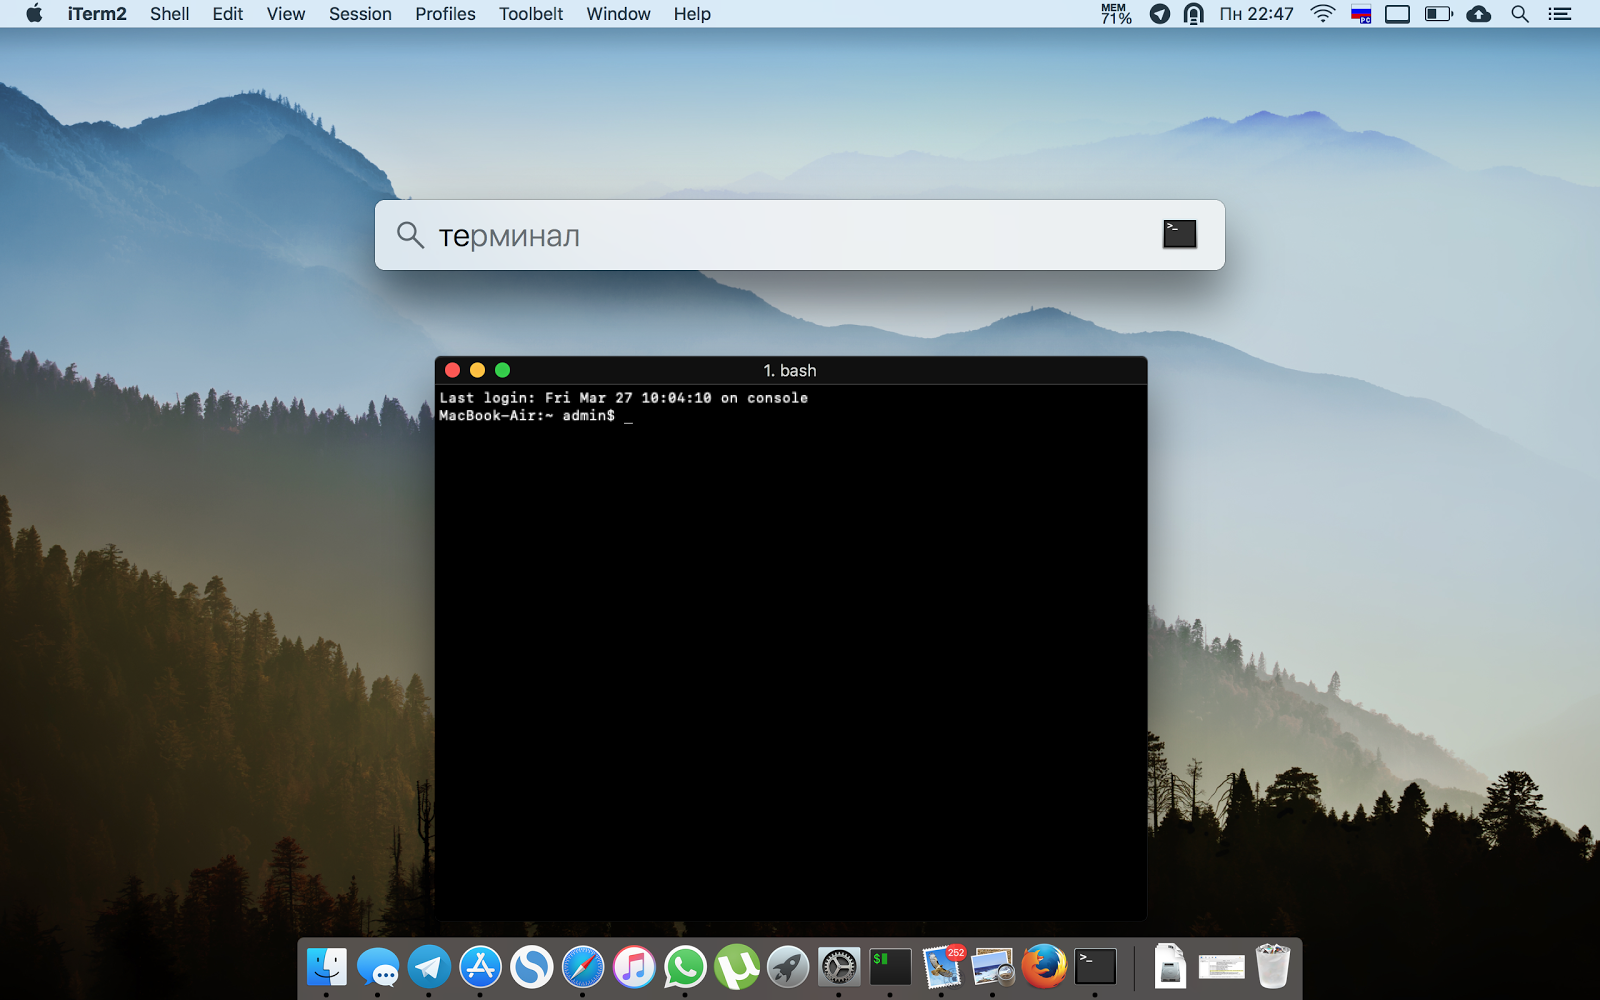
В операционных системах семейства Linux (Ubuntu и др.) его можно открыть сочетанием клавиш Ctrl+Alt+T.
В MacOS приложение Терминал можно найти через Spotlight (иконка поиска в правом верхнем углу экрана).
Подключиться к виртуальному серверу по SSH можно одной командой:
ssh username@ip_adress
где вместо username нужно указать логин пользователя, вместо ip-adress — IP-адрес сервера, к которому вы подключаетесь. Если на сервере используется нестандартный порт SSH, команда изменится:
ssh username@ip_adress -p 22
где 22 — порт, по которому будет произведено подключение по SSH.
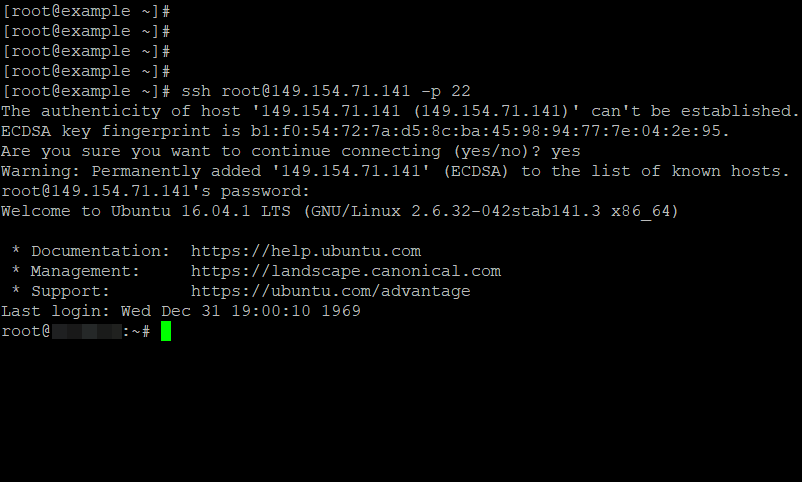
После ввода команды система запросит подтверждение подключения (необходимо ввести yes и нажать Enter) и пароль пользователя. После ввода нажмите клавишу Enter — откроется SSH-соединение:
Этот материал был полезен?
Меня всегда удручало подключение к Windows машинам. Нет, я не противник и не сторонник Microsoft и их продуктов. Каждый продукт существует для своей цели, но речь не об этом.
Для меня всегда было мучительно больно подключаться к серверам с Windows, потому что эти подключения либо настраиваются через одно место (привет WinRM с HTTPS) либо работают не очень стабильно (здравствуй RDP к виртуалкам за океаном).
Поэтому, случайно натолкнувшись на проект Win32-OpenSSH, я решил поделиться опытом настройки. Возможно кому-нибудь эта тулза сэкономить кучу нервов.

Варианты установки:
- Вручную
- Через пакет Chocolatey
- Через Ansible, например роль jborean93.win_openssh
Далее я буду рассказывать про первый пункт, так как с остальными и так все более менее понятно.
Отмечу, что данный проект пока что находится на стадии beta, поэтому его не рекомендуют использовать в production.
Итак, скачиваем последний релиз, на текущий момент это 7.9.0.0p1-beta. Есть версии как для 32 так и для 64 битных систем.
Распаковываем в C:Program FilesOpenSSH
Обязательный момент для корректной работы: права на запись в этой директории должны быть только у SYSTEM и у админской группы.
Устанавливаем сервисы скриптом install-sshd.ps1 находящимся в этой директории
powershell.exe -ExecutionPolicy Bypass -File install-sshd.ps1Разрешаем входящие подключения на 22 порт:
New-NetFirewallRule -Name sshd -DisplayName 'OpenSSH Server (sshd)' -Enabled True -Direction Inbound -Protocol TCP -Action Allow -LocalPort 22Уточнение: апплет New-NetFirewallRule используется на Windows Server 2012 и новее. В наиболее старых системах (либо десктопных) можно воспользоваться командой:
netsh advfirewall firewall add rule name=sshd dir=in action=allow protocol=TCP localport=22
Запускаем сервис:
net start sshdПри запуске будут автоматически сгенерированы хост-ключи (если отсутствуют) в %programdata%ssh
Автозапуск сервиса при запуске системы мы можем включить командой:
Set-Service sshd -StartupType AutomaticТак же, можно сменить командную оболочку по умолчанию (после установки, по умолчанию — cmd):
New-ItemProperty -Path "HKLM:SOFTWAREOpenSSH" -Name DefaultShell -Value "C:WindowsSystem32WindowsPowerShellv1.0powershell.exe" -PropertyType String -ForceУточнение: Необходимо указывать абсолютный путь.
Что дальше?
А дальше настраиваем sshd_config, который расположем в C:ProgramDatassh. Например:
PasswordAuthentication no
PubkeyAuthentication yes
И создаем в пользовательской папке директорию .ssh, а в ней файл authorized_keys. Туда записываем публичные ключи.
Важное уточнение: права на запись в этот файл, должен иметь только пользователь, в чьей директории лежит файл.
Но если у вас проблемы с этим, всегда можно выключить проверку прав в конфиге:
StrictModes noК слову, в C:Program FilesOpenSSH лежат 2 скрипта (FixHostFilePermissions.ps1, FixUserFilePermissions.ps1), которые должны
но не обязаны
фиксить права, в том числе и с authorized_keys, но почему-то не фиксят.
Не забывайте перезапускать сервис sshd после для применения изменений.
ru-mbp-666:infrastructure$ ssh Administrator@192.168.1.10 -i ~/.ssh/id_rsa
Windows PowerShell
Copyright (C) 2016 Microsoft Corporation. All rights reserved.

PS C:UsersAdministrator> Get-Host


Name             : ConsoleHost
Version          : 5.1.14393.2791
InstanceId       : 653210bd-6f58-445e-80a0-66f66666f6f6
UI               : System.Management.Automation.Internal.Host.InternalHostUserInterface
CurrentCulture   : en-US
CurrentUICulture : en-US
PrivateData      : Microsoft.PowerShell.ConsoleHost+ConsoleColorProxy
DebuggerEnabled  : True
IsRunspacePushed : False
Runspace         : System.Management.Automation.Runspaces.LocalRunspace

PS C:UsersAdministrator>
Субъективные плюсы/минусы.
Плюсы:
- Стандартный подход к подключению к серверам.
Когда есть немного Windows машин, очень неудобно когда:
Так, сюда мы ходим по ssh, а тут рдп,
и вообще best-practice с бастионами, сначала ssh-туннель, а через него RDP. - Простота настройки
Считаю что это очевидно. - Скорость подключения и работы с удаленной машиной
Нет графической оболочки, экономятся как ресурсы сервера, так и количество передаваемых данных.
Минусы:
- Не заменяет RDP полностью.
Не все можно сделать из консоли, увы. Я имею ввиду ситуации, когда требуется GUI.
Материалы использованные в статье:
Ссылка на сам проект
Варианты установки бессовестно скопированы с Ansible docs.
![]()
Download Article
Quickstart guide for SSH on Windows
![]()
Download Article
If you’re connecting to a Unix system over the internet, it’s important to encrypt your connection so your passwords and other data remain secure. An easy way to do this is to install an SSH client on your computer and use that to make a command-line connection. This wikiHow article will teach you how to install an SSH client on Windows (as Linux and macOS already have SSH), and how to connect to a remote host with a secure shell.
-

1
Install SSH. For Windows, you will need to download and install an SSH client program. The most popular one is Cygwin, which is available for free from the developer’s website. Download and install it like you would any other program. Another popular free program is PuTTY.
- During the Cygwin installation, you must choose to install OpenSSH from the Net section.
- Linux and Mac OS X come with SSH already installed on the system. This is because SSH is a UNIX system, and Linux and OS X are derived from UNIX.
- If you have Windows 10 with the Anniversary Update, you can install the Windows Subsystem for Linux which comes with SSH preinstalled.
-
2
Run SSH. Open the terminal program that is installed by Cygwin, or Bash on Ubuntu on Windows for Windows 10, or open the Terminal in OS X or Linux. SSH uses the terminal interface to interact with other computers. There is no graphical interface for SSH, so you will need to get comfortable typing in commands.
Advertisement
-
3
Test the connection. Before you dive into creating secure keys and moving files, you’ll want to test that SSH is properly configured on your computer as well as the system you are connecting to. Enter the following command, replacing <username> with your username on the remote computer, and <remote> with the address for the remote computer or server:
$ ssh <username>@<remote>- If you want to specify a port, add
-p 0000, (replace 0000 with the desired port number). - You will be asked for your password once the connection is established. You will not see the cursor move or any characters input when you type your password.
- If this step fails, then either SSH is configured incorrectly on your computer or the remote computer is not accepting SSH connections.


Advertisement
-
1
Navigate the SSH shell. When you first connect to the remote computer, you should be located in your HOME directory. To move around the directory structure, use the
cdcommand:[1]
-
cd ..will move you up one directory. -
cd <directoryname>will move you into the specified subdirectory. -
cd /home/directory/path/will move you into the specified directory from the root (home). -
cd ~will return you to your HOME directory.
-
-
2
Check your current directory’s contents. To see what files and folders in your current location, you can use the
lscommand:[2]
-
lswill list all of the files and folders in your current directory. -
ls –lwill list the contents of the directory along with additional information such as size, permissions, and date. -
ls-awill list all the contents including hidden files and folders.
-
-
3
Copy files from your location to the remote computer. If you need to copy files from your local computer to the computer you are accessing remotely, you can use the
scpcommand:-
scp /localdirectory/example1.txt <username>@<remote>:<path>will copy example1.txt to the specified <path> on the remote computer. You can leave <path> blank to copy to the root folder of the remote computer. -
scp <username>@<remote>:/home/example1.txt ./will move example1.txt from the home directory on the remote computer to the current directory on the local computer.
-
-
4
Copy files through the shell. You can use the
cpcommand to make copies of files either in the same directory or into a directory of your choosing:-
cp example1.txt example2.txtwill create a copy of example1.txt called example2.txt in the same location. -
cp example1.txt <directory>/will create a copy of example1.txt in the location specified by <directory>.
-
-
5
Move and rename files. If you want to change a file’s name or move it without copying, you can use the
mvcommand:-
mv example1.txt example2.txtwill rename example1.txt to example2.txt. The file will stay in the same location. -
mv directory1 directory2will rename directory1 to directory2. The directory’s contents will remain unchanged. -
mv example1.txt directory1/will move example1.txt into directory1. -
mv example1.txt directory1/example2.txtwill move example1.txt into directory1 and rename it to example2.txt
-
-
6
Delete files and directories. If you need to remove anything from the computer you are connected to, you can use the
rmcommand:-
rm example1.txtwill delete the file example1.txt. -
rm –I example1.txtwill delete the file example1.txt after prompting you to confirm. -
rm directory1/will delete directory1 and all of its contents.
-
-
7
Change permissions for your files. You can change the read and write privileges of your files using the
chmodcommand:-
chmod u+w example1.txtwill add the write (modify) permission to the file for the user (u). You can also use thegmodifier for group permissions or theofor world permissions. -
chmod g+r example1.txtwill add the read (access) permission to the file for the group. - There are a large list of permissions that you can use to secure or open various aspects of your system.[3]
-
-
8
Learn the other assorted basic commands. There are a few more important commands that you will be using quite a bit in the shell interface. They include:
-
mkdir newdirectorywill create a new subdirectory called newdirectory. -
pwdwill display your current directory location. -
whoshows who is logged into the system. -
pico newfile.txtorvi newfile.txtwill create a new file and open the file editor. Different system will have different file editors installed. The most common are pico and vi. You may need to use different commands if you have a different file editor installed.
-
-
9
Get detailed information on any command. If you are unsure as to what a command will do, you can use the
mancommand to learn about all of the possible uses and parameters:-
man <command>will display information about that command. -
man –k <keyword>will search all of the man pages for the keyword you specify.[4]
-


Advertisement
-
1
Create your SSH keys. These keys will allow you to connect to the remote location without having to enter your password each time. This is a much more secure way to connect to the remote computer, as the password will not have to transmitted over the network.
- Create the key folder on your computer by entering the command
$ mkdir .ssh - Create the public and private keys by using the command
$ ssh-keygen –t rsa - You will be asked if you would like to create a passphrase for the keys; this is optional. If you don’t want to create a passphrase, press Enter. This will create two keys in the .ssh directory: id_rsa and id_rsa.pub
- Change your private key’s permissions. In order to ensure that the private key is only readable by you, enter the command
$ chmod 600 .ssh/id_rsa
- Create the key folder on your computer by entering the command
-
2
Place the public key on the remote computer. Once your keys are created, you’re ready to place the public key on the remote computer so that you can connect without a password. Enter the following command, replacing the appropriate parts as explained earlier:
$ scp .ssh/id_rsa.pub <username>@<remote>:- Make sure to include the colon (:) at the end of the command.
- You will be asked to input your password before the file transfer starts.
-
3
Install the public key on the remote computer. Once you’ve placed the key on the remote computer, you will need to install it so that it works correctly. First, log in to the remote computer the same way that you did in Step 3.
- Create an SSH folder on the remote computer, if it does not already exist:
$ mkdir .ssh - Append your key to the authorized keys file. If the file does not exist yet, it will be created:
$ cat id_rsa.pub >> .ssh/authorized_keys - Change the permissions for the SSH folder to allow access:
$ chmod 700 .ssh
- Create an SSH folder on the remote computer, if it does not already exist:
-
4
Check that the connection works. Once the key has been installed on the remote computer, you should be able to initiate a connection without being asked to enter your password. Enter the following command to test the connection:
$ ssh <username>@<remote>- If you connect without being prompted for the password, then the keys are configured correctly.


Advertisement
Add New Question
-
Question
How can I use the SCP command when using Windows Power Shell Open SSH? I am remoting an Ubuntu 16.04 VPS. It still asks for my password.

Aiden Martinez
Community Answer
If you try to use Powershell on a non-admin account, it will request a password. Try typing in your account password if you’re the admin.
-
Question
What if I need to access a certain port?
Use flag-p, followed by the port number. For example: @ -p
Ask a Question
200 characters left
Include your email address to get a message when this question is answered.
Submit
Advertisement
Video
Thanks for submitting a tip for review!
References
About This Article
Article SummaryX
To use SSH, start by downloading and opening SSH if you have Windows, or simply opening it if you have a Mac or Linux system. Then, enter the command “$ ssh,” your username on the remote computer, followed by the computer or server’s address. Next, enter the command “cd . .” to move up 1 directory, or “cd < directoryname >” to move into a subcategory. You can also use the command “ls” to list all of the files and folders in the current directory. For tips on how to set up encryption keys, read on!
Did this summary help you?
Thanks to all authors for creating a page that has been read 1,357,677 times.