I am running a putty client on a Windows machine to connect successfully to a Linux box. Now I want to be able to copy a file from the Linux machine under the path /home/ubuntu/myfile to C:/Users/Anshul/Desktop on my local computer. The user at the Windows machine is anshul. I am giving the following command on putty but it is not working:
scp /home/ubuntu/myfile ip_address_of_windows_machine:C:/Users/Anshul/Desktop
I think the path for the Windows machine is wrong. Please help as I have banged my head on a large number of forums but none seem to give correct path for Windows server. Don’t suggest alternate options like WinScp
![]()
Guy Avraham
3,3623 gold badges40 silver badges49 bronze badges
asked Apr 19, 2012 at 19:56
![]()
5
This one worked for me.
scp /home/ubuntu/myfile username@IP_of_windows_machine:/C:/Users/Anshul/Desktop
answered Mar 12, 2018 at 6:04
![]()
emoblazzemoblazz
1,3111 gold badge6 silver badges3 bronze badges
6
Download pscp from Putty download page, then use it from Windows Command Line CMD as follows:
pscp username_linux_machine@ip_of_linux_machine:/home/ubuntu/myfile.ext C:UsersNameDownloads
Copying starts once you enter the password for the Linux machine.
![]()
ifnotak
3,8673 gold badges21 silver badges35 bronze badges
answered Jun 8, 2016 at 20:49
![]()
Hesham EraqiHesham Eraqi
2,4254 gold badges22 silver badges45 bronze badges
3
Try this, it really works.
$ scp username@from_host_ip:/home/ubuntu/myfile /cygdrive/c/Users/Anshul/Desktop
And for copying all files
$ scp -r username@from_host_ip:/home/ubuntu/ *. * /cygdrive/c/Users/Anshul/Desktop
![]()
fluffyBatman
6,3443 gold badges22 silver badges24 bronze badges
answered Jun 10, 2014 at 11:57
![]()
8
Access from Windows by Git Bash console (also works for CMD and PowerShell):
scp user@ip:/dir1/dir2/file "D:dir1dir2"
![]()
Wenfang Du
7,3807 gold badges49 silver badges79 bronze badges
answered Jan 4, 2019 at 13:18
![]()
byteprombyteprom
4514 silver badges4 bronze badges
5
You could use something like the following
scp -r linux_username@linux_address:path/to/file path/to/local/directory
This will copy file to the specified local directory on the system you are currently working on.
The -r flag tells scp to recursively copy if the remote file is a directory.
answered Feb 16, 2015 at 23:58
![]()
AtifAtif
3251 gold badge4 silver badges16 bronze badges
Windows doesn’t support SSH/SCP/SFTP natively. Are you running an SSH server application on that Windows server? If so, one of the configuration options is probably where the root is, and you would specify paths relative to that root. In any case, check the documentation for the SSH server application you are running in Windows.
Alternatively, use smbclient to push the file to a Windows share.
![]()
George
6,5193 gold badges42 silver badges56 bronze badges
answered Apr 19, 2012 at 19:59
![]()
theglaubertheglauber
27.9k7 gold badges29 silver badges46 bronze badges
5
For all, who has installed GiT completly with «Git Bash»: You can just write:
scp login@ip_addres:/location/to/folders/file.tar .
(with space and DOT at the end to copy to current location). Than just add certificate (y), write password and that’s all.
answered Oct 3, 2017 at 12:31
![]()
1
Your code isn’t working because c:/ or d:/ is totally wrong for linux just use /mnt/c or/mnt/c
From your local windows10-ubuntu bash use this command:
for download:
(from your remote server folder to d:/ubuntu) :
scp username@ipaddress:/folder/file.txt /mnt/d/ubuntu
Then type your remote server password if there is need.
for upload:
(from d:/ubuntu to remote server ) :
scp /mnt/d/ubuntu/file.txt username@ipaddress:/folder/file.txt
Then type your remote server password if there is need.
note: I tested and it worked.
answered Feb 19, 2019 at 12:09
![]()
I had to use pscp like above Hesham’s post once I downloaded and installed putty. I did it to Windows from Linux on Windows so I entered the following:
c:ssl>pscp username@linuxserver:keenan/ssl/* .
This will copy everything in the keenan/ssl folder to the local folder (.) you performed this command from (c:ssl). The keenan/ssl will specify the home folder of the username user, for example the full path would be /home/username/keenan/ssl. You can specify a different folder using a forward slash (/), such as
c:ssl>pscp username@linuxserver:/home/username/keenan/ssl/* .
So you can specify any folder at the root of Linux using :/.
![]()
halfer
19.7k17 gold badges95 silver badges183 bronze badges
answered Dec 14, 2018 at 12:47
![]()
To send a file from windows to linux system
scp path-to-file user@ipaddress:/path-to-destination
Example:
scp C:/Users/adarsh/Desktop/Document.txt root@127.0.0.1:/tmp
keep in mind that there need to use forward slash(/) inplace of backward slash() in for the file in windows path else it will show an error
C:UsersadarshDesktopDocument.txt: No such file or directory
.
After executing scp command you will ask for password of root user in linux machine.
There you GO…
To send a file from linux to windows system
scp -r user@ipaddress:/path-to-file path-to-destination
Example:
scp -r root@127.0.0.1:/tmp/Document.txt C:/Users/adarsh/Desktop/
and provide your linux password.
only one you have to add in this command is -r.
Thanks.
answered Mar 15, 2019 at 6:00
![]()
ADARSH KADARSH K
5967 silver badges20 bronze badges
Here is the solution to copy files from Linux to Windows using SCP without password by ssh:
-
Install sshpass in Linux machine to skip password prompt
-
Script
sshpass -p 'xxxxxxx' scp /home/user1/*.* testuser@x.x.x.x:/d/test/
Details:
sshpass -p 'password' scp /source_path/*.* windowsusername@windowsMachine_ip:/destination_drive/subfolder/
![]()
serenesat
4,59110 gold badges35 silver badges53 bronze badges
answered Aug 28, 2015 at 12:47
![]()
As @Hesham Eraqi suggested, it worked for me in this way (transfering from Ubuntu to Windows (I tried to add a comment in that answer but because of reputation, I couldn’t)):
pscp -v -r -P 53670 user@xxx.xxx.xxx.xxx:/data/genetic_map/sample/P2_283/* \Desktop-mojbd3ndcc_01-1940_data
where:
-v: show verbose messages.
-r: copy directories recursively.
-P: connect to specified port.
53670: the port number to connect the Ubuntu server.
\Desktop-mojbd3ndgenetic_map_data: I needed to transfer to an external HDD, thus I had to give permissions of sharing to this device.
answered Jun 27, 2019 at 3:37
![]()
giannkasgiannkas
1683 silver badges14 bronze badges
Open bash window. Preferably git bash.
write
scp username@remote_ip:/directory_of_file/filename ‘windows_location_you_want_to_store_the_file’
Example:
Suppose your username is jewel
your IP is 176.35.96.32
your remote file location is /usr/local/forme
your filename is logs.zip
and you want to store in your windows PC’s D drive forme folder
then the command will be
scp jewel@176.35.96.32:/usr/local/forme/logs.zip ‘D:/forme’
**Keep the local file directory inside single quote.
answered Apr 7, 2019 at 6:02
![]()
ZenithZenith
9371 gold badge8 silver badges21 bronze badges
I know this is old but I was struggling with the same. I haven’t found a way to change directories, but if you just want to work with the C drive, scp defaults to C. To scp from Ubuntu to Windows, I ended up having to use (notice the double back-slashes):
scp /local/file/path user@111.11.11.111:Users\Anshul\Desktop
Hope this helps someone.
![]()
Racil Hilan
24.2k12 gold badges49 silver badges52 bronze badges
answered Jul 29, 2016 at 0:35
![]()
AcmagAcmag
12 bronze badges
2
Try this:
scp /home/ubuntu/myfile C:usersAnshulDesktop
![]()
Pang
9,344146 gold badges85 silver badges121 bronze badges
answered Jan 12, 2013 at 2:50
![]()
Corey BurnettCorey Burnett
7,2629 gold badges54 silver badges92 bronze badges
1
If you want to copy paste files from Unix to Windows and Windows to Unix just use filezilla with port 22.
answered Sep 4, 2012 at 7:38
![]()
Windows 10 now has OpenSSH built in.
https://docs.microsoft.com/en-us/windows-server/administration/openssh/openssh_install_firstuse
Get an admin command prompt
Open PowerShell as an Administrator.
Check available versions
Get-WindowsCapability -Online | ? Name -like 'OpenSSH*'
Install client
Add-WindowsCapability -Online -Name OpenSSH.Client~~~~0.0.1.0
Install server
Add-WindowsCapability -Online -Name OpenSSH.Server~~~~0.0.1.0
Start server and enable at boot
Start-Service sshd
Set-Service -Name sshd -StartupType 'Automatic'
Find your Windows IP address
ipconfig
On your remote (Linux) machine, find your IP address.
ifconfig
Create a public SSH key
ssh-keygen.exe
Copy public key from local (Windows) to remote (Linux) machine so you don’t have to type in a password all the time.
Note that ssh-copy-id is not currently available on Windows.
cat C:UsersYOU/.ssh/id_rsa.pub | ssh USER@REMOTE_IP 'mkdir -p ~/.ssh && cat >> ~/.ssh/authorized_keys'
Do the same on your Linux machine (Note, ssh-copy-id does not work)
ssh-keygen # if needed
cat ~/.ssh/id_rsa.pub | ssh USER@WINDOWS_IP 'mkdir -p ~/.ssh && type con >> C:/Users/YOU/.ssh/authorized_keys'
-
The method above did not work for me, so I ended up manually SCPing the public key over and pasting it into the C:/Users/YOU/.ssh/authorized_keys file.
-
That still did not work, so I had to modify the sshd_config file.
-
Open Notepad as Administrator
-
Open %programdata%sshsshd_config
-
Add the following lines:
-
        Match User YOU
             AuthorizedKeysFile C:/Users/YOU/.ssh/authorized_keys
- Reboot
Create a password on Windows if you don’t already have one
System Settings...Sign-in options
— Note, you can still disable the Windows login screen by a) Setting the ‘Require sign-in’ option to never and b) Using the ‘netplwiz’ command and unticking the ‘Users must enter password…’ checkbox.
Now you should be able to SSH or SCP from your Linux machine
scp FILE WINDOWS_IP:C:/Users/YOU/Desktop
Copying data from a Windows PC to Linux—or in the other direction—can seem intimidating at first. After all, it’s something that seems like it should be simple but turns out to be difficult.
In truth, sharing files from Windows to Linux is easy, but only if you know how to do it. Ready to find out? Here’s everything you need to know about how to transfer files from Windows to Linux and back again.
4 Ways to Transfer Files From Windows to Linux
If you want to move data between Windows and Linux operating systems, it’s easier than you think. We’ve compiled four ways for you to do this:
- Securely copy files via SSH
- Windows to Linux file transfer with FTP
- Share data using sync software
- Use shared folders in your Linux virtual machine
With each of these methods, you’ll be able to easily (and, in some cases, effortlessly) carry out Linux to Windows or Windows to Linux file transfer.
Let’s look at them in turn and find out which one suits you best.
1. Copy Files Between Windows and Linux via SSH
With SSH enabled on your Linux device, you can send data via the command line from one computer to another. For this to work, however, you will need to set up an SSH server on your Linux machine.
Start by opening a terminal and updating and upgrading the OS.
 sudo apt update
sudo apt upgrade
Once complete, install the SSH server. The OpenSSH server is a good option.
sudo apt install openssh-server
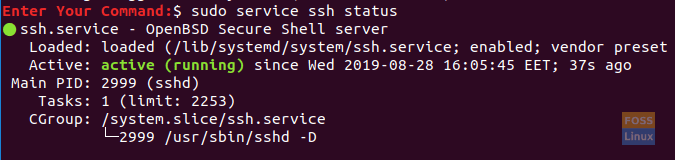
Wait while it installs. To check at any time if the OpenSSH server is running, use:
sudo service ssh status
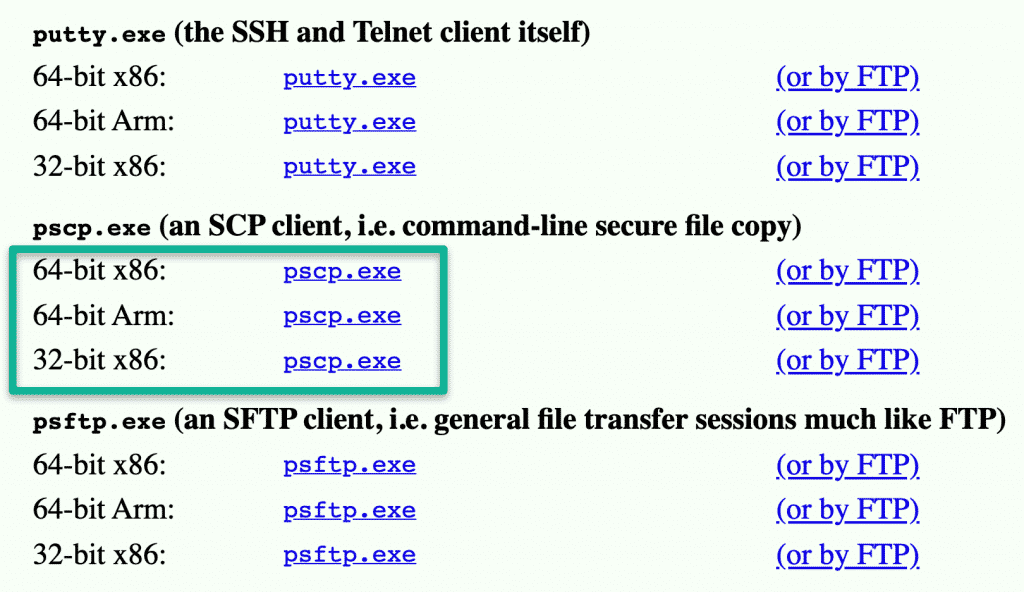
To transfer data from Windows, use an SSH client like PuTTY. This needs the PSCP (secure copy client) tool to download to your Windows system to run alongside PuTTY. Find both on the PuTTY downloads page.
Download: PuTTY
Note that while PuTTY will need installing, PSCP won’t. Instead, save the downloaded pscp.exe file in the root of the Windows C: drive or else set it up as an environment variable. You’ll also need to confirm the IP address of the Linux device. Check in the Linux terminal with:
hostname -I
With a connection established, you can transfer a file from Windows to Linux like this:
c:pscp c:somepathtoafile.txt user@remoteIP:homeusersomepathnewname.txt
You’ll be prompted for your password for the Linux computer before the transfer commences.
Want to copy files from Linux to Windows in the same SSH session? This command will download the specified file to the current directory:
c:pscp user@remoteIP:homeusersomefile.txt .
Note the lone period at the end, which you must include, or the transfer will not work.
2. How to Transfer Files From Linux to Windows Using FTP
You can also use a file transfer protocol (FTP) application with SSH support. Transferring files via SFTP in a mouse-driven user interface is arguably easier than relying on typed commands.
Again, an SSH server must be running on the Linux machine before you start. You should also ensure you have installed an FTP app on Windows, like FileZilla, which has SFTP support.
Download: FileZilla
To use this method, run FileZilla, then:
- Open File > Site Manager
- Create a New Site
- Set the Protocol to SFTP
- Add the target IP address in Host
- Specify a username and password
- Set the Logon Type to Normal
- Click Connect when ready
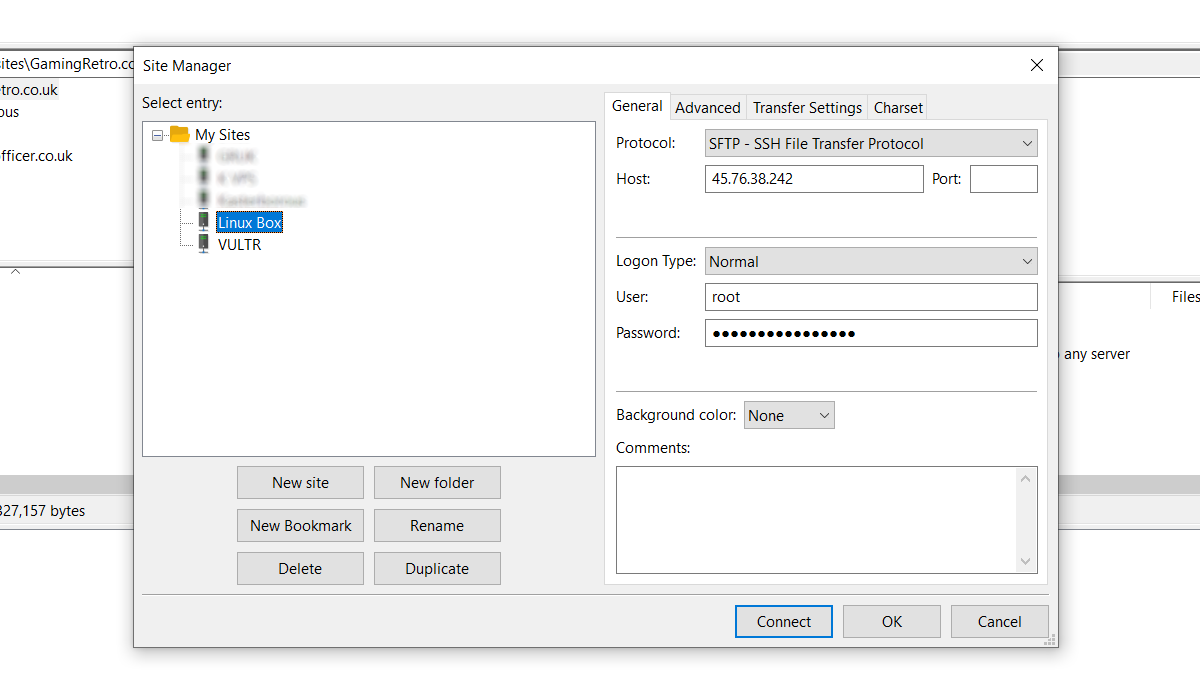
You can then use the FTP app to move files from Windows to Linux and back using drag and drop.
Another option you should consider is a file-syncing program. These are typically cross-platform and use an encrypted key to manage the connection between devices.
All you need to do is install the app, nominate a sync folder, then create the key. Set this up on the second PC, and your data will then sync. Two good options are available for this:
- Resilio Sync: Formerly known as BitTorrent Sync, Resilio is available on almost any platform you can think of. There is a paid version, but the free option is enough for syncing two devices
- Syncthing: For Linux, Windows, macOS, and Android, this Resilio Sync alternative offers a similar feature without the paid component
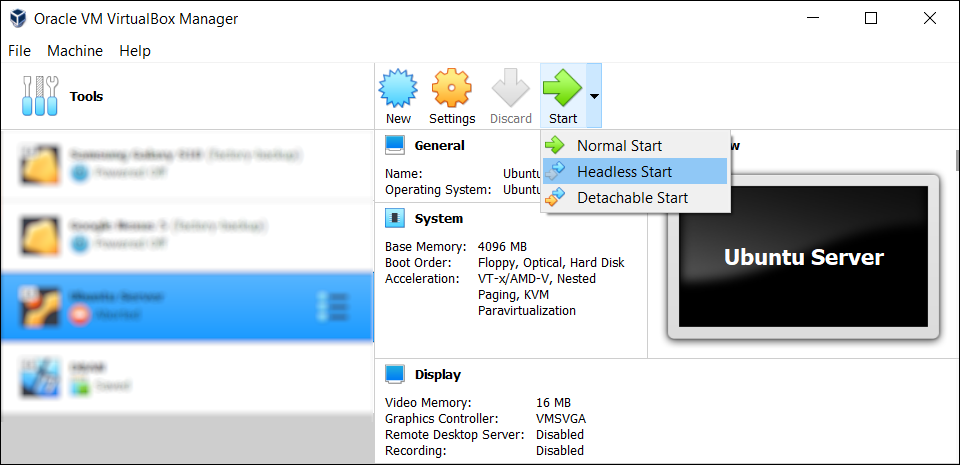
4. How to Transfer Files From Windows to a Linux Virtual Machine
Instead of running a separate PC, it’s common to run Linux or Windows in a virtual machine (VM). But is there a way to transfer files between Windows and Linux when one is installed in a VM?
Fortunately, yes. With VirtualBox, you can create a virtual shared directory for data syncing.
If you’re running Windows in a VM on Linux (or vice versa), VirtualBox is already set up for sharing. Ensure you have the Guest Additions installed on your virtual machine before proceeding.
In the VirtualBox manager, select the VM, then:
- Choose Start > Headless Start (or with the VM running, Devices > Shared Folders)

- Once running, right-click the VM and select Settings > Shared Folders
- Select Machine Folders
- Click the + symbol on the right (or right-click and select Add Shared Folder)
- Browse the Folder Path and find the directory you want to use
- Set a name (if necessary), then OK

- Use the Auto-mount checkbox to ensure the share is available whenever the VM runs
- Click OK again to confirm and exit
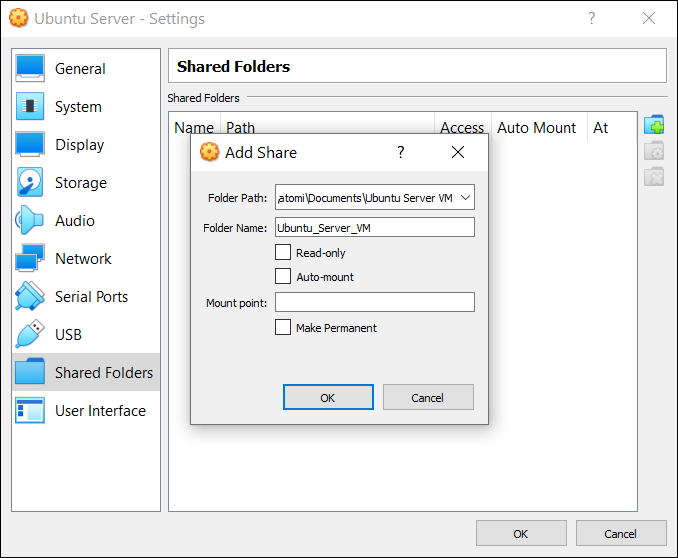
When you reboot the VM, the share will be ready to swap data between the host PC and the guest operating system.
There is another option for sharing files between Windows and Linux PCs. However, creating a shared file on one or both systems and then accessing it across a network is unreliable at best.
Sharing Files Between Windows and Linux Is Easy
Whether you’re new to Linux or you find Windows unfamiliar, sharing data between them is easier than you think. Now that you know how to transfer files from Windows to Linux and vice versa, we’d recommend you try all the methods we’ve mentioned above and work out which one you’re most comfortable with.
If you’re syncing data to Linux, there’s a good chance you’re switching from Windows. Don’t worry—it’s easier than you think.
Secure data transfer via SCP
In the last article I showed you how to transfer data to a Ubuntu system via FTP. Nowadays FTP is not secure enough for internet use. Therefore I will show you SCP today. SCP is based on the SSH protocol. Therefore you need a user who can also access the server via SSH. As with SSH, you can use SSH keys to establish SCP connections. How to create SSH keys and store them on your server is shown in this article.
Since Linux servers can also be managed from a Windows client, I will also show you the free program WinSCP in the course of this article, with which you can also transfer data from Windows to Linux servers via SCP.
Prepare Server
Since SCP or SSH as a client is a fixed part of every Linux distribution, you don’t need any further preparation on the client side. On the server side, depending on the distribution, you may need to install the SSH server service.
As before any installation, you should update your server to the latest version. For operating systems based on Debian (such as Ubuntu or Kubuntu), use the following command:
Copyapt -y update && apt -y upgrade && apt -y dist-upgrade
For CentOS or Red Hat or similar distributions YUM is used as package manager. Therefore, the command is as follows:
Copyyum update
To update your Fedora system, use the following command.
Copydnf update && dnf upgrade
Then start the installation with the following command:
Debian / Ubuntu
Copyapt -y install openssh-server
CentOS / RHEL
Copyyum install openssh-server
Fedora
Copydnf install openssh-server
Establishing a SSH connection
To test if the setup was successful, connect to your server via SSH. Open a terminal from your Linux or Apple client and execute the following command:
Copyssh <username>@<IPorDomainofServer>
Example:
Copyssh root@10.10.0.12
If you are using an SSH key, enter the password for your key now. Otherwise, the password for the user on the remote computer must be specified.
If everything is set up, the console of the remote computer should now be visible. If not, check your firewall settings. SSH requires port 22/tcp. You can also check the config of the SSH server and make sure that your user has the appropriate permissions.
Once you have successfully established the connection, you can close it again. Simply enter the command exit.
Copyexit
Transfer a file via SCP
For testing purposes, it is best to create a test file.
Copytouch /test.file
To transfer the file test.file to the other server use the following command:
Copyscp /path/to/file <benutzername>@<IPorDomainofServer>:/Path/to/destionationfolder/
Example:
Copyscp /test.file root@10.10.0.12:/root/secret/test.file
The file is now transferred to /root/secret on the server with IP 10.10.0.12.
If you want to download a file from a remote computer, you can also use SCP. The structure of the command has to be reversed.
Copyscp <username>@<IPorDomainofServer>:/Path/to/file/destination/path
Example:
Copyscp root@10.10.0.12:/root/secret/test.file /root/lokalsecrets/test.file
Make sure that the directories already exist.
You can also use SCP to transfer files from one server to another, from your client.
The syntax will look like this.
Copyscp <username>@<IPorDomainofServer>:/path/to/file <username>@<IPorDomainofServer>:/Path/to/destination
Example:
Copyscp root@10.10.0.12:/test.datei root@10.10.0.13/root/secret/test.file
If you use Windows 10 as client (from version 16.07) you can install the Linux subsystem and get a Ubuntu Bash including APT. With this you can use the syntax already shown.
Right-click “Start”, then on “Programs and Features” or for version 1703 “Apps and Features” and then on “Programs and Features”, then on “Activate or deactivate Windows features”. In the now open window, look for “Windows subsystem for Linux (beta)”. Afterwards the developer mode must be activated under Start -> Settings -> Update and security -> For developers. After the installation run cmd and type the command bash.
bash
Then confirm the installation with Y and type in a user name and password after a short wait.
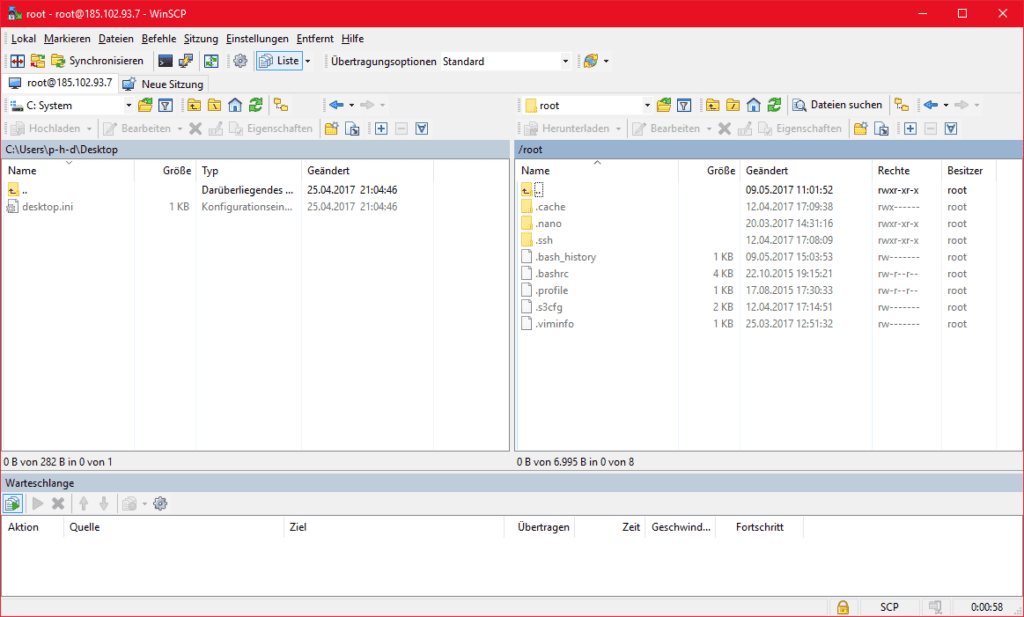
If you are using an older version of Windows, you can take a look at the WinSCP program. You can find the current release here.
The setup of the tool is quite simple. Select Total Commander mode during installation. So on the left side of the window you will see your Local Folder Structure and on the right side the one of the server you have connected to. Files can be moved back and forth via Drag ‘n Drop and renamed, executed or deleted with a right click.
Conclusion
SCP is fairly quick to learn and reliably transmits even large amounts of data securely over the Internet. SCP is unfortunately very Linux-heavy – that means – Windows as client is no problem, but as soon as you use Windows as server, it becomes very difficult. As an alternative you can use WebDAV for example. I’ll show you how this works in this article. So if you work with different operating systems, you should take a look at both techniques.
In this updated guide, I will walk you through the steps to copy files from Windows to Linux using easy-to-follow steps.
I will show you two ways to copy files from windows to Linux
- Using command line with pscp
- Using GUI FTP utility.
Copy File from Windows To Linux Using PSCP
It is not always that you will need to copy a file from Windows to Linux or vice versa.
But at times when you are automating things or trying to achieve some copy functionality using a script, it is good to have a utility to do that.
Here is where pscp comes into play. Using pscp you can copy the file to/from windows and Linux.
Step 1: Download pscp.exe from here. Select the appropriate package.
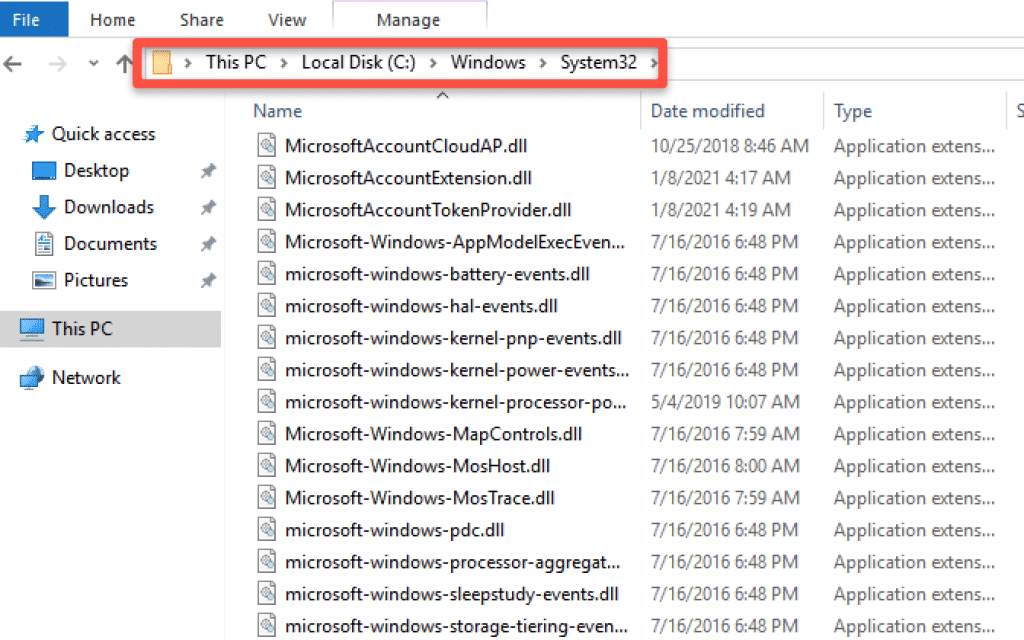
Step 2: copy the pscp.exe executable to the system32 directory of your windows machine. This folder normally exists in C:WindowsSystem32 path.
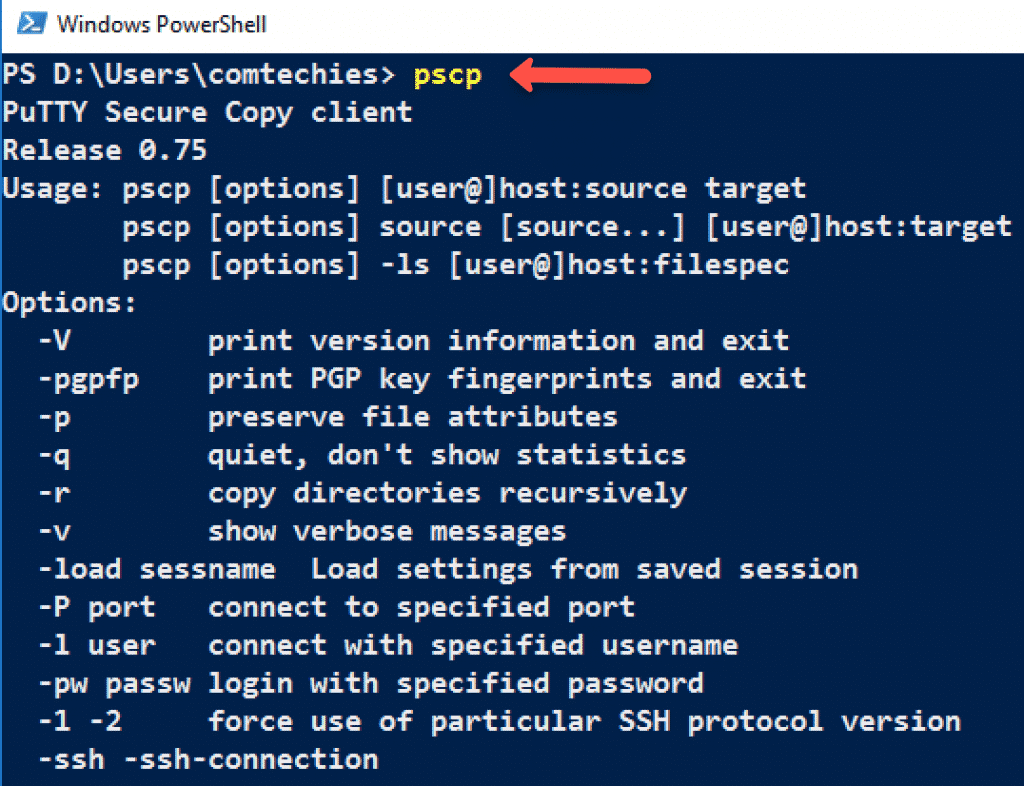
Step 3: Open Windows PowerShell and use the following command to verify if pscp is accessible from the path.
pscp
You should see the following output.
Step 4: Use the following format to copy the single file from Windows to the Linux box.
pscp -pw password C:UsersAdminDesktoptest.txt
[email protected]:/home/vagrant
Here is the explanation of the command.
-pwfor the password.- Replace
passwordwith the Linux user password. C:UsersAdminDesktoptest.txtrepresents the path of the file that has to be copied to the Linux system.192.168.33.10is the IP of the Linux server./home/vagrantis the user-accessible path in the Linux system to copy the file.
If you want to copy all the files in a directory to Linux, you need to add a start to the folder. eg. folder*. An example is shown below.
pscp -pw password C:UsersAdminDesktopfolder*
[email protected]:/home/vagrant
If you are using Linux private keys for authentication, you can use -i flag instead of -pw followed by the path to the .ppk , .pem or id_rsa file.
If your key file is in pem format, you can use the puttygen command to convert it to ppk. See this ec2 server guide for the pem to ppk conversion.
Info: Learn Linux & Windows administration from Pluralsight with its 10 days free account
For Linux Private key-based authentication, the command looks like below.
pscp -i /path/to/key.ppk C:UsersAdminDesktoptest.txt
[email protected]:/home/vagrant
Copy File From Linux To Windows Using PSCP
You can use pscp to copy files from Linux to windows. use the following command format for the same.
pscp -pw password [email protected]:/path/to/file
C:UsersAdminDesktop
The above command will copy the file in Linux from the specified path to the Windows desktop.
Copy File from Windows To Linux Using FTP GUI
If you are not familiar with the Windows command line, you can use an FTP tool like Filezilla.
This tool is really helpful if you are working with Web Hosting providers to upload your website files from your local workstation.
You can download Filezilla from here –> FileZilla Download.
After download, install Filzill as you install any other windows software.
After installation, open the Filezilla app and enter the remote Linux server details as shown below. It will connect to the server and shows the remote server files in the file explorer.
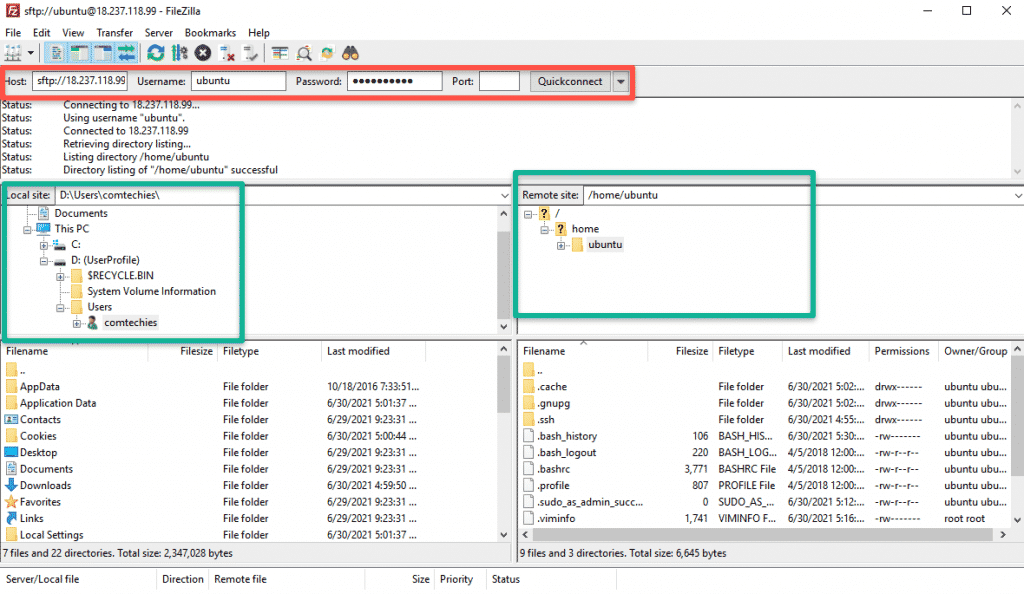
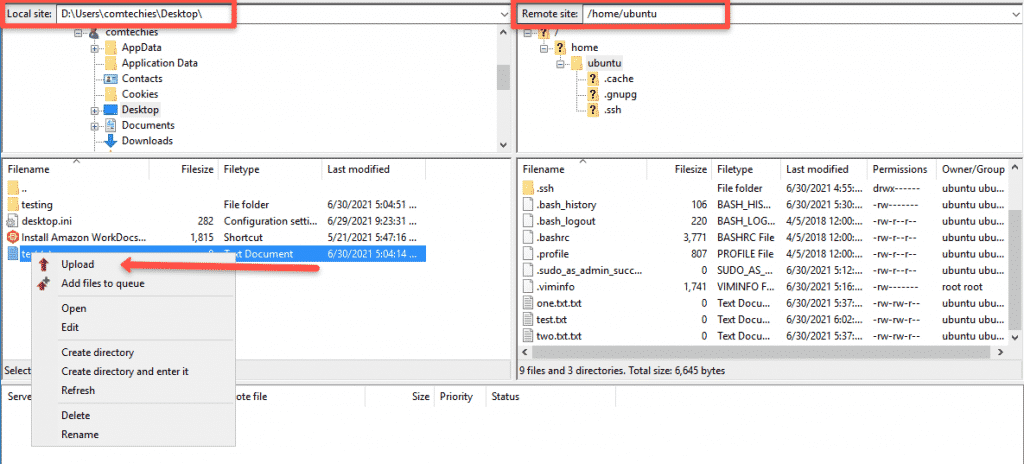
To upload a file, all you have to do is do a right-click and click upload, as shown in the image below. The file will get uploaded to the remote path, which is opened in the Filezilla explorer. You can also change the remote path from Filezilla.
Conclusion
I have shown two best and recommended ways to transfer files from Windows to Linux and vice versa.
If you face any issues while copying files, please drop the issues as a comment. I will look into it.

He loves to write about WordPress and cloud hosting. He is a Cloud Architect by profession with experience hosting high scale applications on Amazon and Google cloud platforms. He has successfully set up and grown several WordPress websites by following good tech practices.
В статье мы расскажем, как копировать файлы в Windows и Linux-системах, и покажем основные команды, с помощью которых происходит передача файлов по SSH.
Для копирования файлов по SSH в Linux-системах и Windows используют разные инструменты:
- scp (Secure CoPy) — утилита для безопасного копирования данных между Linux-системами по протоколу SSH. Она входит в состав OpenSSH, поэтому для работы с утилитой не нужно устанавливать дополнительное ПО;
- pscp.exe — утилита для загрузки файлов по SSH в ОС Windows. Она обладает теми же возможностями, что и scp. Утилита входит в состав программы Putty — SSH-клиента для Windows. Скачать программу можно по ссылке.
Обратите внимание
Если файл, который вы хотите скопировать, уже существует на целевом хосте, при копировании он будет перезаписан.
Копирование файлов по SSH на Linux
Для Linux копирование файлов по SSH происходит с использованием команды scp. С её помощью можно копировать файлы:
- с локального компьютера на удалённый сервер,
- с удалённого сервера на локальный компьютер,
- с одного удалённого сервера на другой.
Общий вид команды:
scp [опция] [источник] [получатель]Обратите внимание
Для подключения к удалённому серверу вам понадобится логин и пароль пользователя.
Как скопировать файл по SSH с локальной машины на удалённый сервер
Как загрузить файл на сервер по SSH? Для этого используйте команду вида:
scp [путь к файлу] [имя пользователя]@[имя сервера/ip-адрес]:[путь к файлу]Пример команды:
scp /home/test.txt root@123.123.123.123:/directoryФайл test.txt будет скопирован на хост 123.123.123.123 в директорию «/directory».
Как скопировать файлы с удалённого сервера на локальный компьютер
При подключённом SSH скачать файл на локальный компьютер с удалённого сервера можно с помощью команды:
scp [имя пользователя]@[имя сервера/ip-адрес]:[путь к файлу] [путь к файлу]Пример команды:
scp root@123.123.123.123:/home/test.txt /directoryФайл test.txt будет загружен с сервера 123.123.123.123 на локальный компьютер в папку «/directory».
Как скопировать файл по SSH с одного удалённого сервера на другой
Подключитесь по SSH к серверу, на котором расположен файл. Затем выполните команду:
scp [путь к файлу] [имя пользователя]@[имя сервера/ip-адрес]:[путь к файлу]Пример команды:
scp /home/test.txt root@123.123.123.123:/directoryФайл test.txt будет скопирован на хост 123.123.123.123 в директорию «/directory».
Как скачать папку со всеми файлами и подпапками
Если вы хотите скачать папку со всеми файлами и подпапками, используйте ключ -r:
scp -r [источник] [получатель]Как подключиться к серверу по нестандартному порту
Бывает, что для подключения по SSH нужно указать нестандартный порт. Без указания порта команда подключается к серверу по стандартному 22 порту. Чтобы указать нестандартный порт, введите команду с ключом -P:
scp -P [источник] [получатель]Пример команды:
scp -P 12345 /home/test.txt root@123.123.123.123:/directoryЭта команда подключается по порту 12345 к серверу 123.123.123.123 и копирует на него файл «test.txt» с локального компьютера в директорию «/directory».
Как передать и скачать файлы по SSH на Windows
Скопировать файл по SSH на сервер можно командой:
pscp [путь к файлу] [имя пользователя]@[имя сервера/ip-адрес]:[путь к файлу]Скачать файл по SSH с сервера командой:
pscp [имя пользователя]@[имя сервера/ip-адрес]:[путь к файлу] [путь к файлу]Увидеть список папок и файлов на сервере можно через pscp.exe. Для этого введите:
pscp -ls [имя пользователя]@[имя сервера/ip-адрес]:[путь]Если в пути или в названии файла есть пробелы, используйте кавычки:
pscp “C:files or docsfile name” root@123.123.123.123:/homePreviously we have shown you how to remotely connect to your Linux machine from a Windows one (Click here). Now, what if you need to transfer some files between your Windows and Linux systems?
You Might Be Interested In
Well, a USB drive comes handy for simple data transfers. For a large number of files at different times, you need another efficient method. Transferring your data between Linux and Windows using your local network is the recommended option. With an easy and quick one time setup, you can share your files between various machines.
File Sharing between Linux and Windows Systems
In this tutorial, we shall walk you through sharing your files between Ubuntu and Windows machines over a local network, and we shall also show you how to transfer files between Windows and Linux on the same PC.
Over the Network
Transferring files between Ubuntu and Windows can be done in many ways, but in this tutorial, we are going to discuss the following popular methods:
- Transfer files between Ubuntu and Windows via the SSH.
- Transfer files between Ubuntu and Windows using Samba.
- Transfer files between Ubuntu and Windows using Shared Network Folders.
Method 1: Transfer Files Between Ubuntu And Windows Via SSH
In this method, you need to install and enable SSH service on Ubuntu. Also, we need an SSH client application on Windows. In this tutorial, we shall be using Putty. Next, we are going to use the command line to share your files across the network.
Step 1. Install the SSH package on Ubuntu using the next command.
sudo apt install openssh-server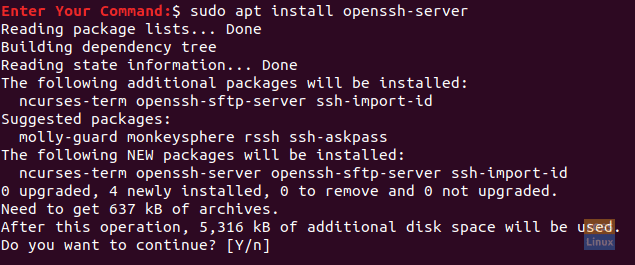
Install The Open SSH Package On Ubuntu
Step 2. After installation finishes successfully, you can check the SSH service status using the following command.
sudo service ssh status
The output of the command should look like the below screenshot:
Check The SSH Service Status
If the service is not running, you can use the following command to start it:
sudo service ssh start
Also, to enable the SSH service to start every time your system starts up, you can use the following command:
sudo service ssh enable
Step 3. Install the net-tools package.
sudo apt install net-tools
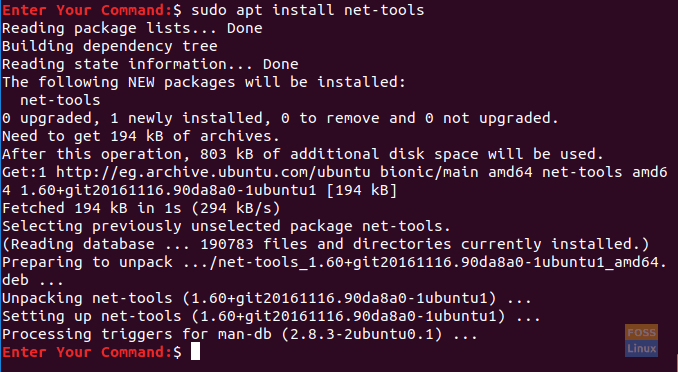
Install net-tools package
Step 4. Execute the next command to get your Ubuntu machine IP.
ifconfig

Ubuntu Machine IP
Step 5. From your Windows machine, we need an SSH client (which is Putty) and a PSCP. PSCP is considered a secure copy tool that is used alongside with Putty to transfer files securely over a network.
You can download both (Putty and PSCP) from the Putty official website. (Click here.) Kindly note that Putty will need to be installed while the PSCP won’t. You have to put the PSCP.exe in the “C:” drive to be used, as you should see shortly.
Step 6. Now open the file explorer and use the next command to start transferring your files from your Windows machine to Ubuntu.
c:pscp "C:Ubuntu TutorialsWindows Shared FolderWindows Shared Folder.txt" hendadel@192.168.1.8:windowssharedfile.txt

Copy File From Windows To Ubuntu Via SSH
Step 7. Next, you should enter your Ubuntu password.

Enter Your Ubuntu Password
Step 8. After entering the password successfully, the command shall copy the text file from your Windows machine to your Ubuntu home. You can check your home directory now, and you should find the file there.
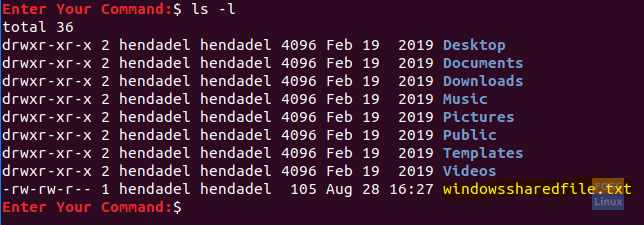
Check The Copied File
Step 9. Now in case you need to transfer your files from Ubuntu machine to Windows, open the file explorer from your Windows machine and use the next command. Be careful, and do not forget the dot at the end of the command.
c:pscp hendadel@192.168.1.8:ubuntushared .

Copy File From Ubuntu To Windows Via SSH
By executing the previous command, you should enter the password of your Ubuntu machine. Next, the file gets transferred from Ubuntu to the Windows current directory.
![]()
File Copied Successfully
Method 2: Transfer Files Via Samba
In this method, we are going to install the Samba package on Ubuntu. Moreover, use the Windows run application to connect to the Ubuntu shared directories.
Step 1. Install the Samba package on Ubuntu using the following command.
sudo apt install samba
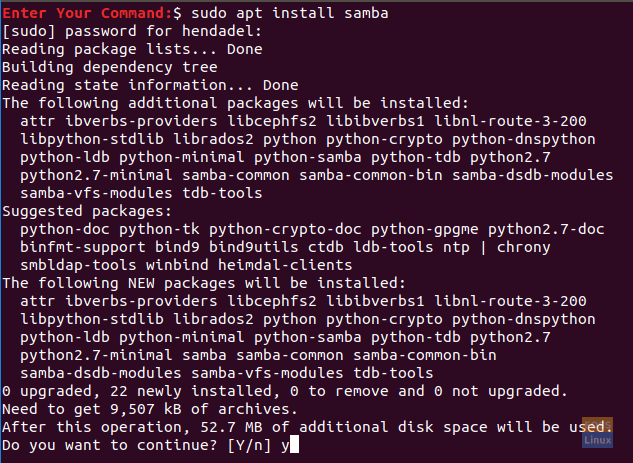
Install Samba Package On Ubuntu
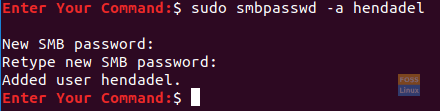
Step 2. You can set a password to the samba share as follows.
sudo smbpasswd -a hendadel
Add A User For Samba Share
where hendadel is an Ubuntu user that you shall use while accessing the Ubuntu shared directory.
Step 3. Let’s create a directory that is used for sharing your files.
mkdir /home/hendadel/UbuntuSharedDir

Create Directory For The Shared Data
Step 4. Using your favorite text editor, open the samba configuration file.
sudo vi /etc/samba/smb.conf
![]()
Open Samba Configuration File
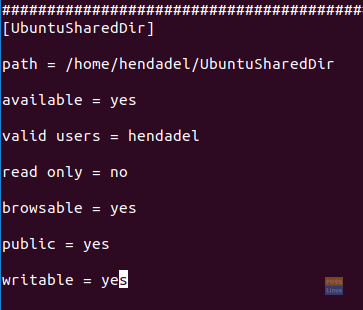
Step 5. Add the next lines at the end of the samba configuration file.
[UbuntuSharedDir]
path = /home/hendadel/UbuntuSharedDir
available = yes
valid users = hendadel
read only = no
browsable = yes
public = yes
writable = yes
The samba configuration file should like the below:
Edit Samba Configuration File
Save and exit the samba configuration file.
Step 6. Restart the samba service using the following command:
sudo service smbd restart
![]()
Restart Samba Service
Step 7. From the Windows machine, open the run application from the Start menu and enter the Ubuntu machine IP with the shared directory name as follows.
\192.168.1.8UbuntuSharedDir
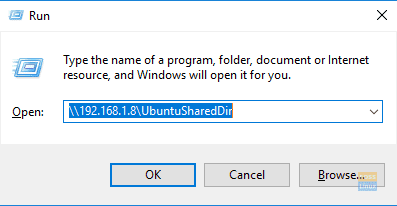
Remote Access To Your Ubuntu
Press the OK button to continue.
Step 8. A Windows Security message will appear, you should have to enter your samba username and password. Then press the OK button to continue.
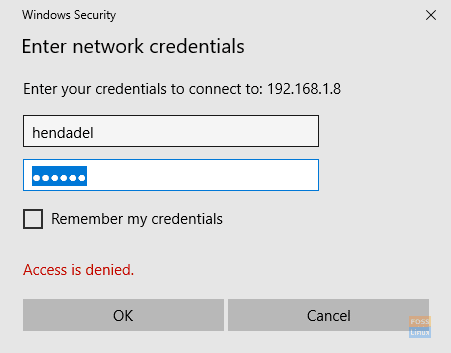
Authentication Required
Step 9. Now you should have access to your Ubuntu shared directory, and you can transfer files.
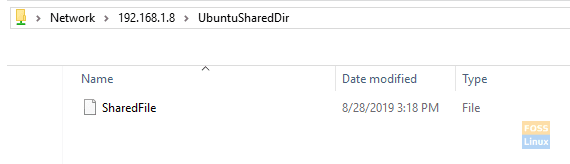
Welcome To Your Ubuntu Shared Directory
Method 3: Shared Network Folders
This is the easiest method among all. In this method, we share any folder from the Windows machine to be visible in the Ubuntu machine.
Step 1. From the Windows machine, right-click on the network connections icon in the right bottom of the taskbar.
![]()
Right Click On Network Connections
Step 2. Choose the “Open Network & Internet Settings.”

Open Network and Internet Settings.
Step 3. Next, choose “Sharing Options.”
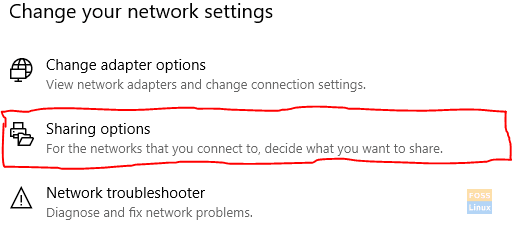
Open Sharing Options
Step 4. Now from your current network profile, choose the following options:
- Turn on network discovery.
- Turn on file and printer sharing.
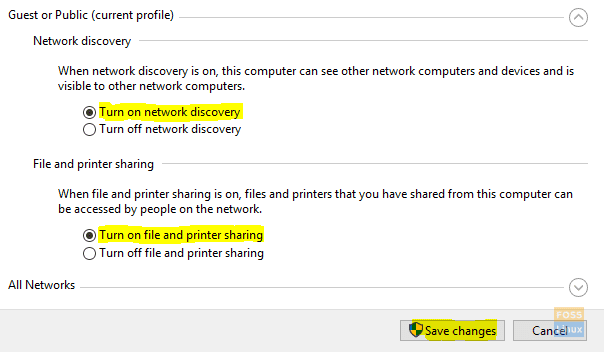
Choose Options And Save Changes
Don’t forget to save your changes.
Step 5. Now open your file explorer and go to the directory that you need to share. Right-click on the folder then select Properties.

Open Folder Properties
Step 6. After opening the folder properties, let’s choose the Sharing tab. Also, select the Advanced Sharing button.

Open Advanced Sharing
Step 7. Mark “Share this folder” box.
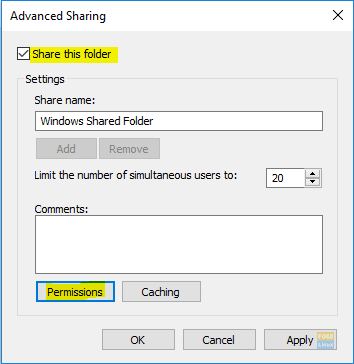
Check The Share This Folder
In case you need to set permissions on the shared folder like (Read, Write), you can select the permissions button and set your permissions.

Set Sharing Permissions
Press the OK button to continue.
Step 8. Now from the Ubuntu machine, open the file browser.
From Your Ubuntu Open The File Browser
Step 9. From the left panel, choose “Other Locations.”
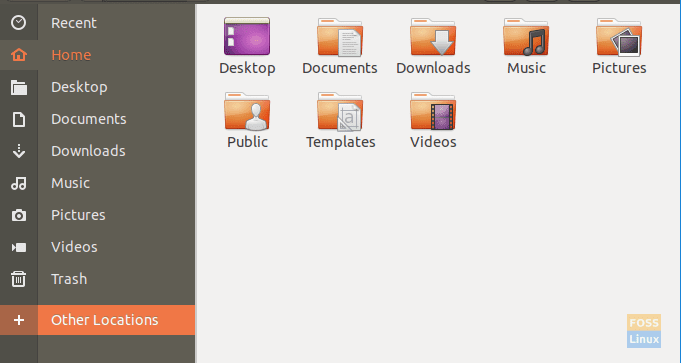
Open Other Locations
Step 10. In the bottom bar, enter your Windows machine IP and path to the shared folder as follows:
smb://192.168.1.6/Windows Shared Folder
![]()
Connect To Windows Shared Folder
Then press the Connect button.
Step 11. An authentication message should appear. Enter your username and password. Press the Connect button to continue.
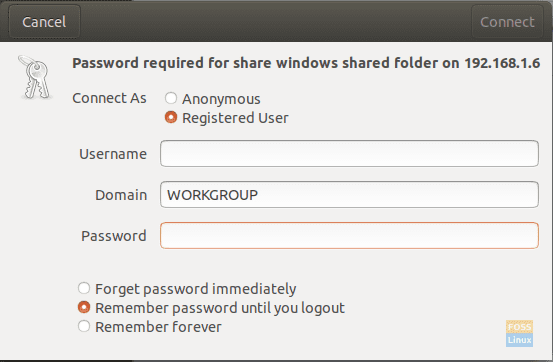
Enter Your Windows Machine Username And Password
Step 12. Next, you should be able to see your Windows shared folder. Now you can transfer files between the two machines.

Welcome To Your Windows Shared Folder
Transferring files between Windows and Linux on the same machine
Previously, we looked at how we can share files between a Linux PC and a Windows PC over a network. Some of the utilities used included SSH, Samba, and Shared Network Folders. Here, we will look at a relatively similar situation only that this time around, it will be on the same machine.
You might be wondering why can’t we copy files directly from a Linux partition to a Windows partition and Vice-versa? The simple answer is that; It will work for one but doesn’t work for the other. Let’s look at the reasons behind this.
Why it isn’t easy
The NTFS partition format used by Windows doesn’t support Linux file permissions. Therefore, we can’t consider installing Linux on an NTFS partition other than the Ext4. On the other hand, Windows cannot read the Linux file system even though Linux systems can read an NTFS partition. In most cases, the Linux partition is not listed in the “This PC” section on Windows in a dual boot. Therefore, you can copy a file from the Windows partition on Linux but not the vice-versa.
A simple solution
With the above information in mind, we need to find a way to favor both operating systems and wouldn’t pose any data corruption issues. For example, if you delete or alter any file in the Windows partition while accessing it with Linux, there is a high probability that Windows might raise some errors on boot.
Since Linux can’t run on an NTFS or FAT32 partition and Windows can’t read a Linux file system, we will need to configure a third partition that can be accessed by both operating systems. This third partition will contain commonly shared files between the two. Let’s call it the SharedPartition.
We can use other methods to share files, including external storage like USB or online storage like Google Drive and DropBox. However, these are tedious as one will require a reboot to switch from one OS to another while the other method is dependent on bandwidth.
Create a SharedPartition
Whether you have an SSD or Hard drive, we will require at least Four partitions:
- Linux Partition
- Windows Partition
- A SWAP space
- The SharedPartition (NTFS)
I believe you already have the first three. To create the SharedPartition, you can safely check our post on ‘Creating or resizing partitions in Linux.‘ Ensure you format it to NTFS. Additionally, you might need to understand the partition Table used on your Drives. That can be GPT or MBR. Our post on ‘Booting Linux or Windows from a USB drive‘ gives you a comprehensive guide on this. You will also understand the advantage of one over the other.
Up to here, we already have a SharedPartition that can be accessed by both Operating Systems. However, we might need to perform some configurations like Auto-mount on Linux and setting it as the default location for various files.
Configure Auto-Mount on Linux
We will need to execute several commands on the command-line. If you are just getting started with, don’t panic. Please copy and paste the commands as they are below. Our Linux distribution of choice in this post is Ubuntu 20.04 LTS.
Note: Remember to replace the name SharedPartition with the label of your new partition in any of the commands.
Step 1. Install the ntfs-3g driver, which enables Linux to read and write NTFS partitions.
sudo apt install ntfs-3g

Install NTFS-3g
Step 2. Create a directory where we will mount our new partition.
sudo mkdir /media/SharedPartition

Create Mount directory
Step 3. Get the UUID (universally unique identifier) of the new SharedPartition with the command below.
sudo blkid
You should see an output like this.

Know your UUID
Copy the UUID of the SharedPartition. The UUID identifies the partition in the /etc/fstab file.
Step 4. Since we will be editing the /etc/fstab file, create a backup with the command below.
sudo cp /etc/fstab /etc/fstab.backup
Step 5. Execute the command below to edit /etc/fstab using the nano editor.
sudo nano /etc/fstab
You should see a window like the one below. Add the following line at the end but remember to replace the UUID with yours.
# SharedStorage
UUID=66E53AEC54455DB2 /media/SharedPartition/ ntfs-3g auto,user,rw 0 0
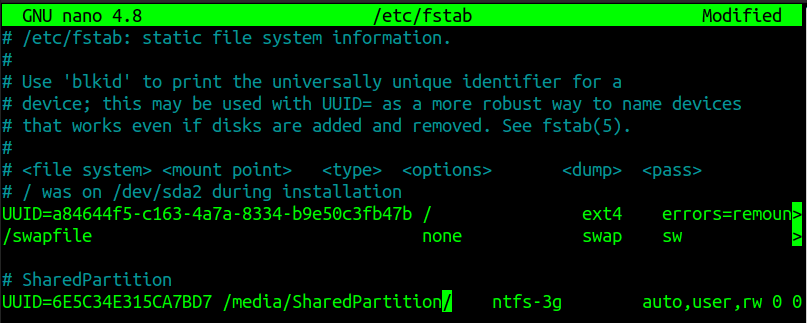
Edit etc-fstab
After this step, reboot your PC. You should now see the SharedPartition mounted under the ‘Other Locations’ menu.
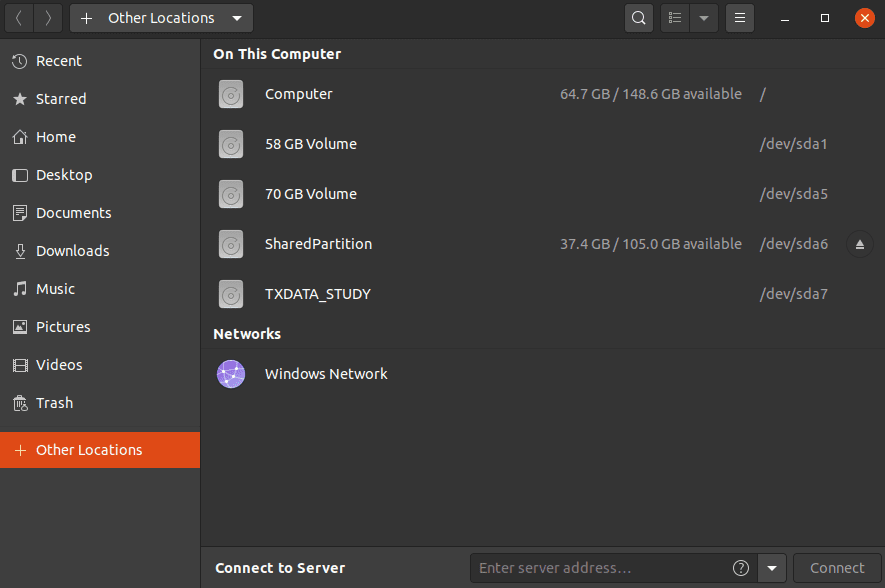
SharedPartition
Configure your Special Folders (Linux)
Special folders in Linux are those present on your Home directory. They include Desktop, Documents, Videos, etc. Execute the below command to edit their paths.
sudo nano .config/user-dirs.dirs
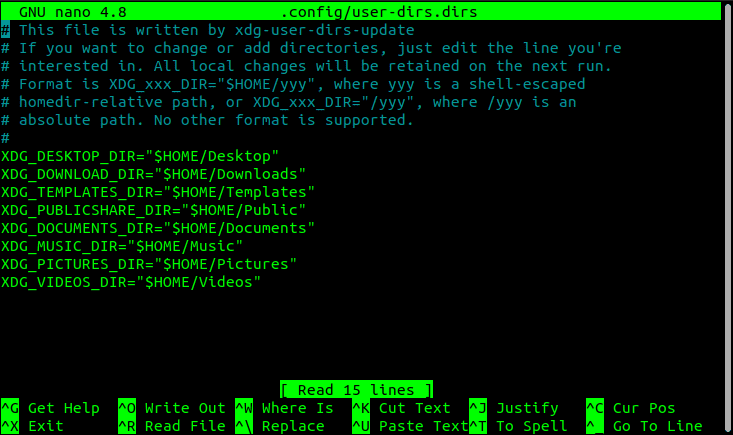
Special Folders
Now, we need to edit the paths to point to our SharedPartition mounted in /media/SharedPartition. For example, for Downloads, we will add the path “/media/SharedPartition/Downloads” and delete the “$HOME/Downloads” path. After applying the changes, you should have something similar to this:
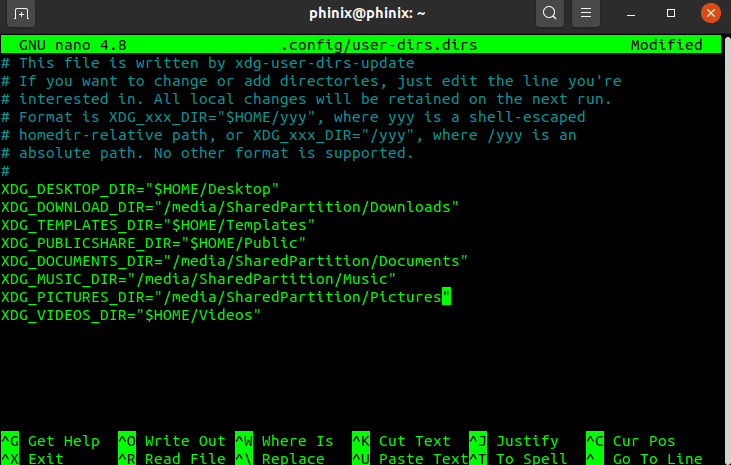
Special Folders
Save your changes and close the Nano editor.
Configure your Special Folders (Windows)
Step 1. Open the File Explorer and type %userprofile% on the address bar. Hit enter.
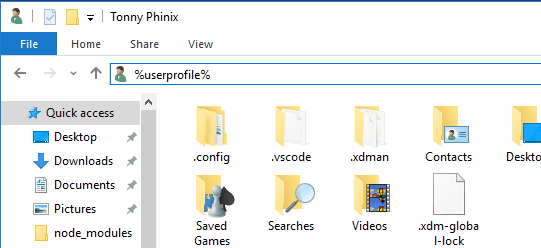
User Profiles
Step 2. Select a folder, say Downloads, that you want to access in both operating systems. Right-click and select the properties option.
Step 3. On the pop-up window that opens, select the Location tab.
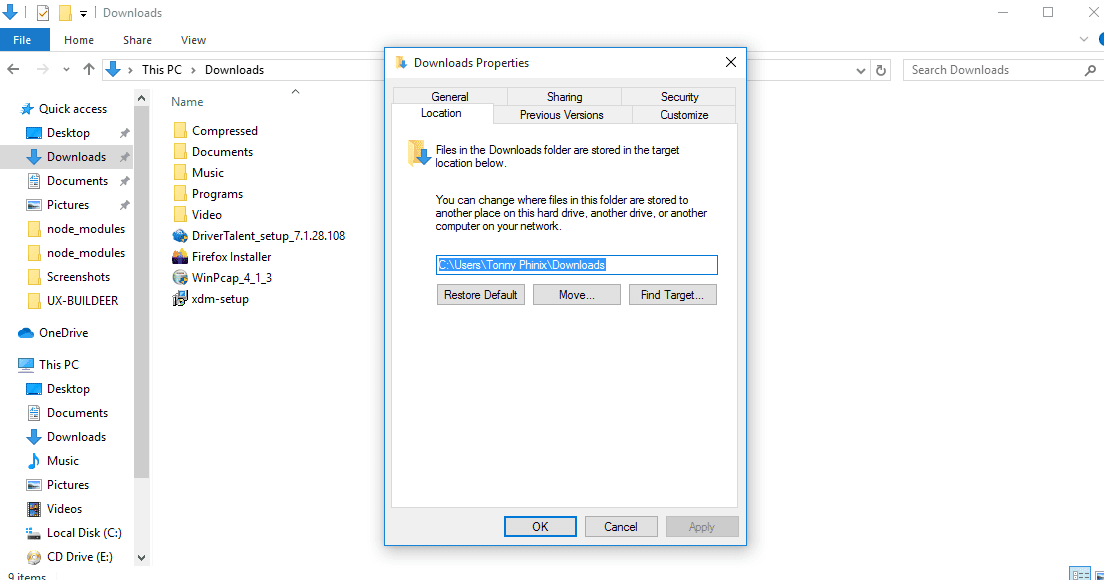
Location Tab
You will see the default path to your Downloads location.
Step 4. Click on the Move button. That will open a window where you will select your new Downloads path. Navigate to your SharedPartition and choose the Downloads folder already created in Linux. Click on the Select Folder button.

Select Destination Folder
Step 5. Click on the Apply button to set the changes.
You will see a pop-up window prompting you to move the content in the old folder to this new location. Click OK.
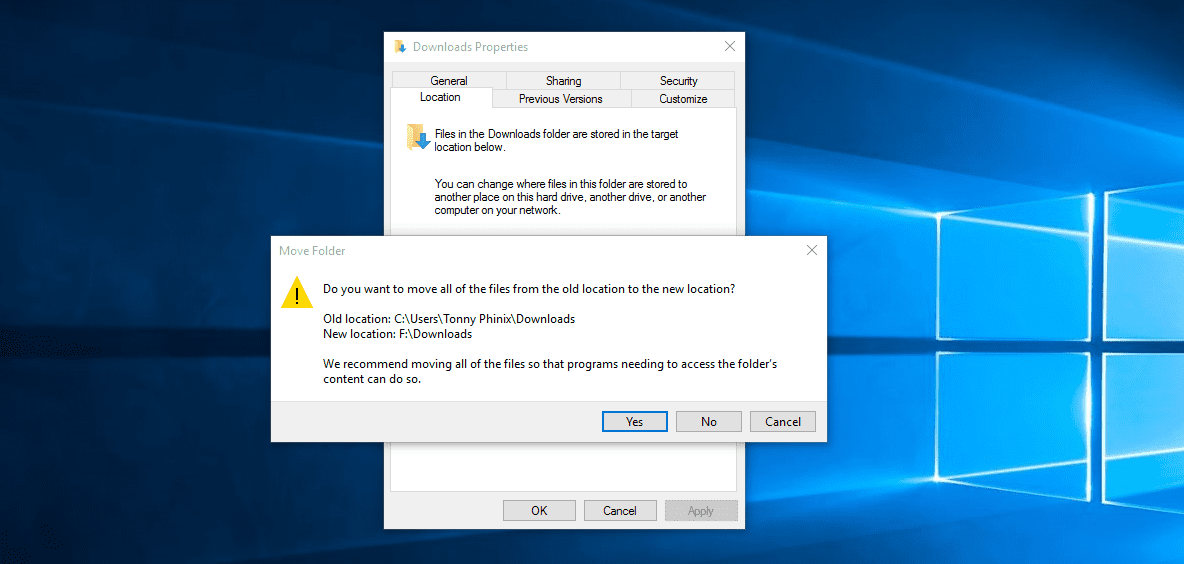
Apply Changes
That’s it. You can now proceed to do the same for the other Folders. Now, anything you save on these folders, e.g., Documents on Windows, will be accessible on Linux in the Documents directory.
Using another partition to share files between the two operating systems is the most reliable option since Windows cannot read the Linux file system without using third-party software. With this method, you don’t need to have duplicate files. Both operating systems can read and write on the same partition.
You Might Be Interested In
I am trying to copy one file from Linux (CentOS) to Windows.
scp file.txt administrator@x.x.x.x:C:/
The output I get is:
ssh: connect to host x.x.x.x port 22: Connection refused
lost connection
x.x.x.x is the IP of my Windows machine. Port 22 is open but I cannot connect via telnet from CentOS to Windows
curl -v x.x.x.x:22

* About to connect() to 10.109.10.135 port 22 (#0)
*   Trying 10.109.10.135... Connection refused
* couldn't connect to host
* Closing connection #0
curl: (7) couldn't connect to host
The firewall is disabled on Windows and Port 22 is open. I can connect via putty client to CentOS on that port. I’m quite confused here.
Thanks.
![]()
hyph
2812 silver badges13 bronze badges
asked Mar 28, 2017 at 20:22
![]()
5
The fact that you can initiate a connection from the windows box to the Linux box does in no way imply that the reverse is possible as well.
If you want to be able to scp to your Windows machine, you need to make sure you have a SSH service running on your Windows machine which allows for incoming ssh connections. The fact that you get a ‘connection refused’ message suggests that that isn’t set up or the service is not started.
Since you share that you’ve been able to reach your Linux machine using ssh, it’s probably easier to just turn things around, and run scp on the Windows machine instead.
answered Mar 28, 2017 at 23:14
![]()
1
I’ve would simply implement ftp or sftp server on the Windows side (installation will open port for u) and do it this way. It will get job done much easier. With no NTFS issues etc.
answered Mar 29, 2017 at 11:06
![]()
Download pscp in windows and use
pscp -P 801 machine@192.xxx.xx.x:/root/filename.txt ./
-P is the option to supply a port number.
![]()
jesse_b
34.6k10 gold badges87 silver badges136 bronze badges
answered Jan 4, 2020 at 16:06
![]()
1
You could as well mount the windows computer’s drive as smb share via cifs on your linux machine and perform a local copy.
answered Jan 4, 2020 at 17:52
![]()
jf1jf1
3971 silver badge10 bronze badges
Содержание
- Копирование файлов через SSH
- Копирование файлов по SSH на Linux
- Как скопировать файл по SSH с локальной машины на удалённый сервер
- Как скопировать файлы с удалённого сервера на локальный компьютер
- Как скачать папку со всеми файлами и подпапками
- Как подключиться к серверу по нестандартному порту
- Как передать и скачать файлы по SSH на Windows
- Копирование файлов scp
- Что такое SCP?
- Копирование файлов scp
- Выводы
Копирование файлов через SSH
В статье мы расскажем, как копировать файлы в Windows и Linux-системах, и покажем основные команды, с помощью которых происходит передача файлов по SSH.
Для копирования файлов по SSH в Linux-системах и Windows используют разные инструменты:
Копирование файлов по SSH на Linux
Для Linux копирование файлов по SSH происходит с использованием команды scp. С её помощью можно копировать файлы:
scp [опция] [источник] [получатель]
Как скопировать файл по SSH с локальной машины на удалённый сервер
Как загрузить файл на сервер по SSH? Для этого используйте команду вида:
scp [путь к файлу] [имя пользователя]@[имя сервера/ip-адрес]:[путь к файлу]
scp /home/test.txt root@123.123.123.123:/directory
Файл test.txt будет скопирован на хост 123.123.123.123 в директорию «/directory».
Как скопировать файлы с удалённого сервера на локальный компьютер
При подключённом SSH скачать файл на локальный компьютер с удалённого сервера можно с помощью команды:
scp [имя пользователя]@[имя сервера/ip-адрес]:[путь к файлу] [путь к файлу]
scp root@123.123.123.123:/home/test.txt /directory
Файл test.txt будет загружен с сервера 123.123.123.123 на локальный компьютер в папку «/directory».
Как скачать папку со всеми файлами и подпапками
Если вы хотите скачать папку со всеми файлами и подпапками, используйте ключ -r:
Как подключиться к серверу по нестандартному порту
Бывает, что для подключения по SSH нужно указать нестандартный порт. Без указания порта команда подключается к серверу по стандартному 22 порту. Чтобы указать нестандартный порт, введите команду с ключём -P:
Эта команда подключается по порту 12345 к серверу 123.123.123.123 и копирует на него файл «test.txt» с локального компьютера в директорию «/directory».
Как передать и скачать файлы по SSH на Windows
Скопировать файл по SSH на сервер можно командой:
pscp [путь к файлу] [имя пользователя]@[имя сервера/ip-адрес]:[путь к файлу]
Скачать файл по SSH с сервера командой:
pscp [имя пользователя]@[имя сервера/ip-адрес]:[путь к файлу] [путь к файлу]
Увидеть список папок и файлов на сервере можно через pscp.exe. Для этого введите:
Если в пути или в названии файла есть пробелы, используйте кавычки:
pscp “C:files or docsfile name” root@123.123.123.123:/home
Источник
Копирование файлов scp
Если у вас есть домашний сервер или сервер в интернете, то вам понадобится способ для безопасного перемещения файлов между машинами. Между локальными машинами мы могли бы просто переносить данные с помощью флешки, но на удаленный сервер нужно передавать данные только через сеть. Есть много способов реализации этой задачи.
В этой статье мы рассмотрим как выполняется копирование файлов с помощью утилиты scp (Secure Copy Command), а также что из себя представляет команда Linux scp. При передаче файлы шифруются, так что больше никто не сможет получить к ним доступ и самое интересное, что вам не нужно настраивать FTP или другое дополнительное программное обеспечение. Будет достаточно сервера SSH.
Что такое SCP?
Копирование файлов scp
Эта статья рассчитана в первую очередь на начинающих, поэтому я попытаюсь объяснять все как можно подробнее. Перед тем, как мы перейдем к практике, нужно рассмотреть общий синтаксис команды:
$ scp опции пользователь1@хост1 : файл пользователь2@хост2: файл
Опции утилиты больше касаются протокола SSH и настраивают общее ее поведение. Дальше следует адрес первого и второго файла. Каждый из них может быть расположен как на локальной, так и на удаленной машине. А теперь рассмотрим основные опции, которые могут нам понадобиться:
scp /home/sergiy/file root@losst.ru:/root/

В качестве пользователя нужно использовать любого пользователя, который есть на сервере. Вместо IP вы можете также домен сервера. Только необходимо, чтобы у выбранного пользователя были права записи в указанную папку.

Убедитесь, что у исходного каталога нет косой черты, а у каталога назначения она должна обязательно быть. Немного изменив синтаксис с косой чертой можно передать все файлы из каталога на удаленный сервер:

Если поменять местами локальный путь и сервер, то вы сможете копировать файлы scp c удаленного сервера на локальный компьютер:
scp root@losst.ru:/root/file /home/sergiy/
Таким же самым образом вы можете копирование файлов scp или папок с сервера:

Обратите внимание, что папка, в которую вы собираетесь копировать должна завершаться косой чертой, иначе папка, которую вы копируете запишется вместо той, в которую нужно скопировать.
Чтобы скачать файл scp из одного сервера на другой, просто необходимо указать данные аутентификации на каждом из них. Например, скопируем один файл:
scp root@losst.ru:/home/root/index.html root@losst.ru:/home/root/www/
Скопируем папку с того же удаленного сервера:
scp root@losst.ru:/root/photos root@losst.ru:/home/root/www/
Выводы
В этой статье мы рассмотрели как выполняется передача файлов scp, как это работает и что вы можете сделать с помощью этой утилиты. Как вы видите, перемещать файлы с одного сервера на другой очень просто. В Linux достаточно понять основы чтобы начать работать эффективнее! А команда scp один из таких инструментов.
Источник