Transfer photos from an iPhone to your PC.
First, connect your iPhone to a PC with a USB cable that can transfer files.
-
Turn your phone on and unlock it. Your PC can’t find the device if the device is locked.
-
On your PC, select the Start button and then select Photos to open the Photos app.
-
Select Import > From a USB device, then follow the instructions. You can pick the items you want to import and select where to save them. Allow a few moments for detection and transfer.
Make sure the photos you want to import are actually on the device rather than in the cloud. Then, follow the steps for your type of device.
For more info, see Import photos and videos from phone to PC
Need more help?
Why Do You Need to Transfer Photos from iPhone to PC in Windows 10
The photos on your iPhone generally take most of your device storage. To free up your iPhone storage and make it run faster, you may want to remove the biggest occupier from your iOS device. However, photos are so important that you don’t want to directly remove them without making a backup. Thus, to avoid data loss, you need to transfer photos from iPhone to PC first.
If you are looking to copy photos from iPhone to Windows 10, read on and learn four proven ways to do it.
Method 1. How to Transfer Photos from iPhone to PC in Windows 10 via File Explorer
Compared with transferring photos from PC to iPhone, it’s much easier to import photos from iPhone to PC, because you can transfer photos from iPhone to Windows 10 directly using a USB cable, and no third-party software is needed.
By connecting your iOS device to PC, you can access the DCIM folder in your iPhone internal storage via File Explorer (called Windows Explorer in earlier versions), and then you can copy the photos and videos in that folder to your desktop.
The only flaw of manually copying photos from your iPhone to PC is that: If you are going to transfer photos selectively, it will take you a long time to select the items, since all the photos and videos are all stored in the folder in an unorganized way.
To transfer photos from iPhone to Windows 10:
Step 1. Connect your iPhone to your PC using a USB cable.
Step 2. Unlock your device and trust the computer.
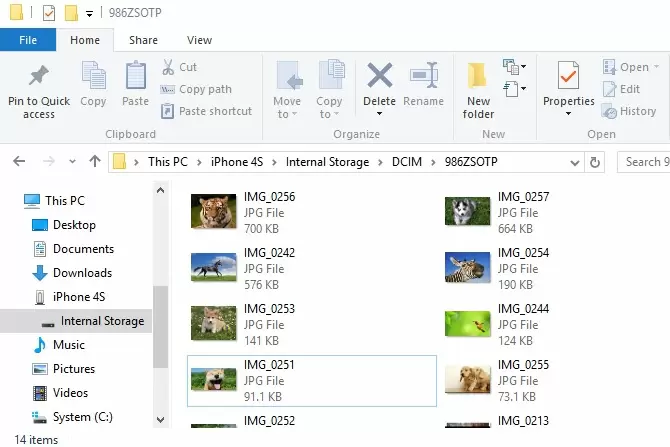
Step 3. Head over to «This PC» > «Internal Storage» > «DCIM» > «100APPLE» and now you could see all the photos and videos on your iPhone.
Step 4. Copy and paste the pictures you want to transfer to your computer.

Method 2. How to Transfer Photos from iPhone to Windows 10 PC via Photos
Since you are looking to transfer photos from iPhone to Windows 10 PC, you can also apply the Windows Photos app to help you get things done. The Photos app is available on Windows PCs since the release of Windows 8. It is designed to help you view and manage photos on your computer or an external device, including your iPhone. With it, you will be able to import photos from your iPhone to PC using a USB cable.
To transfer iPhone photos to PC in Windows 10 via the Photos app:
Step 1. Connect your iOS device to your Windows 10 PC with a USB cable.
Step 2. Unlock your device and trust the computer in the pop-up.
Step 3. Launch the Photos app on your PC. (If you don’t know where it is, go to the Start menu and search for it.)
Step 4. In the program, click «Import» in the top-right corner of the window, and choose «From a USB device».
Step 5. Then Photos will look for a device to import photos from. When it has done, it will show you the new photos and videos it found.
Step 6. Uncheck the items you don’t want to import and click «Continue» to start transferring iPhone photos to PC.
If the Windows 10 Photos app is not working, learn how to fix it from the troubleshooting guide.

Both File Explorer and Photos are applicable to import photos from iPhone to PC only. If you want to put photos on iPhone from the computer, they won’t help.
Method 3. How to Transfer iPhone Photos to PC in Windows 10 with iPhone Transfer Software
Convenient as they are, the two methods above can only import your iPhone photos and videos to your Windows PC. If you also need to transfer other types of content, like music, contacts, messages, books, and more, you will need free iPhone data transfer software, like EaseUS MobiMover. This tool works well to:
- Transfer files between iPhone/iPad and computer
- Transfer data from one iPhone/iPad to another
- View and manage iDevice content from computer
Moreover, it is also a free video & audio downloader that allows you to download online video & audio to your computer or iPhone/iPad directly.
To transfer photos from iPhone to PC in Windows 10:
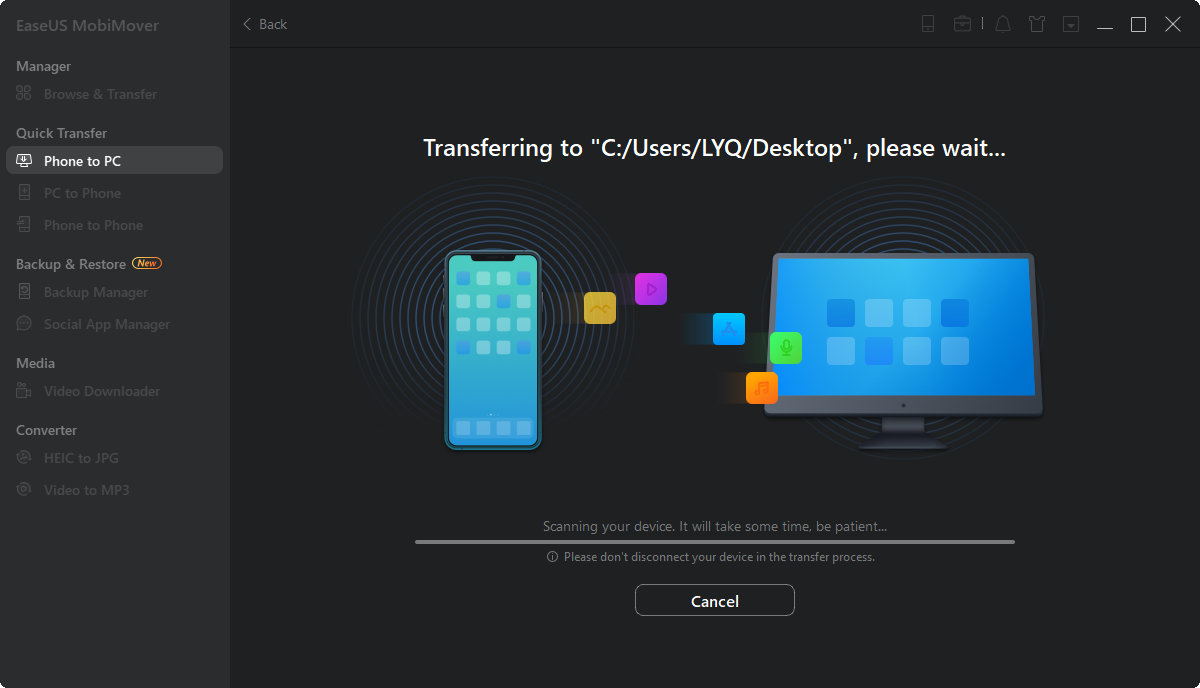
Step 1. Connect your iPhone to PC running Windows 7 or later. Run EaseUS MobiMover and click «Phone to PC» on the screen. Then, click the «Next» button to continue.

Step 2. Check the category/categories you want to transfer from your iPhone to PC running Windows 10/8/7. As you can see, you can copy other supported files together with photos from your iPhone to PC at once.
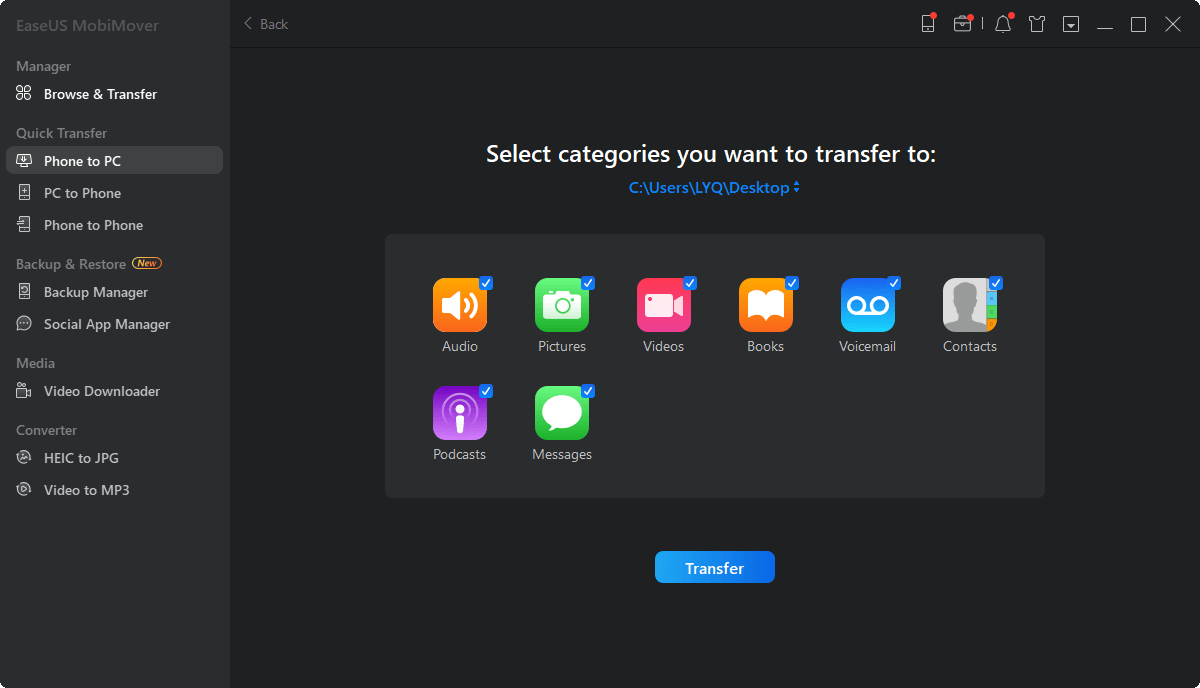
Step 3. Now, click the «Transfer» button to transfer the photos from iPhone to your PC in one-click. If you’ve customized the storage path, find the files there. If not, you can check them on your desktop.
Method 4. How to Transfer Photos from iPhone to PC Wirelessly
The three ways above all need a USB cable to work. If you want to import photos from iPhone to Windows 10 PC wirelessly, iCloud is a good choice for you.
Unlike iTunes that can only sync photos from PC to iPhone, iCloud helps whether you want to transfer photos from Windows 10 to iPhone or vice versa. It will sync all photos from iPhone to PC in Windows 10 at once. If you prefer to copy some specific items, using iCloud won’t meet your needs.
To import photos from iPhone to PC in Windows 10 via iCloud, you have two ways to choose from, depending on whether you have installed iCloud for Windows. Make sure you have enough iCloud storage to save your iPhone photos and follow one of the tips below to continue.
If you have installed iCloud for Windows:
Step 1. Turn on «iCloud Photos» on your iPhone via the Settings app.
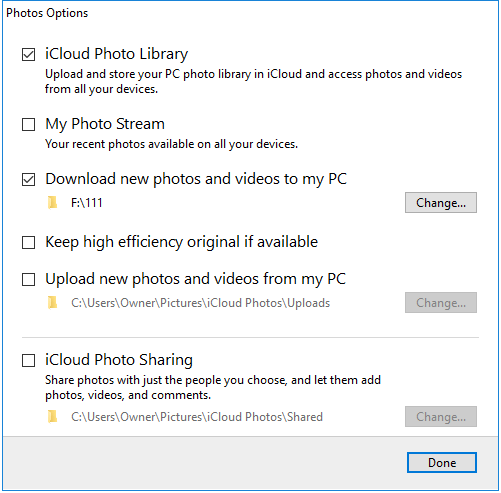
Step 2. On your PC, go to iCloud settings and click «Options» next to Photos.
Step 3. Enable «iCloud Photo Library» > «Download new photos and videos to my PC».
Step 4. Go to the folder shown under the option to check the photos and videos from your iPhone.
If you don’t want to install iCloud control panel:
Step 1. Switch on «iCloud Photos» via Settings on your iPhone.
Step 2. On your PC, open a browser and visit iCloud.com.
Step 3. Sign in with the Apple ID account you use on your mobile device.
Step 4. Choose «Photos» among the options.
Step 5. Now you could see the items from your iPhone.
Step 6. Download iCloud Photos to your PC. By doing so, you can transfer photos from your iPhone to PC in Windows 10.

Bonus Tip: How Do I Transfer Photos from iPhone to PC Using iTunes
As mentioned, iTunes is helpful to transfer photos from PC to iPhone but not from iPhone to PC. There is no direct way to import iPhone photos to PC. If you have to, you can back up your iPhone with iTunes, which will back up almost all your iPhone and settings, including photos, to your computer.
The Bottom Line
It’s easy to transfer photos from iPhone to Windows computer with the ways provided above.
If you want to transfer photos and videos only, using Windows File Explorer or the Photos app could solve the problem. If you want to transfer other files together with pictures, use a tool like EaseUS MobiMover instead. While if you want to get things done wirelessly, applying cloud storage services, e.g. iCloud, Dropbox, Google Photos, is advisable.
Carry out the way you like best to get your iPhone photos to PC in Windows 10 within minutes.

Apple iPhone is still one of the best smartphones out there that can take beautiful pictures. iPhone users tend to keep a backup of these photos for future purposes. As to the methods, most iPhone users will turn to iTunes which can sync iPhone data to PC. But as we all know, iTunes is saying goodbye now. Therefore, many iPhone users are wondering if there is a simple way to transfer photos from iPhone to Windows 10 without the need for iTunes. This article will show you three practical methods to do this.

Three methods to transfer iPhone photos to Windows 10
- Using Windows 10’s new function – Photos app
- Using wireless transfer tool – AirMore
- Using Windows 10 File Explorer
Method 1: Windows 10 Photos app
Microsoft adds the Photos app function to its newest OS which can help you copy photos from iPhone to Windows 10 in bulk. It’s very interesting. You may have a try.
Step 1: Plug your iPhone into your PC over the USB cable.
Step 2: Open Photos app. This can be found by typing “Photos” into the search bar at the lower left corner of the screen in Windows 10.
Step 3: Click the button at the top-right of the Photos app to import. You can click the three dots to get the text reminder.

Step 4: Select your iPhone from the options that appear and tap “Import” to import photos from iPhone to Windows 10.
Pros:
- Transfer photos in bulk.
Cons:
- It can’t do this without USB cable.
- It’s not precise.
- It’s not able to load all photos of iPhone and export photos from PC to iPhone.
Now let’s see another method through which you transfer photos between iPhone and Windows 10 with ease.
Method 2: AirMore – transfer photos from iPhone to Windows 10 wirelessly
AirMore is a powerful mobile devices management tool based on web. It has been favored by most of iPhone users for its useful function in transferring photos between iPhone and Windows PC or Apple Mac. It only takes you seconds to copy photos from iPhone to Windows 10 without using iTunes and any USB cable. Now get started with steps below.
Step 1: Download this app from Apple Store and install it on your iPhone or you can directly download it by hitting the download button below.
Step 2: Connect iPhone with AirMore.
- Open AirMore on iPhone. Scan the QR code or hit your device name in Radar on the AirMore web. You can go to the AirMore web page by visiting “web.airmore.com” through Google Chrome, Firefox and Safari.

- If you connect two devices in Radar, then click “Accept” button when a notification box pops up on your handset in order to confirm your agreement on iPhone’s connection with this app.


Tips: To get a successful connection, please set up your iPhone and PC in the same Wi-Fi.
Step 3: How to transfer photos from iPhone to Windows 10
- Choose “Pictures” icon on the app interface of PC, from which you can move photos from iPhone to Windows 10.
- Tick photos you want and then hit on “Export” button. Within seconds, these photos will be copied to your PC if your network’s pretty smooth.

Pros:
- Without using iTunes and USB cable.
- Import/Export function.
- 100% free.
Cons:
- It relies on smooth network.
Sometimes your PC and iPhone’s network might be not stable. In this case, you may try the third method.
Method 3: Windows 10 File Explorer
File Explorer is a built-in function of Windows PC with which you can view and manage files in your devices and drives. As to this function, Windows 10 has a more outstanding performance than Windows 8 and Windows 7. Let’s see how it works.
Step 1: Connect your iPhone to your Windows 10 PC using the USB cable provided by Apple. Check your iPhone screen now and a notification with “Trust” option will appear. Choose “Trust” option to continue.
Step 2: Open Windows File Explorer. You can press the Start key on your keyboard and you’ll see the “File Explorer” icon on the left pane.
Step 3: Under “This PC”, you should see your iPhone as a drive. Double-click the icon for your iPhone here. You will also need to open “Internal Storage” > “DCIM”, then another folder inside to get access to your photos.
Step 4: Photos and videos taken on your iPhone should now be visible. Then you can select the photos to transfer them to Windows 10.
Pros:
- No additional apps needed.
- Easy to achieve.
Cons:
- It relies on USB cable.
- It fails to read all photos of iPhone.
Conclusion
As we can see, all methods mentioned above allows you to transfer photos from iPhone to Windows 10 PC. However, taking all aspects into considered, AirMore will be your best choice. Because AirMore enables users to wirelessly transfer photos and other files between iPhone and PC. In addition, using AirMore, you can easily add files or delete unnecessary files in just one click. All in all, with this smart tool, you can manage nearly all your iPhone data with very ease.
This article shows the easiest methods for importing photos from iPhone to PC using cloud storage services, the Windows 10 Photos app, File Explorer, and email and messaging apps. You can also, of course, transfer photos from an iPhone to a Mac as well.
How to Import Photos From iPhone to PC With OneDrive
By far, the easiest way to download pictures from iPhone to a computer is to use a cloud service such as Microsoft’s OneDrive. After the initial setup, this method will allow your iPhone to wirelessly sync all of your iPhone photos and videos to your Windows 10 computer automatically, so you won’t have to worry about connecting any cables or manually copying files.
Download the OneDrive app
-
After you’ve installed the OneDrive app on your iPhone, open it and tap Allow Access to All Photos.
-
Log into OneDrive with the same Microsoft account you use on your Windows 10 PC and tap your profile photo in the top-left corner.
You may be automatically logged into OneDrive if you use other Microsoft services or apps on your iPhone such as Microsoft Teams or Word.
-
Tap Settings.
-
Tap Camera Upload.
-
Tap the switch to turn on the Camera Upload feature.
-
Disable Use Mobile Network if you need to save data and want media uploaded when connected to Wi-Fi. Enable Include Videos if you want videos you record on your iPhone transferred to your PC as well.
-
Your photos, and videos if selected, should now begin uploading to Microsoft’s OneDrive servers. They will then download onto your connected Windows 10 device as soon as it’s turned on and connected to the internet.
Your downloaded media should be available within the OneDrive > Pictures > Camera Roll folder on your PC once the sync is complete.
While OneDrive is convenient due to it being pre-installed with the Windows 10 operating system, many other cloud services, such as Dropbox, also offer camera upload functions from their mobile apps that work in much the same way.
How to Download Pictures From iPhone to Computer With the Photos App
Another common way to import pictures from iPhone to Windows 10 is to use the native Windows 10 Photos app. It can be a bit fiddly at first, though, as it requires you to download and install the iTunes app and register your iPhone within iTunes before your computer can read the contents of your iPhone’s storage.
Here’s how to transfer photos from an iPhone to a computer with the Windows 10 Photos app.
-
If you haven’t yet, download and install the free iTunes app on your Windows 10 device, connect your iPhone to your PC via USB with iTunes open, and register your smartphone following the instructions shown on the screen.
You’ll only need to do this iTunes/iPhone setup process once.
-
Open the Windows 10 Photos app.
-
Click Import.
-
Click From a connected device.
If you get an error message in Photos, re-open iTunes and make sure you’re logged in with your Apple ID.
-
The Photos app will begin scanning your iPhone for media to transfer to your PC.
The app may take several minutes to find the pictures and videos on your iPhone; once it discovers the first few, it will quickly scan the rest.
-
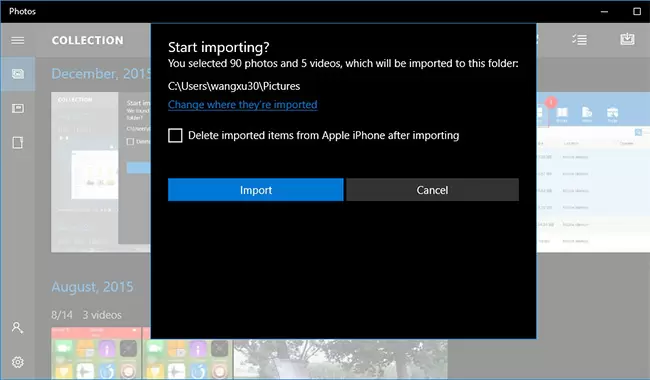
Select all of the photos on your iPhone you want to copy to your Windows 10 device.
If you want to delete them from your iPhone after they’re copied to your PC, check the box next to Delete the original items after import.
-
When you’re ready to begin the transfer, click Import.
-
Once your photos have been transferred from your iPhone to your computer, you’ll be shown a message informing you the process has been completed.
The message will show a link to the photos’ location on your computer, which you can use to view them with Windows 10’s File Explorer, but the Photos app will also show all of your imported media.
How to Transfer Photos From iPhone to Computer via File Explorer
If you don’t like using the Photos app, you can also download pictures from your iPhone to your computer using the basic Windows 10 File Explorer tool you typically use to browse folders on your device.
Once you’ve installed and set up iTunes, open File Explorer, which you can access via the Documents link in the Start Menu and navigate to This PC > Apple iPhone > Internal Storage > DCIM to access your pictures and videos.
Your iPhone photos may be in multiple folders, but all you need to do now is find the ones you want and copy them to another folder on your Windows 10 PC.
Import Pictures From iPhone to Windows 10 Using Email and Messaging Apps
If you’re not a fan of cloud services or don’t feel like downloading any additional apps, you can still transfer photos from an iPhone to a computer the old-fashioned way by using email.
All you need to do is compose an email on your iPhone, make sure to attach your photos to it, send the email to yourself, and then check the email on your Windows 10 computer.
You can send emails from and to the same email address. You don’t need to worry about managing multiple accounts to transfer your photos this way.
Another alternative is to add your photos to a conversation in an iPhone chat app and open it in the Windows 10 version on your computer. Once you open the conversation on your PC, you can download all of the images in it.
Apps such as WhatsApp, Instagram, and Facebook Messenger have Windows 10 versions free to download. However, most services also have web versions that you can access from any browser.
Thanks for letting us know!
Get the Latest Tech News Delivered Every Day
Subscribe

You’ve been taking some beautiful pictures with your iPhone or iPad, and you want to be able to see them on your Windows 10 computer. Maybe there’s some tweaking you want to make before sharing them, or you want to have a long-term archive for your shots. Whatever your reason, we’ll help you move those photos painlessly.
The easiest way to go about this process is to set up an automatic sync between your iPhone or iPad and your Windows computer. This will make sure your photos transfer to your computer without you having to do anything other than open the folder they’re supposed to go into. This can also make sure your Windows pictures show up on your iPhone or iPad. Take a look at our guide on setting up an iTunes sync for Windows to see how this works. If you would rather have manual control over how photos move from your iOS device to your computer, we’ll show you how here.
- How to transfer iPhone or iPad pictures to a Windows 10 computer using File Explorer
- How to transfer photos from your iPhone or iPad using the Windows 10 Photos app
- How to transfer photos from iPhone or iPad to Windows 10 using iCloud
How to transfer iPhone or iPad pictures to a Windows 10 computer using File Explorer
- Install iTunes — this ensures your computer can communicate with your iPhone or iPad even if you don’t specifically use iTunes to transfer files.
- Plug in your iPhone or iPad with your Lightning to USB or 30-pin Dock to USB cable.
- Launch Windows Explorer from the Start menu, desktop, or taskbar. The button looks like a yellow folder with a blue stand. You can also use the Windows key + E shortcut on your keyboard.
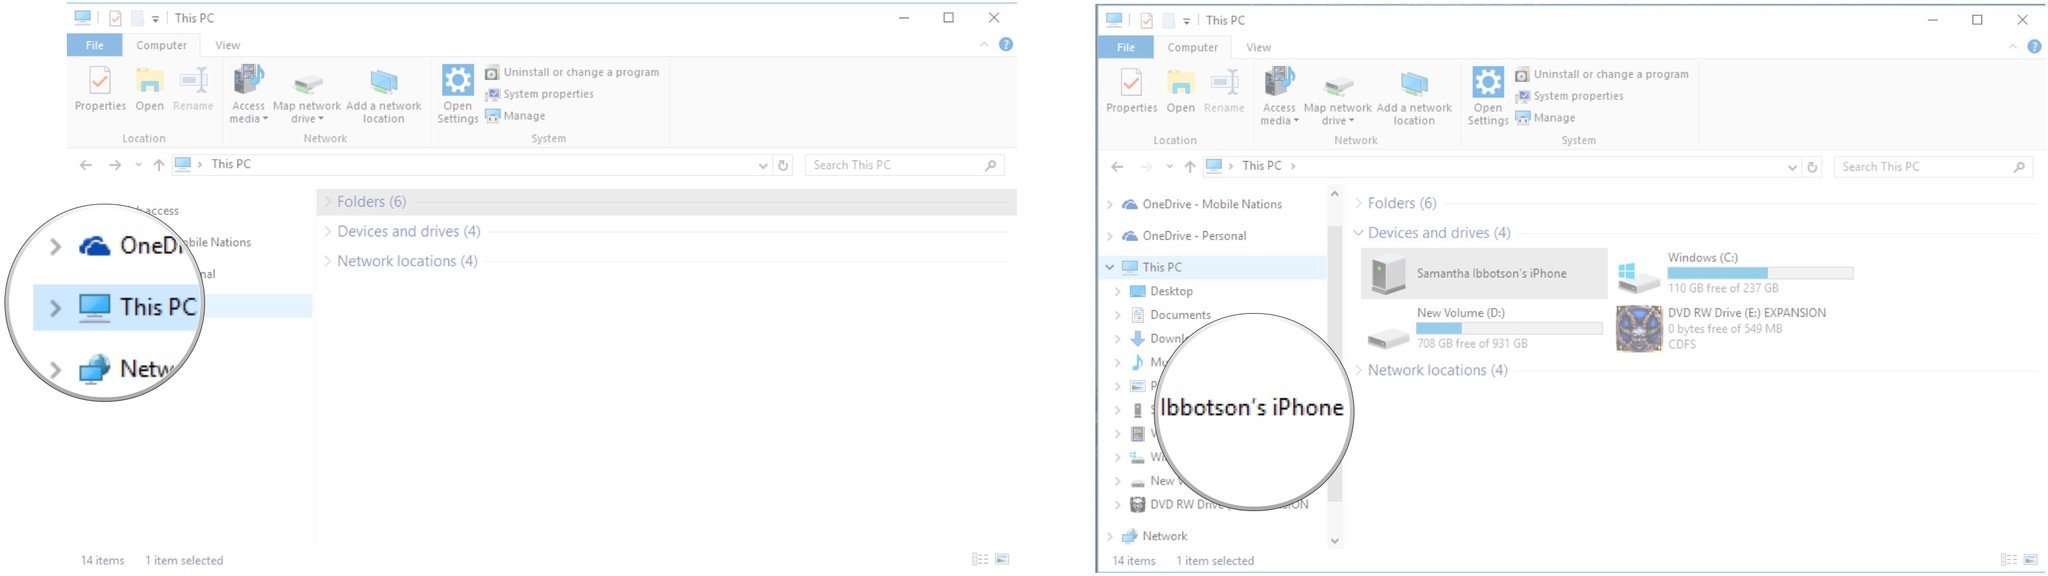
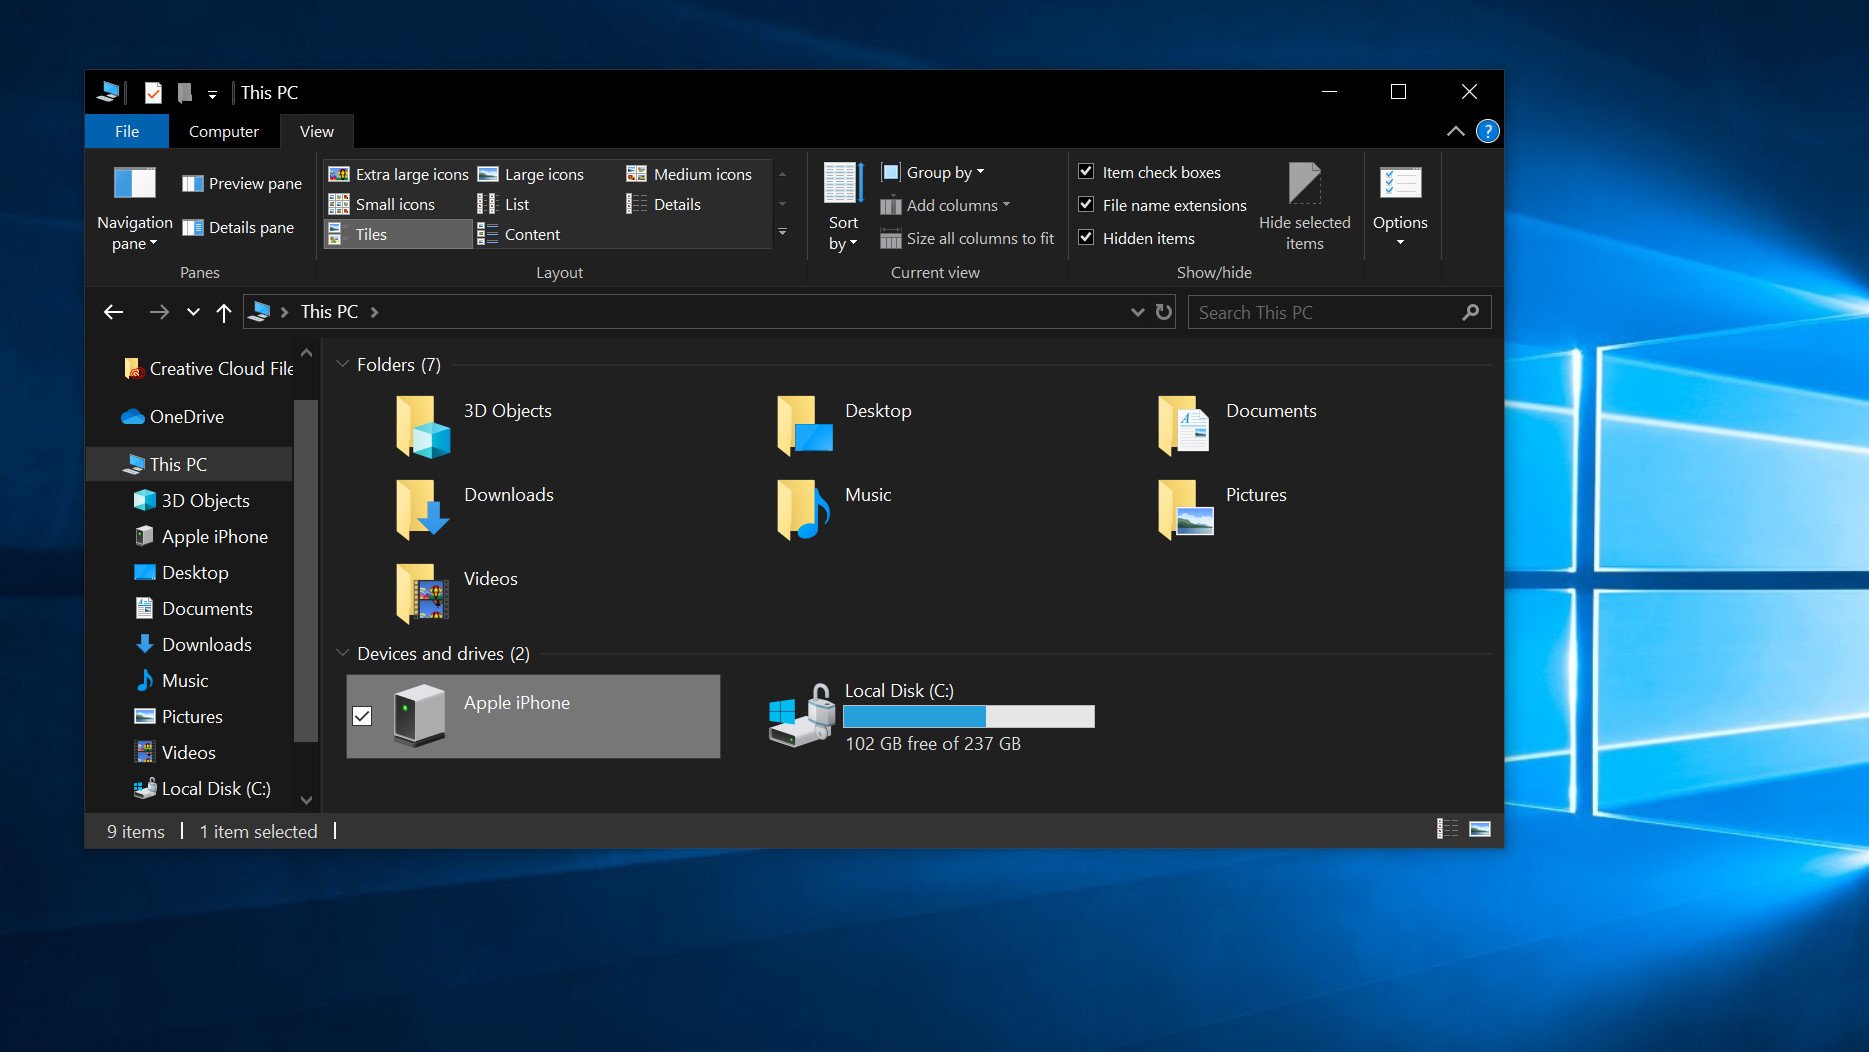
- Click the arrow next to This PC. It’s located in the menu to the left of the window and looks like >.
- Click NAME’s iPhone or NAME’s iPad in the This PC sub-menu.
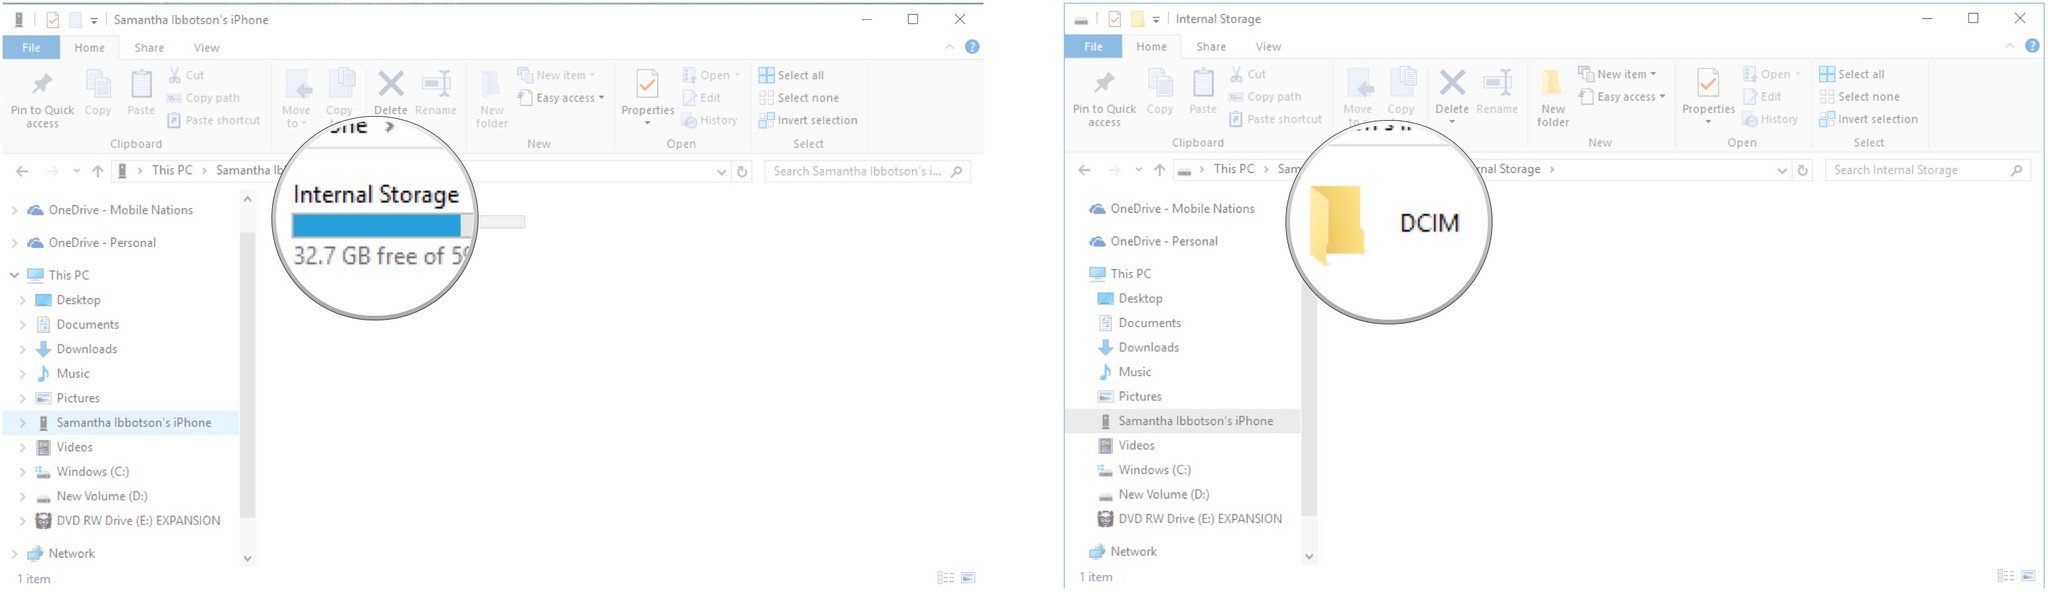
- Double-click Internal Storage.
- Double-click DCIM.
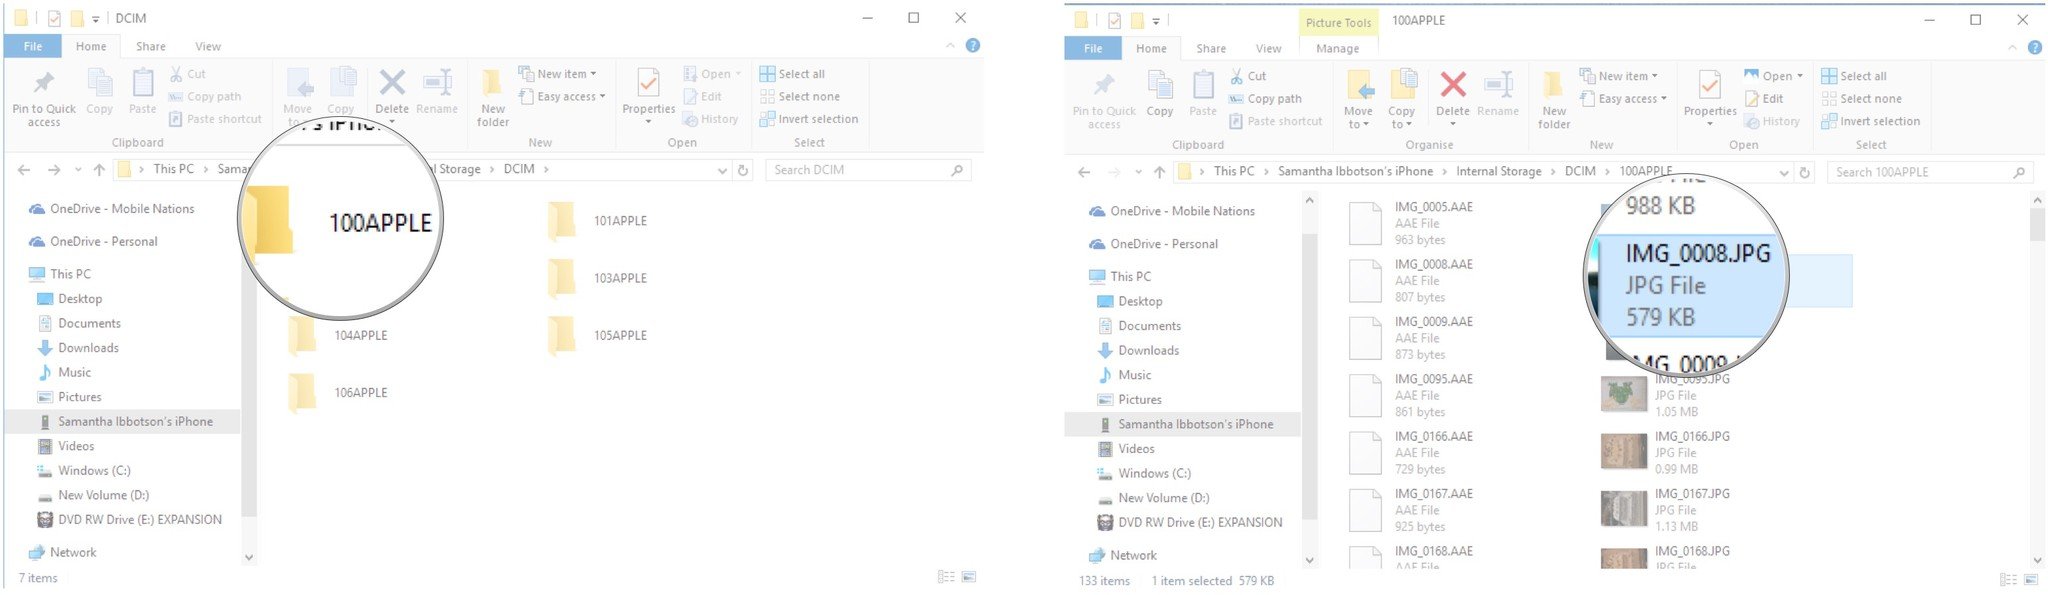
- Double-click a folder — these all contain images.
- Click an image. You can hold Ctrl on your keyboard and select multiple images. You can also hit the Ctrl + A shortcut on your keyboard to select all photos.
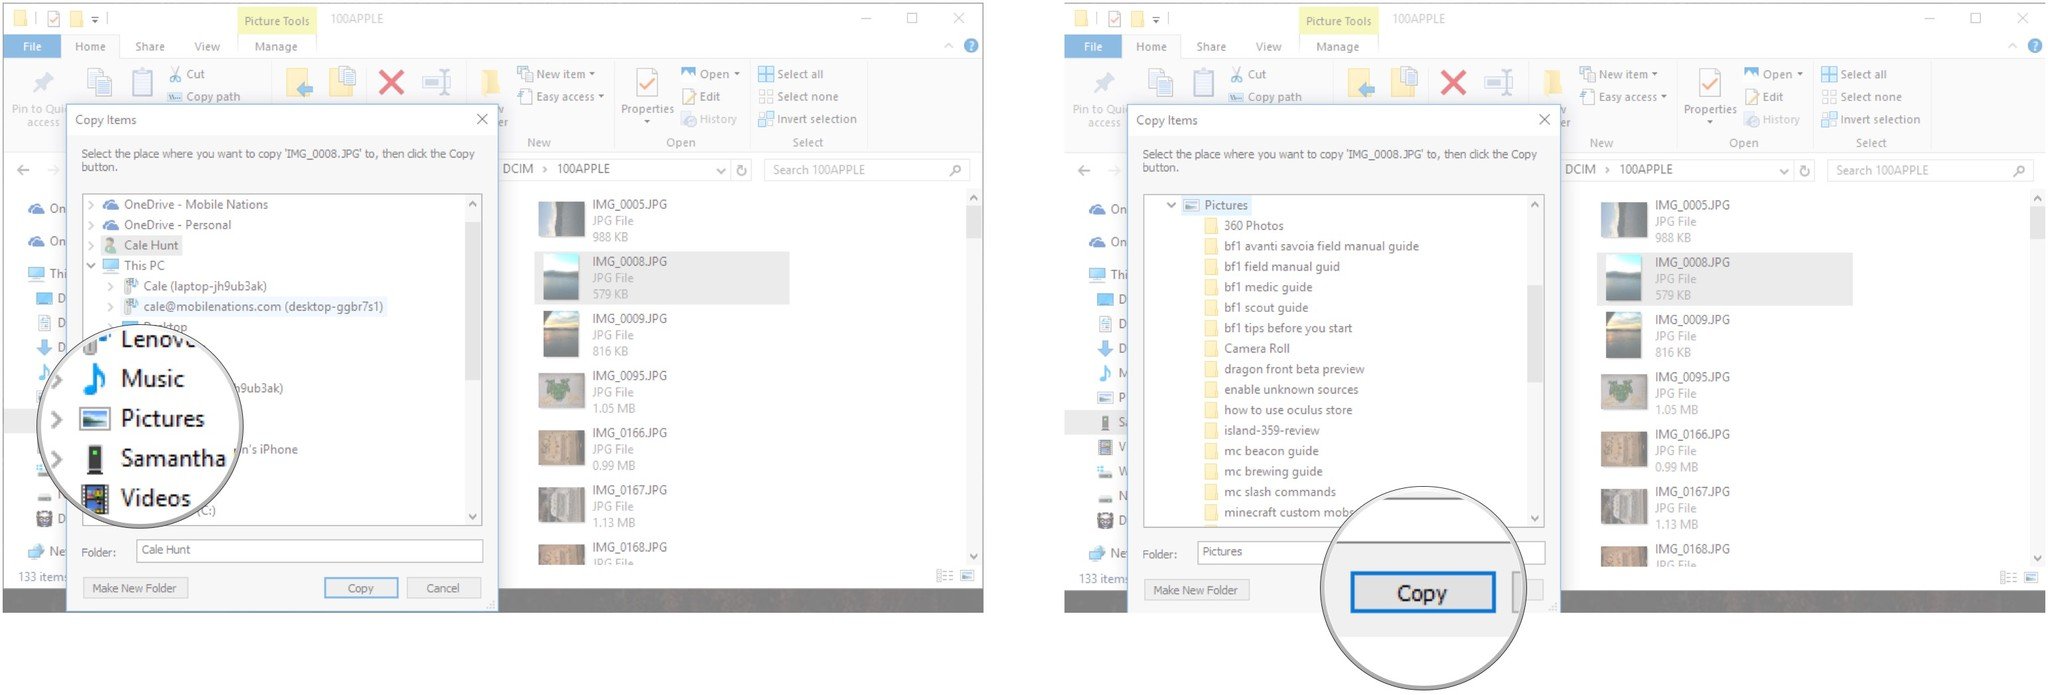
- Click Copy to. It is located near the top of the window.
- Click Choose location… to select a location. You can also click one of the options already listed on the dropdown menu.

- Click a folder where you’d like to move the photos.
- Click Copy.
How to transfer photos from your iPhone or iPad using the Windows 10 Photos app
If you’re feeling adventurous, you can also use the Windows Photos app to import your photos. It can easily transfer your photos in bulk, and the app is very nice for looking at your pictures.
- Install iTunes — this ensures your computer can communicate with your iPhone or iPad even if you don’t specifically use iTunes to transfer files.
- Plug in your iPhone or iPad with your Lightning to USB or 30-pin Dock to USB cable.
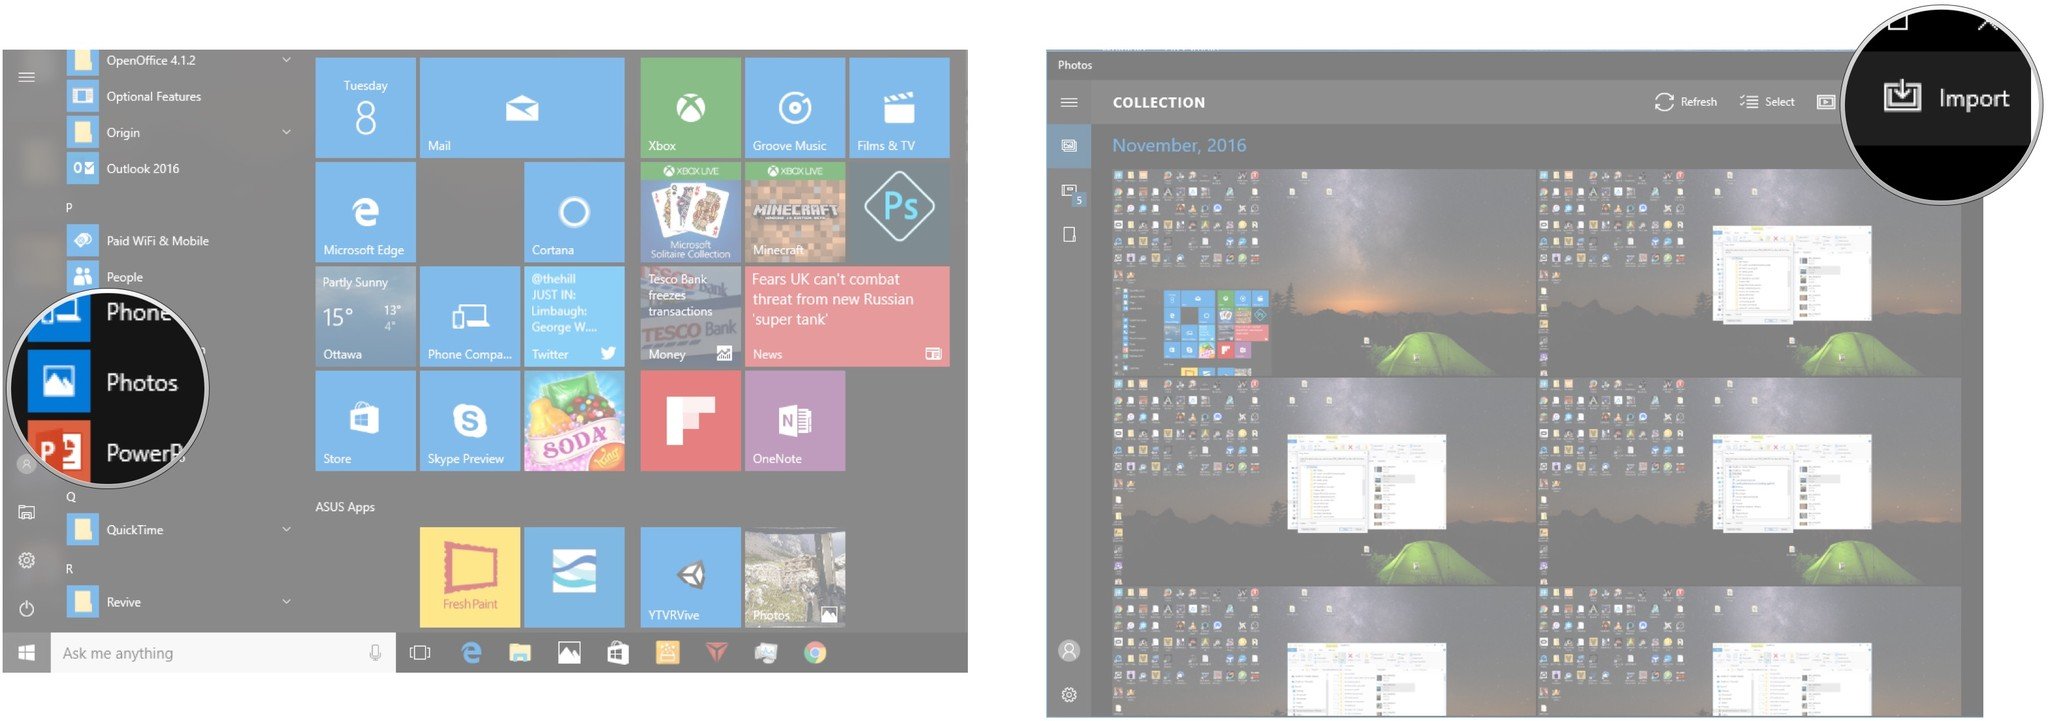
- Launch the Photos app from your desktop, Start menu, or taskbar.
- Click Import — it is located at the top right of the window.
- Click any photos you’d like to not import. They will all be imported by default.
- Click Continue. Your photos will now be imported into the Photos app.

How to transfer photos from iPhone or iPad to Windows 10 using iCloud
Windows 10 has the ability to use iCloud to wirelessly sync your photos as long as you’ve backed up the photos on your iPhone or iPad to iCloud. Here’s how to do it.
- Launch your favorite web browser from the Start menu, taskbar, or desktop.
- Navigate to the iCloud for Windows download site (opens in new tab).
- Click Download. You might have to scroll down a bit to find it.
- Click Save.

- Click Run when the download his finished.
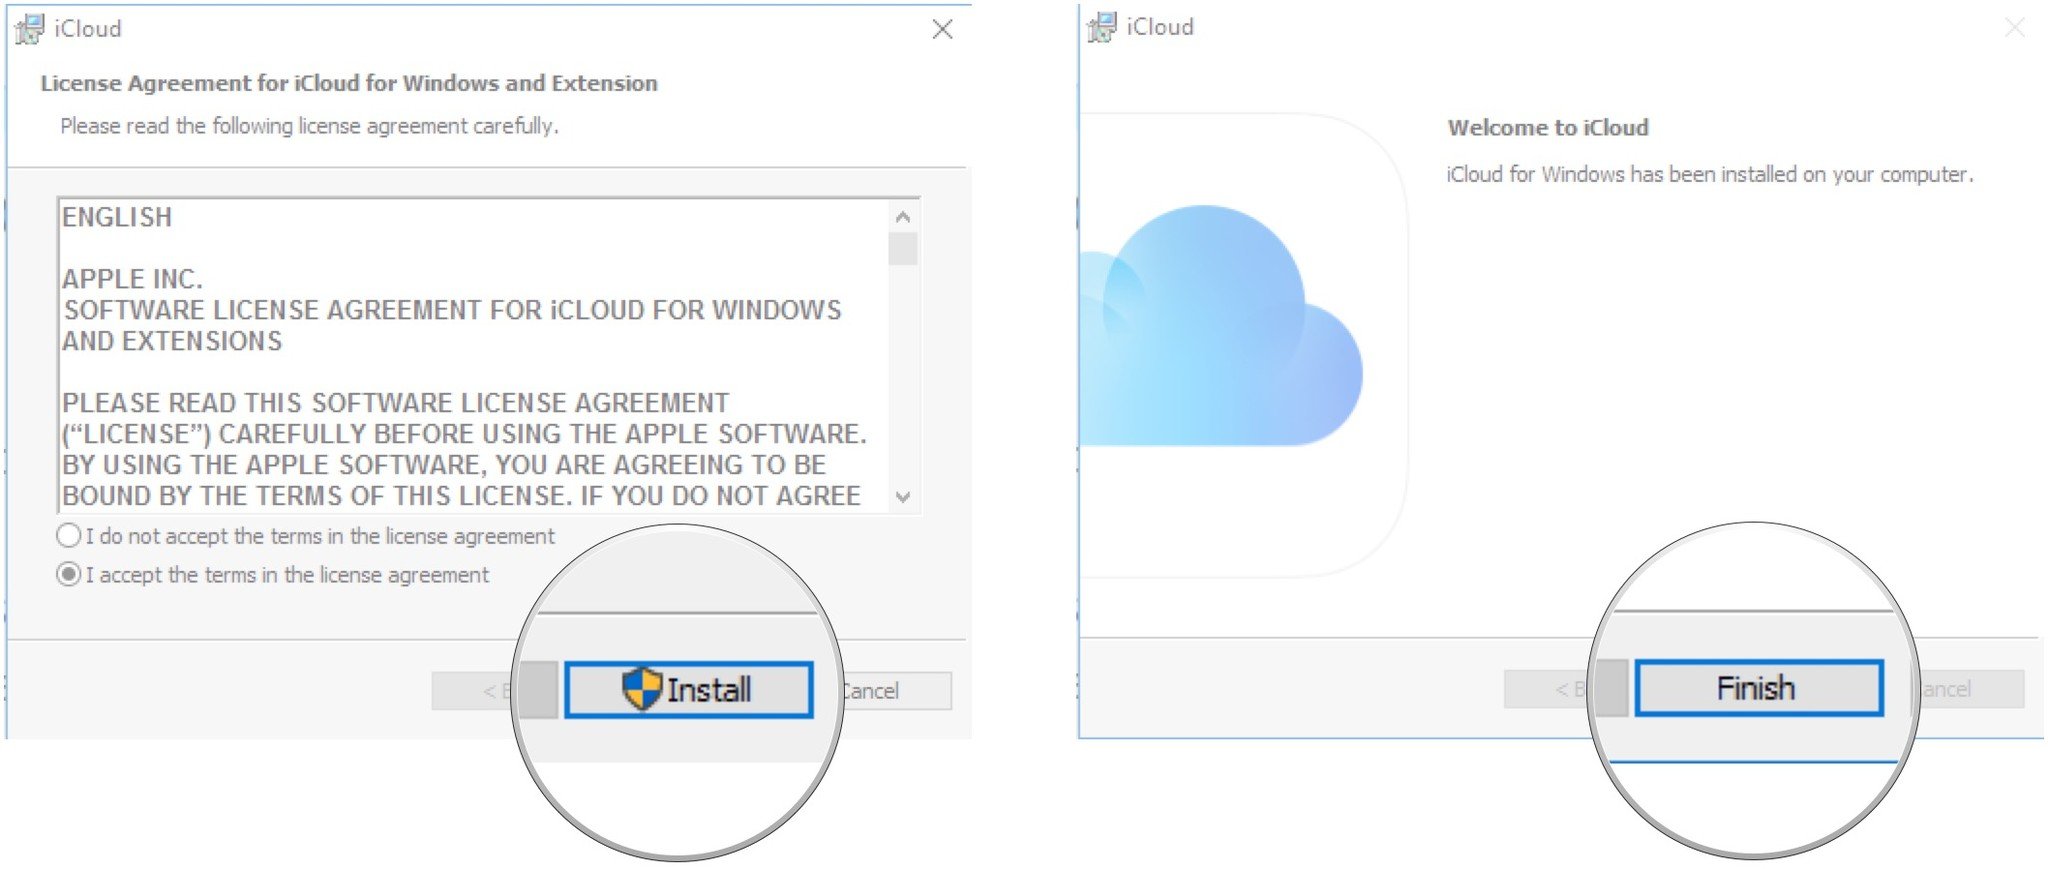
- Click I accept the terms….

- Click Install.
- Click Finish. Your computer will restart and, upon restart, the iCloud window will automatically appear.
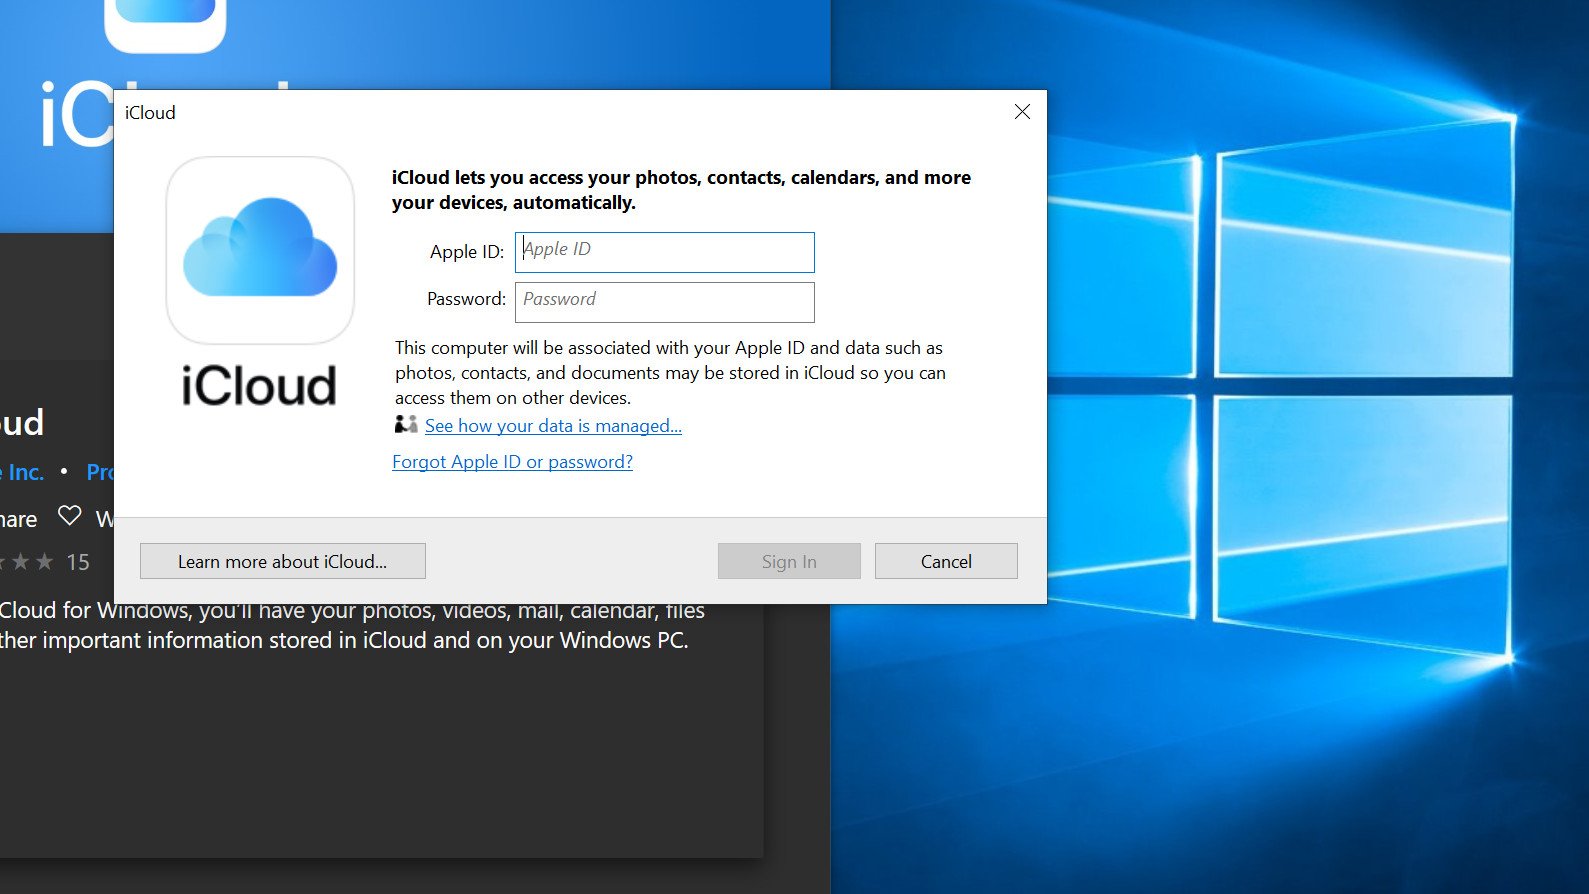
- Type your Apple ID.
- Type your password.

- Click Sign In.
- Click the Options button next to Photos.
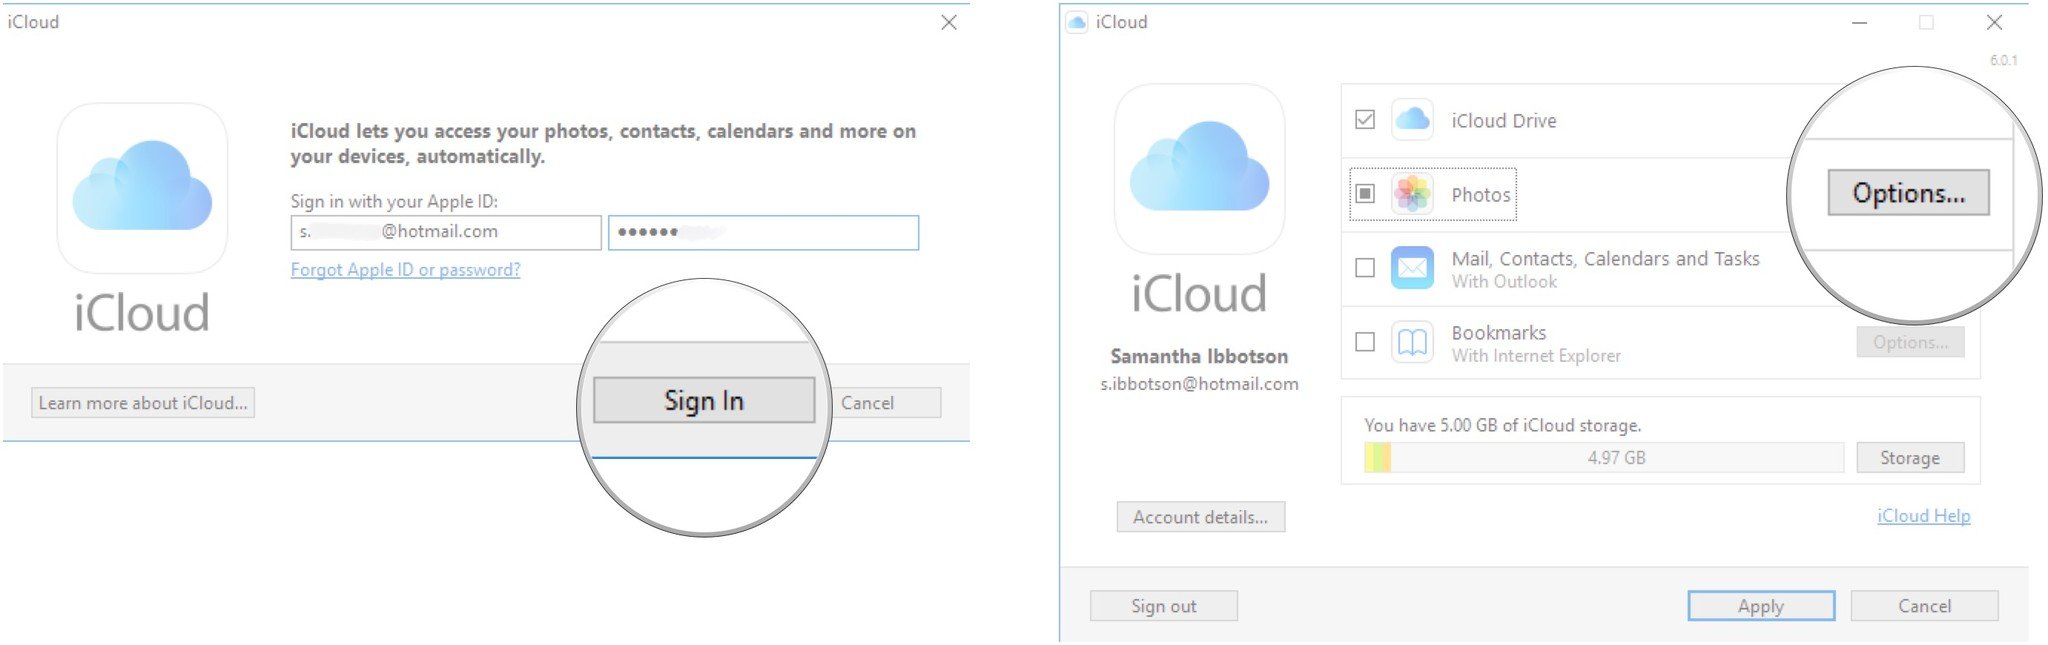
- Click the box next to My Photo Stream so that a checkmark appears.
- Click the box next to Upload new photos from my PC so that the checkmark disappears. You can set these options how you’d like, but this ensures you’re just getting the photos off your iPhone or iPad onto your PC.
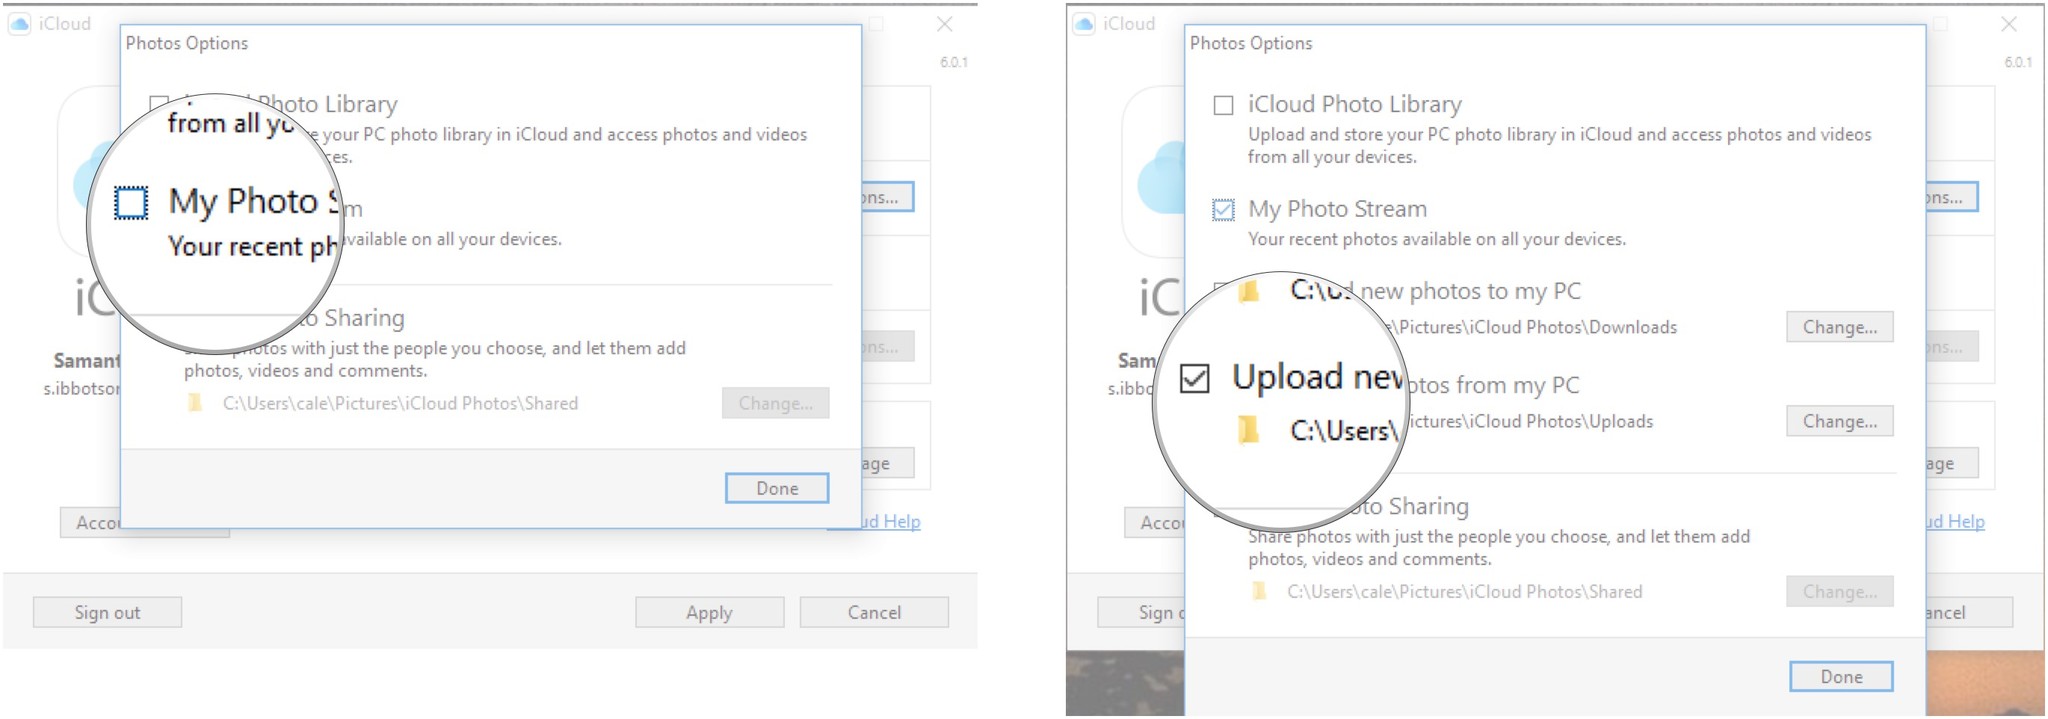
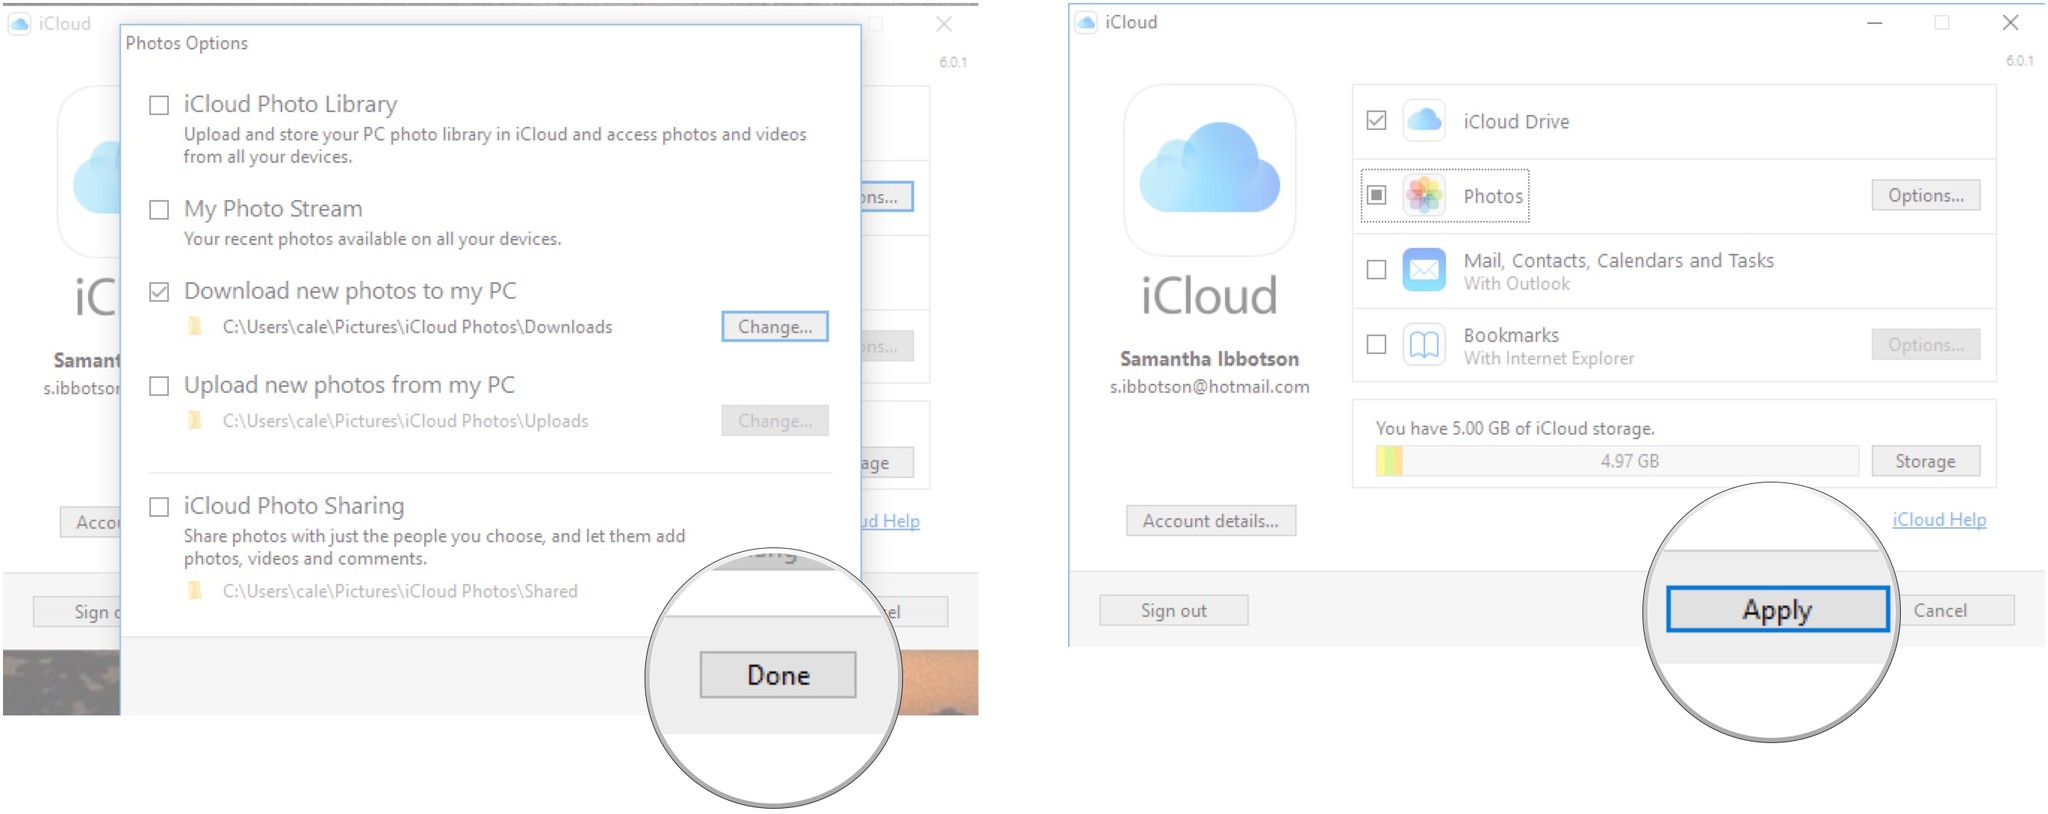
- Click Done.
- Click Apply. Any photos in your iCloud will now download to your PC.
Questions?
Let us know in the comments below!
Get the best of iMore in in your inbox, every day!
Cale Hunt is a staff writer at Mobile Nations. He focuses mainly on PC, laptop, and accessory coverage, as well as the emerging world of VR. He is an avid PC gamer and multi-platform user, and spends most of his time either tinkering with or writing about tech.
Вы столкнулись с необходимостью перенести сделанные фотоснимки с гаджета на компьютер? В этом нет ничего сложного.
Способ первый.
Перенос фото с помощью встроенных средств Windows
Перед тем как импортировать фотографии на ПК необходимо проверить версию iTunes, которая установлена в операционной системе. Она должна быть самой свежей. Также убедитесь, что фото находятся на iPhone, а не в облаке iCloud. Если на гаджете включена функция загрузки фотофайлов в облако, то вначале необходимо скачать полноразмерные файлы на iPhone, а затем приступить к их копированию на компьютер.
Для того чтобы скопировать фотофайлы на ПК, необходимо подключить гаджет к компьютеру через USB-кабель. Затем система запросит пароль для разблокировки смартфона (в случае, если вход на iPhone осуществляется по паролю).
Введите пароль, и следуйте инструкции на экране.
Если устройство не будет разблокировано, то его невозможно будет увидеть в проводнике.
После отображения гаджета нажмите «Пуск», запустите стандартное приложение для просмотра фотографий и выберите в нем функцию «Импорт». Затем укажите путь «С USB-устройства», выберите файлы, которые нужно скопировать и определитесь с папкой для сохранения. В остальном следуйте инструкциям.
После копирования фотографий на жесткий диск компьютера они могут отображаться в приложении «Фотографии» ОС Windows 10 неправильно. Нормальный просмотр можно обеспечить с помощью программы iTunes, которая установлена на ПК.
Способ второй.
Перенос фото с облачного сервиса iCloud
Второй способ сложнее предыдущего. Для экономии места и удобства доступа на устройствах Apple применяется облачный способ хранения файлов. Добавленные в облако файлы доступны для любого яблочного устройства.
До переноса файлов убедитесь, что iCloud для Windows 10 обновлена. Войдите в приложение с помощью своей учетной записи.
Затем активируйте в программе функцию «Фото iCloud» (загрузка фотографий в облачное хранилище) и настройте ее соответствующим образом.
Если фотографии с устройства iOS были синхронизированы с помощью iTunes, а затем на нем была включена функция загрузки фото в облачное хранилище, то они будут удалены с устройства, но сохранятся на жестком диске компьютера.
При этом необходимо знать, что фото- и видеофайлы, синхронизированные между ПК и гаджетом с помощью iTunes, в дальнейшем невозможно перекинуть обратно в Windows. Если необходимо скопировать удаленные файлы обратно на гаджет, то нужно сделать следующее. Включить функцию загрузки фото в iCloud на компьютере. Файлы будут автоматически скопированы в облачное хранилище и их можно будет открыть на любом синхронизированном с хранилищем устройстве iOS.

The reality of our device-rich world is this: You’ll sometimes have a phone or tablet that isn’t the same make as your computer. To make matters worse, you might have photos on your iPhone or iPad that you want to transfer to your Windows PC.
Apple and Microsoft don’t make this easy at times, but with the right tools, it’s a quick process to save your photos where you want them. Better still, you don’t have to rely on just one method. You can utilize both the cloud and good old-fashioned hardware to back up your photos.
How to download and install iTunes

While iPhones and other Apple devices have traditionally worked best within its ecosystem, Windows remains dominant in the desktop world. Apple realizes this, with iTunes still available on Windows PCs, acting as the hub for managing your Apple devices and content.
Hooking up an iPhone or iPad to your Windows PC isn’t as simple as plugging in the device. Many everyday tasks require iTunes, which includes a piece of software known as «Apple Mobile Device Support,» allowing your iPhone or iPad to communicate freely with your PC to communicate freely. This allows you to browse the device via the File Explorer, or instantly import photos and videos to your hard drive.
iTunes is available direct from Apple, but also via the integrated Microsoft Store (opens in new tab). We recommend that those with Windows 10 and Windows 11 visit the Microsoft Store app, providing an easier installation process, versus the traditional application.
Alternatively, you can download iTunes from Apple (opens in new tab) if you’re using a Windows version prior to Windows 10. Folks using older versions of Windows will need to install this version of the software, although it offers identical features.
How to transfer iPhone and iPad photos using File Explorer
Once iTunes is installed on your PC, Apple devices like the iPhone and iPad will be automatically detected when connected over USB. File Explorer is one of the simplest ways to extract photos and videos, directly connecting the device’s onboard storage.
Apple devices are often named NAME’s iPhone or NAME’s iPad, the NAME denoting the owner’s first name. Selecting the device through File Explorer will surface various files, including a DCIM media folder. Diving into the DCIM folder isn’t much different from a digital camera, with easy drag-and-drop access to files on your phone or tablet.
Transferring images from your iPhone or iPad is only a few clicks away through File Explorer, using the steps below.
- Plug your iPhone or iPad into your PC using a suitable USB cable.
- Launch Windows Explorer from your desktop, Start menu, or taskbar. You can also use the Windows key + E shortcut on your keyboard.
- Click the arrow next to This PC in the menu on the left side of the window. The arrow looks like >.
- Click NAME’s iPhone or NAME’s iPad in the This PC sub-menu.
- Double-click Internal Storage.
- Double-click DCIM.
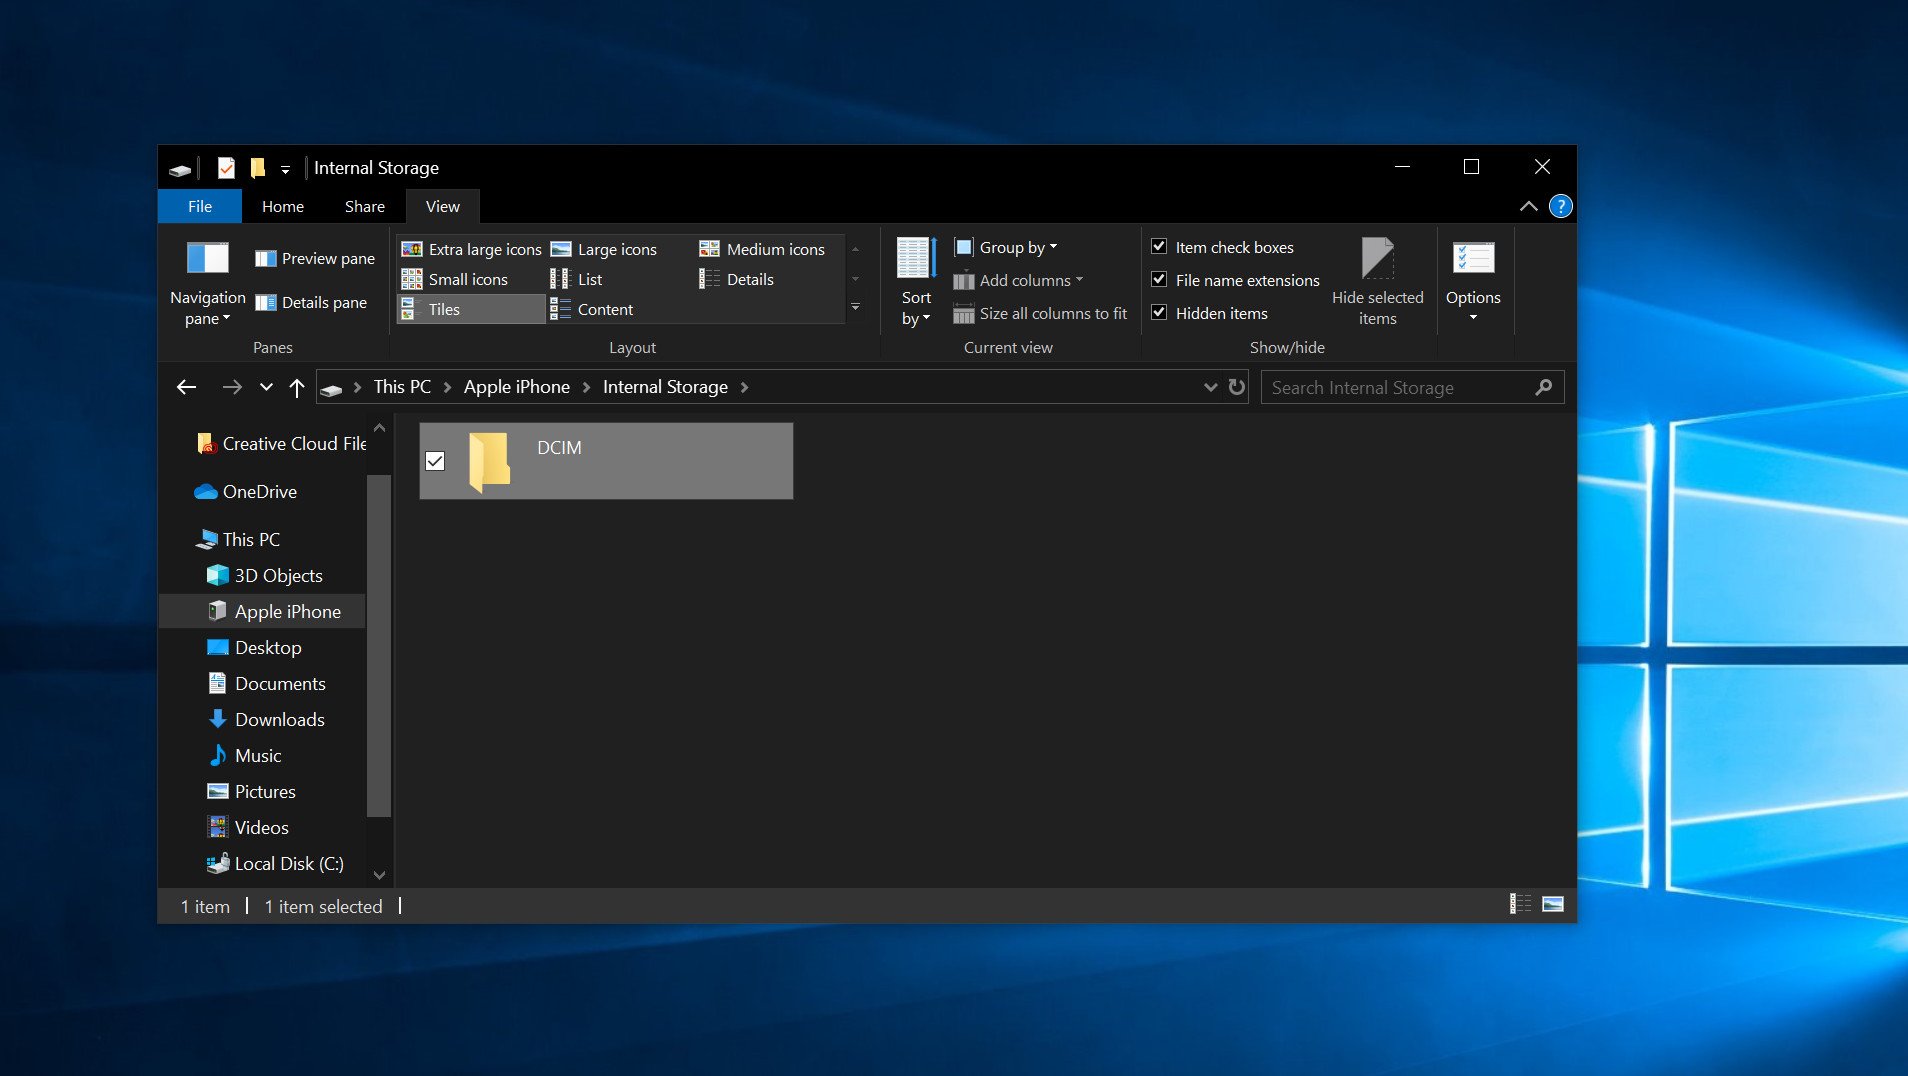
Now, you can begin the process of selecting the photos you want to copy from your Apple device to your PC.
- Double-click a folder. They should all contain images.
- Click an image. You can hold the Ctrl key on your keyboard and click to select multiple images. You can also use the Ctrl + A shortcut on your keyboard to select all photos at once.
- Click Copy to — it is located near the top of the window.
- Click Choose location… to select a location. You can also click one of the options listed in the dropdown menu.
- Click a destination to save the pictures.
- Click Copy. Make sure you don’t unplug your iPhone or iPad during the process!

How to transfer iPhone and iPad photos using the Windows Photos app
Windows also ships with a dedicated Photos app, ideal for viewing and editing photos through a slick, easy interface. It also allows you to import photos from iPhones and iPads in bulk, providing a one-click solution to move all your photos to your PC.

- Plug your iPhone or iPad into your PC using a suitable USB cable.
- Launch the Photos app from the Start menu, desktop, or taskbar.
- Click Import. It is located in the top-right corner of the window.
- Click any photos you’d like to not import; all new photos will be selected for import by default.
- Click Continue. The Photos app will begin the import process. Make sure you don’t unplug your iPhone or iPad during the process!
How to transfer iPhone or iPad photos using iCloud
Windows 10 also supports Apple’s iCloud storage service, allowing iPhone and iPad users to wirelessly pull photos and videos from their accounts over the internet. Unlike transfers over a USB cable, you don’t need to install iTunes and dig around in local files.
Syncing photos via iCloud only requires the standalone iCloud app available via the Microsoft Store and Apple, offering the option to automatically sync content uploaded using the same Apple ID. While you might need to pay for extra iCloud storage when transferring media in bulk, it’s a hassle-free way to import iPhone and iPad photos without the wire.
- Launch the Microsoft Store from the Start menu, taskbar, or desktop.
- Search for iCloud (opens in new tab) in the Microsoft Store.
- Click Get. ICloud will now download to your PC.
- Click Launch once the download is complete.
- Type your Apple ID.
- Type your password.
- Click Sign In.
- Click the Options button next to Photos.
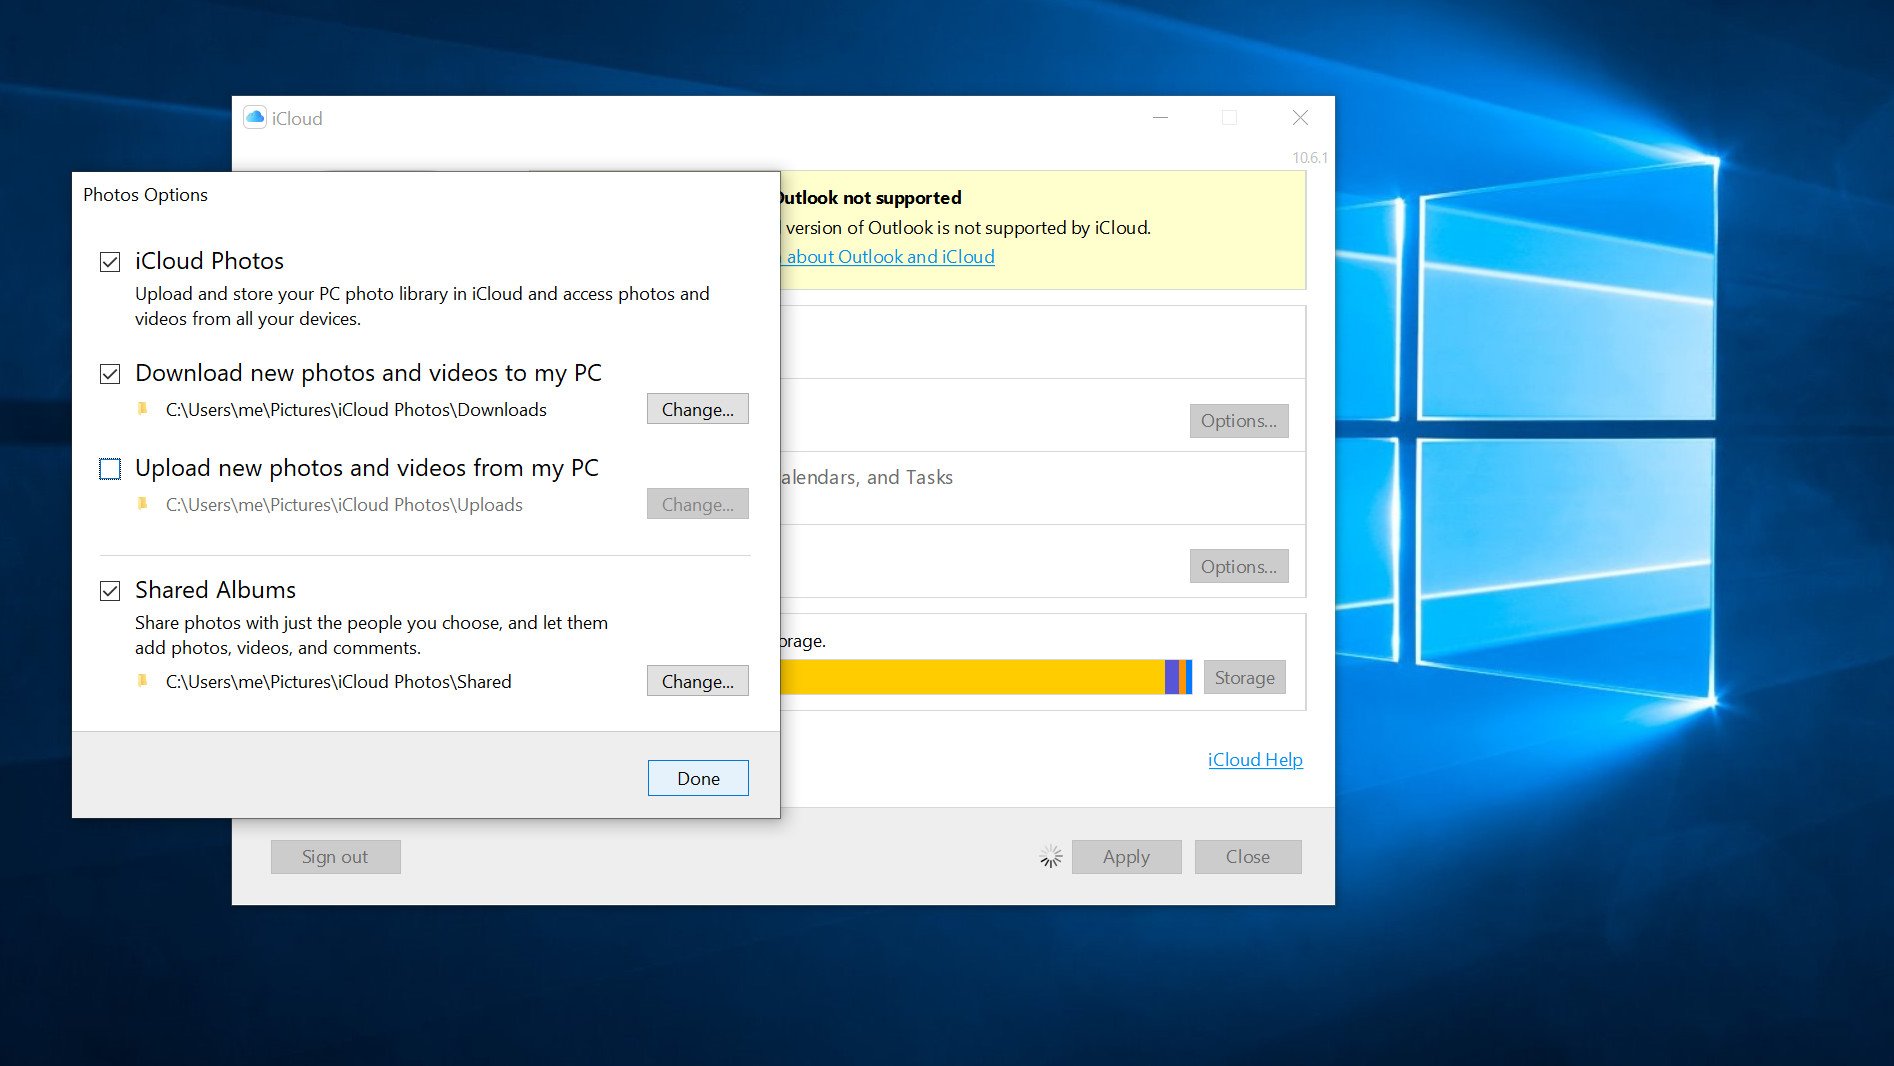
- Click the box next to iCloud Photos so that a checkmark appears.
- Click the box next to Upload new photos from my PC so that the checkmark disappears. You can set these options how you’d like, but this ensures you’re just getting the photos off your iPhone or iPad onto your PC.
- Click Done.
- Click Apply. Any photos in your iCloud will now download to your PC.
Alternatively, you can download iCloud from Apple (opens in new tab) if you’re using a Windows version prior to Windows 10. Folks using older versions of Windows will need to install the traditional application, although it offers identical features.
Get the best of Windows Central in in your inbox, every day!
Cale Hunt is formerly a Senior Editor at Windows Central. He focuses mainly on laptop reviews, news, and accessory coverage. He’s been reviewing laptops and accessories full-time since 2016, with hundreds of reviews published for Windows Central. He is an avid PC gamer and multi-platform user, and spends most of his time either tinkering with or writing about tech.