
With the arrival of Windows 10’s Bash shell, you can now create and run Bash shell scripts on Windows 10. You can also incorporate Bash commands into a Windows batch file or PowerShell script.
Even if you know what you’re doing, this isn’t necessarily as simple as it seems. Windows and UNIX use different end-of-line characters, and the Windows file system is accessible in a different location in the Bash environment.
How to Write a Bash Script on Windows 10
RELATED: How to Install and Use the Linux Bash Shell on Windows 10
When writing shell scripts on Windows, bear in mind that Windows and UNIX-like systems like Linux use different “end of line” characters in text files in shell scripts.
In other words, this means that you can’t simply write a shell script in Notepad. Save the file in Notepad and it won’t be interpreted properly by Bash. However, you can use more advanced text editors–for example, Notepad++ allows you to give a file UNIX end-of-line characters by clicking Edit > EOL Conversion > UNIX/OSX Format.

However, you’re better off just writing the shell script in the Bash environment itself. The Ubuntu-based Bash environment comes with both the vi and nano text editors. The vi editor is more powerful, but if you’ve never used it before, you may want to start with nano. It’s easier to use if you’re new.
For example, to create a bash script in nano, you’d run the following command in bash:
nano ~/myscript.sh
This would open the Nano text editor pointed at a file named “myscript.sh” in your user account’s home directory. (The “~” character represents your home directory, so the full path is /home/username/myscript.sh.)
Start your shell script with the line:
#!/bin/bash
RELATED: The Beginner’s Guide to Shell Scripting: The Basics
Enter the commands you want to run, each one on its own line. The script will run each command in turn. Add a “#” character before a line to treat it as a “comment”, something which helps you and other people understand the script but which isn’t run as a command. For more advanced tricks, consult a more detailed guide to Bash scripts on Linux. The same techniques will work in Bash on Ubuntu on Windows.
Note that there’s no way to run Windows programs from within the Bash environment. You’re restricted to Linux terminal commands and utilities, just as you would be on a typical Linux system.
We’ll use a basic “hello world” script as an example here:
#!/bin/bash
# set the STRING variable
STRING="Hello World!"
# print the contents of the variable on screen
echo $STRING
If you’re using the Nano text editor, you can save the file by pressing Ctrl+O and then Enter. Close the editor by pressing Ctrl+X.
Make the Script Executable and then Run It
You’ll probably want the make the script executable so you can run it more easily. On Linux, that means you need to give the script file the executable permission. To do so, run the following command in the terminal, pointing it at your script:
chmod +x ~/myscript.sh
To run the script, you can now just run it in the terminal by typing its path. Whenever you want to launch the script in the future, just open the Bash shell and type the path to the script.
~/myscript.sh
(If the script is in the current directory, you can run it with ./myscript.sh)
How to Work With Windows Files in a Bash Script
RELATED: How to Access Your Ubuntu Bash Files in Windows (and Your Windows System Drive in Bash)
To access Windows files in the script, you’ll need to specify their path under /mnt/c, not their Windows path. For example, if you wanted to specify the C:UsersBobDownloadstest.txt file, you’d need to specify the /mnt/c/Users/Bob/Downloads/test.txt path. Consult our guide to file locations in Windows 10’s Bash shell for more details.
How to Incorporate Bash Commands into a Batch or PowerShell Script
RELATED: How to Set Your Default Linux Distribution on Windows 10
Lastly, if you have an existing batch file or PowerShell script you want to incorporate commands into, you can run Bash commands directly using the bash -c command.
For example, to run a Linux command in a Command Prompt or PowerShell window, you can run the following command:
bash -c "command"
This trick allows you to add Bash commands into batch files or PowerShell scripts. The Bash shell window will appear when a Bash command is running.
Update: If you have multiple Linux environments installed, you can use the wslconfig command to choose the default Linux environment used when you run the bash -c command.
To create a shortcut to a Bash script from within Windows, just create a shortcut like normal. For the shortcut’s target, use the bash -c command we outlined above and point it at the Bash script you created.
For example, you’d point a shortcut at ” bash -c "~/myscript.sh" ” to run the example script above. You can also just run this command from a Command Prompt or PowerShell window, too.
READ NEXT
- › How to Run Windows Programs from Windows 10’s Bash Shell
- › How to Run Two or More Terminal Commands at Once in Linux
- › How to Use Double Bracket Conditional Tests in Linux
- › Everything You Can Do With Windows 10’s New Bash Shell
- › PSA: You Can Email Books and Documents to Your Kindle
- › How to Change Your Age on TikTok
- › The New HP Pro x360 Fortis Is a 2-In-1 Laptop Under $500
- › How to Screen Record on iPhone
Bash-скрипты: начало
Bash-скрипты, часть 2: циклы
Bash-скрипты, часть 3: параметры и ключи командной строки
Bash-скрипты, часть 4: ввод и вывод
Bash-скрипты, часть 5: сигналы, фоновые задачи, управление сценариями
Bash-скрипты, часть 6: функции и разработка библиотек
Bash-скрипты, часть 7: sed и обработка текстов
Bash-скрипты, часть 8: язык обработки данных awk
Bash-скрипты, часть 9: регулярные выражения
Bash-скрипты, часть 10: практические примеры
Bash-скрипты, часть 11: expect и автоматизация интерактивных утилит
Сегодня поговорим о bash-скриптах. Это — сценарии командной строки, написанные для оболочки bash. Существуют и другие оболочки, например — zsh, tcsh, ksh, но мы сосредоточимся на bash. Этот материал предназначен для всех желающих, единственное условие — умение работать в командной строке Linux.

Сценарии командной строки — это наборы тех же самых команд, которые можно вводить с клавиатуры, собранные в файлы и объединённые некоей общей целью. При этом результаты работы команд могут представлять либо самостоятельную ценность, либо служить входными данными для других команд. Сценарии — это мощный способ автоматизации часто выполняемых действий.

Итак, если говорить о командной строке, она позволяет выполнить несколько команд за один раз, введя их через точку с запятой:
pwd ; whoami
На самом деле, если вы опробовали это в своём терминале, ваш первый bash-скрипт, в котором задействованы две команды, уже написан. Работает он так. Сначала команда pwd выводит на экран сведения о текущей рабочей директории, потом команда whoamiпоказывает данные о пользователе, под которым вы вошли в систему.
Используя подобный подход, вы можете совмещать сколько угодно команд в одной строке, ограничение — лишь в максимальном количестве аргументов, которое можно передать программе. Определить это ограничение можно с помощью такой команды:
getconf ARG_MAXКомандная строка — отличный инструмент, но команды в неё приходится вводить каждый раз, когда в них возникает необходимость. Что если записать набор команд в файл и просто вызывать этот файл для их выполнения? Собственно говоря, тот файл, о котором мы говорим, и называется сценарием командной строки.
Как устроены bash-скрипты
Создайте пустой файл с использованием команды touch. В его первой строке нужно указать, какую именно оболочку мы собираемся использовать. Нас интересует bash, поэтому первая строка файла будет такой:
#!/bin/bash
В других строках этого файла символ решётки используется для обозначения комментариев, которые оболочка не обрабатывает. Однако, первая строка — это особый случай, здесь решётка, за которой следует восклицательный знак (эту последовательность называют шебанг) и путь к bash, указывают системе на то, что сценарий создан именно для bash.
Команды оболочки отделяются знаком перевода строки, комментарии выделяют знаком решётки. Вот как это выглядит:
#!/bin/bash
# This is a comment
pwd
whoami
Тут, так же, как и в командной строке, можно записывать команды в одной строке, разделяя точкой с запятой. Однако, если писать команды на разных строках, файл легче читать. В любом случае оболочка их обработает.
Установка разрешений для файла сценария
Сохраните файл, дав ему имя myscript, и работа по созданию bash-скрипта почти закончена. Сейчас осталось лишь сделать этот файл исполняемым, иначе, попытавшись его запустить, вы столкнётесь с ошибкой Permission denied.

Попытка запуска файла сценария с неправильно настроенными разрешениями
Сделаем файл исполняемым:
chmod +x ./myscriptТеперь попытаемся его выполнить:
./myscriptПосле настройки разрешений всё работает как надо.
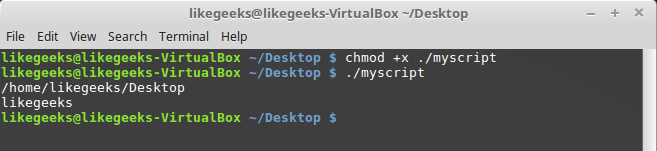
Успешный запуск bash-скрипта
Вывод сообщений
Для вывода текста в консоль Linux применяется команда echo. Воспользуемся знанием этого факта и отредактируем наш скрипт, добавив пояснения к данным, которые выводят уже имеющиеся в нём команды:
#!/bin/bash
# our comment is here
echo "The current directory is:"
pwd
echo "The user logged in is:"
whoami
Вот что получится после запуска обновлённого скрипта.

Вывод сообщений из скрипта
Теперь мы можем выводить поясняющие надписи, используя команду echo. Если вы не знаете, как отредактировать файл, пользуясь средствами Linux, или раньше не встречались с командой echo, взгляните на этот материал.
Использование переменных
Переменные позволяют хранить в файле сценария информацию, например — результаты работы команд для использования их другими командами.
Нет ничего плохого в исполнении отдельных команд без хранения результатов их работы, но возможности такого подхода весьма ограничены.
Существуют два типа переменных, которые можно использовать в bash-скриптах:
- Переменные среды
- Пользовательские переменные
Переменные среды
Иногда в командах оболочки нужно работать с некими системными данными. Вот, например, как вывести домашнюю директорию текущего пользователя:
#!/bin/bash
# display user home
echo "Home for the current user is: $HOME"
Обратите внимание на то, что мы можем использовать системную переменную $HOME в двойных кавычках, это не помешает системе её распознать. Вот что получится, если выполнить вышеприведённый сценарий.

Использование переменной среды в сценарии
А что если надо вывести на экран значок доллара? Попробуем так:
echo "I have $1 in my pocket"
Система обнаружит знак доллара в строке, ограниченной кавычками, и решит, что мы сослались на переменную. Скрипт попытается вывести на экран значение неопределённой переменной $1. Это не то, что нам нужно. Что делать?
В подобной ситуации поможет использование управляющего символа, обратной косой черты, перед знаком доллара:
echo "I have $1 in my pocket"Теперь сценарий выведет именно то, что ожидается.

Использование управляющей последовательности для вывода знака доллара
Пользовательские переменные
В дополнение к переменным среды, bash-скрипты позволяют задавать и использовать в сценарии собственные переменные. Подобные переменные хранят значение до тех пор, пока не завершится выполнение сценария.
Как и в случае с системными переменными, к пользовательским переменным можно обращаться, используя знак доллара:
#!/bin/bash
# testing variables
grade=5
person="Adam"
echo "$person is a good boy, he is in grade $grade"
Вот что получится после запуска такого сценария.

Пользовательские переменные в сценарии
Подстановка команд
Одна из самых полезных возможностей bash-скриптов — это возможность извлекать информацию из вывода команд и назначать её переменным, что позволяет использовать эту информацию где угодно в файле сценария.
Сделать это можно двумя способами.
- С помощью значка обратного апострофа «`»
- С помощью конструкции
$()
Используя первый подход, проследите за тем, чтобы вместо обратного апострофа не ввести одиночную кавычку. Команду нужно заключить в два таких значка:
mydir=`pwd`При втором подходе то же самое записывают так:
mydir=$(pwd)А скрипт, в итоге, может выглядеть так:
#!/bin/bash
mydir=$(pwd)
echo $mydir
В ходе его работы вывод команды pwdбудет сохранён в переменной mydir, содержимое которой, с помощью команды echo, попадёт в консоль.

Скрипт, сохраняющий результаты работы команды в переменной
Математические операции
Для выполнения математических операций в файле скрипта можно использовать конструкцию вида $((a+b)):
#!/bin/bash
var1=$(( 5 + 5 ))
echo $var1
var2=$(( $var1 * 2 ))
echo $var2
Математические операции в сценарии
Управляющая конструкция if-then
В некоторых сценариях требуется управлять потоком исполнения команд. Например, если некое значение больше пяти, нужно выполнить одно действие, в противном случае — другое. Подобное применимо в очень многих ситуациях, и здесь нам поможет управляющая конструкция if-then. В наиболее простом виде она выглядит так:
if команда
then
команды
fi
А вот рабочий пример:
#!/bin/bash
if pwd
then
echo "It works"
fi
В данном случае, если выполнение команды pwdзавершится успешно, в консоль будет выведен текст «it works».
Воспользуемся имеющимися у нас знаниями и напишем более сложный сценарий. Скажем, надо найти некоего пользователя в /etc/passwd, и если найти его удалось, сообщить о том, что он существует.
#!/bin/bash
user=likegeeks
if grep $user /etc/passwd
then
echo "The user $user Exists"
fi
Вот что получается после запуска этого скрипта.
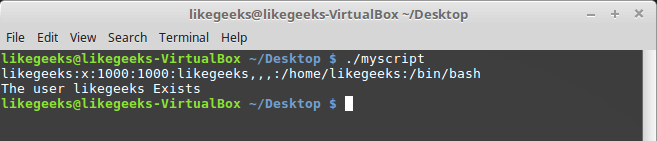
Поиск пользователя
Здесь мы воспользовались командой grepдля поиска пользователя в файле /etc/passwd. Если команда grepвам незнакома, её описание можно найти здесь.
В этом примере, если пользователь найден, скрипт выведет соответствующее сообщение. А если найти пользователя не удалось? В данном случае скрипт просто завершит выполнение, ничего нам не сообщив. Хотелось бы, чтобы он сказал нам и об этом, поэтому усовершенствуем код.
Управляющая конструкция if-then-else
Для того, чтобы программа смогла сообщить и о результатах успешного поиска, и о неудаче, воспользуемся конструкцией if-then-else. Вот как она устроена:
if команда
then
команды
else
команды
fi
Если первая команда возвратит ноль, что означает её успешное выполнение, условие окажется истинным и выполнение не пойдёт по ветке else. В противном случае, если будет возвращено что-то, отличающееся от нуля, что будет означать неудачу, или ложный результат, будут выполнены команды, расположенные после else.
Напишем такой скрипт:
#!/bin/bash
user=anotherUser
if grep $user /etc/passwd
then
echo "The user $user Exists"
else
echo "The user $user doesn’t exist"
fi
Его исполнение пошло по ветке else.

Запуск скрипта с конструкцией if-then-else
Ну что же, продолжаем двигаться дальше и зададимся вопросом о более сложных условиях. Что если надо проверить не одно условие, а несколько? Например, если нужный пользователь найден, надо вывести одно сообщение, если выполняется ещё какое-то условие — ещё одно сообщение, и так далее. В подобной ситуации нам помогут вложенные условия. Выглядит это так:
if команда1
then
команды
elif команда2
then
команды
fi
Если первая команда вернёт ноль, что говорит о её успешном выполнении, выполнятся команды в первом блоке then, иначе, если первое условие окажется ложным, и если вторая команда вернёт ноль, выполнится второй блок кода.
#!/bin/bash
user=anotherUser
if grep $user /etc/passwd
then
echo "The user $user Exists"
elif ls /home
then
echo "The user doesn’t exist but anyway there is a directory under /home"
fi
В подобном скрипте можно, например, создавать нового пользователя с помощью команды useradd, если поиск не дал результатов, или делать ещё что-нибудь полезное.
Сравнение чисел
В скриптах можно сравнивать числовые значения. Ниже приведён список соответствующих команд.
n1 -eq n2Возвращает истинное значение, еслиn1равноn2.
n1 -ge n2Возвращает истинное значение, еслиn1больше или равноn2.
n1 -gt n2Возвращает истинное значение, еслиn1большеn2.
n1 -le n2Возвращает истинное значение, еслиn1меньше или равноn2.
n1 -lt n2Возвращает истинное значение, если n1 меньшеn2.
n1 -ne n2Возвращает истинное значение, еслиn1не равноn2.
В качестве примера опробуем один из операторов сравнения. Обратите внимание на то, что выражение заключено в квадратные скобки.
#!/bin/bash
val1=6
if [ $val1 -gt 5 ]
then
echo "The test value $val1 is greater than 5"
else
echo "The test value $val1 is not greater than 5"
fi
Вот что выведет эта команда.

Сравнение чисел в скриптах
Значение переменной val1больше чем 5, в итоге выполняется ветвь thenоператора сравнения и в консоль выводится соответствующее сообщение.
Сравнение строк
В сценариях можно сравнивать и строковые значения. Операторы сравнения выглядят довольно просто, однако у операций сравнения строк есть определённые особенности, которых мы коснёмся ниже. Вот список операторов.
str1 = str2Проверяет строки на равенство, возвращает истину, если строки идентичны.
str1 != str2Возвращает истину, если строки не идентичны.
str1 < str2Возвращает истину, еслиstr1меньше, чемstr2.
str1 > str2Возвращает истину, еслиstr1больше, чемstr2.
-n str1Возвращает истину, если длинаstr1больше нуля.
-z str1Возвращает истину, если длинаstr1равна нулю.
Вот пример сравнения строк в сценарии:
#!/bin/bash
user ="likegeeks"
if [$user = $USER]
then
echo "The user $user  is the current logged in user"
fi
В результате выполнения скрипта получим следующее.

Сравнение строк в скриптах
Вот одна особенность сравнения строк, о которой стоит упомянуть. А именно, операторы «>» и «<» необходимо экранировать с помощью обратной косой черты, иначе скрипт будет работать неправильно, хотя сообщений об ошибках и не появится. Скрипт интерпретирует знак «>» как команду перенаправления вывода.
Вот как работа с этими операторами выглядит в коде:
#!/bin/bash
val1=text
val2="another text"
if [ $val1 > $val2 ]
then
echo "$val1 is greater than $val2"
else
echo "$val1 is less than $val2"
fi
Вот результаты работы скрипта.

Сравнение строк, выведенное предупреждение
Обратите внимание на то, что скрипт, хотя и выполняется, выдаёт предупреждение:
./myscript: line 5: [: too many arguments
Для того, чтобы избавиться от этого предупреждения, заключим $val2 в двойные кавычки:
#!/bin/bash
val1=text
val2="another text"
if [ $val1 > "$val2" ]
then
echo "$val1 is greater than $val2"
else
echo "$val1 is less than $val2"
fi
Теперь всё работает как надо.

Сравнение строк
Ещё одна особенность операторов «>» и «<» заключается в том, как они работают с символами в верхнем и нижнем регистрах. Для того, чтобы понять эту особенность, подготовим текстовый файл с таким содержимым:
Likegeeks
likegeeks
Сохраним его, дав имя myfile, после чего выполним в терминале такую команду:
sort myfileОна отсортирует строки из файла так:
likegeeks
Likegeeks
Команда sort, по умолчанию, сортирует строки по возрастанию, то есть строчная буква в нашем примере меньше прописной. Теперь подготовим скрипт, который будет сравнивать те же строки:
#!/bin/bash
val1=Likegeeks
val2=likegeeks
if [ $val1 > $val2 ]
then
echo "$val1 is greater than $val2"
else
echo "$val1 is less than $val2"
fi
Если его запустить, окажется, что всё наоборот — строчная буква теперь больше прописной.
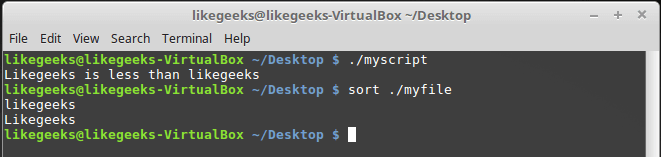
Команда sort и сравнение строк в файле сценария
В командах сравнения прописные буквы меньше строчных. Сравнение строк здесь выполняется путём сравнения ASCII-кодов символов, порядок сортировки, таким образом, зависит от кодов символов.
Команда sort, в свою очередь, использует порядок сортировки, заданный в настройках системного языка.
Проверки файлов
Пожалуй, нижеприведённые команды используются в bash-скриптах чаще всего. Они позволяют проверять различные условия, касающиеся файлов. Вот список этих команд.
-d fileПроверяет, существует ли файл, и является ли он директорией.
-e fileПроверяет, существует ли файл.
-f fileПроверяет, существует ли файл, и является ли он файлом.
-r fileПроверяет, существует ли файл, и доступен ли он для чтения.
-s file Проверяет, существует ли файл, и не является ли он пустым.
-w fileПроверяет, существует ли файл, и доступен ли он для записи.
-x fileПроверяет, существует ли файл, и является ли он исполняемым.
file1 -nt file2Проверяет, новее лиfile1, чемfile2.
file1 -ot file2Проверяет, старше лиfile1, чемfile2.
-O fileПроверяет, существует ли файл, и является ли его владельцем текущий пользователь.
-G fileПроверяет, существует ли файл, и соответствует ли его идентификатор группы идентификатору группы текущего пользователя.
Эти команды, как впрочем, и многие другие рассмотренные сегодня, несложно запомнить. Их имена, являясь сокращениями от различных слов, прямо указывают на выполняемые ими проверки.
Опробуем одну из команд на практике:
#!/bin/bash
mydir=/home/likegeeks
if [ -d $mydir ]
then
echo "The $mydir directory exists"
cd $ mydir
ls
else
echo "The $mydir directory does not exist"
fi
Этот скрипт, для существующей директории, выведет её содержимое.

Вывод содержимого директории
Полагаем, с остальными командами вы сможете поэкспериментировать самостоятельно, все они применяются по тому же принципу.
Итоги
Сегодня мы рассказали о том, как приступить к написанию bash-скриптов и рассмотрели некоторые базовые вещи. На самом деле, тема bash-программирования огромна. Эта статья является переводом первой части большой серии из 11 материалов. Если вы хотите продолжения прямо сейчас — вот список оригиналов этих материалов. Для удобства сюда включён и тот, перевод которого вы только что прочли.
- Bash Script Step By Step — здесь речь идёт о том, как начать создание bash-скриптов, рассмотрено использование переменных, описаны условные конструкции, вычисления, сравнения чисел, строк, выяснение сведений о файлах.
- Bash Scripting Part 2, Bash the awesome — тут раскрываются особенности работы с циклами for и while.
- Bash Scripting Part 3, Parameters & options — этот материал посвящён параметрам командной строки и ключам, которые можно передавать скриптам, работе с данными, которые вводит пользователь, и которые можно читать из файлов.
- Bash Scripting Part 4, Input & Output — здесь речь идёт о дескрипторах файлов и о работе с ними, о потоках ввода, вывода, ошибок, о перенаправлении вывода.
- Bash Scripting Part 5, Sighals & Jobs — этот материал посвящён сигналам Linux, их обработке в скриптах, запуску сценариев по расписанию.
- Bash Scripting Part 6, Functions — тут можно узнать о создании и использовании функций в скриптах, о разработке библиотек.
- Bash Scripting Part 7, Using sed — эта статья посвящена работе с потоковым текстовым редактором sed.
- Bash Scripting Part 8, Using awk — данный материал посвящён программированию на языке обработки данных awk.
- Bash Scripting Part 9, Regular Expressions — тут можно почитать об использовании регулярных выражений в bash-скриптах.
- Bash Scripting Part 10, Practical Examples — здесь приведены приёмы работы с сообщениями, которые можно отправлять пользователям, а так же методика мониторинга диска.
- Bash Scripting Part 11, Expect Command — этот материал посвящён средству Expect, с помощью которого можно автоматизировать взаимодействие с интерактивными утилитами. В частности, здесь идёт речь об expect-скриптах и об их взаимодействии с bash-скриптами и другими программами.
Полагаем, одно из ценных свойств этой серии статей заключается в том, что она, начинаясь с самого простого, подходящего для пользователей любого уровня, постепенно ведёт к довольно серьёзным темам, давая шанс всем желающим продвинуться в деле создания сценариев командной строки Linux.
Уважаемые читатели! Просим гуру bash-программирования рассказать о том, как они добрались до вершин мастерства, поделиться секретами, а от тех, кто только что написал свой первый скрипт, ждём впечатлений.
Только зарегистрированные пользователи могут участвовать в опросе. Войдите, пожалуйста.
Переводить остальные части цикла статей?
Проголосовали 1528 пользователей.
Воздержались 124 пользователя.
Are you interested in working with shell scripts on Windows? Thanks to a recent addition by Microsoft, you can now use Windows Subsystem for Linux to make this happen.
Once you enable shell scripts in Windows 10, you can start creating shell scripts of your own. Shell scripts are great for automating simple tasks. You can also work on open-source Linux-based projects if that’s an area of interest to you. Finally, you’ll learn how to execute shell scripts on Windows 10. Continue reading to learn more.
What is Linux?
Linux is an open-source operating system that is highly popular among computer enthusiasts. Linux competes with other computer operating systems like Microsoft’s Windows, Apple’s macOS, and mobile operating systems like Android and iOS.
The Linux operating system was originally developed by Linus Torvalds back in 1991. The Linux kernel was designed as a Unix-like operating system. Unix was an early operating system created by Bell Labs in 1969. Today, modern Linux distributions are still Unix-like, meaning they retain the basic structure and properties that Unix had. An example of a non-Unix operating system would be Microsoft Windows.
The top Linux distributions have changed over the years, but as of 2022, Ubuntu, Debian, CentOS, Fedora, and Red Hat rank as the top 5 most popular options.
What is Bash?
When Linus Torvalds created Linux, he included a Unix shell called Bash. Bash had been created just two years before, in 1989 by Brian Fox. Bash has been the longtime default for Linux and was also the default for Apple macOS until it was replaced by Z shell in 2019.
Until 2016, Windows users could not use the Linux kernel or Bash at all. Windows first introduced the Windows Subsystem for Linux (WSL) beta with Windows 10 version 1607 update. About a year later, in October 2017, WSL was fully released in Windows 10 version 1709. Microsoft developed WSL for hobbyists and developers who want to work on open-source Linux-based projects.
It’s important to note that WSL is not preinstalled on Windows 10. If you would like access to create and run shell scripts on Windows 10, you will need to manually install WSL or join the Windows insider program.
What is a shell script?
A Shell script is a type of script that cannot be run without a Unix shell. Further, a shell script is a series of commands that are executed line by line by the command line.
You can use shell scripts to automate processes and avoid repetitive tasks. Instead of manually completing each step in a series, you can execute a script, and the command line will handle the rest.
For example, if you find yourself regularly stopping processes that are hogging your CPU, you can automate this process with a script. When you execute the script, it may be designed to find a set of processes using CPU resources and request to kill them.
Enabling shell scripts in Windows 10
- Click on the Start (Windows) button and enter “Control Panel” into the search bar. Click Open on the Control Panel result on the right-hand side.

- Within the Control Panel window, find and click on Programs.

- Now, from the Programs window, find Click Turn Windows features on or off underneath the Programs and Features header.

- In the Windows Features window, scroll to the very bottom of the window. Check the Windows Subsystem for Linux option. Then click OK.

- Windows will automatically install the necessary files. When the installation is complete, select Restart Now.

- When your computer restarts, you need to install Ubuntu from the Microsoft store.

- After installation, make sure you open Ubuntu and see it up. You are now ready to use scripts on your Windows 10 machine.
If you encounter any issues with Ubuntu or bash commands not working correctly, you may want to check that Virtualization is turned on in your BIOS. The most updated WSL version, WSL 2, runs the Linux kernel using virtualization technology. This means a virtual machine needs to be able to run on your system.
Now that Windows Subsystem for Linux and Ubuntu has been installed, you are ready to start creating shell scripts in Windows 10. You may be tempted to write bash scripts with Notepad, but this is not recommended. Because Notepad is designed for Windows/DOS systems, the line endings will differ from those that are found at the end of Unix/Linux line endings.
Text editors for shell scripts
You should use software that is designed to convert to Unix/OSX end-of-line characters. The best open-source software available for this is Notepad++. Amazingly, Notepad++ is lovingly maintained and developed by a single individual, Don Ho.
If you try Notepad++ and don’t like it, you can try another fan favorite, nano. Nano is a text editor for Unix/Linux systems. You can easily create shell scripts that will run in bash, using nano. Download nano to get started.
Example shell scripts
Let’s look at some basic shell scripts, so you can learn more about what you are going to be coding and see how some formatting and syntax work.
1. Hello World!
echo "Hello World!"This script will print out the infamous Hello World! Notice that echo can be used as a print command when not combined with any other modifiers. It will print the string on a new line. If you add the -n modifier, the output will print on the same line.
2. Sum two numbers
If you want to do some basic arithmetic, you might have a script that looks like:
# Add two numbers together
((sum=25+35))

# Print the sum of the numbers
echo $sum
Note that the # symbol is used to make comments that are not expressed. The output of this script will print the sum of 25+35, which is 60.
3. Take user input
The following script will ask for the user’s name and then use the read command to take the user’s input. Then the user’s name is passed into the following expression, ultimately welcoming you to Windows Subsystem for Linux.
echo "What is your name?"
read name
echo "Welcome $name to Windows Subsystem for Linux."
Write basic shell scripts in Windows 10
Continue reading to learn how to write basic shell scripts in Windows 10 using Notepad++.
- Click the Start button and search for “Notepad++” and click Run as administrator on the right-hand side.

- Now you can create your script.

- Once your script is complete, you need to use the EOL Conversion option available in Notepad++. Click Edit and locate EOL Conversion from the dropdown menu. Hover over this option and then select UNIX/OSX Format from the next dropdown menu.

- Now select File and then Save As. Make sure to name your file something you will recognize and add .sh to make it a shell script file.

- Once the shell script is saved, continue to the next section to learn how to run your own shell scripts.
How to run shell scripts (.sh files) on Windows 10
You’ve created your first shell scripts, and it’s time to execute the sh file. Remember that when using WSL, you can only use Linux commands and utilities. Windows 10 programs will not work in bash scripts. To execute a script file, follow these step-by-step instructions:
- Click on the Start (Windows) button and enter “Command Prompt” into the search bar. Click Run as administrator on the Command Prompt result on the right-hand side.
- Navigate to the folder where the script file is saved. You move around in the command prompt using the cd command. For example, if you want to access the Documents folder, you would enter the following and press Enter:
cd C:UsersUsernameOneDriveDocuments
Note: Username would be the username that you set up for yourself when you registered your computer.

- Now enter bash file-name.sh, where file-name is the whatever you’ve named your script file.
bash file-name.sh
The script will execute, and if there are any outputs or print statements included in the script, the output will be returned.
Bash scripts running on Windows 10
You’ve made it far and learned a ton of information in one go. Command-line utilities, different operating systems, and learning to write and execute shell scripts can be difficult topics. In fact, these topics will take time to master. You have a ton of learning to do for scripting, but resources are available to help you all over the internet.
Within this guide, you learned the basics of Linux and Bash. You learned what shell scripts are and that you need to specifically enable Windows Subsystem for Linux (WSL) to use them. You learned how to create shell scripts using Notepad++ and how to execute the scripts in bash. Enjoy experimenting!

С появлением оболочки Bash Windows 10 вы можете теперь создавать и запускать сценарии оболочки Bash в Windows 10. Вы также можете включить команды Bash в командный файл Windows или сценарий PowerShell.
Даже если вы знаете, что делаете, это не обязательно так просто, как кажется. Windows и UNIX используют разные символы конца строки, а файловая система Windows доступна в другом месте в среде Bash.
Как написать сценарий Bash в Windows 10
При написании сценариев оболочки в Windows помните, что Windows и UNIX-подобные системы, такие как Linux, используют разные символы «конца строки» в текстовых файлах в сценариях оболочки.
Другими словами, это означает, что вы не можете просто написать сценарий оболочки в «Блокноте». Сохраните файл в «Блокноте», и он не будет правильно интерпретироваться Bash. Тем не менее, вы можете использовать более сложные текстовые редакторы, например, Notepad ++ позволяет вам предоставить файл конечных символов UNIX, нажав «Редактировать»> «Преобразование EOL»> «Формат UNIX / OSX».

Однако вам лучше просто написать сценарий оболочки в самой среде Bash. В среде Bash, основанной на Ubuntu, есть как редакторы vi, так и nano. Редактор vi более мощный, но если вы никогда не использовали его раньше, вы можете начать с nano. Это проще в использовании, если вы новичок.
Например, чтобы создать скрипт bash в nano, вы выполните следующую команду в bash:
nano ~/myscript.sh
Это откроет текстовый редактор Nano, указанный в файле с именем «myscript.sh» в домашнем каталоге вашей учетной записи пользователя. (Символ «~» представляет ваш домашний каталог, поэтому полный путь: /home/username/myscript.sh.)

Запустите сценарий оболочки с помощью строки:
#!/bin/bash
Введите команды, которые вы хотите запустить, каждый из которых находится в отдельной строке. Скрипт будет запускать каждую команду по очереди. Добавьте символ «#» перед строкой, чтобы рассматривать его как «комментарий», что поможет вам и другим людям понять сценарий, но который не запускается как команда. Для получения более совершенных трюков обратитесь к более подробному руководству по сценариям Bash в Linux. Те же методы будут работать в Bash на Ubuntu в Windows.
Обратите внимание: нет возможности запуска программ Windows из среды Bash. Вы ограничены командами и утилитами терминала Linux, так же, как и в обычной Linux-системе.
Например, давайте просто воспользуемся базовым сценарием «hello world» в качестве примера:
#!/bin/bash # set the STRING variable STRING='Hello World!' # print the contents of the variable on screen echo $STRING
Если вы используете текстовый редактор Nano, вы можете сохранить файл, нажав Ctrl + O, а затем Enter. Закройте редактор, нажав Ctrl + X.

Сделайте исполняемый файл сценария, а затем запустите его
Вероятно, вам понадобится сделать исполняемый файл сценария, чтобы вы могли легко запускать его. В Linux это означает, что вам нужно предоставить файлу сценария исполняемое разрешение. Для этого запустите следующую команду в терминале, указав ее на свой скрипт:
chmod +x ~/myscript.sh

Чтобы запустить скрипт, вы можете просто запустить его в терминале, введя его путь. Всякий раз, когда вы хотите запустить сценарий в будущем, просто откройте оболочку Bash и введите путь к скрипту.
~/myscript.sh
(Если скрипт находится в текущем каталоге, вы можете запустить его с ./myscript.sh)

Как работать с файлами Windows в сценарии Bash
Чтобы получить доступ к файлам Windows в сценарии, вам нужно указать их путь в / mnt / c, а не в пути к ним. Например, если вы хотите указать файл C: Users Bob Downloads test.txt, вам нужно указать путь /mnt/c/Users/Bob/Downloads/test.txt. Для получения дополнительной информации обратитесь к нашему руководству по расположению файлов в оболочке Bash Windows 10.
Как включить команды Bash в скрипт Batch или PowerShell
Наконец, если у вас есть существующий командный файл или сценарий PowerShell, в который вы хотите включить команды, вы можете запускать команды Bash напрямую, используя bash -c команда.
Например, чтобы запустить команду Linux в окне командной строки или PowerShell, вы можете запустить следующую команду:
bash -c 'command'
Этот трюк позволяет добавлять команды Bash в командные файлы или сценарии PowerShell. Окно оболочки Bash появится, когда запущена команда Bash.
Обновить: Если у вас установлено несколько Linux-сред, вы можете использовать команду wslconfig для выбора среды Linux по умолчанию, используемой при запуске bash -c команда.

Чтобы создать ярлык для сценария Bash изнутри Windows, просто создайте ярлык, как обычно. Для цели ярлыка используйте bash -c которую мы описали выше, и укажем на созданный вами сценарий Bash.
Например, вы укажете ярлык на » bash -c '~/myscript.sh' Msgstr «запустить приведенный выше пример скрипта. Вы также можете просто запустить эту команду из окна командной строки или окна PowerShell.
Tweet
Share
Link
Plus
Send
Send
Pin
Table of content
- What is Shell ?
- What is Bash ?
- What is Shell Scripting or Bash Scripting?
- How to create Shell scripts and execute it ?
- Basic fundamentals of Shell Scripting?
- Run bash scripts on Visual Studio
- Conclusion
What is Shell ?
Shell is a command line interpreter and a programming language, basically what ever you are executing on terminal of your Linux machine is a shell command. There are thousands of commands which are already inbuilt such as cat , cd , ls , kill , history or pwd. The shell provides variables, flow control constructs, scripts, and functions. It also allows you to pipe commands, substitute command , do conditional testing , iterations etc. Whatever scripts you run , commands you execute are executed on shell or commonly known as Unix Shell.
- There are different types of Unix shell available:
- Bourne shell (sh) which is present in /bin/sh or /usr/bin/sh
- Korn shell (ksh) which is present in /bin/ksh or /usr/bin/ksh
- Bourne Again shell (bash) which is present in /bin/bash or /usr/bin/bash
- POSIX shell (sh)
- C shell (csh)
- TENEX/TOPS C shell (tcsh)
- To check on which shell you’re
echo $SHELL
What is Bash?
Bash is a Unix shell and also a command line interpreter. It is also known as Bourne again shell . This is improved version of Bourne shell that “sh”. This is present in almost all the operating system. It is a default login shell mostly in all Linux distributions. Also it is default login shell in Apple macOS and Solaris. Bash process shell commands. In bash you write all your commands in text format and execute commands. When bash executes any commands from other files then they can called as shell scripts.
It also contains keywords , variable , functions etc. just like sh shell . It is very much similar to Bourne shell (sh) .Latest version is bash-5.1 which was released in 2020-12-07.
To check the location of bash , you can use command.
echo $BASH
What is Shell Scripting or Bash Scripting?
Shell Script is simply a text of file with various or lists of commands that are executed even on terminal or shell one by one. But in order to make thing little easier and run together as a group and in quick time we write them in single file and run it.
Main tasks which are performed by shell scripts are : file manipulation , printing text , program execution. We can include various environmental variables in script that can be used at multiple places , run programs and perform various activities are known as wrapper scripts.
A good shell script will have comments, preceded by a pound sign or hash mark, #, describing the steps. Also we can include conditions or pipe some commands to make more creative scripts.
When we execute a shell script, or function, a command interpreter goes through the ASCII text line-by-line, loop-by-loop, test-by-test, and executes each statement as each line is reached from the top to the bottom.
How to create Shell scripts and execute it ?
Now we will create a very simple script and execute it.
- Create a directory under /opt directory
mkdir script-demo
- Create a file myscript.sh
touch myscript.sh- Edit the file
vi myscript.sh- Paste the code as shown in code snippet
#!/bin/bash
# This is a comment
echo Hello World, its automateinfra.com here!
echo I am using $SHELL which is a default shell.
- Let us go through the code
- #! is known as Shebang which is a syntax for a bash script. You can ignore this if you run your script by adding prefix bash . For example bash myscript.sh
- Here #!/bin/bash or #!/usr/bin/bash declares a Bourne-Again (Bash) shell
- Similarly for Bourne shell we can use #!/bin/sh or #!/usr/bin/sh declares a Bourne shell
- # is a comment
- echo is a command
- Grant the execution permissions
chmod + x myscript.sh- Execute the script
./myscript.sh
- Script has been executed successfully.
Basic fundamentals of Shell Scripting
- Shell Scripts are case sensitive
- To execute a function
function function-name
{
  Commands
}- You can run your scripts with specific shells as
- ksh myscript.sh
- bash myscript.sh
- csh myscript.sh
- If you are running a script in a particular location you should provide absolute path and if you are running in same directory then use “./”
/home/ubuntu/myscript.sh  # Complete path

./myscript # Run in same directory- Use of if loops
if [condition]
then
   command
else
   command
fi- Use of for loops
for condition
do
   commands
done- To Create a variable we use “$” symbol and this substitutes the variable to a value.
a = 5
echo $a
- The command-line arguments $1, $2, $3,…$9 are positional parameters, with $0 pointing to the actual command, program, shell script, or function and $1, $2, $3, …$9 as the arguments to the command
- Let us know see Special variables
| $0 is the filename of the current script. | |
| $n These variables correspond to the arguments with which a script was invoked. | |
| $# The number of arguments supplied to a script. | |
| $* All the arguments are double quoted. If a script receives two arguments, $* is equivalent to $1 $2. | |
| $@ All the arguments are individually double quoted. If a script receives two arguments, $@ is equivalent to $1 $2. | |
| $? The exit status of the last command executed. | |
| $$ The process number / process ID of the current shell. | |
| $! The process number of the last background command. |
Run bash scripts on Visual Studio
- Firstly to run bash script in Visual studio , follow the tutorial to download the git for windows.
- You must have Visual studio else follow link to install and setup the Visual studio code for windows.
- Once both the steps are completed open Visual studio.

- From the dropdown menu of terminals select default shell
- Then you will see Git Bash and click on it.

- Now type a command to test if bash script works
hello automateinfra.com
Conclusion
You should now have a very sound knowledge of what is shell , what is Bash shell and Shell Scripting or Bash scripting. . Also we discussed how to work create a shell script and what are basic fundamentals or points one should know to getting started on bash scripting. Finally we ran bash script in windows machine on Microsoft’s Visual Studio Code.
This tutorial consists of all the practical’s which were done on our lab server with lots of hard work and efforts.
Please share the tutorial with everyone if you like it and hoping you get benefit out of this tutorial.
Написание скриптов в Windows 10 Bash
Справка:https://www.howtoip.com/how-to-create-and-run-bash-shell-scripts-on-windows-10/
Пример тестировался мной в подсистеме linux windows pro build 15063
Как писать скрипты на win 10 bash
Вы можете писать сценарии в системе Windows, но вам нужно выполнить преобразование EOL> формат UNIX / OSX, чтобы дать символ строки UNIX конца файла
(Это можно сделать в некоторых программных блокнотах, таких как блокнот ++)
В среде Bash на основе Ubuntu с двумяVIс участиемНано-нано
НаноИспользуйте: nano ~ / myscript.sh — командный файл (файл использует абсолютный путь в bash)
~ — Представляет ваш домашний каталог, поэтому полный путь — /home/username/myscript.sh)
Описание скрипта: добавить#!/bin/bash
Весь процесс скрипта от написания до исполнения
Случай:
#!/bin/bash
read -p “Please input yes or no:” anw
case $anw in
[yY][eE][sS]|[yY])
echo yes
;;
[nN][oO]|[nN])
echo no
;;
*)
echo false
;;
esac
Оцените ввод да или нет
- Выполните подсистему windows 10 linux: напрямую введите bash.exe в командную строку или запустите и нажмите Enter.
- Запустите редактор файлов: nano yesorno-new.sh
- После ввода содержимого нажмите ctrl + o, а затем Enter, чтобы сохранить. Снова нажмите Ctrl + X
-
Сделайте скрипт исполняемым и запустите его: Измените права доступа: chmod + x ~ / yesorno.sh Выполните: ~ / yesorno.sh
График эффекта бега:

Как использовать файлы Windows в сценарии Bash
Чтобы получить доступ к файлам Windows в скрипте, вам необходимо указать их путь в / mnt / c, а не путь к ним.
Например
Путь в Windows: C: users bob downloads test.txt
Путь в Bash: /mnt/c/users/bob/downloadstest.txt
Как включить команды Bash в пакетные сценарии или сценарии PowerShell
Запустите команды Linux из PowerShell:
bash -c «команда»
Bash is a command-line interpreter or Unix Shell and it is widely used in GNU/Linux Operating System. It is written by Brian Jhan Fox. It is used as a default login shell for most Linux distributions. Scripting is used to automate the execution of the tasks so that humans do not need to perform them individually. Bash scripting is a great way to automate different types of tasks in a system. Developers can avoid doing repetitive tasks using bash scripting.
Bash scripting supports variables, conditional statements, and loops just like programming languages. Below are some of the applications of Bash Scripts –
Applications of Bash Scripts:
- Manipulating files
- Executing routine tasks like Backup operation
- Automation
The advantages of using Bash Scripts are given below –
Advantages of Bash Scripts:
- It is simple.
- It helps to avoid doing repetitive tasks
- Easy to use
- Frequently performed tasks can be automated
- A sequence of commands can be run as a single command.
The disadvantages of the Bash Scripts are given below –
Disadvantages of Bash Scripts:
- Any mistake while writing can be costly.
- A new process launched for almost every shell command executed
- Slow execution speed
- Compatibility problems between different platforms
How to Write Bash Scripts?
To write a Bash Script we will follow the steps –
- First, we will create a file with the .sh extension.
- Next, we will write down the bash scripts within it
- After that, we will provide execution permission to it.
To create and write a file with the .sh extension we can use gedit text editor. The command for it will be –
gedit scriptname.sh
The first line of our script file will be –
#!/bin/bash
This will tell, the system to use Bash for execution. Then we can write our own scripts.
Let’s write down just a simple script that will print some lines in the terminal. The code for it will be –
#!/bin/bash

echo "Hello, GeeksforGeeks"
Now we will save the file and provide the execution permission to it. To do so use the following command –
chmod +x scriptname.sh
Next to execute the following script we will use the following command –
./scriptname.sh
Here is the terminal shell pictorial depiction after executing the above commands as follows:
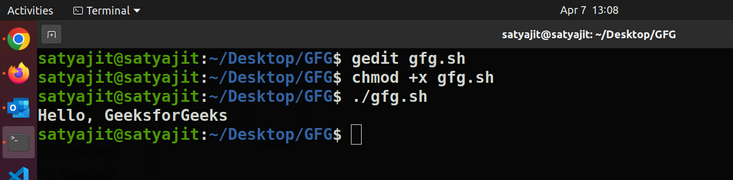
Here the script file name is gfg.sh.
Now we can also write more complicated commands using Bash Scripts. Here is an example below in which we are using a condition statement –
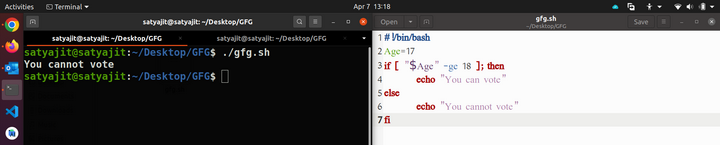
Example Script:
#!/bin/bash
Age=17
if [ "$Age" -ge 18 ]; then
    echo "You can vote"
else
    echo "You cannot vote"
fi
Output:
You cannot vote
Here is the terminal shell pictorial depiction after executing the above script as follows:
In the above way, we can execute multiple Bash commands all at once.
Now Let’s look into the other important concepts related to Bash Scripting.
File Names and Permissions
In the above example, we have saved the file using gfg.sh name and also provided execute permission using chmod command. Now, let’s understand why we have done that.
While writing bash scripts we should save our file with the .sh extension, so that the Linux system can execute it. When we first create a file with the .sh extension, it doesn’t have any execute permission and without the execute permission the script will not work. So, we should provide execute permission to it using the chmod command.
The filename of a bash script can be anything but by convention, it is recommended to use snake case ( my_bash_script.sh ) or hyphens ( my-bash-script.sh ) for naming a script file.
Variables
We can use variables in bash scripting. Below is a sample program to understand the usage of variables in Bash scripts.
Example Script:
Name="SATYAJIT GHOSH"
Age=20

echo "The name is $Name and Age is $Age"
Output of Variables:
The name is SATYAJIT GHOSH and Age is 20
So, here is have declared two variables Name and another one is Age. These variables are accessible using $Name and $Age. That means, we can declare a variable in a bash script using VariableName=Value and can access it using $VariableName. Here is the terminal shell pictorial depiction after executing the above script as follows:

There are two types of variables present within Bash Scripting. Conventionally, If a variable, is declared inside a function then it is generally a local variable and if it is declared outside then it is a global variable. In the case of a bash script, this concept is a little bit different, here any variable whether it is written inside a function or outside a function by default is a global variable. If we want to make a local variable then we need to use the keyword “local”.
Note: It is best practice to always use a local variable inside a function to avoid any unnecessary confusion.
An example of the same is given below –
Example Script:
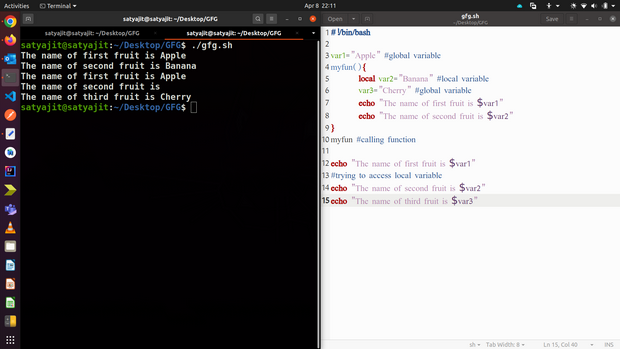
#!/bin/bash

var1="Apple" #global variable
myfun(){
    local var2="Banana" #local variable
    var3="Cherry" #global variable
    echo "The name of first fruit is $var1"
    echo "The name of second fruit is $var2"
}
myfun #calling function

echo "The name of first fruit is $var1"
#trying to access local variable
echo "The name of second fruit is $var2"
echo "The name of third fruit is $var3"
Output of local and global variables:
The name of first fruit is Apple
The name of second fruit is Banana
The name of first fruit is Apple
The name of second fruit is
The name of third fruit is Cherry
Here in this above example, var2 is a local variable, so when we are accessing it from the function it is doing fine but when we are trying to access it outside the function, it is giving us an empty result in the output.
On the other hand, unlike programming languages, even though var3 is defined inside a function still it is acting as a global variable and it can be accessed outside the function. Below is the terminal shell depiction after executing the script –
Input and Output
Input & output are fundamental concepts for shell scripting. A script can take one or more inputs and can also produce zero or many outputs. It may even produce some errors. Let’s understand this with an example –
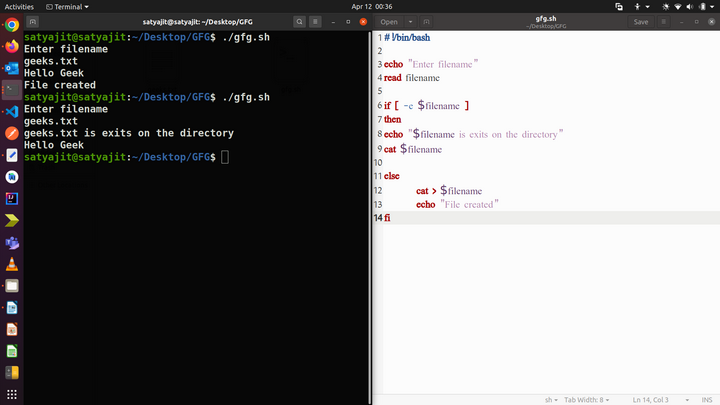
Example Script:
echo "Enter filename"
read filename

if [ -e $filename ]
then
echo "$filename is exits on the directory"
cat $filename

else
    cat > $filename
    echo "File created"
fi
Output of Input & Output:
First time:
Enter filename
geeks.txt
Hello Geek
File created
Second time:
Enter filename
geeks.txt
geeks.txt is exits on the directory
Hello Geek
So, in this above example the first time, the script could not find any file with that file name, and the else block gets executed. It created the file and put some data into that file. When we run it a second time with the same file name, then it finds the file. So, is the if block gets executed and that displays the contents of the file. Reading the file contents is input and on the first time putting data into the file is considered to be output. Here we have used > for storing the content in a file. The > notation is used to redirect stdout to a file. On the other hand, we can use 2> notation to redirect stderr, and &> to redirect both stdout and stderr.
Below is the terminal shell pictorial depiction after executing the following script –
Functions
In programming, A function is a block of code that performs some tasks and it can be called multiple times for performing tasks. The simplest example of the use of function in Bash scripting can be given as –
Example Script:
#!/bin/bash
#It is a function
myFunction () {
echo Hello World from GeeksforGeeks
}

#function call
myFunction
Output of Functions:
Hello World from GeeksforGeeks
The above example shows a function that prints something when called.
So, the basic syntax for writing functions within a Bash Script will be –
Syntax of Functions:
#for defining
function_name(){
    commands
    .....
}

function_name # for calling
Besides this, we can also have functions with passing arguments and with return values.
Decision Making
In programming, Decision Making is one of the important concepts. The programmer provides one or more conditions for the execution of a block of code. If the conditions are satisfied then those block of codes only gets executed.
Two types of decision-making statements are used within shell scripting. They are –
1. If-else statement:
If else statement is a conditional statement. It can be used to execute two different codes based on whether the given condition is satisfied or not.
There are a couple of varieties present within the if-else statement. They are –
- if-fi
- if-else-fi
- if-elif-else-fi
- nested if-else
The syntax for the simplest one will be –
Syntax of If-else statement:
if [ expression ]; then

    statements

fi
Example Script:
Name="Satyajit"
if [ "$Name" = "Satyajit" ]; then
  echo "His name is Satyajit. It is true."
fi
Output of if-else statement:
His name is Satyajit. It is true.
In the above example, during the condition checking the name matches and the condition becomes true. Hence, the block of code present within the if block gets executed. In case the name doesn’t match then will not have an output. Below is the terminal shell pictorial depiction after executing the following script –

2. case-sac statement:
case-sac is basically working the same as switch statement in programming. Sometimes if we have to check multiple conditions, then it may get complicated using if statements. At those moments we can use a case-sac statement. The syntax will be –
Syntax of case-sac statement:
case $var in
   Pattern 1) Statement 1;;
   Pattern n) Statement n;;
esac
Example Script:
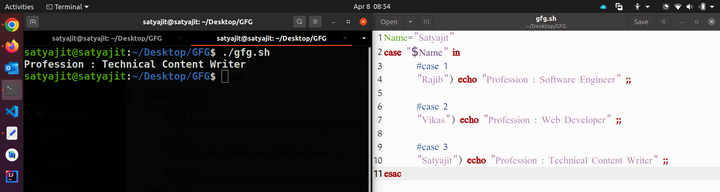
Name="Satyajit"
case "$Name" in
    #case 1
    "Rajib") echo "Profession : Software Engineer" ;;

    #case 2
    "Vikas") echo "Profession : Web Developer" ;;

    #case 3
    "Satyajit") echo "Profession : Technical Content Writer" ;;
esac
Output of case-sac statement:
Profession : Technical Content Writer
In the above example, the case-sac statement executed the statement which is a part of the matched pattern here the ‘Name’. Below is the terminal shell pictorial depiction after executing the following script –
String and Numeric Comparisons
The string comparison means in the shell scripting we can take decisions by doing comparisons within strings as well. Here is a descriptive table with all the operators –
| Operator | Description |
|---|---|
| == | Returns true if the strings are equal |
| != | Returns true if the strings are not equal |
| -n | Returns true if the string to be tested is not null |
| -z | Returns true if the string to be tested is null |
Arithmetic operators are used for checking the arithmetic-based conditions. Like less than, greater than, equals to, etc. Here is a descriptive table with all the operators –
| Operator | Description |
|---|---|
| -eq | Equal |
| -ge | Greater Than or Equal |
| -gt | Greater Than |
| -le | Less Than or Equal |
| -lt | Less Than |
| -ne | Not Equal |
Below is a simple example of the same –
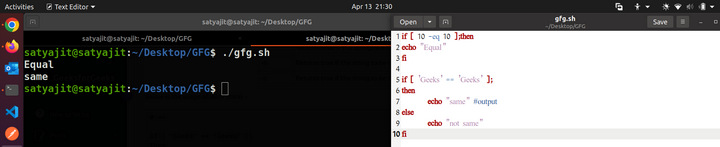
Example Script:
if [ 10 -eq 10 ];then
echo "Equal"
fi

if [ 'Geeks' == 'Geeks' ];
then
    echo "same" #output
else
    echo "not same"
fi
Output of String and Numeric Comparisons:
Equal
same
In this example first one (-eq )is a numeric comparison that checks for equality. The second one ( == ) is also check for equality but in strings. Below is the terminal shell pictorial depiction after executing the following script –
We will learn more about this concept in the next articles.