![]()
Download Article
![]()
Download Article
Learning how to do simple file management at the Command Prompt (cmd) comes in handy when you’re learning to code. When you create files and folders at the command line, you can access, use, and manipulate those folders and files in Windows apps. We’ll show you how to create folders (directories) and text files at the Windows Command Prompt, and teach you commands for deleting unneeded files and folders.
-

1
Open the Command Prompt. The easiest way to do this is to press Win + S to activate the search bar, type cmd, and then click Command Prompt in the search results.
-
2
Go to the directory in which you want to create the file. The prompt will open to C:UsersYourName by default. If the directory is somewhere else, type cd path_to_directory and press Enter. Replace path_to_directory with the actual directory location.[1]
- For example, if you want to create a file on the Desktop, type cd desktop and press Enter.
- If the directory you’re looking for isn’t in your user directory (e.g., C:UsersYourName), you’ll have to type in the whole path (e.g., C:UsersSomeoneElseDesktopFiles).
Advertisement
-
3
Create an empty file. If you don’t want to create an empty file, skip to the next step.[2]
To create an empty file:- Type type nul > filename.txt.
- Replace filename.txt with whatever you want to call your new file. The «.txt» part indicates that this is a plain text file. Other common file extensions include «.docx» (Word document), «.png» (empty photo),and «.rtf» (rich text document). All of these file types can be read on any Windows computer without installing additional software.
- Press Enter.
-
4
Create a file containing certain text. If you don’t want to create a file with certain text inside, skip to the next step.[3]
Use these steps to create a plain text file that you can type into:- Type copy con testfile.txt, but replace testfile with the desired file name.[4]
- Press Enter.
- Type some text. This is a rudimentary text editor, but it’s good for quick notes or code. You can use the Enter key to go to the next line.
- Press Control + Z when you’re finished editing the file.
- Press the Enter key. You’ll see «1 file(s) copied,» which means your file is now saved with the name you created.
- Another way to do this is to run this command: echo enter your text here > filename.txt.
- Type copy con testfile.txt, but replace testfile with the desired file name.[4]
-
5
Create a file that’s a certain size. If you don’t want to create a file that’s a specific size, skip this step.[5]
To create a blank text file based on byte size, use this command:- fsutil file createnew filename.txt 1000.
- Replace filename with the desired file name, and 1000 with the actual number of bytes you’d like the file to be.


Advertisement
-
1
Open the Command Prompt. The easiest way to do this is to press Win + S to activate the search bar, type cmd, and then click Command Prompt in the search results.
-
2
Go to the directory containing the file you want to delete. The prompt will open to C:UsersYourName by default. If the file is somewhere else, type cd path_to_directory and press Enter. Replace path_to_directory with the actual directory location.
- For example, if you want to delete a file from the Desktop, type cd desktop and press Enter.
- If the directory you want to view isn’t in your user directory (e.g., C:UsersYourName), you’ll have to type in the whole path (e.g., C:UsersSomeoneElseDesktopFiles).
-
3
Type dir and press ↵ Enter. This displays a list of all files in the current directory. You should see the file you want to delete in this list.
- Using Command Prompt to delete files results in the files being deleted permanently rather than being moved to the Recycle Bin. Exercise caution when deleting files via Command Prompt.
-
4
Type del filename and press ↵ Enter. Replace filename with the full name and extension of the file you want to delete.[6]
File names include file extensions (e.g., *.txt, *.jpg). This deletes the file from your computer.- For example, to delete a text file entitled «hello», you would type del hello.txt into Command Prompt.
- If the file’s name has a space in it (e.g., «hi there»), you will place the file’s name in quotations (e.g., del "hi there").
- If you get an error that says the file cannot be deleted, try using del /f filename instead, as this force-deletes read-only files.


Advertisement
-
1
Open the Command Prompt. The easiest way to do this is to press Win + S to activate the search bar, type cmd, and then click Command Prompt in the search results.[7]
-
2
Go to the directory in which you want to create the new directory. The prompt will open to C:UsersYourName by default. If you don’t want to create a new directory here, type cd path_to_directory and press Enter. Replace path_to_directory with the actual directory location.[8]
- For example, if you want to create a directory on your Desktop, you would type in cd desktop and press Enter.
- If the directory you’re looking for isn’t in your user directory (e.g., C:UsersYourName), you’ll have to type in the whole path (e.g., C:UsersSomeoneElseDesktopFiles).
-
3
Type mkdir NameOfDirectory at the prompt. Replace NameOfDirectory with the name of the directory you wish to create.[9]
- For example, to make a directory named «Homework», you would type mkdir Homework.
-
4
Press ↵ Enter. This runs the command to create a folder with the desired name.


Advertisement
-
1
Open the Command Prompt. The easiest way to do this is to press Win + S to activate the search bar, type cmd, and then click Command Prompt in the search results.[10]
-
2
Go to the folder containing the directory you want to delete. The prompt will open to C:UsersYourName by default. If the directory you want to delete is somewhere else, type cd path_to_directory and press Enter.[11]
Replace path_to_directory with the actual directory location.- For example, if you want to delete a directory from your Desktop, type cd desktop.
- If the directory isn’t in your user directory (e.g., C:UsersYourName), you’ll have to type in the whole path (e.g., C:UsersSomeoneElseDesktopFiles).
-
3
Type rmdir /s DirectoryName. Replace DirectoryName with the name of the directory you want to delete.[12]
- For example, if you’re trying to delete your «Homework» folder, you’d type in rmdir /s Homework here.
- If the directory’s name has a space in it (e.g., «Homework assignments»), place the name in quotations (e.g., rmdir /s "Homework assignments").
-
4
Press ↵ Enter to run the command.[13]
- If you try to delete a directory that contains hidden files or directories, you’ll see an error that says «The directory is not empty.» In this case, you’ll have to remove the «hidden» and «system» attributes from the files inside the directory. To do this:[14]
- Use cd to change into the directory you want to delete.
- Run dir /a to view a list of all files in the directory and their attributes.
- If you’re still okay with deleting all of the files in the directory, run attrib -hs *. This removes special permissions from the undeletable files.
- Type cd .. and press Enter to go back one directory.
- Run the rmdir /s command again to delete the folder.
- If you try to delete a directory that contains hidden files or directories, you’ll see an error that says «The directory is not empty.» In this case, you’ll have to remove the «hidden» and «system» attributes from the files inside the directory. To do this:[14]
-
5
Press y and then ↵ Enter to confirm. This will permanently remove the directory.[15]


Advertisement
Add New Question
-
Question
How can I create directories?

Subhodeep Roy
Community Answer
If you are creating a directory in C drive, the command will be»C:MD {the name of the directory/folder}» then press Enter.
-
Question
How do I create a folder using CMD?
Navigate to where you want the subfolder created and type «mkdir «.
-
Question
How do I create a test file under the sub folder?
Change directory into the new sub folder and then on the next line, create your new test file. For example: cd mysubfolder $ type nul > newtextfile.txt
See more answers
Ask a Question
200 characters left
Include your email address to get a message when this question is answered.
Submit
Advertisement
Video
Thanks for submitting a tip for review!
-
Using Command Prompt to delete files results in the files being deleted permanently rather than being moved to the Recycle Bin. Exercise caution when deleting files via Command Prompt.
Advertisement
About This Article
Article SummaryX
1. Use the mkdir command to create a folder.
2. Use rmdir /s to delete a folder.
3. Use the copy con or echo command to create a file.
4. Use del to delete a file.
For tips on how to create a file inside a folder, read on!
Did this summary help you?
Thanks to all authors for creating a page that has been read 1,202,199 times.
Is this article up to date?
File creation is perhaps one of the most trivial tasks you perform on your computer almost every day. If you’re a Windows user, you probably do it via the graphical interface.

Although this approach may seem easier in practice, especially if you’ve no previous experience with CLI, it has its shortcomings. Unlike the CLI way, which provides a quick and efficient way to create files on your computer, a GUI approach involves multiple steps, making it time-consuming and inefficient.
So here’s a guide to walk you through the different methods you can use to create a file in Windows (be it Windows 11, Windows 10, Windows 8, or Windows 7) with Command Prompt.
Command Prompt or CMD is a powerful Windows utility that allows you to perform various system operations on your computer with ease. It’s pre-installed on the system and lets you run commands for a multitude of actions, everything from file management to running batch files for task automation.
Creating files happens to be one such task, which you can perform more quickly and efficiently with the CMD prompt than using the File Explorer. But before we jump in and demonstrate how to create a file in Command Prompt, you must know how to navigate the Windows directory structure on it so you can create files in your desired folder.
Navigating Windows File System Using Command Prompt
To navigate the Windows file system with CMD, first, open the Command Prompt. For this, press the Windows + X keyboard shortcut and select Command Prompt from the menu.
Next, enter the dir command to list all the files and directories (or folders) inside a folder. Once you’ve identified the folder you want to open, enter the following command and press Enter:
cd folder_name
Eg:
cd Documents
To go back to the parent directory, run:
cd ..
For accessing the root directory:
cd
While we’re at it, you should also know that you can create directories (or folders) using the Command Prompt. For this, use the cd command to navigate to the folder where you want to create a new folder and use the following syntax:
mkdir directory_name
For example, to create a directory name MyDocs, run:
mkdir MyDocs
Finally, when you’re in the folder where you want to create a file, use any of the following methods to create files with CMD.
Creating a File Using echo Command
The echo command displays messages you type into the CMD window. However, when used with the redirection operator (>), it doubles as a file creation command that creates a file out of your inputted text.
For creating a file using the echo command, open the Command Prompt and enter your command using the following syntax:
echo your_text_here > filename.extension
For example, if you want to create a text file named MyFile with This is sample text as its text and .txt as the file extension, you’d run:
echo This is sample text > MyFile.txt
Once you’ve created the file, verify that it has been created successfully by running:
type filename.extension
Eg:
type MyFile.txt
Creating a File Using copy con Command
Unlike the echo command, which takes your input for the content of the file you’re creating at the outset, the copy con command takes a rather different approach.
With it, you only need to give a name to your file initially. And, it then opens the new file in a text editor, where you can populate it with text.
To create a file using copy con, use the syntax below:
copy con filename_with_extension
Eg:
copy con MyFile.txt
It will now put you inside the file in Command Prompt window itself, where you can add your desired text to it. Once you’ve done that, hit Ctrl + Z to save the file and Ctrl + C to exit editing.
Creating a File in Notepad Using Command Prompt
While both methods we’ve mentioned so far work well, they are not ideal for when you want to enter long text paragraphs into your text file. An alternative way to deal with this is to use Notepad, which you usually use to create files, but via the Command Prompt.
For this, enter your command in the CMD window using the following syntax and hit Enter:
notepad filename.extension
For example, if you want to create a file named SampleDoc, you’d run:
notepad SampleDoc.txt
After this, CMD will open the file in Notepad. It will prompt you to create a new file since the file you enter doesn’t exist. Click Yes to accept and create the file.
Now, just like how you would use Notepad, enter your text to the file and hit Ctrl + S to save and Ctrl + W to close the file.
Creating Multiple Files Using Command Prompt
For times when you want to create multiple files inside a folder at once and populate them later, you can use the for loop as shown in the following syntax:
for /l %a in (1 1 10) do type nul > "%a.txt"
…where (1 1 10) tells the CMD to perform the task in the sequence from 1, in steps of 1, up to 10. To create 20 files, replace 10 with 20 in your command.
If you want to add a common name to the start of every file and follow that up with a number, you’d need to use the following syntax:
for /l %a in (1 1 10) do type nul > "filename %a.txt"
…where you need to replace filename with the name you’d like to give your files.
For example, running the command below will create 10 blank files in the following name syntax: MyDoc-1.
for /l %a in (1 1 10) do type nul > "MyDoc-%a.txt"
Besides, if you want to create multiple files with the same text, you can tweak the command to incorporate the same action. To do this, instead of including do type nul, you need to use do echo your_desired_text.
For example, if you want to create 10 files named MyDoc-1.txt, MyDoc-2.txt,… and so on with This is sample text as text, you’d run:
for /l %a in (1 1 10) do echo This is sample text> "MyDoc-%a.txt"
…and it will create them in your current directory.
Efficiently Creating Files on Windows With Command Prompt
The methods listed in this guide should help you with pretty much all sorts of file creation tasks in Command Prompt, be it creating single-line text files, multiple paragraph text files, or even multiple files with custom text and file names.
So depending on requirements, you can choose a method accordingly and create files on Windows quickly and efficiently.
FAQs About CMD Create File
1. How do I create a text file in Windows command line?
Creating a text file in Windows is pretty straightforward, and you have a few different ways to go about it. If all you need is a simple one-line text file, you can use the echo command, whereas if you want to create a text file with multiple lines of text, you can either use the copy con command or create the file in Notepad. Lastly, if you want to create multiple text files, you can use the for loop.
2. Which command is used to create a file?
Microsoft offers a few different CMD commands to create a file, such as echo and copy con. However, you can also use other methods, wherein you can either create a file in Notepad or run a for loop to generate multiple files with your desired name and file name.
Was this article helpful?
YesNo
TechPP is supported by our audience. We may earn affiliate commissions from buying links on this site.
Without redirection, Luc Vu or Erik Konstantopoulos point out to:
copy NUL EMptyFile.txt
copy /b NUL EmptyFile.txt
«How to create empty text file from a batch file?» (2008) also points to:
type NUL > EmptyFile.txt
# also
echo. 2>EmptyFile.txt
copy nul file.txt > nul # also in qid's answer below
REM. > empty.file
fsutil file createnew file.cmd 0 # to create a file on a mapped drive
Nomad mentions an original one:
C:UsersVonCprogtests>aaaa > empty_file
'aaaa' is not recognized as an internal or external command, operable program or batch file.

C:UsersVonCprogtests>dir

 Folder C:UsersVonCprogtests

27/11/2013  10:40    <REP>          .
27/11/2013  10:40    <REP>          ..
27/11/2013  10:40                 0 empty_file
In the same spirit, Samuel suggests in the comments:
the shortest one I use is basically the one by Nomad:
.>out.txt
It does give an error:
'.' is not recognized as an internal or external command
But this error is on stderr. And > only redirects stdout, where nothing have been produced.
Hence the creation of an empty file.
The error message can be disregarded here. Or, as in Rain’s answer, redirected to NUL:
.>out.txt 2>NUL
(Original answer, November 2009)
echo.>filename
(echo "" would actually put «» in the file! And echo without the ‘.’ would put «Command ECHO activated» in the file…)
Note: the resulting file is not empty but includes a return line sequence: 2 bytes.
This discussion points to a true batch solution for a real empty file:
 <nul (set/p z=) >filename

 dir filename
 11/09/2009  19:45                 0 filename
 1 file(s)                         0 bytes
The «
<nul» pipes anulresponse to theset/pcommand, which will cause the
variable used to remain unchanged. As usual withset/p, the string to the
right of the equal sign is displayed as a prompt with no CRLF.
Since here the «string to the right of the equal sign» is empty… the result is an empty file.
The difference with cd. > filename (which is mentioned in Patrick Cuff’s answer and does also produce a 0-byte-length file) is that this «bit of redirection» (the <nul... trick) can be used to echo lines without any CR:
<nul (set/p z=hello) >out.txt
<nul (set/p z= world!) >>out.txt
dir out.txt
The
dircommand should indicate the file size as 11 bytes: «helloworld!«.
Knowing how to conduct rudimentary file management at the Command Prompt comes in useful when you’re starting to code. Any file you make from the Command Prompt persists in multiple areas of Windows—this means that generating an index or document at the prompt fixes things so that you can access, utilize, and control that catalog or record in the Windows platform.
There are two ways to create files from the command line. The first method uses the fsutil command, and the second method uses the echo command.
Create File with Echo Command
|echo some-text > filename.txt
Create File with Fsutil Command
|fsutil file createnew filename number_of_bytes
Step-by-Step Process to Create Files via Command Line
STEP 1: Launch the command prompt.
The quickest way to implement this is to open the search bar by pressing Win + S, type cmd, and then select Command Prompt.
STEP 2: Choose the folder where you wish to save the file.
By default, the prompt will open under C:UsersYourName. Suppose the folder is elsewhere; type the cd path to the folder and hit Enter. Modify the way to the folder with the actual folder path.
STEP 3: Make a blank file.
Type |type nul > filename.txt
Modify filename.txt with a name according to your preference and hit Enter.
The “.txt” extension means that it’s a plain text file.
“.docx” (Word document), “.png” (empty photo), and “.rtf” (rich text document) are other popular file extensions.
All of these file formats may be viewed on any Windows system without the need for extra software.
Step 4: Make a file with certain text in it.
Replace testfile with the appropriate file name in copy con testfile.txt. Hit Enter.
Enter any text. This is a basic text editor, but it’s adequate for brief notes or coding. To move to the following line, use the Enter key.
Press Control + Z after you’re done editing the file.
Hit the Enter key. You should notice “1 file(s) copied,” meaning your file has been saved using the name you chose.
OR
|echo enter your text here > filename.txt.
STEP 5: Make a file of a specific size.
Avoid this step, if you don’t wish to deliver a document of a specific size. Utilize the accompanying order to produce a clear text document dependent on its byte size.
|fsutil file createnew filename.txt 1000
Replace filename with the name of your wish and 1000 with the exact number of bytes you want the document to be.
Other useful articles:
- Basic Windows CMD commands
- Cool CMD Commands Tips and Tricks
- Best CMD Commands for Hacking
- CMD Commands for Wireless Network Speed
- Useful Keyboard Shortcuts for CMD
- What Info about My Laptop Can I Check with CMD and How?
- Getting Started with CMD Windows
- TOP-12 Command-Line Interview Questions (Basic)
- Command-Line Interview Questions (Advanced)
- CMD Commands to Repair Windows
- CMD Commands to Speed Up Computer
- CMD Commands for MAC OS
- How Does the Command Line Work?
- MS-Dos Interview Questions in 2021
- Windows OS Versions and History
- Recent Windows Versions Compared
- Basic Windows Prompt Commands for Every Day
- Windows Command Line Cheat Sheet For Everyone
- Windows Command Line Restart
- Windows Command Line for Loop
- Windows Command — Change Directory
- Windows Command — Delete Directory
- Windows Command Line – Set Environment Variable
- How Do I Run Command Line
- Windows Command Line Create File
-
MiniTool
-
MiniTool News Center
- How to Create and Delete a File or Folder with CMD
By Alisa | Follow |
Last Updated December 25, 2019
![]()
This tutorial introduces how to create a file or folder/directory with cmd.exe (Command Prompt) on Windows 10. MiniTool software also provides the professional data recovery software to help you recover any deleted/lost files from computer and various storage devices.
- How do you create a file using Command Prompt?
- Which command is used to create a file in DOS?
If you are wondering how to create a file or folder using Command Prompt, this tutorial provides a detailed guide.
How to Create a Folder with CMD
Step 1. Open Command Prompt
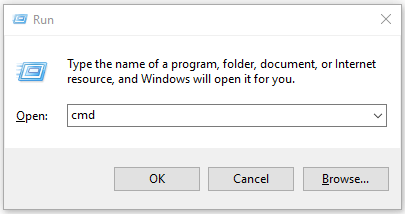
At the beginning, you can press Windows + R to open Run dialog, type cmd in Run, and press Enter to open Command Prompt in Windows 10.
Step 2. Go to the Folder Location
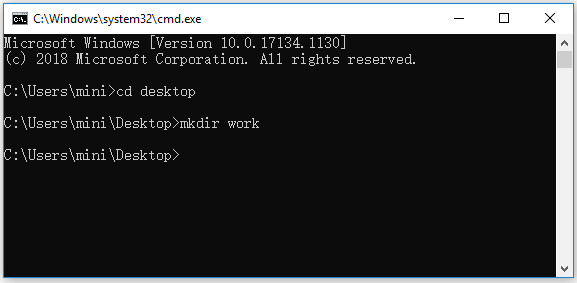
After you enter into Command Prompt, you are at C:UsersYourName by default. If you want to create a folder in another directory, you can type cd folder path (replace the folder path with the actual folder location), and press Enter to go to the desired directory.
Tip: If the default folder isn’t your target folder and you want to create a file with cmd in anther folder, you should type the whole folder path and hit Enter.
Step 3. Create a Folder with CMD
Then you can type mkdir folder name (replace folder name with the exact name of the folder you want to create), for instance, mkdir work. After you type the command line, you should press Enter key to run this command to create the folder.
How to Delete a Folder in Command Prompt
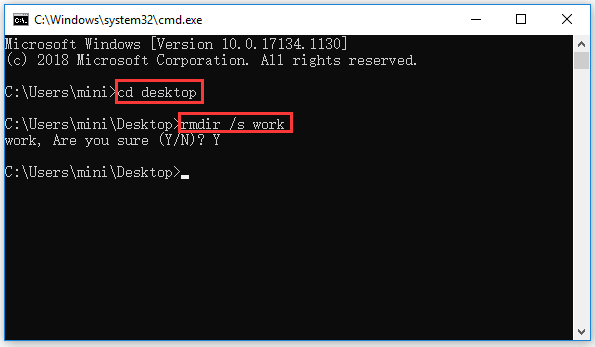
Step 1. If you want to delete a folder with CMD, you can follow the same instructions above to enter into Command Prompt and go the directory you want to delete a folder.
Step 2. Then you can type rmdir /s folder name (replace folder name with the exact folder name you’d like to delete), e.g. rmdri /s work. If the folder name has a space between words, you should place the folder name in quotations, e.g. rmdir /s “work 2020”. Finally hit Enter to execute the command, and type “Y” to confirm the action.
How to Create a File with CMD
Step 1. Still, follow the same operation above to open Command Prompt in Windows 10 and go to the folder path in which you want to create a file.
Step 2. Type type nul > filename.fileextension in Command Prompt window and hit Enter, e.g. type nul > work.docx, this will create an empty word file named work.

If you want to create a file with some text in it, you can type echo enter your text here >filename.txt. Replace “enter your text here” with the exact text you want to contain in the file and replace the “filename.txt” with the desired file name and extension. For example, echo How to Create a File with CMD >work.txt.

If you want to create a file with a certain file size in CMD, you can type fsutil file createnew filename.docx 1000, replace filename and 1000 with your preferred file name and file byte size.
How to Delete a File in Command Prompt
Step 1. To delete a file with CMD, you can also open Command Prompt and go to the folder path in Command Prompt.
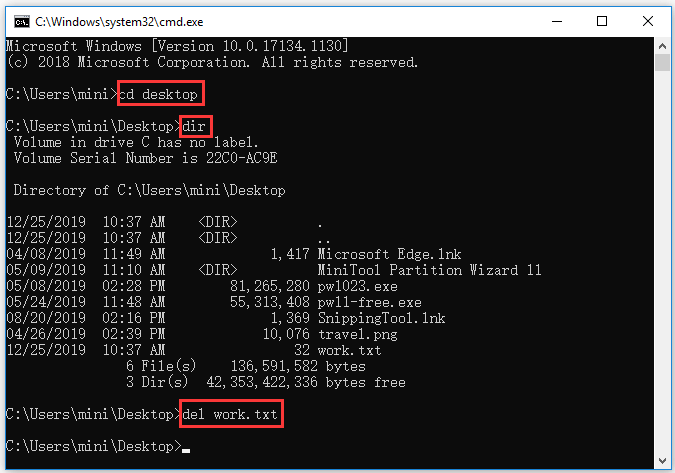
Step 2. Next you can type dir and press Enter to display all the files in the current folder. Find the file you want to delete.
Step 3. Then you can type del filename.fileextension and press Enter to delete the target file with CMD. You should replace the filename with the exact file name and file extension of the deleting file, e.g. del work.txt. If the file name has spaces, you should put the file name into quotations.
If you receive an error message saying that the file can’t be deleted, you can check: how to force delete a file that cannot be deleted.
Note: Deleting a file/folder using Command Prompt in Windows 10 will permanently delete the file and the deleted file will not go to the Recycle Bin, so please be careful with file deletion with CMD.
How to Recover a Mistakenly Deleted File/Folder
Using CMD to delete a file or folder will permanently delete the file. If you mistakenly delete a file/folder, you can use MiniTool Power Data Recovery – professional free data recovery software for Windows 10/8/7 – to easily recover any deleted/lost files and folder from computer, external hard drive, SSD, USB, SD card, and more in 3 simple steps.
About The Author

Position: Columnist
Alisa is a professional English editor with 4-year experience. She loves writing and focuses on sharing detailed solutions and thoughts for computer problems, data recovery & backup, digital gadgets, tech news, etc. Through her articles, users can always easily get related problems solved and find what they want. In spare time, she likes basketball, badminton, tennis, cycling, running, and singing. She is very funny and energetic in life, and always brings friends lots of laughs.
To create a file in Windows, right-click on your desktop or in File Explorer and click on New. Is this post going to be the shortest post ever? Nope. Because using the GUI sometimes won’t work, you can use the command prompt to create a file. In this tutorial, you will learn just about every way possible to use PowerShell and Windows command prompt to create file on the command line.
Let’s get started!
Prerequisites
If you’d like to follow along with the steps in this tutorial, be sure you have the following ahead of time:
- A Windows PC – All demos in this tutorial will use Windows 10, but Windows 7+ will work also.
- PowerShell 3.0+ – All demos in this tutorial will use PowerShell v7.1.3.
Using Windows Command Prompt to Create File
You have two command-line options in Windows; the command prompt (cmd.exe) or PowerShell. Let’s first cover how to use the Windows command prompt to create a file that is blank.
To get started, open the Windows command prompt by clicking on the Start button, typing cmd.exe, and hitting Enter. The Windows command prompt should come up, and you’re ready to go.
Using the ECHO Command
Let’s start this tutorial by first covering the echo command. The echo command is a command-line utility that allows you to display messages in a command prompt. In Windows, if you can send something to the command console, you can also redirect that output to a file!
In the Windows Command Prompt window:
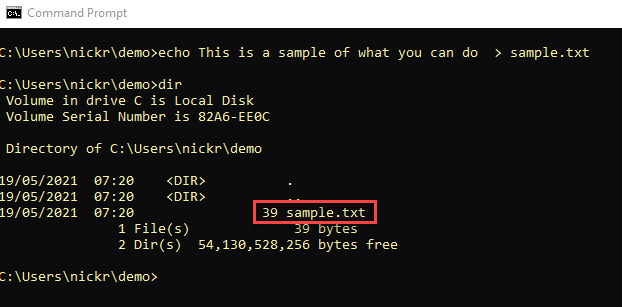
1. Run the echo command as shown below. This command echoes the text provided (This is a sample text file) to the command console. But, since the command is using the redirection operator (>), this operator tells Windows to instead create a file with the text (sample.txt).
When you’ve created the file, run the dir command to list all files in the current working directory
echo This is a sample text file > sample.txt
 dir
You can see below that Windows creates the sample.txt file in the current working directory.
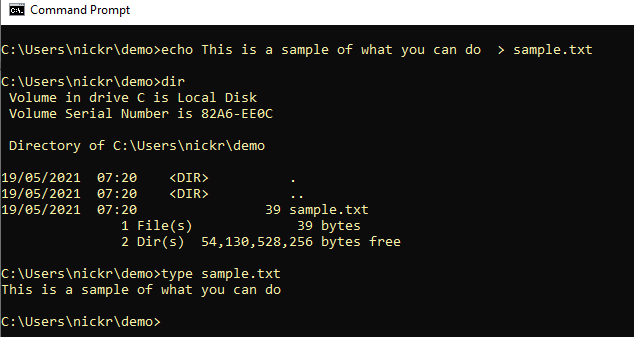
2. To confirm the file contains the expected “This is a sample text file” text, execute the type command followed by the file name. The type command reads the file and returns the text inside.
You can see below that sample.txt does, indeed, contain the expected text.
Using the COPY CON Command
If the echo command doesn’t fit your taste, you can always use the copy command using the con argument. Instead of copying files, the con argument tells the copy command to copy output to the console.
The
conargument is actually a device, not a command.
To create a file using copy con:
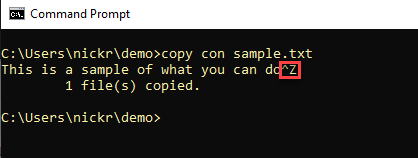
1. Run copy con followed by a file name. This command won’t immediately create the file. You’ll be presented with a flashing cursor.
2. Once you see that flashing cursor type in some text you’d like to include in the file and press Enter.
This is a sample of what you can doWhen you’re done, press Ctrl-Z and press Enter to exit the interactive prompt. Pressing Ctrl-Z will also add an end-of-file marker to tell Windows to close the open file handle.
You can see below pressing Ctrl-Z will display ^Z, and Windows will tell you it’s “copied” one file. This file will be the file you specified and will contain the text you just typed.
Using the FSUTIL Command
You can also use Windows command prompt to create file by introducing fsutil! Fsutil is a file system management tool built into Windows.
To use fsutil on the command prompt to create a new file:
1. Close the command prompt if you still have it open and open it up again, but this time as an administrator. Unfortunately, the fsutil utility requires it.

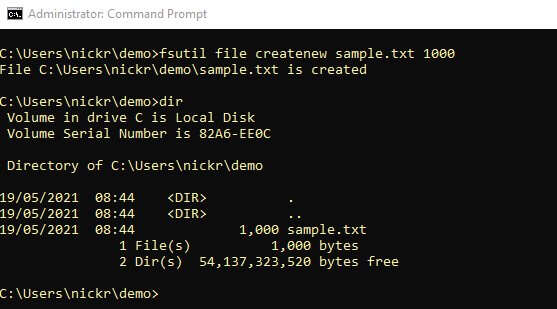
2. Now, invoke the file function of fsutil to create a new file using the createnew argument followed by the file name to create (sample.txt) and the size in bytes you’d like the file to be (1000).
The below command will create a file called sample.txt in the current working directory that’s 1KB in size.
fsutil file createnew sample.txt 10003. Type dir again to list all files in the current working directory and you should see a 1,000-byte file now exists.
Since the fsutil utility can create blank files of a certain size, the utility is great for creating dummy files for network performance testing!
Creating a File with PowerShell
It’s now time to use a more modern approach of using a Windows command prompt to create file; with PowerShell! PowerShell has a few different ways to create a file so let’s cover them all.
So, open your Windows PowerShell or PowerShell console and let’s get started!
Using the New-Item Cmdlet
One of the easiest ways to create a file in Windows with PowerShell is to use the New-Item cmdlet This cmdlet creates new items (a file in this case).
The
New-Itemcmdlet can also create Windows registry keys or folders.
1. Run the New-Item cmdlet specifying the directory to create the file in (Path), the Name of the file, the type of item (ItemType), and finally, the text to include in the file (Value).
The below command will create a file called sample.txt in the current working directory (.) with the text This is a text string inside the file.
New-Item -Path . -Name "sample.txt" -ItemType "file" -Value "This is a text string"
You can also use
New-Itemto create a directory by using theDirectoryargument for theItemTypeparameter.
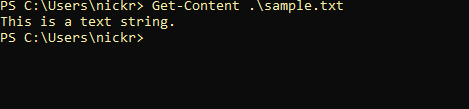
2. Now, take a look at the file just created using the Get-Content cmdlet to tell PowerShell to read the file and display its contents.
Using the Set-Content and Add-Content Cmdlets
Next, let’s check out the Set-Content and Add-Content PowerShell cmdlets. These two cmdlets can create files in a similar fashion but Set-Content creates and overwrites a file while Add-Content will create and append to an existing file.
With PowerShell still open, run the Set-Content cmdlet providing it the Path and name of the file to create with the text you’d like the file to contain (Value) as shown below.
The command below will create a file called sample.txt in the current working directory with the text This is a text string inside the file.
Set-Content -Path .sample.txt -Value "This is a text string"To create the same file, simply replace
Set-ContentwithAdd-Content. TheAdd-Contentwill create files and will also append text to existing files.
Using the Out-File Cmdlet
To round out how to create a file on the command prompt with PowerShell, let’s end this tutorial with the Out-File cmdlet.
The Out-File cmdlet is a handy command similar to the redirection operator (>) previously covered in the Windows Command Prompt section. The Out-File cmdlet accepts input from the PowerShell console and writes that output to a file of your choosing.
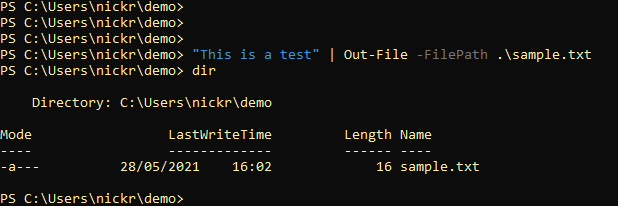
With PowerShell still open, type some text ("This is a test") and pipe that text to the Out-File cmdlet providing the path to the file to create (FilePath).
The below command will create a file called sample.txt in the current working directory with the text This is a test inside.
"This is a test" | Out-File -FilePath .sample.txt You can see below that PowerShell created a 16-byte file called sample.txt.
Conclusion
In this tutorial you learned different ways to use PowerShell and Windows command prompt to create file. By now, you should know just about all the ways to create text files on the command line.
Which method do you prefer?
 Если вы оказались без доступа к чему-либо кроме командной строки или Windows PowerShell и по какой-то причине вам требуется возможность создания или чтения текстовых файлов, это вполне реализуемо, причем более чем одним методом.
В этой инструкции подробно о работе с текстовыми файлами в командной строки или PowerShell (разумеется, можно и в Терминале Windows) — создание и сохранение текстовых файлов, их вывод и чтение в консоли.
Создание текстовых файлов в командной строке
Возможность создания текстовых файлов доступна как в командной строке (cmd.exe), так и в PowerShell. Начнем с первого варианта.
Во всех случаях учитывайте, что при использовании кириллицы потенциально возможны проблемы с кодировкой, а в некоторых случаях кодировка может отличаться при использовании разных команд.
Команда ECHO
Команда командной строки echo предназначена для вывода текстовых сообщений в окне консоли, например, при выполнении сценария в bat-файле, но может быть использована и для вывода текста в файл, благодаря возможности использования оператора «>» для перенаправления вывода из консоли в файл.
Пример команды:
echo Содержимое текстового файла > file.txt
В результате её выполнения в текущей рабочей папке командной строки будет создан файл с именем file.txt и содержимым «Содержимое текстового файла».

COPY CON
Команда copy с параметром con позволяет скопировать содержимое консоли в файл. Использование возможности будет состоять из следующих шагов:
- Введите команду
copy con имя_файла.txt
файл не будет создан, но после выполнения указанной команды у вас появится возможность набрать содержимое этого файла, которое по завершении процесса будет в него сохранено.
- Курсор переместится на строчку ниже, и вы сможете набирать текст так, как делаете это обычно, включая перенос строки.

- Для завершения набора и сохранения текстового файла нажмите сочетание клавиш Ctrl+Z, а затем — Enter. Это добавит отметку конца файла и сохранит его в текущей папке с указанным на 1-м шаге именем.


Создание текстового файла в PowerShell
PowerShell также имеет набор встроенных командлетов для сохранения текстовых данных в файл.
Out-File
Использование Out-File в PowerShell по своей функциональности сходно с оператором перенаправления вывода в командной строке. Вывод консоли перенаправляется в заданный файл.
Пример использования:
"Текстовая строка" | Out-File -FilePath .file.txt
В этом примере в текущей папке PowerShell будет создан файл с именем file.txt и содержимым «Текстовая строка».
New-Item
Создание нового текстового файла в PowerShell возможно с помощью командлета New-Item. Пример команды, в которой создается текстовый файл file.txt, содержащий «Текстовая строка» в текущем расположении:
New-Item -Path . -Name "file.txt" -ItemType "file" -Value "Текстовая строка"

Set-Content и Add-Content
Ещё два командлета PowerShell для работы с текстовыми файлами:
- Set-Content — перезаписывает содержимое файла
- Add-Content — добавляет содержимое в конце выбранного файла
Их использование можно увидеть на примере следующей команды:
Add-Content -Path .file.txt -Value "Ещё одна текстовая строка"

Вывод (чтение) текстового файла в командной строке и PowerShell
Теперь перейдем к способам просмотреть текстовые файлы в командной строке или PowerShell. Как и в предыдущем случае, учитывайте, что для файлов, содержащих кириллицу, возможны проблемы с отображением символов в правильной кодировке.
TYPE
Самый простой вариант — использование команды TYPE с указанием пути к файлу, который нужно отобразить в консоли, например:
type file.txt

MORE
Если файл объемный и содержит большое количество строк, используйте команду more, например:
more file.txt
Выполнив команду, вы увидите часть содержимого текста, которая помещается в окне консоли, далее вы можете использовать следующие клавиши:

- Enter — для отображения следующей строки файла.
- Пробел — для отображения следующих строк документа, которые поместятся в активное окно консоли.
- P — Показать следующие N строк. После нажатия этой клавиши с последующим указанием количества строк, будет выведено соответствующее количество строк текстового документа.
- S — пропустить следующие N строк, работает аналогично предыдущему варианту.
- Клавиша «=» — для отображения текущего номера строки.
- Q — для прекращения выполнения команды more.
Get-Content
Вывести содержимое текстового файла в PowerShell можно с помощью Get-Content с указанием пути к файлу, например:
Get-Content file.txt

Также вы можете выводить определенные строки файла, с помощью команд вида (вывод первых или последних 10 строк соответственно):
Get-Content file.txt | Select-Object -First 10
Get-Content file.txt | Select-Object -Last 10
Или присвоить содержимое файла переменной и вывести конкретную строку:
$file_text = Get-Content file.txt
$file_text[2]

Помимо использования ручного ввода команд, вы можете использовать консольные текстовые редакторы — сторонние в версиях для Windows, такие как Vim, Nano, Kinesics Text Editor или даже старый встроенный edit.com (может отсутствовать в вашей версии системы и требовать патча NTVDMx64).
Создание файла, пожалуй, одна из самых тривиальных задач, которые вы выполняете на своем компьютере почти каждый день. Если вы пользователь Windows, вы, вероятно, делаете это через графический интерфейс.
Хотя на практике этот подход может показаться более простым, особенно если у вас нет опыта работы с CLI, у него есть свои недостатки. В отличие от способа CLI, который обеспечивает быстрый и эффективный способ создания файлов на вашем компьютере, подход GUI включает в себя несколько шагов, что делает его трудоемким и неэффективным.
Итак, вот руководство, которое проведет вас по различным методам, которые вы можете использовать для создания файла в Windows (будь то Windows 11, Windows 10, Windows 8 или Windows 7) с помощью командной строки.
Командная строка или CMD — это мощная утилита Windows, которая позволяет с легкостью выполнять различные системные операции на вашем компьютере. Он предустановлен в системе и позволяет запускать команды для множества действий, от управления файлами до запуска пакетных файлов для автоматизации задач.
Создание файлов является одной из таких задач, которую вы можете выполнить быстрее и эффективнее с помощью командной строки CMD, чем с помощью проводника. Но прежде чем мы перейдем к делу и продемонстрируем, как создать файл в командной строке, вы должны знать, как перемещаться по структуре каталогов Windows на нем, чтобы вы могли создавать файлы в нужной папке.
Навигация по файловой системе Windows с помощью командной строки
Чтобы перемещаться по файловой системе Windows с помощью CMD, сначала откройте командную строку. Для этого нажмите сочетание клавиш Windows + X и выберите в меню «Командная строка».
Затем введите команду dir, чтобы вывести список всех файлов и каталогов (или папок) внутри папки. После того, как вы определили папку, которую хотите открыть, введите следующую команду и нажмите Enter:
cd folder_name
Например:
cd Documents
Чтобы вернуться в родительский каталог, выполните:
cd ..
Для доступа к корневому каталогу:
cd
Пока мы на этом, вы также должны знать, что вы можете создавать каталоги (или папки) с помощью командной строки. Для этого используйте команду cd, чтобы перейти к папке, в которой вы хотите создать новую папку, и используйте следующий синтаксис:
mkdir directory_name
Например, чтобы создать каталог с именем MyDocs, запустите:
mkdir MyDocs
Наконец, когда вы находитесь в папке, в которой хотите создать файл, используйте любой из следующих методов для создания файлов с помощью CMD.
Создание файла с помощью команды echo
Команда echo отображает сообщения, которые вы вводите в окно CMD. Однако при использовании с оператором перенаправления (>) он удваивается как команда создания файла, которая создает файл из введенного вами текста.
Для создания файла с помощью команды echo откройте командную строку и введите команду, используя следующий синтаксис:
echo your_text_here > filename.extension
Например, если вы хотите создать текстовый файл с именем MyFile с текстом This is sample text и расширением .txt, вы должны запустить:
echo This is sample text > MyFile.txt
После создания файла убедитесь, что он был успешно создан, выполнив:
type filename.extension
Например:
type MyFile.txt
Создание файла с помощью команды copy con
В отличие от команды echo, которая с самого начала принимает от вас содержимое файла, который вы создаете, команда copy con использует несколько иной подход.
С ним вам нужно только изначально дать имя вашему файлу. Затем он открывает новый файл в текстовом редакторе, где вы можете заполнить его текстом.
Чтобы создать файл с помощью copy con, используйте следующий синтаксис:
copy con filename_with_extension
Например:
copy con MyFile.txt
Теперь вы попадете в файл в самом окне командной строки, где вы можете добавить к нему желаемый текст. Сделав это, нажмите Ctrl + Z, чтобы сохранить файл, и Ctrl + C, чтобы выйти из редактирования.
Создание файла в блокноте с помощью командной строки
Хотя оба метода, которые мы упоминали до сих пор, работают хорошо, они не идеальны, когда вы хотите ввести длинные текстовые абзацы в свой текстовый файл. Альтернативный способ справиться с этим — использовать Блокнот, который вы обычно используете для создания файлов, но через командную строку.
Для этого введите команду в окне CMD, используя следующий синтаксис, и нажмите Enter :
notepad filename.extension
Например, если вы хотите создать файл с именем SampleDoc, вы должны запустить:
notepad SampleDoc.txt
После этого CMD откроет файл в Блокноте. Вам будет предложено создать новый файл, поскольку введенный вами файл не существует. Нажмите Да, чтобы принять и создать файл.
Теперь, точно так же, как вы используете Блокнот, введите текст в файл и нажмите Ctrl + S, чтобы сохранить, и Ctrl + W, чтобы закрыть файл.
Создание нескольких файлов с помощью командной строки
В случаях, когда вы хотите создать несколько файлов внутри папки одновременно и заполнить их позже, вы можете использовать цикл for, как показано в следующем синтаксисе:
for /l %a in (1 1 10) do type nul > "%a.txt"
…где (1 1 10) указывает CMD выполнять задачу в последовательности от 1, с шагом от 1 до 10. Чтобы создать 20 файлов, замените 10 на 20 в вашей команде.
Если вы хотите добавить общее имя в начало каждого файла, а затем номер, вам нужно использовать следующий синтаксис:
for /l %a in (1 1 10) do type nul > "filename %a.txt"
… где вам нужно заменить имя файла на имя, которое вы хотите дать своим файлам.
Например, выполнение приведенной ниже команды создаст 10 пустых файлов со следующим синтаксисом имени: MyDoc-1.
for /l %a in (1 1 10) do type nul > "MyDoc-%a.txt"
Кроме того, если вы хотите создать несколько файлов с одним и тем же текстом, вы можете настроить команду так, чтобы она включала одно и то же действие. Для этого вместо включения do type nul вам нужно использовать do echo your_desired_text.
Например, если вы хотите создать 10 файлов с именами MyDoc-1.txt , MyDoc-2.txt,… и т. д. с помощью This is sample text as text , вы должны запустить:
for /l %a in (1 1 10) do echo This is sample text> "MyDoc-%a.txt"
…и они будут созданы в вашем текущем каталоге . .
Эффективное создание файлов в Windows с помощью командной строки
Методы, перечисленные в этом руководстве, должны помочь вам практически со всеми видами задач по созданию файлов в командной строке, будь то создание однострочных текстовых файлов, текстовых файлов с несколькими абзацами или даже нескольких файлов с настраиваемым текстом и именами файлов.
Таким образом, в зависимости от требований вы можете выбрать соответствующий метод и быстро и эффективно создавать файлы в Windows.

Здравствуйте, уважаемые читатели сайта itswat.ru. Если вам неизвестно, как через cmd создать файл, и в каких ситуациях это актуально, то данная статья будет вам особо полезна.
Командная строка позволяет реализовывать многие опции, в том числе и создание файла. В этом процессе нет ничего сверхсложного. Следует просто выполнять определённые шаги. Они и представлены в данном материале. Также дано само определение командной строки, поскольку некоторые пользователи не имеют о ней представления.
Содержание статьи:
-
- Определение
- Вопрос по запуску
- Специфики работы
- Создание новой папки
- Сотворение файла
Определение

Командной строкой (cmd) называется программная оболочка, которая является обязательной составляющей операционной системы (ОС). Она организует прямую взаимосвязь между компьютером и пользователем. Также помогает решить некоторые дилеммы, связанные с общим функционированием ПК и отдельного софта.
Яркие примеры её применения таковы:
- Заражение компьютера вирусами или программами-вредителями.
- Неполадки в системных файлах.
- Восстановление Windows (на сленге пользователей – «винды»).
- Корректировка опций в играх.
В неё необходимо прописывать команды, чтобы реализовать те или иные задачи. На эту процедуру тратится существенно меньше времени, чем при работе с графическим интерфейсом.
Работать с ней требуется очень внимательно и осторожно. В прописанных командах не должно быть ошибок. Иначе можно получить совершенно неожиданные результаты, преобразующиеся в дальнейшем в проблемы.
Вопрос по запуску
Перед решением основной дилеммы необходимо изучить версии активации командной строки. Варианты отличаются в зависимости от вида винды (XP, семёрка, восьмёрка или десятка).
Для вызова системного окошка со строкой нужны такие действия:
- Зажать синхронно две кнопки: «Win» (обозначается на клавиатуре флажком) и букву R. Принцип работает на Windows 7 и XP. На восьмёрке используется сочетание кнопок «Win» + X (английская буква).
- В появившейся графе пропишите cmd и нажмите «Enter».
Можно задействовать меню «Пуск». Наводите курсор в нижний левый угол и нажимаете левую кнопку мыши. Выберите графу «Все программы». Перейдя в раздел под названием «Стандартные», выберите «Командную строку».
Но такой вариант оптимален только для версий системы до Windows 10.
Сама работа в командной строке происходит по одному сценарию без зависимости от операционной системы. Отличия касаются только её вызова.
Например, если вас интересует, как создать файл в командной строке Windows 10, то в первую очередь вызовите её.
Для этого в меню «Пуск» выбираете разделе «Служебные»,а после этого – командную строку.
Есть и универсальный способ вызова для всех ОС. Он выражается в следующем алгоритме:
- Используя проводник, открыть диск с системной папкой (как правило его буквенное обозначение C) с виндой.
- Открывается папка «Windows», а в ней -«System32». Там и находится файл «cmd.exe». Это та самая командная строка.
- Этот файл запускается от администратора.
После данных действий можно создавать файл с применением команд.
Специфики работы
Для начала необходимо освоиться в перечне команд, которые пригодны для командной строки. Пропишите слово «help» и нажмите «Enter». Это клавиша служит для подтверждения всех команд и попадания на новой строке.
Если в строке требуется наличия скопированного текста, тогда в ней наведите курсор на любое пустое место и кликните правой кнопкой. Из появившегося меню выберите опцию «Вставить». Можно поместить текст комбинацией «Ctrl+V».
Чтобы скопировать слова из этой строки, выделите их левой кнопкой мышки и нажмите «Enter».
Для более удобной и оперативной работы можно все команды предварительно прописать в текстовом документе. Проверьте точность их написания. Затем просто копируйте и вставляйте их в нужные места.
Создание новой папки
Папка в данном контексте рассматривается так же, как каталог. Создать её нетрудно, знаю специальную команду.
Сначала указывается путь к директории, в которой появится новый файл. После чего прописывается команда md с именем нового каталога. Например: md papka.

Указанная команда это аббревиатура фразы make directory (в переводе -сделать каталог). Далее можно создать файл в папке, созданной только что, применив определённые команды. Обычно этот метод выбирают те, кому не подходят стандартные решения.
Сотворение файла
В данном примере рассмотрен вариант, как создать файл с расширением txt через cmd.
Не покидая необходимого каталога введите в строке следующее: «copy con filename.txt».
Здесь copy con – это команда копирования вводимой фразы в файл.

Далее становится доступным режим для ввода текста. Чтобы завершить сотворение файла, щёлкните на кнопку F6 и подтвердите операцию (клавишей «Enter»). В некоторых системах вместо F6 нажимается Ctrl+Z.
Как создать новый текстовый файл через cmd? Для этого вводится команда NUL> с именем файла. Пример на изображении:

Операцию можно повторять столько раз, сколько вам требуется файлов. Если такой надобности нет, то процедура завершается. Можно закрывать командную строку.