Unlike in previous versions of Windows, you’ll need to use the media creation tool to create an ISO file to install Windows 10. Make sure you have a license to install Windows 10, and then follow these steps:
-
On the Windows 10 download page, download the media creation tool by selecting Download tool now, then run the tool.
-
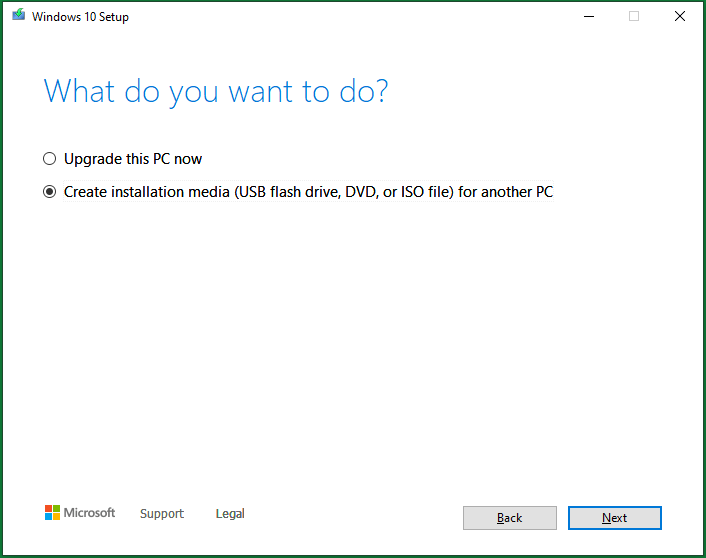
In the tool, select Create installation media (USB flash drive, DVD, or ISO) for another PC > Next.
-
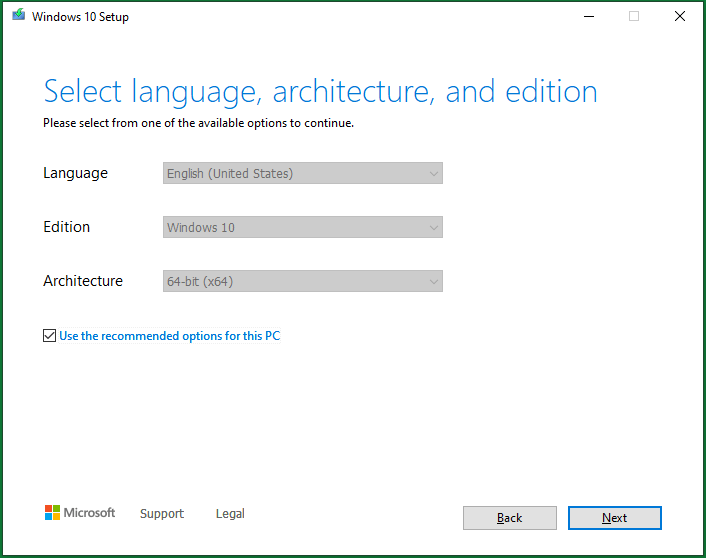
Select the language, architecture, and edition of Windows, you need and select Next.
-
Select ISO file > Next, and the tool will create your ISO file for you.
-
To use the ISO file as a backup for your PC or on another PC, burn it onto a DVD.
Download the tool and learn more
Need more help?

The built-in backup utilities in Windows are pretty solid. Let’s take a look at how to create a full backup image of your PC without the need for a third party utility.
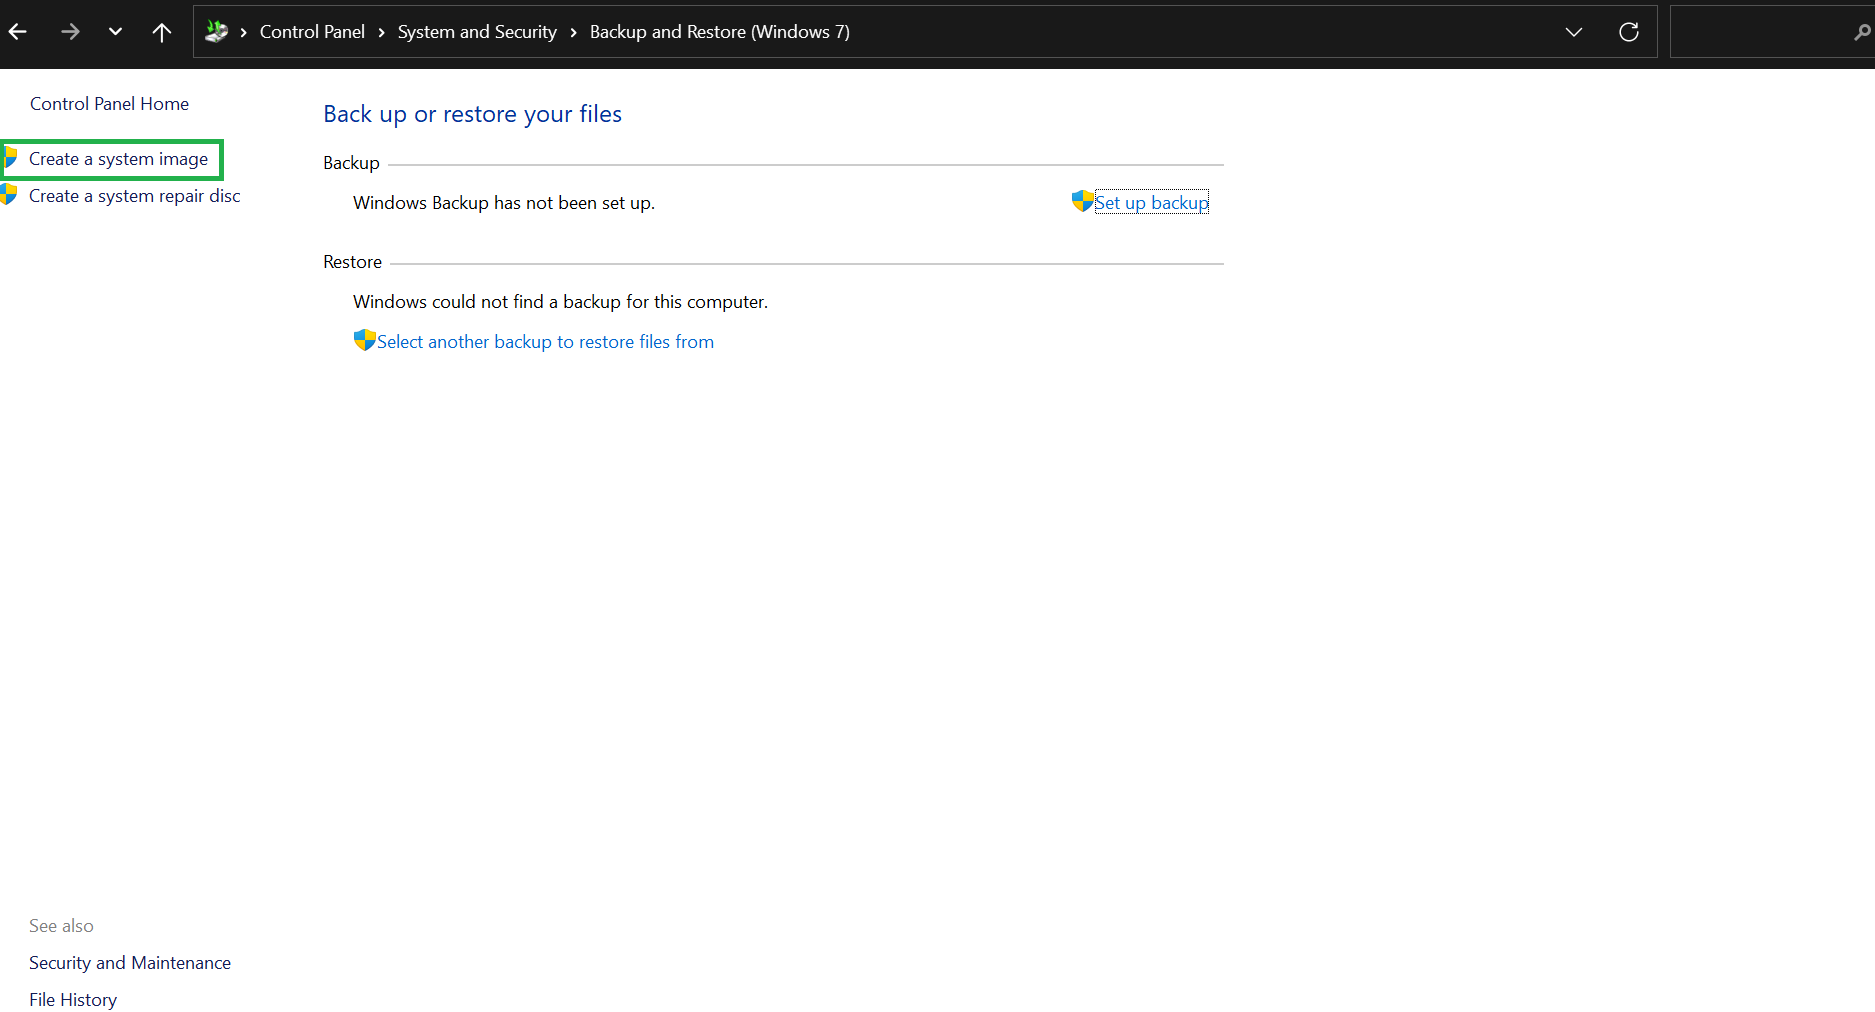
- Open the System Backup Image Tool. In Windows 10, head to Control Panel > Backup and Restore (Windows 7) > Create a System Image.
- Choose where you want to save the backup image.
- Select the drives to back up.
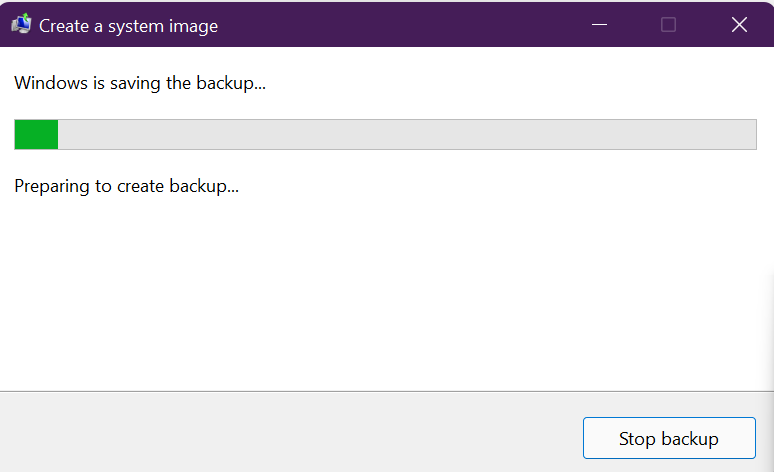
- Start the backup.
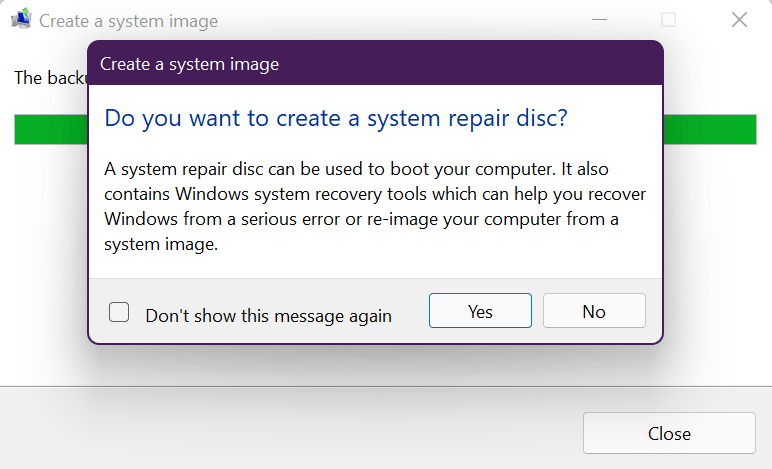
- Optionally, create a system repair disc that you can use to start your computer and restore a backup image.
Normal backup programs, like CrashPlan or Windows’ built-in File History feature, essentially copy your files to another location. A system image backup, on the other hand, is like a full snapshot of an entire hard drive. The advantage of a system image is that if a hard drive crashes, you can replace it, restore the image, and have your system right back to where it was when the image was captured. No need to reinstall Windows or your apps.
The biggest disadvantage with system image backups—other than taking a bit longer—is that you can’t restore the backup to a different PC. You’re creating an image of your full Windows installation and, since Windows is set up specifically for your hardware, it just won’t work as-is in another PC. It would be like trying to plug your hard drive into another PC and expecting everything to load well. With that in mind, though, image backups can still be really handy.
RELATED: How to Use All of Windows 10’s Backup and Recovery Tools
Third-party apps like like Macrium Reflect or Acronis True Image—at least, the paid versions—do offer some advanced features you won’t find in the Windows system image backup tool. For example, both support incremental backups, password protected images, and the ability to browse backups for individual files. But free is free, and if you don’t need the extra features, the Windows tool offers a solid way to perform a full backup of your system.
Step One: Open System Image Backup
The process of finding the System Image Backup tool is different in Windows 7 than in Windows 8 and 10, so we’ll show you to find the tool in all versions, and then explain how to create and use the system image.
Open System Image Backup in Windows 10
In Windows 10, hit Start, type “backup,” and then select the entry.

In the “Backup and Restore (Windows 7)” window, click the “Create a system image” link.
Open System Image Backup in Windows 8
In Windows 8, hit Start, type “file history,” and then select the “File History” entry.
In the “File History” window, click the “System Image Backup” link.
Open System Image Backup in Windows 7
Hit Start, click the arrow to the right of the “Getting Started” item, and then click “Back up your files.”
In the “Backup and Restore” window, click the “Create a system image” link.
Once you’ve opened the system image tool, the steps for creating a system image are the same in Windows 7, 8, or 10.
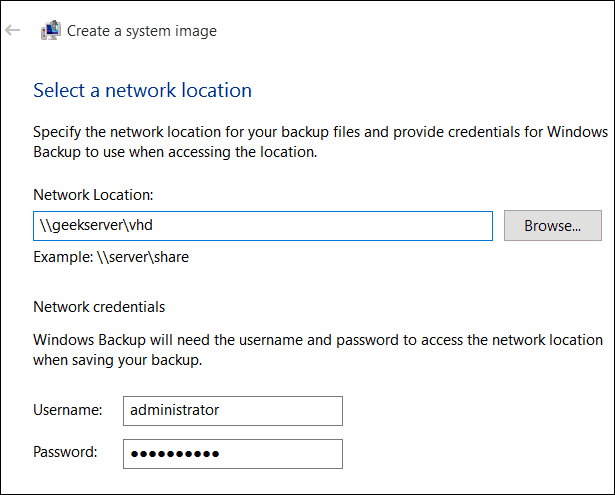
When you first open the tool, it will scan your system for external drives. You can then decide where you want to save the image. It can be to an external drive, multiple DVD’s, or on a network location. Select where you want to save your backup and then click “Next.”
By default, the tool only backs up your system drive. You can include other drives if you want, but remember that this will add to the size of the final image. Typically, we like to create separate image backups for each drive.
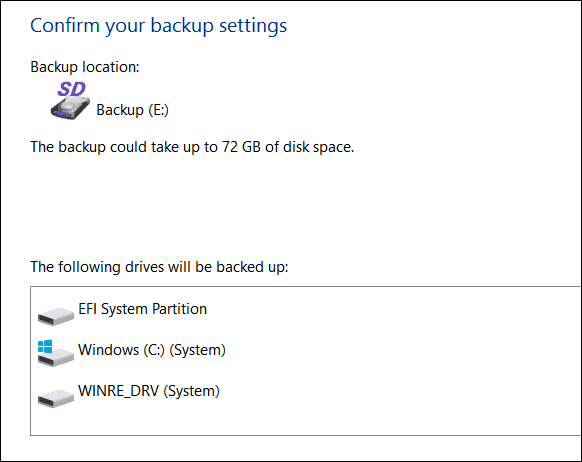
At the confirmation screen, notice the amount of space the image may take. If anything doesn’t look right, you can still go back and make adjustments. If everything looks okay, click the “Start Backup” button.
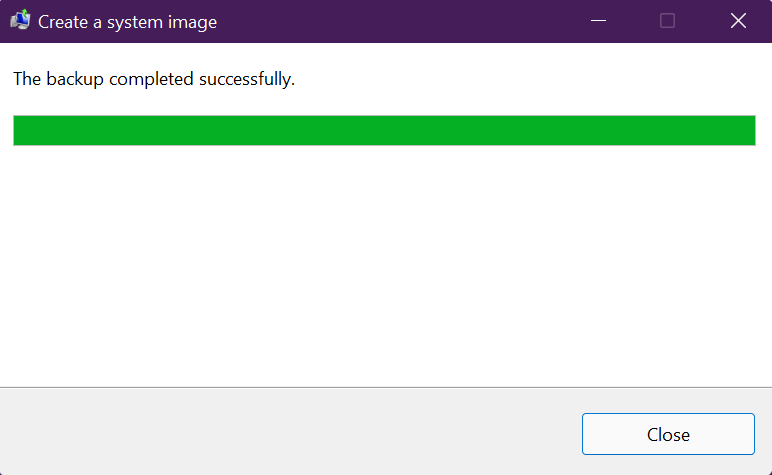
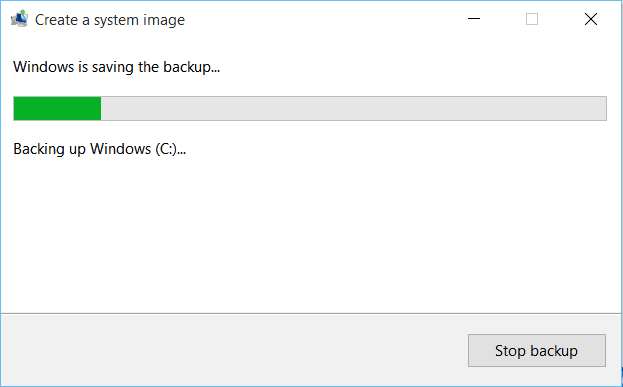
You’ll see a progress meter as the tool creates the image.
It can take a while. In this example, we’re backing up a drive with about 319 GB of data. It took about 2.5 hours when backed up to an external hard disk connected to our PC via USB. Your time will vary depending on your PC and the type of storage to which you’re backing up.
Step Three: Create a System Repair Disc
RELATED: How to Create and Use a Recovery Drive or System Repair Disc in Windows 8 or 10
When the backup is complete, Windows gives you the option to create a system repair disc. You can use this disc to start your PC and restore from your image backup in the event you ever need to replace your hard drive and can’t start Windows. We highly recommend you go ahead and create the disc, then label and store it in a secure location.
Select the drive you want to use to create the disc and then click the “Create Disc” button.
When it comes time to restore the image, you can start your PC from the recovery disc to get access to a number of recovery tools—including “System Image Recovery.”
RELATED: How to Restore System Image Backups on Windows 7, 8, and 10
Creating an image backup can take some time, so it’s best to do it when you won’t need your computer for a few hours—or even overnight. And should the need ever arise when you need to put that backup to use, be sure to check out our full guide to restoring image backups in Windows.
READ NEXT
- › USB Flash Drive vs. External Hard Drive: Which Is Better?
- › Disk Cleanup is Going Away in Windows 10 and We Miss It Already
- › 4 Ways to Quickly Install Your Desktop Programs After Getting a New Computer or Reinstalling Windows
- › Create a System Repair Disc in Windows 7
- › How to Upgrade from Windows 7 or 8 to Windows 10 (Right Now)
- › What You Need to Know About Creating System Image Backups
- › What’s New in Windows 10’s Fall Creators Update, Available Now
- › This Huge Curved Ultrawide Monitor From LG Is $337 Today
This article published by MiniTool corporation teaches you three methods to convert Windows existing installation into portable ISO. It also introduces you to how to make use of the created ISO file and the benefits of using an ISO file.
About Create Windows 10/11 ISO Image from Existing Installation
ISO image here is a file that contains all operating system-related items. It includes everything that needed to boot up a computer or install the OS. To create a Win10/11 ISO image from the existing installation means to make a system image file based on the current Windows 10/11 OS.
Then, how to create Windows 10 ISO from existing installation? There are several methods.
Usually, you have to rely on a professional and powerful tool to create a system ISO. Such tools can pick up everything needed to build an image file from your computer and make sure the created ISO image is bootable. Below will take MiniTool ShadowMaker for example to show you how to make a bootable iso of existing windows installation.
Free Download
Step 1. Download, install, and launch MiniTool ShadowMaker on your computer. If it pops up asking you for purchase, click Keep Trial to keep using it freely.
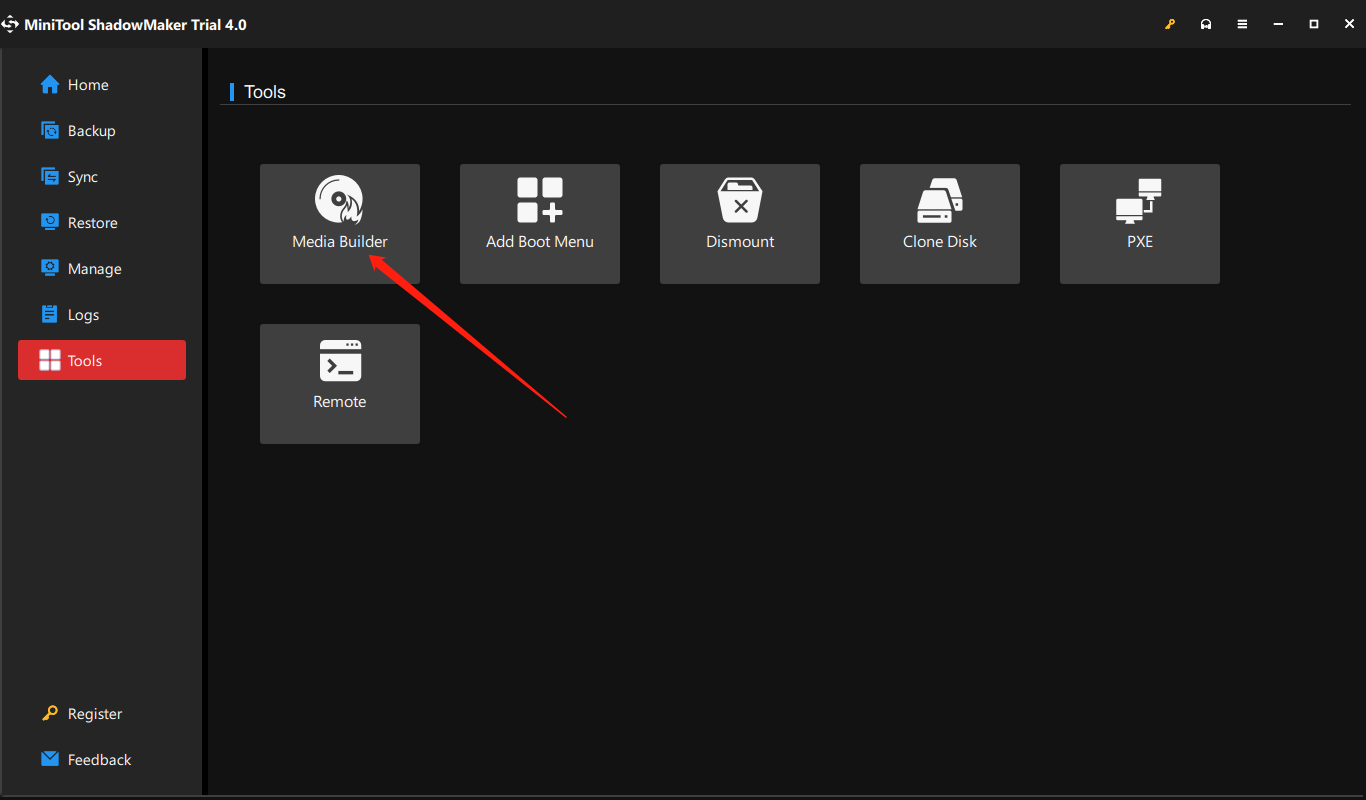
Step 2. When entering the main interface of the program, select the Tools option.
Step 3. In the Tools tab, choose Media Builder.
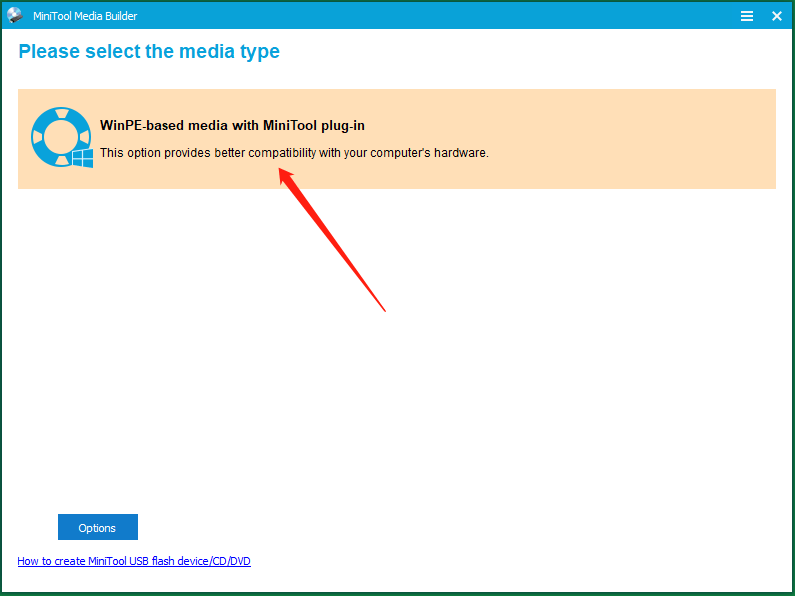
Step 4. In the pop-up new window named MiniTool Media Builder, click on WinPE-based media with MiniTool plug-in to select it.
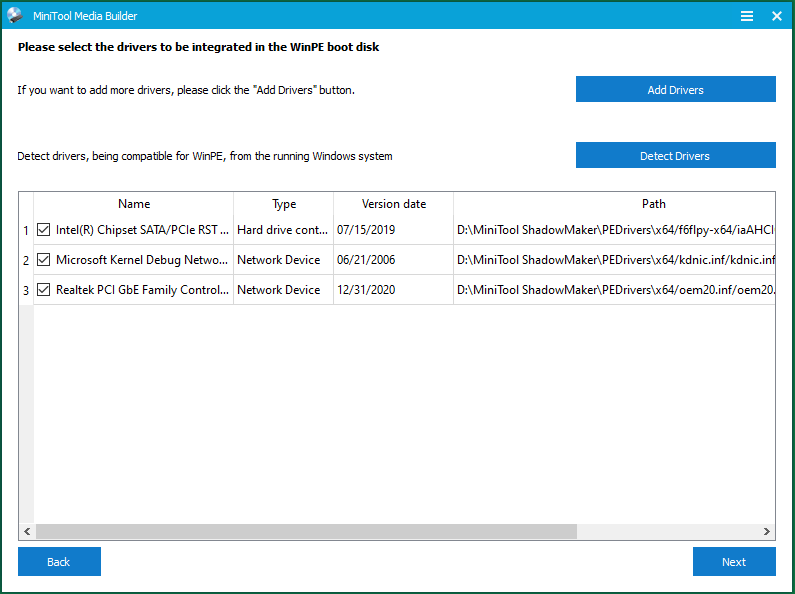
Step 5. There is an Options button in the lower-left for you to specify which drivers to be included in the Windows 10/11 ISO image.
Add Drivers – To manually add drivers on your computer into the upcoming ISO file.
Detect Drivers – To automatically detect drivers that are compatible with WinPE from the running Windows.
Step 6. Next, select ISO File and choose a local location to save the ISO. It will start to create the Windows ISO immediately after you pick up a storage address.

Besides creating ISO files, MiniTool ShadowMaker also allows you to create bootable USB flash drives, CDs, or DVDs.
Step 7. Wait until the process finishes. It won’t take too long (usually within 10 minutes). Or, you can do your other business during the task is processing.
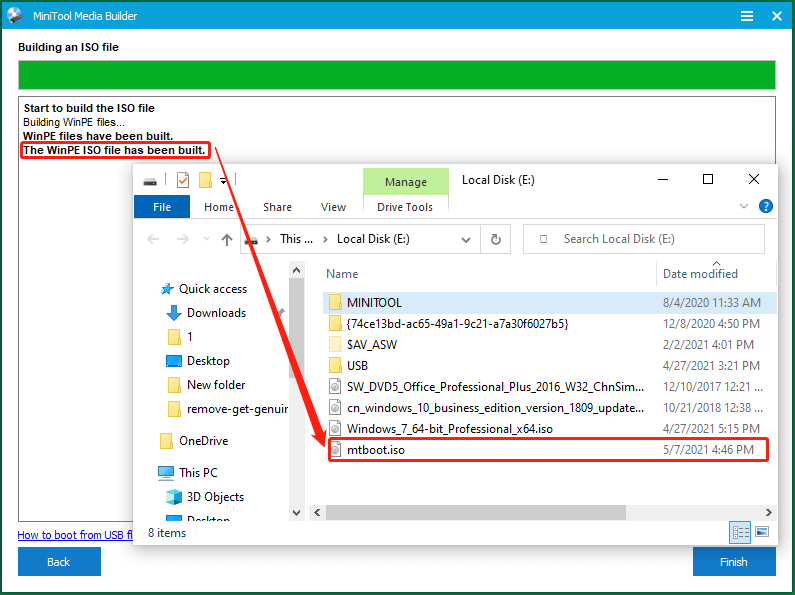
Finally, you can see the crated Windows 10/11 ISO image in the location you choose.
Besides creating a Windows ISO image from the existing installation, MiniTool ShadowMaker also enables you to back up files/folders, partitions/volumes, system, and hard disk drives. Actually, MiniTool ShadowMaker is more a data backup app than a bootable media creator.
The Windows Media Creation Tool is specially designed for building installation media or upgrading the system to Windows 10/11. As for the installation media, you can use it to install Windows 10/11 on a different PC, a new copy, a clean installation, or just reinstallation.
Before starting, you are required to have a license to install Windows 10/11 with the Windows media you are going to create. Then, you can firstly download Windows Media Creation Tool on your computer.
Step 1. Click on the downloaded MediaCreationTool20H2.exe file to run it.
Step 2. Select Accept to agree to the applicable notices and license terms to continue.
Step 3. Choose to Create installation media (USB flash drive, DVD, or ISO file) for another PC in the What do you want to do screen.
Step 4. Select language, architecture, and edition for the Windows media. It will detect your current settings and select them as default for you. If you would like to change those options, just uncheck the Use the recommended options for this PC and specify new settings for the Windows media.
Step5. Choose ISO file in the Choose which media to use screen. Then, click Next to select a location on your local machine to save the Windows 10/11 ISO image.

You will need to burn the ISO file to a DVD later before making use of it to install the system.
Step 6. Wait until the system image creation completes. It will take a certain period of time depending on the different versions of Windows 10/11. For me, it costs me about 35 minutes to finish the task. Yet, you can work on your other business during the task with only a slower computer performance.

When it finishes, you can continue to use this tool to burn the created ISO file to a DVD. The detailed guide will be described below.
Besides the MiniTool ShadowMaker mentioned above, the MiniTool Media Builder is also embedded in MiniTool Partition Wizard. Therefore, you can also rely on MiniTool Partition Wizard to build Windows 10/11 ISO images from an existing installation.
Free Download
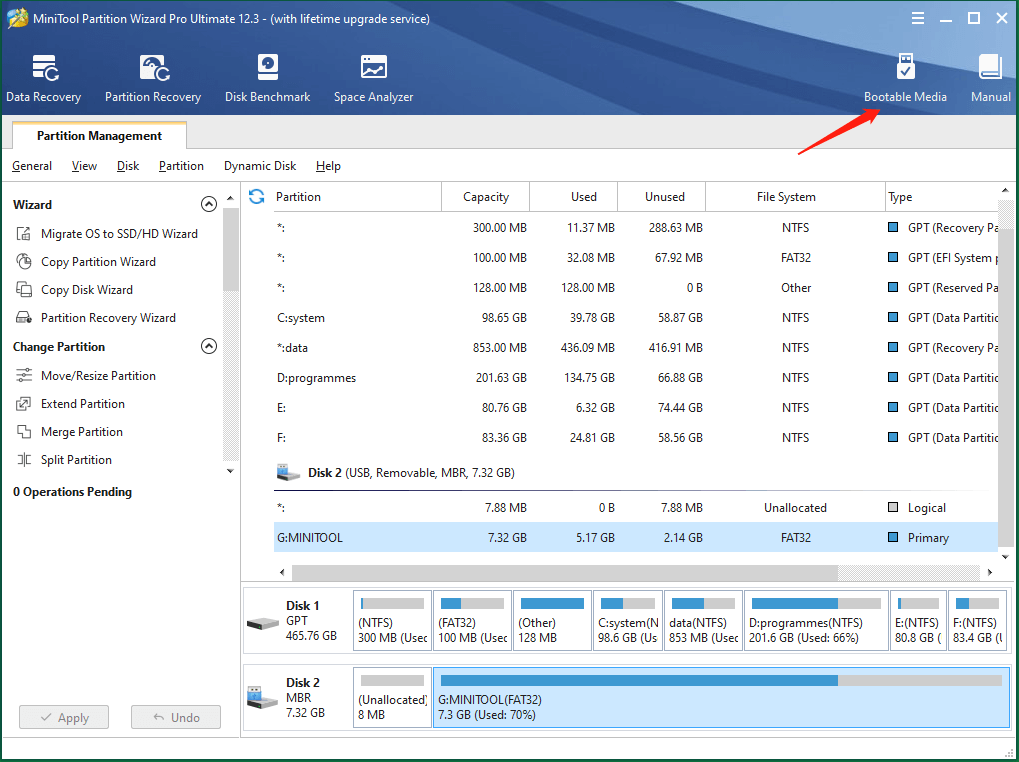
The way to make system ISO on MiniTool Partition Wizard is similar to that of with MiniTool ShadowMaker. First of all, download and install MiniTool Partition Wizard on your computer. Next, open the program and click the Bootable Media icon on the upper right. Then, the MiniTool Media Builder window will pop up and just follow the guide in Way 1.
Wonderful, I have learned all 3 ways to build Windows 10/11 ISO images from existing installation! All of them are easy to operate and workable!Click to Tweet
Use the Windows 10/11 ISO Image Created from Existing Installation
In general, there are two ways you can make use of the Win10/11 ISO image file.
Case 1. Burn ISO file into CD/DVD/USB
No matter in which way you create the Win10/11 ISO, you can burn it into a CD, DVD, or USB and then rely on the DVD, CD, or USB to install Windows 10/11 or something like that.
You will need a professional ISO burner. The Windows Media Creation Tool itself is also an ISO burner. So, you can continue to use it to burn the created Windows 10/11 ISO to a DVD or USB.
For the first place, insert a USB or DVD into your machine. The target disc will be overwritten and the data on it will be deleted. So, make sure you have moved out all important files before using it to store the ISO image. A blank disc is recommended here.
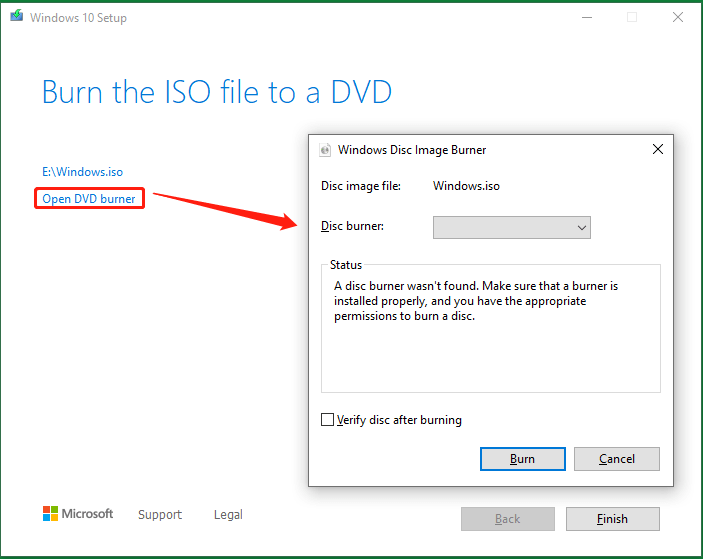
Actually, when the media creation task completes, Windows Media Creation Tool will provide you two options, one for opening the location where the created ISO is stored and one for launching the DVD burner. Just click the Open DVD burner option, select the target disc in the new Windows Disc Image Burner window, and click Burn to start the task.
Tip:
- You can check the integrity of the burned disc by ticking the Verify disc after burning.
- If you are informed that the disc image file is too large while burning a DVD from an ISO file, you will need to use Dual Layer (DL) DVD Media.
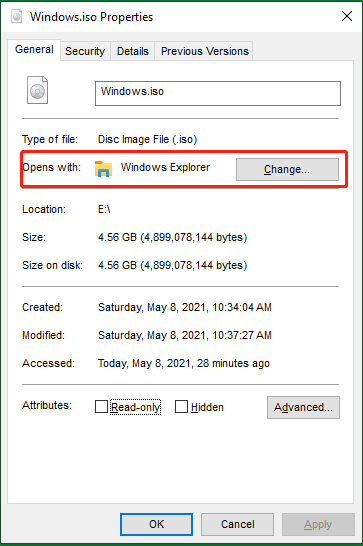
You can also access the Windows Disc Image Burner by right-clicking on the created Windows ISO file in its saved location and select Burn disc image. If you cannot see the option, you should first go to the ISO file Properties, and change the Open with app of the ISO file to Windows Explorer in the General tab. You need to click Apply to save the changes.
You can also use other applications to burn the created Windows ISO to CD/DVD such as UltraISO. Also, you are able to burn the ISO image into a USB disk with third-party tools like Rufus.
After burning the bootable disc, you need to change computer boot order settings to switch from the current boot disk to the new burned media, restart your computer to boot it from the bootable media, and enter the Windows installation. In the Install Windows screen, personalize your language, time, and keyboard preferences, select Next, and click Install Windows.
Case 2. Mount Windows 10/11 ISO Image
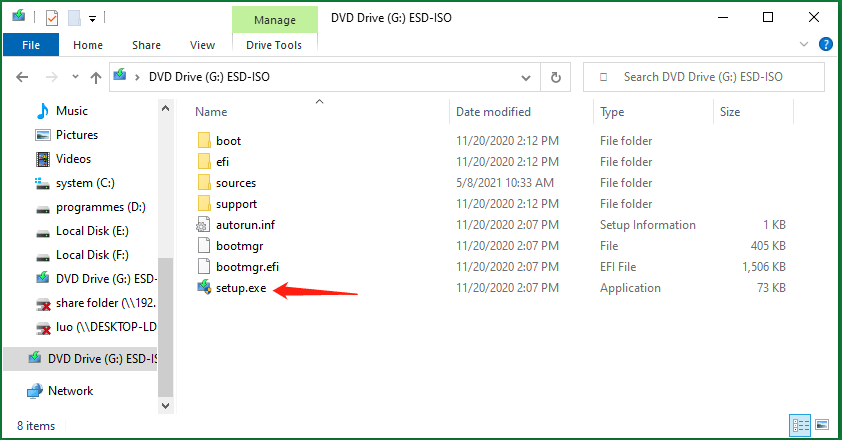
Besides, you can directly make use of the created system ISO. Easily, right-click on the ISO file and choose Mount. Within the mounted DVD drive, double-click the setup.exe to trigger the Windows 10/11 Setup. Then, follow the on-screen guidance to finish upgrading to Windows 10/11.
Actually, you can directly create a bootable CD/DVD/USB with the software above. Doing that, you do not need to further burn the ISO image into a physical disc or USB.
Why Need to Create Windows 10/11 ISO Image from Existing Installation?
Just as mentioned in the above content, the Windows ISO image file can be used to install a system or boot up dead computers. Compared with the bootable USBs, CDs, or DVDs, which has the same function as the ISO files, ISO images have the following advantages.
- No need for extra devices like CD, DVD, or USB.
- You can view its contents by mounting it as a virtual drive.
- You can run the ISO file on a virtual machine.
To install Windows 10/11, you can also make a system backup image and restore it to its original location (reinstallation) or another computer (clean installation) with MiniTool ShadowMaker. Yet, an ISO file is better than a backup image file for:
- Easier to be deployed on any computer.
- You can view its contents by mounting it as a virtual drive.
OK, that is all I want to share about creating ISO images from Windows build. If you have other methods that can achieve the same purpose, please share them with our readers. Or, if you have anything want to say about this topic, feel free to leave a message in the below comment zone. And, if you encounter any problem while using MiniTool products, just contact our support team at [email protected].
PS: Most of the contents of this article apply to Windows 7, Windows 8, and Windows 8.1. Surely, you can create Windows 7 ISO image from existing installation by MiniTool ShadowMaker or MiniTool Partition Wizard.
Also read
- [Solved] How to Download TikTok Video Without Filter?
- 5 Best Keyboards for Video Editing for Mac/Windows in 2023!
- 30 vs 60 FPS Video Recording: Which Is Better & How to Record?
- [2 Ways] How to Circle Crop Photo by Office Apps (Word)?
- [7 Fixes] Windows 11 Can’t Find Camera or Camera Doesn’t Work
(Image credit: Future)
As part of your recovery plan, a full backup should be at the top of your list since it is the best strategy against hardware failure, apps, upgrade problems, and malware attacks that can corrupt your files and damage your Windows 10 installation. If you are not proactively creating full backups, you will be putting at risk documents, priceless pictures, and configurations you have spent long hours setting up.
If you use Windows 10, you have many different methods to create a backup. For example, you can use third-party solutions to create a backup of the entire system, copy files to an external drive manually, or upload them to a cloud storage service like OneDrive. However, if you do not want to use manual methods or third-party tools, you can always create a full backup using the legacy built-in System Image Backup tool.
A system image is another way to say «full backup,» as it contains a copy of everything on the computer, including the installation, settings, apps, and files. Usually, you will find this tool better suited to restore the entire system from critical hardware or software problems, such as hard drive failure or when trying to roll back to a previous version of Windows 10.
This guide will walk you through creating a full backup with all your custom settings, apps, files, and installation using the system image tool.
How to create a backup with system image tool on Windows 10
The system image tool allows you to create a full backup to an external drive or network-shared folder. However, it is best to use removable storage, which you can disconnect and store in a different physical location.
Quick note: The System Image Backup tool for Windows 10 is no longer a maintained feature, but you can still use it for the foreseeable future. The instructions outlined in this guide are meant to create a temporary full backup while the feature is still available. You can also read this guide with alternative ways to back up your computer.
To create a full backup of Windows 10 with the system image tool, use these steps:
- Open Settings.
- Click on Update & Security.
- Click on Backup.
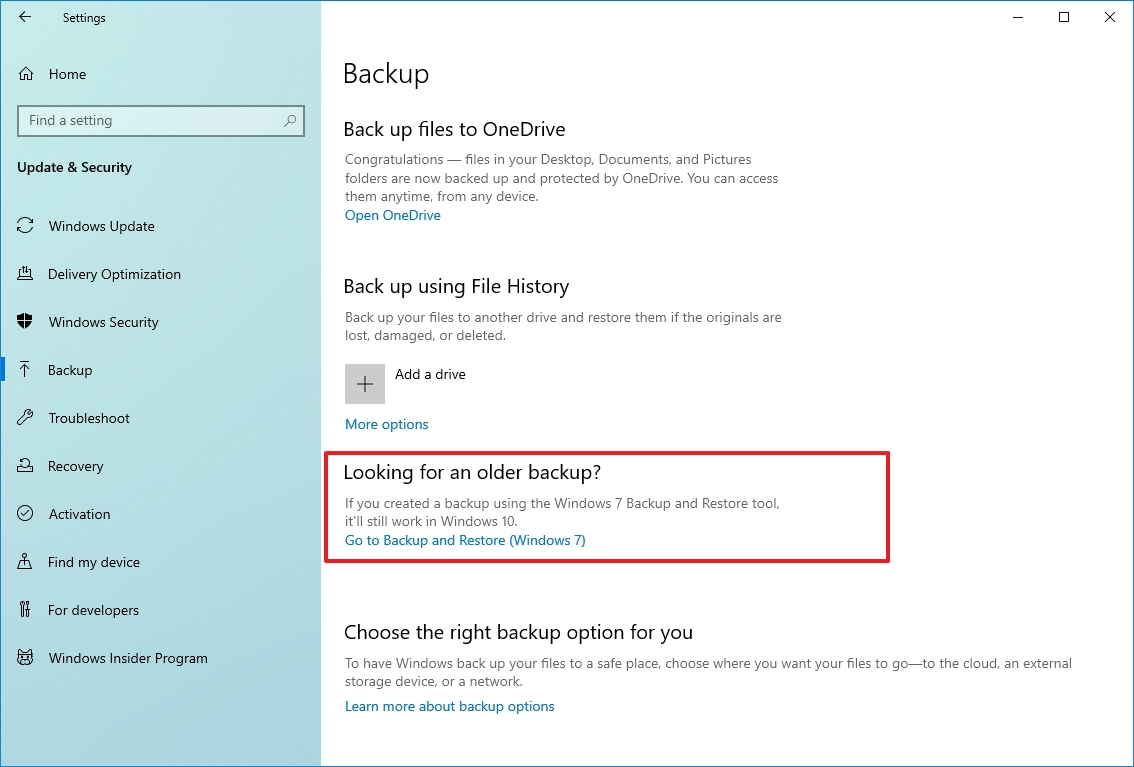
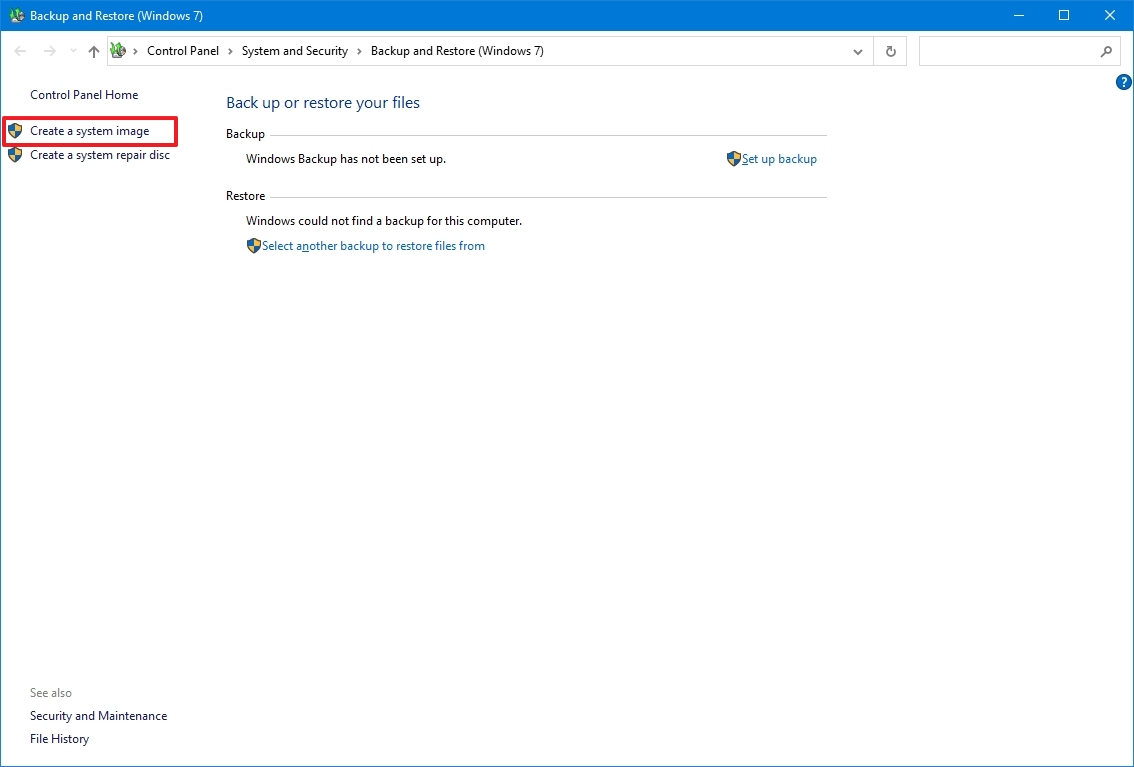
- Under the «Looking for an older backup?» section, click the «Go to Backup and Restore (Windows 7)» option.
- Click the «Create a system image» option from the left pane.
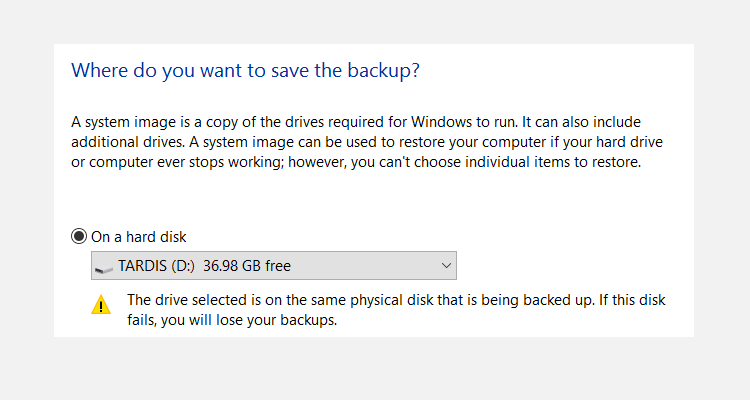
- Select the «On a hard disk» option.
- Use the «On a hard disk» drop-down menu and select the location to export the Windows 10 full backup.
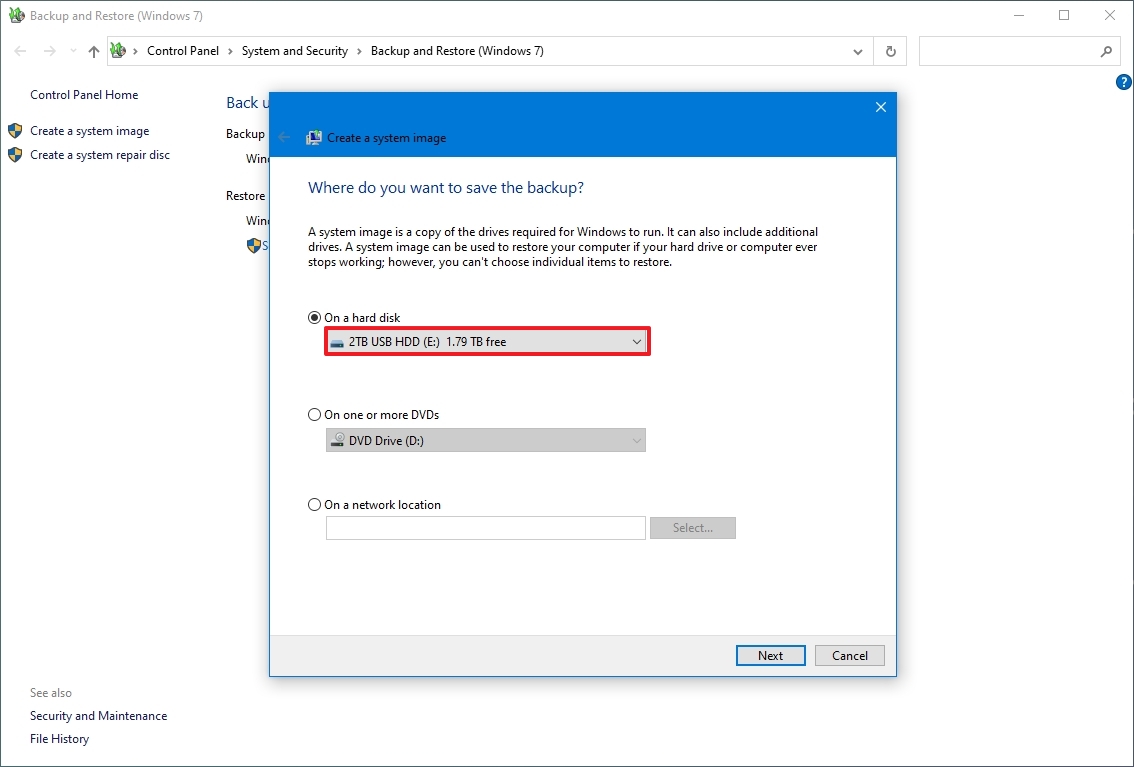
- Click the Next button.
- (Optional) Select any additional hard drives to include them in the backup.
- Click the Next button.
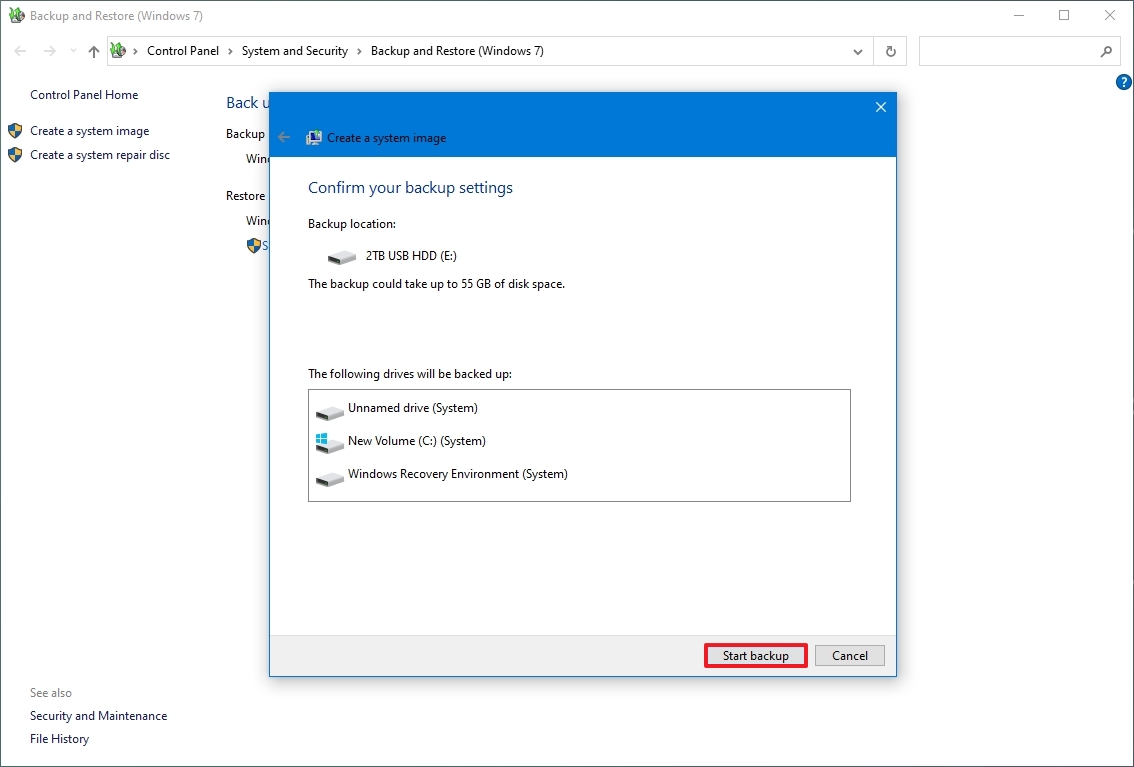
- Click the Start backup button.
- Click the No button.
- Quick note: You’ll also receive a prompt to create a system repair disc, but because most devices no longer include an optical drive, you can skip it. If you must restore the machine, you can use a USB installation media to access the recovery environment.
- Click the Close button.
Once you complete the steps, the tool will create an image of the entire system that includes everything on the primary hard drive and other drives you may have selected.
While the backup is in progress, you can continue working on the device since it uses the «Shadow Copy» feature to backup files even if files are open and apps are running.
After the process, you can disconnect and store the external drive safely. You may consider keeping the backup in a different physical location if you have valuable data.
How to restore a backup with system image tool on Windows 10
If you need to replace the hard drive or hardware failure occurs, you can use one of the backups to recover the device and files.
To restore a backup on Windows 10, use these steps:
- Connect the drive with the full backup to the device.
- Connect the Windows 10 USB bootable drive to the computer.
- Start the computer.
- On the USB bootable drive startup prompt, press any key to continue.
- Quick tip: If the device does not start in the Windows Setup wizard, you will need to access the Basic Input/Output System (BIOS) or Unified Extensible Firmware Interface (UEFI) to change the boot order settings. You can use this guide to access the BIOS/UEFI, but the steps are usually different per manufacturer and device model. It is recommended to check your manufacturer support website for more specific details.
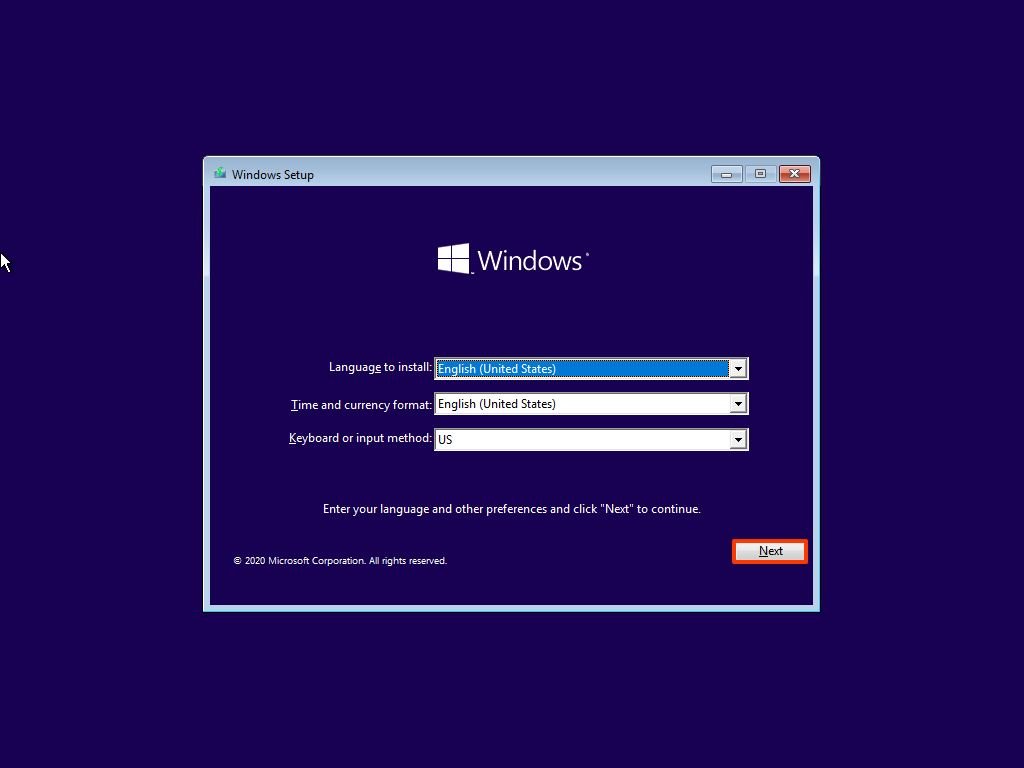
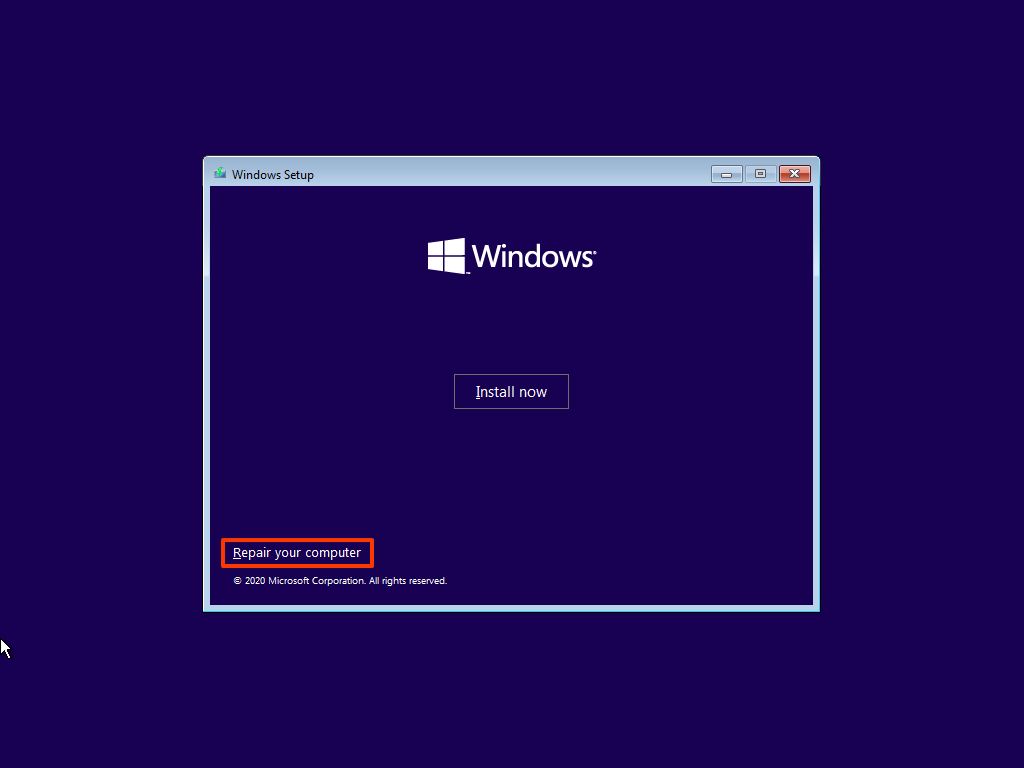
- On the «Windows Setup» page, click the Next button.
- Click the «Repair your computer» option from the bottom-left corner of the screen.
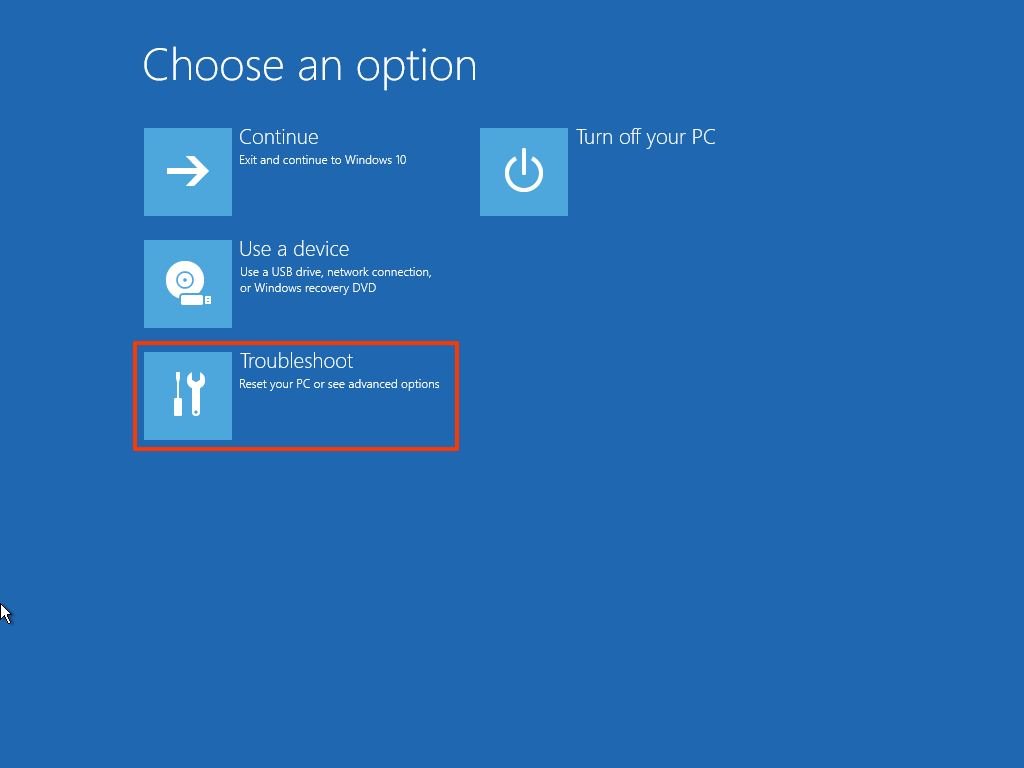
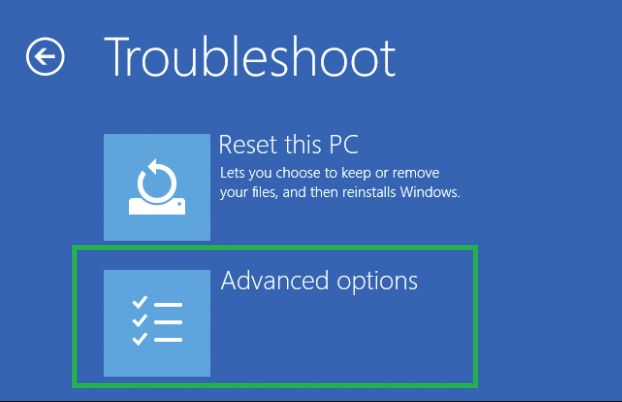
- Click the Troubleshoot option.
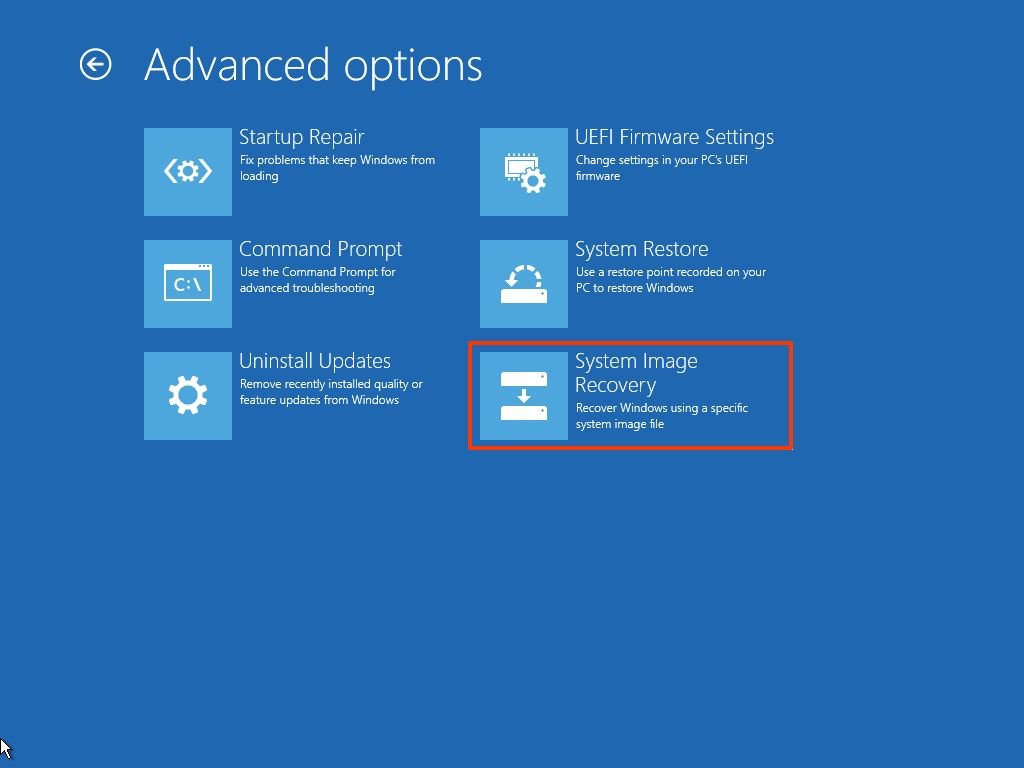
- Click the «System Image Recovery» option.
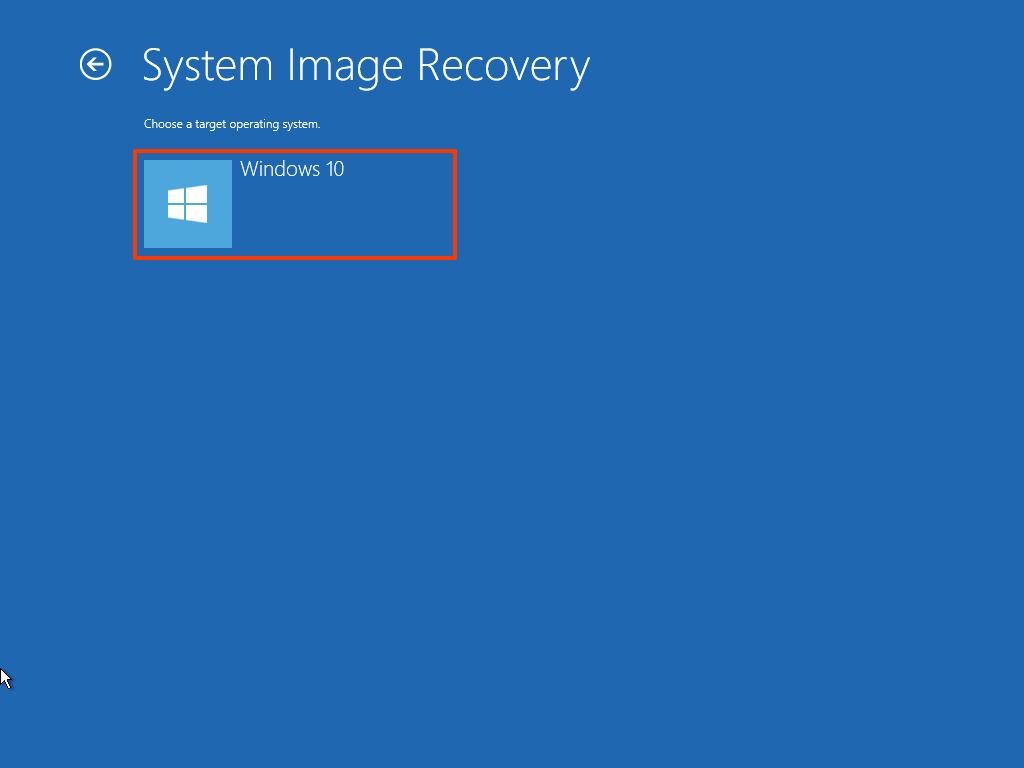
- Select the Windows 10 option as the target operating system.
- On the «Re-image your computer» page, select the «Use the latest available system image» option.
- Quick tip: You can use the «Select a system image» option if you have multiple backups and you are trying to restore an older version of the system and files.
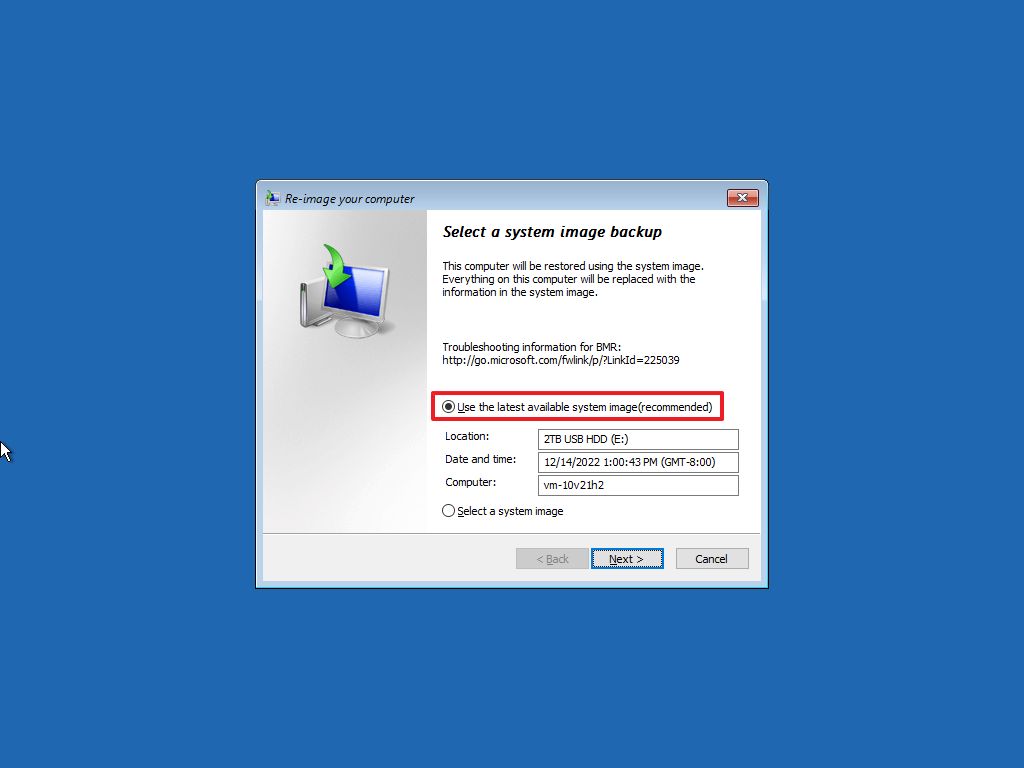
- Click the Next button.
- (Optional) Carefully select the «Format and repartition disks» option before restoring the backup (if you are restoring the backup on a new drive).
- Quick tip: If you choose this option, use the Exclude disks option to prevent formatting secondary drives that may contain data.
- (Optional) Check the «Only restore system drivers» option (if the backup contains a copy of multiple drives and you only want to restore the operating system).
- Click the Next button.
- Click the Finish button.
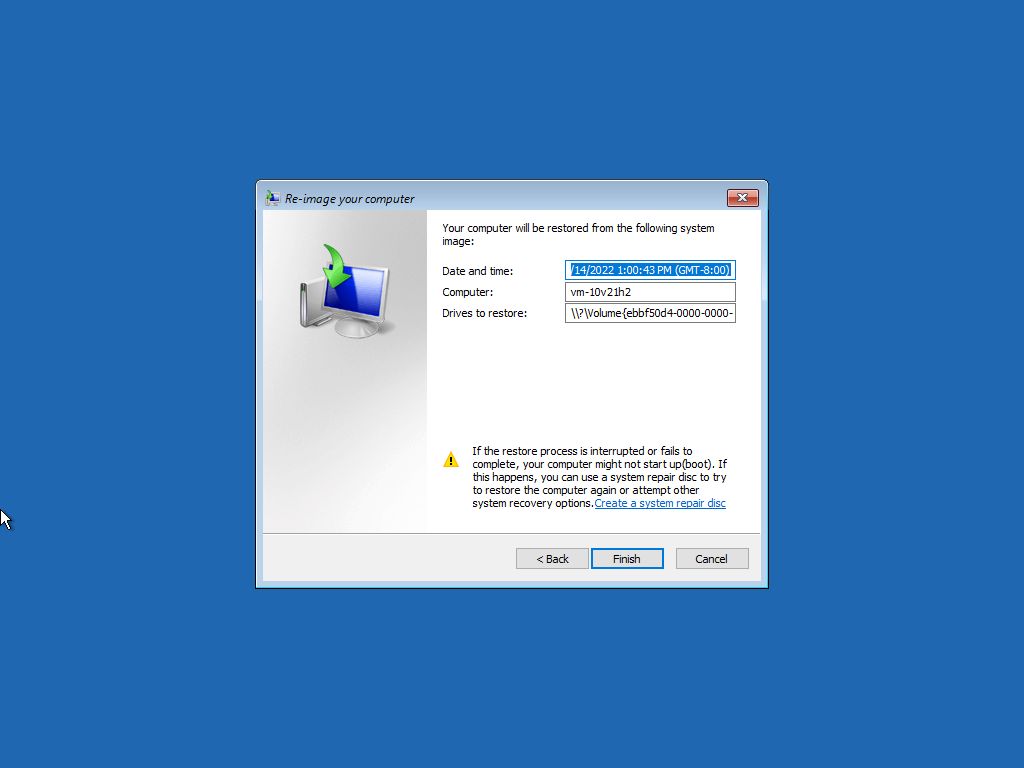
- Click the Yes button.
After you complete the steps, the recovery process will start on the computer. The time to finish the restoration will depend on the amount of data and hardware configuration.
If you are about to restore a device, do not interrupt the process, as it can cause the backup to fail, making it unbootable. It is always recommended to have the laptop connected to a power source and a desktop computer to an uninterruptible power supply (UPS) to avoid problems.
Once the backup has been restored, open Settings > Update & Security > Windows Update, and click the Check for Updates button to quickly install any missing security updates.
Although there are many other backup solutions, you still have many reasons to choose the System Image Backup tool. For example, when you do not have another solution and need a recovery plan, when you are about to upgrade to a new version or make system changes. Or when you are about to replace the main hard drive or need a quick way to transfer the installation and files without reinstallation.
It’s also a good idea to periodically create a backup of your computer in case the unexpected happens, and you need to recover from system or hardware failure, malware, ransomware, or hacker attacks.
One thing to keep in mind with this tool is that it is meant to recover the entire system, not individual files and settings. If you want to keep updated copies of your files, you should be using other solutions, such as OneDrive or File History. Also, you need to be proactive about creating backups because you can only recover the system with the files and settings until the last backup. Anything after the full backup won’t be available during recovery.
More resources
For more helpful articles, coverage, and answers to common questions about Windows 10, visit the following resources:
- Windows 11 on Windows Central — All you need to know
- Windows 10 on Windows Central — All you need to know

(opens in new tab)
Cutting-edge operating system
A refreshed design in Windows 11 enables you to do what you want effortlessly and safely, with biometric logins for encrypted authentication and advanced antivirus defenses.
Get the best of Windows Central in in your inbox, every day!
Mauro Huculak is technical writer for WindowsCentral.com. His primary focus is to write comprehensive how-tos to help users get the most out of Windows 10 and its many related technologies. He has an IT background with professional certifications from Microsoft, Cisco, and CompTIA, and he’s a recognized member of the Microsoft MVP community.
Содержание
- Способ 1: UltraISO
- Способ 2: PowerISO
- Способ 3: CDBurnerXP
- Способ 4: ImgBurn
- Создание загрузочной флешки/диска с Windows 7
- Вопросы и ответы

Некоторые пользователи могут столкнуться с необходимостью записи установочных файлов операционной системы Windows 7 в качестве ISO-образа, чтобы в дальнейшем создать загрузочную флешку или диск для инсталляции ОС. Случается такая ситуация редко, поскольку сами файлы инсталляции часто распространяются уже в виде готовых образов, однако если такая надобность все же возникла, справиться с ней помогут специальные программы для создания ISO, о которых мы поговорим далее.
Способ 1: UltraISO
Сегодня мы возьмем за пример четыре разных программных обеспечения, чтобы каждый пользователь нашел подходящее для себя. Первой на очереди выступит софт под названием UltraISO, который распространяется платно. В бесплатной версии имеется ограничение на объем записываемых файлов, поэтому учитывайте это при загрузке.
Скачать UltraISO
- Для начала нажмите по кнопке выше, чтобы перейти к приобретению или загрузке программы. После установки убедитесь в том, что на локальном хранилище находятся все необходимые для записи файлы, поскольку наличие каждого из них является обязательным, а нарушение целостности приведет к проблемам с дальнейшей инсталляцией ОС.
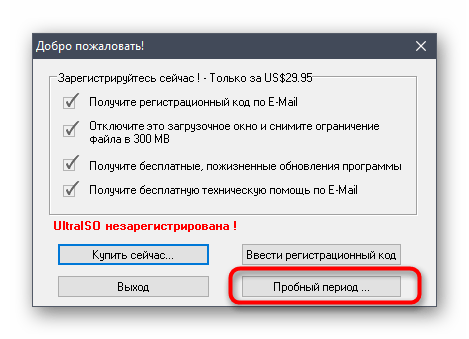
- Запустите UltraISO и начните пробный период, если вы не приобрели лицензию.
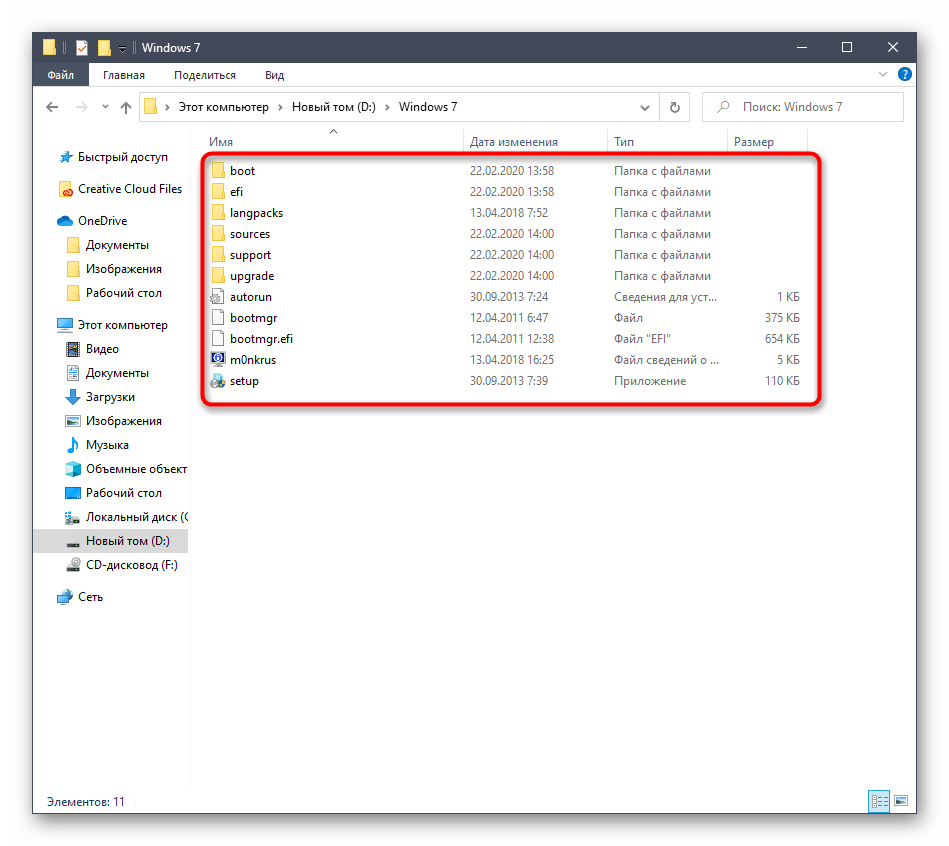
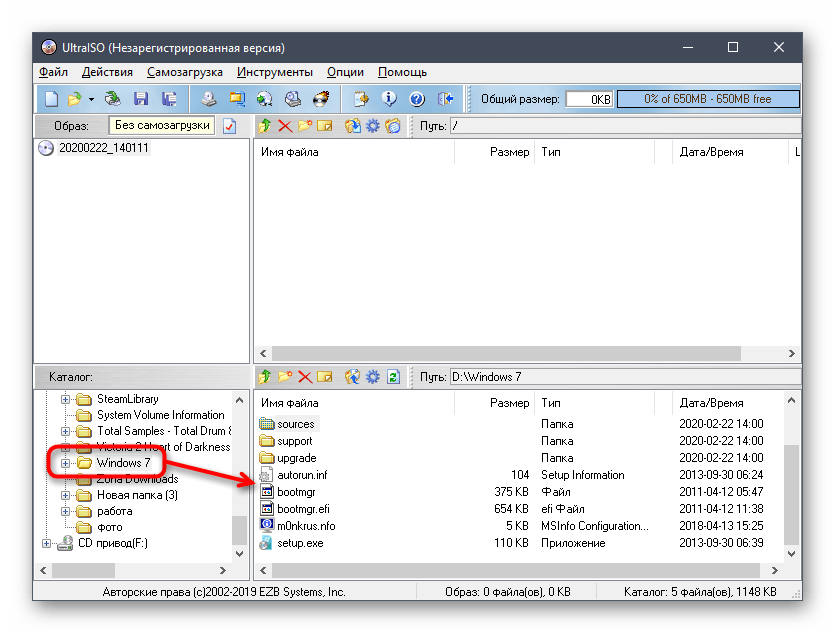
- Мы предлагаем воспользоваться встроенным обозревателем для добавления файлов. Вам нужно лишь раскрыть соответствующий раздел жесткого диска и отыскать там директорию с объектами Виндовс.
- Все они отобразятся в правой части обозревателя, а это означает, что можно переходить к добавлению файлов для образа.
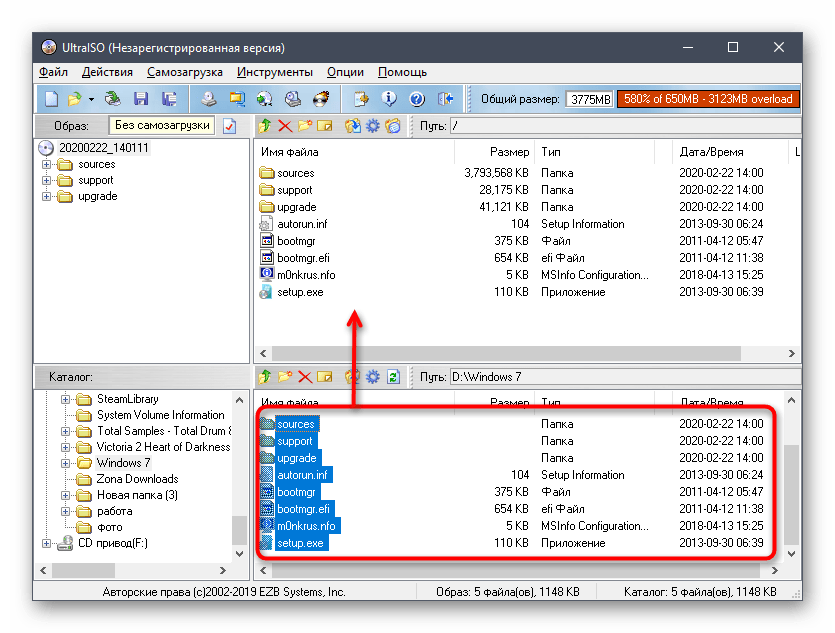
- Выделите все элементы и с зажатой левой кнопкой мыши перенесите их на верхнюю часть. Если они будут отображаться в этой части, значит, перемещение прошло успешно.
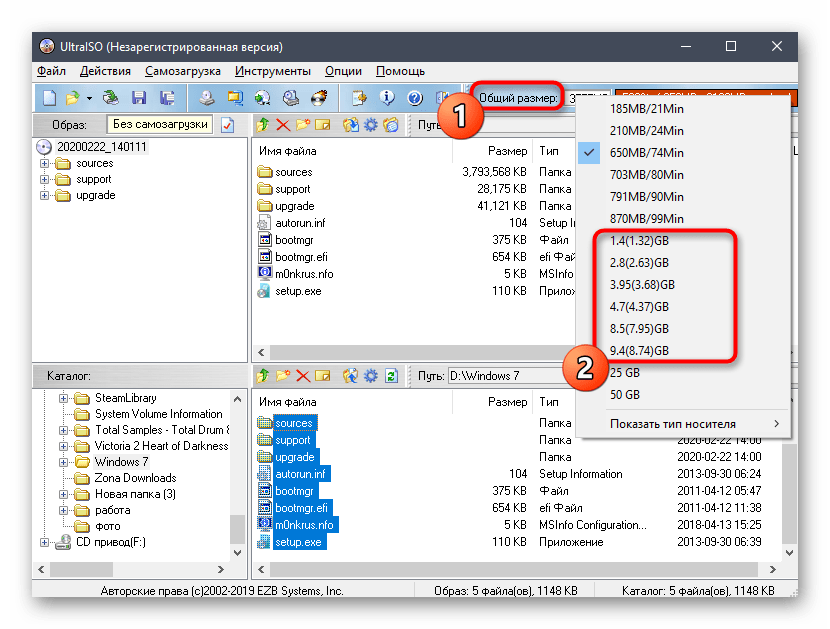
- Изначально размер виртуального диска выбран 650 мегабайт, чего недостаточно для операционной системы, поэтому перед сохранением нажмите по кнопке «Общий размер» и в появившемся списке выберите оптимальный для себя вариант, отталкиваясь от общего объема файлов.
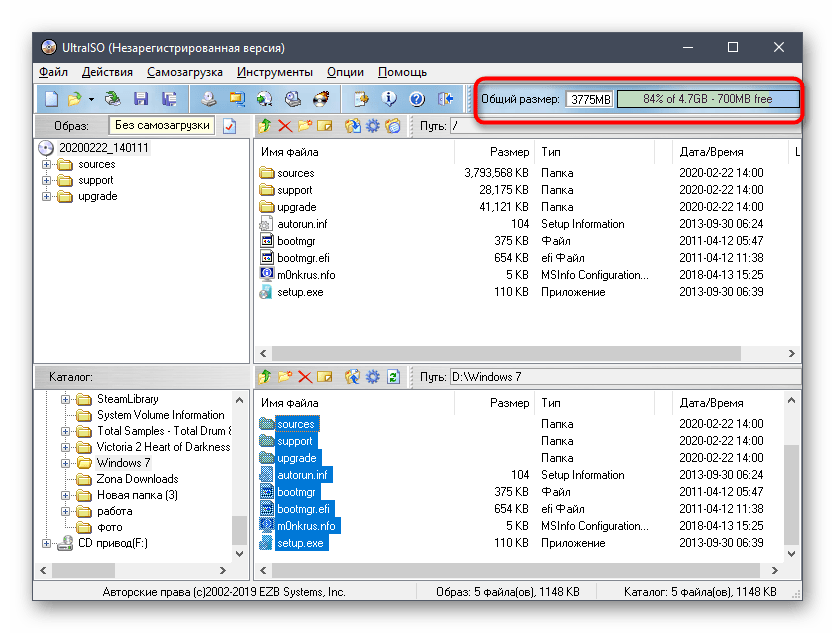
- Теперь вы можете убедиться в том, что размера виртуального накопителя хватает для того, чтобы сохранить образ.
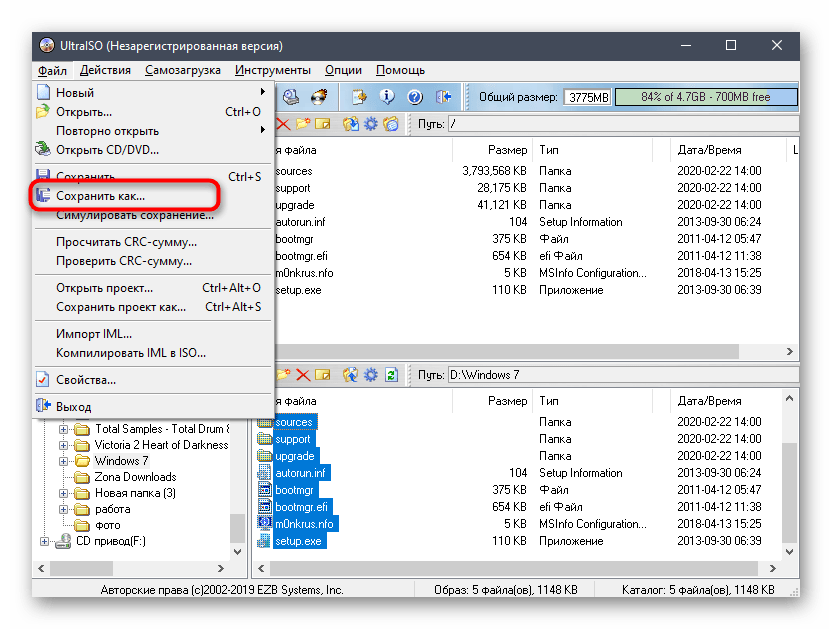
- Разверните меню «Файл» и в списке выберите пункт «Сохранить как…».
- Откроется стандартное окно Проводника, где укажите произвольное имя файла и в качестве типа задайте формат ISO. После этого укажите место на носителе и подтвердите сохранение образа.

Запись ISO-образа займет определенное количество времени, поэтому вам придется подождать завершения этой операции, а уже потом можно закрывать UltraISO и переходить к непосредственному взаимодействию с полученным объектом.
Способ 2: PowerISO
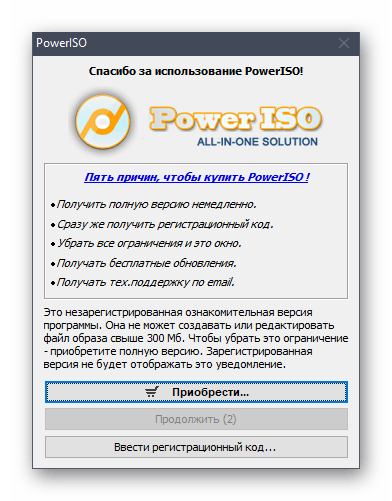
PowerISO практически ничем не отличается от рассмотренной выше программы и так же распространяется платно, имея пробную версию. Однако без приобретения лицензии в нашем случае не обойтись, поскольку ограничение пробного режима в 300 мегабайт не позволит создать образ операционной системы. После приобретения выполните следующие действия.

Скачать PowerISO
- Установите и запустите PowerISO на своем компьютере. Если уведомление о пробной версии до сих пор появляется, потребуется повторно ввести регистрационный код, чтобы убрать его.
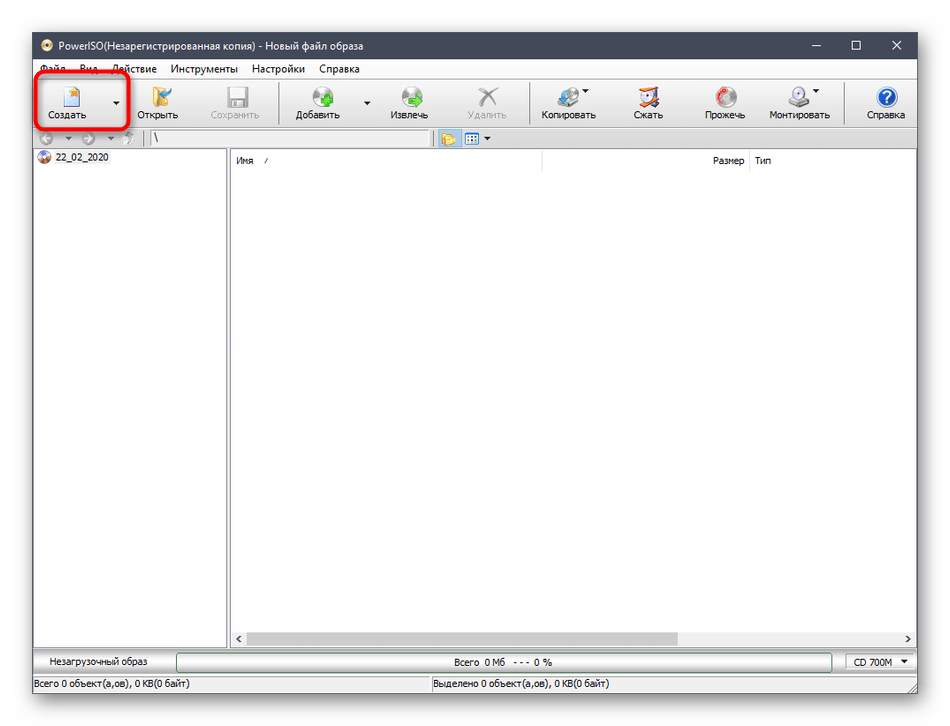
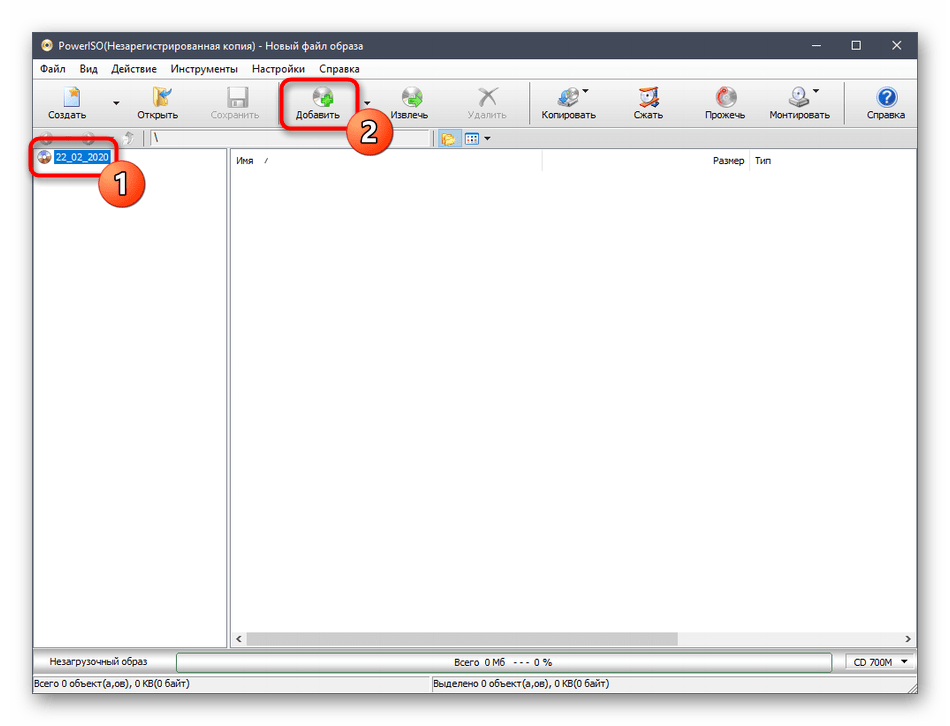
- После открытия главного окна приложения щелкните по «Создать».
- Откроется список с дополнительными опциями, где следует выбрать «Образ данных CD/DVD».
- Теперь слева вы увидите новый созданный проект, который следует выделить, нажав по нему один раз левой кнопкой мыши. Затем кликните по «Добавить», которая расположилась на верхней панели PowerISO.
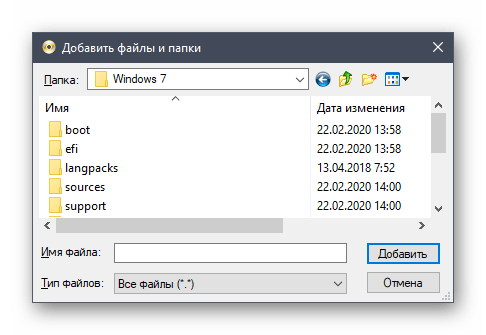
- В открывшемся окне Проводника укажите все те файлы, которые относятся к Windows 7, и повторно нажмите на кнопку добавления.
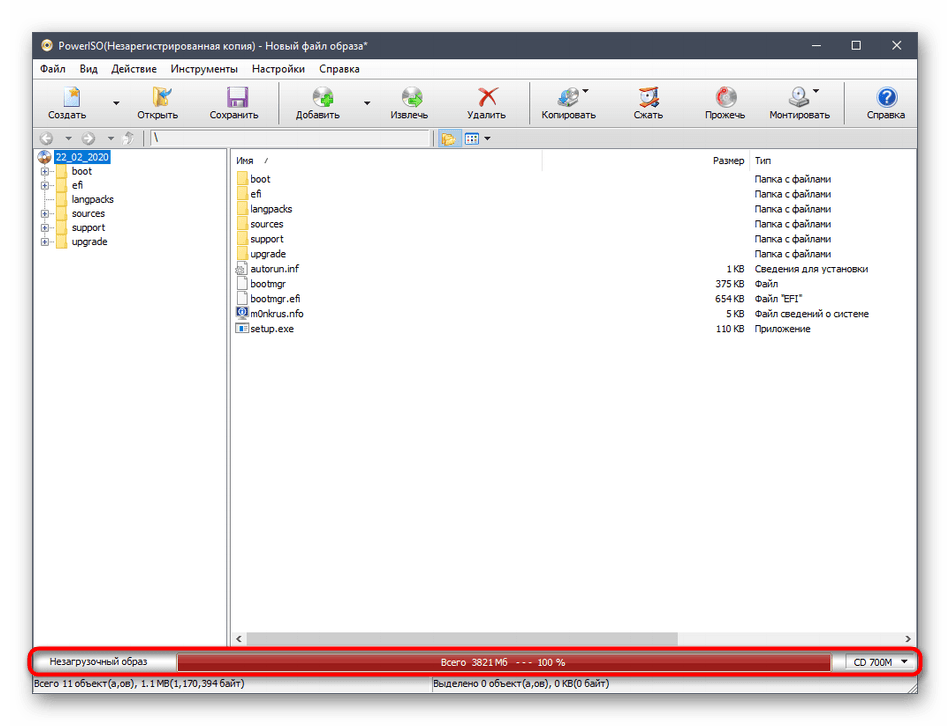
- Вы сразу же будете уведомлены, что места на виртуальном диске не хватает, поскольку по умолчанию выбран режим CD.
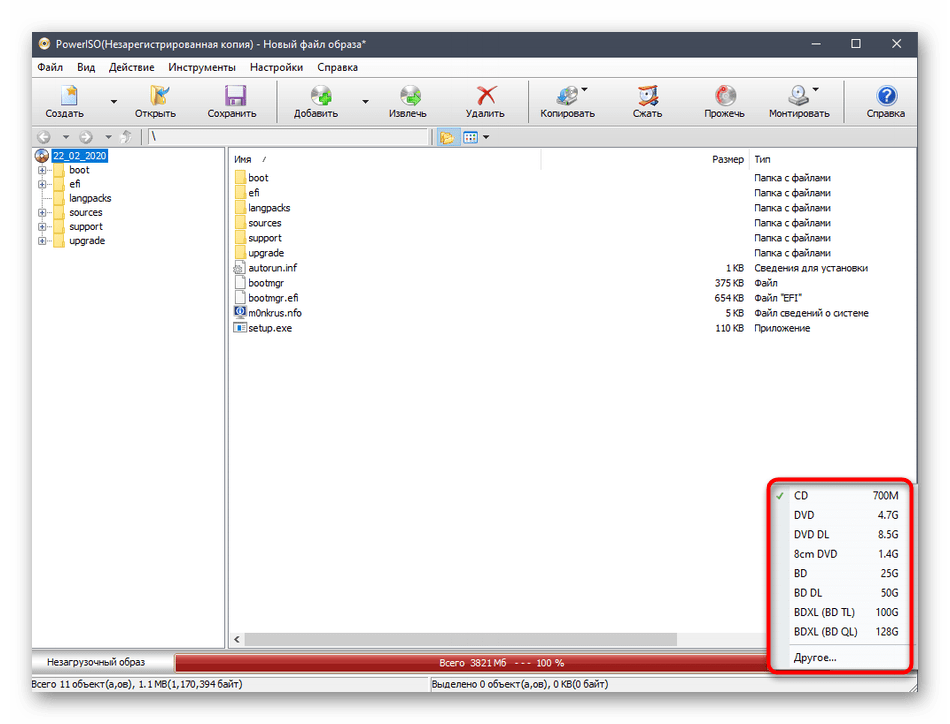
- Разверните список доступных вариантов и выберите там подходящий. В большинстве случаев хватает и обычного DVD, поскольку размер файлов операционной системы не превышает 4,7 гигабайта.
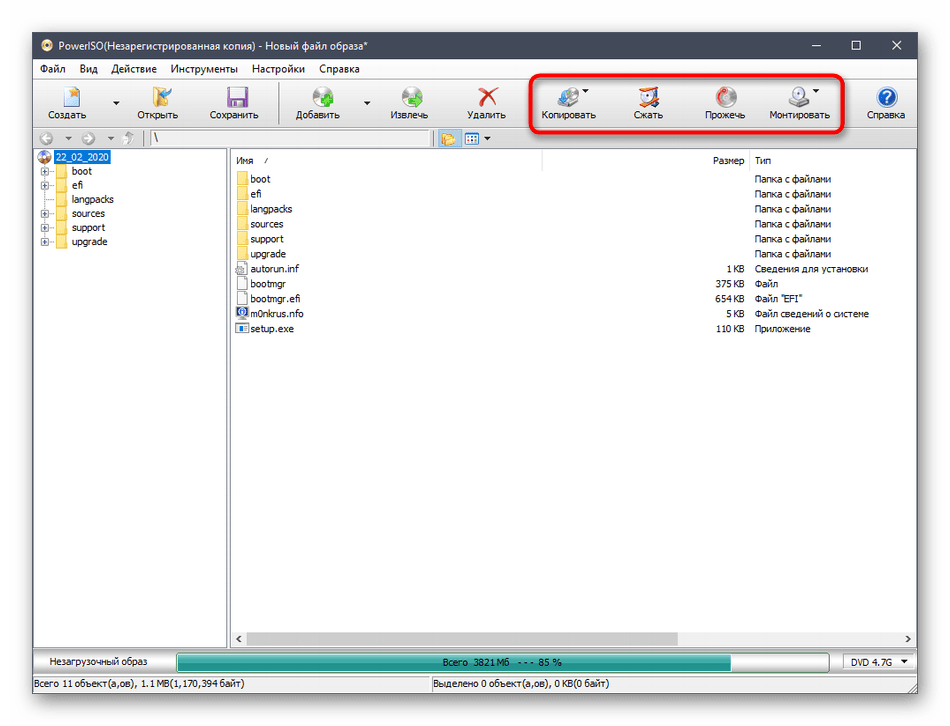
- Если требуется выполнить дополнительные действия, например, сразу же смонтировать файлы, скопировать их на диск, сжать или прожечь накопитель, обратите внимание на четыре специально отведенные кнопки. Они отвечают за все эти опции в PowerISO.
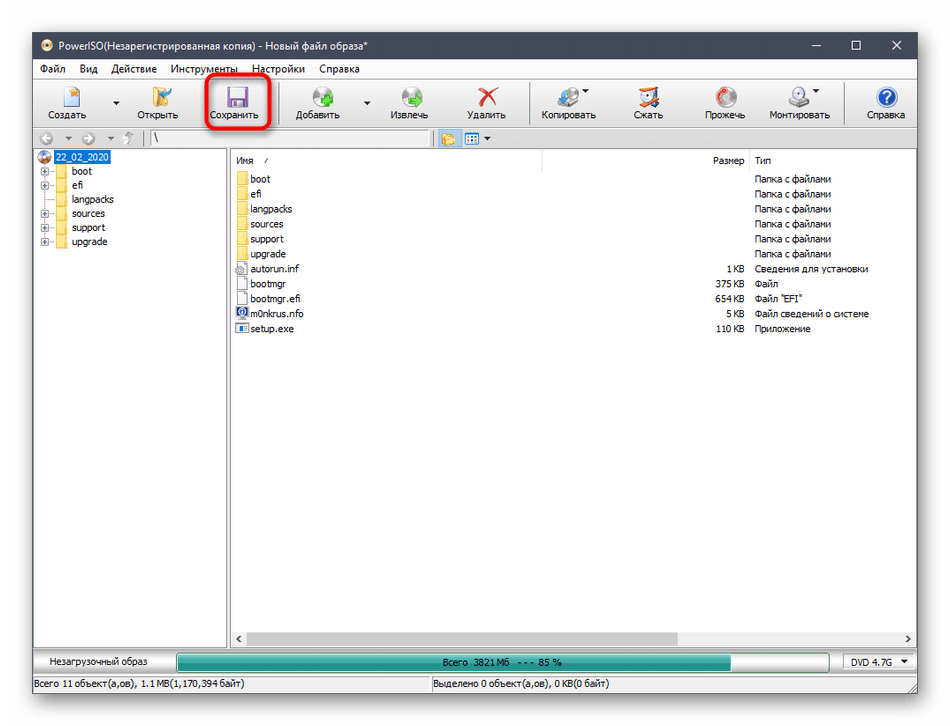
- По завершении настройки остается только нажать на «Сохранить» или же можно использовать комбинацию клавиш Ctrl + S.
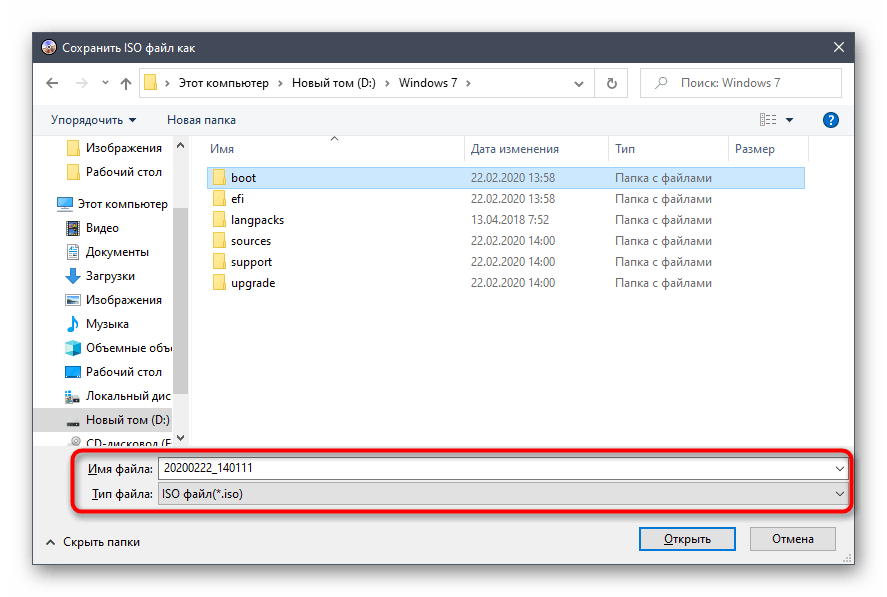
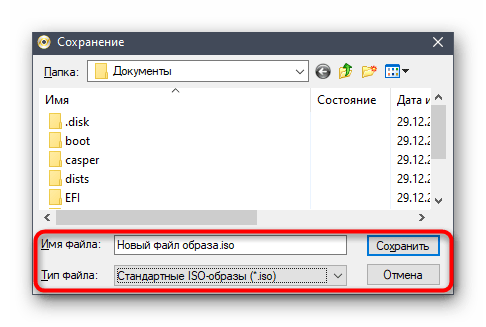
- В окне Проводника задайте подходящее расположение, имя и тип файла для сохранения.
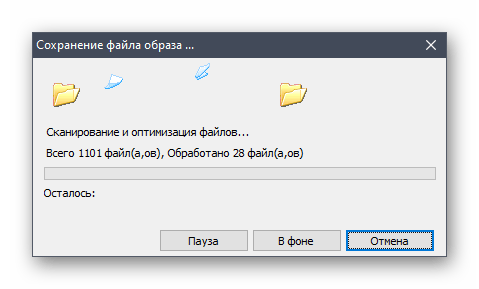
- Ожидайте окончания сохранения образа. Во время этого процесса следите за прогрессом в отдельном окне. Вы будете уведомлены об успешном сохранении.

Главный недостаток PowerISO заключается в том, что без приобретения лицензии записать образ с операционной системой не получится, и далеко не все юзеры хотят тратить деньги на программу подобного рода. Если вас не устраивает такое положение вещей, обратите внимание на два следующих метода, где за пример взяты полностью бесплатные, но более простые решения.
Способ 3: CDBurnerXP
CDBurnerXP — полностью бесплатное программное обеспечение с максимально простым интерфейсом и понятной реализацией функций. С его помощью можно без проблем создать диск с данными в формате ISO, не испытав никаких ограничений даже при записи рассматриваемой сегодня Windows 7. Весь процесс выглядит следующим образом:
Скачать CDBurnerXP
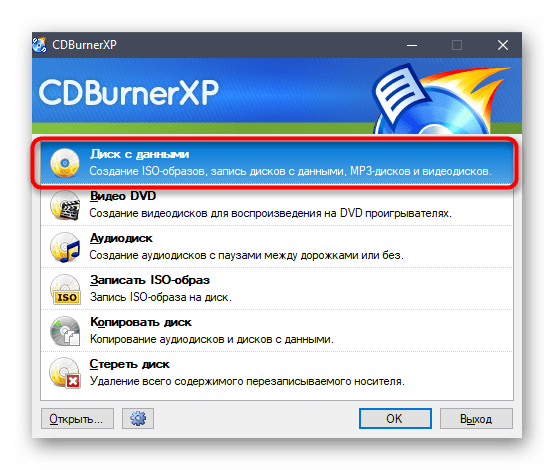
- После инсталляции запустите CDBurnerXP и в главном окне выберите первый режим «Диск с данными».
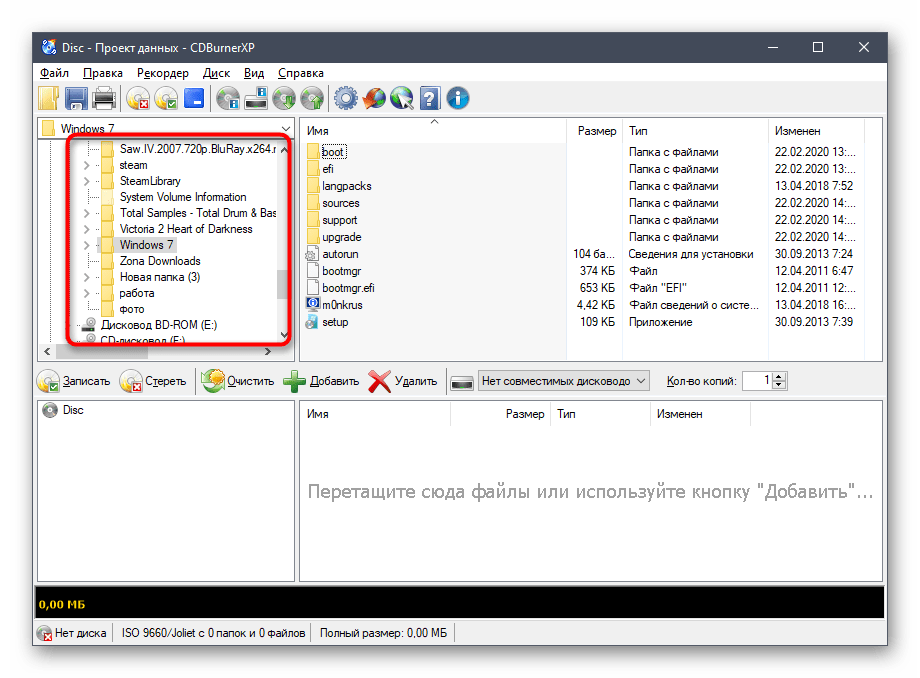
- Откроется отдельное окно создания проекта, где через встроенный обозреватель отыщите папку с файлами.
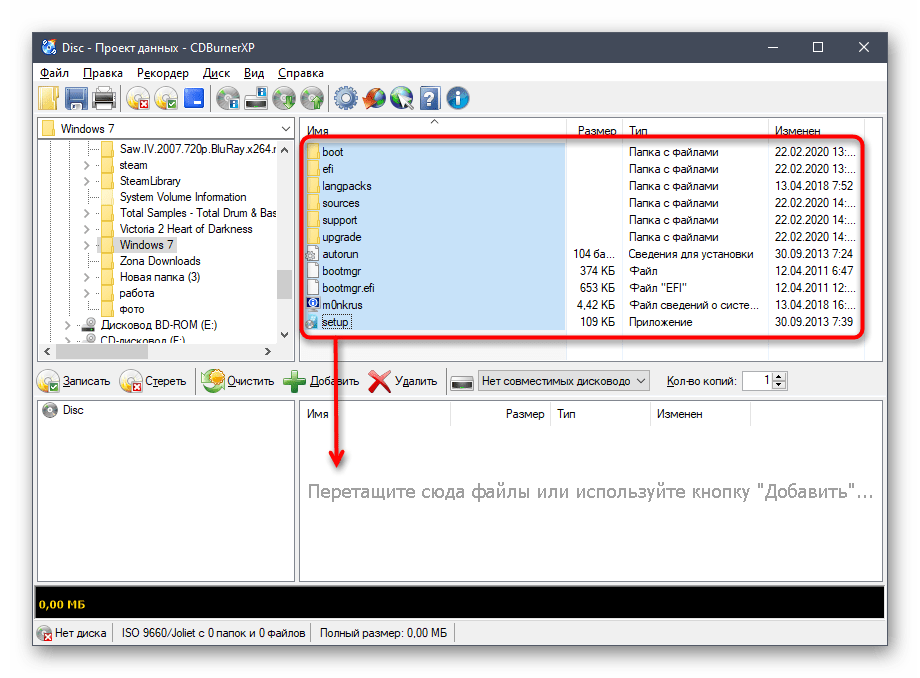
- Выделите их все и перетащите в нижнюю часть окна. Вместо этого можно использовать кнопку «Добавить», о чем предупреждают и сами разработчики, оставив соответствующую надпись.
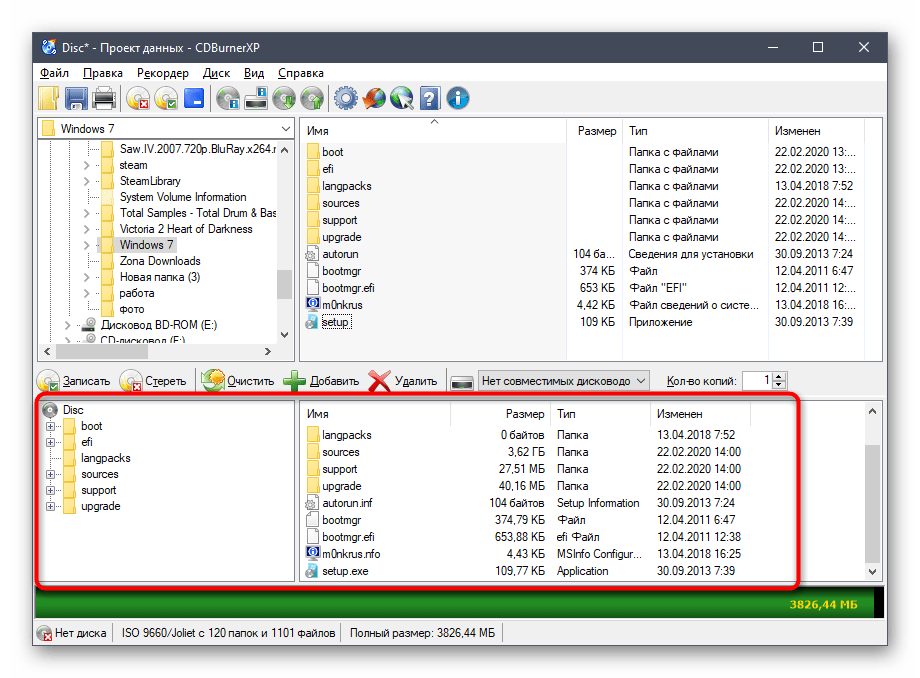
- После этого внимательно изучите сам проект. Повторно убедитесь в том, что все файлы и директории успешно перенесены.
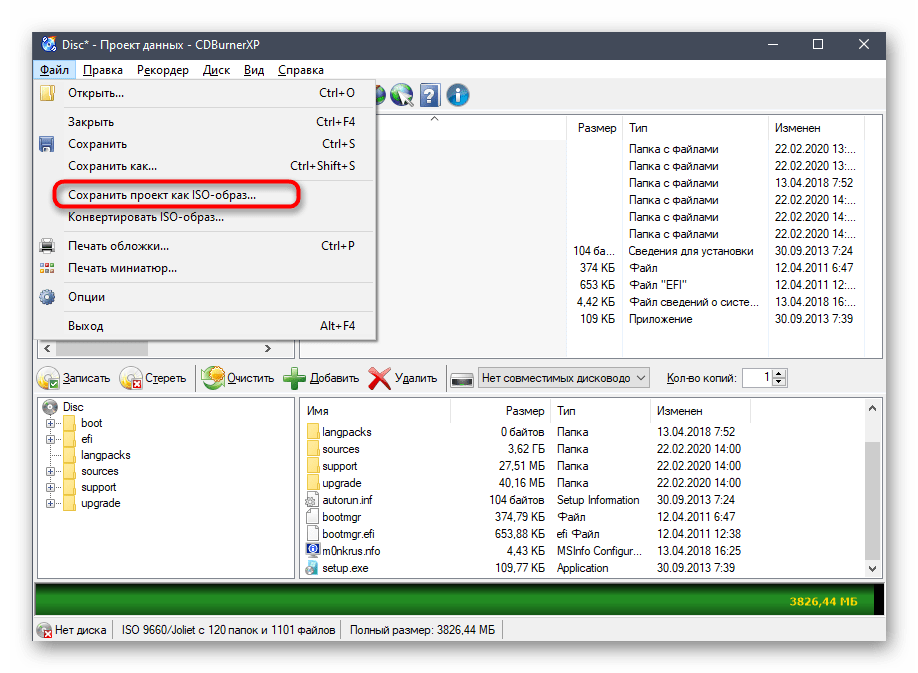
- Во всплывающем меню «Файл» выберите пункт «Сохранить проект как ISO-образ».
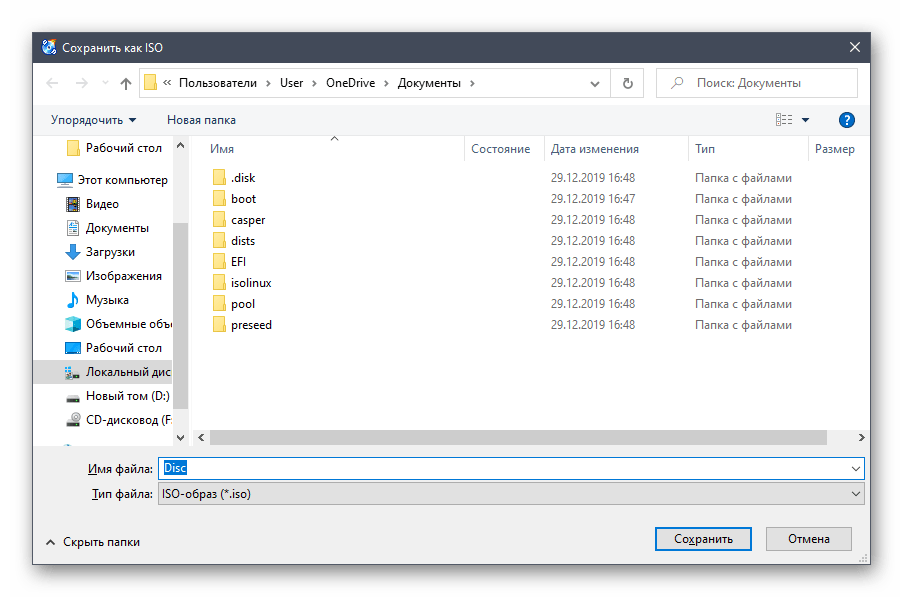
- Задайте ему название и укажите место на носителе, после чего нажмите по «Сохранить».
Остается только дождаться окончания операции создания образа. Она не займет много времени, а вы получите уведомление о том, что сохранение прошло удачно. После этого откройте расположение ISO-файла и убедитесь в его работоспособности, например, открыв через эту же программу для просмотра содержимого или смонтировав в качестве виртуального привода.
Способ 4: ImgBurn
ImgBurn — последняя программа, о которой мы хотим поговорить в рамках сегодняшнего материала. Ее название уже говорит само за себя, но помимо стандартного прожига разработчики предоставляют и опцию по созданию образов, чем мы и предлагаем воспользоваться.
Скачать ImgBurn
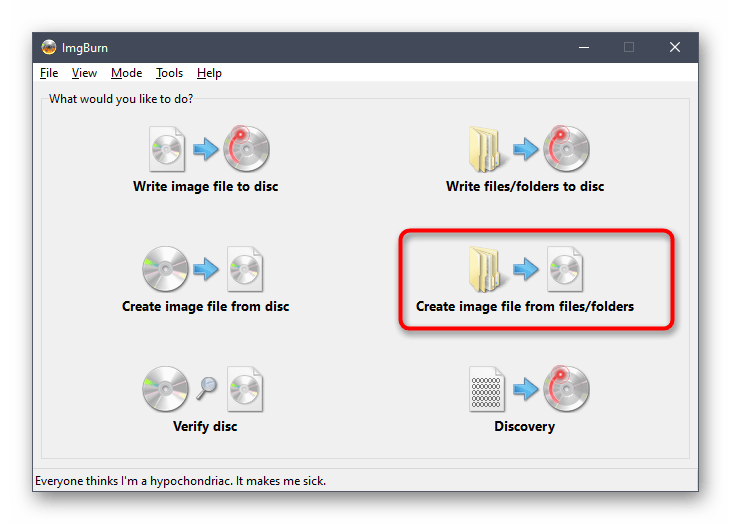
- В главном окне ImgBurn происходит выбор действия для создания проекта. В вашем случае потребуется кликнуть по «Create image from files/folder».
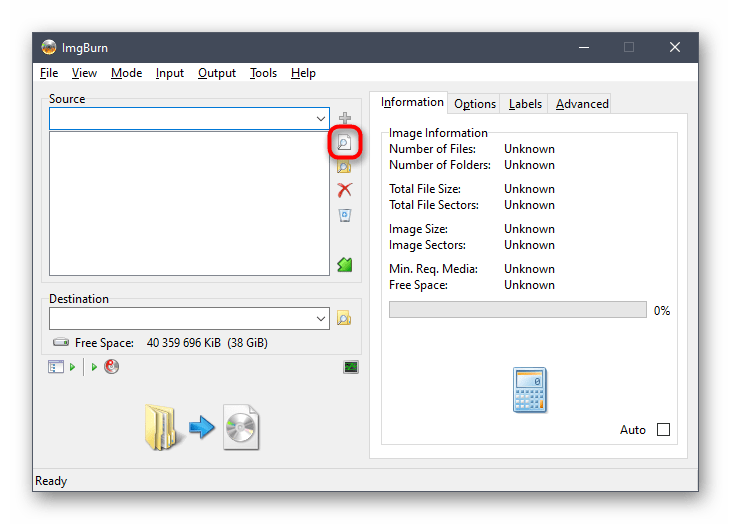
- В появившемся менеджере проектов щелкните по маленькой кнопке в виде файла с лупой, чтобы перейти к добавлению файлов.
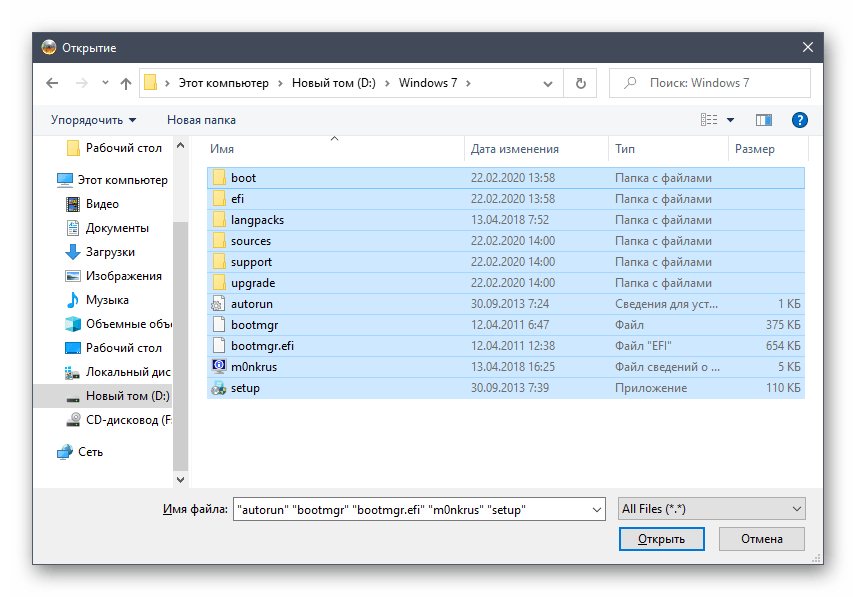
- Через стандартный Проводник выделите все объекты, которые хотите поместить в образ, а затем нажмите по «Открыть».
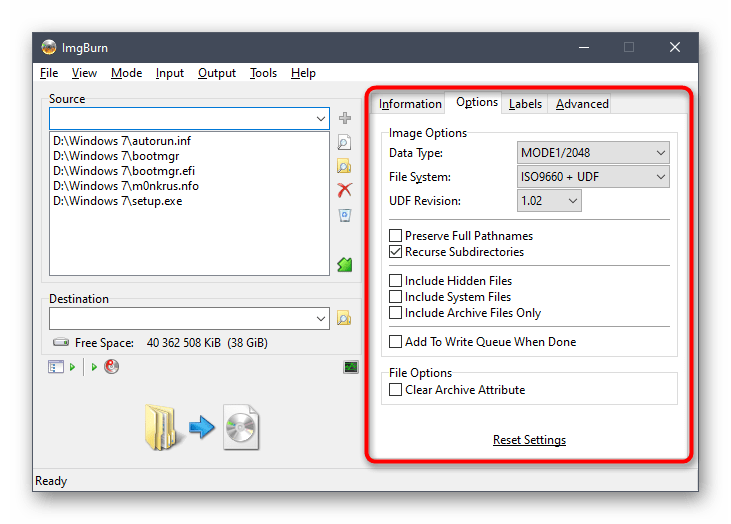
- Если требуется, задайте дополнительные опции, например, поменяв файловую систему или настроив включение архивных, скрытых и системных файлов. Однако в большинстве случаев подобная конфигурация не требуется, поэтому мы и не будем останавливаться на ней.
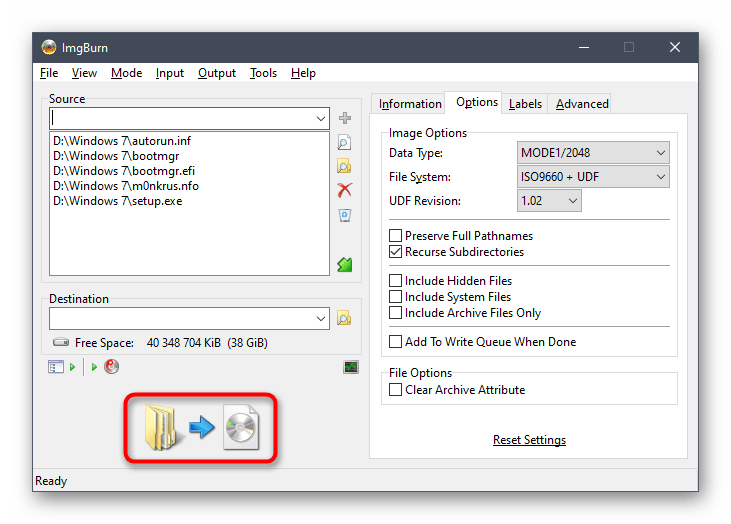
- По завершении нажмите на кнопку внизу окна, которая и отвечает за запись образа.
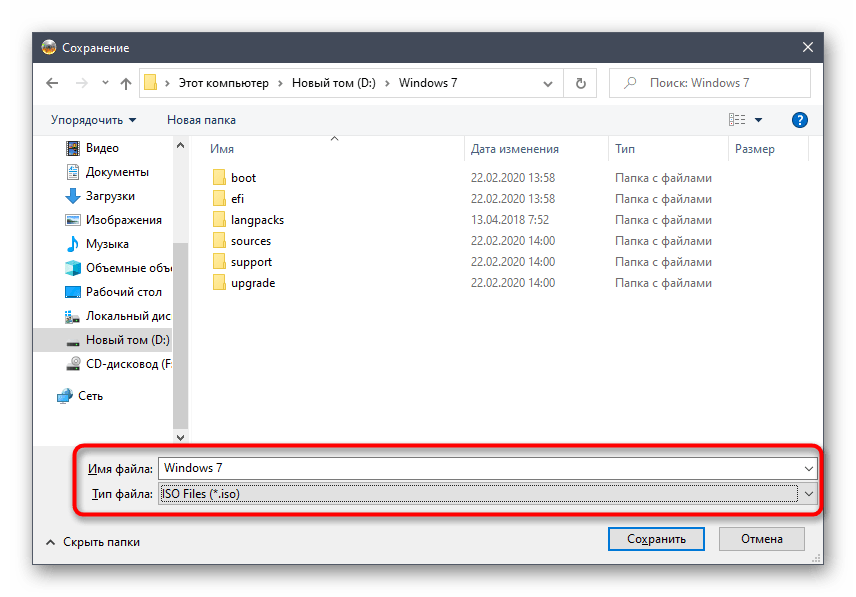
- Укажите место на носителе, задайте название и тип файла, а затем подтвердите намерения в сохранении.
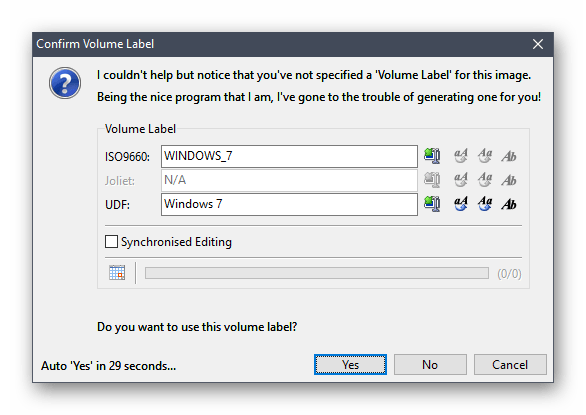
- Вам повторно предложат поменять файловую систему или настроить запланированное редактирование. Нужно лишь нажать на «Yes», чтобы начать использовать этот образ.
В завершение сегодняшнего материала мы хотим дать несколько подсказок для тех пользователей, кто создал ISO-образ с операционной системой для дальнейшей ее установки через загрузочную флешку или диск. Дело в том, что создание образа — лишь первый шаг на пути к инсталляции. Далее нужно создать загрузочный носитель, записав ISO при помощи специализированных программ. Можно задействовать те же приложения, о которых шла речь выше, но более детально с реализацией этой цели мы предлагаем ознакомиться в других тематических материалах на нашем сайте, кликнув по одному из следующих заголовков.
Подробнее:
Создание загрузочного диска с Windows 7
Создаем загрузочную флешку с Windows 7
Теперь вы знакомы не только с процессом создания ISO-образа с Windows 7, но и знаете о принципах выполнения всех следующих действий. Останется только инсталлировать саму ОС на свой компьютер в качестве дополнительной или основной. Об этом тоже написано другими авторами в статьях на нашем сайте.
Читайте также:
Установка операционной системы Windows 7 с компакт-диска
Установка Windows 7 на ноутбук с UEFI
Устанавливаем Windows 7 вместо Windows 10
Еще статьи по данной теме:
Помогла ли Вам статья?
Download PC Repair Tool to quickly find & fix Windows errors automatically
A System Image in Windows can be considered as a replica of the hard drive required for running Windows. In the event of an unfortunate, when the hard drive fails to function, a System Image allows restoration. It is recommended that you create a System Image of your computer periodically as a part of your backup plan. This post shows how to create a System Image in Windows 11/10/8.1, without switching to third-party tools – and also how to restore the System Image. Using this post, you can move Windows 11/10 Installation to another HDD or SSD.
Connect your external hard drive to your computer and then open Control Panel > System and History > File History. In the left pane, you will see System Image Backup. Click on it. Another way to do it is to type sdclt.exe in Start search and hit Enter. To open the Backup and Restore (Windows 7) applet and click on Create a system image link on the left side.

A Create a system image wizard will open. A System Image is a copy of the Drives required for Windows to run. It can also include additional drives. This image can be used to restore your computer if your hard drive or computer ever stops working; however, you can’t select individual items to restore.
You will have to select the location where you want to save the system image.

An external USB/Media/Hard Drive with adequate space is recommended. Make your choice and click Next.
Now select the drives you want to include in the backup and click Next.
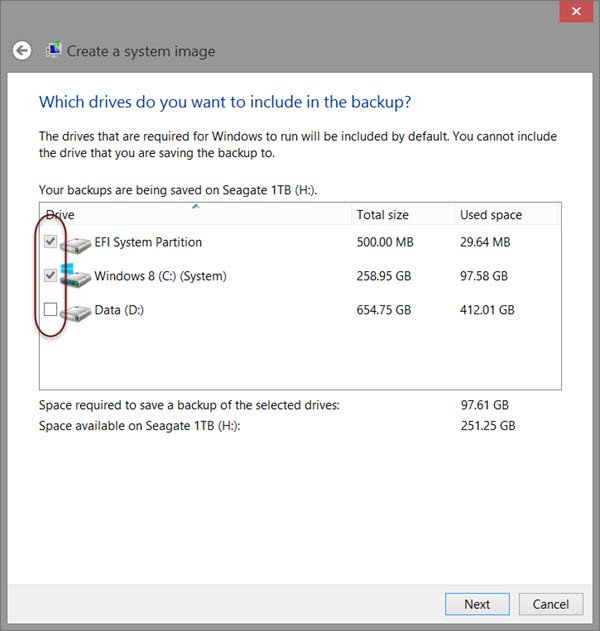
Including system drives and partitions in recommended. After you have clicked Next, you will be asked to confirm your settings.

Review them and click on Start backup. The image file, after some time, will be saved in the drive you selected earlier.
After this procedure is completed, Windows will offer you the option to create a System Repair Disc. A System Repair Disc can be used to boot your computer. Create it and keep it in a safe location. You can also create a System Image in Windows using Powershell. The procedure to create a system image in Windows 7 is however a bit different.
Read:
- How to validate Windows System Backup Image
- Use DISM with /scanhealth to verify that Windows Component Store is healthy.
System Image Recovery
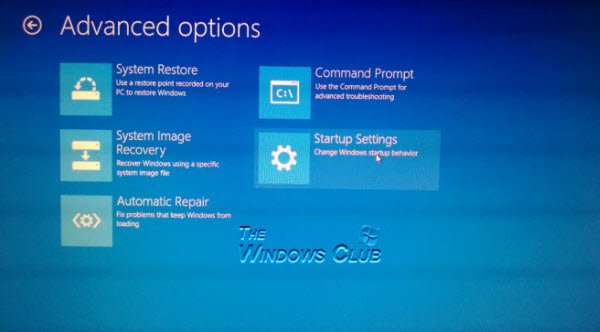
If your Windows computer fails to boot, then this System Image can come in handy as it can help you get back control of your computer, as you can restore it, using Advanced Startup Options. To restore the System Image, power on your computer, and when it is booting, keep pressing F8 to see the Advanced boot options screen.
Select Repair your computer and press Enter. Next select System Image Recovery and then follow the on-screen instructions.
You can also use the Windows 8.1 installation media to restore the System Image. Insert the media and start your computer. When you get to the Install now screen, you will see Repair your computer link in the bottom left corner.
Click on Repair and ignore the other Install Now option. Upon being directed to the Advanced Startup menu, select Troubleshoot > Advanced options > System Image Recovery option. Follow the on-screen instructions to restore your System Image.
Related: How to transfer Windows to an external hard drive.
Related reads:
- How to create a System Recovery Drive in Windows
- System Image Backup failed, Error 0x80780038 on Windows.

Anand Khanse is the Admin of TheWindowsClub.com, a 10-year Microsoft MVP (2006-16) & a Windows Insider MVP (2016-2022). Please read the entire post & the comments first, create a System Restore Point before making any changes to your system & be careful about any 3rd-party offers while installing freeware.
Contents
- How to Create a System Image in Windows 10
- Here is the step-by-step guide on how to create a disk image in Windows 10:
- How to Restore a Backup on Windows 10
- Here are the steps:
- How to Recover Deleted Files on Your Drives
- Closing Thoughts

Having a full backup of your Windows 10 system image can prove handy when a disaster strikes and you lose all your data. You never know when issues like hardware failure, software problems, malware attacks, system crashes, or hacking activities might occur.
That’s why regularly backing up your Windows 10 PC should be part of your routine. Learning how to back up Windows 10 will not only protect your system but will also help get your system up and running in no time.
A system image or a full backup means creating a copy of everything in your computer, including configurations, installation files, apps, and settings. When something bad happens, you can easily restore your entire system. Creating a full backup is also useful when trying to roll back to a previous version of Windows 10.
How to Create a System Image in Windows 10
It doesn’t matter whether you work from home or in an office, it’s advisable to backup vital data. If you use Windows 10, several tools can help you create a disk image.
However, the easiest option is to use the legacy built-in System Backup tool. While Microsoft no longer maintains it, System Image Backup still functions as well as it used to. While it’s still available, it remains one of the best ways to create a backup of Windows 10.
The System Backup tool lets you create a system image to an external drive or network shared folder. It is wise to use external storage, which you can safely keep separately from the computer.
If you intend to save the image backup to an external drive, be sure to connect it to your computer before you begin the process.
Here is the step-by-step guide on how to create a disk image in Windows 10:
- Go to Settings (Win + I) and select Update & Security > Backup.
- On the right sidebar, under Looking for an older backup? section, select the link that says Go to Backup and Restore (Windows 7).
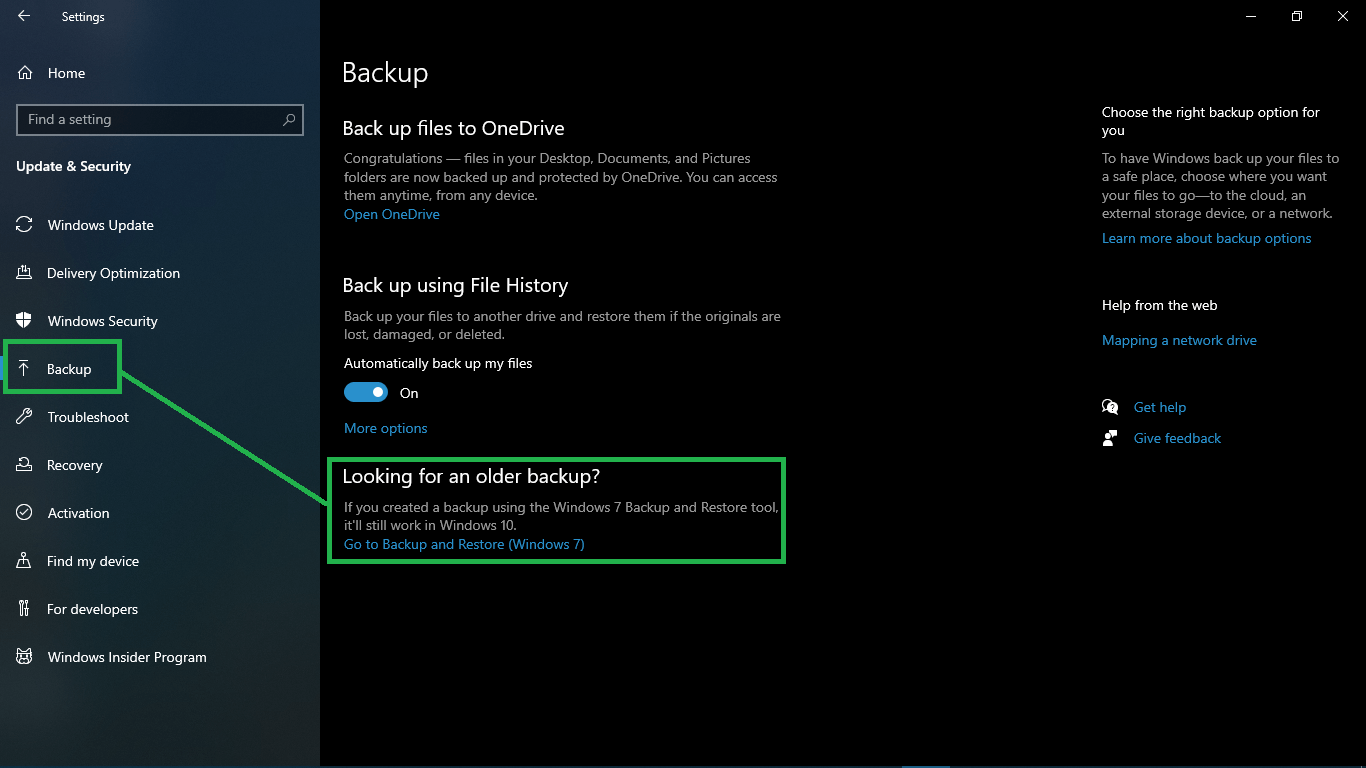
- This action opens the Backup and Restore (Windows 7) page in Control Panel. In the left sidebar, click on the Create a system image link. Your PC will scan for backup devices.
- On the Where do you want to save the backup screen, use the available toggles and drop-down lists to choose your preferred storage medium. For this post, we’ll use the hard disk option. So, select the On a hard disk toggle button and use the drop-down menu to choose the connected hard drive.
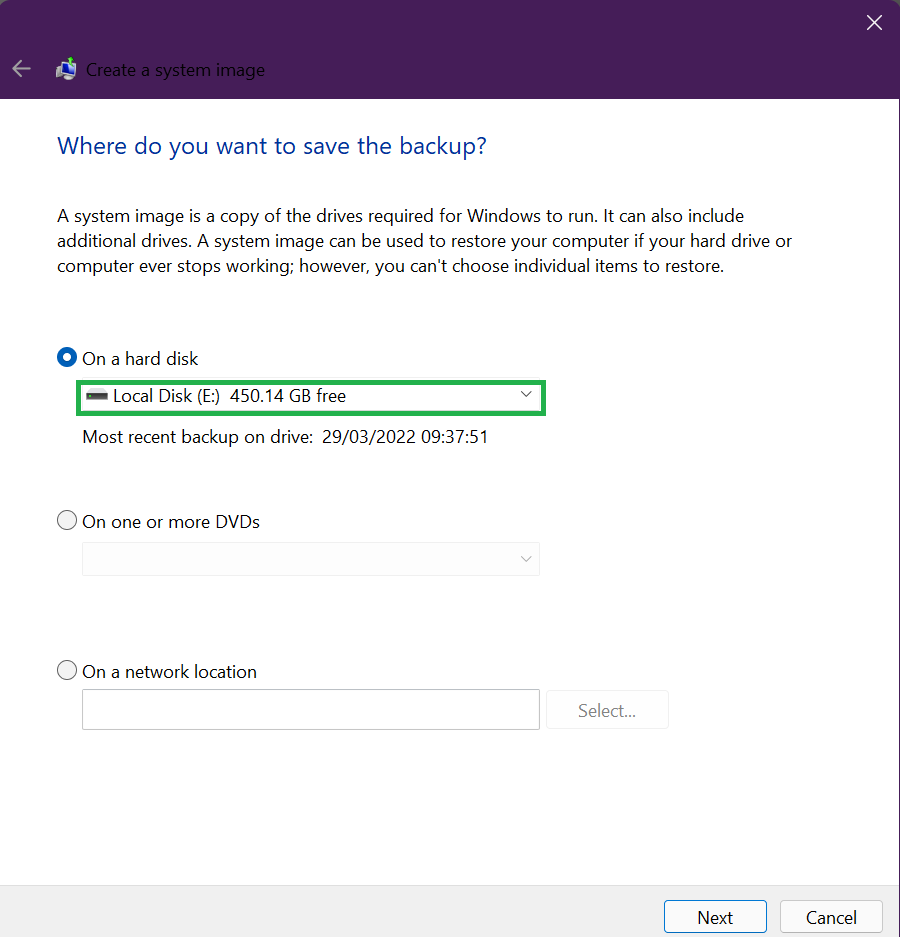
- Click Next.
- On the next screen, confirm your selections, and once you’re ready, click on the Start backup button. The system will initiate the process and prepare to create a backup.
Quick note: You may see an option to create a system repair disk. If your PC has an optical drive, select Yes. Otherwise, click No. Most devices no longer have an optical drive anyway, so you may skip this step altogether.
The backup process will begin and may take a while, depending on how big the installations being backed up are and the speed of your drives. The good thing is that you can keep using your system as this is happening.
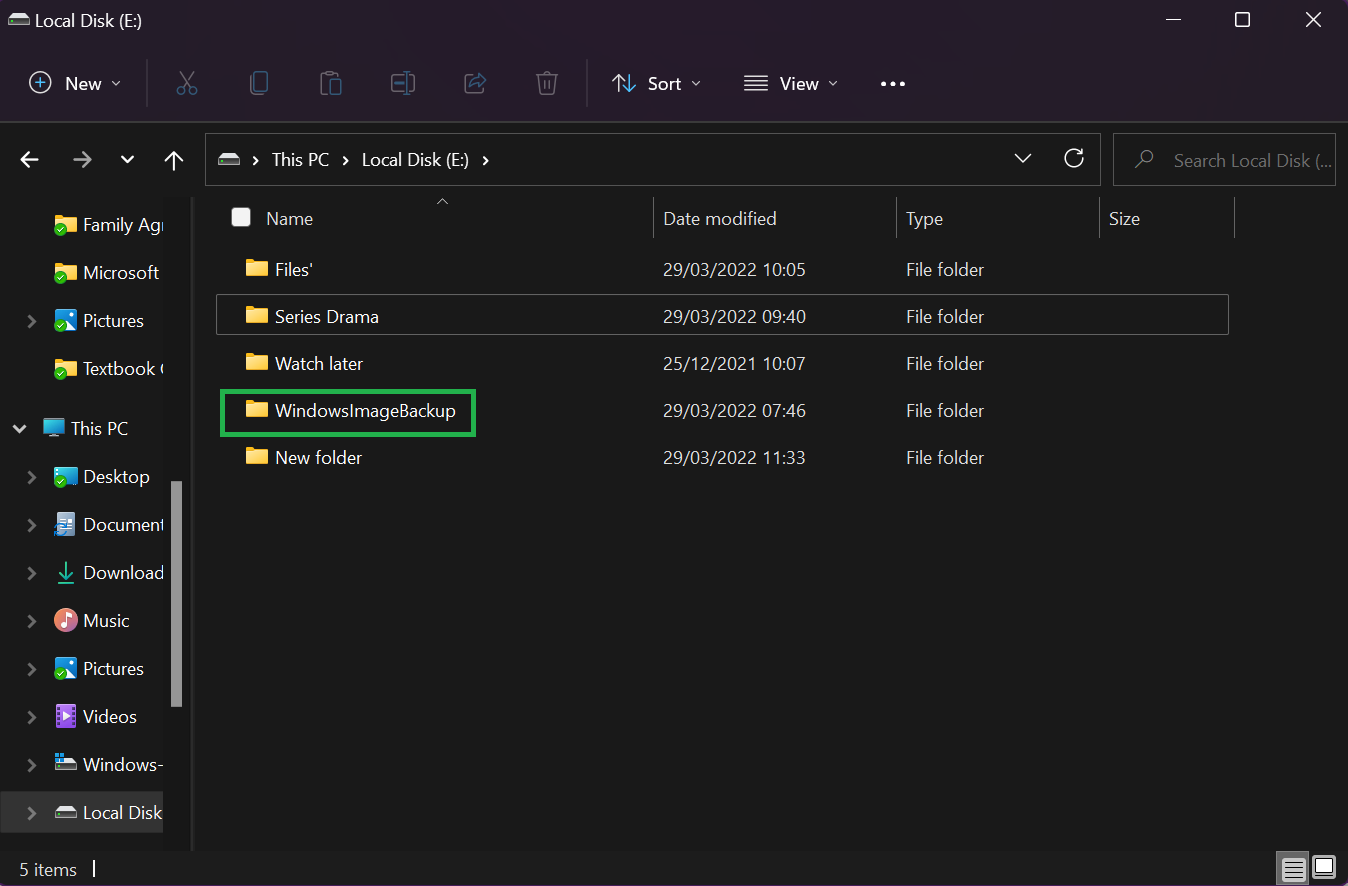
After the backup is complete, the tool will have created an image of your entire system, including everything on your drive. If you’re wondering where your image backup is on the drive, look for a folder called WindowsImageBackup.
Remember to disconnect the external drive from the machine and store it somewhere safe.
How to Restore a Backup on Windows 10
Hopefully, nothing will happen to your system that will damage your data. But in case of hardware failure or you need to access the data due to a ransomware attack, you can easily restore the backup.
Here are the steps:
- Plug the external drive containing the full backup to your Windows 10 PC.
- Boot your machine and repeatedly press the F8or F11 key to access the troubleshooting screen. Note that each Windows 10 computer brand uses different keys to boot directly to Advanced Startup Options. You should find the appropriate key that works for your PC.
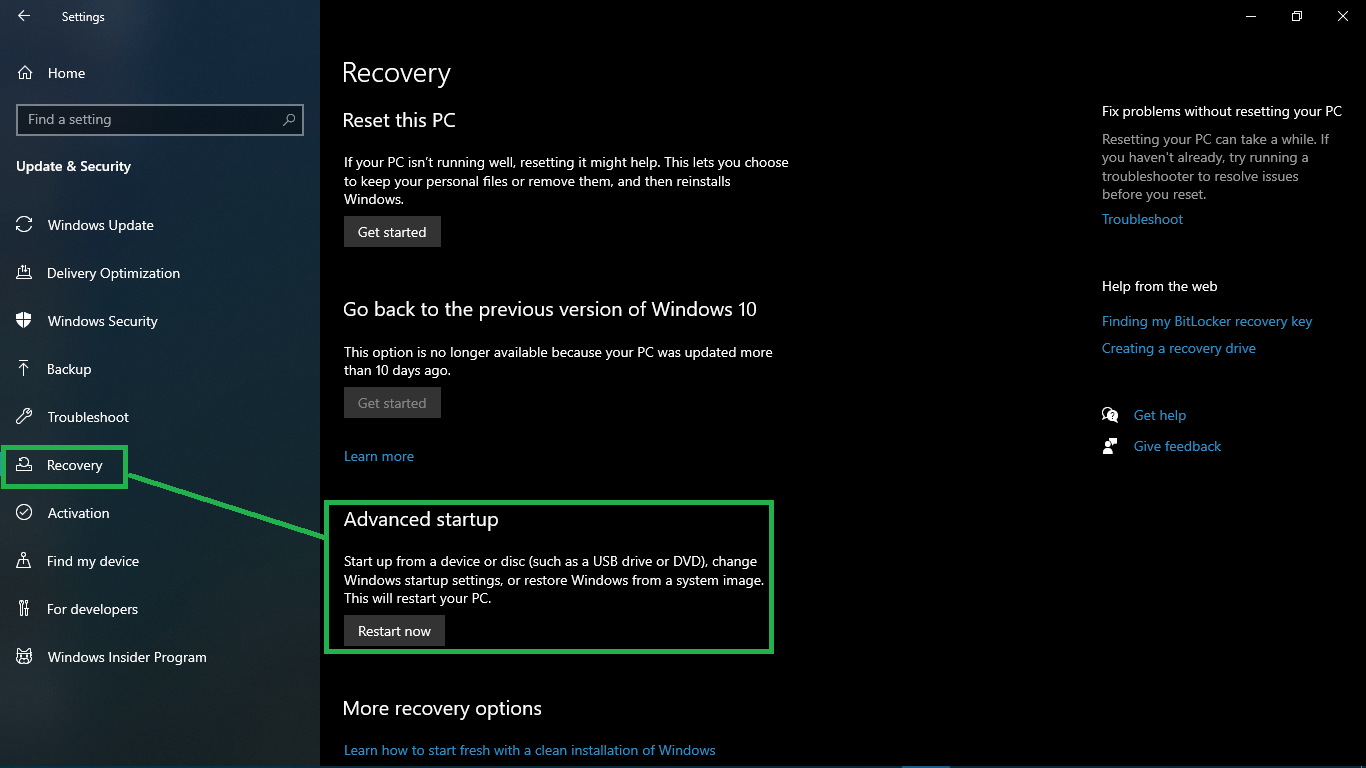
Useful Tip: There are various ways to access Advanced Startup Options. The method you use will depend on whether Windows 10 starts normally or not. If you can start Windows 10 normally, hold down the Shift key and click Restart. You can also go to Settings > Update & Security > Recovery > Advanced startup > Restart now. If your PC won’t start, you can use a recovery drive or a Windows installation media (you’ll need to have created this bootable drive beforehand). Alternatively, you can use someone else’s bootable disk or USB containing installation files. All you need is to access Advanced Startup Options. Keep in mind that using a bootable drive requires changing the boot order settings in BIOS.
- If you use a bootable drive, starting the computer should take you to the Windows Setup page. Press Next, and choose the Repair your computer option in the bottom-left corner of the screen.
- Select Troubleshoot on the Choose an option screen that appears next.
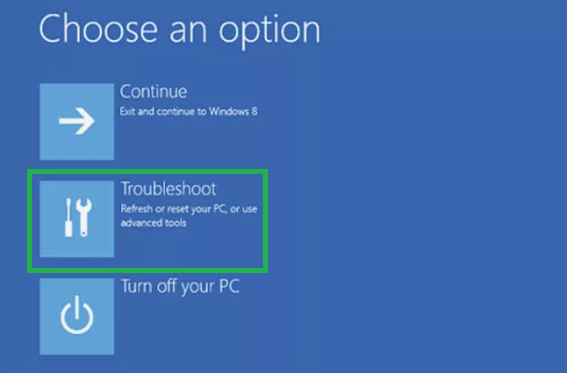
- Click on Advanced options and select System Image Recovery.

- Choose Windows 10 as the target operating system.
- On the Re-image your computer screen, choose Use the latest available system image. If you have multiple backups, use the Select a system image option to manually select the system image.
- Click Next.
Tip: If you’re restoring to a new drive, use the Format and repartition disks option before you proceed. Remember to Exclude disks to prevent your other disks from being formatted in the process.
- Be sure to select the Only restore system drives option if your backup contains multiple drives and you only want to restore the operating system.
- Click Next and then Finish.
- Click Yes to continue.
The recovery process will begin and may take a while depending on the size of your backup and the amount of data and configuration being restored. The recovery process shouldn’t be interrupted. It’s, therefore, advisable to connect a laptop to a power source and a desktop to an uninterruptible power supply (UPS) to prevent issues.
Once your Windows 10 backup has been restored successfully, you’ll need to update your system to install the missing security updates and any other updates. To do so, launch the Settings app using the Win + I hotkeys, open Update & Security, and select Check for Updates.
How to Recover Deleted Files on Your Drives
As powerful as computers are, your files are never completely safe or secure. Anything can happen from a sudden system crash to a malware attack to a damaged drive or hacking activity. Sometimes, you or someone else can accidentally delete important files, documents, videos, or photos from a hard drive.
Fortunately, you don’t have to worry about losing valuable or sensitive data. Auslogics File Recovery is a robust tool that can undelete any kind of file. It works on hard disk drives, memory cards, and USB flash drives. Plus, it can recover all file types, including those from lost partitions.
File Recovery is easy to use, thanks to the Easy Recovery Wizard that guides you. Additionally, you can quickly sort through hundreds of deleted files using advanced filters to find specific files that you want to restore.
The tool even lets you preview files to confirm their contents before recovering them. This ensures that you restore only the items you need. With Auslogics File Recovery, you no longer have to panic when you accidentally format your USB flash drive, memory card, or even HDD. Simply download it and let it do its magic!
Closing Thoughts
That’s how to back up Windows 10 image. It’s worth mentioning that the System Image Backup tool is used to create an image disk of the entire system to safeguard your configurations and installation files in case of a hiccup. If you want to back up your files and keep updated copies in the cloud, use a solution like OneDrive.
You should also know that anything you do after the full backup, such as installing new apps, adding new files, or changing certain settings won’t be available during the recovery process. Like System Restore, you can only recover the image up to the last backup.
For this reason, we recommend performing a full backup of your Windows 10 PC periodically to keep an updated image.
Need a quick and easy way to back up and restore Windows without relying on backup tools or the cloud for your data?
Several third-party Windows backup and restore tools are available, but they can be complicated and time-consuming to use. So, why not learn how to make an ISO image of your Windows PC instead?
Why Choose a Windows Image Backup?
We all know that backing up our data is essential, especially when upgrading to a new Windows version. But rather than fiddle around with partitions for specific data or syncing to the cloud, why not simply back up your entire Windows installation?
You can add personal folders to an image backup but omit apps and games. Alternatively, you could opt to create an image of your entire system drive. Naturally, you would need a suitable volume of storage for such a backup.
Thanks to the ISO image format, it is possible to back up your entire PC. This essentially creates an exact copy of your entire drive or selected directories. In addition, you’ll be able to restore the image backup should disaster strike. You can also use ISO files to back up existing CDs and DVDs.
Creating a Windows 10 ISO System Image With DataNumen
One widespread use for disk images is creating a clone of your hard storage (hard disk drive or solid-state drive), which might be on its last legs.
DataNumen Disk Image (a.k.a. «DDKI») is one such solution, runs on all versions of Windows and is available as freeware. After downloading and installing the utility, use the Clone tab to select the drive you wish to make an image of; to clone multiple drives, use the Batch Clone tab.
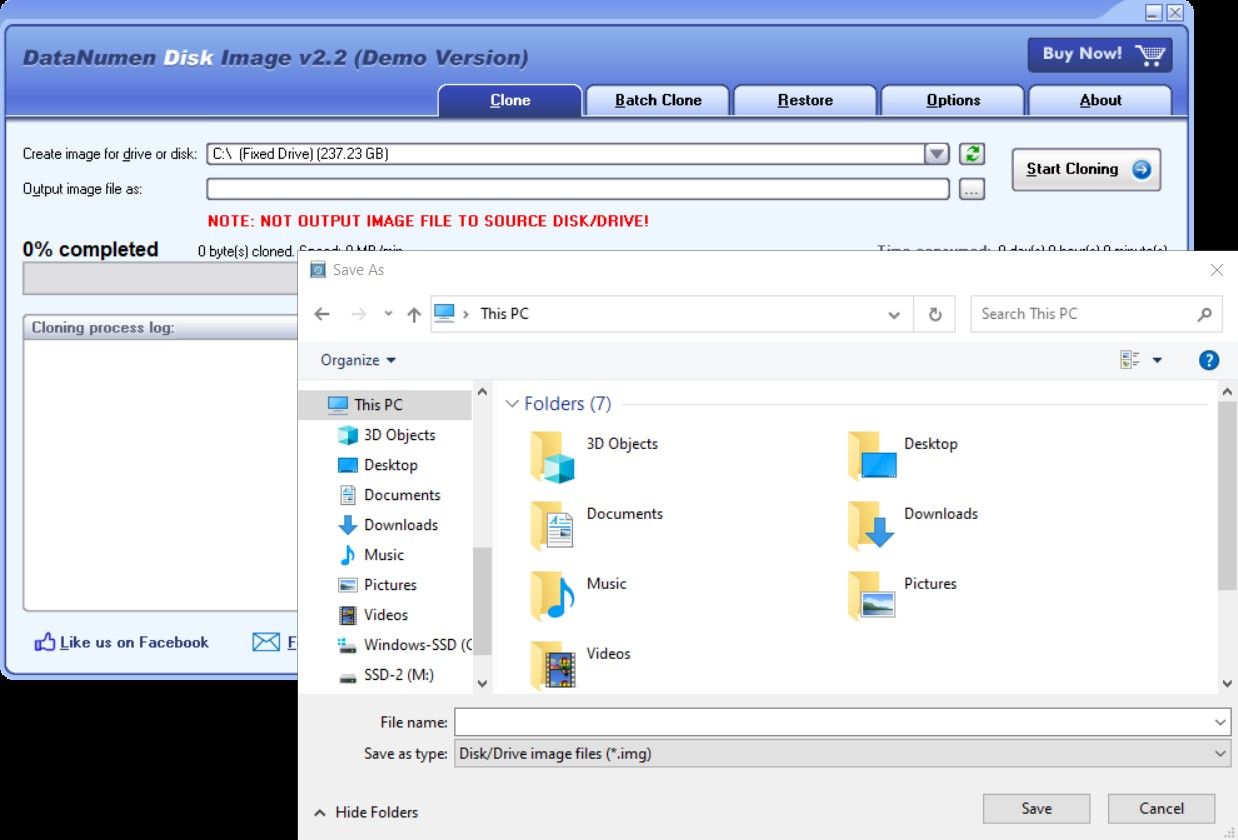
Select the destination location and assign a filename in the Output image file as a box, where you should select the target disk drive. This is the device you’re using to save the backup. It might be an existing external drive or an HDD you’ve recently purchased.
Once you click Start Cloning, it will copy your disk to its destination device, ready to use. Our look at HDD cloning covers this topic in greater depth.
Download: DataNumen Disk Image for Windows 10
How to Create an ISO File of Windows 7
Although cloud backups are straightforward, there’s no reason not to prepare an ISO disk image for disaster recovery scenarios. You might make an image of the system in its current state. You might alternatively create an image of a freshly installed operating system. Perhaps this will include some apps and games that you have installed.
If you’re using Windows 7, backing up to an ISO disk image is part of the Windows 7 backup and restore feature.
To create a system image in Windows 7, open Start > Getting Started > Back up your files. Then, in the left-hand pane, click Create a system image, and select the destination.
This might be an external hard disk drive or some other large volume. You can also write to DVDs (you’ll need more than one) or Blu-ray.
Do you have a home server or some ample storage on your network, perhaps in the shape of a purchased NAS? If so, you can use the On a network location option. If you want to use a USB flash device, connect this to your computer in advance and select it as the destination.
Also, ensure that the System drive (by default, the C: drive) is selected.
The confirmation screen will detail how much space will be taken up by the backup. Check this to ensure the figure matches the remaining space on the target device; then proceed with the backup and wait while it completes. The duration will depend on the size of the backup and the speed of the drive.
Restoring the Windows 7 Disk Image
Once complete, Windows will suggest you create a system restore disc. This is a good idea, so find a blank disc and follow the instructions. You can then use this to boot your PC and select the System Image Recovery option to restore the ISO Disk Image of your Windows installation following a disaster scenario.
Creating an ISO Disk Image in Windows 8.1
The same tool for creating a disk image is available in later versions of Windows. Therefore, you ideally need to have upgraded Windows 8 to Windows 8.1 (or even learn how to upgrade from Windows 8.1 to Windows 11) before proceeding here.
To find the system image creation tool, press Start and search for «file history.» The automatic search will display Restore your files with File History entry first, so click this to open the File History tool, then System Image Backup in the lower-left corner.

You can then proceed as detailed in the Windows 7 section above. With the ISO backup created, use the steps for Windows 8.1 below to restore the image in Windows 10.
In a disaster recovery scenario, you will need to boot into Windows 10’s Safe Mode to restore the image. See how to boot into Safe Mode on Windows 10 for more information.
Restoring Your Windows 8.1 Disk Image
If a Windows 10 upgrade doesn’t work out for you (perhaps you’ll experience a reboot loop), having an ISO image to fall back on is a massive advantage. You can restore the Windows 8.1 disk image in Windows’ Advanced options screen, which you will find by pressing F8 repeatedly when your PC boots up (or holding Shift as you click Restart).
In Advanced Startup Options, select Repair your Computer > System Image Recovery and follow the instructions, ensuring that Windows can find the ISO file.
Note that you can still restore the disk image even if you have the Windows 8.1 installation media. At the Install now screen, use the Repair your computer link and then Repair.
From here, you’ll be redirected to the Advanced Startup menu, navigate to Troubleshoot > Advanced options > System Image Recovery, and follow the on-screen instructions to restore your Windows ISO system image.
Microsoft recommends creating an ISO image of your Windows 10 using the Windows Media Creation tool. Windows 10 users can download the software for free from Microsoft. You can use the Windows Media Creation Tool to create a bootable Windows 10 USB stick quickly, update the PC to Windows 10, or create the Windows 10 ISO image.
To create an ISO image with the Windows Media Creation Tool:
- Download and launch the Windows Media Creation tool
- Select Create installation media (USB flash drive, DVD, or ISO) for another PC and click on Next
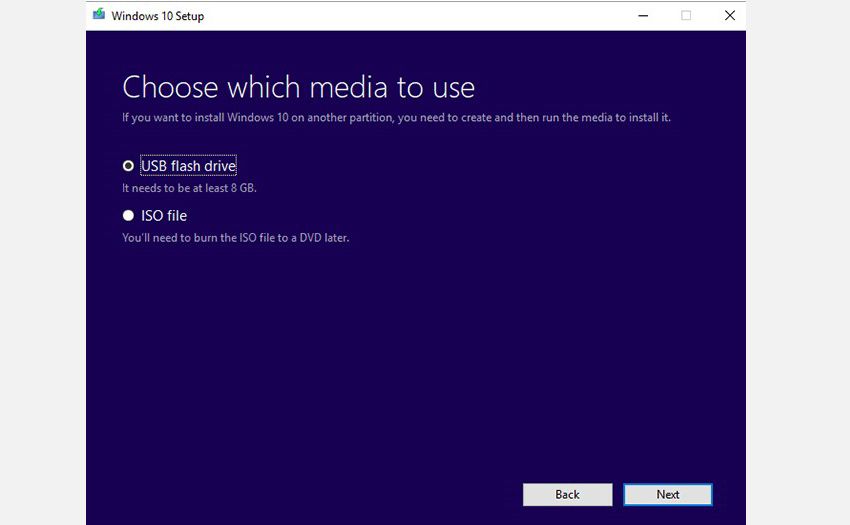
- You now need to select the system architecture (you can choose to create a system image of either 64-bit, 32-bit, or both), language, and Windows edition. If these options confuse you, you can always rely on Use the recommended options for this PC. Click on Next to proceed.
- Select ISO file, and once you click Next, the Media Creation tool will create the ISO image.
It is recommended to have an 8GB USB stick at least to back up the ISO file.
Download: Windows 10 Media Creation Tool for Windows
Similar to Windows 10, you can easily create an ISO file on your Windows 11 thanks to the Media Creation Tool made available by Windows 11. Head to the official Windows 11 downloads page, and grab the Installation Media from there. Once you have the files, follow the steps below to get started:
- Launch the installation .exe file.
- On the next dialog box, click on Accept.
- Choose the Language and Edition and click on Next.
- Select the ISO file radio box and click on Next.
- Choose the path where you’d like to store the ISO file and click on Next.
That’s it. The ISO file will be successfully downloaded, and you can use it at any time in the future.
Download: Windows 11 Media Creation Tool
Backup Your Windows PC With an ISO File
As you can see, creating an ISO image backup of your entire Windows system is perfect for backing up in advance of a significant system upgrade. Additionally, the speed with which the ISO can be created and subsequently restored should make it a far more attractive option than just backing up your data and hoping for the best.

A toolset you might be used to from Windows 7 in Windows 10 is creating a System Image backup. It can be used to restore your entire PC or individual files.
Windows 10 offers several ways to back up and recover your data. One toolset that you might be used to from Windows 7 is creating a full system image backup. A system image can be used to recover files or restore your entire PC if you’re unable to boot into Windows.
It can also be used to access files in backups you might have made in Windows 7 or Windows 8.1.
To get started, hit the Windows key on your keyboard and type: control panel and choose the Control Panel app from the results. That will open the classic Control Panel that you’re used to from earlier versions of Windows.

Once you have Control Panel open, click Backup and Restore (Windows 7).
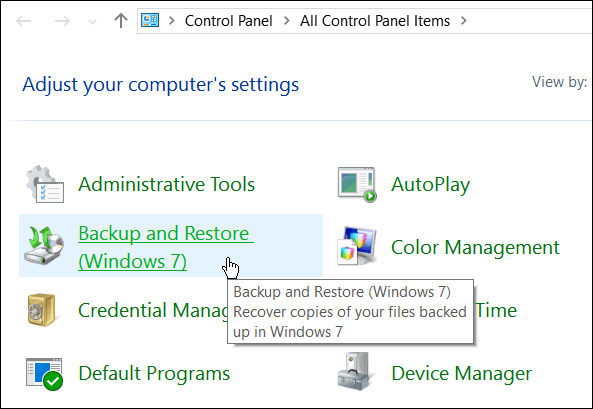
Then click the Create a system image link on the left side of the menu.

Windows will scan your computer for backup devices, and you have a few different ways to create your system image. You can use an extra internal or external drive, a network location, and still go “old school” and use DVDs.

Note: Backing up to a network location like a NAS or Windows Home Server is for experienced users and takes a bit of work. Make sure that Windows is set to discover network locations, browse to the network share, and the first time you’ll need to enter your admin credentials. Unless you have a network share set up, you don’t need to worry about this option.
For this example, I will use what most people would — an external drive plugged into my PC. After selecting your drive and everything looks right, select Start Backup and wait while the image is created.
You’ll get a progress screen while the backup is being saved. The amount of time it takes will vary depending on the amount of data you have and your hardware.
When it completes, you will get the option to create a USB recovery drive. If you haven’t created one yet, definitely do it now, so you’re prepared to recover your computer if needed.

If you’re wondering where the image is, go into the drive or network location you used, and look for the folder called WindowsImageBackup.

More on Windows 10 Backup and Recovery Tools
Windows 10 has several new backup and recovery features that can come in quite handy if something goes awry.
A PC Reset feature allows you to restore Windows 10 while keeping your files or even downgrade to your previous version of Windows (within the first 30 days of upgrading).
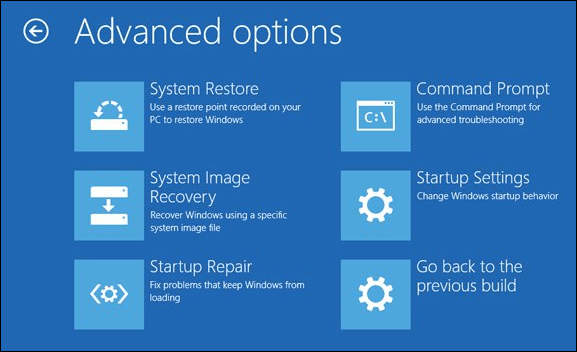
And the Advanced Recovery environment provides System Restore, System Image Recovery, Startup Repair, Selective Startup, and a command prompt for advanced troubleshooting. You can access Advanced Options by holding down the Shift Key and clicking Restart.
In fact, we showed you that trick when we covered how to start Windows 10 in Safe Mode. You can also access the Advanced Options environment by creating a Windows 10 USB Recovery Drive.
When it comes to file recovery, and backup, in addition to making a System Image, there is File History that can be configured to automatically back up your most important files to a separate drive or network location. It’s a lot like Time Machine in Apple’s OS X, but for Windows.
Even with all of these options to backup and recover your data or PC, there might come a time when things are so bad (deeply embedded malware, for example), or you want a fresh start, and that’s where grabbing the Windows 10 ISO and doing a clean install comes into play.
If you haven’t upgraded your Windows PC to Windows 10 yet, make sure you back up your data first. And with that, you might want to create a system image. Check out the link that pertains to your system below for a step-by-step guide:
- Create a Windows 7 System Image Backup
- Create a Windows 8.1 System Image Backup
![]()