Бывают случаи, когда вам нужно записать Windows на флешку в Linux, например, когда вы хотите поставить эту систему второй для использования специализированных программ, или вам нужно переустановить операционку своим знакомым. Или же есть пользователи Linux, которые решили вернуться на Windows, но единственную флешку уже перезаписали под Linux LiveUSB.
Загрузочная флешка Windows в Linux создается достаточно просто. Я предлагаю несколько способов решения этой проблемы. Все их я перечислил ниже.
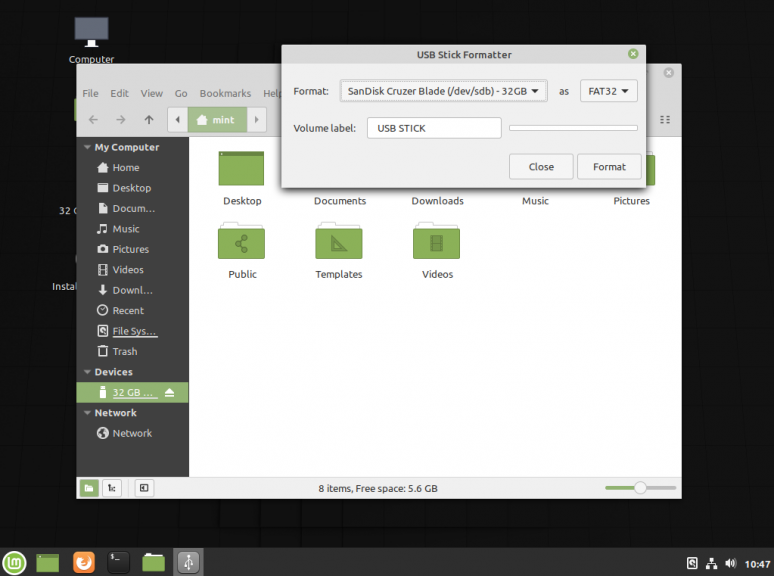
Загрузочную флешку можно создать с помощью терминала или специальных графических утилит. Настоятельно рекомендую отформатировать флешку в Fat32 (или Exfat) перед использованием любого из предложенных методов. Форматирование можно выполнить через Gparted, сfdisk+mkfs или через usb stick formatter (форматирование USB флеш накопителя).
Способ 1. Утилита USB Image Write
Для создания флешки можно воспользоваться утилитой Запись образа на USB. В некоторых дистрибутивах она уже предустановленна (Ubuntu, Mint и др.):
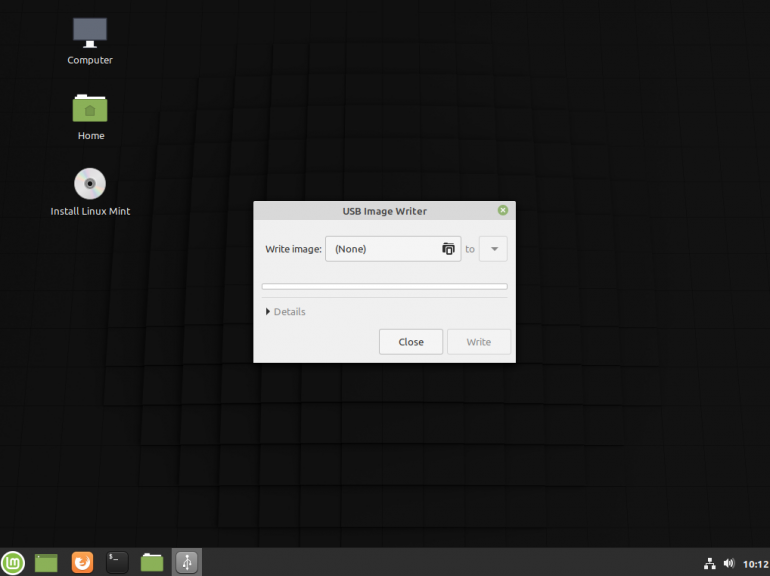
Выбрать образ в графе Write image образ и в поле to выбрать флешку. Далее нажимаем Write.
Способ 2. Утилита WoeUSB
Пожалуй, это самый простой способ создания. Установка в Ubuntu выполняется с помощью таких команд:
sudo add-apt-repository ppa:nilarimogard/webupd8
sudo apt update
sudo apt install woeusb
Откройте утилиту в меню приложений:
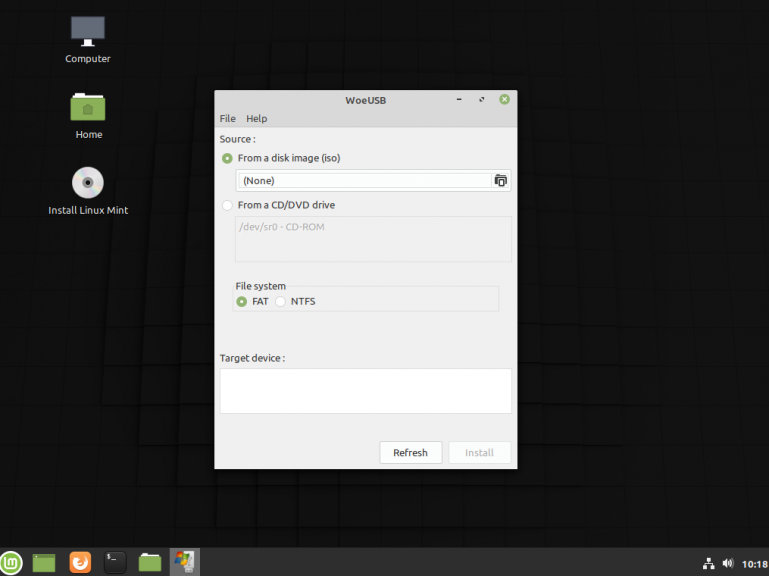
Интерфейс простой. Нажмите на кнопку Обзор со значком папки и выберите образ. Target device это флешка, на которую будет идти запись, если у вас их несколько выберите нужную. Ещё есть поле File system, где нужно выбрать какую файловую систему будете использовать. Рекомендую FAT. Затем нажмите Install и дождитесь окончания.
При появлении ошибки с кодом 256 Source media is currently mounted, размонтируйте образ ISO с Windows, если вы его смонтировали. При ошибке Target device is currently busy, извлеките флешку, затем снова подключите её. Если не сработало, попробуйте отформатировать её.
Способ 3. Терминал и Gparted
Положите образ в домашнюю папку и переименуйте его в windows.iso во избежание проблем с пробелами. Затем перейдите в терминале в домашнюю папку
cd ~
Запустите терминал через главное меню или с помощью сочетания клавиш Ctrl + Alt + T затем используйте команду dd для записи образа на флешку:
dd if=/windows.iso of=/dev/sdX
Замените X на букву вашей флешки! Узнать её можно через Gparted. В правом верхнем углу есть кнопка переключения дисков:
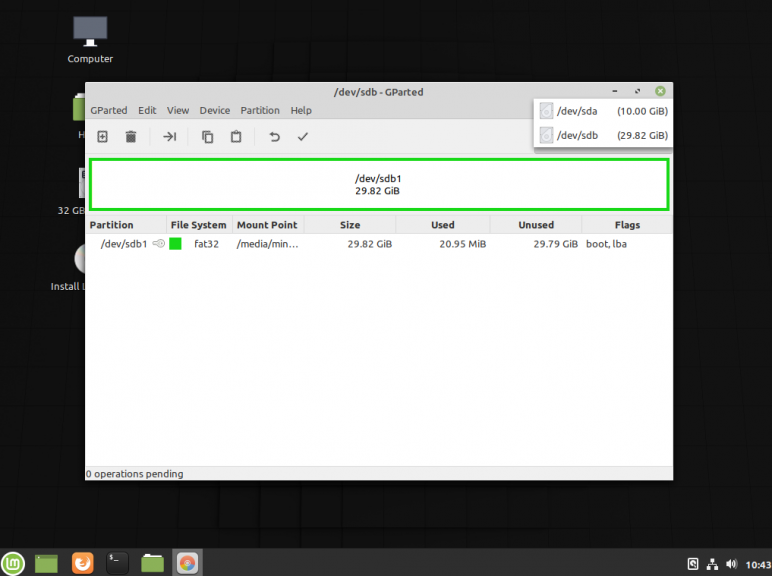
Тот диск который соответствует размеру вашей флешки и есть ваша флешка. В моем случае флешка на 32 гб это /dev/sdb. Значит команда будет иметь вид:
dd if=/windows.iso of=/dev/sdb
Дождитесь окончания записи и извлеките флешку.
Выводы
Как видите, создание загрузочной флешки Windows в Linux не представляет сложности. Это были все способы, которые я знаю. Если они вам помогли, напишите об этом. Если вы знаете еще способы, обязательно напишите о них в комментариях!

Статья распространяется под лицензией Creative Commons ShareAlike 4.0 при копировании материала ссылка на источник обязательна .
Об авторе

Здравствуйте, я изучаю Linux и обладаю хорошими знаниями английского.
Содержание
- How to Easily Create Windows 10 Bootable USB on Ubuntu or Any Linux Distro
- What you need
- Download Windows 10 ISO
- Creating a Windows 10 Bootable USB for UEFI Firmware
- Boot Windows 10 ISO Installer without USB (BIOS & UEFI)
- Creating a Windows 10 Bootable USB for Legacy BIOS Using WoeUSB
- How to Use WoeUSB From the Command Line
- How to create Windows 10 USB installation Drive in Linux
- Requirements
- Creating Windows 10 USB installation Drive in Linux
- Format the USB Drive
- Format USB with Disks Utility
- Format USB with GParted
- Ubuntu/Debian
- Fedora
- Mageia
- OpenSUSE
- 1. Create a bootable Windows USB with Disk Image Mounter
- 2. Create a bootable Windows USB with WoeUSB
- Install WoeUSb
- Ubuntu/Debian
- Fedora
- Linux Mint
- Elementary OS
- 3. Create a bootable Windows USB with UNebootin
- Conclusion
How to Easily Create Windows 10 Bootable USB on Ubuntu or Any Linux Distro
This tutorial is going to show you an easy way to create a Windows 10 bootable USB on Linux. I use Ubuntu 20.04 as an example. The method applies to any Linux distribution. I use Windows to do online banking because my bank doesn’t support Linux and sometimes play games that can’t run on Linux.
What you need
Download Windows 10 ISO
First, you should download Windows 10 ISO from Microsoft official download link. Note that you might not be able to download the ISO from this link on a Windows computer. This download link is visible to users on Linux computer. Once downloaded, follow the instructions below.
Note: It’s recommended to download the Windows 10 April 2018 update ISO, because the October Update ISO contains a file that is larger than 4GB, which can not be copied to a FAT32 partition.

Update: Microsoft doesn’t allow you to download the Windows 10 April 2018 Update ISO from their website anymore. You can download the ISO via this link: Win10 1803 English x64 ISO
Creating a Windows 10 Bootable USB for UEFI Firmware
This method works for UEFI firmware and is very simple. You create a GUID partition table on your USB stick, create a FAT32 file system on it, and then mount Windows 10 ISO image and copy those Windows 10 files to your USB stick and you are done. The following is a step-by-step guide.
First, install GParted partition editor on your Linux distribution. Ubuntu users run the following command.
Then insert your USB stick to your computer. Make sure you back up important files in your USB stick if there’s any. Next, launch Gparted. You will need to enter your password in order to use GParted.


If there’s a key icon after the partition name, that means the partition is mounted. Make sure all partitions on your USB stick are unmounted. To unmount a partition, simply right-click on it and select unmount.

Next, on the menu bar, select Device > Create partition table.

Choose GPT as the partition table type and click Apply.

Then right-click on the unallocated space and select New to create a new partition.

Change file system type from ext4 to fat32 and click Add.
Update: It is my observation that my NTFS formatted USB stick isn’t bootable on my old laptop, which was bought in 2012. However, it is bootable on my desktop computer, which was bought in 2017. It has a graphical UEFI firware (I can use my mouse to configure firmware settings).

Next, click the green check button on the toolbar to apply this operation. Once that’s done, close GParted (This is important), then find your Windows 10 ISO in file manager. Open it with disk image mounter.

Open the mounted file system. Select all files and folders and copy them to your USB stick.

Sometimes the file manager on Ubuntu hangs and it seems that the copy operation has stopped. Actually it’s working, just be patient. When you see a check mark, it means the copy operation has finished.

If your file manager doesn’t have the Disk image mounter in the context menu, then you can use the following commands to mount. The first command will create a mount point for Windows 10 ISO and the second command will mount Windows 10 ISO under that mount point.
Now in your file manager, go to /mnt/windows10/ and copy all files and folders to your USB stick.
Once the file and folders are copied, your windows 10 bootable USB is created! You can shut down your computer, boot it from this USB stick and install Windows 10 in UEFI mode. Keep in mind that you may need to disable compatibility support module (CSM) in the firmware in order to boot in UEFI mode. You may also need to remove USB stick from your computer and insert it back in order for the firmware to detect the boot loader on your USB stick.
Boot Windows 10 ISO Installer without USB (BIOS & UEFI)
Ever wondered if you can boot Windows 10 ISO installer without a USB flash drive? Yes, you can do it with GRUB2, which is the standard boot loader on Linux.
GRUB2 can not boot Windows 10 ISO directly. You need to create a separate NTFS partition on your hard disk or SSD with a partition editor like GParted and extract the Windows 10 ISO to that partition. Download the Windows 10 ISO file. The latest Windows 10 ISO file is 5.8G. The new NTFS partition should be at least 7G and it should not be used to store any other files.

Then find your Windows 10 ISO in file manager. Open it with disk image mounter.

Open the mounted file system. Select all files and folders and copy them to the NTFS partition.

Sometimes the file manager on Ubuntu hangs and it seems that the copy operation has stopped. Actually, it’s working. Just be patient. When you see a checkmark, it means the copy operation has finished.
Next, open up a terminal window and edit the /etc/grub.d/40_custom file with a text editor such as Nano.
In this file, we can add custom entries to the GRUB boot menu. In this case, we want to add an entry to boot the Windows 10 installer. If your computer still uses the traditional BIOS firmware, then add the following lines in this file.
If your computer uses UEFI firmware, then add the following text in this file.

Then update GRUB boot menu.
Next, set GRUB to boot the Windows 10 installer for the next boot with the following command.
Unplug all your external USB storage devices, then reboot your computer. GRUB will choose the Windows 10 installer.

GRUB2 can also boot Linux ISO files stored on the hard drive, so you don’t need to create Linux live USB.
Creating a Windows 10 Bootable USB for Legacy BIOS Using WoeUSB
WoeUSB is a fork of WinUSB. Both of them are open-source software (licensed in GPL) for making Windows bootable USB sticks on Linux platform, but the latter hasn’t been updated since 2012. You may be wondering why it’s named WoeUSB. The author said it’s a GNU convention to abbreviate software that support Windows to “woe”.
To install WoeUSB on Ubuntu 14.04/16.04/17.04, you can use the following PPA. Simply open up a terminal window and run the following commands one by one. Other Linux distro users can compile this software by following the instructions on the Github project page.
This PPA contains many other software. If you don’t need them, you can now remove this PPA from your system.
You can launch WoeUSB from Unity Dash or your application menu.

You can also start it from command line with:
It’s very easy to use the WoeUSB GUI. Select Windows ISO image and your target USB device. Make sure your data on the USB device is backed up before hitting the Install button.

Then wait for the installation to complete.

Once done, you can use the bootable USB to install Windows 10 on your computer.
How to Use WoeUSB From the Command Line
First, find the device name of your USB stick using the following command.

In my test, the Windows 10 USB created with WoeUSB can boot in both legacy and UEFI mode on my old computer. On my new computer, it can boot in legacy mode but failed in UEFI mode. I don’t know the exact reason, but it’s probably because of bug in this software.
That’s it! I hope this tutorial helped you create windows 10 bootable USB on Ubuntu or any Linux distribution. As always, if you found this post useful, then subscribe to our free newsletter to get new tutorials.
Источник
How to create Windows 10 USB installation Drive in Linux
Are you wondering if you can create Windows 10 USB drive on your Linux PC? If so, yes, it is possible, and here are detailed steps on how to do that.
![]()
W e have previously looked at how you can create a bootable USB drive of various Linux distributions from a Windows PC. Some of these posts include Creating a Linux Mint Live USB drive on Windows and create a bootable Ubuntu Live USB drive on Windows using tools like Rufus and PowerISO. This post will do the reverse – How to create Windows 10 USB installation Drive in Linux.
Requirements
Creating Windows 10 USB installation Drive in Linux
To get started, download the Windows 10 ISO file from their official website. Earlier versions were around 4GB in size, but I saw the latest version is nearly 5.7GB. That’s why I recommend you have a USB drive with at least 8GB of space. However, if you are using an earlier Windows ISO version (maybe Windows 10 2015), which is about 3.6GB, a 4GB-USB Drive would be okay.
Format the USB Drive
Even though we will look at various methods you can use to make the USB drive bootable, always ensure your USB is formatted with the right file format. We will use the disk utility that comes pre-installed with most Linux distribution and Gparted. Note: GParted is not pre-installed in most Linux distribution, but it’s one of the best tools to manage and partitions your disks. Our post on How to safely create or resize partitions in Linux using GParted can give you a little more insight into this fantastic tool.
Format USB with Disks Utility
Step 1. Insert/Plug your USB drive and launch the Disks utility from the applications menu.
 Launch Disks
Step 2. The Disk Utility window will open, listing all the available Hard drives and USB drives connected to your PC. Select your USB drive. From the image below, you can see I have my 8GB USB drive selected.
 Disk Utility
Step 3. With your USB selected, click on the Settings button (represented with a gear icon). A menu will pop-up with several options. Select the first option, which is ‘Format.’
 Open Settings
Step 4. A window will pop-up listing several options. Enter the Volume Name (can be any) and select the file format you want to use.
Note: If your Windows ISO file is less than 4GB, you can select the FAT option. However, if it’s bigger than that, use the NTFS option as I have done on the image below. That is because the FAT file system only supports a maximum file size of 4GB; for any file more extensive than 4GB, use exFAT or NTFS. Click Next when done.
 Format USB
Step 5. You will see a warning – “all data on the volume will be lost.” You can also see the configurations below. Click on Format to finalize the process.
 Confirm and Format USB
Once the format process complete, you can now create a bootable USB drive of Windows.
Format USB with GParted
Gparted is a free Disk manager utility available for most Linux distributions. It creates, resize, and move partitions, format and also create partition tables.
To install Gparted, execute any of the commands below depending on your distribution.
Ubuntu/Debian
Fedora
Mageia
OpenSUSE
Once you have successfully installed GParted, proceed to launch it from the applications menu or execute the command GParted on the Terminal. Note: GParted requires root privileges. You will, therefore, be required to enter your Root password.
 Launch GParted
Select your USB drive from the drop-down menu at the top-left corner.
 Select USB drive
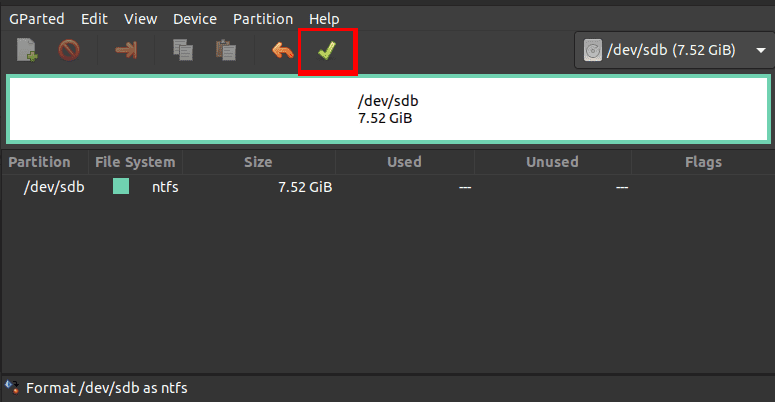
Right-click on your USB drive and select the Format option. Use the NTFS file system. If you don’t see these options (or they are greyed out), you might need to unmount your USB drive first. You will see the unmount option when you right-click on the USB.
Once done, click on the Green tick at the top to apply the changes.
 Apply Changes
Let’s now look at the various methods you can use to create a bootable USB drive of Windows on Linux.
1. Create a bootable Windows USB with Disk Image Mounter
Step 1. Launch the File Manager and navigate to the directory containing your Windows ISO file. Right-click on it and select the option “Open with Disk Image Mounter.”
 Disk Image Mounter
Step 2. The Windows ISO file will be mounted as a drive, and you can find it on the left side of the file manager. For some, you might need to click on “Other Locations” to see the mounted Windows ISO.
 Mount Windows ISO
Step 3. Click on the mounted Windows ISO and copy all the contents to the USB drive. You can use the shortcuts Ctrl + A to select everything, Ctrl + C to copy, and Ctrl + V to paste the files to the USB drive.
 Copy Files to USB
Now, wait for the process to complete. Once done, you can proceed to eject your PC from the file manager. Do this by right-clicking on the drive and clicking the eject option. You might get an error like “Do not unplug the drive until the write process has finished.” Please wait for a while until you see the notification, “can be safely removed.”
 Eject USB Drive
Note: From my experience working with Linux systems, never remove/unplug your USB drive from your PC without ejecting it from the file manager first. That’s especially when copying files. Even though it might show a “tick,” which means the copying process is complete, that might not be the case, and you will lose data if you forcefully unplug it without ejecting it.
If you did everything correctly, you now have a bootable USB drive of Windows 10. You can proceed to use it to boot up your PC and install Windows 10.
2. Create a bootable Windows USB with WoeUSB
WoeUSB is a Linux tool used to create a bootable USB drive for Windows. The tool is available in two formats. The woeusb program runs on the command-line and the woeusbgui, which presents a graphical interface. WoeUSb is free, and the source code is available on GitHub.
Install WoeUSb
Below are the installation procedure and commands for various Linux distributions.
Ubuntu/Debian
Alternatively, you can download the DEB file from the link below;
Note: If you get an error like “woeusb : Depends: libwxgtk3.0-0v5 (>= 3.0.4+dfsg), but it is not installable – E: Unable to correct problems, you have held broken packages” while executing the commands above, download and install the libwxgtk package from this link. Once done, try installing WoeUSB again.
 Broken package error
Fedora
To install WoeUSb on Fedora, we will use the Snap package format. Execute the commands below:
Linux Mint
use the commands below:
Elementary OS
Like Fedora, use the snap package manager to install WoeUSb on Elementary OS:
If you are using any other Linux distribution that is not mentioned above, use Snap to install WoeUSb. Now, let’s proceed and see how you can create a bootable USB drive of Windows in Linux systems.
Step 1. Format the USB drive. Use any of the methods described above.
Step 2. Once you have successfully installed WoeUSB, launch it from the applications menu.
The main WoeUSB window will open. It contains three main sections. The Source section is where you will select the Windows ISO file you want to use. In the File system section, select the file system format you want to use – whether FAT or NTFS. The final section is the Target device. Here, you will need to select the destination USB drive that you want to make bootable.
 WoeUSB main window
Step 3. After you have selected the ISO file, chosen the file system format to use, and the destination USB drive, click on the Install button at the bottom right. WoeUSB will start copying the files to the destination USB drive.
 WoeUSB
Note: It might take some time to make the USB drive bootable (up to 15 minutes). You might see the “Done” notification but don’t eject the USB drive until you see an “Installation Success” pop-up window.
 Installation Success
Step 4. Click OK and close the WoeUSb window. You can now eject the USB drive from the file manager and use it to boot and install Windows.
3. Create a bootable Windows USB with UNebootin
UNetbootin is a cross-platform utility used to create a bootable USB drive. Unlike WoeUSb, which supports only Windows ISO files, UNetbootin can also create bootable USB drives of Linux files. One additional exciting feature with the UNetbootin is it is available as a bin file. Therefore, you are only required to make it executable and run it. You don’t need to install it.
Step 1. Download UNetbootin bin file.
To download the 64bit file of UNetbootin, execute the command below.
To download the 32bit file of UNetbootin, execute the command below:
In my case, I will download the 64bit file.
 UNetbootin 64bit
Step 2. Make the UNetbootin bin file executable with the command below
 Make the file executable
Step 3. Once done, you can proceed to run the bin file. Execute the command below to run UNetbootin as root.
Please note, you might need to change the path to point to the directory containing the Windows ISO file.
 Launch UNetbootin
The UNetbootin main window will open.
 UNetbootin Main Window
Step 4. There are two main sections – Distribution and Diskimage. Select the Diskimage area and choose the path of the Windows ISO file. Just below that, select Disk Type and the USB drive. Once done, Click OK.
 UNetbootin
Step 5. UNetbootin will start making the USB drive bootable. You can follow what’s happening on the UNetbootin window. You can track the overall progress at the bottom of the window in the progress bar.
 UNetbootin Booting process
Step 6. Once done, you will see the Complete Installation message. Click on the Exit button that appears.
 UNetbootin Finish window
You can now eject the USB from the file manager and use it to boot and install Windows.
Conclusion
That’s our complete guide on how you can create a bootable USB drive of Windows on Linux systems. Out of the three methods discussed above, I would highly recommend the Disk Image Mounter method. Do you have another way that you use to create a bootable USB drive of Windows on Linux? Please, share with our readers in the comments below. If you come across any errors executing the commands above, feel free to hit the comments.
If you are new with the whole procedure of booting your PC from a USB drive, please check out our post on How to boot your Windows or Linux PC from a USB Drive. It will give you a detailed guide on the entire process.
Источник
Windows 10 October 2018 release UEFI bootable USB drive on any Linux distribution.
Notice, that since Windows 10 October 2018 release the installation file sources/install.wim is larger than the maximum FAT32 file size, so we will format USB drive to NTFS. Windows installer also cannot work with an EFI partition (code ef00), so we will use Microsoft basic data partition type (code 0700).
Variant A (For PCs with NTFS support)
Steps for creating USB drive with name /dev/sdc (Replace all commands with YOUR device name!):
- Insert USB drive to computer and make sure it is unmounted. Some distributions like to automount USB drives, so make sure you unmount them. Mounted partitions can be found with
mount -l | grep '/dev/sdc', then unmount withsudo umount /dev/sdcX(whereXis partition number). - Open USB block device using
gdisk /dev/sdc, configure it asGPTand createMicrosoft basic datapartition (code0700), then write changes and quit (Next steps will destroy partition table in your USB drive!!!).
sudo gdisk /dev/sdc
o
> This option deletes all partitions and creates a new protective MBR.
> Proceed? (Y/N): y
n
> Partition number ... > hit Enter
> First sector ... : > hit Enter
> Last sector ... : > hit Enter
> Current type is 'Linux filesystem'
> Hex code or GUID (L to show codes, Enter = 8300): 0700
p
> Should print something like:
> Disk /dev/sdc: 15646720 sectors, 7.5 GiB
> Model: DataTraveler 160
> Sector size (logical/physical): 512/512 bytes
> Disk identifier (GUID): ...
> Partition table holds up to 128 entries
> Main partition table begins at sector 2 and ends at sector 33
> First usable sector is 34, last usable sector is 15646686
> Partitions will be aligned on 2048-sector boundaries
> Total free space is 2014 sectors (1007.0 KiB)
> Number  Start (sector)    End (sector)  Size       Code  Name
>    1            2048        15646686   7.5 GiB     0700  Microsoft basic data
w
> Final checks complete. About to write GPT data. THIS WILL OVERWRITE EXISTING PARTITIONS!!
> Do you want to proceed? (Y/N): y
q
- Format new partition as NTFS (thx @Alex for
-Qidea):
sudo mkfs.ntfs -Q /dev/sdc1
- Mount new USB partition to temporary directory in your home:
mkdir ~/tmp-win10-usb-drive
sudo mount /dev/sdc1 ~/tmp-win10-usb-drive
- Download Windows installation ISO, create new temporary directory in your home and mount it there:
mkdir ~/tmp-win10-iso-mnt
sudo mount Win10_1809Oct_English_x64.iso ~/tmp-win10-iso-mnt
- Copy all files from mounted ISO to USB drive (you can use
rsyncto see progress):
sudo cp -rT ~/tmp-win10-iso-mnt/ ~/tmp-win10-usb-drive/
- Unmount Windows ISO and USB drive and remove temporary directories:
sudo umount ~/tmp-win10-iso-mnt/ ~/tmp-win10-usb-drive/
rmdir ~/tmp-win10-iso-mnt/ ~/tmp-win10-usb-drive/
- Insert USB drive to new computer and boot from it.
Variant B (For PCs without NTFS support)
Steps for creating USB drive with name /dev/sdc (Replace all commands with YOUR device name!):
- Insert USB drive to computer and make sure it is unmounted. Some distributions like to automount USB drives, so make sure you unmount them. Mounted partitions can be found with
mount -l | grep '/dev/sdc', then unmount withsudo umount /dev/sdcX(whereXis partition number). - Open USB block device using
gdisk /dev/sdc - Configure it as
GPT - Create first partition of 1GB size and type
Microsoft basic data(code0700). - Create second partition of rest of the size and type
Microsoft basic data(code0700). - Write changes and quit (Next steps will destroy partition table in your USB drive!!!).
sudo gdisk /dev/sdc
> o
> This option deletes all partitions and creates a new protective MBR.
> Proceed? (Y/N): y
> n
> Partition Number: Enter
> First sector: Enter
> Last sector: 1G
> Type: 0700
> n
> Partition Number: Enter
> First sector: Enter
> Last sector: Enter
> Type: 0700
> p
# Should print something like:
> Disk /dev/sdc: 30031250 sectors, 14.3 GiB
> Model: Ultra USB 3.0
> Sector size (logical/physical): 512/512 bytes
> Disk identifier (GUID): C657C0AF-3FE2-4152-8BF1-CE3CCA9F3541
> Partition table holds up to 128 entries
> Main partition table begins at sector 2 and ends at sector 33
> First usable sector is 34, last usable sector is 30031216
> Partitions will be aligned on 2048-sector boundaries
> Total free space is 4061 sectors (2.0 MiB)

> Number  Start (sector)    End (sector)  Size       Code  Name
>    1            2048         2048000   999.0 MiB   0700  Microsoft basic data
>    2         2050048        30031216   13.3 GiB    0700  Microsoft basic data

w
> Final checks complete. About to write GPT data. THIS WILL OVERWRITE EXISTING PARTITIONS!!
> Do you want to proceed? (Y/N): y
q
- Format first partition as FAT32 and second as NTFS:
sudo mkfs.fat -F32 /dev/sdc1
sudo mkfs.ntfs -Q  /dev/sdc2
- Mount new USB partitions to temporary directories in your home:
mkdir ~/tmp-win10-fat-usb-drive
mkdir ~/tmp-win10-ntfs-usb-drive
sudo mount /dev/sdc1 ~/tmp-win10-fat-usb-drive
sudo mount /dev/sdc2 ~/tmp-win10-ntfs-usb-drive
- Download Windows installation ISO, create new temporary directory in your home and mount it there:
mkdir ~/tmp-win10-iso-mnt
sudo mount Win10_1809Oct_English_x64.iso ~/tmp-win10-iso-mnt
- Copy following files with from mounted ISO to FAT32 formatted USB drive (basically copy everything besides
sources/but includesources/boot.wim):
sudo cp ~/tmp-win10-iso-mnt/* ~/tmp-win10-fat-usb-drive/
sudo cp -r ~/tmp-win10-iso-mnt/boot ~/tmp-win10-fat-usb-drive/
sudo cp -r ~/tmp-win10-iso-mnt/efi ~/tmp-win10-fat-usb-drive/
sudo cp -r ~/tmp-win10-iso-mnt/support ~/tmp-win10-fat-usb-drive/
sudo mkdir ~/tmp-win10-iso-mnt/sources ~/tmp-win10-fat-usb-drive/
sudo cp ~/tmp-win10-iso-mnt/sources/boot.wim ~/tmp-win10-fat-usb-drive/sources
- Copy everything from mounted ISO to NTFS formatted USB drive:
sudo cp -rT ~/tmp-win10-iso-mnt/ ~/tmp-win10-ntfs-usb-drive/
- Unmount Windows ISO and both USB partitions and remove temporary directories:
sudo umount ~/tmp-win10-iso-mnt/ ~/tmp-win10-usb-fat-drive/ ~/tmp-win10-usb-ntfs-drive/
rmdir ~/tmp-win10-iso-mnt/ ~/tmp-win10-usb-drive/
- Insert USB drive to new computer and boot from it.
We have previously looked at how you can create a bootable USB drive of various Linux distributions from a Windows PC. Some of these posts include Creating a Linux Mint Live USB drive on Windows and create a bootable Ubuntu Live USB drive on Windows using tools like Rufus and PowerISO. This post will do the reverse – How to create Windows 10 USB installation Drive in Linux.
You Might Be Interested In
Requirements
- Windows 10 ISO file
- A USB drive (at least 8GB)
- Root privileges
- An active internet connection to download some of the tools
Creating Windows 10 USB installation Drive in Linux
To get started, download the Windows 10 ISO file from their official website. Earlier versions were around 4GB in size, but I saw the latest version is nearly 5.7GB. That’s why I recommend you have a USB drive with at least 8GB of space. However, if you are using an earlier Windows ISO version (maybe Windows 10 2015), which is about 3.6GB, a 4GB-USB Drive would be okay.
Download Windows 10
Format the USB Drive
Even though we will look at various methods you can use to make the USB drive bootable, always ensure your USB is formatted with the right file format. We will use the disk utility that comes pre-installed with most Linux distribution and Gparted. Note: GParted is not pre-installed in most Linux distribution, but it’s one of the best tools to manage and partitions your disks. Our post on How to safely create or resize partitions in Linux using GParted can give you a little more insight into this fantastic tool.
Format USB with Disks Utility
Step 1. Insert/Plug your USB drive and launch the Disks utility from the applications menu.

Launch Disks
Step 2. The Disk Utility window will open, listing all the available Hard drives and USB drives connected to your PC. Select your USB drive. From the image below, you can see I have my 8GB USB drive selected.

Disk Utility
Step 3. With your USB selected, click on the Settings button (represented with a gear icon). A menu will pop-up with several options. Select the first option, which is ‘Format.’

Open Settings
Step 4. A window will pop-up listing several options. Enter the Volume Name (can be any) and select the file format you want to use.
Note: If your Windows ISO file is less than 4GB, you can select the FAT option. However, if it’s bigger than that, use the NTFS option as I have done on the image below. That is because the FAT file system only supports a maximum file size of 4GB; for any file more extensive than 4GB, use exFAT or NTFS. Click Next when done.

Format USB
Step 5. You will see a warning – “all data on the volume will be lost.” You can also see the configurations below. Click on Format to finalize the process.

Confirm and Format USB
Once the format process complete, you can now create a bootable USB drive of Windows.
Format USB with GParted
Gparted is a free Disk manager utility available for most Linux distributions. It creates, resize, and move partitions, format and also create partition tables.
To install Gparted, execute any of the commands below depending on your distribution.
-
Ubuntu/Debian
sudo apt install gparted
-
Fedora
su -c "yum install gparted"
-
Mageia
sudo urpmi gparted
-
OpenSUSE
sudo zypper install gparted
Once you have successfully installed GParted, proceed to launch it from the applications menu or execute the command GParted on the Terminal. Note: GParted requires root privileges. You will, therefore, be required to enter your Root password.

Launch GParted
Select your USB drive from the drop-down menu at the top-left corner.

Select USB drive
Right-click on your USB drive and select the Format option. Use the NTFS file system. If you don’t see these options (or they are greyed out), you might need to unmount your USB drive first. You will see the unmount option when you right-click on the USB.
Once done, click on the Green tick at the top to apply the changes.
Apply Changes
Let’s now look at the various methods you can use to create a bootable USB drive of Windows on Linux.
1. Create a bootable Windows USB with Disk Image Mounter
Step 1. Launch the File Manager and navigate to the directory containing your Windows ISO file. Right-click on it and select the option “Open with Disk Image Mounter.”

Disk Image Mounter
Step 2. The Windows ISO file will be mounted as a drive, and you can find it on the left side of the file manager. For some, you might need to click on “Other Locations” to see the mounted Windows ISO.

Mount Windows ISO
Step 3. Click on the mounted Windows ISO and copy all the contents to the USB drive. You can use the shortcuts Ctrl + A to select everything, Ctrl + C to copy, and Ctrl + V to paste the files to the USB drive.

Copy Files to USB
Now, wait for the process to complete. Once done, you can proceed to eject your PC from the file manager. Do this by right-clicking on the drive and clicking the eject option. You might get an error like “Do not unplug the drive until the write process has finished.” Please wait for a while until you see the notification, “can be safely removed.”

Eject USB Drive
Note: From my experience working with Linux systems, never remove/unplug your USB drive from your PC without ejecting it from the file manager first. That’s especially when copying files. Even though it might show a “tick,” which means the copying process is complete, that might not be the case, and you will lose data if you forcefully unplug it without ejecting it.
If you did everything correctly, you now have a bootable USB drive of Windows 10. You can proceed to use it to boot up your PC and install Windows 10.
2. Create a bootable Windows USB with WoeUSB
WoeUSB is a Linux tool used to create a bootable USB drive for Windows. The tool is available in two formats. The woeusb program runs on the command-line and the woeusbgui, which presents a graphical interface. WoeUSb is free, and the source code is available on GitHub.
Install WoeUSb
Below are the installation procedure and commands for various Linux distributions.
-
Ubuntu/Debian
sudo add-apt-repository ppa:nilarimogard/webupd8
sudo apt update
sudo apt install woeusb
Alternatively, you can download the DEB file from the link below;
Download WoeUSB DEB
Note: If you get an error like “woeusb : Depends: libwxgtk3.0-0v5 (>= 3.0.4+dfsg), but it is not installable – E: Unable to correct problems, you have held broken packages” while executing the commands above, download and install the libwxgtk package from this link. Once done, try installing WoeUSB again.

Broken package error
-
Fedora
To install WoeUSb on Fedora, we will use the Snap package format. Execute the commands below:
sudo dnf install snapd
sudo ln -s /var/lib/snapd/snap /snap
sudo snap install woe-usb --edge
-
Linux Mint
use the commands below:
sudo add-apt-repository ppa:nilarimogard/webupd8
sudo apt update
sudo apt install woeusb
-
Elementary OS
Like Fedora, use the snap package manager to install WoeUSb on Elementary OS:
sudo apt update
sudo apt install snapd
sudo snap install woe-usb --edge
If you are using any other Linux distribution that is not mentioned above, use Snap to install WoeUSb. Now, let’s proceed and see how you can create a bootable USB drive of Windows in Linux systems.
Step 1. Format the USB drive. Use any of the methods described above.
Step 2. Once you have successfully installed WoeUSB, launch it from the applications menu.

Launch WoeUSB
The main WoeUSB window will open. It contains three main sections. The Source section is where you will select the Windows ISO file you want to use. In the File system section, select the file system format you want to use – whether FAT or NTFS. The final section is the Target device. Here, you will need to select the destination USB drive that you want to make bootable.

WoeUSB main window
Step 3. After you have selected the ISO file, chosen the file system format to use, and the destination USB drive, click on the Install button at the bottom right. WoeUSB will start copying the files to the destination USB drive.

WoeUSB
Note: It might take some time to make the USB drive bootable (up to 15 minutes). You might see the “Done” notification but don’t eject the USB drive until you see an “Installation Success” pop-up window.

Installation Success
Step 4. Click OK and close the WoeUSb window. You can now eject the USB drive from the file manager and use it to boot and install Windows.
3. Create a bootable Windows USB with UNebootin
UNetbootin is a cross-platform utility used to create a bootable USB drive. Unlike WoeUSb, which supports only Windows ISO files, UNetbootin can also create bootable USB drives of Linux files. One additional exciting feature with the UNetbootin is it is available as a bin file. Therefore, you are only required to make it executable and run it. You don’t need to install it.
Step 1. Download UNetbootin bin file.
To download the 64bit file of UNetbootin, execute the command below.
wget https://github.com/unetbootin/unetbootin/releases/download/675/unetbootin-linux64-675.bin
To download the 32bit file of UNetbootin, execute the command below:
wget https://github.com/unetbootin/unetbootin/releases/download/675/unetbootin-linux-675.bin
In my case, I will download the 64bit file.

UNetbootin 64bit
Step 2. Make the UNetbootin bin file executable with the command below
chmod +x unetbootin-linux64-675.bin

Make the file executable
Step 3. Once done, you can proceed to run the bin file. Execute the command below to run UNetbootin as root.
sudo QT_X11_NO_MITSHM=1 /home/tuts/Downloads/Programs/unetbootin-linux64-675.bin
Please note, you might need to change the path to point to the directory containing the Windows ISO file.

Launch UNetbootin
The UNetbootin main window will open.

UNetbootin Main Window
Step 4. There are two main sections – Distribution and Diskimage. Select the Diskimage area and choose the path of the Windows ISO file. Just below that, select Disk Type and the USB drive. Once done, Click OK.

UNetbootin
Step 5. UNetbootin will start making the USB drive bootable. You can follow what’s happening on the UNetbootin window. You can track the overall progress at the bottom of the window in the progress bar.

UNetbootin Booting process
Step 6. Once done, you will see the Complete Installation message. Click on the Exit button that appears.

UNetbootin Finish window
You can now eject the USB from the file manager and use it to boot and install Windows.
Conclusion
That’s our complete guide on how you can create a bootable USB drive of Windows on Linux systems. Out of the three methods discussed above, I would highly recommend the Disk Image Mounter method. Do you have another way that you use to create a bootable USB drive of Windows on Linux? Please, share with our readers in the comments below. If you come across any errors executing the commands above, feel free to hit the comments.
If you are new with the whole procedure of booting your PC from a USB drive, please check out our post on How to boot your Windows or Linux PC from a USB Drive. It will give you a detailed guide on the entire process.
You Might Be Interested In