If you have every used the Command Line, or CMD, interface in Windows, you probably have some idea of the powerful things it can do. Creating your own CMD scripts, you can do even more, but faster.
A CMD script does the same thing as if you typed commands into the CMD window. If you want to do something on a regular basis, such as telling Windows to turn off your computer after an hour, you can write a script and then you can activate the script whenever you want to run it.
Understanding CMD and Written Commands
In the early days of personal computing almost everything was done by typing command_s into a command line interface. If you wanted to open a program, you had to type the name of the program into the command line. Today, you can simply click or touch an icon on your screen to perform most actions. But Windows still accepts type-written commands in the CMD utility. You can write commands_ to open programs, add or change account permissions, back up files or get information about your computer using the CMD window.
Understanding CMD Scripts
The Command Prompt utility in Windows can be opened at any time, simply by typing «cmd» in the Windows Start menu. Here, you can type all sorts of commands to open programs, change settings and make tweaks to how Windows and its programs perform. In Microsoft’s long history of operating systems, CMD i_s a relative newcomer. In MS-DOS, before Windows was released, when you wanted to run a script, you would save it as a .bat file. While you can still save files with that extension today, most people use the .cmd extension._
Using a Script CMD to Open Notepad
To create and save a CMD switch, it’s best to use a basic text editor. Using a word processor like Microsoft Word makes saving the file a hassle. Notepad is much easier to use. So to demonstrate how CMD works, let’s open use it to open Notepad.
- Type CMD in the Windows Start menu and press Enter to open CMD.exe.
- Change the directory from your current username folder to the base directory by typing «cd» and pressing Enter. It should now read «C:>» before the blinking cursor.
- Type the following line and press Enter: start «c:windowssystem32» notepad.exe
As soon as you press Enter, you will see Notepad open. The command you entered has told Windows to start the notepad.exe program, which is located in the system32 folder, which is inside the Windows folder, on the C: drive. CMD commands are not case-sensitive so you can use lowercase or uppercase letters interchangeably.
Creating Your First Script CMD File
Now that Notepad is open, create your first CMD script file by typing the same line you used in the CMD window into notepad: start «c:windowssystem32» notepad.exe
Save the batch file to your desktop by selecting «Save As» from the File menu. Name the file «firstscript.cmd» and click «Save.» Notepad script commands must be saved with the .cmd extension, rather than the default .txt extension.
Double-click the new CMD file on your desktop. You will see the CMD window open for a fraction of a second and then close as Notepad is launched.
This is hardly a useful script, since a desktop shortcut does the same thing. To create something more useful, let’s edit the file so that it creates a new text file on your desktop listing all of your programs.
Using Echo and Echo Off
While the CMD window wasn’t open long enough to see it, by default it will always display the text that was entered in the CMD file when it runs. For longer scripts, this can be a nuisance, so it’s generally good form to turn this off by using the Echo Off command in the first line of the CMD file. By itself, Echo Off disables the display of any text that follows it. To make the Echo Off command apply to itself, put an @ symbol in front of it. Thus, your two-line CMD script would be:
@echo off
start «c:windowssystem32» notepad.exe
Creating a Text File Script
This CMD script will list all the files you have in your Program Files folder and put that list in a new text file.
- Open Notepad. Type «@echo off«in the first line and press Enter.
- In the second line, type: dir «C:Program Files» > list_of_files.txt
- Select «Save As» from the File menu and save the file as «program-list-script.cmd.»
- Double-click the new text file on your desktop to see the list of files and folders.
The text file will appear in the same folder where the script file itself is. So if the script file is on your desktop, the list-of-files.txt file will also appear on your desktop.
If you want to change the folder where the text file is placed, you can specify its own folder in the script. For example, if you want it to be placed in your Documents folder, use: dir «C:Program Files» > C:UsersDavidDocumentslist_of_files.txt
Creating a Systems Information Script
If you want to use a script to give you needed information, it’s not always necessary to produce a text document with a script. You can have the information posted directly in the CMD window.
The example script below will give you basic information about your computer, including the operating system and version number, the BIOS version, the total physical memory and your computer’s network address. To use the script, type or copy the lines below into a new Notepad file and save it with the .cmd file extension, such as «my_computer_info.cmd.»
In this example, ECHO OFF is used to prevent the CMD window from displaying the script.
The ECHO command is used to display specific text, as well as some equal signs (===) as lines to organize the information in sections.
To insert a comment for your own use — without it affecting the script or appearing in the CMD window — type two colons first. Anything in the same line following » :: « will be commented out from the script.
The PAUSE command directs the CMD program to stay open. Pressing any key on your keyboard will close the window.
@ECHO OFF
:: This CMD script provides you with your operating system, hardware and network information.
TITLE My System Info
ECHO Please wait… Gathering system information.
ECHO =========================
ECHO OPERATING SYSTEM
systeminfo | findstr /c:»OS Name»
systeminfo | findstr /c:»OS Version»
ECHO =========================
ECHO BIOS
systeminfo | findstr /c:»System Type»
ECHO =========================
ECHO MEMORY
systeminfo | findstr /c:»Total Physical Memory»
ECHO =========================
ECHO CPU
wmic cpu get name
ECHO =========================
ECHO NETWORK ADDRESS
ipconfig | findstr IPv4
ipconfig | findstr IPv6
PAUSE
Using Scripts to Shut Down Your Computer
Normally, when you shut down your computer, it happens instantaneously. Suppose, however, that you’re listening to an audiobook or watching a training video — and you know that you will fall asleep after an hour. You can use a CMD script to tell your computer to shut itself down, after a specified period of time, using the shutdown command.
When you use the shutdown command, you need to include two additional switches, or subcommands. The first tells the computer to either shutdown or restart. You can use either -s or — r. The second tells the computer how many seconds to wait before performing the command. For this you use -t, followed by the number of seconds.
To shutdown the computer in one second, use: shutdown -s -t 01
To restart the computer in eight seconds, use: shutdown -r -t 08
To shutdown the computer in two hours use: shutdown -s -t 7200
Backing Up Files With a CMD Script
If you find it tedious to back up your files to a second storage device, using a CMD script makes the process a breeze. For this, use the Robocopy command. For example, if you want to back up all of the files in your Documents folder onto a removable storage device, you can write the command in a CMD file and then — at the end of the day — simply double click the file to activate it.
The Robocopy command needs to know, first — which folder you want to copy and, second — where you want the copy placed. Both the source and destination need to be in quotation marks.
If you’re not certain what your drive letters are, open File Explorer and click on «My Computer.»
For example, if your User name is MyName, your Documents folder is in your C: drive and your Backup folder is in a removable storage D: drive, then the command would be:
robocopy D:UsersMyNameDocuments F:Backup /XA:H /W:0 /R:1 > F:Backupbackup.log
This example is a bit more complicated, since Robocopy offers you a lot of options.
D:UsersMyNameDocuments: the folder you want to back up.
F:Backup: the location of your Backup folder.
/XA:H: ignores hidden files.
/W:0: waits zero seconds between retries, instead of the default 30 seconds.
/R:1: retry only once if the file is locked.
> F:Backupbackup.log: create a backup log placed in the Backup folder.
Note that because this is a mirror backup, if you delete files from the source folder, they will be deleted from the Backup folder the next time you use the script. It would be a good idea to explore additional switches available for Robocopy, so that you ensure that you backup your files the way that works best for you.
Without redirection, Luc Vu or Erik Konstantopoulos point out to:
copy NUL EMptyFile.txt
copy /b NUL EmptyFile.txt
«How to create empty text file from a batch file?» (2008) also points to:
type NUL > EmptyFile.txt
# also
echo. 2>EmptyFile.txt
copy nul file.txt > nul # also in qid's answer below
REM. > empty.file
fsutil file createnew file.cmd 0 # to create a file on a mapped drive
Nomad mentions an original one:
C:UsersVonCprogtests>aaaa > empty_file
'aaaa' is not recognized as an internal or external command, operable program or batch file.

C:UsersVonCprogtests>dir

 Folder C:UsersVonCprogtests

27/11/2013  10:40    <REP>          .
27/11/2013  10:40    <REP>          ..
27/11/2013  10:40                 0 empty_file
In the same spirit, Samuel suggests in the comments:
the shortest one I use is basically the one by Nomad:
.>out.txt
It does give an error:
'.' is not recognized as an internal or external command
But this error is on stderr. And > only redirects stdout, where nothing have been produced.
Hence the creation of an empty file.
The error message can be disregarded here. Or, as in Rain’s answer, redirected to NUL:
.>out.txt 2>NUL
(Original answer, November 2009)
echo.>filename
(echo "" would actually put «» in the file! And echo without the ‘.’ would put «Command ECHO activated» in the file…)
Note: the resulting file is not empty but includes a return line sequence: 2 bytes.
This discussion points to a true batch solution for a real empty file:
 <nul (set/p z=) >filename

 dir filename
 11/09/2009  19:45                 0 filename
 1 file(s)                         0 bytes
The «
<nul» pipes anulresponse to theset/pcommand, which will cause the
variable used to remain unchanged. As usual withset/p, the string to the
right of the equal sign is displayed as a prompt with no CRLF.
Since here the «string to the right of the equal sign» is empty… the result is an empty file.
The difference with cd. > filename (which is mentioned in Patrick Cuff’s answer and does also produce a 0-byte-length file) is that this «bit of redirection» (the <nul... trick) can be used to echo lines without any CR:
<nul (set/p z=hello) >out.txt
<nul (set/p z= world!) >>out.txt
dir out.txt
The
dircommand should indicate the file size as 11 bytes: «helloworld!«.
![]()
Download Article
![]()
Download Article
Learning how to do simple file management at the Command Prompt (cmd) comes in handy when you’re learning to code. When you create files and folders at the command line, you can access, use, and manipulate those folders and files in Windows apps. We’ll show you how to create folders (directories) and text files at the Windows Command Prompt, and teach you commands for deleting unneeded files and folders.
-

1
Open the Command Prompt. The easiest way to do this is to press Win + S to activate the search bar, type cmd, and then click Command Prompt in the search results.
-
2
Go to the directory in which you want to create the file. The prompt will open to C:UsersYourName by default. If the directory is somewhere else, type cd path_to_directory and press Enter. Replace path_to_directory with the actual directory location.[1]
- For example, if you want to create a file on the Desktop, type cd desktop and press Enter.
- If the directory you’re looking for isn’t in your user directory (e.g., C:UsersYourName), you’ll have to type in the whole path (e.g., C:UsersSomeoneElseDesktopFiles).
Advertisement
-
3
Create an empty file. If you don’t want to create an empty file, skip to the next step.[2]
To create an empty file:- Type type nul > filename.txt.
- Replace filename.txt with whatever you want to call your new file. The «.txt» part indicates that this is a plain text file. Other common file extensions include «.docx» (Word document), «.png» (empty photo),and «.rtf» (rich text document). All of these file types can be read on any Windows computer without installing additional software.
- Press Enter.
-
4
Create a file containing certain text. If you don’t want to create a file with certain text inside, skip to the next step.[3]
Use these steps to create a plain text file that you can type into:- Type copy con testfile.txt, but replace testfile with the desired file name.[4]
- Press Enter.
- Type some text. This is a rudimentary text editor, but it’s good for quick notes or code. You can use the Enter key to go to the next line.
- Press Control + Z when you’re finished editing the file.
- Press the Enter key. You’ll see «1 file(s) copied,» which means your file is now saved with the name you created.
- Another way to do this is to run this command: echo enter your text here > filename.txt.
- Type copy con testfile.txt, but replace testfile with the desired file name.[4]
-
5
Create a file that’s a certain size. If you don’t want to create a file that’s a specific size, skip this step.[5]
To create a blank text file based on byte size, use this command:- fsutil file createnew filename.txt 1000.
- Replace filename with the desired file name, and 1000 with the actual number of bytes you’d like the file to be.


Advertisement
-
1
Open the Command Prompt. The easiest way to do this is to press Win + S to activate the search bar, type cmd, and then click Command Prompt in the search results.
-
2
Go to the directory containing the file you want to delete. The prompt will open to C:UsersYourName by default. If the file is somewhere else, type cd path_to_directory and press Enter. Replace path_to_directory with the actual directory location.
- For example, if you want to delete a file from the Desktop, type cd desktop and press Enter.
- If the directory you want to view isn’t in your user directory (e.g., C:UsersYourName), you’ll have to type in the whole path (e.g., C:UsersSomeoneElseDesktopFiles).
-
3
Type dir and press ↵ Enter. This displays a list of all files in the current directory. You should see the file you want to delete in this list.
- Using Command Prompt to delete files results in the files being deleted permanently rather than being moved to the Recycle Bin. Exercise caution when deleting files via Command Prompt.
-
4
Type del filename and press ↵ Enter. Replace filename with the full name and extension of the file you want to delete.[6]
File names include file extensions (e.g., *.txt, *.jpg). This deletes the file from your computer.- For example, to delete a text file entitled «hello», you would type del hello.txt into Command Prompt.
- If the file’s name has a space in it (e.g., «hi there»), you will place the file’s name in quotations (e.g., del "hi there").
- If you get an error that says the file cannot be deleted, try using del /f filename instead, as this force-deletes read-only files.


Advertisement
-
1
Open the Command Prompt. The easiest way to do this is to press Win + S to activate the search bar, type cmd, and then click Command Prompt in the search results.[7]
-
2
Go to the directory in which you want to create the new directory. The prompt will open to C:UsersYourName by default. If you don’t want to create a new directory here, type cd path_to_directory and press Enter. Replace path_to_directory with the actual directory location.[8]
- For example, if you want to create a directory on your Desktop, you would type in cd desktop and press Enter.
- If the directory you’re looking for isn’t in your user directory (e.g., C:UsersYourName), you’ll have to type in the whole path (e.g., C:UsersSomeoneElseDesktopFiles).
-
3
Type mkdir NameOfDirectory at the prompt. Replace NameOfDirectory with the name of the directory you wish to create.[9]
- For example, to make a directory named «Homework», you would type mkdir Homework.
-
4
Press ↵ Enter. This runs the command to create a folder with the desired name.


Advertisement
-
1
Open the Command Prompt. The easiest way to do this is to press Win + S to activate the search bar, type cmd, and then click Command Prompt in the search results.[10]
-
2
Go to the folder containing the directory you want to delete. The prompt will open to C:UsersYourName by default. If the directory you want to delete is somewhere else, type cd path_to_directory and press Enter.[11]
Replace path_to_directory with the actual directory location.- For example, if you want to delete a directory from your Desktop, type cd desktop.
- If the directory isn’t in your user directory (e.g., C:UsersYourName), you’ll have to type in the whole path (e.g., C:UsersSomeoneElseDesktopFiles).
-
3
Type rmdir /s DirectoryName. Replace DirectoryName with the name of the directory you want to delete.[12]
- For example, if you’re trying to delete your «Homework» folder, you’d type in rmdir /s Homework here.
- If the directory’s name has a space in it (e.g., «Homework assignments»), place the name in quotations (e.g., rmdir /s "Homework assignments").
-
4
Press ↵ Enter to run the command.[13]
- If you try to delete a directory that contains hidden files or directories, you’ll see an error that says «The directory is not empty.» In this case, you’ll have to remove the «hidden» and «system» attributes from the files inside the directory. To do this:[14]
- Use cd to change into the directory you want to delete.
- Run dir /a to view a list of all files in the directory and their attributes.
- If you’re still okay with deleting all of the files in the directory, run attrib -hs *. This removes special permissions from the undeletable files.
- Type cd .. and press Enter to go back one directory.
- Run the rmdir /s command again to delete the folder.
- If you try to delete a directory that contains hidden files or directories, you’ll see an error that says «The directory is not empty.» In this case, you’ll have to remove the «hidden» and «system» attributes from the files inside the directory. To do this:[14]
-
5
Press y and then ↵ Enter to confirm. This will permanently remove the directory.[15]


Advertisement
Add New Question
-
Question
How can I create directories?

Subhodeep Roy
Community Answer
If you are creating a directory in C drive, the command will be»C:MD {the name of the directory/folder}» then press Enter.
-
Question
How do I create a folder using CMD?
Navigate to where you want the subfolder created and type «mkdir «.
-
Question
How do I create a test file under the sub folder?
Change directory into the new sub folder and then on the next line, create your new test file. For example: cd mysubfolder $ type nul > newtextfile.txt
See more answers
Ask a Question
200 characters left
Include your email address to get a message when this question is answered.
Submit
Advertisement
Video
Thanks for submitting a tip for review!
-
Using Command Prompt to delete files results in the files being deleted permanently rather than being moved to the Recycle Bin. Exercise caution when deleting files via Command Prompt.
Advertisement
About This Article
Article SummaryX
1. Use the mkdir command to create a folder.
2. Use rmdir /s to delete a folder.
3. Use the copy con or echo command to create a file.
4. Use del to delete a file.
For tips on how to create a file inside a folder, read on!
Did this summary help you?
Thanks to all authors for creating a page that has been read 1,202,199 times.
Is this article up to date?
On Windows 10, a batch file typically has a «.bat» extension, and it is a special text file that contains one or multiple commands that run in sequence to perform various actions with Command Prompt.
Although you can type commands manually to execute a particular task or change system settings on Windows 10, a batch file simplifies the work of having to re-type the commands, saving you time and avoiding mistakes.
You can also use other tools like PowerShell to write even more advanced scripts. However, running batch files in Command Prompt is still relevant for executing commands to change settings, automate routines, and launch apps or web pages on your computer.
This guide will walk you through the steps to create and run a batch file on Windows 10. Also, we will outline the steps to create advanced scripts and rum them automatically on schedule using the Task Scheduler.
How to create a batch file on Windows 10
The process of writing a batch file is not complicated. You only need Notepad or another text editor and some basic knowledge of typing commands in Command Prompt. These instructions will help you create a basic and advanced batch file to query system settings.
Create basic Windows 10 batch file
To create a basic batch file on Windows 10, use these steps:
- Open Start.
- Search for Notepad and click the top result to open the text editor.
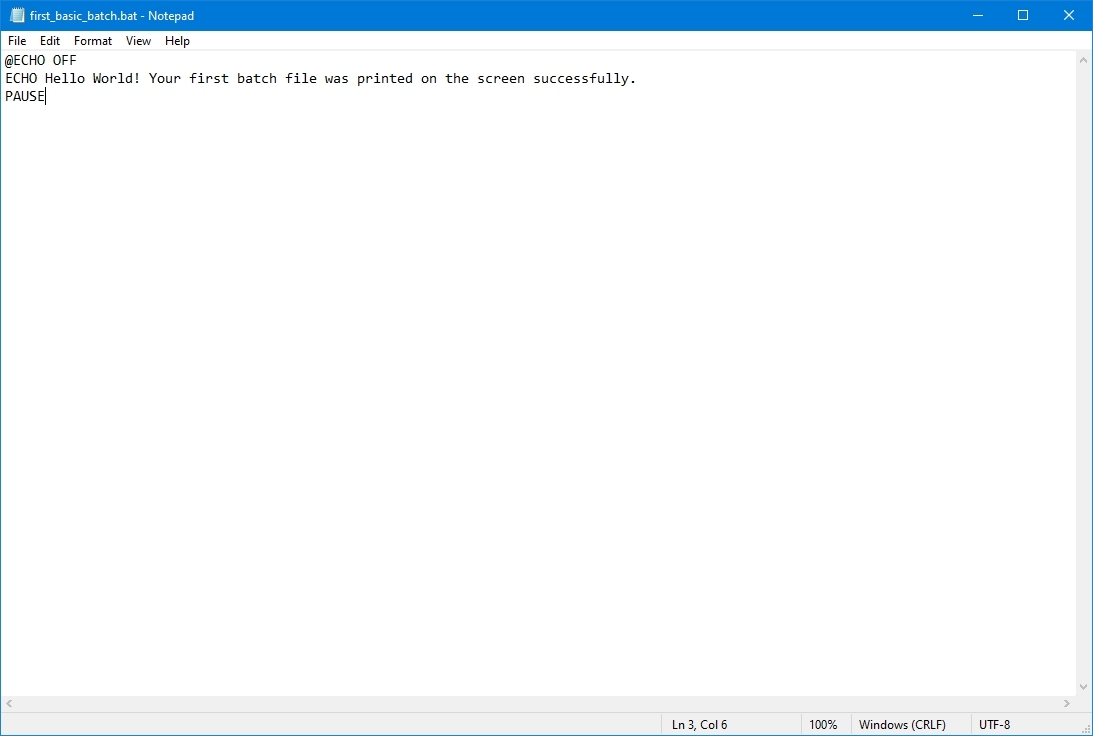
- Type the following lines in the text file to create a batch file:
@ECHO OFF
ECHO Hello World! Your first batch file was printed on the screen successfully.
PAUSE
The above script outputs the phrase, «Hello World! Your first batch file was printed on the screen successfully,» on the screen.
- @ECHO OFF — Shows the message on a clean line disabling the display prompt. Usually, this line goes at the beginning of the file. (You can use the command without the «@» symbol, but it’s recommended to include it to show a cleaner return.)
- ECHO — The command prints the text after the space on the screen.
- PAUSE — Allows the window to stay open after the command has been executed. Otherwise, the window will close automatically as soon as the script finishes executing. You can use this command at the end of the script or after a specific command when running multiple tasks and wanting to pause between each line.
- Click the File menu.
- Select the Save as option.
- Confirm a name for the script — for example, first_basic_batch.bat.
- Quick note: While batch files typically use the .bat file extensions, you can also find them using the .cmd or .btm file extensions.
Once you complete the steps, double-click the file to run it. Alternatively, you can use the steps below to learn how to run a batch file with Command Prompt, File Explorer, or Task Scheduler.
Create advanced Windows 10 batch file
To create an advanced Windows batch file with multiple commands, use these steps:
- Open Start.
- Search for Notepad and click the top result to open the text editor.
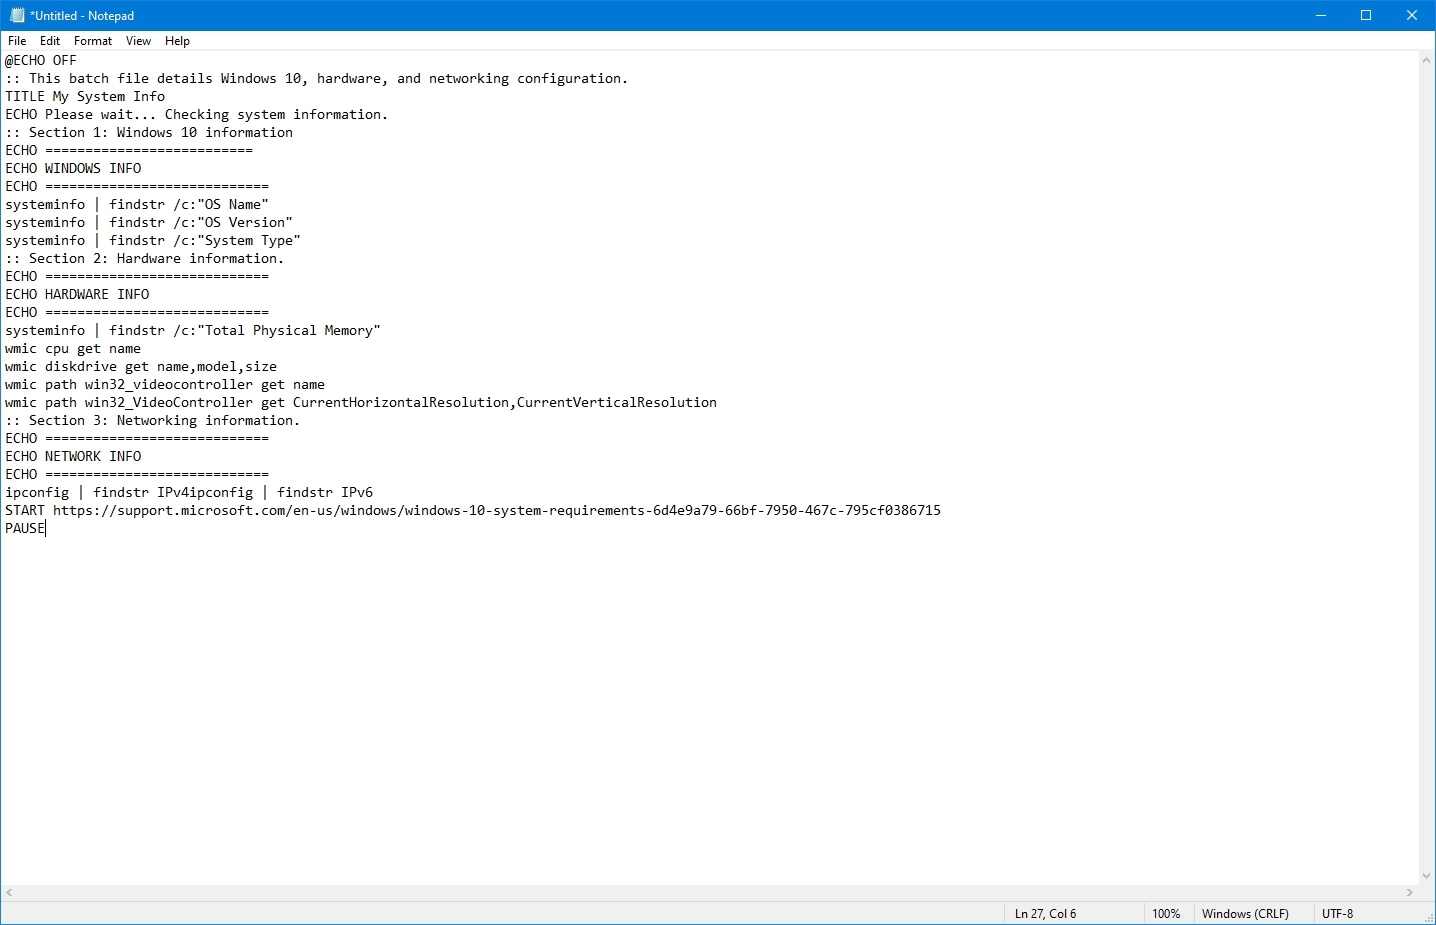
- Type the following lines in the text file to create a more advanced Windows 10 batch file:
@ECHO OFF
:: This batch file details Windows 10, hardware, and networking configuration.
TITLE My System Info
ECHO Please wait… Checking system information.
:: Section 1: Windows 10 information
ECHO ==========================
ECHO WINDOWS INFO
ECHO ============================
systeminfo | findstr /c:»OS Name»
systeminfo | findstr /c:»OS Version»
systeminfo | findstr /c:»System Type»
:: Section 2: Hardware information.
ECHO ============================
ECHO HARDWARE INFO
ECHO ============================
systeminfo | findstr /c:»Total Physical Memory»
wmic cpu get name
wmic diskdrive get name,model,size
wmic path win32_videocontroller get name
wmic path win32_VideoController get CurrentHorizontalResolution,CurrentVerticalResolution
:: Section 3: Networking information.
ECHO ============================
ECHO NETWORK INFO
ECHO ============================
ipconfig | findstr IPv4ipconfig | findstr IPv6
START https://support.microsoft.com/en-us/windows/windows-10-system-requirements-6d4e9a79-66bf-7950-467c-795cf0386715
PAUSE
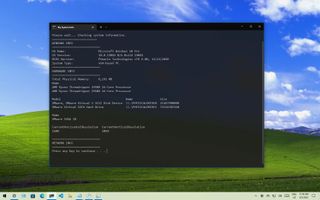
The above script runs each line to query a series of system details, and the result will be divided into three categories, including «WINDOWS INFO,» «HARDWARE INFO,» and «NETWORK INFO.» Also, the «START» command will open the web browser in the official support page outlining the Windows 10 system requirements, which you can check against your information.
- @ECHO OFF — Shows the message on a clean line disabling the display prompt. Usually, this line goes at the beginning of the file.
- TITLE — Prints a custom name in the title bar of the console window.
- :: — Allows writing comments and documentation information. These details are ignored when the system runs the batch file.
- ECHO — Prints the text after the space on the screen.
- START — Opens an app or website with the default web browser.
- PAUSE — Tells the console window to stay open after running the command. If you do not use this option, the window will close automatically as soon as the script finishes executing.
- Click the File menu.
- Select the Save as option.
- Type a name for the script — for example, first_advanced_batch.bat.
After you complete the steps, double-click the .bat file to run it or use the steps below to execute the script with Command Prompt, File Explorer, or Task Scheduler.
Create actionable Windows 10 batch file
You can also write batch scripts for any task that does not require user interaction. For instance, to map a network drive, install an application, change system settings, and more.
To create a non-interactive batch file on Windows 10, use these steps:
- Open Start.
- Search for Notepad and click the top result to open the text editor.
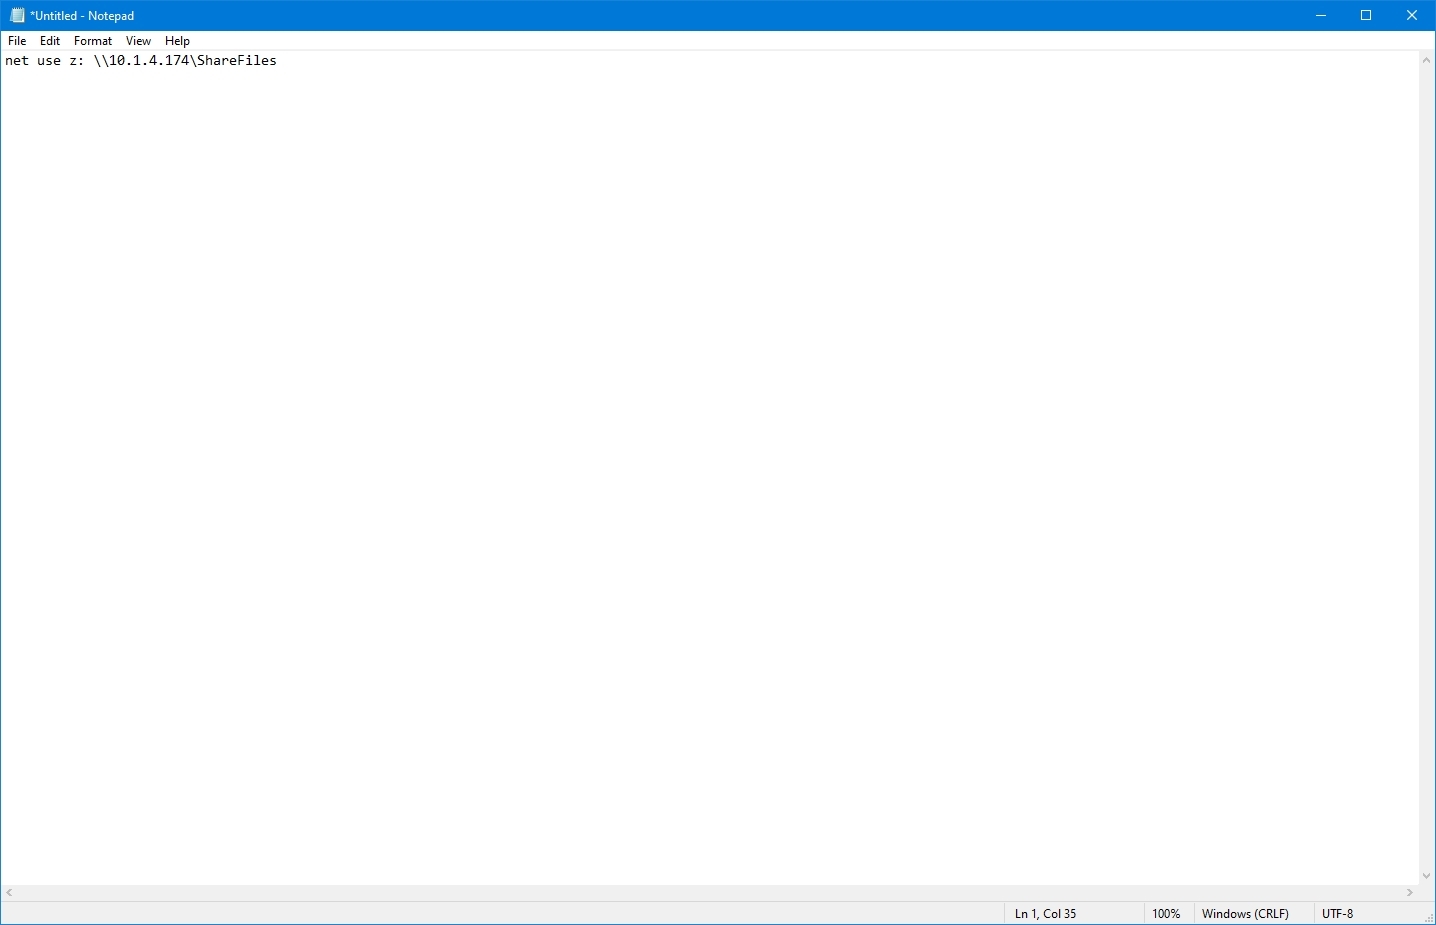
- Type the following command to map a network drive in the text file: net use z: \PATH-NETWORK-SHAREFOLDER-NAME /user:YOUR-USERNAME YOUR-PASSWORD
In the command, replace the «\PATH-NETWORK-SHAREFOLDER-NAME» for the folder network path to mount on the device and «YOUR-USERNAME YOUR-PASSWORD» with the username and password that authenticates access to the network share.
This example maps a network folder as a drive inside File Explorer using the «Z» drive letter: net use z: \10.1.4.174ShareFiles
- Quick note: If you are accessing the files from another computer that uses a specific username and password, do not forget to use the /user: option with the correct credentials.
- Click the File menu.
- Select the Save as option.
- Confirm a name for the script — for example, mount-z-network-drive.bat.
Once you complete the steps, the batch file will map the network folder without opening a Command Prompt window.
We only demonstrate a script with a single command, but you can include as many as you like, as long as you write them one per line.
How to run a batch file on Windows 10
Windows 10 has at least three ways to write batch files. You can run them on-demand using Command Prompt or File Explorer. You can configure the script using the Task Scheduler app to run it on schedule. Or you can save the batch files in the «Startup» folder to let the system run them as soon as you sign into the account.
Run batch file on-demand
If you want to run a script on-demand, you can use File Explorer or Command Prompt.
Command Prompt
To run a script file with Command Prompt on Windows 10, use these steps:
- Open Start.
- Search for Command Prompt, right-click the top result, and select the Run as administrator option.
- Type the following command to run a Windows 10 batch file and press Enter: C:PATHTOFOLDERBATCH-NAME.bat
In the command, make sure to specify the path and name of the script.
This example runs the batch file located in the «scripts» folder inside the «Downloads» folder: C:UsersUserAccountDownloadsfirst_basic_batch.bat
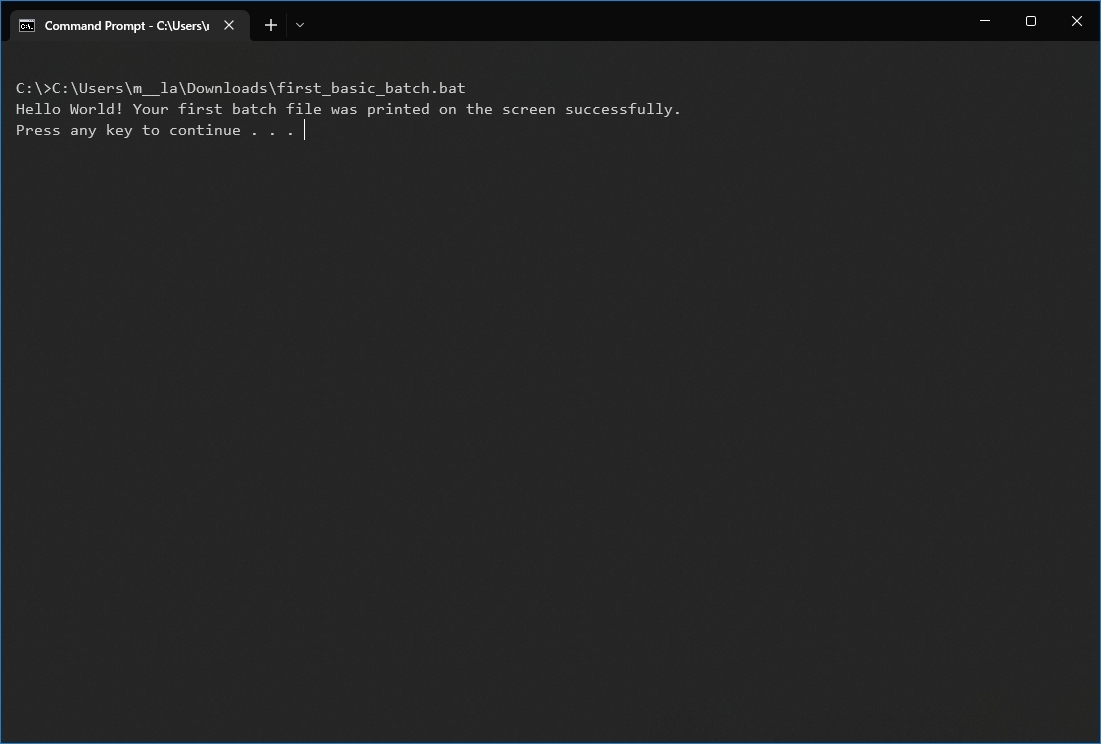
After you complete the steps, the console will return the results, and the window won’t close even if the script does not include the «PAUSE» command since you are invoking the script from within a console session that was already open.
File Explorer
To run a batch file with File Explorer, use these steps:
- Open File Explorer.
- Browse to the folder with the batch file.
- Double-click the script file to run it.
- (Optional) If a command in the batch file requires administrator privileges, you will have to run the script as an admin by right-clicking the file and selecting the Run as administrator option.
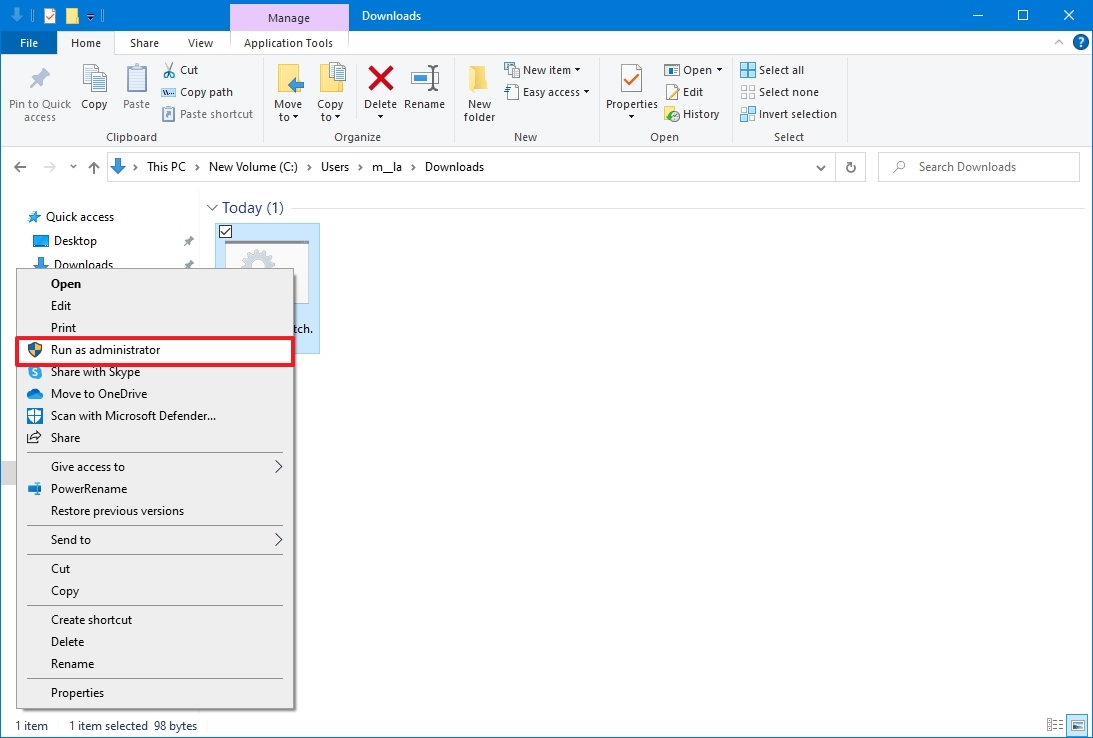
- Click the Yes button
Once you complete the steps, the script will run each command in sequence, displaying the results in the console window.
Run batch files on startup
Windows 10 also features a known folder called «Startup,» which the system checks every time it starts to run applications, shortcuts, and scripts automatically without the need for extra configuration.
To run a script on the Windows 10 startup, use these steps:
- Open File Explorer.
- Open the folder containing the batch file.
- Right-click the batch file and select the Copy option.
- Use the Windows key + R keyboard shortcut to open the Run command.
- Type the following command: shell:startup
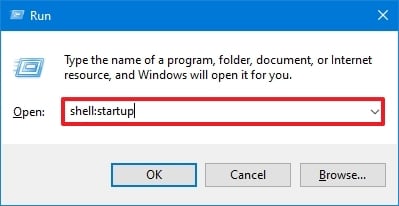
- Click the OK button.
- Click the Paste option from the «Home» tab in the Startup folder. (Or click the Paste shortcut button to create a shortcut to the batch file.)
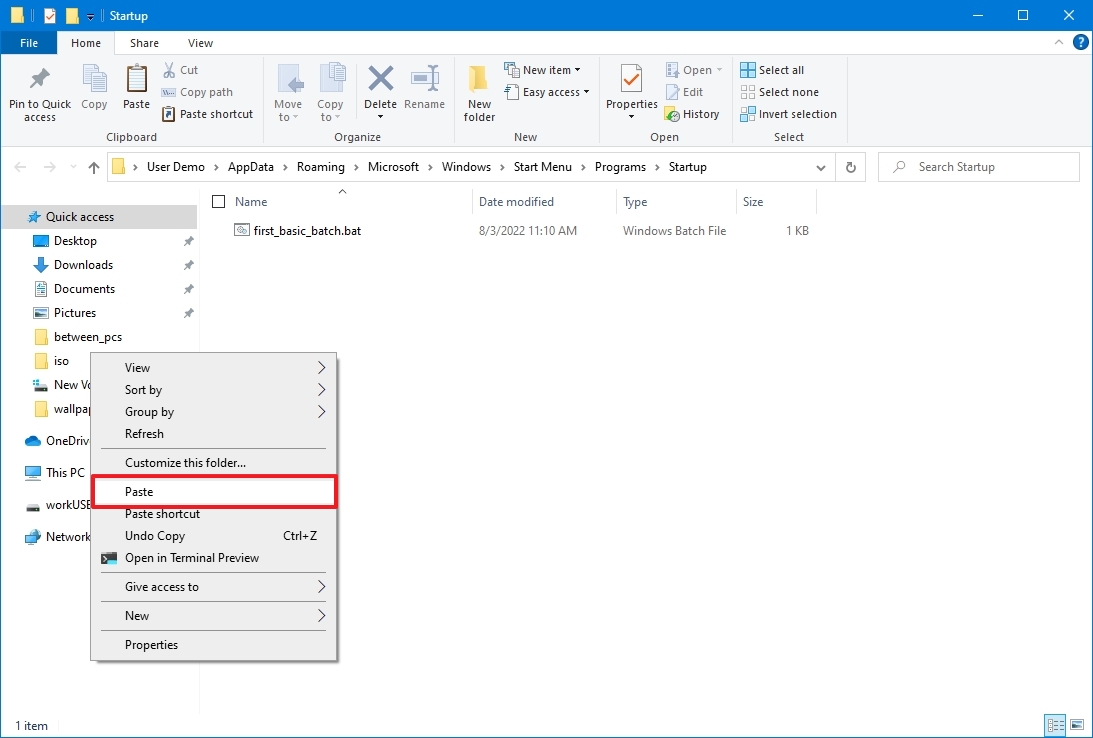
After you complete the steps, the batch file will execute automatically every time you log into your account.
Run batch file with Task Scheduler
To use Task Scheduler to run the batch file automatically at a specific time, use these steps:
- Open Start.
- Search for Task Scheduler and click the top result to open the app.
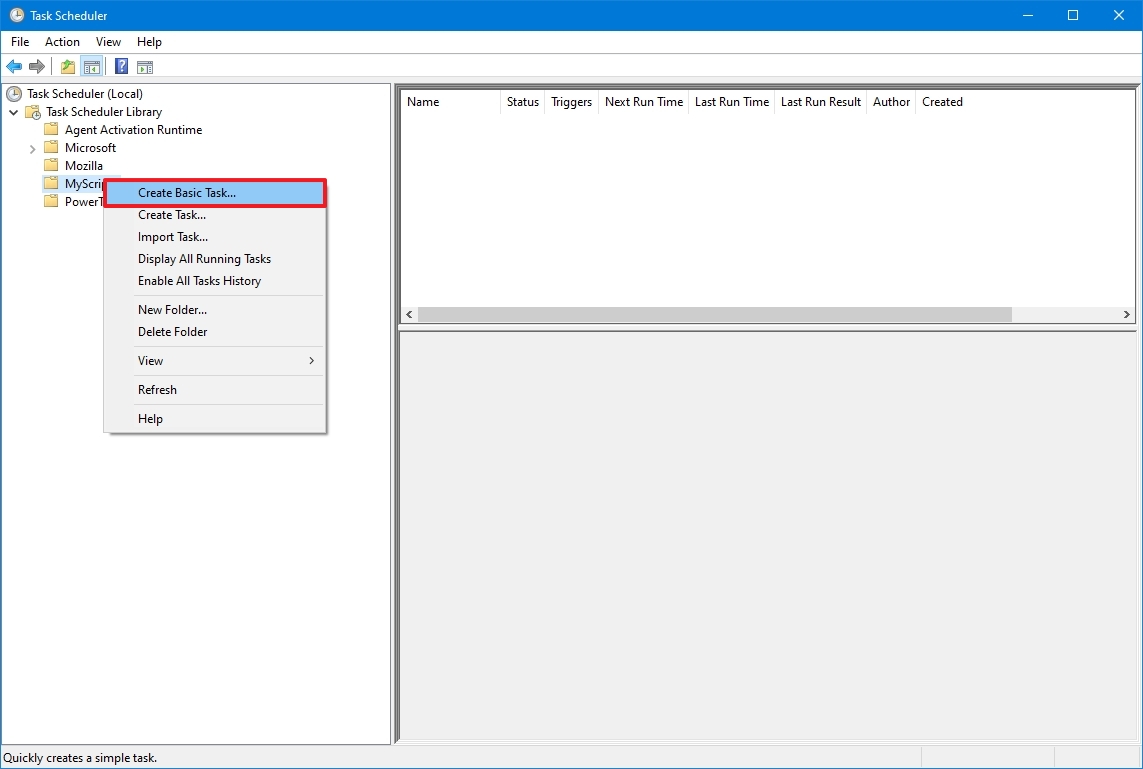
- Right-click the «Task Scheduler Library» branch and select the New Folder option.
- Confirm a name for the folder — for example, MyScripts.
- Quick note: You don’t need to create a folder, but keeping the system and your tasks separate is recommended.
- Click the OK button.
- Expand the «Task Scheduler Library» branch.
- Right-click the MyScripts folder.
- Select the Create Basic Task option.
- In the «Name» field, confirm a name for the task — for example, SystemInfoBatch.
- (Optional) In the «Description» field, write a description for the task.
- Click the Next button.
- Select the Monthly option.
- Quick note: Task Scheduler lets you choose from different triggers, including a specific date, during startup, or when a user logs in to the computer. In this example, we will select the option to run a task every month, but you may need to configure additional parameters depending on your selection.
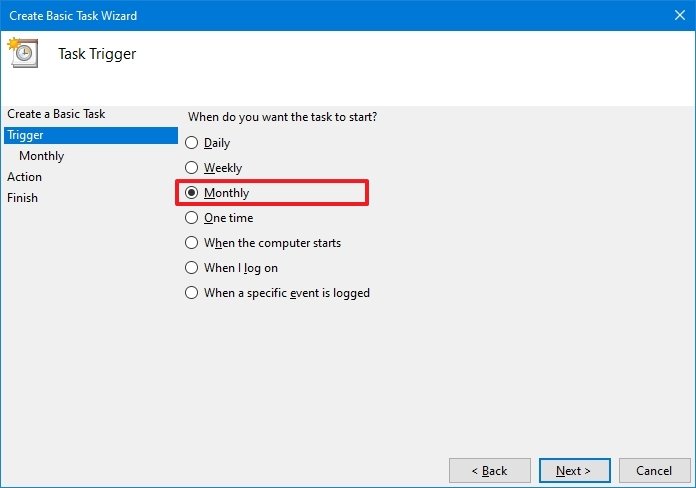
- Click the Next button.
- Use the «Start» settings to confirm the day and time to run the task.
- Use the «Monthly» drop-down menu to pick the months of the year to run the task.
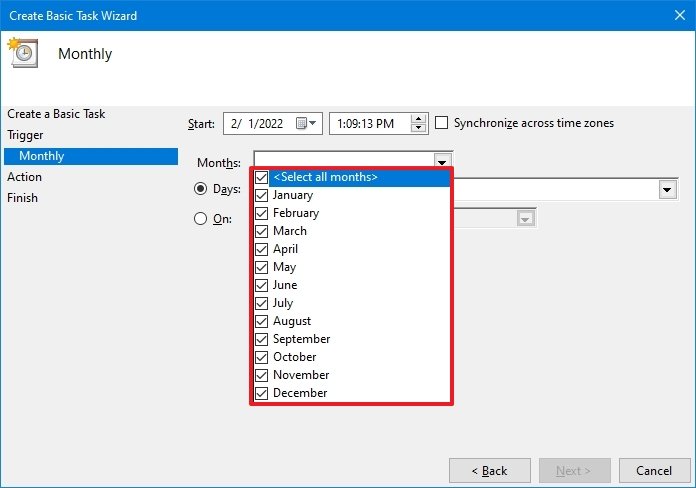
- Use the «Days» or «On» drop-down menu to confirm the days to run the task.
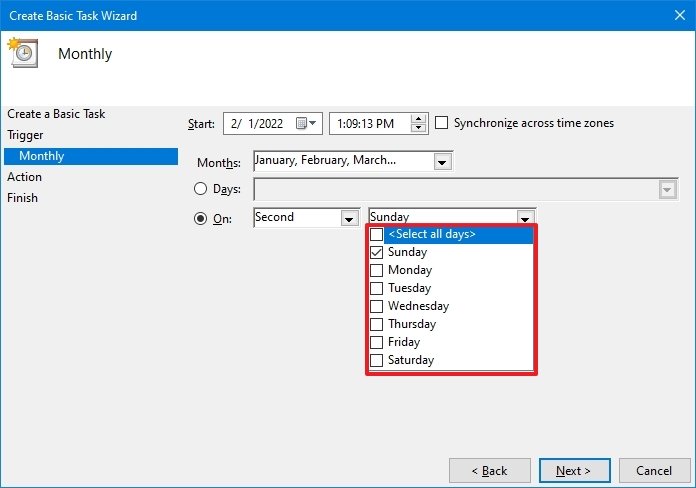
- Click the Next button.
- Select the Start a program option to run the batch file.
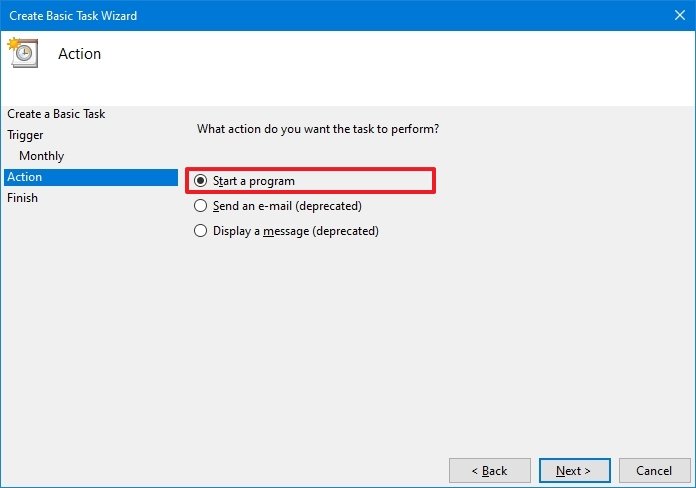
- In the «Program/script» field, click the Browse button.
- Select the batch file you want to execute.
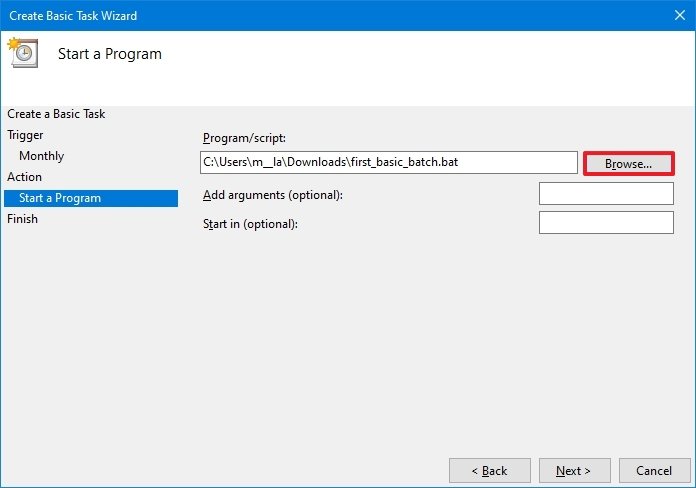
- Click the Finish button.
Once you complete the steps, the task will run the script during the configured time and date or action.
The above instructions are meant to schedule only a basic task. You can use these instructions to create a more customizable task with the Task Scheduler.
This guide focuses on Windows 10, but the same steps will also work for older versions, including Windows 8.1 and 7. Also, you can refer to these instructions if you have Windows 11 installed on your computer.
More Windows resources
For more helpful articles, coverage, and answers to common questions about Windows 10 and Windows 11, visit the following resources:
- Windows 11 on Windows Central — All you need to know
- Windows 10 on Windows Central — All you need to know
Get the best of Windows Central in in your inbox, every day!
Mauro Huculak is technical writer for WindowsCentral.com. His primary focus is to write comprehensive how-tos to help users get the most out of Windows 10 and its many related technologies. He has an IT background with professional certifications from Microsoft, Cisco, and CompTIA, and he’s a recognized member of the Microsoft MVP community.
Очередная статья будет полезна пользователям если:
— Вы не хотите зависеть от оболочки Windows, от программ notepad, Wordpad, Microsoft Office.
— У Вас не загружается оболочка Windows.
— Нет оболочки Windows, например, вы загружаетесь c Dos или Вам просто интересно как создать файл в командной строке
Начнем.
Для начала, необходимо перейти в командную строку, воспользовавшись сочетаниями клавиш Win+R, в окне Выполнить напечатайте cmd и нажмите кнопку enter

В командной строке перейдите в нужную папку или диск где вы будете создавать файл.
В примере файл мы будем создавать на диске C:
Ниже, на изображении, мы переходим на диск C:

После перехода на диск C: напечатайте команду для создания файла:
copy con Имя вашего файла и нажмите кнопку Enter
В примере, на изображении ниже, мы создаем файл testfile.txt на диске C:

После того, как мы нажали кнопку Enter можно приступать к оформлению текста
или команд внутри файла

После того, как вы напечатали текст.
Для сохранения файла на диске:
Перейдите на следующую строку нажав кнопку Enter, нажмите кнопку F6 и далее на
кнопку Enter
Результат будет как на изображении ниже:

При нажатии кнопки F6 появляется сочетание символа и буквы ^Z которые и отвечают
за сохранение файла.
Можно использовать сочетание клавиш ctrl+z для получения данных символов.
Осталось просмотреть файл в командной строке.
Для просмотра файла через командную строку, напечатайте команду:
type testfile.txt
или вместо testfile.txt имя файла который создали вы
Результатом данной команды будет просмотр файла который мы создали

Помимо текстовых файлов, вы можете создавать cmd файлы с набором команд для
тихой установки приложений или изменений параметров операционной системы через командную строку.
The next article will be useful to users if:
You don’t want to depend on Windows shell, notepad, Wordpad, Microsoft Office programs.
You do not load the Windows shell.
You don’t have a Windows shell, for example, you boot from dos or you’re just wondering how to create a file on the command line
Start.
To start, you must go to the command line, using the keyboard shortcuts Win+R, type cmd in the Run window and press enter

In the example file we will create on the drive C:
Below, in the image, we go to disk C:

After switching to the C: drive, type the command to create the file:
copy con the Name of your file and press Enter
In the example, in the image below, we create a testfile.txt on drive С:

Once we have pressed the Enter button, you can start formatting the text or commands inside the file

To save a file to disk:
Go to the next line by pressing Enter, press F6 and then press Enter
The result will be as in the picture below:

When you press the F6 button, a combination of the symbol and the letter ^Z appears, which are responsible for saving the file. You can use the ctrl+z key combination to get the symbol data.
It remains to view the file on the command line.
To view the file from the command line, type:
type testfile.txt
or instead of testfile.txt the name of the file you created
The result of this command will be a preview of the file we created

In addition to text files, you can create cmd files with a set of commands to silently install applications or change operating system settings via the command line.