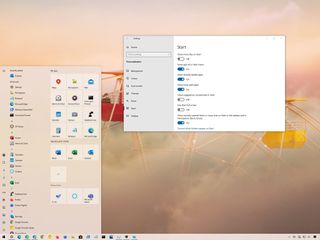
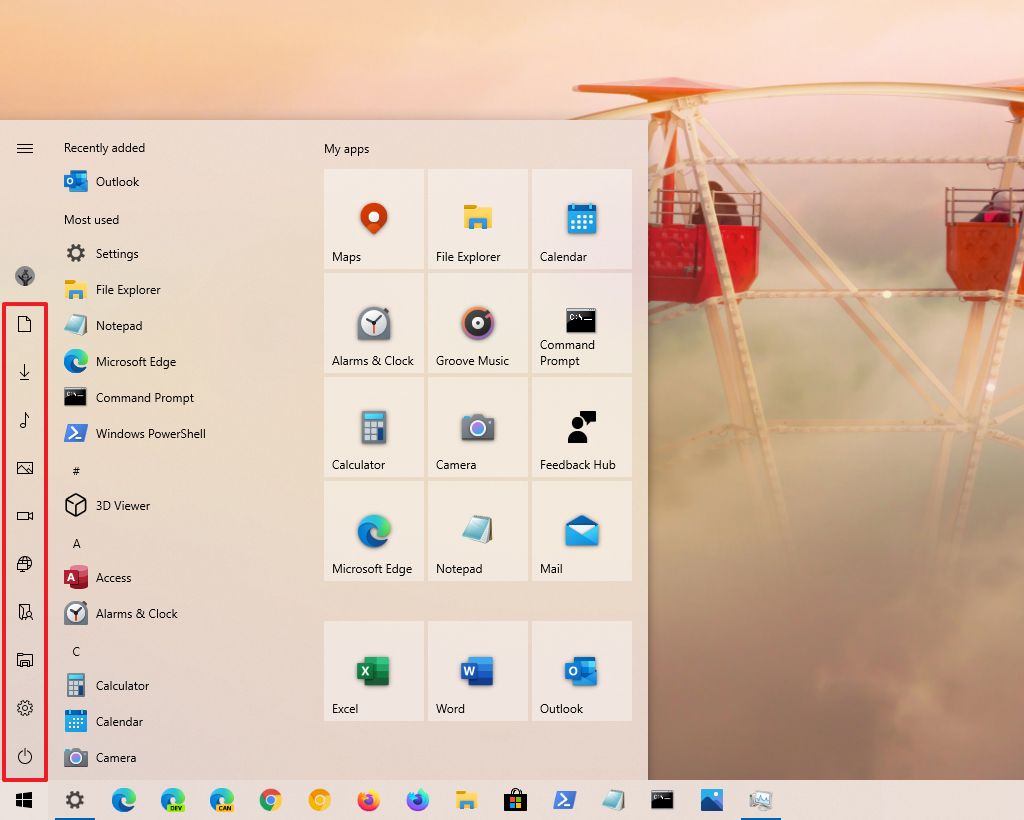
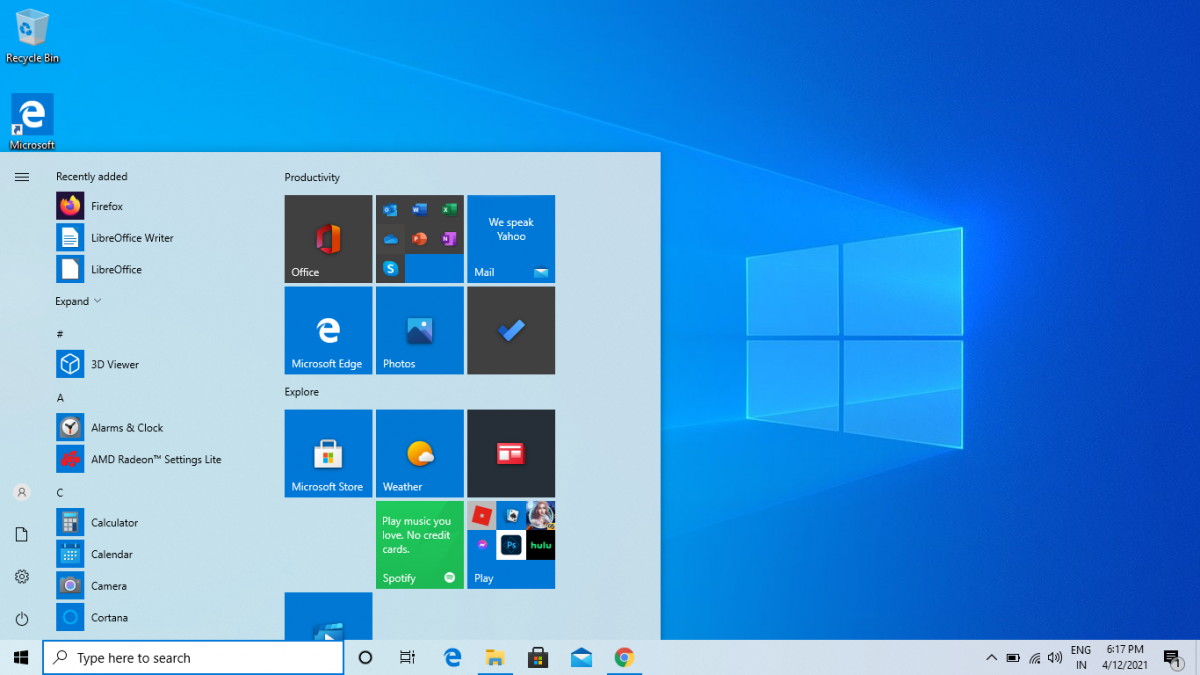
(Image credit: Windows Central)
On Windows 10, the Start menu is an essential component, as it’s the experience you use every day to find apps, settings, and files. Although over the years, the Start menu has gone through many transformations – at one point, it was even removed from the OS–, this version combines the familiarity of Windows 7 with the modern Start screen from Windows 8.x.
Out of the box, the Start menu includes a default layout with elements and settings that usually fit most people. However, if you want to make it more functional and personal, the experience available on Windows 10 is highly customizable.
For instance, you can change the size and color or use the Start menu’s full-screen version. You can use folders and groups to optimize the space and organize your apps. You can change various settings to decide how the «All apps» list should appear, and much more.
In this Windows 10 guide, we’ll walk you through the easy steps to customize the Start menu on your device.
- How to change size of Start menu
- How to enable full screen for Start menu
- How to change color of Start menu
- How to manage system folders in Start menu
- How to remove suggestions in Start menu
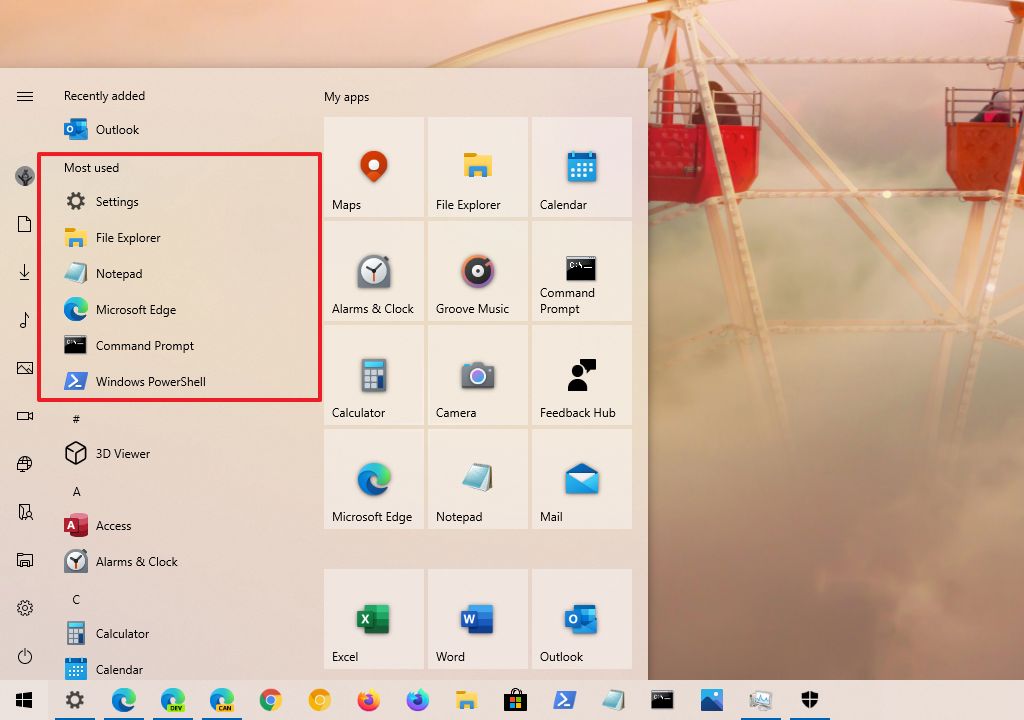
- How to show recently added apps in Start menu
- How to show most used apps in Start menu
- How to disable app list in Start menu
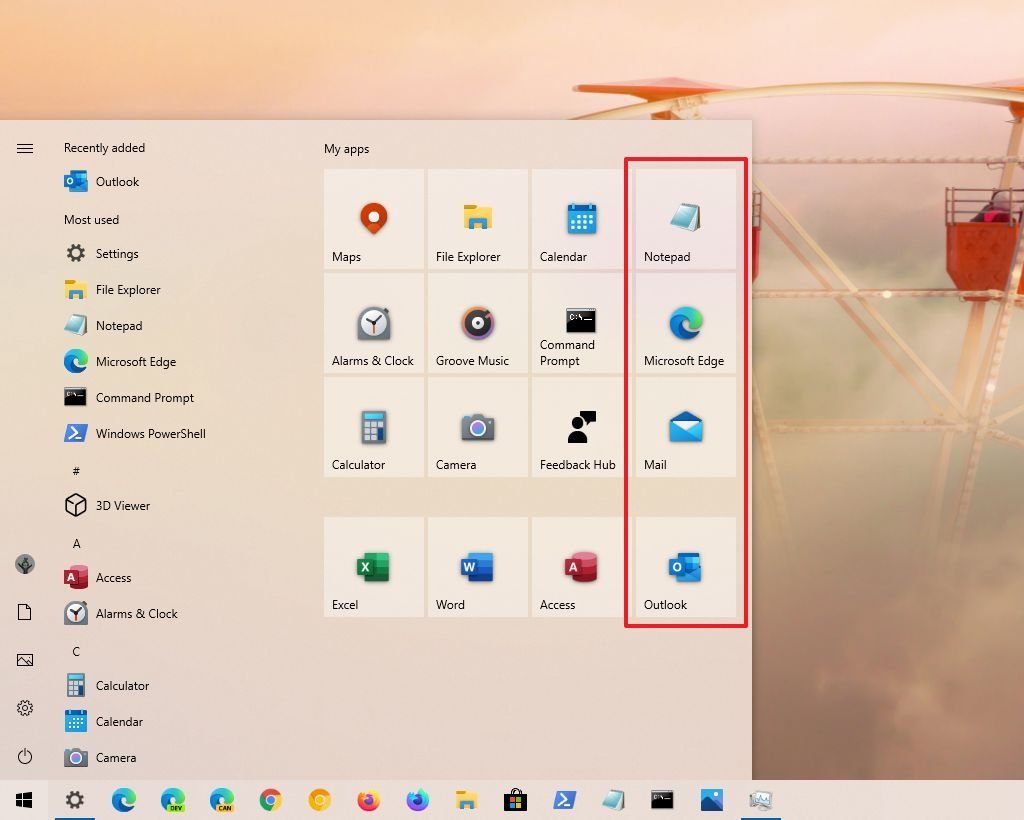
- How to add apps in Start menu
- How to customize app tiles in Start menu
- How to create folders in Start menu
- How to create groups in Start menu
- How to bring back the classic Start menu
On Windows 10, there are at least two ways to adjust the size of the Start menu to make smaller or larger, you can resize it using the mouse or keyboard shortcut, and you can even enable an option to allow more tiles per row.
Resize manually
To resize the Start menu on Windows 10 manually, use these steps:
- Open Start.
- Click and stretch the top edge upwards with the mouse to make the menu taller.
- Click and pull the side edge outwards using the mouse to make it wider.
You can also open the Start menu and then use the Ctrl + arrow keys keyboard shortcut to change the height and width. For example, you can use the Ctrl + up arrow key multiple times to make it taller, or use the Ctrl + right arrow key stretch the menu.
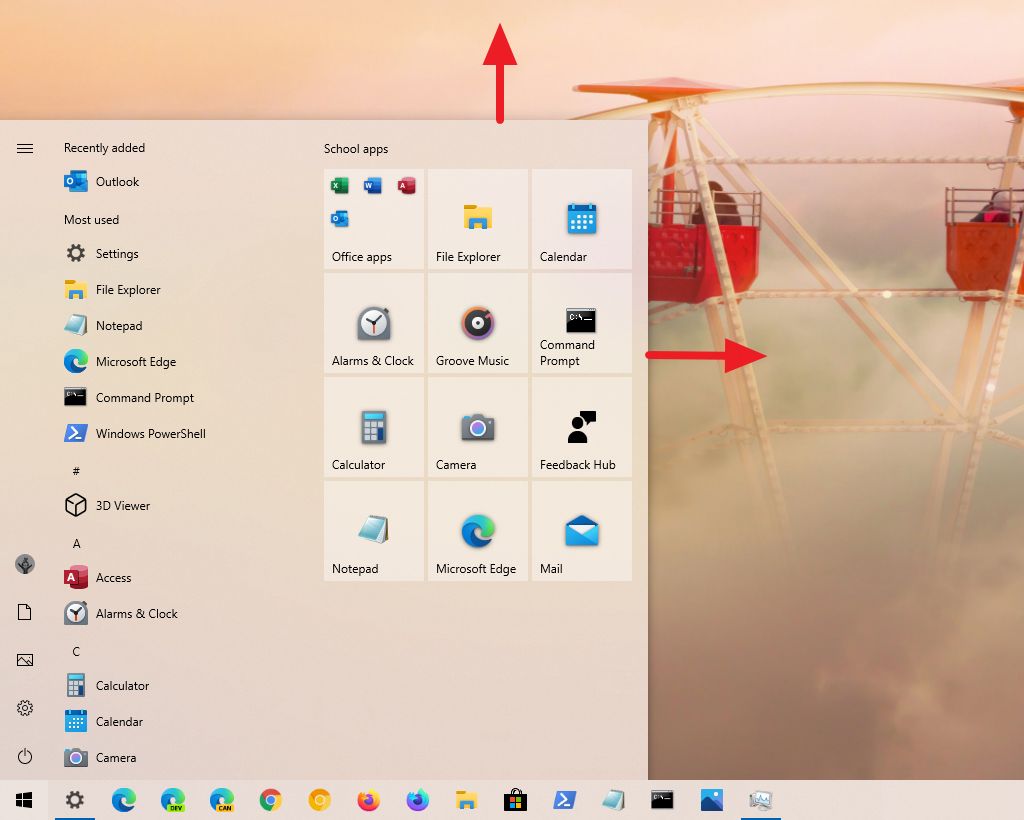
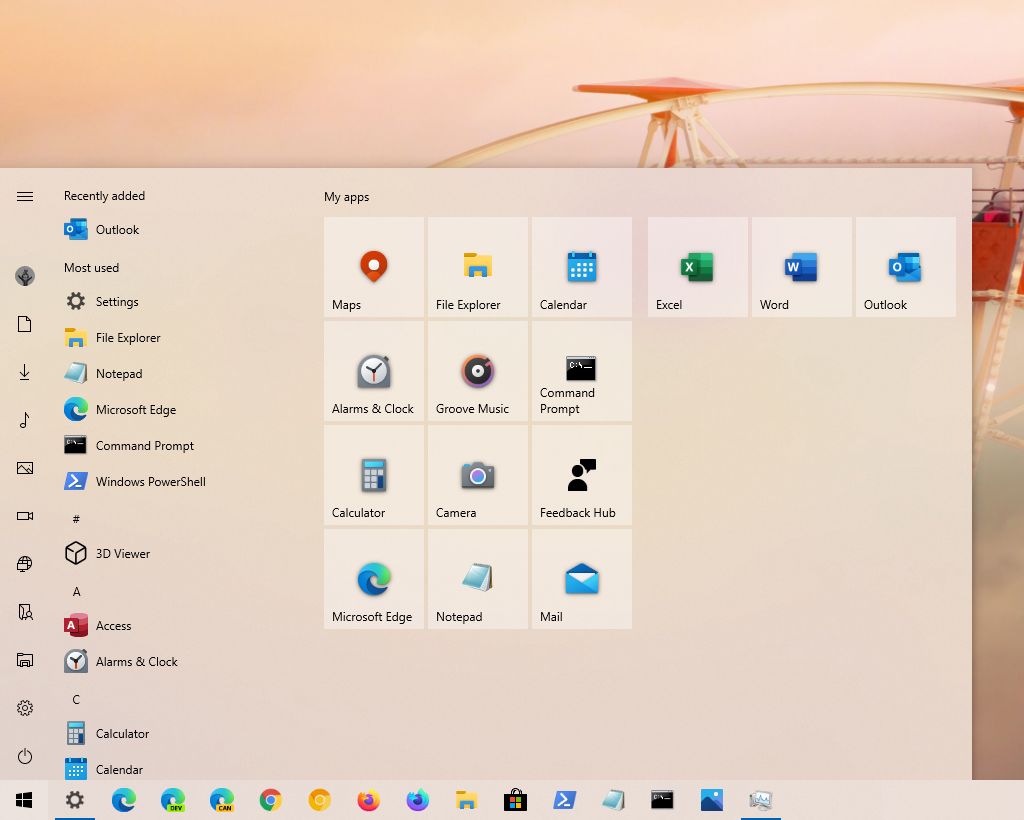
Show more tiles
To add a fourth row of tiles per column to the Start menu, use these steps:
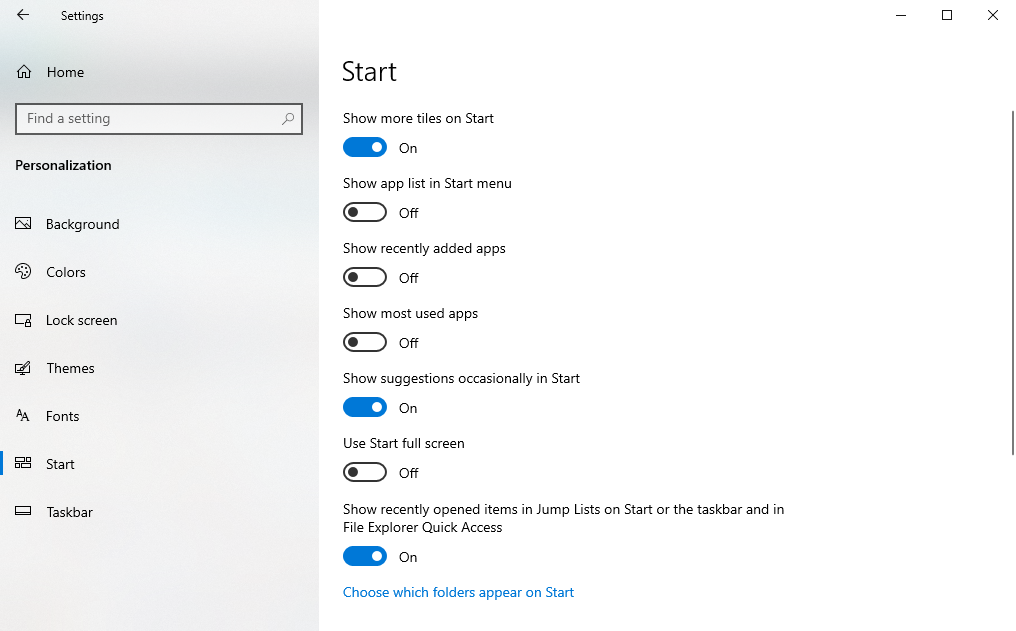
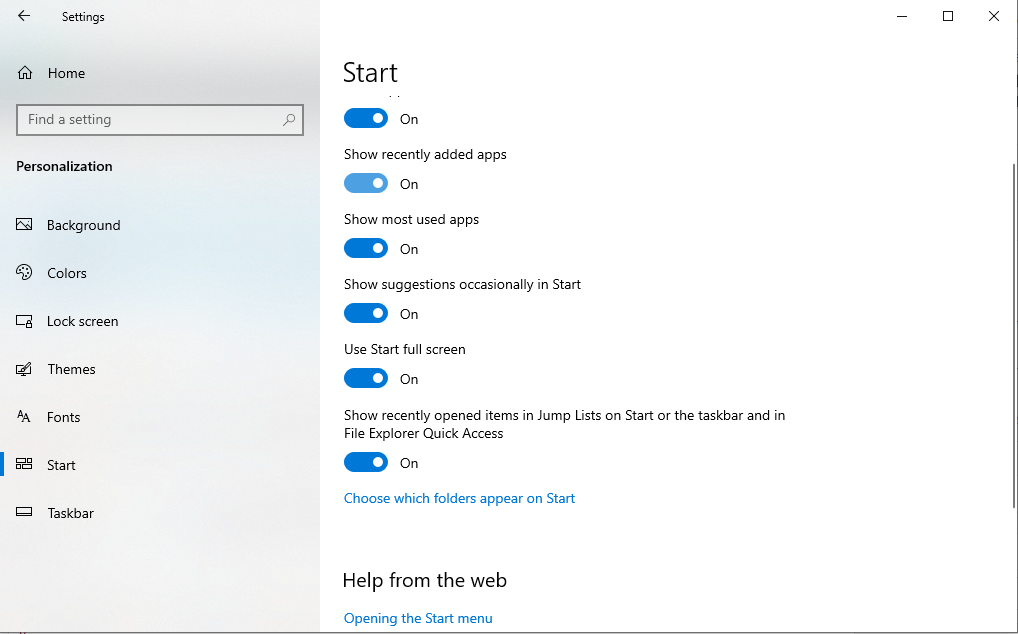
- Open Settings.
- Click on Personalization.
- Click on Start.
- Turn on the Show more tiles in Start toggle switch.
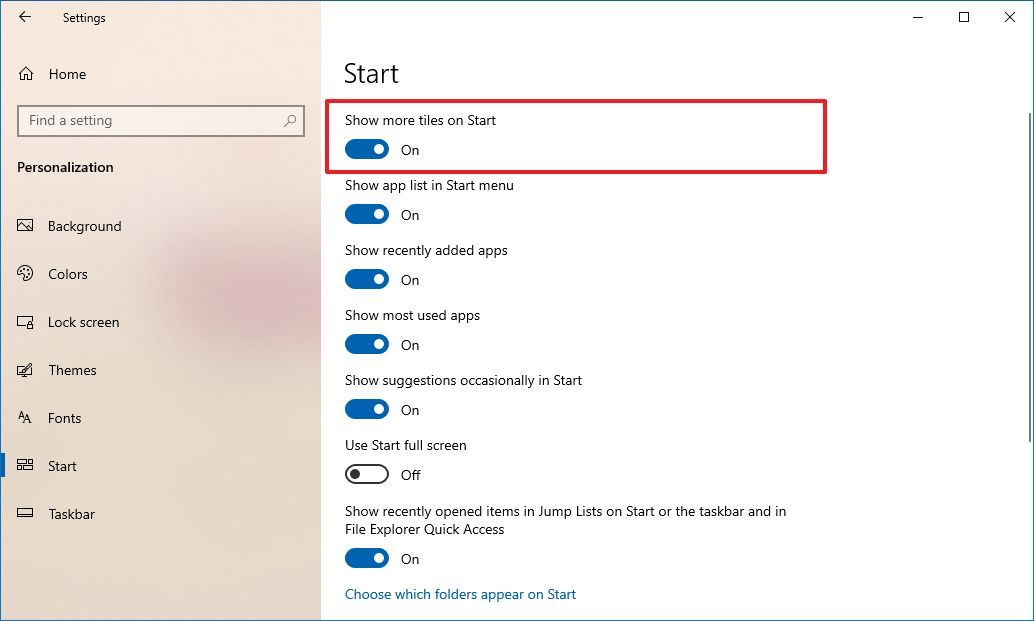
- Confirm the change opening Start.
Once you complete the steps, you’ll be able to add a fourth row of app tiles on each column.
To enable the full-screen mode in Start, use these steps:
- Open Settings.
- Click on Personalization.
- Click on Start.
- Turn on the Use Start full-screen toggle switch.
- Confirm the change opening Start.
After you complete the steps, when opening the Start menu, you’ll notice a Windows 8.1 Start screen-like experience that fills out the entire desktop, allowing you to see more groups of items without scrolling.
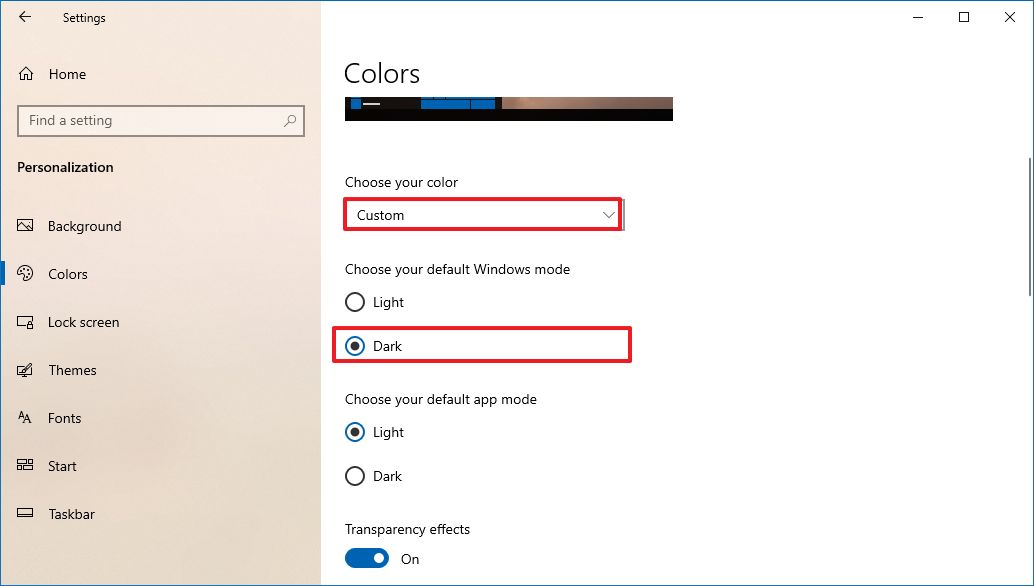
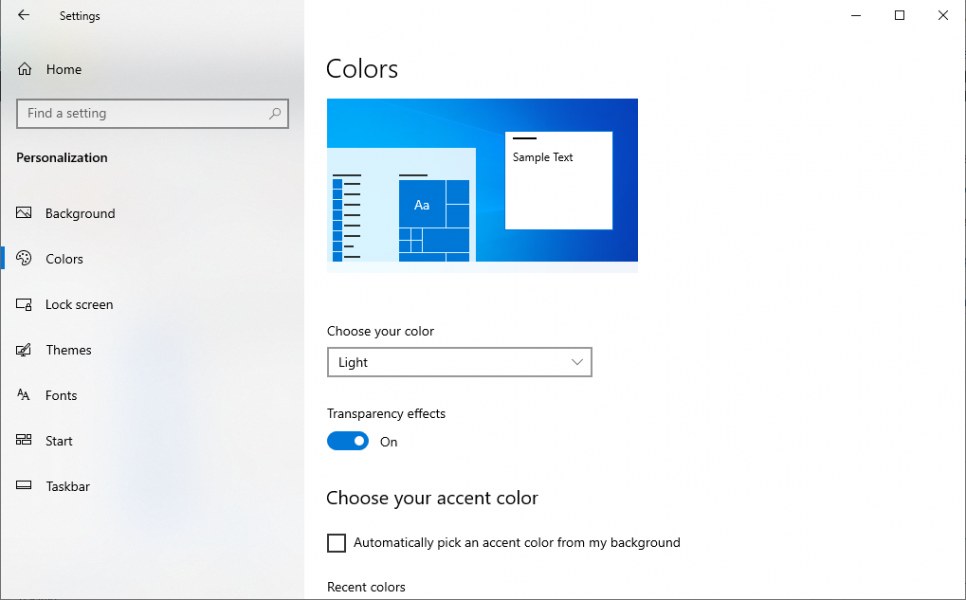
To change the Start menu color on Windows 10, use these steps:
- Open Settings.
- Click on Personalization.
- Click on Colors.
- Under the «Choose your color» section, use the drop-down menu and select the Dark or Custom option with the Dark option for the «Choose your default Windows mode» setting.
- Under the «Show accent color on the following surfaces» section, check the Start, taskbar, and action center option.
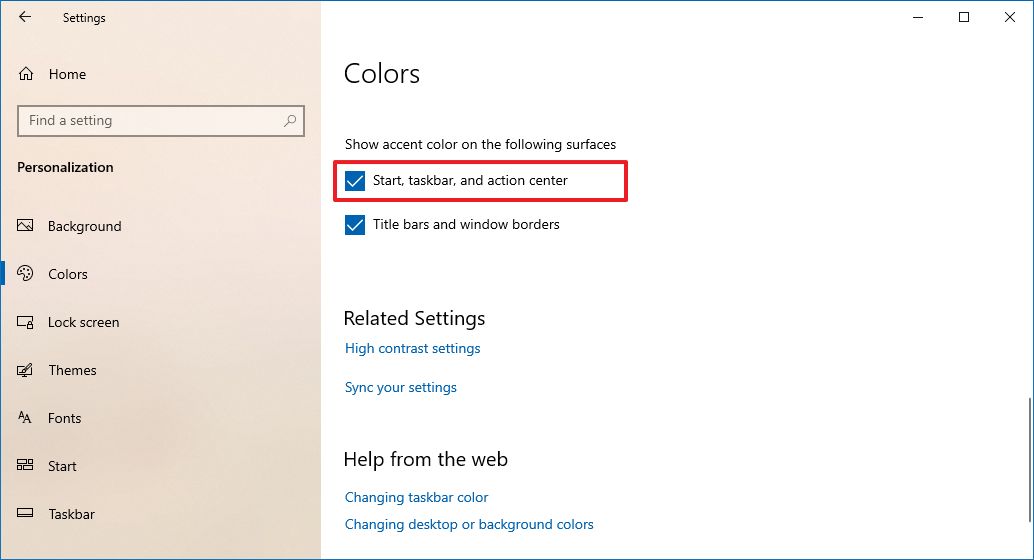
- Use the «Windows colors» picker to select the color for the Start menu and other elements.Quick tip: Alternatively, if you want the menu to take the color pattern from the current background, check the Automatically pick an accent color from my background option. Also, if the color you want isn’t on the list, you can create a custom color clicking the Custom color button.
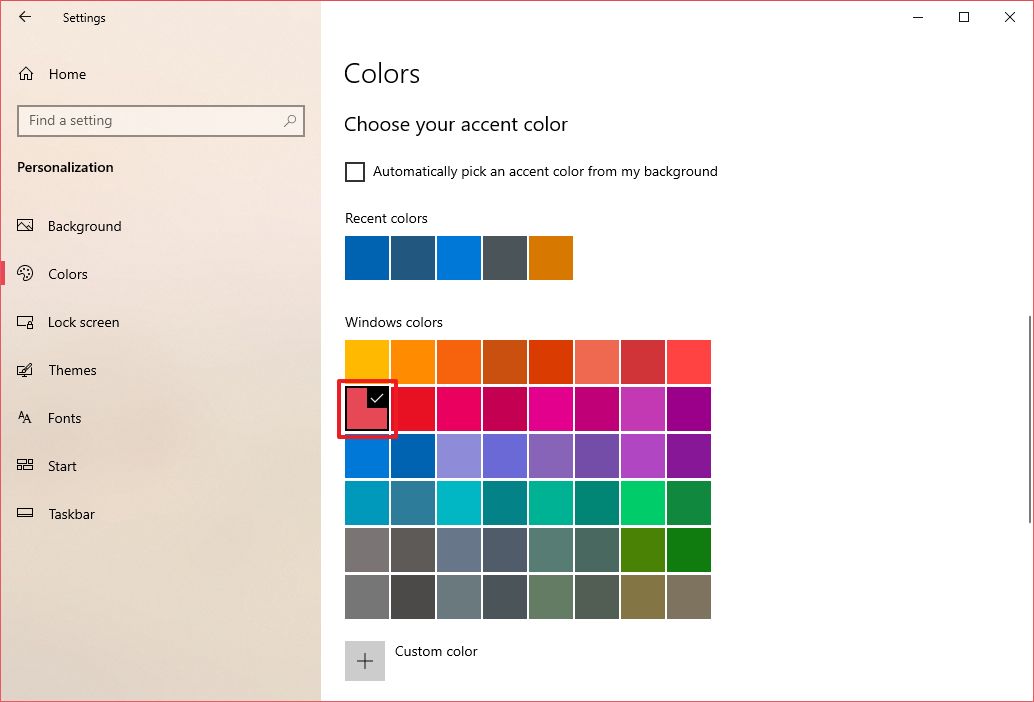
- Confirm the new color opening Start.
Once you complete the steps, the Start menu, as well as the taskbar and action center, will reflect the new color scheme.
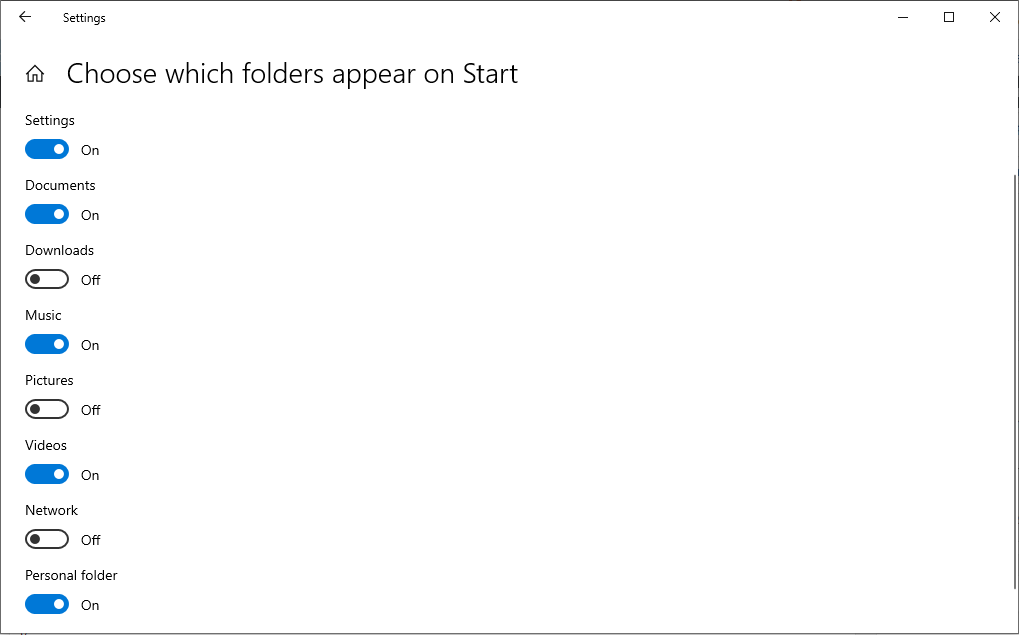
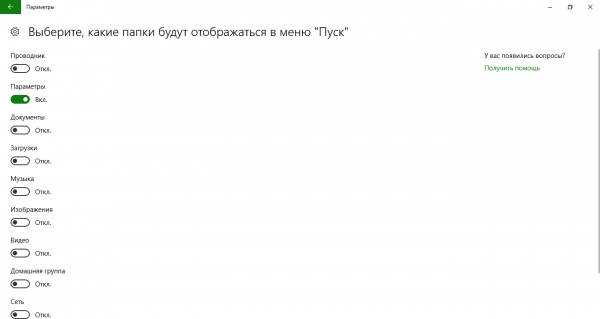
To add and remove the system folders available through Start, use these steps:
- Open Settings.
- Click on Personalization.
- Click on Start.
- Click the Choose which folders appear in Start option.
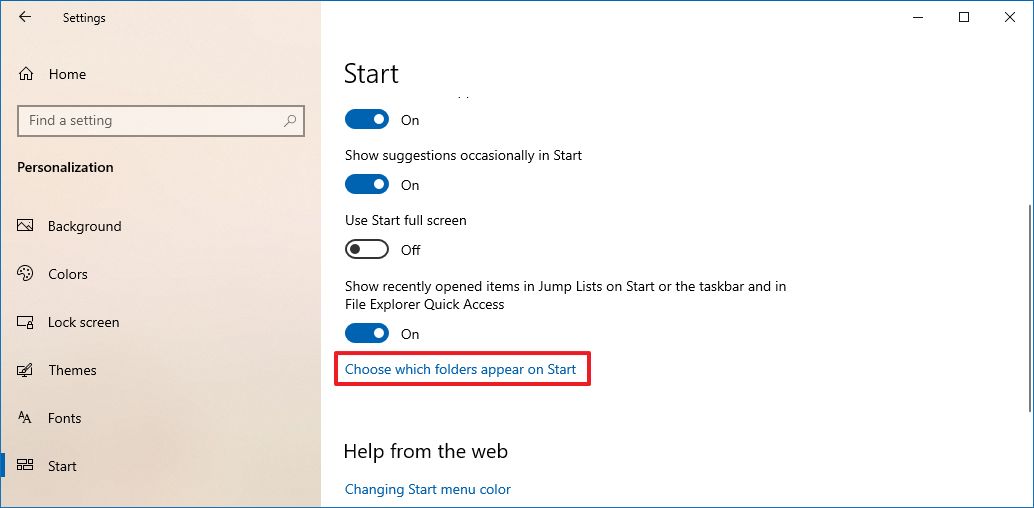
- Select the system folders you want to see in the left rail, including:
- File Explorer.
- Settings.
- Downloads.
- Music.
- Pictures.
- Videos.
- Network.
- Personal folder.
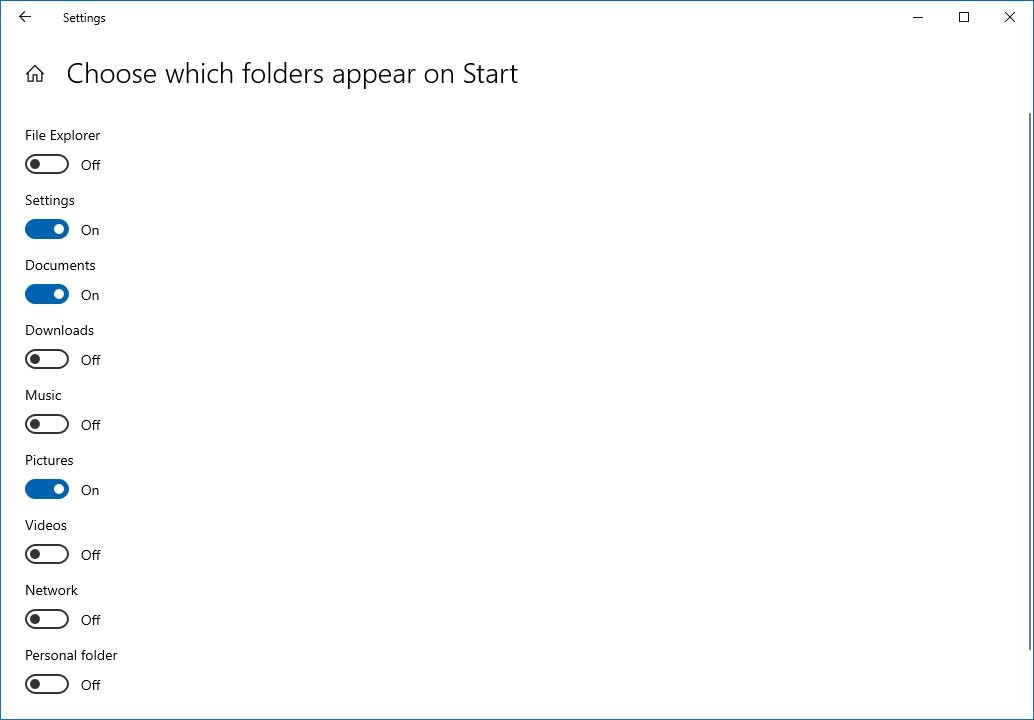
- Confirm the changes opening Start.
After you complete the steps, you’ll be able to find the shortcuts in the left rail of the Start menu above the Power menu.
Sometimes, the Start menu can show apps suggestions. For example, when you open the menu, you may see recommendations of apps in the «All apps» list. Or if you perform a search for «Chrome» or «Firefox,» you might get a suggestion recommending to use Microsoft Edge instead alongside the result. Although they’re not ads, they kind of behave like if they were. If you rather stop this behavior, you can disable the option.
To stop getting app suggestions in Start, use these steps:
- Open Settings.
- Click on Personalization.
- Click on Start.
- Turn off the Show suggestions occasionally in Start toggle switch.
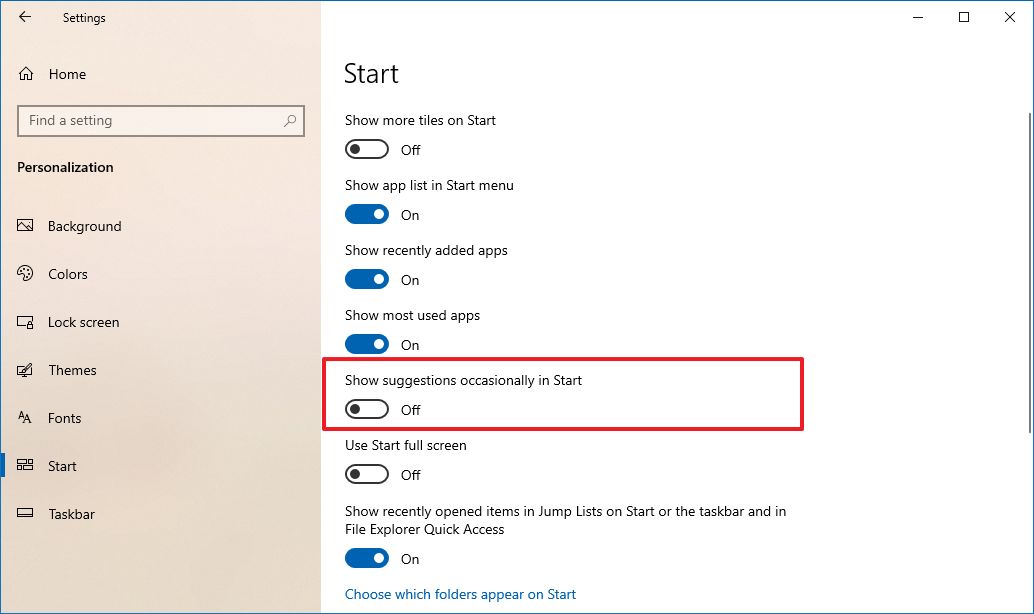
Once you complete the steps, the Start menu will no longer try to show app suggestions when you’re using the experience.
To see a list of recently added apps in the Windows 10 Start menu, use these steps:
- Open Settings.
- Click on Personalization.
- Click on Start.
- Turn on the Show recently added apps toggle switch.
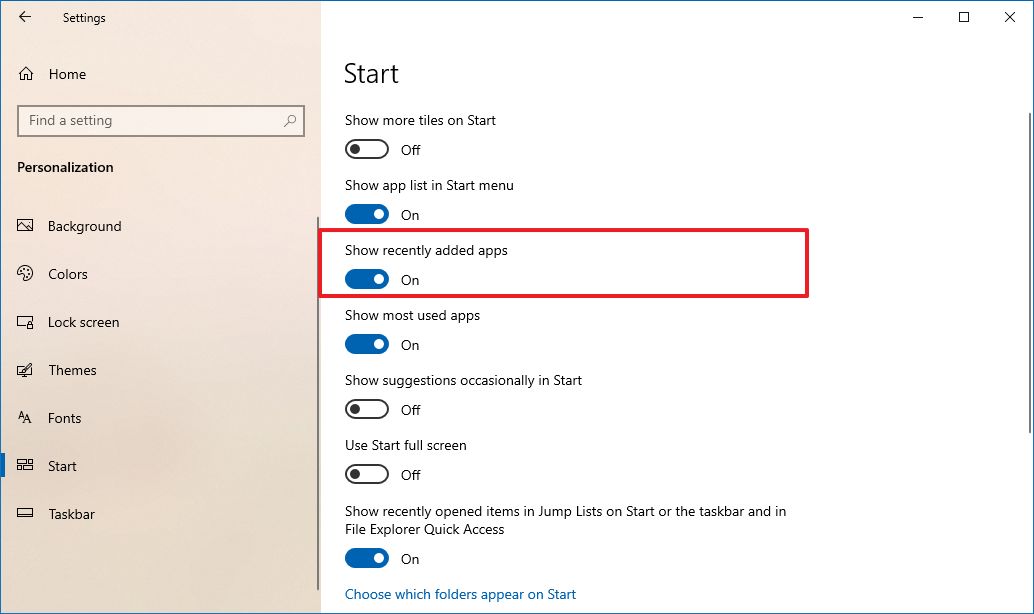
- Confirm the list of recently added apps in Start.

After you complete the steps, you’ll see recently added apps at the top of the «All apps» list.
To get quick access to your most frequent apps in Start, use these steps:
- Open Settings.
- Click on Personalization.
- Click on Start.
- Turn on the Show most used apps toggle switch.
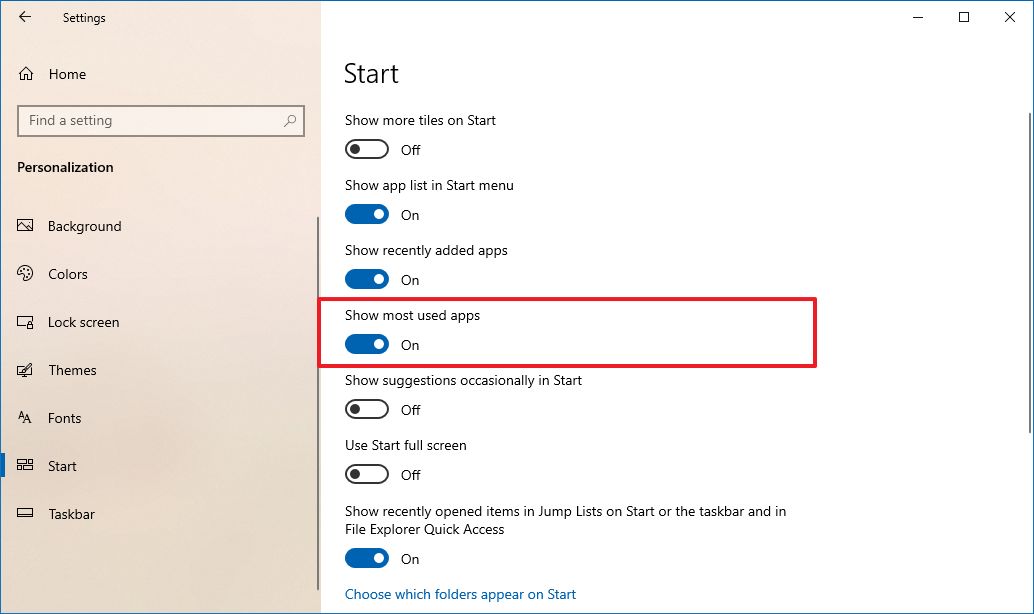
- Confirm the list of recently added apps in Start.
Once you complete the steps, the top six most frequent apps you use on Windows 10 will appear at the top of the «All apps» list.
To disable the all apps list in Start, use these steps:
- Open Settings.
- Click on Personalization.
- Click on Start.
- Turn off the Show app list in Start toggle switch.
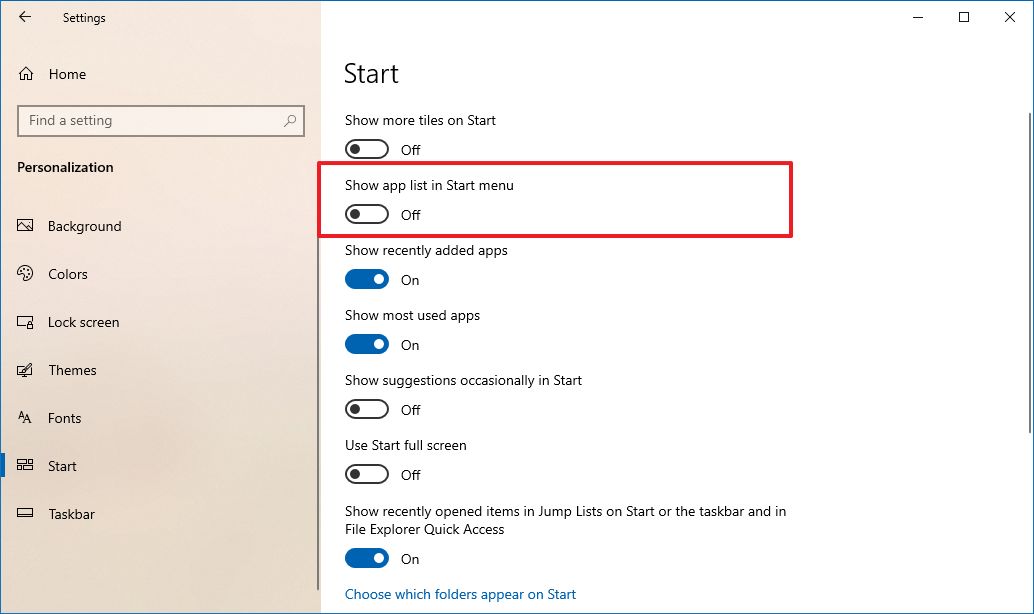
- Confirm the app list is disabled opening Start.
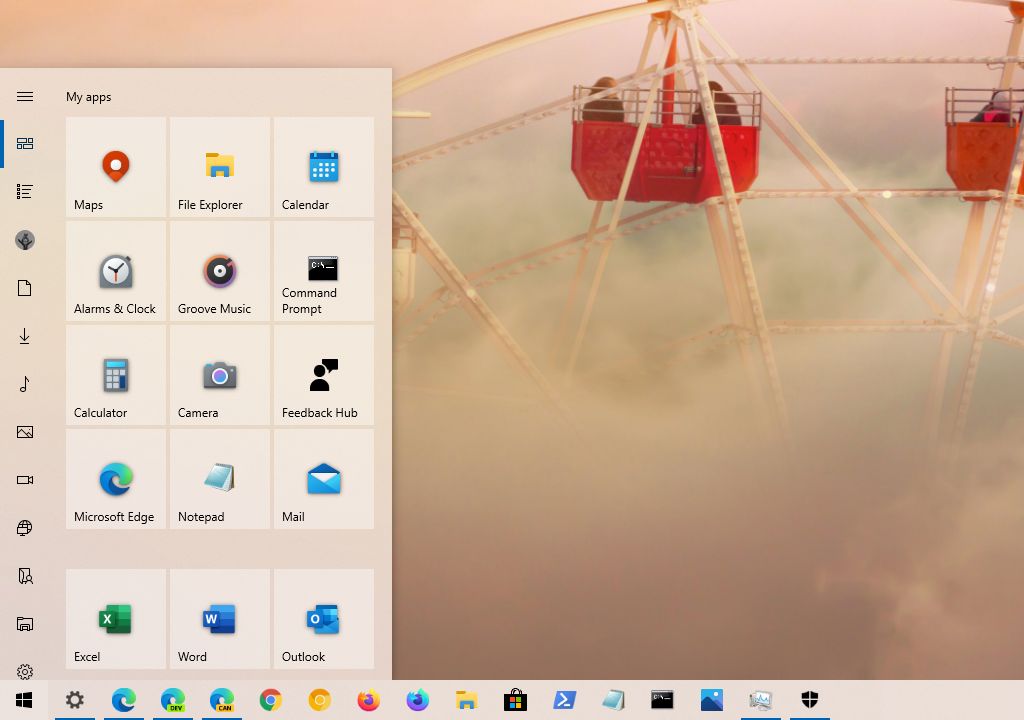
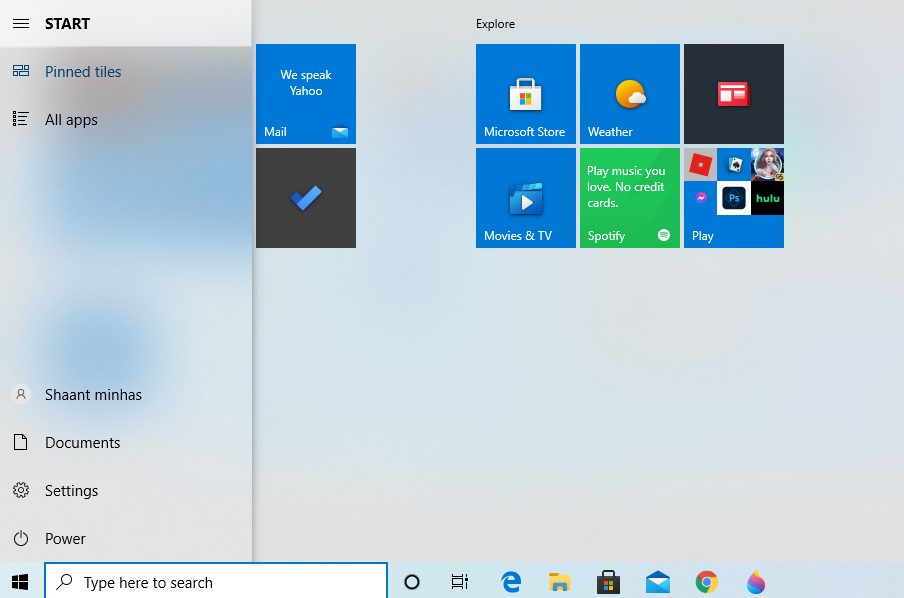
After you complete the steps, the «All apps» list will no longer appear by default in the Start menu. However, if you ever need to reaccess the list, you can switch between the «Pinned tiles» and «All apps» view using the buttons on the top-left corner.
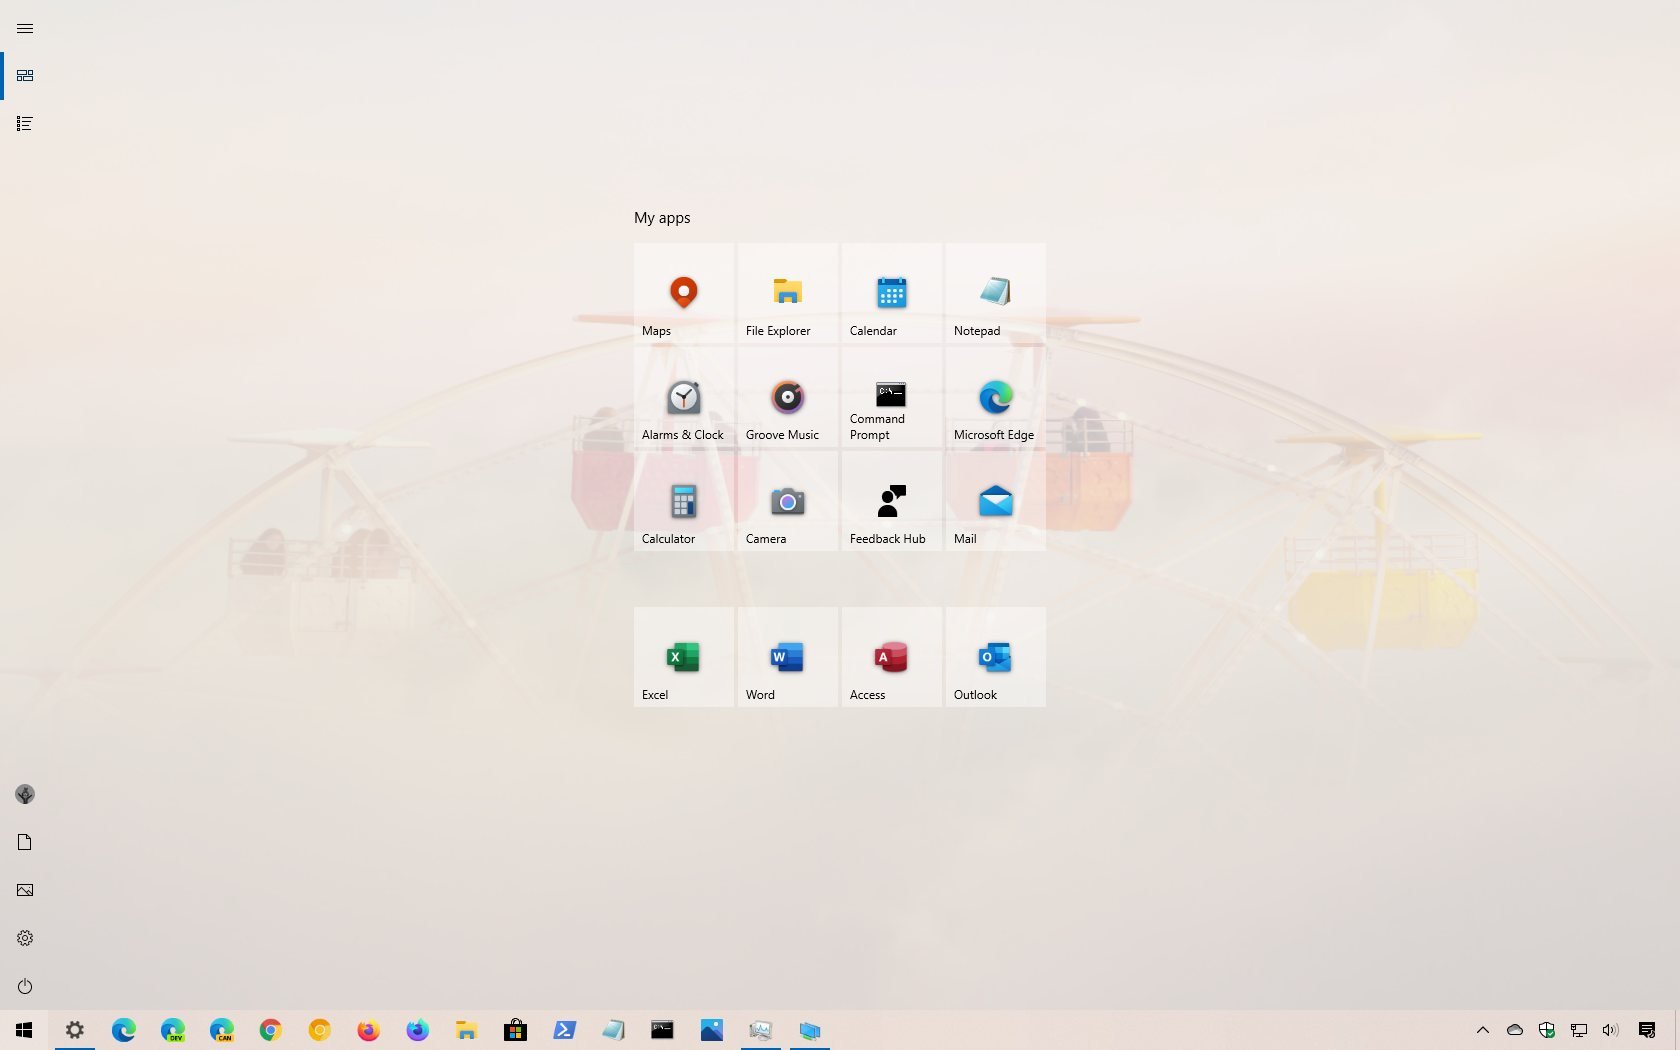
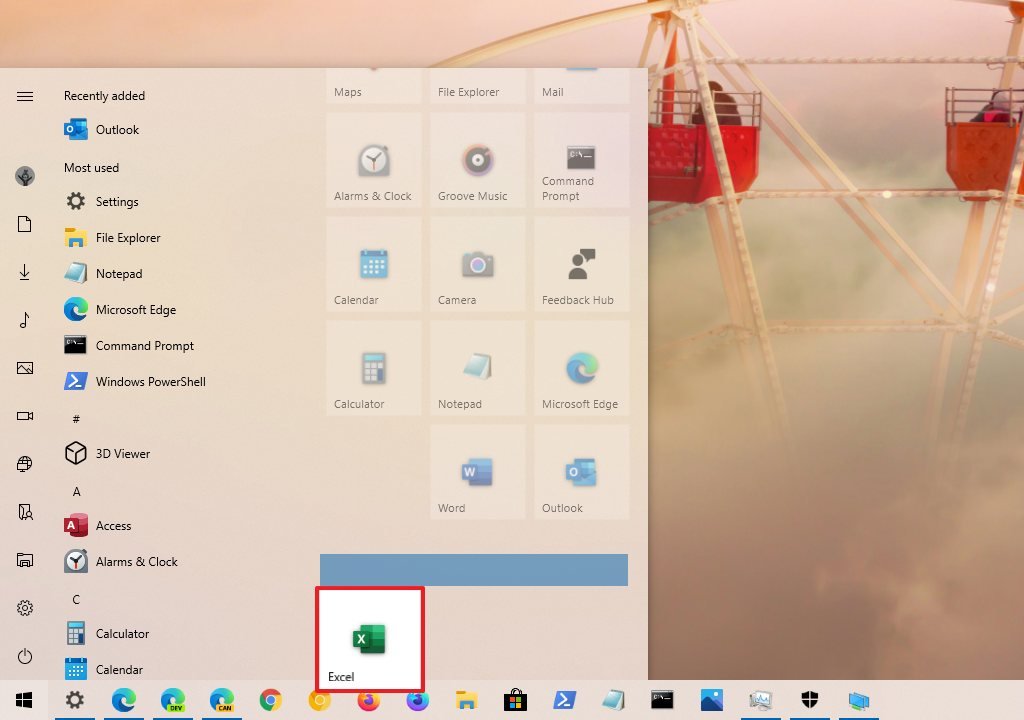
On Windows 10, you can quickly add and remove apps from the tiles section.
Pin apps
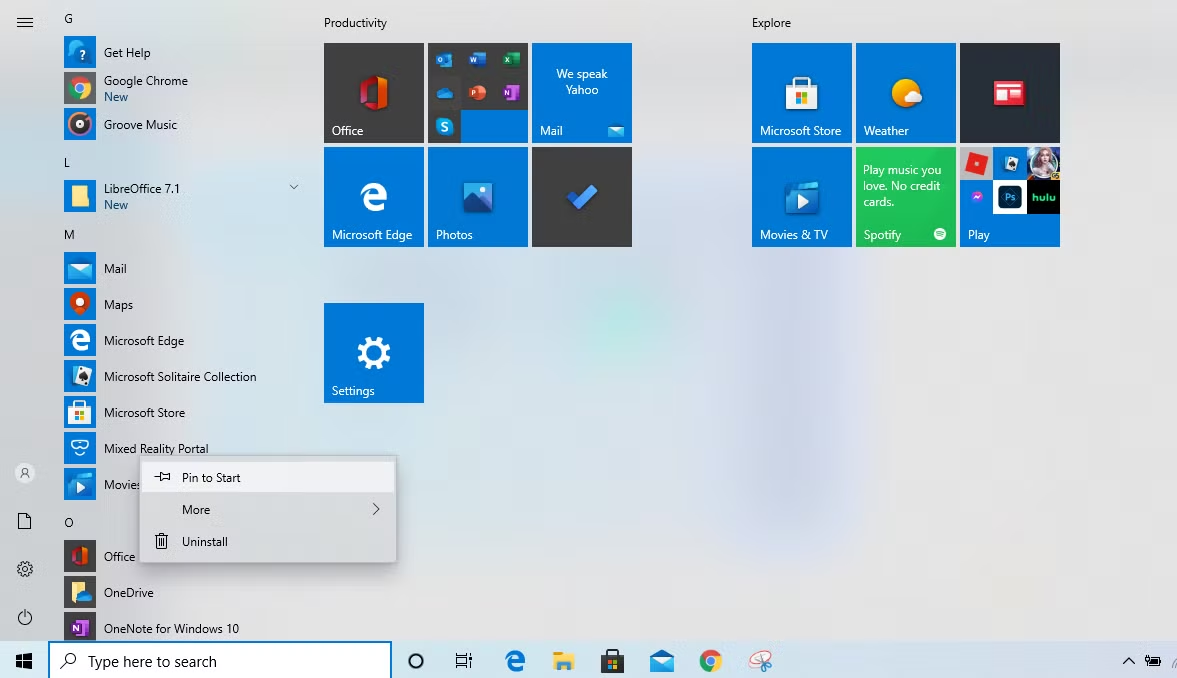
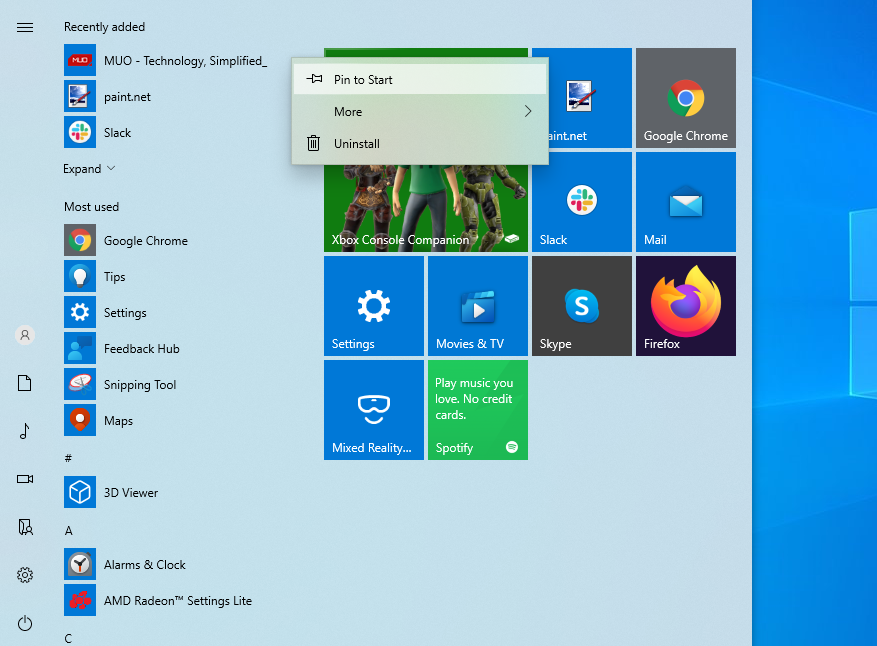
To pin apps to the tiles section, use these steps:
- Open Start.
- Right-click an app from the app list.
- Select the Pin to Start option.
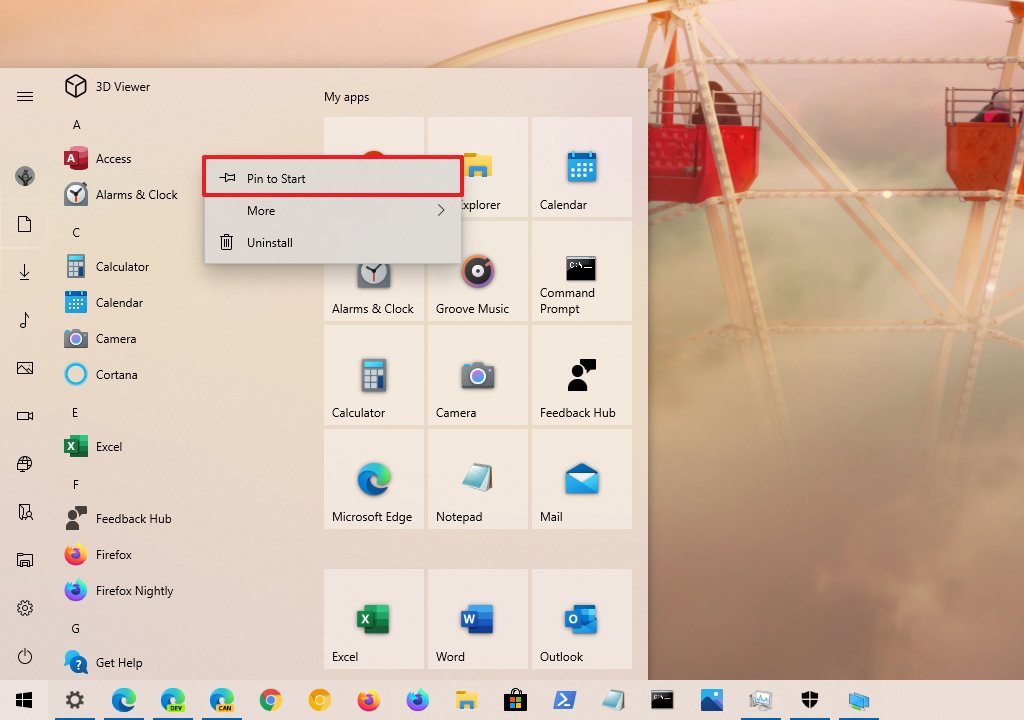
- Repeat step No. 2 and No. 3 to pin additional apps.
Once you complete the steps, the apps will appear in the Pinned tiles section.
Unpin apps
To unpin apps from Start, use these steps:
- Open Start.
- Right-click an app from the app tiles section on the right side.
- Select the Unpin to Start option.
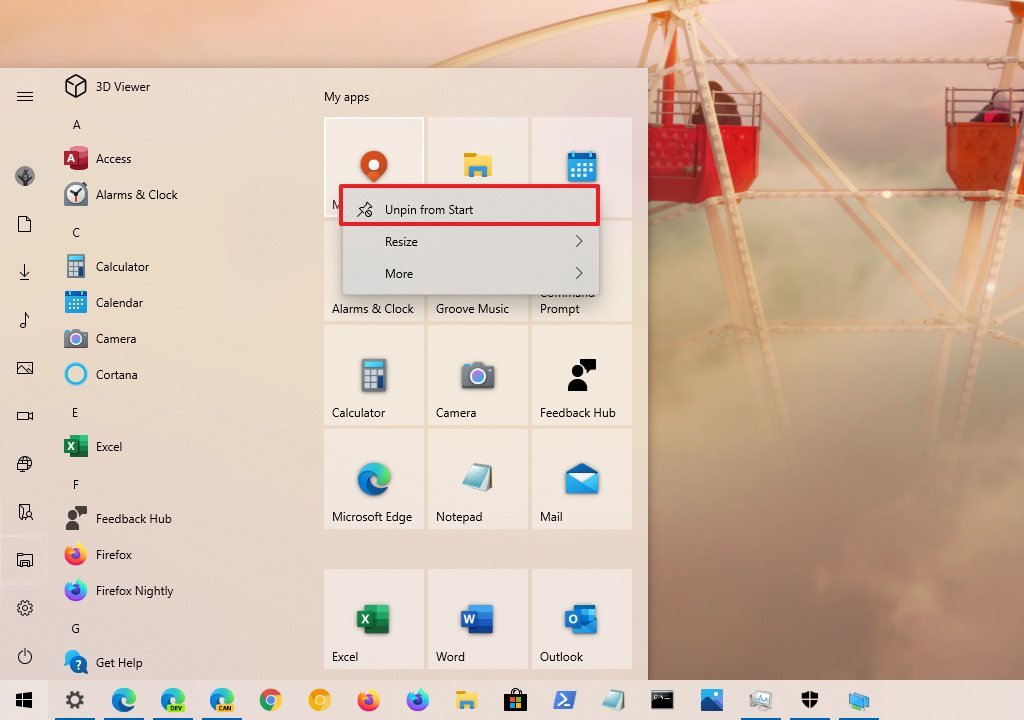
After you complete the steps, the app will be removed from the Pinned tiles section.
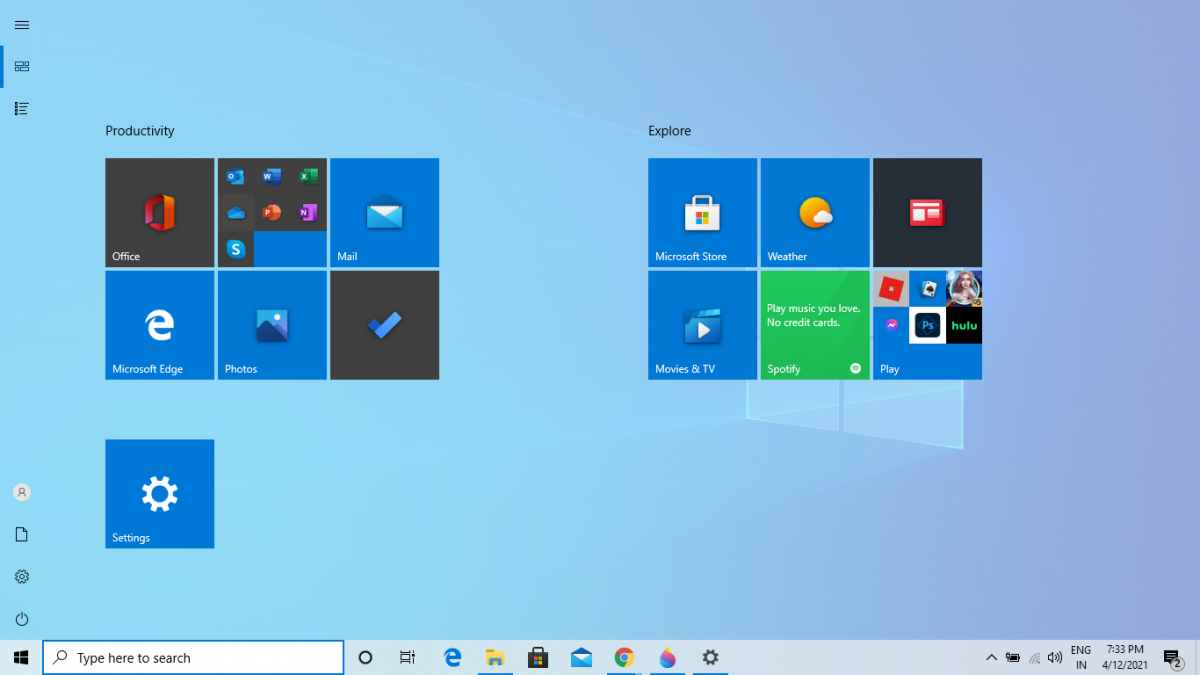
On Windows 10, to better organize the experience, you can customize the app tiles in several ways. You can change their size, round them up into groups, and group them into folders to optimize the space in the menu.
Resize tiles
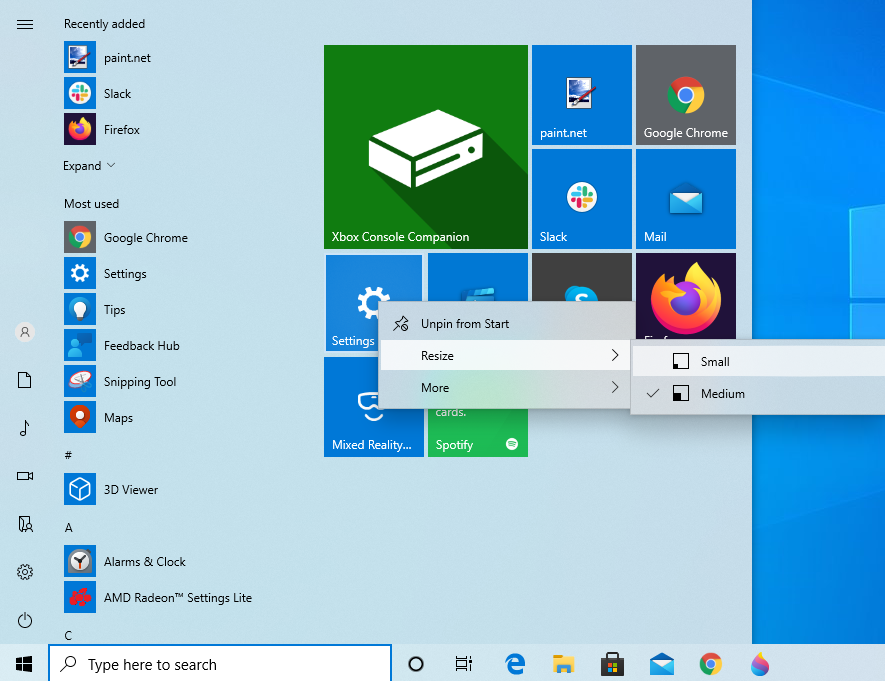
To change the size of an app tile, use these steps:
- Open Start.
- Right-click an app tile from the right side.
- Select the Resize submenu and choose one of the available sizes:
- Small.
- Medium.
- Wide.
- Large.
Once you complete the steps, the size of the tile will change to the one you specified.
While the Start menu offers four different tile sizes, not all the apps support all the formats.
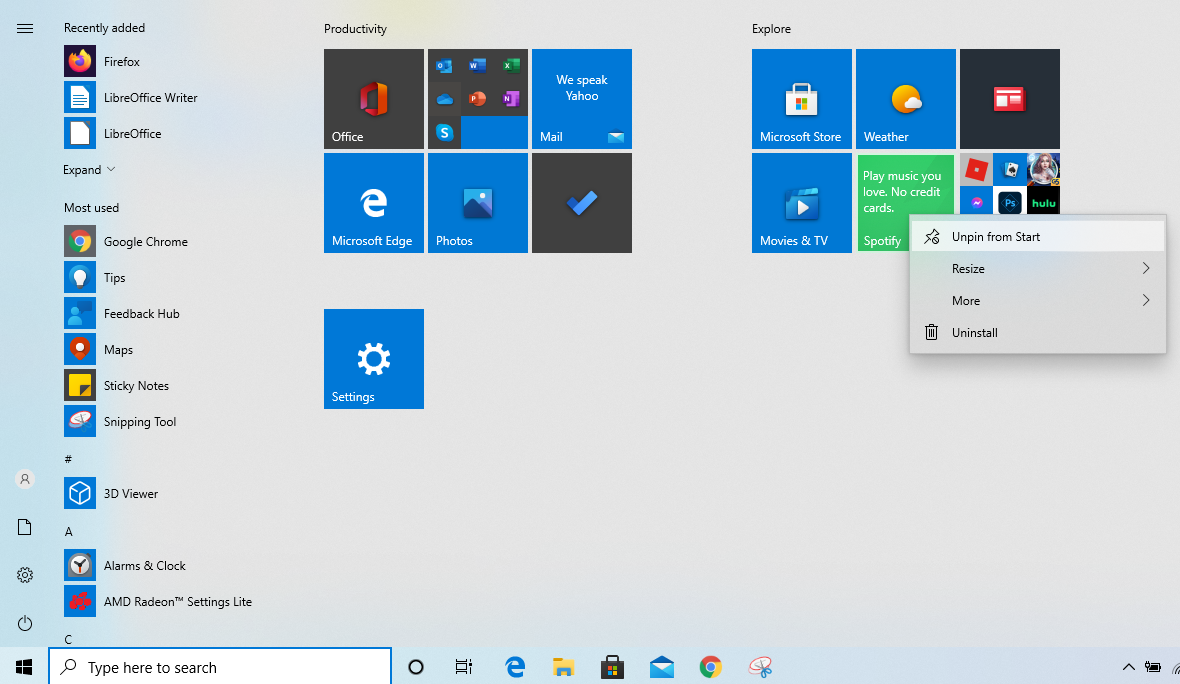
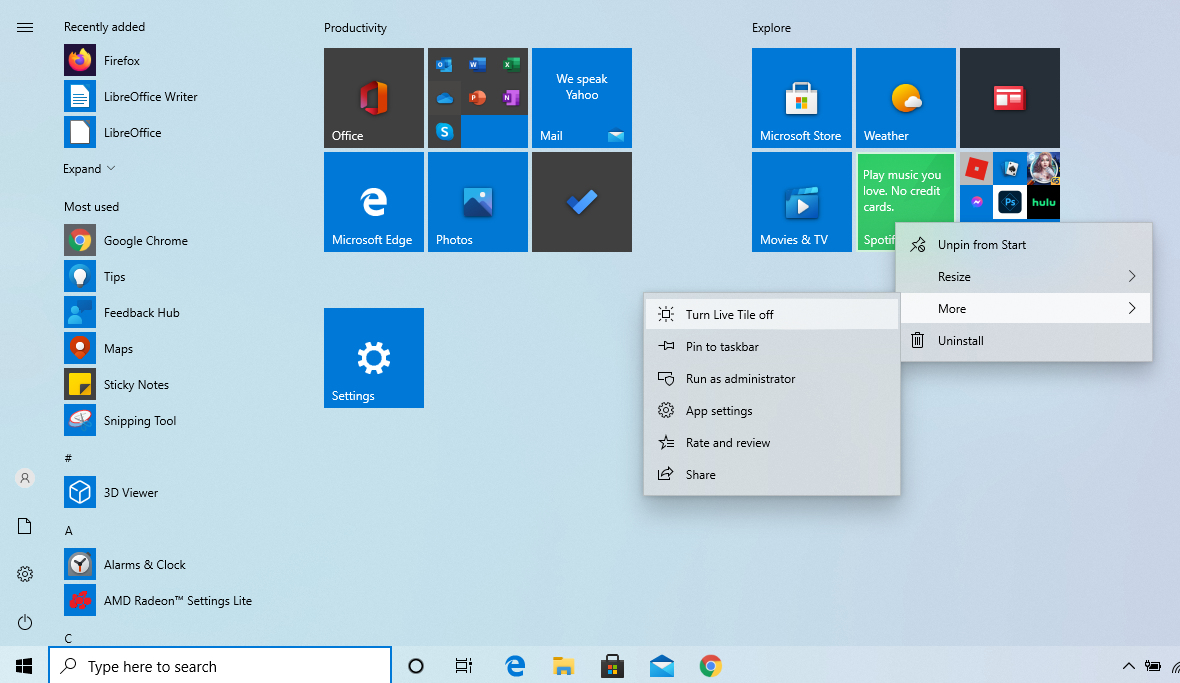
Turn off Live Tiles updates
Although Microsoft already showed signs that the Start menu could eventually remove Live Tiles, you can still decide whether to see app updates on apps.
To disable live updates for app tiles, use these steps:
- Open Start.
- Right-click an app tile from the right side.
- Select the More submenu and choose the Turn Live Tile off option (or Turn Live Title on option).
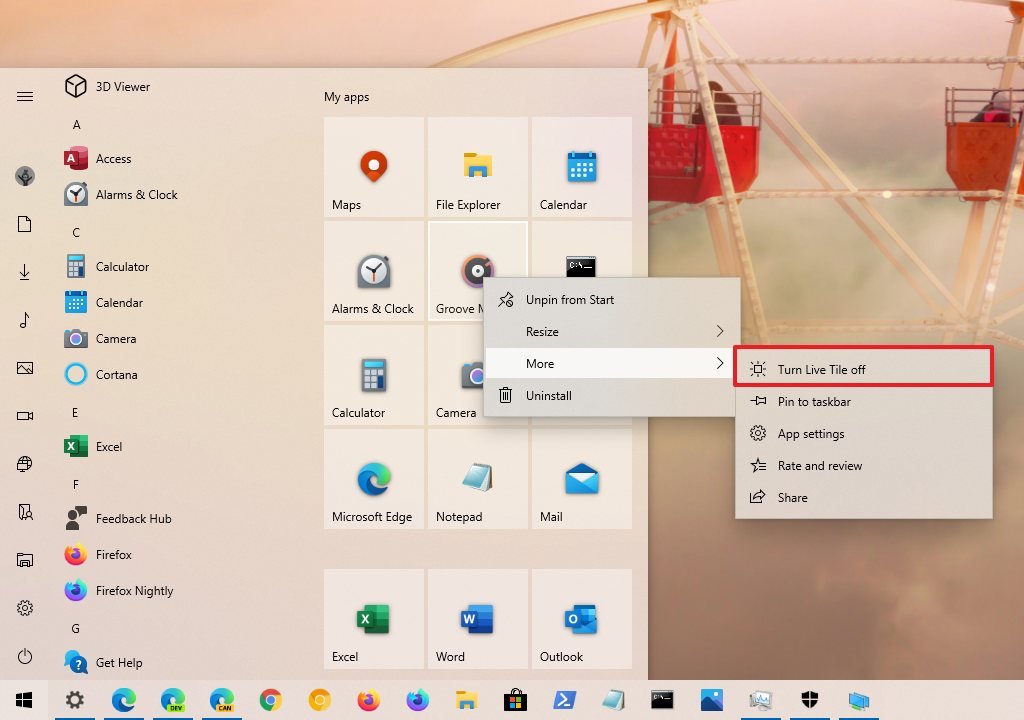
After you complete the steps, the tile will no longer show live updates about the app.
On the Start menu, folders are another way to group tiles to optimize the space to fit more apps.
To create a folder on the Start menu, use these steps:
- Open Start.
- Drag and drop an app tile on top of another.
- Drag and drop more tiles inside the folder as necessary.
- Click the «Name folder» header and specify a custom name for the folder—for example, Work apps.
If you want to remove the folder, simply drag and drop each tile outside of the folder. After removing all the tiles, the folder will delete automatically.
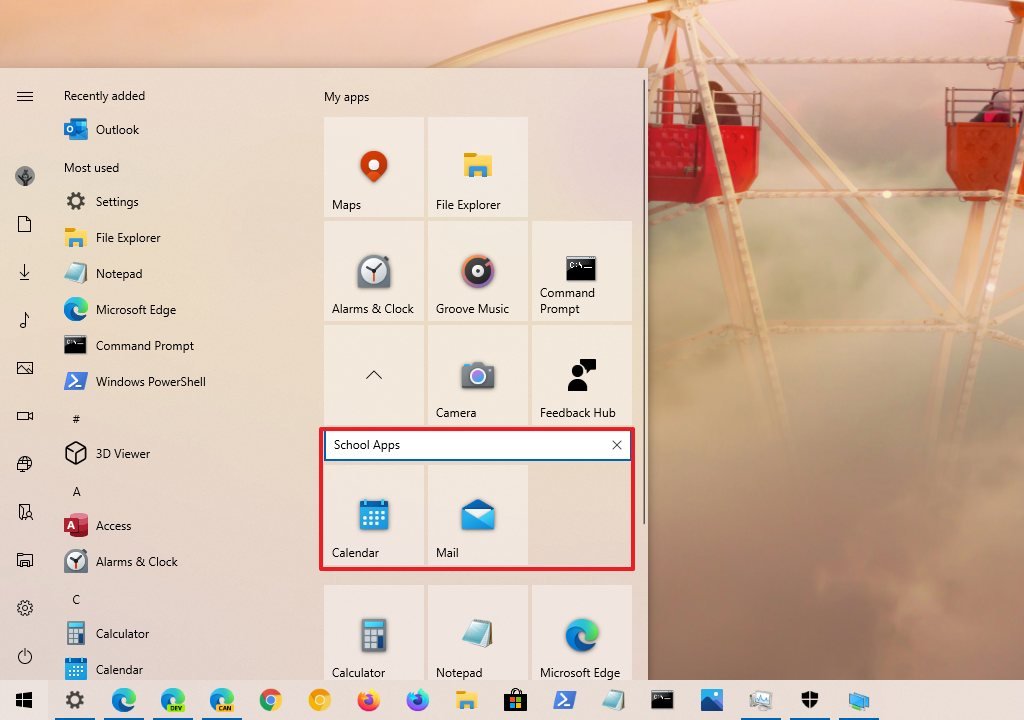
You can also organize the Start menu tiles into groups. For example, you can create a group to round up all your work applications, group your frequent apps, or group your favorite games.
To create groups on the Start menu, use these steps:
- Open Start.
- Drag and drop an app tile on an empty space.Quick note: As you drag the tile, a visual element should appear indicating the end of the current group and the beginning of the new one.
- Drag and drop more app tiles to the section as necessary.
- Hover over the header of the group and click the Name group option.
- Specify a custom name for the group. For example, App Group for School.
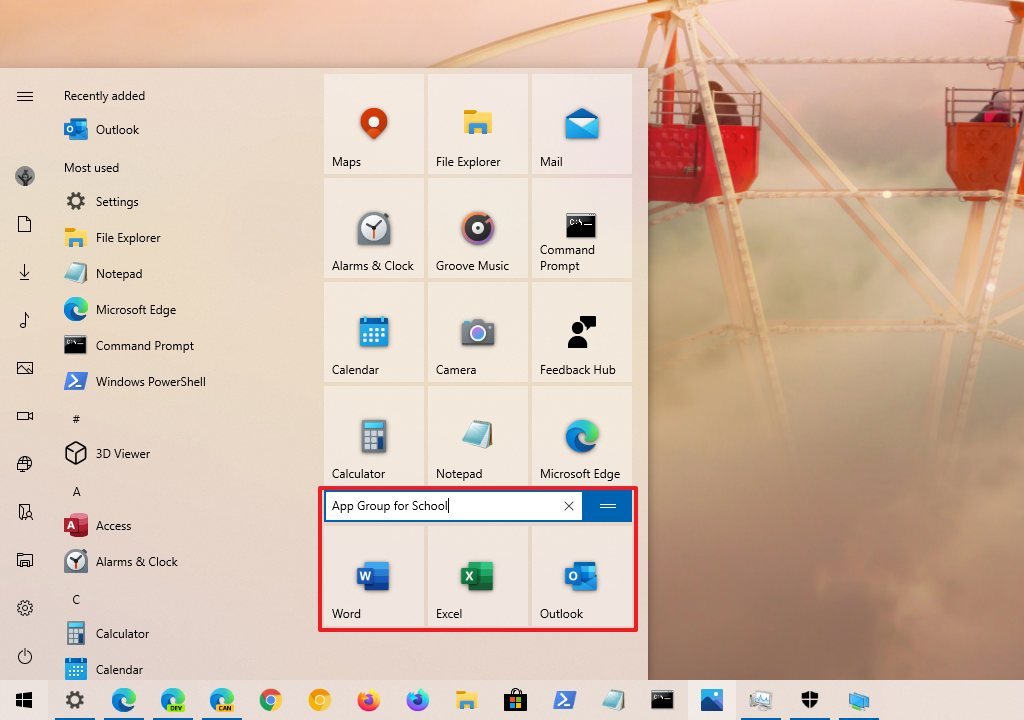
Once you complete the steps, you can create additional groups to organize your apps more logically.
Rearrange tiles
To rearrange apps in the Windows 10 Start menu, use these steps:
- Open Start.
- Drag a tile to the location you want in Start.

After you complete the steps, you can repeat the steps to rearrange other apps.
If the location you want to position the app is occupied by another tile, drag the tile over to make the other tiles to make them move to make the space.
If you prefer a more classic look, you can remove all the app tiles to get only a view of the app apps list, which is similar to the menu style available on Windows 7.
To get a menu similar to the one on Windows 7, use these steps:
- Open Start.
- Right-click a tile and select the Unpin from Start option.
- Repeat step No. 2 to unpin all the tiles.
Once you complete the steps, you’ll end up with a Start menu similar to the classic look available in previous versions.
Get the best of Windows Central in in your inbox, every day!
Mauro Huculak is technical writer for WindowsCentral.com. His primary focus is to write comprehensive how-tos to help users get the most out of Windows 10 and its many related technologies. He has an IT background with professional certifications from Microsoft, Cisco, and CompTIA, and he’s a recognized member of the Microsoft MVP community.
The Start menu is the pivotal point of Windows.
If used well, the Start menu tiles can add a lot of value to your Windows experience. In particular, visually-minded users will appreciate the creative freedom that tiles offer. Here we’ll show you the potential of tiles, and along the way, you’ll learn about their different features and other ways to customize the Start menu.
You do not have to stay stuck with the settings. With few simple tricks, you can easily change the size of the Windows 10 Start menu.
You can implement Start menu customization in two ways. First, you can change the size of the Start menu tiles manually, using either the keyboard or mouse. Another way to go about it is to increase the number of tiles per row and increase its size.
Let’s start with the manual method first.
To customize the start menu icons on Windows 10 manually, follow the steps below:
- Click the Start menu icon.
- Then, take the cursor to the edge of the Start menu panel. From there, stretch the window up and down to personalize the Start menu to your liking.
You can also resize its width by stretching it sideways.
Add More Tiles
Another way to influence the Start menu size is by adding extra tiles to it. To do this, open Windows Settings by pressing Windows Key + I and select Personalization > Start. From there, toggle on the Show more tiles on Start option.
If you use a specific app often, it’s a good idea to pin it to the Start menu for convenience. Conversely, you can also unpin anything that you use only once in a while.
To pin a new app to the Start menu, open the Start menu and right-click on a particular app. Then, select Pin to stick the app to the Start menu.
However, if you’re looking to get rid of a tile, right-click on the tile you want to remove and select Unpin.
Some tiles on the Start menu will keep changing as they are set to live. If you are not a fan of such animation, however, you can easily stop it. To do so, right-click on an animated tile, navigate to more, and select Turn Live Tile Off.
You can alter the Windows 10 Start menu to full screen from its default settings. To do this, go to Settings > Personalization > Start. Now, toggle on Use Start Full Screen.
Apart from this, you can also make a plethora of other changes from here, such as showing your most-used apps, enabling suggestions on the Start menu, visibility of app list in Start menu, etc.
You can change the folders that appear on the left corner of your Start menu. Here’s how the default view of your folder might be.
You can change it from Windows Settings (press Windows Key + I). From there, select Personalization > Start and select Choose which folders appear on Start. For example, here, we’ve chosen to add the Music, Videos, and Personal folder to Start.
You can add new folders to customize your Windows 10 Start menu. To get started, open the Windows Start menu. Once there, drag and drop an app icon on top of another.
After you do this, you’ll be asked to name the newly created folder. Name it as you like, and you’ll have a new folder with you.
![]()
If you don’t like a newly created folder, however, do not worry. You can always bring your settings back to normal by simply dragging the app icons out of the folder.
If you’d like the old classic Windows 7 look, you can easily achieve it. Follow the steps below the change the start menu.
- Open the Start menu and right-click on a tile.
- Select unpin to remove it from the menu.
Now do this for all the tiles one by one, and soon, you’ll have yourself the classic Start menu.
This is one of my favorite customizations. You can mix things up a little in the Start menu by changing the size of its tiles. To resize, right-click on a specific tile. Then, hover over Resize and select a size you want.
Do this to a bunch of tiles for a cool effect.
Another way to change the Start menu on Windows 10 is by categorizing the tiles in groups. Follow the steps below to do it successfully:
- Open the Start menu.
- Drag and drop a tile to a free space.
- As soon as you do this, you’ll have a new group. You can name it by hovering over it.
- You can then add as many tiles as you like to the new group.
On a classic desktop PC, tiles may seem like a waste of space. Once you’re using Windows 10 on a hybrid or mobile device, however, where scrolling through menus can be tedious, tiles quickly become indispensable.
Don’t like the name of a given tile in your Start menu?
Right-click the tile, select Open file location, then rename the respective file in Windows Explorer. While you’re at it, you can also change the icon used for the tile.
In Windows Explorer, right-click the file, select Properties, then in the Shortcut tab, click Change Icon, and select a given icon or Browse for an alternative icon on your computer.
Create Shortcuts to Universal Windows Apps
Shortcuts can help you access a file or app from various locations.
Universal Windows apps don’t provide an obvious way to create a shortcut, but we know two different methods. The first is almost too simple: drag an app from the Start menu to the desktop. What you’ll get is a shortcut on the desktop, and the app will still sit in your Start menu.
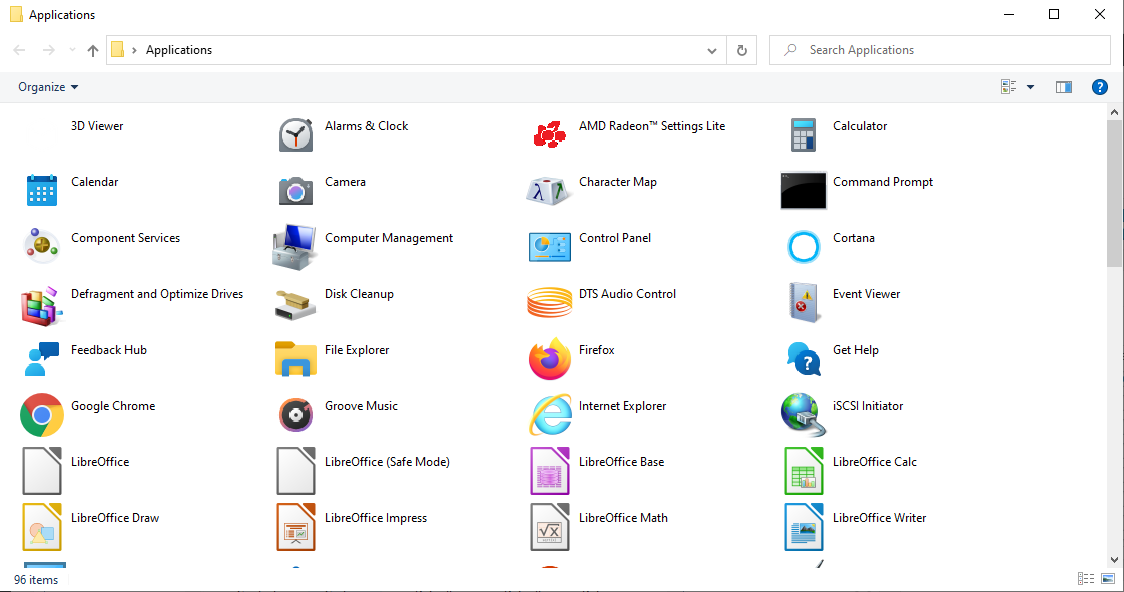
Alternatively, you can open the Applications shell folder, which hosts all applications installed on your computer, including Universal Windows apps. Press Windows Key + R to open the Run dialog (or long-press the Start Button and select Run from the Power Menu), type shell:AppsFolder, and select OK.
From here, you can create shortcuts for any of your applications.
Once you have created a shortcut, you can rename it, change its icon, and pin it to your Start menu. That’s how you can create custom icons for Universal Windows Apps.
Now that you know what you can do with tiles, let’s see how you can expand on that. These tips will help you put your creative energy to work and turn your Start menu tiles into a piece of art.
Add Tiles for Steam Games
Tiles are the perfect canvas for game covers. The Universal Windows app Steam Tile creates beautiful Live Tiles for your Steam titles, as demonstrated by Reddit user xpopy.
Since he didn’t like how Steam Tile launches games, he manually created shortcuts to individual Steam games.
The process is a little convoluted and not as visually pleasing as Steam Tile. Unfortunately, shortcuts only support small or medium-sized tiles.
Add Chrome Web Apps
You can edit the Windows 10 Taskbar by adding any website to it. Although in Windows 10, it actually adds them to the Start menu as a tile. Click the three dots icon in Google Chrome in the top-left corner, go to More Tools > Create shortcut, and check Open as window.
The tile will now launch the website in an app-like window, without distracting toolbars or tabs. This is particularly neat for websites like Gmail, Facebook, or YouTube.
12. Manage the All Apps List
Compared to previous Windows versions, the All Apps list appears stale and is difficult to navigate. Moreover, you cannot easily remove items unless you’re happy to uninstall them. With the file location trick already described above, however, you regain some flexibility.
Classic desktop software is added to the All Apps list with a folder, but you really just need the Dropbox application shortcut in that list.
When you right-click an item and select Open file location, you will access the Programs directory, based on which the All Apps menu is created. This is where you can move shortcuts or create additional folders.
For example, I could move the Dropbox shortcut from the Dropbox folder to the Programs directory, then delete the Dropbox folder.
You have to reboot for the latter to take effect.
Also, note that you can quickly jump to a different location in the All Apps list by clicking or long-pressing a letter, then selecting your target from the menu that comes up.
13. Change Color & Transparency
Compared to the Windows 10 Preview, your options here are rather limited, and none of them can be found in the Start menu itself. Press Windows Key + I or launch the Settings app through the Start menu and navigate to Personalization > Colors.
By default, the Start menu and Taskbar are dark grey, but you can make them adapt the Windows-wide accent color. This, in turn, can be picked based on your background, or you can manually select one. Finally, you can make the Start menu transparent, but you cannot customize this setting.
The chances are that even once future updates roll around, you might not be satisfied with the new Windows 10 Start menu. Fortunately, you can always install a third-party Start menu, such as Open Classic Shell. These tools can either replace the default Windows 10 Start menu, or you can choose settings to allow access to both menus.

You can play around with the Open-Shell Menu (shown above) and choose your favorite Start menu customization. There are different tabs such as Start Menu Style, Basic Settings, Skin, and Customize Start Menu to explore for implementing a particular style.
As a side note, some alternative Start menu apps, including Start Menu Reviver, also work for Windows 7.
That’s about it for Start menu customization in Windows 10, folks! There are many ways to customize your Windows 10 Start menu. Now you know the basics and some neat tricks and tips, you can customize to your heart’s desire.

Windows 10 finally brought back the Start menu, and it’s more customizable than ever. Here’s a quick rundown of all the different ways that you can make the Start menu your own.
Organize, Edit, Delete, or Add New Items to the Apps List
You can easily get to the Start menu’s folder structure on the hard drive to edit, rearrange, or even add new items. This also gives you the benefit of being able to search for these new shortcuts that you create. And yes, you can do this by dragging items around individually on (or to) the Start menu, but rearranging via File Explorer is much quicker if you have a bunch of things you want to change.

It’s worth noting that the Start menu folder won’t show Universal apps you have installed, so you’ll need to deal with those just using the menu itself. For the most part, you can uninstall any app—except for some built-in apps—by right-clicking them in the Start menu and choosing “Uninstall.”
Resize the Start Menu
You can quickly resize the Start menu by dragging the top or right edge of the menu with your mouse.
Resizing vertically works just as you’d expect. When you resize horizontally, you can increase the Start menu by one full column of icon groups at a time—up to four columns. Unfortunately, you can only narrow the menu down to one column.
You can also set Windows to show a few extra tiles in each column. Just head to Settings > Personalization > Start and turn on the “Show more tiles on Start” option.
With the “Show more tiles on Start” option on, you can see that the tile column has expanded by the width of one medium-sized tile.
Note that if you do turn on the “Show more tiles” option, you can still resize the Start menu horizontally, but only up to three columns of icon groups instead of four.
Pin and Unpin Tiles
You can easily pin and unpin tiles by right-clicking on each one and selecting “Unpin from Start.”
If there’s an app that isn’t pinned, but you want a tile for it, just browse through the list of apps on the left side of the Start menu. When you find what you’re looking for, right-click the app and choose “Pin to Start.”
Resize Tiles
You can change the size of a tile by right-clicking it, pointing to “Resize,” and then picking the size you want.
Four small tiles fit into a medium tile. Four medium tiles fit into a large tile. And a wide tile is the size of two side-by-side medium tiles.
Unfortunately, the tiling can be a little weird, so if you have an odd number of small tiles, you’ll end up with blank space.
Turn Off Live Tile Updates
If all those flashing tiles end up annoying you, just right-click on them, point to “More,” and then choose “Turn live tile off.”
Compared to the example above, you can see that the News tile is back to being a regular tile button.
For the most part, we find live tiles a little busy for our tastes, but they can be useful for tiles like Weather or Calendar where it’s nice to have some at-a-glance info.
Group Tiles Into Folders
You can also group tiles on the Start menu into folders. These folders work much like app folders on a smartphone. To create a new folder, drag any tile and drop it onto another tile. Those tiles will then be grouped into a folder. You can then add other tiles to the folder by dragging them on top of the folder.
Once you have tiles in a folder, you just have to click the folder to expand it.
Then, you can click any tile inside to launch the app. Click the arrow above the folder to collapse it again.
If you want to remove tiles from a folder, drag them back out of the folder and drop them directly on your Start menu. You could also unpin the tile from your Start menu and then pin it back again if dragging them out is too awkward.
Remove All Live Tiles if You Don’t Like Them
If you don’t like the tiles on your Start menu at all, you can remove them. Just right-click each one and then click “Unpin from Start” until they’re all gone.
After you unpin the last tile, you can resize the Start menu horizontally by grabbing its right edge and dragging until the tile section disappears. You’re then left with just a nice, trim list of apps.
Change the Start Menu (and Taskbar) Color
You can easily change the color of your Start Menu and Taskbar. Head to Settings > Personalization > Colors to get started. Windows lets you pick a single accent color from a preselected group, or you can fine tune the accent color you want by clicking the “Custom Color” button. Just click any color you want to use. You can also let Windows pick an accent color for you based on your current background wallpaper by selecting the “Automatically pick an accent color from my background” option.
After picking an accent color, your next step is choosing where that accent color gets used. Scroll down a bit to the “More Options” section. Your two options here are “Start, taskbar, and action center” and “Title bars.” The first option uses the accent color as the background for your Start menu, taskbar, and action center and also highlights certain items on those elements—such as app icons on the Start menu—with the same accent color. The second option uses the accent color for the title bar of your active window.
Unfortunately, the Start menu, taskbar, and Action Center elements are grouped for color selection, and you can’t make them different colors. We do, however, have a quick registry hack that can at least let you keep a black background on your Start menu and action center. The second option uses the accent color on the title bar of active windows, though we also have another hack for you if you want to use the accent color on inactive windows, as well.
Back on the Colors personalization screen, you’ll also find a “Transparency effect” option for making your Start menu, taskbar, and action center transparent or not. This option does not affect the accent color if it’s used on those elements.
And finally, you can enable a dark mode for settings and apps. While this app mode setting doesn’t affect every app, we do have some tricks you might enjoy for using a dark theme almost everywhere in Windows 10.
Control How Your App Lists Appear on the Start Menu
By default, your Start menu displays several of your recently installed, most used, and suggested apps, followed by a list of all the apps installed on your system.
If you don’t like these—say you’d rather just see your full list of apps without having to scroll for it—all three sections are easy to turn off. Head to Settings > Personalization > Start. Look for the “Show app list in Start menu,” “Show recently added apps,” and “Show most used apps” options and turn off any you don’t want to see on your Start menu.
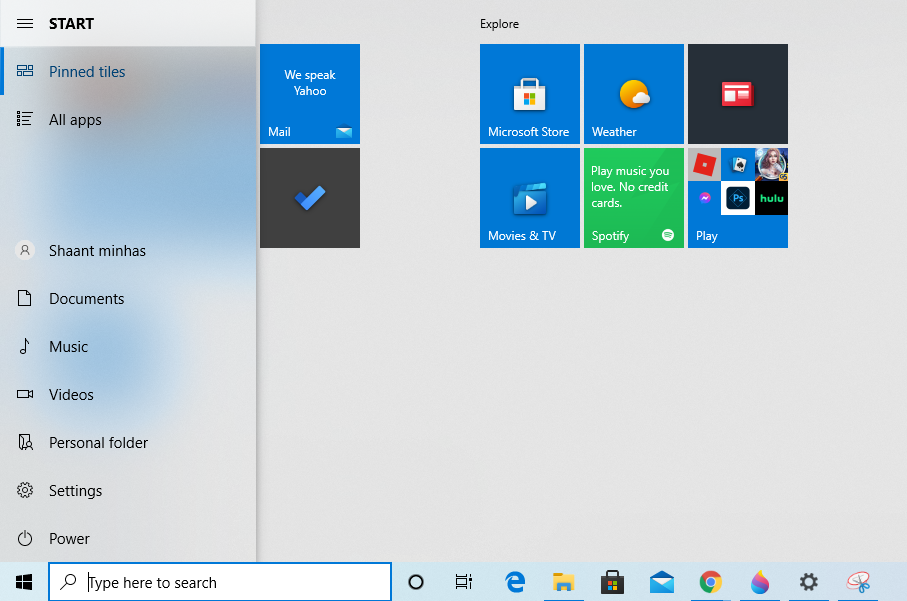
Choose Which Folders Appear on the Start Menu
The User, Documents, Pictures, Settings, and Power options are now tucked away in a tiny column on the far left of the Start menu. Click the button at the top left of the Start menu to expand this column.
You can see those same options with their full names and also a lot of nice, inviting open space above them. You can add stuff to that space.
Head to Settings > Personalization > Start. On the right, scroll all the way to the bottom and click the “Choose which folders appear on Start” link.
Choose whatever folders you want to appear on the Start menu.
And here’s a side-by-side look at how those new folders look as icons and in the expanded view.
Use a Full-Screen Start Menu
On the other hand, if you really like the tiles and miss the full-screen Start experience from Windows 8, you can have the Start menu always open full screen. Head to Settings > Personalization > Start. Turn on the “Use Start full screen” option.
Now, whenever you open your Start menu, you will see it in all its full-screen glory.
Remove Suggested Apps from Your App List
As you’ve used your Start menu, you’ve probably noticed the occasional suggestions for apps you might want to install appear in your app list.
To get rid of those, all you have to do is head to Settings > Personalization > Start and turn off the “Occasionally show suggestions in Start” option.
Note that these suggested apps are different than the preinstalled apps and ads—like Candy Crush—that you also likely don’t want. To get rid of those, you’ll need to right-click each one and uninstall it. And while you’re at it, you might want to look at how to disable all of Windows 10’s built-in advertising.
And don’t forget: if you don’t like the Windows 10 Start menu at all, you can return to the glory days of Windows 7—and still keep much of the Windows 10 functionality—with a Start menu replacement like Start10 or ClassicShell.
READ NEXT
- › How to Restart Windows’ Explorer.exe (Along With the Taskbar and Start Menu)
- › How to Remove the “Uninstall” Option from the Windows 10 Start Menu
- › How to Disable Notifications Everywhere
- › The Start Menu Should Be Sacred (But It’s Still a Disaster in Windows 10)
- › How to Stop Windows 10 From Using So Much Data
- › Microsoft Just Leaked a New Start Menu. Which Do You Prefer?
- › How to Open the Start Menu Folder in Windows 7 or 10
- › How to Screen Record on iPhone
In the past few years, the Windows Start menu has been dangled in front of us and taken away more times than we can count, but it’s finally back—and it’s brought a lot of new tricks. For the first time ever, the Start menu is very customizable, which means you can make it work exactly how you want it to.
- Off
- English
We discussed a few of these tips in our guide to tweaking Windows 10, but if you’re looking to dive a little deeper and really change up your Start menu, here’s everything you can to do customize it.
Change the Menu’s Size and Shape
G/O Media may get a commission

It’s a camera. For your car.
The Ring Car Cam’s dual-facing HD cameras capture activity in and around your car in HD detail.
By default, the Start menu will adjust its size based on the resolution of your screen. For example, on my 1900×1200 monitor, it’s pretty wide. I don’t want it to take up that much space, so I resized it to be a bit more compact.
Resizing is so easy you’ll wonder why you’re reading this sentence: just mouse over the corner of the Start menu and resize it like you would any other window. You can make it short and wide, tall and thin, or any other dimensions you desire.
Add, Remove, and Resize Live Tiles
The biggest difference between the Windows 7 and Windows 10 Start menus are, obviously, the live tiles. The ones Microsoft includes by default aren’t necessarily the most useful, so you’ll definitely want to rearrange and resize tiles based on what you actually need.
For example, I don’t need anything in the “Play and Explore” section, so I removed it entirely. Meanwhile, the Weather tile is pretty handy, but it’s much too small to show all the useful information it has, so I made it bigger at the expense of other, lesser-used tiles.
Customizing the tiles is easy: click and drag them to rearrange them, or right-click them to unpin them from the Start menu altogether. If you drag a tile all the way to the bottom of the menu, it’ll create a new category, which you can rename whatever you want.
You can also right-click a tile to pick from four sizes—small, medium, wide, and large—each of which will show different amounts of information. If you decide you don’t want a tile to show live info, but want to keep the shortcut, you can right-click it and choose “turn live tile off”.
To add a new tile, find it in the All Apps section or in the left sidebar and right-click it. Choose “Pin to Start”. If you need suggestions for good live tiles, check out our guide to making the Start screen useful.
Change the Menu’s Color
To change the color of the Start menu and its tiles, right-click on the desktop and choose “Personalize”. Click “Colors” in the left sidebar, and choose your favorite color from the pallette. This will affect other parts of Windows as well, but primarily the Start menu. You can also have it automatically adjust the color to match your desktop background, which is pretty neat.
By default, this will only act as an “accent” color, affecting the tiles on your Start menu. But if you scroll down and tick the “Show color on Start, Taskbar, and Action Center” box, the start menu and taskbar will inherit that color all over.
Customize the Left Sidebar’s Shortcuts
By default, the left sidebar shows a few shortcuts to File Explorer and Settings, along with links to your most used apps. But you can add a few more folders to this sidebar as well.
Right-click on the desktop and choose “Personalize”. Head to the Start tab. From here, you can uncheck options to show oft-used apps or recently opened items. You can also click “Choose which folders appear on Start” to add shortcuts to your personal folders, like Documents or Music, as well as your Network drives or Personal folder.
(And, if you actually liked the Windows 8 start screen, you can tick the “Use Start full screen” box to get back to a more Windows 8-like experience.)
Pin Windows Settings to the Start Menu
This setting’s a bit lesser-known, but quite useful. If you have a few settings that you access often, you can pin them to the Start menu too. Just right-click on any item in the Settings app and choose “Pin to Start”.
Install an Alternative Start Menu
If all this isn’t enough for you, an alternative Start menu might be just what you need. Start menu replacements became really popular in Windows 8 when the Start menu went missing, but they’re still around, and offer a host of features and customizations that the built-in menu doesn’t offer. Classic Shell is still around if you prefer something free and more Windows 7-like, but for Windows 10, we really dig Start10. It’s $5, it blends in beautifully with Windows 10, lets you skin the Start button, and offers a ton of different layouts and tweaks. You can try it out for free before you buy, too, so there’s no reason not to give it a shot.
Многие пользователи привыкли к стандартному системному меню Windows 7 («Пуску»), так как он лаконичный и удобный. С появлением Windows 10 и его современного «Пуска» возникает вопрос: можно ли вернуть «старое доброе» меню, не переустанавливая при этом Windows? Сегодня рассмотрим, как можно настроить «Пуск», чтобы он был похож на классический, а также как вернуть ему стандартный стиль с помощью стороннего софта.
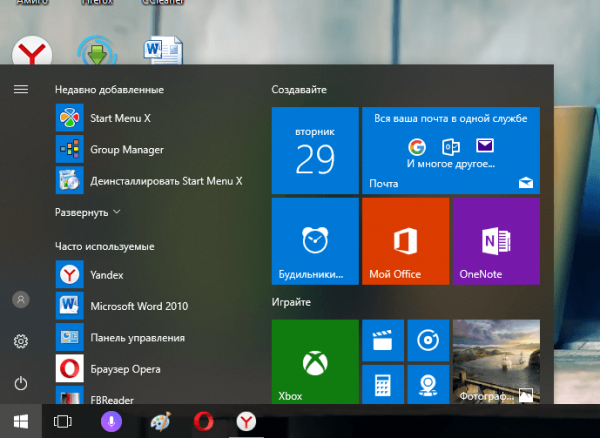
Новый «Пуск» в Windows 10 сильно отличается от системного меню, который был в Windows 7, XP и Vista. Его можно назвать средней производной между классическим «Пуском» и начальным экраном Windows 8. Что в новом современном меню изменилось по сравнению со старым, к которому привыкло большинство пользователей этой операционной системы?
Новое меню разделено на две части. С левой стороны находятся списки всех установленных программ, а справа — живые плитки. Это своеобразные иконки различных сервиосв и программ на компьютер. Их можно менять местами, удалять, переименовывать, а также добавлять новые и изменять их размер. Плитки дают быстрый доступ к часто используемым сервисам, разделам и программам.

Изменилось также положение кнопки отключения ПК: теперь она находится в левой части экрана прямо над кнопкой Windows. Сохранился также раздел часто используемых утилит в левой части меню, а также доступ к параметрам компьютера. Однако добавились пункты и для других разделов, которых раньше не было, например, «Диспетчер задач» и «Сетевые подключения».
Настройка меню «Пуск» на Windows 10
Каким образом можно поменять внешний вид «Пуска», чтобы он напоминал стандартное окно из Windows 7? Вы можете изменить цвет и размер окна, а также убрать плитки с помощью самих настроек меню.
Изменение размера и цвета
Любой даже начинающий пользователь сможет легко изменить размер большого «Пуска» в Windows 10. Меню уменьшается так же, как и окно «Проводника Windows».
- Подведите курсор мышки к правому краю меню, чтобы появилась двойная стрелка, направленная в правую и левую сторону.
- Перетяните стрелку влево, чтобы уменьшилась ширина «Пуска».
- Повторите те же действия с верхним краем меню. В результате у вас будет меню, которое по размеру буде практически соответствовать системному меню Windows 7 или XP.

Окно «Пуск» стало меньше после определения его границ с помощью мыши
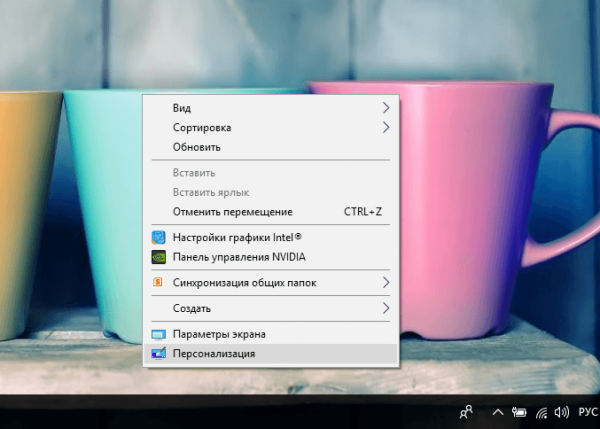
В разделе «Персонализация» поменяйте цвет окна, если вас не устраивает чёрный. Как это сделать?
- На «Рабочем столе» найдите пустое место, на котором нет иконок. Щёлкните по нему правой кнопкой мыши.
- В появившемся небольшом списке опций выбираем самый последний пункт «Персонализация».

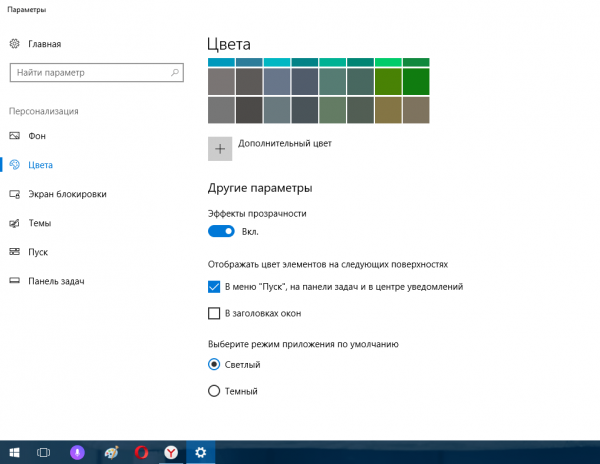
Выберите последний параметр «Персонализация», чтобы открыть окно с настройками внешнего вида - Во втором разделе «Цвета» выберите нужный вам оттенок в палитре.
- Теперь прокручиваем страницу до пункта «Отображать цвет элементов на следующих поверхностях». Ставим значение «В меню «Пуск», на панели задач и в центре уведомлений». Вы сразу увидите, что панель задач поменяла цвет. Закрываем окно настроек.

Отметьте пункт «В меню «Пуск», на панели задач и в центре уведомлений»
Действия с плитками
С живыми плитками в правой части экрана можно проводить разные манипуляции: добавлять, менять местами, переименовывать, создавать и т. д. Однако большинство пользователей интересуются, как избавиться от плиток, если они не нужны. Рассмотрим, как их вовсе удалить из «Пуска», если они вам мешают:
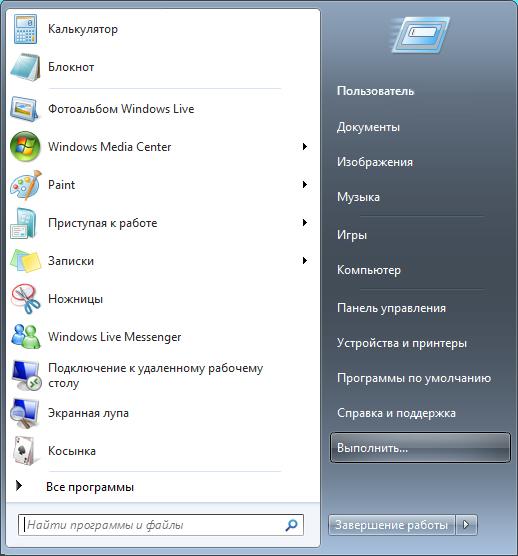
- Кликните левой кнопкой мыши по Windows в левом нижнем углу, чтобы вызвать системное меню.
- Теперь щёлкните по любой плитке правой кнопкой мыши. В небольшом списке опций нужно выбрать «Открепить от начального экрана» — она сразу же исчезнет из меню.

Выберите «Открепить от начального экрана» - Повторите это действие для каждой плитки.
- Когда не останется ни одной, уменьшите размер меню, как это было описано в разделе «Изменение размера и цвета» в этой статье. В результате вы получите меню, которое напоминает «Пуск» из Windows 7.

Вы можете удалить все плитки из меню «Пуск» и уменьшить его размер
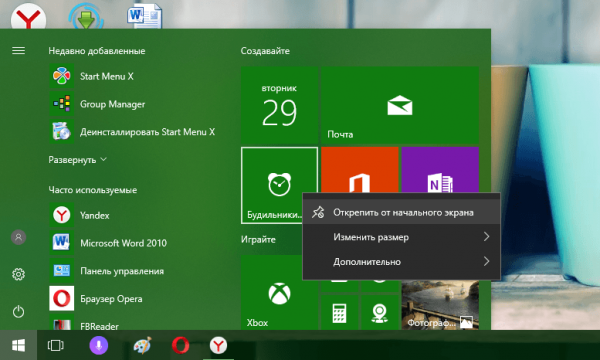
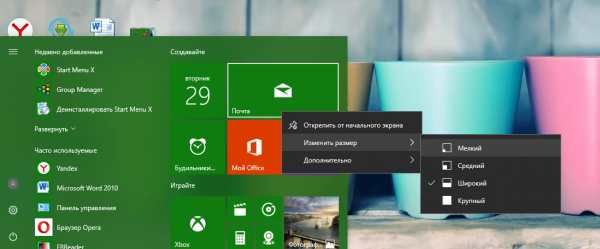
Если не хотите совсем убирать плитки, измените их размер. Кликните по плитке правой кнопкой мыши и в списке выберите «Изменить размер», а затем щёлкните по «Мелкий». Повторять эту процедуру нужно будет для каждой плитки в отдельности.
Настройка левого блока
Запустите окно «Персонализации», как это было описано в разделе «Изменение размера и цвета» в этой статье. Перейдите на вкладку «Пуск». Здесь и будем проводить все дополнительные манипуляции. Отключите следующие пункты:
- Показывать больше плиток. Чтобы в меню осталась только его левая часть без плиток.
- Показывать список приложений в меню «Пуск». Большой список программ исчезнет из меню. Вместо этого списка, мы поставим другие блоки. Как это сделать, опишем ниже в этом разделе статьи.
- Показывать недавно добавленные приложения. Утилиты, которые вы недавно установили, не будут появляться в меню «Пуск».
- Показывать наиболее часто используемые приложения. Вы не будете видеть список с программами, которыми пользуетесь чаще всего.
- Иногда показывать рекомендации в меню «Пуск». Windows не будет отображать рекомендации в плитках.
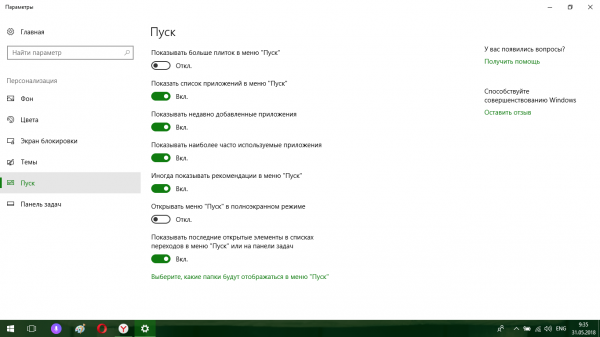
Чтобы заполнить очищенное пространство левой части, нажмите ссылку «Выберите, какие папки будут отображаться в меню «Пуск». В представленном разделе выберите блоки, которые будут отображаться в виде списка в левой зоне меню.
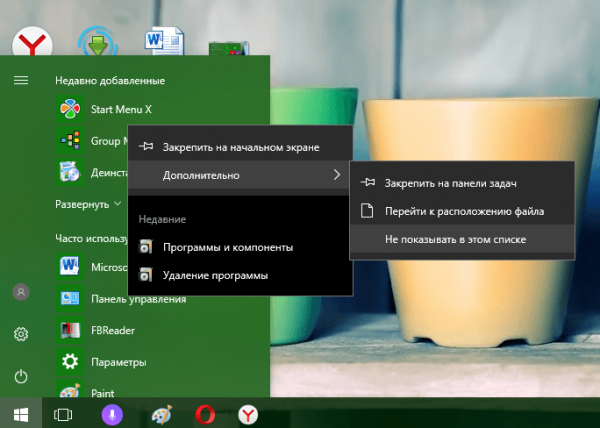
Если вы хотите убрать только некоторые программы из списка, не удаляя его полностью, воспользуйтесь следующей инструкцией:
- Откройте «Пуск». Кликните по разделу в списке правой кнопкой мыши.
- В меню «Дополнительно» выберите «Не показывать в этом списке».

Нажмите на «Не показывать в этом списке», чтобы программа была удалена из меню «Пуск» - Повторите эти действия для каждой программы, которую вы хотите убрать из списка.
Сортировка плиток по группам
Вы можете распределить все необходимые вам плитки по определённым группам, чтобы в меню «Пуск» не было беспорядка. Используйте уже имеющиеся или создавайте свои.
Чтобы создать новую группу кликните по иконке с двумя параллельными полосками и введите в поле название группы. Перетащите в эту группу все необходимые плитки.
Видео: как настроить и оптимизировать «Пуск» в Windows 10
Как вернуть классическое меню «Пуск» в Windows 10
Если у вас Windows 10, это не значит, что вам можно довольствоваться только новым меню «Пуск». Вы можете поставить обратно его старый вариант при помощи простых в освоении программ. Сегодня рассмотрим несколько самых популярных утилит: установку и работу в них.
С помощью программы Classic Shell
Classic Shell — популярное средство для возврата классического меню «Пуск». Его огромное преимущество в том, что оно бесплатное. В утилиту включены три компонента, которые можно установить все сразу или по отдельности:
- Classic Start Menu — возвращение классического меню «Пуск».
- Classic Explorer — добавление панели инструментов в «Проводник Windows».
- Classic IE — настройка панелей в браузере Internet Explorer.
Где можно загрузить эту программу, как её установить, а затем работать в ней?
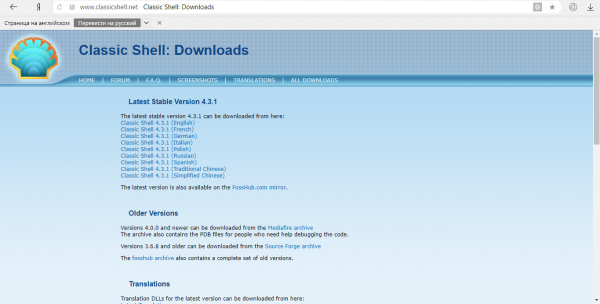
- У этого софта есть свой официальный ресурс, поэтому загружать инсталлятор будем с него. Перейдите по ссылке и щёлкните по Classic Shell 4.3.1 (Russian), чтобы скачать русский вариант программы.

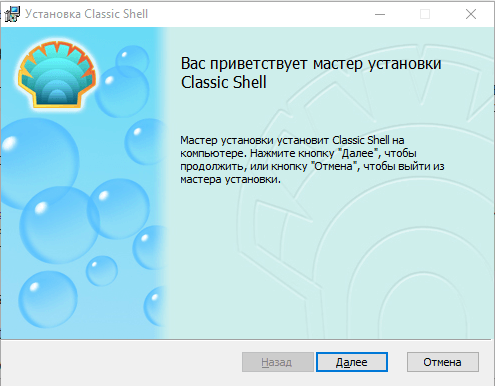
Загрузите инсталлятор Classic Shell с официального сайта - В «Загрузках» найдите файл установщика и запустите его. Левой кнопкой щёлкните по «Далее».

Кликните по «Далее» - Затем поставьте галочку слева от пункта о том, что вы принимаете соглашение.
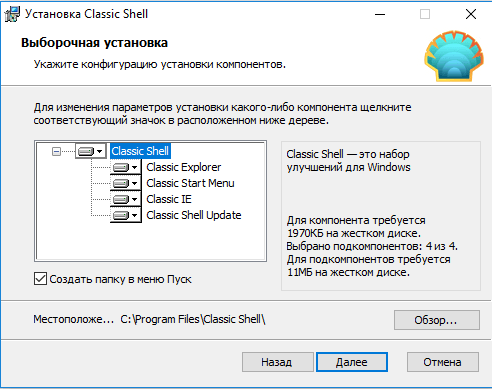
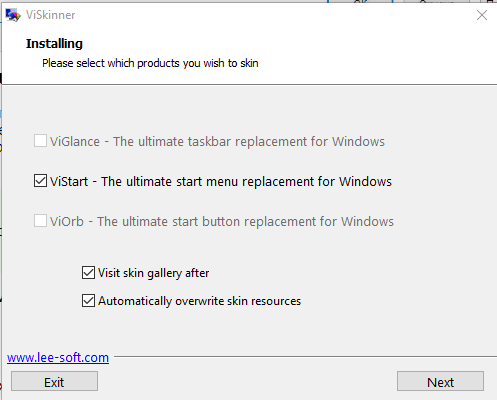
- В следующем разделе мастера установки вам предложат выбрать компоненты для установки. Выбираем только Classic Start Menu, если ваше цель — изменение внешнего вида «Пуска».

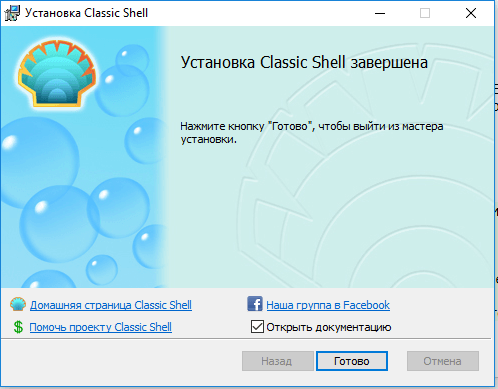
Выберите компоненты, которые вам нужно установить на ПК - Теперь просто нажмите на кнопку «Установить». Подождите, когда инсталляция завершится. Щёлкните по «Готово».

Нажмите на «Готово» - Нажмите правой кнопкой мыши на значок «Пуск» в левом нижнем углу экрана. В небольшом списке опций выберите «Настройка», чтобы запустить Classic Shell.
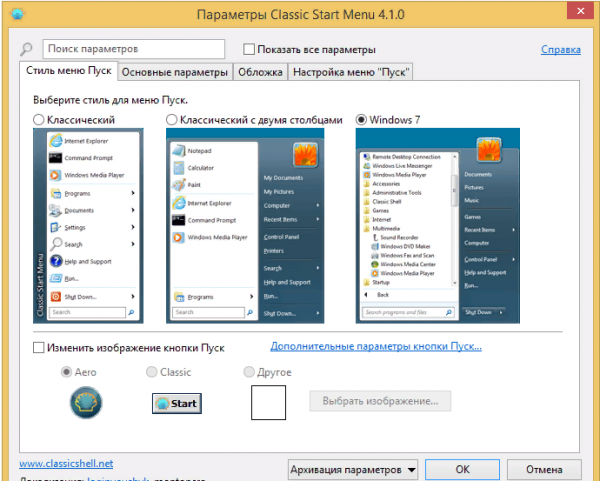
- В появившемся окне выберите один из трёх вариантов меню «Пуск».

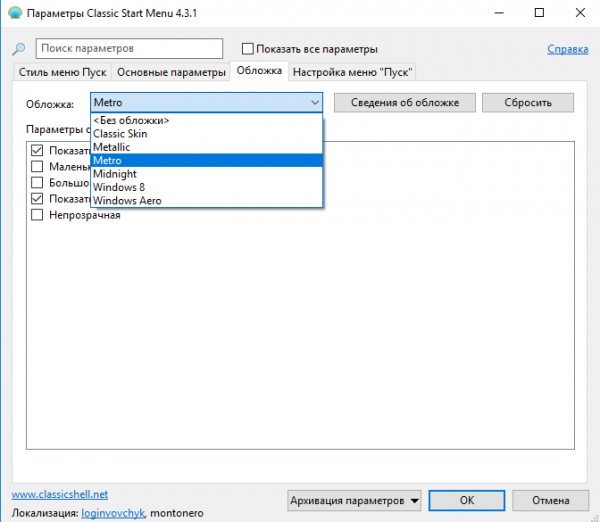
Выберите стиль для меню «Пуск» - Нажмите на вкладку «Обложка», чтобы выбрать стиль меню.

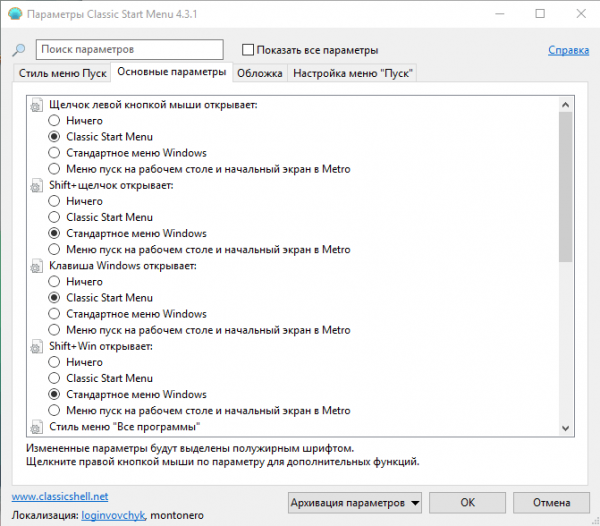
Выберите обложку для меню «Пуск» - Во вкладке «Основные параметры», вы можете поставить свои значения для различных пунктов. Однако можно ничего не менять, оставив параметры по умолчанию. Классическое меню «Пуск» все равно будет открываться.

Вы можете по желанию изменить значения основных параметров - Более тонкая настройка производится в скрытых вкладках. Чтобы их открыть, отметьте пункт «Показывать все настройки» вверху окна — появятся новые разделы.

Отметьте пункт «Показать все параметры», чтобы увидеть больше настроек - Когда завершите настройку, нажмите на ОК.
Видео: как вернуть стандартный «Пуск» за счёт Classic Shell
С помощью программы StartIsBack ++
Инструмент StartIsBack представляет собой бесплатную утилиту с интерфейсом на русском языке. Она позволит не только вернуть стандартное меню «Пуск», но и настроить его под свои предпочтения. С помощью этой программы вы можете:
- менять макеты меню;
- настраивать прозрачность;
- ставить большие значки программ в меню;
- использовать улучшенный поиск;
- сортировать списки утилит, отображаемых в «Пуске»;
- включать опцию «Все программы», если хотите, чтобы у вас был доступ ко всем утилитам через «Пуск» и многое другое.
Плюс программы ещё в том, что она очень быстро устанавливается на ПК: всего в пару кликов. Рассмотрим подробнее, как установить утилиту, а затем работать в ней.
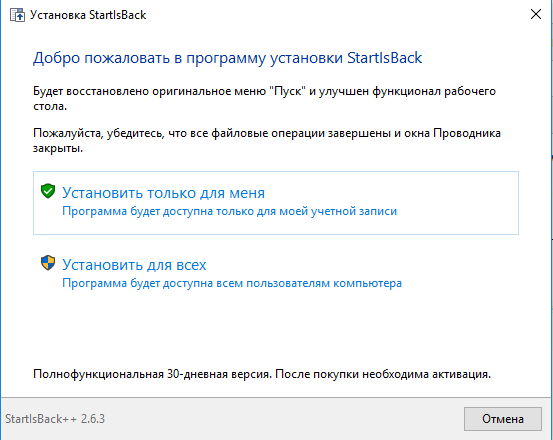
- Откройте в любом обозревателе официальный ресурс разработчика утилиты. Во вкладке Download будет большая зелёная кнопка для загрузки установщика. Щёлкните левой кнопкой по ней. Когда он загрузится, запустите его.

Кликните по зелёной кнопке StartIsBack - Выберите один из двух пунктов: «Установка только для меня» и «Установка для всех» в зависимости от того, хотите ли вы, чтобы классическим меню Windows пользовались все учётные записи этого компьютера или нет. Если вы — единственный пользователь, выберите первый пункт.

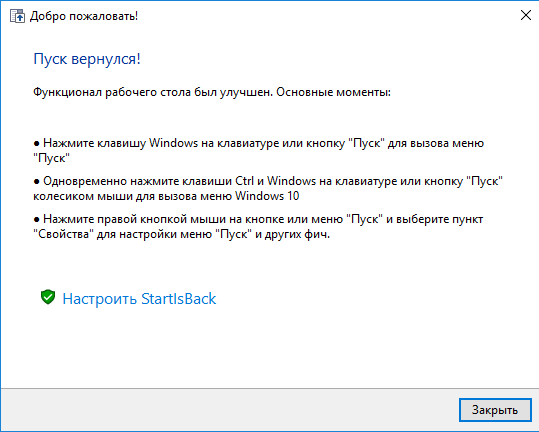
Выберите установку StartIsBack либо только для себя, либо для всех учётных записей компьютера - Софт тут же восстановит прежний «Пуск». Чтобы изменить параметры меню, кликните по «Настроить StartIsBack».

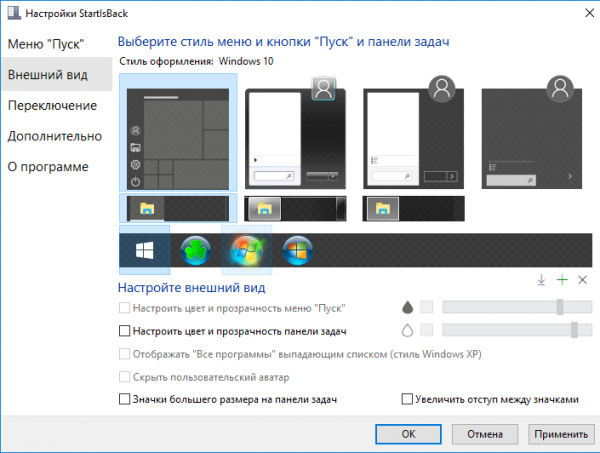
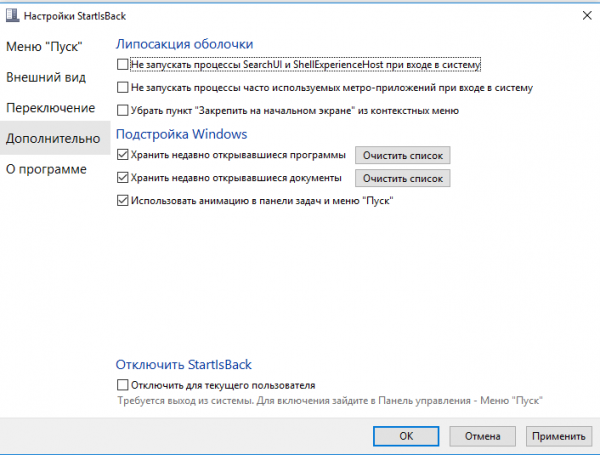
Кликните по «Настроить StartIsBack» - Откроется окно инструмента. Во вкладке «Внешний вид» выберите понравившийся стиль оформления, а также значок для кнопки «Пуск». Под стилями доступны также и другие параметры: прозрачность, цвет, значки большого размера на «Панели задач», удаление аватара из «Пуска» и другие.

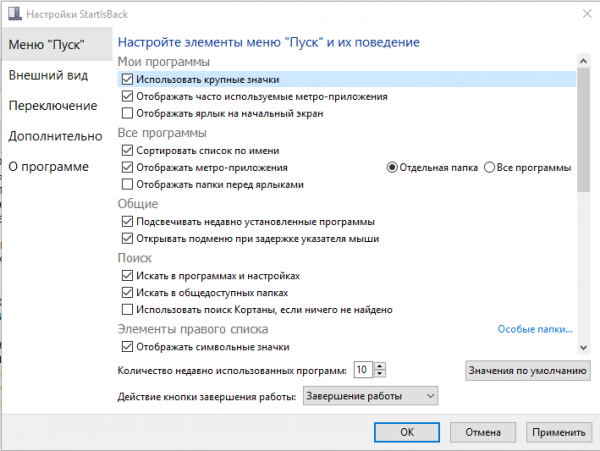
Выберите стиль оформления меню «Пуск» и кликните по «Применить» - В первой вкладке «Меню «Пуск» измените основные настройки по желанию: крупные иконки программ, сортировка программ в списке, подсвечивание недавно установленных приложений и многое другое.
Поставьте галочки слева от необходимых вам опций и нажмите на «Применить» - Во вкладке «Дополнительно» вы можете удалить историю недавно открытых утилит или отключить опцию хранения истории, а также включить анимацию на «Панели задач» и в меню «Пуск».

Отключите хранение списка недавно открывавшихся программ или очистите этот список с помощью специальной кнопки

Видео: как пользоваться StartIsBack++
С помощью программы ViStart 8.1
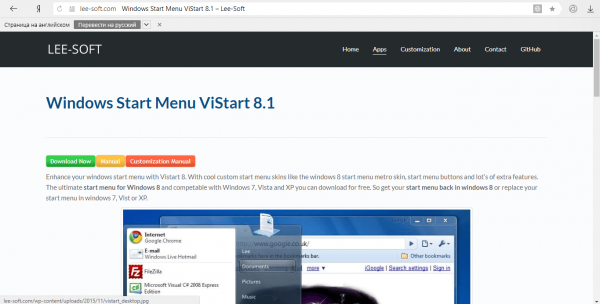
Софт под названием ViStart даёт возможность пользователям бесплатно наслаждаться привычным «Пуском» из Windows XP и Windows 7. Утилита предлагает на выбор большое количество стилей меню. Однако их уже нужно будет по отдельности загружать и устанавливать на ПК. В самой программе вы можете выбрать между четырьмя оформлениями. Минус утилиты в том, что её интерфейс на английском. Сейчас поможем вам разобраться в ней.
- В любом обозревателе откройте официальный ресурс этого помощника. Нажмите на маленькую зелёную кнопку Download, чтобы загрузить инсталлятор.
Кликните по Download Now - Щёлкните по Next, чтобы началась инсталляция.

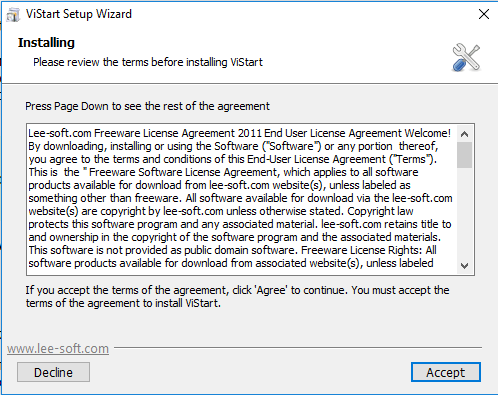
Щёлкните левой кнопкой мыши по Next - Теперь нажмите на Accept, чтобы принять условия соглашения. ПО моментально установится у вас на компьютере.

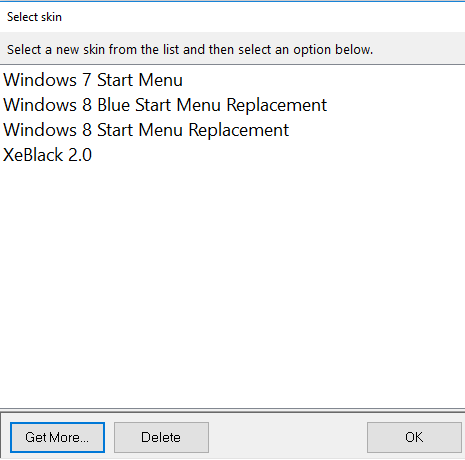
Нажмите на Accept, чтобы принять условия соглашения - В открывшемся окне выберите необходимый тип «Пуска» левой кнопкой мыши. Теперь просто нажмите на ОК — программа установит классическое меню.

Выберите стиль вашего меню «Пуск» из четырёх вариантов - Если вы хотите посмотреть на другие стили, которые предлагают разработчики, кликните по Get More. На открывшемся сайте нажмите на ссылку I’d like to change the appearance of My Windows Start Menu.

Нажмите на ссылку I’d like to change the appearance of My Windows Start Menu - Откроется страница, где вы можете выбрать любой понравившийся вам стиль абсолютно бесплатно. Определитесь со стилем и кликните по нему левой кнопкой мыши.

Выберите стиль на официальном сайте программы для вашего меню «Пуск» - Щёлкните по чёрной кнопке Download.

Нажмите на чёрную кнопку Download - Откройте загруженный файл. Кликните в сером окошке по Next. Новый стиль меню «Пуск» установится на ПК.

В новом окне кликните по Next, чтобы установить новый стиль

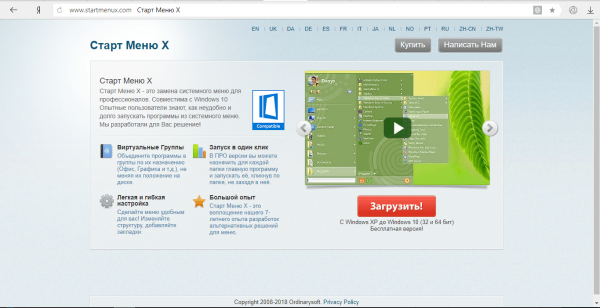
Start Menu X — современное решение проблемы неудобного меню «Пуск» в Windows 10. Разработчики этой программы предлагают на выбор платную и бесплатную версии. Интерфейс программы полностью на русском языке. В окне есть много вкладок, в которых можно тонко настроить внешний вид и функционал «Пуска». За счёт этой утилиты системное меню может иметь стиль Windows XP, Vista, 7, 8 и 10.
Сначала установим программу, а затем рассмотрим, как ей пользоваться.
- На официальной странице программы щёлкните по красной кнопке «Загрузить».
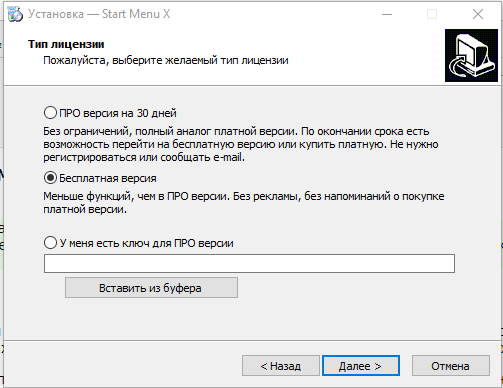
Нажмите на красную кнопку «Загрузить!» - Откройте установщик и поставьте круглую отметку слева от «Я принимаю условия соглашения». Кликните по «Далее».
- Отметьте пункт «Бесплатная версия». Снова нажмите на «Далее».

Выберите «Беплатный тип лицензии» и кликните по «Далее» - В следующем меню выберите пункт «Объединить Программы и Приложения в одном пункте главного меню». Снова щёлкаем по «Далее».
- Выбираем папку для установки утилиты.
- Кликаем по «Установить». Ждём, когда инсталляция закончится. Нажимаем на кнопку «Завершить».
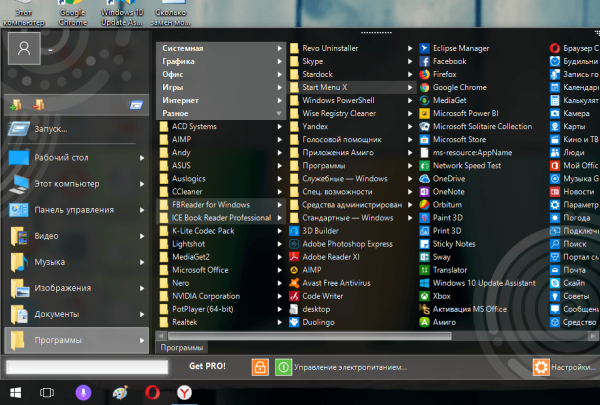
- Открываем трей на «Панели задач». В нём находим значок Start Menu X.

В трее Windows кликните левой кнопкой мыши по значку в виде цветка - Кликаем по нему левой кнопкой мыши — откроется меню «Пуск» с большим списком программ.

В Start Menu X можно открыть любую программу и сервис, установленный на ПК - Нажмите на этот же значок правой кнопкой мыши и выберите пункт «Настройки».

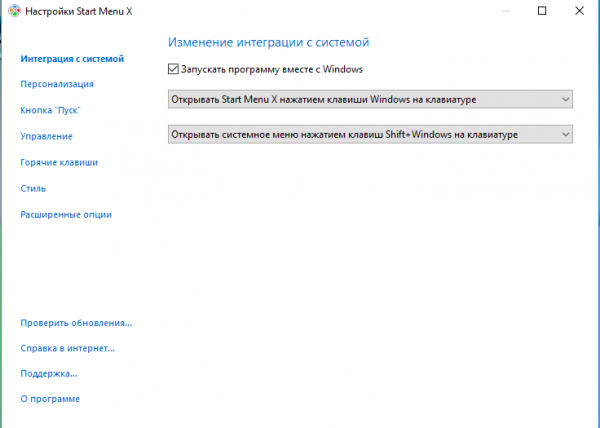
Выберите «Настройки» в контекстном меню - В первой вкладке «Интеграция с системой» выберите комбинацию клавиш, которая будет открывать Start Menu X. Включите также запуск утилиты вместе с загрузкой Windows.
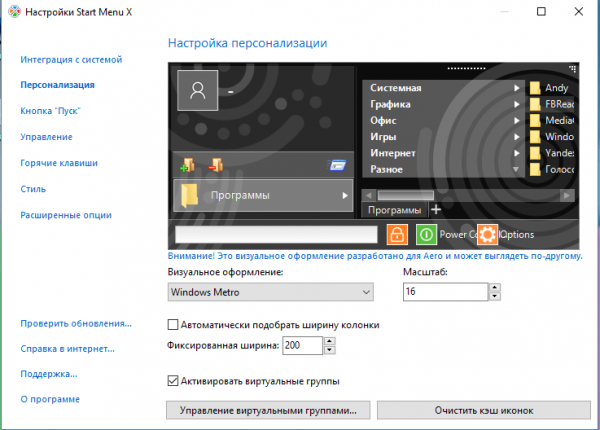
Выберите клавиши, с помощью которых будет запускаться Start Menu X на вашем ПК - В разделе «Персонализация» настройте визуальное оформление: тип, масштаб, ширину колонки. В этом же блоке можно очистить кэш иконок.

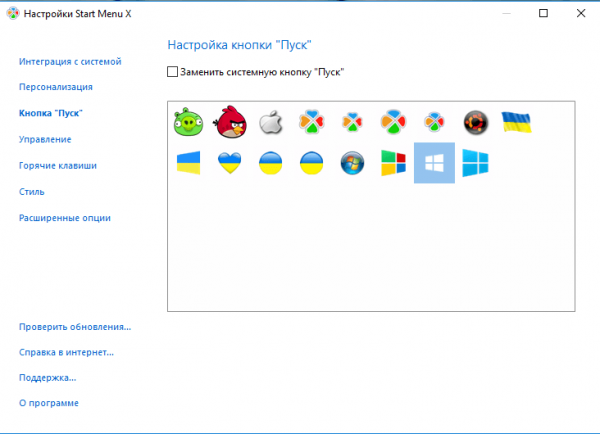
Выберите визуальное оформление Start Menu X и настройте масштаб - В «Кнопке «Пуск» выберите понравившийся вам значок.

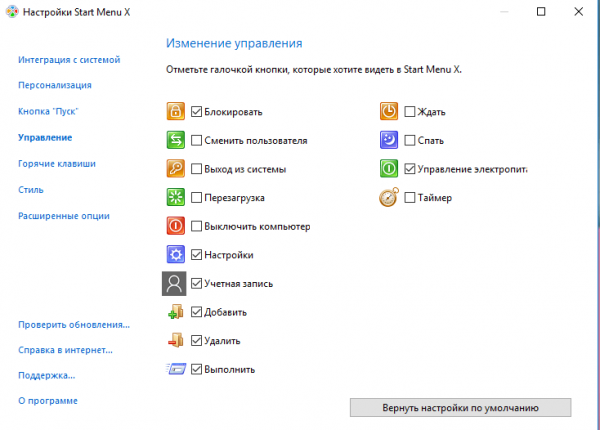
Выберите значок для «Пуска» из списка доступных - В разделе «Управление» выберите системные опции, которые вы хотите видеть в «Пуске».
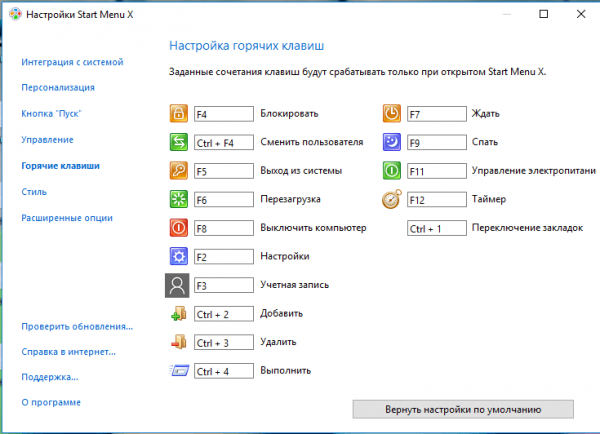
Отметьте разделы, которые хотите видеть в Start Menu X - Измените горячие клавиши для запуска системных опций в активном окне «Пуска».
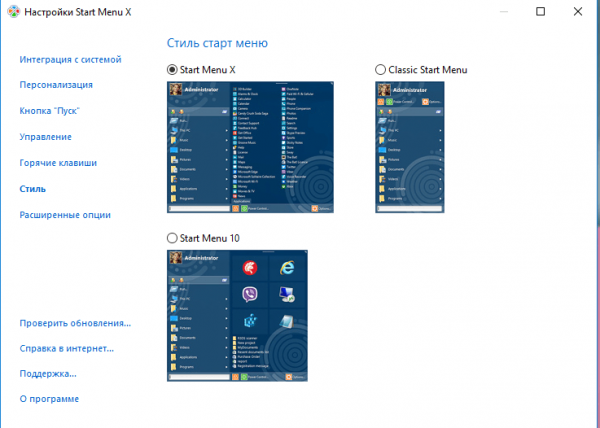
Выберите сочетания клавиш для открытия тех или иных разделов при открытом Start Menu X - В блоке «Стиль» измените общий внешний вид меню: Start Menu X, Classic Start Menu или Start Menu 10.
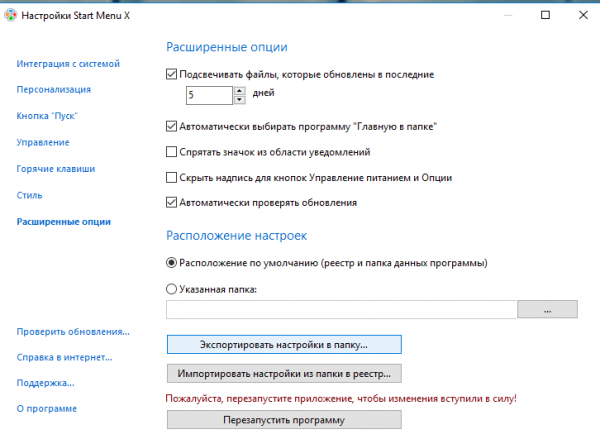
Выберите один из трёх стилей для Start Menu X - Раздел «Расширенные опции» позволит вам более тонко настроить меню «Пуск».

По желанию установите необходимые параметры во вкладке «Расширеннные опции» и закройте окно с настройками


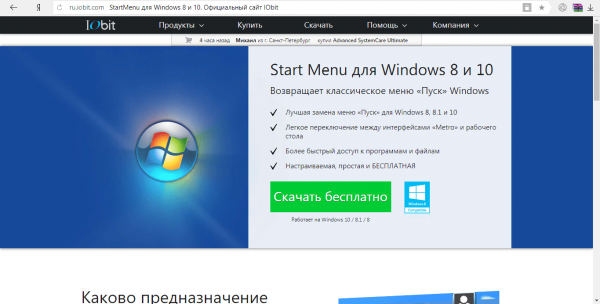
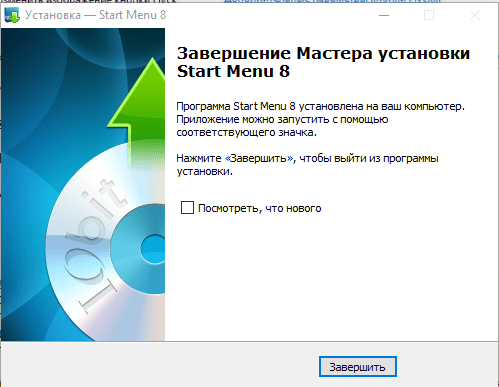
Инструмент под названием Start Menu 8 от разработчика IObit может похвастаться довольно простым в освоении интерфейсом на русском языке. Таким образом, он подойдёт даже новичку, которому неудобно работать с новым большим «Пуском» Windows 10.
Минус программы в том, что она платная. Этой утилитой можно пользоваться бесплатно в течение недели. Затем вас попросят активироваться, то есть приобрести подписку.
- Сначала посетим официальный ресурс разработчика IObit для безопасной закачки инсталлятора этой полезной программы.
- Щёлкаем по большой зелёной кнопке «Скачать бесплатно».
Загрузите Start Menu на официальном сайте IObit - Запускаем уже загруженный инсталлятор, чтобы сразу перейти к установке утилиты.
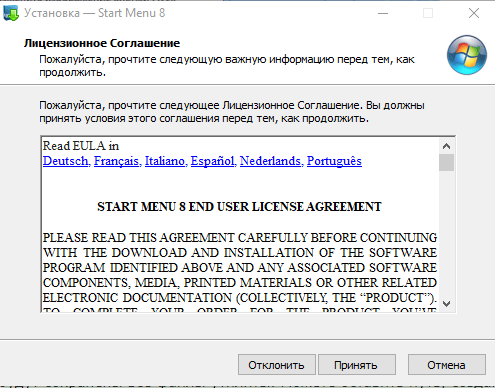
- Щёлкните по «Да», чтобы разрешить приложению вносить изменения на вашем компьютере, а затем в окне мастера установки на «Далее», чтобы запустить инсталляцию.
- Кликните по «Принять».

Нажмите на «Принять» - Укажите путь к папке, в которой будут сохранены все файлы утилиты. Можете оставить путь, созданный автоматически. Щёлкните по «Далее».
- Дождитесь окончания инсталляции и нажмите на «Завершить».

Щёлкните по «Завершить» - После этого найдите иконку программы на «Рабочем столе» и кликните по ней два раза мышью.
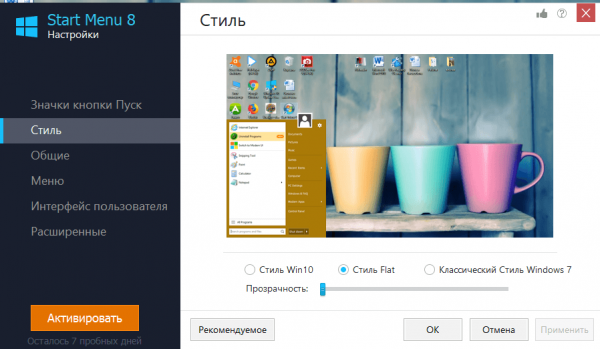
- Во вкладке «Стиль» выберите один из трёх вариантов внешнего вида «Пуска»: Win 10, Flat или классический стиль Windows 7. В этом же окне вы можете настроить уровень прозрачности «Пуска». Кликните по «Применить».

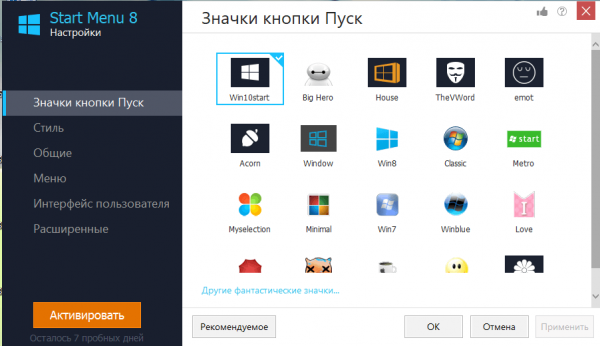
Выберите стиль для будущего меню «Пуск» и нажмите на «Применить» - Перейдите на вкладку «Значки кнопки «Пуск». Здесь нужно определиться со типом кнопки в левом нижнем углу экрана. Выберите любой понравившийся и нажмите на «Применить».

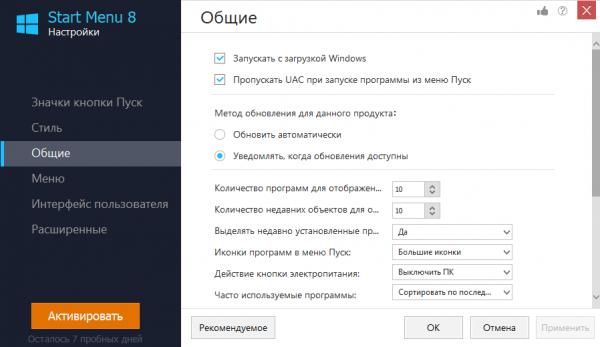
Выберите значок и нажмите на «Применить» - В левой части экрана переключитесь на раздел «Общие». В этой вкладке вы можете установить значения для главных параметров программы: запускаться ли ей с загрузкой Windows, обновлять ли данную утилиту, определить количество программ, которые будут показаны в «Пуске», тип иконок программ в меню (маленькие или большие) и т. д.

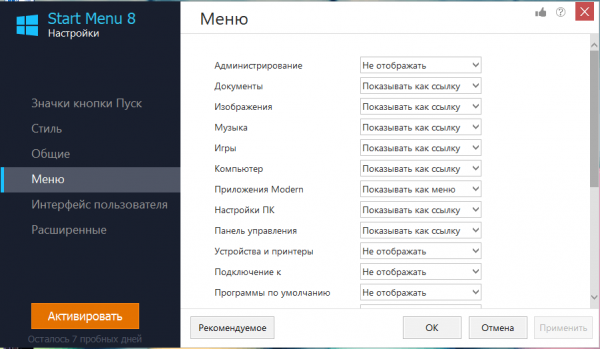
Установите по желанию свои значения для общих параметров - В разделе «Меню» вы можете выбрать конкретные разделы, которые будут отображаться в меню «Пуск».
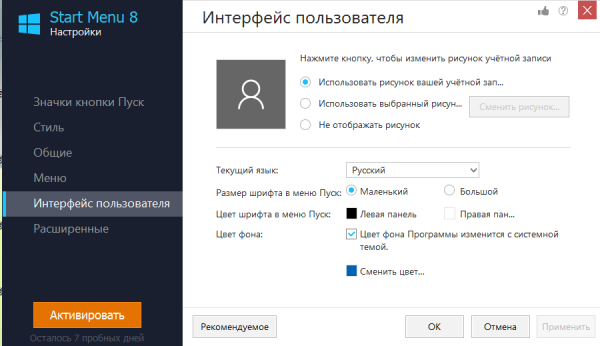
Выберите разделы, которые должны отображаться в вашем «Пуске» - В «Интерфейсе пользователя» вы можете настроить цвет и размер шрифта, цвет фона, а также поставить изображение для вашего профиля.
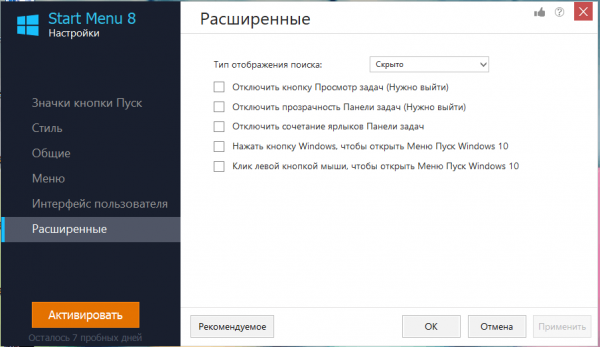
Измените пользовательские настройки меню: фон, размер и цвет шрифта, изображение учётной записи и другое - Во вкладке «Расширенные» пользователь вправе отключать или включать прозрачность «Панели задач», кнопку «Просмотр задач» и другое.
Включите нажные параметры и оставьте все отключенным - По мере изменений параметров, сразу же будет меняться меню «Пуск». При этом вам не нужно перезагружать компьютер, чтобы увидеть изменения.
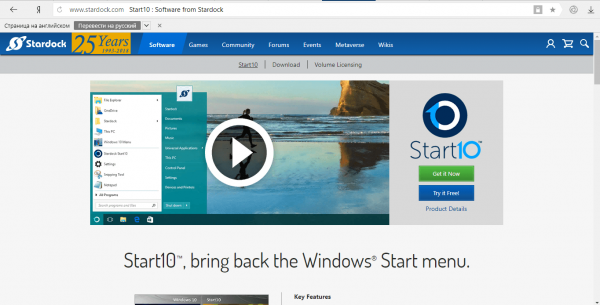
С помощью Stardock Start10
Утилита предлагает на выбор три стиля для меню «Пуск». Это может быть стандартное окно Windows 7 или современное меню под стиль Windows 10. Программой также очень легко пользоваться, так как интерфейс на русском. Недостаток, как и в случае IObit Start Menu, в том, что она платная. Сначала можно пользоваться бесплатно в течение мясца.
- Левой кнопкой щёлкните по ссылке, которая ведёт на официальный ресурс разработчика Stardock.
- Так как программа не бесплатная, кликаем по синей кнопке Try It Free, чтобы загрузить бесплатную версию утилиты. Сразу же скачается необходимый инсталлятор. Находим его в «Загрузках» и запускаем.

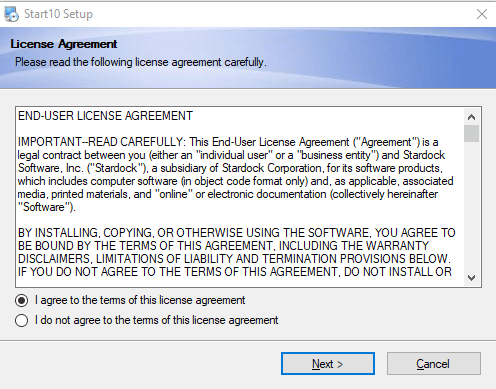
Кликните по Try it Free - В появившемся окне соглашаемся с условиями использования программы. Ставим отметку рядом с I agree to the terms of this license agreement.

Щёлкните по кнопке Next - Указываем путь к папке, в которой будут храниться файлы программы. Затем щёлкаем по Next.
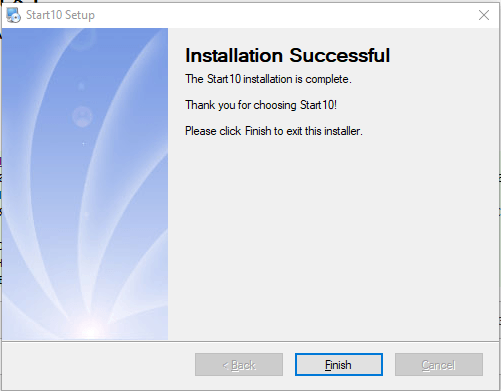
- Ждём, когда завершится запущенная инсталляция. Щёлкаем по Finish.

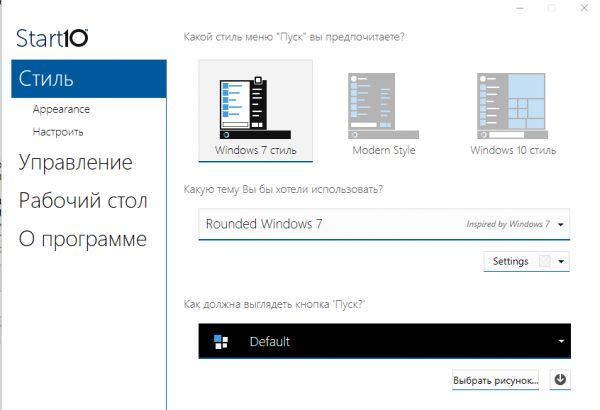
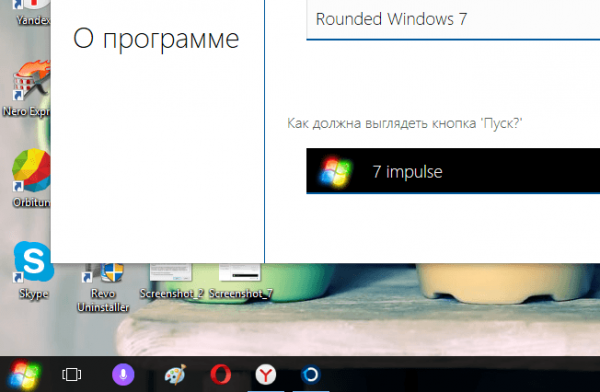
Кликните по Finish - В первом же блоке окна «Стиль» выбираем «Windows 7 стиль».

Выберите стиль для меню «Пуск» в соответствующем разделе - В следующем параметре для темы выбираем нужное значение в выпадающем меню, например, Rounded Windows 7.

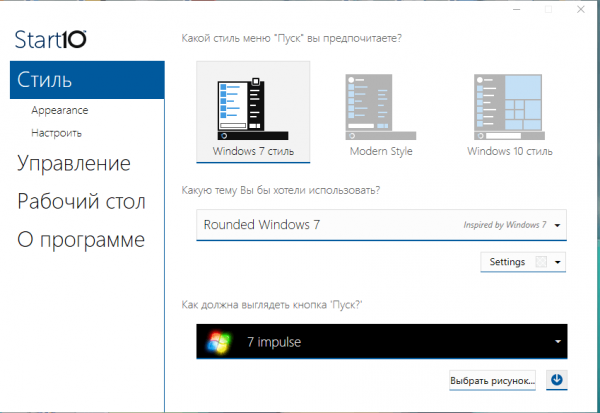
В выпадающем меню выберите тему - Теперь определяем, как будет выглядеть кнопка «Пуск», например, делаем выбор в пользу 7 impulse.

Определитесь с тем, как будет выглядеть кнопка «Пуск» - Вы сразу же увидите, что кнопка «Пуска» поменялась.

Кнопка «Пуск» сразу же изменилась - В блоке «Настроить» включите или выключите функции: большие иконки программ, подсвечивание в списке недавно установленных утилит, показ фото на аватаре учётной записи и другое. Можете оставить всё по умолчанию. После настройки просто закройте окно. Все изменения вступят в силу.

По желанию измените настройки в Start10 и закройте окно программы


Если вас не устраивает новый «Пуск» в Windows 10, вы сможете всегда вернуть стандартное меню в стиле Windows 7. Это можно сделать с помощью специальных утилит: StartIsBack, Classic Shell, IObit Start Menu и многих других. Бес установки сторонних утилит, вы можете сделать новое меню похожим на классическое за счёт доступных настроек: изменение размера, удаление плиток, добавление новых разделов и т. д.
- Распечатать
Оцените статью:
- 5
- 4
- 3
- 2
- 1
(7 голосов, среднее: 4 из 5)
Поделитесь с друзьями!