As you probably know, in order to be able to store files on a hard drive, it needs to be prepared first: it needs to be initialized, partitioned, and formatted just the right way. If you’ve bought an external drive in a store, the preparation has probably been already done by the drive manufacturer. However, what if you want the drive to be prepared differently? For example, you may want to re-format the drive, or change the partitions that it has. The way to do such tasks in Windows is to use the Disk Management tool that comes preinstalled with Windows.
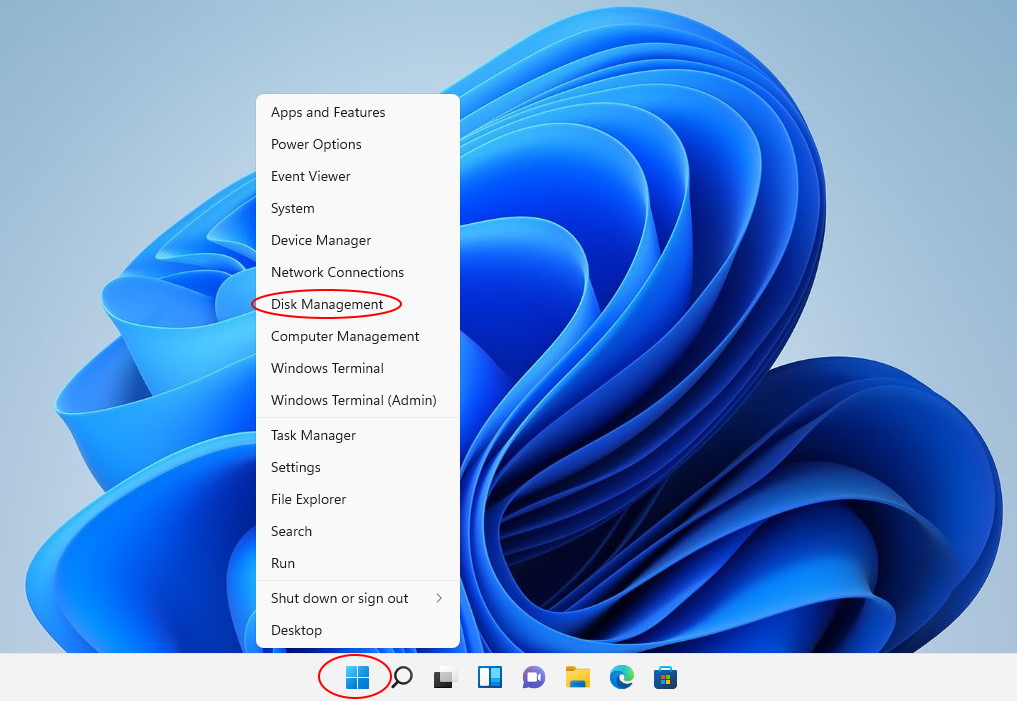
It’s easy to open Disk Management, but the procedure is slightly different in different versions of Windows. If you have a newer version of Windows, such as Windows 11 or 10 right-click on the Start Menu, and choose Disk Management from the menu displayed. (If you have Windows 7, run Windows Explorer, right-click on Computer, choose Manage from the menu, then select Disk Management under Storage.)
Before you continue, first things first: Disk Management is a very powerful tool, and with great power comes great responsibility! If you are not very experienced with computers, you can look, but better not touch and let someone more knowledgeable to do the job. Because with Disk Management it’s very easy to destroy your partitions and lose your files, if you don’t know what you are doing.
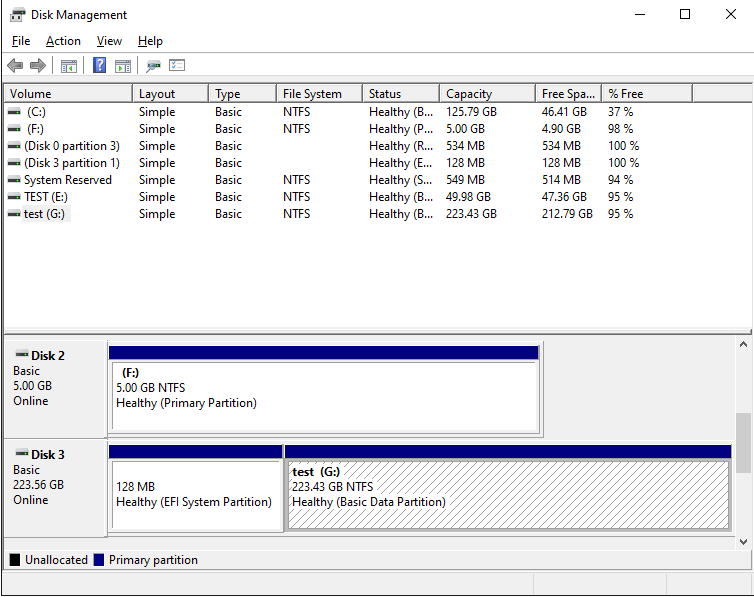
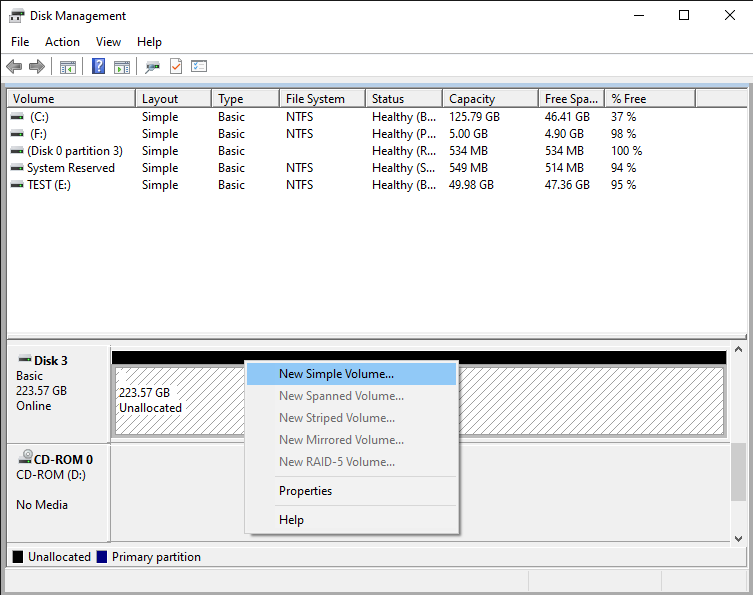
The most important thing when using the Disk Management tool is to make sure you can identify the disk you want to manage in the list. Usually you can do it by the total size of the disk displayed, although it may be confusing. For example, in this example, a hard drive that’s described as a 240 GB drive by the manufacturer, is shown to have only 223.56 GB by Windows. (Apparently, the disk manufacturers and Windows have a different understanding of what a «gigabyte» is.) Also, if you have several disks of the same size attached, it may get even more confusing. If in doubt, better unplug all external drives except for the one you actually want to work with, to make sure you are not accidentally erasing data on a wrong disk!
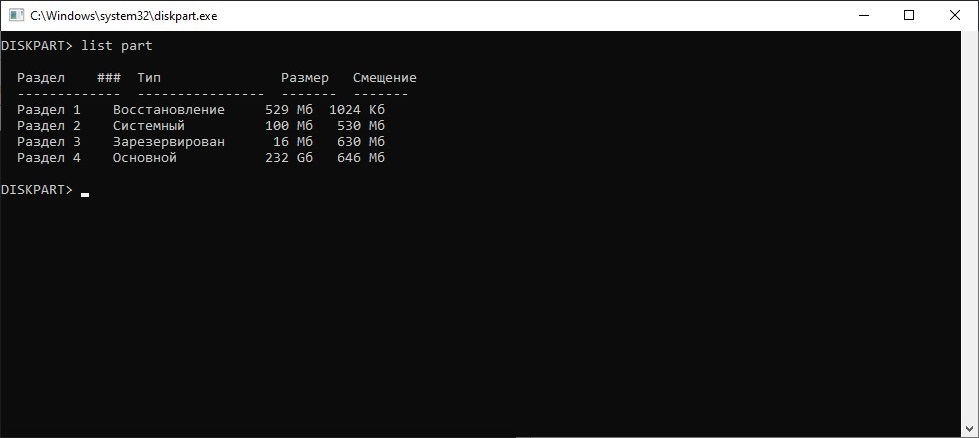
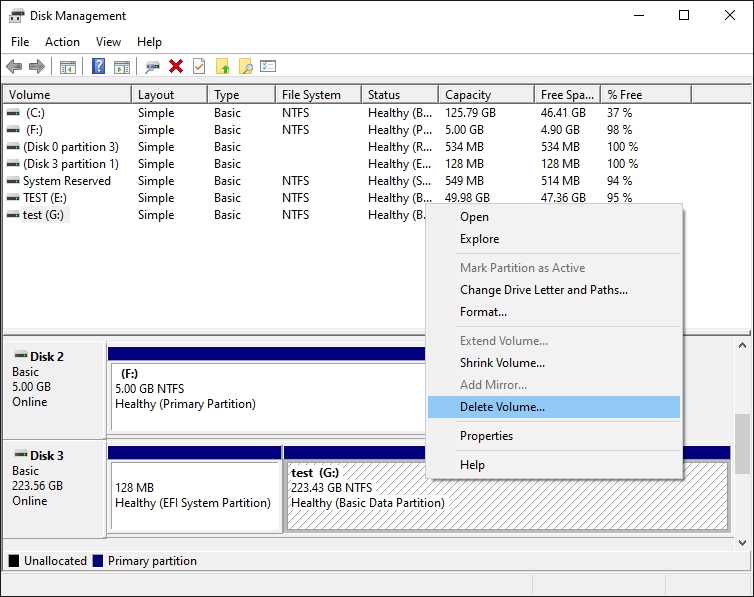
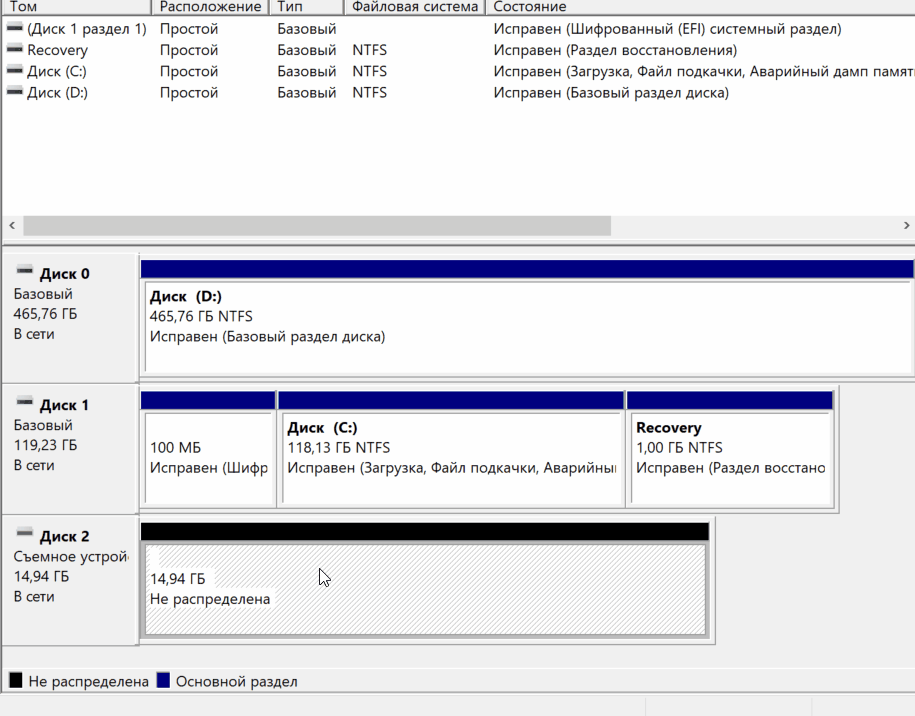
In our case, the 240 GB disk (shown as 223.56 GB disk in the list) is Disk 3 (let’s remember this number, we will need it a bit later.) It has two partitions, one is a 128MB EFI partition that has no drive letter assigned, and another NTFS partition of the size 223.43 GB, that has the label test and the drive letter G:. Although these two partitions looks similar, they are treated very differently by Windows. If you right-click on the normal NTFS partition, you should see the normal menu that lets you perform various tasks on that partition, including the Delete Volume command:
However, if we right-click on the first EFI partition, the menu we get is completely disabled:
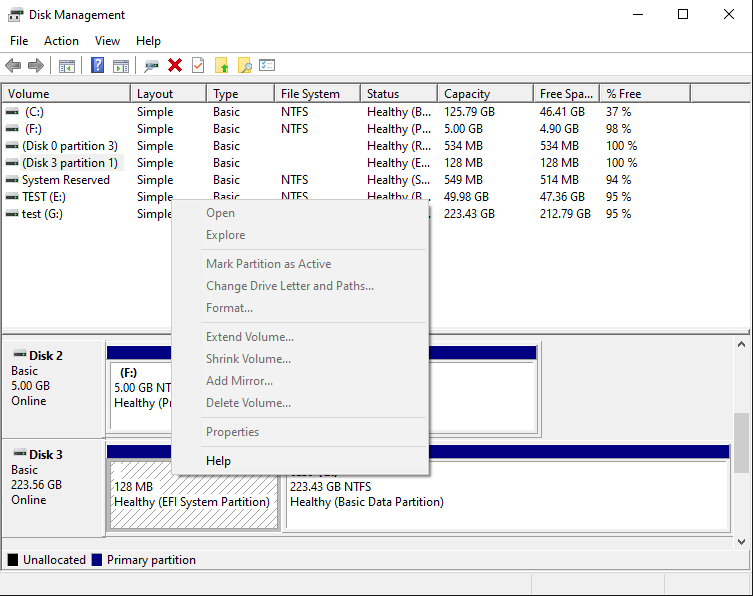
As you can see, the system partition is protected in such a way that even the powerful Disk Management tool cannot do anything to it. Note that it’s not because the partition is EFI, it’s because the tool that created that partition had marked it in a way that prohibits other tools to tamper with it. However, what if we want to delete the EFI system partition and re-initialize the disk from scratch?
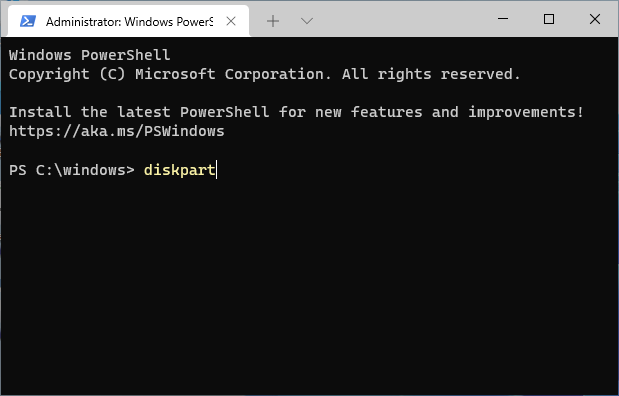
While the Disk Management tool is helpless in this situation, fortunately Windows offers another tool, DISKPART, that can do things to the disks that Disk Management can’t. The tricky part is, that DISKPART is a command-line tool, that requires us to type commands into its command prompt to make it do what we want.
The procedure of getting to the DISKPART tool is slightly different in different versions of Windows. First, you need to open Windows command prompt in the «administrator» mode. In the recent versions of Windows you can simply right-click on the Start button and choose one of the command offered:
- Windows Terminal (Admin)
- Power Shell (Admin)
- Command Prompt (Admin)

If you have an older version of Windows such as Windows 7, you can open the command prompt in the administrator mode as follows: click the Start button and enter cmd in the search box; make sure that cmd is highlighted on the menu displayed, but do not press the Enter key yet; instead, press the Ctrl and Shift keys together, and while keeping them depressed, press Enter. The Ctrl+Shift combination should force the command prompt to open in the «administrator» mode.
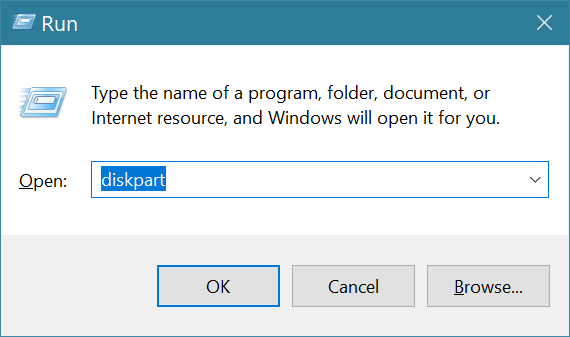
When the command prompt window opens, start the DISKPART tool by entering the diskpart command into the command prompt window:
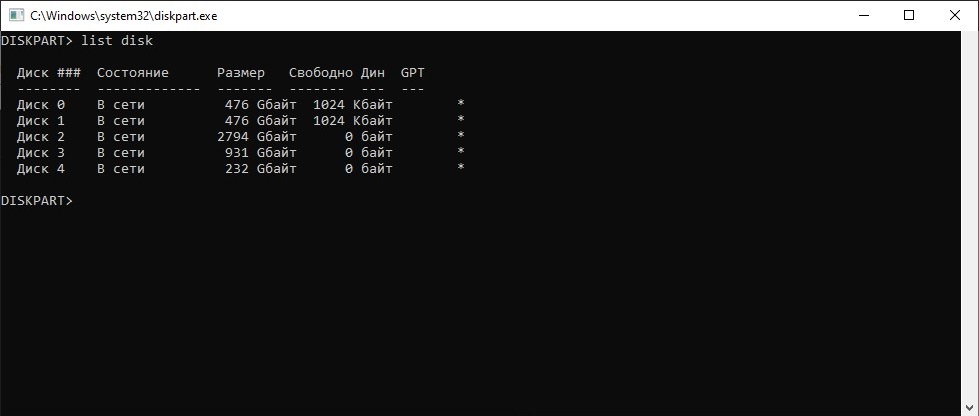
This should display the DISKPART command prompt. The first command we should use is list disk that should display the list of the disks currently connected to the computer:
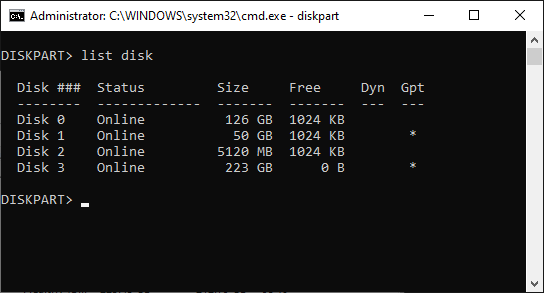
Again, it’s very important to properly identify the disk we want to work with in the list. Our 240 GB disk is still listed as Disk 3 with the capacity 223 GB. (Notice that it is listed as having 0B free. This is because all available disk space is currently allocated for the two partitions we’ve discussed above.) Once we are sure that this is the disk we want to re-initialize, we need to select it, by entering the command select disk 3 (yes, that’s how selection is usually done when using the command line tools!). Then, let’s use the list disk command again, to confirm that the disk in question is indeed now selected:
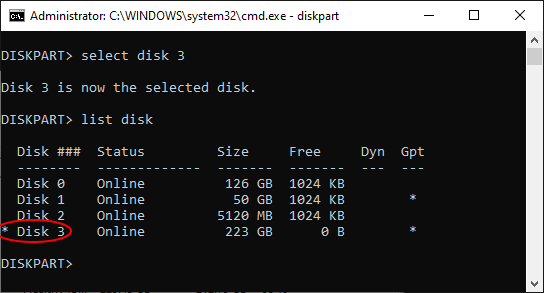
After double-checking that Disk 3 is now selected (it should have the star character * in front of its label), it’s time to finally issue the command that will erase everything on the disk 3, including the protected partition. The command that does that is clean. Note that this command erases everything on the selected disk, all partitions, protected or not. If you still have files on other partitions of disk 3 that you want to keep, you should exit now and backup those files, because after using the clean command all such files will be erased without a trace!
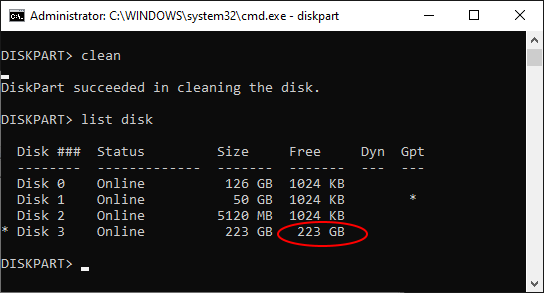
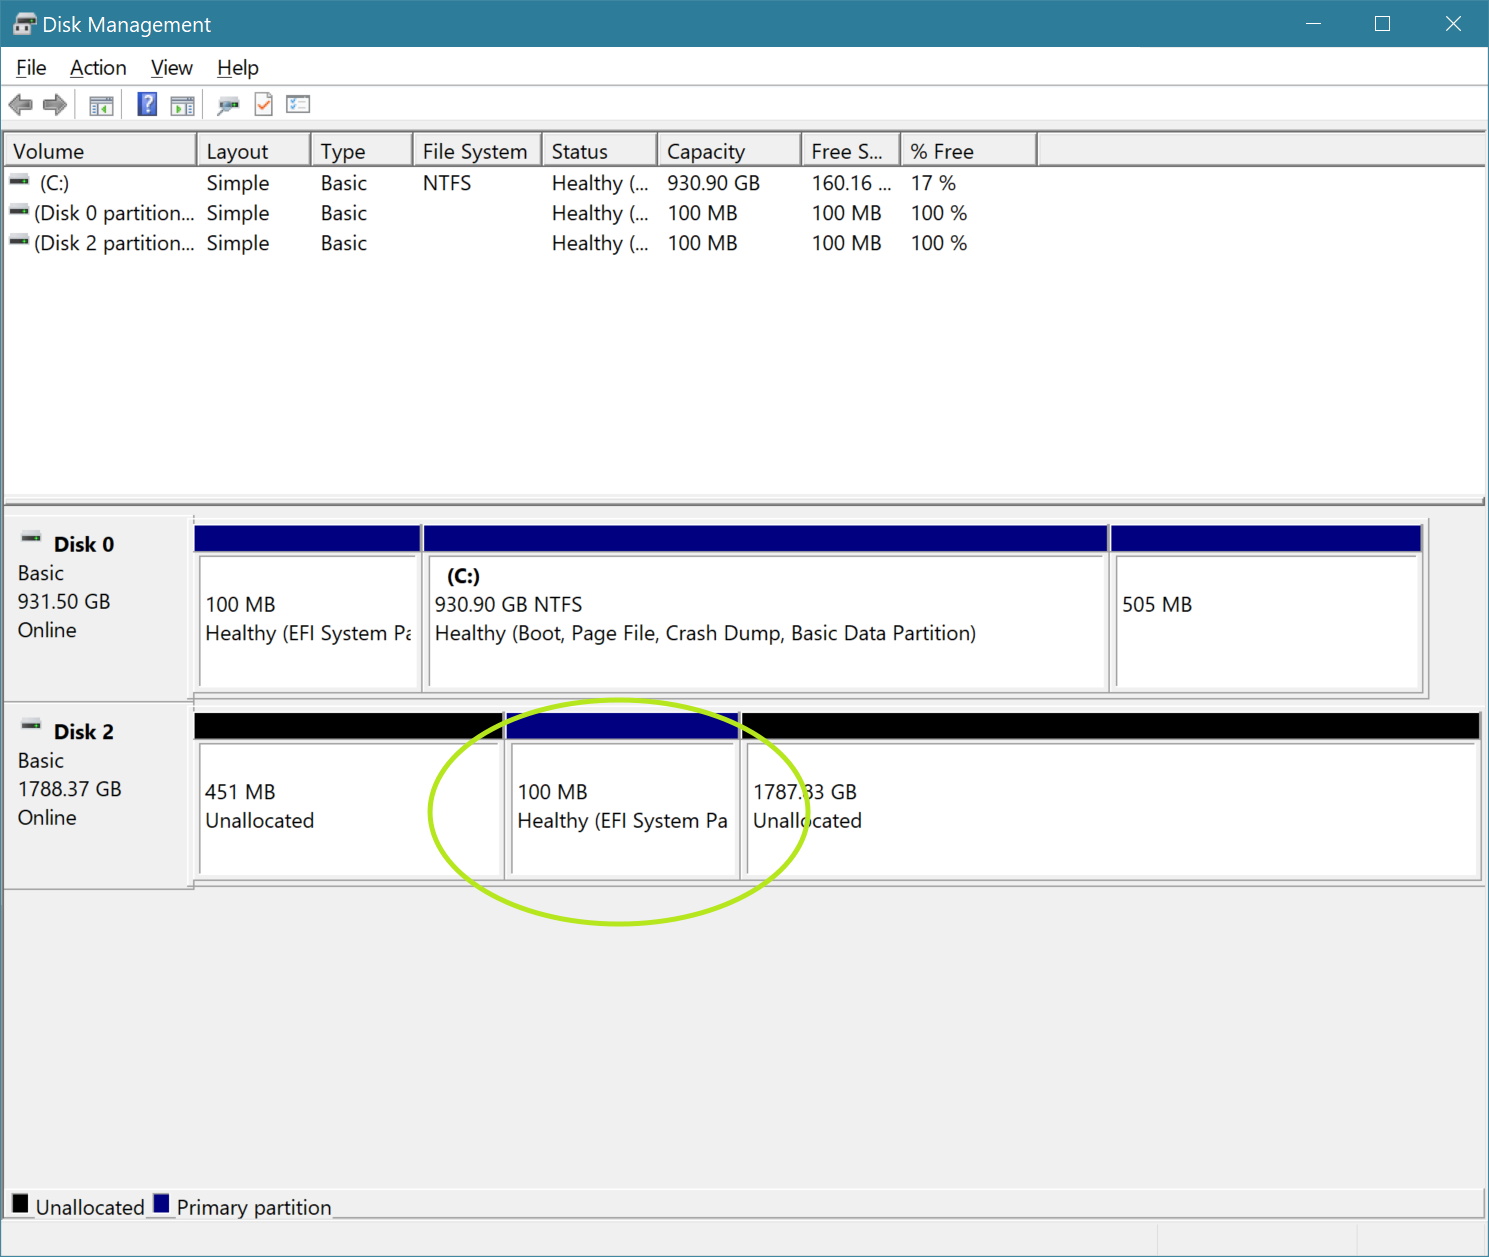
After the clean command is done (it should take no more than a few seconds), we get a fresh disk with all partitions erased. We can exit the DISKPART command prompt (by typing exit into its command line), and go back to the Disk Management tool (see above how to open it.) When it starts, it automatically detects the presence of the clean disk and prompts us to initialize it:
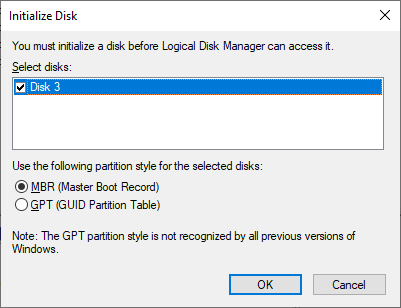
Press OK and the newly cleaned disk will appear in the list. The difference is, the protected EFI partition is gone! (The normal NTFS partition that used to be on the disk 3, is gone, too.) The disk is now ready for you to start creating partitions, formatting them, and do other things as needed:
Note that if you are trying to erase the system disk that hosts the C: drive where Windows itself is installed and running, then even the powerful DISKPART command can’t work: Windows simply refuses to erase the drive from which it is running. To erase such a disk, you need to physically remove it from the computer, attach it to another computer as an external drive, and then use DISKPART on that computer to erase the disk.
Happy disk managing!
If you want to link to this article, you can use this HTML code: <a href=»https://www.winability.com/delete-protected-efi-disk-partition/»>How to delete a protected EFI system partition with Windows 11, 10, 8, or 7</a>
Read more
When you install Windows 11 or 10 on your PC’s boot drive, the process automatically creates a partition called the EFI System Partition, which stores some critical files the computer needs to read at boot time. The EFI System Partition doesn’t take up a lot of space, usually using only a few hundred megabytes (mine was 100MB at the time of writing). Because this partition is needed to boot, Windows doesn’t, by default, allow you to delete it.
However, if you take an SSD or hard drive that was once a boot drive and want to completely reformat it to use as a data drive, you may want to get rid of the EFI System Partition so you can have one single, big partition for all of your files. Using the simple instructions below, you can delete the EFI System Partition in Windows 10 or 11. Just make sure you don’t do this on your boot drive or you won’t be able to boot!
How to Delete the EFI System Partition in Windows
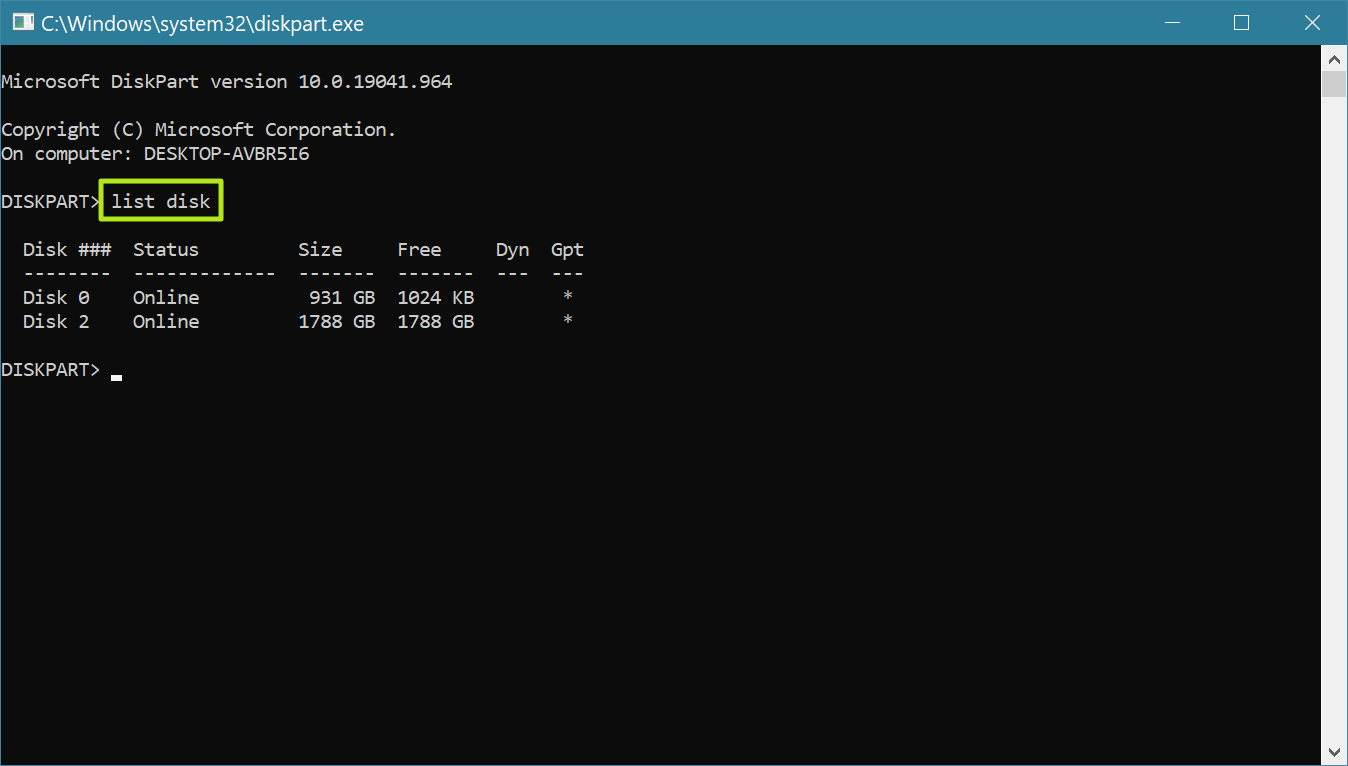
1. Launch Diskpart.
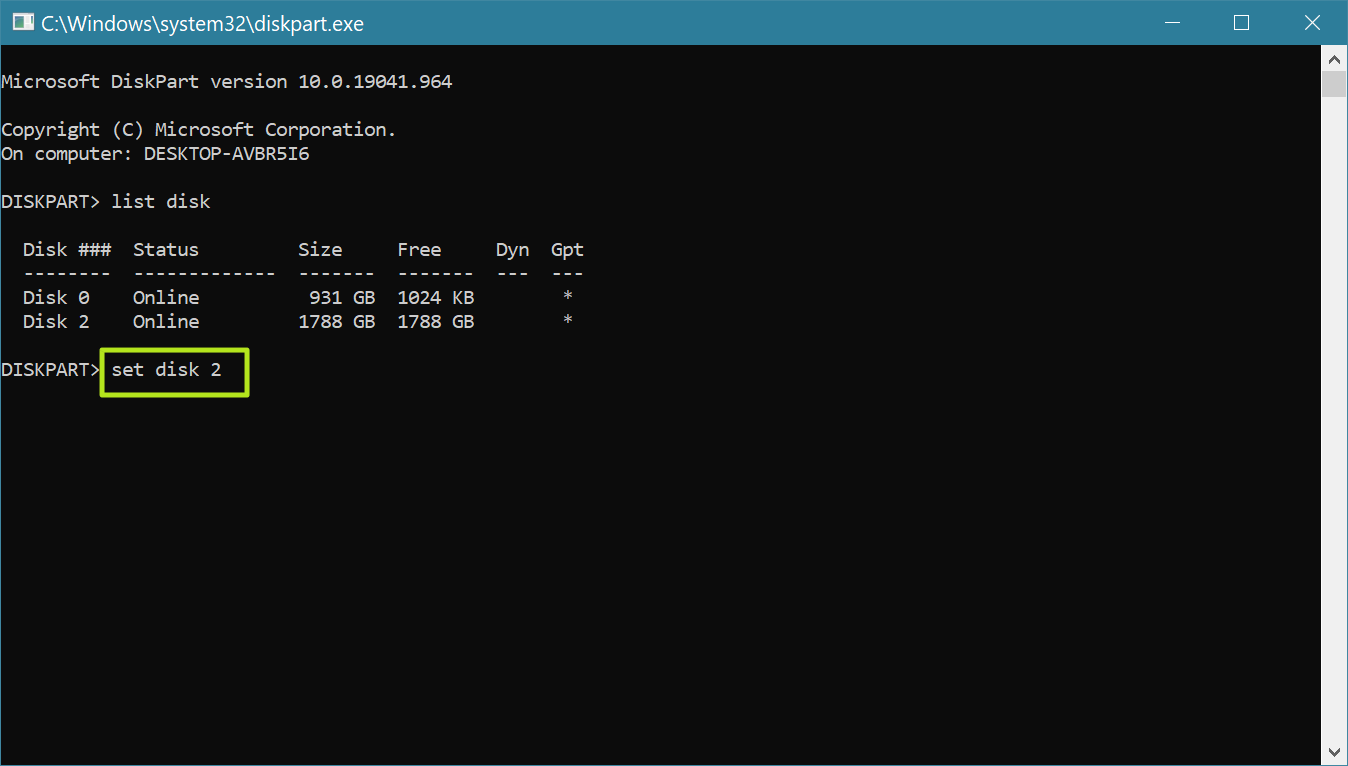
2. Enter list disk to see a list of all the connected drives. The drive number of the drive you want to delete from should be the same as it appears in the Disk Manager app.
3. Enter set disk [Disk Number] where [Disk Number] is the number of the drive you want to delete from.
4. Enter list partition.
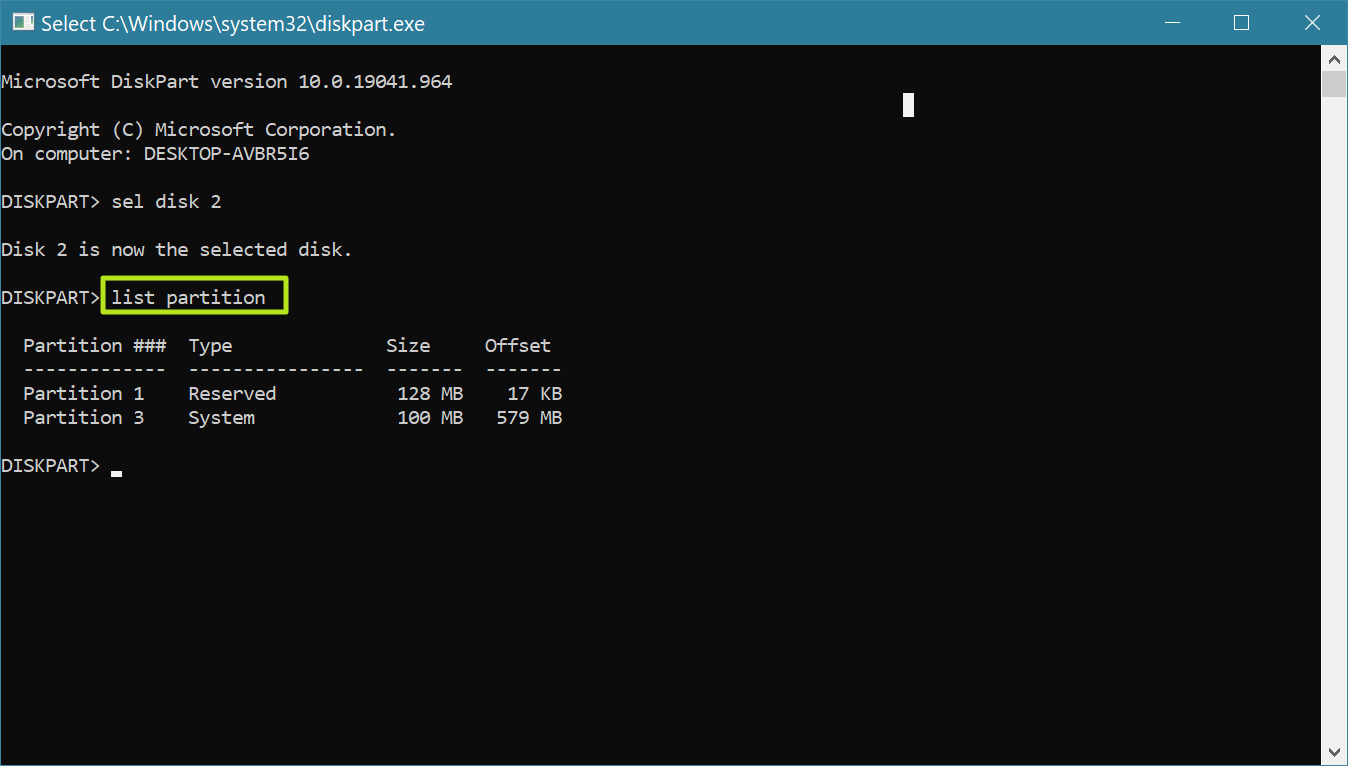
5. Enter sel parition [PARTITION NUMBER] to choose the reserved partition you wish to delete.
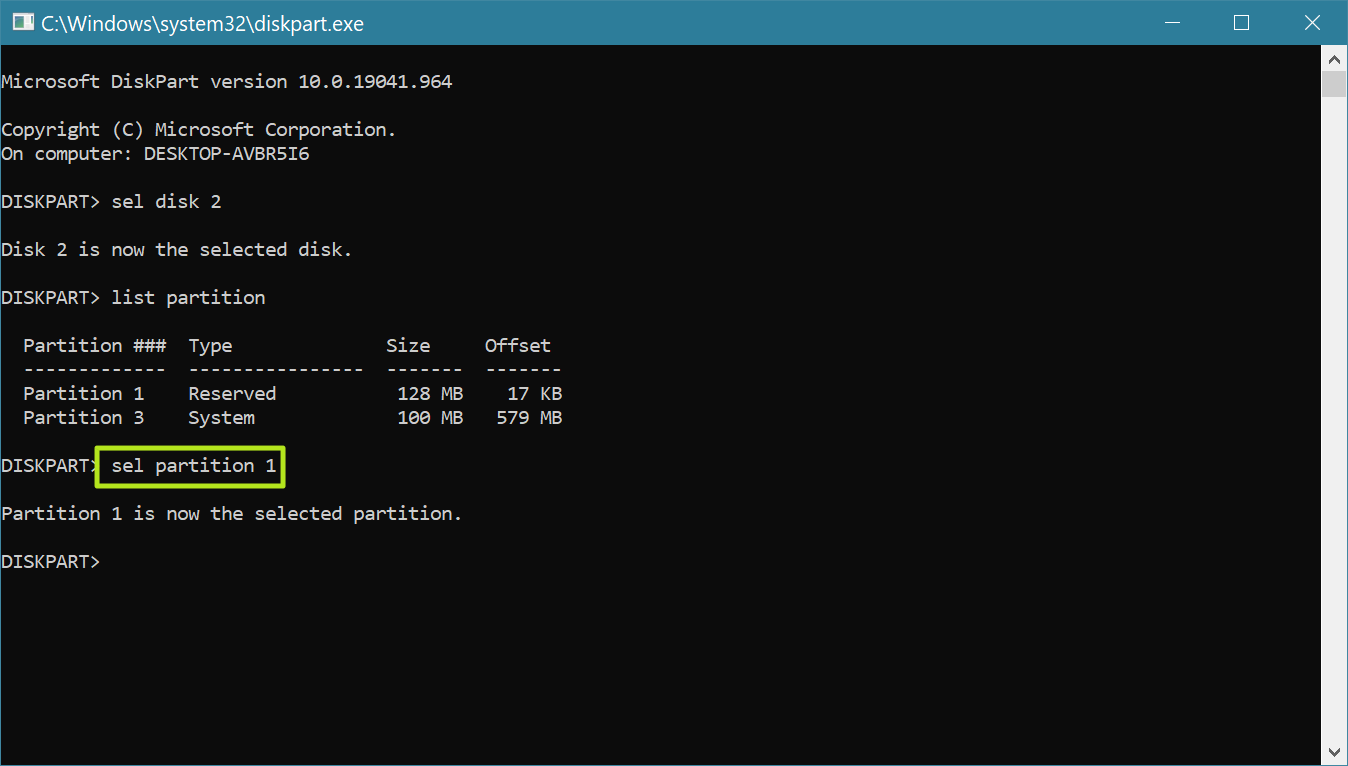
6. Enter delete partition override.
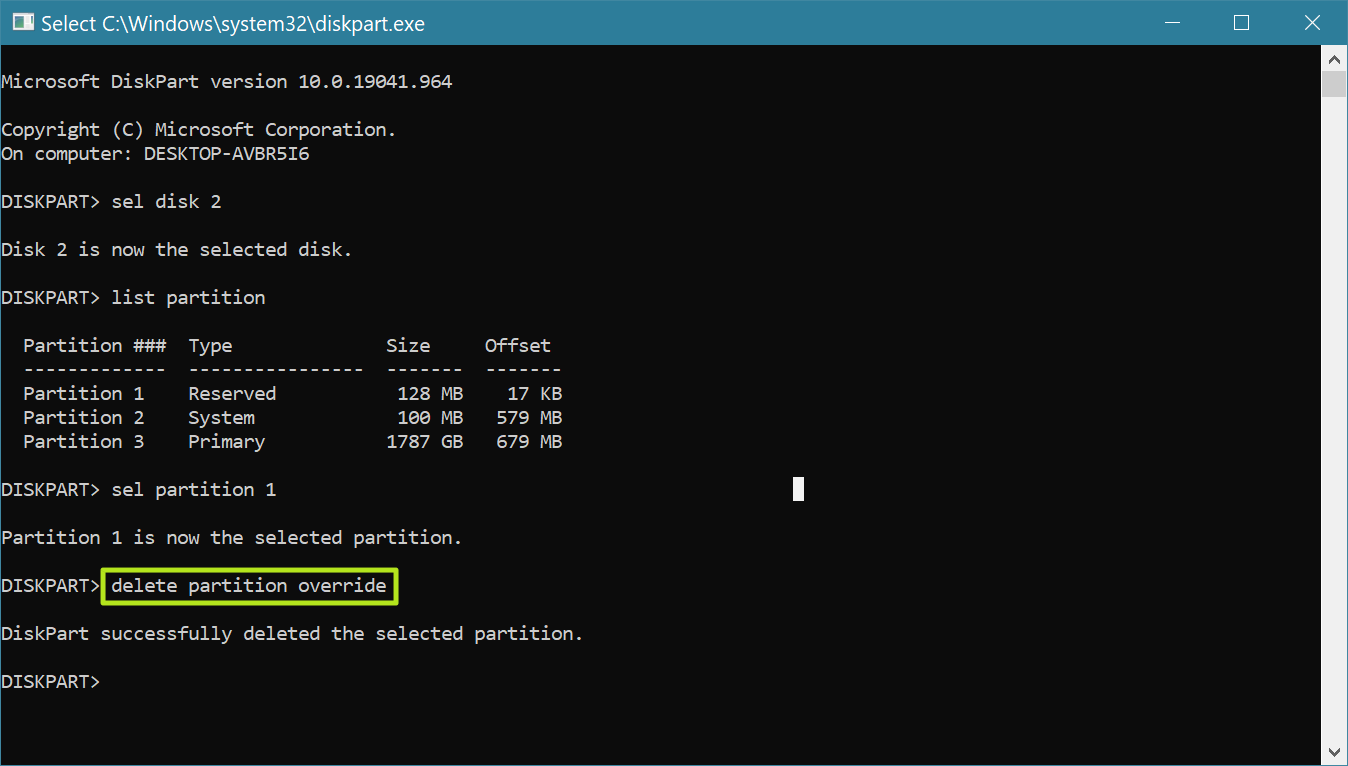
At this point, the EFI System Partition should be deleted. However, you should confirm by looking at the disk in the Windows Disk Management app (load it by searching for «disk management.»). If it still appears, reboot and check again.
Get instant access to breaking news, in-depth reviews and helpful tips.
Avram Piltch is Tom’s Hardware’s editor-in-chief. When he’s not playing with the latest gadgets at work or putting on VR helmets at trade shows, you’ll find him rooting his phone, taking apart his PC or coding plugins. With his technical knowledge and passion for testing, Avram developed many real-world benchmarks, including our laptop battery test.
Всем привет! Сегодня я расскажу о том, как можно удалить шифрованный EFI раздел с USB флешки в Windows 10 без установки и использования каких-то сторонних приложений, т.е. способ, который будет рассмотрен в данной статье, подразумевает использование стандартных инструментов операционной системы Windows.

Содержание
- Зачем удалять шифрованный EFI раздел с USB флешки
- Как удалить шифрованный EFI раздел с флешки в Windows
- Шаг 1 – Запускаем утилиту DiskPart
- Шаг 2 – Вводим команды для удаления EFI раздела
- Шаг 3 – Создаем новый раздел на флешке
- Видео-инструкция – Удаление шифрованного EFI раздела с USB флешки в Windows 10
В одном из прошлых материалов я рассказывал о том, как создать мультизагрузочную USB флешку с помощью программы Ventoy. И в процессе создания такой мультизагрузочной флешки на самой флешке создается шифрованный EFI раздел, который используется для загрузки.
Данный раздел не отображается в интерфейсе операционной системы Windows, что на самом деле удобно, ведь создается впечатление, что мы пользуемся обычной флешкой, но при этом она загрузочная.
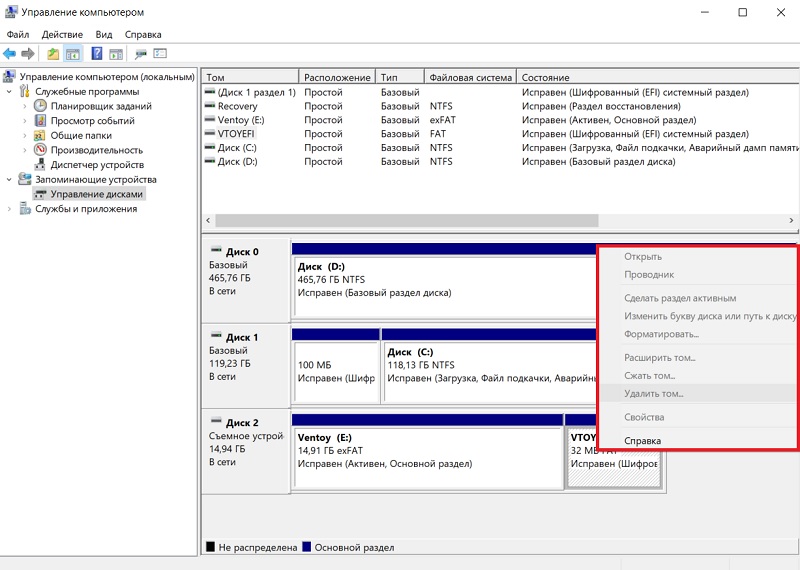
Однако в стандартной оснастке «Управление дисками» этот раздел не активен, т.е. мы с ним ничего не можем сделать, например, мы не можем отформатировать его или удалить, все пункты контекстного меню, связанные с действиями над этим разделом, просто не активны.
И таким образом, если мы захотим вернуть все как было, т.е. сделать флешку обычной, нам необходимо будет прибегать к помощи каких-то сторонних приложений, которые предназначены для работы с жёсткими дисками, ведь для того чтобы сделать такую мультизагрузочную флешку обычной, нужно удалить этот шифрованный EFI раздел с USB флешки, а как Вы уже поняли, стандартным компонентом «Управление дисками» мы это сделать не можем.
Заметка! «Режим бога» в Windows – что это такое и как его включить.
Как удалить шифрованный EFI раздел с флешки в Windows
В операционной системе Windows, кроме стандартного компонента «Управление дисками», существуют и стандартные консольные утилиты для работы с дисками, с помощью которых мы можем удалить даже шифрованный EFI раздел с USB флешки.
Поэтому нет никакой необходимости устанавливать и использовать сторонние приложения для работы с дисками, однако если у Вас уже установлена такая программа и есть опыт работы с ней, то Вы, конечно же, можете ее использовать.
Но в данной статье я расскажу о способе удаления EFI раздела с флешки, который подразумевает использование стандартной консольной утилиты DiskPart, тем более, что сделать это на самом деле достаточно просто.
DiskPart – интерпретатор команд для управления дисками и разделами компьютера в операционной системе Windows.
Примечание! Если на флешке есть нужные и важные для Вас данные, то перед началом всей процедуры их нужно сохранить (например скопировать на жесткий диск), так как процесс удаления EFI раздела таким способом подразумевает удаление всех разделов и, соответственно, всех данных с USB флешки.
Шаг 1 – Запускаем утилиту DiskPart
Для запуска утилиты DiskPart можно использовать диалоговое окно «Выполнить», чтобы запустить данное окно, нажимаем на клавиатуре сочетание клавиш «Win+ R».
После запуска вводим название утилиты, т.е. в нашем случае diskpart, и нажимаем «ОК».
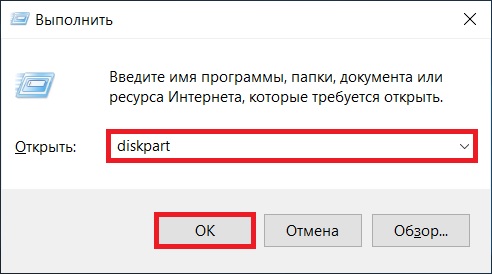
Примечание! Для работы с данной утилитой требуются права администратора, поэтому если Вы работаете в системе от имени пользователя, то на данном этапе Вам необходимо будет ввести учетные данные администратора компьютера.
Шаг 2 – Вводим команды для удаления EFI раздела
В результате запустится программа, где нам необходимо ввести команды для удаления разделов с флешки.
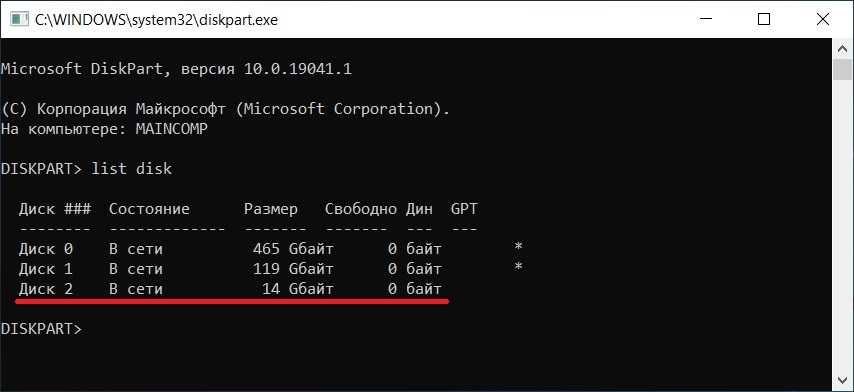
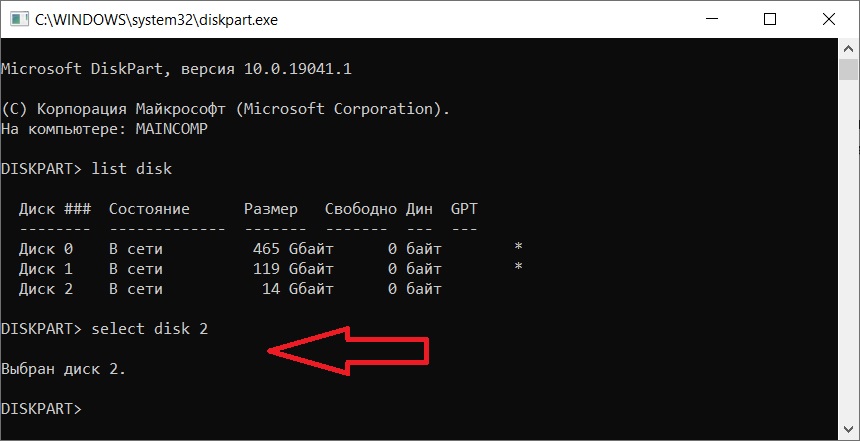
Сначала нам необходимо вывести список всех дисков, чтобы мы могли определить диск, с которым мы будем работать. Для этого вводим команду
list disk
В итоге мы получим список дисков, в моем случае их три (два диска и одна флешка).

Чтобы определить нужный нам диск, т.е. USB флешку, которую мы будем очищать, можно ориентироваться на размер разделов, ведь размер USB флешки определенно будет значительно меньше, чем размер основных дисков в системе, в моем случае флешка это Диск 2. Главное, не перепутайте с основными дисками, так как снова повторюсь, все данные с выбранного диска будут удалены.
Заметка! Чем занято место на диске в Windows 10.
После того, как мы определили USB флешку, вводим следующую команду, где Вы вместо цифры 2 указываете номер Вашего диска.
Таким образом, мы выбираем диск, т.е. получаем нужный нам фокус, в контексте которого мы и будем выполнять все команды.
select disk 2
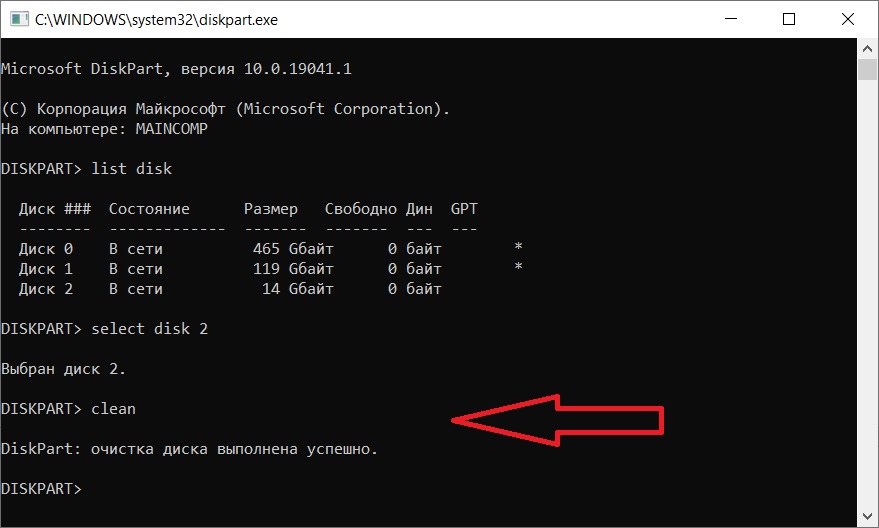
Затем вводим команду, которая удалит все разделы с данного диска.
clean
Для проверки того, что все разделы удалены, можем ввести команду
list partition
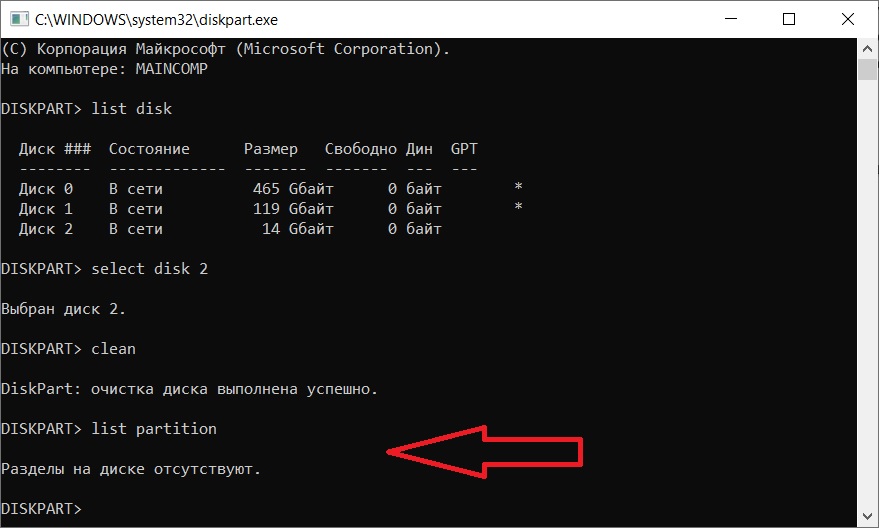
Как видим, все разделы удалены, и мы можем закрывать эту программу.
Данный способ подойдет и для удаления других скрытых разделов на USB флешке, так как в данном случае, как Вы понимаете, удаляются абсолютно все разделы с флешки.
Заметка! ТОП 5 популярных CMS для блога.
Шаг 3 – Создаем новый раздел на флешке
После перечисленных выше действий все разделы и файловые системы с USB флешки будут удалены, т.е. образуется неразмеченное пространство, поэтому теперь нам необходимо создать новый раздел на этой флешке, а это можно сделать стандартными инструментами, например, в оснастке «Управление дисками».
Для этого щелкните правой кнопкой мыши по нераспределенной области (флешке) и нажмите «Создать простой том».
Затем следуйте указаниям мастера:
- В окне приветствия нажимаем «Далее».
- В окне, где необходимо указать размер тома, оставляем по умолчанию и нажимаем «Далее».
- В окне «Назначение буквы диска или пути» в случае необходимости можете задать разделу определенную букву или просто оставить по умолчанию. Нажимаем «Далее».
- В окне «Форматирование раздела» можно выбрать файловую систему, которую необходимо создать на разделе и задать метку тома. Я выбираю NTFS и задаю метку «MyUSB». Нажимаем «Далее».
- В завершающем окне проверяем параметры и нажимаем «Готово».
Заметка! Как записать GIF с экрана компьютера.
Видео-инструкция – Удаление шифрованного EFI раздела с USB флешки в Windows 10
На этом все, мы удалили шифрованный EFI раздел с USB флешки и теперь эта флешка не загрузочная, а обычная.
Надеюсь, материал был Вам полезен, пока!
Раздел EFI -обязательный для GPT разметки на системах с UEFI. Стандартный размер раздела EFI равен 100MB, но на дисках расширенного формата 4K Native (секторы 4KB) он увеличен до 260MB.
Стандартной утилитой «Управление дисками» в Windows не удастся удалить шифрованные EFI тома.
Но в операционной системе есть консольная утилита Diskpart.
Запускаем коммандную строку (cmd) от имени администатора и выполняем команду diskpart
Удалить шифрованный EFI
Команды diskpart для удаления разделов:

list disk – смотрим список дисков
select disk 1 – выбираем диск 1
clean – удаление всех разделов или томов на диске
list partition – проверка, что все разделы удалены
Создать новый раздел
Команды diskpart для создания нового раздела:
list disk (смотрим список дисков)
select disk 1 (выбираем диск 1)
create partition primary size=n (n - размер раздела в мегабайтай)
assign letter=H (добавляем метку к диску)
format fs=ntfs quick (быстрое форматирование в формат NTFS)

У блога появился хостинг, его любезно предоставила компания Облакотека. Облакотека — облачные сервисы для создания и управления виртуальной ИТ-инфраструктурой.
Если вам понравился мой блог и вы хотели бы видеть на нем еще больше полезных статей, большая просьба поддержать этот ресурс.
Если вы размещаете материалы этого сайта в своем блоге, соц. сетях, и т.д., убедительная просьба публиковать обратную ссылку на оригинал
Windows, Windows 10, Windows 7, Windows 8, Windows Server, Windows Vista, Windows XP
- 27.04.2020
- 20 164
- 15
- 09.06.2020
- 105
- 99
- 6
- Содержание статьи
- Удаление EFI раздела
- Комментарии к статье ( 15 шт )
- Добавить комментарий
При подключении жесткого диска (твердотельного накопителя, флешки или другого накопителя информации), который использовался для работы операционной системы, можно столкнуться с тем, что там есть раздел EFI. Просто удалить его через управление дисками не получится, но это не значит, что это невозможно. Сделать это можно через утилиту командной строки diskpart, которая идет в комплекте с операционными системами Windows.
Удаление EFI раздела
Попытки удалить данный раздел с Вашего системного диска приведут к выходу из строя операционной системы!
- Сперва нужно запустить программу управления дисками, выполнив следующую команду в Командной строке, меню Пуск или Выполнить:
diskpart - Запустится отдельное окно командной строки с программой diskpart.

- В нем вводим команду для показа всех известных системе жестких дисков:
list disk
- Выбираем нужный диск:
select disk [НОМЕР ДИСКА]где [НОМЕР ДИСКА] — номер жесткого диска, на котором находится EFI раздел, который вы хотите удалить (тот, который показала команда
list disk). - Теперь необходимо отобразить все разделы на данном диске. Делается это следующей командой:
list part
- Ориентируясь по полученному списку разделов, выбираем нужный раздел EFI:
select part [НОМЕР РАЗДЕЛА]где [НОМЕР РАЗДЕЛА] — EFI раздел, который сейчас будет удален.
- Теперь осталось дело за малым — удалить раздел EFI. Делается это одной простой командой:
del part override - После выполнения данной команды, раздел EFI будет удален, теперь можно спокойно закрыть окно программы.