This article describes how to add or remove accounts on your PC. Having different accounts on a shared PC lets multiple people use the same device, all while giving everyone their own sign-in info, plus access to their own files, browser favorites, and desktop settings.
In addition, if you use the same PC for personal projects and work or school, you may want to add different accounts to your PC.
Note: If you have a new device, you may see an account named «defaultuser0″—this account is inactive and it won’t hurt your device or give anyone else access. If you want to remove it, you can restart your device and then sign in again.
Add people to a home PC
The best way to add someone to your PC is to have them sign in with a Microsoft account. Learn more about Microsoft accounts in Sign in with a Microsoft account.
-
Select Start > Settings > Accounts > Family & other users.
-
Under Other users > Add other user, select Add account.
-
Enter that person’s Microsoft account information and follow the prompts.
If you need to remove that person’s sign-in information from your PC:
-
Select Start > Settings > Accounts > Family & other users.
-
Under Other users, select the flyout for the account you want to remove.
-
Next to Account and data, select Remove. Note that this will not delete the person’s Microsoft account, it will just remove their sign-in info from your PC.
Add people to a work or school PC
The best approach is for everyone who shares a PC at work or school to have their own Microsoft account. Learn more about Microsoft accounts in Sign in with a Microsoft account.
To add someone with an existing Microsoft account:
-
Select Start > Settings > Accounts > Other users (in some Windows editions, it may be labeled as Other people or Family & other users).
-
Under Work or school users > Add a work or school account, select Add account.
-
Enter that person’s user account, select the account type, and then select Add.
If you need to remove that person’s sign-in information from your PC:
-
Select Start > Settings > Accounts > Other users.
-
Select the person’s name or email address, then select Remove.
-
Read the disclosure and select Delete account and data. Note that this will not delete the person’s Microsoft account, but it will remove their sign-in info and account data from your PC.
Add work or school accounts to your PC
If you’re using the same PC for both personal and school or business work, you may want to add various accounts to your PC to make it easier for you to get to the files, apps, and information associated with each account. When you access work or school, you’ll be connected to your organization’s domain and have access to its resources.
To add another account to your PC:
-
Select Start > Settings > Accounts > Access work or school .
-
Next to Add a work or school account, select Connect.
-
Enter that person’s account info, select the account type, and then select Add.
If you need to remove an account from your PC:
-
Select Start > Settings > Accounts > Access work or school .
-
Select the account you wish to remove, then select Disconnect.
-
Select Yes to confirm your actions. Note that this will not delete the account entirely, it will just remove access from your PC
Note: If an account is either the only account on the PC or the primary account on the PC, it can’t be removed.
Add accounts used by apps
To make signing in to your accounts easier and faster, you may want to add accounts for different apps.
To add an account used by apps to your PC:
-
Select Start > Settings > Accounts > Email & accounts .
-
To add an account used by email. calendar, or contacts, select Add an account under Accounts used by email, calendar, and contacts. For other apps, select Add a Microsoft account or Add a work or school account.
-
Follow the prompts to add the account.
To remove an account used by apps from your PC:
-
Select Start > Settings > Accounts > Email & accounts .
-
Select the account you wish to remove, then select Remove.
-
Select Yes to confirm your actions.
Add people to a family group
If you’ve added your family’s Microsoft accounts to your PC, you can set them up as a Microsoft family. It’s a free service that helps families stay connected and keep kids safer on Windows 11 and Xbox One devices, along with Android devices running Microsoft Launcher.
Add people to a home PC
The best way to add someone to your PC is to have them sign in with a Microsoft account. Learn more about Microsoft accounts in Sign in with a Microsoft account.
On Windows 10 Home and Windows 10 Professional editions:
-
Select Start > Settings > Accounts > Family & other users.
-
Under Other users, select Add someone else to this PC.
-
Enter that person’s Microsoft account information and follow the prompts.
If you need to remove that person’s sign-in information from your PC:
-
Select Start > Settings > Accounts > Family & other users.
-
Select the person’s name or email address, then select Remove. Note that this will not delete the person’s Microsoft account, it will just remove their sign-in info from your PC.
Add people to a work or school PC
The best approach is for everyone who shares a PC at work or school to have their own Microsoft account. Learn more about Microsoft accounts in Sign in with a Microsoft account.
To add someone with an existing Microsoft account:
-
Select Start > Settings > Accounts > Other users (in some Windows editions, it may be labeled as Other people or Family & other users).
-
Under Work or school users, select Add a work or school user.
-
Enter that person’s user account, select the account type, and then select Add.
If you need to remove that person’s sign-in information from your PC:
-
Select Start > Settings > Accounts > Other users.
-
Select the person’s name or email address, then select Remove.
-
Read the disclosure and select Delete account and data. Note that this will not delete the person’s Microsoft account, but it will remove their sign-in info and account data from your PC.
Add work or school accounts to your PC
If you’re using the same PC for both personal and school or business work, you may want to add various accounts to your PC to make it easier for you to get to the files, apps, and information associated with each account. When you access work or school, you’ll be connected to your organization’s domain and have access to its resources.
To add another account to your PC:
-
Select Start > Settings > Accounts > Access work or school .
-
Select Connect, then follow the prompts to add the accounts.
If you need to remove an account from your PC:
-
Select Start > Settings > Accounts > Access work or school .
-
Select the account you wish to remove, then select Disconnect.
-
Select Yes to confirm your actions. Note that this will not delete the account entirely, it will just remove access from your PC
Note: If an account is either the only account on the PC or the primary account on the PC, it can’t be removed.
Add accounts used by apps
To make signing in to your accounts easier and faster, you may want to add accounts for different apps.
To add an account used by apps to your PC:
-
Select Start > Settings > Accounts > Email & accounts .
-
To add an account used by email. calendar, or contacts, select Add an account under Accounts used by email, calendar, and contacts. For other apps, select Add a Microsoft account or Add a work or school account.
-
Follow the prompts to add the account.
To remove an account used by apps from your PC:
-
Select Start > Settings > Accounts > Email & accounts .
-
Select the account you wish to remove, then select Remove.
-
Select Yes to confirm your actions.
Add people to a family group
If you’ve added your family’s Microsoft accounts to your PC, you can set them up as a Microsoft family. It’s a free service that helps families stay connected and keep kids safer on Windows 10 and Xbox One devices, along with Android devices running Microsoft Launcher.
Need more help?
При закрытии учетной записи Майкрософт по какой-либо причине корпорация Майкрософт хочет убедиться в двух вещах:
-
Во-первых, Майкрософт необходимо проверить, что учетную запись закрываете действительно вы.
-
Во-вторых, что вы не теряете важные сведения, которые понадобятся вам позже.
Примечание: Если вы забыли сведения об учетной записи и пришлось сбросить данные безопасности, необходимо подождать 60 дней, прежде чем закрыть учетную запись.
Если вы точно хотите закрыть свою учетную запись Майкрософт:
-
Узнайте больше о том, что необходимо проверить в первую очередь.
-
Ознакомьтесь с инструкциями по закрытию учетной записи.
-
Узнайте, что происходит после закрытия учетной записи.
Продолжить
Нужна дополнительная помощь?
February 25, 2018 updated by
Leave a reply »
How to unlink or delete Microsoft account from Windows 10? If you want to share less data with Microsoft, deleting your Microsoft account can be a great way to ensure that none of your data is uploaded to Microsoft’s servers without your consent. In this tutorial we’ll show you how to completely delete Microsoft account on Windows 10.
Part 1: Delete Microsoft Account Locally
- Press the Windows key + I to open the Settings app, click Accounts.
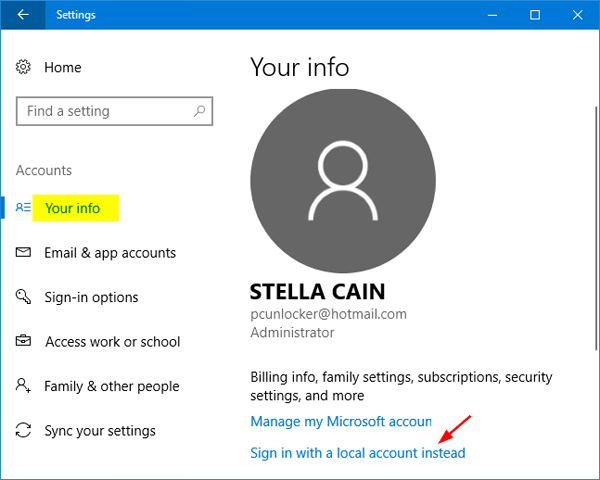
- Once you’ve selected the Your info tab, click the option labeled “Sign in with a local account instead” on the right side.
- Enter your Microsoft account password and it will let you create a new local account. When you’re done, Windows 10 will log you out and you need to log back in with the local account.
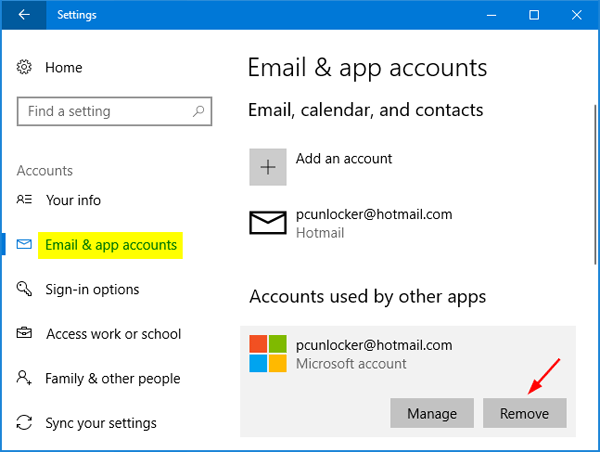
- Open the Settings app again and navigate to Accounts -> Email & app accounts. Your deleted Microsoft account is still listed under “Accounts used by other apps”. Click on it and then select the Remove option.
Part 2: Permanently Close Your Online Microsoft Account
- Visit the Close your account page at Microsoft website. Sign in with the Microsoft account you want to close permanently.
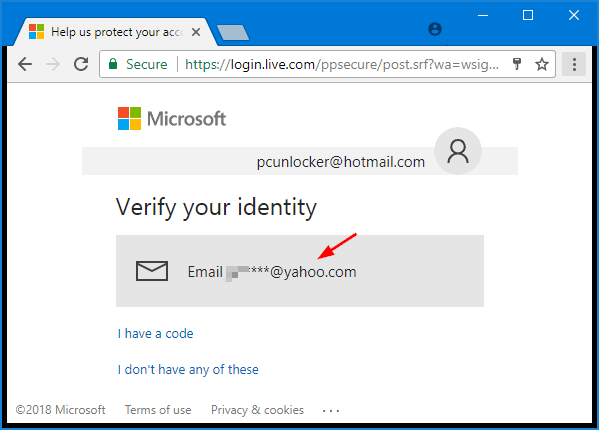
- You’ll be taken to the following page, which will verify your identity with a security code. In this case, we used a secondary email address to receive security code.
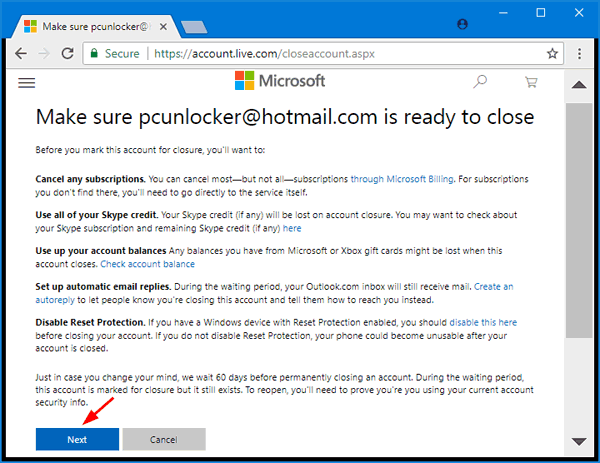
- After verifying your identity, Microsoft will inform you about all the things you must first do before closing your account. Click Next.
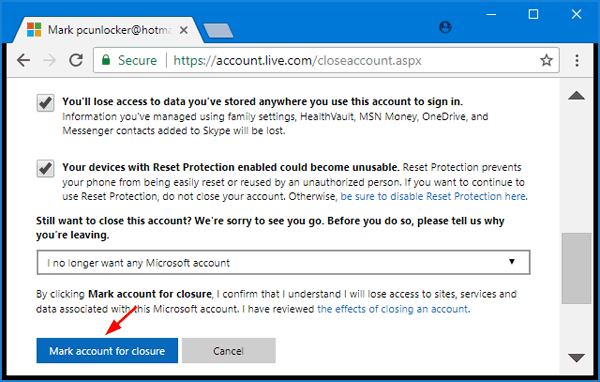
- Tick all check boxes acknowledging that you understand the consequences of canceling the account and select a reason for leaving, then click the Mark account for closure button.
It will take 60 days to permanently close the account. If you change your mind later, you can reopen your Microsoft account within 60 days.
- Previous Post: 4 Ways to Enable or Disable Aero Peek in Windows 10 / 8 / 7
- Next Post: Easy Ways to Open Character Map in Windows 10


