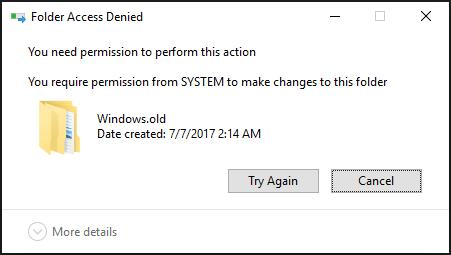
When you upgrade your computer to a new version of Windows 10, or you install a preview build, the installation process saves a copy of the previous version in the «Windows.old» folder.
This is part of the safety mechanism in case the upgrade process goes wrong. If the installation fails for any reason, the system can use the Windows.old folder to undo the changes. Also, if the upgrade completes successfully, the backup copy of the previous version will be kept to provide the option to rollback in the case the new installation is causing issues.
Although this is a handy feature, if your computer is working correctly after the upgrade, you can safely delete the Windows.old folder to reclaim gigabytes of space.
In this Windows 10 guide, we’ll walk you through the different ways that you can get rid of the Windows.old folder to free up several gigabytes of space to store more important files.
- How to delete the Windows.old folder using Storage sense settings
- How to delete the Windows.old folder using Temporary files settings
- How to delete the Windows.old folder using Disk Cleanup
Update November 29, 2018: We’ve updated this article with the latest information for the Windows 10 October 2018 Update.
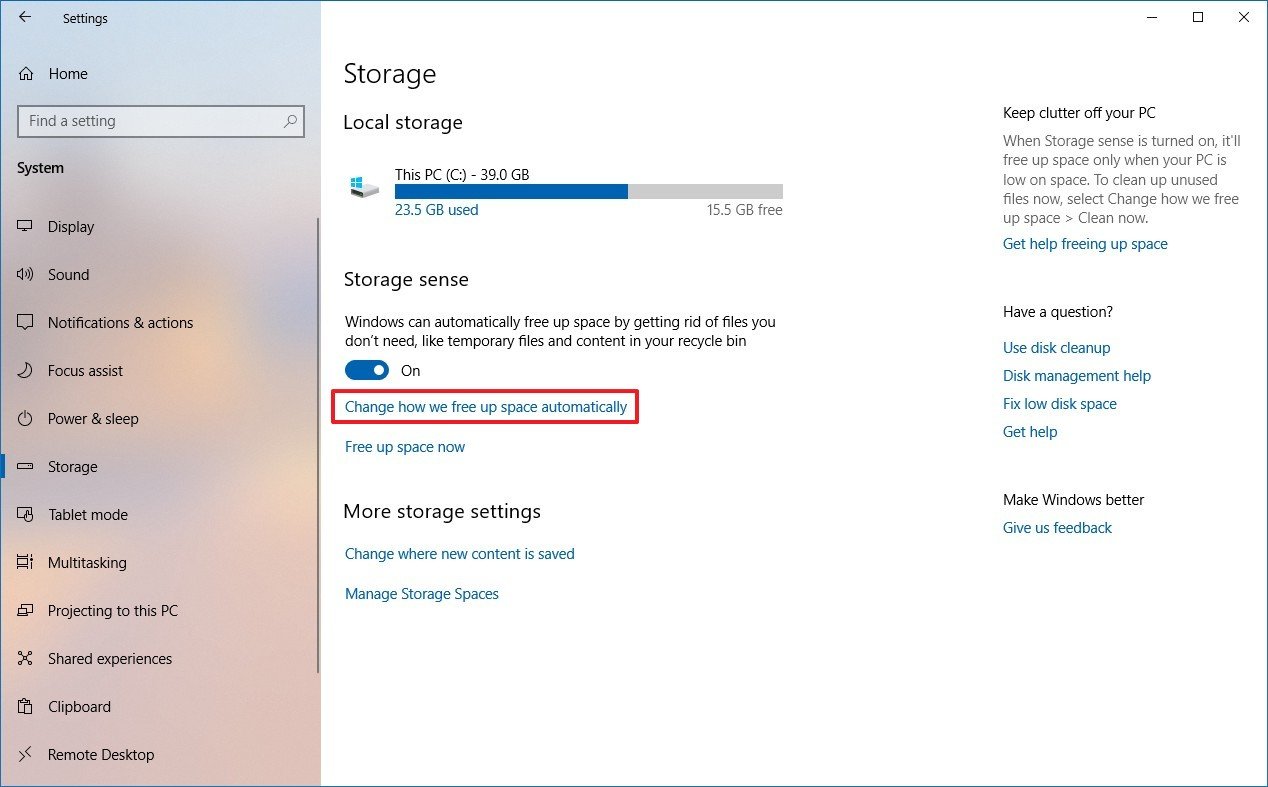
How to delete the Windows.old folder using Storage sense settings
The easiest method to delete the Windows.old folder from your device is to use the Storage sense with these steps:
- Open Settings.
- Click on System.
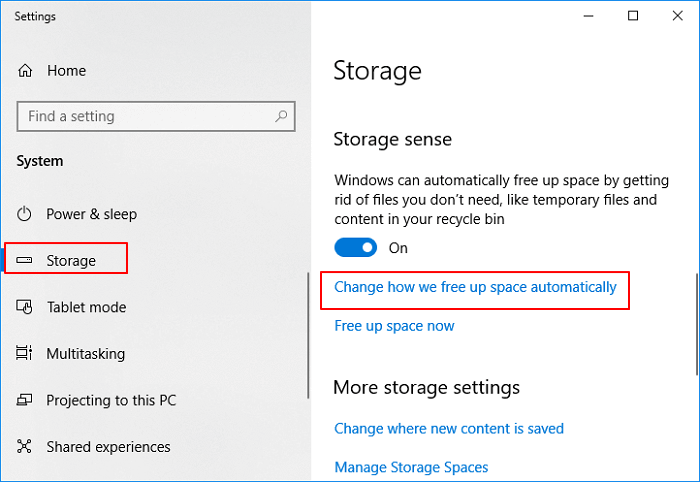
- Click on Storage.
- Under the «Storage sense» section, click the Change how we free up space automatically option.
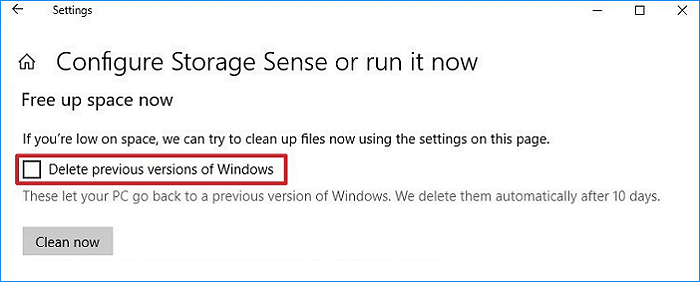
- Under the «Free up space now» section, check the Delete previous version of Windows option.
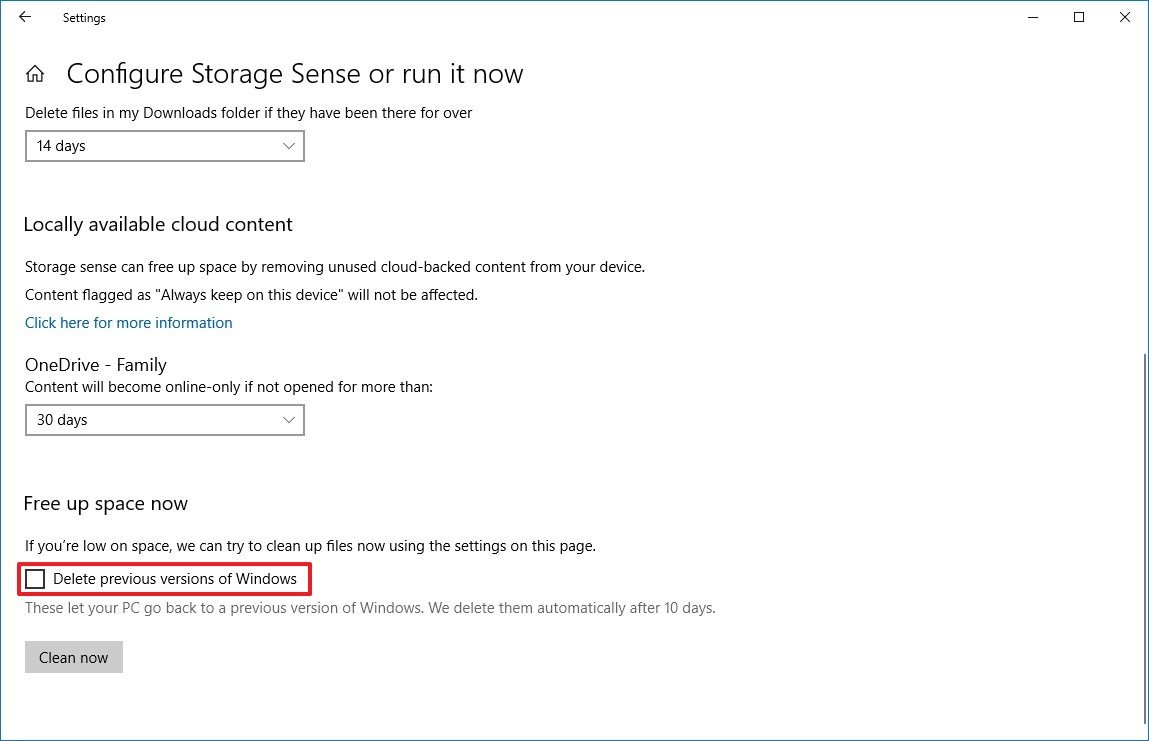
- Click the Clean now button.
Once you’ve completed the steps, the folder with the previous installation of Windows 10 will no longer be available on your device.
How to delete the Windows.old folder using Temporary files settings
Alternatively, using the Settings app, you can delete the Windows.old folder using the Temporary files settings with these steps:
- Open Settings.
- Click on System.
- Click on Storage.
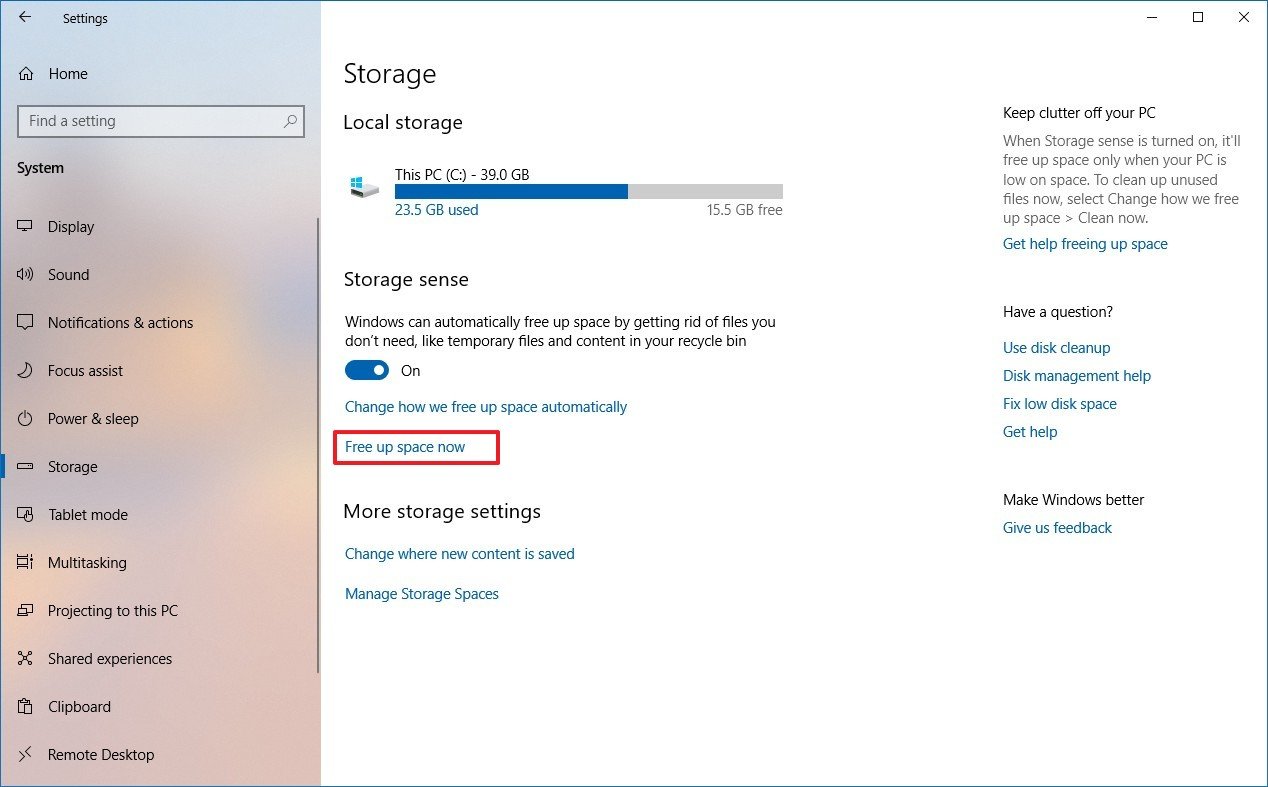
- Under the «Storage sense» section, click the Free up space now option.
- Check the Previous Windows installation(s) option.
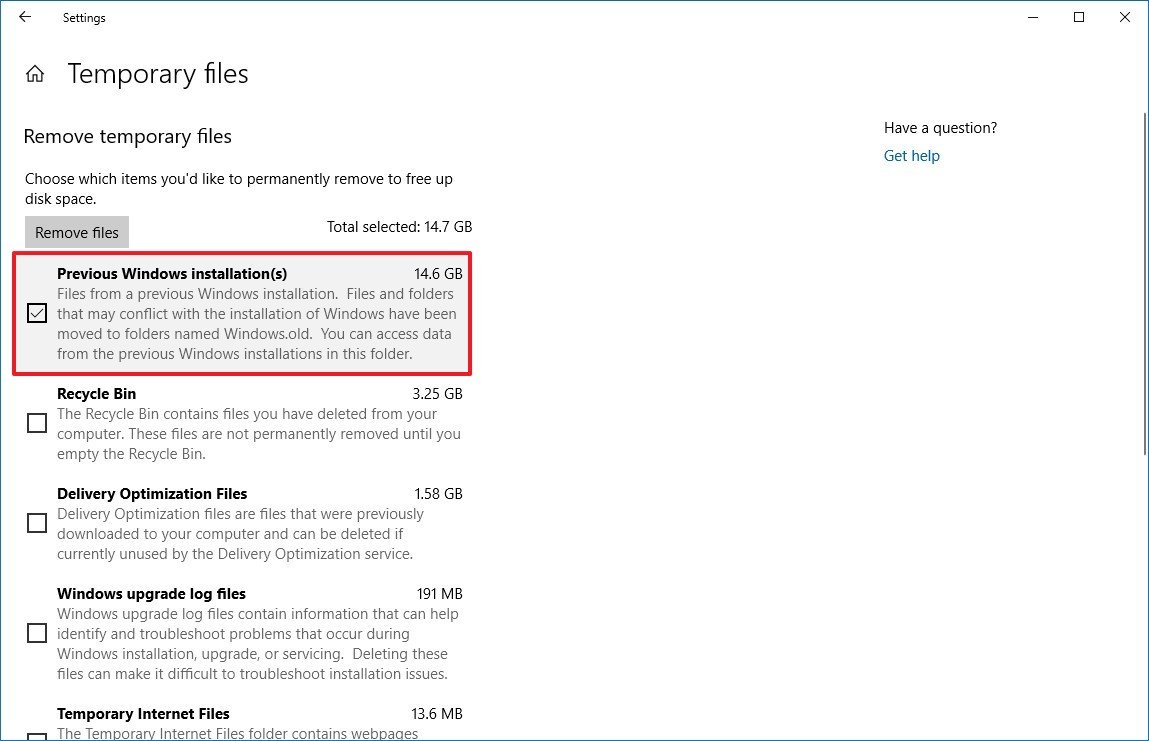
- (Optional) Clear the default selected options if you only want to remove the Windows.old folder to free up space.
- Click the Remove files button.
After completing the steps, the folder with the previous installation of Windows 10 will be removed freeing up 14GB to 20GB of storage space on your primary hard drive.
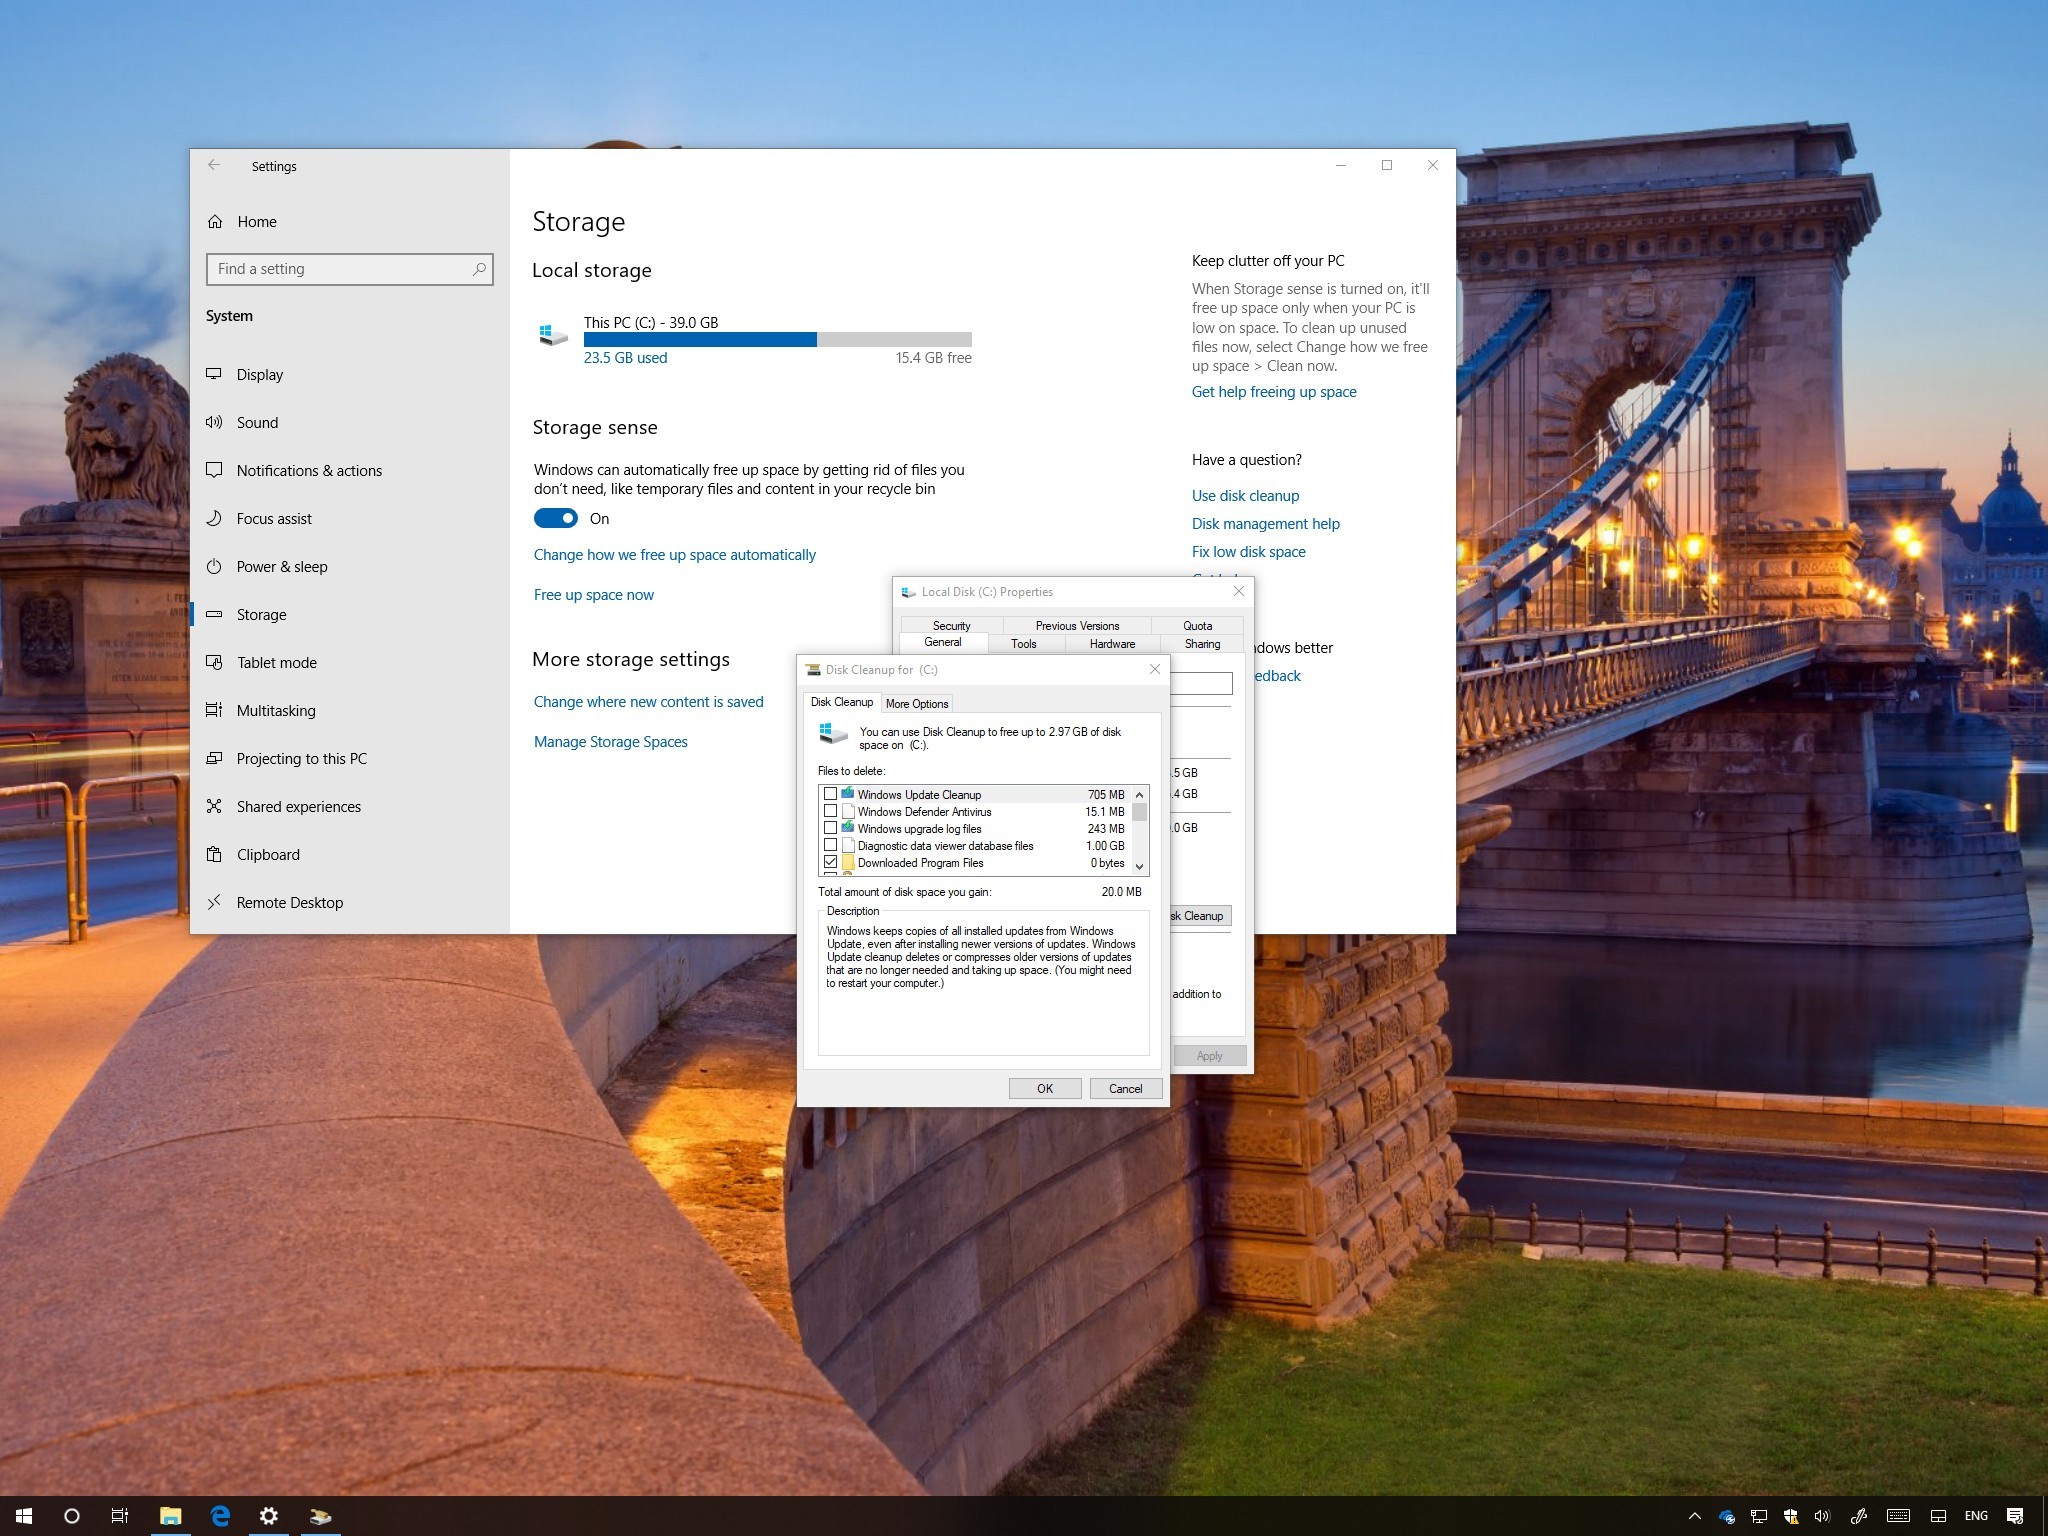
How to delete the Windows.old folder using Disk Cleanup
You can also delete the Windows.old folder using the legacy Disk Cleanup tool with these steps:
- Open File Explorer.
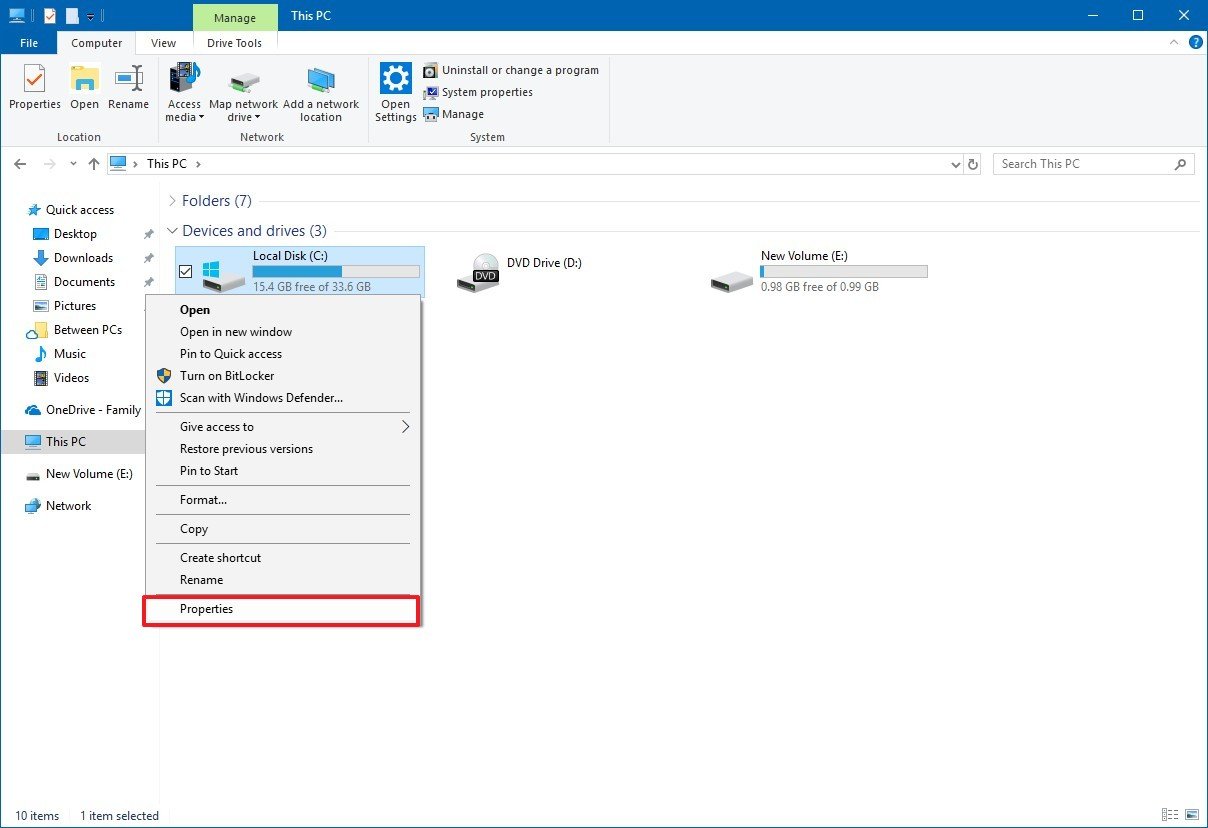
- Click on This PC from the left pane.
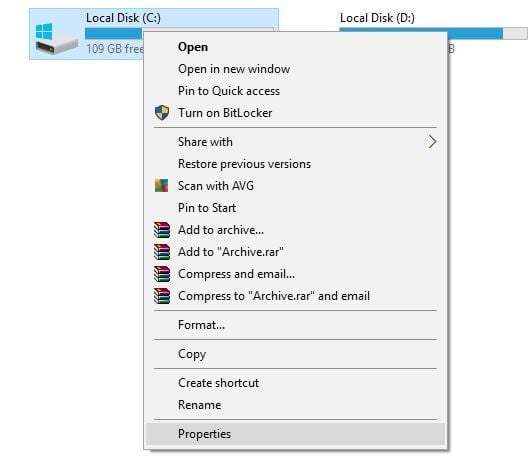
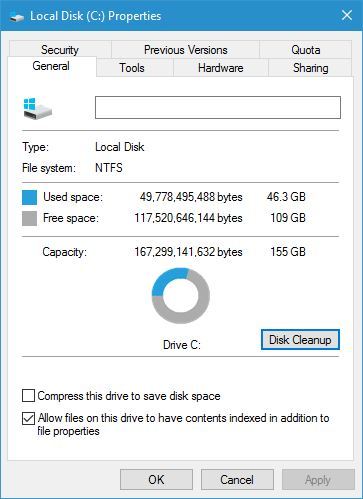
- Under the «Devices and drives» section, right-click the drive with the Windows 10 installation (usually the C drive) and select the Properties option.
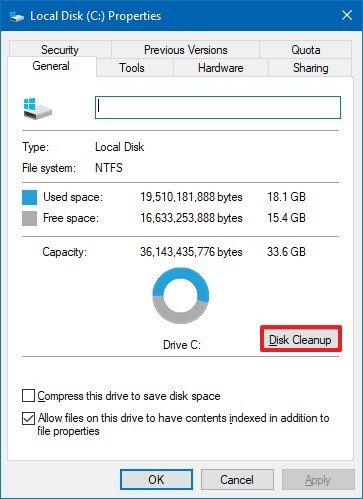
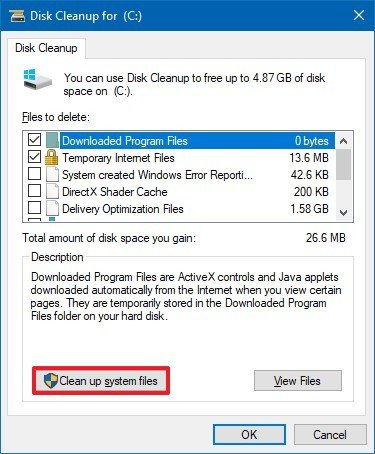
- In the «General» tab, click the Disk Cleanup button.
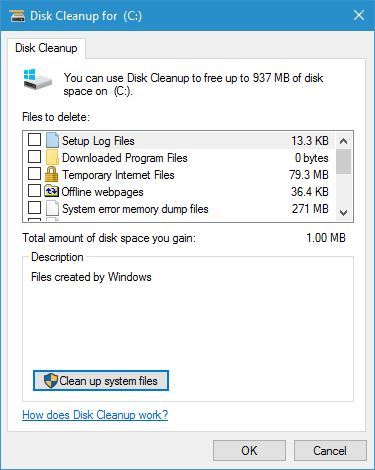
- Click the Cleanup system files button.
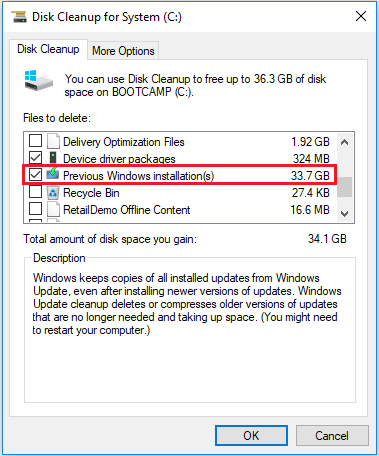
- Check the Previous Windows installation(s) option.
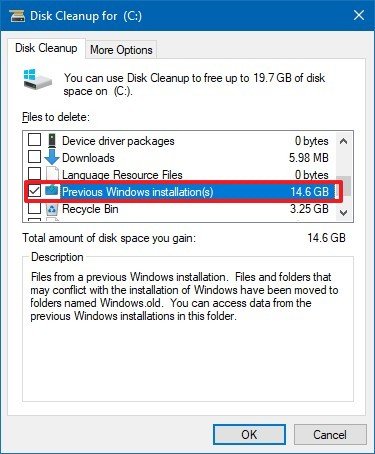
- (Optional) Clear the default selected options if you only want to remove the Windows.old folder to free up space.Important: Starting with the October 2018 Update, Windows 10 is deprecating Disk Cleanup in favor of Storage sense, but it adds an option to delete all the contents from the Downloads folder. If you’re using this option, and you have important files in the Downloads folder, make sure to clear this option.
- Click the OK button.
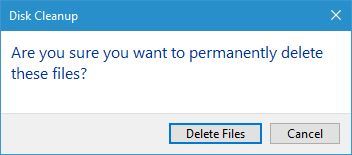
- Click the Delete Files button to confirm the deletion.
- Click the Yes button to confirm the warning.
Once you’ve completed the steps, the Windows.old folder will be removed from your device.
Wrapping things up
While it’s safe to delete the Windows.old folder, if you remove its contents, you will no longer be able to use the recovery options to rollback to the previous version of Windows 10. If you delete the folder, and then you want to rollback, you’ll need to perform a clean installation with the desire version.
More Windows 10 resources
For more helpful articles, coverage, and answers to common questions about Windows 10, visit the following resources:
- Windows 10 on Windows Central – All you need to know
- Windows 10 help, tips, and tricks
- Windows 10 forums on Windows Central
Get the best of Windows Central in in your inbox, every day!
Mauro Huculak is technical writer for WindowsCentral.com. His primary focus is to write comprehensive how-tos to help users get the most out of Windows 10 and its many related technologies. He has an IT background with professional certifications from Microsoft, Cisco, and CompTIA, and he’s a recognized member of the Microsoft MVP community.
![]()
Download Article
Delete your old Windows installation to quickly free up space on your hard drive
![]()
Download Article
- Using Storage Settings (Windows 10 & 11)
- Using Disk Cleanup
- Using the Command Prompt
- Video
- Q&A
|
|
|
|
If you recently upgraded to a new version of Windows, you may have noticed a huge folder called Windows.old on your hard drive. This folder contains a copy of the previous version of Windows in case you need to roll back your upgrade. Windows.old is automatically deleted 10 days after the upgrade (or 28 days for older versions), but you can delete it early if you’re running low on disk space and are 100% sure you won’t want to go back. This wikiHow article will show you 3 easy ways to remove Windows.old: Using the Storage area of your Settings, the Disk Cleanup tool, and the Command Prompt.
Things You Should Know
- On Windows 10 and 11, go to Settings > System > Storage > Temporary Files, select «Previous versions of Windows,» and click «Remove Files.»
- You can use Disk Cleanup on any version of Windows (from Windows 7 through 11) to delete your previous Windows installation.
- If you can’t delete Windows.old or have multiple Windows.old folders, you can forcefully delete them using the Command Prompt.
-

1
Open your Windows Settings. You can do this easily by clicking Settings or the gear icon in your Windows Start menu.
- On both Windows 10 and 11, Windows.old and other previous operating system files are deleted automatically 10 days after the upgrade.[1]
- You can delete Windows.old early to reclaim several gigabytes of disk space. Just keep in mind that you won’t be able to downgrade to your previous Windows version if you change your mind.
- On both Windows 10 and 11, Windows.old and other previous operating system files are deleted automatically 10 days after the upgrade.[1]
-
2
Click System. If you’re using Windows 11, it’ll be at the top of the left panel. On Windows 10, you’ll see the system icon in the main panel.
Advertisement
-
3
Click Storage. Once you click this option, Windows will take a few moments to analyze your hard drive(s) and display how you’re utilizing your disk space.
-
4
Click Temporary Files. You’ll see this under your main hard drive.
-
5
Check the box next to «Previous version of Windows.» If you’ve recently upgraded, you’ll see this option in the list.
- If you don’t see this option but still have a Windows.old folder, use this method to delete it.
- Remove the checkmarks from any other file types that you don’t want to delete. For example, if you don’t want to delete the files in your Downloads folder, remove the checkmark from the «Downloads» box.
-
6
Click Remove files. You’ll see this button above the list. A confirmation pop-up will appear.
-
7
Click Continue to confirm. This removes all selected files, including the Windows.old folder that contains your previous version of Windows.
- Shopping for a new computer? Take a look at our coupon site for HP product discounts.


Advertisement
-
1
Open the Disk Cleanup utility. This utility will delete the Windows.old folder on any version of Windows, including Windows 7. There are a couple of different ways you can open it.
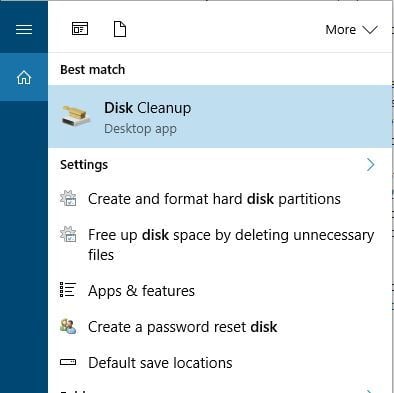
- On Windows 8, 10, and 11, you can press Windows key + S, type cleanup, and then click Disk Cleanup.
- You can also press Windows key + R, type cleanmgr, and press Enter.
- Another way is to open the Control Panel, select «System and Security», click «Administrative Tools, then select Disk Cleanup.
-
2
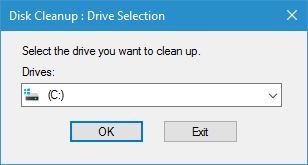
Select the drive that contains the Windows.old folder. This is usually the C: drive.
-
3
Click the Clean up system files button. You may be prompted for the administrator password.
-
4
Select your drive again if prompted. Disk Cleanup will scan the drive again.
-
5
Check the «Previous Windows installation(s)» box. You can also check the boxes for any other types of files on the list you want to remove.
- If you don’t want to delete any other files, remove the checkmarks from other selected options now.
- If you don’t see this option but still have a Windows.old folder, see this method.
-
6
Click OK. This deletes Windows.old and all previous operating system files from your PC. [2]


Advertisement
-
1
Try another method first. If you’ve already tried to delete Windows.old (or have multiple Windows.old files ending with different numbers) and were unsuccessful, you can use the Command Prompt to permanently delete the files.
-
2
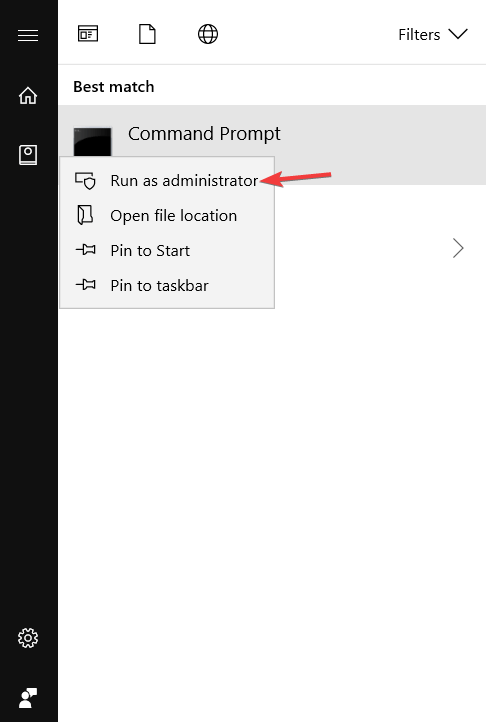
Open the Command Prompt as an Administrator. To do this, type cmd into the Windows search bar, right-click Command prompt, then select Run as Administrator.
-
3
Take ownership of the file. To do this, type takeown /F "C:Windows.old" /A /R /D Y and press Enter.
- If your Windows.old folder is not on the C drive, replace C: with the correct drive letter.
-
4
Change the permissions to allow deletion. To do this, type icacls "C:Windows.old" /grant *S-1-5-32-544:F /T /C /Q and press Enter.
-
5
Use the RD command to delete Windows.old. Type RD /S /Q "C:Windows.old" and press Enter to permanently delete the folder.
-
6
Repeat for additional Windows.old folders. If you have multiple Windows.old folders, run all of these commands for each of them. For example, takeown /F "C:Windows.old.000" /A /R /D Y.


Advertisement
Add New Question
-
Question
How can I remove an old Windows?

ッRosie~Dosieッ
Community Answer
You can’t remove the old Windows system, but you can upgrade to a newer version if you wish.

Ask a Question
200 characters left
Include your email address to get a message when this question is answered.
Submit
Advertisement
Video
Thanks for submitting a tip for review!
About This Article
Thanks to all authors for creating a page that has been read 125,560 times.
Is this article up to date?
Ten days after you upgrade to Windows, your previous version of Windows will be automatically deleted from your PC. However, if you need to free up drive space, and you’re confident that your files and settings are where you want them to be in Windows, you can safely delete it yourself.
Warning: If it’s been fewer than 10 days since you upgraded to Windows, your previous version of Windows will be listed as a system file you can delete. You can delete it, but keep in mind that you’ll be deleting your Windows.old folder, which contains files that give you the option to go back to your previous version of Windows. If you delete your previous version of Windows, this can’t be undone (you won’t be able to go back to your previous version of Windows).
-
Press the Windows logo key on your keyboard, then select Settings > System > Storage.
Open Storage Settings
-
Under your hard drive information, select Temporary files.
-
Select the Previous version of Windows check box, and then select Remove files.
Related topics
-
Free up drive space in Windows
Need more help?
Try expert-tested solutions to get rid of it
by Milan Stanojevic
Milan has been enthusiastic about technology ever since his childhood days, and this led him to take interest in all PC-related technologies. He’s a PC enthusiast and he… read more
Updated on August 31, 2022
Reviewed by
Vlad Turiceanu

Passionate about technology, Windows, and everything that has a power button, he spent most of his time developing new skills and learning more about the tech world. Coming… read more
- The Windows.old folder is created when you install a new version of Windows.
- This folder contains the old installation files for the previous OS.
- A lot of disk space is occupied by the Windows.old.folder.
- We are going to show you how to delete it from your Windows 10 device.

XINSTALL BY CLICKING THE DOWNLOAD FILE
This software will repair common computer errors, protect you from file loss, malware, hardware failure and optimize your PC for maximum performance. Fix PC issues and remove viruses now in 3 easy steps:
- Download Restoro PC Repair Tool that comes with Patented Technologies (patent available here).
- Click Start Scan to find Windows issues that could be causing PC problems.
- Click Repair All to fix issues affecting your computer’s security and performance
- Restoro has been downloaded by 0 readers this month.
Windows 10 and some previous versions of Windows sometimes create a folder called Windows.old.
This folder is usually created when you install a new version of Windows, and today we’re going to explain what this folder does and how to remove it from Windows 10.
What is the Windows.old folder?
When you install a new version of Windows, such as Windows 10 for example, your system automatically moves your older installation to Windows.old folder.
With this folder available you can easily restore the previous version of Windows if the new one isn’t working properly for you.
In addition, this folder works as a backup, so even if the installation process fails for some reason, your PC can use Windows.old folder to restore the previous version of Windows.
You should also know that you can roll back to the previous version of Windows 10 days after its installation, and after that period ends, Windows.old folder will be automatically deleted from your system.
As you can see, Windows.old folder can be extremely useful since it allows you to restore the previous version of Windows, but many users want to delete this folder since it takes a lot of space on their hard drive.
Keep in mind that by deleting this folder you won’t be able to revert back to the older version of Windows in case there’s any major problem.
- READ ALSO: How to retrieve your files from Windows.old
Since this folder can take 30GB or more of your hard drive space, today we’re going to show you how to safely remove it from your PC.
Can I remove Windows.old?
You can easily remove it through Disk Cleanup. Keep in mind that deleting the folder will leave you without a restore point. Another way to remove it is by using Command Prompt or a Linux Live CD.
For more info on how to remove the folder from your device, check the guides below.
How to delete Windows.old folder from Windows 10
1. Use Disk Cleanup tool to remove the Windows.old folder
Windows 10 comes with a useful little tool called Disk Cleanup that allows you to quickly free up space on your hard drive. This application will scan your hard drive partition for old or temporary files and allow you to remove them easily with a single click.
This tool also allows you to remove Windows.old folder and you can do that by following these steps:
- Press Windows Key + S and enter disk. Select Disk Cleanup from the menu.

- When Disk Cleanup tool opens you’ll need to select which drive you want to clean. Select the drive where Windows 10 is installed and click OK.

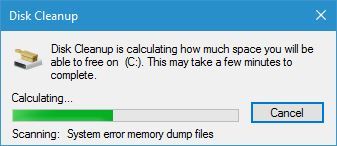
- Disk Cleanup tool will now scan your PC for old and temporary files. This process might take a minute or two depending on the size of your partition.

- Check if Previous Windows installation(s) option is available. If it is, check it and click OK. You should see a confirmation message available. Select Delete Files and wait until the previous version of Windows is removed.

- Optional: If Previous Windows installation(s) option isn’t available for you, click Clean up system files button and wait for the scan to complete. After that, select Previous Windows installation(s) and follow the instructions from previous step.

Another way to run Disk Cleanup is to check your hard drive partition properties from This PC. To do that, follow these steps:
- Open This PC.
- Locate your primary hard drive partition and right-click it. Choose Properties from the menu.

- Go to the General tab and click the Disk Cleanup button.

- Now follow the instructions described in the steps above.
-READ ALSO: How to fix Disk Cleanup issues on Windows 10, 8.1
2. Use Command Prompt
1. Press the Windows Key to open the search box.
2. In the Windows search box type cmd.
3. Right-click the first result and select Run as administrator.
4. When Command Prompt opens, enter the following lines and press Enter after each one:
- attrib -r -a -s -h C:Windows.old /S /D
- RD /S /Q %SystemDrive%windows.old
5. After the commands are executed, close Command Prompt and check if the Windows.old folder is removed.
Few users reported that they needed to use two extra commands before they can remove Windows.old folder from their PC. If that is the case, jump to step 6.
6. Input and run the following commands to take ownership over the folder and remove it:
- takeown /F C:Windows.old /A /R
- icacls C:Windows.old /Grant Administrators:F /inheritance:e /T
An easy and quick method to delete the Windows.old folder on your device is to do this through Command Prompt. All you need to do is run a few deletion commands, then the tool will remove the folder for good.
Some PC issues are hard to tackle, especially when it comes to corrupted repositories or missing Windows files. If you are having troubles fixing an error, your system may be partially broken.
We recommend installing Restoro, a tool that will scan your machine and identify what the fault is.
Click here to download and start repairing.
Usually, the best way to delete Windows.old folder is to use the Disk Cleanup tool. If you can’t delete it by using Disk Cleanup, you might want to consider using Command Prompt.
Keep in mind that Disk Cleanup is the simplest and the safest solution and you should always use it first.
3. Remove the Windows.old folder using cmd at boot
You can also remove Windows.old folder by using Command Prompt at boot. To do that, you need to start Command Prompt by following these steps:
- Click the Start button.
- Click the Power button, hold the Shift key and choose the Restart option.

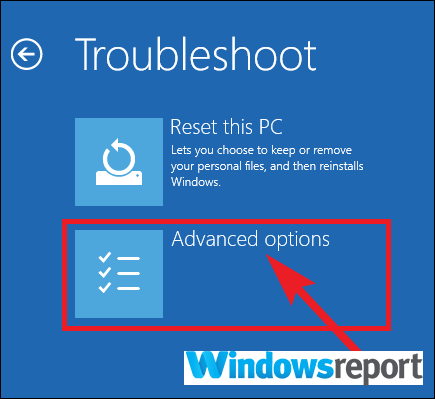
- When your PC restarts, choose Troubleshoot > Advanced options.

- A list of options will be available. Select Command Prompt.

Now we need to determine what is your drive letter. If you use Command Prompt during the boot, it’s rather possible that your drive letter will change, so you need to use diskpart tool to find it. You can do that by following these steps:
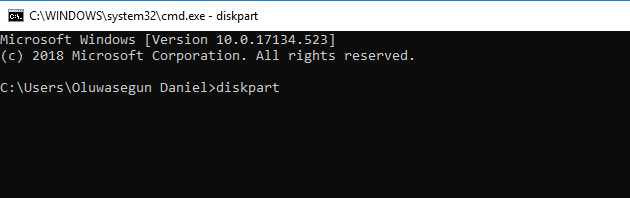
- Enter diskpart in Command Prompt and press Enter. We have to warn you that diskpart is a powerful tool, so use extra caution while using it.

- Now enter list volume.
- List of all available partitions will now appear. Now you need to locate your drive letter. The easiest way to do that is to compare the size of available partitions. After you find the desired partition, check the Ltr column and memorize its letter. In most cases it should be D, but it might be different on your PC.
- Enter exit to quit diskpart tool.
- Now enter RD /S /Q “D:Windows.old” command and press Enter to run it. Keep in mind that you need to use the correct letter that you got in Step 3. In our case that was D, but be sure to double check it on your PC.
- After running the aforementioned command, Windows.old folder will be removed from your PC. Now you just need to close Command Prompt and start Windows 10 normally.
As we already mentioned, using Disk Cleanup is the safest and simplest way to remove Windows.old folder from your PC, so you should use it always over Command Prompt.
If you decide to use Command Prompt from Windows 10, you’ll have to change the attributes of Windows.old folder.
That can sometimes cause certain issues so it might be better that you use Command Prompt during the boot since it doesn’t require that you change the attributes of the Windows.old folder.
- READ ALSO: Here’s what you need to do if Windows cannot access the disk
4. Use CCleaner to get rid of the Windows.old folder
CCleaner is a useful tool that is designed to remove old and temporary files from your PC. Some users use it to remove Windows.old folder, and if you use CCleaner you can remove Windows.old folder by following these steps:
- Start CCleaner and click the Cleaner title.
- Select only Old Windows Installation on Windows and Applications sections. You should find this option in Advanced list.
- Now click the Analyze button to start the scan.
- You should now see how much space does the Windows.old folder take. Click Run Cleaner button and wait until CCleaner removes this folder from your PC.
-READ ALSO: Download Free CCleaner for Windows 10 [Latest Version]
5. Change the security permissions
If you try to delete Windows.old folder manually you’ll probably see an error message saying that you lack the necessary privileges to delete this folder. You can fix this problem by following these steps:
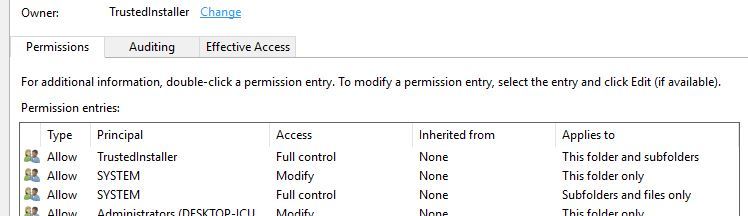
- Locate Windows.old folder, right-click it and choose Properties.
- Navigate to the Security tab and click the Advanced button.
- Locate the Owner section and click Change.

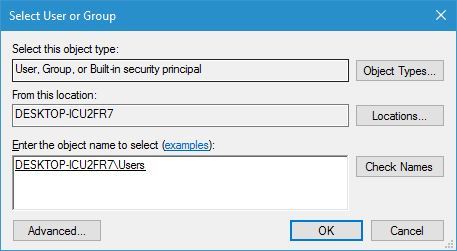
- Select User or Group window will now appear. In Enter the object name to select field enter Users and click Check Names. Click OK.

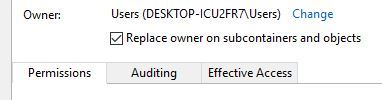
- The owner section will now be changed. Check Replace owner on subcontainers and objects and Replace all child permission entries with inheritable permission entries from this object.

- Click Apply and OK to save changes.
- If you get any security warnings just select Yes.
After changing the permissions you’ll be able to delete Windows.old folder without any problems.
We have to mention that changing the permissions of Windows.old folder can sometimes cause issues with your Windows 10 installation, so you might want to consider using Disk Cleanup tool instead.
6. Disable certain devices from Device Manager
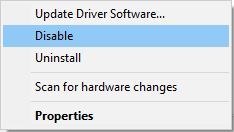
According to users, they were unable to remove Windows.old folder due to some driver files that were still in use by their PC. To find and remove those files you’ll need to do the following:
- Locate the driver files that can’t be deleted in Windows.old directory. Usually that are SurfaceAccessoryDevice.sys, SurfaceCapacitiveHomeButton.sys, SurfaceDisplayCalibration.sys and SurfacePenDriver.sys. Keep in mind that these driver files might be different on your PC.
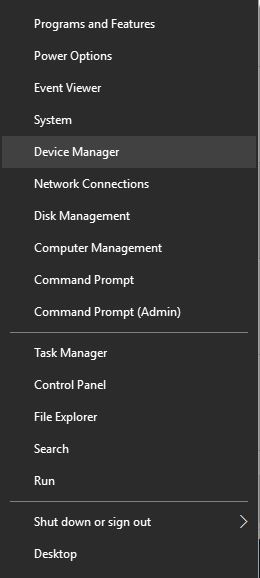
- After you find the problematic drivers, you’ll need to disable the corresponding devices from Device Manager. To do that, press Windows Key + X and choose Device Manager from the list.

- When Device Manager opens, look for the devices that are related to those drivers. After you find the problematic device, right click it and choose Disable.

- After disabling all the problematic devices, try to delete Windows.old again.
- After Windows.old folder is removed, enable the disabled devices again.
Apparently this issue appears on Surface devices, but if you experience this problem on your PC, feel free to try this solution.
7. Use Linux Live CD to remove Windows.old folder on Windows 10
If you can’t delete Windows.old folder from your PC, you might want to consider using a Linux Live CD. Windows.old folder is protected by your system, and in order to delete it you need to change certain privileges.
Obtaining the necessary privileges might not be easy for non-advanced users, and if you want to delete Windows.old folder without changing your privileges, you might want to consider using a Linux Live CD.
Simply download any version of Linux and create a bootable media. After that, boot to your PC from a bootable media. After Linux starts, locate and delete Windows.old folder.
After deleting the folder, remove the bootable media and restart your PC.
As you can see, Windows.old folder is extremely useful because it allows you to restore your PC after an upgrade in case anything goes wrong.
Using Windows.old folder you can restore your documents and some other files even with the new version of Windows installed.
As we already mentioned, Windows.old folder will be stored on your hard drive only for 10 days, so if you want to revert, be sure to do it quickly.
If you’re concerned about your storage space, you can delete the Windows.old folder by using Disk Cleanup tool or by following any other solution from this article.
Hope that now you can understand better what Windows.old folder is and whether to delete it or not in Windows 10. If you have any more questions, leave them in the comments section below.
![]()
Newsletter
 После установки Windows (или после обновления Windows 10) некоторые начинающие пользователи обнаруживают на диске C внушительных размеров папку, которая при этом не удаляется полностью, если пробовать это сделать обычными методами. Отсюда и возникает вопрос о том, как удалить папку Windows.old с диска. Если что-то в инструкции оказалось не ясным, то в конце есть видео руководство об удалении этой папки (показано на Windows 10, но подойдет и для предыдущих версий ОС).
Папка Windows.old содержит файлы предыдущей установки Windows 10, 8.1 или Windows 7. Кстати, в ней же, вы можете отыскать некоторые пользовательские файлы с рабочего стола и из папок «Мои документы» и аналогичных им, если вдруг после переустановки вы их не обнаружили. В этой инструкции будем удалять Windows.old правильно (инструкция состоит из трех разделов от более новых к более старым версиям системы). Также может быть полезным: Как очистить диск C от ненужных файлов.
Как удалить папку Windows.old в Windows 10 1803 April Update и 1809 October Update
В последней версии Windows 10 появился новый способ удалить папку Windows.old с предыдущей установкой ОС (хотя и старый метод, описанный далее в руководстве, продолжает работать). Учитывайте, что после удаления папки, автоматический откат к предыдущей версии системы станет невозможным.
В обновлении была усовершенствована автоматическая очистка диска и теперь выполнить её можно и вручную, удалив, в том числе, и ненужную папку.
Шаги будут следующими:
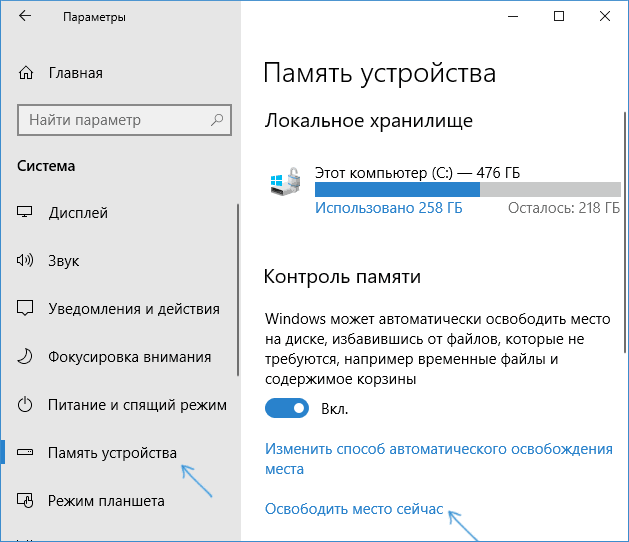
- Зайдите в Пуск — Параметры (или нажмите клавиши Win+I).
- Перейдите в раздел «Система» — «Память устройства».
- В разделе «Контроль памяти» нажмите «Освободить место сейчас».

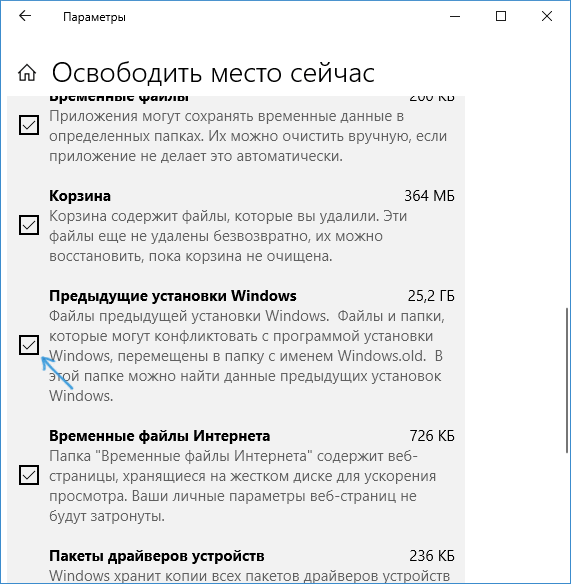
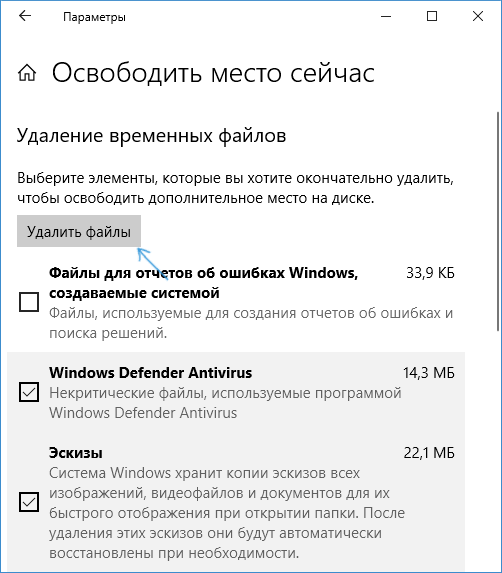
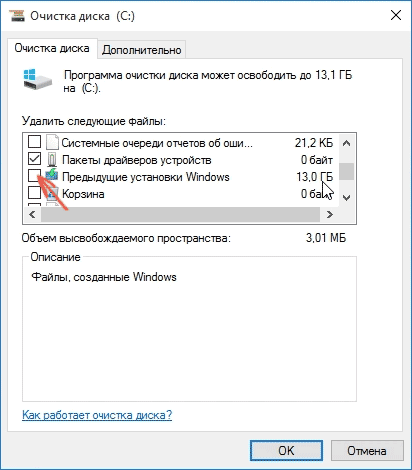
- После некоторого периода поиска необязательных файлов, отметьте пункт «Предыдущие установки Windows».

- Нажмите кнопку «Удалить файлы» вверху окна.

- Дождитесь завершения процесса очистки. Выбранные вами файлы, в том числе папка Windows.old будет удалена с диска C.
В чем-то новый метод удобнее описанного далее, например, он не запрашивает прав администратора на компьютере (хотя, не исключаю, что при их отсутствии может и не работать). Далее — видео с демонстрацией нового способа, а после него — методы для предыдущих версий ОС.
Если же у вас одна из предыдущих версий системы — Windows 10 до 1803, Windows 7 или 8, используйте следующий вариант.
Удаление папки Windows.old в Windows 10 и 8
Если вы обновились до Windows 10 с предыдущей версии системы или же использовали чистую установку Windows 10 или 8 (8.1), но без форматирования системного раздела жесткого диска, на нем окажется папка Windows.old, подчас занимающая внушительные гигабайты.
Ниже описан процесс удаления этой папки, однако, следует учитывать, что в том случае, когда Windows.old появилась после установки бесплатного обновления до Windows 10, файлы, находящиеся в ней, могут послужить для быстрого возврата к предыдущей версии ОС в случае возникновения проблем. А потому я бы не рекомендовал удалять ее для обновившихся, по крайней мере в течение месяца после обновления.
Итак, для того, чтобы удалить папку Windows.old, выполните по порядку следующие действия.
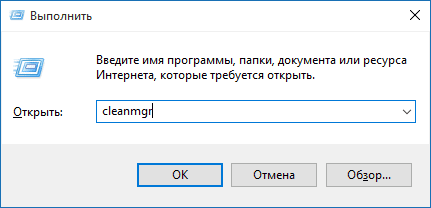
- Нажмите на клавиатуре клавиши Windows (клавиша с эмблемой ОС) + R и введите cleanmgr а затем нажмите Enter.

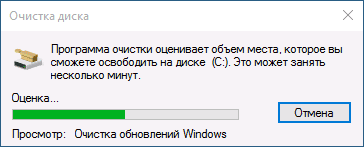
- Дождитесь запуска встроенной программы очистки диска Windows.

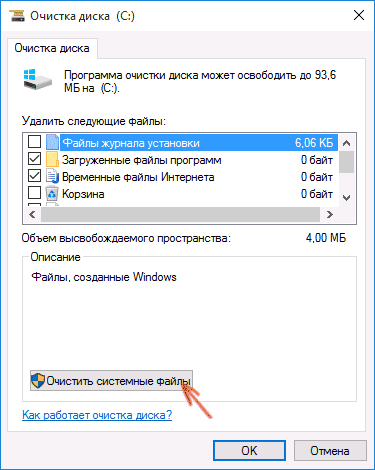
- Нажмите кнопку «Очистить системные файлы» (вы должны иметь права администратора на компьютере).
- После поиска файлов, найдите пункт «Предыдущие установки Windows» и отметьте его. Нажмите «Ок».

- Дождитесь завершения очистки диска.
В результате этого, папка Windows.old будет удалена или, по крайней мере, ее содержимое. Если что-то осталось непонятным, то в конце статьи есть видео инструкция, в которой показан весь процесс удаления как раз в Windows 10.
В том случае, если по какой-то причине этого не произошло, кликните правой кнопкой мыши по кнопке Пуск, выберите пункт меню «Командная строка (администратор)» и введите команду RD /S /Q C:windows.old (при условии, что папка находится на диске C) после чего нажмите Enter.
Также в комментариях был предложен еще один вариант:
- Запускаем планировщик заданий (можно через поиск Windows 10 в панели задач)
- Находим задание SetupCleanupTask и дважды кликаем по нему.
- Кликаем по названию задания правой кнопкой мыши — выполнить.
По итогу указанных действий папка Windows.old должна быть удалена.
Как удалить Windows.old в Windows 7
Самый первый шаг, который сейчас будет описан, может закончиться неудачей в случае, если вы уже пробовали удалить папку windows.old просто через проводник. Если так случится, не отчаивайтесь и продолжайте чтение руководства.
Итак, начнем:
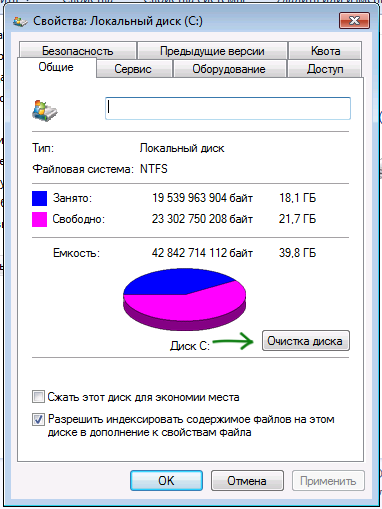
- Зайдите в «Мой компьютер» или Проводник Windows, кликните правой кнопкой мыши по диску C и выберите пункт «Свойства». Затем нажмите кнопку «Очистка диска».

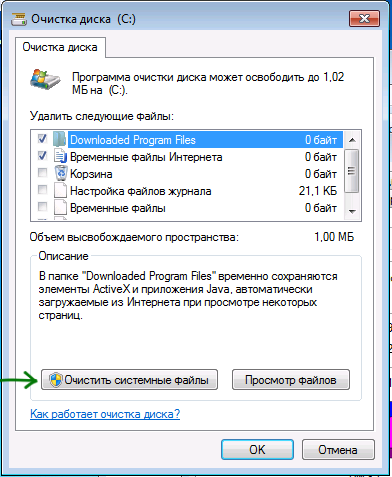
- После непродолжительного анализа системы откроется диалоговое окно очистки диска. Нажмите кнопку «Очистить системные файлы». Снова придется подождать.

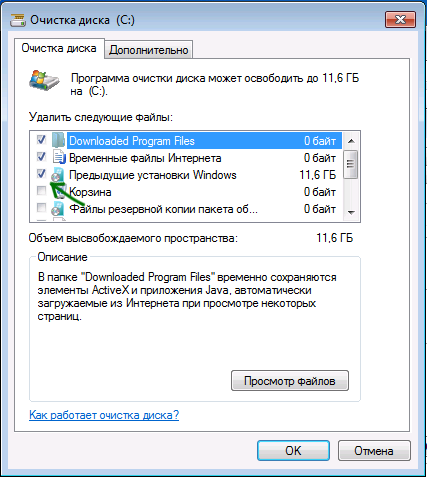
- Вы увидите, что в списке файлов для удаления появились новые пункты. Нас интересует «Предыдущие установки Windows», как раз они и хранятся в папке Windows.old. Отметьте галочкой и нажмите «Ок». Дождитесь завершения операции.

Возможно, уже описанных выше действий будет достаточно для того, чтобы ненужная нам папка исчезла. А возможно и нет: могут остаться пустые папки, вызывающие при попытке удаления сообщение «Не найдено». В этом случае, запустите командную строку от имени администратора и введите команду:
rd /s /q c:windows.old
После чего нажмите Enter. После выполнения команды папка Windows.old будет полностью удалена с компьютера.
Видео инструкция
Также записал и видео инструкцию с процессом удаления папки Windows.old, где все действия производятся в Windows 10. Однако те же способы подойдут и для 8.1 и 7.
Если ничто из статьи вам по какой-то причине не помогло, задавайте вопросы, а я постараюсь ответить.
| Workable Solutions | Step-by-step Troubleshooting |
|---|---|
| 1. Use Disk Cleanup | Step 1. Press Windows + E, click This PC…Full steps |
| 2. Temporary File Settings | Step 1. Open Settings by typing settings in the Search, then click on it…Full steps |
| 3. Storage Sense Settings | Step 1. Open Settings by right-clicking the Windows icon and select «Settings»…Full steps |
Something You Need to Know About Windows.old Folder
Before you start deleting Windows.old folder on your PC, here is something that we think you should know about this folder.
What Is Windows.old?
Windows.old folder is generated by the Windows operating system when you upgrade from one version of Windows to another. The Windows.old folder isn’t something new with Windows 10, which starts with Windows Vista.
The Windows.old folder contains all the files and data from your previous Windows installation, including Windows system files, user accounts’ settings, User Profile, and User Folder files, etc.
You can apply it to restore Windows to the previous version if you don’t like the new version. You can also dig into the Windows.old folder to find a specific file that wasn’t properly copied to your new Windows installation.
Where is the Windows.old Folder?
So you may wonder where is the Windows.old folder saved on the computer and how to delete it right? Usually, Windows.old folder is saved in C: drive under the Windows folder after Windows system upgrade as shown below:
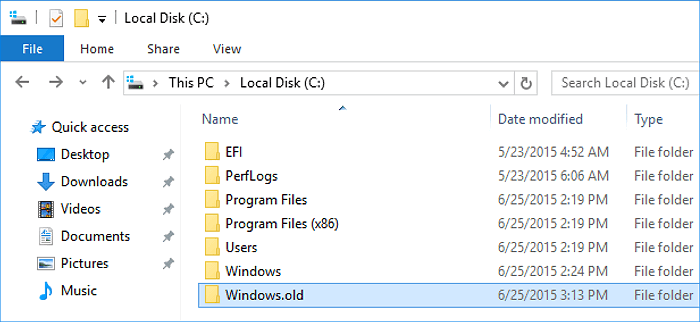
It takes up a huge space as nearly the same size as your C: drive before the Windows upgrade. This explains why so many people notice that their C drive gets full quickly after a Windows update.
Is It Safe to Delete Windows.old Folder?
So is it safe to delete the Windows.old folder? Yes. If you decide to stay with the new Windows system and all your files are safe on the new OS, you can delete it from your PC so as to free up the disk space.
Why Can’t I Remove Windows.old Folder?
According to the Microsoft Windows forum and some tech forums, users complain that they can’t remove Windows.old folder as Windows reports that the file not found or target is not a valid file or directory.
Why is that? Here are two main reasons that explain why you can’t delete Windows.old folder directly from your C: drive:
1. The Windows.old folder has been removed by Windows OS
In order to save disk space, Windows Operating System is designed to delete the Windows.old folder automatically after you upgrade:
- On Windows 10, Windows.old folder gets deleted automatically in 10 days after Windows upgrade.
- On Windows 8.1/8, Windows.old gets deleted automatically in 28 days after Windows upgrade.
- On Windows 7 and older OS, Windows.old will be removed automatically in 30 days after OS update.
2. Delete Windows.old needs administrator permission
Although Windows.old folder is accessible for you to check and view the saved files. But it requires administrator permission from the System to make changes to this folder. Therefore, if you don’t have permission, you can’t directly delete Windows.old from C: drive.
How to Delete Windows.old Folder — 3 Methods
Applies to: Resolve «Can’t delete Windows.old folder» issue with three effective methods, no data loss.
Before You Start — Preparations
#1. Create Backup of Windows.old Folder
Before taking the steps below to delete the Windows.old folder, you can create a backup of the Windows.old in case that you may want to perform a system restore or restore a single file from the folder.
You can either copy Windows.old folder to an external hard drive or to back Windows.old folder with EaseUS free backup software in only three simple steps as listed below:
- Launch EaseUS Todo Backup Free, then choose» File Backup».
- Choose the important files/data or system and then select a backup destination.
- Click «Proceed» to start the backup process.
#2. Gain Administrator Permission from System
The other important thing to make sure that you can delete Windows.old folder successfully is to check whether you are logging in to Windows OS as administrator.
If you have several user accounts on your computer, switch to login your computer with your administrator account:
Step 1. Click the Windows icon and click your username at the top.
Step 2. Select Administrator on the list, click to switch to it.
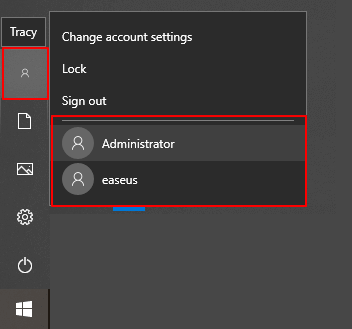
Step 3. Sign in with the password of your administrator account.
Method 1. Delete Windows.old Folder in Windows 11/10 Using Use Disk Cleanup
Windows.old folder cannot just directly delete by hitting the delete key and you may try to use the Disk Cleanup tool in Windows to remove this folder from your PC:
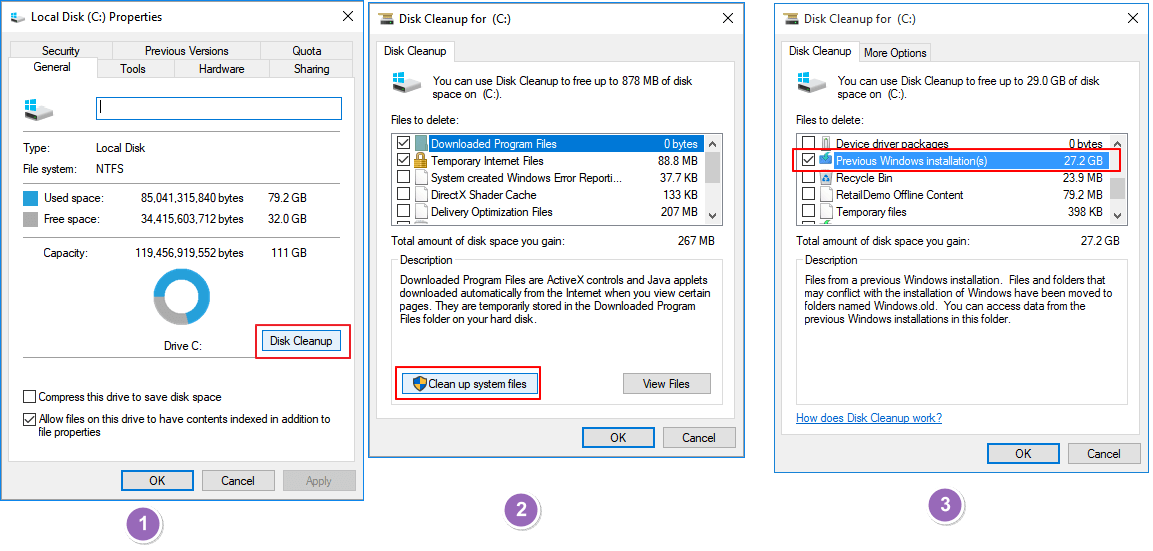
- Press Windows + E, click This PC.
- Right-click the drive with Windows installation and click Properties.
- Click Disk Cleanup and select Clean up the system.
- Select the Previous Windows Installation(s) option to delete Windows.old folder.
- You can also choose to delete other installation files including Windows upgrade log files and Temporary Windows installation files etc.
- Click OK and select Delete Files on the pop-up dialog to confirm the deletion.
- Click Yes.
Method 2. Delete Windows.old Folder in Windows 10 Using Temporary File Settings
The other method that you can try is to use Windows Temporary File Settings to remove the Windows.old folder on your PC. Here are the steps:
Step 1. Open Settings by typing settings in the Search, then click on it.
Step 2. Select System > Storage > This PC and then scroll down the list and choose Temporary files.
Step 3. Under Remove temporary files, check Previous Windows Installation then choose to «Remove files».
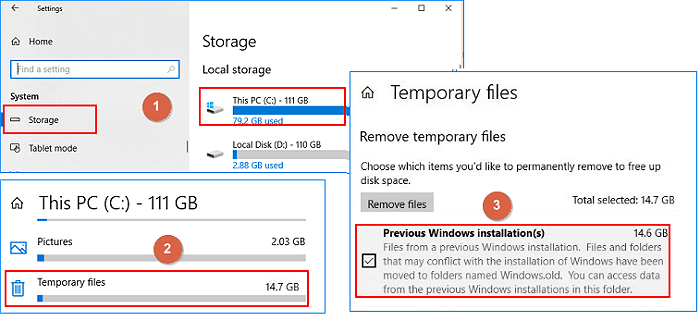
Then Windows.old folder will be deleted in Windows 10 without any obstacles.
Method 3. Delete Windows.old Folder in Windows 10 Using Storage Sense Settings
Windows 10 Storage Sense settings can also help you remove Windows.old folder on your PC. Follow the steps to delete it now:
Step 1. Open Settings by right-clicking the Windows icon and select «Settings».
Step 2. Go to System, click «Storage», then click «Change how we free up space automatically» under Storage Sense.
Step 3. Check «Delete the previous version of Windows» and click «Clean now».
Once you complete the steps, the Windows.old folder will no longer exist on your computer.
Here is a quick tutorial that has SOLVED ‘can’t delete Windows.old’ error in Windows 10. Scroll down to check the #complete solutions# with detailed guidelines.
Video source: YouTube; Created by Sele Training.
2 Bonus Tips: Extend System Drive After Deleting Windows.old
Besides deleting Windows.old folder using the above 3 methods, you can also try other methods to extend system C drive space. If this is what you want, try the following 2 quick tips to gain space and extend your C drive immediately:
#1. Extend C Drive using Free Partition Manager Software
Free partition manager software provided by EaseUS software can efficiently extend the system C drive with its Resize/Move feature.
Here are the steps:
Step 1: Free up unallocated space for C drive.
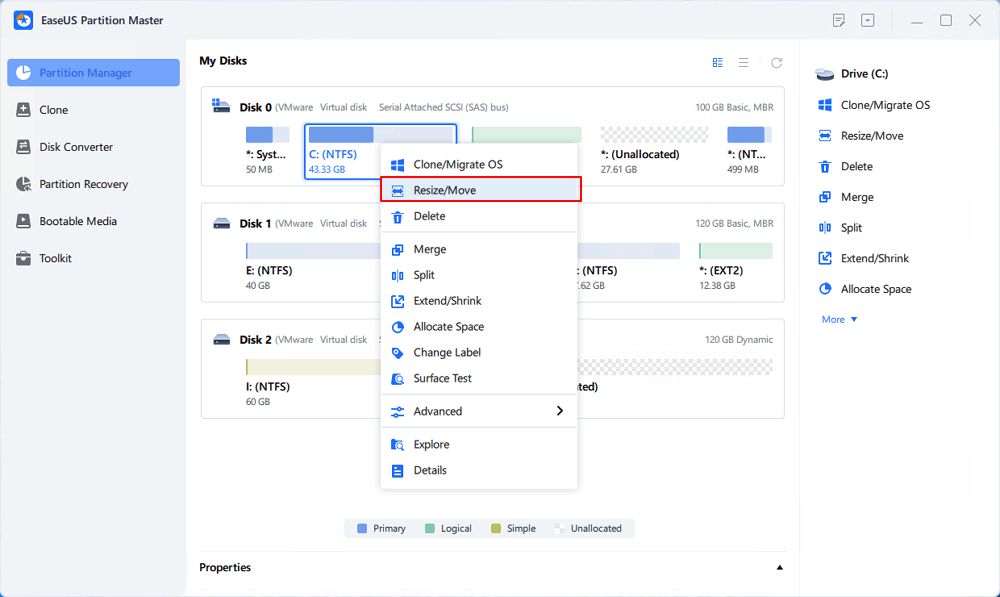
If there is no unallocated space on the system disk, go to Partition Manager and right-click on a partition next to the C: drive and select «Resize/Move».
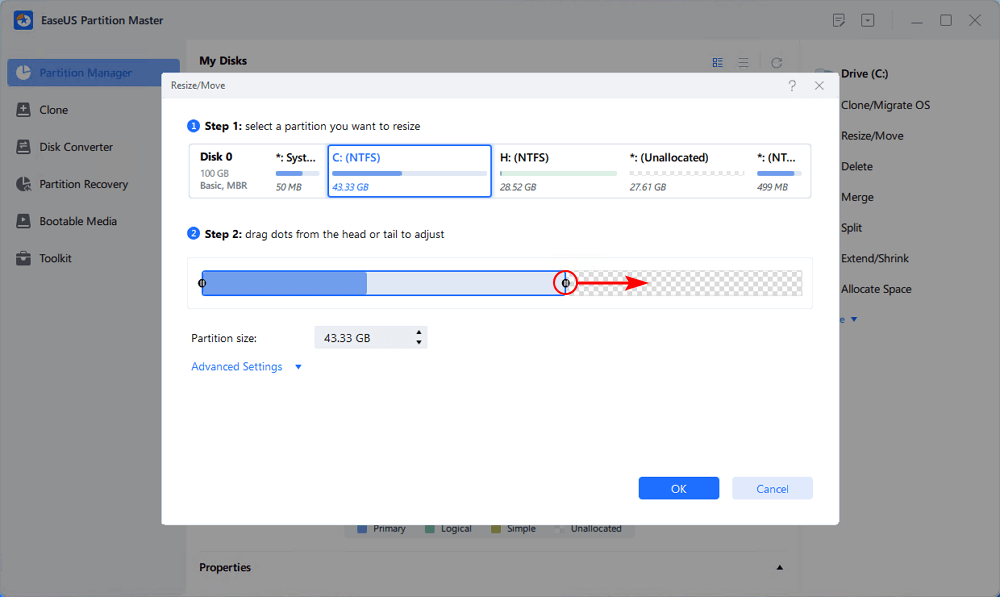
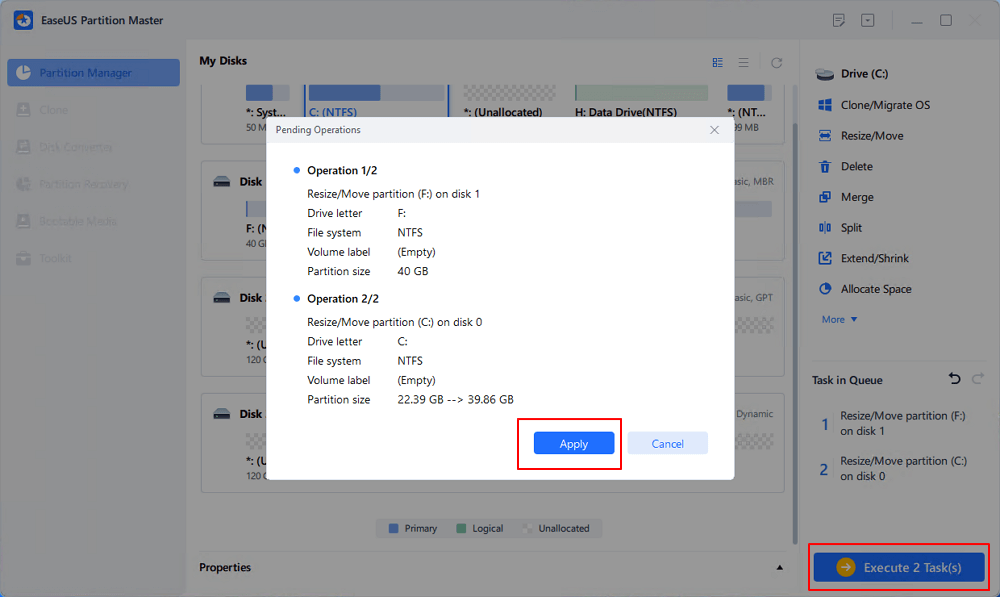
Drag left panel of the partition to shrink and leave unallocated space behind the system C: drive and click «OK».
Step 2: Increase C drive space.
1. Right-click on C: drive and select «Resize/Move».
2. Drag the system partition end into unallocated space so to add space to C: drive and click «OK».
Step 3: Keep all changes to extend C: drive.
Click the «Execute Task» and click «Apply» to keep all changes so to extend the system C: drive.
#2. Clean Up Large File on System Drive
Step 1. Download and install EaseUS Partition Master Suite.
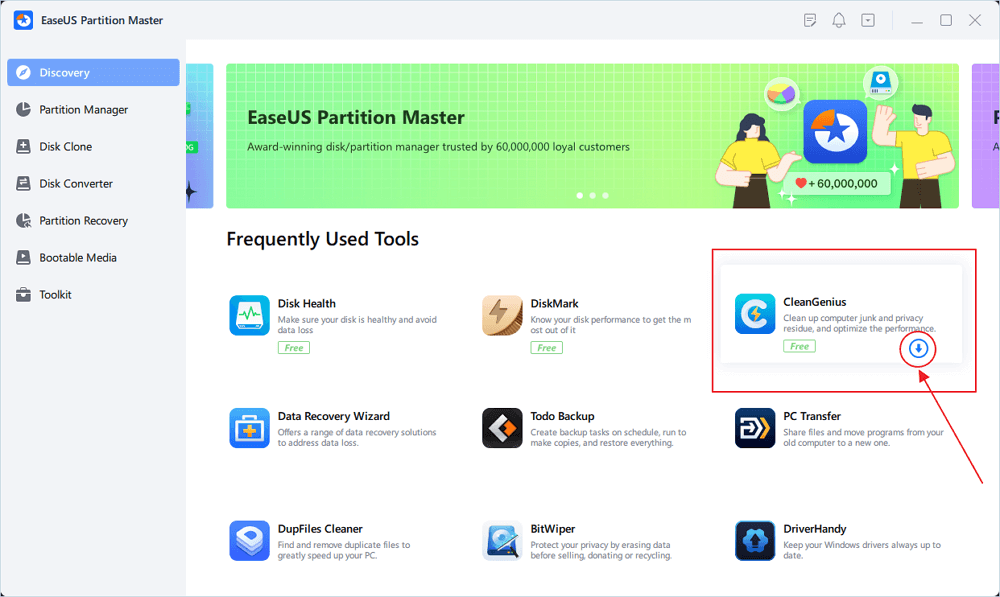
Step 2. Click PC Cleaner and install EaseUS CleanGinus. Then, click «Cleanup» and click «Scan» to start cleaning up the system and make your PC as good as new.
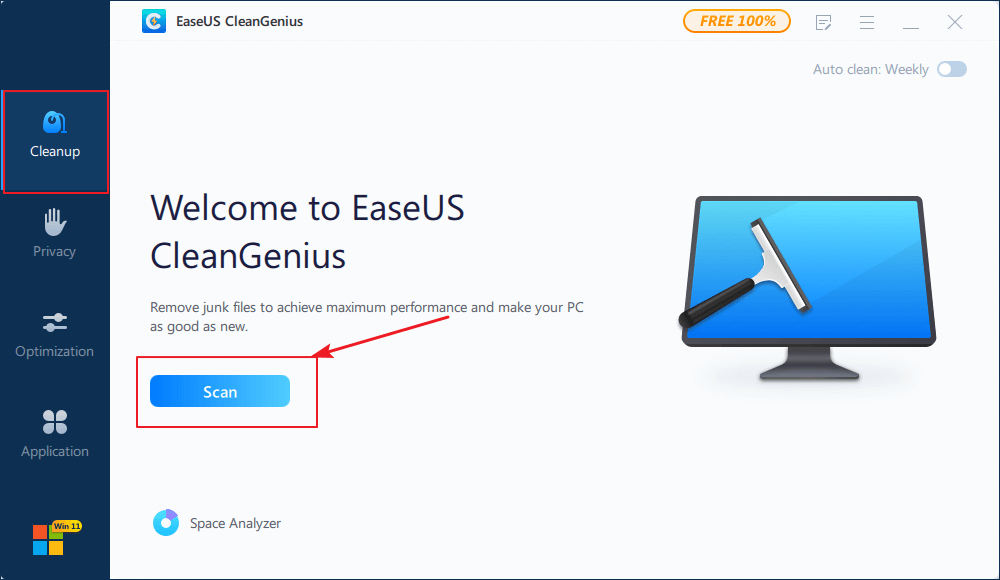
Step 3. The software will scanning all over your computer to find idle data files that take a huge amount of disk space, you can select useless large files, system junk files and Windows invalid entries and click «Clean» to start system cleanup process.
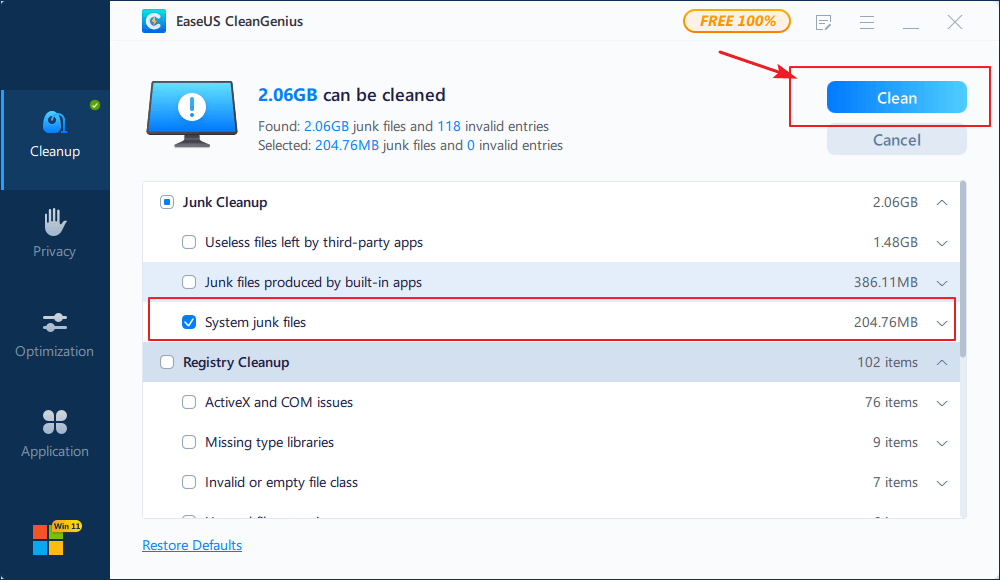
Step 4. When the scan is complete, click «Done» to finish cleaning system junk files.
Conclusion and Windows.old FAQS
On this page, we explained what is Windows.old folder, what you can do with Windows.old folder, the default location of this folder, and offered three practical methods to help you fix «can’t remove Windows.old folder» issue on Windows 10.
These methods also can be applied to delete this folder on other older Windows operating systems, like Windows 8.1/8/7, etc. Here, we also collected some top concerned questions and left brief answers to help you out. If you are having the same concerns, check and find the answers:
1. How do I manually delete Windows.old?
Based on the provided methods on this page, you will need to first log in to your computer as an administrator.
And then you can use Windows Temporary file settings, Windows disk cleanup, or Windows Storage Sense settings to manually delete Windows.old folder from your computer. For a detailed guide, refer to the detailed steps listed in Method 1, Method 2, and Method 3.
2. How do I restore system from Windows.old?
To restore system from the Windows.old folder, you can navigate to Settings > Update & security > Recovery. Then click «Get started» under «Go back to Windows 7» or «Go back to Windows8.1».
Note that this option is only available for 10 days or 1 month after you upgrade.
3. How do I restore files from Windows.old?
There are three ways to get back the Windows.old folder. You can manually or automatically recover the Windows.old folder. Or restore files from Windows.old folder using EaseUS file recovery software in just three steps.
For a detailed guide, you may refer to Windows.old Restore for a guide.
4. Will deleting Windows.old cause problems?
Usually, deleting Windows.old folder or files on your computer will not do any damage on your PC.
But if the Windows update failed to keep all your files or you lost files after the Windows update, you can try to bring the lost files from your Windows old by rolling back to the previous version of Windows.
Anyone who uses Windows and regularly cleans up their system by removing unnecessary data will repeatedly come across folders and files whose functionality and use are unknown to them. It is thus better to leave this data alone when performing a system cleanup and delete other files instead to free up the desired disk space. While you are playing it safe by doing so, this often results in much more memory being used than necessary.
A good example of this is the Windows.old folder, which is often found in the system partition (in addition to the current Windows version folder). In this article, you will learn exactly what this folder is as well as why and how to delete the Windows.old folder.
Contents
- Windows.old: What exactly is this system folder?
- How to delete Windows.old
- Deleting Windows.old in Windows 10: how it works in newer versions
- Is Windows.old a practical solution as a long-term backup?
Windows.old: What exactly is this system folder?
The “Windows.old” folder is a kind of backup copy of an older version of Windows. It contains the various files and settings from the previous installation of the Microsoft system which are necessary to restore the old version. Normally, Windows.old is automatically deleted after a specified period (ten days), but in practice this does not always happen leaving the folder, which is often several gigabytes in size, on the system partition alongside the current Windows folder.
You might encounter such a scenario when you perform a new Windows installation on a hard drive where Windows (the same or a different version) is already installed. In this case, the Windows.old folder is often generated but not always automatically deleted by the Disk Cleanup tool. In some cases, the backup folder will remain on the system after the specified storage period has passed following a system upgrade (e.g. from Windows 8 to Windows 10) or a Windows version update.
Note
In many cases, the Windows.old folder stores more than just system-relevant data. It also stores data from third-party applications which is the main reason why the folder is often so large and is excluded by the Disk Cleanup tool.
In order to protect your privacy, the video will not load until you click on it.
If you weresuccessful when switching to a new or alternative version of Windows a while back and you are satisfied with the system, you can confidently delete the Windows.old folder in the event that it can still be found on your hard drive after the new installation or upgrade/update.
Tip
Before deleting Windows.old, you should look at your system folder again! Check whether there are any personal files there that you may still need but have only saved in this location.
As with all system-relevant files in Windows, you cannot easily delete Windows.old as you normally would other files. To do this, you’ll need the Disk Cleanup tool mentioned earlier which is the tool that performs the deletion process automatically. When the automatic clean-up process does not work, you will need to perform the action manually using the following steps:
Step 1: Open the file explorer via the Windows Start menu or the keyboard shortcut [Windows] key + [E]. Then, click on the icon labeled “This PC”. Next, right-click on the drive containing Windows or the Windows.old folder and select “Properties” from the menu:

Step 2: Go to the “General” menu and click the “Disk Cleanup” button to start the Disk Cleanup.

Step 3: Click “Clean up system files”.

Step 4: Windows will display a list of system files that you can delete using Disk Cleanup. Check the box next to “Windows Update Cleanup” and confirm your selection by clicking the “OK” button. This will delete all data related to previous Windows updates or versions, including the Windows.old folder. This process may take some time.

Deleting Windows.old in Windows 10: how it works in newer versions
In Windows 10, Microsoft completely overhauled many of the system’s older structures and grouped together several features and functions in the “Settings” section. While this is generally very practical, it also means that the Disk Cleanup tool cannot always display or find outdated Windows files. If you find this to be the case, you can try to delete the Windows.old folder via that same «Settings» menu.
Step 1: Access the Windows 10 settings by opening the Start menu and clicking on the “Settings” tile (gear icon). Alternatively, you can select the Windows icon (Start menu) by right-clicking and selecting «Settings» from the menu:

Step 2: Select the “System” option:

Step 3: From the menu located on the left-hand side of the page, select “Storage”. Then, click on the link labeled “Configure Storage Sense or run it now”:

Step 4: Under “Free up space now”, click “Clean now” to delete Windows.old.

Is Windows.old a practical solution as a long-term backup?
Windows can save the Windows.old backup folder for up to ten days or a whole month for the purpose of restoring the system to its previous state before the folder is automatically deleted. It could technically be used as a backup to restore the system later after the defined period has passed if the folder has been left on the hard disk or if you also backed it up to an external storage device. However, this rarely works in practice since Windows automatically disables the usual system restore process that uses theWindows.old data. Furthermore, the included system files and settings, which take up a lot of disk space for a backup, quickly become obsolete.
If you want to have a long-term back-up solution after a successful system update or upgrade, we recommend using the built-in “restore points” in Windows instead. These system images are much more reliable for the purpose of restoring Windows and take up much less disk space than the Windows.old folder.

How to fix a Blue Screen of Death (BSOD)
The infamous blue screen of death usually shows up without any warning. It’s an important indicator of internal problems with hardware, software, or drivers. If Windows can no longer be run as a result of such a problem, then the forced shutdown takes place in the form of a blue screen containing an error message. This may cause unsaved files and documents to be lost. The most important thing with…
How to fix a Blue Screen of Death (BSOD)

CMD commands for the Windows command prompt
There are more than 200 CMD commands available with Windows. The command prompt can be used to control large parts of the operating system, computer, or drives. You can also use the Windows “command prompt” commands to organize your files or run network tasks. To do this, though, you have to know the right commands. Here we explain how to use CMD commands and which functions they have. Our article…
CMD commands for the Windows command prompt

“Reboot and select proper boot device” – how to fix this error
“Reboot and select proper boot device” sounds straightforward enough. It means “Restart your computer and select the hardware your system uses to start.” But how would one go about that? Because the error message can have various causes, there are multiple strategies for troubleshooting this fairly common error on Windows PCs.
“Reboot and select proper boot device” – how to fix this error

Preparing to configure Windows is stuck – how to fix it?
After a computer update, you may see the message: “Preparing to configure Windows. Do not turn off your computer.” It can take a while for the process to finish so patience is in order. However, if you’ve been waiting for a long time, preparing to configure Windows may be stuck. Find out how to fix it.
Preparing to configure Windows is stuck – how to fix it?

Activate Windows 10 God Mode — step by step
The Windows Control Panel is used to manage hardware, software, updates, audio devices, and much more in Windows. However, the control panel with its hierarchies and categories is somewhat confusing, so you may have to search for a long time. It gets easier with the Windows God Mode. We explain how the Windows 10 God Mode simplifies access to the Control Panel.
Activate Windows 10 God Mode — step by step
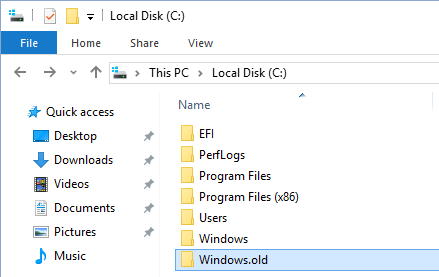
If you upgraded Windows 10 from an old version of Windows, you have a Windows.old folder on the C: drive of your computer. In this post, we show you what Windows.old folder is, whether you can delete Windows.old folder and how to delete Windows.old quickly.
What Is Windows.old Folder
When you upgrade Windows 7/8/10 to a newer version, your previous Windows installation is moved to a folder named Windows.old. Windows.old is created by Windows Setup and is an archive of your old Windows installation. It is regarded as your return ticket to your previous Windows version within 30 days.
So, what is saved in Windows.old? In particular, you will find the old registry hives in C:Windows.oldSystem32config, and your personal profile files in C:Windows.oldSystem32Users, which includes Cookies, Start Menu, UserData and more.
How to Delete Windows.old Folder
Let’s start with a question put forwarded in tenforums.com:
I’m in the Windows Insider program and have updated Windows 10 several times now. Each time, creating a Windows.old folder. Do I need to keep these, and if not, what’s the best way of deleting them? This is probably a silly question, but better safe than sorry. Thanks!
Windows.old usually takes 10 GB around disk space, depending on how large your previous Windows installation was. Hence, you may wonder: can I delete Windows.old folder to get spare disk space, and how can I delete Windows.old, just like the one wondering in tenforums.com.
The answers here are positive. As long as you’re satisfied with your current Windows system and don’t want to downgrade, and as long as you have saved all your important files from Windows.old, you can go ahead and remove it.
Detailed steps are shown below, just keep reading.
1st Move: Show Windows.old Folder
Windows.old is regarded as a system file. In case you have set to hide protected operating system files, you need to make Windows.old appear on your PC to get your important files (if there is any) from it in advance. So the first move here is to make sure that option is unchecked.
Take deleting Windows.old folder in Windows 10 for example.
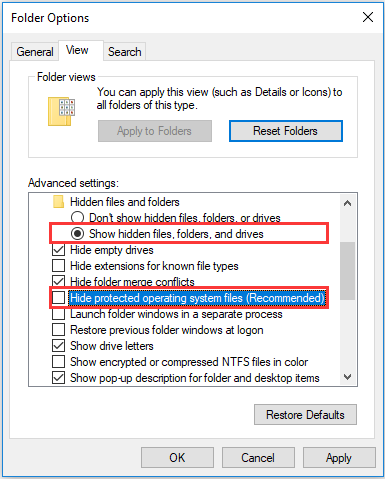
Step 1. Go to File Explorer, navigate to View > Options > Change folder and search options to get Folder Options window.
Step 2. Then navigate to View tab. Under “Hidden files and folders”, be sure to select “Show hidden files, folders and drives” and uncheck the “Hide protected operating system files (Recommended)”.
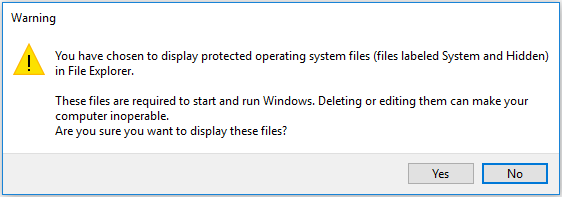
Step 3. Immediately after you uncheck the “Hide protected operating system files (Recommended)”, you will receive a warning message saying that these files are required to start and run Windows, deleting or editing them can make your computer inoperable. Just click Yes to confirm the display of these files.
Tip: After deleting Windows.old, you can revert to the previous settings to hide the system protected files.
Step 4. Finally, press OK on the Folder Options window to save your change.
2nd Move: Save Important Files from Windows.old
Before you delete Windows.old folder, you’d better take the chance to save important files from Windows.old if there are.
Step 1. Please go to C:Windows.old to find the folder named with your username.
Then open it and copy the files you need including documents, music, pictures, etc. to another location. If you want to import your Windows Live Mail messages from the Windows.old folder, you can click here to know the detailed steps.
Now it’s time for you to delete Windows.old files.
3rd Move: Delete Windows.old Files
Please note that deleting Windows.old is different from deleting a normal folder. You can’t delete Windows.old folder by simply right clicking that folder and choose Delete. If you do like this, you will need permission from system to delete Windows.old. See the following picture:
So, you should refer to either of the two ways below to delete Windows.old files.
Way 1: Use Disk Cleanup
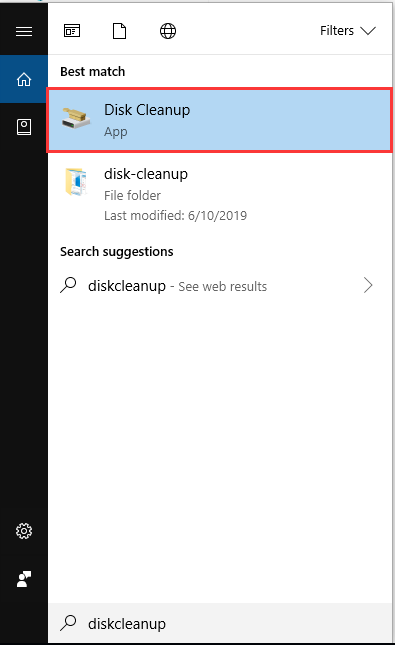
Step 1: Click in Windows’ search field, type “Cleanup”, then click Disk Cleanup form the best match.
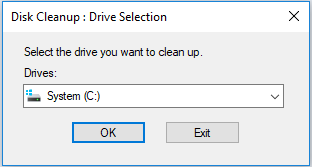
Step 2. You will come across a window allowing you to select a drive to clean up. Since Windows.old is saved to C: and C: is selected here by default, you just click OK to continue. Disk Clean-up will take some time to calculate how much space is able to be released. Please wait patiently.
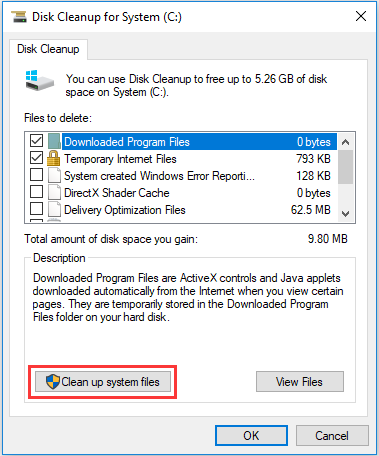
Step 3. Click the «Clean up system files» button. Again, choose the C drive to.
Step 4. Wait a bit while Windows scans for files, then scroll down the list until you see «Previous Windows installation(s).» Check the box next to the entry, then make sure there are no other boxes checked (unless you do indeed want to delete those items). Click OK to start the cleanup.
By doing these, Windows.old should have been deleted.
Way 2: Use CMD
However, some users report that Disk Cleanup does not delete Windows.old. Here is a true example we extract from forums.lenovo.com:
I just bought a Lenovo Y50-70 notebook, and it came with windows 10 preinstalled. Fiddling around, I found a Windows.old folder in the C: drive, so I figured the shop already did the upgrade for me. I tried using disk clean up to remove Windows.old folder, but after it’s done, the folder still doesn’t go, occupying around 1GB of my storage.
Why can’t I delete Windows.old? Any help would be appreciated.
At this time, we strongly recommend using CMD. How to delete Windows.old using CMD? Want to know the best part? Please follow the guide below:
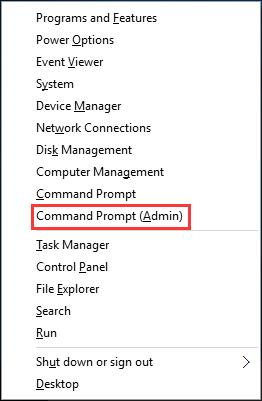
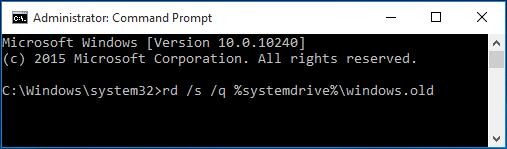
Step 1. Press “Win + X” to call out the power user menu. Then select “Command Prompt (Admin)” and allow it to take control of your PC.
Step 2. In the command prompt window, type “RD /S /Q %SystemDrive%windows.old” and hit Enter. Then Windows.old folder will be deleted in Windows 10 without any obstacles.
“Wow! Windows.old can be easily deleted by using these two solutions. You also want to release more disk space from C drive by deleting Windows.old? Why not have a try!”Click to Tweet
More Windows 10 Tips: Hard Drive Is Full without Reason in Windows 10/8/7? Solutions Are Here.
Downgrading Windows 10 to the Previous Version
If you are not certain whether you want to downgrade after 30 days, we suggest that you make a backup of the current Windows 10 before you delete Windows.old. Then use the Windows 10 copy to downgrade to the previous Windows 7/8 or Windows 10. In this way, if someday you want to go back to the previous version, you can avoid the reinstallation.
Users who back up Windows operating system do these two things well: first of all, they prepare another hard drive; secondly, they download MiniTool Partition Wizard Free which is compatible with Windows 7/8.1/10 all editions.
Free Download
MiniTool Partition Wizard Free is professional disk management software that has helped numerous of Windows users deal with their hard drive issues. For example, it helps to address low disk space warning, it is able to resolve New Simple Volume greyed out issue, and plays an important role in SD card formatting. The useful features are too many, and we are not going to cover all of them here.
To back up Windows 10, please follow the steps below.
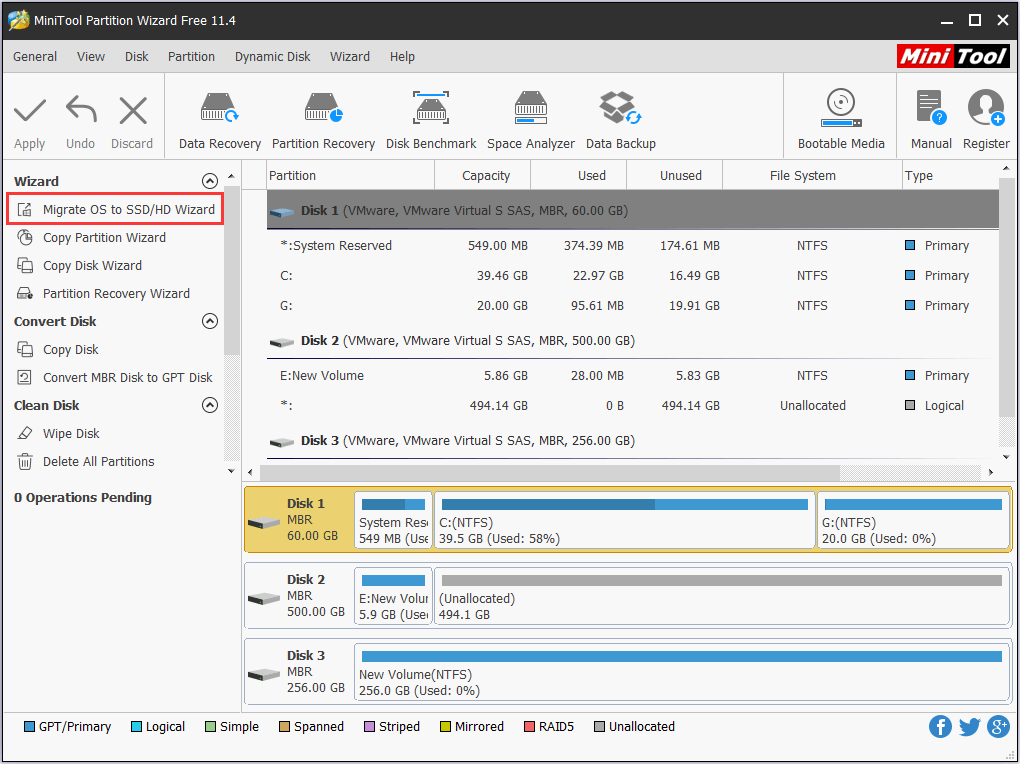
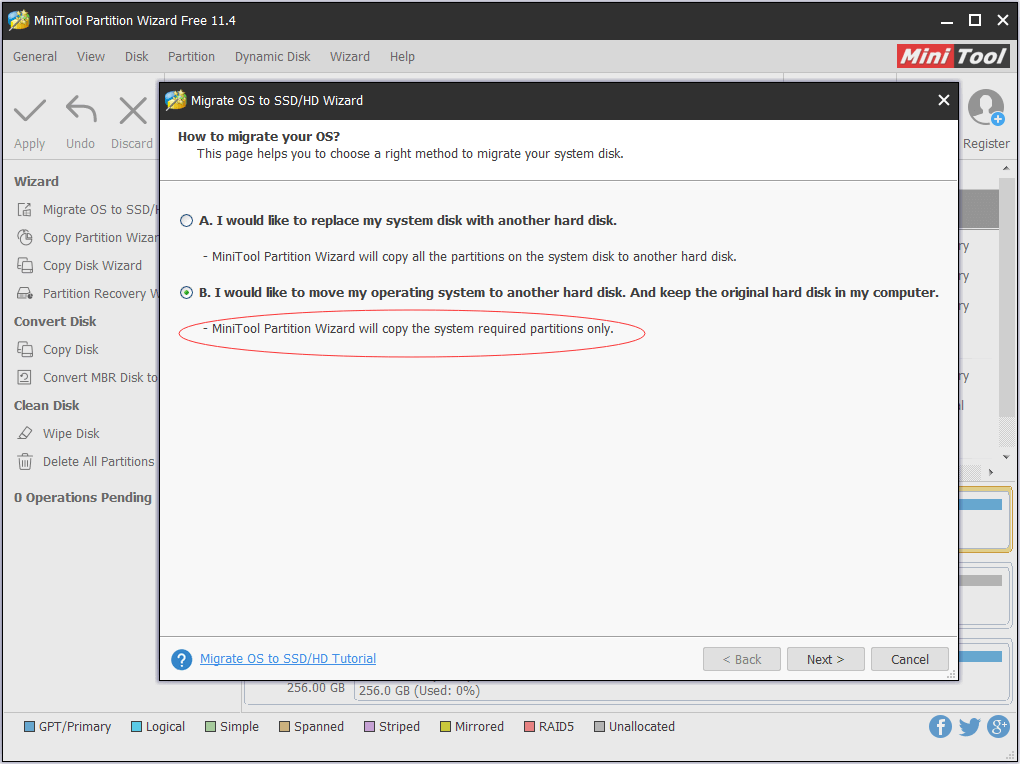
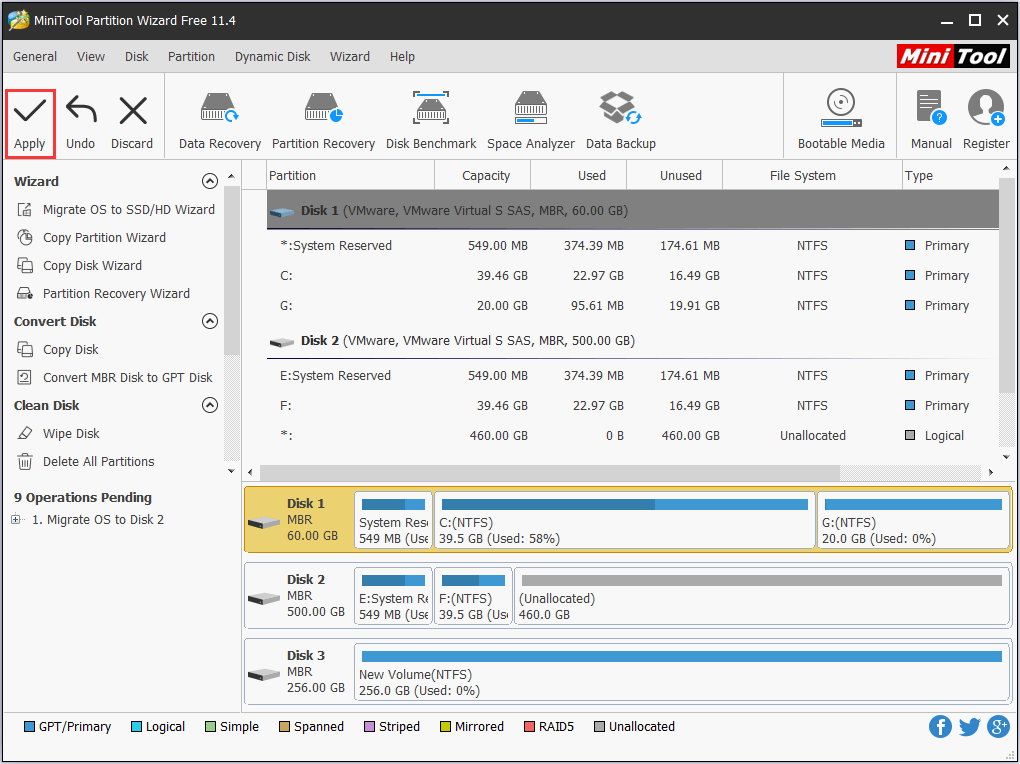
Step 1. After installing MiniTool Partition Wizard on computer, click Migrate OS to SSD/HD from the tool bar.
Tip: If you want to back up the whole drive, Copy Disk is the best choice for you.
Step 2. MiniTool Partition Wizard will ask you how you would like to migrate your OS. Since we recommend backing up system, choose option B to copy the system required partitions only. Then click Next to continue.
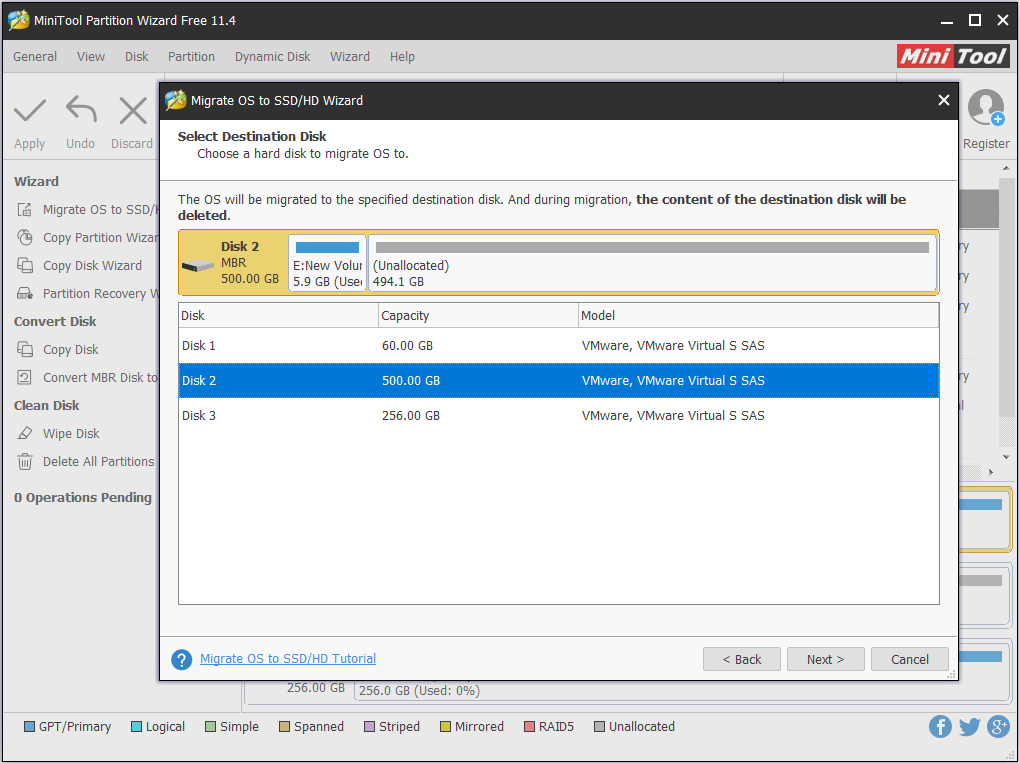
Step 3. Select a destination disk to hold Windows 10. Note that the destination disk should be basic disk and it will be cleaned for a successful system migration. Taking that into account, you had better transfer the important files on the destination disk to another location before you continue this work. When the destination disk is ready for system migration, hit Next to go on.
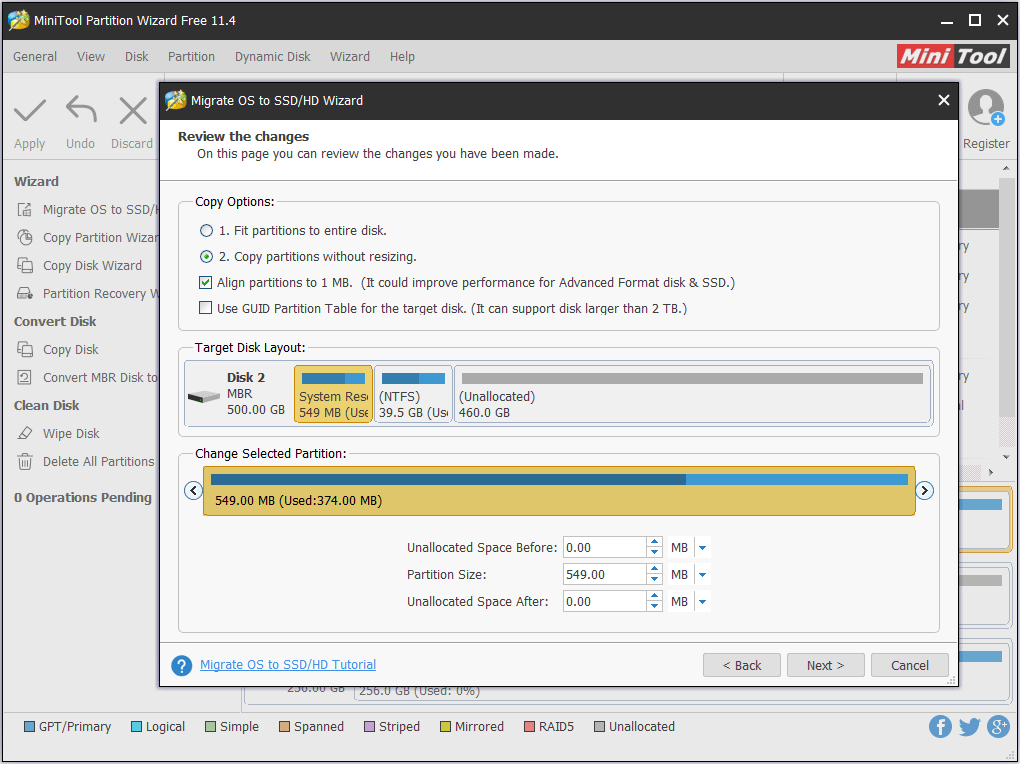
Step 4. On this page, you can preview what is going to happen to your destination disk. Also, you can make some changes to the target disk. Click Next button.
- “Fit partitions to entire disk” is selected by default, but you can also choose “Copy partitions without resize”.
- Please keep “Align partitions to 1MB” checked if your target disk is an SSD or advanced format disk.
- It is worth mentioning that “Use GUID Partition Table” is a paid feature, but you don’t need to pay for this since you are only doing a backup. What’s more, you can resize each partition by dragging the sliding bar.
Step 5. On this page, MiniTool Partition Wizard tells you how to boot from the destination disk. Since you will use this backup copy, you should read it carefully before you click Finish.
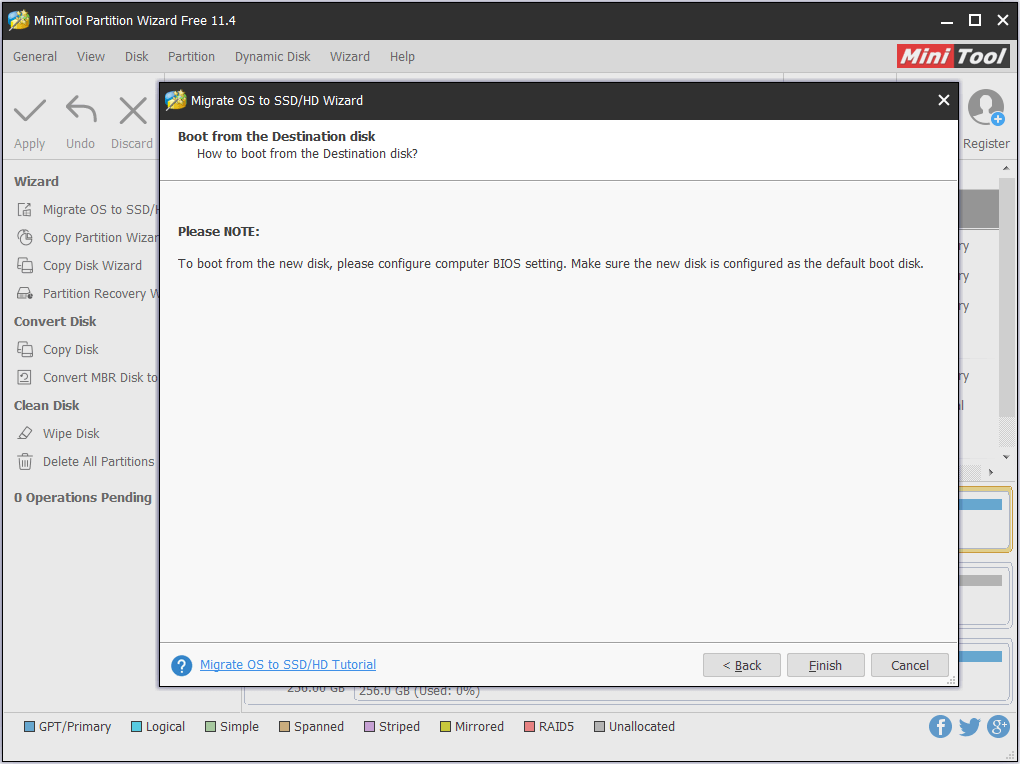
Step 6. Now you are back to the main interface where you can preview the target disk from the disk map. If you agree on this change, click Apply button on the tool bar to start system migration. Your computer will be restarted in order to finish this job.
Tip: MiniTool will keep Windows 10 on the original hard drive. Through Migrate OS to SSD/HD feature, you get two copies of Windows 10.
Free Download
“Still hesitating whether you want to go back to the previous version of Windows? Why not use MiniTool Partition Wizard to make a system backup and then roll it back!” Click to Tweet
Now it is time to boot your computer from this backup copy and then roll back Windows 10 to the previous version.
To roll back using the native Windows 10 recovery tool, go to Settings -> Update & Security -> Recovery. Click the “Get started” button under “Go back to Windows 7” or “Go back to Windows 8.1” depending on your previous OS.

The rollback option via Windows.old is available for at most 30 days. If you no longer see the option shown above, you either have passed the valid-date OR you installed a newer version of Windows 10, in which case the respective choice will be “Go back to an earlier build”.
Be aware that the Windows.old backup only allows downgrading to the last version of Windows. If you upgraded Windows 10 from Windows 7, then installed another update of Windows 10, you are only allowed to downgrade to the first edition of Windows 10 instead of going back to Windows 7.
When you have downgraded Windows 10 to the previous version, shout down your PC and set your computer to boot from the original system disk. By doing these, you can continue using the latest Windows operating system and have the chance to use the previous version as well. Now you can delete Windows.old without worries.
More Windows 10 Tips:
- Rollback Windows 10 to Windows 7 or 8.1 after One Month Limit
- How to Free Backup Windows 10 to USB Flash Drive
Bottom Line
Here comes to the end of this post. In this article, we introduce what is Windows.old folder, and how to delete Windows.old files. In addition, we also tell how to use Windows.old to roll back to the previous version of Windows. But if you are satisfied with the new updated system, you can go ahead and just delete it.
And remember, Windows will automatically remove the Windows.old folder a month after you upgrade, anyway.
Now, it is your turn. If this post is proved to be useful, share with friends. If you have any questions or suggestions on this subject, let us know by typing your questions in the comment section. Or you can contact us via [email protected]. Thanks!