Ten days after you upgrade to Windows, your previous version of Windows will be automatically deleted from your PC. However, if you need to free up drive space, and you’re confident that your files and settings are where you want them to be in Windows, you can safely delete it yourself.
Warning: If it’s been fewer than 10 days since you upgraded to Windows, your previous version of Windows will be listed as a system file you can delete. You can delete it, but keep in mind that you’ll be deleting your Windows.old folder, which contains files that give you the option to go back to your previous version of Windows. If you delete your previous version of Windows, this can’t be undone (you won’t be able to go back to your previous version of Windows).
-
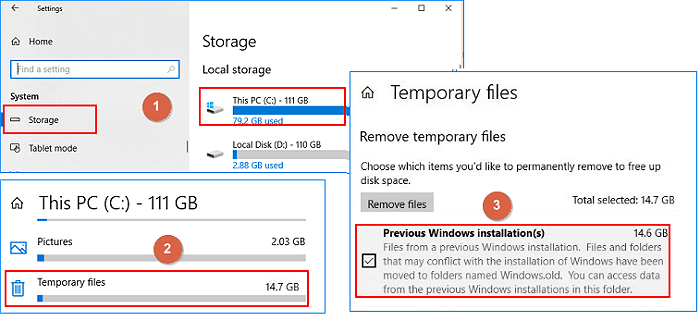
Press the Windows logo key on your keyboard, then select Settings > System > Storage.
Open Storage Settings
-
Under your hard drive information, select Temporary files.
-
Select the Previous version of Windows check box, and then select Remove files.
Related topics
-
Free up drive space in Windows
Need more help?
When you upgrade your computer to a new version of Windows 10, or you install a preview build, the installation process saves a copy of the previous version in the «Windows.old» folder.
This is part of the safety mechanism in case the upgrade process goes wrong. If the installation fails for any reason, the system can use the Windows.old folder to undo the changes. Also, if the upgrade completes successfully, the backup copy of the previous version will be kept to provide the option to rollback in the case the new installation is causing issues.
Although this is a handy feature, if your computer is working correctly after the upgrade, you can safely delete the Windows.old folder to reclaim gigabytes of space.
In this Windows 10 guide, we’ll walk you through the different ways that you can get rid of the Windows.old folder to free up several gigabytes of space to store more important files.
- How to delete the Windows.old folder using Storage sense settings
- How to delete the Windows.old folder using Temporary files settings
- How to delete the Windows.old folder using Disk Cleanup
Update November 29, 2018: We’ve updated this article with the latest information for the Windows 10 October 2018 Update.
How to delete the Windows.old folder using Storage sense settings
The easiest method to delete the Windows.old folder from your device is to use the Storage sense with these steps:
- Open Settings.
- Click on System.
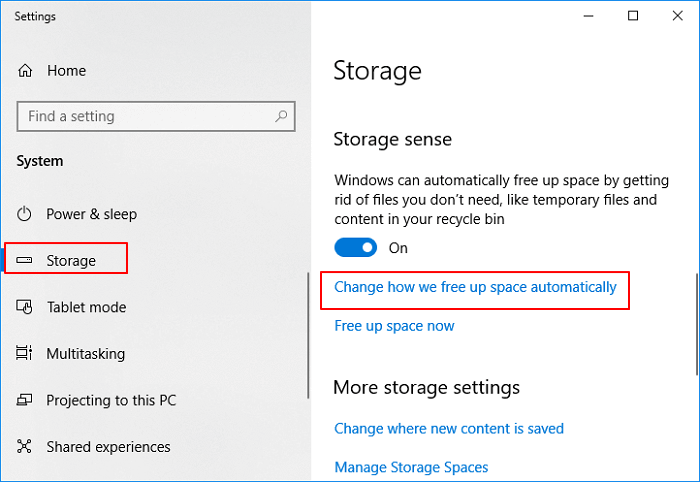
- Click on Storage.
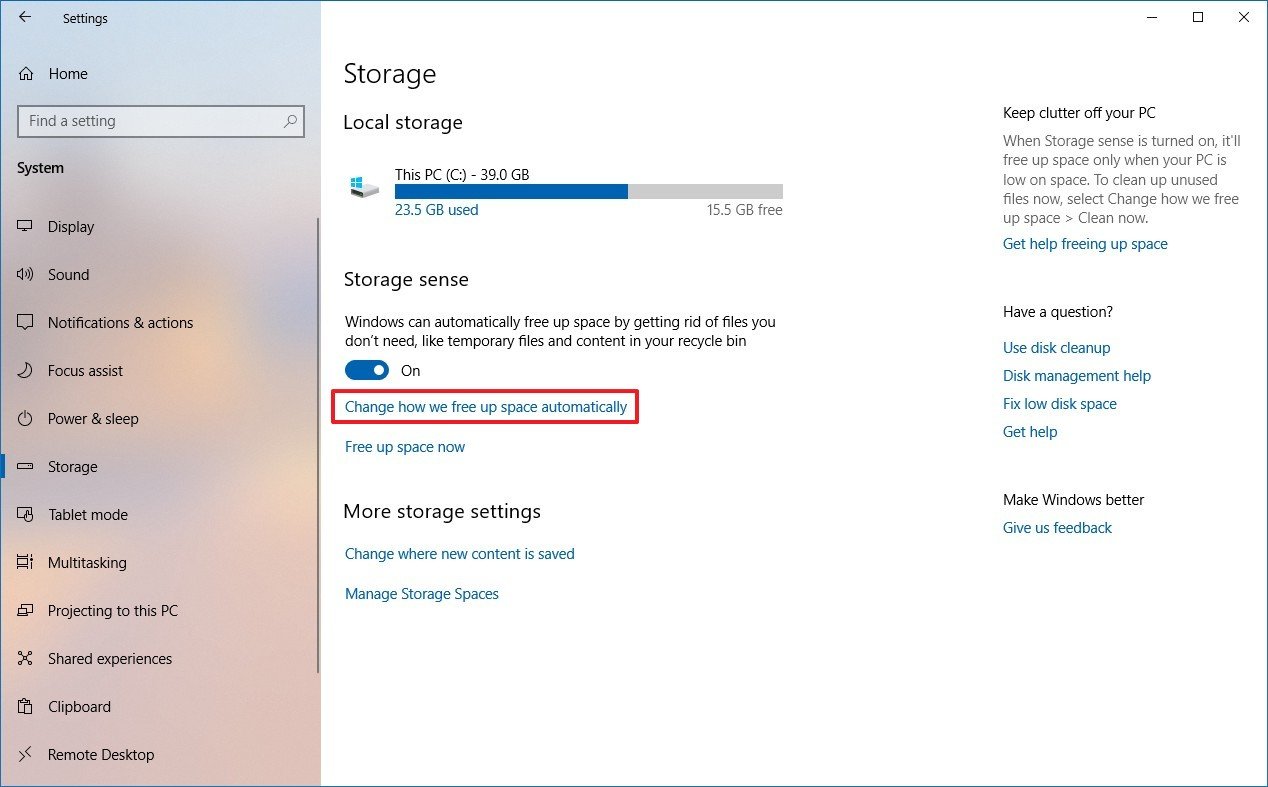
- Under the «Storage sense» section, click the Change how we free up space automatically option.
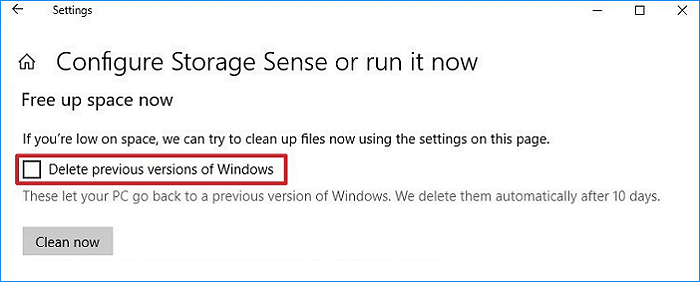
- Under the «Free up space now» section, check the Delete previous version of Windows option.
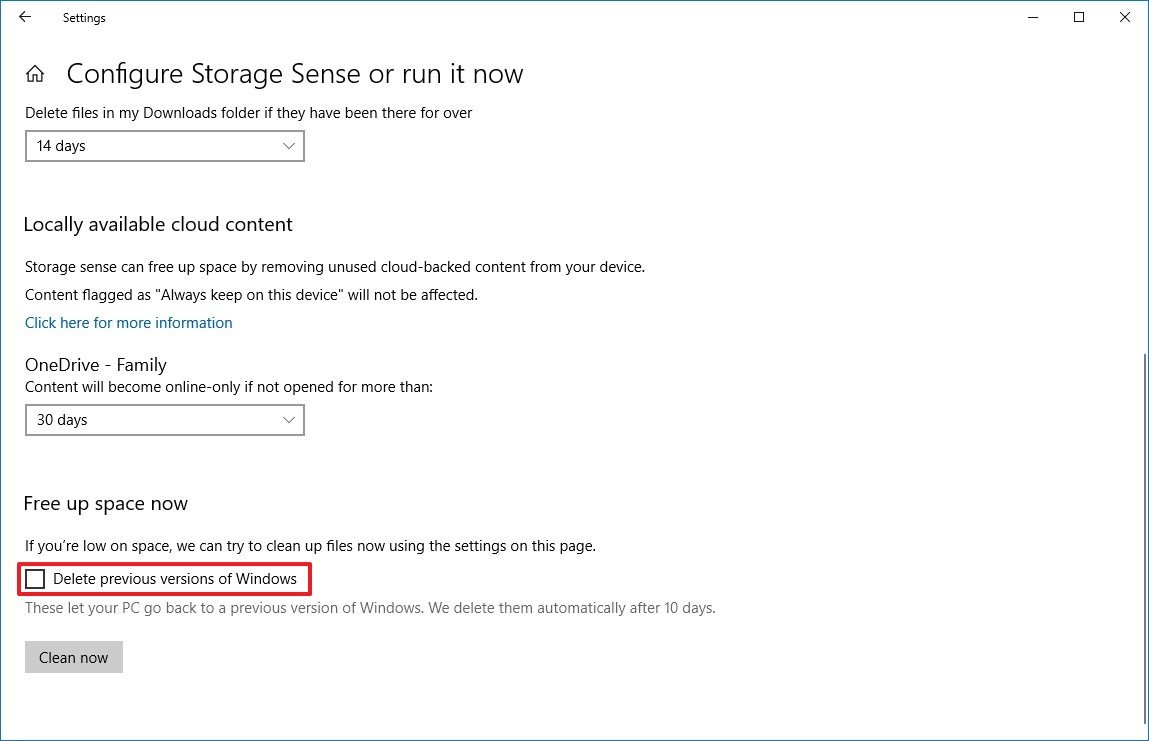
- Click the Clean now button.
Once you’ve completed the steps, the folder with the previous installation of Windows 10 will no longer be available on your device.
How to delete the Windows.old folder using Temporary files settings
Alternatively, using the Settings app, you can delete the Windows.old folder using the Temporary files settings with these steps:
- Open Settings.
- Click on System.
- Click on Storage.
- Under the «Storage sense» section, click the Free up space now option.
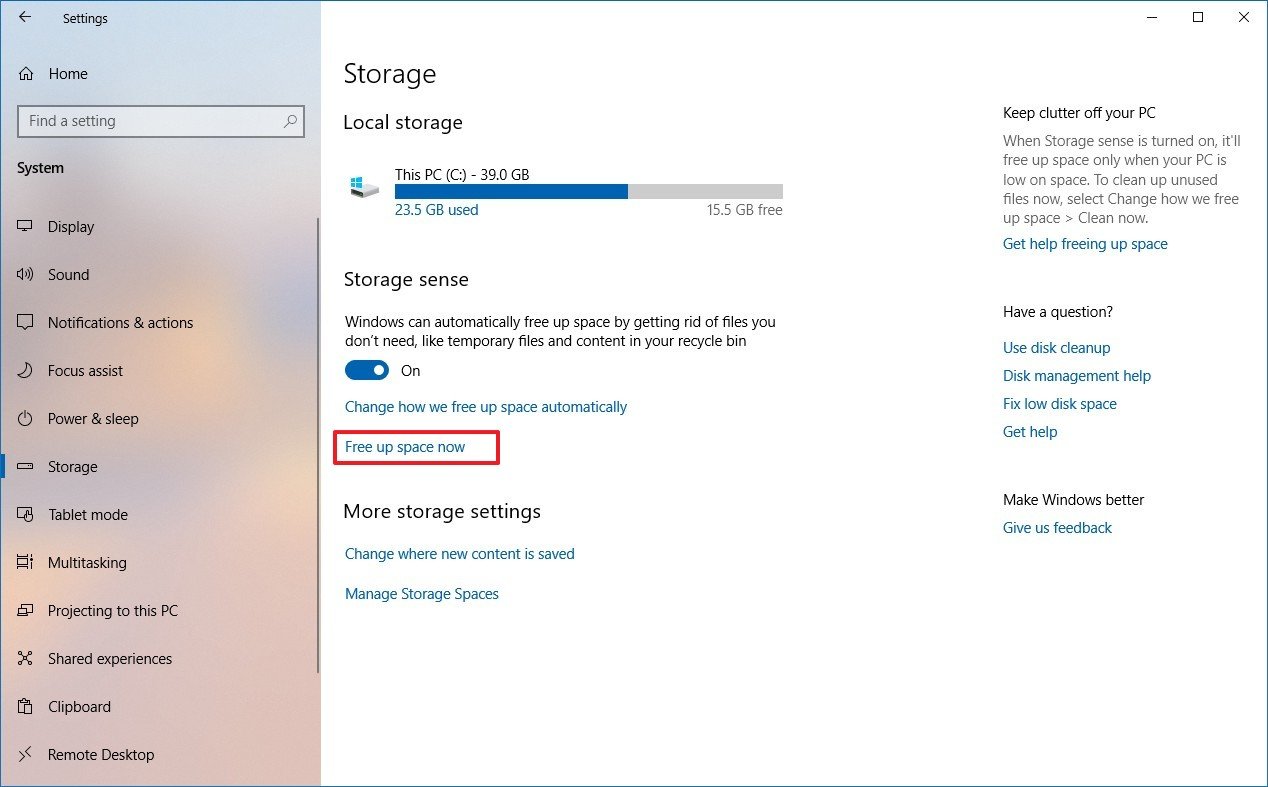
- Check the Previous Windows installation(s) option.
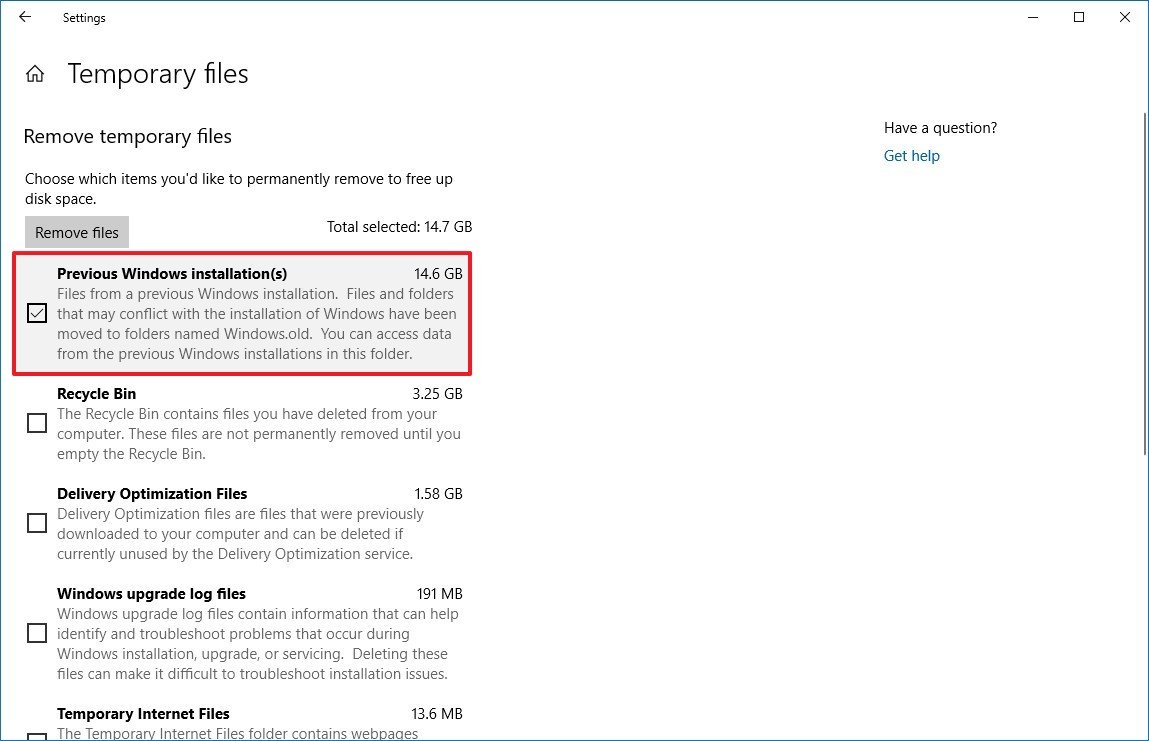
- (Optional) Clear the default selected options if you only want to remove the Windows.old folder to free up space.
- Click the Remove files button.
After completing the steps, the folder with the previous installation of Windows 10 will be removed freeing up 14GB to 20GB of storage space on your primary hard drive.
How to delete the Windows.old folder using Disk Cleanup
You can also delete the Windows.old folder using the legacy Disk Cleanup tool with these steps:
- Open File Explorer.
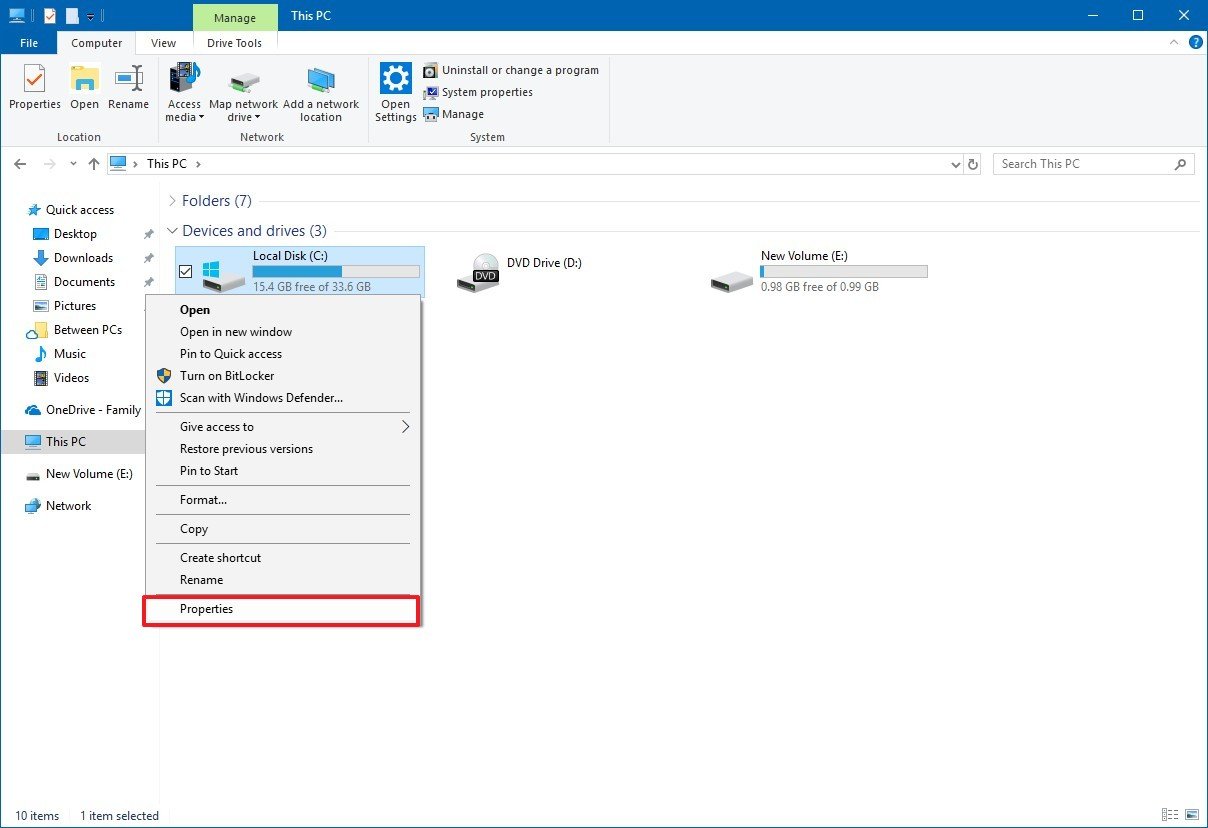
- Click on This PC from the left pane.
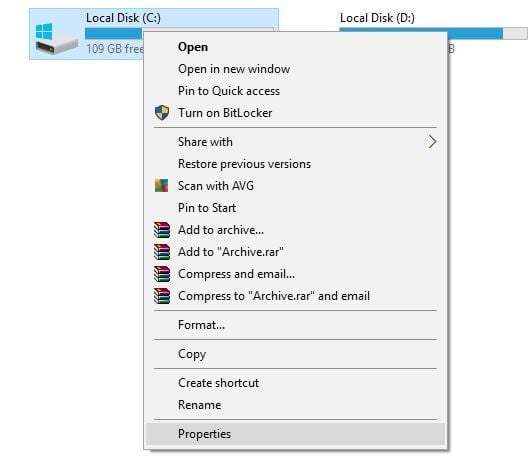
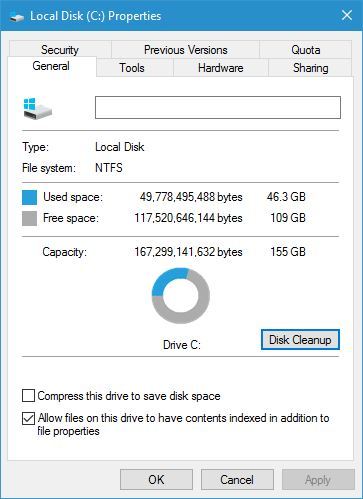
- Under the «Devices and drives» section, right-click the drive with the Windows 10 installation (usually the C drive) and select the Properties option.
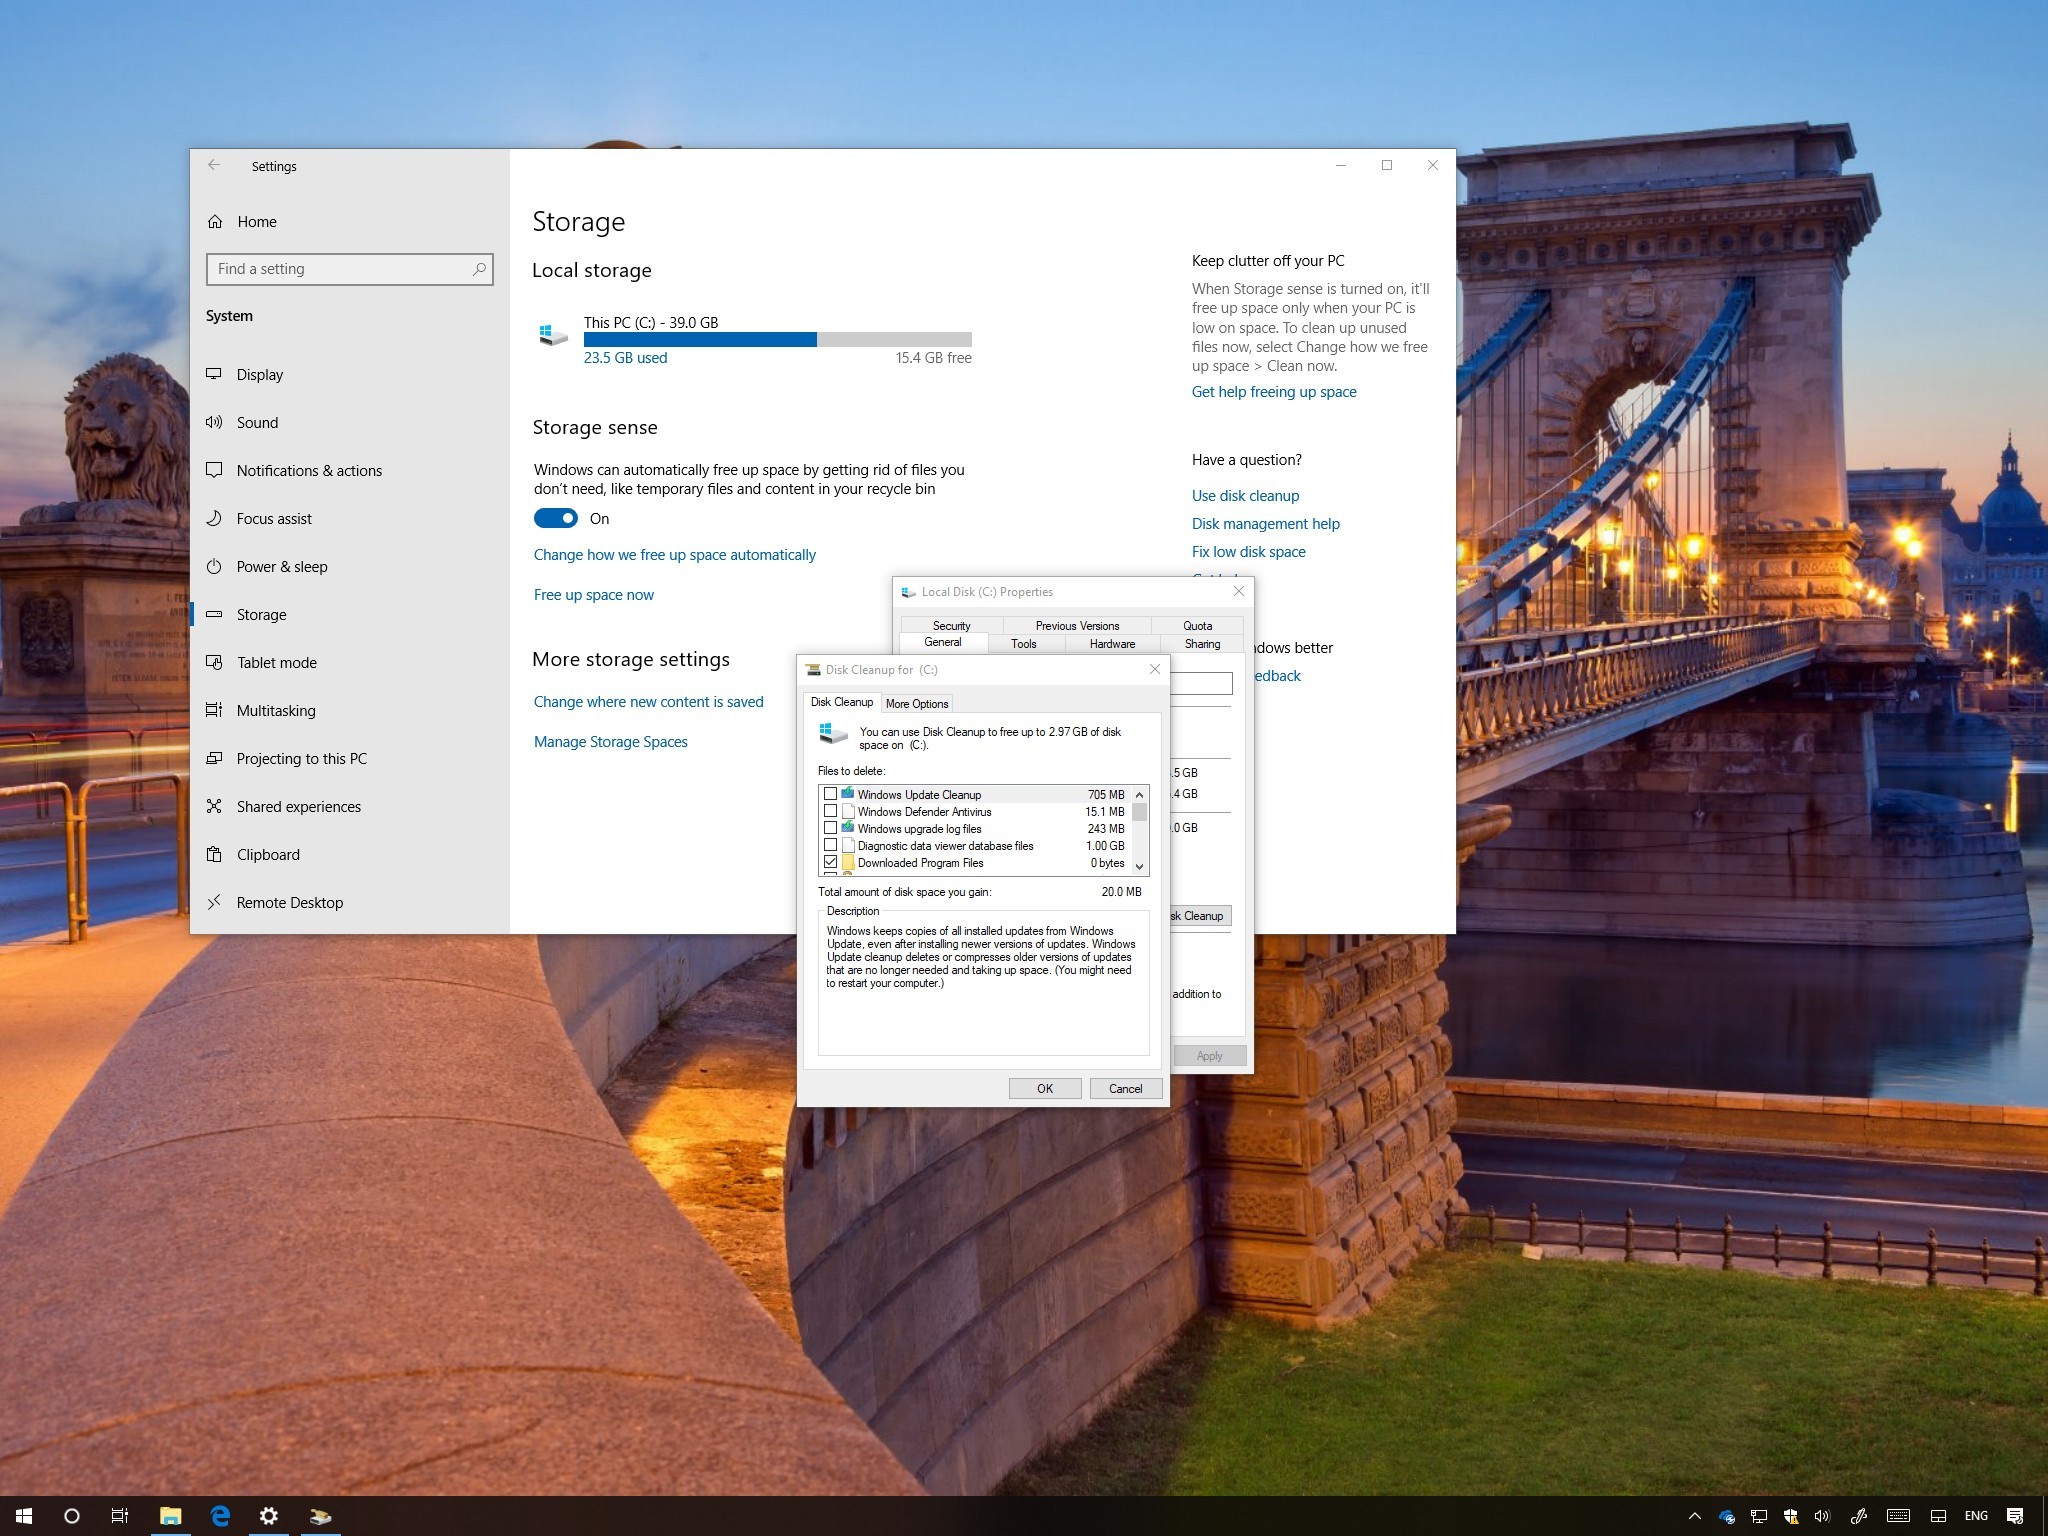
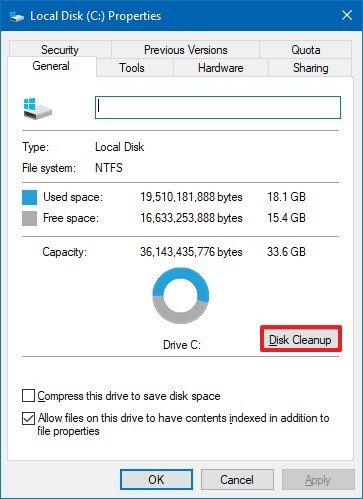
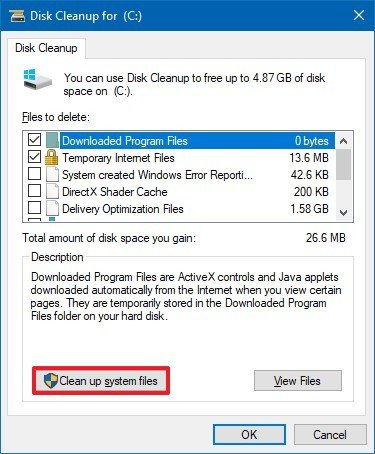
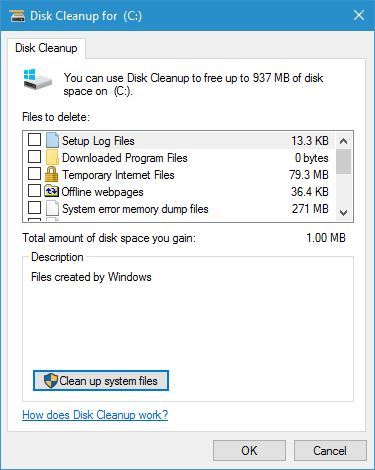
- In the «General» tab, click the Disk Cleanup button.
- Click the Cleanup system files button.
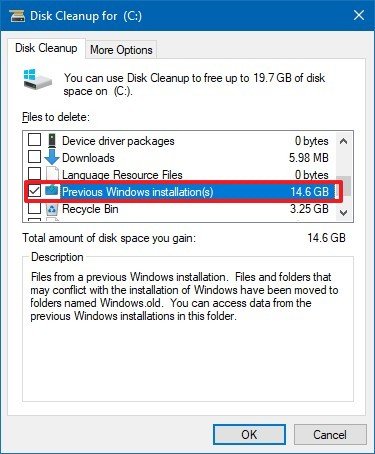
- Check the Previous Windows installation(s) option.
- (Optional) Clear the default selected options if you only want to remove the Windows.old folder to free up space.Important: Starting with the October 2018 Update, Windows 10 is deprecating Disk Cleanup in favor of Storage sense, but it adds an option to delete all the contents from the Downloads folder. If you’re using this option, and you have important files in the Downloads folder, make sure to clear this option.
- Click the OK button.
- Click the Delete Files button to confirm the deletion.
- Click the Yes button to confirm the warning.
Once you’ve completed the steps, the Windows.old folder will be removed from your device.
Wrapping things up
While it’s safe to delete the Windows.old folder, if you remove its contents, you will no longer be able to use the recovery options to rollback to the previous version of Windows 10. If you delete the folder, and then you want to rollback, you’ll need to perform a clean installation with the desire version.
More Windows 10 resources
For more helpful articles, coverage, and answers to common questions about Windows 10, visit the following resources:
- Windows 10 on Windows Central – All you need to know
- Windows 10 help, tips, and tricks
- Windows 10 forums on Windows Central
Get the best of Windows Central in in your inbox, every day!
Mauro Huculak is technical writer for WindowsCentral.com. His primary focus is to write comprehensive how-tos to help users get the most out of Windows 10 and its many related technologies. He has an IT background with professional certifications from Microsoft, Cisco, and CompTIA, and he’s a recognized member of the Microsoft MVP community.
Windows.old folder gets created when you upgrade your Windows installation to a newer version of Windows operating system, when you install Windows on an existing version of Windows without formatting the drive, or when you perform a Refresh operation.
Why Windows.old folder is used?
If you have Windows.old folder under the root of your Windows 10 installed drive, it’s either because you have upgraded from Windows 7/8 to Windows 10 or performed a clean installation of Windows 10 without formatting the drive containing previous Windows installation files.
The Windows.old folder contains all files and apps from the previous Windows installation. The Windows installer uses this folder when you want to downgrade to the earlier version of Windows or when the installation of a newer version of Windows fails to complete.
Is it safe to delete the Windows.old folder?
Yes, it’s safe to delete the Windows.old folder unless you have plans to downgrade to the previous version.
Why remove the Windows.older folder?
Since the Windows.old folder contains all Windows operating system files and installed apps, it takes a significant amount of disk space. In some cases, Windows.old folder size might go up to 10 to 15 GB, depending on the total size of the previous Windows installation.
Users who have installed Windows on a smaller SSD drive or users who don’t have allocated a significant amount of disk space to the Windows installed drive might want to delete or remove Windows.old folder to gain some valuable disk space.
But Windows.old folder can’t be quickly deleted by right-clicking on it and then clicking the Delete button.
So how to delete Windows.old folder to free up disk space in Windows 10? There are a couple of ways out there to delete Windows.old folder. You can either use the native Disk Cleanup tool or use third-party free tools like CCleaner for the job.
Follow the instructions in one of the below-mentioned methods to get rid of Windows.old folder and free up GBs of disk space in Windows 10.
WARNING: Don’t delete Windows.old folder if you have plans to revert to the previous version of Windows. That is if you have upgraded your Windows 7/8 installation to Windows 10 and now planning to downgrade to Windows 7/8 again for some reason, don’t even think of deleting Windows.old folder as downgrade operation can’t be performed without the Windows.old folder.
Method 1 of 3
Delete Windows.old folder in Windows 10 using Disk Cleanup
Step 1: Open up This PC. Right-click on the drive where Windows is installed and click Properties.
Step 2: Under the General tab, click the small Disk Cleanup button to run the same. And if the Disk Cleanup button is not appearing as shown in the picture below, please refer to our Disk cleanup missing from drive properties in Windows 10 guide to restore the same.
Step 3: Once the Disk Cleanup utility shows the following dialog box, click the Clean up system files button to begin the scan.
Step 4: Finally, when you see the following dialog, look for the entry named Previous Windows installation(s) or Windows.old folder. Check Previous Windows installation files or Windows.old folder, and then click OK button to delete the Windows.old folder.
That’s all!
The Windows.old folder should no longer appear under the root of Windows installed drive.
Method 2 of 3
Removing Windows.old folder using CCleaner
If the Disk Cleanup tool isn’t listing Windows.old folder, you could take the help of popular CCleaner software to delete it.
Step 1: Download and install CCleaner software if it is not already installed on your PC. You can download the latest version of CCleaner for Windows 10 from here.
Step 2: Run CCleaner, click on the Cleaner tile in the sidebar, and uncheck all options except Old Windows Installation on the right side under Windows and Applications if you are interested in deleting only Windows.old folder.
Step 3: Click the Analyze button to begin the scan. Once done you’ll see Old Windows Installation and its size on the right-side. Click Run cleaner button to delete the Windows.old folder from your Windows 10 PC.
That’s it!
Method 3 of 3
Delete Windows.old folder in Windows 10 using Command Prompt
Step 1: Open elevated Command Prompt. To do so, type CMD in the taskbar search box or Start search box and then simultaneously press Ctrl+Shift+Enter keys to open Command Prompt as administrator. Click the Yes button when you see the UAC dialog.
Step 2: In the Command Prompt, paste the following command and then press Enter key to delete Windows.old folder.
RD /S /Q %SystemDrive%windows.old
If you’re getting any error, make sure that you launched the Command Prompt as administrator. Good luck!
Try expert-tested solutions to get rid of it
by Milan Stanojevic
Milan has been enthusiastic about technology ever since his childhood days, and this led him to take interest in all PC-related technologies. He’s a PC enthusiast and he… read more
Updated on August 31, 2022
Reviewed by
Vlad Turiceanu

Passionate about technology, Windows, and everything that has a power button, he spent most of his time developing new skills and learning more about the tech world. Coming… read more
- The Windows.old folder is created when you install a new version of Windows.
- This folder contains the old installation files for the previous OS.
- A lot of disk space is occupied by the Windows.old.folder.
- We are going to show you how to delete it from your Windows 10 device.

XINSTALL BY CLICKING THE DOWNLOAD FILE
This software will repair common computer errors, protect you from file loss, malware, hardware failure and optimize your PC for maximum performance. Fix PC issues and remove viruses now in 3 easy steps:
- Download Restoro PC Repair Tool that comes with Patented Technologies (patent available here).
- Click Start Scan to find Windows issues that could be causing PC problems.
- Click Repair All to fix issues affecting your computer’s security and performance
- Restoro has been downloaded by 0 readers this month.
Windows 10 and some previous versions of Windows sometimes create a folder called Windows.old.
This folder is usually created when you install a new version of Windows, and today we’re going to explain what this folder does and how to remove it from Windows 10.
What is the Windows.old folder?
When you install a new version of Windows, such as Windows 10 for example, your system automatically moves your older installation to Windows.old folder.
With this folder available you can easily restore the previous version of Windows if the new one isn’t working properly for you.
In addition, this folder works as a backup, so even if the installation process fails for some reason, your PC can use Windows.old folder to restore the previous version of Windows.
You should also know that you can roll back to the previous version of Windows 10 days after its installation, and after that period ends, Windows.old folder will be automatically deleted from your system.
As you can see, Windows.old folder can be extremely useful since it allows you to restore the previous version of Windows, but many users want to delete this folder since it takes a lot of space on their hard drive.
Keep in mind that by deleting this folder you won’t be able to revert back to the older version of Windows in case there’s any major problem.
- READ ALSO: How to retrieve your files from Windows.old
Since this folder can take 30GB or more of your hard drive space, today we’re going to show you how to safely remove it from your PC.
Can I remove Windows.old?
You can easily remove it through Disk Cleanup. Keep in mind that deleting the folder will leave you without a restore point. Another way to remove it is by using Command Prompt or a Linux Live CD.
For more info on how to remove the folder from your device, check the guides below.
How to delete Windows.old folder from Windows 10
1. Use Disk Cleanup tool to remove the Windows.old folder
Windows 10 comes with a useful little tool called Disk Cleanup that allows you to quickly free up space on your hard drive. This application will scan your hard drive partition for old or temporary files and allow you to remove them easily with a single click.
This tool also allows you to remove Windows.old folder and you can do that by following these steps:
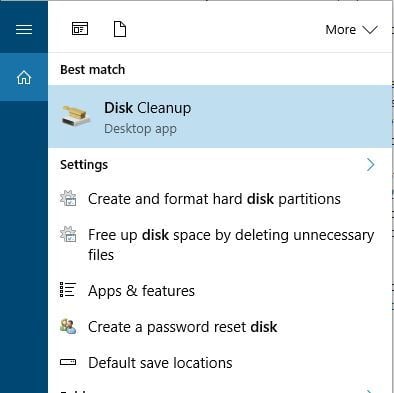
- Press Windows Key + S and enter disk. Select Disk Cleanup from the menu.

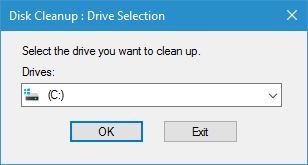
- When Disk Cleanup tool opens you’ll need to select which drive you want to clean. Select the drive where Windows 10 is installed and click OK.

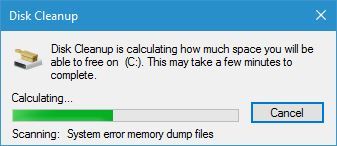
- Disk Cleanup tool will now scan your PC for old and temporary files. This process might take a minute or two depending on the size of your partition.

- Check if Previous Windows installation(s) option is available. If it is, check it and click OK. You should see a confirmation message available. Select Delete Files and wait until the previous version of Windows is removed.

- Optional: If Previous Windows installation(s) option isn’t available for you, click Clean up system files button and wait for the scan to complete. After that, select Previous Windows installation(s) and follow the instructions from previous step.

Another way to run Disk Cleanup is to check your hard drive partition properties from This PC. To do that, follow these steps:
- Open This PC.
- Locate your primary hard drive partition and right-click it. Choose Properties from the menu.

- Go to the General tab and click the Disk Cleanup button.

- Now follow the instructions described in the steps above.
-READ ALSO: How to fix Disk Cleanup issues on Windows 10, 8.1
2. Use Command Prompt
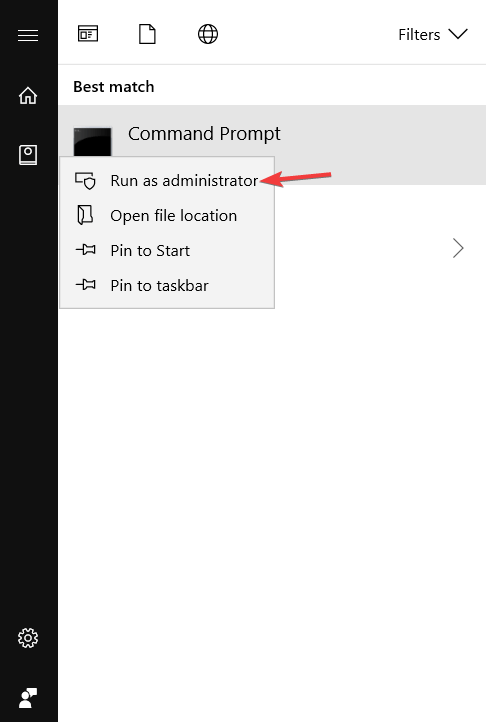
1. Press the Windows Key to open the search box.
2. In the Windows search box type cmd.
3. Right-click the first result and select Run as administrator.
4. When Command Prompt opens, enter the following lines and press Enter after each one:
- attrib -r -a -s -h C:Windows.old /S /D
- RD /S /Q %SystemDrive%windows.old
5. After the commands are executed, close Command Prompt and check if the Windows.old folder is removed.
Few users reported that they needed to use two extra commands before they can remove Windows.old folder from their PC. If that is the case, jump to step 6.
6. Input and run the following commands to take ownership over the folder and remove it:
- takeown /F C:Windows.old /A /R
- icacls C:Windows.old /Grant Administrators:F /inheritance:e /T
An easy and quick method to delete the Windows.old folder on your device is to do this through Command Prompt. All you need to do is run a few deletion commands, then the tool will remove the folder for good.
Some PC issues are hard to tackle, especially when it comes to corrupted repositories or missing Windows files. If you are having troubles fixing an error, your system may be partially broken.
We recommend installing Restoro, a tool that will scan your machine and identify what the fault is.
Click here to download and start repairing.
Usually, the best way to delete Windows.old folder is to use the Disk Cleanup tool. If you can’t delete it by using Disk Cleanup, you might want to consider using Command Prompt.
Keep in mind that Disk Cleanup is the simplest and the safest solution and you should always use it first.
3. Remove the Windows.old folder using cmd at boot
You can also remove Windows.old folder by using Command Prompt at boot. To do that, you need to start Command Prompt by following these steps:
- Click the Start button.
- Click the Power button, hold the Shift key and choose the Restart option.

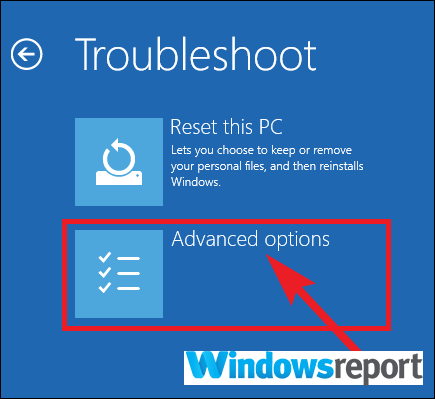
- When your PC restarts, choose Troubleshoot > Advanced options.

- A list of options will be available. Select Command Prompt.

Now we need to determine what is your drive letter. If you use Command Prompt during the boot, it’s rather possible that your drive letter will change, so you need to use diskpart tool to find it. You can do that by following these steps:
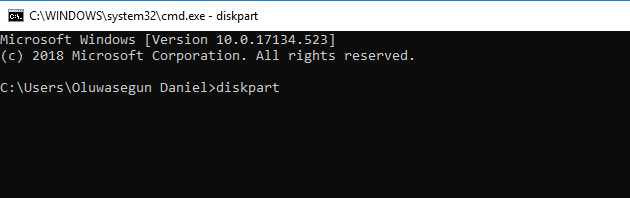
- Enter diskpart in Command Prompt and press Enter. We have to warn you that diskpart is a powerful tool, so use extra caution while using it.

- Now enter list volume.
- List of all available partitions will now appear. Now you need to locate your drive letter. The easiest way to do that is to compare the size of available partitions. After you find the desired partition, check the Ltr column and memorize its letter. In most cases it should be D, but it might be different on your PC.
- Enter exit to quit diskpart tool.
- Now enter RD /S /Q “D:Windows.old” command and press Enter to run it. Keep in mind that you need to use the correct letter that you got in Step 3. In our case that was D, but be sure to double check it on your PC.
- After running the aforementioned command, Windows.old folder will be removed from your PC. Now you just need to close Command Prompt and start Windows 10 normally.
As we already mentioned, using Disk Cleanup is the safest and simplest way to remove Windows.old folder from your PC, so you should use it always over Command Prompt.
If you decide to use Command Prompt from Windows 10, you’ll have to change the attributes of Windows.old folder.
That can sometimes cause certain issues so it might be better that you use Command Prompt during the boot since it doesn’t require that you change the attributes of the Windows.old folder.
- READ ALSO: Here’s what you need to do if Windows cannot access the disk
4. Use CCleaner to get rid of the Windows.old folder
CCleaner is a useful tool that is designed to remove old and temporary files from your PC. Some users use it to remove Windows.old folder, and if you use CCleaner you can remove Windows.old folder by following these steps:
- Start CCleaner and click the Cleaner title.
- Select only Old Windows Installation on Windows and Applications sections. You should find this option in Advanced list.
- Now click the Analyze button to start the scan.
- You should now see how much space does the Windows.old folder take. Click Run Cleaner button and wait until CCleaner removes this folder from your PC.
-READ ALSO: Download Free CCleaner for Windows 10 [Latest Version]
5. Change the security permissions
If you try to delete Windows.old folder manually you’ll probably see an error message saying that you lack the necessary privileges to delete this folder. You can fix this problem by following these steps:
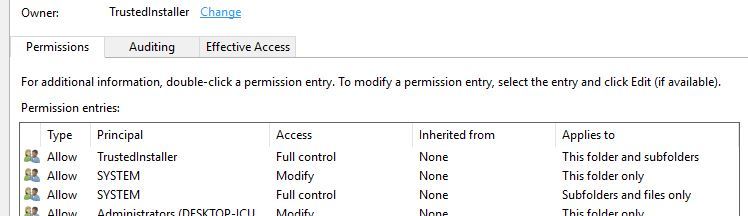
- Locate Windows.old folder, right-click it and choose Properties.
- Navigate to the Security tab and click the Advanced button.
- Locate the Owner section and click Change.

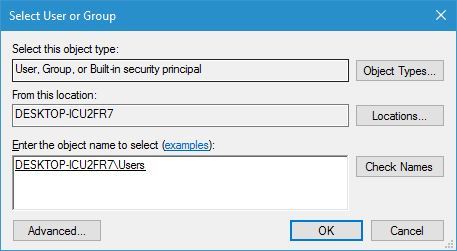
- Select User or Group window will now appear. In Enter the object name to select field enter Users and click Check Names. Click OK.

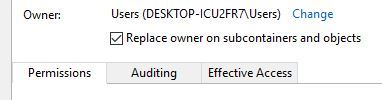
- The owner section will now be changed. Check Replace owner on subcontainers and objects and Replace all child permission entries with inheritable permission entries from this object.

- Click Apply and OK to save changes.
- If you get any security warnings just select Yes.
After changing the permissions you’ll be able to delete Windows.old folder without any problems.
We have to mention that changing the permissions of Windows.old folder can sometimes cause issues with your Windows 10 installation, so you might want to consider using Disk Cleanup tool instead.
6. Disable certain devices from Device Manager
According to users, they were unable to remove Windows.old folder due to some driver files that were still in use by their PC. To find and remove those files you’ll need to do the following:
- Locate the driver files that can’t be deleted in Windows.old directory. Usually that are SurfaceAccessoryDevice.sys, SurfaceCapacitiveHomeButton.sys, SurfaceDisplayCalibration.sys and SurfacePenDriver.sys. Keep in mind that these driver files might be different on your PC.
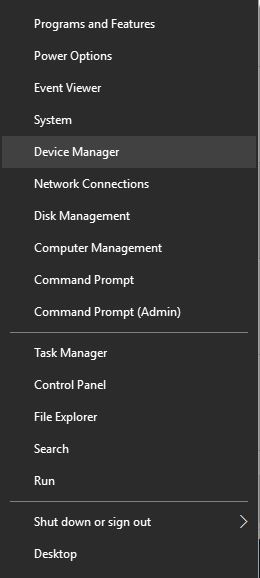
- After you find the problematic drivers, you’ll need to disable the corresponding devices from Device Manager. To do that, press Windows Key + X and choose Device Manager from the list.

- When Device Manager opens, look for the devices that are related to those drivers. After you find the problematic device, right click it and choose Disable.

- After disabling all the problematic devices, try to delete Windows.old again.
- After Windows.old folder is removed, enable the disabled devices again.
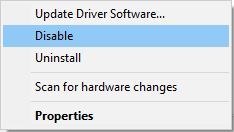
Apparently this issue appears on Surface devices, but if you experience this problem on your PC, feel free to try this solution.
7. Use Linux Live CD to remove Windows.old folder on Windows 10
If you can’t delete Windows.old folder from your PC, you might want to consider using a Linux Live CD. Windows.old folder is protected by your system, and in order to delete it you need to change certain privileges.
Obtaining the necessary privileges might not be easy for non-advanced users, and if you want to delete Windows.old folder without changing your privileges, you might want to consider using a Linux Live CD.
Simply download any version of Linux and create a bootable media. After that, boot to your PC from a bootable media. After Linux starts, locate and delete Windows.old folder.
After deleting the folder, remove the bootable media and restart your PC.
As you can see, Windows.old folder is extremely useful because it allows you to restore your PC after an upgrade in case anything goes wrong.
Using Windows.old folder you can restore your documents and some other files even with the new version of Windows installed.
As we already mentioned, Windows.old folder will be stored on your hard drive only for 10 days, so if you want to revert, be sure to do it quickly.
If you’re concerned about your storage space, you can delete the Windows.old folder by using Disk Cleanup tool or by following any other solution from this article.
Hope that now you can understand better what Windows.old folder is and whether to delete it or not in Windows 10. If you have any more questions, leave them in the comments section below.
![]()
Newsletter
![]()
Download Article
Delete your old Windows installation to quickly free up space on your hard drive
![]()
Download Article
- Using Storage Settings (Windows 10 & 11)
- Using Disk Cleanup
- Using the Command Prompt
- Video
- Q&A
|
|
|
|
If you recently upgraded to a new version of Windows, you may have noticed a huge folder called Windows.old on your hard drive. This folder contains a copy of the previous version of Windows in case you need to roll back your upgrade. Windows.old is automatically deleted 10 days after the upgrade (or 28 days for older versions), but you can delete it early if you’re running low on disk space and are 100% sure you won’t want to go back. This wikiHow article will show you 3 easy ways to remove Windows.old: Using the Storage area of your Settings, the Disk Cleanup tool, and the Command Prompt.
Things You Should Know
- On Windows 10 and 11, go to Settings > System > Storage > Temporary Files, select «Previous versions of Windows,» and click «Remove Files.»
- You can use Disk Cleanup on any version of Windows (from Windows 7 through 11) to delete your previous Windows installation.
- If you can’t delete Windows.old or have multiple Windows.old folders, you can forcefully delete them using the Command Prompt.
-

1
Open your Windows Settings. You can do this easily by clicking Settings or the gear icon in your Windows Start menu.
- On both Windows 10 and 11, Windows.old and other previous operating system files are deleted automatically 10 days after the upgrade.[1]
- You can delete Windows.old early to reclaim several gigabytes of disk space. Just keep in mind that you won’t be able to downgrade to your previous Windows version if you change your mind.
- On both Windows 10 and 11, Windows.old and other previous operating system files are deleted automatically 10 days after the upgrade.[1]
-
2
Click System. If you’re using Windows 11, it’ll be at the top of the left panel. On Windows 10, you’ll see the system icon in the main panel.
Advertisement
-
3
Click Storage. Once you click this option, Windows will take a few moments to analyze your hard drive(s) and display how you’re utilizing your disk space.
-
4
Click Temporary Files. You’ll see this under your main hard drive.
-
5
Check the box next to «Previous version of Windows.» If you’ve recently upgraded, you’ll see this option in the list.
- If you don’t see this option but still have a Windows.old folder, use this method to delete it.
- Remove the checkmarks from any other file types that you don’t want to delete. For example, if you don’t want to delete the files in your Downloads folder, remove the checkmark from the «Downloads» box.
-
6
Click Remove files. You’ll see this button above the list. A confirmation pop-up will appear.
-
7
Click Continue to confirm. This removes all selected files, including the Windows.old folder that contains your previous version of Windows.
- Shopping for a new computer? Take a look at our coupon site for HP product discounts.


Advertisement
-
1
Open the Disk Cleanup utility. This utility will delete the Windows.old folder on any version of Windows, including Windows 7. There are a couple of different ways you can open it.
- On Windows 8, 10, and 11, you can press Windows key + S, type cleanup, and then click Disk Cleanup.
- You can also press Windows key + R, type cleanmgr, and press Enter.
- Another way is to open the Control Panel, select «System and Security», click «Administrative Tools, then select Disk Cleanup.
-
2
Select the drive that contains the Windows.old folder. This is usually the C: drive.
-
3
Click the Clean up system files button. You may be prompted for the administrator password.
-
4
Select your drive again if prompted. Disk Cleanup will scan the drive again.
-
5
Check the «Previous Windows installation(s)» box. You can also check the boxes for any other types of files on the list you want to remove.
- If you don’t want to delete any other files, remove the checkmarks from other selected options now.
- If you don’t see this option but still have a Windows.old folder, see this method.
-
6
Click OK. This deletes Windows.old and all previous operating system files from your PC. [2]


Advertisement
-
1
Try another method first. If you’ve already tried to delete Windows.old (or have multiple Windows.old files ending with different numbers) and were unsuccessful, you can use the Command Prompt to permanently delete the files.
-
2
Open the Command Prompt as an Administrator. To do this, type cmd into the Windows search bar, right-click Command prompt, then select Run as Administrator.
-
3
Take ownership of the file. To do this, type takeown /F "C:Windows.old" /A /R /D Y and press Enter.
- If your Windows.old folder is not on the C drive, replace C: with the correct drive letter.
-
4
Change the permissions to allow deletion. To do this, type icacls "C:Windows.old" /grant *S-1-5-32-544:F /T /C /Q and press Enter.
-
5
Use the RD command to delete Windows.old. Type RD /S /Q "C:Windows.old" and press Enter to permanently delete the folder.
-
6
Repeat for additional Windows.old folders. If you have multiple Windows.old folders, run all of these commands for each of them. For example, takeown /F "C:Windows.old.000" /A /R /D Y.


Advertisement
Add New Question
-
Question
How can I remove an old Windows?

ッRosie~Dosieッ
Community Answer
You can’t remove the old Windows system, but you can upgrade to a newer version if you wish.

Ask a Question
200 characters left
Include your email address to get a message when this question is answered.
Submit
Advertisement
Video
Thanks for submitting a tip for review!
About This Article
Thanks to all authors for creating a page that has been read 125,560 times.
Is this article up to date?
| Workable Solutions | Step-by-step Troubleshooting |
|---|---|
| 1. Use Disk Cleanup | Step 1. Press Windows + E, click This PC…Full steps |
| 2. Temporary File Settings | Step 1. Open Settings by typing settings in the Search, then click on it…Full steps |
| 3. Storage Sense Settings | Step 1. Open Settings by right-clicking the Windows icon and select «Settings»…Full steps |
Something You Need to Know About Windows.old Folder
Before you start deleting Windows.old folder on your PC, here is something that we think you should know about this folder.
What Is Windows.old?
Windows.old folder is generated by the Windows operating system when you upgrade from one version of Windows to another. The Windows.old folder isn’t something new with Windows 10, which starts with Windows Vista.
The Windows.old folder contains all the files and data from your previous Windows installation, including Windows system files, user accounts’ settings, User Profile, and User Folder files, etc.
You can apply it to restore Windows to the previous version if you don’t like the new version. You can also dig into the Windows.old folder to find a specific file that wasn’t properly copied to your new Windows installation.
Where is the Windows.old Folder?
So you may wonder where is the Windows.old folder saved on the computer and how to delete it right? Usually, Windows.old folder is saved in C: drive under the Windows folder after Windows system upgrade as shown below:
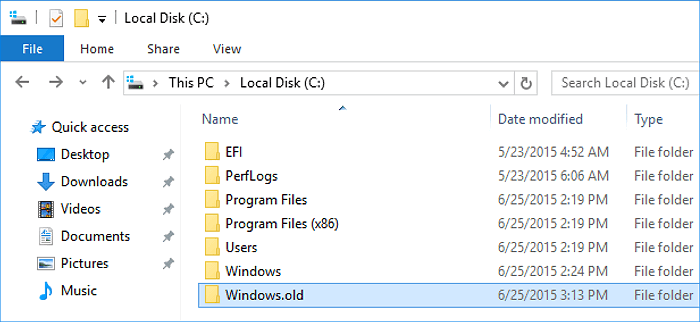
It takes up a huge space as nearly the same size as your C: drive before the Windows upgrade. This explains why so many people notice that their C drive gets full quickly after a Windows update.
Is It Safe to Delete Windows.old Folder?
So is it safe to delete the Windows.old folder? Yes. If you decide to stay with the new Windows system and all your files are safe on the new OS, you can delete it from your PC so as to free up the disk space.
Why Can’t I Remove Windows.old Folder?
According to the Microsoft Windows forum and some tech forums, users complain that they can’t remove Windows.old folder as Windows reports that the file not found or target is not a valid file or directory.
Why is that? Here are two main reasons that explain why you can’t delete Windows.old folder directly from your C: drive:
1. The Windows.old folder has been removed by Windows OS
In order to save disk space, Windows Operating System is designed to delete the Windows.old folder automatically after you upgrade:
- On Windows 10, Windows.old folder gets deleted automatically in 10 days after Windows upgrade.
- On Windows 8.1/8, Windows.old gets deleted automatically in 28 days after Windows upgrade.
- On Windows 7 and older OS, Windows.old will be removed automatically in 30 days after OS update.
2. Delete Windows.old needs administrator permission
Although Windows.old folder is accessible for you to check and view the saved files. But it requires administrator permission from the System to make changes to this folder. Therefore, if you don’t have permission, you can’t directly delete Windows.old from C: drive.
How to Delete Windows.old Folder — 3 Methods
Applies to: Resolve «Can’t delete Windows.old folder» issue with three effective methods, no data loss.
Before You Start — Preparations
#1. Create Backup of Windows.old Folder
Before taking the steps below to delete the Windows.old folder, you can create a backup of the Windows.old in case that you may want to perform a system restore or restore a single file from the folder.
You can either copy Windows.old folder to an external hard drive or to back Windows.old folder with EaseUS free backup software in only three simple steps as listed below:
- Launch EaseUS Todo Backup Free, then choose» File Backup».
- Choose the important files/data or system and then select a backup destination.
- Click «Proceed» to start the backup process.
#2. Gain Administrator Permission from System
The other important thing to make sure that you can delete Windows.old folder successfully is to check whether you are logging in to Windows OS as administrator.
If you have several user accounts on your computer, switch to login your computer with your administrator account:
Step 1. Click the Windows icon and click your username at the top.
Step 2. Select Administrator on the list, click to switch to it.
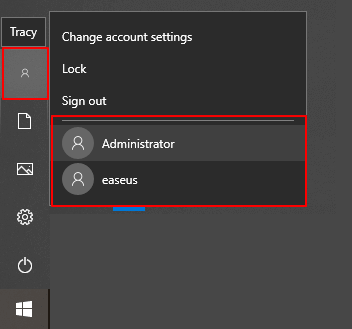
Step 3. Sign in with the password of your administrator account.
Method 1. Delete Windows.old Folder in Windows 11/10 Using Use Disk Cleanup
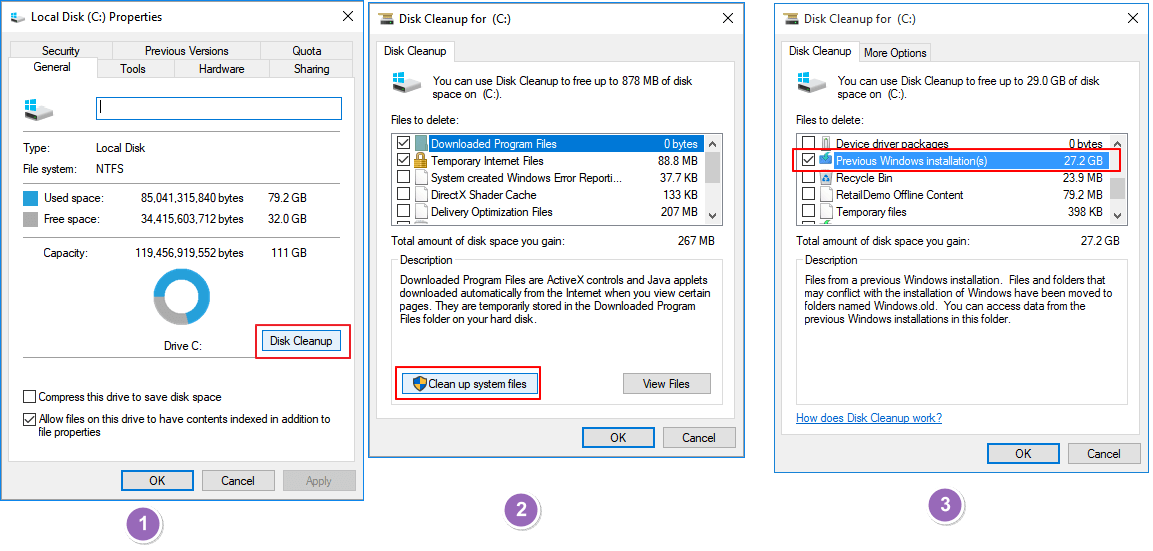
Windows.old folder cannot just directly delete by hitting the delete key and you may try to use the Disk Cleanup tool in Windows to remove this folder from your PC:
- Press Windows + E, click This PC.
- Right-click the drive with Windows installation and click Properties.
- Click Disk Cleanup and select Clean up the system.
- Select the Previous Windows Installation(s) option to delete Windows.old folder.
- You can also choose to delete other installation files including Windows upgrade log files and Temporary Windows installation files etc.
- Click OK and select Delete Files on the pop-up dialog to confirm the deletion.
- Click Yes.
Method 2. Delete Windows.old Folder in Windows 10 Using Temporary File Settings
The other method that you can try is to use Windows Temporary File Settings to remove the Windows.old folder on your PC. Here are the steps:
Step 1. Open Settings by typing settings in the Search, then click on it.
Step 2. Select System > Storage > This PC and then scroll down the list and choose Temporary files.
Step 3. Under Remove temporary files, check Previous Windows Installation then choose to «Remove files».
Then Windows.old folder will be deleted in Windows 10 without any obstacles.
Method 3. Delete Windows.old Folder in Windows 10 Using Storage Sense Settings
Windows 10 Storage Sense settings can also help you remove Windows.old folder on your PC. Follow the steps to delete it now:
Step 1. Open Settings by right-clicking the Windows icon and select «Settings».
Step 2. Go to System, click «Storage», then click «Change how we free up space automatically» under Storage Sense.
Step 3. Check «Delete the previous version of Windows» and click «Clean now».
Once you complete the steps, the Windows.old folder will no longer exist on your computer.
Here is a quick tutorial that has SOLVED ‘can’t delete Windows.old’ error in Windows 10. Scroll down to check the #complete solutions# with detailed guidelines.
Video source: YouTube; Created by Sele Training.
2 Bonus Tips: Extend System Drive After Deleting Windows.old
Besides deleting Windows.old folder using the above 3 methods, you can also try other methods to extend system C drive space. If this is what you want, try the following 2 quick tips to gain space and extend your C drive immediately:
#1. Extend C Drive using Free Partition Manager Software
Free partition manager software provided by EaseUS software can efficiently extend the system C drive with its Resize/Move feature.
Here are the steps:
Step 1: Free up unallocated space for C drive.
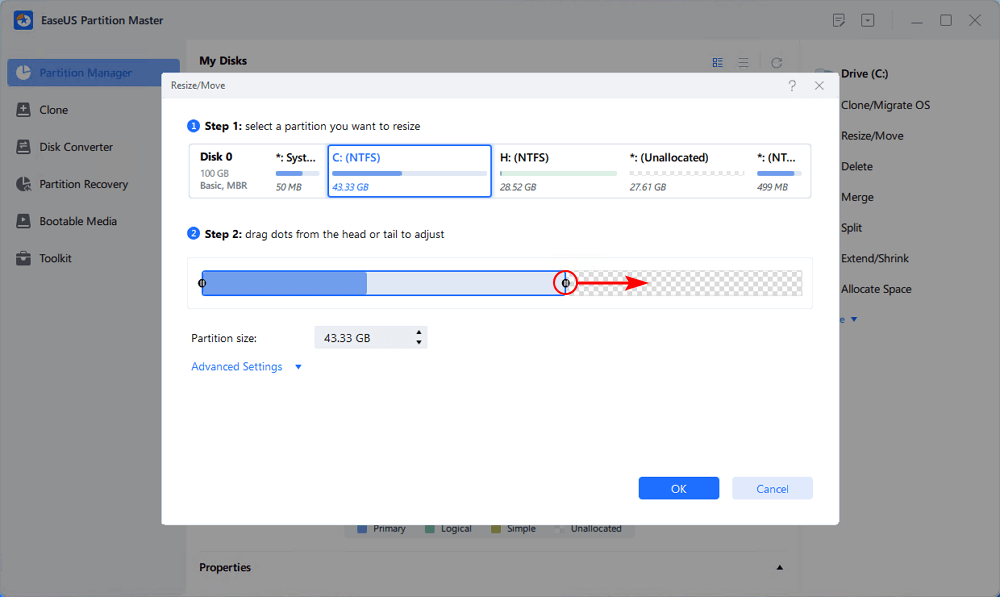
If there is no unallocated space on the system disk, go to Partition Manager and right-click on a partition next to the C: drive and select «Resize/Move».
Drag left panel of the partition to shrink and leave unallocated space behind the system C: drive and click «OK».
Step 2: Increase C drive space.
1. Right-click on C: drive and select «Resize/Move».
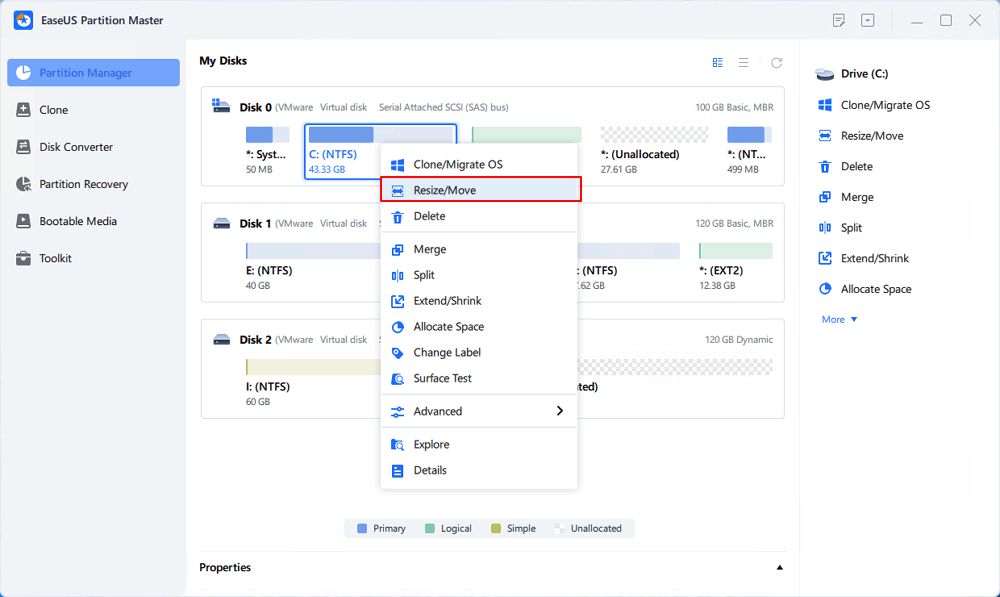
2. Drag the system partition end into unallocated space so to add space to C: drive and click «OK».
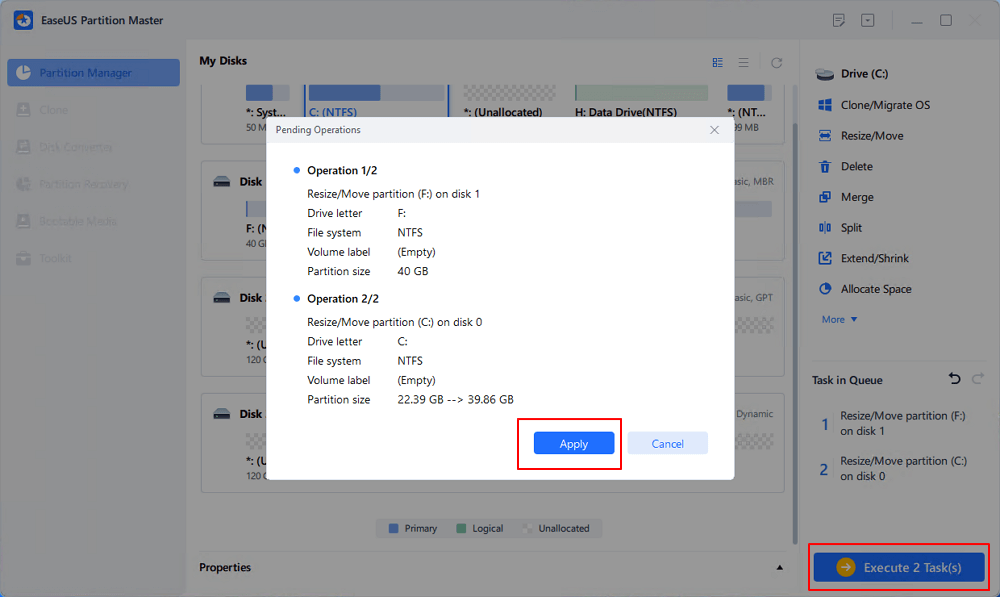
Step 3: Keep all changes to extend C: drive.
Click the «Execute Task» and click «Apply» to keep all changes so to extend the system C: drive.
#2. Clean Up Large File on System Drive
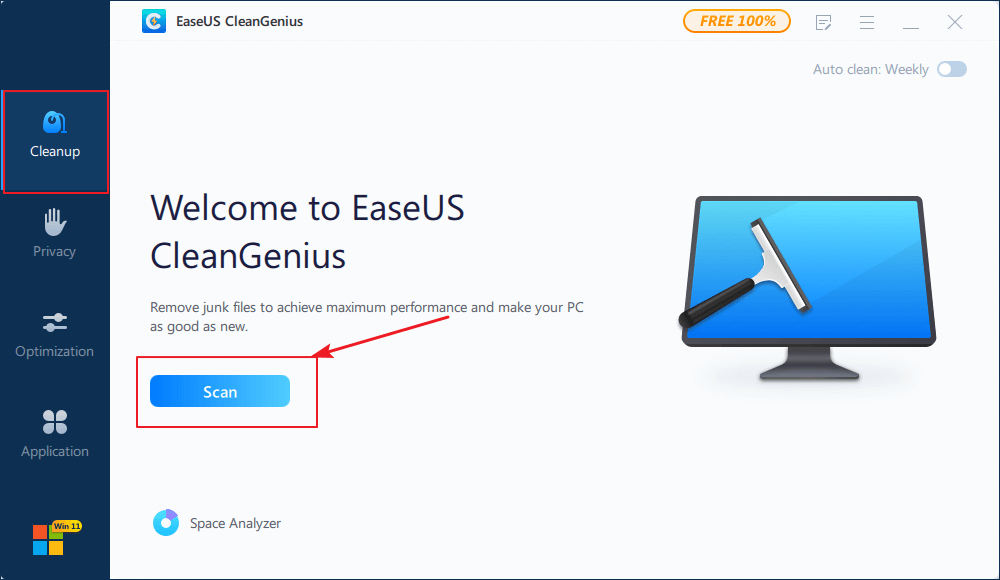
Step 1. Download and install EaseUS Partition Master Suite.

Step 2. Click PC Cleaner and install EaseUS CleanGinus. Then, click «Cleanup» and click «Scan» to start cleaning up the system and make your PC as good as new.
Step 3. The software will scanning all over your computer to find idle data files that take a huge amount of disk space, you can select useless large files, system junk files and Windows invalid entries and click «Clean» to start system cleanup process.
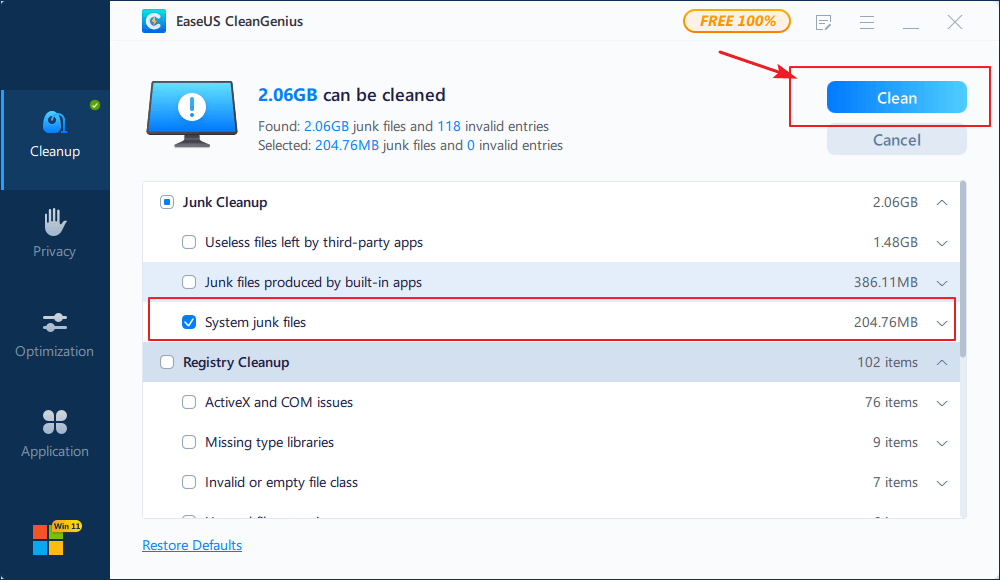
Step 4. When the scan is complete, click «Done» to finish cleaning system junk files.
Conclusion and Windows.old FAQS
On this page, we explained what is Windows.old folder, what you can do with Windows.old folder, the default location of this folder, and offered three practical methods to help you fix «can’t remove Windows.old folder» issue on Windows 10.
These methods also can be applied to delete this folder on other older Windows operating systems, like Windows 8.1/8/7, etc. Here, we also collected some top concerned questions and left brief answers to help you out. If you are having the same concerns, check and find the answers:
1. How do I manually delete Windows.old?
Based on the provided methods on this page, you will need to first log in to your computer as an administrator.
And then you can use Windows Temporary file settings, Windows disk cleanup, or Windows Storage Sense settings to manually delete Windows.old folder from your computer. For a detailed guide, refer to the detailed steps listed in Method 1, Method 2, and Method 3.
2. How do I restore system from Windows.old?
To restore system from the Windows.old folder, you can navigate to Settings > Update & security > Recovery. Then click «Get started» under «Go back to Windows 7» or «Go back to Windows8.1».
Note that this option is only available for 10 days or 1 month after you upgrade.
3. How do I restore files from Windows.old?
There are three ways to get back the Windows.old folder. You can manually or automatically recover the Windows.old folder. Or restore files from Windows.old folder using EaseUS file recovery software in just three steps.
For a detailed guide, you may refer to Windows.old Restore for a guide.
4. Will deleting Windows.old cause problems?
Usually, deleting Windows.old folder or files on your computer will not do any damage on your PC.
But if the Windows update failed to keep all your files or you lost files after the Windows update, you can try to bring the lost files from your Windows old by rolling back to the previous version of Windows.
Introduction
If you have upgraded to a new version of Windows 10, you end up with a folder named Windows.old under C:.
Now comes the next question, is it safe to delete the Windows.old folder?
In this blog post, I explain the Windows.old folder and if it’s safe to delete the folder.
What is the Windows.old folder?
This folder contains the contents from the previously installed Operating System. It is used to restore to a previous version of Windows 10.
The Windows.old folder is created after an update to a new version of Windows 10.
The Windows.old folder is automatically deleted after ten days if you have not made any changes to it locally or via a Group Policy.
Here you can see the Recovery area in the Settings app in Windows 10:

If you are sure you do not wish to restore to a previous version of Windows 10, it is safe to remove the Windows.old directory.
The Windows.old folder may take 50+ GB of storage, so it’s advisable to delete it if you want to free up disk space.
The folder contains temporary files that you can use to restore the previous version of Windows 10. If you are not planning to restore your operating system, these are not essential files.
How to restore a previous version of Windows 10 using Windows.old
If you want to restore your PC to the previous version of Windows 10, you can do it through Settings -> Recovery > Go back to the previous version of Windows 10.
Note that there is a time window when it’s possible to restore your machine. In my case, I can’t restore, since I upgraded my PC more than 10 days ago. The amount of time here can be changed via Group Policy.

How to delete the Windows.old folder
Here I describe a few different ways of removing the Windows.old directory:
- Using the Disk Cleanup Tool
- Using the Command Prompt
Delete Windows.old using the Disk Cleanup Tool
Open the File Explorer in Windows, Right-click and press Properties.

Select Disk Cleanup.

To remove the Windows.old folder, you need to click the Clean up system files button. Because the folder is considered to be a system folder, and requires elevation, you might receive a UAC prompt. Press Yes at the prompt.

5. Select Previous Windows installation(s).

6. Select Yes at the confirmation prompt.

Delete Windows.old using the command prompt
To be able to delete the Windows.old folder, we need to do the following:
- Take ownership of the Windows.old directory
- Set permissions for the Windows.old folder
- Remove the folder
You can accomplish the above actions using the following sequence:
- Open an elevated command prompt or elevated Powershell prompt
- Run the following command: takeown /F C:Windows.old* /R /A /D Y
- Follow up with this command: cacls C:Windows.old*.* /T /grant administrators:F
- The last command to run: rmdir /S /Q C:Windows.old
Summary
If you are not planning on rolling back your Windows 10 installation to a previous version, you should safely remove the Windows.old folder.
Have you removed your Windows.old folder? Please leave a comment below!
References
- Retrieve files and folders from Windows.old
Related posts
- Check Bitlocker status using Powershell or the command line
- How to install .NET Framework 3.5 on Windows 10
- How to mount an ISO file in Windows 10

Contents
- 1 How to Delete Windows.old and $Windows.~BT Folders in Disk Cleanup
- 2 How to Remove Windows.old and $Windows.~BT Folders via Storage Settings
- 3 Removing Old Windows Versions via Elevated Command Prompt
- 4 How to Delete Windows.old Folder via a Command Prompt at Boot
- 5 How to Cleanup the WinSxS Folder and Enable CompactOS
If your PC is low on space, there’s little doubt that at one point or another you’ve been eyeing up your Windows.old folder. This folder can occupy a hefty amount of storage that you can’t afford to lose if your operating system is on a small SSD or micro-SD card. But how to delete Windows.old, and is it even safe? We’ll be answering these questions in today’s tutorial. Let’s start with the most asked question:
Can I delete Windows.old?
Short answer, yes. But you may have gathered that by the fact that this tutorial exists. Removing the Windows.old folder, however, isn’t always as simple as clicking on it and pressing the delete key. This is why there’s often confusion.
The more pertinent question, then, is if Windows.old is safe to delete. The answer to this question really depends on your situation, so it helps to understand what Windows.old is.
Windows.old is typically stored on your C: drive, and like the name suggests, stores an old version of Windows. More specifically, your old version of Windows, before you refreshed, upgraded, or performed a custom install of Windows on the same partition as your previous installation.
If you chose to “keep” nothing during your refresh or upgrade, the folder will contain your personal files from the previous installation. As a result, you should only delete it if you’re sure there’s nothing there you need. When you remove Windows.old, you also remove your ability to roll back to your previous version of Windows, so keep that in mind.
After ten days, Microsoft will automatically delete Windows.old from your drive. If you’re patient, then, you don’t need to take any action to remove it. If you need the storage space now, you can follow the steps below. Just make sure you copy across anything you need first:
How to Delete Windows.old and $Windows.~BT Folders in Disk Cleanup
As well as Windows.old, we’ll be showing you how to remove the $Windows.~BT folder, which is used to roll back to earlier versions of Windows. The most user-friendly way to do so is via the Disk Cleanup tool, which provides a handy interface.
- Open Disk Cleanup
Press Start or the search button and type “Disk Cleanup”, then click on the top result.

- Press “Clean up system files”
You’ll have to provide admin approval to continue the process.
- Tick Previous Windows Installation(s) and press “OK”
If a confirmation dialog pops up, press “Delete Files”. It will take a minute or two for Disk Cleanup to delete Windows.old and $Windows.~BT from your system.


How to Remove Windows.old and $Windows.~BT Folders via Storage Settings
As you’d expect, the Windows 10 settings app is also quite an intuitive way to remove Windows.old and $Windows.~BT. It does essentially the same thing as above, but looks prettier.
- Open Settings
Press the “Start” button, then click the settings cog, above the power button. Alternatively, press Windows + I.
- Click on “System”
- Open “Storage” settings from the sidebar, then click “Temporary files”
- Tick “Previous Windows installation(s) and press “Remove files”
The process to delete Windows.old will start and should be complete in a few minutes.


Removing Old Windows Versions via Elevated Command Prompt
If you don’t have access to a UI, or just prefer the command line, you can use the trusty Command Prompt to remove WIndows.old and $Windows.~BT.
- Open Command Prompt as an admin
Press the Start button and type “Command Prompt”, then click “Run as administrator” on the right-hand side.
- Take ownership of the Windows.old folder
Before you can delete Windows.old, you need to wrestle control of it from your operating system. This is to avoid accidental deletion and modification. Run the following command to do so:
takeown /F "C:Windows.old" /A /R /D Y
- Wait for the completion message
It should read something like:
SUCCESS: The file (or folder): "C:Windows.oldassemblyGAC_MSILSystem.Deployment.Resources..." now owned by the administrators group.
Once complete, you’ll be able to type commands again from the C: drive.
- Run the Windows.old delete command
Finally, we can use the icals command to modify the access control list, followed by the folder selection command:
icacls "C:Windows.old" /grant *S-1-5-32-544:F /T /C /Q
RD /S /Q "C:Windows.old"
If you’d like to delete the Windows BT folder, repeat the command above but with the file path to BT instead:
takeown /F "C:$Windows.~BT*" /A /R /D Y
icacls "C:$Windows.~BT*.*" /grant *S-1-5-32-544:F /T /C /Q
icacls "C:$Windows.~BT*.*" /grant *S-1-5-32-544:F /T /C /Q
You can close the Command Prompt window when you’re done.


How to Delete Windows.old Folder via a Command Prompt at Boot
If you can’t get take ownership to work, you can also delete Windows.old via Command Prompt at boot. First, boot to Advanced Startup by following our dedicated guide. One advantage of this method is that you won’t need to take ownership of the folder.
- Click on “Troubleshoot”
- Select “Advanced options”
- Click on “Command Prompt”
- Enter diskpart
In your Command Prompt window, type
diskpartand press Enter. - Rum the list volume command
Run the
list volumecommand, then look for the drive letter of your Windows 10 drive under theltrcolumn. For 98% of people, this should be the C drive. Check the size to see if it matches.Note down this drive letter.
- Type “exit” and press Enter
- Run the delete Windows.old command
Run the following command to remove theWindows.old folder, replacing
C:with your drive letter if necessary:RD /S /Q "C:Windows.old"Close your Command Prompt Window and click “Continue” to boot into your OS.


How to Cleanup the WinSxS Folder and Enable CompactOS
If you’re still struggling for space, you can follow our guide on how to cleanup the WinSxS folder to free up a little more. If you’re still struggling after that, you may have to take more drastic measures like enabling CompactOS, which may affect performance.