153
153 people found this article helpful
How to Disable Cortana in Windows 10
If Microsoft’s voice assistant annoys you, turn it off
What to Know
- Open Cortana > select menu > Settings > turn off Keyboard shortcut > reboot > open Cortana again.
- Next, select Settings > Voice activation > Voice activation permissions.
- Finally, turn off Let Cortana respond to «Cortana» keyword.
This article explains how to temporarily and permanently disable Cortana in Windows 10. Additional information covers how to prevent Cortana from recording and storing your search habits and history.
How to Install Cortana in Windows 11
How to Disable Cortana Temporarily
If Cortana sometimes activates when you don’t want it to, but you still want to be able to activate it manually, the first step is to make sure that Cortana won’t respond to your voice:
-
In the taskbar, select the Cortana icon (small circle) to open it.
-
In the upper-left corner of the Cortana app, select the three vertical dots.
-
Select Settings.
-
Select Keyboard shortcut.
-
Turn off Keyboard shortcut. You’ll need to restart your PC to apply the changes.
-
After rebooting, repeat steps 1-3. Select Voice activation.
-
Select Voice activation permissions.
-
Turn off Let Cortana respond to «Cortana» keyword.
For most users, disabling Cortana’s ability to automatically respond to a voice command or a keyboard shortcut is enough. This will prevent Cortana from ever activating accidentally, but it won’t affect your search experience, and everything will continue to operate as normal.
How to Disable Cortana Permanently Using the Windows Registry
Cortana is heavily integrated into the Windows 10 search functionality, so fully disabling it may impact your user experience. Nonetheless, users of Windows 10 Home Edition can disable Cortana with the Registry Editor tool. Users of Windows 10 Pro and Enterprise can use either the Registry Editor or the Group Policy Manager.
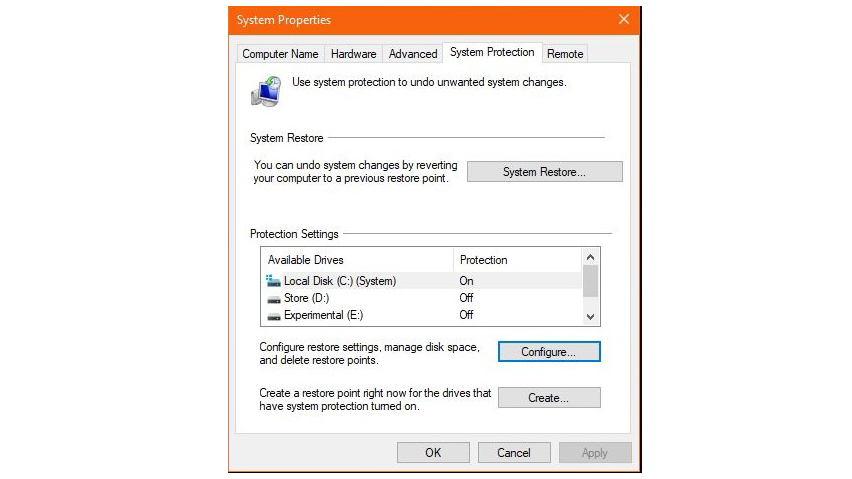
After you’ve created a system restore point, and you’re absolutely sure you want to disable Cortana permanently, then you will need to open the Registry Editor:
Disabling Cortana via the Windows Registry Editor is often irreversible unless you performing a clean install of Windows 10.
-
Right-click the Windows icon and select Run to open the command prompt.
Alternatively, use the keyboard shortcut Windows+R.
-
Type regedit and press Enter.
If a User Account Control (UAC) window appears, select Yes to proceed.
-
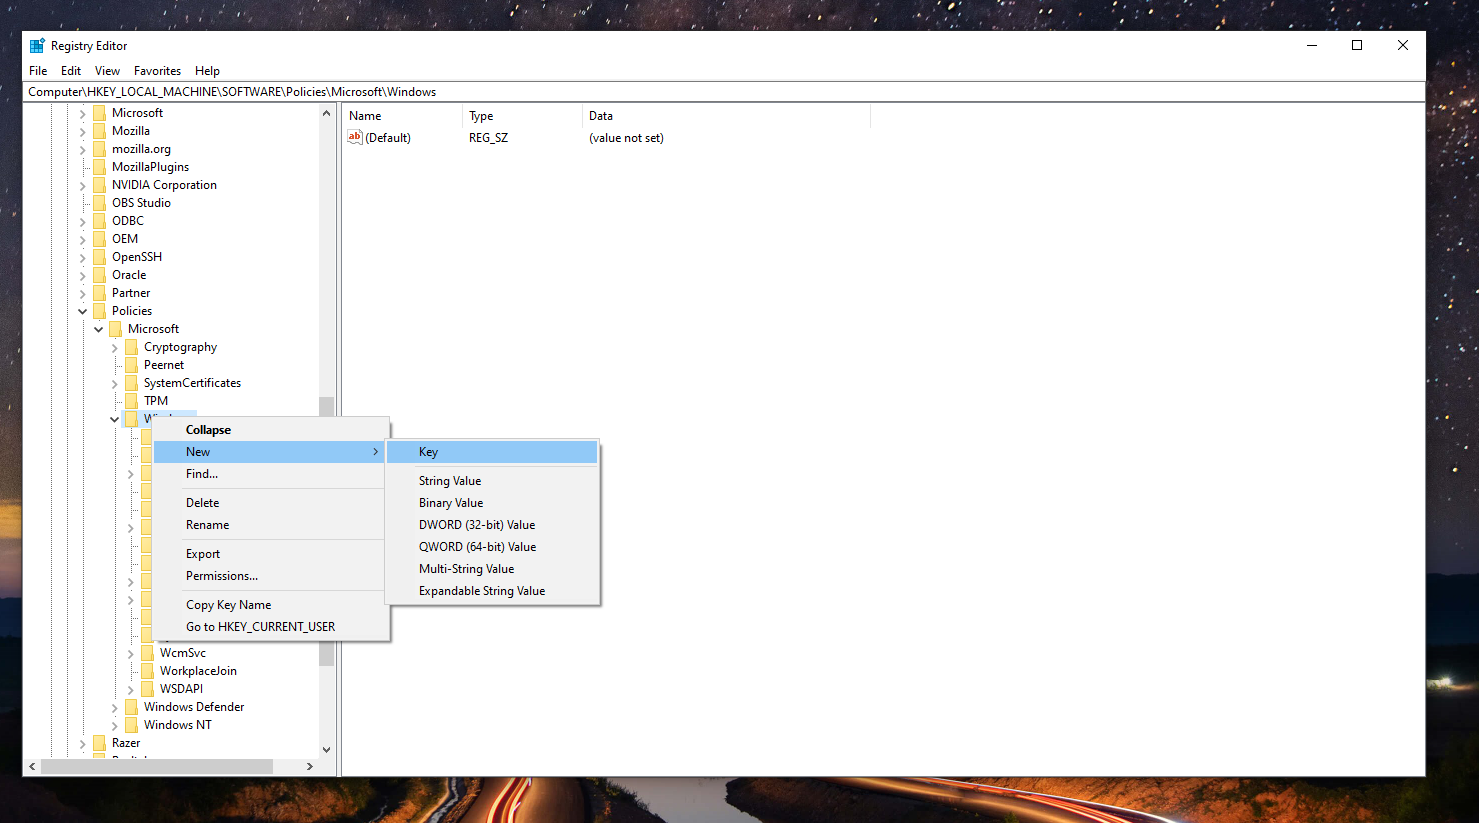
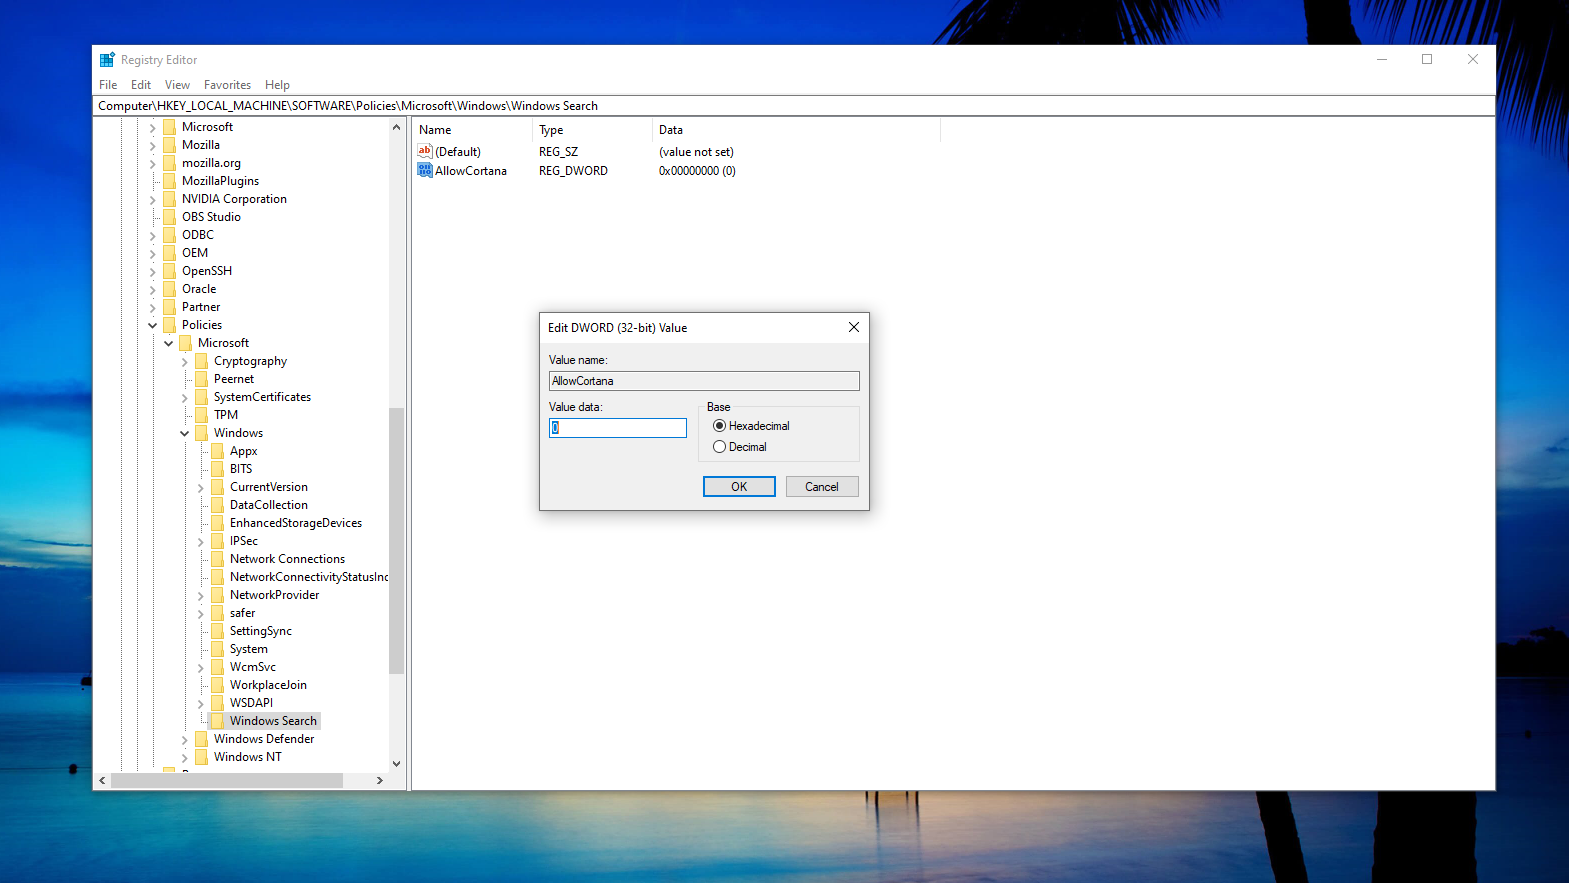
Navigate to HKEY_Local_Machine > SOFTWARE > Policies > Microsoft > Windows, then right-click the Windows directory and select New > Key.
-
Name the new folder Windows Search.
-
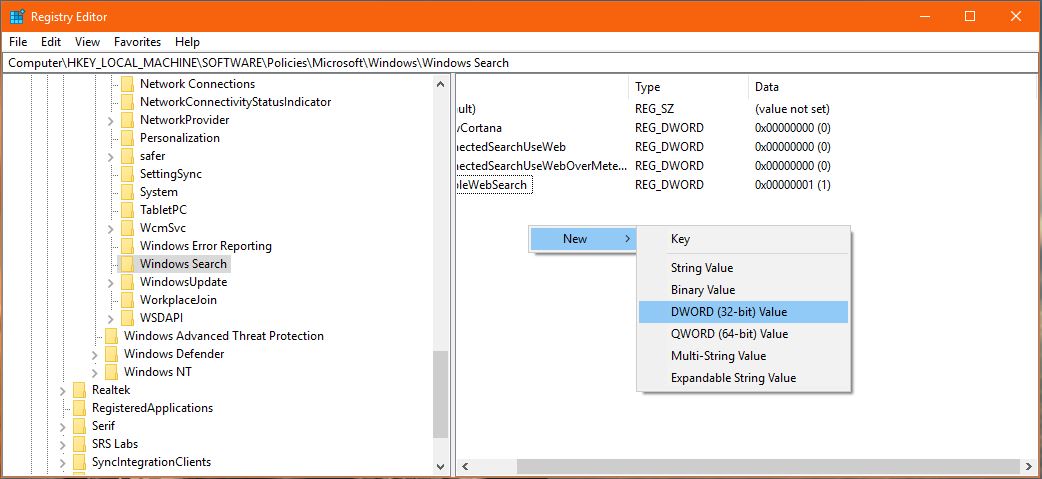
Right-click the Windows Search folder and select New > DWORD (32-bit) Value.
-
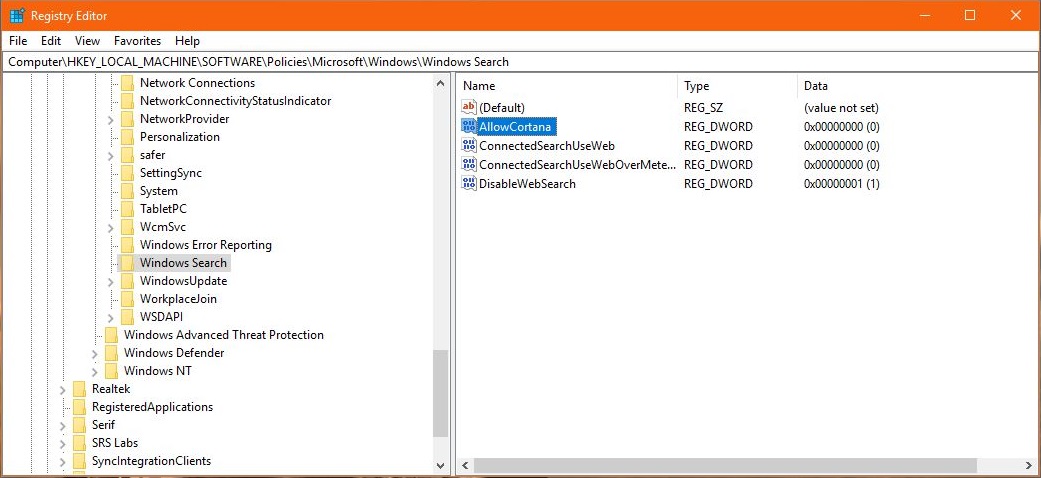
Name the new file AllowCortana.
-
Double-click the AllowCortana file to open it, set the value to 0, then select OK.
-
Close the Registry Editor and restart your computer.
How to Disable Cortana Permanently in Group Policy Editor
While Windows 10 Pro and Windows 10 Enterprise users can disable Cortana through the Registry Editor, they have another option that’s a little safer. To turn off Cortana using the Group Policy Editor:
Before using the Registry Editor or Group Policy Editor methods, consider setting up a system restore point. Your system may become unstable or even fail to boot if you make a mistake.
-
Press Windows+R to open the command prompt, type gpedit.msc into the command line, and then press Enter.
If a User Account Control (UAC) window appears, select Yes to proceed.
-
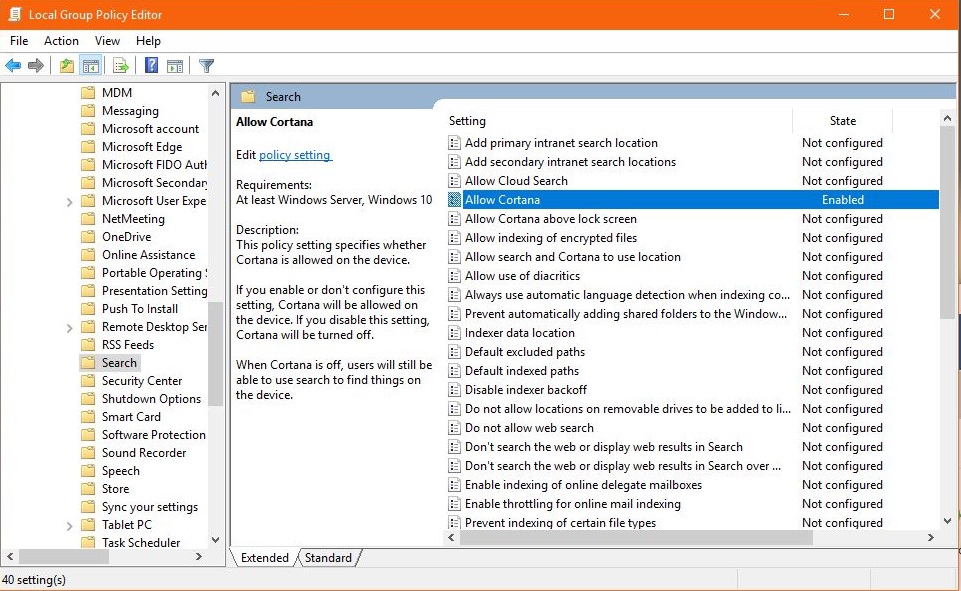
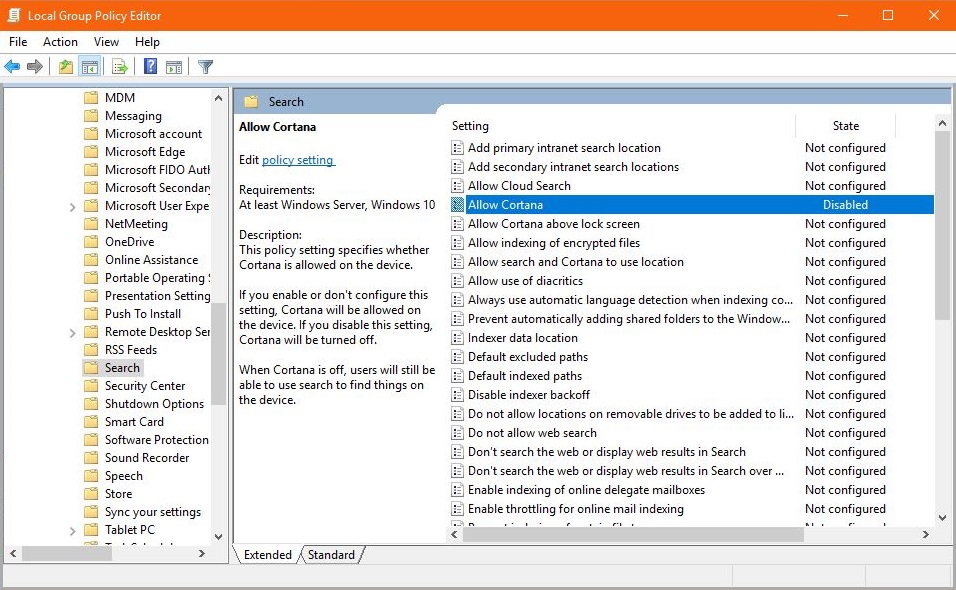
Navigate to Computer Configuration > Administrative Templates > Windows Components > Search, then double-click Allow Cortana in the right pane.
-
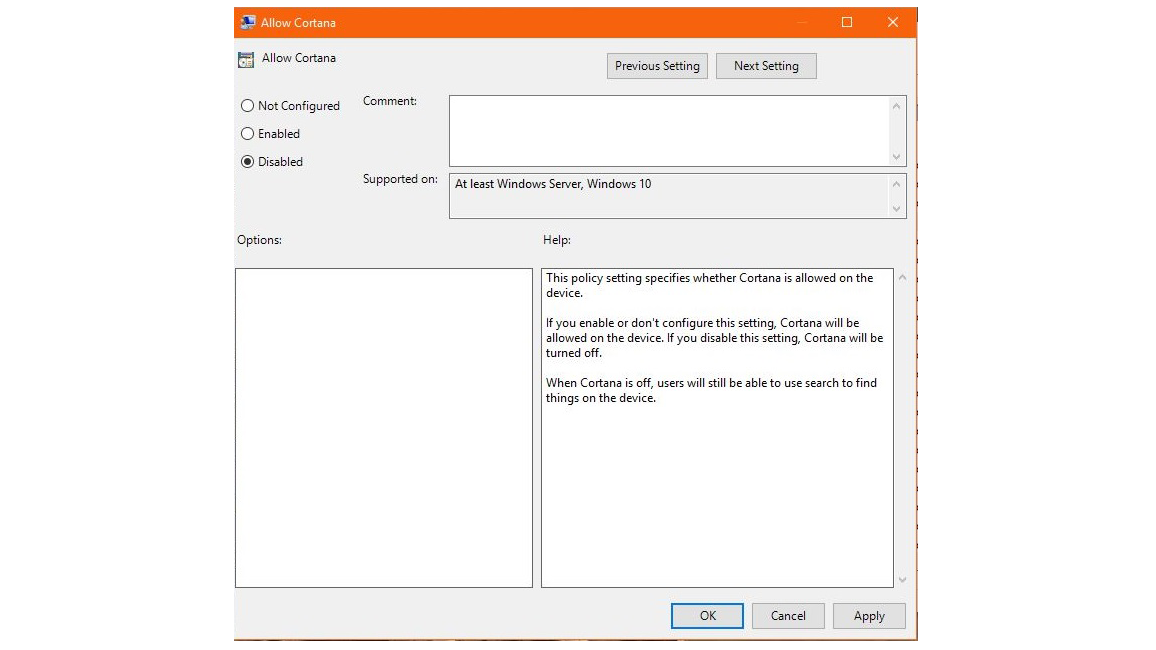
Select Disabled, then select OK.
-
Close the Group Policy Editor and restart your computer.
If you want to turn on Cortana in the future, follow the steps above, but set the Allow Cortana setting to Enabled.
How to Turn Cortana Back on If You Disabled It via Regedit
If you change your mind about disabling Cortana, or if something goes wrong, the easiest way to turn Cortana back on is to use a system restore point. You can also try going back into the Registry Editor and deleting the AllowCortana file you created.
How to Prevent Cortana From Recording and Storing Your Search Habits and History
Some users have privacy concerns about Cortana and Microsoft keeping track of their search histories and habits in the cloud. Completely disabling Cortana is one way to deal with this concern, or you can turn off each setting that allows Cortana to record and store information about you:
-
Type Permissions and history in the Windows search box and press Enter.
-
Scroll down to History and turn off Search history on this device. Select Clear device search history to clear Cortana search history.
-
In the Find a setting search, enter speech privacy settings and select Speech privacy settings.
-
Turn off Use your voice for dictation and other apps using Microsoft’s online speech recognition technology.
Cortana will remain installed on your computer, but it will not be able to gather information, report information to Microsoft, or interact with you in any way. If you wish to use Cortana in the future, change all of the settings back to the On position.
FAQ
-
How do I activate Cortana in Windows 10?
To activate Cortana in Windows 10, click in the search bar, select the Notebook icon, select Settings (gear icon), and turn on Cortana.
-
How do I turn off the Cortana daily briefing?
To opt-out of Cortana’s personalized briefing email, go to the email message’s footer and select Unsubscribe. If your company is using the daily briefing via Exchange Server, use PowerShell in Exchange Online to reach the feature’s configuration settings and turn it off.
-
How do I remove Cortana from the taskbar?
On the taskbar, right-click the Cortana icon, then deselect Show Cortana Button.
Thanks for letting us know!
Get the Latest Tech News Delivered Every Day
Subscribe

As one of the best digital assistants, Microsoft Cortana has been considerably helpful in our daily life and work. However, Cortana collects various information to know you, such as your contacts, text messages, locations, in order to better help you with the tasks. So there are privacy issue with Cortana in Windows 10.
But don’t worry! You can completely disable Cortana in Windows 10. This article introduces how to disable Cortana in Windows 10, including Windows 10 Pro, Windows 10 Enterprise, and Windows 10 Home. Check it out.
How do I turn off Cortana in Windows 10?
Prior to Windows 10 Anniversary Update, you could disable Cortana by simply toggling a switch, but it’s not possible now after Windows 10 Anniversary Update. There are fixes to this issue. Check the methods below to easily turn off Windows 10 Cortana.
- Disable Cortana via Group Policy in Windows 10 Pro and Enterprise
- Disable Cortana via Registry in Windows 10 Home
- Prevent Cortana from knowing you
- Bonus Tip
How to check my Windows 10 version
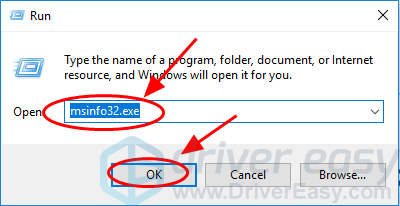
If you don’t know whether you’re using Windows 10 Pro or Windows 10 Home, follow this to check:
1) On you keyboard, press the Windows logo key
2) Type msinfo32.exe, and click OK.
3) You can check your Windows OS and version here.
Then you can choose the method to disable Cortana depending on your Windows 10 OS name.
1. Disable Cortana via Group Policy in Windows 10 Pro and Enterprise
If you’re using Windows 10 Pro or Enterprise, you can disable Cortana completely via Group Policy. To do so, follow these steps:
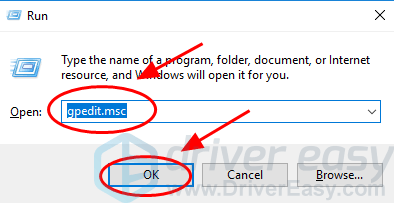
1) On your keyboard, press the Windows logo key
2) Type gpedit.msc in the Run box and click OK.
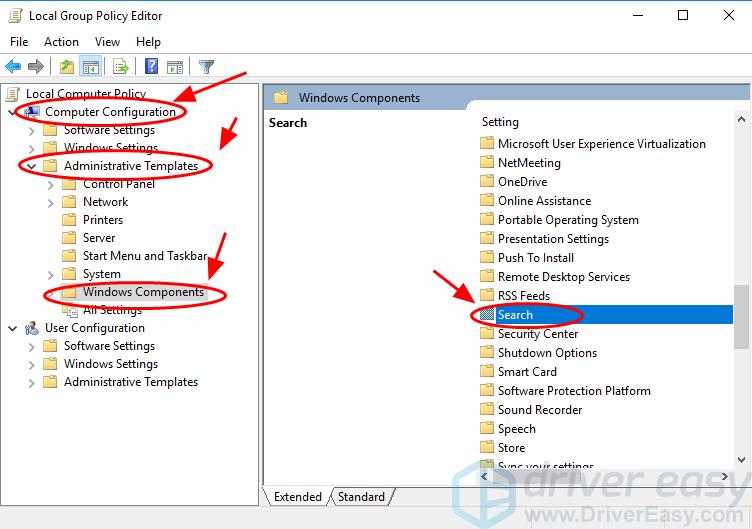
3) On Local Group Policy Editor, go to Computer Configuration > Administrative Templates > Windows Components > Search. Double click Search.
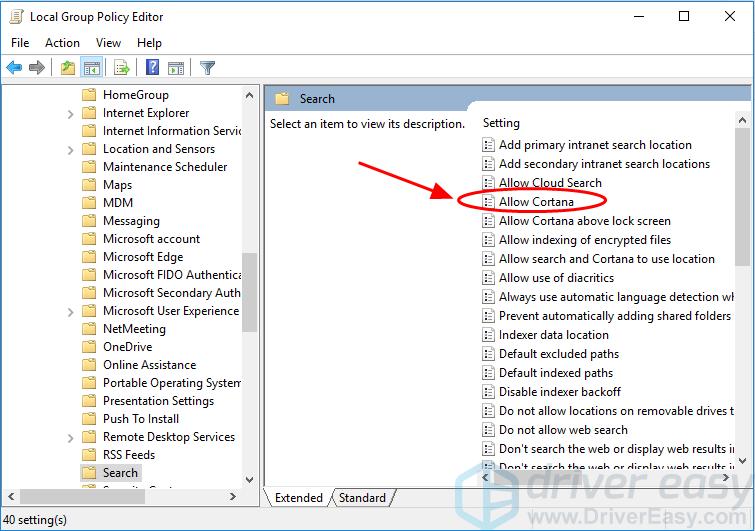
4) Double click Allow Cortana to open its settings.
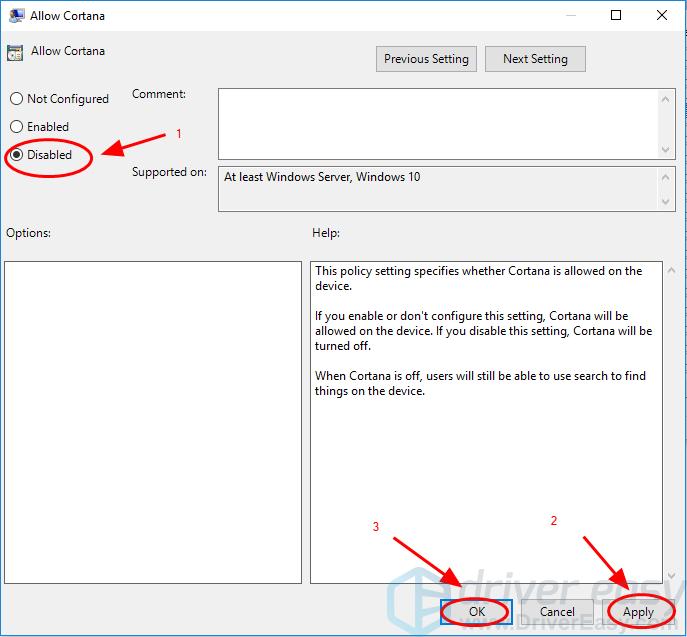
5) In the Allow Cortana section, select Disabled. Then click Apply and OK to save.
6) You should’ve disabled Cortana in your Windows 10 now.
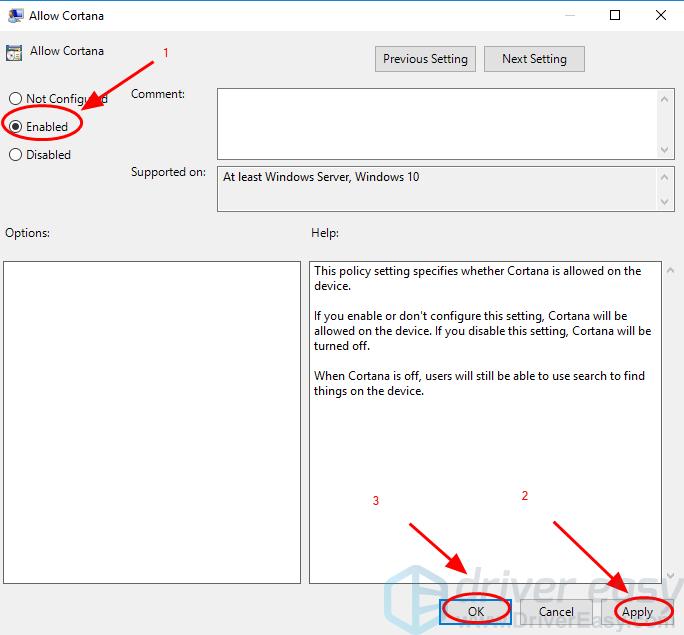
INFORMATION: If you want to enable Cortana later, you just go to the Group Policy by following the steps above, and reset Allow Cortana to Enabled.
If this method doesn’t work for you, you can try method 2 below.
2. Disable Cortana via Registry in Windows 10 Home
For some reasons, Windows 10 Home users doesn’t have the Group Policy in the computer, so disabling Cortana via Group Policy is impossible. But don’t worry, you can turn off Cortana in your Windows 10 Home via Registry.
For those using Windows 10 Pro and Enterprise, you can also turn off Cortana via Registry. Follow the instructions step by step:
Note: this method requires editing the registry, so backup first then proceed with instructions.
1) On your keyboard, press the Windows logo key
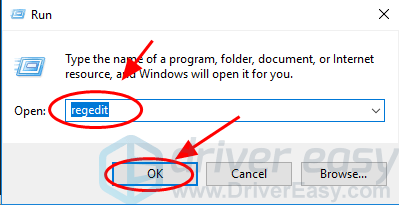
2) Type regedit in the Run box and click OK to open Registry. Then click Yes to confirm.
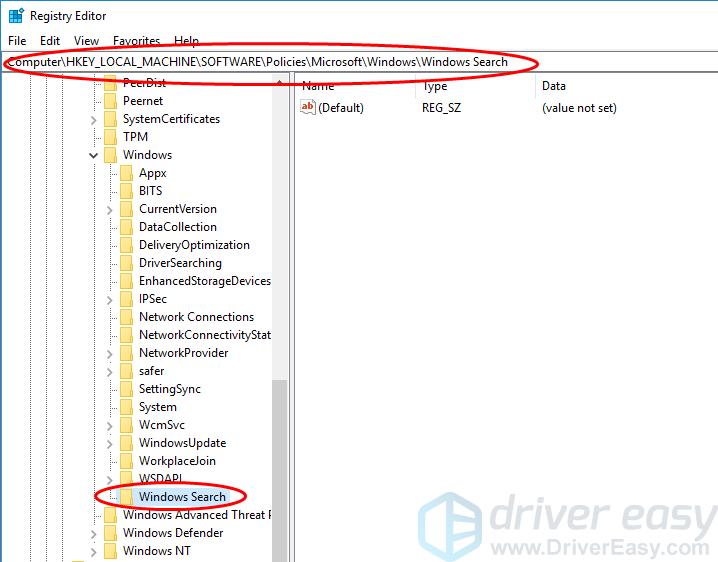
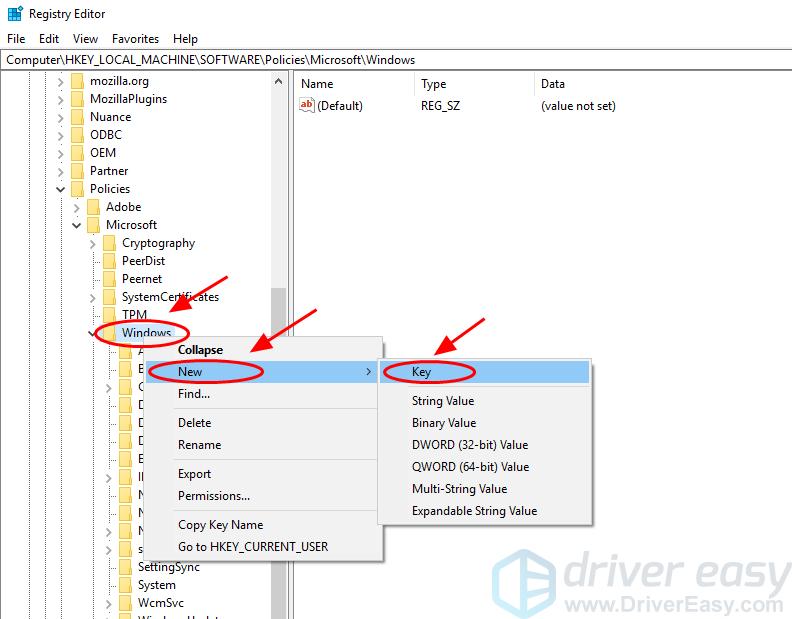
3) Go to HKEY_LOCAL_MACHINESOFTWAREPoliciesMicrosoftWindowsWindows Search.
Note: If you don’t see the Windows Search key (folder) below the Windows folder, right-click the Windows folder and select New > Key. Name it Windows Search.
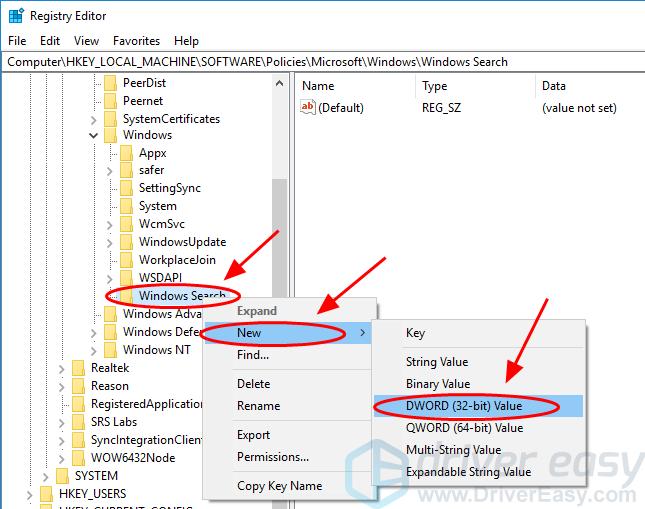
4) Right click the Windows Search key, and select New > DWORD (32-bit) Value.
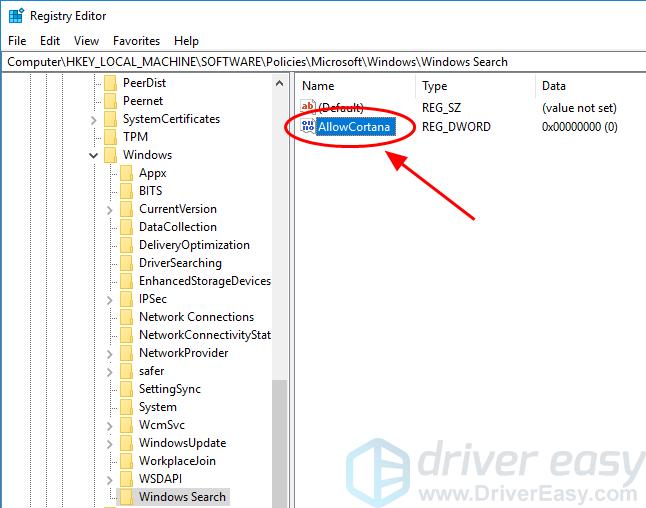
5) Name the newly-created value AllowCortana.
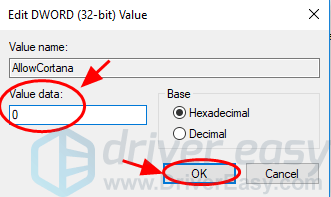
6) Double click AllowCortana, and set the Value data to 0. Then click OK to save.
You should disable Cortana in Windows 10 now.
INFORMATION: If you’d like to turn on Cortana in Windows 10 later, you can follow the steps above in Registry, and set the AllowCortana key value to 1, or delete the AllowCortana key.
3. Prevent Cortana from knowing you
You should also check the privacy settings in Cortana to stop it from spying on you.
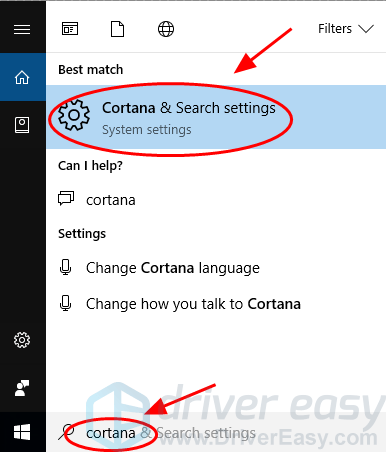
1) Type Cortana in the search box in Start, and select Cortana and Search settings (or Cortana settings).
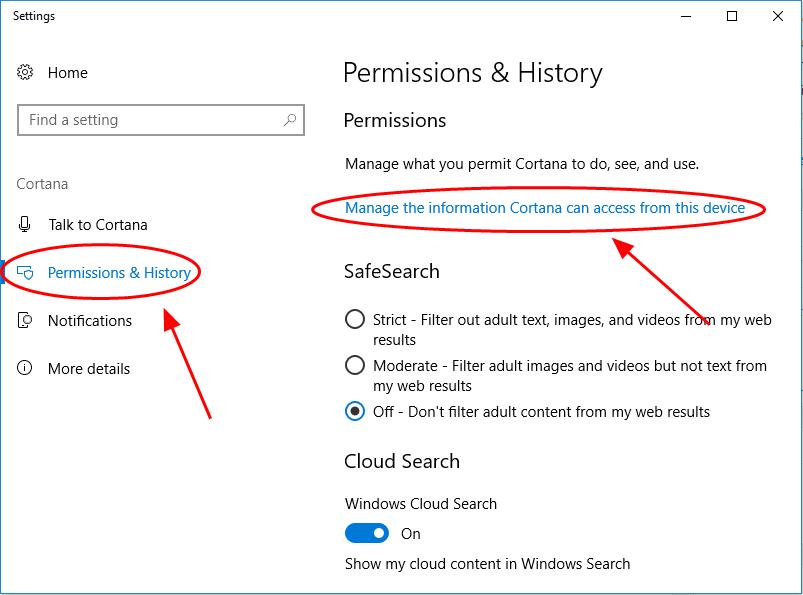
2) Click Permissions & History, and click Manage the information Cortana can access from this device.
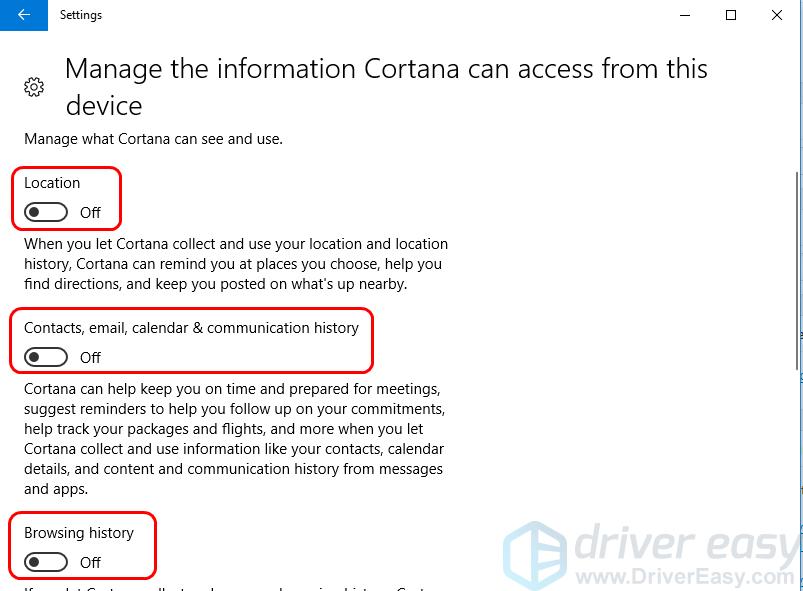
3) Make sure that the permissions that Cortana can see and use available are off, including Location, Contacts, email, calender & communication history, Browsing history.
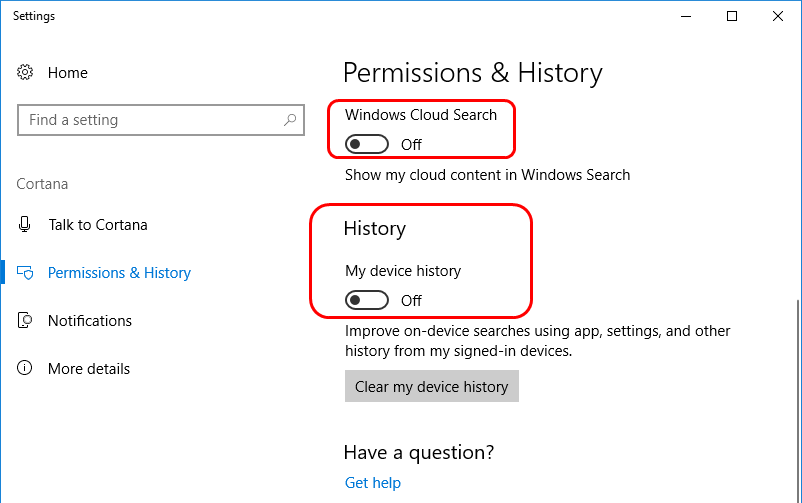
4) Click Back, and make sure that Windows Cloud Search and History are off.
Disabling Cortana on one device doesn’t mean that Cortana is disabled in all your device, and you should proceed it in other devices if you need to.
If you don’t want Microsoft to store your personal information in the cloud, you should clear all your personal information from your Microsoft account.
4. Bonus Tip
Many Windows 10 users have found that they’ve encountered the driver issues after upgrading to Windows 10. So you should verify that drivers in your computer are up to date, and update those that aren’t.
You can manually download the latest version of the drivers and install it in your computer. This requires time and computer skills.
If you don’t have time or patience, you can do it automatically with Driver Easy.
Driver Easy will automatically recognize your system and find the correct drivers for it. You don’t need to know exactly what system your computer is running, you don’t need to be troubled by the wrong driver you would be downloading, and you don’t need to worry about making a mistake when installing.
You can update your drivers automatically with either the FREE or Pro version of Driver Easy. It only takes 2 simple clicks with the Pro version (and you will get full support and a 30-day money back guarantee).
1) Download and install Driver Easy.
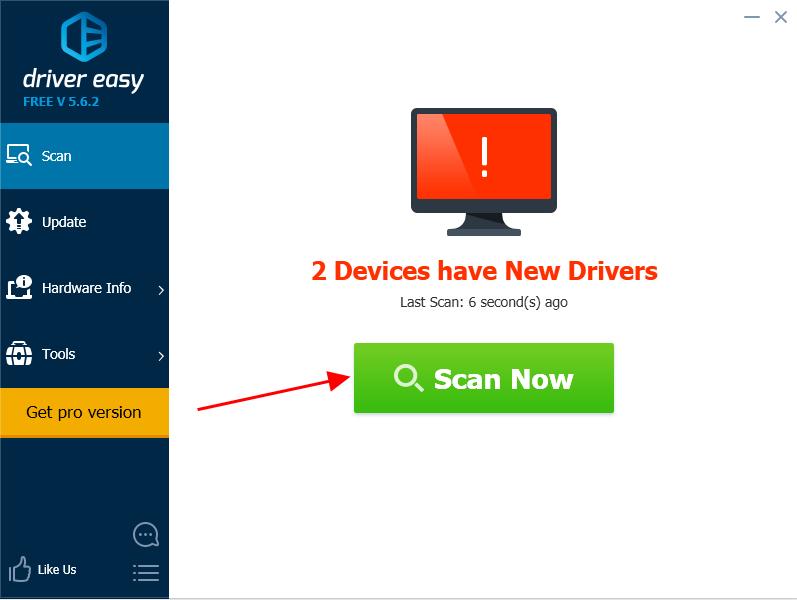
2) Run Driver Easy and click Scan Now. Then Driver Easy will scan your computer and detect any problem drivers.
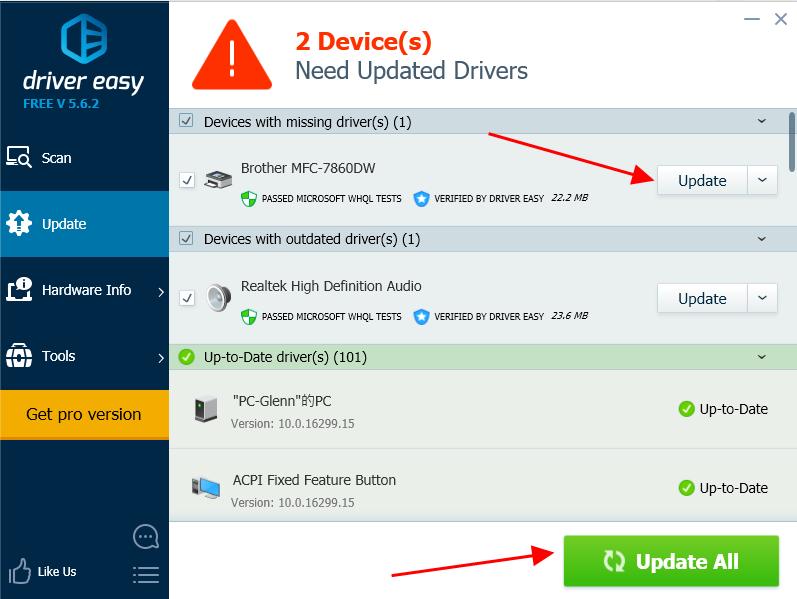
3) Click Update button next to the device name to download the latest driver (you can do that with the FREE version). Then install the driver in your computer.
Or click Update All to automatically download and install the correct version of all the problem drivers (you can do that with Pro version, and you’ll be prompted to upgrade when you click Update All).
4) Restart your computer to take effect.
These’re the ways to disable Cortana in Windows 10 completely. Hope it helps you. Feel free to leave a comment below and share your idea.
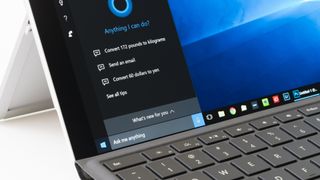
You’ve come to the right place if you want to know how to uninstall Cortana from Windows 11 or Windows 10. Thankfully, it’s rather simple to shut down Microsoft’s digital assistant, as the company continues making it less and less prevalent on devices like the best Windows laptops.
Is Microsoft surrendering territory to Alexa, Google Assistant and (possibly) Siri? Perhaps, but we’re here to discuss how to uninstall Cortana — with instructions for both regular folks and power users alike.
There are two ways to disable Cortana, as outlined by Windows Latest. You can either stop it from automatically opening when you boot your PC (the easier way) or remove the new Cortana app from Windows 10 (which is a little harder). We’ve got full instructions below.
Alternatively, you could just upgrade to Windows 11, because Microsoft has stripped Cortana almost entirely out of it.
How to disable Cortana in Windows 10
- Use the keyboard shortcut Ctrl + Shift + Esc.
- In Task Manager, click the Startup column.
- Select Cortana.
- Click Disable.
- Then, open the Start menu.
- Find Cortana under All Apps.
- Right-click on Cortana.
- Select More.
- Click on App settings.
- Turn off the switch next to ‘Runs at log-in.’
How to uninstall the Cortana app in Windows 10
These steps require a little tinkering, so a word of caution. Since you’re going to be poking around in PowerShell, back up your system first. Our best cloud backup solutions provide easy ways to protect your data.
- Open the Start Menu and type in PowerShell.
- Right click on Windows PowerShell.
- Select ‘Run as administrator’.
- Type the following text (minus the ‘ marks) in: ‘Get-AppxPackage -allusers Microsoft.549981C3F5F10 | Remove-AppxPackage’
- Press Enter.
Of course, power users set on eradicating Cortana will need to dive even deeper into Windows Registry — which is even riskier for everyday users. Since it’s less necessary and a bit dangerous, we recommend skipping that part.
You’ve already shut Cortana up and removed its app presence. That should be enough for some extra peace of mind.
How to disable Cortana in Windows 11
While Cortana comes disabled by default in Windows 11, it’s possible to bring it back, as we’ll explain below. If you, or someone else, did that to your PC, and you want to remove it you can disable it just as easily.
We’ve got two ways to do it here, and our first is arguably the easiest.
- Click Windows + I (that’s an I not an L) to open Settings.
- Select Apps from the left menu.
- Select Apps and Features on the right menu.
- Scroll to Cortana, click the three dots icon and select Advanced options
- Flip the «Run at Log-in» toggle to the OFF position.
How to disable Cortana in Windows 11 with the Task Manager
This is another way to stop it in its tracks, pulling Cortana out of your Startup apps.
- Right-click the Windows Start button from the bottom of the screen
- Select Task Manager
- Open the Startup tab
- Find and right-click Cortana
- Select Disable
How to install Cortana in Windows 11
Windows 11 doesn’t even have Cortana active by default. But, what if, just play along with us here, you wanted to enable Cortana in Windows 11?
Fortunately, it’s really easy.
- Click Windows + I (that’s an I not an L) to open Settings.
- Select Apps from the left menu.
- Select Apps and Features on the right menu.
- Scroll to Cortana, click the three dots icon and select Advanced options
- Turn the «Run at Log-in» toggle to the ON position.
Get instant access to breaking news, the hottest reviews, great deals and helpful tips.
Henry is a managing editor at Tom’s Guide covering streaming media, laptops and all things Apple, reviewing devices and services for the past seven years. Prior to joining Tom’s Guide, he reviewed software and hardware for TechRadar Pro, and interviewed artists for Patek Philippe International Magazine. He’s also covered the wild world of professional wrestling for Cageside Seats, interviewing athletes and other industry veterans.
Содержание
- Способ 1: Отключение разрешений
- Способ 2: Удаление связанных файлов
- Способ 3: Редактирование параметров реестра
- Способ 4: Редактирование параметров локальных групповых политик
- Способ 5: Изменение региона и языка интерфейса
- Вопросы и ответы
Кортана — встроенный в Windows 10 голосовой помощник, обладающий элементами искусственного интеллекта. Пока что использовать его могут только те пользователи, которые выбрали США в качестве региона и английский язык основным в операционной системе. Отключение Кортаны может понадобиться в разных ситуациях, поэтому стоит подобрать оптимальный способ реализации данной задачи, ознакомившись со всеми доступными.
Способ 1: Отключение разрешений
Для Кортаны можно отключить все разрешения, например, доступ к микрофону и вывод уведомлений. Это поможет избавиться от случайной активации функции и сделает ее неактивной до тех пор, пока пользователь не передумает и снова не установит соответствующие разрешения. Все действия осуществляются через настройки приватности, используя текущую учетную запись.
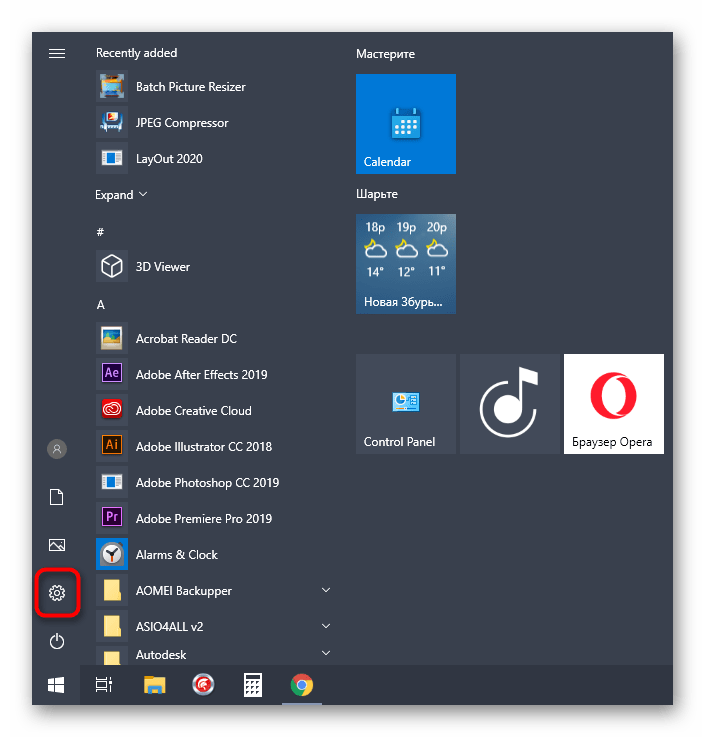
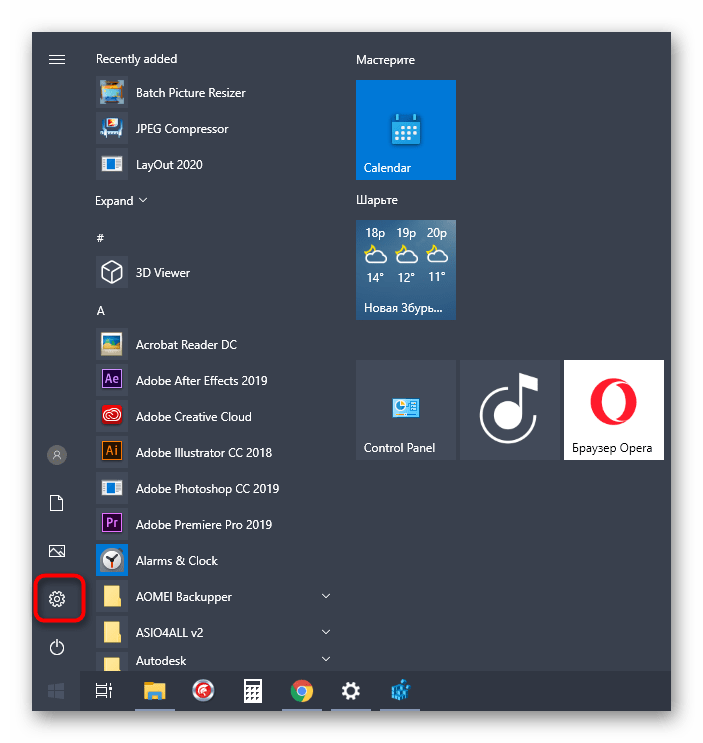
- Откройте «Пуск» и перейдите в «Параметры», кликнув по значку в виде шестеренки.
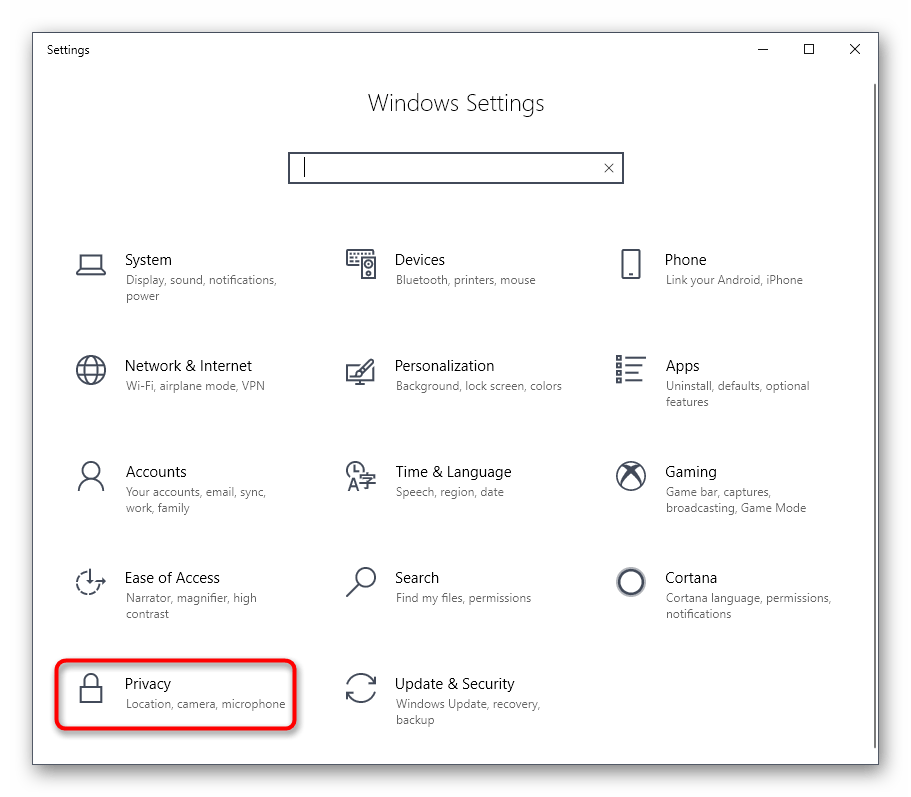
- В появившемся меню выберите пункт «Privacy».
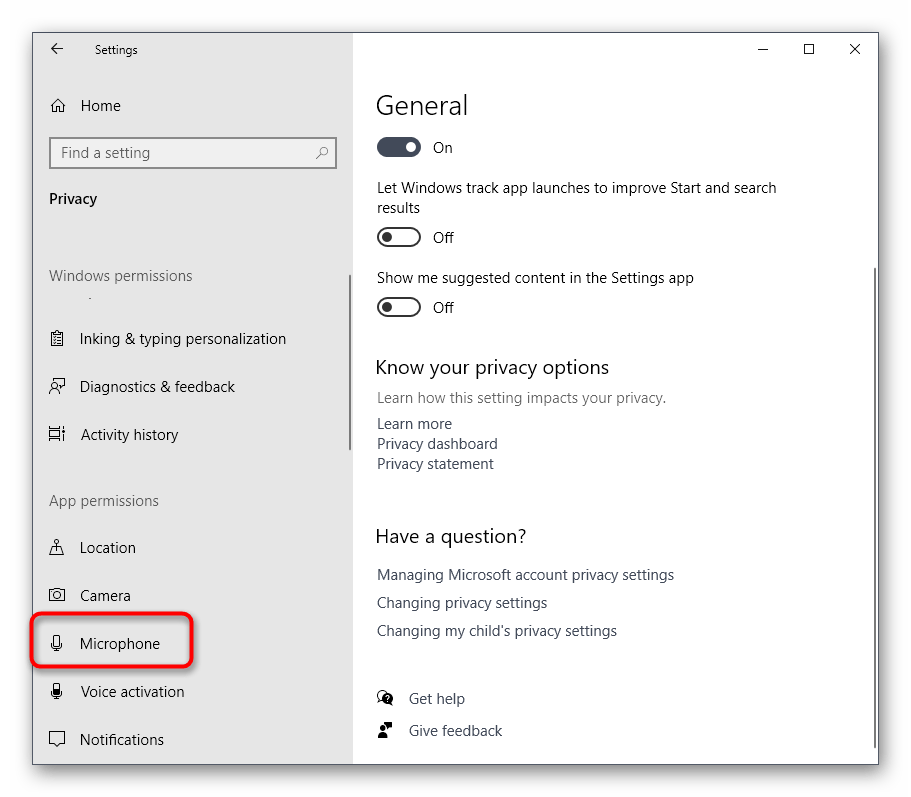
- Через левую панель переместитесь к категории «Microphone».
- Переведите ползунок «Cortana» в отключенное состояние.
- Далее переместитесь к «Voice activation», где можете сразу же отключить активацию голосом для всех существующих приложений.
- Опуститесь вниз, чтобы отыскать раздел «Cortana». Отключите все опции, связанные с этим голосовым помощником.
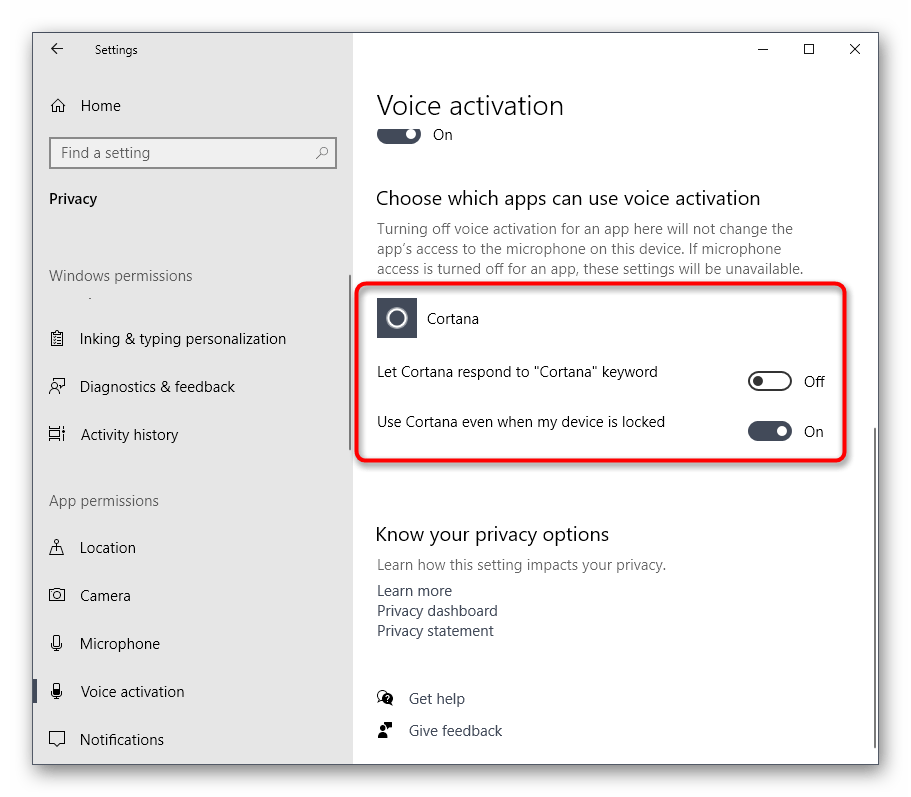
Теперь у рассматриваемого голосового помощника просто не будет прав, чтобы использовать микрофон или выводить на экран соответствующие уведомления. Вы можете быть уверены, что Кортана не активируется случайно. При необходимости предоставьте отключенные разрешения, чтобы снова наладить нормальное функционирование технологии.
Способ 2: Удаление связанных файлов
Перед началом выполнения этого метода уточним, что он является радикальным и заключается в удалении всех системных файлов, связанных с Cortana. Если вы их удалите, наладить работу помощника можно будет только путем повторной загрузки языковых пакетов или восстановлением исходного состояния операционной системы.
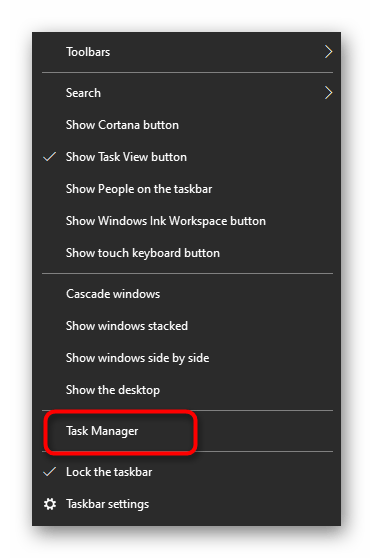
- Щелкните по пустому месту на панели задач и в появившемся меню выберите «Task Manager».
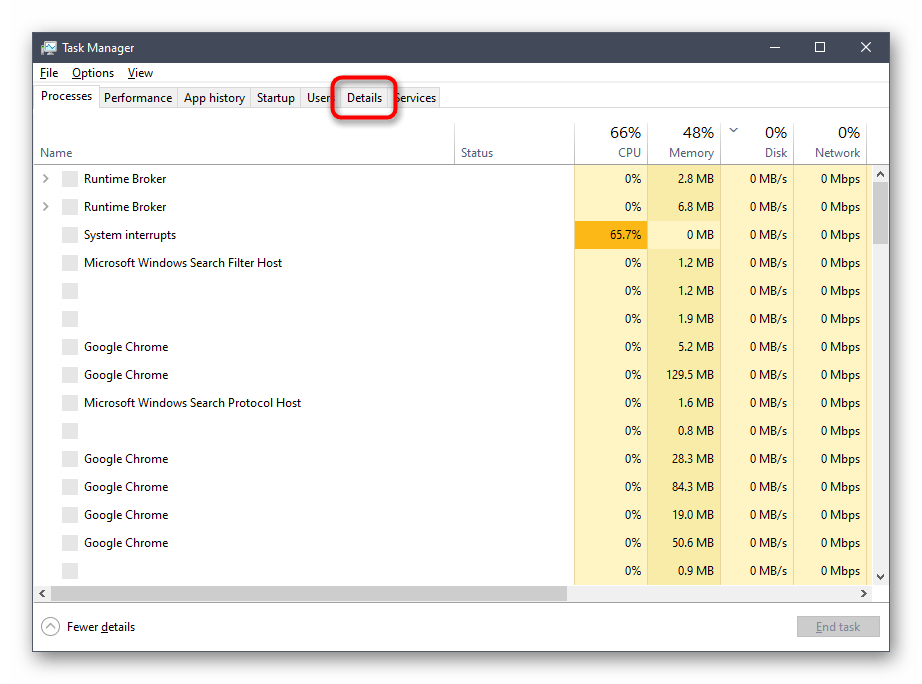
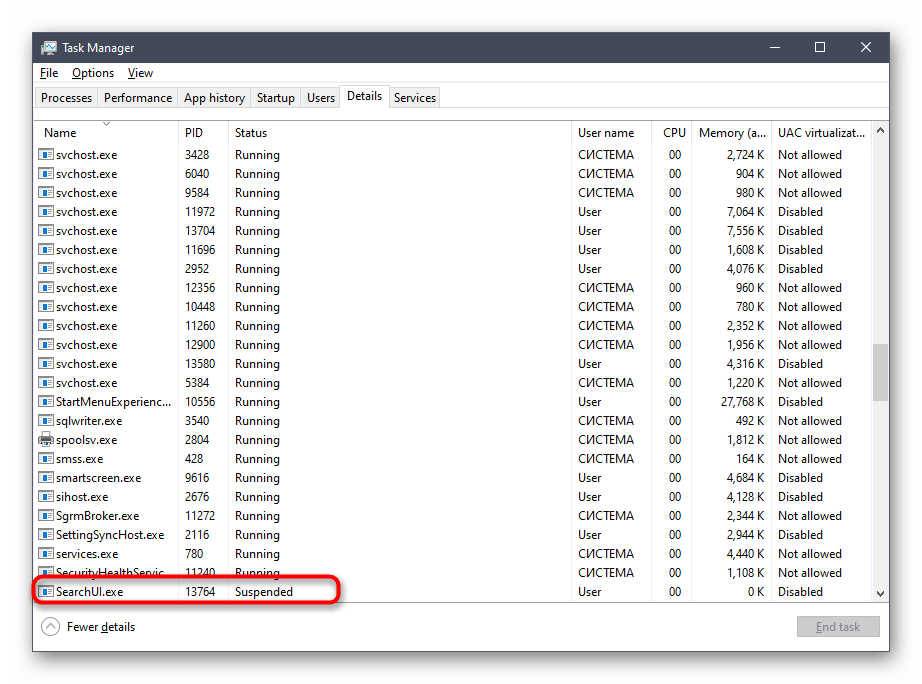
- В Диспетчере задач переместитесь на вкладку «Details».
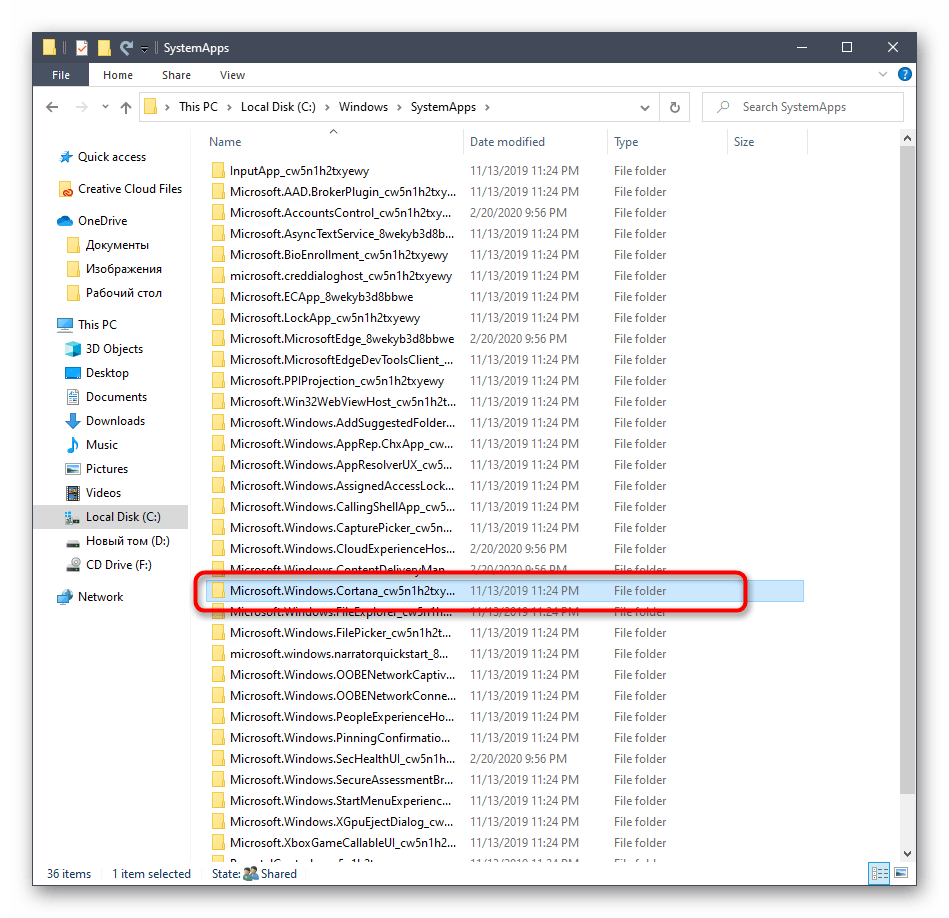
- Среди списка процессов отыщите «SearchUI.exe». Через контекстное меню перейдите в свойства и откройте расположение этого процесса («Open file location»).
- Удалите папку «Microsoft.Windows.Cortana…».
- Вернитесь к Диспетчеру задач и завершите дерево процессов «SearchUI.exe».

Остается только перезагрузить компьютер, чтобы удостовериться в том, что голосовой помощник теперь отсутствует в операционной системе и сможет активироваться любыми средствами.
Способ 3: Редактирование параметров реестра
Этот вариант менее радикальный, поскольку попросту отключает все функции Кортаны до момента, пока пользователь самостоятельно не вернет значение параметра в исходное состояние. Его принцип заключается в редактировании параметров реестра, что осуществляется так:
- Нажмите горячую клавишу Win + R, чтобы вызвать системную утилиту «Выполнить». В поле напишите
regeditи нажмите на Enter для активации команды. - Перейдите по пути
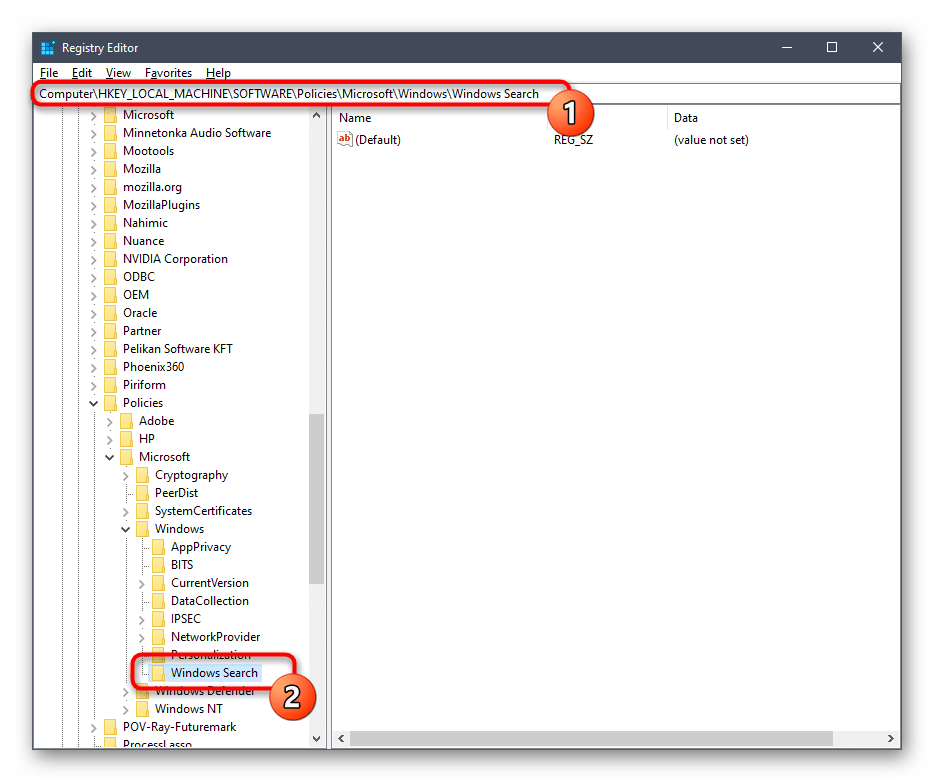
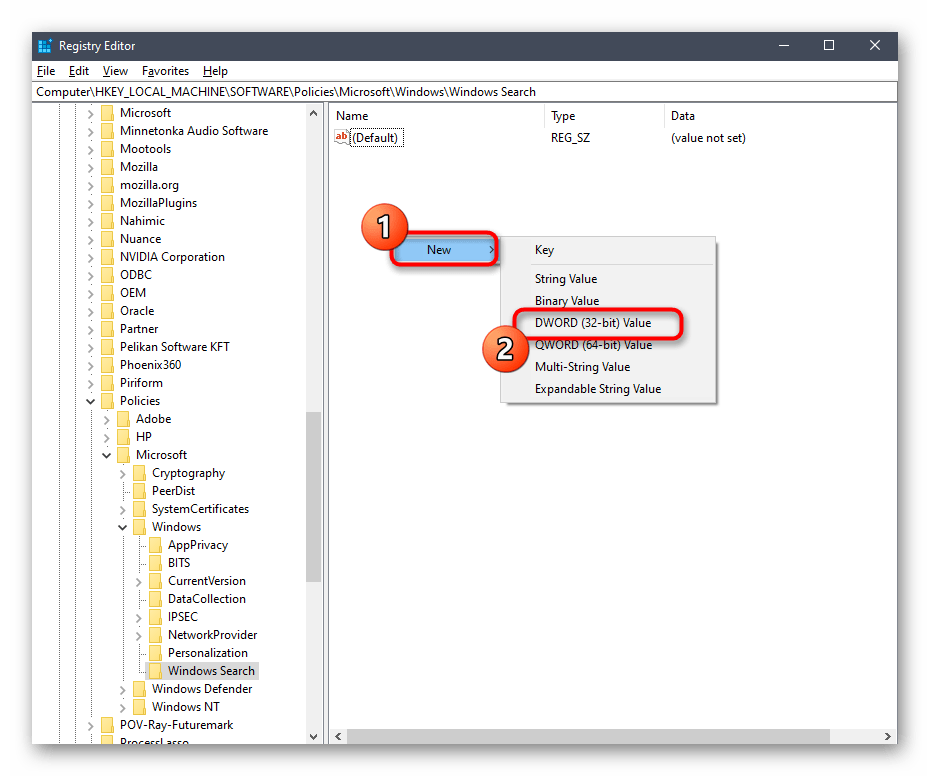
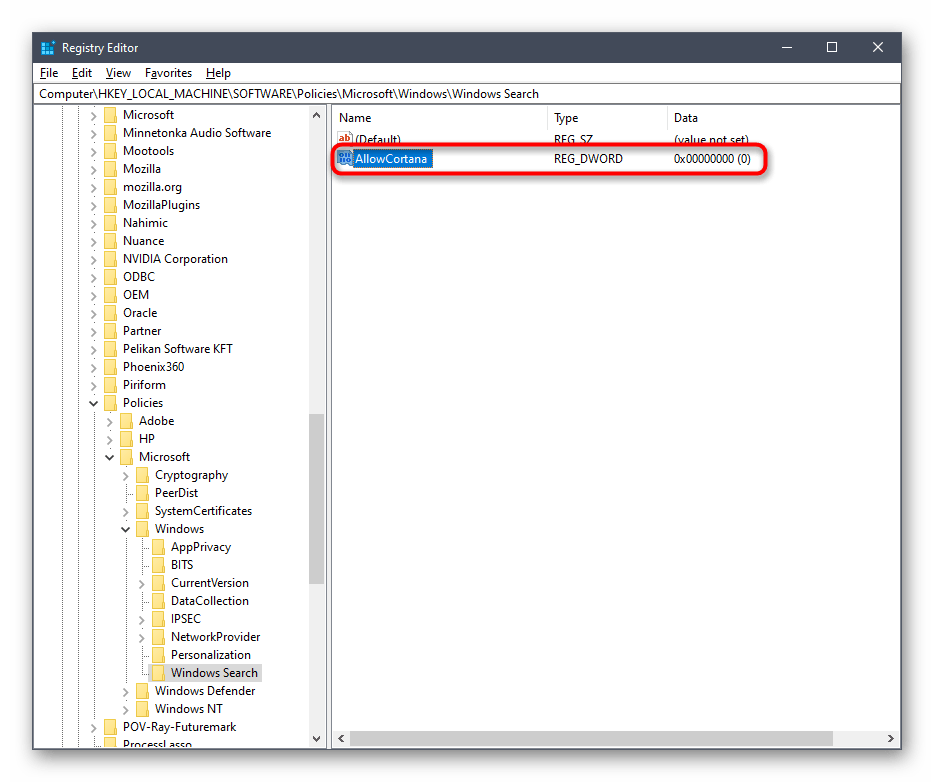
HKEY_LOCAL_MACHINESOFTWAREMicrosoftWindows. Создайте в текущем ключе папку «Windows Search», если она отсутствует. Для этого щелкните ПКМ по папке «Windows» слева и выберите «Создать» — «Раздел». - После этого в директории «Windows Search» кликните правой кнопкой мыши по пустому месту и выберите «DWORD (32-bit) Value».
- Задайте параметру название «Allow Cortana».
- Убедитесь, что в качестве значения параметра установлен «0». Если рассматриваемую технологию придется повторно активировать, просто поменяйте значение на «1» и перезагрузите Виндовс.
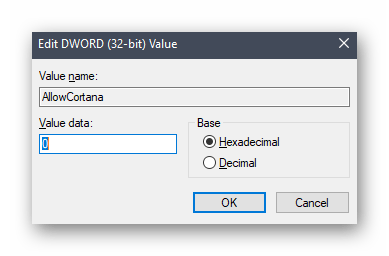
Любые изменения в редакторе реестра вступают в силу только после создания нового сеанса операционной системы, поэтому не забывайте после настройки перезагружать ПК.
Способ 4: Редактирование параметров локальных групповых политик
Данный вариант подойдет только обладателям версий Windows 10 Pro и Enterprise, а в остальных случаях эта же настройка производится через редактор реестра так, как было показано в предыдущем методе, поскольку редактор локальных групповых политик присутствует только в упомянутых сборках. Через него отключение Cortana производится буквально в несколько кликов.
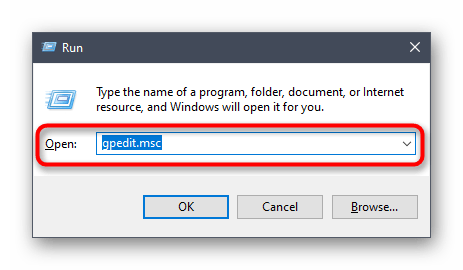
- Откройте «Выполнить» (Win + R), в поле напишите
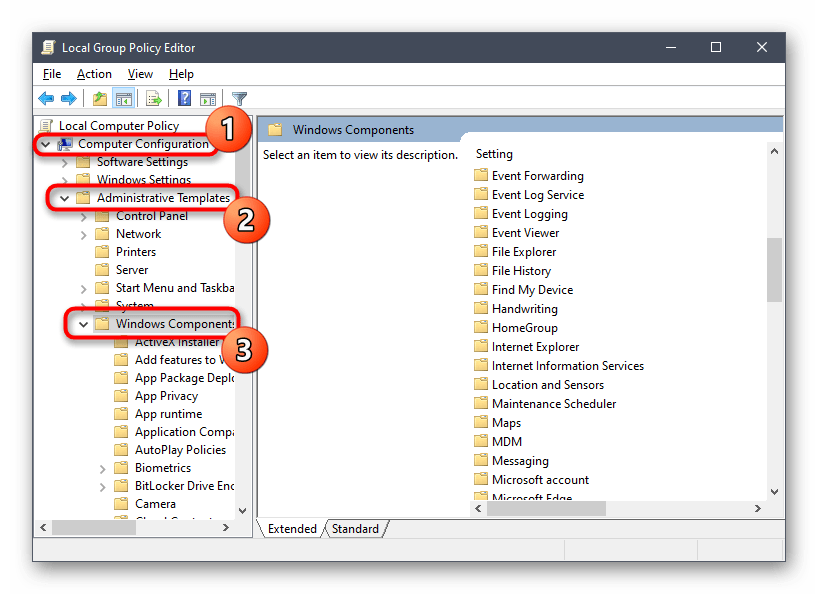
gpedit.mscи нажмите на Enter. - Перейдите по пути «Computer Configuration» — «Administrative Templates» — «Windows Components».
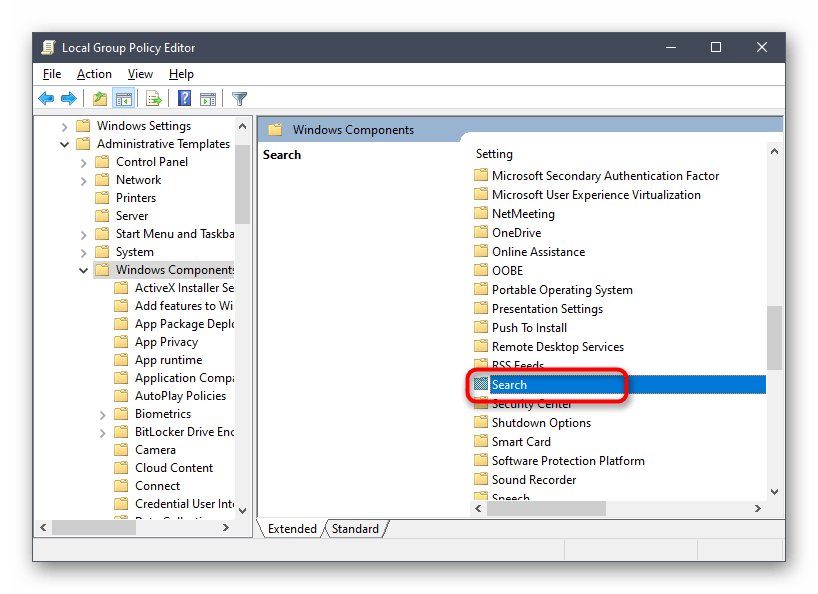
- В конечной папке отыщите каталог «Search» и откройте его для просмотра параметров.
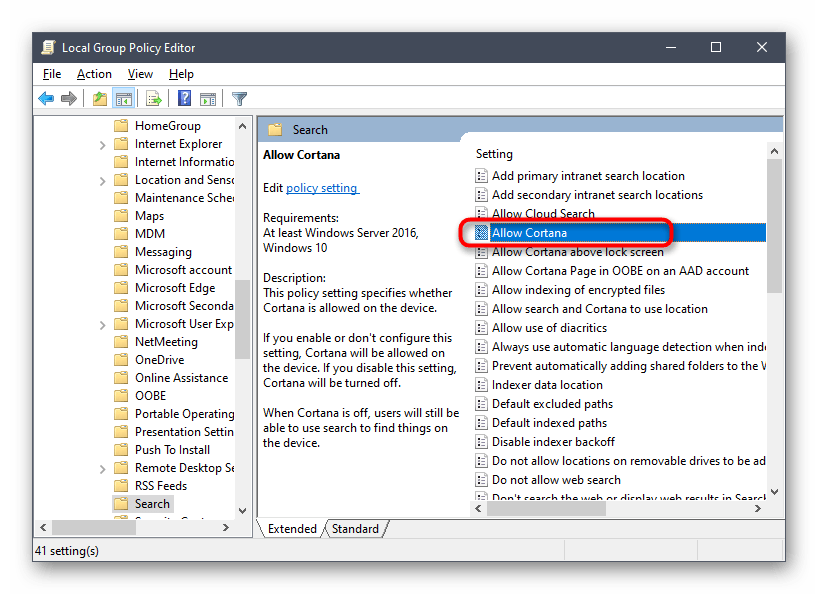
- Дважды щелкните по строке «Allow Cortana», чтобы перейти к редактированию настройки.
- Отметьте маркером пункт «Disabled» и примените изменения.
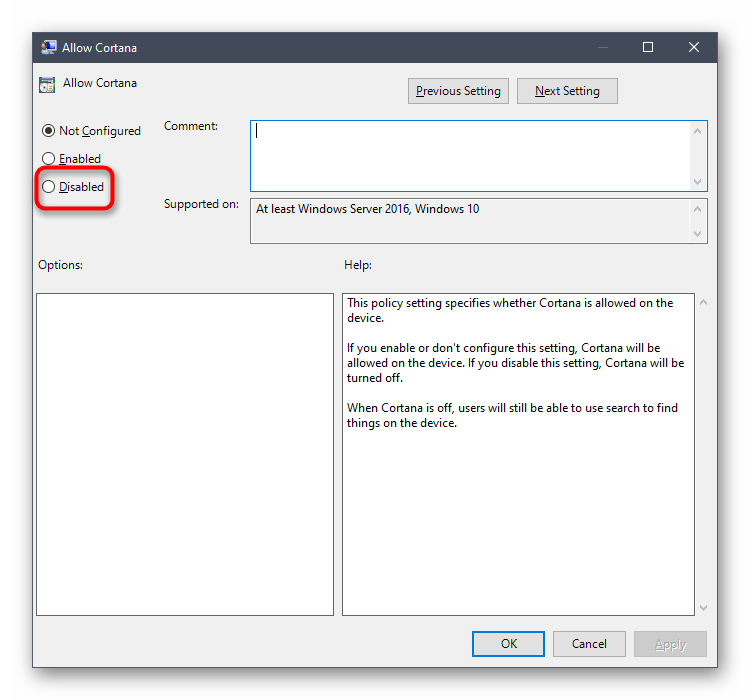
Для повторной активации голосового помощника выполните такие же действия, но в качестве значения для параметра отметьте «Enabled». Не забывайте и о перезагрузке компьютера, чтобы все изменения были применены.
Способ 5: Изменение региона и языка интерфейса
Последний вариант нашего сегодняшнего материала подойдет только тем пользователям, кто для отключения Кортаны готов поменять регион и язык интерфейса Windows 10, например, на привычный русский. Дело в том, что на текущий момент времени голосовой помощник не поддерживается в этом регионе, поэтому его функции сразу будут полностью деактивированы.
- Откройте «Пуск» и перейдите в «Параметры».
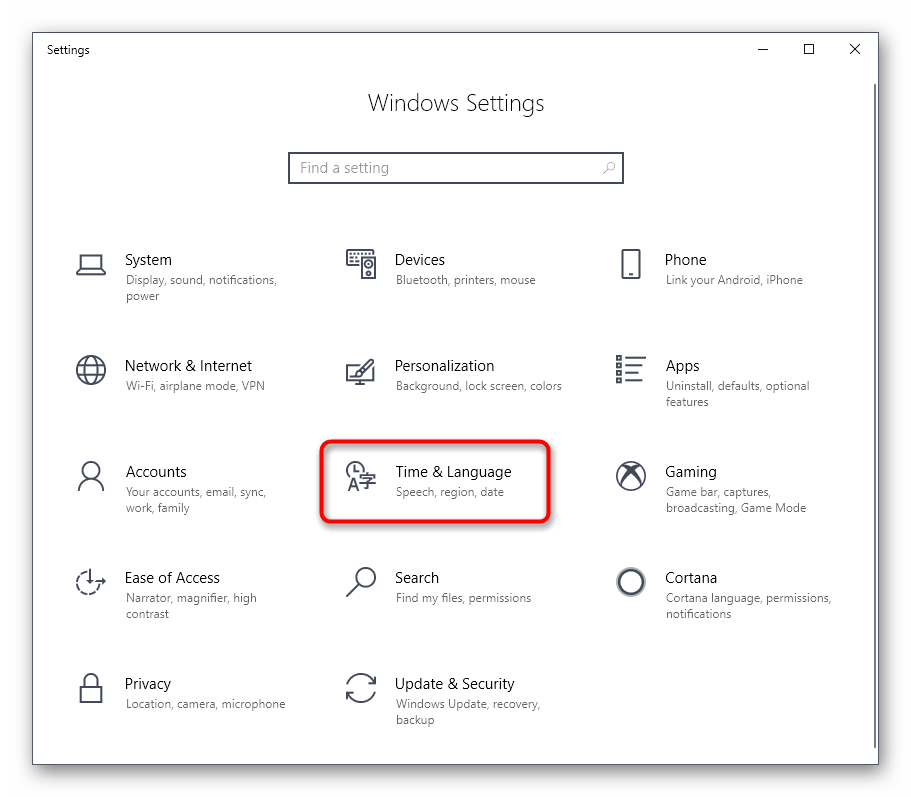
- Выберите раздел «Time & Language».
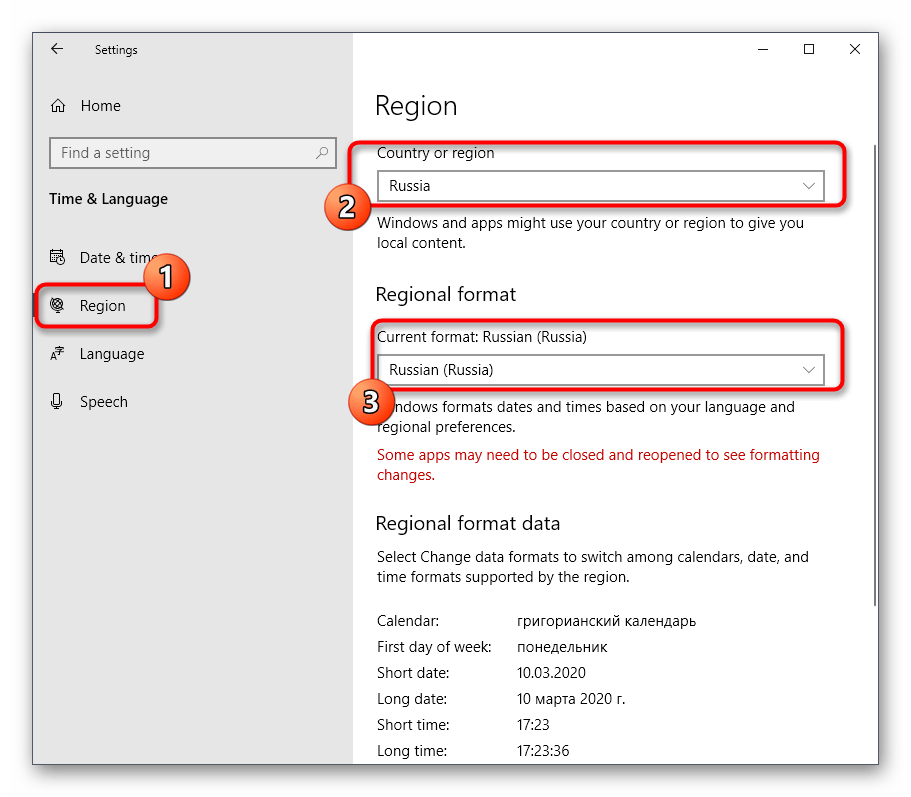
- В разделе «Region» укажите «Russia» и установите такой же региональный формат.
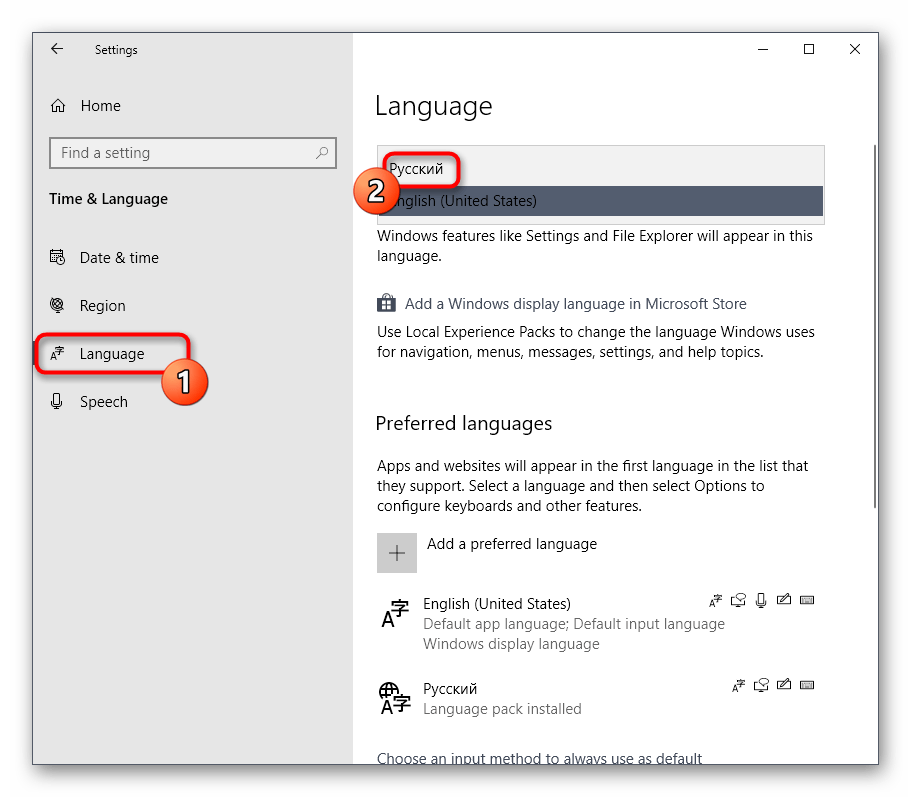
- После этого переместитесь в «Language» и во всплывающем меню тоже отметьте «Русский». Если этот язык там отсутствует, его потребуется дополнительно установить из фирменного магазина.
- Теперь на экране появится уведомление о необходимости повторного входа в систему, чтобы все изменения вступили в силу. Сделайте это сразу же или позже, завершив взаимодействие с компьютером.
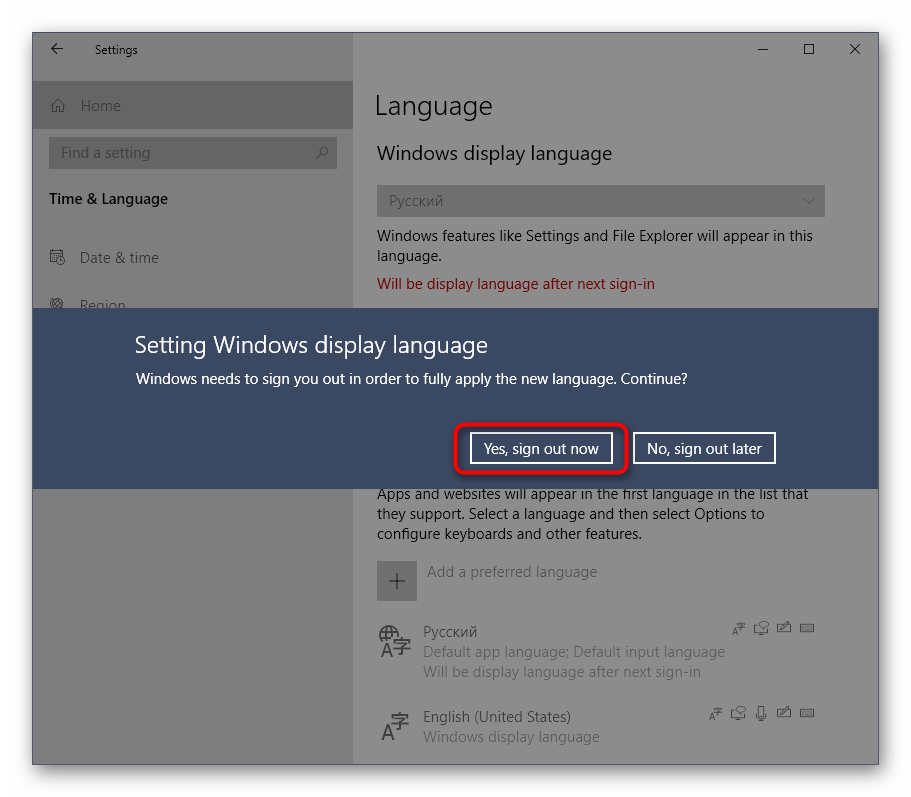
Если во время произведения данного способа возникли какие-либо проблемы, советуем обратиться к расширенной инструкции по этой теме, которая представлена в другой статье на нашем сайте по следующей ссылке.
Подробнее: Изменение языка интерфейса в Windows 10
Только что вы ознакомились с пятью доступными методами отключения Кортаны в Windows 10. Как видите, каждый из них подразумевает выполнение определенного алгоритма действий, поэтому подойдет пользователям, столкнувшимся с разными задачами и требованиями.
Cortana is a cloud-based virtual-personal assistant created by Microsoft for Windows 10 and other platforms. Cortana will collect your personal data to personalise your experiences. This includes your search history, location history, calendar details, contacts and content and communication history from messages, apps, and notifications. If you are concerned about your personal data and privacy, you can disable this feature. This article will show you how to disable Cortana on your Windows 10 PC, but it only works for Windows 10 Pro or Enterprise users.
Steps
-
1
Open Windows Group Policy Editor. Click on the Start menu, at the bottom-left corner of the screen (or hit the Windows button in your keyboard) and search for “gpedit.msc” or “Group Policy Editor”. Select gpedit.msc or Edit group policy from the results.
- Alternatively, open the RUN feature by pressing ⊞ Win+R and type “gpedit.msc” into the box; hit ↵ Enter to continue.
-
2
Navigate to the “Computer Configuration” section and select Administrative Templates from the list. It will be the third option in there.
-
3
Double-click on the Windows Components option. This will open a list of options.
-
4
Select Search on the right side. Hit the S button quickly find this option and double-click on it.
-
5
Locate Allow Cortana from there. It will be the fourth option on the context menu. Double click it. This will open a new window.
-
6
Select Disabled from the window. Click on the OK button to save your changes. Also, restart your PC to remove the Cortana icon or search box from your taskbar. The Cortana icon will be replaced by a search icon in the taskbar. You’re done!
Ask a Question
200 characters left
Include your email address to get a message when this question is answered.
Submit
-
To re-enable the Cortana, select Not Configured or Enabled from the same settings.
-
Remember to restart your PC afterwards for the new changes to be configured, as it may have some conflicts without restarting your PC.
References
About this article
Thanks to all authors for creating a page that has been read 10,050 times.
Is this article up to date?
Cortana is the digital voice assistant built into Windows 10, designed to make your life easier with simple voice commands. And like Siri for Apple, Alexa for Amazon, and Google’s self-named voice assistant, Cortana can be finicky.
If you’re not interested in those voice assistant features, don’t want it piping up when you click on the search bar, or you’re worried about your privacy, here’s how to disable Cortana. Microsoft doesn’t make it easy, but we’ll walk you through the process.
Before you disable Cortana
When Windows 10 was first released it was simple to switch off Cortana, but doing so broke Windows Search. Turning it off now doesn’t break search in quite the same way, but it can have an impact. It’s also not quite as easy as it used to be. Changes were made in the Windows 10 Anniversary Update to how Cortana integrates into Windows and how we can turn it off. Not all previous methods work, but the steps in this guide will.
Cortana is tightly integrated into Windows 10 and Windows Search, so you will lose some Windows functionality if you disable Cortana: personalized news, reminders, and natural language searches through your files. But standard file search will still work just fine. And the good news is that you can reverse this process. If you don’t like what happens when you disable Cortana in Windows 10, just perform the steps again and undo the changes you made.
Before disabling Cortana, create a Windows Restore Point. Always better to be safe than sorry.
(opens in new tab)
- Type ‘system restore’ into the Windows search box and select ‘Create a restore point.’
- Select Create at the bottom of the popup box that appears.
- Give it a name and select Create.
The process will take a few minutes and will create a snapshot we can use in the unlikely event something goes wrong when disabling Cortana.
How to disable Cortana in Windows 10 Pro and Enterprise
The most effective way to disable Cortana in Windows 10 is to use Group Policy. GPEdit allows us to turn off Cortana with minimal impact and can be done in a couple of minutes. The downside is that Local Group Policy Editor is only available in Windows 10 Pro and Enterprise. You are able to add it to Windows 10 Home, but you can also use the registry editor, which is easier (more on that below). See our guide on the difference between Windows 10 Home and Pro (opens in new tab) for more on version variations.
(opens in new tab)
- Type ‘group policy’ into the Windows search box. You can use Windows key + R and type «gpedit.msc’ if you prefer, both will work.
- In the left pane of Local Group Policy Editor, navigate to Computer Configuration, Administrative Templates, Windows Components and Search.
- Select Allow Cortana in the right pane.
- Right click Allow Cortana and select Edit.
(opens in new tab)
- Select Disabled in the radio button on the left.
- Select Apply and the window will close. You should now see Disabled on the Allow Cortana line rather than Enabled.
(opens in new tab)
That’s all there is to it. You have now disabled Cortana in Windows 10 using Group Policy Editor. If you want to reinstate Cortana, just repeat the above and select Enable at Step 5.
How to disable Cortana in Windows 10 Home
As Group Policy Editor is not available in Windows 10 Home unless you install it yourself, we need to use the registry to make the change. Thankfully it’s just as straightforward.
- Type ‘regedit’ into the Windows search. You can use Windows key + R and type ‘regedit’ if you prefer, both will work.
- Navigate to HKEY_LOCAL_MACHINESOFTWAREPoliciesMicrosoftWindowsWindows Search in the left pane of regedit.
(opens in new tab)
- Right click an empty space in the right pane of regedit and select New and DWORD (32-bit) Value.
- Name it ‘AllowCortana’ and give it a Value of 0.
(opens in new tab)
- Select OK to save your new key.
And you’re done! Cortana won’t bug you anymore—at least, not until a big Windows update conveniently reenables it.
Sign up to get the best content of the week, and great gaming deals, as picked by the editors.
Say goodbye to Cortana for good
(Image: © Shutterstock)
Cortana in Windows 10 never really lived up to its legendary name. Even away from the desktop, gradually Cortana has been killed off, with mobile access and the Invoke smart speaker consigned to the tech scrap heap.
Cortana is still shipped in Windows 10, though, so for folks who actually get some use from it, there is at least an outlet. But for the rest, Cortana is just another piece of bloat they don’t want. And, while knowing how to speed up Windows 10 is a necessary skill if you’re a Windows 10 user, you’ll still want to minimize all the bloatware that cause slowdows.
It’s not easy to disable Cortana completely, but where there’s a will, there’s usually a way. Here’s what you need to do.
- Here’s how to screenshot on Windows 10
- Have yet to switch? Here’s how to upgrade to Windows 10 for free
How to hide Cortana from the Windows 10 taskbar
If all you want is to get rid of the Cortana button from the Windows 10 taskbar, there’s a simple fix. It won’t disable Cortana, but it’ll hide it from plain sight.
‘Right click’ anywhere on the taskbar and click ‘Show Cortana button’. If Cortana was previously displayed, the button will now be gone. If you ever want to bring it back, do the same process again.
How to disable Cortana in Windows 10
Unfortunately, Cortana can’t easily be uninstalled from your Windows 10 PC. As a built-in feature, Microsoft has disabled this possibility.
The good news is you’re not out of luck. There are a couple of methods you can use to disable Cortana, but the first one is universal whether you’re on Windows 10 Home or Pro.
It should be noted before beginning that this involves making changes to the registry, and care should always be taken. Making changes to things you don’t understand could lead to some pretty dire consequences on your PC, so always tread carefully.
1. Open the Registry Editor
The first thing you need to do to disable Cortana in Windows 10 is to open up the Registry Editor. You’ll find this in the ‘Windows Administrative Tools’ folder in the Start Menu.
Alternatively, use the Windows 10 search box and just type ‘Registry Editor’. When asked if you want to allow this app to make changes to your device, click ‘Yes’.
2. Locate the necessary registry entry
For the first part, you’ll need to be in the sidebar filled with folders. First, locate the folder ‘HKEY_LOCAL_MACHINE’ and then expand the ‘SOFTWARE’ folder.
From here you need to locate ‘Policies’, then ‘Microsoft’, then ‘Windows’. Inside the ‘Windows’ folder (also known as a Key) you might already have another labeled ‘Windows Search’. If you don’t, then first you’ll need to make one.
Right-click on the ‘Windows’ folder, then select ‘New’ followed by ‘Key’. Name it ‘Windows Search’.
3. Disable Cortana in the registry
The next step is where you’ll actually disable Cortana in Windows 10. Once again, you need to first create a new entry in the registry.
Right-click on the ‘Windows Search’ folder you created in the previous step, select ‘New’ and this time choose ‘DWORD (32-bit) Value’ and name it ‘AllowCortana’.
Double click on this new item and ensure its value is set to ‘0’. Click ‘OK’ and close the Registry Editor. You’ll now need to restart your PC for it to take effect.
Once rebooted, Cortana will be disabled. You can check this by right-clicking on the taskbar and you’ll no longer see the ‘Show Cortana Button’ option that was once there. It will still show in the list of apps in the Start Menu, but it’s now completely disabled as you’ll see when you try to open it.
If you ever want to enable Cortana again, follow the same steps and in ‘AllowCortana’ change the value to ‘1’.
4. How to disable Cortana in Windows 10 Pro with Group Policy Editor
If you’re using Windows 10 Pro, the above method will also work but there is an alternative not possible in Windows 10 Home. Cortana can be disabled with the Group Policy Editor in Windows 10 Pro, removing the need to make any changes to the registry.
Open the Group Policy Editor by pressing ‘Win + R’ to open the Run box and then enter ‘gpedit.msc’. Next, navigate to the necessary folder by first going to ‘Computer Configuration’, then ‘Administrative Templates’, ‘Windows Components’ and finally ‘Search’.
Moving over to the right-hand pane, locate the entry called ‘Allow Cortana’ and double-click to open. Set it to ‘Disabled’ then click ‘OK’ and close the Group Policy Editor.
As with the registry method, you’ll now need to reboot your PC for the changes to take effect.
Summary
It’s unfortunate that Cortana never really achieved its full potential, as smart assistants like Siri, Google Assistant, and Alexa have become an integral part of daily life for millions.
There are plenty of reasons someone might want to disable Cortana on their Windows 10 PC, and fortunately, even though Microsoft doesn’t want you to, there’s a way around it.
- Best laptop 2021: our pick of the 15 best laptops you can buy this year

