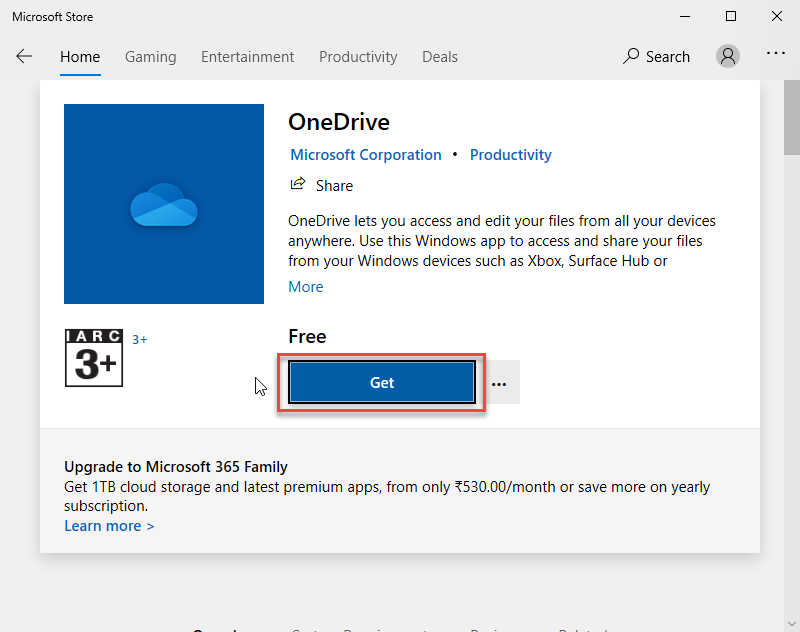
Turn off, disable, or uninstall OneDrive
OneDrive for Business SharePoint Server Subscription Edition SharePoint Server 2019 SharePoint in Microsoft 365 Office for business Microsoft 365 admin OneDrive (work or school) Office.com OneDrive (home or personal) OneDrive (work or school) operated by 21Vianet OneDrive for Mac OneDrive for Windows SharePoint admin center SharePoint in Microsoft 365 Small Business SharePoint operated by 21Vianet More…Less
If you want to stop syncing for a short time, learn How to pause and resume sync in OneDrive.
If you want to stop syncing a file, read How to stop or cancel sync in OneDrive.
If you want to remove a OneDrive folder from your computer, follow the steps in Choose which OneDrive folders to sync to your computer.
If you want to cancel your OneDrive subscription, see How to cancel your Microsoft subscription.
If you want to sign out of OneDrive on the web, select your profile photo, then select Sign out.
If you just don’t want to use OneDrive, the easiest solution is to unlink it.
Unlink OneDrive
You won’t lose files or data by unlinking OneDrive from your computer. You can always access your files by signing in to OneDrive.com.
Windows
-
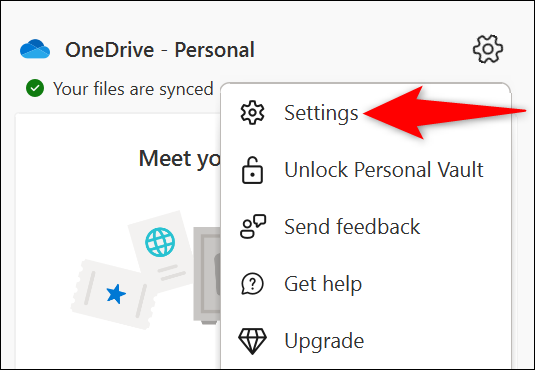
Open OneDrive settings (select the OneDrive cloud icon in your notification area, and then select the OneDrive Help and Settings icon then Settings.)
-
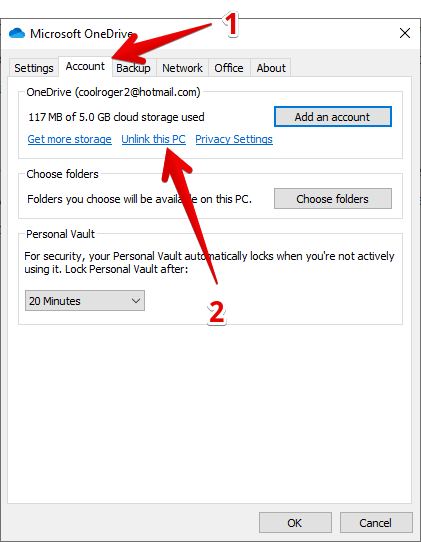
Go to the Account tab.
-
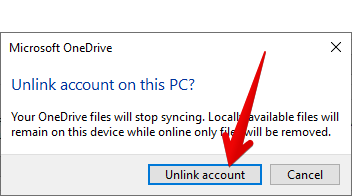
Select Unlink this PC.
macOS
-
Click the OneDrive cloud icon up in your Menu bar, click the three dots to open the menu, and select Preferences.
-
Go to the Account tab.
-
Select Unlink this PC.
Hide or uninstall OneDrive
On some versions of Windows, you can also hide or uninstall OneDrive. You can also uninstall the OneDrive mobile app from Android and iOS devices.
OneDrive is built in to some versions of Windows and can’t be uninstalled. But you can hide it and stop the sync process, so it stays hidden. To do this, turn off all the OneDrive settings and remove the OneDrive folder from File Explorer.
Windows 10/11
-
Select the white or blue OneDrive cloud icon in the notification area, at the far right of the taskbar.

Note: You might need to click the Show hidden icons arrow
next to the notification area to see the OneDrive icon. If the icon doesn’t appear in the notification area, OneDrive might not be running. Select Start, type OneDrive in the search box, and then select OneDrive in the search results. -
Select
> Settings.
-
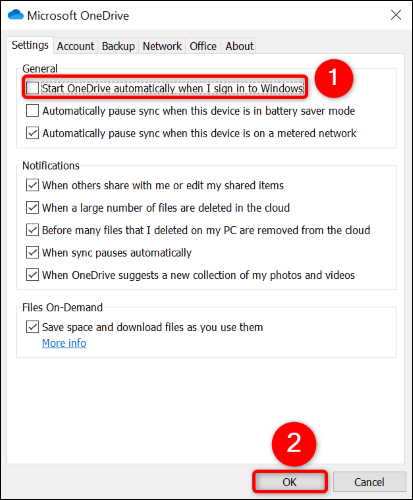
On the Settings tab, uncheck all the boxes under General.
-
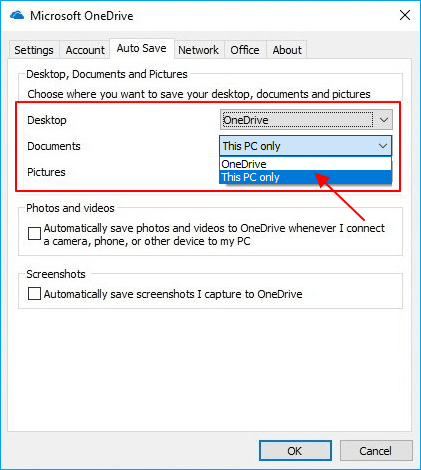
On the Auto Save tab, set the Documents and Pictures lists to This PC only, and uncheck the other boxes.
-
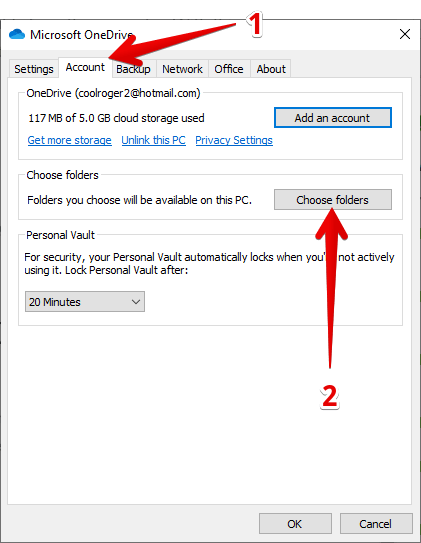
On the Account tab, click Choose folders.
-
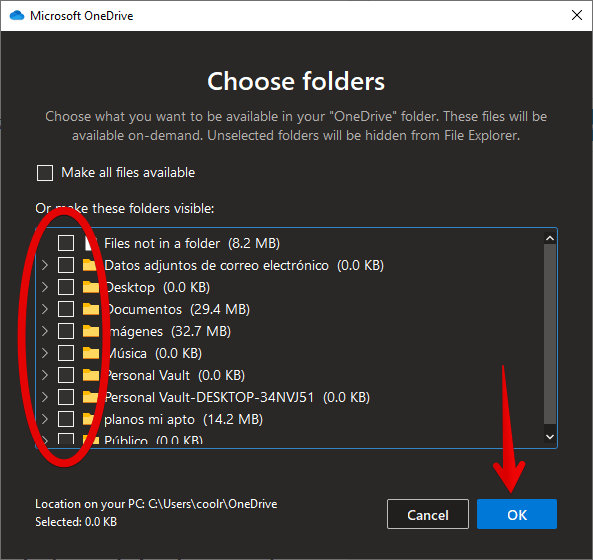
In the Sync your OneDrive files to this PC box, check and uncheck the box at Sync all files and folders in my OneDrive. (The first check selects all the boxes, then the uncheck clears them all.) Click OK to close the box and return to settings.
This step removes all OneDrive files from your computer, but leaves them on OneDrive.com.
-
Click OK to save your changes in the Settings box.
-
Open the Settings again. On the Account tab, click Unlink OneDrive. Close the Welcome to OneDrive box that appears.
-
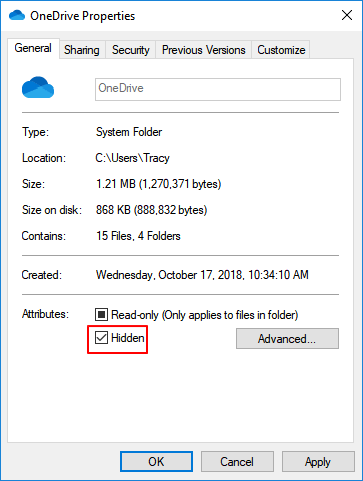
Open File Explorer, right-click OneDrive, and then click Properties.
On the General tab, next to Attributes, check the Hidden box. This hides OneDrive from File Explorer.
-
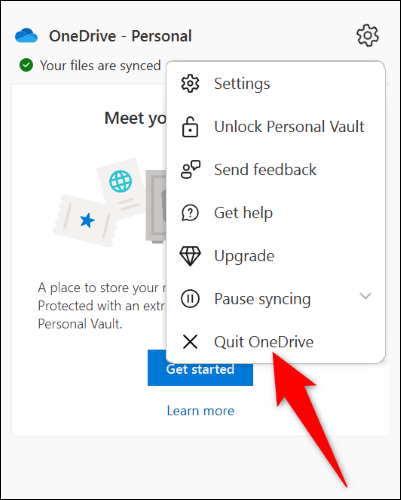
One more time, select
and select Quit OneDrive. This removes the OneDrive icon from the Notifications area.

 next to the notification area to see the OneDrive icon. If the icon doesn’t appear in the notification area, OneDrive might not be running. Select Start, type OneDrive in the search box, and then select OneDrive in the search results.
 > Settings.
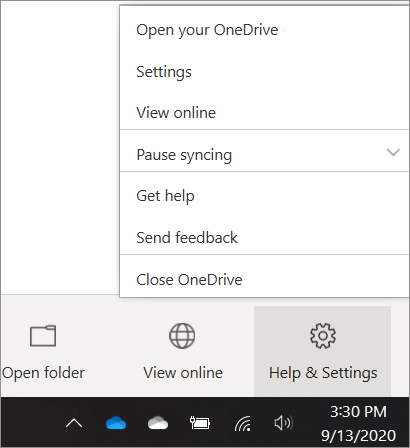
Windows 8.1
Important: Beginning January 1, 2022, we are ending support for selected OneDrive desktop apps running on Windows 7, 8, and 8.1. Learn more.
-
In your computer’s Start menu, press and hold or right-click the OneDrive tile, and then select Unpin from Start.
-
Go to PC Settings, using the PC Settings tile in the Start menu, or swipe in from the right edge of the screen, select Settings, and then select Change PC settings.
-
Under PC settings, select OneDrive.
-
On the File Storage tab, turn off the switch at Save documents to OneDrive by default.
-
On the Camera roll tab, select Don’t upload photos and turn off the switch at Automatically upload videos to OneDrive.
-
On the Sync settings tab, under Sync settings with OneDrive, turn off the switch at Sync your settings on this PC.
-
On the Metered connections tab, turn off all the switches.
-
To hide OneDrive from File Explorer, open File Explorer and in the folder list on the left, right-click OneDrive and then click Properties.
On the General tab, at Attributes, check the Hidden box.
You won’t lose files or data by uninstalling OneDrive from your computer. You can always access your files by signing in to OneDrive.com.
Windows 10
-
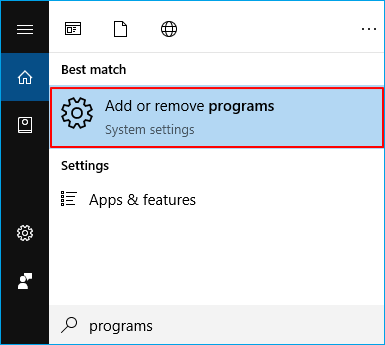
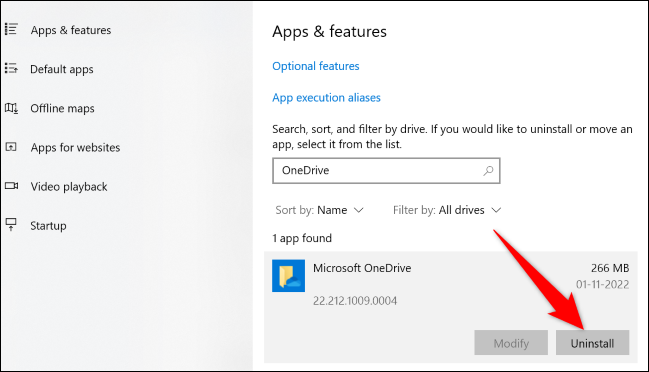
Select the Start button, type Programs in the search box, and then select Add or remove programs in the list of results.
-
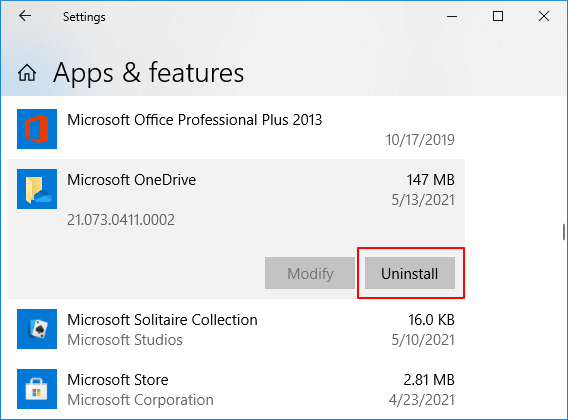
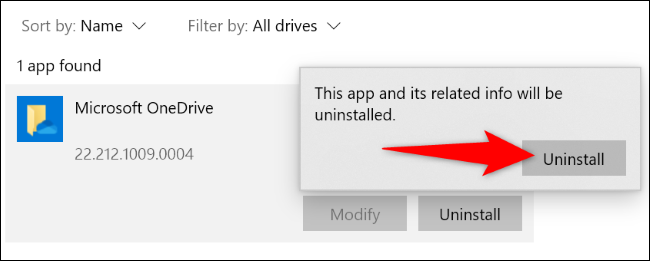
Under Apps & features, find and select Microsoft OneDrive, and then select Uninstall. If you’re prompted for an administrator password or confirmation, type the password or provide confirmation.
Windows 8.1
-
The OneDrive app comes with Windows 8.1 and Windows RT 8.1 and cannot be uninstalled.
Windows 7 or Windows Vista
Important: Beginning January 1, 2022, we are ending support for selected OneDrive desktop apps running on Windows 7, 8, and 8.1. Learn more.
-
Click the Start button, then in the search box, type Add Programs, and then, in the list of results, click Programs and Features.
-
Click Microsoft OneDrive, and then click Uninstall. If you’re prompted for an administrator password or confirmation, type the password or provide confirmation.
Android devices
-
Go to Settings and select Storage/Memory.
-
Select OneDrive and tap Uninstall.
iOS devices
-
Go to the Home Screen, tap and hold on the OneDrive app icon
-
Tap X that appears in the upper left corner of the app icon.
macOS
-
Just drag the OneDrive app to the Trash.
Need more help?
How to cancel an upload or stop a download in OneDrive
Need more help?
«Can I turn off OneDrive in Windows 10 as it keeps syncing my files to OneDrive? And I even lost some files saved on my local OneDrive folder when I removed them from the Cloud. How am I supposed to restore the lost OneDrive Files?»
Don’t worry if you don’t want to OneDrive keeps syncing your files on Windows 10, the easiest way is to disable or unlink it. Follow this complete guide and learn to disable OneDrive and fix OneDrive issues on your computer now.
| Workable Solutions | Step-by-step Troubleshooting |
|---|---|
| 1. Unlinking Account | Click the white or blue OneDrive cloud icon on the taskbar in Windows 10…Full steps |
| 2. Hiding or Uninstalling OneDrive | Click the OneDrive icon on the taskbar in Windows 10. Click «Help & Settings»…Full steps |
| 3. Stop File Syncing in OneDrive | Click the OneDrive icon on the taskbar, select «…More» or «Help & Settings», and click «Pause Syncing»…Full steps |
| 4. Disable via Group Policy | Press Windows + R keys, to open the run dialog, type gpedit.msc and click «OK»…Full steps |
| 5. Disable It Using Registry Editor | Press Windows + R keys, type regedit, and click «OK». When the Registry Editor opens…Full steps |
Note: If you are currently with the OneDrive file loss issue, go and follow the 3 ways to recover lost OneDrive files in Windows 10 first before you disable OneDrive.
What Is OneDrive?
OneDrive is designed for personal cloud storage that saves your files and photos to OneDrive, allowing you to access them from any device, anywhere.
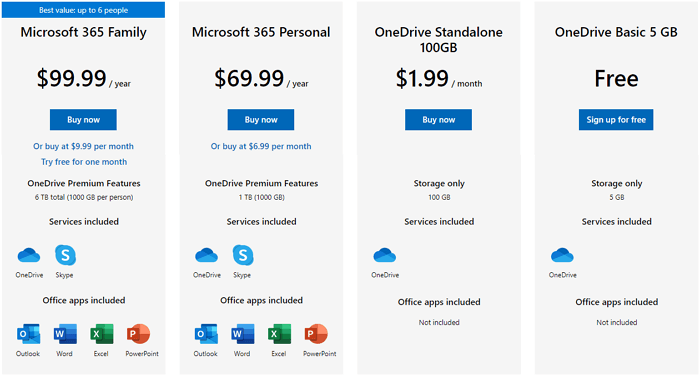
Microsoft has currently upgraded OneDrive to several editions that both home users and business users can all use it. And you can pick a suitable edition to satisfy your need in backing up and sharing files online via OneDrive:
Why Do You Need and Don’t Need OneDrive
So why are there so many people recommending OneDrive and also some of them are trying to disable or uninstall OneDrive in Windows 10? Let’s see:
Why do you need OneDrive?
Here is a list of features that you may like:
- Access Anywhere: Accessing, editing, and sharing files anywhere on all your devices.
- Protect & Backup: Your files won’t be lost with the device when they are saved in OneDrive.
- Real-Time Collaborate: Share and edit documents, photos in real-time with Office apps.
Accordingly, if you prefer a reliable file backup plan and want to access and share files with your friends, OneDrive is an ideal tool.
![]()
![]()
Why do you need to remove or disable OneDrive?
According to some OneDrive users, they also want to disable and even uninstall OneDrive from their computers. Here is a list of reasons that can explain why:
- Syncing feature cause file loss on OneDrive after deleting local drive data.
- OneDrive starts automatically and runs in the background, taking high CPU and RAM usage.
- OneDrive folder taking large space on a local drive.
- OneDrive runs out of space and extending cloud storage chards high fees.
- Simply don’t like using OneDrive.
So how to disable, unlink, remove, or even uninstall OneDrive from your computer? In the next part, we’ll take Windows 10 as an example that you can follow to remove OneDrive in 5 reliable ways.
How to Disable, Unlink, or Remove OneDrive in Windows 10 — 5 Ways
In this part, we collected 5 ways that can help you disable, unlink, and even remove OneDrive in Windows 10. The methods are also working on Windows 8.1/8/7, etc., computers. Pick the suitable method and follow to remove OneDrive from your computer now:
Note: As some of the methods may cause OneDrive file loss. Make sure that you back up important OneDrive files to an external drive first.
#1. Disable OneDrive by Unlinking Account
Source: Microsft Official solution
https://support.microsoft.com/en-us/office/turn-off-disable-or-uninstall-onedrive-f32a17ce-3336-40fe-9c38-6efb09f944b0
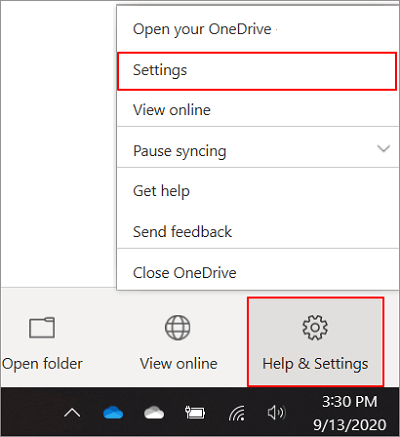
Step 1. Click the white or blue OneDrive cloud icon on the taskbar in Windows 10.
Step 2. Click «Help & Settings», then select «Settings».
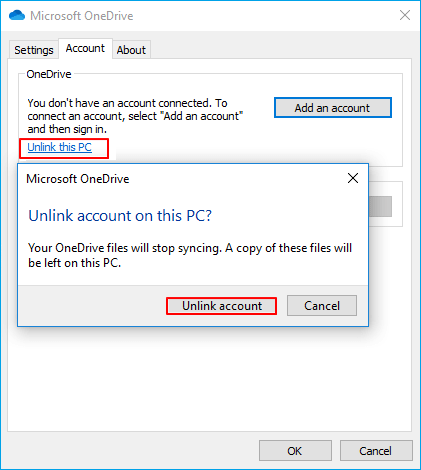
Step 3. Go to the Account tab, click «Unlink this PC» and select «Unlink account».
Then click «OK» to confirm.
#2. Permanently Disable/Remove OneDrive — Hide or Uninstall OneDrive
Source: Microsft Official solution
https://support.microsoft.com/en-us/office/turn-off-disable-or-uninstall-onedrive-f32a17ce-3336-40fe-9c38-6efb09f944b0
Option 1. Hide OneDrive
As OneDrive is built into some versions of Windows and you can’t directly uninstall it. Here is the guide for you to hide it from your PC:
Step 1. Click the OneDrive icon on the taskbar in Windows 10.
Step 2. Click «Help & Settings», and select «Settings».
Step 3. Under General, uncheck all the boxes.
Step 4. Go to the Auto Save tab, set the «Documents and Pictures» list to «This PC only», and uncheck the other boxes.
Step 5. Go to the Account tab, click «Choose folders». Check and uncheck the box at Sync all files and folders in my OneDrive.
Step 6. Click «OK» to save changes.
Step 7. Open Settings, go to the Account tab, click «Unlink OneDrive» and close the «Welcome to OneDrive» box.
Step 8. Open File Explorer, right-click OneDrive and click «Properties».
Step 9. Go to the General tab, check the «Hidden» box.
Step 10. Go to Help and Settings, select «Quit OneDrive».

Option 2. Uninstall OneDrive
Step 1. Select the Start button, type Programs in the search box, and select «Add or remove programs».
Step 2. Under Apps & features, select «Microsoft OneDrive» and select «Uninstall».
#3. Stop File/Folder Syncing in OneDrive Sync App
Source: Microsft Official solution
https://support.microsoft.com/en-us/office/choose-which-onedrive-folders-to-sync-to-your-computer-98b8b011-8b94-419b-aa95-a14ff2415e85
If syncing is a bad time or you don’t want OneDrive syncing files to your PC, you can stop it from syncing files and folders.
According to some users, it’s easy to lost files on your computer, especially when you delete files in OneDrive and turned on the syncing feature.
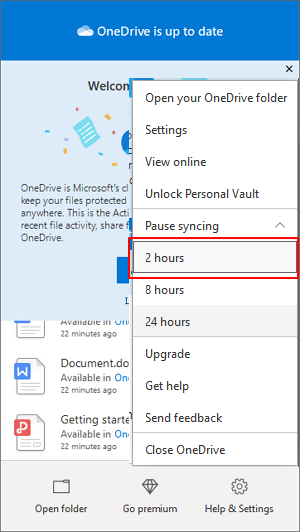
Step 1. Click the OneDrive icon on the taskbar, select «…More» or «Help & Settings», and click «Pause Syncing», select «2 hours».
Step 2. Click OneDrive icon, select «Help & Settings», click «Settings».
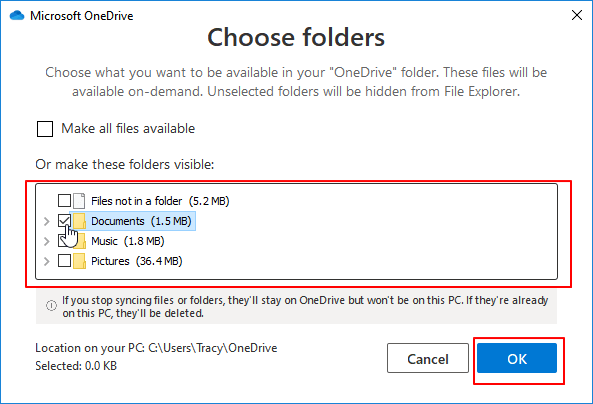
Step 3. Go to the Account tab, select «Choose folders».
Step 4. In the Sync your OneDrive files to this PC window, uncheck folders that you don’t want to sync to the computer and click «OK».
After this, you can edit and adjust files on OneDrive or your computer without affecting the data on the other platform.
![]()
OneDrive Not Syncing on Windows PC?
You’ll learn some tips that will make sure that OneDrive is running correctly so that you can access and sync files. Also, remember to try the quick fixes first.
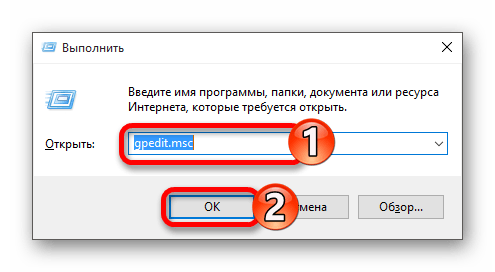
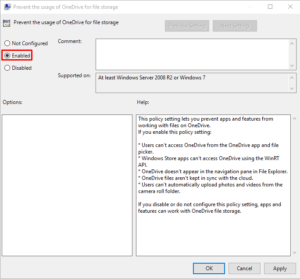
#4. Disable OneDrive via Group Policy
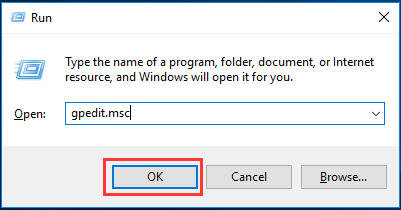
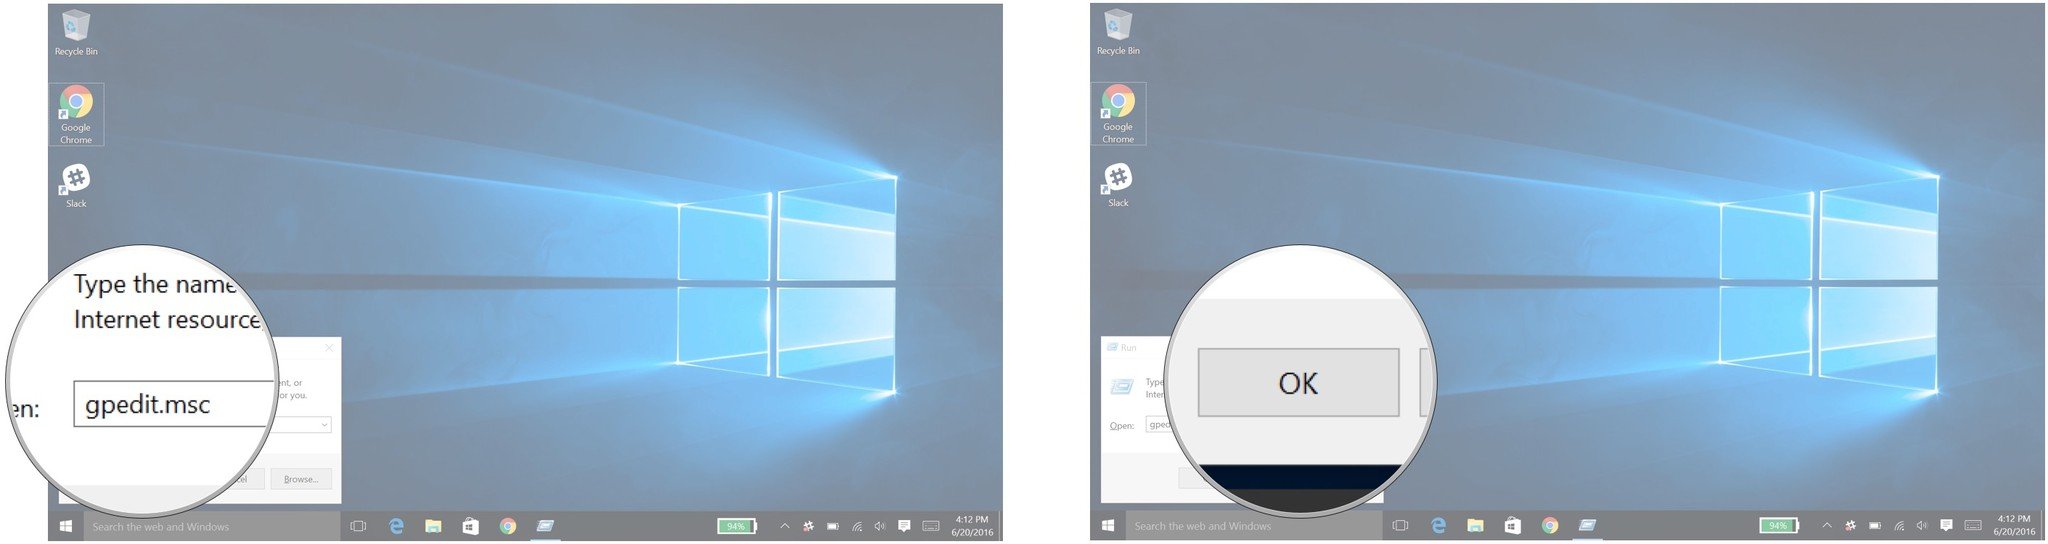
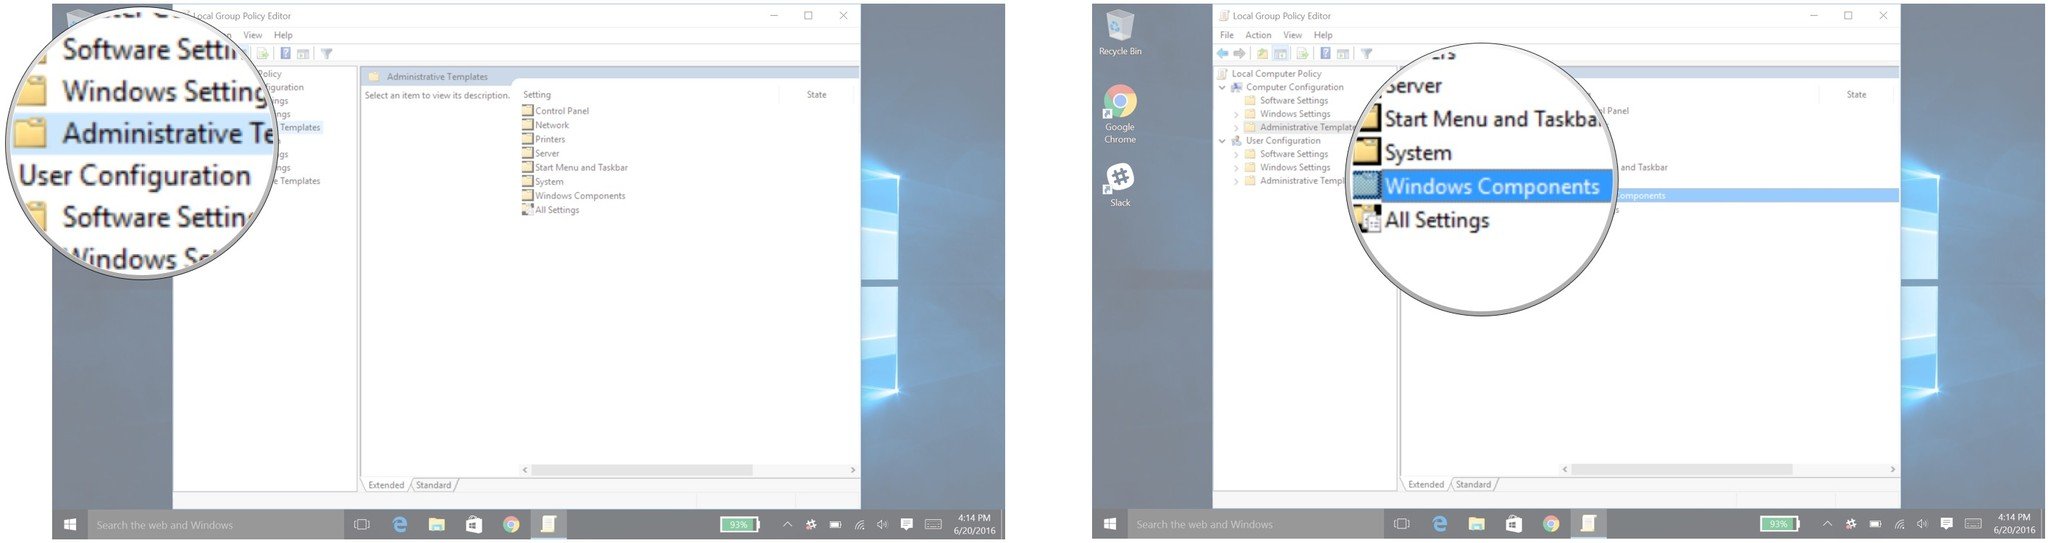
Step 1. Press Windows + R keys, to open the run dialog, type gpedit.msc and click «OK».
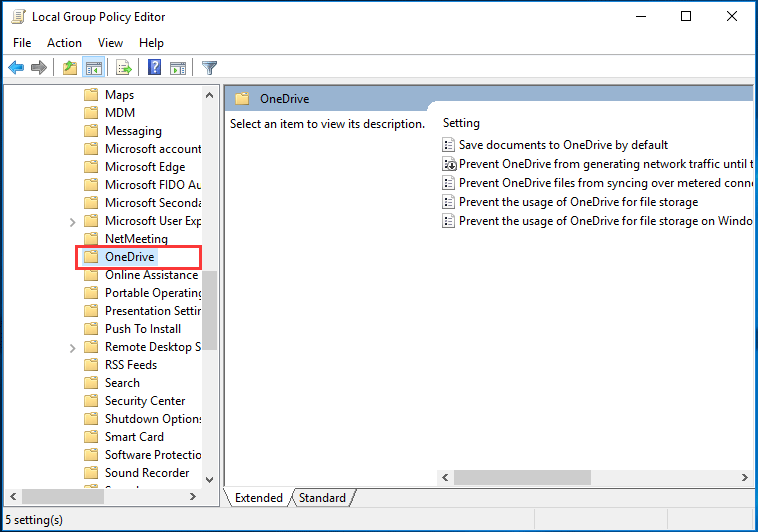
Step 2. When the Local Group Policy window opens, go to:
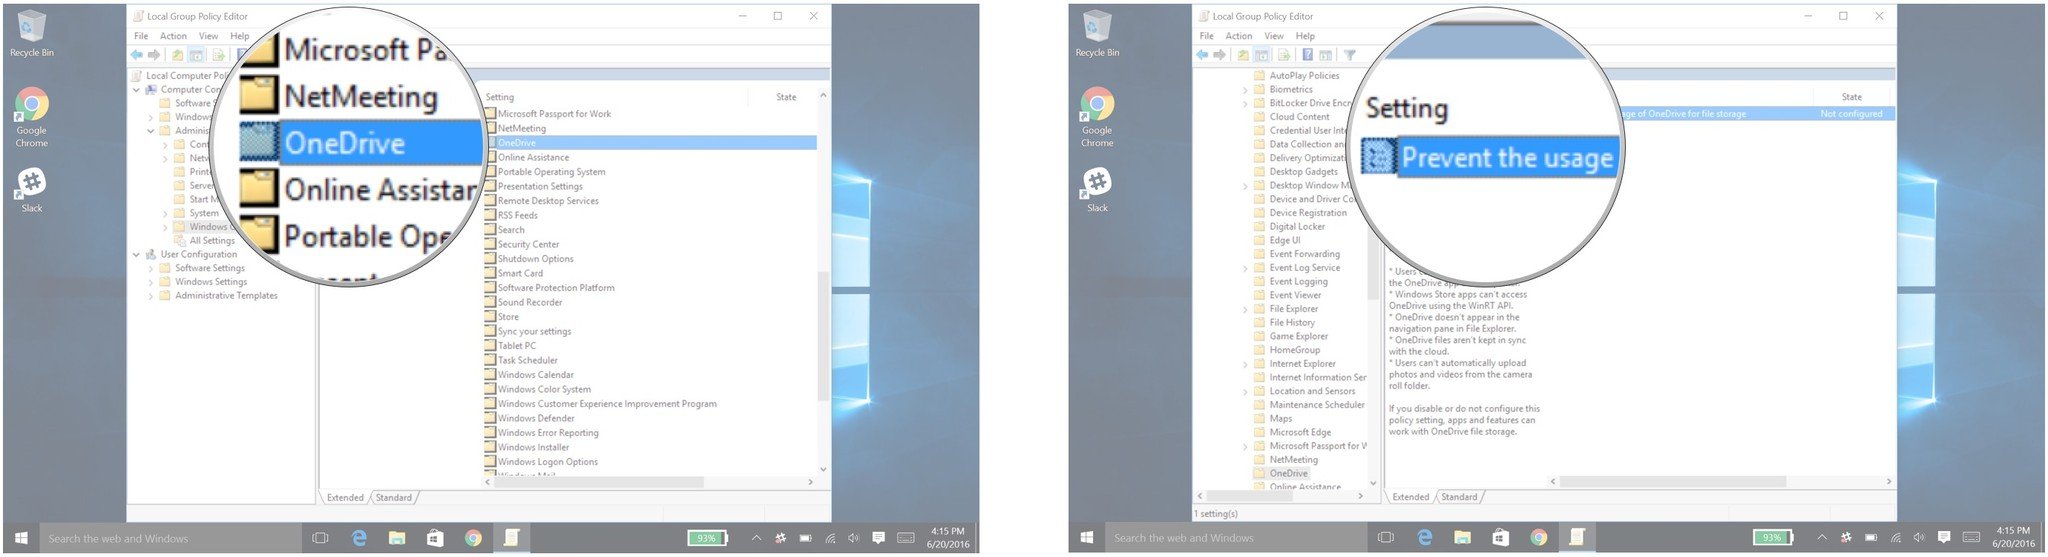
Computer ConfigurationAdministrative TemplatesWindows ComponentsOneDrive.
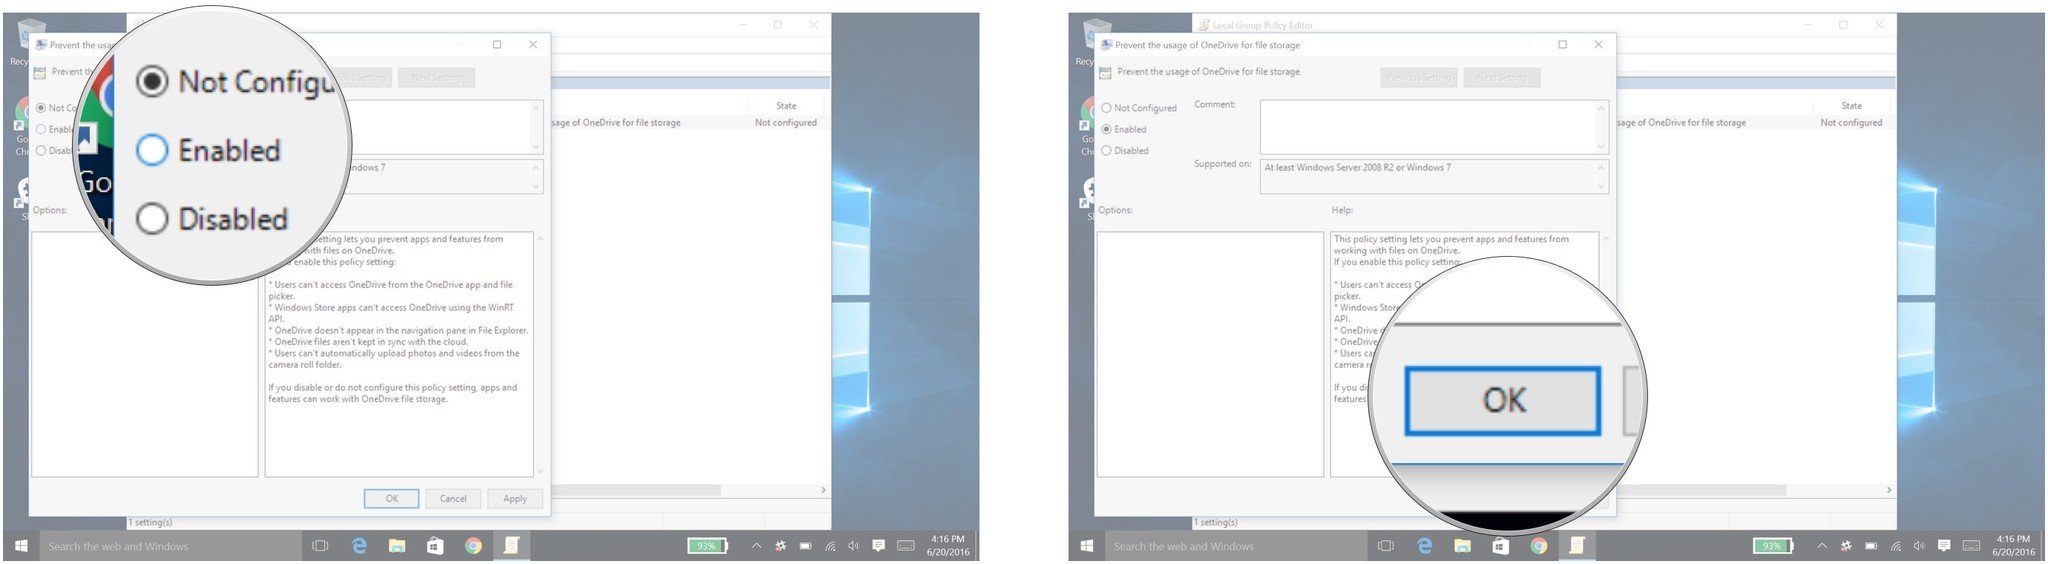
Step 3. Double-click on Prevent the usage of OneDrive for file storage.
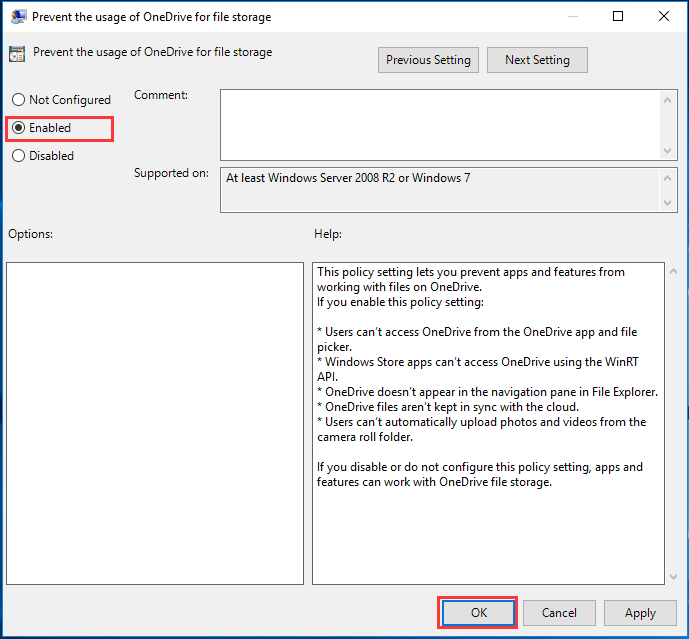
Step 4. Check «Enabled» and click «Apply» and «OK» to save the changes.
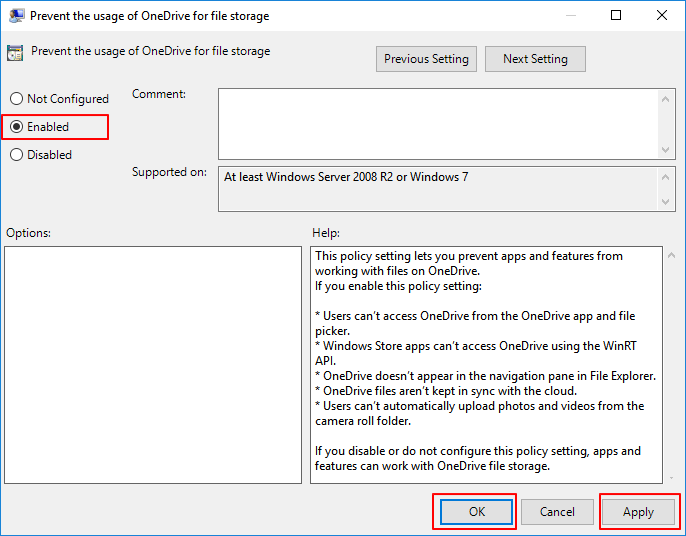
After this, restart the PC and you’ll see that OneDrive is on your PC but not accessible now.
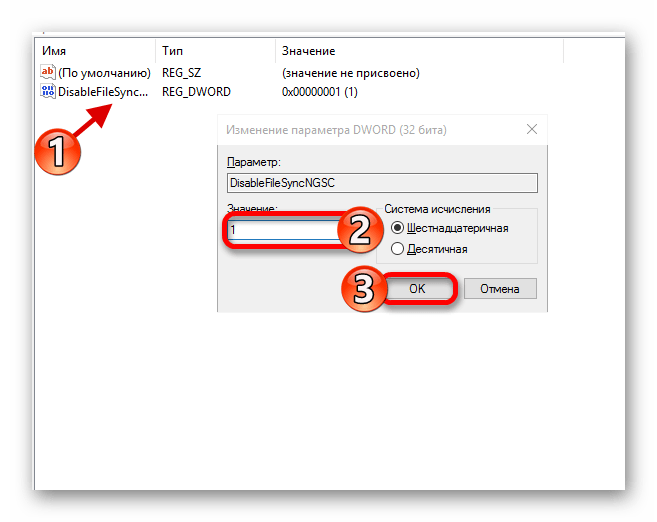
#5. Disable OneDrive Using Registry Editor
Note: It’s normally not recommended that you use Registry Editor to disable OneDrive. Though it is workable any false operation may cause serious results.
So make sure that you be very careful while following the steps below to disable OneDrive:
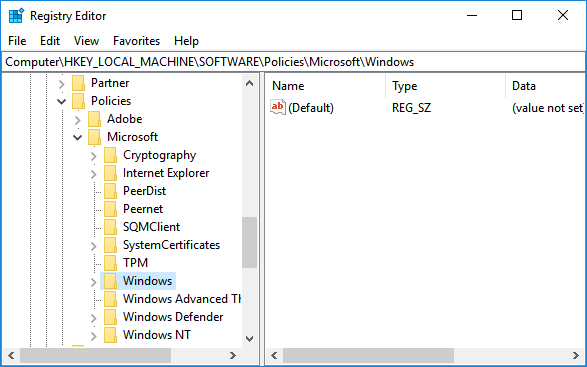
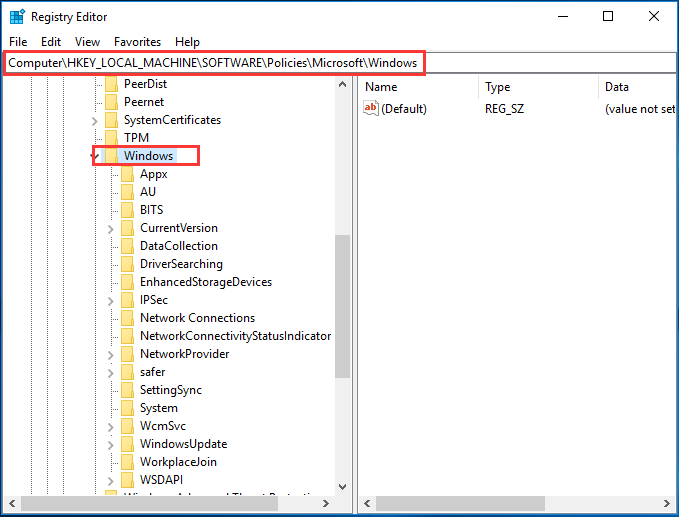
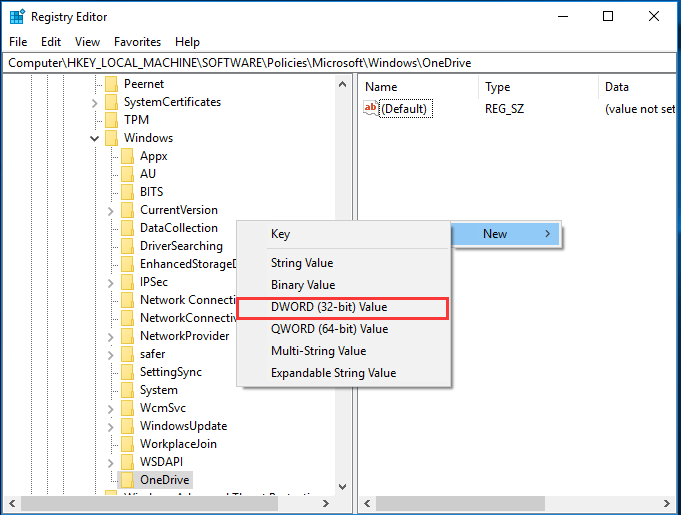
Step 1. Press Windows + R keys, type regedit, and click «OK».
Step 2. When the Registry Editor opens, go to:
HKEY_LOCAL_MACHINESOFTWAREPoliciesMicrosoftWindows.
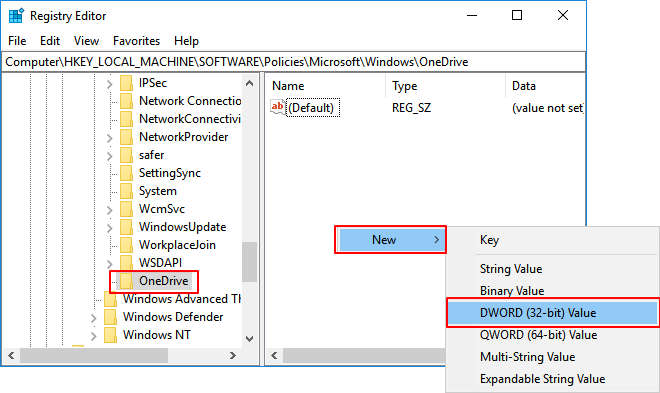
Step 3. Right-click Windows key and select «New» > «Key».
Step 4. Name the new key as «OneDrive».
Step 5. Select the OneDrive folder, and right-click on the empty area on the right pane and select «New» > «DWORD (32-bit) Value.
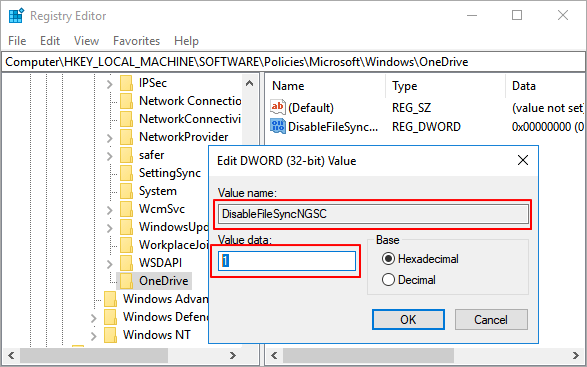
Step 6. Name the new key as «DisableFileSyncNGSC», double-click the key and change its value data to 1 and click «OK».
After this, restart your computer.
How to Access and Restore Lost or Deleted OneDrive Files — 3 Ways
Some of you may also want to know how to access and restore the lost OneDrive files online or on a local computer.
Here we’ve collected two ways that will help you out:
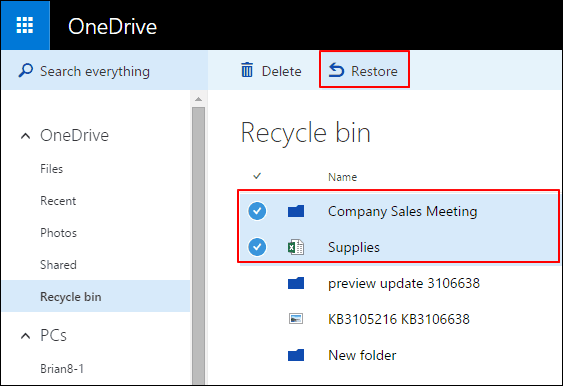
#1. Recover Deleted Files from OneDrive Recycle Bin
Step 1. Go to the OneDrive website:
https://go.microsoft.com/fwlink/p/?LinkID=251869
Step 2. Sign in with your account and click «Recycle Bin» on the left pane.
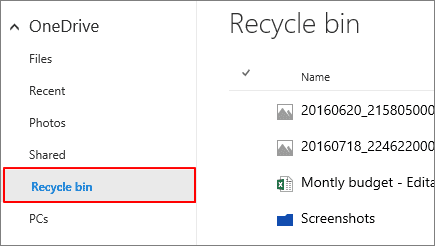
Step 3. Select files or folders that you deleted online, and move your mouse to point to the deleted items.
Click the circle check box that appears and click «Restore».
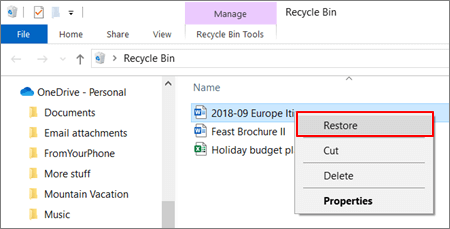
#2. Recover Deleted OneDrive Files or Folder on Your PC
Step 1. Open Recycle Bin on your computer and find the deletd files.
Step 2. Right-click the deleted OneDrive files or folder, and select «Restore».
#3. Recover Permanently Deleted OneDrive Files on PC
When you deleted and emptied the OneDrive files from Recycle Bin on your computer, reliable EaseUS Data Recovery Wizard can help.
EaseUS OneDrive Recovery Tool
- Recover lost or deleted files, documents, photos, audio, music, emails effectively
- Recover files from emptied recycle bin, memory card, flash drive, digital camera, and camcorders
- Support over 1000 types of file recovery on both Windows and Mac PCs and laptops.
It will fully scan and restore the permanently deleted OneDrive files from your PC in only 3 steps as shown below:
Extra Tip: Your Best OneDrive Alternative for Windows 10/8/7
As for some users who give up OneDrive but still need a powerful file syncing tool for protection or automatically backing up data to a target storage device,you’ve come to the right place.
In this part, you’ll find a perfect alternative tool — EaseUS Todo Backup to replace OneDrive for file syncing and data backup in Windows 10/8/7.
See what EaseUS Todo Backup do for you:
- 1. Support file backup, OS backup, Disk/Partition backup.
- 2. Support disk clone, system clone, and OS migration.
- 3. Support cloud backup, such as backup files to OneDrive, GoogleDrive, Dropbox, etc.
So how to make use of the OneDrive alternative — EaseUS Todo Backup in Windows 10? Let’s see:
#1. Fully Back Up Windows 10 Data
2
#2. Automatically Back Up Windows 10 Files
3
#3. Transfer or Migrate Windows 10 OS to SSD Without Reinstallation
Disabling OneDrive Is Possible, Diable It without Damaging Your Files
On this page, we introduced what is OneDrive, discussed when should you use OneDrive and when you might want to disable it from your PC. Based on the different needs, we offered 5 ways to disable, remove, or unlink OneDrive from your Windows 10 computer.
For someone who deleted OneDrive files can also follow the 3 file recovery ways to bring back lost OneDrive data. Among these, EaseUS EaseUS Data Recovery Wizard is efficient and powerful in OneDrive file recovery.
Besides, if you need a OneDrive alternative tool to protect and back up your Windows files, EaseUS Todo Backup is worthy to try.
How to Disable OneDrive in Windows 10? How to uninstall or remove OneDrive in Windows 10? This article shows you the best solutions to disable or remove OneDrive in Windows 10 as well as shows an alternative to OneDrive.
What Is OneDrive?
OneDrive is a storage platform based on the Internet with a chunk of space provided for you with a Microsoft account.
The OneDrive was first launched in August 2007. It allows you to save files and data to the Cloud. In addition, the OneDrive also allows you to share files, and sync files across Android, IOS mobile devices, Windows or MacOS computers.
OneDrive offers 5GB of storage space to users for free. However, if you need more space, you need to pay for it.
The OneDrive also has some powerful features. For example:
- OneDrive enables you to sync pictures automatically. OneDrive automatically uploads pictures from the device to the cloud and saves them without manual intervention. In this way, you can also get and view pictures from the Cloud even if the device fails.
- Microsoft has added the Office Online feature to the OneDrive. In this way, it allows you to upload, create, edit and share Word, Excel, PowerPoint and OneNote documents directly within a web browser. Online edited files are saved in real time so as to provide better protection for data.
- You can share the files and folders in OneDrive by sending the link to anyone.
OneDrive has already existed in Windows 10, so there is no necessary for you to download and install it. If it is turned on, it can help you sync files or folders so as to keep data safe.
OneDrive is a piece of two-way sync software. And the synchronized files are saved on the OneDrive folder in File Explorer by default. In addition, you can choose to change the location.
How to Disable OneDrive Windows 10?
Although the OneDrive is useful to some extent, there are situations where you want to disable or remove it from your computer.
Therefore, do you know how to disable OneDrive or remove OneDrive in Windows 10?
If no, please go on your reading and the following part will show you the solutions. Thus, we will show you how to turn off OneDrive Windows 10 with three different ways.
Quick Video Guide:
Way 1. Disable OneDrive Through Settings
Step 1: Open OneDrive
- Select the OneDrive icon in the taskbar.
- Right-click it to open the OneDrive.
Note: If you don’t find it in the taskbar, you need to click the Show hidden icons to select the OneDrive icon. If the icon doesn’t appear at here, you need to type OneDrive in the search box of Windows 10 and select it.
Step 2: Disable OneDrive
- In the context menu, choose More to continue.
- Then click Settings.
- In the popup window, please go to the Settings Then uncheck the option Start OneDrive automatically when I sign into Windows.
- Then go to Account tab, click Unlink this PC.
- Click Unlink account to continue.
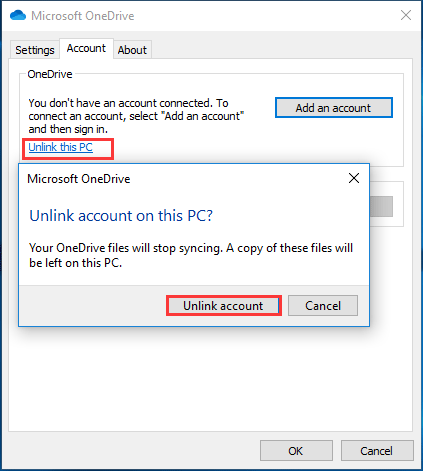
After that, you can see a popup window which requires you to enter your email address. And you need to enter the required information and wait the disable process is completed. After a while, you will completely log out OneDrive from your computer. After that, you have stopped OneDrive sync Windows 10.
Way 2. Disable OneDrive Through Group Policy
And now, we will show you the second method to disable the OneDrive. You can stop OneDrive sync Windows 10 through group policy.
And now, we will show you the detailed tutorials.
Step 1: Open Group Policy
- Press Windows key and R key together to open Run dialog.
- Type msc in the box and click OK to continue.
Step 2: Disable OneDrive
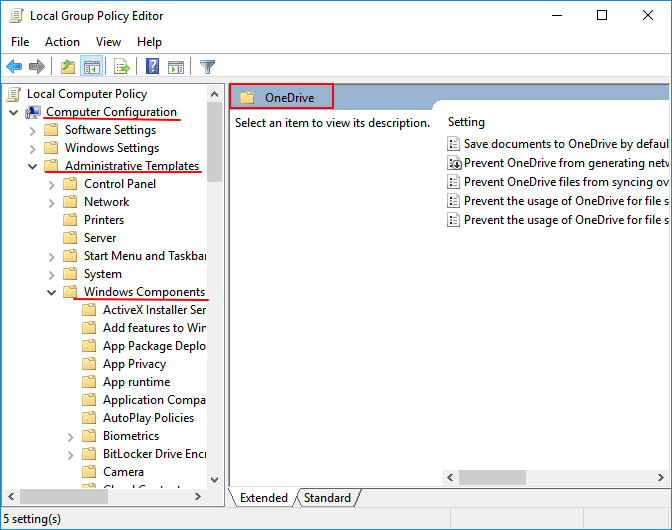
1. In the Local Group Policy Editor window, navigate to the OneDrive folder according to the path: Computer Configuration > Administrative Templates > Windows Components > OneDrive
2. Then select the item Prevent the usage of OneDrive for file storage and double-click it.
3. In the popup window, choose Enabled and click Apply and OK to confirm the changes.
When you have finished all steps, you can restart your computer. After that, you can find that the OneDrive is still on the File Explorer, but it is not available now.
And if you want to re-enable the OneDrive again, you can change the status of Prevent the usage of OneDrive for file storage to Not Configured.
Way 3. Disable OneDrive Through Registry Editor
Now, we will show you the third method to turn off OneDrive Windows 10. You can use the Registry editor to disable OneDrive Windows 10.
The registry editor is a very powerful tool and editing on it is pretty risky since changing keys and values may lead to your computer useless. So, before going ahead, you had better back up the registry. Thus, you can try the professional Windows backup software – MiniTool ShadowMaker.
Free Download
How to Back up Windows to Safeguard Your Computer? Try MiniTool!
After you have backed up the registry editor or the computer, you can proceed to disable OneDrive Windows 10.
Step 1: Open Registry Editor
- Press Windows key and R key together to open Run dialog.
- Type regedit in the box and click OK to continue.
Step 2: Disable OneDrive
1. In the Registry Editor window, navigate to the following key:
HKEY_LOCAL_MACHINESOFTWAREPoliciesMicrosoftWindows
2. Right-click Windows key and choose New > Key to continue.

3. Name the new key as OneDrive.
4. Select OneDrive key and right-click on right white area. Then choose New > DWORD(32-bit) Value to continue.
5. Name the new key as
6. Then double-click new key and change the Value Data to 1.

When you have finished all steps, you can close the Registry Editor window and reboot your computer. After that, the OneDrive of your computer will be disabled.
If you need to use OneDrive again or want to sync files to OneDrive, you can re-enable it.
However, some people also ask whether there is any way to uninstall or remove OneDrive permanently since they don’t want to use it any more.
Of course, the answer is positive. If you don’t need it any longer, you can choose to remove it. And in the following part, we will show you how to remove OneDrive Windows 10 permanently.
How to Uninstall or Remove OneDrive Windows 10?
As a matter of fact, to uninstall or remove OneDrive Windows 10, you can refer to the following contents.
Step 1: Open Control Panel
- Type Control Panel in the search box of Windows
- Choose the best-matched one to continue.
Step 2: Uninstall OneDrive
1. In the popup window, click Uninstall a program under Program to continue.
2. Then you will see all programs of your computer are listed here. Select Microsoft OneDrive and choose Uninstall from the context menu to remove it.
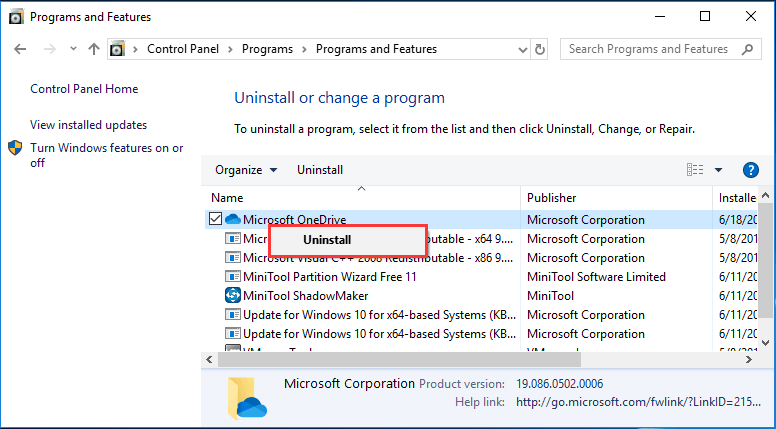
After you have finished the above steps, you have successfully uninstalled or removed OneDrive from your computer.
Besides this method, you can also try to uninstall OneDrive through commands. Thus, just run Command Prompt as Administrator. Then type the following commands to continue:
- taskkill /f /im OneDrive.exe
- %SystemRoot%System32OneDriveSetup.exe /uninstall (for 32-bit Windows 10)
- %SystemRoot%SysWOW64OneDriveSetup.exe /uninstall (for 64-bit Windows 10)
And please hit Enter after each command.
When you have finished the above steps, you have successfully uninstalled or removed OneDrive from your computer.
Alternative to OneDrive in Windows 10/8/7
In this part, we will show you an alternative to OneDrive in Windows 10/8/7 which plays an important role when you have removed OneDrive. Not only can the alternative to OneDrive sync files, but also it can back up the OS to keep computer safe.
The alternative to OneDrive in Windows 10/8/7 is MiniTool ShadowMaker. It is a piece of file sync software which enables you to sync files or folders to two or more locations so as to keep your data safe.
In addition, MiniTool ShadowMaker is also a piece of backup software that is designed to back up files, folders, disks, partitions, and even the operating system. So if you want to keep data safe, besides file synchronization, you can also choose to create an image.
With so many powerful features, you can download MiniTool ShadowMaker Trial from the following button or choose to purchase an advanced edition.
Free Download
And now, we will show you how to use MiniTool ShadowMaker to sync files so as to keep data safe.
Step 1: Launch MiniTool ShadowMaker
- Download MiniTool ShadowMaker and install it.
- Launch it.
- Click Keep Trail.
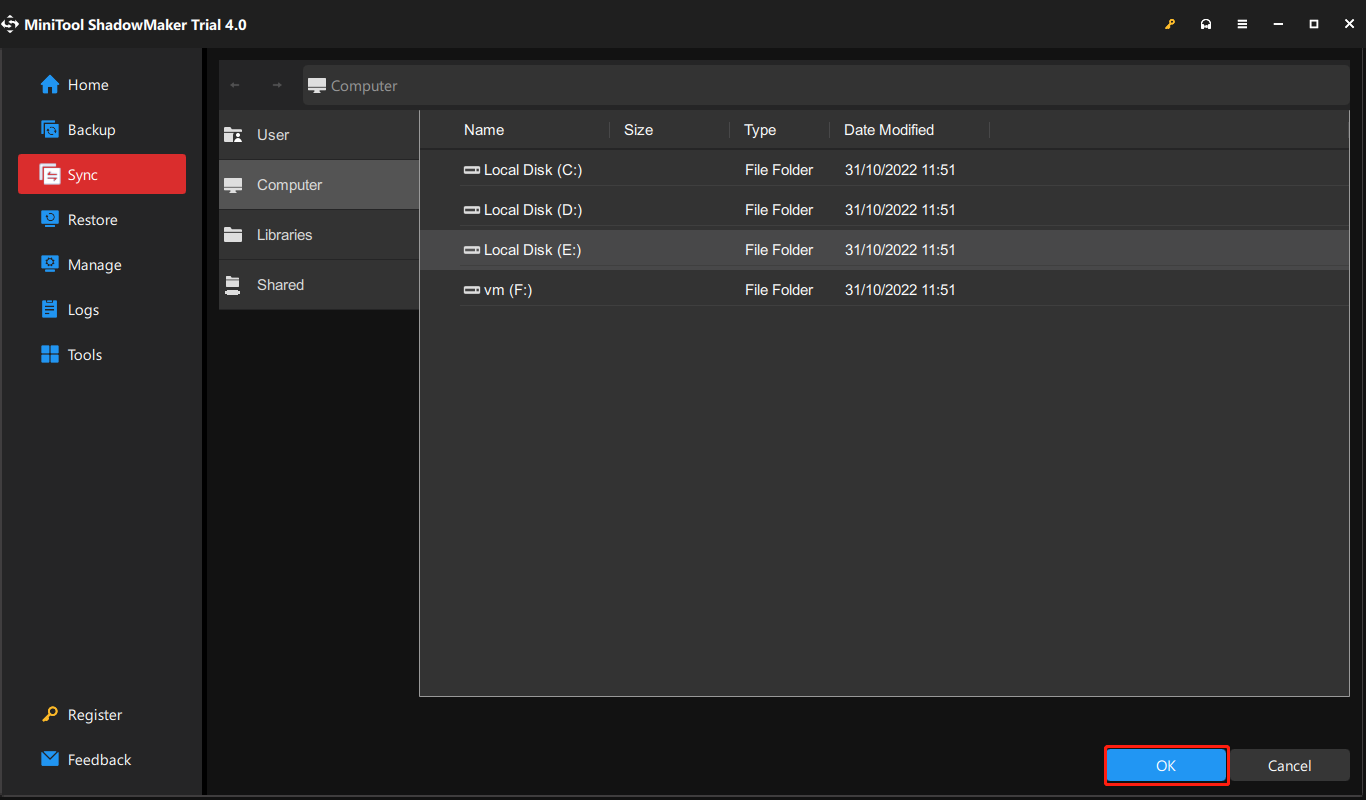
Step 2: Select the synchronization source
1. After entering its main interface, please go to the Sync page.
2. Click the SOURCE module to choose the synchronization source and click OK.
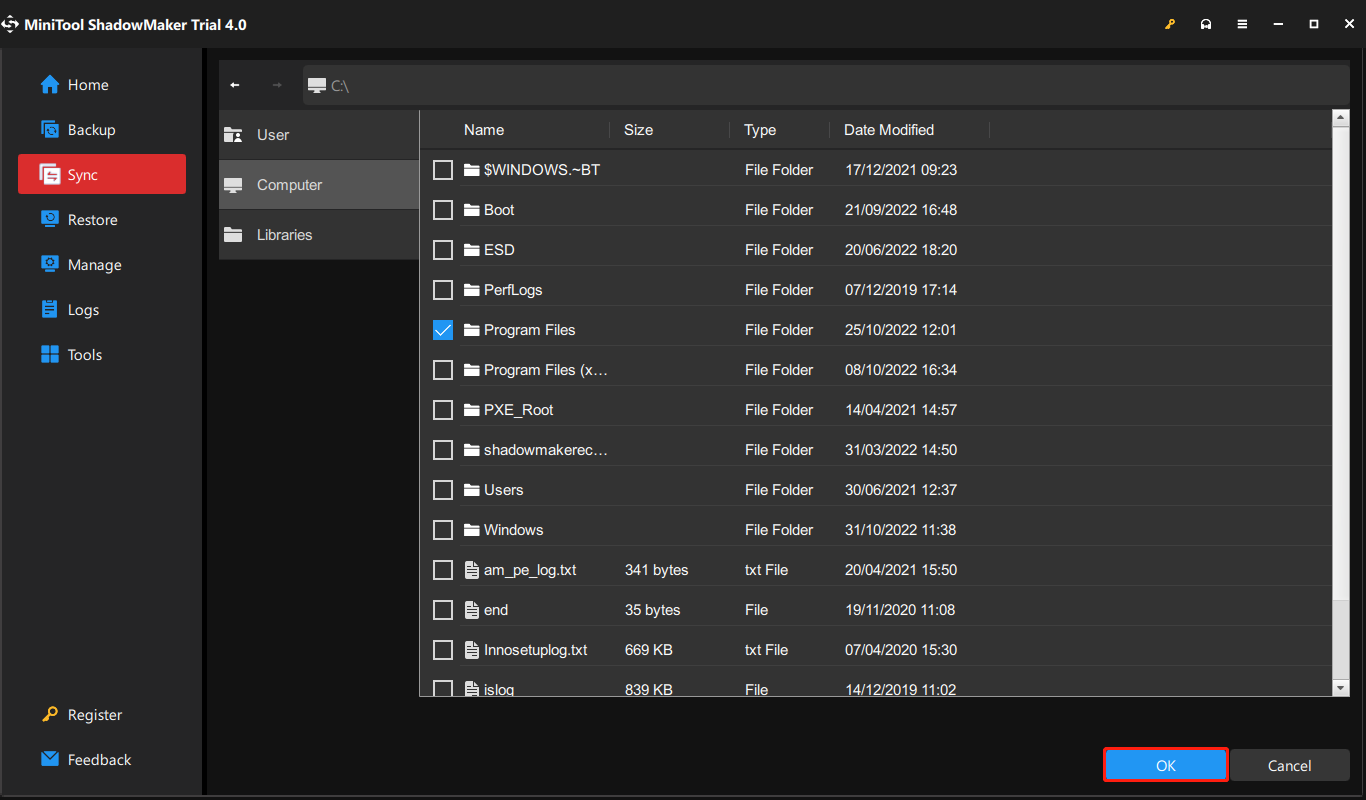
Step 3: Choose a target disk
- Click the DESTINATION module to continue.
- Choose a target disk to save the synchronized files. Here are five destination paths to be chosen. It is recommended to choose an external hard drive.
- Click OK.
Further reading:
- MiniTool ShadowMaker enables you to sync files automatically. You just go to Options > Schedule Settings to activate this feature.
- You can also set some advanced file sync parameters. Just click Options > File Sync Options to go on.
Step 4: Start to sync files
- After you have selected the synchronization source and destination, you can click Sync Now to start the task immediately.
- Or you can click Sync Later to delay the task. But you need to restart it on the Manage page.

When all steps are finished, you have successfully synchronized files to another location. And you can see that MiniTool ShadowMaker also enables you to create a system image.
And when you don’t want to sync files, you don’t have to disable it because it will not start automatically.
From the above information, you can find that MiniTool ShadowMaker plays an essential role when you have disabled or removed OneDrive Windows 10.
Free Download
MiniTool ShadowMaker is a powerful tool which can help me to sync files with ease. It is more flexible than OneDrive.Click to Tweet
Bottom Line
To sum up, this post has introduced what the OneDrive is and also showed you how to disable OneDrive with three methods. In addition, this post has introduced how to remove or uninstall OneDrive Windows 10.
If you have any better method on how to disable OneDrive or how to remove OneDrive, you can share it on the comment zone.
At the same time, if you have any problem with MiniTool ShadowMaker, please don’t hesitate to email us to [email protected] and we will reply to you as soon as possible.
How to Disable OneDrive FAQ
How do I turn off Microsoft OneDrive?
You can disable Microsoft OneDrive with three different methods.
- Disable OneDrive through Settings.
- Disable OneDrive through Group Policy.
- Disable OneDrive through Registry Editor.
You can find more detailed operations through the above part.
How do I stop Windows 10 from saving to OneDrive?
- Press Windows key and I key together to open Settings.
- Click System, then click Storage.
- Under Save locations, expand the drop down list and change a file saving location.
Is it OK to disable Microsoft OneDrive on startup?
If you want to disable OneDrive, you can choose to disable it on startup.
- Right-click on the Taskbar and choose Task Manager.
- In the pop-up window, go to the Startup tab.
- Then select Microsoft OneDrive and choose Disable.
- After that, restart your computer and the OneDrive will no longer start with Windows.
Can I remove OneDrive from my computer?
To remove or uninstall OneDrive from your computer, you can choose to remove or uninstall it through the Control Panel.
- Open Control Panel.
- Choose Uninstall a program under Programs section.
- On the next page, select the Microsoft OneDrive and right-click it.
- Then choose Uninstall to continue.
- After that, you will successfully remove OneDrive from the computer.
Содержание
- Отключаем ВанДрайв в Виндовс 10
- Способ 1: Отключение автозапуска и скрытие иконки
- Способ 2: Редактирование системного реестра
- Способ 3: Изменение локальной групповой политики
- Заключение
- Вопросы и ответы

Фирменное облако Microsoft OneDrive, интегрированное в ОС Windows 10, предоставляет довольно полезные возможности для безопасного хранения файлов и удобной работы с ними на синхронизированных устройствах. Несмотря на явные преимущества этого приложения, некоторые пользователи все же предпочитают отказаться от его использования. Наиболее простым решением в данном случае является деактивация предустановленного облачного хранилища, о чем мы и расскажем сегодня.
Для того чтобы временно или навсегда остановить работу OneDrive, необходимо обратиться к инструментарию операционной системы Windows 10 или параметрам самого приложения. Какой из доступных вариантов отключения этого облачного хранилища выбрать, решать только вам, мы же рассмотрим их все подробнее.
Примечание: Если вы считаете себя опытным пользователем и хотите не просто отключить ВанДрайв, а полностью удалить его из системы, ознакомьтесь с представленным по ссылке ниже материалом.
Подробнее: Как навсегда удалить OneDrive в Windows 10
Способ 1: Отключение автозапуска и скрытие иконки
По умолчанию OneDrive запускается вместе с операционной системой, но прежде чем приступить к его отключению, необходимо деактивировать функцию автозапуска.
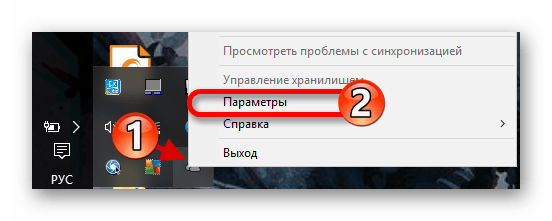
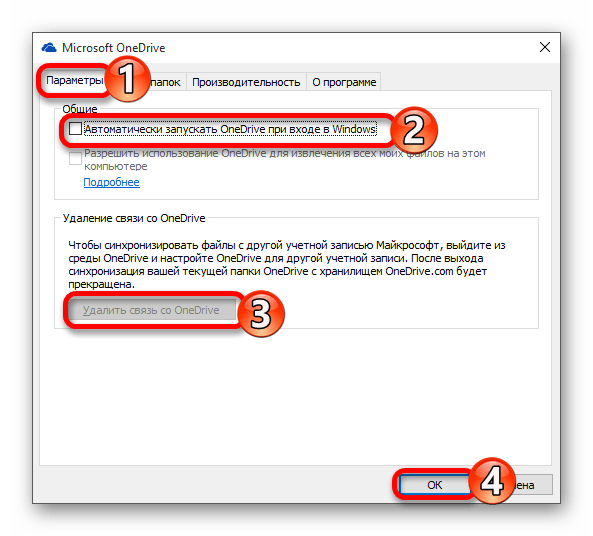
- Для этого найдите в трее иконку программы, кликните по ней правой кнопкой мыши (ПКМ) и выберите в открывшемся меню пункт «Параметры».
- Перейдите во вкладку «Параметры» открывшегося диалогового окна, уберите отметку в поле «Автоматически запускать OneDrive при старте Windows» и «Удалите связь с OneDrive», нажав по одноименной кнопке.
- Для подтверждения внесенных изменений кликните «ОК».
С этого момента приложение больше не будет запускаться при старте ОС и прекратит синхронизироваться с серверами. При этом в «Проводнике» все еще останется его значок, убрать который можно следующим образом:
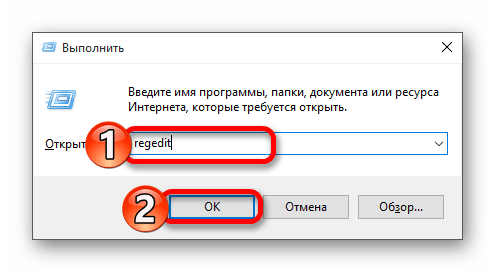
- Воспользуйтесь сочетанием клавиш «Win+R» для вызова окна «Выполнить», введите в его строку команду
regeditи нажмите по кнопке «ОК». - В открывшемся окне «Редактора реестра», используя расположенную слева панель навигации, перейдите по обозначенном ниже пути:
HKEY_CLASSES_ROOTCLSID{018D5C66-4533-4307-9B53-224DE2ED1FE6} - Найдите параметр «System.IsPinnedToNameSpaceTree», кликните по нему дважды левой кнопкой мышки (ЛКМ) и смените его значение на «0». Нажмите «ОК» для того чтобы внесенные изменения вступили в силу.


После выполнения изложенных выше рекомендаций ВанДрайв больше не будет запускаться вместе с Виндовс, а его иконка исчезнет из системного «Проводника»
Способ 2: Редактирование системного реестра
Работая с «Редактором реестра», следует быть предельно осторожным, так как любая ошибка или неверное изменение параметров может негативно сказаться на функционировании всей операционной системы и/или отдельных ее компонентов.
- Откройте «Редактор реестра», вызвав для этого окно «Выполнить» и указав в нем следующую команду:
regedit - Перейдите по представленному ниже пути:
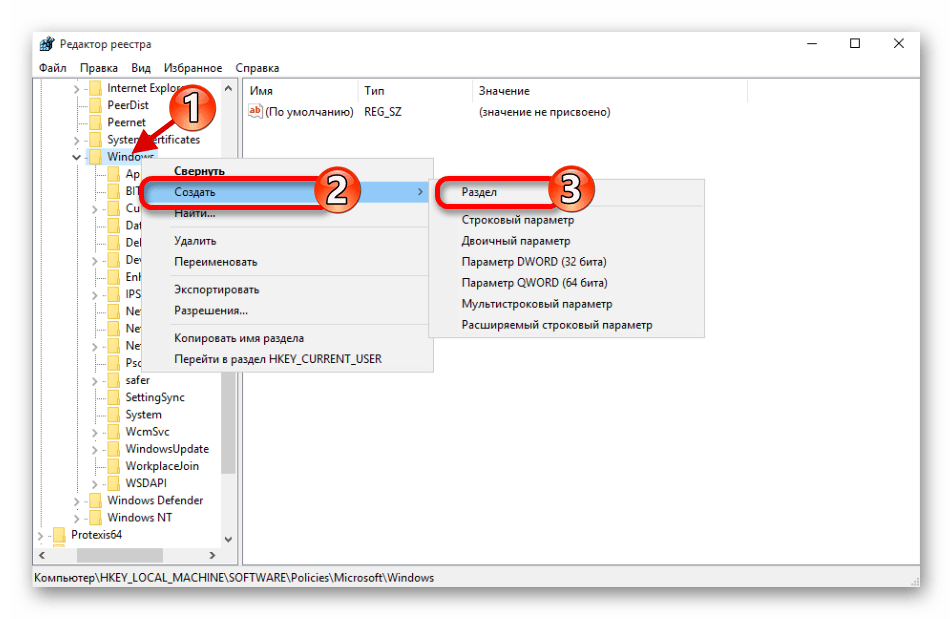
HKEY_LOCAL_MACHINESOFTWAREPoliciesMicrosoftWindowsЕсли папка «OneDrive» будет отсутствовать в каталоге «Windows», её потребуется создать. Для этого вызовите контекстное меню на директории «Windows», выберите поочередно пункты «Создать» — «Раздел» и назовите его «OneDrive», но без кавычек. Если же таковой раздел был изначально, переходите к шагу №5 текущей инструкции.
- Кликните ПКМ по пустому месту и создайте «Параметр DWORD (32 бита)», выбрав соответствующий пункт в меню.
- Назовите этот параметр «DisableFileSyncNGSC».
- Кликните по нему дважды ЛКМ и установите значение «1».
- Перезагрузите компьютер, после чего OneDrive будет отключен.


Способ 3: Изменение локальной групповой политики
Отключить облачное хранилище ВанДрайв данным способом можно только в редакциях Виндовс 10 Professional, Enterprise, Education, но не в Home.
Читайте также: Отличия версий операционной системы Windows 10
- Используя уже знакомую вам комбинацию клавиш, вызовите окно «Выполнить», укажите в нем команду
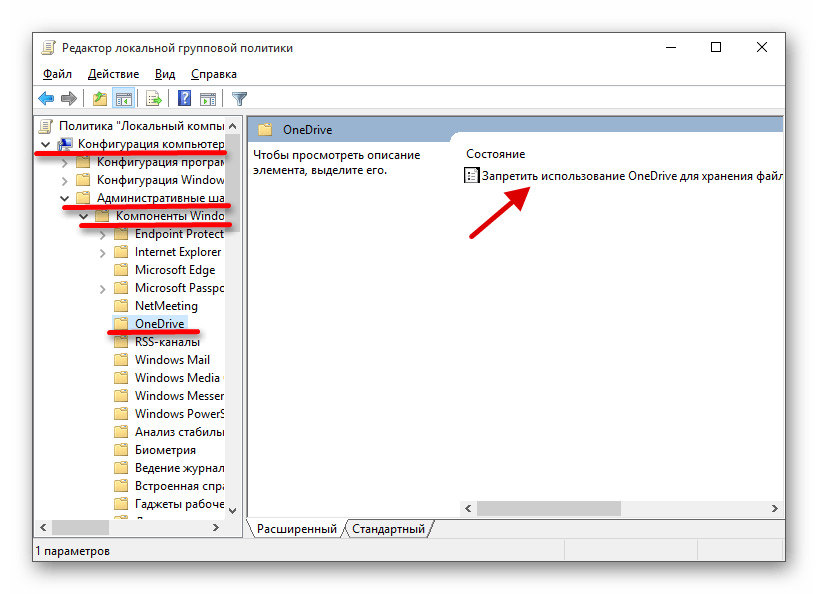
gpedit.mscи нажмите «ENTER» или «ОК». - В открывшемся окне «Редактора групповой политики» перейдите по следующему пути:
Конфигурация компьютераАдминистративные шаблоныКомпоненты WindowsOneDriveили
Computer ConfigurationAdministrative TemplatesWindows ComponentsOneDrive(зависит от локализации операционной системы)
- Теперь откройте файл с названием «Запретить использование OneDrive для хранения файлов» («Prevent the usage of OneDrive for file storage»). Отметьте маркером пункт «Включено», после чего нажмите «Применить» и «ОК».
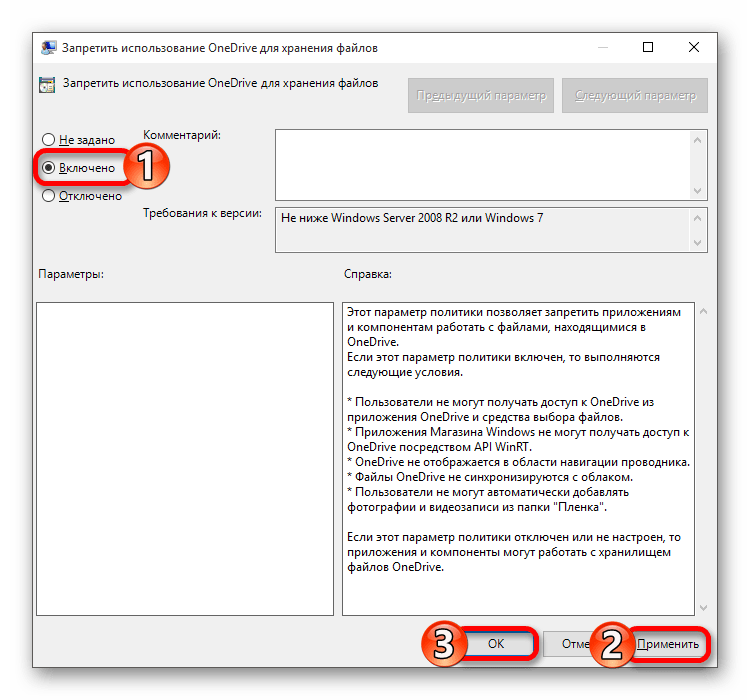
Таким образом вы сможете полностью отключить ВанДрайв. В Виндовс 10 Домашней редакции, по обозначенным выше причинам, придется прибегнуть к одному из двух предыдущих способов.
Заключение
Отключение OneDrive в Windows 10 – задача не самая сложная, но перед ее выполнением все же стоит хорошенько подумать, действительно ли так сильно это облачное хранилище «мозолит глаза», что вы готовы копаться глубоко в параметрах операционной системы. Наиболее безопасное решение заключается в банальном отключении его автозапуска, что было рассмотрено нами в первом способе.
Еще статьи по данной теме:
Помогла ли Вам статья?

(Image credit: Microsoft)
With the plethora of cloud storage services out there, you may find Microsoft’s OneDrive a little redundant. If you’ve already have your own cloud storage service that you trust, you may be inclined to disable OneDrive.
We say disable, because since OneDrive is a built-in application you can’t actually uninstall it; however, disabling the app will cause it to no longer function as if you had uninstalled it.
How to disable or uninstall OneDrive on Windows 10
Important note: By going into your PC’s Local Group Policy Editor, you are entering advanced system settings that could cause Windows 10 to malfunction if not handled with care.
We have done our best to give you easy and harmless instructions to ensure you are only disabling OneDrive; however you’ve got to be careful as anytime you tinker with settings like this, the smallest change could have unforeseen consequences. We suggest having an up-to-date backup of your PC just in case before proceeding.
- Press the Windows key + R shortcut to open the Run command window.
- Type in gpedit.msc.
- Click the OK button.
- Click on the Administrative Templates folder.
- Double-click on the Windows Components folder.
- Double-click on the OneDrive folder.
- Double-click on Prevent the usage of OneDrive for file storage.
- Click the option button beside the word Enabled.
- Click on the OK button.
And that’s all. OneDrive should now be disabled — you won’t be able to open the application, but the icons are still going to be there.
Get the best of Windows Central in in your inbox, every day!
![]()
OneDrive is becoming more popular, not only because Microsoft is encouraging people to use it, but also because businesses want to take advantage of the benefits of OneDrive for Business. For most users, multiple OneDrives can be very confusing. You can end up with more than one OneDrive if you have a personal OneDrive (e.g. the one that comes with Windows 10) and you install Office 2013, which includes OneDrive for Business, or you may have installed OneDrive for Business as a stand-alone product. In this article I will show you how to disable ore remove OneDrive in Windows 10.
NOTE: OneDrive used to be called SkyDrive and OneDrive for Business used to be called SkyDrive Pro. Due to legal issues, Microsoft was unable to use the name SkyDrive so the name was changed to OneDrive.
In case you are wondering, here’s the difference between OneDrive and OneDrive for Business.
| Product | Description |
| OneDrive | This product is included in Outlook.com account, Windows phone and Windows 10. People can use OneDrive to store their personal files securely in the cloud on Microsoft’s servers. Think of OneDrive as your own personal file server hosted by Microsoft. You can access the files on OneDrive from anywhere and share them with certain people, just like you would on a file server. You can either give them read-only access, or give them the ability to edit the files. |
| OneDrive for Business | OneDrive for Business is not really the personal OneDrive product enhanced for business use, as one might assume. The two products have very little in common. OneDrive for Business works with SharePoint, while OneDrive does not. You can either install OneDrive for Business as part of Microsoft Office 2013, or download it from Microsoft as a stand-alone product. OneDrive for Business is also the new name for what used to be called My Site in SharePoint. In SharePoint 2013, My Site has been replaced with OneDrive for Business. |
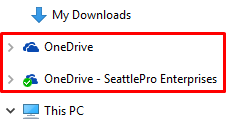
If you have both OneDrive personal and OneDrive for Business on your computer, you will notice that the clouds icon in the taskbar is gray for personal OneDrive and dark blue for OneDrive for Business, as shown below.
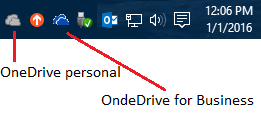
In File Explorer the icons are dark blue in both cases. In the image below, the first OneDrive is my personal OneDrive connected to Outlook.com and requires me to sign in with my Microsoft account at Outlook.com. The second OneDrive is my OneDrive for Business and requires me to use my Office 365 account.
Disabling OneDrive in Windows 10
Getting rid of the OneDrive in Windows 10 is not as easy as one might think. You can get rid of the OneDrive icon in the taskbar by exiting OneDrive but that doesn’t disable OneDrive from other places in Windows 10, such as File Explorer. To disable OneDrive completely you have to use the Group Policy Editor. This will prevent it from syncing with the cloud, or connecting with other apps. Notice I used the word disable, not remove. By disabling OneDrive, you can re-enable it any time if there is a need. Here’s how.
- If you want to disable your personal OneDrive that is included in Windows 10 Pro or Windows 10 Enterprise then first exit the OneDrive. Right-click the OneDrive gray icon in the taskbar and select Exit.
- Type gpedit.msc in the Windows 10 Search box to locate the Group Policy Editor. You will not be able to use the Group Policy Editor in Windows 10 Home version.

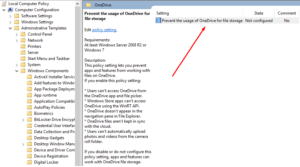
Best Practice: Never install a home version of any Microsoft operating system (Windows 7, Windows 8, Windows 10, etc.) on your home computer because it is essentially a limited version of the actual operating system, such as the “Pro” version. - In the Local Computer Policy go to Computer Configuration -> Administrative Templates -> Windows Components -> OneDrive. You will notice the setting Prevent the usage of OneDrive for file storage. By default, this setting is not configured.

- Double-click the setting, select the Enabled radio button, and then click OK. By enabling this setting you are disabling your OneDrive on your computer. Keep in mind that when you modify the local policy it will effect everyone who uses your computer. In other words, no one will be able to use OneDrive on this particular computer.

- Close the Group Policy Editor.
- Reboot your computer.
- When you login to your computer your OneDrive for Business should still be there. You may have to sign into your account. Your personal OneDrive should no longer be on the taskbar or in the File Explorer. If you see it in the File Explorer, wait for a few minutes and it should go away. At least that’s what my experience has been. If you are still seeing OneDrive in some places then try using the following techniques in this article from Microsoft.
- In the Notifications area on the bottom of the Windows screen, right-click the OneDrive icon. You might have to click the Show Hidden Icons arrow to find OneDrive.
- Click Settings, and on the Settings tab, uncheck all the boxes under General.
- On the Auto save tab, set the Documents and Pictures lists to This PC only, and uncheck the other boxes.
- On the Account tab, click Choose folders.
- In the Sync your OneDrive files to this PC box, check and uncheck the box at Sync all files and folders in my OneDrive. (The first check selects all the boxes, then the uncheck clears them all.) Click OK to close the box and return to settings.This step removes all OneDrive files from your computer, but leaves them on OneDrive.com.
- Click OK to save your changes in the Settings box.
- Open the Settings box again: In the Notifications area, right-click the OneDrive icon, click Settings. On the Account tab, click Unlink OneDrive. Close the Welcome to OneDrive box that appears.
- Open File Explorer, right-click OneDrive, and then click Properties.On the General tab, next to Attributes, check the Hidden box. This hides OneDrive from File Explorer.
- One more time, back in the Notifications area, right-click the OneDrive icon and click Exit. This removes the OneDrive icon from the Notifications area.

WARNING! According to Microsoft, OneDrive cannot be uninstalled from all versions of Windows 10 because it is built into Windows 10. Although it is possible, depending on your Windows version, to remove OneDrive from Windows 10, I recommend that you only disable OneDrive through Group Policy and then hide it from Windows 10, rather than completely removing it because there’s a lot of cleanup you will have to do to completely remove it from your computer. Also keep in mind that because OneDrive is built into Windows 10, removing it (rather than disabling it) may have some unexpected consequences.
Removing OneDrive Completely in Windows 10
Again, I don’t recommend removing OneDrive completely because you can always disable it and hide it. However, if you must then you can remove OneDrive from your Windows 10 by using the following command on a 32-bit computer. Make sure that you are logged in as an Administrator:
%SystemRoot%System32OneDriveSetup.exe /uninstall
On a 64-bit computer use the following command:
%SystemRoot%SysWOW64OneDriveSetup.exe /uninstall
To reinstall OneDrive on a 64-bit computer, you will use the above command without /uninstall switch at the end.
%SystemRoot%SysWOW64OneDriveSetup.exe
Copyright © 2016 SeattlePro Enterprises, LLC. All rights reserved.
This div height required for enabling the sticky sidebar
We use cookies on our website to give you the most relevant experience by remembering your preferences and repeat visits. By clicking “Accept”, you consent to the use of ALL the cookies.
Disclosure: We are not providing any kind of paid support. Beware of scammers. This page may contain affiliate links read disclaimer
Microsoft OneDrive is a free cloud storage service offered by Microsoft. It allows you to save and synchronize documents, photos, and many other types of files and folders that you want to sync or backup.
Yes, this is Windows 10’s default and most basic option for backing up your files. To avail this service, you only need to have a Microsoft account to start using it.
If you are currently using another 3rd party backup service (other than OneDrive), you may want to disable OneDrive completely, then here is the step-by-step guide to disable the OneDrive App.
- How to Enable One Drive
- How to Disable OneDrive
How to Disable Microsoft OneDrive
To disable OneDrive from your computer, you just have to follow the following steps. These method for Windows 10 but you can use the same steps for Windows 7 and Windows 8 operating system.
1. Disable OneDrive from Task Manager
- Right-click on the taskbar and click on the task manager. OR press control+Shift+Esc button together to open the task manager directly.
- In the task manager, go to the startup tab and the find for “Microsoft OneDrive“
- Right click on “Microsoft OneDrive” and click on Disable.

2. Unlink OneDrive account from the PC
The first method we will see is to unlink the OneDrive account from the computer. Consequently, local files will remain available. However, the files in the cloud will no longer be accessible from the computer.
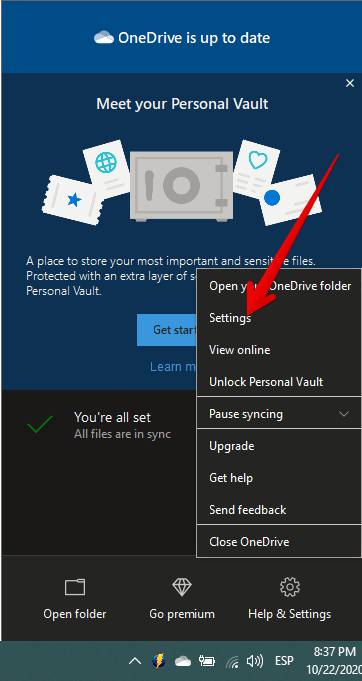
- Right-click on the OneDrive icon in the taskbar. Then select Settings:

- Once there, press the Account tab. Then click on Unlink this PC.

- Then confirm the action on the warning signal. Click on “Unlink Account” button.

- You can check if the account has been successfully unlinked by clicking on the OneDrive icon in the taskbar.

- To re-link your OneDrive account, just click on Sign in
3. Stop OneDrive synchronization
Depending on the version of Windows you have, you may not be able to use the above method. In these cases, what we will do is stop all types of synchronization between the cloud and the computer.
- Go back to the OneDrive settings. Once you’re there, click on the Accounts tab. Then click on Choose Folders.

- Then uncheck all the boxes corresponding to the folders. Press OK.

- This action deletes all files in the local folder. However, they remain available in the cloud.
4. Delete OneDrive Folder Using File Explorer
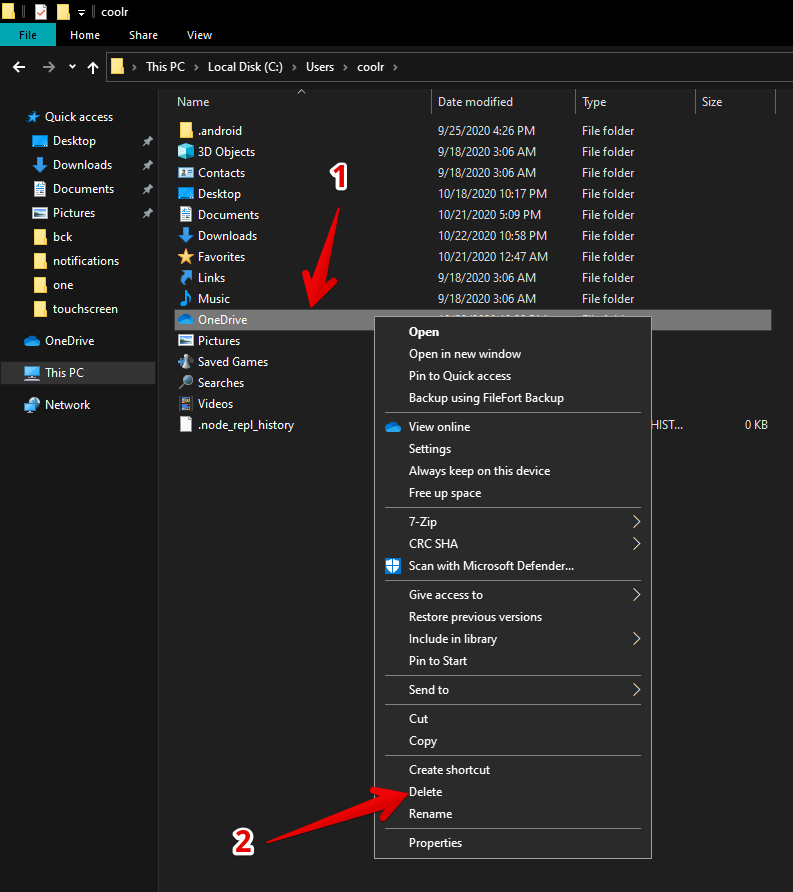
Delete the OneDrive folder from your PC’s user profile folder. Let’s see how to do it.
- Go to Windows hard drive partition – usually it is in C: then go to USERS and then double-click on your user-profile’s folder name. In my case it is coolr, so my path is: “c:userscoolr“. Delete the OneDrive folder from there.

5. Uninstall OneDrive from Windows 10
The most recent versions of Windows 10, allow you to uninstall OneDrive easily.
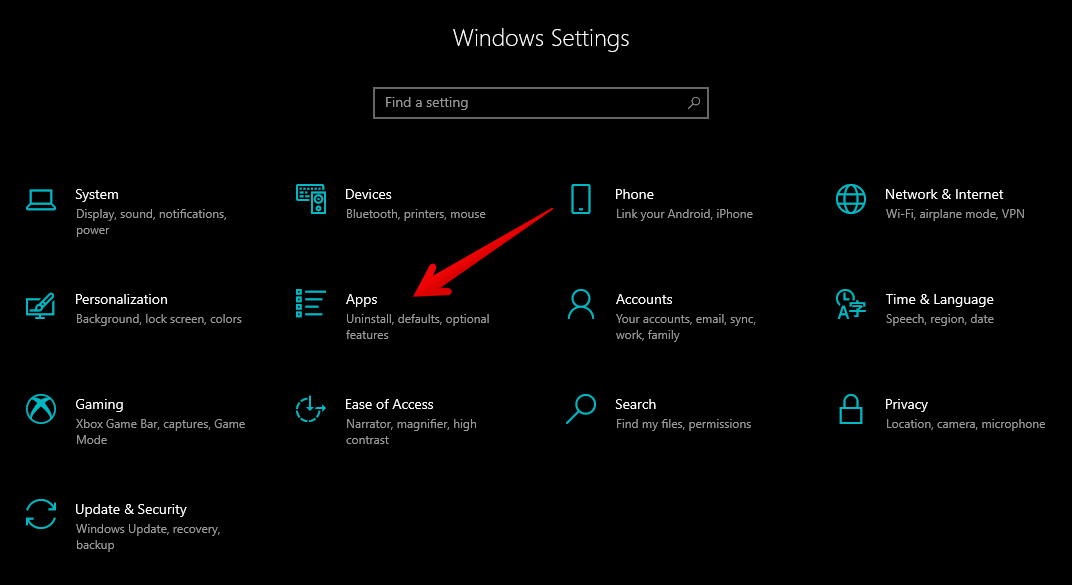
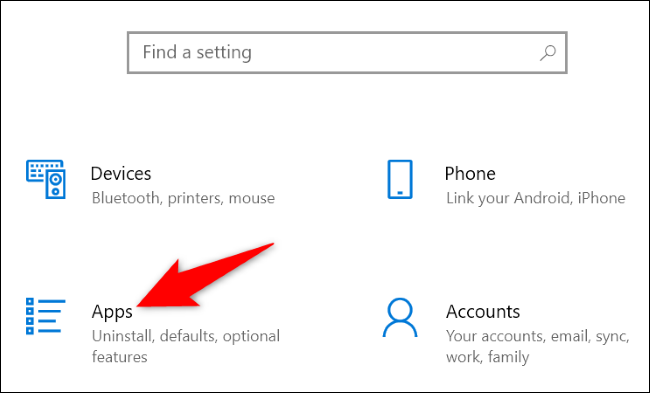
- To do this, you need to enter Windows Settings. With this in mind, press the Win+I in the combination. Once you’re there, click on Apps.

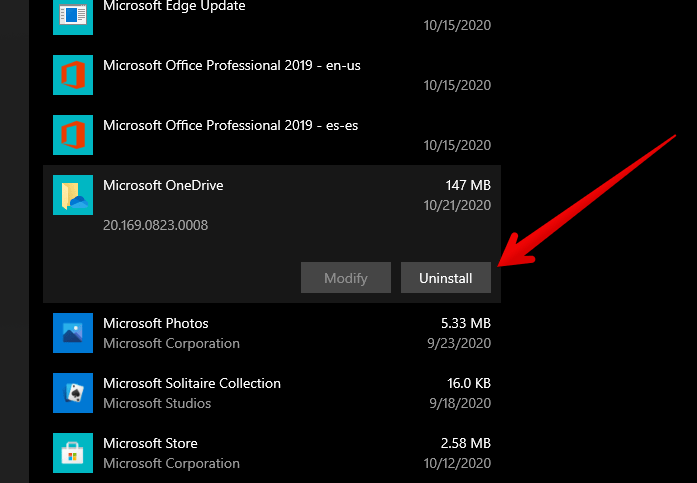
- A list of available apps and features will be displayed immediately. Please scroll down to get Microsoft OneDrive. Then click on Uninstall.

How to Enable Microsoft OneDrive
To re-enable OneDrive on your computer, you just have to follow the following steps:
1. Enable OneDrive from Task Manager:
- Right-click on the taskbar and click on the task manager. OR press control+Shift+Esc button together to open the task manager directly.
- In the task manager, go to the startup tab and the find for “Microsoft OneDrive“
- Right click on “Microsoft OneDrive” and click on Disable.
2. Reinstall OneDrive from Task Manager:
To reinstall it, you need to go to the Microsoft store and search for OneDrive and re-install it from there.
3. Link OneDrive to your PC
To do that, you just need to login to your Microsoft account and then you’ll be linked and start synchronization.
Finally, we have seen how to disable and enable OneDrive in Windows 10. Stay tuned for more news about our favorite operating system.
Чтобы остановить синхронизацию с OneDrive, щелкните значок приложения на панели задач. Щелкните значок шестеренки, затем выберите «Приостановить синхронизацию» и временной интервал. Вы также можете выйти из OneDrive, запретить его открытие при запуске или удалить его.
Не знаете, как отключить OneDrive? Вы можете приостановить синхронизацию файлов OneDrive, закрыть приложение, запретить его открытие при запуске или навсегда избавиться от приложения на своем компьютере. Мы покажем вам, как сделать все это на вашем компьютере с Windows.
Содержание
- Как отключить OneDrive в Windows
- Как запретить OneDrive синхронизировать файлы
- Как Выйти из OneDrive
- Как запретить запуск OneDrive при запуске
- Как удалить OneDrive
Как отключить OneDrive в Windows
Первый способ – отключить синхронизацию файлов OneDrive. Это идеальный метод, если вы хотите сохранить приложение на своем ПК, но не хотите, чтобы ваши будущие файлы синхронизировались с ним. Позднее вы сможете возобновить синхронизацию файлов и синхронизировать все изменения со своей облачной учетной записью.
Второй вариант — закрыть приложение OneDrive. Это удалит приложение из области уведомлений, а также отключит синхронизацию файлов. Вы также можете предотвратить автоматический запуск приложения во время запуска, чтобы ваши файлы случайно не начали синхронизироваться.
Наконец, если вы больше не планируете использовать OneDrive, вы можете удалить приложение и полностью избавиться от него. Позже, если вам снова понадобится служба, вы сможете переустановить приложение на своем компьютере.
Как запретить OneDrive синхронизировать файлы
Чтобы предотвратить синхронизацию ваших файлов, на панели задач щелкните значок OneDrive (значок облака).

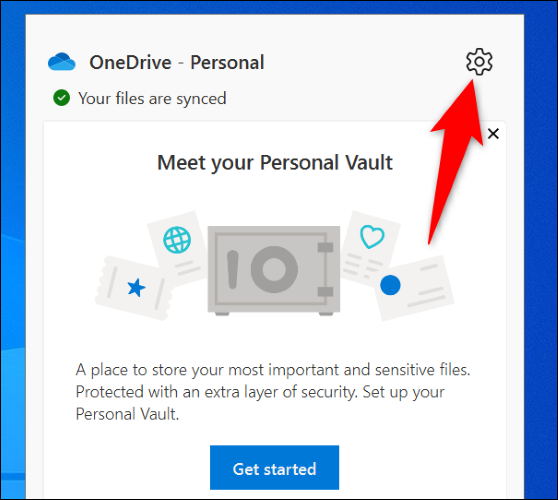
Вы увидите панель OneDrive. Здесь, в правом верхнем углу, нажмите значок шестеренки.
В открывшемся меню выберите «Приостановить синхронизацию». Затем выберите период времени, на который вы хотите отключить синхронизацию файлов. Возможные варианты: 2, 8 и 24 часа.
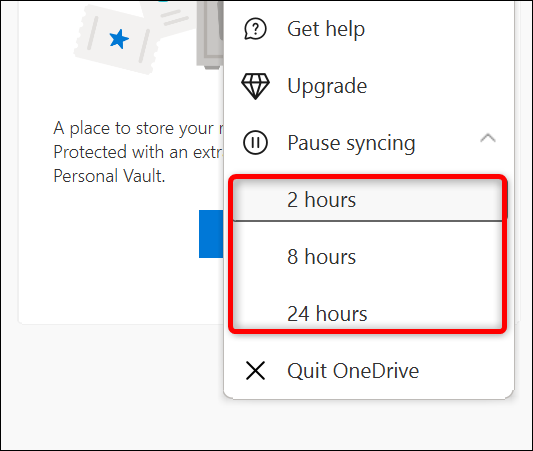
После того, как вы сделаете выбор, OneDrive приостановит синхронизацию файлов. Синхронизация возобновится по истечении указанного периода времени.
Таким образом вы можете заставить OneDrive временно остановить загрузка ваших файлов в облако.
Как Выйти из OneDrive
Чтобы выйти из приложения OneDrive, щелкните значок приложения на панели задач и выберите значок шестеренки в правом верхнем углу.
Затем в открывшемся меню выберите «Выйти из OneDrive».

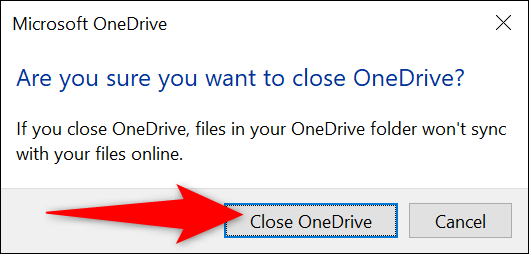
Появится запрос, действительно ли вы хотите выйти из OneDrive. Выберите «Закрыть OneDrive».

И все готово. OneDrive больше не будет синхронизировать ваши файлы или мешать вам уведомлениями.
Как запретить запуск OneDrive при запуске
Чтобы предотвратить дальнейшую синхронизацию файлов и прекратить получение каких-либо уведомлений, вы также можете отключить автоматический запуск OneDrive при запуске.
Начните с поиска значка OneDrive в вашем в системном трее и щелкните его. Затем в правом верхнем углу панели OneDrive щелкните значок шестеренки и выберите «Настройки».
В верхней части окна «Microsoft OneDrive» выберите вкладку «Настройки». Затем отключите параметр «Автоматически запускать OneDrive при входе в Windows».
Сохраните изменения, нажав «ОК» на в нижней части окна.
Вот и все.
Как удалить OneDrive
Отключение OneDrive для хорошо можно сделать, удалив приложение. Это приведет к удалению всех функций OneDrive с вашего ПК.
Для этого закройте OneDrive на своем компьютере. Для этого выберите значок OneDrive на панели задач, нажмите на три точки в правом верхнем углу и выберите «Выйти из OneDrive».
Выберите «Закрыть OneDrive» в приглашении.
Откройте приложение «Параметры Windows», нажав Windows + i. Затем выберите «Приложения».
Примечание. Следующие шаги были выполнены на ПК с Windows 10. Удалить приложения в Windows 11 также легко.
На странице «Приложения и функции» найдите и выберите «Microsoft OneDrive». Затем нажмите «Удалить».
Выберите «Удалить» в приглашении.
OneDrive теперь удален с вашего ПК с Windows и ваше новое приложение облачного хранилища может взять на себя управление.

Windows 10 includes OneDrive, but if you’d rather not see it, there are several ways to disable OneDrive and remove it from File Explorer on Windows 10.
Home Users: Uninstall OneDrive Normally
RELATED: What’s New in Windows 10’s Creators Update
Starting in Windows 10’s Creators Update, you can now easily uninstall OneDrive like you would any other desktop program. Only Windows 10 Home users should do this. If you’re using Windows 10 Professional, Enterprise, or Education, skip this step and use the below Group Policy Editor method instead.
Head to either Control Panel > Programs > Uninstall a Program or Settings > Apps > Apps & features. You’ll see a “Microsoft OneDrive” program appear in the list of installed software. Click it and click the “Uninstall” button.

Windows will immediately uninstall OneDrive, and the OneDrive icon will disappear from the notification area.
(If you ever want to reinstall OneDrive in the future, you’ll need to run the OneDrive installer buried in the Windows system folder. Just head to the C:WindowsSysWOW64 folder on a 64-bit version of Windows 10 or the C:WindowsSystem32 folder on a 32-bit version of Windows 10. Double-click the “OneDriveSetup.exe” file here and Windows will reinstall OneDrive.)
There’s one problem with uninstalling OneDrive this way: The empty OneDrive folder will still appear in File Explorer’s sidebar. If you’re fine with that, you can stop now. OneDrive has been removed and is no longer doing anything. However, if the empty OneDrive folder bothers you, you’ll need to use the below tricks.
Pro and Enterprise Users: Disable OneDrive with the Local Group Policy Editor
If you’re using Windows 10 Professional, Enterprise, or Education, the easiest way to disable and hide OneDrive is by using the Local Group Policy Editor. It’s a pretty powerful tool, so if you’ve never used it before, it’s worth taking some time to learn what it can do. Also, if you’re on a company network, do everyone a favor and check with your admin first. If your work computer is part of a domain, it’s also likely that it’s part of a domain group policy that will supersede the local group policy, anyway.
In Windows 10 Pro or Enterprise, hit Start, type gpedit.msc, and press Enter.
In the Local Group Policy editor’s left pane, drill down to Computer Configuration > Administrative Templates > Windows Components > OneDrive. Double-click the “Prevent the usage of OneDrive for file storage” policy setting in the right pane, set it to “Enabled,” and click “OK.”
This completely disables access to OneDrive. OneDrive will be hidden from File Explorer and users won’t be allowed to launch it. You won’t be able to access OneDrive at all, not even from within Windows Store apps or use the camera roll upload feature.
You shouldn’t uninstall OneDrive from the Control Panel or Settings application if you use this method. If you do, you’ll continue to see an empty OneDrive folder in File Explorer. If you see an empty OneDrive folder in File Explorer after changing this group policy setting, you’ll need to reinstall OneDrive from the Windows system folder. Once you do, the empty OneDrive folder will vanish from File Explorer.
To undo this change, just head back to here and change the policy to “Not Configured” instead of “Enabled.”
There doesn’t seem to be an associated registry setting you can modify to get the same effect as the group policy setting on Windows 10. The “DisableFileSync” and “DisableFileSyncNGSC” registry settings that worked on Windows 8.1 no longer works on Windows 10.
RELATED: Using Group Policy Editor to Tweak Your PC
Home Users: Remove the OneDrive Folder From File Explorer by Editing the Registry
Update: You no longer have to edit your PC’s registry to do this on Windows 10 Home. We recommend uninstalling OneDrive instead.
If you have Windows 10 Home, you can edit the Windows Registry to remove the OneDrive folder from the File Explorer’s left sidebar. You can also do it this way on Windows Pro or Enterprise, but the Group Policy Editor method is a better solution for cleanly disabling OneDrive.
RELATED: How to Backup and Restore the Windows Registry
Standard warning: Registry Editor is a powerful tool and misusing it can render your system unstable or even inoperable. This is a pretty simple hack and as long as you stick to the instructions, you shouldn’t have any problems. That said, if you’ve never worked with it before, consider reading about how to use the Registry Editor before you get started. And definitely back up the Registry (and your computer!) before making changes.
To get started, open the Registry Editor by hitting Start and typing “regedit”. Press Enter to open Registry Editor and give it permission to make changes to your PC.
In the Registry Editor, use the left sidebar to navigate to the following key. In the Creators Update, you can also just copy and paste this address into the Registry Editor’s address bar.
HKEY_CLASSES_ROOTCLSID{018D5C66-4533-4307-9B53-224DE2ED1FE6}
Double-click the System.IsPinnedToNameSpaceTree option in the right pane. Set it to 0 and click “OK”.
If you’re using a 64-bit version of Windows 10, you will also need to navigate to the following key in the left sidebar.
HKEY_CLASSES_ROOTWow6432NodeCLSID{018D5C66-4533-4307-9B53-224DE2ED1FE6}
Double-click the System.IsPinnedToNameSpaceTree option in the right pane. Set it to 0 and click “OK”.
The OneDrive folder will vanish from the File Explorer’s sidebar immediately. If it doesn’t, try rebooting your computer.
Download Our One-Click Registry Hack
Update: You no longer have to edit your PC’s registry to do this. We recommend uninstalling the OneDrive client on Windows 10 Home, or using Group Policy on Windows 10 Professional.
If you don’t feel like diving into the Registry yourself, we’ve created downloadable registry hacks you can use. One hack removes the OneDrive folder from File Explorer, while another hack restores it. We’ve included versions for both 32-bit and 64-bit versions of Windows 10. Double-click the one you want to use, click through the prompts, and then restart your computer.
Download Remove OneDrive From File Explorer Hacks
To check whether you’re using a 32-bit or 64-bit version of Windows 10, head to Settings > System > About. Look at “System type” and see whether it says you’re using a “64-bit operating system” or “32-bit operating system.”
RELATED: How to Make Your Own Windows Registry Hacks
These hacks just change the same settings we changed above. Running the “Hide OneDrive From File Explorer” hack sets the value to 0, while running the “Restore OneDrive to File Explorer” hack sets the value back to 1. And if you enjoy fiddling with the Registry, it’s worth taking the time to learn how to make your own Registry hacks.
If any local copies of your OneDrive files have synced to your PC, you may want to delete them to free up space. Navigate to the C:UsersNAMEOneDrive folder, which contains your user’s downloaded OneDrive files. These won’t be automatically deleted when you unlink your account and stop syncing. Deleting them won’t delete them from OneDrive if your account is unlinked from OneDrive—they’ll just be deleted from your local device.
READ NEXT
- › Get Help With File Explorer on Windows 10
- › Get Rid of the Annoying Microsoft OneDrive Sign In Popup
- › How to Fix All of Windows 10’s Annoyances
- › Windows Registry Demystified: What You Can Do With It
- › How to Hide OneDrive Images in the Windows 11 Photos App
- › The 10 Best Registry Hacks for Windows 10
- › How to Delete a Notebook in Microsoft OneNote
- › How to Change Your Age on TikTok