Disable this keyboard feature many find annoying in Windows 10, 8, and 7
Updated on April 24, 2022
What To Know
- In Windows 10: Settings > Ease of Access > Keyboard. Scroll to Sticky Keys, and toggle it off.
- In 7 or 8: Control Panel > Ease of Access > Make the Keyboard Easier > Make it Easier To Type.
This article explains how to disable Sticky Keys on Windows. Instructions apply to Windows 10, Windows 8, and Windows 7.
How to Turn off Sticky Keys in Windows 10
The simplest way to turn sticky keys on and off in Windows 10 is the following technique. Tap Shift five times with sticky keys turned on to shut it off. You can also press any two keys simultaneouslyto turn off Sticky Keys.
If the above doesn’t work, or you want to turn off this shortcut in Settings, follow these steps:
-
Press the Windows key or select the Windows icon in the lower left-hand corner and select Settings.
-
Select Ease of Access > Keyboard
You can also reach this menu by pressing Win+U.
-
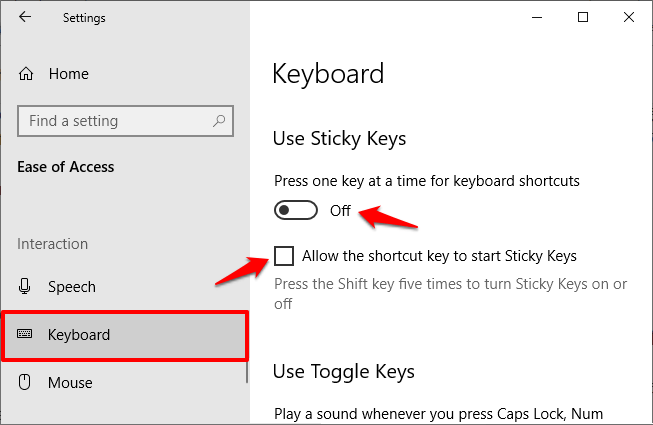
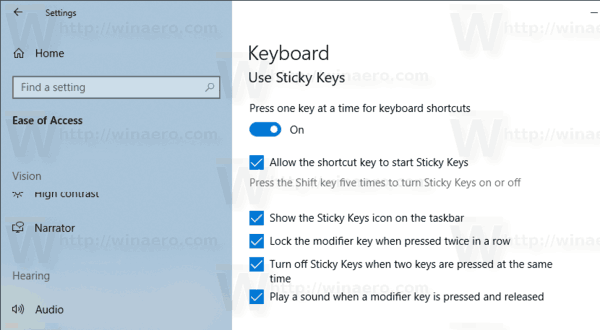
Scroll down and select the Sticky Keys toggle to set it to off. You can also disable the shortcut here.
-
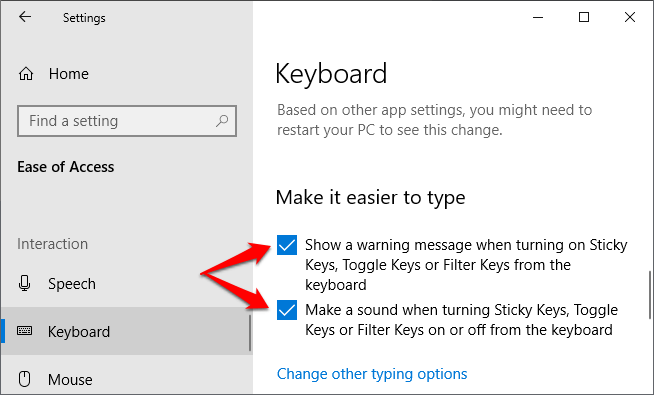
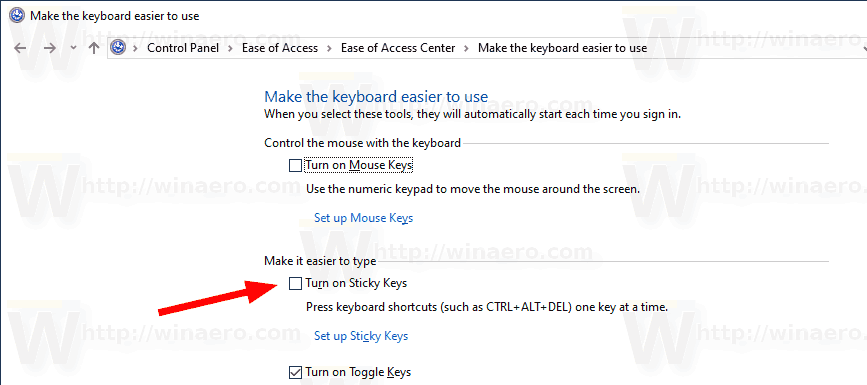
Scroll down to Make It Easier To Type. Verify that both the warning message and make-a-sound options are enabled, so you won’t turn sticky keys on by accident.
How to Turn off Sticky Keys on Windows 7 and 8
Windows 7 and 8 also uses the «press Shift five times» shortcut to enable and disable Sticky Keys. Pressing two keys at the same time will also disable it. To disable or enable it in the Settings:
-
Open the Control Panel.
-
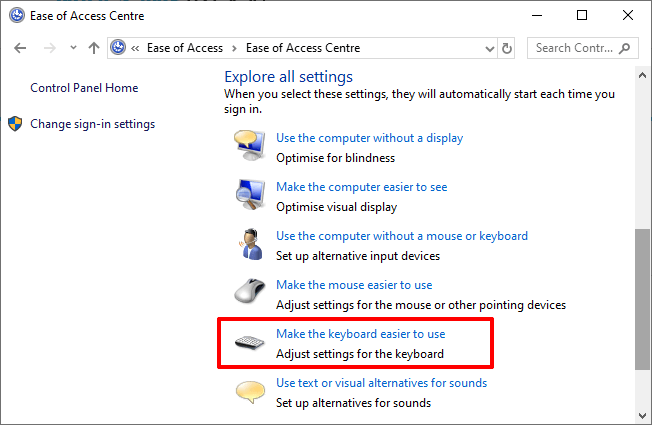
Select Ease of Access > Make the Keyboard Easier To Use
In Windows 8, you can also do Win+U if your keyboard has a Windows key.
-
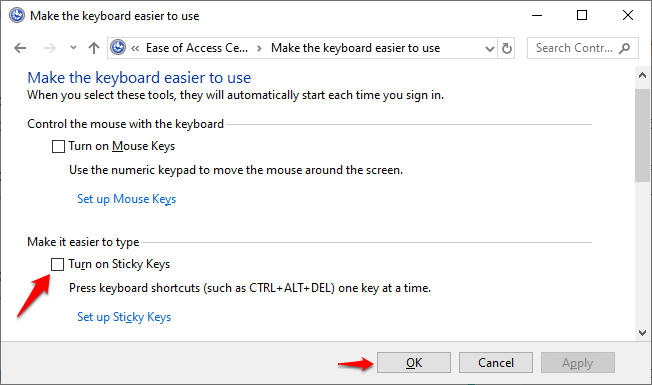
Scroll down to Make it Easier To Type and check or uncheck Turn on Sticky Keys. Then select Apply.
What Are Sticky Keys?
Every keyboard uses modifier keys, which change the function of a letter key. The one you probably use most often is Shift, which changes lowercase letters to uppercase and use the «top row» characters on most keys, like the exclamation point (!) over the 1 key.
Depending on the programs you use on your computer, you can also use Ctrl, Alt, or the Windows keys on Windows devices. Use the Command key on Macs.
Sticky keys assist people with disabilities or who suffer from repetitive stress injuries. Instead of holding down a button, you can tap it and it will stay “down” until you press another key. In Windows 7, 8, or 10, try this feature by pressing the Shift key five times. A box pops up asking you if you want to enable sticky keys. Afterward, try typing something, and you’ll see it in action.
Sticky keys can be useful if you don’t like holding down a key for long periods of time. If you’re not a touch-typist, in particular, or if you’re learning how to use software that makes heavy use of modifier keys, it can be useful while you track down which key you want to press. Otherwise, they’re probably not worth leaving on.
FAQ
-
How do I turn off the Sticky Keys notification in Windows?
To disable the Sticky Keys pop-up notification in Windows 10 and earlier, go to the keyboard settings; under Make it Easier To Type, uncheck the notification box. In Windows 11, go to Settings > Accessibility > Keyboard and uncheck Notify me when I turn on Sticky Keys.
-
How do I change my keyboard keys in Windows 10?
To remap the keyboard in Windows, download Microsoft Power Toys and go to Keyboard Manager > Remap a Key or Remap a Shortcut. If you have an external keyboard and mouse, use the Windows Mouse and Keyboard Center.
-
How do I disable the keyboard in Windows?
To disable your Windows keyboard, right-click Start and select Device Manager > Keyboards. Next, right-click your keyboard and select Disable Device.
Thanks for letting us know!
Get the Latest Tech News Delivered Every Day
Subscribe
- You can turn off Sticky Keys in Windows by pressing the Shift key five times.
- On Windows 10 and 11, you can also turn Sticky Keys off in Settings and disable the shortcut there.
- On Windows 7 and 8, you can turn off Sticky Keys and disable the shortcut in the Control Panel.
Sticky Keys is a feature in Windows that allows modifier keys like Ctrl and Shift to remain active even when you’re not pressing them. This can help users with physical impairments, who have trouble pressing two keys at a time (like using Shift to make uppercase letters).
By default, you can turn it on by pressing Shift five times in a row. However, this shortcut makes it easy to turn the feature on by mistake.
Here’s how to turn off Windows 10’s Sticky Keys feature for good, and disable that shortcut.
How to turn off Sticky Keys with a keyboard shortcut
If you want to turn off Sticky Keys, the easiest way is to use the keyboard shortcut you use to turn them on – pressing the Shift key five times. Alternatively, you can press two function keys at the same time (Ctrl, Alt, Shift, or the Windows key).
This won’t prevent the problem from happening again, but it will solve your problem immediately.
How to turn off Sticky Keys from the Settings menu
If you’re using Windows 10 or 11, you can enable or disable Sticky Keys by going into the settings.
Let’s start by looking at how to do it in Windows 11:
1. Press the Windows logo on your keyboard, or click the Windows icon in the Taskbar.
2. Search for «Accessibility.»
3. Click on Accessibility keyboard settings in the search results.
Stefan Ionescu
4. Toggle the switch next to Sticky keys to Off.
Stefan Ionescu
5. To disable the shortcut, click on Sticky keys and toggle the switch next to Keyboard shortcut for Sticky keys to Off.
Stefan Ionescu
In Windows 10:
1. Press the Windows logo on your keyboard, or click the Windows icon at the bottom left of your screen on the Taskbar.
2. Search for «Ease of Access.»
3. Select Ease of Access keyboard settings in the search results.
Stefan Ionescu
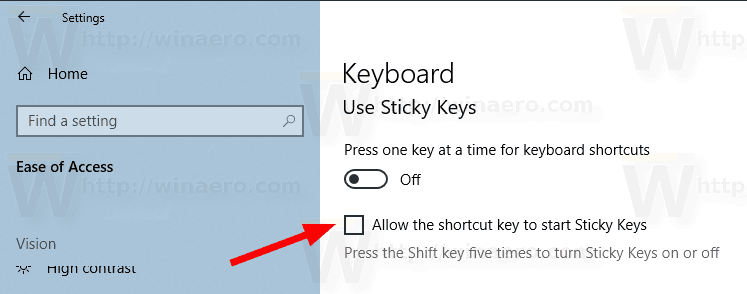
4. Toggle the switch under Use Sticky Keys to Off. You can also turn off the shortcut so it won’t activate again by unchecking Allow the shortcut key to start Sticky Keys.
Stefan Ionescu
How to turn off Sticky Keys from the Control Panel
Follow the below steps if you’re using Windows 7 or 8.
1. Press the Windows logo on your keyboard, or click the Windows icon at the bottom left of your screen on the Taskbar.
2. Select Control Panel to open it.
3. Click on Ease of Access.
Stefan Ionescu
4. Under Ease of Access Center, click Change how your keyboard works.
Stefan Ionescu
5. In the Make it easier to type section, untick the box next to Turn on Sticky Keys.
Stefan Ionescu
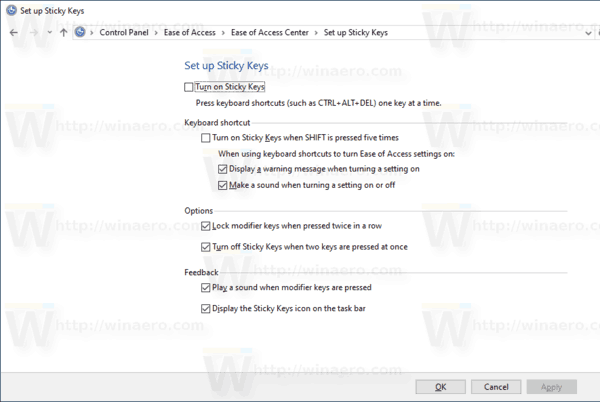
6. To disable the shortcut, click on Set up Sticky Keys and uncheck the box next to Turn on Sticky Keys when SHIFT is pressed five times.
Stefan Ionescu
7. Click on OK.
Ross James is a freelance writer for Business Insider.
Read more
Read less
Ваш компьютер показывает некоторые нежелательные команды, такие как знаки препинания или заглавные буквы в середине предложения? Если да, то функция залипания клавиш может быть виновата в таких вещах.
Но что делать, если вы не знаете, как отключить Sticky Keys в Windows 10? Что ж, не беспокойтесь об этом, потому что вот наше двухминутное руководство, чтобы узнать, как отключить Sticky Keys Windows 10. Так что просто прокрутите, чтобы узнать больше.
Липкие клавиши тяготеют к системе, в которой вам не нужно постоянно нажимать клавишу для выполнения определенных команд; вместо этого вы должны нажать его один раз, и он останется прежним, если вы не нажмете некоторые другие клавиши. Эта функция очень полезна для многих. Но, с другой стороны, проблематично для некоторых пользователей Windows 10.
Вот почему здесь мы собираемся предоставить вам полный обзор процессов отключения липких клавиш в операционных системах Windows 10.
Что такое Sticky Keys в Windows 10?
Прежде чем углубляться в пошаговые методы, вы должны получить четкое представление о липких клавишах Windows 10 . Итак, эти клавиши вашей клавиатуры известны как клавиши-модификаторы, которые изменяют способ работы буквенных клавиш. Одна из наиболее распространенных «липких» клавиш — «Shift». Почти каждый пользователь использовал эту клавишу хотя бы один раз, чтобы превратить строчные буквы в прописные.
Теперь вы можете подумать — действительно ли в Windows 10 нужны Sticky Keys?
Ну, Sticky Keys предназначены для помощи людям с ограниченными возможностями или пострадавшим от различных травм. Пока включены липкие клавиши (Ctrl, Alt, Shift, клавиша с логотипом Windows), нет необходимости нажимать какие-либо кнопки в течение длительного или нескольких раз. Нажмите на нее один раз, и она останется внизу, если вы не нажмете другую кнопку.
На компьютерах с Windows 7, Windows 8 или Windows 10, если вы нажмете кнопку «Shift» 5 раз подряд, откроется диалоговое окно с сообщением, хотите ли вы включить закрепленные клавиши или нет. Однако эти клавиши весьма полезны, если вы не хотите долго нажимать клавишу. Иначе, вероятно, они не достойны того, чтобы уходить.
Самый простой способ выключить липкие клавиши — нажать кнопку Shift одновременно 5 раз, пока липкие клавиши включены. И это отключит липкие клавиши в системах Windows 10. Но в случае, если этот простой метод не работает, перейдите к нашим двум лучшим методам, чтобы навсегда отключить липкие клавиши Windows 10. Вот так:
Метод 1: Отключить Sticky Keys через настройки клавиатуры легкого доступа
Помимо одновременного пятикратного нажатия кнопки Shift, использование приложения «Настройки» (настройки клавиатуры с легкостью доступа) — это самый простой способ отключить липкие клавиши на ноутбуках с Windows 10 или настольных компьютерах. Итак, просто следуйте этим шагам и узнайте, как отключить липкие клавиши в операционных системах Windows 10:
Шаг (1): сначала нажмите клавишу с логотипом Windows на клавиатуре, а затем нажмите значок «Настройки».
Шаг (2): в настройках Windows, нажмите на «Простота доступа», а затем «Клавиатура».
Шаг (3). Теперь в разделе «Клавиатура» просто отключите параметр «Использовать липкие клавиши».
Шаг (4): Кроме того, снимите флажок «Разрешить сочетанию клавиш запускать Sticky Keys», чтобы убедиться, что вы не включите его снова по незнанию.
Шаг (5): Наконец, прокрутите вниз до опции «Упростить ввод» и установите оба этих флажка:
◾ Показывать предупреждающее сообщение при включении Sticky Keys, Toggle Keys или Filter Keys с клавиатуры
◾ Издавать звук при включении или выключении Sticky Keys, Toggle Keys или Filter Keys с клавиатуры
Выполнив последний шаг, вы узнаете, случайно включив Sticky Keys. Теперь проверьте, успешно ли вы отключили липкие клавиши в Windows 10 или они все еще активны. В случае, если липкие клавиши не выключаются после выполнения этих шагов, выполните следующий метод, приведенный ниже.
Способ 2: отключить липкие клавиши с помощью панели управления
В случае, если вы не можете отключить «залипание» клавиш в Windows 10 с помощью настроек клавиатуры «Легкость доступа» в приложении «Настройки», то отключение «залипаний» клавиш через панель управления — еще один быстрый и упрощенный способ. Вот как можно отключить липкие клавиши Windows 10 на постоянной основе с помощью панели управления:
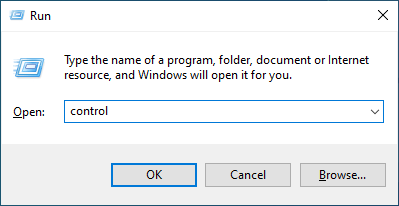
Шаг (1): Прежде всего, нажмите клавишу Windows + R вместе, чтобы открыть диалоговое окно «Выполнить», затем введите элемент управления и нажмите кнопку ОК.
Шаг (2). Теперь в окне «Панель управления» нажмите «Простота доступа», а затем «Центр легкости доступа».
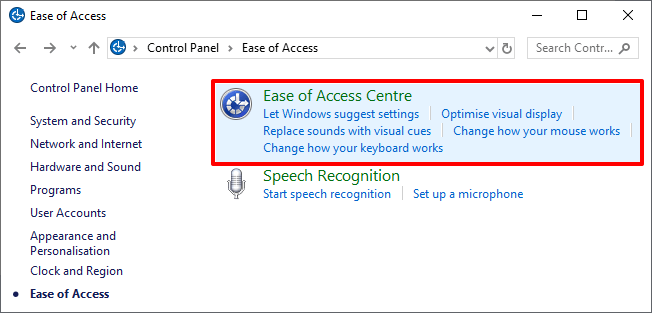
Шаг (3): После этого в окне Ease of Access Center щелкните опцию «Упростить использование клавиатуры».
Шаг (4). Теперь в разделе «Упростить использование клавиатуры» снимите флажок «Включить залипание клавиш».
Шаг (5): Наконец, нажмите кнопку ОК и затем кнопку Применить , чтобы сохранить изменения.
Точно выполнив эти шаги, вы сможете навсегда отключить липкие клавиши Windows 10. Разве это не очень простой процесс?
Вывод
Вот и все! Вы, должно быть, успешно отключили Sticky Keys в Windows 10 сейчас. Если вы столкнулись с какой-либо проблемой во время выполнения шагов или у вас есть дополнительный вопрос о том, как отключить Sticky Keys Windows 10, не стесняйтесь оставить комментарий в поле ниже.
Skip to content
Windows 10 inherits a useful feature from previous versions of the OS. It is called Sticky Keys. When enabled, it will allow you to press and release a modifier key (Shift, Ctrl, or Alt) and then press the next key in the shortcut sequence instead of holding it.
Sticky keys is an accessibility feature of some graphical user interfaces to assist users who have physical disabilities. The Sticky Keys feature makes a modifier key remain active until another key is pressed. This lets you press a single key at a time to access a keyboard shortcut. For example, you need to press Ctrl + Shift + A. With Sticky Keys enabled, you can press and release the Ctrl key, then the Shift key, and finally the A key. You don’t have to press all three keys down at once.
Pressing a modifier key once locks a modifier key down until the user presses a non-modifier key. Pressing a modifier key twice locks the key until the user presses the same modifier key a third time.
There are a number of methods you can use to enable or disable Sticky Keys in Windows 10. Let’s review them.
- Press the Shift key five times to turn Sticky Keys on. Confirm the operation.

- A sound will play indicating that the feature is now enabled.
- When Sticky Keys is turned on, press the Shift key five times to disable the feature.
- A low pitch sound will play when it is disabled.

Turn On or Off Sticky Keys With Settings
- Open the Settings app.
- Go to Ease of Access -> Keyboard.
- On the right, enable the option Press one key at a time for keyboard shortcuts to turn on Sticky Keys.

- You can customize the following options:
- Allow the shortcut key to start Sticky Keys
- Show the Sticky Keys icon on the taskbar
- Lock the modifier key when pressed twice in a row
- Turn off Sticky Keys when two keys are pressed at the same time
- Play a sound when a modifier key is pressed and released
- Finally, to disable Sticky Keys, turn off the option Press one key at a time for keyboard shortcuts.
Tip: If you accidentally or intentionally hit the Shift key 5 time during a game, this may ruin your gaming experience. You can avoid this issue by disabling the option Allow the shortcut key to start Sticky Keys in Settings.
You are done.
Turn On or Off Sticky Keys in Control Panel
- Open the classic Control Panel app.
- Navigate to Control PanelEase of AccessEase of Access CenterMake the keyboard easier to use.
- Turn on Sticky Keys under Make it easier to type.

- To customize the options for Sticky Keys, click on Set up Sticky Keys link under Turn on Sticky Keys. This will open the following page.

- Change the required options, the click on Apply and OK.
That’s it.
Articles of interest:
- Play a Sound for Caps Lock and Num Lock in Windows 10
- Enable Visual Alerts for Notifications in Windows 10 (Sound Sentry)
- Enable Underline Access Keys for Menus in Windows 10
- Disable High Contrast Keyboard Shortcut in Windows 10
- How to Enable High Contrast Mode in Windows 10
- Change Cursor Thickness in Windows 10
- How To Enable Xmouse Window Tracking in Windows 10
- All Ways to Enable Narrator in Windows 10
Support us
Winaero greatly relies on your support. You can help the site keep bringing you interesting and useful content and software by using these options:
If you like this article, please share it using the buttons below. It won’t take a lot from you, but it will help us grow. Thanks for your support!
Hello. Add your message here.
-
MiniTool
-
MiniTool News Center
- How to Turn Off Sticky Keys on Windows 10 (4 Ways)
By Alisa | Follow |
Last Updated January 16, 2020
![]()
If you want to turn off sticky keys on Windows 10, this post provides 4 ways. Namely, turn off sticky keys on Windows 10 with keyboard shortcuts, Shift key, control panel, and disable sticky keys on Windows 10 from Settings. MiniTool software is also available to help you recover lost data/files in Windows 10.
What Are Sticky Keys?
Sticky keys function is an accessibility feature available on Windows and macOS. On UNIX system, it is as a part of AccessX utility.
Sticky keys is designed for people who have difficulty in holding on two or more keyboard keys at the same time. It serializes keystrokes but not pressing multiple keys simultaneously. It allows users to press and release a modifier key like Shift, Ctrl, Alt, Windows logo key, and keeps this key remain active until any other key is pressed.
If you want to turn off sticky keys on Windows 10, you can easily realize it. Below we provide 4 ways for you.
1. Turn Off Sticky Keys Windows 10 with Keyboard Shortcuts
The easiest way you can use to disable stick keys on Windows 10 is to use keyboard shortcuts.
You can press two modifier keys on the keyboard at the same time, e.g. press any two keys of Alt, Ctrl, Windows, Shift, etc. simultaneously. And it will auto turn off Sticky Keys feature on your Windows 10 computer.
2. Turn On or Off Sticky Keys on Windows 10 with Shift Key
Another easy ways to turn on or off Windows 10 Sticky Keys feature is through Shift key. You can press Shift key 5 times to open or close Sticky Keys in Windows 10.
3. How to Turn Off Sticky Keys Windows 10 from Settings
Step 1. You can click Start -> Settings, or press Windows + I keys on the keyboard at the same time to open Settings Window.
Step 2. In Settings Window, you can click Ease of Access option, then click Keyboard from the left column.
Step 3. Make sure the switch under Use Sticky Keys is in Off status. Thus, the Sticky Keys feature is turned off.
4. How to Turn Off Sticky Keys Windows 10 from Control Panel
The fourth method to disable Sticky keys feature in Windows 10 is using Control Panel.
Step 1. Press Windows + R keys on the keyboard to open Windows Run box. Type control panel and click OK to open Windows Control Panel.
Step 2. Click Ease of Access and click Ease of Access Center in Control Panel window.
Step 3. Next click Make the keyboard easier to use, and uncheck Turn on Sticky Keys box, and click OK to turn off Stick Keys feature on Windows 10.

Best Free Data Recovery Software for Windows 10
You may be interested in a top free data recovery program to help you recover mistakenly deleted files (recover my files) or lost data in Windows 10 due to system crash, malware/virus infection, hard drive error, etc.
MiniTool Power Data Recovery is a powerful, free, clean data recovery tool compatible with Windows 10/8/7 and Windows Servers.
You can use it to recover data from almost any storage device, incl. computer hard drive, external hard drive, SSD, USB pen drive, SD card, and more with no hassle. The whole process is easy and fast and it owns an extremely intuitive interface. Novice users can use this tool to recover data with ease.

About The Author

Position: Columnist
Alisa is a professional English editor with 4-year experience. She loves writing and focuses on sharing detailed solutions and thoughts for computer problems, data recovery & backup, digital gadgets, tech news, etc. Through her articles, users can always easily get related problems solved and find what they want. In spare time, she likes basketball, badminton, tennis, cycling, running, and singing. She is very funny and energetic in life, and always brings friends lots of laughs.
Содержание
- Способ 1: Клавиша Shift
- Способ 2: Параметры Windows
- Способ 3: Иконка в трее
- Что делать, если залипание клавиш не отключается
- Включение и выключение настроек залипания
- Настройка электропитания клавиатуры
- Устранение проблем с драйвером
- Вопросы и ответы
Способ 1: Клавиша Shift
Залипание клавиш отключается точно так же, как и включается — клавишей Shift. Нажмите по ней 5 раз, чтобы остановить работу функции. Если в системе включено звуковое сопровождение при некоторых нажатиях клавиш во время залипания, вы услышите короткий сигнал, свидетельствующий об успешном выполнении действия.
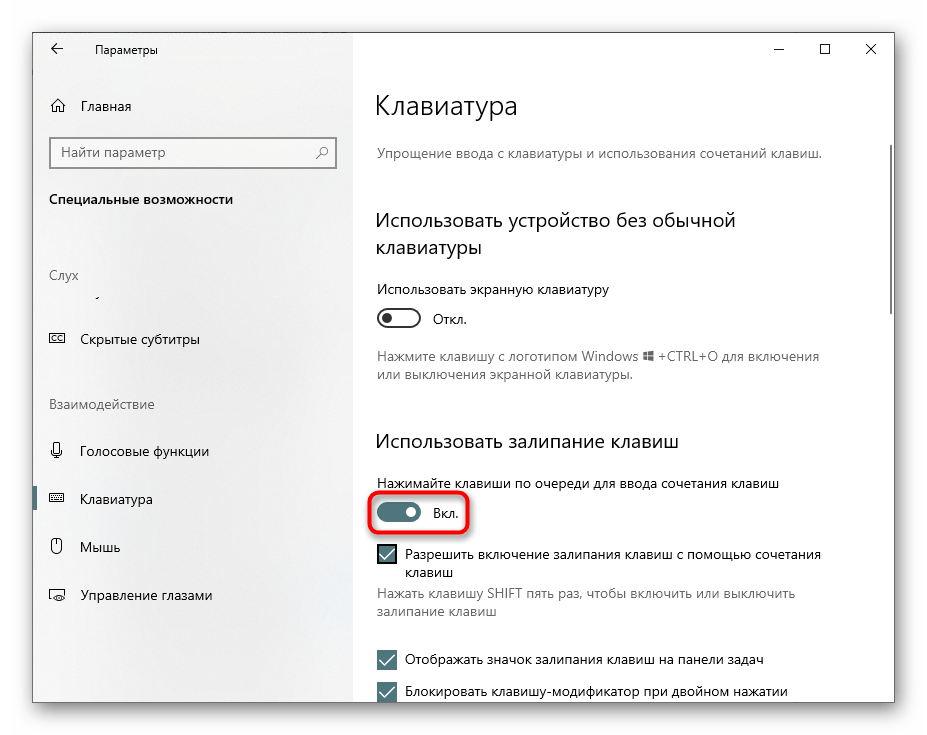
Через стандартное приложение «Параметры» можно и настраивать залипание клавиш, и управлять состоянием функции.
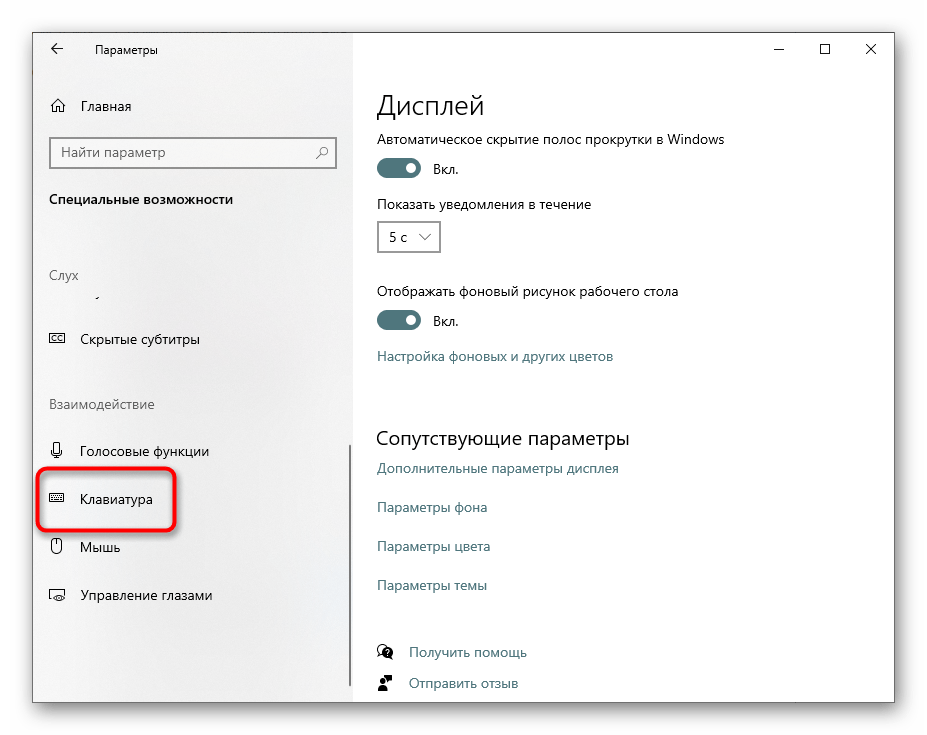
- Разверните «Пуск» и нажмите на иконку шестеренки, чтобы попасть в «Параметры».
- Зайдите в меню «Специальные возможности».
- Прокрутите левую панель до раздела «Взаимодействие» и перейдите отсюда в «Клавиатура».
- Найдите блок «Использовать залипание клавиш» и сдвиньте регулятор, кликнув по нему. Дополнительно можете просмотреть другие параметры, если планируете пользоваться функцией в будущем.


Способ 3: Иконка в трее
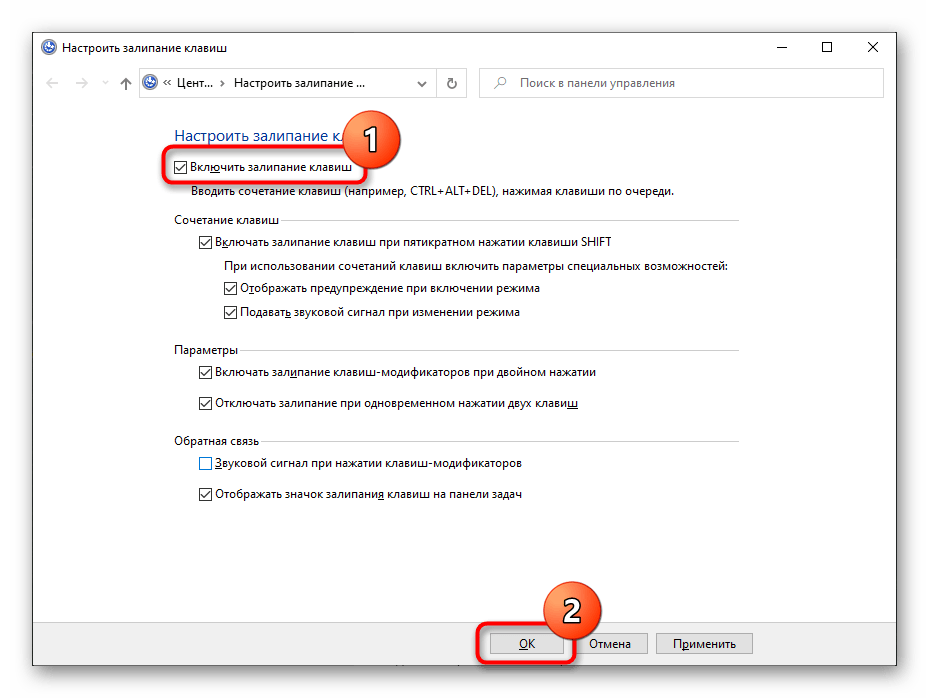
При стандартных настройках залипания клавиш их активация создает значок в трее, расположенном на панели задач. Он может быть сразу же рядом с другими иконками или скрываться в мини-окне.
- Найдите его там и дважды щелкните левой кнопкой мыши.
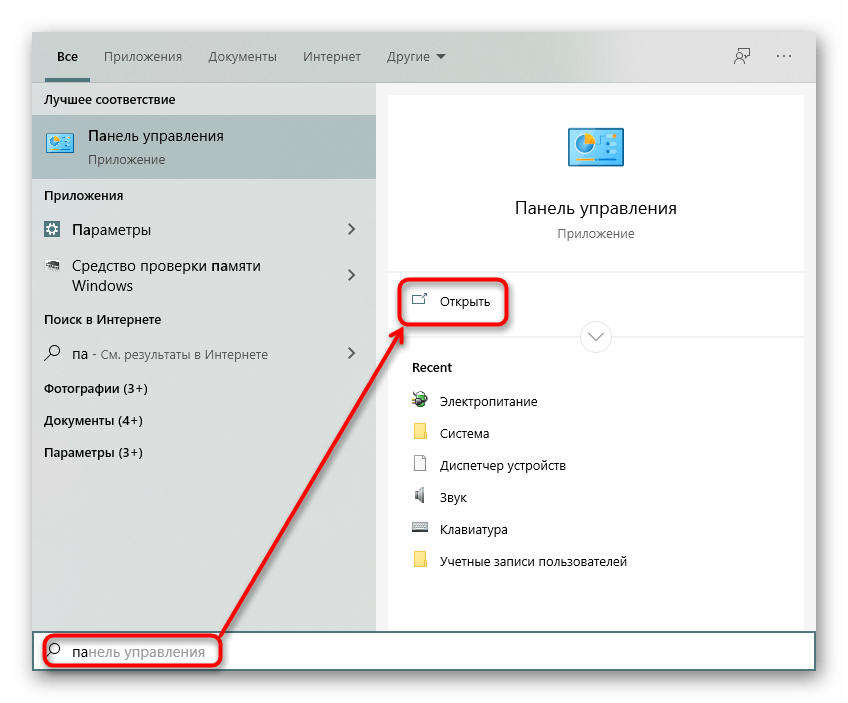
- Откроется раздел «Панели управления», где сразу же будет предложено настроить эту возможность. Снимите галочку с пункта «Включить залипание клавиш» и нажмите «ОК».
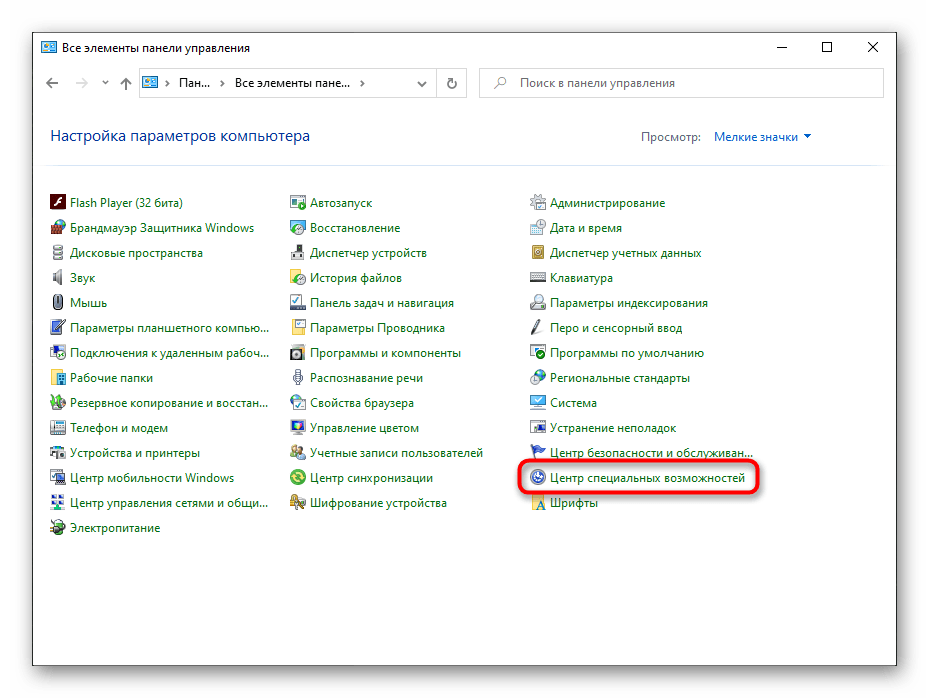
- Кстати, вы также можете пользоваться этим приложением в будущем, если «Параметры» вам не подходят. Для этого найдите «Панель управления» через «Пуск».
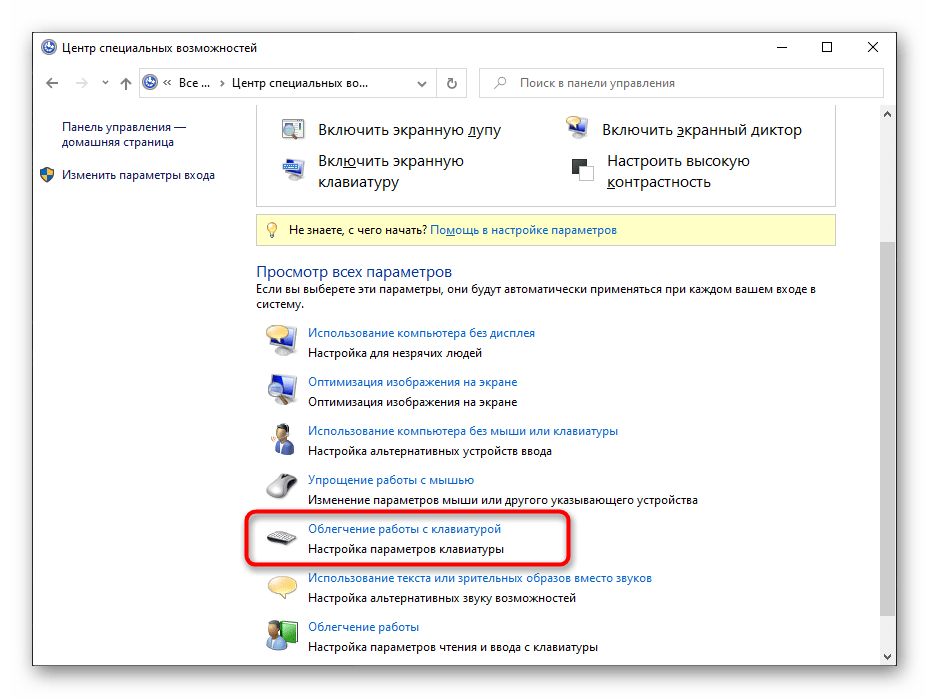
- Перейдите в «Центр специальных возможностей».
- Найдите меню «Облегчение работы с клавиатурой».
- Там и расположены интересующие вас настройки, просто немного пролистните страницу вниз.

Что делать, если залипание клавиш не отключается
Иногда этими методами не удается отключить залипание — довольно часто функция включается обратно при следующем сеансе Windows. В такой ситуации может помочь следующее.
Включение и выключение настроек залипания
Попробуйте зайти в «Параметры» или «Панель управления» и включить все пункты, отвечающие за залипание. Перезагрузите компьютер, затем таким же образом отключите все включенные параметры. Снова выполните перезапуск ПК. Этот вариант иногда оказывается эффективным для пользователей, отключающих залипание клавишей Shift.
Настройка электропитания клавиатуры
У некоторых моделей клавиатуры рассматриваемая проблема появляется из-за некоторых программных конфликтов. Устранить их помогает изменение одной настройки электропитания.

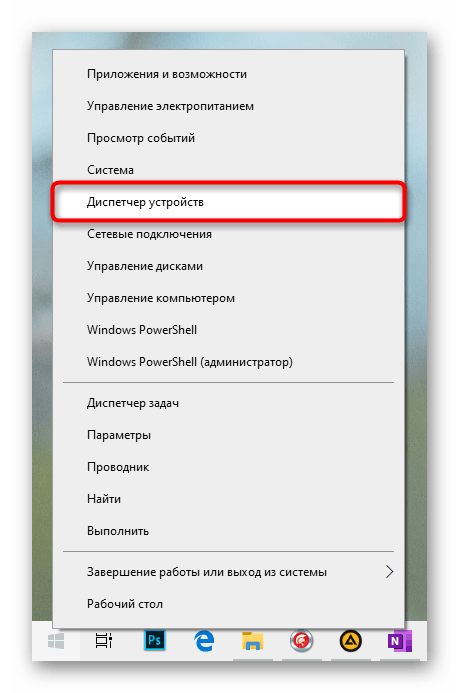
- Нажмите ПКМ по «Пуску» и перейдите в «Диспетчер устройств».
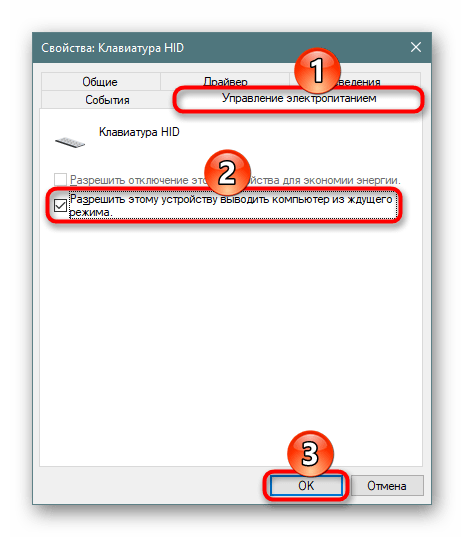
- Найдите список «Клавиатуры» и разверните его. Вызовите свойства подключенного устройства, нажав по нему дважды левой кнопкой мыши.
- Переключитесь на вкладку «Управление электропитанием» и снимите галочку с пункта «Разрешить этому устройству выводить компьютер из ждущего режима». Сохраните и закройте окно кнопкой «ОК».
- Дополнительно проверьте, отключено ли в текущей сессии залипание клавиш. Если нет, отключите их, перезапустите Windows 10 и проверьте, была ли устранена неполадка.

Устранение проблем с драйвером
Порой проблему вызывает программное обеспечение клавиатуры. Тогда надо попробовать найти источник сбоя.
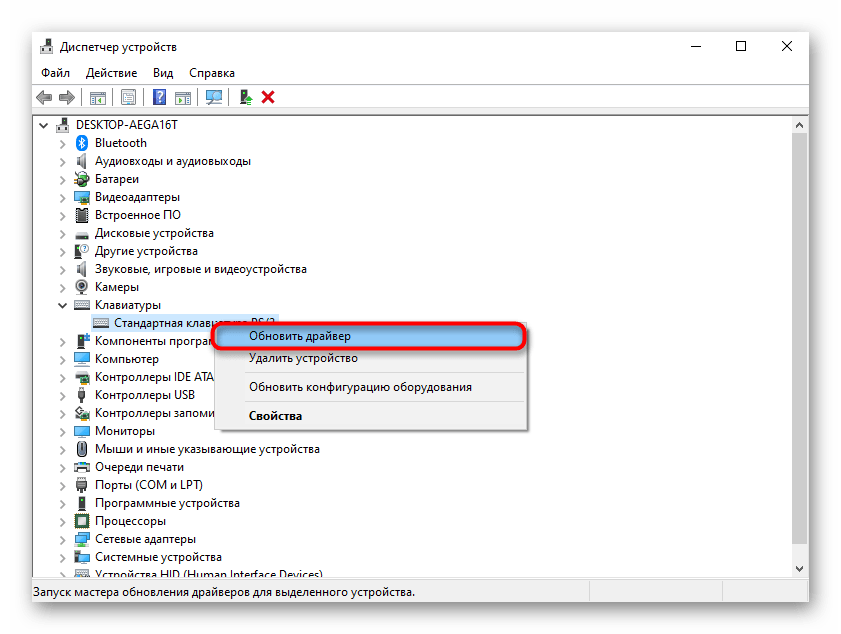
Обновление драйвера
- Снова откройте «Диспетчер устройств» и найдите там свою клавиатуру. Кликните по ней правой кнопкой мыши и выберите пункт «Обновить драйвер».
- Воспользуйтесь автоматическим поиском.
- Если ПО не нуждается в обновлении, вы получите соответствующее уведомление, после чего переходите к следующим разделам этой статьи. Когда драйвер все же обновится, перезагрузите ПК и проверьте, отключилось ли залипание клавиш.
- Обладатели ноутбуков также могут скачать новую версию драйвера с официального сайта производителя устройства, а вот пользователям десктопов с отдельной клавиатурой этот совет вряд ли пригодится: как правило, с официального сайта скачивается фирменное приложение для дополнительного управления (создание макросов, настройка подсветки), и оно вряд ли может вызвать неполадку.

Удаление драйвера клавиатуры
Способ с обновлением помогает не часто, поскольку в большинстве случаев обновлений драйверов для этого устройства попросту нет. В такой ситуации лучше выполнить переустановку стандартного драйвера, который инсталлирует Виндовс автоматически. Для этого достаточно удалить драйвер, после чего операционная система сама заново установит его во время следующего включения ПК.
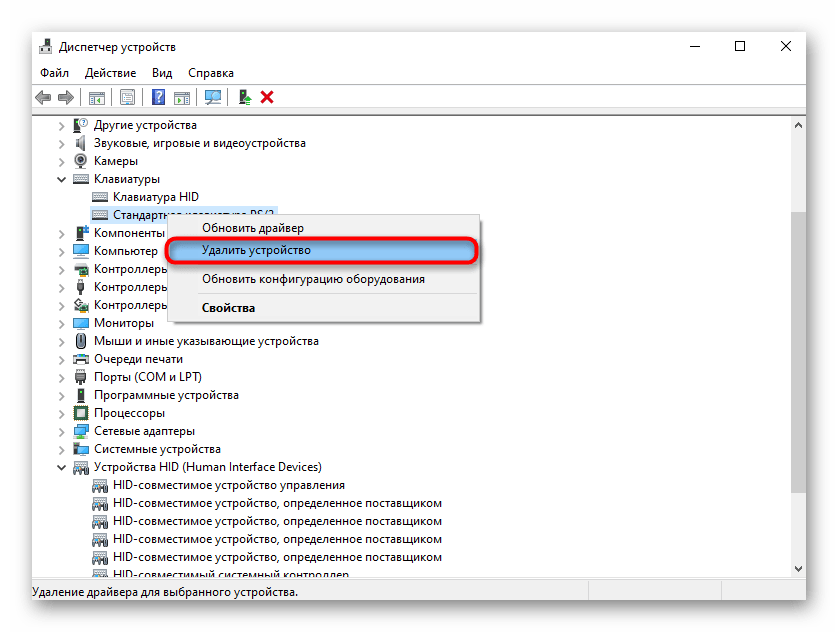
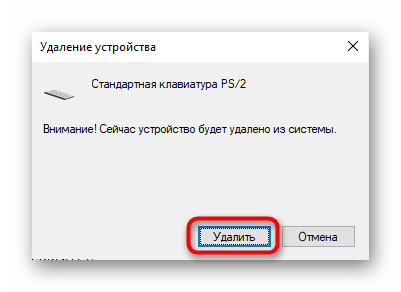
- В «Диспетчере устройств» найдите клавиатуру, кликните по ней правой кнопкой мыши и используйте пункт «Удалить устройство».
- Ответьте утвердительно в окне с предупреждением.
- Отправьте компьютер на перезагрузку.
Помните, что не всегда залипание клавиш является следствием соответствующих настроек в ОС. Хаотично залипающие клавиши могут означать механическую неполадку, например, из-за разлитой жидкости, забившейся пыли или неисправности устройства.
Читайте также: Чистим клавиатуру в домашних условиях
Еще статьи по данной теме:
Помогла ли Вам статья?

To turn it on and off, you can adopt the following methods.
- Video guide on how to turn on and off Sticky Keys in Windows 10:
- Way 1: Use the Shift key.
- Step 1: Continuously press the Shift key 5 times.
- Step 2: Select Yes in the confirmation dialog.
- Way 2: Make it in Ease of Access keyboard settings.
To turn off Sticky Keys, press the shift key five times or uncheck the Turn On Sticky Keys box in the Ease of Access control panel. If the default options are selected, pressing two keys simultaneously will also turn off Sticky Keys.
How do I disable hotkeys in Windows 10?
Step 2: Navigate to User Configuration > Administrative Templates > Windows Components > File Explorer. In the right-side pane, find Turn off Windows + X hotkeys and double-click on it. Step 4: Restart the computer to make the settings take effect. Then Win + hotkeys will turn off in your Windows 10.
Why does Sticky Keys keep turning on?
Press the Windows key. In the Start menu type “sticky keys”. You must also then click “Set up sticky keys” to disable the shortcut forever. Uncheck the option that says “Turn on Sticky Keys when SHIFT is pressed five times.”
How do I fix sticky keys?
No parts specified.
- Step 1 How To Fix Sticky Keyboard Keys on a MacBook.
- Dip a q-tip in isopropanol, and wipe around each sticky key.
- Use a toothpick to remove crumbs or debris from under the sticky keys.
- Now test out your keys.
- Use a spudger or plastic opening tool to pry up sticky keys.
How do I permanently turn off Sticky Keys?
Disable Sticky Keys Permanently
- Click Start → Control Panel → Ease of Access → Change how your keyboard works.
- Click “Set up Sticky Keys” (or press ALT+C).
- If there is a check in the box labeled “Turn On Sticky Keys”, un-check it.
- Un-check “Turn on Sticky Keys when SHIFT is pressed five times”.
How do I turn off Sticky keys in the registry?
Press Windows Key + R and type regedit. Click OK or press Enter. Navigate to HKEY_CURRENT_USERControl PanelAccessibilityStickyKeys in the left pane. In the right pane locate Flags, double click it and change its value to 506.
How do I disable the Fn key in Windows 10?
To access it on Windows 10 or 8.1, right-click the Start button and select “Mobility Center.” On Windows 7, press Windows Key + X. You’ll see the option under “Fn Key Behavior.” This option may also be available in a keyboard settings configuration tool installed by your computer manufacturer.
How do I turn off hotkey mode?
To disable the hotkey mode:
- Shut down the computer.
- Press the Novo button and then select BIOS Setup.
- In the BIOS setup utility, open the Configuration menu, and change the setting of HotKey Mode from Enabled to Disabled.
- Open the Exit menu, and select Exit Saving Changes.
How do I change hotkeys in Windows 10?
Change Hotkeys to Switch Keyboard Layout in Windows 10
- Open Settings.
- Go to Time & language – Keyboard.
- Click on the Advanced keyboard settings link.
- There, click on the link Language bar options.
- This will open the familiar dialog “Text Services and Input Languages”.
- Switch to the Advanced Key Settings tab.
- Select Between input languages in the list.
Do you want to turn on Sticky Keys keeps popping up?
To prevent Windows from popping up the Sticky / Filter Keys popup dialog, you also need to disable the corresponding keyboard shortcuts. Click the Set up Sticky Keys link. In the Sticky Keys setup screen, uncheck the box for “Turn on Sticky Keys when SHIFT is pressed five times“.
Do you want to turn on Toggle Keys pop up?
Open the Settings app, and click/tap on the Ease of Access icon. 2. Click/tap on Keyboard on the left side, and turn ON or OFF (default) to Hear a tone when you press Caps Lock, Num Lock, and Scroll Lock under Toggle Keys.
What are sticky keys used for?
Sticky Keys is a Microsoft Windows accessibility feature that causes modifier keys to remain active, even after they have been pressed and released, making it easier to do keyboard shortcuts.
How do you fix slime that is sticky?
Pick the slime up with your hands; it will be a little sticky. Knead the slime by stretching it out, then squishing it back together. Keep doing this for a few minutes until the slime is no longer sticky. If the slime is still sticky, then add 1/4 teaspoon of contact saline solution and knead it again.
How do I use sticky keys in Windows 10?
To turn it on and off, you can adopt the following methods.
- Video guide on how to turn on and off Sticky Keys in Windows 10:
- Way 1: Use the Shift key.
- Step 1: Continuously press the Shift key 5 times.
- Step 2: Select Yes in the confirmation dialog.
- Way 2: Make it in Ease of Access keyboard settings.
How do you unstick a key from a lock?
Jiggle the key while pulling outward gently. Avoid pulling hard, which merely binds the key against the lock pins. The up-and-down motion of jiggling may free the teeth that are stuck in the lock pins so you can pull out the key. Wrap one or two ice cubes in a plastic bag and hold them against the key.
How do you get rid of a sticky keyboard?
Steps
- Gather the necessary tools.
- Disconnect the keyboard from its power source.
- Spray the keyboard with compressed air.
- Remove any remaining objects with a toothpick.
- Wipe down your keyboard with isopropyl alcohol.
- Test the keys.
- Take a picture of your keyboard.
- Remove the sticky keys from the keyboard.
What are sticky keys on a laptop?
The Sticky Keys feature allows you to use key combinations involving the Ctrl , Alt , or Shift key by pressing only one key at a time. To turn Sticky Keys on or off in Windows 7 or Vista, press the Shift key five times.
How do I turn off filter keys?
Disable Filter Keys in Windows Vista
- Click Start → Control Panel → Ease of Access Center.
- Click “Make the keyboard easier to use”.
- Un-check the box labeled “Turn on FilterKeys”.
- Click “Set up FilterKeys”.
- Un-check the box labeled “Turn on FilterKeys when right SHIFT is pressed for 8 seconds”.
- Click the OK button twice.
How do I turn off sticky keys pop up?
In Windows XP, follow these steps to disable the Sticky Keys warning:
- Click the Settings button in the Sticky Keys dialog box.
- Click the Settings button in the StickyKeys area.
- Remove the check mark by the option Use Shortcut.
- Click the OK button and then click OK to dismiss the Accessibility Options dialog box.
What is Filter Keys Windows 10?
FilterKeys is a feature of Microsoft Windows. It is an accessibility function that tells the keyboard to ignore brief or repeated keystrokes, in order to make typing easier for users with hand tremors.
What is toggle key in computer?
A toggle key is a key that is used to turn a function on or off, or to switch between two functions. Examples of toggle keys are the caps lock key, number lock key and scroll lock key. A toggle key can also be used as an accessibility option to alternate the input mode of keys.
How do I use function keys without pressing Fn in Windows 10 Lenovo?
Enable F1-F12 keys without Fn on Lenovo Ideapad S400u 4 answers.
2 Answers
- Access the BIOS (See below for how to do this in Windows 10).
- Once in the BIOS menu, select the “Configuration” tab.
- Select “Hotkey Mode” and set to “Disabled”.
- Save and Exit the BIOS menu (press F10 and then Enter ).
How do I reverse the Fn key?
Solution
- Access the BIOS by hitting F2 once you power on the system.
- Once inside BIOS look for an option that says HOTKEY mode or hotkey, and this should be found under the configuration tab.
- Change the option and that should reverse the use of FN on your system.
How do I turn off Fn lock on Lenovo?
To get to the standard F1-F12, you have to hold down Fn+the function key. This used to be adjustable in the BIOS, but for this laptop model, it no longer is available. You can press Fn+esc, and it locks it for that session, but when the computer reboots, this is reset back to the default.
How do I set hotkeys in Windows 10?
How to Create Keyboard Shortcuts in Windows 10
- Type “explorer shell:AppsFolder” (without quotes) at the command prompt and hit Enter.
- Right click on an app and select Create shortcut.
- Click Yes when asked if you want the shortcut on the desktop.
- Right click on the new shortcut icon and select Properties.
- Enter a key combination in the Shortcut key field.
What are hotkeys in Windows 10?
The ultimate guide to Windows 10 keyboard shortcuts
| Keyboard shortcut | Action |
|---|---|
| Windows key + Ctrl +D | Add a virtual desktop. |
| Windows key + Ctrl + Left or Right arrow | Switch between virtual desktops. |
| Windows key + Ctrl + F4 | Close current virtual desktop. |
| Windows key + Enter | Open Narrator. |
45 more rows
How do I change the key sequence in Windows 10?
Posts Tagged ‘change key sequence in windows 10’
- Open the Control Panel.
- Click the Advanced settings link on the left sidebar.
- In the next window, scroll down to the “Switching input methods” section and click the “Change language bar hot keys” link.
- This will bring up the “Text Services and Input Languages” dialogue.
Are sticky keys useful?
With Sticky Keys enabled, however, you don’t have to press two keys simultaneously. Instead, the Alt, Ctrl, Shift, and Windows keys become “sticky,” meaning that you can press one of those keys, release it, and then press the other key you want to use.
Should sticky keys be on or off?
To turn off Sticky Keys, press the shift key five times or uncheck the Turn On Sticky Keys box in the Ease of Access control panel.
What causes sticky keys on a computer?
Sticky keys can happen because of dirt and debris in the keyboard, but they can also be a result of spilled drinks or other stickiness.
How do I enable Ctrl on Windows 10?
Steps to disable or enable Ctrl key shortcuts in CMD on Windows 10: Step 1: Open Command Prompt. Step 2: Right-tap the Title bar and choose Properties. Step 3: In Options, deselect or select Enable Ctrl key shortcuts and hit OK.
How do I turn off filter keys on my Lenovo laptop?
Windows 7
- Open Start menu -> Control Panel.
- View by Small icons.
- Click Ease of Access Centre -> Make the keyboard easier to use.
- In the next windows, uncheck Turn on Filter Keys and click OK to turn off. Vice versa, check this option to turn it on.
Why does Sticky Keys exist?
It serializes keystrokes instead of pressing multiple keys at a time, allowing the user to press and release a modifier key, such as Shift, Ctrl, Alt, or the Windows key, and have it remain active until any other key is pressed.
Photo in the article by “Army.mil” https://www.army.mil/article/222418/fort_detrick_energy_service_contract_to_replace_aging_utilities
How to Disable Sticky Keys in Windows 10
Sticky Keys is one of several accessibility options available in Windows and can be helpful for some users, making complex commands easier. Despite these advantages, it can also be annoying if you do not need it.

Sticky Keys are usually generated by consecutively pressing the Shift key five times. The main purpose of this feature is to help users who have difficulty pressing multiple keys at once.
For example, opening Task Manager is usually done using a keyboard shortcut — pressing Ctrl+Shift+Esc simultaneously. The Sticky Keys feature avoids the need to hold all keys pressed at once. Many users have no use for this feature but reported that they cannot disable Sticky Keys.
To fix the problem, you might need to edit Windows Registry, scan the computer for malware, check if the Sticky Keys feature is disabled, reinstall keyboard drivers, check for the latest Windows Updates, and take other measures.
Video Showing How to Turn Off Sticky Keys:
Table of Contents:
- Introduction
- Edit Windows Registry
- Check Windows Settings
- Reinstall Keyboard Drivers
- Update Windows
- Scan Your System for Malware
- Other Solutions
- Video Showing How to Turn Off Sticky Keys
Edit Windows Registry
Windows Registry is a collection of databases of configuration settings in Microsoft Windows operating systems. It stores much of the information and settings for software programs, hardware devices, user preferences, operating system configurations, and much more.
In this guide, we show how to edit Accessibility registry keys and change values in StickyKeys, Keyboard Response, and ToggleKeys. You will first need to open the Run dialog box.
Press the Windows Windows key + R, or right-click Start and select «Run» and type «regedit». Press Enter or click «OK».

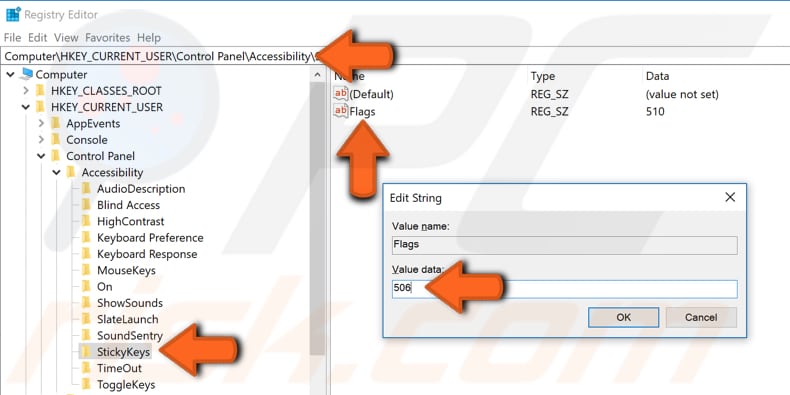
To disable StickyKeys, Keyboard Response, and ToggleKeys, follow this path: «HKEY_CURRENT_USERControl PanelAccessibility» and select the «StickyKeys» key.
Double-click the «Flags» REG_SZ file in the right pane and change the Flags value data to «506». Click «OK» to save the changes.
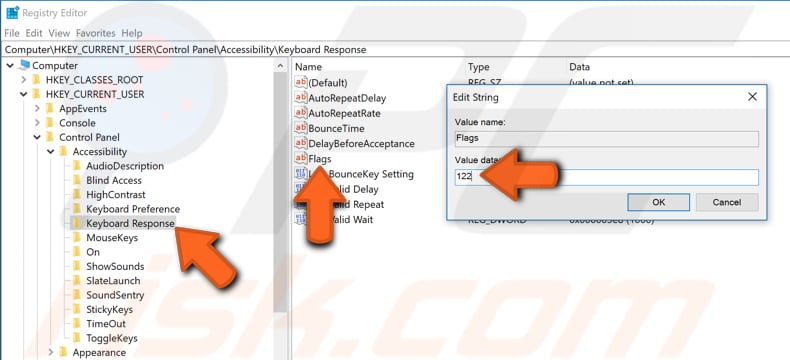
Now select the «Keyboard Response» key, double-click the «Flags» REG_SZ in the right pane and change the Flags value data to «122». Click «OK» to save the changes.
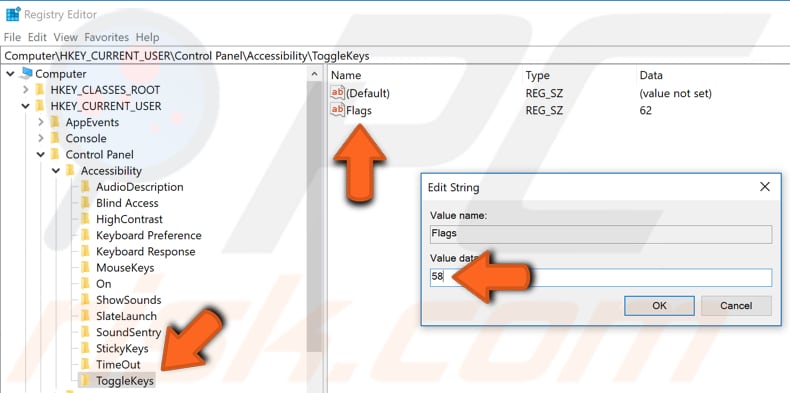
Now select the «ToggleKeys» key, double-click the «Flags» REG_SZ in the right pane and change the Flags value data to «58». Click «OK» to save the changes.
Check if Sticky Keys are now turned off. If editing Windows Registry does not solve the problem, we recommend you undo the changes by entering the previous values.
[Back to Table of Contents]
Check Windows Settings
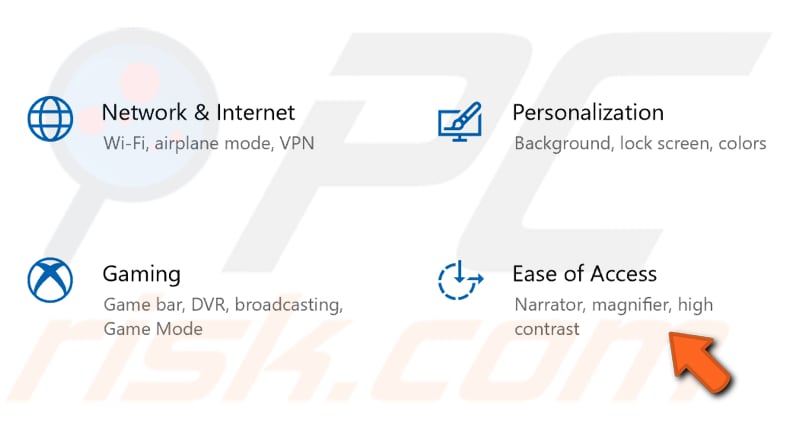
Go to Windows Settings and check if the Sticky Keys feature is disabled. Go to Settings and click the «Ease of Access» option.
Select the Keyboard section on the left pane and ensure that the «Use Sticky Keys» option is disabled (off). Additionally, disable the «Allow the shortcut key to start Sticky Keys» by unticking the checkbox.
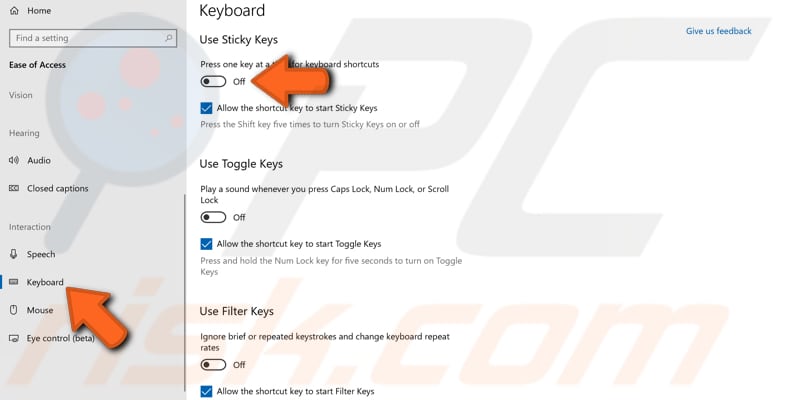
Also, try to disable the «Use Toggle Keys» and «Use Filter Keys» features.
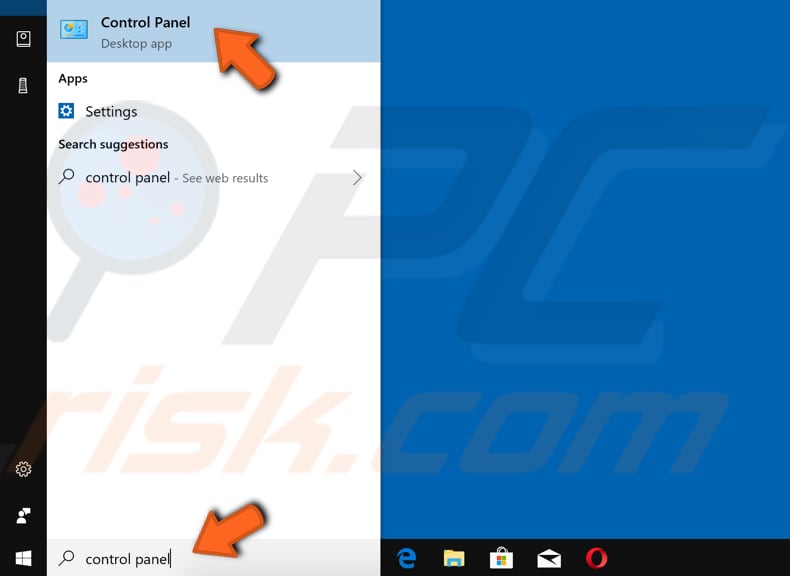
Now type «control panel» in Search and click the «Control Panel» result.
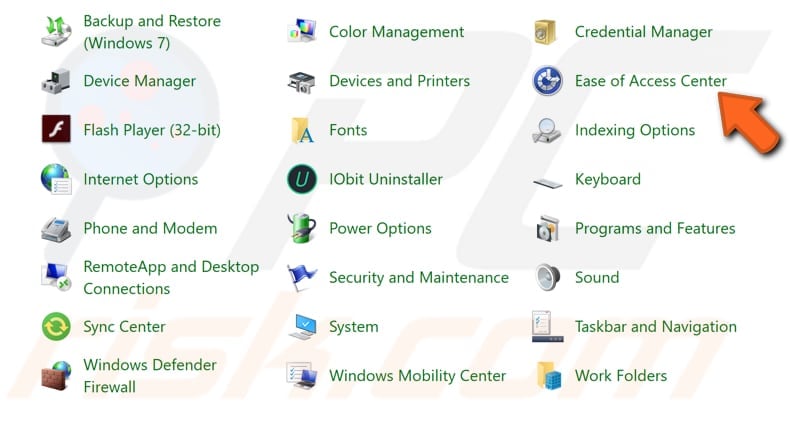
Find and click the «Ease of Access Center» option.
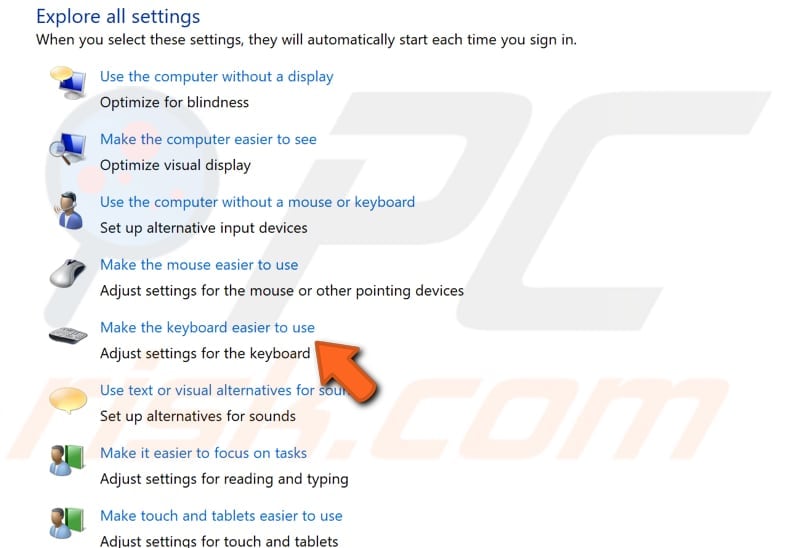
Now click the «Make the keyboard easier to use» option.
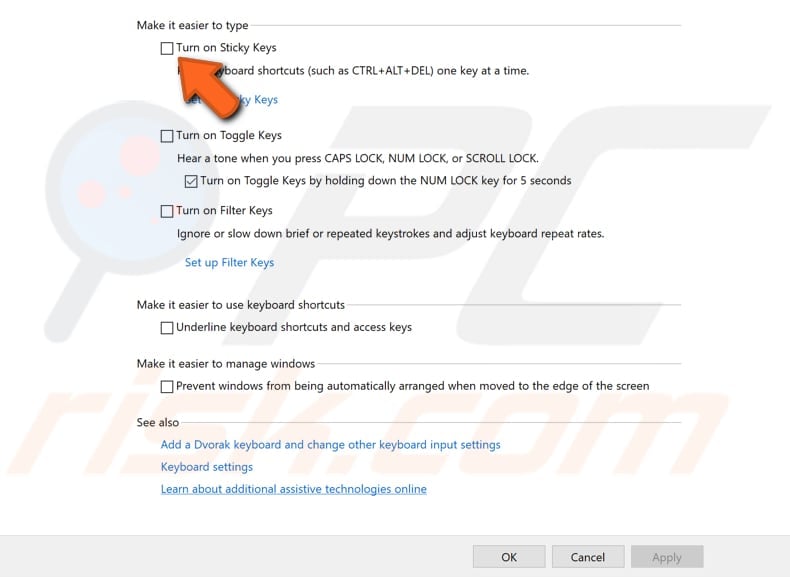
Make sure that the «Turn on Sticky Keys» checkbox is unticked, and click «Apply» to save the changes (if any were made).
Check if Sticky Keys are now disabled and the problem is solved.
[Back to Table of Contents]
Reinstall Keyboard Drivers
A device driver informs the operating system and other software how to interact with particular hardware. If the appropriate driver is not installed, the device might not function properly, if at all.
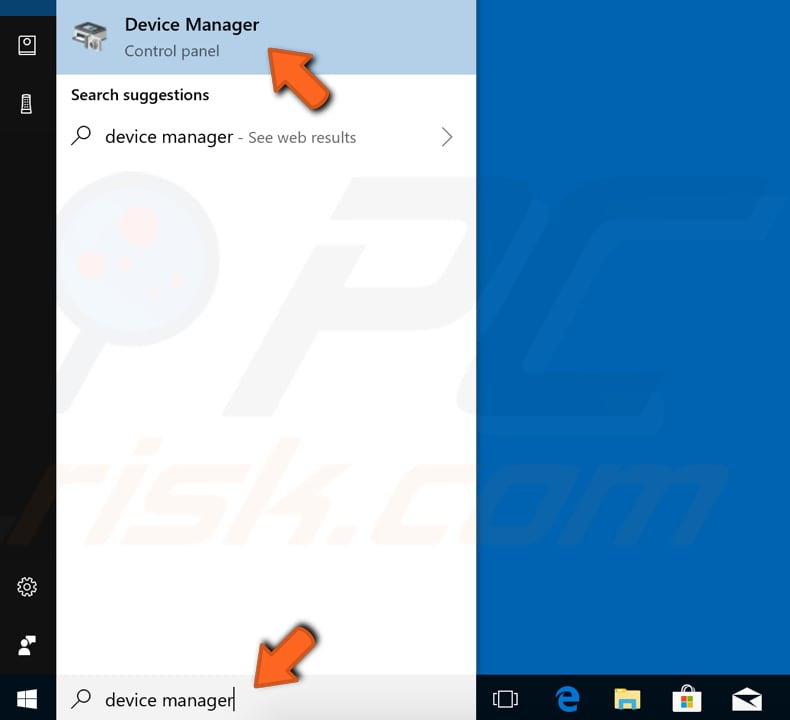
To reinstall Keyboard drivers, open Device Manager by right-clicking the Start button and selecting «Device Manager» result from the contextual menu, or type «device manager» in Search and click the «Device Manager» result.
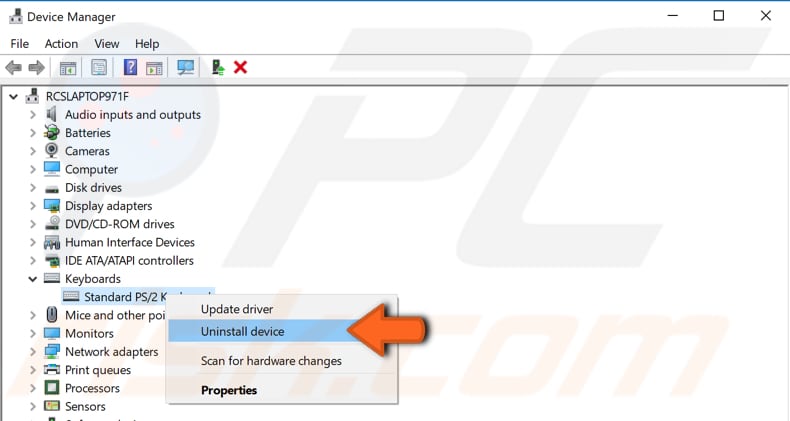
In Device Manager, you will see a list of devices connected to your computer. Expand the Keyboards section, right-click your keyboard, and click the «Uninstall device» option.
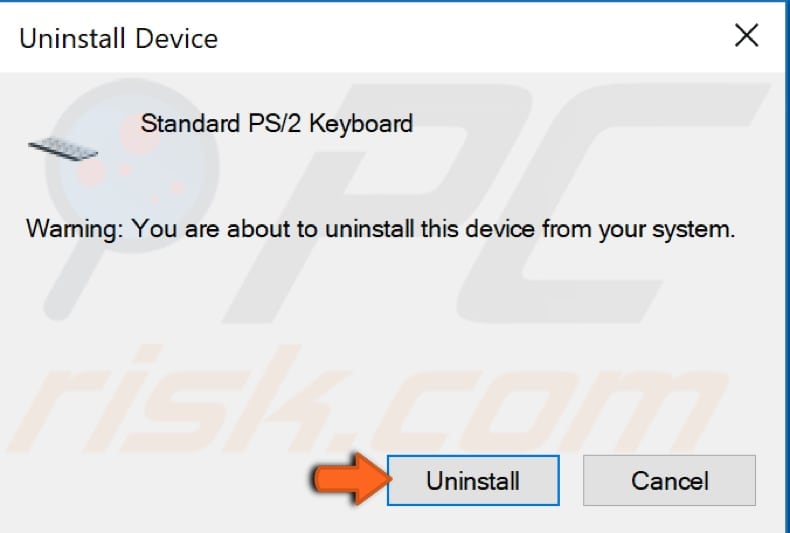
Click the «Uninstall» button to confirm the uninstall.
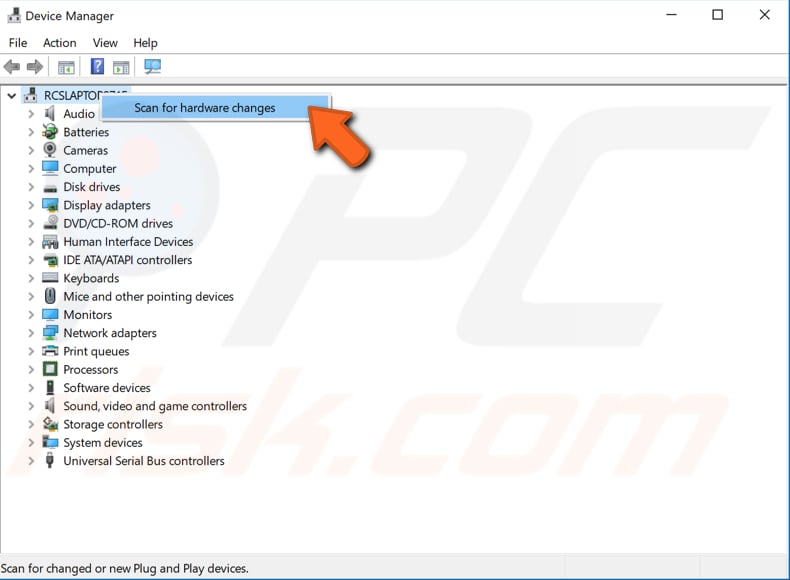
Restart your computer. The missing keyboard drivers should be installed by Windows automatically. If Windows does not install the missing (uninstalled) drivers, return to Device Manager, right-click your computer name, and select «Scan for hardware changes». It should detect missing drivers and install them.
[Back to Table of Contents]
Update Windows
A bug in the Windows operating system might cause problems with Sticky Keys. Windows is usually updated automatically, but you could also check for Windows updates manually and check if there are any updates available.
Type «check for updates» in Search and click the «Check for updates» result.
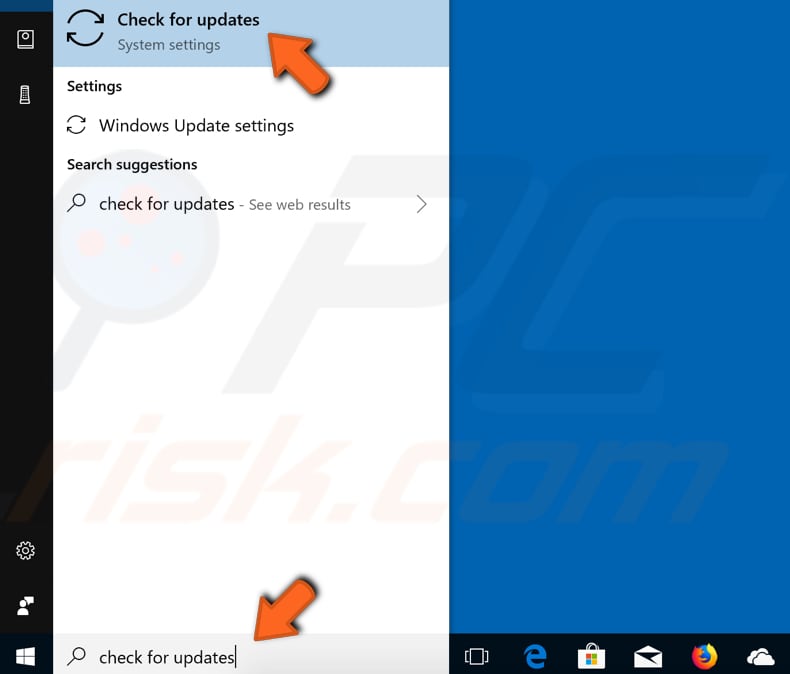
You should be automatically directed to the Windows Update section. Click «Check for updates». Windows will start checking for updates. If there are updates available, install them. After the updates are installed, restart your computer and see if the problem persists.

[Back to Table of Contents]
Scan Your System For Malware
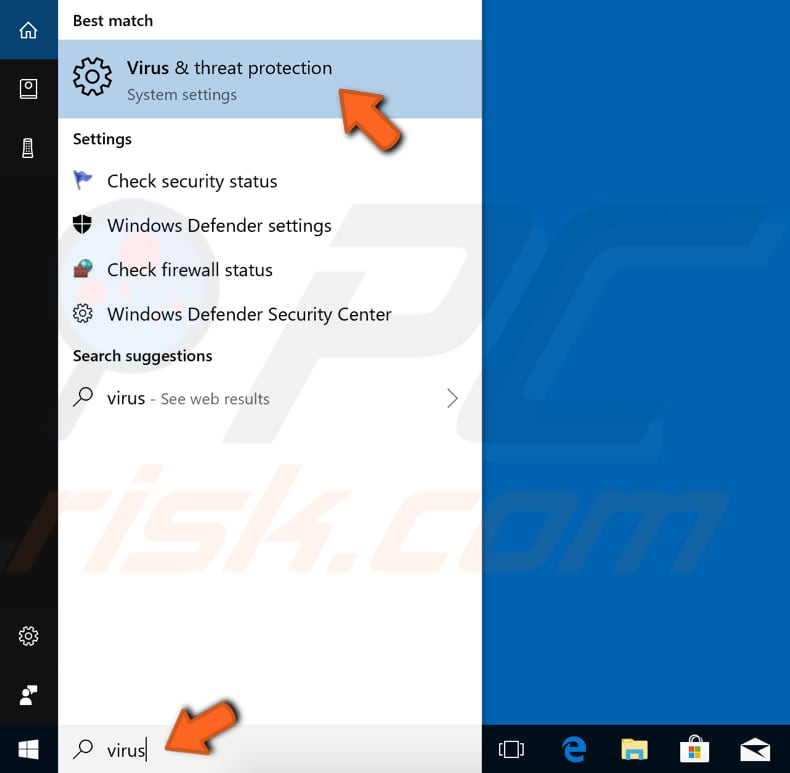
You may have malware installed on your computer, causing the problem with Sticky Keys. We recommend that you scan your system with Windows Defender (a built-in antivirus program), protecting computers against viruses, spyware, other malicious software. You can also run other third-party antivirus software if you have it installed.
To run full a system scan using Windows Defender, type «virus» in Search and click on the «Virus & threat protection» result.
In the Virus & threat protection window, find and click the «Run a new advanced scan» option.
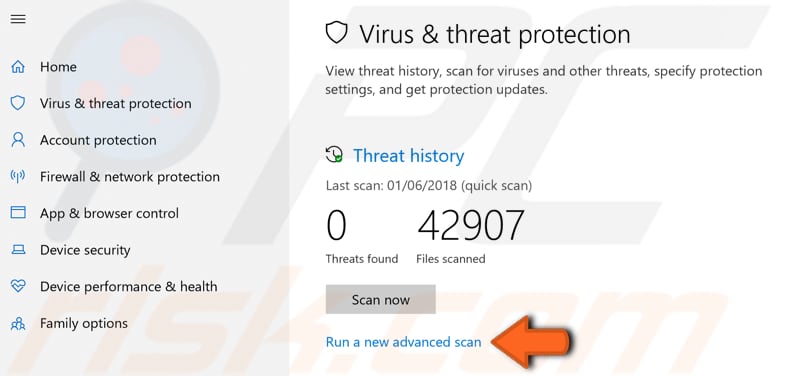
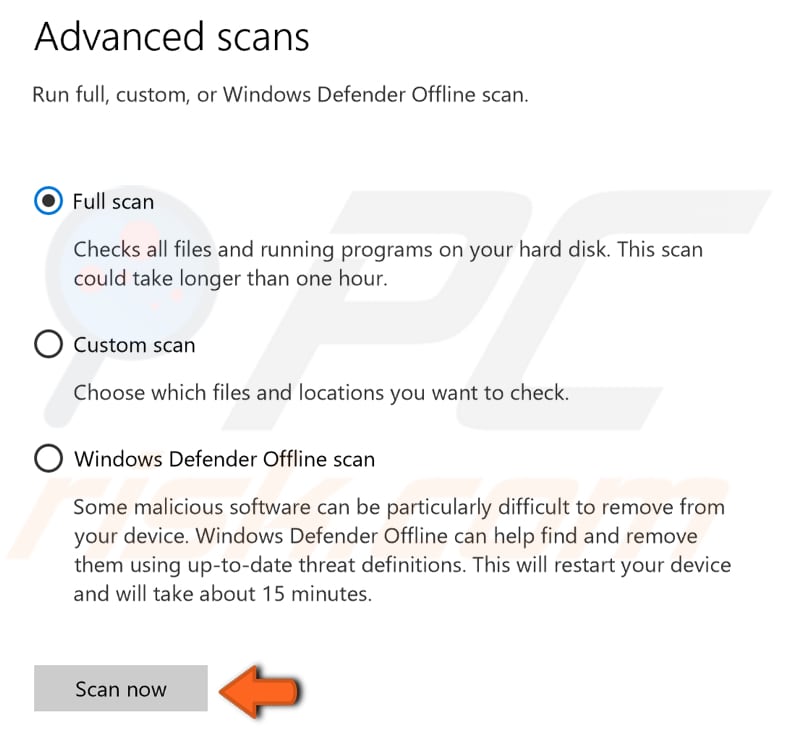
You will see a list of advanced scans. We recommend that you choose «Full scan», which will check all files and running programs on your hard disk. This will take some time (usually over an hour to complete).
To start a Full scan, click «Scan now» when the «Full scan» option is selected.
You can also choose a virus and malware scanner from our Top anti-malware list. The list consists of well-known top spyware removers and will help you choose the right software for your computer’s protection. You can find the list at this link.
[Back to Table of Contents]
Other Solutions
You may be using a faulty keyboard, which is preventing you from disabling the Sticky Keys feature. Try to connect a different keyboard and see if that solves the problem.
If you are using a laptop, turn off the Num Lock key. Some users have reported that simply disabling the Num Lock key solved the problem. Press the left and right Shift keys at once. Also, press one and then the other while still holding the first.
We hope that one of these methods solved the problem and you could disable Sticky Keys. If you know of other solutions to this problem not mentioned in our guide, please share them with us by leaving a comment below.
[Back to Top]