You are here:
Home » Windows 10 » 5 Ways To Disable The Touchpad In Windows 10/8.1/7
Touchpad (also known as a trackpad) has been around for over two decades now but the fact is most laptops that ship with Windows don’t offer great touchpad experience. Only a handful number of Windows laptops ship with a good quality touchpad. It’s because of this reason, most users plug in a mouse while using a laptop for productive work.
If you’re the kind of user who prefers connecting a mouse to your laptop to get the job done, you might want to disable the touchpad when a mouse is connected to the laptop.
While some notebooks ship with a tiny physical button to quickly enable or disable the touchpad, most of the notebooks don’t include this functionality. In order to turn off the touchpad, you need to either use a third-party tool or disable the touchpad under Device Manager.
Follow one of the given below methods to completely disable the touchpad on a laptop running Windows 10.
WARNING: If you don’t have a mouse nearby, please don’t attempt to disable the touchpad using one of these methods, as once the touchpad is disabled, you’ll need a mouse to work on the machine. Also, you need to connect a mouse (not required if you know how to navigate to the Device Manager and enable the touchpad using the keyboard) in order to enable the previously disabled touchpad. And if you’re on a Mac, please follow our how to disable MacBook’s trackpad guide.
Tip: If you want to automatically turn off the touchpad when a mouse is connected, refer to our how to turn off the touchpad when a mouse is connected guide.
The following directions are applicable to Windows 10. However, some of them might work on Windows 8/8.1 and Windows 7 as well.
Disable the touchpad from Settings in Windows 10
If your laptop is equipped with a precision touchpad, you can turn on or off the touchpad from within the Settings app in Windows 10. The precision touchpad offers more touchpad gestures and settings. Here is how to turn off the touchpad via Settings in Windows 10.
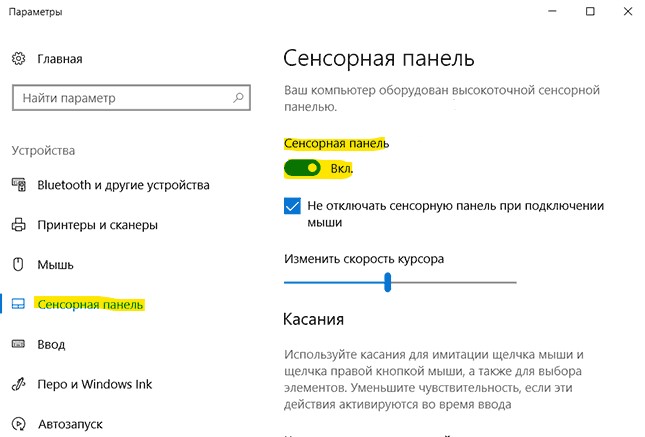
Step 1: Navigate to Settings > Devices > Touchpad.
Step 2: Turn off the Touchpad option to disable the touchpad and its settings. If the Touchpad option doesn’t show up (as shown in the picture), it’s because your laptop is using a non-precision touchpad.
Disabling touchpad using the native Device Manager
Step 1: Open Device Manager. To do so, simultaneously press Windows logo and R keys to open the Run command, type Devmgmt.msc in the box, and then press enter key.
Step 2: Once Device Manager is there on your screen, expand Test (if it’s not already), and then expand Mice and other pointing devices to see HID-compliant mouse entries.
Step 3: Right-click on the first HID-compliant mouse entry and then click the Disable option. Click Yes button when you see “Disabling this device will cause it to stop functioning. Do you really want to disable it?” warning message to disable the touchpad.
In most cases, disabling the first HID-compliant mouse should disable the built-in touchpad. But if the touchpad is working even after disabling the first entry, disable other HID-compliant mouse one after another.
In order to enable the touchpad again, you need to right-click on disabled HID-compliant mouse entry and then click enable option.
Enable or disable touchpad in BIOS
While not all OEMs offer an option in the BIOS to enable or disable the touchpad, most laptops have an option in the BIOS to turn on or off the touchpad. For instance, there is an option in my ThinkPad BIOS to enable or disable the touchpad. Boot into BIOS to check if an option is present.
Turn off the touchpad with the help of TouchPad Blocker
There are a couple of free tools out there to help you disable the touchpad on a laptop running Windows but we recommend TouchPad Blocker as it not only lets you type as fast and accurate as you can (by locking the touchpad input for a small period of time after a key is pressed) but also allows you enable or disable the touchpad with a keyboard shortcut.
TouchPad Blocker resides in the system tray area of the taskbar, meaning you can quickly access all features and options with a click. Visit the developer’s page to download the executable. Please click on the black-colored Download button on the download page in order to download the program.
Download TouchPad Blocker
Prevent accidental clicks using Touchfreeze
If you’re looking for a program not to disable the touchpad but to prevent accidentally changing the mouse cursor position that happens when your palm or wrist touches the touchpad while typing, Touchfreeze is the software you need.
Unlike TouchPad Blocker, Touchfreeze doesn’t include many options but it does its job very well. In simple words, when Touchfreeze is running, it locks the touchpad for a very small period after hitting a key. I have been using this software for the past two years and can confirm that it works as advertised. It’s a must-have program if you type a lot on your laptop. An option is available to load the program with Windows as well.
Download Touchfreeze
When buying a new laptop, we highly value a sleek and smooth touchpad. However, there may be times when you wish to get rid of it altogether. The touchpad might be registering unintentional clicks when you type on the keyboard, you might want to use an external device, or there could be another reason.
It is not possible to disconnect it from the laptop physically, but you can disable it. Let’s take a look at six different ways you can disable the touchpad on your laptop.
1. Disabling the Touchpad in Windows Settings
In Windows, the Settings app is the first place you should go to make any changes in settings. So let’s look at how you can disable the touchpad in Windows settings before we move on to more complex methods of disabling it.
Right-click on the Windows Start button and go to Settings. Then, navigate to Devices and go to Touchpad from the left-sidebar. Turn off the Touchpad toggle to disable the touchpad.
You may only see the touchpad’s sensitivity settings, which means that you can’t disable it in the Settings app.
2. Disabling the Touchpad in the Control Panel
As an alternative, you can disable the touchpad in the Windows Control Panel. If you want to take this route, you have three options:
1. Disabling Touchpad Completely
Navigate to the Mouse category in Windows Control Panel. Head to the touchpad tab in Mouse Properties, which in this case is ELAN. Click on ELAN Touchpad and hit Stop Device. Tapping on Yes in the Disable Device warning popup will disable your touchpad.
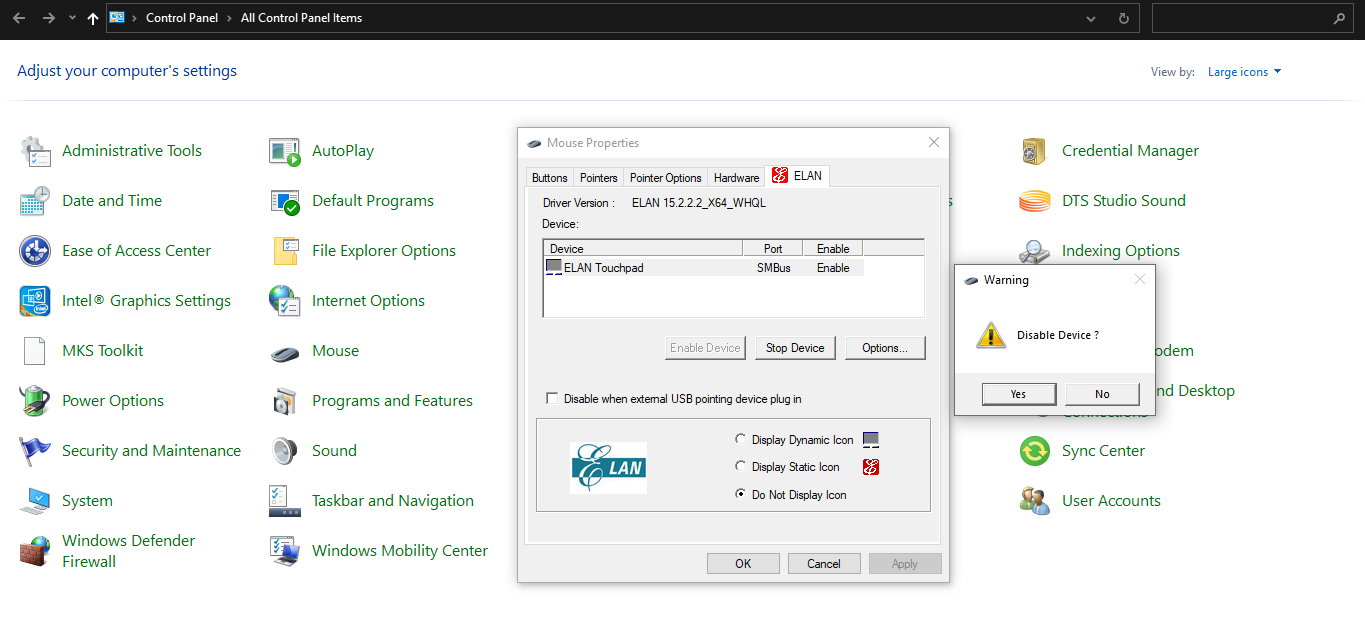
Note: Using an external mouse is the only way to get your touchpad working again, so keep it nearby if you don’t want to get stuck after disabling the touchpad.
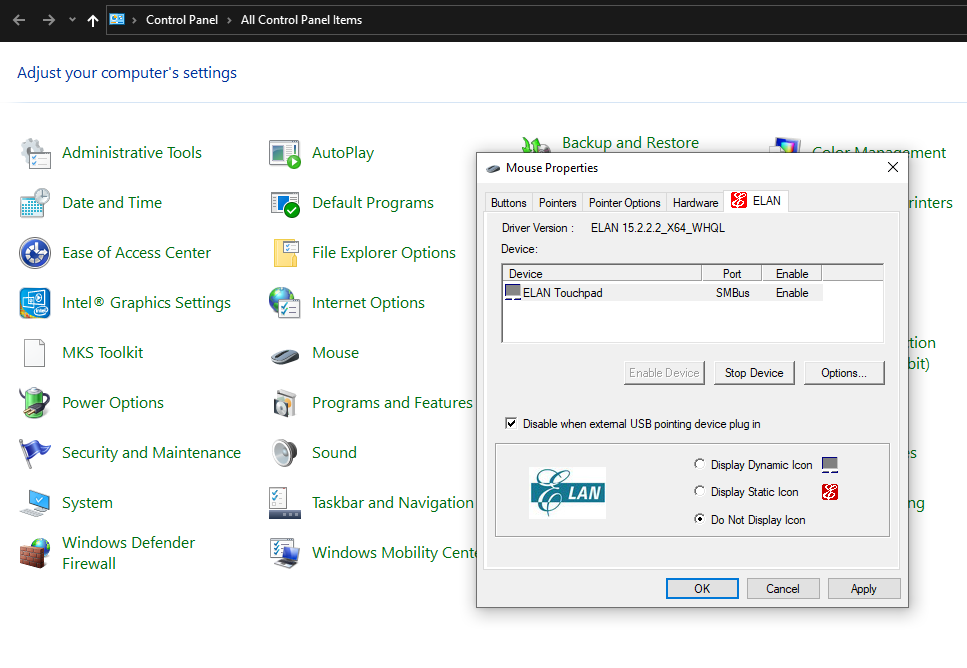
2. Disabling Touchpad When You Connect an External Device
In the same window, you can check the box for Disable when external USB pointing device plug in, which will disable the touchpad pad as soon as you connect an external pointing device.
After you unplug the external device, the touchpad will work again.
3. Disabling Touchpad Clicks While Keeping Its Scroll Functionality
Last but not least, if you want to disable clicks on the touchpad but keep the scrolling on the touchpad and its button working, there is another way out.
Go to Control Panel and this time head over to the Touchpad category. Go to Tapping configuration in One-finger settings. Unchecking the box for Enable will disable the clicks on the touchpad while keeping the rest of its functionality working.
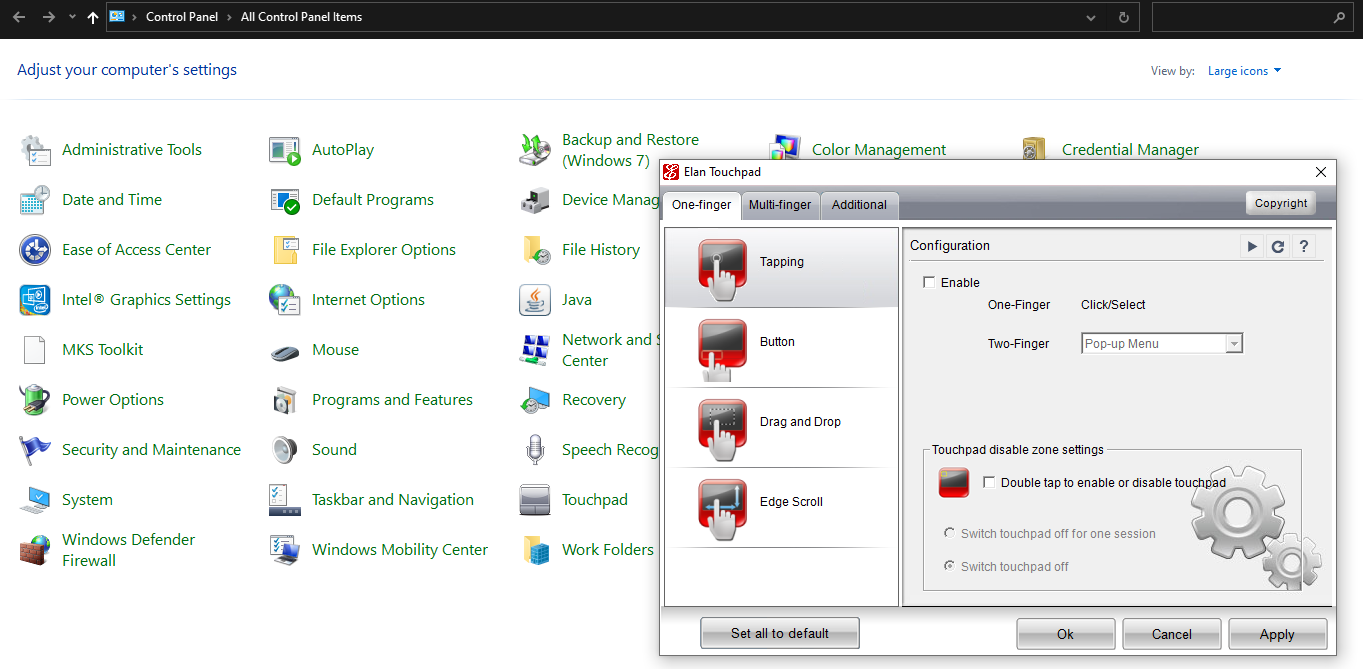
To set your touchpad to your desired settings, you can choose from three options. Suppose these methods haven’t worked for you; move on to other methods of disabling the touchpad in Windows.
3. Disabling the Touchpad in Device Manager
If the above methods don’t work for you, the Device Manager should be your next stop to disable the touchpad. Here is how it works:
- Left-click on the Start button and head over to Device Manager.
- Expand the category for Mice and other pointing devices.
- Right-click the driver for your touchpad and tap Disable device.

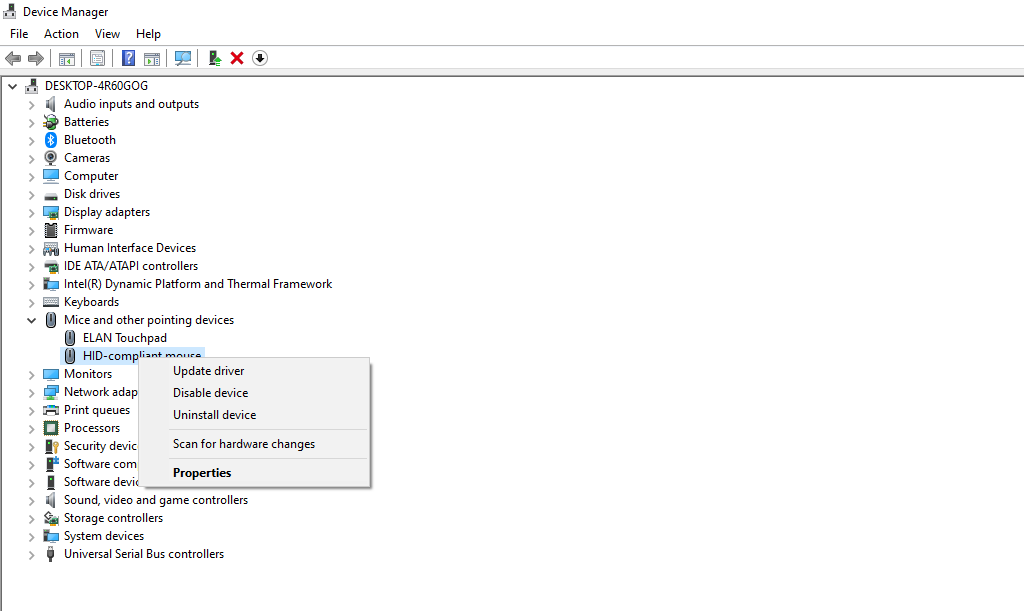
If you find both your external pointing device and touchpad with the same driver name, you may have to disable them one by one to see which one represents your touchpad.
This method is inapplicable in some instances when Windows doesn’t allow disabling the primary touchpad device via its driver.
4. Disabling the Touchpad via ETD Control Centre
ETD Control Centre, known as Elan Trackpad Device Control Centre, is a program that runs in the background of your device, controlling your trackpad activity. Stopping this program will disable your trackpad.
The following instructions will help you disable this program if you have it installed on your device:
- Right-click on the taskbar and go to Task Manager.
- Locate the ETD Control Centre from the list of programs.
- Tap End Task (or Disable) by left-clicking on it.

Restart your computer once to apply the changes. Once it is disabled, it won’t run at bootup, preventing your touchpad from working. However, if your computer has its own touchpad driver, disabling ETD Control Centre won’t make any difference.
ETD Control Centre is also not available on all laptops, so if you don’t have this program controlling your touchpad activity, this fix won’t apply.
5. Disabling the Touchpad via the Windows Registry
Try modifying the registry if nothing seems to disable the touchpad. However, do this only when you know what you are doing. Even if you are familiar with such modifications, it is good to back up the registry. As a result, if your expertise fails you and you mess up something, you can restore it.
Here is what you need to do to disable the touchpad via Registry:
- Press Win + R to open the Run command box.
- Type «Regedit» and hit OK.
- Allow user control access by tapping Yes.
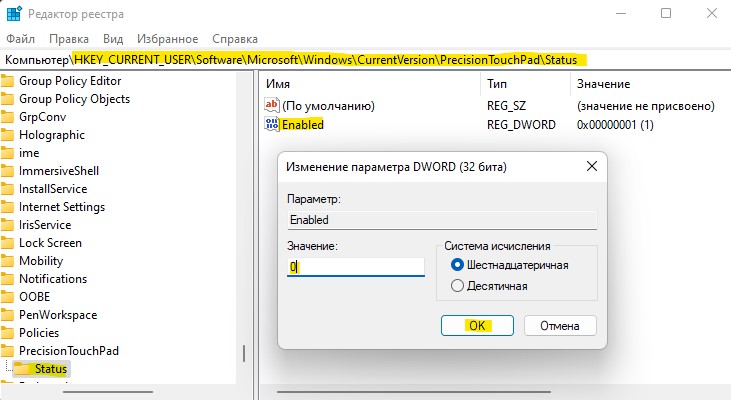
- Navigate to the PrecisionTouchPad status folder using the following path. (You can also copy-paste it into the Registry.)
ComputerHKEY_CURRENT_USERSOFTWAREMicrosoftWindowsCurrentVersionPrecisionTouchPadStatus - Double-tap on Enabled entry to change Value data.
- Set Value data to 0 instead of 1.
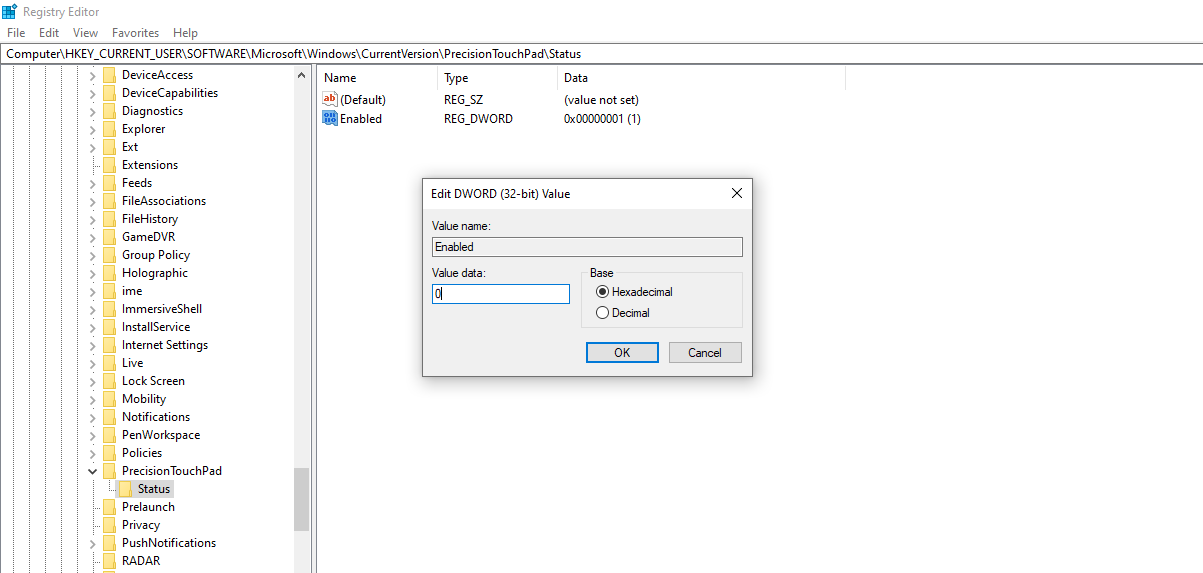
As a result, the touchpad will not work unless you change the data value back to 1. If you are still unable to disable the touchpad following these steps, consider using third-party apps.
6. Use Third-Party Software
If all else fails, you can use third-party apps. Touchpad Blocker is a great free tool for enabling or disabling the touchpad with a combination of keys. By default, they are set as CTRL + ALT + F9. You can turn the blocker on and off by pressing CTRL + F9 (no ALT).
To use this software, visit Touchpad Blocker’s official website. Download and install the Touchpad Blocker software. Once installed, press CTRL + F9 to activate it. Later, you can access the touchpad blocker either from the taskbar or from the list of hidden icons.
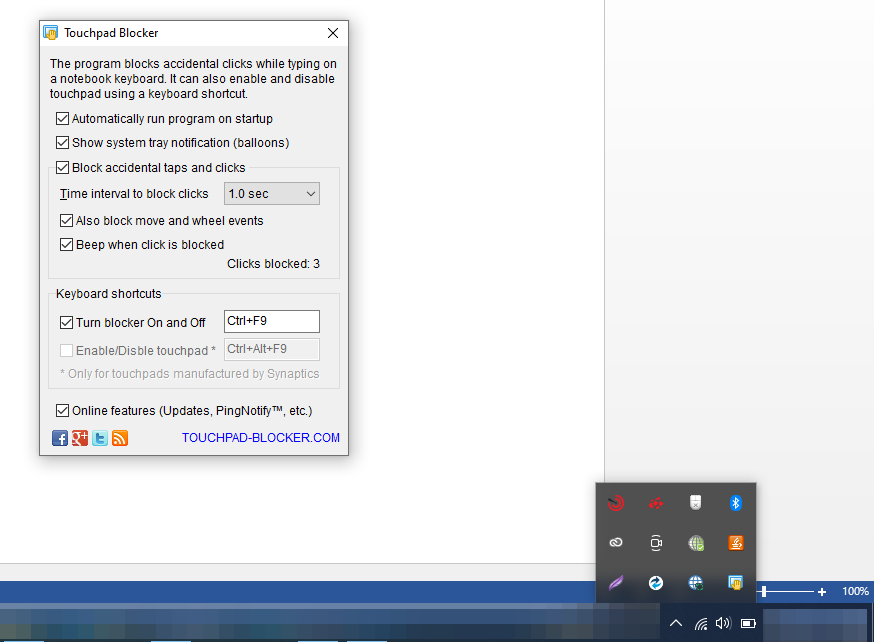
Apart from disabling the touchpad, you can also configure the program to run at startup automatically, make a beep sound when the click is blocked, and block move and wheel events when necessary.
Moreover, it allows you to stop accidental taps and clicks and set time intervals to block clicks. There are so many things you can do with Touchpad Blocker to control touchpad activity.
Deactivate Your Touchpad and Get Back to Work
Some of the fixes may work for you, while others may not. No matter what, the last option will work in every case if none of the other options has worked. Regardless of which version of Windows you are using, Touchpad Blocker is compatible with Windows XP/Vista/7/8 and 10.
If you face problems with the touchpad after reactivating it, you should update the driver, unplug any external pointing device, or reset other mouse settings.
No longer using the Windows 10 touchpad? Turn it off
Updated on September 19, 2022
What to Know
- Check for a key with an icon resembling a touchpad. Tap it to enable/disable touchpad functionality.
- Or, select the Windows icon > Settings gear > Devices > Touchpad. To adjust sensitivity, select Touchpad sensitivity.
- To reset, select Windows icon > Settings gear > Devices > Touchpad > Reset touchpad settings and gestures to defaults > Reset.
This article explains how to disable a laptop touchpad in Windows 10. Additional instructions cover how to adjust touchpad sensitivity and how to reset touchpad settings.
How to Disable the Touchpad on Windows 11
Why Disable the Touchpad in Windows 10?
Some users prefer using a mouse because it’s generally more comfortable. Others with touchscreen-enabled PCs may prefer to tap and swipe their laptop screens like a tablet.
While working on a document, you might want to temporarily disable the touchpad to avoid accidentally tapping something or moving the mouse pointer while typing on the keyboard. A touchpad’s proximity to the keyboard makes it more vulnerable to these kinds of accidents.
Make sure you have a mouse connected and ready to use before disabling the touchpad. Depending on the device, there may or may not be a manual key you can press to turn it back on.
How to Disable the Touchpad on Windows 10
Check to see if there’s a physical key on your laptop to disable/enable your touchpad’s functionality. The key may have an icon resembling a touchpad. You will likely have to hold the Fn key as you press it.
If your device doesn’t have such a key, follow these instructions to disable the touchpad from your Windows Settings:
-
Select the Windows icon in the lower-left corner of your screen, then select the gear icon to open Windows Settings.
Alternatively, type settings in the Windows search box and select Settings from the list of options that appear.
-
Select Devices.
-
Select Touchpad in the left pane, then switch Touchpad to Off.
To automatically turn off the touchpad when you plug in your mouse, uncheck Leave touchpad on when a mouse is connected.
-
If you want to change the touchpad’s level of sensitivity, scroll down to Touchpad Sensitivity. You can also choose what happens when you tap the touchpad, and when you Scroll and zoom.
-
Scroll down farther to customize Three-finger gestures and Four-finger gestures.
-
Scroll to the bottom of the screen and select Reset to restore the touchpad’s default settings.
FAQ
-
How do I disable Pinch Zoom touchpad options in Windows 10?
Open Mouse & Touchpad settings, then select Additional Mouse Options > Device Settings > Settings. Next, select the Pinch Zoom option and turn off Enable Pinch Zoom, then select Apply > OK to save.
-
How do I change touchpad sensitivity in Windows 10?
Open Settings and select Devices > Touchpad > Taps. Then use the drop-down menu to choose between «Most sensitivity.» «High sensitivity.» Medium sensitivity» (the default). and «Low sensitivity.»
-
How do I uninstall and reinstall the driver for my touchpad?
Open Device Manager, then right-click the touchpad > select Uninstall Device > Uninstall. Windows will automatically try to reinstall the latest driver the next time you restart your PC.
Thanks for letting us know!
Get the Latest Tech News Delivered Every Day
Subscribe
Некоторым пользователям ноутбуков может понадобиться отключить тачпад, если они используют мышь, чтобы курсор в играх не сбивался. Также, иногда бывает так, что по чистой случайности пользователи отключают TouchPad и не знают как его включить обратно.
Разберем, как отключить и включить Тачпад на ноутбуке HP, Asus, Lenovo и MSI под управлением Windows 11/10.
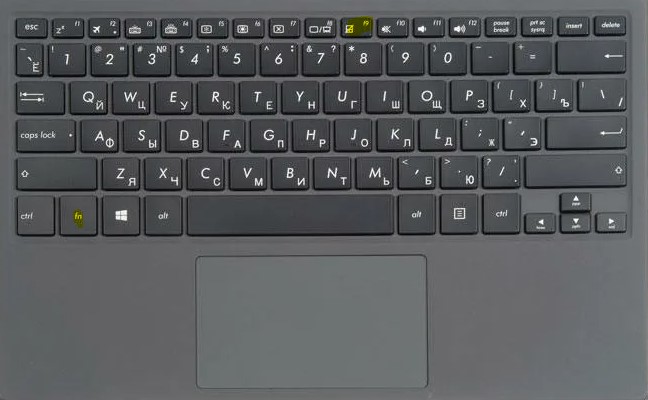
Как отключить и включить TouchPad на клавиатуре
Обратите внимания на свою клавиатуру и поищите иконку в виде сенсорной панели. Обычно это кнопки от F1 до F12. Также, иконка сенсорной панели может быть и на алфавитных кнопках.
1. Чтобы отключить или включить TouchPad на ноутбуке HP, Asus, Lenovo или MSI, нужно нажать сочетание кнопок Fn+F1…F12.
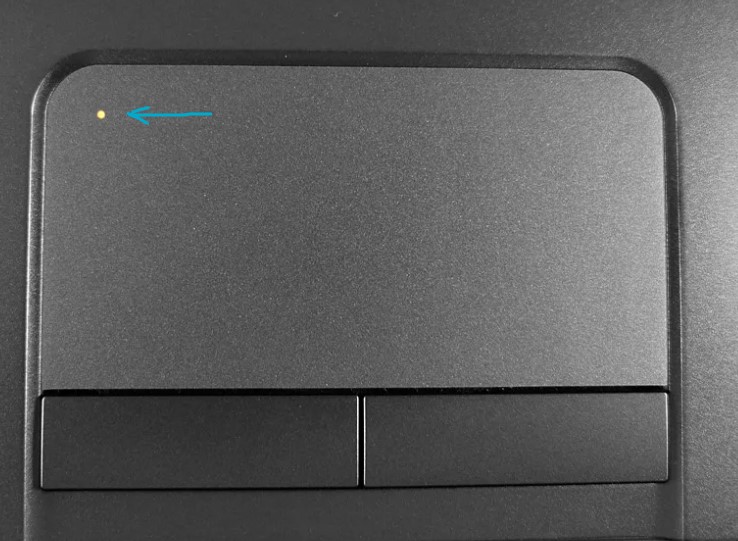
2. На некоторых моделях ноутбуков нужно нажать по краю самой сенсорной панели, чтобы выключить или отключить Тачпад.
! Вместо индикатора может быть выемка.
Как включить и отключить TouchPad через диспетчер устройств
Тачпад на ноутбуке можно включить и отключить через диспетчер устройств. Для этого:
- Нажмите Win+X и выберите Диспетчер устройств
- Разверните графу Мыши и иные указывающие устройства
- Нажмите правой кнопкой мыши по TouchPad и Отключить устройство или Включить

Как отключить и включить TouchPad в Windows 11/10
Чтобы включить и отключить Тачпад на ноутбуке с Windows 11 и 10:

Windows 11: Откройте Параметры > Bluetooth и устройства > Сенсорная панель и отключите или включите тачпад при помощи ползунка.

Windows 10: Откройте Параметры > Устройства > Сенсорная панель и отключите или включите тачпад.
Включение и отключение Тачпада через реестр
Чтобы отключить и включить тачпад в TouchPad на ноутбуке с Windows 11/10 через реестр, нажмите Win+R и введите regedit, чтобы открыть редактор реестра. В реестре перейдите по следующему пути:
HKEY_CURRENT_USERSoftwareMicrosoftWindowsCurrentVersionPrecisionTouchPadStatus
- Справа дважды щелкните по Enabled
- Установите значение 0, чтобы отключить тачпад
- Установите значение 1, чтобы включить тачпад
- Перезагрузите ноутбук
Смотрите еще:
- Не работает Тачпад на ноутбуке? 5 способов решения TouchPad
- Как изменить чувствительность Touchpad в Windows 10
- Как включить сенсорный проводник UWP File Explorer в Windows 10
- Как удалить и отключить OneDrive в Windows 11
- Как отключить обновление драйверов в Windows 11
[ Telegram | Поддержать ]
On Windows 10, touchpads not only offer a mechanism to navigate the user interface, but over the years they have improved, and now you can also use gestures to perform navigation tasks even faster. However, even with all the changes, many users still prefer the traditional mouse.
Although you can disable the touchpad completely, if you prefer to use a mouse, it’s possible to configure Windows 10 to disable the touchpad automatically only when a USB or Bluetooth mouse is connected. This way, if you need to work with your laptop, and you don’t have a mouse nearby, you can still move around the OS to get work done.
In this Windows 10 guide, we’ll walk you through the easy steps to disable your laptop’s touchpad when you connect a mouse using the Settings app and Control Panel.
- How to disable touchpad when mouse is connected using Settings
- How to disable touchpad when mouse is connected using Control Panel
How to disable touchpad when mouse is connected using Settings
- Open Settings.
- Click on Devices.
- Click on Touchpad.
- Under «Touchpad,» clear the Leave touchpad on when a mouse is connected option.
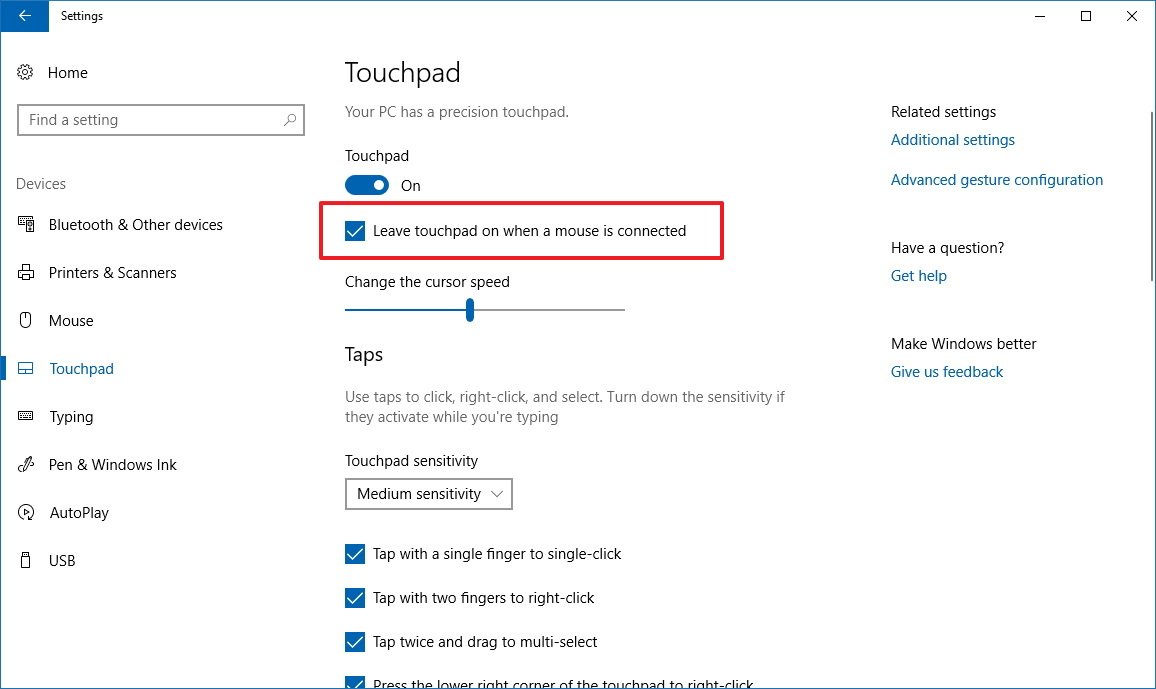
Once you completed the steps, the touchpad will remain disabled unless you disconnect your mouse.
How to disable touchpad when mouse is connected using Control Panel
It should be noted that the option in the Settings app is only available on devices featuring a precision touchpad. If you have another type of touchpad, it’s possible to change the mouse settings using Control Panel, or a third-party tool — usually provided by your device manufacturer.
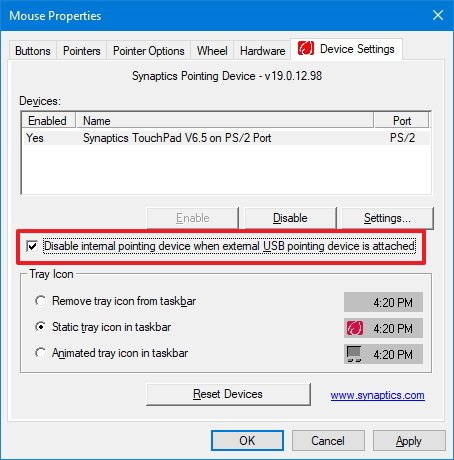
For example, if you’re using a Synaptics touchpad, you can use Control Panel to change the mouse settings using the following steps:
- Open Control Panel.
- Click on Hardware and Sound.
- Under «Devices and Printers,» click on Mouse.
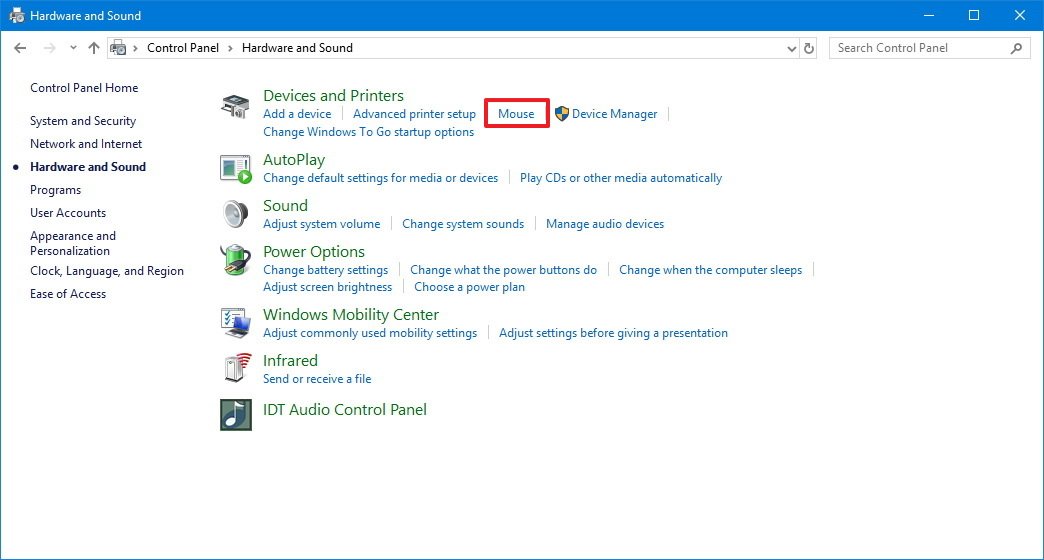
- On the «Device Settings» tab, clear the Disable internal pointing device when external USB pointing device is attached option.
Also, note that depending on the manufacturer, the option to disable the touchpad when a mouse is connected can be buried within the support software.
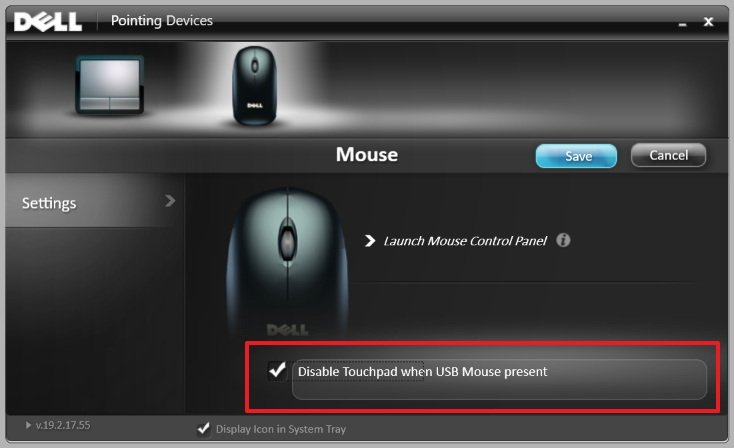
For example, on some Dell laptops, the setting to disable the touchpad is located in the Dell’s support software.
- Open the touchpad application.
- Select the mouse you’re using.
- Check the Disable Touchpad when USB Mouse present option.
More Windows 10 resources
For more helpful articles, coverage, and answers to common questions about Windows 10, visit the following resources:
- Windows 10 on Windows Central – All you need to know
- Windows 10 help, tips, and tricks
- Windows 10 forums on Windows Central
Get the best of Windows Central in in your inbox, every day!
Mauro Huculak is technical writer for WindowsCentral.com. His primary focus is to write comprehensive how-tos to help users get the most out of Windows 10 and its many related technologies. He has an IT background with professional certifications from Microsoft, Cisco, and CompTIA, and he’s a recognized member of the Microsoft MVP community.
- You can disable the touchpad on your Windows 10 laptop easily if it stops working, or you decide to use an external mouse.
- Disabling the touchpad can be done through Windows 10’s Settings app, the Device Manager, and possibly with your computer’s keyboard.
- Visit Business Insider’s homepage for more stories.
The touchpad on your Windows 10 laptop is one of its most important features. It allows you to scroll and click through apps and web pages with ease — essentially, it does everything that a normal mouse is designed to do.
But your touchpad can also get in the way. If you’re typing and find yourself accidentally swiping the touchpad with your arm by mistake, or if you simply prefer to use an external mouse, you might want to disable your touchpad temporarily or permanently.
Fortunately, if you’re running a Windows 10, disabling the touchpad is a simple process. It can be done via your Settings menu, via the Device Manager, and possibly even with a keyboard shortcut.
Check out the products mentioned in this article:
Windows 10 (From $139.99 at Best Buy)
Microsoft Surface Pro X (From $999 at Best Buy)
How to disable the touchpad in Windows 10 through the Settings menu
1. Click the Windows icon in the lower left-hand corner of your screen (or tap it on your keyboard), then type «Settings.»
2. Click the «Settings» app that appears in the search results.
3. Click «Devices.»
Jennifer Still/Business Insider
4. Toggle the «Touchpad» bar to off, turning it from green to grey, then exit the Settings menu.
How to disable the touchpad in Windows 10 through the Device Manager
1. Click the Windows button and type «Device Manager,» clicking the app when it appears in the search results by name.
2. Click on «Mice and other pointing devices» to expand the menu.
Jennifer Still/Business Insider
3. Find your computer’s touchpad and right click on it, then click «Disable» to turn the touchpad off. You may need to use the keyboard’s «Enter» key to save these changes if you don’t have an external mouse hooked up yet.
How to disable the touchpad in Windows 10 through the keyboard
Some Windows 10 keyboards have shortcuts that allow you to disable and enable the touchpad at will.
In general, this shortcut will be Fn + one of the numbered F keys at the top of the keyboard. Look for the numbered F key that has a picture of the touchpad, or a finger touching a square — this generally represents the touchpad.
Amazon
Related coverage from How To Do Everything: Tech:
-
How to change the refresh rate on a Windows 10 computer, to improve your viewing or gaming experience
-
How to change your background on a Windows 10 device using your settings or a shortcut
-
How to test your microphone on a Windows 10 computer, and make sure your PC is using the right input
-
How to turn off sleep mode on your Windows 10 device, or adjust the time it takes for it to turn on
-
How to turn off ‘tablet mode’ on your Windows 10 device in 5 simple steps
Jennifer is a writer and editor from Brooklyn, New York, who spends her time traveling, drinking iced coffee, and watching way too much TV. She has bylines in Vanity Fair, Glamour, Decider, Mic, and many more. You can find her on Twitter at @jenniferlstill.
Read more
Read less
Insider Inc. receives a commission when you buy through our links.