Skip to content
User Account Control, or just UAC is a part of the Windows security system which prevents apps from making unwanted changes on your PC. When some software tries to change system-related parts of the Registry or the file system, Windows 10 shows an UAC confirmation dialog, where the user should confirm if he really wants to make those changes. Thus, UAC provides a special security environment for your user account with limited access rights and can elevate a particular process to full access rights when necessary. However, many users are not happy to see these UAC prompts and prefer to use Windows 10 with the classic security model, i.e. by creating limited and administrator accounts like in Windows XP and earlier. If you are one of those users, here is how to disable UAC and get rid of its popups in Windows 10.
There are two ways to disable UAC in Windows 10, we will review both.
Option one: Disable UAC via the Control Panel
To disable UAC using the Control Panel options, you need to do the following:
- Open Control Panel.
- Go to the following path:
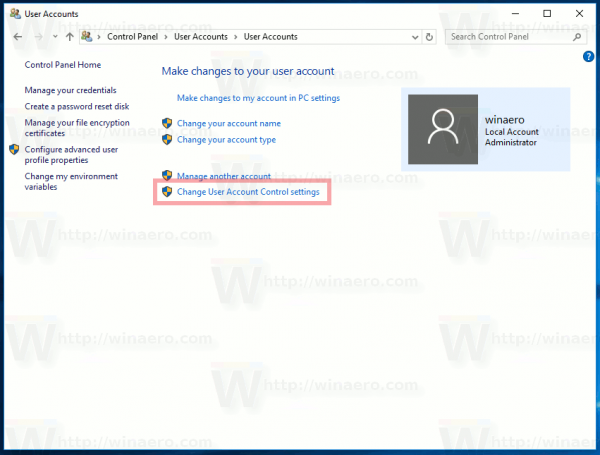
Control PanelUser Accounts and Family SafetyUser Accounts
There you will find the Change User Account Control settings link. Click it.

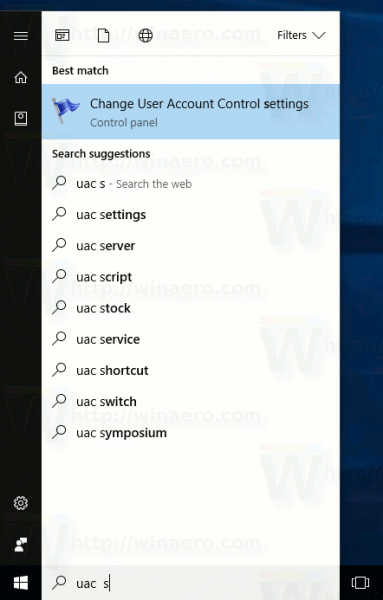
Alternatively, you can click the Start button to open the Start menu and type the following in the Search box:
uac s
Click ‘Change User Account Control settings’ in the search results:

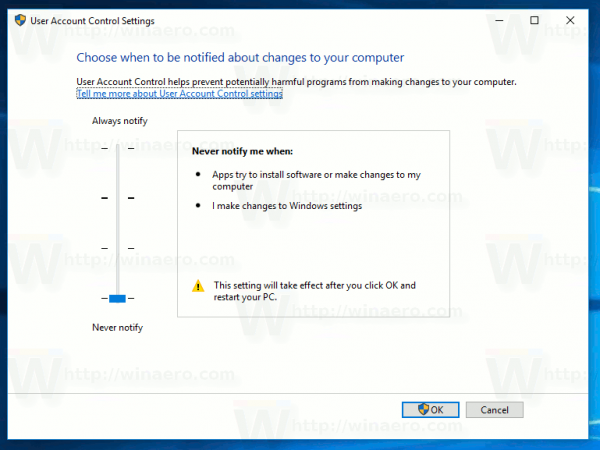
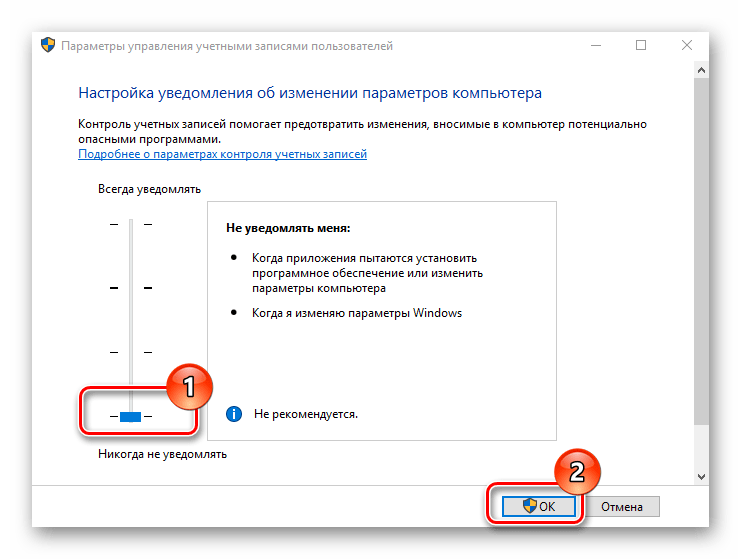
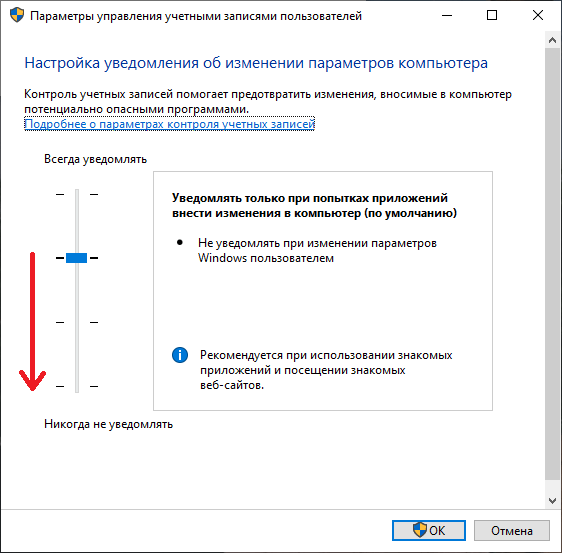
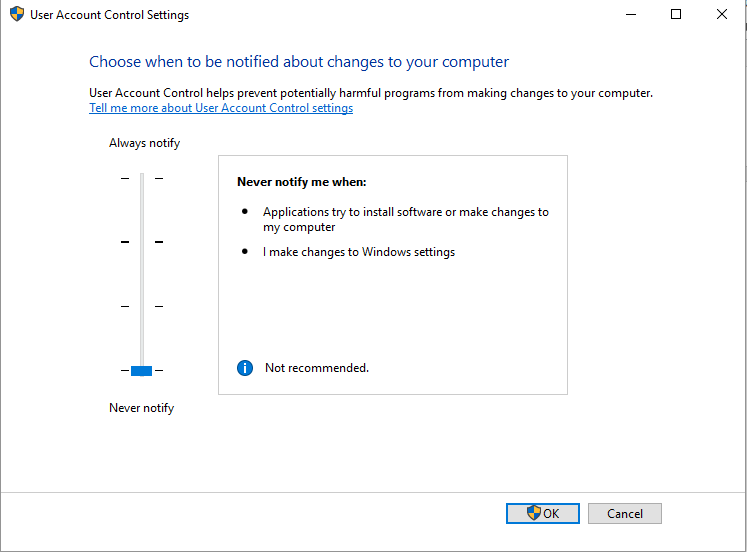
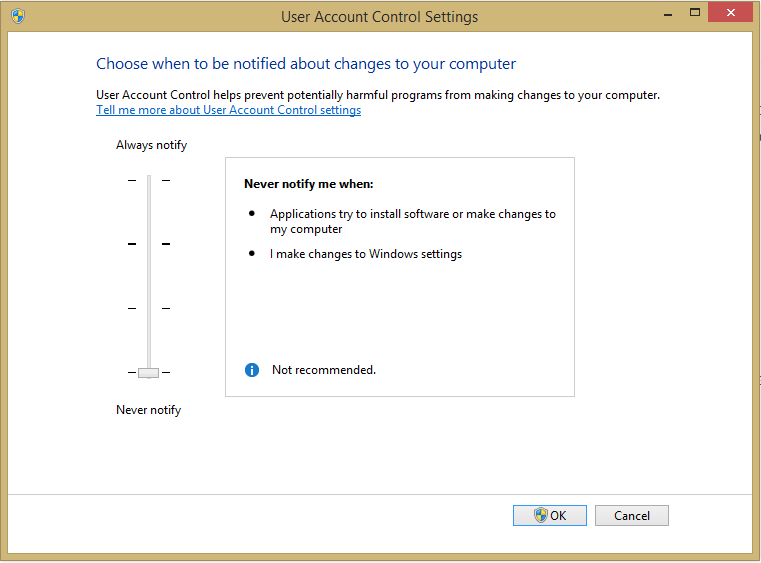
- In the User Account Control settings dialog, move the slider to the bottom (Never Notify):
 Click OK. This will disable UAC.
 Click OK. This will disable UAC.
Option two — Disable UAC with a simple Registry tweak
It is possible to turn off UAC using the Registry Editor.
- Open Registry Editor.
- Navigate to the following key:
HKEY_LOCAL_MACHINESOFTWAREMicrosoftWindowsCurrentVersionPoliciesSystem
If you do not have such a Registry key, then just create it.
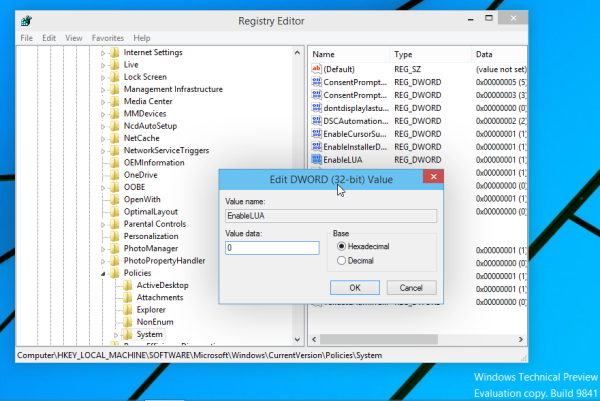
Tip: You can access any desired Registry key with one click. - In the right pane, modify the value of the EnableLUA DWORD value and set it to 0:

If you do not have this DWORD value, then create it. - Restart your computer.
The same can be done using Winaero Tweaker. Go to User Accounts -> Disable UAC: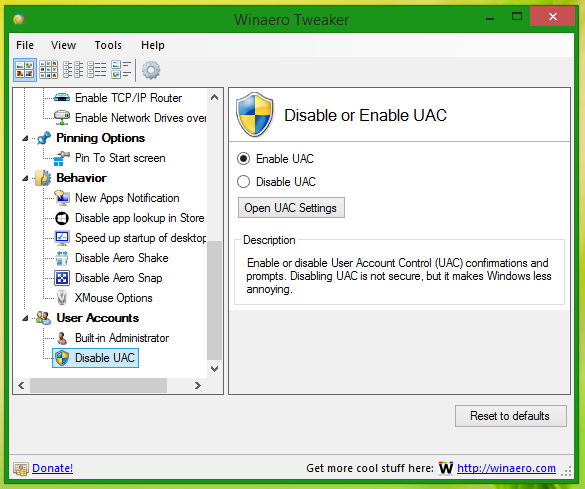 Use this option to avoid Registry editing.
That’s it. Personally I always keep UAC enabled and do not recommend you to disable it. Having UAC enabled is additional protection from dangerous apps and viruses which can elevate silently if it is disabled and do anything malicious on your PC.
Support us
Winaero greatly relies on your support. You can help the site keep bringing you interesting and useful content and software by using these options:
If you like this article, please share it using the buttons below. It won’t take a lot from you, but it will help us grow. Thanks for your support!
Hello. Add your message here.
 Контроль учетных записей или UAC в Windows 10 уведомляет вас при запуске программ или выполнении действий, которые требуют права администратора на компьютере (что обычно означает, что программа или действие приведет к изменению системных настроек или файлов). Сделано это с целью защитить вас от потенциально опасных действий и запуска ПО, которое может нанести вред компьютеру.
По умолчанию UAC включен и требует подтверждения для любых действий, могущих оказать влияние на операционную систему, однако вы можете отключить UAC или настроить его уведомления удобным для себя способом. В конце инструкции также имеется видео, где показаны оба способа отключения контроля учетных записей Windows 10. Примечание: если даже при отключенном контроле учетных записей какая-то из программ не запускается с сообщением, что администратор заблокировал выполнение этого приложения, должна помочь эта инструкция: Приложение заблокировано в целях защиты в Windows 10.
- Отключение контроля учетных записей в панели управления Windows 10
- Изменение параметров UAC в редакторе реестра
- Отключение UAC в командной строке
- Как отключить контроль учетных записей в редакторе локальной групповой политики
- Видео инструкция
Как отключить контроль учетных записей в панели управления Windows 10
Первый способ — использовать соответствующий пункт в панели управления Windows 10 для изменения настроек контроля учетных записей.
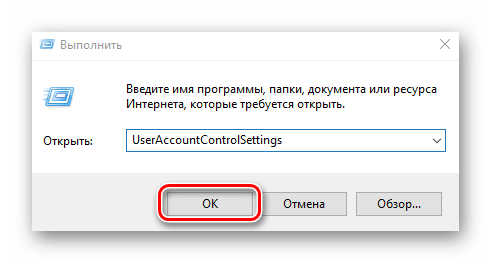
- Откройте панель управления, для этого можно использовать поиск в панели задач или нажать клавиши Win+R, ввести control и нажать Enter. А можно сразу перейти к 4-му шагу, нажав Win+R и введя UserAccountControlSettings
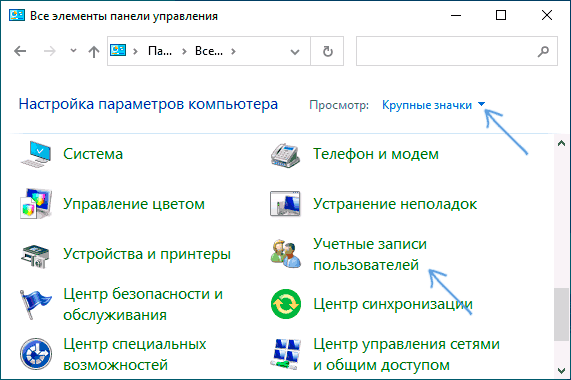
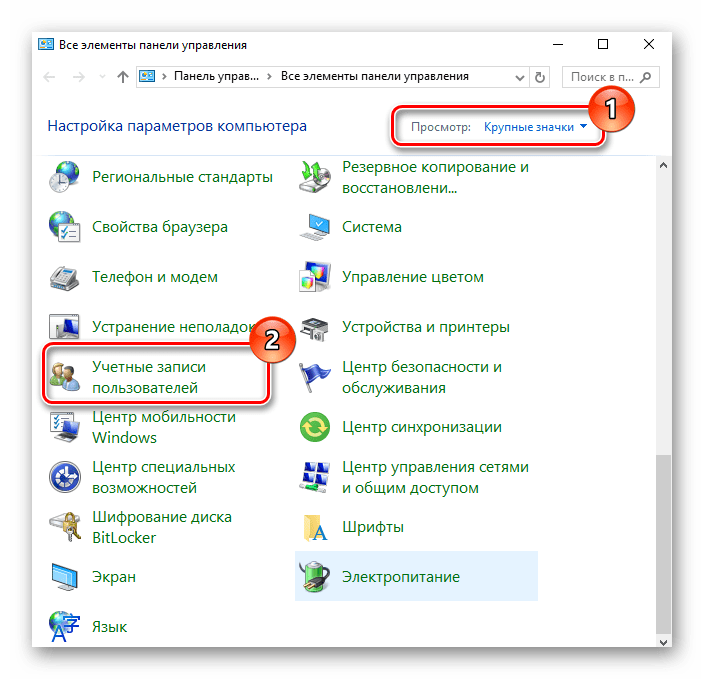
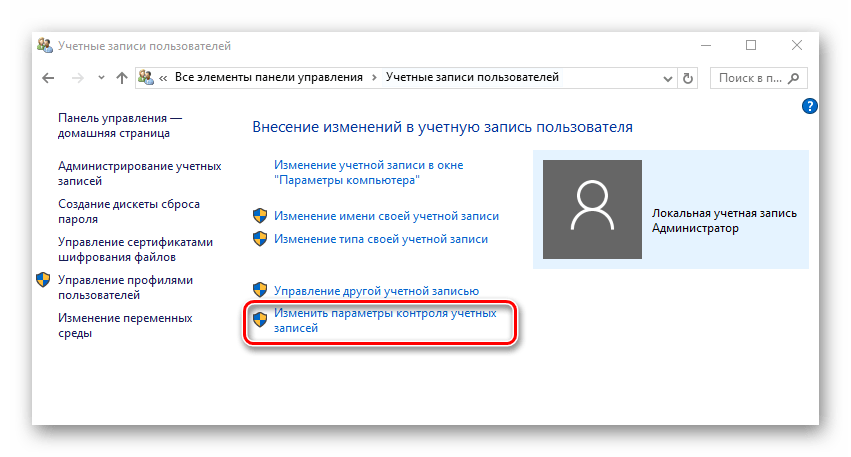
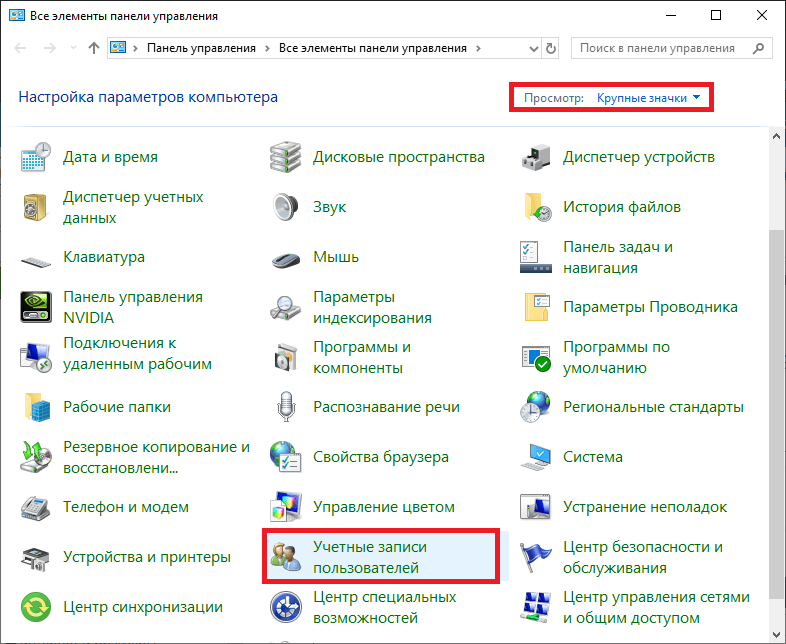
- В панели управления вверху справа в поле «Просмотр» вместо «Категории» установите «Значки», а затем откройте пункт «Учетные записи пользователей».

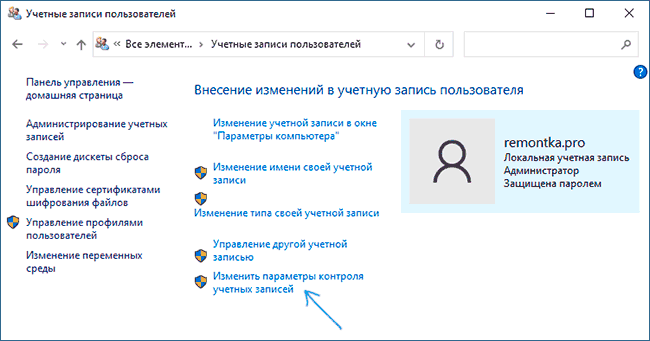
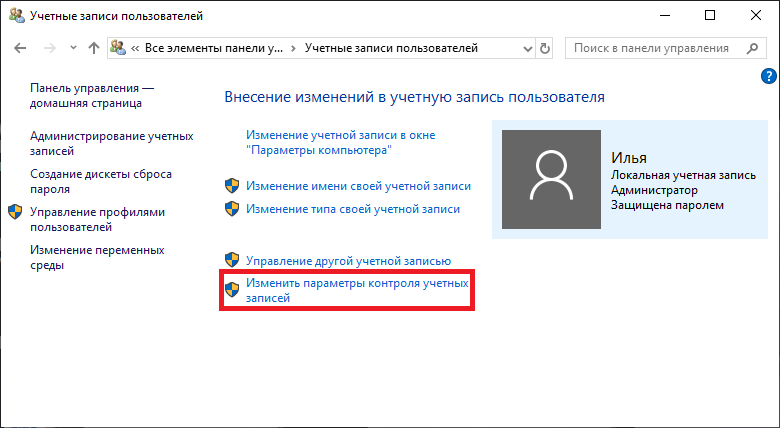
- В следующем окне нажмите «Изменить параметры контроля учетных записей».

- Далее вы можете вручную задать параметры UAC или отключить контроль учетных записей Windows 10, достаточно выбрать один из вариантов настроек работы UAC, каждый из которых пояснён далее.

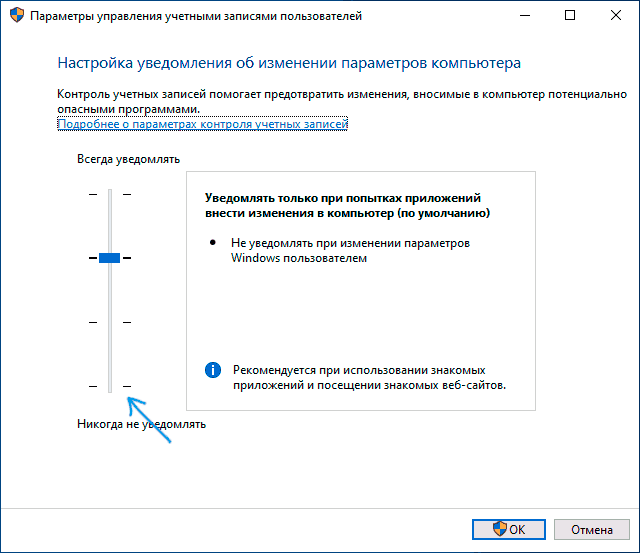
Возможные варианты настроек контроля учетных записей в панели управления от верхнего к нижнему:
- Всегда уведомлять, когда приложения пытаются установить программное обеспечение или при изменении параметров компьютера — самый безопасный вариант, при любом своем действии, которое может что-то изменить, а также при действиях сторонних программ вы будете получать уведомление об этом. Обычные пользователи (не администраторы) должны будут ввести пароль для подтверждения действия.
- Уведомлять только при попытках приложений внести изменения в компьютер — этот параметр установлен в Windows 10 по умолчанию. Он означает, что контролируются только действия программ, но не действия пользователя.
- Уведомлять только при попытках приложений внести изменения в компьютер (не затемнять рабочий стол). Отличие от предыдущего пункта в том, что рабочий стол не затемняется и не блокируется, что в некоторых случаях (вирусы, трояны) может быть угрозой безопасности.
- Не уведомлять меня — UAC отключен и не уведомляет о каких-либо изменениях в параметрах компьютера, инициированных вами или программами.
Если вы решили отключить контроль учетных записей Windows 10, что является совсем не безопасной практикой, в дальнейшем следует быть очень внимательным, поскольку все программы будут иметь к системе тот же доступ, что и вы, в то время как контроль учетных записей не сообщит, если какая-то из них может повлиять на работу системы. Иными словами, если причина отключения UAC только в том, что он «мешает», я настойчиво рекомендую включить его обратно.
Изменение параметров контроля учетных записей в редакторе реестра
Отключение UAC и выбор любого из четырех вариантов работы контроля учетных записей Windows 10 возможен и с помощью редактора реестра (чтобы запустить его нажмите Win+R на клавиатуре и введите regedit).
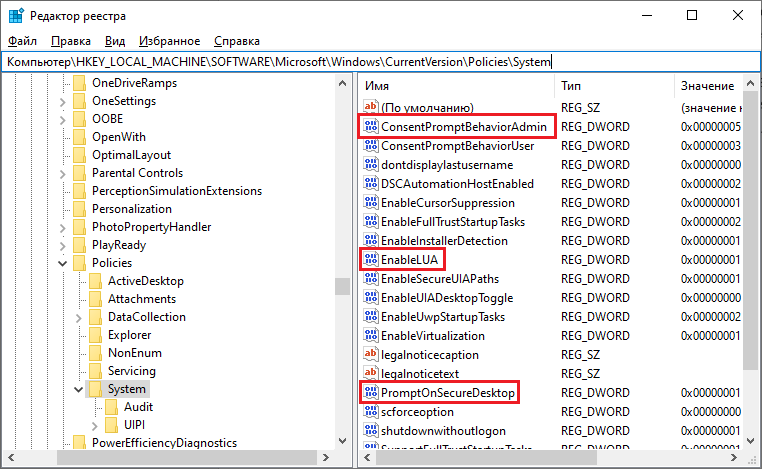
Параметры работы UAC определяются тремя ключами реестра, находящимися в разделе
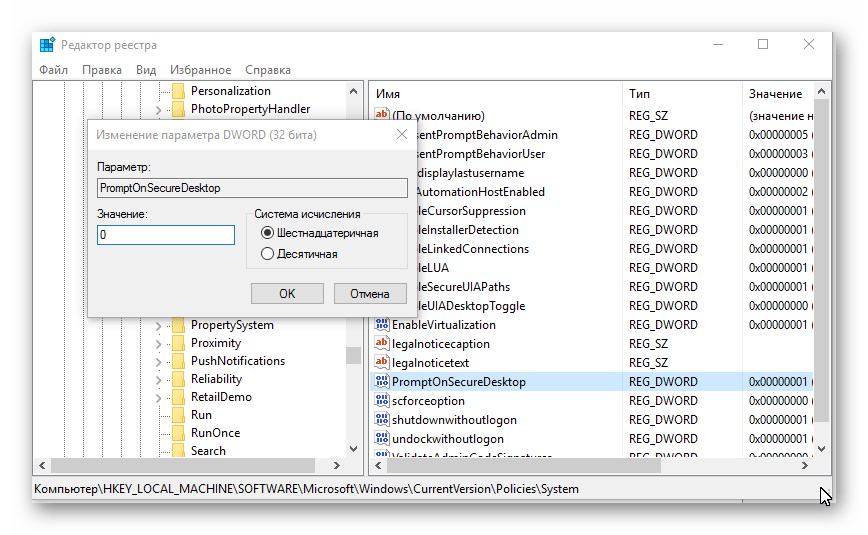
HKEY_LOCAL_MACHINESOFTWAREMicrosoftWindowsCurrentVersionPoliciesSystem
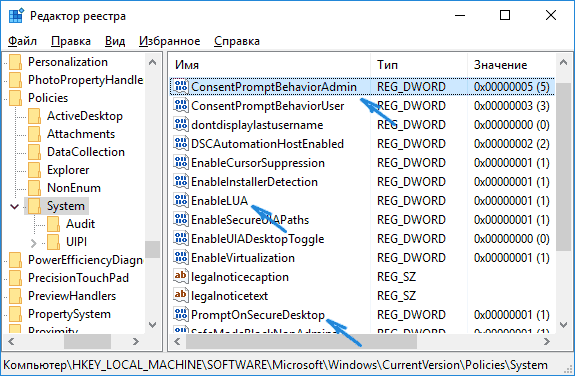
Перейдите в этот раздел и найдите следующие параметры DWORD в правой части окна: PromptOnSecureDesktop, EnableLUA, ConsentPromptBehaviorAdmin. Для полного отключения контроля учетных записей достаточно изменить значение параметра EnableLUA на 0 (ноль), закрыть редактор реестра и перезагрузить компьютер.
Однако, когда вы меняете параметры UAC в панели управления, сама Windows 10 оперирует тремя параметрами одновременно и делает это несколько иначе (хотя предыдущий метод проще и быстрее). Далее привожу значения каждого из ключей PromptOnSecureDesktop, EnableLUA, ConsentPromptBehaviorAdmin в том порядке, как они указаны для разных вариантов оповещений контроля учетных записей.
- Всегда уведомлять — 1, 1, 2 соответственно.
- Уведомлять при попытках приложений изменить параметры (значения по умолчанию) — 1, 1, 5.
- Уведомлять без затемнения экрана — 0, 1, 5.
- Отключить UAC и не уведомлять — 0, 1, 0.
Отключение UAC в командной строке
Быстрый способ полностью отключить контроль учетных записей — использовать командную строку, для этого:
- Запустите командную строку от имени администратора, в Windows 10 для этого можно начать вводить «Командная строка» в поиск на панели задач, а когда найдется нужный результат — либо нажать по нему правой кнопкой мыши и выбрать нужный пункт меню, либо выбрать «Запуск от имени администратора» в панели справа.
- Введите команду (нажав Enter после ввода)
reg ADD HKLMSOFTWAREMicrosoftWindowsCurrentVersionPoliciesSystem /v EnableLUA /t REG_DWORD /d 0 /f
- Закройте командную строку и перезапустите компьютер или ноутбук.
По своей сути этот метод является вариантом способа с редактором реестра, который описан выше: просто нужный параметр изменяется с помощью указанной команды.
Как отключить контроль учетных записей UAC в редакторе локальной групповой политики Windows 10
Этот метод подойдёт для Windows 10 Pro и Enterprise, где присутствует редактор локальной групповой политики. Шаги будут следующими:
- Нажмите клавиши Win+R на клавиатуре, введите gpedit.msc и нажмите Enter.
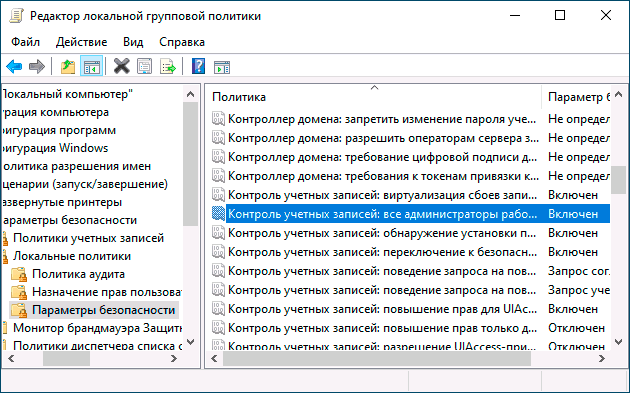
- В редакторе перейдите к разделу «Конфигурация компьютера» — «Конфигурация Windows» — «Параметры Безопасности» — «Локальные политики» — «Параметры безопасности».
- В правой панели найдите параметр «Контроль учетных записей: все администраторы работают в режиме одобрения администратором» и дважды нажмите по нему.

- Установите параметр в значение «Отключен» и нажмите «Ок».

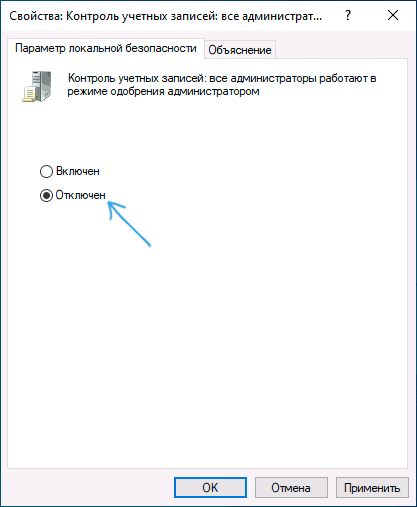
Перезагрузка компьютера обычно не требуется.
Видео
В завершение еще раз напомню: я не рекомендую отключать контроль учетных записей ни в Windows 10 ни в других версиях ОС, если только вы абсолютно точно не знаете, для чего вам это нужно, а также являетесь достаточно опытным пользователем.
Use Control Panel or Registry Editor, but understand the risks
What to Know
- Best way: Go to Control Panel > User Accounts > Change User Account Control settings > Never notify.
- User Account Control (UAC) helps prevent unauthorized changes. We don’t recommend switching it off.
- Using the Control Panel leaves little room for error vs. editing the registry. This only works for admin users.
This article describes how to disable UAC in Windows 10 using two different methods. We’ll also explain why you might want to turn off UAC and if it’s safe to do so.
How to Disable UAC in Windows 10
There are two primary methods. This first uses Control Panel and is what we recommend because it’s the «normal» technique and leaves little room for error. But if you like to work in the registry (or you need to for whatever reason), those steps are further down the page.
Control Panel
There’s an easy-to-use slider-style option in Control Panel to disable User Account Control.
-
Open Control Panel. One way to get there is to search for it using the search bar by the Start menu.
-
Choose User Accounts. If you see it again on the next page, select it once more.
-
Select Change User Account Control settings.
-
Drag the button to the very bottom, to Never notify, and then select OK.
-
Confirm the change with Yes.
Edit the Registry
Another way to completely disable UAC is through a Windows Registry tweak. It’s a bit more involved than the Control Panel method but still doable.
-
Open Registry Editor. The quickest way is to open the Run box with Win+R and then enter regedit.
-
Go to this path:
HKEY_LOCAL_MACHINESOFTWAREMicrosoftWindowsCurrentVersionPoliciesSystem -
Double-click EnableLUA from the right side to open its settings.
-
Set the value to 0 and then select OK.
-
Restart your computer for the change to take effect.
Is It Safe to Turn Off UAC?
User Account Control’s default state is to be enabled. And for a good reason. Under normal circumstances, you’d get a prompt to confirm various actions before they can take place on your computer. Most notably, when installing programs, opening Registry Editor, and changing key system settings. Several tasks trigger the prompt.
What leads most people to want to disable UAC is that it can be annoying. Being bombarded by these prompts every time you want to run those tasks can seem intrusive. Most people probably don’t think twice when it appears, clicking as fast as possible to get past it and on to whatever it is they were doing before.
Although it’s easy to forget because of how often you see it, the prompt is there for a reason. If you’re not careful, you could accept a malicious program’s request for elevated privileges, which could ultimately lead to disastrous results. The rights it had before get upgraded because you gave it the go-ahead.
This process is put on auto-drive when UAC is off. All of those critical, system-related tasks that you should vet before taking place are granted elevated permissions without a second thought. Opening Registry Editor just…happens—no prompt. Program installations can proceed silently without your authorization. You can see just how dangerous that could be.
We don’t recommend that you turn off User Account Control. But if you have to temporarily for whatever reason, be sure to re-enable it when you finish your task.
Thanks for letting us know!
Get the Latest Tech News Delivered Every Day
Subscribe
Содержание
- Отключаем UAC в Виндовс 10
- Способ 1: Панель управления
- Способ 2: Редактор реестра
- Вопросы и ответы

UAC или контроль учетных записей — это одновременно компонент и технология от компании Майкрософт, задача которой улучшить безопасность путем ограничения доступа программ к системе, позволяя им выполнять более привилегированные функции только с позволения администратора. Другими словами, UAC предупреждает пользователя что работа того или иного приложения может привести к изменению системных файлов и настроек и не позволяет этой программе выполнять эти действия, пока он не запустит ее с правами администратора. Это сделано для того, чтобы защитить ОС от потенциально опасных воздействий.
По умолчанию в Виндовс 10 включен UAC, который требует от пользователя постоянного подтверждения практически всех действий, которые теоретически могут в той или иной мере повлиять на работу операционной системы. Поэтому у многих возникает потребность отключить надоедливые предупреждения. Рассмотрим, как можно деактивировать UAC.
Способ 1: Панель управления
Один из двух методов отключения (полного) контроля учетных записей — это использование «Панели управления». Процедура отключения UAC таким способом выглядит следующим образом.
- Запустите «Панель управления». Это можно осуществить, кликнув правой кнопкой мыши по меню «Пуск» и выбрав соответствующий пункт.
- Выберите режим просмотра «Крупные значки», а затем нажмите на пункт «Учетные записи пользователей».
- Далее кликните по пункту «Изменить параметры контроля учетных записей» (для выполнения этой операции потребуются права администратора).
- Перетяните ползунок в самый низ. При этом будет выбрано положение «Не уведомлять меня» и кликните по кнопке «ОК» (также потребуется наличие прав администратора).
Существует альтернативный способ зайти в окно редактирования UAC. Для этого нужно через меню «Пуск» зайти в окно «Выполнить» (вызывается комбинацией клавиш «Win+R»), там ввести команду UserAccountControlSettings и нажать кнопку «ОК».
Способ 2: Редактор реестра
Второй метод избавится от уведомлений UAC состоит во внесении изменений в редактор реестра.
- Откройте «Редактор реестра». Наиболее простой способ это сделать — в окне «Выполнить», которое открывается через меню «Пуск» или комбинацию клавиш «Win+R», ввести команду
regedit.exe. - Перейдите в следующую ветку
HKEY_LOCAL_MACHINESOFTWAREMicrosoftWindowsCurrentVersionPoliciesSystem. - С помощью двойного клика измените параметр DWORD для записей «EnableLUA», «PromptOnSecureDesktop», «ConsentPromptBehaviorAdmin» (установите значения 1, 0, 0 соответственно каждому пункту).

Стоит заметить, что отключение контроля учетных записей, независимо от метода, обратимый процесс, то есть, всегда можно вернуть первоначальные настройки.
Как итог, можно отметить, что отключение UAC может иметь негативные последствия. Поэтому, если Вы не уверены в том, что этот функционал Вам не нужен, не выполняйте подобных действий.

Еще статьи по данной теме:
Помогла ли Вам статья?

Contents
- 1 How to Disable UAC in Windows 10 via the Control Panel
- 2 How to Turn off Windows 10 UAC via Registry Editor
- 3 How to Disable UAC via the Local Group Policy Editor
Windows 10 User Account Control (UAC) dialogs can be frustrating. They add an additional step to the process each time you run an exe file or run a program as administrator. As a result, it’s tempting to disable UAC in Windows 10 entirely, but you should understand the risks associated with such a change.
What is UAC in Windows 10?
User Account Control in Windows 10 is an integral part of the OS’ security. When an app attempts to make changes to your PC, it steps in, asking for confirmation. Accepting allows the program to temporarily act with the full rights of the user: administrator rights.
Without UAC, it may be trivial for malware to compromise your computer. Applications will not require your approval to make changes to your system and may make modifications without your knowledge.
As a result, we can only recommend you disable UAC in specific circumstances. For example, if you have a user account with no administrative privileges and a separate admin account to perform any installation or configuration tasks.
If you’re confident you’ll be secure, this guide will show you how to turn off UAC in Windows 10 via the Control Panel, Registry, or Local Group Policy Editor.
Disabling UAC via the Control Panel is the most user-friendly route and leaves little room for error. However, it’s worth noting that you’ll still need administrator rights to be able to do this. Switch to your admin account if you need to, or ask your IT department if you’re in an enterprise or education scenario.
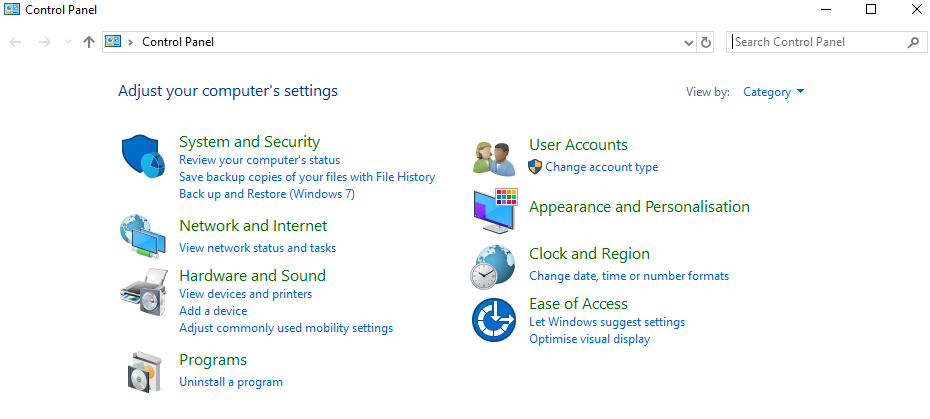
- Open Control Panel
Press Start and type “Control Panel“. Click the top result, “Control Panel”, in the Start menu.

- Click”User Accounts” in the Control Panel

- Click “User Accounts” again

- Press “Change User Account Control settings”
At this point, you’ll need to accept a UAC prompt to make changes.

- Turn off UAC in Windows 10
In the User Account Control Settings window, you’ll see a slider under the heading “Choose when to be notified about changes to your computer”. To disable user account control entirely, move the slider down until it says “Never notify”.
Click “OK” and agree to your final UAC prompt.


How to Turn off Windows 10 UAC via Registry Editor
Power users can disable user account control via the registry if they don’t enjoy the control panel interface or have limited access to it.
- Open the Registry Editor
Press the Start button and type “Registry Editor”. Click the top result in the Start menu.

- Modify the “EnableLUA” DWORDDisabling UAC via the registry is still quite easy. In its search bar, paste
ComputerHKEY_LOCAL_MACHINESOFTWAREMicrosoftWindowsCurrentVersionPoliciesSystem.In the main pane, scroll down the list or press E on your keyboard until you find an entry called “EnableLUA”. Double-click it to open the DWORD editor and change the “Value data” field to “0”. If you don’t have the DWORD value, you can create it yourself. Once you’re done, press “OK” to save the changes and then restart your computer.


How to Disable UAC via the Local Group Policy Editor
Users with Windows 10 Pro or higher additionally have access to the Group Policy Editor, commonly known by its filename, gpedit. This performs similar changes to Regedit but offers a more safe and intuitive interface.
- Open gpedit
Press Start and type “gpedit”. Click the first result in your Start menu, which should read “Edit group policy”.

- Double-click the User Account Control policy
Navigate to “Windows settings > Security Settings > Local Policies > Security Options”. In the main panel, scroll until you find “User Account Control: Run all administrators in Admin Approval Mode” if you’d like to turn off UAC.

- Disable User Account Control
Change the toggle from “Enabled” to “Disabled”. Press “OK” to disable UAC in Windows 10.


We covered the various methods to disable UAC today, but there are other User Account Control options that you may want to consider. Here’s a full list (via Microsoft):
| Registry key | Group Policy setting | Registry setting |
|---|---|---|
| FilterAdministratorToken | User Account Control: Admin Approval Mode for the built-in Administrator account | 0 (Default) = Disabled 1 = Enabled |
| EnableUIADesktopToggle | User Account Control: Allow UIAccess applications to prompt for elevation without using the secure desktop | 0 (Default) = Disabled 1 = Enabled |
| ConsentPromptBehaviorAdmin | User Account Control: Behavior of the elevation prompt for administrators in Admin Approval Mode | 0 = Elevate without prompting 1 = Prompt for credentials on the secure desktop 2 = Prompt for consent on the secure desktop 3 = Prompt for credentials 4 = Prompt for consent 5 (Default) = Prompt for consent for non-Windows binaries |
| ConsentPromptBehaviorUser | User Account Control: Behavior of the elevation prompt for standard users | 0 = Automatically deny elevation requests 1 = Prompt for credentials on the secure desktop 3 (Default) = Prompt for credentials |
| EnableInstallerDetection | User Account Control: Detect application installations and prompt for elevation | 1 = Enabled (default for home) 0 = Disabled (default for enterprise) |
| ValidateAdminCodeSignatures | User Account Control: Only elevate executables that are signed and validated | 0 (Default) = Disabled 1 = Enabled |
| EnableSecureUIAPaths | User Account Control: Only elevate UIAccess applications that are installed in secure locations | 0 = Disabled 1 (Default) = Enabled |
| EnableLUA | User Account Control: Run all administrators in Admin Approval Mode | 0 = Disabled 1 (Default) = Enabled |
| PromptOnSecureDesktop | User Account Control: Switch to the secure desktop when prompting for elevation | 0 = Disabled 1 (Default) = Enabled |
| EnableVirtualization | User Account Control: Virtualize file and registry write failures to per-user locations | 0 = Disabled 1 (Default) = Enabled |
Before you make any of these changes, however, we recommend you read our existing literature on the Registry Editor. Learn how to safely use regedit and create an automatic registry backup so you’re fully prepared.
If at your home or your workplace, you have several systems or computers then, one thing that you need to control is, which users or apps get to change things in that system. If there is a single person, as an administrator, then, this will become very easy to prevent authorized changes. However, it’s not enough to have a single person managing everything. So, in this article, we’re gonna figure out the question – What is UAC in Windows 10, and How to Disable It?
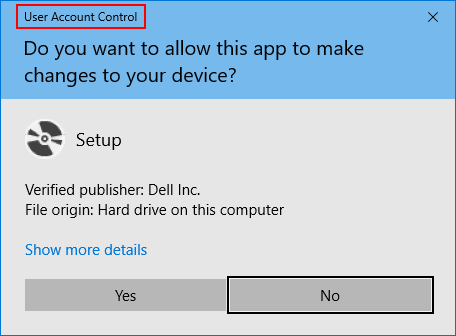
UAC is a security feature in Windows 10, while you go to install an application on your PC and click on that application to open and run with administrator privileges you get a popup, in this, you are asked whether you want to run the application on your PC or not. Eventually, to complete the installation process you click on the “Yes” button.
This popup is called UAC(User Account Control). Basically, a user account control: reminds you that whether you are installing the application is safe for your computer or not. In this way, this helps to boost your system security consequences. But sometimes this can bother you. But, hopefully, there are methods present to disable it from your Windows 10 PC.
More about User Account Control
UAC works as a guard to prevent non-certified changes or the installation of applications that can change the settings (Hyperlink) of your PC. You will get a popup of user account control when any changes are appearing in your system at the administrator level.
When it’s necessary to disable the UAC?
If you frequently open a certain program and you are getting a popup back to back, then it’ll become necessary to disable the UAC.
Note- If you want to disable the UAC from your Windows 10 computer, then, you can do it at your own risk.
Now, here we go to the methods to disable the user account control from your Windows 10 PC. Just follow the methods and steps to do this.
How to Disable UAC on Windows 10
In this article, we’ll teach you three methods to disable UAC from your Windows 10 PC.
- Disable User Account Control in Windows 10 through Security and Maintenance.
- Disable User Account Control in Windows 10 through the Prompt.
- Disable UAC on Windows 10 through the User Account.
Let’s start with the first method.
Disable User Account Control in Windows 10 through Security and Maintenance.
Please follow the following steps to disable UAC through security and maintenance.
Step 3. Now, from here, you have two options to open the User Account Control settings window.
- Go to the left side of the page, you will see the 4 links. Now, press the second positioned tap which is User Account Control Settings.
- Second, you can click on the arrow tip on the security option from the right side of the page to expand it.
By scrolling, find out the UAC in the lowermost area, and click on the “Change Settings” link.
Step 4. Now, the UAC window will appear on the screen. Here, you’ll be able to see a slider indicating different positions and their respective responsibilities mentioned by their side. By default, the second position is selected (From the top).
Step 5. Drag the slider to the last position. Here, you will get the option- Never Notify. Click on it to successfully disable it. Now, Click on the Save button.
Step 6. If it asks for a password, then put your password to validate.
Step 7. Now, reboot your system, and your UAC will disabled now.
Disable User Account Control in Windows 10 through the Prompt.
Step 1. By running or installing an application, launch a UAC popup.
Step 2. Now, click on the “Show More Details” link. After clicking on it a new link will appear- Change when these notifications appear, click on this link.
Step 3. A UAC settings window will appear now, Move the slider to the bottom, where it is written “Never notify” then press ‘OK’. That’s it.
Disable UAC (User Account Control) on Windows 10 through User Account.
You can also disable the User Account Control by this method. To disable your UAC by this method, please follow the below-mentioned steps.
Step 1. Make a right-click on the Windows icon on your computer. A navigation bar is open, navigate “Control Panel” and hit on it.
Step 2. Now, choose the User Account on the control panel window and click on it.
Step 3. Now, press the link named- “Change User Account Control settings”.
Step 4. Now, move your slider to the bottom where it is written “Never notify” then press ‘OK’. That’s it.
That’s it. Hope this will help you.
Крупная часть нововведений, появившихся в Windows 10, была связана с усилением безопасности и контролем над действиями пользователя с правами администратора – от ограничений на запуск приложений вне «Microsoft Store» до встроенного антивируса «Защитника Windows». Нельзя сказать, насколько они плохи или хороши сами по себе, но сам факт усиления контроля над используемым ПО сложно отрицать.
Многие из этих функций могут препятствовать запуску нелицензионных приложений, но иногда и встроенная система безопасности допускает ошибки, или же просто оказывается чрезвычайно бдительной к действиям пользователя, например, к запуску программ с правами администратора.

Довольно стандартный вид для пользователей Windows 10
Для чего нужна система контроля учётных записей
Эта функция является далеко не новой – её история ведётся ещё с первых графических версий Windows. Предназначение этой функции лежит в коренном различии между работой в системах Linux и Windows – если в первой на каждое действие с правами администратора требовалось ручное подтверждение с введением пароля, то вторая достаточно долго брезговала предупреждениями при запуске приложений.
Почему это важно? Права администратора предоставляют использующей их утилите полный доступ к системе – если такие права попадут к вредоносному приложению, то вряд ли что-то остановит его в случае атаки на антивирусное ПО и, собственно, сам компьютер. Система контроля учётных записей, она же – User Account Control или UAC – впервые появилась на Windows Vista, и была призвана закрыть эту дыру в безопасности системы.
На практике это выглядит примерно следующим образом – при попытке запуска любого приложения с правами администратора будет появляться предупреждение, требующее ручного подтверждения соответствующих разрешений. Вот так эти уведомления выглядели на предыдущих версиях Windows и в 10-ом издании системы. 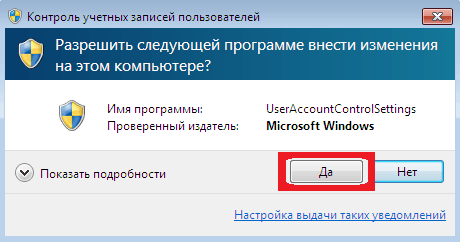
Несмотря на мелкие косметические изменения, система фактически не менялась с первого появления в Windows Vista
Суть выносимого предупреждения абсолютно не изменилась – Windows уточняет, точно ли мы желаем предоставить этому приложению права на внесение изменений в систему. Казалось бы, достаточно здравый интерес, но при частом использовании ПО с такими разрешениями прокликивание подтверждения превращается в сущую муку.
Стоит ли отключать UAC, чтобы избежать надоедливых уведомлений? Крайне спорный вопрос – эта не самая безопасная практика лишает систему одного из средств защиты от несанкционированного доступа к её ресурсам. Если мы всё же решим отключить систему контроля, стоит убедиться, что остальные средства защиты остаются в активном состоянии, и стараться не запускать подозрительные приложения, чтобы избежать заражения.
Что ж, мы всё же решили отключить систему контроля учётных записей. Чтобы сделать это штатными средствами, подойдут 3 способа.
Через «Панель управления»
Воспользуемся классической утилитой Windows для отключения UAC. Для этого:
- Откроем «Панель управления», запустив её любым удобным способом: поиском соответствующего приложения через меню «Поиск» или вводом команды «control» в «Командной строке».
- Обратимся к параметру «Просмотр» – он находится в верхнем правом углу – и выставим значение «Крупные значки».

Откроем раздел «Учётные записи» в «Панели управления»
- Откроем раздел «Учётные записи пользователей», нажав на ссылку с иконкой с двумя людьми.
- Нажмём на ссылку «Изменить параметры контроля учётных записей» – она является последней в правой панели.

Несмотря на появление меню «Параметры», все основные настройки так же осуществляются в «Панели управления»
- В новом окне мы увидим четырёхуровневый ползунок настройки UAC – по умолчанию он находится на третьем уровне. Для полного отключения сдвинем его вниз до конца.

Классический ползунок – довольно оригинальное решение для настройки одного из главных параметров безопасности Windows
- Нажмём на кнопку «ОК» и подтвердим внесённые изменения.
Используем «Редактор реестра»
Альтернативным методом отключения UAC будет прямой запрет на его активацию через реестр. В случае если мы используем этот метод, единственным способом повторной активации будет возвращение значений реестра на исходные.
Для деактивации контроля учётных записей в Windows 10:
- Откроем «Редактор реестра» любым подходящим нам способом – введя команду «regedit.msc» в «Командной строке» или утилите «Выполнить», найдя соответствующее приложение через меню «Поиск» или как-то иначе.
- В новом окне обратимся к левой панели – мы увидим визуальное представление файловой системы реестра. Перейдём по следующему пути: HKEY_LOCAL_MACHINE SOFTWAREMicrosoftWindows CurrentVersionPoliciesSystem.

Для удобства можно просто скопировать путь в адресную строку в верхней части программы.
- В последней папке нам потребуется внести изменения в несколько параметров: PromptOnSecureDesktop, EnableLUA, ConsentPromptBehaviorAdmin. Их значения стоит выставлять в соответствии с этой схемой.

Значения указаны в порядке перечисленных параметров
- После внесения изменений закроем реестр и перезагрузим компьютер.

Через «Конфигурацию системы»
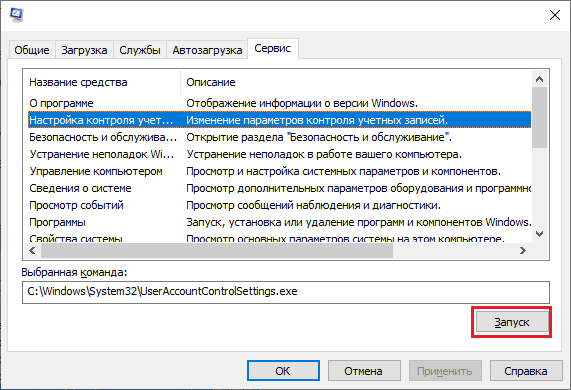
Последним способом станет использование достаточно редко вызываемого меню «Конфигурация системы». Для этого:
- Введём команду «msconfig» в меню «Поиск» и запустим соответствующее приложение. Также можно запустить его через утилиту «Выполнить» или «Командную строку».
- В новом окне обратимся к верхней панели и откроем вкладку «Сервис».

Одно из редко используемых меню всё же пригодится для настройки UAC
- Выделим пункт «Настройка контроля учётных записей» щелчком мыши и нажмём на кнопку «Запуск».
- В новом окне опустим ползунок до нижнего положения и нажмём на «ОК».
- Перезагрузим систему.
Воспользовавшись любым из вышеуказанных способов, мы сможем отключить систему UAC. И всё же, если единственная причина её отключения заключается в назойливых уведомлениях, рекомендуем ещё раз подумать, стоит ли оно того.
Post Views: 624
User Account Control also known as UAC is an important component of the «Windows security system«. This helps the applications running in the windows to prevent your system from making any undesired changes. Whenever software is running in a system and it tries to make changes in the system, a window dialog box appears that is basically UAC. It notifies the user about the changes and whether he wants to apply the changes to his system or not.
UAC also provides a very special and secure environment for a user account. It provides the user with access rights according to the situation. In this tutorial, we will learn how to disable the user account control in Windows 10, 8 and 7 respectively.
Most of the Windows 10 users are not always happy to see the UAC prompts. They prefer to use Windows 10 with the classic security model and limited number of administrator accounts. By following the method listed below, you can easily disable UAC popups in Windows 10.
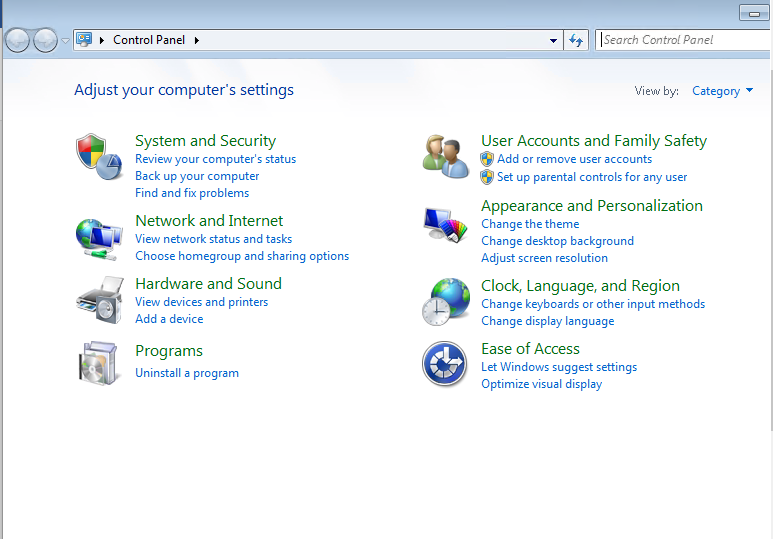
Step 1: Open the control panel and locate the user accounts.
![]()
Step 2: On clicking the user accounts, select “Change user account settings” in the currently open window. Once you find it, double-click on it.
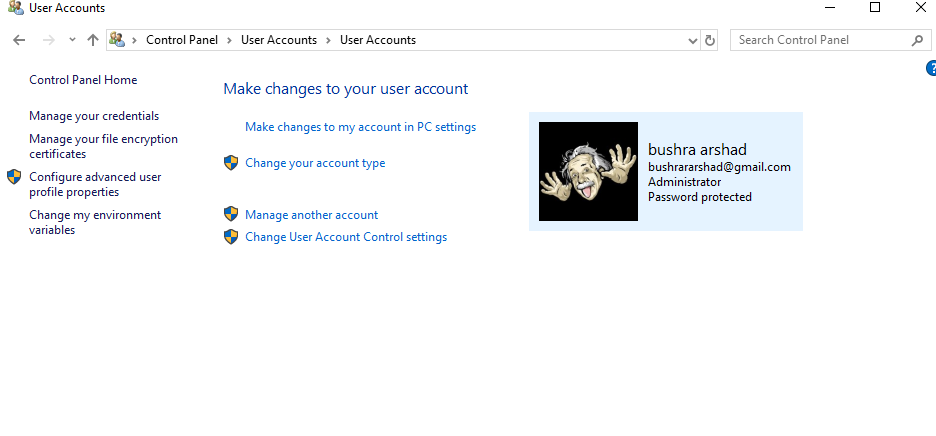
![]()
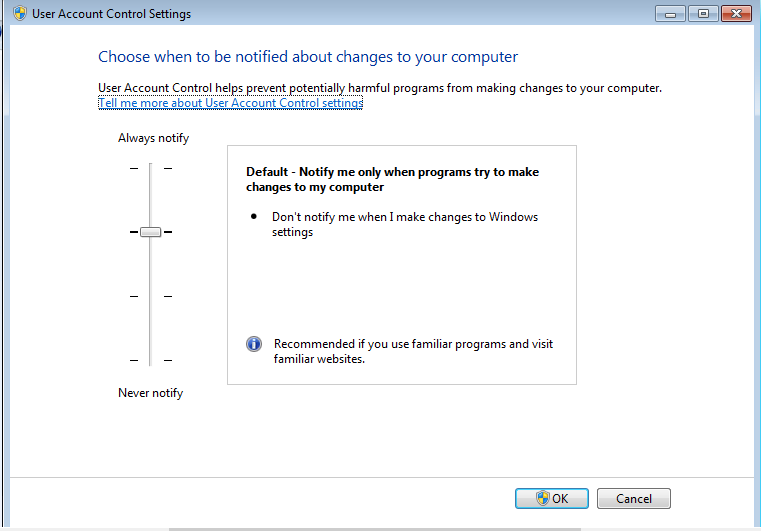
Step 3: Once, you click on “Change User Account Settings” a window will appear as shown below. On Clicking “OK” you will be able to disable UAC.
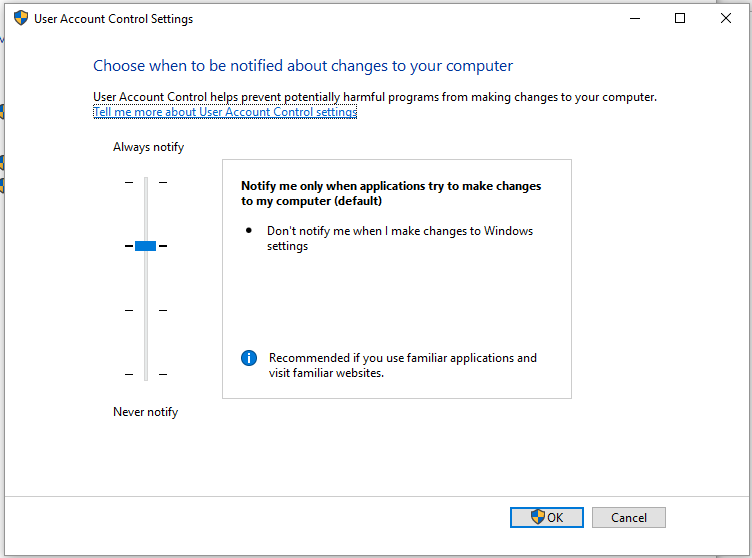
Step 4: Move the slider to the second bar from the top with ‘to notify only when apps try to make changes’ label.
![]()
Step 5: Click on ‘OK’ to disable notifications of UAC in Windows 10.
![]()
If you want to turn off UAC, you need to drag the slider down to the last bar, as shown in the screenshot above. Then click on “OK”. You will be prompted to confirm your selection one time.
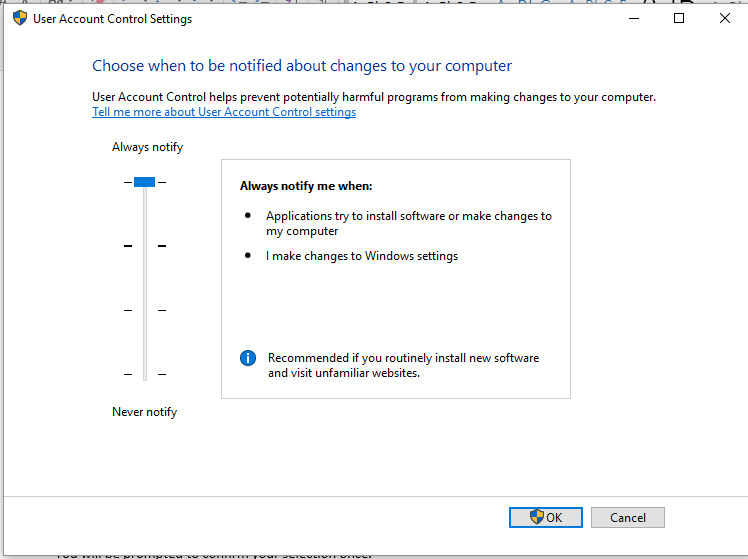
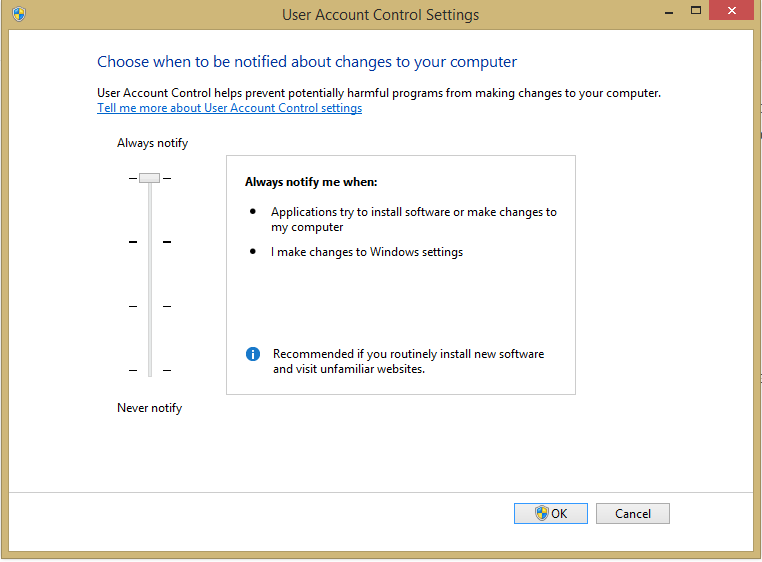
If you want to turn UAC back on, drag the slider to the topmost bar as done in the screenshot below. On clicking “OK” it will enable UAC and a prompt will appear to confirm your selection.
 Reboot your computer to make these changes effective on your Windows 10.
 ![]()
Disabling the user account control in Windows 8
User Account Control was introduced in Windows Server 2008. The idea behind it was to provide its users with an extra layer of system security. It works by creating several prompts that ask a user for their permission every time an application tries to make any change to a system or a user wants to install new software. Prompts also appear when a user tries to make changes in any application. The most important change to UAC in Windows 8 is the innovative setting of UAC to «Never Notify» in User Account Control Settings. It does not actually turn off UAC as it did completely back in Windows 7. In order to make changes in UAC in Windows 8, you need to see the following steps.
Step 1: Open file explorer and type control panel in the search bar in order to open it.
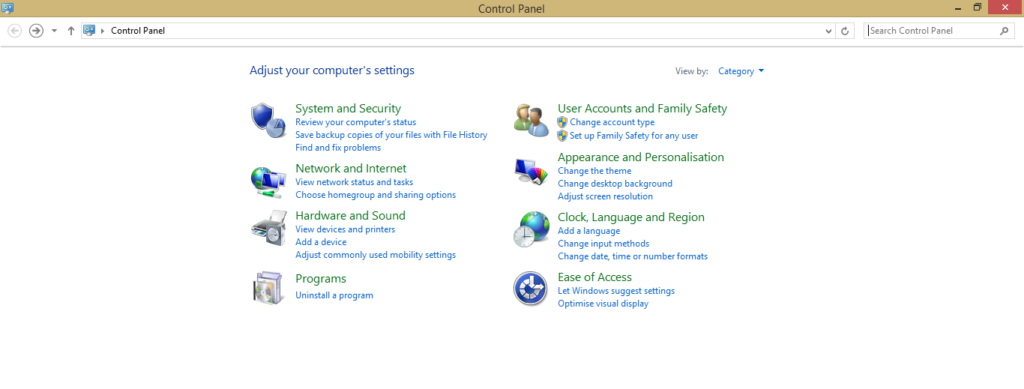
![]()
Step 2: Look for ‘user accounts and family safety’ and open it.
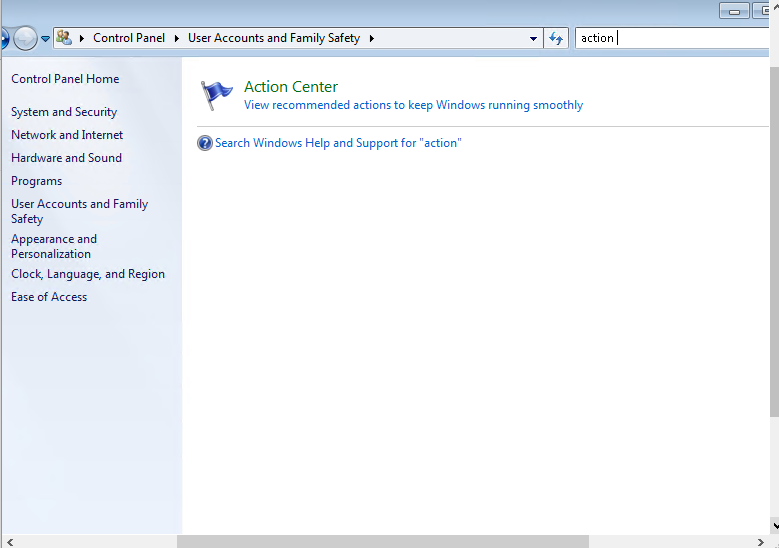
Step 3: Type «UAC» in the search bar of control panel.

![]()
Step 4: Click on ‘Change user account settings’ in the search results.
Step 5: A window will open with a slider which you can use to make changes in the UAC settings.
Step 6: Put the slider in the middle in order to get notification only when apps try to make changes but do not notify when you change Windows settings.

Step 7: In order to turn your UAC off, drag the slider down towards ‘Never notify’ and click on “OK”. To confirm the selection a prompt will appear before it proceeds any further. In order to make these changes effective, you need to reboot the system.
![]()
In order to make your UAC on, you need to drag the slider up towards ‘Always Notify me’ and click on “OK”. Reboot the system afterwards.
![]()
Disabling the user account control in Windows 7
Now, we will look into the ways to disable a user account control in windows 7. Here in Windows 7, UAC settings contains a slider with the options of «Always Notify», «Notify me only when programs try to make changes to my computer (do not dim my desktop)», «Notify me only when programs try to make changes to my computer», «Never notify». If you disable UAC, then you need to be aware of which programs you run. Since these programs will have the same access to the computer as you have to them.
Step 1: To disable UAC in Windows 7, open the control panel.
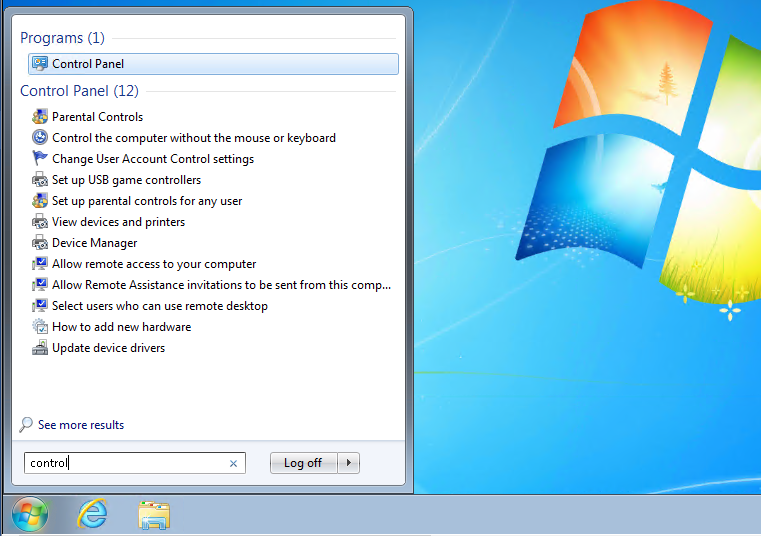
![]()
Step 2: In the control panel, you will see the option ‘user accounts and family safety’. Click on ‘user account’.
![]()
Step 3: The window of UAC settings will open. Click on «user account settings» link. Or alternatively, go on action center to change the settings.
![]()
Step 4: In order to disable UAC, move the slider to ‘Never notify’. After doing that click on “OK” and reboot the system.
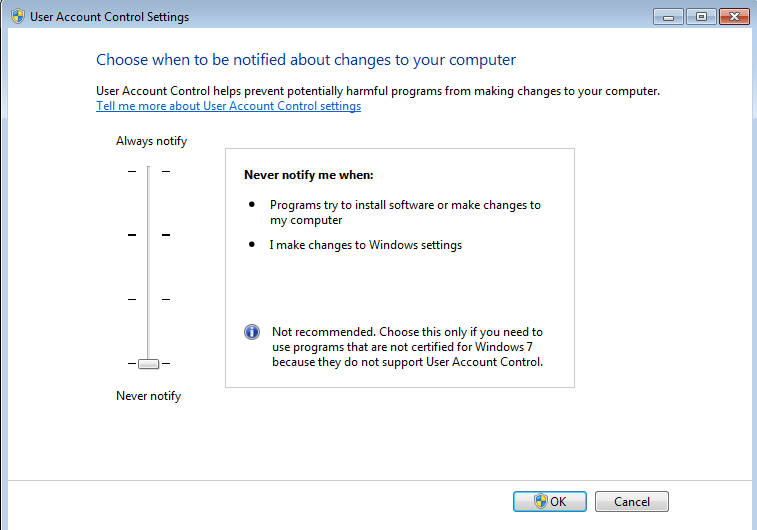
![]()
Step 5: In order to enable UAC, move the slider towards ‘Always notify’, click on «OK» and reboot the system.

![]()
Conclusion
In this tutorial, we have learned how to disable UAC in Windows 10, 8 and 7, respectively. Although, it is not recommended to disable UAC as having UAC in enabled mode provides an additional protection layer against harmful applications and viruses. Let us know in the comments about the version of Windows in which you have disabled the user account control.