On Windows 10, cumulative updates download and install automatically as soon as they become available. Although this approach allows laptops and desktop computers to receive security updates to patch vulnerabilities, improve performance, and bring enhancements without user interaction, it is a very controversial feature.
Typically, it’s because updates contain bugs that can negatively affect the experience in many ways. For example, they could break existing features, introduce driver and application compatibility problems, or cause the Blue Screen of Death (BSoD), and they require a system restart to complete the installation, which can disrupt your workflow.
If you experience more problems than benefits during updates, or if you have a good reason to use a device without updates, depending on your edition of Windows 10, you can disable automatic updates using the Settings app or permanently with Group Policy and Registry.
This guide will walk you through the steps to prevent Windows Update from automatically downloading and installing updates on Windows 10.
How to disable automatic updates using Settings
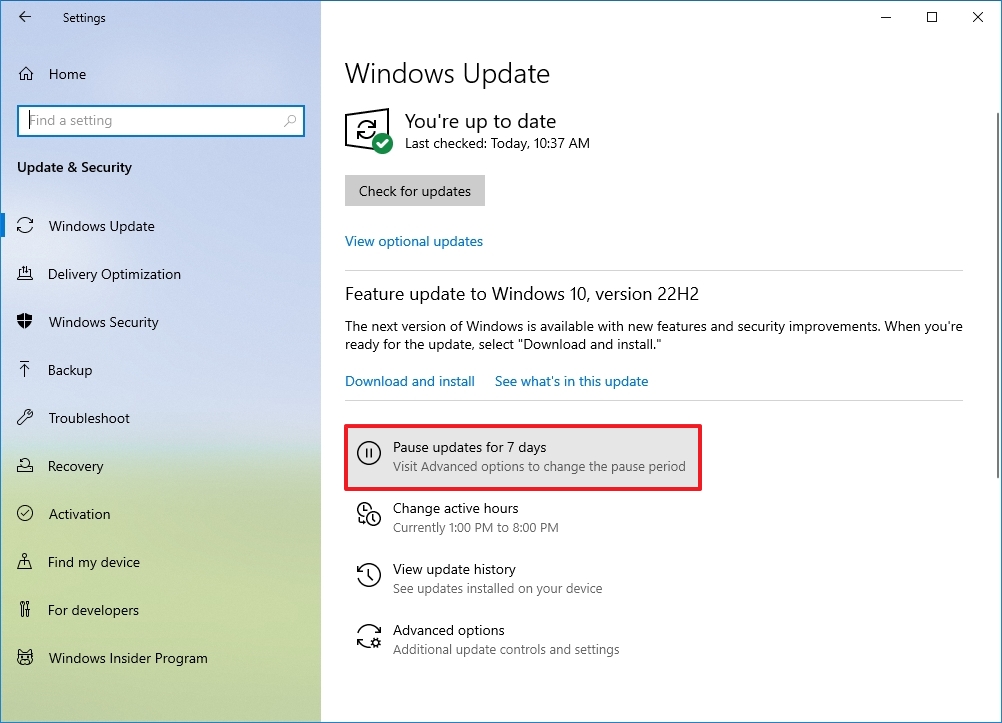
You do not need to disable Windows Update permanently if you want to prevent the system from downloading a specific update immediately. Instead, you could pause updates for up to seven days.
To disable automatic updates temporarily, use these steps:
- Open Settings.
- Click on Update & Security.
- Click on Windows Update.
- Click the «Pause updates for 7 days» option.
Once you complete the steps, Windows Update will no longer download for the time you specified. When the system reaches the pause limit, you will need to install the latest patch available to make the option available again.
You can always undo the changes with the instructions outlined above, but on step 4, choose the Select date option. Alternatively, you can accomplish the same effect by clicking the Resume updates button.
How to disable automatic updates using Group Policy
On Windows 10 Pro, the Local Group Policy Editor includes policies to permanently disable automatic updates or change the update settings to choose when patches should be installed on the device.
Disable Windows 10 updates
To disable automatic updates on Windows 10 permanently, use these steps:
- Open Start.
- Search for gpedit.msc and click the top result to launch the Local Group Policy Editor.
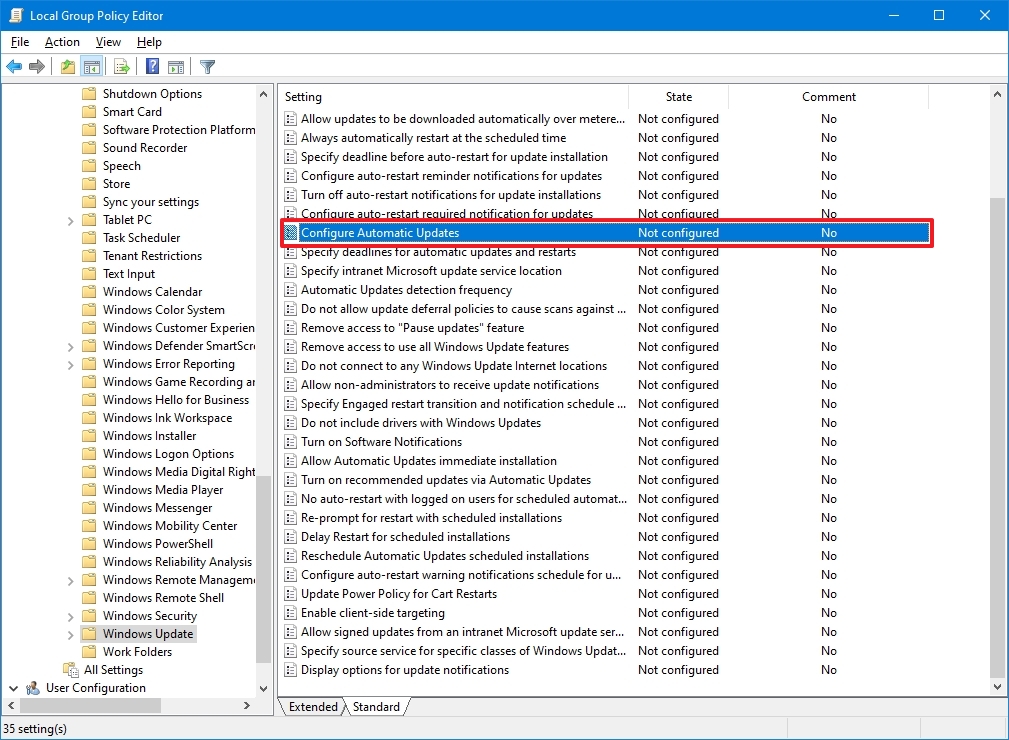
- Navigate to the following path: Computer Configuration > Administrative Templates > Windows Components > Windows Update
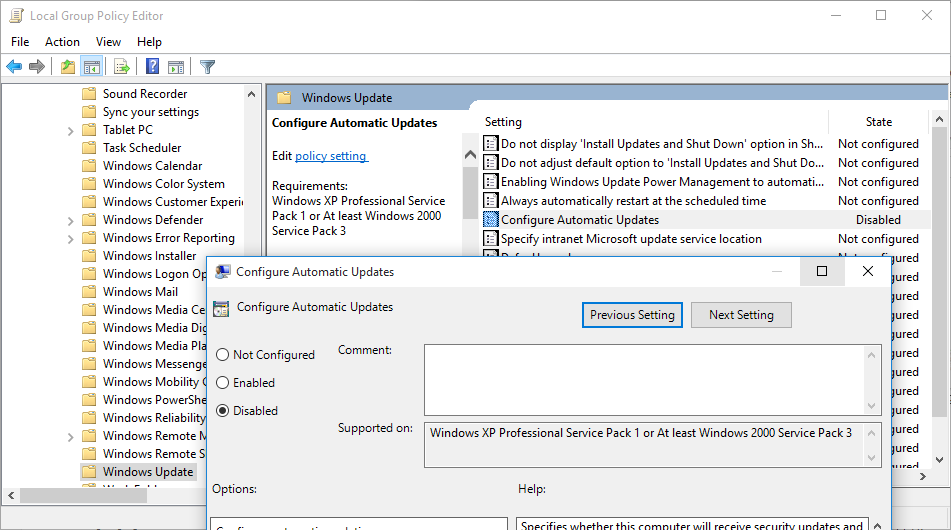
- Double-click the «Configure Automatic Updates» policy on the right side.
- Check the Disabled option to turn off automatic Windows 10 updates permanently.
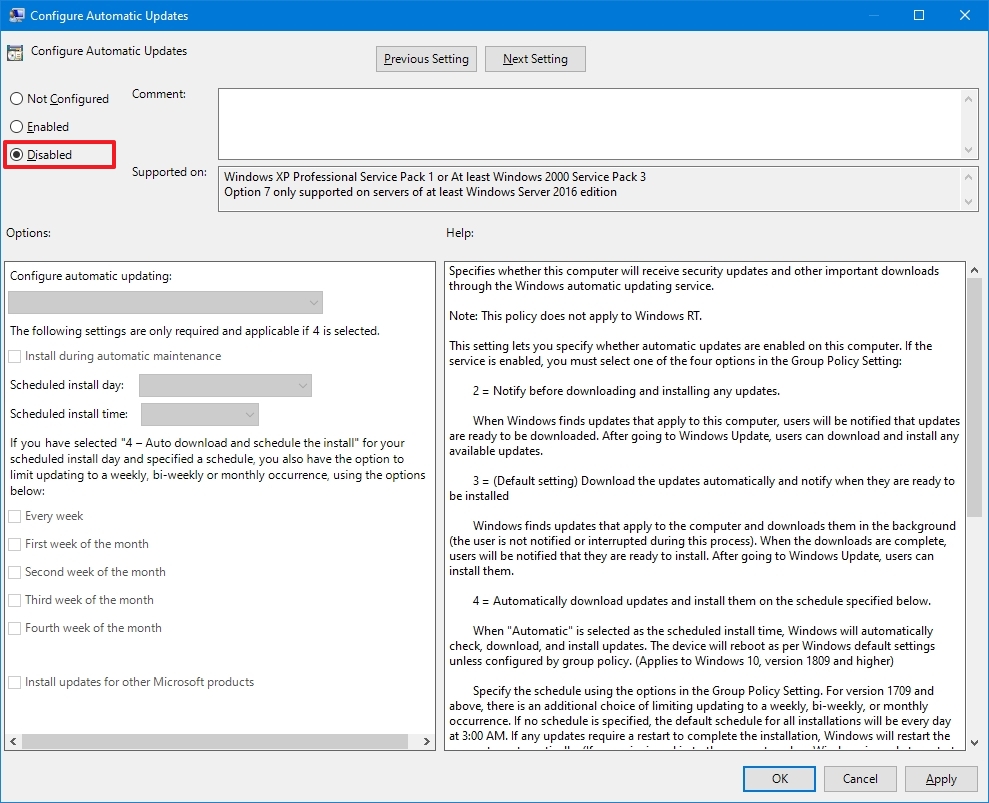
- Click the Apply button.
- Click the OK button.
After you complete the steps, Windows 10 will stop downloading updates automatically. However, the ability to check for updates manually will continue to be available on Settings > Update & Security > Windows Update, and clicking the Check for updates button to download the most recent patches as needed.
If you want to enable automatic updates on the computer again, you can use the same instructions outlined above, but in step 5, make sure to select the Not Configured option.
Limit Windows 10 updates
The Local Group Policy Editor also lets you choose how to disable automatic updates.
To manage Windows Update automatic downloads with Group Policy on Windows 10, use these steps:
- Open Start.
- Search for gpedit.msc and select the top result to launch the experience.
- Navigate to the following path: Computer Configuration > Administrative Templates > Windows Components > Windows Update
- Double-click the Configure Automatic Updates policy on the right side.
- Check the Enable option to turn on the policy.
- Under the «Options» section, select the option to prevent updates from downloading automatically on Windows 10:
- 2 — Notify for download and auto install.
- 3 — Auto download and notify for install.
- 4 — Auto download and schedule the install.
- 5 — Allow local admin to choose setting.
- 7 — Auto Download, Notify to install, Notify to Restart.
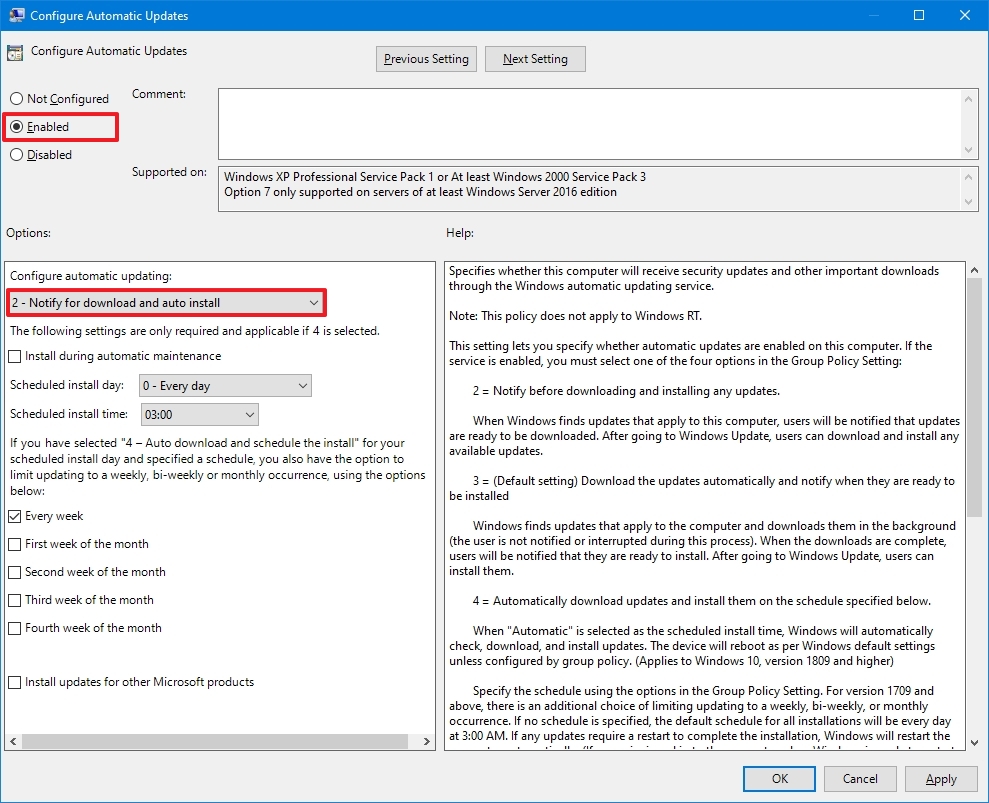
- Quick tip: The best option to disable automatic updates is the 2 — Notify for download and auto install option, but you can make a different selection. If you choose option 2, updates won’t download automatically. Instead, you will now see an «Install now» button to manually trigger an update on the Windows Update settings page.
- Click the Apply button.
- Click the OK button.
Once you complete the steps, automatic updates will be permanently disabled on Windows 10. However, when new updates become available, you can install them manually from the Windows Update settings page.
How to disable automatic updates with Registry
You can also use the Registry in two different ways to disable automatic updates on Windows 10.
Warning: This is a friendly reminder that editing the Registry is risky and can cause irreversible damage to your installation if you don’t do it correctly. Before proceeding, it’s recommended to make a backup of your PC.
Disable updates
To disable Windows 10 updates permanently by changing the Registry settings, use these steps:
- Open Start.
- Search for regedit and click the top result to launch the Registry Editor.
- Navigate to the following path: HKEY_LOCAL_MACHINESOFTWAREPoliciesMicrosoftWindows
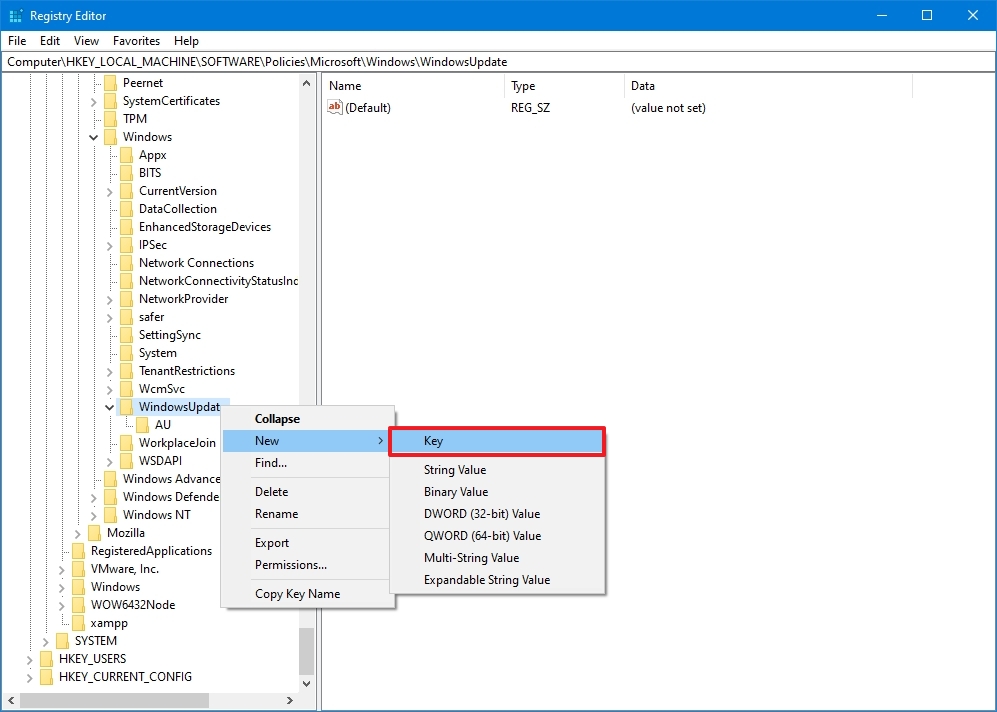
- Right-click the Windows (folder) key, select the New submenu and choose the Key option.
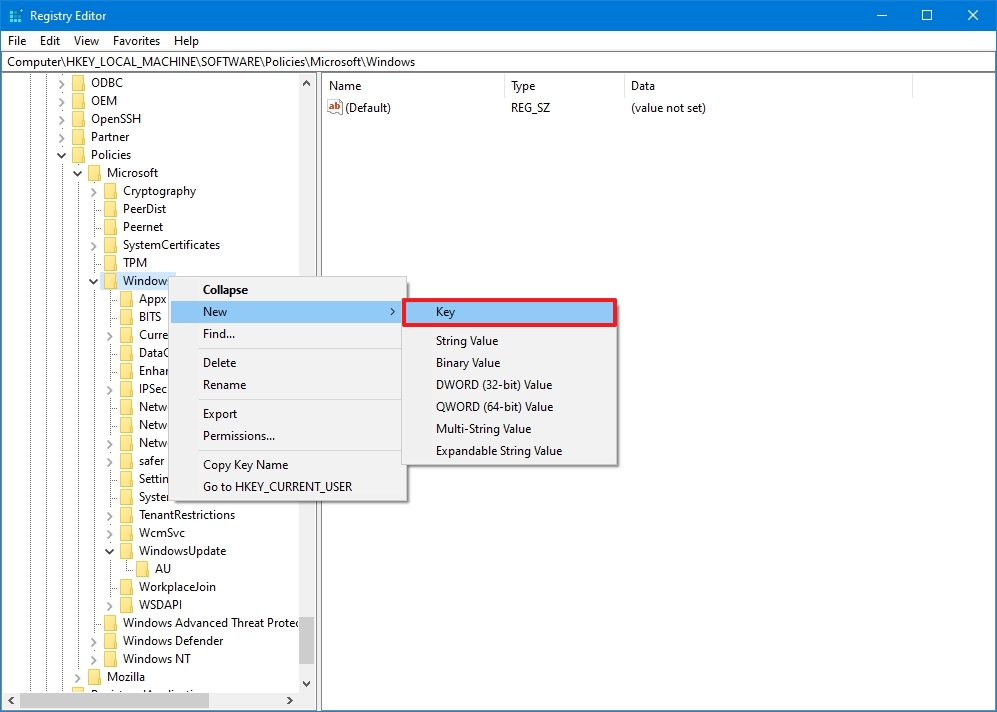
- Name the new key WindowsUpdate and press Enter.
- Right-click the newly created key, select the New submenu, and choose the Key option.
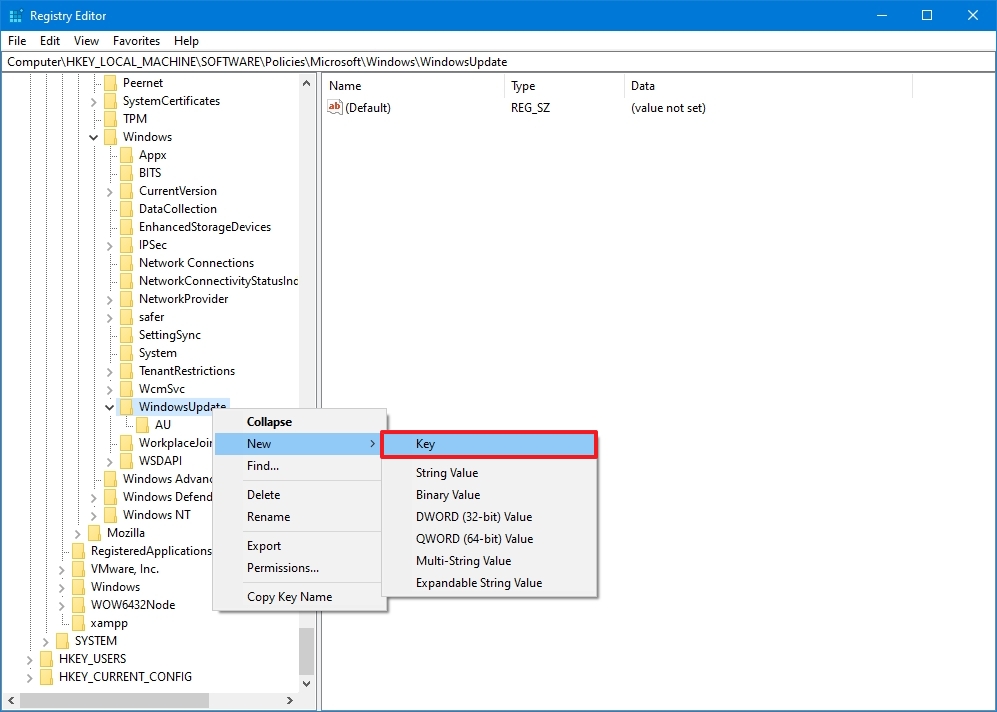
- Name the new key AU and press Enter.
- Right-click the AU key, select the New submenu, and choose the DWORD (32-bit) Value option.
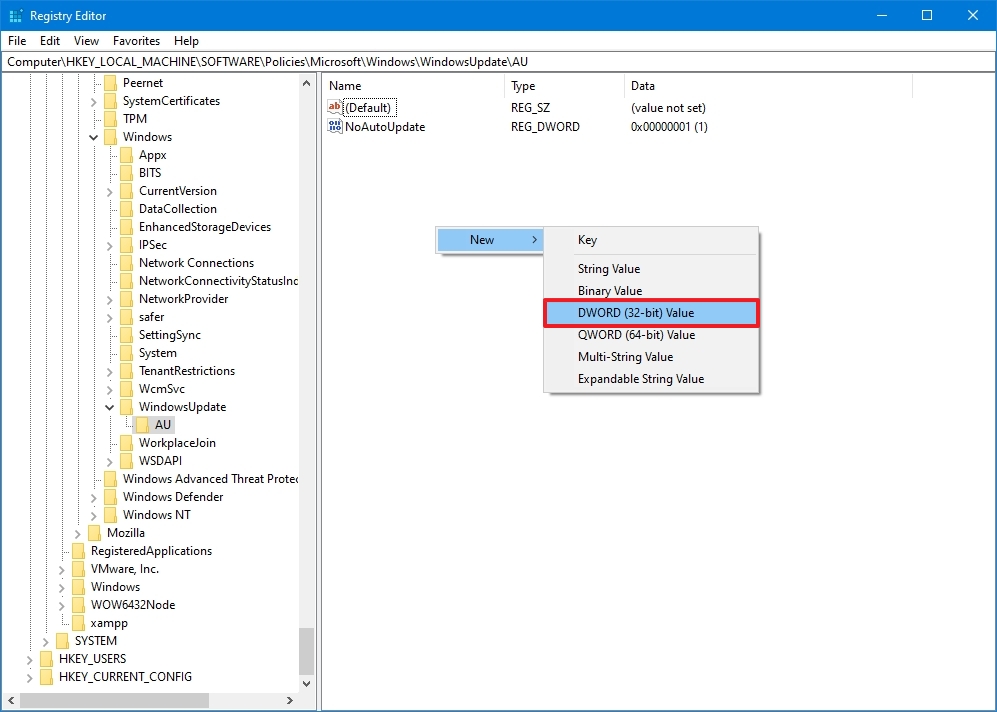
- Name the new key NoAutoUpdate and press Enter.
- Double-click the newly created key and change its value from 0 to 1.
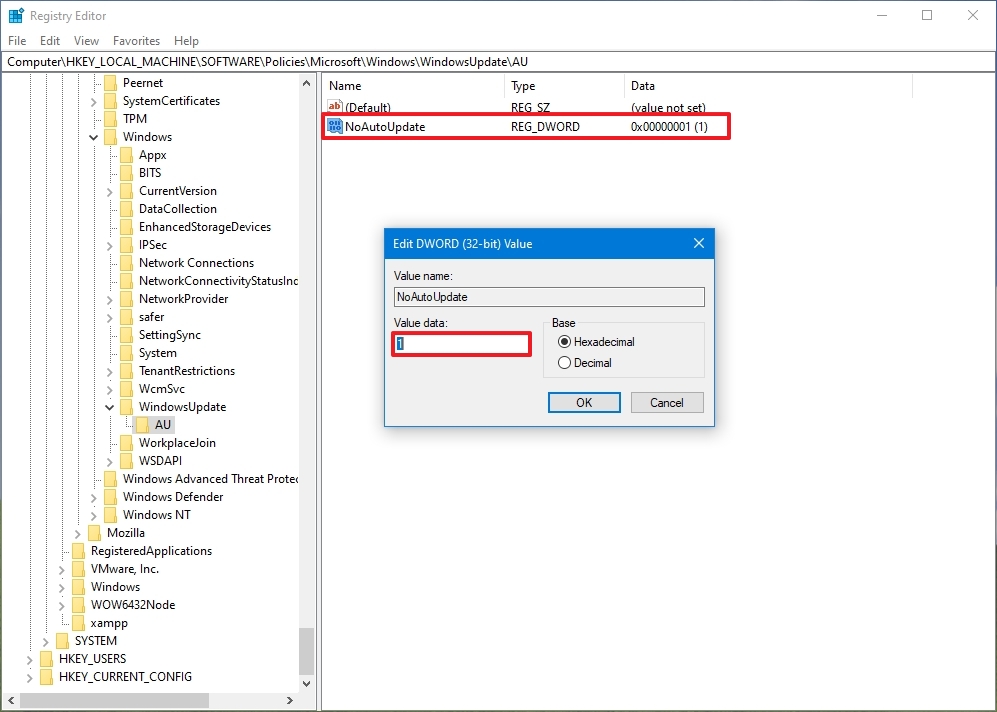
- Click the OK button.
- Restart the computer.
After you complete the steps, automatic updates will be disabled permanently on the device. However, you will still be able to download updates by clicking the Check for updates button on the Windows Update settings page.
If you want to undo the changes, you can use the same instructions outlined above, but on step 4, right-click the WindowsUpdate key, select the Delete option, then reboot the computer to apply the settings.
Limit updates
Finally, you can use the Registry to configure the system settings to decide how to get updates on Windows 10.
To use the Registry to stop automatic updates (but choosing how to receive updates), use these steps:
- Open Start.
- Search for regedit and click the top result to open the Registry Editor.
- Navigate to the following path: HKEY_LOCAL_MACHINESOFTWAREPoliciesMicrosoftWindows
- Right-click the Windows (folder) key, select the New submenu and choose the Key option.
- Name the new key WindowsUpdate and press Enter.
- Right-click the newly created key, select the New submenu, and choose the Key option.
- Name the new key AU and press Enter.
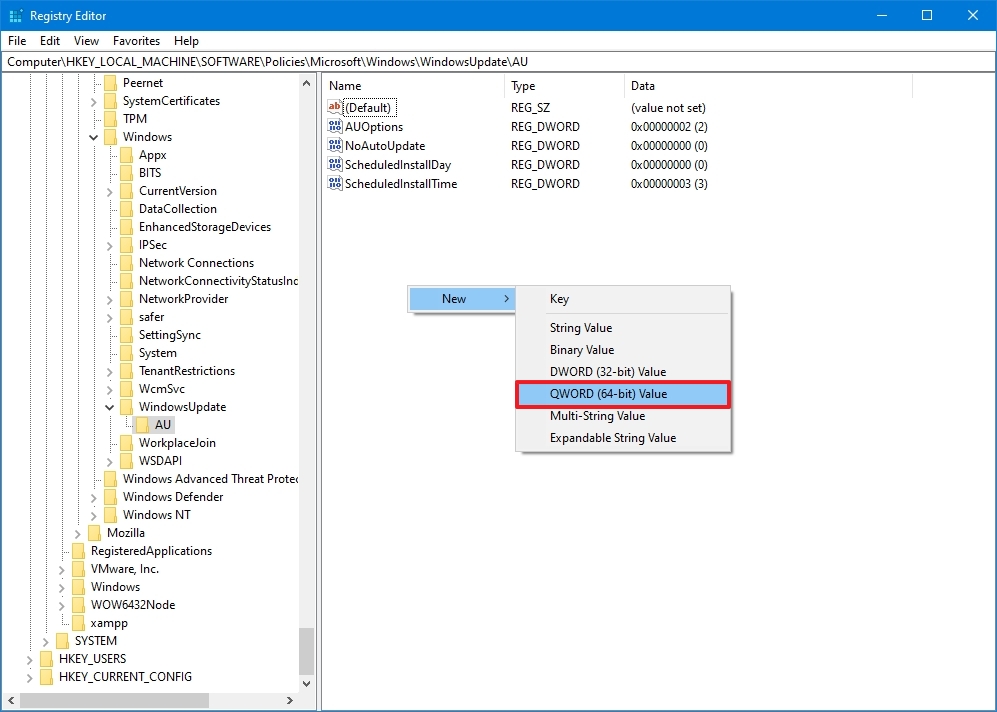
- Right-click the AU key, select the New submenu, and select the DWORD (32-bit) Value option.
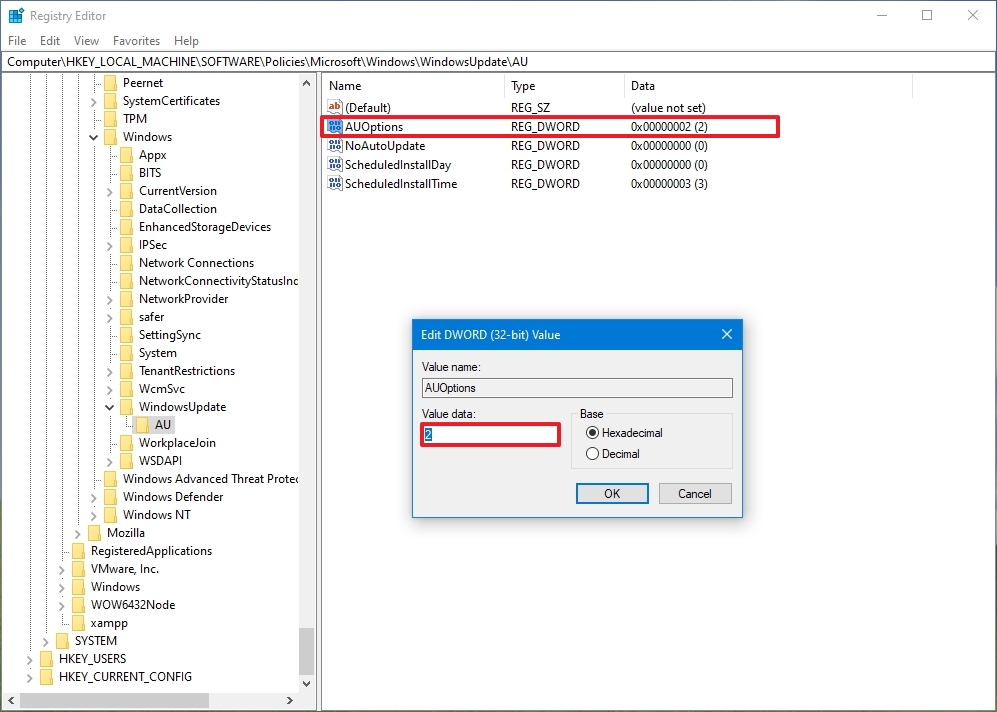
- Name the new key AUOptions and press Enter.
- Double-click the newly created key and change the value (number only) to:
- 2 — Notify for download and auto install.
- 3 — Auto download and notify for install.
- 4 — Auto download and schedule the install.
- 5 — Allow local admin to choose settings.
- 7 — Auto Download, Notify to install, Notify to Restart.
- Quick note: These options are the same as the Group Policy settings, and option 2 is the closest to disable Windows Update permanently.
- Click the OK button.
- Restart the computer.
Once you complete the steps, cumulative updates will no longer download and install automatically. However, when a new update becomes available, you will find the option to install it manually from the Windows Update settings.
You can use the same instructions outlined above to restore the original settings, but on step 4, right-click the WindowsUpdate key, select the Delete option, and reboot the computer.
Updates are essential to fix security vulnerabilities, resolve issues, and improve the overall experience, no matter the version of Windows you use. However, you may still need to disable this feature in some situations. For instance, when you want to have complete control over updates on Windows 10, when you want to avoid issues since bugs are common in most rollouts, or when you are using a critical app or equipment and you do not want to encounter any compatibility issues.
More resources
For more helpful articles, coverage, and answers to common questions about Windows 10 and Windows 11, visit the following resources:
- Windows 11 on Windows Central — All you need to know
- Windows 10 on Windows Central — All you need to know
Get the best of Windows Central in in your inbox, every day!
Mauro Huculak is technical writer for WindowsCentral.com. His primary focus is to write comprehensive how-tos to help users get the most out of Windows 10 and its many related technologies. He has an IT background with professional certifications from Microsoft, Cisco, and CompTIA, and he’s a recognized member of the Microsoft MVP community.
One of the controversial features of Windows 10 is a new way that the operating system handles updates. Cumulative updates are installed automatically when Windows decides to do it. This can be extremely frustrating for Windows 10 users as they are often forced to restart their machine at an inopportune time.
Before proceeding, remember that some of the automatic updates will be security updates or important stability improvements that you will want to have installed on your system. Keep this in mind if you choose to keep automatic updates turned off for an extended period of time.
One option which we will not look at in depth is to make registry changes to your Windows operating system to disable automatic updates. This is a dangerous procedure and should only be taken by experienced users who have taken a full backup of their machine before attempting the registry changes. Mistakes during this process can have serious negative effects on your computer and its performance.
Option 1. Disable the Windows Update Service
Windows Update is essentially just another Windows Service and can be turned off in a similar manner to other services.
Follow these steps to stop Windows 10 updates:
When you want to re-enable automatic updates you just follow the same procedure except you select “Automatic” when choosing the “Startup Type”.
Option 2. Set Up a Metered Connection
If you are using WiFi to connect your Windows 10 machine to the Internet, you have the option of setting up a metered connection. In a metered connection, bandwidth is conserved by only automatically downloading and installing priority updates.
Microsoft’s method of classification may remain a mystery, but driver and software feature updates that may cause stability problems are minimized by opting for this option for stopping Windows 10 automatic updates.
To disable Windows 10 updates:
For some reason, Microsoft only offers this option if you are using a WiFi connection. If you connect to the Internet through an Ethernet cable you will not be able to set up a metered connection.
Option 3. Group Policy Editor
You can make changes to the Group Policy Editor if you are using Windows 10 Education, Pro or Enterprise editions. Users of Windows 10 Home edition are out of luck regarding this way of disabling Windows 10 updates.
If you opt for this solution, security updates will still be installed automatically. For all other updates, you will be notified that they are available and can install them at your convenience. This is the way Windows update worked in the past. Today, Microsoft wants to eliminate the need for novice users to engage in updates, but it has enforced this at the cost of flexibility for more experienced users.
Here’s how to update your Group Policy Editor to prevent automatic Windows 10 updates:
From this point forward Windows should notify you that updates are available and it is your responsibility to make sure that they get downloaded and installed.
Why Would I Need to Know How to Disable Windows 10 Updates?
Operating system, driver, and application updates can often lead to unexpected behavior on the computer on which they are installed. One way to protect yourself and your machine from unanticipated problems is to perform a backup before installing updates to your system.
Unfortunately, when automatic updates are being installed without your approval, you cannot take this precautionary step and face the possibility of having to resort to an older backup if you need to go back past the update.
Many updates need to reboot your machine when complete and certainly take up bandwidth while downloading. This can lead to slower response time and unforeseen reboots that can cause havoc with your work life.
So there are indeed valid reasons to turn off automatic updates in Windows 10. Just be careful not to turn the service off and forget to check for updates. While automatic updates can be problematic, letting your system lag behind critical updates can also have serious consequences.

Jeff Cochin
Jeff Cochin is a data management and recovery expert. He also serves as a technical writer, testing and reviewing tech solutions in various fields. Jeff Cochin is a professional data management, warehousing and recove…
Read full bio
Jeff Cochin is a data management and recovery expert. He also serves as a technical writer, testing and reviewing tech solutions in various fields. Jeff Cochin is a professional data management, warehousing and recove…
Read full bio

Approved by
Brett Johnson
This article has been approved by Brett Johnson, Data Recovery Engineer at ACE Data Recovery. Brett has a Bachelor’s Degree in Computer Systems and Network, 12 years of experience.
This article has been approved by Brett Johnson, Data Recovery Engineer at ACE Data Recovery. Brett has a Bachelor’s Degree in Computer Systems and Network, 12 years of experience.
For some reason Microsoft decided to remove the option to turn Automatic Updates On of Off in Windows 10. Hence, Windows 10 will start downloading the updates on any connection as long as it is not marked Metered. Whilst its good for a lot of the users who have speedy connections, the ones with slow broadband connections suffer because Windows Update takes most out of the little speed that their connection offers. This results in slow browsing and even slower downloads. So here’s how to turn off Automatic Updates in Windows 10 and save some bandwidth.
Stopping Windows 10 from Updating Automatically
There are two alternative ways to turn off the Windows update. One where the updates are only stopped from automatically downloading and the other where they are entirely disabled and a manual check won’t work either. First one is preferred.
Method 1 – Disable Automatic Downloading of Windows Updates
Just a note, while you can follow the steps below to disable Windows Update, be sure to still run it manually once in a while (when PC is idle) and let the PC update. That’s because a lot of updates are important to keep Windows stable and running. Windows Update also brings security fixes and driver updates which can improve hardware compatibility.
If your PC is connected to internet via a WiFi connection, it is better to mark that particular connection as ‘Metered’ and Windows won’t update on such a connection.
- Type gpedit.msc in Start and press Enter key to open the Group Policy Editor. Alternatively, press + R, type gpedit.msc and hit Enter.
- In the left pane, navigate to: Computer Configuration> Administrative Template> Windows Components> Windows Update.
- Now in the right pane, double-click on Configure Automatic Updates.

Set to Disabled - Change the value from Not configured to Disabled and press OK.
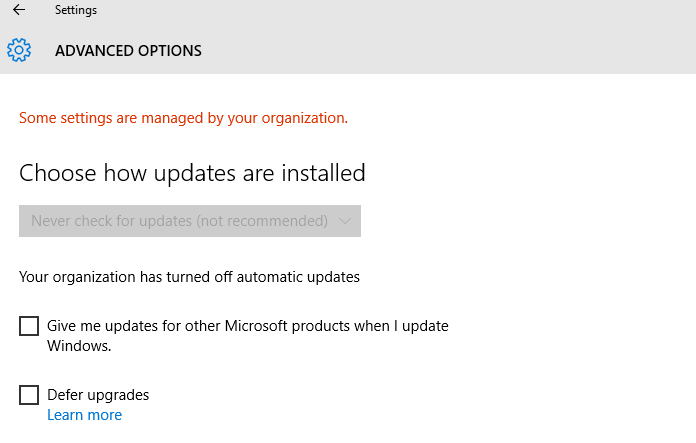
From then onward, Windows will not automatically check for and download updates. The same will be reflected by a note on the Advanced settings page under Windows update settings.
Method 2: Disable both Automatic & Manual Updates
This method disables Windows Update entirely and you need to follow the steps mentioned in 2.1 below to make it work again.
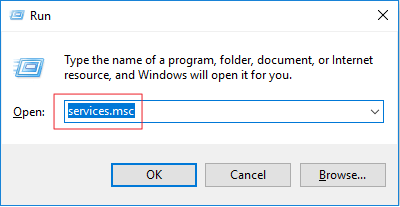
- Open Run by pressing Windows Key + R. Alternatively, you can also right-click Start button and choose Run.
- Enter services.msc and hit Enter.
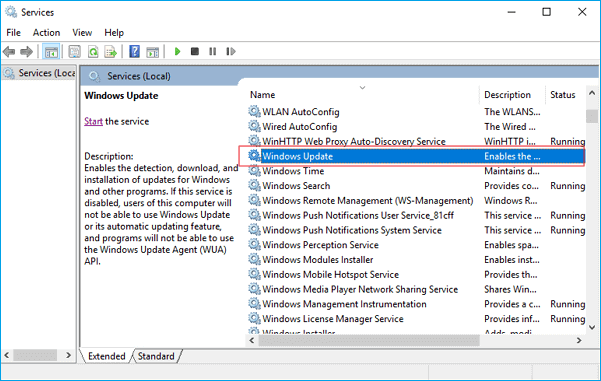
- In the Services window, locate service with the name Windows Update.
- Right click on Windows Update and choose Properties.
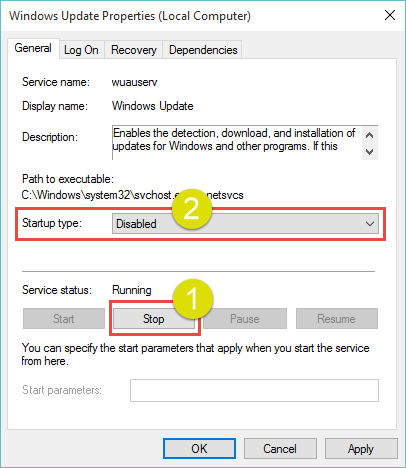
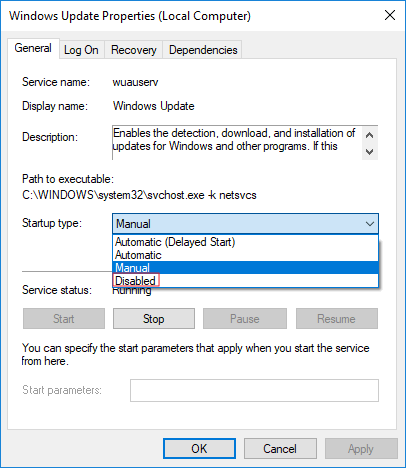
- Firstly stop the service by clicking the Stop button. Then change Startup type from Manual to Disabled.

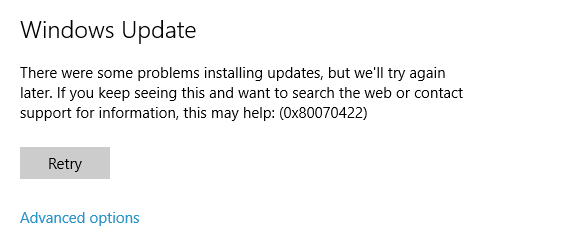
- Click OK and you’re good to go. Windows will try to check for updates, but because the service is not running, it will go into an error state.

Error checking for Updates
2.1 Enabling Windows Updates Again
Because updates are important, you should turn on updates from time to time and update your PC to the latest. To turn Windows Update on:
- Follow steps 1 to 4 in the above procedure.
- Change Startup type from Disabled to Manual.
- Click OK.
- Go to Windows Update in PC Settings and press on Check for Updates and Windows will start installing updates.
Read this article to find out how to disable automatic update option in Windows 10. Let’s explore how to remove an unnecessary or faulty Windows update by using integrated system tools or with third-party apps.

Do it with the Services tool
The first method works for Windows 10 Home, Professional and Enterprise.
Type Services in the search field (the magnifying glass icon on the taskbar) and run this system tool.

Find Windows Update service and open its properties.

Click on Stop and select Startup Type – Disabled

After these changes are applied and the computer restarts, Windows Update will not work anymore, so updates won’t be downloaded and installed automatically.
Try Local Group Policy Editor
The second method is only good for Windows 10 Professional and Enterprise. As other versions of Windows lack such component as Local Group Policy Editor.
To start the Local Group Policy Editor, type gpedit.msc in the search field and press Enter.

When in the Editor, go to Computer Configuration – Administrative Templates – Windows Components – Windows Update.

Find the policy Configure Automatic Updates, open it and set it to Disabled. Click Apply/Ok.

Free utilities to disable automatic updates in Windows 10
Also, you can use free utilities to prevent Windows 10 from updating automatically.
As an example, we’ll show you Win Updates Disabler, but there are other tools as well.
Run the program, jump to the tab Disable to check the box next to Disable Windows Updates. After that, click Apply Now for the changes to take effect.
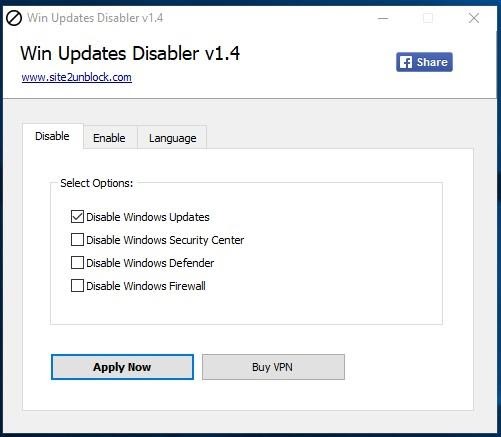
As seen from the screenshot, this program can also disable Windows Firewall and Windows Defender. If necessary, you can turn everything on again in the tab Enable.

How to remove the updates that have already been installed?
If some updates were installed incorrectly, or you want to remove only particular Windows 10 updates, this is also possible.
To do it:
Go to Control Panel and select Programs & Features.
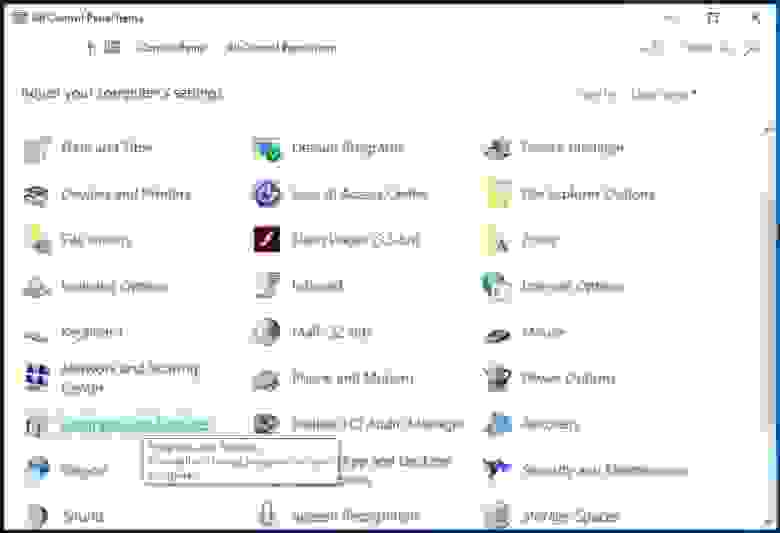
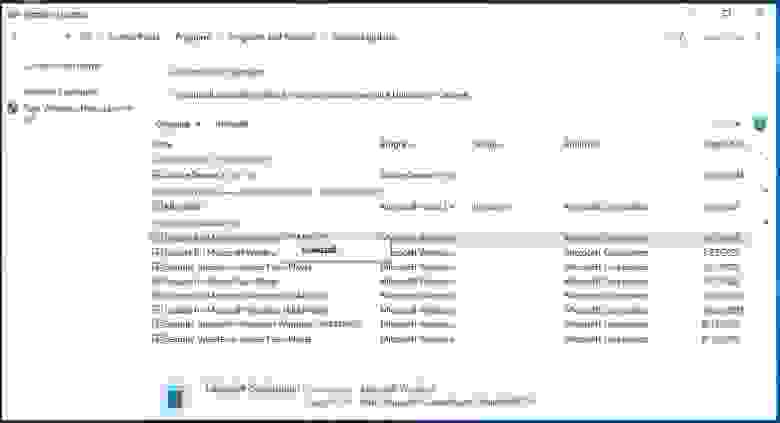
Jump to the tab View Installed Updates.

Sort them by installation date by clicking on Installed On.

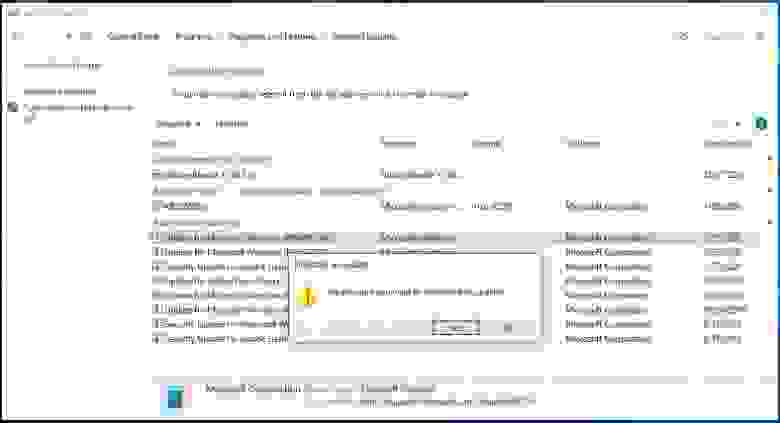
Right-click on one of the updates which you want to delete from the system and click Uninstall.
Confirm your decision and changes will take effect after the system restart.
See the full article with all additional video tutorials. If you still have any questions, please ask in a comments. Also visit our Youtube channel, there are over 400 video tutorials.
![]()
Download Article
![]()
Download Article
- Disabling the Update Service
- Using a Metered Connection
- Using Group Policy Editor
- Disabling App Updates
- Video
- Q&A
- Tips
- Warnings
|
|
|
|
|
|
|
This wikiHow teaches you how to prevent your Windows 10 computer from updating itself. Unfortunately, there is no way to permanently disable automatic updates, but you can delay them indefinitely by using the Services program or by setting your Wi-Fi as a metered connection. You can also disable automatic updates for the apps and drivers on your computer if you like.
-

1
Understand the limitations of this method. While disabling the automatic update service will temporarily halt any Windows 10 cumulative updates, the service will re-enable itself after a certain amount of time.
-
2
Open Start
. Click the Windows logo in the bottom-left corner of the screen.
Advertisement
-
3
Type in services. This will search your computer for the Services program.
-
4
Click Services. It’s at the top of the Start menu, just right of a gear-shaped icon. Doing so will open the Services window.
-
5
Scroll down to the «Windows Update» option. You’ll find this near the bottom of the window.
-
6
Double-click the «Windows Update» option. Doing so opens the Windows Update Properties window.
-
7
Click the «Startup type» drop-down box. It’s in the middle of the window. Clicking this option prompts a drop-down menu.
- If you don’t see this option, first make sure that you’re on the right tab by clicking General at the top of the Properties window.
-
8
Click Disabled. It’s in the drop-down menu. This will prevent the Windows Update service from automatically starting itself for the time being.
-
9
Click Stop. You’ll find this option near the bottom of the window. Clicking it prompts the Windows Update service to stop running.
-
10
Click Apply, then click OK. Both options are at the bottom of the window. Doing so will apply your settings and close the Properties window. The Windows Update service should now be disabled.
-
11
Check the update service periodically. Any time you restart your computer or go more than two days without shutting down, open Services and check the «Windows Update» status to ensure that it’s still disabled. While the Windows Update service shouldn’t turn itself back on often, it will occasionally do so.
- If you see «Disabled» to the right of the «Windows Update» heading, Windows Update is still disabled.
- If you see anything other than «Disabled» to the right of the «Windows Update» heading, disable the Windows Update again.


Advertisement
-
1
Understand that this method won’t work for Ethernet connections. You can only disable automatic updates by using this method on a Wi-Fi connection.
-
2
Open Start
. Click the Windows logo in the bottom-left corner of the screen. The Start menu will pop up.
-
3
Open Settings
. Click the gear-shaped icon in the lower-left side of the Start menu. This will open the Settings window.
-
4
Click
Network & Internet. It’s in the Settings window.
-
5
Click the Wi-Fi tab. You’ll find this option in the upper-left side of the window.
-
6
Click your current connection’s name. It’s near the top of the page. Doing so will open the Wi-Fi connection’s settings page.
-
7
Scroll down to the «Set as metered connection» section. This section is near the bottom of the page.
-
8
Click the «Off» switch
. This will turn it on
, which will prevent Windows from downloading updates over your currently connected network.[1]
- If this switch is colored and has «On» next to it, your Wi-Fi is already set up as a metered connection.


Advertisement
-
1
Make sure that you’re using the right version of Windows. You’ll need a pre-Anniversary edition of Windows 10 Pro or an equivalent. You can’t use this method if you’re using Windows 10 Home edition.
- The Windows 10 Education and Enterprise editions also include the Group Policy Editor.
- You can check your version of Windows by typing system into Start, clicking System Information near the top of the menu, and looking for «Microsoft Windows 10 Professional» to the right of the «OS Name» heading.
- The Windows Anniversary update removed the option to turn off automatic updates from the Group Policy Editor.
-
2
Open Start
. Click the Windows logo in the bottom-left corner of the screen.
-
3
Type in run. Doing so will search your computer for the Run program.
-
4
Click Run. It’s the speeding envelope icon near the top of the Start window. Doing so opens the Run program in the bottom-left side of your computer’s screen.
-
5
Launch the Group Policy Editor. Type gpedit.msc into the Run window, then click OK. The Group Policy Editor window will open.
-
6
Navigate to the «Windows Update» folder. In the sidebar on the left side of the Group Policy Editor window, do the following:
-
7
Click Configure Automatic Updates. It’s an item in the main Group Policy Editor window. Doing so selects this item.
-
8
Open the «Configure Automatic Updates» properties window. Right-click the selected Configure Automatic Updates item, then click Edit in the resulting drop-down menu.[2]
-
9
Check the «Enabled» box. It’s in the upper-left side of the window.
-
10
Click the «Configure automatic updating» drop-down box. This option is on the left side of the window.
-
11
Click 2 — Notify for download and notify for install. It’s in the drop-down menu. This option ensures that you’ll be asked before updates are installed, allowing you to decline the updates.
-
12
Click Apply, then click OK. Doing so saves your changes.
-
13
Apply your changes. To do so:
- Open Start
- Open Settings
- Click Update & Security
- Click Windows Update
- Click Check for updates
- Wait for Windows to identify available updates (Windows will not install these updates).
-
14
Restart your computer. Click Start
, click Power
, and click Restart in the pop-up menu. Once your computer finishes restarting, your update preferences will be saved.
- You’ll still be able to manually allow updates as they become available.


Advertisement
-
1
Open Start
. Click the Windows logo in the bottom-left corner of the screen. The Start menu will pop up.
-
2
Click
Microsoft Store. You should usually see this option on the right side of the Start menu.
- If you don’t see the Store icon in the Start menu, type store into the search bar at the bottom of the menu and then click Store when it appears at the top of the menu.
-
3
Click ⋯. It’s in the top-right corner of the window. This will prompt a drop-down menu.
- On older versions of Windows 10, you’ll click your profile picture in the upper-left corner of the Windows Store.
-
4
Click Settings. This is in the drop-down menu.
-
5
Click the colored «Update apps automatically» switch
. Doing so will turn off the switch
.
- If this switch is off, updates for Windows apps are already disabled.


Advertisement
Add New Question
-
Question
What do I do if the Windows Update Service keeps turning itself back on when I disable it?

When you are disabling the Microsoft Update Service, on tabs you’ll see «recovery» is set to «one» in «one minute» and «at restart.» change that to «9999,» «day» and no restart. This will prevent it from restarting the service automatically, unless you restart it manually.
-
Question
If updates are disabled, will my PC still boot?
Yes. Updates simply keep the system more up-to-date and secure.
-
Question
Why does Windows need updates?
There are different types of updates. Security updates help fix any vulnerabilities in Windows so that malware cannot infect your system. Feature updates add new features and interface changes, and are usually delivered a few times a year. Bug fixes fix any software errors and glitches that make it work improperly. These updates can either be delivered alone or bundled with each other in a Windows update.

See more answers
Ask a Question
200 characters left
Include your email address to get a message when this question is answered.
Submit
Advertisement
Video
-
Automatic updates often improve the use and security of Windows, though these updates can eventually slow down an older computer.
Thanks for submitting a tip for review!
Advertisement
-
Disabling Windows Updates makes your system vulnerable to malware[3]
. It is strongly recommended that you do not disable updates in Windows.
Advertisement
About This Article
Article SummaryX
1. Type «services» into the Windows search bar.
2. Click Services.
3. Double-click Windows Update.
4. Select Disabled from the «Startup type» menu.
5. Click Stop.
6. Click Ok.
7. Click Ok.
Did this summary help you?
Thanks to all authors for creating a page that has been read 254,611 times.
Is this article up to date?
- Windows 11 Update Rolls Out:
- In June 2022, Microsoft has released the Insider version of Windows 11 (codenamed Sun Valley). The official version will reach every compatible computer since October 2022. The new Windows 11 requires users’ computers to equip with TPM 2.0 and boot in UEFI mode. If you want to upgrade to Windows 11 but do not sure if your computer is compatible with the minimum requirements, you can click this link to check the update to Windows 11.
«Every time I try to shut down my computer, I was forced to update my Windows 10. But I really don’t want to update my operating system because the automatic update might take up the system and network resources. Is there anybody who can help me solve this problem and disable Windows 10 update? Thanks in advance.»
All solutions to disable Windows 10/11 update:
| Solutions | Step-by-step Troubleshooting |
|---|---|
| 1. Manually Disable Windows Update | Press the Windows key + R to open the Run box…Full steps |
| 2. Change the Settings of the Group Policy Editor | Go to Computer Configuration > Administrative Templates…Full steps |
| 3. Meter Your Network Connection | Click «Network & Internet» in the Settings app…Full steps |
| 4. Change Update Settings using Registry | Type regedit, and click OK to open the Registry…Full steps |
Whenever you are faced with Windows’ automatic update notification like:
- Install updates automatically
- Download Updates but choose when to install them
- Check for updates but let me choose whether to download and install them
What would you do? Here, we have the following solutions.
- Tip
- Before proceeding with the four solutions to fully stop Windows 10 updates, check your own Windows 10 edition (Home, Professional, Education, or Enterprise) by going to Settings -> System -> About so that you can find the most appropriate solution. Besides, the fourth way of trying to control the Windows 10 update by using Registry is somewhat risky, do remember to back up your data and the details will be shown in the extra tips section.
Applies to: Windows 11, Windows 10, Windows 8. For different system versions, the operation steps may be slightly different.
Solution 1. Disable Windows Update Service
Understand the limitations of this method. While disabling the automatic update service will temporarily halt any Windows 10 cumulative updates, the service will re-enable itself after a certain amount of time. Here are the directions:
1. Press the Windows logo key + R at the same time to invoke the Run box.
2. Type services.msc and press Enter.
3. Scroll down to Windows Update, and double-click it.
4. In Startup type, select «Disabled». Then click «Apply» and «OK» to save the settings.
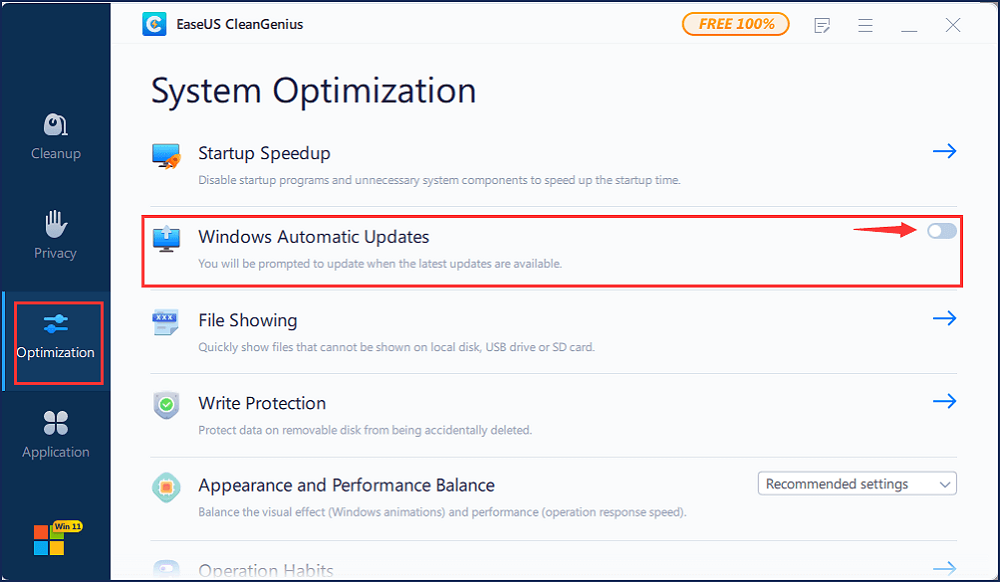
Do you prefer a one-click solution to disable the Windows automatic update feature? If so, get the versatile toolkit — EaseUS CleanGenius to help you. With it, you can disable/enable Windows Update, repair hard drives, remove/enable write-protection, and more within seconds.
To disable Windows Update:
Step 1. DOWNLOAD EaseUS CleanGenius for free and install it on your computer.
Step 2. Launch EaseUS CleanGenius and go to «Optimization».
Step 3. The tool will detect the status of the Windows Update service automatically. If Windows Update is currently enabled, click the switch to stop the service.
Step 4. If you want to check whether you have disabled the service automatically, go to «Start» > type «Services» > right-click «Services» and choose «Run as administrator».
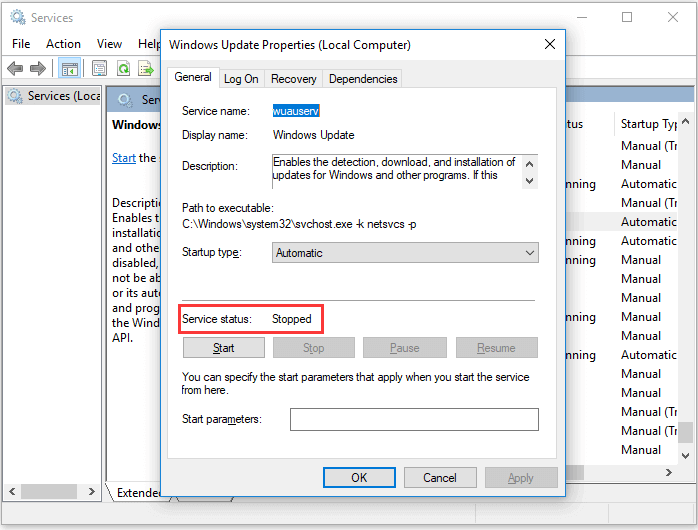
Step 5. In the list of services, find and right-click «Windows Update» > «Properties». In the «Service status» section, you should see the service has been stopped.
Solution 2. Change the Setting of the Group Policy Editor
The Group Policy feature is not available in the Home edition. So, only when you run Windows 10 Professional, Enterprise, or Education, you can use the Group Policy Editor to change the settings to prevent Windows 10 from automatically updating. The group policy editor will notify you of new updates without automatically installing them.
- Press the Windows logo key + R then type gpedit.msc and click OK.
- Go to «Computer Configuration» > «Administrative Templates» > «Windows Components» > «Windows Update».
- Double-click «Configure Automatic Updates».
- Select «Disabled» in Configured Automatic Updates on the left, and click Apply and «OK» to disable the Windows automatic update feature.
Note: If you need to update your Windows version later, you can repeat the steps above, then select Enabled to turn on this feature, so that you can continue to download the updates.
Solution 3. Meter Your Network Connection
Understand that this method won’t work for Ethernet connections. You can only disable automatic updates by using this method on a Wi-Fi connection. If your computer is connected to WiFi, you can try this to stop Windows 10 automatic updates.
1. Click the Start button at the bottom left on your desktop, then click the «Settings» app.
2. Click «Network & Internet».
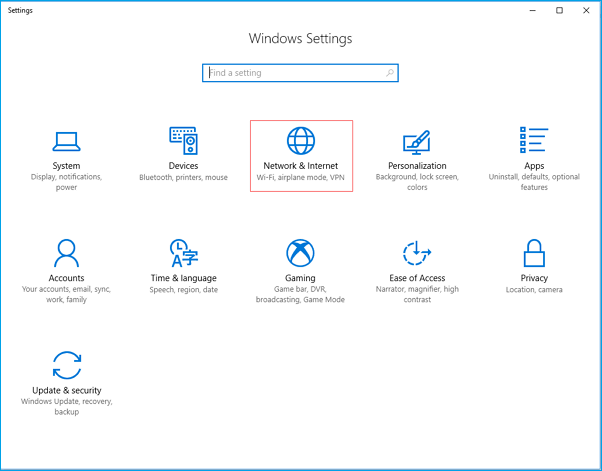
3. Click WiF in the left pane, then click the name of your Wi-Fi connection.
4. Click to turn on Set as metered connection.
Solution 4. Change the way of Windows 10/11 Updates Using Registry
Extra Tips: Editing the registry is risky, and it can cause irreversible damage to your installation if you don’t do it correctly. It’s recommended that you make a full backup of your computer before proceeding. All you need to do is use this backup software to back up your data in three steps:
Step 1. Click «Select backup contents» to initiate a backup.

Step 2. There are four data backup categories, File, Disk, OS, and Mail, click File.

Step 3. Local and network files will be displayed on the left side. You may extend the directory to choose which files to back up.

Step 4. Select the location where you want to store the backup by following the on-screen instructions.

Click «Options» to encrypt the backup with a password in «Backup Options,» and to setup a backup schedule and choose to initiate a backup at a certain event in «Backup Scheme.» There are a variety of other customization options available for the backup process.

Step 5. You may save the backup to a local disk, EaseUS’ online service, or a NAS.

Step 6. EaseUS Todo Backup enables customers to back up data to a third-party cloud drive and its own cloud drive.
If you want to back up data to a third-party cloud drive, choose Local Drive, scroll down to add Cloud Device, add your account, and then log in.

You can also save backups to EaseUS’s cloud storage service. Sign up for an EaseUS Account and log in after clicking EaseUS Cloud.

Step 7. To begin backup, click «Backup Now» Once the backup process has been finished, it will be shown as a card on the panel’s left side. To further manage a backup job, right-click it.

With a backup at hand, now it’s safe to customize a Windows 10 update without receiving any forced updates on your computer. Here’s how to make the change in Registry:
1. Press the Windows key + R key to open the Run command.
2. Type regedit, and click OK to open the Registry.
Browse the following path:
HKEY_LOCAL_MACHINESOFTWAREPoliciesMicrosoftWindows
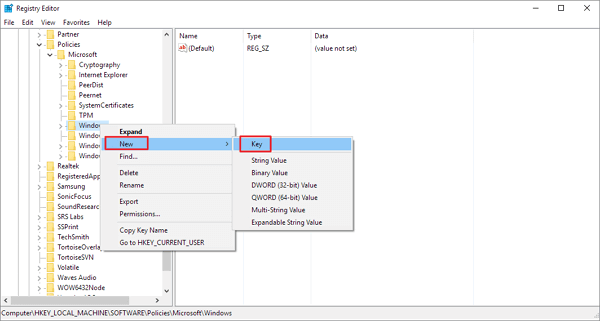
3. Right-click the Windows folder, select «New» and then click «Key».
4. Name the new key «WindowsUpdate» and press «Enter».
5. Right-click the newly created key, select «new», and click «Key».
6. Name the new key AU and press Enter.
Inside the newly created key, right-click on the right side, select «New», and click on «DWORD (32-bit) Value».
7. Name the new key AUOptions and press Enter.
Double-click the newly created key and change its value to 2. It’s for «Notify for download and notify for install». Click «OK».
8. Close the Registry to complete the task.
Using this value prevents Windows 10 from downloading updates automatically, and you’ll get a notification when new updates are available. In this way, you can avoid any auto Windows 10 update effectively.
That’s how you could make an attempt to disable Windows 10/11 updates in every way. Each method has been proved to work as long as you wish to turn off all the automatic updates in Windows 10.
![]()
FAQ on How to Disable Windows 10 Update
1. Should I stop automatic updates on Windows 10?
Automatic updates help keep your computer safe and secure by downloading and installing the latest security patches as soon as they’re released. If you disable automatic updates, you’ll need to remember to manually update your computer regularly to ensure that it remains secure. So, we suggest not stopping it, but you can pause it.
2. How do I stop Windows 10 from automatically updating?
To stop Windows 10 from automatically updating, you can manually disable Windows update, change the settings of the Group Policy editor, meter your network connection, or change update settings using Registry. You can refer to the post for detailed steps.
Looking for ways how to control windows 10 Automatic update installation? Or you have experienced Previously windows 10 auto-update/upgrade broken your system settings, face different problems like store app/start menu stopped working, apps start misbehaving etc. And this time you are looking to stop windows 10 updates to download and install automatically. If you’re running a professional version of Windows 10 (Professional, Enterprise or Education), you actually can disable windows 10 automatic updates using the Group Policy editor. But like most people, if you are using Windows 10 Home (Where the group policy feature not available). Here is how to disable automatic updates on windows 10 Home.
Disable automatic updates windows 10 Home
Microsoft regularly rollout windows updates with feature and security improvements, and bug fixes to fix the security hole created by third-party applications. So an up-to-date operating system is a secure operating system. And with Windows 10 Microsoft Decided to Windows 10 automatically checks for, download and install new updates to your PC whether you like it or not. But everyone doesn’t like Windows automatically download and install updates. And windows didn’t leave any options to control these options. But don’t worry here we have 3 Tweaks to disable automatic updates on windows 10.
Note: automatic updates are typically a good thing and I recommend leaving them on in general. As such these methods should primarily be used for preventing a troublesome update from automatically reinstalling (the dreaded crash loop) or stopping a potentially troublesome update from installing in the first place.
Tweak windows registry
This is the best method to control Windows 10 Automatic updates installation for both Windows 10 home And pro users. As Windows 10 Home users don’t have group policy feature Tweak registry editor is the best way to stop windows 10 Automatic update installation.
— Advertisement —
Press Windows + R, type regedit and click ok to open the windows registry editor. Now first backup the registry database and navigate to the following path.
HKEY_LOCAL_MACHINESOFTWAREPoliciesMicrosoftWindows
Here Right-click the Windows (folder) key, select New -> Key and Rename it to WindowsUpdate.
Again Right-click the newly created key (WindowsUpdate), select new -> Key And name the new key AU.
— Advertisement —
Now right-click on AU, select New and click DWord (32-bit) Value and rename it to AUOptions.
— Advertisement —
Double-click on AUOptions key. Set the base as “Hexadecimal” and change its value data using any of the below-mentioned value:
- 2 – “Notify for download and notify for install”.
- 3 – “Auto download and notify for install”.
- 4 – “Auto download and schedule the install”.
- 5 – “Allow local admin to choose the settings”.
You can use any of these available values, your best choice is to change the value to 2 to configure the “Notify for download and notify for install” option. Using this value prevents Windows 10 from downloading updates automatically, and you’ll get a notification when new updates are available. Note: When you want to re-enable (windows update) then either delete AUOptions or change its value data to 0.
Disable the Windows Update service
>Windows Update service can detect, download and install the Windows updates and programs. Once disabled, you can not use the Windows automatic update feature, and programs will not be able to automatically download and install. This is another best way to stop windows 10 Updates from automatically download and install.
To do this Press Windows + R, type services.msc and hit the enter key. This will open windows services, scroll down and look for Windows update service. When you got simply double-click on it on properties Change the Startup type Disable and Stop the service if it’s running. Now click the Recovery tab, select Take No Action in the First failure section, then click Apply and OK to save the setting.
Whenever you change your mind to re-enable Windows Update simply repeat these steps, but change the Startup Type to ‘Automatic’ And Start the service.
Setup metered connection
Windows 10 offers users on metered connections a compromise to save bandwidth. Microsoft confirms the operating system will only automatically download and install updates it classifies as ‘Priority’. So whether it is Windows 10 home or professional does not permit the Windows Update files to download when the metered connection is functional.
Note: If your PC uses an Ethernet cable to connect to the Internet the Metered Connection option will be disabled as it works with Wi-Fi connections only.
Setup your internet connection as metered Open Settings -> Network & Internet. On the left side select WiFi, Double click on your wifi connection and Toggle ‘Set as metered connection’ to On.
Now, Windows 10 will assume that you have a limited data plan on this network and won’t download all updates over it automatically.
Turn the Battery Saver on
This is another option To Disable Automatic Updates on Windows 10. You can use the opportunity of enabling a Battery saver setting. Go to Settings -> System -> Battery and click on the toggle the respective setting towards On mode.
Also, you can control it with a single click on Action Center, Or by clicking on the Battery icon on the system tray.
Tweak Group policy editor
This solution is not applicable for Windows 10 Home users, Because of Group policy feature not available for on Windows 10 Home users.
This is one more method to control Disable windows 10 Automatic updates. It works only for Windows 10 Pro (Professional, Enterprise or Education) users. To do this type gpedit.msc on start menu search and hit the enter key. On group policy window navigate to Computer Configuration > Administrative Templates > Windows Components > Windows Update.
On middle pane double-click on the Configure Automatic Updates and select the radio button Enabled. Now Under Configure automatic updating, select option 2 – “Notify for download and auto install” to stop the automatic installation of updates. Click Apply then OK and restart windows to successfully apply these settings.
That’s all you have successfully disable automatic updates on Windows 10 Home. Still have any queries, suggestions or any other ways to stop Windows 10 updates that you know. Feel free to share in the comments below.
Also, Read
- Fix your windows license will expire soon on Windows 10
- How to repair corrupted system files in Windows 10, 8.1 and 7
- Can’t adjust screen brightness on laptop after windows 10 update? Try these solutions
- How To well Optimize Windows 10 Performance For Gaming
- Bluetooth disappeared after a recent Windows 10 update? Try these solutions to fix it
Want to turn off or disable Windows Update in Windows 10? Here are thee ways to stop Windows 10 from automatically downloading updates or completely disable Windows Update in Windows 10.
It’s no secret that Microsoft has changed the expected location of many tools and components in Windows 10. Many of the settings have been moved from the classic Control Panel to the new Settings app, and during the process, some of the options have been completely left out.
In Windows 10, Windows Update settings have been moved from the classic Control Panel to the new Settings app. While the traditional Control Panel is still present in Windows 10 and we need to navigate to the classic Control Panel to access many of the settings, some of the familiar Windows Update settings have been completely removed.
In previous Windows versions, we could choose what updates are downloaded and installed. In Windows 10, users have very little control over updates.
If, for whatever reason, you want to turn off or disable Windows Update in Windows 10, follow the given below workarounds.
Method 1 of 7
Pause updates for up to 35 days
Windows 10 lets you pause updates for up to 35 days. That is, you can temporarily pause updates with ease. However, once the 35-day limit is crossed, Windows 10 will have to install available updates before you pause updates again. Nevertheless, this is a good option if you want to stop updates for up to 35 days.
Step 1: Go Settings > Update & Security > Windows Update.
Step 2: On the right side, click Advanced options.
Step 3: In the Pause updates section, select a date until which you would like to pause updates.
Method 2 of 7
Pause feature updates for up to 365 days
Features updates are the major updates Windows 10 receives twice a year. Around April and October, Microsoft releases major updates (feature updates) to Windows 10. Here is how to stop them for a year:
Step 1: Open the Settings app. Go to Updates & Security > Windows Update.
Step 2: On the right side, click on Advanced options.
Step 3: In the Choose when updates are installed section, you will see “A feature update includes new capabilities and improvements. It can be deferred for these many days” option. Select a number from the drop-down box. The maximum supported is 365 days.
Method 3 of 7
Use Group Policy to disable Windows Update
In this method, we are going to use the Local Group Policy Editor. Since Group Policy Editor is not present in Windows 10 Home edition, this method is not applicable to Windows 10 Home.
Step 1: Open Local Group Policy Editor. To do so, type Edit Group Policy in Start or taskbar search box and then press Enter key. Alternatively, open Run command box, type Gpedit.msc, and then press Enter key to open the same.
Step 2: Navigate to the following policy:
Computer Configuration > Administrative Templates > Windows Components > Windows Update.
Step 3: On the right-side, double-click on the policy labeled Configure Automatic Updates to open its properties.
Step 4: Select the Enabled option. Under Configure automatic updating, select the second option labeled Notify for download and notify for install. Don’t touch the rest of the settings.
Click the Apply button. As mentioned before, this method will not turn off Windows Update, but you will be notified when updates are available to download. You can ignore the alert to avoid downloading and installing updates.
When this policy is enabled, you’ll see Some settings are managed by your organization message under Advanced options of Windows Update.
Method 4 of 7
Disable updates via Registry
If you are on Windows 10 Home, you can disable the automatic update by making modifications to the Registry. Here is how to do that.
Step 1: Open the Registry Editor by typing Regedit.exe in the Start/taskbar search field and then hitting the Enter key.
Step 2: Navigate to the following key:
ComputerHKEY_LOCAL_MACHINESOFTWAREPoliciesMicrosoftWindows
Step 3: Right-click on the Windows key, click New and then click Key. Name it as WindowsUpdate.
Step 4: Now that you have created WindowsUpdate key, right-click on it, click New, and then name it as AU.
Step 5: Now, right-click on the AU key, click New and then click DWORD (32-bit) Value. Name it as NoAutoUpdate.
Step 6: Double-click on NoAutoUpdate and then change its value data from 0 to 1 to disable automatic updates.
Note that this disables automatic updates only. You can manually check for updates by clicking the Check for updates button in Settings > Update & Security > Windows Update page.
Method 5 of 7
Disable Windows Update service permanently
This is the best method to completely disable Windows Update in Windows 10. In this method, we will disable the service responsible for checking, downloading, and installing updates for Windows and other programs including Windows Defender.
Step 1: Type Services in Start menu or taskbar search box and then press Enter key. Alternatively, you can type Services.msc in Run command box and then press Enter key to open Services.
Step 2: Here, look for the service named Windows Updates. Right-click on it and click Properties to open Windows Update Properties dialog.
Step 3: Here, change the Startup type to Disabled. Click the Apply button and then reboot your computer. That’s it!
From here on, Windows 10 will not be able to check for updates. Good luck!
Method 6 of 7
Use Windows Update Disabler
Over the past few years, a bunch of applications has been released to help Windows 10 users block updates. One of them and probably the best of the lot is Windows Update Disabler. With Windows Update Disabler, you can disable the updates in Windows 10 with a click.
Download Windows Update Blocker
Method 7 of 7
Change your network type to Metered
This solution is no longer effective as Windows 10 now download priority or critical updates when on a metered connection.
By default, Windows 10 doesn’t download all updates when you’re on a metered connection. It downloads only priority updates when on a metered connection. You can make use of this by setting Metered connection property to your network connection.
To set a network as metered, do this:
Step 1: Navigate to Settings app > Network & Internet > Wi-Fi.
Step 2: On the right side, you can see the Wi-Fi network name (SSID) that your PC is connected to. Click on it.
Step 3: In the Metered connection section, turn on the Set as the metered connection option.
For ethernet connection, refer to our how to set an Ethernet connection as a metered network in Windows 10 guide for step-by-step instructions.