Top tips to stop the Windows key from interrupting your activities
by Milan Stanojevic
Milan has been enthusiastic about technology ever since his childhood days, and this led him to take interest in all PC-related technologies. He’s a PC enthusiast and he… read more
Updated on November 29, 2022
Reviewed by
Alex Serban

After moving away from the corporate work-style, Alex has found rewards in a lifestyle of constant analysis, team coordination and pestering his colleagues. Holding an MCSA Windows Server… read more
- Have you wondered how to disable the Windows key? Modifying the registry is one solution.
- Instead of modifying the registry, you can download a .reg file and use it to disable the Windows key.
- Usually, gaming keyboards have dedicated software so that you can check the key settings there.
XINSTALL BY CLICKING THE DOWNLOAD FILE
This software will repair common computer errors, protect you from file loss, malware, hardware failure and optimize your PC for maximum performance. Fix PC issues and remove viruses now in 3 easy steps:
- Download Restoro PC Repair Tool that comes with Patented Technologies (patent available here).
- Click Start Scan to find Windows issues that could be causing PC problems.
- Click Repair All to fix issues affecting your computer’s security and performance
- Restoro has been downloaded by 0 readers this month.
The Windows key is somewhat helpful and is a part of many shortcuts on Windows 10. However, many users use it frequently, and some want to disable it.
The key can sometimes be a problem, especially during intense gaming sessions. By default, pressing the Windows key will open the Start Menu, which can make you lose focus while gaming.
This guide will show you the easy ways to disable the Windows key and prevent any distractions.
Can you disable the Windows key while gaming?
There are limited ways to disable the Windows key in game mode. This is because Microsoft views and has placed much importance on the key.
However, some gaming keyboards have a unique feature to lock and unlock the Windows key. Another option is to disable the Windows key from opening the Start Menu in-game.
This will require you to alter the keyboard configuration and controls in the game.
How can I disable the Windows key?
1. Modify your registry
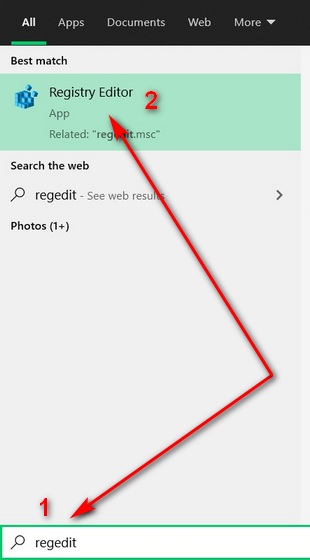
- Press the Windows key + R, type regedit, and click OK.

- To be on the safe side, click File > Export… to create a backup.

- Select All as Export range, choose a safe location, enter the desired file name and click on Save.

- In the left panel, navigate to:
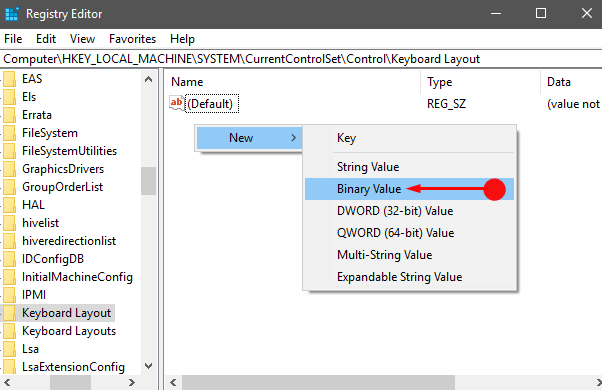
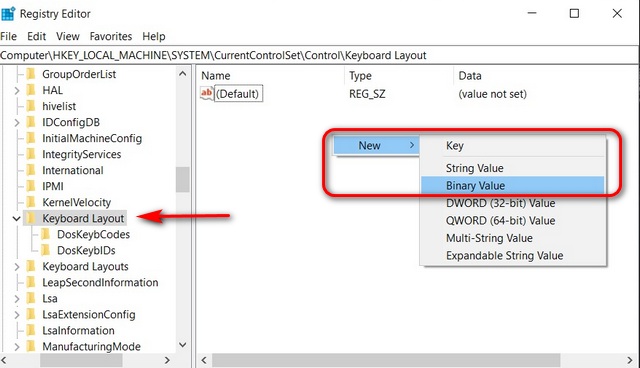
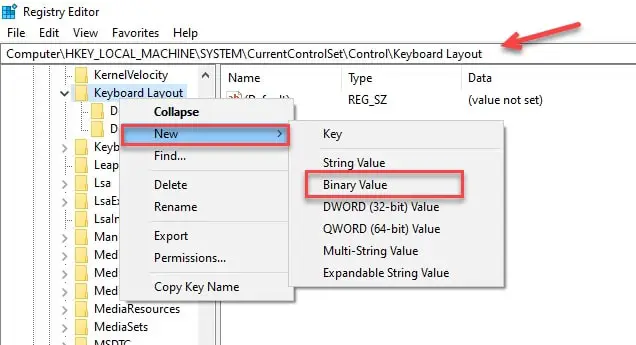
ComputerHKEY_LOCAL_MACHINESYSTEMCurrentControlSetControlKeyboard Layout - In the right pane, right-click the space and choose New >Binary Value from the menu.
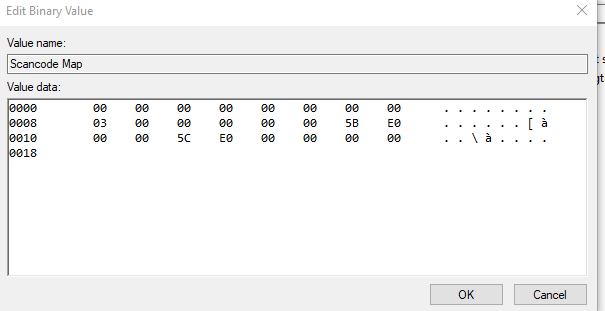
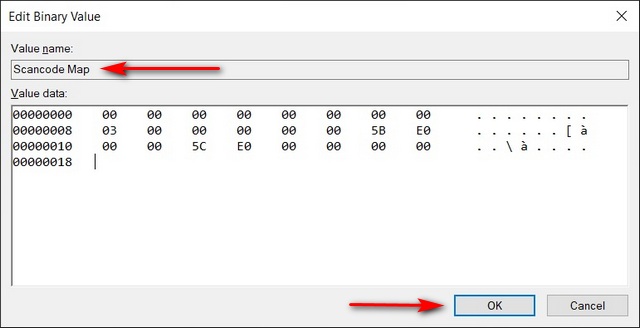
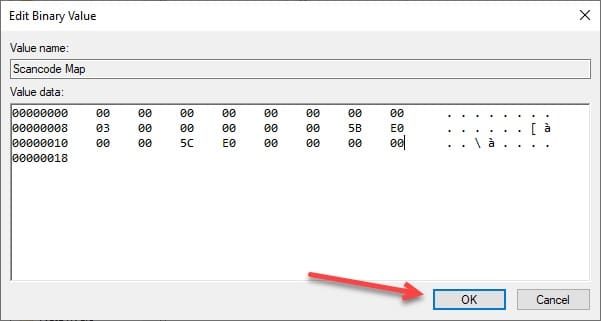
- Enter Scancode Map as the name of the new value.

- Double-click the Scancode Map value and enter 00000000000000000300000000005BE000005CE000000000 in the Data field.
- Be extra cautious and double-check if the entered value is correct. Now click OK.

- After doing that, close Registry Editor and restart your PC.


Keep in mind that your registry has sensitive information in it. So, if you want to edit it, use extra caution. If you encounter problems with your PC after modifying the registry, restore the backup created.
After your PC restarts, the Scancode Map you created in the registry should disable the Windows key altogether. Therefore, you need to delete the Map from the Registry Editor to enable it later.
Finally, if you are uncomfortable editing your registry manually, download Disable Windows key.reg and run it. This will perform the task for you quickly. To enable the key later, you must download and run Enable Caps Lock and Windows keys.reg.
2. Use Registry Editor to block Windows Key hotkeys
- Open Registry Editor.
- When Registry Editor opens, from the left panel, go to:
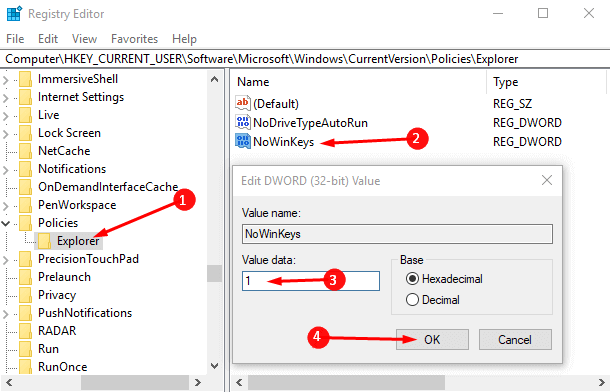
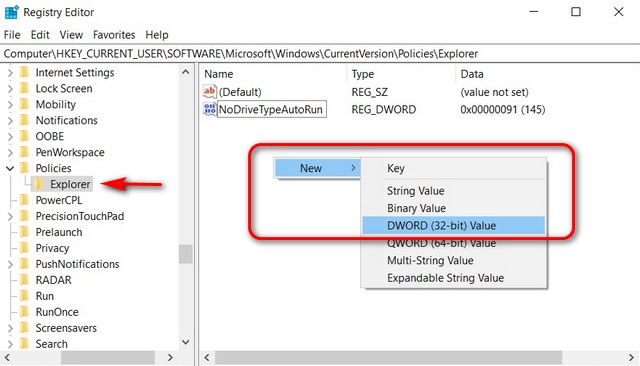
HKEY_CURRENT_USERSoftwareMicrosoftWindowsCurrentVersionPoliciesExplorer - Right-click any space in the right panel and choose New > DWORD (32-bit value).
- Enter NoWinKeys as the name of the new DWORD.

- Double-click NoWinKeys DWORD to open its properties.
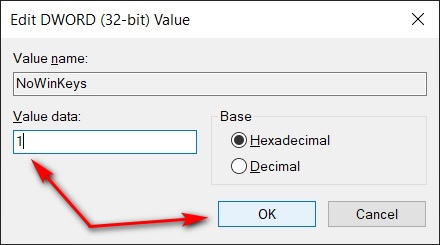
- Set Value data to 1 and click OK to save changes.

- After you’re done, close Registry Editor and restart your PC to apply the changes.


Some PC issues are hard to tackle, especially when it comes to corrupted repositories or missing Windows files. If you are having troubles fixing an error, your system may be partially broken.
We recommend installing Restoro, a tool that will scan your machine and identify what the fault is.
Click here to download and start repairing.
This solution is ideal for you if you want to disable the Windows key because of a shortcut affecting games like Razer Huntsman and Apex Legends. It disables all shortcuts related to the Windows key entirely.
3. Use Group Policy Editor
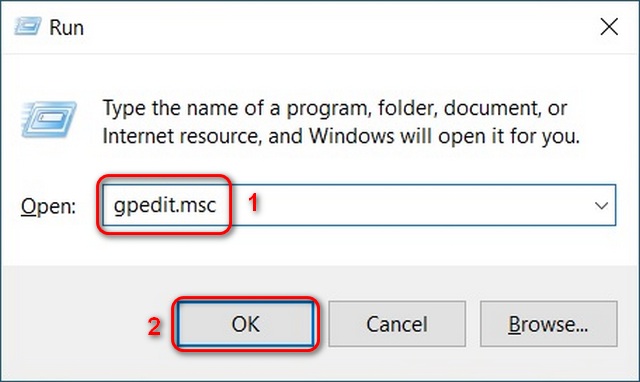
- Press the Windows key+ R, enter gpedit.msc, and click OK.
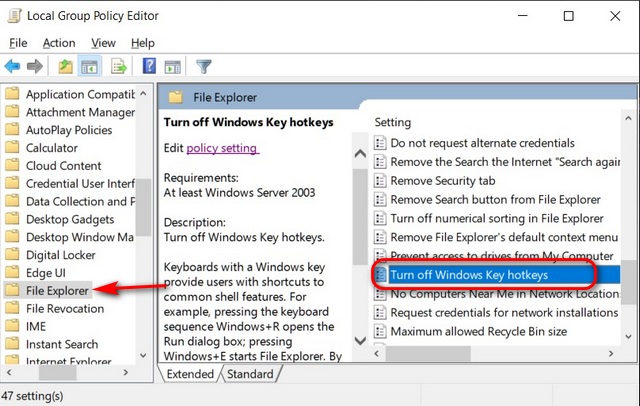
- Now navigate to the User Configuration > Administrative Templates > Windows Components > File Explorer in the left pane.
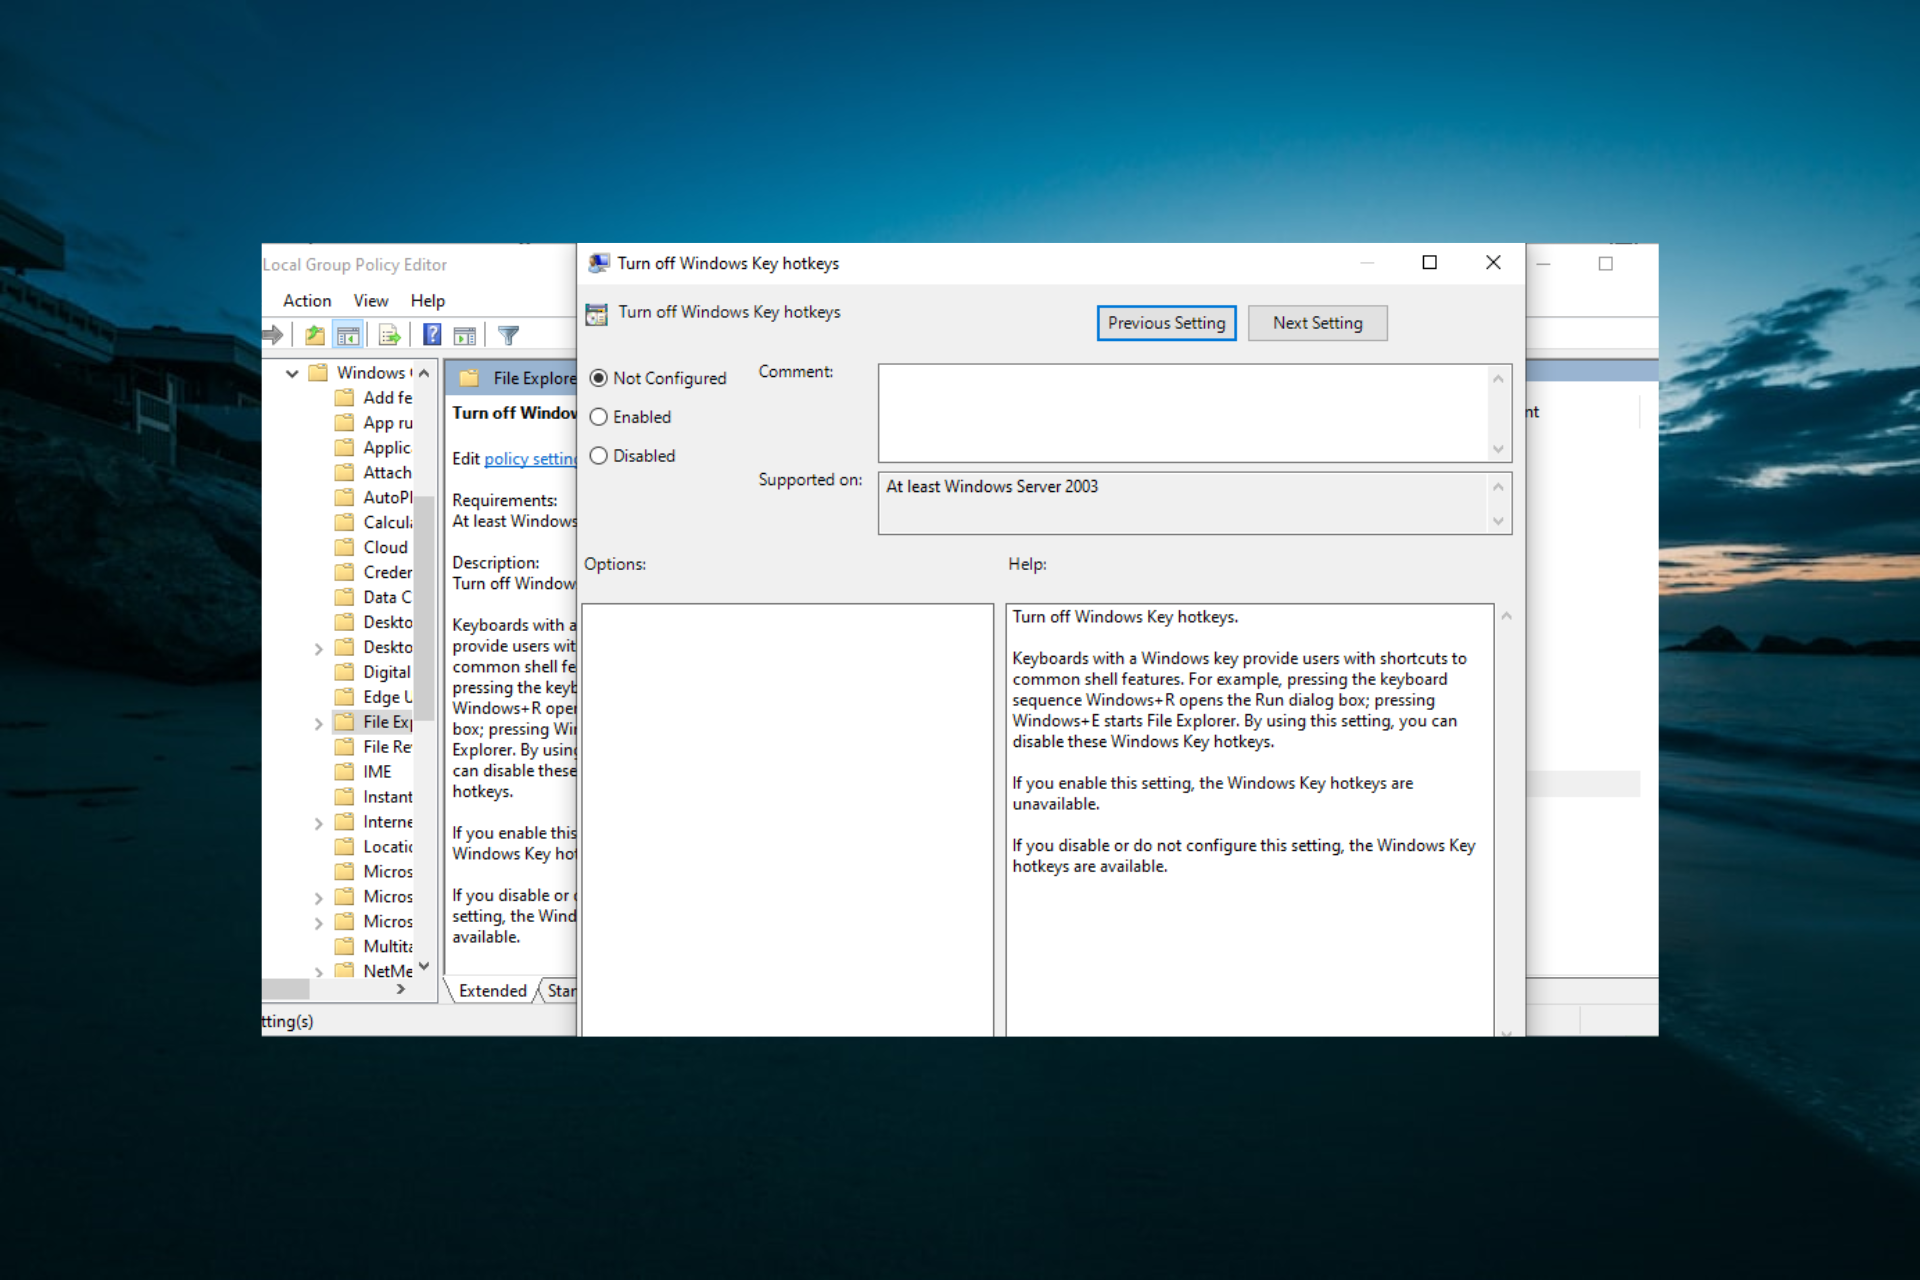
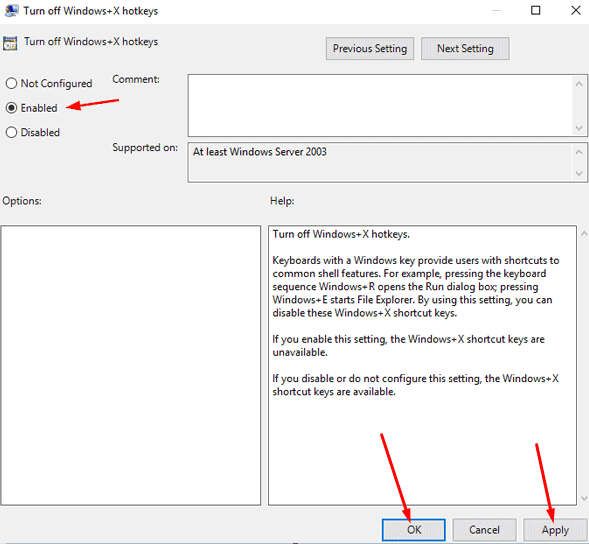
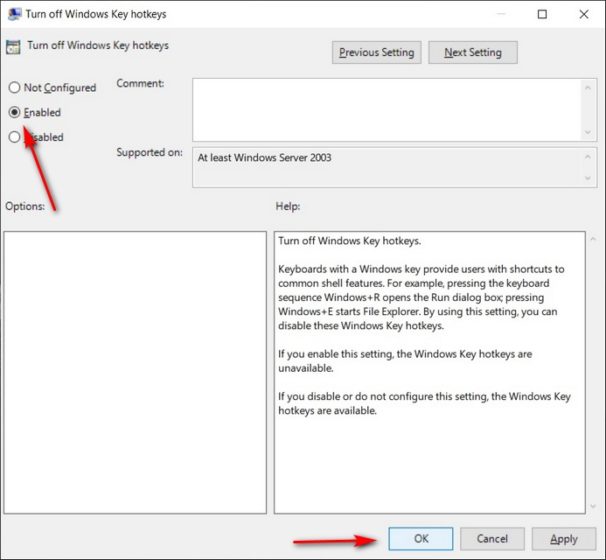
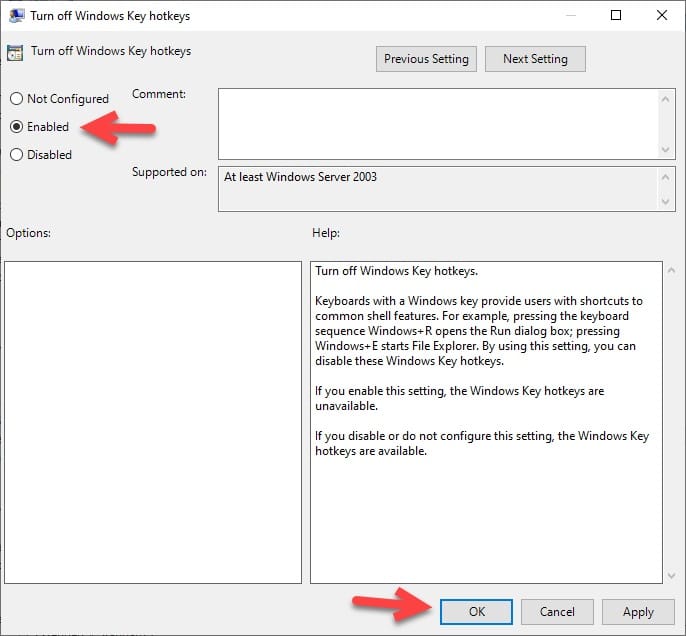
- Locate and double-click the Turn off Windows key hotkeys option in the right pane.

- Select the Enabled option and click on Apply and OK to save changes.

- After that, restart your PC and check if that solves the problem.


This is a simple solution, but like before, it should disable only the Windows key shortcuts. If you need to disable the Windows key entirely, you might want to try a different solution.
4. Use a third-party software
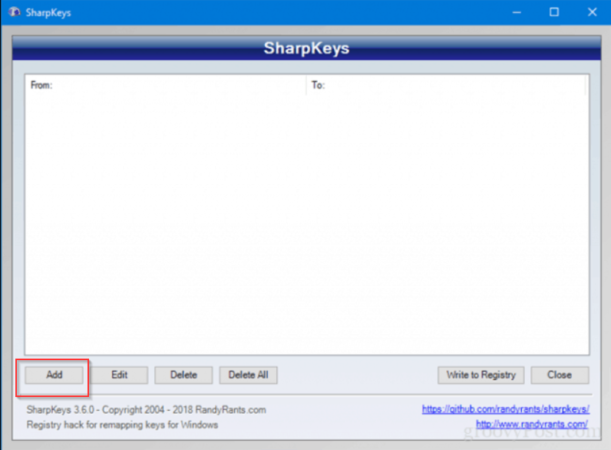
- Download and start SharpKeys.
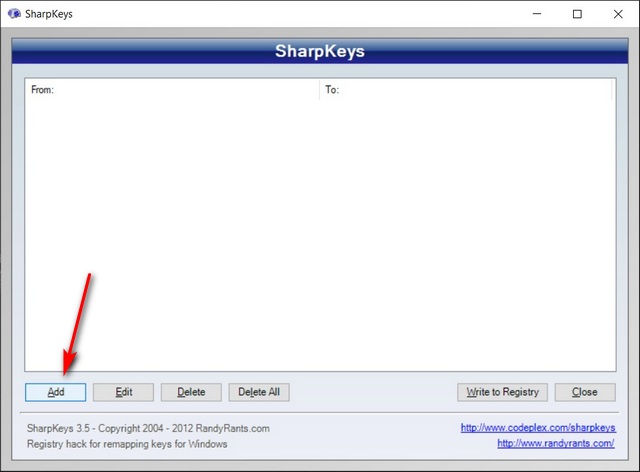
- Once the application starts, click on Add.

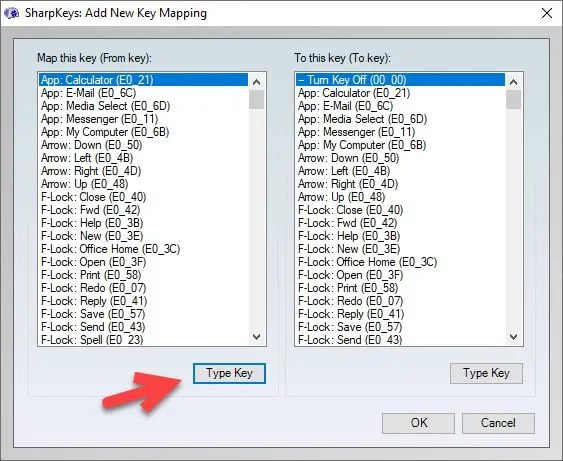
- Now you’ll see two columns. Click on the Type Key in the left pane and press the Windows key.

- Now click on OK to select the pressed key.

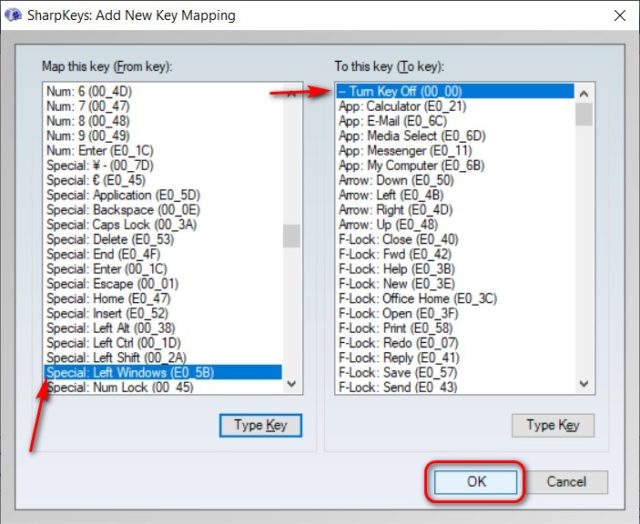
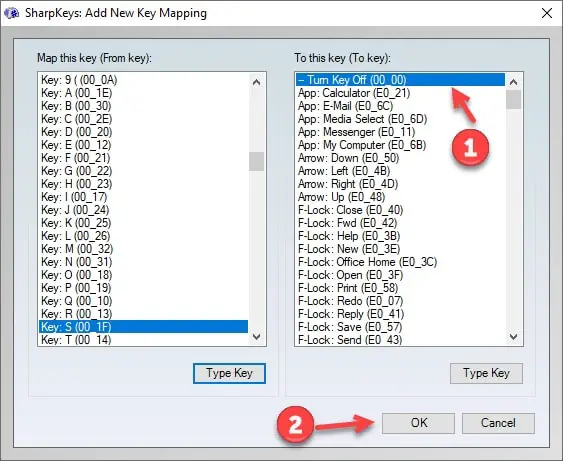
- Select Turn Key Off in the right pane and click OK to save changes.

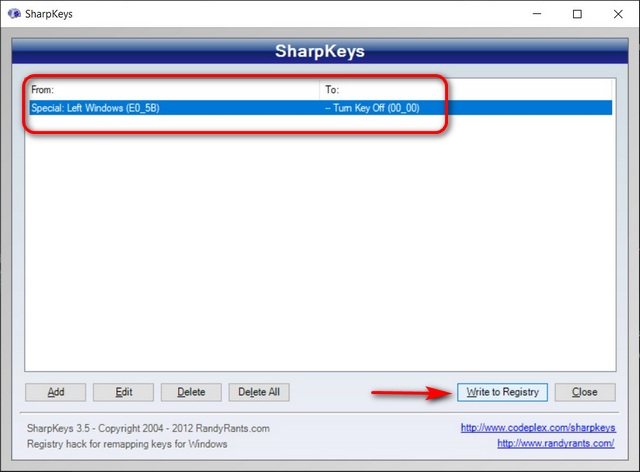
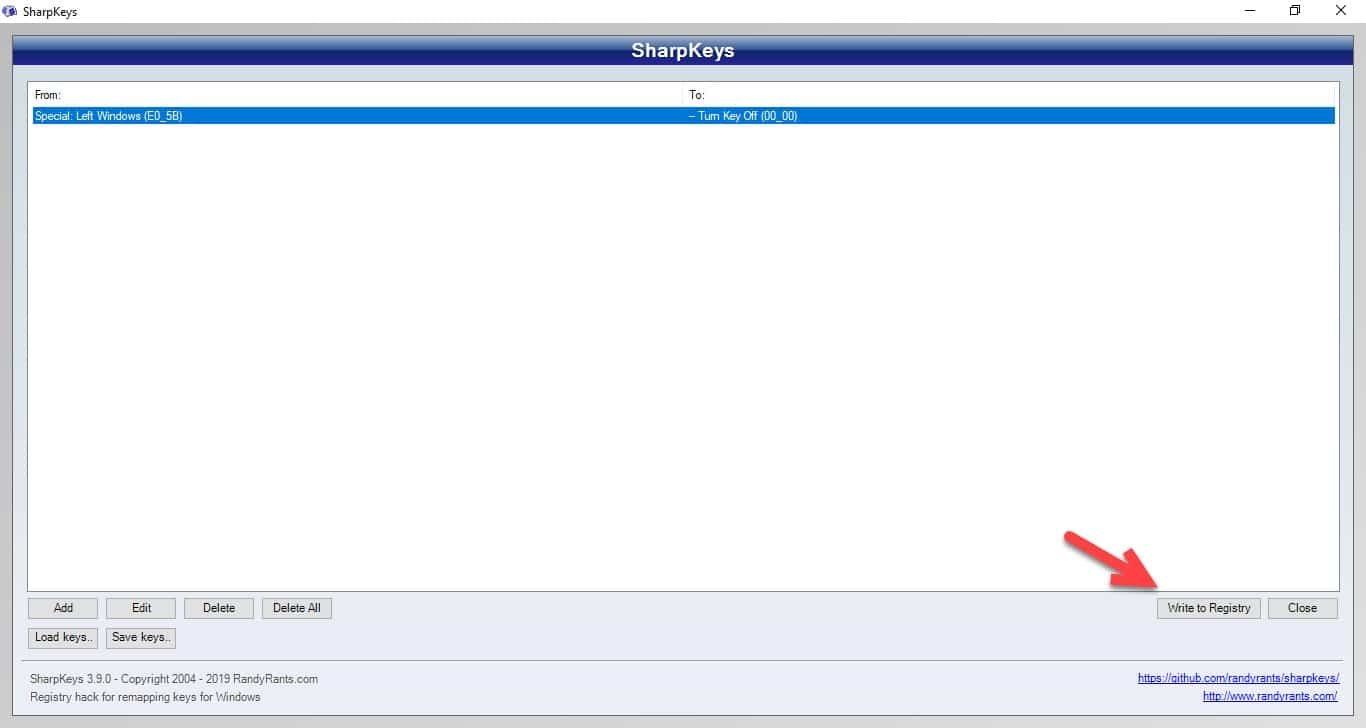
- Now, click on the Write to Registry button.

- From here, restart your PC or log out and log back in to apply the changes.
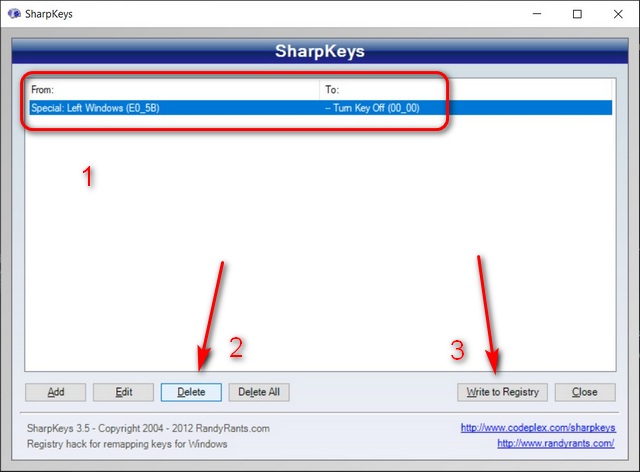
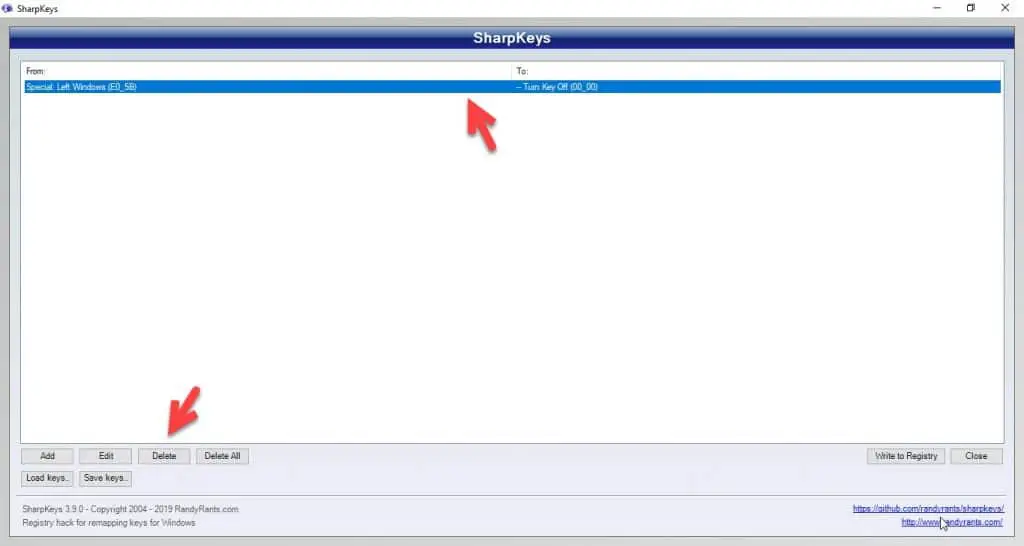
- Start Sharpkeys, select the desired key from the menu to enable the Windows key again and click on Delete.

- After deleting the key, click on the Write to Registry button.

- Now restart your PC or log off and back on to apply the changes.


This free and portable tool allows you to remap your keys but can also disable keys or assign them to certain functions. Remember that this is a powerful application, so you’re using it at your own risk.
Other third-party options include the simple-to-use Winkill and creating a script with Autohotkey to disable the Windows key.
- Failed to Determine Source Edition Type: 5 Ways to Fix It
- Fix: This Page Isn’t Eligible to Have a Username [Facebook]
5. Use Gaming mode on your keyboard
Many gaming keyboards have a Gaming mode feature that allows you to block the Windows key with ease. However, you usually have to press a particular keyboard shortcut to activate Gaming mode.
Some keyboards even have a controller icon on one of its keys so you can easily find the shortcut key for Gaming mode. However, if you can’t find the shortcut, we advise you to check your keyboard manual for detailed instructions on activating Gaming mode.
Remember that not all keyboards support this feature, so check if your keyboard supports it.
The Windows key is beneficial but can get in your way sometimes. While there are many ways to disable it, the best and safest option is to use a gaming keyboard and set it to Gaming mode.
If you need a list of the best Logitech gaming keyboards, you can buy them today; check our detailed guide for the top picks you can select from.
If you have suggestions or questions, leave them in the comments section below, and we’ll take a look.
![]()
Newsletter

Many gamers want to know how to disable the Windows key on their keyboard. Pressing it accidentally while playing a game on your PC can open the Start menu or trigger a «hotkey» keyboard shortcut that snaps you right out of what you’re doing.
These hotkeys include «Windows key + R» for opening the Run box, «Windows key + D» for showing (and hiding) the desktop, and «Windows key + L» for locking your screen. Sometimes these shortcuts can be very useful, but when you’re involved in something important, be it a game, video call, or intensive work, they can prove very annoying. Worst of all, there are two Windows keys on your keyboard, which doubles your chance of hitting one at an inconvenient moment.
Dedicated gaming keyboards solve this problem by automatically disabling the Windows key when you switch to «Gaming mode,» but on standard keyboards, the key can be a real nuisance.
Fortunately, there are several ways to tweak the Windows key so that it doesn’t interrupt your gaming and other activities. You can either toggle it on or off as required, deactivate hotkeys but keep the Start menu-opening function, or disable it altogether.
In our guide below, we’ll explain three ways to disable the Windows key, so you can use the one that best suits your needs,
How to disable the Windows key using WinKill
The easiest way to disable the Windows key in Windows 10 is to use a tiny free program called WinKill. This has the advantage over other methods of letting you toggle the Windows key on and off as required. Here’s how to use it.
1. Download WinKill from Major Geeks (opens in new tab). The program hasn’t been updated for several years, and was originally designed for Windows XP, Vista, and 7, but it works just fine in Windows 10.
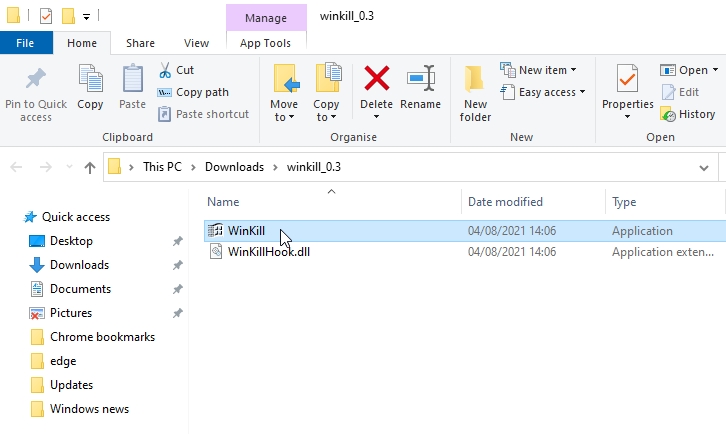
Extract the contents of the zip file, then double-click the WinKill executable file to run the program.
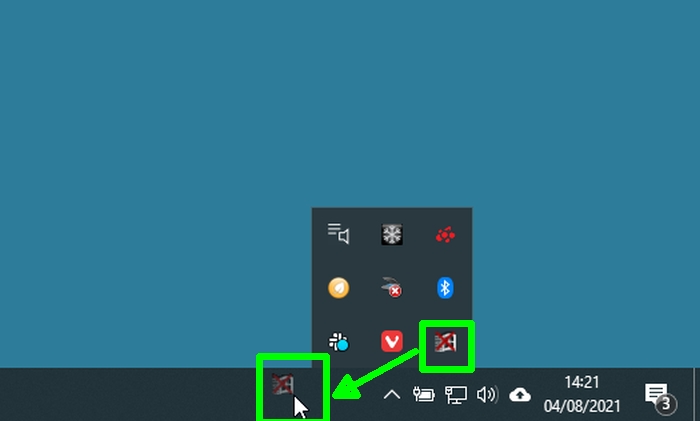
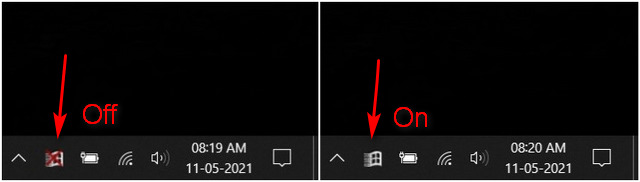
2. WinKill doesn’t require installation and you might think nothing has happened, but you should see its icon appear in the system tray on your taskbar.
If not, click the up arrow in the system tray and look for a Windows logo with a red cross through it. Drag this icon onto your taskbar for easy access.
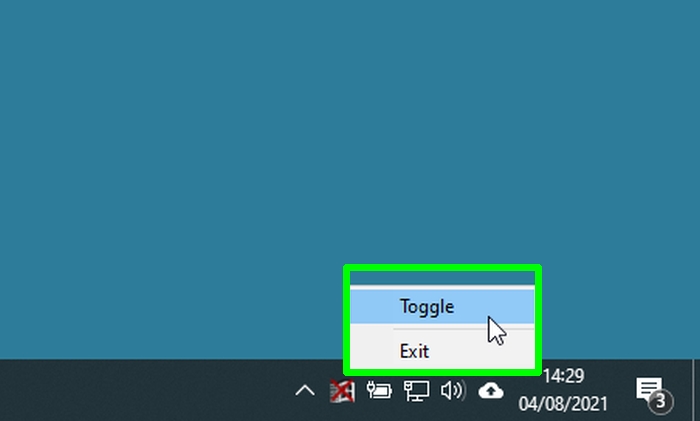
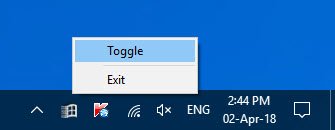
3. Press your Window key and you’ll now find that it doesn’t respond because WinKill has disabled it. To activate the key again, either click the WinKill icon to remove the red cross, or right-click it and choose «Toggle.»
Alternatively, you can close WinKill and restore the Windows key by selecting «Exit.» The program doesn’t run on Windows startup, so you’ll need to run it manually each time you need it.
How to disable the Windows key by editing the Registry
If you never use any Windows key hotkeys, you can tweak the key so you don’t have to worry about triggering them accidentally. You can do this in Windows 10 by editing the registry. This will still let you press the Windows key to open the Start menu.
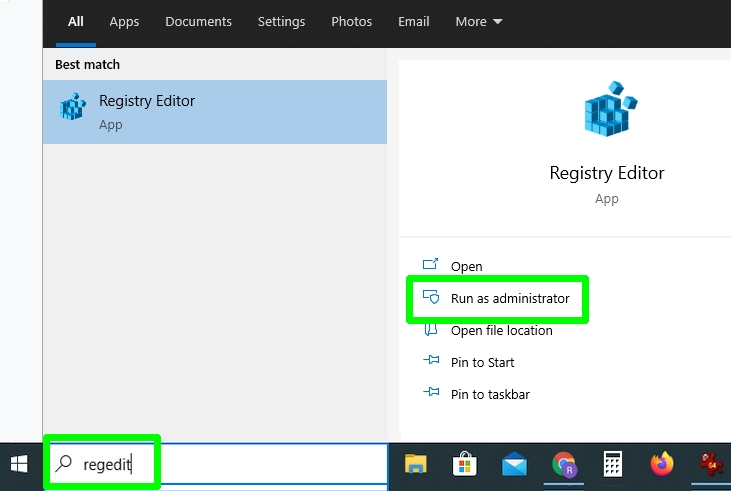
1. Type “regedit” in the Windows search box and click “Run as administrator” next to the Registry Editor result.
2. When the Registry Editor opens, navigate to the following key, or just copy and paste it into the Registry Editor address bar and press Enter:
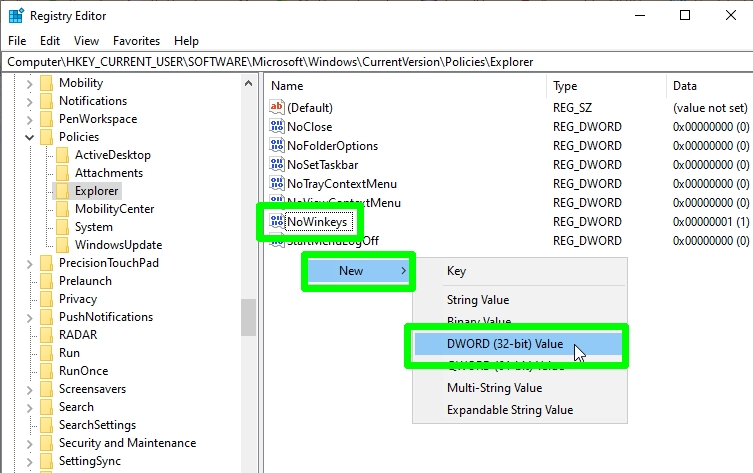
HKEY_CURRENT_USERSoftwareMicrosoftWindowsCurrentVersionPoliciesExplorer
3. You should see a value in the right-hand pane of the window called “NoWinkeys.” If not, right-click an empty space in that pane and choose “New,” then “DWORD (32-bit) Value.” Call the value “NoWinkeys.”
4. Double-click the NoWinkeys value and change its value data from “0” to “1.” Click OK to confirm.

5. Restart your PC and press the Windows key. This will still open the Start menu, but it won’t trigger any hotkeys that interrupt your gameplay and other activities.
To re-enable hotkeys, go back to the same registry key and either change the NoWinkeys value data back to “0” or delete that value.
How to disable the Windows key using PowerToys
If you’d prefer to disable the Windows key completely, so that it doesn’t do anything when pressed, you can “remap” it using Microsoft PowerToys (opens in new tab). This set of tools for tweaking Windows 10 is free to download and packed with useful options. Here’s how to use its Keyboard Manager.
1. Visit the GitHub page for Microsoft PowerToys (opens in new tab) and download the PowerToysSetup executable file. You’ll find the link at the bottom of the page.
Install the program on your PC and launch it from the Start menu.

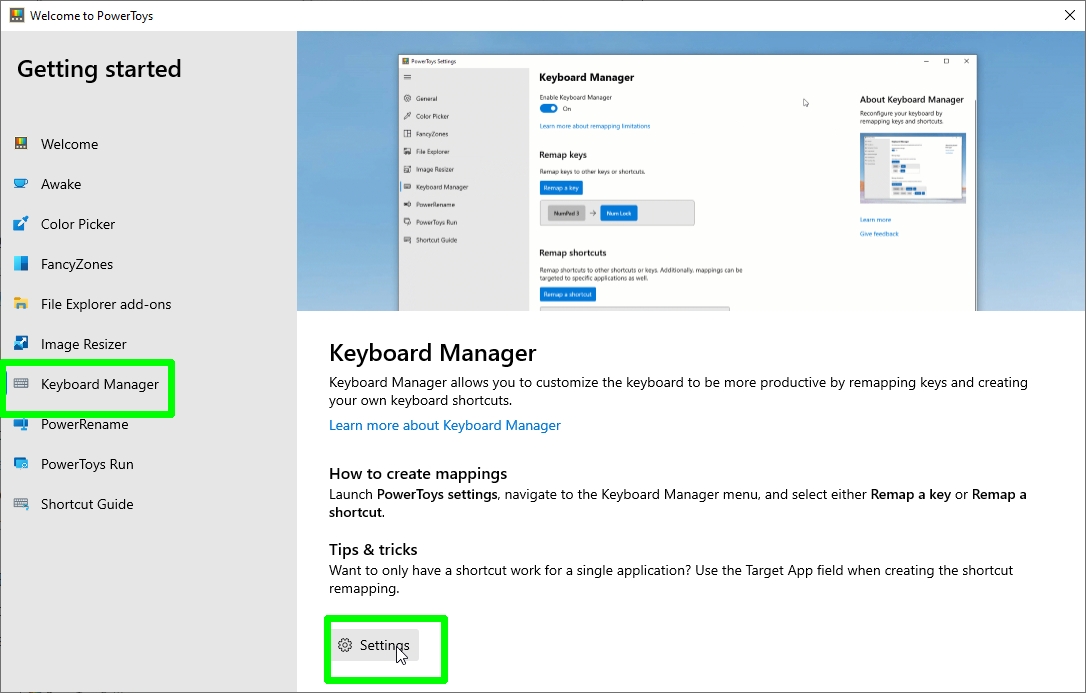
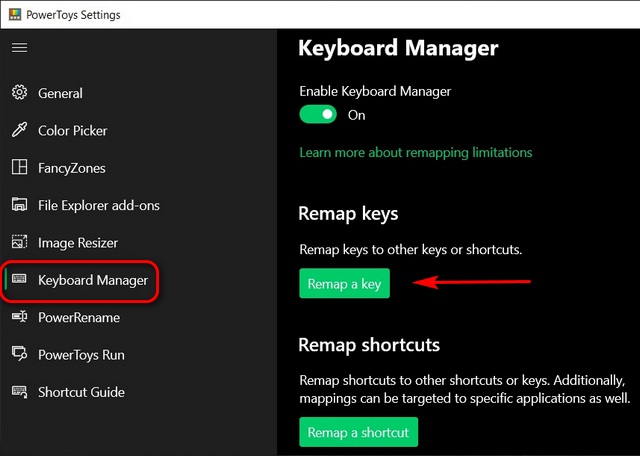
2. When PowerToys opens, click the “Keyboard Manager” option in the left-hand menu and choose Settings.
3. Ensure that “Enable Keyboard Manager” is switched on and click the “Remap a key” button to open the “Remap keys” window.
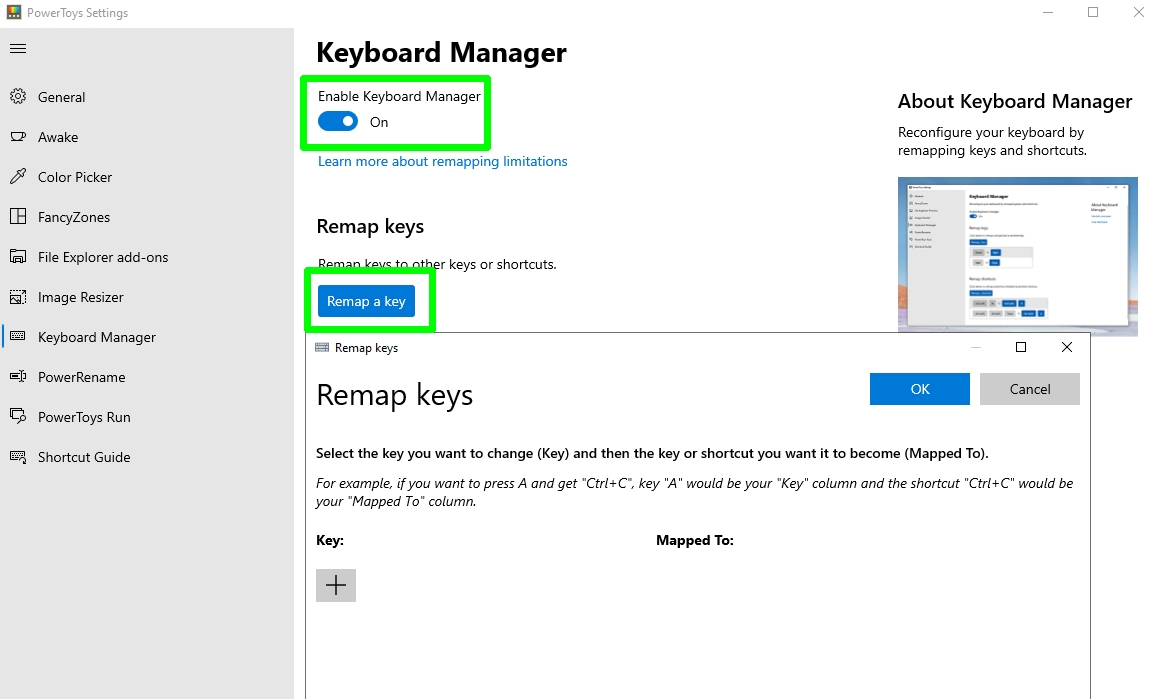
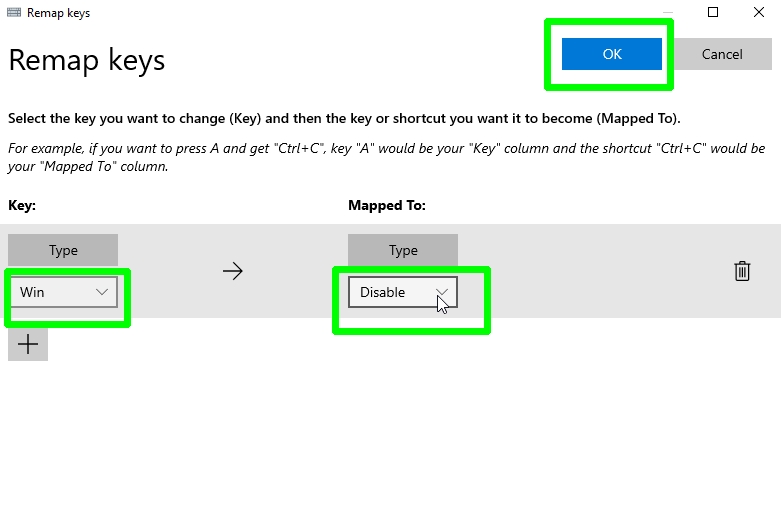
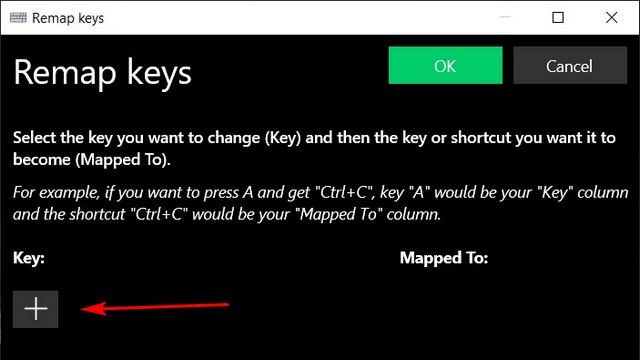
4. Click the plus button, then click the “Key” drop-down menu. Scroll down to “Win” and select that option. Now click the “Mapped To” drop-down menu and choose Disable. Click OK to confirm.
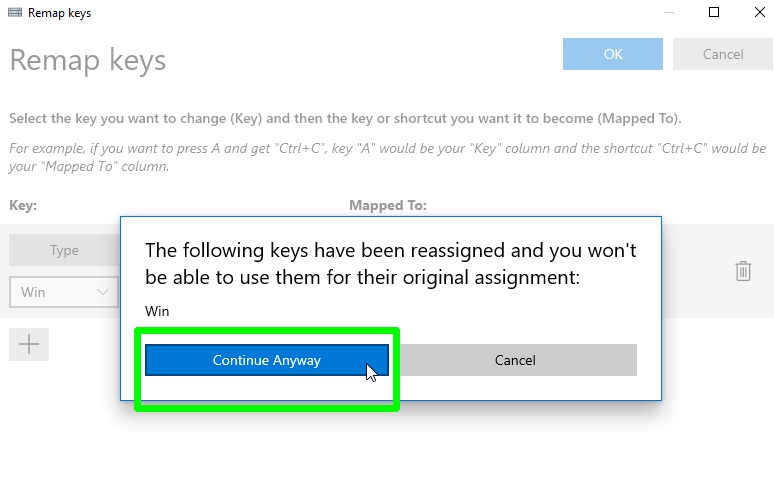
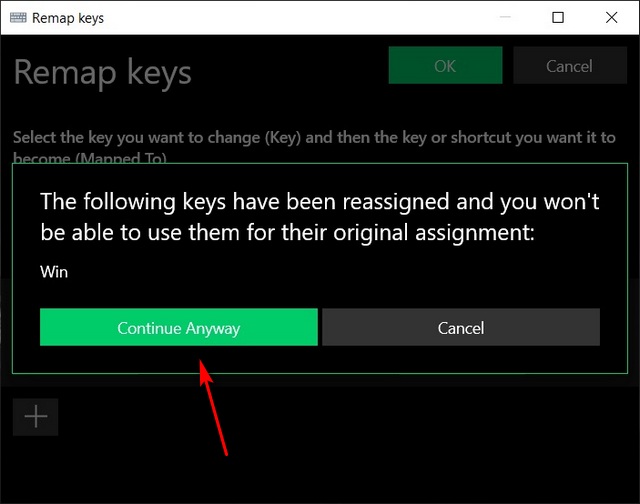
5. Windows will warn you that you won’t be able to use the Win key anymore. As this is what you want, click “Continue Anyway.”
Both Windows keys on your keyboard will be instantly disabled, with no need to restart your PC.
To re-enable the Windows key, simply close PowerTools: right-click its icon in the system tray and choose “Exit.”
- How to remove the Windows 10 news and weather widget
- How to uninstall Cortana from Windows 10
- How to uninstall Microsoft Edge and stop it reinstalling
- How to hide desktop icons in Windows
- How to keep your PC awake without touching it
- How to change keyboard language — in Windows and macOS
- How to type an em dash on Windows and macOS
Get instant access to breaking news, the hottest reviews, great deals and helpful tips.
Robert Irvine was previously the How-To Editor at Tom’s Guide. He has been writing tutorials about software, hardware, websites and other tech topics since the days of dial-up modems, and was previously the editor of Web User magazine. Robert enjoys cooking, and makes a mean sausage casserole, but is definitely not the celebrity chef of the same name.
Download PC Repair Tool to quickly find & fix Windows errors automatically
Pressing the Windows keys opens the start menu. Using combinations of WinKey with other keys on your keyboard lets you perform many actions and commands that you perform with the mouse. These are the WinKey or Windows Key shortcuts, and they are very useful. However, if you want to disable the Windows key hotkeys in Windows 11/10, here is how you can do that.
When one is gaming, and if presses the Windows Key, any open PC game where the taskbar is not shown, will minimize without exiting the program! This often becomes a nightmare for PC gamers, and as such, while playing PC games, most prefer to disable this key.
Let us see how we can disable the Windows key on the keyboard to improve the Gaming experience.
There are five ways to disable the WinKey or Windows Key:
- Use WinKey Killer or WinKill
- Edit the Registry manually
- Use the Group Policy Editor
- Use the Registry.
- Use RemapKeyboard PowerToy.
1] Use WinKey Killer or WinKill
Download and use WinKey Killer, a freeware app. But this does not appear to be working on later Windows versions.

I have, however, tried WinKill on my Windows 11/10 and it worked.
WinKill sits in the system tray where you can toggle On or Off the killing of the Windows Key. You can download it here.
2] Edit the Registry manually
To completely disable the Windows key, follow these steps:
- Open regedit.
- On the Windows menu, click
HKEY_LOCAL_ MACHINEon Local Machine. - Double-click the
SystemCurrentControlSetControlfolder, and then click the Keyboard Layout folder. - On the Edit menu, click Add Value, type in Scancode Map, click REG_BINARY as the Data Type, and then click OK.
- Type
00000000000000000300000000005BE000005CE000000000in the Data field, and then click OK. - Close Registry Editor and restart the computer.
To enable the Windows key, follow these steps:
- Open regedit.
- On the Windows menu, click
HKEY_LOCAL_ MACHINEon Local Machine. - Double-click the
SystemCurrentControlSetControlfolder, and then click the Keyboard Layout folder. - Right-click the Scancode Map registry entry, and then click Delete. Click Yes.
- Close Registry Editor and restart the computer.
You may want to backup your registry first.
3] Using the Group Policy Editor
To disable Windows Key hotkeys in Windows 11/10 using Group Policy, follow these steps:
Run gpedit.msc and navigate to the following setting:
User Configuration > Administrative Templates > Windows Components > File Explorer

In the right pane, you will see Turn off Windows Key hotkeys. Double-click on it and select Enabled.
Keyboards with a Windows key provide users with shortcuts to common shell features. For example, pressing the keyboard sequence Windows+R opens the Run dialog box; pressing Windows+E starts File Explorer. By using this setting, you can disable these Windows+X shortcut keys. If you enable this setting, the Windows+X shortcut keys are unavailable. If you disable or do not configure this setting, the Windows+X shortcut keys are available.
Click the OK button. This should do the job!
4] Using Registry Editor
If your Windows, does not have the Group Policy Editor, you can use the Registry Editor to turn off the Windows key.
Navigate to –
HKEY_CURRENT_USERSoftwareMicrosoftWindowsCurrentVersionPoliciesExplorer
Create a 32-bit DWORD value, name it NoWinKeys and give it a value of 1.
5] Using Remap Keyboard PowerToy

- Download and install Microsoft PowerToys.
- Launch PowerToys
- Go to Keyboard Manager
- Select Remap a key
- Click the ‘+’ button
- Under Key click on the Type Key button
- Press your Winkey and click OK.
- Under Mapped To, select Undefined from the drop-down.
That’s it!
How do I turn off Windows hotkeys?
To turn off Windows hotkeys in Windows 11/10, you can use the Registry Editor, Group Policy Editor, or WinKey Killer tool. In the Group Policy Editor, you need to enable the Turn off Windows Key hotkeys setting. In the Registry Editor, you need to set the Value data of NoWinKeys as 1.
How do I turn off Windows 11/10 hotkeys?
There are multiple ways to turn off Windows 11/10 hotkeys. The most convenient way is by using a software called WinKill. Otherwise, you can use the Registry Editor or PowerToys to get the job done. In the Registry Editor, you need to open the Explorer in HKCU and set the Value data of NoWinKeys as 1.
Check this post if your WinKey or Windows key has become disabled, and this one if you’d like to only disable Win+L Shortcut Key.

Anand Khanse is the Admin of TheWindowsClub.com, a 10-year Microsoft MVP (2006-16) & a Windows Insider MVP (2016-2022). Please read the entire post & the comments first, create a System Restore Point before making any changes to your system & be careful about any 3rd-party offers while installing freeware.
Procedures to Disable and Enable Windows Key in Windows 10 with steps. – On the Keyboard, Windows key performs multiple tasks such as open Start menu, Supports other keys to work as shortcuts. Some users find the key in the disabled state on Windows 10. Moreover few want to disable it for their own reasons.
So you will see here a guide explaining How to Disable / Enable Windows Key on Windows 10 with different methods. You should know that Ctrl+Esc functions as a substitute for the key on the keyboard. So in absence of the Windows key, you can effectively use this shortcut combination. See a very interesting article How to Create Keyboard Shortcut for a Website on Windows 10 in this regard.
This will take a few minutes to perform. Just read the steps given below to accomplish the task.
Method 1 – Using Registry Editor
Step 1 – Click the Start button, type regedit and press Enter. This will open the Registry Editor on your screens.
Read this guide to find more ways to Access Registry Editor in Windows 10.
Step 2 – Navigate to the following path:
HKEY_LOCAL_MACHINE> System> CurrentControSet> Control> Keyboard Layout
Step 3 – Go to the right pane, right click on an empty field and select New followed by Binary Value. Name the value Scancode Map.
Step 4 – Right click on the Scancode Map Binary value and select Modify.
Step 5 – Edit Binary Value pop up appears. Type the following value data manually in the value data field –
00 00 00 00 00 00 00 0003 00 00 00 00 00 5B E000 00 5C E0 00 00 00 00
and click OK.
Step 5 – Close the Registry Editor and restart the system. When you need to again enable the key just delete Scancode Map value and restart the PC.
Method 2 – Again Disable / Enable Windows Key on Keyboard Windows 10 using the Registry editor
Step 1 – Access the Registry Editor (Click Start, type regedit, and press Enter).
Step 2 – Navigate to the following keys:
HKEY_CURRENT_USERSoftwareMicrosoftWindowsCurrentVersionPoliciesExplorer
Step 3 – Navigate to the right pane, right-click on an empty space and select DWORD (32-bit) value from the list. Name it NoWinKeys.
Step 4 – Double click on NoWinKeys, and put value 1 under Value data and select OK. Oppositely, use the value data 0 to restore the previous status.
That’s it. Simply close the system and restart it.
Method 3 – Using the Group policy Editor
Step 1 – Press the shortcut key Win+R. Run dialog box will appear in the bottom left of the screen.
Step 2 – Type gpedit.msc and click OK.
Follow the additional methods to Open Group Policy Editor in Windows 10.
Step 3 – Navigate to the following path in your Group Policy editor
Computer configuration > Administrative Templates > Windows Components > File Explorer
Step 4 – Check in the right pane, an entry name Turn off Windows + X hotkeys. Double click on it and select Enabled.
That’s all done now.
Finalizing words
So these are the ways leading to Disable / Enable Windows Key on Keyboard Windows 10. Once you make the key working it supports you perform the above-said works. And disabling the same you prevent using to open the Start menu, pay supportive role as keyboard shortcuts.
Nearly every Windows PC features a Windows key on the keyboard. The Windows key can be pressed to bring up the Start menu immediately. As useful as it sounds, it can be quite annoying at times. If you’re playing a game and mistakenly press it, it’ll kick you out of the full screen. On old systems with limited resources, it may cause your PC to suddenly freeze up. Luckily, there’s a way to disable the Windows key on your PC.
1. Disable Windows Key Using PowerToys Tool
The easiest way to disable the Windows key is by remapping the key. This means assigning it to another function that doesn’t interfere with what we are doing. You can remap the key using Microsoft’s free PowerToys utility.
To disable the Windows key on your PC, follow the steps below:
1. Download and install Microsoft PowerToys on your PC. You will also need .NET Core to install it. You can download it straight from the link provided in the installer if you don’t have it already installed.
2. Once installed, launch the utility.
3. Click on “Keyboard Manager” from the menu on the left.

4. In the “Keyboard Manager” window, click the “Remap a key” button.

5. Click on the “+” plus icon. This will allow you to add a mapping customization.

5. Select the key in the left column (in this case, the Windows key). You can also select “Type key” and press the Windows key on your keyboard. In the right column, select “Undefined.”

Here, selecting “Undefined” will remove the functionality of the Windows key, and nothing will happen when you press it. If you’d like to remap it to perform another function, you can select that from the right column.
6. Click OK and then “Continue Anyway.”

After that, the Windows key should be disabled. The settings save automatically, so you can close the utility and use your computer as usual.
However, if you’ve previously disabled your Windows key and want to re-enable it, you can use the same PowerToys utility to do so:
1. Open the PowerToys utility and navigate to “Keyboard Manager -> Remap a Key.”
2. In the listing, locate the “Win -> Undefined” mapping and click the nearby trash icon. This will delete it. Press OK to confirm the setting.

2. Disable Windows Key Using Group Policy Editor
If you are an advanced user, then you can remap the Windows key using the Registry Editor. Here are the steps to do that:
1. Press Win + R keys to open the Run command and enter gpedit.msc to open the Group Policy Editor.

2. Head over to the below-mentioned path:
User Configuration -> Administrative Templates -> Windows Components -> File Explorer
3. From the right pane, locate the entry “Turn off Windows Key hotkeys.”

4. Double-click on “Turn off Windows Key hotkeys” and make sure to select “Enabled” in the new window that opens. Hit OK and Apply to save changes.

Note: Group Policy Editor is not available in Windows 10 Home edition, so you need to install it manually.
3. Disable Using Third-Party Tools
There are multiple third-party tools that you can download to disable the Windows key on your Windows 10 PC. In our case, we are using a tool called SharpKeys. It is a popular tool that makes it easier to disable keys on your keyboard.
1. Download SharpKeys on your PC and open it.
2. Click on the Add button.

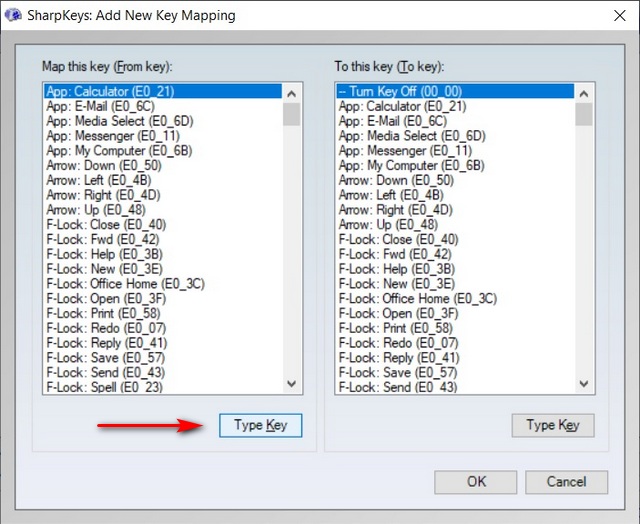
3. Press “Type Key” located on the left pane, then press the Windows key.

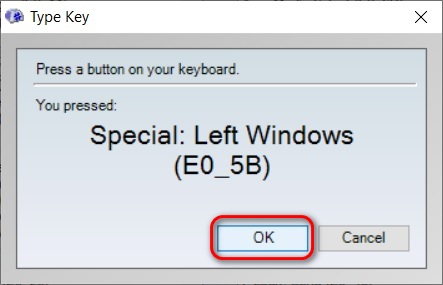
5. Click on OK to select the pressed key.
6. From the right pane, you need to select “Turn Key Off” and click on OK to save the changes.

8. Finally, hit the “Write to Registry” button and restart your PC.

In order to enable the Windows key again, open the SharpKeys tool and delete the desired key from the main menu. After deletion, click on Write to Registry to store the changes.
Wrapping Up
These are some of the methods to disable the Windows key on Windows 10. There are also several other software you can use to remap the Windows button. Check them out.

Sagar Naresh
My work has been published on Android Authority, Android Police, Android Central, BGR, Gadgets360, GSMArena, and more. A Six Sigma and Google Certified Digital Marketer who is covering tech-related content for the past 2 years.
Subscribe to our newsletter!
Our latest tutorials delivered straight to your inbox
Windows shortcuts are an integral part of the PC experience, and many of us use them on a daily basis. The Windows key is used in many keyboard shortcuts in Windows 10, like opening the Settings menu (Win key + I), accessing the Run dialog box (Win key + R), locking the computer (Win key + L), etc. However, it could sometimes be a bit of a nuisance while gaming if you accidentally press the Windows key and end up pulling up random menus or minimizing the game. So today, we will show you how to disable the Windows key for an uninterrupted gaming experience.
You can disable the Windows key using a variety of methods on Windows 10 devices. That includes using native methods like the registry editor and group policy editor, as well as a whole host of third-party programs. Microsoft’s power-user tool, PowerToys, is another utility that lets you disable the Windows key effortlessly. So without any further delay, let’s check out all the ways you can use to disable the Windows key on your Windows 10 PC.
Table Of Contents
1. Disable Windows Key Using Registry Editor
There are two methods to manually disable the Windows key on your keyboard using the registry editor. While one will only disable the Windows key, the other will disable all Windows key shortcuts. We have discussed both methods in this article.
Method 1: Disable Only the Windows Key
- First, open the Windows Registry Editor. To do that, search for ‘regedit’ in the Windows Search Bar and click on the first result.
- In the Registry Editor window, use the left sidebar to navigate to the following key:
ComputerHKEY_LOCAL_MACHINESYSTEMCurrentControlSetControlKeyboard Layout. In the right pane, right-click on the empty space and choose New -> Binary Value from the menu. Name the new key ‘Scancode Map‘ (without quotes).
- Now double-click on Scancode Map and enter the following value in the data field:
00000000000000000300000000005BE000005CE000000000. Hit ‘OK‘ when done. Then, restart your PC to apply the changes.
That’s it. You have successfully disabled the Windows key on your PC. To re-enable the Windows key, go back into the Registry Editor and delete the Scancode Map key (right-click -> Delete).
Method 2: Disable All Windows Key Shortcuts
- Open the Windows registry editor as described above. Now navigate to the following key:
HKEY_CURRENT_USERSoftwareMicrosoftWindowsCurrentVersionPoliciesExplorer. Next, right-click on the empty space in the right pane and select New -> DWORD (32-bit) Value. Enter ‘NoWinKeys‘ (without quotes) as the name of the DWORD.
- Next, double-click on the DWORD key, and change the Value Data to “1” (without quotes) in the pop-up window. Hit ‘OK‘ and restart your PC to apply the changes.
Well, those are the steps you need to follow to disable all Windows key shortcuts on your PC. To re-enable Windows key shortcuts, go back into the Registry Editor and delete the new key (right-click -> Delete).
2. Using a Reg File
If editing the Windows registry is too much work or if you are afraid of messing up your Windows installation, you can use a registry file to disable the Windows key. For that, download this reg file (courtesy of Ten Forums) and run it on your Windows 10 PC. You will get a warning message about making changes to the registry. Click on ‘Yes’ to get the job done.
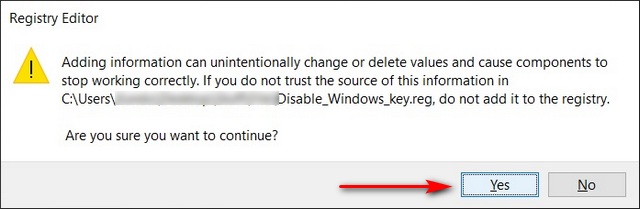
This method is the fastest and the simplest way to disable the Windows key on your keyboard. To revert the changes and re-enable the Windows key, download and run another reg file, also courtesy of the folks over at Ten Forums. Restart your PC after running the file, and the changes should reflect after that.
3. Using Group Policy Editor
The following process disables Windows key shortcuts rather than the key itself. If you want to disable the Windows key entirely, move over to the next method.
- Hit Windows key + R simultaneously to open the Run dialog box. You can also search for ‘Run’ in the Windows Search Bar. Now type ‘gpedit.msc’ and hit Enter to open the Group Policy Editor.
- In the Group Policy Editor window, go to the following path using the left sidebar:
User Configuration > Administrative Templates > Windows Components > File Explorer. In the right pane, locate the entry that says: ‘Turn off Windows Key hotkeys‘.
- Double-click on the ‘Turn off Windows Key hotkeys’ setting and select ‘Enabled‘ in the pop-up window. Finally, click ‘OK‘ or ‘Apply‘ to save your changes.
Note: Group Policy Editor is not available in Windows 10 Home. So if that’s what you are using on your computer, follow our step-by-step guide to enable Group Policy Editor on Windows 10 Home.
4. Using Microsoft PowerToys
Microsoft PowerToys is an immensely useful free utility that offers power users many options to tweak Windows 10. We have already written a detailed tutorial on how to use PowerToys on Windows 10, including how to use the built-in keyboard manager. And today, we will show you how to use that feature to disable the Windows key on your computer.
- First off, download Microsoft PowerToys from GitHub (Free) if you don’t already have it on your computer. Now launch the app and click on ‘Keyboard Manager‘ on the left sidebar. Now click the ‘Remap a Key‘ button on the right pane.
- In the ‘Remap Keyboard’ window, click on the ‘+‘ sign under ‘Key’ to add a custom mapping rule.
- Next, use the drop-down menu on the left to select the ‘Win‘ key. You can also click on ‘Type’ and press the ‘Win’ key. Now move over to the ‘Mapped To’ drop-down menu on the right and select ‘Disable‘. Hit ‘OK‘ once you are done. This will set the new mapping rule for both left and right Windows keys at once.
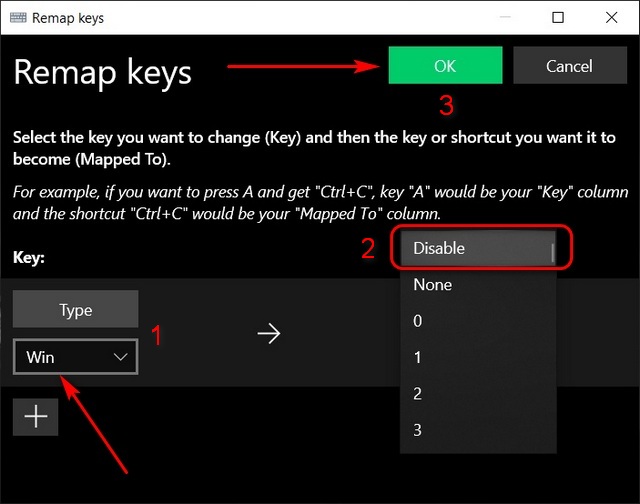
- Windows will warn you that you won’t be able to use the Windows keys after disabling them. Hit ‘Continue Anyway‘ to proceed.
- Both Windows keys on your keyboard will be immediately disabled (no restart needed). But remember that you will need to keep PowerToys open at all times for this mapping rule to work. To re-enable the Windows keys, simply ‘Exit’ the app from the system tray, and the Windows keys will work once again.
5. Using Third-Party Applications
There are plenty of third-party applications that allow users to remap keys in Windows 10. One such utility is the open-source app SharpKeys (Free). It comes either in an installable package for x86 and x64 systems or an installer-less package (ZIP file) that works on both x86/ x64 and ARM-based Windows 10 computers. Here’s how you use it:
- Open SharpKeys and click on ‘Add‘ at the bottom-left corner.
- You will now see the option to remap keys on your keyboard. Click on the ‘Type Key‘ button at the bottom-left.
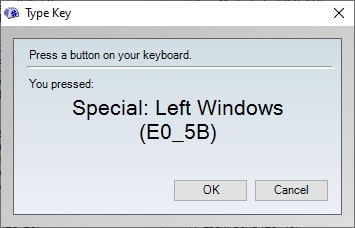
- You will get a popup prompting you to ‘Press a button on your keyboard’. Press the Windows key. The app will immediately read the keypress and let you know which key you are going to remap. Click on ‘OK‘ to confirm your selection.
- On the right pane, select the ‘Turn Key Off‘ option and then hit ‘OK‘.
- Finally, click on ‘Write to Registry‘ to seal the deal. Repeat the process with the second Windows key on the keyboard if you so want. Now restart your PC to apply the changes.
- To enable the Windows key(s) again, select the target key(s) from the SharpKeys menu, and then click on Delete -> Write to Registry. Now restart your PC to get your Windows key(s) back in working order.
Other Third-Party Tools to Disable Windows Key
If you want a simpler one-click solution, you can use a utility that blocks the Windows key on your Windows 10 PC. We recommend the free and portable WinKill app, which lets you temporarily disable the Windows key without rebooting your computer. To use it, download it from GitHub (Free) or MajorGeeks (Free) and then install it on your PC. Now click on the WinKill icon in the system tray to toggle the Windows key on or off.
WinKill is a nifty utility that works as advertised. It uses almost zero resources, requires just one click to enable or disable the Win key, and is simple enough for your grandma. However, if you still need other options, there are various other similar applications you can check out. They include WKey Disabler (Free), Disable Windows Key (Free), AutoHotkey (Free), etc.
6. Activate ‘Gaming Mode’ on Your Gaming Keyboard
One of the fastest, simplest, and safest ways to disable the Windows key on your Windows 10 computer is through the custom software that comes with your gaming keyboard. These utilities typically offer you options to configure various settings such as macros and lighting.
Most gaming keyboards ship with custom software that includes, among other things, a ‘Gaming Mode’ that allows you to block the Windows key while gaming. If you are unsure of how to activate the feature, check your keyboard manufacturer’s support site for detailed instructions. Do note that not every gaming keyboard supports this feature, so make sure to check if your keyboard offers this function.

Meanwhile, if you don’t use a gaming keyboard or thinking of getting a new one, check out the best gaming keyboards you can buy in 2021. Also, check out our ultimate gaming keyboard guide to learn about different mechanical switches, keycaps, and more in gaming keyboards.
Disable the Windows Key for Uninterrupted Gaming
Hopefully, the tutorial above will help you get the chicken dinner that you rightfully deserve. So go ahead, disable the Windows key on your PC and let us know which method you chose and why in the comments section below. Once you do that, also check out how you can optimize your Windows 10 PC for gaming and keep your PC’s temperature under control to prevent thermal throttling. Finally, check out the best budget gaming SSDs and the best DDR4 RAM for gaming you can buy.
Windows 10 key is one of the oldest and the most useful key in Windows OS, it has been serving the users since 1994 and will continue to do. The best thing about this key apart from it being the quickest way to launch the Start Menu, the shortcuts that allow you to do things quickly.
It is very easy to disable the Windows key and in this article, we are going to do just that.
There are a plethora of methods by which you can easily disable the Windows Key. According to many professional gamers, they don’t want any accidental presses, and if the windows key is enabled then the chances of accidental presses increases. Let’s just methods to disable the Windows Key.
1. Disable Windows Key by Registry
The registry is one of the best ways to alter settings in your computer is by Registry. In this section, we are going to use Registry to disable the Windows Key.
Note: Be careful while doing anything with the registry as it can damage some other settings as well.
To disable Windows Key with the help of Registry you need to follow the prescribed steps:-
Step 1: Launch the Registry Editor by either searching it out from the start menu or by RUN(Win + R), type “regedit” and hit enter.
Step 2: Now, we are going to create a backup as it can be helpful if things go wrong by File> Export.

Step 3: From the Export Range section select All, file name: Backup, and click Save.

This will create a backup and will help you in the future if things go wrong.
Now you need to alter the settings with the help of the following steps:-
Step 4: Now, either navigate to the Keyboard layout with the help of the given route by clicking on the drop arrow from the left panel or by copying the given route and pasting it in the search bar.
ComputerHKEY_LOCAL_MACHINESYSTEMCurrentControlSetControlKeyboardLayout
Step 5: Now, right-click on the Keyboard Layout then New> Binary Value and rename the newly created entity to ScancodeMap.
Step 6: Launch the ScancodeMap by double-clicking on it and insert the following value.
Note: You can’t just copy and paste the value, you have to manually enter it.
00000000000000000300000000005BE000005CE000000000
Then click Apply and OK to confirm the alteration.
Finally, restart your PC and you are good to go.
The best thing about this method is that whenever you feel like you need to enable the Windows Key, just go to the registry and delete the created entity ScancodeMap.
2. Disable Windows Keys by SharpKeys
SharpKeys is a third-party application that allows you to remap the keyboard keys. In this section, we are going to use it to disable the Windows Keys. To do that, you need to follow the prescribed steps:-
Step 1: Download the SharpKey and launch it.
Step 2: On the appeared screen, click on the Add button.

Step 3: Now, from the appeared screen, click on the Type Key of the left panel.
Step 4: On the appeared screen, press the Win key and click OK.
Step 5: Now from the left panel of the Window, choose Turn Key Off and click OK.
Step 6: Finally, click on the Write to Registry option to end the task.
This will turn the Windows Keys off, to get things right you need to restart your computer and hopefully, you will be able to enjoy a seamless gaming experience.
If you want to revert the settings and allow the Windows Key then do as follows:-
Step 1: Launch the application.
Step 2: Select the created entity and then click on the Delete button.
Step 3: Click on the Write to Registry button and you are good to go.

This will enable the Windows Key but you still should restart your computer once, in order to get things in the right place.
3. Disable Windows Key by using a Gaming Mode
If you are someone looking to disable the Windows Key then the chances of you being a gamer are high. If you are interested in gaming and have a Gaming Keyboard then you can use its gaming mode to disable the Windows Keys.
Many gaming keyboards have either a physical manual or a virtual one. In that manual, you can see the shortcuts by which you can enter the Gaming mode which usually disabled the Windows Key.
One thing you should know, this option is temporary and best for gamers as you don’t want to disable the Windows Keys permanently because of its plethora of features.
4. Disable Windows Keys from the Keyboard Applications
This one goes hand in hand with the former method. As we have already mentioned, gaming keyboards allow you to disable the Windows Key with the help of an application that is provided to you by the manufacturer or the one you have downloaded from the manufacturer’s official website.
Many applications allow you to disable the Windows Key, you can either ask your vendor to provide you the software or visit the official website to download the software.
5. Disable Windows Keys by AutoHotKey Script
Now, let’s write some script and disable the AutoHotKey. AutoHotKey is an open-source software on which you can write short scripts and then run it to perform a specific task.
But before going any further you need to download the AutoHotKey. After downloading follow the prescribed steps to disable the Windows Key.
Step 1: Right-click on the desktop screen, New> AutoHotKey Script.
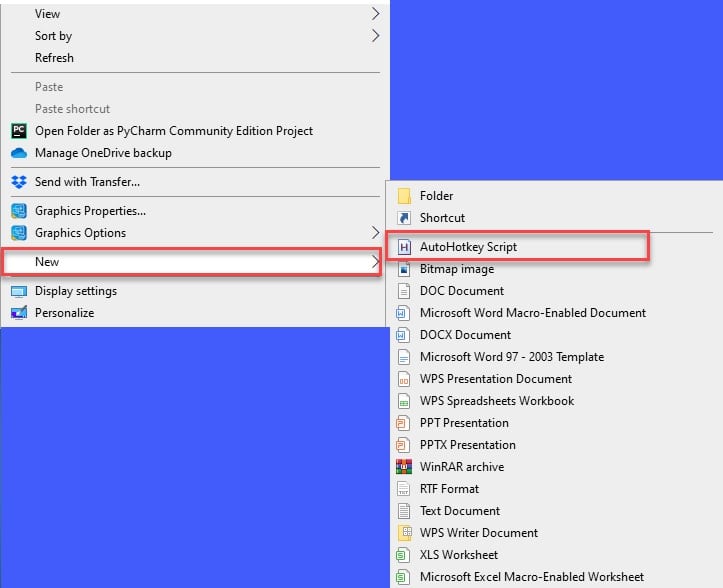
Step 2: A new blank AutoHotkey file will be formed, right-click on it, and then select Edit Script.
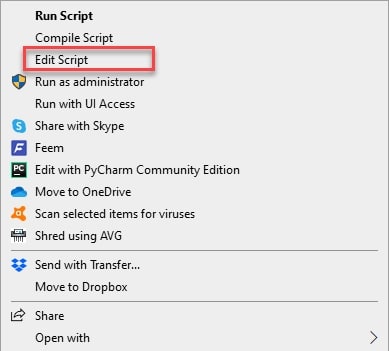
Step 3: This will redirect you to the AutoHotKey coding panel, there, you need to type the following commands.
~LWin Up::return
~RWin Up::return
Save the script, right-click on the AutoHotKey file, and select Run Script from the appeared list.
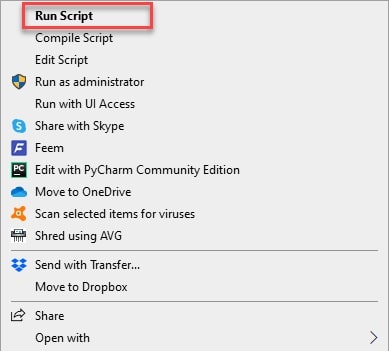
Now, every time you need to disable the Windows Key just RUN the formed script. And you are good to go.
There is a lot more cool stuff that you can do with AutoHotKey other than disabling the Windows Key. read our guide on Best AutoHotKey Script To Make Your Life Easier.
6. Disable Windows Keys by blocking HotKeys with register
In this section, we are going to use the registry editor to block Windows Key hotkeys. To do that, you need to be obedient to the following steps:-
Step 1: Launch the Registry Editor by either searching it out from the start menu or by RUN(Win + R), type “regedit” and hit enter.
Step 2: Now reach the Explorer by either expanding the folders in the following order or just by copying and pasting the following route.
HKEY_CURRENT_USERSoftwareMicrosoftWindowsCurrentVersionPoliciesExplorer
Step 3: Now, right-click on Explorer from the left panel and then New> DWORD(32-bit) value.
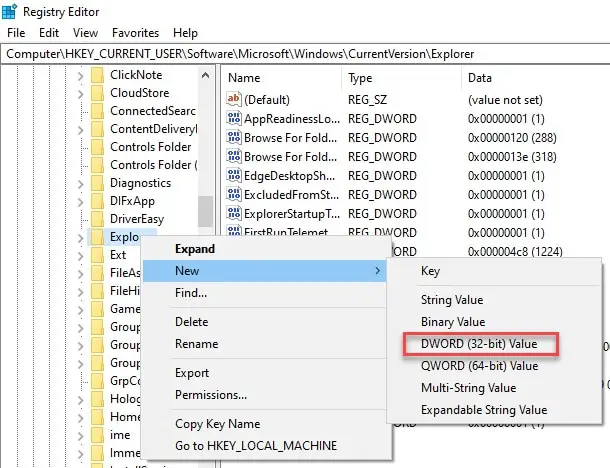
Step 4: Name the newly created value, like NoWinKey.
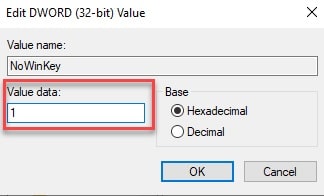
Step 5: Launch the newly created registry, change the values to 1, and hit enter.
This will disable the Windows Key. Restart your computer to get things on track and you are good to go.
Now, you can enjoy them without thinking about the accidental presses.
7. Disable Windows Keys by Group Policy Editor
Group Policy Editor allows you to alter the settings of your Windows OS and enable or disable features like PowerShell or command prompt. In this section, we are going to disable the Windows Keys with the help of the Group Policy Editor.
To do that, you need to follow the prescribed steps:-
Step 1: Launch the Group Policy Editor either by searching it out from the start menu or by RUN(Win + R), type “gpedit.msc” and hit enter.

Step 2: Now, we need to reach File Explorer from the given path by expanding the folders from the left panel of the screen.
User Configuration> Administrative Templates> Windows Component> File Explorer
Step 3: After reaching the File Explorer double click on “Turn off Windows Key hotkeys” from the right side of the screen.

Step 4: Now, from the appeared screen, select Enabled and click OK.
Finally, restart your computer and you longer will be able to use the Windows Key.
If you want to enable it, go to the same location, launch the “Turn off Windows Key hotkeys” and select disabled.
8. Disable Windows Keys by third-party apps
There are tons of applications out there in the market by which you can easily turn off the Windows Key. They may or may not be specifically for this purpose but they get the job done.
Winkill:-
Winkill is one of those applications specifically built to disable the Windows Key and shortcuts associated with it. The best thing about Winkill is that you don’t need to restart your computer as you did in all the previous methods.
You just need to download and launch and Windows Key and shortcuts associated with it will be blocked.
This software was primarily built for gamers in order to save them from accidental presses. Any version of Windows(XP or after) is supported by this application. Therefore download it and use this small and simple tool to disable the Windows Key.
Simple disable Key:-
Simple Disable Key is another of those third-party applications that will allow you to disable the Windows Key. The best part about this application is that you can disable any key on your keyboard with its help.
To disable Windows Key with the help of Simple Disable Key you need to follow the prescribed steps:
Step 1: Download and launch the Simple Disable Key application.
Step 2: Now from the appeared screen, select Windows Key and then click Add key.
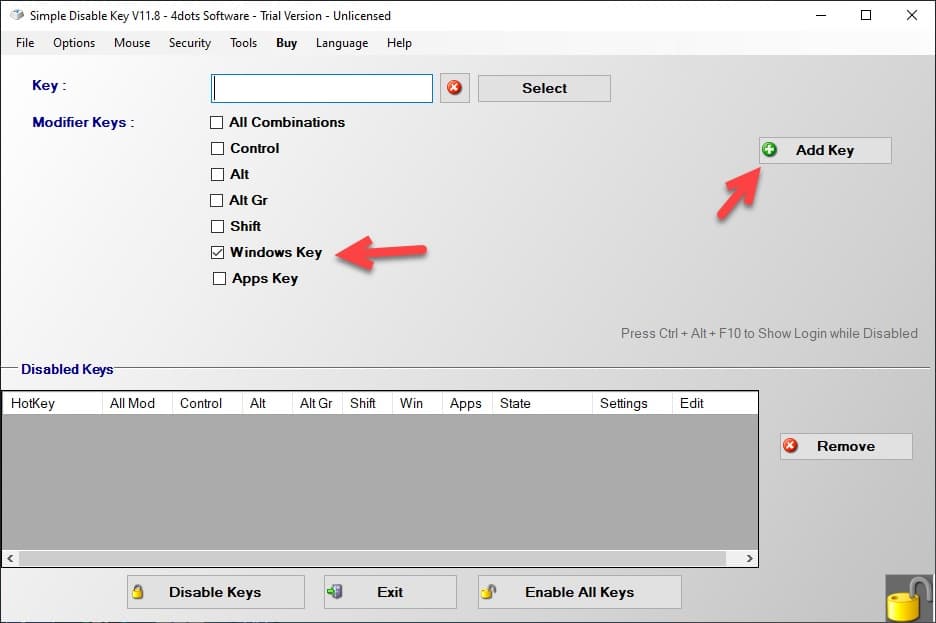
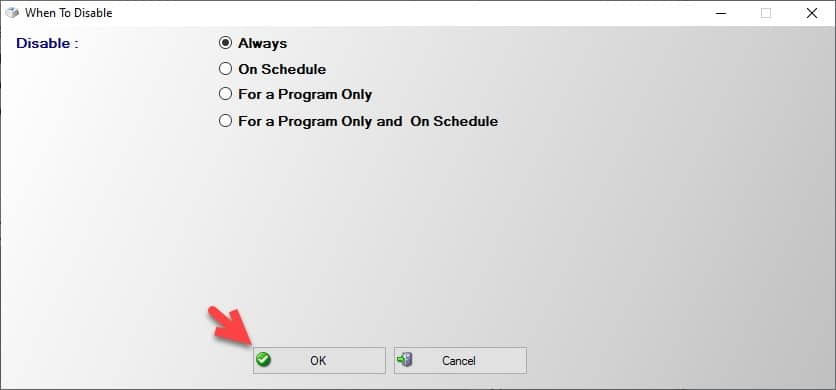
Step 3: This will redirect you to the “When to disable Windows”, there you need to select according to your need and then click OK to end the process.
Wrap-up:-
In this article, we have seen different methods by which you can disable the Windows key and at the same time few third-party applications that you can use. All of them work well and you can choose one for you.
Let’s just quickly go over them:-
- By registry: Launch the registry editor, navigate via ComputerHKEY_LOCAL_MACHINESYSTEMCurrentControlSetControlKeyboardLayout then right-click on the Keyboard Layout then New> Binary Value, double-click on the newly created entity, enter 00000000000000000300000000005BE000005CE000000000 and click OK
- By SharpKey: Add> Type Key> press win key> OK from the left panel Turn Key Off> OK> Write to registry.
- Using Gaming: Check your keyboard’s official website or provided manual.
- By Keyboard Application.
- By AutoHotKey Script: Right-click on desktop> New> AutoHotKey, right-click on AutoHotKey file> Edit Script> type “~LWin Up::return ~RWin Up::return” > Save, right-click on AutoHotKey file> Run Script.
- By Registry: Launch the registry editor, navigate via
HKEY_CURRENT_USERSoftwareMicrosoftWindowsCurrentVersionPoliciesExplorer
Then right-click on Explorer> New> DWORD(32-bit) value, launch the newly created entity, and change the value to 1.
- By Group Policy: Launch the Group Policy Editor, navigate to File Explorer by User Configuration> Administrative Templates> Windows Component> File Explorer and then double click on “Turn off Windows Key hotkeys”, select Enabled, and click OK.
- By Third-party app: Winkill and Simple Disable Key.
Run winkill, install SharpKeys, or edit the Windows Registry
What to Know
- Easiest: Run the portable winkill program.
- Install SharpKeys; set the Windows key to Turn Key Off.
- Most complex: Editing the Windows Registry manually is another option.
This article describes the three best ways to disable the Windows key in Windows 10. There are other methods, but these work for everyone and provide varying levels of control no matter your experience level.
Run winkill to Disable the Windows Keys
The Windows key pulls up the Start menu, and when pressed with other keys, it can trigger other Windows-related shortcuts. If you find yourself accidentally doing this while gaming, watching videos, etc., you can avoid this distraction by simply disabling the key.
One way to do this is by running a small, portable program to disable Windows keys instantly. Enabling them again is as simple as pressing one button, meaning that you can switch between enabled and disabled mode at any time (no reboot required, like the other methods below).
-
Download winkill and extract the contents from the ZIP file.
-
Execute WinKill.exe from the folder. If you’re asked to confirm, select Run.
-
Both Windows keys are instantly disabled by default. To enable them or quickly toggle between on and off, right-click the program’s icon in the notification area (near the clock) and choose Toggle. You can also double-click the icon.
Pick Which Windows Key to Disable With SharpKeys
Another free program gets the job done, as well. Go this route if you want control over which key gets disabled.
-
Install SharpKeys. There’s also a ZIP version on the download page if you’d prefer to use it without installing anything.
-
Select Add.
-
Choose Special: Left Windows (E0_5B) from the left column, ensure that Turn Key Off (00_00) is selected in the right column, and select OK.
To disable the right Windows key, repeat these last two steps for Special: Right Windows (E0_5C).
-
Choose Write to Registry, and then select OK on the confirmation box.
-
Restart your computer or sign out to apply the changes.
If you need the key to be usable again, open SharpKeys, select the key from the list, choose Delete at the bottom, and then complete the same last two steps from above.
Edit the Registry to Disable the Windows Key
Not interested in having a program do it for you? You can make the change yourself manually by creating a new entry in the registry and giving it a very specific value.
Editing the registry is easy, even if you’re unfamiliar with it. Just be sure to follow these steps exactly as you see them, no exceptions. This method disables both Windows keys.
-
Open Registry Editor. A quick way to get there is to search for regedit in the Start menu.
-
Back up the registry. While not necessarily required for this task, backing up ensures that a simple registry restore can undo changes if something unexpected happens during the edit.
-
Navigate here using the folders on the left:
HKEY_LOCAL_MACHINESYSTEMCurrentControlSetControlKeyboard Layout
-
With Keyboard Layout selected, right-click the blank area on the right and go to New > Binary Value.
-
Name it Scancode Map.
-
Double-click that newly created item and type this (pasting won’t work):
00 00 00 00 00 00 00 00 03 00 00 00 00 00 5B E0 00 00 5C E0 00 00 00 00
Don’t use spaces, and don’t worry about the leading numbers in the left column; they’ll change automatically as you type.
-
Select OK after confirming that the values are correct.
-
Close Registry Editor and sign off or restart to apply the changes.
To undo this, complete Step 3 and remove Scancode Map by right-clicking it and choosing Delete. Alternatively, rename it—anything will do, like Scancode Map OLD—to turn on the keys. Renaming it makes it easy to return to the first name later if you want to block them again.
FAQ
-
How do I disable the Windows Key while I’m in a game?
The easiest way to gain the ability to disable the Windows Key while gaming is to purchase a specialized gaming keyboard with a built-in disable function. Also, some games, such as Starcraft II, include an in-game option to disable the Windows key.
-
How do I disable the Fn key in Windows 10?
Open your BIOS menu during bootup and access the system configuration menu. Navigate to Action Keys Mode and press Enter to disable the setting. There may also be a Function Key Behavior setting under the Advanced configuration options depending on your computer. In another scenario, if you’ve set the F1 through F12 keys as hotkeys and you need to press Fn so you can use them in an app or game, press the Fn lock key. You won’t have to press Fn anymore to use the F1 through F12 keys; you can use them as standard F keys. The Fn lock key often shares a key with the Esc button or Shift button.
Thanks for letting us know!
Get the Latest Tech News Delivered Every Day
Subscribe