Follow these steps to temporarily turn off real-time Microsoft Defender antivirus protection in Windows Security. However, keep in mind that if you do, your device may be vulnerable to threats.
-
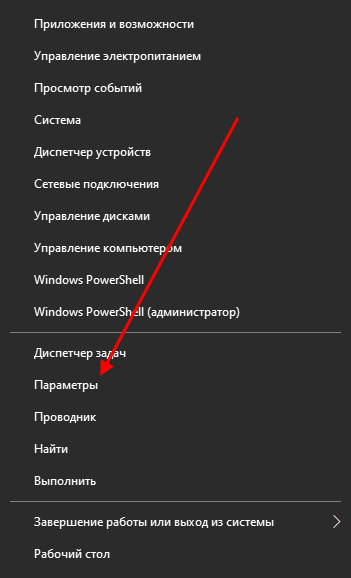
Select Start and type «Windows Security» to search for that app.
-
Select the Windows Security app from the search results, go to Virus & threat protection, and under Virus & threat protection settings select Manage settings.
-
Switch Real-time protection to Off. Note that scheduled scans will continue to run. However, files that are downloaded or installed will not be scanned until the next scheduled scan.
Notes:
-
If you just want to exclude a single file or folder from antivirus scanning you can do that by adding an exclusion. This is safer than turning the entire antivirus protection off. See Add an exclusion to Windows Security.
-
If you install a compatible non-Microsoft antivirus program Microsoft Defender antivirus will automatically turn itself off.
-
If Tamper Protection is turned on, you’ll need to turn Tamper Protection off before you’ll be able to turn Real-time protection off.
How malware can infect your PC
Need more help?
В Windows 10 имеется встроенный антивирус Windows Defender («Защитник Windows»), защищающий компьютер и данные от нежелательных программ: вирусов, шпионских программ, программ-вымогателей и многих других типов вредоносных программ и действий хакеров.
И хотя встроенного решения для защиты достаточно для большинства пользователей, бывают ситуации, в которых вы можете не захотеть пользоваться этой программой. К примеру, если вы настраиваете устройство, которое не будет выходить в сеть; если вам необходимо выполнить задачу, блокируемую этой программой; если вам нужно уложиться в требования политики безопасности вашей организации.
Единственная проблема связана с тем, что полностью удалить или отключить Windows Defender у вас не выйдет – эта система глубоко интегрирована в Windows 10. Однако есть несколько обходных путей, при помощи которых вы можете отключить антивирус – это использование локальной групповой политики, реестра или настроек Windows в разделе «Безопасность» (временно).
Как отключить Защитник Windows через настройки безопасности Windows
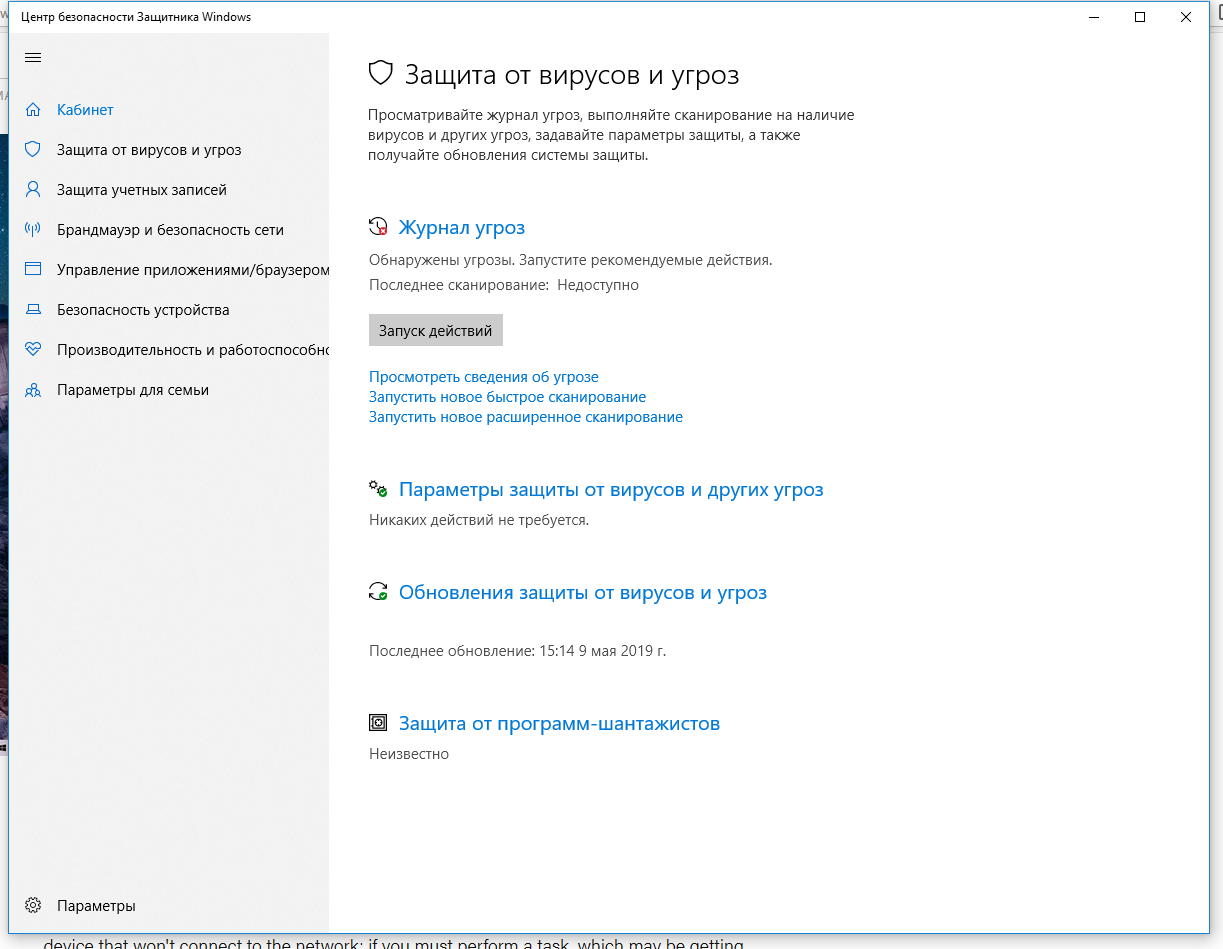
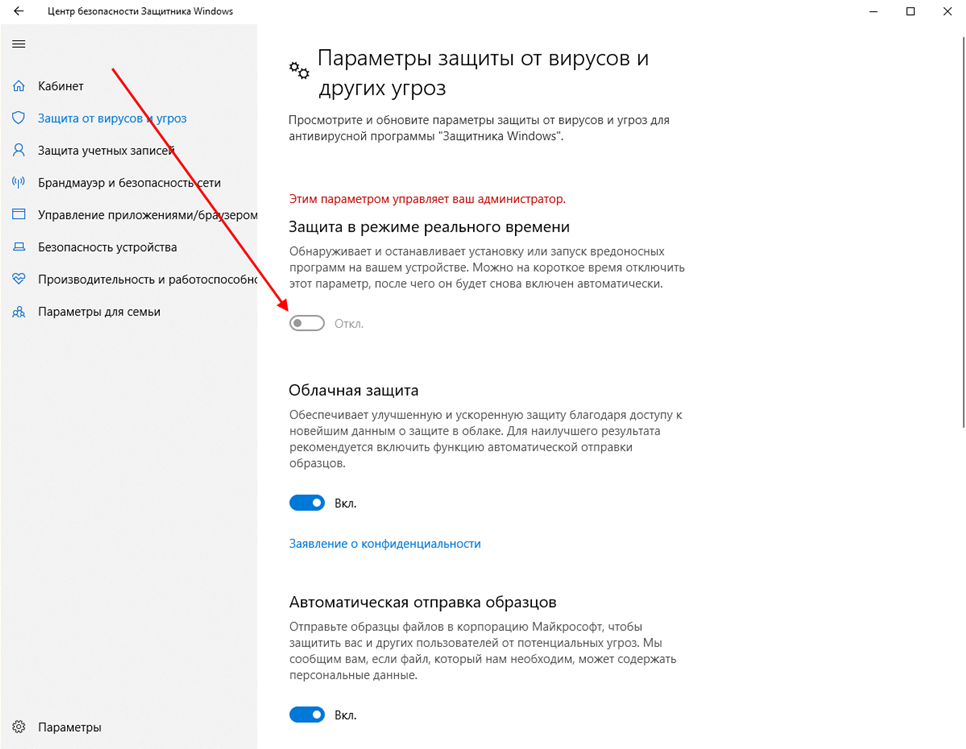
Если вам нужно выполнить определённую задачу, и не нужно отключать Защитника полностью, вы можете сделать это временно. Для этого при помощи поиска в кнопке «Пуск» найдите раздел «Центр безопасности Защитника Windows», и выберите в нём пункт «Защита от вирусов и угроз».
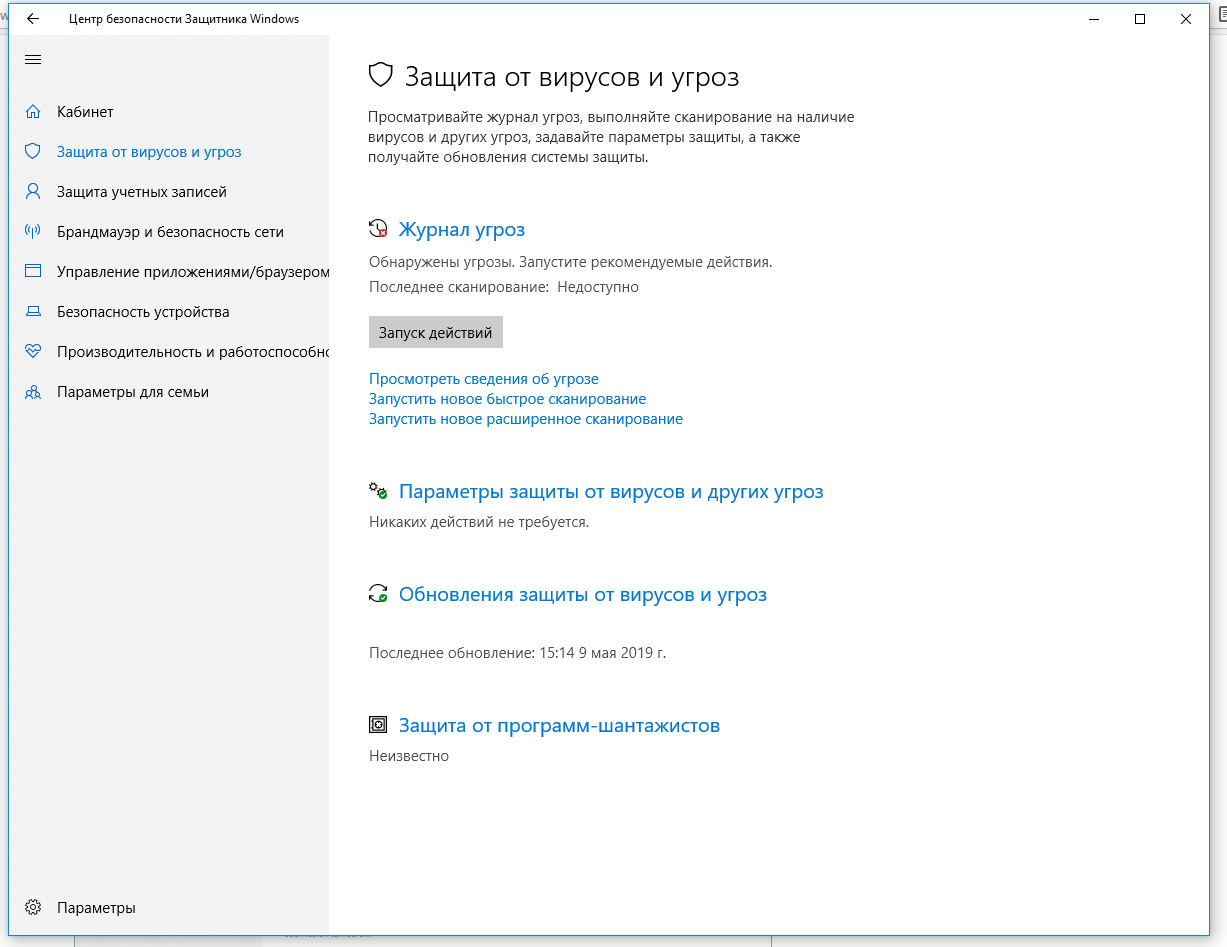
Там перейдите в раздел «Параметры защиты от вирусов и других угроз» и кликните по переключателю «Защита в режиме реального времени».
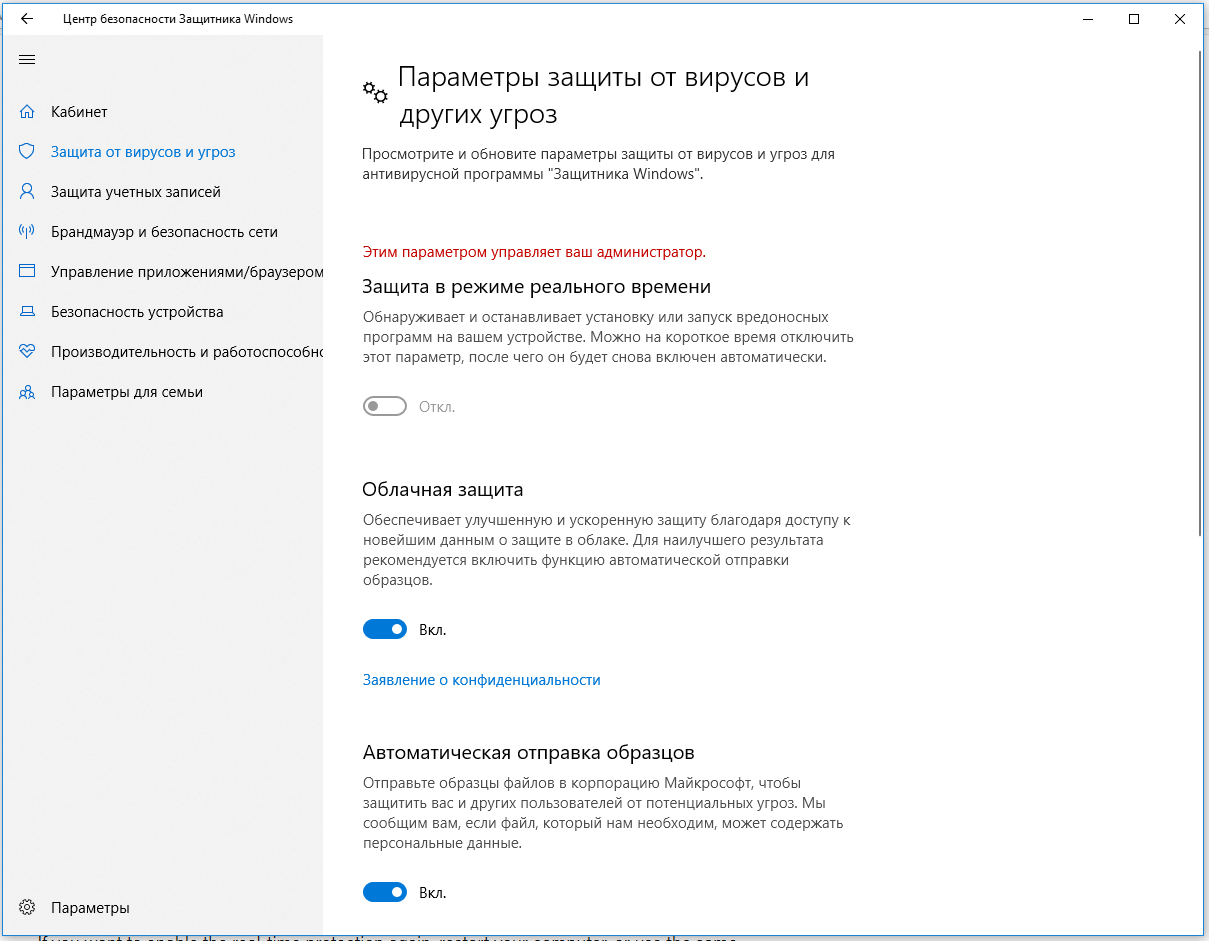
После этого антивирус отключит защиту компьютера в реальном времени, что позволит вам устанавливать приложения или выполнять определённую задачу, которая была недоступна вам из-за того, что антивирус блокировал необходимое действие.
Чтобы снова включить защиту в реальном времени, перезапустите компьютер или заново пройдите все этапы настроек, но на последнем шаге включите переключатель.
Это решение не является постоянным, но лучше всего подходит для отключения антивируса Windows 10 для выполнения определённой задачи.
Как отключить Защитник Windows через групповые политики
В версиях Windows 10 Pro и Enterprise вам доступен редактор локальных групповых политик, где можно навсегда отключить Защитника следующим образом:
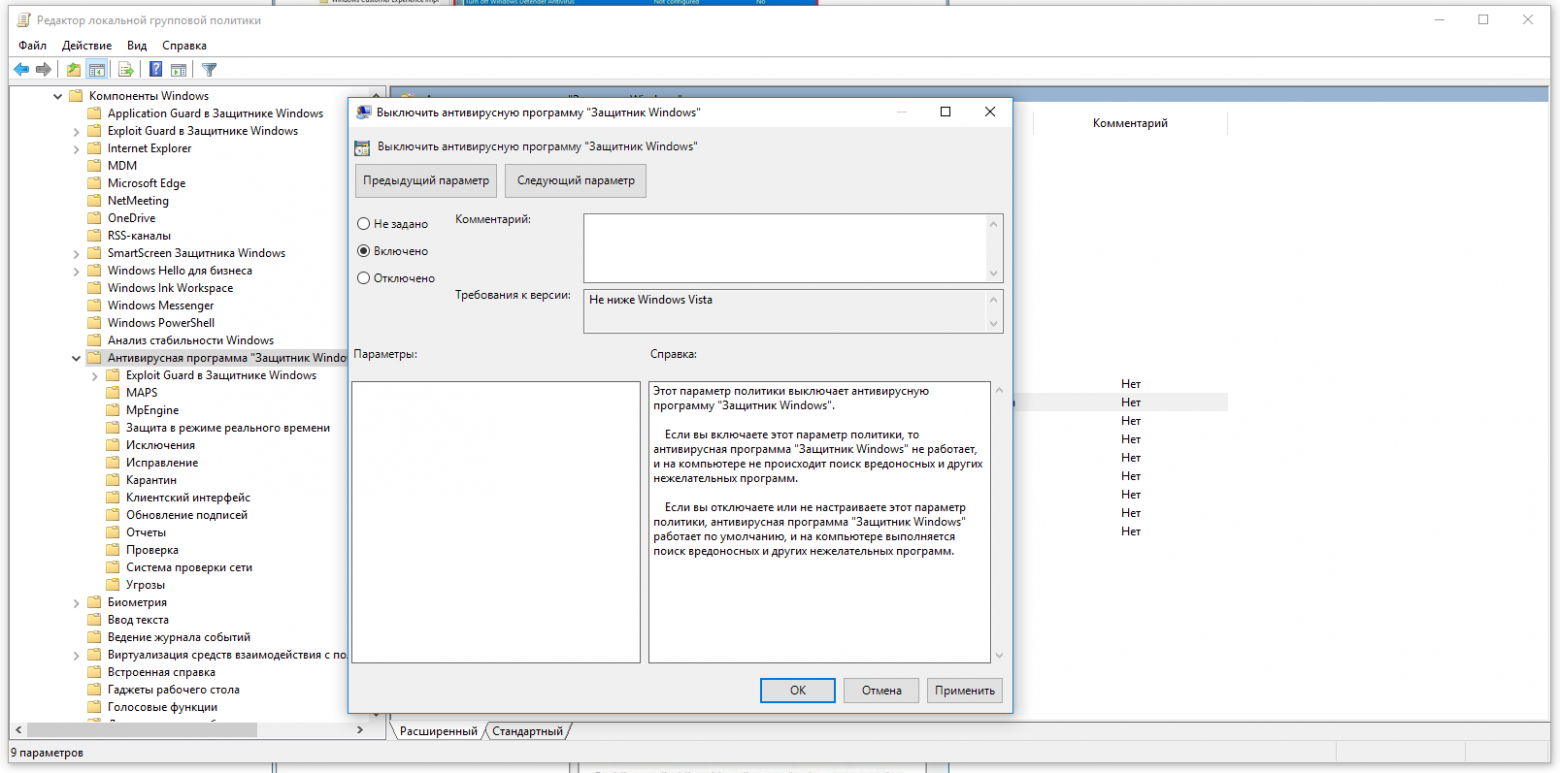
Через кнопку «Пуск» запустите исполняемый скрипт gpedit.msc. Откроется редактор политик. Перейдите по следующему пути: Конфигурация компьютера > Административные шаблоны > Компоненты Windows > Антивирусная программа «Защитник Windows».

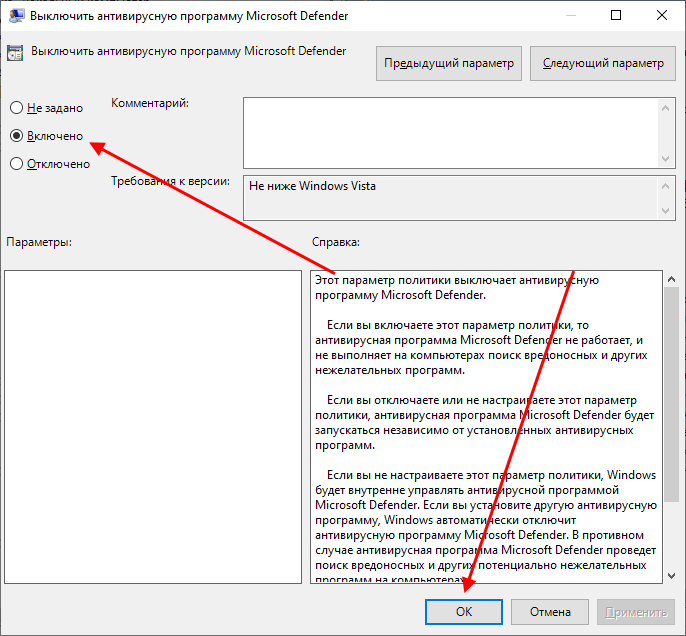
Двойным нажатием откройте пункт «Выключить антивирусную программу „Защитник Windows“». Выберите настройку «Включено» для включения этой опции, и, соответственно, отключения Защитника.
Нажмите «ОК» и перезапустите компьютер.
После этого антивирус будет навсегда отключён на вашем устройстве. Но вы заметите, что иконка со щитом останется в панели задач – так и должно быть, поскольку эта иконка принадлежит к приложению «Безопасность Windows», а не самому антивирусу.
Если вы передумаете, вы всегда можете заново включить Защитника, повторив эти шаги, и на последнем шаге выбрав вариант «Не задано», после чего снова нужно будет перезагрузить компьютер.
Как отключить Защитник Windows через реестр
Если у вас нет доступа к редактору политик, или у вас установлена Windows 10 Home, вы можете отредактировать реестр Windows, отключив тем самым Защитника.
Напоминаю, что редактировать реестр рискованно, и ошибки в этом деле могут нанести непоправимый ущерб текущей установленной копии Windows. Лучше сделать резервную копию системы перед тем, как начинать редактирование.
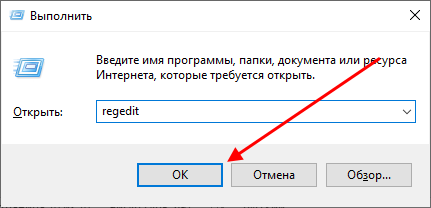
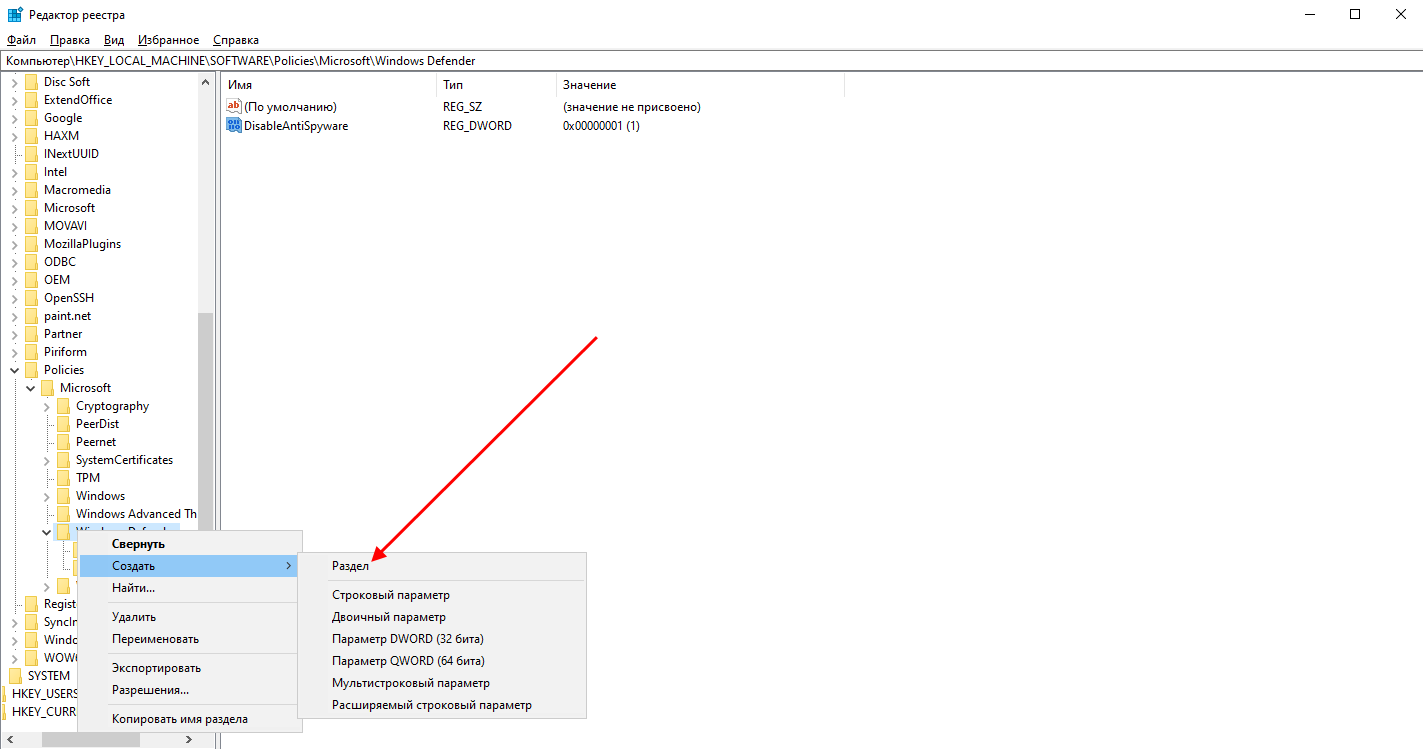
Чтобы полностью отключить Защитиника через реестр, запустите через кнопку «Пуск» программу regedit, и перейдите в ней по следующему пути:
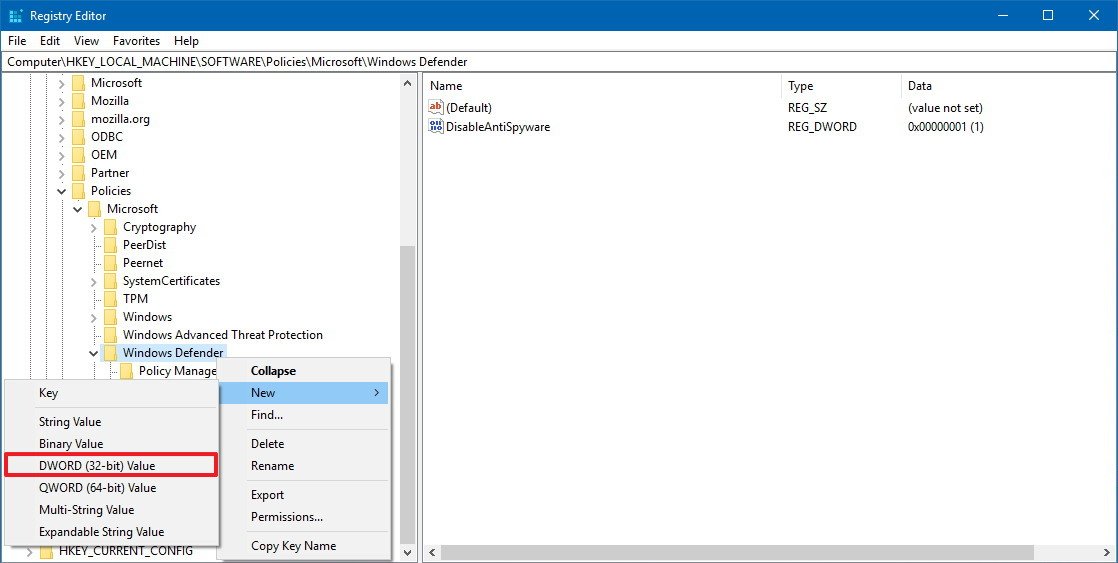
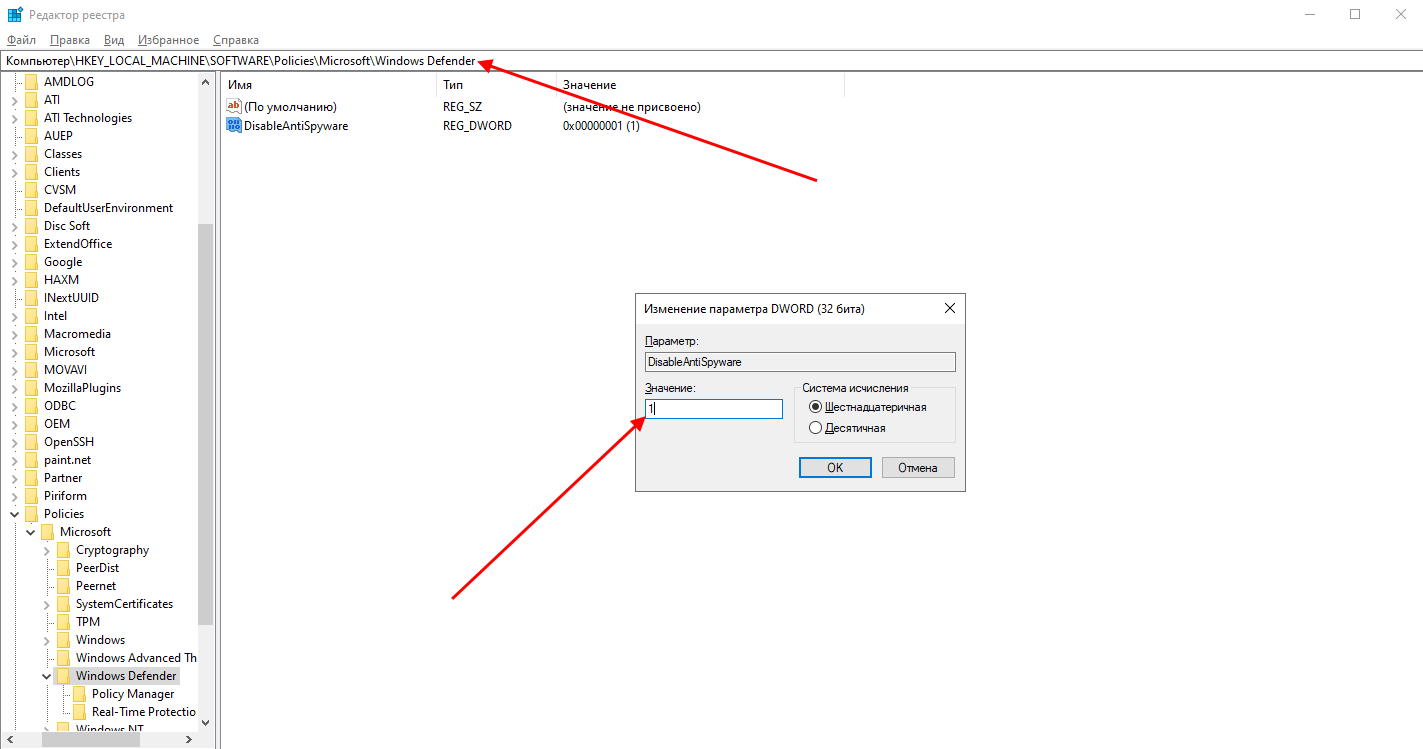
HKEY_LOCAL_MACHINESOFTWAREPoliciesMicrosoftWindows Defender
Совет: этот путь можно скопировать и вставить в адресную строку редактора реестра.
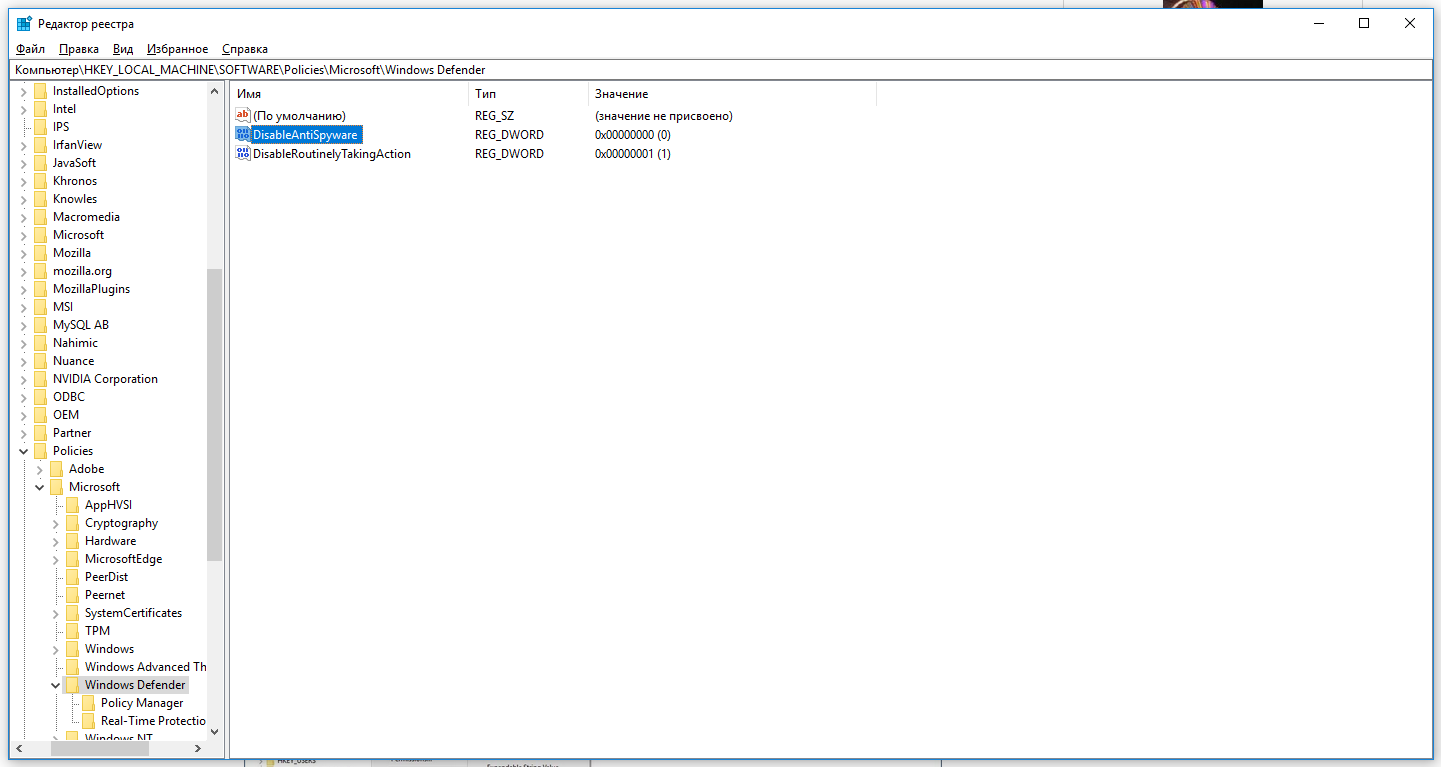
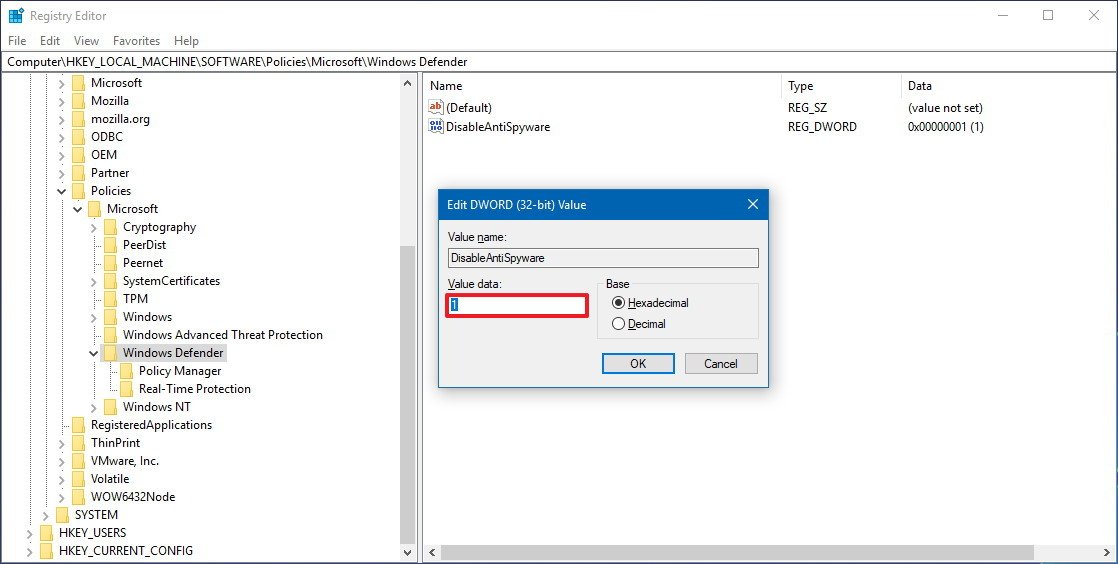
Затем правой клавишей нажмите на ключ (каталог) Windows Defender, выберите «Новый» и DWORD (32-bit) Value. Назовите новый ключ DisableAntiSpyware и нажмите «Ввод». Затем двойным щелчком откройте редактор ключа и задайте ему значение 1.
Нажмите ОК, и перезапустите компьютер.
После этого Защитник Windows уже не будет защищать вашу систему. Если вы захотите отменить эти изменения, повторите все шаги, но в конце удалите этот ключ или назначьте ему значение 0.
Рекомендации
Несмотря на наличие нескольких методов отключения Защитника Windows, мы не рекомендуем использовать компьютер вообще без антивирусных программ. Однако вы можете столкнуться с ситуациями, в которых отключение этой функции будет лучшим вариантом. А если вы устанавливаете стороннюю программу-антивирус, вам не нужно отключать Защитника вручную, поскольку во время установки он отключится автоматически.
Windows Defender Antivirus is the free malware solution that Microsoft includes on every installation of Windows 10. It’s a security software package meant to provide the first line of defense to protect your device and data against malware, including viruses, ransomware, rootkits, spyware, and other types of malicious programs.
Although the antivirus runs automatically, and it can disable itself as you install a third-party security software, the only caveat is that Windows 10 doesn’t offer a way to disable it permanently. Perhaps the obvious reason is that Microsoft doesn’t want you to use your device without any protection, which is a good thing.
However, there are still some cases where some users may prefer not to use Windows Defender Antivirus, such as on a kiosk device that isn’t connected to a network and where peripheral connectivity isn’t allowed.
In this Windows 10 guide, we’ll walk you through the steps to permanently disable the Windows Defender Antivirus on your computer using Group Policy, Registry, and Windows Defender Security Center.
- How to disable Windows Defender Antivirus using Group Policy
- How to disable Windows Defender Antivirus using Registry
- How to disable Windows Defender Antivirus using Security Center
How to disable Windows Defender Antivirus using Group Policy
On Windows 10 Pro, it’s possible to use the Group Policy Editor to disable the Windows Defender Antivirus permanently.
- Use the Windows key + R keyboard shortcut to open the Run command.
- Type gpedit.msc and click OK to open the Local Group Policy Editor.
- Browse the following path:
Computer Configuration > Administrative Templates > Windows Components > Windows Defender Antivirus - On the right side, double-click the Turn off Windows Defender Antivirus policy.
- Select the Enabled option.
- Click Apply.
- Click OK.
- Browse the following path:
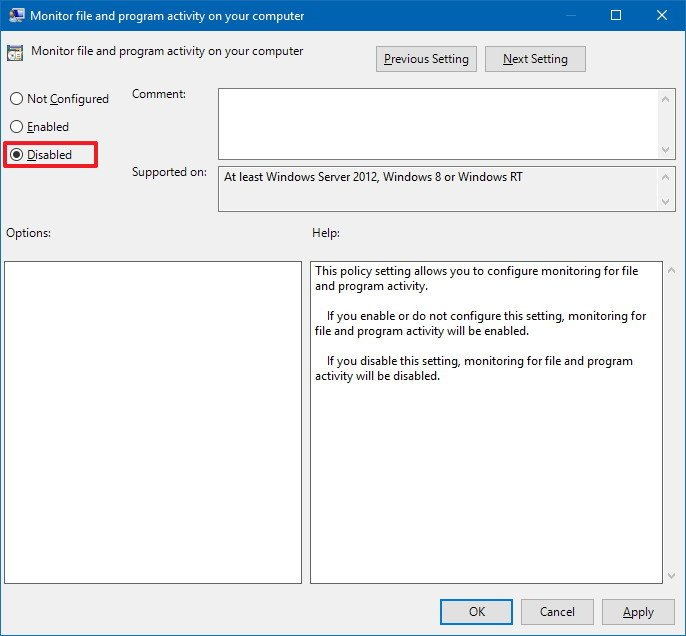
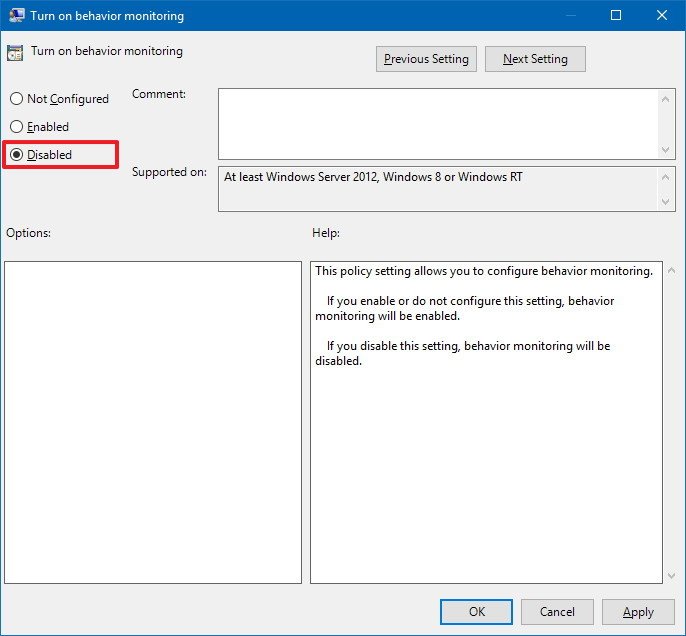
Computer Configuration > Administrative Templates > Windows Components > Windows Defender Antivirus > Real-time Protection - On the right side, double-click the Turn on behavior monitoring policy.
- Select the Disabled option.
- Click Apply.
- Click OK.
- On «Real-time Protection,» double-click the Monitor file and program activity on your computer policy.

- Select the Disabled option.
- Click Apply.
- Click OK.
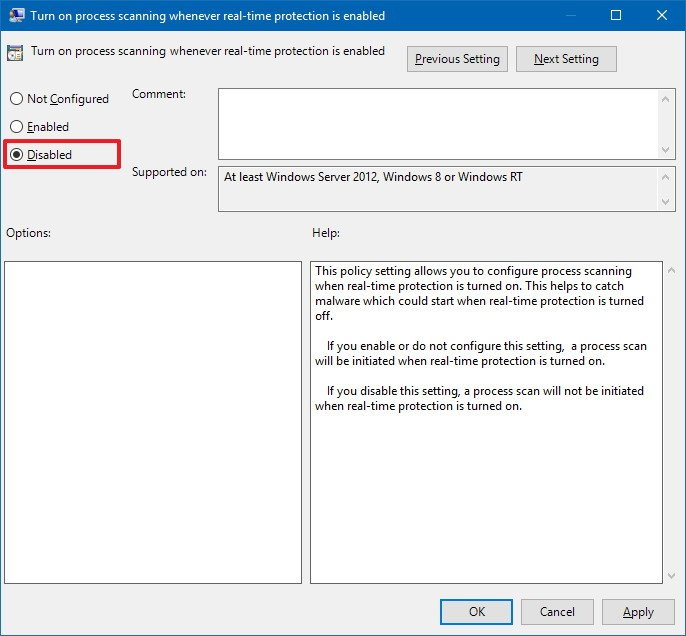
- On «Real-time Protection,» double-click the Turn on process scanning whenever real-time protection is enabled policy.
- Select the Disabled option.
- Click Apply.
- Click OK.
- On «Real-time Protection,» double-click the Turn on behavior monitoring policy.
- Select the Disabled option.
- Click Apply.
- Click OK.
- Restart your computer.
Once you’ve completed the steps, Windows Defender Antivirus will no longer scan and detect malware on your device, even after restarting your computer.
At any time, you can enable the Windows Defender Antivirus using the same steps, but on step No. 5, 10, and 14, make sure to select the Not Configured option. Then just restart your device to apply the changes.
How to disable Windows Defender Antivirus using Registry
The Local Group Policy Editor is not available on Windows 10 Home, but you can still achieve the same results changing the Registry settings.
Warning: This is a friendly reminder that editing the registry is risky, and it can cause irreversible damage to your installation if you don’t do it correctly. It’s recommended to make a full backup of your PC before proceeding.
- Use the Windows key + R keyboard shortcut to open the Run command.
- Type regedit, and click OK to open the Registry.
- Browse the following path:
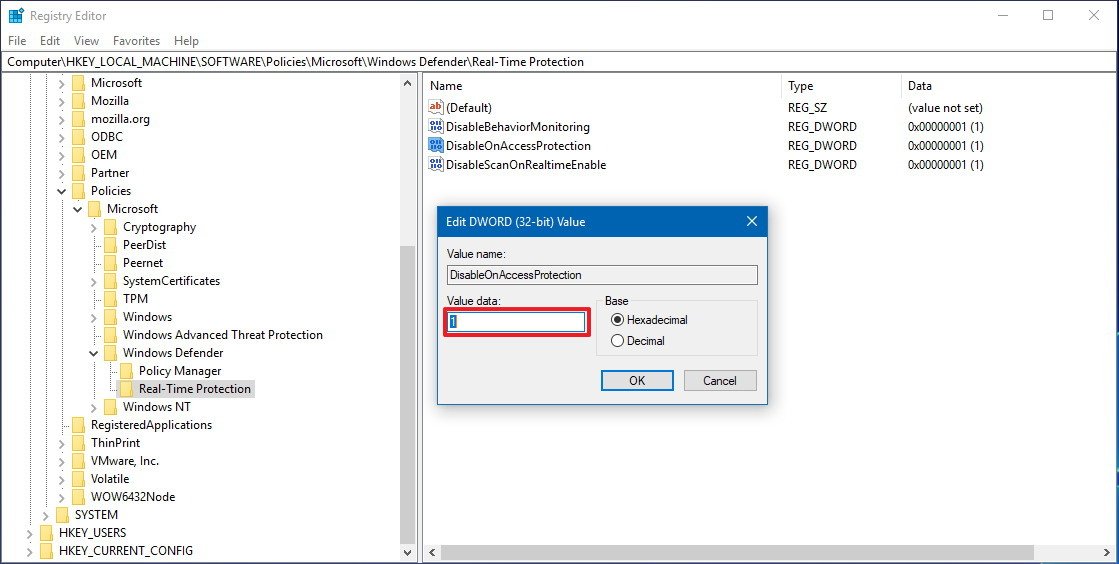
HKEY_LOCAL_MACHINESOFTWAREPoliciesMicrosoftWindows Defender - Right-click on the Windows Defender (folder) key, select New, and click on DWORD (32-bit) Value.
- Name the key DisableAntiSpyware and press Enter.
- Double-click the newly created key and set the value from 0 to 1.
- Click OK.
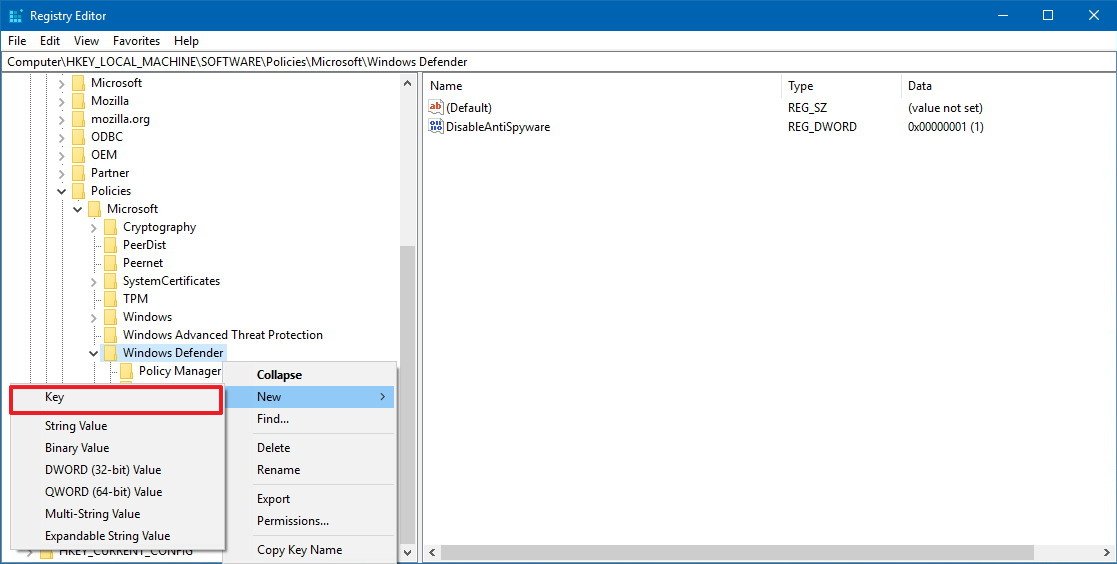
- Right-click on the Windows Defender (folder) key, select New, and click on Key.
- Name the key Real-Time Protection and press Enter.
- Right-click on the Real-Time Protection (folder) key, select New, and click on DWORD (32-bit) Value.
- Name the key DisableBehaviorMonitoring and press Enter.
- Double-click the newly created key and set the value from 0 to 1.
- Click OK.
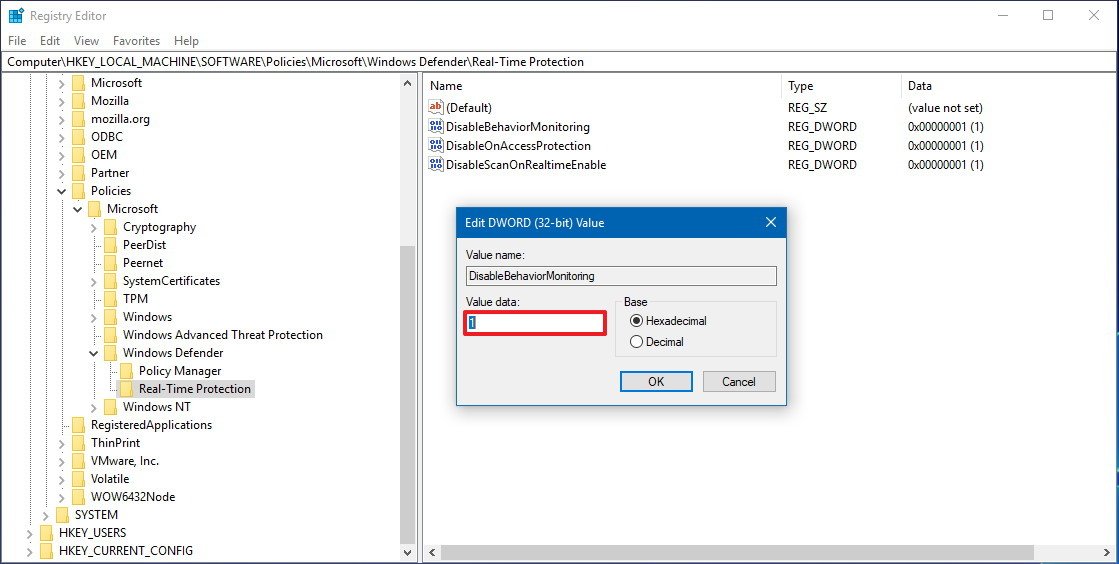
- Right-click on the Real-Time Protection (folder) key, select New, and click on DWORD (32-bit) Value.
- Name the key DisableOnAccessProtection and press Enter.
- Double-click the newly created key and set the value from 0 to 1.
- Click OK.
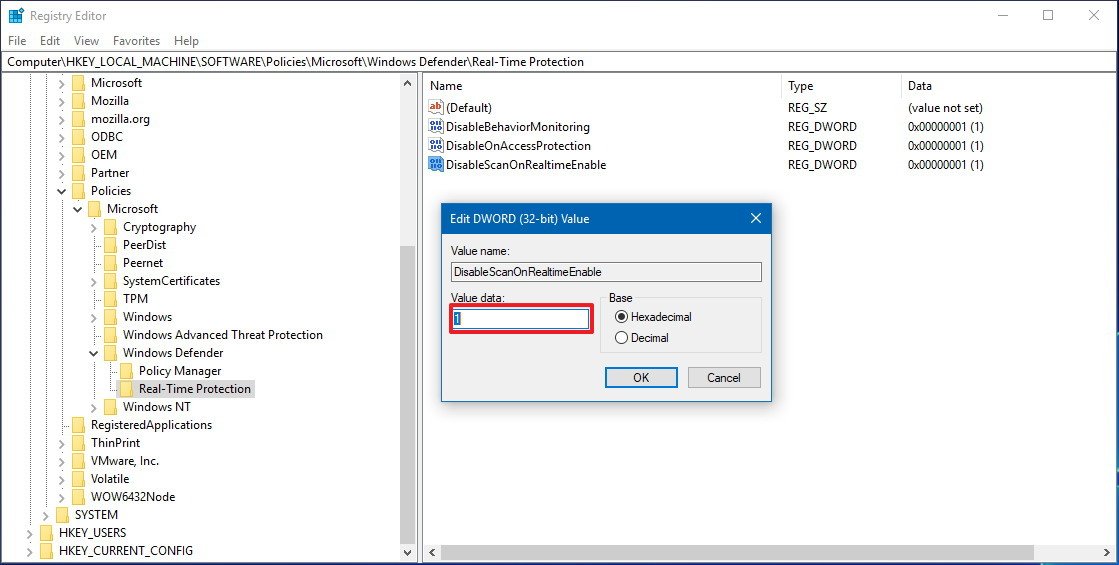
- Right-click on the Real-Time Protection (folder) key, select New, and click on DWORD (32-bit) Value.
- Name the key DisableScanOnRealtimeEnable and press Enter.
- Double-click the newly created key and set the value from 0 to 1.
- Click OK.
After completing the steps, simply restart your computer to disable the Windows Defender Antivirus permanently.
If you change your mind, you can always revert the changes using the same instructions, but on step No. 3, right-click the DisableAntiSpyware key, and select Delete. Then inside the Windows Defender (folder) key, right-click the Real-Time Protection (folder) key and select Delete to remove key and its content. Finally, restart your device to complete reverting the changes.
How to disable Windows Defender Antivirus using Security Center
Alternatively, if you’re installing a piece of software that requires deactivating the antivirus to install correctly, or you simply want to disable the Windows 10 built-in antivirus temporarily, you can use the following steps:
- Open Windows Defender Security Center.
- Click on Virus & threat protection.
- Click the Virus & threat protection settings option.
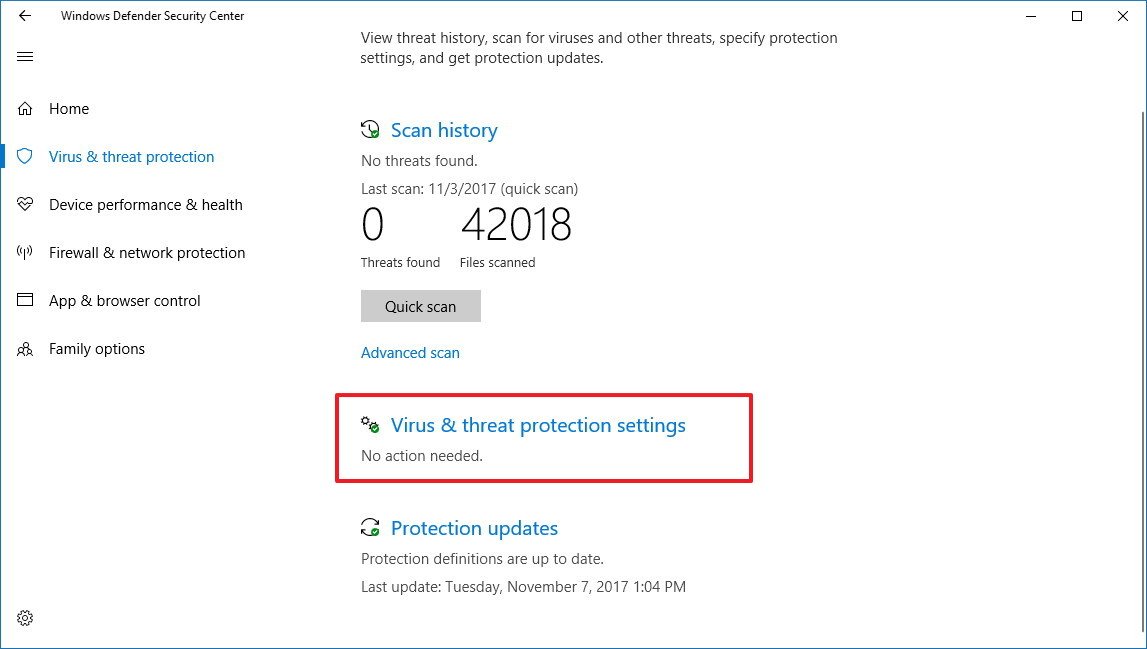
- Turn off the Real-time protection toggle switch.
After completing the steps, Windows Defender Antivirus will be disabled making it unable to monitor and stop malware from taking over your device. However, this is a temporary solution, eventually, the antivirus will re-activate automatically after you restart your device.
Wrapping things up
While there could be scenarios where you may need to disable the antivirus, it’s never recommended to have your device without malware protection.
If you’re trying to get rid of Windows Defender Antivirus because you prefer another security software, you should know that the built-in antivirus will disable itself automatically during the installation of third-party security software.
It’s should also be noted that the shield icon will continue to appear in the notification area of the Taskbar because it’s the Windows Defender Security Center icon, not merely dedicated to the antivirus.
In the case you don’t like the default anti-malware solution, here are a few alternatives that won’t cost you a penny for basic protection.
- Bitdefender (opens in new tab)
- Kaspersky (opens in new tab)
- Avira (opens in new tab)
- AVG (opens in new tab)
More Windows 10 resources
For more helpful articles, coverage, and answers to common questions about Windows 10, visit the following resources:
- Windows 10 on Windows Central – All you need to know
- Windows 10 help, tips, and tricks
- Windows 10 forums on Windows Central
Get the best of Windows Central in in your inbox, every day!
Mauro Huculak is technical writer for WindowsCentral.com. His primary focus is to write comprehensive how-tos to help users get the most out of Windows 10 and its many related technologies. He has an IT background with professional certifications from Microsoft, Cisco, and CompTIA, and he’s a recognized member of the Microsoft MVP community.
По умолчанию в операционной системе Windows 10 функционирует «Защитник», фирменная антивирусная утилита от Microsoft. Разработчики предполагали, что Защитник Windows 10 станет незаменимым приложением, способным полностью обезопасить пользователей от потенциальных угроз, но все пошло не по плану.
Несомненно, Defender блокирует некоторые угрозы, но зачастую их список настолько мал, что проще установить сторонний бесплатный антивирусник. Кроме того, на слабых компьютерах процесс Antimalware Service Executable, отвечающий за защиту системы, часто «забивает» процессор на 50 и более процентов, что сильно сказывается на производительности компьютера. Сюда же входит и повышенная нагрузка на жесткий диск. Именно такие проблемы чаще всего наводят пользователей на отключение Защитника Windows 10.
Деактивировать Защитник не так уж и просто, так как доступная опция отключения защиты позволяет выключить программу только на время – после перезагрузки системы она снова будет активна. Однако нет ничего невозможного: есть два эффективных способа, которые позволяют полностью отключить встроенную защиту.
Рассмотрим способы временной и полной деактивации.
Способ 1: Через настройки безопасности Windows
Обратите внимание, что данный способ деактивирует Защитник лишь на время. Как только компьютер будет перезагружен, Defender автоматически включится, и для его отключения снова потребуется открыть настройки системы.
Выключаем Защитник Windows 10:
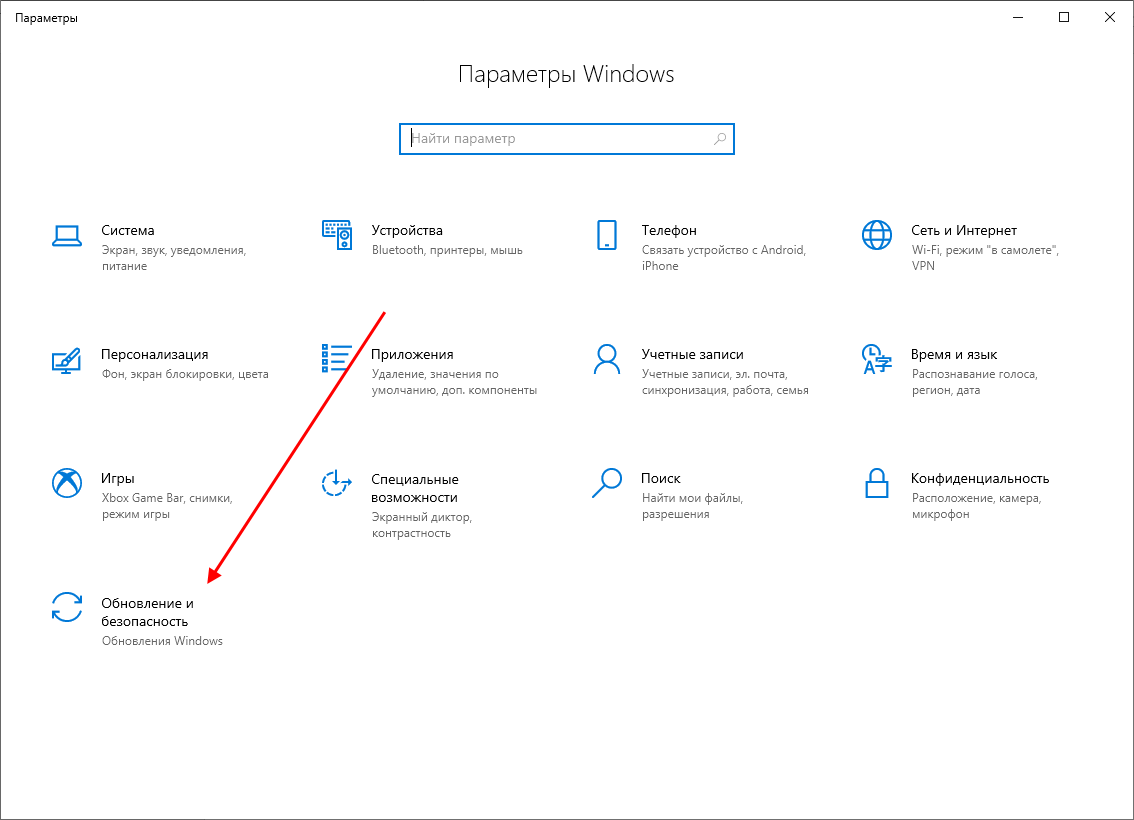
- Первым делом нам потребуется перейти в настройки системы – для этого кликаем правой кнопкой мыши по меню «Пуск» и выбираем «Параметры». Также попасть в данный раздел можно с использованием комбинации клавиш «WIN+I», где WIN – клавиша, расположенная в нижнем левом углу клавиатуры с логотипом Windows.

- Переходим в раздел «Обновление и безопасность».
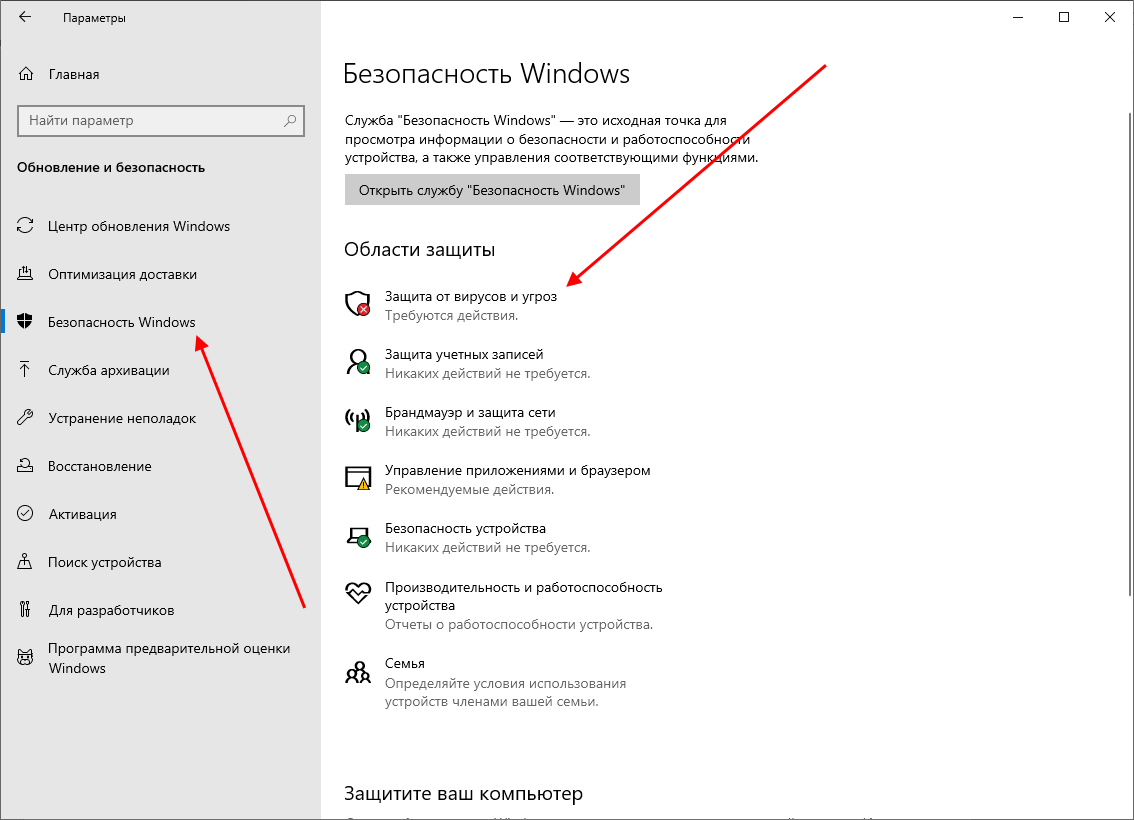
- Следующим шагом открываем подраздел «Безопасность Windows» и выбираем «Защита от вирусов и угроз». Обратите внимание, что в моем случае иконка горит красным цветом – в вашей системе она будет зеленой, так как защита системы активна.
- В правой части кликаем по кнопке «Параметры защиты от вирусов и других угроз».
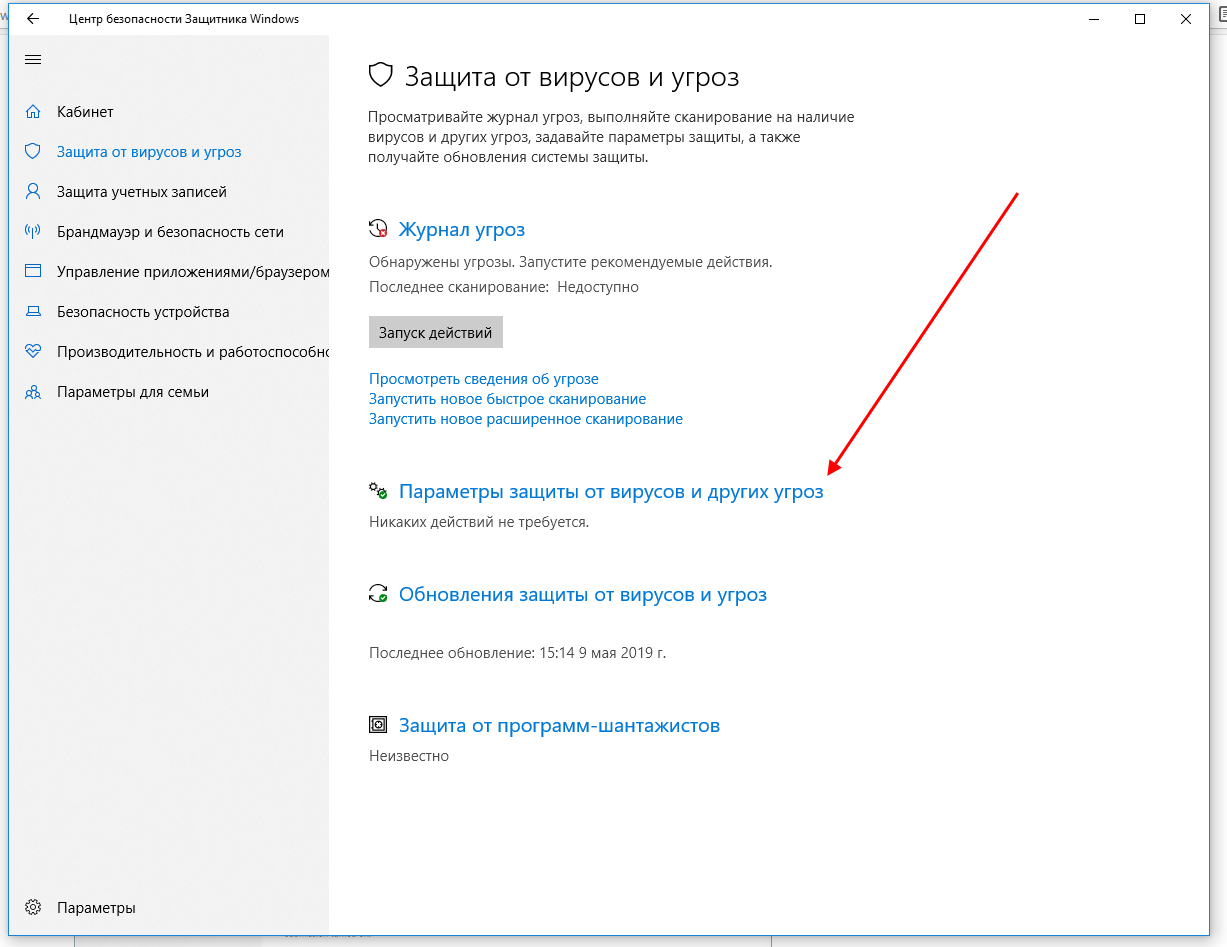
- В версии 1903 операционной системы Windows 10 появилась функция «Защита от подделки», которая блокирует изменения настроек безопасности. Для того чтобы вручную отключить «Защитник», для начала нужно выключить данную опцию.
- Остается в блоке «Защита в режиме реального времени» установить ползунок в режим «Откл.».
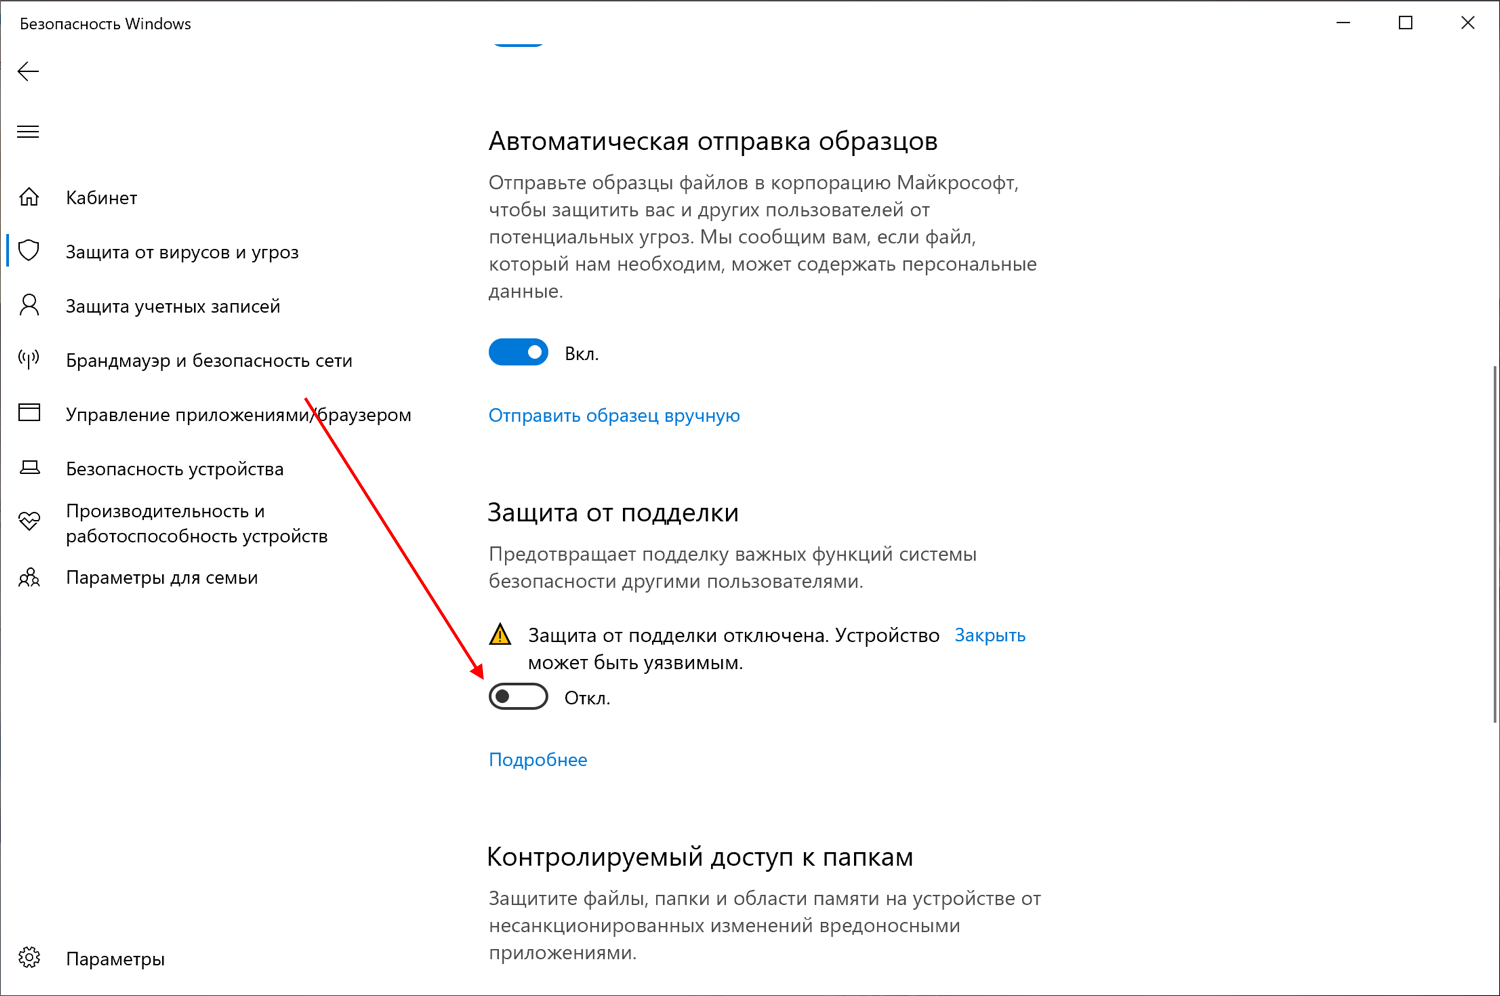
Готово! Теперь Защитник Windows 10 полностью отключен до перезагрузки компьютера. Таким образом, вы можете установить программу или открыть сайт, который был заблокирован системой ранее. Будьте бдительны – посещение небезопасных сайтов и установка подозрительного ПО может навредить вашей системе.
Комьюнити теперь в Телеграм
Подпишитесь и будьте в курсе последних IT-новостей
Подписаться
Способ 2: Через групповые политики
Данный способ подойдет исключительно для версий Windows 10 Pro и Enterprise – с его помощью можно навсегда отключить встроенный антивирус. Для прочих версий системы воспользуйтесь редактором реестра, о котором мы поговорим в следующем разделе.
Отключаем Windows Defender:
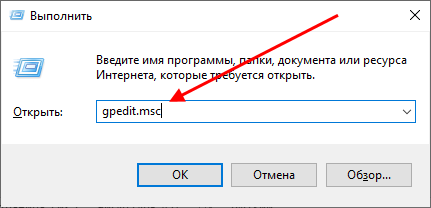
- Воспользуемся комбинацией клавиш «WIN+R», чтобы открыть окно «Выполнить» – в него вводим запрос gpedit.msc и жмем «Enter».
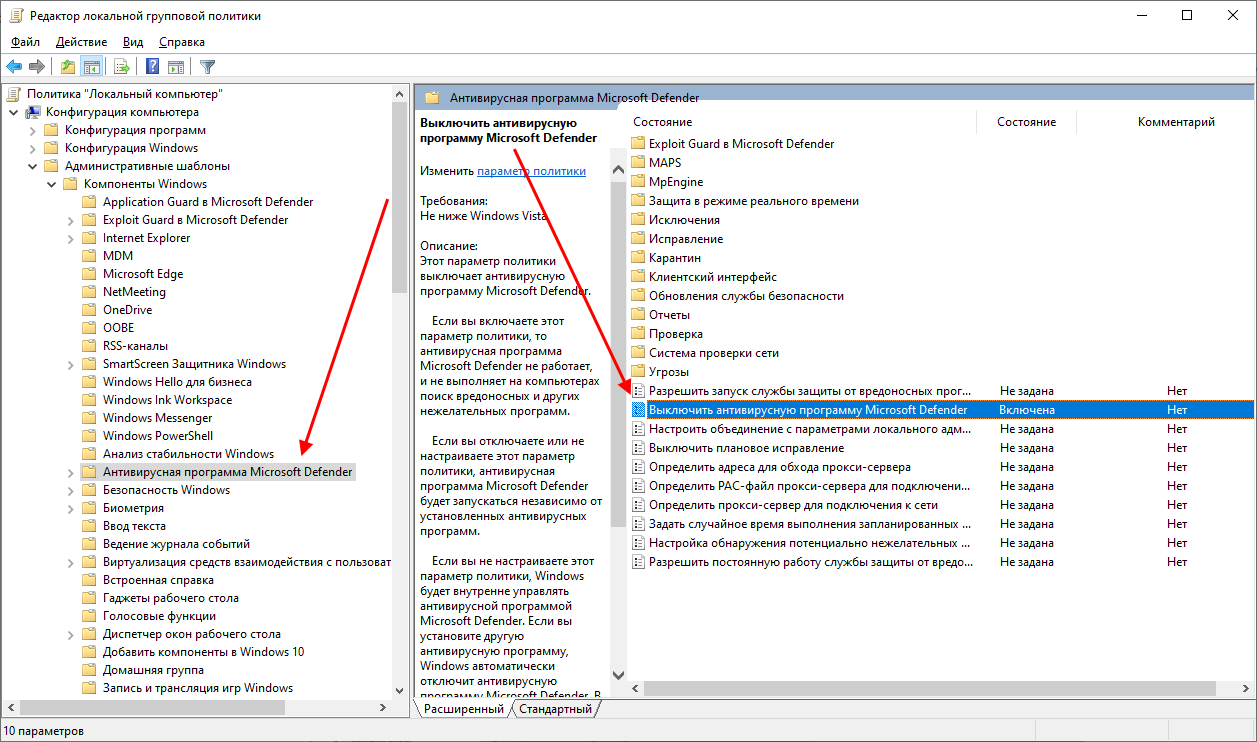
- Далее раскрываем пункт «Конфигурация компьютера» и переходим в подраздел «Административные шаблоны» – там выбираем «Компоненты Windows» и открываем «Антивирусная программа Microsoft Defender». В отобразившемся разделе кликаем двойным щелчком мыши по пункту «Выключить антивирусную программу Microsoft Defender».
- Отмечаем пункт «Включено», чтобы активировать параметр деактивации антивируса, и жмем «ОК».
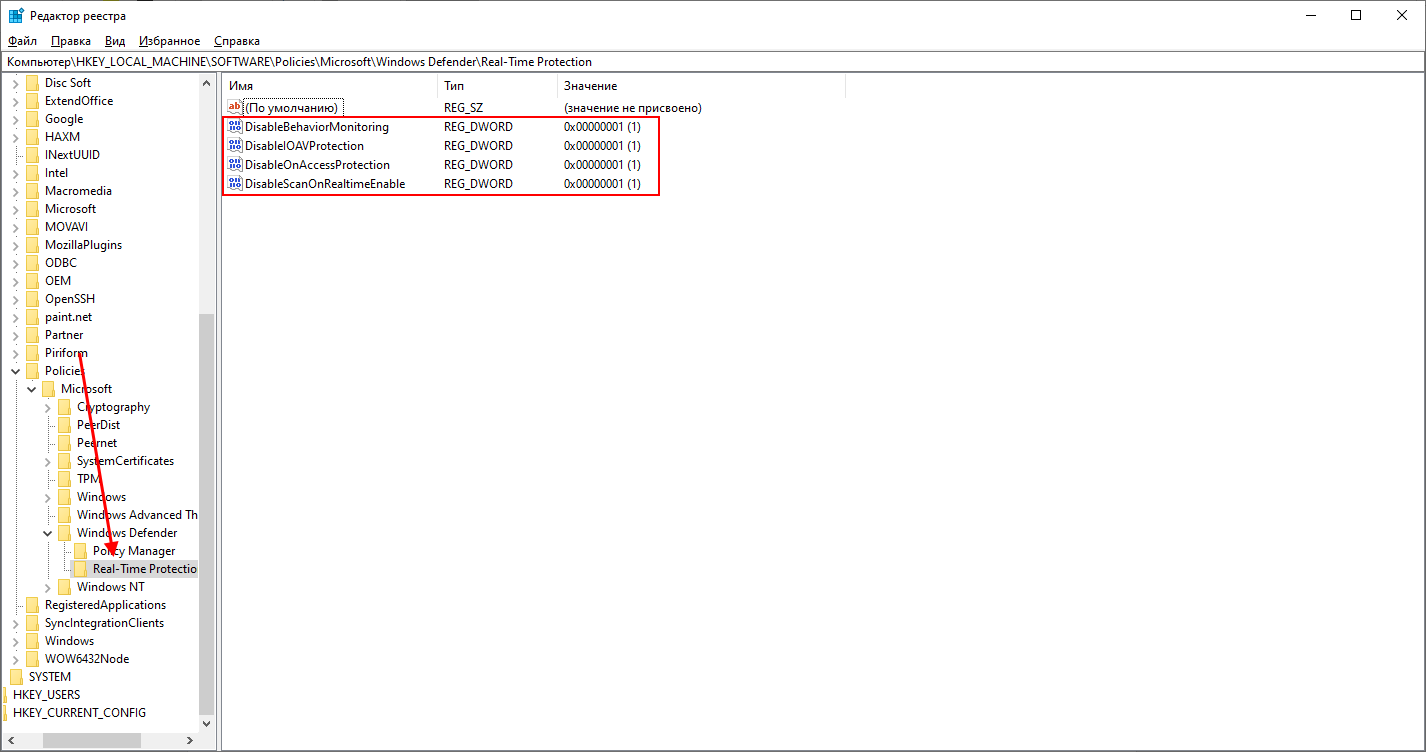
- Последним действием переходим в подраздел «Защита в режиме реального времени» и отключаем параметры, указанные на картинке. Просто заходим в каждый из них и отмечаем пункт «Отключено».

После выполнения вышеупомянутых действий перезагружаем компьютер и убеждаемся, что встроенная система защиты была полностью отключена. Если она до сих пор работает, то перепроверьте правильность выполнения действий либо воспользуйтесь следующим способом.
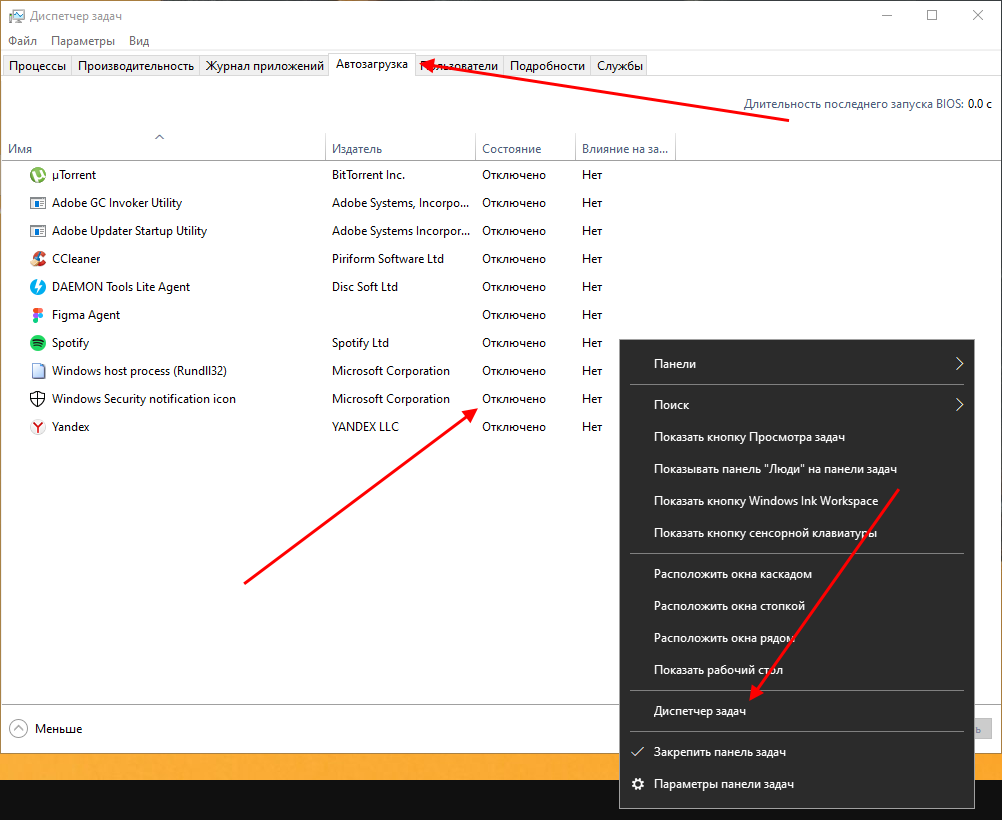
Также обратите внимание на то, что после деактивации программы ее иконка все равно будет отображаться в области уведомлений на панели задач. Чтобы ее отключить, необходимо перейти в «Диспетчер задач» через правый клик кнопки по панели задач и переключить параметр «Windows Security notification icon» в состояние «Отключено».
В любой момент вы сможете восстановить работу встроенного антивируса – достаточно зайти в редактор групповых политик и вернуть параметрам стандартное значение.
Способ 3: Через реестр
Если вы никогда не работали в редакторе реестра, то не рекомендую отходить от нижеуказанной инструкции.
Деактивируем Защитник Windows:
- Открываем окно «Выполнить» с помощью комбинации клавиш «WIN+R» и вводим запрос regedit.
- Разрешаем приложению вносить изменения и попадаем в его главное меню. В верхнюю строку вставляем следующий путь: HKEY_LOCAL_MACHINESOFTWAREPoliciesMicrosoftWindows Defender. Создаем здесь новый параметр DWORD (32 бита) со значением 1. Задаем ему название DisableAntiSpyware и жмем «ОК».
- Затем в левой части кликаем правой кнопкой мыши по папке «Windows Defender» и создаем новый раздел с названием Real-Time Protection.
- Следующим шагом создадим 4 параметра DWORD (32 бита): DisableBehaviorMonitoring, DisableOnAccessProtection, DisableScanOnRealtimeEnable, DisableIOAVProtection. Всем параметрам выставляем значение 1.
Перезагружаем компьютер и проверяем работоспособность Защитника – он должен быть выключен.
Если вы захотите вернуть Windows Defender к жизни, то полностью удалите раздел Real-Time Protection, а также параметр DisableAntiSpyware в папке «Windows Defender». После этого потребуется перезагрузить операционную систему.
Как видите, отключить встроенный активирус в ОС Windows 10 несложно. Рекомендуем не оставлять свой компьютер без надежного защитника: если вы любитель «походить» по небезопасным ресурсам, то вам непременно потребуется антивирусная программа, которая защитит систему от угроз.
Надеюсь, что у вас не возникло никаких проблем при выполнении вышеуказанных действий. Спасибо за внимание!
![]()
Download Article
Easy step-by-step guide to disable Defender antivirus protection
![]()
Download Article
- Disabling Defender Temporarily
- Disabling Permanently with Other Antivirus Software
- Disabling with Group Policy Editor
- Q&A
- Tips
- Warnings
|
|
|
|
|
This wikiHow guide will show you how to turn off Microsoft Defender (formerly Windows Defender) in Windows 10. Microsoft Defender can be disabled in Settings, but will turn back on automatically when you restart your computer. If you want to turn off Defender permanently, you’ll need to install a different antivirus program. You can also use the built-in Group Policy Editor to permanently turn off Defender. Keep in mind that turning off Defender without having another antivirus installed will open up your PC to security threats.
Things You Should Know
- Go to Settings > Update & Security > Windows Security > Virus & threat protection to turn off Defender temporarily.
- Download a 3rd-party antivirus software to automatically turn off Defender.
- Use the Local Group Policy Editor to permanently turn off Defender.
- Note that the Group Policy Editor is only available on Windows Pro, Ultimate, and Enterprise.
-
1
Open your Windows Settings
. Click the gear-shaped Settings icon in the lower-left side of the Start menu. Doing so opens the Settings window.
- This method turns off Microsoft Defender’s real-time antimalware protection temporarily, which can be helpful if you need to install trusted software that Defender improperly flags as harmful. Defender will turn back on automatically after you restart your PC.
-
2
Click
Update & Security. It’s in the bottom row of Settings options.
Advertisement
-
3
Click Windows Security. This tab is in the upper-left side of the window.
-
4
Click Virus & threat protection. It’s the first option below the «Protection areas» heading near the top of the page. Doing so opens the Windows Defender window.
-
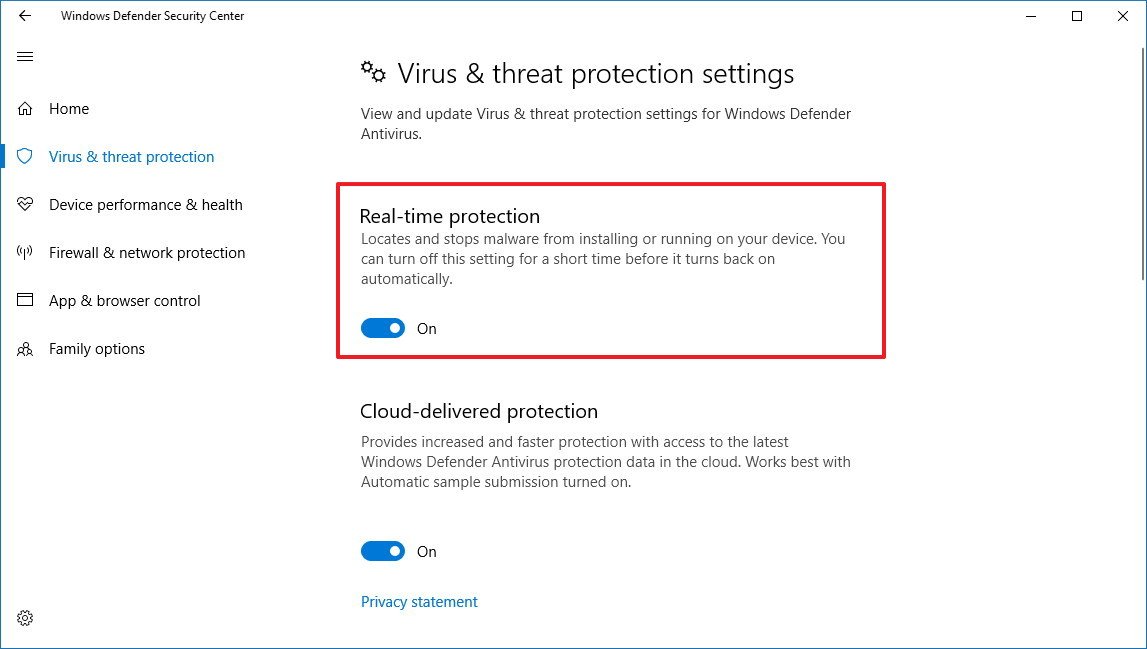
5
Click Virus & threat protection settings. You’ll find this option in the middle of the page.
-
6
Disable Microsoft Defender’s real-time scanning. Turning off real-time protection will mean your device is vulnerable until it turns back on.[1]
- Click the blue «On» switch
below the «Real-time protection» heading.
- Click Yes when prompted. This will turn off the real-time scanning feature of Microsoft Defender.
- You can also disable Microsoft Defender’s cloud-based protection by clicking the blue «On» switch below the «Cloud-delivered protection» heading and then clicking Yes when prompted.
- Microsoft Defender will turn itself back on the next time you restart your computer.
- Click the blue «On» switch


Advertisement
-
1
Go to the website for your preferred 3rd-party antivirus program. To turn off Microsoft Defender permanently, you can install a 3rd party antivirus software like Bitdefender, McAfee Antivirus Plus, or Malwarebytes Premium.
- For more general info, check out our guide on protecting your computer with antivirus software.
-
2
Download the setup file for the 3rd-party antivirus. The download location on the website will vary depending on your selected software.
- For example, Bitdefender Antivirus Free for Windows is available through the FOR HOME tab on their website. The button says FREE DOWNLOAD FOR WINDOWS.
- Make sure your computer meets the minimum specifications for the software.
-
3
Double-click the setup file. This is the file downloaded from the antivirus’s website. The installer will open to begin installing the antivirus on your computer.
-
4
Complete the installation. Follow the instructions provided by the installer to finish installing the antivirus. You may be required to restart your computer during the process. Once you’ve installed a different antivirus program, Microsoft Defender will automatically turn off.
- For additional computer safety, make sure to password protect your Windows PC.
Advertisement
-
1
Turn off Tamper Protection. If you’re using Windows 10 Pro or Enterprise, you can use the built-in Group Policy Editor to permanently turn off Microsoft Defender. Note that your computer will be vulnerable to malware after turning off Defender. You’ll need to turn off Tamper Protection to turn off Microsoft Defender:[2]
- Open the Windows Security app.
- Click Virus & threat protection.
- Click Manage settings.
- Switch Tamper Protection to “Off”.
-
2
Press ⊞ Win+R. The Run menu will open.
-
3
Type gpedit.msc in the Run window and press ↵ Enter. This will open the Group Policy Editor menu.[3]
-
4
Navigate to the policy to turn off Microsoft Defender. Take these steps in the Group Policy Editor to find this option:
- Computer Configuration
- Administrative Templates
- Windows Components
- Microsoft Defender Antivirus
- In the policy list, look for “Turn off Microsoft Defender Antivirus”.
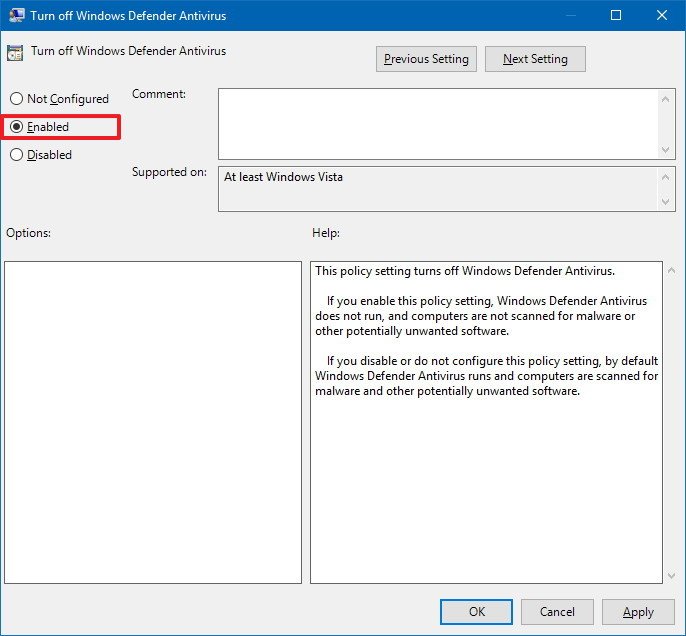
-
5
Double-click “Turn off Microsoft Defender Antivirus”. This will open an options menu for the policy.
-
6
Click Enabled.
-
7
Click OK. This will confirm the choice to turn off Microsoft Defender and close the window.
-
8
Restart your computer. Microsoft Defender will be turned off.
- Change the “Turn off Microsoft Defender Antivirus” to Not Configured in the Group Policy Editor to turn Microsoft Defender back on.
Advertisement
Add New Question
-
Question
I did not order Microsoft Defender, how do I delete it?

Microsoft Defender comes with Windows 10, and, unfortunately, it cannot be deleted.
-
Question
Is there a way to turn it off without admin privileges?
No, you need to be an administrator to disable Windows Defender. This is a security measure to prevent viruses from turning Windows Defender off. However, if you know what you are doing and are certain of the safety of a third party app, it is possible to turn it off by using third party operating systems or startup disks which can access system settings of this system or user account, and disabling services with help of third party apps.
-
Question
It keeps getting switched back to on. Why?
This is because Microsoft Defender automatically turns itself back on whenever Windows restarts.

See more answers
Ask a Question
200 characters left
Include your email address to get a message when this question is answered.
Submit
Advertisement
-
Installing a third-party antivirus will not delete Microsoft Defender, but it will deactivate it so that they don’t conflict.
Thanks for submitting a tip for review!
Advertisement
-
Disabling Microsoft Defender may also disable any other antivirus programs, such as Norton or McAfee.
-
Disabling Microsoft Defender may open your computer up to security threats. You should not do this unless you know what you are doing.
Advertisement
About This Article
Article SummaryX
1. Open the Start menu.
2. Click Settings.
3. Click Update & Security.
4. Click Windows Security.
5. Click Virus & threat protection.
6. Click Virus & threat protection settings.
7. Toggle off «Real-time protection.»
For more information on how to disable Microsoft Defender, read on!
Did this summary help you?
Thanks to all authors for creating a page that has been read 1,872,944 times.
Is this article up to date?
There are times when we want to turn off Windows Defender on Windows 10 quickly. For example, if we are installing a software which requires that the antivirus should be disabled during installation (yes there are some software which requires this).
Windows Defender is an all in one security software from Microsoft consisting of antivirus and a firewall. Windows Defender comes pre-installed with Windows 10. It gets all its updates from Windows Update.
Although you can turn Windows Defender on or off from Windows Settings, there are other quick ways to turn it on or turn off Windows Defender Windows 10 or even Windows 8/8.1. You should choose the best method according to the version of Windows you are using.
Table of contents
- Why turn off Windows Defender?
- How to Turn Off Windows Defender Using Windows Settings
- How To Disable Windows Defender Using Command Prompt
- How To Permanently Disable Windows Defender Using PowerShell
- How To Permanently Turn Off Windows Defender Using Group Policy
- How To Permanently Disable Windows Defender Using Windows Registry
- How to turn off Windows Firewall only
- How to turn off Windows Defender real-time antivirus only
- Verdict
A general recommendation in terms of security is that you should always have security enabled for your PC at all times. This could be using Windows Defender, Microsoft’s own security solution built into Windows 10, or using a third-party security tool.
Sometimes you will need to disable antivirus and firewall protection in Windows. For example, when you are playing a game but the antivirus keeps on scanning the files and slows down the system. Another example can be when the antivirus detects a program as a false positive although you know that the program is completely safe to use.
Some people believe that it is safe to turn off Windows Defender and use cracking software. This includes activating Windows using illegal tools like KMSPico or the Microsoft Toolkit. These cracking tools are not safe at all. They may inject malware into the system that may not be detectable by the antivirus after installation. The malware is used for cryptomining and other hacking purposes.
There are two ways to turn off Windows Defender, either temporarily or permanently. We will discuss both ways here.
How to Turn Off Windows Defender Using Windows Settings
If you want to turn Windows Defender on or off using Windows Settings, follow the steps below:
- Open Windows Settings (Windows key + i)
- Go to Update & Security –> Windows Security
- From the right-hand pane, select Manage settings under Virus & threat protection settings.
- Toggle the switch to Off under Real-time protection.

This will turn off real-time protection while a manual scan is available at your disposal.
How To Disable Windows Defender Using Command Prompt
To turn off Windows Defender using Command Prompt, follow these steps:
-
Open command prompt with administrative privileges
-
Run the following command to disable Windows Defender:
sc stop WinDefend -
To make sure that Windows Defender is stopped, run this command:
sc query WinDefend
To enable Windows defender again, run the following command:
sc start WinDefendPlease note that this is a temporary method to stop Windows Defender. The service will return to its original state once the system is restarted.
To disable Windows Defender permanently using the command prompt, run the following command:
sc config WinDefend start= disabled
sc stop WinDefend
To enable it again on startup, run the following commands:
sc config WinDefend start= auto
sc start WinDefend
If you want to check the current state of the Windows Defender service, run the following command:
sc query WinDefendCheck the STATE variable. It should be in RUNNING state if it is enabled.

How To Permanently Disable Windows Defender Using PowerShell
One advantage of PowerShell is that you can deploy changes to Windows Defender on multiple computers across the network.
If you prefer PowerShell way, follow the steps below:
- Run PowerShell with administrative privileges (Windows key + X + A)
- To disable real-time monitoring for Windows Defender, run the following command:
Set-MpPreference -DisableRealtimeMonitoring $true - To enable real-time monitoring, run the following command:
Set-MpPreference -DisableRealtimeMonitoring $false
The above method will only turn off real-time monitoring of Windows Defender. If you want to completely remove Windows Defender from Windows 10, use the following PowerShell command:
Uninstall-WindowsFeature -Name Windows-Defender
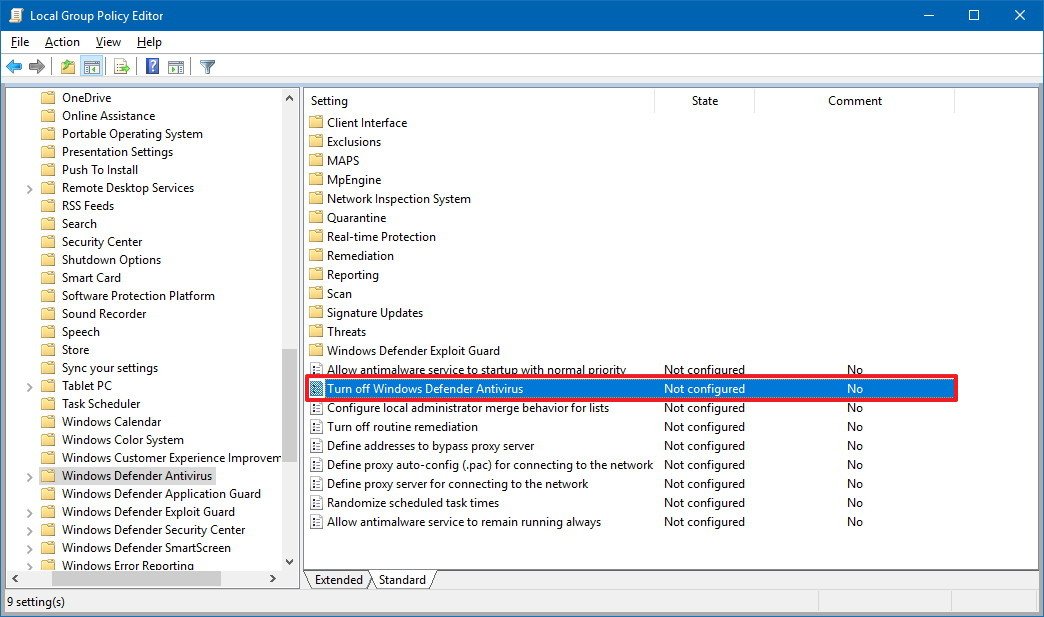
How To Permanently Turn Off Windows Defender Using Group Policy
If you are a network admin and want to disable Windows Defender from your network, it is wise to use Group Policy. Just follow the steps below to turn off Windows Defender using the Group Policy editor:
- Open Group Policy Editor (Run –> gpedit.msc)
- Go to Computer Configuration –> Administrative Templates –> Windows Components –> Windows Defender Antivirus

- From the right-hand pane, open Turn off Windows Defender Antivirus and select Enabled


This setting can be accessed through Local Group Policy as well as Domain Group Policy. The local policy will turn off Windows Defender for all local users while the domain policy will disable it for all systems on which the policy is applied.
How To Permanently Disable Windows Defender Using Windows Registry
You can also disable Windows Defender permanently from Windows Registry just by creating or altering a few registry keys.. Follow the steps below:
- Go to Run –> regedit. This will open the Windows Registry Editor.
- Navigate to the following key:
HKEY_LOCAL_MACHINESOFTWAREPoliciesMicrosoftWindows Defender - In the right pane, right-click the empty area and create a new DWORD (32-bit) value.
- Rename the new item to DisableAntiSpyware
- Double-click DisableAntiSpyware and change its value to 1.
Windows Defender will not load after the next computer restart. To enable Windows Defender again, you can either delete the created registry key or simply change its value to 0.
Please note that you can’t completely uninstall the Windows Defender. Even if you manage to delete its service or files, it will most likely be restored on the next major Windows update.
There are a few scenarios where the user wants to disable a specific part of the Windows Defender system. We will discuss the scenarios below.
How to turn off Windows Firewall only
To turn off Windows Firewall only and keep using other Windows Defender functionality, follow the steps below:
- Open Windows Settings (Windows key + i)
- Click on Update & Security and then Windows Security
- In the right-hand pane, click on Open Windows Security
- From the left-hand pane, select Firewall & network protection
- In the right-hand pane, you will see three protection types. Domain network, Private network, Public network.
- Click on each network type and toggle it to disabled.
This will only turn off the firewall. The antivirus and other functionality of Windows Defender will keep on working.
How to turn off Windows Defender real-time antivirus only
If you want to turn off the antivirus real-time functionality only, you can follow the steps below:
- Open Windows Settings (Windows key + i)
- Click on Update & Security and then Windows Security
- From the left-hand pane, click on Virus & threat protection
- In the right-hand pane, toggle real-time protection to off.
Verdict
If you have not installed any third-party antivirus, then you should keep Windows Defender running as it will protect you from the most common virus/hacking threats while you are connected to the Internet. There should always be an anti-malware solution running on your computer at all times. These methods should be used to disable the security software temporarily.
I hope this has been informative for you. If there are any other easier ways to enable or disable Windows Defender, please let us know in the comments below!
Also see:
Usman Khurshid is a seasoned IT Pro with over 15 years of experience in the IT industry. He has experience in everything from IT support, helpdesk, sysadmin, network admin, and cloud computing. He is also certified in Microsoft Technologies (MCTS and MCSA) and also Cisco Certified Professional in Routing and Switching.