Download for Windows
Click here to download the latest (2.39.1) 32-bit version of Git for Windows. This is the most recent maintained build. It was released 18 days ago, on 2023-01-17.
Other Git for Windows downloads
Standalone Installer
32-bit Git for Windows Setup.
64-bit Git for Windows Setup.
Portable («thumbdrive edition»)
32-bit Git for Windows Portable.
64-bit Git for Windows Portable.
Using winget tool
Install winget tool if you don’t already have it, then type this command in command prompt or Powershell.
winget install --id Git.Git -e --source winget
The current source code release is version 2.39.1. If you want the newer version, you can build it from the source code.
Now What?
Now that you have downloaded Git, it’s time to start using it.
-

Read the Book
Dive into the Pro Git book and learn at your own pace.
-
Download a GUI
Several free and commercial GUI tools are available for the Windows platform.
-
Get Involved
A knowledgeable Git community is available to answer your questions.

How to install Git on any OS
Git can be installed on the most common operating systems like Windows, Mac, and Linux. In fact, Git comes installed by default on most Mac and Linux machines!
Checking for Git
To see if you already have Git installed, open up your terminal application.
- If you’re on a Mac, look for a command prompt application called «Terminal».
- If you’re on a Windows machine, open the windows command prompt or «Git Bash».
Once you’ve opened your terminal application, type git version. The output will either tell you which version of Git is installed, or it will alert you that git is an unknown command. If it’s an unknown command, read further and find out how to install Git.
Install Git Using GitHub Desktop
Installing GitHub Desktop will also install the latest version of Git if you don’t already have it. With GitHub Desktop, you get a command line version of Git with a robust GUI. Regardless of if you have Git installed or not, GitHub Desktop offers a simple collaboration tool for Git. You can learn more here.
Install Git on Windows
- Navigate to the latest Git for Windows installer and download the latest version.
- Once the installer has started, follow the instructions as provided in the Git Setup wizard screen until the installation is complete.
- Open the windows command prompt (or Git Bash if you selected not to use the standard Git Windows Command Prompt during the Git installation).
- Type
git versionto verify Git was installed.
Note: git-scm is a popular and recommended resource for downloading Git for Windows. The advantage of downloading Git from git-scm is that your download automatically starts with the latest version of Git included with the recommended command prompt, Git Bash . The download source is the same Git for Windows installer as referenced in the steps above.
Install Git on Mac
Most versions of MacOS will already have Git installed, and you can activate it through the terminal with git version. However, if you don’t have Git installed for whatever reason, you can install the latest version of Git using one of several popular methods as listed below:
Install Git From an Installer
- Navigate to the latest macOS Git Installer and download the latest version.
- Once the installer has started, follow the instructions as provided until the installation is complete.
- Open the command prompt «terminal» and type
git versionto verify Git was installed.
Note: git-scm is a popular and recommended resource for downloading Git on a Mac. The advantage of downloading Git from git-scm is that your download automatically starts with the latest version of Git. The download source is the same macOS Git Installer as referenced in the steps above.
Install Git from Homebrew
Homebrew is a popular package manager for macOS. If you already have Homwbrew installed, you can follow the below steps to install Git:
- Open up a terminal window and install Git using the following command:
brew install git. - Once the command output has completed, you can verify the installation by typing:
git version.
Install Git on Linux
Fun fact: Git was originally developed to version the Linux operating system! So, it only makes sense that it is easy to configure to run on Linux.
You can install Git on Linux through the package management tool that comes with your distribution.
Debian/Ubuntu
- Git packages are available using
apt. - It’s a good idea to make sure you’re running the latest version. To do so, Navigate to your command prompt shell and run the following command to make sure everything is up-to-date:
sudo apt-get update. - To install Git, run the following command:
sudo apt-get install git-all. - Once the command output has completed, you can verify the installation by typing:
git version.
Fedora
- Git packages are available using
dnf. - To install Git, navigate to your command prompt shell and run the following command:
sudo dnf install git-all. - Once the command output has completed, you can verify the installation by typing:
git version.
Note: You can download the proper Git versions and read more about how to install on specific Linux systems, like installing Git on Ubuntu or Fedora, in git-scm’s documentation.
Other Methods of Installing Git
Looking to install Git via the source code? Learn more here.
Contribute to this article on GitHub.
Get started with git and GitHub
Review code, manage projects, and build software alongside 40 million developers.
Sign up for GitHub
Sign in
Introduction
Git is a widely used open-source software tracking application used to track projects across different teams and revision levels.
This guide will show you how to install Git on Windows.
Prerequisites
- Administrator privileges
- Access to a command-line
- Your favorite coding text editor
- Username and password for the Github website (optional)
Steps For Installing Git for Windows
Installing Git prompts you to select a text editor. If you don’t have one, we strongly advise you to install prior to installing Git. Our roundup of the best text editors for coding may help you decide.
Note: If you are new to Git, refer to our post How Does Git Work to learn more about Git workflow and Git functions.
Download Git for Windows
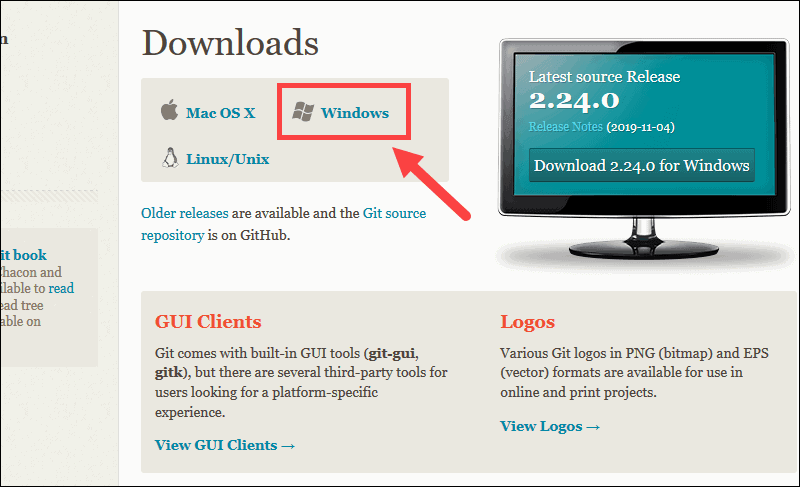
1. Browse to the official Git website: https://git-scm.com/downloads
2. Click the download link for Windows and allow the download to complete.
Extract and Launch Git Installer
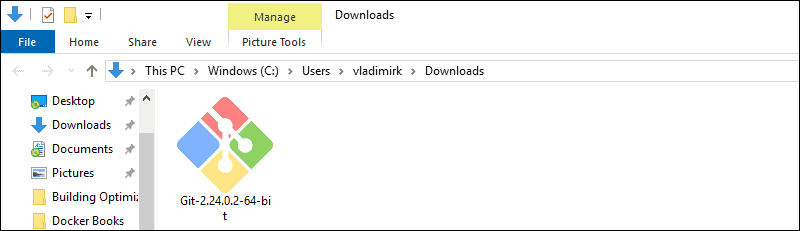
3. Browse to the download location (or use the download shortcut in your browser). Double-click the file to extract and launch the installer.
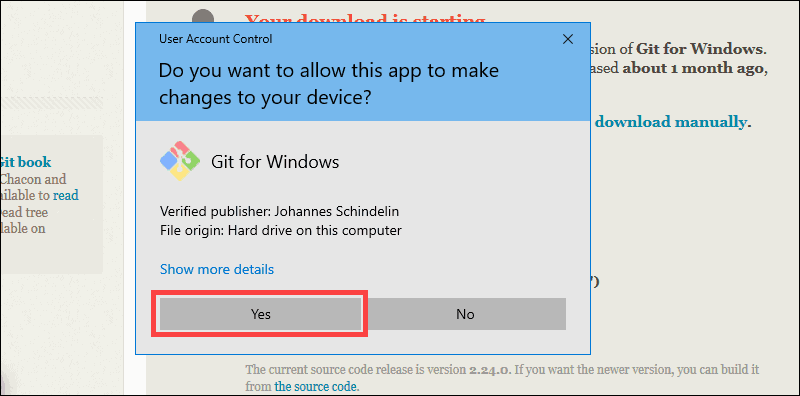
4. Allow the app to make changes to your device by clicking Yes on the User Account Control dialog that opens.
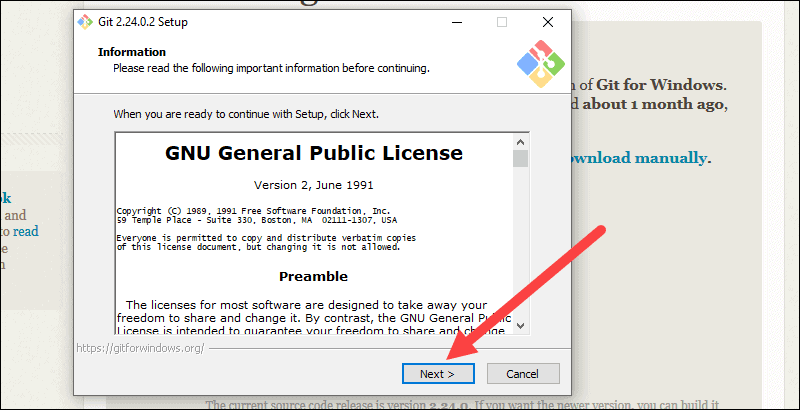
5. Review the GNU General Public License, and when you’re ready to install, click Next.
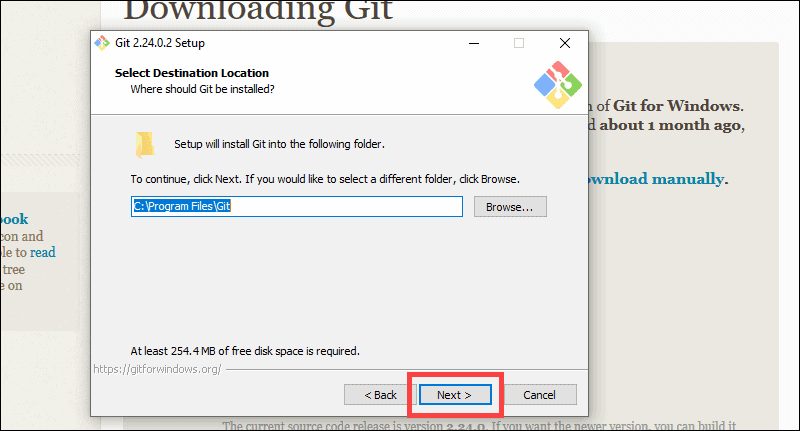
6. The installer will ask you for an installation location. Leave the default, unless you have reason to change it, and click Next.
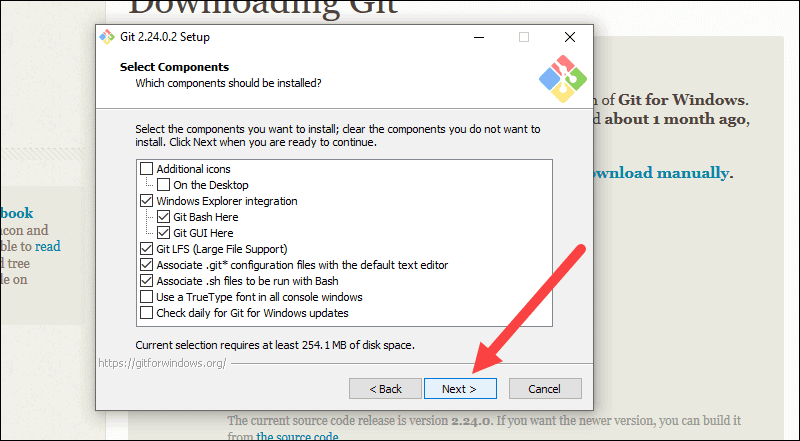
7. A component selection screen will appear. Leave the defaults unless you have a specific need to change them and click Next.
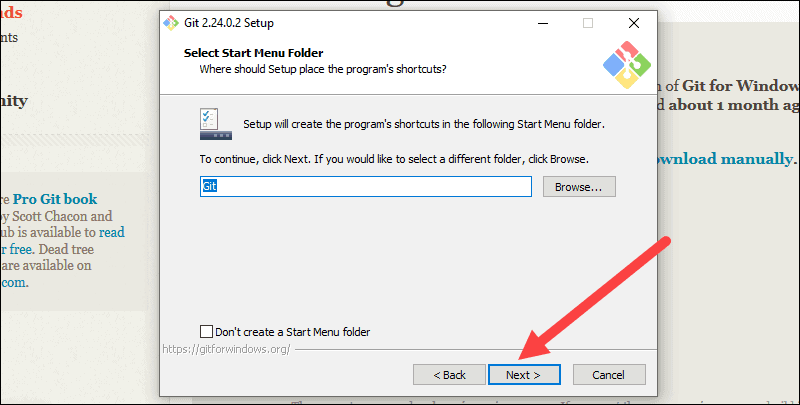
8. The installer will offer to create a start menu folder. Simply click Next.
9. Select a text editor you’d like to use with Git. Use the drop-down menu to select Notepad++ (or whichever text editor you prefer) and click Next.

10. The next step allows you to choose a different name for your initial branch. The default is ‘master.’ Unless you’re working in a team that requires a different name, leave the default option and click Next.

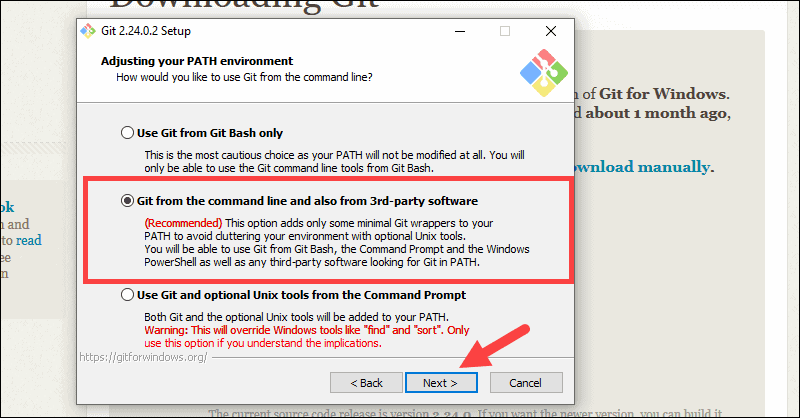
11. This installation step allows you to change the PATH environment. The PATH is the default set of directories included when you run a command from the command line. Leave this on the middle (recommended) selection and click Next.
Server Certificates, Line Endings and Terminal Emulators
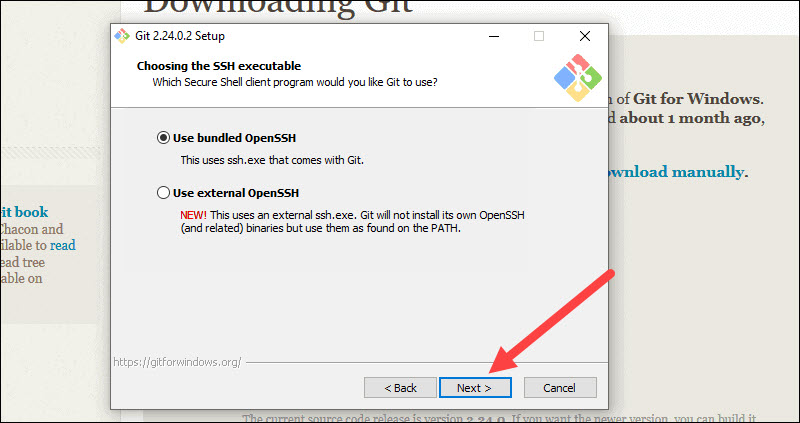
12. The installer now asks which SSH client you want Git to use. Git already comes with its own SSH client, so if you don’t need a specific one, leave the default option and click Next.
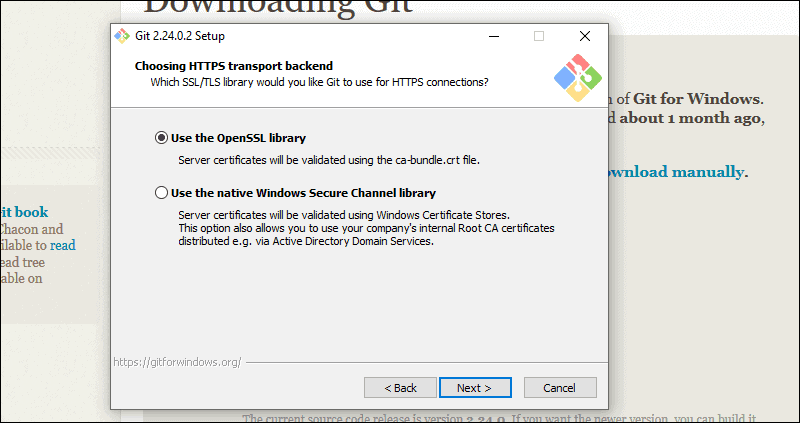
13. The next option relates to server certificates. Most users should use the default. If you’re working in an Active Directory environment, you may need to switch to Windows Store certificates. Click Next.
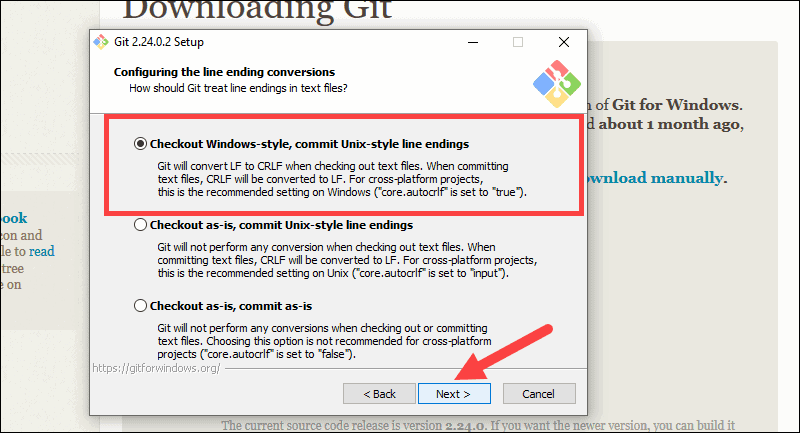
14. The next selection converts line endings. It is recommended that you leave the default selection. This relates to the way data is formatted and changing this option may cause problems. Click Next.
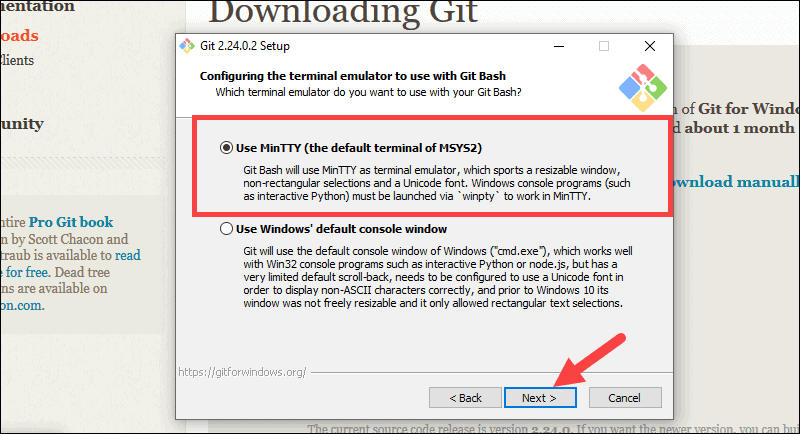
15. Choose the terminal emulator you want to use. The default MinTTY is recommended, for its features. Click Next.
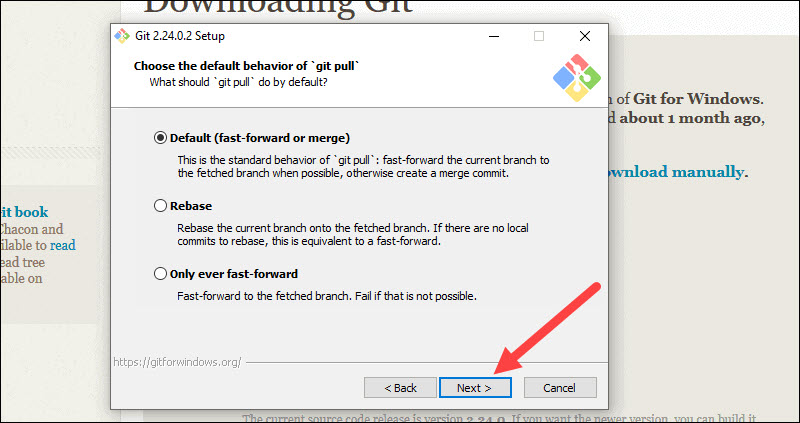
16. The installer now asks what the git pull command should do. The default option is recommended unless you specifically need to change its behavior. Click Next to continue with the installation.
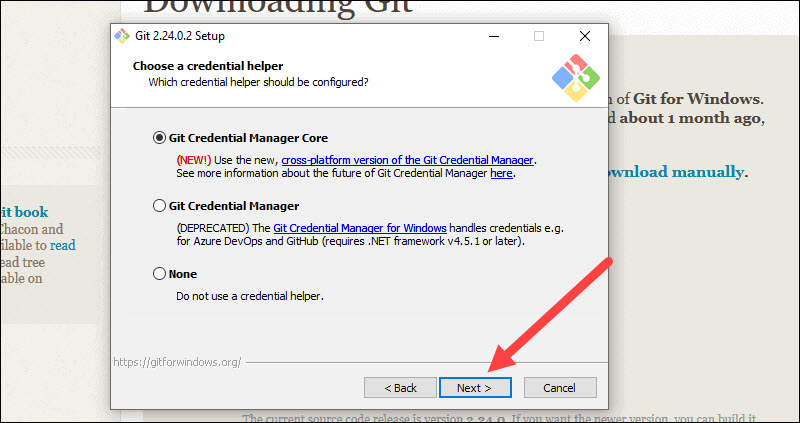
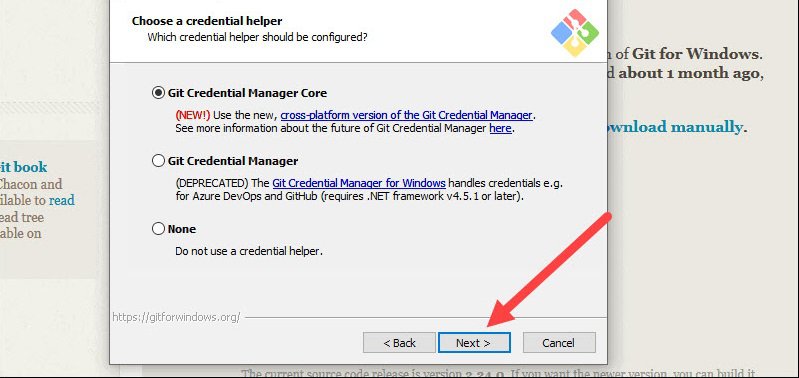
17. Next you should choose which credential helper to use. Git uses credential helpers to fetch or save credentials. Leave the default option as it is the most stable one, and click Next.
Additional Customization Options
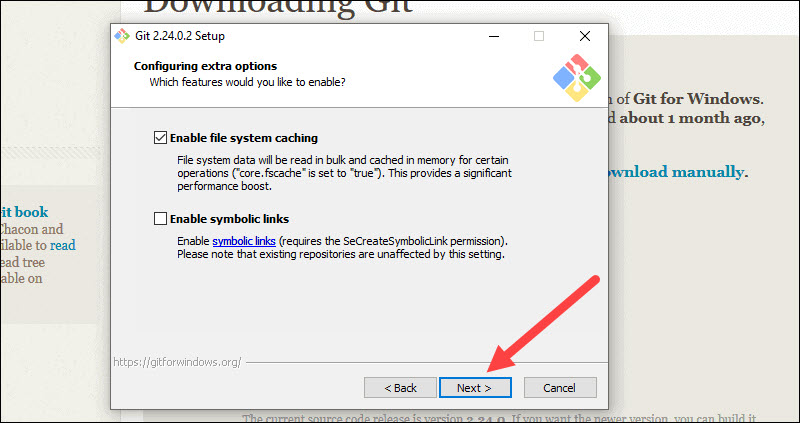
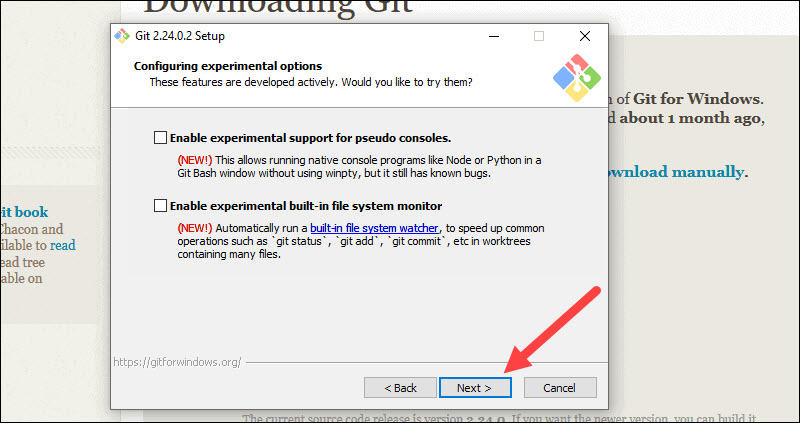
18. The default options are recommended, however this step allows you to decide which extra option you would like to enable. If you use symbolic links, which are like shortcuts for the command line, tick the box. Click Next.
19. Depending on the version of Git you’re installing, it may offer to install experimental features. At the time this article was written, the options to include support for pseudo controls and a built-in file system monitor were offered. Unless you are feeling adventurous, leave them unchecked and click Install.
Complete Git Installation Process
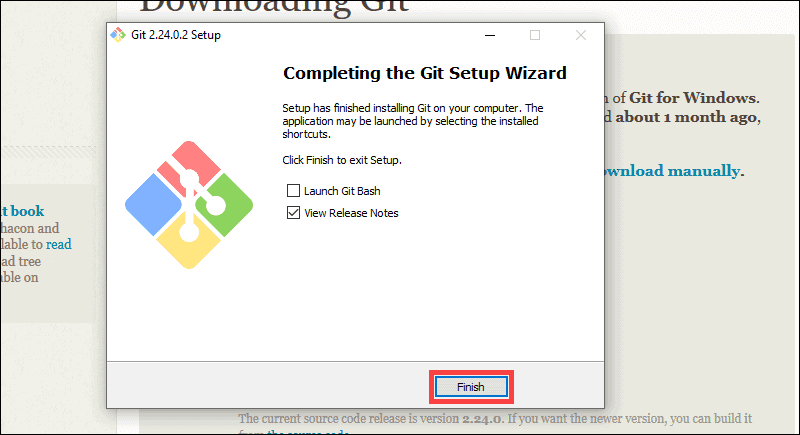
20. Once the installation is complete, tick the boxes to view the Release Notes or Launch Git Bash, then click Finish.
How to Launch Git in Windows
Git has two modes of use – a bash scripting shell (or command line) and a graphical user interface (GUI).
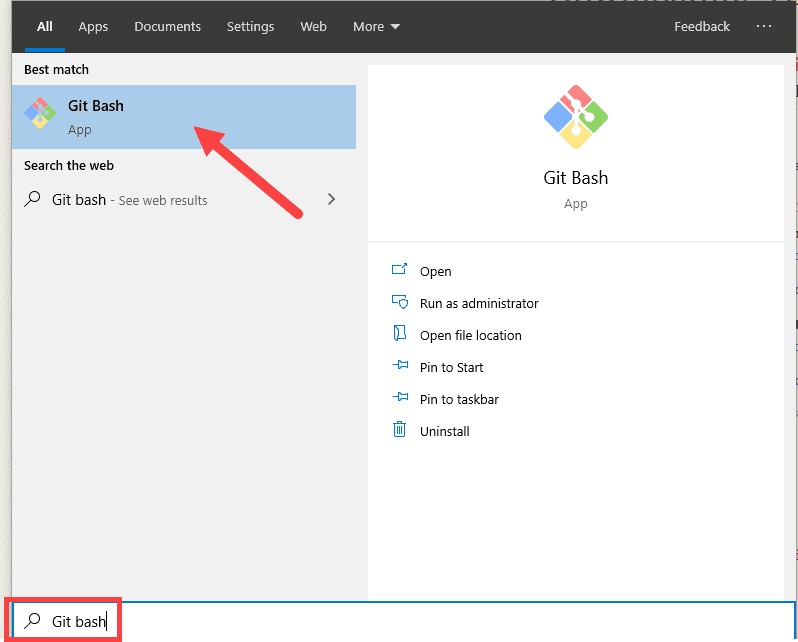
Launch Git Bash Shell
To launch Git Bash open the Windows Start menu, type git bash and press Enter (or click the application icon).
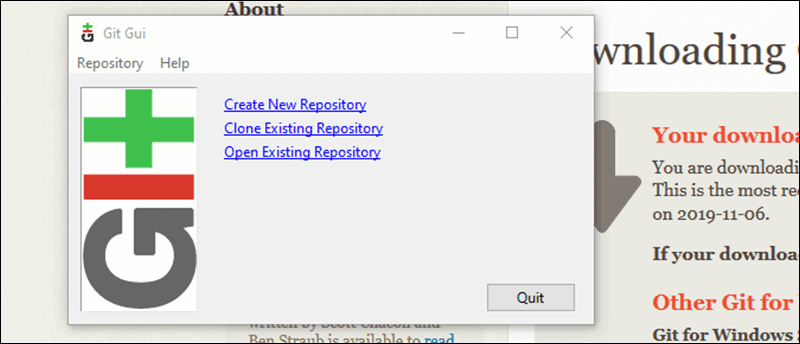
Launch Git GUI
To launch Git GUI open the Windows Start menu, type git gui and press Enter (or click the application icon).
Connecting to a Remote Repository
You need a GitHub username and password for this next step.
Create a Test Directory
Open a Windows PowerShell interface by pressing Windows Key + x, and then i once the menu appears.
Create a new test directory (folder) by entering the following:
mkdir git_testAn example of the PowerShell output.
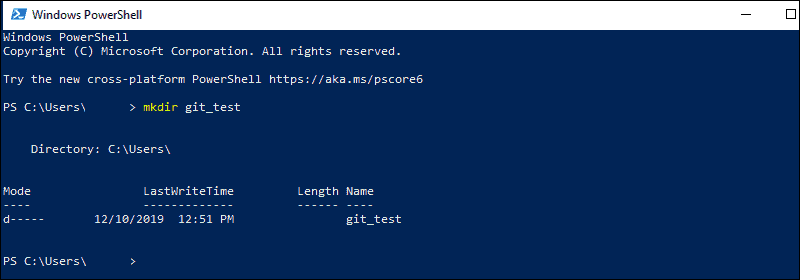
Change your location to the newly created directory:
cd git_testNote: If you already have a GitHub repository, use the name of that project instead of git_test.
Configure GitHub Credentials
Configure your local Git installation to use your GitHub credentials by entering the following:
git config --global user.name "github_username"git config --global user.email "email_address"Note: Replace github_username and email_address with your GitHub credentials.
Clone a GitHub Repository
Go to your repository on GitHub. In the top right above the list of files, open the Clone or download drop-down menu. Copy the URL for cloning over HTTPS.
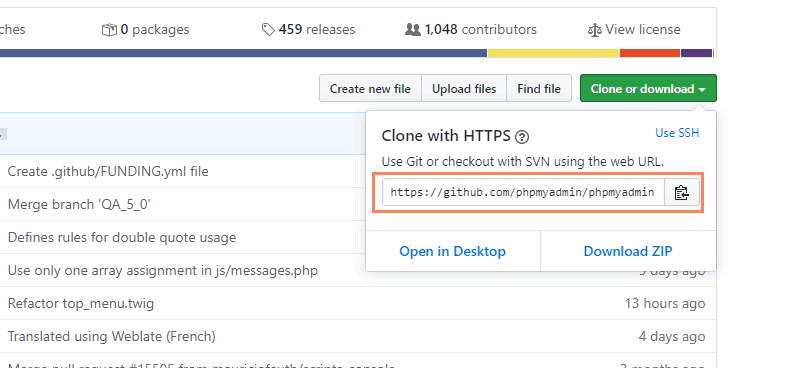
Switch to your PowerShell window, and enter the following:
git clone repository_urlImportant: In the example above, the command will clone the repository over HTTPS. Another option is cloning with SSH URLs. For that option to work, you must generate an SSH key pair on your Windows workstation and assign the public key to your GitHub account.
List Remote Repositories
Your working directory should now have a copy of the repository from GitHub. It should contain a directory with the name of the project. Change to the directory:
cd git_projectNote: Replace git_project with the actual name of the repository you downloaded. If it’s not working, you can list the contents of the current directory with the ls command. This is helpful if you don’t know the exact name or need to check your spelling.
Once you’re in the sub-directory, list the remote repositories:
git remote -vPushing Local Files to the Remote Repository
Once you’ve done some work on the project, you may want to submit those changes to the remote project on GitHub.
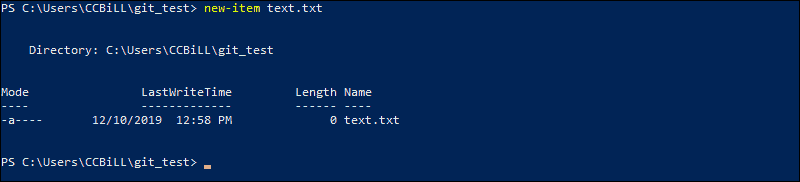
1. For example, create a new text file by entering the following into your PowerShell window:
new-item text.txt2. Confirmation that the new file is created.
3. Now check the status of your new Git branch and untracked files:
git status4. Add your new file to the local project:
git add text.txt5. Run git status again to make sure the text.txt file has been added. Next, commit the changes to the local project:
git commit -m "Sample 1"6. Finally, push the changes to the remote GitHub repository:
git pushYou may need to enter your username and password for GitHub.
Note: You can remove a remote repository if the need for it no longer exists. To learn how, visit our guide How to Remove a Git Remote.
Conclusion
You now have a working installation of Git on your Windows system. After installing Git on your Windows, you might find helpful how to update Git. Use Git’s features to coordinate work among programmers on a project.
For Linux and MacOS installation guides, check out our articles on installing Git on Ubuntu, CentOS and MacOS.
Install Git on Mac OS X
There are several ways to install Git on a Mac. In fact, if you’ve installed XCode (or it’s Command Line Tools), Git may already be installed. To find out, open a terminal and enter git --version.
$ git --version git version 2.7.0 (Apple Git-66)Apple actually maintain and ship their own fork of Git, but it tends to lag behind mainstream Git by several major versions. You may want to install a newer version of Git using one of the methods below:
Git for Mac Installer
The easiest way to install Git on a Mac is via the stand-alone installer:
-
Download the latest Git for Mac installer.
-
Follow the prompts to install Git.
-
Open a terminal and verify the installation was successful by typing
git --version:$ git --versiongit version 2.9.2 -
Configure your Git username and email using the following commands, replacing Emma’s name with your own. These details will be associated with any commits that you create:
$ git config --global user.name "Emma Paris"$ git config --global user.email "eparis@atlassian.com" -
(Optional) To make Git remember your username and password when working with HTTPS repositories, configure the git-credential-osxkeychain helper.
Install Git with Homebrew
If you have installed Homebrew to manage packages on OS X, you can follow these instructions to install Git:
-
Open your terminal and install Git using Homebrew:
$ brew install git -
Verify the installation was successful by typing which
git --version:$ git --version git version 2.9.2 -
Configure your Git username and email using the following commands, replacing Emma’s name with your own. These details will be associated with any commits that you create:
$ git config --global user.name "Emma Paris"$ git config --global user.email "eparis@atlassian.com" -
(Optional) To make Git remember your username and password when working with HTTPS repositories, install the git-credential-osxkeychain helper.
Install Git with MacPorts
If you have installed MacPorts to manage packages on OS X, you can follow these instructions to install Git:
-
Open your terminal and update MacPorts:
$ sudo port selfupdate -
Search for the latest available Git ports and variants:
$ port search git$ port variants git -
Install Git with bash completion, the OS X keychain helper, and the docs:
$ sudo port install git +bash_completion+credential_osxkeychain+doc -
Configure your Git username and email using the following commands, replacing Emma’s name with your own. These details will be associated with any commits that you create:
$ git config --global user.name "Emma Paris"$ git config --global user.email "eparis@atlassian.com" -
(Optional) To make Git remember your username and password when working with HTTPS repositories, configure the git-credential-osxkeychain helper.
Install the git-credential-osxkeychain helper
Bitbucket supports pushing and pulling your Git repositories over both SSH and HTTPS. To work with a private repository over HTTPS, you must supply a username and password each time you push or pull. The git-credential-osxkeychain helper allows you to cache your username and password in the OSX keychain, so you don’t have to retype it each time.
-
If you followed the MacPorts or Homebrew instructions above, the helper should already be installed. Otherwise you’ll need to download and install it. Open a terminal window and check:
$ git credential-osxkeychain usage: git credential-osxkeychainIf you receive a usage statement, skip to step 4. If the helper is not installed, go to step 2.
-
Use curl to download git-credential-osxkeychain (or download it via your browser) and move it to
/usr/local/bin:$ curl -O http://github-media-downloads.s3.amazonaws.com/osx/git-credential-osxkeychain $ sudo mv git-credential-osxkeychain /usr/local/bin/ -
Make the file an executable:
$ chmod u+x /usr/local/bin/git-credential-osxkeychain -
Configure git to use the osxkeychain credential helper.
$ git config --global credential.helper osxkeychainThe next time Git prompts you for a username and password, it will cache them in your keychain for future use.
Install Git with Atlassian Sourcetree
Sourcetree, a free visual Git client for Mac, comes with its own bundled version of Git. You can download Sourcetree here.
To learn how to use Git with Sourcetree (and how to host your Git repositories on Bitbucket) you can follow our comprehensive Git tutorial with Bitbucket and Sourcetree.
Build Git from source on OS X
Building Git can be a little tricky on Mac due to certain libraries moving around between OS X releases. On El Capitan (OS X 10.11), follow these instructions to build Git:
-
From your terminal install XCode’s Command Line Tools (if you haven’t already):
$ xcode-select --install -
Install Homebrew.
-
Using Homebrew, install openssl:
$ brew install openssl -
Clone the Git source (or if you don’t yet have a version of Git installed, download and extract it):
$ git clone https://github.com/git/git.git -
To build Git run make with the following flags:
$ NO_GETTEXT=1 make CFLAGS="-I/usr/local/opt/openssl/include" LDFLAGS="-L/usr/local/opt/openssl/lib"
Next Step: Learn Git with Bitbucket Cloud
Install Git on Windows
Git for Windows stand-alone installer
-
Download the latest Git for Windows installer.
-
When you’ve successfully started the installer, you should see the Git Setup wizard screen. Follow the Next and Finish prompts to complete the installation. The default options are pretty sensible for most users.
-
Open a Command Prompt (or Git Bash if during installation you elected not to use Git from the Windows Command Prompt).
-
Run the following commands to configure your Git username and email using the following commands, replacing Emma’s name with your own. These details will be associated with any commits that you create:
$ git config --global user.name "Emma Paris" $ git config --global user.email "eparis@atlassian.com" -
Optional: Install the Git credential helper on Windows
Bitbucket supports pushing and pulling over HTTP to your remote Git repositories on Bitbucket. Every time you interact with the remote repository, you must supply a username/password combination. You can store these credentials, instead of supplying the combination every time, with the Git Credential Manager for Windows.
Install Git with Atlassian Sourcetree
Sourcetree, a free visual Git client for Windows, comes with its own bundled version of Git. You can download Sourcetree here.
To learn how to use Git with Sourcetree (and how to host your Git repositories on Bitbucket) you can follow our comprehensive Git tutorial with Bitbucket and Sourcetree.
Next Step: Learn Git with Bitbucket Cloud
Install Git on Linux
Debian / Ubuntu (apt-get)
Git packages are available via apt:
-
From your shell, install Git using apt-get:
$ sudo apt-get update$ sudo apt-get install git -
Verify the installation was successful by typing
git --version:$ git --versiongit version 2.9.2 -
Configure your Git username and email using the following commands, replacing Emma’s name with your own. These details will be associated with any commits that you create:
$ git config --global user.name "Emma Paris"$ git config --global user.email "eparis@atlassian.com"
Fedora (dnf/yum)
Git packages are available via both yum and dnf:
-
From your shell, install Git using dnf (or yum, on older versions of Fedora):
$ sudo dnf install gitor
$ sudo yum install git -
Verify the installation was successful by typing
git --version:$ git --versiongit version 2.9.2 -
Configure your Git username and email using the following commands, replacing Emma’s name with your own. These details will be associated with any commits that you create
$ git config --global user.name "Emma Paris"$ git config --global user.email "eparis@atlassian.com"
Build Git from source on Linux
Debian / Ubuntu
Git requires the several dependencies to build on Linux. These are available via apt:
-
From your shell, install the necessary dependencies using apt-get:
$ sudo apt-get update$ sudo apt-get install libcurl4-gnutls-dev libexpat1-dev gettext libz-dev libssl-dev asciidoc xmlto docbook2x -
Clone the Git source (or if you don’t yet have a version of Git installed, download and extract it):
$ git clone https://git.kernel.org/pub/scm/git/git.git -
To build Git and install it under
/usr, runmake:$ make all doc info prefix=/usr$ sudo make install install-doc install-html install-info install-man prefix=/usr
Fedora
Git requires the several dependencies to build on Linux. These are available via both yum and dnf:
-
From your shell, install the necessary build dependencies using dnf (or yum, on older versions of Fedora):
$ sudo dnf install curl-devel expat-devel gettext-devel openssl-devel perl-devel zlib-devel asciidoc xmlto docbook2Xor using yum. For yum, you may need to install the Extra Packages for Enterprise Linux (EPEL) repository first:
$ sudo yum install epel-release$ sudo yum install curl-devel expat-devel gettext-devel openssl-devel perl-devel zlib-devel asciidoc xmlto docbook2X -
Symlink docbook2X to the filename that the Git build expects:
$ sudo ln -s /usr/bin/db2x_docbook2texi /usr/bin/docbook2x-texi -
Clone the Git source (or if you don’t yet have a version of Git installed, download and extract it):
$ git clone https://git.kernel.org/pub/scm/git/git.git -
To build Git and install it under
/usr, runmake:$ make all doc prefix=/usr$ sudo make install install-doc install-html install-man prefix=/usr
Next Step: Learn Git with Bitbucket Cloud
Git is an open-source and free, decentralized version control system designed to handle projects of all sizes with speed and efficiency. Basically, it is a software tracking application that is commonly used to monitor projects across several teams. The best way of downloading and installing Git on the windows command line is to download it from its official site. Lets learn the step for the same,
Steps to download and install Git on Windows
Downloading
Step 1: Go to the official website: https://git-scm.com
Step 2: Click on 64-bit Git for Windows Setup and allow the download to complete.

Extract and Launch Git Installer
Step 3: Go to your download location and double-click the file to launch the installer.
Step 4: Allow the app to modify your device by selecting Yes in the User Account Control window that appears.

Step 5: Check the GNU General Public License and click Next.

Step 6: Select the install location. If you don’t have a reason to modify it, leave it to default and click Next.

Step 7: A screen for component selection will display. Leave the settings as it is and click Next.

Step 8: The installer asks you to create a start menu folder. Simply click Next.

Step 9: Choose the text editor you want to use with Git and click Next.

Step 10: The following step allows you to give your original branch a new name. ‘Master’ is the default. Leave the default choice selected and press the Next button.

Step 11: You can adjust the PATH environment during this installation phase. When you run a command from the command line, the PATH is the default set of folders that are included. Continue by selecting the middle (recommended) option and clicking Next.

Step 12: The following option concerns server certificates. The default choice is used by the majority of users. Simply click Next.

Step 13: This step deals with how data is structured, and altering this option may create issues. So, it is advised to leave the default selection.

Step 14: Select the terminal emulator that you wish to use. Because of its features, the default MinTTY is suggested. Click Next.

Step 15: The installer now prompts you to specify what the git pull command should perform. Leave the default selected option and click Next.

Step 16: The next step is to decide which credential helper to employ. Credential helpers are used by Git to retrieve or save credentials. Leave the default selection and click Next.
Step 17: Although the default choices are suggested, this step allows you to select which additional features to activate.

Step 18: Git offers to install some experimental features. Leave them unchecked and click Install.

Step 19: Once the installation is complete, launch the Git bash.
