
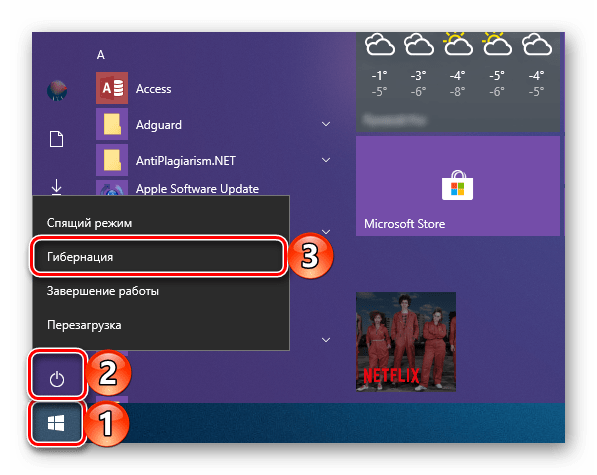
By default, when you open the Start menu in Windows 10 and select the power button, there is no option for Hibernate. Here’s how to enable it.
Hibernate mode puts your PC into a low power state that allows a shutdown without losing any of your work. Apps stay open, and when you turn your computer on again, you are back to where you left off. It uses less power than Sleep mode. It is a good choice if you know you won’t be using your PC for an extended time. However, the Hibernate option is missing from the Power button and other power areas on Windows 10. Here’s how to enable it.
Windows 10 Power Options
By default, when you open the Start menu in Windows 10 and select the Power button, no Hibernate mode is listed.

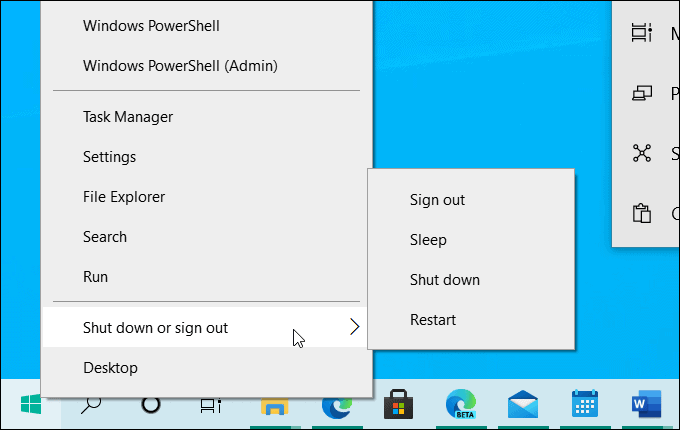
Alternately, you can right-click the Start button or use the Windows key + X keyboard shortcut to bring up the “power user menu” and go to Shutdown or sign out. Even there, you will not find a Hibernate option.
To enable Hibernate mode in Windows 10, head to Settings > System > Power & sleep. Then scroll down on the right-hand side and click the “Additional power settings” link.
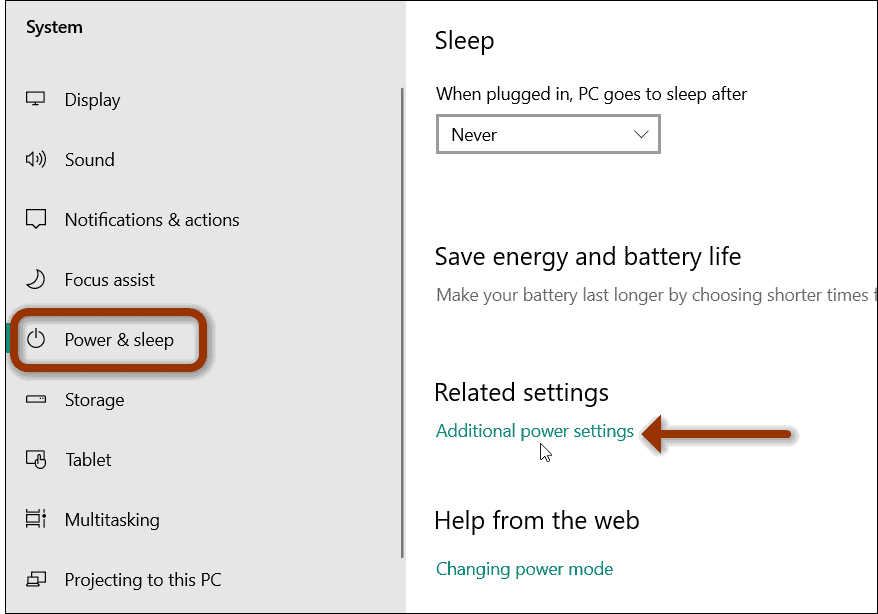
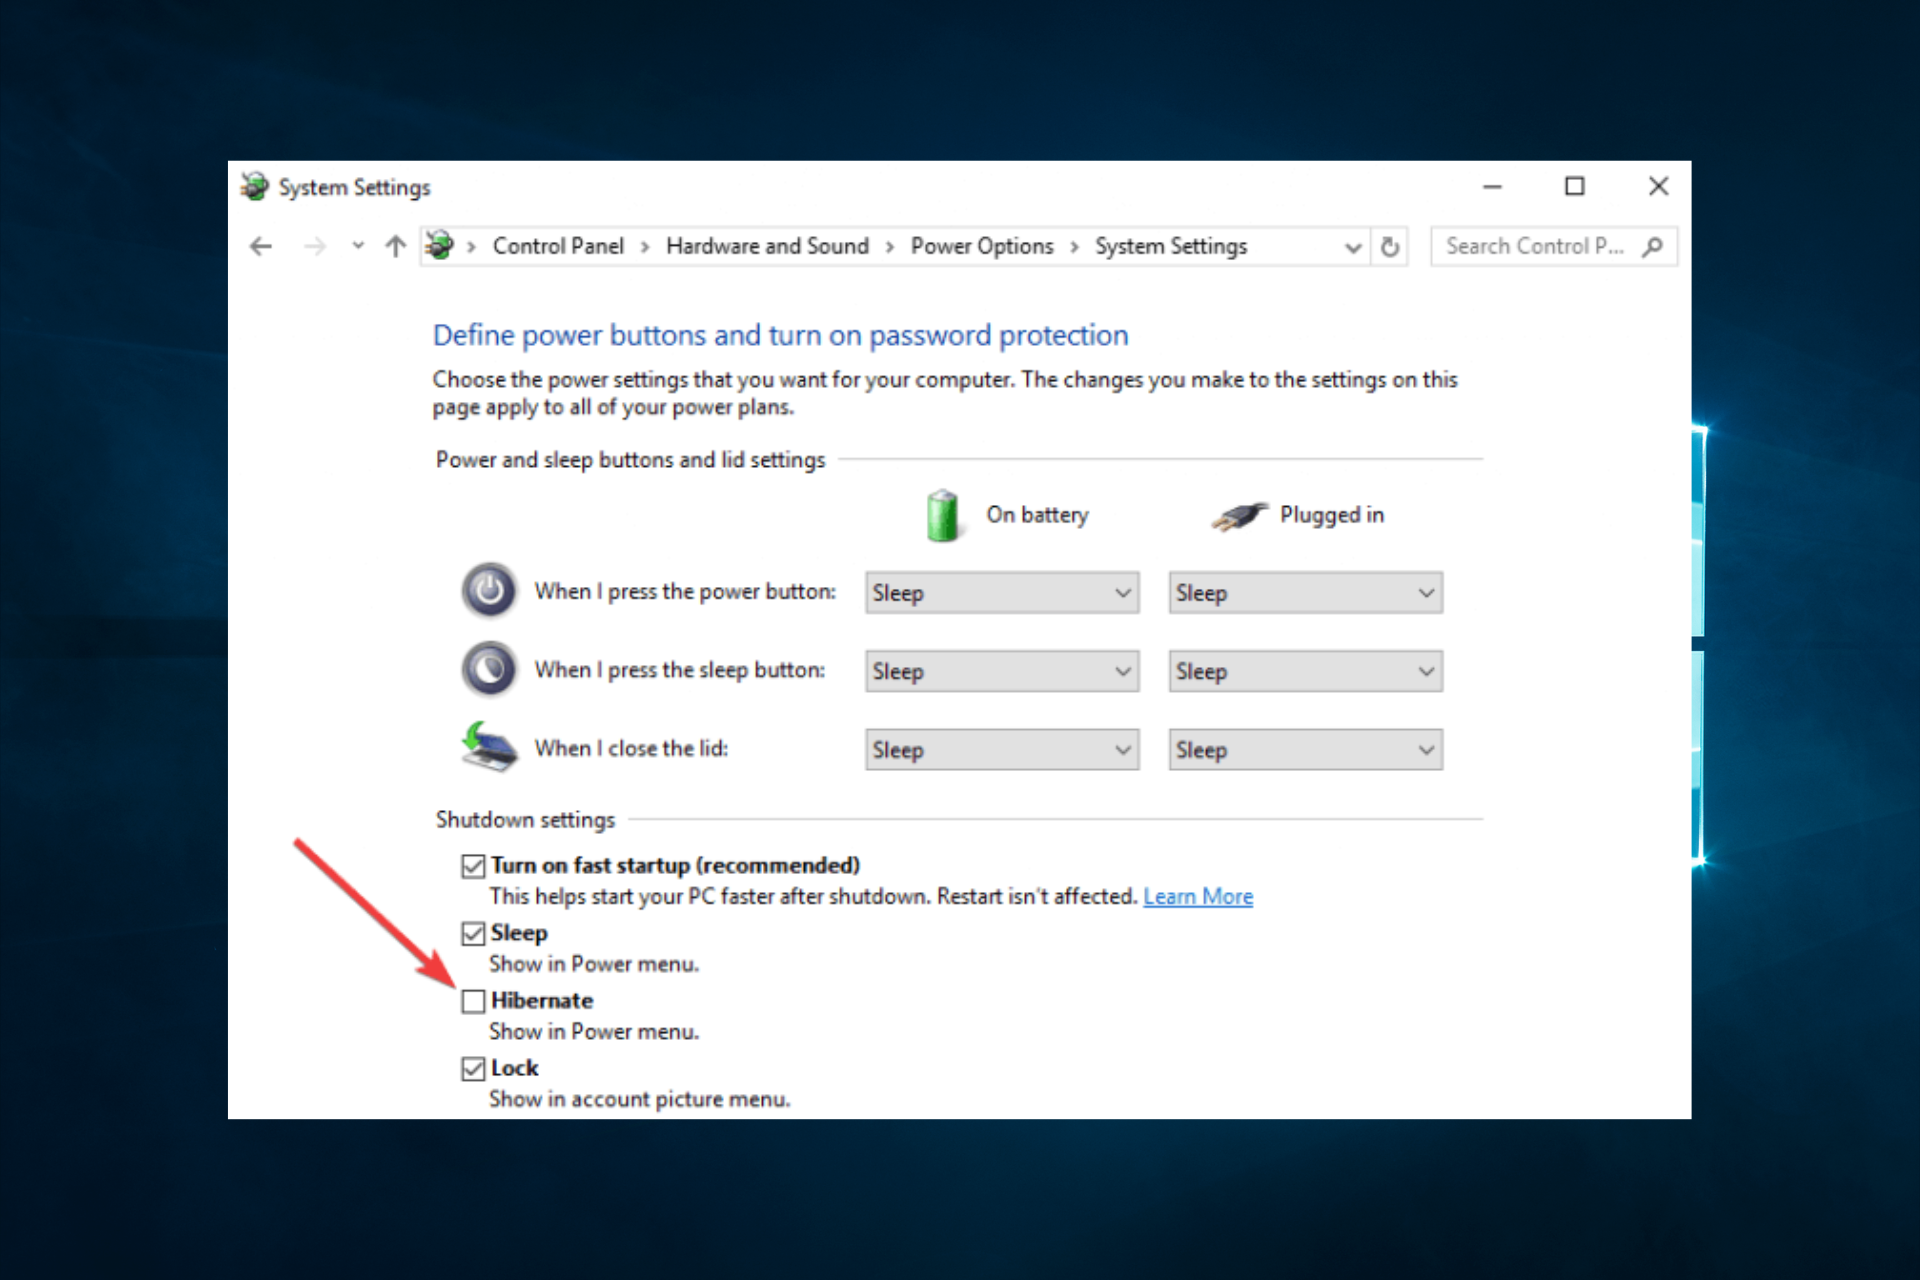
That will open Power Options in the classic Control Panel. From the left column, click the “Choose what the power buttons do” link.

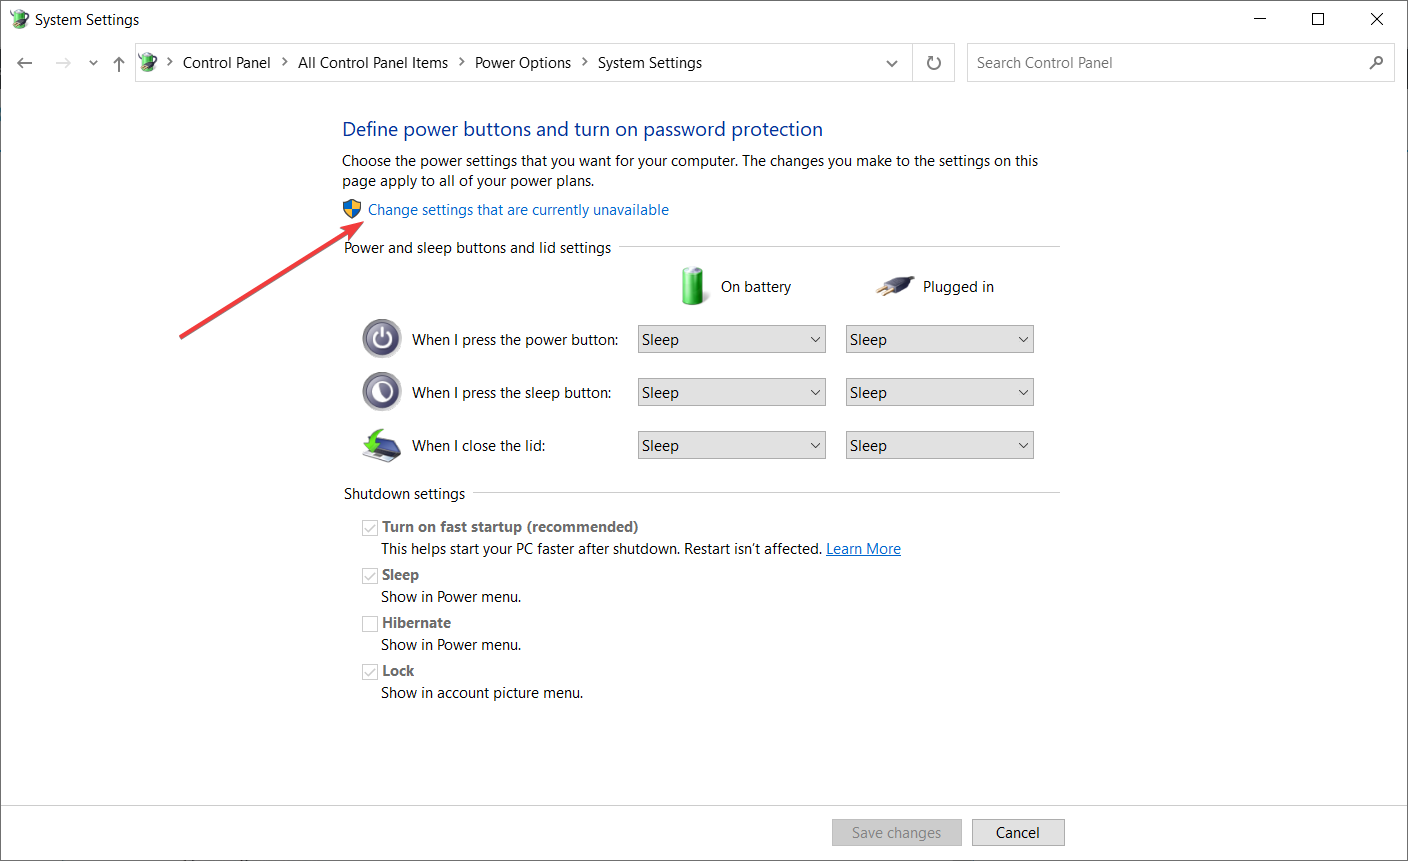
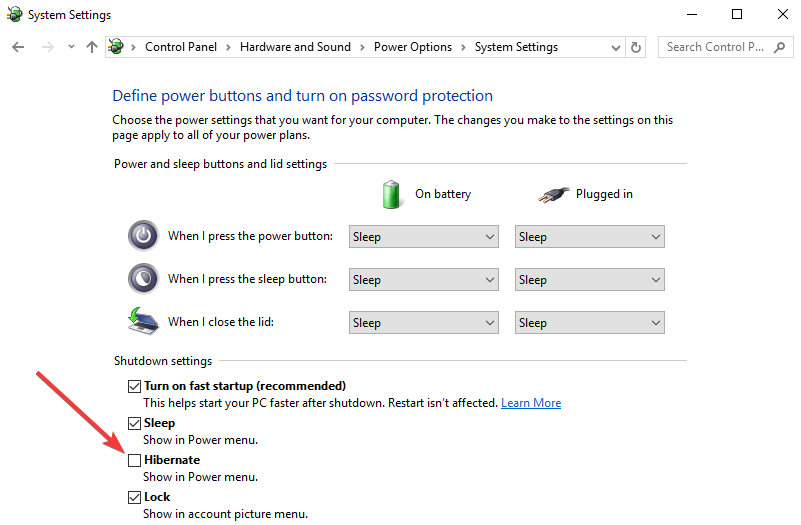
Next, you will see some different shutdown settings and power and button settings. Under the “Shutdown settings” section, you should see a list of additional options like Fast Startup, Sleep, and Hibernate. But all of those options are probably grayed out. To make Hibernate available, click the “Change settings that are currently unavailable” link.
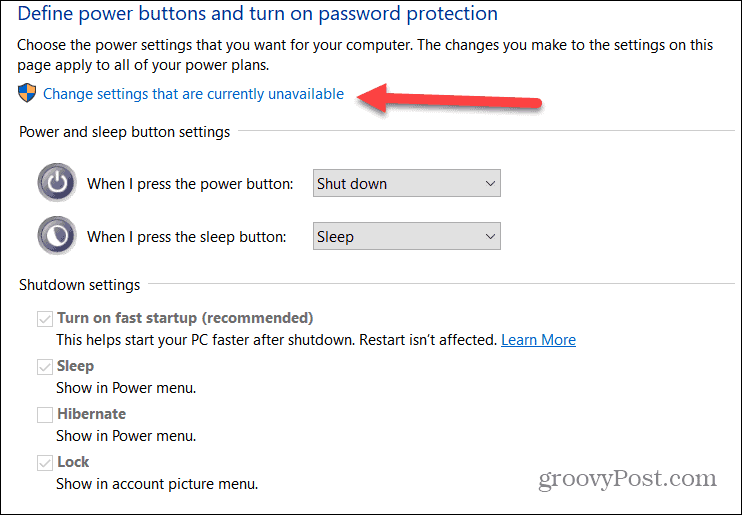
After clicking the link, those options should become available. Check the Hibernate box (or other shutdown settings you want available) and make sure to click the Save changes button.

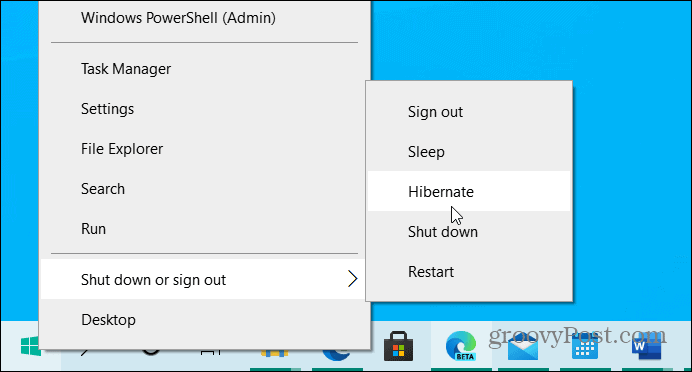
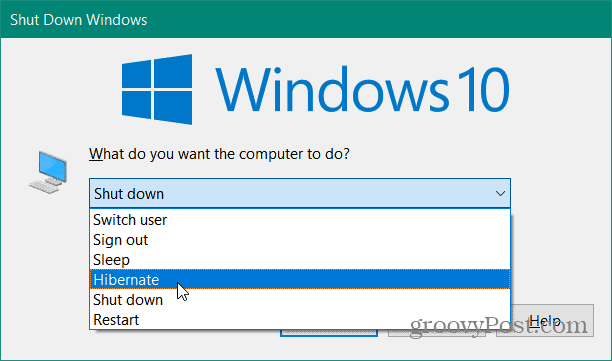
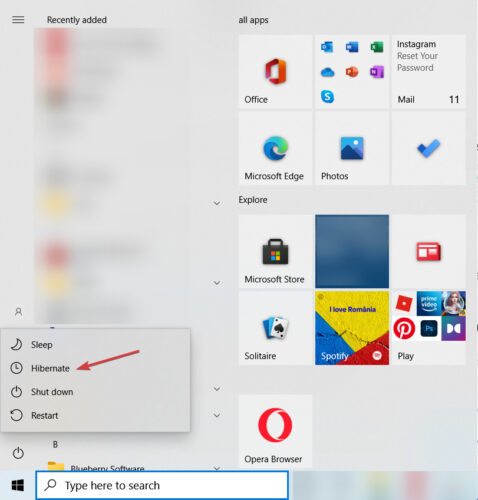
That’s all there is to it. The next time you open the Start menu and select the Power button, you will see that “Hibernate” is now available from the menu.

It will also be listed if you right-click the Start button (Windows key+X) and go to “Shut down or sign out” on the menu.
It’s also worth noting that the old-school method of using the keyboard shortcut Alt + F4 from the desktop still works, too. And by following the steps above, it adds the Hibernate option there as well.
If you’re still running Windows 7 (which is no longer supported), you can read how to enable Hibernate mode in this article. If you’re not sure which mode to use on your Windows 10 computer, read our article on the differences between Sleep and Hibernate modes.
![]()
There are many ways to shut down your PC—you can turn the PC off completely, you can make it sleep, or you can hibernate the PC.
Turn your PC off completely
To shut down, select Start and then select Power > Shut down.
Sleep
Sleep uses very little power, your PC starts up faster, and you’re instantly back to where you left off. You don’t have to worry that you’ll lose your work because of your battery draining because Windows automatically saves all your work and turns off the PC if the battery is too low. Use Sleep when you’re going to be away from your PC for just a little while—like when you’re taking a coffee break.
For a lot of PCs (especially laptops and tablets), your PC goes to sleep when you close your lid or press the power button.
To set your PC so it goes to sleep when you close the lid or press the power button:
-
Select Search on the taskbar, type control panel, and select it from the results.
-
Select System and Security.
-
In the Power Options section, select Change what the power buttons do.
-
Select Change settings that are currently unavailable.
-
Select options based on how you want Sleep to work:
-
For a laptop, expand the list for When I close the lid in the On battery column and select Sleep. Repeat for the Plugged in column, if desired.
-
For a desktop, tablet, or laptop, expand the list for When I press the power button in the On battery column and select Sleep. Repeat for the Plugged in column, if desired.
-
-
Select Save changes.
When you’re ready to make your PC sleep, just press the power button on your desktop, tablet, or laptop, or close your laptop’s lid.
On most PCs, you can resume working by pressing your PC’s power button. However, not all PCs are the same. You might be able to wake it by pressing any key on the keyboard, clicking a mouse button, or opening the lid on a laptop. Check the documentation that came with your computer or go to the manufacturer’s website.
Hibernate
This option was designed for laptops and might not be available for all PCs. (For example, PCs with InstantGo don’t have the hibernate option.) Hibernate uses less power than sleep and when you start up the PC again, you’re back to where you left off (though not as fast as sleep).
Use hibernation when you know that you won’t use your laptop or tablet for an extended period and won’t have an opportunity to charge the battery during that time. First check to see if this option is available on your PC and if it is, turn it on.
To set your PC so it hibernates:
-
Select Search on the taskbar, type control panel, and select it from the results.
-
Select System and Security.
-
In the Power Options section, select Change what the power buttons do.
-
Select Change settings that are currently unavailable.
-
In the Shutdown settings section, select Hibernate.
-
Select Save changes.
Now you’ll be able to hibernate your PC in a few different ways:
-
Select Start , and then select Power > Hibernate.
-
Press the Windows logo key + X on your keyboard, and then select Shut down or sign out > Hibernate.
Note: If devices connected to your PC (like monitors, printers, or scanners) aren’t working properly after waking up from sleep or hibernate, you might need to disconnect and reconnect your device or restart your PC. You should also make sure that you have the most current drivers for all of your devices.
Turn your PC off completely
To shut down, select Start and then select Power > Shut down.
Sleep
Sleep uses very little power, your PC starts up faster, and you’re instantly back to where you left off. You don’t have to worry that you’ll lose your work because of your battery draining because Windows automatically saves all your work and turns off the PC if the battery is too low. Use Sleep when you’re going to be away from your PC for just a little while—like when you’re taking a coffee break.
For a lot of PCs (especially laptops and tablets), your PC goes to sleep when you close your lid or press the power button.
To set your PC so it goes to sleep when you close the lid or press the power button:
-
Open power options—select Start , then select Settings > System > Power & sleep > Additional power settings.
-
Do one of the following:
-
If you’re using a desktop, tablet, or laptop, select Choose what the power buttons does. Next to When I press the power button, select Sleep, and then select Save changes.
-
If you’re using only a laptop, select Choose what closing the lid does. Next to When I close the lid, select Sleep, and then select Save changes.
-
When you’re ready to make your PC sleep, just press the power button on your desktop, tablet, or laptop, or close your laptop’s lid.
On most PCs, you can resume working by pressing your PC’s power button. However, not all PCs are the same. You might be able to wake it by pressing any key on the keyboard, clicking a mouse button, or opening the lid on a laptop. Check the documentation that came with your computer or go to the manufacturer’s website.
Hibernate
This option was designed for laptops and might not be available for all PCs. (For example, PCs with InstantGo don’t have the hibernate option.) Hibernate uses less power than sleep and when you start up the PC again, you’re back to where you left off (though not as fast as sleep).
Use hibernation when you know that you won’t use your laptop or tablet for an extended period and won’t have an opportunity to charge the battery during that time. First check to see if this option is available on your PC and if it is, turn it on.
To hibernate your PC:
-
Open power options—select Start , then select Settings > System > Power & sleep > Additional power settings.
-
Select Choose what the power button does, and then select Change settings that are currently unavailable. Under Shutdown settings, select the Hibernate checkbox (if it’s available), and then select Save changes.
Now you’ll be able to hibernate your PC in a few different ways:
-
Select Start , and then select Power > Hibernate.
-
Press the Windows logo key + X on your keyboard, and then select Shut down or sign out > Hibernate.
Note: If devices connected to your PC (like monitors, printers, or scanners) aren’t working properly after waking up from sleep or hibernate, you might need to disconnect and reconnect your device or restart your PC. You should also make sure that you have the most current drivers for all of your devices.
Turn your PC off completely
To shut down Windows 8.1 or Windows RT 8.1, move your mouse to the lower left-hand corner of the screen and right-click Start or press the Windows logo key + X on your keyboard. Tap or select Shut down or sign out and choose Shut down.
Sleep
Sleep uses very little power, your PC starts up faster, and you’re instantly back to where you left off. You don’t have to worry that you’ll lose your work because of your battery draining because Windows automatically saves all your work and turns off the PC if the battery is too low. Use Sleep when you’re going to be away from your PC for just a little while—like when you’re taking a coffee break.
For a lot of PCs (especially laptops and tablets), your PC goes to sleep when you close your lid or press the power button.
To set your PC so it goes to sleep when you close the lid or press the power button:
-
Open power options—swipe in from the edge of the screen, tap Search (or if you’re using a mouse, point to the upper-right corner of the screen, move the mouse pointer down, and then select Search), type Power options in the search box, and then tap or select Power options.
-
Do one of the following:
-
If you’re using a desktop, tablet, or laptop, select Choose what the power buttons do. Next to When I press the power button, select Sleep, and then select Save changes.
-
If you’re using only a laptop, select Choose what closing the lid does. Next to When I close the lid, select Sleep, and then select Save changes.
-
When you’re ready to make your PC sleep, just press the power button on your desktop, tablet, or laptop, or close your laptop’s lid.
On most PCs, you can resume working by pressing your PC’s power button. However, not all PCs are the same. You might be able to wake it by pressing any key on the keyboard, clicking a mouse button, or opening the lid on a laptop. Check the documentation that came with your computer or go to the manufacturer’s website.
Hibernate
This option was designed for laptops and might not be available for all PCs. (For example, PCs with InstantGo don’t have the hibernate option.) Hibernate uses less power than sleep and when you start up the PC again, you’re back to where you left off (though not as fast as sleep).
Use hibernation when you know that you won’t use your laptop or tablet for an extended period and won’t have an opportunity to charge the battery during that time. First check to see if this option is available on your PC and if it is, turn it on.
To hibernate your PC:
-
Open power options—swipe in from the edge of the screen, tap Search (or if you’re using a mouse, point to the upper-right corner of the screen, move the mouse pointer down, and then select Search), type Power options in the search box, and then tap or select Power options.
-
Select Choose what the power button does, and then select Change settings that are currently unavailable. Under Shutdown settings, select the Hibernate checkbox (if it’s available), and then select Save changes.
Now you’ll be able to hibernate your PC in a few different ways:
-
Move your mouse to the lower left-hand corner of the screen and right-click Start or press Windows logo key + X on your keyboard. Tap or select Shut down or sign out and choose Hibernate.
-
Swipe in from the right edge of the screen and then tap Settings. (If you’re using a mouse, point to the lower-right corner of the screen, move the mouse pointer up, and then select Settings.) Tap or select Power > Hibernate.
Note: If devices connected to your PC (like monitors, printers, or scanners) aren’t working properly after waking up from sleep or hibernate, you might need to disconnect and reconnect your device or restart your PC. You should also make sure that you have the most current drivers for all of your devices.
Turn your PC off completely
To shut down, select Start  and then select Shut down.
Sleep
Sleep uses very little power, your PC starts up faster, and you’re instantly back to where you left off. You don’t have to worry that you’ll lose your work because of your battery draining because Windows automatically saves all your work and turns off the PC if the battery is too low. Use Sleep when you’re going to be away from your PC for just a little while—like when you’re taking a coffee break.
For a lot of PCs (especially laptops and tablets), your PC goes to sleep when you close your lid or press the power button.
To set your PC so it goes to sleep when you close the lid or press the power button:
-
Open power options—select Start
 , then select Control Panel > System and Security > Power Options.
 -
Do one of the following:
-
If you’re using a desktop, tablet, or laptop, select Choose what the power buttons do. Next to When I press the power button, select Sleep, and then select Save changes.
-
If you’re using only a laptop, select Choose what closing the lid does. Next to When I close the lid, select Sleep, and then select Save changes.
-
-
When you’re ready to make your PC sleep, just press the power button on your desktop, tablet, or laptop, or close your laptop’s lid.
On most PCs, you can resume working by pressing your PC’s power button. However, not all PCs are the same. You might be able to wake it by pressing any key on the keyboard, clicking a mouse button, or opening the lid on a laptop. Check the documentation that came with your computer or go to the manufacturer’s website.
Hibernate
This option was designed for laptops and might not be available for all PCs. (For example, PCs with InstantGo don’t have the hibernate option.) Hibernate uses less power than sleep and when you start up the PC again, you’re back to where you left off (though not as fast as sleep).
Use hibernation when you know that you won’t use your laptop or tablet for an extended period and won’t have an opportunity to charge the battery during that time. First check to see if this option is available on your PC and if it is, turn it on.
To hibernate your PC:
-
Open power options—select Start
, then select Control Panel > System and Security > Power Options. -
Select Choose what the power button does, and then select Change settings that are currently unavailable. Under Shutdown settings, select the Hibernate checkbox (if it’s available), and then select Save changes.
Now you’ll be able to hibernate your PC—select Start , select the arrow next to Shut down, and then select Hibernate.
Note: If devices connected to your PC (like monitors, printers, or scanners) aren’t working properly after waking up from sleep or hibernate, you might need to disconnect and reconnect your device or restart your PC. You should also make sure that you have the most current drivers for all of your devices.
Содержание
- Режим гибернации в Виндовс 10
- Шаг 1: Включение режима
- Шаг 2: Настройка
- Шаг 3: Добавление кнопки
- Шаг 4: Переход в гибернацию
- Заключение
- Вопросы и ответы

Гибернация – энергосберегающим режим, ориентированный в первую очередь на ноутбуки, хотя вполне может использоваться и на компьютерах. При переходе в него сведения о состоянии операционной системы и приложений записываются на системный диск, а не в оперативную память, как это происходит в режиме сна. Расскажем, как активировать гибернацию на ПК с ОС Windows 10.
Каким бы полезным не казался рассматриваемый нами сегодня энергосберегающий режим, в операционной системе нет очевидного способа его активации – приходится обращаться к консоли или редактору реестра, а затем еще и копаться в «Параметрах». Рассмотрим подробнее действия, которые требуется выполнить для включения гибернации и обеспечения удобной возможности перехода в нее.
Примечание: Если операционная система у вас установлена на SSD, режим гибернации лучше не включать и не использовать – ввиду постоянной перезаписи больших объемов данных это сократит срок службы твердотельного накопителя.
Шаг 1: Включение режима
Итак, чтобы иметь возможность перехода в режим гибернации, его сначала нужно активировать. Сделать это можно двумя способами.
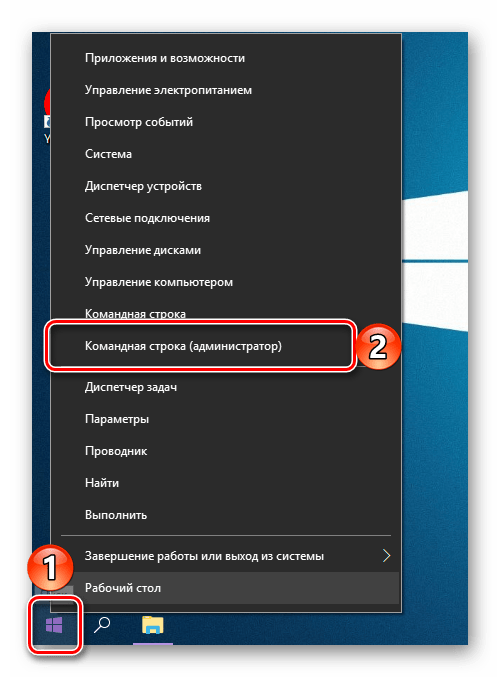
«Командная строка»
- Запустите «Командную строку» от имени администратора. Для этого нажмите правой кнопкой мышки по меню «Пуск» (или «WIN+X» на клавиатуре) и выберите соответствующий пункт.
- Введите представленную ниже команду и нажмите «ENTER» для ее выполнения.
powercfg -h on
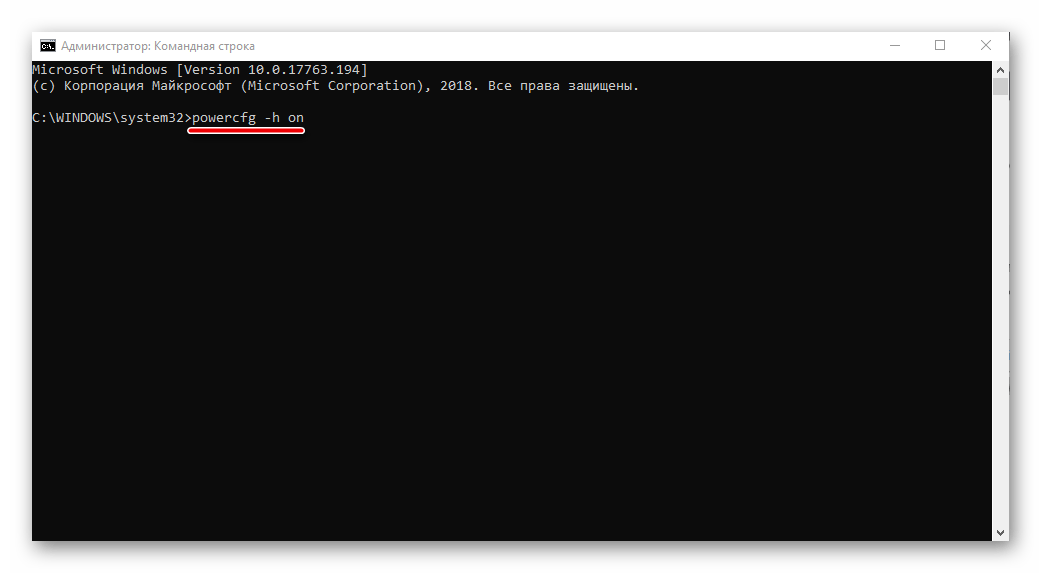
Режим гибернации будет включен.
Примечание: В случае необходимости отключения рассматриваемого режима, все в той же «Командной строке», запущенной от имени администратора, введите команду powercfg -h off и нажмите «ENTER».

Читайте также: Запуск «Командной строки» от имени администратора в Windows 10
«Редактор реестра»
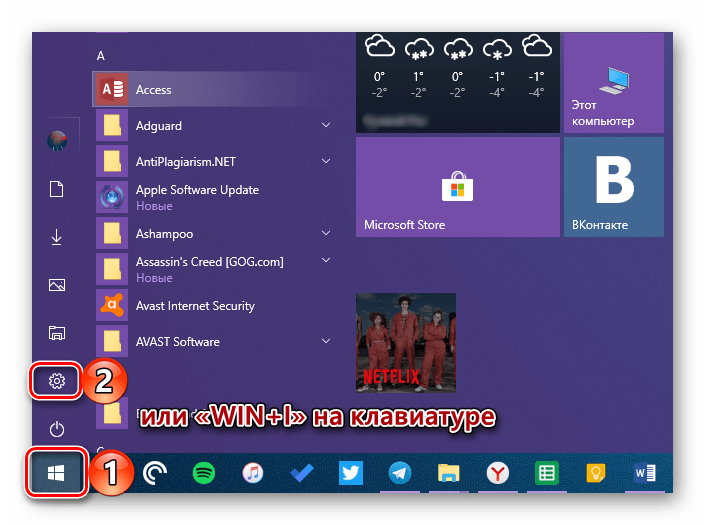
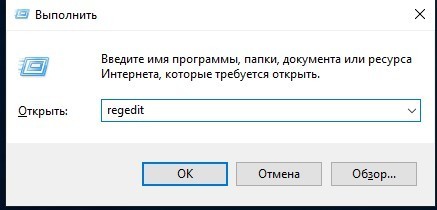
- Вызовите окно «Выполнить» (клавиши «WIN+I»), введите указанную ниже команду, после чего нажмите «ENTER» или «ОК».
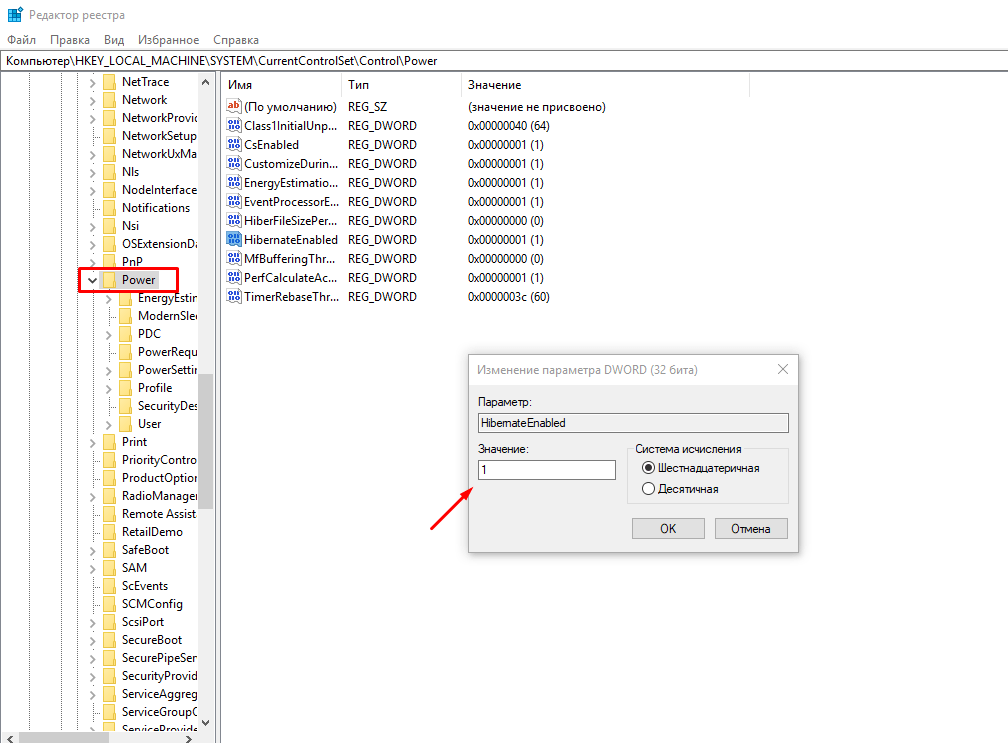
regedit - В открывшемся окне «Редактора реестра» перейдите по обозначенному ниже пути или просто скопируйте его («CTRL+C»), вставьте в адресную строку («CTRL+V») и нажмите «ENTER».
КомпьютерHKEY_LOCAL_MACHINESYSTEMCurrentControlSetControlPower - В перечне файлов, содержащихся в конечной директории, найдите «HibernateEnabled» и откройте его двойным нажатием левой кнопки мышки (ЛКМ).
- Измените параметр DWORD, указав в поле «Значение» цифру 1, после чего нажмите «ОК».
- Гибернация будет включена.
Примечание: Для отключения режима гибернации, если это потребуется, в окне «Изменение параметра DWORD» введите в поле «Значение» цифру 0 и подтвердите внесение изменений нажатием кнопки «ОК».


Читайте также: Запуск Редактора реестра в ОС Виндовс 10
Каким бы из предложенных выше способов вы не активировали рассматриваемый нами режим энергосбережения, обязательно перезагрузите ПК после выполнения этих действий.
Шаг 2: Настройка
Если вы хотите не только самостоятельно вводить свой компьютер или ноутбук в режим гибернации, но и принудительно «отправлять» его туда по истечении некоторого времени бездействия, как это происходит с отключением экрана или сном, потребуется выполнить еще некоторые настройки.
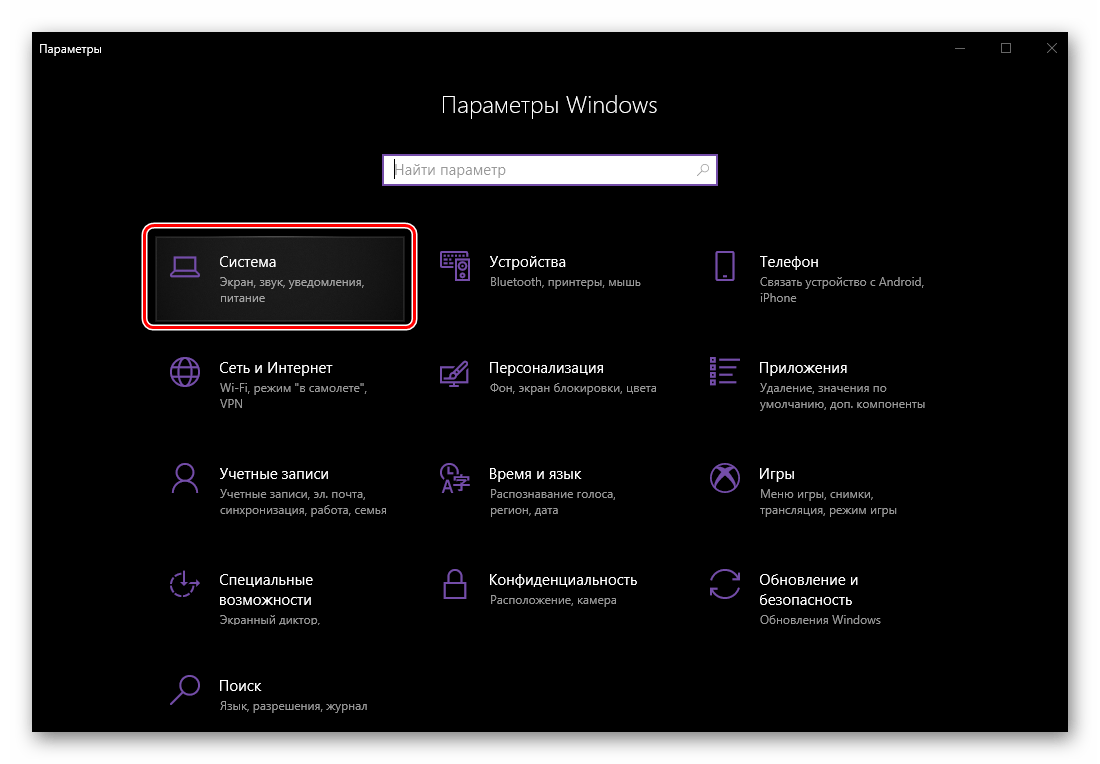
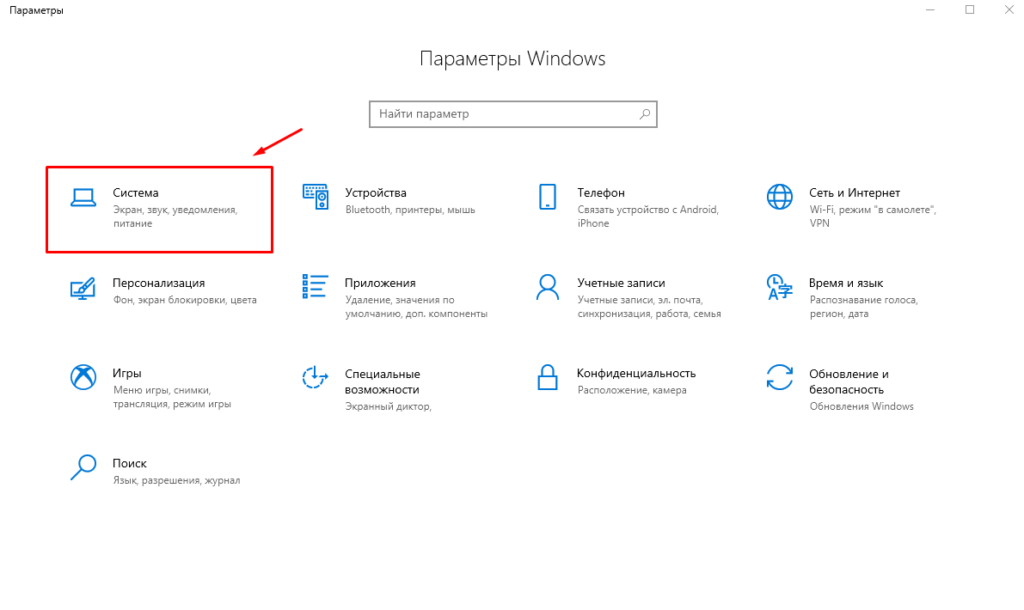
- Откройте «Параметры» Windows 10 – для этого нажмите на клавиатуре «WIN+I» или воспользуйтесь иконкой для его запуска в меню «Пуск».
- Перейдите к разделу «Система».
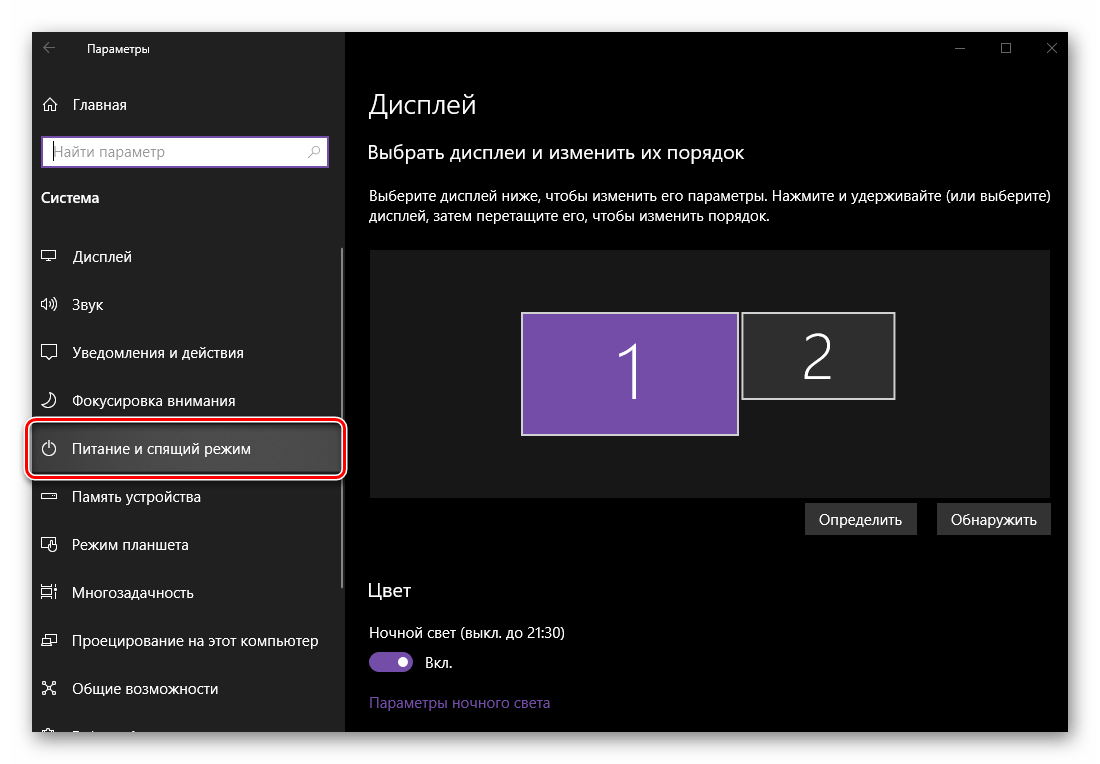
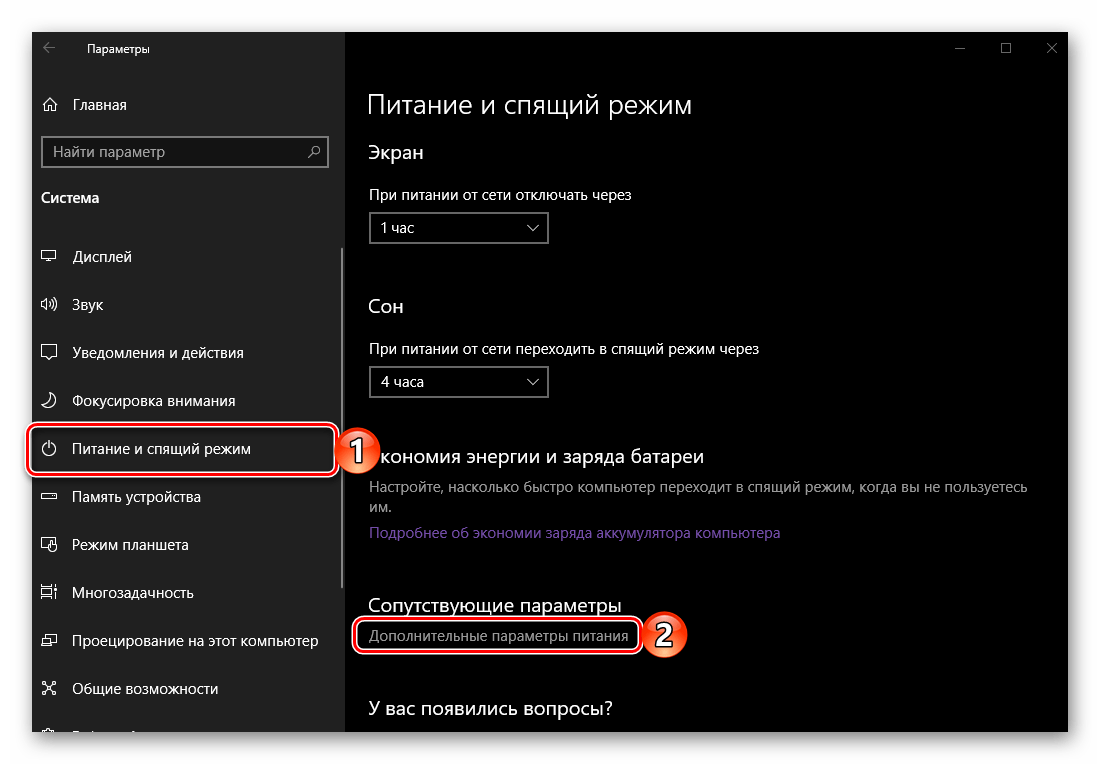
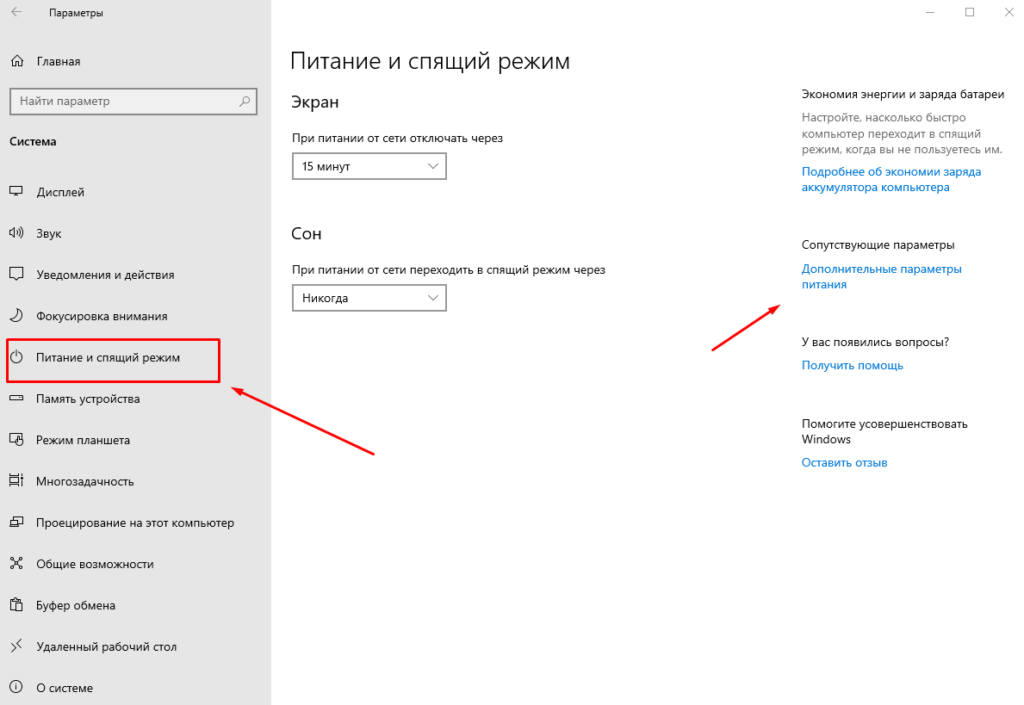
- Далее выберите вкладку «Питание и спящий режим».
- Нажмите на ссылку «Дополнительные параметры питания».
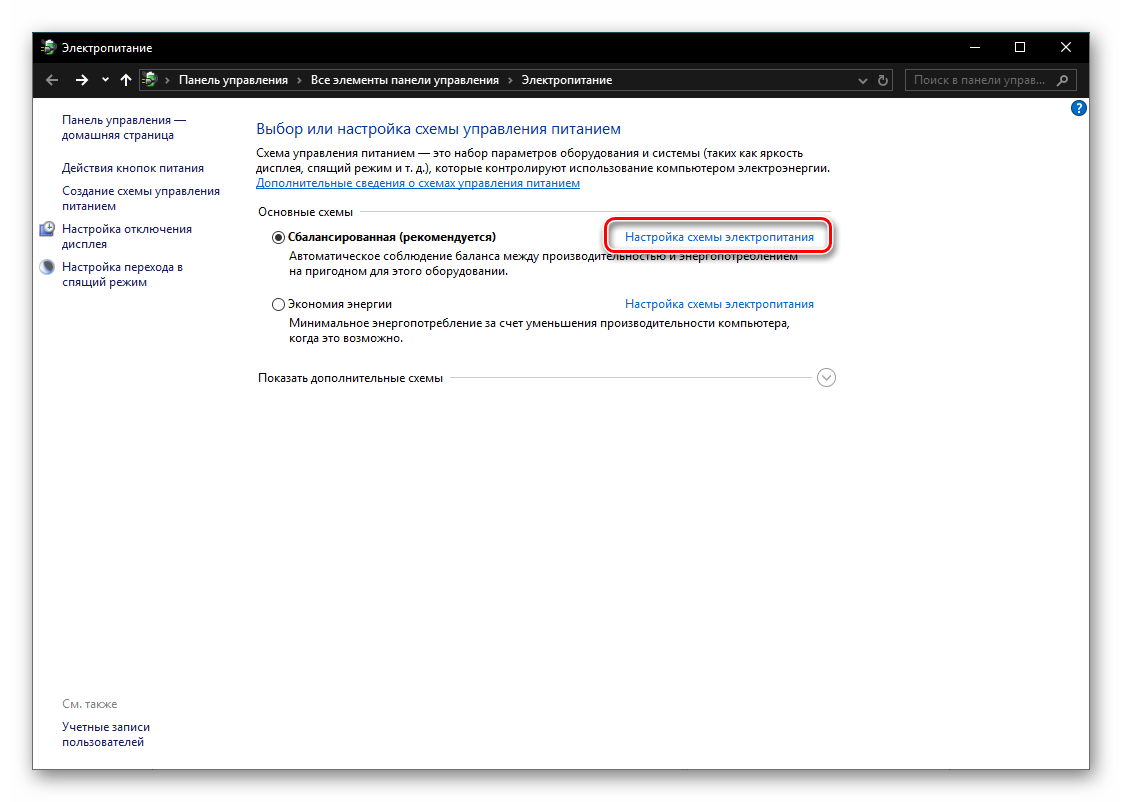
- В открывшемся окне «Электропитание» перейдите по ссылке «Настройка схемы электропитания», расположенной напротив активного в настоящий момент режима (название выделено жирным, отмечено маркером).
- Затем выберите пункт «Изменить дополнительные параметры питания».
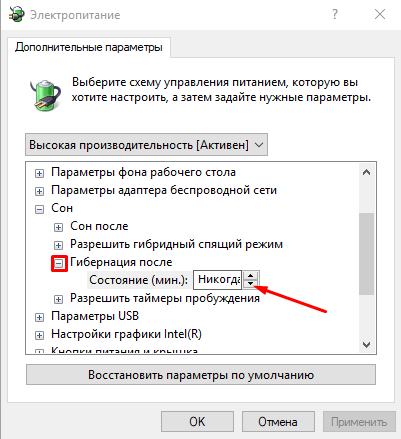
- В диалоговом окне, которое будет открыто, поочередно разверните списки «Сон» и «Гибернация после». В поле напротив пункта «Состояние (мин.)» укажите желаемый период времени (в минутах), по истечении которого (при условии бездействия) компьютер или ноутбук будет уходить в гибернацию.
- Нажмите «Применить» и «ОК», чтобы внесенные вами изменения вступили в силу.


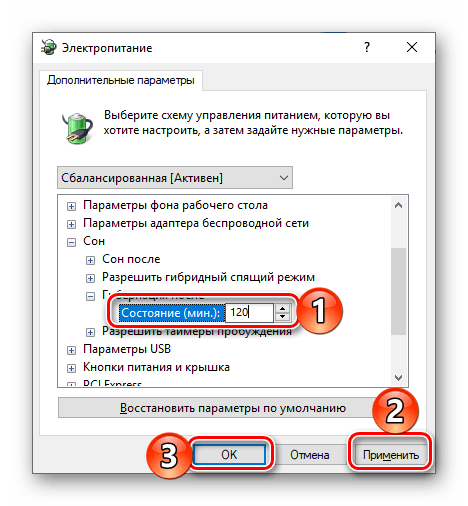
С этого момента «простаивающая» в бездействии операционная система будет переходить в гибернацию спустя заданный вами промежуток времени.
Шаг 3: Добавление кнопки
Описанные выше действия позволяют не только активировать энергосберегающий режим, но и в определенной степени автоматизировать его работу. Если же вы хотите иметь возможность самостоятельного ввода ПК в гибернацию, как это может делаться с выключением, перезагрузкой и спящим режимом, потребуется еще немного покопаться в параметрах электропитания.
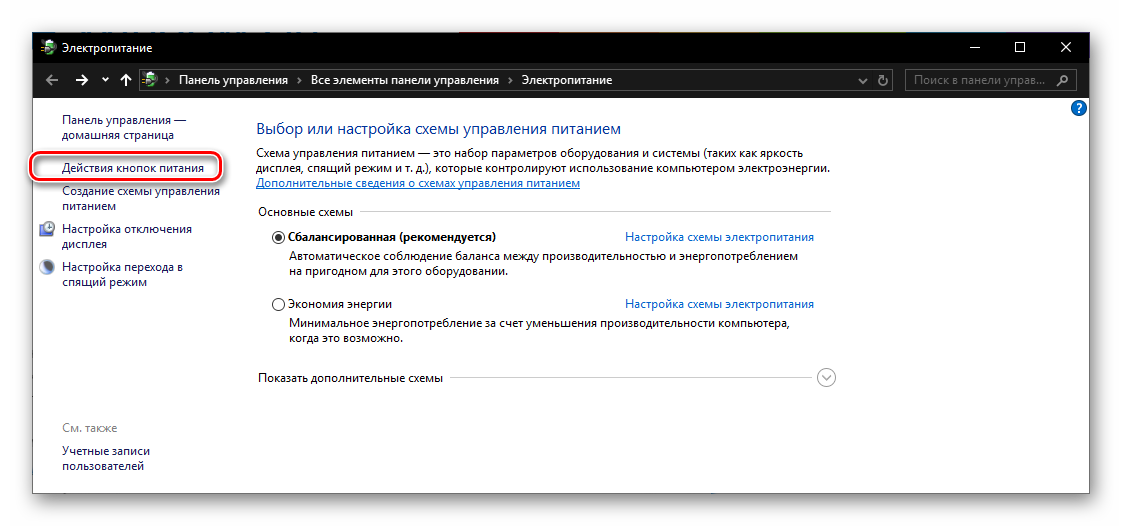
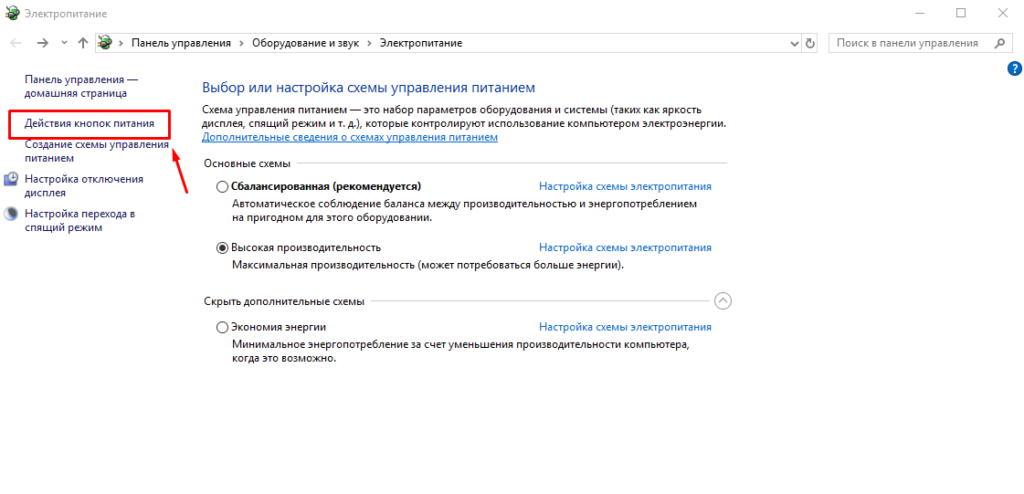
- Повторите шаги №1-5, описанные в предыдущей части статьи, но в окне «Электропитание» перейдите к разделу «Действия кнопок питания», представленном в боковом меню.
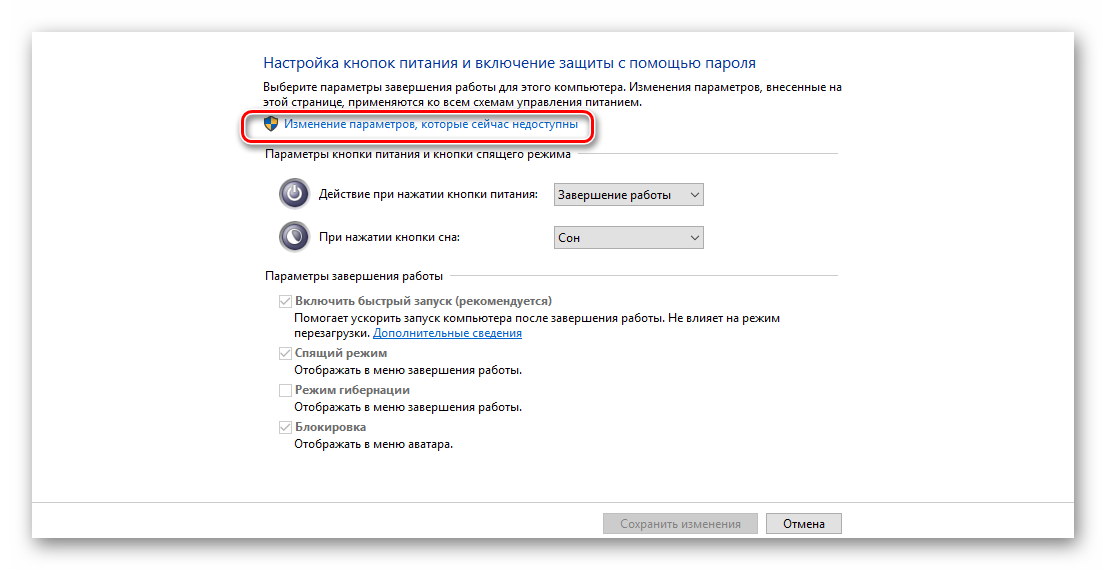
- Нажмите по ссылке «Изменение параметров, которые сейчас недоступны».
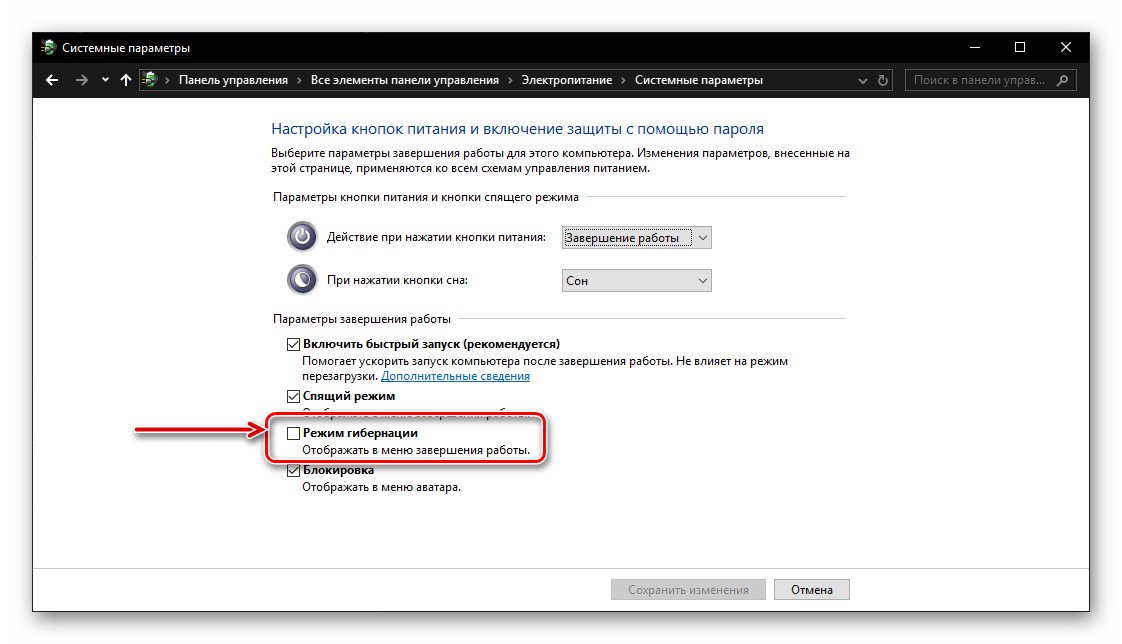
- Установите галочку напротив ставшего активным пункта «Режим гибернации».
- Нажмите по кнопке «Сохранить изменения».
- С этого момента вы сможете вводить свой компьютер или ноутбук в энергосберегающий режим, когда захотите, о чем мы и расскажем далее.

Шаг 4: Переход в гибернацию
Для того чтобы ввести ПК в энергосберегающий режим гибернации, потребуется выполнить практически те же действия, что и для его выключения или перезагрузки: вызовите меню «Пуск», нажмите на кнопку «Выключение» и выберите пункт «Гибернация», который мы с вами добавили в это меню на предыдущем шаге.
Заключение
Теперь вы знаете, как включить гибернацию на компьютере или ноутбуке, работающем под управлением Windows 10, а также о том, как добавить возможность перехода в данный режим из меню «Завершение работы». Надеемся, эта небольшая статья была полезна для вас.
Еще статьи по данной теме:
Помогла ли Вам статья?
Learn to add this feature to the Start menu for quick access
by Ivan Jenic
Passionate about all elements related to Windows and combined with his innate curiosity, Ivan has delved deep into understanding this operating system, with a specialization in drivers and… read more
Updated on January 20, 2023
Reviewed by
Vlad Turiceanu

Passionate about technology, Windows, and everything that has a power button, he spent most of his time developing new skills and learning more about the tech world. Coming… read more
- Hibernate mode is a very useful feature that temporarily turns off your PC while saving all your open applications and processes for future use.
- Although Hibernate mode is very similar to Sleep mode, the former does not use any electrical power and allows you to return where you left off within seconds.
- Windows 10 PCs do not have Hibernation mode enabled on them by default, but you can add it to their Start menus in a few clicks.
XINSTALL BY CLICKING THE DOWNLOAD FILE
This software will repair common computer errors, protect you from file loss, malware, hardware failure and optimize your PC for maximum performance. Fix PC issues and remove viruses now in 3 easy steps:
- Download Restoro PC Repair Tool that comes with Patented Technologies (patent available here).
- Click Start Scan to find Windows issues that could be causing PC problems.
- Click Repair All to fix issues affecting your computer’s security and performance
- Restoro has been downloaded by 0 readers this month.
If you want to save as much battery power as you can when using your computer, you might want to consider using the Hibernate option.
Many desktop computers come with Hibernate mode enabled by default. However, this is not the case with Windows 10 PCs.
We will show you how to add Hibernate mode to the Start menu in Windows 10, and how to enable it afterward.
If you decide to upgrade your OS, we have a different guide for enabling and disabling Hibernation mode in Windows 11.
Hibernate vs Sleep modes in Windows 10
Using the sleep option, you can turn off most of your computer hardware and store your current information on your RAM.
While using Sleep mode, your computer will still use some power although a lot less. So it’s good to use this option if you’re going to be away from your computer for a short period of time.
One advantage of sleep mode is that your PC wakes up in just a matter of seconds, so you can easily continue where you left off.
The Hibernate option, also known as Hibernation mode, works in a similar way, but it stores your open documents and running applications on your hard drive and shuts down your computer.
In Hibernate mode, your computer uses zero electrical power, so it’s good to use this option if you’re going to be away for a while and you want to continue where you left off when you get back.
The only downside of Hibernation mode is that it takes a bit more to start compared to Sleep mode.
Let’s find out now how to add Hibernation mode to the Start menu and enable it on Windows 10.
How can I turn on Hibernate Mode in Windows 10?
You need to add the Hibernate mode to your Windows 10’s Start menu before you can use it. Enabling this mode is very easy and can be done via Power Settings in a few minutes.
1. To start off, press the Windows key on your keyboard or click on the Start button on the taskbar to open the Search menu.
Some PC issues are hard to tackle, especially when it comes to corrupted repositories or missing Windows files. If you are having troubles fixing an error, your system may be partially broken.
We recommend installing Restoro, a tool that will scan your machine and identify what the fault is.
Click here to download and start repairing.
2. Type control panel in it and click on the result to open the app.
3. Navigate to Hardware and Sound > Power Options.
4. Click on Choose what the power buttons do.
5. Next, click the Change Settings that are currently unavailable link. This will allow you to change shutdown options.
6. Check the Hibernate (Show in Power menu) option.
7. Click on Save changes and close the window. The Hibernate mode is now added to the Power menu.
8. If you want to use the feature, you need to press the Start button on the taskbar once more to bring up the Search menu, then hover the Shut down or sign out setting to open a drop-down menu.
You will now see the following options: Sign Out, Sleep, Hibernate and Restart.
9. Click on Hibernate to put your PC in hibernation mode.
Note: If the hibernate option is missing in step 6, run the following 2 scripts on the command prompt.powercfg /hibernate onpowercfg /h /type full
- What to do if your laptop wakes up from sleep on its own
- Windows 10/11 Control Panel not responding [Fixed]
- FIX: Windows 10/11 power plans are missing
Is it dangerous to use Hibernation mode?
Unfortunately, various technical issues may occur after enabling the Hibernation mode on Windows 10. For example, your computer may fail to enter hibernation. In other cases, your computer may take too long to wake up from hibernation.
In case you encounter any of these issues, you can use our troubleshooting guides. Follow the instructions available in the respective guides, and you should be able to fix the problem in just a few minutes.
If your PC won’t exit Sleep Mode, check out our guide to solve the problem. On the other hand, if you’re having trouble keeping your PC in sleep mode, then we recommend you take a look at our other dedicated article to find a solution.
Now you should have Hibernate option available in the Start menu on your Windows 10 PC. If you have any comments or questions, just reach for the comments section below.
![]()
Newsletter
Гибернация в Windows 10 – это такой энергосберегающий режим системы, при котором происходит выключение компьютера с полным сохранением предыдущей сессии. Хотя выключением гибернацию назвать тоже сложно, так как при выключении сессия не сохраняется. Изначально данный режим разрабатывался специально для портативных устройств (ноутбуков и планшетов), но затем стал весьма популярен и на стационарных компьютерах.
Для чего нужна гибернация
Если ваш ПК эксплуатируется много и часто, то для вас гибернация будет более предпочтительна ввиду быстрой загрузки системы, наличию всех необходимых программ и документов уже в открытом состоянии.
Во время гибернации все компоненты Windows 10 находятся в выключенном состоянии, а работать остается BIOS, который потребляет незначительное количество энергии от встроенной батарейки.
После выхода из режима гибернации компьютер очень быстро подгружает последнюю сессию. Информация обо всех открытых документах и приложениях хранится в оперативной памяти устройства, а все данные в файле hiberfyl.sys, который спрятан в корне системы. В момент запуска системы информация из файла hiberfil.sys переносится в оперативную память, что в свою очередь позволяет производить мгновенный запуск.
К сожалению, файл гибернации в Windows 10 может занимать очень много места, и некоторые пользователи предпочитают его удалять или сжимать до 50% обычного размера (сжимать сильнее не рекомендуется).
По умолчанию режим гибернации выключен, но ее можно включить.
Включаем гибернацию и устанавливаем на панель «Пуск»
- Нажимаем на кнопку «Пуск».
- Выбираем «Параметры».
- Открываем раздел «Система».

В «Параметрах» выбираем раздел «Система»
- Выбираем «Питание и спящий режим».

Слева выбираем «Питание и спящий режим»
- Далее переходим в «Дополнительные параметры электропитания» (аналогичным образом можно пройти до раздела «Электропитание» через панель управления Windows 10 в общем списке).
- Жмем на «Действия кнопок питания».

Слева нажимаем «Действия кнопок питания»
- Далее жмем на «Изменить параметры, которые сейчас не доступны» и ставим галочку на гибернации. Сохранить.

Ставим галочку на режиме гибернации

Гибернация по таймеру
Гибернацию в Windows 10 можно настроить на автоматическое включение по таймеру.
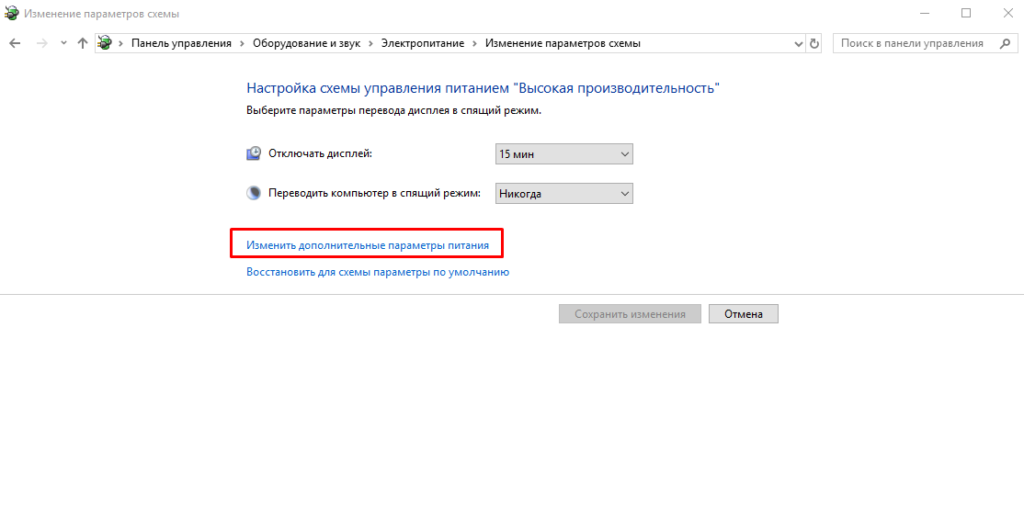
- Для этого нам необходимо вернуться на настройки электропитания и выбрать «Настройку схемы электропитания», которая используется для системы в данный момент.
- Затем жмем на «Изменить дополнительные параметры питания».

Нажимаем по ссылке «Изменить дополнительные параметры питания»
- Устанавливаем в Windows таймер гибернации. Она будет автоматически включаться. Например, через 20 минут покоя.

Настраиваем таймер для автоматического включения
Привязка гибернации к кнопке включения
Гибернацию можно и настроить на кнопку включения компьютера.
Для этого надо в системных параметрах питания Windows установить гибернацию на действие при нажатии кнопки. Гибернацию также можно привязать и на кнопку сна, если у вашего компьютера или ноутбука она имеется.
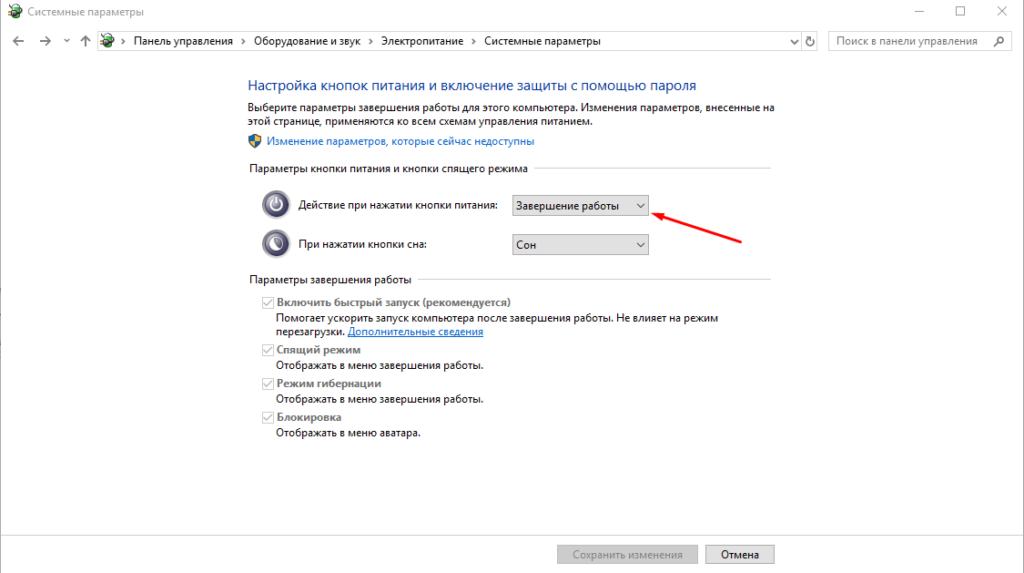
Привязываем гибернацию по кнопке включения
Если гибернация не работает
Некоторые пользователи жалуются, что после проведения обновления системы опция гибернации отключается. Microsoft заявляет, что виной тому конфигурация некоторых моделей видеокарт. Если с вашей Windows 10 произошла такая проблема, то нет ничего страшного: гибернацию достаточно просто включить обратно!
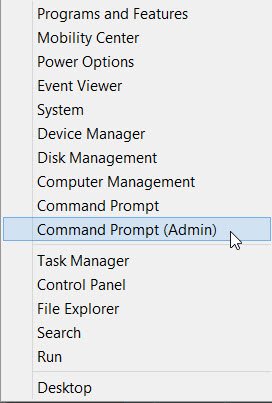
- Жмем на значок «лупы» на панели управления, чтобы включить «Поиск».
- Вводим в поиск «Командная строка» и запускаем приложение (другой вариант: пройти через «Программы» – «Служебные»– «Командная строка» – «Дополнительно» – «Запуск от имени администратора»).
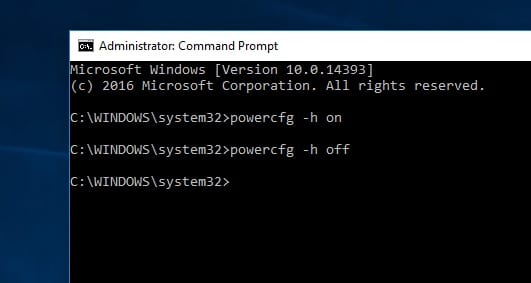
- Набираем в командной строке: powercfg -h on (on значит включить).

Включаем гибернацию в командной строке
Включение гибернации через редактор реестра
Также режим гибернации можно активировать через редактор реестра Windows.
- Жмем Win+R и вводим в появившемся окне regedit.

Вводим в консоли regedit
- Далее нужно пройти по следующему пути: HKEY_LOCAL_MACHINE System CurrentControlSet Control Power.
- Находим HibernateEnabled. Если стоит значение 0, значит гибернация отключена. Значение выставляем на 1.

Меняем в HibernateEnabled значение на 1, если стоит 0
Как отключить гибернацию
Отключение файла hiberfil.sys возможно только через командную строку или реестр, так как вручную файл найти не представляется возможным: он скрыт от пользователя настройками системы.
Обычно я поступаю следующим образом, в Windows 10 набираем в командной строке: powercfg -h off (–h параметр гибернации, а значение off – деактивация функции). Про то, как включить командную строку, я писал выше.

Отключаем гибернацию в командной строке
Если ввести значение с off на конце, то система удалит hiberfil.sys и запретит возможность быстрого старта операционной системы. Как и в примере с включением, режим гибернации можно отключить через реестр.
В разделе реестра HibernateEnabled нужно поставить значение равное нулю. О том, как включить реестр и перейти на данный раздел через командную строку – выше.
Как уменьшить файл hiberfil.sys
На Windows 10 размер файла hiberfil.sys на винчестере составляет около 60%-80% от общего размера ОЗУ. Для кого-то данный объем является значительным, и пользователи предпочитают уменьшать его.
Уменьшение объема данного файла лишает пользователя возможности перевести компьютер в режим гибернации ручным способом, но сохраняет возможность быстрого запуска системы. Уменьшение файла возможно только через командную строку, как и в случае с отключением.
Чтобы уменьшить файл hiberfil.sys в Windows 10, нам необходимо:
- Найти командную строку в поиске.
- Нажать на нее правой кнопкой мыши и осуществить «Запуск от имени администратора».
- Ввести команду powercfg /h /type reduced и нажать Enter.

Уменьшаем файл через командную строку
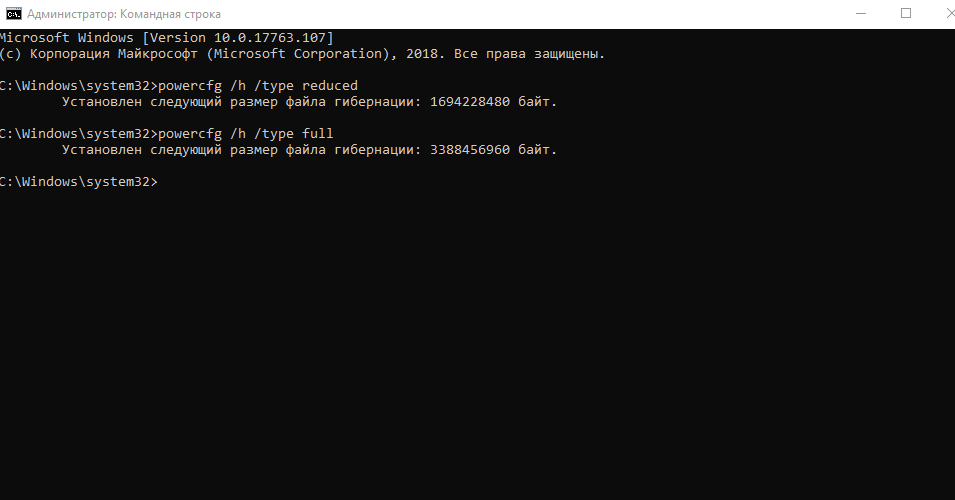
После этого системный файл будет уменьшен на 50%. Уменьшение файла гибернации в Windows 10 обратимо, и в случае необходимости ему можно вернуть прежний размер. Для этого необходимо заменить в команде слово reduced на full. То есть полная команда будет выглядеть следующим образом: powercfg /h /type full.
Смотрите также: Windows 10 не выходит из спящего режима.
Post Views: 1 500
Download PC Repair Tool to quickly find & fix Windows errors automatically
If your Hibernate button is missing, then we will see how you can enable the Hibernate option in Windows 11/10, using CMD, Control Panel, our Ultimate Windows Tweaker, or Windows Registry.
The Hibernate feature allows the Windows operating system to save and write the running state to a hard disk, before powering off the computer. Of all the power-saving states in Windows, hibernation is the most economical, as it uses the least amount of power. You can use it to save computer energy when you know you won’t be using your laptop for an extended period and won’t get an opportunity to charge the battery anytime soon.
The Hibernate feature uses the Hiberfil.sys file. The Hiberfil.sys hidden system file is located in the root folder of the drive where the operating system is installed. The Windows Kernel Power Manager reserves this file when you install Windows. The size of this file is approximately equal to how much random access memory (RAM) is installed on the computer. The computer uses the Hiberfil.sys file to store a copy of the system memory on the hard disk when the hybrid sleep setting is turned on. If this file is not present, the computer cannot hibernate.
The path for enabling the Hibernate option has changed a bit in Windows 10/8/7 from what it was in Windows XP, earlier. If you have been having trouble finding the Hibernate option in Windows, this short tutorial will help you out.
Hibernate Option is Missing
The hibernate button can disappear after a disk cleanup, or if you delete the hibernate file. So, if you cannot find the Hibernate button or if the Hibernate Option is Missing, you may do any of the following:
- Using POWERCFG command
- Use ControlPanel
- Tweak Registry
- Use Ultimate Windows Tweaker.
1] Using POWERCFG command
Type cmd in Windows Start menu search bar. Right-click on cmd and select ‘Run as Administrator’ to open an elevated Command Prompt. In Windows 10, you may simply use the WinX menu and select Command Prompt (Admin).
Running the following command will display the available Sleet States on your system:
powercfg /availablesleepstates
Enable Hibernate
To enable hibernation using PowerCFG simply type
powercfg /hibernate on
Disable Hibernate
To turn hibernation off, type instead
powercfg /hibernate off
Related: Check if Windows last boot was from Fast Startup, Full Shutdown, or Hibernate.
2] Use Control Panel
In Windows 11/10, by default, the Hibernate option is not activated in the Power Button options. Users may notice that there is no hibernate option in Windows 11/10/8.1. You can enable it and show the Hibernate button, by using the Control Panel.

Follow this post on how to activate and display Hibernate in Power Button options and how to change Power Button options.
See this post if the Hibernate option is missing in Control Panel.
3] Tweak Registry
You can also tweak the Windows Registry to enable or disable Hibernate. To do so navigate to the following key:
HKEY_LOCAL_MACHINESYSTEMCurrentControlSetControlPower

Give HibernateEnabled a value of 1 to enable Hibernation and 0 to disable Hibernation.
Read: Laptop stuck on Hibernating screen
4] Use Ultimate Windows Tweaker
While you can always use our Ultimate Windows Tweaker, to enable or disable Hibernate easily in a click.
Microsoft has released a Fix It solution specifically for this purpose. See if the Fix-It applies to your version of Windows:
Disable Hibernation using Fix It 50462 | Enable Hibernation using Fix-It using 50466. [They have been discontinued now].
Do remember that in Windows 11/10/8.1, if you disable Hibernate, it will disable Fast Startup too.
Now read: How to enable Wake-on-LAN in Windows 11/10.

Anand Khanse is the Admin of TheWindowsClub.com, a 10-year Microsoft MVP (2006-16) & a Windows Insider MVP (2016-2022). Please read the entire post & the comments first, create a System Restore Point before making any changes to your system & be careful about any 3rd-party offers while installing freeware.
Hibernation is a state in which the Windows PC saves the current state and shuts itself down so that it no longer needs power. When put windows into hibernate, it takes a snapshot of your system files and drivers and saves that snapshot to your hard drive before shutting down. Next time When the PC is turned on again, all open files and programs are restored to the same state as they were before hibernation. Windows 10 by default does not include the Hibernate option under the power menu, but there’s an easy way to enable it. Continue Reading This Post To know How to enable or disable Windows 10 hibernate Option with easy simple steps.
In a Hibernate mode, your computer uses zero electrical power. This is a good option in Windows where you can save power by turning off PC but not closing all the apps which help you to get back to work as soon as you turn on the PC. Also, This allows your computer to start up faster because it doesn’t need to re-establish those files and settings. The Only downside of Hibernation mode is that it takes a bit more to start compared to Sleep mode.
Enable Hibernate Mode in Windows 10
You can Enable The Hibernate option using Windows 10 power option, Simply Type one command line on the windows command prompt or you can use Windows Registry tweak. Here Check All Three Options Starting form windows 10 power options.
Using Power options
- From start, menu search type Control panel and select the first option
- On the Control panel window, search for and select Power Options.
- Here From the left column select Choose what the power buttons do.

- Now on the System Settings window, you will see the options Turn on Fast Startup, Sleep, Hibernate and lock under shutdown settings.
- If options are grayed out, select Change settings that are currently unavailable.
- Here check the Hibernate box and click save changes.
- Close opened window.

- Now when you open the Start menu and select the Power button, the Hibernate option will be available.
Using Command Prompt
Using the Command prompt enable the Hibernate option is a very simple way. you just want to Type one command line and Hit the Enter key to activate the Hibernate option. Here fallow to do.
- First, open the Elevated Command prompt.
- Now On Command prompt Type the below command and hit the enter key.
powercfg -h on
After that, you won’t see any confirmation of success but you should see an error If it doe’s not worked for any Reason. Now when you select the power options you will see on the power configuration entry have a Hibernate option.
If you want to disable the Hibernate option Type the below command and hit the enter key.
powercfg -h off
Windows Registry
Both methods are the best option to enable Hibernate mode on windows 10. but if for any reason you get an error while performing these steps you can use the Windows Registry Editor to enable Hibernate mode. Here follow bellow
- First press Win + R to open Run, type Regedit and press the enter key.
- On the Windows Registry window navigate to the following:
- HKEY_LOCAL_MACHINESYSTEMCurrentControlSetControlPower.
- Now on the right pane of the Power key, double-click on the Hibernate Enabled subkey.
- This will open the edit DWORD value. Here on the value date box Type in 1 To Enable Hibernate option and click OK.
- Restart windows to changes take effect. Simply change the Value Data 0 to Turn off Hibernate mode for windows.
Disable Hibernate in Windows 10
You can disable the Hibernate option any time by following the same process. simply uncheck the Hibernate option on Control Panel All Control Panel ItemsPower OptionsSystem Settings.
Also, Read
- Difference between Sleep, Hybrid Sleep, Fast Startup and Hibernate on Windows 10
- Windows 10 stuck at hibernating? Here is how to fix…!!
- Automatically Delete Temp Files in Windows 10
- How to Repair or rebuild Master Boot Record (MBR) on Windows 10/8.1
- Solved: Cannot install apps from Microsoft store – Windows 10

Have you ever needed to step away from your computer for an indefinite period but didn’t want to shut it down? This could be for various reasons; maybe you have some work that you wish to get right back into post your lunch break or your PC boots on like a snail. The sleep mode in Windows OS lets you do just that, but what if I told you there’s a better power-saving feature than the usual sleep mode?
Hibernation mode is a power option that lets Windows users exploit the features of both a complete system shut down and the sleep mode. Just like Sleep, users can configure when they want their systems to go under Hibernation, and if they wish, the feature can be entirely disabled, too (although keeping it active does make for a better overall experience).
In this article, we will be explaining the difference between sleep and hibernation modes, and also show you how to enable or disable hibernation on Windows 10.
Contents
- What is Hibernation?
- How to Enable or Disable Hibernation on Windows 10?
- Method 1: Enable or Disable Hibernation using Command Prompt
- Method 2: Enable or Disable Hibernation Via Registry Editor
- Method 3: Enable or Disable Hibernation Via Advanced Power Options
What is Hibernation?
Hibernation is a power-saving state primarily made for laptops, although it is available on certain computers as well. It differs from Sleep in terms of power usage and where your currently open (before you left your System); files are saved.
The sleep mode is activated by default when you leave your computer without shutting it down. In the sleep state, the screen is turned off, and all the foreground processes (files and applications) are saved in the memory (RAM). This allows the System to be in a low-power state but still be running. You can get back to work by a single click of the keyboard or by simply moving your mouse. The screen boots on within a few seconds, and all your files & applications will be in the same state as they were when you left.
Hibernation, pretty much like Sleep, also saves the state of your files & applications and is activated after your System has been under Sleep for a prolonged period. Unlike Sleep, which stores files in the RAM and therefore requires a constant power supply, Hibernation doesn’t require any power (like when your System is shut down). This is made possible by storing the current state of the files in the hard drive instead of the temporary memory.
When in an extended sleep, your computer automatically transfers the state of your files to the hard disk drive and switches to Hibernation. As the files have been moved to the hard drive, the System will take a little extra time to boot on than required by Sleep. Although, the boot on time is still faster than booting your computer after a complete shutdown.
Hibernation is particularly useful when the user doesn’t want to lose the state of his/her files but also won’t have the opportunity to charge the laptop for some time.
As obvious, saving the state of your files requires reserving some amount of memory and this amount is occupied by a system file (hiberfil.sys). The reserved amount is roughly equal to 75% of the System’s RAM. For example, if your System has 8 GB of RAM installed, the hibernation system file will take up almost 6 GB of your hard disk storage.
Before we move on to enabling Hibernation, we will need to check if the computer has the hiberfil.sys file. If absent, the computer can not go under Hibernation (PCs with InstantGo do not have the hibernation power option).
To check if your computer can hibernate, follow the below steps:
1. Launch File Explorer by double-clicking on its icon on the desktop or pressing the keyboard shortcut Windows Key + E. Click on Local Drive (C:) to open C Drive.

2. Switch to the View tab and click on Options at the end of the ribbon. Select ‘Change folder and search options’.

3. Again, switch to the View tab of the Folder Options window.
4. Double click on Hidden files and folders to open a sub-menu and enable Show hidden files, folders, or drives.

5. Uncheck/untick the box next to ‘Hide protected operating system files (Recommended).’ A warning message will appear when you try to untick the option. Click on Yes to confirm your action.

6. Click on Apply and then OK to save changes.

7. The Hibernation file (hiberfil.sys), if present, can be found at the root of the C drive. This means your computer is eligible for hibernation.

Enabling or disabling Hibernation is quite easy, and either action can be achieved in a couple of minutes. There are also multiple methods via which one can enable or disable Hibernation. The easiest one is executing a single command in an elevated command prompt while other methods include editing Windows Registry Editor or accessing advanced power options.
Method 1: Enable or Disable Hibernation using Command Prompt
As mentioned, this is the easiest way to enable or disable Hibernation on Windows 10 and, therefore, should be the first method you try.
1. Open Command Prompt as an administrator using any of the listed methods.
2. To enable Hibernation, type powercfg.exe /hibernate on, and press enter.
To disable Hibernation, type powercfg.exe /hibernate off and press enter.

Both the commands do not return any output, so to check if the command you entered was executed properly, you will need to head back to the C drive and look for the hiberfil.sys file (Steps are mentioned earlier). If you find the hiberfil.sys, it implies you were successful in enabling Hibernation. On the other hand, if the file is absent, Hibernation has been disabled.
Method 2: Enable or Disable Hibernation Via Registry Editor
The second method has the user editing the HibernateEnabled entry in the Registry Editor. Be careful when following this method as Registry Editor is an extremely powerful tool, and any accidental mishap can lead to a whole other set of problems.
1. Open Windows Registry Editor using any of the following methods
a. Open Run Command by pressing Windows Key + R, type regedit and press enter.
b. Press Windows Key + S, type regedit or registry editor, and click on Open when the search returns.

2. From the left panel of the registry editor window, expand HKEY_LOCAL_MACHINE by double-clicking on it or by clicking on the arrow to its left.
3. Under HKEY_LOCAL_MACHINE, double-click on SYSTEM to expand.
4. Now, expand CurrentControlSet.
Follow the same pattern and navigate to Control/Power.
The final location indicated in the address bar should be:
HKEY_LOCAL_MACHINESYSTEMCurrentControlSetControlPower

5. In the right-hand panel, double click on HibernateEnabled or right-click on it and select Modify.

6. To enable Hibernation, type 1 in the text box under Value Data.
To disable Hibernation, type 0 in the text box under Value Data.

7. Click on the OK button, exit registry editor, and restart your computer.
Again, head back to the C drive and look for the hiberfil.sys to ensure if you were successful in enabling or disabling Hibernation.
Also Read: Disable Windows Pagefile and Hibernation To Free Up Space
Method 3: Enable or Disable Hibernation Via Advanced Power Options
The final method will have the user enable or disable Hibernation through the Advanced Power Options window. Here, users can also set the time frame after which they want their system to go under Hibernation. Like the previous methods, this one is also quite simple.
1. Open Advanced Power Options by any of the two methods
a. Open Run command, type powercfg.cpl, and press enter.

b. Open Windows Settings (Windows Key + I) and click on System. Under Power & Sleep settings, click on Additional power settings.
2. In the Power Options window, click on Change plan settings (highlighted in blue) under the Selected plan section.

3. Click on Change advanced power settings in the following Edit Plan Settings window.

4. Expand Sleep by clicking on the plus to its left or by double-clicking on the label.
5. Double-click on Hibernate after and set the Settings (Minutes) to how many minutes you would like your System to sit idle for before going into Hibernation.

To disable Hibernation, set the Settings (Minute) to Never and under Allow hybrid sleep, change the setting to Off.

6. Click on Apply, followed by OK to save the changes you made.

Recommended:
- How to Enable Google Feed in Nova Launcher
- 5 Ways to Remove Hyperlinks from Microsoft Word Documents
- How to Identify different USB Ports on your Computer
We hope you were successful in enabling or disabling Hibernation on Windows 10. Also, let us know which one of the three above methods did the trick for you.