
*This article was updated to accommodate a guide for enabling Remote Desktop on Windows 11.
Microsoft Remote Desktop is most frequently used to provide technical support or control a computer remotely. It allows you to get full access to your Windows PC from another Windows, Mac, or Linux computer in order to transfer files, play video games, operate locally-attached peripherals, etc.
But before using Remote Desktop Protocol (RDP) to connect to a remote device, you should enable Remote Desktop first.
In this guide, we’ll explain how to allow remote desktop access to your computer using the Settings app in Windows 10/11 or the more traditional Control Panel.
Note: Remote Desktop is not available on Windows 10 and Windows 11 Home edition. Remote Desktop is only available for Pro and Enterprise versions. However, you could still use third-party solutions like Chrome Remote Desktop or Teamviewer to set up Remote Desktop on Windows 10/11 Home.
Enable RDP via System Settings in Windows 11
Let’s take a closer look at how to turn on RDP on Windows 11 with the help of the standard Settings app.
- Open Start → Settings.
-
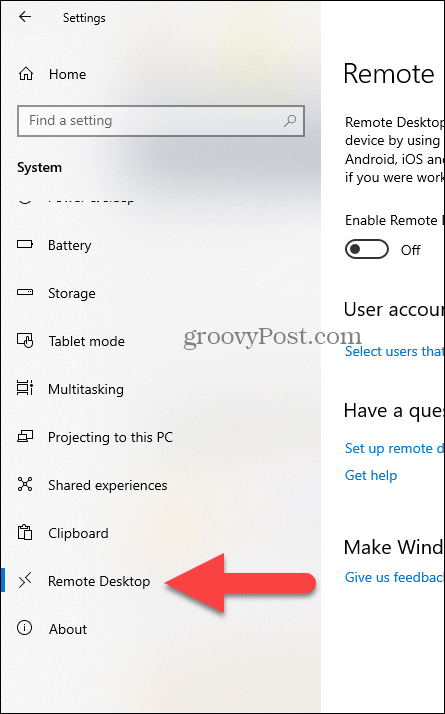
In the Settings window, select “System”. Then scroll down and click “Remote Desktop” on the right pane.

-
Click the toggle switch button to enable the Remote Desktop on your Windows 11 device. Confirm your action in the pop-up window.


Once done, your PC is set up to connect via RDP. To connect to the remote machine, you can use, for example, the new Remote Desktop app or classic Remote Desktop Connection.
Allow RDP connections on Windows 10 using Settings
Using the Settings app, follow the steps below to enable remote access on Windows 10:
-
Open Settings on a Windows 10 device and select “System”.

- Click “Remote Desktop”.
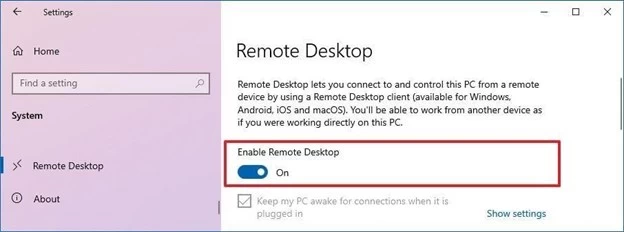
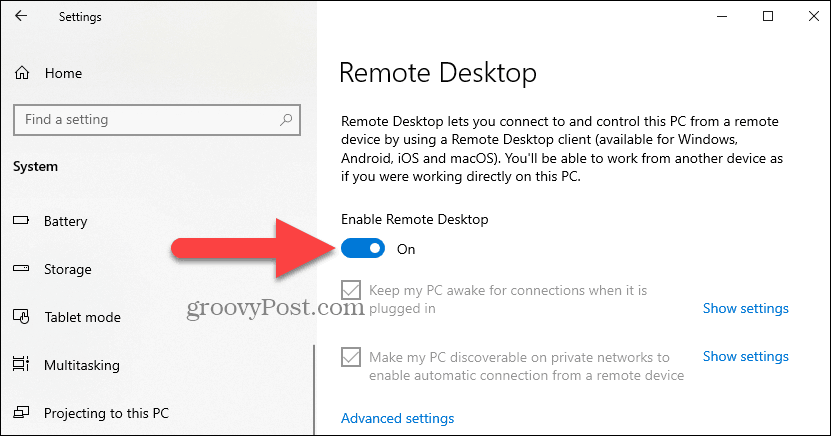
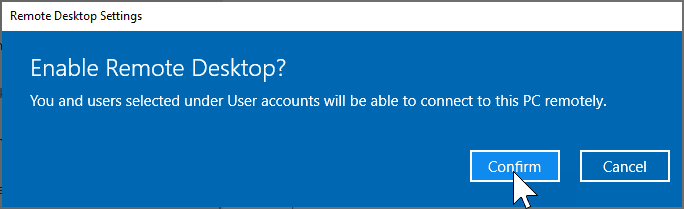
- Toggle the “Enable Remote Desktop” switch to “On”.
-
Hit “Confirm”.


Once you’ve allowed Remote Desktop on Windows 10, there will be two additionally enabled options:
- • Keep my PC awake for connection when it’s plugged in.
- • Make my PC discoverable on private networks to enable automatic connection from a remote device.
These settings ensure that users always can connect to the remote machine whenever they like.

If users go to the “Advanced settings” window, they’ll see extra advanced features, like the option to require computers to utilize “Network Level Authentication” when connecting remotely.
This ensures the connections are more secure by restricting access only to those who can authorize the connection with the network before they can access the device.

Users will also find the current Remote Desktop port on the “Advanced settings” page. This information is useful if the user ever needs to reconfigure a router to permit remote desktop access from outside of their network.
Note: By default, the port number is set to 3389.
Allow remote connections on Windows 10/11 using the Control Panel
Even though the Settings app is an easy option for enabling remote access, it can also be done using the Control Panel. Below you’ll find the instructions on how to enable remote desktop on Windows 10 or 11 via the Control Panel:
-
Open the Control Panel. The most optimal way would be to type in the query in the search box.

-
Select “System and Security”.

-
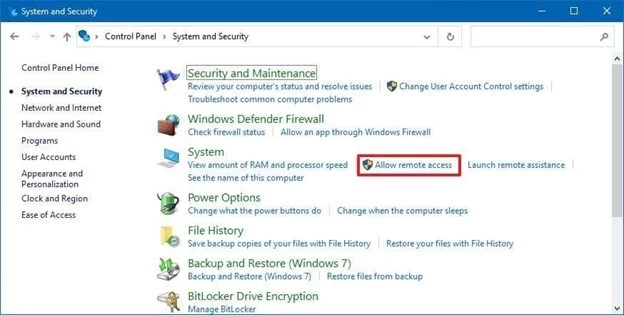
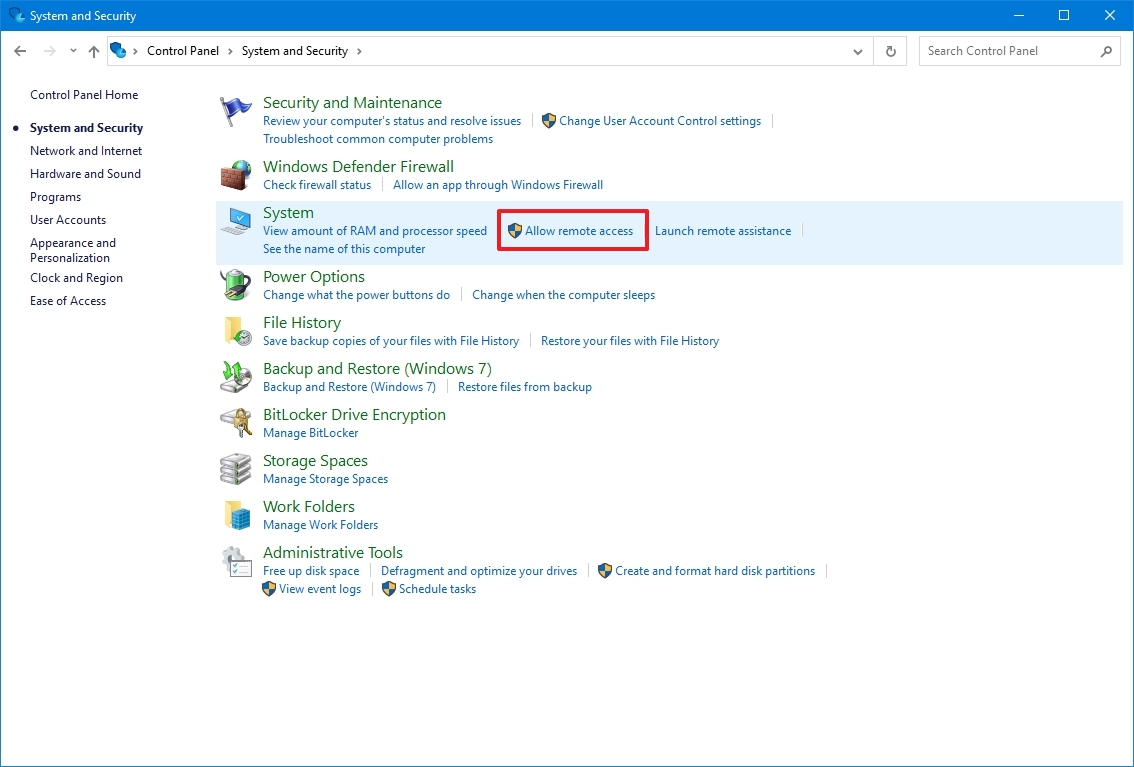
Under the “System” section, click “Allow remote access”.

-
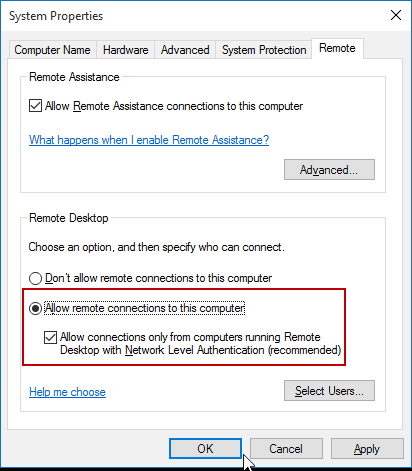
The System Properties window will appear. In the Remote tab, check the box “Allow Remote Assistance connections to this computer” in the section Remote Assistance. Then, select “Allow remote connections to this computer” in the section Remote Desktop.

- Hit “Apply” and then “OK”.


That’s it! Now, it will be possible to connect to this computer from a remote machine over RDP.
After turning on the remote desktop on Windows 10/11, it’s time to connect to the remote computer using the modern Remote Desktop application (recommended) or with the built-in Remote Desktop Connection (RDC) utility that comes with every Windows version.
If you would then need to disable Remote Desktop access to your Windows 10/11 device, then you should not experience any issues since you will need just to reverse the steps from this guide.
Note: Enabling RDP access in Windows 10/11 via the Control Panel, makes the “Network Level Authentication” option switched on by default (however, it is an option that users should keep on regardless).
Enabling RDP access through the Control Panel is available on previous Windows versions which will allow you to create a remote desktop connection from Windows 10 to Windows 7. However, the Settings app is only present in Windows 10 and 11.
To Enable remote desktop windows 10 is incredibly easy to achieve. Here are a few ways for you to windows 10 remote desktop home
How do I Enable Remote Access Windows 10 Home?
1. Remote Access — Windows Remote Desktop Connection or RDC — Enable Remote Desktop Windows 10 has been a prominent Microsoft feature since the first launch of XP Pro. This tool makes it simple for someone to connect a local device to a remote computer from a distant location. This highlight, in any case, is disabled by default. To enable remote desktop windows 10 Home (RDC), follow these steps accordingly:

-
Hit Start
-
Type in remote settings into the Cortana search box
-
Click Allow remote pc access to your computer
-
From the System Properties, click the Remote tab
-
Select Allow remote desktop connections to this computer
-
Make sure the box beside Network Level Authentication is ticked. This will ensure that you have a more secure remote access experience
2. Enable Remote Desktop Windows 10 Home — Another option we have in this list is ITarian Remote Access This third-party remote access software is designed to provide you with the ability to access a remote computer in a secure and safe manner. This software is for free, and it uses solid encryption methods to ensure that no confidential information is leaked or spilled. If it’s your first time downloading,
Steps to Follow to Enable Remote Desktop Windows 10
Visit remoteaccess.itarian.com
-
Click Get Now For Free
-
Type in your email address. Select Get Now For Free
-
Hit Save
-
Run the downloaded setup file
-
After reading the license agreement, click Install
-
To open the app, select Launch
-
Note that ITarian Remote Access Windows 10 will automatically provide you with a generated ID number and password
-
You should also install ITarian Remote Access to the endpoint device that you want to remote to
Related Resources:
What is Remote Access?
How do I enable remote access?
Related Product Resources:
Free Remote Access Software
Best Remote Desktop Software
Remote Access to Computer
Category: Remote Access
- Released: 03/07/2019
- Updated: 10/11/2022
In this post, you will learn how to enable or disable Remote Desktop Access in Windows 10. You can use Remote Desktop to connect to and control your PC from a remote device, When you allow remote connections to your PC, you can use another device to connect to your PC and have access to all of your apps, files, and other resources without going in front of PC. To connect to a remote PC, the target computer must be turned on and have a network connection.
This post will help you to provide the steps to enable Remote Desktop to connect and access your files and apps remotely using the Settings app as well as using Registry on Windows 10.
Enable Windows Remote Desktop Access Using Settings
You can configure your PC for remote access with following steps. Lets get started
You must be logged in as an Administrator on the computer.
- On the Windows 10 device you want to connect to, select Start and then click the Settings. Select the System.

- Under System, scroll down to select Remote Desktop. Use the slider to enable Remote Desktop then click confirm.

- Click the Confirm button on the confirmation dialog box.

- When you turn on Remote Desktop, It is also recommended to keep the PC awake and discoverable to facilitate connections. By default these two options are automatically enabled, If its not Click Show settings to enable.
- If needed, add users who can connect remotely by clicking Select users that can remotely access this PC. Members of the Administrators group automatically have access.

- In the Advanced settings, you will get additional options. This is used to more secure the connection by require devices to use Network level authentication. Under Remote Desktop Port – Port number 3389 being mapped. This is the default port used by Remote Desktop connections.

- Once you complete the steps, you will be able to take remote access to devices.
Enable or Disable Windows Remote Desktop Assistance Using Registry
To add or import a registry value follow these steps:
- To Enable Windows Remote Desktop, Open Notepad, Copy and paste the registry value below into the text editor.
Windows Registry Editor Version 5.00

[HKEY_LOCAL_MACHINESYSTEMCurrentControlSetControlRemote Assistance]
"fAllowToGetHelp"=dword:00000001- It will look like in the following syntax, when you see the file.

To Disable Windows Remote Desktop, Open Notepad, Copy and paste the registry value below into the text editor.
Windows Registry Editor Version 5.00

[HKEY_LOCAL_MACHINESYSTEMCurrentControlSetControlRemote Assistance]
"fAllowToGetHelp"=dword:00000000- In the File menu, Select Save As and click Browse to your preferred folder or location. In the File name box provide the appropriate name “FileName.reg” with .reg extension and Choose Save as type “All” from drop-down list. Click Save.
- The registry file will appear on your saved location. To start the execution, Double click or Right click and select Merge option on the saved .reg file content to merge into the local registry.
- A warning box with the following messages prompted, Click Yes to continue.

- Once Information in path of .reg file has been successfully entered into the registry below prompt will be appear. Click OK.

Resources
- Remote Desktop – Allow access to your PC
- How to Manage Virtual Desktops in Windows 10
- How to Change Screen Brightness in Windows 10
- How to Set File Explorer to Open This PC instead of Quick Access in Windows 10
- FIX This PC can’t be upgraded to Windows 10 version 2004 or 20H2 Issue | Upgrade on Hold
- How to Disable User Sign-in Animation in Windows 10 | First
- FIX Black or frozen screen in Skype for Business during Screen Share | SfB | Windows 10
- How to Hide or Show Cortana Button on Taskbar in Windows 10
- Install .NET Framework 3.5 in Windows 10 | Quick Easy Way
- How to Unblock App Files in Windows 10
- SCCM Task Sequence Available Deployment Options in Distribution Points Tab | ConfigMgr
- How to Extract Specific Windows Index from Windows 10 Multiple Edition ISO
- How to Configure Collection Size Limits for Task Sequence Deployment Settings | Configuration Manager | SCCM
![How to Enable Remote Desktop in Windows 10? [Complete Guide]](https://monovm.com/wp-content/uploads/2021/05/cover961-847xAuto.webp)
List of content you will read in this article:
- 1. How to Enable Remote Desktop in Windows 10?
- 2. Conclusion
If you wish to use the Remote Desktop Protocol on Windows 10, then you have landed at the right place. This article will deliver an in-depth analysis of how to enable remote desktop in Windows 10, and to enable RDP on your PC. The basic objective of the Remote Desktop is to permit remote access to that device using the RDP. In simple words, this feature is generally used when you are not present physically in front of the desktop but want to access it.
In Windows 10, you can configure the settings and then enable Remote Desktop on your system. Now, there are various ways through which you can accomplish this task. Take a look:
How to Enable Remote Desktop in Windows 10?
Here you will start your journey with enabling RDP in windows 10 using:
- Windows Settings
- Command Prompt
- Control Panel
- PowerShell
Let us analyze each pointer in detail.
Method 1: Enable Remote Desktop using Settings [Step by step guide]
Follow the below-outlined steps to enable Remote Desktop on Windows 10 through Settings:
Step 1: First you have to visit the Settings section and search for Remote Desktop and select Remote Desktop. Simply click on the option Enable Remote Desktop as shown in the snapshot below.
Step 2: Now, click on confirm and move ahead.
Step 3: You have to visit the Advanced Settings page now and select, ‘Require computers to use Network-level authentication to connect’, option. But what is the need of selecting this option? Well, this feature helps to make your connection extra secure.
The users are asked to authenticate with the network prior to the connection with the device. Hence, this option proves helpful to you in the longer run. Have a look.
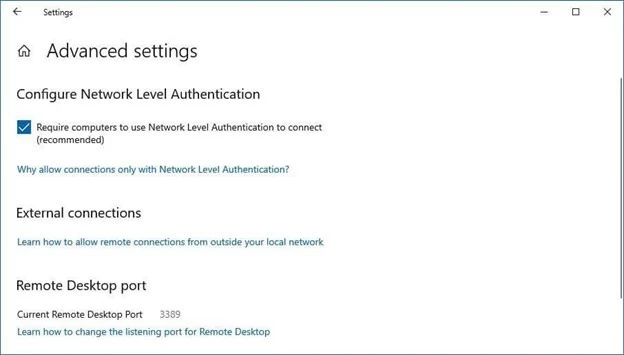
As you can see, at the bottom of the window, there is some information about the current Remote Desktop port. Now, if you want to configure the router to permit the establishment of remote connections outside the domain of your network, you can make specific changes here. Otherwise, the by default RDP port number will always remain at 3389.
Moving a little further, our next segment is to understand the process to enable Remote Desktop using the Control Panel.
Method 2: Enable Remote Desktop using Control Panel
Follow these simple steps to accomplish this objective:
Step 1: Go to the Control panel and select System and Security. On the right-hand side, find System and tap on Allow remote access option. Take a look at the picture below.
Step 2: Now, click on System properties, and in the Remote Desktop section, choose the option — ‘Allow remote connections to this computer. Then subsequently click Apply and then press OK.
Remember that whenever you enable this feature using the Control panel, the NLA or the Network Level Authentication automatically gets selected. Otherwise, you need to enable this option on your system.
Furthermore, let us analyze the process of enabling Remote Desktop using the Command prompt.
Method 3: Enable Remote Desktop using Command Prompt
The steps are really simple.
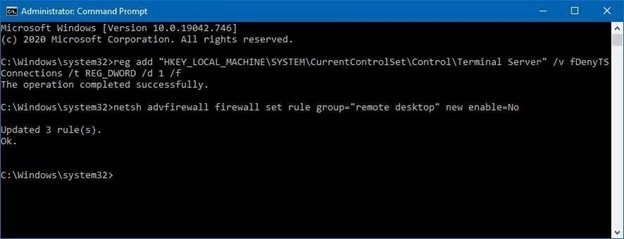
Step 1: Select Start and search for the Command Prompt. Click-right on Command Prompt and hit the option stating, Run as administrator.
Step 2: Now, type the following command:
reg add "HKEY_LOCAL_MACHINESYSTEMCurrentControlSetControlTerminal Server" /v fDenyTSConnections /t REG_DWORD /d 0 /f
Step 3: After typing the command, press Enter. This window appears in front of your screen.
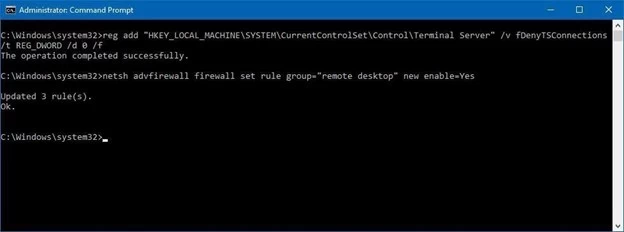
Step 4: Additionally, if you wish to implement Windows Firewall, simply type this command:
netsh advfirewall firewall set rule group="remote desktop" new enable=Yes
That is it, you are done with setting up enabling RDP using CMD.
How to disable RDP in Windows 10 using CMD?
Furthermore, what if you want to disable the Remote Desktop? Well, it is a simple process to follow these steps:
Step 1: Click on Start and find the command prompt.
Step 2: Then Right Click and again select Run as Administrator.
Step 3: Now, enter the below-stated command and press enter:
reg add "HKEY_LOCAL_MACHINESYSTEMCurrentControlSetControlTerminal Server" /v fDenyTSConnections /t REG_DWORD /d 1 /f
Here is a snapshot for you.
Time to hop onto our next section, shall we?
Method 4: Enable Remote Desktop using PowerShell
It’s really simple to enable remote desktop on your Windows 10 by using PowerShell commands. Let us discuss this in full detail.
As you have seen that there are various methods to enable or even disable Remote Desktop. This method is used for the creation of a script that helps to configure the remote desktop devices quickly. It is also beneficial to send the script to a particular user and they can simply double-click and set up the feature automatically.
Take a look at the following steps:
Step 1: Click on Start and search for the PowerShell option and click right on it. Choose the Run as administrator option and subsequently type the following stated command.
Set-ItemProperty -Path 'HKLM:SystemCurrentControlSetControlTerminal Server' -name "fDenyTSConnections" -value 0
Step 2: Now, this command helps to enable the Remote Desktop. After typing, press Enter. You see this window in front of you.
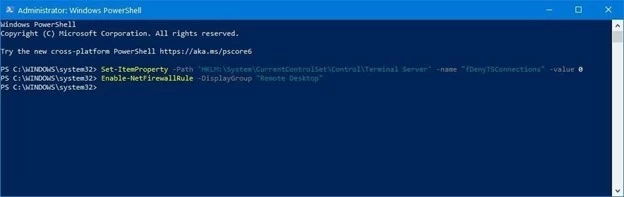
Step 3: Additionally, if you want to enable the RDP through the Windows firewall, you can enter the following command and then press Enter.
Enable-NetFirewallRule -DisplayGroup “Remote Desktop”
How to disable RDP using Powershell
After you complete the following steps, you can easily enable the remote desktop on your system. Moreover, if you wish to disable the Remote Desktop, use these steps:
Step 1: Click on start and find PowerShell. Again choose the run as administrator option and type this command as shown below:
Set-ItemProperty -Path 'HKLM:SystemCurrentControlSetControlTerminal Server' -name "fDenyTSConnections" -value 1
Step 2: Moreover, if you also want to disable the feature via the Windows firewall, then follow this command:
Disable-NetFirewallRule -DisplayGroup "Remote Desktop"
Conclusion
Now you have successfully learned how to enable remote desktop on Windows 10 and various ways through which you can accomplish your objective of enabling remote desktop on Windows 10. Keep practicing, keep learning! If you have any questions or suggestions, please leave them in the comment section given below.
People are also reading:
- How to make RDP faster?
- What is RDP?
- How to Change RDP Port?
- How to Use RDP Client for Mac?
Содержание
- 1 Подключение к удаленному рабочему столу
- 2 Enable Remote Desktop for Windows 10 Pro
- 3 Remote Into Your PC
- 4 Настройка RDP на Windows 10
- 5 Включение доступа и добавление пользователей
- 6 Настройка и управление IP
- 7 Настройка порта RDP
- 8 Подключение к удаленному рабочему столу в Windows 10
- 9 Устранение неполадок при подключении к удаленному рабочему столу
 Операционные системы семейства Windows дают пользователям возможность администрирования через локальную или глобальную сеть. В этой статье мы разберем способы удаленного подключения к рабочему столу в Виндовс 10.
Подключение к удаленному рабочему столу
Подключиться к компьютеру через сеть можно как с помощью встроенных системных средств, так и воспользовавшись специальными программами для удаленного администрирования. Обязательным условием для успешного соединения является разрешение системы на такие подключения, которое нужно настроить, посетив соответствующий раздел параметров.
Подготовка
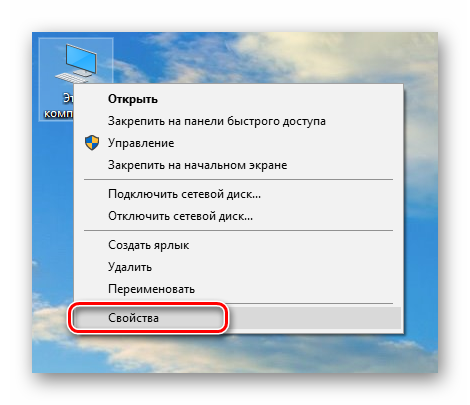
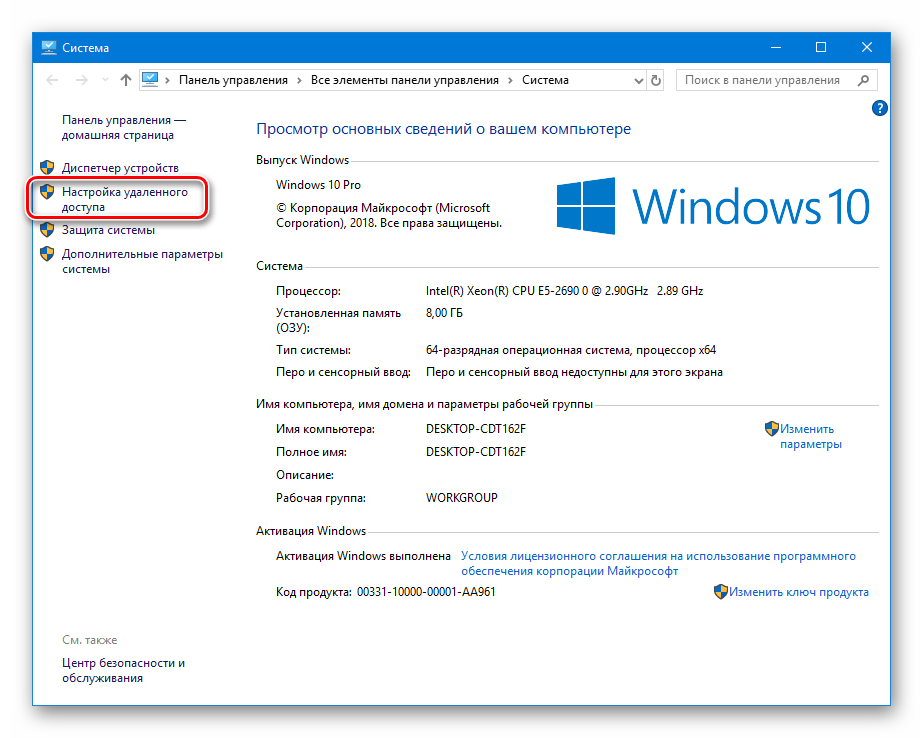
- Кликаем по ярлыку «Этот компьютер» на рабочем столе правой кнопкой мыши и идем в «Свойства».

- В левом блоке со ссылками переходим к управлению удаленным доступом.

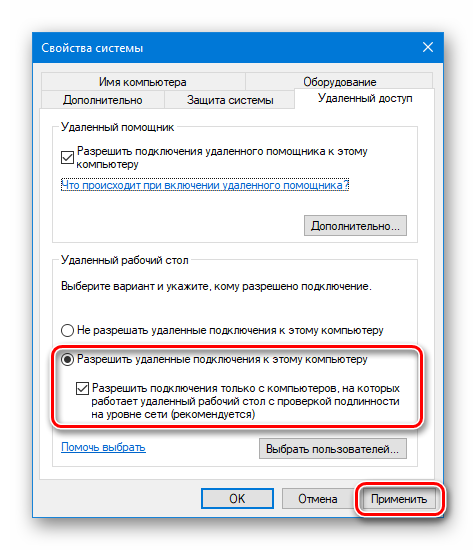
- Устанавливаем переключатель в указанное на скриншоте положение («Разрешить»), устанавливаем галку для проверки подлинности (это нужно для повышения безопасности подключений) и жмем «Применить».

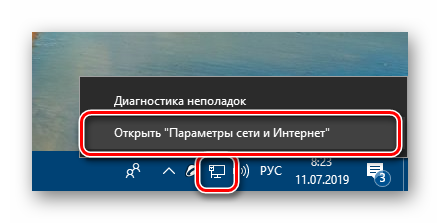
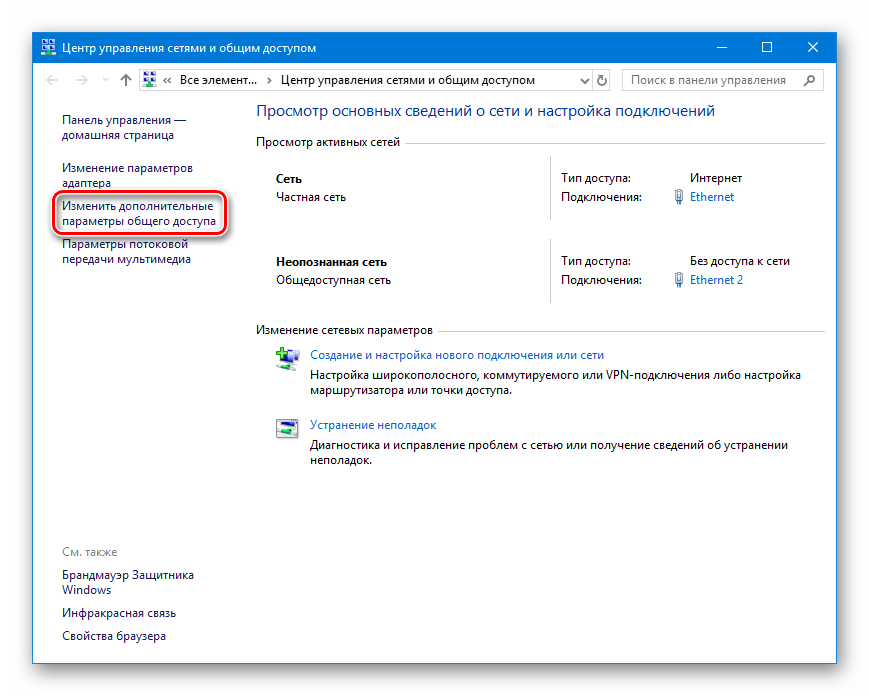
- Далее требуется проверить настройки сетевого обнаружения. Нажимаем ПКМ по значку сети в области уведомлений и переходим к «Параметрам сети и интернета».

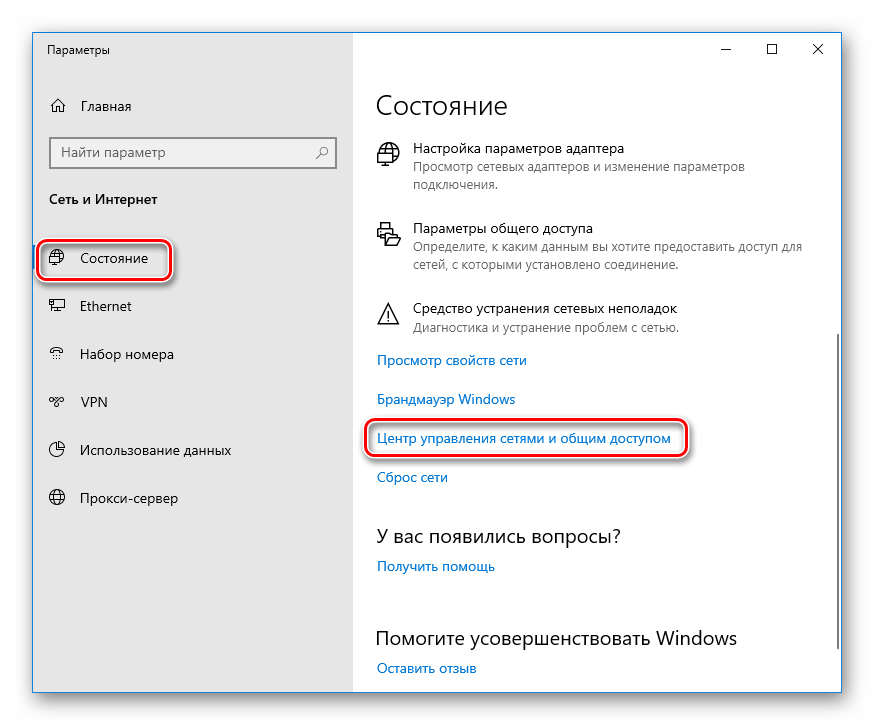
- На вкладке «Состояние» прокручиваем правый блок вниз и переходим по ссылке «Центр управления сетями и общим доступом».

- Нажимаем на ссылку изменения дополнительных параметров.

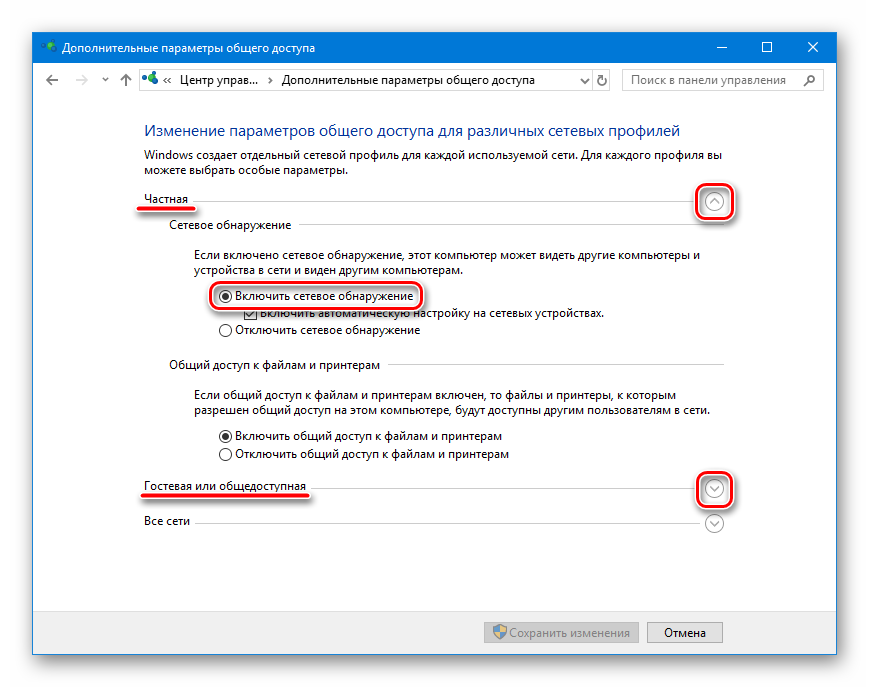
- На вкладках «Частная» (сеть) и «Гостевая или общедоступная» включаем сетевое обнаружение.

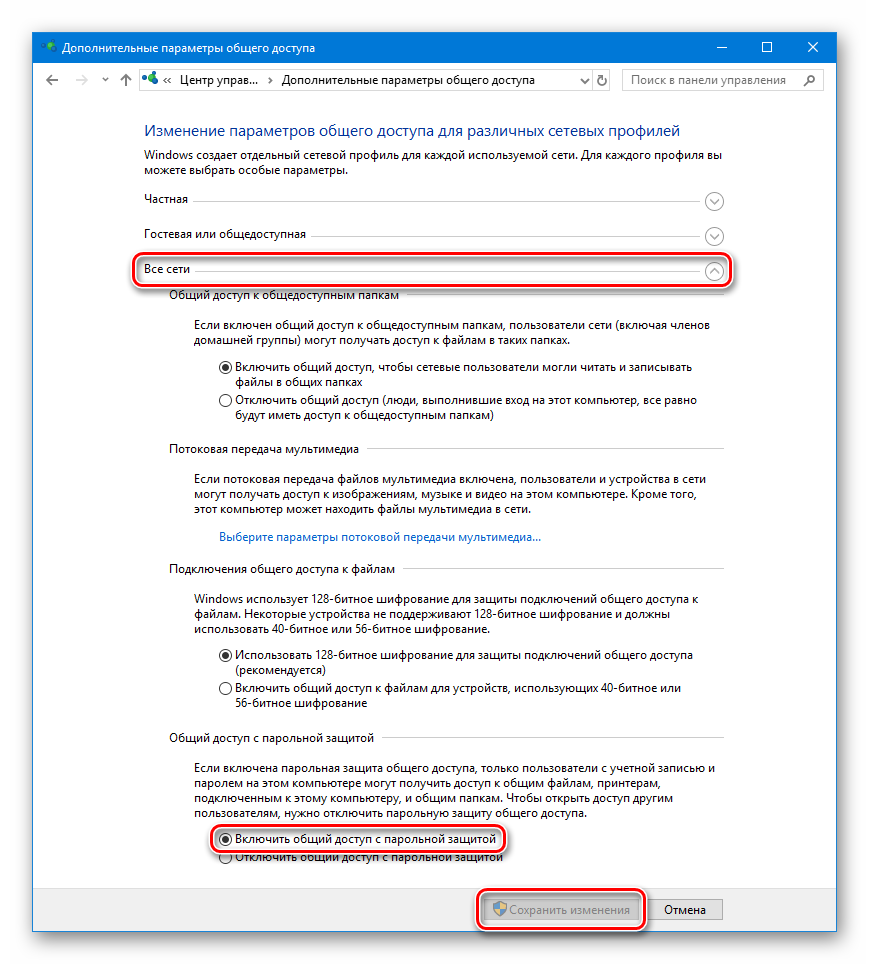
- На вкладке «Все сети» включаем доступ с парольной защитой. После всех манипуляций жмем «Сохранить изменения».

Если возникают проблемы с удаленным доступом, также следует проверить работоспособность некоторых служб. В статье, доступной по ссылке ниже, мы отключали возможности удаленного доступа к ПК, в том числе и работали с системными сервисами. При неполадках просто выполните действия в обратном порядке.
Подробнее: Отключаем удаленное управление компьютером
После того, как все параметры будут проверены и настроены, можно устанавливать удаленное подключение.
Способ 1: Специальные программы
Софт, предназначенный для удаленных подключений, широко представлен на просторах интернета. Такие продукты распространяются как на платной, так и на бесплатной основе и имеют некоторые различия в функционале. Выбрать подходящий можно, перейдя к статьям по ссылкам ниже.
Подробнее:Программы для удаленного администрирования ПКБесплатные аналоги TeamViewer
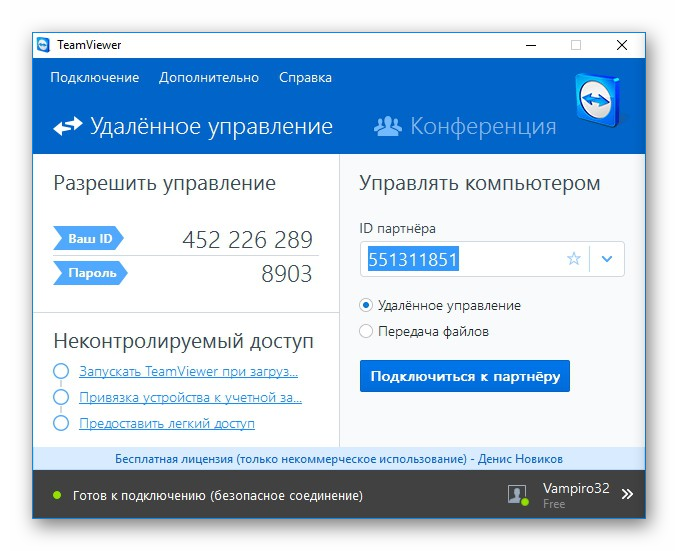
Бесспорно, наиболее популярной программой является TeamViewer. Он позволяет подключаться к компьютеру и выполнять любые действия – производить настройки, устанавливать и удалять приложения, а также перемещать файлы между системами с разрешения владельца.
Подробнее: Подключение к другому компьютеру через TeamViewer
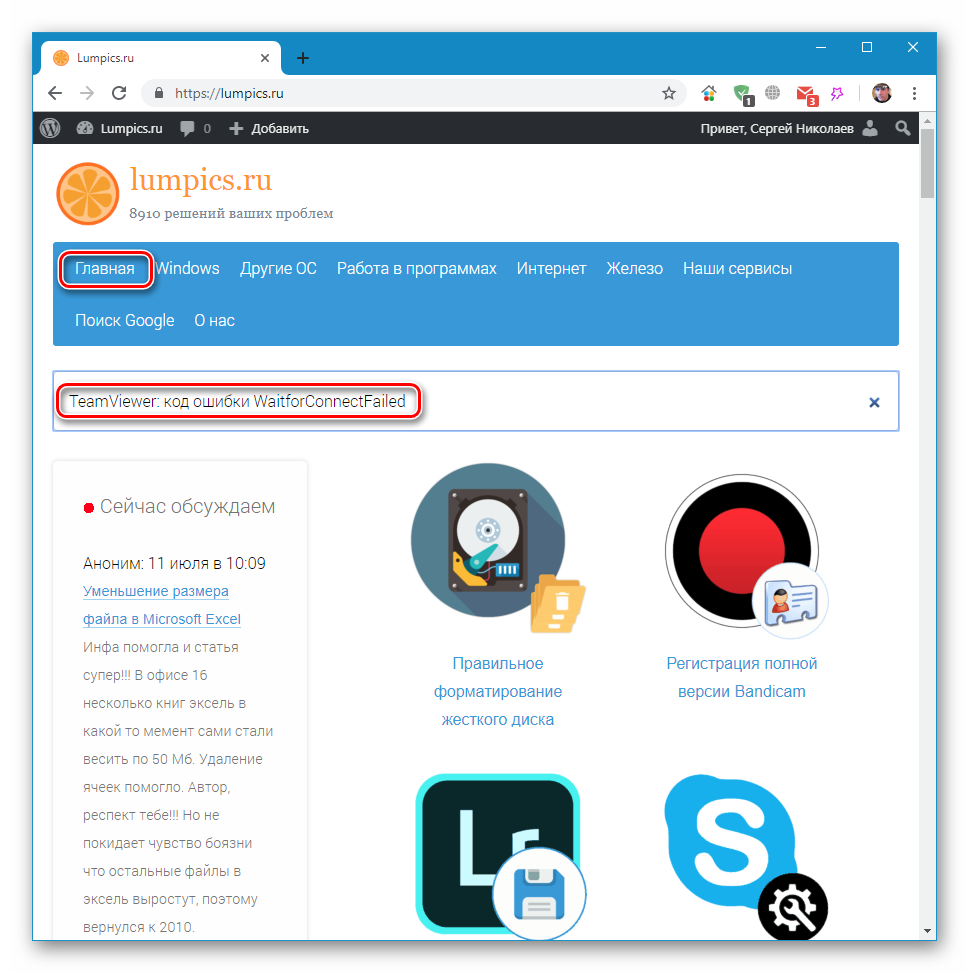
Как и любой другой программный продукт, TeamViewer подвержен сбоям при работе. К тому же во взаимодействии систем участвует третья сторона в виде промежуточного сервера, и его некорректное функционирование или неверные запросы с компьютеров могут приводить к проблемам. Ввиду широкой поддержки разработчиков они решаются довольно быстро, чего нельзя сказать о другом подобном софте. На нашем сайте также опубликовано несколько статей с инструкциями по устранению неполадок в программе, которые помогут избавиться от многих неприятностей. Найти их можно, введя в поисковое поле на главной странице название софта и нажав ENTER. Можно добавить к запросу и текст ошибки. Например, «TeamViewer код ошибки WaitforConnectFailed».
Далее мы поговорим о системных инструментах для удаленного доступа.
Способ 2: Удаленный рабочий стол Windows
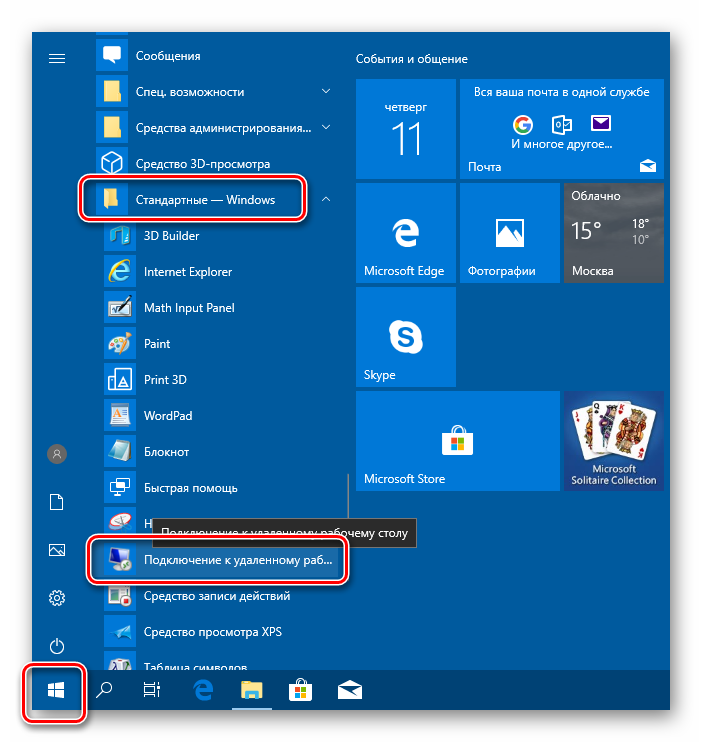
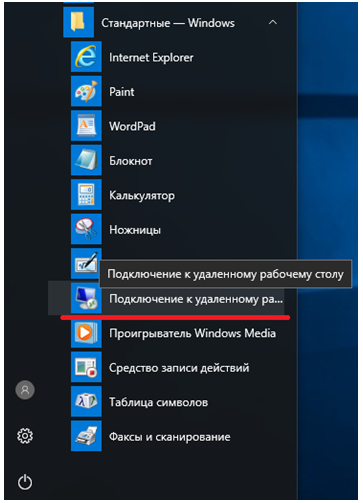
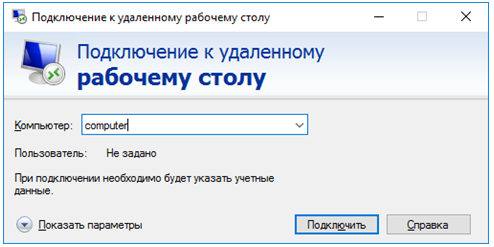
В Виндовс имеется средство под названием «Подключение к удаленному рабочему столу». Оно открывает доступ к компьютеру, используя его IP-адрес и данные для авторизации – имя пользователя и пароль. Найти инструмент можно в меню «Пуск» в папке «Стандартные — Windows».
Обязательным условием успешного подключения является наличие статического («белого») IP-адреса на целевом ПК. Например, при проводном подключении к провайдеру чаще всего выдается именно такой адрес. В локальной сети также у каждого компьютера имеется собственный IP. А вот при использовании модема-флешки айпи будет динамическим («серым») и подсоединиться к такой машине будет невозможно.
Выяснить, какой у вас IP, можно связавшись с поставщиком интернета. У него же можно заказать статический адрес за дополнительную плату. С 3g-4G модемами это также работает. Есть и другой способ, менее надежный, выяснить природу айпи. Перейдите на один из сервисов, указанных в статье по ссылке ниже, и посмотрите соответствующее значение. Перезагрузите ПК и снова проверьте цифры. Если они отличаются от предыдущих, значит IP динамический, а если нет — статический.
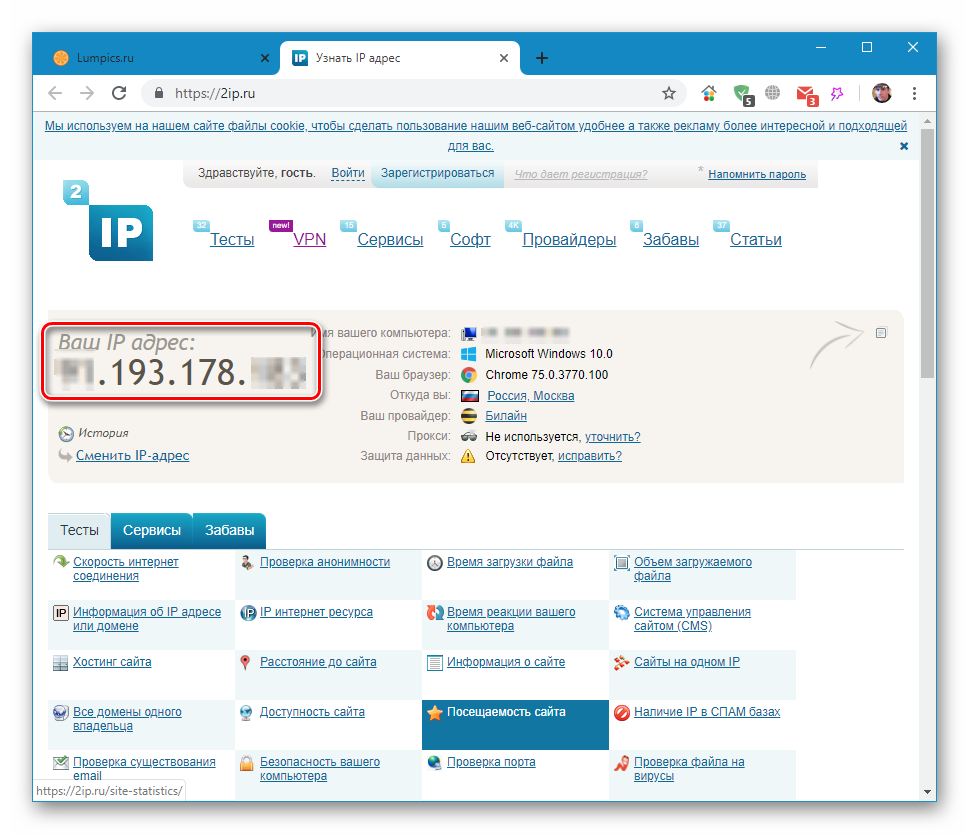
Подробнее: Как узнать IP-адрес своего компьютера
Ниже мы приведем инструкции по подключению с помощью этого приложения.
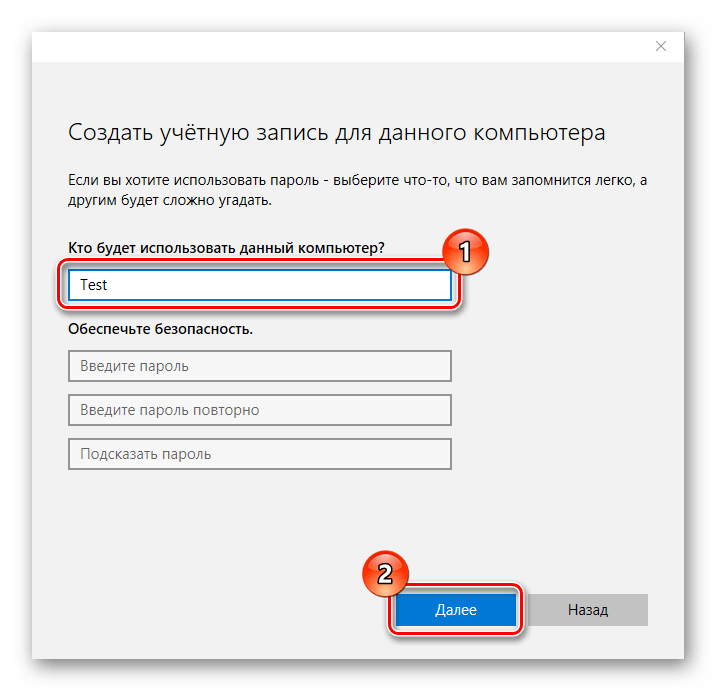
Создание нового локального пользователя
Этот шаг можно пропустить, если вы или доверенное лицо подключаетесь к своему компьютеру с другого рабочего места. Необходимость в нем возникает тогда, когда требуется ограничить доступ к личным или системным файлам или параметрам ОС. При создании пользователя обратите внимание на тип учетной записи — «Стандартный» или «Администратор». Это будет влиять на уровень прав в системе. Также не забудьте установить пароль для новой «учетки», так как без него доступ будет невозможен.
Подробнее:Создание новых локальных пользователей в Windows 10Управление правами учетной записи в Windows 10
Добавление нового пользователя удаленного рабочего стола
- Переходим к настройкам удаленного доступа (см. параграф «Подготовка»).
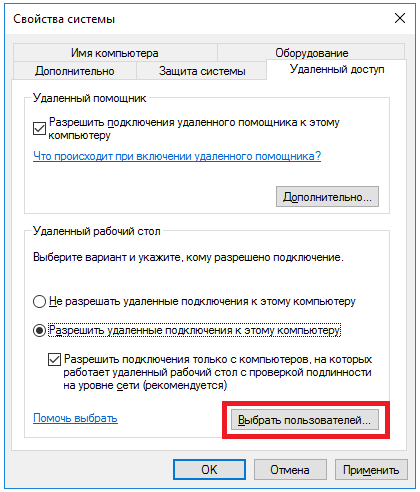
- В нижней части окна жмем на кнопку «Выбрать пользователей».
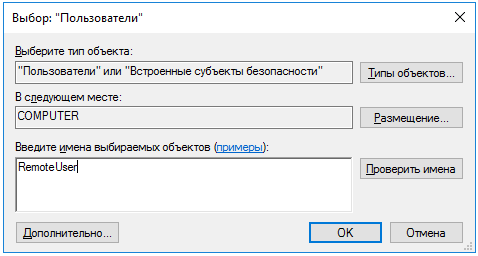
- Нажимаем «Добавить».
- Далее жмем на кнопку «Дополнительно».
- «Поиск».
- Выбираем нашего нового пользователя и нажимаем ОК.
- Проверяем, чтобы в поле «Введите имена выбираемых объектов» появилась соответствующая строчка и снова ОК.
- Еще раз ОК.
Определение IP-адреса
Как узнать наш айпи в интернете, мы уже знаем (см. выше). Определить же адрес машины в локальной сети можно только в настройках маршрутизатора (если он есть) или в параметрах системы. Второй вариант проще, им и воспользуемся.
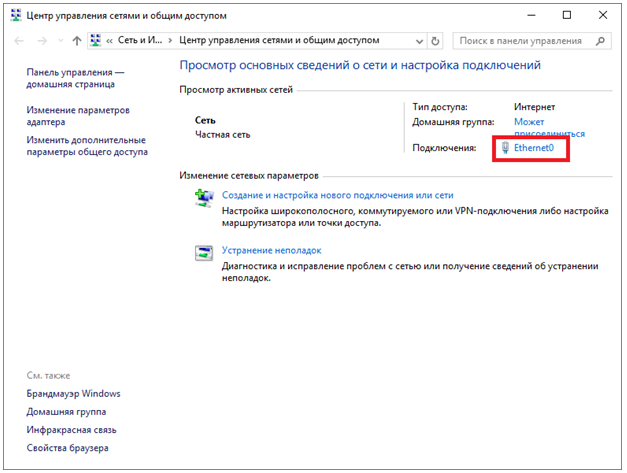
- Нажимаем ПКМ по значку сети в трее и переходим к параметрам сети, после чего идем в «Центр управления сетями и общим доступом». Как это сделать, читайте в параграфе «Подготовка».
- Кликаем по ссылке с названием подключения.
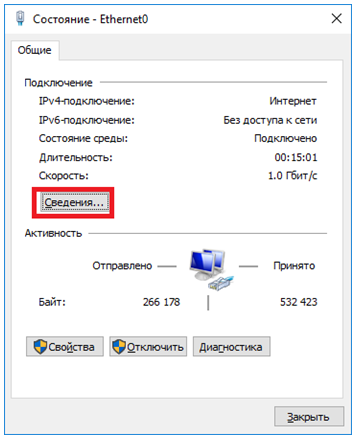
- В открывшемся окне состояния нажимаем кнопку «Сведения».
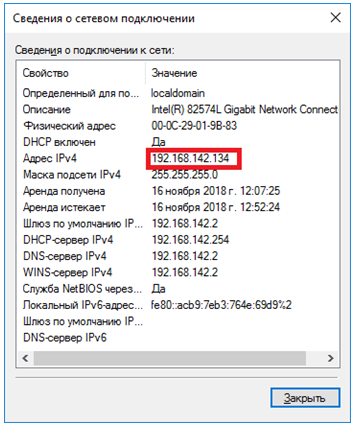
- Записываем данные, указанные напротив пункта «Адрес IPv4» и закрываем все окна.
Обратите внимание, что нам требуется именно адрес вида
192.168.х.х
Если он другой, например, такой, как на скриншоте ниже, выберите соседний адаптер.
Подключение
Целевую машину мы подготовили и получили все необходимые сведения, теперь можно к ней подключиться с другого ПК.
- Запускаем приложение «Подключение к удаленному рабочему столу» (см. выше) и нажимаем «Показать параметры».
- Вводим IP-адрес удаленной машины и имя пользователя, которому разрешали доступ, и жмем «Подключить».
- Если введенные данные верны, откроется окно авторизации, где вводим пароль пользователя и нажимаем ОК.
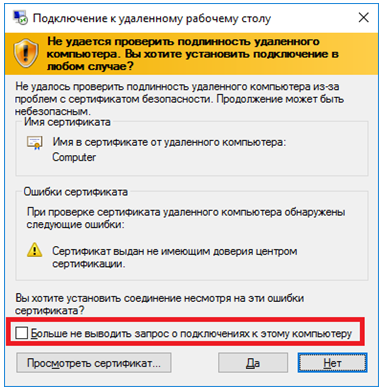
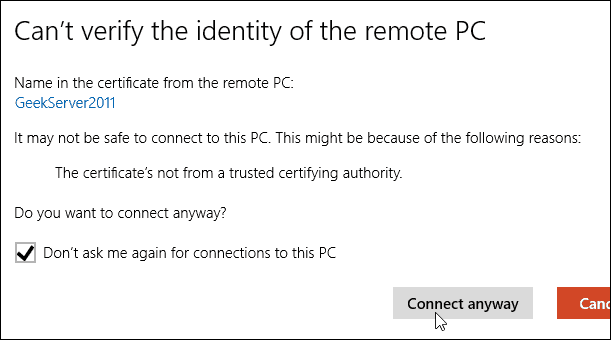
- Вполне вероятно, что система «заругается» на подлинность удаленного компьютера из-за проблем с сертификатом. Просто нажимаем «Да».
- Далее мы увидим экран блокировки удаленного компьютера с предупреждением о том, что другой пользователь будет отключен. В этом и заключается главный минус данного способа, а конкретно в невозможности совместного использования рабочего стола (как, например, в TeamViewer). Нажимаем «Да».
Пользователь на целевой машине может подтвердить выход или отказаться. Если реакции не будет в течение 30 секунд, отключение произойдет автоматически, и мы попадем в удаленную систему.
- Также вероятно, что нам будет предложено настроить параметры конфиденциальности. Если бы выполнялось подключение к существующему пользователю, это окно было бы пропущено. Внимательно знакомимся со всеми пунктами, включаем нужные или отключаем ненужные. Нажимаем «Подтвердить».
- Попадаем на рабочий стол удаленного компьютера. Можно работать. Управление окном (сворачивание и закрытие) производится с помощью специальной панели в верхней части.
Если закрыть окно крестиком, после подтверждения произойдет разрыв соединения.
Сохранение подключения
Если требуется регулярно подключаться к этой машине, можно создать ярлык приложения на рабочем столе для быстрого доступа.
- Запускаем приложение, вводим данные (IP-адрес и имя пользователя) и устанавливаем галку «Разрешить мне сохранять учетные данные».
- Идем на вкладку «Дополнительно» и отключаем предупреждение о проблемах с подлинностью сертификата. Обратите внимание, что делать это можно, только если вы подключаетесь к «знакомому» ПК.
- Возвращаемся на вкладку «Общие» (если она скрылась из видимости, нажимаем на стрелку «влево») и жмем «Сохранить как».
- Выбираем место, даем имя подключению («.rdp» дописывать не обязательно) и сохраняем.
- Запускаем созданный файл, ставим галку «Больше не выводить запрос» (если окно предупреждения появится) и нажимаем «Подключить».
- Вводим пароль. Сделать это нужно будет только один раз, чтобы система его сохранила. Устанавливаем флажок напротив «Запомнить меня» и подключаемся кнопкой ОК.
Все последующие подключения с помощью созданного ярлыка будут производиться без дополнительных подтверждений и ввода учетных данных при условии, что удаленный компьютер включен, пользователь все еще существует (и его пароль тот же), а настройки разрешают доступ.
Способ 3: Удаленный помощник Windows
В Windows есть еще один инструмент для удаленного подключения. Из дополнительных функций в «Помощнике» присутствует только чат, но этого вполне достаточно для решения задач.
- Для начала проверяем, включена ли функция в настройках удаленного доступа (см. выше). Если нет, устанавливаем галку и нажимаем ОК.
- Открываем системный поиск, нажав на значок лупы возле кнопки «Пуск», и пишем
msraПереходим к «Помощнику», нажав на единственный пункт в поисковой выдаче.
- Нажимаем кнопку со словом «Пригласить».
- Сохраняем приглашение как файл.
- Выбираем место и жмем «Сохранить».
- Откроется окно «Помощника», которое необходимо оставить открытым до осуществления подключения, иначе все придется делать заново.
- Копируем пароль, нажав по полю с ним и выбрав единственный пункт в контекстном меню.
- Теперь передаем созданный файл вместе с паролем другому пользователю любым удобным способом. Он его должен запустить на своем ПК и ввести полученные данные.
- На нашем компьютере появится окно, в котором мы должны разрешить подключение, нажав «Да».
- Удаленный пользователь увидит наш рабочий стол. Для того чтобы управлять системой, он должен нажать кнопку «Запросить управление».
Мы должны разрешить доступ кнопкой «Да» в открывшемся диалоговом окне.
- Для завершения сеанса достаточно закрыть окно «Помощника» на одном из компьютеров.
Заключение
Мы познакомились с тремя способами удаленного подключения к компьютеру. Все они имеют свои достоинства и недостатки. Специальные программы весьма удобны, но требуют поиска и установки, а также могут стать «дырой» в безопасности. Стандартные средства вполне надежны, но подразумевают наличие определенных знаний в управлении параметрами, а приложение «Подключение к удаленному рабочему столу» не предоставляет возможность совместной работы в системе. Решайте сами, в какой ситуации пользоваться тем или иным инструментом. Мы рады, что смогли помочь Вам в решении проблемы.Опишите, что у вас не получилось. Наши специалисты постараются ответить максимально быстро.
Помогла ли вам эта статья?
How to Enable and Use Remote Desktop for Windows 10
By Brian BurgessLast Updated on September 21, 2019
Remote Desktop Protocol (RDP) has been a feature of Windows since the XP Pro days. Here’s a look at using it in Windows 10 with the Remote Desktop app.
</span>
Remote Desktop Protocol (RDP) has been a feature of Windows since the XP Pro days. It makes it easy to connect from one PC or device to another to retrieve files or provide PC support.
There are several free utilities out there that will get you set up with a remote connection. Some that come to mind are services such as join.me, TeamViewer, and Chrome Remote Desktop and are especially handy when connecting between different platforms. But if you’re in a pure Windows environments, here’s a look at how to enable the built-in RDP utility in Windows 10 which will allow you to connect to your Windows box remotely.
Enable Remote Desktop for Windows 10 Pro
The Remote Desktop or RDP feature is disabled by default so you will need to enable it in the settings. There are several ways to do this, let’s review the easiest.
- Open Settings
- Click System > Remote Desktop
- Click the toggle Enable Remote Desktop
- Click Confirm when promoted.
Expert Note:
You can also enable Remote Desktop using the System Properties. Press the Windows Key and Type: advanced system. Click View advanced system settings.
Click the Remote tab and select Allow remote connections to this computer. Keep the box checked for Network Level Authentication for better security. Also, note that you will need to enable incoming remote connections on the PC you’re connecting.
Remote Into Your PC
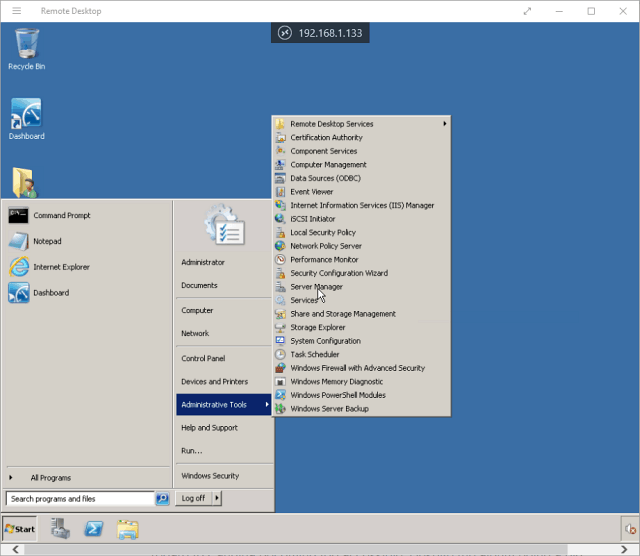
You have a couple of choices when it comes to how you remotely connect to the other computer. You can use the traditional desktop app or the Remote Desktop universal app. For this, I’m connecting to my Windows Home Server on my home network. I’m also going to use the app that you can install from the Store. It’s more versatile and can be used on mobile platforms including iOS and Android.
Tip: If you have a lot of PCs and devices on your home network, a useful free utility to use is Advanced IP Scanner.
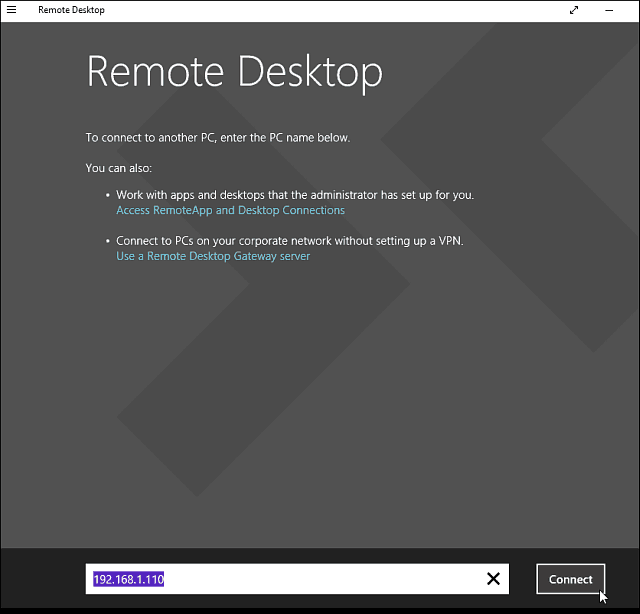
Launch the app and type a name for the PC or device, its hostname or IP address, and select Connect.
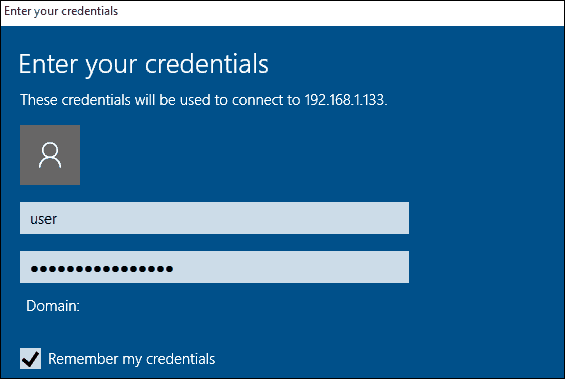
Next enter the username and password used for the computer you’re connecting into. Also, if you’re going to remote into it often, check the box to remember your credentials.
If you get the following security message, click Go ahead and Connect and check the box for it to not remind you again. You know what you’re doing, no reason to for Windows to be constantly nagging you.
There you have it. You can now start using the remote computer for configuration, remote support, or however you need to use it.
I should also mention that you can go to Settings > connection settings in the app and configure the appearance, devices, and make other adjustments that work for you.
More About Remote Desktop Connections
If you’re running a previous version of Windows or looking to remote access your Windows PC from your smartphone or tablets, check out the articles linked below for more.
35 Comments
35 Comments
-
Jim Autrey
These instructions are for Windows 10 Pro. I don’t think they apply to Windows 10 Home. For that, one will have to try the other options listed.
Reply
-
Jan Bekaert
Hi Jim,
What is meant by ‘the other options listed’? In Windows 10 Home I don’t see the ‘Remote Desktop’ section under ‘System Properties’ (second pic in this article). The idea is to use it on an htpc which is meant for audio streaming purposes only between a WHS2011 and the DAC. No screen, keyboard or mouse should get hooked up.
Thanks.
Best Regards, Jan Bekaert – Belgium
Reply
-
KP
Here is the easiet fix, I have found, to run remote desktop on Windows Home 10:
1) Click on the search box, Cortana, or start search on the lower left of your desktop.
2) Type cmd
3) when the command prompt box opens, type mstsc
4) The remote desktop will open. Click “show options” in the bottom left corner, then click “save as” and save to your desktop.
Now you are all set to go, just like previous versions of Windows.
Reply
-
Chris Bartholome
unfortunately, this is backwards to what i’m looking for… that works the same as if i were to launch the app directly from the device that it is i want to connect to…
If you could offer some insight on how to get the feature back into WinX Home, that allows you to connect to WinX Home, that would be helpful, otherwise, thanks, but no thanks.
WinX Home > WinX Pro =/= WinX Pro > WinX Home
Reply
-
-
Lolo
What makes remotes desktop remote to be accessed without allowing it from server
Reply
-
Chris Bartholome
Uh… please refine your statement, this makes no sense…
Reply
-
-
bscheibe
Windows 10 Home edition does not allow remote connections.
Reply
-
Geopge Robbins
Not sure WHAT Windows OS this is for but certainly NOT Windows 10 PRO. I HAVE an up to date 10 PRO and close, BUT THESE INSTRUTIONS are NOT Windows 10 PRO “up to date” version. The Microsoft approach to this is cumbersome, difficult to do, as usual. I was hoping this article would make it easier as I bought “10 PRO” JUST FOR THIS. What a disappointment.
Reply
-
-
Jim Autrey
Here’s the excerpt I was referring to:
There are several free utilities out there that will get you set up with a remote connection. Some that come to mind are join.me, TeamViewer, and Chrome Remote Desktop and are especially handy when connecting between different platforms.
Reply
-
James
Window 10 doesn’t come with remote connection< you have to get Windows 10 pro upgrade for an extra 99.00…argggggg
Reply
-
derrick
How many remote connections can a Windows 10 computer handle at once?
Reply
-
Chris Bartholome
its a one at a time deal. The fact that Microsoft left out such a vital part of Windows in the Home edition is sad and overall pathetic. If this feature was standard throughout all the Windows Editions, and then suddenly its taken away, like what? seriously? I’m not allowed to RDC to my laptop anymore?! Microsoft should really reconsider this decision, i haven’t been so thoroughly ticked off in a while with Winx but that was remedied with this discovery. I thought it was a Feature that needed to be manually installed for the WinX Home users, but nope, if you have WinX Home, only YOU can connect to other computers via RDP, as long as they have any prior Windows, or WinX Pro.
As a loyalist users of Windows, i expect better from Microsoft, but after seeing recent traits, i’m beginning to doubt the company, especially their feature department.
Reply
-
Twobob
Hi MS don’t care. The vision is reduced functionality that meets the needs of the masses financially aces great technology that meets the needs of everyone but has a higher maintenance, development and support cost.
After lots of time to do the math, They just don’t care about the annoying “power user” corner cases anymore.
They stopped focusing on making the OS “best in class” long ago.
Numbers = driver, so complain all you want. It really won’t matter
Reply
-
-
-
Dar
I too am just realizing that this feature is missing from my Windows 10 Dell PC. Very frustrating.
Reply
-
Donna Ehler
Read KP May 11, 2016 at 10:12 am # comment on HOW to find the connection for windows 10 HOME. It did it just as it was stated and it works great. KP May 11, 2016 at 10:12 am # Here is the easiet fix, I have found, to run remote desktop on Windows Home 10:
1) Click on the search box, Cortana, or start search on the lower left of your desktop.
2) Type cmd
3) when the command prompt box opens, type mstsc
4) The remote desktop will open. Click “show options” in the bottom left corner, then click “save as” and save to your desktop.
Now you are all set to go, just like previous versions of Windows.
THANK YOU KP for this sure appreciate it. Gramme
Reply
-
Chris Bartholome
unfortunately, this is backwards to what i’m looking for… that works the same as if i were to launch the app directly from the device that it is i want to connect to…
If you could offer some insight on how to get the feature back into WinX Home, that allows you to connect to WinX Home, that would be helpful, otherwise, thanks, but no thanks.
WinX Home > WinX Pro =/= WinX Pro > WinX Home Also what a majority of our complaints are about.
Reply
-
-
Musaddique Ali
I use Windows 10 Pro but I still prefer TeamViewer for remote access. Because it’s user friendly and doesn’t require so much configuration than that required by Remote Desktop.
Reply
-
matt
Out of all the suggestions this one worked! This Teamviewer app works great on my Windows phone and PC. Microsoft should buy them out
Reply
-
-
Kailash
Thnaks
Reply
-
Adam Senour
One thing that I’d like to add to this article: if you’re using Windows 10 Pro and a non-standard RDP port, you may need to add in a rule within Windows Firewall with Advanced Security to open your custom RDP port. This is the one additional step that I needed to take.
Reply
-
Chris Bartholome
It’s easier to Port Forward it in the Router, i haven’t had a single problem connecting out on a different port, and windows by default leaves that default port open for secure connections. All you have to do is port forward from the custom port to the default port on that machines IP in your port forwarding on your router and boom, connected via new port.
Reply
-
-
Satya Nemana
TeamViewer.com works, but Microsoft should support by default even in Non-Pro Windows upgrades. RDP is a basic fundamental feature, that we got used in previous non-pro versions. If we keep losing such precious features, we have to move away from Windows. Microsoft should seriously reconsider. Is there a plan in future? When can we expect this from Microsoft in Non-Pro windows upgrades?
Reply
-
Steve Krause
Agreed. It’s very odd Microsoft will not add RDP Host support in the Windows 10 home edition. Perhaps the design is for home users to leverage remote assistance… Personally, I use TeamViewer for any Home Desktop support… (TBH)
Reply
-
-
Prasanta Shee
The above steps are too tech savvy and complicated. Instead, I would recommend use of remote support tools like R-HUB remote support servers, logmein, teamviewer etc. for establishing remote desktop connection and successfully accessing Windows 10 computers.
Reply
-
Twobob
Click a thing. Put a u/n P/w in? Tech Savvy?
Intentionally crippled perhaps, tech savvy it is not
Reply
-
Alan Kmiecik
would not say it is too tech savvy, it’s kinda the level you need to understand to get it done.
I would like to understand how the name is resolved. I get how DNS works for websites but, every time I try Microsoft remote desktop, the remote computer name is not found.
How is it suppose to be found? Does MS keep a special DNS like thing that matches the computer name with where is it?
Reply
-
-
Ruby
So to clarify…. For Windows 10 Home, you can use your computer that has this operating system to remote access other devices. But, if you want to use your tablet/phone to remote access your computer that has the windows 10 home, you’re out of luck unless you put a program on your computer such as teamviewer?
Reply
-
Ruby
Alright, to save everyone time, I went ahead and downloaded Chrome Desktop Remote app, and it works from computer to computer but for some reason my android was unable to even detect my computer. So, I tried TeamViewer, and it worked beautifully for computer to computer, and android to computer, and it was very easy to set up and use.
Unfortunately, after all said and done… Remote Accessing your computer to play pc game on android such as DreamFall…. DOES NOT WORK. Don’t waste your time if this is the reason why you are trying Remote access. lol
It was a long shot.
If someone figured out how to come out with a Remote Access app that allows you to access your PC games from your phone without using complicated emulators such as Limbo, downloading this (Streaming/Cloud PC emulators) and that… They sure will have it made. Hint Hint.
After all, who wouldn’t want to be able to play and save space on their phones???
Reply
-
Frank
And I like use Remote Desktop like LiteManager for free administration.
Reply
-
Pearl
You may use R-HUB remote desktop server for setting up remote connection to PC. It works on all platforms viz. Windows, Mac, iOS and Android. It is in-house, secure and supports unlimited users.
Reply
-
Chris
does this only work within your own home network? If you are outside and on your laptop trying to remote into your desktop don’t you need other credentials than the ip address of the computer you are trying to connect to? The public ip of the carrier or something else? I tried this and had no luck, it seems to simple from outside your home network. Thanks
Reply
-
Steve Krause
Correct. RDP is primarily used only to connect to computers on your local network. If you want to connect to a system on another network (Perhaps from home to work or vice-versa), we suggest you use Teamviewer. It’s free and simple to use. At the top of the article we link to the groovyPost article on how to use it.
Reply
-
Laurence
Ah thanks for the info, but what a pain. Surely there’s some workaround for this? Perplexing limitation from Microsoft – I mean why have the iOS and Android apps if can’t use it when mobile?
Reply
-
-
-
George Robbins
I am a Senior and handicapped. I have a HP Desktop with Windows 7, a DELL Laptop but it is a Dell Precision M6800 Laptop, Windows 10 PRO that weights a TON. I now need TO OPERATE it FROM BED mostly. My thoughts were to get a Inspiron 11″ 3000 Laptop with “PRO” then I could REMOTE in to my Dell 6800 [with PRO] and my HP with Windows 7. But the Inspiron 11 3000 Laptop normally doesn’t have PRO on them. Is my only option to: Get a Inspiron 11 3000 Laptop at a reasonable price with HOME and a third party REMOTE ACCESS software?
Reply
-
Denis
There is some problem with compatible between XP and Win 10, I use LiteManager for remote desktop connections
Reply
Leave a Reply
Cancel reply</h3>Related Items:microsoft, rdp, Windows 10ShareTweetShareShareEmail
Традиционный сценарий использования ПК предполагает, что вы подходите к компьютеру, садитесь в кресло и физически контактируете с устройством. Однако есть и другой вариант — настройка RDP Windows 10 и использование удаленного подключения. У такого метода масса достоинств: не нужно тратить время, чтобы добраться до рабочего места, можно со слабого устройства выполнять задачи на более мощном компьютере или даже попросить более компетентного специалиста подключиться и оказать помощь.
Но прежде, чем браться за настройку RDP в Windows 10, убедитесь, что у вас установлена версия Pro или выше: в Home отключены нужные системные компоненты. Плюс, потребуется защитить паролем вашу учетную запись:
- если его нет – установите через соответствующий раздел в Панели управления;
- выберите сложный пароль. Если его можно подобрать за 4 секунды – это плохой пароль.
Включение доступа и добавление пользователей
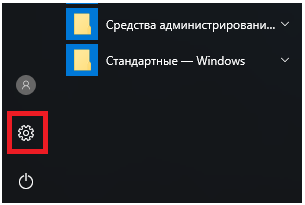
Первый шаг настройки – корректировка настроек Windows 10, чтобы сделать соединение через интернет с использованием RDP в принципе возможным. Откройте Пуск и нажмите на шестеренку Параметры.
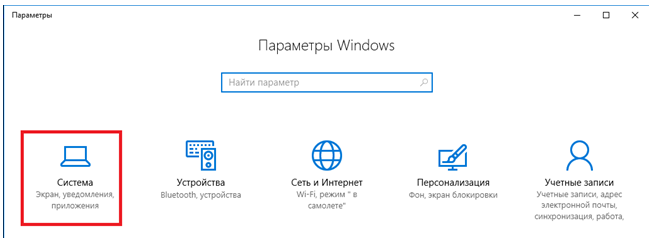
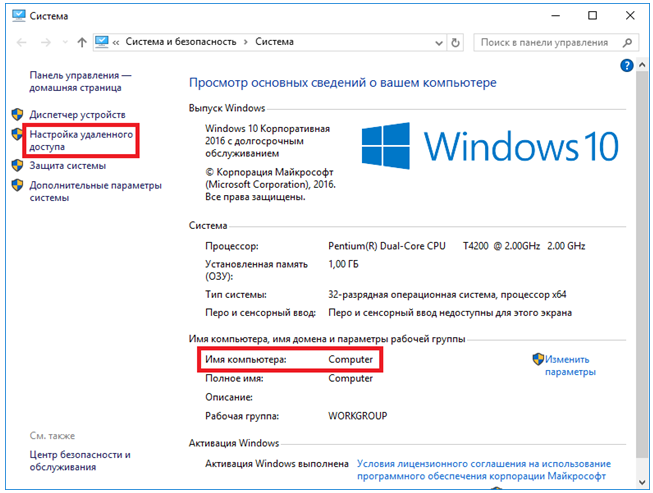
Откройте раздел с настройкой системы.
Просмотрите детальные сведения (можно сразу открыть этот экран комбинацией Win-Pause или Win-Break).
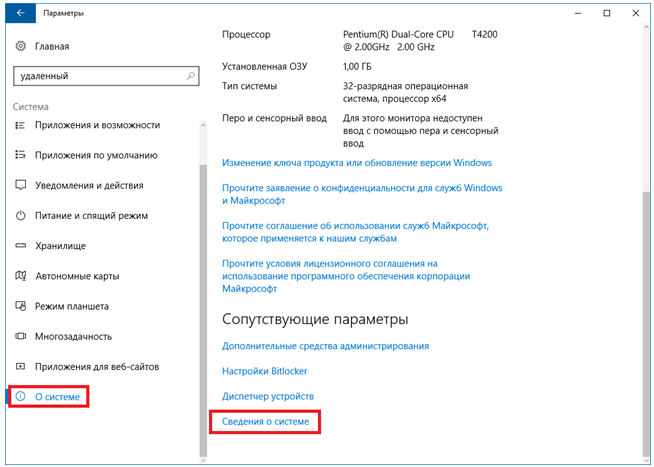
Запомните, какое имя указано для компьютера. Далее перейдите к настройке удаленного доступа.
Если в системе настроено автоматическое переведение в «спячку», то будет показано предупреждение.
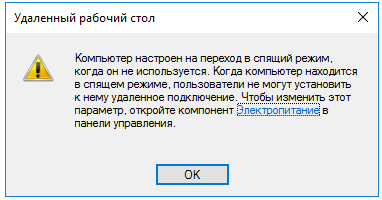
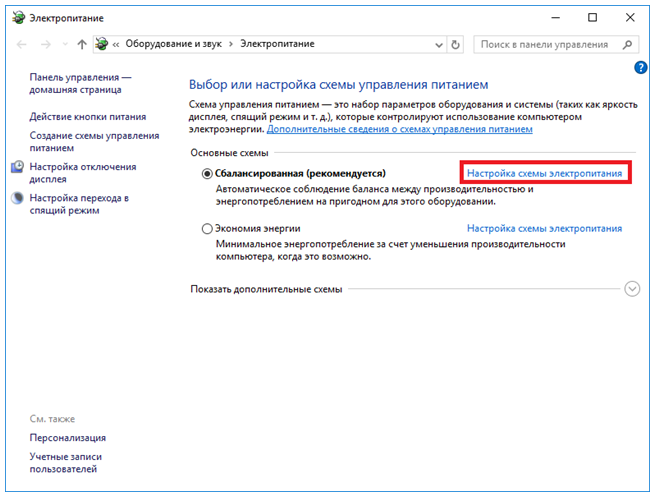
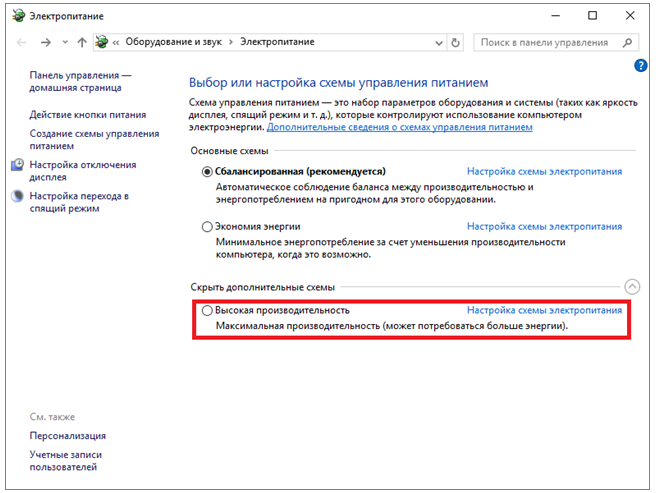
Нажмите Электропитание и далее настройки схемы, чтобы убрать помехи к использованию RDP в Win 10.
Выберите из списка «Никогда», если хотите, чтобы ПК был постоянно доступен.
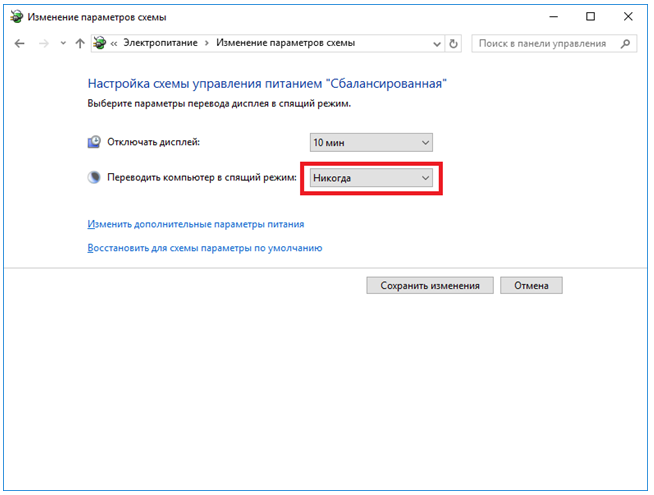
Альтернативный способ – активировать режим повышенной производительности, тогда компьютер не будет отключаться.
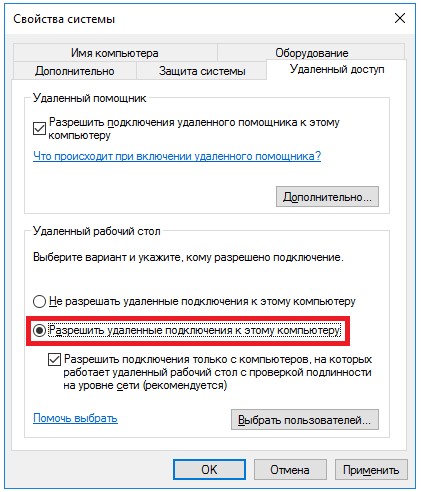
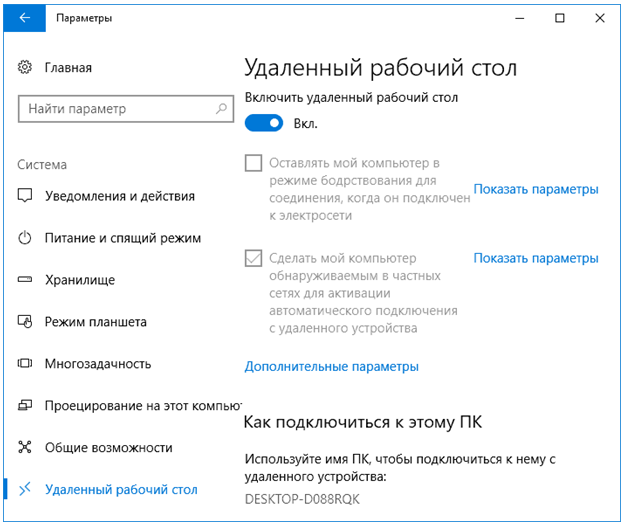
В подразделе удаленного рабочего стола разрешите подключаться к компьютеру.
При желании можно провести настройку RDP Windows 10 для нескольких пользователей, нажав кнопку чуть ниже переключателя.
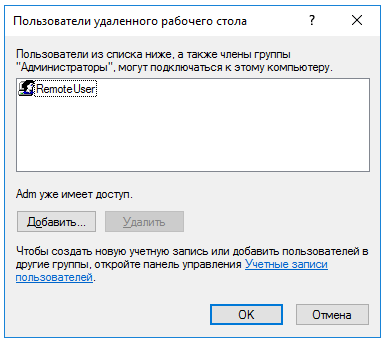
По умолчанию доступ дается администраторам, но можно добавить произвольного пользователя (например, специально созданного для этих целей).
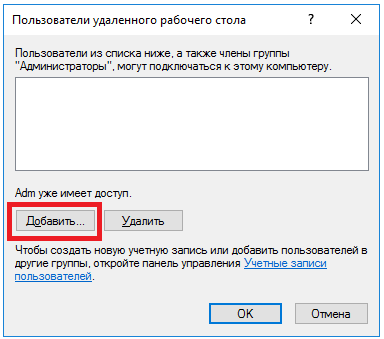
Впишите его имя в системе.
Пользователь появится в списке допуска к RDP.
В зависимости от версии ОС, порядок действий может несколько отличаться. Например, официальное руководство предлагает перейти к параметрам рабочего стола непосредственно в подразделе «Система» или же открыть в браузере адрес «ms-settings:remotedesktop».
Настройка и управление IP
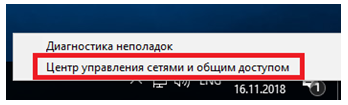
Вместо имени компьютера часто используется IP. Чтобы его просмотреть, правым кликом по значку текущего подключения вызовите Центр управления сетями.
Далее кликните непосредственно по каналу связи с интернетом (например, Ethernet) для просмотра состояния.
В просмотре состояния нажмите Сведения.
Отобразится детальная информация, из которой нужно запомнить или записать IP.
Если адрес выдается динамическим образом, то при повторных включениях ПК он может измениться, и тогда потребуется его каждый раз заново узнавать. Вместо этого, иногда настраивают статический адрес, который остается неизменным при перезагрузках.
Важно! Если у вашей сети есть ответственный администратор, проконсультируйтесь с ним о допустимости такой настройки. Впрочем, это относится и к разрешению удаленного доступа в целом.
В окне просмотра состояния перейдите к свойствам. Далее выберите протокол IPv4 и откройте детальный просмотр.
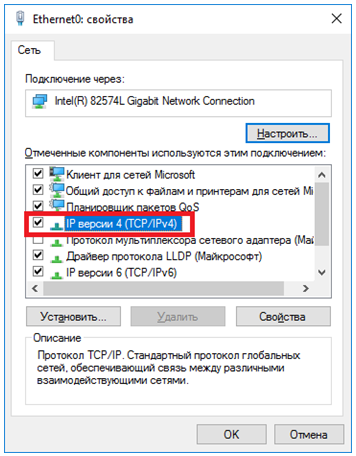
В качестве адреса укажите значение, которое не попадает в используемый для динамического использования диапазон. Соответствующую настройку можно опять-таки найти в роутере.
Традиционно маска указывается в виде 255.255.255.0, так что IP должен отличаться от адреса шлюза (его не меняем) только последним числом.
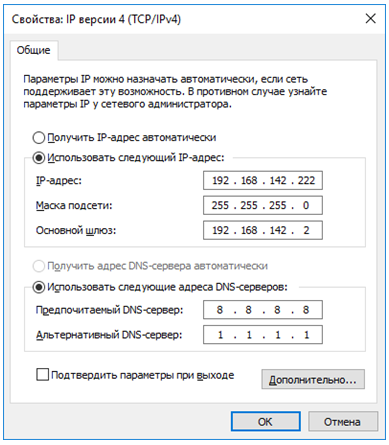
В качестве DNS можно указать используемые в вашей сети значения или же воспользоваться публичными сервисами: 8.8.8.8 от Google, 1.1.1.1 от Cloudflare и так далее.
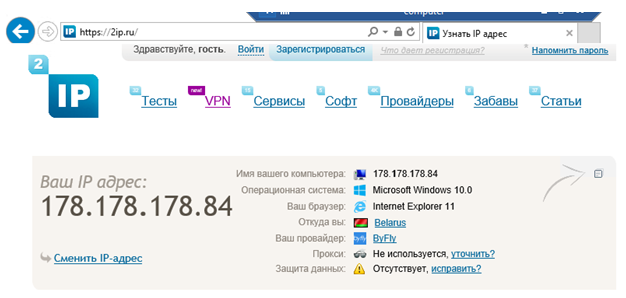
Если используется фиксированный адрес и прямое подключение (то есть у вашего ПК «белый» IP, уточните данную информацию у своего провайдера), его также можно просмотреть при помощи внешних сервисов вроде https://2ip.ru.
Настройка порта RDP
Если система, которой выполняется RDP подключение, находится за роутером, то может потребоваться настройка порта. Для этого стандартным образом подключитесь к роутеру через веб-интерфейс (используемый для этого адрес необходимо уточнить в инструкции к оборудованию). Далее найдите в настройках раздел Port Forwarding (перенаправление портов). Потребуется добавить в него правило со следующими параметрами:
- название может быть произвольным;
- в качестве порта выберите 3389 TCP;
- IP введите от своего ПК;
- локальный порт также пропишите 3389;
- выберите протокол TCP из списка.
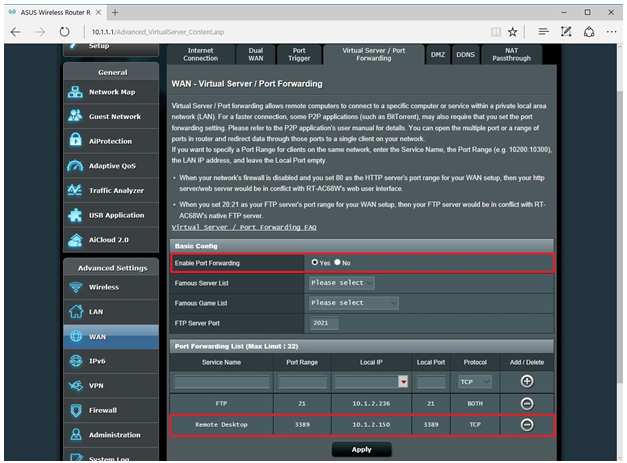
После этого станет возможно подключаться удаленно и работать с ПК.
Подключение к удаленному рабочему столу в Windows 10
После настройки для подключения в режиме RDP можно использовать стандартную программу.
Минимальные требования для соединения – указать имя или IP целевого компьютера.
Далее система сама запросит данные для входа в учетную запись. Используйте один из тех аккаунтов, которые добавили на этапе настройки. Можно поставить галочку, чтобы в будущем не вводить их заново.

Если показывается уведомление об отсутствии сертификата, его допустимо проигнорировать (вы же уверены в своем ПК, верно?).
Также в окне подключения можно раскрыть детальные параметры подключения:
Важно! В отличие от настройки RDP на Windows Server 2016, здесь одновременно работать может только один пользователь, независимо от того, прямо за компьютером или удаленно. Так что если попробуете подключиться к системе, куда уже кто-то вошел, появится предупреждение. Можно или отключить активного пользователя, или самому подключиться позже.
Если вам нужно настроить РДП с одновременной работой, переходите на серверные ОС, такие как Windows Server 2012 r2.
После этого откроется окно с удаленной системой. По умолчанию режим полноэкранный, а сверху показывается панель подключения.
Если нажать на ней крестик, то пользователь останется залогинен в удаленной системе.
Чтобы полностью выйти в меню Пуск удаленной машины выберите «Отключиться».
Узнайте также:
- Как открыть RAR файл на Windows 10,
- Настройка роутера с помощью My.Keenetic.
Устранение неполадок при подключении к удаленному рабочему столу
Если брандмауэр Windows не дает соединиться, откройте его настройки в параметрах.
Нажмите на изменение параметров над списком.
Укажите для удаленного рабочего стола обе галочки.
В случае, если не срабатывает подключение по порту, нужно уточнить наличие такой возможности у провайдера.
Если показывается ошибка об отсутствии ответа со стороны ПК, к которому вы подключаетесь – убедитесь, что он вообще включен и что он не ушел в спящий режим.
Также может потребоваться переключить в параметрах, в разделе подключения, тип сети с общественной на доверенный.
Выберите частную, в противном случае компьютер может быть не виден даже при работе по локальной сети.
Используемые источники:
- https://lumpics.ru/remote-desktop-connection-in-windows-10/
- https://www.groovypost.com/howto/setup-use-remote-desktop-windows-10/
- https://virtualniy-mir.ru/kak-nastroit-rdp-na-vindovs-10/

Remote Desktop Protocol (RDP) has been a feature of Windows since the XP Pro days. Here’s a look at using it in Windows 10 with the Remote Desktop app.
Remote Desktop Protocol (RDP) has been a feature of Windows since the XP Pro days. It makes it easy to connect from one PC or device to another to retrieve files or provide PC support.
There are several free utilities out there that will get you set up with a remote connection. Some that come to mind are services such as join.me, TeamViewer, and Chrome Remote Desktop and are especially handy when connecting between different platforms. But if you’re in a pure Windows environment, here’s a look at how to enable the built-in RDP utility in Windows 10, which will allow you to connect to your Windows box remotely.
The Remote Desktop or RDP feature is disabled by default, so you will need to enable it in the settings. There are several ways to do this; let’s review the easiest.
-
- Open Settings
- Click System > Remote Desktop
-
- Click the toggle Enable Remote Desktop
- Click Confirm when prompted.

Expert Note:
You can also enable Remote Desktop using the System Properties. Press the Windows Key and Type: advanced system. Click View advanced system settings.

Click the Remote tab and select Allow remote connections to this computer. Keep the box checked for Network Level Authentication for better security. Also, note that you will need to enable incoming remote connections on the PC you’re connecting.
Remote Into Your PC
You have a couple of choices when it comes to how you remotely connect to the other computer. You can use the traditional desktop app or the Remote Desktop universal app. For this, I’m connecting to my Windows Home Server on my home network. I’m also going to use the app that you can install from the Store. It’s more versatile and can be used on mobile platforms, including iOS and Android.
Tip: If you have many PCs and devices on your home network, a useful free utility to use is Advanced IP Scanner.
Launch the app and type a name for the PC or device, its hostname or IP address, and select Connect.
Next, enter the username and password used for the computer you’re connecting into. Also, if you’re going to remote into it often, check the box to remember your credentials.
If you get the following security message, click Go ahead and Connect and check the box not to remind you again. You know what you’re doing; no reason for Windows to be constantly nagging you.
There you have it. You can now start using the remote computer for configuration, remote support, or however you need to use it.
I should also mention that you can go to Settings > connection settings in the app and configure the appearance, devices and make other adjustments that work for you.

More About Remote Desktop Connections
If you’re running a previous version of Windows or looking to remote access your Windows PC from your smartphone or tablets, check out the articles linked below for more.
- How to Enable Remote Desktop in Windows 7
- Make Remote Desktop Connections Work Faster
- Enable Remote Desktop for Windows 8
- Using the Windows Phone Remote Desktop App
- Remote Desktop Into Windows from a Mobile Device
![]()

Enable Remote Desktop for Windows 10 Pro.
The RDP feature is disabled by default, and to turn the remote feature on, type: remote settings into the Cortana search box and select Allow remote access to your computer from the results at the top.
System Properties will open the Remote tab.
How do I allow remote access to my computer?
To allow remote connections on the computer you want to connect to
- Open System by clicking the Start button. , right-clicking Computer, and then clicking Properties.
- Click Remote settings.
- Click Select Users.
- In the Remote Desktop Users dialog box, click Add.
- In the Select Users or Groups dialog box, do the following:
How do I setup Remote Desktop on Windows 10 home?
How to enable Remote Desktop on Windows 10 using Control Panel
- Open Control Panel.
- Click on System and Security.
- Under the “System” section, click the Allow remote access link.
- Under the “Remote Desktop” section, select the Allow remote connections to this computer option.
- Click the Apply button.
- Click the OK button.
Can’t RDP into Windows 10?
To enable remote connections on your Windows 10 computer, do the following:
- Go to Search, type remote settings, and open Allow Remote connections to your computer.
- Check Allow remote connections to this computer and click OK to save changes.
Can you Remote Desktop from Windows 10 home?
Although all version of Windows 10 can connect to another Windows 10 PC remotely, only Windows 10 Pro allows remote access. So if you have Windows 10 Home edition, then you won’t find any settings to enable Remote Desktop Connection on your PC, but you will still be able to connect to another PC running Windows 10 Pro.
How do I open Remote Desktop on Windows 10?
5 ways to open Remote Desktop Connection in Windows 10: Way 1: Open it in Start Menu. Click the bottom-left Start button to display the menu, expand All apps, open Windows Accessories and tap Remote Desktop Connection. Type remote in the search box on taskbar, and choose Remote Desktop Connection from the items.
Why can’t i remote access my computer?
This computer can’t connect to the remote computer. Try connecting again. If the problem continues, contact the owner of the remote computer or your network administrator. Allow connections from computers only from computers running Remote Desktop with Network Level Authentication (more secure)
How do I enable RDP network level authentication?
Open gpedit.msc applet.
- Navigate to Computer Configuration -> Administrative Templates -> Windows Components -> Remote Desktop Services -> Remote Desktop Session Host -> Security.
- Enable Require use of specific security layer for remote (RDP) connections and select RDP as Security Layer.
How can I access another computer using IP address?
Within the Settings menu, click “Remote Desktop” and then choose “Enable Remote Desktop.” Make a note of the name of the computer. Then, on another Windows computer, open the Remote Desktop app and type the name or IP address of the computer you want to connect to.
What is Windows 10 RDP?
On Windows 10, Microsoft introduced a new Remote Desktop app, which you can download from the Windows Store, and it aims to make it easier for anyone to connect to another computer over a local network or an internet connection. However, the app is just one piece of the puzzle.
How do I open RDP on Windows 10?
To change the Remote Desktop (RDP) port in Windows 10, do the following.
- Open the Registry Editor app.
- Go to the following Registry key. HKEY_LOCAL_MACHINESystemCurrentControlSetControlTerminal ServerWinStationsRDP-Tcp.
- On the right, modify the 32-Bit DWORD value “PortNumber”.
- Restart Windows 10.
How do I enable remote desktop in Windows 10?
Enable Remote Desktop for Windows 10 Pro. The RDP feature is disabled by default, and to turn the remote feature on, type: remote settings into the Cortana search box and select Allow remote access to your computer from the results at the top. System Properties will open the Remote tab.
How do I reinstall Remote Desktop on Windows 10?
First, uninstall the RDP and after that reinstall RDP Windows 10. Follow the steps to do so: Click Start > right-click on Computer > choose Properties. Choose the “Remote Desktop” tab > click Advanced > choose to Allow whether you have an older version or latest version of RDP installed on your system.
How do I RDP to a server?
Run the Remote Desktop Connection Client
- Open the Remote Desktop Connection Client by clicking Start > All Programs > Accessories > Communications > Remote Desktop Connection.
- Enter the IP address of the server in the Computer field and click Connect.
How do I use Windows Remote Desktop over the Internet?
How to Access Windows Remote Desktop Over the Internet
- By default, Windows Remote Desktop will only work on your local network.
- Next, you’ll log into your router and locate the Port Forwarding section.
- You now should be able to log into Remote Desktop over the internet by connecting to the public IP address your router exposes for your local network.
How do I connect to a server on Windows 10?
How to Map a Network Drive in Windows 10
- Open File Explorer and select This PC.
- Click the Map network drive drop-down in the ribbon menu at the top, then select “Map network drive.”
- Select the drive letter you want to use for the network folder, then hit Browse.
- If you receive an error message, then you’ll need to turn on network discovery.
Does Windows 10 home have Remote Desktop?
The Remote Desktop Connection client program is available in all editions of Windows including Windows 10 Home and Mobile. The RDP server required to access a Windows PC remotely is however only available on PCs running either Windows 10 Professional or Enterprise editions.
How do I open Remote Desktop Connection?
To allow remote connections on the computer you want to connect to
- Open System by clicking the Start button. , right-clicking Computer, and then clicking Properties.
- Click Remote settings.
- Click Select Users.
- In the Remote Desktop Users dialog box, click Add.
- In the Select Users or Groups dialog box, do the following:
How do I start Remote Desktop from command line?
Run command for remote desktop (RDP client) The Run command for Windows Remote desktop application is Mstsc. Just open Run from start menu and type mstsc in the text box next to open and press enter. This command mstsc can be used from command line too.
How can I tell if remote access is enabled?
How to Check If Remote Desktop Is Enabled
- Right-click the “My Computer” or “Computer” icon on your desktop and click “Properties.”
- Click the “Remote” tab to see the related Remote Desktop settings.
- Check if the Remote Desktop feature is enabled by seeing if the “Don’t allow connections to this computer” is not selected.
Does Windows 10 home have Remote Desktop Connection?
The Remote Desktop Connection client program is available in all editions of Windows including Windows 10 Home and Mobile. The RDP server required to access a Windows PC remotely is however only available on PCs running either Windows 10 Professional or Enterprise editions.
How do I ping a remote computer?
Steps
- Open the Command Prompt or Terminal. Every operating system has a command line interface that will allow you to run the Ping command.
- Enter the Ping command. Type ping hostname or ping IP address .
- Press Enter to see your ping output. The results will be displayed beneath the current command line.
What is Remote Desktop Windows 10?
Use Remote Desktop on your Windows 10 PC or on your Windows, Android, or iOS device to connect to a PC from afar. Set up the PC you want to connect to so it allows remote connections: On the device you want to connect to, select Start > Settings > System > Remote Desktop, and turn on Enable Remote Desktop.
How do I use Remote Assistance in Windows 10?
Send Invite to Control Computer
- Hold the Windows Key, then press “R” to bring up the Run box.
- Type “msra“, then press “Enter“
- Select “Invite someone you trust to help you“.
- You may be able to select “Use e-mail to send an invitation” if your default email client is setup properly.
How do I enable Remote Desktop on Server 2016?
Allowing Remote Desktop
- Open Server Manager.
- Within the Server Manager window, select Local Server from the left hand side.
- Click on the Disabled text which will open the System Properties window in the Remote tab.
- From the System Properties window, select “Allow remote connections to this Computer” as shown below.
Photo in the article by “Ybierling” https://www.ybierling.com/en/blog-socialnetwork-linkedinactivelyseekingemployment
(Image credit: Future)
On Windows 10, the «Remote Desktop» app makes connecting to other computers easy over the local network and internet. It’s also the experience that replaces the built-in legacy «Remote Desktop Connection» program, which is still available.
The app is user-friendly, but depending on the computer you need to establish a connection, the app is only one of the steps since you may have to configure additional settings, including forwarding the appropriate port in the router to connect to another device. Also, there’s a small problem. You can install the Remote Desktop app on any edition of Windows 10. However, the remote desktop protocol (RDP) that makes the connection possible is only available on the «Pro» edition and business variants of the operating system. (Windows 10 Home doesn’t allow remote connections.)
This guide will walk you through the steps to allow remote connections from within the local network or internet and how to use the Remote Desktop app to start a remote session.
How to allow remote connections on Windows 10
Remote Desktop makes it easy to connect to other computers. However, the configuration will depend on whether the connection happens over the local network or through the internet.
Enable remote connections
In a local area network (LAN), you only need to enable the option to allow remote desktop connections on your computer. You can complete this task from the Settings app or Control Panel.
Settings app
To enable the Remote Desktop feature using the Settings app, use these steps:
- Open Settings.
- Click on System.
- Click on Remote Desktop.
- Turn on the «Enable Remote Desktop» toggle switch.
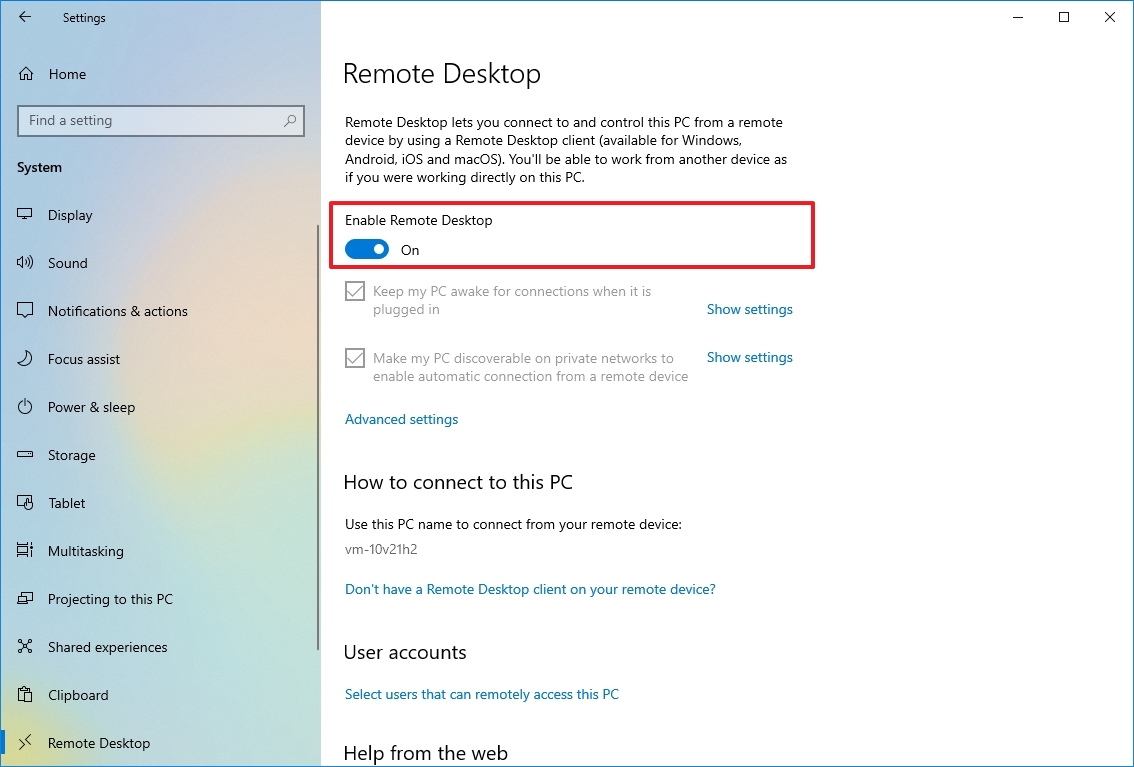
- Click the Confirm button.
Once you complete the steps, remote desktop connections will be allowed on the device. Windows 10 will also add the necessary rules in the built-in Microsoft Defender Firewall. However, you may need to configure the rules manually if you have a third-party security solution.
Control Panel
To enable remote connections on Windows 10, use these steps:
- Open Control Panel.
- Click on System and Security.
- Under the «System» section, click the «Allow remote access» option.
- Click the Remote tab.
- Under the «Remote Desktop» section, check the «Allow remote connections to this computer» option.
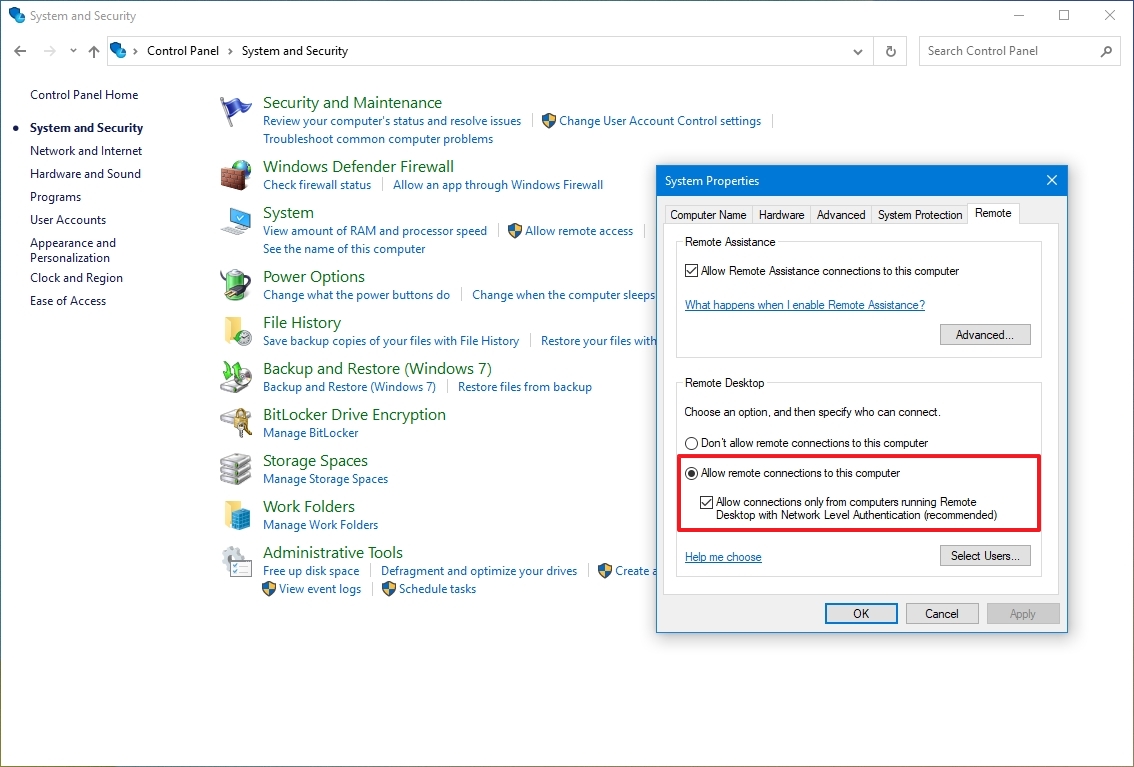
- Check the «Allow connections only from computers running Remote Desktop with Network Level Authentication» option.
- Click the OK button.
- Click the Apply button.
- Click the OK button.
Continue with the steps below if you need to configure a remote desktop using an internet connection. If you have to connect to another device within the local network, skip to the steps below, and continue with the start a remote desktop connection instructions.
Enable remote connections on router
If the remote connection happens over an internet connection, you will also have to configure the router to allow the remote connection. In addition, you will need to know the public address to contact the remote computer.
Configure static IP address
A computer usually receives a dynamic IP address from the DHCP server (router), which means it can change. If you plan to use the remote desktop feature for some time, you may want to configure a static IP address to avoid reconfiguring port forwarding on the router when the device changes the network configuration.
Control Panel
To configure a permanent network configuration, use these steps:
- Open Control Panel.
- Click on Network and Internet.
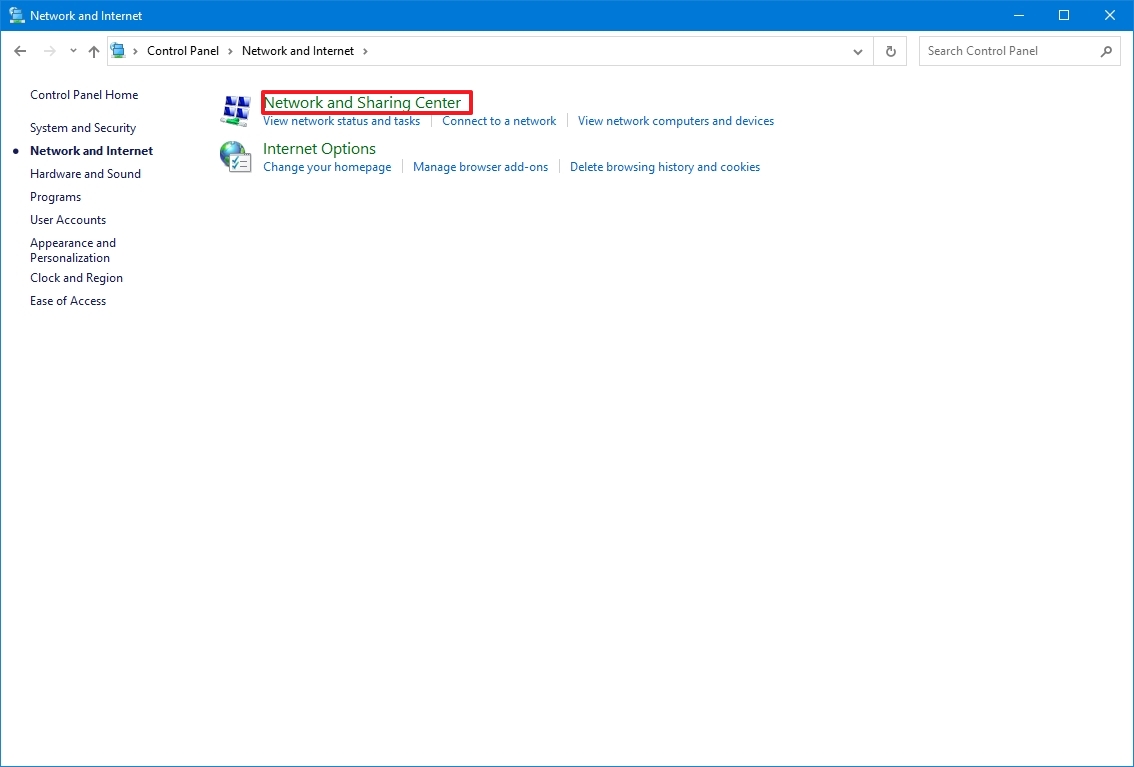
- Click on Network and Sharing Center.
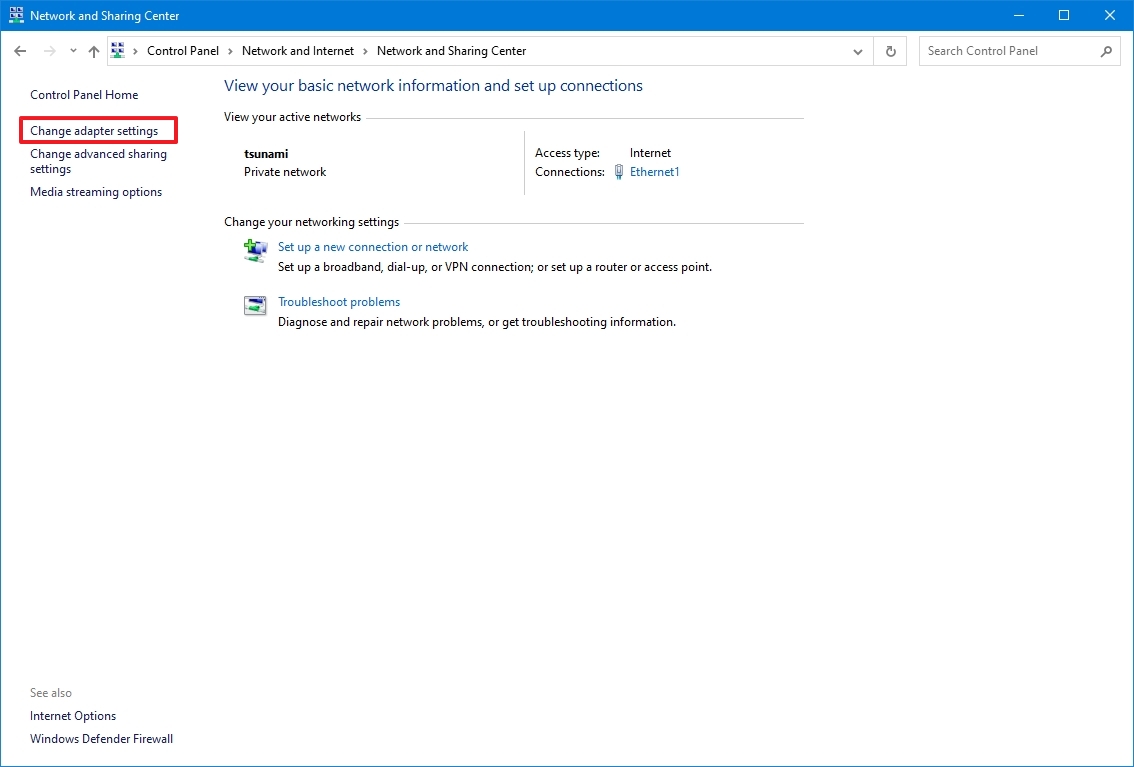
- Click the «Change adapter settings» option from the left navigation pane.
- Right-click the active network adapter and select the Properties option.
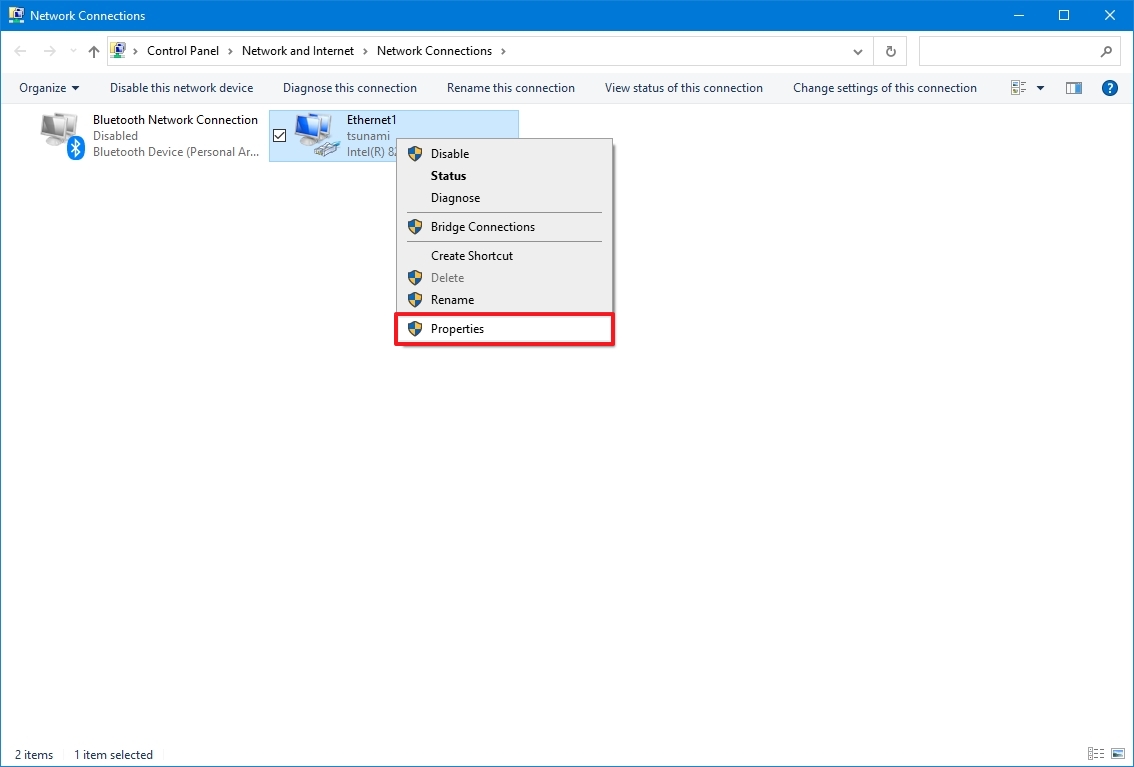
- Select the «Internet Protocol Version 4 (TCP/IPv4)» option.
- Click the Properties button.
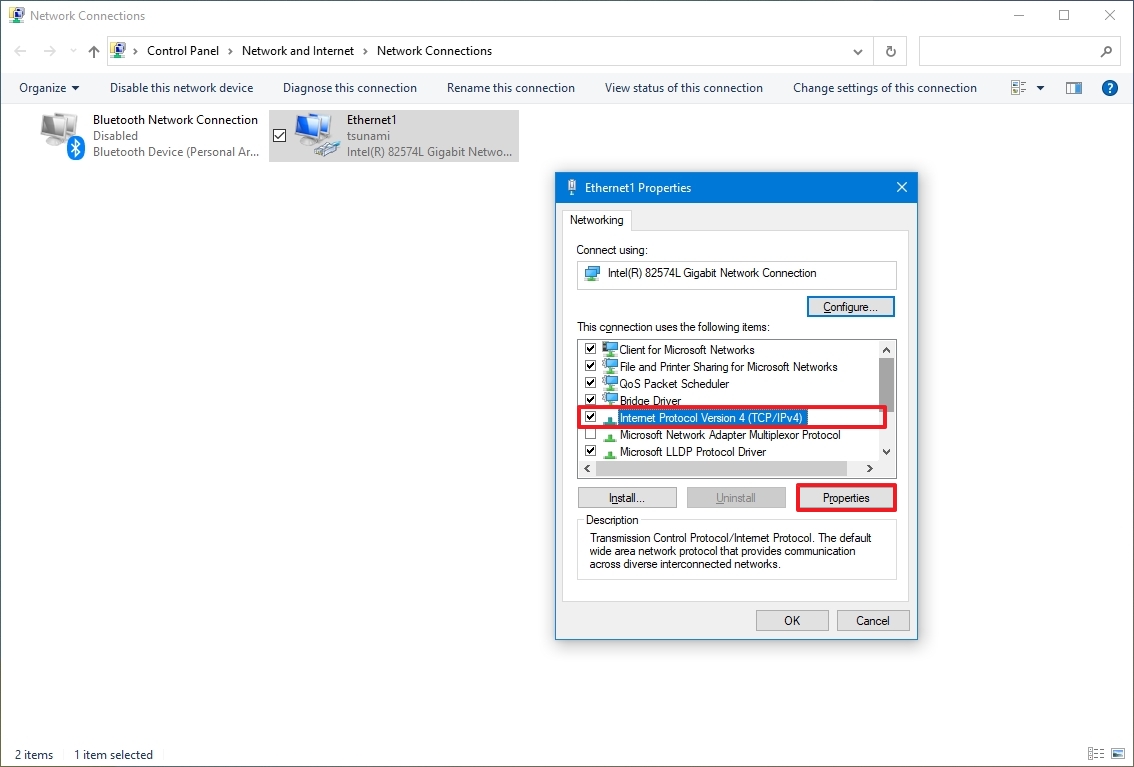
- Click the General tab.
- Select the «Use the following IP address» option.
- Specify a local IP address outside the local DHCP scope to prevent address conflicts – for example, 10.1.4.201.
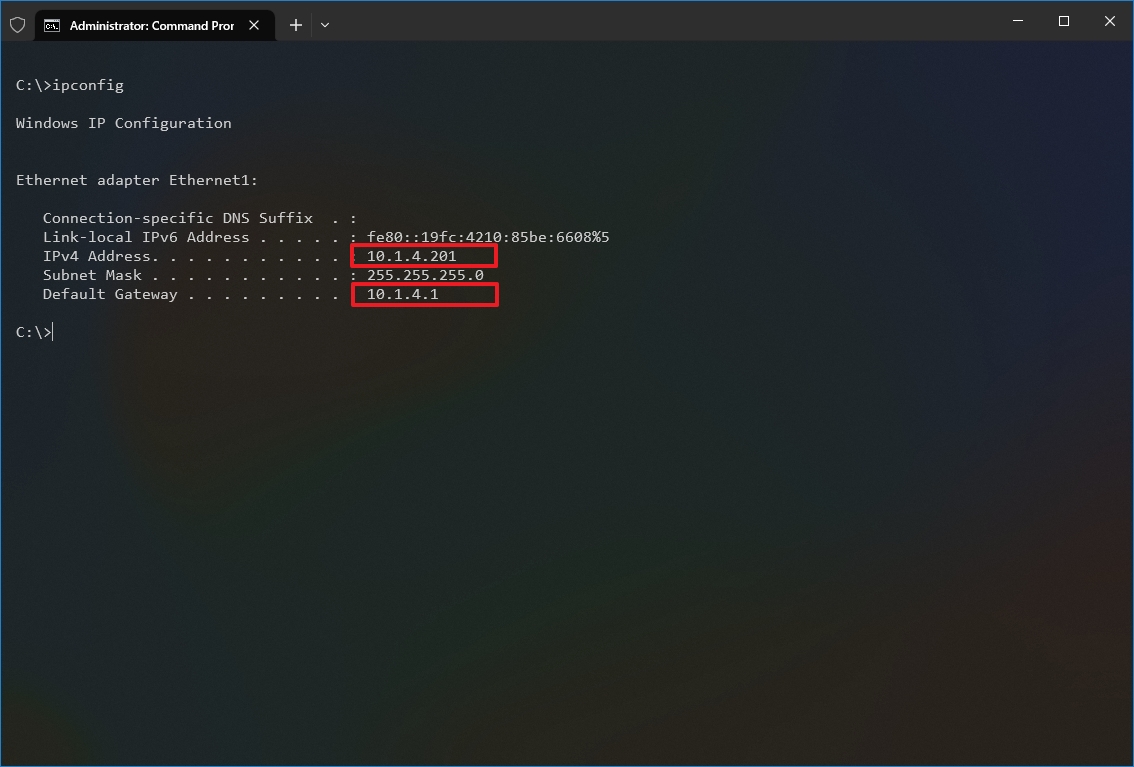
- Quick tip: Usually, you’ll find this information inside the DHCP settings section on the router. Since not every router is created equal, you may need to consult your manufacturer support website for more specific details to find this information. If you’re unsure of the configuration you have to use, use your current TCP/IP configuration as a reference, which you can review with the ipconfig /all command in Command Prompt.
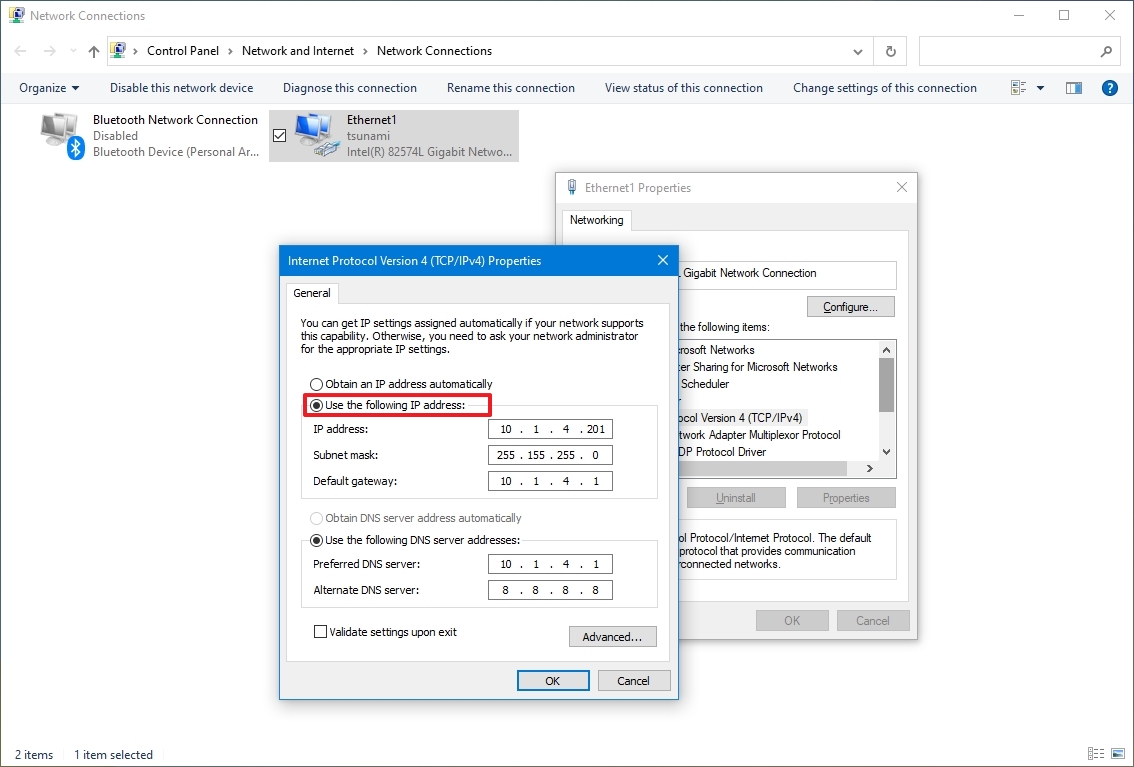
- Specify a subnet mask for the network (255.255.255.0), but the system usually fills this information from you based on the «IP address.»
- Specify the default gateway address, which should be the router’s address — for example, 10.1.4.1.
- Under the «Use the following DNS server addresses» section, in the «Preferred DNS server» field, specify the IP address of your DNS server, which in most cases is also the router’s address — for example, 10.1.4.1.
- Quick tip: If you can’t connect to the internet, try using one of the Google Public DNS addresses (such as 8.8.8.8) for the «Alternate DNS server» option.
- Click the OK button.
- Click the Close button.
After you complete the steps, the network configuration will apply, and the IP settings will never change.
Some routers include a feature to make the current TCP/IP configuration static. If you want to use this option, consult your manufacturer support website for specific steps to complete this task.
Identify network public IP address
You will also need the remote network’s public IP address to contact the device over the internet.
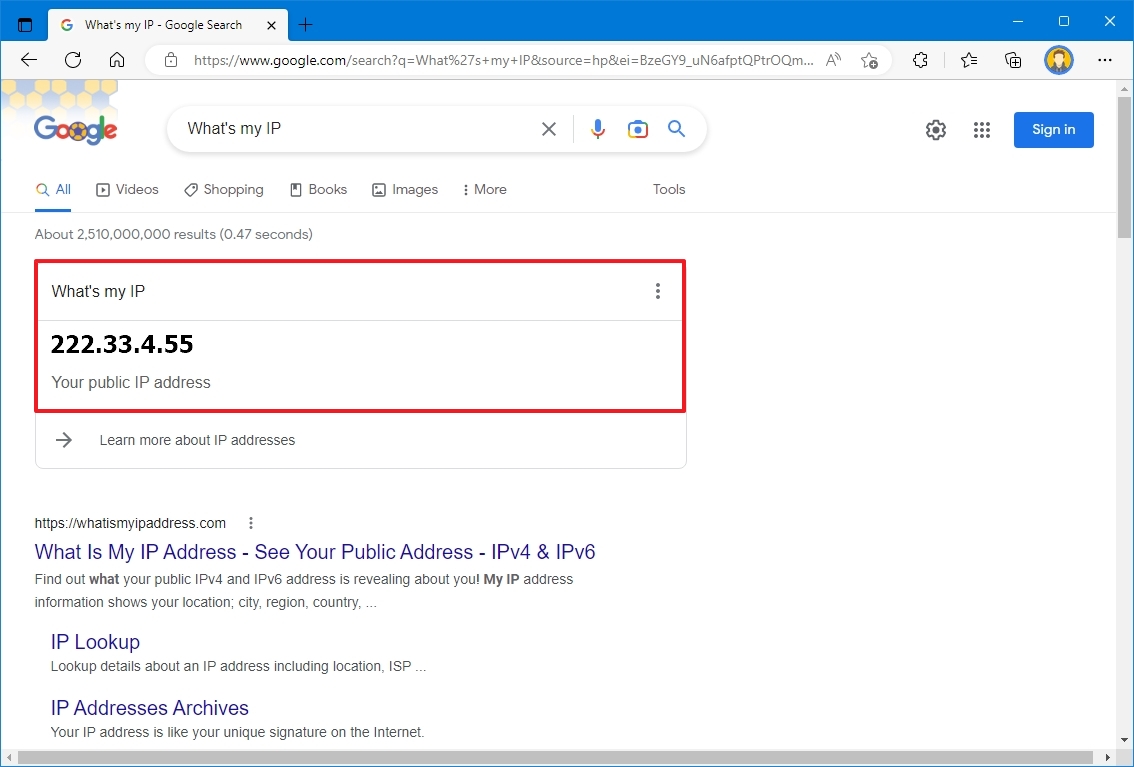
To determine the IP address assigned by the Internet Service Provider (ISP), use these steps:
- Open the web browser.
- Visit Bing.com or Google.com.
- Search for «What’s my IP.»
- Confirm the public IP address in the first result.
Typically, internet providers also offer dynamic public IP addresses for residential customers, which means that your public IP address may change from time to time.
If you need a more reliable solution, you may want to look into «Dynamic Domain Name System» (DDNS) services (such as DynDNS, OpenDNS, No-IP, or Asus.com for Asus routers), which can track public IP changes. Alternatively, you can also contact your ISP to request a static IP address, which might cost you extra since this is typically a feature reserved for businesses.
Configure port forwarding
You must also forward the TCP port 3389 on the router to allow connections through the internet to the computer in the local network.
Quick note: The router interface experience can vary depending on the manufacturer. However, you can use these instructions as a reference to configure your router. You can always check the manufacturer support website for more specific details.
To forward a port on your router, use these steps:
- Open Start.
- Search for Command Prompt and click the top result to open the app.
- Type the following command to check the current TCP/IP configuration and press Enter: ipconfig
- Under the «IPv4 Address» field, confirm the device address — for example, 10.1.4.201.
- Under the «Default Gateway» field, confirm the device gateway address (the router address) — for example, 10.1.4.1.
- Open your preferred browser.
- Type the router’s IP address (default gateway) in the address bar and press Enter.
- Sign in to the router using the correct username and password.
- Quick tip: If you have never done this, and you are using the router provided by the ISP, you may be able to find the information on a sticker attached to the device.
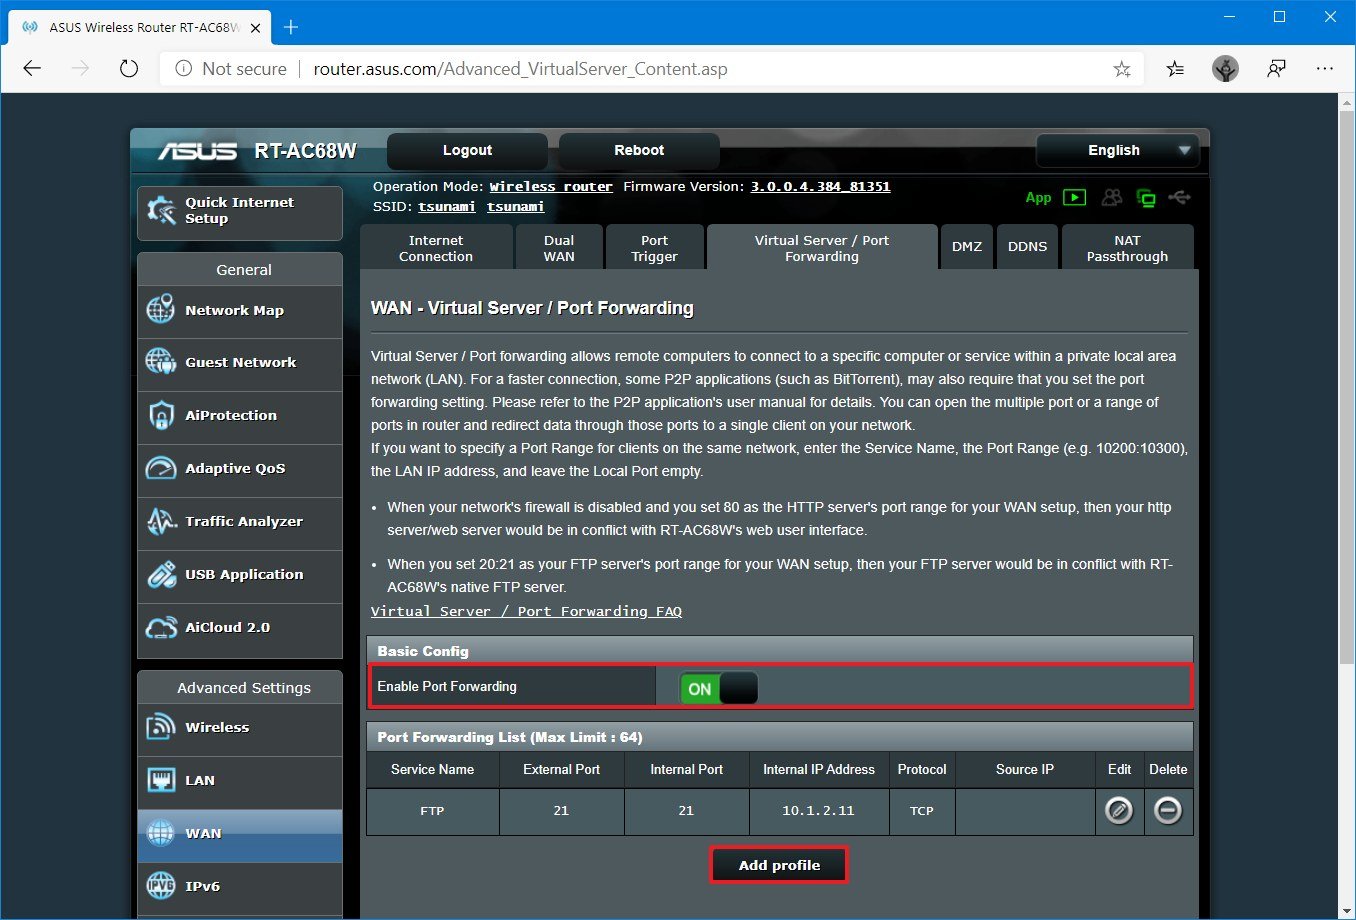
- Open the Port Forwarding settings page.
- Confirm that the Port Forwarding service is enabled (if applicable).
- Under the port forwarding list, click (in this case) the Add profile button.
- Create a new port forward with the required information — for example:
- Service name: (optional) Specify the reference name for the service.
- Protocol: TCP.
- External Port: 3389.
- Internal Port: 3389.
- Internal IP Address: Specify the IP address of the computer you’re trying to connect — for instance, 10.1.4.100.
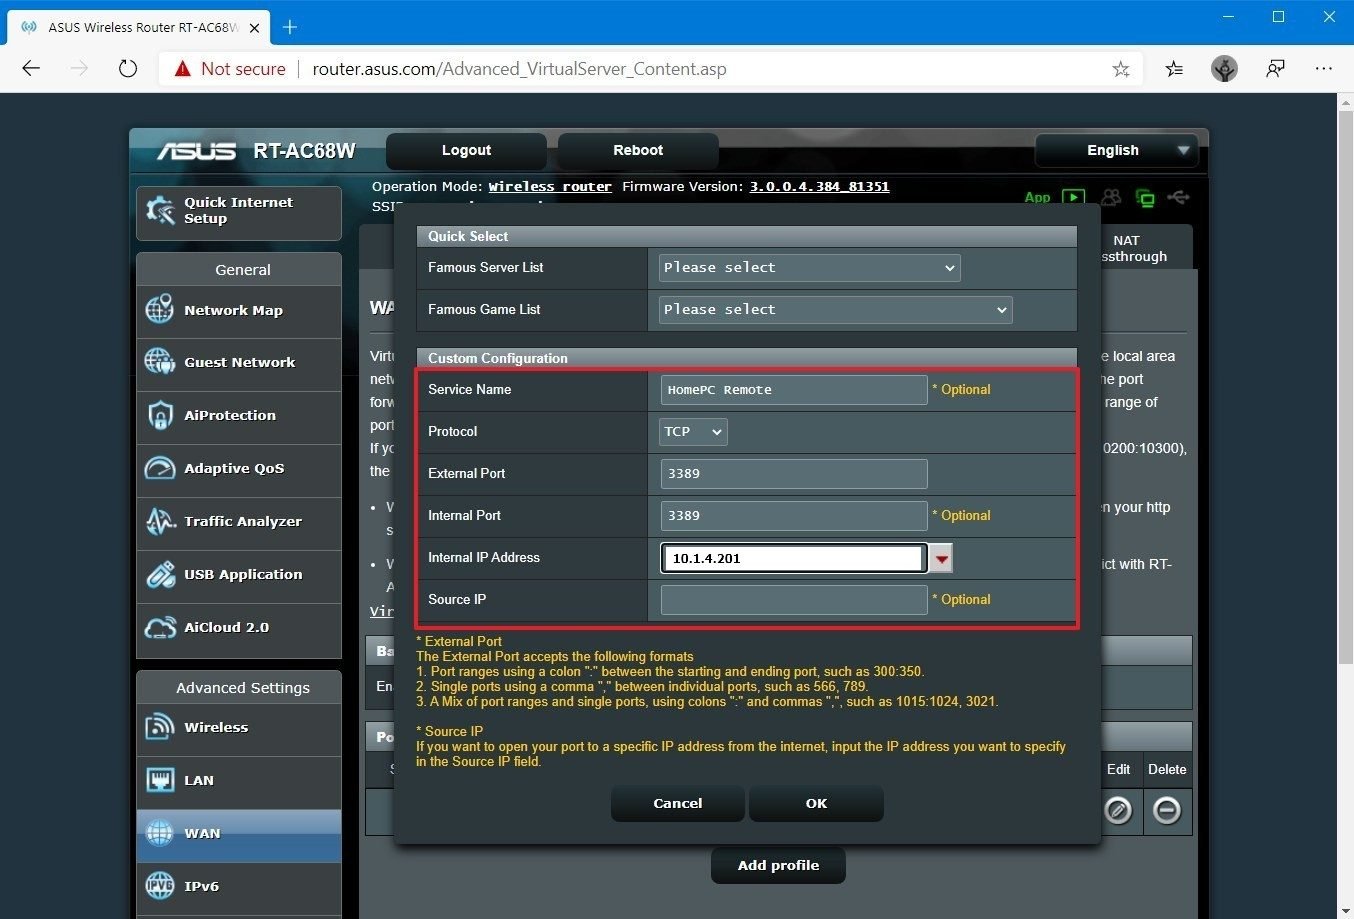
- Click the OK button.
Once you complete the steps, the port will open on the router, allowing remote desktop connections through the internet to that specific device.
How to establish remote desktop connection on Windows 10
After setting up the computer and router, you can initiate a remote connection using the Remote Desktop app on Windows 10.
Install Remote Desktop app
The Remote Desktop app should already be available on Windows 10, but you can always install it from the Microsoft Store.
To install the Remote Desktop app on Windows 10, use these steps:
- Open Microsoft Remote Desktop app page (opens in new tab).
- Click the Get (or Install) button.
- Click the Open Microsoft Store button.
- Click the Get (or Install) button.
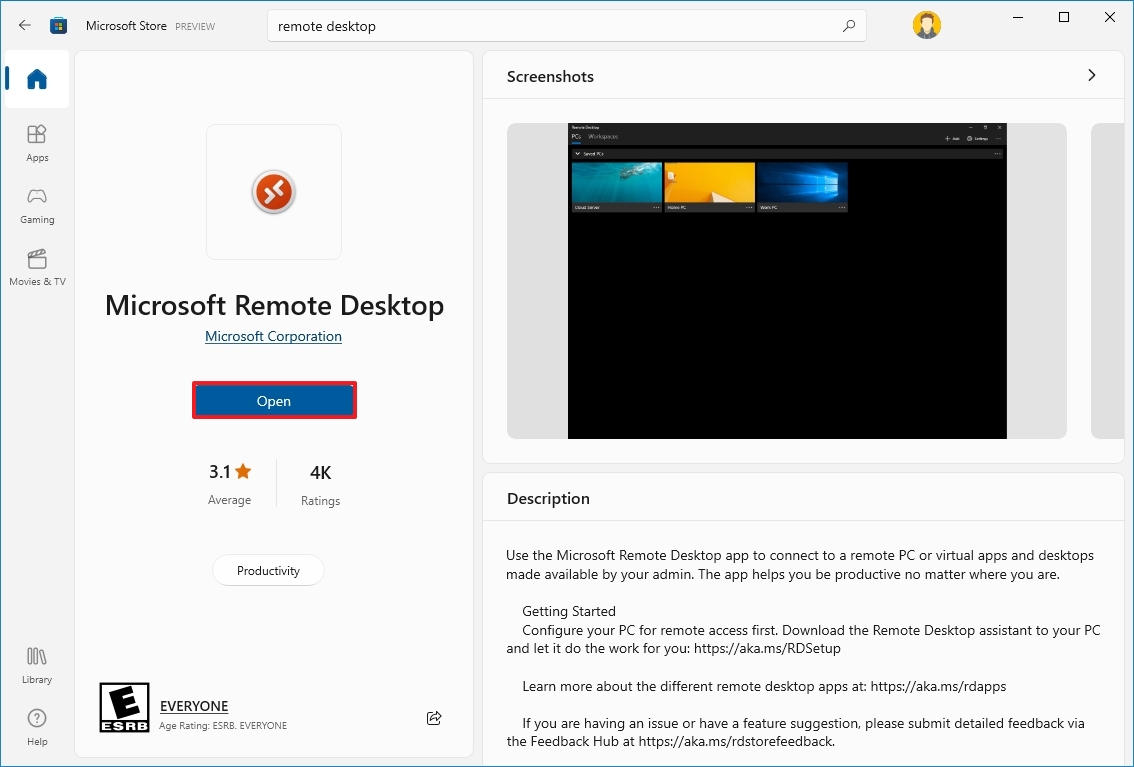
Once you complete the steps, open the app from within the Microsoft Store or Start menu.
Start remote desktop connection
To connect to a computer remotely on Windows 10, use these steps:
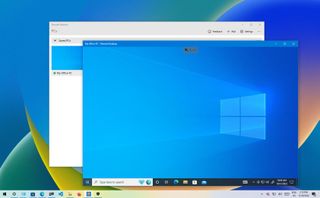
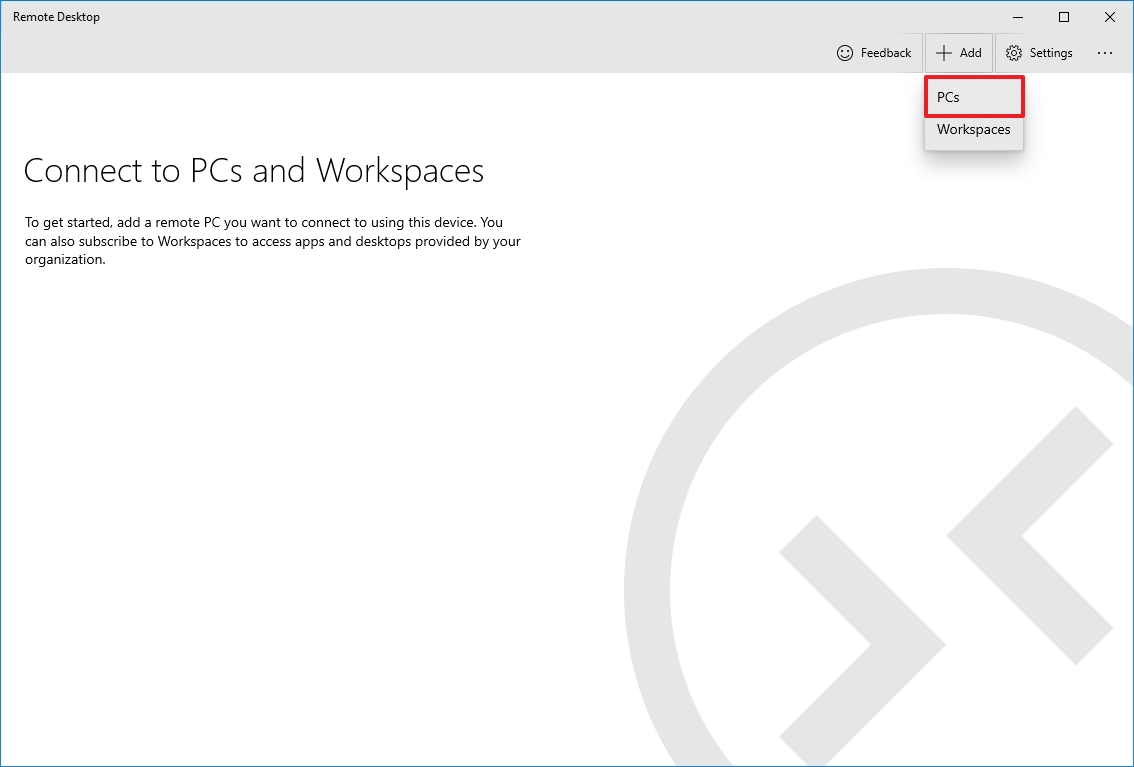
- Open the Remote Desktop app.
- Click the + Add button in the top right.
- Click the PCs option.
- Under the «PC name» section, specify the TCP/IP address of the remote computer:
- If the device is inside a private network, enter the local IP address.
- If the device is in a remote network (via the internet), enter the public IP address.
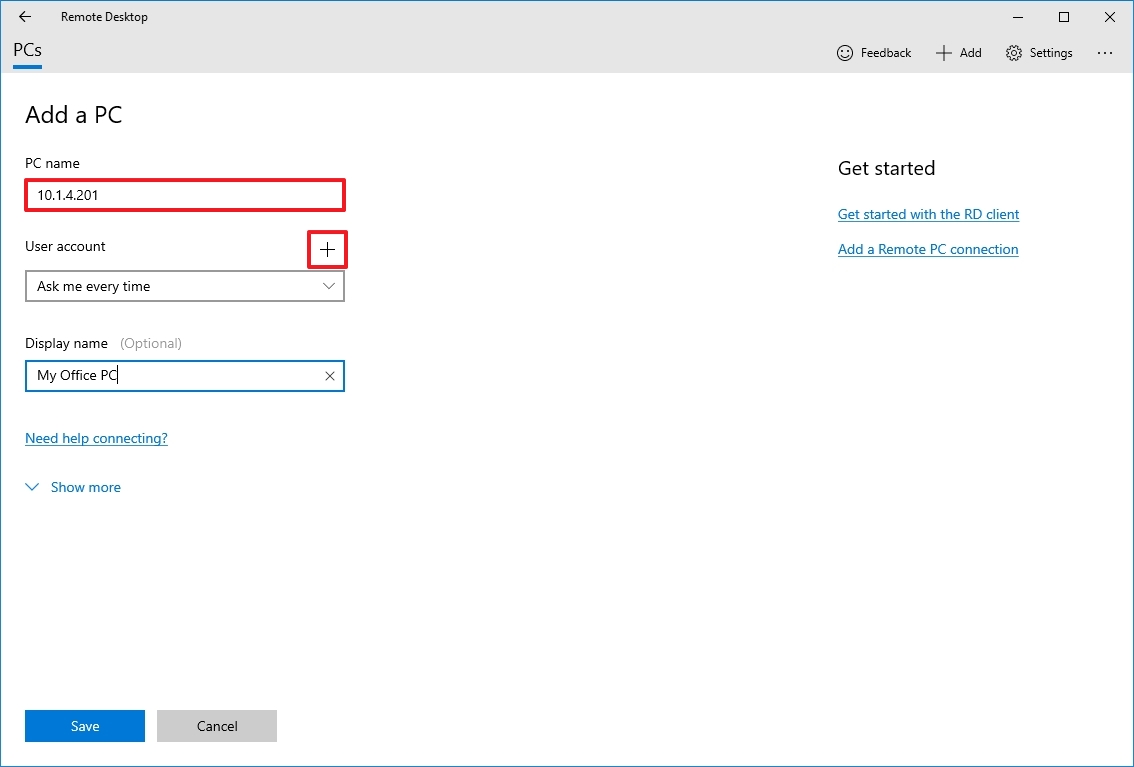
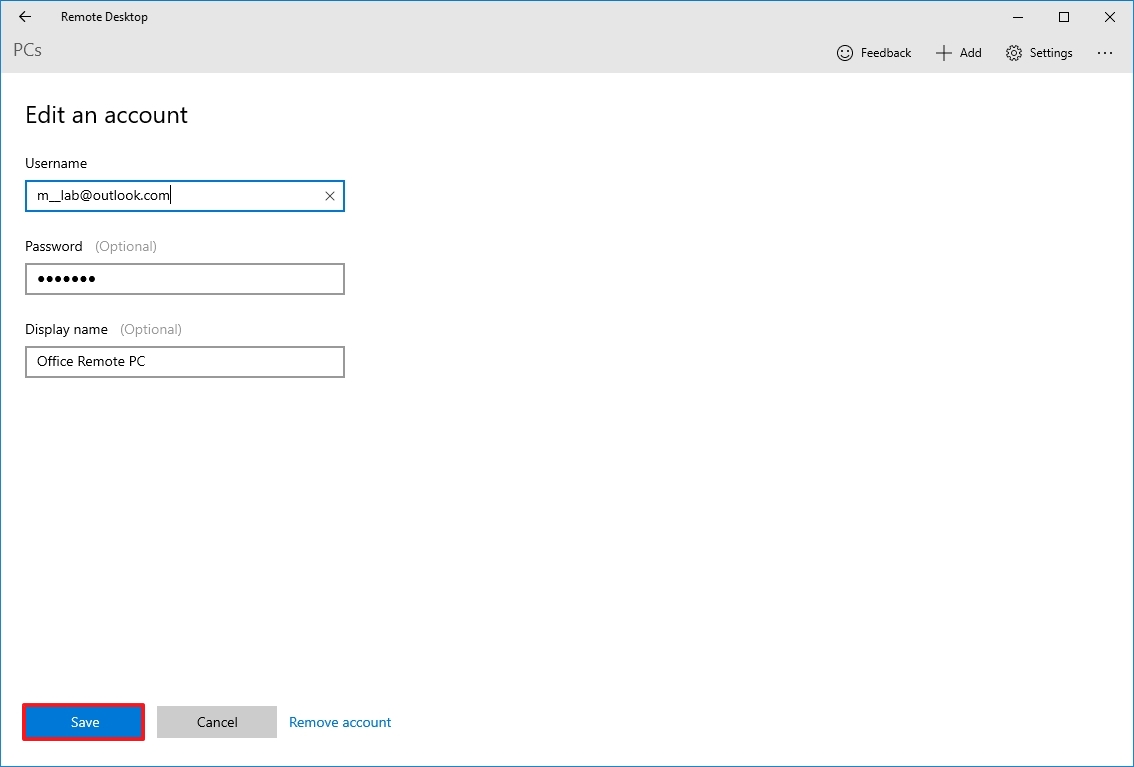
- Under the «User account» section, click the + (plus) button in the top right.
- Confirm the account information to sign in to the remote computer:
- If the remote device is using a Microsoft account, enter that Microsoft account sign-in information.
- If the remote device uses a local account, enter the local username and password to sign in.
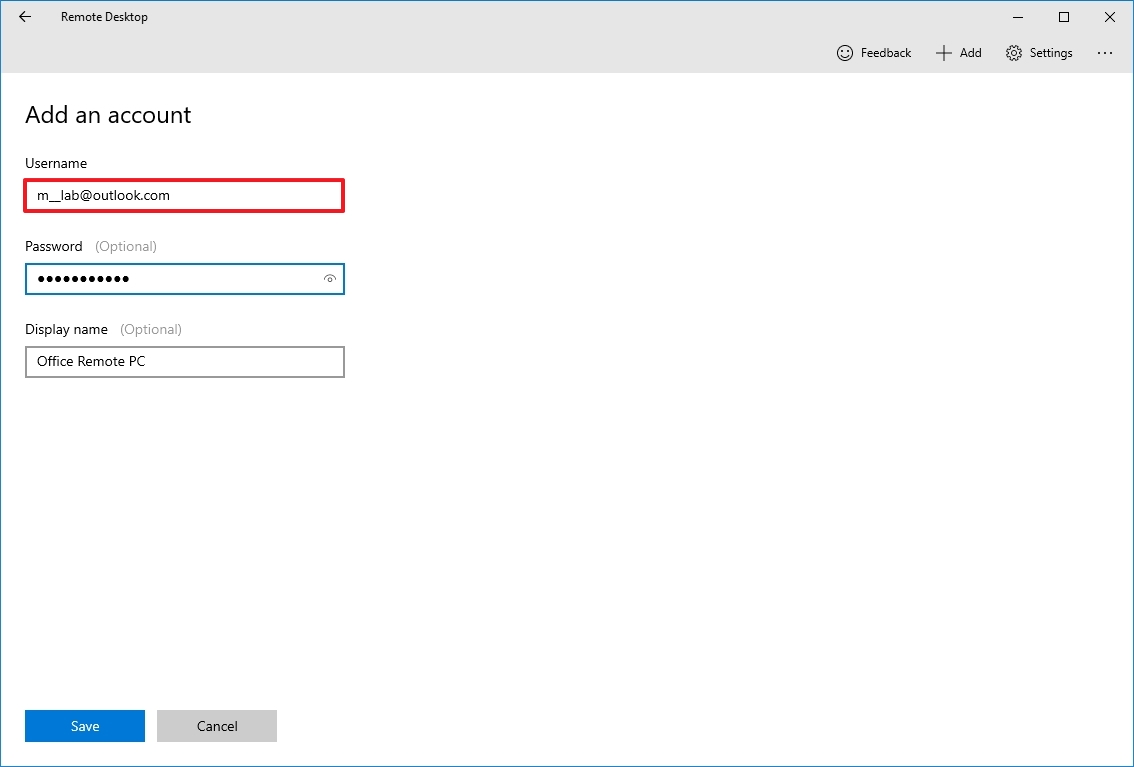
- (Optional) Under the «Display name» section, specify the account settings’ name.
- Click the Save button.
- (Optional) Under the «Display name» section, specify the connection’s name — for example, Office Remote PC.
- Click the Show more option.
- (Optional) Select additional settings as necessary.
- Quick tip: The additional settings include the option to connect using an admin session, set the remote session resolution, and clipboard, among others. Typically, you don’t need to configure these options, and you should only use them depending on the scenario.
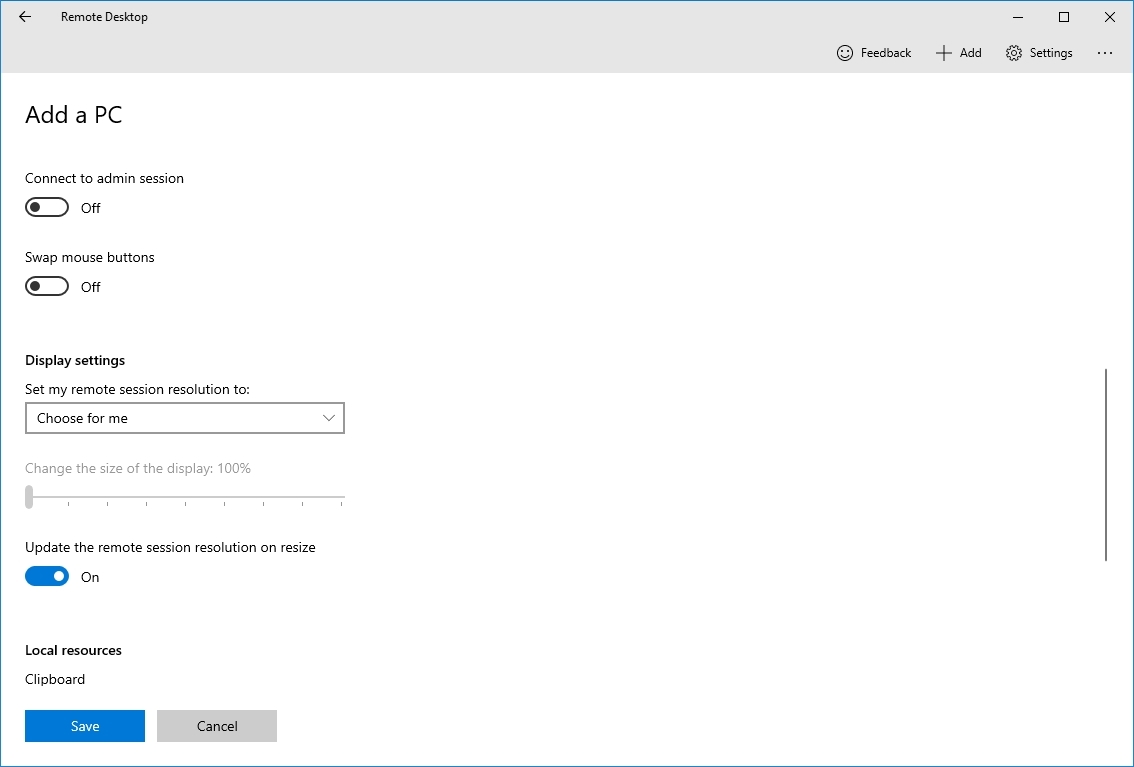
- Click the Save button.
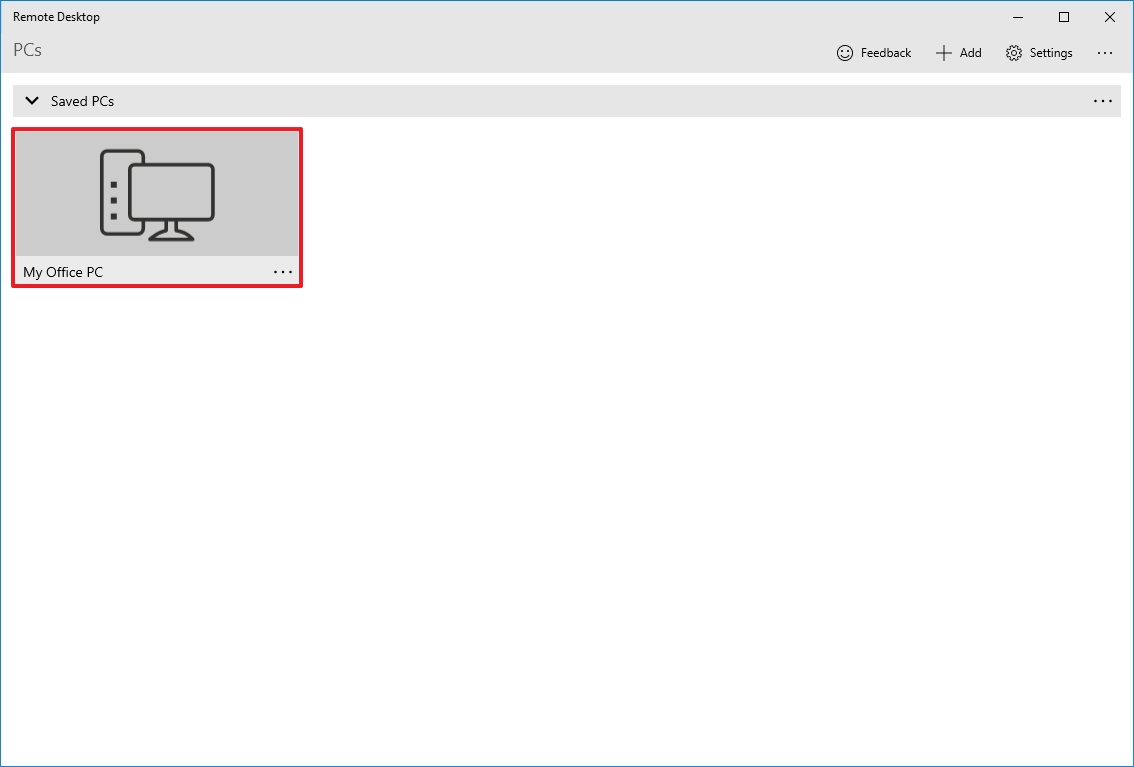
- Under the «Saved Desktops» section, click the connection to start a remote session.
- Check the «Don’t ask about this certificate again» option (if applicable).
- Click the Connect button.
After you complete the steps, the remote connection should establish without problems if everything has been configured correctly.
If you want to terminate the session, you can close the window, click the three-dotted menu button from the top-middle and then click the Disconnect button.
Change app and connection settings
On Windows 10, the Remote Desktop app allows you to customize various settings, including additional configuration options, and modify existing settings.
Change general settings
To change general settings in the Remote Desktop app, use these steps:
- Open the Remote Desktop app.
- Click the Settings button in the top right.
- Select the user account from the list.
- Click the Edit (pen) button to adjust the settings.
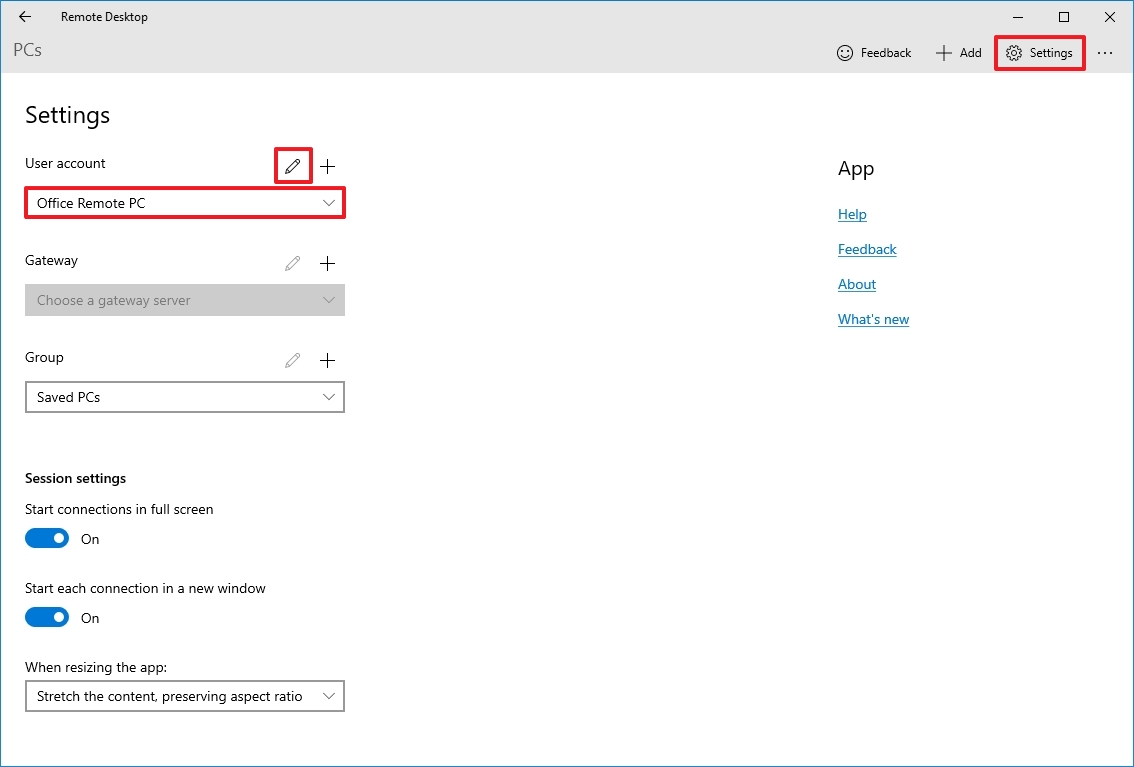
- Click the Save button.
You can also pre-add additional user accounts (with the plus + button) that you can use later to connect to other devices or as a different user.
The Gateway option allows you to set a gateway server, but you’ll rarely need to use this option. Also, the Group option enables you to organize connections into different and more manageable groups.
Change session settings
To change the session settings for Remote Desktop on Windows 10, use these steps:
- Open the Remote Desktop app.
- Click the Settings button in the top right.
- Turn on or off the «Start connections in full screen» toggle switch.
- Turn on or off the «Start each connection in a new window» toggle switch.
- Use the «When resizing the app» drop-down menu to choose how the remote desktop session will look as you resize the app:
- Stretch the content, preserving aspect ratio (recommended).
- Stretch the content.
- Show scroll bars.

- Use the «Use keyboard command with a» drop-down menu to choose whether shortcuts (such as «Ctrl + C» and «Ctrl + V») work only locally or on the remote desktop. Options available include.
- My local PC only.
- My remote session when it’s in full screen (recommended).
- My remote session when it’s in use.
- (Optional) Turn on the «Prevent the screen from timing out» toggle switch.
Alongside editing the account and session settings, you can also enable the option to show a preview of the remote desktop in the connection, which adds a visual queue to make it easier to find the connection in the app.
Change connection settings
To edit the settings of a remote connection, use these steps:
- Open the Remote Desktop app.
- Click the menu (three-dotted) button in the connection and select the Edit option.
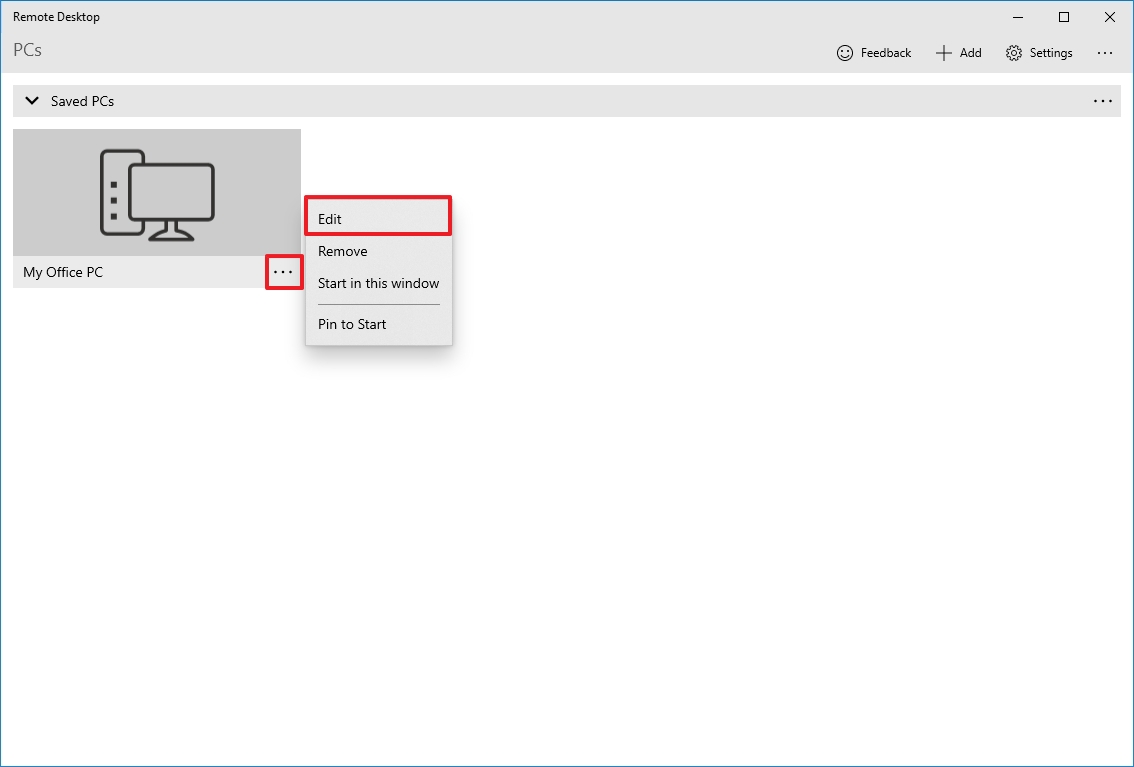
- Change the device name, account, and settings as needed.
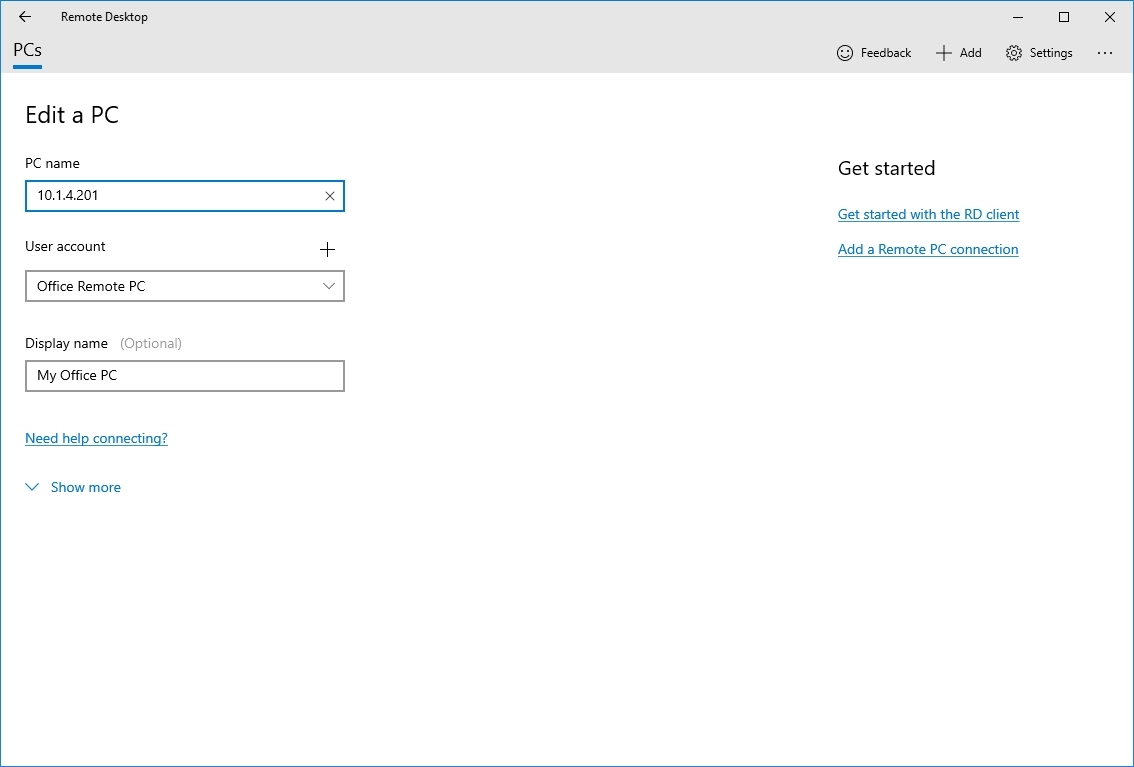
- Click the menu (three-dotted) button in the connection and choose the Remove option to delete it.
- Click the menu (three-dotted) button in the connection, and choose the Pin to Start option to quickly access the remote computer from the Start menu.
Once you complete the steps, the settings will save and apply automatically in the connection.
How to troubleshoot remote desktop connection on Windows 10
Typically, you won’t find issues using the Remote Desktop app, but if you cannot connect to a device, you will need to troubleshoot the problem.
Confirm firewall settings
Windows 10 opens the required firewall ports automatically when you configure Remote Desktop, but it might not always be the case. If the connection fails, check the firewall to ensure it’s allowing the Remote Desktop service.
To enable remote connections through the firewall on Windows 10, use these steps:
- Open the Windows Security app.
- Click on Firewall & network protection.
- Click the «Allow an app through firewall» option.
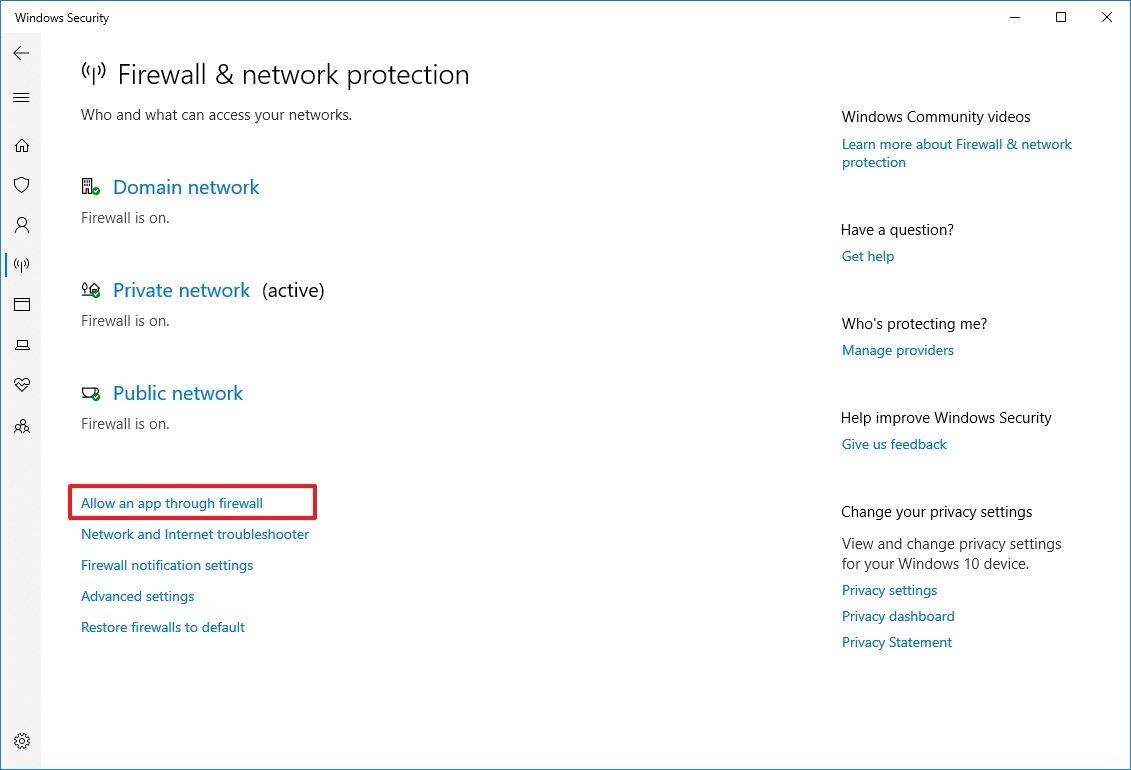
- Click the Change settings button.
- Check the Remote Desktop option and check the options for Private and Public.
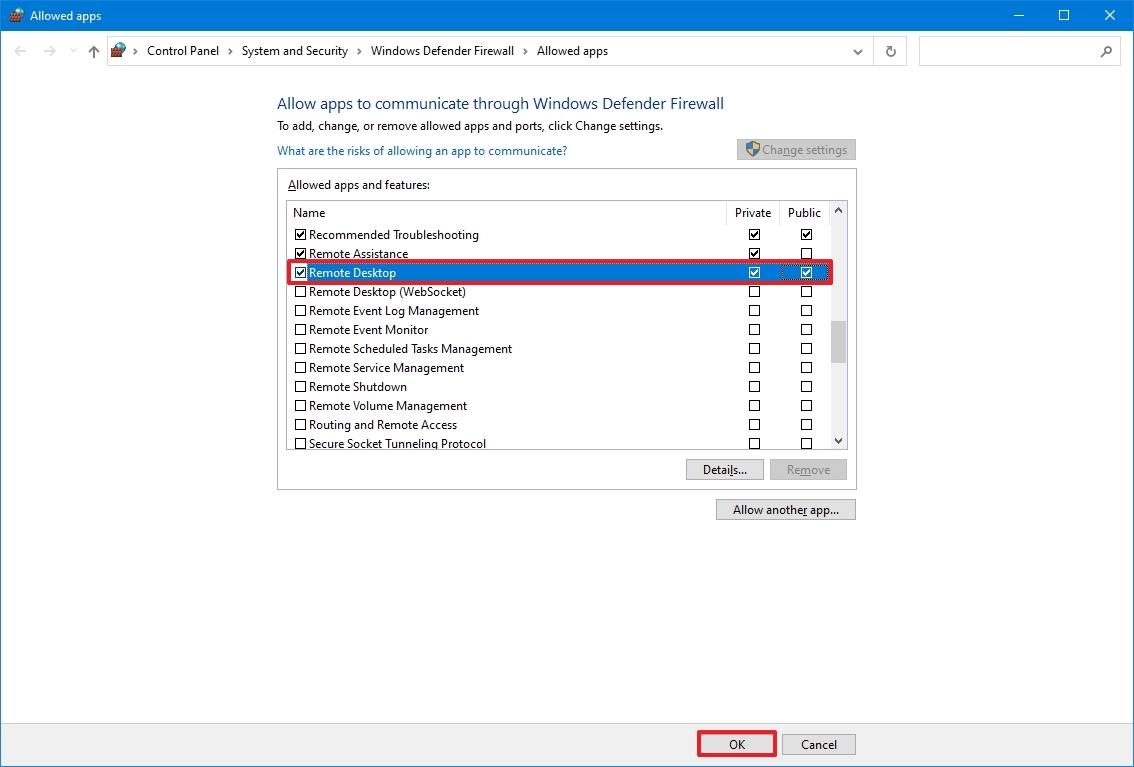
- Click the OK button.
If you have a third-party firewall or antivirus, you may want to disable these security applications to check if you can connect. You may need to check the software support website for more specific details to complete this task.
Unblock the remote connection port
If the settings are correct, and you still can’t connect, there’s a chance the internet provider is blocking the remote desktop port for security reasons. In this case, you may want to contact the ISP directly to resolve the issue.
Use the computer IP address (not the name)
When using the Remote Desktop app, it’s better to use the device’s IP address instead of the computer name. Otherwise, you may stumble upon some resolution issues.
Also, when adding a new computer, remember to enter the appropriate IP address. For example, use the local IP address to connect remotely from within the private network and use the correct public IP address to connect over the internet.
Confirm remote desktop service
You may also be unable to connect because the required remote desktop services are not running on Windows 10.
To determine whether the remote desktop service is running on your device, use these steps:
- Open Start.
- Search for Services and click the top result to open the app.
- Select the «Remote Desktop Service» and check that the «Status» column reads Running.
- If it’s not running, right-click the service and select the Start option.
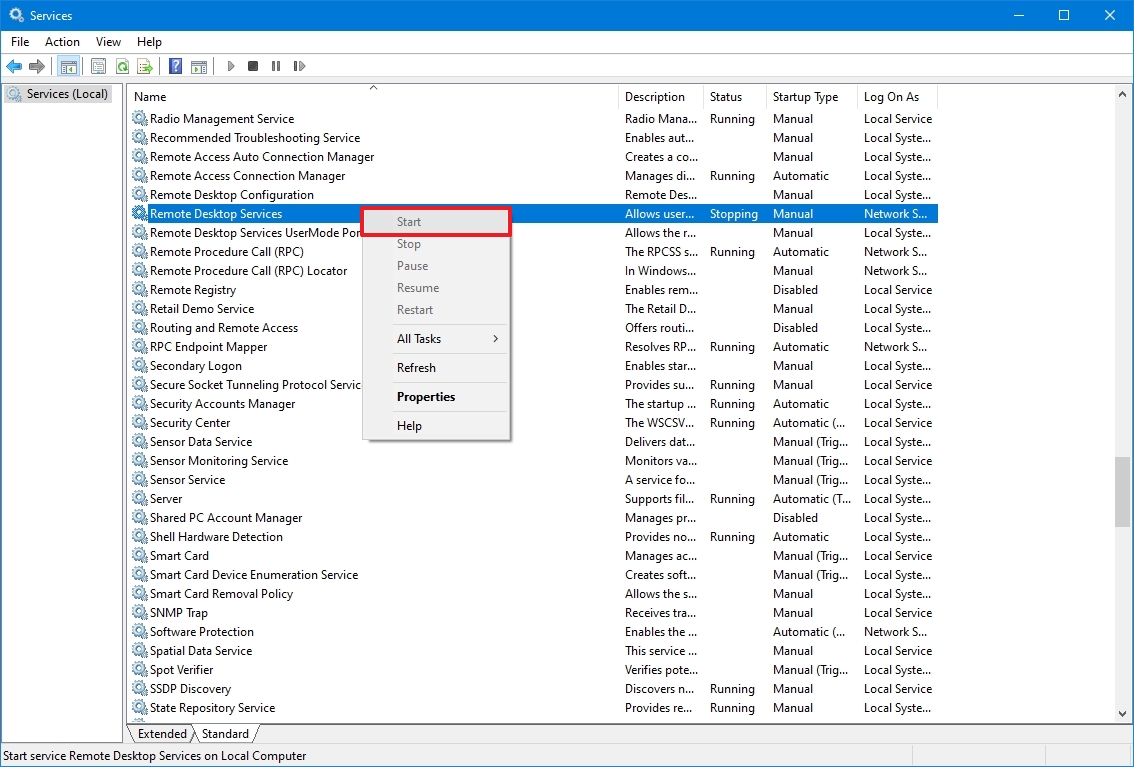
After you complete the steps, you should be able to establish a remote session on Windows 10.
Switch to Internet Protocol Version 4 (TCP/IPv4)
Windows 10 can use both networking stacks, IP version 4 (IPv4) and version 6 (IPv6) — also known as dual-stack — but sometimes, it’ll choose version 6 for the connection, which may cause problems with the remote desktop protocol (RDP).
To set IPv4 as the default networking stack on Windows 10, use these steps:
- Open Control Panel.
- Click on Network and Internet.
- Click on «Network and Sharing Center.»
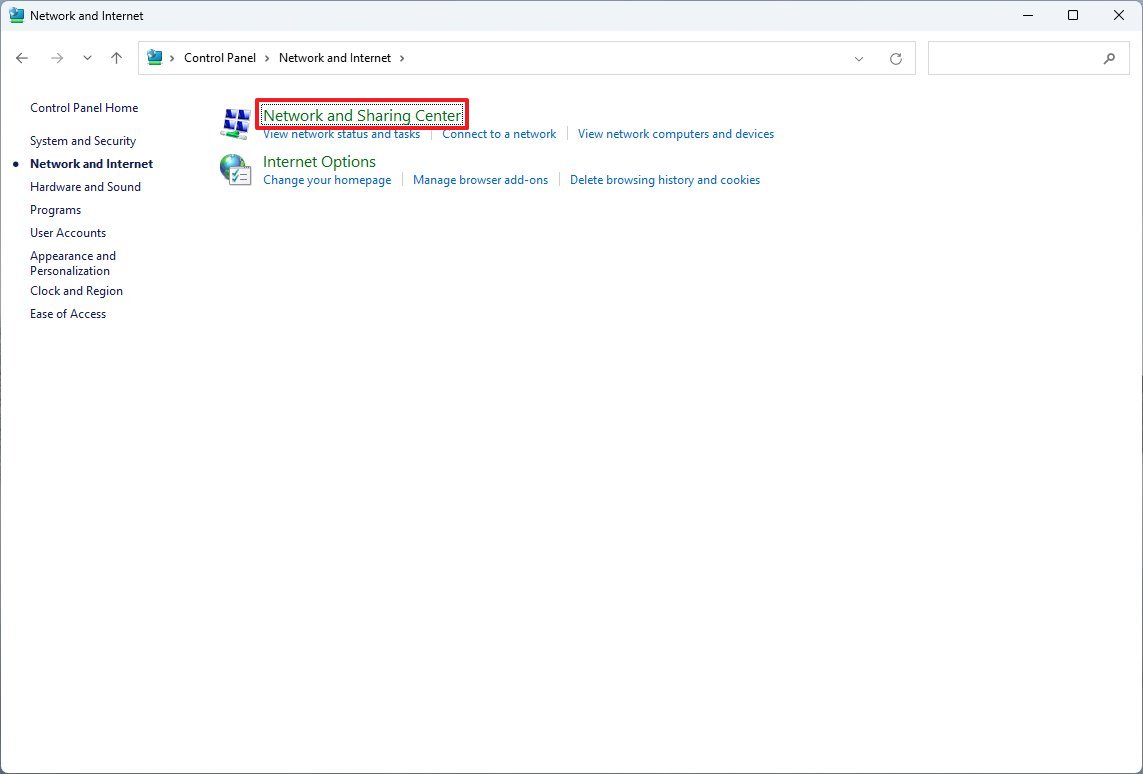
- Click the «Change adapter settings» option from the left navigation pane.
- Right-click the active adapter and select the Properties option.
- Clear the «Internet Protocol Version 6 (TCP/IPv6)» option.

- Click the OK button.
- Restart the computer.
Once you complete the steps, you should now be able to connect using a remote connection.
Use local account instead of Microsoft account
If you try to connect, but the authentication fails, and you are using a Microsoft account, it’s probably a problem with the authentication method. For instance, you may encounter issues if the Microsoft account has the two-step verification or passwordless security feature enabled. You may consider creating and using a local account for remote access if this is the case.
To create a local administrator account on Windows 11, use these steps:
- Open Settings.
- Click on Accounts.
- Click on Family & other users.
- Under the «Other users» section, click the «Add someone else to this PC» option.
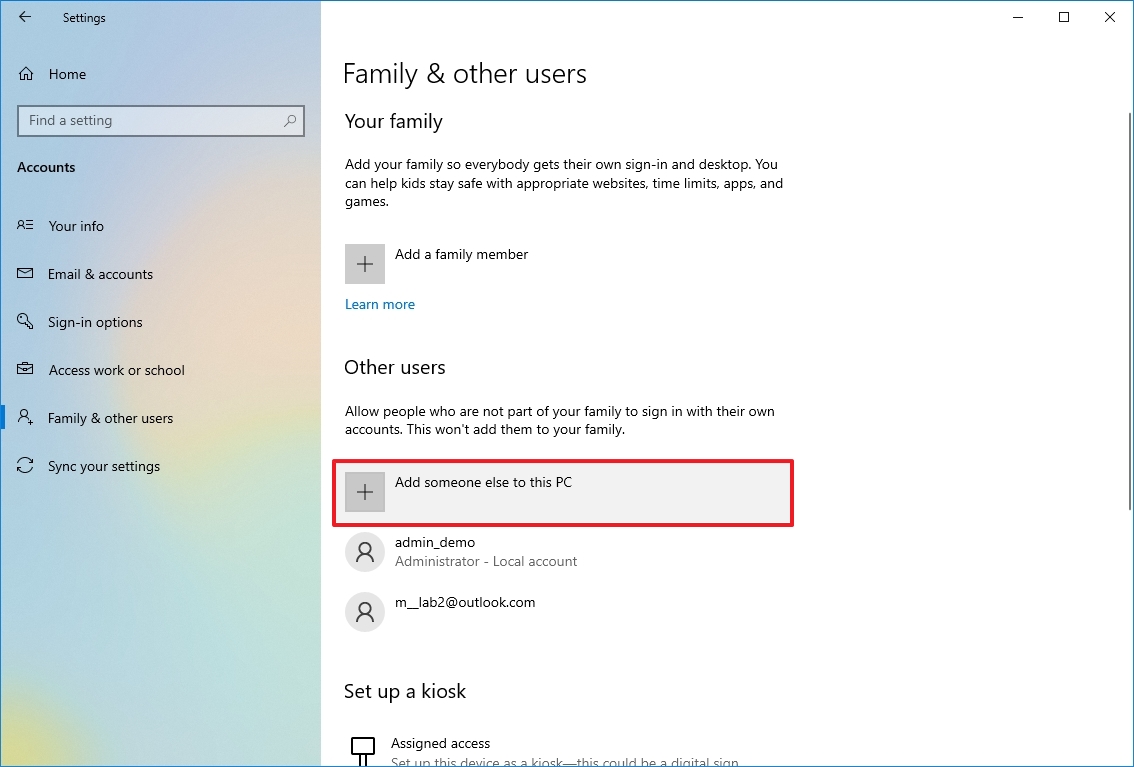
- Click the «I don’t have this person’s sign-in information» option.
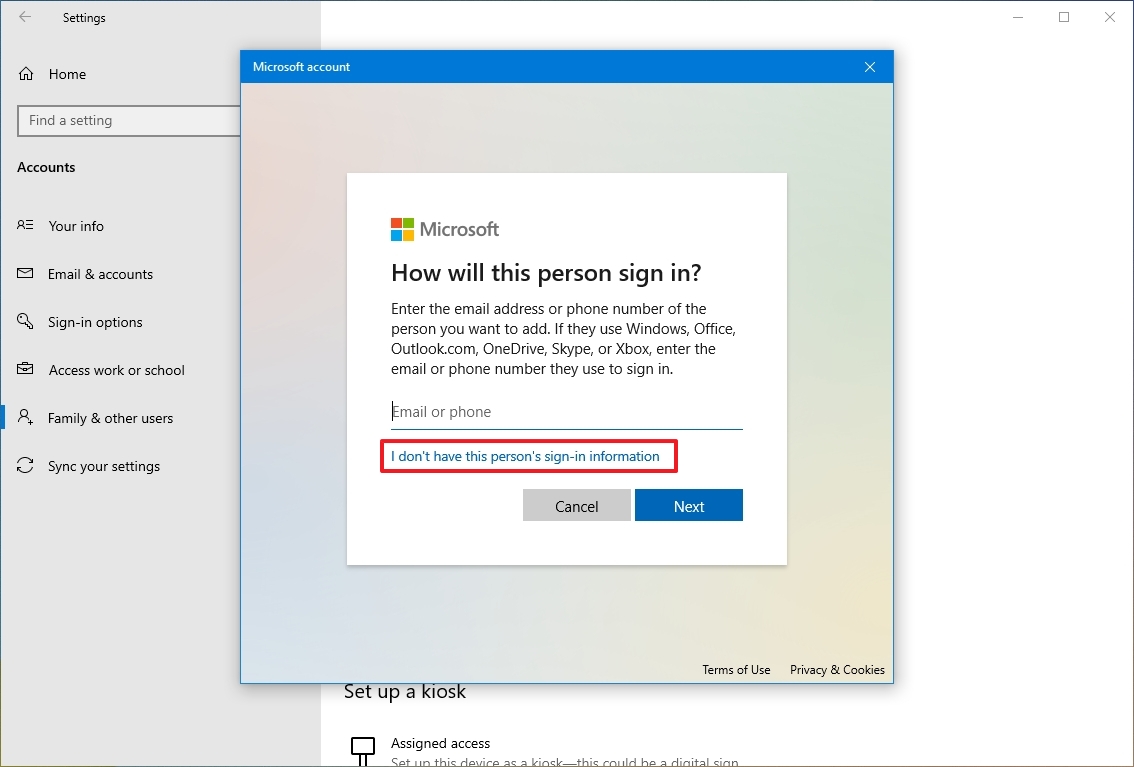
- Click the «Add a user without a Microsoft account» option.
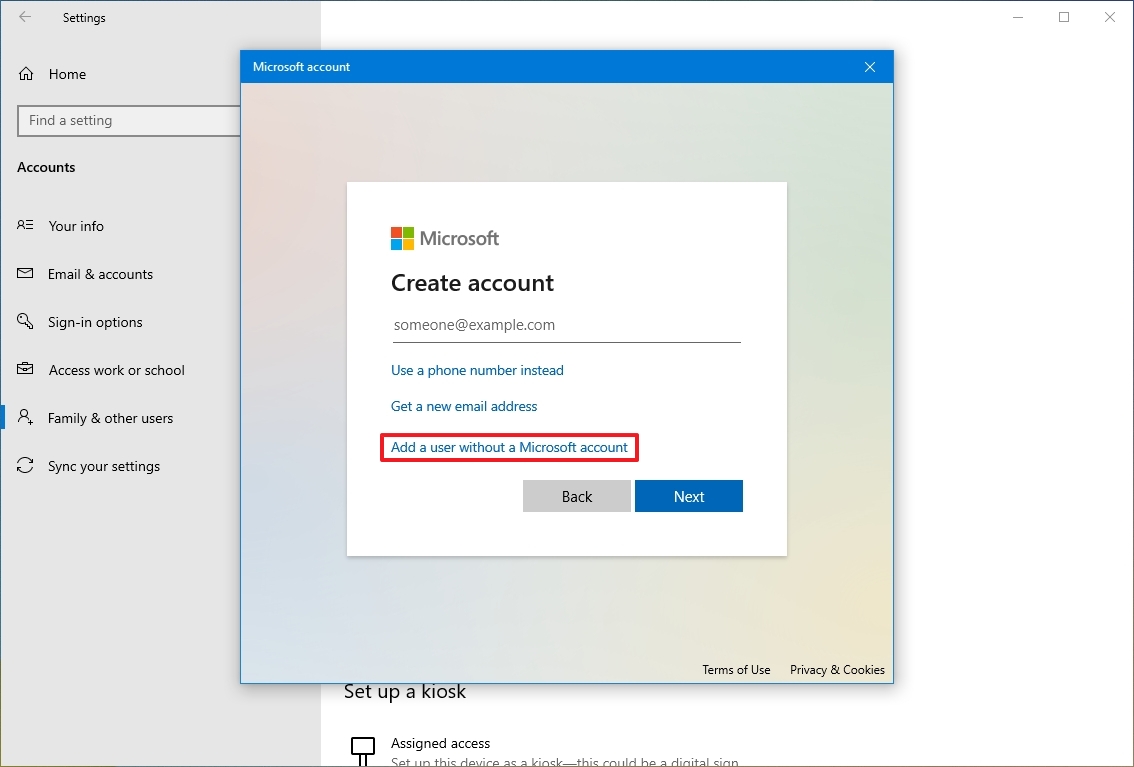
- Confirm the username.
- Create a strong password.
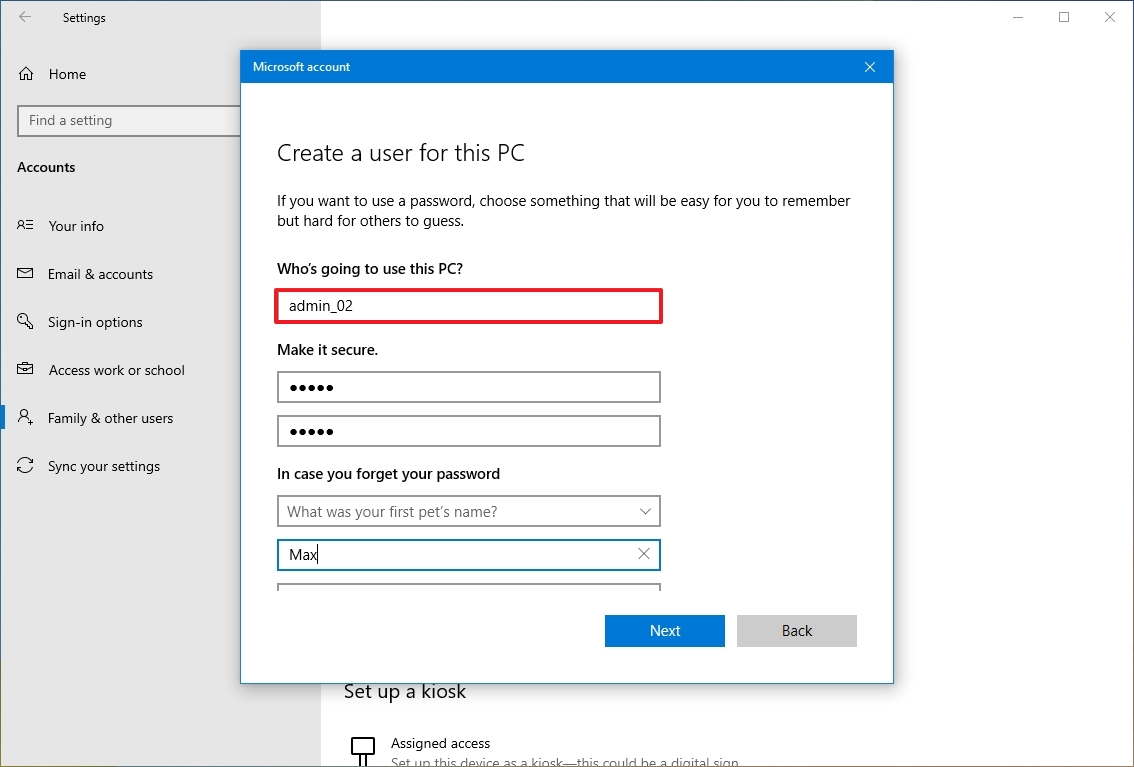
- Complete the security questions to allow password reset from the Sign-in screen.
- Click the Next button.
- Select the newly created account and click the «Change account type» button.
- Choose the Administrator option.
- Click the OK button.
After you complete the steps, you can use the local account information instead of the Microsoft account to connect to a remote desktop session.
We outlined the steps to connect to a device inside a private network and through the internet. However, allowing remote desktop connections (mainly through the internet) could be a security risk.
Remember that having the remote desktop protocol enabled and opening ports could allow malicious individuals to gain unauthorized access to the computer. If you need to use this feature, use a strong password, disable the remote desktop service and remove the port forwarding settings from the router when they are no longer needed.
More resources
For more helpful articles, coverage, and answers to common questions about Windows 10 and Windows 11, visit the following resources:
- Windows 11 on Windows Central — All you need to know
- Windows 10 on Windows Central — All you need to know
Get the best of Windows Central in in your inbox, every day!
Mauro Huculak is technical writer for WindowsCentral.com. His primary focus is to write comprehensive how-tos to help users get the most out of Windows 10 and its many related technologies. He has an IT background with professional certifications from Microsoft, Cisco, and CompTIA, and he’s a recognized member of the Microsoft MVP community.