Table of Contents
- Enabling The Telnet Client
- Verifying The Install
- Summary
- See Also
The Telnet Client is a great tool for developers and administrators to help manage and test network connectivity. However, the Telnet Client application is disabled by default in Microsoft Windows 10. Attempts to use it before activation returns the error
message ’not recognized as an internal or external command, operable program or batch file’.

The following step-by-step shows you how to enable
Telnet.
Enabling The Telnet Client
To enable Telnet Client on Windows 10, follow these steps:
- Right-click the Start button and select Programs and Features.

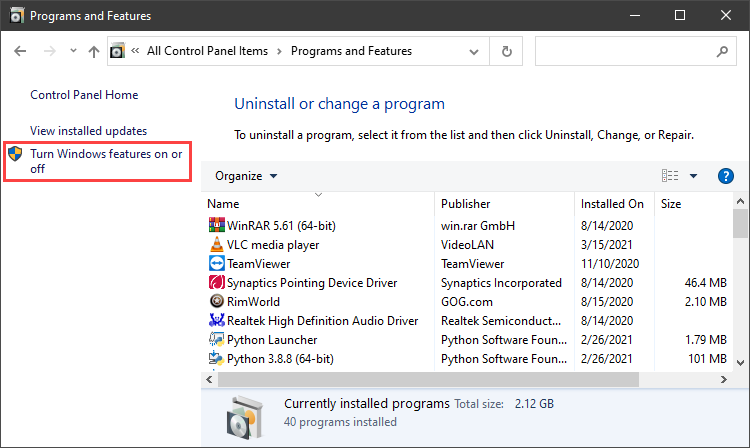
- Click Turn Windows features on or off from the left-hand menu.
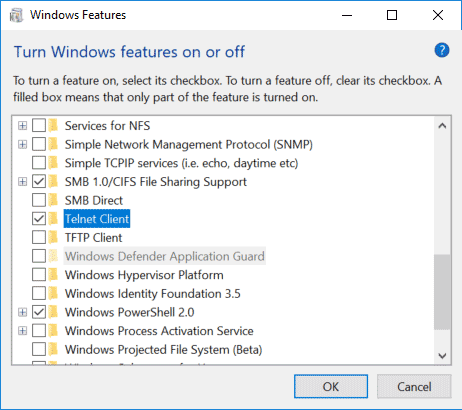
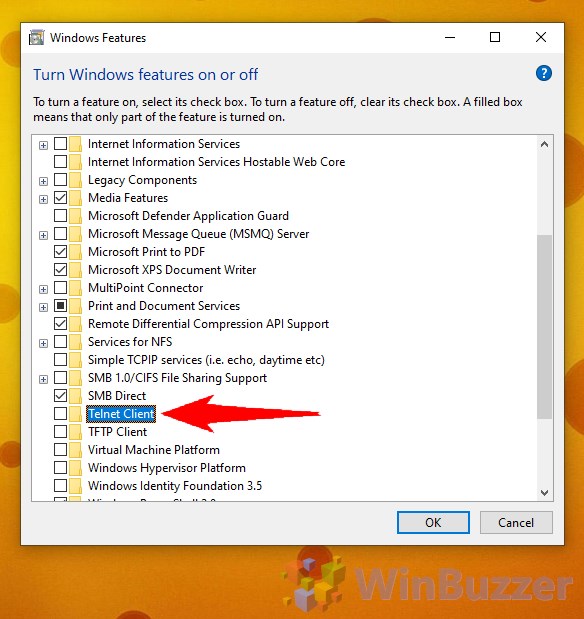
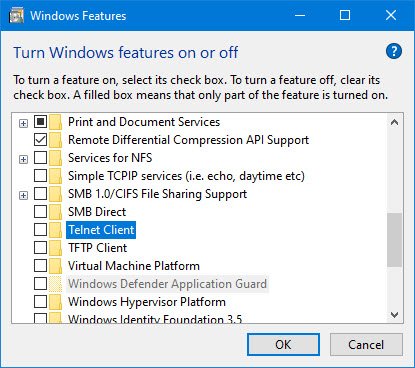
- The Windows Features dialog box appears. Scroll down and select Telnet Client. Click
OK.
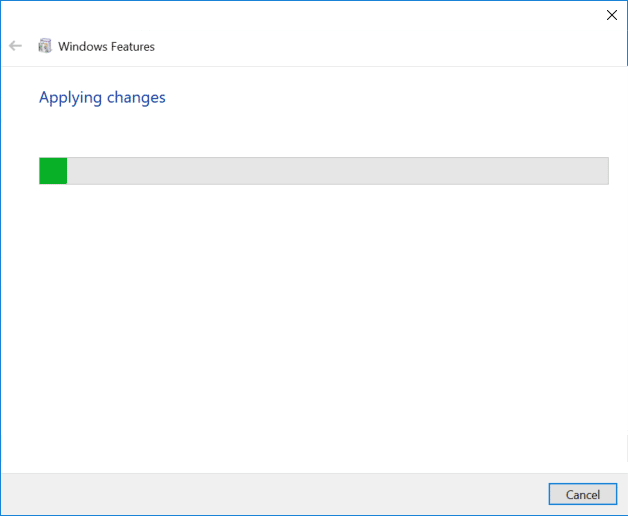
- The Telnet Client installations begins.
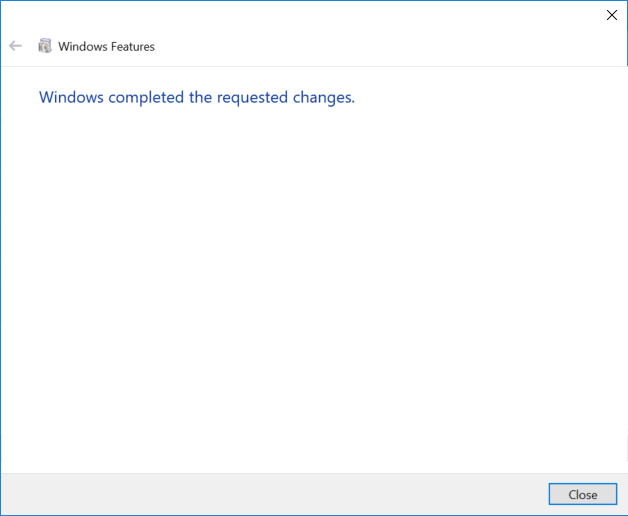
- Once complete, a success message appears.
- Click Close. There’s no need to restart your computer.


Verifying The Install
Once the installation completes, we can use the Telnet Client.
- Launch the Command Prompt by typing Command Prompt into the search box on the menu bar and clicking the app returned.
- Alternatively, you can also type Windows Key + R to open the
Run command dialog. Type cmd and hit the
Enter key. - Type telnet and hit Enter to access the Telnet Client.
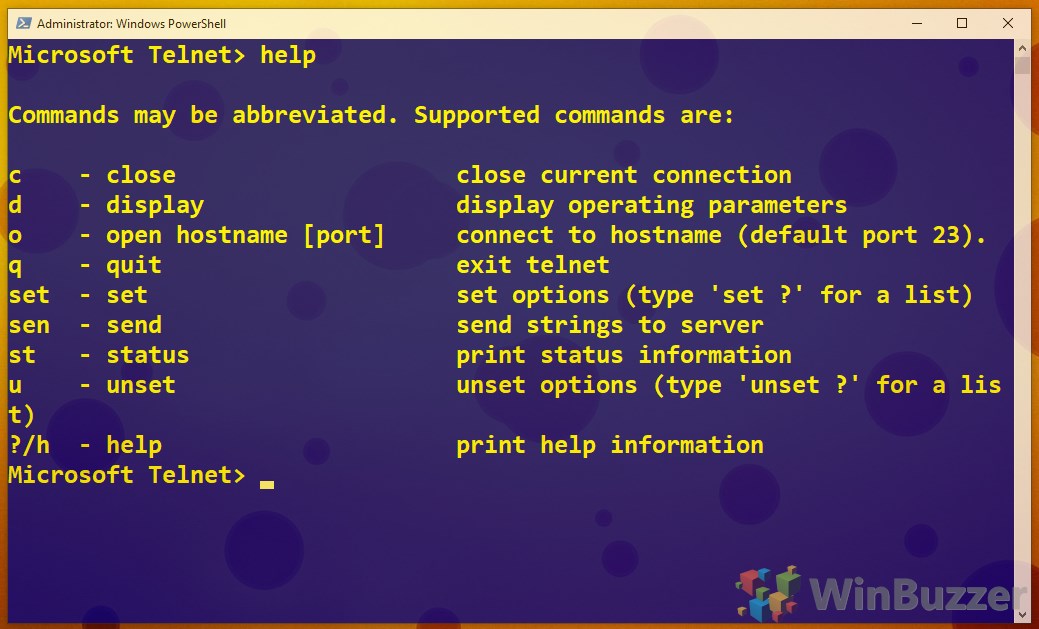
- Type help to see the supported Telnet commands.
- Type q or quit to exit Telnet.
- Type telnet google.com 80 to Telnet into Google on port 80.


Summary
In this article, we have seen how to enable and use the Telnet Client in Windows 10.
See Also
- How To Enable Telnet in Windows Server 2012
- Windows 7: Enabling Telnet Client
By default the telnet client in Microsoft’s Windows operating systems is disabled, this is unfortunate as it is an extremely useful tool which can be used for testing TCP connectivity to external hosts on a specified port.
This is great when you’re trying to troubleshoot network connectivity problems, for example, say we have a web server which should be listening on port 80 to serve HTTP traffic but we are not able to load a web page, by using telnet to connect to the web server on port 80 we can verify the connectivity.
It may be that the connectivity is fine but there is a problem with the web server, or that the web server is stopped and the port is not listening at all, for instance. With telnet we can get a better understanding of what’s going on.
Update October 21st 2015: I have also created a video showing the process:
Enabling the Telnet Client
Firstly you need to enable the telnet client, if you don’t enable it you’ll get a result similar to the below message when trying to use it.
C:>telnet google.com 80
'telnet' is not recognized as an internal or external command, operable program or batch file.
C:>
You can enable the client either by command line or through the graphical interface.
Enabling the telnet client through command line
Run the below command in command prompt with administrator permissions.
dism /online /Enable-Feature /FeatureName:TelnetClient
That’s it, after a few seconds telnet should be ready to use.
Enabling the telnet client through the graphical user interface
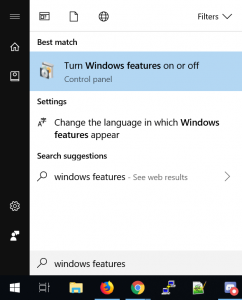
- Click the start button, then start typing “Turn Windows features on or off”, and select this option, as shown below.

- The “Turn Windows Features on or off” window should open, scroll down and select “Telnet Client”.

- Click the OK button to proceed, this will display a screen while the changes apply.

- When complete it will display as below, you can now close the window.
Verifying that the telnet client is enabled
Simply open command prompt or powershell, type ‘telnet’ and press enter. If this was successful you should have a prompt similar to the below:
Welcome to Microsoft Telnet Client

Escape Character is 'CTRL+]'

Microsoft Telnet>
Already have telnet installed but still failing?
In some cases you must run command prompt or powershell as administrator in order to issue the telnet command, otherwise it will give the same error as if it was not enabled at all.
Summary
Now that you have enabled telnet you should be able to start issuing commands with it and using it to troubleshoot TCP connectivity problems.
Содержание
- Способ 1: «Программы и компоненты»
- Способ 2: «Командная строка / «Windows PowerShell»»
- Вопросы и ответы

В настоящее время протокол Telnet является устаревшим. Использовать его для удаленного управления компьютером небезопасно, поскольку весь трафик передается в незашифрованном виде. В современных версиях Windows вместо протокола Telnet рекомендуется использовать защищенный протокол SSH.
Способ 1: «Программы и компоненты»
Это самый простой и очевидный способ задействовать компонент «Telnet», предназначенный для удаленного управления компьютером. Чтобы открыть оснастку «Программы и компоненты», сделайте следующее:
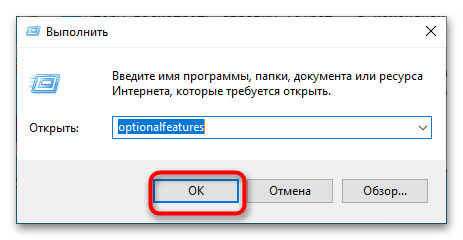
- Вызовите нажатием Win + R окошко быстрого выполнения команд, вставьте в него команду
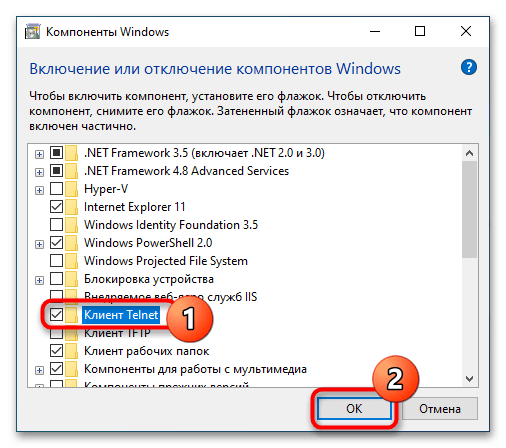
optionalfeaturesи нажмите клавишу ввода. Также открыть оснастку можно через приложение «Параметры», перейдя в раздел «Приложения и возможности» → «Дополнительные компоненты» → «Другие компоненты Windows». - Отыщите в открывшемся окне оснастки пункт «Клиент Telnet», отметьте его флажком и нажмите кнопку «OK».
- Windows 10 выполнит поиск необходимых файлов и установит их.
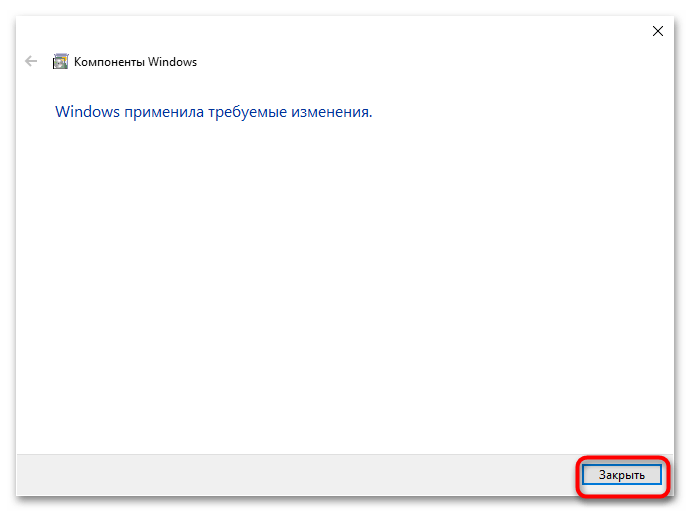
Если Windows попросит перезагрузить компьютер, дайте согласие на перезагрузку.
Способ 2: «Командная строка / «Windows PowerShell»»
Для включения устаревшего клиента «Telnet» можно задействовать классическую «Командную строку» либо же консоль «PowerShell».
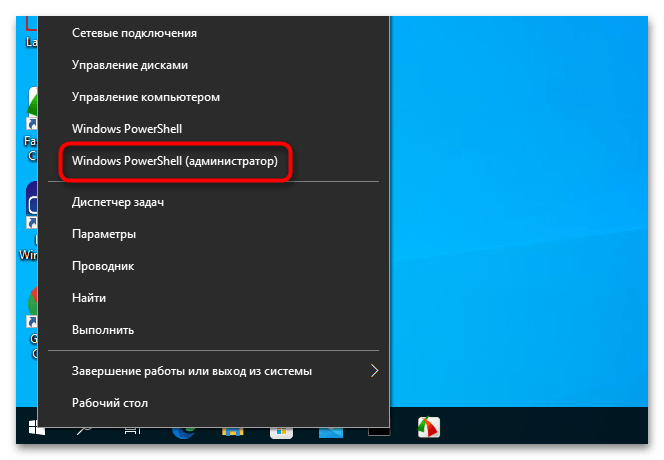
- Запустите ту или иную консоль от имени администратора любым удобным вам способом. Например, из контекстного меню кнопки «Пуск».
- Вставьте или введите в консоль команду
dism /online /Enable-Feature /FeatureName:TelnetClientи нажмите клавишу ввода.
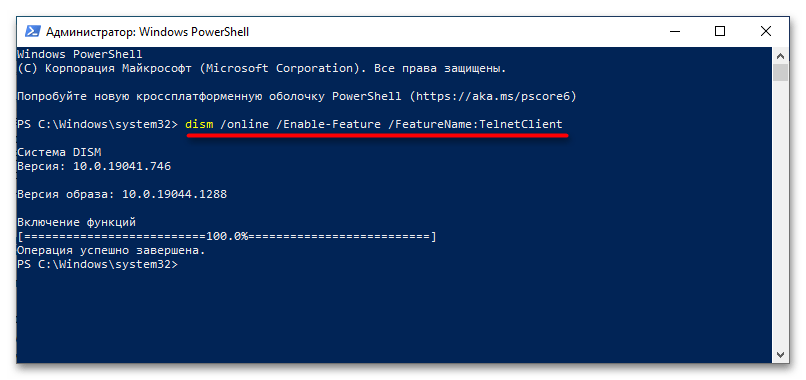
В случае удачного включения компонента команда вернет сообщение «Операция успешно завершена».
Еще статьи по данной теме:
Помогла ли Вам статья?
Introduction
Telnet (teletype network) is a network protocol for two-way text-based communication through a CLI, allowing remote access. Telnet is vulnerable to cybersecurity attacks because it lacks encryption methods compared to the more modern SSH. However, it is still helpful for tasks that do not involve transmitting sensitive information.
This article teaches you what Telnet is as well as how to use Telnet on Windows to test for open ports.
Prerequisites
- Windows OS with administrator privileges
- Access to the command prompt
- An address and port to test
What is Telnet?
Telnet is a client-server protocol predating the TCP protocol. The network protocol allows a user to log into another computer within the same network through a TCP/IP connection.
A client machine running the Telnet client connects to a CLI on a remote device, most commonly a dedicated platform. Telnet is lightweight and fast, making it the preferred option in some use cases:
- Initial network hardware configuration.
- Remote access to trusted internal networks.
- Testing for open or used ports.
- Troubleshooting mail and web servers.
- Checking port forwarding.
How Does Telnet Work?
The Telnet protocol creates a communication path through a virtual terminal connection. The data distributes in-band with Telnet control information over the transmission control protocol (TCP).
Unlike other TCP/IP protocols, Telnet provides a log-in screen and allows logging in as the remote device’s actual user when establishing a connection on port 23. This type of access grants direct control with all the same privileges as the owner of the credentials.
Telnet comes with a command accessible from the command line in Windows. The telnet command also exists for macOS and Linux operating systems.
How to Enable Telnet on Windows 10?
In Windows systems, Telnet is disabled by default. To check if Telnet is already activated, open your command line, and run telnet:

If the command prompt does not recognize the command, there are two possible ways to enable the Telnet client in Windows.
Option 1: Enable Telnet using GUI
To activate the Telnet command using the GUI:
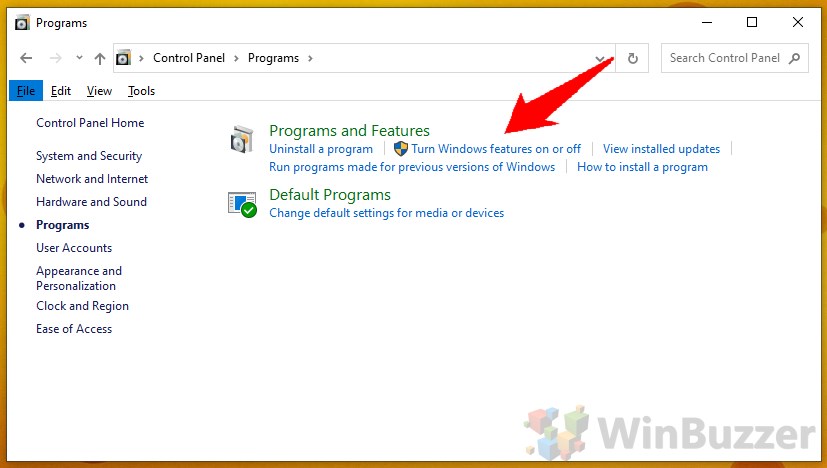
1. Open the Programs and Features options in Control Panel:

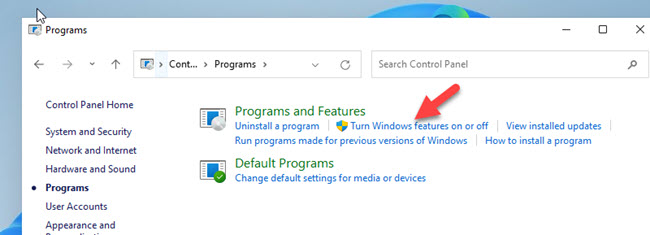
2. Click the Turn Windows features on or off setting:
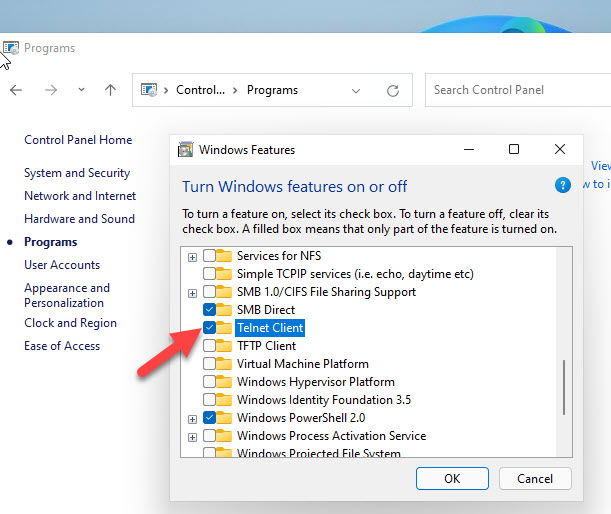
3. Locate the Telnet Client option on the list, select it and click OK to install the feature:

4. When Windows completes the requested change, click Close.
5. Open the command prompt and run telnet to open the Microsoft Telnet Client:

6. Run quit to exit the Telnet client.
Option 2: Enable Telnet Using Command Prompt
To activate the Telnet client from the command prompt:
1. In the command prompt, run:
pkgmgr /iu:"TelnetClient"2. Restart the command prompt and run telnet to open the Microsoft Telnet Client.
3. Run quit to exit the client:

How to Use Telnet in Windows to Test Open Ports
The Telnet syntax for testing open ports is:
telnet <address> <port number>The command accepts both symbolic and numeric addresses. For example:
telnet towel.blinkenlights.nl 23Or alternatively:
telnet 127.0.0.1 80After running the command, one of the following three options happen:
1. The command throws an error, indicating the port is not available for connection:

2. The command goes to a blank screen, indicating the port is available.
3. Running the command on an open port 23 displays the screen of the telnet host, confirming an established Telnet connection:

Note: Learn how Telnet differs from SSH in our comparison article Telnet vs SSH.
Conclusion
The Telnet communication protocol provides a way to establish a direct connection with a remote host. Although not a secure option for most tasks, there are use cases where Telnet is a viable option.
For further reading, check out the more secure option and learn how to use SSH to connect to a remote server in Linux or Windows.
В данной статье показаны действия, с помощью которых можно включить компонент Telnet Client в операционной системе Windows 10, Windows 8.1 и Windows 7.
Telnet (teletype network) — сетевой протокол с помощью которого можно удаленно (через интернет или локальную сеть) подключиться и управлять различными сетевыми устройствами, например удаленные компьютеры, серверы, роутеры и другие устройства.
По умолчанию компонент Telnet Client в операционных системах Windows 10, Windows 8.1 и Windows 7 отключён, но при необходимости можно легко включить его используя любой из способов, которые представлены далее в этой инструкции.
Содержание
- Включение Telnet Client в окне «Компоненты Windows»
- Активация в командной строке
- Включение через Windows PowerShell
Включение Telnet Client в окне «Компоненты Windows»
Чтобы включить компонент Telnet Client, нажмите сочетание клавиш ![]() + R, в открывшемся окне Выполнить введите (скопируйте и вставьте) OptionalFeatures и нажмите клавишу Enter↵.
+ R, в открывшемся окне Выполнить введите (скопируйте и вставьте) OptionalFeatures и нажмите клавишу Enter↵.

В открывшемся окне «Компоненты Windows» установите флажок компонента Telnet Client и нажмите кнопку OK.

Через непродолжительное время Windows применит требуемые изменения и компонент Telnet Client будет включен.

Активация в командной строке
Вы можете включить или отключить компонент Telnet Client в командной строке используя DISM
Чтобы включить компонент Telnet Client, запустите командную строку от имени администратора и выполните следующую команду:
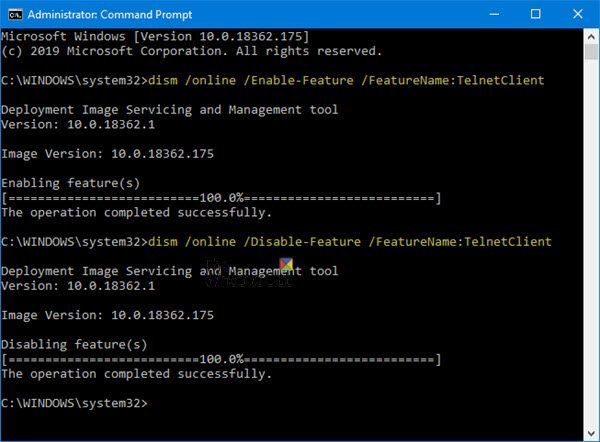
Dism /online /Enable-Feature /FeatureName:TelnetClient

Чтобы отключить компонент Telnet Client, запустите командную строку от имени администратора и выполните следующую команду:
Dism /online /Disable-Feature /FeatureName:TelnetClient

Включение через Windows PowerShell
Также включить или отключить компонент Telnet Client можно в консоли PowerShell
Чтобы включить компонент Telnet Client, откройте консоль Windows PowerShell от имени администратора и выполните следующую команду:
Enable-WindowsOptionalFeature –FeatureName «TelnetClient» -Online

Чтобы отключить компонент Telnet Client, откройте консоль Windows PowerShell от имени администратора и выполните следующую команду:
Disable-WindowsOptionalFeature –FeatureName «TelnetClient» -Online

После включения компонента Telnet Client можно использовать утилиту telnet для выполнения необходимых задач.

Если компонент Telnet Client отключен, то при вводе команды telnet в консоли командной строки вы увидите сообщение о том что:
«telnet» не является внутренней или внешней
командой, исполняемой программой или пакетным файлом.

Используя рассмотренные выше действия, можно включить или отключить компонент Telnet Client в операционной системе Windows 10, Windows 8.1 и Windows 7
As you may have already discovered, in Windows 10, the Telnet command, «is not recognized as an internal or external command, operable program or batch file». This is happening, because the Telnet client, which is a very useful tool for administrators to verify and test the network connectivity, is disabled by default in Windows 10.

In this tutorial you ‘ll find all the available ways to enable the ‘Telnet’ command in Windows 10 in order to resolve the error «telnet is not recognized as an internal or external command, operable program or batch file».
How to Turn On Telnet Client in Windows 10.
Method 1. Enable Telnet Client from Programs & Features.
Method 2. Enable Telnet Client from Command Prompt.
Method 3. Enable Telnet client from PowerShell or Command Prompt using DISM.
Method 1. How to Enable Telnet Client from Programs & Features.
1. Open Programs and features in Control Panel.
2. Click Turn Windows features on or off, on the left.

3. Select the Telnet Client and click OK.

4. Let Windows to install the required files for the Telnet client.
5. When the installation in completed, click Close, any you’re done!

Method 2. How to Install Telnet Client from Command Prompt in Windows 10.
To enable the Telnet client from command prompt in Windows 10:
1. Open Command Prompt as Administrator. To do that:
1. At the search box type: command prompt or cmd
2. Right-click at Command Prompt result and select Run As Administrator.

2. In command prompt, paste the below command and press Enter.
- pkgmgr /iu:”TelnetClient”

Method 3. How Add Telnet Client feature from PowerShell in Windows 10.
1. Open PowerShell (or Command Prompt) as Administrator. To open PowerShell as administrator:
1. At the search box type: powershell
2. Right click on Windows PowerShell on the results and select Run as administrator.

3. In PowerShell, give the following command to enable the Telnet client:
-
dism /online /Enable-Feature /FeatureName:TelnetClient

That’s it! Let me know if this guide has helped you by leaving your comment about your experience. Please like and share this guide to help others.
If this article was useful for you, please consider supporting us by making a donation. Even $1 can a make a huge difference for us in our effort to continue to help others while keeping this site free:

If you want to stay constantly protected from malware threats, existing and future ones, we recommend that you install Malwarebytes Anti-Malware PRO by clicking below (we
do earn a commision from sales generated from this link, but at no additional cost to you. We have experience with this software and we recommend it because it is helpful and useful):
Full household PC Protection — Protect up to 3 PCs with NEW Malwarebytes Anti-Malware Premium!
Telnet is one of the famous network protocols widely used to manage network devices and other equipment that support this protocol. If you are a system or network administrator, I’m sure you know the importance of having a telnet client on your desktop or laptop. Since it is an optional feature, the latest Windows OS versions do not come with an installed telnet client. By default, you can’t use Windows 10 or Windows 11 to connect other network devices without installing the built-in or third-party telnet clients.
If you search for telnet in apps or type ’telnet’ in the command prompt, it will return an error message saying ’not recognized as an internal or external command’. Installing the Microsoft telnet client from the control panel in Windows 10 and 11 will solve this issue easily.

Any installation disks, ISO or downloads are not required for this purpose.
1) Go to Control Panel.
In Windows 10, you can use the start button to access the control panel. Right-click on the button and select Control Panel as shown below.

On Windows 8.1 and 8, you can use the charm bar (by moving the cursor to the top right corner or press the Windows key + I ) from the desktop then select Control Panel. It is easy to access the Control Panel from Windows 7.
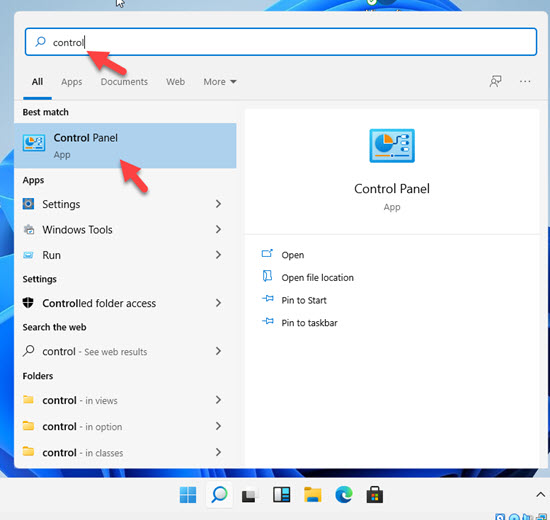
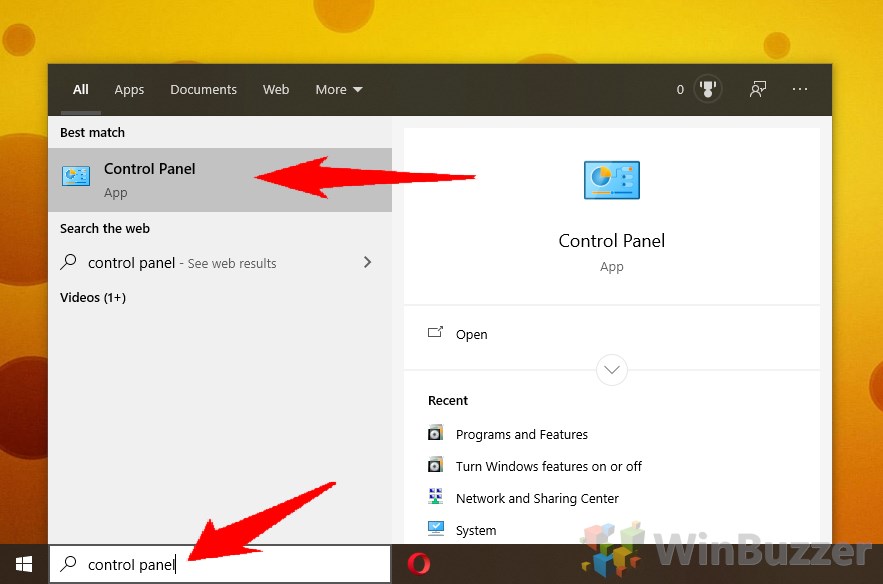
 On Windows 11, you can search for the Control panel as shown below in the screenshot.
From here onwards, installing or enabling Telnet on Windows 11/10 or older versions remain similar.
2) In the ‘Category’ view, click ‘Programs’.
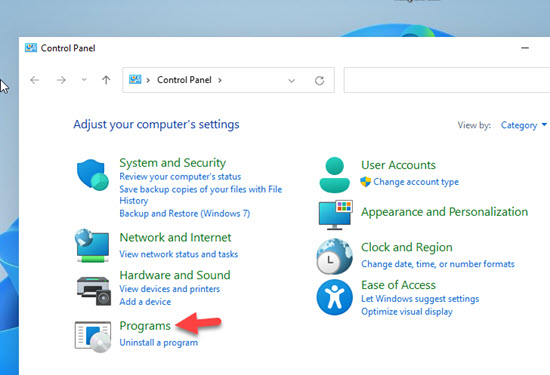
3) Click ‘Turn Windows features on or off’ on the next screen.
4) The earlier step will bring a dialogue box where you can select extra features to install. Select ‘Telnet Client’ by ticking the box. A small installation will run once you press OK.
That’s it, we do not need to restart the PC after the installation. We have successfully installed the telnet client on Windows 10/11.
Install From Command Prompt
Open the command prompt as Administrator and execute the below command.
pkgmgr /iu:”TelnetClient”

Alternatively, you can try the below command from command prompt or PowerShell.
dism /online /Enable-Feature /FeatureName:TelnetClient
Now if you try the telnet command or search in Apps, you will get the correct telnet prompt as below.

How to remove Telnet Client from Windows OS?
From the same place where we installed the feature (Control Panel -> Programs -> Turn Windows features on or off), untick the ‘Telnet Client’ and press OK to remove from Windows computer.
Alternates for Windows Telnet
The built-in telnet client in Windows Operating Systems is pretty basic. You can’t manage or use it with more devices easily. If you are a professional network administrator, the built-in Windows telnet client utility will not be suitable for you. You must have an alternate and professional telnet client.
PuTYY is a great telnet client which is freely available and fully compatible with Windows 10 and Windows 11.

Here we have listed the PuTTY alternatives that can be used to manage and customize telnet sessions from your computer. You can follow the same steps to install Telnet client on Windows Server Operating Systems such as Windows 2012 R2 and Windows 2016/2019 server versions.

Despite its age, Telnet is still used by some applications, leading many to wonder what it is. You have to enable the Telnet client separately in Windows 10 to even use it, which makes those who wonder if there are any security issues they should be aware of.
Those to trying to run Telnet without it enabled will face errors such as “Telnet is not recognized as an internal or external command” and “CreateProcess ‘telnet’ is not recognized (C++)”.
What is Telnet?
At its core, Telnet, or “teletype network” is a communications protocol developed in 1969. It lets users connect to a remote device or host remotely via a Telnet client to manage files other functions as if they were a regular user. The default telnet port is typically 23.
As you can image, Telnet can be quite useful, letting users remotely run programs, check emails and weather, or even run simple games if they wish. In recent times, though, Telnet has been largely replaced by SSH (Secure Shell) due to its complete lack of encryption. Everything you do over Telnet is transmitted in plaintext, meaning someone snooping on the network can steal account information and other private communications. This wasn’t too scary in 1969, but now there are billions of people on the internet who can hack you.
This is a big reason why Telnet is disabled in Windows 10 by default, but it still has its uses. Some very old, legacy equipment only accepts Telnet, especially in the scientific field. It also has a small nostalgia-driven enthusiast community and is used by amateur radio operators.
Now that you know what Telnet is and its inherent risks, we can move onto how to enable the Telnet Client in Windows 10.
Time needed: 2 minutes.
The most user-friendly route to enable the Telnet client in Windows 10 is via the Control Panel.
- Open the Control Panel
Press Start and type “Control Panel”. Click the first result.

- Enter the program settings menu
Select the “Programs” category.

- Open the Windows features menu
Under “Programs and Features”, choose the sub-heading “Turn Windows features on or off”.

- Enable Telnet in Windows 10 Features
Scroll down the list of features until you find the folder named “Telnet Client”. Tick it, then press “OK” to enable Telnet in Windows 10.

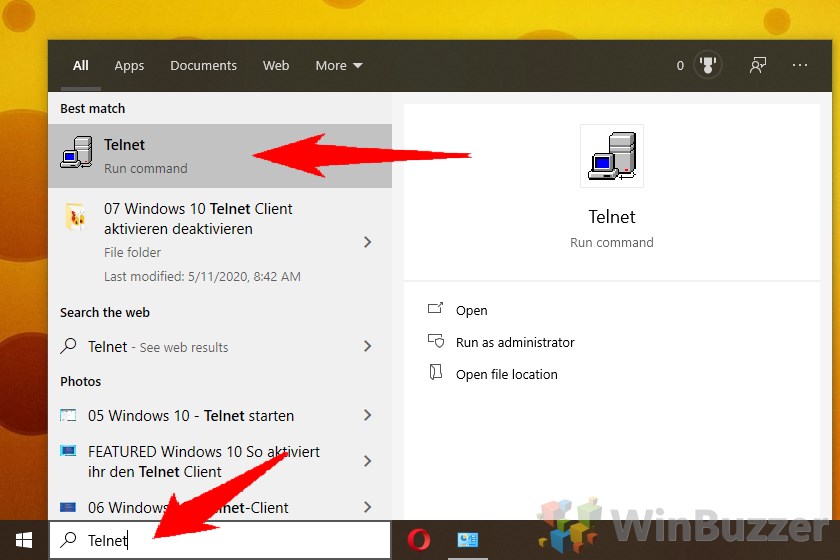
- Open Telnet
You can verify that Telnet is enabled by pressing the Start key and searching for “Telnet”. Click the application to run the client.

- Run your commands
Telnet will open a Windows PowerShell window with a list of supported commands. You can now use these at your leisure to access other computers with Telnet support.


Download PC Repair Tool to quickly find & fix Windows errors automatically
On Windows 11/10/8/7, the Telnet Client and Server is disabled by default. If you want to enable it, you can do so using the Command Prompt or via the Control Panel. For your information, Telnet (short for teletype network) is a protocol meant for internet or LAN communication. It is primarily used to control other computers easily. On Windows, it is available as a command-line utility, and using it helps in opening a command-line interface for the remote computer.
To disable or enable the Telnet client on Windows 11/10/8/7 you can use the Command Prompt or Control Panel.
1] Enable Telnet via Control Panel
In case you want to enable it through Windows Explorer here are the steps:
- Click on Start and under search type in appwiz.cpl
- Then click Turn Windows feature on or off from the right-side panel
- There look for Telnet Server and Telnet Client and click on that box
- Click OK and reboot the system if prompted.
To disable Telnet, you have to uncheck Telnet Client, click OK and restart your system.
2] Enable Telnet using CMD
To enable Telnet through Command Prompt:
Click on Start and under search type in CMD
Right-click on CMD and click on Run as administrator
Enter the Administrator password if it prompt
Then type in the following command and hit Enter to enable the Telnet Client:
pkgmgr /iu:"TelnetClient" OR dism /online /Enable-Feature /FeatureName:TelnetClient
We have used the pkgmgr /iu:”TelnetServer” command to enable the Telnet Server.
To disable Telnet, you have to use:
dism /online /Disable-Feature /FeatureName:TelnetClient
Take a look at some of these interesting Telnet tricks like watching Star Wars using Telnet in Windows. See this post if Telnet is not recognized as an internal or external command on Windows 11/10.
Read: How to enable TFTP client on Windows 11/10.

Shyam aka “Captain Jack” is a Microsoft MVP alumnus and a Windows Enthusiast with an interest in Advanced Windows troubleshooting. Suggestions made and opinions expressed by him here are his personal ones and not of his current employers.