Windows 10 gives you many configuration options directly within the operating system, but on every laptop or desktop, there are some settings you can only change in the BIOS (basic input/output system). This software is built right into your computer’s motherboard, and it controls everything from the boot order of your drives to preboot security options to whether the Fn key on your keyboard activates a function key or a media control.
However, since the BIOS is a pre-boot environment, you can’t access it directly from within Windows. On some older computers (or those deliberately set to boot slowly), you can hit a function key such as F1 or F2 at power-on to enter the BIOS.
However, most computers made in the past four years boot Windows 10 far too quickly to listen for a keypress at startup. To access your BIOS on a Windows 10 machine, you must follow these steps.
How to enter the BIOS on a Windows 10 PC
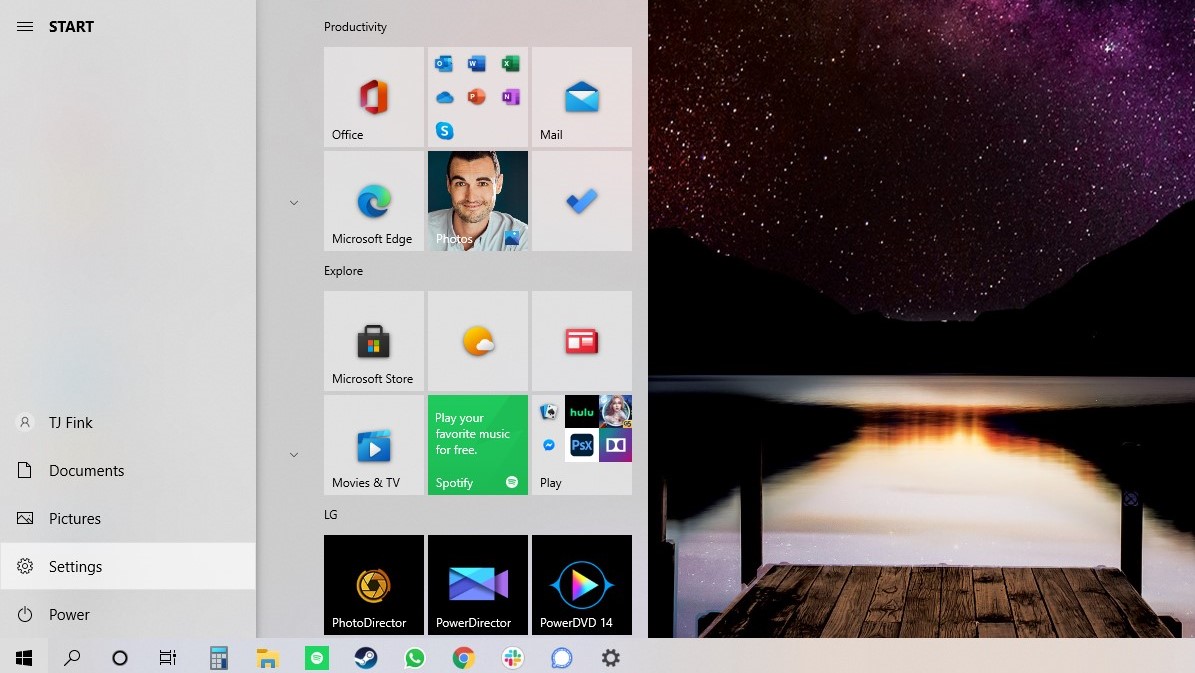
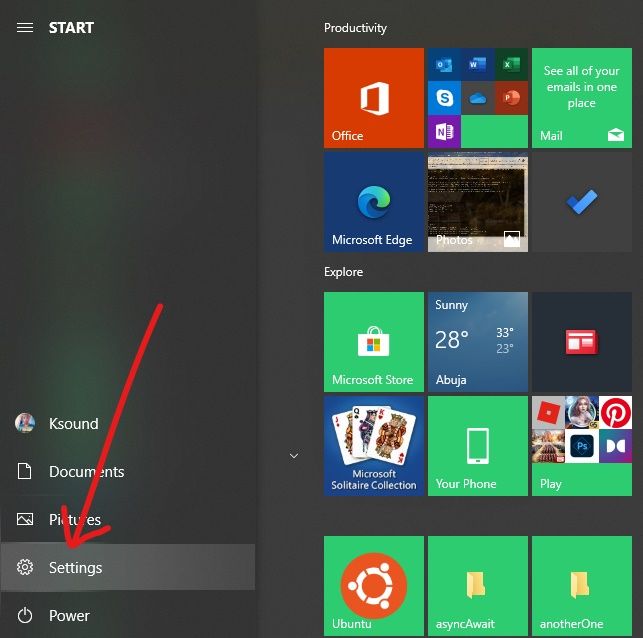
1. Navigate to Settings. You can get there by clicking the gear icon on the Start menu.
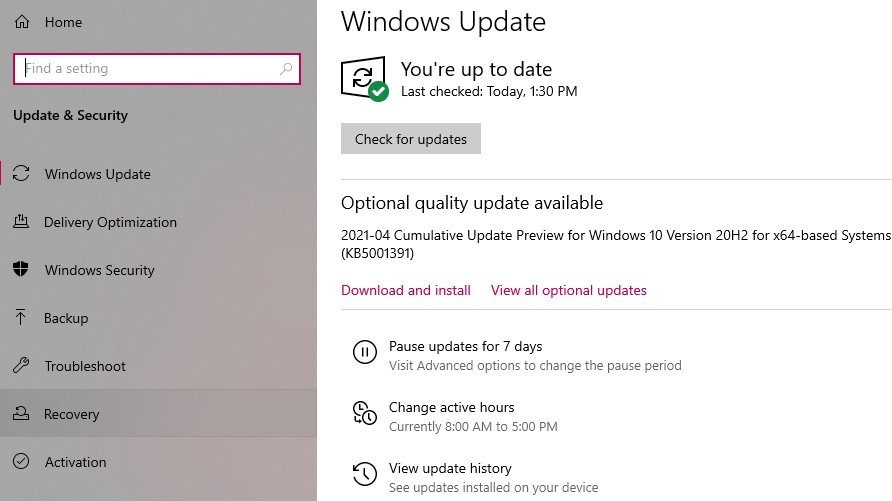
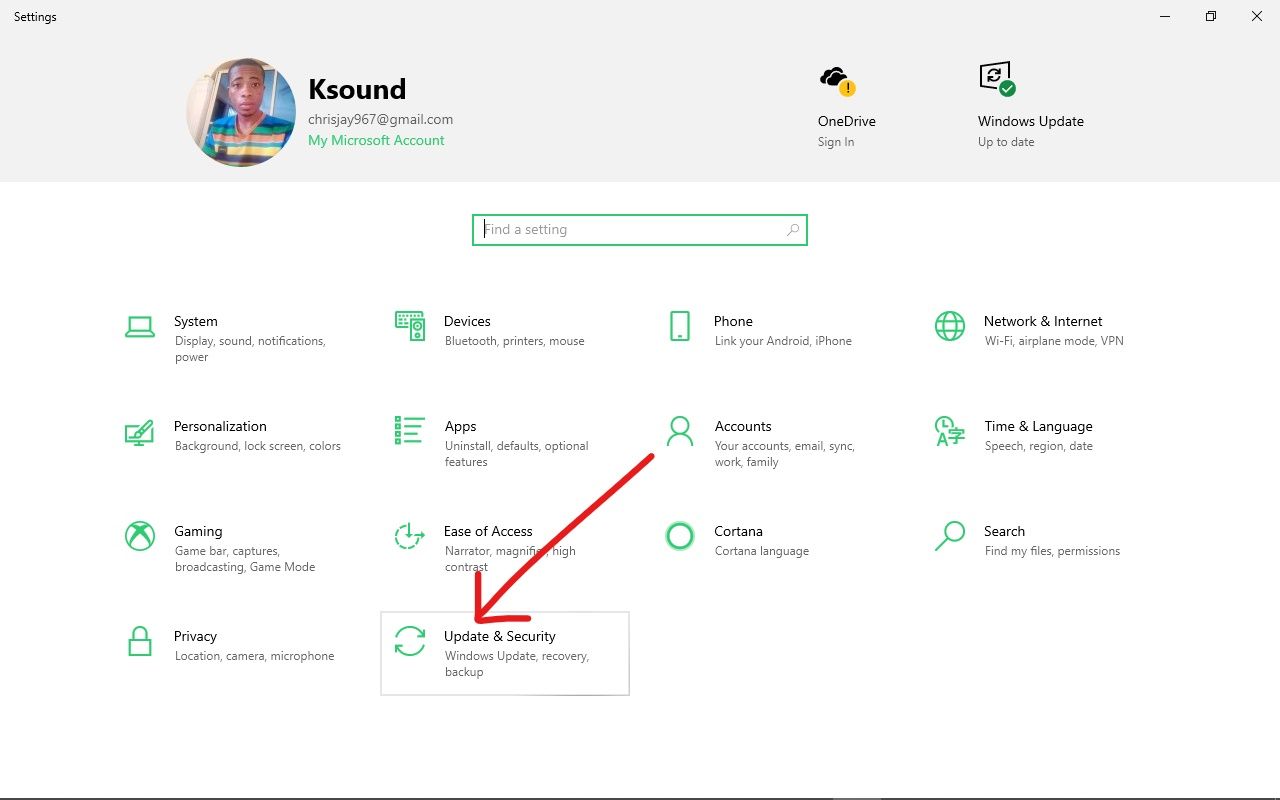
2. Select Update & Security.

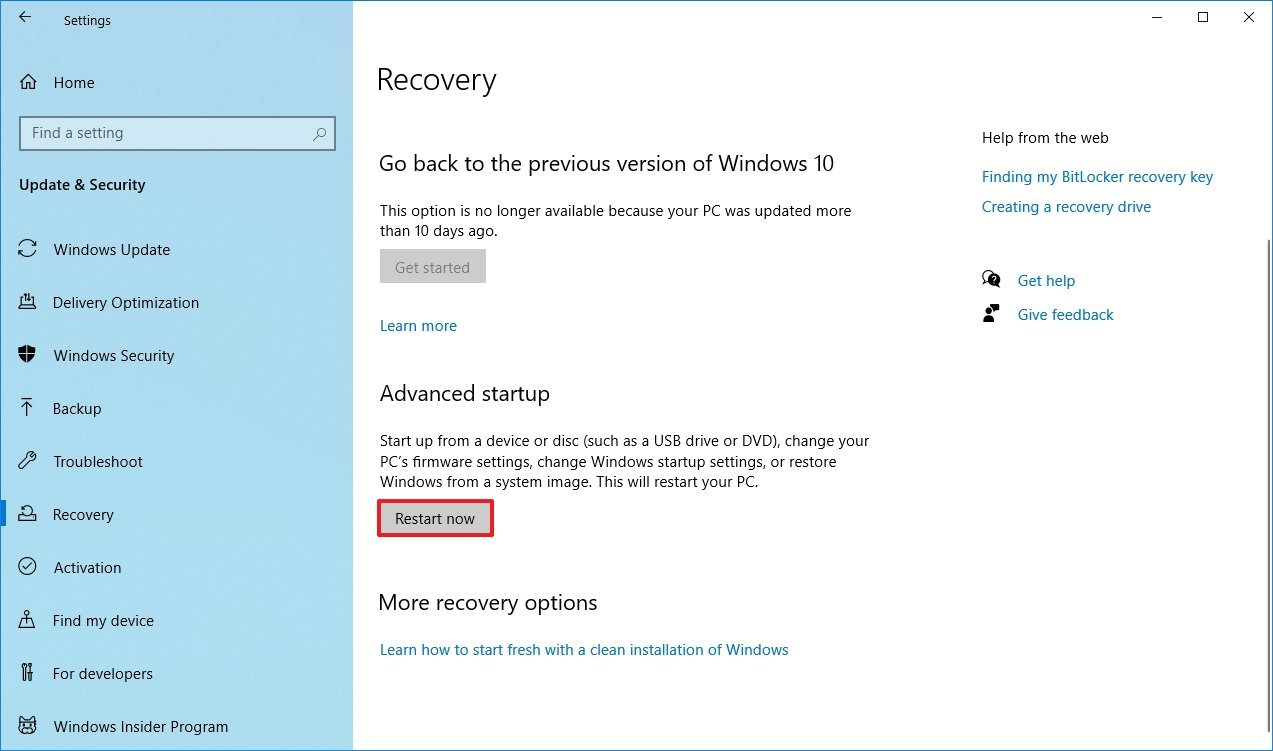
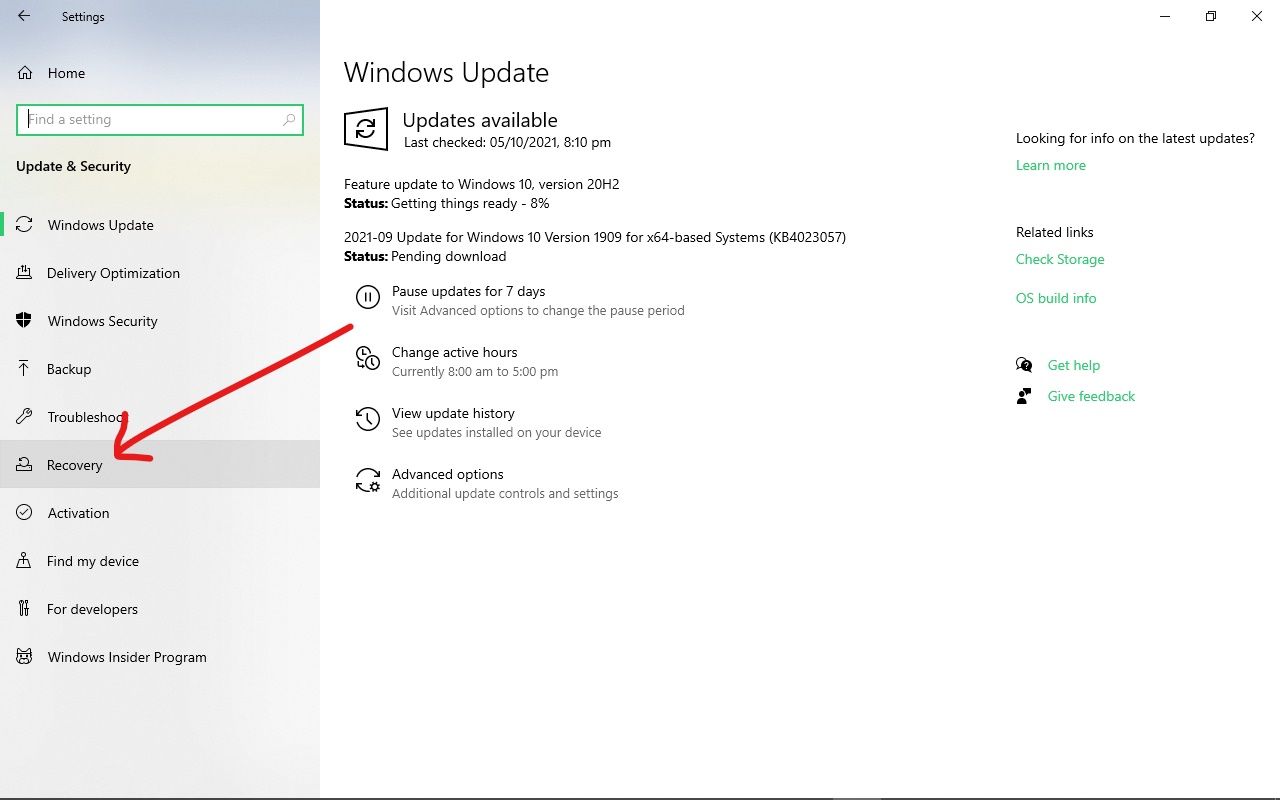
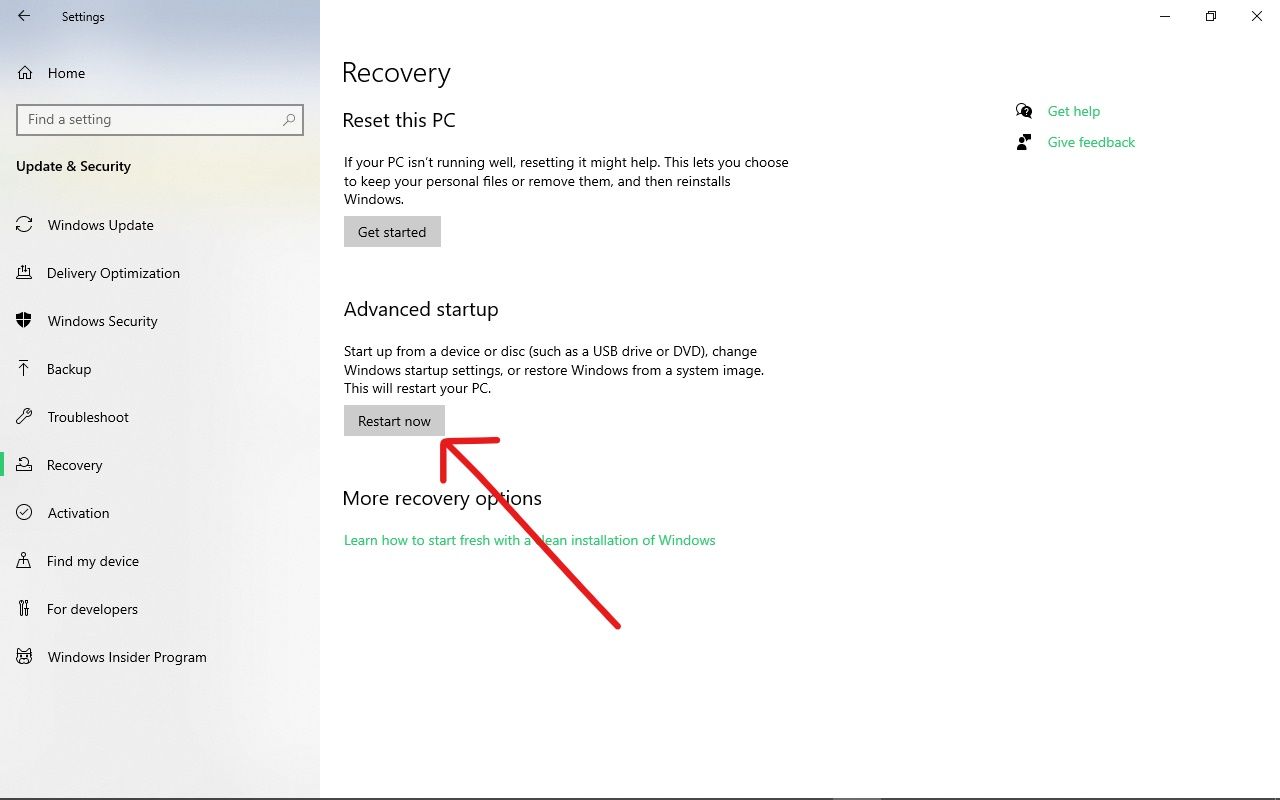
3. Select Recovery from the left menu.
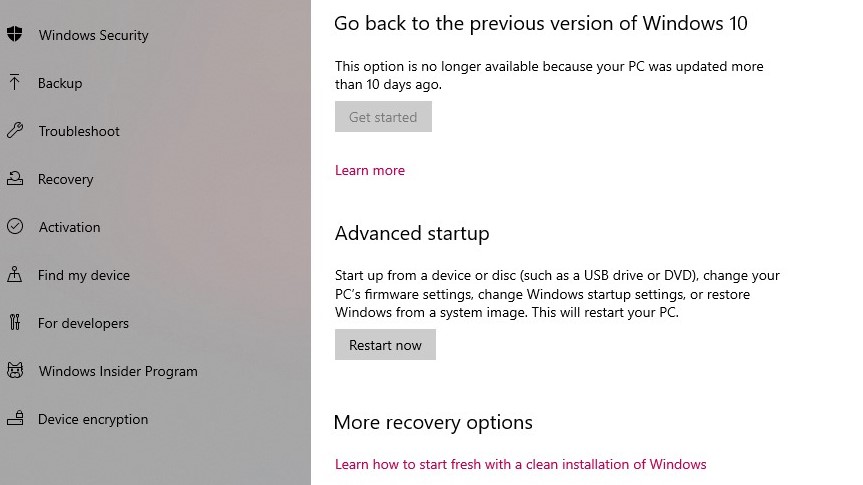
4. Click Restart Now under Advanced startup. The computer will reboot to a special menu.
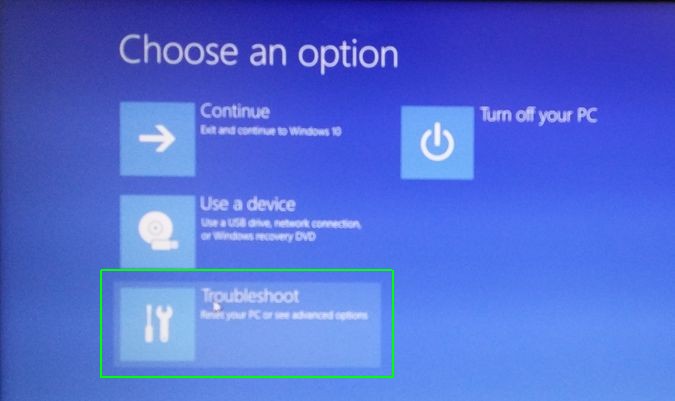
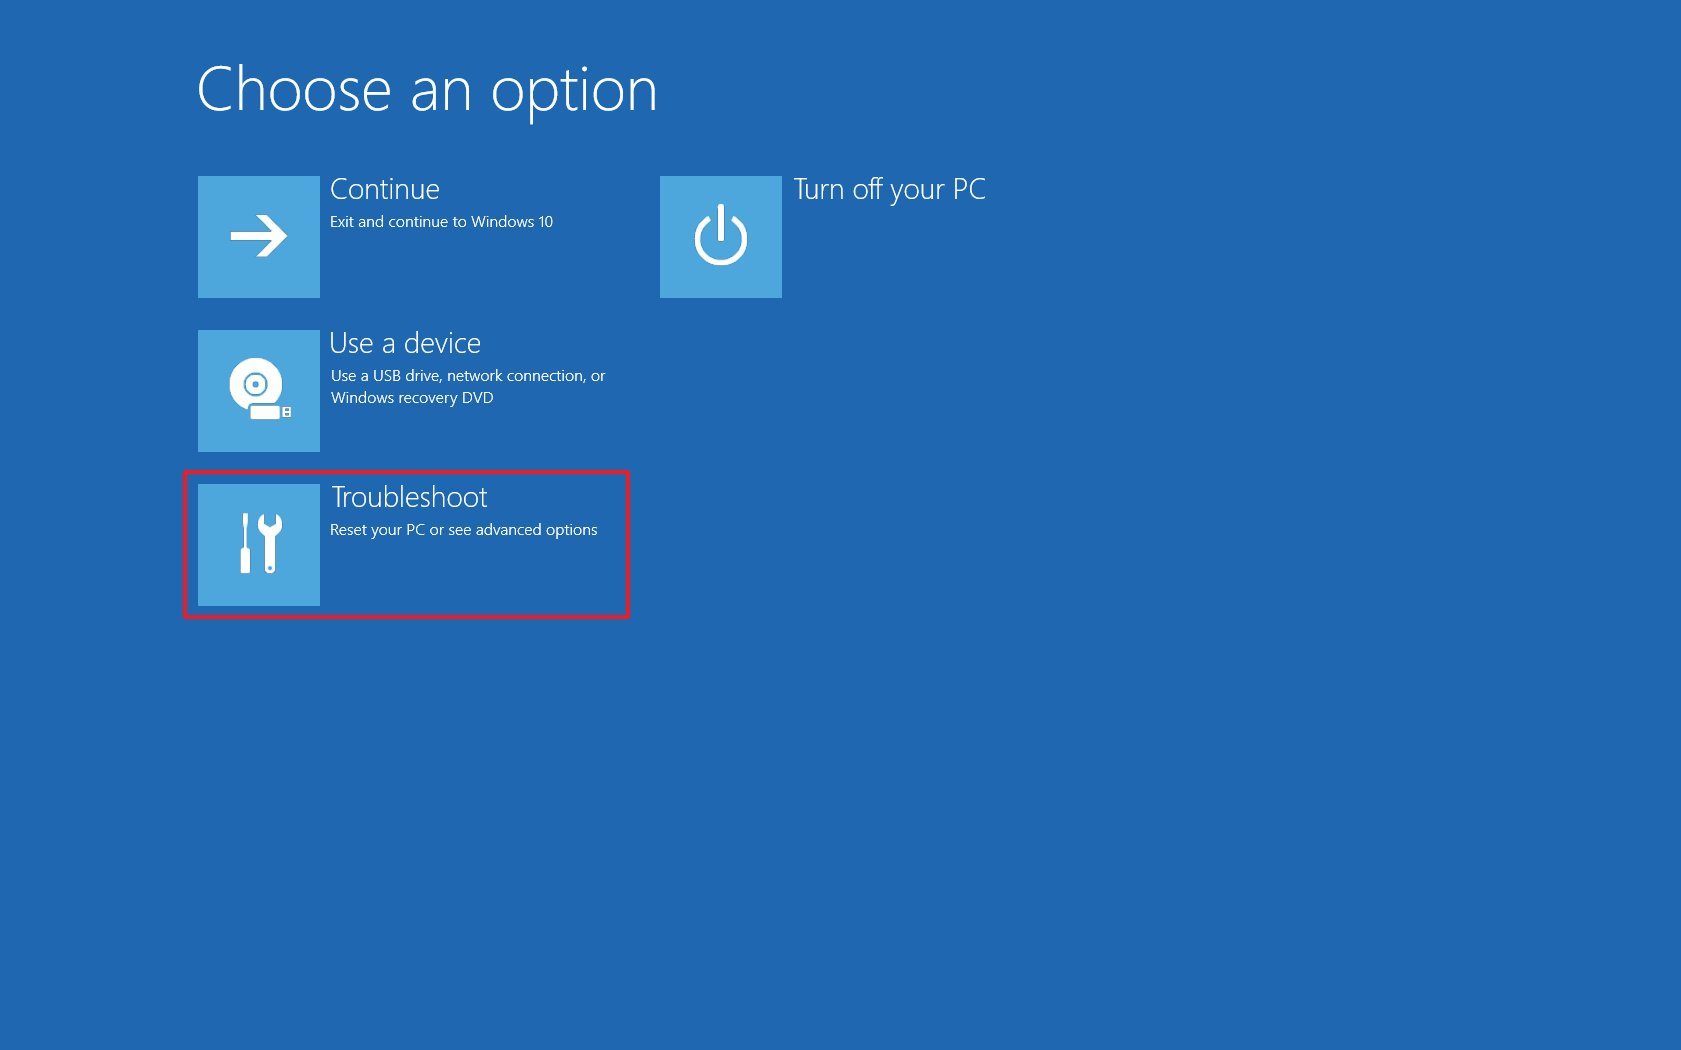
5. Click Troubleshoot.
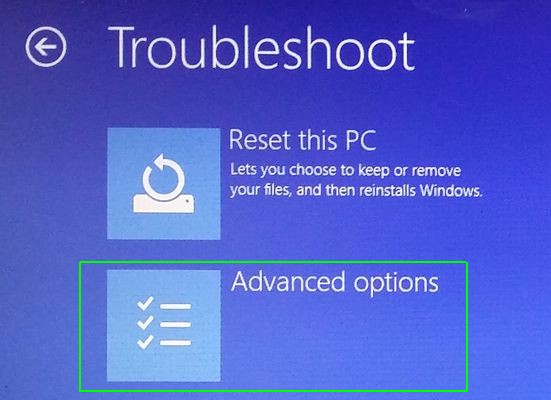
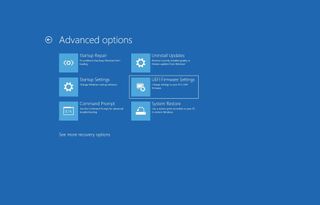
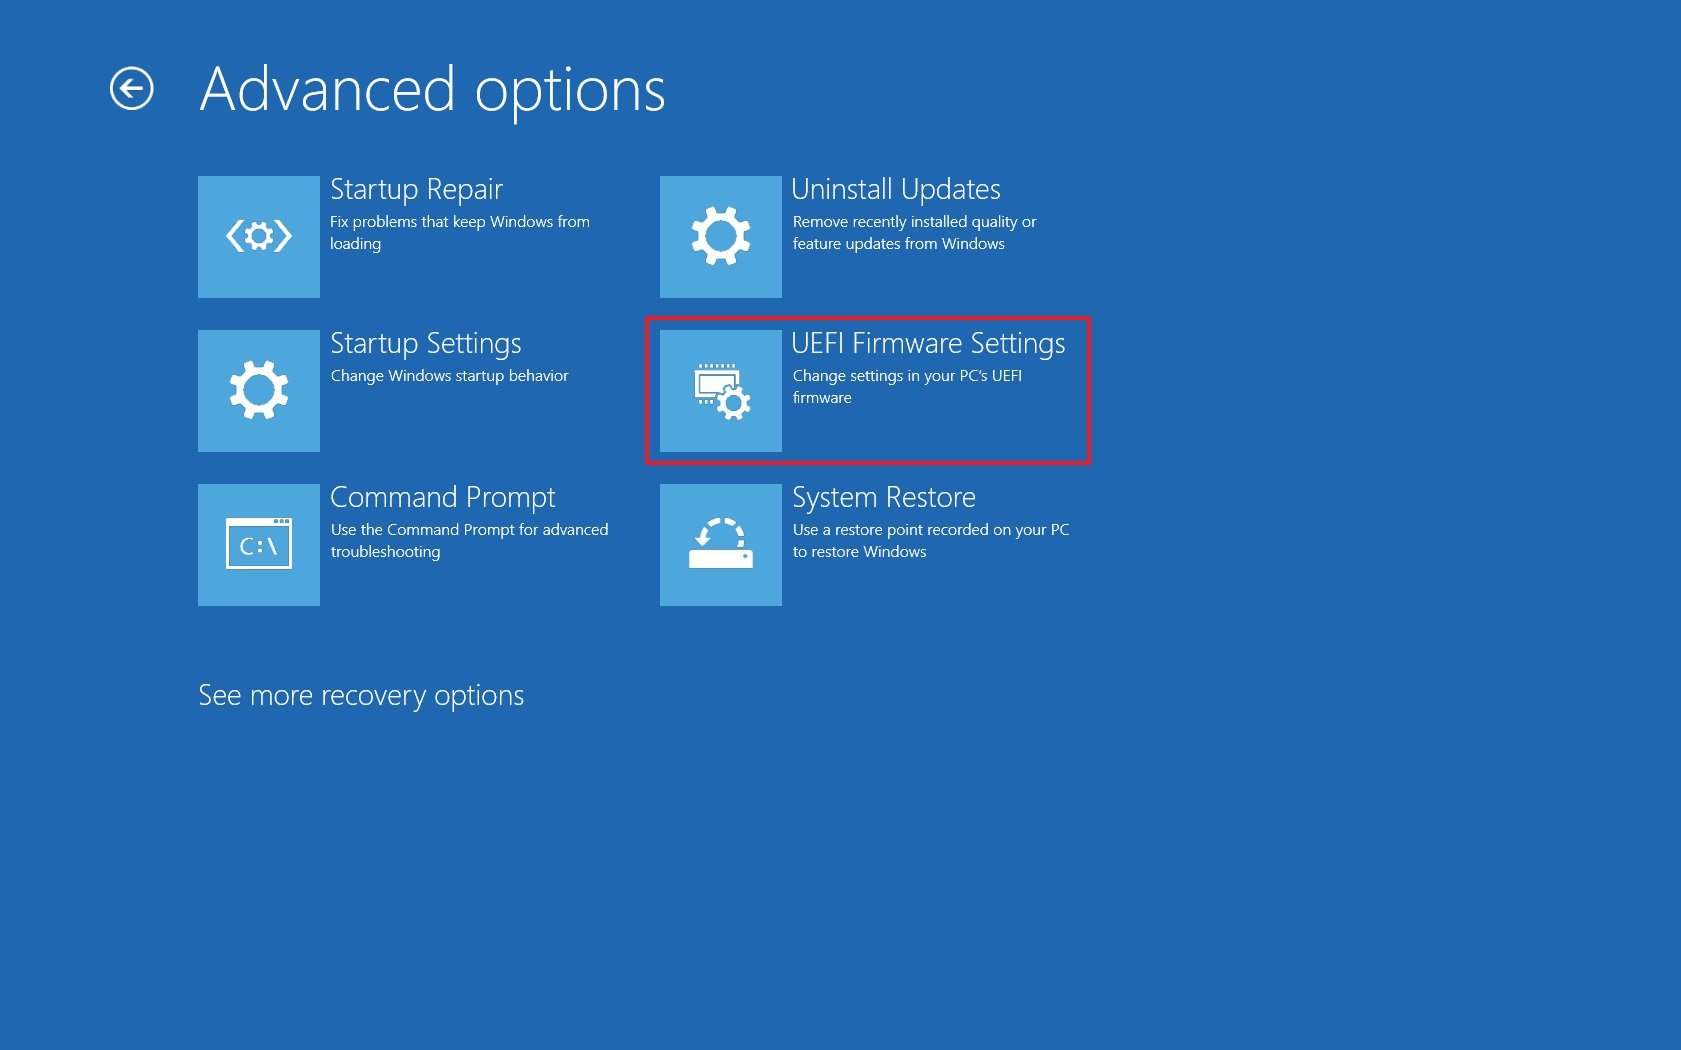
6. Click Advanced options.
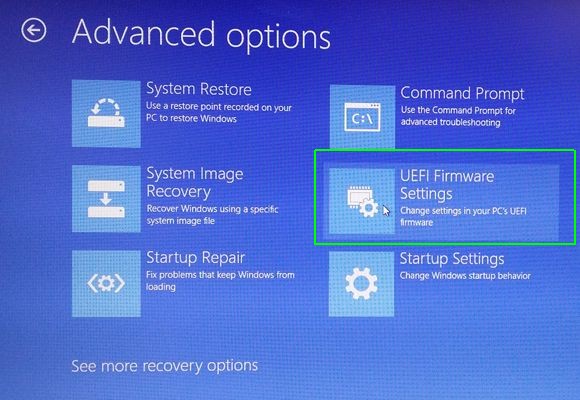
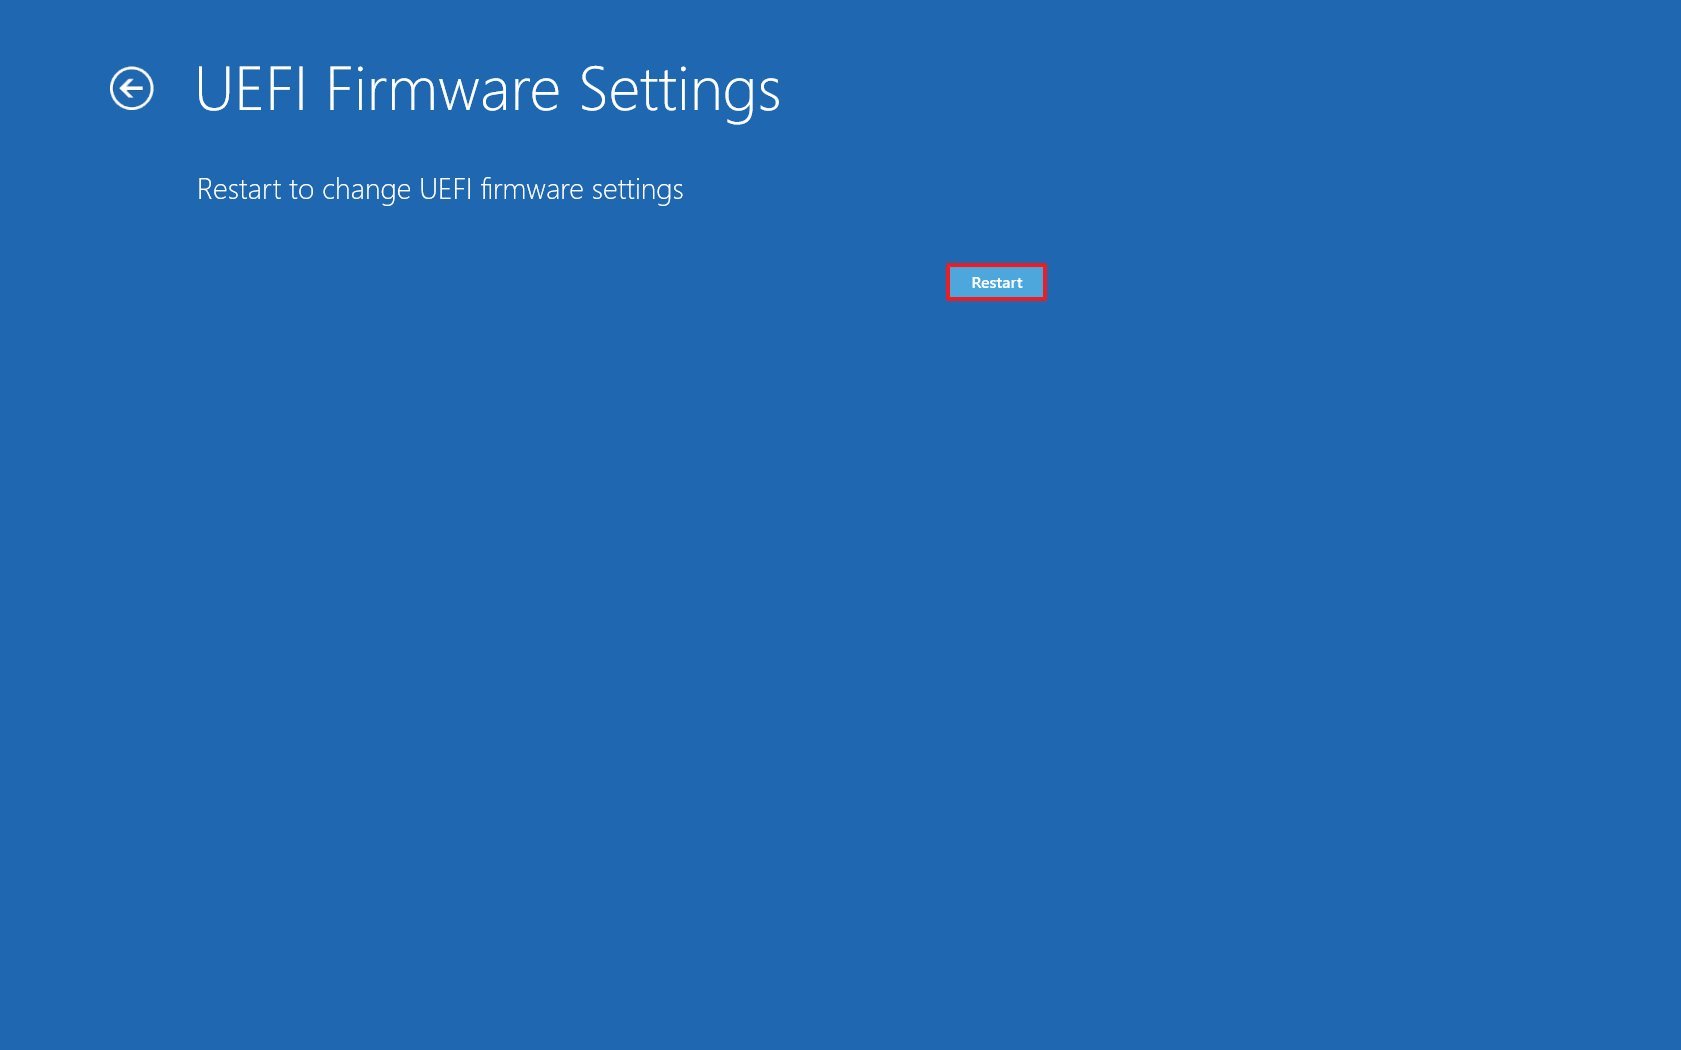
7. Select UEFI Firmware Settings. If you don’t see this icon, then press Startup Settings instead. When your PC is restarting, tap F1 (or F2) to access the BIOS.
8. Click Restart.
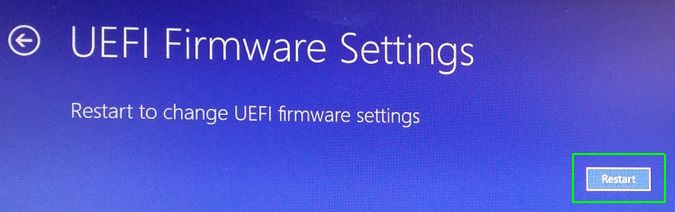
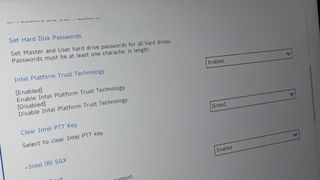
Your system will restart and take you to the BIOS.
Get instant access to breaking news, the hottest reviews, great deals and helpful tips.
The official Geeks Geek, as his weekly column is titled, Avram Piltch has guided the editorial and production of Laptopmag.com since 2007. With his technical knowledge and passion for testing, Avram programmed several of LAPTOP’s real-world benchmarks, including the LAPTOP Battery Test. He holds a master’s degree in English from NYU.
Содержание
- How to Enter BIOS on Windows 10
- Boot into BIOS on startup
- What to Know
- How to Access (Legacy) BIOS on Windows 10
- How to Boot Into UEFI BIOS on Windows 10
- How to Enter BIOS in Windows 10? Simple Ways
- What is BIOS?
- Why You Have to Access Bios?
- How to Enter Bios in Windows 10:
- Method-1: From Settings App
- Method-2: Using the specific key from Keyboard
- Conclusion
- Как зайти в БИОС (UEFI) в Windows 10
- Вход в параметры UEFI из Windows 10
- Вход в БИОС при включении компьютера
How to Enter BIOS on Windows 10
Boot into BIOS on startup
:max_bytes(150000):strip_icc()/SaikatBasu-ProfilePhoto-ff7f64f953704daa8b25efd2b22097a1.jpg)
:max_bytes(150000):strip_icc()/jonfishersquare-93eb80e77a004035887f56816d3623c5.jpg)
What to Know
- Enter BIOS by pressing a specific key at the precise time.
- F2, F10, or DEL are the standard hotkeys, but this can differ for each PC brand.
- Newer computers have UEFI BIOS which you can boot into from Windows Settings.
This article explains how to enter BIOS (Basic Input / Output System) on Windows 10.
How to Access (Legacy) BIOS on Windows 10
Entering the BIOS may be necessary to change the system date and time, hardware settings, or the boot order. You can enter BIOS with a keypress on a specific hotkey while the system is booting. But the time interval is short so be ready to press the right key at the right time just after the POST beep.
Newer computers with UEFI BIOS offer an easier way to enter the BIOS (or the Setup as it is often called) by booting into Windows 10 first.
The precise moment to press the BIOS hotkey is somewhere after the computer switches on and Windows initializes. Older computers on legacy BIOS give some time (though not much) to press the key. If the brand logo disappears before the keypress, the time has passed, and you will need to restart the PC again to enter BIOS.
Look out for a message that says “Press to Enter Setup.” Here, Key_Name can be the DEL, ESC, F2, F10, or any other key supported by the manufacturer.
Press the Power button to switch on your computer.
Press the BIOS hotkey (e.g., F2, F10, Esc, or DEL) as soon as the brand’s splash screen appears.
Tap on the hotkey repeatedly until you enter the setup mode. Alternatively, keep your finger on the key even before switching on the computer and press it until the BIOS comes up.
The exact key or even a key combination depends on the make of the computer. Consult the computer’s manual for the right key if it’s not on the boot screen.
Here are some keys you can try on these brands.
| Brand | BIOS Key |
| HP | F9 or Esc |
| Dell | F12 |
| Acer | F12 |
| Lenovo | F12 |
| Asus | Esc |
| Samsung | F12 |
| Sony | Esc |
| Microsoft Surface Pro | Volume Down Button |
How to Boot Into UEFI BIOS on Windows 10
The Unified Extensible Firmware Interface (UEFI) is the successor to the older BIOS. The firmware is a part of all modern computers and provides faster boot times. It is functionally more sophisticated and visually richer than the legacy BIOS. It also supports both the keyboard and the mouse.
Faster boot speed is a unique feature of UEFI firmware settings, so you may find it easier to enter the BIOS from within Windows 10 without going through the startup routine.
Select Settings from the Start Menu (or press Windows + I).
:max_bytes(150000):strip_icc()/A1-EnterBIOSonWindows10-annotated-4bc21f102b674825852418e5434a9749.jpg)
Go to Update & Security. Select Recovery.
:max_bytes(150000):strip_icc()/A2-EnterBIOSonWindows10-annotated-1722b2b5d3814d0fbc31c6046fe71158.jpg)
Go down to Advanced startup. Select Restart now and let the computer reboot.
:max_bytes(150000):strip_icc()/A3-EnterBIOSonWindows10-annotated-732d33d014bb4977b48b81e08c23d2df.jpg)
The computer restarts to display boot options. Select Troubleshoot.
:max_bytes(150000):strip_icc()/A4-EnterBIOSonWindows10-annotated-24af4a8846ed4d789f20072f24a28a0e.jpg)
Select Advanced options.
:max_bytes(150000):strip_icc()/A5-EnterBIOSonWindows10-annotated-6103c8b409624f09999e72eb5ae9954a.jpg)
Select UEFI Firmware Settings.
:max_bytes(150000):strip_icc()/A6-EnterBIOSonWindows10-annotated-f1bbfee62f254fdf81252e354ebf7e9a.jpg)
Select Restart to open the UEFI BIOS.
Источник
How to Enter BIOS in Windows 10? Simple Ways
BIOS is not a common topic for average users. But if you are a concerned user, you have reasons to explore BIOS stuff. As it isn’t a common topic, the majority of us don’t know how to access it even what BIOS is actually! But things are so simple. In this article, you will know how to enter BIOS in windows 10 and other BIOS related terms. Keep in touch.
 How to Enter Bios in Windows 10
Table of Contents
What is BIOS?
- BIOS stands for Basic Input Output System. It’s a small software installed on every computer by the manufacturer company itself.
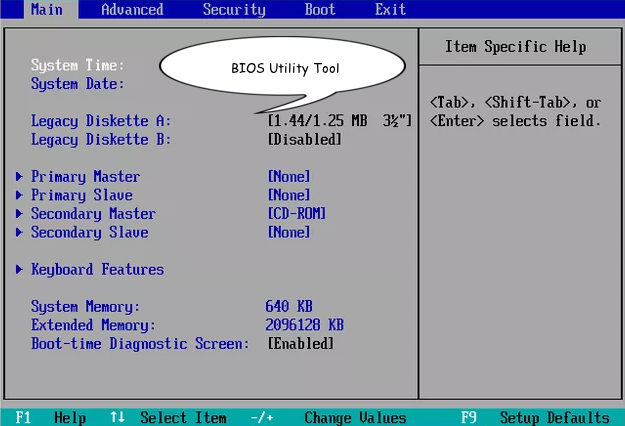 Bios Utility
Why You Have to Access Bios?
- Many users don’t know what BIOS is. It’s totally okay as knowing BIOS matters isn’t a mandatory thing for every pc user. But if you know the BIOS stuffs, you can manage
some extra facilities from it. Moreover, in many cases, you have to access your BIOS setting to get rid of problems. - As BIOS isn’t a part of OS, you have to access your BIOS if you want to change some settings related to your computer’s hard drive, motherboard, or components not related to OS.
- You can change your boot order from the BIOS setting. You must have to access BIOS if you want to change your boot order.
- You can change the settings of your Hard drive, Floppy drive, CD/DVD drive from BIOS. Advertisements
- You can change CPU, PC memory settings, and System Voltages from BIOS.
- You can create, change, or remove the BIOS password from BIOS settings.
- You can customize your power button functions from BIOS. You can disable your computer’s logo if you wish.
- You can enable or disable the Power On Self Test, CPU internal cache, BIOS caching from BIOS settings.
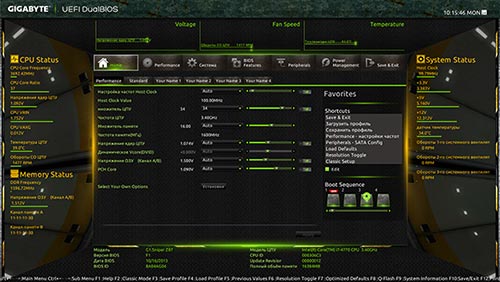
- You can check CPU and System temperatures, Fan speeds, System voltages here. You can change Fan speed settings if you wish.
- You can choose to overclock both CPU and RAM to enhance performance.
- Besides those above utilities, you can access many more features in BIOS settings. It’s a tool installed for your better usage.
How to Enter Bios in Windows 10:
There are several ways you can enter BIOS in windows 10. Let’s see them one by one.
Method-1: From Settings App
We cannot enter into BIOS directly from the settings menu as it’s a part of Windows 10. We will use the recovery app to enter into BIOS. Let’s go.
- Click on the windows start icon and then click on the option Settings.

- Now Click on the option ‘Update and Security’.

 Update And Security
 Recovery’ Option
 Troubleshoot Option
 Advanced Option
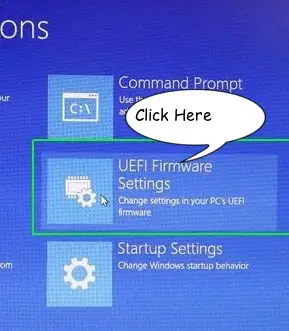 UEFI Firmware Settings

Your computer will be restarted now and you will be taken to the BIOS.
Method-2: Using the specific key from Keyboard
This is an old method used to enter into BIOS in earlier versions of windows. This a simple technique to enter into BIOS but it isn’t that much efficient in Windows 10 as boot time is now faster than earlier versions of windows. But this is a relatively faster way to enter into BIOS. Let’s go to work.
- At first, make sure your computer is turned off. If not, turn off your computer.
- Now turn on your computer. Before loading your computer with OS, you will see a message on your computer’s screen regarding which key you have to press if you want to enter into BIOS. You will see message somewhat like the below messages:
- Enter BIOS by pressing [A Key name]
- Setup [A Key name]
- Press [A Key name] to enter BIOS
- Press [A Key name] to access BIOS
- Press [A Key name] to enter setup
- Press [A Key name] to enter system configuration
You have to notice the message carefully and find out the key or keys your system is telling to press in the message. Now several cases can happen→
- One thing can happen you cannot notice the error message as Windows 10 boot time is faster. If this happens, restart the process and try to notice the message carefully. You can pause this startup process by pressing the pause button from your keyboard. If you cannot notice the desired message, press Esc to hold your startup process while turning on your system and then notice the BIOS message. Advertisements
- You may see the logo of your computer instead of any message regarding BIOS settings. If you see any logo of your computer while turning on your system, then press the Esc key from your keyboard. This time you should see a BIOS message.
- If you cannot see any BIOS message by any means (But you should), then visit the official website of your computer’s system providers and search that information. You can find it there.
- This time you should find out the key(s) you have to press to enter into BIOS. Now restart or turn on(if it’s been turned off) your computer and press the key(s) quickly while your computer is being turned on. You have to press the desired key(s) before your OS has been loaded. You are done now. You will be taken to BIOS after pressing the selected key(s).


Conclusion
Hope, now you know to enter BIOS in windows 10. I have described two simple methods. I would suggest you follow method-1 as it is easier than method-2. However, if you cannot enter BIOS with method-1, you can follow method-2 to get your things done. Follow the above-mentioned instructions carefully and hopefully, you have to face no problem. Go, check your BIOS!
Источник
Как зайти в БИОС (UEFI) в Windows 10
 Один из частых вопросов, касающихся последних версий ОС от Майкрософт, включая Windows 10 — как зайти в БИОС. При этом чаще имеется в виде все-таки UEFI (часто характеризующийся наличием графического интерфейса настроек), новый вариант ПО материнских плат, который пришел на замену стандартному БИОС, и предназначенный для того же — настройки работы оборудования, опций загрузки и получения информации о состоянии системы.
В связи с тем, что в Windows 10 (как и в  реализован режим быстрой загрузки (представляющий собой вариант гибернации), при включении компьютера или ноутбука вы можете не увидеть приглашение наподобие Press Del (F2) to enter Setup, позволяющее зайти в БИОС по нажатию клавиши Del (для ПК) или F2 (для большинства ноутбуков). Тем не менее, попасть в нужные настройки несложно.
Вход в параметры UEFI из Windows 10
Для использования этого способа, Windows 10 должна быть установлена в режиме UEFI (как правило, так и есть), а вы должны иметь возможность либо войти в саму ОС, либо хотя бы попасть на экран входа в систему со вводом пароля.
В первом случае вам достаточно кликнуть по значку уведомлений и выбрать пункт «Все параметры». После чего в настройках открыть «Обновление и безопасность» и перейти к пункту «Восстановление».
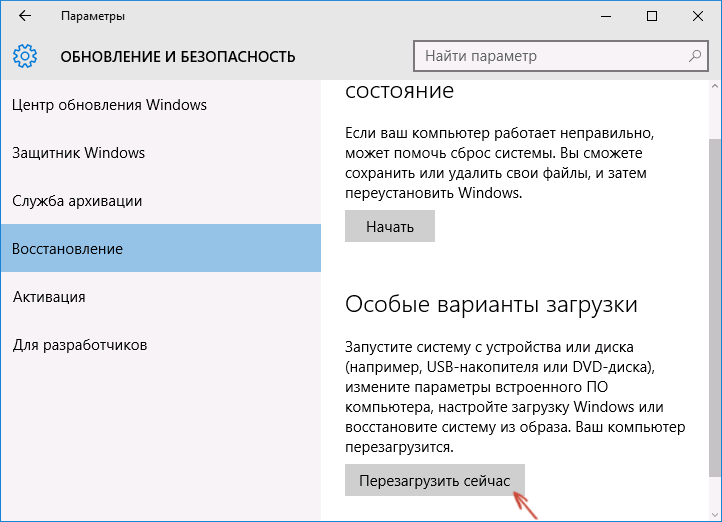
В восстановлении нажмите в разделе «Особые варианты загрузки» кнопку «Перезагрузить сейчас». После того, как компьютер перезагрузится, вы увидите экран такой же (или подобный) тому, что изображен ниже.
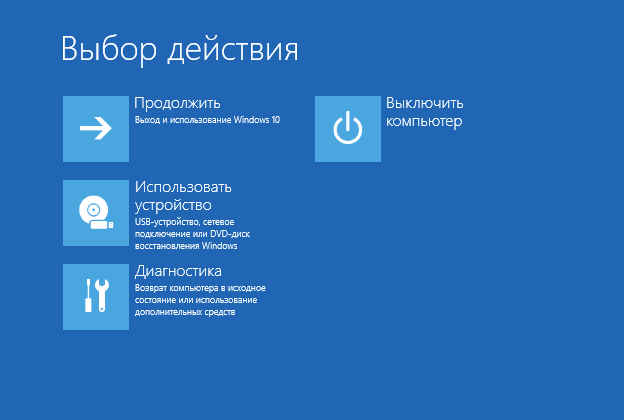
Выберите пункт «Диагностика», затем — «Дополнительные параметры», в дополнительных параметрах — «Параметры встроенного ПО UEFI» и, в завершение, подтвердите сове намерение, нажав кнопку «Перезагрузить».

После перезагрузки вы попадете в БИОС или, если точнее, UEFI (просто у нас по привычке настройки материнской платы обычно называют БИОС, наверное, так будет продолжаться и в дальнейшем).
В том случае, когда вы не можете войти в Windows 10 по каким-либо причинам, но можете попасть на экран входа, вы также можете зайти в настройки UEFI. Для этого, на экране входа в систему, нажмите кнопку «питание», а затем, удерживая клавишу Shift нажмите пункт «Перезагрузка» и вы попадете в особые варианты загрузки системы. Дальнейшие шаги уже были описаны выше.

Вход в БИОС при включении компьютера
Есть и традиционный, всем известный метод войти в БИОС (подходит и для UEFI) — нажать клавишу Delete (для большинства ПК) или F2 (для большинства ноутбуков) сразу при включении компьютера, еще до начала загрузки ОС. Как правило, на экране загрузки внизу отображается надпись: Press Название_Клавиши to enter setup. Если такой надписи нет, вы можете ознакомиться с документацией к материнской плате или ноутбуку, там должна присутствовать такая информация.
Для Windows 10 вход в БИОС этим способом это осложняется тем, что загрузка компьютера происходит действительно быстро, и не всегда эту клавишу можно успеть нажать (или даже увидеть сообщение о том, какую именно).
Для решения этой проблемы, вы можете: отключить функцию быстрой загрузки. Для этого, в Windows 10 кликните правой кнопкой мыши по кнопке «Пуск», выберите в меню «Панель управления», а в панели управления — электропитание.
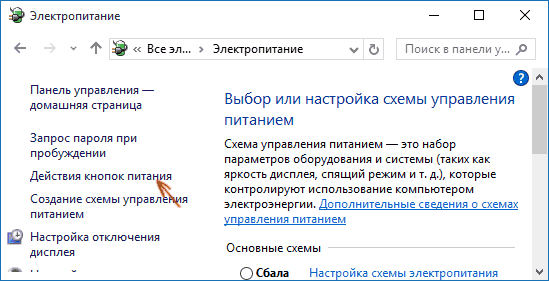
Слева кликните «Действия кнопок питания», а на следующем экране — «Изменение параметров, которые сейчас недоступны».
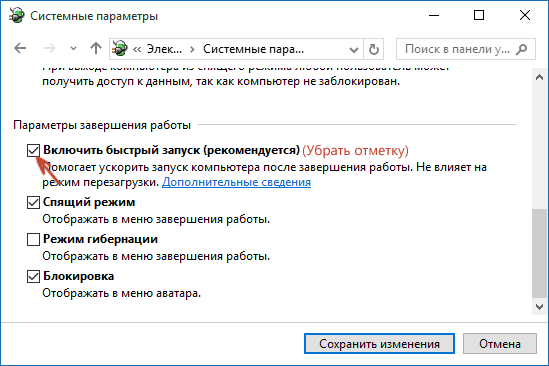
Внизу, в разделе «Параметры завершения работы» уберите отметку «Включить быстрый запуск» и сохраните изменения. После этого, выключите или перезагрузите компьютер и попробуйте войти в БИОС с помощью необходимой клавиши.
Примечание: в некоторых случаях, когда монитор подключен к дискретной видеокарте, вы можете не увидеть экран БИОС, а также информацию о клавишах для входа в него. В этом случае может помочь его переподключение к интегрированному графическому адаптеру (выходы HDMI, DVI, VGA на самой материнской плате).
Источник
(Image credit: Windows Central)
On Computers, the Basic Input Output System (BIOS) is an essential low-level software that sits on one of the chips of the motherboard, and it’s responsible for basic operations, such as booting and configuring hardware (mouse, keyboard, memory, processor, etc.). The Unified Extensible Firmware Interface (UEFI) is a modern software designed to replace the legacy BIOS with additional benefits, such as improved security, faster boot times, large capacity hard drive support, and more.
Although these are different technologies, modern devices now use UEFI, but to avoid confusion, sometimes you’ll continue to hear the term «BIOS» to refer to «UEFI.»
If you use a Windows 10 device, usually, the firmware works automatically. However, sometimes you may still need to enter the motherboard BIOS to troubleshoot problems, enable or disable features (such as virtualization, RAID array, and secure boot), adjust memory and processor advanced settings, and more.
The only caveat is that the BIOS is a startup environment, which means that you can’t access it when Windows 10 is running. However, if you have to change some system settings, there are multiple methods to access the motherboard firmware.
In this Windows 10 guide, we’ll walk you through the steps to enter the BIOS/UEFI on your computer to change advanced system settings.
- How to access UEFI (BIOS) using Settings
- How to access UEFI (BIOS) using boot key option
How to access UEFI (BIOS) using Settings
To enter the UEFI firmware from Windows 10, use these steps:
Warning: Changing the wrong firmware settings can prevent your computer from starting correctly. You should only access the motherboard firmware when you have an excellent reason. It’s assumed that you know what you’re doing.
- Open Settings.
- Click on Update & Security.
- Click on Recovery.
- Under the «Advanced startup» section, click the Restart now button.
- Click on Troubleshoot.
- Click on Advanced options.

- Click the UEFI Firmware settings option.
- Click the Restart button.
Once you complete the steps, the device will restart and boot into the UEFI firmware allowing you to change advanced settings, such as to disable or enable secure boot, change boot order, set up a hardware RAID array, enable virtualization, and other settings depending on the motherboard support.
How to access UEFI (BIOS) using boot key option
If you don’t have access to the Windows 10 desktop or you’re using a device with a legacy BIOS, then you can still access the firmware during boot.
To enter the UEFI or legacy BIOS during boot, use these steps:
- Press the Power button.
- See the screen splash to identify the key you must press to enter the firmware (if applicable).
- Press the required key repeatedly until you enter the setup mode. Usually, you need to press the ESC, Delete, or one of the Function keys (F1, F2, F10, etc.).
After you complete the steps, the device will access the BIOS or UEFI firmware, depending on the motherboard support. If you don’t see the information on the screen or the device boots too fast, restart the device again, and as soon as the boot starts, press the required key multiple times quickly.
If you can’t make the computer to access the firmware using the keyboard, you may need to check your device manufacturer to find out the key that you need to press during boot.
Here are some computer brands and their respective keys to access the motherboard firmware:
- Dell: F2 or F12.
- HP: ESC or F10.
- Acer: F2 or Delete.
- ASUS: F2 or Delete.
- Lenovo: F1 or F2.
- MSI: Delete.
- Toshiba: F2.
- Samsung: F2.
- Surface: Press and hold volume up button.
In the case that your device is using a UEFI firmware, and you can’t seem to access it during startup, then it’s recommended to use the Settings option from within Windows 10.
Get the best of Windows Central in in your inbox, every day!
Mauro Huculak is technical writer for WindowsCentral.com. His primary focus is to write comprehensive how-tos to help users get the most out of Windows 10 and its many related technologies. He has an IT background with professional certifications from Microsoft, Cisco, and CompTIA, and he’s a recognized member of the Microsoft MVP community.
Для настройки и проверки работы аппаратной части используется программное обеспечение низкого уровня: BIOS – использовался в более ранних версиях ПК – и UEFI, который был выпущен позже и со временем пришел на замену первому. Я расскажу вам, чем эти системы отличаются друг от друга и какими способами их можно запустить на Windows 10.
Чем отличается BIOS от UEFI
Обе программы предназначены для настройки работы аппаратных комплектующих и подключенных устройств. Работа их не зависит от операционной системы Windows. В функционал прошивок входит запуск ПК с внешних носителей (флешек, карт памяти, дисководов и переносных хардов), разгон процессора, регулировка температурного режима и системы охлаждения, также включение или отключение некоторых интерфейсов.
BIOS – это основная система контроля ввода и вывода, расшифровывается как Basic Input-Output system. Она отвечает за включение аппаратных компонентов и их правильное функционирование. После успешного окончания всех проверок программа запускает операционную систему Windows.
С момента выпуска в1980 году система практически не менялась. Основные изменения касались добавления расширений, совершенствования интерфейса управления питанием и конфигураций. С каждым обновлением настройка становилась все легче.
Классический BIOS имеет серьезные ограничения, в число которых входит запуск с жестких дисков объемом не более 2.1 ТБ. И если установить хард на 3 ТБ, BIOS в нем просто не будет поддерживаться. Кроме того, программа должна работать в 16-битном режиме процессора, и для этого ей выделяется только 1 МБ памяти. Еще есть проблемы с одновременной инициализацией нескольких устройств, впоследствии ведущие к замедлению загрузки.
Работа над EFI началась в 1998 году компанией Intel. Apple перешел на ее архитектуру в Макбуках еще в 2006 году. Остальные производители ПК, в том числе Intel, AMD и Microsoft, приняли новую спецификацию – UEFI (Unified Extensible Firmware Interface, или унифицированный интерфейс расширяемой прошивки). Ее поддержка в ОС Windows началась после выхода версий Vista Service Pack 1 и Windows 7. Сегодня большая часть компьютеров функционирует именно на UEFI.
Плюсы UEFI – более продвинутая и понятная графическая оболочка с поддержкой управления мышью. Прошивка грузится с дисков объемом от 2.2 ТБ и работает в 32 и 64-битном режимах. Еще она поддерживает безопасный запуск Secure Boot для проверки влияния на загрузку ОС сторонних вредоносных программ.
Как открыть BIOS или UEFI
Открыть BIOS или UEFI в компьютере возможно несколькими способами, причем как перед, так и после загрузки операционной системы Windows 10.
Во время загрузки
В этом случае при включении компьютера и перед загрузкой ОС необходимо нажать на специальную клавишу. Чаще всего это F2 или Del, но встречаются другие варианты или даже некоторые комбинации. А вот какую клавишу нажать – зависит от производителя компьютера или ноутбука, а также модификации системы BIOS.
|
Версия BIOS |
Клавиши для входа в BIOS |
|
AMD |
F1 |
|
DTK |
Esc |
|
AMI |
F2, Delete |
|
ALR |
F2, Ctrl + Alt + Esc, Ctrl + Alt + Del |
|
Award |
Del, Ctrl + Alt + Esc |
|
Phoenix Award |
Ctrl + Alt + S, Ctrl + Alt + Esc, Ctrl + Alt + Ins, Ctrl + S |
Как войти в BIOS или UEFI на ноутбуке c Windows 10
Каждый производитель устанавливает на свои компьютеры или ноутбуки определенную комбинацию или клавишу.
- Acer (Aspire, Power, Veriton, Extensa, Ferrari, TravelMate, Altos) – F1, Del;
- Acer (старые модели) – Ctrl + Alt + Esc;
- ARI – Ctrl + Alt + Esc, Ctrl + Alt + Del;
- AST Advantage – Ctrl + Alt + Del, Ctrl + Alt + Esc;
- Compaq (Presario, Prolinea, Deskpro, Systempro, Portable) – F10;
- Compaq (старые компьютеры) – F1, F2, F10, или Del;
- CompUSA, eMachine, Intel Tangent, Roverbook, Tiget – Del;
- Cybermax – Esc;
- Dell 400 – F1, F3;
- Dell (старые модели 486) – Ctrl + Alt + Enter, Fn + Esc;
- Dell – F2, Del, нажать Reset дважды, Fn+F1;
- EISA Computer – Ctrl + Alt + Esc, Ctrl + Alt + S;
- eMachines (eTower, eMonster, S-Series, eOne, T-Series) – Tab, Del;
- eMachine (старые ПК) – F2;
- Fujitsu (LifeBook, Esprimo, Amilo, Tablet, DeskPower) – F2;
- HP – F1 при появлении логотипа, F2, Esc;
- HP Tablet PC – F10, F12;
- Gateway, HP – F1, F2;
- IBM (большинство ПК) – F1, Ctrl + Alt + F11;
- IBM с клавиатурой PS/2 – Ctrl + Alt + Ins, Ctrl + Alt + Del;
- IBM (PC, XT, AT) – F1;
- IBM (старые ПК и ноутбуки) – F2;
- Lenovo (ThinkPad, IdeaPad, 3000, ThinkCentre, ThinkStation) – F1, F2;
- Micron – Del, F1, F2;
- Microid Research MR BIOS – F1;
- NEC (PowerMate, Versa, W-Series) – F2;
- NEC Versa Notebook – F1;
- Olivetti PC Pro – Ctrl + Alt + Shift + Del;
- Packard Bell – F1, F2, Del;
- Packard Bell (старые модели 386 и 486) – Ctrl + Alt + S;
- Sharp – F2;
- Shuttle – F2, Del;
- Sony (VAIO, PCG-Series, VGN-Series) – F1, F2, F3;
- Sony VAIO 320 серии – F2;
- Tandon и Tandon 386 – Ctrl + Shift + Esc;
- Toshiba – Esc;
- Toshiba на Phoenix BIOS – F1;
- Zenith на Phoenix – Ctrl + Alt + Ins.
Через меню «Параметры»
Есть и другой способ входа без необходимости нажатия на клавиши. Для этого мне понадобится войти в параметры компьютера – сделать это можно через иконку в меню «Пуск» или нажатием на комбинацию Win + I.
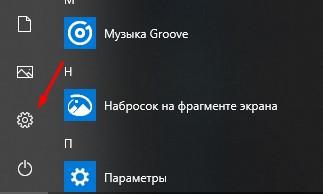
Значок шестеренок
Далее мне следует перейти в категорию «Обновление и безопасность».
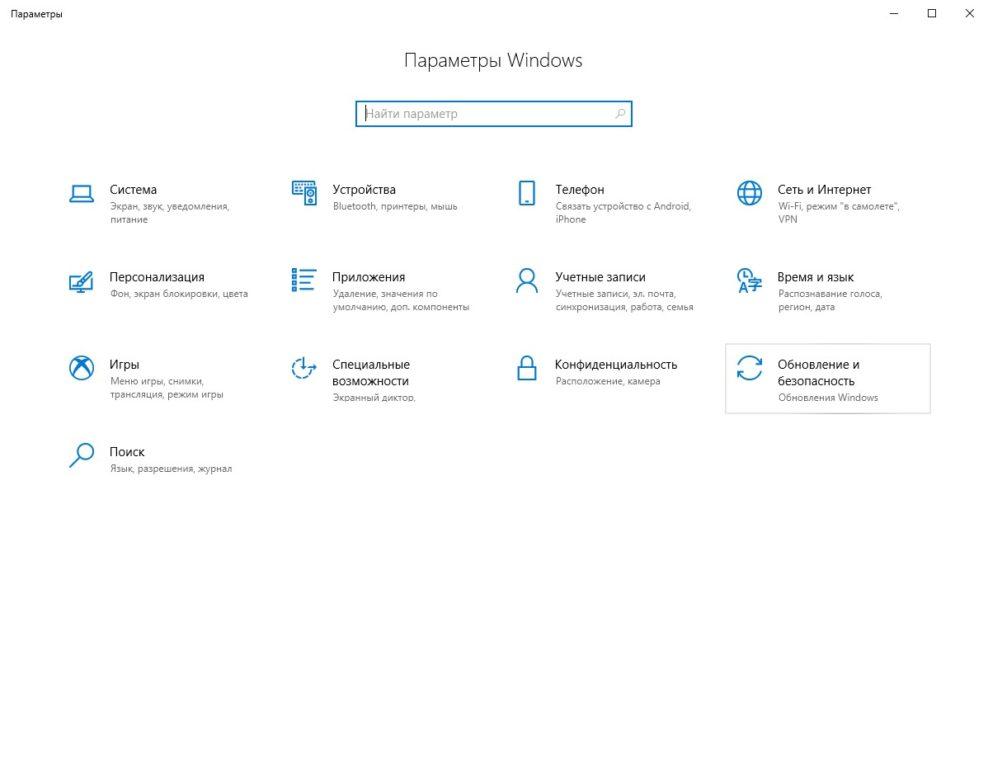
Перейдем в Параметры
Во вкладке «Восстановление», в самом низу окна, выйдет раздел особых вариантов загрузки. Под ними подразумевается загрузка системы с DVD диска или USB карты, а также изменение некоторых параметров или восстановление из созданного образа. Мне лишь надо нажать на кнопку «Перезагрузить сейчас».
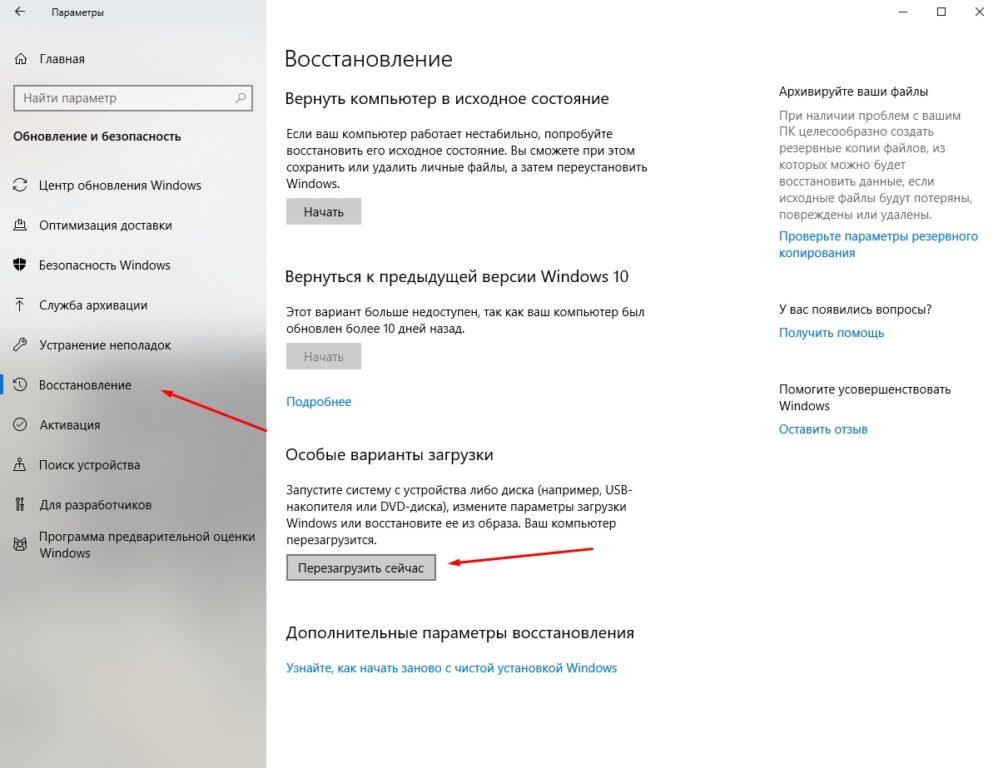
Жмем на кнопку
Сразу после этого система перезагрузится, но перейдет в безопасный режим. На мониторе передо мной высветится меню с выбором действий. Мне нужен пункт «Поиск и исправление неисправностей».
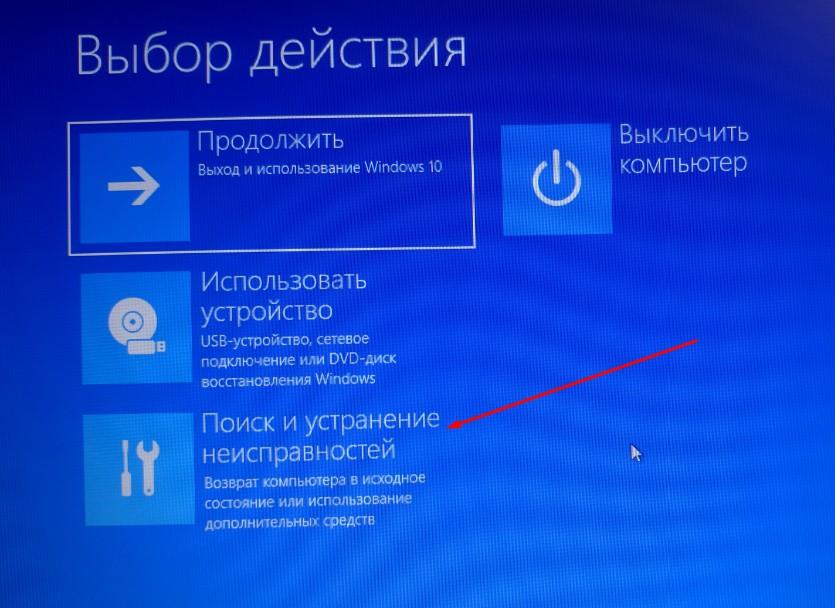
Жмем сюда
С окна «Диагностика» перехожу в раздел дополнительных параметров.
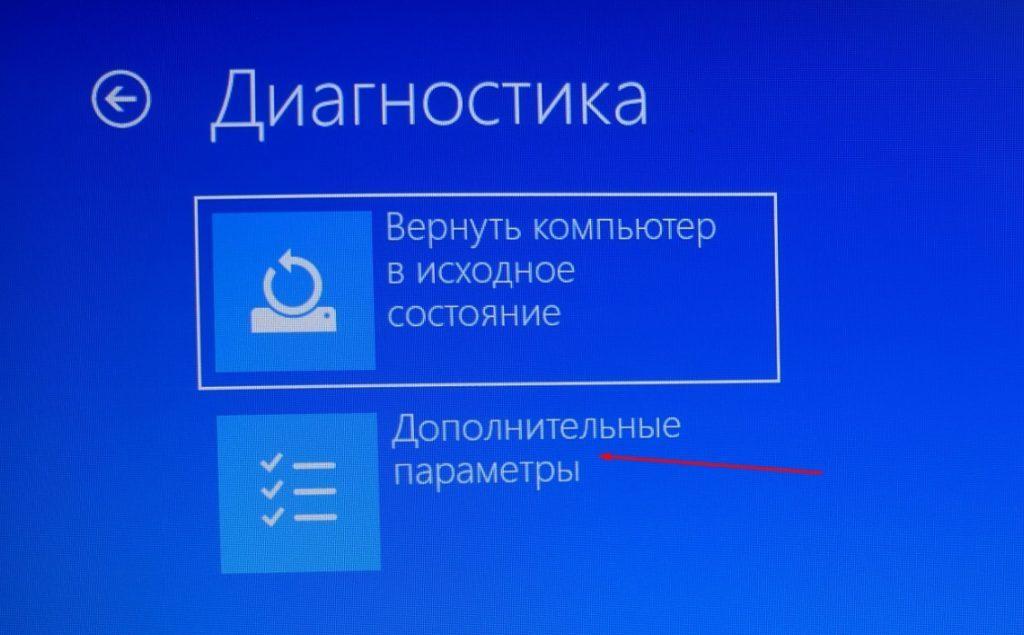
Жмем сюда
В результате на экране представится несколько пунктов, в числе которых выйдет искомый – «Параметры встроенного ПО UEFI».
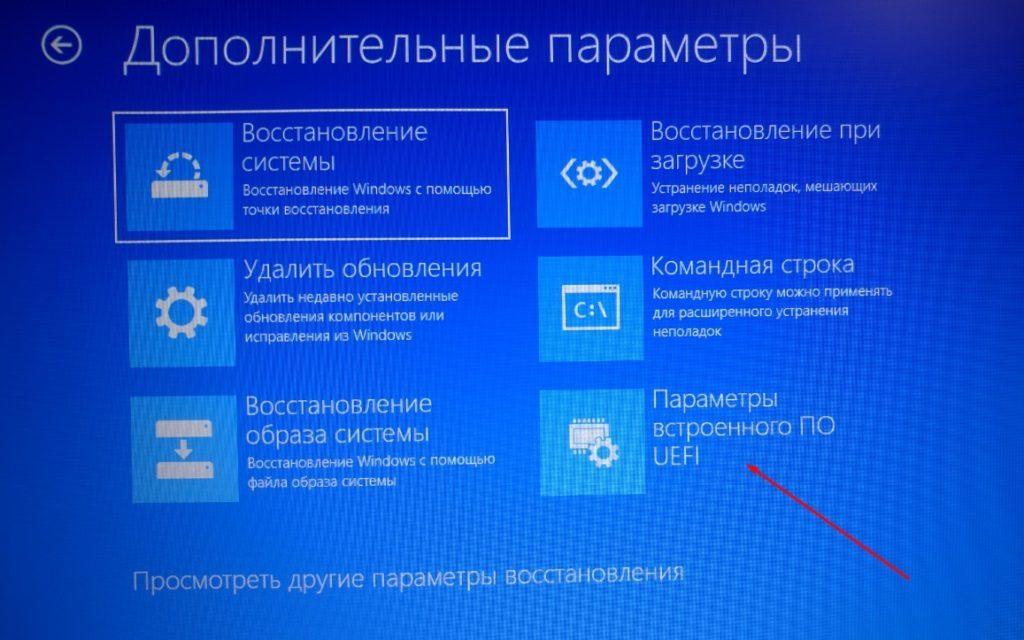
Нам нужен данный пункт
После выбора система вновь перезапустится, и уже вместо системы или безопасного режима на экране высветится окно UEFI.
Как отменить быструю загрузку системы
Этот метод понадобится в том случае, если система загружается слишком быстро, и компьютер не успевает реагировать на нажатие нужной кнопки. Сначала я открываю панель управления. Для этого можно воспользоваться несколькими способами: ввести в поиск панели задач запрос,
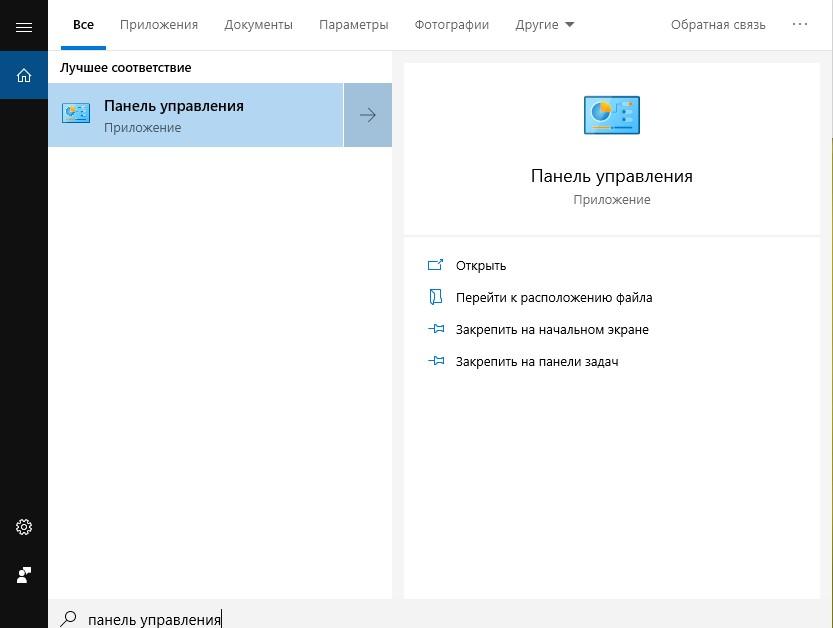
В поиске вводим
выбрать соответствующий раздел в настройках, либо воспользоваться поиском,
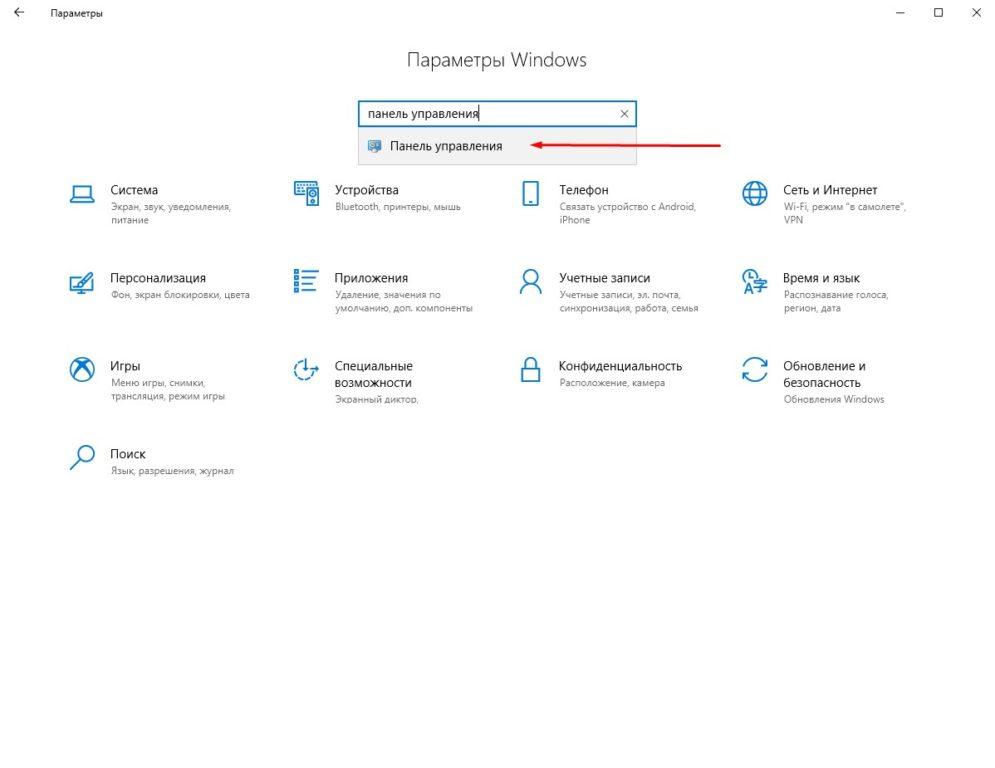
В поисковой строке параметров
Также можно набрать в поле окна «Выполнить» команду control.exe, после чего нажать на клавишу Enter или кнопку ОК.
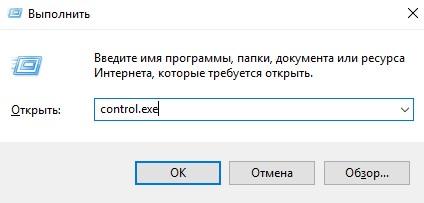
control.exe
В новом окне появится раздел «Электропитание» – в него-то мне и нужно перейти.
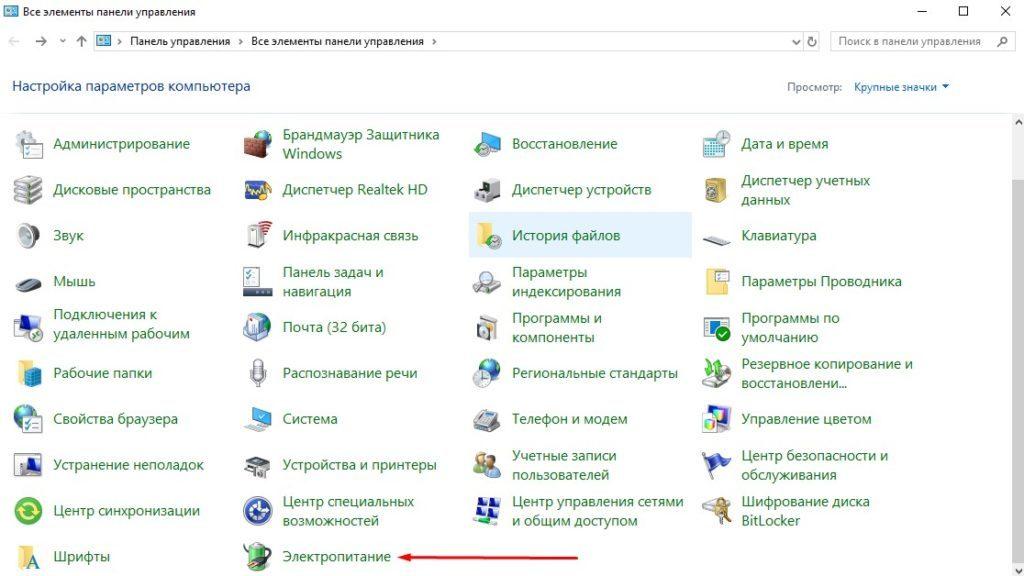
Сюда
Затем кликну по ссылке «Действия кнопок питания», расположенной в списке в левой части.
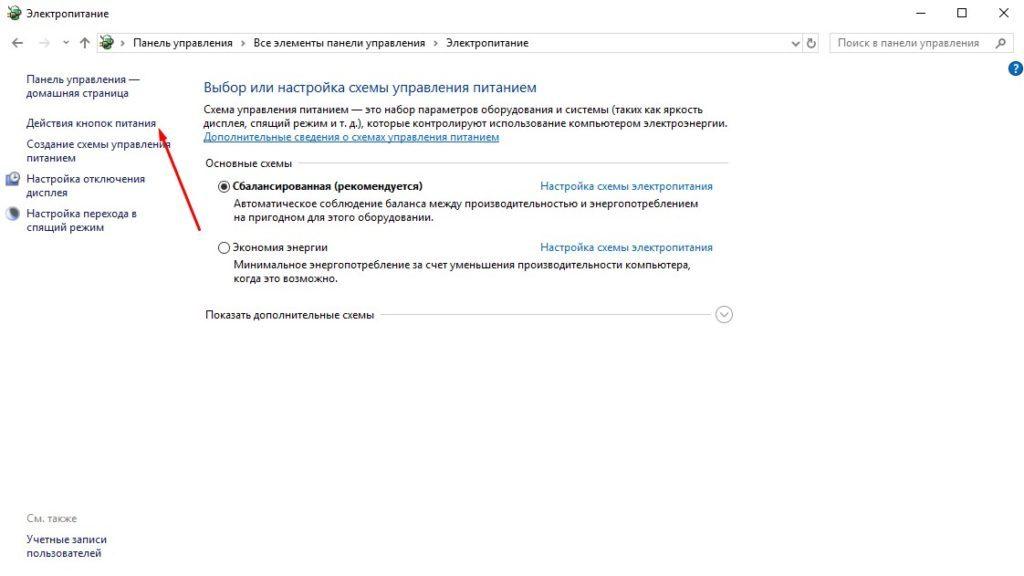
Действия кнопок электропитания
Нужный пункт будет недоступен, но его можно открыть, нажав на ссылку «Изменение параметров, которые сейчас недоступны».
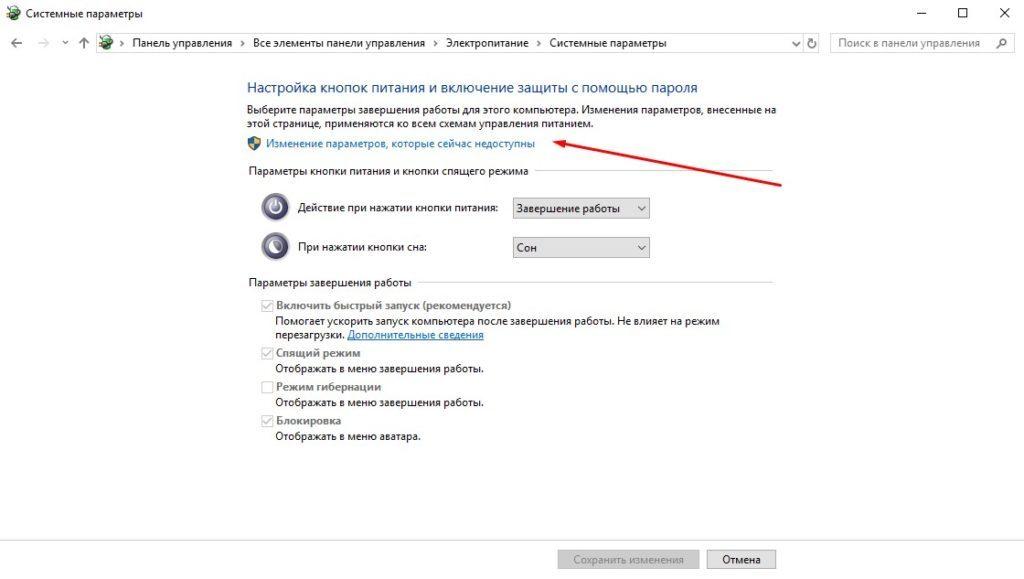
Переходим в Изменение параметров, которые сейчас недоступны
Как только доступ откроется, я сниму галочку с пункта «Включить быстрый запуск».
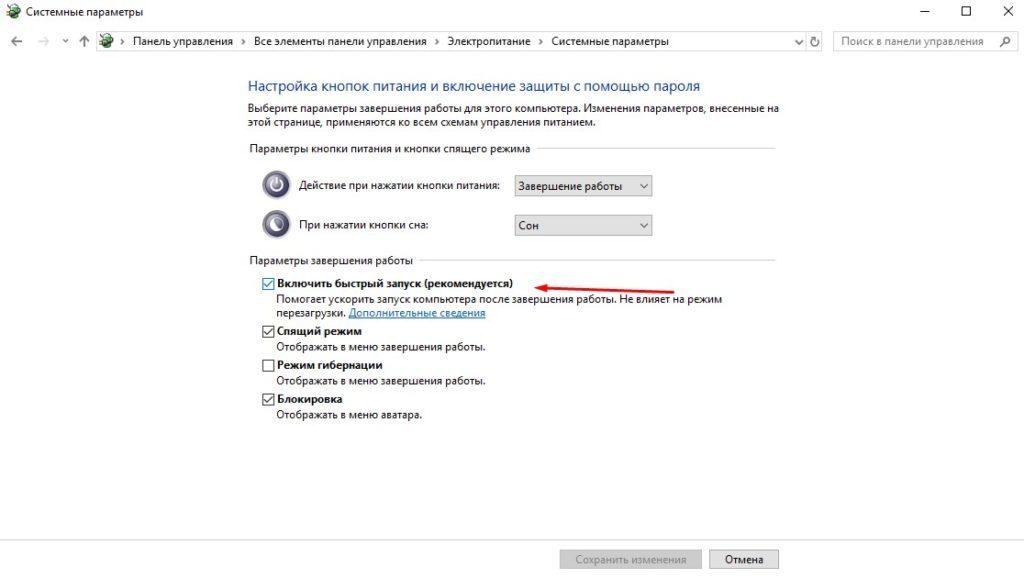
Надо поставить галочку
Перезапущу компьютер. В результате загрузка аппаратных элементов будет происходить медленнее, поэтому я успею вызвать BIOS или UEFI.
Иногда по каким-либо причинам ПК может не перезагружаться, а проверить работу аппаратных компонентов все равно необходимо. В этом случае можно прибегнуть к другим способам перезапуска системы.
Через командную строку
Он подойдет только в том случае, если стандартная кнопка не работает. Вызываю командную строку. Для этого можно использовать два способа – в строке поиска введу запрос cmd/командная строка (желательно запустить от имени администратора),
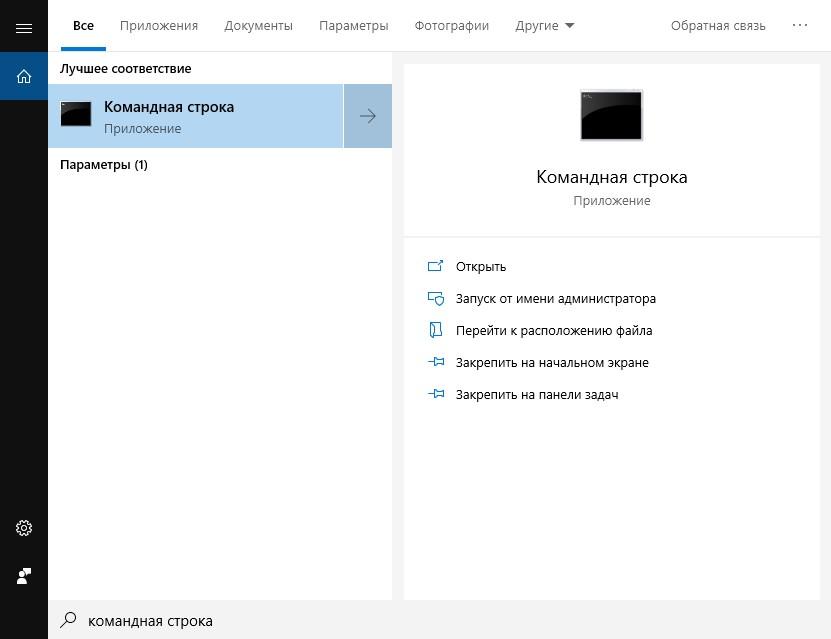
Найдем командную строку или Power Shell
или же открою окно «Выполнить» комбинацией Win + R, в поле введу CMD и нажму на кнопку ОК.
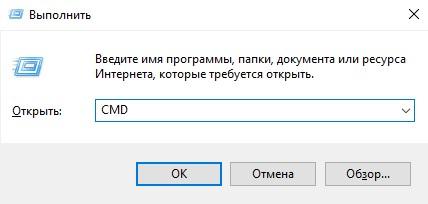
Выполнить CMD
В строке нужно задать команду shutdown.exe /r /o, которая перезагрузит компьютер и откроет безопасный режим.
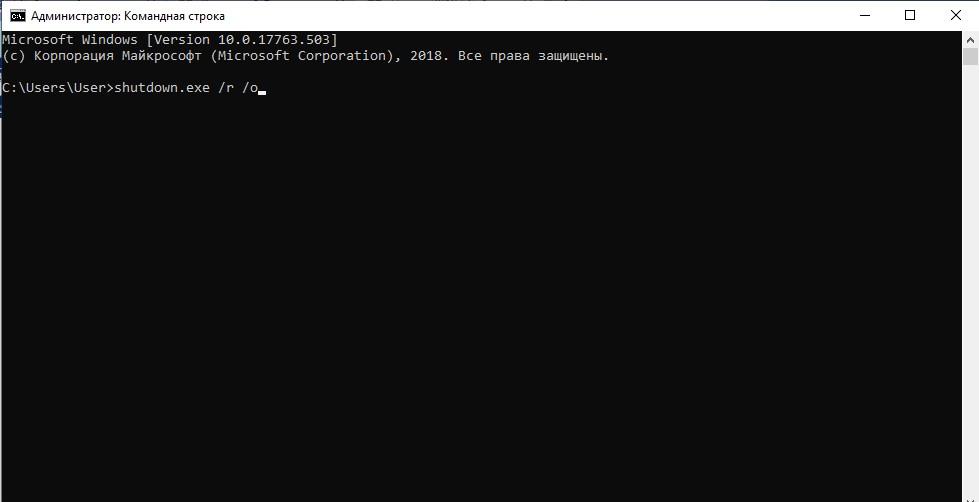
Введем команду
Эту же операцию можно выполнять через программу Windows PowerShell, и тоже желательно с правами администратора.
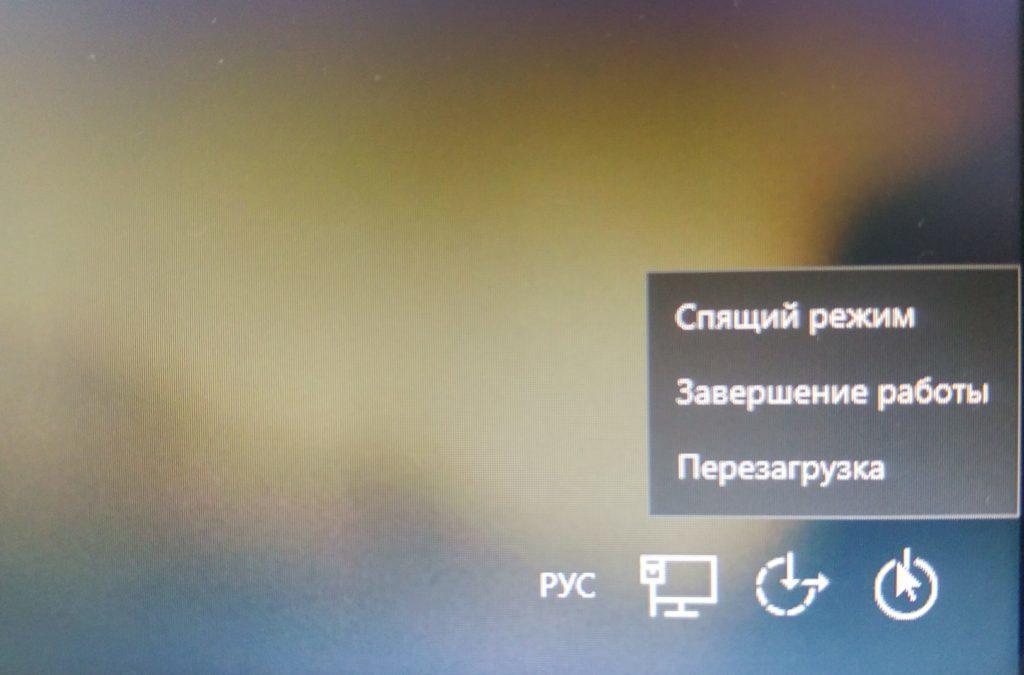
Перезапуск без входа в систему
Если в систему не удается войти – например, вы забыли пароль, доступ заблокирован сторонними программами или вирусами, то систему можно перезагрузить из панели входа в учетную запись. Для этого в правой нижней части нажму на кнопку питания и выберу пункт «Перезагрузка».
Перезагрузка
Другой способ перехода на безопасный режим
Безопасный режим – он же «Среда восстановления», в котором загружается только часть системных компонентов. Чаще всего используется для проверки системы на наличие вирусов или сбоев. Помимо вышеперечисленного в Windows 10 можно войти в этот режим еще несколькими способами. См. также: как зайти в безопасный режим в Windows 10.
- Перезагрузка системы
Для этого нужно открыть меню «Пуск», нажать на кнопку питания и выбрать вариант перезагрузки. НО, при нажатии необходимо удерживать клавишу Shift.
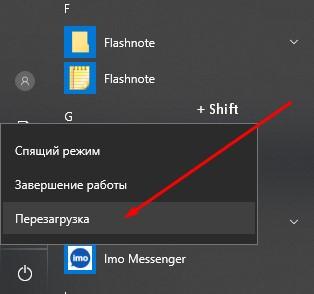
Не забываем зажать клавишу Shift
Этот же способ сработает на экране блокировки в том случае, если войти в систему не удалось.

Даже без входа в систему
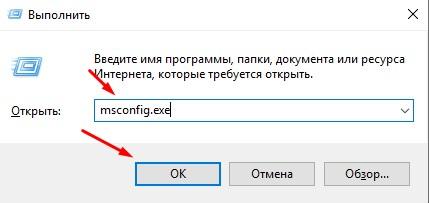
- С помощью конфигураций системы
Открываю окно «Выполнить» комбинацией Win + R, ввожу в строку msconfig.exe и нажимаю на ОК.
msconfig.exe команда
Могу поступить иначе – ввести в строке поиска запрос Конфигурация системы.
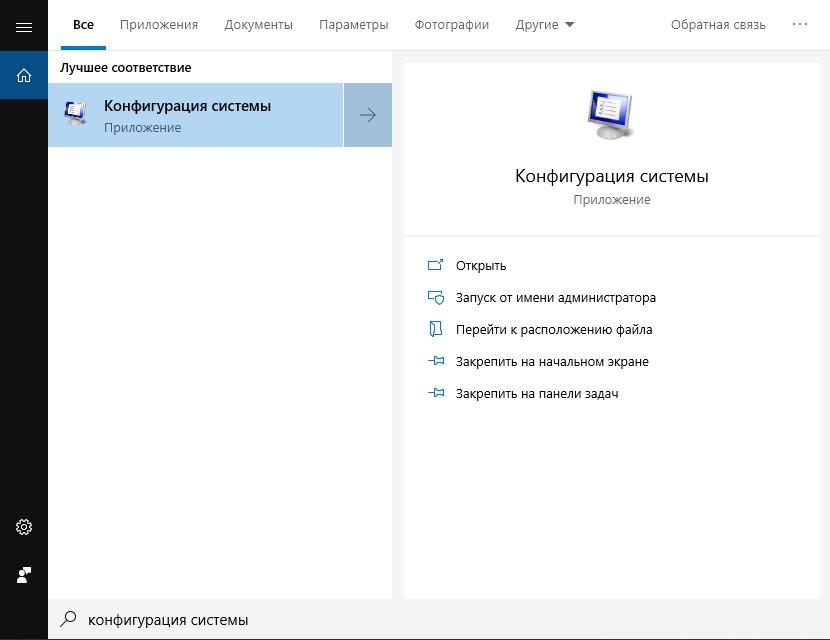
Приложение Конфигурация системы
Перехожу во вкладку «Загрузки», и в категории «Параметры загрузки» ставлю галочку у пункта «Безопасный режим». После этого система предложит провести перезагрузку. Впоследствии в первую очередь будет запущена нужная среда.
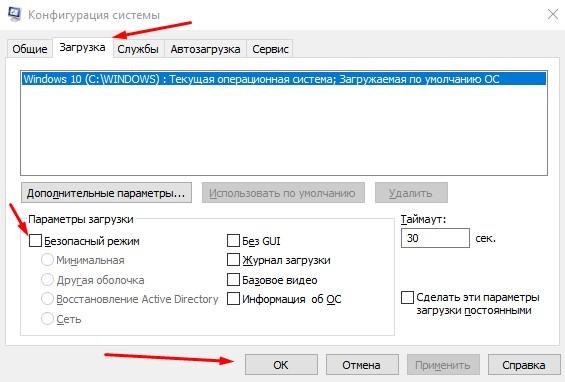
Надо поставить галочку
Как только режим запустится, необходимо следовать тому же пути, что был описан выше – выйти в диагностику/поиск и устранение неисправностей – дополнительные настройки – параметры встроенного ПО UEFI и дождаться перезагрузки.
Сброс с помощью перемычки
Может случиться, что доступ к настройкам BIOS или UEFI не предоставляется из-за наличия ключа на материнской плате. На персональных компьютерах сброс легко осуществить, воспользовавшись перемычкой CCMOS. Как правило, она устанавливается возле небольшой батарейки.
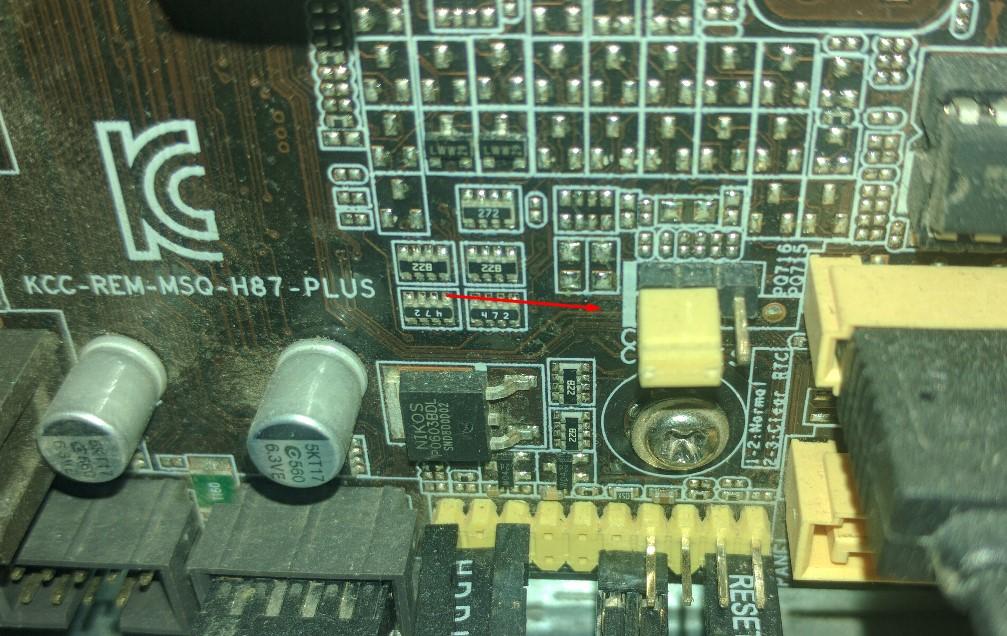
Вот тут, например
В ее конструкции предусмотрено три контакта, на два первых и вставлена перемычка. Для сброса нужно вытащить ее с крайних правых и переместить на крайние левые. Если не получается найти перемычку, можно вынуть маленькую батарейку. Настройки BIOS после совершенных действий переведутся на заводские.
Единственный минус этого метода – в компьютере собьется время. Но это можно легко исправить. И самое важное – перед совершением этих операций обязательно требуется выключить компьютер.
Что делать, если не удалось войти в BIOS или UEFI
Причин неудачной загрузки может быть много, но чаще всего встречаются следующие:
- Неверно подобранная клавиша. Возможно, для входа в BIOS нужно нажимать на другую клавишу или даже воспользоваться какой-то комбинацией. Рекомендуется сначала уточнить модель аппаратного ПО, воспользовавшись сторонними программами, к примеру, AIDA В ноутбуках узнать версию можно на сайте производителя, введя полное наименование модели.
- В некоторых ноутбуках, особенно от производителя Lenovo, в конструкции есть специальная кнопка, с помощью которой и осуществляется вход в BIOS. Обычно она располагается на боковом торце или около кнопки питания.

Корпус Lenovo
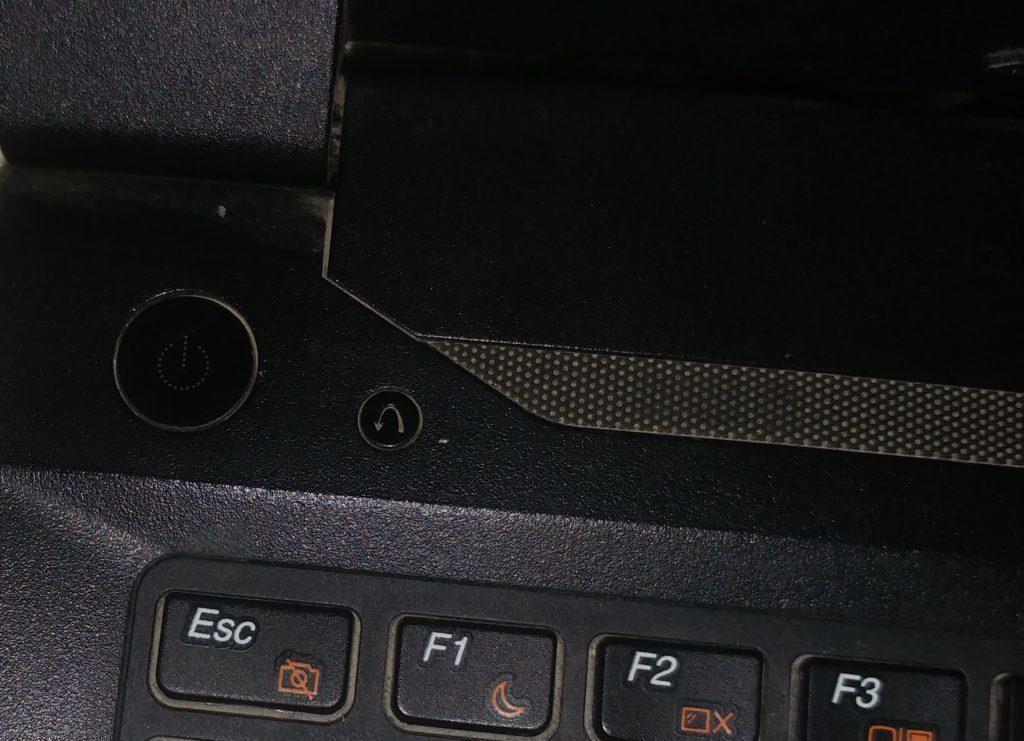
Такая вот кнопочка
- Использование клавиатуры со входом USB. Вероятно, при загрузке система не считывает с порта информацию, поэтому нажатие не распознается. Лучше всего для этого воспользоваться клавиатурой с выходом PS/2. Если покупать отдельно ее нет желания, можно просто приобрести небольшой переходник.

Переходник PS/2
- На некоторых ноутбуках производители исключают возможность входа в BIOS при питании от батареи. Эту проблему очень просто решить подсоединением устройства к сети.
- Обновление на несовместимую версию. При самостоятельной установке обновлений или замене BIOS на UEFI могла быть подобрана неподходящая конфигурация.
- Выход из строя микросхемы, на которую записана программа. В этом случае придется произвести ремонт или отнести ПК в сервисный центр.
- Неисправность клавиатуры. Возможно, определенная группа клавиш в связи с этим не работает. Необходимо отремонтировать или заменить ее.
Ошибки, возникающие при входе в BIOS или UEFI
При загрузке системы BIOS или UEFI иногда возникают определенные сбои и высвечивается окно об ошибке. Чтобы знать, как реагировать, нужно разобраться в причине их возникновения.
|
Ошибка |
Причина появления |
|
8042 Gate A20 Error |
Неисправности контроллера клавиатуры |
|
Address Line Short |
Повреждение плат расширения материнской платы |
|
BIOS ROM Checksum Error — System Halt |
Ошибка контрольных сумм ПЗУ |
|
BIOS Update For Installed CPU Failed |
Версия BIOS не соответствует модели процессора |
|
Bad PnP Serial ID Checksum |
Неисправности контрольной суммы устройств Plug&Play |
|
Boot Error — Press F1 To Retry Disk Boot Failure, Insert System Disk And Press Enter |
Загрузочный диск не обнаружен |
|
Bus Time Out NMI At Slot XXX |
Установлена шина EISA |
|
CH2 Timer Error |
Проблема распознавания второго таймера |
|
CMOS Battery Failed |
Села батарейка CMOS |
|
CMOS Battery Has Failed |
|
|
CMOS Battery State Low |
|
|
CMOS Checksum Bad (Error, Failure) |
Неполадки контрольной суммы микросхемы CMOS |
|
CMOS Date/Time Not Set |
Неисправности при установке системного времени и даты |
|
CMOS Display Type |
Неверное указание характеристик монитора |
|
CMOS Memory Size Mismatch |
Неверно указан объем ОЗУ |
|
CMOS System Options Not Set |
Содержимое CMOS памяти повреждено |
|
Checking NVRAM |
Обновление конфигураций ПК |
|
DMA Bus TimeOut |
Нет ответа на запрос контроллера DMA |
|
DMA Error |
Ошибка контроллера DMA |
|
Display Type Has Changed Since Last Boot |
Неверно введен тип дисплея |
|
Drive X: Error |
Неполадки в работе харда |
|
Drive X: Failure |
Жесткий диск не распознан |
|
ECC Error |
Проблемы с ОЗУ |
|
EISA CMOS Inoperational |
Ошибка платы EISA микросхемы CMOS памяти |
|
EISA Configuration Checksum Error |
Неисправности контрольной суммы CMOS памяти платы EISA |
|
EISA Configuration Is Not Complete |
Ошибка платы EISA микросхемы CMOS памяти |
|
Error Encountered Initializing Hard Drive |
Неполадки при распознавании харда IDE |
|
Error Initializing Hard Drive Controller |
Проблемы с чтением контроллера IDE |
|
Expansion Board Not Ready At Slot XXX |
Проблемы с распознанием платы в указанном слоте |
|
Extended RAM Failed At Offset: XXX |
Невозможно распознать расширенную память |
|
FDD Controller Failure |
Ошибка распознавания контроллера флоппи-дисковода |
|
Floppy Disk Controller Resource Conflict |
Конфликт контроллера флоппи-дисковода с другим устройством |
|
HDD Controller Failure |
Неудачное распознавание контроллера IDE |
|
Hard Disk Install Failure |
Проблемы с чтением харда IDE |
|
Hard Disk Diagnosis Fail |
Проблемы с распознанием хард диска |
|
Hard Disk Fail (20) Hard Disk Fail (40) |
|
|
I/O Card Parity Error at XXX |
Ошибка четности платы расширения |
|
INTR #1 Error |
Проблемы с распознаванием первого канала контроллера прерываний (IRQ0-IRQ7) |
|
INTR #2 Error |
Проблемы с распознаванием второго канала контроллера прерываний (IRQ8-IRQ15) |
|
Incorrect Drive A/B — Run Setup |
Ошибка чтения флоппи-дисковода |
|
Invalid Drive Specification |
Повреждение жесткого диска |
|
Invalid Media In Drive X: |
|
|
Invalid System Configuration Data |
Ошибка конфигураций устройств Plug and Play |
|
Invalid System Configuration Data — Run Configuration Utility Press F1 to Resume, F2 to Setup |
|
|
K/B Interface Error |
Проблема с клавиатурой |
|
Keyboard Error |
|
|
Keyboard Error Or No Keyboard Present |
Проблемы с работой клавиатуры |
|
Keyboard Failure, Press [FL] To Continue |
|
|
Keyboard Is Locked Out — Unlock The KeyKeyboard Is Locked |
Залипание клавиши на клавиатуре |
|
Memory Adress Error at XXX |
Проблемы с оперативной памятью |
|
Memory Parity Error at XXX |
|
|
Memory Size Decreased |
В BIOS неправильно указан объем оперативной памяти |
|
Memory Size Has Changed Since Last Boot |
|
|
Memory Size Increased |
|
|
Memory Test Fail |
Проблемы с оперативной памятью |
|
Memory Verify Error at XXXX |
|
|
Missing Operation System |
Ошибка при загрузке системы с винчестера (возможно вызвано вирусом) |
|
Monitor Type Does Not Match CMOS — Run Setup |
В BIOS неправильно указан системный монитор |
|
NVRAM Checksum Error |
Неисправности NVRAM-памяти |
|
NVRAM Cleared |
|
|
NVRAM Data Invalid |
|
|
No ROM Basic |
Ошибка при загрузке системы с винчестера |
|
Off Board Parity Error |
Загрузка с дискеты при отсутствии системной дискеты в дисководе |
|
Offending Address Not Found |
Проблемы с устройствами, не встроенными в материнскую плату (процессор, ОЗУ) |
|
Offending Segment |
Ошибка неизвестного устройства (проблемы с передачей данных или в работе портов) |
|
On Board Parity Error |
Неполадка встроенных в материнскую плату устройств (контроллер харда, шина PCI) |
|
Onboard PCI VGA Not Configured For Bus Master |
Проблема со встроенной видеокартой |
|
Operating System Not Found |
Ошибка при загрузке операционной системы Windows (возможно вызвано вирусом) |
|
Override Enabled — Default Loaded |
Система не загружается, параметры BIOS сбросятся до заводских |
|
PCI I/O Port Conflict |
Конфликт устройств на шине PCI подсоединенных через один порт ввода/вывода |
|
PCI IRQ Conflict |
|
|
PCI Memory Conflict |
Конфликт устройств на PCI шине при подключении к одной области памяти |
|
Parallel Port Risource Conflict |
Конфликт устройств с параллельными портами подключения |
|
Parity Error |
Ошибка контроля четности ОЗУ |
|
Press A Key To Reboot |
Система загрузилась неудачно |
|
Press ESC To Skip Memory Test |
Проверка оперативной памяти по сокращенной программе |
|
Press FL To Disable NMI, F2 To Reboot |
Не удалось определить устройство, запрашивающее немаскируемое прерывание |
|
Primary Boot Device Not Found |
Первичный загрузочный диск не найден |
|
Primary Master Hard Disk Fail |
Неполадки с тестом харда Primary Master |
|
Primary Slave Hard Disk Fail |
Неудачный тест жесткого диска Primary Slave |
|
Primary/Secondary IDE Controller Resource Conflict |
Ресурсы компьютера, запрашиваемые IDE контроллером, заняты |
|
RAM Parity Error — Checking For Segment |
Ошибка четности ОЗУ (возможна неправильная установка планки) |
|
Real Time Clock Error |
Ошибки в параметрах даты и времени |
|
Real Time Clock Failure |
|
|
Secondary Master Hard Disk Fail |
Неудачный тест харда Secondary Master |
|
Secondary Slave Hard Disk Fail |
Неудачный тест жесткого диска Secondary Slave |
|
Serial Port 1 Resource Conflict |
Несовместимость устройств, использующих порт COM1 |
|
Serial Port 2 Resource Conflict |
Конфликт устройств в последовательном порте COM2 |
|
Should Be Empty But EISA Board Found |
Ошибка EISA платы |
|
Should Have EISA Board But Not Found |
Плата EISA не отвечает на системные запросы |
|
Slot Not Empty |
Плата расширения на шине ELSA не распознана |
|
Software Port NMI Inoperational |
Проблемы с портом NMI прерывания |
|
State Battery CMOS Low |
Разрядилась CMOS батарея |
|
System Battery Is Dead |
|
|
System Battery Is Dead Replace And Run Setup |
|
|
System CMOS Checksum Bad |
Ошибка в CMOS-памяти контрольной суммы |
|
Static Device Resource Conflict |
Несовместимость нескольких устройств |
|
System Device Resource Conflict |
|
|
System Halted, (CtrlAltDel) To Reboot |
Работа системы остановлена |
|
System RAM Failed At Offset: XXXX |
Ошибка чтения ОЗУ, неверно установлена планка |
|
Type Display CMOS Mismatch |
Неверно указан тип системного дисплея |
|
Uncorrectable ECC DRAM Error |
Проблемы с памятью ОЗУ |
|
Unknown PCI Error |
Неполадки PCI-шины |
|
Update Failed |
Информация о новых устройствах Plug&Play не обновлена |
|
Update OK! |
Информация о новых устройствах успешно обновлена |
|
Wrong Board In Slot |
Ошибка распознавания платы расширения EISA |
Заключение
Включить BIOS или UEFI на компьютере можно разными способами – нажатием на кнопку во время загрузки, через безопасный режим или другие методы. При входе в программу самое главное – не экспериментировать и не менять все параметры. В ином случае выйдет окно с ошибкой, или компьютер вовсе не включится. Всегда стоит быть аккуратным при настройке функционирования аппаратной части компьютера.
Post Views: 9 764
Entering the BIOS Setup program is typically done by pressing a keystroke (or a keystroke combination) during the early part of the bootup sequence, before the operating system loads.
I would try pressing one of the other common combinations, like Delete, F1, F2, F8, F10, F12, or maybe Alt-F1, Alt-F2, Shift-F1, etc. (Note that if you press F8 too late, you might send F8 to the operating system, which may show a different boot menu). Sometimes F8 is used to select a boot device, but read the options carefully, because somethings there is an option, or other directions, which may provide you with a way to get into the BIOS setup program.
The manual for your motherboard should also enable the correct sequence, which could help to eliminate the guesswork. (If you can’t figure it out, figure out what motherboard you have, because that information can be useful for anyone else who tries to provide specific instructions.)
Once you successfully get into the BIOS setup menu, look for some options to enable bootup messages, or disable fast booting (which often eliminates such messages).
BIOS stands for Basic Input/Output System. It is embedded into computers as a motherboard chip and is primarily responsible for booting the computer system.
Apart from booting up your computer, BIOS is responsible for a lot of other functionality behind the scenes – like managing data flow between an operating system and attached hardware devices such as printers, mouse, keyboard hard disk, and scanners.
Once everything has been certified OK during startup, your computer will boot successfully. Otherwise, an error message such as the BSOD (blue screen of death) or several others will be displayed.
If you can access BIOS on your PC, you can do various things such as change hard drive settings, create a password for BIOS to make your computer more secure, change the boot order, and more.
So, in this article, I’m going to show you two ways you can get into BIOS in Windows 10.
How to Get into BIOS in Windows 10 Through Settings
Step 1: Click on Start and select Settings to open up the Settings app. Or simply press WIN (Windows key) + I.
Step 2: Click on “Update and Security”.
Step 3: Select “Recovery”.
Step 4: Under “Advanced startup”, Click on “Restart now”. This will allow you to reboot your computer for restoration and some configurations.
Step 5: After your PC reboots, you’ll see a blue background menu containing options like “Continue”, “Troubleshoot”, and “Turn off your PC”. Click on Troubleshoot.
Step 6: Click on “Advanced options”
Step 7: Select “UEFI Firmware Settings” to finally enter your computer BIOS.
And that’s it — you should be in.
If you don’t find UEFI Firmware Settings, using hotkeys to enter BIOS will come to the rescue. Let’s look at how to use them now.
How to Get into BIOS in Windows 10 Through Hotkeys
Some computer manufacturers give users several keys or key combinations to press while booting so they can enter BIOS. This is typically the F2 key on many devices, but there are a few exceptions.
The table below shows the hotkeys for entering BIOS in different brands of computers.
HP: ESC (Escape) to enter startup menu, then F10 or F12.
| Brand | Hotkey(s) |
|---|---|
| ACER | F2 or DEL (Delete) |
| Toshiba | F2 |
| Lenovo Thinkpad | ENTER + F1 |
| Lenovo Desktop | F1 |
| Dell | F2 |
| MSI | DEL |
| Samsung | F2 |
| Sony | F2 |
| Origin PC | F2 |
Conclusion
In this guide, you learned how to get into BIOS in Windows 10, so you can have more control over your device. It also lets you dive into more settings you might not find in the Settings app.
Windows 10 Settings provides a better way to enter BIOS on modern computers, but if you are using older devices, using hotkeys might be your best bet to get into BIOS.
If you are wondering what UEFI is, it stands for Unified Extensible Firmware Interface. It works like BIOS but provides faster boot time, and can support drive sizes up to 9 zettabytes, whereas BIOS only supports up to 2.2 terabytes.
Be careful what you do while in BIOS because whatever you tamper with might have a long-lasting effect on your Computer.
Thank you for reading.
Learn to code for free. freeCodeCamp’s open source curriculum has helped more than 40,000 people get jobs as developers. Get started
![]()
Download Article
![]()
Download Article
Do you need to change your PC’s boot order or reset your system clock? Once you learn how to access your PC’s BIOS or UEFI (the updated version of the BIOS), making changes to the configuration is quick and easy. Entering the BIOS or UEFI varies from computer to computer, but the basic process is always the same. This wikiHow article will teach you how to boot into the BIOS on any Windows PC using a setup key or through your Windows settings.
-
1
Reboot your computer. If you’re using an earlier version of Windows or weren’t able to use the steps in the Windows 10 or Windows 8 and 8.1 methods, you can enter the BIOS by pressing a special key on your keyboard right after the computer restarts.
- Entering the BIOS requires you to restart your PC. Save your work and shut down other programs before you continue with this method.
-
2
Press the Setup key repeatedly. As soon as you see the manufacturer’s logo, press the key indicated on the screen to enter Setup or BIOS. They key you’ll need to use varies by manufacturer and model. Keep pressing it over and over again until you enter the BIOS.
- Here’s a list of some of the most common setup keys by manufacturer:
- Acer: F2 or DEL
- ASUS: F2 or Del
- Dell: F2 or F12
- HP: ESC or F10
- Lenovo: F2 or Fn + F2
- Lenovo Desktops: F1
- Lenovo ThinkPads: Enter + F1.
- MSI: DEL for motherboards and PCs
- Microsoft Surface Tablets: Press and hold the volume-up button.
- Origin PC: F2
- Samsung: F2
- Sony: F1, F2, or F3
- Toshiba: F2
- If you don’t hit the key in time, Windows will load and you will have to reboot and retry.
Advertisement
- Here’s a list of some of the most common setup keys by manufacturer:
-
3
Navigate the BIOS. As long as you pressed the correct key, the BIOS or UEFI will load. You can use your keyboard to navigate the menus as your mouse will most likely not be working.


Advertisement
-
1
Open your Windows Settings
. You’ll find it in the Start menu. As long as you are able to access your Windows desktop, you should be able to enter the UEFI/BIOS without worrying about pressing special keys at boot time.[1]
- Entering the BIOS requires you to restart your PC. Save your work and shut down other programs before you continue with this method.
-
2
Click Update & Security. It’s the icon of two curved arrows.
-
3
Click the Recovery tab. It’s in the left column.
-
4
Click Restart Now under «Advanced startup.» It’s in the right panel, although you may need to scroll down a little to find this button.
-
5
Click Troubleshoot on the menu. Additional menu options will appear.
-
6
Click UEFI Firmware Settings. It’s the icon of a microchip with a gear on it. A confirmation screen will appear.
- If you don’t see this option, you’ll need to use the Using the Setup Key method.
-
7
Click Restart. This will restart your PC into the BIOS/UEFI.
- Once you’re in the BIOS or UEFI, use the arrow keys on your keyboard (or your mouse, if it works) to navigate and make menu selections.


Advertisement
-
1
Open the Charms bar. You can do this by holding the mouse cursor at the bottom-right corner of your desktop.
- Entering the BIOS requires you to restart your PC. Save your work and shut down other programs before you continue with this method.
-
2
Click Settings
. It’s the gear icon on the Charms bar.
-
3
Click Change PC settings. It’s at the bottom of the menu.
-
4
Click Update & Recovery. It’s at the bottom of the left panel.
- If you’re using Windows 8 and haven’t updated to 8.1, select General in the left panel instead.
-
5
Click Recovery (Windows 8.1 only). It’s in the left panel.[2]
-
6
Click Restart Now. It’s under the «Advanced Setup» header in the right panel.
-
7
Click Troubleshoot on the menu. It’s the second option.
-
8
Click Advanced options. It’s the last option.
-
9
Click UEFI Firmware Settings. It’s the icon of a microchip with a gear on it. A confirmation screen will appear.
- If you don’t see this option, you’ll need to use the Using the Setup Key method.
-
10
Click Restart. This option will restart your PC into the BIOS/UEFI.
- Once you’re in the BIOS or UEFI, use your mouse to navigate and make menu selections.


Advertisement
Add New Question
-
Question
How do I reset BIOS with an external monitor?

1: Power on. 2: Press Fn + F8. 3: Press F2 or Delete key depending on your notebook to enter BIOS. (You can do 3 before 2.)
-
Question
How can I get in if I do not know the password?
You can’t. The BIOS has been designed to require a password to deter potential hackers.
-
Question
How do I enter BIOS on a Windows 7 computer?
Siemen360
Community Answer
The operating system is irrelevant. Google your PC manufacturer or motherboard to find out what key to press on your keyboard. Once you know it, reboot your PC and press the key to enter the BIOS as soon as your PC powers on and the logo of your manufacturer shows.
See more answers
Ask a Question
200 characters left
Include your email address to get a message when this question is answered.
Submit
Advertisement
Video
Thanks for submitting a tip for review!
-
Don’t change any settings with the BIOS unless you are sure about what you are doing.
Advertisement
About This Article
Article SummaryX
1. Open your Windows Settings.
2. Click Update & Security.
3. Click Recovery.
4. Click Restart Now.
5. Click Troubleshoot.
6. Click UEFI Firmware Settings.
7. Click Restart.
Did this summary help you?
Thanks to all authors for creating a page that has been read 813,642 times.