Three ways to remove stored networks
Published on November 29, 2021
What to Know
- Click the network icon on the taskbar > network button in the quick settings menu > right-click a network > Forget.
- Right-click the network icon on the taskbar, select Network and internet settings > Wi-Fi > Manage known networks > Forget.
- To forget all networks: Open the command prompt and enter netsh wlan delete profile name=* i=*
This article explains how to forget a network on Windows 11. If you’re experiencing network connection problems, Wi-Fi network conflicts may be at fault. If you force your device to forget old network connections and remove them from Windows’ list of connections, that may fix your problem and allow you to get online again.
How Do I Completely Forget a Network in Windows 11?
When you connect to a network in Windows 11, it remembers it for the future. That may lead to issues (although rarely) and conflicts which interfere with your ability to connect to the internet. If a connection has been misconfigured, the information Windows 11 remembers about the connection can also cause problems.
You can have Windows 11 completely forget a network to fix those issues. Windows 11 will then treat the just-forgotten network as a brand new connection. It won’t try to connect automatically, and if you choose to join, it will treat it as a new network.
Here’s how to completely forget a network in Windows 11:
-
Click the network icon in the action center on the taskbar.
-
Click the network status button (top left).
-
Right-click the network you want to forget.
-
Click Forget.
If you select the network you’re currently connected to, your computer will disconnect from the network immediately.
-
Windows 11 will remove that network from its list of connections.
How Do I Force a Network to Forget?
The list of networks in the action center Wi-Fi menu only includes networks currently in connection range, so you can’t forget a network that’s out of range. If you want to force a network to forget, and it isn’t in the list, you can do so from the Windows 11 settings app.
Here’s how to force Windows 11 to forget a network from Settings:
-
Right-click the network icon in the action center on the taskbar, and select Network and internet settings.
-
Click Wi-Fi.
-
Click Manage Known Networks.
-
Locate the network you want to remove, and click Forget.
How to Delete All Networks in Windows 11
If you want to remove everything and start fresh, you can do so by using the procedure from the previous section and clicking on each network. That can be time-consuming if Windows 11 has a lot of stored networks, but there is a faster option that uses the Command Prompt. Using this method, you can have Windows 11 forget every stored network at once.
Here’s how to delete all of the stored networks in Windows 11:
-
Open the Command Prompt.
-
Type netsh wlan delete profile name=* i=*
-
Press Enter and all known networks will be purged. The removed networks will be listed in the Command Prompt window.
Why Clear Networks on Windows 11?
If you aren’t experiencing problems, then clearing out your stored networks is entirely optional. Windows 11 automatically keeps the information about networks it has seen, making it easier to connect to networks in the future. The list can get too long, though, if your computer has been around and connected to many different networks. Corrupt or incorrect network information can also cause connection problems.
The main reason people clear networks on Windows 11 is to fix network problems on Windows 11. You may find your computer repeatedly connects to the wrong Wi-Fi network, or you are unable to connect to the network you want. You can often fix connection problems if you have Windows 11, forget the networks you don’t want to use, or forget a network you’re trying to join.
People sometimes have Windows 11 forget network connections because they don’t want the device to connect to the internet. For example, a parent may wish to lend a laptop to their child for homework purposes but prevent them from connecting to the internet to avoid distractions. A simple solution is to have Windows 11 forget the network connection, so the user must reenter the Wi-Fi password to establish an internet connection.
FAQ
-
How do I change the wireless network on Windows 11?
Connect to a wireless network on Windows 11 from the Action Center > Manage Wi-Fi Connections > network name > Connect. You can also switch to a different network from Settings > Network & Internet > Wi-Fi > Show Available Networks. To connect from the Control Panel, select Network & Internet > Connect to a network > network name > Connect.
-
How do I forget a network on Windows 10?
You can forget a network on Windows 10 by accessing Network & Internet settings. Use the taskbar or control center to get to these settings. Or, click Start > Settings > Network & Internet > Wi-Fi > Manage Known Networks > select the network > Forget.
Thanks for letting us know!
Get the Latest Tech News Delivered Every Day
Subscribe
![]()
Wi-Fi is a handy way to set up your laptop with an internet connection. But, if you’ve been using this way of network connectivity for a while, then there your Wi-Fi settings might have a massive list of networks to choose from.
If you take a closer look at those networks, you might realize that a lot of them haven’t been in use for a long while. Moreover, for whatever reason, in some rare cases the network itself might stop working properly. In situations like these, it’s best to forget them. In this article, we cover how you can forget a Wi-Fi network in Windows.
1. How to forget Wi-Fi network through Settings
The Settings is a central hub in Windows that lets you tweak almost all things in your computer. Unsurprisingly, to forget the Wi-Fi settings of your PC, you can access the Settings section again. However, before you forget a network it’s essential you take note of your Wi-Fi password, so you can log in again.
When you’ve noted down the password, you can move on to clearing the Wi-Fi network. Here’s how:
- Go to the Start menu search bar, type in ‘settings,’ and select the Best match. Alternatively, press Windows key + I.
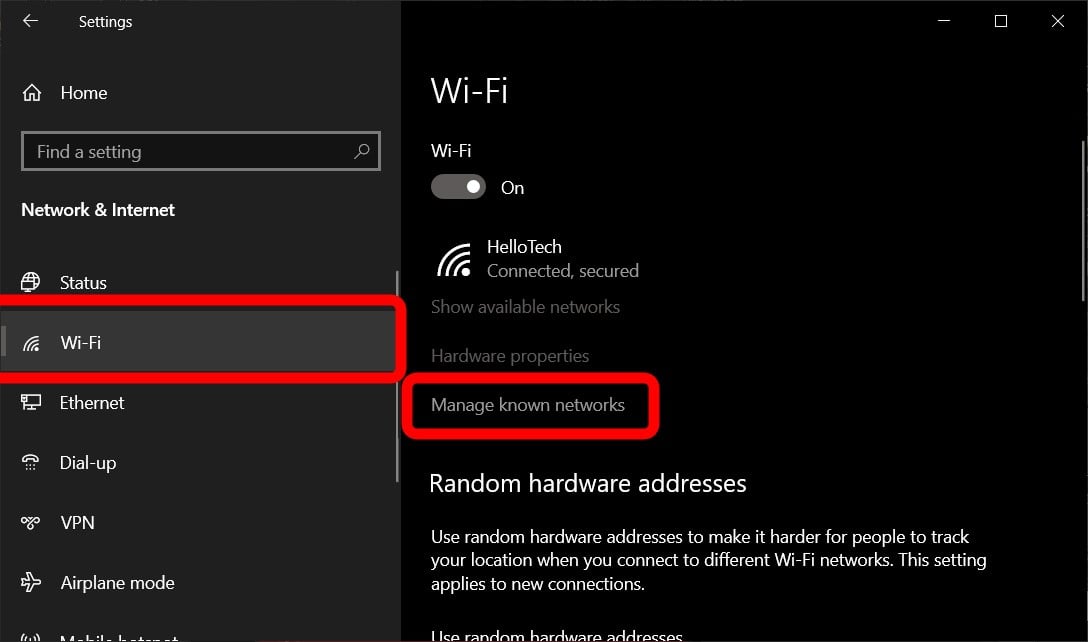
- From the Settings option, click on Network & Internet and select Wi-Fi option from the left.
- Now click on Manage known networks.


As soon as you do that, you’ll get taken to a screen where you can see a host of Wi-Fi networks. From here, pick the network you want to forget and click on Forget. Right when you do this, your network will be forgotten.
2. From Quick Settings
The second method to forget the Wi-Fi network in Windows is through the use of Quick Settings. Don’t worry, it’s right there at your desktop tray. Here’s how you can do it:
- Go to the lower-right corner of your taskbar and press the quick settings button. Alternatively, press the Windows key + A shortcut to launch the Quick Settings.
- When the new menu pops open, click on Network.
As soon as you follow the above points, a whole list of your network will drop down. From there, right-click on a network you want to forget and select Forget.

Forgetting a network in Windows 10 or Windows 11
Random problems can arise in a Wi-Fi network if you haven’t done the usual checkup for a while. By forgetting the network manually in your Windows, you can then hope to troubleshoot the issue and try to log in again. Hopefully, one of these ways helped you clear whatever Wi-Fi network you wanted to remove from your PC.
On Windows 10, every time you connect to a Wi-Fi network a profile for that particular network with its SSID (Service Set Identifier), network security key, and other information will be created on your device. In the future, if you want to connect, you simply select the wireless network, and Windows 10 will do the rest automatically.
The only caveat is that Windows 10 will save a profile of every network even if you no longer plan to use that particular connection or if it gets corrupted, but you can quickly delete (or forget) a wireless network in a number of ways.
In this guide, you’ll learn the steps to forget a Wi-Fi network on Windows 10 using the Settings app, taskbar, and Command Prompt.
- Forget Wi-Fi network connections using Settings
- Forget Wi-Fi network connections using taskbar
- Forget Wi-Fi network connections using Command Prompt
Forget Wi-Fi network connections using Settings
To remove previously configured and currently connected Wi-Fi networks, use these steps:
-
Open Settings on Windows 10.
-
Click on Network & Internet.
-
Click on Wi-Fi.
-
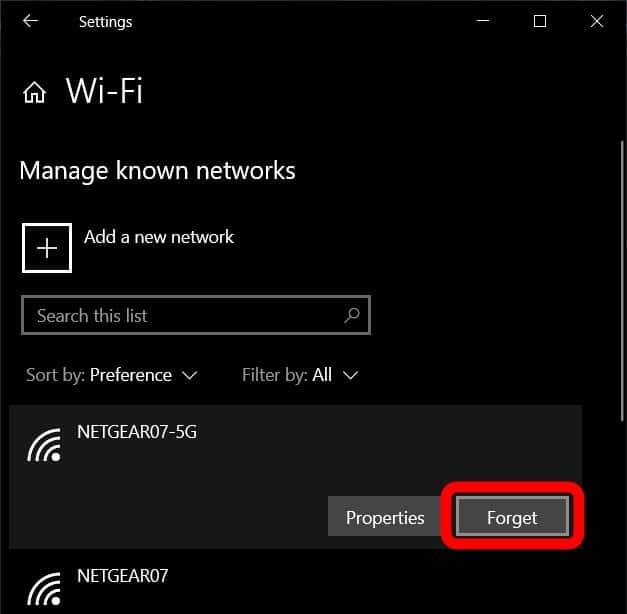
Click the Manage known networks option.

Wi-Fi settings manage known networks option -
Select the network you want to remove, and click the Forget button.
Forget Wi-Fi network profile Once you complete the steps, the Wi-Fi network you selected will be removed from your computer. If you need to remove other networks, simply follow the same steps.


Forget Wi-Fi network connections using taskbar
To forget a wireless connection from the taskbar, use these steps:
-
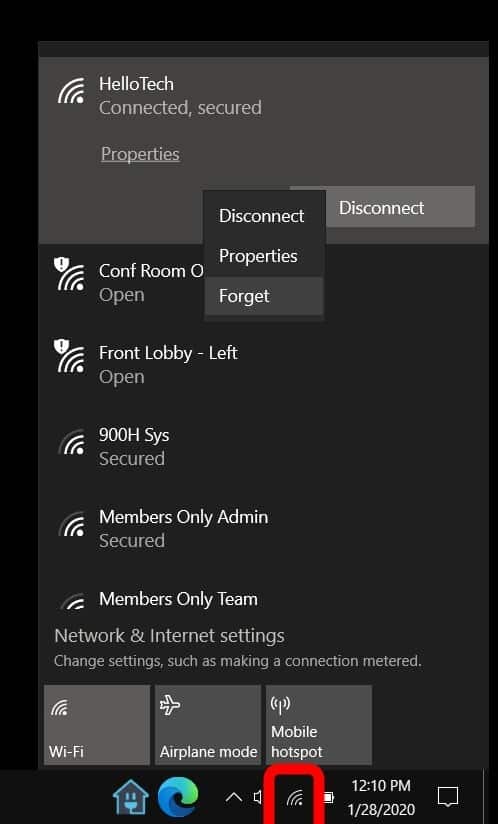
Click the wireless icon in the notification area.
-
Right-click the network and select the Forget option.

Forget Wi-Fi profile from taskbar

After you complete the steps, you’ll no longer see nor you will be able to connect to the same network unless you manually configure it again.
Forget Wi-Fi network connections using Command Prompt
To use netsh with Command Prompt to remove network files, use these steps:
-
Open Start.
-
Search for Command Prompt, right-click the top result, and select the Run as administrator option.
-
Type the following command to identify the network and press Enter:
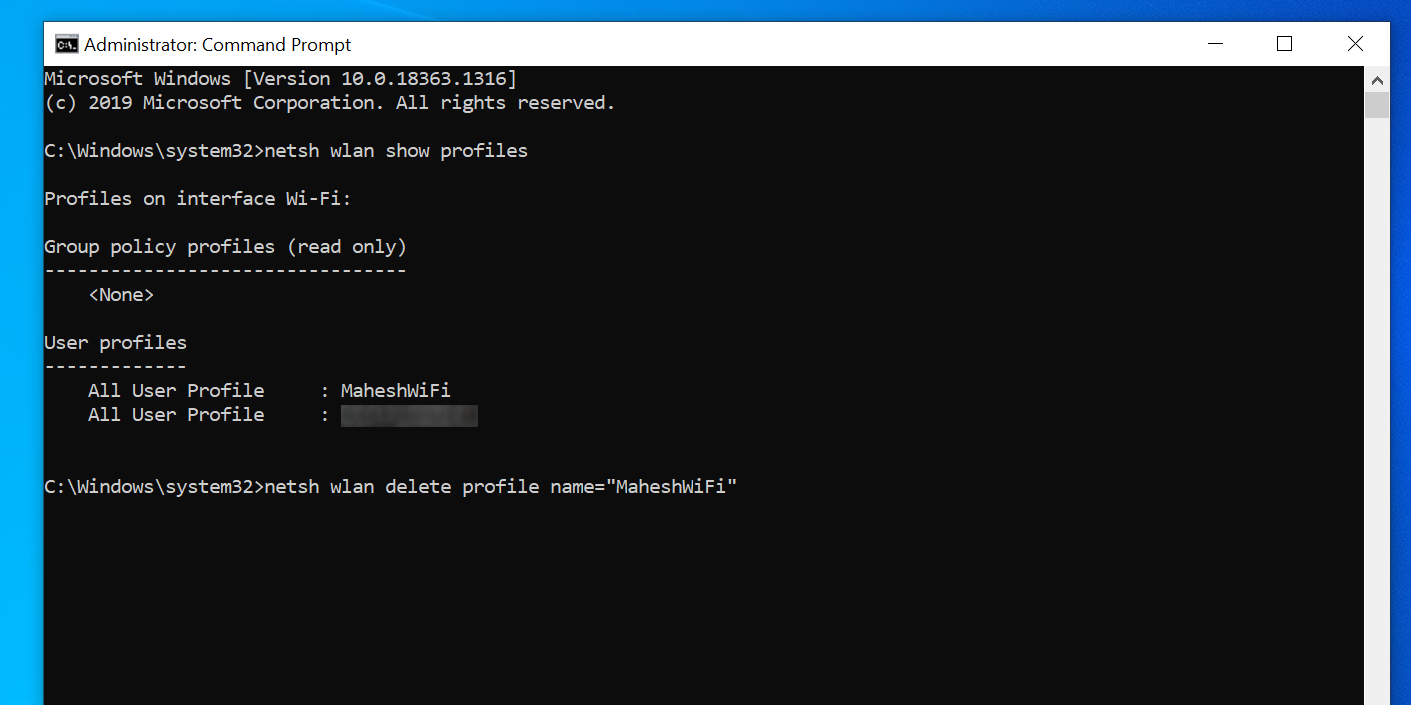
netsh wlan show profiles
-
Type the following command to remove the wireless network and press Enter:
netsh wlan delete profile name="WIFI NAME TO REMOVE"

Netsh delete Wi-Fi network profile on Windows 10

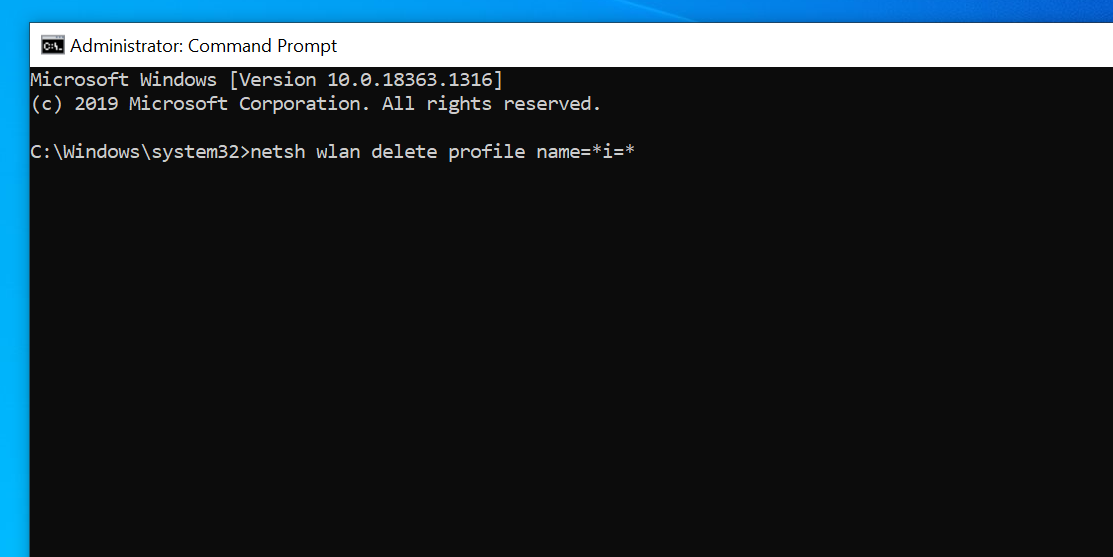
Quick tip: Alternatively, you can forget all networks at once using this command: netsh wlan delete profile name=* i=*.
Once you complete the steps, the Wi-Fi network will be removed from Windows 10.
Update August 10, 2020: Originally published in December 2017, and it’s been revised to reflect the new changes on Windows 10.
We may earn commission for purchases using our links to help keep offering the free content. Privacy policy info.
All content on this site is provided with no warranties, express or implied. Use any information at your own risk. Always backup of your device and files before making any changes. Privacy policy info.
Обновлено 25.11.2019

Добрый день! Уважаемые читатели и гости IT блога Pyatilistnik.org. В прошлый раз мы рассмотрели вопрос, как включить Num Lock при загрузке Windows 10, это была полезная информация для владельцев мобильных устройств. Сегодня мы снова поговорим про флагманскую операционную систему Microsoft и научимся забывать сеть WIFI на Windows 10, разберемся для чего это нужно и естественно рассмотрим, все варианты реализации.
Для чего нужно забывать WIFI сети в Windows?
Если обратиться к статистике устройств, которыми пользуются пользователи, то начиная с 2010-х годов можно наблюдать, увеличение мобильных и переносных устройств и постепенное снижение количества персональных компьютеров. И это нормально, так как зачастую даже планшет процентов на 90 удовлетворяет всем ежедневным задачам и требованиям пользователя, которые в подавляющем случае банальны и сводятся к:
- Использованию браузера и серфинга по интернету
- Просмотр Youtube
- Оплата коммунальных услуг, ЖКХ и других платежей
- Использованию различных приложений, упрощающих жизнь и экономию времени
У нас компании у большинства сотрудников ноутбуки, и всех стараются пересадить на них, это удобно и все мобильны, но накладывает и свои нюансы. Например, сотрудник может подключаться к большому количеству WI-FI сетей, на работе, в торговых центрах, Макдональдсе, дома, в гостях и много, где еще. Логично, что его список WIFI профилей забивается мусором и его нужно чистить. В операционной системе Windows 10 процедура очистки называется забыть сеть. Именно этим мы и будем заниматься, будем чистить и забывать WIFI профили, которые нам уже давно не нужны. Это позволит всегда держать актуальный список и ускорит вашу работу.

Методы позволяющие забыть сеть WIFI
Ниже я покажу, известный мне список методов, позволяющих почистить ваш список WIFI подключений:
- Через область уведомления
- Через параметры Windows
- Через удаление конфигурационного файла с профилем
- Через реестр Windows
Как забыть сеть WIFI на Windows 10 из области уведомления
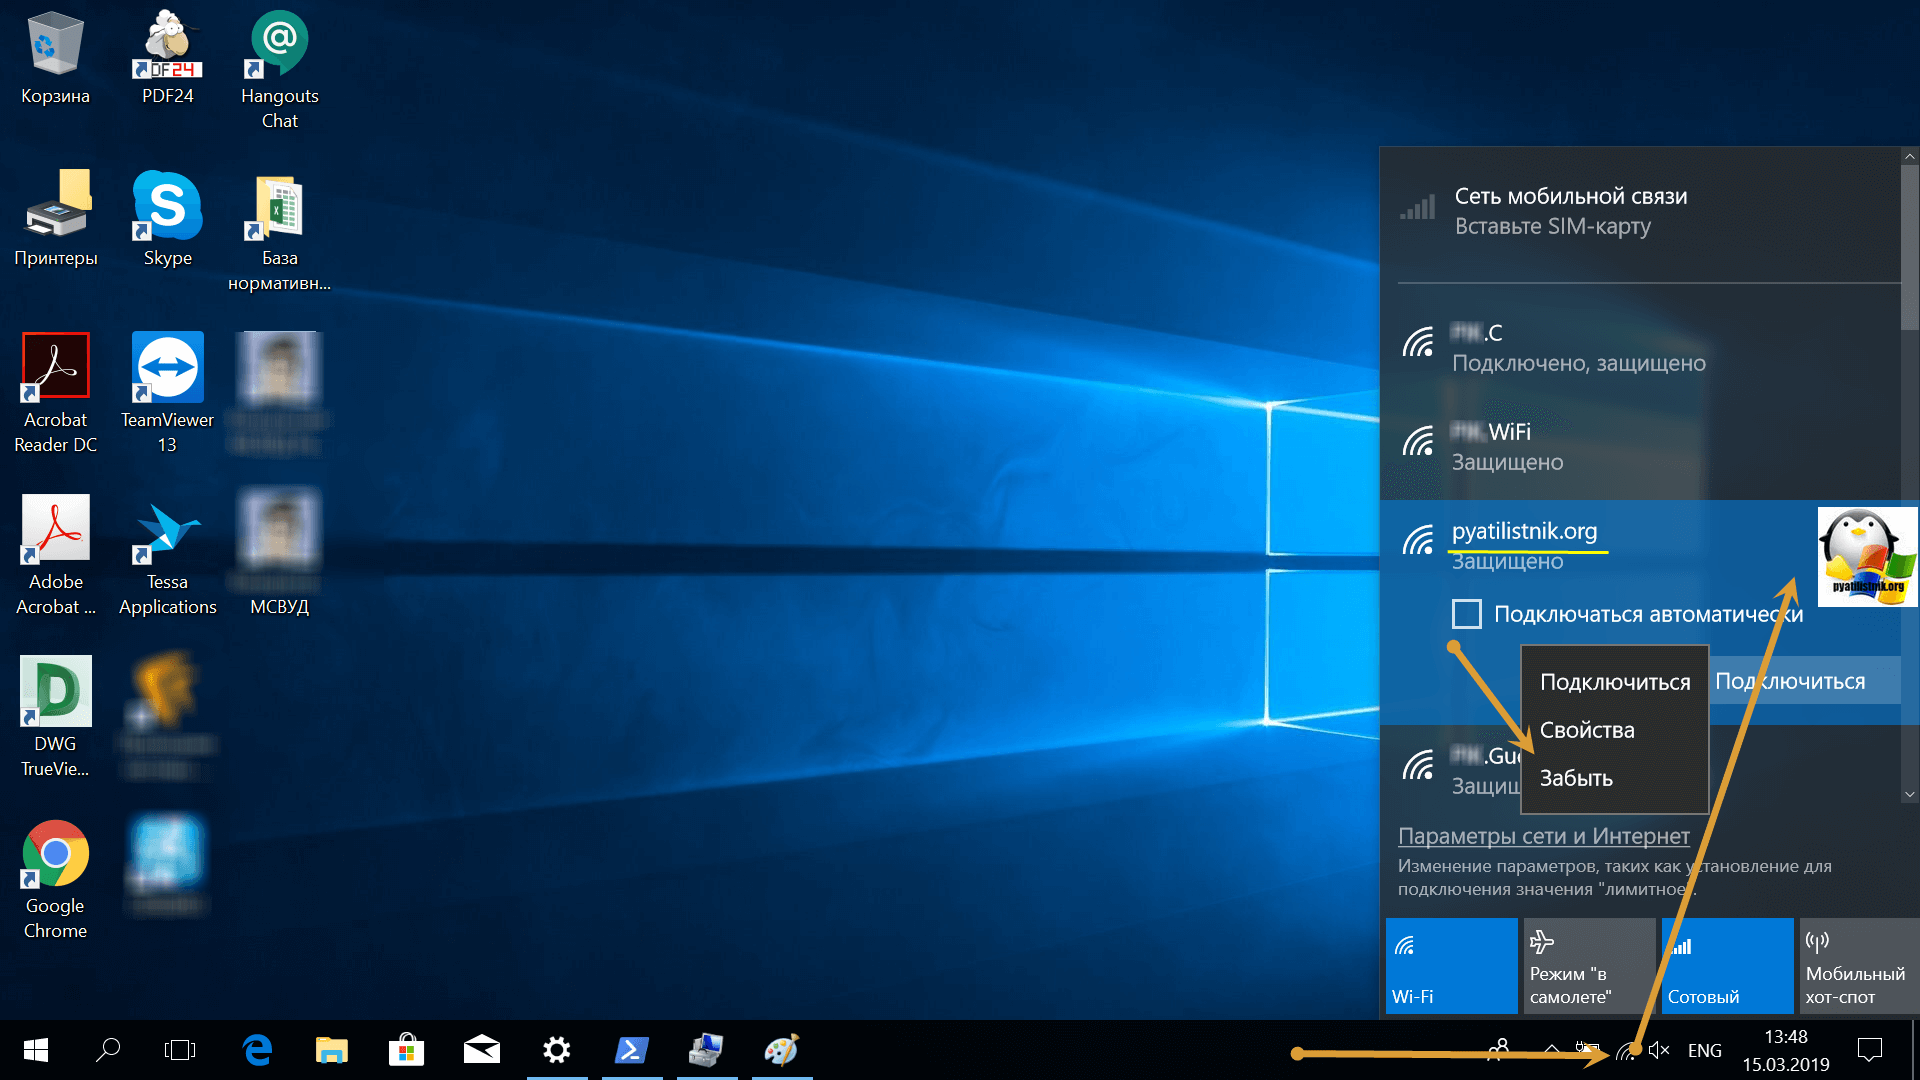
Данный метод очистки лишних беспроводных подключений, самый простой и потребует от вас два клика. От вас потребуется в области уведомления нажать на значок беспроводной сети (Доступ к Интернету). Находим нужное подключение и нажимаем по нему правым кликом, из контекстного меню, выберите пункт «Забыть». После этого. данный WiFi профиль исчезнет.
Забываем WiFi из параметров Windows
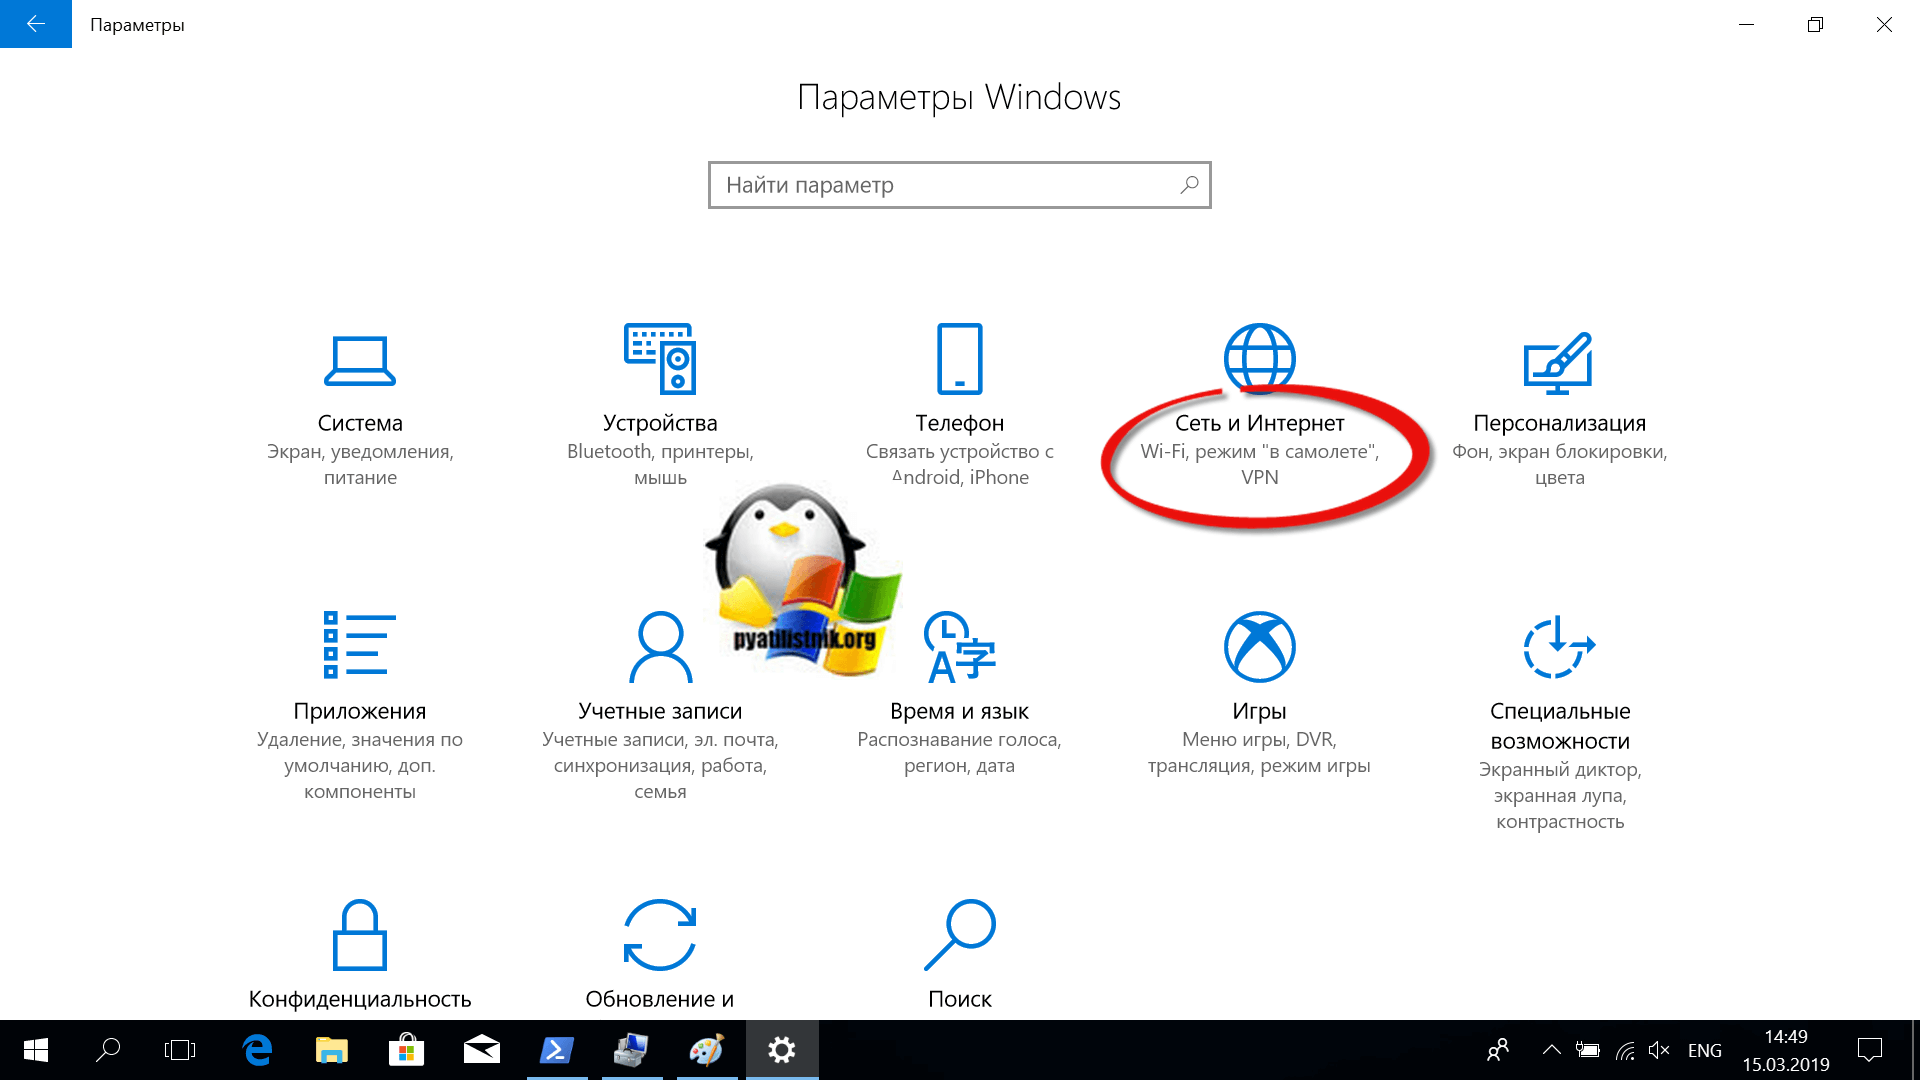
И так, для того чтобы забыть сеть вай фай откройте через меню пуск «Параметры Windows» (Так же это можно сделать, нажав WIN+I). Выберите пункт «Сеть и Интернет (Wi-Fi, режим «в самолете», VPN).
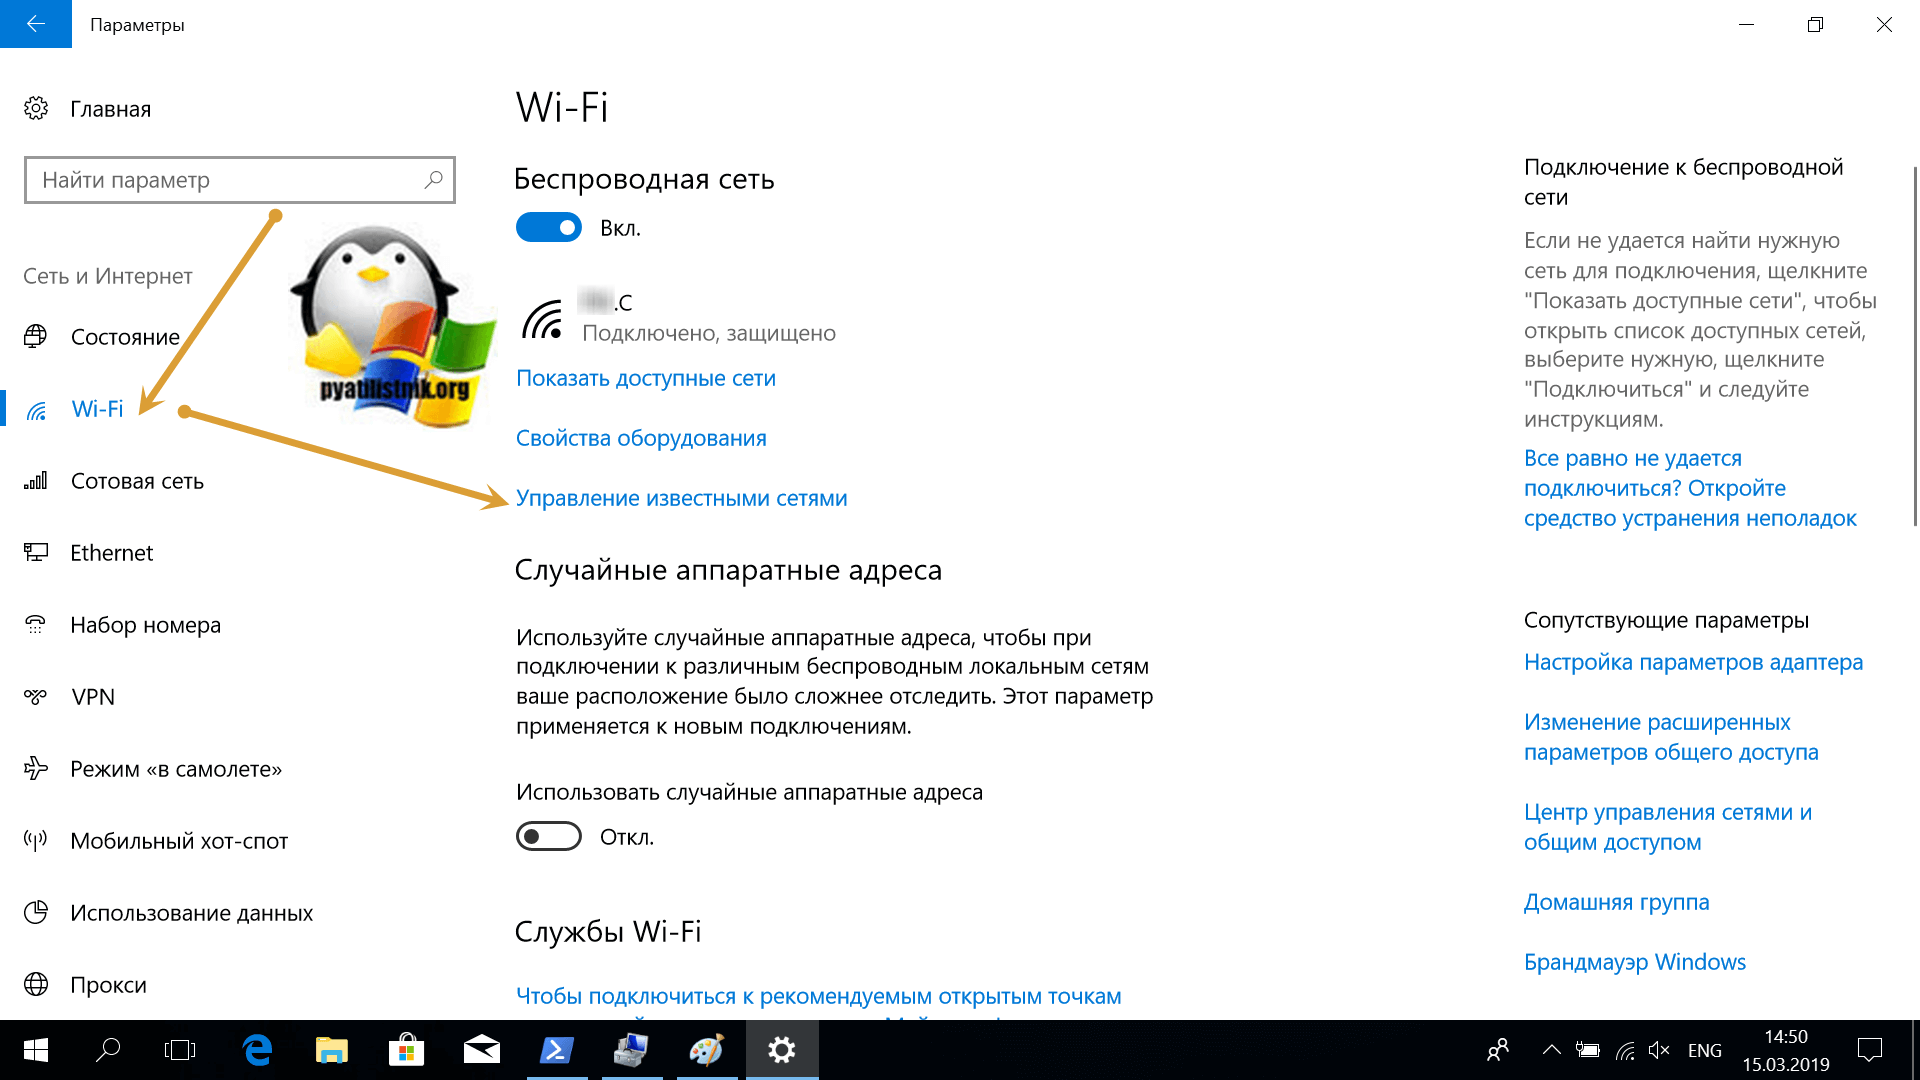
В левом столбце находим пункт Wi-Fi, открыв его щелкаем по ссылке «Управление известными сетями», именно там и будут располагаться все наши известные профили беспроводных подключений.
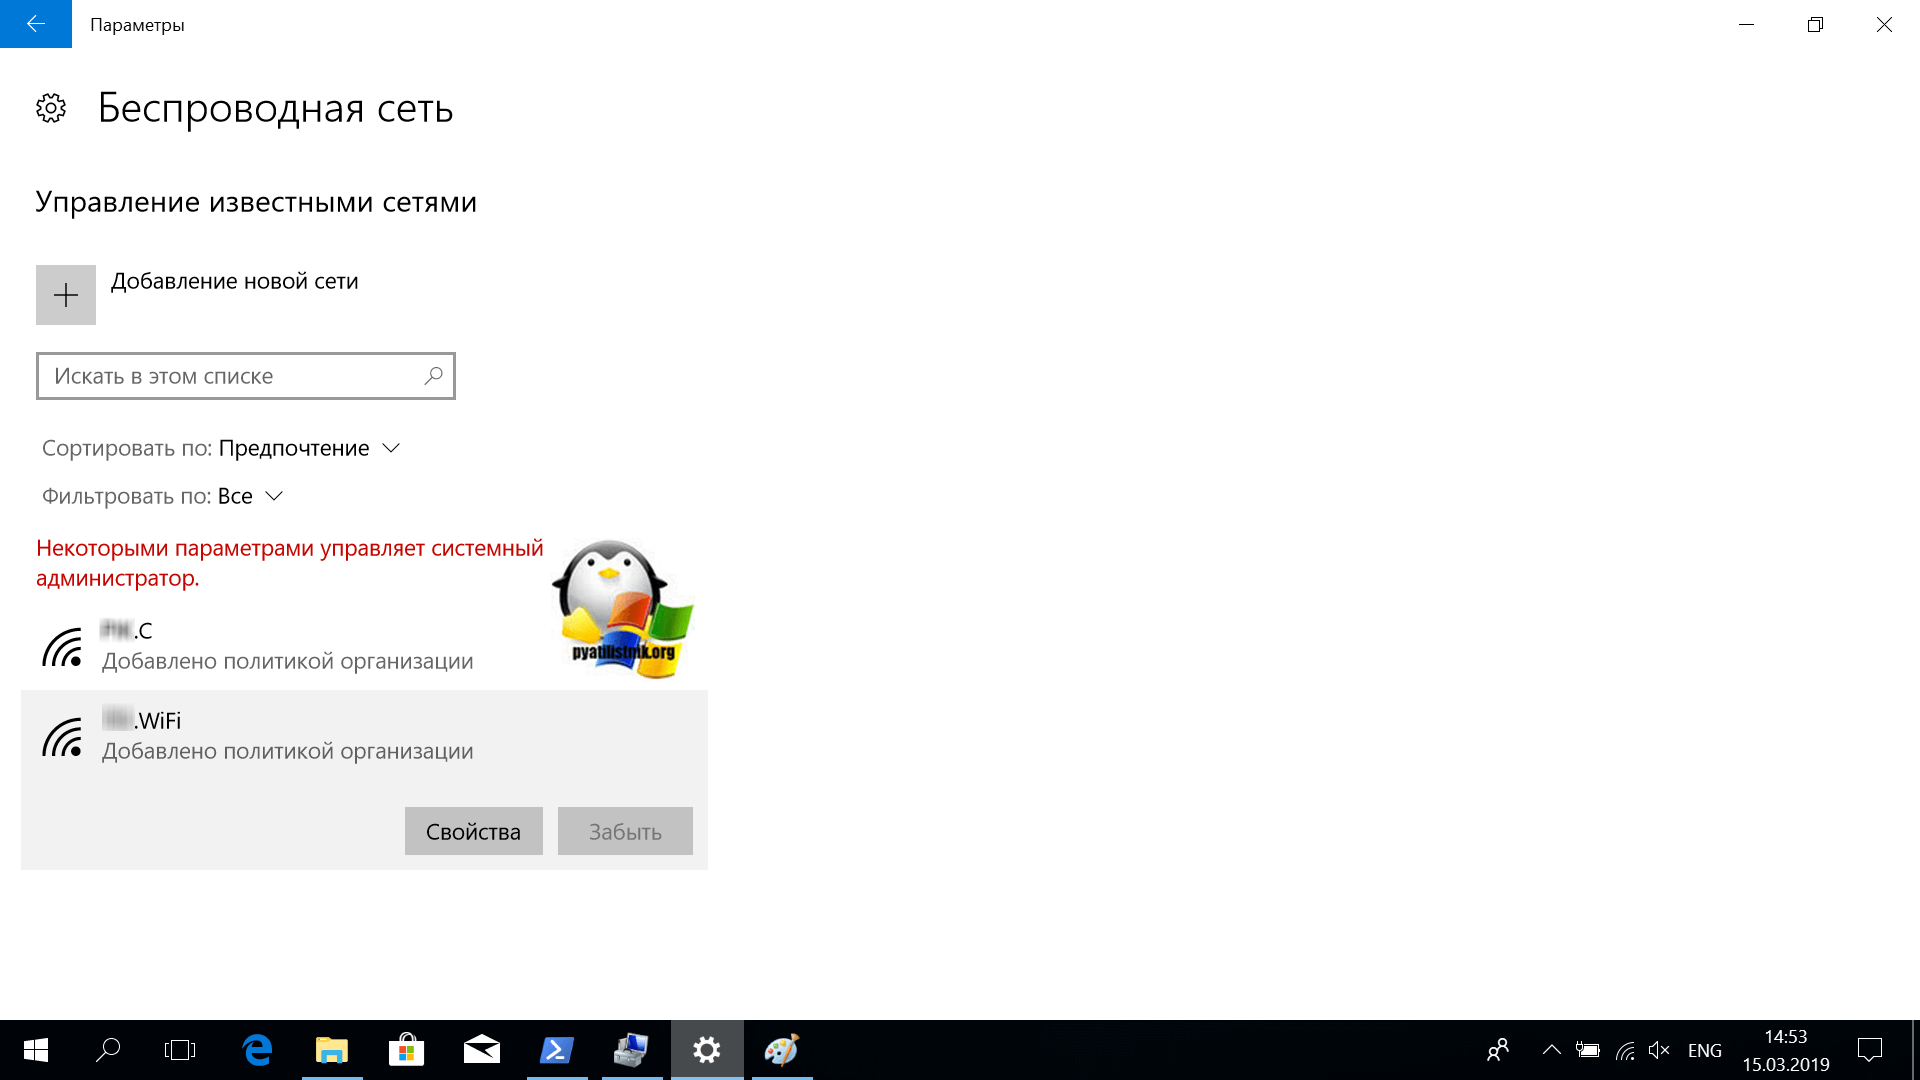
В параметрах «Беспроводная сеть» Windows 10 вам отобразит список, со всеми ранее подключаемыми сетями. В моем примере их три. Для начала я бы хотел забыть сеть pyatilistnik.org. Для этого выберите ее и нажмите кнопку «Забыть». После чего данная Wi-Fi сеть будет удалена из вашей Windows 10.
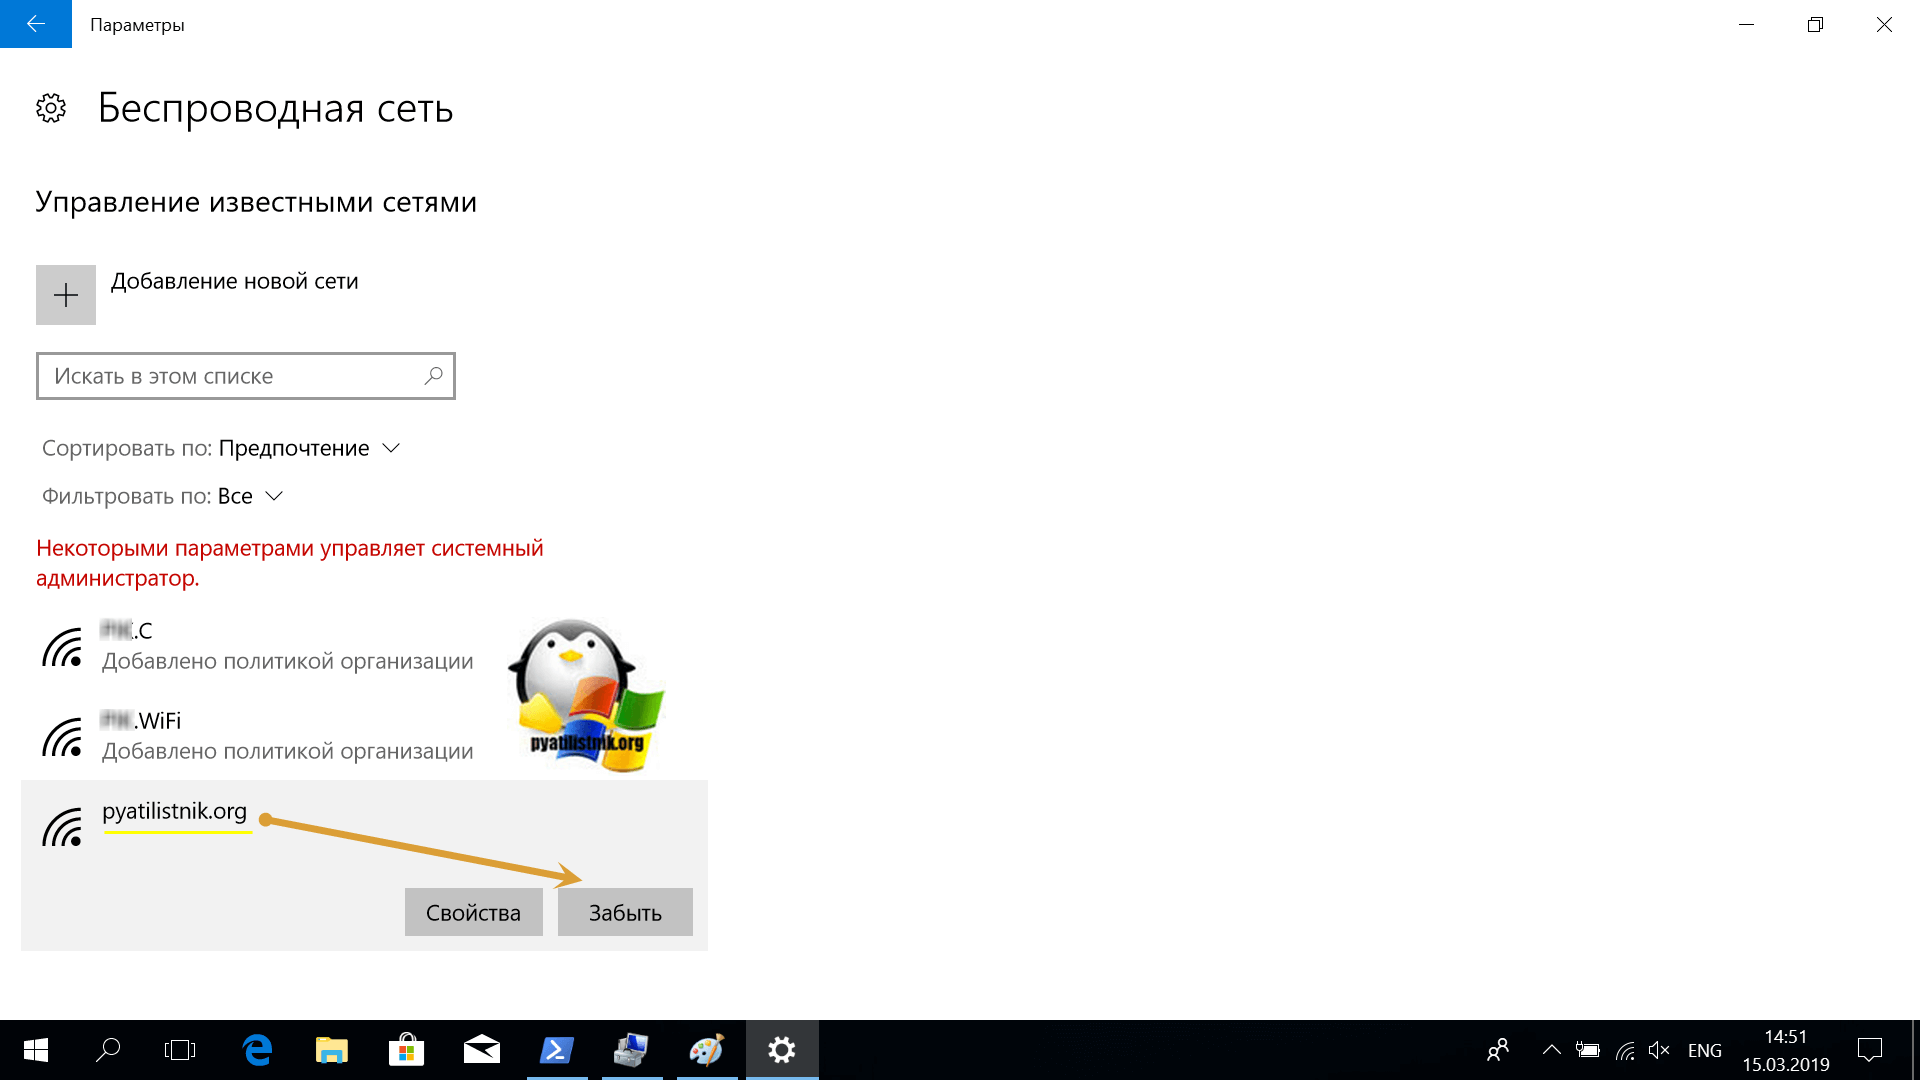
Если у вас доменный компьютер входящий в Active Directory, то многими параметрами могут управлять системные администраторы. В моем примере видно, что с помощью групповой политики у меня были созданы два профиля WI-FI, об этом говорит надпись «Некоторыми параметрами управляет системный администратор». Это означает, что такие профили Wi-Fi я не могу забыть в Windows 10, кнопка просто не активна, если конечно вы не отключите данную политику для данного устройства.
Забыть сохраненную сеть Wi-Fi на Windows 10 через командную строку
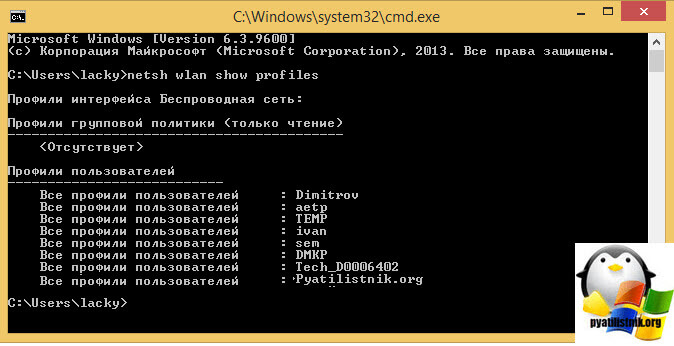
Есть еще один прекрасный и быстрый метод забыть сеть wifi. Заключается он в использовании уже знакомой нам утилиты netsh wlan, мы ее уже применяли, когда делали из стационарного компьютера или ноутбука с Windows 7 точку доступа WiFi. И так, что мы делаем, открываем командную строку от имени администратора, как это сделать читайте по ссылке. Далее нам необходимо получить список существующих профилей, это делается с помощью вот такой команды:
Находим в списке профилей удаленного подключения нужный вам, в моем случае, это Wi-Fi сеть с именем «Pyatilistnik.org», ее я и буду забывать.
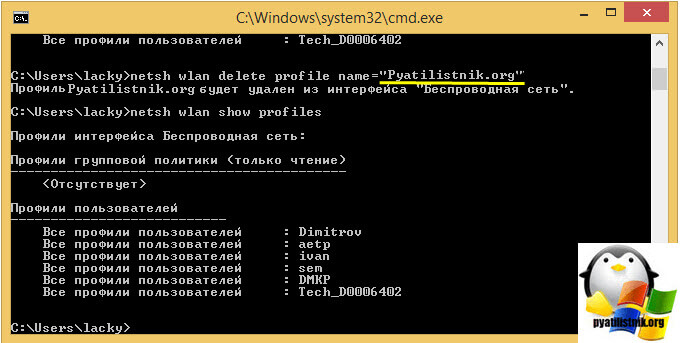
Когда мы определились с сетью и знаем ее точный SSID, то выполняем вот такую команду:
netsh wlan delete profile name=»Pyatilistnik.org»
Если команда выполнена успешно, то вы увидите сообщение «Профиль Pyatilistnik.org будет удален из интерфейса беспроводных сетей». Как видите данный метод так же прост.
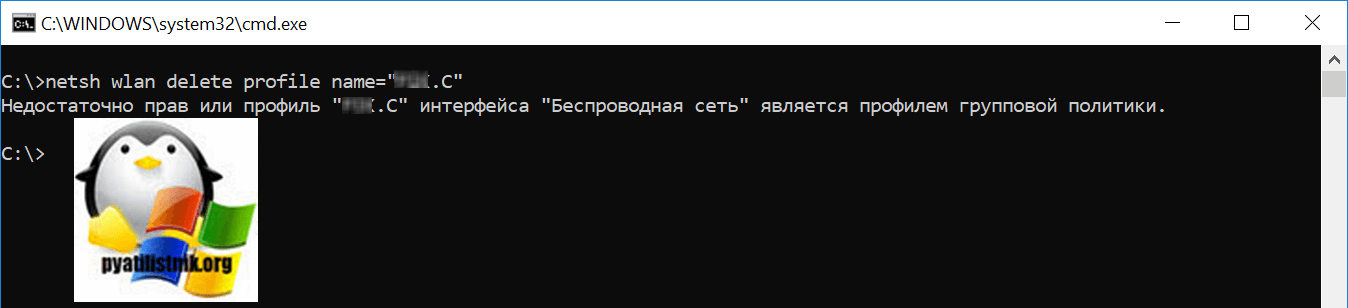
Как я и писал выше, если некоторые профили WIFI в вашу систему попадают путем применения групповой политики, то при попытке их удалить вы получите ошибку:
Недостаточно прав или профиль интерфейса «Беспроводная сеть» является профилем групповой политики
В таких случаях, только отменять данную GPO политику и выполнять gpupdate /force.
Как забыть сеть WIFI в Windows 10 через проводник
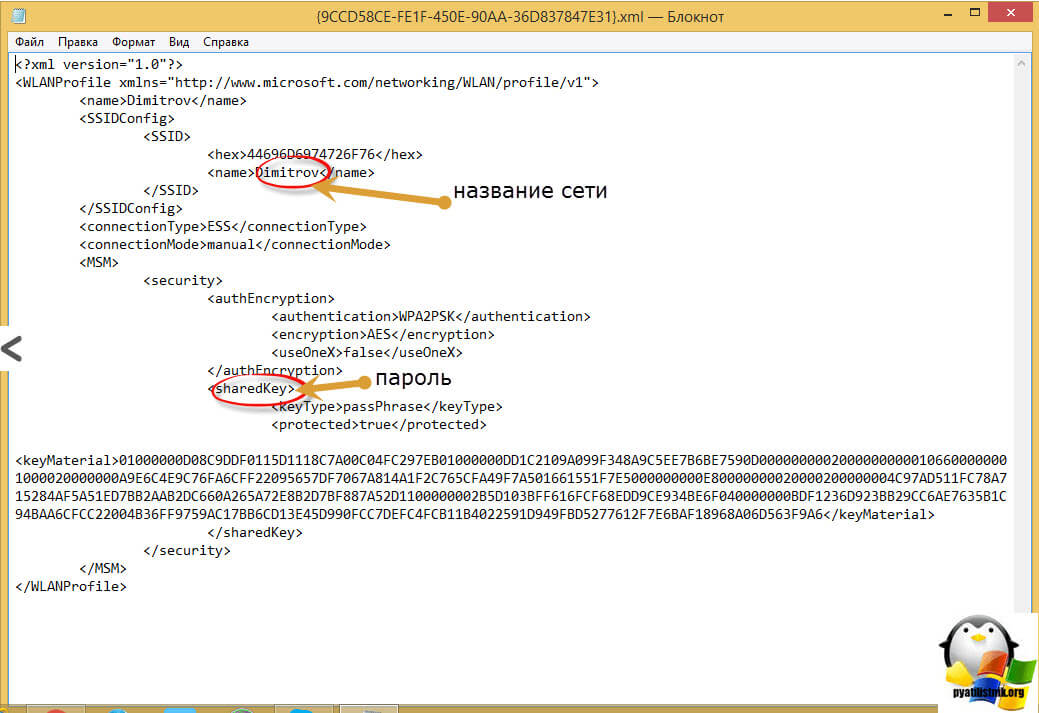
Логично предположить, что все настройки, которые вы видите из графического режима или из команды netsh wlan, где-то хранятся и это правильно. По сути своей каждый такой профиль, это всего лишь конфигурационный файл в формате xml. Удаляя такой конфигурационный файл, вы забываете нужную WiFi сеть в Windows 10. Чтобы их найти вам для начала необходимо включить отображение скрытых файлов и папок в вашей системе. Когда вы это сделали, то откройте в проводнике вот такой путь:
%ProgramData%MicrosoftWlansvcProfilesInterfaces

Попав в папку с профилями вы увидите списки WIFI подключений в виде xml файлов с GUID названиями. Каждый такой файл легко открыть в любом тестовом редакторе, элементарно в блокноте.

Вот пример содержания такого xml файла. Вам необходимо найти нужный, для этого надо проверить, что в поле <name> указано нужное название WIFI. После чего спокойно удаляем этот файл, данное действие приведет к забыванию сети. Может потребоваться перезагрузка.
Забываем WiFi из реестра Windows
Еще один метод, который меня выручал много раз, заключается в использовании реестра Windows. Его преимущество в том, что я как администратор могу подключиться к реестру по сети и удалить нужный мне раздел, в том числе и тот который отвечает за определенный профиль WiFi. Откройте реестр Windows. Перейдите по пути:
HKEY_LOCAL_MACHINESOFTWAREMicrosoftWindows NTCurrentVersionNetworkListProfiles
Данный куст будет содержать в себе все известные в Windows 10 WIFI профили. Вам так же придется пробежаться по каждому из профилей и найти нужный, имя будет содержаться в «ProfileName».
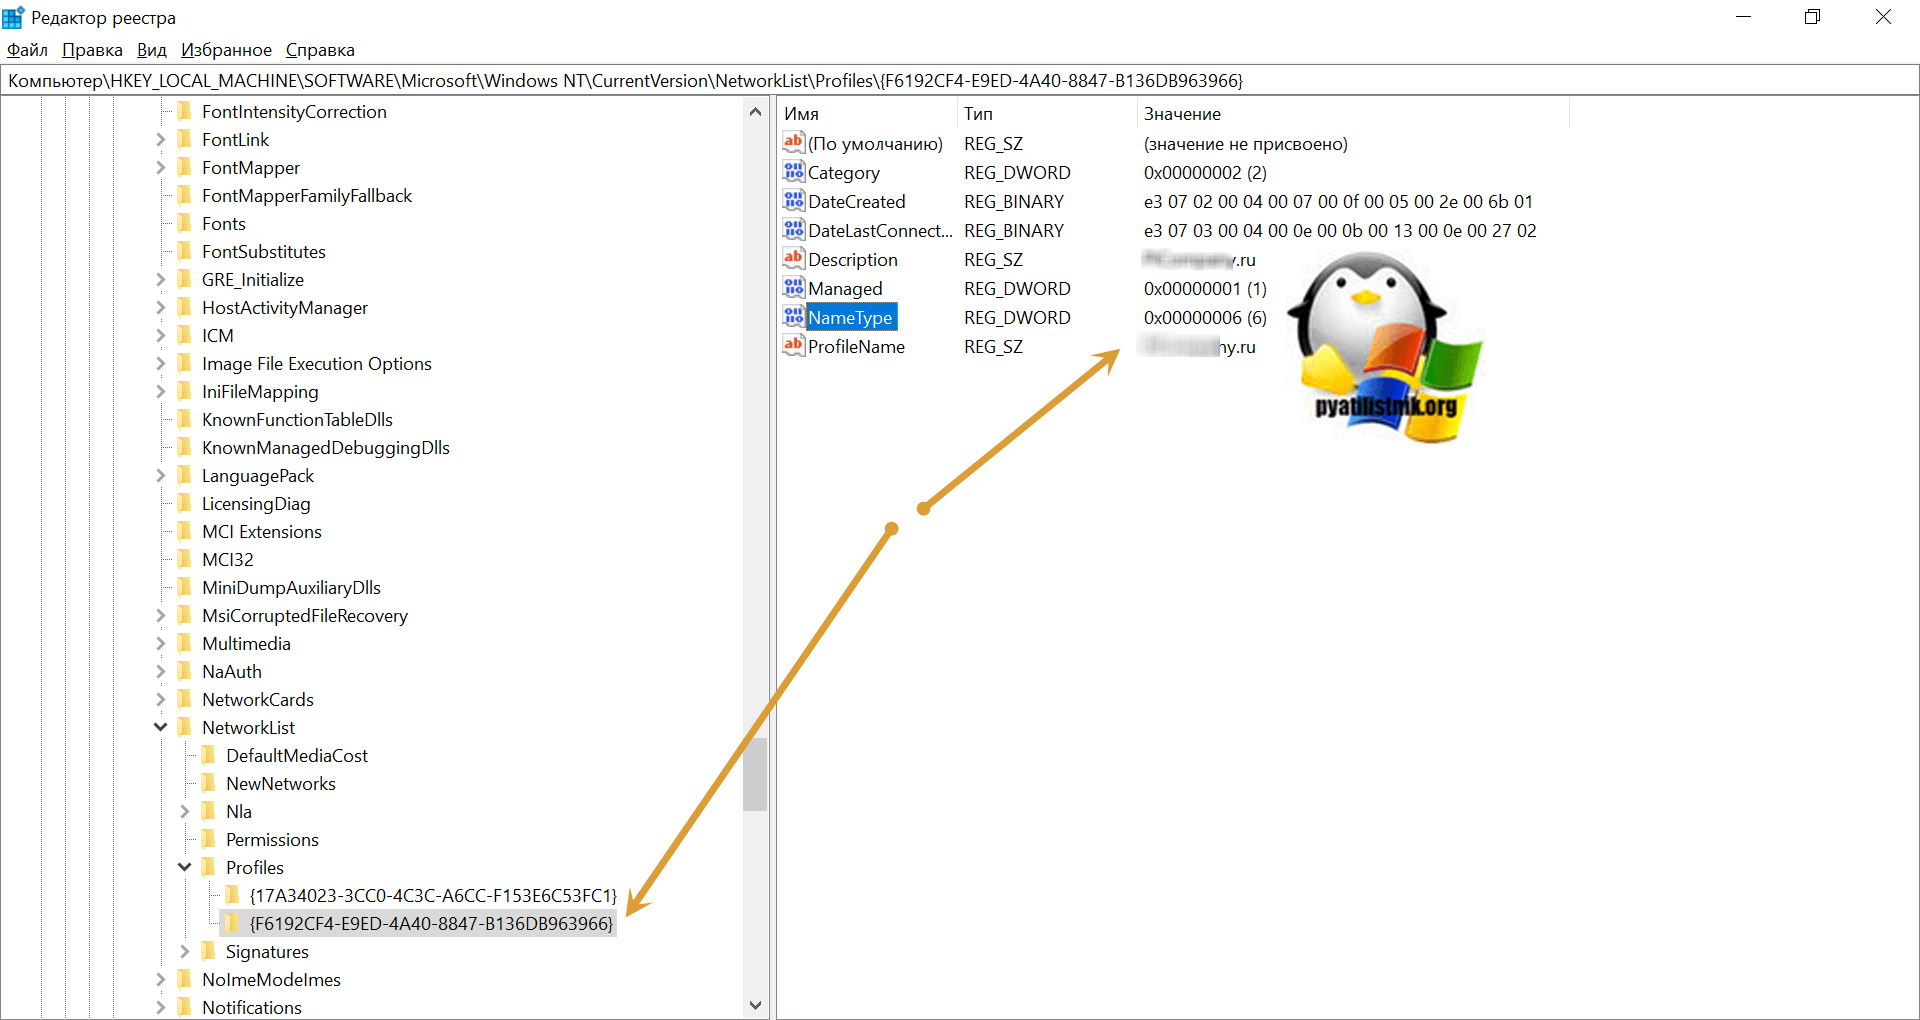
Когда вы нашли нужную сеть, которую требуется забыть, то удалите ее куст, через правый клик. Вот такие вот у меня получились методы забывания WIFI сетей в Windows 10. Данные подсказки будут актуальны и для других версий Windows. На этом у меня все, с вами был Иван Семин, автор и создатель IT блога Pyatilistnik.org.
Nowadays, most of us use Wi-Fi technology to connect our devices to the internet. When Windows 10 devices are connected via Wi-Fi, they store the Wi-Fi network name (SSID), password, and encryption type to enable them to reconnect when required without having to enter the same information every time.
Occasionally, travelers may encounter two Wi-Fi networks that have the same SSID and their computer would have difficulty connecting. The authentication failed as a different password has already been set for this name.

Although you can recover the wifi passwords saved on your computer, they can’t be modified. You will need to “forget” your saved Wi-Fi network(s) and then reconnect. This article discusses four ways through which you can forget a single or all Wi-Fi connections saved on a device.
Table of contents
- How to forget Wi-Fi network in Windows 10
- Forget Wi-Fi network in Windows 10 using System Tray
- Forget Wi-Fi network in Windows 10 using Settings app
- Forget Wi-Fi network in Windows 10 using command line (Command Prompt & PowerShell)
- Forget all Wi-Fi networks in Windows 10 using command line (Command Prompt & PowerShell)
- How to connect to Wi-Fi network in Windows 10
- Closing words
How to forget Wi-Fi network in Windows 10
Forget Wi-Fi network in Windows 10 using System Tray
This is possibly the quickest and easiest way to forget the Wi-Fi network on your device. However, this method is only feasible if you want to remove one network at a time. To remove all networks at the same time, continue reading the article.
- Click on the Wi-Fi icon in the system tray in the bottom-right corner of the screen.

- Now right-click the network you want to remove and click Forget.


You will now notice that the network will immediately be removed and your system will not try to automatically connect to it. However, remember that this does not mean that your computer will stop discovering it at all.
Forget Wi-Fi network in Windows 10 using Settings app
The Settings application is a great utility that allows you to manage and configure your PC as per your desire. Let us also use it to forget saved Wi-Fi networks.
- Navigate to the following:
Start Menu -> Settings -> Network & Internet -> Wi-Fi - Now click Manage known networks on the right.

- In this window, click on the network you want to remove, and then click Forget.


As you will see, the saved network will vanish immediately and the credentials will no longer exist on your computer.
Forget Wi-Fi network in Windows 10 using command line (Command Prompt & PowerShell)
You can also remove a Wi-Fi network profile from your PC using the command line. It is quick and easy to list all of the saved Wi-Fi networks and then remove the selected one. Both Command Prompt and Windows PowerShell can be used to complete the task as the commands used are the same and compatible with both.
- Open Command Prompt or Windows PowerShell with administrative privileges.
- Enter the following command to view your saved Wi-Fi profiles:
netsh wlan show profiles
- Now that you know the exact name of the profile you want to remove, use the following command to do so:
netsh wlan delete profile name="<em>ProfileName</em>"
Replace ProfileName with the precise name of the Wi-Fi profile you want to remove, as in the example below


You have now successfully removed the credentials of a Wi-Fi network from your computer. Remember that the same commands can also be used when using Windows PowerShell.
Forget all Wi-Fi networks in Windows 10 using command line (Command Prompt & PowerShell)
If you feel like you have many Wi-Fi credentials saved on your PC unnecessarily and do not connect to them that frequently, you can remove all of them in an instant, altogether. Use the command given below in either Command Prompt or PowerShell to do so. Remember to launch them with administrative privileges.
netsh wlan delete profile name=* i=*

The asterisks in the command mean “all,” hence removing all profile names and their information from your computer. You will now need to provide your credentials again when connecting to Wi-Fi. This will now create new profiles on your PC.
How to connect to Wi-Fi network in Windows 10
In case you had previously removed a Wi-Fi profile from your computer, you will now need to connect to it as the computer will require the correct credentials in order to do so. Make sure you have the correct password before connecting to a Wi-Fi network. Remember that these passwords are case-sensitive.
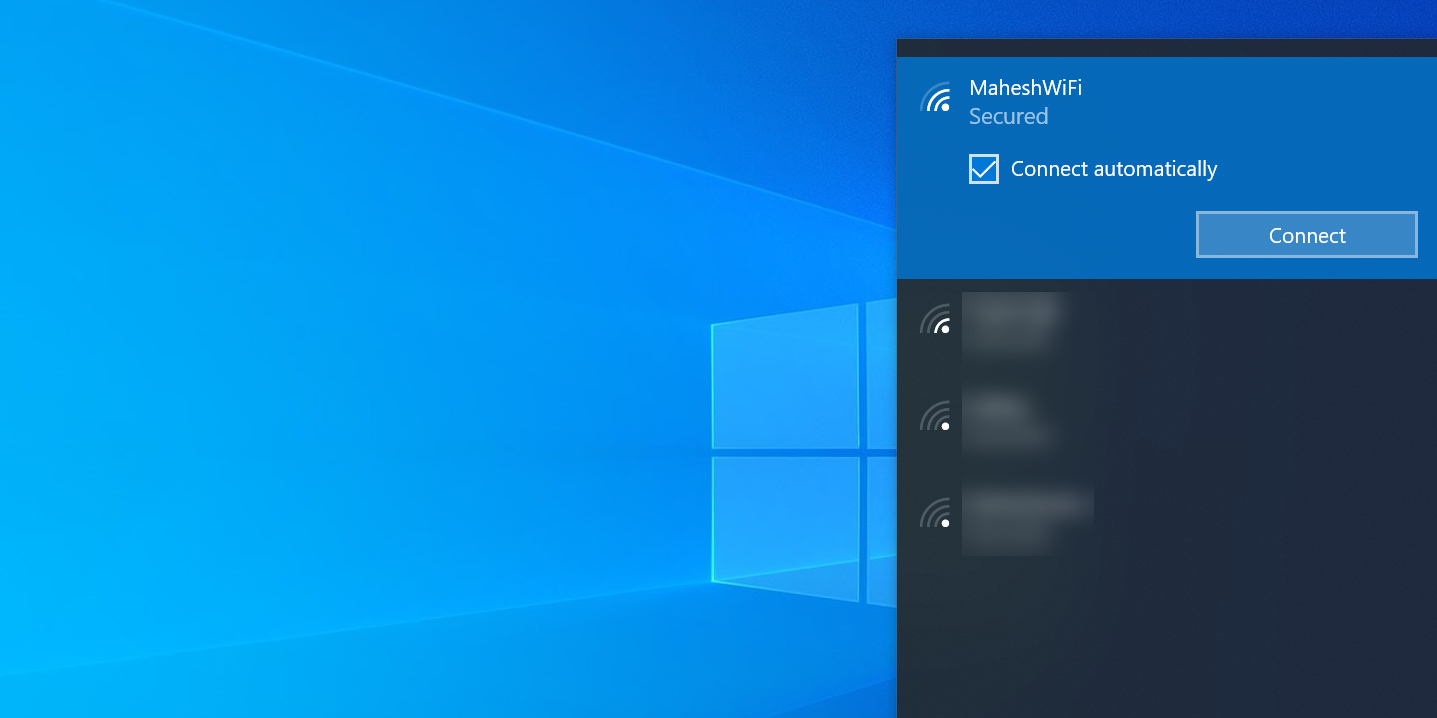
- The easiest way to connect to a discoverable Wi-Fi network is through the System Tray. Click on the Wi-Fi network icon in the tray to expand the discovered Wi-Fi networks. Note that the icon can be either one of the following depending upon its current state: Disconnected (left) or connected (right).

- Now click on the Wi-Fi network you wish to connect to, check the box next to Connect automatically if you wish to, and then click Connect.

- You will now need to enter the password to connect to the network if it is secure. Enter your password in the text field and click Next.

- You will now be asked whether you wish for your computer to be discoverable while connected to this network. Select an option of your choosing.


Your PC will now verify the information with the Wi-Fi router and connect. This information will now be saved as a separate network profile.
Closing words
Most people rarely modify their SSIDs, leaving the default settings as provided by the Internet service provider (ISP). This results in the same SSIDs being discovered in different parts of the neighborhood, however, with different passwords. Thus, you might encounter the prompt that the network could not be connected.
You may even be able to connect to a Wi-Fi network automatically because it has the same SSID and password that was already saved on your computer. We strongly advise users to change their Wi-Fi password so someone else won’t be able to access it.
Also see:
Subhan Zafar is an established IT professional with interests in Windows and Server infrastructure testing and research, and is currently working with Itechtics as a research consultant. He has studied Electrical Engineering and is also certified by Huawei (HCNA & HCNP Routing and Switching).
When you connect your Windows 10 PC to a Wi-Fi network, your PC saves that network’s password. If you want to forget the network to remove it from your system permanently, you need to remove the saved password.
In this guide, you’ll learn five ways to delete a Wi-Fi network on your computer.
Why Forget a Wireless Network on Windows 10?
There are many reasons you would want to do this.
It might be that you’re experiencing an issue with your network, and you’ve been advised to forget and rejoin your network.
Or, it might be that you’re letting someone use your computer, and you don’t want them to be connected to your Wi-Fi network. Removing the network will prompt them to enter a password, and they’ll remain disconnected if you haven’t given them your Wi-Fi password.
Either way, forgetting your Wi-Fi network should help you.
Forget a Wi-Fi Network on Windows 10 Using the System Tray
The easiest and quickest way to forget a Wi-Fi network on your Windows 10 PC is to use the system tray. There’s an icon here that lets you quickly find your network and remove it from your computer.
To use this method, follow the following steps:
- Click the Wi-Fi icon in your system tray.
- Find the network you want to forget in the list.
- Right-click the network and select Forget.
- Your PC will remove the network without any prompts.
Make sure you know the password for your forgotten network, as you’ll need it the next time you want to connect to it.
Forget a Wi-Fi Network on Windows 10 Using the Settings App
The Settings app lets you configure various options on your PC, including options for your wireless networks. You can use this app to connect, disconnect, and forget Wi-Fi networks on your computer.
If this is your preferred method, here’s how you use the Settings app to delete a saved wireless network on your PC:
- Open the Start menu, search for Settings, and launch the app.
- Click Network & Internet on the screen that follows.
- Click Wi-Fi on the left to view your wireless networks.
- You’ll see an option that says Manage known networks on the right. Click this option.
- A list of Wi-Fi networks that you’ve saved passwords for will appear.
- Find the network you want to forget, click that network in the list, and select Forget.
Your PC will delete your selected Wi-Fi network straightaway; there won’t be any prompts.
Once the network is removed, it won’t appear in the list anymore.
Forget a Wi-Fi Network on Windows 10 Using the Command Prompt or PowerShell
If you’re someone who prefers a command-line interface over a graphical user interface, you can actually use the Command Prompt or PowerShell to manage Wi-Fi networks on your computer.
There’s a command that allows you to view all the saved Wi-Fi networks on your PC. You can use a parameter with this command to remove any of your networks from the list.
The following shows how you do that using the Command Prompt:
- Open the Start menu, search for Command Prompt, and click Run as administrator.
- Hit Yes in the prompt.
- Type the following command into the Command Prompt window and press Enter. This command displays all the Wi-Fi networks you’ve saved on your PC.
netsh wlan show profiles - Find the network you want to forget in the list and note the network name.
- Type the following command, replace WIFINAME with your network name, and hit Enter.
netsh wlan delete profile name="WIFINAME” - The Command Prompt should say that the selected Wi-Fi network is deleted.
If the Command Prompt generates an error, make sure you’re using the utility with the admin privileges. If you followed the first step properly, you shouldn’t have any issues.
The same command works for PowerShell, too.
Forget All Wi-Fi Networks on Windows 10 at Once
If you’re selling or giving away your Windows 10 PC, you might want to remove all your Wi-Fi networks from the PC and not just the select ones. If this is what you want to achieve, there’s a command to help you do that.
Either in the Command Prompt or PowerShell, you can run a command that forgets all the Wi-Fi networks you’ve ever joined on your PC in a single keystroke.
This is an ideal method to use if you have several networks saved on your PC, and you don’t want to remove each one individually. Here’s how you bulk remove your networks:
- Access the Start menu, search for Command Prompt, right-click this utility, and select Run as administrator.
- Click Yes in the prompt.
- Enter the following command in the Command Prompt and press the Enter key.
netsh wlan delete profile name=* i=* - The Command Prompt will delete all the Wi-Fi networks on your PC. You’ll see a list of networks that have been removed.
How to Connect to a Wi-Fi Network After You’ve Forgotten It
Forgetting a Wi-Fi network isn’t the same as blocking the network. You can reconnect to any of your forgotten networks at any time, as long as you know the passwords for those networks.
To reconnect to a network, click the Wi-Fi icon in your system tray, find the network you want to connect to in the list, click the Connect button for that network, and enter the Wi-Fi password for it.
This network will no longer be forgotten as your PC now has its password again.
The Easy Way to Delete Wi-Fi Networks in Windows 10
One way to prevent your computer from automatically connecting to a Wi-Fi network is to forget the network on your PC. The methods above should help you do that so that your PC won’t connect to any network without an explicit order.
If you’re removing Wi-Fi networks because of a network problem, it’s worth learning some of the troubleshooting tips for wireless networks. This way, you might be able to fix the issue without actually having to forget and reconnect to your network.
Your computer conveniently saves all the WiFi passwords you enter, which allows you to automatically log in to a particular network when you are within range. However, there might be instances when you don’t want your computer to remember a wireless network. For example, if you want to use a different network, but your computer automatically signs you into one that you don’t want to use. Here’s how to forget a network on Windows 10.
How to Forget a Network on Windows 10
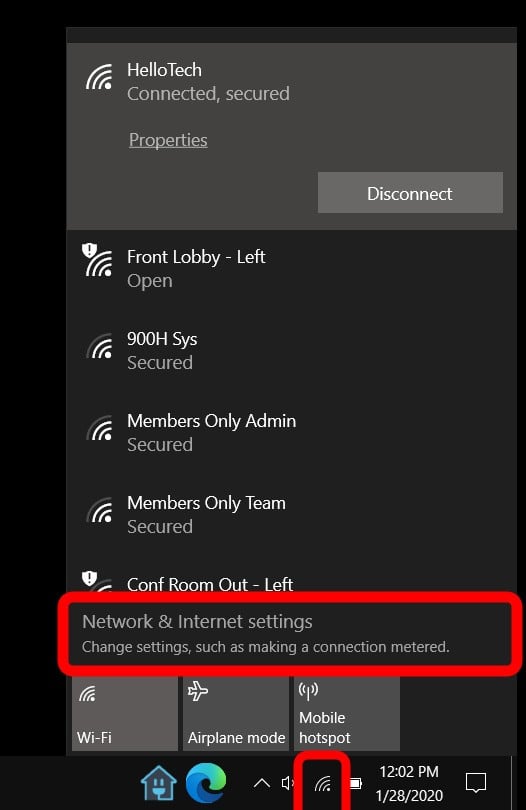
- Click the WiFi icon found in the bottom-right corner of your screen. If you don’t see this button, click the notification center icon in the bottom-right corner of your screen and click Expand above the row of icons at the bottom. Then you can select Network from the list.
- Then click Network & Internet settings. You can also navigate to this screen by clicking the Windows icon in the bottom-left corner of your screen and selecting Settings. Then go to Network & Internet.

- Then select WiFi in the left sidebar.
- Next, click Manage known networks.
- Select a network you want to forget. You will be shown a list of all the wireless network profiles saved on your computer. Scroll through this list and select the network you don’t want your Windows 10 to remember.
- Finally, click the Forget button.
How to Forget a Network within Your Range
If the wireless network profile you want to forget is within your
immediate area, such as your neighbor’s WiFi, then you don’t have to go through
all the six steps above. Here’s a quicker way:
- Click the WiFi icon in the bottom-right corner of your screen. This will display a list of the networks within your range.
- Right-click on the WiFi network you want to delete.
- Then click Forget in the pop-up menu. This will immediately remove the WiFi network profile from your system, and you won’t be signed in automatically.
Why You Should Learn How to Forget a WiFi Network on Windows 10
It is convenient to have your computer save network profiles and
sign you in automatically. However, there are benefits to knowing how to forget
WiFi networks on your Windows 10 PC.
Over time, your computer can build up a long list of wireless
profiles, which will include IP addresses, WiFi passwords, and other
network-related data. Some of the old network information might not be of use
to you any longer. For instance, other network owners may change their
passwords, or you might find it troublesome if you automatically get signed into
the wrong network.
Forgetting a network also has security benefits. It will keep hackers and malware from accessing your relevant network information. If you’re a Mac user too, make sure to check out our guide on how to forget a WiFi network on a Mac.
Whenever you connect to a network, Windows will autosave the passwords and other connection data so that you can log back into it again when it is within range. But what if you want to forget a Wi-Fi network?
Though it is not something that people generally do, you may end up in a situation where you have no other choice but to forget a network. Well, here’s everything you need to know about it and when you should be doing it.
How to forget Wi-Fi networks and network profiles
There are a few ways by which you can forget Wi-Fi networks that are saved by Windows. Let’s start with the simplest ones first and progress gradually to the more technical ones.
Related: How to Wipe a Hard Drive on Windows 11
Method #1: Forget a network within range from the Action Center
There is a conveniently placed network option in the Action Center that lets you access all the Wi-Fi connections that are currently within range, and delete their profiles, provided you have connected to them earlier.
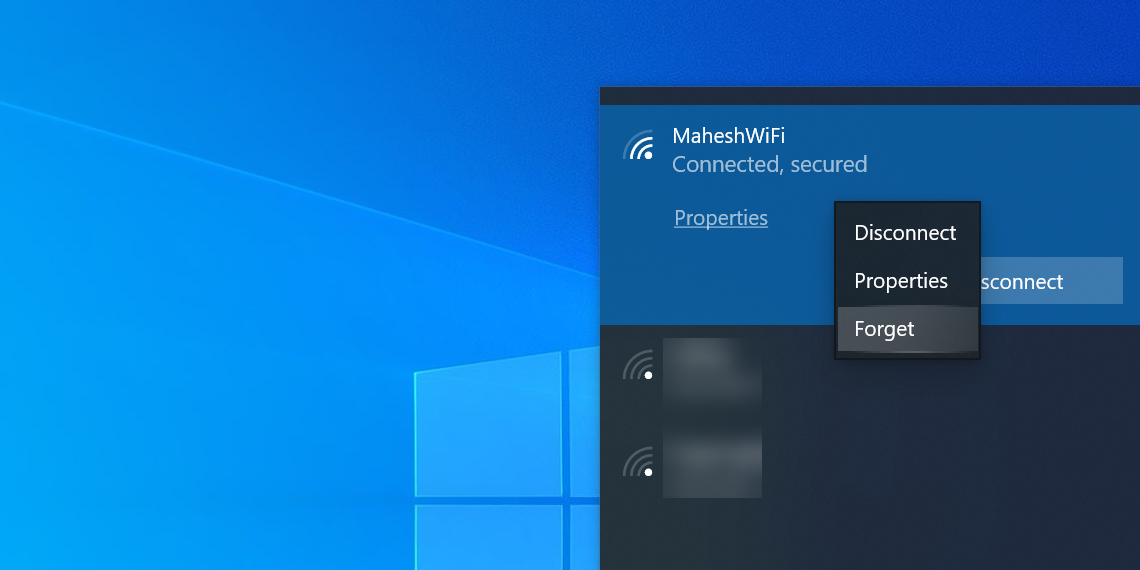
Click on the Wi-Fi icon in the Action Center (towards the right of the Taskbar).

Click on the arrow next to your Wi-Fi.

Right-click on a Wi-Fi network that you’ve connected to before and select Forget.

You can even forget the network that you’re currently connected to. You can’t, however, forget networks that you’ve never connected to before as there is nothing there to forget.
Also, do note that the network will still be discovered by Windows and, when within range, will show up in the list of available networks so that you have the option to connect to it later if you want to.
Method #2: Forget a saved network from the Settings app
If you want to forget a network that is not within range presently, you can find that saved network from within the Settings app. Here’s how:
Right-click on the Wi-Fi icon in the Action Center (right of the Taskbar).

Click on Network and Internet settings.

Click on Wi-Fi.

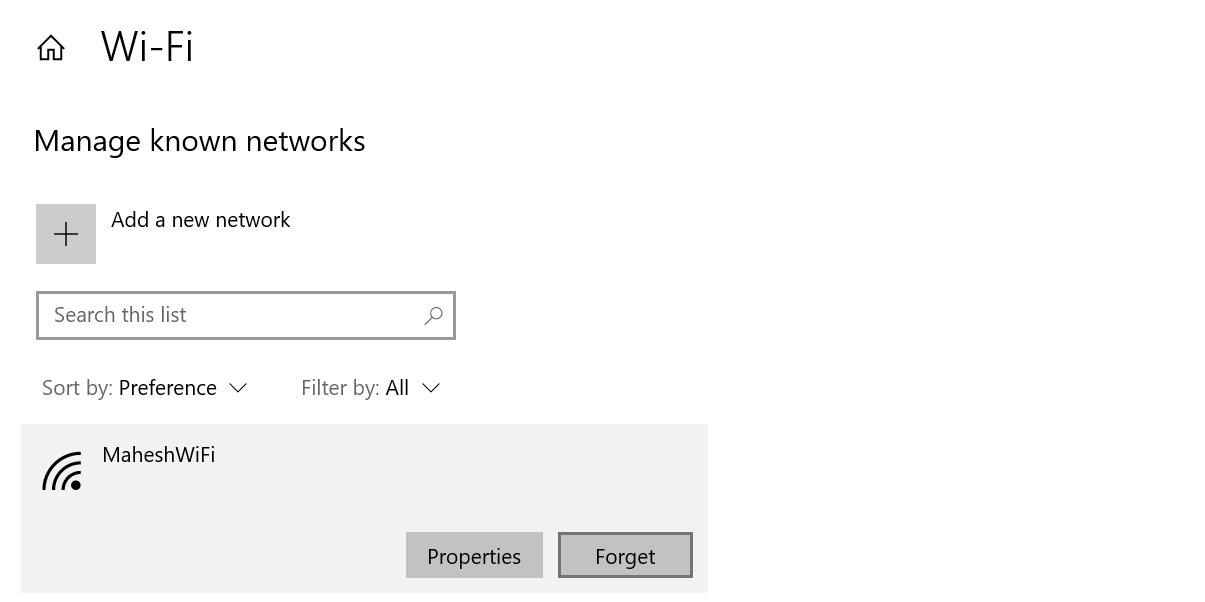
Click on Manage known networks.

Here, you will find all the networks that you have connected to before. Click on Forget next to the one that you want to remove.

Related: How to Repair Windows 11 [15 Ways]
Method #3: Forget a network from Command Prompt
Using the command prompt is a surefire way of getting things done, and forgetting a network is a breeze. Here’s how to go about it.
Press Start, type cmd, and click on Run as administrator.

Now, type the following command to get a list of all your saved Wi-Fi networks:
netsh wlan show profiles

Press Enter. The Command Prompt will now list all saved network profiles.

To forget one, type this command:
netsh wlan delete profile name='network name'

Make sure to change ‘network name’ to the actual name of the network that you want to forget. Then press Enter.
You will get a confirmation message telling you that the network profile “is deleted from interface ‘Wi-Fi’”.

Method #4: Forget a network from PowerShell
The steps to forget a network for PowerShell are the same as on the Command Prompt.
Press Start, type PowerShell, and click on Run as administrator.

To get a list of all saved Wi-Fi profiles, type the following command:
netsh wlan show profiles

Then press Enter. Just as with the Command Prompt, you will get a list of Wi-Fi network profiles that you’ve connected to before.

To delete a network, type this command:
netsh wlan delete profile name="network name"

As before, replace ‘network name’ with the actual name of the network that you want to delete. Then press Enter.
Related: How to Install Fonts on Windows 11
Method #5: Delete all known network profiles instantly from the Command Prompt
You can also delete all saved networks in one go. To do so, open an elevated instance of the Command Prompt (from Start) and type the following command:
netsh wlan delete profile name=* i=*

Press Enter to remove these networks. All the removed networks will be listed here.

Method #6: Remove network profiles from the Registry Editor
You can also delete saved networks from the registry editor. Follow the steps below to know how:
Press Win + R to open the RUN box, type regedit, and press Enter.

Then navigate to the following Registry address:
ComputerHKEY_LOCAL_MACHINESOFTWAREMicrosoftWindows NTCurrentVersionNetworkListProfiles
Alternatively, you can copy the above path and paste it into the Registry Editor’s address bar.

On the left, under the Profiles folder, you will see a long list of subkeys with scrambled numbers and letters. Each one is linked to a specific Wi-Fi network profile.

To find out the actual name of the Wi-Fi profile, select one and then look at the ‘ProfileName’ key on the right. The name will be shown under the ‘Data’ column.

If it is a network profile that you want to delete, right-click on the subfolder in the left panel and select Delete.

Click Yes to confirm.

All the information about this wireless network will be forgotten.
Related: How to Stop Pop Ups on Windows 11
How to remove LAN or ethernet connection
Though it makes more sense to delete Wi-Fi network profiles, you may sometimes want to remove prior LAN or ethernet connections as well, if only to clear the clutter. To do so, right-click on the Start menu and select Device Manager.

Once ‘Device Manager’ opens up, click on Network adapters to expand its branch.

Then find the LAN connection that you want removed, right-click on it and select Uninstall Device (confirm).

When prompted, place a check next to Attempt to remove this driver for this device, and click Uninstall.

How to reconnect to a forgotten network
Deleting or forgetting a network profile doesn’t mean that it won’t be discovered by Windows again. It only deletes its paswword and other connection data saved on your computer. So, if you want to reconnect, just connect to it as you would to any other network for the first time. The fastest way is through the the Action Center:

Click on the arrow next to the Wi-Fi icon.

Select your Wi-Fi connection and click on Connect.

Enter your password and click Connect.

And that’s it. Your network is reconnected and the data is saved again.
What happens when you forget or remove a network
When you forget or delete a network, its password and connection data are deleted. Windows also won’t automatically connect to the network when it is within range. You will still be able to connect to it if you want to, but you’ll have to do so manually, not least because you’ll have to type in the password again.
Why should you forget a network on Windows 11
There are a number of scenarios where forgetting a saved network is the prudent thing to do. For instance, if Windows keeps connecting to the same network every time it is within range, forgetting the network will keep it from doing and you’ll be free to choose which network you actually want to connect to.
Another instance when you may want to forget a network is if you’re letting someone else borrow your device for a while but don’t want them accessing your wireless network. Unless you’ve given them the password, they won’t be able to connect to the network.
Forgetting a network that you used before is also a good security measure to prevent hackers and malware from accessing your network information.
Frequently Asked Questions (FAQs)
Here we answer the commonly asked queries related to forgetting saved network profiles.
How do I find the password of a saved network profile?
Because Windows is saving the passwords for us, many of us tend to forget them over time. So if you’re wary of forgetting a profile because you worried you won’t be able to connect again, here’s how to find your Wi-Fi network password on Windows 11:
Press Win + R to open the RUN window, type control panel, and hit Enter.

Click on Network and Internet.

Then click on Network and Sharing Center.

On the left, click on Change adapter settings.

Double-click on your network.

Click on Wireless Properties.

Switch over to the ‘Security’ tab.

Here, check Show characters to reveal the password above.

Note down the password and save it somewhere so you can reconnect to the network later if you want.
How do I completely forget a network in Windows?
All the methods mentioned in this guide help forget a network in its entirety. But if you really want to make sure of it, you can count on the methods involving Windows terminals like CMD or PowerShell, or deleting it from the registry (Methods 3-6).
Being able to forget network profiles is a handy little know-how that gives you more control over your Wi-Fi settings and how you want it to behave. We hope the methods shown in this guide helped you achieve it.
RELATED
- How to Uninstall Apps on Windows 11: Everything You Need to Know
- Windows 11 Shortcuts: Our Complete List
- How to Find Product Key on Windows 11
- How to Use Focus Assist on Windows 11
- How to Fix 100% Disk Usage issue on Windows 10 or 11 [18 Ways]