Follow these steps to temporarily turn off real-time Microsoft Defender antivirus protection in Windows Security. However, keep in mind that if you do, your device may be vulnerable to threats.
-
Select Start and type «Windows Security» to search for that app.
-
Select the Windows Security app from the search results, go to Virus & threat protection, and under Virus & threat protection settings select Manage settings.
-
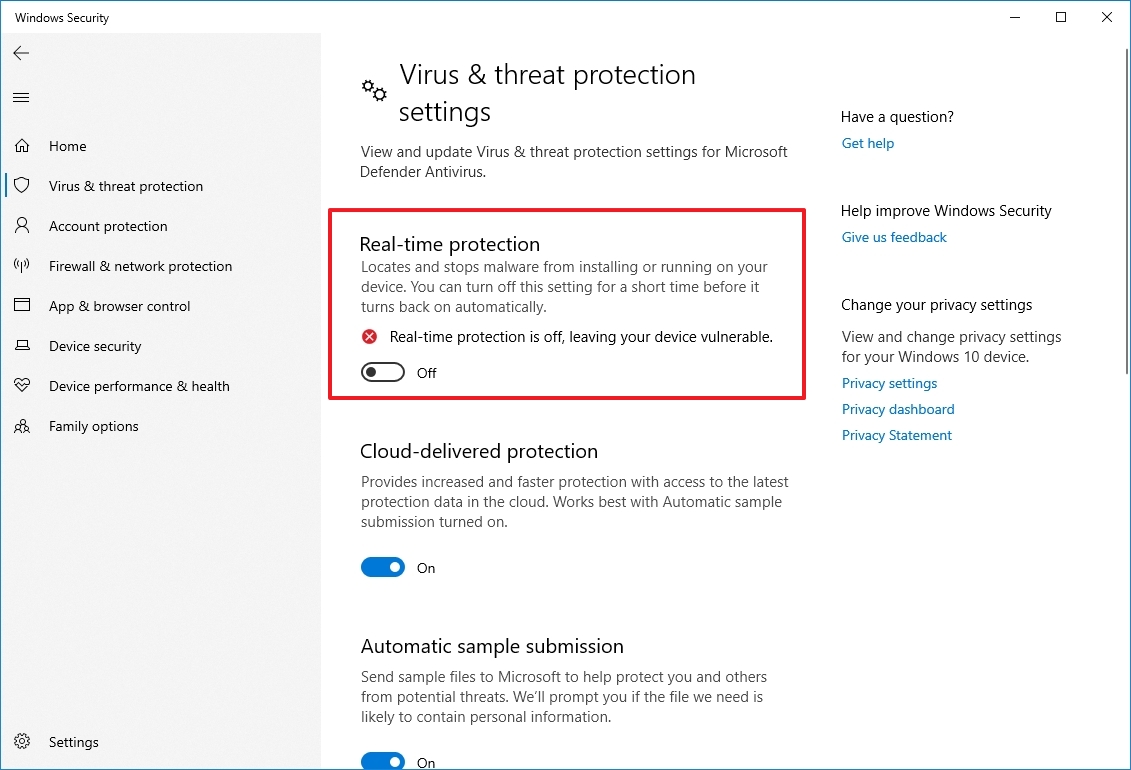
Switch Real-time protection to Off. Note that scheduled scans will continue to run. However, files that are downloaded or installed will not be scanned until the next scheduled scan.
Notes:
-
If you just want to exclude a single file or folder from antivirus scanning you can do that by adding an exclusion. This is safer than turning the entire antivirus protection off. See Add an exclusion to Windows Security.
-
If you install a compatible non-Microsoft antivirus program Microsoft Defender antivirus will automatically turn itself off.
-
If Tamper Protection is turned on, you’ll need to turn Tamper Protection off before you’ll be able to turn Real-time protection off.
How malware can infect your PC
Need more help?
(Image credit: Future)
On Windows 10, Microsoft Defender Antivirus is the anti-malware solution that protects your computer and files from unwanted viruses, ransomware, spyware, and other malware and hackers. While it is considered one of the best computer antivirus software options, you may still find situations where you may want to disable it permanently.
For example, if you don’t like the security app for personal reasons, if you have to change system settings conflicting with the antivirus, or if you have to set up a computer that won’t connect to the network and security is not a concern. Or if you are a network administrator and must comply with the organization’s policies on some specific computers.
Although Windows 10 does not include an option to uninstall Microsoft Defender Antivirus, it is possible to permanently disable the app using Group Policy or install a third-party solution. Or you can also disable the antivirus temporarily using the Windows Security app.
This guide will walk you through the different methods to permanently disable Microsoft Defender Antivirus (or temporarily) on Windows 10.
How to disable Microsoft Defender Antivirus using Windows Security
If the antivirus conflicts with another application or installation, you don’t have to disable the Microsoft Defender Antivirus permanently. You only need to turn off the feature temporarily.
To temporarily disable the real-time antivirus protection on Windows 10, use these steps:
- Open Start.
- Search for Windows Security and click the top result to open the app.
- Click on Virus & threat protection.
- Under the «Virus & threat protection settings» section, click the Manage settings option.
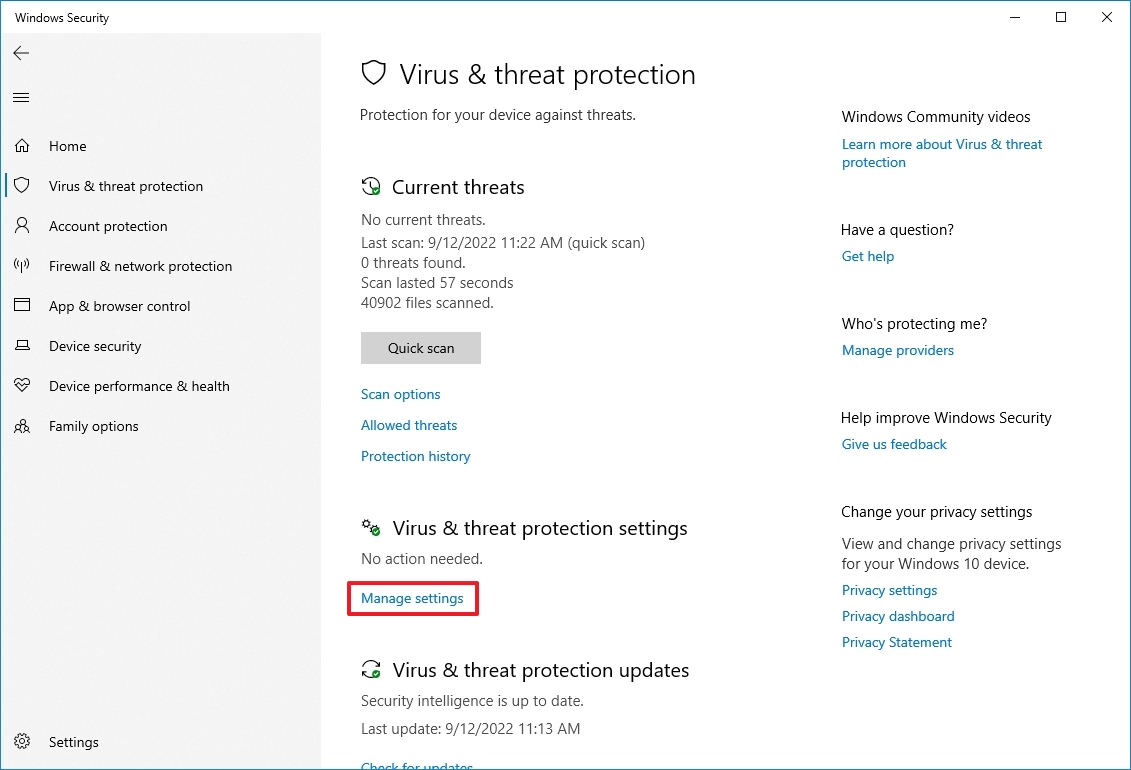
- Turn off the Real-time protection toggle switch to disable Microsoft Defender Antivirus temporarily.
Once you complete the steps, the antivirus will temporarily disable its protection to install apps or make specific system changes without unwanted conflicts.
After restarting the computer, the antivirus will enable again automatically. Or you can use the same instructions outlined above, but in step 5, make sure to turn on the Real-time protection toggle switch.
This is not a permanent solution, but it’s the best option to disable the protection to make system changes or install programs that are causing conflicts.
How to disable Microsoft Defender Antivirus using Group Policy
If you want to disable Microsoft Defender Antivirus permanently, you can use the Group Policy Editor. The only caveat is that you must also disable the «Tamper Protection» feature before the policy can apply.
On Windows 10, Tamper protection is a feature that protects Windows Security against unwanted changes from outside the app. Since the Local Group Policy Editor modifies the security settings from outside the app, the antivirus will restore any changes you have made during the next restart.
Disable Tamper Protection
To disable Tamper Protection, use these steps:
- Open Start.
- Search for Windows Security and click the top result to open the app.
- Click on Virus & threat protection.
- Under the «Virus & threat protection settings» section, click the Manage settings option.
- Turn off the Tamper Protection toggle switch.
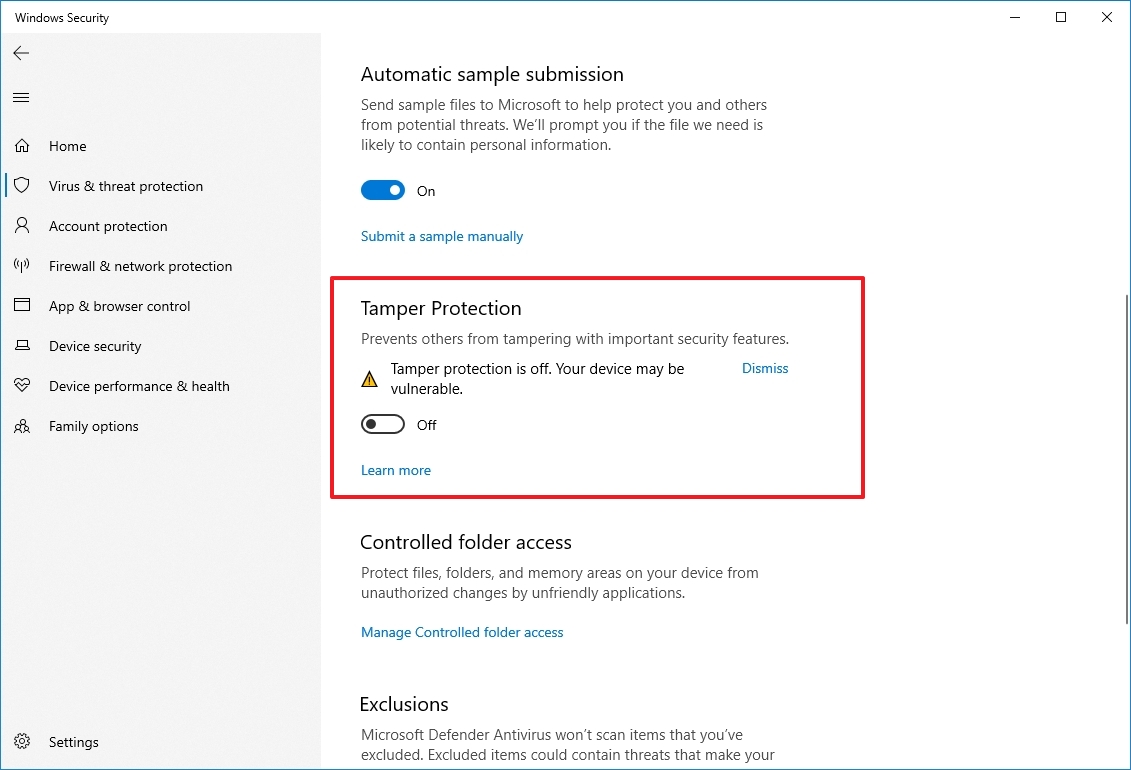
After you complete the steps, continue with the instructions to disable default Windows 10 antivirus using Group Policy.
Disable Microsoft Defender Antivirus
To disable Microsoft Defender Antivirus permanently on Windows 10, use these steps:
- Open Start.
- Search for gpedit.msc and click the top result to open the Local Group Policy Editor.
- Browse the following path: Computer Configuration > Administrative Templates > Windows Components > Microsoft Defender Antivirus
- Double-click the «Turn off Microsoft Defender Antivirus» policy.
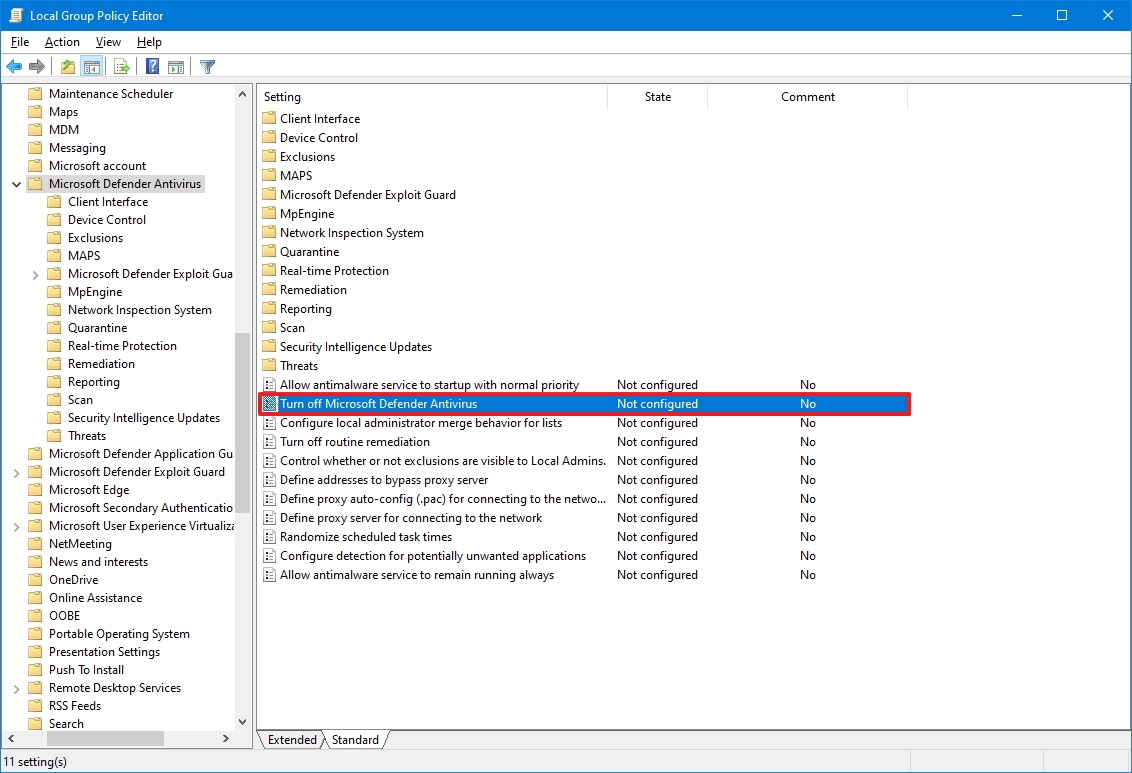
- Select the Enabled option to disable Microsoft Defender Antivirus permanently.
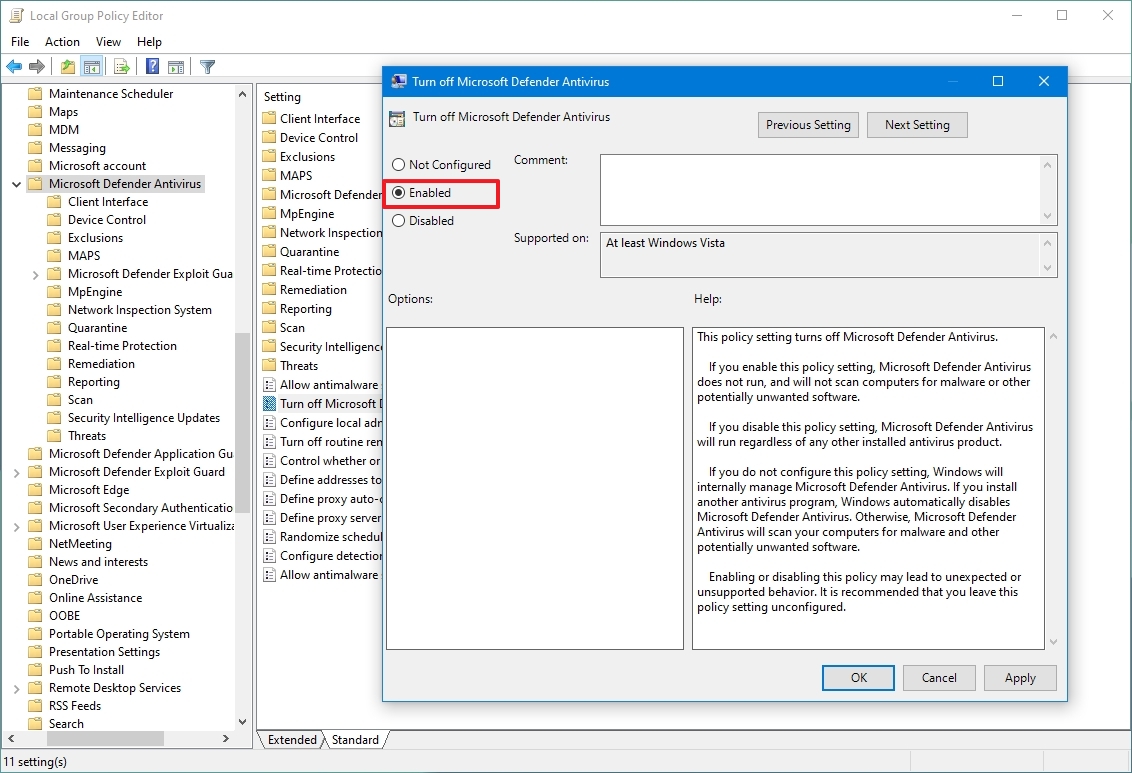
- Click the Apply button.
- Click the OK button.
- Restart your computer.
Once you complete the steps, the Windows antivirus will be disabled permanently, but the «shield» icon will remain in the Taskbar because the icon is part of the Windows Security app, not the antivirus program.
You can always undo the changes using the same instructions, but in step 5, select the Not Configured option. In addition to enabling the antivirus, it is also a good idea to turn on the «Tamper Protection» feature again using the same steps outlined above, but in step 5, make sure to enable the toggle switch.
How to disable Microsoft Defender Antivirus using third-party solution
If you plan to disable the antivirus to install another anti-malware software, this process isn’t necessary since installing another security software will disable Microsoft Defender Antivirus automatically.
To disable Microsoft Defender Antivirus using third-party protection, use these steps:
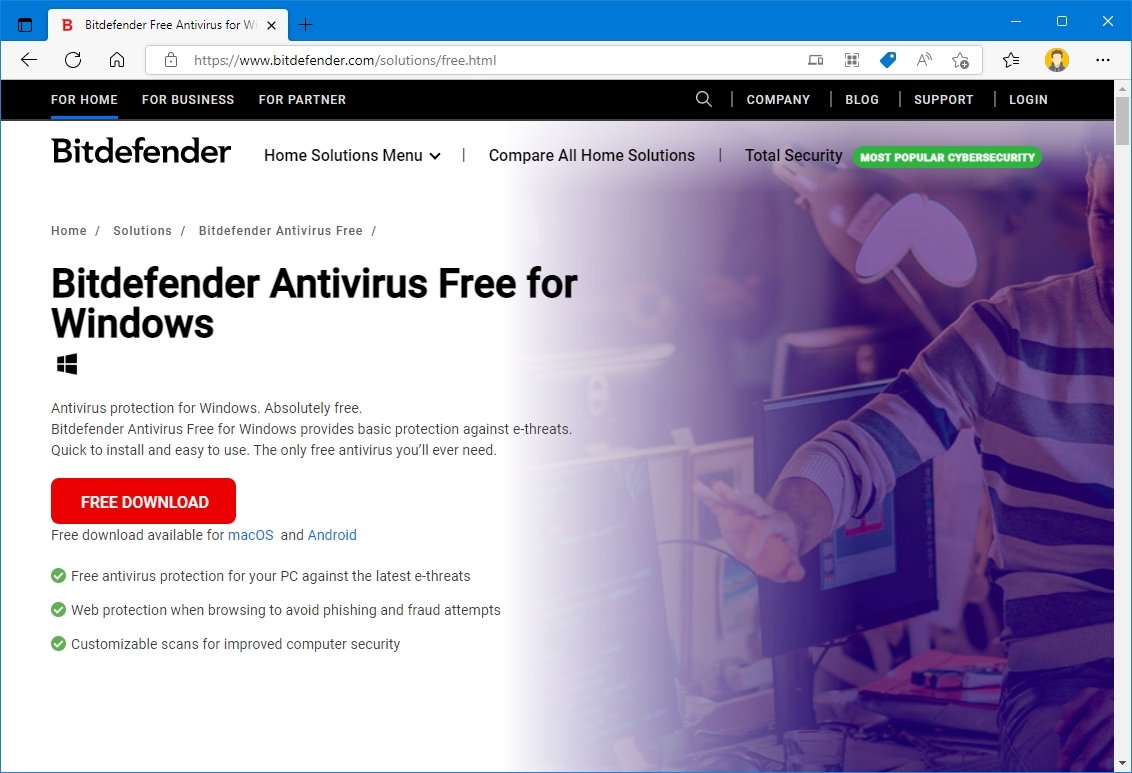
- Open the antivirus download page.
- Quick note: We will be installing Bitdefender, but the instructions will be similar to any other software. Of course, it is always recommended to check the software documentation for more specific details.
- Click the Download button to save the installer on the device.
- Double-click the file to launch the installation.
- Check the option to agree to the licensing terms (if applicable).
- Click the Install button.
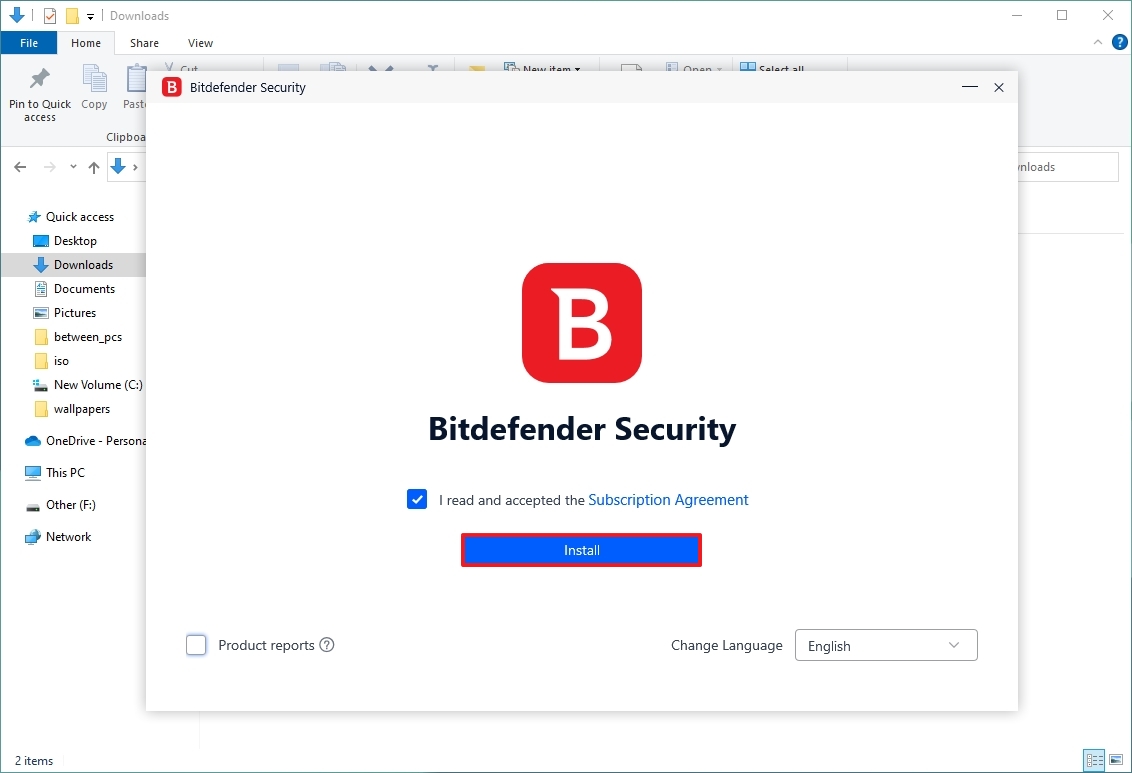
After you complete the steps, Windows 10 will detect the installation and automatically disable Microsoft Defender Antivirus on the computer.
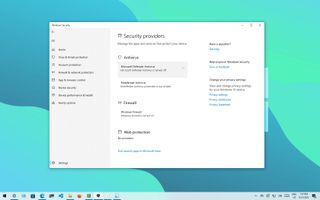
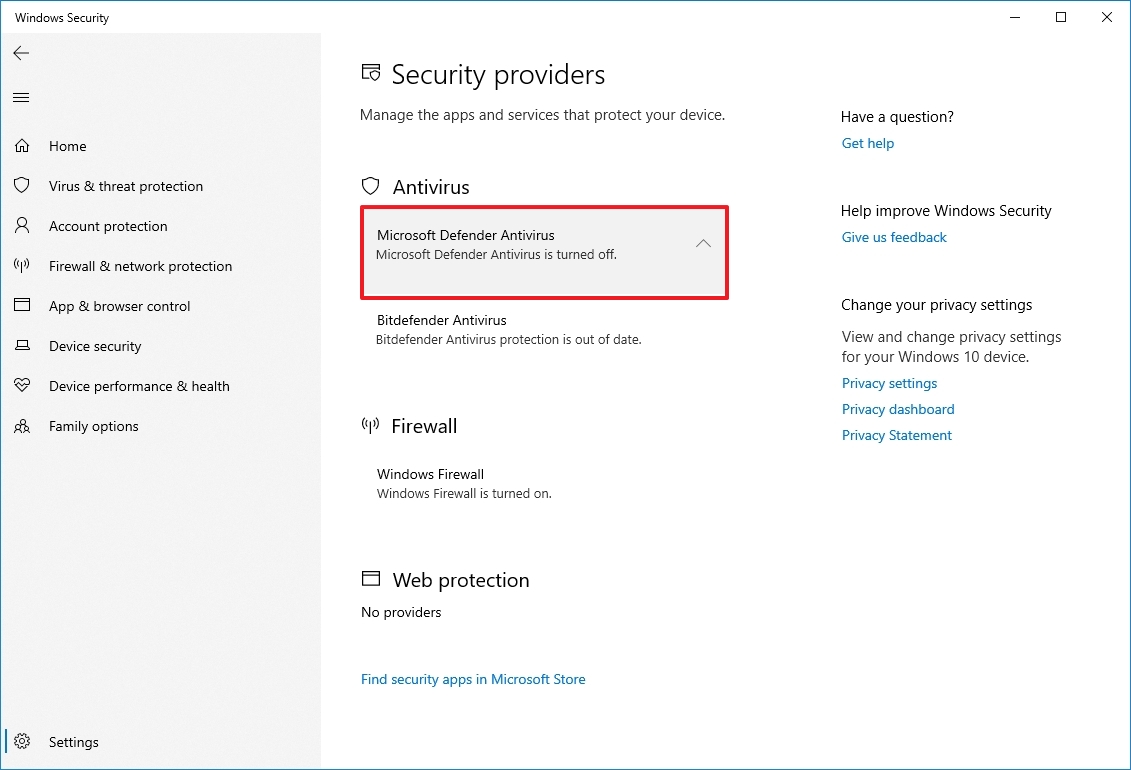
Check current security provider
To check the default antivirus has been disabled, use these steps:
- Open Start.
- Search for Windows Security and click the top result to open the app.
- Click on Settings at the bottom of the page.
- Under the «Security providers» section, click the Manage providers option.
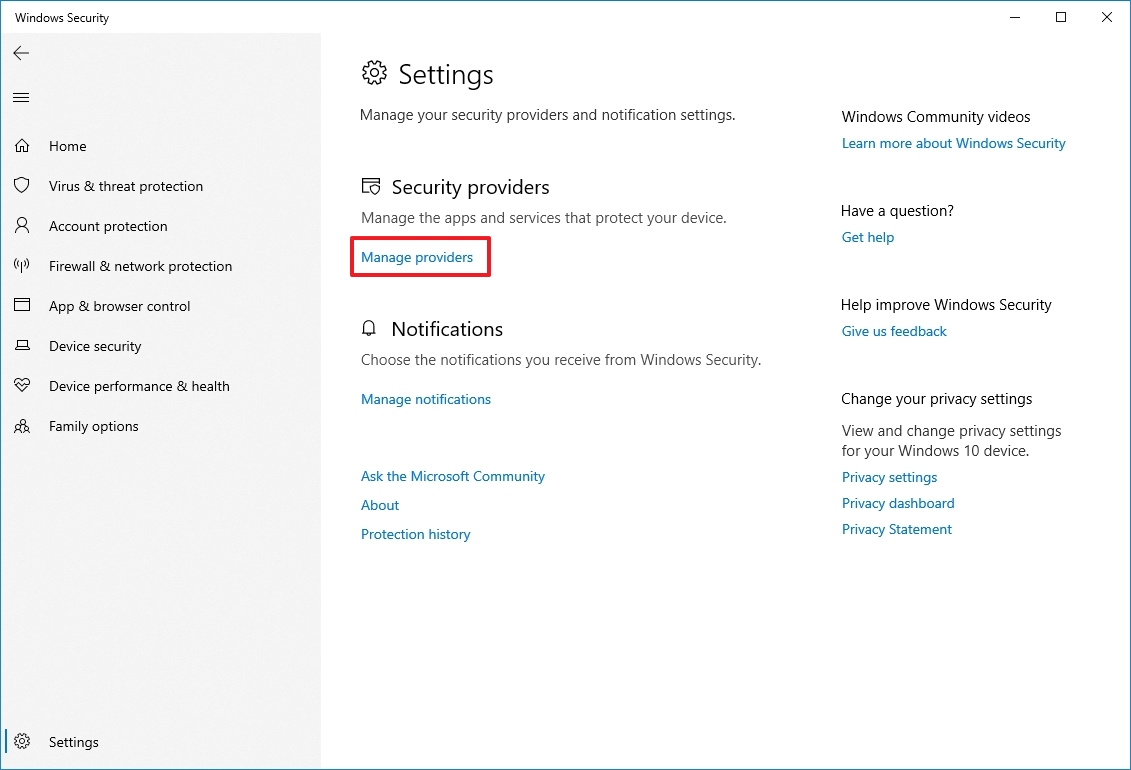
- Under the «Antivirus» section, Microsoft Defender Antivirus should appear permanently disabled.
Although multiple methods exist to disable the default antivirus on Windows 10, we do not recommend using a computer without anti-malware protection. However, some situations might still be where disabling the security feature could make sense.
If you are in the market for an alternative to Microsoft Defender Antivirus, you should consider these options:
- Bitdefender (opens in new tab)
- Norton AntiVirus Plus (opens in new tab)
More resources
For more helpful articles, coverage, and answers to common questions about Windows 10 and Windows 11, visit the following resources:
- Windows 11 on Windows Central — All you need to know
- Windows 10 on Windows Central — All you need to know
Get the best of Windows Central in in your inbox, every day!
Mauro Huculak is technical writer for WindowsCentral.com. His primary focus is to write comprehensive how-tos to help users get the most out of Windows 10 and its many related technologies. He has an IT background with professional certifications from Microsoft, Cisco, and CompTIA, and he’s a recognized member of the Microsoft MVP community.
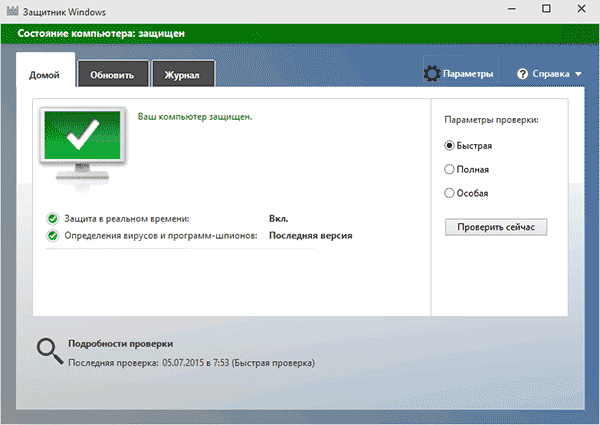
 Защитник Windows (или Windows Defender) — встроенный в последние версии ОС антивирус от Microsoft — Windows 10 и 8 (8.1). Он работает по умолчанию, пока вы не установите какой-либо сторонний антивирус (а при установке, современные антивирусы отключают Защитник Windows. Правда, с недавних пор — не все) и обеспечивает, пусть не идеальную, но защиту от вирусов и вредоносных программ (хотя последние тесты говорят о том, что он стал сильно лучше, чем был). См. также: Как включить защитник Windows 10 (если он пишет, что это приложение отключено групповой политикой).
В этой инструкции — пошаговое описание того, как отключить Защитник Windows 10 и Windows 8.1, несколькими способами, а также о том, как включить его обратно при необходимости. Это может потребоваться в некоторых случаях, когда встроенный антивирус не дает установить программу или игру, считая их вредоносными, а возможно и в других ситуациях. Сначала описан способ отключения в последних версиях Windows 10 — 21H1, 2004, 1909, 1903, 1809 и 1803, а затем — в предыдущих версиях Windows 10, 8.1 и 8. Также в конце руководства приведены альтернативные способы выключения (не системными средствами). Примечание: возможно, более разумным будет добавить файл или папку в исключения защитника Windows 10. Также может быть полезным: Лучший бесплатный антивирус.
- Временное отключение Защитника Windows 10 в параметрах
- Как отключить Защитник Windows 10 в редакторе локальной групповой политики
- Отключение Защитника Windows 10 в редакторе реестра
- Отключение службы «Антивирусная программа Защитника Windows»
- Видео инструкция
- Программы, позволяющие отключить встроенный антивирус
- Как отключить Защитник в предыдущих версиях Windows 10 и 8.1
- Отключение защитника с помощью PowerShell (временное)
Как отключить Защитник Windows 10
В последних версиях Windows 10 отключение Защитника Windows несколько изменилось по сравнению с предыдущими версиями. Как и раньше, отключение возможно с использованием параметров (но в данном случае встроенный антивирус отключается лишь временно), либо с помощью редактора локальной групповой политики (только для Windows 10 Pro и Enterprise) или редактора реестра.
Временное отключение встроенного антивируса Windows 10 с помощью настройки параметров
Если вам не требуется полное отключение защитника, а необходимо лишь временно отключить его для установки какой-либо программы, вы можете сделать это следующем способом:
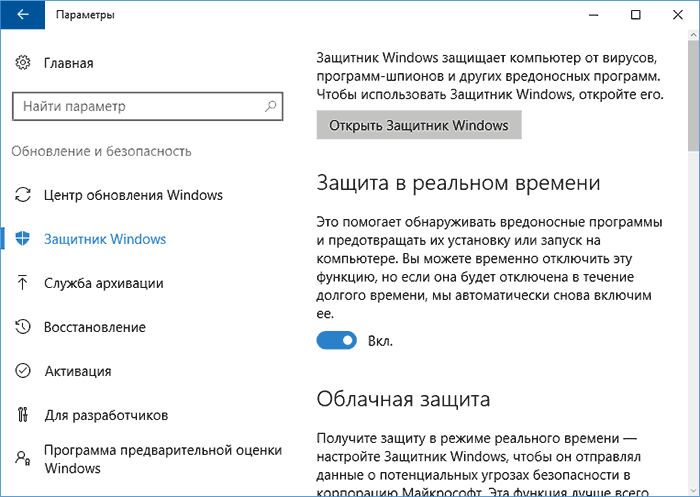
- Зайдите в «Центр безопасности Защитника Windows». Это можно сделать, дважды нажав мышью по значку защитника в области уведомлений справа внизу и выбрав «Открыть», либо в Параметры — Обновления и безопасность — Защитник Windows — Кнопка «Открыть Центр безопасности защитника Windows».
- В центре безопасности выберите страницу настройки защитника Windows — пункт «Защита от вирусов и угроз» (иконка с изображением щита), а затем нажмите «Управление настройками» в разделе «Параметры защиты от вирусов и других угроз».

- Отключите «Защита в режиме реального времени» и «Облачная защита».

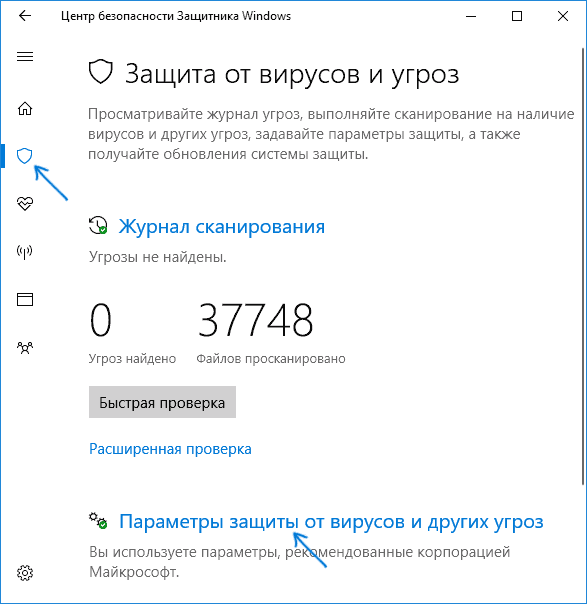

При этом защитник Windows будет отключен лишь на некоторое время и в дальнейшем система снова задействует его. Также не забывайте о возможности добавления программы в исключения защитника. Если же требуется отключить его полностью, для этого потребуется использовать следующие способы.
Примечание: при использовании далее описанных способов, возможность настройки работы защитника Windows в параметрах станет неактивной (до тех пор, пока вы не вернете измененные в редакторе значения на значения по умолчанию).
Отключение Защитника Windows 10 в редакторе локальной групповой политики
Данный способ подойдет только для редакций Windows 10 Профессиональная и Корпоративная, если у вас Домашняя — в следующем разделе инструкции приведен способ с использованием редактора реестра.
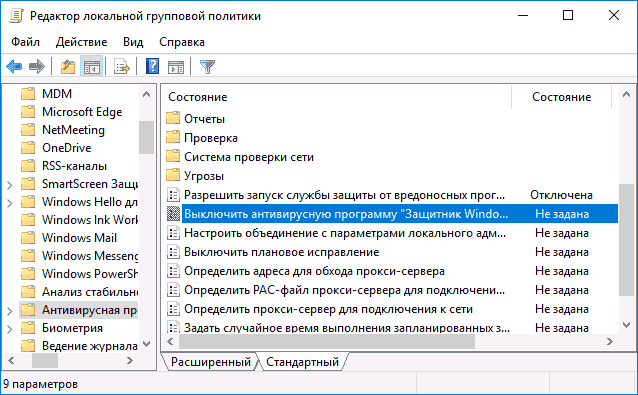
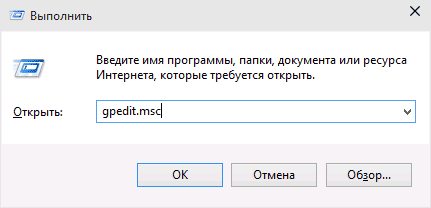
- Нажмите клавиши Win+R на клавиатуре и введите gpedit.msc
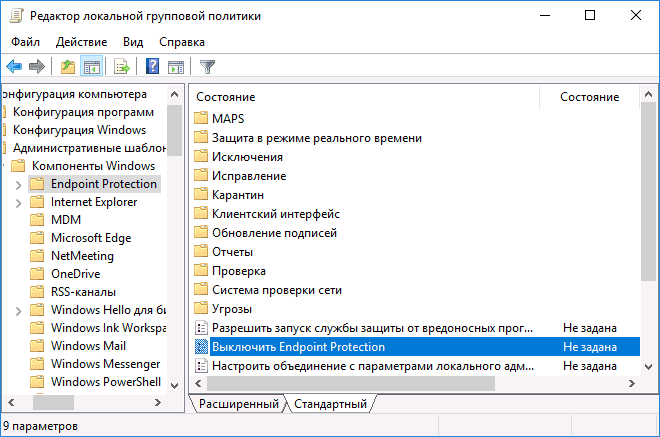
- В открывшемся редакторе локальной групповой политики перейдите к разделу «Конфигурация компьютера» — «Административные шаблоны» — «Компоненты Windows» — «Антивирусная программа Защитник Windows».

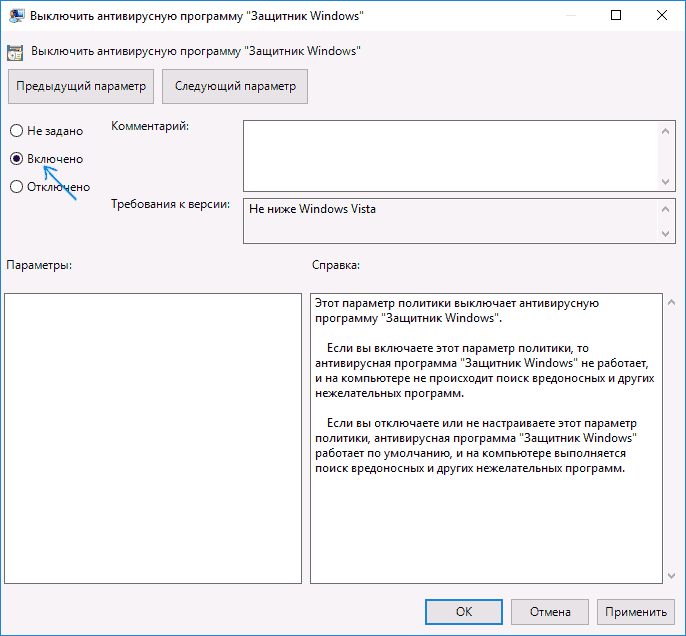
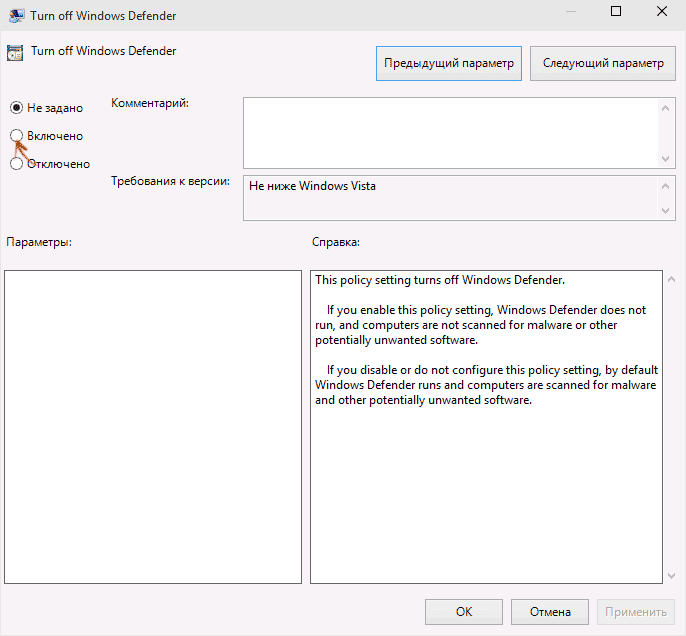
- Дважды нажмите по параметру «Выключить антивирусную программу Защитник Windows» и выберите «Включено» (именно так — «Включено» отключит антивирус).

- Аналогичным образом отключите параметры «Разрешить запуск службы защиты от вредоносных программ» и «Разрешить постоянную работу службы защиты от вредоносных программ» (установить «Отключено»).
- Зайдите в подраздел «Защита в режиме реального времени», дважды кликните по параметру «Выключить защиту в реальном времени» и установите «Включено».
- Дополнительно отключите параметр «Проверять все загруженные файлы и вложения» (здесь следует установить «Отключено»).
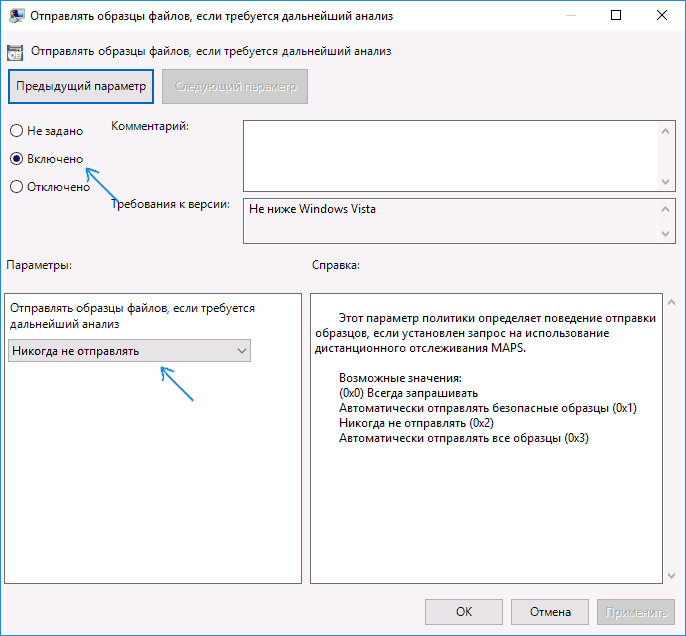
- В подразделе «MAPS» отключите все параметры, кроме «Отправлять образцы файлов».
- Для параметра «Отправлять образцы файлов, если требуется дальнейший анализ» установите «Включено», а внизу слева (в том же окне настройки политики) задайте «Никогда не отправлять».
Однако, в последних версиях Windows 10 этого недостаточно, дополнительно требуется отключить службу защитника Windows, причем сделать это просто в службах не получится. О том, как именно она отключается — в соответствующем разделе сразу после следующего способа.
Как полностью отключить защитник Windows 10 с помощью редактора реестра
Параметры, настраиваемые в редакторе локальной групповой политики можно задать и в редакторе реестра, тем самым отключив встроенный антивирус. Очень важное примечание: последняя версия Windows 10 не позволяет изменять указанные параметры реестра до тех пор, пока вы не отключите Защитник Windows 10 в параметрах, как это было описано в первом разделе инструкции. При этом обязательно требуется отключить и пункт Защита от подделки в том же разделе параметров.
Порядок действий будет следующим (примечание: при отсутствии каких-то из указанных разделов, вы можете их создать, нажав правой кнопкой мыши по «папке», находящейся на уровень выше и выбрав нужный пункт в контекстном меню):
- Нажмите клавиши Win+R, введите regedit и нажмите Enter.
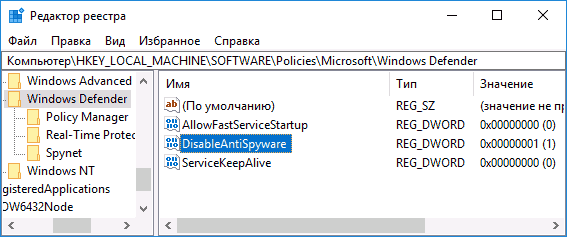
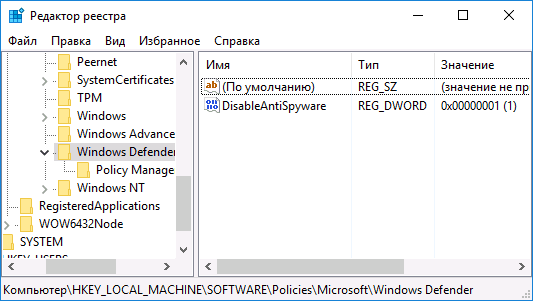
- В редакторе реестра перейдите к разделу
HKEY_LOCAL_MACHINESOFTWAREPoliciesMicrosoftWindows Defender
- В правой части редактора реестра нажмите правой кнопкой мыши, выберите «Создать» — «Параметр DWORD 32 бита» (даже если у вас 64-бит система) и задайте имя параметра DisableAntiSpyware

- После создания параметра дважды нажмите по нему и задайте значение 1.
- Там же создайте параметры AllowFastServiceStartup и ServiceKeepAlive — их значение должно быть 0 (ноль, задается по умолчанию).
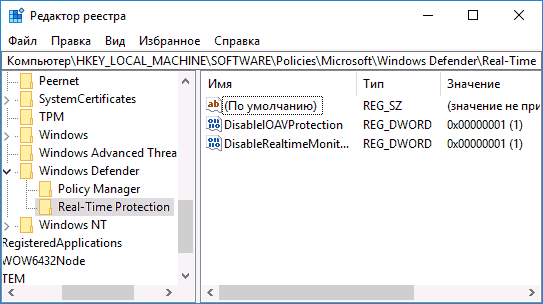
- В разделе Windows Defender выберите подраздел Real-Time Protection (или создайте его), а в нем создайте параметры с именами DisableIOAVProtection и DisableRealtimeMonitoring

- Дважды кликните по каждому из этих параметров и задайте значение 1.
- В разделе Windows Defender создайте подраздел Spynet, в нем создайте параметры DWORD32 с именами DisableBlockAtFirstSeen (значение 1), LocalSettingOverrideSpynetReporting (значение 0), SubmitSamplesConsent (значение 2). Это действие отключает проверку в облаке и блокировку неизвестных программ.

С этим закончили, но не торопитесь закрывать редактор реестра: для полного отключения защитника нужно также отключить соответствующую ему службу.
Отключение службы Антивирусная программа Защитника Windows
В завершение требуется отключить службу антивирусной программы защитника Windows, причем сделать это в services.msc не получится. Отключение возможно следующим методом:
- Перезапустите Windows 10 в безопасном режиме, зайдите в редактор реестра (клавиши Win+R, ввести regedit) и перейдите к разделу
HKEY_LOCAL_MACHINESYSTEMCurrentControlSetServicesWinDefend
- Дважды кликните мышью по параметру Start в правой панели редактора реестра и задайте для него значение 4.

- Примените настройки, закройте редактор реестра и перезагрузите компьютер в обычном режиме.
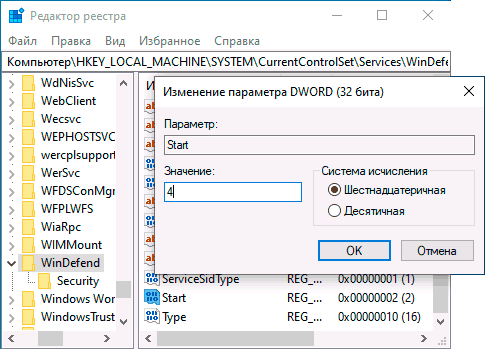
Примечание: в последних версиях Windows 10 параметр Start в этих случаях меняется на 3 автоматически, но служба сама не запускается (при желании, однако, вы можете удалить в безопасном режиме весь раздел реестра WinDefend и тогда запуск службы станет невозможным даже вручную, но настоятельно рекомендую сначала экспортировать этот раздел для быстрого возврата, либо создать точку восстановления системы). Также может иметь смысл тем же способом (изменив параметр Start на 4) отключить службу wscsvc (Центр обеспечения безопасности) и Sense, соответствующие разделы реестра находятся в том же расположении.
Готово, теперь Защитник Windows 10 не будет работать.
Дополнительно: в последних обновлениях Windows 10 значок защитника Windows по умолчанию отображается в области уведомлений панели задач. Вы можете отключить её, зайдя в диспетчер задач (через правый клик по кнопке Пуск), включив подробный вид и выключив на вкладке «Автозагрузка» пункт Windows Defender Notification icon.
![]()
При следующей перезагрузке иконка отображаться не будет (тем не менее, защитник продолжит работать, если его не отключить описываемыми способами). Чтобы избавиться от уведомления о том, что отключена защита от вирусов, используйте инструкцию: Защита от вирусов и угроз — как отключить уведомление.
Как отключить защитник Windows 10 — видео инструкция
Ввиду того, что описываемое действие в Windows 10 не такое уж и элементарное, предлагаю также к просмотру видео, в котором показано два способа отключения защитника Windows 10.
Отключение защитника Windows 10 с помощью бесплатных программ
Есть множество бесплатных программ, позволяющих, помимо прочего, отключить защитник Windows 10, среди них можно отметить очень простую бесплатную утилиту Defender Control, а также следующие:
- Winaero Tweker — бесплатная программа для настройки параметров Windows 10. Отключение Защитника доступно в разделе Windows Defender. О возможностях программы и где её скачать: Настройка и оптимизация Windows 10 в Winaero Tweaker.

- O&O ShutUp 10 — еще одна бесплатная утилита для настройки поведения ОС, где доступна такая опция.

- Утилита Dism++
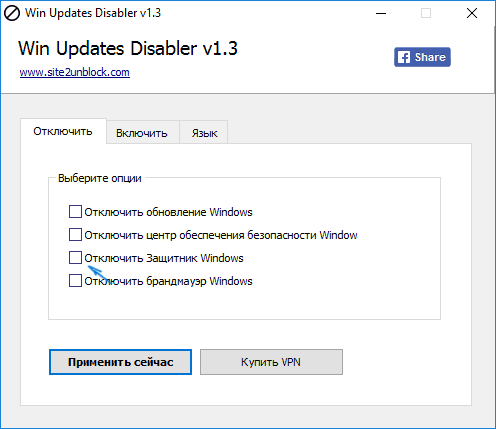
- Win Updates Disabler. Программа создавалась для отключения автоматических обновлений Windows 10, но может отключить (и, что важно — включить обратно) и другие функции, включая защитник и брандмауэр. Официальный сайт программы вы можете увидеть на скриншоте ниже.


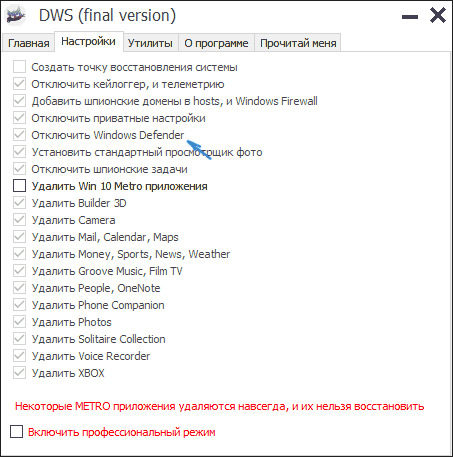
Еще один вариант — использование утилиты Destroy Windows 10 Spying или DWS, основная цель которой — отключение функций слежения в ОС, но, в настройках программы, если вкючить расширенный режим, вы можете также отключить и Защитник Windows (впрочем, он отключается в этой программе и по умолчанию).
Отключение защитника Windows 10 предыдущих версий и Windows 8.1
Необходимые действия, чтобы выключить Защитник Windows будут отличаться в двух последних версиях операционной системы от Microsoft. В общем случае, достаточно начать с выполнения следующих шагов в обеих ОС (но для Windows 10 процедура полного отключения защитника несколько сложнее, далее будет описано подробно).
Зайдите в панель управления: самым простым и быстрым способом для этого будет правый клик по кнопке «Пуск» и выбор соответствующего пункта меню.
В панели управления, переключенной в вид «Значки» (в пункте «Просмотр» справа вверху), выберите «Защитник Windows».
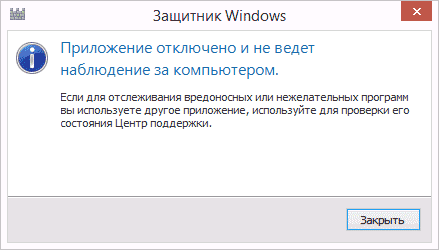
Запустится главное окно Защитника Windows (если вы увидите сообщение о том, что «Приложение отключено и не ведет наблюдение за компьютером», то, вероятнее всего, у вас просто установлен другой антивирус). В зависимости от того, какая версия ОС у вас установлена, выполните следующие шаги.
Windows 10
Стандартный способ (который не вполне работоспособен) отключения защитника Windows 10 выглядит таким образом:
- Зайдите в «Пуск» — «Параметры» (иконка с шестеренкой) — «Обновление и безопасность» — «Защитник Windows»
- Отключите пункт «Защита в реальном времени».

В результате защита будет отключена, но только на некоторое время: примерно через 15 минут она включится снова.
Если же такой вариант нам не подходит, то есть способы и полностью и навсегда отключить Защитник Windows 10 двумя способами — используя редактор локальной групповой политики или редактор реестра. Способ с редактором локальной групповой политики не подходит для Windows 10 Домашняя.
Для отключения с помощью редактора локальной групповой политики:
- Нажмите клавиши Win+R и введите gpedit.msc в окно «Выполнить».

- Зайдите в Конфигурация компьютера — Административные шаблоны — Компоненты Windows — Антивирусная программа Защитник Windows (в версиях Windows 10 до 1703 — Endpoint Protection).

- В правой части редактора локальной групповой политики дважды кликните по пункту Выключить антивирусную программу защитник Windows (ранее — Выключить Endpoint Protection).
- Установите «Включено» для этого параметра, если требуется отключить защитник, нажмите «Ок» и выйдите из редактора (на скриншоте ниже параметр называется Turn off Windows Defender, таково его название было в ранних версиях Windows 10. Сейчас — Выключить антивирусную программу или выключить Endpoint Protection).
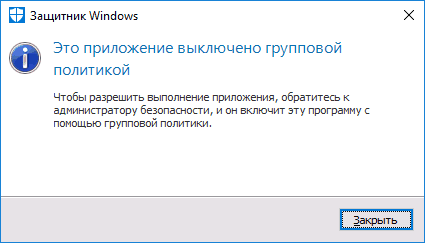
В результате служба защитника Windows 10 будет остановлена (т.е. он будет полностью отключен) и при попытке запуска защитника Windows 10 вы увидите сообщение об этом.
Также вы можете выполнить то же самое действия с помощью редактора реестра:
- Зайдите в редактор реестра (клавиши Win+R, ввести regedit)
- Перейдите к разделу реестра
HKEY_LOCAL_MACHINESOFTWAREPoliciesMicrosoftWindows Defender
- Создайте параметр DWORD с именем DisableAntiSpyware (если он отсутствует в данном разделе).
- Установите для данного параметра значение 0, чтобы защитник Windows был включен или 1, если его требуется отключить.

Готово, теперь, если встроенный антивирус от Microsoft вас и потревожит, то только уведомлениями о том, что он отключен. При этом, до первой перезагрузки компьютера, в области уведомлений панели задач вы будете видеть иконку защитника (после перезагрузки она исчезнет). Также появится уведомление о том, что защита от вирусов отключена. Чтобы убрать эти уведомления, кликните по нему, после чего в следующем окне нажмите «Не получать больше уведомлений об антивирусной защите»
Если отключения встроенного антивируса не произошло, далее есть описание способов отключить защитник Windows 10 с помощью бесплатных программ для этих целей.
Windows 8.1
Отключение Защитника Windows 8.1 куда проще, чем в предыдущем варианте. Все, что вам требуется — это:
- Зайдите в Панель управления — Защитник Windows.
- Откройте вкладку «Параметры», а затем пункт «Администратор».

- Снимите отметку «Включить приложение»
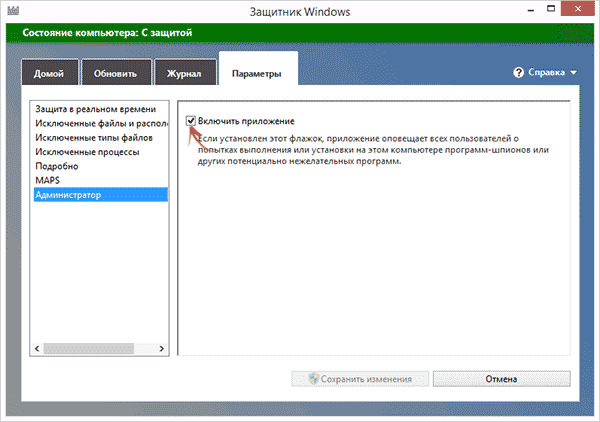
В результате вы увидите уведомление о том, что приложение отключено и не ведет наблюдение за компьютером — то, что нам и требовалось.
Отключение защитника Windows с помощью командной строки или PowerShell
Еще один способ отключить защитник Windows 10 (правда не навсегда, а только временно — также, как и при использовании параметров) — использование команды PowerShell. Windows PowerShell следует запустить от имени администратора, что можно сделать, используя поиск в панели задач, а затем — контекстное меню по правому клику мышью.
В окне PowerShell введите команду
Set-MpPreference -DisableRealtimeMonitoring $true
Сразу после ее выполнения защита в реальном времени будет отключена.
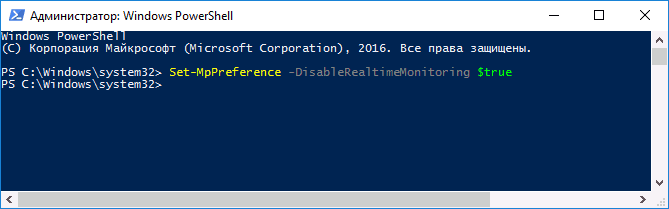
Чтобы использовать эту же команду в командной строке (также запущенной от имени администратора), просто введите powershell и пробел перед текстом команды.
Отключение уведомления «Включение защиты от вирусов»
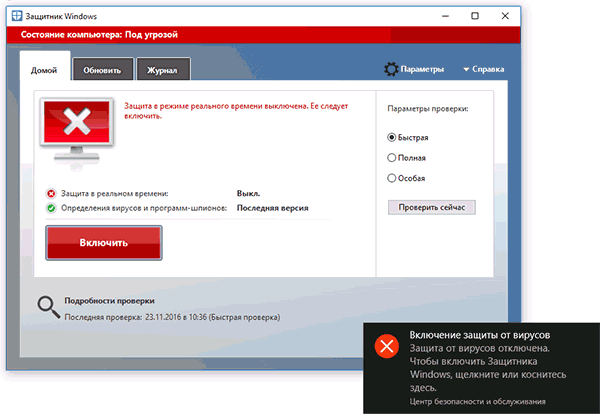
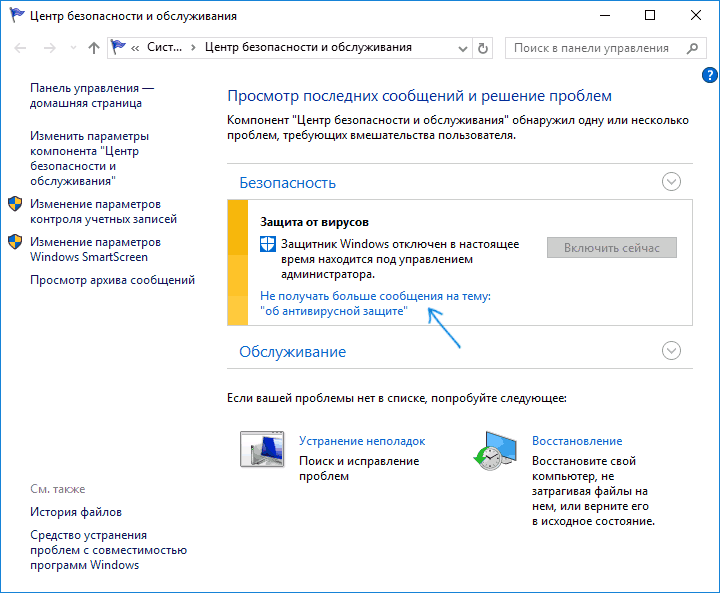
Если после действий по отключению защитника Windows 10 постоянно появляется уведомление «Включение защиты от вирусов. Защита от вирусов отключена», то для того чтобы убрать это уведомление, вы можете выполнить следующие шаги:
- С помощью поиска на панели задач зайдите в «Центр безопасности и обслуживания» (или найдите этот пункт в панели управления).
- В разделе «Безопасность» нажмите «Не получать больше сообщений на тему об антивирусной защите».

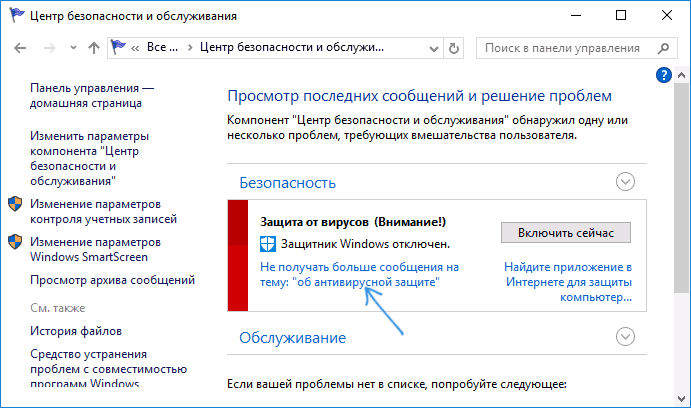
Готово, в дальнейшем вы не должны будете увидеть сообщений о том, что защитник Windows отключен.
Защитник Windows пишет Приложение отключено (как включить)
Обновление: подготовил обновленную и более полную инструкцию на эту тему: Как включить защитник Windows 10. Однако, если у вас установлена Windows 8 или 8.1, используйте шаги, описанные далее.
Если при входе в панель управления и выборе пункта «Защитник Windows», вы видите сообщение о том, что приложение отключено и не ведет наблюдение за компьютером, это может говорить о двух вещах:
- Защитник Windows отключен потому, что на вашем компьютере установлен другой антивирус. В этом случае ничего делать не стоит — после удаления сторонней антивирусной программы он включится автоматически.
- Вы сами выключили защитник Windows или он был отключен по какой-либо причине, тут вы можете его включить.
В Windows 10 для включения защитника Windows вы можете просто кликнуть по соответствующему сообщению в области уведомлений — все остальное система сделает за вас. За исключением того случая, когда вы использовали редактор локальной групповой политики или редактор реестра (в этом случае, следует проделать обратную операцию по включению защитника).
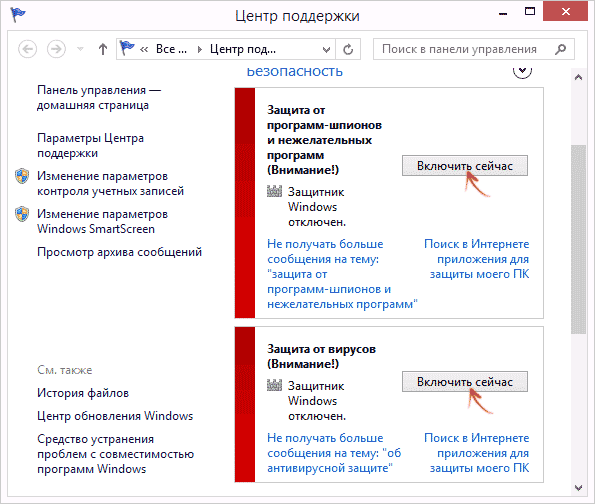
Для того, чтобы включить защитник Windows 8.1, зайдите в Центр поддержки (правый клик по «флажку» в области уведомлений). Вероятнее всего, вы увидите два сообщения: о том, что выключено защита от программ-шпионов и нежелательных программ и выключена защита от вирусов. Достаточно нажать «Включить сейчас», чтобы Защитник Windows снова запустился.
When using Windows, you’ll notice that it comes with its own antivirus called Windows Defender (now called Windows Security and Microsoft Defender in later versions of Windows 10 and Windows 11). For some, Windows Defender is more of a hindrance than a help, and they’ll want to disable Windows Defender completely. As you’ll discover in this tutorial, disabling Windows Defender isn’t as easy as it should be. Regardless, making sure Defender goes down and stays down isn’t very tricky at all.
Content
- Why Not Use the Default Option?
- Disable Windows Defender Permanently
- Using the Registry (Available for ALL Users)
- Using Local Group Policy
- Use a Third-Party Antivirus
- Disable Periodic Scanning
- Disable Windows Defender Tasks
- Frequently Asked Questions
Why Not Use the Default Option?
It may seem a little confusing that turning off Windows Defender permanently is trickier than it should be. After all, there’s an option within Windows to disable Defender.
- You can access it by going to “Start -> Settings -> Privacy & security.”

- Select “Windows Security” or “Windows Defender,” depending on your version of Windows.
- In Windows 10, you’ll see an option to turn Defender off under “Real-time protection.” However, if you read the description of the setting, you’ll spot the problem. Windows Defender will only stay inactive for a short period of time. When it detects that it’s been off for too long, it will automatically turn itself back on again. If you want Windows Defender to stay disabled, you’ll have to keep toggling this option off every time Windows resets it. What a hassle!

- If you’re using Windows 11, the same settings exist, but you have to go through a few extra screens. Click on “Open Windows Security.”

- Select “Virus & threat protection.”

- Scroll until you see “Virus & threat protection settings.” Click the “Manage Settings” link.

- Toggle the various options to “Off,” just like you would in Windows 10. It’s a pain trying to get to the settings, but once you do, they’ll look similar to Windows 10.

Also, just as in Windows 10, turning everything off is just temporary. This is great if you just need to turn Windows Defender off for a short while but doesn’t solve the ultimate goal of turning off Windows Defender permanently.
Note: if you’re already using another antivirus instead of Windows Defender, you may not see these settings at all – which is a fix in itself and will be detailed below.
Fortunately, there are ways to make it so that Windows Defender doesn’t reenable itself. Keep in mind that you’ll have to make sure you do not browse the Web without a functioning antivirus active! You need to have something installed beforehand to make up for Windows Defender being turned off.
You have a few options when it comes to disabling Windows Defender.
- The first is the simplest: just install a third-party virus program on your PC to disable the Defender in part.
- For a more permanent solution, you can go through the registry or Local Group Policy window. Typically, the Local Group Policy solution is a little easier to perform, but you can only use it on Pro, Enterprise, and Education editions of Windows 10 and 11.
If you don’t use any of the above editions, or aren’t sure which one you’re using, don’t worry! All versions of Windows 10 and Windows 11 can turn off Windows Defender using the registry method. Just follow the steps below, and you should have your problem fixed in no time.
Before you proceed with registry options, you have to disable Windows Defender Tamper Protection. This is a great feature that helps prevent another user or even a virus from disabling your built-in antivirus. Otherwise, any changes you make in the following sections will go away once you restart.
- Go to “Start -> Settings -> Privacy & security -> Windows Security.”
- Select “Virus & threat protection.” If you don’t see this option, select “Open Windows Security,” then select “Virus & threat protection.”

- Select “Manage Settings.”

- Toggle off “Tamper Protection.”

Using the Registry (Available for ALL Users)
- Open the Run command by pressing Win + R. In the box that appears, type
regeditand click “OK.”

Note: Make a backup of your registry before you make any changes. You can do this by opening the Registry Editor, then “File -> Export.” Place the copy in a safe place. If you want to clean up your registry from time to time, learn how to defragment it.
- The system registry will open. On the left, navigate to the following folder:
HKEY_LOCAL_MACHINESOFTWAREPoliciesMicrosoftWindows Defender
- You may see a folder after Windows Defender called “Policy Manager.” Don’t click on it. Instead, select the Windows Defender folder as shown in the following image.

- On the right side of the window, you may see a file called “DisableAntiSpyware.” If you do, that’s great! If not, we’re going to have to make our own. To do this, right-click in the empty space on the right side of the window and go to “New -> DWORD (32-bit) Value.”

- Windows will create an untitled DWORD file. Right-click the file and click “Rename,” then call it “DisableAntiSpyware.” Make sure you enter the name perfectly!
- Right-click the “DisableAntiSpyware” file and click “Modify.”

- To enable the policy that disables Windows Defender, set the value data to “1” and click “OK.” This tells the computer that the policy that was just created should be enabled, and Windows will disable Defender for you. If you ever want to bring Windows Defender back, just return to this file and change the value to “0.” This disables the policy and allows Windows Defender to work again.

- The next time you try to load Windows Defender, you’ll see the following error message saying it’s been turned off.

If anything related to Defender is still running, add the following DWORD values in the following folder locations using the same process as above:
- DisableRealtimeMonitoring – set the value to 1.
- DisableRoutinelyTakingAction – set the value to 1.
- DisableAntiVirus – set the value to 1.
- DisableSpecialRunningModes – set the value to 1.
- ServiceKeepAlive – set value to 0.
You may also need to create three new folders under Windows Defender. Right-click the “Windows Defender” folder and select “New -> Key.” Add three new Keys: “Signature Updates,” “Real-Time Protection,” and “Spynet.”
Next, add the following DWORD values to the corresponding folders:
HKEY_LOCAL_MACHINESOFTWAREPoliciesMicrosoftWindows DefenderSignature Updates
- ForceUpdateFromMU – set value to 0.
HKEY_LOCAL_MACHINESOFTWAREPoliciesMicrosoftWindows DefenderReal-Time Protection
- DisableRealtimeMonitoring – set value to 1.
- DisableOnAccessProtection – set value to 1.
- DisableBehaviorMonitoring – set value to 1.
- DisableScanOnRealtimeEnable (Set value to 1)
HKEY_LOCAL_MACHINESOFTWAREPoliciesMicrosoftWindows DefenderSpynet
- DisableBlockAtFirstSeen – set value to 1.
Tip: if you’re having trouble opening Windows Security on your PC, here are some fixes.
Using Local Group Policy
- Press Win + R to load the Run box, then type
gpedit.mscinto the box and press “OK.”

- If you attempt to run it in a different edition, such as Home, you’ll get the following error. This means you cannot use this method to disable Windows Defender. In this case, you’ll want to use one of the other two remaining methods outlined in this article.

- When the Local Group Policy window loads, select “Computer Configuration -> Administrative Templates” on the right.
- Go to “Windows Components -> Windows Defender (Antivirus).” Scroll down until you see a file called “Turn off Windows Defender.”

- Double-click it and click “Enabled” on the left. This turns on the “Turn off Windows Defender” policy, which disables Windows Defender. If you change your mind in the future, you can come back and select “Disabled” instead.

Use a Third-Party Antivirus
You’re not under any obligation to use what Windows comes with. While it does work surprisingly well, you can use any third-party antivirus. This is also an easy way to permanently disable Windows Defender.
- Download and install the antivirus of your choice. We have several recommendations along with advice on using a third-party antivirus with Windows 11.
- Once installed, Windows Defender should go into passive mode, which means it’s no longer running. If your antivirus doesn’t have a firewall, the Windows Defender firewall will still run.
- Check that your system is using the correct antivirus by going to “Start -> Settings -> Privacy & Security -> Windows Security.”
- Select either “Virus & threat protection” or “Open Windows Security.” If you choose the latter, you’ll need to select “Virus & threat protection” on that page.
- Select “Manage providers.” Depending on your version of Windows, this may be listed in the center of the window or to the far right.

- Check that your third-party antivirus is turned on and that Microsoft Defender Antivirus is turned off. If it’s the other way around, select your antivirus and turn it on, then turn off Defender.

- If you have another firewall installed, you’ll also be able to change your firewall preferences under the “Firewall & network protection” section. Otherwise, the Microsoft Firewall will stay on.
Windows Defender issues might cause you to get a “This setting is managed by your administrator” error. Fortunately, we can help you solve it.
Disable Periodic Scanning
Even if you’ve installed another antivirus, Windows may still run periodic scans. These won’t run at the same time as your third-party antivirus, but if you want to fully disable Windows Defender, you’ll want to stop these extra scans. By default, Windows 11 turns periodic scans off when installing another antivirus, but Windows 10 doesn’t always do this.
- Go to “Start -> Settings -> Privacy & security -> Windows Security.”
- Open “Virus & threat protection.” If this isn’t an option, select “Open Windows Security” first.
- Expand “Microsoft Defender Options.”

- Turn off “Periodic scanning.”
Disable Windows Defender Tasks
If Windows Defender is still trying to run, you may need to manually disable a few tasks and services.
- Click the Start menu and search for “task scheduler.” Select “Task Scheduler.”

- In the left pane, open “Task Scheduler Library -> Microsoft -> Windows -> Windows Defender.”

- If you see any tasks listed here, right-click each one and choose “Disable.”
- As a final step, you may also need to disable one or more Windows Defender services. This is especially true if you’re having trouble turning off the built-in firewall and want to use something else. Press Win + R, type
services.mscand click “OK.”

- Look for both “Microsoft Defender” and “Windows Defender.” We had the following services listed: Microsoft Defender Antivirus, Microsoft Defender Antivirus Network Inspection Service, and Windows Defender Firewall.
- If the services are listed as “Manual” or “Disabled” under “Startup Type” and aren’t listed as “Running,” you don’t need to worry about it. If it’s running or listed as “Automatic,” right-click the service and select “Properties.”

- Stop the service if it’s running and change the “Startup type” to “Manual” or “Disabled.”

- Press “Apply” to confirm the changes. You may be prompted to restart your computer after disabling tasks and services.
Ever wondered if your antivirus is working properly? Learn how to test your program against real malware to get the answer.
Frequently Asked Questions
Is it safe to permanently disable Windows Defender?
Yes. However, you should immediately turn on another antivirus program. Windows Defender is designed to protect you from the moment you start using Windows, but you don’t have to use it if you don’t want to. That’s why it’s a good idea to leave it running until you’re ready to install something else. Even if you’re extremely careful, odds are that you’ll encounter a virus at some point. Blocking it is much easier than trying to remove it. While you can remove it without an antivirus, it’s not easy.
Can Windows Defender cause my PC to run slowly?
Unless you’re running a full scan, you shouldn’t notice any real interference. In fact, Windows Defender uses fewer system resources than most antivirus apps. If your PC is running slowly, check Task Manager (Win + X and select “Task Manager”) to see what’s running and using the most resources. It could actually be a sign of a virus infection that got past Windows Defender or another antivirus app you have installed.
Is it safe to run Windows Defender with another antivirus app?
Yes, but you can only use the firewall and periodic scans in Windows Defender while another antivirus is active. Consider Defender a backup antivirus. Or, if something happens to your third-party antivirus, Windows Defender will immediately take over until you resolve any issues with your other antivirus.
Why is Windows Defender coming back on after every restart?
Ensure you turned off Tamper Protection in the Windows Defender settings. Outside of installing a third-party antivirus, anything you do to disable Windows Defender will go away after a restart if Tamper Protection is left on. It’s also possible you don’t have admin privileges to change these settings.
Image credit: Unsplash. All screenshots by Crystal Crowder.

Crystal Crowder
Crystal Crowder has spent over 15 years working in the tech industry, first as an IT technician and then as a writer. She works to help teach others how to get the most from their devices, systems, and apps. She stays on top of the latest trends and is always finding solutions to common tech problems.
Subscribe to our newsletter!
Our latest tutorials delivered straight to your inbox
![]()
Download Article
Easy step-by-step guide to disable Defender antivirus protection
![]()
Download Article
- Disabling Defender Temporarily
- Disabling Permanently with Other Antivirus Software
- Disabling with Group Policy Editor
- Q&A
- Tips
- Warnings
|
|
|
|
|
This wikiHow guide will show you how to turn off Microsoft Defender (formerly Windows Defender) in Windows 10. Microsoft Defender can be disabled in Settings, but will turn back on automatically when you restart your computer. If you want to turn off Defender permanently, you’ll need to install a different antivirus program. You can also use the built-in Group Policy Editor to permanently turn off Defender. Keep in mind that turning off Defender without having another antivirus installed will open up your PC to security threats.
Things You Should Know
- Go to Settings > Update & Security > Windows Security > Virus & threat protection to turn off Defender temporarily.
- Download a 3rd-party antivirus software to automatically turn off Defender.
- Use the Local Group Policy Editor to permanently turn off Defender.
- Note that the Group Policy Editor is only available on Windows Pro, Ultimate, and Enterprise.
-

1
Open your Windows Settings
. Click the gear-shaped Settings icon in the lower-left side of the Start menu. Doing so opens the Settings window.
- This method turns off Microsoft Defender’s real-time antimalware protection temporarily, which can be helpful if you need to install trusted software that Defender improperly flags as harmful. Defender will turn back on automatically after you restart your PC.
-
2
Click
Update & Security. It’s in the bottom row of Settings options.
Advertisement
-
3
Click Windows Security. This tab is in the upper-left side of the window.
-
4
Click Virus & threat protection. It’s the first option below the «Protection areas» heading near the top of the page. Doing so opens the Windows Defender window.
-
5
Click Virus & threat protection settings. You’ll find this option in the middle of the page.
-
6
Disable Microsoft Defender’s real-time scanning. Turning off real-time protection will mean your device is vulnerable until it turns back on.[1]
- Click the blue «On» switch
below the «Real-time protection» heading.
- Click Yes when prompted. This will turn off the real-time scanning feature of Microsoft Defender.
- You can also disable Microsoft Defender’s cloud-based protection by clicking the blue «On» switch below the «Cloud-delivered protection» heading and then clicking Yes when prompted.
- Microsoft Defender will turn itself back on the next time you restart your computer.
- Click the blue «On» switch


Advertisement
-
1
Go to the website for your preferred 3rd-party antivirus program. To turn off Microsoft Defender permanently, you can install a 3rd party antivirus software like Bitdefender, McAfee Antivirus Plus, or Malwarebytes Premium.
- For more general info, check out our guide on protecting your computer with antivirus software.
-
2
Download the setup file for the 3rd-party antivirus. The download location on the website will vary depending on your selected software.
- For example, Bitdefender Antivirus Free for Windows is available through the FOR HOME tab on their website. The button says FREE DOWNLOAD FOR WINDOWS.
- Make sure your computer meets the minimum specifications for the software.
-
3
Double-click the setup file. This is the file downloaded from the antivirus’s website. The installer will open to begin installing the antivirus on your computer.
-
4
Complete the installation. Follow the instructions provided by the installer to finish installing the antivirus. You may be required to restart your computer during the process. Once you’ve installed a different antivirus program, Microsoft Defender will automatically turn off.
- For additional computer safety, make sure to password protect your Windows PC.
Advertisement
-
1
Turn off Tamper Protection. If you’re using Windows 10 Pro or Enterprise, you can use the built-in Group Policy Editor to permanently turn off Microsoft Defender. Note that your computer will be vulnerable to malware after turning off Defender. You’ll need to turn off Tamper Protection to turn off Microsoft Defender:[2]
- Open the Windows Security app.
- Click Virus & threat protection.
- Click Manage settings.
- Switch Tamper Protection to “Off”.
-
2
Press ⊞ Win+R. The Run menu will open.
-
3
Type gpedit.msc in the Run window and press ↵ Enter. This will open the Group Policy Editor menu.[3]
-
4
Navigate to the policy to turn off Microsoft Defender. Take these steps in the Group Policy Editor to find this option:
- Computer Configuration
- Administrative Templates
- Windows Components
- Microsoft Defender Antivirus
- In the policy list, look for “Turn off Microsoft Defender Antivirus”.
-
5
Double-click “Turn off Microsoft Defender Antivirus”. This will open an options menu for the policy.
-
6
Click Enabled.
-
7
Click OK. This will confirm the choice to turn off Microsoft Defender and close the window.
-
8
Restart your computer. Microsoft Defender will be turned off.
- Change the “Turn off Microsoft Defender Antivirus” to Not Configured in the Group Policy Editor to turn Microsoft Defender back on.
Advertisement
Add New Question
-
Question
I did not order Microsoft Defender, how do I delete it?

Microsoft Defender comes with Windows 10, and, unfortunately, it cannot be deleted.
-
Question
Is there a way to turn it off without admin privileges?
No, you need to be an administrator to disable Windows Defender. This is a security measure to prevent viruses from turning Windows Defender off. However, if you know what you are doing and are certain of the safety of a third party app, it is possible to turn it off by using third party operating systems or startup disks which can access system settings of this system or user account, and disabling services with help of third party apps.
-
Question
It keeps getting switched back to on. Why?
This is because Microsoft Defender automatically turns itself back on whenever Windows restarts.

See more answers
Ask a Question
200 characters left
Include your email address to get a message when this question is answered.
Submit
Advertisement
-
Installing a third-party antivirus will not delete Microsoft Defender, but it will deactivate it so that they don’t conflict.
Thanks for submitting a tip for review!
Advertisement
-
Disabling Microsoft Defender may also disable any other antivirus programs, such as Norton or McAfee.
-
Disabling Microsoft Defender may open your computer up to security threats. You should not do this unless you know what you are doing.
Advertisement
About This Article
Article SummaryX
1. Open the Start menu.
2. Click Settings.
3. Click Update & Security.
4. Click Windows Security.
5. Click Virus & threat protection.
6. Click Virus & threat protection settings.
7. Toggle off «Real-time protection.»
For more information on how to disable Microsoft Defender, read on!
Did this summary help you?
Thanks to all authors for creating a page that has been read 1,872,944 times.
Is this article up to date?
Windows Defender — встроенное в операционную систему программное обеспечение, которое защищает пользователя от вирусов и шпионских программ. В принципе, он обеспечивает неплохой уровень защиты, но иногда мешает установить новое ПО, даже лицензионное и от известных разработчиков. Поэтому многие пользователи часто задаются вопросом, как отключить Microsoft Defender Windows. Сделать это можно сразу несколькими способами, при этом находиться за целевым компьютером вам вовсе не обязательно.
Содержание
- Отключаем Windows Defender через параметры защиты
- Как отключить Windows Defender через групповые политики
- Как отключить Защитника Windows через реестр
- Отключаем Windows Defender с помощью стороннего софта
- Итоги
Отключаем Windows Defender через параметры защиты
Самый простой способ отключения Защитника Windows зашит в саму операционную систему. В ней существует несколько гибких настроек, влияющих на работу Защитника. Чтобы их изменить, выполните следующие действия:
- Нажмите комбинацию клавиш Win + I и перейдите в раздел Обновление и безопасность.
- Затем в левой части окна выберите пункт Безопасность Windows.
- После этого выберите Защита от вирусов и угроз.
- В появившемся окне под разделом Параметры защиты от вирусов и других угроз перейдите в Управление настройками.
- Здесь можно отключить облачную защиту, защиту от подделки и защиту в режиме реального времени. Первая из них обеспечивает доступ к новейшим данным о защите в облаке, вторая предотвращает подделку важных функций системы безопасности, а третья обнаруживает и блокирует установку вредоносного ПО. В большинстве случаев вам нужно отключить последнюю функцию, которая напрямую мешает установке нового софта, если посчитает его подозрительным.
После этого можно возвращаться к работе. Но, возможно, Defender уже заблокировал какой-то исполняемый файл и поместил его в карантин. В таком случае, даже если отключить все вышеописанные функции, вы не получите доступ к заблокированному файлу. Придется его восстанавливать.
- Для этого вернитесь в окно Защита от вирусов и угроз и перейдите в раздел Журнал защиты.
- Здесь вы обнаружите рекомендации и последние действия, которые выполнил защитник. Сверху можно отфильтровать все недавние элементы.
- Раскройте интересующий вас пункт и в графе Действия выберите восстановление. Файл появится в той же папке, в которой был изначально.

Как отключить Windows Defender через групповые политики
Если вы хотите отключить Windows Defender навсегда, то воспользуйтесь редактором групповых политик. Для этого выполните следующие действия:
- Нажмите комбинацию клавиш Win + R и в появившемся окне введите команду gpedit.msc.
- В левой части утилиты проследуйте по адресу: Конфигурация компьютера — Административные шаблоны — Компоненты Windows — Антивирусная программа «Защитник Windows».
- В правой части окна найдите пункт Выключить антивирусную программу «Защитник Windows» и нажмите по нему два раза.
- По умолчанию данная опция выключена. Вам требуется только активировать её.
После этого нужно обязательно перезагрузить компьютер. Аналогичными действиями Windows Defender можно включить снова. Только не забывайте каждый раз выполнять ребут всей системы. Данный способ пригодится в том случае, если вы хотите навсегда отключить встроенную защиту. Разумеется, мы не рекомендуем этого делать начинающим пользователям. Тем более, если у вас нет альтернативы Защитнику в виде другого антивируса. О лучших из них, кстати, можно прочитать здесь.
Как отключить Защитника Windows через реестр
Иногда в корпоративных сетях или в некоторых версиях Windows у пользователя нет доступа к редактору групповых политик. В таком случае ответ на вопрос о том, как отключить защитник Windows 11 и 10 кроется в редакторе реестра. С его помощью можно также навсегда отключить встроенную защиту. Но будьте аккуратны: ОС очень чувствительна к параметрам реестра и сделав что-то не так, можно с легкостью «положить» всю систему. Поэтому перед тем, как приступить к действиям, мы рекомендуем создать точку восстановления или бэкап всего реестра. И лишь после этого можно решится на эксперименты с самим реестром.
- Нажмите комбинацию клавиш Win + R и в открывшемся поле введите команду regedit.
- В левой части окна проследуйте по адресу HKEY_LOCAL_MACHINESOFTWAREPoliciesMicrosoftWindows Defender.
- В правой части окна вы найдете параметры, присвоенные этому ключу. Один из них будет называться DisableAntiSpyware. Откройте его и задайте значение 1. Тем самым вы его активируете.
- Если этого параметра нет, то создайте его вручную с таким же именем. Правой клавишей мыши по свободному пространству в правой части окна — Создать — Параметр DWORD (32 бита). И также присвойте ему значение 1.
Закройте реестр и перезагрузите компьютер. С большой долей вероятности Windows Defender вас больше не побеспокоит. Впрочем, в некоторых случаях это может не оказать на Защитник должного эффекта. Ну а для большей эффективности нам понадобится еще несколько шагов:
- Щелкните правой кнопкой мыши по папке Windows Defender в реестре, выберите Создать -> Раздел и назовите его Real-Time Protection.
- Поочередно добавьте в него новые параметры DWORD с названиями DisableBehaviorMonitoring, DisableOnAccessProtection, DisableScanOnRealtimeEnable и DisableIOAVProtection, присвоив каждому из них значение «1».
- Закройте редактор реестра и перезагрузите компьютер.
После этого Windows Defender перестанет защищать ваш ПК, но сама иконка программы продолжит висеть в трее. Можете не обращать на нее внимание. Но еще раз скажем, что отключать Защитник стоит только при наличии достойной альтернативы, а если ее нет, после установки нового софта или других действий не забудьте включить его обратно. Для этого удалите созданные нами параметры и раздел, а также присвойте DisableAntiSpyware значение 0. В общем, верните систему в исходное состояние.
Отключаем Windows Defender с помощью стороннего софта
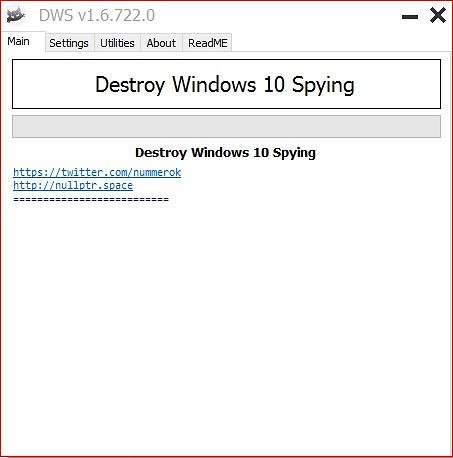
Народных умельцев с самого запуска «десятки» много что не устраивало. В том числе и встроенный Защитник. В природе встречается множество утилит, которые отключают часть функций Windows 10. Одна из самых простых и популярных — Destroy Windows Spying. Первоначальная цель программы, как понятно из названия — борьба с телеметрией, которая тоже мало кому приходится по душе. Но и Windows Defender тоже попал под раздачу.
Софт не требует установки и поддерживает русский язык. Здесь вы обнаружите богатый набор возможностей. Помимо вышеописанных функций, утилита умеет удалять ненужные Metro-приложения, отключать UAC, останавливать регулярные обновления, редактировать hosts и многое другое. Но будьте аккуратны, у некоторых пользователей после этого софта операционная система начинает работать нестабильно. Оно и неудивительно, всё таки программа вносит свои коррективы во многие фундаментальные параметры Windows 10. Так что используйте утилиту на свой страх и риск.
В общем, в рамках этой статьи нам пригодится только одна из множества функций программы. Ну а алгоритм работы с ней максимально прост. Откройте вкладку Настройки и включите Профессиональный режим, поставив соответствующую галку в нижней части окна Destroy Windows Spying, а еще одну галку поставьте напротив пункта Отключить Windows Defender. После этого перейдите на вкладку Главная и нажмите большую кнопку Destroy Windows 10 Spying. После того, как программа закончит свою работу, о Защитник Windows окажется полностью отключен.
Итоги
Существующую службу антивирусной программы Microsoft Defender можно временно отключить. Иногда она достаточно нервно реагирует на совершенно безобидные приложения, блокируя их установку или помещая в карантин. Поэтому в некоторых случаях такое действие необходимо. Благо, отключается Защитник достаточно просто. Главное, не оставляйте свой компьютер без антивируса дольше, чем это необходимо, и после всех манипуляций не забудьте вернуть его настройки в исходное состояние. Тем более, что сам Защитник на удивление неплохо справляется со своими прямыми обязанностями, о чем говорят многочисленные тесты антивирусного программного обеспечения, и пренебрегать им не стоит.
Читайте также:
- 8 лучших бесплатных VPN-сервисов для ПК, которые пока работают в России
- Лучший бесплатный антивирус 2022: наша большая подборка
There are times when we want to turn off Windows Defender on Windows 10 quickly. For example, if we are installing a software which requires that the antivirus should be disabled during installation (yes there are some software which requires this).
Windows Defender is an all in one security software from Microsoft consisting of antivirus and a firewall. Windows Defender comes pre-installed with Windows 10. It gets all its updates from Windows Update.
Although you can turn Windows Defender on or off from Windows Settings, there are other quick ways to turn it on or turn off Windows Defender Windows 10 or even Windows 8/8.1. You should choose the best method according to the version of Windows you are using.
Table of contents
- Why turn off Windows Defender?
- How to Turn Off Windows Defender Using Windows Settings
- How To Disable Windows Defender Using Command Prompt
- How To Permanently Disable Windows Defender Using PowerShell
- How To Permanently Turn Off Windows Defender Using Group Policy
- How To Permanently Disable Windows Defender Using Windows Registry
- How to turn off Windows Firewall only
- How to turn off Windows Defender real-time antivirus only
- Verdict
A general recommendation in terms of security is that you should always have security enabled for your PC at all times. This could be using Windows Defender, Microsoft’s own security solution built into Windows 10, or using a third-party security tool.
Sometimes you will need to disable antivirus and firewall protection in Windows. For example, when you are playing a game but the antivirus keeps on scanning the files and slows down the system. Another example can be when the antivirus detects a program as a false positive although you know that the program is completely safe to use.
Some people believe that it is safe to turn off Windows Defender and use cracking software. This includes activating Windows using illegal tools like KMSPico or the Microsoft Toolkit. These cracking tools are not safe at all. They may inject malware into the system that may not be detectable by the antivirus after installation. The malware is used for cryptomining and other hacking purposes.
There are two ways to turn off Windows Defender, either temporarily or permanently. We will discuss both ways here.
How to Turn Off Windows Defender Using Windows Settings
If you want to turn Windows Defender on or off using Windows Settings, follow the steps below:
- Open Windows Settings (Windows key + i)
- Go to Update & Security –> Windows Security
- From the right-hand pane, select Manage settings under Virus & threat protection settings.
- Toggle the switch to Off under Real-time protection.

This will turn off real-time protection while a manual scan is available at your disposal.
How To Disable Windows Defender Using Command Prompt
To turn off Windows Defender using Command Prompt, follow these steps:
-
Open command prompt with administrative privileges
-
Run the following command to disable Windows Defender:
sc stop WinDefend -
To make sure that Windows Defender is stopped, run this command:
sc query WinDefend
To enable Windows defender again, run the following command:
sc start WinDefendPlease note that this is a temporary method to stop Windows Defender. The service will return to its original state once the system is restarted.
To disable Windows Defender permanently using the command prompt, run the following command:
sc config WinDefend start= disabled
sc stop WinDefend
To enable it again on startup, run the following commands:
sc config WinDefend start= auto
sc start WinDefend
If you want to check the current state of the Windows Defender service, run the following command:
sc query WinDefendCheck the STATE variable. It should be in RUNNING state if it is enabled.

How To Permanently Disable Windows Defender Using PowerShell
One advantage of PowerShell is that you can deploy changes to Windows Defender on multiple computers across the network.
If you prefer PowerShell way, follow the steps below:
- Run PowerShell with administrative privileges (Windows key + X + A)
- To disable real-time monitoring for Windows Defender, run the following command:
Set-MpPreference -DisableRealtimeMonitoring $true - To enable real-time monitoring, run the following command:
Set-MpPreference -DisableRealtimeMonitoring $false
The above method will only turn off real-time monitoring of Windows Defender. If you want to completely remove Windows Defender from Windows 10, use the following PowerShell command:
Uninstall-WindowsFeature -Name Windows-Defender
How To Permanently Turn Off Windows Defender Using Group Policy
If you are a network admin and want to disable Windows Defender from your network, it is wise to use Group Policy. Just follow the steps below to turn off Windows Defender using the Group Policy editor:
- Open Group Policy Editor (Run –> gpedit.msc)
- Go to Computer Configuration –> Administrative Templates –> Windows Components –> Windows Defender Antivirus

- From the right-hand pane, open Turn off Windows Defender Antivirus and select Enabled


This setting can be accessed through Local Group Policy as well as Domain Group Policy. The local policy will turn off Windows Defender for all local users while the domain policy will disable it for all systems on which the policy is applied.
How To Permanently Disable Windows Defender Using Windows Registry
You can also disable Windows Defender permanently from Windows Registry just by creating or altering a few registry keys.. Follow the steps below:
- Go to Run –> regedit. This will open the Windows Registry Editor.
- Navigate to the following key:
HKEY_LOCAL_MACHINESOFTWAREPoliciesMicrosoftWindows Defender - In the right pane, right-click the empty area and create a new DWORD (32-bit) value.
- Rename the new item to DisableAntiSpyware
- Double-click DisableAntiSpyware and change its value to 1.
Windows Defender will not load after the next computer restart. To enable Windows Defender again, you can either delete the created registry key or simply change its value to 0.
Please note that you can’t completely uninstall the Windows Defender. Even if you manage to delete its service or files, it will most likely be restored on the next major Windows update.
There are a few scenarios where the user wants to disable a specific part of the Windows Defender system. We will discuss the scenarios below.
How to turn off Windows Firewall only
To turn off Windows Firewall only and keep using other Windows Defender functionality, follow the steps below:
- Open Windows Settings (Windows key + i)
- Click on Update & Security and then Windows Security
- In the right-hand pane, click on Open Windows Security
- From the left-hand pane, select Firewall & network protection
- In the right-hand pane, you will see three protection types. Domain network, Private network, Public network.
- Click on each network type and toggle it to disabled.
This will only turn off the firewall. The antivirus and other functionality of Windows Defender will keep on working.
How to turn off Windows Defender real-time antivirus only
If you want to turn off the antivirus real-time functionality only, you can follow the steps below:
- Open Windows Settings (Windows key + i)
- Click on Update & Security and then Windows Security
- From the left-hand pane, click on Virus & threat protection
- In the right-hand pane, toggle real-time protection to off.
Verdict
If you have not installed any third-party antivirus, then you should keep Windows Defender running as it will protect you from the most common virus/hacking threats while you are connected to the Internet. There should always be an anti-malware solution running on your computer at all times. These methods should be used to disable the security software temporarily.
I hope this has been informative for you. If there are any other easier ways to enable or disable Windows Defender, please let us know in the comments below!
Also see:
Usman Khurshid is a seasoned IT Pro with over 15 years of experience in the IT industry. He has experience in everything from IT support, helpdesk, sysadmin, network admin, and cloud computing. He is also certified in Microsoft Technologies (MCTS and MCSA) and also Cisco Certified Professional in Routing and Switching.