![]()
Download Article
![]()
Download Article
Need to take a screenshot on your Windows PC? Whether you want to capture your full screen or just one window or area, there are several quick and easy ways to take screenshots in Windows 10, Windows 11, and Windows 8. This wikiHow article will teach you how to use keyboard shortcuts (including the Print Screen key) and the built-in Snipping Tool app to screen capture any area of your Windows desktop.
-

1
Go to the screen that you want to screenshot. Before you can take a screenshot, make sure that the screen which you want to screenshot is up with no distractions (e.g., open windows or programs).
-
2
Find the «Print Screen» key on your keyboard. The ⎙ Print Screen key is most often found in the upper-right side of the main keyboard (not counting the number pad if your keyboard has one), and it usually has «SysReq» («System Requirements») written below it.
- The Print Screen key will usually be abbreviated to «PrtSc» or something similar.
Advertisement
-
3
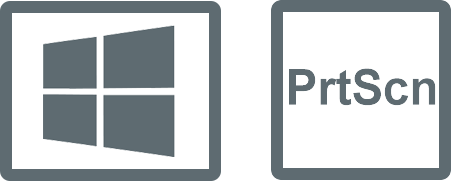
Press the ⊞ Win key and the ⎙ Print Screen key at the same time (although do press the Windows key first). Doing so will take a screenshot of the current screen; in most cases, you’ll see the screen dim briefly.
- Your screen won’t dim if your computer has certain display settings disabled. This is most common on old computers on which you upgraded to Windows 10.
- If your screenshot doesn’t appear when you look for it, try pressing Ctrl+⊞ Win+⎙ Print Screen or Fn+⊞ Win+⎙ Print Screen.
-
4
Find the screenshot. You’ll find the screenshot inside of the «Screenshots» folder, which is inside of your computer’s «Pictures» folder. Each screenshot that you take will be labeled «Screenshot (number)» to correspond with the order in which the screenshot was taken.
- For example, the first screenshot you take will be labeled «Screenshot (1)», etc.


Advertisement
-
1
Go to the screen that you want to screenshot. Before you can take a screenshot, make sure that the screen which you want to screenshot is up with no distractions (e.g., open windows or programs).
-
2
Press the ⎙ Print Screen key. It’s typically found in the upper-right side of the keyboard, just right of the row of «Function» keys (e.g., F12) at the top of the keyboard. Pressing the Print Screen key will take a picture of the entire screen’s contents.
- The Print Screen key may be entitled «PrtSc» or something similar.
- If your computer has an Fn key in the lower-left side of the keyboard, you might need to press Fn and ⎙ Print Screen at the same time.
-
3
Open Paint. This program comes installed on all Windows computers. To open it:
- Open Start
- On Windows 8, open Search
- Click the search bar at the bottom of the Start menu.
- Type in paint
- Click Paint at the top of the Start window.
- On Windows 8, Paint will be in the Search results.
- For a Windows XP computer, click Start, select Programs, select Accessories, and click Paint.
- Open Start
-
4
Paste in the screenshot. Once the Paint window opens, press Ctrl+V to paste in the screenshot. You should see the screenshot appear in the Paint window.
-
5
Save the screenshot. Press Ctrl+S, then enter a name for your screenshot, select a save folder on the left side of the window, and click Save.
- You can change the screenshot’s file type by clicking the «Save as type» drop-down box at the bottom of the window and then clicking a different format (e.g., JPEG) in the drop-down menu.
- The most common file types are JPG and PNG. The recommended format for screenshots is PNG, due to the high quality and small file size.


Advertisement
-
1
Click the window that you want to capture an image of. The One-Window screenshot function will take a picture of the «active» window on your screen, which means that it should be in front of all your other windows.
-
2
Hold down Alt and press ⎙ PrtScr. An image of the window will be copied to the clipboard. The dimensions of the image will be determined by the size of the window when the screenshot is captured.
- You will not receive any confirmation that the screenshot has been taken.
-
3
Open Paint. This program comes installed on all Windows computers. To open it:
- Open Start
- On Windows 8, open Search
- Click the search bar at the bottom of the Start menu.
- Type in paint
- Click Paint at the top of the Start window.
- On Windows 8, Paint will be in the Search results.
- For a Windows XP computer, click Start, select Programs, select Accessories, and click Paint.
- Open Start
-
4
Paste in the screenshot. Once the Paint window loads, press Ctrl+V to paste in the screenshot. You should see it appear in the Paint window.
- You can also paste the screenshot into other programs, such as Word or into the body of an email. Simply open the program that you want to paste the image into and press Ctrl+V.
-
5
Save your screenshot as an image file. Click File, click Save, enter a file name, click a location on the left side of the page, and click Save.
- You can change the screenshot’s file type by clicking the «Save as type» drop-down box at the bottom of the window and then clicking a different format (e.g., JPEG) in the drop-down menu.
- The most common file types are JPG and PNG. The recommended format for screenshots is PNG, due to the high quality and small file size.


Advertisement
-
1
Open the Xbox Game Bar. To do so, press ⊞ Win+G at the same time. This will open the Game Bar.
-
2
Enable gaming features. If you are playing a game, you will need to tell Xbox Game Bar that it is a game by opening Game Bar settings, going to general, and ticking the box «Remember this is a game». This will enable gaming features for the app you are using.
- It is not recommended to do this for non-games as Game Bar may constantly record what you are doing in the background.
-
3
Press the photo button or ⊞ Win+Alt+PrtScn. This will take a screenshot of your game through any gaming overlays such as the Xbox Game Bar overlay or the Discord integration.
-
4
Find your screenshot in the «Captures» folder in «Videos». The game screenshot will be present in this folder, but can also be accessed in the gallery.
Advertisement
-
1
Open the Snipping Tool. The Snipping Tool is available in all versions of Windows Vista, 7, 8 and 10 except the Starter and Basic editions. It is not available in Windows XP.[1]
- In Windows Vista and 7, click the Start button, select All Programs, select Accessories, and select the Snipping Tool from the list.
- In Windows 8, simply start typing snipping tool while on the Start screen and select it from the Search results.
- In Windows 10, click Start
, type in snipping tool, and select Snipping Tool from the Search results.
-
2
Choose the shape of the Snip. «Rectangular Snip» is chosen by default. Click the Arrow button next to the Mode button to change the Snip shape:.
- Free-form Snip lets you draw any shape with your mouse. The area inside the shape will be snipped.
- Rectangular Snip lets you select a rectangular area, which will be snipped.
- Window Snip lets you choose a window to snip.
- Full-screen Snip snips the whole screen, with all windows (except the Snipping Tool window) included.
-
3
Adjust the Snip border. By default, any snip you make will have a red border around it. You can disable or change this by clicking the Tools tab in the top-left side of the Snipping Tool toolbar, selecting Options from the drop-down menu, and unchecking the box next to “Show selection ink after snips are captured”. This will remove the border from any future snips.
-
4
Create a new Snip. Click the New button to start the selection. The screen will fade, and you can draw your Snip area, or select the window if you chose Window Snip. Release the mouse when selecting to create the Snip.
- If you had Full-screen Snip selected, your Snip will automatically be created once you click New.
-
5
Annotate the Snip. Once you create the Snip, it will open in a new window. You can use the Pen tool to draw on it and make notes, and use the Highlight tool to draw attention to text.
- The Erase tool will only erase annotations, not the screenshot itself.
-
6
Save the Snip. Click the floppy disk icon to open the save dialog. Type in a name for the screenshot and change the «Save as type:» field if desired. You can now send the screenshot by email or put it on a website.
- PNG is the default format in Windows 7 and 8. It’s a lossless compressed format, which means that it will take high-quality screenshots at a small file size. It is the recommended format for taking screenshots.
- JPG or JPEG is the default format in Windows Vista. It is a lossy format, meaning that the screenshot will look slightly blocky and some colors may be a bit off. It’s mainly designed for photographs, and not recommended for screenshots.
- GIF is unsuitable for reproducing color photographs, but well-suited for images such as graphics or logos with solid areas of color, resulting in crystal sharp edges between color areas.
-
7
Copy the Snip. By default, the Snip is copied to the clipboard when you create it. This means you can paste it into Paint or Word, much like you would with a full-screen screenshot. In Paint, you can make more edits than you can in the Snip annotation editor.
- To paste the Snip, open a window that supports pasting and press Ctrl+V.


Advertisement
-
1
Go to the page that you want to screenshot. Open the program or screen that you want to take a picture of, making sure that any windows or items that you don’t want on-screen are out of the way.
-
2
Press ⊞ Win+⇧ Shift+S. Doing so will cause your screen to turn light-grey, and your mouse will turn into a crosshairs icon.
-
3
Select an area to screenshot. Click and drag your mouse from the top-left corner of the area that you want to screenshot to the bottom-right corner.
- For example, if you want to screenshot the entire screen, you’d click and drag your mouse from the top-left corner of the screen to the bottom-right corner of the screen.
-
4
Release the mouse button. This will both take a screenshot of your selected area and save it to your clipboard, from which point it can be pasted into any program that accepts pasted photos.
-
5
Paste your screenshot. Open any program which supports pasting in photos (e.g., Paint, Word, etc.) and press Ctrl+V. You should see the section of the screen that you selected appear in your program.
- You can save your screenshot’s document by pressing Ctrl+S, entering a name, selecting a save location, and clicking Save.
- Photos can also be pasted into some online services, such as emails.


Advertisement
-
1
Understand how this works. A program called «PSR.exe» that’s built into virtually all Windows computers allows you to record up to 100 different screens and save them all to one document. This program also makes a note of where you click and which actions you perform on each screen.
-
2
Go to the initial page that you want to screenshot. This should be the first page in the sequence of pages that you want to screenshot.
-
3
Open Start
. Click the Windows logo in the bottom-left corner of the screen. The Start menu will pop up.
-
4
Open the Run program. Type in run and then click Run at the top of the Start window.
-
5
Enter the command to open PSR. Type psr.exe into the Run window.
-
6
Click OK. It’s at the bottom of the Run window. This will bring up a small, rectangular toolbar at the top of the screen.
-
7
Click Start Record. This is at the top of the toolbar. Doing so turns on the Steps Recorder, which will record the next 25 screen changes.
- If you want to record more than 25 changes, first click
on the right side of the toolbar, click Settings…, and change the «Number of recent screen captures to store» number.
- If you want to record more than 25 changes, first click
-
8
Click through your different screens. Each time your screen changes (other than simply moving your mouse), the Steps Recorder will take a screenshot.
-
9
Click Stop Record. It’s at the top of the toolbar. Doing so stops recording screen changes and opens the results window.
-
10
Review your screenshots. Scroll down through the window to make sure that you captured all of the screenshots that you wanted to save.
-
11
Save your screenshots to a ZIP folder. Click Save at the top of the window, enter a file name and select a save location, and click Save.
- This will save the screenshots in one HTML file. You can open the HTML file in your computer’s Internet Explorer browser in order to view its contents.


Advertisement
-
1
Open the screen you want to screenshot. Before you can take a screenshot, you must make sure that the screen which you want to screenshot is up with no distractions (e.g., open windows or programs).
-
2
Press and hold the Windows logo. This is the logo on the bezel of the tablet, not the Windows button on your desktop.
- If there is no Windows button on the tablet, then press the Power button.
-
3
Press the Volume Down button (or Volume Up if using the Power button). The screen will dim momentarily to indicate a screenshot was taken.
- Your screenshot will be stored in the Screenshots folder, which you can access by Opening File Explorer and navigating to Pictures → Screenshots.


Advertisement
Add New Question
-
Question
What versions of Windows include the Snipping Tool?

The Snipping Tool is included in all versions of Windows since Windows Vista. This includes Vista, 7, 8, 10, Server 2008, and Server 2012. The only versions of Windows that it is not included in are Windows 7 Starter and Windows 7 Home Basic. If you are using either of these two versions, you will need to find another utility for taking screenshots, or use the keyboard shortcuts.
-
Question
After I capture a screenshot, how do I create arrows and circles?
You have to load your previous screenshot into a photo editing software (e.g., Adobe Photoshop, Picasa, or even MS Paint) to edit your photo. Then you can draw arrows/circles on your screenshot and save the picture.
-
Question
The screenshots came out fine, but the actual image came out distorted, for example drawers in a dresser appear «squished.» What do I do?
Anuj_Kumar1
Community Answer
Try taking a screenshot at maximum possible resolution for getting good quality shots. Also, you may check the screenshot saving app for the maximum output quality setting. You can take high resolution screenshots in virtual machines (even greater resolution than your monitor screen).

See more answers
Ask a Question
200 characters left
Include your email address to get a message when this question is answered.
Submit
Advertisement
-
For those with Microsoft OneNote, pressing ⊞ Win+S brings up the option to take a rectangular snip of the screen. Doing so causes the snapshot to appear as an image in OneNote. This works even in Windows XP, which does not have the snipping tool.
-
On laptop keyboards, the ⎙ PrtScr key might be combined with another key. This means that you have to press the Fn key or «Function» key to access it. Such a key is usually found on the bottom row of the keyboard.
-
If you’re going to put your screenshot on a website, make sure that the file doesn’t exceed limits on the file size.
Advertisement
-
Saving a screenshot in some file types (such as bitmaps) will result in a very large file. Because of this, it’s highly recommended to use the PNG or JPEG format.
-
Most screenshots will not show the mouse cursor.
-
DRM-protected content will not be visible in your screenshot and will be blanked out.
Advertisement
References
About This Article
Article SummaryX
1. Go to the page that you want to screenshot.
2. Press the ⊞ Win key and the ⎙ Print Screen key at the same time.
3. View your screenshot in the «Screenshots» folder that appears in the «Pictures» folder.
Did this summary help you?
Thanks to all authors for creating a page that has been read 34,966,444 times.
Reader Success Stories
-

«I wanted to know how to take a screen shot of a specific part of my screen, I followed the advice to do a screen…» more
Is this article up to date?
To use the Snipping Tool when you have a mouse and a keyboard:
-
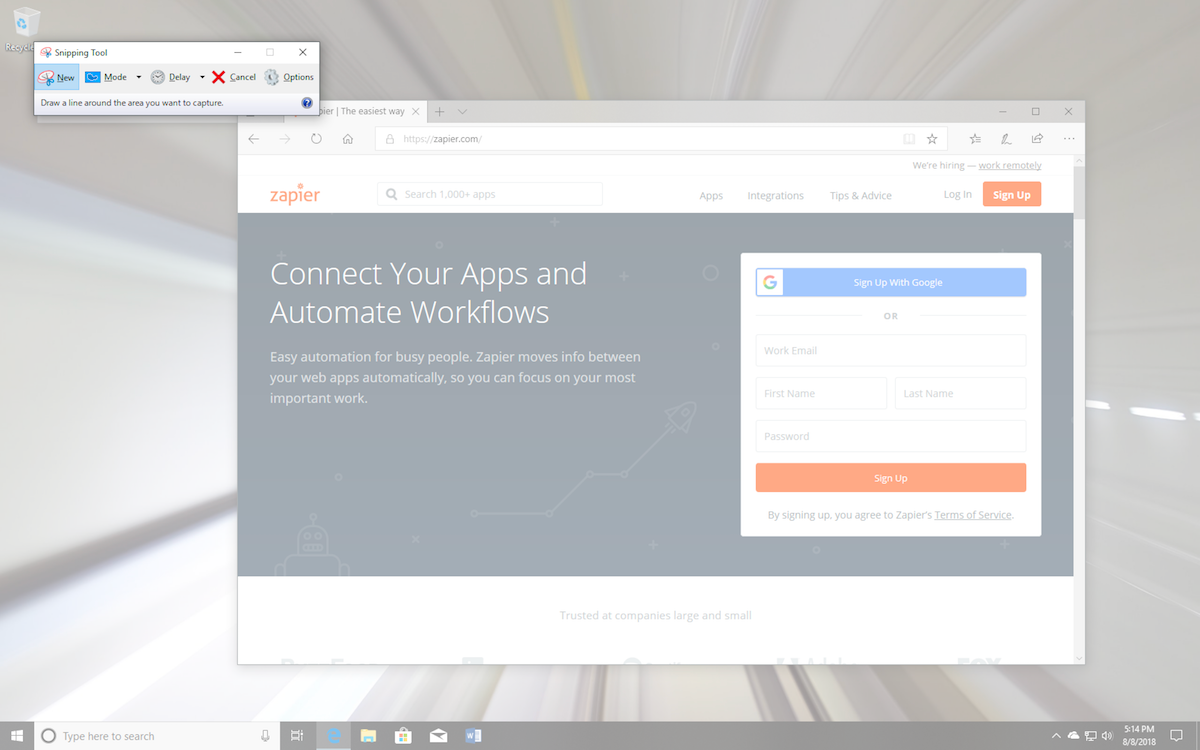
Press Windows logo key + Shift + S. The desktop will darken while you select an area for your screenshot.
-
Rectangular mode is selected by default. You can change the shape of your snip by choosing one of the following options in the toolbar: Rectangular mode, Window mode, Full-screen mode, and Free-form mode.
-
The screenshot is automatically copied to your clipboard. A notification also appears once you’re finished taking a screenshot, select it for more editing options.
To use the Snipping Tool with only a mouse:
-
To open the Snipping Tool, select Start, enter snipping tool, then select it from the results.
-
Select New to take a screenshot.
-
Rectangular mode is selected by default. You can change the shape of your snip by choosing one of the following options in the toolbar: Rectangular mode, Window mode, Full-screen mode, and Free-form mode.
-
The screenshot is automatically copied to your clipboard. A notification also appears once you’re finished taking a screenshot, select it for more editing options.
Learn more about screenshots and the Snipping Tool
Need more help?
Создавайте снимки экрана с помощью системных инструментов или дополнительных программ.
Штатные средства Windows
1. Win + PrtSc
Начнём с самого простого. Чтобы мгновенно сделать снимок всего экрана, используйте комбинацию клавиш Win (с флажком) + PrtSc (Print Screen).
Система сделает скриншот и сразу сохранит его на жёсткий диск в формате PNG. Готовый файл вы найдёте по адресу: «Этот компьютер» → «Изображения» → «Снимки экрана».
2. PrtSc + Paint
Этот способ тоже позволяет создать снимок всего экрана, но при необходимости вы можете сразу отредактировать результат.
Нажмите клавишу PrtSc. Windows сделает скриншот, но не покажет его: система не сохранит изображение на жёсткий диск, а только скопирует в буфер обмена.
Чтобы увидеть скриншот, запустите Paint и вставьте изображение в окно программы с помощью клавиш Ctrl + V. Если необходимо, измените картинку с помощью редактора.
Нажмите «Файл» → «Сохранить как» и сохраните снимок экрана в нужном формате. Изображение появится в указанной вами папке. Вместо Paint можно использовать любой другой графический редактор, установленный на ПК.
3. Alt + PrtSc
Эта комбинация клавиш делает снимок активного окна и, как и предыдущий способ, копирует получившееся изображение в буфер.
Нажмите Alt + PrtSc. Затем откройте Paint или другой графический редактор и воспользуйтесь клавишами Ctrl + V, чтобы вставить скриншот. Отредактируйте изображение, если нужно, и сохраните его в любую папку в удобном формате.
4. Программа «Ножницы»
В Windows 10 есть встроенный менеджер скриншотов, который позволяет делать снимки всего экрана, отдельных фрагментов и выбранных окон. Это приложение «Ножницы». Его легко найти по названию через поиск по системе.
Запустив «Ножницы», нажмите «Режим» и выберите нужную область дисплея. Затем воспользуйтесь кнопкой «Создать» и кликните по экрану.
Когда скриншот будет готов, программа откроет его в новом окне. Здесь на изображение можно нанести свои пометки и отправить его по почте или просто сохранить на жёстком диске.
5. Программа «Фрагмент и набросок»
Недавно в Windows 10 добавили ещё одно приложение для работы со скриншотами — «Фрагмент и набросок». С его помощью тоже можно делать снимки выделенной области, выбранных окон или всего экрана. Скорее всего, в будущем эта утилита заменит «Ножницы».
Чтобы вызвать «Фрагмент и набросок», нажмите Win + Shift + S или найдите программу по названию через поиск по системе. Запустив её, выберите область скриншота с помощью появившихся на дисплее кнопок.
Чтобы увидеть снимок экрана, откройте Paint и нажмите Ctrl + V. Когда изображение появится в программе, его можно будет отредактировать и сохранить на жёстком диске. В некоторых сборках Windows во «Фрагменте и наброске» есть встроенный редактор, который позволяет обойтись без Paint.
Сторонние программы
Если стандартных способов вам мало, можете попробовать эти инструменты с дополнительными функциями.
1. Nimbus Capture
Nimbus Capture — это плагин для браузера, с помощью которого очень удобно делать скриншоты веб‑страниц. Помимо обычных снимков всего экрана, окна или выделенного фрагмента, он также позволяет захватывать полную длину страницы, даже если она не помещается в экран.
А ещё в Nimbus Capture вы можете редактировать изображения и сохранять их прямо в Google Drive. Плюс ко всему плагин умеет записывать видео экрана.
Чтобы сделать скриншот, достаточно кликнуть по кнопке Nimbus Capture на панели браузера и выбрать область экрана. Вы также можете настроить горячие клавиши и формат снимков: PNG или JPG.
Все перечисленные функции доступны бесплатно. Но, если вы захотите прицепить к скриншотам свой логотип, сохранять их в Dropbox и получать оперативную техподдержку, придётся оформить подписку стоимостью 15 долларов в год.

![]()
![]()
2. PicPick
Редактор изображений, очень похожий на Paint, с функцией создания скриншотов. PicPick умеет делать снимки всего экрана, любой выделенной области и выбранного окна — в том числе с прокруткой. Что касается редактора, помимо базовых функций вроде добавления текста и пометок, он позволяет корректировать цвета изображений и накладывать различные эффекты.
Вы можете настроить горячие клавиши и сохранять файл в одном из следующих форматы: PNG, JPG, BMP, PDF и GIF. После установки значок программы появляется на панели задач. Чтобы сделать скриншот, нужно кликнуть по нему и выбрать область экрана.
Программу можно использовать бесплатно, но в таком случае новые версии придётся скачивать с сайта вручную. За возможность автообновления разработчики просят одноразовый платёж размером 30 долларов.
Скачать PicPick →
3. LightShot
LightShot — простейший инструмент, который позволяет делать скриншоты выделенной области в пару кликов. Нужно лишь нажать на иконку программы и выделить мышью необходимый фрагмент. После вы сможете добавить текст, стрелки или что‑нибудь нарисовать поверх изображения.
С помощью LightShot очень удобно делиться снимками экрана. Сделав скриншот, вы можете сразу же сохранить его на сервере программы, чтобы получить прямую ссылку для отправки коллегам или друзьям. К вашим услугам два формата: PNG и JPG.
Приложение бесплатное, но перед установкой предлагает загрузить дополнительное ПО. Не забудьте от него отказаться.
Скачать LightShot →
Этот материал был впервые опубликован в январе 2017 года. В марте 2020‑го мы обновили текст.
Читайте также 💻📧📸
- 15 лучших графических редакторов, которые не стоят ни копейки
- Как установить в Windows 10 динамические обои из macOS Mojave
- Как изменить каталог установки программ по умолчанию в Windows
- 12 вещей, которые нужно сделать после установки Windows 10
- 15 лучших фоторедакторов для разных платформ
How do I take a screenshot?
| hold down | ⊞ Win | and | Shift | and press | S | = | Use your mouse to draw a rectangle in order to specify what to capture. Windows then copies it to the clipboard. |
|
I guess it’s in the clipboard now. How can I paste it into a document or something? |
|||||
| hold down | Ctrl | and press | V | = | Windows pastes the screenshot (that is in the clipboard) into a document or image you are currently editing. |
Where should I paste it? I just need a (graphics) file.
|
|||||
|
|||||
Is there a dedicated program for taking screenshots? How can I find it?
|
|||||

|

- To take a screenshot on Windows 10 or 11, you can use the Print Screen button or Snipping Tool.
- You can also take a screenshot with the Game Bar by pressing the Windows Key + G.
- Third-party apps offer even more features, like automatically uploading screenshots to the internet.
If you want to take a screenshot on your Windows 10 or Windows 11 computer, there are several methods you can use.
Whether you want to save the entire screen or just a piece of it, we’ve rounded up all the best ways to take a Windows screenshot.
The Print Screen button
William Antonelli/Insider
The easiest way to take a screenshot of your entire screen on Windows 10 or Windows 11 is by pressing the Print Screen (PrtScn) button on your keyboard.
The screenshot will be copied to your clipboard. To save the file, paste the screenshot into any program that allows you to insert images, like Microsoft Word or Paint.
William Antonelli/Insider
The Windows key + Print Screen
William Antonelli/Insider
To take a screenshot on Windows 10 or Windows 11 and automatically save the file to the Screenshots folder, press the Windows key + PrtScn. Your screen will go dim and a screenshot of your entire screen will be saved to the folder.
Alt + Print Screen
To only capture the active window you’re working in, press Alt + PrtScn. The screenshot will be copied to your clipboard, and you’ll need to paste it into another program to save it.
The Snip & Sketch tool in Windows 10
Windows 10 Snip & Sketch is the best way to screenshot on Windows if you’re looking to customize, annotate, or share your screen captures.
To activate Snip & Sketch, use the keyboard shortcut Windows Key + Shift + S. Your screen will go dim and a mini menu will appear at the top of your screen, giving you the option to take a rectangular, free-form, window, or full-screen capture.
William Antonelli/Insider
With these Snip & Skitch options, you can choose how you’d like to take a screenshot:
William Antonelli/Insider
After you capture the screenshot, it’ll be saved to your clipboard and a preview notification will appear in the bottom-right corner of your screen.
Click on the preview notification to open the Snip & Sketch app and save, share, or edit the screenshot with the available drawing tools.
The Snipping Tool in Windows 11
Although the Snipping Tool exists in Windows 10, it’s not usually the screenshot tool you’ll want to use. In Windows 11, the Snipping Tool got a major upgrade and it’s now the best way to take custom screenshots.
To start the Snipping Tool in Windows 11, you can search for it or press the Windows Key + Shift + S. Like Snip & Sketch, your screen will go dim and a toolbar of screenshot options will appear at the top of the screen. This toolbar will let you take a rectangular, freeform, full-window, or a full-screen capture.
William Antonelli/Insider
Once you’ve taken your screenshot, it’ll be copied to your clipboard so you can share it right away, and it will be saved to the Screenshots folder. If you click the preview that pops up in the bottom-right corner of your screen, you’ll be able to save and edit it.
The Game Bar
The Game Bar is an overlay you can use within most Windows apps and games to take screenshots and record videos. Follow the steps below to open and use it:
1. Press Windows Key + G.
2. In the overlay menu, click the Capture button – the camera icon – in the top menu to bring up the Capture menu.
William Antonelli/Insider
3. In the Capture menu, click the camera icon to take a screenshot. You can also record a video clip by pressing the record button, with the option to include audio by clicking the microphone icon.
Screenshots and video clips captured by the Game Bar are saved in PNG and MP4 format and you can find them in the Videos > Captures folder in File Explorer. You can also find them through the Game Bar’s Gallery, by clicking Show my captures > See my captures underneath the screenshot and recording buttons in the Capture menu.
Power + Volume Up
To take a screenshot on Windows 10 with a Microsoft Surface device, press the Power Button + Volume Up Button. The screen will go dim, and your screenshot will save to the Pictures > Screenshots folder.
Third-party screenshot apps for Windows
If you’re unsatisfied with any of the built-in Windows methods, there are third-party screenshot tools worth considering, each with its own extra offerings.
William Antonelli/Insider
- Lightshot is a free screenshot tool designed for quick social sharing. When you download and install Lightshot on Windows 10, it replaces the Print Screen function and offers more editing capabilities.
- Greenshot is another free tool that allows you to edit and customize screenshots, as well as the option to capture a complete scrolling web page.
- ScreenRec is a free Windows recording tool that allows you to capture and share videos and screenshots. It also provides tools for annotating your recordings and screen grabs, as well as instantly creating a link that you can share with others so they can view them.
- Snagit is a screenshot tool that allows you to create animated GIFs, take full-page screenshots, and more. The downside? The premium version costs $50. There’s a 30-day free trial option but any picture you capture during the trial will be watermarked.
- Screencast-O-Matic is a web-based video editor and screen-sharing tool for recording your on-screen activities. It also has the ability to take screenshots, you’ll just need to sign up for a free account. You can also upgrade to a premium account to unlock advanced features, starting at $4 a month.
William Antonelli
Tech Reporter for Insider Reviews
William Antonelli (he/she/they) is a writer, editor, and organizer based in New York City. As a founding member of the Reference team, he helped grow Tech Reference (now part of Insider Reviews) from humble beginnings into a juggernaut that attracts over 20 million visits a month.
Outside of Insider, his writing has appeared in publications like Polygon, The Outline, Kotaku, and more. He’s also a go-to source for tech analysis on channels like Newsy, Cheddar, and NewsNation.
You can find him on Twitter @DubsRewatcher, or reach him by email at wantonelli@insider.com.
Read more
Read less
We may receive a commission when you buy through our links, but our reporting and recommendations are always independent and objective.
Learning how to take a screenshot on Windows systems is the simplest way to preserve or share any visual content from a website, program, or video game. You can take it and send it via email, social media, or file-sharing sites with just a few clicks.
This article will show you how to screen-capture any webpage, program, and even full-screen video games using a wide variety of methods. You’ll learn how to capture not just static screenshots but also record videos.
We’ll also explore the differences in screenshotting between the most recent Windows versions: 7, 8, and 10.
Check Out Our Video Guide to Taking a Screenshot on Windows (7, 8, 10)
The Basic Windows Method: Print Screen Key
This method works on any version of Windows, including Windows XP and 95.
Standard keyboards for Windows computers include a dedicated key to capture your screen. It looks something like this:
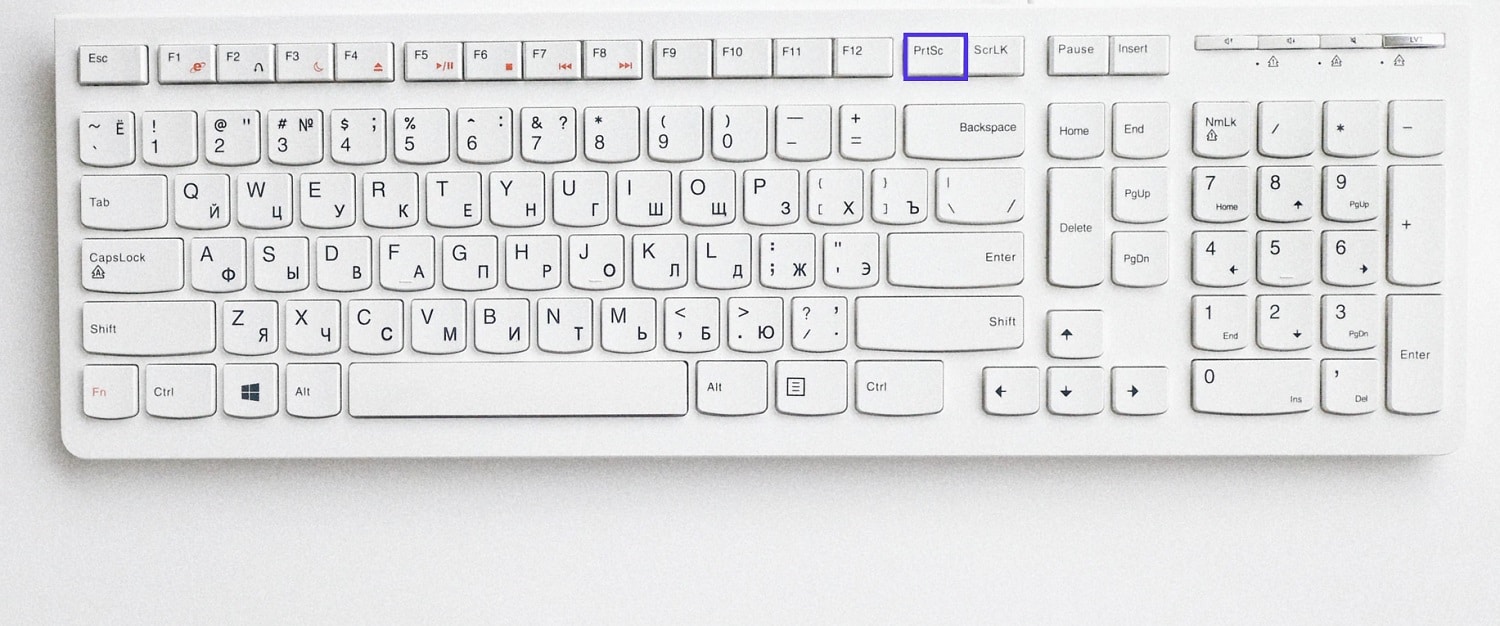
The print screen key says “Print Screen,” “PrtSc,” or “PrtScn,” depending on your keyboard and country. It’s typically in the top right corner beside the final F12 key.
Note: On some newer keyboards, especially on laptops, you need to hold down the “Fn” or “Function” key while pressing “PrtSc” to capture the screen.
When you use this method, the OS copies the entire screen automatically to the clipboard. From there, you can directly paste it into an email, social media platform, or messaging app. You can even start editing it in an image editing software like Photoshop or even MS Paint.
Note: One disadvantage of using this method is that it automatically captures the entire screen, including the toolbar and tab bar of your screen. Manually cropping can lead to inconsistent screenshot sizes.
Quickly capture any webpage, program, and even full-screen video games in Windows with help from this guide 📸Click to Tweet
How to Save and Share the Screenshot
One of the easiest ways to save a screenshot taken with the print screen key is to paste it into your photo editing software of choice. For example, you can use Microsoft Paint, which comes free with all relevant versions of Windows.
Open up Paint and press Ctrl + V to paste the screenshot. You can also right-click and select Paste from the dropdown menu.
From there, you can edit the file as you want before saving it (Ctrl + S) in the image format you prefer.
If you use Windows 10, you can also use Paint 3D. But if you want to use a more powerful image editor, we recommend a specialized tool.
It’s also possible to paste the screenshot directly into an email or a social media message.
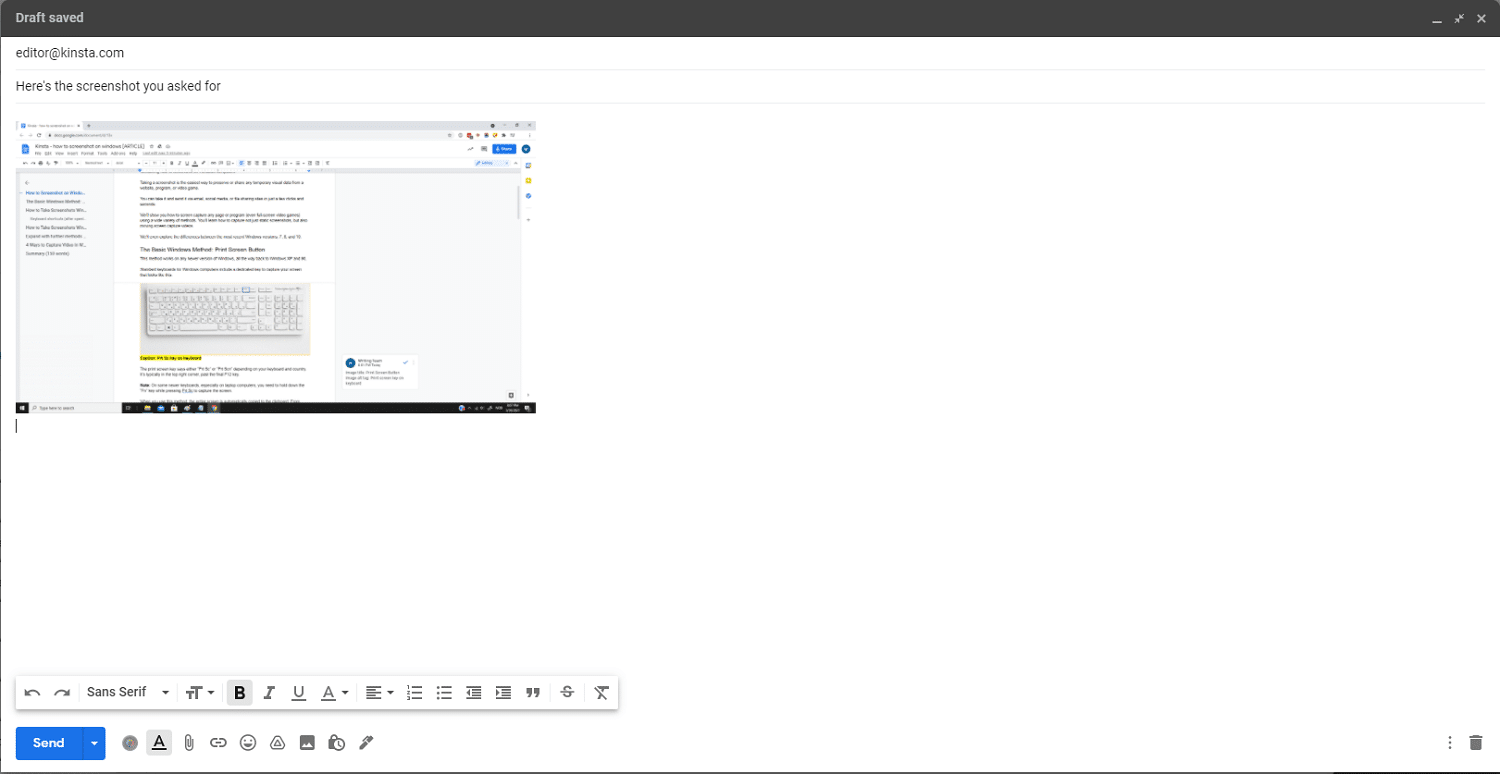
It’s one of the fastest ways to share what’s on your screen without jumping on a call. Press the print screen key, paste it in, press Send, and it’s on its way.
If you want more control over your screenshots, like capturing a tab, you can use the built-in Windows “Snipping Tool” or other third-party apps or software.
That way, you won’t have to crop away the toolbar or other elements manually.
How to Take Screenshots in Windows 7, 8, 10 with the Snipping Tool
All recent versions of Windows, including 7, 8, and 10, include the Snipping Tool. You can easily open it by searching for it in the toolbar search.
Press the Windows key to open the toolbar and jump to Windows search. Alternately, you can also use the Windows + S shortcut to summon Windows search. However, note that in Windows 7, you must manually select the search field before you can type out the keyword. Type in “Snipping Tool” and press Enter.
Note: There’s no keyboard shortcut to open the Snipping Tool. It would be best if you did that manually. In Windows 10, the updated version of this app can be opened with a shortcut—more on that later.
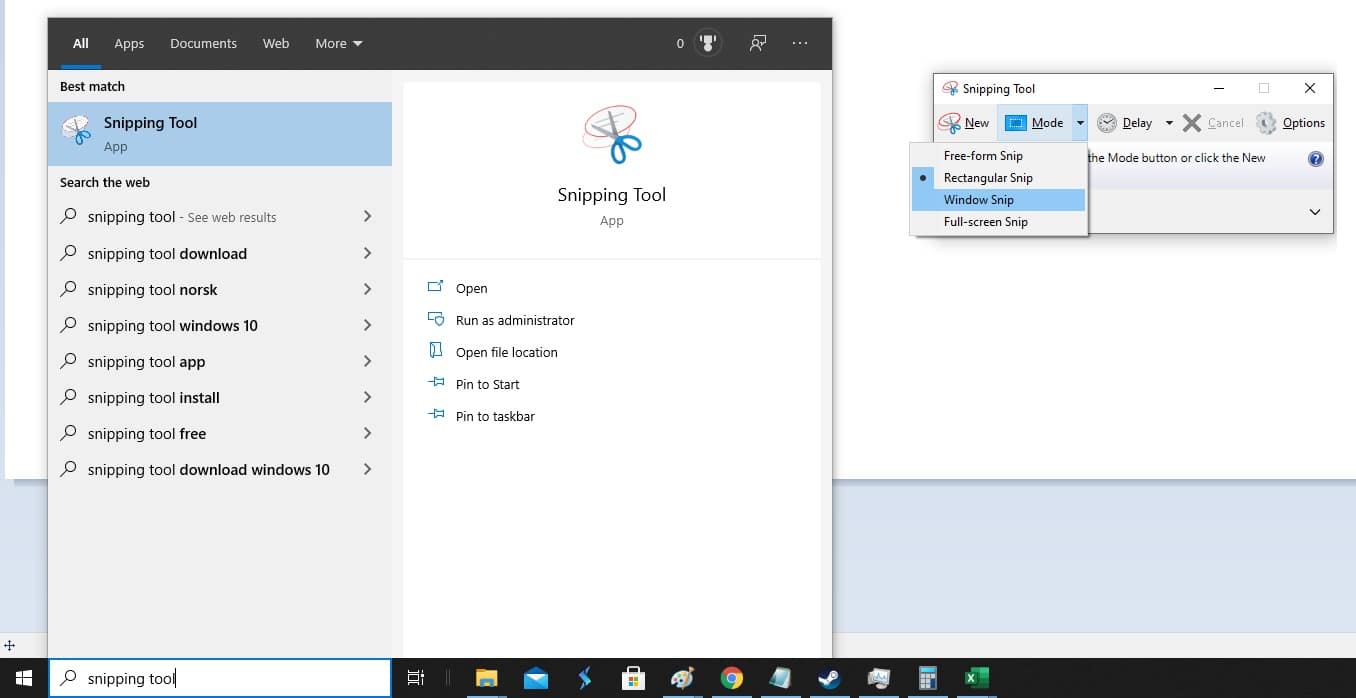
Pressing the Enter key after typing the correct phrase will open the program automatically.
It has various modes, including free-form screenshots, but the basic form is a rectangular screenshot shape. But at least it gives you more flexibility than just pressing the print screen key.
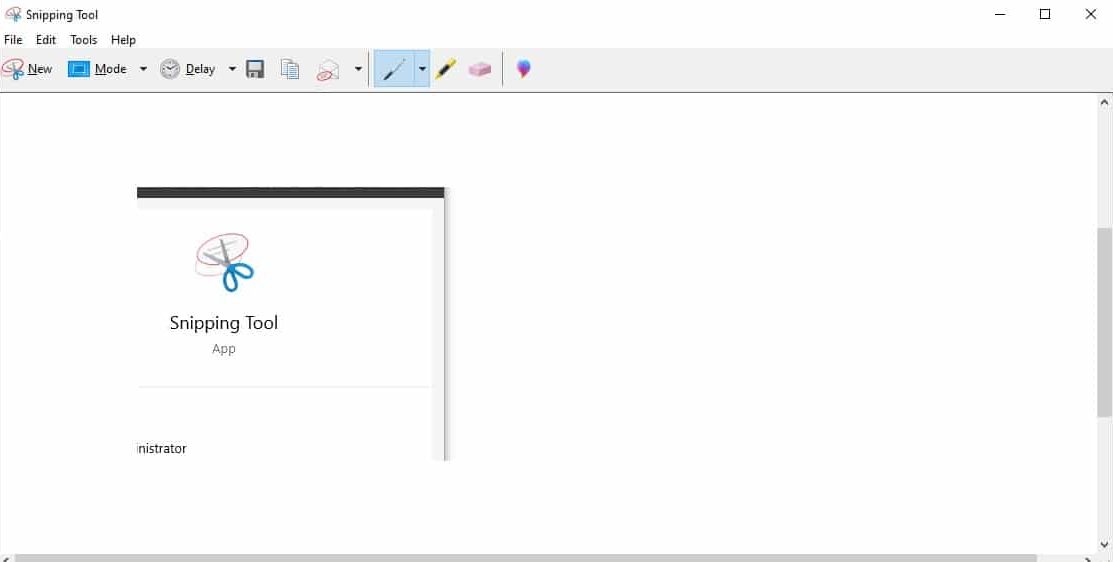
Once you initiate the “Snipping” by clicking the “New” button, the whole screen goes gray. You can then select the area you want to capture and save.
You can now edit the screenshot with the pen, highlighter, and eraser tools. It also offers a few unique options compared to copying and pasting something into Paint, such as the Delay mode for taking delayed (timed) screenshots. You can also highlight something in the screenshot and email it directly from the Snipping Tool.
Once it’s open, you can also use many shortcuts to work faster.
In the table below, we break down all the keyboard shortcuts (only available after opening the Snipping Tool):
| Keyboard Shortcut | What It Does |
| Ctrl + PrtScn / Alt + N | Takes a new screenshot with the Snipping Tool app (when it’s open). |
| Alt + M | Changes between different modes (free-form, rectangular, window, and full-screen). |
| Alt + D | Sets a delay for the screenshot. |
| CTRL + S | Saves the screenshot. |
| CTRL + C | Copies the screenshot to your clipboard. |
One feature we miss is the ability to take multiple screenshots with an identically sized and placed window.
All in all, it’s not a life-changing screenshotting app by any stretch of the imagination, but it’s sufficient for primary use.
How to Take Windows 10 Screenshots with Snip & Sketch Tool
In Windows 10, you also have access to the new and slightly improved Snip & Sketch app.
You can open it in the same way by searching the menu or use the built-in shortcut: Shift + Windows + S.
That’ll automatically open the app menu for taking a screen snip. Also, here, you can choose from window, free-form, full-screen, or rectangle options for your snapshot.
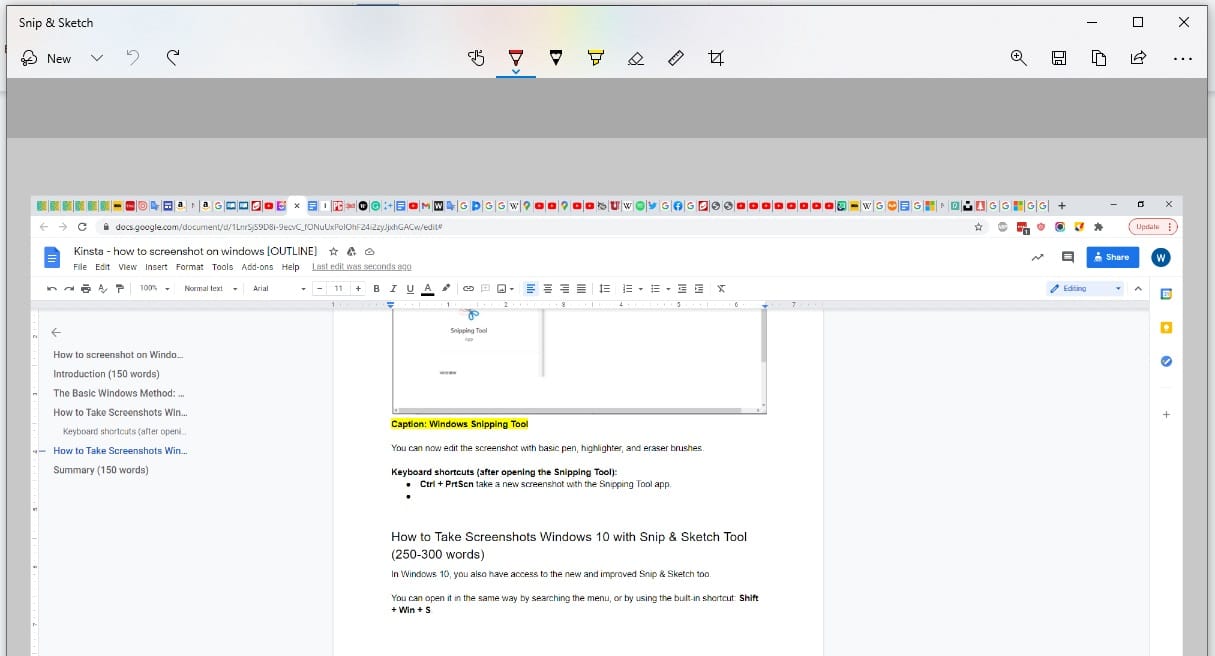
With the window snip option, it doesn’t automatically capture the active window. You can switch tabs with Alt + Tab and then click the specific window you want to capture.
Compared to the original version, there’s been a few changes:
- Screenshots automatically save to the dashboard (including changes you make, like highlights or annotations).
- Automatically add outlines to snips—helpful for partial screenshots.
- Share the screenshot via WiFi or Bluetooth.
- Change the settings, so the PrtScn button opens Snip & Sketch automatically.
- You can no longer set a delay for the screenshot to happen later.
Want to upload these screenshots to your website to spice up your latest blog post?
By default, the PNG format files saved by Windows screenshotting software are unnecessarily large. Once you’ve taken and edited these screenshots, you should make sure to optimize the images for the web.
If you want some extra features, like more powerful editing, automatic web optimization, or full-page website captures, you’ll need to use a third-party tool.
How to Screenshot Tabs and Entire WebPages in Google Chrome
Google Chrome doesn’t come with built-in screenshotting functionality, but there are plenty of great, free extensions available.
Just go to the Chrome Web Store and search for “screenshot,” filter the result by extensions, and you’ll see for yourself. You can then choose from dozens of chrome extensions for screenshotting webpages.

There are so many options that it can be hard to choose. To make things simple, we recommend any of the following:
- Nimbus Screenshot & Screen Video Recorder
- Awesome Screenshot & Screen Recorder
- LightShot (static screenshots only)
All of these tools go way beyond what you can do with Snip & Sketch. For example, you can capture a full-page screenshot instead of only the visible part with each of these.
In Awesome Screenshot, you can even use a Ctrl + Shift + E shortcut or manually open the menu to do this.
If you’re wondering what that looks like, take a peek at this full-screen capture of our homepage: one continuous shot perfectly representing what our site looks like in a browser. It’s an easy way to share what a test site on a local server seems like if there are errors that don’t show up in staging.

Another practical feature is that you can screenshot just the contents of any particular tab. That means you don’t have to crop out your 90+ tab windows or the full URL to your secret document.
In Awesome Screenshot, the shortcut for this is Ctrl + Shift + V.
It also means you can take screenshots with identical dimensions across multiple different pages. That’s perfect if you use screenshots as part of your blogging or content marketing and want to keep your visuals consistent.
Plus, most of these extensions, including Awesome Screenshot, come with a better image editor than what you’ll find natively in Windows.
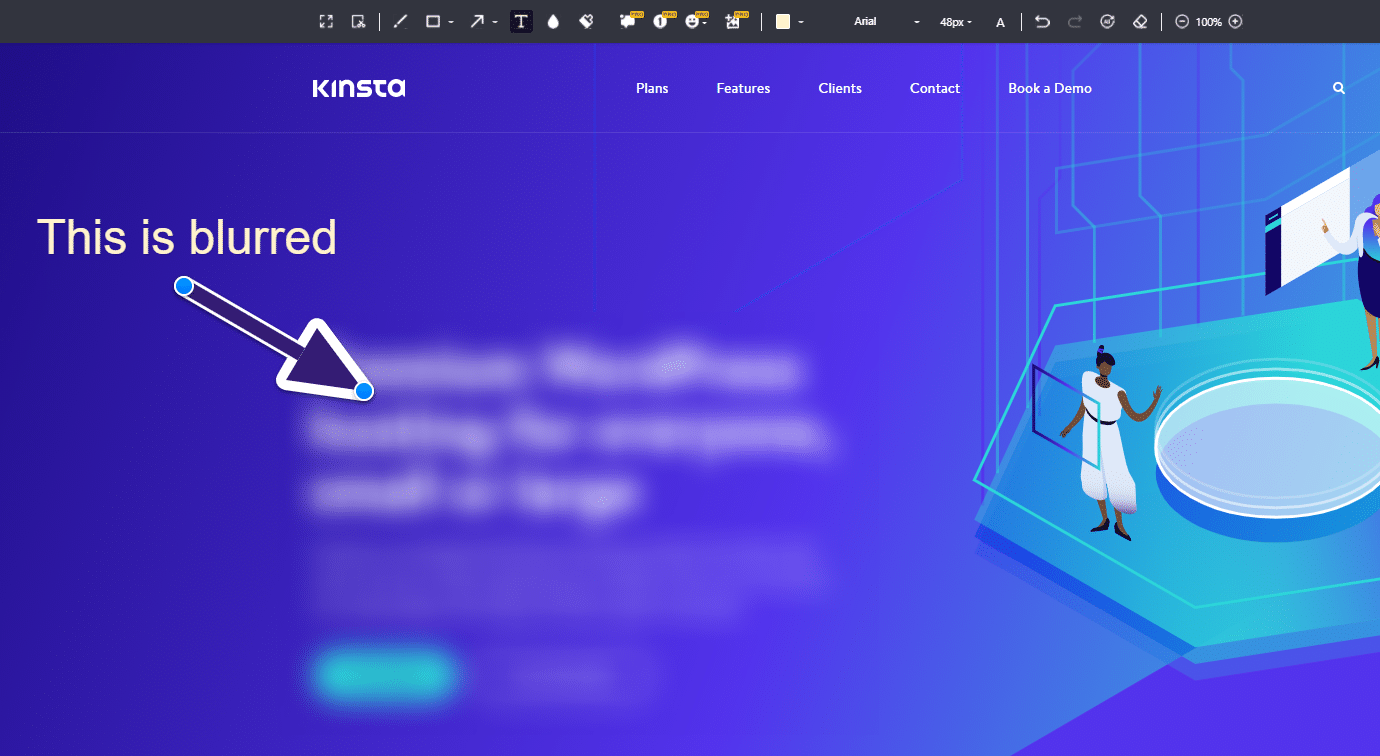
You can, for example, blur out parts of the image, add in shapes, arrows, text boxes, and more. And these options are all available in the free versions.
These features make it easy to edit and prepare tutorial-style screenshots to include in a how-to blog post.
(And if you want to become an even more productive blogger, check out our list of the best Chrome extensions for WordPress users.)
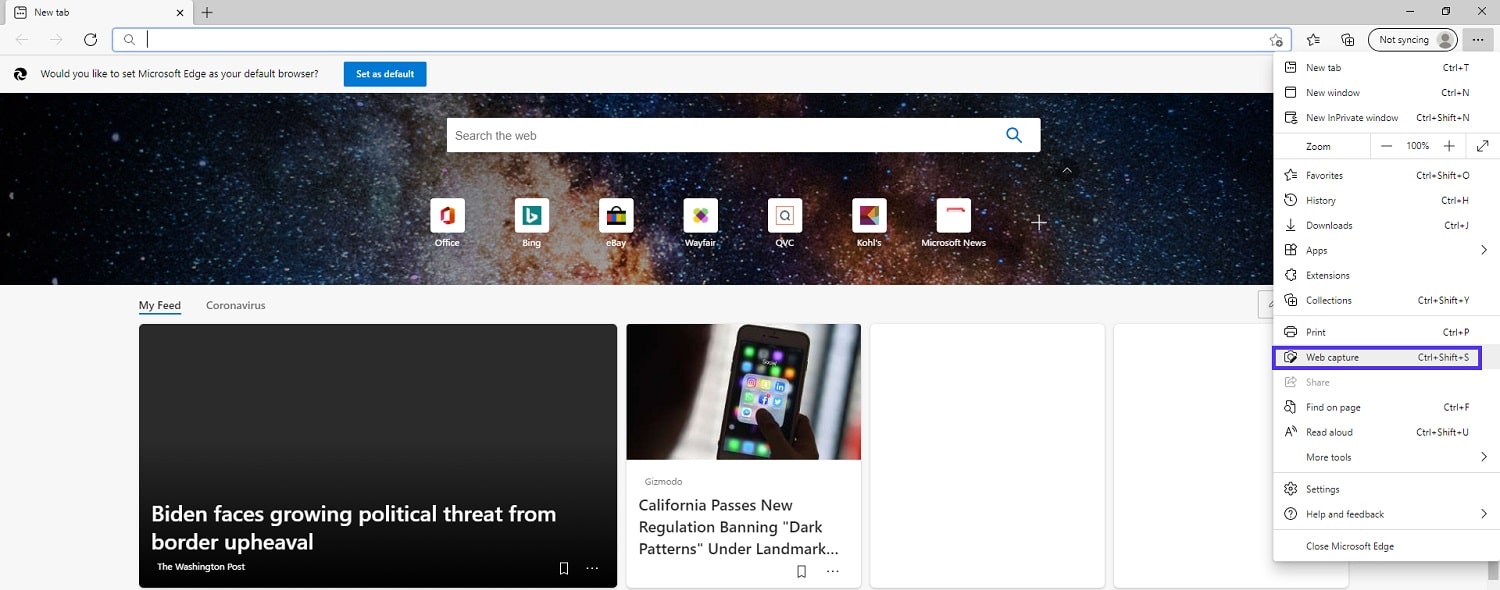
How to Screenshot in Microsoft Edge (Full Page)
One interesting thing about Microsoft Edge is that the latest version has built-in screenshotting.
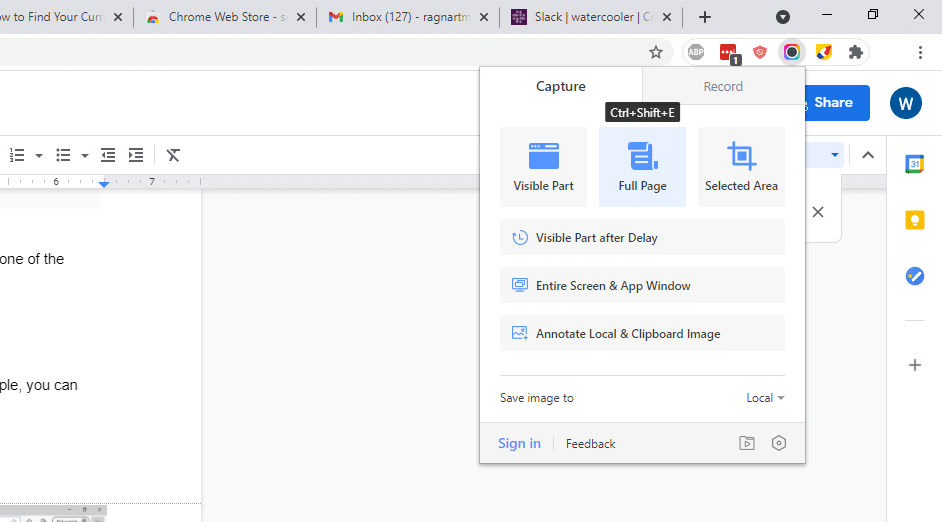
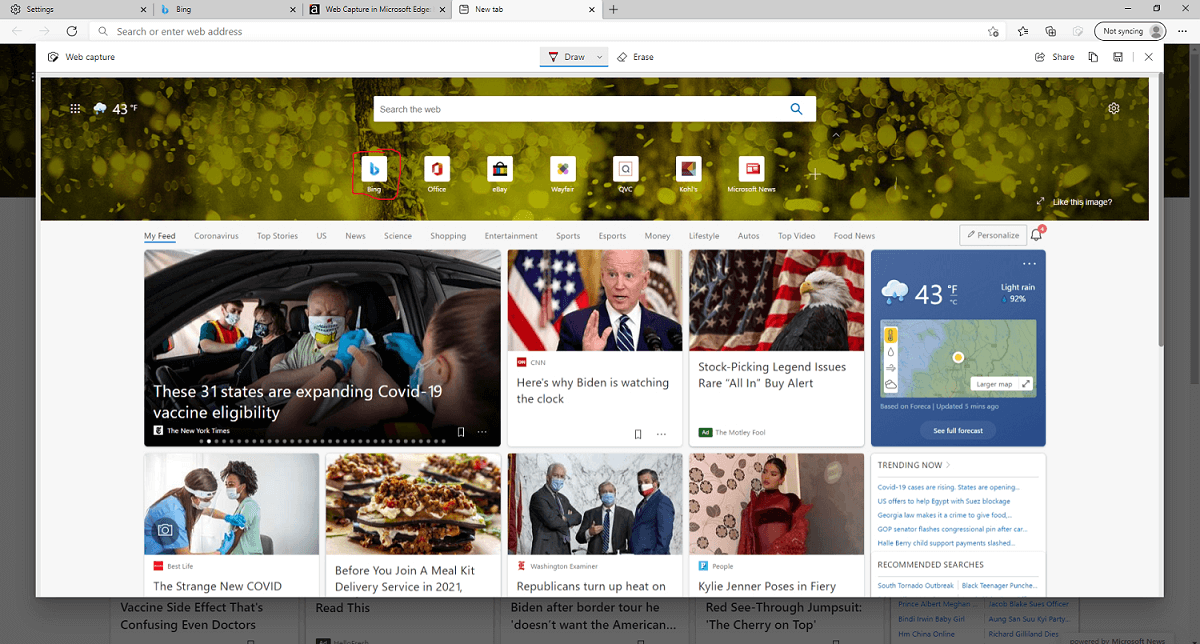
You don’t need to install any additional plugins. Just open up the browser, and start taking screenshots. Use the shortcut Ctrl + Shift + S to open the “Web Capture” overlay.
You can then choose between free selection or capture the whole page.
The full-page capture doesn’t rely on multiple partial screenshots and scrolling. So a floating bar won’t ruin your screenshot.
Once you’ve captured the page, you can then use the available draw and erase tools to highlight items on the page or make annotations.
Beyond that, you can share, copy, or save the screenshot (the default screenshots folder is /User/Downloads/).
The features are rudimentary, but the tool works perfectly to share a webpage with a friend or coworker.
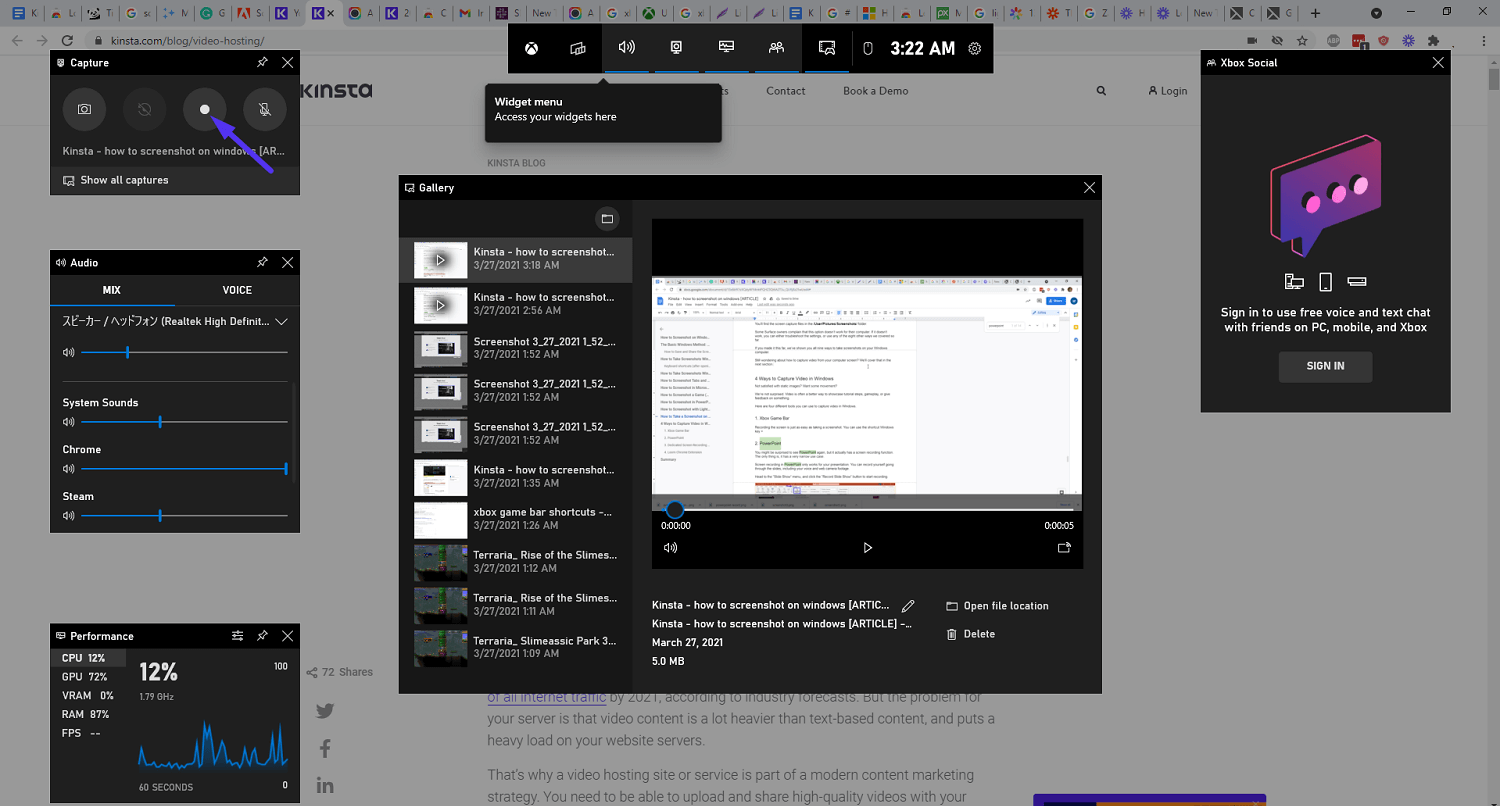
How to Screenshot a Game (or Anything Else) with Xbox Game Bar
In Windows 10, the Xbox Game Bar is installed and active by default (even if you don’t own an Xbox). You can open it at any time by pressing the Windows key + G.
Although it was built into Windows as a feature to screenshot and record video games, it works just as well for capturing movies, websites, or the content of any other program.
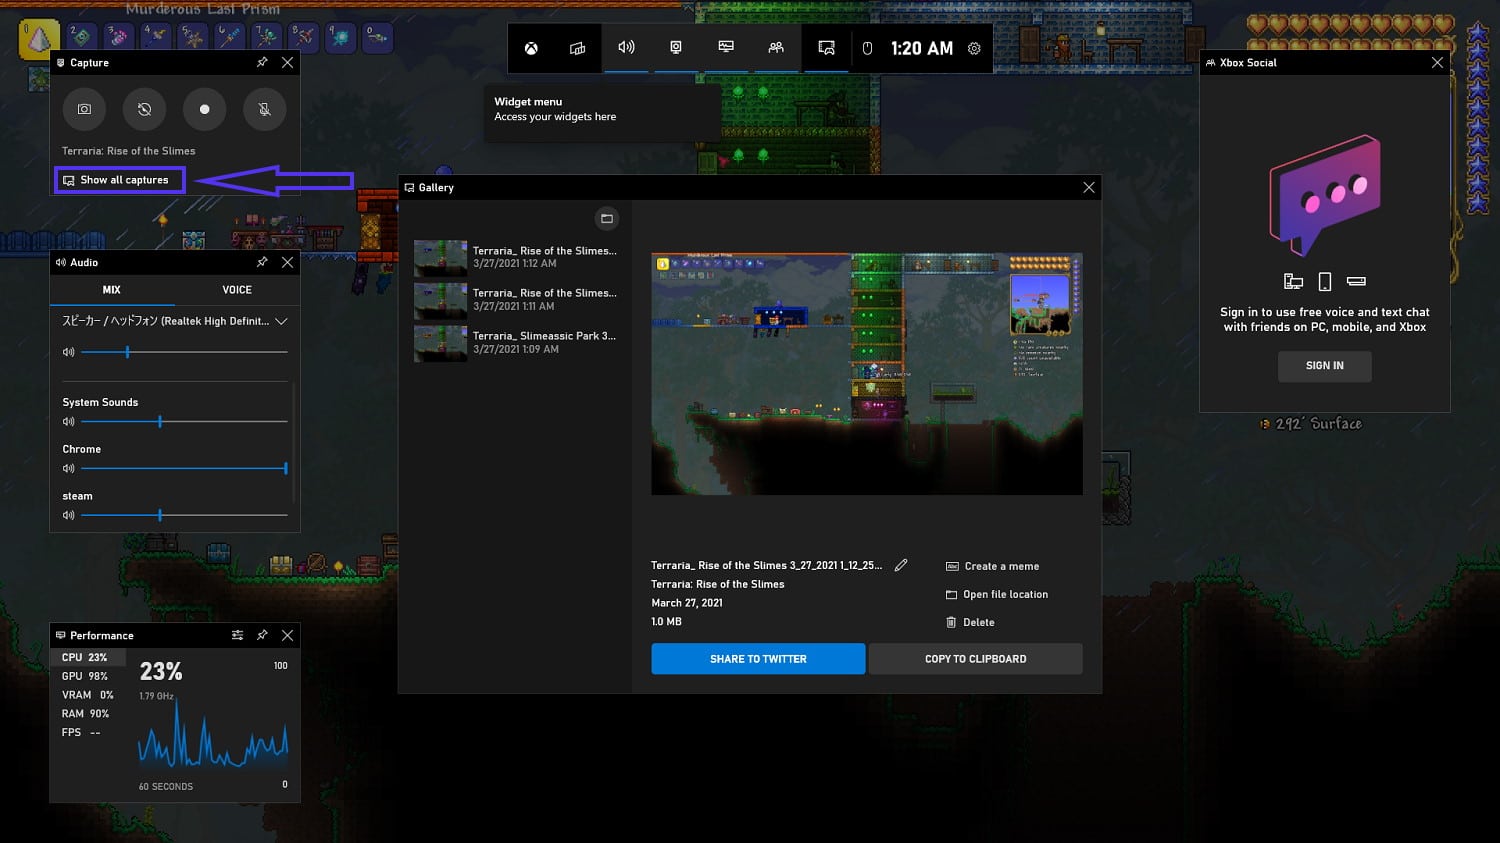
After opening the Xbox Game Bar, you can either press the camera button in the top-left corner or take a screenshot without opening the menu by pressing the print screen shortcut keys: Windows key + Alt + PrtScn.
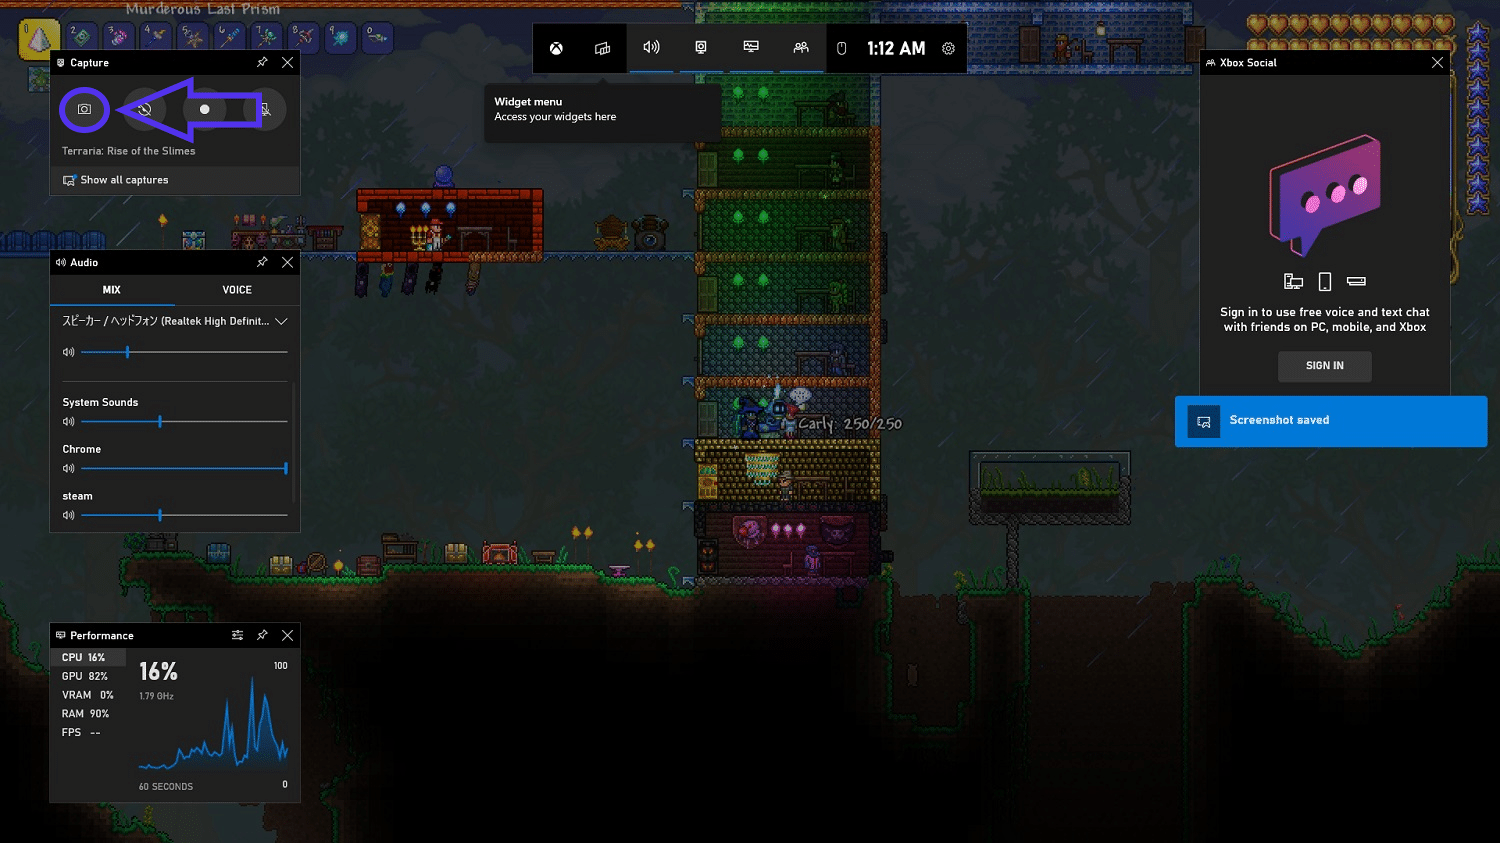
Once you open the Game Bar, you can show recent screenshots by clicking the “Show all captures” button.
From here, you can browse and share all recent screenshots on Twitter. There’s even a super basic “meme editor” that lets you add a big block text to the top and bottom.
The Xbox Game Bar saves files to the /User/Videos/Captures/ folder by default. It has some unique features, like the ability to scale the screenshots up to 4K.
Note: You don’t have to be playing a video game to use the Game Bar to take screenshots.
How to Screenshot in PowerPoint
If you have the latest version of PowerPoint in Windows 10, it supports capturing screenshots.
Instead of using the PrtScn key and pasting it in, you can capture other windows while inside PowerPoint.
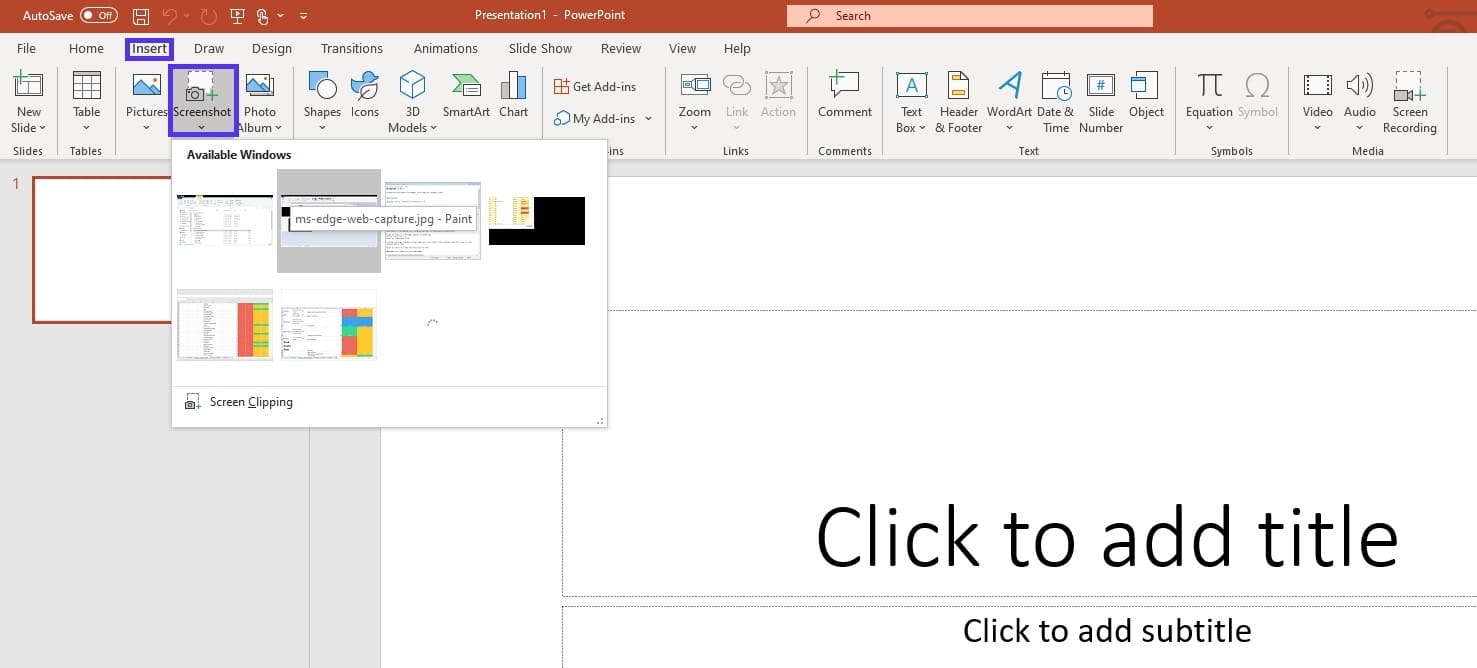
It will automatically insert a screenshot of the window you choose into the slide. If it’s a full-sized window, it’ll cover the entire page.
The newer versions of PowerPoint ship with a fairly powerful image editor. You can change colors, saturation, and even remove the background with a magic wand.
You can also customize the screenshot with shapes, borders, and text within PowerPoint and save the slide as an image.
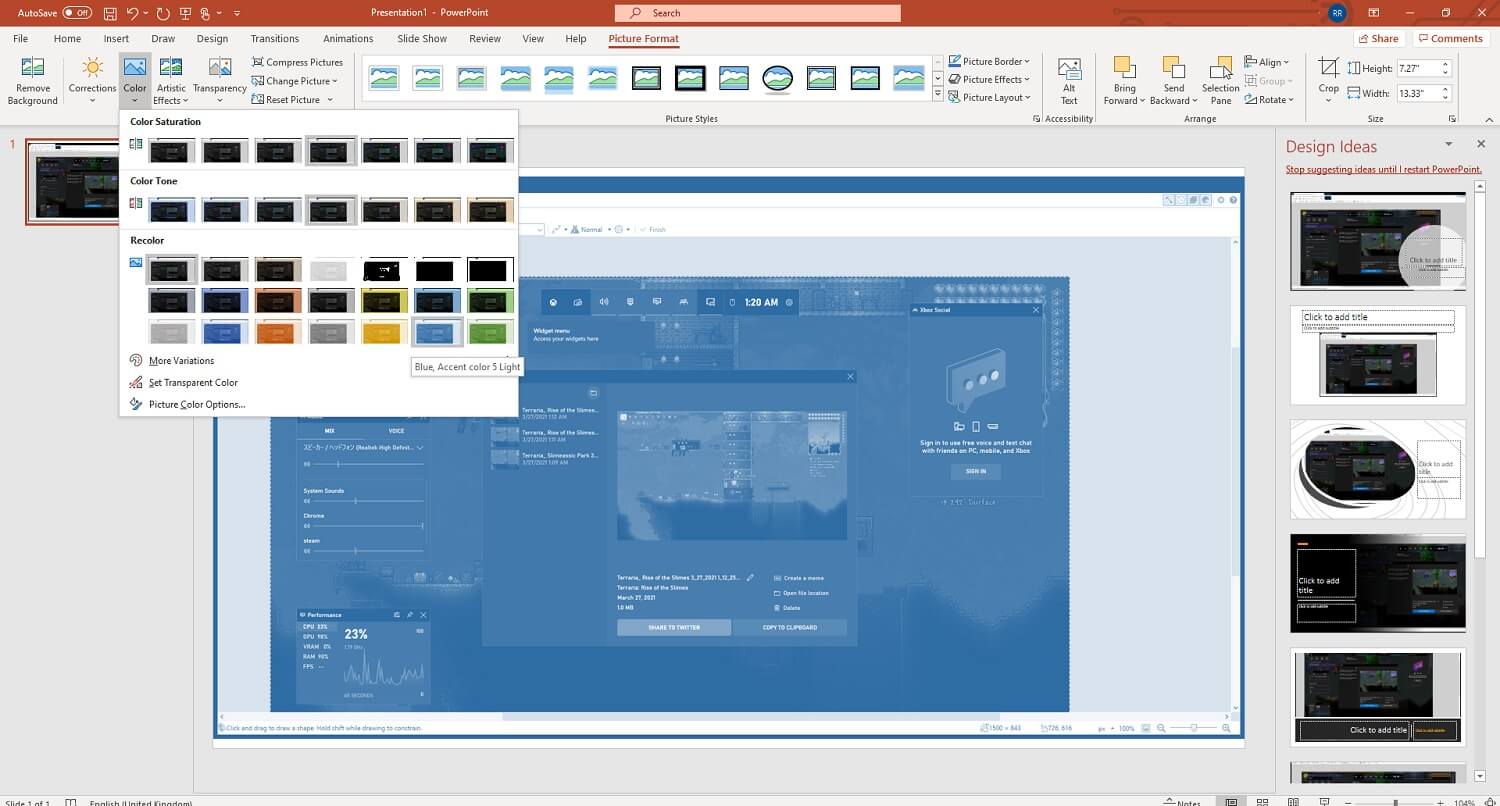
Combined, that probably makes PowerPoint the most potent official Microsoft screenshotting tool.
How to Screenshot with LightShot (and Other Third-Party Apps)
Lightshot is a lightweight—surprise—and easy-to-use screenshotting software. To use third-party software like LightShot, the first thing you need to do is download the program.
Visit the download page on the official website, and download the Windows version using the appropriate button or link.
Once installed, it automatically overrides the regular PrtScn key command. Every time you press that key, now you open up the LightShot interface.
You can select an area of the screen to capture and add simple text, rectangles, or arrows. You can edit the thickness of the lines and elements by using your mouse scroll. If you don’t have a mouse plugged in, try swiping two fingers on your touchpad.
To save the files, you can either press the save icon or use the Windows standard Ctrl + S shortcut. It keeps the files in the /Documents/Lightshot/ folder by default. But you can change that folder and easily save files in other locations.
It’s not super powerful, but it’s fast and effortless to use.
How to Take a Screenshot on Microsoft Surface Devices
On a Microsoft Surface with Windows 10 installed, you can already use any of the ways we mentioned so far.
As if that’s not enough, there’s also a custom way to take screenshots—because it’s technically also a tablet.
To take a screenshot on your Surface device, press and hold the Windows button and simultaneously press the Volume Down button. When it takes a screenshot, the screen will get dimmer.
You’ll find the screen capture files in the /User/Pictures/Screenshots folder.
Some Surface owners complain that this option doesn’t work for their computer. If it doesn’t work, you can either troubleshoot the settings or use any of the eight other ways we’ve covered so far.
If you made it here, we’ve shown you all nine ways to take screenshots on your Windows computer. We’ll cover how to capture video from your computer screen in the next section.
4 Ways to Capture Video in Windows
Not satisfied with static images? Want some movement?
We’re not surprised. Video is often a better way to showcase tutorial steps, share gameplay, or give feedback on something.
Here are four different tools you can use to capture video in Windows.
Check Out Our Video Guide: How to Screen Record on Windows (7, 8, 10)
1. Xbox Game Bar
Recording the screen is just as easy as taking a screenshot. You can use the shortcut Windows key + Alt + R, or open up the Game Bar, to start recording.
Once the game bar is open (Win + G), you can press the recording button to start recording the screen.
Easy, right? It stores all video files in the /User/Videos/Captures/ folder.
But before you upload a step-by-step video tutorial to your site, be warned. Video files are huge. You’re much better off using one of these video hosting solutions instead.
2. PowerPoint
You might be surprised to see PowerPoint in this article again, but it has a screen recording function, too. The only thing is, it has a minimal use case.
Screen recording in PowerPoint only works for your presentation. You can record yourself going through the slides, including your voice and web camera footage.
Head to the Slide Show menu, and click the Record Slide Show button to start recording.
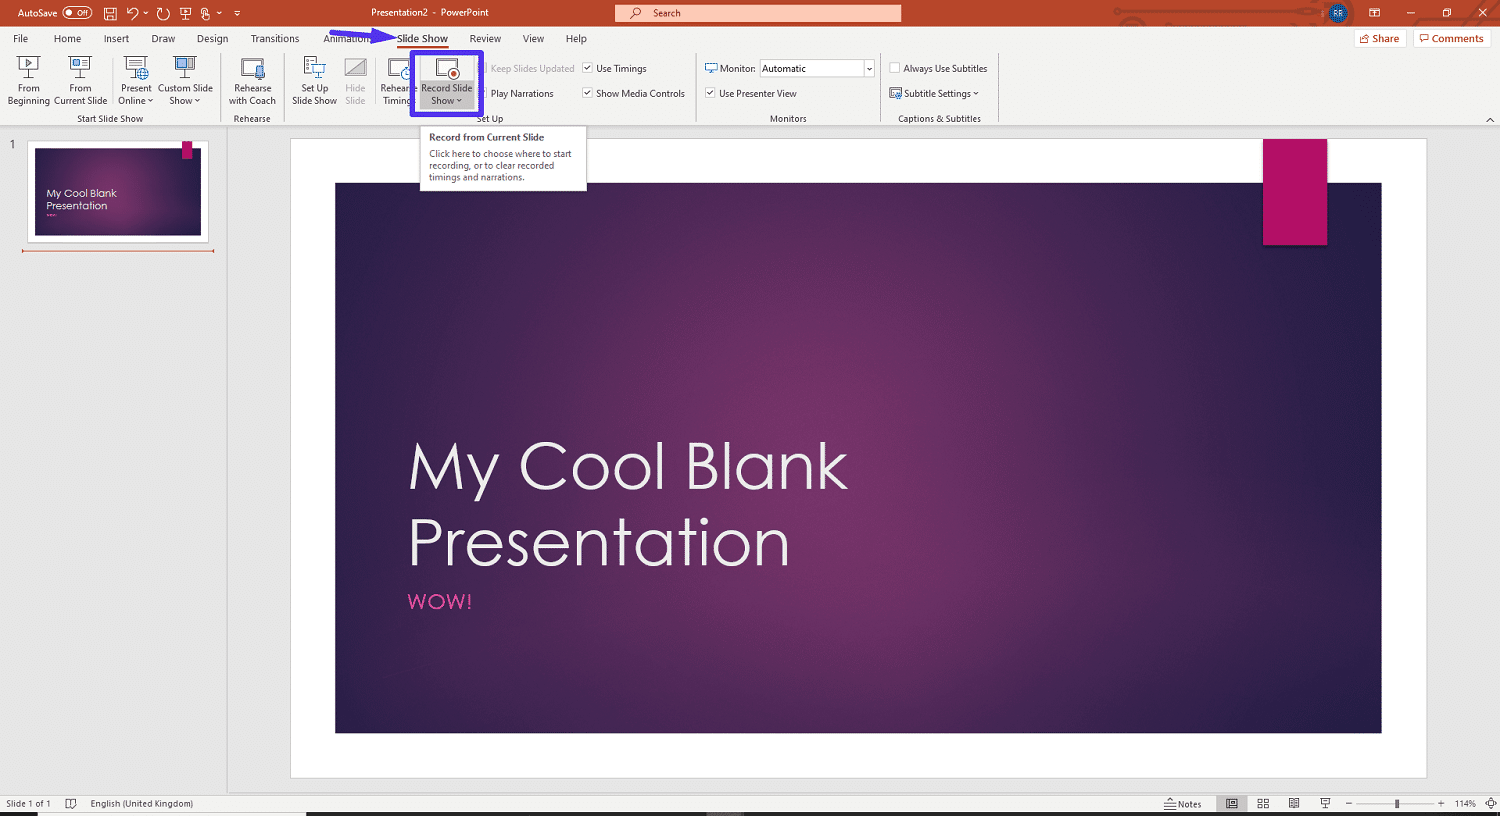
It’ll then record your voice and camera, and you can use drawing tools to aid your explanations.
Note: If you don’t have a powerful computer, fancy animated transitions in PowerPoint presentations can cause a lot of lag and a choppy final video. Keep animations to a minimum to avoid choppy results.
3. Dedicated Screen Recording Software
You can also use a dedicated third-party software solution to record your screen.
For beginners, we’d recommend a simple tool like Snagit or Zappy. However, you’re probably just as well off with the already-installed Xbox Game Bar (if you’re on Windows 10).
For advanced users and experienced video editors, you may want more functionality and customizability.
Camtasia is a powerful screen recorder and video editor in one, making it easy to create detailed tutorial videos from scratch.
At $300, it’s probably out of the budget range in non-professional use cases.
If you want a little bit more functionality than Zappy or the Game Bar without having to pay, we’ve got you covered.
The last option on this list is 100% free. Plus, it’s an excellent fit for a range of professional uses.
4. Loom Chrome Extension
Loom is a simplistic, easy-to-use screen recording tool that you can download as a Chrome extension. It records your screen, voice, and face for up to five minutes (in the free version).
You can open Loom up by clicking on the icon in the start menu or using the Alt + Shift + L shortcut.

It’s the perfect tool for sharing feedback or communicating difficult things with remote coworkers, clients, or business partners.
If you install the desktop version, you can even use a confetti effect with Ctrl + Alt + C to congratulate someone on a job well done.
What makes Loom unique is that it isn’t just a screen capture tool. It’s a free SaaS solution that automatically uploads your screen capture videos with shareable links.
You can easily install it by visiting the Loom Chrome extension page.
Make capturing a screenshot in Windows as easy as 1, 2, 3, thanks to this quick guide ✅Click to Tweet
Summary
Whether you’re working with an old version of Windows 7, or the newest version of Windows 10 on a brand-new Surface laptop, you have tons of options for taking screenshots.
You can use the built-in keyboard key shortcuts, Windows tools like Snip & Sketch, or a third-party app in Chrome. Even PowerPoint has a built-in function for taking screenshots and including them in your presentation.
Like with Windows, the same holds for taking a screenshot on your Mac.
Static screenshots are only the beginning. You can even capture videos showing what you’re doing step-by-step and instantly sharing it online, including commentary.
Get all your applications, databases and WordPress sites online and under one roof. Our feature-packed, high-performance cloud platform includes:
- Easy setup and management in the MyKinsta dashboard
- 24/7 expert support
- The best Google Cloud Platform hardware and network, powered by Kubernetes for maximum scalability
- An enterprise-level Cloudflare integration for speed and security
- Global audience reach with up to 35 data centers and 275+ PoPs worldwide
Test it yourself with $20 off your first month of Application Hosting or Database Hosting. Explore our plans or talk to sales to find your best fit.
Windows for decades has included one screenshot tool: A button that copies a screenshot of your full computer’s screen to your clipboard. You’d then open Paint, paste the picture, add any annotations you want, then save and share it.
There are far more screenshot tools in today’s Windows 10. Here are the screenshot shortcuts you need to capture anything on your Windows PC—along with built-in tools to take timed screenshots and capture a video of your screen.
-
Check our full Screenshot Guide for ways to take screenshots on any other device—along with tips on taking great screenshots.
-
If you’re on a Mac, you can also check out Zappy by Zapier, a screenshot tool for macOS that helps your team share what you see in a snap. With easy-to-use annotation tools, Zappy can help you collaborate with your teammates fast. Quickly capture and share screenshots, GIFs, and recordings for free. Learn more about Zappy.
Most PCs make it so easy to capture screenshots, there’s a dedicated key on your keyboard for it: PrtScn (or Print Screen or PrtSc, depending on your keyboard). Tap that key, and Windows will copy a screenshot of your entire screen to your clipboard, which you can then paste into a document or blank Paint canvas to save.
For more specific screenshots, Windows has built-in keyboard shortcuts for screenshots:
-
Copy full screen screenshot to clipboard:
PrtScn -
Save full screen screenshot:
Windows Key+PrtScn(or Windows Key + Volume Down on a tablet) -
Copy screenshot of single window:
Alt+PrtScn -
Save screenshot of single window:
Windows Key+Alt+PrtScn
Have a Microsoft Surface tablet or laptop? You won’t find a PrtScn key, so here are the keyboard shortcuts to use instead:
-
Copy full screen screenshot to clipboard:
Fn+Space -
Copy screenshot of single window:
Fn+Alt+Space -
Save full screen screenshot:
Fn+Windows Key+Space
Tip: Windows saves screenshots to the Screenshots folder inside your default Pictures folder.
How to Capture a Timed Screenshot on Windows
Windows also comes with additional screenshot tools. For more detailed screenshots, try the Snipping Tool, which lets you capture a full-screen, window, rectangle, or free-form screenshot—a way to capture a screenshot of any area you want with a Paint-style scissors tool. You can also add a delay to your screenshot to capture something that’s harder to take a screenshot of otherwise. Then, you can add quick annotations to your image before copying or saving it.
How to Markup and Screenshot Websites on Windows
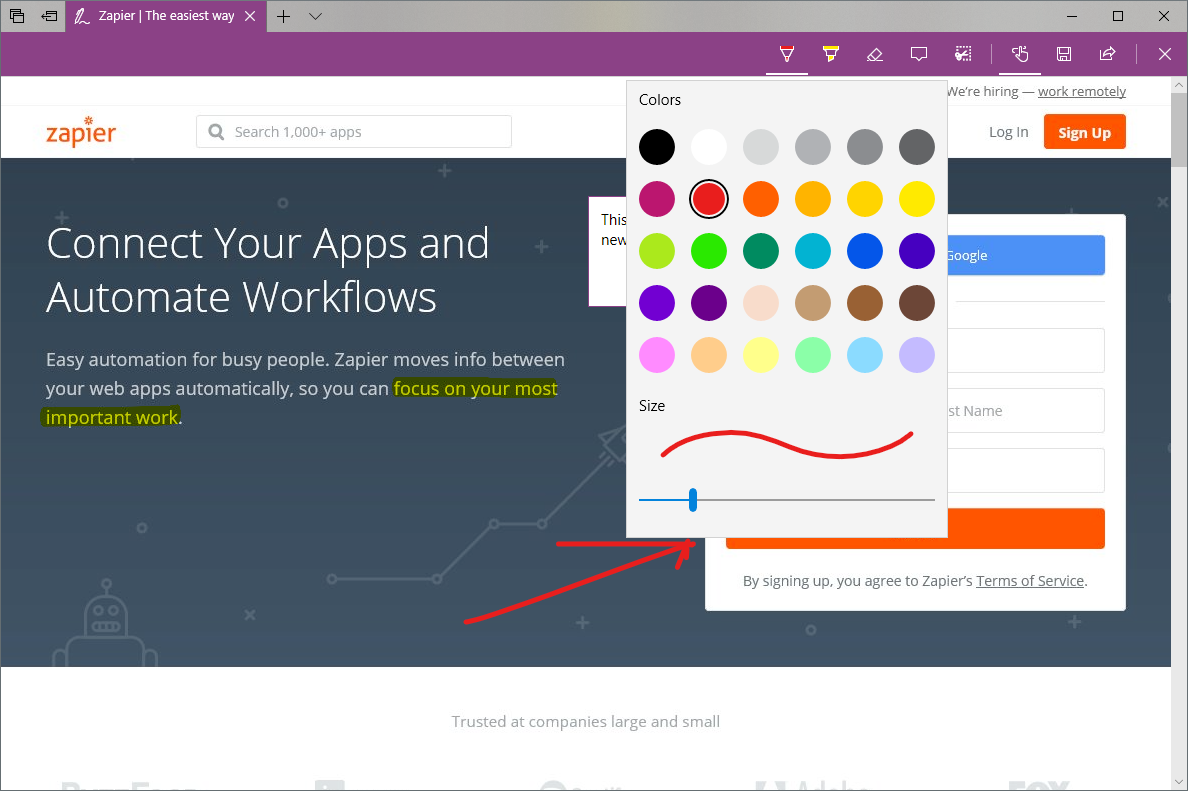
Or, if you want to take a screenshot of a webpage, perhaps with some quick annotations, try Microsoft Edge browser’s Notes tool. Open a webpage, click the pen icon in your toolbar, then highlight or draw on the page with the included tools—each of which works with your mouse or a pen. Click and hold on the button to choose the ink color and thickness. You can add text notes as well, then save the screenshot to your OneNote notebook or share it directly on social networks.
How to Capture a Video of Your Windows PC
If you want to capture a video of your screen—perhaps to show how an app works—use the Xbox app’s Game Recorder in Windows 10. The Xbox app is designed to record videos of games but can also take videos of most apps in Windows—though not your full desktop. It includes settings to tweak the video quality, length, audio capture, and more.
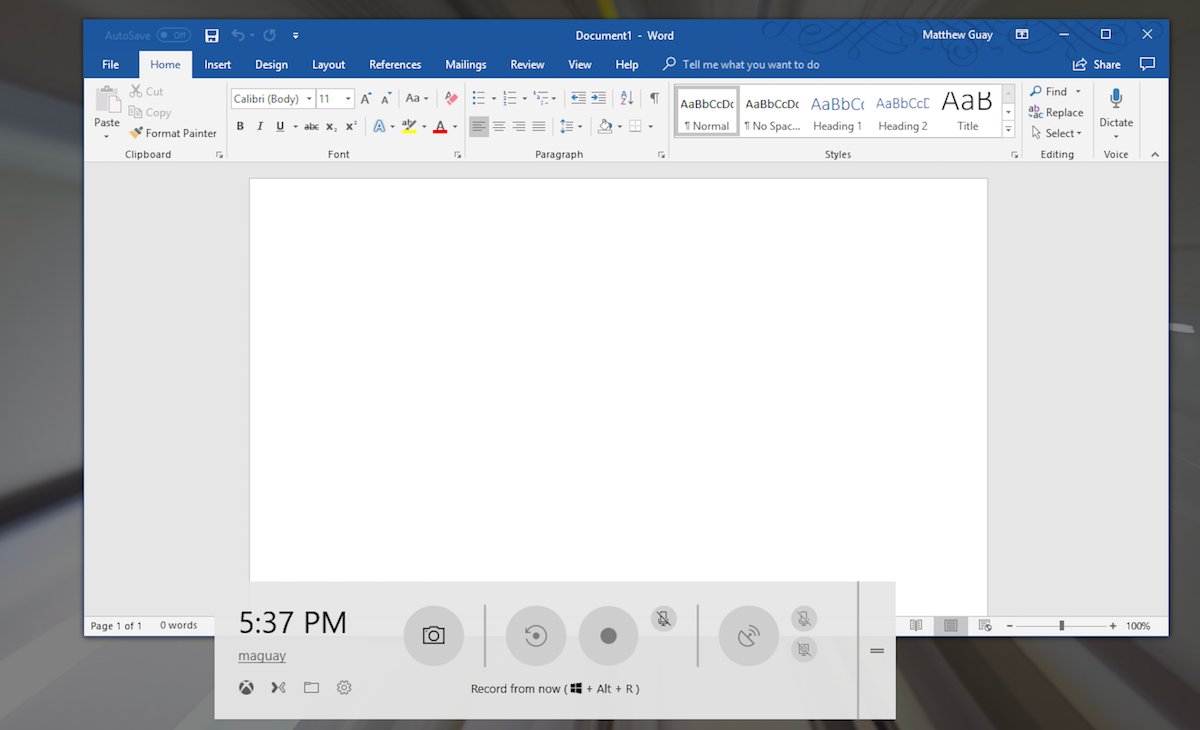
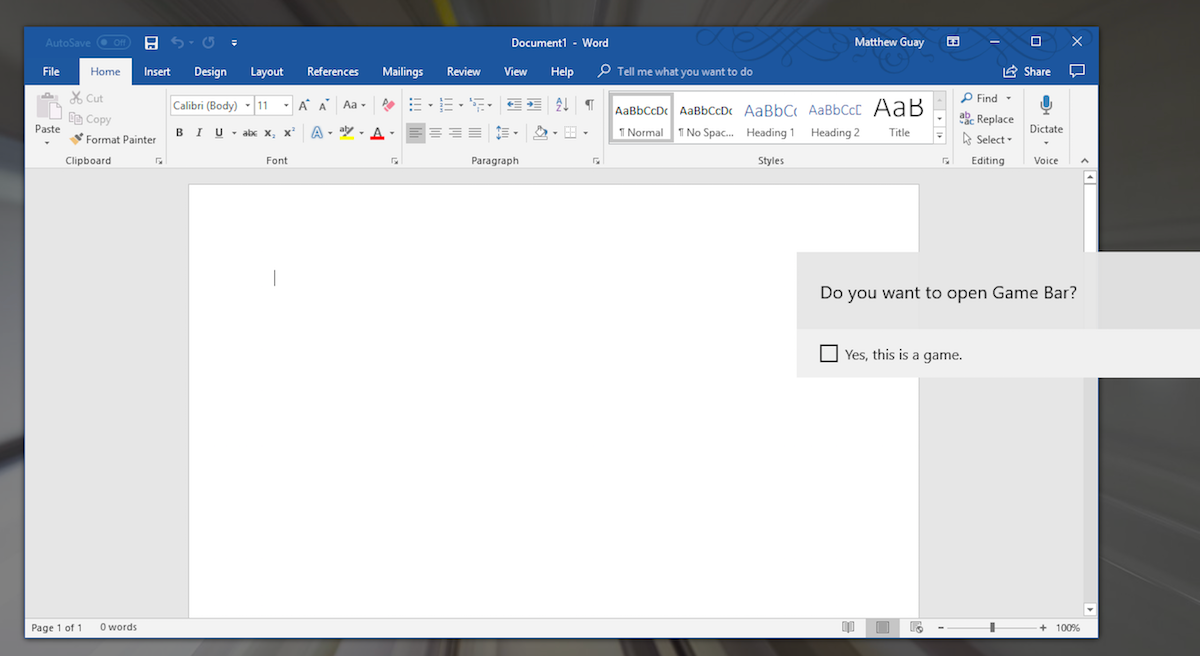
To open Game Recorder, press Windows Key`+G—and if asked, check the Yes, this is a game button (after all, Game Recorder can record almost any app, not only games). That opens a small recorder app where you can click the record button or press Windows Key + Alt + R to stop or start recording.
Most of the time you need a screenshot on a PC, you’ll only have to look down at your keyboard to remember the shortcut: PrtScn. FN+Space does the same on a Surface or many other smaller keyboards. That’s the easiest way to take a screenshot on Windows—then keep this article around to find the shortcuts and tools when you need more specific screenshots.
Continue Reading
-
Learn how to take better screenshots—and how to capture them on any device—in our full Screenshots Guide.
-
Get the most out of your PC with our roundup of the Best Productivity Apps for Windows.
-
Learn more Windows keyboard shortcuts in Microsoft’s Windows 10 documentation.
-
Learn how to make your screenshots shine.