Are you getting the “Activate Windows- Go to settings to activate windows” watermark on your desktop? Or Looking for a way to remove activate windows watermark permanently from your desktop? This is because your windows license has expired. If you have a product key then you can activate it directly, to remove activate Windows watermark. But if you don’t have one, here is how to remove Activate windows 10 watermark without a product key.
Applied different solutions but still, the activate windows watermark keeps coming back. Don’t worry here in this post we have the working ways to remove the windows 10 watermark Permanently.
Remove the active windows watermark with help of cmd
With a simple notepad trick, you can easily remove Activate Windows 10 Watermark from your desktop. Let’s see how to do it.
- First, open notepad on your PC, You can do this by clicking on the start menu search type notepad and hit the enter key. Now on notepad type, the below commands :
@echo off
taskkill /F /IM explorer.exe
explorer.exe
exit

- Go to File and click “Save as”. Here select the location where you want to save the file. Then Change the save as type to All Files (*.*) and Give the file name as “ remove.bat”

- Now open the file location where you saved it. You will see a file as shown below image. Right-click on the remove.bat file and click on “Run as administrator”

A command prompt will be opened and closed itself, Now restart your laptop or desktop. That’s all there is no more “activate windows go to settings to activate windows” on your Desktop.
Registry Tweak to remove Activate windows watermark
Here is another tweak to remove activate windows 10 watermark using the windows registry editor.
- Open the Windows registry editor by Press Windows + R, type regedit, and hit the enter key.
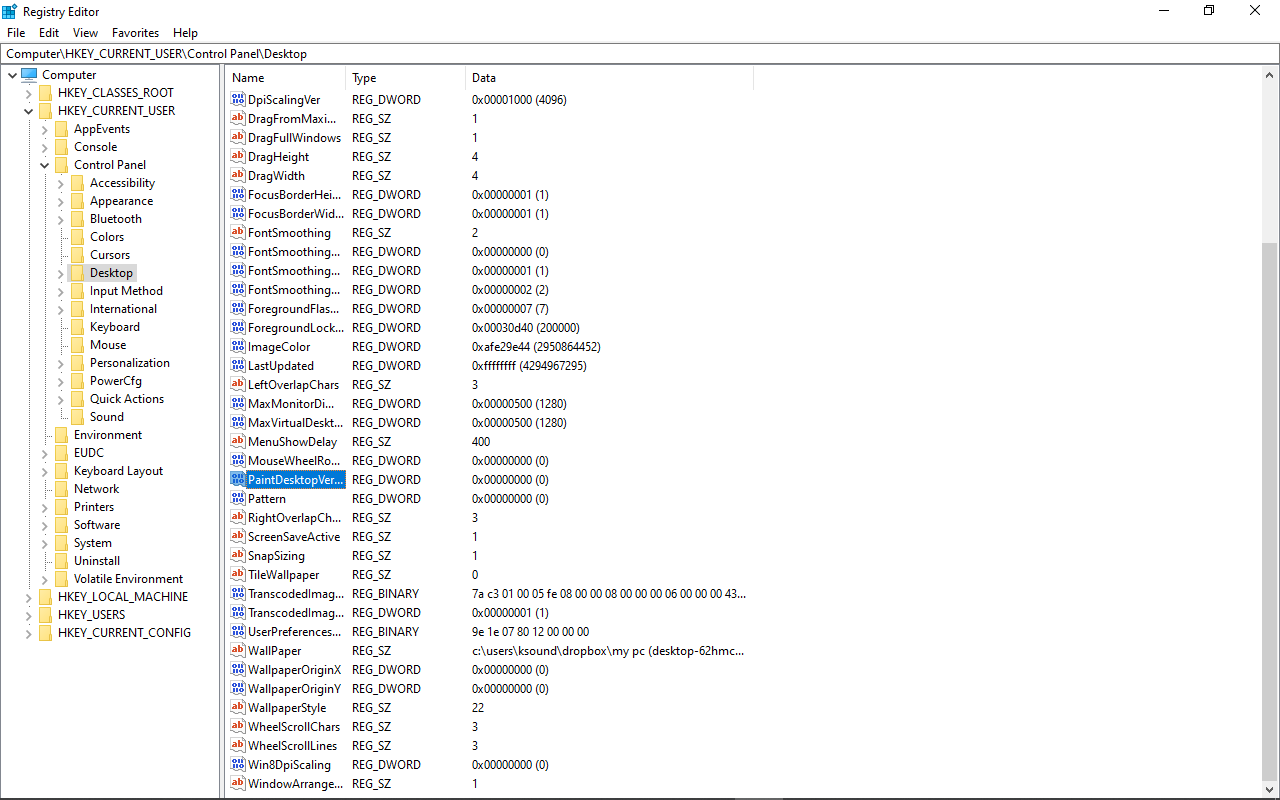
- Then expand HKEY_CURRENT_USERControl PanelDesktop
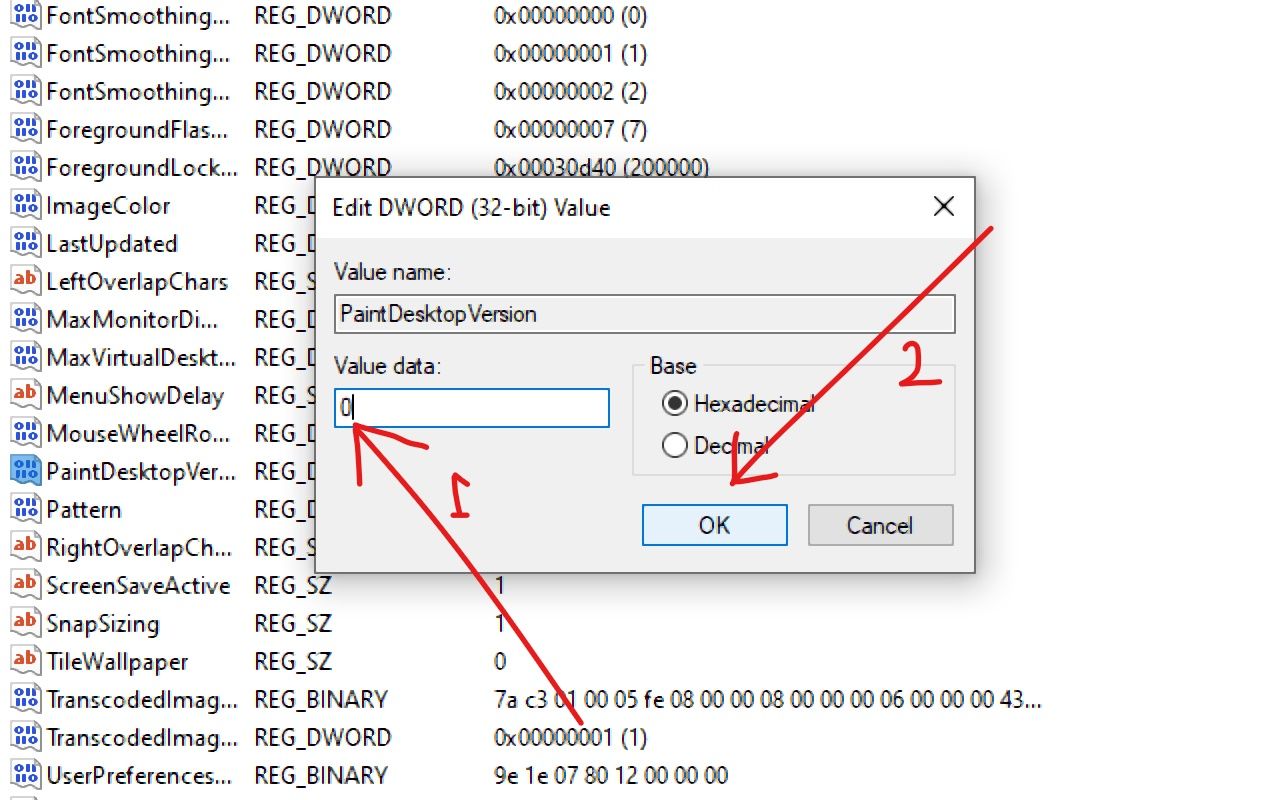
- Double-click on the value “PaintDesktopVersion” in the right-hand window.
- And Change the value “1” to a “0” and click OK to save changes.
- Close the registry editor and any other programs and restart your computer.

Video how to remove windows watermark
In addition, refer to this video for one more registry tweak that helps remove activate the windows watermark on windows 10.
Windows watermark remover tool
Still activate windows watermark keeps coming back? You can use a third-party windows watermark remover tool, “Universal Watermark Disabler 1.0.0.6” which helps remove all kinds of watermarks in Windows 10.
Running this tool didn’t delete any branding strings (for example does not modify system files) only remove watermarks including Test Mode, Build string in the evaluation and pre-release builds,
- Download ‘Universal Watermark Disabler’ here,
- locate and unzip the file in the download folder
- save and close all applications running on your computer
- Finally, double-click on uwd.exe to run the tool, Click yes if UAC prompts for permission,
- Click on install, The application will run and automatically restart your computer.

- On the next start when you log in back to your machine you will notice the remove windows activation message disappear.
Disable Activate Windows Watermark by using Ease of Access
Yes, also you can also remove the windows 10 activation watermark from the ease of access options.
- Press the Windows key + S type control panel and select the first result,
- Go to Ease of Access Centre (to get this option make sure to Change the control panel view by large icons)
- Click on Make the computer easier to see, scroll down to the bottom and check the mark on Remove background images (where available)
- Click ok and restart your PC and check the status of remove the windows 10 activation watermark.

that’s all, did the above solutions help remove activate windows watermark on windows 10? Let us know in the comments below.
Sponsored content:
Did you know you can remotely access your Windows desktop applications from anywhere on any device with high-performance XenDesktop from CloudDesktopOnline powered with top-notch support from Apps4Rent.
Also, read:
- Laptop Buying Guide – What to Look for When Buying a Laptop
- SSD vs HDD Speed and Performance Comparison 2022
- What Is The Difference Between A VPN And A Proxy and how do they work?
- How To Enable and configure Hyper V virtualization on Windows 10
- What is the Difference Between 32-Bit and 64-Bit Windows 10 and Processor (CPU)

If you are using a non-activated version of Windows, there’s a high chance that you have seen the “Activate Windows 10 – Go to settings to activate Windows” watermark on your desktop. If you have got the product key from Microsoft Store or a retailer, you can use it to activate your WIndows 10 and that will remove the watermark.
If you don’t have the Product Key and it’s bothering you, you need not worry. Here are some tweaks which will help you hide or remove the Activate Windows watermark permanently.
Why do you get Activate Windows Watermark?
The reason why “Activate Windows” watermark appears is because your system doesn’t have an activated Windows installed. The other reason can be the expiration of your installed Windows product key. Having an activated Windows lets you access several features of Windows 10 like Windows Defender, Microsoft Office Installation, Security updates, personalization features, and more.
The best and easiest way to remove this watermark is to purchase a product key from any online retailer like Microsoft. Entering the product key will remove the Activate Windows watermark, and will let you access all the Windows 10 features.

If you don’t want to purchase any product key and want to get rid of the Activate Windows watermark, then here are few tweaks to remove Actiavte Windows watermark.
ALSO READ:
- How To Export Your Google Photos Library
- How To Fix the “Sim Not Provisioned MM 2” Error
- 11 Incredible Ways To Speed Up Your Slow Windows 10 PC
There are several ways to remove Activate Windows watermark. We will show you all the possible ways to remove Activate Windows watermark without using a product key.
1. Get rid of Activate Windows Watermark using Regedit
To remove the watermark using regedit, do the following:
1. Click Start and type in Regedit and hit Enter. Select “Yes” if prompted by UAC (User Account Control) box.
2. Now, navigate to HKEY_CURRENT_USER > Control Panel > Desktop.
3. Scroll down and find the PaintDesktopVersion and double click it to open.

4. Once opened, make sure that the Hexadecimal option is selected. Then, change the Value data to 0 and click OK to save changes.
5. Now, close the Registry Editor and restart your Windows PC/Laptop.
When you log in to your desktop again, the Activate Windows watermark should be removed.
2. Disable Activate Windows Watermark via Windows PowerShell
Using this method will activate the Windows on temporary basis (90 days/3 months). You might need to use this command again after 90 days to continue removing the Activate Windows watermark. Here’s how you can remove the watermark using PowerShell:
1. Click Start and type in PowerShell. On the right pane, select “Run as Administrator” option. Choose “Yes” if prompted by UAC.

2. Once PowerShell opens, type this command and hit Enter.
slmgr /renew
3. Close PowerShell and restart your Windows PC/Laptop.
Once restarted, you will get rid of the Activate Windows watermark for the next 90 days. If you see the watermark again, run this command again and you will be good to go.
3. Disable Activate Windows Watermark using CMD (Command Prompt)
It is a rare case but activating Test mode can often cause the Activate Windows watermark to appear. If you disable the Test Mode, you can hide the Activate Windows watermark. To turn this off, follow these steps:
1. Click Start and type in CMD. On the right pane, click on the “Run as Administrator” option. Select “Yes” if prompted by UAC.

2. Once Command Prompt opens up, type this command and hit Enter.
bcdedit -set TESTSIGNING OFF
3. If everything goes good, you’ll see “Operation completed successfully” as a result. Restart your Windows PC/Laptop.
Once you restart your PC, you’ll see that you got rid of the Activate Windows watermark.
4. Remove Activate Windows Watermark with a Script
Although there are many ways to remove the Activate Windows watermark, one of those methods is using a script. Running this script might get rid of the Activate Windows watermark.
1. Click Start > search for Notepad and hit Enter.

2. Once opened, copy and paste the below text to the Notepad.
@echo offtitle Activate Windows 7 / 8 / 8.1 / 10 for FREE!&cls&echo =====================================&echo #Copyright: MSGuides.com&echo =====================================&echo.&echo #Supported products:&echo – Windows 7 Professional&echo – Windows 7 Professional N&echo – Windows 7 Professional E&echo – Windows 7 Enterprise&echo – Windows 7 Enterprise N&echo – Windows 7 Enterprise E&echo – Windows 8 Core&echo – Windows 8 Core Single Language&echo – Windows 8 Professional&echo – Windows 8 Professional N&echo – Windows 8 Professional WMC&echo – Windows 8 Enterprise&echo – Windows 8 Enterprise N&echo – Windows 8.1 Core&echo – Windows 8.1 Core N&echo – Windows 8.1 Core Single Language&echo – Windows 8.1 Professional&echo – Windows 8.1 Professional N&echo – Windows 8.1 Professional WMC&echo – Windows 8.1 Enterprise&echo – Windows 8.1 Enterprise N&echo – Windows 10 Home&echo – Windows 10 Home N&echo – Windows 10 Home Single Language&echo – Windows 10 Home Country Specific&echo – Windows 10 Professional&echo – Windows 10 Professional N&echo – Windows 10 Education N&echo – Windows 10 Education N&echo – Windows 10 Enterprise&echo – Windows 10 Enterprise N&echo – Windows 10 Enterprise LTSB&echo – Windows 10 Enterprise LTSB N&echo.&echo.&echo ====================================&echo Activating your Windows… & cscript //nologo c:windowssystem32slmgr.vbs /ipk FJ82H-XT6CR-J8D7P-XQJJ2-GPDD4 >nul&cscript //nologo c:windowssystem32slmgr.vbs /ipk MRPKT-YTG23-K7D7T-X2JMM-QY7MG >nul&cscript //nologo c:windowssystem32slmgr.vbs /ipk W82YF-2Q76Y-63HXB-FGJG9-GF7QX >nul&cscript //nologo c:windowssystem32slmgr.vbs /ipk 33PXH-7Y6KF-2VJC9-XBBR8-HVTHH >nul&cscript //nologo c:windowssystem32slmgr.vbs /ipk YDRBP-3D83W-TY26F-D46B2-XCKRJ >nul&cscript //nologo c:windowssystem32slmgr.vbs /ipk C29WB-22CC8-VJ326-GHFJW-H9DH4 >nul&cscript //nologo c:windowssystem32slmgr.vbs /ipk BN3D2-R7TKB-3YPBD-8DRP2-27GG4 >nul&cscript //nologo c:windowssystem32slmgr.vbs /ipk 2WN2H-YGCQR-KFX6K-CD6TF-84YXQ >nul&cscript //nologo c:windowssystem32slmgr.vbs /ipk NG4HW-VH26C-733KW-K6F98-J8CK4 >nul&cscript //nologo c:windowssystem32slmgr.vbs /ipk XCVCF-2NXM9-723PB-MHCB7-2RYQQ >nul&cscript //nologo c:windowssystem32slmgr.vbs /ipk GNBB8-YVD74-QJHX6-27H4K-8QHDG >nul&cscript //nologo c:windowssystem32slmgr.vbs /ipk 32JNW-9KQ84-P47T8-D8GGY-CWCK7 >nul&cscript //nologo c:windowssystem32slmgr.vbs /ipk JMNMF-RHW7P-DMY6X-RF3DR-X2BQT >nul&cscript //nologo c:windowssystem32slmgr.vbs /ipk M9Q9P-WNJJT-6PXPY-DWX8H-6XWKK >nul&cscript //nologo c:windowssystem32slmgr.vbs /ipk 7B9N3-D94CG-YTVHR-QBPX3-RJP64 >nul&cscript //nologo c:windowssystem32slmgr.vbs /ipk BB6NG-PQ82V-VRDPW-8XVD2-V8P66 >nul&cscript //nologo c:windowssystem32slmgr.vbs /ipk GCRJD-8NW9H-F2CDX-CCM8D-9D6T9 >nul&cscript //nologo c:windowssystem32slmgr.vbs /ipk HMCNV-VVBFX-7HMBH-CTY9B-B4FXY >nul&cscript //nologo c:windowssystem32slmgr.vbs /ipk 789NJ-TQK6T-6XTH8-J39CJ-J8D3P >nul&cscript //nologo c:windowssystem32slmgr.vbs /ipk TX9XD-98N7V-6WMQ6-BX7FG-H8Q99 >nul&cscript //nologo c:windowssystem32slmgr.vbs /ipk 3KHY7-WNT83-DGQKR-F7HPR-844BM >nul&cscript //nologo c:windowssystem32slmgr.vbs /ipk 7HNRX-D7KGG-3K4RQ-4WPJ4-YTDFH >nul&cscript //nologo c:windowssystem32slmgr.vbs /ipk PVMJN-6DFY6-9CCP6-7BKTT-D3WVR >nul&cscript //nologo c:windowssystem32slmgr.vbs /ipk W269N-WFGWX-YVC9B-4J6C9-T83GX >nul&cscript //nologo c:windowssystem32slmgr.vbs /ipk MH37W-N47XK-V7XM9-C7227-GCQG9 >nulecho ————————————&echo.&echo.&set i=1:serverif %i%==1 set KMS_Sev=kms7.MSGuides.comif %i%==2 set KMS_Sev=kms8.MSGuides.comif %i%==3 set KMS_Sev=kms9.MSGuides.comif %i%==4 goto notsupportedcscript //nologo c:windowssystem32slmgr.vbs /skms %KMS_Sev% >nulcscript //nologo c:windowssystem32slmgr.vbs /ato | find /i “successfully” && (echo.& echo ====================================== & echo. & choice /n /c YN /m “Would you like to visit my blog [Y,N]?” & if errorlevel 2 exit) || (echo The connection to the server failed! Trying to connect to another one… & echo Please wait… & echo. & echo. & set /a i+=1 & goto server)explorer “https://productkey.net”&goto halt:notsupportedecho ======================================&echo.&echo Sorry! Your version is not supported.:haltpause >nul
3. After pasting this text, go to File > Save As and give the file name as windows.cmd only. Choose “All files” from the Save as type dropdown menu.
4. Save the file on Desktop for easier access, and click Save.
5. Now close the notepad, and go to the Desktop. Right-click on the “windows.cmd” file and select “Run as administrator.” Choose “Yes” if prompted by UAC.
6. Once the script runs, restart your computer.
After restarting your PC/Laptop, the Activate Windows watermark will be gone.
5. Remove Activate Windows Watermark via Ease of Access
You can also remove the Activate Windows watermark using Ease of Access option, which is built in Windows. Before you go haywire, here’s how to do that.
1. Click Start and search for Ease of Access Display Settings.
2. Scroll down and toggle off “Show desktop background image” option.

3. Restart your PC/Laptop.
Once restarted, your background should be gone along with the Activate Windows watermark as well.
6. Remove Activate Windows Watermark using a BAT (Batch) File
There’s another notepad tweak that will let you remove the Activate Windows watermark, and that is done by creating a Batch (.BAT) file.
1. Click Start and type in Notepad and hit Enter.
2. Once opened, copy and paste the below command in the Notepad.
@echo off taskkill /F /IM explorer.exe explorer.exe exit
3. After pasting this text, go to File > Save As and give the file name as remove.bat only. Choose “All files” from the Save as type dropdown menu.

4. Save the file on Desktop for easier access, and click Save.
5. Now close the notepad, and go to the Desktop. Right-click on the “remove.bat” file and select “Run as administrator.” Choose “Yes” if prompted by UAC.
6. Once the command window opens up and closes off, restart your computer.
After restarting your PC/Laptop, the Activate Windows watermark will be hidden now.
7. Get rid of Activate Windows Watermark by Disabling WIndows 10 Tips
An easy way to disable the Activate Windows watermark permanently, is through disabling Windows 10 Tips. To disable them, follow the process below.
1. Go to Start and click on the Settings (⚙) icon.
2. Click on Settings, and then click on Notifications & actions from the left pane.
3. Now scroll down and find the option that says “Get tips, tricks, and suggestions as you use Windows” and toggle it OFF.

4. Once done, restart your PC/Laptop.
This shall get rid of the Activate Windows Watermark.
8. Hide Activate Windows Watermark using a Free Third-Party Tool
If none of the above tips worked, your last resort should be a third-party tool to remove the “Activate Windows” watermark. There are many tools available out there. These tools trick Windows to think it’s activated. We don’t recommend using this method, but this should be your last option if nothing works.

1. Download the Universal Watermark Disabler tool using the download link given below.
2. Unzip the file and make sure that all the applications are closed.
3. Double click on uwd.exe file. Click “yes” if prmopted by UAC. A window will popup on your screen.
4. Click on the “Install” button.
If necessary, restart your machine and you will be good to go. The Activate Windows watermark should be gone by now.
Conclusion
These were the 8 ways to remove and hide the Activate Windows watermark. Although, we recommend you to use a Product Key to activate Windows to activate your Windows 10 machine. Concluding this article, we hope we solved your problem when it comes to getting red of the activate windows watermark permanently.
If you have any further queries, let us know in the comments below. We will try our best to resolve them as soon as possible.
For the latest tech news and reviews, follow Tech Baked on Twitter, Facebook, Instagram, and join our Telegram Channel for daily tech news in your inbox.
 Иногда пользователи предпочитают работать в Windows 10 без активации и это вполне возможно (об этом в отдельном материале: Можно ли пользоваться Windows 10 без активации, как долго и с какими ограничениями), но через какое-то время в правом нижнем углу экрана появится надпись «Активация Windows» с пояснением: Чтобы активировать Windows, перейдите в раздел Параметры, предполагающим, что вы перейдете в Параметры — Обновления и безопасность — Активация и введете ключ продукта. Однако, убрать надпись с экрана можно и без этого.
В этой инструкции подробно о том, как навсегда убрать надпись Активация Windows на экране Windows 10 несколькими способами — вручную и с помощью сторонних программ, а также дополнительная информация, которая может оказаться полезной.
Убираем надпись «Активация Windows» с помощью редактора реестра
Первый способ — использовать редактор реестра для отключения показа надписи об активации Windows 10. Если вы уже пробовали этот метод, но параметры возвращались в исходное состояние, решение для этого также будет предложено в этом разделе.
Шаги будут следующими:
- Запустите редактор реестра: нажмите клавиши Win+R (Win — клавиша с эмблемой Windows), введите regedit и нажмите Enter.
- Перейдите к разделу реестра
HKEY_LOCAL_MACHINESOFTWAREMicrosoftWindows NTCurrentVersionSoftwareProtectionPlatformActivation
- Обратите внимание на параметр Manual в правой части окна редактора. Дважды нажмите по нему и задайте значение 1.
- Проделайте то же самое для параметра NotificationDisabled

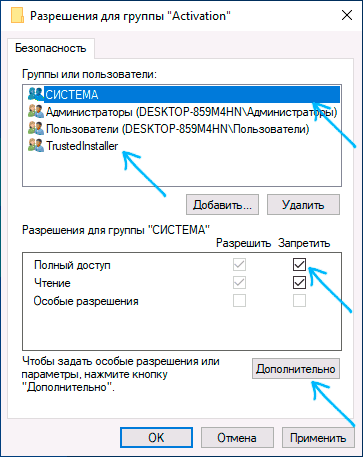
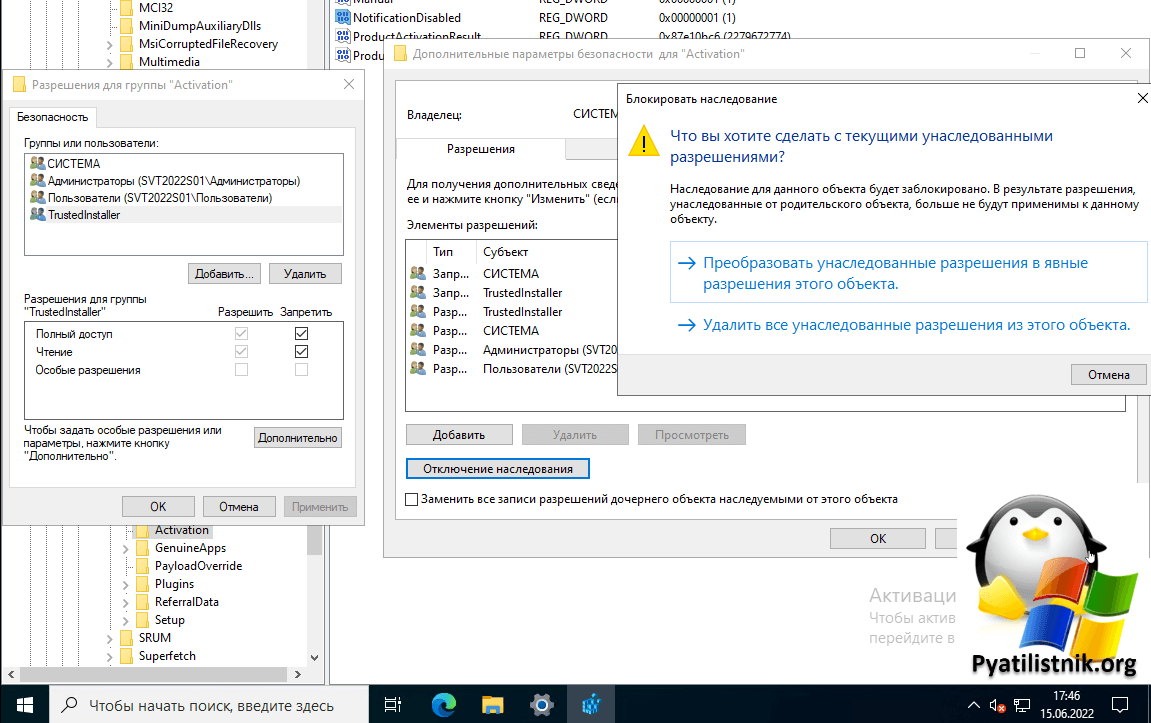
- После перезагрузки надпись исчезнет, но не торопитесь перезагружать: через некоторое время система может убрать ваши изменения. Чтобы этого не произошло, нажмите правой кнопкой мыши по разделу (папке) Activation слева и выберите пункт «Разрешения».
- Выбрав пункты «Система» и «TrustedInstaller» отметьте для них «Запретить» в списке разрешений и нажмите кнопку «Применить».

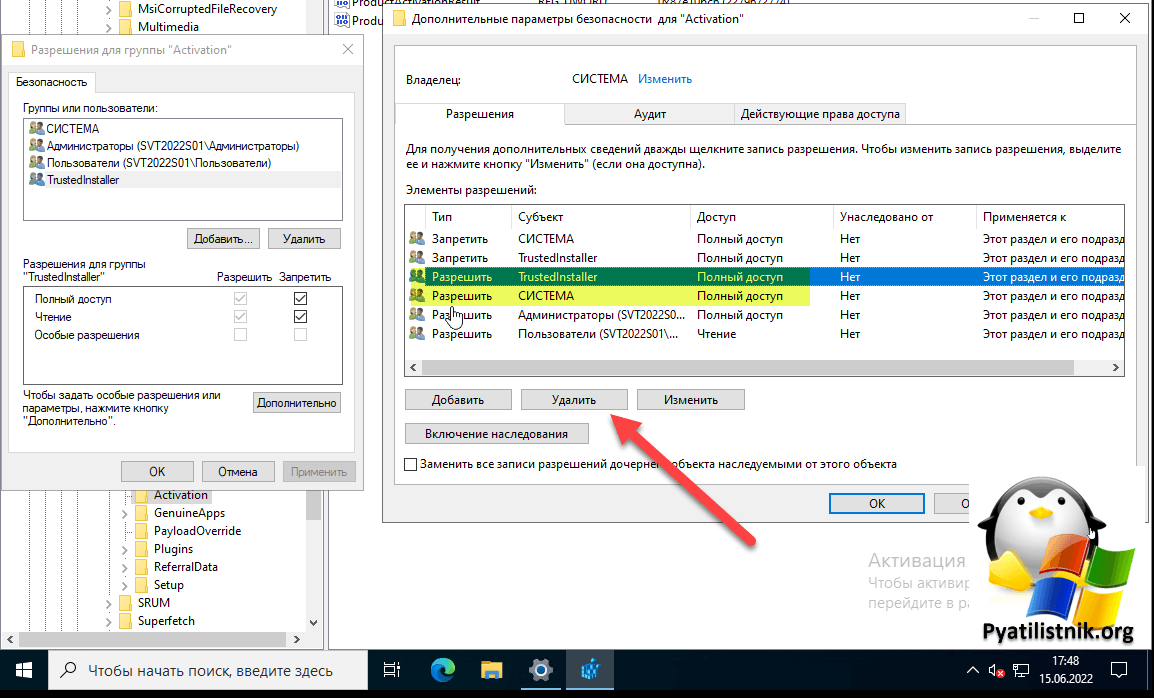
- Нажмите кнопку «Дополнительно», а на следующем экране нажмите «Отключить наследования», подтвердите, а затем удалите пункты TrustedInstaller и Система, для которых в «Тип» указано «Разрешить».
- Примените сделанные настройки и перезагрузите Windows

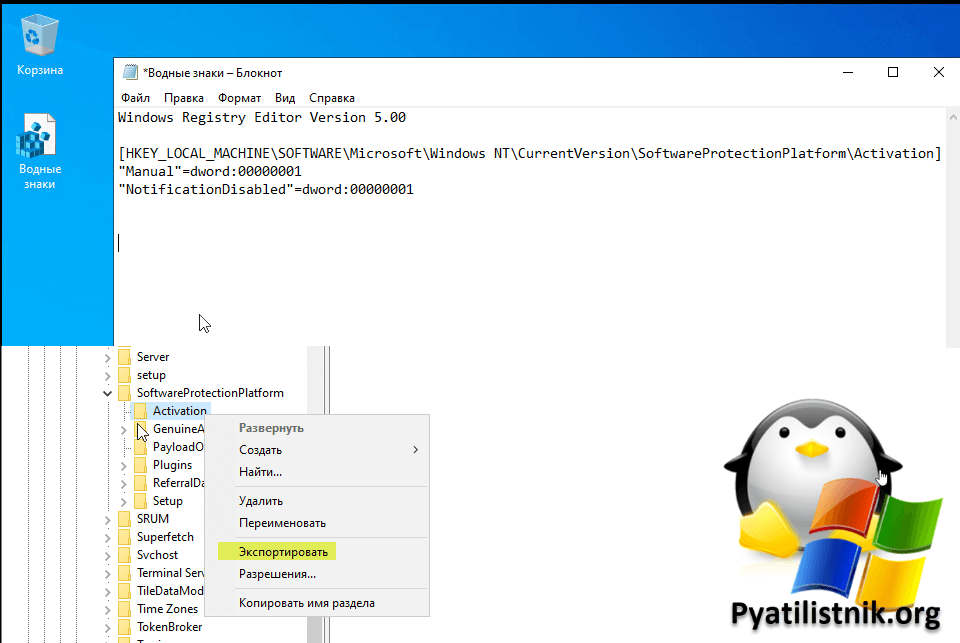
Также можно использовать следующий код, чтобы создать reg файл и внести изменения в реестр. В коде больше параметров, чем в шагах, описанных выше:
Windows Registry Editor Version 5.00

[HKEY_LOCAL_MACHINESOFTWAREMicrosoftWindows NTCurrentVersionSoftwareProtectionPlatformActivation]
"ActivationInterval"=dword:000dbba0
"Manual"=dword:00000001
"NotificationDisabled"=dword:00000001
"DownlevelActivation"=dword:00000002
Еще один метод в дополнение к вышеописанному — отключение службы «Быстрая проверка». Сделать это можно в services.msc (установить тип запуска службы в «Отключена», применить и перезагрузить компьютер), либо в редакторе реестра: в разделе реестра HKEY_LOCAL_MACHINESYSTEMCurrentControlSetServicessvsvc следует изменить параметр Start на 4, а затем перезагрузить компьютер.
Программа Universal Watermark Disabler
Еще один способ убрать надпись «Активация Windows» в углу экрана — использовать простую бесплатную утилиту Universal Watermark Disabler, скачать которую можно с официального сайта https://winaero.com/download.php?view.1794. После загрузки утилиты, распакуйте архив и запустите файл uwd.exe
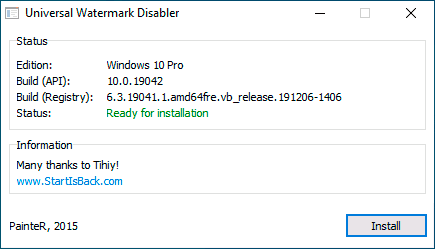
Нажмите кнопку «Install» (может потребоваться подтверждение установки в неподдерживаемой сборке, обычно всё работает), а после этого нажмите «Ок» для выхода из системы.
После автоматического выхода из системы и последующего входа надпись не всегда пропадает, но, если после этого выполнить перезагрузку компьютера или ноутбука — обычно исчезает (но, по моим тестам, не всегда).
Видео инструкция
Надеюсь, один из предложенных способов оказался работоспособным для вашей ситуации и надпись об активации в углу рабочего стола вас больше не побеспокоит.
Желание убрать надпись об активации Windows 10 – не всегда связано с пиратством. Например, сведения об лицензии ОС могли быть повреждены сторонним ПО или пользователь мог по ошибке купить ключ для другой версии системы. Избавиться от навязчивого требования Microsoft нетрудно.
Содержание
- С помощью встроенных возможностей
- Через реестр
- Скрипт AutoActivationOff.reg
- С помощью Windows Powershell
- С помощью cmd
- С помощью специальных возможностей
- Через отключение советов
- Через Центр Поддержки Windows
- Убрать активацию Windows 10 с помощью сторонних утилит
- Winaero
- Kmsauto
- Re loader activator
- Wcp watermark editor
С помощью встроенных возможностей
Чтобы избавиться от надписи необязательно устанавливать стороннее ПО – существует 7 способов справиться подручными средствами.
Через реестр
Факт активации ОС фиксируется в специальной базе данных для хранения настроек операционной системы. Нужную информацию можно ввести туда и вручную – через редактор реестра.
- Кликните на поле поиска, что правее кнопки меню «Пуск».
- Наберите «regedit».
- Нажмите Enter.
- Разрешите приложению вносить изменения на устройстве, если попросят.
- Вставьте в адресную строку такой маршрут HKEY_LOCAL_MACHINESOFTWAREMicrosoftWindows NTCurrentVersionSoftwareProtectionPlatformActivation. Если адресная строка отсутствует, включите её через меню «Вид»-«Адресная строка». Также можете пройти указанный маршрут вручную через окно слева.

- Поочередно открывайте элементы Manual и NotificationDisabled справа. В открывшемся окне каждый раз меняйте значение с 0 на 1 и жмите «ОК».


Разработчики Windows предусмотрели желание пользователей активировать ОС без оплаты лицензии. Существует алгоритм, который выявляет изменения в указанных выше файлах и возвращает первоначальные значения. Чтобы выключить защитный скрипт.
- Не закрывайте окно редактора реестра после выполнения предыдущих инструкций.
- Найдите элемент «Activation» в левой части окна и кликните по нему правой кнопкой мыши.
- В открывшемся контекстном меню выберите пункт «Разрешения».
- Запретите чтение и полный доступ к папке реестра для пользователей «Система» и «TrustedInstaller». Для этого в отношении каждого из них совершите следующие действия:
- Кликните по имени пользователя в верхней части окна.
- Поставьте 2 галочки в колонке «Запретить» внизу.

- Нажмите «Дополнительно».
- Кликните по кнопке «Отключить наследование».
- Подтвердите нужное действие, кликом по «Удалить все унаследованные разрешения из этого объекта».

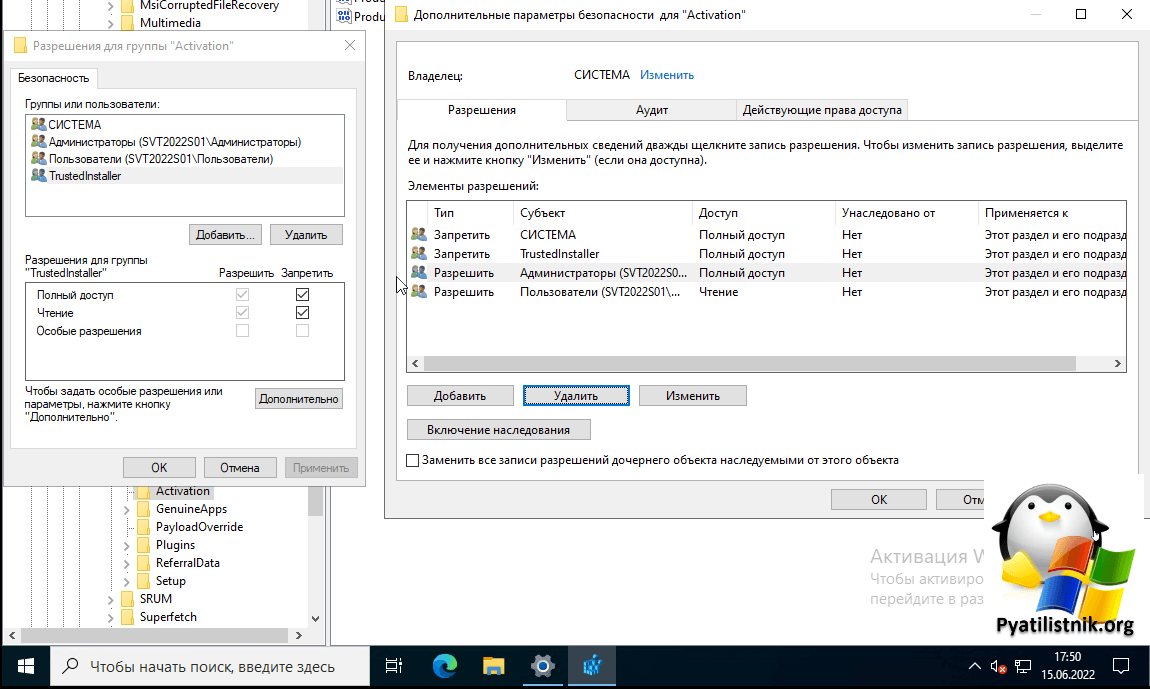
- Поочередно выделяйте «TrustedInstaller» и «СИСТЕМА» в списке элементов разрешений и нажимайте «Удалить» для каждого из субъектов. Этого не нужно делать для элементов, тип которых отличается от значения «Разрешить».

- Поочередно нажимайте «Ок» в открытых окнах, чтобы применить все изменения.


После проделанной работы останется перезагрузиться.
Скрипт AutoActivationOff.reg
Процесс, описанный в предыдущем пункте, можно автоматизировать. Это особенно актуально для тех, кто хочет активировать сразу несколько операционных систем на разных машинах. Создавать файл или скачать придется 1 раз, а дальше его можно использовать хоть 1000 раз.
- Откройте текстовый редактор и вставьте следующее.
Windows Registry Editor Version 5.00
[HKEY_LOCAL_MACHINESOFTWAREMicrosoftWindows NTCurrentVersionSoftwareProtectionPlatformActivation]
«ActivationInterval»=dword:000dbba0
«Manual»=dword:00000001
«NotificationDisabled»=dword:00000000
«DownlevelActivation»=dword:00000002
- Сохраните файл, добавив «.reg» в конце названия.
- Кликните по полученному файлу правой кнопкой мыши.
- Нажмите «Слияние».

- Следуйте инструкциям системы.

Скачать готовый скрипт AutoActivationOff.reg
![]()
Алексей Горбань
Сертифицированный специалист по защите информации.
Задать вопрос
С помощью Windows Powershell
Windows Powershell – официальный инструмент для автоматизации процессов от Microsoft. Одной текстовой команды будет достаточно, чтобы забыть о проблеме активации.
- Кликните на поле поиска, что правее кнопки меню «Пуск».
- Введите Powershell.
- Нажмите Enter.

- Введите «slmgr /renew».

- Нажмите Enter.


Осталось перезагрузить компьютер.
Этот способ придется повторять ежеквартально.
С помощью cmd
Через командную строку придется вводить очень много кода, поэтому мы предлагаем просто скачать файл по ссылке и запустить его.
С помощью специальных возможностей
Разработчики предусмотрели возможность убрать активацию с экрана для людей с плохим зрением. Эта функция спрятана внутри Панели Управления.
- Нажмите комбинацию клавиш Win+R.
- Введите «control» в появившемся окне и кликните по кнопке «Ок».

- Выберите пункт «Специальные возможности».
- Откройте «Центр специальных возможностей».
- Нажмите на надпись «Оптимизация изображения на экране».
- Прокрутите окно до конца вниз.
- Над надписью «См. также» найдите «Удалить фоновое изображение (по возможности)».
- Поставьте галочку напротив надписи.
- Кликните по кнопке «ОК».


Описанный алгоритм не активирует операционную систему, но после перезагрузки мешающий водяной знак должен исчезнуть.
Через отключение советов
Ещё один легальный вариант решения проблемы.
- Нажмите сочетание клавиш Win+I.
- Выберите пункт «Система».
- Откройте «Уведомления и действия» слева.
- Уберите галочки напротив пунктов, где говориться про советы и экран приветствия Windows.

- Закройте окно и сделайте перезагрузку.

Через Центр Поддержки Windows
Чтобы отключить водяной знак.
- Нажмите сочетание клавиш Win+R.
- Введите «control».
- Нажмите Enter.
- Выберите «Система и безопасность».
- Выберите «Центр Поддержки Windows». В более поздних сборках этот пункт называется «Центр безопасности и обслуживания».
- В боковом меню справа выберите пункт, который начинается со слов «Параметры Центра…» или «Изменить параметры компонента…» в зависимости от сборки ОС.

- Снимите галочку напротив «Активация Windows».

- Примените изменения и перезагрузите компьютер.


Описанный способ на некоторых сборках ОС Windows 10 реализовать не получится. В этом случае галочка на шаге 7 будет неактивна.
![]()
Алексей Горбань
Сертифицированный специалист по защите информации.
Задать вопрос
Убрать активацию Windows 10 с помощью сторонних утилит
Инструкции о том, как убрать надпись об активации, пользуются постоянным спросом. Поэтому разработчики ПО буквально забросали интернет разнообразными программами, которые сделают всё за вас.
Расскажем о программных продуктах, которым можно доверять. Перед работой с ними рекомендуем отключить антивирусы и сетевые экраны. Они могут препятствовать активации.
Winaero
Winaero – не просто локальная утилита, а целый веб-хостинг с инструментарием под ОС Windows. Одна из подпрограмм системы – Universal Watermark Disabler.
- Скачайте нужное ПО по ссылке.
- Распакуйте zip-архив.
- Найдите файл «UWD.EXE» и запустите его.
- Нажмите «Install».

- По окончанию процесса, кликните по «ОК».

Всё что нужно, система сделает сама. Если надпись не пропала, перезагрузите устройство.
Kmsauto
Универсальный активатор для программных продуктов корпорации Microsoft.
- Скачайте программу с официального сайта по ссылке. Наиболее удобная ссылка для скачивания находится на самом дне страницы.

- Установите KMS. Если спросят пароль, введите «1234».
- Откройте программу.
- Нажмите «Активация» или «Activation».
- Выберите пункт «Активировать Windows».

- Ожидайте окончания процесса. На синем поле внизу будет отображаться текущий прогресс.
- Нажмите «ОК», если хотите создать задачу в Task Manager для повторного получения лицензии спустя 25 дней.


Активатор перезагрузит устройство сам.
Re loader activator
Функционал этого активатора такой же, как у предыдущего. Программу разбросали по пиратским сайтам, официального портала нет. Чтобы активировать MS Windows.
- Скачиваем ПО по ссылке. Пароль «111».
- Открываем программу.
- Ставим галочку напротив Win. Остальные галочки должны отсутствовать.

- Нажимаем «Активация» и ждем окончания процесса.

Re-loader Activator может использовать разные методы для работы – AntiWPA, OEM и KMS. Если уведомление об активации не пропало с первого раза, то.
- В окне программы перейдите во вкладку «Настройки».
- Кликните в графу напротив надписи «Метод Windows».

- Выберите метод, отличный от использованных ранее.
- Повторите процесс активации.

Wcp watermark editor
WCP Watermark Editor – не активирует ОС, а просто убирает назойливый водяной знак.
- Скачайте программу по ссылке.
- Распакуйте ZIP-архив.
- Запустите exe-файл.
- Поставьте галочку напротив «Remove all watermark».

- Кликните по клавише «Apply…».

Большинство описанных выше способов убрать надпись об активации Windows 10 незаконны и нежелательны, поэтому корпорация Microsoft постоянно развивает методы противодействия. Программисты с обратной стороны виртуального окопа тоже не стоят на месте. Поэтому набор способов по нейтрализации водяного знака постоянно меняется – одни программы устаревают, другие появляются. А мы стараемся держать вас в курсе актуальных вариантов.
Через отключение советов
-54
С помощью Windows Powershell
-65
Скрипт AutoActivationOff.reg
-75
С помощью специальных возможностей
-90
Через Центр Поддержки Windows
-193

Доброго здравия, друзья!
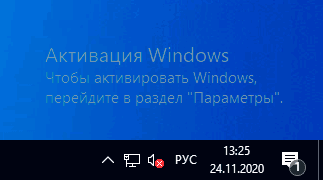
Windows показывает водяной знак «Активировать Windows» в правом нижнем углу не активированного компьютера с Windows.
Если вы используете не активированную Windows 10, скорее всего, вы видели водяной знак «Активировать Windows 10 — перейдите в настройки, чтобы активировать Windows».
Если этот водяной знак вас беспокоит, мы расскажем, как удалить водяной знак активации Windows 10 навсегда.
Причины появления водяного знака активации Windows
Прежде чем перейти к тому, как удалить водяной знак активации Windows, вы должны знать, по каким причинам он появляется на вашем экране.
Есть разные причины для его появления, одна из самых распространенных — когда Windows не активирована/срок действия истек.
Помимо этого, вот еще причины, почему:
- Недействительная лицензия Windows — вы можете ввести ключ, полученный из онлайн-источников, и он просто не работает, потому что его использовали другие. Microsoft использует технологию онлайн-активации для блокировки других пользователей, использующих тот же ключ продукта.
- Несравнимая версия Windows — если вы приобрели ключ для Windows 10 Professional Edition а установили Windows 10 Home Edition на свой компьютер. Хотя ключ действителен на 100%, водяной знак по-прежнему виден из-за несравнимого варианта Windows 10.
Активация Windows также включает некоторые дополнительные функции, которыми вы не сможете воспользоваться, если не активировали Windows на своем компьютере.
Активируя Windows, вы получите обновления Windows, функции безопасности, Защитника Windows и многое другое.
Итак, если у вас есть деньги, вы мгновенно получите ключ с любого авторизованного сайта или даже от Microsoft.
Вы можете активировать Windows с его помощью и вернуться к своим обычным делам.
Однако, если у вас нет ключа, но вы все равно хотите избавиться от этой проблемы.
Далее представлены 4 простых способа избавиться от водяного знака Windows «Активация» на вашем компьютере.
Метод 1: удалить водяной знак активации Windows с помощью Regedit
Чтобы удалить водяной знак активации Windows с помощью Regedit, выполните следующие действия:
Нажмите «Пуск», введите «Regedit» и нажмите Enter (вам будет предложено UAC*, нажмите «Да»)
* UAC — контроль учетных записей Windows 10

Теперь перейдите в «HKEY_CURRENT_USER — Панель управления — Рабочий стол».
В папке «Desktop» прокрутите вниз, чтобы найти «PaintDesktopVersion», и дважды щелкните по нему, чтобы открыть.
Убедитесь, что выбрано шестнадцатеричное число, и измените значение на «0». Затем нажмите «ОК», чтобы сохранить изменения.
Вы закрываете редактор реестра и перезагружаете компьютер. Когда вы снова войдете на рабочий стол, водяной знак должен быть удален.
Метод 2: удалить водяной знак активации Windows с помощью Windows PowerShell
Этот метод временно активирует Windows на 90 дней (3 месяца), что означает, что вы не увидите активированный водяной знак Windows в течение 90 дней.
Однако через 90 дней вам придется повторить этот метод, чтобы убрать его снова. Вот как:
Нажмите «Пуск», введите «PowerShell», щелкните правой кнопкой мыши и выберите «Запуск от имени администратора» (вам будет предложено UAC, нажмите «Да»).
В окне PowerShell введите следующую команду и нажмите Enter.
slmgr /renew
Теперь перезагрузите компьютер, и все будет в порядке в течение следующих 90 дней.
Метод 3: отключить водяной знак активации Windows с помощью скрипта
Мы обсудили несколько способов активации Windows для удаления водяного знака активации Windows.
Вот еще один способ активировать Windows, на этот раз запустив сценарий. Вот как это сделать:
Откройте блокнот на вашем компьютере, скопируйте и вставьте приведенный ниже текст в блокнот.
@echo offtitle Activate Windows 7 / 8 / 8.1 / 10 for FREE!&cls&echo =====================================&echo #Copyright: MSGuides.com&echo =====================================&echo.&echo #Supported products:&echo – Windows 7 Professional&echo – Windows 7 Professional N&echo – Windows 7 Professional E&echo – Windows 7 Enterprise&echo – Windows 7 Enterprise N&echo – Windows 7 Enterprise E&echo – Windows 8 Core&echo – Windows 8 Core Single Language&echo – Windows 8 Professional&echo – Windows 8 Professional N&echo – Windows 8 Professional WMC&echo – Windows 8 Enterprise&echo – Windows 8 Enterprise N&echo – Windows 8.1 Core&echo – Windows 8.1 Core N&echo – Windows 8.1 Core Single Language&echo – Windows 8.1 Professional&echo – Windows 8.1 Professional N&echo – Windows 8.1 Professional WMC&echo – Windows 8.1 Enterprise&echo – Windows 8.1 Enterprise N&echo – Windows 10 Home&echo – Windows 10 Home N&echo – Windows 10 Home Single Language&echo – Windows 10 Home Country Specific&echo – Windows 10 Professional&echo – Windows 10 Professional N&echo – Windows 10 Education N&echo – Windows 10 Education N&echo – Windows 10 Enterprise&echo – Windows 10 Enterprise N&echo – Windows 10 Enterprise LTSB&echo – Windows 10 Enterprise LTSB N&echo.&echo.&echo ====================================&echo Activating your Windows… & cscript //nologo c:windowssystem32slmgr.vbs /ipk FJ82H-XT6CR-J8D7P-XQJJ2-GPDD4 >nul&cscript //nologo c:windowssystem32slmgr.vbs /ipk MRPKT-YTG23-K7D7T-X2JMM-QY7MG >nul&cscript //nologo c:windowssystem32slmgr.vbs /ipk W82YF-2Q76Y-63HXB-FGJG9-GF7QX >nul&cscript //nologo c:windowssystem32slmgr.vbs /ipk 33PXH-7Y6KF-2VJC9-XBBR8-HVTHH >nul&cscript //nologo c:windowssystem32slmgr.vbs /ipk YDRBP-3D83W-TY26F-D46B2-XCKRJ >nul&cscript //nologo c:windowssystem32slmgr.vbs /ipk C29WB-22CC8-VJ326-GHFJW-H9DH4 >nul&cscript //nologo c:windowssystem32slmgr.vbs /ipk BN3D2-R7TKB-3YPBD-8DRP2-27GG4 >nul&cscript //nologo c:windowssystem32slmgr.vbs /ipk 2WN2H-YGCQR-KFX6K-CD6TF-84YXQ >nul&cscript //nologo c:windowssystem32slmgr.vbs /ipk NG4HW-VH26C-733KW-K6F98-J8CK4 >nul&cscript //nologo c:windowssystem32slmgr.vbs /ipk XCVCF-2NXM9-723PB-MHCB7-2RYQQ >nul&cscript //nologo c:windowssystem32slmgr.vbs /ipk GNBB8-YVD74-QJHX6-27H4K-8QHDG >nul&cscript //nologo c:windowssystem32slmgr.vbs /ipk 32JNW-9KQ84-P47T8-D8GGY-CWCK7 >nul&cscript //nologo c:windowssystem32slmgr.vbs /ipk JMNMF-RHW7P-DMY6X-RF3DR-X2BQT >nul&cscript //nologo c:windowssystem32slmgr.vbs /ipk M9Q9P-WNJJT-6PXPY-DWX8H-6XWKK >nul&cscript //nologo c:windowssystem32slmgr.vbs /ipk 7B9N3-D94CG-YTVHR-QBPX3-RJP64 >nul&cscript //nologo c:windowssystem32slmgr.vbs /ipk BB6NG-PQ82V-VRDPW-8XVD2-V8P66 >nul&cscript //nologo c:windowssystem32slmgr.vbs /ipk GCRJD-8NW9H-F2CDX-CCM8D-9D6T9 >nul&cscript //nologo c:windowssystem32slmgr.vbs /ipk HMCNV-VVBFX-7HMBH-CTY9B-B4FXY >nul&cscript //nologo c:windowssystem32slmgr.vbs /ipk 789NJ-TQK6T-6XTH8-J39CJ-J8D3P >nul&cscript //nologo c:windowssystem32slmgr.vbs /ipk TX9XD-98N7V-6WMQ6-BX7FG-H8Q99 >nul&cscript //nologo c:windowssystem32slmgr.vbs /ipk 3KHY7-WNT83-DGQKR-F7HPR-844BM >nul&cscript //nologo c:windowssystem32slmgr.vbs /ipk 7HNRX-D7KGG-3K4RQ-4WPJ4-YTDFH >nul&cscript //nologo c:windowssystem32slmgr.vbs /ipk PVMJN-6DFY6-9CCP6-7BKTT-D3WVR >nul&cscript //nologo c:windowssystem32slmgr.vbs /ipk W269N-WFGWX-YVC9B-4J6C9-T83GX >nul&cscript //nologo c:windowssystem32slmgr.vbs /ipk MH37W-N47XK-V7XM9-C7227-GCQG9 >nulecho ————————————&echo.&echo.&set i=1:serverif %i%==1 set KMS_Sev=kms7.MSGuides.comif %i%==2 set KMS_Sev=kms8.MSGuides.comif %i%==3 set KMS_Sev=kms9.MSGuides.comif %i%==4 goto notsupportedcscript //nologo c:windowssystem32slmgr.vbs /skms %KMS_Sev% >nulcscript //nologo c:windowssystem32slmgr.vbs /ato | find /i “successfully” && (echo.& echo ====================================== & echo. & choice /n /c YN /m “Would you like to visit my blog [Y,N]?” & if errorlevel 2 exit) || (echo The connection to the server failed! Trying to connect to another one… & echo Please wait… & echo. & echo. & set /a i+=1 & goto server)explorer “https://productkey.net”&goto halt:notsupportedecho ======================================&echo.&echo Sorry! Your version is not supported.:haltpause >nul
В блокноте перейдите в раздел «Файл», нажмите «Сохранить как» и назовите файл windows10.cmd (важно, чтобы имя файла оканчивалось на .cmd) и сохраните файл на рабочем столе.
Щелкните правой кнопкой мыши файл windows10.cmd (который мы только что создали) и выберите «Запуск от имени администратора».
Перезагрузите компьютер, чтобы активировать Windows.
Метод 4: отключить водяной знак активации Windows с помощью специальных возможностей
Мы можем удалить водяной знак активации Windows, также используя опцию Windows 10 Ease of Access.
Не запутайтесь, вот как это сделать:
Нажмите на меню «Пуск» и найдите «Панель управления», затем щелкните приложение.
Перейти в «Центр специальных возможностей».
На следующем экране нажмите «Оптимизация изображений на экране».
Теперь прокрутите вниз до нижней части этого экрана, чтобы установить флажок «Удалить фоновые изображения (по возможности)».
Нажмите «ОК» и перезагрузите компьютер.
Водяной знак активации Windows должен исчезнуть.
Метод 5: избавьтесь от водяного знака активации Windows, отключив советы по Windows 10
Еще один способ избавиться от водяного знака активации Windows, особенно в Windows 10 — отключить советы по Windows 10.
Вот как это сделать:
Зайдите в «Пуск» и нажмите «Настройки (кнопка в виде шестеренки)».
Перейдите в систему и нажмите «Уведомления и действия».
Прокрутите вниз и отключите параметр «Показывать приветствие Windows после обновлений и получать советы, рекомендации и предложения при использовании Windows».
Это оно! И все будет хорошо.
Метод 6: избавьтесь от водяного знака активации Windows с помощью CMD
Иногда включение тестового режима в Windows приводит к появлению водяного знака активации Windows.
Если ваш тестовый режим включен, вы можете легко отключить его с помощью CMD. Вот как:
Нажмите «Пуск» и введите «CMD», щелкните правой кнопкой мыши и выберите «Запуск от имени администратора»
(вам будет предложено UAC, нажмите «Да»)
В окне cmd введите команду ниже и нажмите Enter:
bcdedit -set TESTSIGNING OFF
Если все в порядке, вы должны увидеть сообщение «Операция успешно завершена».
Перезагрузите вашу машину. Теперь должно быть все в порядке.
Метод 7: удалить водяной знак активации Windows с помощью сторонних инструментов
Если ничего не помогло, это, вероятно, последний метод, который вы можете попытаться избавиться от водяного знака активации Windows.
Эти бесплатные сторонние инструменты удаляют водяной знак активации Windows, обманывая Windows, полагая, что он был активирован.
Поэтому мы не рекомендуем этот метод, но мы обязаны сообщить вам об этом. Вот как:
1. Универсальное средство отключения водяных знаков (Winaero)
Это программное обеспечение удалит водяной знак активации Windows с вашего компьютера одним нажатием кнопки.
Прежде чем продолжить, убедитесь, что все приложения на вашем компьютере закрыты, и сохраните всю работу. Вот и мы:
- Загрузите «Universal Watermark Disabler» с этой страницы.
- Разархивируйте файл, дважды щелкните uwd.exe и установите его.
- Приложение запустится, а затем автоматически выйдет из системы.
- Снова войдите в свою машину.
- Теперь водяной знак должен быть удален.
2. KMSAuto
Это хорошая альтернатива поддельным ключам продукта Windows.
Его можно использовать для активации не только Windows, но и других продуктов Microsoft, например Office.
- Загрузите KMSAuto и установите его.
- Откройте программу, нажмите «Активировать Windows».
- Как только это будет сделано, ваш компьютер перезагрузится.
- Это оно! Когда вы снова войдете в систему, Windows будет активирована, и водяной знак активации Windows исчезнет.
Заключение
Итак, это 7 простых способов избавиться от водяного знака активации Windows.
Мы рекомендуем активировать Windows оригинальным серийным ключом.
Тем не менее, мы надеемся, что эта статья навсегда решит вашу проблему «удалить водяной знак активации Windows».
Дайте нам знать, если у вас есть какие-либо вопросы, в разделе комментариев ниже или свяжитесь с нами по электронной почте.
До скорых встреч! Заходите!
Обновлено 24.06.2022

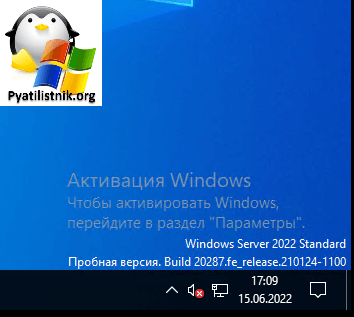
Добрый день! Уважаемые читатели и гости IT блога Pyatilistnik.org. В прошлый раз мы с вами разобрали много сценариев поиска компьютеров в Active Directory с помощью командлета Get-ADComputer, благодаря этому вы теперь понимаете как теперь удобно это использовать в сценариях. Сегодня я хочу вас научить, как навсегда убрать надпись активация Windows 10/11, которую вы можете увидеть после пробного периода, опишу сценарии, где это актуально.
Каждые три года компания Microsoft пытается порадовать пользователей новой операционной системой, не все люди готовы сразу ее ставить после релиза, так как это всегда сопряжено массой проблем в виде синих экранов или выходом из строя оборудования, например код ошибки 10 или код 43.
Кто-то вообще заранее пытается поработать с новой системой, участвуя в программе Insider Preview. В любой этой ситуации есть пробный период, через который у пользователя начинает выскакивать водяная надпись «Активация Windows. Чтобы активировать Windows, перейдите в раздел параметры«. Данная надпись появляется через 180 дней, столько у Microsoft длится пробный период, но его оказывается так же можно сбросить.
Как сбросить пробный период в Windows
В данной инструкции я подробно опишу методы позволяющие навсегда убрать надпись Активация Windows на экране Windows 11 и других версиях 10/8.1/7/Vista, вплоть до Windows Server 2022 ниже и выше. Я разберу как встроенные методы, так и через сторонние утилиты, чтобы у вас всегда был выбор, что очень важно.
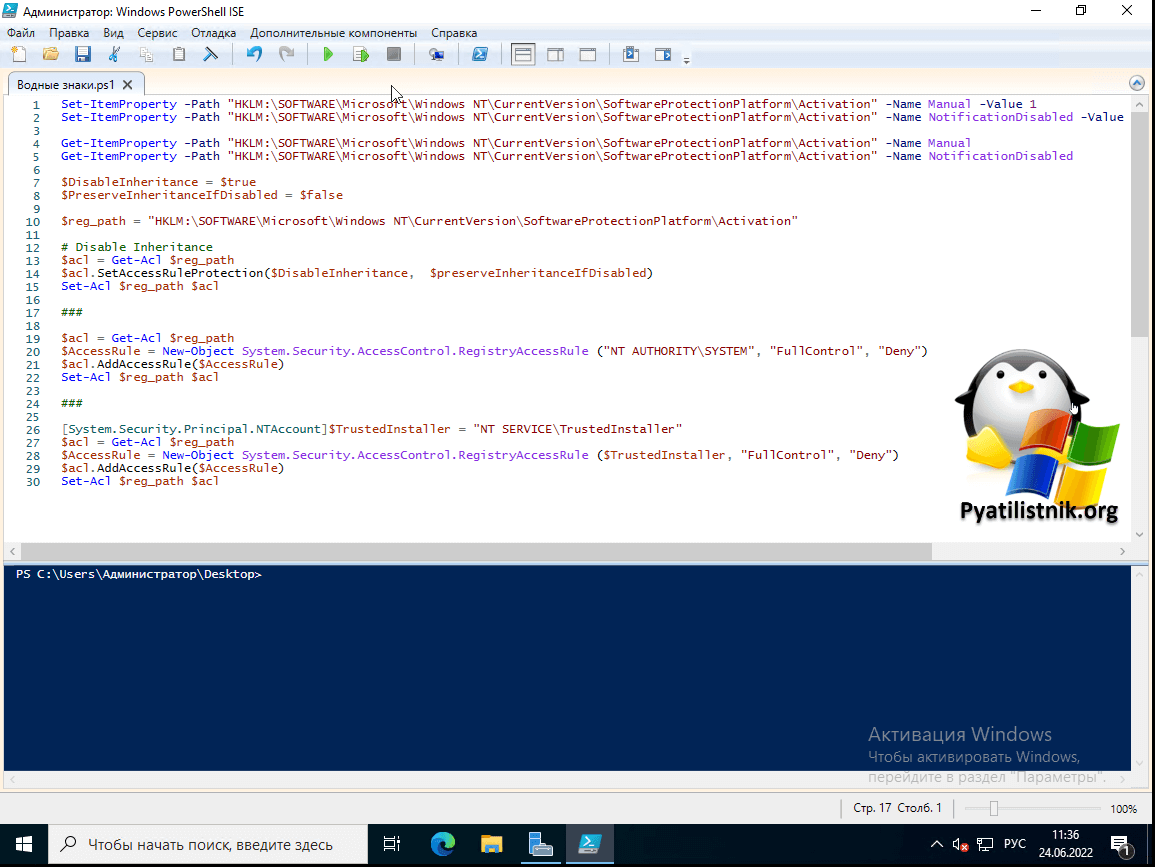
Как скрыть надпись активация Windows через скрипт PowerShell
Самый быстрый метод, который сделает все за одну итерацию, это использование моего скрипта PowerShell. Скрипт делает:
- 1️⃣ Меняет значения у ключей реестра Manual и NotificationDisabled на единицу
- 2️⃣ Убирает права у «СИСТЕМА» и «TrustedInstaller» на раздел Activation и отключает наследование, это сделано для того, чтобы система не смогла сделать откат настроек.
Содержимое скрипта:
# Разработчик Иван Сёмин/Pyatilistnik.org
# Задаем новые значения для ключей реестра
Set-ItemProperty -Path «HKLM:SOFTWAREMicrosoftWindows NTCurrentVersionSoftwareProtectionPlatformActivation» -Name Manual -Value 1
Set-ItemProperty -Path «HKLM:SOFTWAREMicrosoftWindows NTCurrentVersionSoftwareProtectionPlatformActivation» -Name NotificationDisabled -Value 1
# Проверяем значения ключа реестра
Get-ItemProperty -Path «HKLM:SOFTWAREMicrosoftWindows NTCurrentVersionSoftwareProtectionPlatformActivation» -Name Manual
Get-ItemProperty -Path «HKLM:SOFTWAREMicrosoftWindows NTCurrentVersionSoftwareProtectionPlatformActivation» -Name NotificationDisabled
# Объявления переменных
$DisableInheritance = $true
$PreserveInheritanceIfDisabled = $false
# Ветка реестра для которой все выполняется
$reg_path = «HKLM:SOFTWAREMicrosoftWindows NTCurrentVersionSoftwareProtectionPlatformActivation»
# Отключение наследования Disable Inheritance
$acl = Get-Acl $reg_path
$acl.SetAccessRuleProtection($DisableInheritance, $preserveInheritanceIfDisabled)
Set-Acl $reg_path $acl
# Установка запрета «NT AUTHORITYSYSTEM»
$acl = Get-Acl $reg_path
$AccessRule = New-Object System.Security.AccessControl.RegistryAccessRule («NT AUTHORITYSYSTEM», «FullControl», «Deny»)
$acl.AddAccessRule($AccessRule)
Set-Acl $reg_path $acl
# Установка запрета «NT SERVICETrustedInstaller»
[System.Security.Principal.NTAccount]$TrustedInstaller = «NT SERVICETrustedInstaller»
$acl = Get-Acl $reg_path
$AccessRule = New-Object System.Security.AccessControl.RegistryAccessRule ($TrustedInstaller, «FullControl», «Deny»)
$acl.AddAccessRule($AccessRule)
Set-Acl $reg_path $acl
Убираем надпись «Активация Windows» с помощью редактора реестра
Первым, встроенным способом будет редактирование нужных ключей реестра в ручном режиме. Нужно всегда помнить, что в реестре можно исправить или добавить что угодно, это сердце Windows и уж отключение показа надписи об активации системы, правильный путь.
- 1️⃣ Вызовите окно выполнить (WIn + R) и введите слово regedit. Нажмите Enter, это вызовет окно редактора реестра Windows.
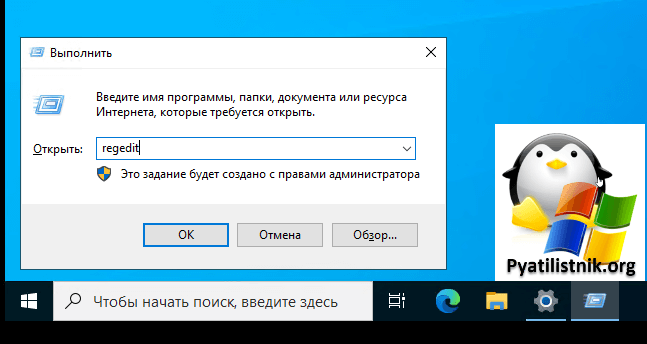
- 2️⃣ Далее вы должны перейти в раздел
HKEY_LOCAL_MACHINESOFTWAREMicrosoftWindows NT CurrentVersionSoftwareProtectionPlatformActivation
- 3️⃣ Найдите ключ Manual он по умолчанию будет иметь значение «0». Щелкаем по нему два раза и в открывшемся окне измените значение на «1». Единица будет означать скрывать надпись активация Windows.
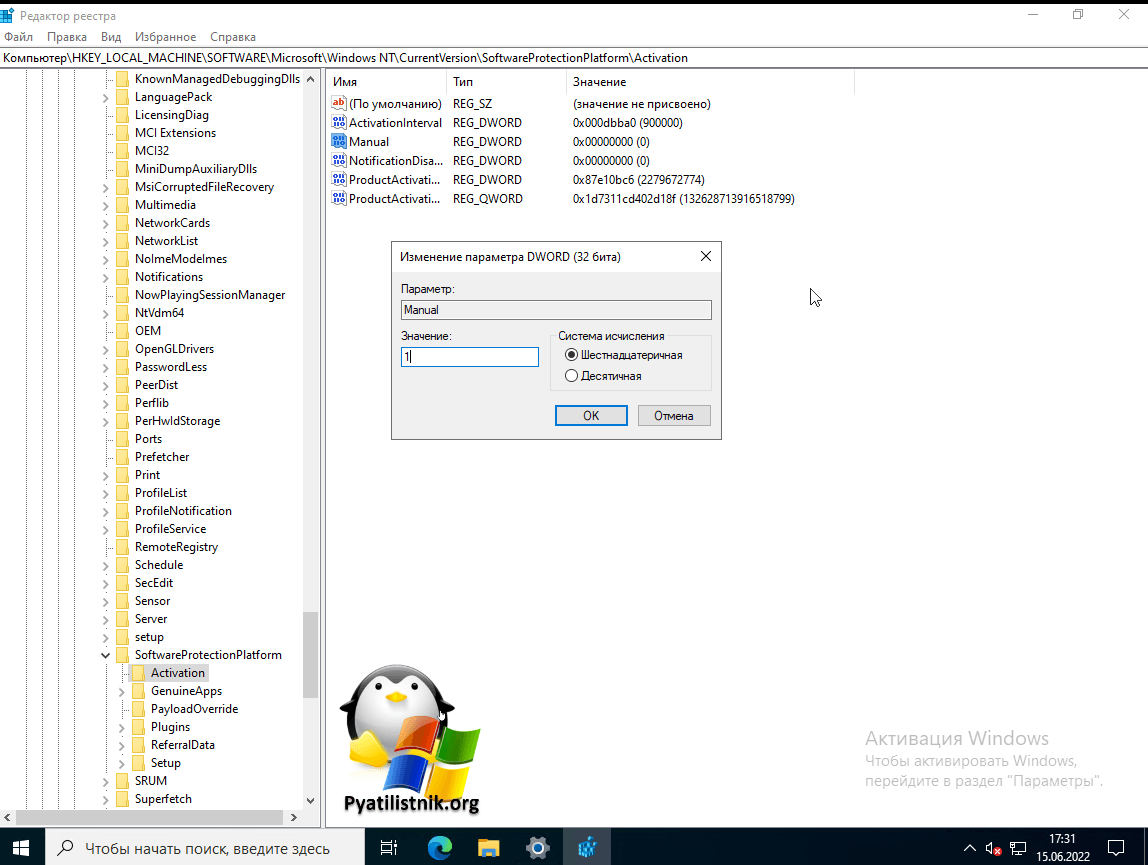
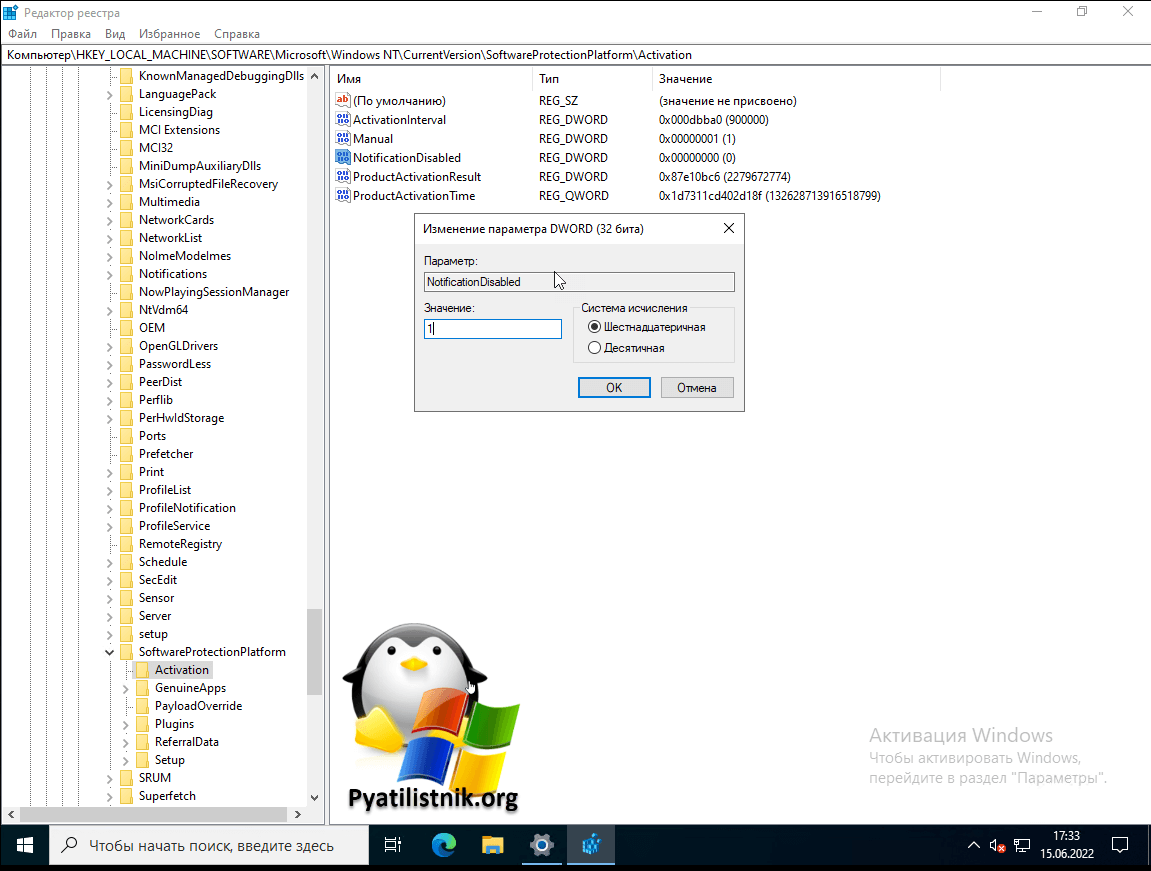
- 4️⃣ Далее найдите ключ NotificationDisabled и поменяйте у него значение на «1». Это отключит так же уведомления с водяными знаками.
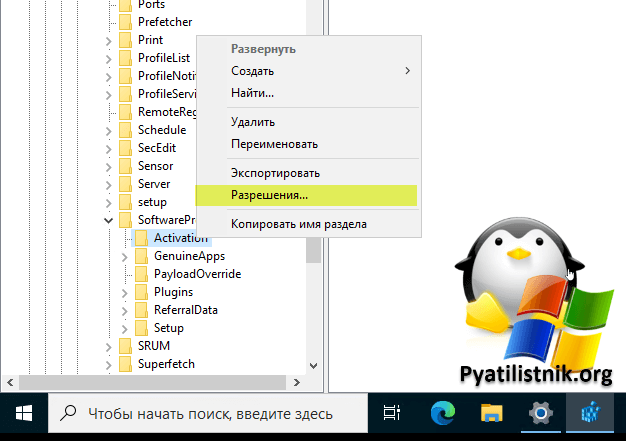
- 5️⃣ Теперь, чтобы после перезагрузки данные параметры не вернулись в исходное состояние, а такое бывает, я вам советую произвести некоторые изменения в правах на разделе Activation, данная хитрость ничего не сломает, так что не переживайте. Для этого кликните правой кнопкой мыши по разделы «Activation» и из контекстного меню выберите пункт «Разрешения«.
- 6️⃣ Для записей «СИСТЕМА» и «TrustedInstaller» вы должны выставить запреты к полному доступу, как это показано на скриншоте. После чего сохраните изменения (Применить).
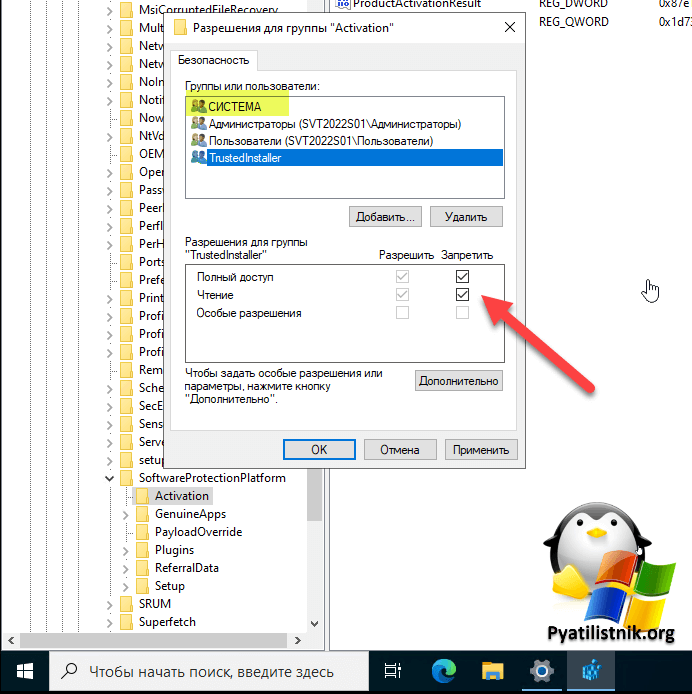
- 7️⃣Остается еще только отключить наследование, для этого нажмите на кнопку «Дополнительно» и нажмите на соответствующий пункт «Отключение наследования«. Подтвердите преобразование унаследованные разрешения в явные разрешения этого объекта.
- 8️⃣ Удалите две разрешающие записи для «СИСТЕМА» и «TrustedInstaller«, должны остаться только запрещающие записи.
- 9️⃣Сохраняем все внесенные изменения. У меня получилось вот так. Перезагружаем систему.
Так же вы всегда можете иметь под рукой созданный reg-файл с нужными параметрами.
Windows Registry Editor Version 5.00
[HKEY_LOCAL_MACHINESOFTWAREMicrosoft Windows NTCurrentVersionSoftwareProtectionPlatformActivation]
«Manual»=dword:00000001
«NotificationDisabled»=dword:00000001
Получить его можно из любого текстового файла со сменой расширения или же можно просто экспортировать готовые настройки в нужный файл, тут вы сами смотрите как вам удобно. Главное, что данный метод на 100% отключает на экране надпись об активации Windows.
Отключение службы «Быстрая проверка»
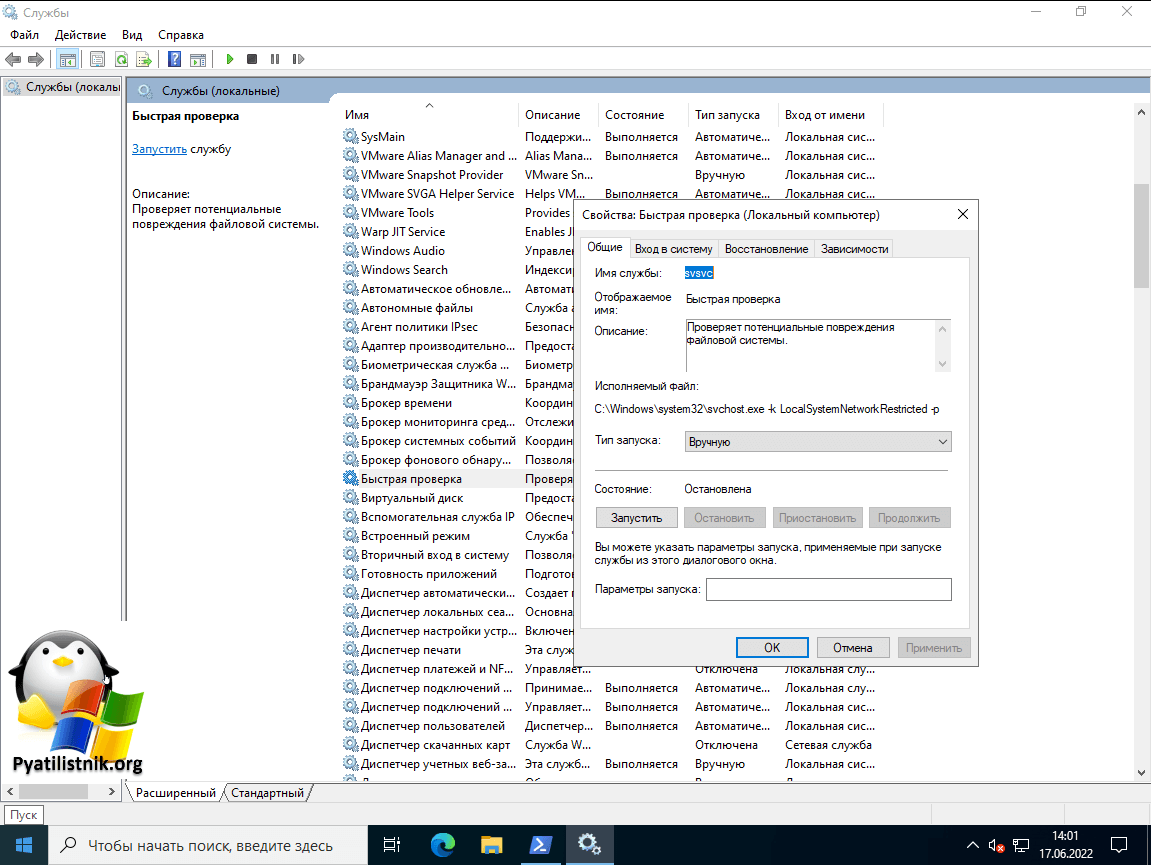
Есть альтернативный метод избавления от водяных надписей по активации. Его суть заключается в том, что вы можете так же отключить службу «Быстрая проверка«. Для этого выполните в окне PowerShell в режиме администратора:
Get-Service svsvc | Stop-Service | Set-Service svsvc -startuptype manual -passthru
В результате вы остановите службу «Быстрая проверка (svsvc)«, далее вы меняете ее тип на ручной запуск.
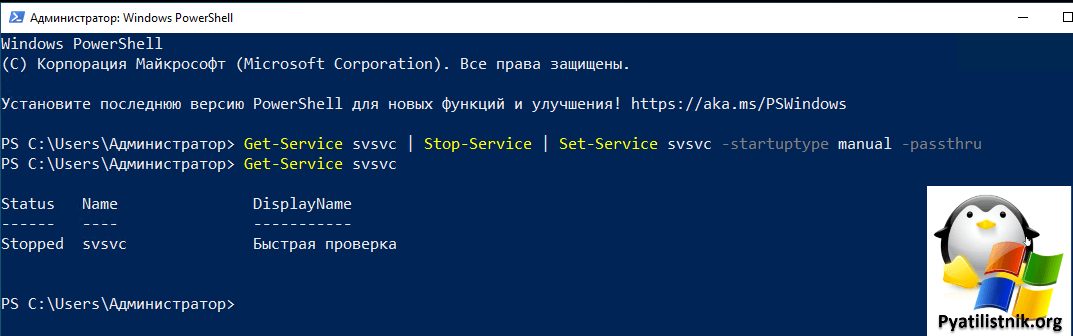
Либо вы можете в оснастке services.msc выставить то же самое.
Или же поменять ключ реестра по пути:
HKEY_LOCAL_MACHINESYSTEM CurrentControlSetServicessvsvc
У ключа Start выставить значение 4, означающее, что будет ручной запуск при загрузке системы. После внесения изменений перезагрузите компьютер.
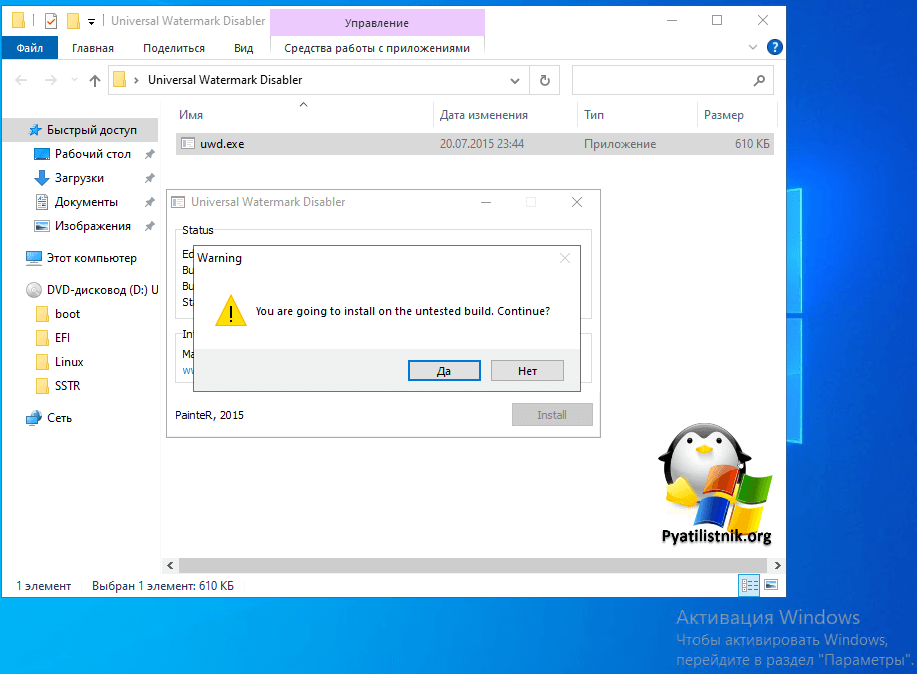
Использование программы Universal Watermark Disabler
Существует ряд сторонних утилит, которые безвозмездно могут вам помочь убрать появившуюся надпись «Активация Windows». Одной из таких является всем известная Universal Watermark Disabler.
Скачать с официальной страницы — https://winaero.com/download-universal-watermark-disabler/ или же можно у меня
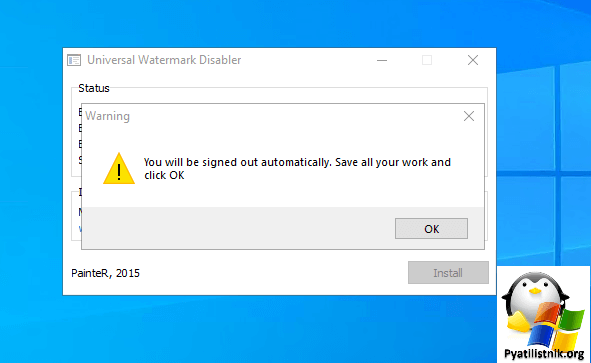
После извлечения архива запустите исполняемый файл uwd.exe, в открывшемся окне просто нажмите «Install«.

Согласитесь с уведомлением, что будите устанавливать.
Вас уведомят, что необходимо произвести выход из системы, нажимаем кнопку «Ok«, но может получиться, что надпись не пропадет, просто делаем перезагрузку.
Сброс пробного периода через командную строку
Вы можете попросить вашу ОС обнулить пробный период, суть данного метода в реарме. Сразу отмечу что ваша Windows если не была активирована, то этого и не случиться, вы лишь получите дополнительный период на тестирование.
Производить сброс через Rearm можно не более 5-ти раз, так что данный метод, просто как временное решение
Запустите командную строку в режиме администратора и введите:
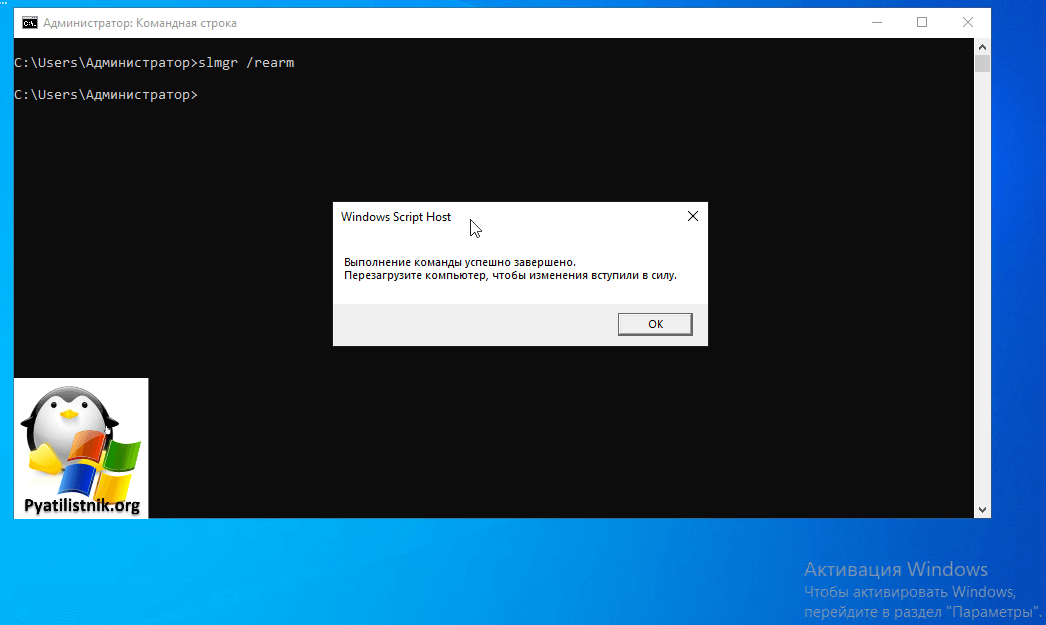
Потом перезагрузка
Еще один из вариантов убрать надпись об активации Windows, это выполнить команду:
@echo off taskkill /F /IM explorer.exe explorer.exe exit
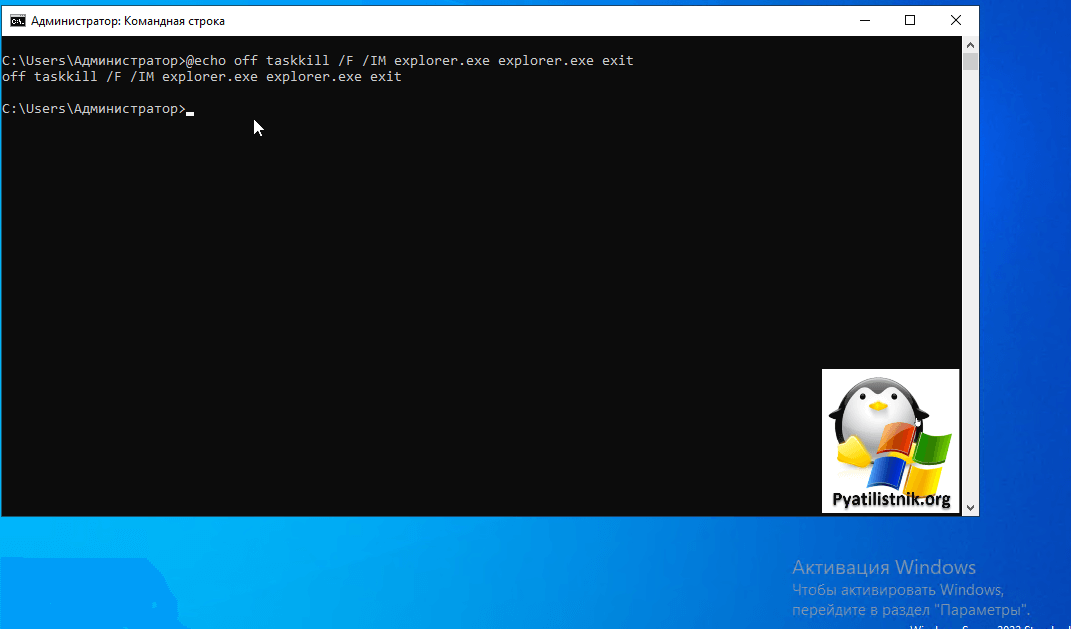
Поздравляю данная надпись теперь пропала навсегда, если остались вопросы, то жду их в комментариях. С вами был Иван Сёмин, автор и создатель IT портала Pyatilistnik.org.
![How to Get Rid of the Activate Windows Watermark [Windows 10 PC Activation Message Removal]](https://www.freecodecamp.org/news/content/images/size/w2000/2021/12/activate.png)
If you’re a Windows user, you might have seen the «Activate Windows» message that displays over every other thing – including your cursor. I guess they gave it a z-index of infinity.
This message gets displayed when you use a Windows OS that has an invalid or expired license. This keeps you from being able to personalize your desktop or get updates for Windows Defender – now Windows Security. You will also be unable to install Microsoft Office.
If this is the case, you can remove the watermark because it could have a negative effect on visual hierarchy and might be embarrassing if you’re taking screenshots or recording your desktop.
This happened to me when I was using freeCodeCamp for my first round of 100DaysOfCode.
In this article, I will show you 4 ways you can remove the Activate Windows watermark on your Windows 10 PC.
Some of the tweaks only remove the message but not the underlying problems, so you should pay attention to the last one, which will remove the message and activate your Windows as well.
Table of Contents
- How to Get Rid of the Activate Windows Watermark with PowerShell
- How to Get Rid of the Activate Windows Watermark with Notepad
- How to Get Rid of the Activate Windows Watermark by Using the Registry
- How to Get Rid of the Activate Windows Watermark with a Product Key
- Conclusion
PowerShell enables you to directly interact with your Windows OS with scripts.
There’s a PowerShell script you can execute that’ll eventually get rid of the Activate Windows message.
To execute the script, follow the steps below.
Step 1: Press WIN (Windows logo key) + S on your keyboard.
Step 2: Search for «powershell». You have to execute the script as an administrator, so click on «Run as Administrator» on the right.
Step 3: Type in «slmgr /renew» (without quotes) and hit ENTER.

Step 4: Restart your PC.
If you’ve made several tweaks with third-party apps in order to activate Windows, this fix might not work for you. If it doesn’t work for you, try the next one.
How to Get Rid of the Activate Windows Watermark with Notepad
As simple as Notepad looks to everyone, you can use it to remove the Activate Windows watermark. In fact, this way is one of the most popular to get rid of the message.
You can use Notepad to get rid of the message with the simple steps below.
Step 1: Hit the WIN button on your keyboard and search for Notepad. Click Open on the right or the Notepad search result to launch the app.
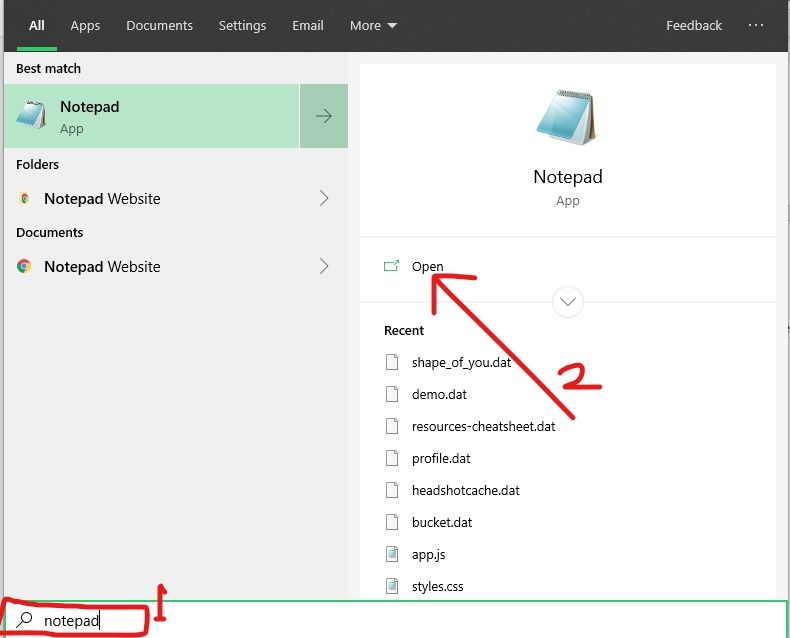
Step 2: Make sure you’re working with a new, untiled file. Paste in the script below:
@echo off taskkill /F /IM explorer.exe explorer.exe exit
Step 3: Click File in the menu and select «Save as».
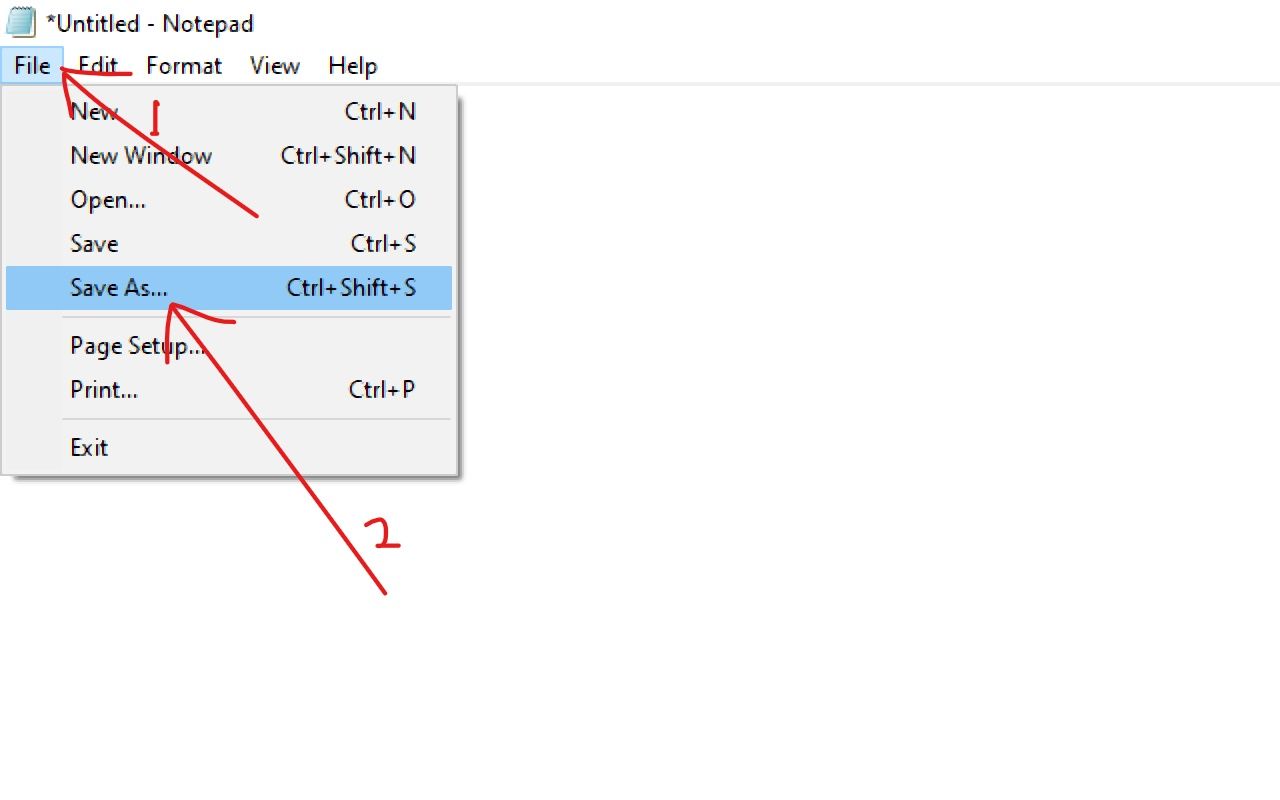
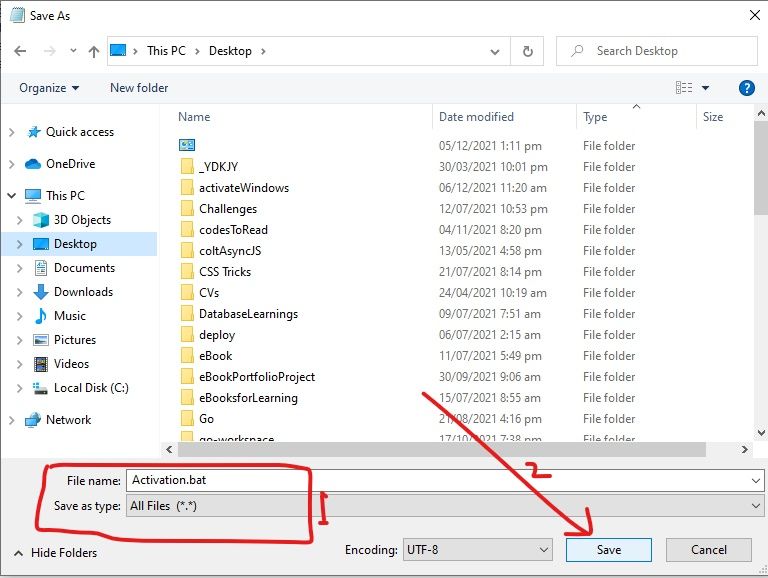
Step 4: Name the file «Activation.bat» and select «All files» as the format. Then save the file to any location you want.
Step 5: Locate the file and right-click on it, then select «Run as Admissions».

The script will be executed quickly and will refresh your computer.
Step 6: Restart your PC.
How to Get Rid of the Activate Windows Watermark by Using the Registry
Windows 10 registry lets you make deeper changes that have significant effects on your computer.
You can get rid of the Activate Windows watermark by making a less complicated modification in the Registry, as done below.
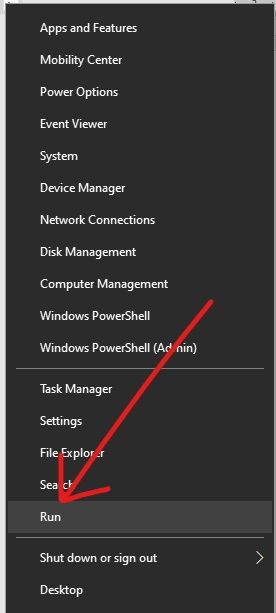
Step 1: Right-click on Start and select Run.
Step 2: Type in «regedit» (without quotes) into the Run dialogue and hit ENTER.

Step 3: Expand HKEY_CURRENT_USER, Control Panel, and then click Desktop.
Step 4: Locate PaintDesktopVersion and double-click on it.
Step 5: Change the value from 1 to 0 and click Ok.
Step 6: Restart your computer.
How to Get Rid of the Activate Windows Watermark with a Product Key
The best way to get rid of the Activate Windows watermark is to do what the message says — activate Windows.
You can activate Windows with a product key you have to buy from Microsoft.
The steps below will help you use your product key to activate Windows:
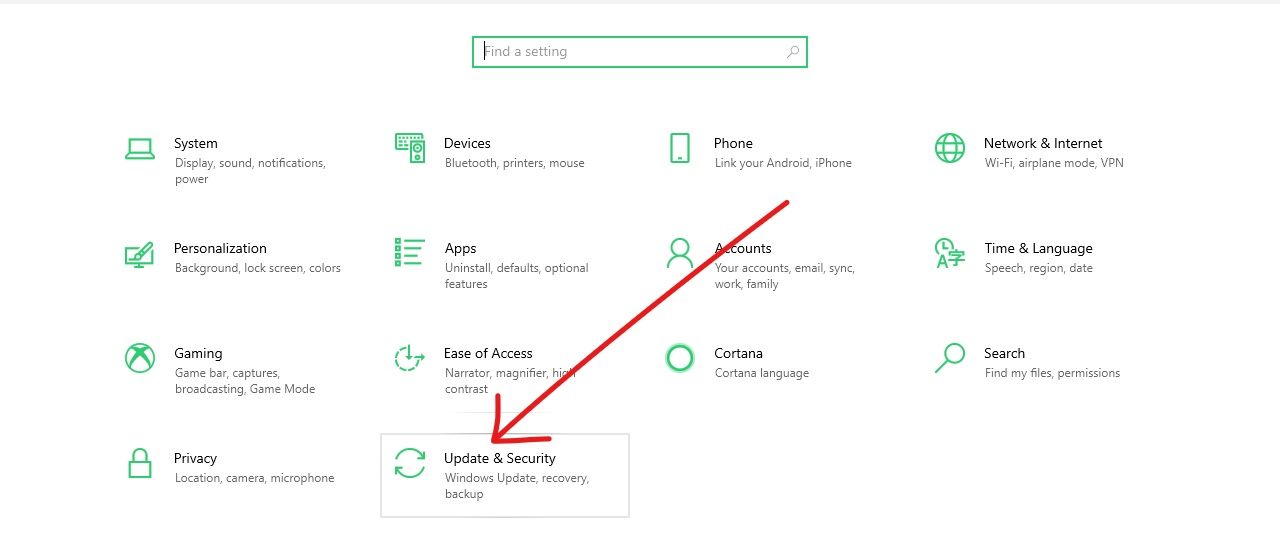
Step 1: Click on Start and select Settings.
Step 2: Choose Updates and Security from the menu tiles.
Step 3: Switch to the Activation tab on the left and click on Change product key.

Step 4: Enter your 24-character alphanumeric product key and click Next.

Windows will get activated as long as the product key is correct.
Conclusion
I hope these ways to get rid of the Activate Windows watermark help you out.
If you find this article helpful, make sure to share it with your friends and family.
Thank you for reading.
Learn to code for free. freeCodeCamp’s open source curriculum has helped more than 40,000 people get jobs as developers. Get started
5 Ways to Remove Activate Windows 10 Watermark Permanently – If you are using a pirated version or a trial version of Windows 10, you may get an ‘Activate Windows’ sign in the lower right corner of your screen. The Activate Windows sign appears when you haven’t activated the operating system.

Actually, the Activate Windows sign will not affect PC performance. But it’s just that the sign seems to interfere with your desktop display. Then how to remove Activate Windows 10 permanently?
Read more:
- What Is VoLTE And How Do You Activate It on Your Phone
- How to Install and Activate SPSS 24 on Windows 10 PC
- How to Activate Windows Defender: Windows 10,8,7 PC
- How to Activate Office 2019: Best Quick Ways
In this article, we will share several ways to remove Activate Windows 10 permanently. All these methods will help you to permanently remove the activation watermark from your system. So, let’s see.
#1. Purchase a License Key
The Activation Watermark will appear if you are using an unactivated version of Windows. So, the easiest way to get rid of the Activate Windows watermark is to buy a license or activation key.
You can buy digital keys from the Microsoft Store directly. You can also buy an activation key from Amazon. The standard home version of Windows 10 costs around $139, while the professional edition of Windows 10 costs around $200.
#2. Editing Registry Value To Remove Windows 10 Watermark

If you don’t want to buy an activation key, then you need to use this method. In this method, we are going to make some changes to the Windows 10 registry file to remove the activation flag.
However, please keep in mind that this will not activate your Windows operating system. This will simply remove the Activate Windows 10 flag from your desktop.
- First of all, open the Run dialog box on your PC.
- In the Run dialog box, enter ‘Regedit’ and press Enter key.
- In Registry Editor, navigate to the following path HKEY_LOCAL_MACHINE > SYSTEM > CurrentControlSet > Services > svsvc
- Now in the svsvc file, look at the right side pane and search for ‘Start’
- Double-click on Start. In the ‘Value Data’ field, enter ‘4’ and click ‘Ok’
- Now close the registry editor and restart your PC.
- After that, restart the PC and you will no longer see the ‘ Activate Windows ‘ watermark.
#3. Using Bat Code To Remove Activate Windows 10

This is one way of removing Activate Windows 10 permanently using a bat code.
Step 1: Create a new text document, then copy the code below:
@echo off
taskkill / F / IM
explorer.exe  exit  explorer.exe
Step 2: Then you “Save As” to save it as a batch file, name it “Activation.bat”
Step 3: You guys run the batch file as administrator
Done! Now you restart your PC or laptop and the Activate Windows watermark on your PC has disappeared.
#4. Activating Windows Using KMSPico

If you are still getting the Activate Windows watermark, then there is only one option left. You can use third-party applications like KMSPico to activate the Windows 10 operating system.
KMSPico has been around for several years, and it activates most Microsoft products like Office suite, Windows 10, etc. Here’s how to use KMSPico.
Step 1: First of all, download the KMSPico application on your PC. Right-click on the file and select ‘Run as administrator
Step 2: Once installed, open Windows search and search for KMSELDI. Right-click on KMSELDI.exe and select ‘Run as administrator
Step 3: Now you will see a new screen. Here click on the ‘Red button’
Step 4: Next, tick the ‘Remove Watermark’ option and click on the ‘ Tokens Backup ‘ button.
Step 5: Now, wait a few seconds. When finished, you will get a success message that says “Watermark has been removed ..”
Now restart your Windows 10 computer to apply the changes. This will also activate the operating system.
#5. Use Code To UnActivate Windows 10

Apart from using the .bat code, you can also use the CMD code to remove Activate Windows 10.
Step 1: You visit windows.txt
Step 2: Copy the code into a new text document.
Step 3: Save it as a batch file, name it “ 1klik.cmd ”
Note: If you are using windows 10, you save it as .bat (named “1klik.bat”)
Step 4: You run the batch file as an administrator
Read more:
- How to Activate Office 2013 Without Product Key
- Best Tricks To Activate Windows 10 Permanently Offline
- How to Activate Microsoft Office 2010 Permanently Offline
Conclusion:
So those were some ways to get rid of Activate Windows 10 permanently. This watermark will continue to appear on Windows systems when you don’t activate Windows from a Microsoft Windows license using a product key to get the premium features of Windows 10.
Windows license helps users to get hacker protection and more additional features. However, you can remove the active windows watermark easily using some of the methods given earlier.
Don’t forget to bookmark and always visit every day Technowizah.com because you can find here the latest Tech Computer Android games How-to Guide Tips&Tricks Software Review etc, Which we update every day.
The “Activate Windows” watermark reminds you that your Windows 10 version is not activated. This tutorial will guide you through the steps to get rid of the “activate windows watermark” and remove the “Activate Windows 10” message in the bottom right of your desktop.
To remove the “Activate Windows” watermark in Windows 10, open Registry Editor and go to HKEY_CURRENT_USER > Control Panel > Desktop. From there, double click on PaintDesktopVersion and set its value to 0, then click on OK and restart your computer. The “Activate Windows” watermark will be removed after restarting your PC.
Why Do I See The “Activate Windows” Watermark?
The “Activate Windows” watermark on the desktop indicates that your Windows 10 operating system is not activated with a valid license. Microsoft reminds you that your Windows version is not valid and that you need to buy an official valid key for your version of Windows to activate all its features.
Windows 10’s features are one of the reasons you should activate it. Many functions of Windows 10 are only available if the license is activated. Such as your system’s dark mode, Windows Defender & Security, Windows Hello, and plenty of other features.
You won’t be able to install Microsoft Office on a “non-activated” version of Windows 10, and you won’t get any Windows Updates, which means your machine will always be subject to bugs, crashes, and infections.
Method 1: Activate Windows” Watermark With Registry
The most effective method to remove the “activate windows” watermark is to edit the Windows registry. We will disable the capability that allows Windows to write text on the desktop by editing the Windows registry. The activate windows message in the bottom right corner of your desktop will be disabled and hidden as a result of this action.
Follow the steps below to remove the “Activate Windows” watermark in Windows 10.
Total Time: 2 minutes
Click on the Start button, type “Regedit” and hit enter
Click the Start button and type “Regedit” to open Registry Editor, and hit enter. (You will be prompted to open Regedit with administrator privileges, click on Yes)
Go to HKEY_CURRENT_USER > Control Panel > Desktop
In the left panel, go to HKEY_CURRENT_USER > Control Panel > Desktop in the folder tree, make sure to click on Desktop. A list of values will show up in the right panel.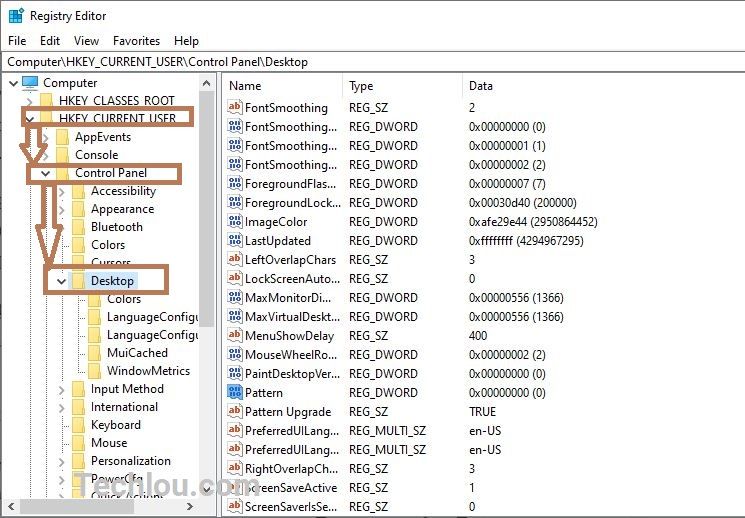
Double click on “PaintDesktopVersion” in the right panel
Scroll down until you find PaintDesktopVersion and double-click on it.
Set the value to 0
Type 0 in the “Value data” textbox. Make sure that the selected base is Hexadecimal.
Click on OK and restart the computer.
Click OK to validate and restart your computer for changes to take effect.
This is how you get rid of and remove the “activate windows” watermark, After restarting your computer the “activate windows” watermark will be removed. (If the watermark reappears after a certain period of time, just run the script again to remove it.)
Method 2: Remove the “Activate Windows” Watermark With a .reg File
To make your life easier, We have made this small .reg script that will automatically remove the activate windows watermark once you click on it.
Follow the steps below to automatically remove the activated windows watermark with a .reg file.
1. Download the script
Click here to download this .zip archive containing a .reg file
2. Unzip the zip file
Uncompress the zip file on your computer (Download 7-zip or Winrar to be able to open the archive)
3. Double click on Remove activate windows watermark.reg
Double click on Remove activate windows watermark.reg to execute it.
4. Click on Yes to confirm
Click on Yes to allow the reg file to edit your Windows Registry.
5. Restart your computer
Restart your computer to apply the modification.
6. The activated windows watermark is now removed
After restarting your computer the “activate windows” watermark should be removed.
All this script does is automatize the registry edition that we have done in the first method.
Method 3: Remove “Activate Windows” Watermark With Powershell
With a single command, you can temporarily activate Windows for 90 days. You can repeat this method every three months and reactivate Windows 10. This solution will remove the activate Windows message for 90 days, which you may then renew.
Follow the steps below to remove the “Activate Windows“ watermark with Powershell.
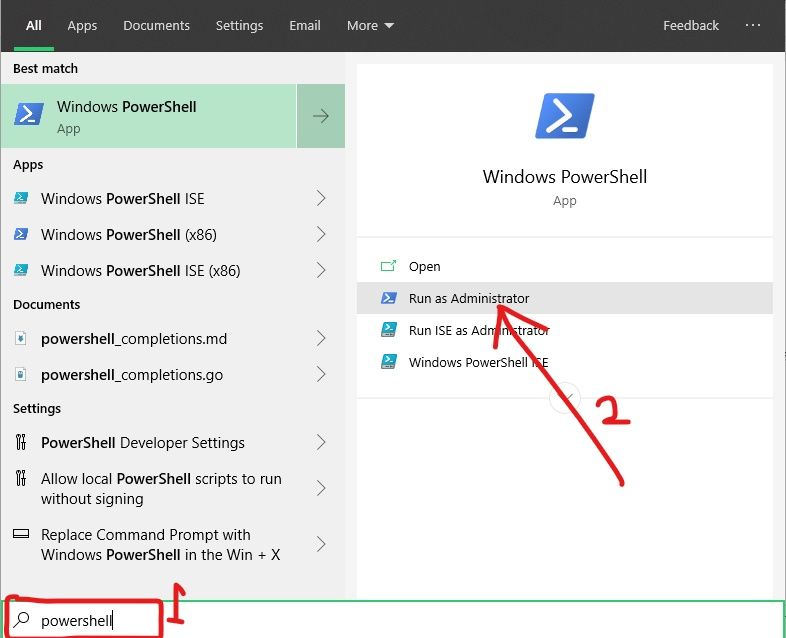
1. Click on Start and type “Powershell”
Click on the Start button or hit the Windows key on your keyboard and type “Powershell“
2. Right-click on “Windows Powershell” and click on “Run as administrator”
Right-click on the “Windows Powershell” and run it as administrator.
3. Type “slmgr /rearm” in Powershell and hit ENTER
In the CMD window type “slmgr /rearm” and hit enter to activate Windows 10 for 90 days.
4. Restart PC to apply changes.
Restart your computer to apply the changes, after Windows 10 starting you will notice that the activate Windows message has been removed.
Method 4: Remove “Activate Windows” Watermark With CMD
One of the easiest and quickest ways to remove the “Activate Windows”watermark is by using to disable the test mode if it’s On. Indeed, Windows 10 has a test mode that if is activated will cause the activation message to show on your desktop.
Follow the steps below to remove the “Activate Windows” watermark using CMD
1. Click on Start and type “cmd”
Click on the Start button or hit the Windows key on your keyboard and type “CMD“
2. Right-click on “Command prompt” and click on “Run as administrator”
Right-click on the “Command prompt” and run it as administrator.
3. Type “bcdedit -set TESTSIGNING OFF” in CMD and hit ENTER.
In the CMD window type “bcdedit -set TESTSIGNING OFF” and hit enter.
4. Restart your computer
Restart your PC to apply changes. After restarting, the “activate windows” watermark should be removed.
Method 5: Remove The “Activate Windows” Watermark By Disabling Background Image
One of the ways to get rid of the “activate Windows” watermark is by disabling the background image from the Ease of Access setting.
Follow the steps below to do so:
1. Press Windows key + U to open Ease of Access settings
On your keyboard, Press Windows Key + U to open Ease of Access settings (The windows key is the key that has the Windows logo on it, located generally on the left of the Alt button)
2. Scroll down and TURN OFF “Show desktop background image”
Scroll down the list of options until you find “Show desktop background image” and switch the little button to turn it off.
This will hide the desktop background image and remove the “activate windows” watermark at the same time.
The inconvenience of this method is that you will have a black screen as a background and you will not be able to change the background image.
Method 6: Remove The “Activate Windows” watermark Using Script
Follow the steps below to remove the “activate Windows” watermark on the desktop using a .bat script:
- Open Notepad.
- Type the following commands:
- @echo off
- taskkill /F /IM explorer.exe
- explorer.exe
- exit
- Save the file as activate.bat
- Right-click and click Run as administrator.
- Restart PC.
If the watermark reappears after a certain period of time, just run the script again to remove it.
Method 7 : Activate Windows 10
You can permanently remove the Activate Windows watermark by activating Windows 10 with this simple script.
Follow the steps below to activate Windows 10 with the script and remove the activate windows watermark.
1. Open Notepad
Open Notepad on your Windows
2. Copy and paste the script below
@echo off
title Activate Windows 10 ALL versions for FREE!&cls&echo ============================================================================&echo #Project: Activating Microsoft software products for FREE without software&echo ============================================================================&echo.&echo #Supported products:&echo - Windows 10 Home&echo - Windows 10 Home N&echo - Windows 10 Home Single Language&echo - Windows 10 Home Country Specific&echo - Windows 10 Professional&echo - Windows 10 Professional N&echo - Windows 10 Education&echo - Windows 10 Education N&echo - Windows 10 Enterprise&echo - Windows 10 Enterprise N&echo - Windows 10 Enterprise LTSB&echo - Windows 10 Enterprise LTSB N&echo.&echo.&echo ============================================================================&echo Activating your Windows...&cscript //nologo slmgr.vbs /ckms >nul&cscript //nologo slmgr.vbs /upk >nul&cscript //nologo slmgr.vbs /cpky >nul&set i=1&wmic os | findstr /I "enterprise" >nul
if %errorlevel% EQU 0 (cscript //nologo slmgr.vbs /ipk NPPR9-FWDCX-D2C8J-H872K-2YT43 >nul&cscript //nologo slmgr.vbs /ipk DPH2V-TTNVB-4X9Q3-TJR4H-KHJW4 >nul&cscript //nologo slmgr.vbs /ipk WNMTR-4C88C-JK8YV-HQ7T2-76DF9 >nul&cscript //nologo slmgr.vbs /ipk 2F77B-TNFGY-69QQF-B8YKP-D69TJ >nul&cscript //nologo slmgr.vbs /ipk DCPHK-NFMTC-H88MJ-PFHPY-QJ4BJ >nul&cscript //nologo slmgr.vbs /ipk QFFDN-GRT3P-VKWWX-X7T3R-8B639 >nul&goto server) else wmic os | findstr /I "home" >nul
if %errorlevel% EQU 0 (cscript //nologo slmgr.vbs /ipk TX9XD-98N7V-6WMQ6-BX7FG-H8Q99 >nul&cscript //nologo slmgr.vbs /ipk 3KHY7-WNT83-DGQKR-F7HPR-844BM >nul&cscript //nologo slmgr.vbs /ipk 7HNRX-D7KGG-3K4RQ-4WPJ4-YTDFH >nul&cscript //nologo slmgr.vbs /ipk PVMJN-6DFY6-9CCP6-7BKTT-D3WVR >nul&goto server) else wmic os | findstr /I "education" >nul
if %errorlevel% EQU 0 (cscript //nologo slmgr.vbs /ipk NW6C2-QMPVW-D7KKK-3GKT6-VCFB2 >nul&cscript //nologo slmgr.vbs /ipk 2WH4N-8QGBV-H22JP-CT43Q-MDWWJ >nul&goto server) else wmic os | findstr /I "10 pro" >nul
if %errorlevel% EQU 0 (cscript //nologo slmgr.vbs /ipk W269N-WFGWX-YVC9B-4J6C9-T83GX >nul&cscript //nologo slmgr.vbs /ipk MH37W-N47XK-V7XM9-C7227-GCQG9 >nul&goto server) else (goto notsupported)
:server
if %i%==1 set KMS=kms7.MSGuides.com
if %i%==2 set KMS=kms8.MSGuides.com
if %i%==3 set KMS=kms9.MSGuides.com
if %i%==4 goto notsupported
cscript //nologo slmgr.vbs /skms %KMS%:1688 >nul&echo ============================================================================&echo.&echo.
cscript //nologo slmgr.vbs /ato | find /i "successfully" && (echo.&echo ============================================================================&echo.&echo #My official blog: MSGuides.com&echo.&echo #How it works: bit.ly/kms-server&echo.&echo #Please feel free to contact me at msguides.com@gmail.com if you have any questions or concerns.&echo.&echo #Please consider supporting this project: donate.msguides.com&echo #Your support is helping me keep my servers running everyday!&echo.&echo ============================================================================&choice /n /c YN /m "Would you like to visit my blog [Y,N]?" & if errorlevel 2 exit) || (echo The connection to my KMS server failed! Trying to connect to another one... & echo Please wait... & echo. & echo. & set /a i+=1 & goto server)
explorer "https://techlou.com"&goto halt
:notsupported
echo ============================================================================&echo.&echo Sorry! Your version is not supported.&echo.
:halt
pause >nul
3. Save file as activate.bat
Click on File and save the file as activate.bat. Make sure to select “All Files (*.*)” in the Save file type list and that the encoding is UTF-8.
4. Right-click on saved file and Run as Administrator
Right-click on activate.bat and click on “Run as administrator“
5. Restart PC to activate Windows 10
Restart your computer to apply the activation, after restarting your Windows 10 should be activated and the “activate windows” watermark should be removed.
Note: If you get the message “Sorry! Your version is not supported.” Open CMD as Administrator and type this command “slmgr.vbs /upk” then proceed with the activation.
Method 8: Use Third-Party Software
Last but not least, you can permanently remove the “Activate Windows” watermark using third-party software like Universal Watermark Disabler
Follow the steps below to do so:
- Download and Universal Watermark Disabler
- Unzip the uwd.zip file
- Double click on uwd.exe
- Click on Install
After installation, restart your computer to apply changes, UDW will remove any watermark on your Windows 10 operating system.
Wrap up
In this article, we have seen how to remove and get rid of the “activate windows”watermark using several methods. Please note that none of these methods will replace an activated Windows 10 system with a genuine key. Most of the methods will only help you to hide the “activate windows” message but your Windows is still not activated. Only the Windows activation with a script and Powershell method will help you get your Windows 10 activated and thus benefit from all the features that an activated Windows has to offer (Updates, Fixes, etc).
See also:
- How To Access Desktop Version Of Facebook on Android
- How To Unsubscribe From ALL Youtube Channels At Once.
- How to remove previously synced Google Account from Android Phone
- How to take background out of a picture
- Find Where Is The Hosts File in Windows 10 and Edit it.