(Image credit: Future)
It doesn’t matter the kind of content you keep on your computer, you’ll always have reasons to hide certain files and folders. Perhaps you have important documents and videos that you want to keep under wraps or prevent users from accidentally deleting certain files if you share your PC with others.
For whatever reason, on Windows 10, you can quickly hide a file or folder in two different ways, including using File Explorer or the «attrib» command-line tool with Command Prompt.
This guide will walk you through the easy steps to hide a file and folder on Windows 10. In addition, you’ll learn the steps to access those hidden items as needed.
How to hide files and folders from File Explorer
To hide files and folders through File Explorer on Windows 10, use these steps:
- Open File Explorer.
- Browse to the file or folder to hide on Windows 10.
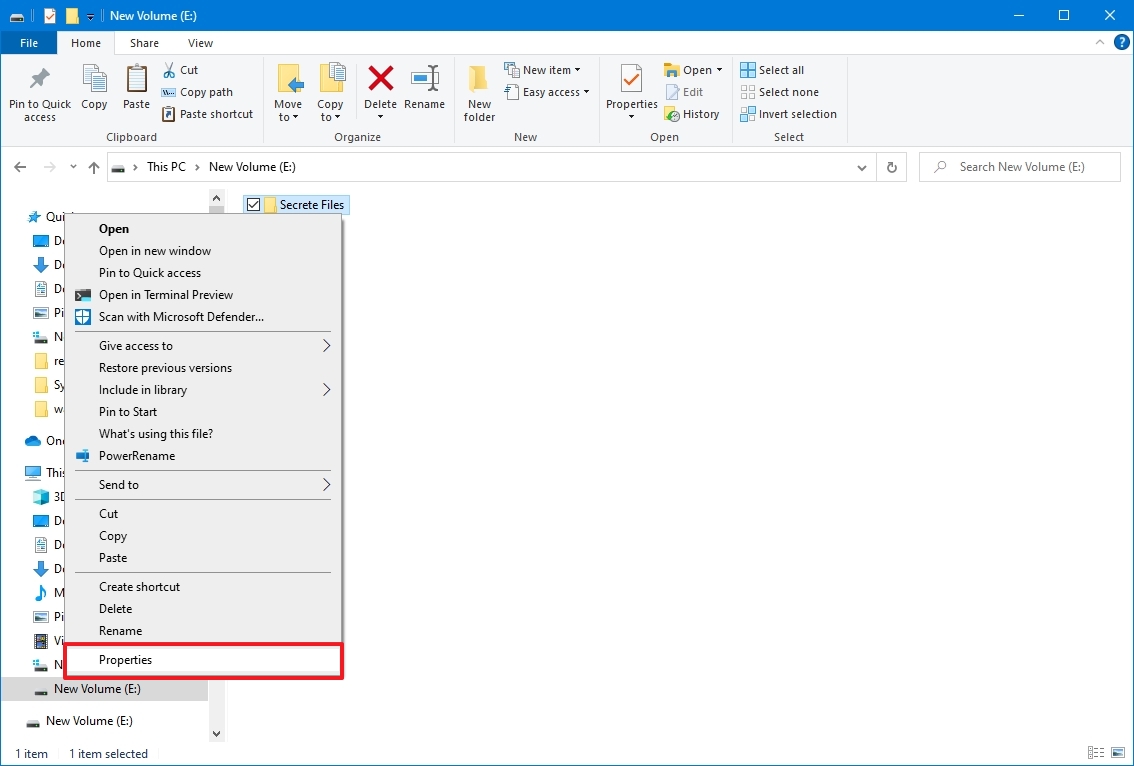
- Right-click the item and select the Properties option.
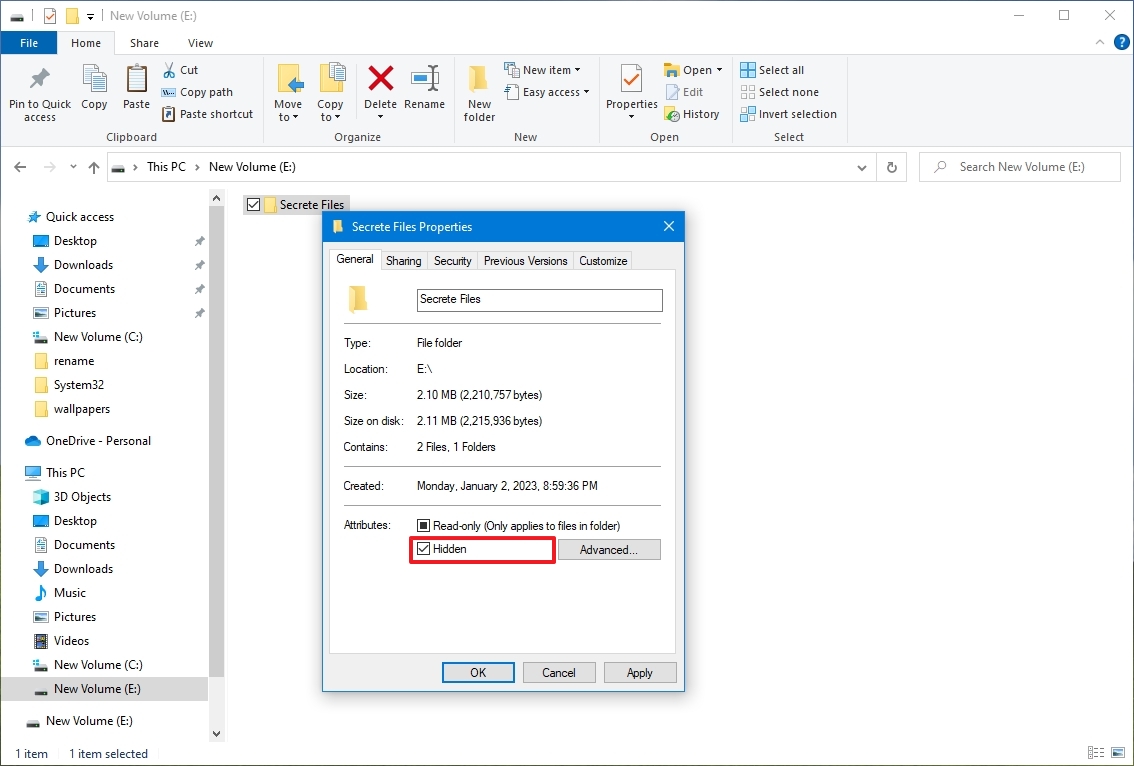
- Click the General tab,
- Under the «Attributes» section, check the Hidden option.
- Click the Apply button.
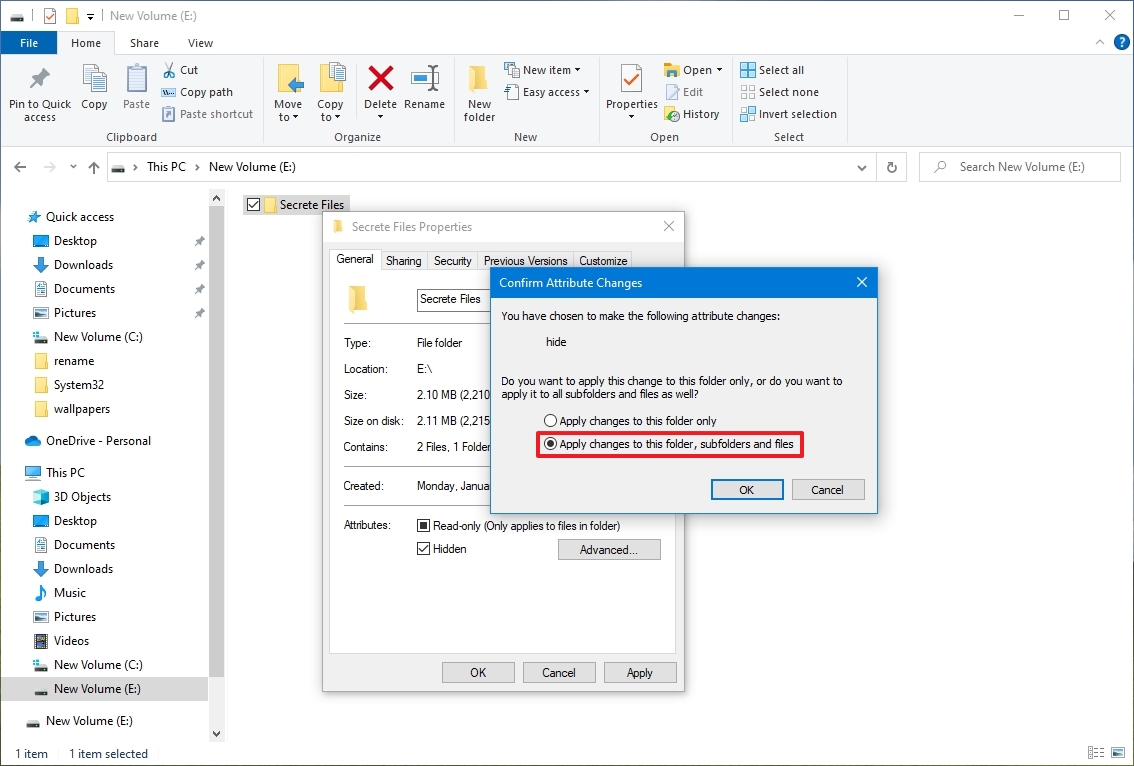
- Select the «Apply changes to this folder, subfolders, and files» option if hiding a folder with files and subfolders.
- Click the OK button.
- Click the OK button.
Once you complete the steps, the hidden items will not be visible anymore, as Windows 10 doesn’t show hidden files by default.
If you want to access your hidden items, you’ll have to type the complete path to the hidden folder or file you want to open and press Enter—for example, C:UsersadminDesktopFilesSecret FilesGreat Secret.txt.
Or you can open File Explorer, click on the «View» tab, and check the «Hidden items» option. Then you can browse your hidden items as you normally do with other content.
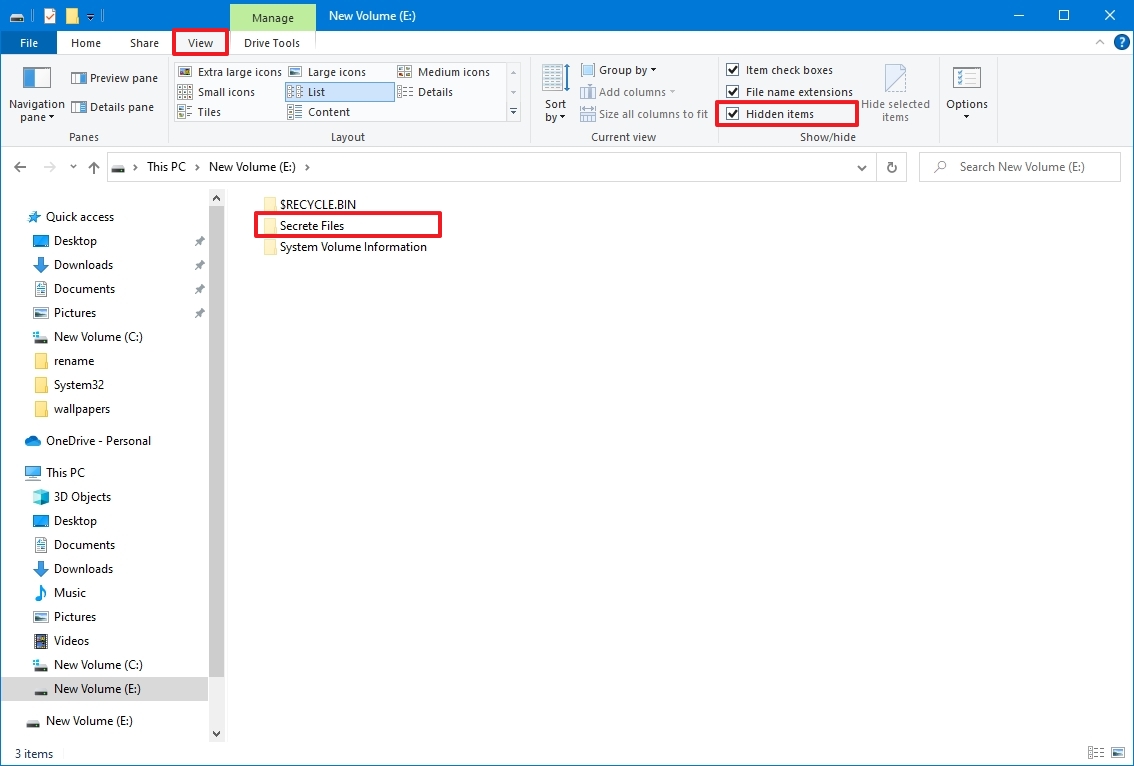
At any time, you can make the files and folders visible again by using the same steps mentioned above, but this time on step 4 make sure to clear the Hidden option.
How to hide files and folders from Command Prompt
Alternatively, you can also use Command Prompt to hide files and folders on Windows 10.
To hide files and folders with commands on Windows 10, use these steps:
- Open Start.
- Search for Command Prompt and click the top result to open the app.
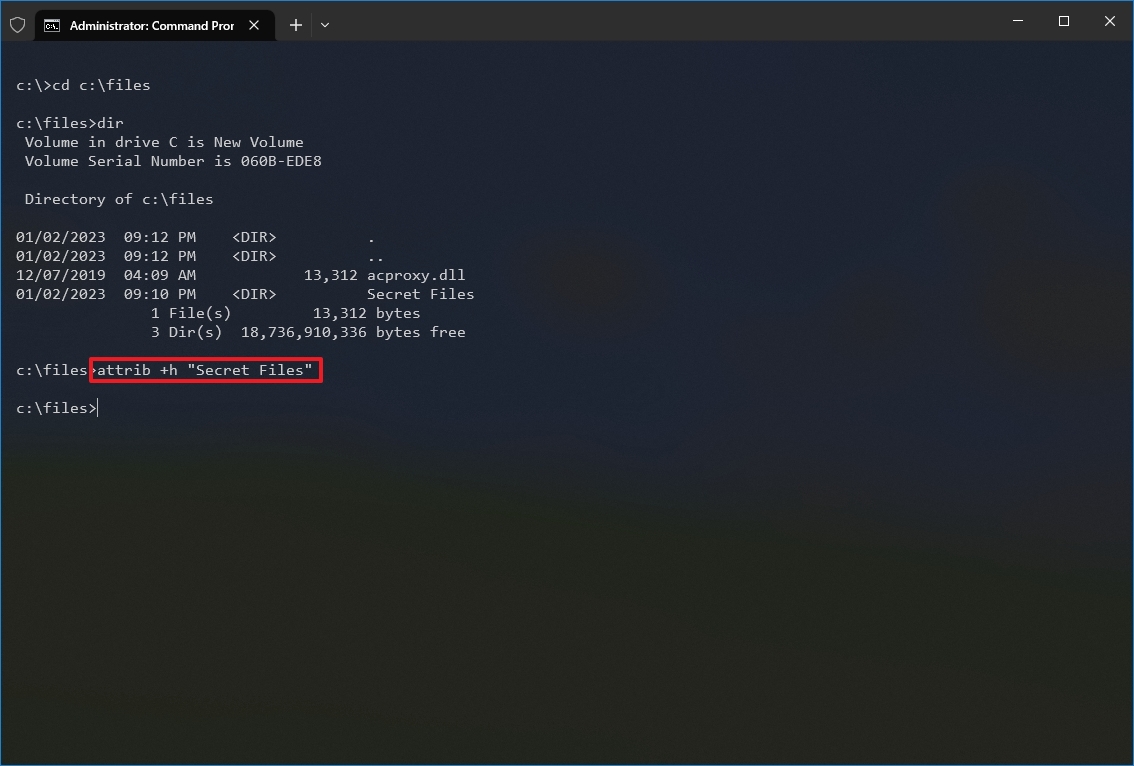
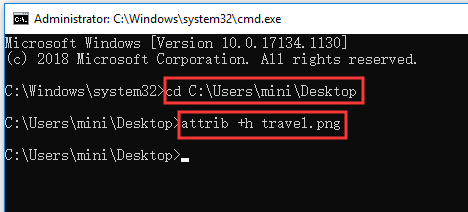
- Type the following command to navigate to the items you want to hide and press Enter: cd c:/SECRET-FILES-LOCATION
In the command, replace the path after «cd» with the path to your file or folder.
- Type the following command to hide a folder or file and press Enter: attrib +h «Secret Files»
In the command, replace «Secret Files» with the name of your folder or file. Quotation marks are only necessary when there are spaces in the name.
After you complete the steps, only the folder will be hidden, but the files and subfolders inside the folder will still be visible to anyone who know the path.
Hide subfolders
If you want to hide a folder with files and subfolders, which you also want to keep hidden, then you’ll need to use these steps:
- Open Start.
- Search for Command Prompt and click the top result to open the app.
- Type the following command to navigate inside the hidden folder and press Enter: cd «SECRET-FILES-LOCATION»
In the command, replace «SECRET-FILES-LOCATION» with the name of your hidden folder.
- Type the following command to hide all files and folders inside the hidden folder and press Enter: attrib +h /s /d

After completing the steps, the items with the hidden attribute will no longer be visible.
Unhide files and folders
To make files and folders visible again with Command Prompt, use these steps:
- Open Start.
- Search for Command Prompt and click the top result to open the app.
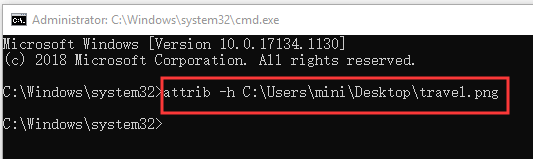
- Type the following command to navigate to the hidden items location and press Enter: cd «SECRET-FILES-LOCATION»
In the command, replace the path after «cd» with the path to your file or folder.
- Type the following command to make the items visible again and press Enter: attrib -h «Secret Files»
In the command, replace «Secret Files» with the name of your folder or file. Quotation marks are only necessary when there are spaces in the name.
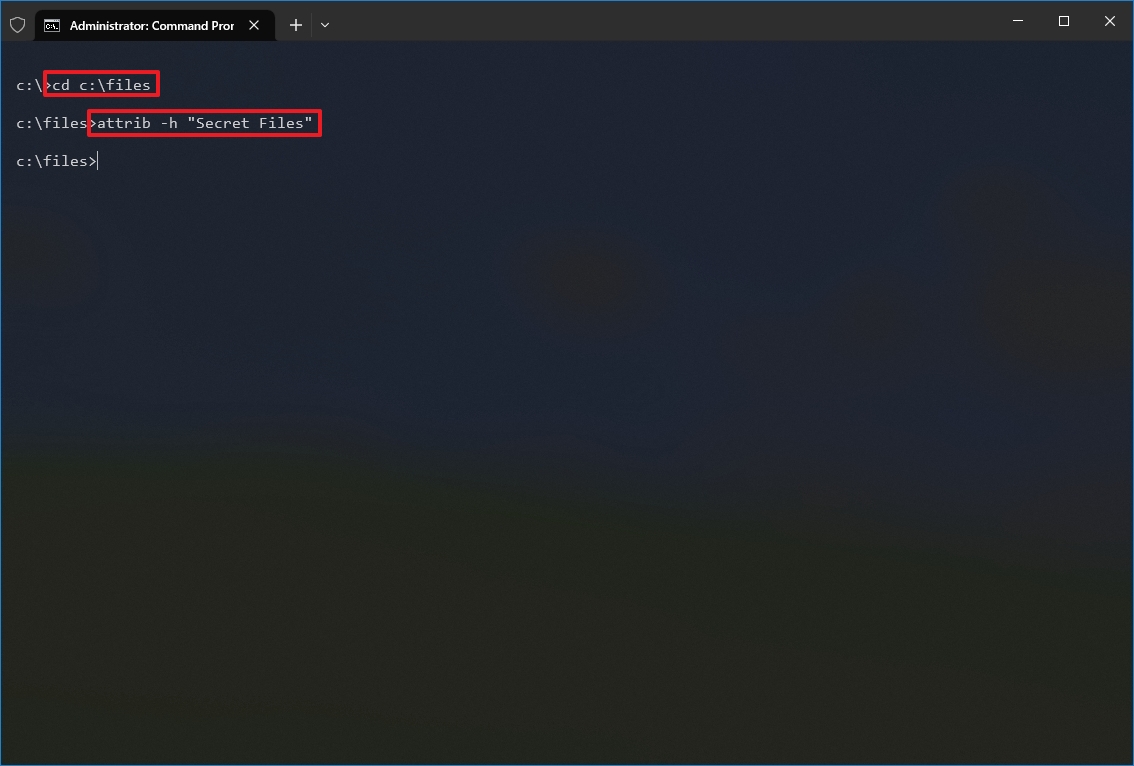
Once you complete the steps, the folder will become visible again on Windows 10.
Remove hidden attribute
To remove the hidden attribute for files and subfolders inside of a folder, use these steps:
- Open Start.
- Search for Command Prompt and click the top result to open the app.
- Type the following command to navigate inside the hidden folder and press Enter: cd «Secret Files»
In the command, replace «Secret Files» with the name of your hidden folder.
- Type the following command to remove the hidden attribute from all files and folders inside the folder and press Enter: attrib -h /s /d
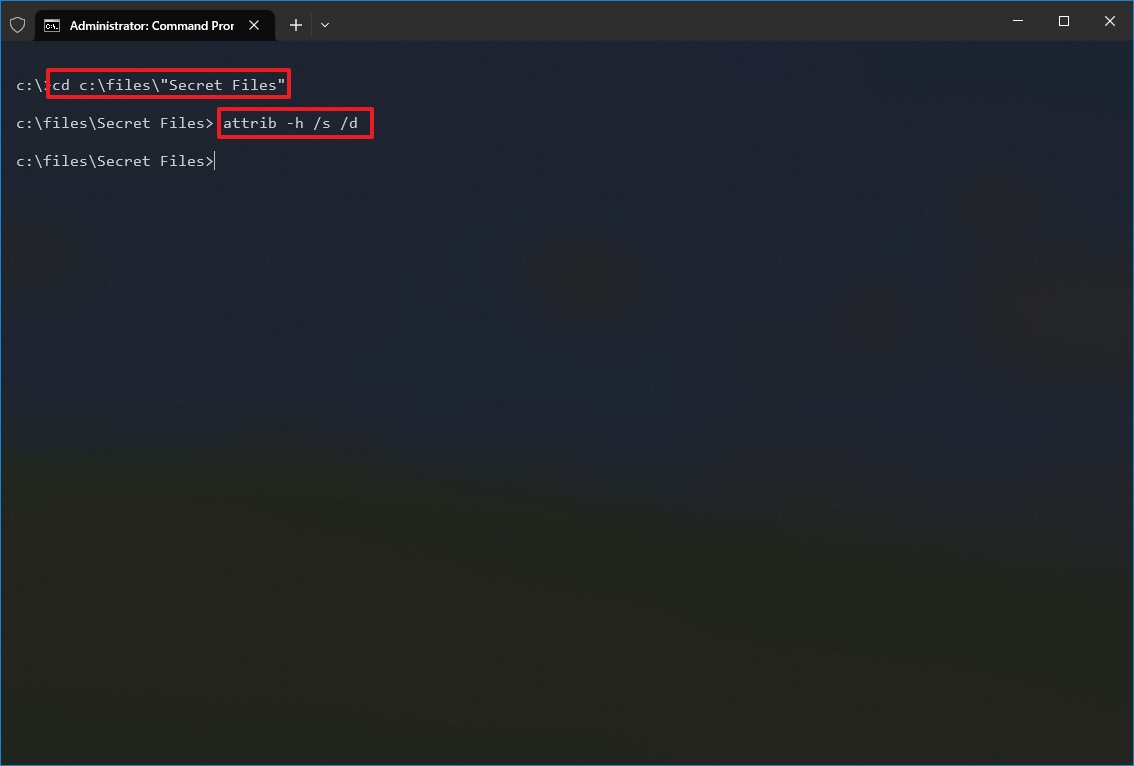
Once you complete the steps, the hidden attribute will be removed from any file or subfolder within the location.
More resources
For more helpful articles, coverage, and answers to common questions about Windows 10 or Windows 11, visit the following resources:
- Windows 11 on Windows Central — All you need to know
- Windows 10 on Windows Central — All you need to know

(opens in new tab)
Cutting-edge operating system
A refreshed design in Windows 11 enables you to do what you want effortlessly and safely, with biometric logins for encrypted authentication and advanced antivirus defenses.
Get the best of Windows Central in in your inbox, every day!
Mauro Huculak is technical writer for WindowsCentral.com. His primary focus is to write comprehensive how-tos to help users get the most out of Windows 10 and its many related technologies. He has an IT background with professional certifications from Microsoft, Cisco, and CompTIA, and he’s a recognized member of the Microsoft MVP community.
If you share your computer with others, you may want to hide certain files and folders so that people don’t go nosing into your files. The main reason to hide a folder in Windows 10 is privacy. If you have sensitive data that you don’t want anyone to see, hiding your files and folders is a great and easy option to boost your security.
Here’s how you can hide any file or folder on Windows 10.
1. Hide Individual Files/Folders On Windows 10 Using the Command Line
A simple way to hide a file or folder is to change its attributes using the attrib command on the command line. Unsure about using the Windows 10 Command Prompt? Here are our top tips for getting started with the Command Prompt.
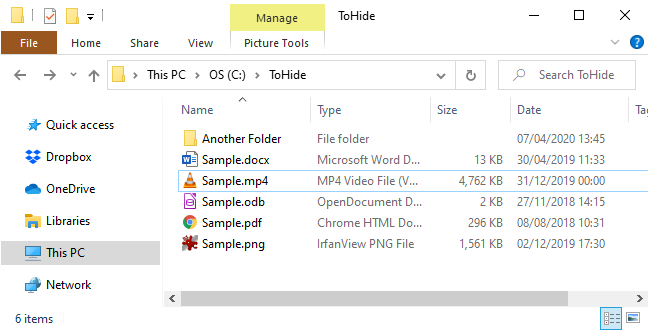
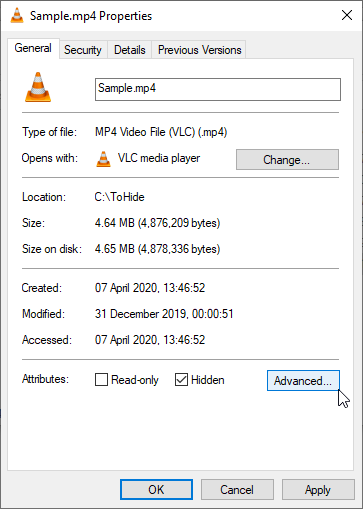
Let’s say you want to hide the Sample.mp4 file in the ToHide folder as shown below.
Open the Command Prompt by pressing Windows key + R to open the Run dialog box. Then, type cmd.exe in the Open box and click OK.
At the prompt, type the following command. Replace the path and file name with the path and file name for the file you want to hide.
attrib C:UsersLoriDocumentsToHideSample.mp4 +s +h
The +s and +h are the attributes you set for the file. The +s attribute is the System file attribute and indicates the file is for use by the operating system and is not normally displayed in a directory listing. The +h is the Hidden file attribute and indicates the file will not be displayed in a directory listing by default.
The attributes in the command are not case sensitive, so you can use either lowercase or uppercase.
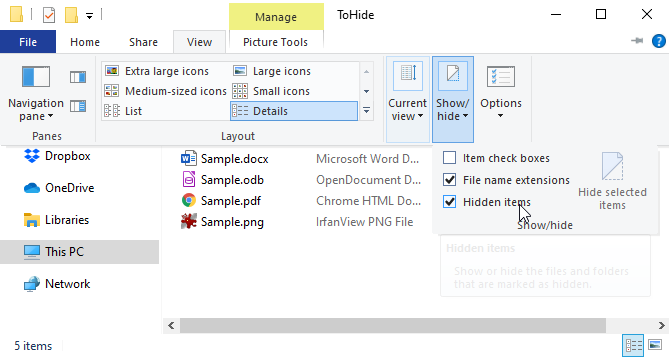
When you open the folder in File Explorer that contains the hidden file or folder, it will not be visible. Even going to View > Show/hide and checking the Hidden items box will not show the hidden file or folder.
You can also hide a folder using the attrib command in the following way. Again, replace the path and the folder name with your own.
attrib C:UsersLoriDocumentsToHideAnotherFolder +s +h
To unhide a file or folder, use the same attrib command, replacing the «+» with «—» in front of the «s» and «h» attributes.
attrib C:UsersLoriDocumentsToHideSample.mp4 -s -h
To learn more about the attrib command, type attrib /? at the command prompt and press Enter.
2. Hide Windows 10 Folders Using File Explorer
Using File Explorer to hide a folder is like using the attrib command described in the previous section, but it’s less secure. Anyone who knows about showing and hiding hidden files in File Explorer can access your files. But if you’re trying to hide data from other family members who are not as tech-savvy as you are, this can work just fine. Hiding files and folders isn’t the only trick the File Explorer has up its sleeve, either. Check out the best File Explorer tricks and tips to take control of your file management.
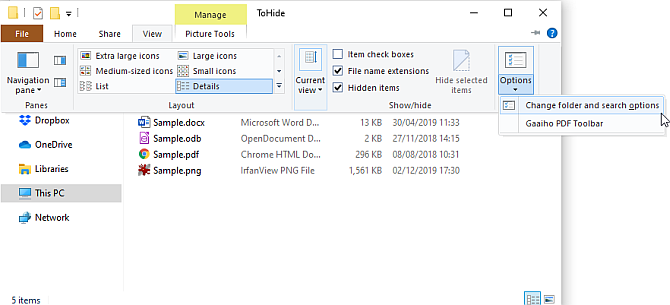
You can set the Hidden attribute for the selected files or folder in File Explorer. But, first, you need to make sure files and folders with the Hidden attribute do not show in File Explorer. To do this, go to View tab > Options and select Change folder and search options.
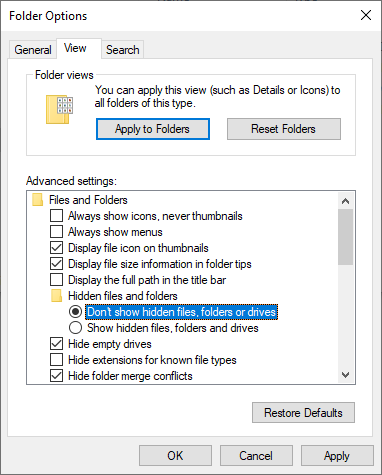
On the View tab, select Don’t show hidden files, folders, or drives under Advanced settings and click OK.
To hide one or more files or folders, select the files or folders, right-click on them, and select Properties.
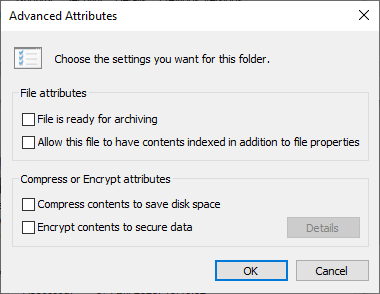
On the General tab on the Properties dialog box, check the Hidden box in the Attributes section. To prevent the files or folders from appearing in Windows search results, click Advanced.
Then, uncheck the boxes in the File attributes section of the Advanced Attributes dialog box and click OK.
To unhide the files or folder, go back to the Properties dialog box for the files or folders in question, and uncheck the Hidden box in the Attributes section.
3. Hide Entire Drives on Windows 10 Using the Registry Editor
This method hides an entire drive instead of just selected files or folders on the drive.
Note: This procedure involves changing the registry. Before you begin, I strongly suggest you back up your registry. You should also check out our tips for not accidentally messing up the Windows registry.
If you’re not comfortable using the Windows registry or are unsure as to what the Windows Registry even is, you can find another method for hiding an entire drive in the Hide Entire Drives Using the Disk Management Utility section below.
To begin, open the Registry Editor by pressing Windows key+R to open the Run dialog box. Then, type regedit in the Open box and click OK.
Navigate to the following key in the left pane.
HKEY_LOCAL_MACHINESoftwareMicrosoftWindowsCurrentVersionPoliciesExplorer
Right-click on the Explorer key and go to New > DWORD (32-bit) Value.
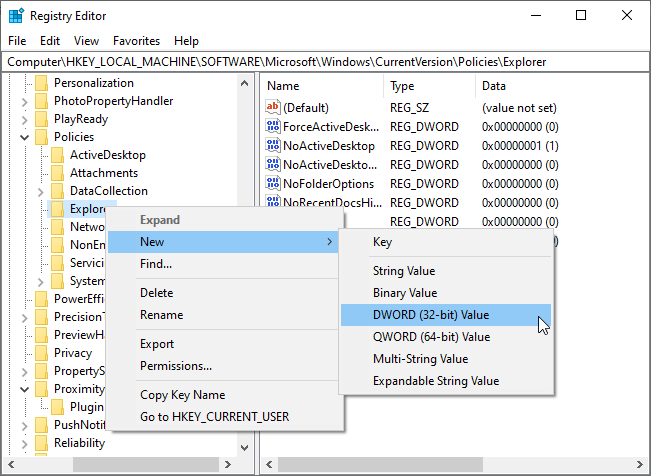
Name the new value NoDrives and then double-click on it.
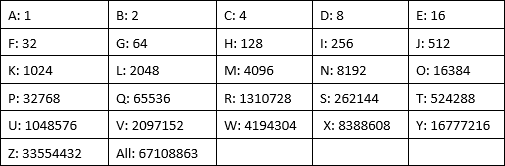
On the Edit DWORD (32-bit) Value dialog box, select Decimal as the Base. Then, enter a number that corresponds to the drive or drives, you want to hide. To find out which number to use, see the table below the following image.
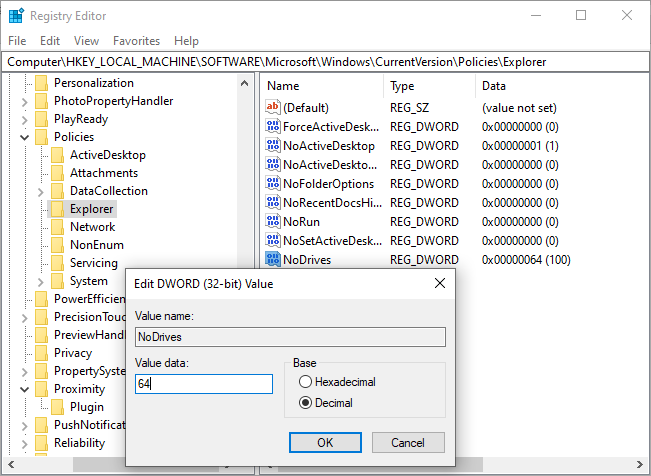
Find the letter for the drive you want to hide in the table below. Enter the number associated with that drive letter in the Value data box for the NoDrives value in the registry. In our example, I entered 64 to hide my G: drive.
If you want to hide more than one drive, add the numbers for all the drive letters you want to hide and enter the total in the Value data box.
After you restart your computer, you will not see the drive in File Explorer.
To show the drive again, go back into the Registry Editor and delete the NoDrives value under the HKEY_LOCAL_MACHINESoftwareMicrosoftWindowsCurrentVersionPoliciesExplorer key and restart your computer again.
4. Hide Entire Drives Using the Disk Management Utility
If you’d rather not edit the registry, you can hide an entire drive using the Disk Management utility. This utility shows you all the internal and external drives connected to your computer.
Press Windows key + R to open the Run dialog box. Then, type diskmgmt.msc in the Open box and click OK.
Right-click the drive you want to hide (in the top or bottom section) and select Change Drive Letter and Paths.
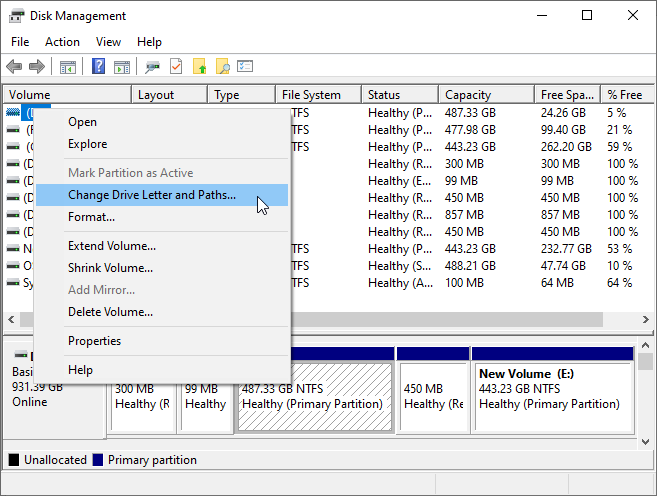
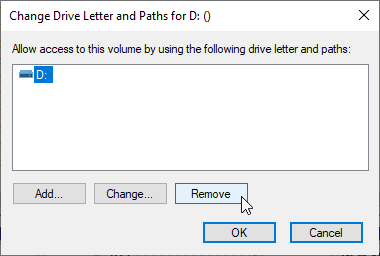
On the Change Drive Letter and Paths dialog box, select the drive letter, click Remove, and then click OK.
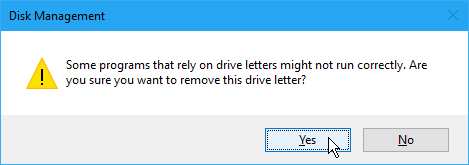
A warning dialog box displays telling you that some programs rely on drive letters and may not work if you remove the drive letter. If you’re sure you want to hide the drive, click Yes to remove the drive letter.
The letter is removed from the drive in the Disk Management Utility.
Once you close and reopen File Explorer, the drive will not be visible and will not be included in Windows search results.
To make the drive visible again, go back into the Disk Management utility and open the Change Drive Letter and Paths dialog box for the hidden drive. Then, click Add.
Make sure Assign the following drive letter is selected (it should be by default). Select the drive letter you want to assign to it from the dropdown list, and click OK.
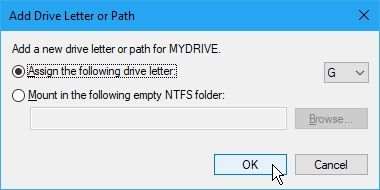
You must close and reopen File Explorer to see the drive again.
5. Hide Folders in Windows 10 Using Third-Party Software
All the methods mentioned above are not as secure as hiding AND password protecting files and folders. Here are some third-party software options for you to consider.
FileFriend
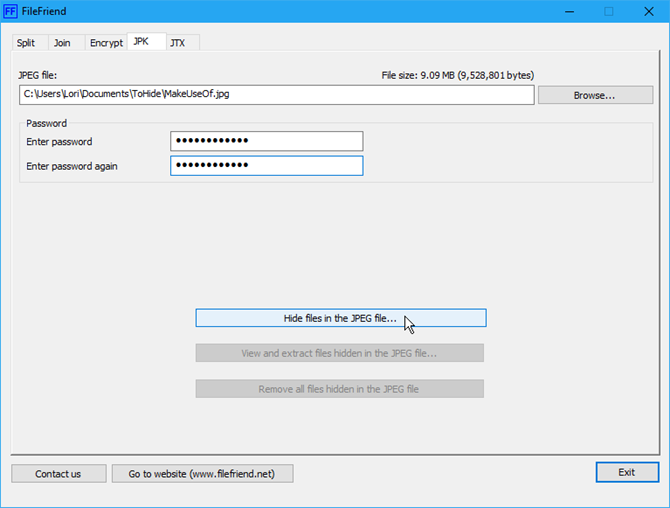
In FileFriend, use the JPK tab to hide files or folders in a JPEG image and add a password to protect the hidden files. FileFriend also allows you to enter text that you want to hide in the image directly in the program, without having to create a text file to hide in the image (using the JTX tab).
Other features of FileFriend include splitting or joining files and encrypting files and folders.
Download: FileFriend for Windows (Free)
Secret Disk
Secret Disk allows you to create a virtual drive, or repository, that’s invisible and password protected. Another layer of security is added with a PIN that’s required to open the Secret Disk program.
When the repository is visible, it displays with a drive letter in File Explorer. You can copy files and folders to it, and work with it in any program, just like any other drive. Then, you can hide the repository again and it becomes invisible.
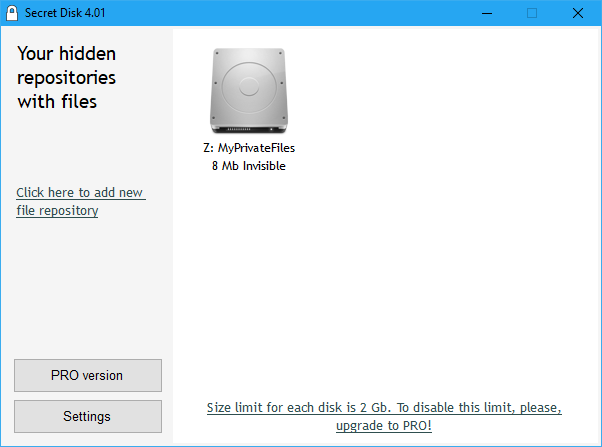
Secret Disk does not need to format your hard drive or make any other changes to your system. It also does not encrypt any files or folders. It just limits access to them by hiding, and password-protecting, the repository.
The Basic version of Secret Disk is free. The PRO version will set you back $14.95 for its added features, including the ability to have more than one repository and choosing the drive letter for each repository.
The repository password and the PIN for opening the program are optional in the PRO version, although these are good features to leave enabled. To upgrade, click the handy PRO version button in the program.
Download: Secret Disk for Windows (Free)
Easy File Locker
Easy File Locker is an easy to use freeware utility that allows you to hide and lock files and folders from other people and from programs. The locked files and folders are protected from opening, modifying, deleting, moving, renaming, or copying. All files and subfolders in a locked folder are protected.
Set a password to open the program by going to System > Set Password. You don’t have to set a password, but, if you don’t, anyone will be able to open the program, turn off the protection for your files and folders, and have access to them.
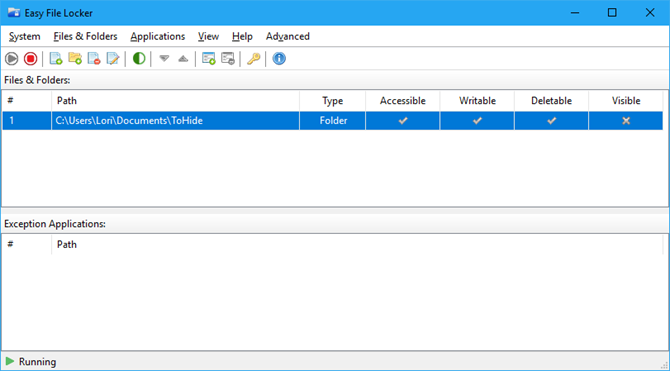
Use the Add File and Add Folder buttons to add files and folders to Easy File Locker. Double-click on a file or folder in the list to change its permissions (Accessible, Writable, Deletable, Visible).
Protect the selected files and folders using the Start Protection button. Make the files and folder visible again by clicking the Stop Protection button.
Download: Easy File Locker for Windows (Free)
My Lockbox
My Lockbox allows you to hide and password-protect almost any folder on your computer.
While you’re installing My Lockbox, you’ll be asked for the location of the folder you want to hide and protect. When the installation is finished, that folder is automatically hidden and locked.
Two icons are added to your desktop. The My Lockbox icon allows you to quickly unlock and open your protected folder. For more options, use the My Lockbox Control Panel icon. Once you enter your password, the following window displays:
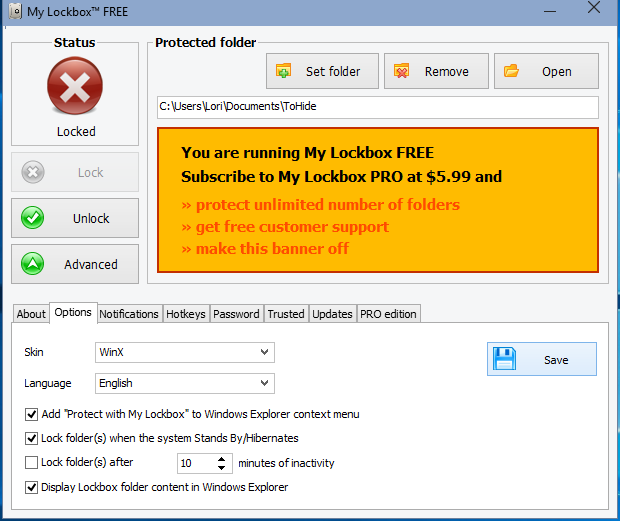
Use Set folder to change the folder you want to protect and Remove to permanently unlock the protected folder and remove it from the program. The Open button automatically unlocks and opens the protected folder. Lock and Unlock the folder using the buttons on the left. Click Advanced for more options and other settings.
The freeware version of My Lockbox allows you to hide and protect one folder with an unlimited number of subfolders.
You can upgrade to the Professional edition if you need to protect more than one folder. However, you can put all the files and folders you want to hide and protect into one folder and use the free version if you don’t mind looking at the bright orange ad for My Lockbox PRO.
Download: My Lockbox for Windows (Free)
Windows 10 File Hiding Methods That Didn’t Work
In addition to the methods covered above, I also tried the two methods below and failed to get them to work. For the sake of completeness, you can check them out below. Please leave us a comment in case you had more luck than I did!
Hide Windows 10 Files/Folders in a JPEG Image
I tested the method of hiding files in a JPEG image using the command line and found success when adding a RAR file to a JPEG image using the following command:
copy /b C:PathToFileOriginalImage.jpg + FilesToHide.rar C:PathToFileNewImageWithHiddenFiles.jpg
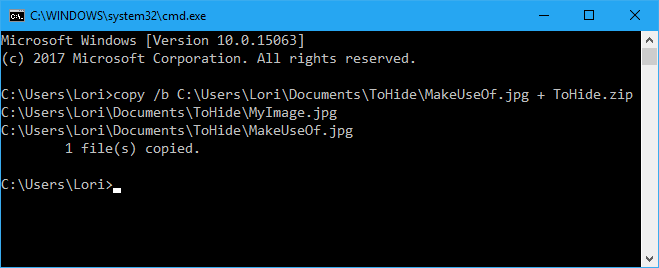
However, I could not extract the files once they were added to the JPEG image file, even using a variety of file extraction programs, such as 7-Zip, WinRAR, and PeaZip.
Hiding a file or folder in a JPEG image is possible using the free tool FileFriend, which is discussed in the Hide a Folder on Windows Using Third-Party Software section above.
Hide Folders in Windows 10 by Redirecting to the Control Panel
There is another method you can try that attempts to hide a folder by redirecting it to the Control Panel. You basically create two batch files, one that locks the folder and one that unlocks it. When the folder is locked, opening it takes you to the Control Panel.
However, I tested this on Windows 7, 8, and 10 and could not get it to work. The lock batch file successfully renamed the folder. But I could open it and view the contents anyway.
If you want to test it yourself, create a folder called Users or Fonts (or something else related to the Control Panel) and put the files you want to hide into it. Then, create a new text file and copy and paste the following line into it.
Replace Users with the name of your folder. Save this file as lock.bat.
ren Users Users.{21EC2020-3AEA-1069-A2DD-08002B30309D}
Then, create another new text file and copy and paste the following line into it. Again, replace Users with the name of your folder. Save this file as key.bat.
ren Users.{21EC2020-3AEA-1069-A2DD-08002B30309D} Users
Both batch files should be in the same folder as the folder you’re hiding (not in the folder). Double-click the lock.bat file to redirect the folder to the Control Panel, hiding the contents of the folder. To unlock the folder, double-click the key.bat file. You should not leave the key.bat file with the folder you’re hiding. Only copy it there to unlock the folder. Then, remove it.
Please let us know if this works for you in the comments below.
You Can Hide Any File or Folder In Windows 10
Hiding files and folders with no password protection should not lull you into a false sense of security. You should not use these methods (except the third-party tools with password protection) to protect very private and sensitive files and folders.
These methods are ways to make your information not obvious to anyone looking over your shoulder or briefly using your computer while you watch.
Hiding your files and folders in Windows 10 isn’t the only option you have for protection. You can also encrypt files and folders using an encryption tool, like VeraCrypt. Alternatively, you can encrypt your entire drive using Bitlocker.

Contents
- 1 How to Hide Folders or Files in Windows 10 with File Explorer
- 2 How to Hide a Folder or File in Windows 10 with Command Prompt and PowerShell
- 3 How to Unhide Folders and Files with Command Prompt
If you’re a fan of minimalism, one of the surefire ways to may your OS cleaner is to hide folders and folders in Windows 10. Though Microsoft hides several folders by default, you may find that your drives fill up with rarely accessed content over time.
This particularly true of the documents folder, which over time will accumulate configuration files, game saves, and other clutter that can make it difficult to remain productive.
Hidden Folders in Windows 10
We are going to show you how to hide folders or files on Windows 10 so you can keep them private or just get them out of the way. We’ll also show you how to show hidden files and unhide hidden files if you need to get them back.
How to Hide Folders or Files in Windows 10 with File Explorer
The most intuitive way to hide a folder in Windows 10 is through File Explorer. An easily accessible toggle makes it trivial for anyone to de-clutter their drives. Here’s how you can make use of it:
- Open the folder or file properties
Before you can hide folders or files, you need to right-click the item in question and select “Properties”.

- Tick the file or folder hide box
In the “General” tab of your file or folder properties, look for the “Hidden” check box and tick it. If you hide a file, that’s all you need to do. When you hide folders, however, you must follow the additional step before.
Meanwhile, if you’re wondering how to unhide files and folders in Windows 10, that’s simple – just untick the Hidden box.
Press “OK” when you’re done.
- Apply the folder hide to subfolders and files
A hidden folder in Windows 10 has two options: you can hide just the root directory, or also hide its subfolders and files.
You may be wondering what the point of this is if the base folder will be gone from File Explorer anyway. The answer is that if you don’t hide subfolders and files, they may still show in search results even if they’re not easily accessible through File Explorer.
In most cases, you’ll want to tick “Apply changes to this folder, subfolders and files” and press “OK”.
- How to show hidden files on Windows 10
If you accidentally hide the wrong folder or need to access one again, you can view hidden files in Windows Explorer with this easy toggle:
In your File Explorer ribbon, click the “View” tab, then look for the “Show/hide” section. Untick the option that reads “Hidden items”. Your hidden folders and files will then display with a slightly greyed-out icon.


How to Hide a Folder or File in Windows 10 with Command Prompt and PowerShell
If you’re on a GUI-less install or need to automate the process, you can also hide folders and files in Windows 10 with a command. We’ll show you how below. The commands work both on the Command Prompt and in PowerShell:
- Open Command Prompt
Press Start and type “CMD”, then click the top result, “Command Prompt”.
- Find the folder you want to hide and run the ‘attrib +h’ command
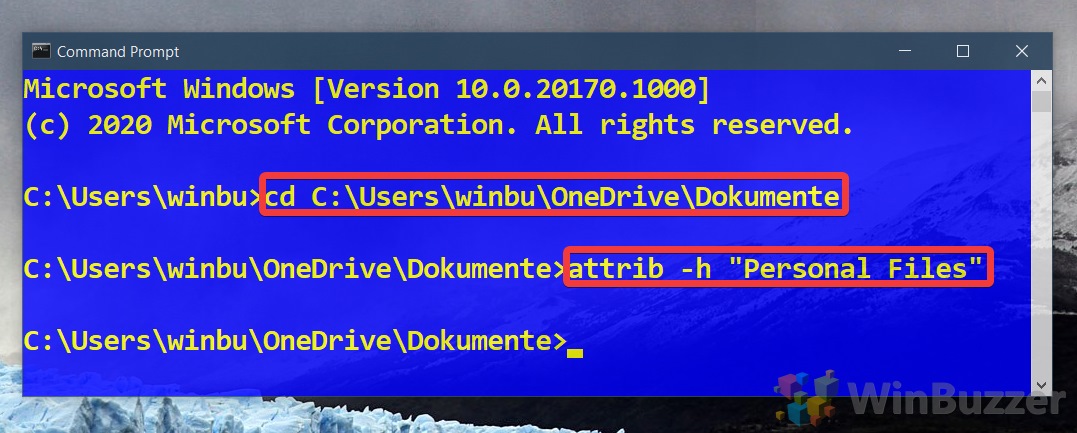
Before we can perform our folder hide or file hide, we need to navigate to its parent folder.
For example, we want to hide the “Personal Files” folder. This is in our OneDrive documents folder, so we’ll navigate to Documents in CMD with the
cdcommand:cd C:UsersyourusernameOneDriveDocuments
Now that we’re here, we can hide a directory or file by adding the
+hattribute to it:attrib +h "Personal Files"
Switch
Personal Filesout for the name of your folder or file. - Hide files and subfolders
If you’re hiding a file, that’s all you need to do. If you want to hide a folder, you’ll want to run one more command.
Though we’ve hidden the root folder, we still need to hide all of the files and folders inside of it. To do that, you can navigate inside the folder with
cd "Your Folder"and run the following command:attrib +h /s /d
All of the items with the hidden attribute will now be invisible.


How to Unhide Folders and Files with Command Prompt
Tou can unhide folders or files with Command Prompt with a very similar command to hiding them. This time, however, we have to remove the hidden attribute rather than adding it. Here’s how:
- Open Command Prompt
Press Start and type “CMD”, then click the top result, “Command Prompt”.
- Unhide a folder of file with the ‘attrib’ command
In your Command Prompt Window, navigate the parent directory of the file or folder you’d like to unhide. In our case, we want to unhide a folder called “Personal Files”, which is in our OneDrive Documents folder:
cd C:UsersusernameOneDriveDocuments
Switch the above command with the path to your parent folder and press Enter. Then run the attrib -h command to unhide the file or folder of your choice:
attrib -h "Folder or File name"
- Unhide subfolders and files
If you unhide a folder with the above method, you’ll notice that its sub-folders and files will still be hidden. You can remedy this by navigating to the folder with
cd "Folder Name"and running:attrib -h /s /d


There you have it. You now know how to hide or unhide folders and files in Windows 10. If you’d like to declutter further, you can follow our tutorials to remove built-in Windows apps and customize the Start Menu.
In case of a common home computer, there is always the possibility of important Files or Folders being accidentally modified or deleted by kids or someone else in the family. An easy way to prevent this from happening is to Hide Files and Folders in Windows 10 using methods as listed below.

The simplest way to Hide Files and Folders in Windows 10 is to access File Properties and designate the selected File as being “Hidden” in the Attributes section of the File Properties.
This easy method of Hiding Files and Folders in Windows 10 should be good enough for Family Computers where the intention is to prevent kids or anyone else in the family from accidentally deleting or modifying important files and folders.
Another method of Hiding Files and Folders in Windows 10 is to make your computer treat your important Files/Folders as System Files, which it automatically hides.
The second method requires the use of command prompt to hide/unhide files, which makes it difficult for anyone with average computer skills to snoop on your files.
Hide Single File or Folder in Windows 10
Follow the steps below to hide individual Files and Folders in Windows 10
1. Right-click on the File/Folder that you want to hide and then click on Properties option in the menu that appears.

2. In the File Properties window, scroll down to the “Attributes” section and then check the little box next to Hidden and click on Apply (See image below).

3. On the “Confirm Attribute Changes” pop-up, choose whether you want to “Apply Changes to this Folder only” or “Apply Changes to this Folder, Subfolders and Files” and click on OK (See image below).

Depending on your selection, the selected Folder or the Folder along with all its Subfolders and Files will become hidden, once you click on OK.
Hide Multiple Files and Folders in Windows 10
Follow the steps below to Hide Multiple Files and Folders in Windows 10.
1. Right-click on the Windows Start button and then click on File Explorer option in the menu that appears.

2. In the File Explorer Window, select the Files/Folders that you want to hide, click on the View Tab in the File Explorer top menu bar and then click on Hide selected items option (see image below)

3. On the “Confirm Attribute Changes” pop-up that appears, choose whether you want to “Apply Changes to the selected Folder only” or “Apply Changes to selected Folder, Subfolders and Files” and then click on OK (See image below).
Unhide Files and Folders in Windows 10
When Files and Folders are hidden, they no longer appear in File Explorer. However, you can easily Unhide Files and Folders that you had previously hidden on your computer by following the steps below.
1. Click on the Windows Start button and then click on File Explorer option in the menu that appears.
2. In the File Explorer Window, click on the View tab and then check the ‘Hidden items’ option in Show/hide toolbox (See image below).

Checking the Hidden Items option will reveal the Hidden Files/Folders in that location. The hidden Files/Folders will appear with partially transparent icons, so that you can clearly distinguish Hidden Files from regular ones (See above image).
Truly Hide Files and Folders in Windows 10 Using Command Prompt
The methods to Hide Files and Folders in Windows 10 as described above are only good for Home or Family Computers, where no one is really trying to snoop on your files.
In order to truly Hide Files and Folders in Windows 10, you can either make use of various Third Party Tools as available in the market or make use of a workaround in Windows 10.
The workaround involves making Windows 10 computer to treat the Files/Folders that you want to Hide as System Files. Once this is done, Windows Operating System will Automatically hide these files, just as it hides other System Files.
1. Right-click on Windows Start button and then click on Command Prompt Admin option in the menu that appears.
 Option in Windows 10")
2. In the command prompt window, type attrib +h +s followed by The File Path and hit the enter key on the keyboard of your computer.

In the above image, a File named as “Family” is located on the desktop and its File Path can be written as C:usersfunaccountdesktopfamily.
Hence, in the command prompt window, we are typing the attribute command as attrib +h +s c:usersfunaccountdesktopfamily. The letters “h” and “s” in the attribute command instruct your computer to treat the selected File/Folder as Hidden and as a System File.
3. Type the Attribute command as required in your case (depending on the location of your File) and hit the Enter Key on the keyboard of your computer
Once the command is executed, the File/Folder named in the “Attrib” Command will be treated as a System File by your computer and it will become hidden.
Important: Make sure that you note down the file path for the hidden files, you will need this to unhide the file.
Unhide Files and Folders in Windows 10 Using Command Prompt
You can make the Hidden Files visible again by replacing “+” sign with “-” in the “attrib” command and running it again on your computer.
1. Right-click on Windows Start button and then click on Command Prompt Admin option in the menu that appears.
2. In the command prompt window, type attrib -s -h C:UsersfunaccountDesktopFamily and hit the Enter Key on the keyboard of your computer.

Once the command is executed, you will see the hidden Files/Folders appearing back on your computer.
- How to Backup Files in Windows 10 Using Backup and Restore
- How to Backup Files Using File History In Windows 10
- How to Zip Files in Windows 10

There are some items that are meant to remain private to the owner. On PCs, such items must stay hidden. If you have files or folders on your Windows 10 system that you want to hide, then carry on reading to find out how to easily hide them. In this guide, you will learn how to hide files and folders from unwanted eyes. This procedure can also be seen as an advantage that improves your security measures.
There are many reasons to keep your content hidden in your system. Just like there are some precious things you don’t want people to see in your house, on your PC, there are also some important documents, videos, and images to keep away from prying eyes. Even if you don’t have anything to hide, there are some items you don’t want to be accidentally deleted by someone else, hence the need to keep them under wraps.
Regardless of the reason, you can successfully hide files and folders in a couple of ways via File Explorer or Command Prompt. In this guide, we will show you several steps that you can easily follow to successfully hide files and folders using either File Explorer or Command Prompt. However, before addressing the elephant in the room, let’s first highlight some important points.
What Is the Purpose of Hiding Files in Windows?
The general method of hiding files or folders in Windows is well known, and you don’t need to be a top technician to figure it out. With that said, it also doesn’t take a genius to show hidden files on File Explorer. That means that applying the easiest method that every Jack and Jill knows is as good as hiding behind your finger. Therefore, mastering the ultimate method of hiding files and folders within your PC can enhance your security. To top that, guest users are not able to tamper with your important files if they are properly hidden. If you have a file that is encrypted, hiding it will keep it extra safe. So, after you’ve applied any of the methods outlined below, if an intruder is to have physical access to your PC, hidden or encrypted files won’t be visible.
How to Hide Files in Windows 10
In this guide, not only will you learn how to hide files and folders, but you will also master the steps of accessing those hidden files and folders. We will outline the two main methods of hiding things, which include using File Explorer and Command Prompt.
How to Hide Files and Folders through File Explorer
This is the easiest way of hiding your important files and folders. All you need to do is follow these simple steps:
1. Access File Explorer.
2. Search for the file or folder you wish to hide.
3. Right-click on it and select Properties.
4. Navigate to the General tab and then check the Hidden option under the Attributes category.
5. Select Apply.
a) If the folder you are hiding contains multiple files and subfolders, you should click on the option Apply changes to this folder, subfolders, and files.
b) Select OK once you have completed step a.
6. Finally, click OK to complete the process.
Once the process has been completed, your hidden files and folders will automatically go into hiding because Windows 10 doesn’t show hidden files by default.
To access the hidden content, you must navigate to File Explorer and type the exact path to the hidden content, then press Enter. For instance, if the hidden file you want to access is labelled Important File, then your path will be C:UsersadmindesktopFilesImportant File.
Alternatively, you can access File Explorer and select the View tab. On the panel, make sure to check the Hidden items option. Your hidden files will appear in faded highlight. At this moment, you can browse within your hidden files as you would normally do with any other content that’s not hidden. Upon completing your session, you can go back to the View panel and uncheck the Hidden items option to make the files invisible again.
How to Hide Windows 10 Folders and Files Using Command Prompt
Another way of hiding files and folders includes the use of Command Prompt. Follow these steps to successfully hide your files and folders:
1. Access the Windows search bar next to the Start Menu.
2. Type Command Prompt and click on the matching app that appears in the results window. Alternatively, you can press the Win + R combo to open the Run window. Type cmd and click Enter.
3. Enter the following command to access the file or folder you wish to hide and then press Enter (note that after typing “cd”, you must replace the rest with the actual path to the file or folder you want to hide):
cd C:UsersadminDesktopFiles
4. Type this command to hide your file or folder and then press Enter:
attrib +h “Important Files”
Note that in the command line above, you should replace “Important Files” with the actual name of the folder or file you wish to hide. Quotes are only necessary if the name has spaces.
In case the folder that you want to hide contains subfolders and files, you should follow this procedure:
1. While in the Command Prompt window, type the following command and hit Enter to browse within the hidden folder:
Cd “Important Files”
Don’t forget to replace the “Important Files” text in the command line with the actual name of the hidden folder.
2. Insert the following command line and press Enter to hide all the files and folders contained within the hidden folder:
Attrib +h /s /d
Upon completing the process, your content will not be visible anymore.
How to View Hidden Files and Folders
If you want to access your hidden content, you can do so by following these steps:
1. Access the Command Prompt as illustrated in the sections above.
2. Type the following command line into the window and press Enter to navigate to the location of the content you have hidden:
cd C:UsersadminDesktopFiles
Replace the text after “cd” with the actual path to the hidden file or folder you wish to access.
Type the below command line to make your file or folder visible and then press Enter:
Attrib -h “Important Files”
Remember to replace the “Important Files” text with the actual name of the folder or file you want to make visible.
If the hidden folder contains hidden files and subfolders, then you should do the following steps:
1. In the next command line, type the following command and press Enter:
cd “Important Files”
Replace the “Important Files” text with the actual name of the hidden folder.
2. Insert the following command line and press Enter to cancel the hidden attribute for all the subfolders and files within the folder: Attrib -h /s /d
| FileWhopper – A Fast & Secure Method of Sending Large Files |
|---|
| FileWhopper is an online file sharing platform that helps users send extremely large files and folders of ANY size fast and securely. To top that, your files’ attributes, such as “hidden” or “read-only”, are transmitted as well with FileWhopper. By default, your transfer includes 1 download and 14 days of storage unless your order additional services that increase the number of downloads to 8 and storage time to 90 days. |
| To send your large files, follow these simple steps: 1.Install the tiny FileWhopper app and upload your large file or folder. All data, including file names, is encrypted for transfer, so it’s absolutely safe to share your sensitive data. The integrity of the transmitted data is guaranteed. 2.The app supports simultaneous upload and download, so once the upload has started, copy the download link so that your recipients can start downloading the content right away. 3.Share the download link together with the password that is saved to your desktop as a .txt file with the intended recipients so that they could decrypt and download the data securely. |
There are several reasons why one would want to hide a file or folder. Maybe, you want to stop others from reading that important file, or perhaps you don’t want others accessing your PC to open up a folder containing pictures or videos that you don’t want to share with others.
While Windows 10, like all earlier versions of the Windows operating system, does not offer a way to password protect a file or folder, but it does allow you to quickly hide a file or folder.
When you hide a file or folder, and when Don’t show hidden files, folders, and drives option is enabled in Folder Options, the file or folder doesn’t appear in the File Explorer (Windows Explorer).
In this guide, we will see how you can hide a file or folder in Windows 10.
Hide a file or folder in Windows 10
Step 1: Right-click on the file or folder that you would like to hide. Click Properties to open file/folder properties dialog.
Step 2: Under the General tab, under the Attributes section, check the box labeled Hidden. Finally, click the Apply button to hide the selected file or folder.
Make File Explorer hide hidden files and folders
The file or folder should disappear from File Explorer when you hide it. And if the file is still showing in File Explorer and file/folder icon is faded out, it’s because the File Explorer is configured to display hidden files and folders. Here is how to change that.
Step 1: Open Folder Options. There are six ways to open Folder Options in Windows 10. The easiest way is to click the File menu in File Explorer and then click Change folder and search options ( or only Options).
Step 2: Switch to the View tab of Folder Options or File Explorer Options. Check Don’t show hidden files, folders, and drives option. Click the Apply button.
To view hidden files and folders again
Step 1: Open Folder Options. Under the View tab, select the radio button labeled Show hidden files, folders, and drives option. Click the Apply button.
Step 2: The hidden file or folder should now appear in its original location, but the icon will be faded out. Right-click on the file or folder, click Properties, and then uncheck the Hidden checkbox and finally, click Apply button to see the file.
Using third-party tools to hide and password-protect files and folders
While the built-in option to hide files and folders is quite good, it doesn’t offer a secure way to hide files and folders yet. Therefore, anyone who gains access to your Windows 10 PC can easily access your hidden files and folders by making appropriate changes to Folder Options.
So, it’s a good idea to use third-party tools like Secret Folder (probably the best in its class) to password protect crucial files and folders in Windows 10.
When it comes to password protecting files and folders, there are quite a few good free software to choose from. You can refer to our top 4 free folder locker software for Windows 10 guide to download the best file and folder locker for Windows 10.

How to hide files and folders using File Explorer
- Open File Explorer.
- Navigate to the file or folder you want to hide.
- Right-click the item and click on Properties.
- On the General tab, under Attributes, check the Hidden option.
- Click Apply.
How do I hide a drive in Windows 10 for another user?
How to hide a drive using Group Policy
- Use the Windows key + R keyboard shortcut to open the Run command.
- Type gpedit.msc and click OK to open the Local Group Policy Editor.
- Browse the following path:
- Double-click the Hide these specified drives in My Computer policy.
- Select the Enabled option.
How do I lock a folder and hide it Windows 10?
How To Lock a Folder With a Password in Windows 10
- Right-click inside the folder where the files you want to protect are located.
- MORE: How to Change Your Password in Windows 10.
- Select “New” from the contextual menu.
- Click on “Text Document.”
- Hit Enter.
- Double-click the text file to open it.
How do I hide files on my computer?
Hiding files in Windows is pretty easy:
- Select the files or folders you want to hide.
- Right-click and choose Properties.
- Click the General tab.
- Click the checkbox next to Hidden in the Attributes section.
- Click Apply.
Can I hide a drive in Windows 10?
Hide Drive using Disk Management. If you want to hide a drive in Windows 8 through Disk Management, you need to right-click on My Computer and then click Manage. In Computer Management Console open Storage by double clicking on it. Now, double-click on Disk Management Snap-in.
How can I hide a drive from another user?
How To Hide Specific Drives from Users in Windows 7
- Then, go to User Configuration -> Administrative Templates -> Windows Components -> Windows Explorer, and open the setting called Hide these specified drives in My Computer.
- In the detail setting window, set option to Enable first, and pick drives that you want to hide from the drop down list under the option section.
Can you password protect a folder in Windows 10?
Unfortunately, Windows Vista, Windows 7, Windows 8, and Windows 10 do not provide any features for password protecting files or folders. You need to use a third-party software program to accomplish this. Select the file or folder you want to encrypt. Right-click the file or folder and select Properties.
How can I lock a folder in Windows 10 without any software?
How to Lock Folder on Windows 10 Without Any Software
- Right-click inside a drive or folder where you would like to place your locked folder and select New > Text Document from the context menu.
- Name the file anything you want or just hit Enter.
- Once created, double-click on the text file to open it.
- Copy and paste the text below into your newly created text document.
How do I lock a folder with BitLocker in Windows 10?
To set up Bitlocker:
- Go to the Control Panel.
- Click System and Security.
- Click BitLocker Drive Encryption.
- Under BitLocker Drive Encryption, click Turn on BitLocker.
- Select Enter a password or Insert a USB flash drive.
- Enter a password and confirm it, and then click Next.
How do I hide apps on Windows 10?
Hide App list from Windows 10 Start Menu
- Step 1: Go to ‘Start’, and open ‘Settings’.
- Step 2: Now select ‘Personalization’. Then from the left menu choose ‘Start’.
- Step 3: Find the setting that says “Show app list in Start menu” and turn it off to hide the app list from the Start menu.
How can I hide my folder?
How to hide files and folders using File Explorer
- Open File Explorer.
- Navigate to the file or folder you want to hide.
- Right-click the item and click on Properties.
- On the General tab, under Attributes, check the Hidden option.
- Click Apply.
How do I hide files on my laptop?
To hide a file or folder on Windows, open a Windows Explorer or File Explorer window and locate the file or folder you want to hide. Right-click it and select Properties. Enable the Hidden checkbox on the General pane of the Properties window. Click OK or Apply and your file or folder will be hidden.
View hidden files and folders in Windows 10
- Open File Explorer from the taskbar.
- Select View > Options > Change folder and search options.
- Select the View tab and, in Advanced settings, select Show hidden files, folders, and drives and OK.
How do I lock a drive in Windows 10?
Steps to set hard drive password in Windows 10: Step 1: Open This PC, right-click a hard drive and choose Turn on BitLocker in the context menu. Step 2: In the BitLocker Drive Encryption window, select Use a password to unlock the drive, enter a password, reenter the password and then tap Next.
How do I hide an OEM partition?
Hide recovery partition via Disk Management. Step 1: Open Disk Management. To do so, type create and format hard disk partitions in Start menu search box, and then press Enter key. Alternatively, you can type Diskmgmt.msc in the Start menu search box or Run command box, and then press Enter key.
How do I hide a drive in Guest account?
Click on Start > Run and type gpedit.msc, and hit enter. Then navigate through: User Configuration, Administrative Templates, Windows Components, and Windows Explorer. Click Hide these specified drives in My Computer. Click to select the Hide these specified drives in My Computer check box.
How do I restrict users in Windows 10?
How to Create Limited-Privilege User Accounts in Windows 10
- Select Settings.
- Tap Accounts.
- Select Family & other users.
- Tap “Add someone else to this PC.”
- Select “I don’t have this person’s sign-in information.”
- Select “Add a user without a Microsoft account.”
How do I lock my computer from another user?
Lock Your Windows Account on Demand
- Press the Windows logo key and the letter ‘L’ at the same time.
- Press Ctrl + Alt + Del and then click the Lock this computer option.
- Create a shortcut to lock the screen.
How do I disable BitLocker in Windows 10?
To disable BitLocker, you need to do the following:
- Open the Search bar and type Manage BitLocker. Select the Manage BitLocker from the menu.
- This will open the BitLocker window, where you you will see all your partitions and you can either select to suspend BitLocker or completely disable it.
How do I unlock BitLocker in Windows 10?
How to turn on BitLocker To Go
- Connect the drive you want to use with BitLocker.
- Use the Windows key + X keyboard shortcut to open the Power User menu and select Control Panel.
- Click System and Security.
- Click BitLocker Drive Encryption.
- Under BitLocker To Go, expand the drive you want to encrypt.
Why can’t I encrypt a folder in Windows 10?
According to users, if encrypt folder option is grayed out on your Windows 10 PC, it’s possible that the required services aren’t running. File encryption relies on Encrypting File System (EFS) service, and in order to fix this problem, you need to do the following: Press Windows Key + R and enter services.msc.
Photo in the article by “Wikimedia Commons” https://commons.wikimedia.org/wiki/File:GNUstep-liveCD.png
Большинство операционных систем не считает необходимым показывать своим пользователем все файлы, ради их сохранности хотя бы. В Windows тоже можно прятать не только файлы, но и папки, а то и целые диски. Этой уловкой продвинутые пользователи регулярно пользуются. Если изначально функция была системной для защиты служебных файлов от случайного удаления, то теперь таким образом обеспечивается конфиденциальность: часто нужно спрятать определенную информацию от других пользователей.
💚 ПО ТЕМЕ: Как найти забытый пароль от вайфая (Wi-Fi сети) на компьютере Windows: 4 способа.
Предположим, что вы хотите в Windows 10 скрыть какие-то файлы или папки, а то и диски, или же увидеть их. Что делать, если один из инструментов по умолчанию не работает? Давайте рассмотрим все способы, при помощи которых вы можете спрятать или найти скрытый файл, папку и диск на вашем компьютере.
💚 ПО ТЕМЕ: Как загружать фото и видео в Instagram с компьютера Mac или Windows.
При помощи меню «Проводника»
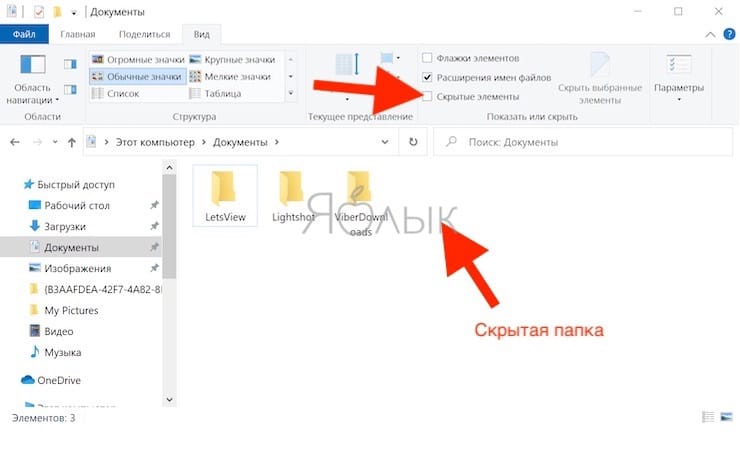
Откройте «Проводник» Windows и выберите все файлы и папки, которые вы хотите скрыть. Нажмите на кнопку «Скрыть выбранные элементы», чтобы скрыть их.
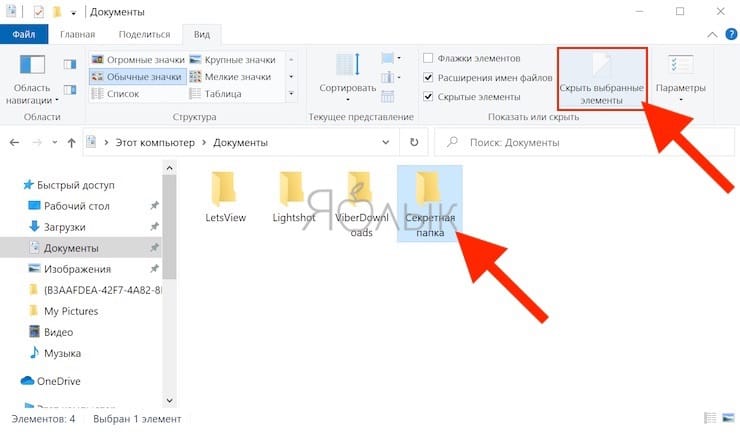
Значки скрытых файлов станут более тусклыми.
Для возврата к прежнему режиму отображения этих элементов снова воспользуйтесь той же кнопкой.
💚 ПО ТЕМЕ: Как ускорить работу компьютера с Windows 10, 8, 7: 20 советов.
При помощи меню Свойства папки
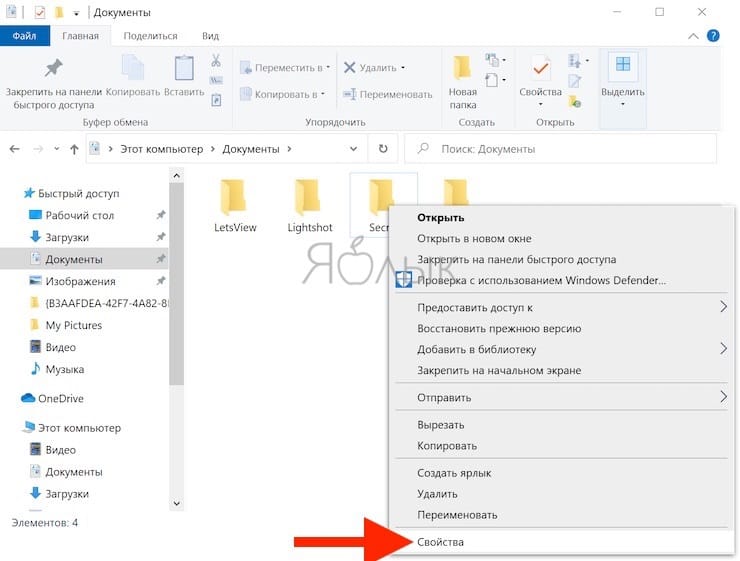
Этот способ работал в Windows 8.1 и предыдущих версиях операционной системы. Откройте «Проводник», но на этот раз щелкните правой кнопкой мыши по любой папке, в которой вы хотите скрыть файлы и папки.

Нам понадобится параметр «Свойства».
На вкладке «Общие» вы найдете атрибут «Скрытый». Активируйте его, чтобы скрыть выбранную папку с файлами в ней.
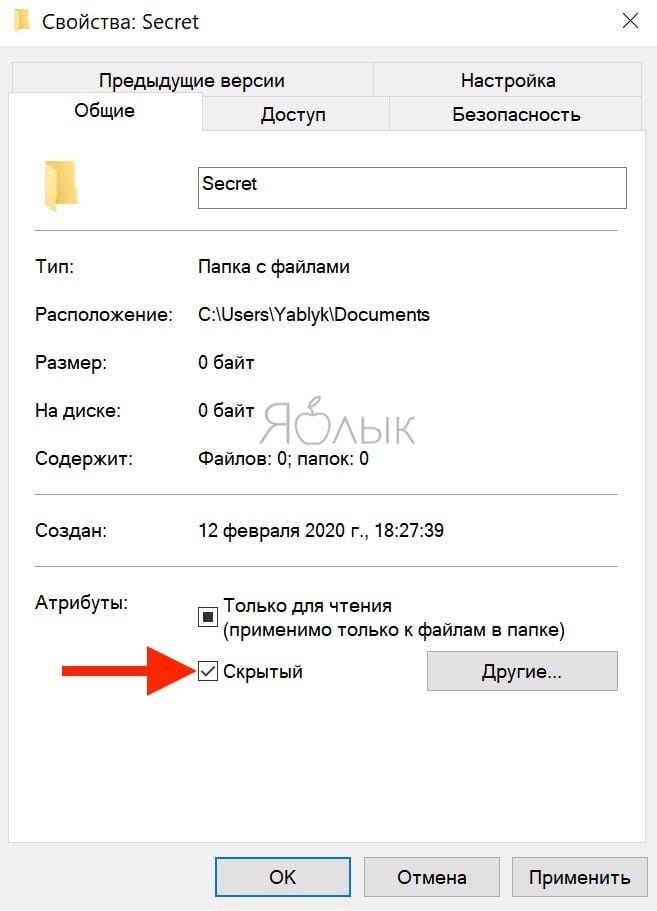
Повторите тот же процесс и снимите этот флажок, чтобы отобразить скрытые ранее выбранные вами папки с файлами.
💚 ПО ТЕМЕ: Папка «con» в Windows: почему нельзя создать директорию с таким названием?
Как скрыть (показать) скрытую папку или файл в Windows
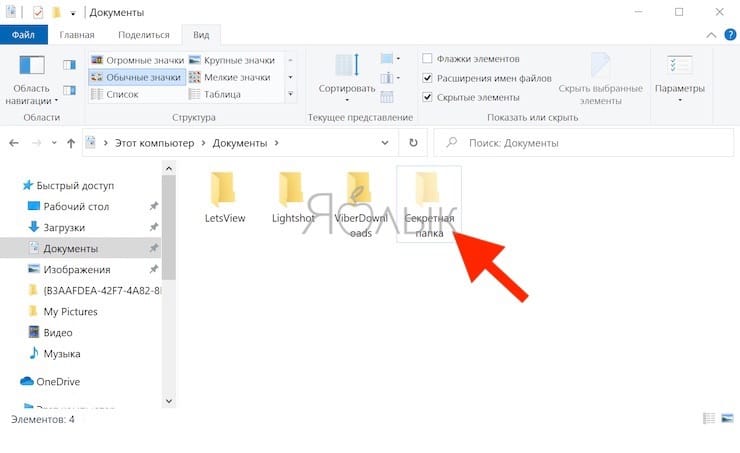
При помощи меню «Проводника»
Откройте «Проводник». На вкладке «Вид» вы можете найти флажок «Скрытые элементы». Активируйте это поле, и вы сможете увидеть все скрытые файлы и папки внутри того каталога, в котором вы находитесь.
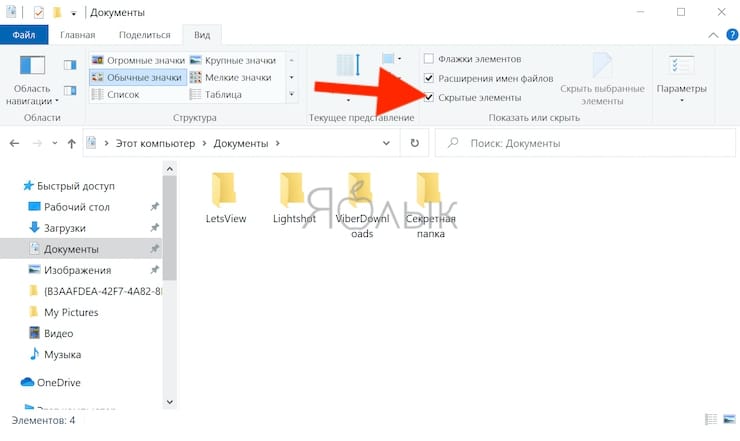
Это меню было добавлено в версии программы для Windows 10. Ранее приходилось переходить к свойствам папок, чтобы дать разрешение отображать спрятанные в них файлы и папки. По окончании работы с нужным каталогом просто снимите галочку и скрытые элементы снова пропадут.
💚 ПО ТЕМЕ: Лучшие аналоги Lightroom: 10 программ для Windows и Mac, доступных без подписки.
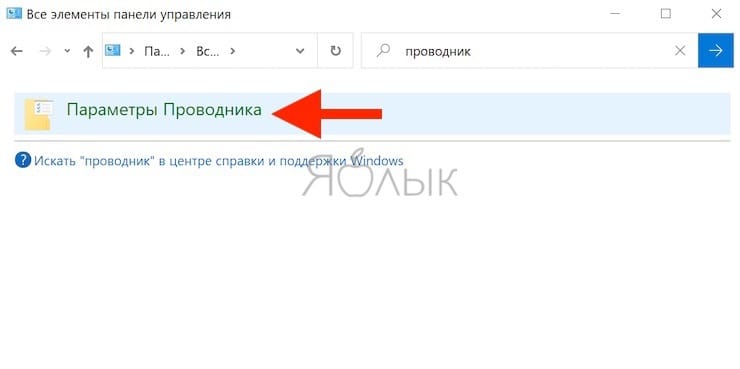
При помощи Панели управления
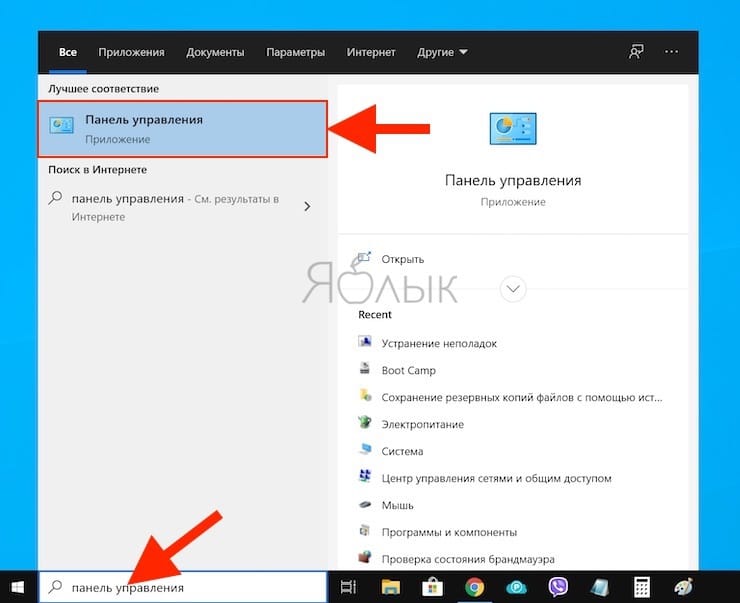
Если по какой-либо причине вышеупомянутый метод не подходят для вас, есть другой способ. Нажмите клавиши Win + S, чтобы открыть меню поиска, найдите «Панель управления» и откройте ее.
В окне поиска уже «Панели управления» найдите «Проводник».
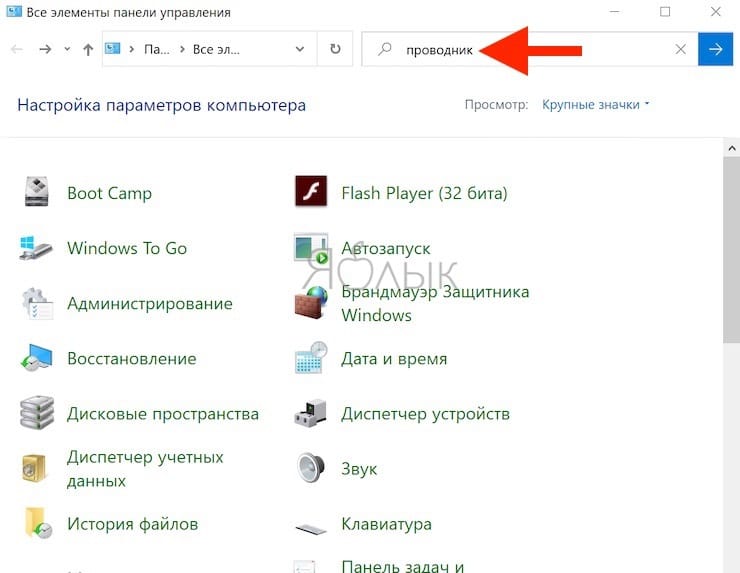
Вы увидите элемент «Параметры проводника».
На вкладке «Вид» активируйте необходимую опцию «Показывать скрытые файлы, папки и диски» или «Не показывать скрытые файлы, папки и диски». Нажмите «Применить» и ОК.
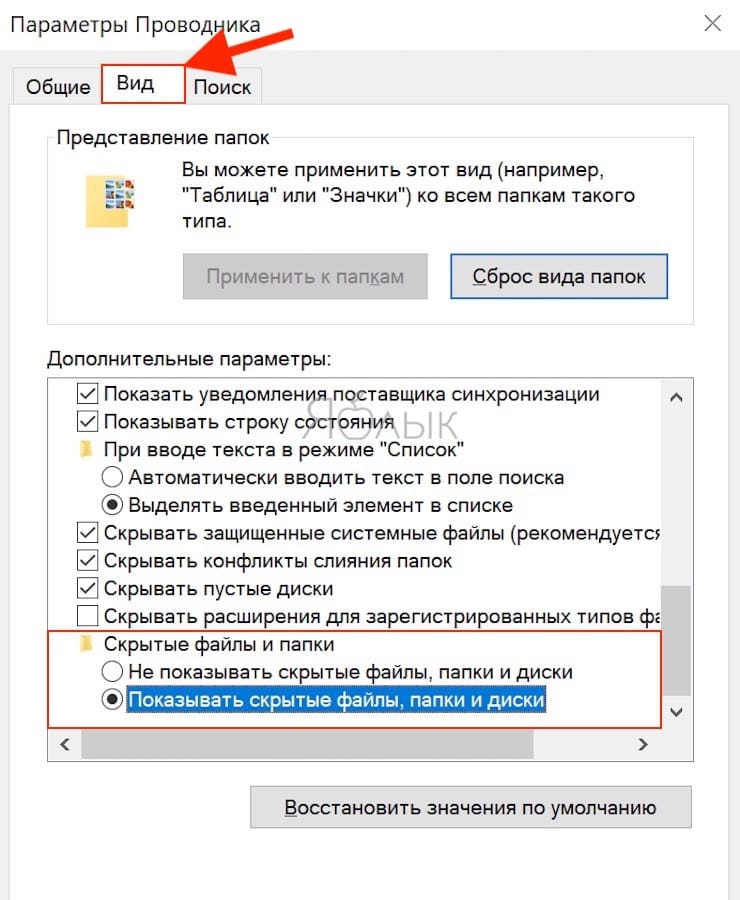
Важно понимать, что это универсальный параметр, означающий возможность показать или скрывать скрытые файлы, папки и диски везде, а не только в той папке, которая вами просматривается. Если вы хотите выполнить определенные действия с конкретной папкой, то следуйте приведенному первым методу.
💚 ПО ТЕМЕ: Зависает компьютер на Windows? Горячие клавиши, которые помогут решить проблему.
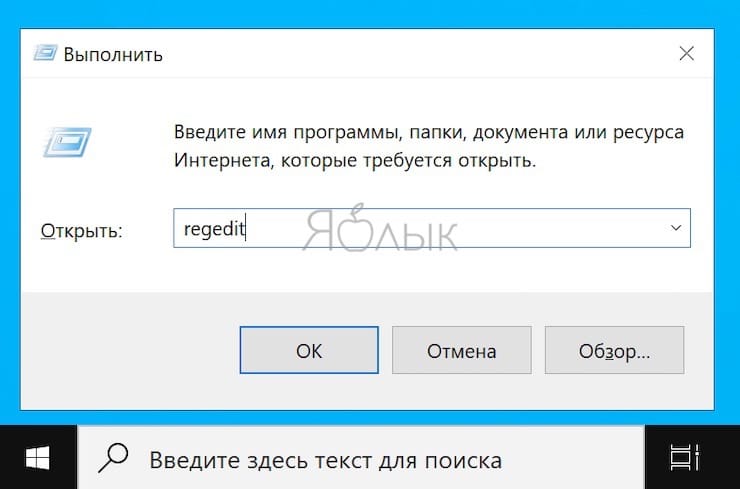
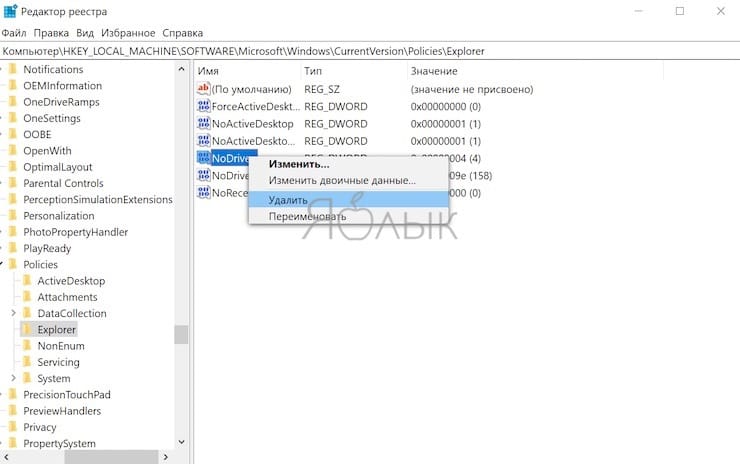
При помощи реестра
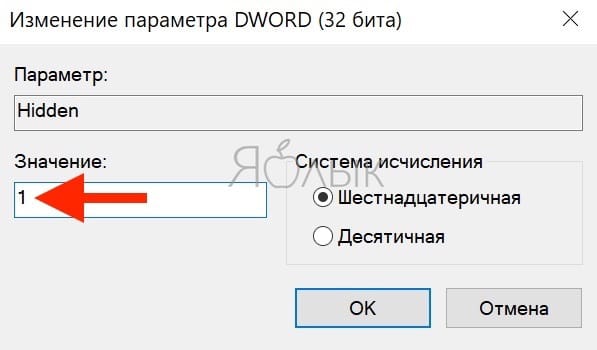
Мы не рекомендуем использовать эту опцию, пока вы не попробуете остальные. Прибегать к работе с реестром стоит, если другие варианты не работают. Для того, чтобы найти и открыть редактор реестра нажмите комбинацию клавиш Win + R, чтобы открыть окно «Выполнить», потом ввести команду regedit и нажать «Ввод» для запуска приложения.
Теперь перейдите к указанной ветке реестра:
Компьютер HKEY_CURRENT_USER Software Microsoft Windows CurrentVersion Explorer Advanced
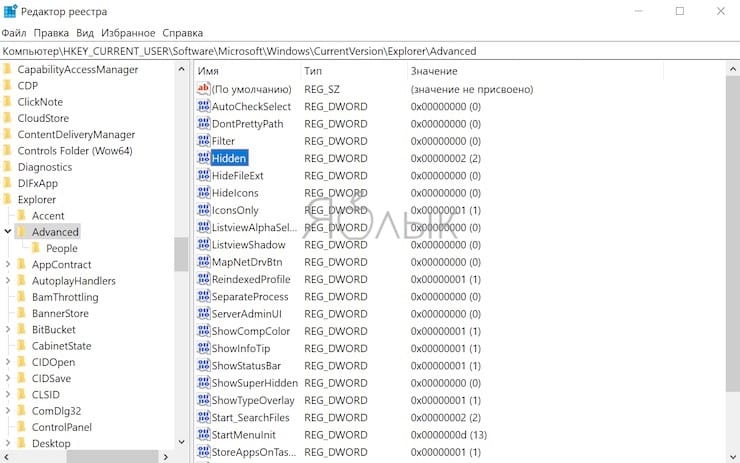
Дважды щелкните по параметру Hidden в правой панели окна и установите значение 1, чтобы отобразить скрытые файлы, папки и диски, или 2, чтобы скрыть их.
💚 ПО ТЕМЕ: Как отключить пароль на вход в Windows 10: рабочие способы.
Как надежно скрыть конкретный файл или папку, чтобы их нельзя было увидеть при помощи обычных (вышеперечисленных) способов
Обратите внимание на этот необычный трюк. Скрытие файла или папки с помощью приведенной ниже команды из окна терминала позволит более надежно скрыть объект. Это означает, что ни один пользователь не сможет просматривать скрытый файл или папку даже при изменении соответствующего атрибута из параметров папки. Это обеспечивает вам дополнительный уровень безопасности, потому что любой, имеющий доступ к вашему компьютеру, может просматривать файлы и папки, используя функцию их свойств и атрибутов.
Запишите путь к файлу, который вы хотите скрыть в первую очередь. Вы можете скопировать его из панели поиска проводника.
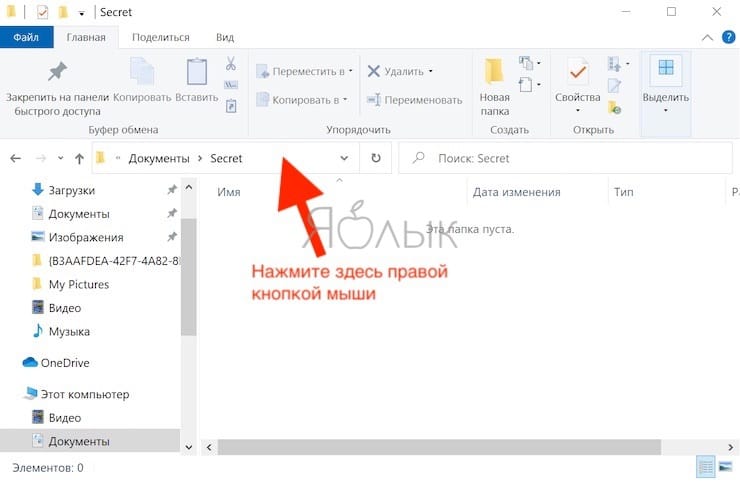
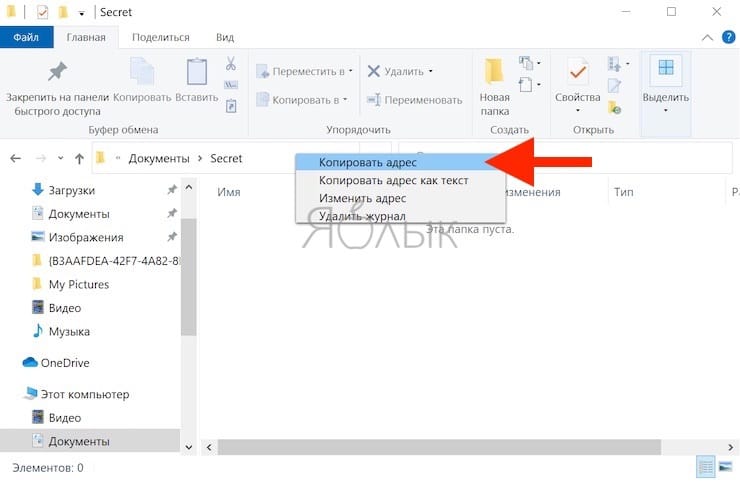
Теперь запустите приложение CMD (командная строка) с правами администратора
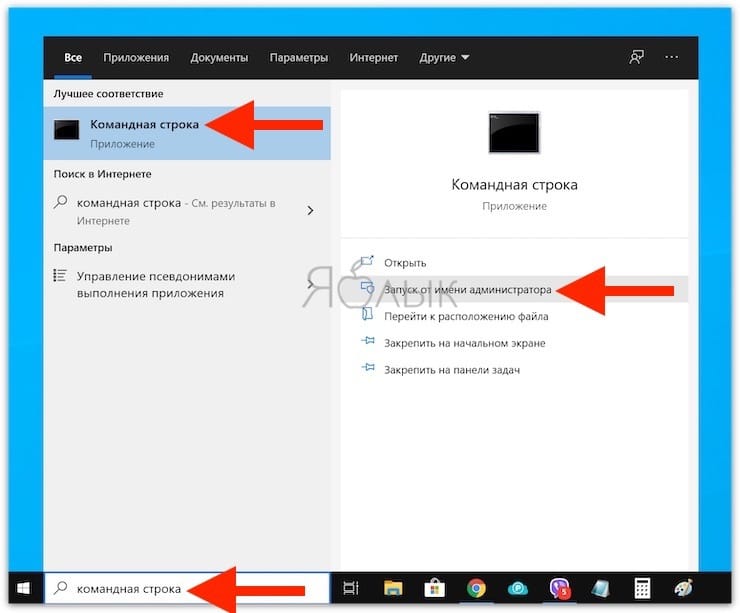
и введите команду такую команду:
attrib C:Users<имя пользователя>PicturesDownloadsfilename.png +s +h
В нашем случае получилась команда:
attrib C:UsersYablykDocumentsSecret +s +h
Примечание: этот способ не поддерживает кириллические символы, это означает, что файл или папка должны иметь название, состоящее из латинских букв или цифр без пробелов.
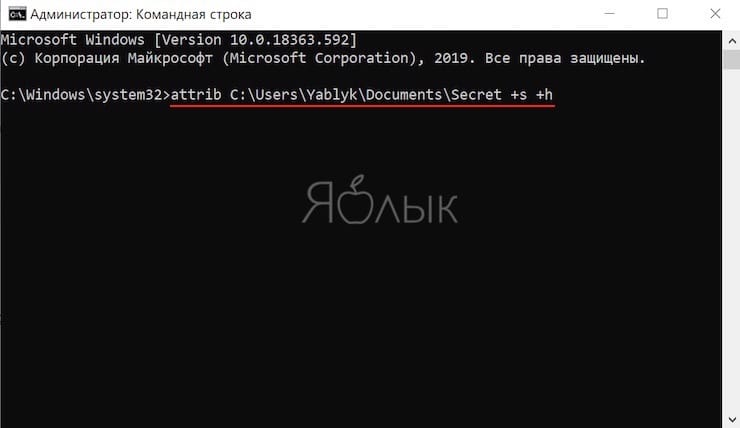
Обязательно измените имя пользователя на имя с вашего компьютера и дальнейшая часть пути вплоть до filename.png на путь к нужному вам файлу с его правильным расширением.
Атрибут +s сообщит операционной системе, что это системный файл, который необходимо защитить, а +h скажет, чтобы файл был скрыт навсегда.
Вы можете использовать эту же команду, чтобы скрыть папку. А чтобы снова отобразить файл или папку, используйте знак минус (-s -h).
attrib C:UsersYablykDocumentsSecret -s -h
Мы предлагаем вам сперва потренироваться на временном файле, ведь вы явно не хотите потерять доступ к важному файлу / папке.
💚 ПО ТЕМЕ: 32- или 64-битная Windows: какая разница и какую систему нужно устанавливать?
Как скрыть весь диск в Windows
Вы можете скрыть весь диск с помощью редактора реестра. Это невозможно сделать в панели управления или в меню параметров папки.
Откройте редактор реестра и перейдите к указанной ветке реестра:
HKEY_LOCAL_MACHINE Software Microsoft Windows CurrentVersion Policies Explorer
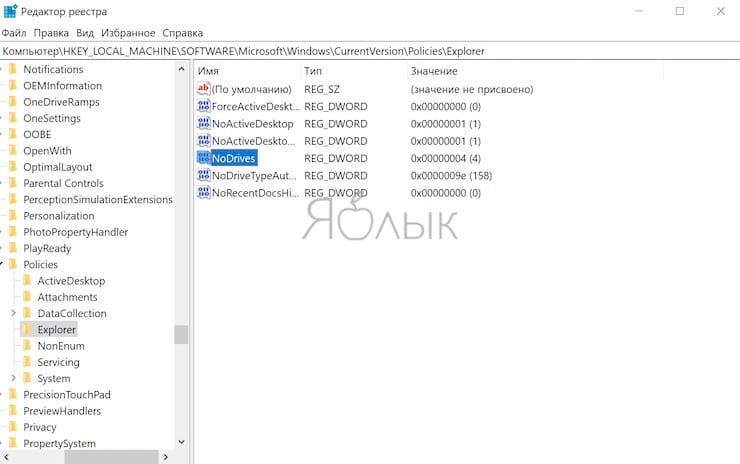
Нажмите на пустое пространство справа и выберите Создать → Параметр DWORD (32 бита).
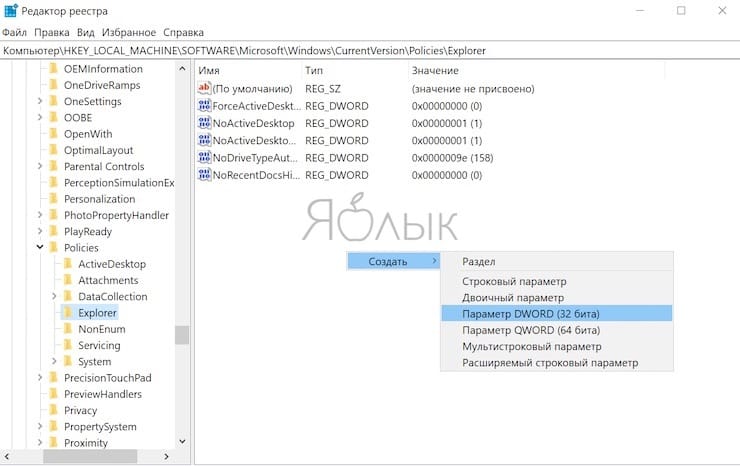
Дайте параметру имя NoDrives, сохраните его, а потом дважды щелкните по нему для его редактирования.
В разделе Система исчисления выберите параметр Десятичная. А в качестве Значения введите номер того диска, который вы хотите скрыть. Вы спросите, как найти номер диска, ведь он обычно представлен в виде буквы алфавита, С или D?
На самом деле это можно сделать довольно легко. Букве A соответствует цифра 1, Букве B – 2, C равно 4, D равно 8 и так далее. Каждая буква имеет удвоенный номер предыдущей буквы. Нетрудно догадаться, что диску E будет соответствовать число 16. Такой номер и надо ввести в качестве значения указанного параметра реестра.
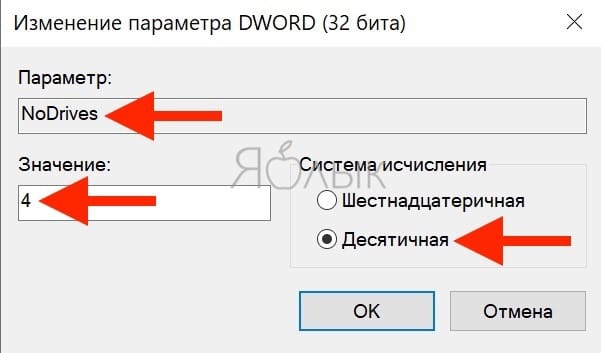
Но что делать, если вы захотите скрыть несколько разных дисков? Просто сложите их номера и введите полученное число. Например, если требуется спрятать диски A и D, то сложите 1 с 8. Параметр NoDrives должен быть равным 9. Не забудьте сохранить значение реестра и перезагрузить компьютер.
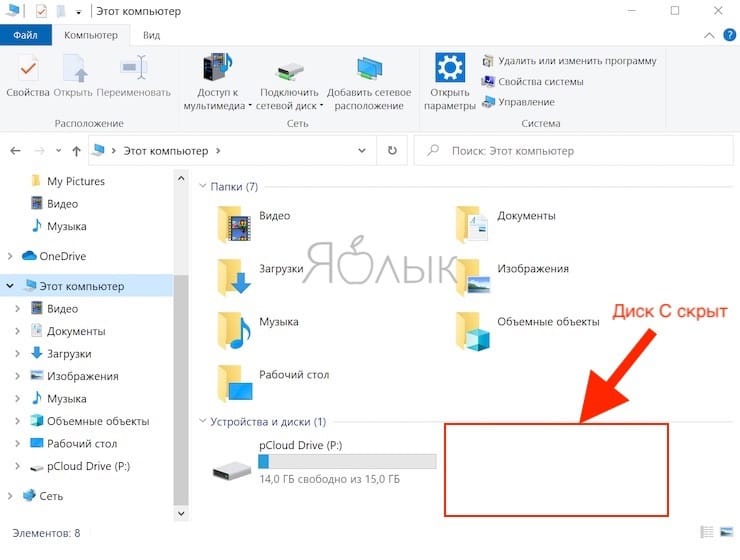
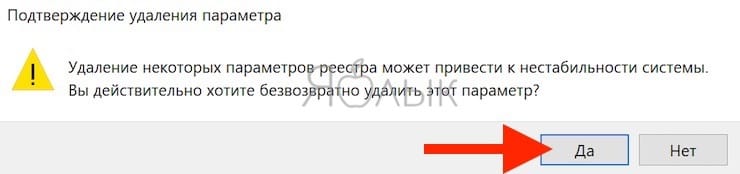
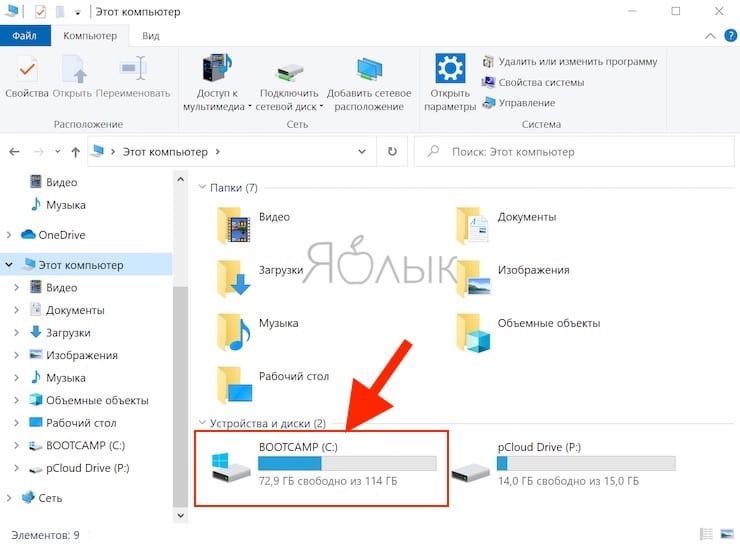
Чтобы отобразить снова диск(и), просто удалите созданную выше запись NoDrives.
💚 ПО ТЕМЕ: Как автоматически переключать язык (раскладку) на клавиатуре в macOS или Windows.
Сторонние приложения
На рынке имеется ряд сторонних приложений, которые помогут вам легко управлять, скрывать или отображать файлы, папки и диски на компьютере с Windows 10. Эти приложения имеют ряд дополнительных функций, которые мы и обсудим.
Первый программа – это Secret Disk, которая создает скрытый еще и защищенный паролем виртуальный диск на вашем компьютере для сохранения конфиденциальных файлов и папок. Базовая версия приложения бесплатна, и для большинства пользователей ее функционала достаточно.
Второе приложение – My Lockbox, оно добавляет свой значок на рабочий стол. С помощью иконки можно быстро прятать или отображать файлы и папки в любом месте. Программа работает с сочетаниями клавиш. Бесплатная версия может заблокировать какую-то одну папку с неограниченным числом подкаталогов и файлов внутри.
Существуют и другие приложения, которые могут помочь вам спрятать файлы, папки и диски в Windows 10, но и этого должно быть достаточно для организации работы. В этой операционной системе есть несколько способов спрятать информацию, все зависит от того, какие файлы или папки вы пытаетесь скрыть и каким образом. Вы можете выбрать один из предложенных нами методов, только предварительно стоит убедиться, что четко понимаете все сложности, с которыми можете столкнуться.
Смотрите также:
- Дни рождения на iPhone, iPad и Mac: как добавлять и включать напоминания.
- Как сохранить страницу сайта в Safari на iPhone (iPad) для чтения без Интернета: 5 способов.
- Как быстро переводить сайты (веб-страницы) в Safari на iPhone и iPad: 3 способа.
-
MiniTool
-
MiniTool News Center
- How to Hide/Unhide a Folder/File in Windows 10 with CMD
By Alisa | Follow |
Last Updated April 29, 2021
![]()
This tutorial offers a step-by-step guide for how to hide a folder or file in Windows 10 by using CMD (Command Prompt). You can also learn how to show hidden files Windows 10 using CMD. To recover deleted or lost files on Windows 10 computer, a top free file recovery software from MiniTool is also provided.
If you want to hide some important folders and files on Windows 10 to keep them away from others’ sight, you can use Windows Command Prompt (cmd.exe) tool to easily and quickly hide a file or folder in Windows 10.
Check below how to hide a folder/file in Windows 10 using CMD, as well as check how to unhide or show hidden files in Windows 10 with Command Prompt when you want.
How to Hide a Folder (File) in Windows 10 Using CMD
Step 1. Open Windows Command Prompt
At first, you should open the cmd.exe. You have several ways to open it. The most common way is to press Windows + R keys at the same time to open Window Run dialog, type cmd in Run window, and press Ctrl + Shift + Enter to open elevated Command Prompt in Windows 10.
Step 2. Hide a Folder or File Using Attrib Command
Then you can type the command line below in Command Prompt window, and hit Enter to hide the target folder in Windows 10.
attrib +h c:documents
In this command, “+” means setting an attribute, “h” refers to the hidden file attribute. You should replace “c:documents” with the folder path and name you’d like to hide, e.g. f:work. You can right-click the file or folder and choose Properties to check its location.

Alternatively, you can also type the command line cd file or folder path in Command Prompt, and hit Enter to go to the file/folder location, for instance, cd f:.
Then type the command line attrib +h work and hit Enter to hide the Work folder in F partition.
Tip: To hide a file in Windows 10 with CMD, you should also include the file extension after the file name in the command line, e.g. f:work.xls.
Thus, you won’t see the hidden file or folder in your Windows 10 computer.
How to Unhide a Folder in Windows 10 with CMD
To show hidden files Windows 10, you can still use the attrib command in Command Prompt to easily realize it.
Step 1. Follow the same instructions above to enter into Command Prompt window.
Step 2. Type the command line attrib -h f:work and hit Enter to make the hidden Work folder in F partition visible again. You should replace “f:work” with the exact path of the folder you’d like to unhide. If it’s a single file you want to unhide, you should also add the file extension after the file name in the attrib command.
Best Free Way to Recover Deleted/Lost Files on Windows 10
Here, we also introduce an easy-to-use, clean and free data recovery software to you to help you recover any lost or deleted files on Windows 10/8/7 computer.
MiniTool Power Data Recovery helps you recover data from computer local hard drive, external hard drive, SSD, USB flash drive, SD card, and more with ease. Its free edition allows you to recover up to 1GB data for free.
Easy user guide: You can just connect your device and launch MiniTool Power Data Recovery, choose the target device in its main UI, and click Scan button, it will automatically scan the data on the target device. After the scanning is completed, you can easily find your lost/deleted files and click Save button to store the recovered files to a new destination.

About The Author

Position: Columnist
Alisa is a professional English editor with 4-year experience. She loves writing and focuses on sharing detailed solutions and thoughts for computer problems, data recovery & backup, digital gadgets, tech news, etc. Through her articles, users can always easily get related problems solved and find what they want. In spare time, she likes basketball, badminton, tennis, cycling, running, and singing. She is very funny and energetic in life, and always brings friends lots of laughs.