(Image credit: Future)
It doesn’t matter the kind of content you keep on your computer, you’ll always have reasons to hide certain files and folders. Perhaps you have important documents and videos that you want to keep under wraps or prevent users from accidentally deleting certain files if you share your PC with others.
For whatever reason, on Windows 10, you can quickly hide a file or folder in two different ways, including using File Explorer or the «attrib» command-line tool with Command Prompt.
This guide will walk you through the easy steps to hide a file and folder on Windows 10. In addition, you’ll learn the steps to access those hidden items as needed.
How to hide files and folders from File Explorer
To hide files and folders through File Explorer on Windows 10, use these steps:
- Open File Explorer.
- Browse to the file or folder to hide on Windows 10.
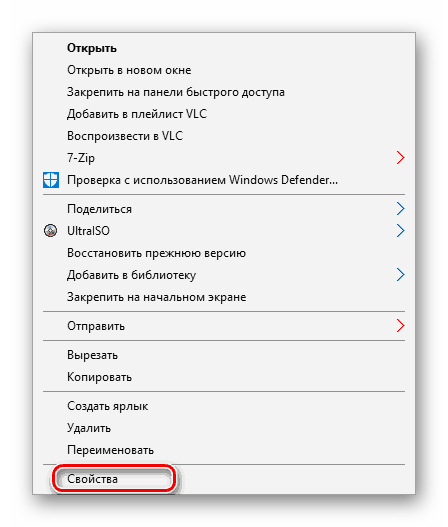
- Right-click the item and select the Properties option.
- Click the General tab,
- Under the «Attributes» section, check the Hidden option.
- Click the Apply button.
- Select the «Apply changes to this folder, subfolders, and files» option if hiding a folder with files and subfolders.
- Click the OK button.
- Click the OK button.
Once you complete the steps, the hidden items will not be visible anymore, as Windows 10 doesn’t show hidden files by default.
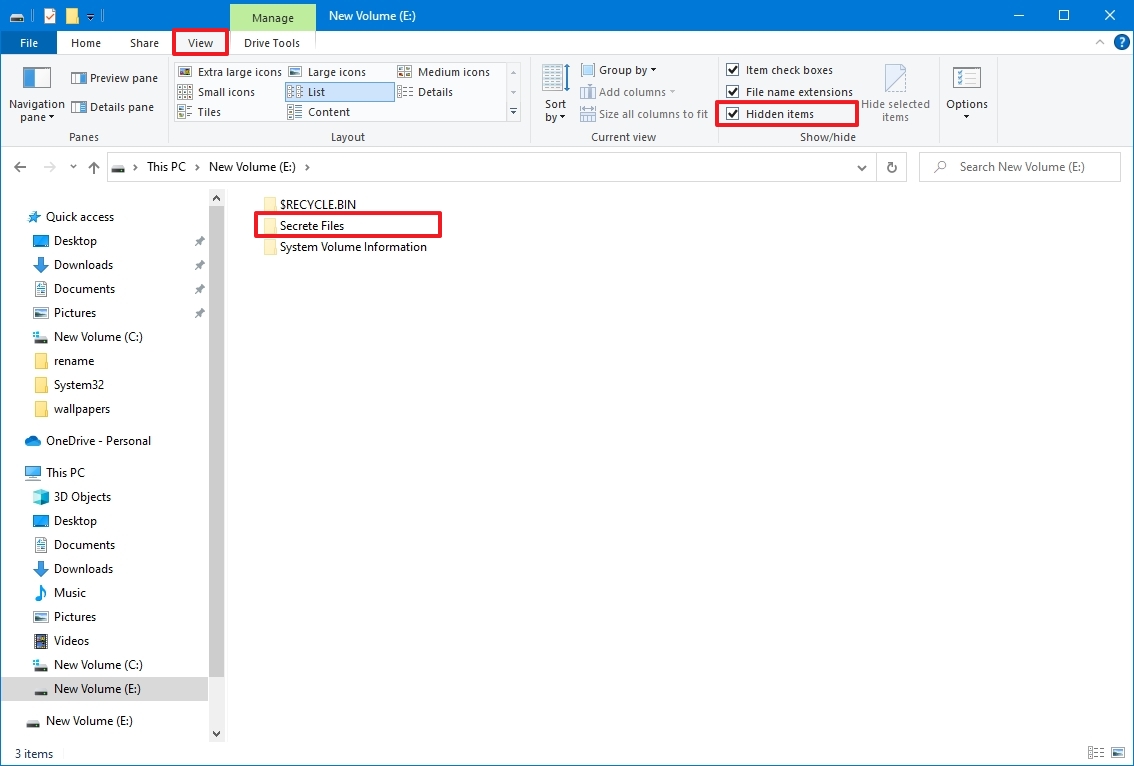
If you want to access your hidden items, you’ll have to type the complete path to the hidden folder or file you want to open and press Enter—for example, C:UsersadminDesktopFilesSecret FilesGreat Secret.txt.
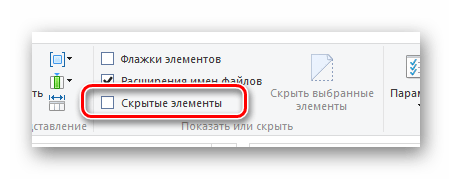
Or you can open File Explorer, click on the «View» tab, and check the «Hidden items» option. Then you can browse your hidden items as you normally do with other content.
At any time, you can make the files and folders visible again by using the same steps mentioned above, but this time on step 4 make sure to clear the Hidden option.
How to hide files and folders from Command Prompt
Alternatively, you can also use Command Prompt to hide files and folders on Windows 10.
To hide files and folders with commands on Windows 10, use these steps:
- Open Start.
- Search for Command Prompt and click the top result to open the app.
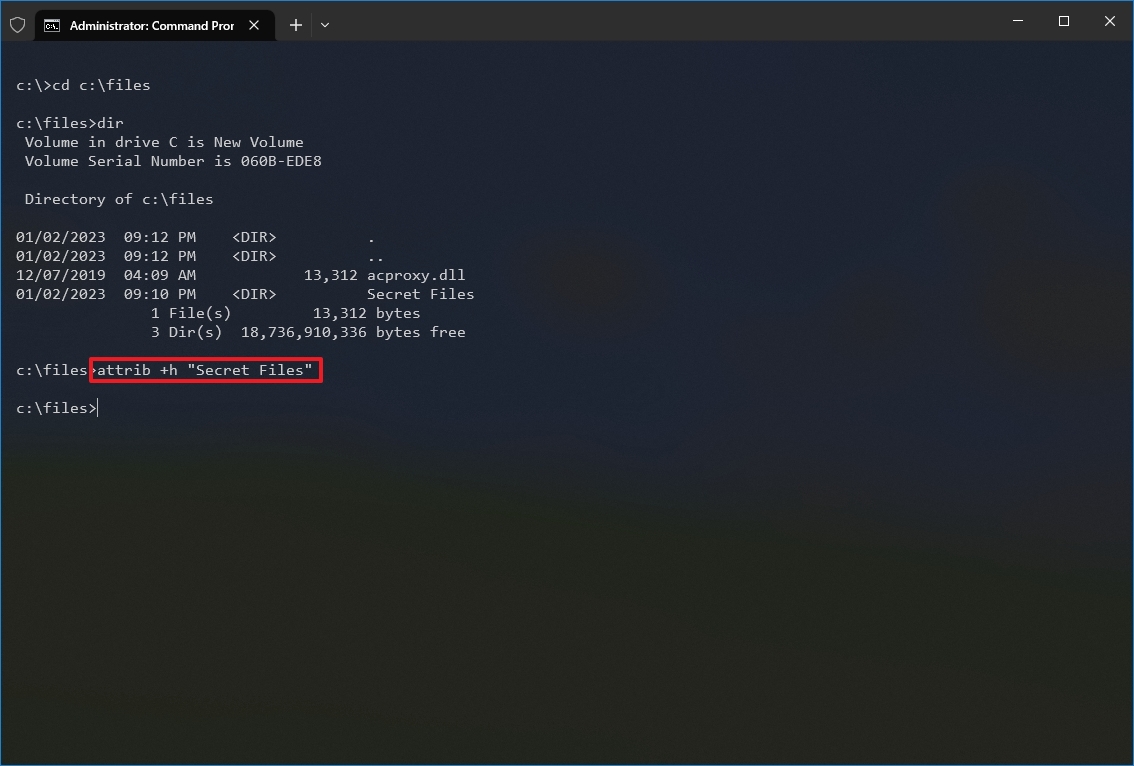
- Type the following command to navigate to the items you want to hide and press Enter: cd c:/SECRET-FILES-LOCATION
In the command, replace the path after «cd» with the path to your file or folder.
- Type the following command to hide a folder or file and press Enter: attrib +h «Secret Files»
In the command, replace «Secret Files» with the name of your folder or file. Quotation marks are only necessary when there are spaces in the name.
After you complete the steps, only the folder will be hidden, but the files and subfolders inside the folder will still be visible to anyone who know the path.
Hide subfolders
If you want to hide a folder with files and subfolders, which you also want to keep hidden, then you’ll need to use these steps:
- Open Start.
- Search for Command Prompt and click the top result to open the app.
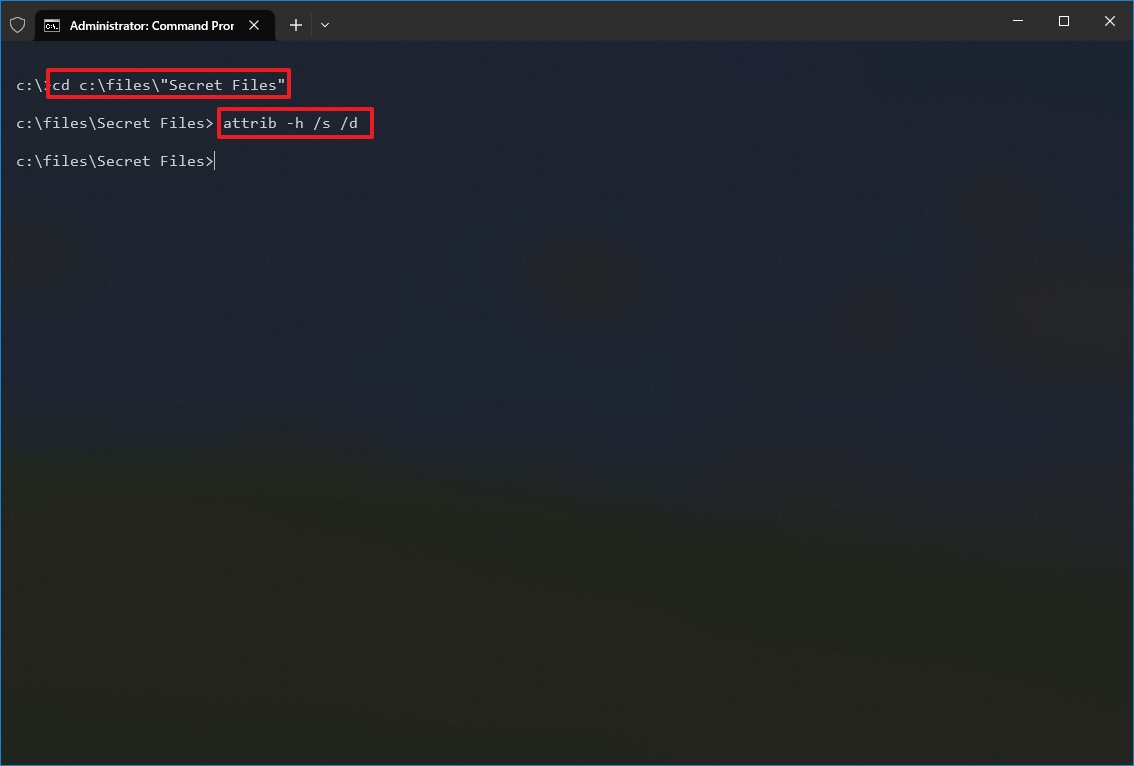
- Type the following command to navigate inside the hidden folder and press Enter: cd «SECRET-FILES-LOCATION»
In the command, replace «SECRET-FILES-LOCATION» with the name of your hidden folder.
- Type the following command to hide all files and folders inside the hidden folder and press Enter: attrib +h /s /d

After completing the steps, the items with the hidden attribute will no longer be visible.
Unhide files and folders
To make files and folders visible again with Command Prompt, use these steps:
- Open Start.
- Search for Command Prompt and click the top result to open the app.
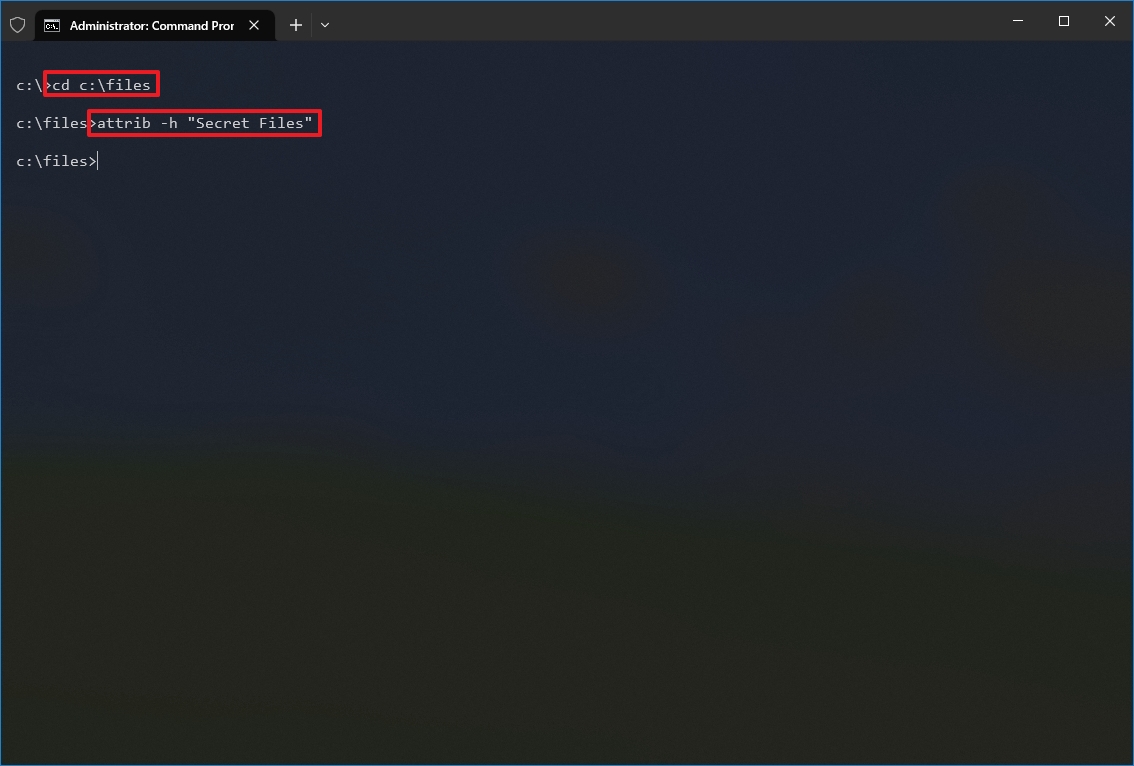
- Type the following command to navigate to the hidden items location and press Enter: cd «SECRET-FILES-LOCATION»
In the command, replace the path after «cd» with the path to your file or folder.
- Type the following command to make the items visible again and press Enter: attrib -h «Secret Files»
In the command, replace «Secret Files» with the name of your folder or file. Quotation marks are only necessary when there are spaces in the name.
Once you complete the steps, the folder will become visible again on Windows 10.
Remove hidden attribute
To remove the hidden attribute for files and subfolders inside of a folder, use these steps:
- Open Start.
- Search for Command Prompt and click the top result to open the app.
- Type the following command to navigate inside the hidden folder and press Enter: cd «Secret Files»
In the command, replace «Secret Files» with the name of your hidden folder.
- Type the following command to remove the hidden attribute from all files and folders inside the folder and press Enter: attrib -h /s /d
Once you complete the steps, the hidden attribute will be removed from any file or subfolder within the location.
More resources
For more helpful articles, coverage, and answers to common questions about Windows 10 or Windows 11, visit the following resources:
- Windows 11 on Windows Central — All you need to know
- Windows 10 on Windows Central — All you need to know

(opens in new tab)
Cutting-edge operating system
A refreshed design in Windows 11 enables you to do what you want effortlessly and safely, with biometric logins for encrypted authentication and advanced antivirus defenses.
Get the best of Windows Central in in your inbox, every day!
Mauro Huculak is technical writer for WindowsCentral.com. His primary focus is to write comprehensive how-tos to help users get the most out of Windows 10 and its many related technologies. He has an IT background with professional certifications from Microsoft, Cisco, and CompTIA, and he’s a recognized member of the Microsoft MVP community.
В современном цифровом мире скрыть что-либо приватное от третьих лиц становится всё сложнее, особенно если речь идёт о данных на компьютере, к которым имеют доступ другие пользователи. Например, члены семьи, друзья, коллеги по работе и так далее. Но если у вас такая необходимость есть, то это можно реализовать в несколько кликов встроенными функциями операционной системы Windows 10. Правда, стоит отметить, что скрыть папку или файлы таким образом можно только от не очень опытного пользователя. Для более серьёзной защиты стоит использовать специальный софт, шифрующий данные, или хотя бы архив с паролем.
Как скрыть папку в Windows 10
Ещё со времён Windows 7 операционные системы компании Microsoft для настольных компьютеров позволяют скрывать файлы и папки штатными методами. Естественно, эта же возможность реализована и в Windows 10. Пользователю, чтобы скрыть нужную ему папку, достаточно выполнить несколько простых шагов.
Для начала нужно изменить настройки системы:
- кликните по меню «Пуск»;
- введите в поиск «Панель управления»;
- перейдите в «Панель управления»;
- в правом верхнем углу «Панели управления» в поиск введите слова «параметры проводника»;
- кликните по иконке «Параметры Проводника»;
- в открывшемся окне в верхней части выберите вкладку «Вид»;
- в меню «Дополнительные параметры» пролистайте до самого низа;
- в пункте «Скрытые файлы и папки» выберите вариант «Не показывать скрытые файлы, папки и диски»;
- нажмите «ОК».
В случае, если по умолчанию в вашей системе скрытые файлы и папки не отображаются, данный этап можно смело пропустить.
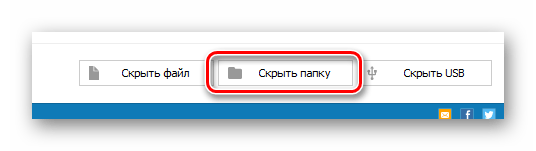
Делаем папку скрытой:
- создайте на своём компьютере папку, которую нужно сделать скрытой (или используйте ту, которая уже создана);
- кликните правой клавишей мыши на данную папку;
- вы выпадающем меню выберите пункт «Свойства»;
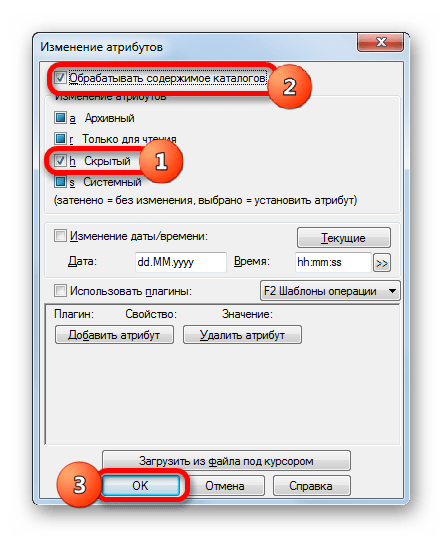
- во вкладке «Общие» поставьте галочку для атрибута «Скрытый»;
- рядом с атрибутом «Скрытый» нажмите на кнопку «Другие…»;
- в открывшемся окне снимите галочку с пункта «Разрешить индексировать содержимое файлов в этой папке в дополнение к свойствам файла»;
- нажмите «ОК», чтобы закрыть данное окно;
- повторно нажмите «ОК».
Данный способ достаточно прост и удобен — найти файлы в папке или саму папку через поиск не выйдет, и если специально скрытый контент не искать, то обнаружить его случайно не получится. Но есть и недостатки — для доступа к папке пользователю каждый раз нужно будет повторять первый этап, делая скрытые файлы вновь видимыми. Кроме того, любой пользователь может найти все скрытые файлы и папки, переключив аргумент в Параметрах Проводника.
Как показать скрытую папку в Windows 10
Для того, чтобы включить демонстрацию всех скрытых папок в системе, пользователю нужно провести довольно простые манимуляции.
Пошаговая инструкция:
- кликните по меню «Пуск»;
- введите в поиск «Панель управления»;
- перейдите в «Панель управления»;
- в правом верхнем углу «Панели управления» в поиск введите слова «параметры проводника»;
- кликните по иконке «Параметры Проводника»;
- в открывшемся окне в верхней части выберите вкладку «Вид»;
- в меню «Дополнительные параметры» пролистайте до самого низа;
- в пункте «Скрытые файлы и папки» выберите вариант «Показывать скрытые файлы, папки и диски»;
- нажмите «ОК».
Как сделать невидимую папку Windows 10
Также имеется более хитрый способ скрытия папки, о котором, конечно, уже давно известно, но менее эффективным он от этого не стал. И, конечно, использовать дополнительный софт вновь не нужно.
Как сделать папку невидимой:
- создайте папку на рабочем столе (правая клавиша мыши — Создать — Папку);
- введите любое название папки;
- кликните правой клавишей мыши по данной папке;
- в выпадающем списке выберите пункт «Свойства»;
- перейдите во вкладку «Настройка»;
- нажмите на кнопку «Сменить значок…»;
- в появившемся окне выберите одну из прозрачных иконок;
- нажмите «ОК» в меню выбора иконки;
- повторно нажмите «ОК» в окне «Свойства»;
- после данной манипуляции иконка папки исчезнет;
- нажмите Windows + R на клавиатуре;
- в окне «Выполнить» введите команду charmap;
- нажмите «ОК»;
- в окне «Таблица символов» выберите шрифт Calibri;
- пролистайте ниже середины и кликните левой клавишей мыши по ячейке с прозрачным символом (подойдёт любой аналог из любого шрифта);
- нажмите на кнопку «Выбрать»;
- нажмите на кнопку «Копировать»;
- кликните правой клавишей мыши по папке;
- выберите пункт «Переименовать»;
- вставьте скопированный символ в поле, после чего нажмите Enter;
- теперь данная папка полностью прозрачна.
Преимущество данного способа в том, что найти папку через поиск практически невозможно, а демонстрация скрытых папок ничего не даст, так как изменений в атрибут папки пользователь не вносит. Но есть и очевидный недостаток — папку можно обнаружить, выделив область на экране или нажав комбинацию клавиш Ctrl+A. Более того, в проводнике скрытый таким образом контент всё же отображается.
- 10 приложений, которые нужно сразу установить на новый компьютер
- 5 альтернатив «Проводника» в Windows: они лучше и по функциям, и по дизайну
- 15 тем для Windows 10, меняющих систему до неузнаваемости. Долго искал четвёртую!
- 3 программы, которые прокачают Пуск в Windows 10. Он станет удобнее и функциональнее
- 7 бесплатных утилит для Windows, о которых знают только продвинутые пользователи

Contents
- 1 How to Hide Folders or Files in Windows 10 with File Explorer
- 2 How to Hide a Folder or File in Windows 10 with Command Prompt and PowerShell
- 3 How to Unhide Folders and Files with Command Prompt
If you’re a fan of minimalism, one of the surefire ways to may your OS cleaner is to hide folders and folders in Windows 10. Though Microsoft hides several folders by default, you may find that your drives fill up with rarely accessed content over time.
This particularly true of the documents folder, which over time will accumulate configuration files, game saves, and other clutter that can make it difficult to remain productive.
Hidden Folders in Windows 10
We are going to show you how to hide folders or files on Windows 10 so you can keep them private or just get them out of the way. We’ll also show you how to show hidden files and unhide hidden files if you need to get them back.
How to Hide Folders or Files in Windows 10 with File Explorer
The most intuitive way to hide a folder in Windows 10 is through File Explorer. An easily accessible toggle makes it trivial for anyone to de-clutter their drives. Here’s how you can make use of it:
- Open the folder or file properties
Before you can hide folders or files, you need to right-click the item in question and select “Properties”.

- Tick the file or folder hide box
In the “General” tab of your file or folder properties, look for the “Hidden” check box and tick it. If you hide a file, that’s all you need to do. When you hide folders, however, you must follow the additional step before.
Meanwhile, if you’re wondering how to unhide files and folders in Windows 10, that’s simple – just untick the Hidden box.
Press “OK” when you’re done.
- Apply the folder hide to subfolders and files
A hidden folder in Windows 10 has two options: you can hide just the root directory, or also hide its subfolders and files.
You may be wondering what the point of this is if the base folder will be gone from File Explorer anyway. The answer is that if you don’t hide subfolders and files, they may still show in search results even if they’re not easily accessible through File Explorer.
In most cases, you’ll want to tick “Apply changes to this folder, subfolders and files” and press “OK”.
- How to show hidden files on Windows 10
If you accidentally hide the wrong folder or need to access one again, you can view hidden files in Windows Explorer with this easy toggle:
In your File Explorer ribbon, click the “View” tab, then look for the “Show/hide” section. Untick the option that reads “Hidden items”. Your hidden folders and files will then display with a slightly greyed-out icon.


How to Hide a Folder or File in Windows 10 with Command Prompt and PowerShell
If you’re on a GUI-less install or need to automate the process, you can also hide folders and files in Windows 10 with a command. We’ll show you how below. The commands work both on the Command Prompt and in PowerShell:
- Open Command Prompt
Press Start and type “CMD”, then click the top result, “Command Prompt”.
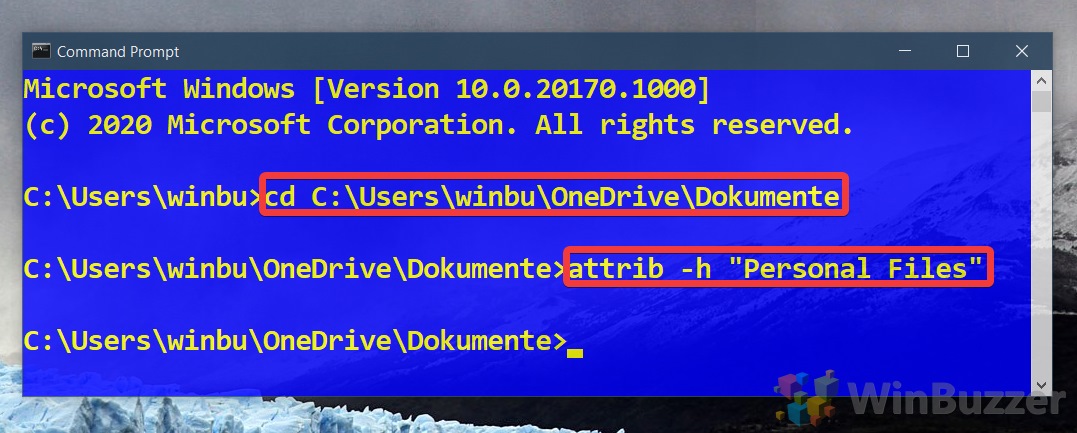
- Find the folder you want to hide and run the ‘attrib +h’ command
Before we can perform our folder hide or file hide, we need to navigate to its parent folder.
For example, we want to hide the “Personal Files” folder. This is in our OneDrive documents folder, so we’ll navigate to Documents in CMD with the
cdcommand:cd C:UsersyourusernameOneDriveDocuments
Now that we’re here, we can hide a directory or file by adding the
+hattribute to it:attrib +h "Personal Files"
Switch
Personal Filesout for the name of your folder or file. - Hide files and subfolders
If you’re hiding a file, that’s all you need to do. If you want to hide a folder, you’ll want to run one more command.
Though we’ve hidden the root folder, we still need to hide all of the files and folders inside of it. To do that, you can navigate inside the folder with
cd "Your Folder"and run the following command:attrib +h /s /d
All of the items with the hidden attribute will now be invisible.


How to Unhide Folders and Files with Command Prompt
Tou can unhide folders or files with Command Prompt with a very similar command to hiding them. This time, however, we have to remove the hidden attribute rather than adding it. Here’s how:
- Open Command Prompt
Press Start and type “CMD”, then click the top result, “Command Prompt”.
- Unhide a folder of file with the ‘attrib’ command
In your Command Prompt Window, navigate the parent directory of the file or folder you’d like to unhide. In our case, we want to unhide a folder called “Personal Files”, which is in our OneDrive Documents folder:
cd C:UsersusernameOneDriveDocuments
Switch the above command with the path to your parent folder and press Enter. Then run the attrib -h command to unhide the file or folder of your choice:
attrib -h "Folder or File name"
- Unhide subfolders and files
If you unhide a folder with the above method, you’ll notice that its sub-folders and files will still be hidden. You can remedy this by navigating to the folder with
cd "Folder Name"and running:attrib -h /s /d


There you have it. You now know how to hide or unhide folders and files in Windows 10. If you’d like to declutter further, you can follow our tutorials to remove built-in Windows apps and customize the Start Menu.
If you share your computer with others, you may want to hide certain files and folders so that people don’t go nosing into your files. The main reason to hide a folder in Windows 10 is privacy. If you have sensitive data that you don’t want anyone to see, hiding your files and folders is a great and easy option to boost your security.
Here’s how you can hide any file or folder on Windows 10.
1. Hide Individual Files/Folders On Windows 10 Using the Command Line
A simple way to hide a file or folder is to change its attributes using the attrib command on the command line. Unsure about using the Windows 10 Command Prompt? Here are our top tips for getting started with the Command Prompt.
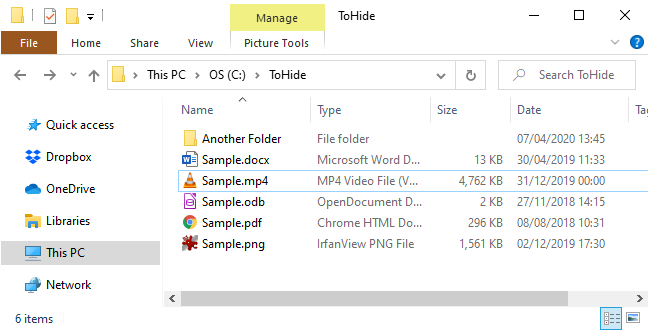
Let’s say you want to hide the Sample.mp4 file in the ToHide folder as shown below.
Open the Command Prompt by pressing Windows key + R to open the Run dialog box. Then, type cmd.exe in the Open box and click OK.
At the prompt, type the following command. Replace the path and file name with the path and file name for the file you want to hide.
attrib C:UsersLoriDocumentsToHideSample.mp4 +s +h
The +s and +h are the attributes you set for the file. The +s attribute is the System file attribute and indicates the file is for use by the operating system and is not normally displayed in a directory listing. The +h is the Hidden file attribute and indicates the file will not be displayed in a directory listing by default.
The attributes in the command are not case sensitive, so you can use either lowercase or uppercase.
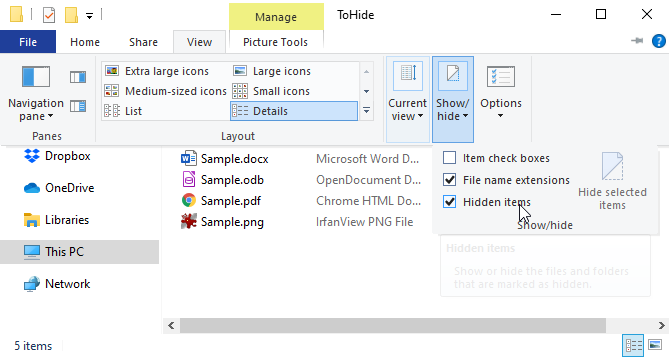
When you open the folder in File Explorer that contains the hidden file or folder, it will not be visible. Even going to View > Show/hide and checking the Hidden items box will not show the hidden file or folder.
You can also hide a folder using the attrib command in the following way. Again, replace the path and the folder name with your own.
attrib C:UsersLoriDocumentsToHideAnotherFolder +s +h
To unhide a file or folder, use the same attrib command, replacing the «+» with «—» in front of the «s» and «h» attributes.
attrib C:UsersLoriDocumentsToHideSample.mp4 -s -h
To learn more about the attrib command, type attrib /? at the command prompt and press Enter.
2. Hide Windows 10 Folders Using File Explorer
Using File Explorer to hide a folder is like using the attrib command described in the previous section, but it’s less secure. Anyone who knows about showing and hiding hidden files in File Explorer can access your files. But if you’re trying to hide data from other family members who are not as tech-savvy as you are, this can work just fine. Hiding files and folders isn’t the only trick the File Explorer has up its sleeve, either. Check out the best File Explorer tricks and tips to take control of your file management.
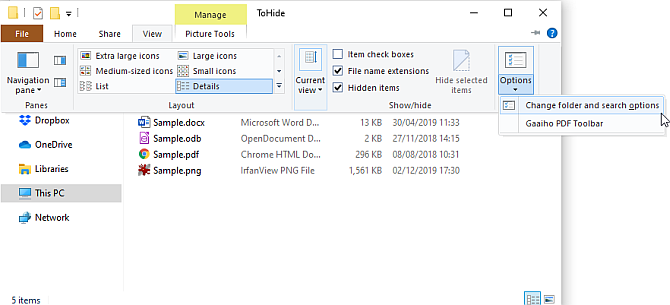
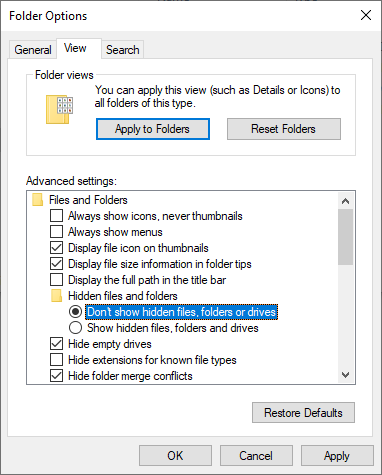
You can set the Hidden attribute for the selected files or folder in File Explorer. But, first, you need to make sure files and folders with the Hidden attribute do not show in File Explorer. To do this, go to View tab > Options and select Change folder and search options.
On the View tab, select Don’t show hidden files, folders, or drives under Advanced settings and click OK.
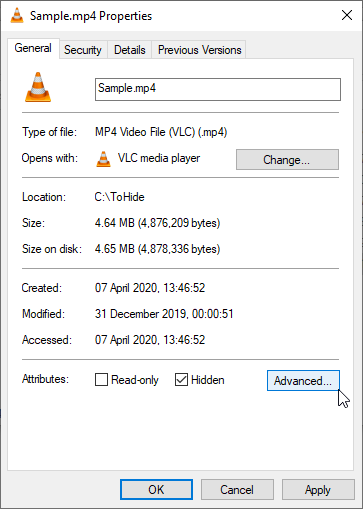
To hide one or more files or folders, select the files or folders, right-click on them, and select Properties.
On the General tab on the Properties dialog box, check the Hidden box in the Attributes section. To prevent the files or folders from appearing in Windows search results, click Advanced.
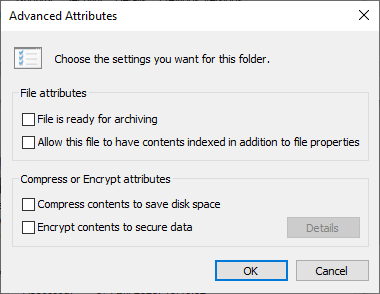
Then, uncheck the boxes in the File attributes section of the Advanced Attributes dialog box and click OK.
To unhide the files or folder, go back to the Properties dialog box for the files or folders in question, and uncheck the Hidden box in the Attributes section.
3. Hide Entire Drives on Windows 10 Using the Registry Editor
This method hides an entire drive instead of just selected files or folders on the drive.
Note: This procedure involves changing the registry. Before you begin, I strongly suggest you back up your registry. You should also check out our tips for not accidentally messing up the Windows registry.
If you’re not comfortable using the Windows registry or are unsure as to what the Windows Registry even is, you can find another method for hiding an entire drive in the Hide Entire Drives Using the Disk Management Utility section below.
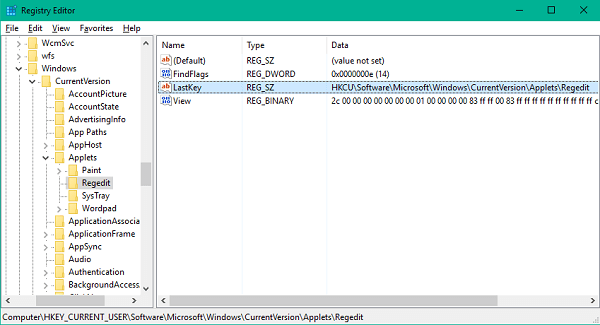
To begin, open the Registry Editor by pressing Windows key+R to open the Run dialog box. Then, type regedit in the Open box and click OK.
Navigate to the following key in the left pane.
HKEY_LOCAL_MACHINESoftwareMicrosoftWindowsCurrentVersionPoliciesExplorer
Right-click on the Explorer key and go to New > DWORD (32-bit) Value.
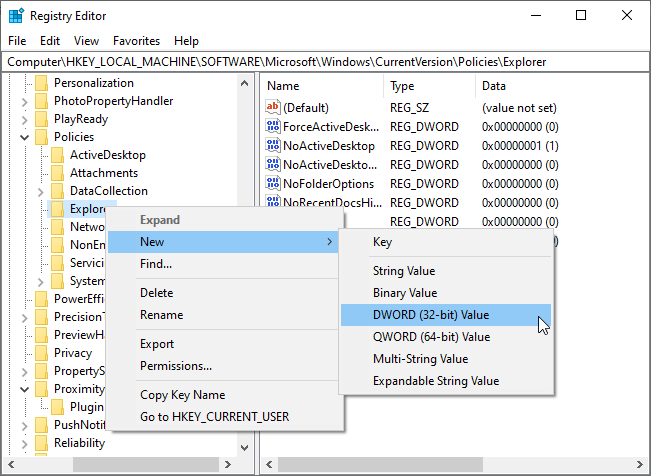
Name the new value NoDrives and then double-click on it.
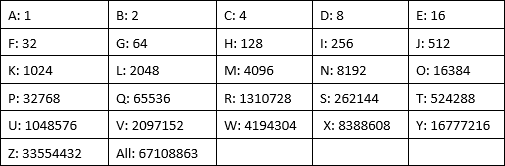
On the Edit DWORD (32-bit) Value dialog box, select Decimal as the Base. Then, enter a number that corresponds to the drive or drives, you want to hide. To find out which number to use, see the table below the following image.
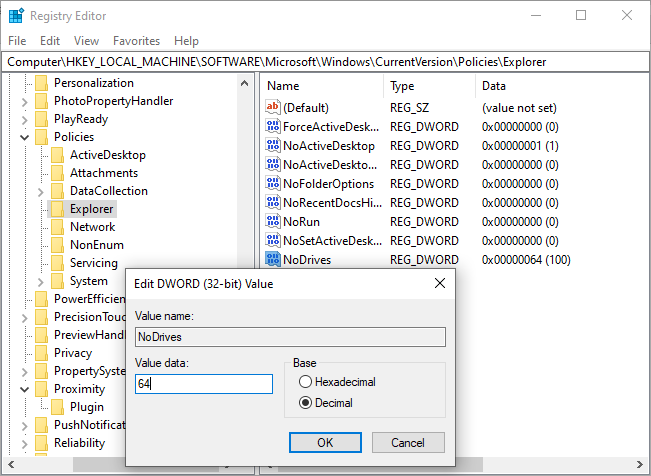
Find the letter for the drive you want to hide in the table below. Enter the number associated with that drive letter in the Value data box for the NoDrives value in the registry. In our example, I entered 64 to hide my G: drive.
If you want to hide more than one drive, add the numbers for all the drive letters you want to hide and enter the total in the Value data box.
After you restart your computer, you will not see the drive in File Explorer.
To show the drive again, go back into the Registry Editor and delete the NoDrives value under the HKEY_LOCAL_MACHINESoftwareMicrosoftWindowsCurrentVersionPoliciesExplorer key and restart your computer again.
4. Hide Entire Drives Using the Disk Management Utility
If you’d rather not edit the registry, you can hide an entire drive using the Disk Management utility. This utility shows you all the internal and external drives connected to your computer.
Press Windows key + R to open the Run dialog box. Then, type diskmgmt.msc in the Open box and click OK.
Right-click the drive you want to hide (in the top or bottom section) and select Change Drive Letter and Paths.
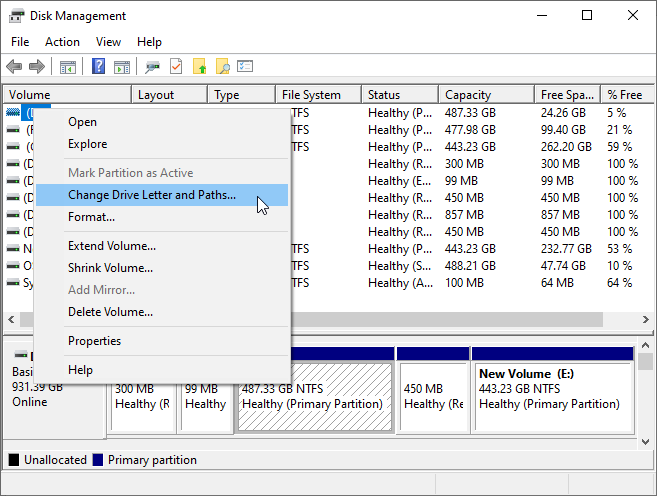
On the Change Drive Letter and Paths dialog box, select the drive letter, click Remove, and then click OK.
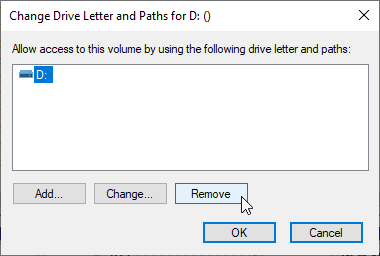
A warning dialog box displays telling you that some programs rely on drive letters and may not work if you remove the drive letter. If you’re sure you want to hide the drive, click Yes to remove the drive letter.
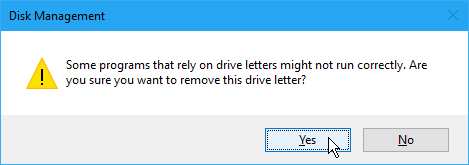
The letter is removed from the drive in the Disk Management Utility.
Once you close and reopen File Explorer, the drive will not be visible and will not be included in Windows search results.
To make the drive visible again, go back into the Disk Management utility and open the Change Drive Letter and Paths dialog box for the hidden drive. Then, click Add.
Make sure Assign the following drive letter is selected (it should be by default). Select the drive letter you want to assign to it from the dropdown list, and click OK.
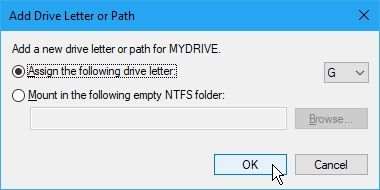
You must close and reopen File Explorer to see the drive again.
5. Hide Folders in Windows 10 Using Third-Party Software
All the methods mentioned above are not as secure as hiding AND password protecting files and folders. Here are some third-party software options for you to consider.
FileFriend
In FileFriend, use the JPK tab to hide files or folders in a JPEG image and add a password to protect the hidden files. FileFriend also allows you to enter text that you want to hide in the image directly in the program, without having to create a text file to hide in the image (using the JTX tab).
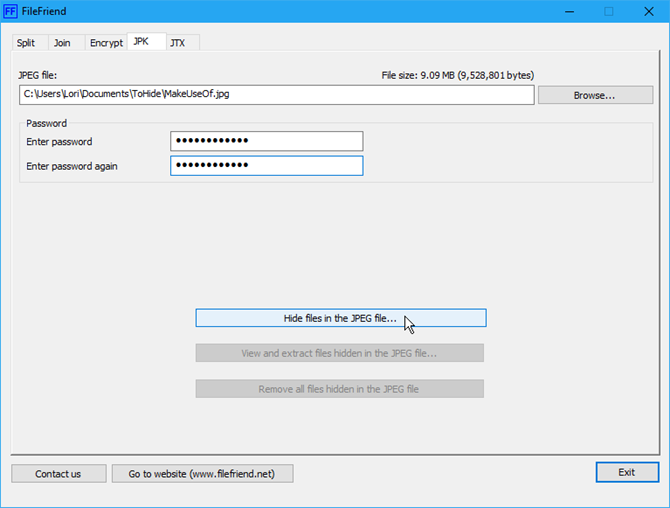
Other features of FileFriend include splitting or joining files and encrypting files and folders.
Download: FileFriend for Windows (Free)
Secret Disk
Secret Disk allows you to create a virtual drive, or repository, that’s invisible and password protected. Another layer of security is added with a PIN that’s required to open the Secret Disk program.
When the repository is visible, it displays with a drive letter in File Explorer. You can copy files and folders to it, and work with it in any program, just like any other drive. Then, you can hide the repository again and it becomes invisible.
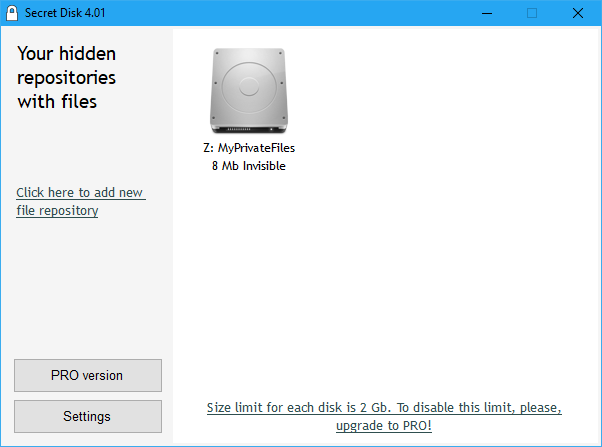
Secret Disk does not need to format your hard drive or make any other changes to your system. It also does not encrypt any files or folders. It just limits access to them by hiding, and password-protecting, the repository.
The Basic version of Secret Disk is free. The PRO version will set you back $14.95 for its added features, including the ability to have more than one repository and choosing the drive letter for each repository.
The repository password and the PIN for opening the program are optional in the PRO version, although these are good features to leave enabled. To upgrade, click the handy PRO version button in the program.
Download: Secret Disk for Windows (Free)
Easy File Locker
Easy File Locker is an easy to use freeware utility that allows you to hide and lock files and folders from other people and from programs. The locked files and folders are protected from opening, modifying, deleting, moving, renaming, or copying. All files and subfolders in a locked folder are protected.
Set a password to open the program by going to System > Set Password. You don’t have to set a password, but, if you don’t, anyone will be able to open the program, turn off the protection for your files and folders, and have access to them.
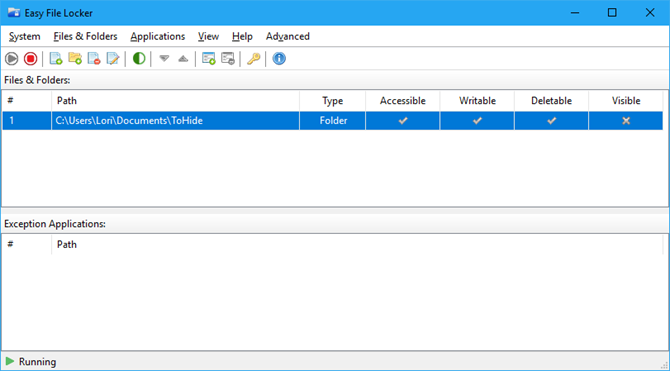
Use the Add File and Add Folder buttons to add files and folders to Easy File Locker. Double-click on a file or folder in the list to change its permissions (Accessible, Writable, Deletable, Visible).
Protect the selected files and folders using the Start Protection button. Make the files and folder visible again by clicking the Stop Protection button.
Download: Easy File Locker for Windows (Free)
My Lockbox
My Lockbox allows you to hide and password-protect almost any folder on your computer.
While you’re installing My Lockbox, you’ll be asked for the location of the folder you want to hide and protect. When the installation is finished, that folder is automatically hidden and locked.
Two icons are added to your desktop. The My Lockbox icon allows you to quickly unlock and open your protected folder. For more options, use the My Lockbox Control Panel icon. Once you enter your password, the following window displays:
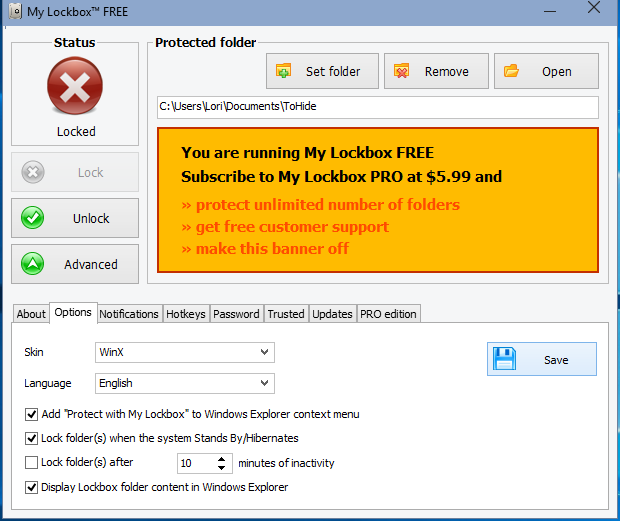
Use Set folder to change the folder you want to protect and Remove to permanently unlock the protected folder and remove it from the program. The Open button automatically unlocks and opens the protected folder. Lock and Unlock the folder using the buttons on the left. Click Advanced for more options and other settings.
The freeware version of My Lockbox allows you to hide and protect one folder with an unlimited number of subfolders.
You can upgrade to the Professional edition if you need to protect more than one folder. However, you can put all the files and folders you want to hide and protect into one folder and use the free version if you don’t mind looking at the bright orange ad for My Lockbox PRO.
Download: My Lockbox for Windows (Free)
Windows 10 File Hiding Methods That Didn’t Work
In addition to the methods covered above, I also tried the two methods below and failed to get them to work. For the sake of completeness, you can check them out below. Please leave us a comment in case you had more luck than I did!
Hide Windows 10 Files/Folders in a JPEG Image
I tested the method of hiding files in a JPEG image using the command line and found success when adding a RAR file to a JPEG image using the following command:
copy /b C:PathToFileOriginalImage.jpg + FilesToHide.rar C:PathToFileNewImageWithHiddenFiles.jpg
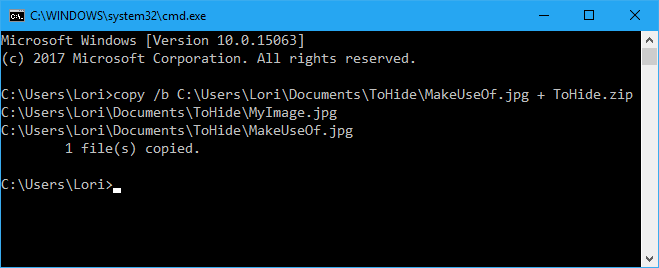
However, I could not extract the files once they were added to the JPEG image file, even using a variety of file extraction programs, such as 7-Zip, WinRAR, and PeaZip.
Hiding a file or folder in a JPEG image is possible using the free tool FileFriend, which is discussed in the Hide a Folder on Windows Using Third-Party Software section above.
Hide Folders in Windows 10 by Redirecting to the Control Panel
There is another method you can try that attempts to hide a folder by redirecting it to the Control Panel. You basically create two batch files, one that locks the folder and one that unlocks it. When the folder is locked, opening it takes you to the Control Panel.
However, I tested this on Windows 7, 8, and 10 and could not get it to work. The lock batch file successfully renamed the folder. But I could open it and view the contents anyway.
If you want to test it yourself, create a folder called Users or Fonts (or something else related to the Control Panel) and put the files you want to hide into it. Then, create a new text file and copy and paste the following line into it.
Replace Users with the name of your folder. Save this file as lock.bat.
ren Users Users.{21EC2020-3AEA-1069-A2DD-08002B30309D}
Then, create another new text file and copy and paste the following line into it. Again, replace Users with the name of your folder. Save this file as key.bat.
ren Users.{21EC2020-3AEA-1069-A2DD-08002B30309D} Users
Both batch files should be in the same folder as the folder you’re hiding (not in the folder). Double-click the lock.bat file to redirect the folder to the Control Panel, hiding the contents of the folder. To unlock the folder, double-click the key.bat file. You should not leave the key.bat file with the folder you’re hiding. Only copy it there to unlock the folder. Then, remove it.
Please let us know if this works for you in the comments below.
You Can Hide Any File or Folder In Windows 10
Hiding files and folders with no password protection should not lull you into a false sense of security. You should not use these methods (except the third-party tools with password protection) to protect very private and sensitive files and folders.
These methods are ways to make your information not obvious to anyone looking over your shoulder or briefly using your computer while you watch.
Hiding your files and folders in Windows 10 isn’t the only option you have for protection. You can also encrypt files and folders using an encryption tool, like VeraCrypt. Alternatively, you can encrypt your entire drive using Bitlocker.
Nowadays, privacy’s all that matters – passwords, physical keys, hints, user approval; everything revolves around this concept, and it’s for the best considering how many mishaps have popped up recently.
One would certainly recall Amazon’s latest voice recording pow-wow, not to mention the fact that even Facebook has been accused more than once of selling its mined data to shady third parties.
Anyway, since everyone’s concerned about stronger passwords and other safety countermeasures, we certainly overlooked one of the simplest and most effective ways to ensure data privacy: hiding files or folders.
It’s fairly easy to do and, as a bonus, hidden files and folders cannot be accessed remotely. So, without further ado, here’s how to hide a folder on Windows 10.
How to hide a folder on Windows 10 using File Explorer
Now, as you might have guessed, the easiest way to hide a file or folder in Windows 10 is through File Explorer. Not very pretty, but who cares as long as the job gets done.
There’s also a “sneakier” way of doing just, but I’ll get into that a bit later. Let’s see about hiding a folder in File Explorer.
Step 1. Create a new folder. You can name it anything you like. I would advise you to create the new folder on a disk partition other than the one you’ve installed Windows 10 – it’s never a good idea to temper with that part of your computer, regardless of the purpose.
Step 2. Add whatever files you want to be hidden to the newly-created folder. For the purpose of this article, I’ve created a new folder called “Now you see me” and added two videos and a .jpeg file.
Step 3. When you’re done gathering that which must be hidden from prying eyes, close the folder.
Step 4. Right-click on “Now you see me”.
Step 5. Select Properties.
Step 6. Under Attributes, check the box next to “Hidden”.
Note: folders, albeit hidden, will still be indexed by Windows. To prevent the OS from including both the folder and its contents, click on the Advanced tab, and deselect the following options: File is ready for archiving and Allow this file to have contents indexed in addition to file properties. Click Ok to save changes and then hit Apply.
Step 7. Click Apply.
Note: if your folder includes subfolders, a message prompt will appear on your screen. If you want to hide the contents and not just the ‘parent’ folder, select the second option (Apply changes to this folder, subfolders, and files). Click on the Ok button to continue.
Step 8. Click Ok to close the window.
Step 9. Profit!
Congrats! You’ve hidden your very first folder. However, it’s for naught to hide a folder if your admin account has the “show hidden files” option active. By default, it should be turned off, but better sure than sorry. To see if the option’s switched on, follow these steps.
Checking if a filefolder is hidden
Step 1. Go to File Explorer. You can do that by double-clicking on the File Explorer icon on your desktop or by pressing the Windows + E buttons.
Step 2. Go to View.
Step 3. Select Options (it’s in the far-right corner, right next to the showhide section.
Step 4. From Options, select Change folder and search options.
Step 5. Click on the View tab.
Step 6. Scroll until you see the Hidden files and folder drop-down menu.
Step 7. Check to box next to the “don’t show hidden files, folder, or drives” option.
Step 8. Click Apply to commit changes.
Step 9. Press the Ok button to close the window.
See how easy that was? Well, because I do like to play it dangerously, I’m going to show you another way to hide your files and folders, using the command prompt. Let’s dig right into it.
Heimdal™ Threat Prevention Home makes sure that link is safe!
Your parents and friends will click any suspicious link, so make sure they’re protected.

Heimdal™ Threat Prevention Home provides:
Automatic and silent software updates
Smart protection against malware
Compatibility with any traditional antivirus.
SECURE YOUR ONLINE BROWSING!
Try it FREE
30-day Free Trial
Hide a Folder on Windows 10 Using Command Prompt
Ready? First, you’ll need to figure out what files and folders you want to hide. For the purpose of this article, I’ve created a second folder in My Documents, which I named “Gib shares”. Inside, I’ve dumped a .jpeg file called crazyrussian. So, now, I will try and hide crazyrussian.jpeg using the command prompt.
Step 1. Ensure that all the files are where they’re supposed to be.
Step 2. Click on Start and type in “command line”.
Step 3. Click on the Command Line icon or hit Enter to continue.
Step 4. In CMD, type in or paste the following line:
attrib C:UsersVDocumentsGib sharescrazyrussian.jpg +s +h
Step 5. Hit Enter to continue.
Note: when performing the operation, you should swap the above-mentioned path with the location of your folder. If you’re too lazy to type in the whole path of the folder, you can always use File Explorer.
Open the folder using Explorer, select the path, and copy it. Go back to the command prompt and simply paste the line. Now you only need add the file you wish to conceal and +s and +h attributes.
By the way, +s stands for System file, which means that it will be used by the operating system, while +h, which stands for hidden, instructs the OS that the file attributed this way will not show up in the GUI nor be indexed by Windows’ search engine.
Now, if you want to undo the changes (unhide a hidden file), you only need to change the operators in front of the “s” and “h” attributes. So, instead of a “+”, you should “-“. Let me give you a quick example:
attrib C:UsersVDocumentsGib sharescrazyrussian.jpg -s -h
That’s about it on how to hide files on Windows 10. Of course, being the nitpicking kind, I’ve searched for even more ways to hide stuff. Enjoy!
How to hide disk drives using Regedit
Source: The Windows Club
You know the saying: if you want to hide something, do it in plain sight, or hide the entire disk drive. It can be achieved, but it’s a bit tricky since it requires tampering with some hex values in the registry editor.
Don’t worry too much about doing something that may endanger your data. However, I would advise you to create a restoration point before beginning the procedure. All done? Great! Let’s get this done.
Step 1. Click the start button and search for Run. You can also press down the Windows + R button to bring up the run manager.
Step 2. Type in Regedit and press Ok.
Step 3. Take a good look at the left pane. Those are the policies that control every aspect of your operating system.
Step 4. Double-click on HKEY_LOCAL_MACHINE
Step 5. Double-click on Software.
Step 6. Double-click on Microsoft.
Step 7. Double-click on Windows.
Step 8. Double-click on Current Version.
Step 9. Double-click on Policies.
Step 10. Double-click on Explorer.
Sounds rather complicated. Let me sum up the path for you:
HKEY_LOCAL_MACHINESoftwareMicrosoftWindowsCurrentVersionPoliciesExplorer
Step 11. Right-click on Explorer.
Step 12. Highlight New and then left-click on DWORD (32-bit) value.
Step 13. Name this value NoDrives. Hit Enter to continue.
Step 14. On the right side of the screen, double-click on NoDrives.
Step 15. Under Base, check the box next to Decimal.
Step 16. Here’s where it may get tricky. You will need to edit the value data field to correspond with the decimal representation of your drive’s letter.
For instance, the corresponding decimal for drive letter G: is 64. Check out this table to find the correct decimal representation of the drive letter you want to hide.
Step 17. Click Ok.
Step 18. Restart your computer for the changes to go into effect.
The drive letter of your choice is now hidden. Now, if you want to revert the changes, simply retrace your steps, delete the NoDrives value, and restart.
There’s another way to hide a drive letter. This method involves using the disk management agent, the same one you use for partitioning, formatting disk drives, change the file system, or delete them.
How to hide a drive letter using disk management

Source: Microsoft Windows
Ready for more sneakiness? That’s the spirit! Up next, I’m going to show you how to hide a disk drive using Microsoft’s disk management tool which, by the way, is very useful for a thing like extending/shrinking volumes or retrieving technical info on a disk drive. Let’s jump right into it.
Step 1. Call up the Run window. See the above section for info on how to do that.
Step 2. In the dialog box, type in diskmgmt.msc
Step 3. In the disk management window, select the drive letter you want to hide.
Step 4. Once the drive is selected, it should appear in the bottom part of the screen.
Step 5. Right-click on the drive letter and select Change Drive Letter and Paths.
Step 6. In the Change Drive Letter and Paths menu, left-click on the drive letter, and then click on Remove.
Step 7. When prompted, click on Yes to continue. That’s it! If you want to unhide the drive:
Right-click on the active disk =>select Change Drive Letter and Paths => click Add =>select the Assign the following drive letter option => choose a drive letter => hit OK.
Bonus
Because you were patient enough to read the article all the way to the end (hope I didn’t bore you to death), I’m going to show you how to password-protect a folder in Window 10.
Sure, it’s still visible, but without the appropriate passkey, it won’t be accessible. So, because talk’s cheap, let’s get cracking.
Step 1. Gather whatever stuff you would like to lock in your password-protected folder (documents, videos, audio clips). For ease of access, I would recommend creating a new folder and dumping everything in there.
Step 2. When ready, right-click anywhere on the screen (make sure the folder’s open), select new, and highlight Text document.
Step 3. Double-click on the newly created text document.
Step 4. Paste the following text in the text document:
cls

@ECHO OFF

title Folder Locker

if EXIST "Control Panel.{21EC2020-3AEA-1069-A2DD-08002B30309D}" goto UNLOCK

if NOT EXIST Locker goto MDLOCKER

:CONFIRM

echo Are you sure you want to lock the folder(Y/N)

set/p "cho=>"

if %cho%==Y goto LOCK

if %cho%==y goto LOCK

if %cho%==n goto END

if %cho%==N goto END

echo Invalid choice.

goto CONFIRM

:LOCK

ren Locker "Control Panel.{21EC2020-3AEA-1069-A2DD-08002B30309D}"

attrib +h +s "Control Panel.{21EC2020-3AEA-1069-A2DD-08002B30309D}"

echo Folder locked

goto End

:UNLOCK

echo Enter password to Unlock folder

set/p "pass=>"

if NOT %pass%==Your-Password-Here goto FAIL

attrib -h -s "Control Panel.{21EC2020-3AEA-1069-A2DD-08002B30309D}"

ren "Control Panel.{21EC2020-3AEA-1069-A2DD-08002B30309D}" Locker

echo Folder Unlocked successfully

goto End

:FAIL

echo Invalid password

goto end

:MDLOCKER

md Locker

echo Locker created successfully

goto End

:End
Step 5. To set your password, delete the line reading “Your Password Here” and replace it with anything. Here’s how it should look:
If NOT %pass%==Youshallnotpass goto FAIL
Step 6. Click on File and select the Save As option.
Step 7. Under Save as Type, select All Files.
Step 8. Under file name, delete everything and replace it with FolderLocker.bat
Step 9. Click Save and exit the document. If you receive a prompt regarding the extension change, click on Yes to confirm.
Step 10. In the Explorer Window, double-click on FoldeLocker .bat executable. You will see that the Locker folder will appear in the same location as the hide-to-be files.
Step 11. Place the files you want to password-protect in the Locker folder.
Step 12. Double-click again on the FolderLocker .bat executable.
Step 13. A command prompt window will appear with the following message: “Are you sure you want to lock the folder (Y/N)”
Step 14. Type in “Y” and hit Enter. The command prompt window will now be closed.
Step 15. To unlock the contents of the Locker folder, double-click on the FolderLocker .bat executable. A new command prompt window will appear asking you to type in the password. Enter the password, hit Enter, and voila! you now have access to your footlocker. Enjoy!
Wrap-up
Well, that’s about all I could muster up on how to hide folders on Windows 10. Of course, there are always more ways to do just that, but it involves tinkering with third-party tools which I found to be rather hard to use. Anyway, for any comments, rants, or beer donations, don’t be shy and shoot me an email.
If you liked this post, you will enjoy our newsletter.
Get cybersecurity updates you’ll actually want to read directly in your inbox.
Содержание
- Скрываем папки в ОС Windows
- Способ 1: Скрытие каталогов в Windows 7
- Способ 2: Скрытие папок в Windows 10
- Способ 3: Используем сторонние программы
- Заключение
- Вопросы и ответы

Нередко у пользователей различных версий операционной системы Windows возникает необходимость произвести скрытие какой-либо отдельно взятой директории с файлами. Выполнить это можно сразу несколькими методами, о которых мы расскажем далее по ходу данной статьи.
Скрываем папки в ОС Windows
В первую очередь важно сделать оговорку на то, что частично тему скрытия папок и файлов в ОС Виндовс мы уже затрагивали в некоторых других статьях. Именно по этой причине далее нами будут представлены ссылки на соответствующие инструкции.
В рамках основной инструкции мы затронем различные версии операционной системы Виндовс. При этом знайте, что по сути ни одна из версий ОС, начиная с седьмой, не имеет каких-либо особо сильных отличий от иных редакций.
Кроме сказанного также рекомендуем вам обратить внимание на статью по теме отображения папок. Это связано с тем, что так или иначе может возникнуть необходимость возврата измененных установок в исходное состояние.
Читайте также: Отображение скрытых папок и файлов
Способ 1: Скрытие каталогов в Windows 7
Как и было нами ранее упомянуто, мы затронем процесс скрытия папок на различных редакциях операционной системы Windows. Однако даже учитывая такой подход, рекомендации вполне применимы не только к рассмотренной версии, но и к другим.
Прежде чем перейти к решению вопроса, важно упомянуто то, что любая директория может быть скрыта точно такими же методами, как и файлы. Таким образом, эта инструкция в равной степени распространяется на любые возможные документы, будь то приложения или медиазаписи.
Скрыть можно любой каталог вне зависимости от степени его заполненности.
Исключением из общих правил использования функционала скрытия директорий являются системные папки. Касается это как более поздних, так и самых ранних версий Виндовс.
В рамках указанной ниже статьи мы расскажем о том, как можно спрятать любого рода данные несколькими различными методами. Особенно это касается тех способов, в которых могут быть задействованы специальные программы.
Обратите внимание, что для опытных пользователей системные средства могут быть существенно расширены благодаря активной эксплуатации командной строки. Имено с ее помощью можно выполнить ускоренное скрытие данных, используя всего-навсего некоторые команды операционной системы.


Подробнее: Как скрыть директорию в Windows 7
На этом с операционной системой Windows 7 можно закончить.
Способ 2: Скрытие папок в Windows 10
Специально для людей, использующих Windows десятой версии, нами также была подготовлена инструкция, затрагивающая скрытие папок с уточнением всех побочных деталей. При этом знайте, что она в равной степени подойдет для пользователей не только Виндовс 10, но и ее предшественницы.
Подробнее: Как скрыть папку в Виндовс 10
В рамках приведенной выше статьи мы затронули возможность использования стороннего ПО, разработанного независимыми разработчиками специально для упрощения процесса управления компьютером и, в частности, сокрытия различного рода данных. Более того, чтобы все самостоятельно опробовать, вам не придется приобретать нужный софт, так как он поставляется на полностью бесплатной основе.

Важно сделать оговорку на то, что если в скрываемой директории находится множество файлов и папок, то процесс их скрытия может потребовать дополнительного времени. При этом скорость обработки данных напрямую зависит от используемого жесткого диска и некоторых других характеристик компьютера.

Читайте также: Как скрыть скрытые элементы в Windows 10
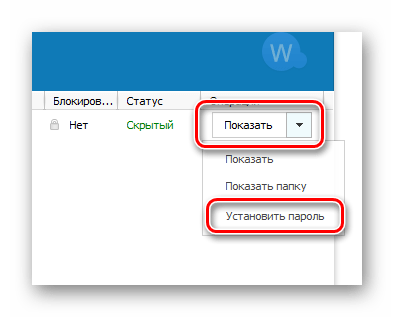
Спрятанные папки мгновенно визуально исчезнут из родительской директории.
Если вы захотите их просмотреть, воспользуйтесь верхней панелью управления.
Более детально процесс отображения файлов мы рассматривали в специальной статье на сайте.
Читайте также: Как отобразить скрытые папки
Каждая директория, в свойствах которой установлена галочка «Скрытый», будет выделяться среди прочих папок прозрачностью иконки.

Для достаточно опытных пользователей обнаружение скрытой информации не является проблемой. Особенно это касается системных средств в совершенно любом дистрибутиве Windows.
В целом, как можно заметить, спрятать папки и файлы с использованием базовых и не только средств проводника операционной системы предельно просто.
Способ 3: Используем сторонние программы
При некоторых обстоятельствах вам, как пользователю ОС Windows, может потребоваться более надёжное средство для скрытия директорий с файлами, в чем отлично помогают специальные программы. В рамках данного раздела статьи мы затронем софт, созданный для помощи пользователям в плане скрытия папок.
Программы зачастую работают независимо от системных средств. Таким образом, вследствие удаления ранее установленного софта, все спрятанные данные снова будут видимы.
Переходя непосредственно к сути этого метода, важно сделать оговорку на то, что в предыдущих рассмотренных способах мы уже затрагивали некоторые программы соответствующего назначения. Однако их ассортимент не ограничивается упомянутым софтом и потому вас могут заинтересовать некоторые другие не менее актуальные приложения.
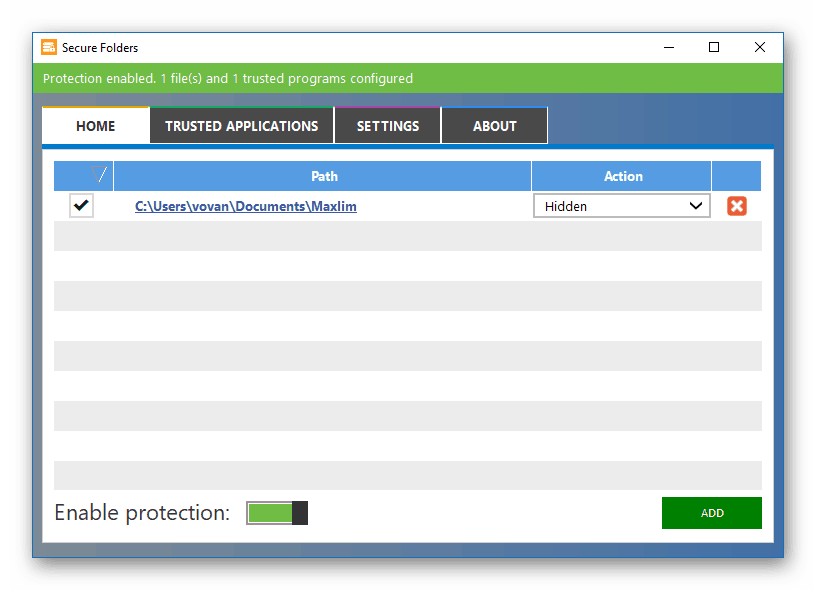
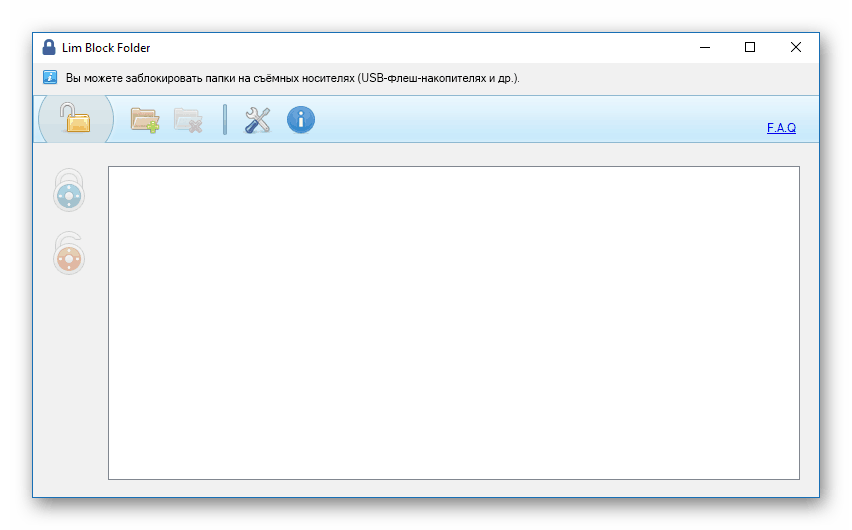
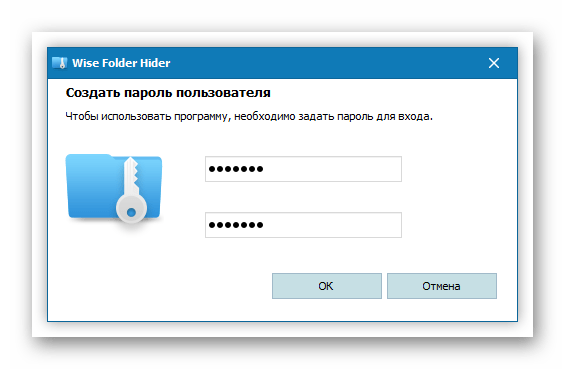
Подробнее: Программы для скрытия каталогов
Обычно программы для скрытия папок требуют от вас ввода и запоминания секретного ключа для последующего доступа к информации.
По необходимости, точно так же, как и в случае с папками, вами могут быть обработаны различные документы.
Некоторые программы поддерживают упрощенную модель управления с помощью перетаскивания скрываемого материала в рабочую область. Это может быть полезно в случае необходимости скрытия нескольких независимых друг от друга папок.

Кроме прочего, софт позволяет использовать увеличенный уровень безопасности, путем установки паролей на файлы и папки.
Спрятать папку, помимо прочего, можно с помощью специального пункта, добавляемого при установке программ и размещаемого в контекстном меню проводника.
Руководствуясь представленным перечнем действий, вы без особых проблем сможете спрятать буквальную любую директорию, вне зависимости от степени ее наполненности. Однако не стоит использовать данный софт с целью скрытия системных файлов и папок, чтобы не столкнуться в будущем с ошибками и трудностями.
Заключение
В качестве завершения этой статьи немаловажно упомянуть о том, что вы можете комбинировать представленные методы, обеспечивая тем самым надежную защиту личным директориям. При этом, пользуясь программой, не забывайте про пароль, утрата которого может стать проблемой для начинающего пользователя.
Не забывайте о том, что некоторые папки могут быть скрытыми простейшим образом, через выключение скрытых файлов в настройках системы.
Надеемся, вы смогли разобраться с основными тонкостями скрытия файловых директорий в среде операционной системы Windows.
In case of a common home computer, there is always the possibility of important Files or Folders being accidentally modified or deleted by kids or someone else in the family. An easy way to prevent this from happening is to Hide Files and Folders in Windows 10 using methods as listed below.

The simplest way to Hide Files and Folders in Windows 10 is to access File Properties and designate the selected File as being “Hidden” in the Attributes section of the File Properties.
This easy method of Hiding Files and Folders in Windows 10 should be good enough for Family Computers where the intention is to prevent kids or anyone else in the family from accidentally deleting or modifying important files and folders.
Another method of Hiding Files and Folders in Windows 10 is to make your computer treat your important Files/Folders as System Files, which it automatically hides.
The second method requires the use of command prompt to hide/unhide files, which makes it difficult for anyone with average computer skills to snoop on your files.
Hide Single File or Folder in Windows 10
Follow the steps below to hide individual Files and Folders in Windows 10
1. Right-click on the File/Folder that you want to hide and then click on Properties option in the menu that appears.

2. In the File Properties window, scroll down to the “Attributes” section and then check the little box next to Hidden and click on Apply (See image below).

3. On the “Confirm Attribute Changes” pop-up, choose whether you want to “Apply Changes to this Folder only” or “Apply Changes to this Folder, Subfolders and Files” and click on OK (See image below).

Depending on your selection, the selected Folder or the Folder along with all its Subfolders and Files will become hidden, once you click on OK.
Hide Multiple Files and Folders in Windows 10
Follow the steps below to Hide Multiple Files and Folders in Windows 10.
1. Right-click on the Windows Start button and then click on File Explorer option in the menu that appears.

2. In the File Explorer Window, select the Files/Folders that you want to hide, click on the View Tab in the File Explorer top menu bar and then click on Hide selected items option (see image below)

3. On the “Confirm Attribute Changes” pop-up that appears, choose whether you want to “Apply Changes to the selected Folder only” or “Apply Changes to selected Folder, Subfolders and Files” and then click on OK (See image below).
Unhide Files and Folders in Windows 10
When Files and Folders are hidden, they no longer appear in File Explorer. However, you can easily Unhide Files and Folders that you had previously hidden on your computer by following the steps below.
1. Click on the Windows Start button and then click on File Explorer option in the menu that appears.
2. In the File Explorer Window, click on the View tab and then check the ‘Hidden items’ option in Show/hide toolbox (See image below).

Checking the Hidden Items option will reveal the Hidden Files/Folders in that location. The hidden Files/Folders will appear with partially transparent icons, so that you can clearly distinguish Hidden Files from regular ones (See above image).
Truly Hide Files and Folders in Windows 10 Using Command Prompt
The methods to Hide Files and Folders in Windows 10 as described above are only good for Home or Family Computers, where no one is really trying to snoop on your files.
In order to truly Hide Files and Folders in Windows 10, you can either make use of various Third Party Tools as available in the market or make use of a workaround in Windows 10.
The workaround involves making Windows 10 computer to treat the Files/Folders that you want to Hide as System Files. Once this is done, Windows Operating System will Automatically hide these files, just as it hides other System Files.
1. Right-click on Windows Start button and then click on Command Prompt Admin option in the menu that appears.
 Option in Windows 10")
2. In the command prompt window, type attrib +h +s followed by The File Path and hit the enter key on the keyboard of your computer.

In the above image, a File named as “Family” is located on the desktop and its File Path can be written as C:usersfunaccountdesktopfamily.
Hence, in the command prompt window, we are typing the attribute command as attrib +h +s c:usersfunaccountdesktopfamily. The letters “h” and “s” in the attribute command instruct your computer to treat the selected File/Folder as Hidden and as a System File.
3. Type the Attribute command as required in your case (depending on the location of your File) and hit the Enter Key on the keyboard of your computer
Once the command is executed, the File/Folder named in the “Attrib” Command will be treated as a System File by your computer and it will become hidden.
Important: Make sure that you note down the file path for the hidden files, you will need this to unhide the file.
Unhide Files and Folders in Windows 10 Using Command Prompt
You can make the Hidden Files visible again by replacing “+” sign with “-” in the “attrib” command and running it again on your computer.
1. Right-click on Windows Start button and then click on Command Prompt Admin option in the menu that appears.
2. In the command prompt window, type attrib -s -h C:UsersfunaccountDesktopFamily and hit the Enter Key on the keyboard of your computer.

Once the command is executed, you will see the hidden Files/Folders appearing back on your computer.
- How to Backup Files in Windows 10 Using Backup and Restore
- How to Backup Files Using File History In Windows 10
- How to Zip Files in Windows 10
-
MiniTool
-
MiniTool News Center
- How to Hide/Unhide a Folder/File in Windows 10 with CMD
By Alisa | Follow |
Last Updated April 29, 2021
![]()
This tutorial offers a step-by-step guide for how to hide a folder or file in Windows 10 by using CMD (Command Prompt). You can also learn how to show hidden files Windows 10 using CMD. To recover deleted or lost files on Windows 10 computer, a top free file recovery software from MiniTool is also provided.
If you want to hide some important folders and files on Windows 10 to keep them away from others’ sight, you can use Windows Command Prompt (cmd.exe) tool to easily and quickly hide a file or folder in Windows 10.
Check below how to hide a folder/file in Windows 10 using CMD, as well as check how to unhide or show hidden files in Windows 10 with Command Prompt when you want.
How to Hide a Folder (File) in Windows 10 Using CMD
Step 1. Open Windows Command Prompt
At first, you should open the cmd.exe. You have several ways to open it. The most common way is to press Windows + R keys at the same time to open Window Run dialog, type cmd in Run window, and press Ctrl + Shift + Enter to open elevated Command Prompt in Windows 10.
Step 2. Hide a Folder or File Using Attrib Command
Then you can type the command line below in Command Prompt window, and hit Enter to hide the target folder in Windows 10.
attrib +h c:documents
In this command, “+” means setting an attribute, “h” refers to the hidden file attribute. You should replace “c:documents” with the folder path and name you’d like to hide, e.g. f:work. You can right-click the file or folder and choose Properties to check its location.

Alternatively, you can also type the command line cd file or folder path in Command Prompt, and hit Enter to go to the file/folder location, for instance, cd f:.
Then type the command line attrib +h work and hit Enter to hide the Work folder in F partition.
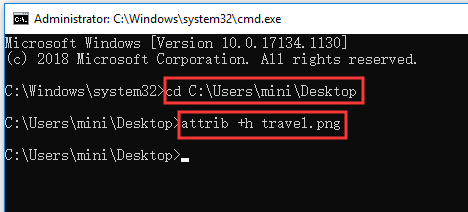
Tip: To hide a file in Windows 10 with CMD, you should also include the file extension after the file name in the command line, e.g. f:work.xls.
Thus, you won’t see the hidden file or folder in your Windows 10 computer.
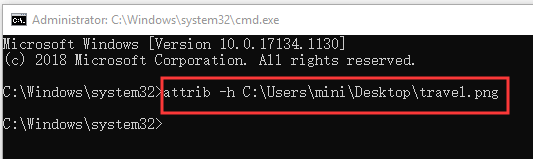
How to Unhide a Folder in Windows 10 with CMD
To show hidden files Windows 10, you can still use the attrib command in Command Prompt to easily realize it.
Step 1. Follow the same instructions above to enter into Command Prompt window.
Step 2. Type the command line attrib -h f:work and hit Enter to make the hidden Work folder in F partition visible again. You should replace “f:work” with the exact path of the folder you’d like to unhide. If it’s a single file you want to unhide, you should also add the file extension after the file name in the attrib command.
Best Free Way to Recover Deleted/Lost Files on Windows 10
Here, we also introduce an easy-to-use, clean and free data recovery software to you to help you recover any lost or deleted files on Windows 10/8/7 computer.
MiniTool Power Data Recovery helps you recover data from computer local hard drive, external hard drive, SSD, USB flash drive, SD card, and more with ease. Its free edition allows you to recover up to 1GB data for free.
Easy user guide: You can just connect your device and launch MiniTool Power Data Recovery, choose the target device in its main UI, and click Scan button, it will automatically scan the data on the target device. After the scanning is completed, you can easily find your lost/deleted files and click Save button to store the recovered files to a new destination.

About The Author

Position: Columnist
Alisa is a professional English editor with 4-year experience. She loves writing and focuses on sharing detailed solutions and thoughts for computer problems, data recovery & backup, digital gadgets, tech news, etc. Through her articles, users can always easily get related problems solved and find what they want. In spare time, she likes basketball, badminton, tennis, cycling, running, and singing. She is very funny and energetic in life, and always brings friends lots of laughs.
How to hide files and folders using File Explorer
- Open File Explorer.
- Navigate to the file or folder you want to hide.
- Right-click the item and click on Properties.
- On the General tab, under Attributes, check the Hidden option.
- Click Apply.
How do I make a folder private in Windows 10?
How To Lock a Folder With a Password in Windows 10
- Right-click inside the folder where the files you want to protect are located.
- MORE: How to Change Your Password in Windows 10.
- Select “New” from the contextual menu.
- Click on “Text Document.”
- Hit Enter.
- Double-click the text file to open it.
Hiding files in Windows is pretty easy:
- Select the files or folders you want to hide.
- Right-click and choose Properties.
- Click the General tab.
- Click the checkbox next to Hidden in the Attributes section.
- Click Apply.
In Windows Vista, right-click on the folder or drive for which you want to create a hidden share and select Properties. Then, on the Folder Properties window, click the Sharing tab and click the Advanced Sharing button.
Can you password protect a folder in Windows 10?
Unfortunately, Windows Vista, Windows 7, Windows 8, and Windows 10 do not provide any features for password protecting files or folders. You need to use a third-party software program to accomplish this. Select the file or folder you want to encrypt. Right-click the file or folder and select Properties.
How do I lock a folder in Windows 10 Quora?
How To Lock a Folder With a Password in Windows 10
- How To Lock a Folder With a Password in Windows 10.
- Right-click inside the folder where the files you want to protect are located.
- Select “New” from the contextual menu.
- Click on “Text Document.”
- Hit Enter.
- Double-click the text file to open it.
How do I hide a folder in Windows?
Select the Start button, then select Control Panel > Appearance and Personalization. Select Folder Options, then select the View tab. Under Advanced settings, select Show hidden files, folders, and drives, and then select OK.
How do I make a folder invisible?
Here’s how you make an “invisible” folder on your desktop.
- Create a new folder.
- Right-click on the shortcut and select ‘rename’.
- Rename the folder with the characters 0160 while pressing and holding the Alt key.
- Right-click the folder and go to properties.
- Click the “Customize” tab.
How To Create an Invisible Folder In Windows 10
- Create a new folder on the Desktop.
- Right-click the folder and select Rename.
- The next step is to make the icon of the folder invisible.
- In the Properties window Customize tab and in the customize option you will see an option for change icon, click on that.
Alternatively referred to as an Administrative share, a hidden share is a network share on a Microsoft network that is not visible when viewing another computer’s shares. However, it is still accessible if the name of the hidden share is known. Default Microsoft Windows hidden shares.
Sorry
- Select Windows Logo+R (or select Start, All Programs, Accessories, Run) to open the Run dialog box, type the network path for the hidden resource, and click OK.
- In a command prompt session, type start, a space, the network path, and then press the Enter key.
- Map the hidden share to a local drive letter.
To access a hidden share, bring up Internet Explorer or My Computer (or just Computer in Vista), enter the UNC path (\computernamesharename$) of the share, and hit Enter. Alternatively, you can use the computer’s local IP address (such as 192.168.1.1) instead of the computer name.
How do I encrypt a folder in Windows 10?
How to encrypt files and folders in Windows 10, 8, or 7
- In Windows Explorer, right-click on the file or folder you wish to encrypt.
- From the context-menu, select Properties.
- Click on the Advanced button at the bottom of the dialogue box.
- In the Advanced Attributes dialogue box, under Compress or Encrypt Attributes, check Encrypt contents to secure data.
- Click OK.
How do I lock a folder on my laptop?
If you want to encrypt a file or folder, this can be done by following these steps:
- Select the file or folder you want to encrypt.
- Right-click the file or folder and select Properties.
- On the General tab, click the Advanced button.
- Check the box for the “Encrypt contents to secure data” option.
- Click Apply and then OK.
Why can’t I encrypt a folder in Windows 10?
According to users, if encrypt folder option is grayed out on your Windows 10 PC, it’s possible that the required services aren’t running. File encryption relies on Encrypting File System (EFS) service, and in order to fix this problem, you need to do the following: Press Windows Key + R and enter services.msc.
How can I lock a folder in Windows 7 without any software?
- Step 1Open Notepad. Start by opening Notepad, either from search, the Start Menu, or simply right-click inside a folder, then choose New -> Text Document.
- Step 3Edit Folder Name & Password.
- Step 4Save Batch File.
- Step 5Create Folder.
- Step 6Lock the Folder.
- Step 7Access Your Hidden & Locked Folder.
How do I unhide folders in Windows 10?
View hidden files and folders in Windows 10
- Open File Explorer from the taskbar.
- Select View > Options > Change folder and search options.
- Select the View tab and, in Advanced settings, select Show hidden files, folders, and drives and OK.
How do I password protect my hard drive in Windows 10?
Steps to set hard drive password in Windows 10: Step 1: Open This PC, right-click a hard drive and choose Turn on BitLocker in the context menu. Step 2: In the BitLocker Drive Encryption window, select Use a password to unlock the drive, enter a password, reenter the password and then tap Next.
Select the Start button, then select Control Panel > Appearance and Personalization. Select Folder Options, then select the View tab. Under Advanced settings, select Show hidden files, folders, and drives, and then select OK.
How do I save a folder without name?
To remove he name and display a blank name, right-click on the folder and select Rename. Now press the Alt key and from the Numeric keypad, press 0160. Now press Enter or click anywhere on the desktop. A folder with no name will be created.
How do I unhide a folder?
Here’s how to display hidden files and folders.
- Open Folder Options by clicking the Start button. , clicking Control Panel, clicking Appearance and Personalization, and then clicking Folder Options.
- Click the View tab.
- Under Advanced settings, click Show hidden files, folders, and drives, and then click OK.
How do I map a drive to another computer C?
Map a network drive
- Open File Explorer from the taskbar or the Start menu, or press the Windows logo key + E.
- Select This PC from the left pane.
- In the Drive list, select a drive letter.
- In the Folder box, type the path of the folder or computer, or select Browse to find the folder or computer.
- Select Finish.
What is the C$ Command?
Search the lexicon. c-command. SYNTAX: C-command is a binary relation between nodes in a tree structure which is defined as follows: (i) Node A c-commands node B iff a A =/= B, b A does not dominate B and B does not dominate A, and c every X that dominates A also dominates B. (
To find and access a shared folder or printer:
- Search for Network , and click to open it.
- Select Search Active Directory at the top of the window; you may need to first select the Network tab on the upper left.
- From the drop-down menu next to “Find:”, select either Printers or Shared Folders.
Option 2 – From Control Panel
- Right-click the “Start” button, then select “Control Panel“.
- Go to “Appearance and Personalization“, then select “File Explorer Options“.
- Click the “View” tab.
- Scroll down a bit and change the “Hidden files and folders” setting to “Show hidden files, folders, and drives“.
How to Show Hidden Files in Windows 10 and Previous
- Navigate to the control panel.
- Select Large or Small icons from the View by menu if one of them is not already selected.
- Select File Explorer Options (sometimes called Folder options)
- Open the View tab.
- Select Show hidden files, folders and drives.
- Uncheck Hide protected operating system files.
Go to Control Panel and open Folder Options. 2. Go to the View tab and select “Show hidden files and folders”. Then uncheck “Hide protected operating system files”.
Can you password protect an internal hard drive?
When you format an internal or external volume, you can encrypt and protect the volume with a password. If you encrypt an internal disk, you must enter a password to access the disk and its information. If you encrypt an external device, you must enter the password when you connect the device to your computer.
Does Windows 10 home have encryption?
No, it’s not available in Home version of Windows 10. Only device encryption is, not Bitlocker. Windows 10 Home enables BitLocker if the computer has a TPM chip. The Surface 3 comes with Windows 10 Home, and not only is BitLocker enabled, but the C: comes BitLocker-encrypted out of the box.
What does encrypting a folder do?
The Encrypting File System (EFS) on Microsoft Windows is a feature introduced in version 3.0 of NTFS that provides filesystem-level encryption. The technology enables files to be transparently encrypted to protect confidential data from attackers with physical access to the computer.
Photo in the article by “Wikimedia Commons” https://commons.wikimedia.org/wiki/File:SoulseekNS.png