(Image credit: Windows Central)
On Windows 10, virtual memory (or paging file) is an essential component (hidden file) designed to remove and temporarily store less frequently use modified pages allocated in RAM (random-access memory) to the hard drive. Using this approach allows the system to prioritize faster physical memory for more frequent processes and applications, improving the overall performance and preventing the device from locking up in the event it runs out of system memory.
In addition, the paging file is important to support crash dumps during a system crash (Blue Screen of Death), as without a large enough page file, a dump with all the contents of the system memory won’t be created.
Although the system does a pretty good job managing the paging file size according to various factors automatically, sometimes, you may still need to increase the default virtual memory values manually. For instance, when you see the «Your system is low on virtual memory» message. You’re noticing slow performance over time, or a particular application requires specific parameters to work as intended.
If you’re experiencing issues with virtual memory, the device doesn’t have enough memory, or you’re trying to improve the system performance, Windows 10 allows you to increase the size of the virtual memory in at least two ways using the Settings app and Command Prompt.
In this Windows 10 guide, we’ll walk you through the steps to increase the size of the virtual memory to improve the system responsiveness.
- How to increase virtual memory using Settings
- How to increase virtual memory using Command Prompt
How to increase virtual memory using Settings
To adjust the virtual memory size on Windows 10, use these steps:
Warning: Although anyone can change the paging file size, it’s only recommended to use these instructions if you have a valid reason, and you know what you’re doing.
- Open Settings.
- Click on System.
- Click on About.
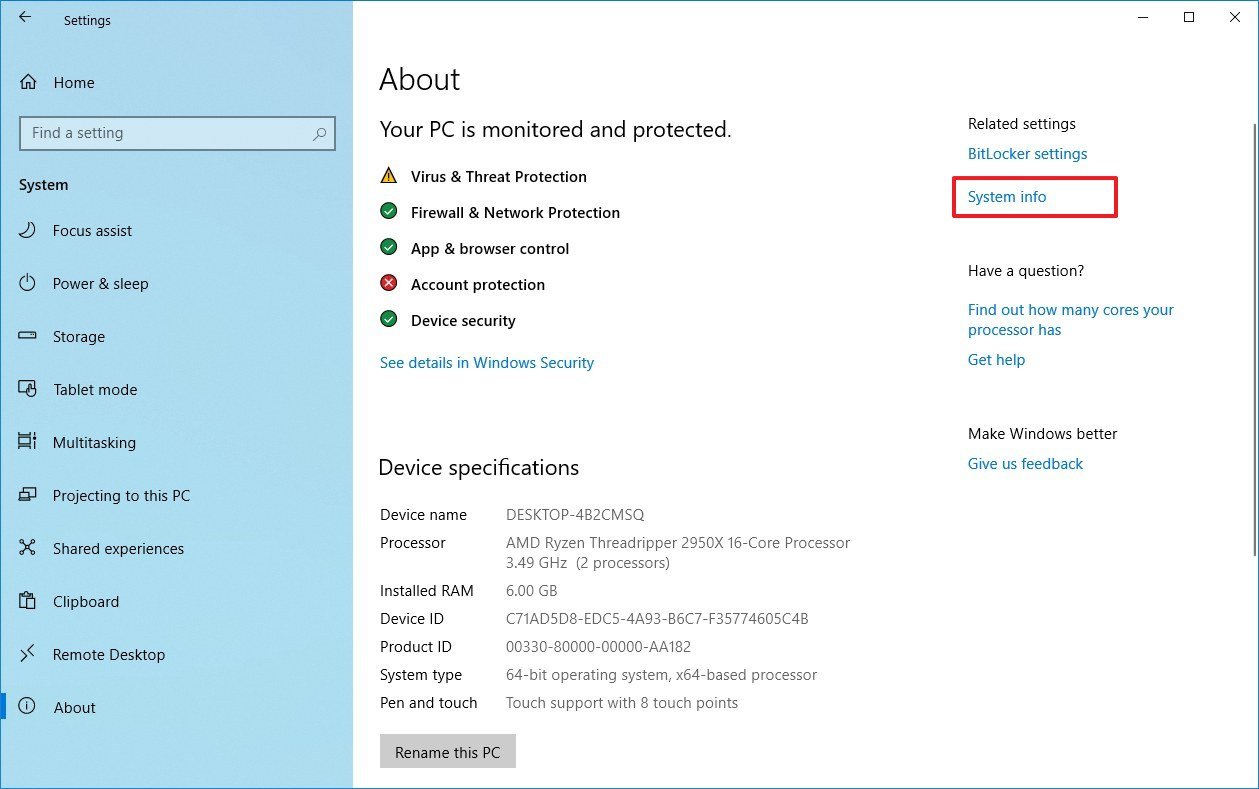
- Under the «Related settings» section, click the System info option.
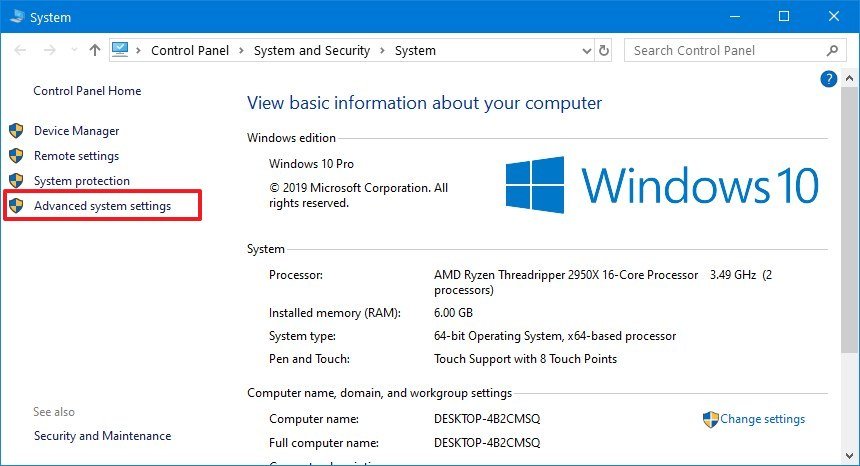
- Click the «Advanced system settings» option from the left pane.
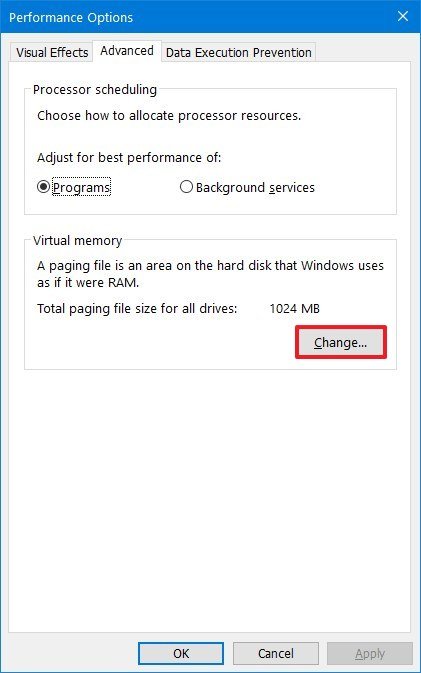
- Click the Advanced tab.
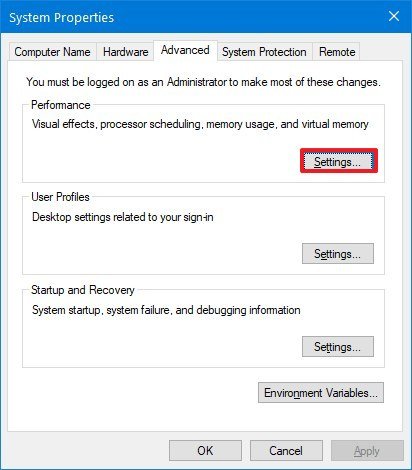
- Under the «Performance» section, click the Settings button.
- Click the Advanced tab.
- Under the «Virtual memory» section, click the Change button.
- Clear the Automatically manage paging files size for all drives option.
- Select the Custom size option.
- Specify the initial and maximum size for the paging file in megabytes.Quick tip: The size of the virtual memory is unique to each device, and it can’t be generalized. However, usually, it’s recommended to use a number that’s one and a half times the total available memory for the «Initial size» and three times of available memory for the «Maximum size» when possible.
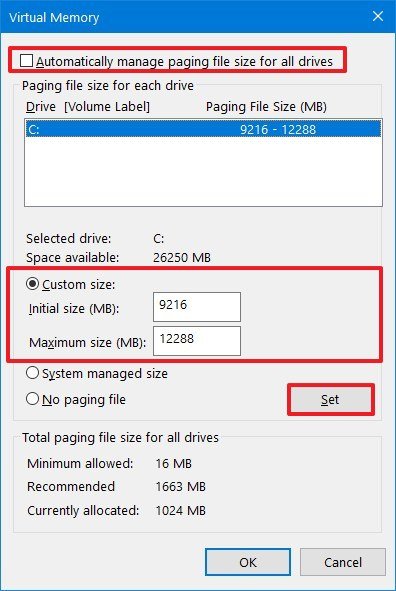
- Click the Set button.
- Click the OK button.
- Click the OK button again.
- Restart your device.
Once you complete the steps, you should notice an increase in performance when navigating Windows 10 as well as when running multiple apps at the same time.
If you need to revert the changes, you can use the same instructions, but on step No. 10, make sure to check the Automatically manage paging size for all drives option, and restart your device.
How to increase virtual memory using Command Prompt
To modify the paging file size with Command Prompt, use these steps:
- Open Start.
- Search for Command Prompt, right-click the top result, and select the Run as administrator option.
- Type the following command to understand the current status of the paging file and press Enter:
wmic pagefile list /format:list

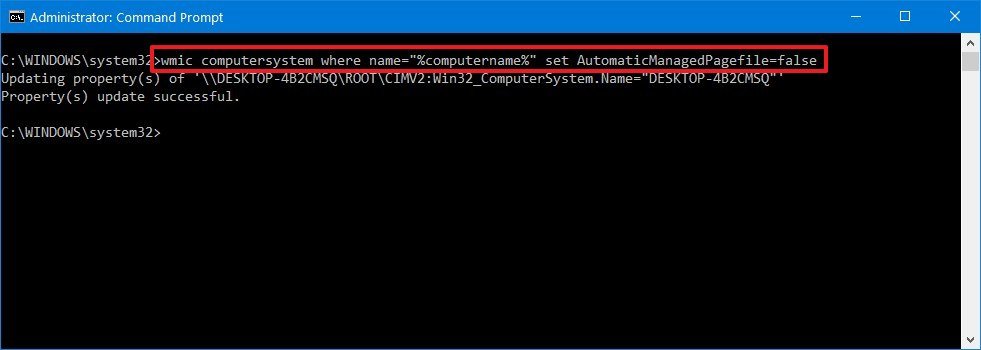
- Type the following command to switch form manage to custom virtual memory and press Enter:
wmic computersystem where name="%computername%" set AutomaticManagedPagefile=false
- Type the following command to set the initial and maximum size of the virtual memory and press Enter:
wmic pagefileset where name="C:\pagefile.sys" set InitialSize=YOUR-INIT-SIZE,MaximumSize=YOUR-MAX-SIZEThis example sets the paging file to «9216» and «12288» megabytes for the initial and maxium size:wmic pagefileset where name="C:\pagefile.sys" set InitialSize=9216,MaximumSize=12288

- Type the following command to restart your computer and press Enter:
shutdown -r -t 00
After you complete the steps, the device will start using the new values for virtual memory, which, if done correctly, should help to improve system performance.
If you no longer need to use the custom size for virtual memory, you can always revert the changes and allow Windows 10 to manage this feature using this command:
wmic computersystem where name="%computername%" set AutomaticManagedPagefile=trueand restarting your device.
While it’s recommended to use one and a half times the available memory for the initial and three times the memory for the maximum size, make sure to test the changes and adjust the values if you’re experiencing freezes, crashes, and other problems.
Although it’s possible to disable virtual memory on Windows 10, even when you have a large amount of system memory, it’s not recommended to disable this feature. Usually, if you disable paging file, some applications may stop working, some system features may not work efficiently, and you may end up with some weird behaviors.
Get the best of Windows Central in in your inbox, every day!
Mauro Huculak is technical writer for WindowsCentral.com. His primary focus is to write comprehensive how-tos to help users get the most out of Windows 10 and its many related technologies. He has an IT background with professional certifications from Microsoft, Cisco, and CompTIA, and he’s a recognized member of the Microsoft MVP community.

When it comes to Windows computer and its storage system, many of us would alter its original SSD (Solid State Drive) or RAM with a larger one. This certainly results in increasing memory on your system. But ever thought of looking for an easy hack? Instead of taking paining of changing existing RAM or SSD, if you can do it easily then?
Well, you can increase virtual memory in your Windows system (that actually is easy way to increase space on disk). But, before we tour you through the guide, let us give a brief on Virtual Memory.
What is Virtual Memory?
Your system has two types of memory: one is its SSD or hard drive that is best used to save all sort of files and documents. While the other one is RAM, which is used to save specific data of various programs on your system. RAM is also responsible for proper working of your system. However, it is used much faster than SSD that results in system slow down and lagging.
With that been said, Microsoft has attempted well to resolve the issue with virtual memory. Virtual memory is that addition memory on your system which is used only when your RAM has been all used. For example, if your system has 1 GB RAM and it has been consumed, then your system will start using its virtual memory in order to work effortlessly for you.
But still, virtual memory is just another memory on your system and is certain to get piled up sooner or later. Apparently this must be the reason for Microsoft to be kind enough and have provided access to users to increase it manually. Sigh! With a few manual steps, you can increase your system’s virtual memory and experience a smooth and clutter free performance of your system.
Follow these Simple Steps to Increase Virtual Memory in Windows 10
- Go to Start Menu and click on Settings.
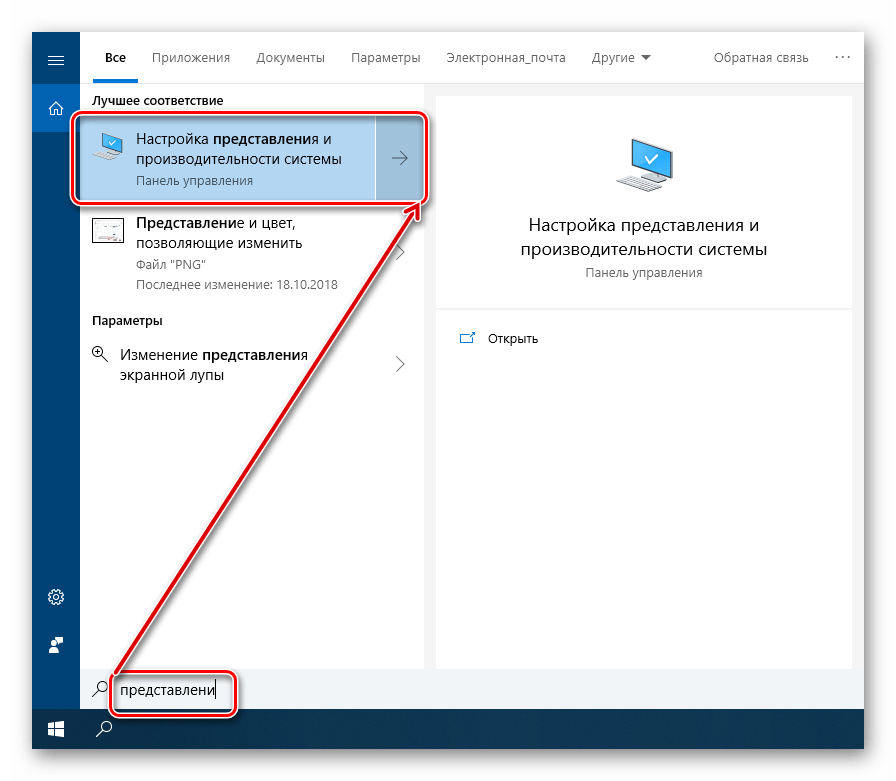
- Now type performance on search bar and select Adjust the appearance and performance of Windows.

- A new Window will open before you. Go to Advanced tab in it.
- You’ll see a Virtual memory section in it. Click on Change

- If the current setting is considerably less than the recommended, unselect the Automatically manage paging file size for all drives box on this window and click on Custom size.
- Now enter the recommended value in the Initial Size box, and a larger figure in the Maximum size
- Click on OK to save the changes.
So, these were the steps to increase virtual memory in windows 10. Increasing virtual memory will help optimize your system’s memory and thereby its performance. We’d also recommend you to disk clean your system occasionally, so that you are never short of storage space.
Содержание
- Настройка виртуальной памяти
- Параметры pagefile.sys
- Второй файл подкачки
- Заключение
- Вопросы и ответы

Виртуальная память представляет собой выделенное дисковое пространство для хранения данных, которые не помещаются в ОЗУ или в данный момент не используются. В этой статье мы подробно расскажем об этой функции и том, как ее настраивать.
Настройка виртуальной памяти
В современных операционных системах виртуальная память располагается в специальном разделе на диске, называемом «файлом подкачки» (pagefile.sys) или «свопом». Строго говоря, это не совсем раздел, а просто зарезервированное для нужд системы место. При недостатке ОЗУ туда «складируются» данные, которые не используются центральным процессором, а при необходимости загружаются обратно. Именно поэтому мы можем наблюдать «подвисания» при работе ресурсоемких приложений. В Windows имеется блок настроек, в котором можно определить параметры файла подкачки, то есть включить, отключить или выбрать размер.
Параметры pagefile.sys
Добраться до нужного раздела можно разными способами: через свойства системы, строку «Выполнить» или встроенный поисковик.
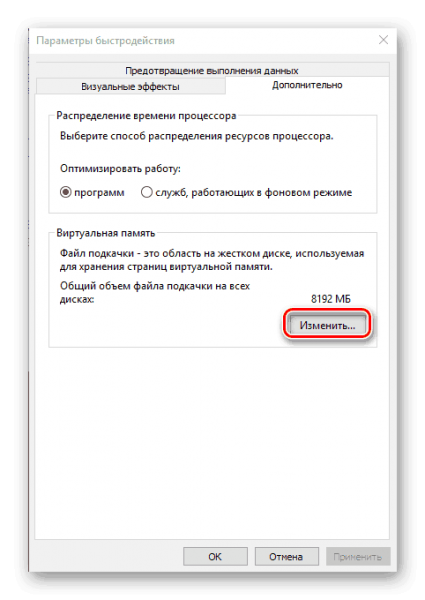
Далее, на вкладке «Дополнительно», следует отыскать блок с виртуальной памятью и перейти к изменению параметров.
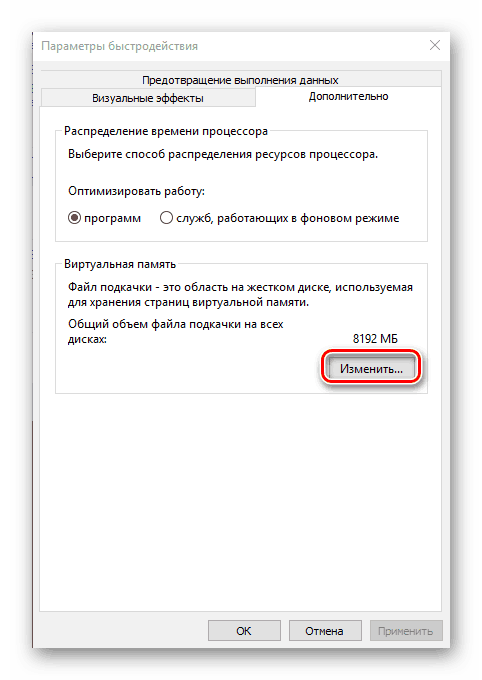
Здесь и производится активация и настройка размера выделенного дискового пространства на основании потребностей или общего объема ОЗУ.
Подробнее:
Как включить файл подкачки на Windows 10
Как изменить размер файла подкачки в Windows 10
В интернете до сих пор не затихают споры, сколько места давать файлу подкачки. Единого мнения нет: кто-то советует отключить его при достаточном количестве физической памяти, а кто-то говорит о том, что без свопа некоторые программы просто не работают. Принять правильное решение поможет материал, представленный по ссылке ниже.
Подробнее: Оптимальный размер файла подкачки в Windows 10
Второй файл подкачки
Да, не удивляйтесь. В «десятке» есть еще один файл подкачки, swapfile.sys, размер которого контролируется системой. Его предназначение состоит в хранении данных приложений из магазина Windows для быстрого к ним доступа. По сути это аналог гибернации, только не для всей системы, а для некоторых компонентов.

Читайте также:
Как включить, отключить гибернацию в Windows 10
Настроить его нельзя, можно только удалить, но если вы пользуетесь соответствующими приложениями, он появится снова. Не стоит беспокоиться, так как этот файл имеет весьма скромный размер и места на диске занимает мало.

Заключение
Виртуальная память помогает слабым компьютерам «ворочать тяжелые программы» и если у вас мало ОЗУ, к его настройке нужно подходить ответственно. Вместе с тем, некоторые продукты (например, из семейства Adobe) требуют обязательного его наличия и могут работать со сбоями даже при большом объеме физической памяти. Не стоит также забывать о дисковом пространстве и нагрузке. Если есть возможность, перенесите своп на другой, не системный, диск.
Еще статьи по данной теме:
Помогла ли Вам статья?
Начинающие пользователи ПК, как правило, понятия не имеют, что такое виртуальная память в системе «Виндовс». В каких целях её используют? Как её включить, поменять размер или вовсе отключить? Как организована виртуальная память в «Виндовс» 10?
Что такое виртуальная память на Windows 10 и зачем она нужна
Вашей «оперативки» может не хватать на то количество программ, которые открыты сейчас на ПК. Чтобы система не тормозила, подключается виртуальная память. Это файл подкачки определённого размера (устанавливается вручную пользователем либо самой системой) на жёстком диске, в который временно помещается память из «оперативки». Иными словами, часть жёсткого диска используется как «оперативка», если последней оказалось мало.
Обычно в файл подкачки помещаются данные об открытых приложениях, которые в данный момент не используются процессором (окна этих приложений свёрнуты). При необходимости данные перемещаются обратно в «оперативку».
Файл подкачки, кстати, называется pagefile.sys.
Где находится виртуальная память Windows 10 и как её включить
Виртуальная память в виде файла подкачки находится в корневой папке локального системного диска. По умолчанию эта память включена в «Виндовс». Но даже если она отключена, вы можете её сами включить в настройках системы — об этом в следующем разделе.
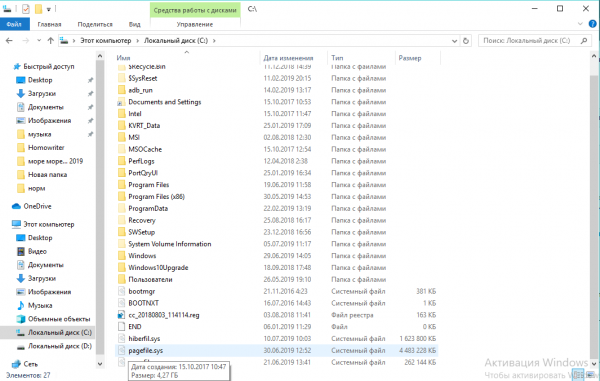
Файл pagefile.sys по умолчанию находится прямо на системном диске
Как настроить виртуальную память: увеличить или уменьшить размер, отключить её
Ручная настройка файла подкачки поможет оптимизировать работу компьютера. Можно увеличить размер памяти, если ваша «оперативка» не справляется с задачей. Если вам не хватает места на системном диске, вы можете перебросить этот файл на пользовательский диск либо вовсе отключить функцию — файл исчезнет, места станет больше. Выключать файл подкачки стоит только в том случае, если вы уверены, что голой «оперативки» вам хватит на все нужды ПК.
Параметры pagefile.sys
В «десятке» можно очень быстро перейти в настройки виртуальной памяти:
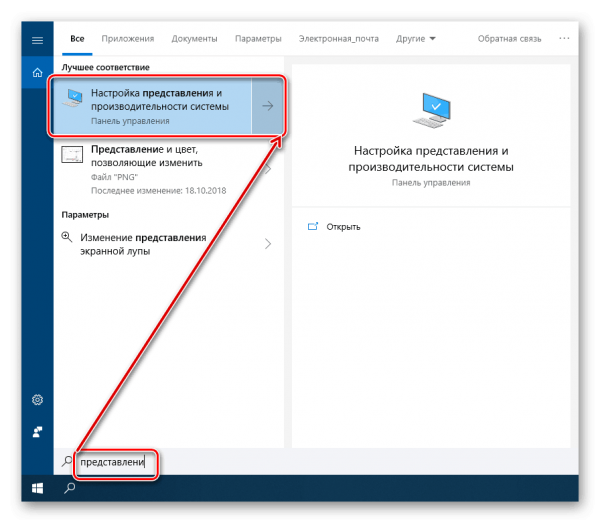
- Кликаем по лупе справа от «Пуска». В поле для поиска набираем слово «представление». По мере ввода должна сразу появиться выдача «Настройка представления и производительности системы». Щёлкаем по этому результату.

Вбейте запрос в «Поиске Виндовс»
- В новом окошке переходим в раздел «Дополнительно» и в блоке для виртуальной памяти кликаем по «Изменить».

Перейдите к изменению параметров виртуальной памяти
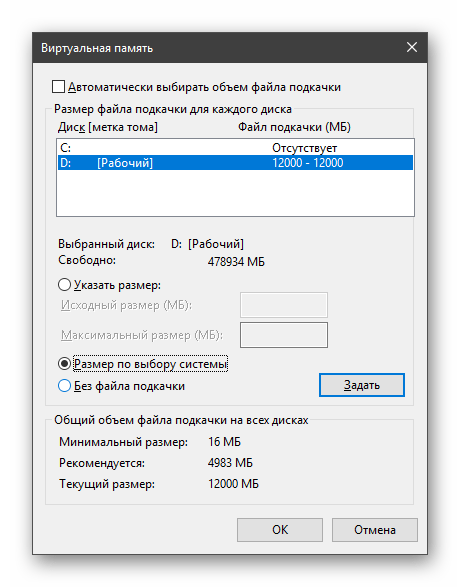
- В открытом окне можно активировать, отключить и настроить сам размер файла подкачки — ничего сложного. Выбираем в белом окошке диск, на котором должен располагаться файл подкачки.

Задайте определённый размер для вашего файла подкачки
- Ниже указываем вручную размер либо ставим второе значение, чтобы система сама выбрала подходящий размер. Чтоб вовсе отключить файл, поставьте третье значение «Без файла». Насчёт размера: в нижней части окна ОС вам подсказывает, какой размер лучше поставить. Обычно это 4983 МБ.
- Если нужно, перемещаем файл подкачки с системного диска на пользовательский. Для этого удаляем файл на диске С (обычно он и есть системный) и добавляем файл на пользовательский.
- Щёлкаем по «Задать», а затем по ОК.

Настройка дополнительного файла подкачки swapfile.sys
В «Виндовс» 10 есть ещё один файл подкачки — дополнительный swapfile.sys. Он также находится на системном диске. Он предназначен для хранения информации о приложениях из магазина «Виндовс Стор». Причём в файле хранятся не отдельные разбросанные данные, а вся информация о работе программы целиком. Благодаря этому файлу программы из магазина могут уходить в гибернацию (режим по типу сна), как это делает вся система «Виндовс».
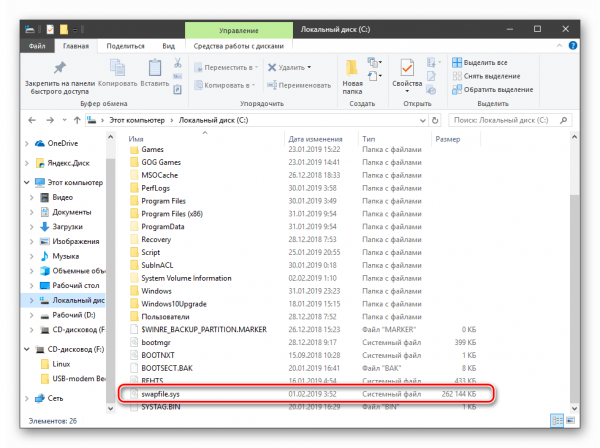
Файл swapfile.sys отвечает за сохранение информации работающих приложений из магазина
Настроить как-либо этот документ нельзя. Вы можете его удалить, но система его вновь создаст, если вы будете пользоваться приложениями из фирменного магазина Windows. Переживать по поводу размеров swapfile.sys не стоит — он весит довольно мало.
Как очистить виртуальную память
Виртуальную память нужно периодически очищать. Можно сразу настроить её очистку вместе с отключением компьютера:
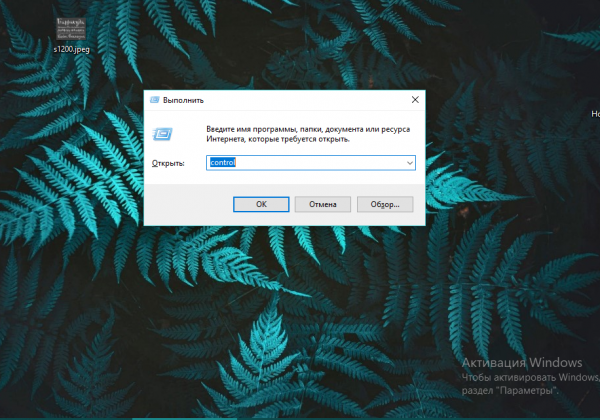
- Запустите «Панель управления» через меню «Пуск» либо с помощью панели «Выполнить». В последнем случае зажмите «Виндовс» и R. Напишите control и щёлкните по ОК.

Выполните команду control
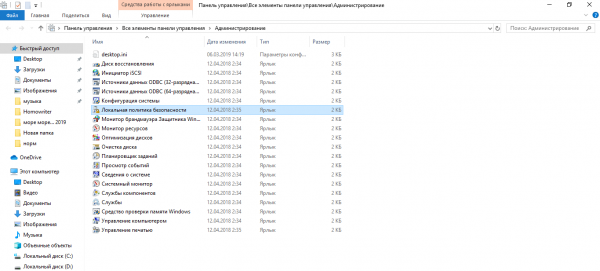
- Зайдите в блок для администрирования.

Перейдите в «Администрирование»
- Откройте утилиту для настройки политики безопасности.

Дважды кликните по ярлыку «Локальная политика безопасности»
- Запустите блок с параметрами безопасности. Отыщите в правой части окна параметр «Завершение работы: очистка файла подкачки». Щёлкните по нему дважды и в новом окошке поставьте значение «Включить». Сохраните изменения.
- Перезапустите компьютер два раза, чтобы виртуальная память полностью очистилась.

Виртуальная память на «Виндовс» может компенсировать нехватку «оперативки», когда система перегружена открытыми окнами. Вы вправе сами указать размер файла подкачки (виртуальной памяти) либо вовсе отключить его, чтобы сэкономить место на системном диске. Желательно сразу настроить очистку виртуальной памяти вместе с отключением «компа».
- Распечатать
Оцените статью:
- 5
- 4
- 3
- 2
- 1
(13 голосов, среднее: 3.5 из 5)
Поделитесь с друзьями!
Содержание
- How to change virtual memory size on Windows 10
- How to increase virtual memory using Settings
- How to increase virtual memory using Command Prompt
- More Windows 10 resources
- Microsoft’s gaming acquisitions to continue, says Xbox lead Phil Spencer
- How to expand Xbox Series X & Series S storage with an external drive
- All the Xbox Game Pass games coming and leaving soon
- The NFL is back! Check out these must-have Windows apps for football fans
- Adjust Virtual Memory on windows 10 October 2020 update (A Quick Guide)
- Virtual memory a combination computer’s physical RAM with temporary space on hard disk. Here how to customize or Adjust Virtual Memory windows 10
- Increasing Virtual Memory in Windows 10
- How To Calculate pagefile size
- How to Increase Virtual Memory on a Windows 10 PC
- What is Virtual Memory?
- What Does “Low on Virtual Memory” Mean?
- How to Increase Virtual Memory
- How to Close Programs Taking Up Too Much Memory
- How to Delete Unnecessary Files Using Disk Cleanup
- How to Manually Set Paging File Size in Control Panel
- How to Increase the Virtual Memory of Your Windows 10
- What is virtual memory?
- What happens when there is little virtual memory available on your computer?
- How to manually increase the virtual memory of your PC?
- Are there other methods to increase your virtual memory in Windows 10?
- Is it advisable to change the virtual memory settings of your Windows 10 device?
- How to Increase Virtual Memory on Windows 10?
- Virtual Memory Overview
- What is Virtual Memory?
- How to Increase Virtual Memory on Windows 10?
- Step 1: Check Windows 10 RAM
- Step 2: Increase Virtual Memory on Windows 10
How to change virtual memory size on Windows 10
 Source: Windows Central
On Windows 10, virtual memory (or paging file) is an essential component (hidden file) designed to remove and temporarily store less frequently use modified pages allocated in RAM (random-access memory) to the hard drive. Using this approach allows the system to prioritize faster physical memory for more frequent processes and applications, improving the overall performance and preventing the device from locking up in the event it runs out of system memory.
In addition, the paging file is important to support crash dumps during a system crash (Blue Screen of Death), as without a large enough page file, a dump with all the contents of the system memory won’t be created.
Although the system does a pretty good job managing the paging file size according to various factors automatically, sometimes, you may still need to increase the default virtual memory values manually. For instance, when you see the «Your system is low on virtual memory» message. You’re noticing slow performance over time, or a particular application requires specific parameters to work as intended.
If you’re experiencing issues with virtual memory, the device doesn’t have enough memory, or you’re trying to improve the system performance, Windows 10 allows you to increase the size of the virtual memory in at least two ways using the Settings app and Command Prompt.
In this Windows 10 guide, we’ll walk you through the steps to increase the size of the virtual memory to improve the system responsiveness.
How to increase virtual memory using Settings
To adjust the virtual memory size on Windows 10, use these steps:
Warning: Although anyone can change the paging file size, it’s only recommended to use these instructions if you have a valid reason, and you know what you’re doing.
Under the «Related settings» section, click the System info option.
 Source: Windows Central
Click the «Advanced system settings» option from the left pane.
Source: Windows Central
Under the «Performance» section, click the Settings button.
![]() Source: Windows Central
Source: Windows Central
Under the «Virtual memory» section, click the Change button.
 Source: Windows Central
Specify the initial and maximum size for the paging file in megabytes.
 Source: Windows Central
Quick tip: The size of the virtual memory is unique to each device, and it can’t be generalized. However, usually, it’s recommended to use a number that’s one and a half times the total available memory for the «Initial size» and three times of available memory for the «Maximum size» when possible.
Once you complete the steps, you should notice an increase in performance when navigating Windows 10 as well as when running multiple apps at the same time.
If you need to revert the changes, you can use the same instructions, but on step No. 10, make sure to check the Automatically manage paging size for all drives option, and restart your device.
How to increase virtual memory using Command Prompt
To modify the paging file size with Command Prompt, use these steps:
Type the following command to understand the current status of the paging file and press Enter:
wmic pagefile list /format:list
 Source: Windows Central
Type the following command to switch form manage to custom virtual memory and press Enter:
wmic computersystem where name=»%computername%» set AutomaticManagedPagefile=false
 Source: Windows Central
Type the following command to set the initial and maximum size of the virtual memory and press Enter:
wmic pagefileset where name=»C:\pagefile.sys» set InitialSize=YOUR-INIT-SIZE,MaximumSize=YOUR-MAX-SIZE
This example sets the paging file to «9216» and «12288» megabytes for the initial and maxium size:
wmic pagefileset where name=»C:\pagefile.sys» set InitialSize=9216,MaximumSize=12288
Source: Windows Central
Type the following command to restart your computer and press Enter:
After you complete the steps, the device will start using the new values for virtual memory, which, if done correctly, should help to improve system performance.
If you no longer need to use the custom size for virtual memory, you can always revert the changes and allow Windows 10 to manage this feature using this command: wmic computersystem where name=»%computername%» set AutomaticManagedPagefile=true and restarting your device.
While it’s recommended to use one and a half times the available memory for the initial and three times the memory for the maximum size, make sure to test the changes and adjust the values if you’re experiencing freezes, crashes, and other problems.
Although it’s possible to disable virtual memory on Windows 10, even when you have a large amount of system memory, it’s not recommended to disable this feature. Usually, if you disable paging file, some applications may stop working, some system features may not work efficiently, and you may end up with some weird behaviors.
More Windows 10 resources
For more helpful articles, coverage, and answers to common questions about Windows 10, visit the following resources:
![]()
Microsoft’s gaming acquisitions to continue, says Xbox lead Phil Spencer
Xbox isn’t done acquiring gaming studios, but the acquisitions have to be a «good match» for the team. Here’s what Xbox chief Phil Spencer had to say on it.
![]()
How to expand Xbox Series X & Series S storage with an external drive
Xbox Series X introduces some notable changes to how storage and external hard drives function, with the introduction of the Xbox Series X Storage Expansion Card. Here’s which solution works for you and where to buy your next storage expansion.
![]()
All the Xbox Game Pass games coming and leaving soon
Xbox Game Pass is constantly evolving with new games joining the service all the time. Keep track of everything coming and going from Xbox Game Pass with our comprehensive guide.
![]()
The NFL is back! Check out these must-have Windows apps for football fans
After months of waiting through the offseason, the NFL is finally back this week. With these Windows 10 apps, you won’t miss a snap of the NFL action.
Источник
Adjust Virtual Memory on windows 10 October 2020 update (A Quick Guide)
Virtual memory a combination computer’s physical RAM with temporary space on hard disk. Here how to customize or Adjust Virtual Memory windows 10
In Windows System Virtual memory is used in place of the physical RAM when it runs out of usable space. Virtual memory combines your computer’s RAM with temporary space on your hard disk called the Swap file, Paging file or Pagefile. Whenever RAM is not enough to complete task windows move data to the paging file and frees up RAM so that your computer can complete its task. And prevent issues like slow down of the machine, Blue Screen of Death (BSOD), Low Memory problem, App Crash Etc.
Virtual memory can be considered as being an extension of the computer’s physical memory.
Your computer has two types of memory: The hard drive or solid-state drive, used for your operating system, photos, music and documents, and RAM (Random Access Memory) used for storing program-specific data. The hard drive is perfect for long-term storage, while RAM much faster and more volatile, acting as a working area for the programs and files you have open.
Every time you open more applications than the RAM on your PC can accommodate, the programs already present in the RAM are automatically transferred to the Pagefile. This process is technically called Paging. Because the Pagefile works as a secondary RAM, many times it is also referred to as virtual memory windows 10.
Increasing Virtual Memory in Windows 10
Windows 10 manages Virtual memory itself only, But at times you might be required to alter the memory allocated. It is always said to customize the virtual memory into a size which is within the permissible limit. Here Fallow To manually Adjust Virtual memory for windows 10.

How To Calculate pagefile size
To Calculate the pagefile size always recommended amount (Refer above image) of total system memory. The maximum size is three (1.5) x the initial size. So let’s say you have 4 GB (1 GB = 1,024 MB x 4 = 4,096 MB) of memory. The and the maximum size would be 1.5 x 4,096 = 6144 MB.
After Set the Initial size (MB)” and “Maximum size (MB)” Value and click on set, Now Click on the OK button and then on the Apply button to save changes. This will prompt to Restart the windows ” you must restart your computer to apply these changes. ”
This is the Best and simple way to Increase Virtual Memory in Windows 10.
Источник
How to Increase Virtual Memory on a Windows 10 PC
If it’s taking you a long time to open, run, and even close programs, your computer might be low on memory. You can add more memory (RAM cards) to help solve this issue. But, if you don’t want to make hardware changes, there are some temporary fixes that can help speed up your computer. Here’s how to increase the virtual memory on your Windows 10 computer.
What is Virtual Memory?
Virtual memory makes your computer think it has more memory than it actually has. Without it, programs that take up more RAM than your computer has will not work properly. Virtual memory helps this by copying data from your RAM to your hard disk (HDD or SSD) to free up space.
However, using virtual data is about a thousand times slower than reading data from your RAM. This is why your computer may not perform as fast when using virtual memory. Under certain conditions, you might even run into an error message saying your virtual memory is low.
What Does “Low on Virtual Memory” Mean?
If you get an error saying your virtual memory is low, it means you have run out of RAM space, as well as hard disk space. This also happens when you run one or multiple memory-intensive programs or commands at the same time, such as working with video files, high-resolution photos, or other large files.
When your virtual memory is too low, Windows will display this message: “Your system is low on virtual memory. Windows is increasing the size of your virtual memory paging file. During this process, memory requests for some applications may be denied. For more information, see help.”

If you see this error, it means that Windows doesn’t have a place to store data when your RAM gets full. This might cause your programs to crash, which could cause you to lose your data.
How to Increase Virtual Memory
You can increase your virtual memory by using the Task Manager to find and quit all memory-intensive programs. You can also delete unnecessary files using Disk Cleanup. Or you can manually set the paging file size from Control Panel. Below are the steps for each method.
How to Close Programs Taking Up Too Much Memory
Note: The “delete” key is not the same as the “backspace” key. The delete key on some keyboards is also labeled as “Del.”
Note: You can also access the Task Manager by right-clicking on your Taskbar at the bottom of your screen and selecting Task Manager from the pop-up menu.
Warning: Closing certain necessary processes can damage your computer. Do not shut down a process unless you know what it is and what it does.

Since virtual memory uses space on your hard disk, it is important to remove files that are taking up too much space. Before you take these steps, you might want to back up your files to another hard drive.

How to Delete Unnecessary Files Using Disk Cleanup
Warning: Deleting certain necessary files can damage your computer. Do not delete files unless you know what they are and what they do.

How to Manually Set Paging File Size in Control Panel
Note: Microsoft recommends that you set virtual memory to not less than 1.5 times the size of your RAM and not more than three times the size of your RAM. So, if you have 2GB of RAM, you could type 6,000MB (1GB equals around 1,000MB) into Initial size and Maximum size boxes.
If you want to learn more about memory and find out how much RAM you have, check out our guide here.

HelloTech editors choose the products and services we write about. When you buy through our links, we may earn a commission.
Источник
How to Increase the Virtual Memory of Your Windows 10
It is likely that with the passage of time you notice that your Windows 10 computer no longer works with the speed and accuracy of the first few days. This is normal since, over time, the hardware requirements of both your operating system and the programs you use increase. If you have an up-to-date PC with a lot of RAM and an SSD (Solid State Drive) instead of a hard drive you probably have no problem, but users of older computers, especially laptops, can clearly see the periodic decline of their computer.
While there are many reasons why your device may slow down, often the main culprit is the lack of memory in the system. When this happens, applications may take several minutes to load and your computer may appear to be frozen and not react to your mouse clicks. To solve these problems, it is advisable to increase the virtual memory of your device.
PC Memory
In today’s article we are going to talk about the Windows 10 virtual memory and how you can increase it to improve the speed and response time of your applications. We hope it helps you.
What is virtual memory?
We all know or have heard of our team’s RAM, but very few of us know for sure what the virtual memory is.
To explain it in a simple way, your PC has two types of memory: the memory of your hard drive and RAM. The first is where you store your operating system, programs, video games and files while the second is where your device stores specific data for each program. The RAM therefore is responsible for managing any program that you have open or is in use on your computer and ensures that it works with the proper performance.
The virtual memory is one that is used when more RAM is no longer available on your computer. This uses part of the memory of your hard drive to be able to expand the operation of your RAM. It is therefore a method to increase the performance of your equipment and so you can more efficiently manage the use of the programs.
However, virtual memory has a problem in relation to RAM: since it comes from your hard drive or SSD, it is much slower. That is why although virtual memory allows certain programs to function normally on your computer, they usually work with a lower performance.
What happens when there is little virtual memory available on your computer?
When your device runs out of virtual memory you receive the message “The system does not have enough virtual memory. Windows is increasing the size of the paged virtual memory file. During this process, memory requests from some applications may be denied.” In this type of case, Windows will try to increase the virtual memory of your PC automatically. By default, Windows will configure virtual memory in a way that is proportional to the amount of RAM you have installed.
If you see that the message does not disappear, you must increase the virtual memory of your device manually.
How to manually increase the virtual memory of your PC?
As we have advanced, you can increase the virtual memory of the device manually. Keep in mind that the paged file can only be at least 1.5 times the size of your RAM or at most three times larger than it. However, do not get carried away by the maximum numbers, as a huge paging file can be dangerous and make your system completely unstable.
To manually increase the virtual memory of your PC you must follow these steps:
First, access the Windows Control Panel and click on the «System» option. This will open a new window where you must click on “Advanced System Settings”, you will find this option in the left side menu of the screen.
Once in the System Properties, click on the «Advanced Options» tab and in the Performance section click on «Settings”.
This will open a new window where you must click on the «Advanced Options» tab and in the Virtual Memory section click on the «Change» button.
You will see how by default the option is activated so that Windows automatically manages the size of the paging file. Uncheck this box and click on the «Custom size» option, you will find it in the center of the window. Now the time has come for you to choose the maximum size you want your system to use for virtual memory.
Remember that at most you will be able to enter a size up to three times larger than your RAM. If you choose any higher number you will compromise the stability of your equipment as well as its operation in general.
Once you have decided on a maximum size, it is time to fill in the boxes of the custom size. As an initial size we recommend that you always enter the size that Windows is currently allocated for virtual memory. You can find this information in the lower part of the window. As for the maximum size, this is in your complete discretion, although remember that a very large size will be counterproductive for your team.
Once you have made all the necessary changes, click on the “Accept” button.
Are there other methods to increase your virtual memory in Windows 10?
It is normal that you do not like to change the virtual memory settings of your device for fear that it may stop working. There are other less dangerous options to increase the performance of Windows 10 and that your PC is able to load and run programs without causing them to fail. One of the simplest methods is to buy more RAM for your device and therefore increase the virtual memory of your computer.
Although at first the idea of acquiring more RAM is a nuisance, in the long run it is one of the most comfortable and safe options to ensure the proper functioning of your equipment. Think that as RAM increases, the volume of virtual memory used will decrease and you will see how there is a notable increase in the speed and performance of your PC and all its programs.
Is it advisable to change the virtual memory settings of your Windows 10 device?
Windows 10 manages your computer’s virtual memory in a really efficient way, making sure to provide a balance between the stability of the operating system and the performance of its programs. While you can manually change the automatic system parameters, it is much more advisable to purchase an extra RAM for your device. And if you have a PC with enough years, your team will appreciate the change and you can enjoy much more speed for your operating system without worrying about possible failures due to a bad virtual memory configuration.
We hope this article will help you to know a little more how it works, how to change and how to increase virtual memory on a Windows 10 computer. Any questions you have on the subject, do not hesitate to share it with us in the comments section.
Источник
How to Increase Virtual Memory on Windows 10?
Contents:
Virtual Memory Overview
Windows 10 RAM (Random Access Memory) goes low while you are running too many applications at the same time, like Google Chrome, Battlegrounds, Microsoft word, YouTube videos, etc. At this moment, the virtual memory is invoked to function on your PC.
But unfortunately, the error that your system is low on virtual memory also appears on Windows 10.
In such a case, you find Windows 10 is slow or freezes as it fails to process with enough virtual memory.
It is said that virtual memory size or to say Windows paging file can be adjusted in accordance with your system basics. So here you might as well increase virtual memory on Windows 10 improve PC’s performance.
What is Virtual Memory?
Simply put it, Windows virtual memory comes to play when there is not enough physical memory (RAM) on your PC. In essence, virtual memory is a tremendous file named PageFile.Sys stored on hard drive, which is why users are prone to call it Page file or Paging file or Swap file.
In this way, to set Windows 10 virtual memory, you are actually adjusting the Page file size.
How to Increase Virtual Memory on Windows 10?
You need to know that no matter you are watching a video or open a webpage in browsers, there will be a program file places in RAM. On this occasion, Windows 10 will use a large amount of RAM, thus easily getting stuck due to slow RAM. Therefore, increasing the virtual memory is quite necessary or sometimes unavoidable.
Nevertheless, since virtual memory on Windows 10 should be managed in line with the RAM, so before you start changing page file size, you would better check the actual physical memory on Windows 10. Then increase virtual RAM on the basis of your RAM.
Step 1: Check Windows 10 RAM
To get to know how much RAM you have on Windows 10, navigate to This PC > Properties > Installed memory.

Here it is 8GB. Like what you notice, there are only 6.94 GB left for use. That lies in that some RAM is used by your video card or something else on the system.
Notes:
But here you should pay attention that if it is Windows 10 32-bit, it means the physical memory is no more than 4GB and even if the RAM shows 8GB or more on a PC of Windows 10 32-bit, only 4GB works. So you can only increase the virtual memory from 4096MB to 6144MB.
Upon getting the RAM size and Windows system type, you now are able to set virtual memory on Windows 7, 8, and 10.
Step 2: Increase Virtual Memory on Windows 10
As you know, by default, Windows 10 tend to automatically manage paging file size for all drives. That is to say, virtual memory has already been customized the time you installed the system. But if you have known how much physical memory you have on Windows 10, it is feasible to change Windows 10 virtual memory.
1. Right click This PC to open its Properties.

2. In System window, hit Change settings.

3. In System Properties, under the Advanced tab, locate Performance and then choose to change its Settings.

Here you are capable of adjusting the performance of Virtual effect, processor scheduling, memory usage, and virtual memory.
4. In Performance Options, under Advanced, find out Virtual memory and then Change it.
As you have noticed, it shows you that a paging file is an area on the hard disk that Windows uses as if it were RAM. And on this PC, the total paging file size for all drives is 1325 MB.
5. In Virtual Memory, uncheck the option – Automatically manage paging file size for all drives, and then Custom size will be available, begin to set both the Initial size and Maximum size.

After that, according to the optimal settings, Windows 10 virtual memory should be 1.5-3 times that of the RAM.
If your physical memory is 1GB, you can set your virtual memory as 1536MB, 2048MB or 3072MB.
If your physical memory is 2GB, you can set your virtual memory as 3072MB, 4096MB or 6144MB.
If your physical memory is 4GB, you can set your virtual memory as 4096MB or 6144MB.
If your physical memory is 8GB, you can set your virtual memory as 8192MB.
Here if you are to increase Windows virtual memory, both the initial size and the maximum one should be larger than the Recommended size 1784 MB, which is what Windows 10 automatically sets for you.
6. Click Set and OK to save changes.
Now you will have increased Windows 10 virtual memory and PC screen flickers will disappear as the programs would turn to virtual memory if using too high RAM.
Источник
Contents:
Virtual Memory Overview
What is Virtual Memory?
How to Increase Virtual Memory on Windows 10?
Virtual Memory Overview
Windows 10 RAM (Random Access Memory) goes low while you are running too many applications at the same time, like Google Chrome, Battlegrounds, Microsoft word, YouTube videos, etc. At this moment, the virtual memory is invoked to function on your PC.
But unfortunately, the error that your system is low on virtual memory also appears on Windows 10.
In such a case, you find Windows 10 is slow or freezes as it fails to process with enough virtual memory.
It is said that virtual memory size or to say Windows paging file can be adjusted in accordance with your system basics. So here you might as well increase virtual memory on Windows 10 improve PC’s performance.
What is Virtual Memory?
Simply put it, Windows virtual memory comes to play when there is not enough physical memory (RAM) on your PC. In essence, virtual memory is a tremendous file named PageFile.Sys stored on hard drive, which is why users are prone to call it Page file or Paging file or Swap file.
In this way, to set Windows 10 virtual memory, you are actually adjusting the Page file size.
How to Increase Virtual Memory on Windows 10?
You need to know that no matter you are watching a video or open a webpage in browsers, there will be a program file places in RAM. On this occasion, Windows 10 will use a large amount of RAM, thus easily getting stuck due to slow RAM. Therefore, increasing the virtual memory is quite necessary or sometimes unavoidable.
Nevertheless, since virtual memory on Windows 10 should be managed in line with the RAM, so before you start changing page file size, you would better check the actual physical memory on Windows 10. Then increase virtual RAM on the basis of your RAM.
Step 1: Check Windows 10 RAM
To get to know how much RAM you have on Windows 10, navigate to This PC > Properties > Installed memory.
Here it is 8GB. Like what you notice, there are only 6.94 GB left for use. That lies in that some RAM is used by your video card or something else on the system.
Notes:
But here you should pay attention that if it is Windows 10 32-bit, it means the physical memory is no more than 4GB and even if the RAM shows 8GB or more on a PC of Windows 10 32-bit, only 4GB works. So you can only increase the virtual memory from 4096MB to 6144MB.
Upon getting the RAM size and Windows system type, you now are able to set virtual memory on Windows 7, 8, and 10.
Step 2: Increase Virtual Memory on Windows 10
As you know, by default, Windows 10 tend to automatically manage paging file size for all drives. That is to say, virtual memory has already been customized the time you installed the system. But if you have known how much physical memory you have on Windows 10, it is feasible to change Windows 10 virtual memory.
1. Right click This PC to open its Properties.
2. In System window, hit Change settings.
3. In System Properties, under the Advanced tab, locate Performance and then choose to change its Settings.
Here you are capable of adjusting the performance of Virtual effect, processor scheduling, memory usage, and virtual memory.
4. In Performance Options, under Advanced, find out Virtual memory and then Change it.
As you have noticed, it shows you that a paging file is an area on the hard disk that Windows uses as if it were RAM. And on this PC, the total paging file size for all drives is 1325 MB.
5. In Virtual Memory, uncheck the option – Automatically manage paging file size for all drives, and then Custom size will be available, begin to set both the Initial size and Maximum size.
After that, according to the optimal settings, Windows 10 virtual memory should be 1.5-3 times that of the RAM.
If your physical memory is 1GB, you can set your virtual memory as 1536MB, 2048MB or 3072MB.
If your physical memory is 2GB, you can set your virtual memory as 3072MB, 4096MB or 6144MB.
If your physical memory is 4GB, you can set your virtual memory as 4096MB or 6144MB.
If your physical memory is 8GB, you can set your virtual memory as 8192MB.
Here if you are to increase Windows virtual memory, both the initial size and the maximum one should be larger than the Recommended size 1784 MB, which is what Windows 10 automatically sets for you.
6. Click Set and OK to save changes.
Now you will have increased Windows 10 virtual memory and PC screen flickers will disappear as the programs would turn to virtual memory if using too high RAM.
All in all, when you are encountering computer bad performance issue, for instance, Windows 10 monitor flashing or high memory usage by ntoskrnl.exe, there is no need to worry about it as you can increase Windows 10 virtual memory to relieve the burden.
Related Articles:
What is OpenAL and Should I Remove it?
Download Windows Photo Gallery Windows 10
There Is No Email Program Associated to Perform The Requested Action
How to Increase Virtual Memory in Windows 10
Yes, you can manually adjust your page file
Updated on November 9, 2021
What to Know
- Go to Control Panel > System > Change Settings > Advanced > Settings.
- Under Virtual memory, select Change, then deselect Automatically manage paging file size for all drives.
- Select Custom size, then set the Initial size and the Maximum size for your paging file.
This article explains how to increase virtual memory in Windows 10 by adjusting the page file.
Adjusting the Page File in Windows 10
Are you seeing warning messages like, «Your system is low on virtual memory»?
This is because your Windows 10 PC doesn’t have enough RAM and is trying to write to virtual memory, but the page file that serves as virtual memory has a file size limit that’s too low.
If you don’t want to see these error messages, you need to increase virtual memory on Windows 10.
-
Open the Control Panel and select System.
While you’re in the System window, make a note of the size of your currently available RAM. You will need this later. In the example shown here, there is 8 GB of available RAM.
-
In the System window, select Change Settings.
-
In the System Properties window, select the Advanced tab. In the Performance section, select the Settings button to open the Performance Options window.
-
Under Virtual memory, select the Change button to modify the virtual memory settings.
-
In the Virtual Memory window, deselect Automatically manage paging file size for all drives. Select Custom size. Now you can set the Initial size and the Maximum size for your paging file.
As a rule of thumb, the paging file should be a minimum of 1.5 times the size of your installed RAM, and a maximum of 3 times your RAM size. For example, if you have 8 GB RAM, your minumum would be 1024 x 8 x 1.5 = 12,288 MB, and your maximum would be 1024 x 8 x 3 = 24,576 MB.
Keep in mind that if you set your paging file size at the upper limit, you could experience significant system slowdown, since data reads and writes to the hard drive where the paging file is stored are much slower than normal RAM. The minimum recommened size is usually enough of an increase to meet your needs. This is often double the amount that the system automatically sets.
Should You Change Virtual Memory in Windows 10?
Increasing the virtual memory in Windows 10 should only be used as a temporary fix to remove the errors. However, since performance when the system uses the paging file is always slower than when it uses RAM, it’s not a good idea to keep your system running under these conditions.
You can use the increased virtual memory solution so that you can continue using your computer until you have time to purchase additional RAM memory cards and upgrade your system. You shouldn’t use this as a permanent solution.
Two terms you may hear used interchangeably are «virtual memory» and «paging file.»
Both of these refer to a file on your hard drive where Windows temporarily moves information that it would normally store in RAM. Whenever you no longer have enough RAM memory available, Windows uses this paging file instead.
The configured size and capacity of this file is referred to as virtual memory. While it isn’t an actual hardware memory card like RAM, it serves the same purpose.
There are a lot of reasons why your Windows 10 PC might slow down. One of the most common is a combination of two things: not having enough RAM and not having enough virtual memory. This combination can lead to poor performance and error messages. The easiest way to fix both of these issues is to increase virtual memory in Windows 10.
The biggest difference between RAM and virtual memory is that the paging file used for virtual memory is stored on your hard drive. Reading and writing to the hard drive is much slower than reading and writing to RAM memory cards. So while using virtual memory allows you to do more than you could without it, you’ll still notice a performance slowdown if your computer has to use virtual memory a lot.
Thanks for letting us know!
Get the Latest Tech News Delivered Every Day
Subscribe
In Windows computers, Virtual memory is used in place of the physical RAM when it runs out of usable space. Virtual memory combines your computer’s RAM with temporary space on your hard disk called the Swap file, Paging file or Pagefile. Whenever RAM is not enough to complete the task windows moves data to the paging file and frees up RAM so that your computer can complete its task. And prevent issues like slow down of the machine, Blue Screen of Death (BSOD), Low Memory problems, App Crashes Etc.
Virtual memory can be considered as being an extension of the computer’s physical memory.
Your computer has two types of memory: The hard drive or solid-state drive, used for your operating system, photos, music and documents, and RAM (Random Access Memory) used for storing program-specific data. The hard drive is perfect for long-term storage, while RAM is much faster and more volatile, acting as a working area for the programs and files you have open.
Every time you open more applications than the RAM on your PC can accommodate, the programs already present in the RAM are automatically transferred to the Pagefile. This process is technically called Paging. Because the Pagefile works as a secondary RAM, many times it is also referred to as virtual memory in windows 10.
Increasing Virtual Memory in Windows 10
Windows 10 and windows 11 manage Virtual memory itself only, But at times you might be required to alter the memory allocated. It is always said to customize the virtual memory into a size that is within the permissible limit. Here is Fallow To manually Adjust Virtual memory for windows computers.
- First press the combination of Win + R keys together to open the Run dialog box.
- Here type sysdm.cpl on it and then click on the OK button.
- This will open “System Properties” of your computer.
- Go to the Advanced tab and click on the Settings option. Which is available under the “Performance” section.
- Now On the “Performance Options” window, go to the Advanced tab and click on the Change button located under the “Virtual Memory” section.

- You will see the Virtual Memory window on your computer screen.
- Here you have to uncheck the “Automatically manage paging file size for all drive” option at the top of the same window.
- Select any of the Drive letters where you allow to create the paging file and then click on Custom size.
- Then enter custom fields in the “Initial size (MB)” and “Maximum size (MB)” fields.
How To Calculate pagefile size
To Calculate the pagefile size always recommended amount (Refer above image) of total system memory. The maximum size is three (1.5) x the initial size. So let’s say you have 4 GB (1 GB = 1,024 MB x 4 = 4,096 MB) of memory. The and maximum size would be 1.5 x 4,096 = 6144 MB.
After Set the Initial size (MB)” and “Maximum size (MB)” Value and click on set, Now Click on the OK button and then on the Apply button to save changes. This will prompt to Restart the window ” you must restart your computer to apply these changes. ”
This is the Best and simple way to Increase Virtual Memory in Windows 10.
Also Read
- Fix Memory-Related problems Using Memory Diagnostic Tool.
- Google Chrome not working/responding after the windows 10 update
- How to Fix Your Computer Is Low On Memory Warning In Windows 10
- 5 Tweaks to fix Slow Boot Times in Windows 10 (Updated)
- Solved: Windows 10 Critical Structure Corruption BSOD Error (5 Working solutions)
- Fix System Restore did not complete successfully error 0x80070005 on Windows 10
Computers have become a part of daily life and we always wish to maintain it to work as good as new. As we use our computer, we keep on adding new software based on our requirements. Every software or application uses some part of the Random Access Memory (RAM). At times we run out of RAM and the system starts showing sluggish performance.
We can’t add physical RAM more than it is supported but we can increase virtual RAM that allows more power and room to use multiple applications at a time. Here in this article, you will explore what is Windows virtual memory and how to increase virtual memory in Windows 10 to get the optimum output from your Windows computer.
What Is Virtual Memory?
When you consume all the RAM available on your PC, your PC starts using Windows virtual memory. It is a special space allocated on the hard drive that allows temporary expansion of RAM. It gives more room to all your multitasking needs and enables your computer to handle more programs at a time.
There are two types of memory in a computer. RAM, Hard Drive, SSD are physical hardware drives where your operating system, files, and photos are stored. There is another space on your hard drive called Read Only Memory (ROM).
RAM stores program-specific data that is quickly accessible and volatile in nature. Whatever programs and applications you open, RAM creates an accessible space to store the temporary information. You can consider it as your workspace for tasks in hand.
How to Increase Virtual Memory in Windows 10
There are several methods to get more space on your hard drive to process tasks in hand. Let us get our hands on the basic ones.
Find Out How Much is Your RAM Size
Before you configure the virtual RAM, it is essential to know your actual RAM size of the machine before you change Windows 10 virtual memory. You may follow these steps to know your RAM size.
Step 1. Click on the ‘Start’ button and then click on the ‘Settings’ option in the left panel.
Step 2. A settings window will open. Click on the ‘System’ option on the top of the settings page.

Step 3. On the left-hand side panel, scroll down and click on the ‘About’ option at the end of the list.
Step 4. Under ‘Device Specifications’, look for the ‘Installed RAM’ size. Take a note of it and close the window.
Also Read: Best PC Optimizer Software to Speed Up Your Computer’s Performance
Manually Increase Paging File Size (Virtual Memory)
Step 1. Click on the Start Button and type in ‘Adjust Performance’ in the search bar.

Step 2. Click on the ‘Adjust the appearance and performance of Windows’ option in the search results.
Step 3. A new window will open. Click on the ‘Advanced’ tab on the top of the window.
Step 4. Section two is for Virtual Memory in the operating system. Click on the ‘Change’ button associated with it.

Step 5. A new window will open to customizing the Windows virtual memory. Uncheck the checkbox on the top that says ‘Automatically manage paging file size for all drivers.’
Step 6. Click on the ‘Custom Size’ radio button in the middle of the window to change Windows 10 virtual memory.
Step 7. Enter the Initial size and Maximum size based on your RAM. The maximum size should be greater than the Initial size for it to accept changes.
“Please Note: As per the guidelines by Microsoft, the virtual memory should not be set less than 1.5 times or greater than 3 times the total size of the RAM. (1 GB = 1024 MB) That means if I have 6 GB RAM, I can keep the paging file size between 9,000 MB to 18,000 MB.”
Step 8. Click on okay to save changes and exit out of the screen. You will need to restart the system to get the changes in effect.
Additional Settings
Additionally, you can also perform Windows system optimization steps to optimize the computer and enhance performance. Kill unwanted tasks from the Task Manager, perform a Disk Cleanup, delete temporary files and browser cookies, or perform Disk Defragmenter.
Summing Up
Now that you know how to increase virtual memory in Windows 10, I am sure you will perform these simple tips and tricks to optimize your computer and get the best performance. You can also make use of Advanced System Optimizer for one-click optimization. This is a one-stop solution to perform all the windows system optimization steps just with a single click. You may write us back if you face any challenges with the steps to increase virtual memory. Happy Computing!
Quick Reaction:

Raj is a creative technical content blogger. He is an experienced analyst coming from Information Technology world proficient in analyzing information and defining a flawless resolution. His technical knowledge and expertise to research, blended with an intimate passion to write made him love his profession to the core. New rides, extreme sports and relishing cooking is his passion. He also dreams of writing a book truly dedicated to an Indian mother.