![]()
Download Article
![]()
Download Article
This wikiHow teaches you how to install Active Directory on a Windows 10 PC. You must be using Windows 10 Professional or Enterprise to install Active Directory.[1]
Things You Should Know
- This only works for Windows 10 Professional or Enterprise.
- You’ll first need to install the remote server administration tools on Windows 10 Professional or Enterprise.
- After you’ve installed the tools needed, you can go to «Control Panel > Programs > Turn Windows features on or off» to enable active directory.
-

1
-
2
Click Download. It’s the red button. You may have to scroll down a little to find it.
Advertisement
-
3
Click the empty box next to “File Name.” This selects all of the files in the list.
-
4
Click Next.
-
5
Download all 4 files to your computer. There are multiple files you’ll need to download, so click Save for all of them as indicated.
-
6
Open your Downloads folder. You’ll find it in This PC or on the desktop.
-
7
Install all 4 files. Double-click the first of the files, then follow the on-screen instructions to complete the installation. Do the same with the other files you just downloaded.


Advertisement
-
1
Open the Control Panel. To do this, type control panel into the search bar, then click Control Panel in the search results.
-
2
Click Programs.
-
3
Click Turn Windows features on or off. A dialog box will appear.
-
4
Scroll down and click + next to “Remote Server Administration Tools.” A list of tools will expand.
-
5
Click the + next to “Role Administration Tools.”
-
6
Check the box next to “AD DS Tools.” Windows will install some files and then prompt you to restart the computer.
-
7
Click Restart now. The computer will turn off and then turn back on. When the computer comes back up, Active Directory tools will be accessible through the Windows Administrative Tools in the Start menu.


Advertisement
Add New Question
-
Question
How do I change my password?

ッRosie~Dosieッ
Community Answer
Select the Start button select Control Panel, select User Accounts, and then select Manage User Accounts. Administrator permission required. If you’re prompted for an administrator password or confirmation, type the password or provide confirmation. On the Users’ tab, under Users for this computer, select the user account name, and then select Reset Password. Type the new password, confirm the new password, and then select OK.

Ask a Question
200 characters left
Include your email address to get a message when this question is answered.
Submit
Advertisement
Thanks for submitting a tip for review!
References
About This Article
Thanks to all authors for creating a page that has been read 317,008 times.
Is this article up to date?
wikiHow Tech Help Pro:
Level up your tech skills and stay ahead of the curve
Let’s go!
Active Directory Users and Computers (ADUC or DSA.msc) is one of the most commonly used tools for managing objects in an Active Directory domain. You can install ADUC on both Windows Server hosts and Windows 10 and 11 computers. The ADUC MMC snap-in is a part of the Microsoft Remote Server Administration Tools (RSAT). In this article, we’ll show how to install and use the Active Directory Users and Computers console on Windows.
Contents:
- How to Install Active Directory and Computers on Windows 10 and 11?
- How to Use Active Directory Users and Computers Console?
- ADUC: Connecting Domain from a Workgroup Computer?
How to Install Active Directory and Computers on Windows 10 and 11?
In modern builds of Windows 10 (1809+) and Windows 11, RSAT is installed online as Features on Demand. To install the Active Directory RSAT on Windows 10/11, go to Settings -> Apps -> Optional Features -> Add an optional feature (View features).
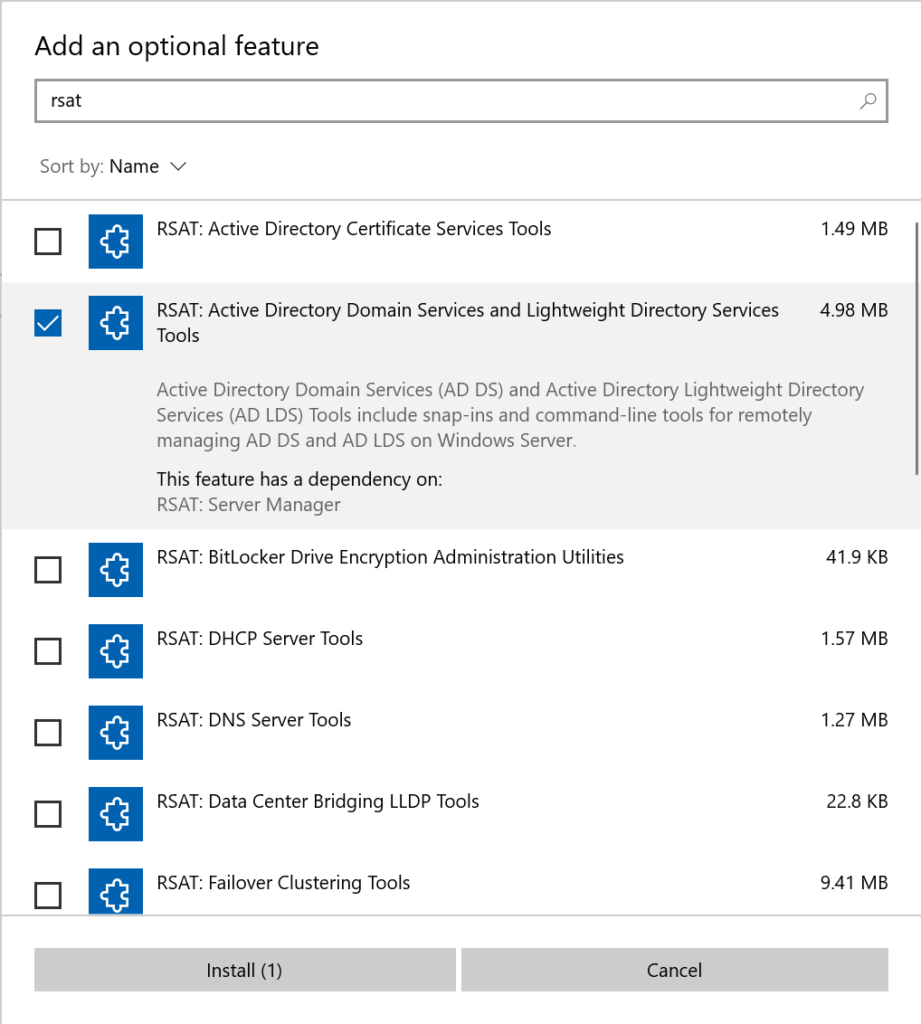
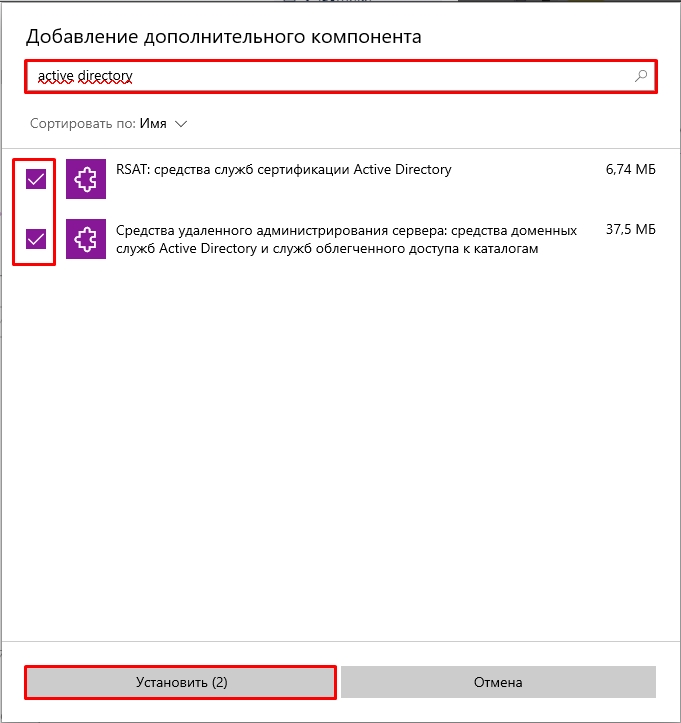
Type ‘Active Directory’ in the search bar and select RSAT: Active Directory Domain Services and Lightweight Directory Services Tool.
Click Next-> Install to start the installation.
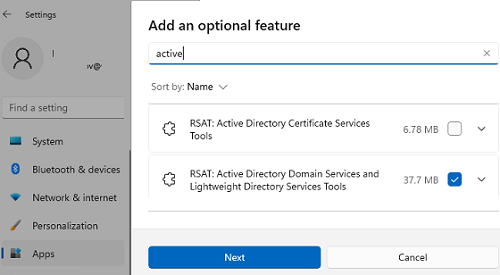
Then Windows connects to Microsoft servers, downloads and installs the Active Directory Remote Server Administration Tools (including Active Directory graphical consoles, command prompt tools, and Active Directory PowerShell module).
Or, you can install AD administration tools using PowerShell:
Add-WindowsCapability –online –Name Rsat.ActiveDirectory.DS-LDS.Tools~~~~0.0.1.0
On a disconnected network, you can install Active Directory tools from Windows 10 Features on Demand ISO image (the FoD image is available in your personal section of the Microsoft Licensing Center).
To install the Active Directory tools from a network share containing the contents of the FoD image, run:
Add-WindowsCapability -Online -Name Rsat.ActiveDirectory.DS-LDS.Tools~~~~0.0.1.0 -LimitAccess -Source \mun-fs1ImagesWindows10-FOD
In previous Windows 10 builds, as well as in Windows 8.1, you can install RSAT using an MSU update. You can download RSAT here:
- RSAT for Windows 10 1803/1709 — https://www.microsoft.com/en-us/download/details.aspx?id=45520
- RSAT for Windows 8.1 — https://www.microsoft.com/en-us/download/details.aspx?id=39296
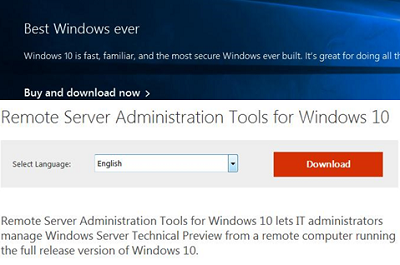
Download the RSAT version that matches the bitness of your operating system. Double-click the file to start installation:
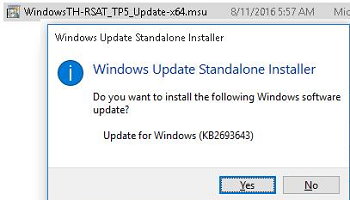
Or install the MSU file from in the command prompt in the quiet mode:
wusa.exe C:InstallWindowsTH-RSAT_TP5_Update-x64.msu /quiet /norestart
After the RSAT installation is complete, restart your computer.
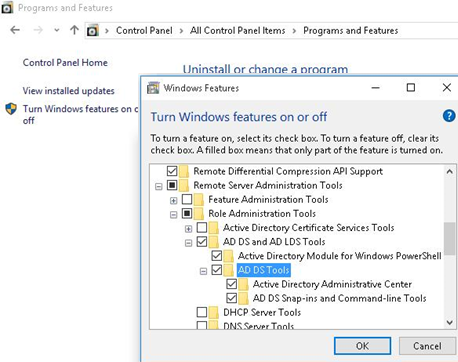
Then you just have to activate the necessary options. To do it:
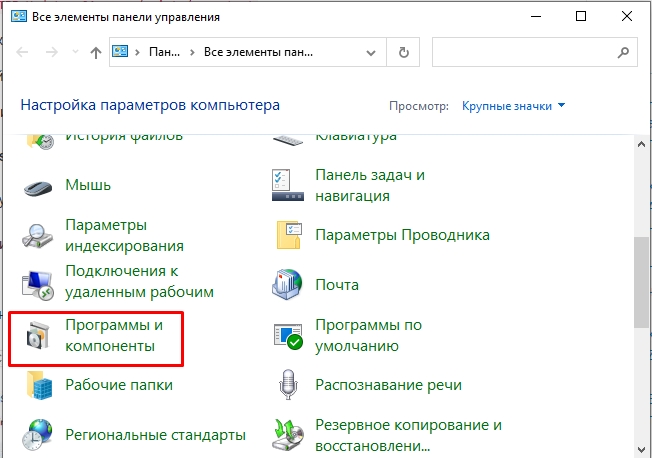
- Right-click Start and select Control Panel;
- Click Programs and Features;
- Click Turn Windows features on or off on the left pane.
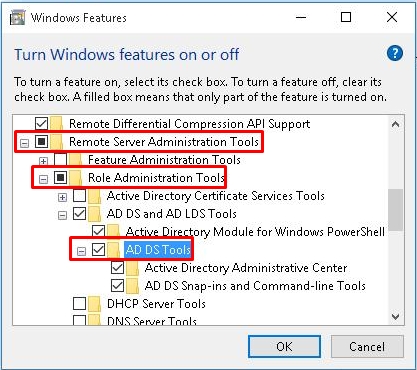
- Expand Remote Server Administration Tools-> Role Administration Tools -> AD DS and AD LDS Tools in the features tree;
- Check AD DS Tools and click OK.
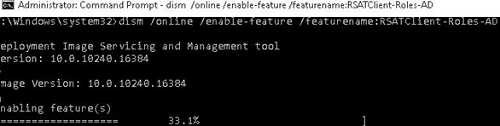
You can install ADUC from the command prompt as well. Run the commands below one by one:
dism /online /enable-feature /featurename:RSATClient-Roles-AD

dism /online /enable-feature /featurename:RSATClient-Roles-AD-DS

dism /online /enable-feature /featurename:RSATClient-Roles-AD-DS-SnapIns
After the administrative tools have been installed, you will see a link to Active Directory Users and Computers snap-in in the Administrative Tools section of the Control Panel.
How to Use Active Directory Users and Computers Console?
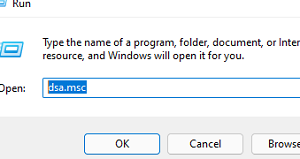
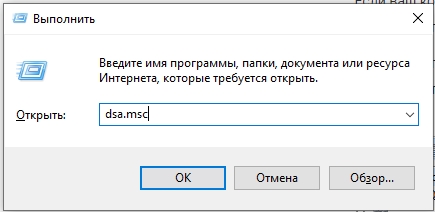
To open the ADUC console, click the icon in the Control Panel or run this command:
dsa.msc
All authenticated domain users can use ADUC to view Active Directory objects.
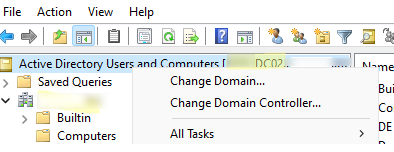
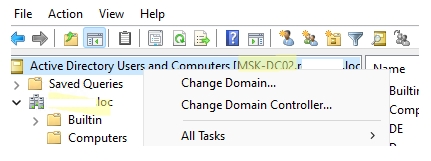
If your computer is joined to an Active Directory domain, then the ADUC connects to a domain controller depending on the current Logon server ($env:LOGONSERVER). The name of the domain controller you are connected to is at the top of the console.
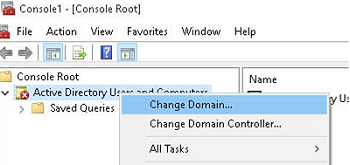
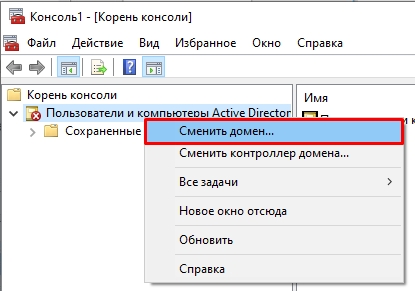
You can connect to another AD domain controller or another domain by clicking the console root and selecting the Change option you want in the context menu.
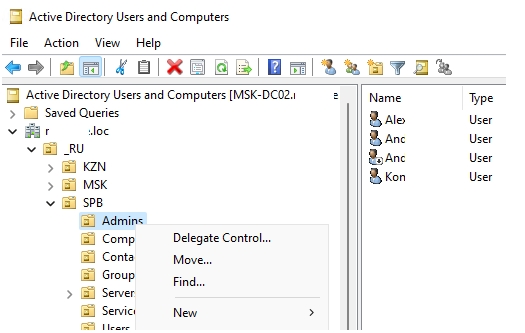
The Active Directory console shows a tree-like Organizational Unit (OU) structure of your domain (and a separate section containing AD Saved Queries).
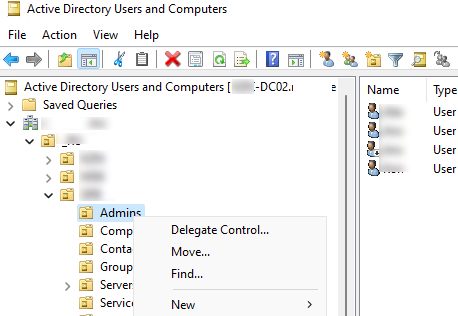
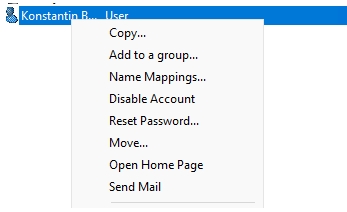
A domain administrator may create containers (OUs) based on a physical or logical organization structure. Using a context menu, you can create new AD objects (users, groups, computers, OUs, contacts), rename, move, or delete objects. Depending on the selected object type, context menu options may vary.
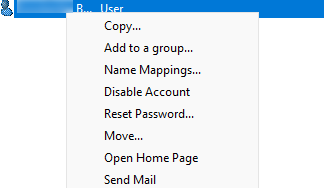
For example, a user has options to reset the AD password or enable/disable the account.
You can use the Search context menu to search for objects in AD.
An administrator can delegate permissions to create/edit/delete objects in Active Directory to other users or groups.
Using the View -> Add/Remove columns menu, you can add object attributes you want to see in the ADUC console.
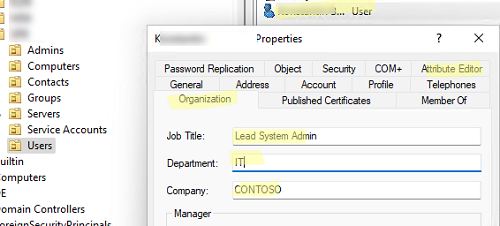
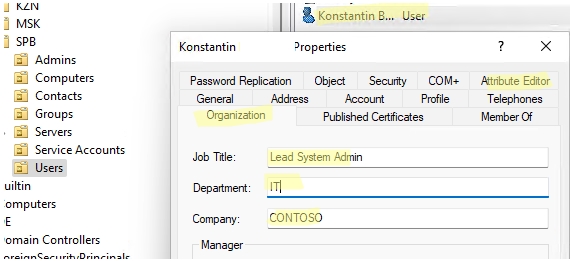
In ADUC, you can view or change domain object properties. For example, you can open user properties and edit its settings. Some user properties are located in the corresponding tabs, and the full list of user attributes is available in the AD Attribute Editor tab.
You can add a separate tab with an AD user photo.
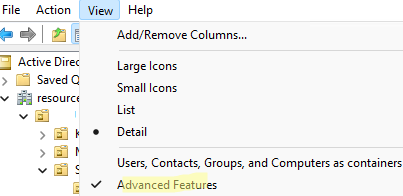
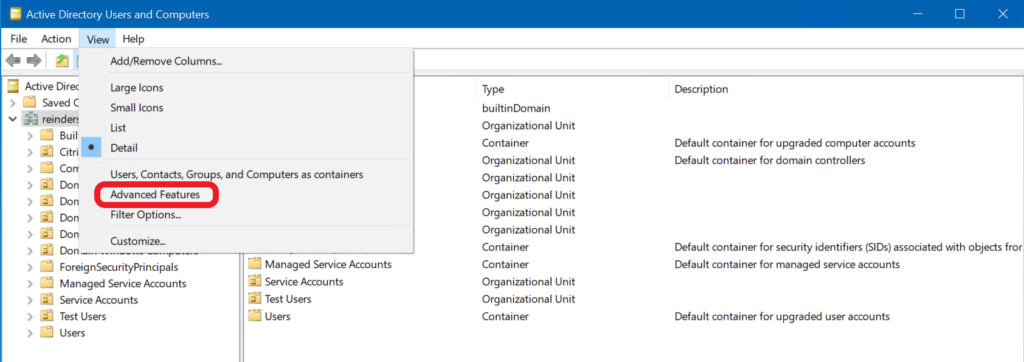
To show system containers and object properties in the Active Directory snap-in (they are hidden by default), check View -> Advanced Features.
Then all AD objects get a number of system tabs. For example, you can get a canonical object name, view an account creation date, or check Protect object from accidental deletion in the Object tab.

ADUC: Connecting Domain from a Workgroup Computer?
If you want to connect to a domain controller from a computer outside your domain (a workgroup computer) using ADUC, follow the instructions below:
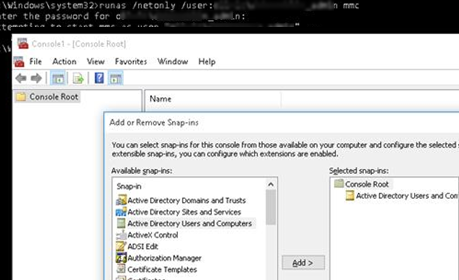
- Open the command prompt and run the mmc console as a different user:
runas /netonly /user:woshubjsmith mmc - In the empty MMC console, select File->Add/Remove Snap-In;
- Move the Active Directory Users and Computers snap-in to the right panel and click Add;
- To connect to a domain, click the console root and select Change domain. Enter the domain name.
Then the ADUC console connects to the domain controller, gets, and displays the container (OU) structure of the Active Directory domain.

Active Directory is an essential part of Windows Server. It allows IT pros to manage computer resources on the network. In this guide, we’ll show you how to install Active Directory Users and Computers and the basics of working with it so you can manage Active Directory.
Table of Contents
- How to install Active Directory Users and Computers
- Why you should install Active Directory Users and Computers on a management workstation
- ADUC vs Active Directory Administrative Center (ADAC)
- Install Active Directory Users and Computers on Windows 10 and later
- How to install Active Directory Users and Computers on older versions of Windows
- How to open Active Directory Users and Computers
- Method 1: The ‘Run’ command
- Method 2: The Start Menu
- Method 3: Control Panel
- How to create and manage user accounts with Active Directory Users and Computers
- Creating an Active Directory user account
- Enabling or disabling an Active Directory user account
- How to reset an Active Directory user account password
- How to delete a user account
- How to create and manage Active Directory groups with Active Directory Users and Computers
- Creating an Active Directory group
- How to add a member to an Active Directory group
- Active Directory security versus distribution groups
- What’s the difference between domain local, global, and universal AD group scopes?
- How to delete a group
- How to manage Active Directory computer accounts with Active Directory Users and Computers
- How to create a new computer account
- How to reset a computer account and why you might need to
- How to delete a computer account
- What to manage Active Directory Organizational Units (OUs) in Active Directory Users and Computers
- How to create a new Organizational Unit
- How to delete an OU
- How to view hidden containers and attributes in Active Directory Users and Computers
- How to protect objects from accidental deletion
- How to search for objects in Active Directory Users and Computers
- How to save search queries
- Conclusion
Active Directory Users and Computers (ADUC) is built as an add-on for the Microsoft Management Console (MMC), and it’s the go-to tool for IT Pros to manage their Active Directory (AD) environments. You can use ADUC to:
- Create AD objects like users, groups, organizational units (OUs), and even printers.
- Make changes to existing users, groups, OUs, etc.
- Delegate permissions
- Move FSMO roles
- Raise the domain functional level
- Work with advanced features like the LostAndFound container, NTDS Quotas, Program Data, and System information.
How to install Active Directory Users and Computers
To install Active Directory Users and Computers on Windows 10 and Windows 11, open the Settings app and go into Apps. From there, add the ‘RSAT: Active Directory Domain Services and Lightweight Directory Services Tools‘ optional feature.
Keep reading to learn in more detail about the various methods you can use to install ADUC on your computer.
Why you should install Active Directory Users and Computers on a management workstation
Before we proceed, I want to make the point, as I have in previous articles, that it is highly recommended to install the Active Directory Domain Services tools on your workstation or whatever management workstation you use for daily tasks. Although the tool is installed automatically on your domain controllers (DCs) when you add the Active Directory Domain Services role, it is not recommended to directly work on your DCs interactively.
ADUC vs Active Directory Administrative Center (ADAC)
I will briefly mention that there are actually two tools installed when you follow the steps here to add the Remote Server Administration Tools (RSAT) for Windows: Active Directory Users and Computers (ADUC) and the Active Directory Administrative Center (ADAC). The latter was written more recently and provides a more intuitive and clean interface for your HelpDesk support representative/”junior admins”.
Install Active Directory Users and Computers on Windows 10 and later
Alright, let’s go through the various methods you can use to install Active Directory Users and Computers on your Windows 10/11 workstation. As you’ll see, based on the version of Windows 10 you’re using, you’ll either install an MSI file with the RSAT tools, or access optional features in Windows Settings to install the tools already built-in to Windows 10 as of version 1809.
If you’re running Windows 10 version 1809 or newer, or Windows 11, follow these steps to install the tool. Make sure you are online and are Internet-enabled (The screens for Windows 11 are slightly different, but you should be able to follow along just fine).
- Click Start -> Settings -> Apps.
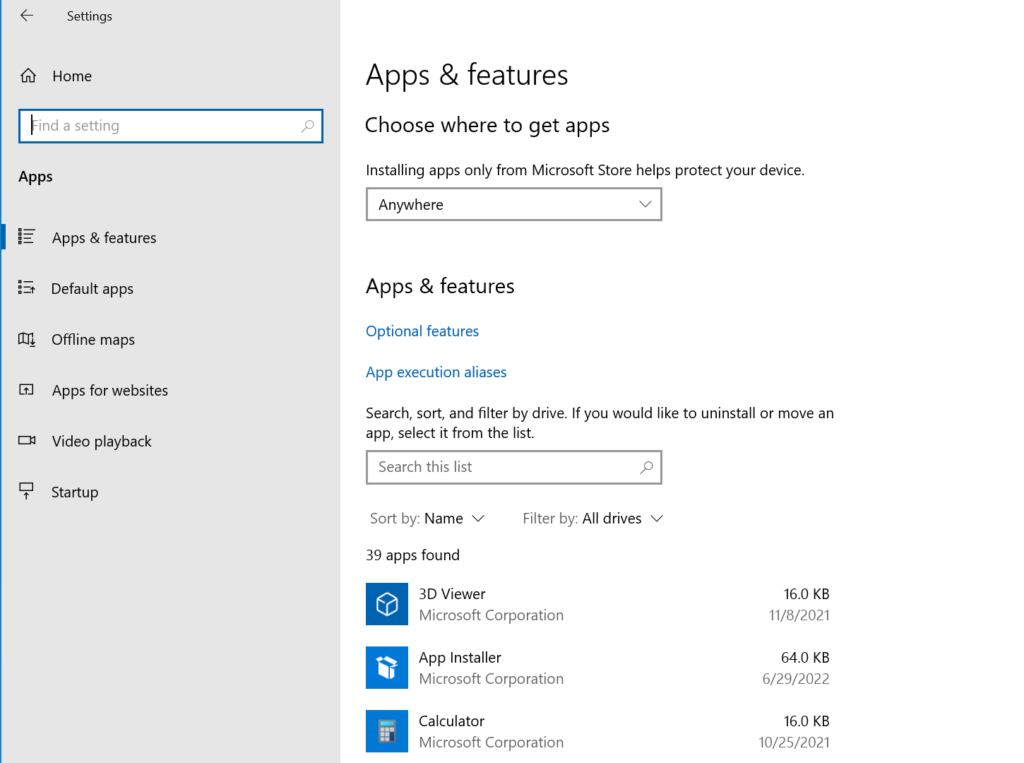
- In the ‘Apps & features‘ section, click ‘Optional features‘. Click the ‘Add a feature‘ plus-sign button.
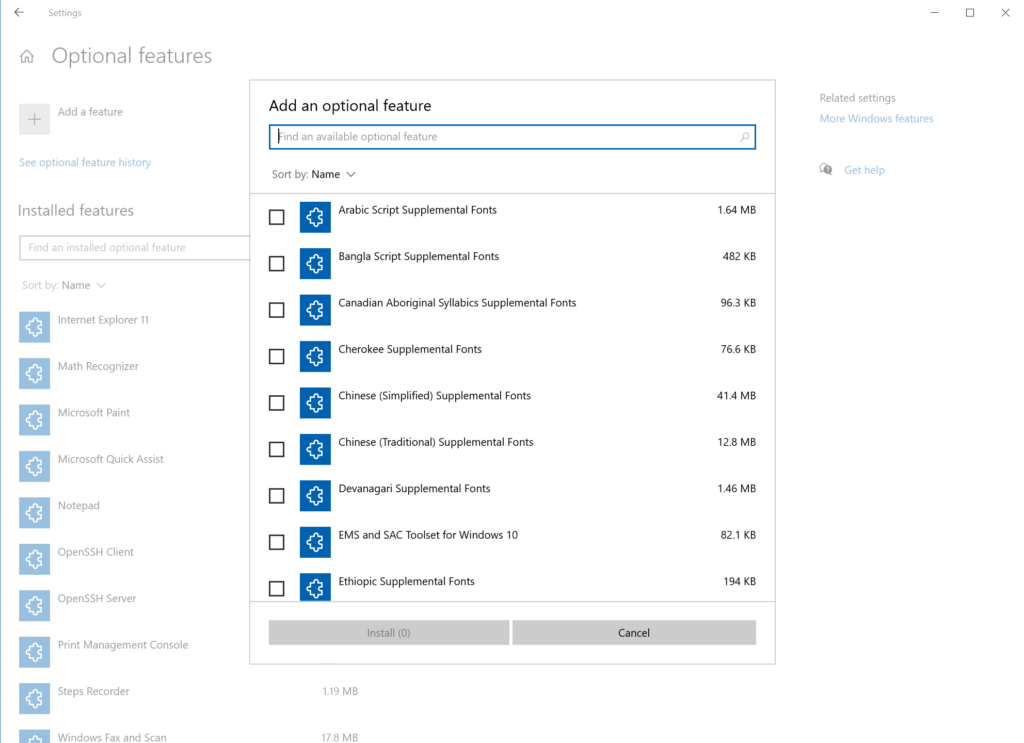
- At the top of the ‘Add an optional feature‘ dialog box, type in ‘rsat‘. Place a checkmark in the item ‘RSAT: Active Directory Domain Services and Lightweight Directory Services Tools,’ and click Install.
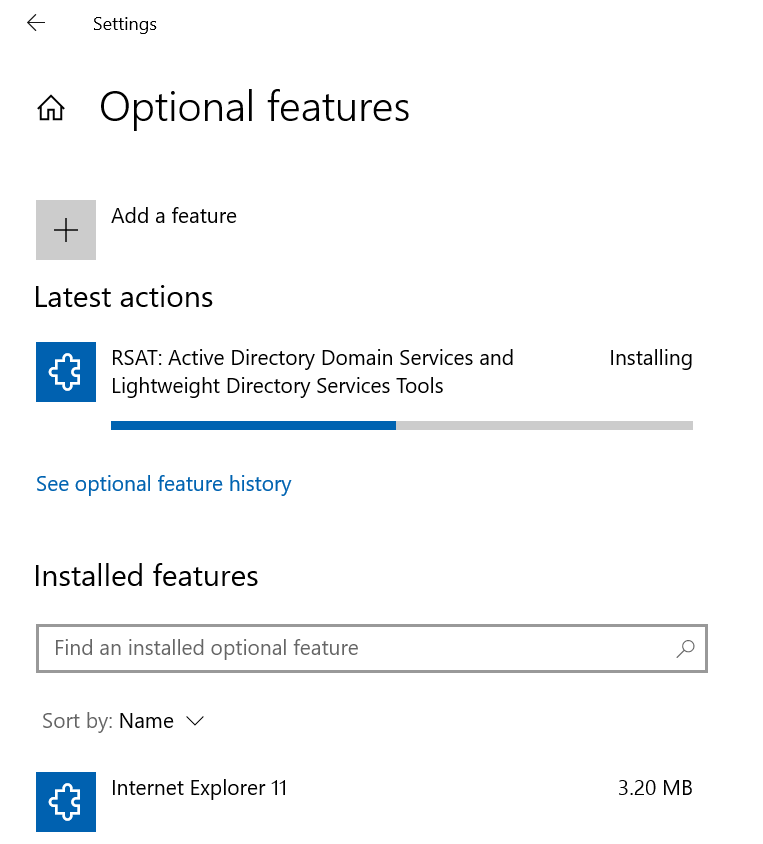
- After clicking Install, you should see some progress…
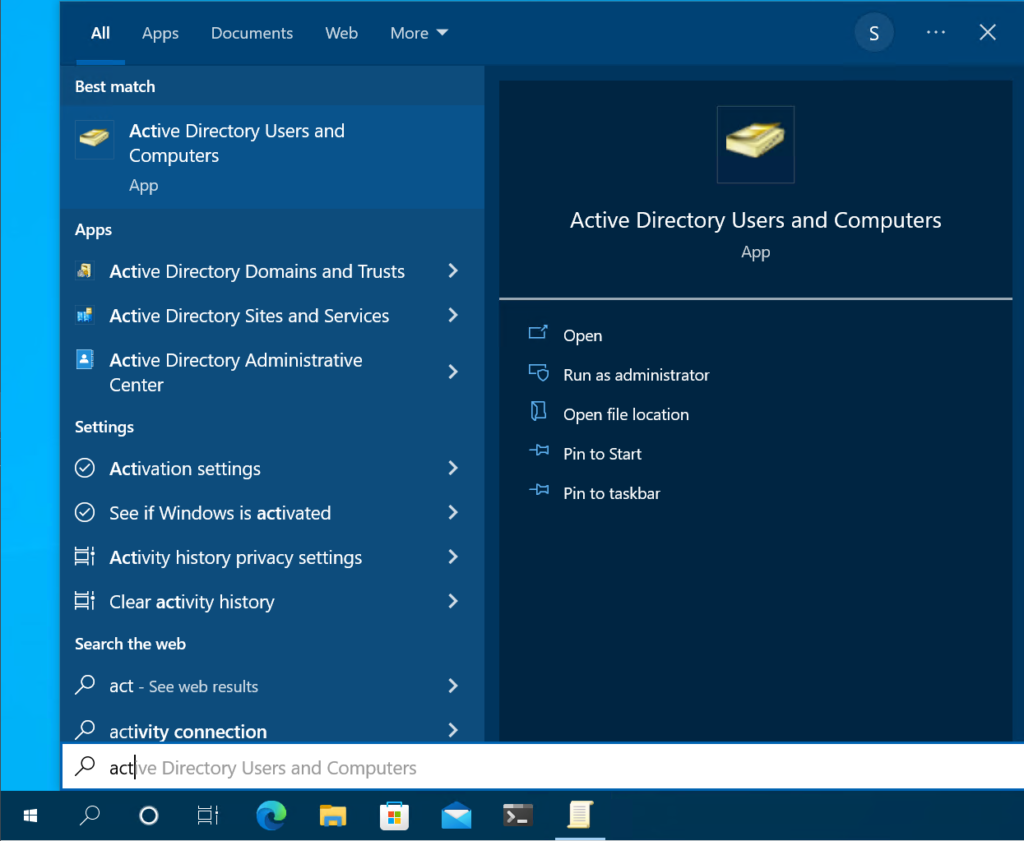
- After installing it, you can find the tool by clicking the Start button, typing in ‘active‘, and clicking ‘Active Directory Users and Computers!
How to install Active Directory Users and Computers on older versions of Windows
If you are still running Windows 10 version 1803 or older (really? Come on. These versions are long out of support…), you can still install Active Directory Users and Computers.
- Download the Remote Server Administration Tools from this link.
- After you’ve downloaded them, simply double-click on the ‘WindowsTH-KB2693643-x64.msu‘ file to install the software on your workstation. After that is complete, you will find the tools again in your Start Menu.
How to open Active Directory Users and Computers
Now that you have the tool installed, let me describe a few ways you can launch the tool. You can use the ‘Run’ command, the Start Menu, and even the Control Panel. Let’s consider each option one by one.
Method 1: The ‘Run’ command
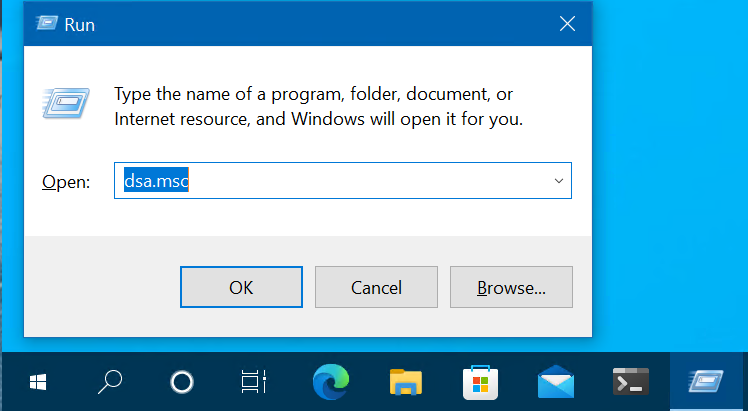
- Press the Windows key down on your keyboard and click ‘R’. Type ‘dsa.msc‘ and hit Enter.
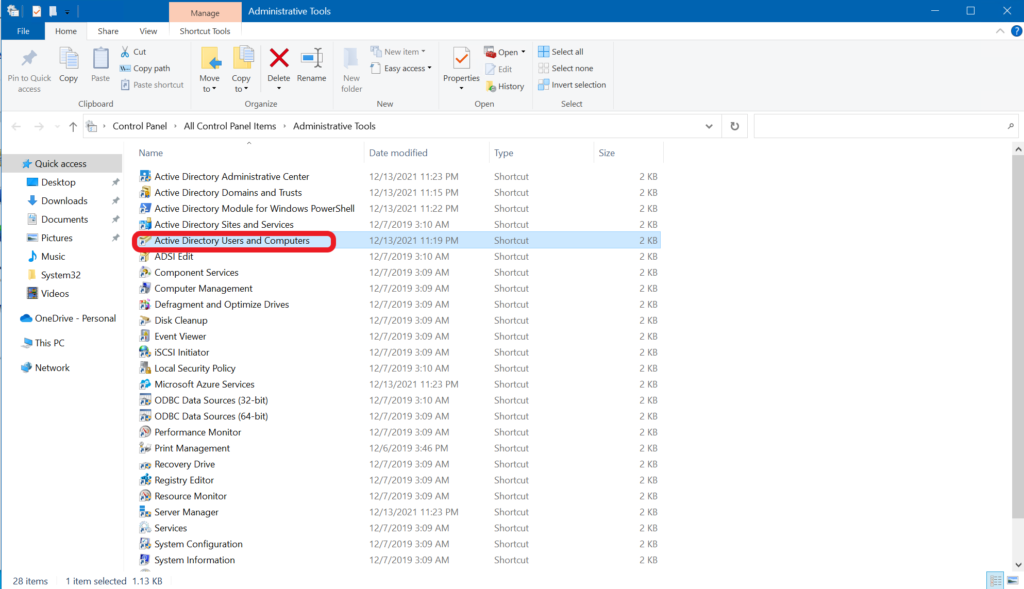
- Go ahead and click the Start button, scroll down in the list towards the bottom where you’ll find ‘Windows Administrative Tools‘.
- Click that folder and you’ll see ‘Active Directory Users and Computers.’ Select it and you’re in!

Method 3: Control Panel
- Click the Start button, and type in ‘control.’ Select Control Panel.
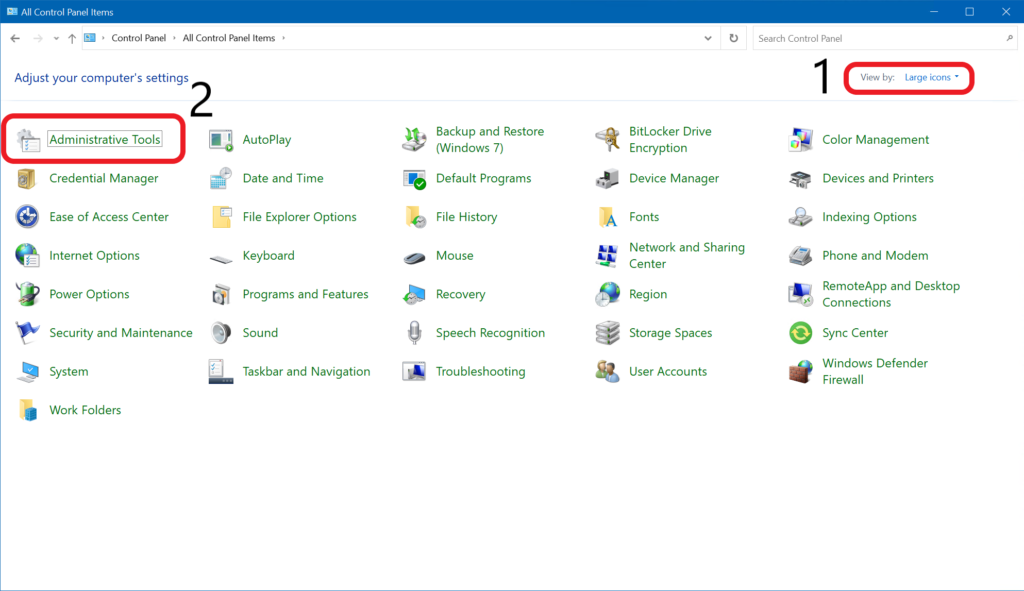
- In the upper-right corner where it says ‘View by:‘ click the dropdown and choose Large icons.
- Open ‘Active Directory Users and Computers‘ and you’re there!
How to create and manage user accounts with Active Directory Users and Computers
Now that we have the tool installed, it would be pretty prudent to show you the basics of how to use it. Right? Sure, let’s get started by adding a user.
Creating an Active Directory user account
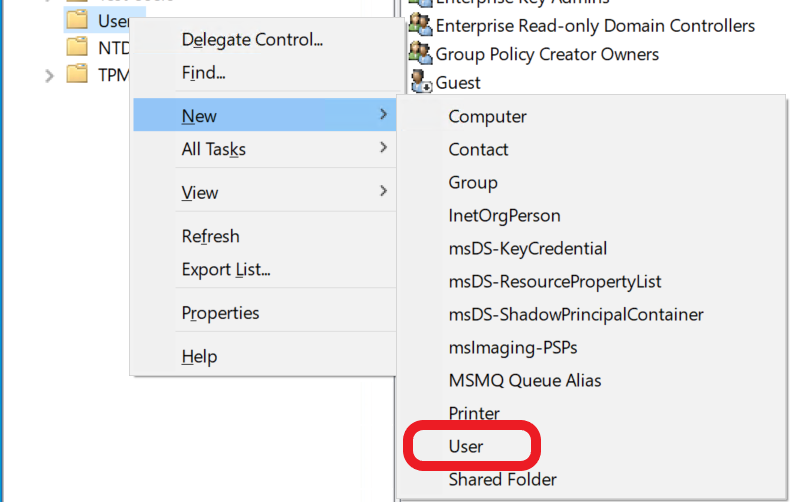
- Although you can always move an account after you create it, let’s select the container or OU you’ll use to store this new user.
- Then, right-click on the OU and click New -> User.
- On the first screen, fill in the user’s basic information including First name, Last name, User logon name, etc.
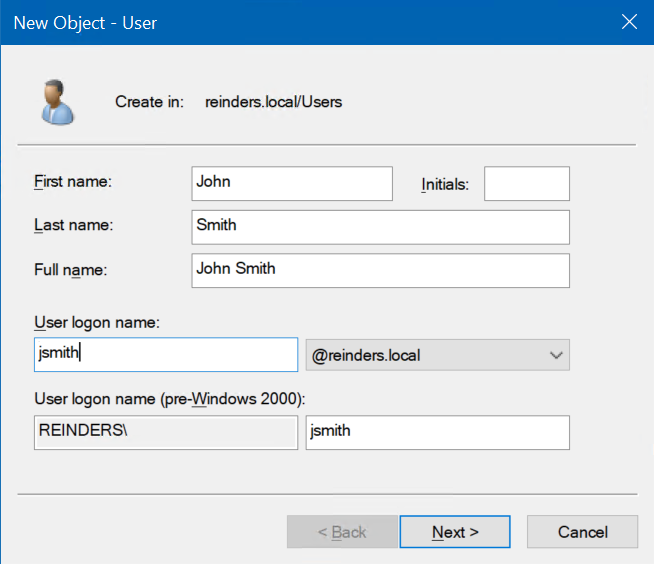
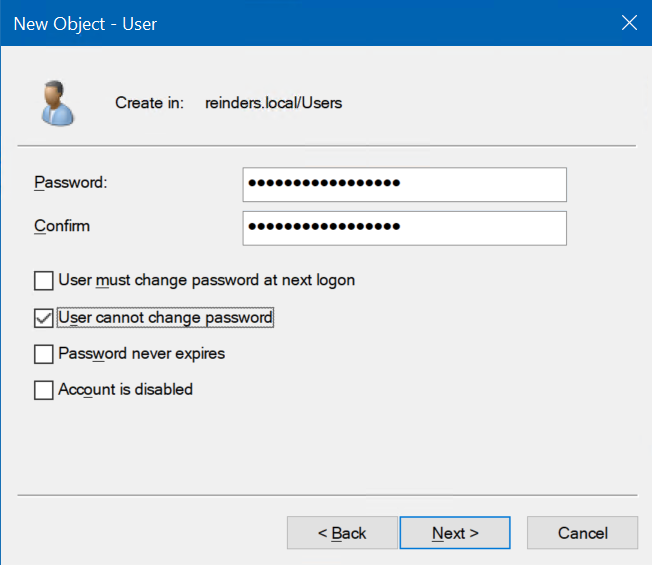
- Next, enter in a new password for the user twice for confirmation. You can optionally set the 4 attributes below to suit your needs. Click Next.
- Click the Finish button on the screen that follows.
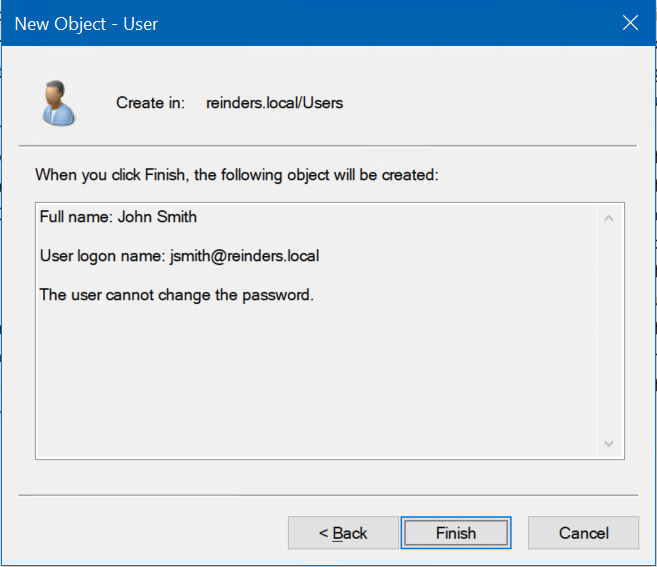
There is our new user, John Smith.

Enabling or disabling an Active Directory user account
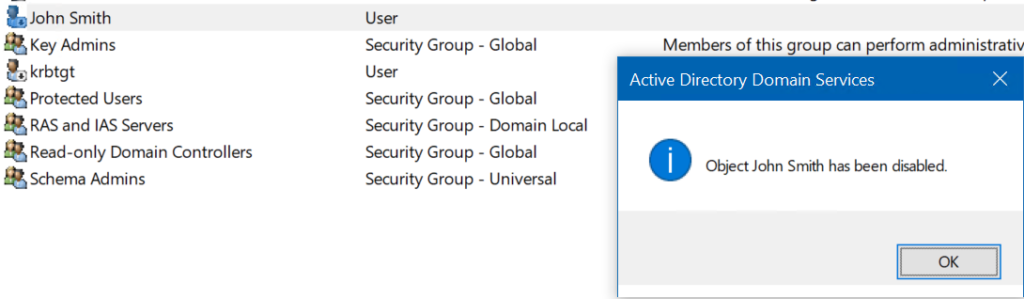
- If you want to enable or disable an account, you can simply right-click on their user object, and choose either ‘Disable account’ or ‘Enable account‘ depending on their current state.
Note: A disabled account can not log in to the domain.
How to reset an Active Directory user account password
If you need to reset a user’s password for any reason, you can do so right on the user object.
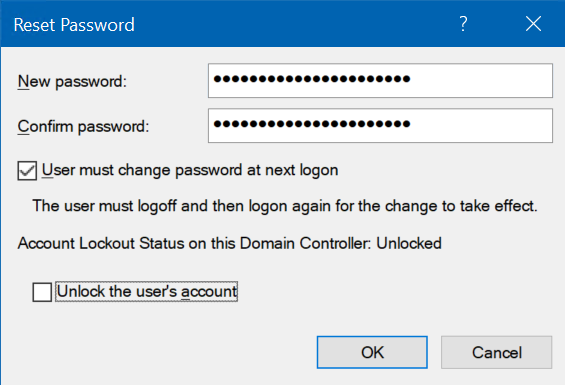
- Right-click on the user and click ‘Reset password…‘
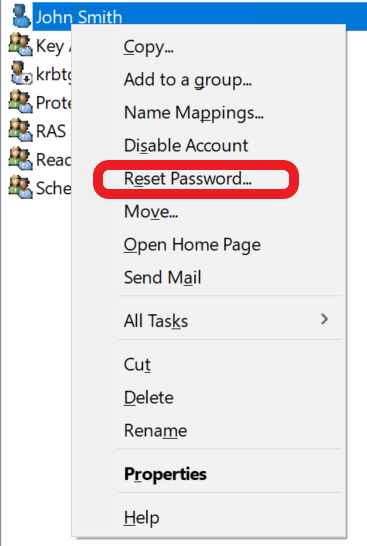
- Enter in a strong, robust password (twice), and optionally force the user to change their password when they use this (temporary) one.
- You can also accomplish two things by checking the ‘Unlock the user’s account‘ checkbox, thereby unlocking their locked account AND changing their password. A very common task and rather easy to use!
How to delete a user account
- To delete a user, right-click on their user account and choose ‘Delete.’

How to create and manage Active Directory groups with Active Directory Users and Computers
Now, throughout your administration of Active Directory, it’s definitely recommended to use groups to help ease the administrative overhead of managing hundreds or even thousands of users.
Instead of granting permissions for 433 people individually to a file server share, you can create a group with those 433 users as members. Then, all you need to do is add your group to the Access Control List (ACL) for the share. The result is one Access Control Entry (ACE) vs. 433!
Creating an Active Directory group
- First, select the container/OU you wish to house the group in.
- Right-click on the container/OU and click New -> Group.
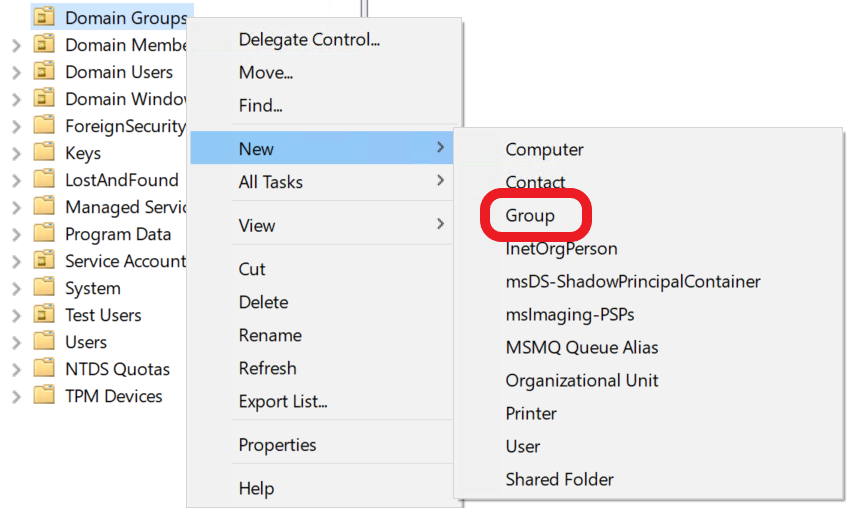
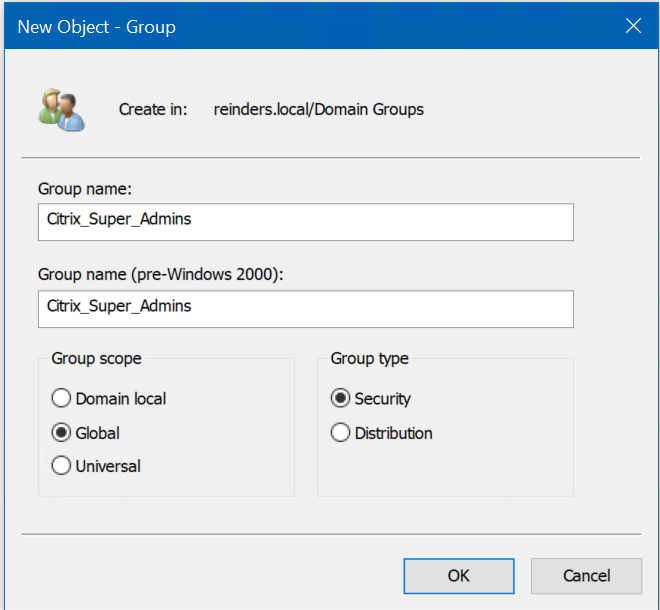
- Enter a Group name, and choose the Group scope and Group type. We’ll cover these options shortly.
How to add a member to an Active Directory group
There are two common methods you use to add a user to a group.
- First, right-click a user object and click ‘Add to a group...’
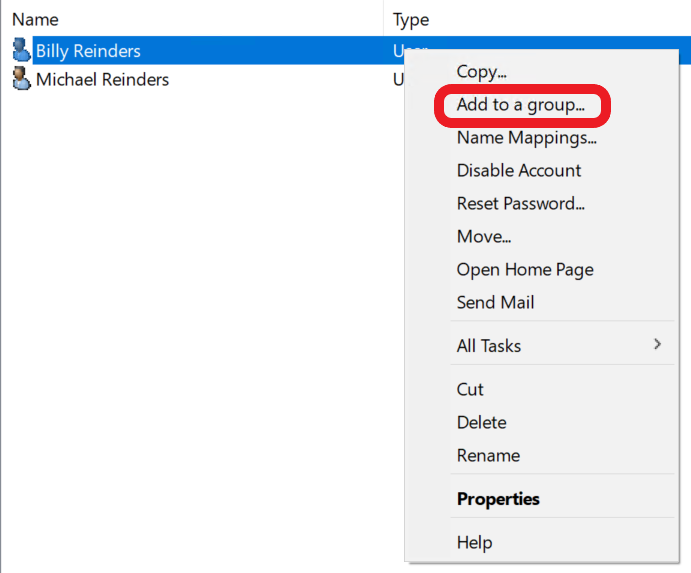
- Here, you can start typing the group name or click the Advanced button to do more fine-tuned searches.
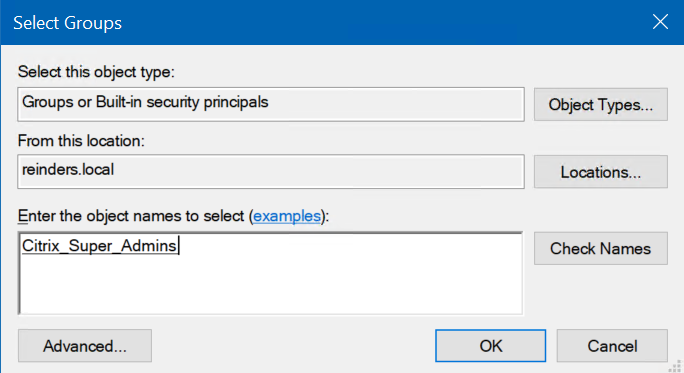
- I’ll type in ‘citrix‘ and click ‘Check Names.’
- There’s our new group, click OK, and they are added.
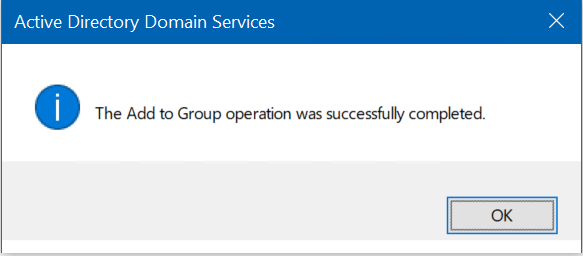
You should see the confirmation window below.
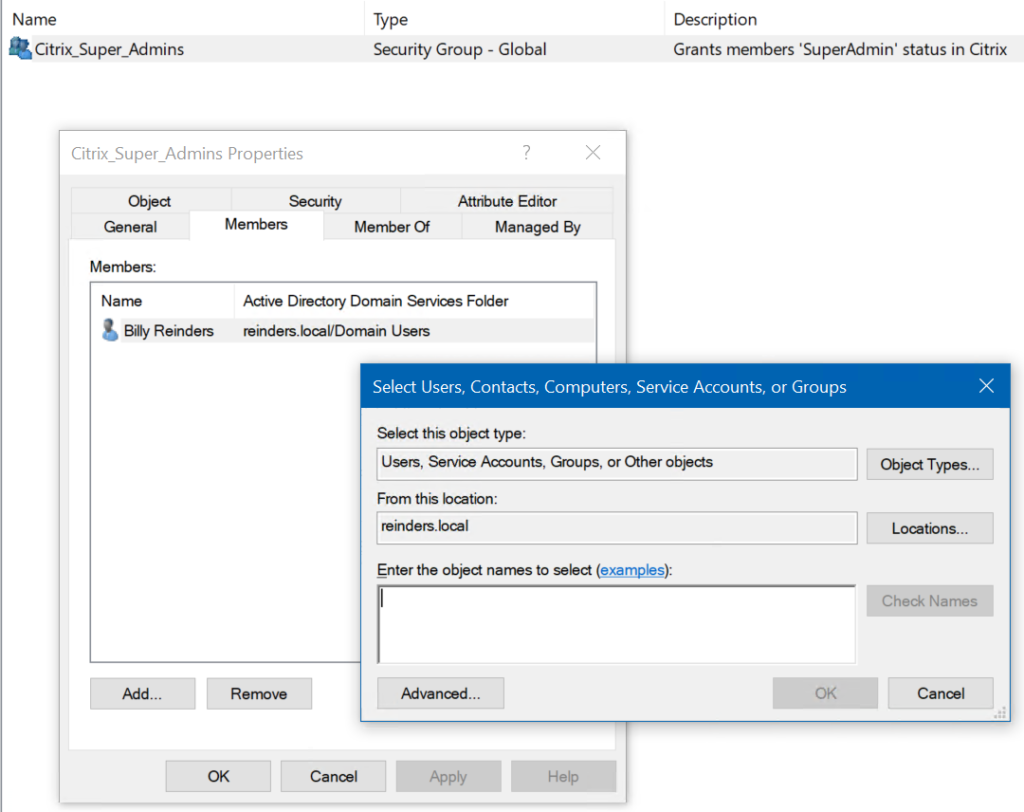
- The other method to add users to a group is to open the Group properties, click the Members tab, and then add users of your choice.
Active Directory security versus distribution groups
The first core attribute of a group in Active Directory is its type: Security or Distribution. The only real difference you need to know is that a distribution group can not be added to an ACL related to the sharing of files. Only a security group can be added.
However, both types of groups can be used for email delivery purposes: You can choose to send an email to a security group, its members will receive the email.
What’s the difference between domain local, global, and universal AD group scopes?
The other core attribute of a group is the scope: Domain local, global, or universal. Here are the main differences between them:
- Domain local: A security or distribution group that can contain universal groups, global groups, other domain local groups from its own domain, and accounts from any domain in the forest. You can only grant rights and permissions with this type of group to resources that reside in the same domain where the group is located.
- Global: A group that can be used in its own domain, in member servers, computers, and in trusting domains. A global group can contain user accounts ONLY from its own domain.
- Universal: A security or distribution group that contains users, groups, and computers from ANY domain in its forest. You can give universal security groups permissions and rights on resources in any domain in the forest!
How to delete a group
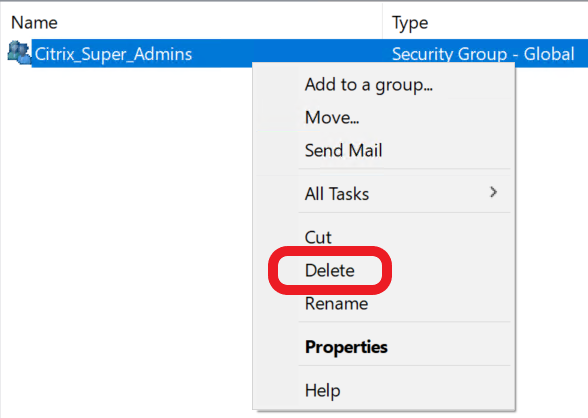
- To delete a group, right-click on it and choose Delete.
How to manage Active Directory computer accounts with Active Directory Users and Computers
A computer account in Active Directory is actually kind of similar to a user account: It allows a computer to log in to the domain.
This grants a token to the computer itself, allowing access to resources on the network and for Group Policy to apply. Every 30 days, the computer will verify that its computer account password is in sync with Active Directory.
How to create a new computer account
- Navigate to the container/OU where you wish to store your new computer account.
- Right-click the OU and click New -> Computer.
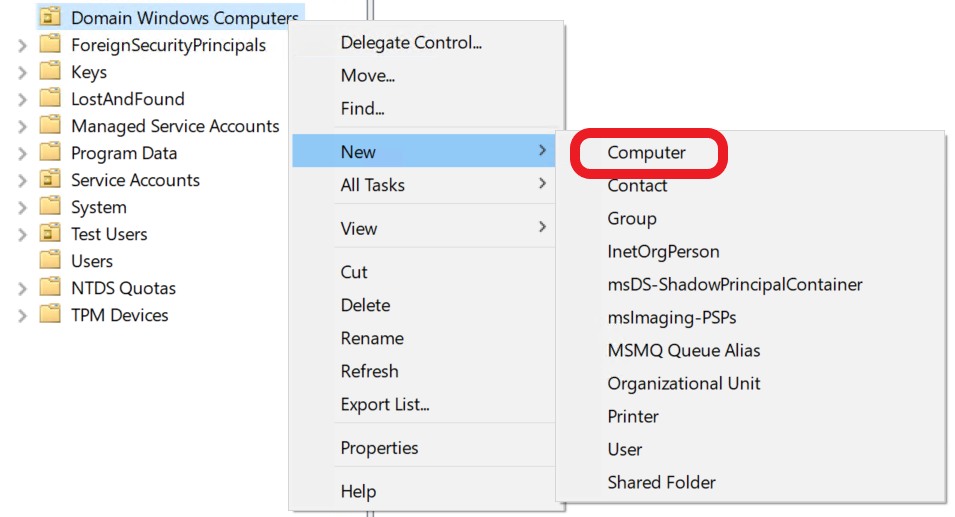
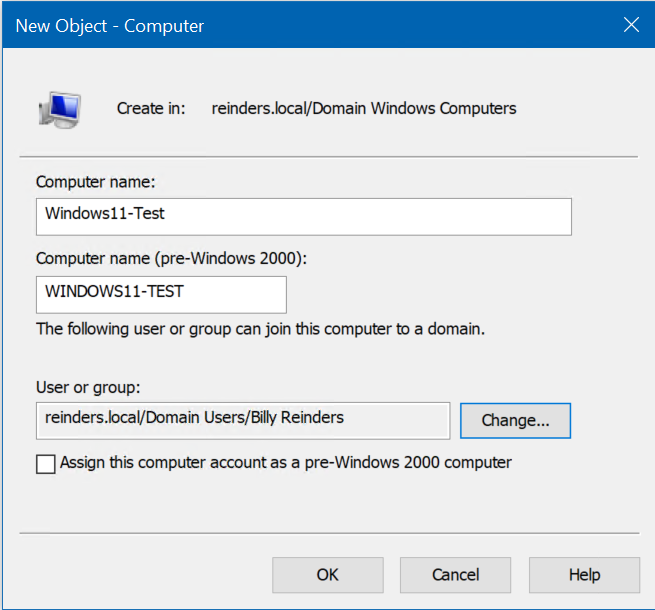
- Type in the computer name. You may optionally change what user or group has the permission to join this computer to the domain.
How to reset a computer account and why you might need to
- If you need to reset a computer account (password), right-click on it and choose ‘Reset account.’
There may be times when you get the dreaded error “Trust Relationship Between This Workstation And The Primary Domain Failed.” If you do, please read my recent article about how to resolve this.
How to delete a computer account
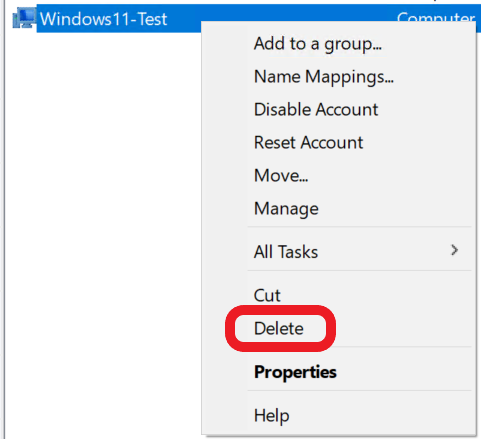
- If you need to delete a computer account, simply right-click on it and choose Delete.
What to manage Active Directory Organizational Units (OUs) in Active Directory Users and Computers
Organization Units (OUs) let you logically group user, service accounts, or computer accounts. You can use these OUs to delegate rights and permissions to administrators (or users), and apply Group Policy in an ordered and logical fashion.
How to create a new Organizational Unit
Creating an OU is similar to creating a user or group.
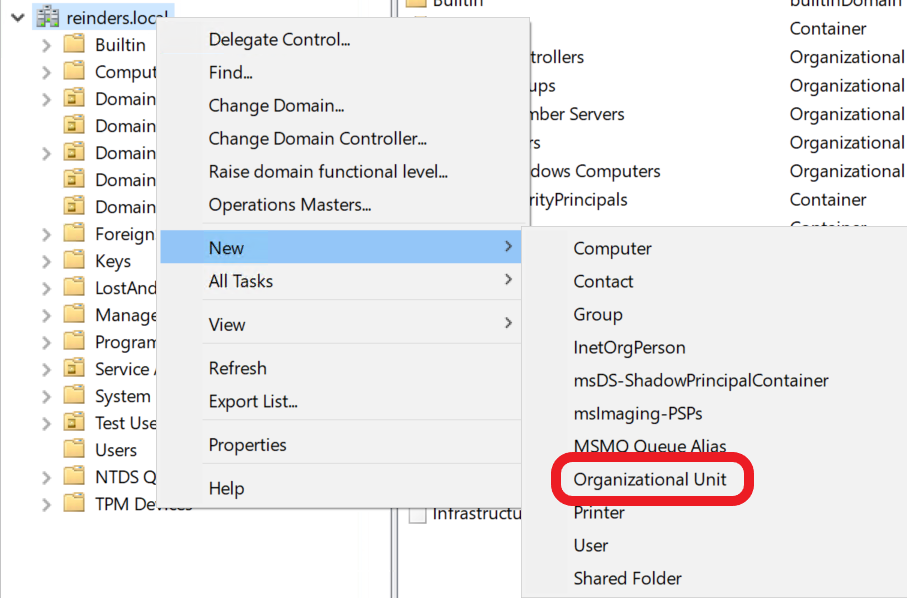
- For our purposes here, let’s right-click on the root of our domain (reinders.local) and choose New -> Organizational Unit.
- Enter a name and click OK.
How to delete an OU
- All you need to do is right-click on the OU and click Delete.
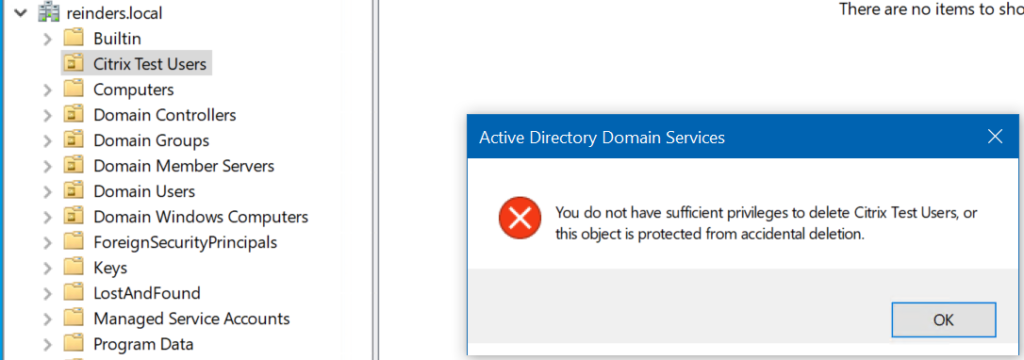
Wait, what? Remember when we created the OU? There was a checkbox, on by default, that protects the object from accidental deletion. I’ll show you that in more detail very soon.
How to view hidden containers and attributes in Active Directory Users and Computers
By default, Active Directory Users and Computers will not display hidden containers and attributes in your domain. You need to enable the ‘Advanced Features‘ option.
- To do so, click the View menu and select ‘Advanced Features.’
- You can read our separate post on how to view the Attribute Editor in Active Directory for more details.
How to protect objects from accidental deletion
Now, as I mentioned above, when I tried to delete an OU, I was ‘blocked’ because the object was protected. Let me show you that setting again.
- Right-click on a user object, a group, or an OU and click Properties. Click the ‘Object‘ tab.
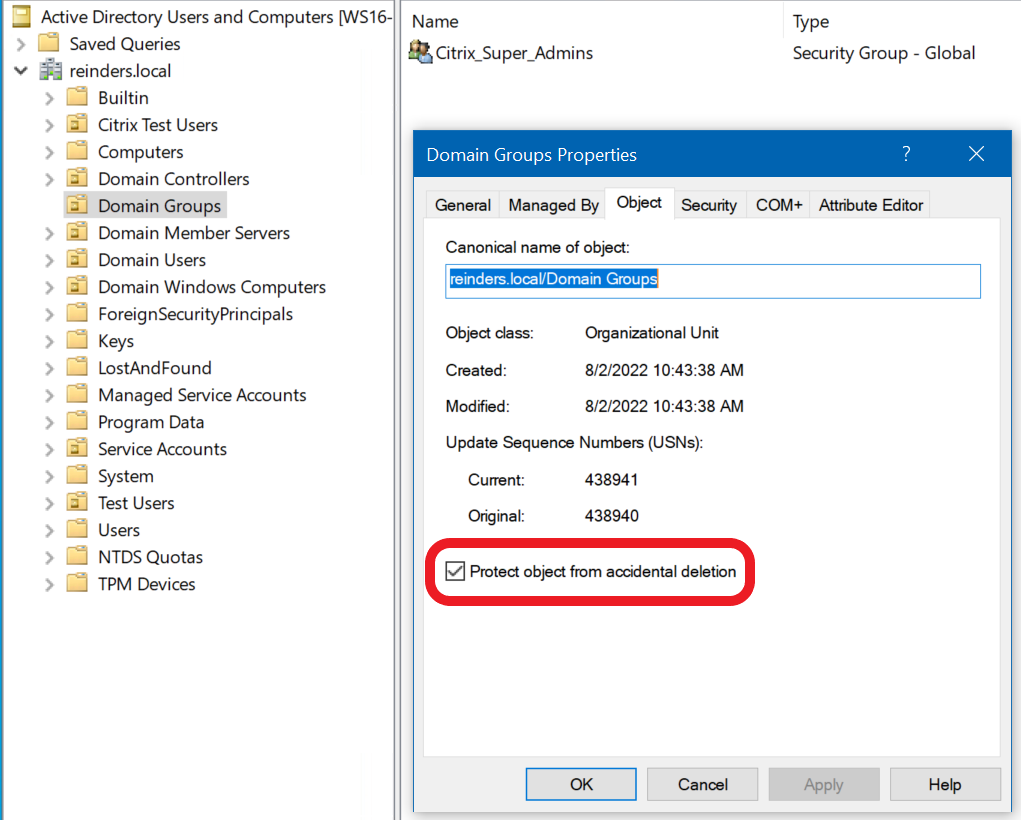
- If you need to delete an object, uncheck the box labeled ‘Protect object from accidental deletion,’ and click OK.
- Then, right-click on the object and click Delete.
By the way, with this attribute enabled, even command line and Windows PowerShell cmdlets will get blocked if you attempt to delete an AD object.
How to search for objects in Active Directory Users and Computers
You can well imagine how difficult it could be to locate an object in a domain with hundreds and thousands of OUs, groups, users, etc. Instead of needing to drill down to find the object, we can use the ‘Find’ function in ADUC.
- You can narrow the search if you initiate the command at an OU or a container, but I almost always right-click on the root of the domain and click Find to make sure I search the entire domain.

- Here, I can type in ‘reinders‘ to find all users, contacts, and groups with ‘reinders’ in the display name.
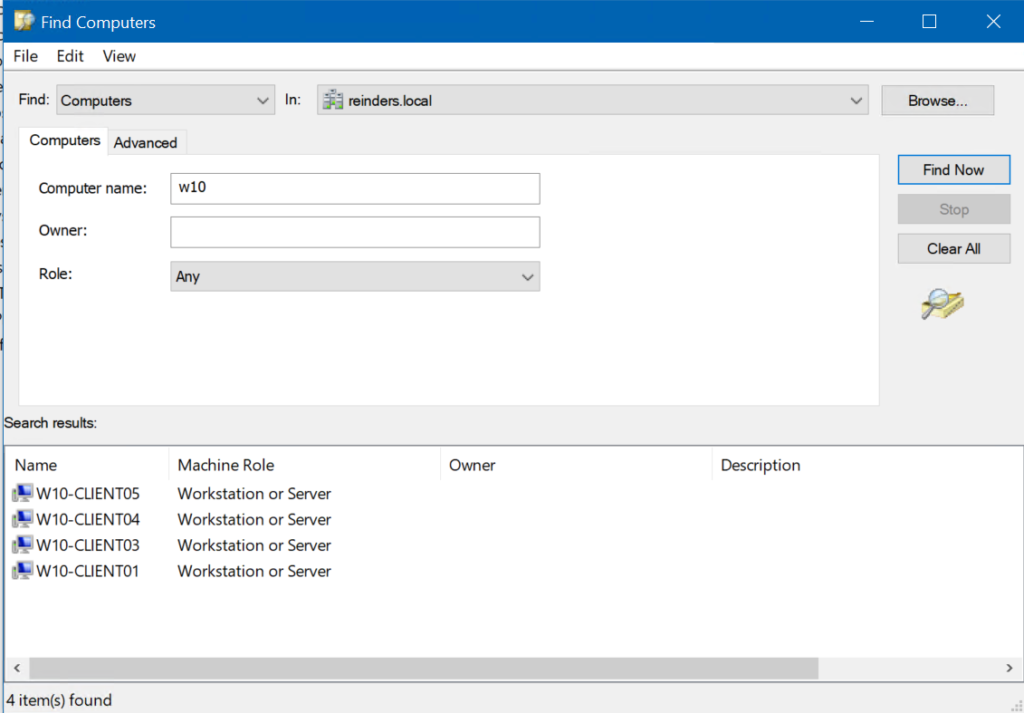
If you want to search for a computer, you first need to change the ‘Find:‘ field in the upper left to Computers. Then, you can do your search using the same methods.
How to save search queries
If you find yourself performing the same or very similar searches often, you can get a nice boost in efficiency by saving your query.
- In the main window view above the domain name, you’ll see Saved Queries.
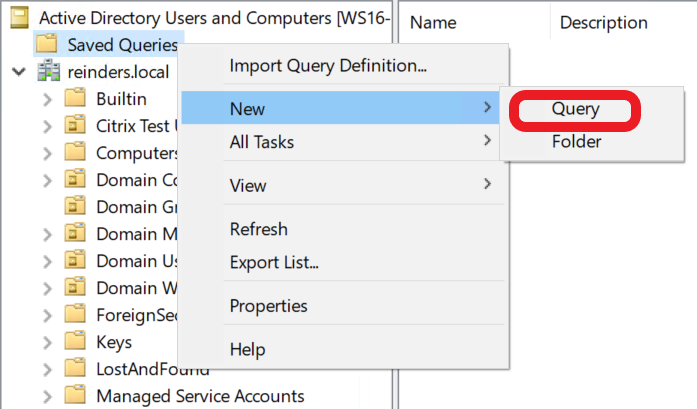
- Select that. Then, right-click and click New -> Query.
- I’ll just choose Users and type in ‘reinders.’
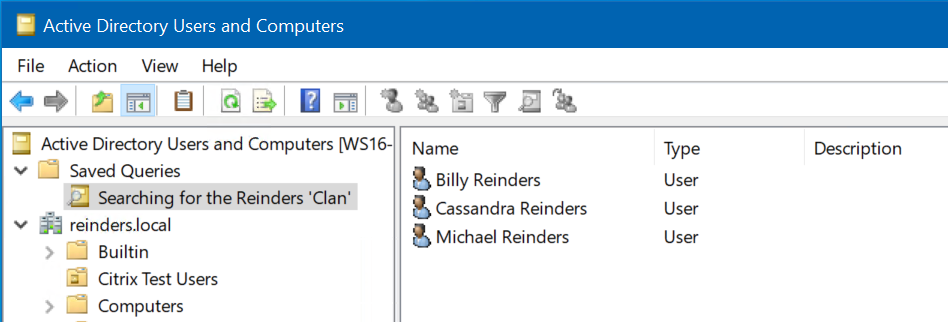
- Now, I can simply click on this search item and it will dynamically run the search for me. I don’t have to do anything else, which is very nice.
Conclusion
In this guide, we’ve detailed how to install Active Directory Users and Computers (ADUC) on Windows 10 and Windows 11. This is an essential tool for managing Active Directory user accounts, computer accounts, groups, and OUs.
However, there are other tools you can use to manage Active Directory such as the Active Directory Administrative Center (ADAC) and Active Directory Sites and Services (ADDS). If you want to learn more about these tools, please check out our previous guide on How to Access Active Directory on Petri.
— Advertisement —
Hello, how are you? Windows Server 2016 and Windows Server 2019 incorporates a very interesting feature called Active Directory Domain. Inasmuch as, allows you to completely manage the users of the organization and also control the client computers in the domain. It is a very useful tool since it allows to develop several management tasks. All its functions and features are very well explained on our website. Indeed, in previous articles, we show you how to how to install Active Directory on Windows Server 2019. For this purpose, we will use the Remote Server Administration Tool. It is a Windows Server component for remote management of other computers also running that operating system. For this reason, I am going to show you how to install Active Directory in Windows 10.
Prerequisites
- The client computer running Windows 10 must be added to a domain running Windows Server 2019. If you don’t know how to do it, I invite you to read this tutorial.
- This function runs only on Windows 10 Professional, Windows 10 Enterprise and Windows 10 Education
- An equal version to or more recent than Windows 10 October 2018 Update.
- Users with a version prior to Windows 10 October 2018 Update, can download and install the RSAT package from here.
Adding Remote Server Administration Tools on Windows 10.
Starting with Windows 10 October 2018 Update, RSAT is included as a set of “Features on Demand” in Windows 10 itself. So what we are going to do is add the feature. With this in mind, type optional in the search bar and select Add an optional feature.

A list of options will open. Click on Add a feature

In the following box navigate to RSAT and there download the function you need.

Once you have selected them, go back to the previous screen to see the progress of the installation.

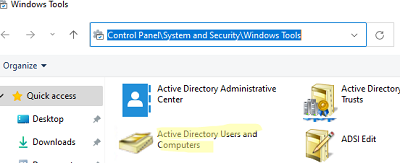
This process will take several minutes, depending on the speed of your connection. After the installation is done, let’s check if it’s working. With that in mind follow this path: Control Panel>System and Security>Administrative Tools.

Then double-click on Active Directory Users and Computers. The Active Directory will then be opened

Add user in Active Directory
To add a user in Active Directory we need to use an account with administrative privileges. With this in mind, on the welcome screen you have to follow the following syntax in the username:
nameofserver/Administrator

In my case, I am working with the Telematic server. Then enter the password. Once the system loads, start Active Directory as explained above. Locate the users folder and right-click on it. Once the system loads, start Active Directory as explained above. And then select new user.

We are going to create a user named Tom Sawyer.

In the following box assign the password, duration and if the user can change it. It also establishes if the account is active or not.

Confirm the parameters and press finish to create the new user.

All right, that’s it for now. Finally, we have learned to install Active Directory in Windows 10. This will allow us to use all the functions offered by this management tool. Before saying goodbye, I would like to invite you to join our Telegram channel.
One of the main Active Directory domain management tools is the Active Directory Users and Computers (ADUC) MMC (Microsoft Management Console) snap-in. The ADUC snap-in is used to perform typical domain administration tasks and manage users, groups, computers, and Organizational Units in the Active Directory domain. By default, the Active Directory Users and Computers (dsa.msc) console is installed on a Windows Server host, when it’s promoted to the domain controller during the Active Directory Domain Services (AD DS) role installation.
In order to use the ADUC snap-in in Windows 10/11, you need to install the Remote Server Administration Tools (RSAT). The RSAT includes various command-line tools, PowerShell modules, and graphical snap-ins to remote manage Windows Servers, Active Directory, and other Windows roles and features, which are running on Windows Server.
How to Install ADUC (dsa.msc) on Windows 10?
By default, RSAT is not installed in Windows 10 (and other Windows desktop operating system versions). Remote Server Administration Tools (RSAT) allows administrators to remotely manage roles and components on Windows Server 2022, 2019, 2016, 2012 R2, 2012, 2008 R2 from user’s workstations running Windows 11, 10, 8.1, 8, and Windows 7. RSAT can’t be installed on computers with the Home editions of Windows, you must have a Professional, Enterprise, or Education version.
You can install ADUC on Windows 10 via the Settings app or with PowerShell.
Enable RSAT:ADUC on Windows 10 via GUI
On modern Windows 10 builds (1809 and newer), the RSAT pack is added to the Features on Demand (FoD). In order to install ADUC, you can add an optional feature from FoD.
- Press the Start menu > Settings > Apps;
- Select Manage Optional Features > Add features;
- In the list of optional features already installed on your Windows 10 desktop, select RSAT: Active Directory Domain Services and Lightweight Directory Tools, and press Install.


After the RSAT installation completes, you need to restart your computer.
Install the Active Directory Users and Computers Using the Command Line
You can install the Active Directory console on Windows 10 via the Сommand prompt (DISM tool) or with PowerShell. To verify if the RSAT ActiveDirectory feature is installed, open a command prompt as an administrator, and run the command:
DISM.exe /Online /Get-CapabilityInfo /CapabilityName:Rsat.ActiveDirectory.DS-LDS.Tools~~~~0.0.1.0
Capability Identity : Rsat.ActiveDirectory.DS-LDS.Tools~~~~0.0.1.0
Name : Rsat.ActiveDirectory.DS-LDS.Tools
State : Not Present
Display Name : RSAT: Active Directory Domain Services and Lightweight Directory Services Tools
Description : Active Directory Domain Services (AD DS) and Active Directory Lightweight Directory Services (AD LDS) Tools include snap-ins and command-line tools for remotely managing AD DS and AD LDS on Windows Server.
Download Size : 5.23 MB
Install Size : 17.35 MB

The screenshot above shows the RSAT Active Directory feature is not installed. To install, you need to run the command:
DISM /Online /Add-Capability /CapabilityName:Rsat.ActiveDirectory.DS-LDS.Tools~~~~0.0.1.0

Now check the status of AD RSAT. It should be changed to State: Installed.

You can also use PowerShell cmdlets to install the Active Directory snap-in on Windows 10.
Get RSAT Active Directory component status:
Get-WindowsCapability -Online | Where-Object {$_.Name -like "RSAT.ActiveDirectory*"}
Install it:
Add-WindowsCapability -Online -Name Rsat.ActiveDirectory.DS-LDS.Tools~~~~0.0.1.0

RSAT components are downloaded over the Internet from Windows Update servers. If you want to install RSAT in a disconnected environment (without Internet access), you need to download the Feature on Demand (FoD) ISO image for your Windows 10 release. FoD DVD media is available for download from your Volume License Servicing Center (VLSC) or on my.visualstudio.com.

To install the ADUC offline, you need to mount the FoD iso image to a virtual drive (for example, to drive F:) and run the installation from local media:
Dism.exe /online /add-capability /source:F: /Rsat.ActiveDirectory.DS-LDS.Tools~~~~0.0.1.0
Install AD Users and Computers MMC Snap-in on Windows 11
You can also install RSAT Active Directory on Windows 11. You can’t install RSAT on devices running Windows 11 Home edition. RSAT is only available for Windows 11 Pro and Enterprise. There are several ways to install the Active Directory snap-in on Windows 11.
On a Windows 11 workstation, you can install RSAT via Optional Features (FoD) in the Settings app.
- Click Start menu and go to Settings > Apps > Optional features;
- Click on View Features and in the Add an optional feature window select to install RSAT: Active Directory Domain Services and Lightweight Directory Services Tools;

- Click Next > Install.
- Windows 11 will download the RSAT binaries from the internet.

Hint. If you use WSUS or SCCM on your network to install Windows Updates on client devices, you need to enable the special GPO option. Open the local Group Policy Editor (gpedit.msc) and go to Computer Configuration > Administrative Templates > System. Enable the GPO option Specify settings for optional component installation and component repair and tick the Download repair content and optional features directly from Windows Update instead of Windows Server Update Services (WSUS) checkbox. Update local Group Policy settings on the client with the gpupdate command: gpupdate /force. Without this option, Windows 11 will try to get RSAT from your local Windows update server (errors 0x8024402c and 0x800f081f).

Also, you can install the Active Directory tools on Windows 11 using PowerShell. List the installed RSAT components by running the command:
Get-WindowsCapability -Name RSAT* -Online | Select-Object -Property DisplayName, State
In our case, the RSAT: Active Directory Domain Services and Lightweight Directory Services Tools feature is not installed (State > NotPresent).

Install the Windows feature with the command:
Add-WindowsCapability -Name Rsat.ActiveDirectory.DS-LDS.Tools~~~~0.0.1.0 –Online
The PowerShell Active Directory module is also installed with the ADUC console.
How to Open Active Directory Users and Computers (dsa.msc) Snap-in on Windows?
In order to run Active Directory snap-in on Windows 11 go to the Start Menu > All apps > Windows tools.

As you can see, a new link to the console %SystemRoot%system32dsa.msc (Active Directory Users and Computers) appeared.
On Windows 10 (and previous versions) the AD Management snap-ins are available in the Administrative Tools section of the Control Panel.

Start the Active Directory Users and Computers snap-in.
Now you can run the ADUC snap-in and connect to any available AD domain controller. If your computer is joined to the Active Directory domain, then the nearest domain controller in your Active Directory site will be selected automatically, based on your Logon server. In addition, to start the ADUC console, you can press the Win+R combination, type dsa.msc, and then click OK.

At startup, the ADUC console automatically connects to the closest DC. If the console doesn’t find the domain controller, get the name of your LogonServer using the PowerShell command:
$env:LOGONSERVER
![]()
Right-click on the root in the ADUC console and select Change Domain Controller. Select the name of your logon DC from the list.

Always try to connect to the closest domain controller. When working with a domain controller at a remote site, the RSAT console may become slow.
If you want to connect to AD using dsa.msc snap-in from a non-domain computer, you must:
- Open the Command prompt and run the command:
runas /netonly /user:Domain_NameDomain_USER mmc
- In the empty MMC Console select File > Add/Remove Snap-In;
- Add Active Directory Users and Computers Snap-In to the right pane and press OK;

- Connect to the domain with right-click on ADUC > Connect to the domain and enter the domain name.


As a result, the structure of your OU Active Directory domain appears in the ADUC snap-in.

You will see a standard set of Active Directory OUs and containers:
- Saved Queries — saved search criteria, allows quickly replay of the previous search in Active Directory (LDAP query supported);
- Builtin — built-in user accounts;
- Computers — default container for computer accounts;
- Domain Controllers — default container for domain controllers;
- ForeignSecurityPrincipals — contains information about objects from trusted external domains. Typically, these objects are created when an object from an external domain is added to the group of the current domain;
- Users — default container for user accounts.
When choosing the OU, you will see a list of objects that are in it. The ADUC console may display security groups, contacts, users, and computers.
Depending on the domain structure, the ADUC console may contain other containers. Some AD folders are not displayed by default. To display them, select View > Advanced Features in the top menu.

The following additional folders should appear:
- LostAndFound — directory objects, that lost the owner;
- NTDS Quotas — data about the quoting of the directory service;
- Program Data — data stored in the directory service for Microsoft applications;
- System — the built-in system parameters.
You can add organizational units to the AD tree by yourself.
In the ADUC console, you can perform the following actions:
- Create and manage user accounts, computers, and Active Directory groups;
- View and edit AD object attributes with ADSI Edit;
- Search for AD objects;
- Change user password in Active Directory or reset it;
- Create organizational units and build hierarchical structures for AD objects. In the future, you can delegate administrative permission on these OUs to other domain users (without granting domain administrator privileges);
- Delegate administrative permissions;
- Raise domain functional level, and transfer FSMO roles with PowerShell to another domain controller.
- About
- Latest Posts

I enjoy technology and developing websites. Since 2012 I’m running a few of my own websites, and share useful content on gadgets, PC administration and website promotion.
Всем привет! Сегодня мы поговорим с вами об оснастке и консоли управления доменами Active Directory – пользователи и компьютеры (ADUC). Данную оснастку используют для управления доменом Active Directory. Сама оснастка по умолчанию не установлена в системе Windows, но её можно инсталлировать несколькими способами. В статье я расскажу где скачать и как установить оснастку Active Directory для Windows 10, 11 и 8.1. Также я очень коротко расскажу, как работать с ней и как подключить компьютер к домену Active Directory из-под рабочей группы.
Содержание
- Установка в Windows
- Способ 1: Через параметры системы
- Способ 2: PowerShell
- Способ 3: Для Windows 10 1803/1709 (Более старых сборок) и Для Windows 8.1
- Как её пользоваться?
- Подключение к домену из рабочей группы
- Видео
- Задать вопрос автору статьи

Итак, в первую очередь нам нужно установить центр администрирования Active Directory. По умолчанию в Windows 10 и Windows 11 они не установлены в системе и являются дополнительными компонентами ОС. Есть несколько способов выполнить установку. Можете выбрать любой из представленных.
Способ 1: Через параметры системы
Вы можете скачать Active Directory для Windows 10 (сборка 1809 старше) и Windows 11 через меню системы.
ВНИМАНИЕ! Если у вас Windows 10 со сборкой до 1809 – смотрите 4 способ.
- Откройте меню «Пуск» и нажмите по шестеренке, чтобы открыть основные параметры ОС.
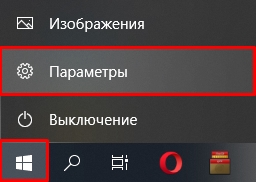
- Переходим в раздел «Приложения» (Apps).

- Вас сразу же перебросит во вкладку «Приложения и возможности». Далее в левом блоке найдите ссылку «Дополнительные компоненты» (Optional Features).
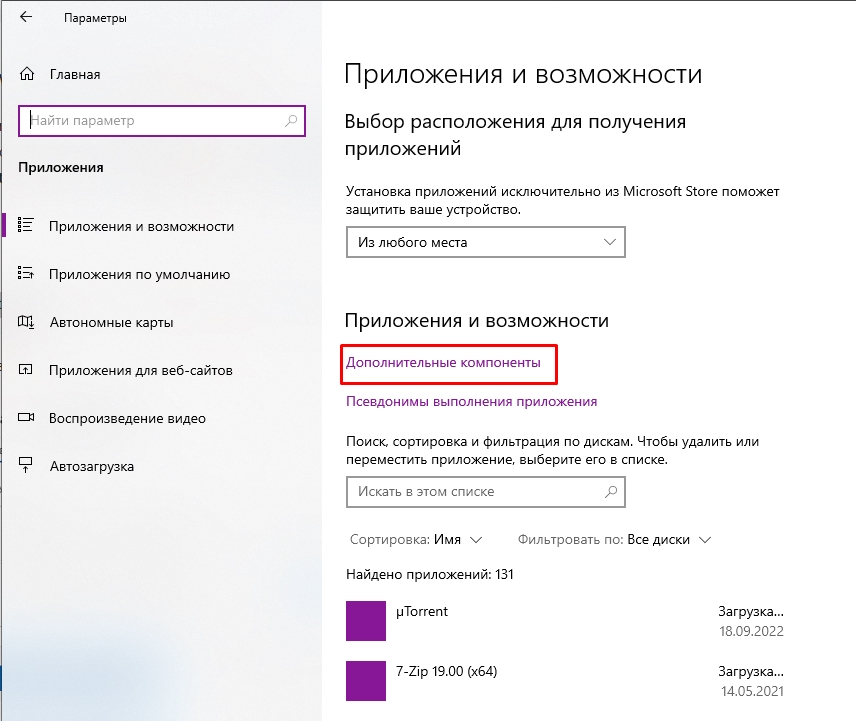
- Жмем по кнопке с плюсиком «Добавить компонент» (Add an optional feature (View features)).

- Дабы не искать их вручную вводим в поисковую строку запрос:
Active Directory
- Вы увидите два компонента. Первый – это RSAT или средства службы сертификации. Второй – инструменты для работы с удаленными администрированием и дополнительные службы. Устанавливаем обе галочки и жмем по кнопке «Установить».
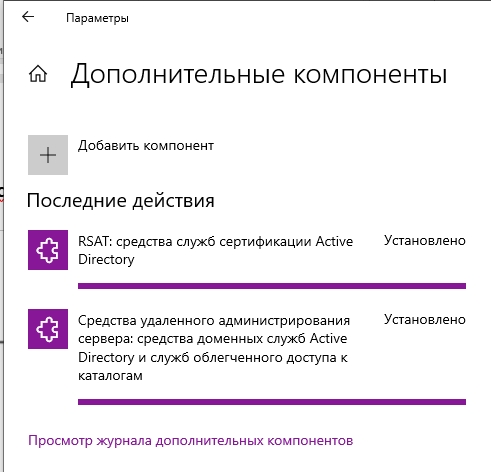
- Они будут скачены с интернета с серверов Microsoft, поэтому в данный момент нужно быть подключенным к глобальной сети. Подождите пока оба компонента установятся.
Способ 2: PowerShell
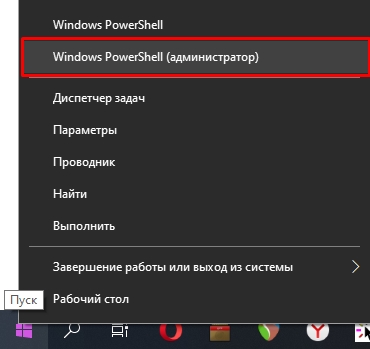
Запустите дополнительную консоль, нажав правой кнопкой мыши по меню «Пуск» и выбрав из контекстного меню нужную команду. Запускаем PowerShell с правами администратора.
Используем команду:
Add-WindowsCapability –online –Name Rsat.ActiveDirectory.DS-LDS.Tools~~~~0.0.1.0

Способ 3: Для Windows 10 1803/1709 (Более старых сборок) и Для Windows 8.1
Если у вас более старая версия Windows 10 или установлена Windows 8.1 – вам нужно скачать пакеты по ссылкам ниже. Скачиваем компоненты для своей разрядности (32 или 64 бита).
- Windows 10.
- Windows 8.1.
После этого просто устанавливаем пакет, дважды щелкнув левой кнопкой мыши. После установки компоненты нужно будет активировать.
- Используем клавиши, нажав одновременно:
+ R
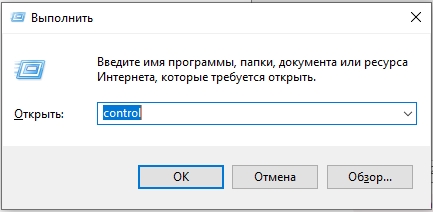
- Вводим команду, чтобы зайти в «Панель управления»:
control
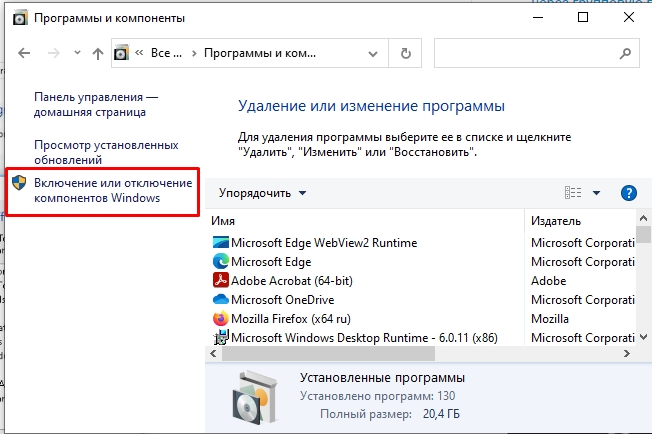
- «Программы и компоненты».
- «Включение и отключение компонентов Windows».
- Откройте основную папку «Remote Server Administration Tools», в ней раскрываем ветку «Role Administration Tools» и находим «AD DS and AD LDS Tools» – «AD LDS Tools» – ставим обе галочки и жмем «ОК».
Дополнительно нужно установить оснастку ADUC через командную строку – запускаем её с правами администратора. Используем команды:
dism /online /enable-feature /featurename:RSATClient-Roles-AD
dism /online /enable-feature /featurename:RSATClient-Roles-AD-DS
dism /online /enable-feature /featurename:RSATClient-Roles-AD-DS-SnapIns
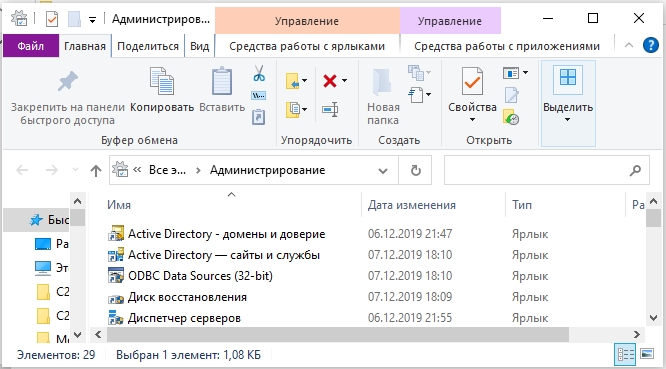
В разделе администрирования в панели управления (control) можно будет увидеть две ссылки на консоли.
Как её пользоваться?
Чтобы запустить саму оснастку консоли, можно использовать команду:
dsa.msc
Второй вариант – это зайти в «Панель управления» – «Администрирования» – далее находим консоль там. Если ваш компьютер уже находится в домене Active Directory, то он автоматически подключится к серверу, который в свою очередь и будет являться контроллером домена. Имя сервера находится в самом верху в квадратных скобках. Если вы хотите изменить домен, кликните по нему правой кнопкой мыши и выберите соответствующую команду.
В качестве корня является сам домен организации. В каждом домене можно создать основные группы или подгруппы какой-то компании. Например, можно создать основную группу, которая будет филиалом в городе. Вы можете создавать новые объекты. Каждый объект может быть как целой группой, так и пользователем с определенными контактами.
Каждый объект можно создавать, перемещать и изменять его характеристики или свойства. Например, конечного пользователя можно добавить в определенную группу, выключить его аккаунт или сбросить пароль. После сброса пароля ему на рабочем месте придется придумывать новый ключ, который он будет использовать при аутентификации в системе (при входе на начальном экране).
Можно зайти в свойства пользователя и изменить некоторые атрибуты. Даже есть возможность добавить фото юзера. Я советую внимательно ознакомиться со всеми вкладками и возможностями.
Представим себе ситуацию, что ваш компьютер находится в рабочей группе, которая никаким образом не связана и не подключена к основному серверу управления домена ADUC.
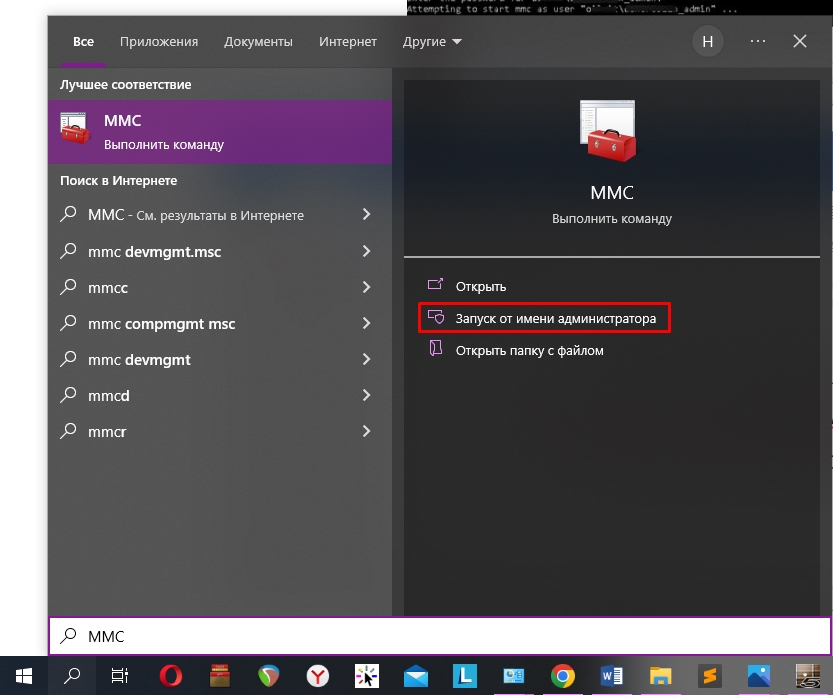
- Запускаем стандартную командную строку винды с правами админа.
- Используем команду для запуска оснастки другого пользователя:
runas /netonly /user:wifigidaaivanov mmc
- Теперь открываем MMC консоль – проще всего воспользоваться поиском системы.
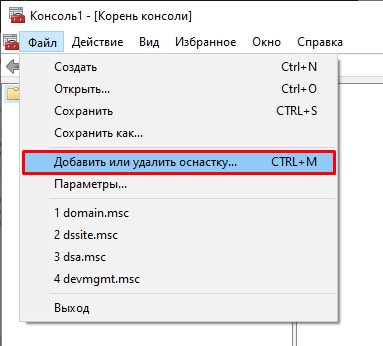
- На панели жмем «Файл» – «Добавить или удалить оснастку». Или используем клавиши:
Ctrl + M
- В левом блоке выбираем «Active Directory – пользователи и компьютеры» и кликаем по кнопке добавления. После этого жмем «ОК».
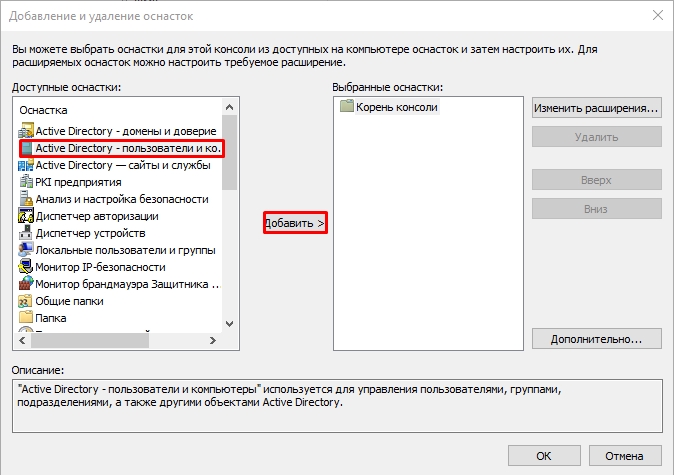
- Кликаем правой кнопкой по созданному пункту, выбираем «Сменить домен». Далее останется ввести наименование домена и компьютер к нему подключится.
Видео
Active Directory (AD) Directory service which is developed and managed by Microsoft for Windows domain controller. The active directory was included in most of the windows server Operating system. There are totally five types of services in AD. Here I am going to show you how to install Active Directory Users and Computers.
What are the roles of Active Directory Users and Computers?
- Managing Users
- Managing Groups
- Managing Computers
- Managing Domains
- Managing Organizational Units
- Troubleshooting Active Directory Users and Computers
- Resources for Active Directory Users and Computers
- User Interface: Active Directory Users and Computers
Software requirements:
- RSAT patch file
- Download from here.
Open Run command by press Windows + R Type services.msc Check windows installer service is running if not click start.  Download the patch file from the link and install it After installation, the system will ask for a reboot, After the installation open Run command by pressing Windows + R Type dsa.msc
  Click on view and select advance features to show more options on the user prompt.
  I hope this guide will help you to install Active Directory in Windows 10 machine.