Содержание
- Шаг 1: Скачивание и распаковка файлов
- Шаг 2: Изменение конфигурационного файла
- Шаг 3: Первый запуск локального веб-сервера
- Вопросы и ответы

В этой статье мы разберем только основные принципы установки и первого запуска веб-сервера Apache на компьютере под управлением Windows. Учитывайте, что все остальные действия, такие как: установка PHP, подключение MySQL, добавление других необходимых компонентов для локального сервера, придется выполнять вручную, из-за чего могут изменяться настройки Apache. Если во время редактирования глобальных параметров возникнут проблемы, не стесняйтесь обращаться к официальной документации и искать в поисковике решение ошибок по их кодам.
Шаг 1: Скачивание и распаковка файлов
Apache для Windows распространяется в виде ZIP-архива, в котором находятся все нужные файлы. Установка через Терминал, как это осуществляется в дистрибутивах Linux, в этом случае недоступна, поэтому для получения файлов выполните следующие действия:
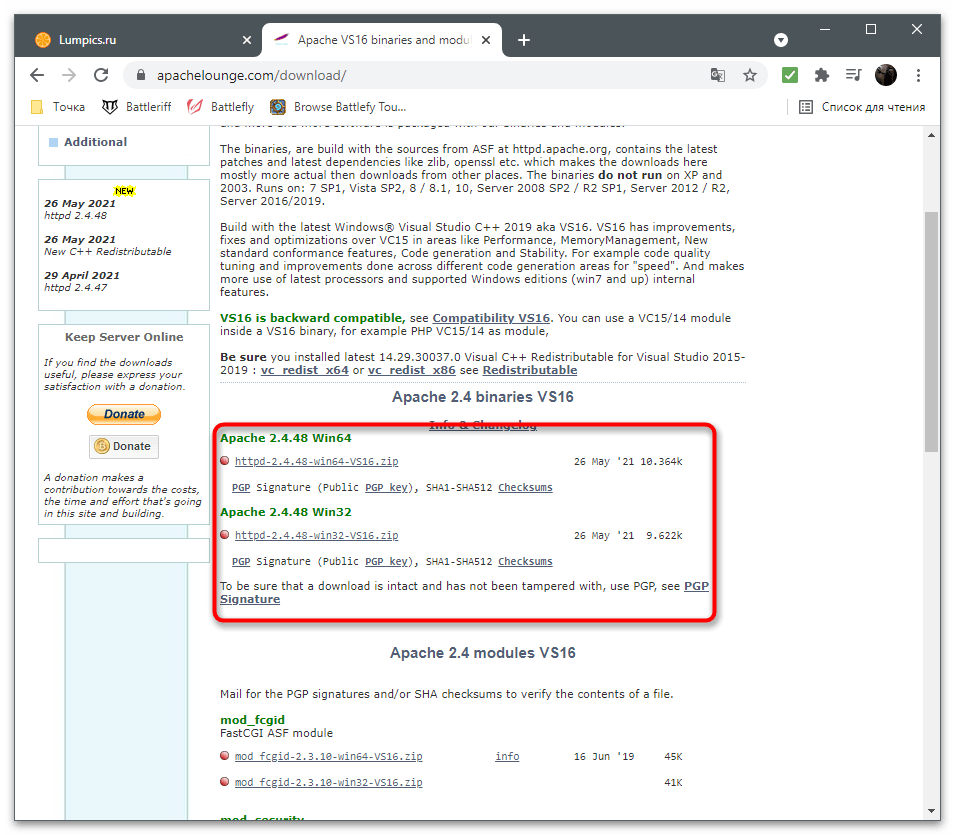
Скачать Apache с официального сайта
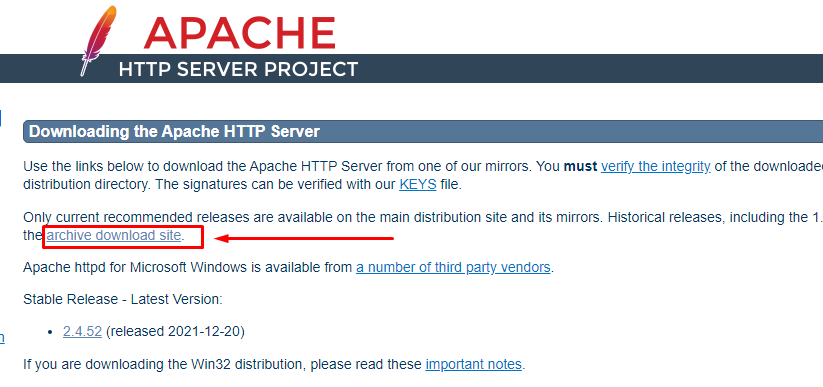
- Кликните по кнопке выше, чтобы перейти на официальный сайт веб-сервера, где нажмите по ссылке с названием последней доступной версии Apache.
- Вы окажетесь на странице описания версии, после чего выберите «Files for Microsoft Windows».
- В разделе «Downloading Apache for Windows» нажмите на ссылку «Apache Lounge».
- Выберите версию для разрядности своей операционной системы и начните загрузку.
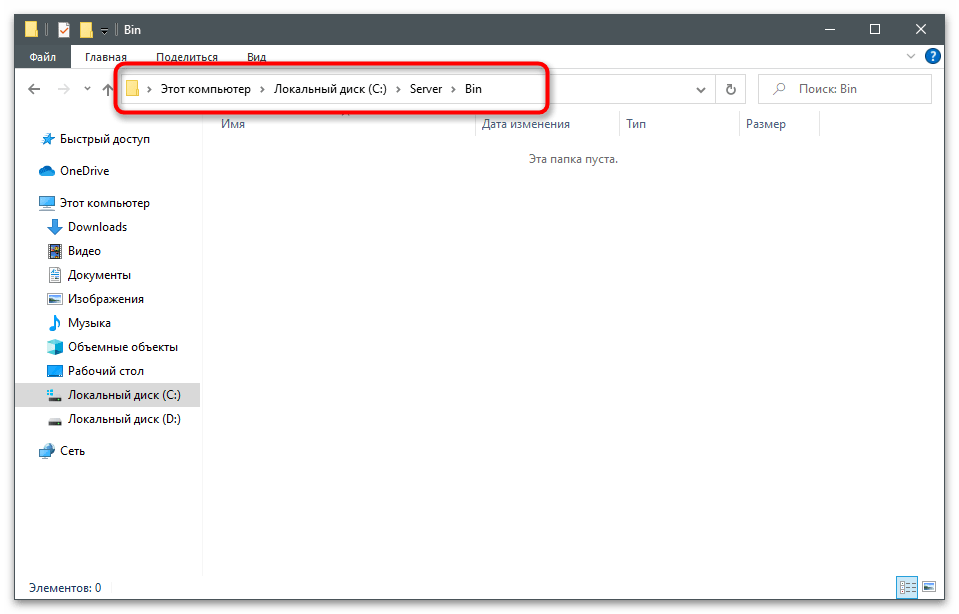
- Пока файлы скачиваются, создайте папку, куда будут помещены все элементы, связанные с веб-сервером. Мы выбрали для этого системный раздел жесткого диска, создали папку «Server», а в ней — «Bin». Это стандартные названия каталогов, поэтому при редактировании конфигурационного файла будем учитывать именно данное расположение.
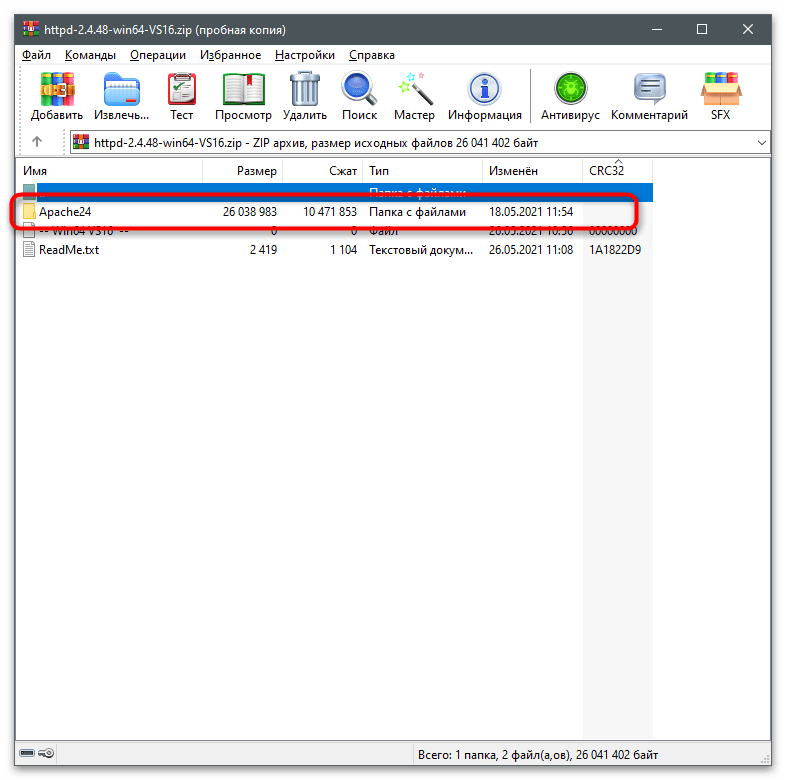
- Перетащите папку «Apache24» из скачанного архива в созданный ранее каталог «Bin».


Шаг 2: Изменение конфигурационного файла
Конфигурация локального веб-сервера, установленная по умолчанию, не подходит для его нормального запуска, чтобы проверить работу и подключить остальные компоненты. Связано это с изменением пути расположения файлов и другими параметрами, влияющими на старт программы. Измените их, выполнив представленные далее шаги.
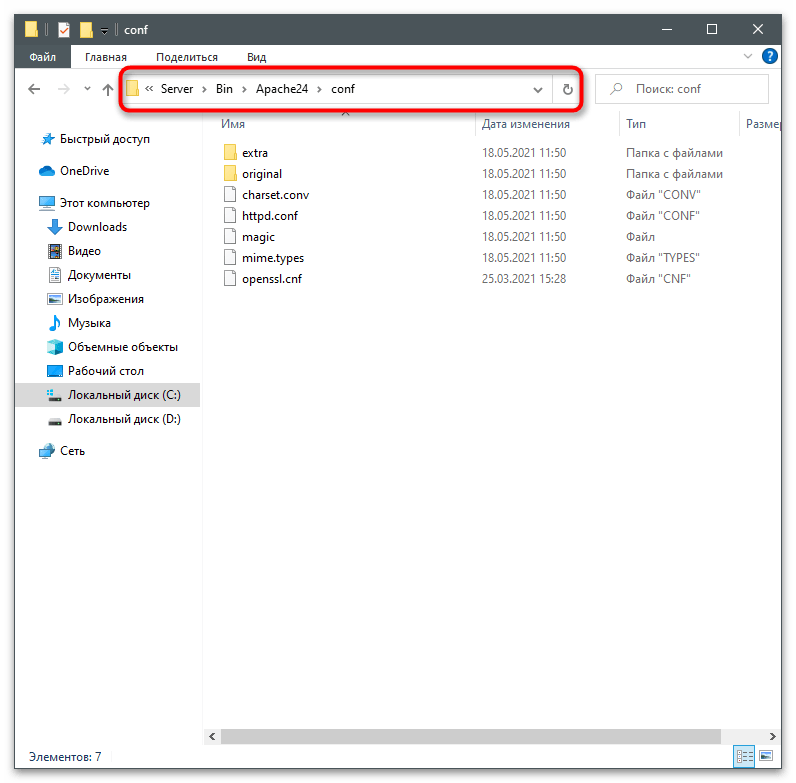
- Перейдите по пути
C:ServerbinApache24conf. - Дважды кликните по файлу «httpd.conf» для его открытия.
- Если у вас есть продвинутый текстовый редактор, выберите его для просмотра файла конфигурации. В противном случае используйте стандартный «Блокнот».
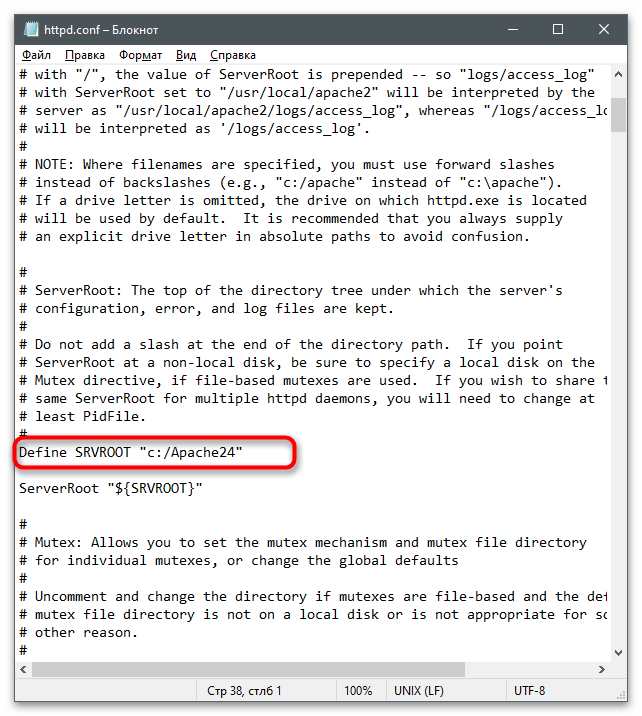
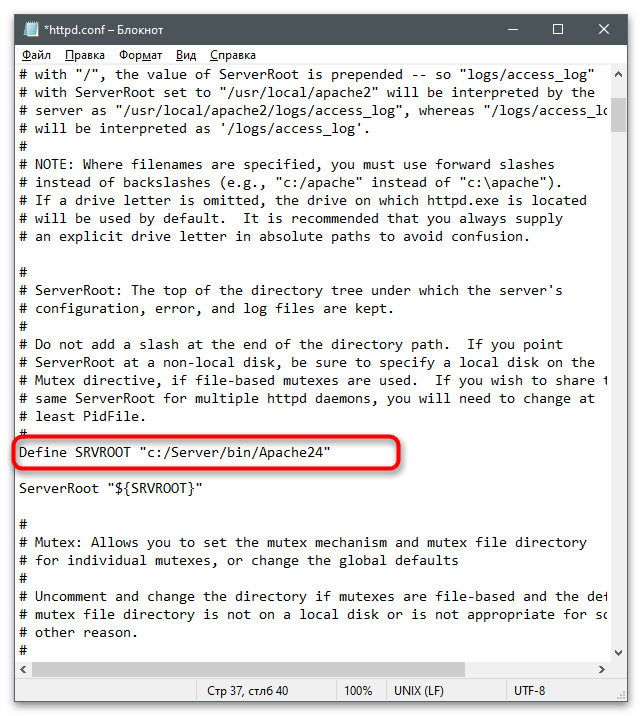
- В документе найдите строку
Define SRVROOT "c:/Apache24". - Замените ее на
Define SRVROOT "c:/Server/bin/Apache24", чтобы указать новый путь к файлам. Учитывайте, что в строке мы указали созданный ранее путь. Если у вас он отличается, поменяйте выражение в кавычках. - Далее найдите строку
#ServerName www.example.com:80, которая по умолчанию заключена в комментарий и неактивна. - Измените ее на
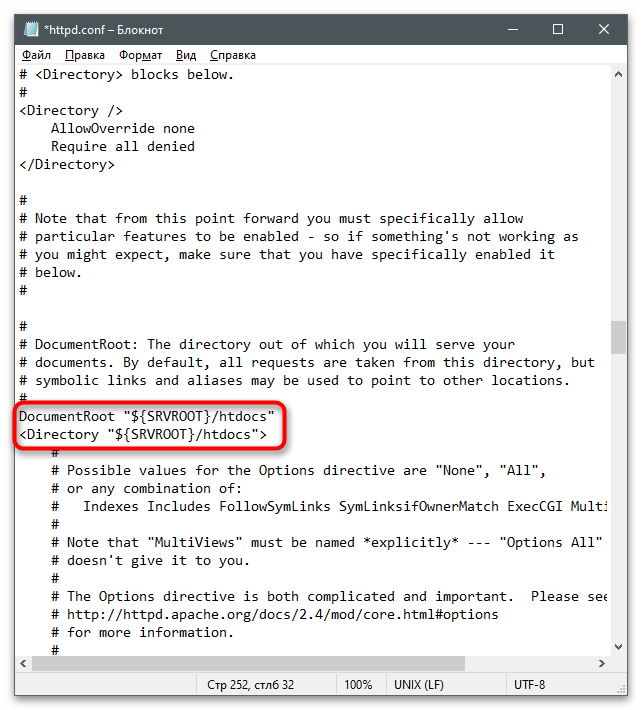
ServerName localhost, указав тем самым локальный адрес, который в дальнейшем и будет использоваться для проверки веб-сервера. - Отыщите строки
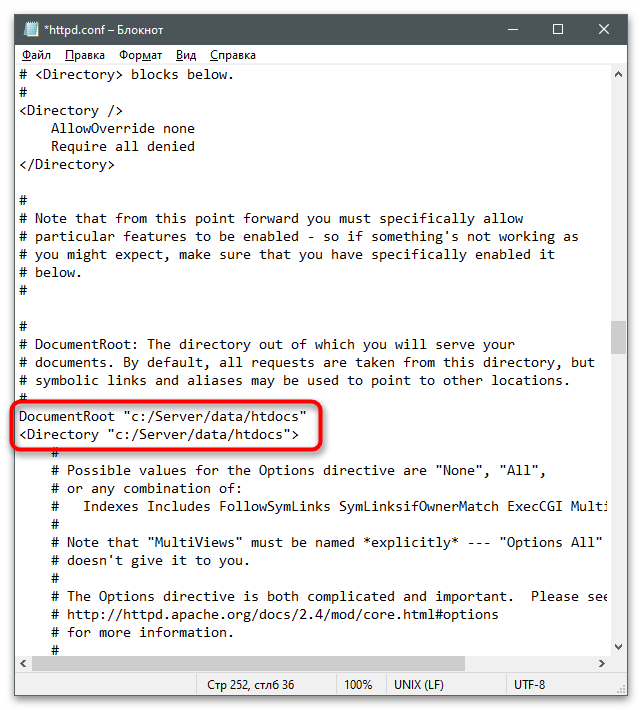
DocumentRoot "${SRVROOT}/htdocs"и<Directory "${SRVROOT}/htdocs">, которые отвечают за расположение связанных с сервером файлов. - Замените их на
DocumentRoot "c:/Server/data/htdocs"и<Directory "c:/Server/data/htdocs">. - Сейчас параметр
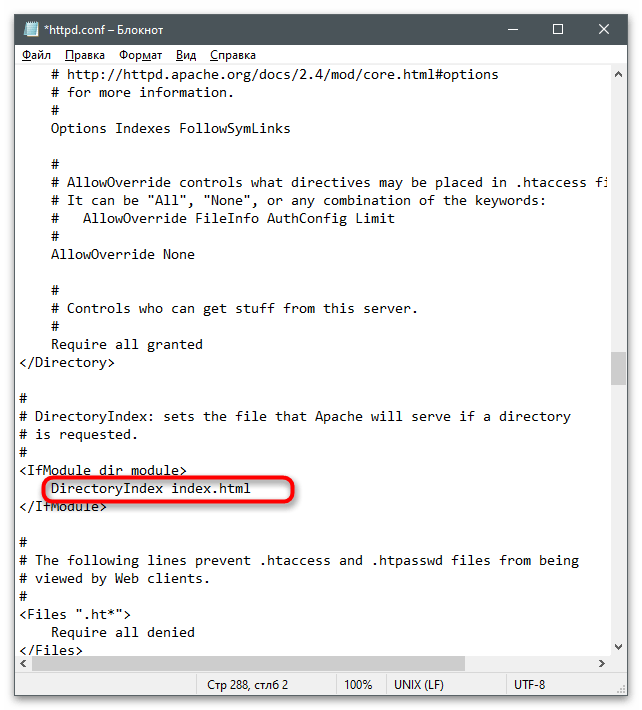
DirectoryIndexимеет только значениеindex.html, поэтому его тоже нужно найти и отредактировать. - Добавьте еще несколько доступных форматов файлов, чтобы в итоге строка обрела вид
DirectoryIndex index.php index.html index.htm. - Для строки
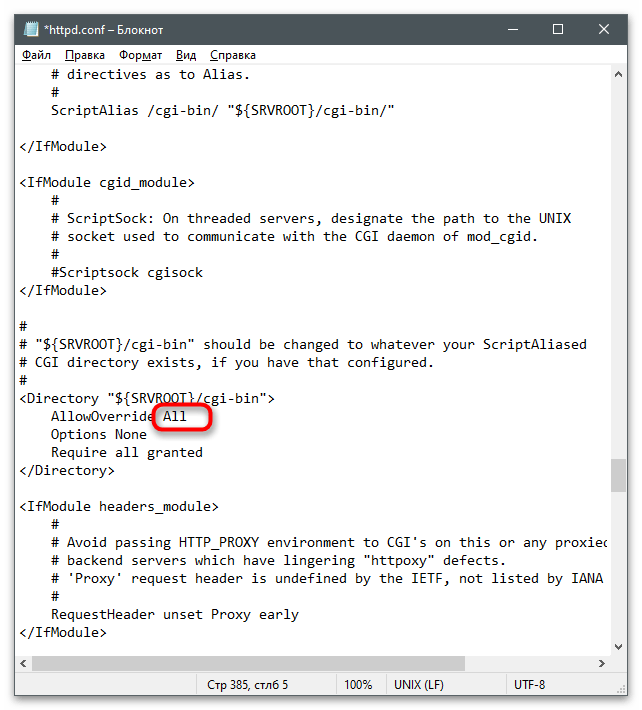
AllowOverride Noneпоменяйте состояние наAll, удалив предыдущее выражение. - Осталось только найти
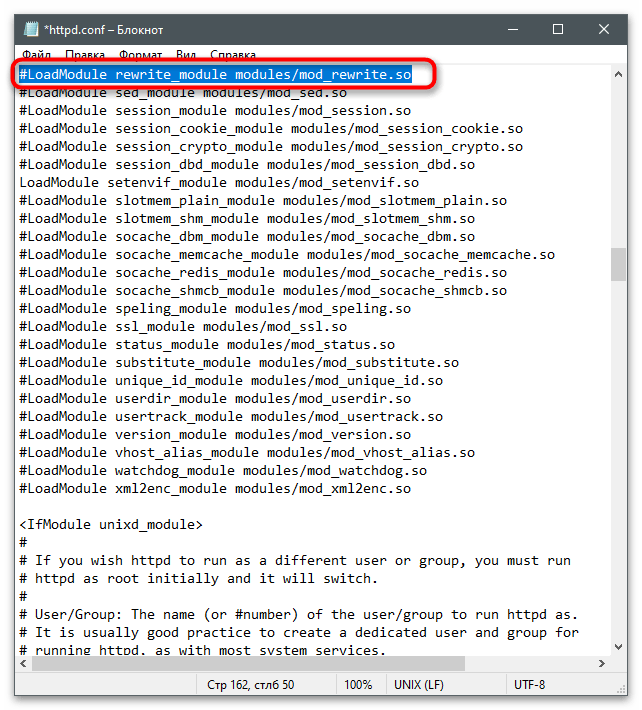
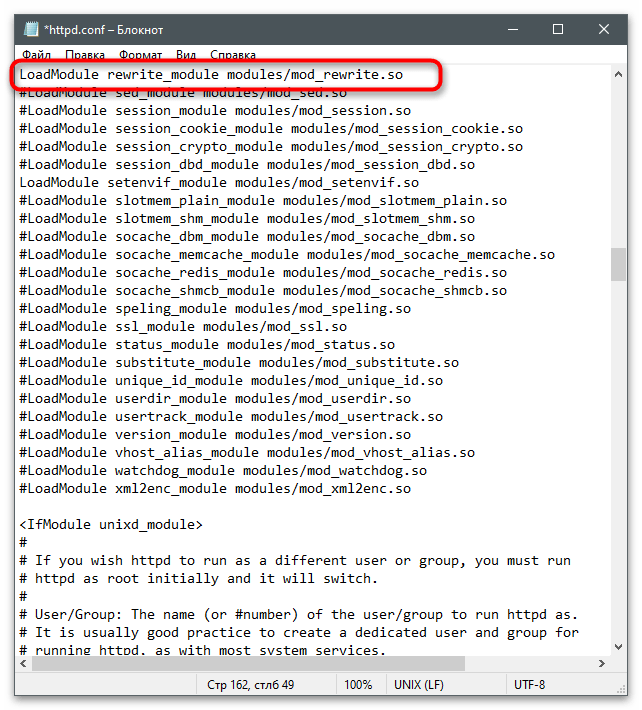
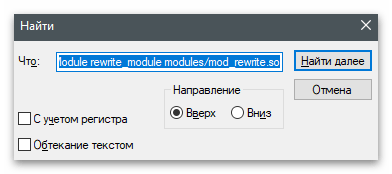
#LoadModule rewrite_module modules/mod_rewrite.soи убрать значок #, активировав тем самым строку. - В итоге она должна отображаться так, как это показано на следующем скриншоте.
- Если с поиском конкретных строк у вас возникают проблемы, используйте сочетание клавиш Ctrl + F, чтобы вызвать инструмент «Найти» и вписать там необходимое выражение.
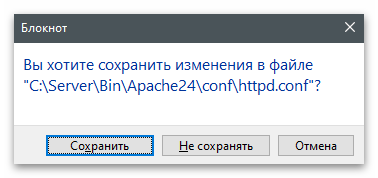
- Перед выходом не забудьте сохранить изменения в конфигурационном файле.


Шаг 3: Первый запуск локального веб-сервера
Приступим к первому запуску локального веб-сервера Apache для проверки его работоспособности. Надо это для того, чтобы при дальнейшей настройке у вас не возникло серьезных неполадок, на решение которых потратится много времени.
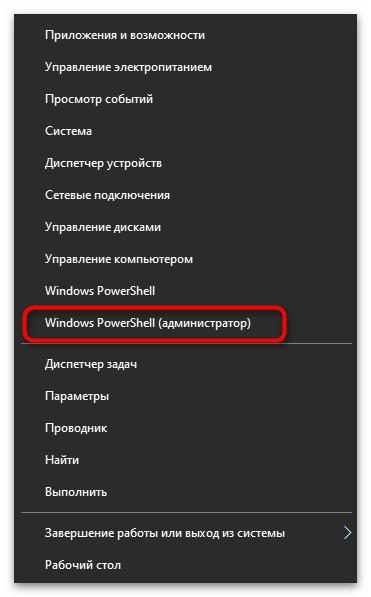
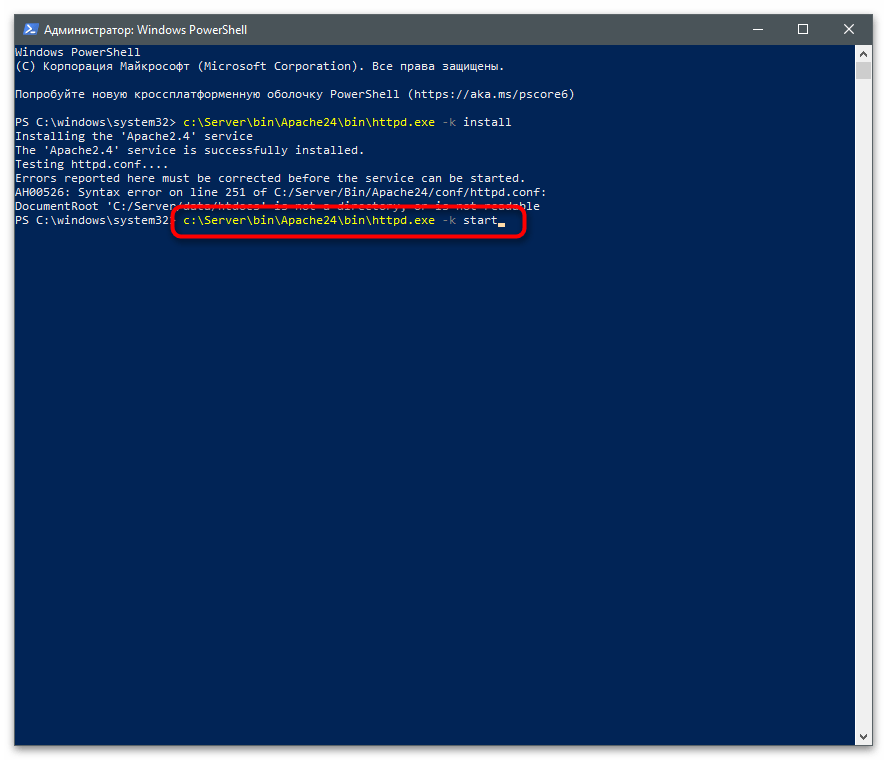
- Щелкните правой кнопкой мыши по меню «Пуск» и из появившегося меню выберите пункт «Windows PowerShell (администратор)».
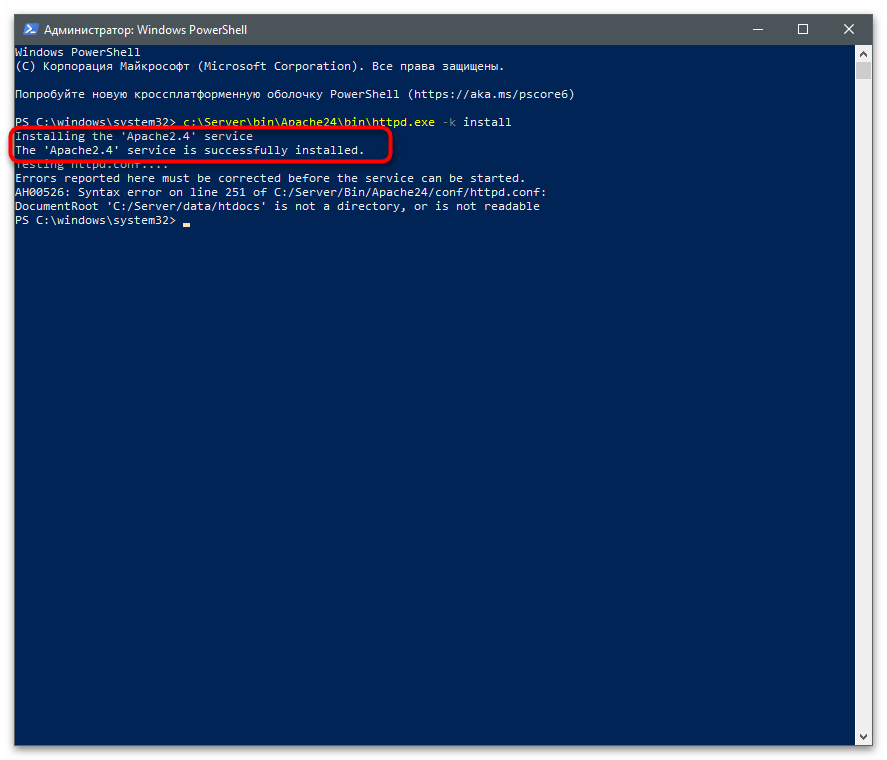
- Введите команду
c:ServerbinApache24binhttpd.exe -k installи нажмите Enter для ее активации. Она установит компоненты Apache и подготовит их к работе. - После получения информации об успешной установке сервисов переходите к следующему шагу.
- Запуск веб-сервера осуществляется через команду c
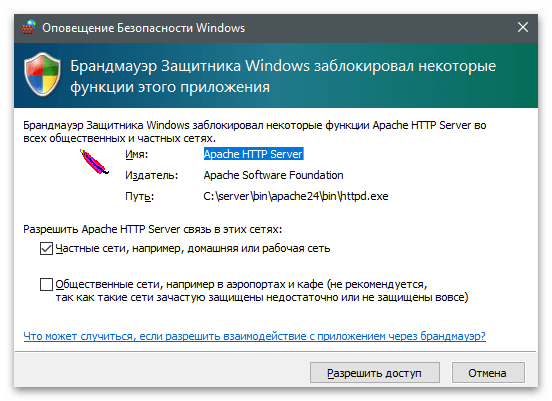
:ServerbinApache24binhttpd.exe -k start. - Появится оповещение Безопасности Windows, которое следует подтвердить, нажав «Разрешить доступ».
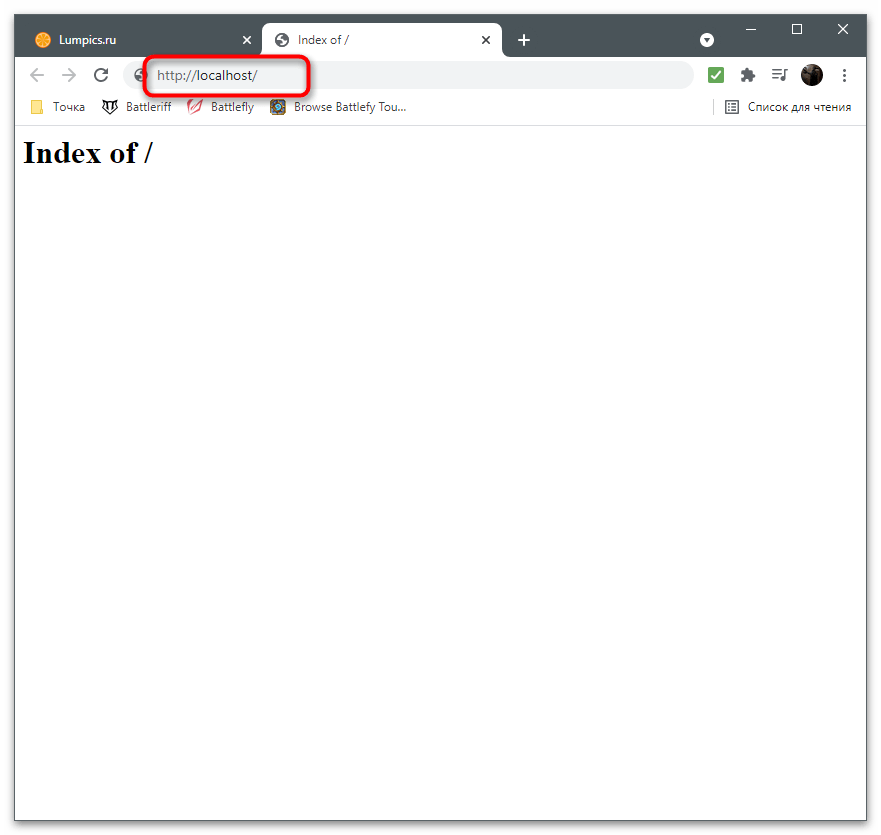
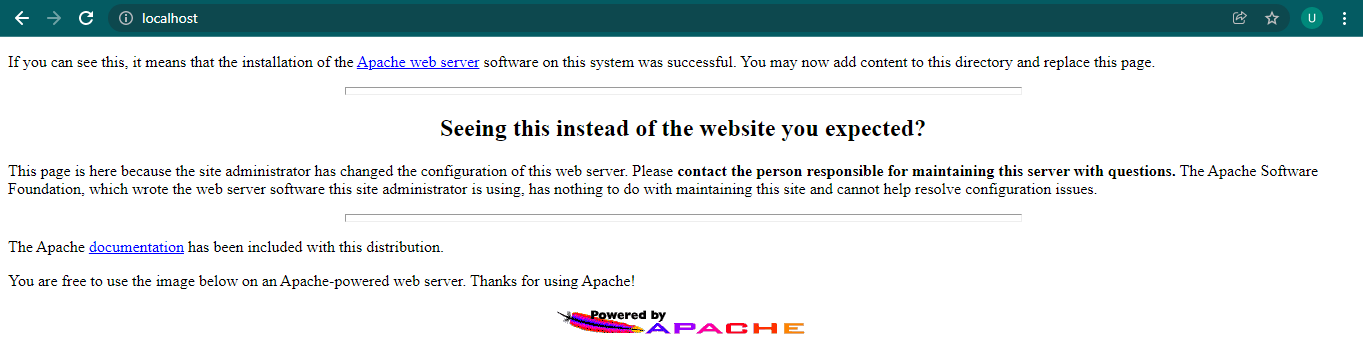
- Откройте любой браузер и перейдите по адресу
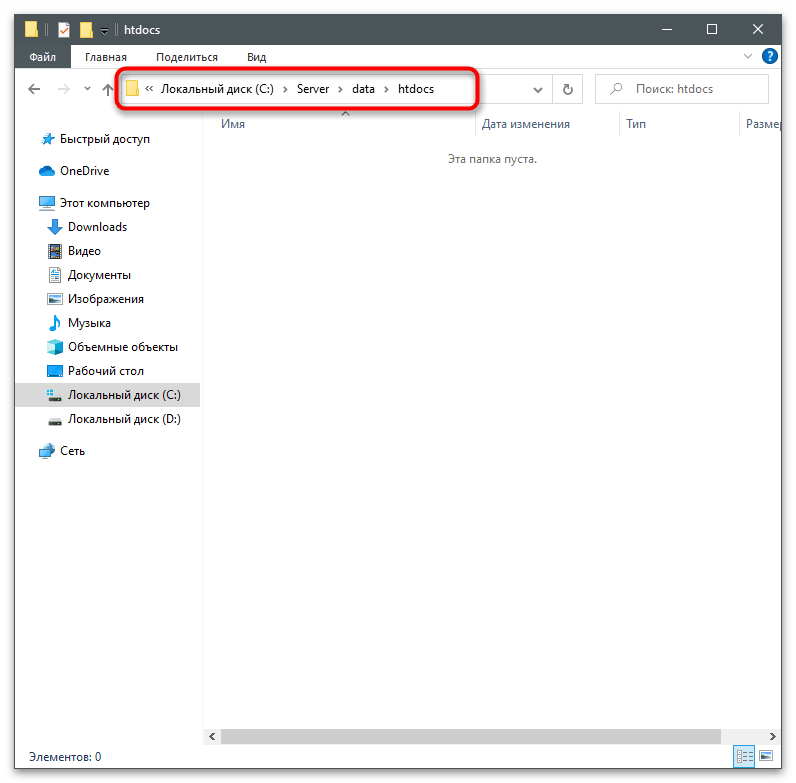
http://localhost/. Если на странице появилась надпись «Index of /», значит, все действия выполнены правильно. - При получении ошибки в консоли, свидетельствующей об отсутствии необходимых папок, перейдите в каталог «Server», создайте там директорию «data» с подпапкой «htdocs».

Еще статьи по данной теме:
Помогла ли Вам статья?
The whole business of a web server is to serve websites on the internet, and these are services that the developers of Apache think a server should offer. The Apache software is open-source infrastructure compatible with any operating system, like Windows. But how do you install Apache on Windows? Well, you’re in for a treat!
In this tutorial, you’ll learn how to install Apache on Windows and set up an Apache server to launch a web application.
Ready? Read on and start setting up your Apache server!
Prerequisites
This tutorial houses step-by-step instructions, but as long as you have a Windows 10 PC, you’re good to go – This tutorial uses a Windows 10 20H2 computer.
Downloading Apache on Windows
You’ll be launching a web application on your Apache server later in this tutorial. But as a first step, you’ll install Apache on your machine. You can download the Apache HTTP Server from Apache’s official download site.
1. Open your web browser, navigate to the Apache HTTP Server download page, and click on the archive download site link below. Doing so redirects your browser to the Apache HTTP Server Source Code Distributions page (step two).
2. Next, find and click on the binaries/ link to see the contents of the binaries package.
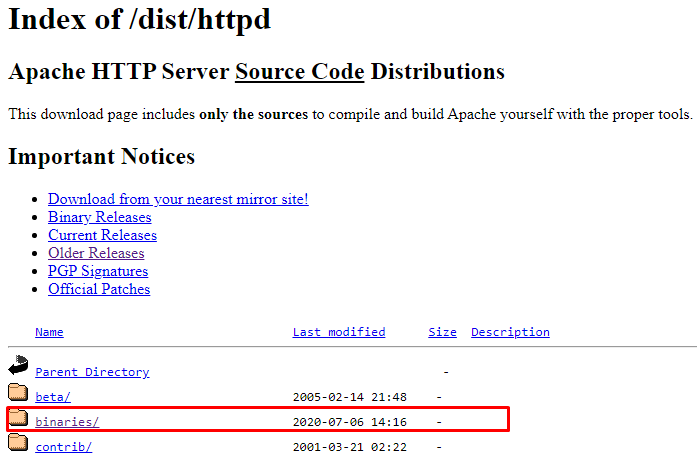
3. Scroll down to the end and click on the win32/ link to see the list of Apache packages you can choose to install on your machine.
4. Finally, look for Apache’s package installer for Windows and click on it to download the Apache package installer. You’ll download Apache 2.0 series for this tutorial, as shown below.

Configuring the Apache Installer to Install Apache on Windows
After downloading the Apache package, you’ll need to configure the installer and set where Apache gets resources to deploy by default.
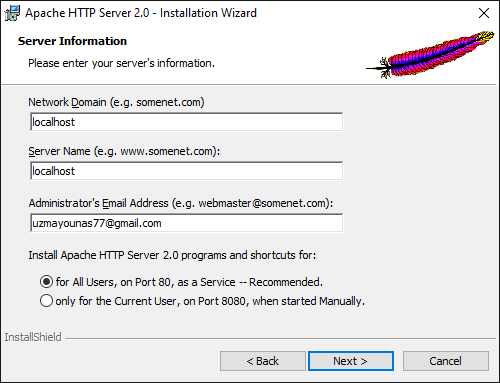
1. Run the Apache installer and click Next to accept the license agreement until you reach the Server Information page (step two).
2. Next, configure the server information with the following:
- Type localhost for the Network Domain as well Server Name.
- Enter your email address in the Administrator’s Email Address field.
- Leave the default setting for All Users, and click on Next.
You can also specify changes in these settings from the configuration files later.
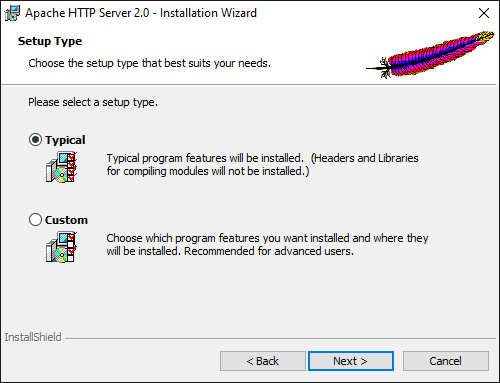
3. Choose Typical in the Setup Type page since you’re only working learning about the basics of Apache on Windows, and click Next.
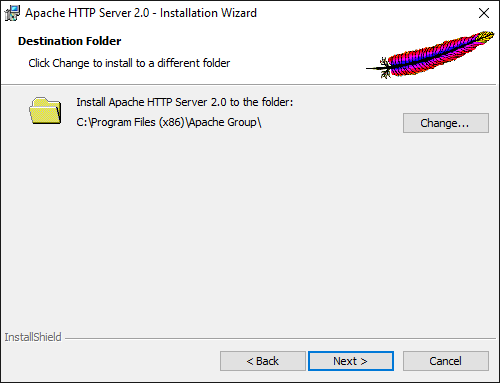
4. Now, leave the default installation path, as shown below, and click on Next.
You can change the installation path you prefer by clicking on the Change button and selecting your desired path.
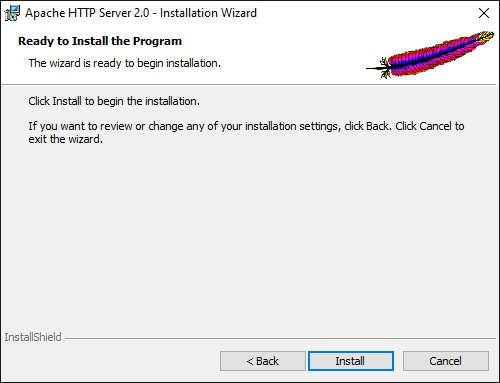
5. Click on Install to start installing Apache HTTP Server on your machine.
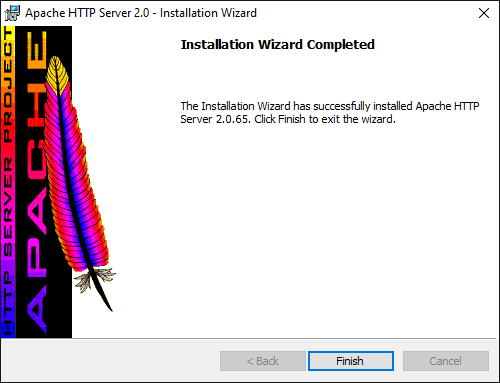
6. Click on Finish once the installation completes. Closing the installation wizard starts the Apache server automatically.
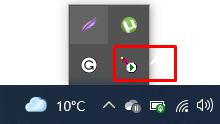
7. Look for the Apache icon in your system tray to verify the Apache server is running.
8. Finally, open your preferred browser and navigate to localhost, as shown below, to test your Apache Server installation.
You will see the following page if the installation is successful.
You can also navigate to the loopback address (http://127.0.0.1/) to access the Apache Server.
Allowing External Connections to the Apache Web Server
Although a localhost connection may work for testing, an external system may need to access the web page. Therefore you must open a connection via the Windows Firewall.
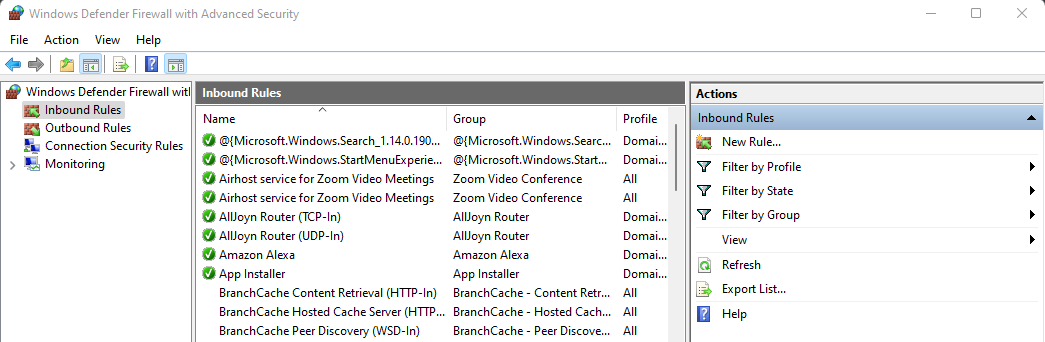
1. First, launch the Windows Defender Firewall with Advanced Security console.
2. Navigate to Inbound Rules and click New Rule.
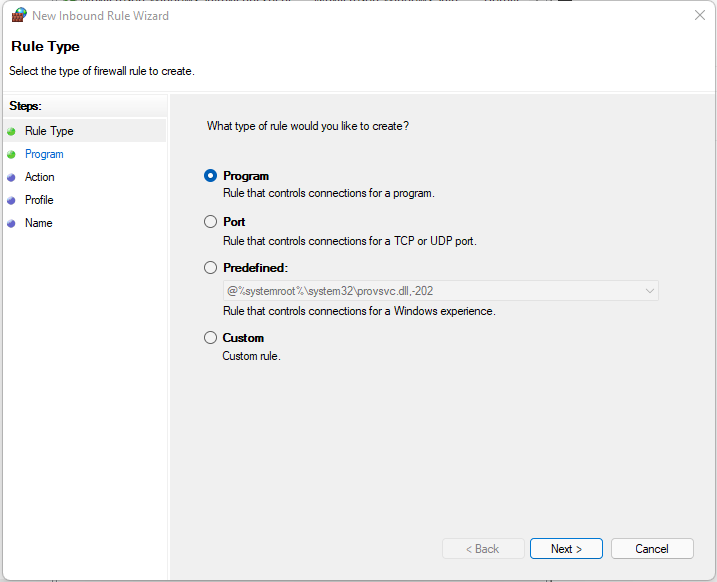
3. Under Rule Type, select Program.
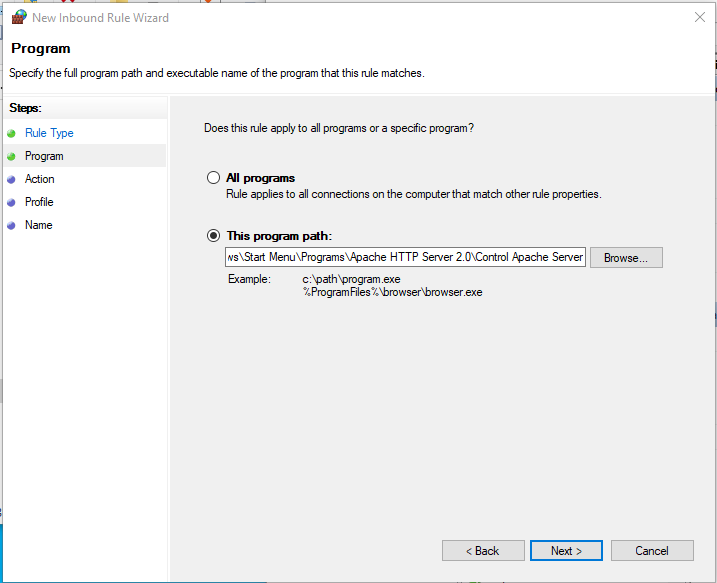
4. Browse, or enter, the path to the Apache server executable.
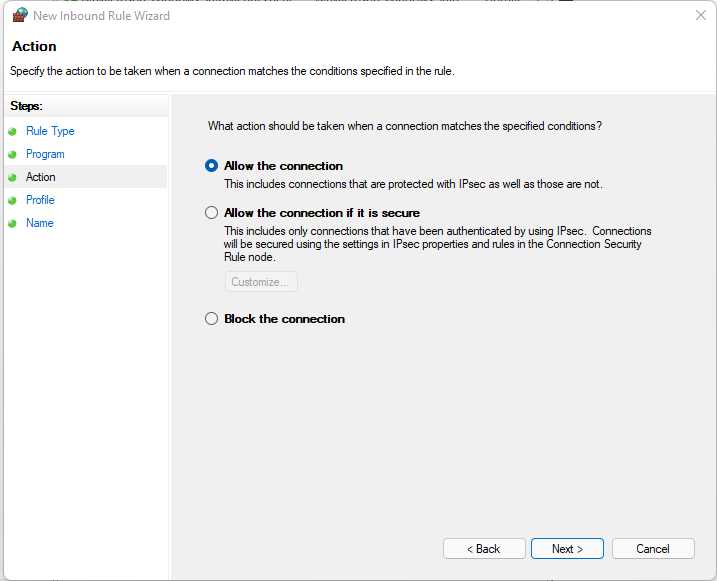
5. For the action, choose to Allow the connection.
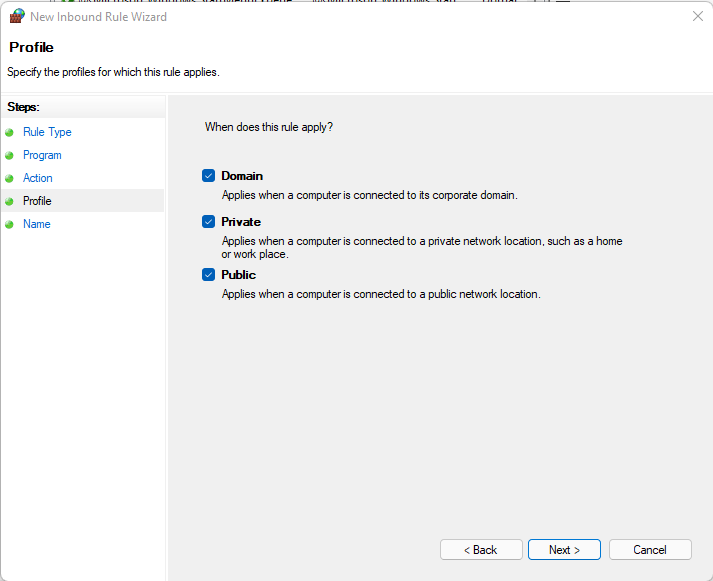
6. Under applied profiles, allow the default of all profiles.
7. Finally, give the rule a name and click on Finish.
Launching a Web Application
You’re now ready to launch your web application as Apache is running correctly. But where exactly do you store your web application for deployment?
The Apache server root directory (C:Program FilesApache GroupApache2) contains at least three important subdirectories:
- conf – Contains a file that tells Apache how to respond to different kinds of requests.
- htdocs – Contains the documents, images, or data that you want to serve to your clients.
- logs – Contains the log files that record what happened. You can consult …/logs/error_log whenever anything fails to work as expected.
Apache returns all the files placed in the C:Program FilesApache GroupApache2htdocs directory when localhost is launched.
To see how the Apache server works, you’ll create an HTML file as your web application to launch.
1. First, delete all the default files in the C:Program FilesApache GroupApache2htdocs directory.
2. Open your preferred text editor to create an index.html file in the htdocs directory, and populate the file with the code below.
The code below prints a message on a page when launched in a web browser.
<html>
<style>
<title>
My Web Page
</title>
</style>
<body>
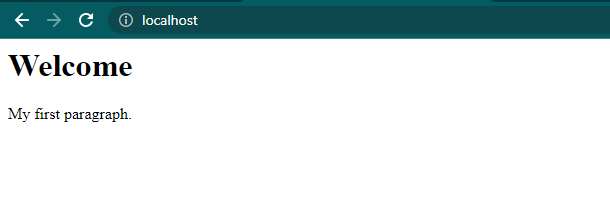
<h1>Welcome</h1>
<p>My first paragraph.</p>
</body>
</html>
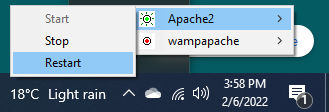
3. Click on the Apache icon at the system tray to restart the Apache server, as shown below.
4. Lastly, navigate to your IP address or localhost on your web browser.
If all goes well, you’ll get the same message as below.
You can place an entire project into the htdocs folder and access it from the browser typing localhost/project_name/.
Updating Server Name and Administrator Email
By default, the Apache files are read-only. But typically, you’ll want to have more control over your Apache server configuration. How? You need to grant Apache files with Write permissions for any modification.
1. For this demo, grant permissions to the conf directory located in the C:Program Files (x86)Apache GroupApache2 directory.
2. Once you’ve enabled the permissions, open the http.conf file located at C:Program Files (x86)Apache GroupApache2conf.
3. Lookup for the following line, replace localhost with your preferred name and save the changes.
ServerName gives the hostname of the server to use when creating redirection URLs
4. Finally, look for the following line, and replace [email protected] with your preferred email address.
ServerAdmin gives Apache an email address for automatic pages generation when some errors occur.
Changing the Root Directory
As you already know, Apache returns files from the htdocs folder. But you can also use another folder or drive to make backups and launch on Apache. Or if you just want to test your project without messing up anything in the original project directory.
1. Create a dummy folder with your preferred name. But for this demo, the folder is named MyApacheFolder in the E drive.
2. Create a new HTML file named index.html in the MyApacheFolder folder, and populate the file with the code below.
The code below prints the Launching Page From Other Directory message when you launch it on your web browser.
<html>
<style>
  <title>My Web Page </title>
</style>

<body>
  <h2>Launching Page From Other Directory</h2>
</body>

</html>
Now open the http.conf file and change some values as follow:
- Look for the DocumentRoot shown below, and change the value to your dummy folder’s path (E:MyApacheFolder).

- Now, change the Directory value below with your dummy folder’s path (E:MyApacheFolder).

- Save the changes you made to the http.conf file. These changes enable the Apache Server to access files from this folder instead of the default directory (htdocs).
4. Lastly, navigate to localhost on your web browser, and you’ll see the following message.
The Apache server will now launch all the sites from the new location (MyApacheFolder).

Conclusion:
Throughout this tutorial, you have learned how to download a Windows Apache server and allow running a website without any overhead. Apache server can be an appropriate solution for practically any HTTP protocol situation.
Now you are ready to host a single-page website or an enormous site serving millions of visitors. You can also use Apache as a test-server on personal desktops, writing and trying code in a local environment before publishing it to a broader audience.
There are a variety of reasons why developer or DevOps professionals locally install the Apache Web Server on a Windows 10 machine. They can use the Apache HTTP server for testing, or to simulate a production HTTP server that acts as static file cache for Apache Tomcat or Jetty. Maybe they simply want an internal web server for the office.
Fortunately, it’s relatively straightforward to install the Apache HTTP Server on Windows. However, you need to be aware of a few caveats.
Download Apache’s HTTP server
The first road-bump to install Apache on Windows is that you can’t download the installation binaries directly from apache.org. You must clone and compile the Apache HTTP Server source code yourself, or download the Apache 2.4 installation media from a third party.
A third-party download of the binaries is definitely the easiest way to go. The Apache website lists several approved options, including:
- Apache Lounge, which provides a single ZIP file you can quickly download and extract
- Apache Haus, which provides an Apache 2.4 install file that is packaged with OpenSSL
- The XAMPP distribution from the Apache Friends, who package Apache with MariaDB, PHP and Perl
- Bitnami, which provides pre-configured VMs, containers and installation media with Apache.
I’m a lifelong regular Bitnami user. I’d say the Bitnami stacks are the best installation media to use. (The WAMP stack with PHP, MySQL and Apache are highly recommended.)
The simplest approach, though, is to download the Apache Web Server installation ZIP file from the Apache Lounge. The website‘s spammy ads are a bit disconcerting, but the Apache download file is verifiable. Just don’t accidentally click on the wrong link and install some adware on your computer.
Step by step Apache install on Windows
If you choose the Apache Lounge as your source for the Apache on Windows installation media, the steps to follow are simple:
- Download the installation media in the form of a ZIP file
- Extract the contents of the Apache Web Server 2.4 zip to the file system
- Locate the extracted Apache24 folder and copy this folder to the root of C:
- Open the C:Apache24bin folder and run the httpd.exe command
- View the Apache HTTP Server landing page at http://localhost:80 to verify the Windows install
When you point your browser to the localhost address, and there are no conflicts on port 80, a landing page will appear that says “It works!” To share files or host a website on the Apache server, simply add folders and files under the htdocs folder. These files become immediately available over the web.
Avoid the ‘Apache ServerRoot must be a valid directory’ error
Somewhat surprisingly, the Bitnami and Apache Lounge installation media require you to install the software directly into the root of the Windows C: drive. Otherwise, you run into a “ServerRoot must be a valid directory” error. To remedy this Apache installation error, either move the Apache24 folder into the C: drive, or update the SRVROOT property defined on line 39 of Apache’s httpd.conf file.
Avoid ServerRoot errors when you install the Apache Web Server on Windows 10.
If you do run into this Apache ServerRoot Directory error with a Bitnami or XAMPP installation, run the configuration file found in the installation’s root or bin directly. The error will go away.
And that’s how easy it is to install the Apache HTTP Server on Windows 10.
Starting web development is easy: you create a file called something.html, edit it in Notepad, and load it in a browser. Simple sites can be built using this process, but to really explore the possibilities, you need a web server.
This popular article was updated in 2020 to provide the most helpful and accurate guidance.
What is a Web Server?
(Skip to the next section if you prefer …)
A web server is software that listens for requests and returns data (usually a file). When you type “www.mysite.com”, the request is forwarded to a machine running web server software which returns a file back to your browser — such as the contents of index.html. The browser might then make further requests based on the HTML content — like CSS, JavaScript, and graphic files.
Since the web server sits between your browser and the requested file, it can perform processing that’s not possible by opening an HTML file directly. For example, it can parse PHP code which connects to a database and returns data.
You can use your host’s web server for testing, but uploading will become tiresome and changes could go live before they’ve been fully tested. What you need is a local web server installation.
Why Apache?
In general, it’s good to use the web server software that your web host uses. Unless you’re creating ASP.NET applications on Microsoft IIS, your host is likely to use Apache — the most widespread and fully-featured web server available. It’s an open-source project, so it doesn’t cost anything to download or install.
The following instructions describe how to install Apache on Windows. macOS comes with Apache and PHP. Most Linux users will have Apache pre-installed or available in the base repositories.
All-in-one Packages
There are some excellent all-in-one Windows distributions that contain Apache, PHP, MySQL and other applications in a single installation file — such as XAMPP (for Windows, Linux and macOS), WampServer and WampDeveloper Pro. There’s nothing wrong with using these packages, although manually installing Apache will help you learn more about the system and its configuration options.
The Apache Installation Wizard
An excellent official .msi installation wizard is available from the Apache download page. This option is certainly recommended for novice users or perhaps those installing Apache for the first time.
Manual Installation
Manual installation offers several benefits:
- Backing up, reinstalling, or moving the web server can be achieved in seconds.
- You have more control over how and when Apache starts.
- You can install Apache anywhere, such as a portable USB drive (useful for client demonstrations).
Step 1: Configure IIS
Apache listens for requests on TCP/IP port 80. You need to uninstall or disable any program that uses that port. If you have a Professional or Server version of Windows, you may already have IIS installed. If you would prefer Apache, either remove IIS as a Windows component or disable its services.
Step 2: Download the files
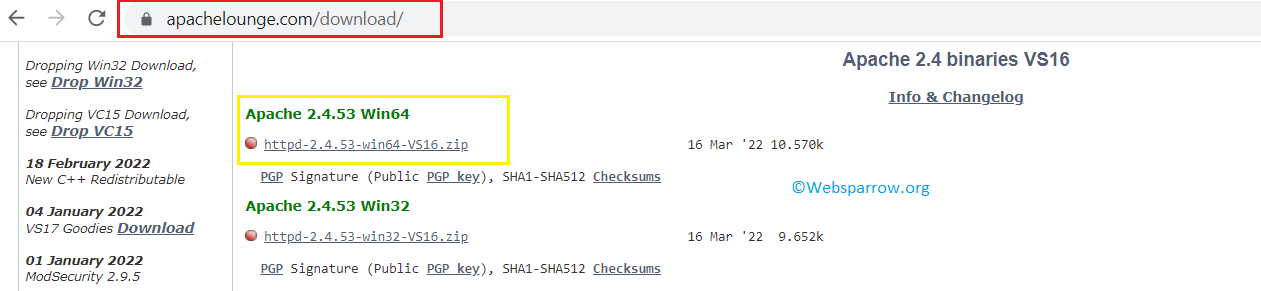
We’re going to use the unofficial Windows binary from Apache Lounge. This version has performance and stability improvements over the official Apache distribution, although I’m yet to notice a significant difference. However, it’s provided as a manually installable ZIP file from www.apachelounge.com/download/.
You should also download and install the Windows C++ runtime from Microsoft.com. You may have this installed already, but there is no harm installing it again.
As always, remember to virus scan all downloads.
We’ll install Apache in C:/Apache24, so extract the ZIP file to the root of the C:/ drive. Apache can be installed anywhere on your system, but you’ll need to change SVROOT configuration to point to your unzipped location — suh as E:/Apache24.
Step 4: Configure Apache
Apache is configured with the text file conf/httpd.conf contained in the Apache folder. Open it with your favorite text editor.
Note that all file path settings use a forward slash (/) rather than the Windows backslash. If you installed Apache anywhere other than C:/Apache24, now is a good time to search and replace all references to C:/Apache24.
There are several lines you should change for your production environment:
-
Line 60, listen to all requests on port 80:
Listen *:80 -
Line 162, enable mod-rewrite by removing the # (optional, but useful):
LoadModule rewrite_module modules/mod_rewrite.so -
Line 227, specify the server domain name:
ServerName localhost:80 -
Line 224, allow
.htaccessoverrides:AllowOverride All
By default, Apache returns files found in its C:/Apache24/htdocs folder. It’s good to use a folder on an another drive or partition to make backups and re-installation easier. For the purposes of this example, we’ll create a folder called D:WebPages and change httpd.conf accordingly:
-
Line 251, set the root:
DocumentRoot "D:/WebPages" -
Line 252:
<Directory "D:/WebPages">
Step 5: Test your Installation
Your Apache configuration can now be tested. Open a command box (Start > Run > cmd) and enter:
# navigate to Apache bin directory
cd /Apache24/bin
# Test httpd.conf validity
httpd -t
It should say “Syntax OK”. If not, correct any httpd.conf configuration errors and retest until none appear.
Step 6: install Apache as a Windows service
The easiest way to start Apache is to add it as a Windows service. Open a new command prompt as administrator, and enter the following:
cd /Apache24/bin
httpd -k install
Open the Control Panel, Administrative Tools, then Services and double-click Apache2.4. Set the Startup type to “Automatic” to ensure Apache starts every time you boot your PC.
Alternatively, set the Startup type to “Manual” and launch Apache whenever you choose using the command “net start Apache2.4”.
Step 7: Test the Web server
Create a file named index.html in Apache’s web page root (either htdocs or D:WebPages) and add a little HTML code:
<html>
    <head>
        <title>Testing Apache</title>
    </head>
    <body>
        <p>Apache is working!</p>
    </body>
</html>
Ensure Apache has started successfully, open a web browser and enter the address http://localhost/. If all goes well, your test page should appear.
In general, most problems will be caused by an incorrect setting in the httpd.conf configuration file. Refer to the Apache documentation if you require further information.
Wrap Up
And that’s it! Here are some other related guides:
- How to Install PHP
- How to Install MySQL
- MySQL: the Pros and Cons of MyISAM Tables
- MySQL: the Pros and Cons of InnoDB Tables
- How to Use MySQL Foreign Keys for Quicker Database Development
For more on workflows, watch our screencast What is npm and How Can I Use It?
By
Atul Rai |
Last Updated: April 2, 2022
Previous Next
In this tutorial, you will learn how to install and configure Apache 2.4 and PHP 8 on a Windows machine. We all know Apache HTTP Server is an open-source cross-platform and free webserver to run web applications and similarly PHP is a free and open-source scripting language used to develop web applications.
To run the PHP code on a Windows machine, first, you’ll need to install and configure a web server (Apache) that executes the PHP application. And on this page, you will find the step-by-step guide on “How to install Apache 2.4 and PHP 8 on a Windows Machine”.
P.S. Tested with Apache 2.4 and PHP 8.1.4 on a Windows 10 machine.
1. Prerequisites
Download the Apache 2.4.x and PHP 8 from its official websites, extract the downloaded file and move it to the C drive.
1.1 Download Apache 2.4.x – Depending on your system build download the binary zip file accordingly.
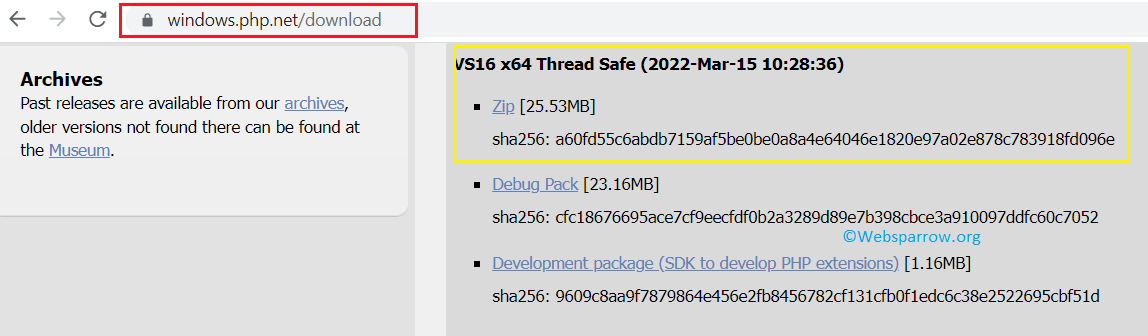
1.2 Download PHP 8 – Similarly, depending on your system build download the Thread Safe version of PHP.
Before jumping to the main configuration part, be sure you installed latest 14.31.31103.0 Visual C++ Redistributable Visual Studio 2015-2022 : vc_redist_x64 or vc_redist_x86 software.
2. Install Apache
To install the Apache HTTP Server on a local Windows machine move the downloaded and extracted Apache 2.4 binary files to the C drive and follow the below steps:
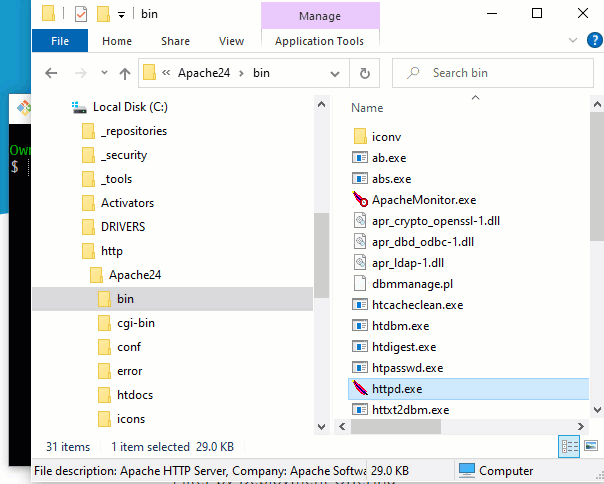
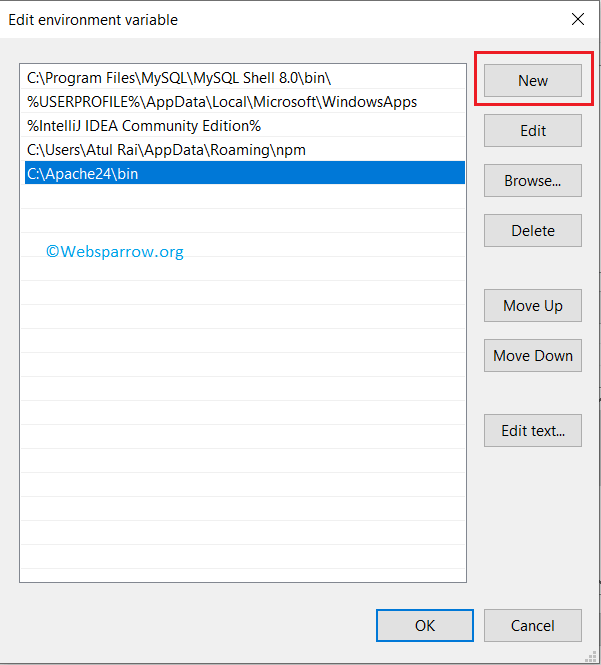
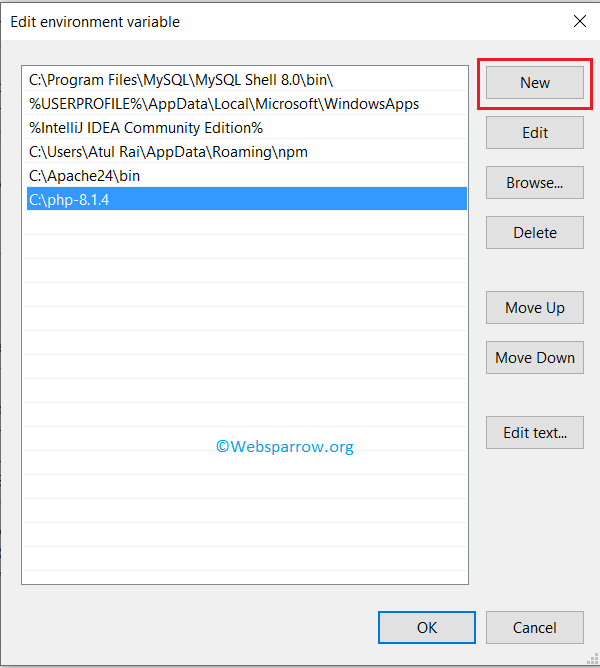
Step 2.1: Go to the Apache 2.4 bin directory path C:Apache24bin (it might be different in your case) and set it into your system environment variable path.
Step 2.2: Open the command prompt with admin privileges and run the httpd -k install command to install the Apache services.
C:WINDOWSsystem32>httpd -k install
Installing the 'Apache2.4' service
The 'Apache2.4' service is successfully installed.
Testing httpd.conf....
Errors reported here must be corrected before the service can be started.
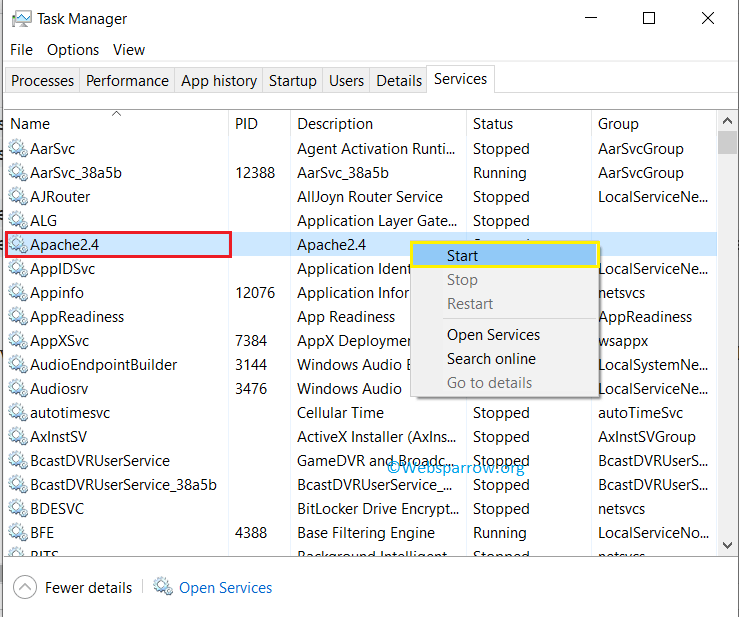
AH00558: httpd: Could not reliably determine the server's fully qualified domain name, using fe80::ccb2:109d:6198:a489. Set the 'ServerName' directive globally to suppress this messageStep 2.3: Start the Apache service with the command httpd -k start or directly through the Task Manager » Services » Search for Apache2.4 » Right-click on the service » Start.
By default, Apache HTTP Server runs on port 80, make sure no other services/servers running on this port.
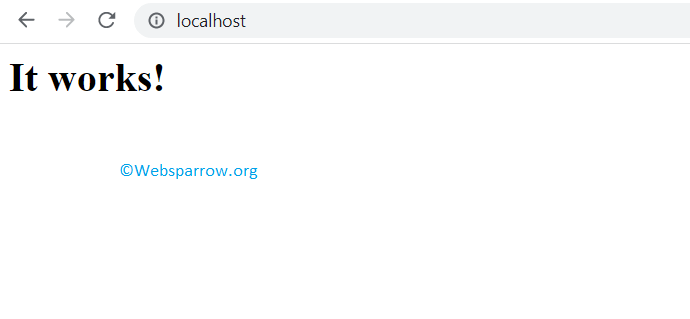
Step 2.4: Open the web browser and hit the default Apache localhost URL i.e localhost or localhost:80. If everything is configured correctly, you will see the default index.html web page contents and it is located inside the C:Apache24htdocs directory.
3. Install PHP 8
The next step is to install PHP 8. To do that, similarly, move the downloaded and extracted PHP 8 binary files to the C drive and follow the below steps:
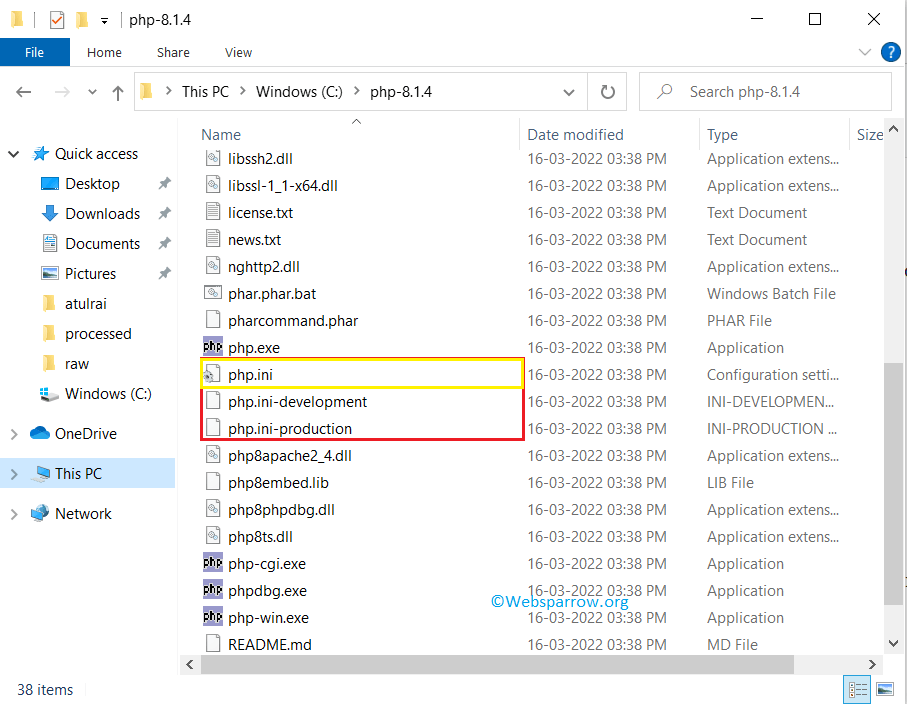
Step 3.1: Copy the PHP 8 home path i.e C:php-8.1.4 and set it into your machine environment variable.
Step 3.2: Open the command prompt and type php -v to check whether the path is set correctly or not. If the PHP path is set correctly, it will print the PHP version.
C:WINDOWSsystem32>php -v
PHP 8.1.4 (cli) (built: Mar 16 2022 09:33:31) (ZTS Visual C++ 2019 x64)
Copyright (c) The PHP Group
Zend Engine v4.1.4, Copyright (c) Zend Technologies
4. Configure Apache and PHP
Now it’s time to configure Apache HTTP Server with PHP 8.
Step 4.1: Go to the C:Apache24conf directory, inside the conf directory edit the httpd.conf file. Go to the end of the file and add the below configuration because, in Apache, PHP is loaded as a module.
httpd.conf
# Note: Repalce php_module location with your PHP path and
#       if the php8apache2_4.dll is not available,
#		download the non thread safe version of PHP.

LoadModule php_module "C:php-8.1.4php8apache2_4.dll"
AddHandler application/x-httpd-php .php
PHPIniDir "C:php-8.1.4"
Step 4.2: Go to the PHP home directory C:php-8.1.4, and you will find two configuration files php.ini-development and php.ini-production. Create a copy of php.ini-development and rename it to php.ini
Step 4.3: Again open the httpd.conf file and search for ServerName, uncomment and edit the ServerName with localhost.
httpd.conf
# ServerName gives the name and port that the server uses to identify itself.
# This can often be determined automatically, but we recommend you specify
# it explicitly to prevent problems during startup.
#
# If your host doesn't have a registered DNS name, enter its IP address here.
#
ServerName localhost
And in the same file also search for DirectoryIndex, and append the default index.php file.
httpd.conf
# DirectoryIndex: sets the file that Apache will serve if a directory
# is requested.
#
<IfModule dir_module>
    DirectoryIndex index.html index.php
</IfModule>
Step 4.4: Open the command prompt and run the httpd -t command to validate whether everything is configured correctly, it will return Syntax OK if everything is configured correctly.
C:WINDOWSsystem32>httpd -t
Syntax OK
5. Test the configuration
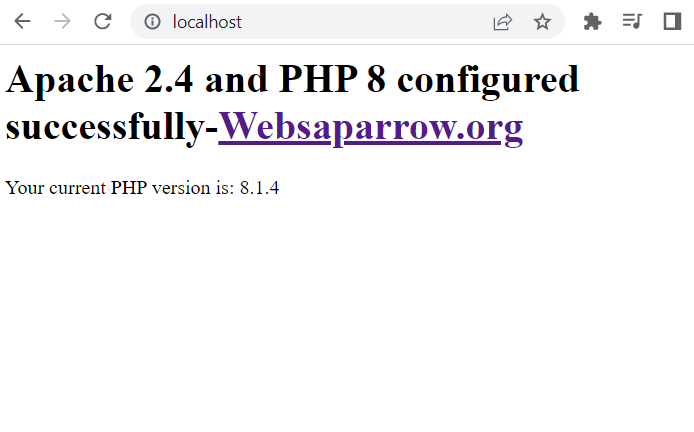
To test the Apache 2.4 and PHP 8 configuration, restart the Apache2.4 service from the Task Manager and rename the index.html file to index.php from the C:Apache24htdocs directory and add the below piece of code.
<?php

	echo '<h1>Apache 2.4 and PHP 8 configured successfully-<a href="https://websparrow.org">Websaparrow.org</a></h1>';
	echo ' Your current PHP version is: ' . phpversion();
	header("Refresh:10; url=https://websparrow.org");

 ?>
Open the web browser and hit the localhost in the URL bar, you will get the following details:
References
- Apache HTTP Server Version 2.4 Documentation
- PHP Installation on Windows
![]()
Download Article
![]()
Download Article
The Apache HTTP Server is one of the most widely used web server softwares available. A web server is the software that powers a website. It is an open-source software that can be run on a large number of different operating systems, including Windows. This article will teach you how to install the Apache web server on your Windows PC.
-

1
If you haven’t done so already, download the Apache HTTPD Web Server from the Apache web site . Be sure to download the apache_2.2.16-win32-x86-no_ssl MSI installer here: (http://httpd.apache.org/download.cgi)
-
2
Save the file to your Windows Desktop
Advertisement
-
3
Double click the MSI file saved on your Windows Desktop. You will see a window that looks like this:
-
4
Click «Next>».
-
5
Click the radio button «I accept the terms in the license agreement».
-
6
Click «Next>».
-
7
On the next window, again click «Next
-
8
Next, fill in all the text boxes with the following information:
- «Network Domain»: localhost
- «Server Name»: localhost
- «Administrator’s Email Address»: your email address
-
9
Make sure the radio button «for all users, on port 80, as a service — recommended» is selected.
-
10
Click «Next>».
-
11
After you have typed in the path, click «OK» and then click «Next>». At this point, you should see a window that looks like this:
-
12
On the next window highlight «Apache HTTP Server» and click the «change» button.
-
13
We are going to install all the packages and scripts in the path C:ServerApache2 (assuming C: is your main hard drive). So in the text box «Folder name:» type in «C:ServerApache2». The ending backslash is important.
-
14
After you have typed in the path, click «OK» and then click «Next>». At this point, you should see a window that looks like this:
-
15
Click «Install» to begin the installation.
-
16
Once the Apache installation software has finished installing all the files on your computer, you will see a final window letting you know the installation was a success. Click the «Finish» button


Advertisement
Ask a Question
200 characters left
Include your email address to get a message when this question is answered.
Submit
Advertisement
Video
-
You can also install XAMPP for a simpler Apache, MySQL, PHP package.
-
To check that the software was in installed successfully, open your favourite browser and type «http://localhost/» into the address bar. You should see a page that looks like this or the words «It Works!»:
Thanks for submitting a tip for review!
Advertisement
About This Article
Thanks to all authors for creating a page that has been read 492,332 times.