Linux on Windows is a reality, thanks to the partnership between Canonical (parent company of Ubuntu) and Microsoft.
When Microsoft’s CEO announced that the Bash shell was coming to Windows, several people couldn’t believe it. #BashOnWindows trended on Twitter for days; such was the impact of this news.
But Bash on Windows (or Windows Subsystem for Linux) was not available to everyone immediately. People had to install the Windows 10 technical preview to install Linux on Windows 10.
That’s not the case anymore; it is pretty easy to install and use WSL now!
📋
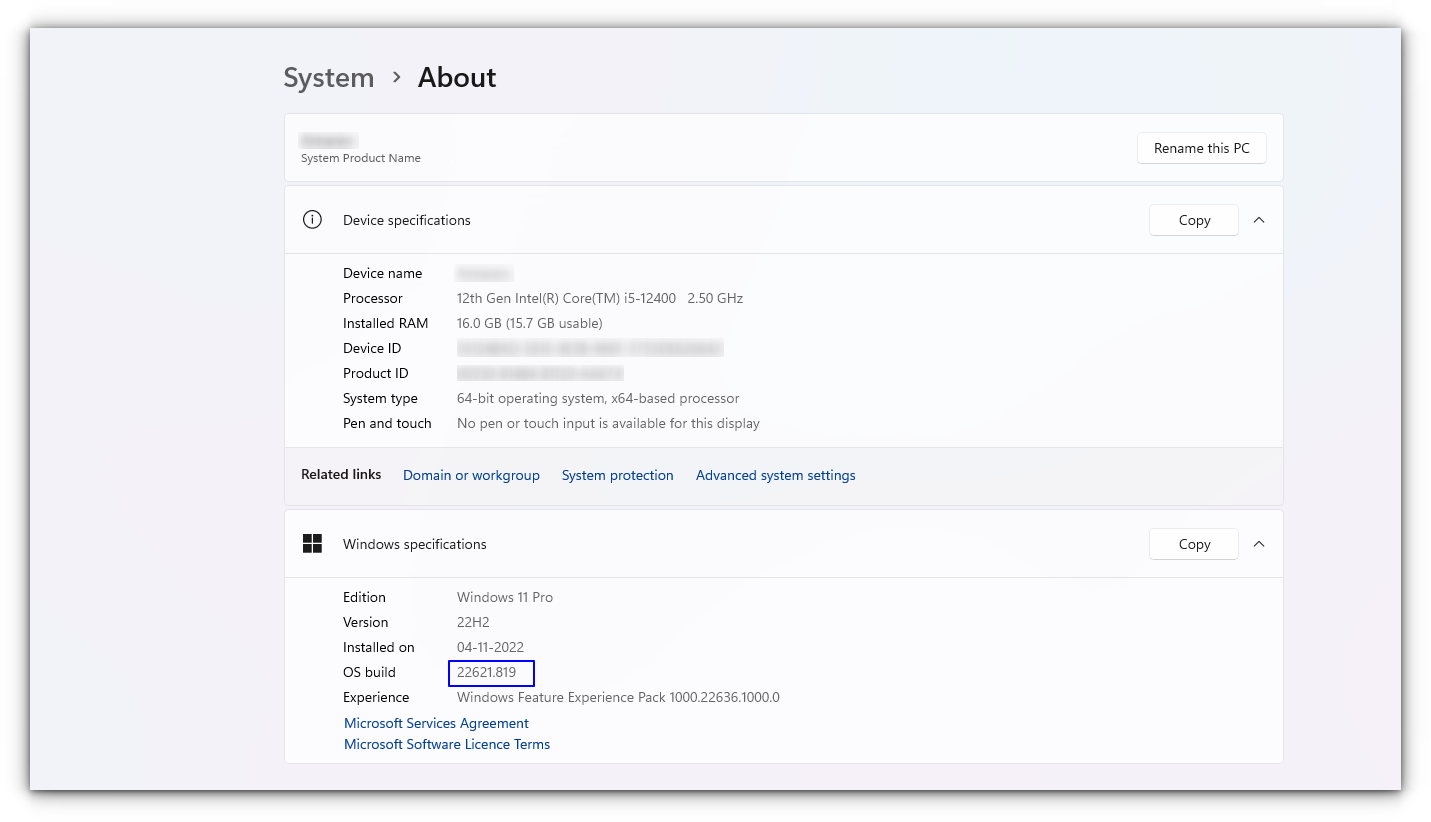
This tutorial was tested with the latest Windows 11 version 22H2, and build 22621.819. You might need to update your Windows installation if you have an older build to follow everything in this tutorial.
What is Bash on Windows?
Bash on Windows provides a Windows subsystem, and Linux runs atop it. It is not a virtual machine or an application like Cygwin. It is a complete Linux system inside Windows 10/11. It allows you to run the same Bash shell you find on Linux. You can run Linux commands inside Windows without installing a virtual machine or dual-boot Linux and Windows.
You install Linux inside Windows like a regular application. This is a good option if your main aim is to learn Linux/UNIX commands.
Check for System Compatibility
You must be running specific versions of Windows for the different features described in this article. Requirements necessary for a particular feature to work are described under its titles. To check your Windows version, search for about in the start menu.
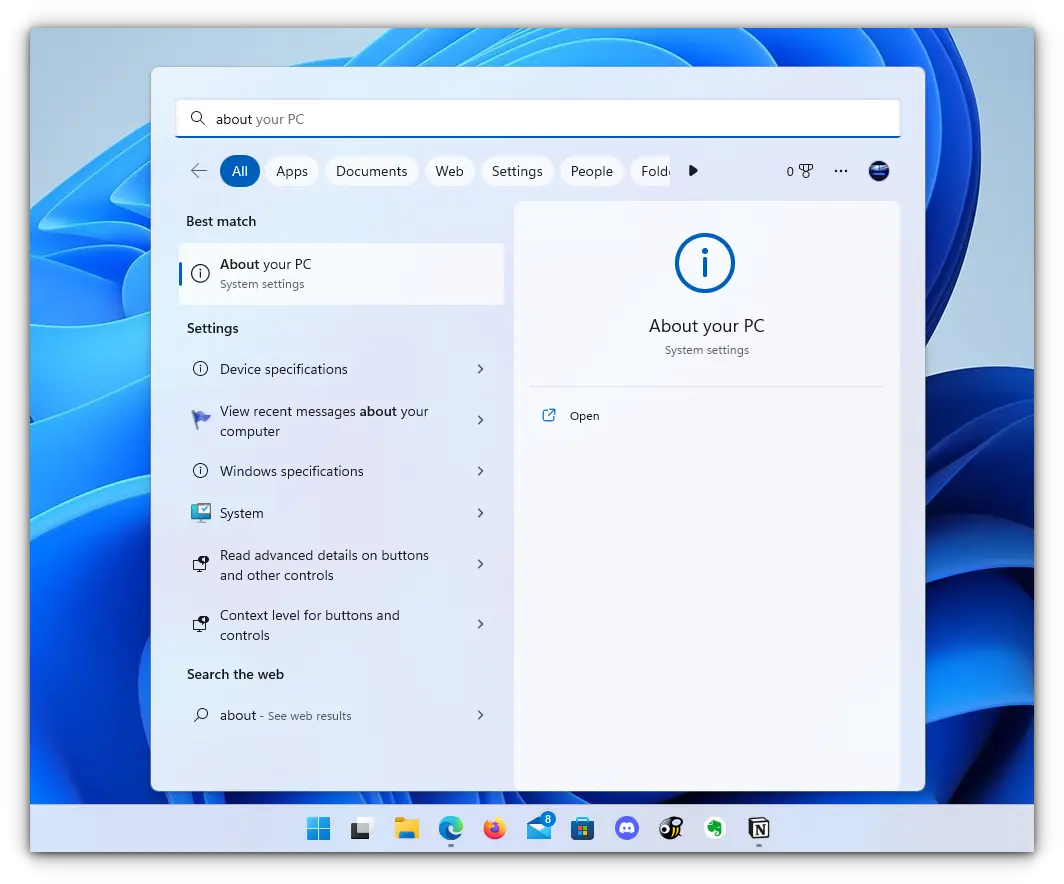
Here, you can see the build of your PC, as shown in the screenshot below. Make sure it is matching with the respective requirements described under various sub-headings here in this article.
- You must be running Windows 10 version 1607 (the Anniversary update) or above.
- WSL only runs on 64-bit versions 32-bit versions are not supported.
Install Bash in Newer Windows 10 and 11
The good thing is that the latest set of upgrades, including the stable release of WSL v1.0 released from Windows, makes it easier to install Bash on Windows.
There are two ways you can go about it:
- You can get it in one click from Windows Store.
- Choose to use the command-line.
1. Install WSL Using the Microsoft Store
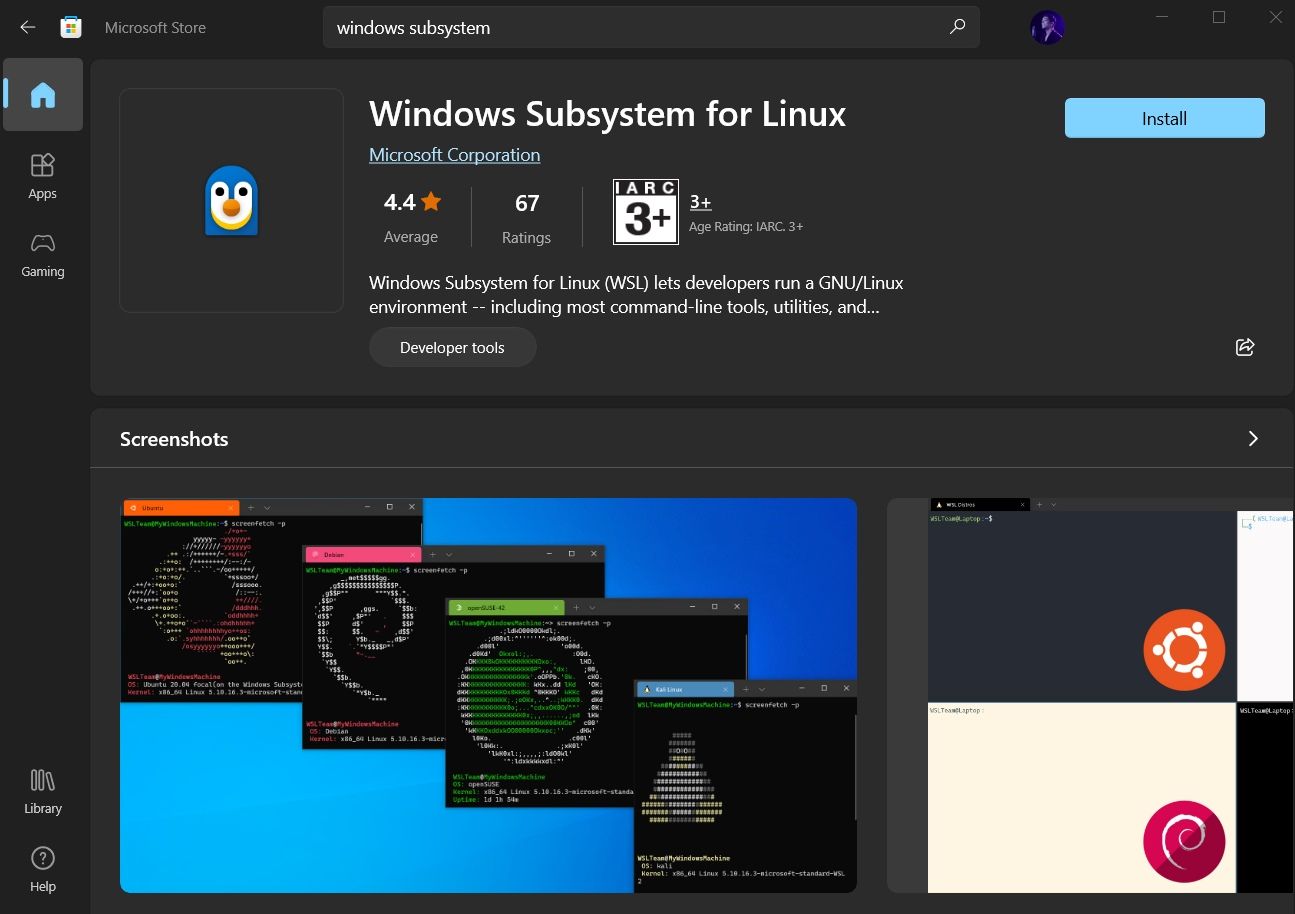
Launch the Microsoft Store and search for «Windows subsystem«.
Install it, and you’re done with the first step. Next, you have to install a Linux distribution.
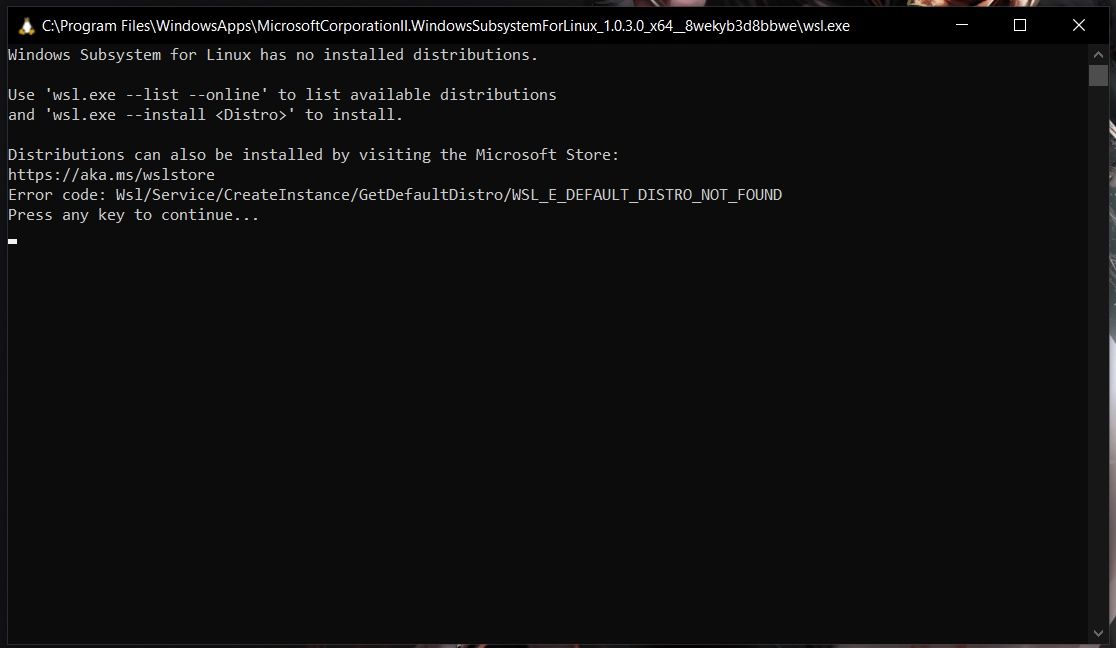
So, if you try to open WSL, you will get to see a window informing you that no distribution is installed.
Similar to WSL, search for the distribution on Microsoft Store, and then install it.
For instance, I installed Ubuntu from the store as shown in the image below:
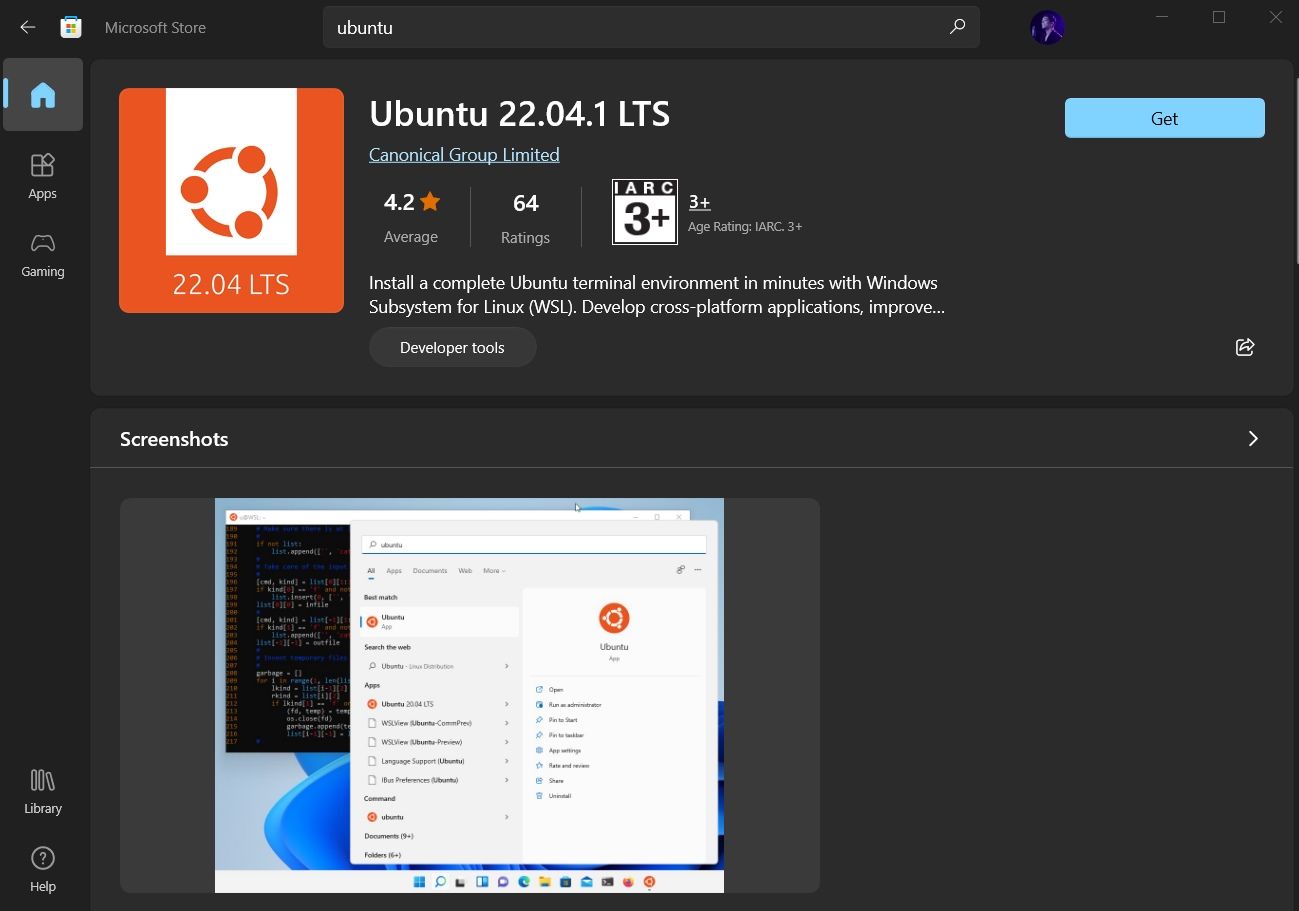
And, then proceed to «Open» it and it will automatically start installing. The procedure is same for any distribution you choose.
We then have to configure it, which is discussed right after installing it through the command line.
2. Install WSL and the default distribution using the command-line
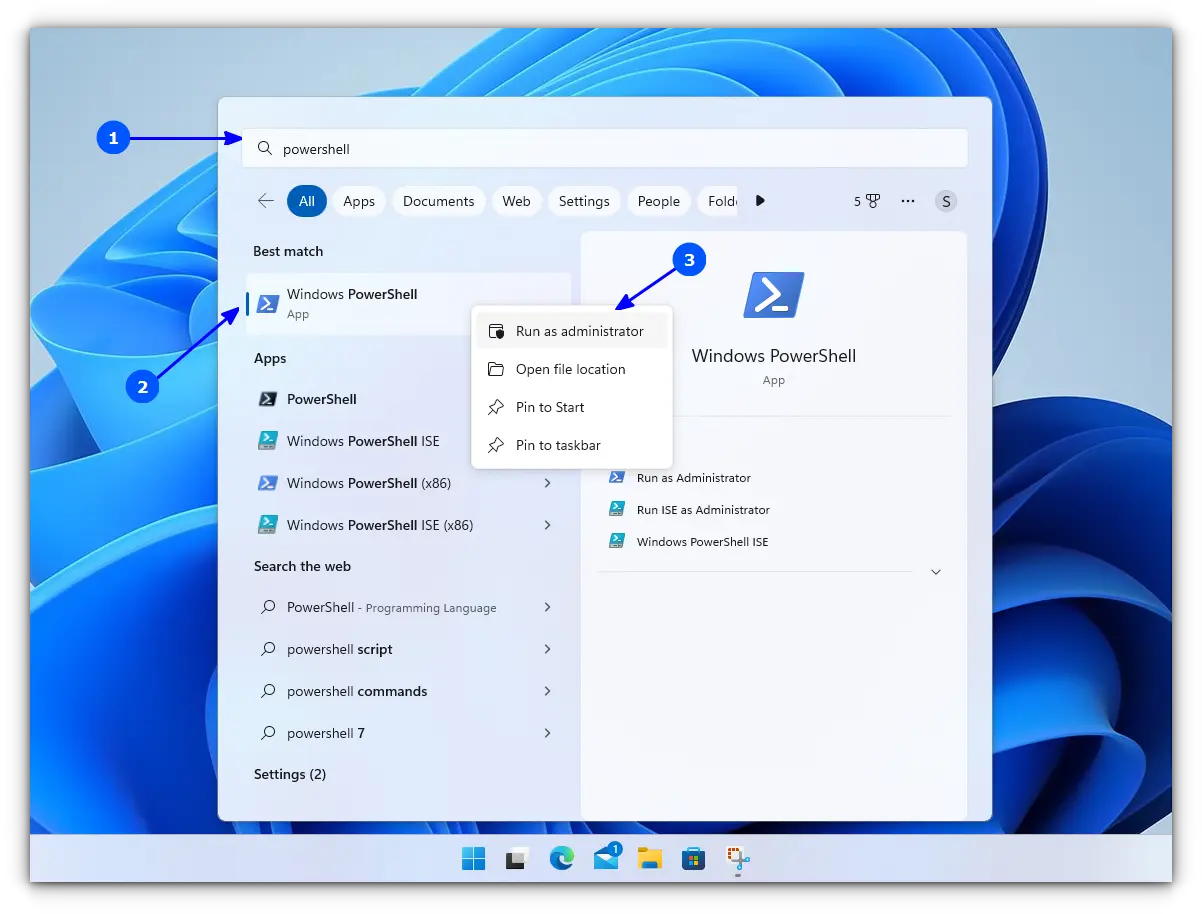
In WSL, the default distribution is Ubuntu (which can be changed). To install, open Powershell as an administrator.
For this, search for Powershell in the start menu, right-click on Powershell and select Run as Administrator.
Inside Powershell, enter the following command to install WSL, along with all necessary features and the default distribution, that is, Ubuntu.
wsl --installOnce finished downloading and installing, you need to reboot to apply the changes.
Whether you installed WSL and Ubuntu using the Microsoft Store or the command line, you need to configure it.
Here’s how it is done:
🛠️ Configure the newly installed Ubuntu
After rebooting, search for Ubuntu in Start Menu and open it.

It will ask you to enter a UNIX Username and Password. Enter these details and press enter key.
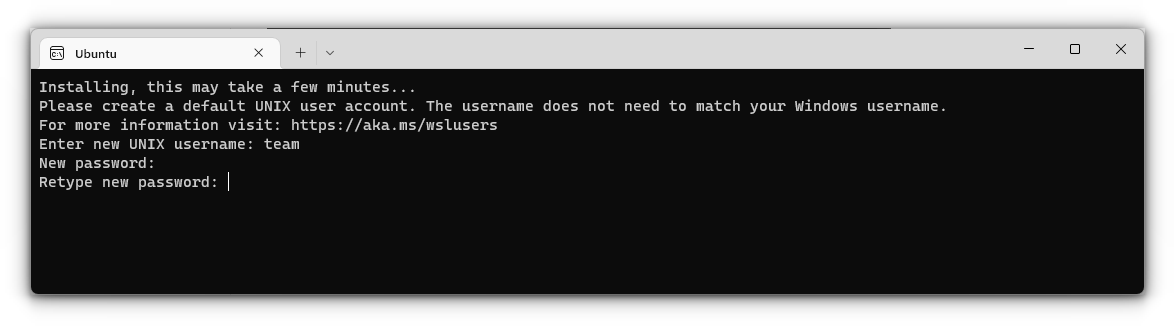
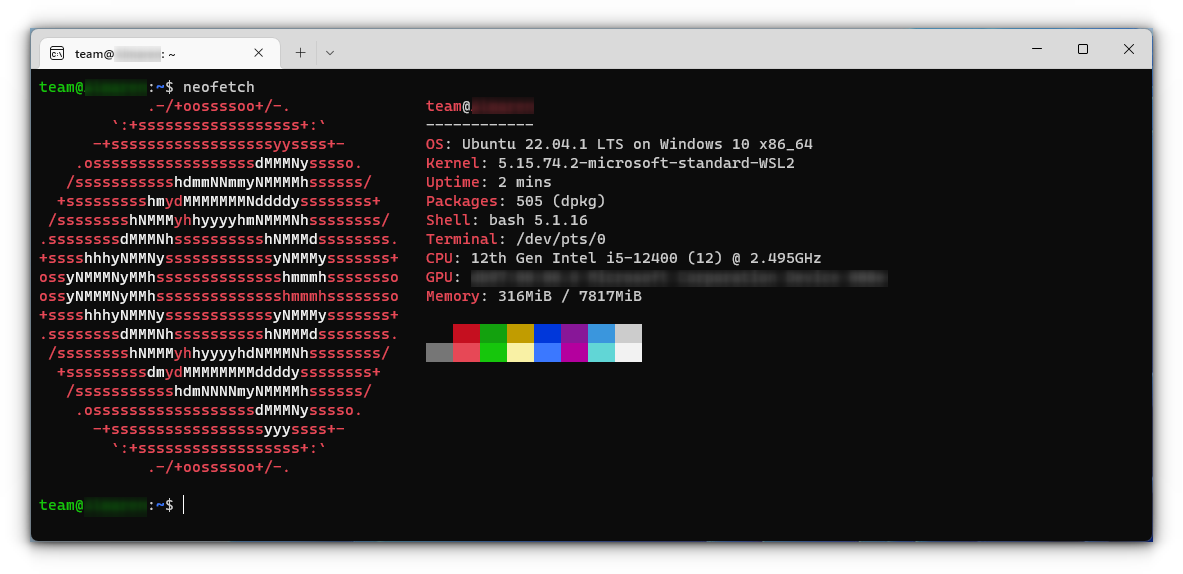
You will now be inside the terminal window of Ubuntu.
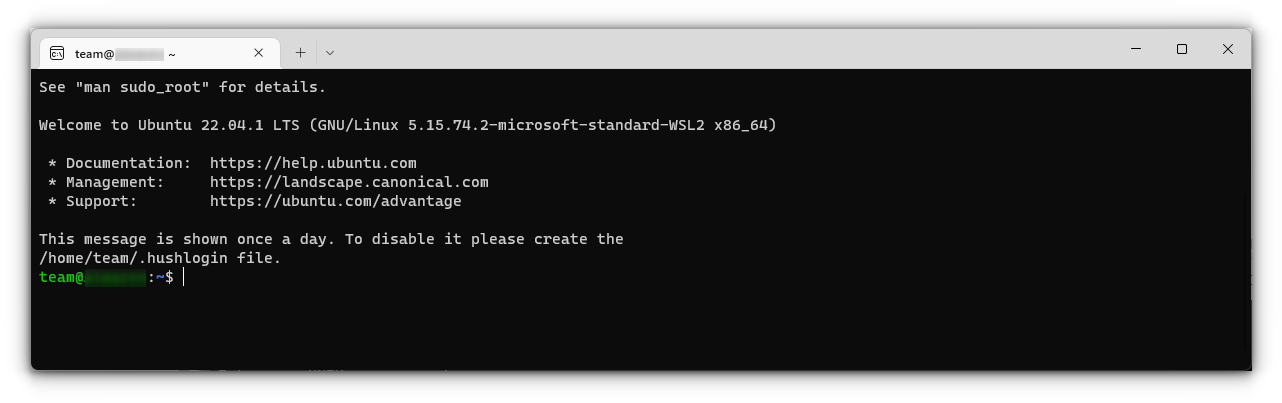
Once logged in, you need to update the installed Ubuntu. For this, enter the following commands one by one:
sudo apt update
sudo apt full-upgrade
After completing the update, you are good to go with Ubuntu in WSL.
Install Bash on Older Windows
If you have the minimum requirements mentioned in the beginning but are running an older Windows build, the previous method may not be supported. So there is a manual installation method.
Also, there are both WSL1 and WSL2 available. WSL2 offers some upgraded functionalities but has some minimum requirements to run:
- For x64 systems: Version 1903 or later, with Build 18362 or later.
- For ARM64 systems: Version 2004 or later, with Build 19041 or later.
So this brings us to two possibilities to install:
- Install Ubuntu with WSL1
- Install Ubuntu with WSL2
1. Install Ubuntu with WSL 1
This is a relatively simple procedure for those with a system incompatible with WSL2. First, you need to enable the Windows Subsystem for the Linux feature. This can be done through the command line. Open Powershell as an administrator and enter the following command:
dism.exe /online /enable-feature /featurename:Microsoft-Windows-Subsystem-Linux /all /norestartOr, to do this via GUI, follow the steps below:
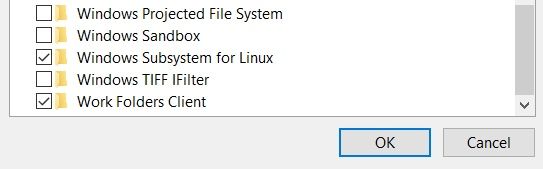
- Search for Windows Features in Start Menu.
- Turn on Windows Subsystem for the Linux feature.
- Reboot your system.
- Open the Windows store and search for the distribution of your choice to install.
Once installation is completed, open the Ubuntu app from the start menu. It will take a couple of seconds to install. You will be prompted to enter a username and password. Provide those credentials, and you are good to go with Ubuntu in WSL1.
2. Install Ubuntu with WSL 2
It is recommended to use WSL2 instead of WSL1 if you have support. To install Ubuntu with WSL2, you need to make sure that the Windows Subsystem for Linux feature is turned on. For this, as in the above case, execute the following command in an elevated Powershell:
dism.exe /online /enable-feature /featurename:Microsoft-Windows-Subsystem-Linux /all /norestartReboot the device once the command is completed.
After this, you need to enable the Virtual Machine Platform feature. Open the Powershell with admin privileges and enter the following command:
dism.exe /online /enable-feature /featurename:VirtualMachinePlatform /all /norestartOnce again, restart the device to complete the WSL install and update to WSL 2.
Now, download the Linux Kernel Update Package for x64 machines from the official website. If you are using ARM64 devices, use this link to download the latest kernel update package.
If you are not sure about the device architecture, enter the command below in Powershell to get the type:
systeminfo | find "System Type"When the file is downloaded, double-click on it and finish the installation of the Kernel update package.
Now, open PowerShell and run this command to set WSL 2 as the default version when installing a new Linux distribution:
wsl --set-default-version 2Once WSL2 is set as the default version, you can now install the Linux distribution of your choice.
Go to Windows Store and install Ubuntu, as described in the earlier steps. and the rest of the procedure is already described above.
Enjoy Linux inside Windows.
🔧 Troubleshooting Tip 1
«The WSL optional component is not enabled. Please enable it and try again.»
You may see an error like this when you try to run Linux inside Windows 10:
The WSL optional component is not enabled. Please enable it and try again.
See https://aka.ms/wslinstall for details.
Error: 0x8007007e
Press any key to continue...
And when you press any key, the application closes immediately.
The reason here is that the Windows Subsystem for Linux is not enabled in your case. You should enable it as explained in this guide. You can do that even after you have installed Linux.
🔧 Troubleshooting Tip 2
Installation failed with error 0x80070003
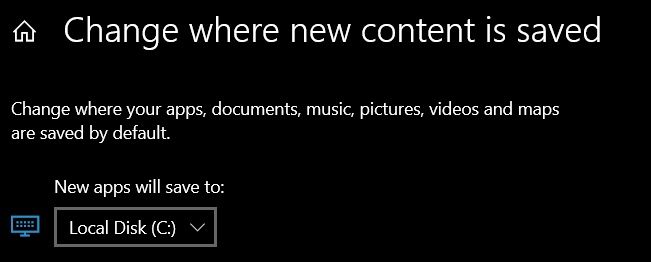
This is because Windows Subsystem for Linux only runs on the system drive i.e. the C drive. You should ensure that when you download Linux from the Windows Store, it is stored and installed in the C Drive.
On Windows 10, go to Settings -> Storage -> More Storage Settings -> Where new content is saved: Change where new content is saved and select C Drive here.
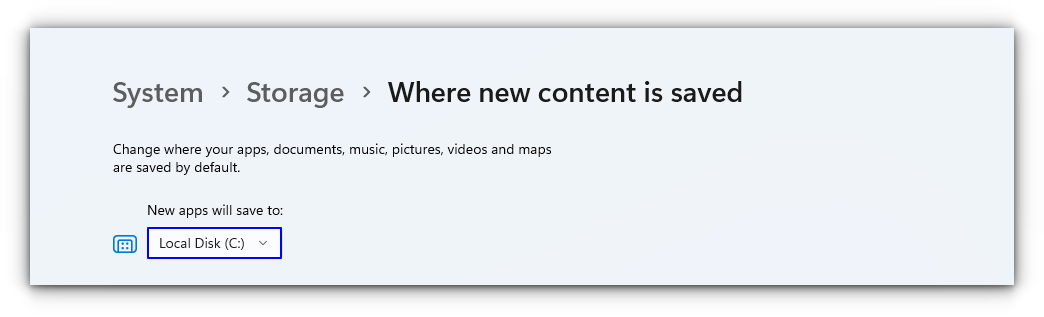
On Windows 11, go to Settings -> System -> Storage -> Advanced storage settings -> Where new content is saved and select C Drive here.
🔧 Troubleshooting Tip 3
«Failed to attach disk Error»
Sometimes, this error will appear when we reinstall the Ubuntu in WSL.
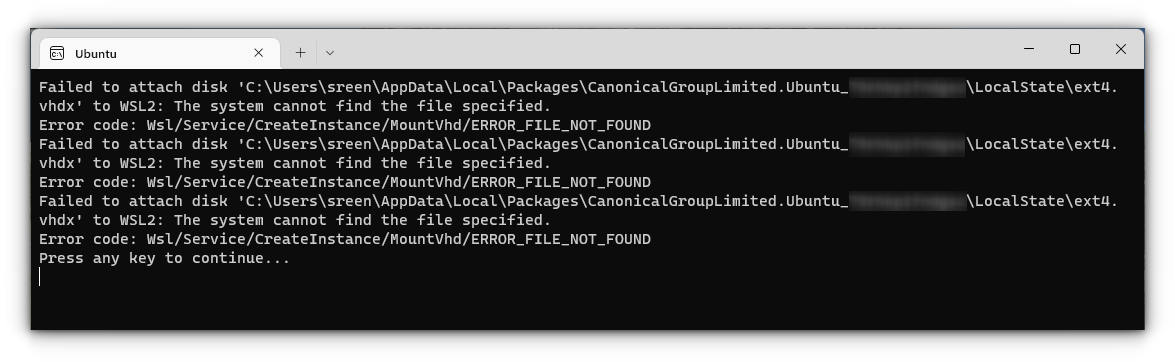
In this case, open Powershell and run the following command:
wsl -l -vThis will list the installed Linux systems. Find the name of the system, that is throwing the error, in my case Ubuntu. Now run the following command:
wsl --unregister UbuntuYou can restart the ubuntu app and it will run without any issues.
You can refer to more common troubleshooting methods from the official website.
Run GUI Apps On Windows Subsystem for Linux
The ability to run GUI apps on Windows Subsystem for Linux was introduced with the WSL 2 release in May 2020.
Windows Subsystem for Linux (WSL) with WSL2 now supports running Linux GUI applications (X11 and Wayland) on Windows in a fully integrated desktop experience. This allows you to install Linux applications and seamlessly integrate them into Windows desktop, including features like “pin to taskbar”.
📋
One crucial point is that you must be on Windows 10 Build 19044+ or Windows 11 to access this feature.
Step 1: Enable/Update WSL 2
This procedure has been explained in the above section and you can refer to it.
Step 2: Download and Install Graphics drivers
To run GUI apps, you need to install appropriate graphics drivers. You can use the following link to download the drivers according to your provider.
- Intel GPU Driver for WSL
- AMD GPU Driver for WSL
- NVIDIA GPU Driver for WSL
Once installed, you are all done.
Step 3: Install some GUI Apps
Now, go to your Ubuntu app and install any GUI app using the APT package manager. You should note that running apps from other sources like flatpak are problematic within WSL.
For this article, I installed the Gedit text editor using the following command:
sudo apt install gedit -yThis will install several MB of packages including required libraries. Once completed, you can run the following command to start the GUI Gedit app in Windows.:
gedit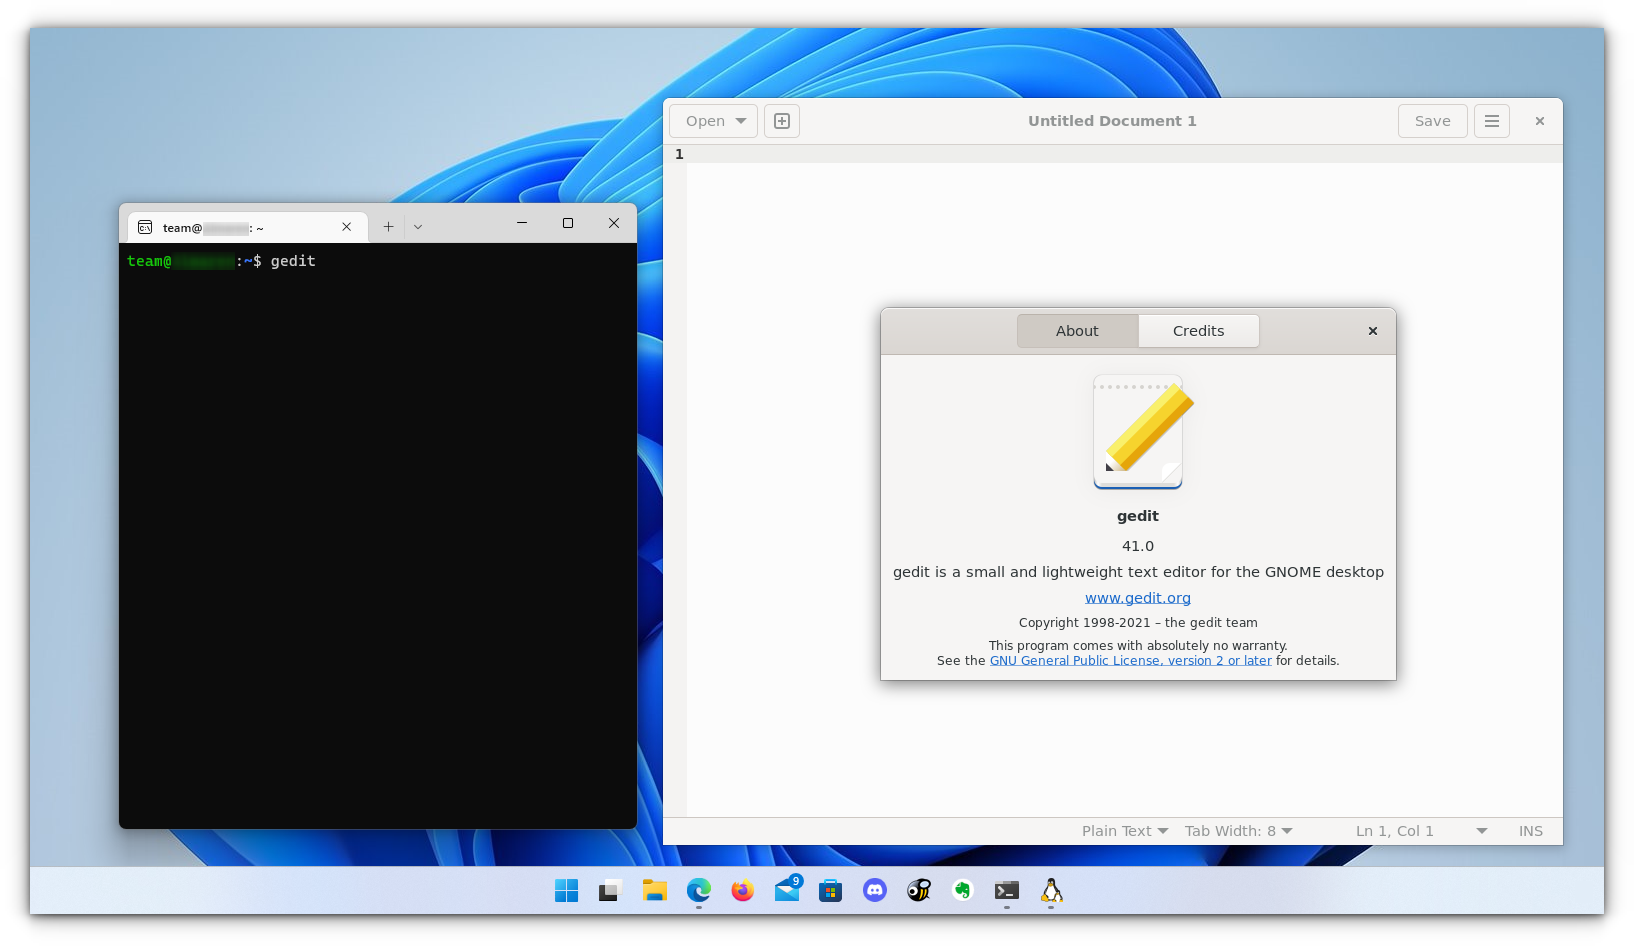
Similarly, you can install all the popular applications available to Linux, including Nautilus file manager, GIMP, etc. For more about running GUI applications in WSL, you can refer to the official documentation.
Install Linux Bash Shell on other older Windows 10
If you cannot get the Fall Creator’s update on Windows 10 for some reason, you can still install it if you have the Anniversary update of Windows 10. But here, you’ll have to enable developer mode. I still recommend upgrading to the Fall Creator’s update or the latest Windows 10 2004 version update though.
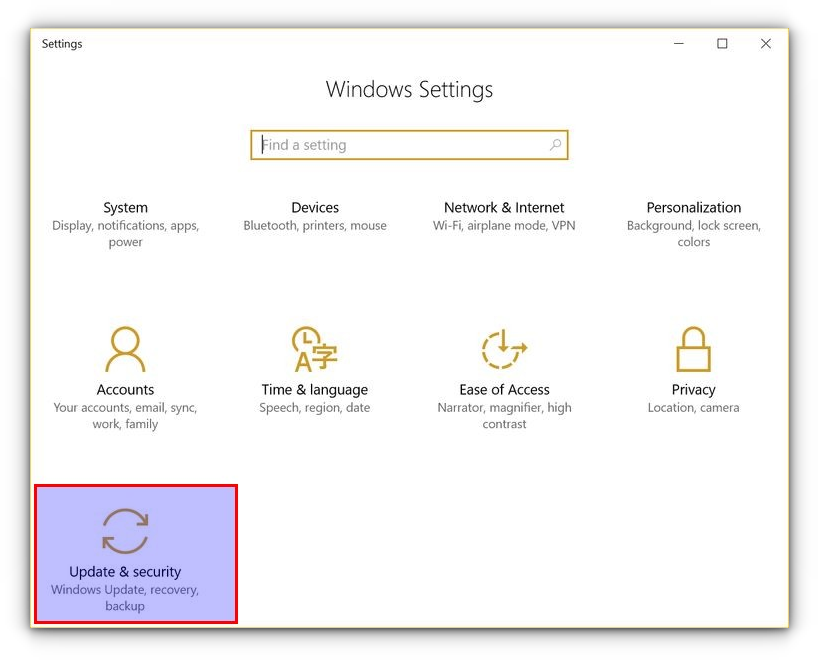
Press Windows Key + I to access Windows system settings. Here, go to Update & Security:
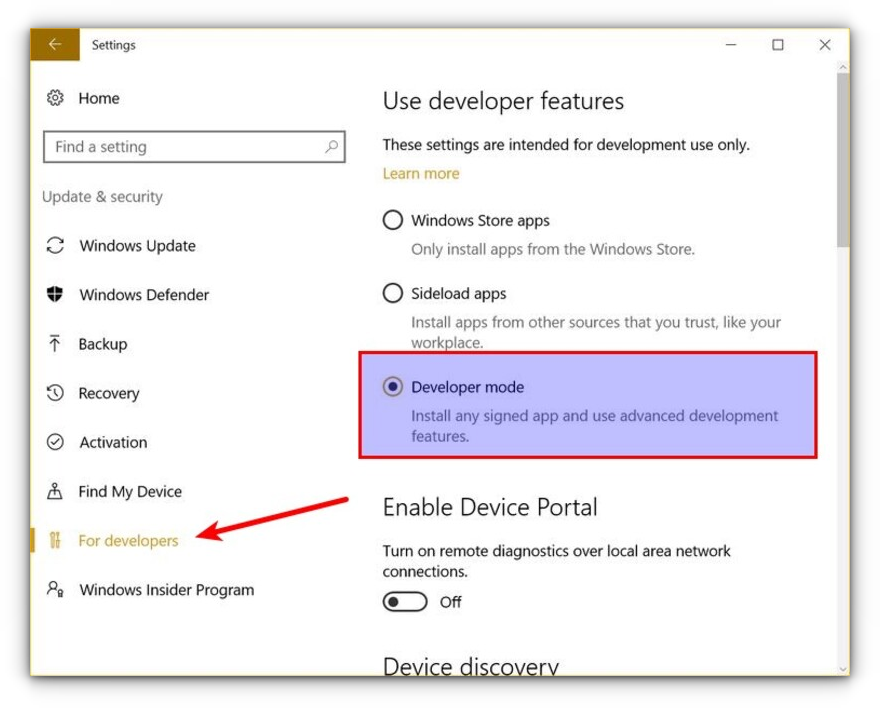
From the left side pane, choose “For developers.” You’ll see an option for “Developer mode.” Enable it.
Now search for Control Panel and in Control Panel, click on “Programs”:
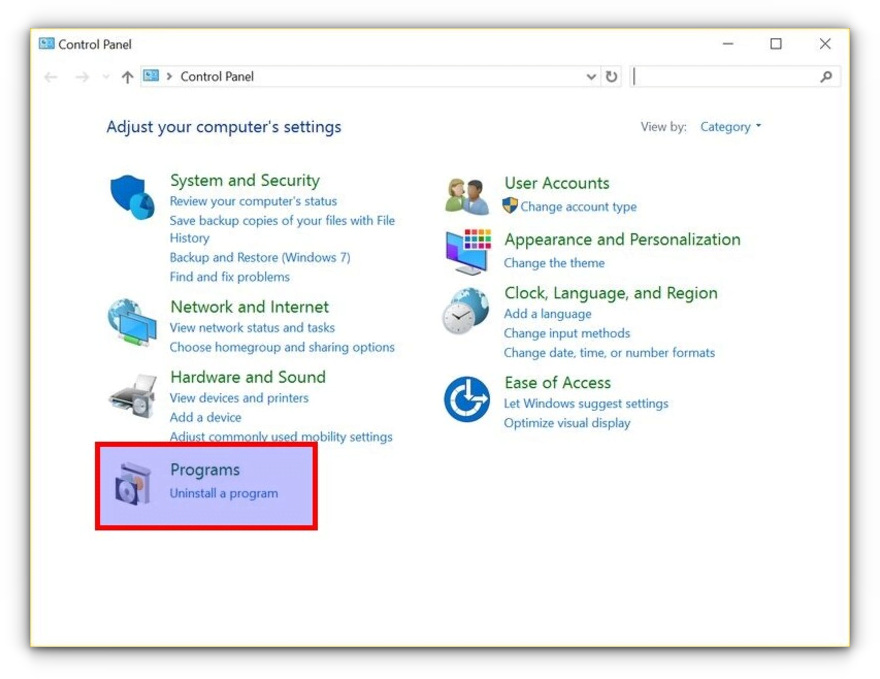
In Programs, click “Turn Windows features on or off”:
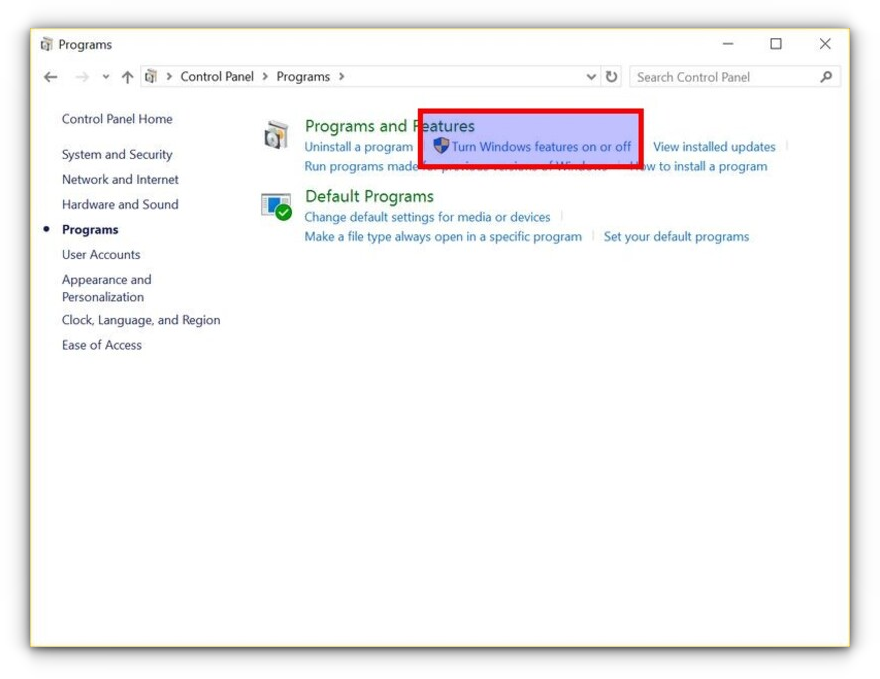
When you do this, you’ll see several Windows features. Look for “Windows Subsystem for Linux” and enable it.
You’ll need to restart the system after doing this.
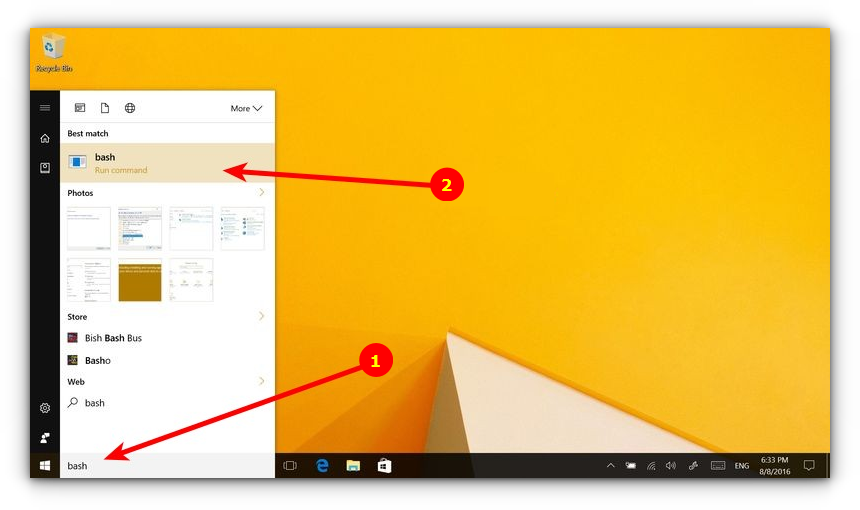
After restarting the computer, click the start button and search for “bash”.
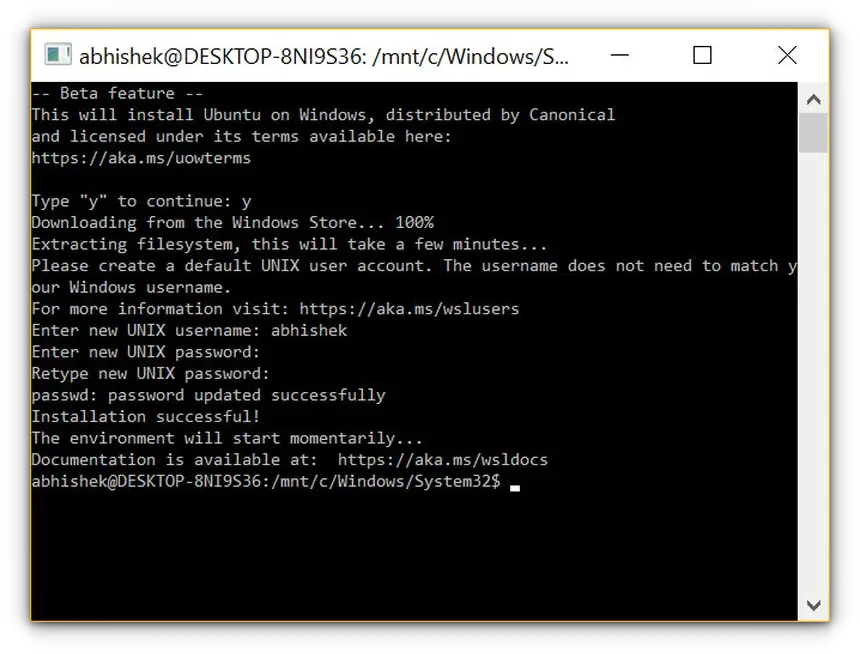
When you run it for the first time, you’ll be given the option to download and install Ubuntu. You’ll be asked to create a username and password during this process. It will install an entire Ubuntu Linux system, so have patience as it will take some time in downloading and installing Linux on Windows.
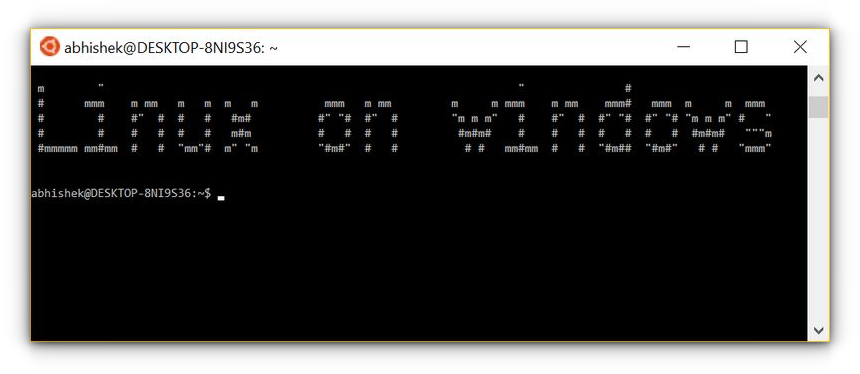
Once this is done, go back to the Start menu and search for Ubuntu or Bash.
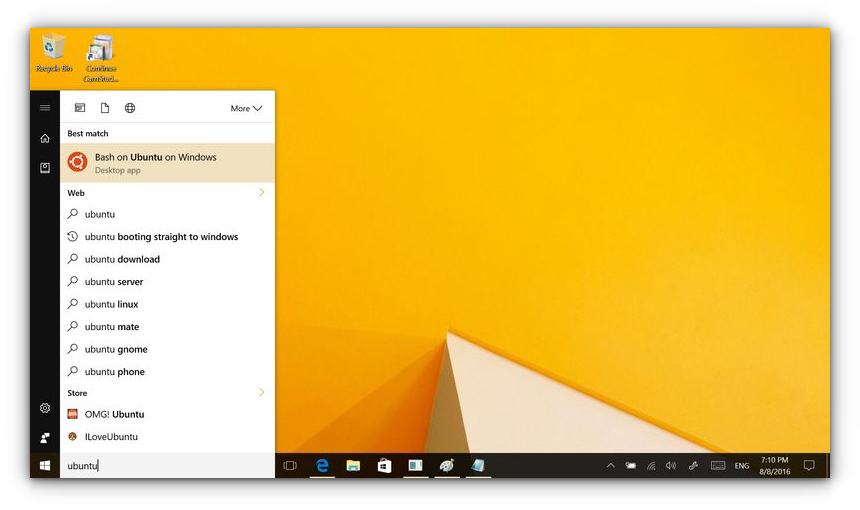
Now you have a command line version of Ubuntu Linux. You can use apt to install various command line tools in it.
💬 I hope you find this tutorial helpful for installing bash on Windows and experimenting with Linux GUI apps on Windows. No wonder WSL lets you play with Linux inside of Windows. If you have questions or suggestions, feel free to ask.
September 28th, 2016
Summary: Learn about the Windows Subsystem for Linux that runs on top of Windows 10.
Today we have a guest article written by Stefan Roth. Take it away Stefan …
Hi, my name is Stefan Roth, and I am a Cloud and Datacenter MVP. In a couple of posts, I would like to show you how cool it is that Microsoft is touching the Linux world. Myself, I am a 100% Microsoft fan, but, as you can read all over the Internet…Microsoft loves Linux. This is not just a one-night stand. Microsoft is really serious about Linux support in all cloud scenarios (private, public, and hybrid). Therefore, we start with something really cool.
I will start a three-part series that touches a few parts of the Linux direction that Microsoft is taking. My first post gives you an overview of Bash on Windows 10 by using Secure Shell (SSH). We’ll run a script that installs the prerequisites and sets up a desired state configuration (DSC) environment. The second post will show you how to install .NET Core and PowerShell on Linux by using DSC. The last part will use Azure Automation DSC and the Operations Management Suite injection API for some fun.
The anniversary update
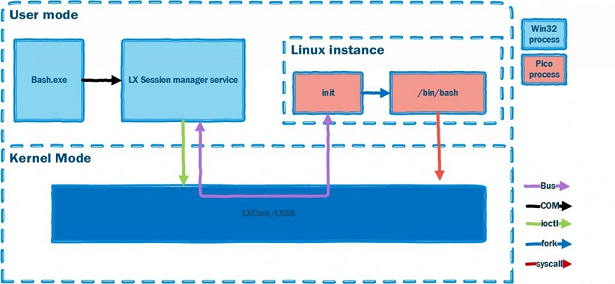
Microsoft released the Windows 10 Anniversary Update on August 2nd. One awesome new feature is the Windows Subsystem for Linux (WSL) that runs on top of Windows 10. What does that mean? This subsystem allows you to run native Linux binaries on Windows. If you remember back to Windows NT, there was already a POSIX subsystem available for Unix-based applications. Because the Windows NT kernel was designed to run such subsystems, Microsoft could use this architecture and build a subsystem for Linux. Exactly how this works is explained in the Windows Subsystem for Linux Overview blog post.
Why should we care at all? Good question. I think there is a short-term goal and a long-term goal. If you watched Technical Fellow Jeffrey Snover announcing PowerShell on Linux and Open Sourced , Jeffrey mentioned a vision to manage any system from any operating system by using Windows PowerShell. One short-term goal is for developers to have a Linux environment available on Windows as also a “native” way to use SSH to connect and manage native Linux systems, which has been requested for years. Scott Hanselmann has released a nice video on his blog, which shows what you can do with Bash and explains some more details.
Install Bash on Windows
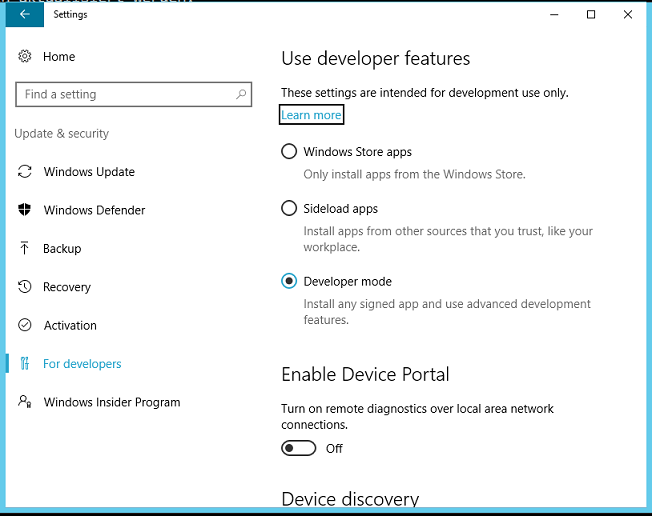
First, let’s install Bash on Windows 10. Make sure that you have the latest Windows 10 Anniversary 64-bit edition and that you have Developer Mode enabled. Open the Settings app and go to Update & security > For developers. Select Developer mode to enable Developer Mode.
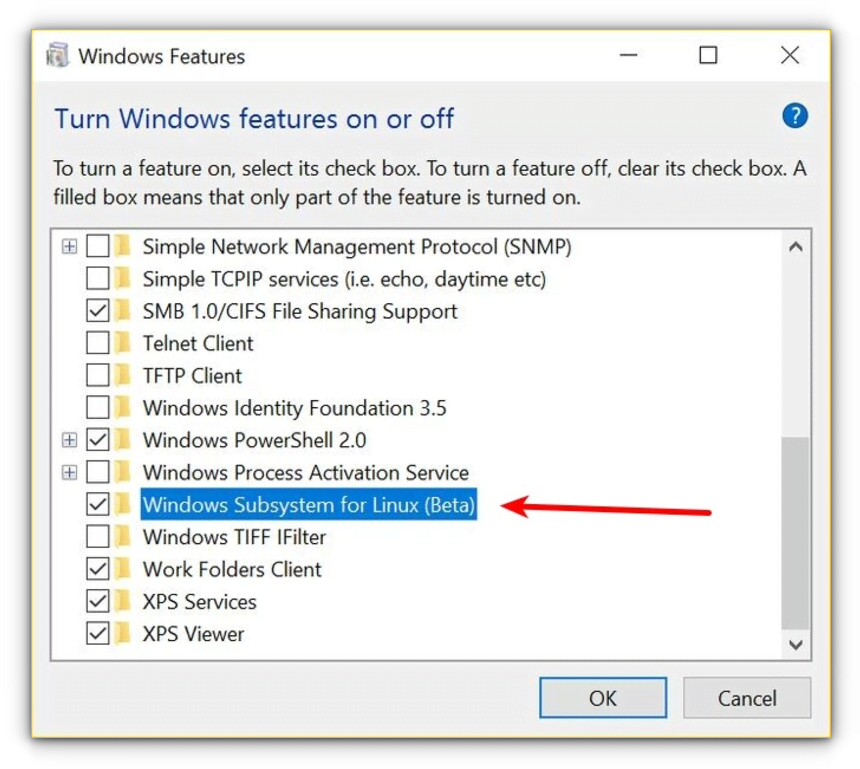
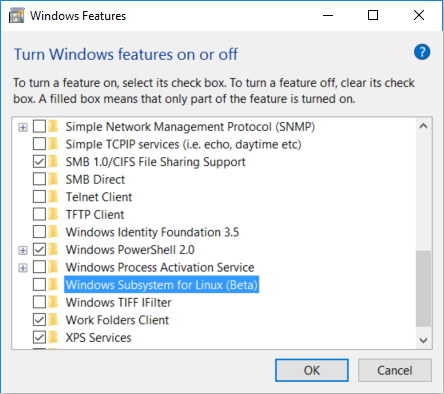
Next, use Turn Windows features on or off to turn on Windows Subsystem for Linux (Beta), reboot, and everything is done.
Type Bash in the Run Window, and follow the instructions to complete the setup. Now you are a proud owner of an Ubuntu Bash on Windows 10 that’s waiting for input.
I have a CentOS 7 x64 Linux system called centos installed on my local Hyper-V server. Now let’s connect from your Windows 10 Bash to the CentOS server system by using SSH.
Type within Bash:
ssh [IP OF YOUR SERVER] -l root
Enter your password when prompted.
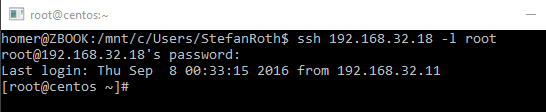
Note: If you receive a response like this, just confirm by typing yes.
The authenticity of host ‘192.168.32.18 (192.168.32.18)’ can’t be established. ECDSA key fingerprint is 26:b6:fb:b1:de:76:b0:2e:47:68:0b:94:32:00:c9:08. Are you sure you want to continue connecting (yes/no)?
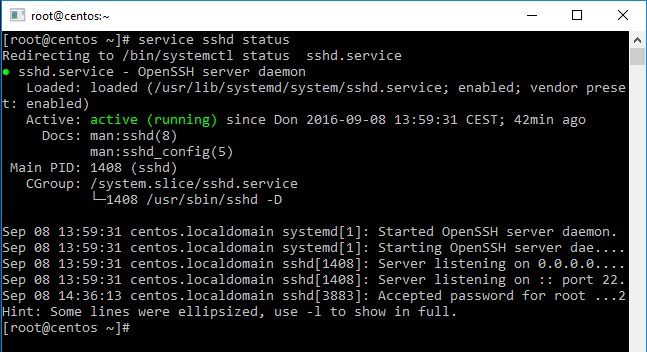
Now you are authenticated as root (root = administrator permission) to the remote system via SSH. If you get an error, check on your Linux server locally to determine if the sshd (SSH daemon) is running by typing:
service sshd status
You should get an output as shown in the following screenshot.
Install the prerequisites
Next, we are going to run a little shell script to download all prerequisites and source for the OMI CIM server and the DSC packages. After successful download, we’ll install the rpm packages (Package Manager for Red Hat).
First, to create the script file, go to /root/Downloads:
- Type
vi install.shto launch an empty file called install.sh. - Type
ito insert text. - Paste the script that follows these steps.
- Type Esc key to change vi editor mode.
- Type
:. - Type
wq!to write and quit.
It should look like this…
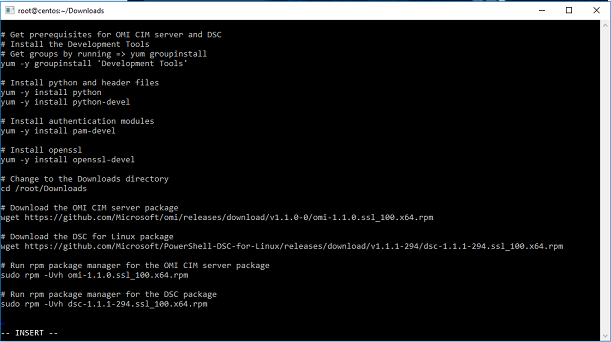
Shell script:
#####################################################################################
#! /bin/sh

# Get prerequisites for OMI CIM server and DSC

# Install the Development Tools

# Get groups by running => yum groupinstall

yum -y groupinstall 'Development Tools'
# Install python and header files

yum -y install python

yum -y install python-devel
# Install authentication modules

yum -y install pam-devel
# Install openssl

yum -y install openssl-devel
# Change to the Downloads directory

cd /root/Downloads
# Download the OMI CIM server package

wget https://github.com/Microsoft/omi/releases/download/v1.1.0-0/omi-1.1.0.ssl_100.x64.rpm
# Download the DSC for Linux package

wget https://github.com/Microsoft/PowerShell-DSC-for-Linux/releases/download/v1.1.1-294/dsc-1.1.1-294.ssl_100.x64.rpm
# Run rpm package manager for the OMI CIM server package

sudo rpm -Uvh omi-1.1.0.ssl_100.x64.rpm
# Run rpm package manager for the DSC package

sudo rpm -Uvh dsc-1.1.1-294.ssl_100.x64.rpm
###############################################################################
Next, to set the permission to the script as executable, type:
chmod +x install.sh
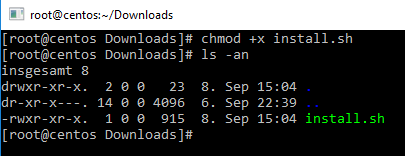
Finally, execute the script. The install process will kick off, and you will see the installation.

Note: If you get an error like “…Another app is currently holding the yum lock”, the yum installer is running in the background. To temporarily prevent the database lock, use the following command to stop the daemon.
Stop yum installer
service packagekit stop
Run the script again ./install.sh. If everything worked, you should have a prompt again and run the next command to see the status of the OMI CIM server.
OMI CIM server status
service omid status
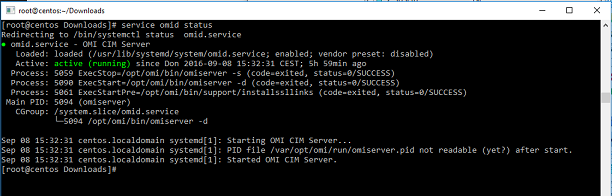
At this point, OMI CIM server and DSC Linux components are installed – up and running.
Testing it
If you want to explore your installation, there are few commands which might help you to troubleshoot OMI CIM server and DSC.
OMI Server
Show OMI server version:
/opt/omi/bin/omiserver -v
Show OMI server help:
/opt/omi/bin/omiserver -h
Shows the OMI server configuration file
vi /etc/opt/omi/conf/omiserver.conf
Shows the OMI server log file
vi /var/opt/omi/log/omiserver.log
DSC
Get DSC configuration
/opt/microsoft/dsc/Scripts/GetDscConfiguration.py
Get LCM configuration
/opt/microsoft/dsc/Scripts/GetDscLocalConfigurationManager.py
Install a DSC custom module
/opt/microsoft/dsc/Scripts/InstallModule.py /tmp/cnx_Resource.zip
Remove a DSC custom module
/opt/microsoft/dsc/Scripts/RemoveModule.py cnx_Resource
Applies a configuration MOF file to the computer
/opt/microsoft/dsc/Scripts/StartDscLocalConfigurationManager.py –configurationmof /tmp/localhost.mof
Applies a Meta Configuration MOF file to the compute
/opt/microsoft/dsc/Scripts/SetDscLocalConfigurationManager.py –configurationmof /tmp/localhost.meta.mof
Shows the DSC log file
vi /var/opt/omi/log/dsc.log
Summary
First, we installed the Windows Subsystem for Linux and used Bash to make a connection to a Linux server by using SSH. From this shell, we ran an installation script to install OMI CIM Server and DSC for Linux.
You might have noticed that we never had to leave the Bash window. We could manage the Linux server from Windows 10 without logging in to the Linux server console. One small but important goodie I like is that we are also able to copy from Windows and paste to the Bash window as we did tocreate the shell script file.
Thank you, Stefan.
I invite you to follow me on Twitter and Facebook. If you have any questions, send email to me at scripter@microsoft.com, or post your questions on the Official Scripting Guys Forum. Also check out my Microsoft Operations Management Suite Blog. Until then, peace.
Ed Wilson, Microsoft Scripting Guy
31
31 people found this article helpful
Use the Linux command line in Windows
What to Know
- Developer Mode: Right-click Start menu > select Settings > Update & Security > For developers.
- Next: Select Developer mode > Yes > enable Windows Subsystem For Linux > restart.
- Use bash: Right-click Start menu > select Windows PowerShell (Admin) > type «bash» > press Enter.
This article explains how to install and setup bash to use Linux commands on the 64-bit version of Windows 10.
How to Turn on Windows Developer Mode
To enable developer functions for Windows:
-
Right-click the Start menu and select Settings.
-
Select Update & Security.
-
Select For developers on the left side.
-
Select Developer mode.
-
Select Yes to confirm, then wait for the developer package to install.
-
Type Windows Features in the desktop search bar and select Turn Windows Features On Or Off.
-
Check the box beside Windows Subsystem For Linux and select OK.
-
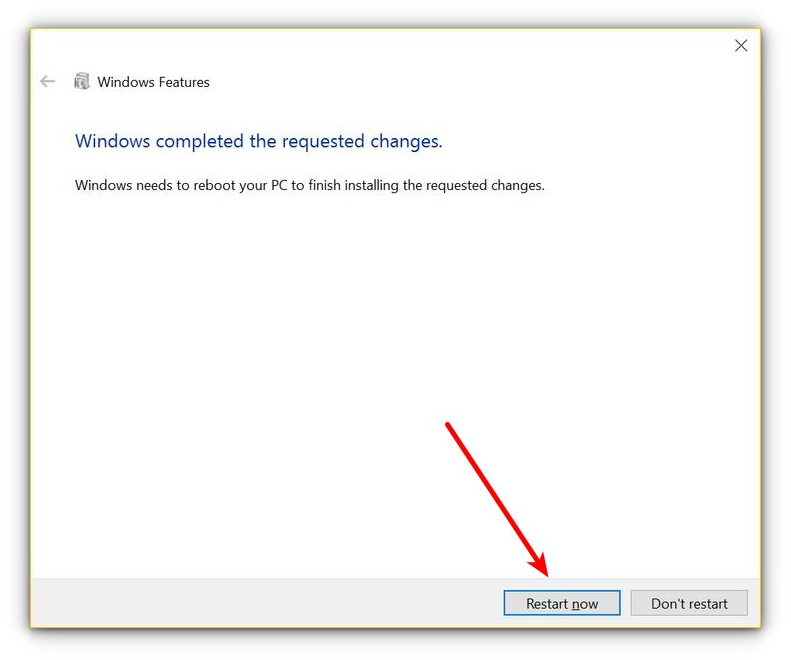
Select Restart now in the dialog box to reboot your computer to apply the changes.
How to Use Bash in Windows
After your computer reboots, you’re ready to set up bash for Windows:
-
Go to the Microsoft Store and select the Linux distribution of your choice. Install it then launch it.
-
Wait for the distribution to finish installing, then create a username in the command window and press Enter. During the first-run process, you’ll have to engage in some basic configuration, depending on the distribution. Often, you must specify a username and password.
-
After the installation is successful, close the window and right-click the Start menu, then select Windows PowerShell (Admin).
-
Type bash in the terminal window and press Enter.
You now have a core version of Ubuntu installed on your system without any graphical desktops or subsystem. Therefore, you can now use Linux commands to communicate with the Windows file structure. Anytime you want to run the Linux command line, open the PowerShell or the command prompt and enter bash.
What You Need to Install Bash on Windows
To run bash, your computer needs to be running a 64-bit version of Windows with a version number no lower than 14393, so update Windows 10 to the latest version before you begin. In order to run the Linux shell, you need to turn on Windows developer mode and enable the Linux subsystem.
Thanks for letting us know!
Get the Latest Tech News Delivered Every Day
Subscribe
Improve Article
Save Article
Improve Article
Save Article
Bash has been one of the most well-known feature of Linux distributions, which due to its flexibility as well as ease of usage, made it popular among programmers. The Windows’ operating system’s command line interface, cmd.exe, on the other hand, lacked various capabilities of it’s Linux counterpart.
Microsoft, therefore, in their Anniversary Update, added several features to the Windows 10 OS, with bash being one of them. To install and use it on Windows 10, one need to perform the following steps :
- Start -> Settings -> Update&Security. Under the ‘Use Developer Features’, select ‘Developer mode’.

- Selecting the developer mode will pop the following alert. Click yes, and let the computer restart.


- Go to Control Panel -> Programs and Features -> Turn Windows Features On and Off. In the window that appears, check the ‘Windows Subsystem for Linux’ option, and click OK.

- This will trigger an alert asking for the system to be restarted to complete the installation of the required components. After the restart is complete, go to the command prompt, and type ‘bash’. Follow the instructions that appear to install bash from Windows store. After it is installed, it will be required to create a UNIX username. After completing the installation, exit the prompt.
- To access the shell, simply type ‘bash’ in the Windows command prompt, and everything is good to go.


Note that bash runs natively on Windows 10, which is different from using emulators like ‘cygwin’ for Windows which enabled GNU tools to run on unsupported Windows environment. Also, Linux subsystem for Windows 10 is only available on the 64-bit version of the OS.
In this post, I will show how to install Bash on Windows 10 and quickly go through some of my experiences with this new Windows feature.
- Author
- Recent Posts

During the Build 2016 keynote, Microsoft made a big announcement: “The Bash shell is coming to Windows.” No one saw that coming. This feature means so much for developers because it allows them to run native Bash on Ubuntu on Windows 10.
It looks like Microsoft listened to feedback and has made it easier for everyone to use open source tools natively on Windows. We should not expect to see support for KDE or Gnome-like Linux desktop experiences, but it is intended for developers to make their lives easier while making the two ecosystems more integrated.
First things first, yes, it runs on Ubuntu. However, it is not an Ubuntu virtual machine or container running on top of Windows. You can think of it as an emulator that translates Linux calls into Windows OS calls. Native Ubuntu binaries are running directly in Windows Subsystem for Linux.
To start with Bash, you must have the latest Windows Insider (Build 14316). It is part of the fast ring of updates.
Next, you need to enable developer mode under Update and Security:
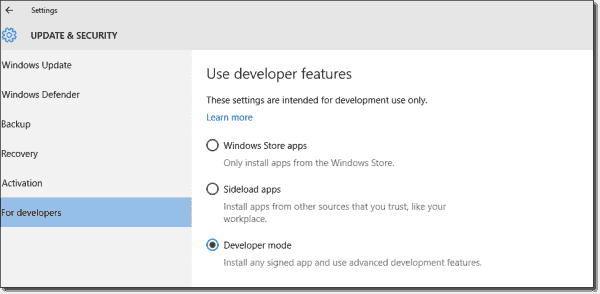
Enable Developer mode
Now you can add the Windows Subsystem for Linux feature using the “Turn Windows Feature on or off” menu:

Turn on feature Windows subsystem on Linux
After the restart, you are ready to go.
Simply open cmd or PowerShell and type “Bash.”

Install Bash for the first time
On the first attempt, you will need to accept the terms, and Bash will be ready in a couple of seconds.
For those with previous experience with Ubuntu or Bash, you’re ready to go! Just start by using your favorite commands. In the beta version, most of the commands are available, such as ssh, apt, find, mysql, python, perl, md5sum, gpg, curl, wget, apache, mysql, python, perl, ruby, php, gcc, diff, and patch.
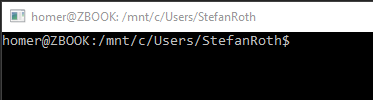
You can see that all default Windows drives are mounted under /mnt.
![]()
mnt mounting

Listing Windows directories
The Ubuntu file system can be found here:

Ubuntu file system
Now, let’s try some cool things.
You can simply SSH to any system without having Putty installed. It just works.

Using SSH
I started my “scripting” career with PowerShell. Yes, I had some bad experiences with VBScript, but PowerShell was a milestone for me. Once I learned most of the concepts, such as statements, loops, variables, etc., I decided to jump over to Python as its syntax is also super easy and allows you to enable a bunch of different automation scenarios.
On my Windows 10 client, I usually install Python and then start to play with it. However, as far as I know, it should already be enabled on Ubuntu, so I just checked it.

Python installation
Yes. Python 2 and 3 are already installed and embedded, so we can say that Windows 10 comes with Python installed by default.
That’s great as you can simply start developing with Python and install additional modules or packages. For instance, if you are interested in game development, you can install one of the popular modules, PYgame, using the following command in Windows:
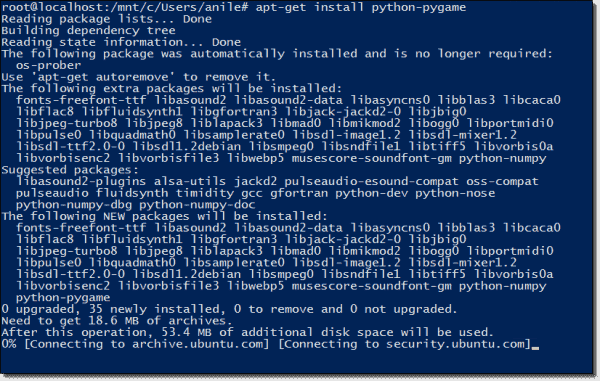
Installing additional Python modules
One thing I realized with Bash is that DNS was not working properly. I’m not sure if it’s a bug or expected configuration, but you need to run the following command with your DNS Server IP address to fix this issue:
![]()
Fixing DNS issue
In conclusion, if you are a Windows Insider and want to check how Bash does in Windows 10, go ahead and try it out. Microsoft also continues to collect feedback regarding Bash support on Windows Command-line UserVoice portal.
Subscribe to 4sysops newsletter!
In my next post, I will give you have tips of what you can do with Windows 10 Bash.
Microsoft’s interest in the open-source world has an exciting outcome; it allows you to run Linux on the Windows machine. You should be able to install a bash shell on Windows that will let you execute Linux commands on Windows!
You Might Be Interested In
You read it right, what more you can do this without the need to create a virtual machine or dual boot Windows and Linux.
In this tutorial, you shall know how to install and enable Bash shell on Windows 10. Also, we shall show you how to uninstall the Bash shell just in case you do not want it anymore.
Installing Linux Bash Shell on Windows 10
Before installing the Linux Bash Shell, you need to enable the Windows Subsystem for Linux feature.
Enabling the Windows Subsystem for Linux
Step 1. On your Windows machine, launch the start menu.
Step 2. In the search bar, search for the Windows PowerShell application, right-click and run it as administrator.
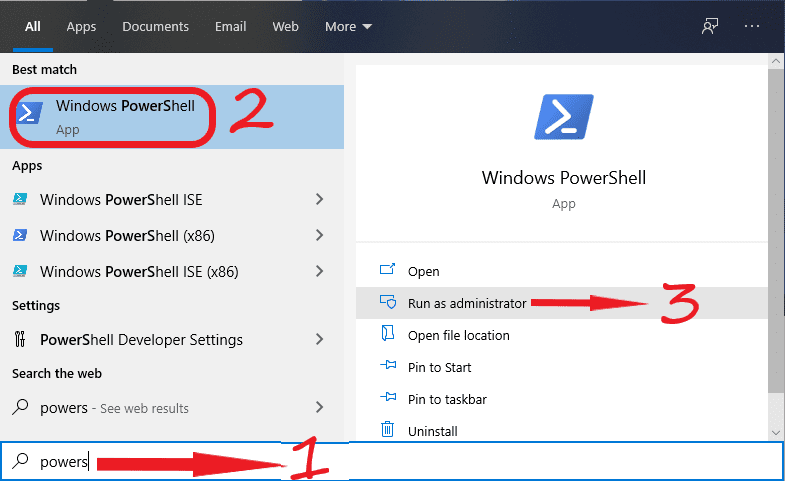
Open PowerShell
Step 3. When the PowerShell opens, run the below command to enable the Windows Subsystem for Linux feature.
Enable-WindowsOptionalFeature -Online -FeatureName Microsoft-Windows-Subsystem-Linux
The command may take some time. When done, it should prompt you to restart your machine.
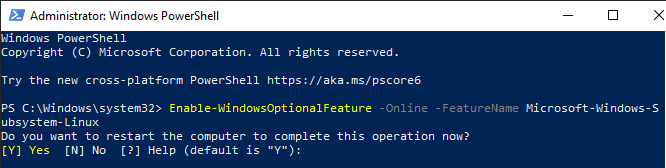
Enable Windows feature
After your machine restarts, you can move on to the next section to start downloading and installing the Bash Shell.
Installing Bash Shell on Windows
Step 1. Launch the Microsoft Store.
Step 2. In the search bar, look for Linux applications. Then select the Ubuntu application and open it.
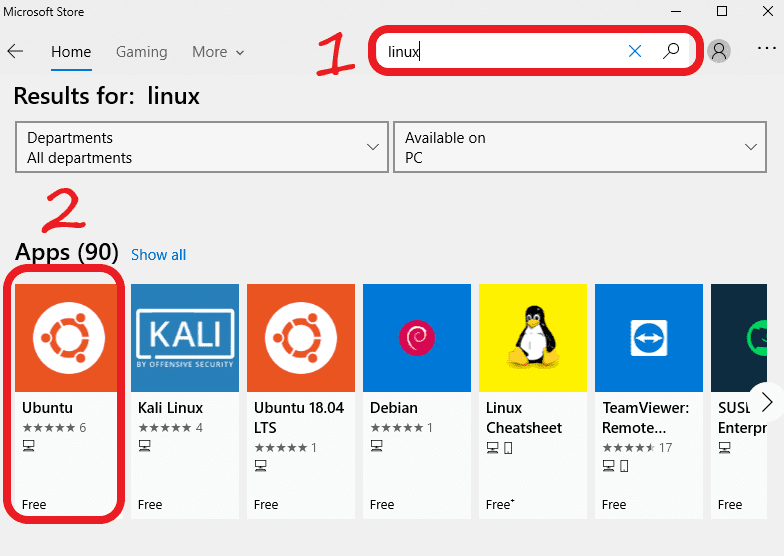
Download Ubuntu Application From Microsoft Store
Step 3. Press the “Get” button to start the download.
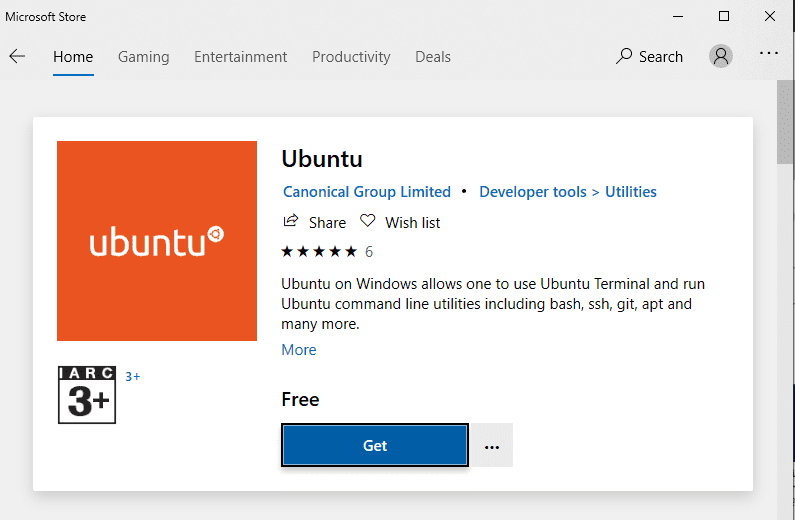
Press the Get Button
Watch your download progress.

Download Will Start Soon

Check your Download Progress
Step 4. Ubuntu for Windows has downloaded successfully; you can launch it now.
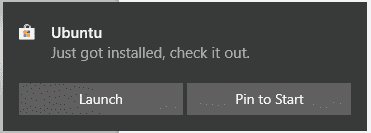
Ubuntu Downloaded Successfully
Step 5. For the first time, it will take a few minutes to set things up.
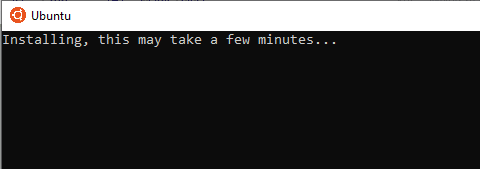
Ubuntu Application Installation
Step 6. After installation is complete, you should be prompted to create a username and password.
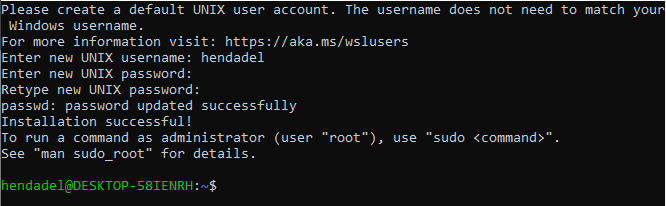
Create Username and Password
Step 7. You should be all set. You can now start using a Bash Shell on the Windows machine.

Start Using Bash on Windows
Uninstalling Bash Shell on Windows 10
Step 1. You should first uninstall the installed Ubuntu application alongside all its files. Open the settings application from your start menu.
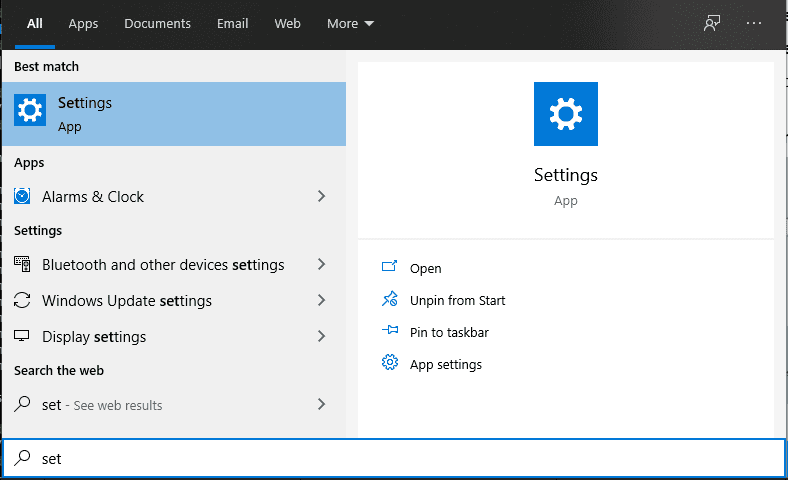
Open Settings application on Windows
Step 2. Select “Apps” and open it.
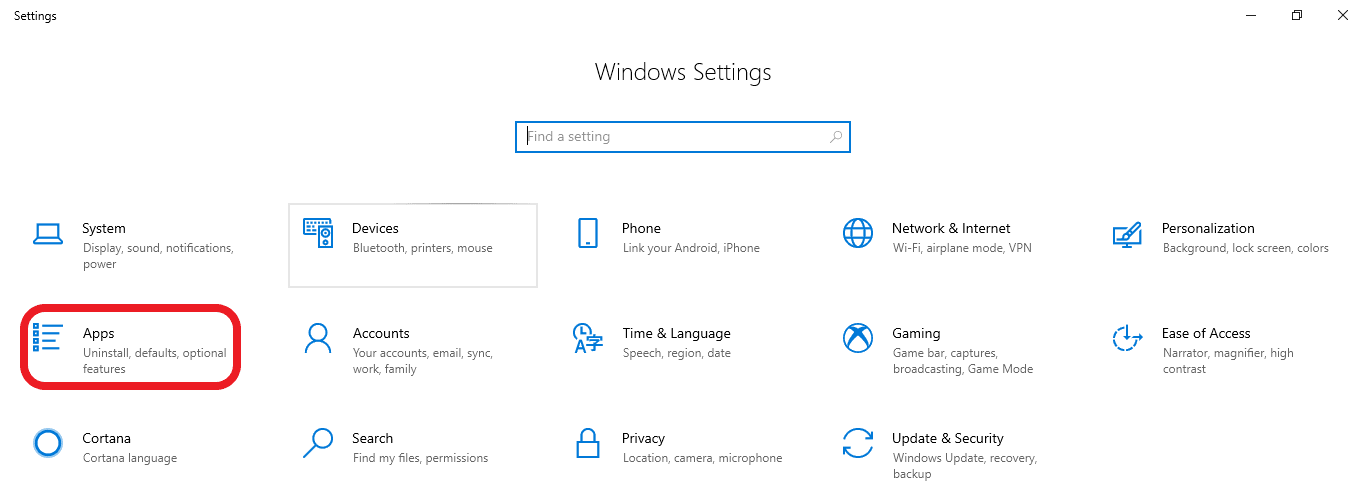
Open Apps
Step 3. Select “Apps and Features,” search for the Ubuntu application and click on it.
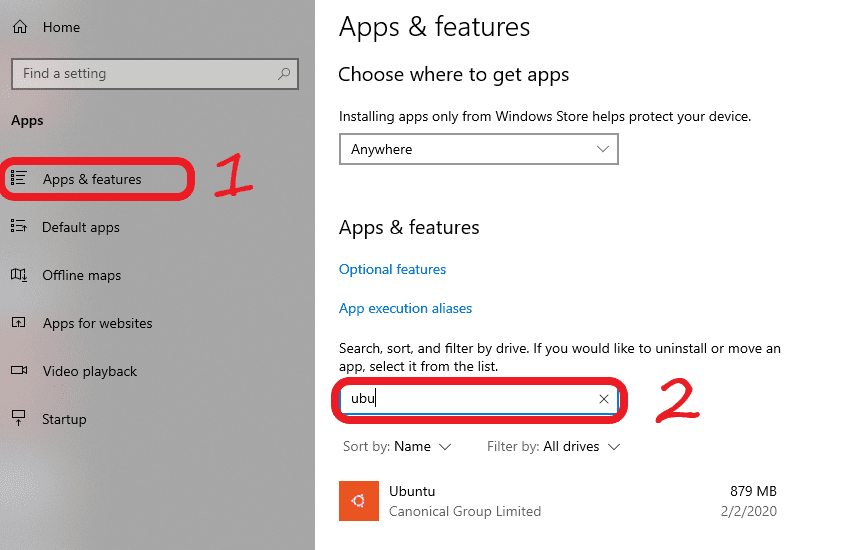
Open Apps and Features
Step 4. Click the “Uninstall” button.
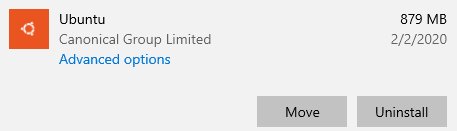
Press the Uninstall Button
Step 5. Check the uninstallation progress.
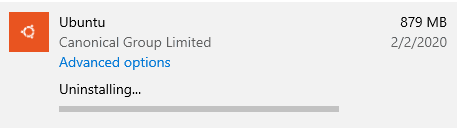
Uninstallation Progress
Step 6. Now let’s disable the Windows Subsystem for Linux feature. Open PowerShell and run it as administrator.
Step 7. Use the following command below to disable the Windows Subsystem for the Linux feature.
Disable-WindowsOptionalFeature -Online -FeatureName Microsoft-Windows-Subsystem-Linux

Disable Windows feature
That’s all about installing and uninstalling the Bash shell on your Windows system.
You Might Be Interested In