![]()
Step 1: Subscribe to the Chocolatey Newsletter (Optional)
Be the first to know about upcoming features, security releases, and news about Chocolatey.
Step 2: Choose Your Installation Method
Know the Requirements:
- Windows 7+ / Windows Server 2003+
- PowerShell v2+ (minimum is v3 for install from this website due to TLS 1.2 requirement)
- .NET Framework 4+ (the installation will attempt to install .NET 4.0 if you do not have it installed)(minimum is 4.5 for install from this website due to TLS 1.2 requirement)
1. Choose How to Install Chocolatey:
Install Chocolatey for Individual Use:
- First, ensure that you are using an administrative shell — you can also install as a non-admin, check out Non-Administrative Installation.
-
Install with powershell.exe
With PowerShell, you must ensure Get-ExecutionPolicy is not Restricted. We suggest using
Bypassto bypass the policy to get things installed orAllSignedfor quite a bit more security.- Run
Get-ExecutionPolicy. If it returnsRestricted, then runSet-ExecutionPolicy AllSignedorSet-ExecutionPolicy Bypass -Scope Process.
Now run the following command:
>
- Run
- Paste the copied text into your shell and press Enter.
- Wait a few seconds for the command to complete.
- If you don’t see any errors, you are ready to use Chocolatey! Type
chocoorchoco -?now, or see Getting Started for usage instructions.
This applies to both open source and commercial editions of Chocolatey.
2. Enter Your Internal Repository Url
(this should look similar to https://community.chocolatey.org/api/v2/)
3. Setup Your Environment
- Ensure you are set for organizational deployment
-
Download the Chocolatey package
- Put the Chocolatey package on your internal repository
4. Get Your Scripts
1. Save this installation script
Save the following as ChocolateyInstall.ps1:
# Download and install Chocolatey nupkg from an OData (HTTP/HTTPS) url such as Artifactory, Nexus, ProGet (all of these are recommended for organizational use), or Chocolatey.Server (great for smaller organizations and POCs)
# This is where you see the top level API - with xml to Packages - should look nearly the same as https://community.chocolatey.org/api/v2/
# If you are using Nexus, always add the trailing slash or it won't work
# === EDIT HERE ===
$packageRepo = 'INTERNAL REPO URL'

# If the above $packageRepo repository requires authentication, add the username and password here. Otherwise these leave these as empty strings.
$repoUsername = ''    # this must be empty is NOT using authentication
$repoPassword = ''    # this must be empty if NOT using authentication

# Determine unzipping method
# 7zip is the most compatible, but you need an internally hosted 7za.exe.
# Make sure the version matches for the arguments as well.
# Built-in does not work with Server Core, but if you have PowerShell 5
# it uses Expand-Archive instead of COM
$unzipMethod = 'builtin'
#$unzipMethod = '7zip'
#$7zipUrl = 'https://chocolatey.org/7za.exe' (download this file, host internally, and update this to internal)

# === ENVIRONMENT VARIABLES YOU CAN SET ===
# Prior to running this script, in a PowerShell session, you can set the
# following environment variables and it will affect the output

# - $env:ChocolateyEnvironmentDebug = 'true' # see output
# - $env:chocolateyIgnoreProxy = 'true' # ignore proxy
# - $env:chocolateyProxyLocation = '' # explicit proxy
# - $env:chocolateyProxyUser = '' # explicit proxy user name (optional)
# - $env:chocolateyProxyPassword = '' # explicit proxy password (optional)

# === NO NEED TO EDIT ANYTHING BELOW THIS LINE ===
# Ensure we can run everything
Set-ExecutionPolicy Bypass -Scope Process -Force;

# If the repository requires authentication, create the Credential object
if ((-not [string]::IsNullOrEmpty($repoUsername)) -and (-not [string]::IsNullOrEmpty($repoPassword))) {
$securePassword = ConvertTo-SecureString $repoPassword -AsPlainText -Force
$repoCreds = New-Object System.Management.Automation.PSCredential ($repoUsername, $securePassword)
}

$searchUrl = ($packageRepo.Trim('/'), 'Packages()?$filter=(Id%20eq%20%27chocolatey%27)%20and%20IsLatestVersion') -join '/'

# Reroute TEMP to a local location
New-Item $env:ALLUSERSPROFILEchoco-cache -ItemType Directory -Force
$env:TEMP = "$env:ALLUSERSPROFILEchoco-cache"

$localChocolateyPackageFilePath = Join-Path $env:TEMP 'chocolatey.nupkg'
$ChocoInstallPath = "$($env:SystemDrive)ProgramDataChocolateybin"
$env:ChocolateyInstall = "$($env:SystemDrive)ProgramDataChocolatey"
$env:Path += ";$ChocoInstallPath"
$DebugPreference = 'Continue';

# PowerShell v2/3 caches the output stream. Then it throws errors due
# to the FileStream not being what is expected. Fixes "The OS handle's
# position is not what FileStream expected. Do not use a handle
# simultaneously in one FileStream and in Win32 code or another
# FileStream."
function Fix-PowerShellOutputRedirectionBug {
$poshMajorVerion = $PSVersionTable.PSVersion.Major

if ($poshMajorVerion -lt 4) {
try{
# http://www.leeholmes.com/blog/2008/07/30/workaround-the-os-handles-position-is-not-what-filestream-expected/ plus comments
$bindingFlags = [Reflection.BindingFlags] "Instance,NonPublic,GetField"
$objectRef = $host.GetType().GetField("externalHostRef", $bindingFlags).GetValue($host)
$bindingFlags = [Reflection.BindingFlags] "Instance,NonPublic,GetProperty"
$consoleHost = $objectRef.GetType().GetProperty("Value", $bindingFlags).GetValue($objectRef, @())
[void] $consoleHost.GetType().GetProperty("IsStandardOutputRedirected", $bindingFlags).GetValue($consoleHost, @())
$bindingFlags = [Reflection.BindingFlags] "Instance,NonPublic,GetField"
$field = $consoleHost.GetType().GetField("standardOutputWriter", $bindingFlags)
$field.SetValue($consoleHost, [Console]::Out)
[void] $consoleHost.GetType().GetProperty("IsStandardErrorRedirected", $bindingFlags).GetValue($consoleHost, @())
$field2 = $consoleHost.GetType().GetField("standardErrorWriter", $bindingFlags)
$field2.SetValue($consoleHost, [Console]::Error)
} catch {
Write-Output 'Unable to apply redirection fix.'
}
}
}

Fix-PowerShellOutputRedirectionBug

# Attempt to set highest encryption available for SecurityProtocol.
# PowerShell will not set this by default (until maybe .NET 4.6.x). This
# will typically produce a message for PowerShell v2 (just an info
# message though)
try {
# Set TLS 1.2 (3072), then TLS 1.1 (768), then TLS 1.0 (192)
# Use integers because the enumeration values for TLS 1.2 and TLS 1.1 won't
# exist in .NET 4.0, even though they are addressable if .NET 4.5+ is
# installed (.NET 4.5 is an in-place upgrade).
[System.Net.ServicePointManager]::SecurityProtocol = 3072 -bor 768 -bor 192
} catch {
Write-Output 'Unable to set PowerShell to use TLS 1.2 and TLS 1.1 due to old .NET Framework installed. If you see underlying connection closed or trust errors, you may need to upgrade to .NET Framework 4.5+ and PowerShell v3+.'
}

function Get-Downloader {
param (
[string]$url
)
$downloader = new-object System.Net.WebClient

$defaultCreds = [System.Net.CredentialCache]::DefaultCredentials
if (Test-Path -Path variable:repoCreds) {
Write-Debug "Using provided repository authentication credentials."
$downloader.Credentials = $repoCreds
} elseif ($defaultCreds -ne $null) {
Write-Debug "Using default repository authentication credentials."
$downloader.Credentials = $defaultCreds
}

$ignoreProxy = $env:chocolateyIgnoreProxy
if ($ignoreProxy -ne $null -and $ignoreProxy -eq 'true') {
Write-Debug 'Explicitly bypassing proxy due to user environment variable.'
$downloader.Proxy = [System.Net.GlobalProxySelection]::GetEmptyWebProxy()
} else {
# check if a proxy is required
$explicitProxy = $env:chocolateyProxyLocation
$explicitProxyUser = $env:chocolateyProxyUser
$explicitProxyPassword = $env:chocolateyProxyPassword
if ($explicitProxy -ne $null -and $explicitProxy -ne '') {
# explicit proxy
$proxy = New-Object System.Net.WebProxy($explicitProxy, $true)
if ($explicitProxyPassword -ne $null -and $explicitProxyPassword -ne '') {
$passwd = ConvertTo-SecureString $explicitProxyPassword -AsPlainText -Force
$proxy.Credentials = New-Object System.Management.Automation.PSCredential ($explicitProxyUser, $passwd)
}

Write-Debug "Using explicit proxy server '$explicitProxy'."
$downloader.Proxy = $proxy

} elseif (!$downloader.Proxy.IsBypassed($url)) {
# system proxy (pass through)
$creds = $defaultCreds
if ($creds -eq $null) {
Write-Debug 'Default credentials were null. Attempting backup method'
$cred = get-credential
$creds = $cred.GetNetworkCredential();
}

$proxyaddress = $downloader.Proxy.GetProxy($url).Authority
Write-Debug "Using system proxy server '$proxyaddress'."
$proxy = New-Object System.Net.WebProxy($proxyaddress)
$proxy.Credentials = $creds
$downloader.Proxy = $proxy
}
}

return $downloader
}

function Download-File {
param (
[string]$url,
[string]$file
)
$downloader = Get-Downloader $url
$downloader.DownloadFile($url, $file)
}

function Download-Package {
param (
[string]$packageODataSearchUrl,
[string]$file
)
$downloader = Get-Downloader $packageODataSearchUrl

Write-Output "Querying latest package from $packageODataSearchUrl"
[xml]$pkg = $downloader.DownloadString($packageODataSearchUrl)
$packageDownloadUrl = $pkg.feed.entry.content.src

Write-Output "Downloading $packageDownloadUrl to $file"
$downloader.DownloadFile($packageDownloadUrl, $file)
}

function Install-ChocolateyFromPackage {
param (
[string]$chocolateyPackageFilePath = ''
)

if ($chocolateyPackageFilePath -eq $null -or $chocolateyPackageFilePath -eq '') {
throw "You must specify a local package to run the local install."
}

if (!(Test-Path($chocolateyPackageFilePath))) {
throw "No file exists at $chocolateyPackageFilePath"
}

$chocTempDir = Join-Path $env:TEMP "chocolatey"
$tempDir = Join-Path $chocTempDir "chocInstall"
if (![System.IO.Directory]::Exists($tempDir)) {[System.IO.Directory]::CreateDirectory($tempDir)}
$file = Join-Path $tempDir "chocolatey.zip"
Copy-Item $chocolateyPackageFilePath $file -Force

# unzip the package
Write-Output "Extracting $file to $tempDir..."
if ($unzipMethod -eq '7zip') {
$7zaExe = Join-Path $tempDir '7za.exe'
if (-Not (Test-Path ($7zaExe))) {
Write-Output 'Downloading 7-Zip commandline tool prior to extraction.'
# download 7zip
Download-File $7zipUrl "$7zaExe"
}

$params = "x -o`"$tempDir`" -bd -y `"$file`""
# use more robust Process as compared to Start-Process -Wait (which doesn't
# wait for the process to finish in PowerShell v3)
$process = New-Object System.Diagnostics.Process
$process.StartInfo = New-Object System.Diagnostics.ProcessStartInfo($7zaExe, $params)
$process.StartInfo.RedirectStandardOutput = $true
$process.StartInfo.UseShellExecute = $false
$process.StartInfo.WindowStyle = [System.Diagnostics.ProcessWindowStyle]::Hidden
$process.Start() | Out-Null
$process.BeginOutputReadLine()
$process.WaitForExit()
$exitCode = $process.ExitCode
$process.Dispose()

$errorMessage = "Unable to unzip package using 7zip. Perhaps try setting `$env:chocolateyUseWindowsCompression = 'true' and call install again. Error:"
switch ($exitCode) {
0 { break }
1 { throw "$errorMessage Some files could not be extracted" }
2 { throw "$errorMessage 7-Zip encountered a fatal error while extracting the files" }
7 { throw "$errorMessage 7-Zip command line error" }
8 { throw "$errorMessage 7-Zip out of memory" }
255 { throw "$errorMessage Extraction cancelled by the user" }
default { throw "$errorMessage 7-Zip signalled an unknown error (code $exitCode)" }
}
} else {
if ($PSVersionTable.PSVersion.Major -lt 5) {
try {
$shellApplication = new-object -com shell.application
$zipPackage = $shellApplication.NameSpace($file)
$destinationFolder = $shellApplication.NameSpace($tempDir)
$destinationFolder.CopyHere($zipPackage.Items(),0x10)
} catch {
throw "Unable to unzip package using built-in compression. Set `$env:chocolateyUseWindowsCompression = 'false' and call install again to use 7zip to unzip. Error: `n $_"
}
} else {
Expand-Archive -Path "$file" -DestinationPath "$tempDir" -Force
}
}

# Call Chocolatey install
Write-Output 'Installing chocolatey on this machine'
$toolsFolder = Join-Path $tempDir "tools"
$chocInstallPS1 = Join-Path $toolsFolder "chocolateyInstall.ps1"

& $chocInstallPS1

Write-Output 'Ensuring chocolatey commands are on the path'
$chocInstallVariableName = 'ChocolateyInstall'
$chocoPath = [Environment]::GetEnvironmentVariable($chocInstallVariableName)
if ($chocoPath -eq $null -or $chocoPath -eq '') {
$chocoPath = 'C:ProgramDataChocolatey'
}

$chocoExePath = Join-Path $chocoPath 'bin'

if ($($env:Path).ToLower().Contains($($chocoExePath).ToLower()) -eq $false) {
$env:Path = [Environment]::GetEnvironmentVariable('Path',[System.EnvironmentVariableTarget]::Machine);
}

Write-Output 'Ensuring chocolatey.nupkg is in the lib folder'
$chocoPkgDir = Join-Path $chocoPath 'libchocolatey'
$nupkg = Join-Path $chocoPkgDir 'chocolatey.nupkg'
if (!(Test-Path $nupkg)) {
Write-Output 'Copying chocolatey.nupkg is in the lib folder'
if (![System.IO.Directory]::Exists($chocoPkgDir)) { [System.IO.Directory]::CreateDirectory($chocoPkgDir); }
Copy-Item "$file" "$nupkg" -Force -ErrorAction SilentlyContinue
}
}

# Idempotence - do not install Chocolatey if it is already installed
if (!(Test-Path $ChocoInstallPath)) {
# download the package to the local path
if (!(Test-Path $localChocolateyPackageFilePath)) {
Download-Package $searchUrl $localChocolateyPackageFilePath
}

# Install Chocolatey
Install-ChocolateyFromPackage $localChocolateyPackageFilePath
}
2. Make script accessible by internal url
Put the script somewhere internally that can be accessed by a url (like a raw/binary repository in Nexus, Artifactory, or ProGet). Do NOT put the script on a NuGet type repository (where your packages will be), create a new Raw/Binary repository.
3. Install/Deploy Chocolatey internally
Now you can do similar to the individual side, but your command will be something like:
Set-ExecutionPolicy Bypass -Scope Process -Force; iex ((New-Object System.Net.WebClient).DownloadString('INTERNAL REPO URL/ChocolateyInstall.ps1'))
3. Add the following to your playbook
# Note: `chocolateyDownloadUrl is completely different than normal
#  source locations. This is directly to the bare download url for the
#  chocolatey.nupkg, similar to what you see when you browse to
#  https://community.chocolatey.org/api/v2/package/chocolatey
node['chocolatey']['install_vars']['chocolateyDownloadUrl'] = 'INTERNAL REPO URL/check_this/chocolatey.VERSION.nupkg'
node['chocolatey']['upgrade'] = true
include_recipe 'chocolatey::default'
The install of Chocolatey is separate from the Chef built-in resources. You will need the Chocolatey Cookbook.
3. Add the following to your DSC script:
cChocoInstaller InstallChocolatey
{
  InstallDir            = "C:ProgramDatachocolatey"
  ChocoInstallScriptUrl = "INTERNAL REPO URL/ChocolateyInstall.ps1"
}
Requires cChoco DSC Resource. See docs at https://github.com/chocolatey/cChoco.
## Note: `chocolatey_download_url is completely different than normal
##  source locations. This is directly to the bare download url for the
##  chocolatey.nupkg, similar to what you see when you browse to
##  https://community.chocolatey.org/api/v2/package/chocolatey
class {'chocolatey':
  chocolatey_download_url => 'INTERNAL REPO URL/check_this/chocolatey.VERSION.nupkg',
  use_7zip                => false,
}
Requires Puppet Chocolatey Provider module. See docs at https://forge.puppet.com/puppetlabs/chocolatey.
5. If applicable — Chocolatey configuration/installation
See infrastructure management matrix for Chocolatey configuration elements and examples.
Chocolatey Licensed Install:
Are you also installing a commercial edition of Chocolatey?
Please see Install the Licensed Edition.
Advanced Chocolatey Install:
Are you installing behind a proxy, need a completely offline install, or wanting to install a licenced edition of Chocolatey? Need even more options? Visit our Documentation or take our new Installation Course to help you get up and running with Chocolatey!
Представьте себе: вам нужно установить новые программы на ПК с Windows 10. Скорее всего, вы будете искать веб-сайт разработчика, пытаясь найти нужную страницу, а затем, как правило, будете переадресованы на страницу загрузки программы для скачивания установщика, после загрузки и установки в добавок к искомой программе вы можете получить абсолютно ненужные дополнительные программы и это в самом лучшем раскладе.
Вы, вероятно, знакомы с этой процедурой, поскольку она практически не менялась за время существования Windows, с тех пор как программное обеспечение стало распространяться в Интернете. У систем Unix есть альтернативный подход, хотя установка программ обрабатывается менеджерами пакетов, которые требуют минимального пользовательского ввода и часто управляются с помощью командной строки. В настоящее значительно вырос интерес к распространению этих преимуществ в Windows 10 с помощью сторонних менеджеров пакетов.
Сегодня мы познакомимся с Chocolatey, альтернативным менеджером пакетов для Windows, который больше ориентирован на пользователя, которому нужны классические программы и приложения.
Chocolatey в первую очередь управляется с помощью командной строки. Не беспокойтесь, если вы новичок в консольных приложениях — введите команды, как показано в документации, и вы не сталкнетесь с какими-либо проблемами. Chocolatey также имеет дополнительный графический интерфейс, который мы рассмотрим позже.
Установка Chocolatey
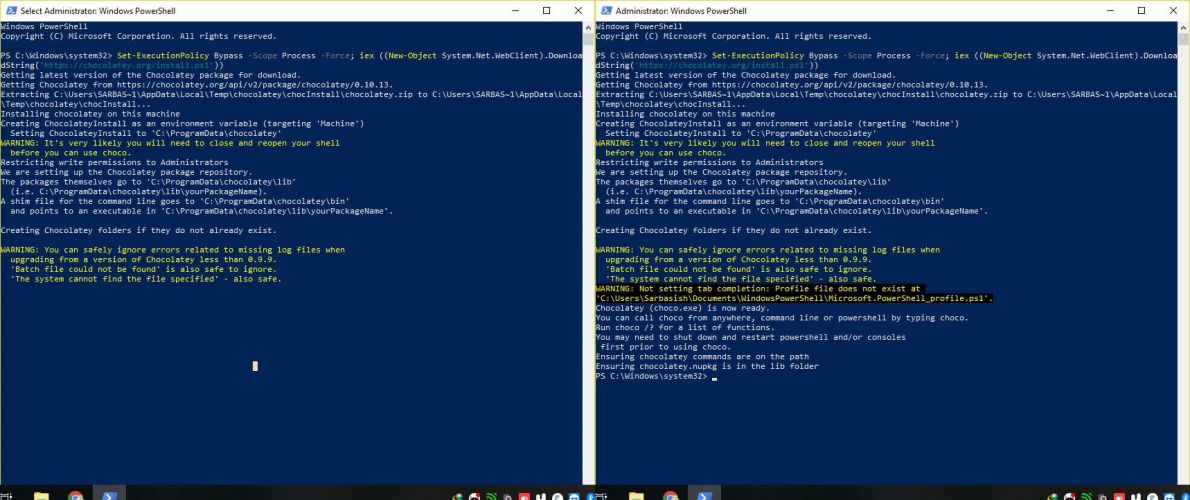
Чтобы установить Chocolatey, откройте PowerShell от имени администратора из меню «Пуск». Затем скопируйте и вставьте следующую строку сценария и нажмите клавишу Enter:
Set-ExecutionPolicy Bypass -Scope Process -Force; iex ((New-Object System.Net.WebClient).DownloadString('https://chocolatey.org/install.ps1'))
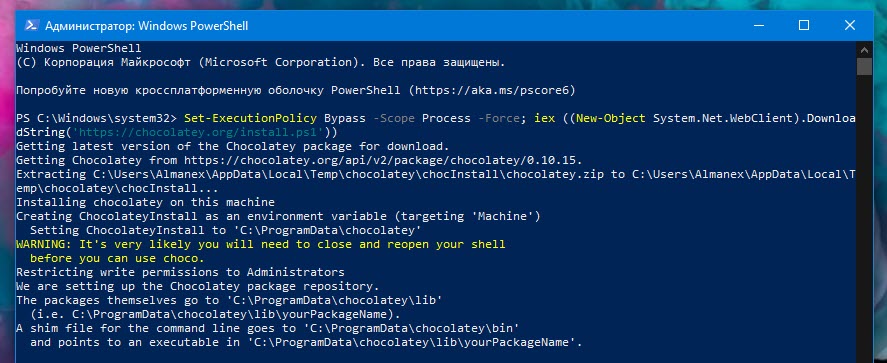
Это позволит настроить PowerShell для работы внешних сценариев перед загрузкой и запуском сценария установки Chocolatey. Для получения более подробной информации об этом процессе, вы должны обратиться к собственной документации Chocolatey. Если вы обеспокоены тем, что делает скрипт, вы должны проверить его вручную перед запуском команды.
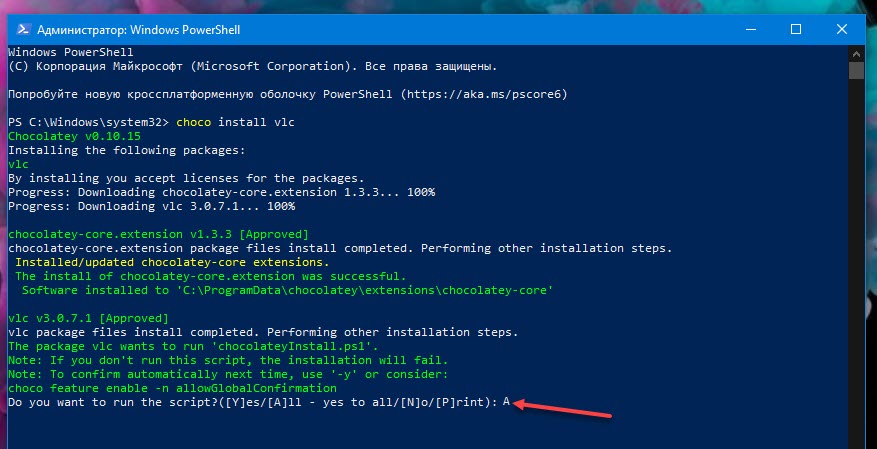
Установка программ с помощью Chocolatey
Основной особенностью данного менеджера пакетов, является возможность установки программного обеспечения Windows с помощью одной команды. Вместо того, чтобы посещать веб-сайт и вручную выбирать установщик, вы можете запустить PowerShell и ввести что-то вроде следующего:
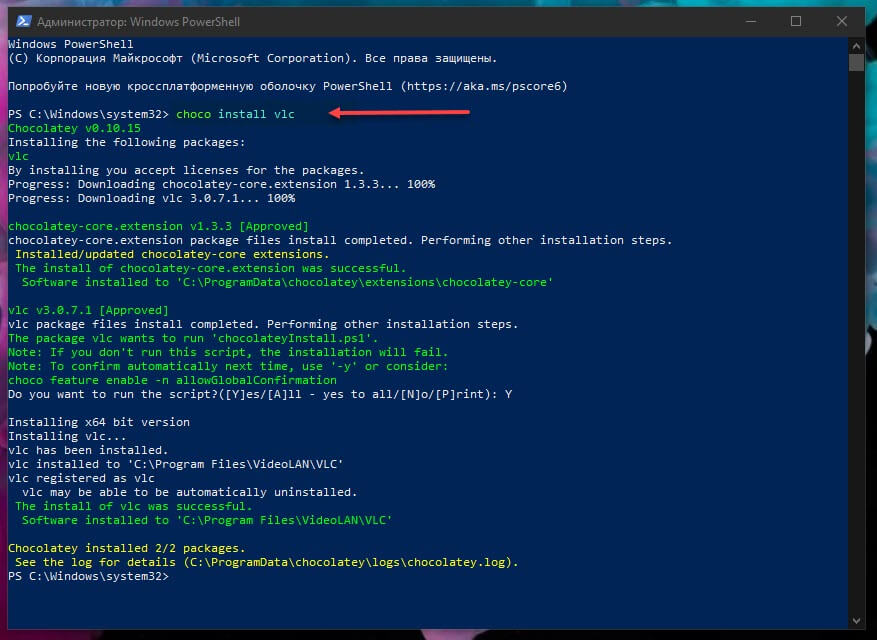
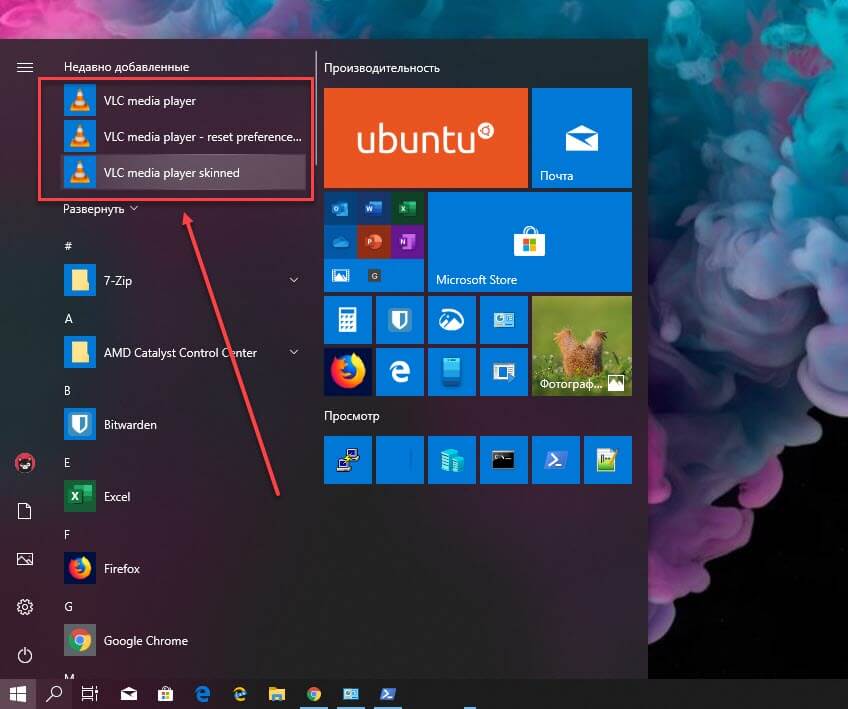
Это позволит загрузить и установить VLC Media Player в вашу систему, не требуя никаких дополнительных действий с вашей стороны. Вы увидите информацию о прогрессе, отображаемую на вашей консоли, когда VLC будет добавлен в вашу систему. Затем вы найдете его в меню «Пуск», как если бы вы запускали установщик самостоятельно.
Примечание: Некоторые программы могут попросить вас запустить скрипт во время их установки. При запросе введите «A» для «All» в консоли и нажмите клавишу Enter, чтобы подтвердить это приглашение и завершить установку.
Без лишней скромности — Chocolatey поддерживает тысячи разных программ, точнее 6869 пакетов, поддерживаемых сообществом. Вы можете посмотреть их, в хранилище пакетов Chocolatey. Некоторые из самых популярных вариантов включают Chrome, Adobe Reader, Firefox, WinRAR и Skype. В хранилище пакетов отображается имя, которое нужно добавить к команде «choco install» для установки любой программы.
Обновление установленных программ
Менеджер пакетов упрощает обновление установленных программ. Выполните следующую команду, чтобы обновить все программы в вашей системе, установленные с помощью Chocolatey:
Вы также можете передать имя для обновления одной программы:
Chocolatey проверит, требуются ли обновления, и автоматически установит новую версию. Если вы хотите узнать, доступны ли обновления, не устанавливая их, вместо этого запустите
choco outdated
Еще команды
Есть несколько других команд, которые вы, вероятно, найдете полезными.
При вводе команды «choco list -lo» будет показан список всех установленных вами программ.
Вы также можете использовать поиск:
choco search имя программы
Замените запрос имя программы, чтобы искать в хранилище пакетов и отобразить все доступные программы, так что вам даже не понадобится веб-браузер для поиска нового программного обеспечения.
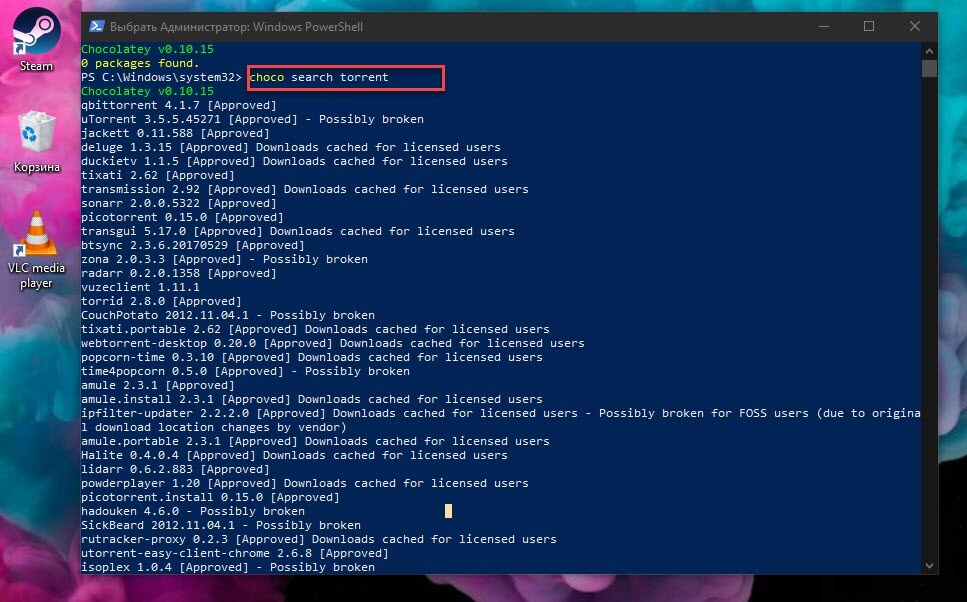
Например, будем искать торрент клиент:
choco search torrent
Получаем вывод, выберем, например transmission. Да, да, популярный торрент клиент, ранее доступный только для Mac OS X и Linux дистрибутивов — Transmission официально выпущен для Windows 10.
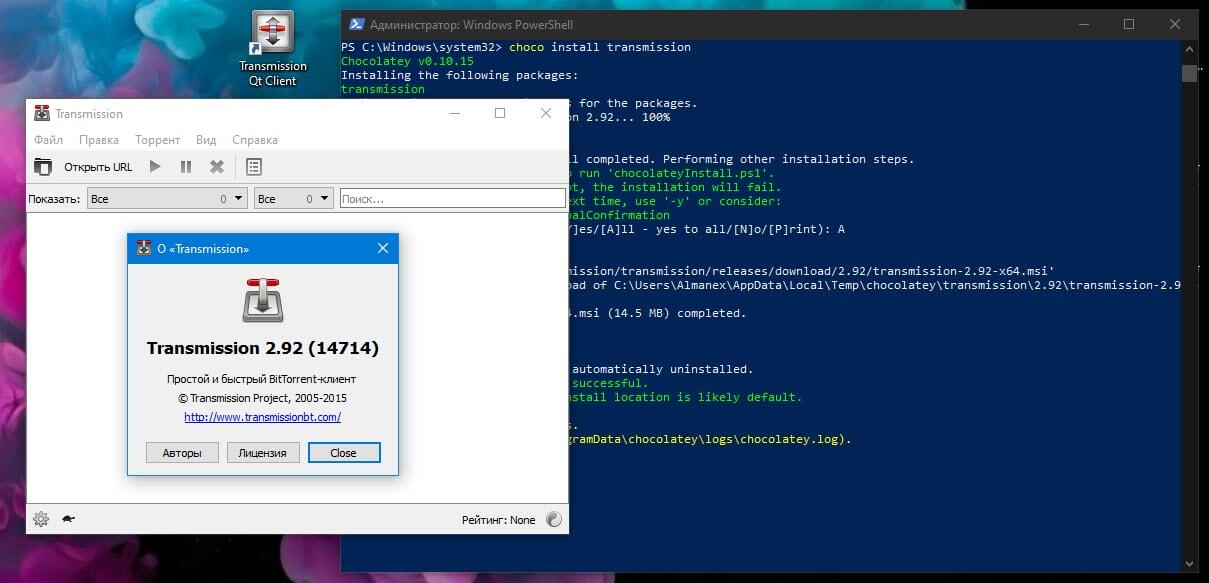
Получив таким образом имя, устанавливаем его командой:
choco install transmission
Несколько секунд и программа установлена, запустите ее с помощью ярлыка на рабочем столе или найдите ее в меню «Пуск».
Когда дело доходит до удаления программы, используйте команду «choco uninstall», добавляя имя программы. Менеджер отслеживает удаление приложений другими способами — если вы устанавливаете программу с Chocolatey, но затем удаляете ее из приложения «Параметры Windows» или Панели управления, она также автоматически исчезает из менеджера пакетов.
Мы рассмотрели в этой статье, самые простые возможности. Для опытных пользователей существует множество параметров конфигурации, а также возможность запуска локальных прокси-серверов, кэшей и репозиториев пакетов.
Графический Интерфейс
Наконец, стоит отметить, что Chocolatey имеет дополнительный графический интерфейс, который помогает вам взаимодействовать с вашими пакетами и устанавливать новые. Как и следовало ожидать, установка пользовательского интерфейса осуществляется через саму Chocolatey!
Запустите «choco install chocolateygui», чтобы установить графический интерфейс.
choco install chocolateygui
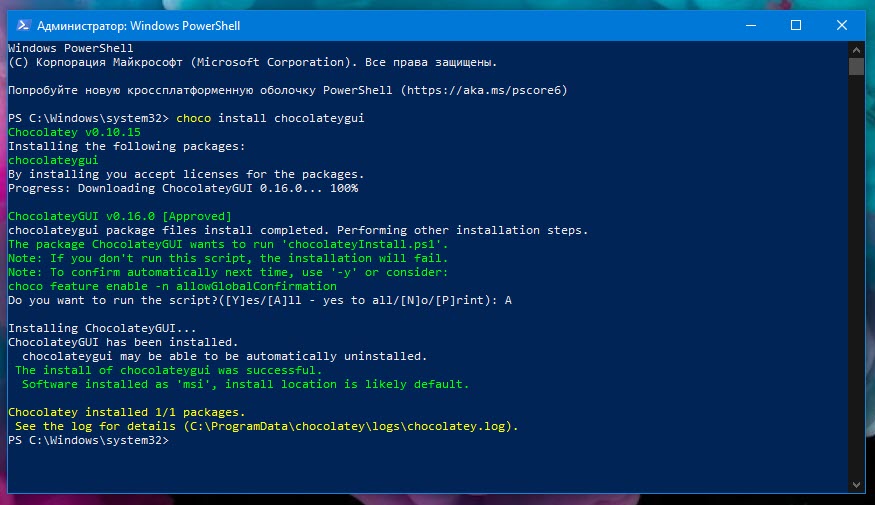
После этого вы сможете запустить графический интерфейс из меню «Пуск» с помощью ярлыка «Chocolatey GUI».
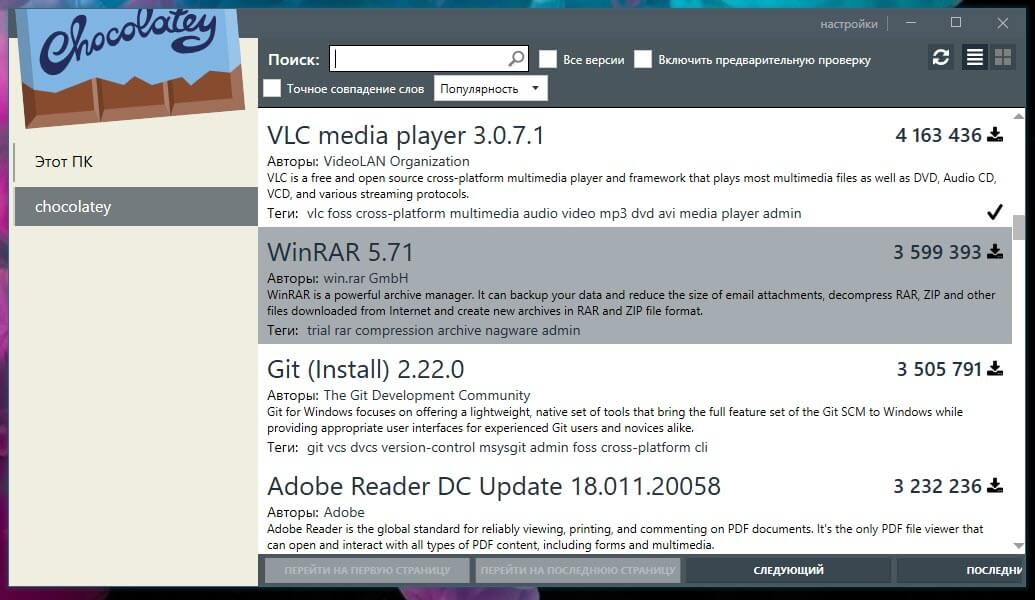
Это дает вам простой графический интерфейс для просмотра установленных пакетов, проверки обновлений и настройки параметров Chocolatey. Вы можете просмотреть каталог программ, нажав «Chocolatey» на левой боковой панели. Здесь вы можете искать новые программы и устанавливать их одним кликом мыши, избегая дальнейшего использования PowerShell.
Поделись этим.
Introduction
Chocolatey is a Windows counterpart to the Linux apt package manager or yum package manager. The software offers a CLI-based package installation and management in Windows with the community-maintained package repository.
In this tutorial, you will learn to install Chocolatey on Windows 10 and learn basic Chocolatey commands.
Prerequisites
- Windows 7+/Windows 2003+ (including Server Core, but excluding Windows Nano Server).
- .NET Framework 4.x+.
- A user account with administrator privileges.
What Is Chocolatey?
Chocolatey is a command-line package manager and installer for Windows operating systems. With the NuGet packaging infrastructure and the Windows PowerShell technology at its core, Chocolatey simplifies and automates the process of installing software and keeping it up to date.
When installing applications, Chocolatey silently configures and installs any dependencies required by the package. Chocolatey also allows users to wrap package installers, executable files, zips, and scripts into compiled packages.
There are two ways to install Chocolatey on Windows:
- Using the Command Prompt.
- Using Windows PowerShell.
Both installations require an account with administrative shell access.
You can also install a portable, non-administrative Chocolatey version if you don’t have administrative shell access. However, the number of packages available is much smaller than the standard Chocolatey installation.
Install via Command Line
Follow the steps below to install Chocolatey using the Command Prompt:
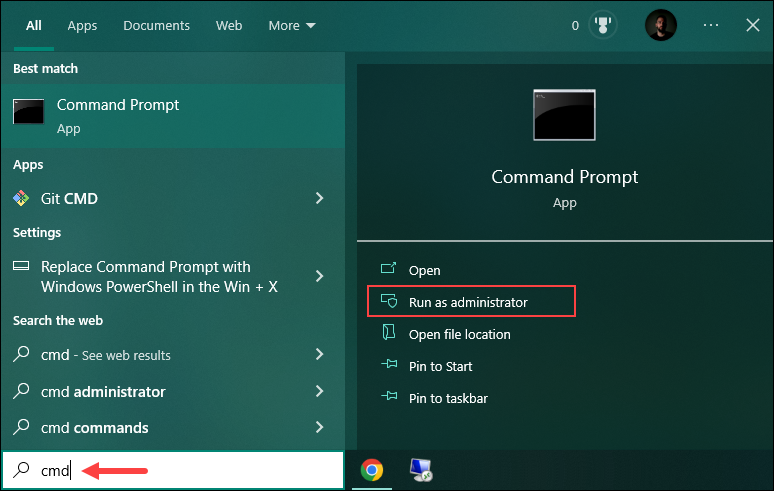
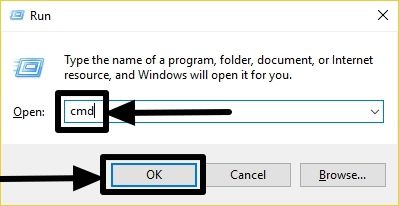
1. Press the Windows key and type «cmd«. Select the Run as administrator option.
2. Run the following command:
@"%SystemRoot%System32WindowsPowerShellv1.0powershell.exe" -NoProfile -InputFormat None -ExecutionPolicy Bypass -Command "[System.Net.ServicePointManager]::SecurityProtocol = 3072; iex ((New-Object System.Net.WebClient).DownloadString('https://community.chocolatey.org/install.ps1'))" && SET "PATH=%PATH%;%ALLUSERSPROFILE%chocolateybin"Wait for the installation process to finish to start using Chocolatey.
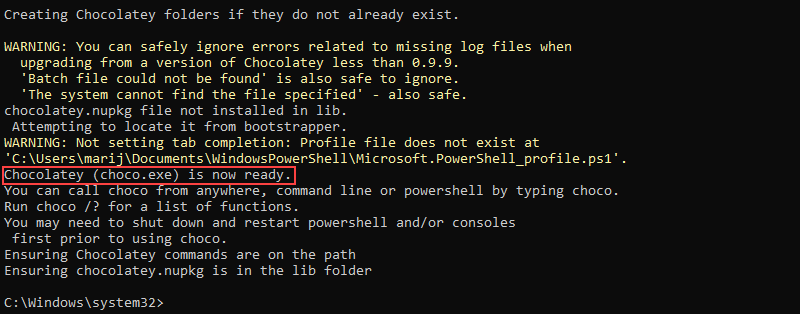
Note: Make sure to close and reopen the shell before using Chocolatey to ensure all the environment variables are loaded correctly.
via PowerShell
Installing Chocolatey via PowerShell involves an additional step compared to installing via the Command Prompt. Follow the steps below to install Chocolatey using Windows PowerShell:
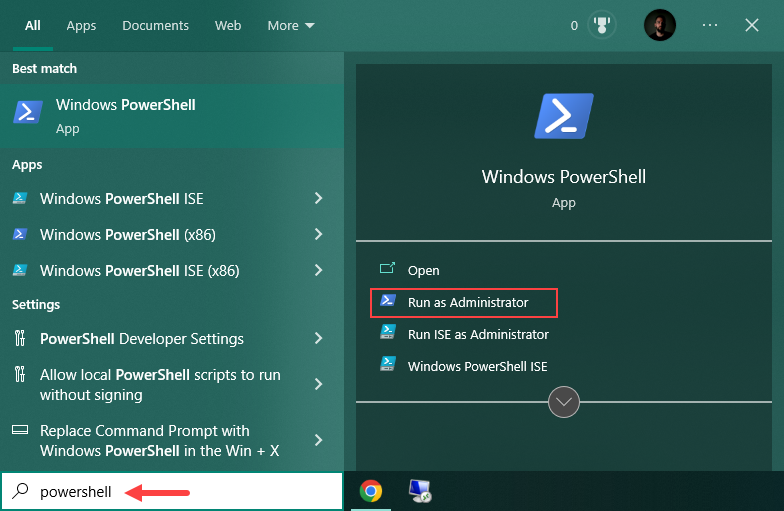
1. Press the Windows key and type «PowerShell». Select the Run as administrator option to open the Windows PowerShell.
2. Before installing Chocolatey, ensure that Get-ExecutionPolicy is not restricted. This PowerShell safety feature controls the conditions for loading configuration files and scripts, thus preventing the execution of malicious programs.
Check the status by running:
Get-ExecutionPolicy
In the example above, the execution policy is restricted. If the execution policy is not restricted, skip Step 3, and proceed with installing Chocolatey.
3. Unrestrict the PowerShell execution policy by running:
Set-ExecutionPolicy AllSigned 
When prompted, type Y to change the execution policy and press Enter to confirm.
4. Install Chocolatey by running:
Set-ExecutionPolicy Bypass -Scope Process -Force; [System.Net.ServicePointManager]::SecurityProtocol = [System.Net.ServicePointManager]::SecurityProtocol -bor 3072; iex ((New-Object System.Net.WebClient).DownloadString('https://community.chocolatey.org/install.ps1'))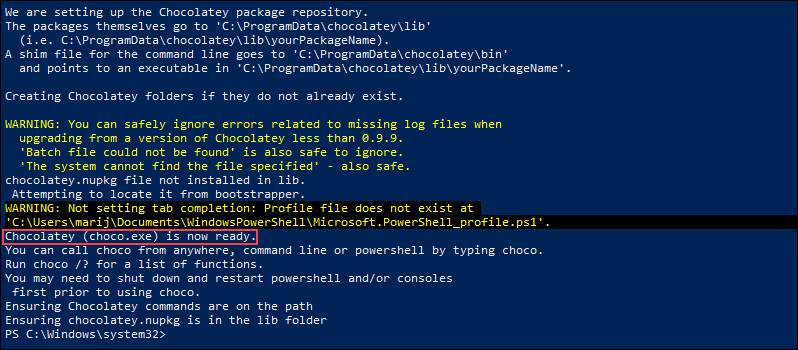
Wait for the installation to complete before you start using Chocolatey.
Chocolatey Features
The core of Chocolatey is the Windows Automation Language which utilizes PowerShell to perform different operations. One of Chocolatey’s most noteworthy features is the ability to keep all the installed software up to date with a single command. Thus, it helps keep all software updated with the latest security features.
Other prominent Chocolatey features are described below.
Packages
Chocolatey packages are nupkg files that contain metadata about the package’s dependencies and versioning with optional automation scripts or embedded software. The packages are compiled NuSpec files compatible with vanilla NuGet packages.
The focus is on managing packages to contain the necessary dependencies and software required for proper functioning. The compiled package file encapsulates everything, saving time by automating the installation and updating process.
Important: If you decide to build packages for Chocolatey, follow the distribution rights governing which software is redistributable in packages.
Chocolatey’s package repository is one of the largest Windows repositories online. Chocolatey also allows users to search the repository and copy the installation command from the website.
Chocolatey Client Software
The Chocolatey client software allows users to connect to software repositories to download packages. The software repository can be the Chocolatey community repository, its main software repository, or an alternative one.
The unified CLI supports every Windows installer type with a single command. It means that every piece of software (MSI, EXE, etc.) can be installed using Chocolatey, eliminating the need for running installers outside the command line.
Chocolatey executes all files using choco.exe. To see the list of arguments and options Chocolatey accepts, run:
choco --help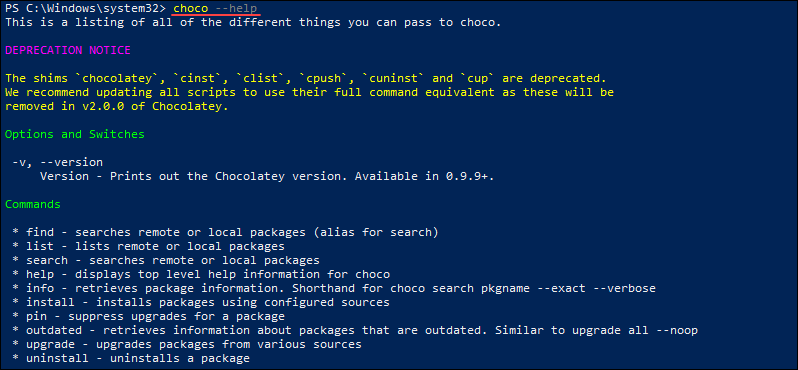
The command outputs the Chocolatey help file and all the accepted arguments and options.
Chocolatey GUI
The GUI app is available in the Chocolatey community repository and allows users to perform most of the tasks available using the CLI. The GUI simplifies the process for users not accustomed to using the CLI.
To install the Chocolatey GUI app, open Windows PowerShell or the Command Prompt as an administrator and run the following command:
choco install chocolateyguiWhen prompted, type A and press Enter to allow Chocolatey to run all the necessary scripts and automatically resolve any dependencies.
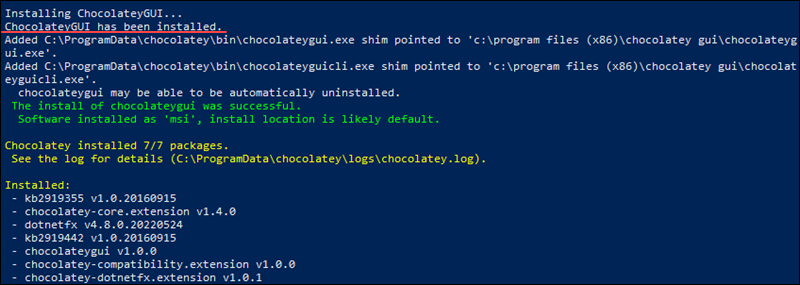
After the installation completes, run the Chocolatey GUI app.
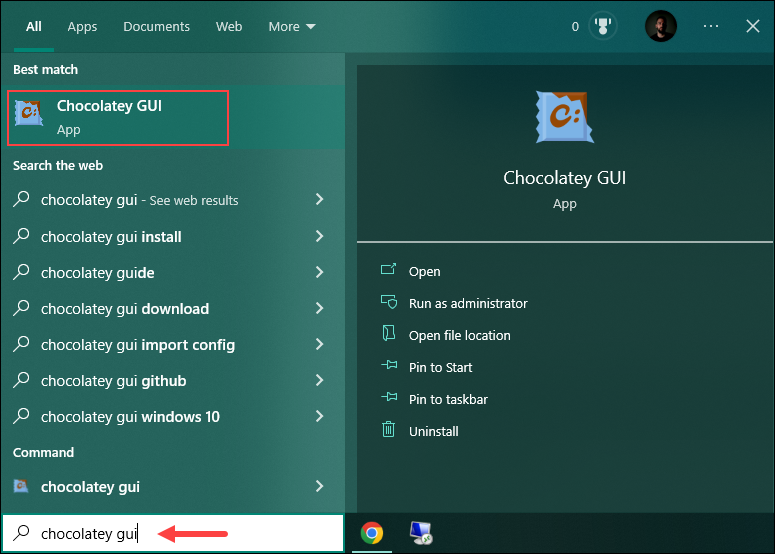
Combined with the Chocolatey agent, the GUI app allows non-admins to install software as well. Below is the app’s homepage.
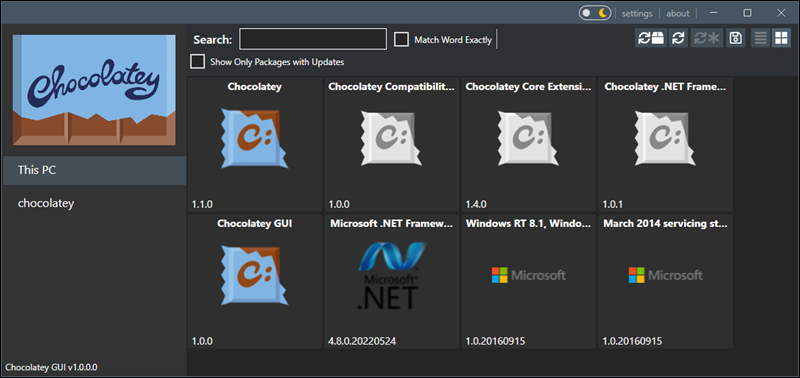
Repositories
Chocolatey allows users to install packages from remote official or custom repositories. The default repository is community-managed, and it is the largest online registry of packages for Windows. Currently, the repository contains over 9500 unique packages.
Note: Chocolatey doesn’t recommend using the community repository in organizations.
To add a custom repository, specify the source using the following syntax:
choco source add -n=[name] --source='https://[URL]'- Replace
[name]with the name for the new source. - Replace
[URL]with the repository web address.
For example:
choco source add -n=choco2 --source='https://example.com'Alternatively, install the Chocolatey Server, an IIS-backed repository supported directly by Chocolatey. It is available as a package in the community repository.
To install Chocolatey Server, run:
choco install chocolatey.server -yThe -y flag automatically answers Yes to any prompts during the installation.
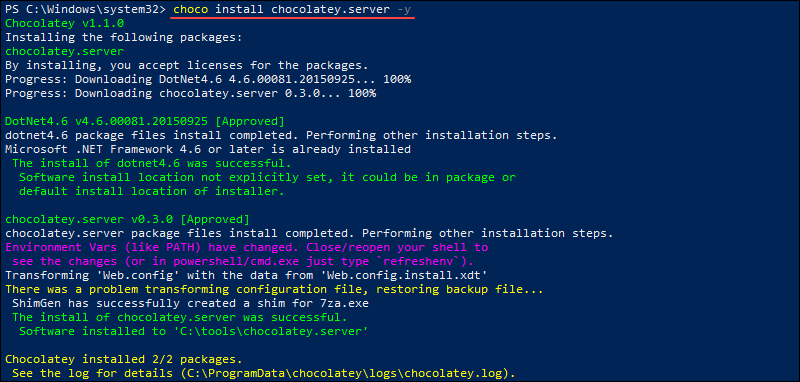
The output provides information about the installed packages and dependencies.
Security
Chocolatey is highly secure and has a strict policy on malicious and pirated software. The following features add up to Chocolatey’s security:
Package Moderation
Each package submitted to the Chocolatey repository goes through multiple moderation reviews, which include an automatic virus scan.
The moderation usually involves a human review to include safety, quality, and correctness checks. On the other hand, automated, machine-based moderation is reserved for trusted packages that come from trusted sources or software vendors.
Each script in the package is also revised to ensure they do only what they are supposed to, preventing malware or virus infections. The packages failing the moderation process are returned to the developers for adjustments.
CDN Download Cache
Chocolatey is open source but offers enhanced functionality, additional PowerShell functions, and exclusive features such as a CDN download cache for its licensed users.
The CDN download cache ensures that the packages on the community repository remain available even if the original website is down. This feature eliminates the possibility of getting a 404 error. A package copy is cached on Chocolatey’s private CDN, making it permanently available to licensed users.
Each cached copy is checked for viruses and checksummed to ensure there is no difference from the original package.
Antivirus Integration
Another Chocolatey security feature available to licensed users is the runtime antivirus protection during package download and installation. Users can choose between scanning packages with VirusTotal or integrating Chocolatey with their installed antivirus software. The default setting is to use VirusTotal.
When the packages download content from the Internet, Chocolatey CLI automatically checks any executables before running. The packages are scanned against more than 50 antivirus scanners.
The CLI automatically fails the install if any results return positive for viruses. In case of a fake positive, users can override the process and install the content anyway.
Since some scanners are more rigorous than others, Chocolatey CLI doesn’t flag a package as positive until at least five scanners identify it as such. The value can be adjusted to a higher or lower number using the following syntax:
choco config set virusCheckMinimumPositives [number]For example, the following command instructs Chocolatey CLI to fail any future installations if there are ten positive virus scans:
choco config set virusCheckMinimumPositives 10Audits
The Chocolatey for Business plan includes the auditing feature to allow users to keep track of who installed a package and the exact installation time and date. The provided information is often critical for audit reports. The installation date and time are in ISO 8601 UTC time.
To view installed packages along with information on the user who installed the package and the installation time, run:
choco list -lo --audit -rBasic Chocolatey Commands
After installing Chocolatey, start with the basic commands, such as searching, installing, or listing installed packages. Run the commands either in Windows PowerShell or in the Command Prompt.
The following table shows an overview of the basic commands, of which the most important ones are further explained in the sections below:
| Command | Description |
|---|---|
search |
Search remote or local packages. Alias for find. |
list |
See a list of installed packages. |
install |
Install a package. |
pin |
Prevent further package upgrades. |
upgrade |
Update a package to the latest version. |
uninstall |
Uninstall a package. |
push |
Push a compiled nupkg package to the specified source. |
source |
Show and configure default Chocolatey sources. |
help |
Show the Chocolatey help file. |
export |
Export the list of currently installed packages. |
download |
Download packages from remote resources to local ones. |
convert |
Convert a package from one type to another. |
Install Program
Use the following syntax to install one or multiple packages:
choco install [pkg|packages.config] [pkg2 ...]- Any package name ending with .config is considered a packages.config file.
For example, to install the 7zip package from the default repository, run:
choco install 7zip -y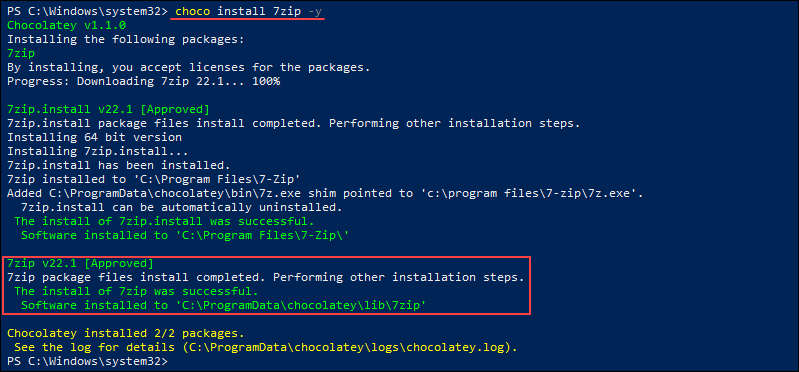
Update Program
The upgrade command upgrades the specified package or list of packages. If the package is not installed, upgrade installs it instead.
The syntax is:
choco upgrade [pkg] [pkg2 ...]For example, to upgrade the Opera browser package, run:
сhoco upgrade opera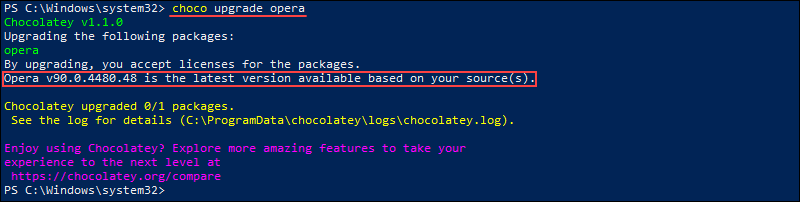
Since there is no new version available, Chocolatey states that the package version is already the latest available.
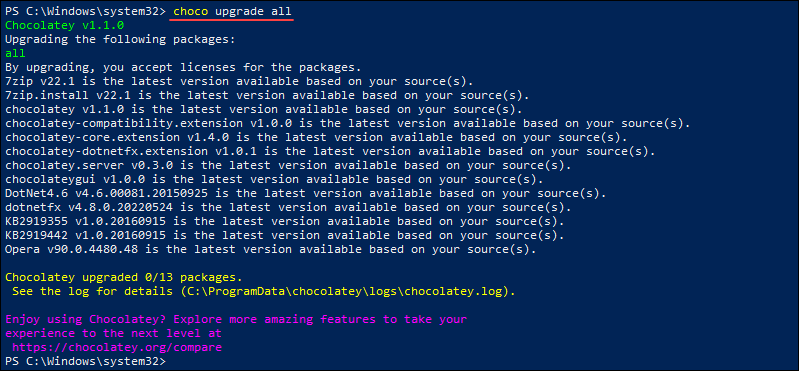
Update All Programs
Add the all flag to the upgrade command to update all installed packages. Run:
choco upgrade allNote: The cup command was an alias for choco upgrade, but it is now deprecated and will be removed as of version 2.0.0.
In the following example, Chocolatey outputs that all packages installed are the latest available version:
Search For a Program
The search command allows users to search for a package locally or remotely. Although search is currently an alias for the list command, starting from version 2.0.0, list will work only for local and installed packages. search and find will be used for remote sources as well.
The syntax for searching for a package is:
choco search [pkg]For example, to search for 7zip packages, run:
choco search 7zip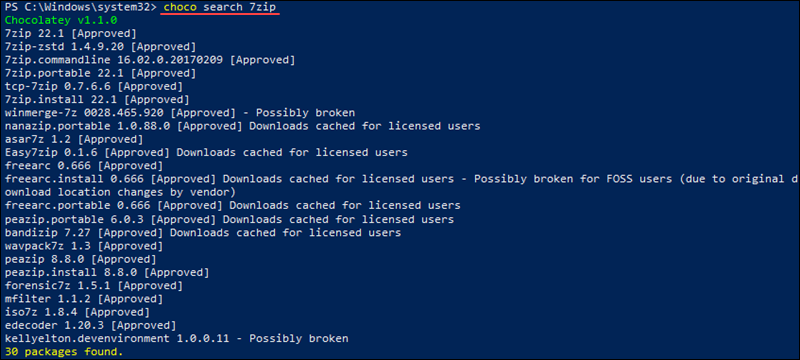
The command outputs all the results from the search along with the program version and a description (if available).
See Installed Programs
The list command allows users to see all the programs installed on their system using Chocolatey. Run the following command:
choco list --local-onlyFor example:

The output shows a list of packages on the system installed using Chocolatey.
Update Chocolatey
It is important to periodically check for new program version because each new version may address important security issues or include bug fixes and patches. Run the following command to update the Chocolatey client to the latest available version:
choco upgrade chocolatey
The program checks for a new version and installs it when available. Alternatively, the output is a message saying that your version is the latest available version.
Conclusion
This guide showed how to install and use Chocolatey on Windows 10. If you don’t like Chocolatey, try using Winget, a Windows native package manager aiming at making software management simpler and more efficient.
In this article will show how to install programs and packages from the Command Prompt/Power shell on Windows operating system using Chocolatey – The package manager for Windows
The Linux distributions come with a package manager, which is a powerful tool for most power users to install, update and remove packages, directly from the command line or terminal. While most users are not comfortable with the interface of the command line or Terminal on Linux distributions, it is undeniably a great tool, if you know how to use it. On the other hand, Windows users enjoy the graphical user interface to install, update and uninstall programs and packages, which isn’t unified for all the programs you use regularly. Even though it is easy to manage programs on Windows in the user-friendly GUI, you should keep a constant tab to prevent the installer from installing any malware or unnecessary programs.
Considering likes and dislikes for the Terminal and the GUI to be a relative aspect, the good side is, you can even install programs on your Windows computer using the command line, just the way you do it on Linux-based operating systems or Linux distributions. As Windows doesn’t have native support for installing programs directly from the Command Prompt, you will have to use third-party software to enable this feature on Windows. Don’t worry. It isn’t going to cost you an arm and a leg, nor it is going to be too challenging.
So without further delay, let’s get started with how you can start installing apps on Windows directly from the Command Prompt or PowerShell, whichever is convenient for you.
The minimum requirements to install Chocolatey package manager
- You should be running Windows 7 or Windows 2003 or any other later version of Windows along with PowerShell v2 or any later version to use Chocolatey.
- .NET Framework 4 or better should also be installed on your computer.
So that was all about the minimum requirements to run Chocolatey on your Windows computer.
Ways to install Chocolatey Packages on Windows
Using Command Prompt
Step 1: Open Command Prompt
Press ‘Win + R’ and type ‘cmd’. Now press the key combination ‘Ctrl + Shift + Enter’ to open Command Prompt with administrator permissions.
Now type in the following command, and hit the enter key to execute the same.
@"%SystemRoot%System32WindowsPowerShellv1.0powershell.exe" -NoProfile -InputFormat None -ExecutionPolicy Bypass -Command "iex ((New-Object System.Net.WebClient).DownloadString('https://chocolatey.org/install.ps1'))" && SET "PATH=%PATH%;%ALLUSERSPROFILE%chocolateybin"

Step 2: Download and install Chocolatey
Let Command Prompt download and install Chocolatey for you. You will get the following screen, and once the installation is complete, you can get back the prompt to enter the subsequent commands.

#Using Windows PowerShell to install Chocolatey
Step 1: Using PowerShell
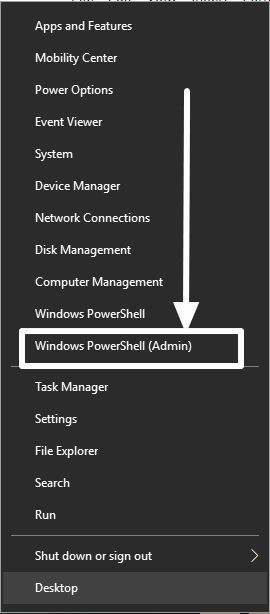
Open Windows PowerShell with administrator rights by right-clicking on the Start menu and by clicking on ‘Windows PowerShell (Admin)’.
Now type in the following command to install Chocolatey using Windows PowerShell.
Set-ExecutionPolicy Bypass -Scope Process -Force; iex ((New-Object System.Net.WebClient).DownloadString('https://chocolatey.org/install.ps1'))

Wait for the download and installation process to be complete, and once it is complete, you can get back the prompt to enter a command and carry out your work.
The installation of Chocolatey using Command Prompt or Windows PowerShell is complete now.
I would recommend you to restart your computer before you carry out any real activity using Chocolatey.
Now open Command Prompt, and you can search for, install, update, and uninstall programs directly from the Command Prompt.
Some useful Chocolatey commands
Let’s find out some useful commands that can be handy for you while you are using Chocolatey. The commands aren’t platformed specific, and you can use the command on both Command Prompt and Windows PowerShell. But make sure, you are executing the commands with the administrator privileges.
- Getting help: choco -?
- Searching for programs: choco search <app/package_name>
- Installing programs: choco install <app/package_name>
- Updating programs: choco update <app/package_name>
- Uninstalling programs: choco uninstall <app/package_name>
- Updating Chocolatey: choco update chocolatey
There are hundreds of command available for Choco, and you can even use additional arguments with all the commands, however, you will not need to add extra arguments for if you are using it for personal usage. It can also be a tough job to remember the arguments, so nevermind. But if your friends call you a geek, and you are a confident power user, the extra arguments can surely come in handy once in a while. Here are the additional commands to use Chocolatey.
How to use Chocolatey command to download software packages
An example
Chocolatey is super easy to use. Just search for the program, and install it effortlessly with just the command. So let me search for Vivaldi browser, and install it on my system.
Type the following command to search for the keyword Vivaldi, in the packages, which Chocolatey has access to.
choco search vivaldi

Now you will have to install Vivaldi on your system using the ‘install’ command.
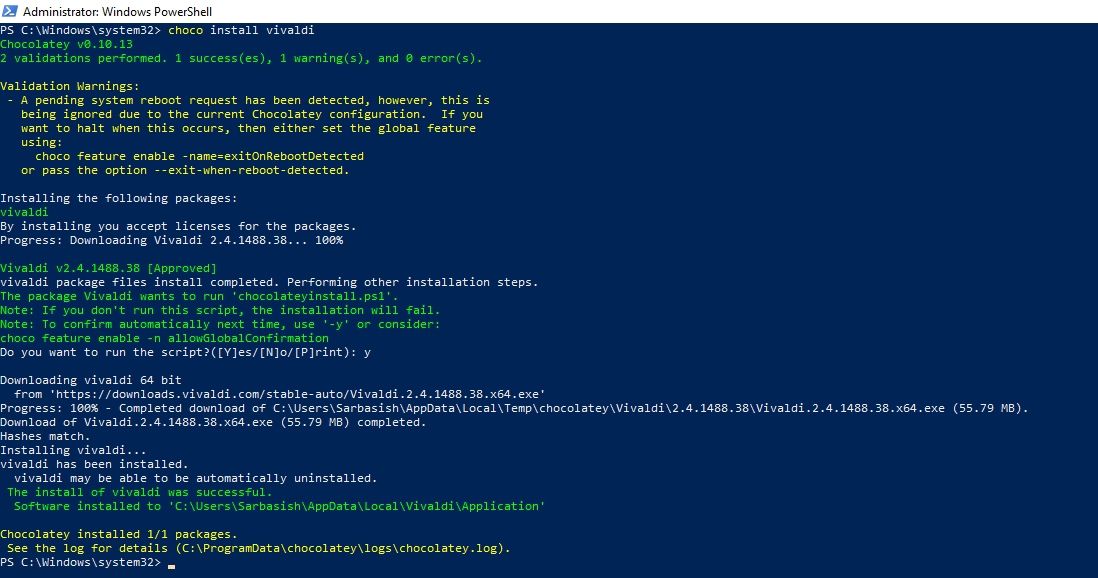
Type in the following command to install Vivaldi.
choco install vivaldi
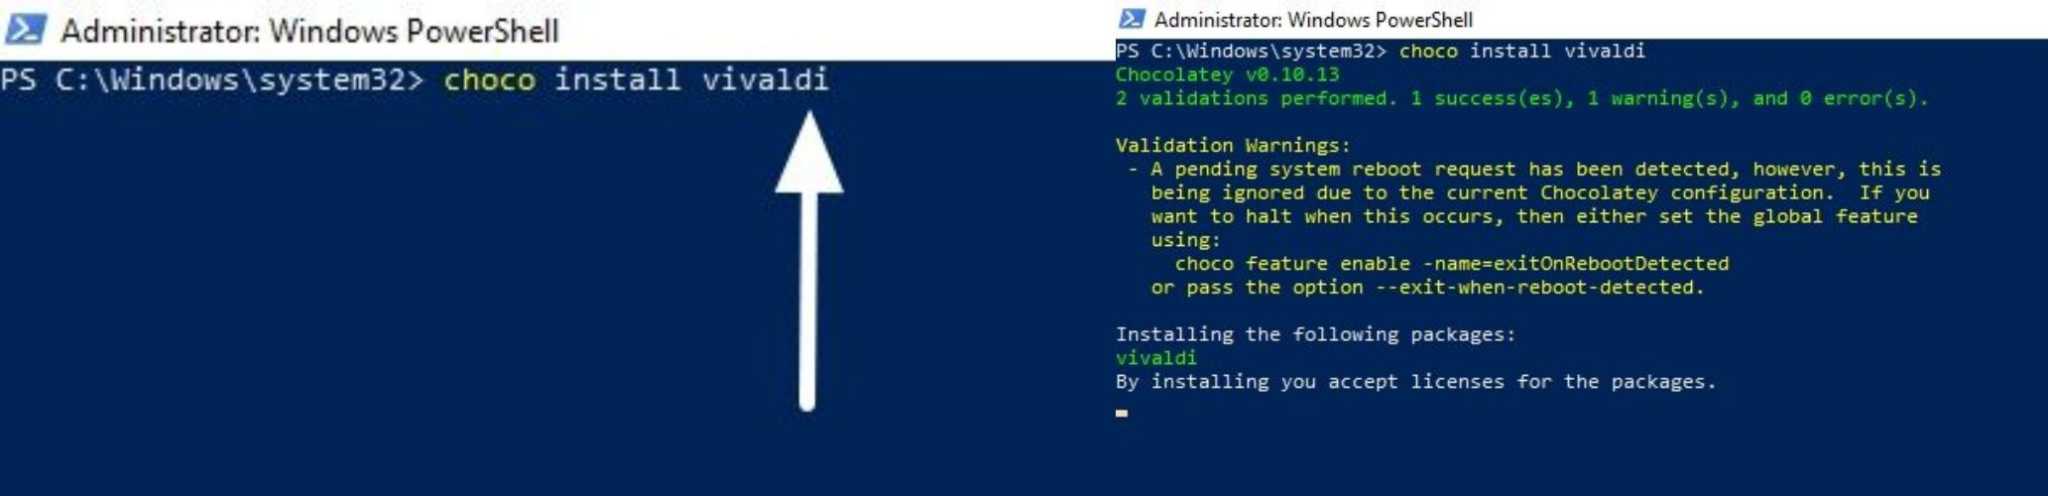
It isn’t necessary to install the complete package name. Just type in the name of the program or package, and leave the rest to Chocolatey.
The installation will start immediately, and meanwhile, you will be asked, whether you want to execute the script to download and install Vivaldi. Just type in Y, N, P respectively followed by the enter key to allow execution, prevent execution, and print the script respectively.
Needless to say, you need to enter ‘Y’ for installing Vivaldi. You will get the following screen, as long as the download and installation process goes on.

Once the installation is complete, you will get back the prompt.
Vivaldi will now be automatically available on your desktop.
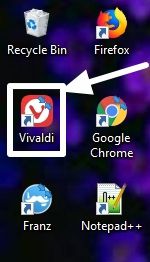
Just open it to start using Vivaldi, just the way you do it for other programs on Windows.
How To Upgrade Chocolatey
Just in Command Prompt or Power shell of the Windows 10/8/7 use the below-given command.
choco upgrade chocolatey
How to uninstall Chocolatey installed Packages
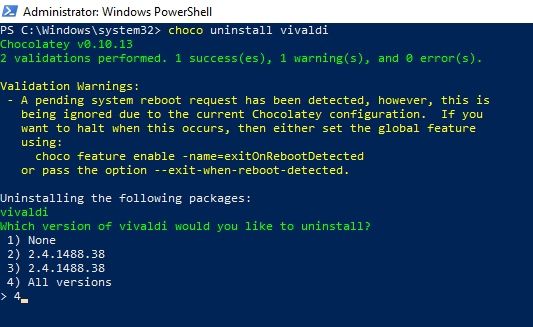
To uninstall Vivaldi now, just type in the following command followed by hitting the enter key.
choco uninstall vivaldi

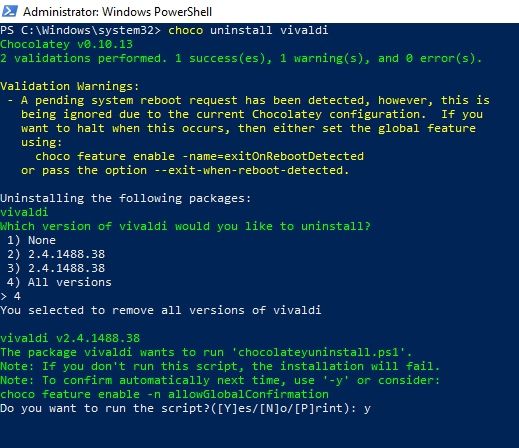
Now you will have to choose the version of Vivaldi, which you want to uninstall. I want to uninstall all the versions of Vivaldi, and thus, I will choose 4, and hit the enter key.
You will again be asked, whether you want to execute the script. Just type ‘Y’ and hit the enter key to execute the script and delete Vivaldi.
Vivaldi will not be uninstalled from your system. Depending upon which program you are uninstalling, you might be asked for a GUI-based confirmation to uninstall the program. You might even use additional arguments to force uninstall programs, the provision for which, is also available on Chocolatey.
Chocolatey is undoubtedly a powerful tool to manage programs and packages effortlessly on Windows. There are hundreds of programs, which you can download and install, using Chocolatey. Chocolatey is a kind of repository just like Linux, where you can download all your programs with just a single command. However I will never compare the power of Chocolatey repository with the apt repository for Linux, as both are meant for two different platforms, and availability will undoubtedly vary on the two.platforms.
With Chocolatey, you will not even need to enter the full name of the package, which is cool, as well. I searched for some random less well-known programs, most users haven’t heard about and I was amazed to see some results turn up. I am sure, the database of programs will keep expanding in the coming days. Chocolatey can be considered as a command line alternative for Ninite on Windows, which can help you install multiple selected programs in one go.
Chocolatey is open-source, though there are personal and business editions available, and you can see their prices here. You will no longer have to worry about automatic updates slowing down your internet connection, your computer or both, as you can update the programs and packages whenever you want, directly from the Command Prompt.
How cool was that! I know you will thank me later for this. Hope the information was useful for you. Do you have any additional questions? Feel free to comment the same down below.
- How to install ADB on Windows 10,8, 7 and Linux, the easiest way
- Download & install npm and node.js packages on Windows 10/8/7
- How to install Gimp on Ubuntu via command terminal
- Tutorial Install and use Node.js http-server (Web server) via NPM
- How to proceed with the Python Canopy installation steps, on Windows and Linux?
- Install Node js on Ubuntu 19.04
- Install Grunt on Windows 10/8/7
— Advertisement —
Hello, how are you? Today we’re going to talk a bit about the package management system. That system, also known as a package manager, is a collection of tools that serve to automate the process of installing, updating, configuring and removing software packages. This term is intimately associated with GNU/Linux systems. Because they rely heavily on package managers. As we mentioned at the beginning, this term is intimately associated with Linux, as it is the main method for installing and uninstalling applications. However, it is possible to install a package manager on Windows. We are talking about Chocolatey. This software management and automation system is based on PowerShell and is able to work with different software installers for Windows systems such as MSI, NSIS, InnoSetup, installation binaries and compressed files (ZIP). Sounds great, doesn’t it? So, we’re going to see how to install and use Chocolatey in Windows 10.
Installing Chocolatey.
Chocolatey behaves just like any other package manager. Additionally, it simply handles all aspects of software administration. In other words, installation, configuration, updating, and uninstallation. In addition, this manager is that it allows you to install and maintain both free and open-source software and proprietary software that requires licenses. On the other hand, the download process is safe since the packages in the Chocolatey repository use automation scripts that download the software from official distribution sites. Now, to download and install the package manager, you need to open a PowerShell with administrative privileges. With this in mind, press the Win+X combination:

Once inside the PowerShell you have to add the following text:
Set-ExecutionPolicy Bypass -Scope Process -Force; iex ((New-Object System.Net.WebClient).DownloadString('https://chocolatey.org/install.ps1'))
By running this script, the console will connect to Chocolatey’s website. Then, it will download the latest compressed version, unzip it and install it. All this automatically.

It can be seen that the installation route was in C:ProgramDatachocolatey In the same way, the subdirectory lib is used for the packages.
First steps with Chocolatey
We have seen that the installation process is very simple. To access the help manager, simply run the following command from the PowerShell or any CMD:
choco /?

To search for packages, just use the search subcommand:

In the previous box, we did a search for open-source software. But there is also the availability of proprietary software:

On the other hand, you can access the Chocolatey package repository and search for available programs. To install the program just add the install parameter. It is always necessary to confirm the installation. Let’s try with Notepad++

If you want to answer yes automatically, you must add the -and option. Additionally, check the installation, looking for Notepad++ in Windows programs.

Other basic chocolatey commands.
To uninstall a package, simply use the uninstall subcommand. For example:
choco uninstall firefox
To update a package, run the subcommand upgrade:
choco upgrade firefox
To update all packages, add the keyword all -y:
choco upgrade all -y
We have finally seen how to install chocolatey in Windows 10. Thanks to this tool, it is possible to manage the software of a set of Windows systems in an automated and unattended way. This is it, for now, check our post about Apache in Windows 10.
- Requirements
- Installing Chocolatey
- Install with cmd.exe
- Install with PowerShell.exe
- Additional considerations
- More Install Options
- Install from PowerShell v3+
- Completely offline install
- Install with Puppet
- Install using PowerShell from cmd.exe
- Install using NuGet Package Manager
- Install using NuGet.exe from PowerShell
- Install downloaded NuGet package from PowerShell
- Install licensed edition
- Installing behind a proxy
- Installing behind an explicit proxy
- Installing to a different location
- Installing a particular version of Chocolatey
- Use Windows built-in compression instead of downloading 7zip
- Installing with restricted TLS
- Option 1 — Host Internally
- Option 2 — Updated PowerShell and .NET
- Option 3 — Manual
- Non-Administrative install
- Upgrading Chocolatey
- Uninstalling Chocolatey
- FAQs
- I’m having trouble installing Chocolatey
- I’m getting a 403 attempting to install
- Why isn’t there an MSI?
Requirements
- Windows 7+ / Windows Server 2003+
- PowerShell v2+ (Not PowerShell Core yet though)(minimum is v3 for install from this website due to TLS 1.2 requirement)
- .NET Framework 4+ (the installation will attempt to install .NET 4.0 if you do not have it installed)(minimum is 4.5 for install from this website due to TLS 1.2 requirement)
That’s it! All you need is choco.exe (that you get from the installation scripts) and you are good to go! No Visual Studio required.
Installing Chocolatey
Chocolatey installs in seconds. You are just a few steps from running choco right now!
- First, ensure that you are using an administrative shell — you can also install as a non-admin, check out Non-Administrative Installation.
- Copy the text specific to your command shell — cmd.exe or powershell.exe.
- Paste the copied text into your shell and press Enter.
- Wait a few seconds for the command to complete.
- If you don’t see any errors, you are ready to use Chocolatey! Type
chocoorchoco -?now, or see [[Getting Started|GettingStarted]] for usage instructions.
NOTES:
- If you are behind a proxy, please see Installing behind a proxy.
- Need completely offline solution? See Completely Offline Install.
- Installing the licensed edition? See [[install licensed edition|Installation-Licensed]].
- More Options / [[Troubleshooting|Troubleshooting]]
Install with cmd.exe
Run the following command:
@"%SystemRoot%System32WindowsPowerShellv1.0powershell.exe" -NoProfile -InputFormat None -ExecutionPolicy Bypass -Command "[System.Net.ServicePointManager]::SecurityProtocol = 3072; iex ((New-Object System.Net.WebClient).DownloadString('https://chocolatey.org/install.ps1'))" && SET "PATH=%PATH%;%ALLUSERSPROFILE%chocolateybin"
Install with PowerShell.exe
With PowerShell, there is an additional step. You must ensure Get-ExecutionPolicy is not Restricted. We suggest using Bypass to bypass the policy to get things installed or AllSigned for quite a bit more security.
- Run
Get-ExecutionPolicy. If it returnsRestricted, then runSet-ExecutionPolicy AllSignedorSet-ExecutionPolicy Bypass -Scope Process. - Now run the following command:
Set-ExecutionPolicy Bypass -Scope Process -Force; [System.Net.ServicePointManager]::SecurityProtocol = [System.Net.ServicePointManager]::SecurityProtocol -bor 3072; iex ((New-Object System.Net.WebClient).DownloadString('https://chocolatey.org/install.ps1'))
Additional considerations
NOTE: Please inspect https://chocolatey.org/install.ps1 prior to running any of these scripts to ensure safety. We already know it’s safe, but you should verify the security and contents of any script from the internet you are not familiar with. All of these scripts download a remote PowerShell script and execute it on your machine.
We take security very seriously. Learn more.
«Why do I need to enable TLS 1.2 in PowerShell? Shouldn’t it be on by default when I load PowerShell?»
Unfortunately it’s not always a default, and more of the time it is not. The low level is that it depends on .NET Framework and Windows.
- Explicitly set — Basically you need .NET Fx 4.5 at a minimum to be able to explicitly set TLS 1.2.
- Load by default — To have it load by default when you run PowerShell, you need at least .NET Fx 4.7 AND the Operating System’s SystemDefault to have TLS 1.2 enabled.
The load by default is really hard to see, so you should check to ensure it is there. Assume it doesn’t and set explicitly.
More Install Options
- Install from PowerShell v3+
- Completely offline/internal install
- Install with Puppet
- Install using PowerShell from cmd.exe
- Install using NuGet Package Manager
- Install using NuGet.exe from PowerShell
- Install downloaded NuGet package from PowerShell
- Install licensed edition
- Installing behind a proxy
- Installing behind an explicit proxy
- Installing to a different location
- Installing a particular version of Chocolatey
- Use Windows built-in compression instead of downloading 7zip
- Installing with restricted TLS
- Non-Administrative install
Install from PowerShell v3+
NOTE: The command for installing with PowerShell at the top of the page works for all versions of PowerShell from v2 on. This is provided as an additional note for folks who want a more terse command that is easier to remember.
With PowerShell, there is an additional step or two. You must ensure Get-ExecutionPolicy is not Restricted. We suggest using Bypass to bypass the policy to get things installed or AllSigned for quite a bit more security.
- Run
Get-ExecutionPolicy. If it returnsRestricted, then runSet-ExecutionPolicy AllSignedorSet-ExecutionPolicy Bypass. - Now run the following command:
Set-ExecutionPolicy Bypass -Scope Process -Force; [System.Net.ServicePointManager]::SecurityProtocol = [System.Net.ServicePointManager]::SecurityProtocol -bor 3072; iwr https://chocolatey.org/install.ps1 -UseBasicParsing | iex
Completely offline install
With completely offline use of Chocolatey, you want to ensure you remove the default community package source (choco source list followed by choco source remove -n chocolatey, or however you would do that with a configuration manager like Puppet).
- The first step with offline is to obtain a copy of the Chocolatey Nupkg (nupkg files are just fancy zip files). Go to https://chocolatey.org/packages/chocolatey and find a version you want.
- Click on Download to download that version’s nupkg file.

- You can also download the latest version directly.
- You can put the chocolatey.nupkg on an internal package repository and then address that full path, similar to how you see in the Puppet provider — https://forge.puppet.com/puppetlabs/chocolatey#manage-chocolatey-installation
- Then you would run a script similar to the below to address that local install. If it is on a repository somewhere, you will need to enhance the below script to get that file (the Chocolatey Puppet provider install script shows that).
# Download and install Chocolatey nupkg from an OData (HTTP/HTTPS) url such as Artifactory, Nexus, ProGet (all of these are recommended for organizational use), or Chocolatey.Server (great for smaller organizations and POCs)
# This is where you see the top level API - with xml to Packages - should look nearly the same as https://chocolatey.org/api/v2/
# If you are using Nexus, always add the trailing slash or it won't work
# === EDIT HERE ===
$packageRepo = '<INSERT ODATA REPO URL>'

# If the above $packageRepo repository requires authentication, add the username and password here. Otherwise these leave these as empty strings.
$repoUsername = ''    # this must be empty is NOT using authentication
$repoPassword = ''    # this must be empty if NOT using authentication

# Determine unzipping method
# 7zip is the most compatible, but you need an internally hosted 7za.exe.
# Make sure the version matches for the arguments as well.
# Built-in does not work with Server Core, but if you have PowerShell 5
# it uses Expand-Archive instead of COM
$unzipMethod = 'builtin'
#$unzipMethod = '7zip'
#$7zipUrl = 'https://chocolatey.org/7za.exe' (download this file, host internally, and update this to internal)

# === ENVIRONMENT VARIABLES YOU CAN SET ===
# Prior to running this script, in a PowerShell session, you can set the
# following environment variables and it will affect the output

# - $env:ChocolateyEnvironmentDebug = 'true' # see output
# - $env:chocolateyIgnoreProxy = 'true' # ignore proxy
# - $env:chocolateyProxyLocation = '' # explicit proxy
# - $env:chocolateyProxyUser = '' # explicit proxy user name (optional)
# - $env:chocolateyProxyPassword = '' # explicit proxy password (optional)

# === NO NEED TO EDIT ANYTHING BELOW THIS LINE ===
# Ensure we can run everything
Set-ExecutionPolicy Bypass -Scope Process -Force;

# If the repository requires authentication, create the Credential object
if ((-not [string]::IsNullOrEmpty($repoUsername)) -and (-not [string]::IsNullOrEmpty($repoPassword))) {
    $securePassword = ConvertTo-SecureString $repoPassword -AsPlainText -Force
    $repoCreds = New-Object System.Management.Automation.PSCredential ($repoUsername, $securePassword)
}

$searchUrl = ($packageRepo.Trim('/'), 'Packages()?$filter=(Id%20eq%20%27chocolatey%27)%20and%20IsLatestVersion') -join '/'

# Reroute TEMP to a local location
New-Item $env:ALLUSERSPROFILEchoco-cache -ItemType Directory -Force
$env:TEMP = "$env:ALLUSERSPROFILEchoco-cache"

$localChocolateyPackageFilePath = Join-Path $env:TEMP 'chocolatey.nupkg'
$ChocoInstallPath = "$($env:SystemDrive)ProgramDataChocolateybin"
$env:ChocolateyInstall = "$($env:SystemDrive)ProgramDataChocolatey"
$env:Path += ";$ChocoInstallPath"
$DebugPreference = 'Continue';

# PowerShell v2/3 caches the output stream. Then it throws errors due
# to the FileStream not being what is expected. Fixes "The OS handle's
# position is not what FileStream expected. Do not use a handle
# simultaneously in one FileStream and in Win32 code or another
# FileStream."
function Fix-PowerShellOutputRedirectionBug {
  $poshMajorVerion = $PSVersionTable.PSVersion.Major

  if ($poshMajorVerion -lt 4) {
    try{
      # http://www.leeholmes.com/blog/2008/07/30/workaround-the-os-handles-position-is-not-what-filestream-expected/ plus comments
      $bindingFlags = [Reflection.BindingFlags] "Instance,NonPublic,GetField"
      $objectRef = $host.GetType().GetField("externalHostRef", $bindingFlags).GetValue($host)
      $bindingFlags = [Reflection.BindingFlags] "Instance,NonPublic,GetProperty"
      $consoleHost = $objectRef.GetType().GetProperty("Value", $bindingFlags).GetValue($objectRef, @())
      [void] $consoleHost.GetType().GetProperty("IsStandardOutputRedirected", $bindingFlags).GetValue($consoleHost, @())
      $bindingFlags = [Reflection.BindingFlags] "Instance,NonPublic,GetField"
      $field = $consoleHost.GetType().GetField("standardOutputWriter", $bindingFlags)
      $field.SetValue($consoleHost, [Console]::Out)
      [void] $consoleHost.GetType().GetProperty("IsStandardErrorRedirected", $bindingFlags).GetValue($consoleHost, @())
      $field2 = $consoleHost.GetType().GetField("standardErrorWriter", $bindingFlags)
      $field2.SetValue($consoleHost, [Console]::Error)
    } catch {
      Write-Output 'Unable to apply redirection fix.'
    }
  }
}

Fix-PowerShellOutputRedirectionBug

# Attempt to set highest encryption available for SecurityProtocol.
# PowerShell will not set this by default (until maybe .NET 4.6.x). This
# will typically produce a message for PowerShell v2 (just an info
# message though)
try {
  # Set TLS 1.2 (3072), then TLS 1.1 (768), then TLS 1.0 (192), finally SSL 3.0 (48)
  # Use integers because the enumeration values for TLS 1.2 and TLS 1.1 won't
  # exist in .NET 4.0, even though they are addressable if .NET 4.5+ is
  # installed (.NET 4.5 is an in-place upgrade).
  [System.Net.ServicePointManager]::SecurityProtocol = 3072 -bor 768 -bor 192 -bor 48
} catch {
  Write-Output 'Unable to set PowerShell to use TLS 1.2 and TLS 1.1 due to old .NET Framework installed. If you see underlying connection closed or trust errors, you may need to upgrade to .NET Framework 4.5+ and PowerShell v3+.'
}

function Get-Downloader {
param (
  [string]$url
 )
  $downloader = new-object System.Net.WebClient

  $defaultCreds = [System.Net.CredentialCache]::DefaultCredentials
  if (Test-Path -Path variable:repoCreds) {
    Write-Debug "Using provided repository authentication credentials."
    $downloader.Credentials = $repoCreds
  } elseif ($defaultCreds -ne $null) {
    Write-Debug "Using default repository authentication credentials."
    $downloader.Credentials = $defaultCreds
  }

  $ignoreProxy = $env:chocolateyIgnoreProxy
  if ($ignoreProxy -ne $null -and $ignoreProxy -eq 'true') {
    Write-Debug 'Explicitly bypassing proxy due to user environment variable.'
    $downloader.Proxy = [System.Net.GlobalProxySelection]::GetEmptyWebProxy()
  } else {
    # check if a proxy is required
    $explicitProxy = $env:chocolateyProxyLocation
    $explicitProxyUser = $env:chocolateyProxyUser
    $explicitProxyPassword = $env:chocolateyProxyPassword
    if ($explicitProxy -ne $null -and $explicitProxy -ne '') {
      # explicit proxy
      $proxy = New-Object System.Net.WebProxy($explicitProxy, $true)
      if ($explicitProxyPassword -ne $null -and $explicitProxyPassword -ne '') {
        $passwd = ConvertTo-SecureString $explicitProxyPassword -AsPlainText -Force
        $proxy.Credentials = New-Object System.Management.Automation.PSCredential ($explicitProxyUser, $passwd)
      }

      Write-Debug "Using explicit proxy server '$explicitProxy'."
      $downloader.Proxy = $proxy

    } elseif (!$downloader.Proxy.IsBypassed($url)) {
      # system proxy (pass through)
      $creds = $defaultCreds
      if ($creds -eq $null) {
        Write-Debug 'Default credentials were null. Attempting backup method'
        $cred = get-credential
        $creds = $cred.GetNetworkCredential();
      }

      $proxyaddress = $downloader.Proxy.GetProxy($url).Authority
      Write-Debug "Using system proxy server '$proxyaddress'."
      $proxy = New-Object System.Net.WebProxy($proxyaddress)
      $proxy.Credentials = $creds
      $downloader.Proxy = $proxy
    }
  }

  return $downloader
}

function Download-File {
param (
  [string]$url,
  [string]$file
 )
  $downloader = Get-Downloader $url
  $downloader.DownloadFile($url, $file)
}

function Download-Package {
param (
  [string]$packageODataSearchUrl,
  [string]$file
 )
  $downloader = Get-Downloader $packageODataSearchUrl

  Write-Output "Querying latest package from $packageODataSearchUrl"
  [xml]$pkg = $downloader.DownloadString($packageODataSearchUrl)
  $packageDownloadUrl = $pkg.feed.entry.content.src

  Write-Output "Downloading $packageDownloadUrl to $file"
  $downloader.DownloadFile($packageDownloadUrl, $file)
}

function Install-ChocolateyFromPackage {
param (
  [string]$chocolateyPackageFilePath = ''
)

  if ($chocolateyPackageFilePath -eq $null -or $chocolateyPackageFilePath -eq '') {
    throw "You must specify a local package to run the local install."
  }

  if (!(Test-Path($chocolateyPackageFilePath))) {
    throw "No file exists at $chocolateyPackageFilePath"
  }

  $chocTempDir = Join-Path $env:TEMP "chocolatey"
  $tempDir = Join-Path $chocTempDir "chocInstall"
  if (![System.IO.Directory]::Exists($tempDir)) {[System.IO.Directory]::CreateDirectory($tempDir)}
  $file = Join-Path $tempDir "chocolatey.zip"
  Copy-Item $chocolateyPackageFilePath $file -Force

  # unzip the package
  Write-Output "Extracting $file to $tempDir..."
  if ($unzipMethod -eq '7zip') {
    $7zaExe = Join-Path $tempDir '7za.exe'
    if (-Not (Test-Path ($7zaExe))) {
      Write-Output 'Downloading 7-Zip commandline tool prior to extraction.'
      # download 7zip
      Download-File $7zipUrl "$7zaExe"
    }

    $params = "x -o`"$tempDir`" -bd -y `"$file`""
    # use more robust Process as compared to Start-Process -Wait (which doesn't
    # wait for the process to finish in PowerShell v3)
    $process = New-Object System.Diagnostics.Process
    $process.StartInfo = New-Object System.Diagnostics.ProcessStartInfo($7zaExe, $params)
    $process.StartInfo.RedirectStandardOutput = $true
    $process.StartInfo.UseShellExecute = $false
    $process.StartInfo.WindowStyle = [System.Diagnostics.ProcessWindowStyle]::Hidden
    $process.Start() | Out-Null
    $process.BeginOutputReadLine()
    $process.WaitForExit()
    $exitCode = $process.ExitCode
    $process.Dispose()

    $errorMessage = "Unable to unzip package using 7zip. Perhaps try setting `$env:chocolateyUseWindowsCompression = 'true' and call install again. Error:"
    switch ($exitCode) {
      0 { break }
      1 { throw "$errorMessage Some files could not be extracted" }
      2 { throw "$errorMessage 7-Zip encountered a fatal error while extracting the files" }
      7 { throw "$errorMessage 7-Zip command line error" }
      8 { throw "$errorMessage 7-Zip out of memory" }
      255 { throw "$errorMessage Extraction cancelled by the user" }
      default { throw "$errorMessage 7-Zip signalled an unknown error (code $exitCode)" }
    }
  } else {
    if ($PSVersionTable.PSVersion.Major -lt 5) {
      try {
        $shellApplication = new-object -com shell.application
        $zipPackage = $shellApplication.NameSpace($file)
        $destinationFolder = $shellApplication.NameSpace($tempDir)
        $destinationFolder.CopyHere($zipPackage.Items(),0x10)
      } catch {
        throw "Unable to unzip package using built-in compression. Set `$env:chocolateyUseWindowsCompression = 'false' and call install again to use 7zip to unzip. Error: `n $_"
      }
    } else {
      Expand-Archive -Path "$file" -DestinationPath "$tempDir" -Force
    }
  }

  # Call Chocolatey install
  Write-Output 'Installing chocolatey on this machine'
  $toolsFolder = Join-Path $tempDir "tools"
  $chocInstallPS1 = Join-Path $toolsFolder "chocolateyInstall.ps1"

  & $chocInstallPS1

  Write-Output 'Ensuring chocolatey commands are on the path'
  $chocInstallVariableName = 'ChocolateyInstall'
  $chocoPath = [Environment]::GetEnvironmentVariable($chocInstallVariableName)
  if ($chocoPath -eq $null -or $chocoPath -eq '') {
    $chocoPath = 'C:ProgramDataChocolatey'
  }

  $chocoExePath = Join-Path $chocoPath 'bin'

  if ($($env:Path).ToLower().Contains($($chocoExePath).ToLower()) -eq $false) {
    $env:Path = [Environment]::GetEnvironmentVariable('Path',[System.EnvironmentVariableTarget]::Machine);
  }

  Write-Output 'Ensuring chocolatey.nupkg is in the lib folder'
  $chocoPkgDir = Join-Path $chocoPath 'libchocolatey'
  $nupkg = Join-Path $chocoPkgDir 'chocolatey.nupkg'
  if (!(Test-Path $nupkg)) {
    Write-Output 'Copying chocolatey.nupkg is in the lib folder'
    if (![System.IO.Directory]::Exists($chocoPkgDir)) { [System.IO.Directory]::CreateDirectory($chocoPkgDir); }
    Copy-Item "$file" "$nupkg" -Force -ErrorAction SilentlyContinue
  }
}

# Idempotence - do not install Chocolatey if it is already installed
if (!(Test-Path $ChocoInstallPath)) {
  # download the package to the local path
  if (!(Test-Path $localChocolateyPackageFilePath)) {
    Download-Package $searchUrl $localChocolateyPackageFilePath
  }

  # Install Chocolatey
  Install-ChocolateyFromPackage $localChocolateyPackageFilePath
}
Install with Puppet
NOTE: If you have the licensed edition, see [[Setting up Licensed Edition with Puppet|Installation-Licensed#set-up-licensed-edition-with-puppet]] instead. This only additionally contains some package examples and setting up tab completion.
Here’s an example of setting Chocolatey up with Puppet that sets up and configures Chocolatey, sets up an internal package repository, and shows setting up the licensed edition and ensuring some packages.
- Download the chocolatey.nupkg from the community repository — download the latest chocolatey nupkg or see Completely offline install to get an older version.
- Optionally download the chocolatey.server package from the community repository — download the latest chocolatey.server nupkg.
- Use
choco pushto push those items to your internal package repository (e.g.choco push chocolatey.0.10.7.nupkg -s http://internal_repo/ -k abc123) - Determine how to get the bare url to download the Chocolatey.Nupkg directly. You will need that for the internal url for installing Chocolatey offline. For the community repository, it is https://chocolatey.org/api/v2/package/chocolatey
# Requires puppetlabs/chocolatey module
# See https://forge.puppet.com/puppetlabs/chocolatey

## Set resource defaults for `package` resources on Windows to use the Chocolatey provider
case $operatingsystem {
  'windows':    {
    Package {
      provider => chocolatey,
    }
  }
}

## - Ensure Chocolatey Install -
#include chocolatey
## OR
## Download chocolatey.nupkg to your internal repository (see above
##  about getting the package for offline use)
## Note: `chocolatey_download_url is completely different than normal
##  source locations. This is directly to the bare download url for the
##  chocolatey.nupkg, similar to what you see when you browse to
##  https://chocolatey.org/api/v2/package/chocolatey
class {'chocolatey':
  chocolatey_download_url => 'https://<internalurl/to>/chocolatey.nupkg',
  use_7zip                => false,
}

## If you need FIPS compliance
## make this the first thing you configure before you do any additional
## configuration or package installations
#chocolateyfeature {'useFipsCompliantChecksums':
#  ensure => enabled,
#}

## Keep chocolatey up to date based on your internal source
## You control the upgrades based on when you push an updated version
##  to your internal repository.
## Note the source here is to the OData feed, similar to what you see
##  when you browse to https://chocolatey.org/api/v2
package {'chocolatey':
  ensure   => latest,
  provider => chocolatey,
  source   => 'https://<internal_repo>/chocolatey',
}


## - Configure Chocolatey -
### Config Settings

## Move cache location so Chocolatey is very deterministic about
## cleaning up temporary data
chocolateyconfig {'cacheLocation':
  value => 'c:ProgramDatachoco-cache',
}

## Increase timeout to 4 hours
chocolateyconfig {'commandExecutionTimeoutSeconds':
  value => '14400',
}

### Sources
## Remove the default community package repository source
chocolateysource {'chocolatey':
  ensure   => absent,
  location => 'https://chocolatey.org/api/v2/',
}

## Add default sources for your internal repositories
chocolateysource {'internal_chocolatey':
  ensure   => present,
  location => 'http://internal_location/OData/endpoint',
  priority => 1,
  username => 'optional',
  password => 'optional,not ensured',
}

### Features
chocolateyfeature {'checksumFiles':
  ensure => enabled,
}

## When using Puppet for installs
chocolateyfeature {'showDownloadProgress':
  ensure => disabled,
}

chocolateyfeature {'useRememberedArgumentsForUpgrades':
  ensure => enabled,
}


## - Chocolatey Simple Server Package Repository -
## Requires chocolatey/chocolatey_server module  - see
##  https://forge.puppet.com/chocolatey/chocolatey_server
## this contains the bits to install the custom server
## - Ensures IIS and Ensure ASP.NET
## - Installs and configures the Chocolatey.Server website and app pool
## - Sets permissions appropriately

#include chocolatey_server
## OR
## `server_package_source` is to the OData feed, similar to what you see
##  when you browse to https://chocolatey.org/api/v2
class {'chocolatey_server':
  server_package_source => 'https://internalurl/odata/server',
}

chocolateysource {'local_chocolatey_server':
  ensure   => present,
  location => 'http://localhost/chocolatey',
  priority => 2,
}


## - Tab Completion -
## Ensure that when someone uses choco from powershell.exe, they have tab completion
file {'C:/Users/Administrator/Documents/WindowsPowerShell':
  ensure => directory,
}

file {'C:/Users/Administrator/Documents/WindowsPowerShell/Microsoft.PowerShell_profile.ps1':
  ensure => file,
  content => '$ChocolateyProfile = "$env:ChocolateyInstallhelperschocolateyProfile.psm1"
if (Test-Path($ChocolateyProfile)) {
  Import-Module "$ChocolateyProfile"
}',
}


## - Package Examples -
package {'roundhouse':
  ensure   => '0.8.5.0',
}

package {'git':
  ensure => latest,
}

## see https://forge.puppet.com/puppetlabs/chocolatey#install-options-with-spaces
package {'launchy':
  ensure          => installed,
  install_options => ['--override', '--installArgs','"', '/VERYSILENT','/NORESTART','"'],
}

package {['virustotaluploader',
          'googlechrome',
          'notepadplusplus',
          '7zip',
          'ruby',
          'charles',
          'grepwin',
          'stexbar',
          'inkscape',
          'gitextensions',
          'pandoc',
          'snagit',
          'nodejs',
          ]:
  ensure => latest,
  source => 'https://chocolatey.org/api/v2/',
}

package {'screentogif':
  ensure => '2.2.160907',
  source => 'https://chocolatey.org/api/v2/',
}

package {'dotnet4.5.2':
  ensure => latest,
}
Install using PowerShell from cmd.exe
This is the best method if you want to repeat it or include it in source control. It requires no change to your existing PowerShell to allow for remote unsigned scripts.
Create a file named installChocolatey.cmd with the following:
@echo off

SET DIR=%~dp0%

::download install.ps1
%systemroot%System32WindowsPowerShellv1.0powershell.exe -NoProfile -ExecutionPolicy Bypass -Command "((new-object net.webclient).DownloadFile('https://chocolatey.org/install.ps1','%DIR%install.ps1'))"
::run installer
%systemroot%System32WindowsPowerShellv1.0powershell.exe -NoProfile -ExecutionPolicy Bypass -Command "& '%DIR%install.ps1' %*"
You can also get to this file by going to https://chocolatey.org/installchocolatey.cmd.
If you prefer to have the install.ps1 file already, comment out the download line in the batch file and download the install.ps1 from chocolatey.org and save it as install.ps1 next to the installChocolatey.cmd file.
Run installChocolatey.cmd from an elevated cmd.exe command prompt and it will install the latest version of Chocolatey. You can not run this from powershell.exe without making changes to your execution policy.
NOTE: To create and save a .cmd file, please use a text editor and nothing fancy like Microsoft Word or OneNote.
Install using NuGet Package Manager
When you have Visual Studio 2010+ and the NuGet extension installed (pre-installed on any newer versions of Visual Studio), you can simply type the following three commands and you will have Chocolatey installed on your machine.
Install-Package chocolatey
Initialize-Chocolatey
Uninstall-Package chocolatey
Install using NuGet.exe from PowerShell
You can also use NuGet command line to download Chocolatey:
nuget install chocolatey or nuget install chocolatey -pre
Once you download it, open PowerShell (remote unsigned), navigate to the tools folder and run:
& .chocolateyInstall.ps1
Install downloaded NuGet package from PowerShell
You can also just download and unzip the Chocolatey package (.nupkg is a fancy zip file):
- Download the Chocolatey package.
- Ensure the downloaded nupkg is not blocked.
- Unzip it using any application that supports
zipformat. - Open a PowerShell command shell and navigate into the unzipped package’s tools folder.
- NOTE: Ensure PowerShell execution policy is set to at least bypass or remote signed (if you have issues, you may need to set it to Unrestricted).
- Call
& .chocolateyInstall.ps1to allow Chocolatey to install. - NOTE: This will not set Chocolatey as an installed package, so it may be a good idea to also call
choco upgrade chocolatey -yand let it reinstall the same version, but at least it will be available for upgrades then.
Install licensed edition
Please see [[installation of licensed edition|Installation-Licensed]].
Installing behind a proxy
Have a proxy? Try
- Cmd.exe:
@powershell -NoProfile -ExecutionPolicy Bypass -Command "[System.Net.WebRequest]::DefaultWebProxy.Credentials = [System.Net.CredentialCache]::DefaultCredentials; iex ((New-Object System.Net.WebClient).DownloadString('https://chocolatey.org/install.ps1'))" && SET PATH="%PATH%;%ALLUSERSPROFILE%chocolateybin"
- PowerShell.exe (Ensure Get-ExecutionPolicy is at least RemoteSigned):
[System.Net.WebRequest]::DefaultWebProxy.Credentials = [System.Net.CredentialCache]::DefaultCredentials; iex ((New-Object System.Net.WebClient).DownloadString('https://chocolatey.org/install.ps1'))
Installing behind an explicit proxy
See [[Installing Chocolatey Behind a Proxy Server|Proxy-Settings-for-Chocolatey#installing-chocolatey-behind-a-proxy-server]]
Installing to a different location
- Create a machine level (user level will also work) environment variable named
ChocolateyInstalland set it to the folder you want Chocolatey to install to prior to installation (this environment variable must be set globally or available to PowerShell- it is not enough to simply make it available to your current command prompt session). - Don’t use
"C:Chocolatey"unless necessary. - Create the folder manually.
- If you have already installed (and want to change the location after the fact):
- Follow the above steps.
- Install Chocolatey again.
- Copy/Move over the items from the old lib/bin directory.
- Delete your old install directory.
NOTE: There is one really important consideration when installing Chocolatey to a non-default location: Chocolatey only locks down the permissions to Admins when installed to the default location %PROGRAMDATA%Chocolatey, which means the same thing as %SystemDrive%ProgramDataChocolatey.
If you are installing to another location, you will need to handle this yourself, i. e. restrict write access to Admins in case you so desire.
This is due to alternative locations could have a range of permissions that should not be changed.
See [[Why does Chocolatey install where it does|DefaultChocolateyInstallReasoning]] and chocolatey/choco#398 for more details.
Installing a particular version of Chocolatey
Set the following environment variable prior to install:
chocolateyVersion— controls what version of Chocolatey is installed
In PowerShell, it looks like this:
$env:chocolateyVersion = '0.9.9.12'
# install script
NOTE: This will only work with the installation methods that call https://chocolatey.org/install.ps1 as part of the install.
Use Windows built-in compression instead of downloading 7zip
Set the following environment variable prior to install:
chocolateyUseWindowsCompression— this will bypass the download and use of 7zip.
In PowerShell, it looks like this:
$env:chocolateyUseWindowsCompression = 'true'
# install script
NOTE: This will only work with the installation methods that call https://chocolatey.org/install.ps1 as part of the install.
Installing with restricted TLS
NOTE: Chocolatey.org now requires TLS 1.2 at a minimum. Please see https://chocolatey.org/blog/remove-support-for-old-tls-versions.
NOTE: If your server is restricted to TLS 1.1+, you need to add additional logic to be able to download and install Chocolatey (this is not necessary when running Chocolatey normally as it does this automatically).
NOTE: If this is for organizational use, you should consider hosting the Chocolatey package internally and installing from there.
If you see an error that looks similar to the following:
Exception calling "DownloadString" with "1" argument(s): "The underlying connection was closed: An unexpected error
occurred on a receive."
At line:1 char:1
+ iex ((New-Object System.Net.WebClient).DownloadString('https://chocolatey.org/in ...
+ ~~~~~~~~~~~~~~~~~~~~~~~~~~~~~~~~~~~~~~~~~~~~~~~~~~~~~~~~~~~~~~~~~~~~~~~~~~~~~~~~
    + CategoryInfo          : NotSpecified: (:) [], MethodInvocationException
    + FullyQualifiedErrorId : WebException
OR:
Exception calling "DownloadString" with "1" argument(s): "The request was aborted: Could not create SSL/TLS secure
channel."
At line:1 char:51
+ ... ess -Force; iex ((New-Object System.Net.WebClient).DownloadString('ht ...
+                 ~~~~~~~~~~~~~~~~~~~~~~~~~~~~~~~~~~~~~~~~~~~~~~~~~~~~~~~~~
    + CategoryInfo          : NotSpecified: (:) [], MethodInvocationException
    + FullyQualifiedErrorId : WebException
It’s possible that you are attempting to install from a server that needs to use TLS 1.1 or TLS 1.2 (has restricted the use of TLS 1.0 and SSL v3), you have some options. Chocolatey.org now requires TLS 1.2 at a minimum.
Option 1 — Host Internally
If you are an organization, this is your best option and it reduces issues with rate limiting that could occur later.
See https://chocolatey.org/install#organization for details.
Option 2 — Updated PowerShell and .NET
Upgrade to the following:
- PowerShell v3+
- .NET Framework 4.5
try {
  # Set TLS 1.2 (3072) as that is the minimum required by Chocolatey.org
  # Use integers because the enumeration value for TLS 1.2 won't exist
  # in .NET 4.0, even though they are addressable if .NET 4.5+ is
  # installed (.NET 4.5 is an in-place upgrade).
  [System.Net.ServicePointManager]::SecurityProtocol = [System.Net.ServicePointManager]::SecurityProtocol -bor 3072
} catch {
  Write-Warning 'Unable to set PowerShell to use TLS 1.2. This is required for contacting Chocolatey as of 03 FEB 2020. https://chocolatey.org/blog/remove-support-for-old-tls-versions. If you see underlying connection closed or trust errors, you may need to do one or more of the following: (1) upgrade to .NET Framework 4.5+ and PowerShell v3+, (2) Call [System.Net.ServicePointManager]::SecurityProtocol = 3072; in PowerShell prior to attempting installation, (3) specify internal Chocolatey package location (set $env:chocolateyDownloadUrl prior to install or host the package internally), (4) use the Download + PowerShell method of install. See https://chocolatey.org/docs/installation for all install options.'
}

iex ((New-Object System.Net.WebClient).DownloadString('https://chocolatey.org/install.ps1'))
Option 3 — Manual
You need to download and unzip the Chocolatey package, then call the PowerShell install script from there. See the Download + PowerShell Method section below.
Non-Administrative install
NOTE: This option should be a last resort and is considered to be a more advanced scenario — most things you do on Windows require administrative rights, especially surrounding software management, so you are going to be limited even in packages you attempt to install. If you are using the community package repository, there are over 200 packages you can install from the community repository without administrative permission — see https://chocolatey.org/packages?q=id%3Aportable+tag%3Aportable.
You must choose a different location than the default (see Installing to a different location above). The default is a more secure location that only administrators can update.
- Save the script below as
ChocolateyInstallNonAdmin.ps1. - Use the script below, determine where you might want Chocolatey installed if it is not to
C:ProgramDatachocoportable. - Open PowerShell.exe.
- Run the following
Set-ExecutionPolicy Bypass -Scope Process -Force; - Run
.ChocolateyInstallNonAdmin.ps1.
ChocolateyInstallNonAdmin.ps1:
# Set directory for installation - Chocolatey does not lock
# down the directory if not the default
$InstallDir='C:ProgramDatachocoportable'
$env:ChocolateyInstall="$InstallDir"

# If your PowerShell Execution policy is restrictive, you may
# not be able to get around that. Try setting your session to
# Bypass.
Set-ExecutionPolicy Bypass -Scope Process -Force;

# All install options - offline, proxy, etc at
# https://chocolatey.org/install
iex ((New-Object System.Net.WebClient).DownloadString('https://chocolatey.org/install.ps1'))
Examples of packages you can install:
choco install puppet-agent.portable -y
choco install ruby.portable -y
choco install git.commandline -y

# pick an editor
#choco install visualstudiocode.portable -y # not yet available
choco install notepadplusplus.commandline -y
#choco install nano -y
#choco install vim-tux.portable

# What else can I install without admin rights?
# https://chocolatey.org/packages?q=id%3Aportable
If you prefer or need cmd.exe example, please see https://gist.github.com/ferventcoder/78fa6b6f4d6e2b12c89680cbc0daec78
Upgrading Chocolatey
Once installed, Chocolatey can be upgraded in exactly the same way as any other package that has been installed using Chocolatey. Simply use the command to upgrade to the latest stable release of Chocolatey:
Uninstalling Chocolatey
See [[uninstall|Uninstallation]].
FAQs
I’m having trouble installing Chocolatey
Make sure you’ve reviewed More Install Options and looked over [[Troubleshooting|Troubleshooting]]. If you’ve done those things, reach out over the mailing list or over the chat (Gitter). The links to those can be found in the open source section of https://chocolatey.org/support.
I’m getting a 403 attempting to install
This is addressed in [[Troubleshooting|Troubleshooting]].
Why isn’t there an MSI?
tl;dr — Chocolatey installs as a nupkg like everything else, a PowerShell install script just ensures that.
Chocolatey was born out of providing automation for Windows and doing that with packages, packages that could surround an installer but didn’t necessarily need to. The Chocolatey install scripts use the Chocolatey package (a nupkg file itself) to be installed and upgraded as just another package. This means Chocolatey is «eating its own dogfood» and it is unlikely we’d offer it as an MSI (native installer)as it would fly a bit in the face of what Chocolatey represents (although it is something that we would not rule out).
The installation actually ensures a couple of things:
-
PowerShell is installed and is set up properly.
PowerShell is a requirement for using Chocolatey, not just for install. It is what drives the package installation process in most cases. Every package can have binaries and/or installation/uninstallation scripts (written in PowerShell). Chocolatey is the framework and each package gets to define how it is installed, upgraded, and uninstalled. It’s an extremely flexible framework that has been proven to meet the insanity that is the Windows software installation ecosystem. That flexibility would not be easily achieved without PowerShell.
We do recognize there are a few organizations that disable PowerShell, so it’s very likely in the future our Business Edition will meet that need. PowerShell is a staple of Windows automation, so it is not the norm for an organization in this day and age to disable PowerShell.
Having an install process that uses PowerShell helps you determine quickly if Chocolatey will be able to be used in your environment.
-
You are open to doing things in a slightly different way, e.g. working with packages as opposed to installers.
You are open to the concept of using packages. Some folks might say this means we are asking folks to learn to ‘do things «our way» because we know better’. It’s less about «knowing better» and more about learning that Chocolatey does things in a slightly different way. It does that because the world of software is not just installers. Software goes beyond Programs and Features and a system that can track all of that also needs to as well. Package management is not a new concept in the world of software, perhaps just newer to Windows. If folks are not open to that, then they are probably not going to be open to Chocolatey. And that’s completely fine. Chocolatey is not for everyone. We may eventually get to more of a masses approach. Right now we are targeting a specific type of audience — those that are looking for better ways to manage software on Windows and open to looking for the best process of doing that.
Как сказал один мудрец (и по совместительству просто мой друг):
“нет плохих или хороших операционных систем, есть подходящие и
не подходящие для решения конкретных пользовательских задач”.
Глубокая мысль, я с этим полностью согласен.
Хотя для решения конкретно моих рабочих задач намного лучше подходят
другие ОС, у Windows тоже есть своя ниша.
Я уже давно привык пользоваться в повседневной деятельности
Unix-подобными операционными системами, такими как Fedora Linux и macOS.
Но недавно я решил совершить очередной набег в мир Windows
— попробовать новые классные фичи WSL2
да в игры поиграть.
Только в этот раз я решил сразу сделать всё по-правильному, и
устанавливать весь софт так, чтобы им потом было удобно управлять и обновлять.
В поисках решения этой задачи я открыл для себя
замечательный инструмент Chocolatey,
который теперь считаю жизненно необходимым для комфортного пользования
Windows.
Chocolatey — это пакетный менеджер для Windows,
примерно как apt
в мире Debian/Ubuntu или
dnf
в мире Fedora/CentOS.
Пакетный менеджер занимается установкой, удалением и обновлением программ.
Если вам, как и мне, надоело ставить галочки под текстом лицензии
(хоть раз вообще читали?)
и безразлично нажимать кнопку “далее”, то Chocolatey вам поможет.
Он имеет интерфейс командной строки — то, что надо для такого гика, как я!
У Chocolatey большая библиотека пакетов
— больше 7500 штук, всё популярное там точно есть.
Хоть я привёл в пример apt и dnf, на самом деле,
Chocolatey имеет намного больше общего с
Homebrew — пакетным менеджером для macOS.
В Linux пакетные менеджеры уже давно стали насущной необходимостью
— там этим никого не удивить, а Chocolatey и Homebrew работают в окружениях,
где изначально пакетные менеджеры не предусмотрены.
При этом оба они отлично справляются со своими задачами.
Chocolatey написан на C# и PowerShell, имеет
открытый исходный код.
Для работы требует Windows 7 или новее.
Установка
Чтобы установить Chocolatey, нужно запустить командную строку
с правами администратора. Сделать это в Windows 10 можно так:
- Нажимаем на клавиатуре кнопку Win или просто открываем меню «Пуск»;
- Набираем
cmd; - На найденной программе нажимаем правой кнопкой мыши
и выбираем пункт “Run as administrator” или, в русской локализации,
“Запуск от имени администратора”.
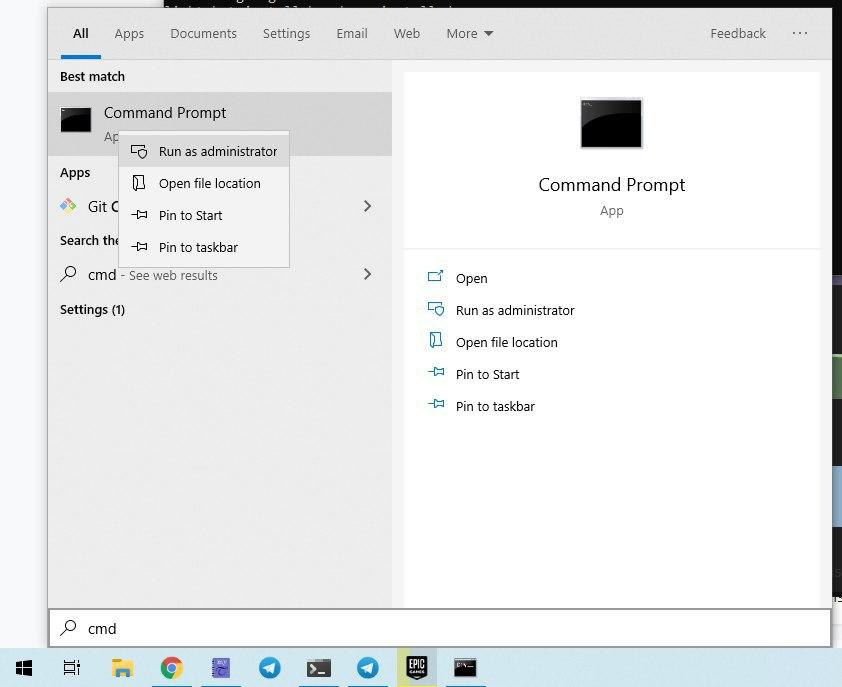
В открывшееся окно терминала нужно вставить следующую команду:
@"%SystemRoot%System32WindowsPowerShellv1.0powershell.exe" -NoProfile -InputFormat None -ExecutionPolicy Bypass -Command " [System.Net.ServicePointManager]::SecurityProtocol = 3072; iex ((New-Object System.Net.WebClient).DownloadString('https://chocolatey.org/install.ps1'))" && SET "PATH=%PATH%;%ALLUSERSPROFILE%chocolateybin"
На всякий случай, если эта команда устареет и перестанет работать,
или вы предпочитаете вставлять в администраторский терминал команды
только из официальных источников (и правильно делаете), то документация
по установке находится
вот здесь.
После того, как команда отработает (у меня установка заняла примерно минуту),
нужно перезапустить терминал. Вместо cmd
можно запустить PowerShell (тоже от имени администратора) — он немного
удобнее. Можно проверить установку:
Если вы видите справку по команде, то установка прошла успешно.
Установка программ
Давайте установим через choco первые программы.
Все эти программы найдены в реестре пакетов
и проверены мной — работают.
При установке вы можете заметить, что все программы скачиваются с
официальных сайтов разработчиков.
Если вы переживаете по поводу вирусов, то рекомендую почитать,
какие меры предпринимают мейнтейнеры Chocolatey,
чтобы обеспечить безопасность пакетов (там всё серьезно).
Во всех командах я добавил флаг -y, чтобы установщик не задавал
вообще никаких вопросов. Эта команда автоматически соглашается с
лицензиями и разрешает запуск скриптов установки. Ради интереса
можете попробовать убрать этот флаг из команд, и посмотреть, что будет.
Допустим, что вам нужен браузер (удалите из команды ненужные названия):
choco install -y googlechrome firefox
Или текстовый редактор/IDE (удалите из команды ненужные названия):
choco install -y notepadplusplus.install vscode
Я являюсь заядлым пользователем PyCharm, который лучше всего устанавливать
через JetBrains Toolbox
(как и любые другие IDE от JetBrains):
choco install -y jetbrainstoolbox
Инструменты для разработки:
choco install -y git python3 microsoft-windows-terminal postman
Мессенджеры и видео-конференции:
choco install -y telegram.install slack zoom
Игры:
choco install -y steam epicgameslauncher
Всякое прочее-разное полезное:
choco install -y 7zip vlc paint.net teamviewer qbittorrent thunderbird putty.install
И для установки даже не пришлось кликать мышью по кнопкам!
Тут можете почитать
про удаление программ при помощи choco.
Обновление
Вот так можно обновить все установленные через choco программы
до актуальных версий:
По-моему, это очень круто и удобно!
Заключение
choco — теперь для меня это просто маст-хэв на Windows.
Самая первая программа, которую я буду устанавливать.
Благодаря Chocolatey, для меня Windows стала немного дружелюбнее.
Всем рекомендую попробовать!
Если понравилась статья, то
подпишитесь на уведомления
о новых постах в блоге, чтобы ничего не пропустить!
Дополнительное чтение
- официальный сайт Chocolatey;
- реестр пакетов;
- исходный код;
- видео про Chocolatey для тех, кто больше любит воспринимать информацию визуально.
Обложка: Jean Beaufort, Chocolate