There are several ways to install CMake, depending on your platform.
Windows
There are pre-compiled binaries available on the Download page for Windows as MSI packages and ZIP files. The Windows installer has an option to modify the system PATH environment variable. If that is not selected during installation, one may manually add the install directory (e.g. C:Program FilesCMakebin) to the PATH in a command prompt.
One may alternatively download and build CMake from source. The Download page also provides source releases. In order to build CMake from a source tree on Windows, you must first install the latest binary version of CMake because it is used for building the source tree. Once the binary is installed, run it on CMake as you would any other project. Typically this means selecting CMake as the Source directory and then selecting a binary directory for the resulting executables.
macOS
There are pre-compiled binaries available on the Download page for macOS as disk images and tarballs. After copying CMake.app into /Applications (or a custom location), run it and follow the “How to Install For Command Line Use” menu item for instructions to make the command-line tools (e.g. cmake) available in the PATH. Or, one may manually add the install directory (e.g. /Applications/CMake.app/Contents/bin) to the PATH.
One may alternatively download and build CMake from source as in the following section.
Linux, UNIX
There are pre-compiled binaries available on the Download page for some UNIX platforms. One may alternatively download and build CMake from source. The Download page provides source releases. There are two possible approaches for building CMake from a source tree. If there is no existing CMake installation, a bootstrap script is provided:
  ./bootstrap
  make
  make install
(Note: the make install step is optional, cmake will run from the build directory.)
By default bootstrap will build CMake without any debug or optimization flags. To enable optimizations you will need to specify the CMAKE_BUILD_TYPE option to bootstrap like this: ./bootstrap -- -DCMAKE_BUILD_TYPE:STRING=Release
For more options with bootstrap, run ./bootstrap --help .
Or, an existing CMake installation can be used to build a new version:
  cmake .
  make
  make install
(Note: the make install step is optional, cmake will run from the build directory.) If you are not using the GNU C++ compiler, you need to tell the bootstrap script (or cmake) which compiler you want to use. This is done by setting the environment variables CC and CXX before running it. For example:
  env CC=cc CXX=CC ./bootstrap
  make
  make install
Download Verification
Each release on the Download page comes with a file named cmake-$version-SHA-256.txt, where $version is the release version number.
One may use this file to verify other downloads, such as the source tarball. For example:
  $ curl -OL https://github.com/Kitware/CMake/releases/download/v3.20.1/cmake-3.20.1-SHA-256.txt
  $ curl -OL https://github.com/Kitware/CMake/releases/download/v3.20.1/cmake-3.20.1.tar.gz
  $ sha256sum -c --ignore-missing cmake-3.20.1-SHA-256.txt
  cmake-3.20.1.tar.gz: OK
The SHA-256 file itself can be verified by GPG signature:
  $ curl -OL https://github.com/Kitware/CMake/releases/download/v3.20.1/cmake-3.20.1-SHA-256.txt.asc
  $ gpg --keyserver hkps://keyserver.ubuntu.com --recv-keys C6C265324BBEBDC350B513D02D2CEF1034921684
  $ gpg --verify cmake-3.20.1-SHA-256.txt.asc cmake-3.20.1-SHA-256.txt
The GPG key C6C265324BBEBDC350B513D02D2CEF1034921684 is a signing subkey whose expiry is updated yearly.
How to setup CMake for C++ (Windows)
by | Last Updated:
2021-02-08
C++
In this article I will provide you with the information on how to setup CMake and compile your C++ project. You may also use this to compile third-party projects and solutions that you depend upon.
Table of Contents
- What do you need to follow through this tutorial
- Why do we need CMake?
- Install CMake
- Creating our project
- How to generate build files
- Adding more source files
- Using CMake GUI to build
- Using Visual Studio 2017/2019
What do you need to follow through this tutorial
- You would need to have some basic knowledge of C++ as I will not be explaining why or what the application that we are compiling does. Start from this post that explains the basics of C++.
- There are some terminal commands being executed but you will not need previous knowledge on Command Prompts / PowerShell. Check out this post on how to operate the command line.
- Visual Studio installed with support for C++ compilation. CMake will automatically detect your Visual Studio installation later.
Why do we need CMake?
C++ is an old language. Do not make a mistake it is really powerful and provides a lot of control over low level memory and system programming. As an old language though it misses some of the modern high-level language concepts. When programming in C++ it is hard to target multiple platforms as there is no unified project structure as well as good package management.
On other languages like Java, C# and python the code is always compiled to an intermediate language or is interpreted directly at runtime. That code is then run by a special virtual machine that translates it to commands for the specific machine.
This is what CMake strives to solve but the other way around. It is a project generator. On Windows one would want to work with Visual Studio project files and solutions and on Linux one would rather have Make files. This essentially means that we unify our project files under CMake which on the other hand generates the project files for the specific system.
Read more: You can check out more on how the compiler and linker work to gain in depth knowledge on why the process is different than other languages.
Install CMake
To install cmake you open this page: https://cmake.org/download/
You should find the corresponding binary for your windows installation (x64, x86) and download the .msi file. It should roughly look something like this:

The install wizard is pretty straightforward just make sure that on the question “By default CMake does not add its directory to the system PATH” you check one of the options Add CMake to system Path so that later we can execute commands from the windows terminal.
Creating our project
We will have the most simple example for our first compile using CMake. We will start as always with our “Hello, World!” application using a single .cpp file to demonstrate how CMake will generate a project and compile that file.
We will have the following project structure:
root
├── src/
│  └── main.cpp
└── CMakeLists.txt
In our “main.cpp” file we will write down the following “Hello, World!” application:
#include <iostream>

int main() {
    std::cout << "Hello, World!" << std::endl;
    return 0;
}
The “CMakeLists.txt” file is our base of operations when using CMake. It can link other CMakeLists files which later on will make it easy to include dependency (vendor) projects and compile them along our application. We will start with the most basic content for our file so that we can compile our “main.cpp” into a simple console application:
# This will set the minimum version of CMake required to generate the projects
# CMakeLists has its own language and features and as more and more versions are
# added it will include new keywords and options
cmake_minimum_required(VERSION 3.18)

# This will give our project a name
project(Main)

# This instructs CMake that we want to generate an executable file from this project
# Other options would be add_library but this is a topic for another time
# You can notice that we also pass on the path to our cpp file
add_executable(Main src/main.cpp)
How to generate build files
To start generating the cmake projects we will need to open a terminal window inside the root folder where our CMakeLists.txt file resides. This can easily be done by clicking shift + right mouse button inside the folder and then selecting “Open PowerShell window here”. After we’ve done that we can execute the following commands:
mkdir build
cd build
cmake ..
This will create the directory build, then move the terminal working directory to build and then generate projects using the “CMakeLists.txt” file in the previous directory as noted by the two dots after cmake (single dot means current directory, two dots means one directory up).
You can also specify the source and build directories by adding the following flags:
cmake -B [build directory] -S [source directory]After executing this command the “build” folder will be filled with project files. Double clicking the “Main.sln” file would open up Visual Studio. If you’ve followed up until now you would have 3 projects in the solution explorer as follows:
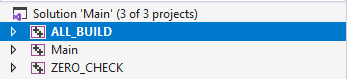
- Main – this is the project that we want to build and that will generate our executable.
- ALL_BUILD – by default this will be set up as the startup project and it will run Main and ZERO_CHECK.
- ZERO_CHECK – as our project is not actually controlled by visual studio but generated externally we cannot add source/header files inside of visual studio itself. To do that we would need to append them into the add_executable command inside of “CMakeLists.txt”. The ZERO_CHECK project would then monitor for changes in that file and regenerate VS projects based on the changes.
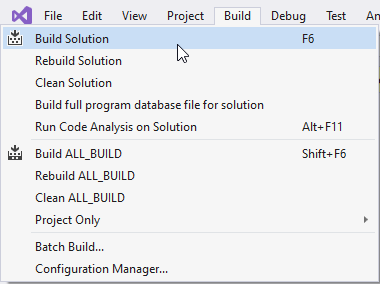
Now that we have Visual Studio open we can build the project. Use the shortcut ctrl + shift + b to run the build command or click on the top menu “Build” -> “Build Solution”.
Note: If you still have the command line open you can also use the command
cmake --build . --config Debug
You can run the project by right clicking on the “Main” project in Visual Studio solution explorer and selecting the option “Set as Startup Project”. On the top navigation bar you will notice a play button with the label of “Local Windows Debugger” that you can click to run your project (shortcut is ctrl + F5).
Note: If you’ve built the project using the command line you can run the application that we just compiled by using the following commands:
cd Debug

.Main.exe
Adding more source files
To add other files to the project you would need to create them in the target directory using Windows Explorer and then add them to CMakeLists. Lets say for example that we decide to move the “#include <iostream>” and all future includes into another file. We also want to create a header file called “main.h” and another C++ file called “other.cpp” resulting in the following following changes:
root
├── build/
│  └── Generated Build Files
├── src/
│  ├── main.h
│  ├── main.cpp
│  └── other.cpp
└── CMakeLists.txt
Create a file called main.h in the src directory with the following content
void print_hello_world();Then we modify main.cpp to include main.h instead of <iostream> and also call the newly defined function. This would result into the following file:
#include "main.h"

int main() {

print_hello_world();
    return 0;
}
Lets also add another file that would implement the print_hello_world function and call it other.cpp:
#include <iostream>

void print_hello_world() {
    std::cout << "Hello, World!" << std::endl;
}
At this point visual studio would not be able to compile the project as it will not know about other.cpp. It would be able to find the main.h file. To fix this we need to open CMakeLists.txt and modify the following line:
add_executable(Main src/main.cpp src/other.cpp src/main.h)Though it is no need to add the header file it is a good practice to list all source files so that you can also see them listed in the solution explorer later.
You can now run build. Visual Studio will display a prompt if you want to reload the projects. Be sure to click on “Reload All”.
Using CMake GUI to build
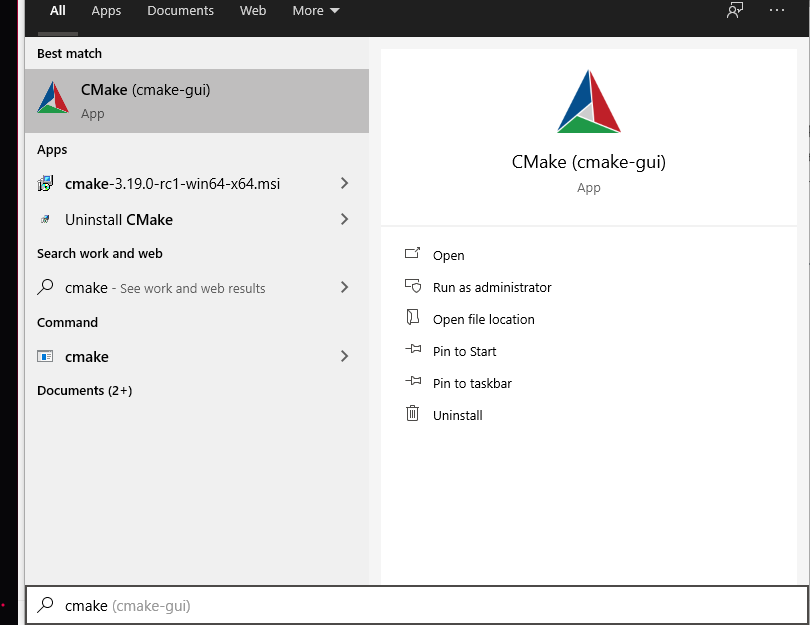
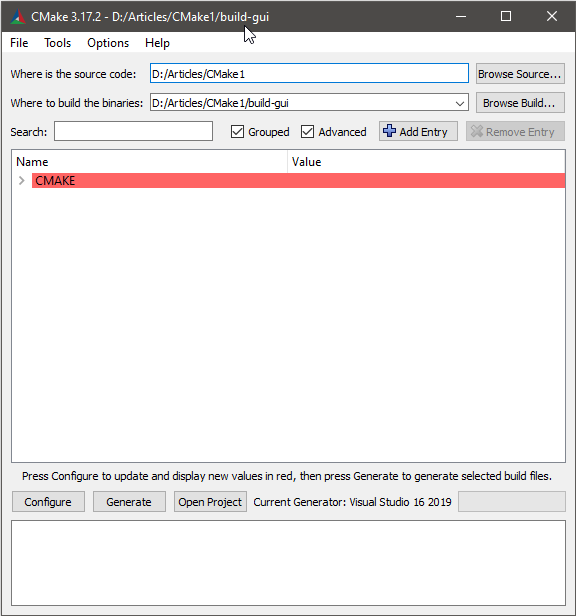
To use the visual CMake application is even easier. As CMake is already installed on Windows you can open the “Start” menu and start typing “cmake”. Select the “CMake (cmake-gui)” that should appear as a search result.
After you open it a window will appear where you can put on some options for generating the project files. First thing you should locate the “Where is the source code” input field and select the folder where your project resides (the root CMakeLists.txt file). Then you can select a directory where the projects will be generated by giving a value to the “Where to build the binaries”. In my case I create a separate directory but you can also just write the path to the “build” directory again. After these two fields are filled in you can click on the “Generate” button bellow. It should look something like this:
After the projects are generated you can repeat the steps above for the new directory “build-gui”. You will also have the option to click on the “Open Project” button in the CMake GUI Window.
Using Visual Studio 2017/2019
On the latest versions of visual studio you can open alternatively open the root directory with Visual Studio. It will automatically detect that it is a CMake type of project. The benefit of opening the solution this way is that Visual Studio will not actually generate a solution. It will use another build system called “Ninja” that I will talk about in another post. This system is faster on rebuilds which makes it more efficient to compile C++ code.
You can follow up with:
- What are CMake targets
- How to manage dependencies in CMake: Vanilla vs Vcpkg
- More posts on CMake
- Posts on the topic of C++ game development
Step#1: download Cmake
- Download the Cmake software through this link—>
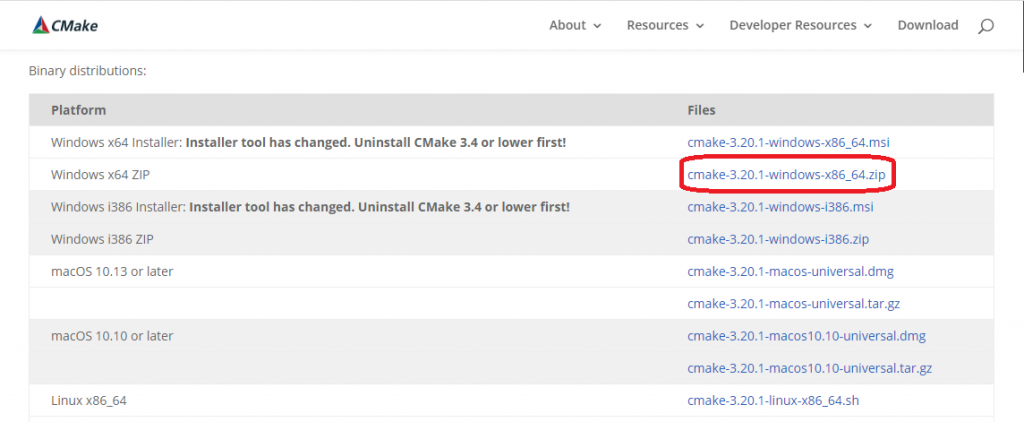
- Go to the download section
- Select option as window’s x64 zip
- After complete download extract files by using WinRAR software
Step#2: set binaries
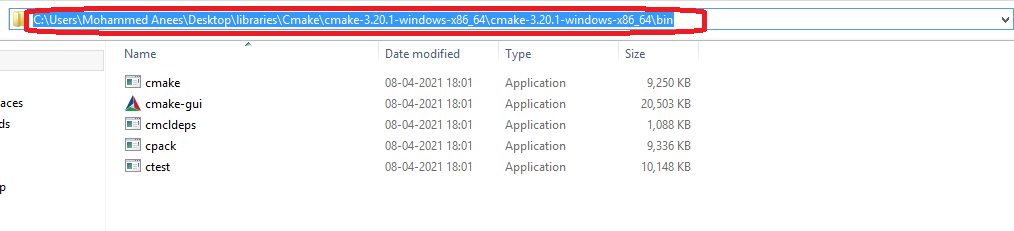
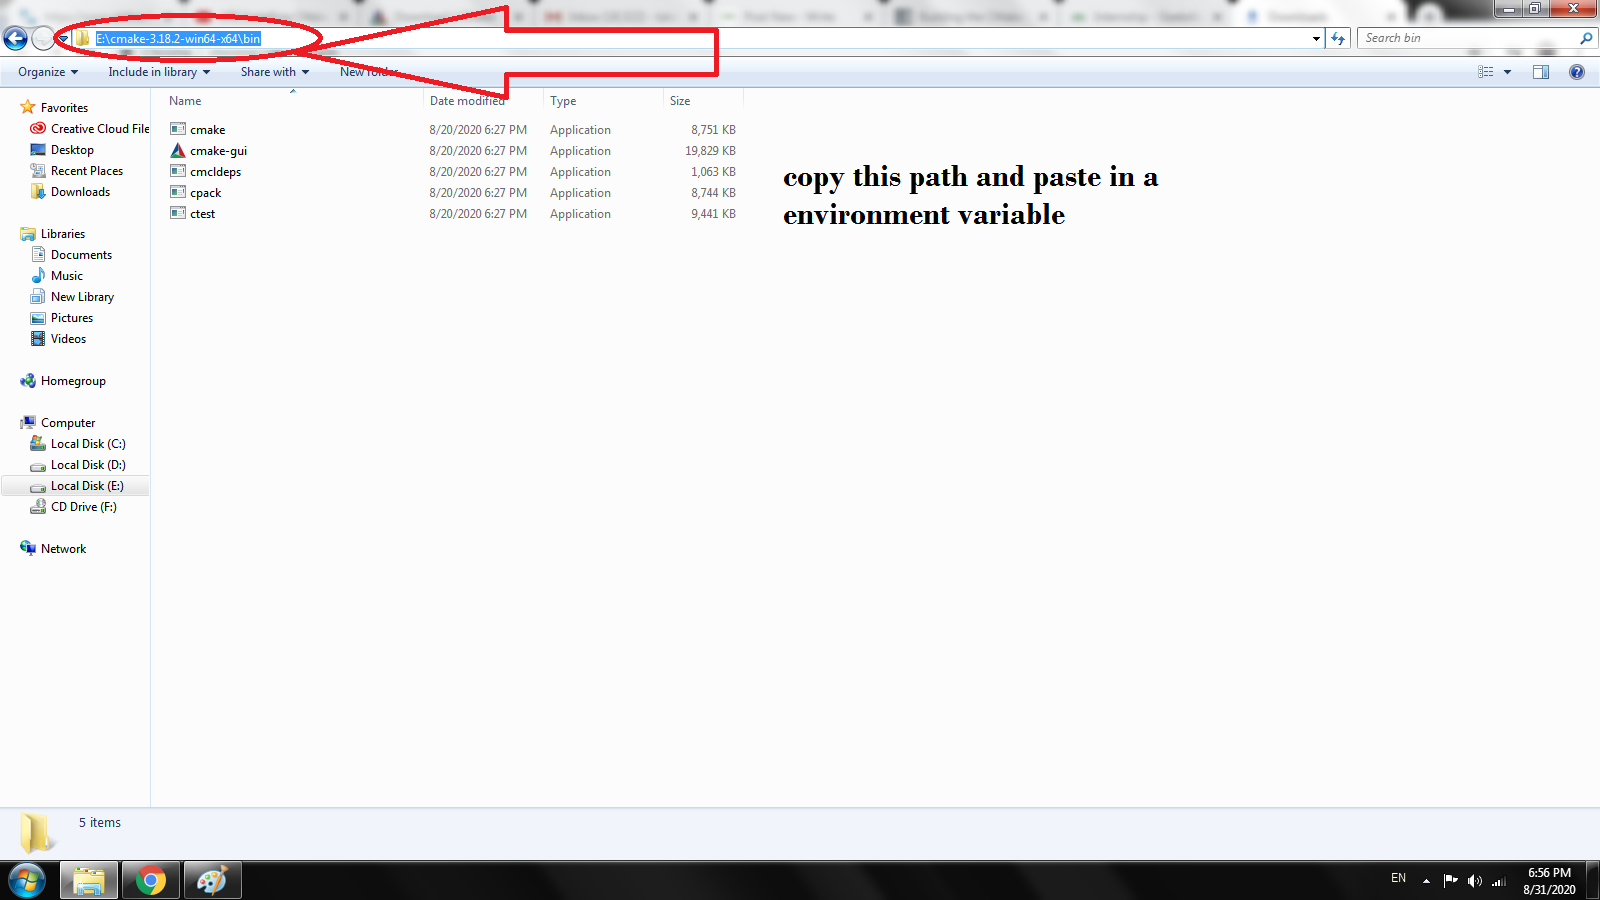
- Open the CMake folder and locate the bin folder
- Open the bin folder and copy the path
- C:UsersMohammed AneesDesktoplibrariesCmakecmake-3.20.1-windows-x86_64cmake-3.20.1-windows-x86_64bin
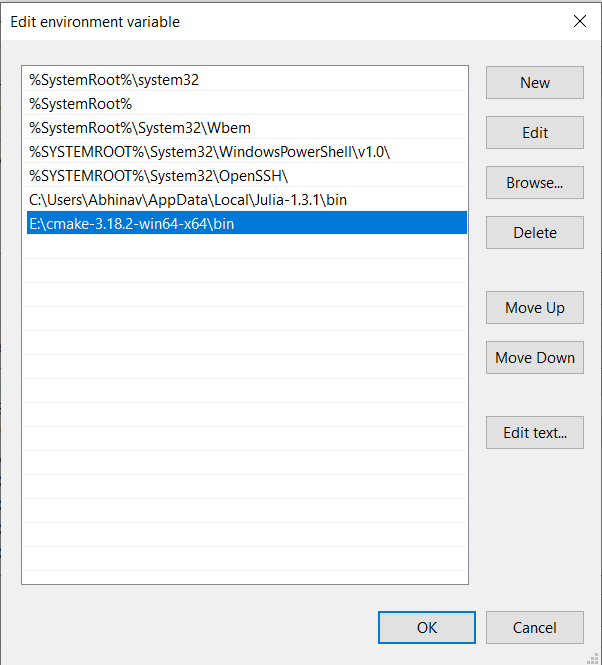
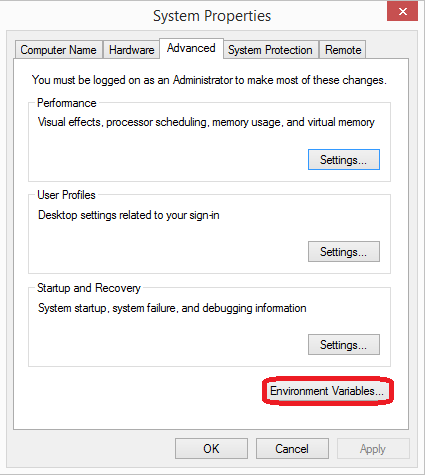
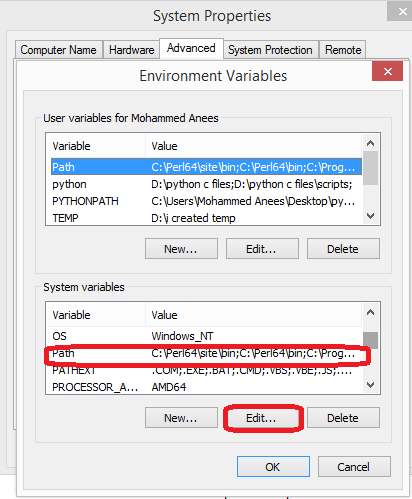
Now go to this pc—>properties—>advanced system settings—> environment variables
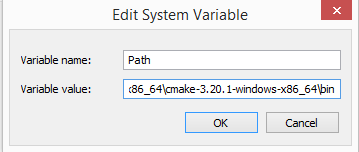
Select the path and edit it
Don’t delete the existing path but first, add(semicolon ; ) before the path and then paste it
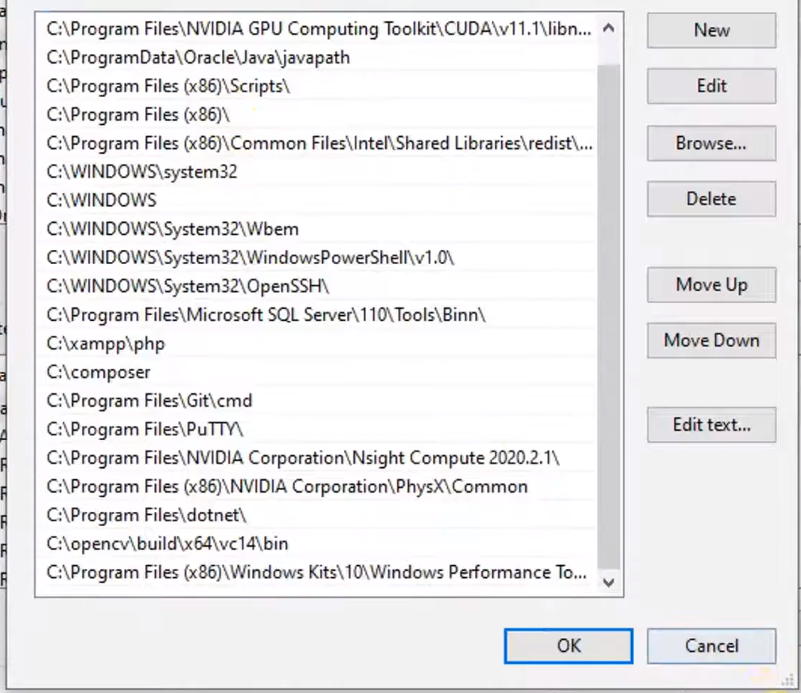
In some pc, you might get a different window like below in that case you no need to add( semicolon ; ) just click new and paste the bin path
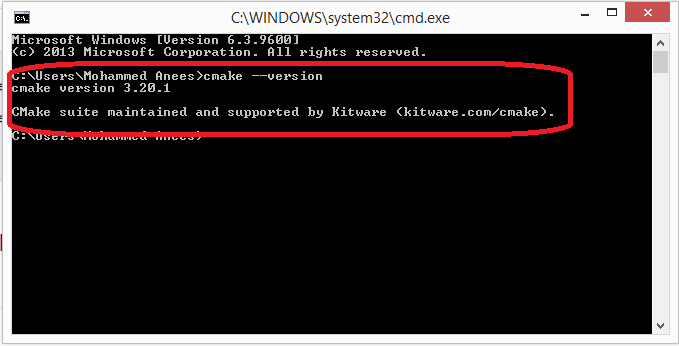
Step#3: check whether you install it right
- Win+x —>Go to Run —> type CMD—> then type the command cmake – -version
Step#3: Create CMake-GUI on desktop
- Open CMake folder—>bin—> CMake-gui—> right click—> send to desktop

Mohammed Anees
Hey there, welcome to aneescraftsmanship I am Mohammed Anees an independent developer/blogger. I like to share and discuss the craft with others plus the things which I have learned because I believe that through discussion and sharing a new world opens up
Improve Article
Save Article
Improve Article
Save Article
CMake is a cross-platform free and open-source software tool for managing the build process of software using a compiler-independent method. It supports directory hierarchies and applications that depend on multiple libraries.
Installation of CMake
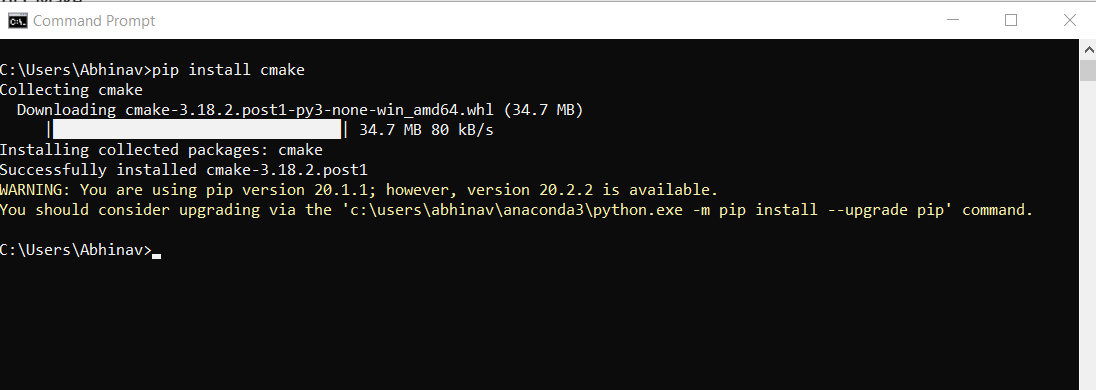
CMake in Python can be easily installed with the use of pip package management tool provided by python. Just use the following command for the Installation process:
pip install cmake
Setting up Environment Variable
Step 1: Open https://cmake.org/ and click on Downloads
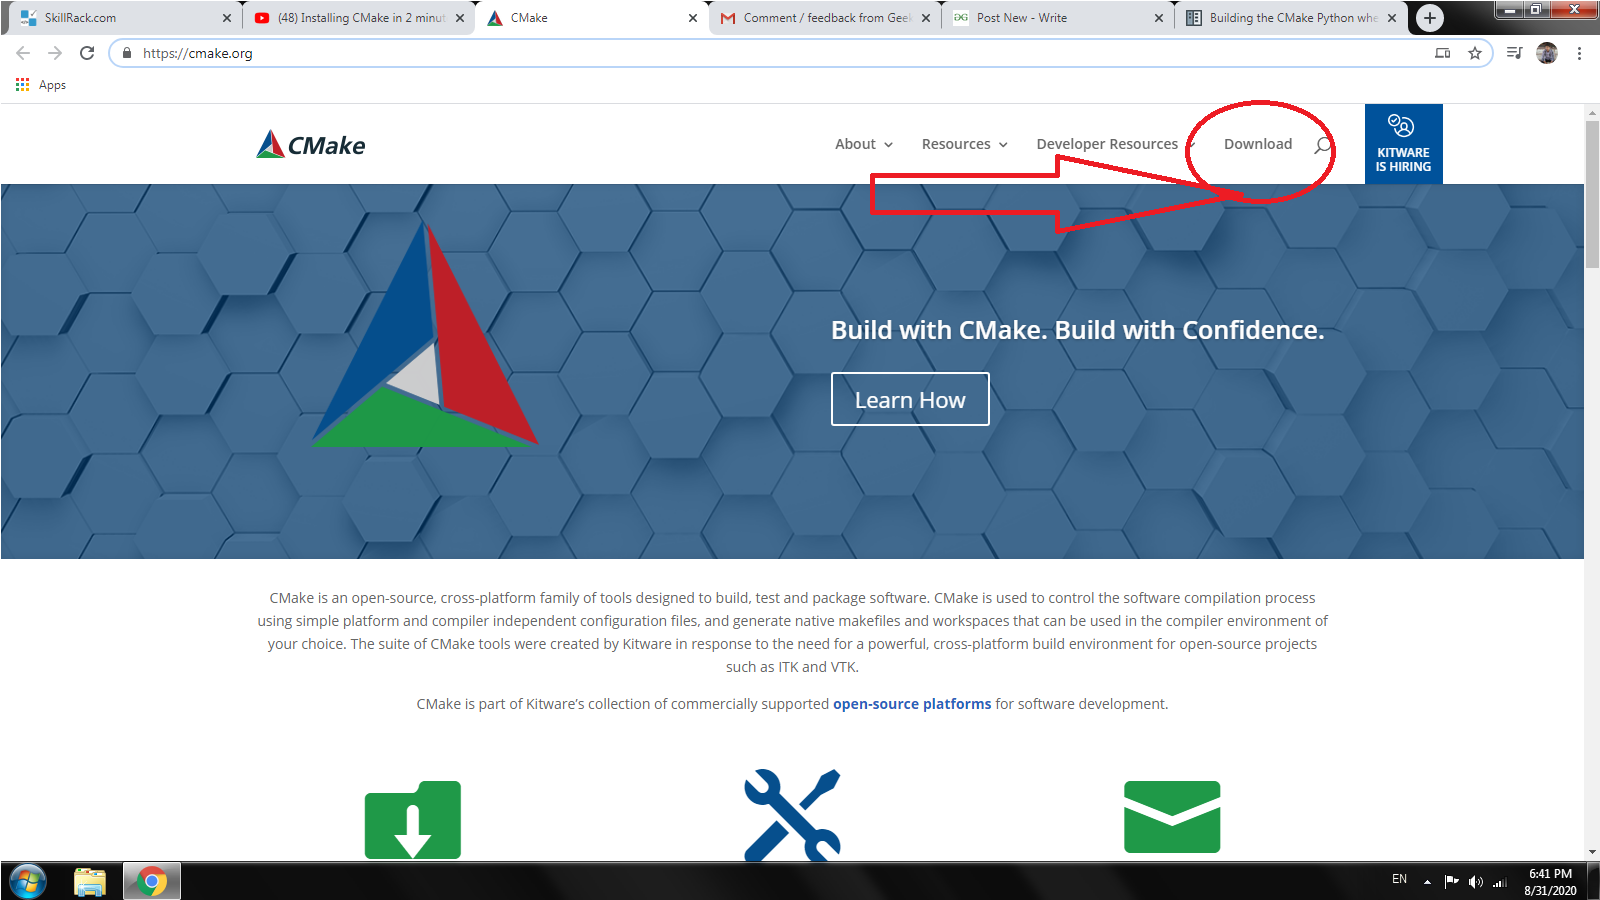
Step 2: Download the Zip file of CMake.
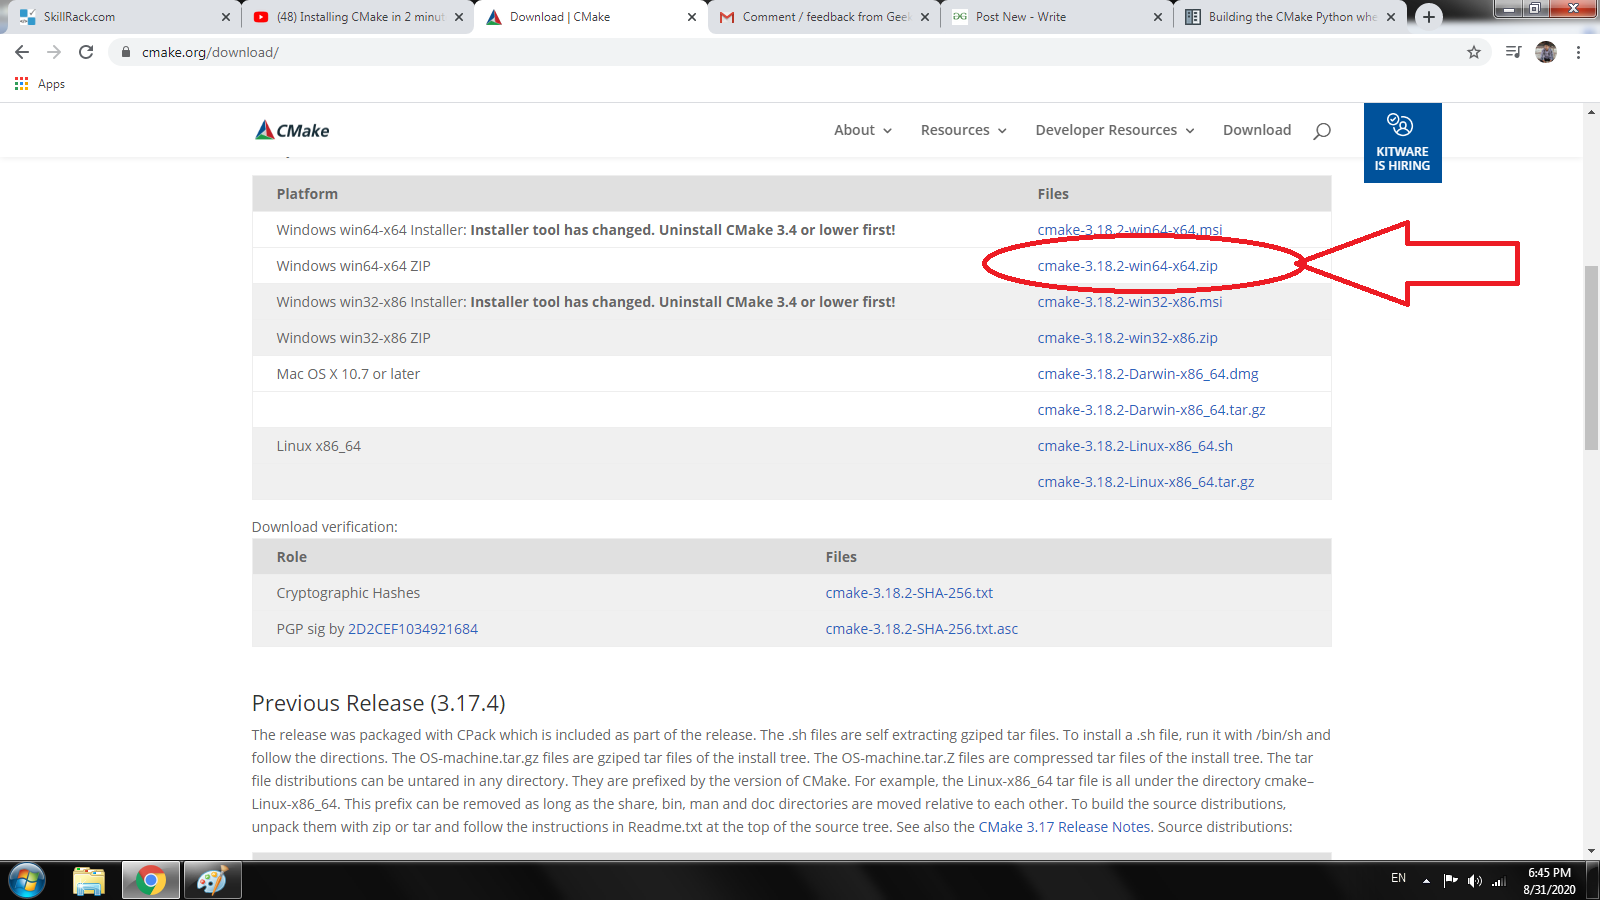
Step 3: Extract the file and copy the bin file path.
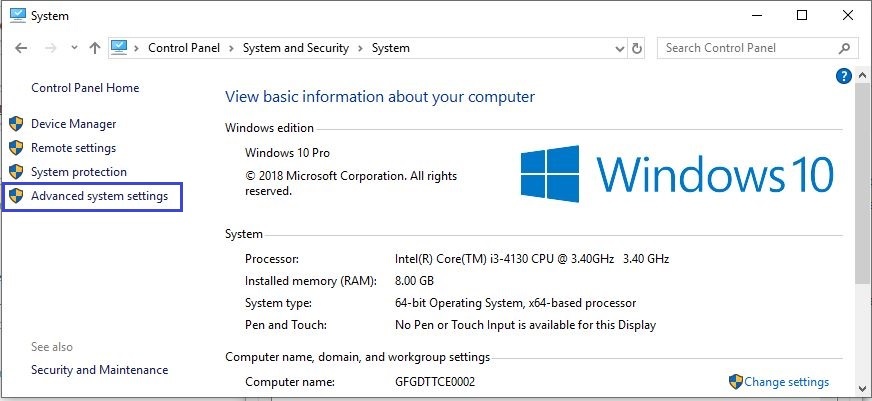
Step 4: Go to Control Panel -> System and Security -> System
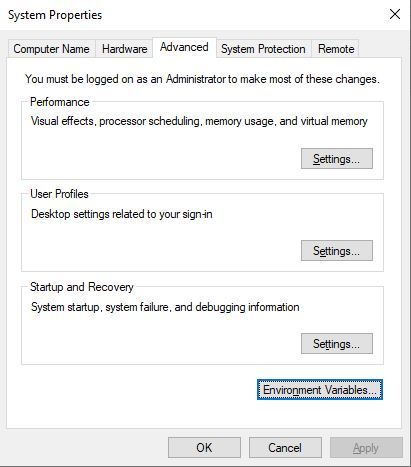
Under Advanced System Setting option click on Environment Variables as shown below:
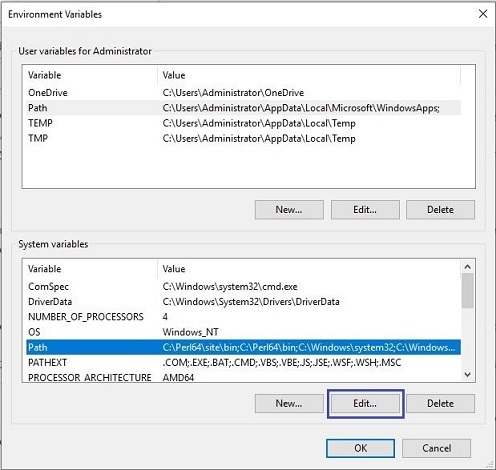
Step 6: Now, we have to alter the “Path” variable under System variables so that it also contains the path to the CMake environment. Select the “Path” variable and click on the Edit button as shown below:
Step 7: We will see a list of different paths, click on the New button, and then add the path where CMake was installed and then click OK.