CUDA Install Guide
This is a must-read guide if you want to setup a new Deep Learning PC. This guide includes the installation of the following:
- NVIDIA Driver
- CUDA Toolkit
- cuDNN
- TensorRT
Recommendation
Debian installation method is recommended for all CUDA toolkit, cuDNN and TensorRT installation.
For PyTorch, CUDA 11.0 and CUDA 10.2 are recommended.
For TensorFlow, up to CUDA 10.2 are supported.
TensorRT is still not supported for Ubuntu 20.04. So, Ubuntu 18.04 is recommended
Install NVIDIA Driver
Windows
Windows Update automatically install and update NVIDIA Driver.
Linux
Update first:
sudo apt update
sudo apt upgrade
Check latest and recommended drivers:
sudo ubuntu-drivers devices
Install recommended driver automatically:
sudo ubuntu-drivers install
Or, Install specific driver version using:
sudo apt install nvidia-driver-xxx
Then reboot:
Verify the Installation
After reboot, verify using:
Install CUDA Toolkit
Installation Steps
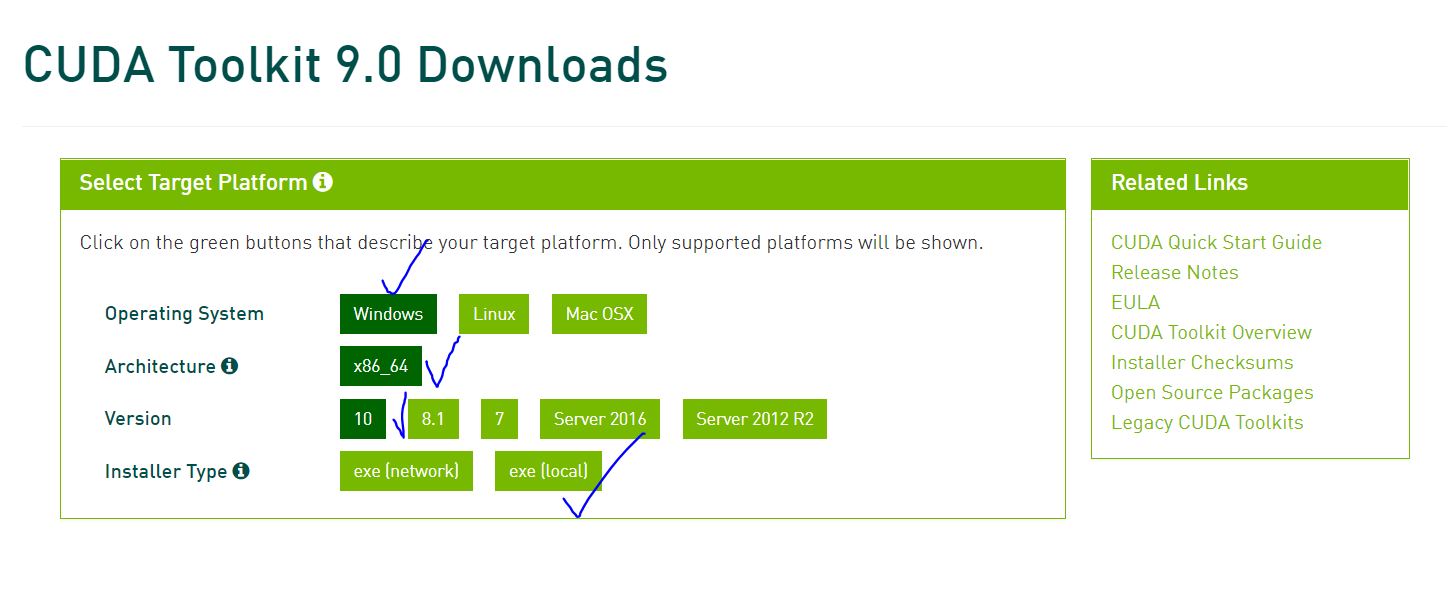
- Go to https://developer.nvidia.com/cuda-toolkit-archive and choose your desire CUDA toolkit version that is compatible with the framework you want to use.
- Select your OS.
- Select your system architecture.
- Select your OS version.
- Select Installer Type and Follow the steps provided. (.exe on Windows and .run or .deb on Linux)
Post-Installation Actions
Windows exe CUDA Toolkit installation method automatically adds CUDA Toolkit specific Environment variables. You can skip the following section.
Before CUDA Toolkit can be used on a Linux system, you need to add CUDA Toolkit path to PATH variable.
Open a terminal and run the following command.
export PATH=/usr/local/cuda-11.1/bin${PATH:+:${PATH}}
or add this line to .bashrc file.
In addition, when using the runfile installation method, you also need to add LD_LIBRARY_PATH variable.
For 64-bit system,
export LD_LIBRARY_PATH=/usr/local/cuda-11.1/lib64${LD_LIBRARY_PATH:+:${LD_LIBRARY_PATH}}
For 32-bit system,
export LD_LIBRARY_PATH=/usr/local/cuda-11.1/lib${LD_LIBRARY_PATH:+:${LD_LIBRARY_PATH}}
Note: The above paths change when using a custom install path with the runfile installation method.
Verify the Installation
Check the CUDA Toolkit version with:
Install cuDNN
The NVIDIA CUDA Deep Neural Network library (cuDNN) is a GPU-accelerated lirbary of primitives for deep neural networks. cuDNN provides highly tuned implementations for standard routines such as forward and backward convolution, pooling, normalization and activation layers.
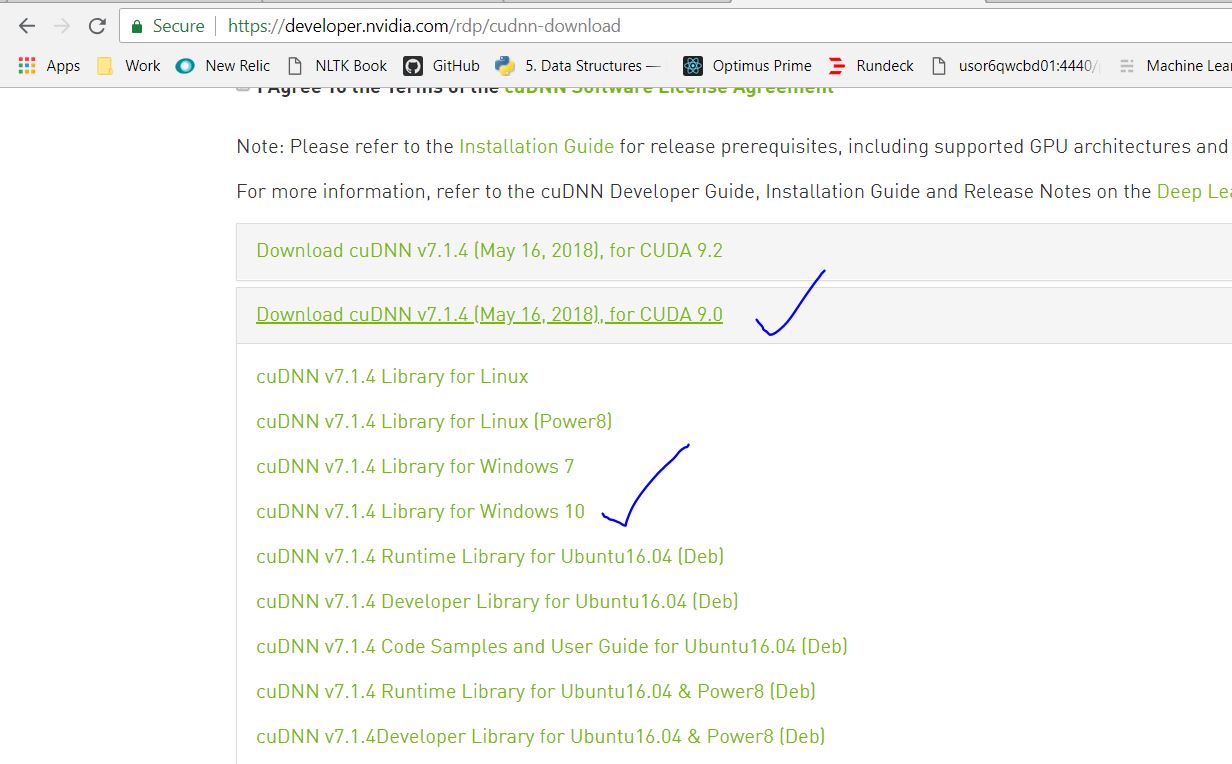
- Go to https://developer.nvidia.com/cudnn and click «Download cuDNN».
- You need to sing in to proceed.
- Then, check «I Agree to the Terms…».
- Click on your desire cuDNN version compatible with your installed CUDA version. (If you don’t find desire cuDNN version, click on «Archived cuDNN Releases» and find your version. If you don’t know which version to install, latest cuDNN version is recommended).
Windows
-
Choose «cuDNN Library for Windows (x86)» and download. (That is the only one available for Windows).
-
Extract the downloaded zip file to a directory of your choice.
-
Copy the following files into the CUDA Toolkit directory.
a. Copy
<extractpath>cudabincudnn*.dlltoC:Program FilesNVIDIA GPU Computing ToolkitCUDAvx.xbin.b. Copy
<extractpath>cudaincludecudnn*.htoC:Program FilesNVIDIA GPU Computing ToolkitCUDAvx.xinclude.c. Copy
<extractpath>cudalibx64cudnn*.libtoC:Program FilesNVIDIA GPU Computing ToolkitCUDAvx.xlibx64.
Linux
Download the 2 files named as:
- cuDNN Runtime Library for …
- cuDNN Developer Library for …
for your installed OS version.
Then, install the downloaded files with the following command:
sudo dpkg -i libcudnn8_x.x.x...deb
sudo dpkg -i libcudnn8-dev_x.x.x...deb
Install TensorRT
TensorRT is meant for high-performance inference on NVIDIA GPUs. TensorRT takes a trained network, which consists of a network definition and a set of trained parameters, and produces a highly optimized runtime engine that performs inference for that network.
- Go to https://developer.nvidia.com/tensorrt and click «Download Now».
- You need to sing in to proceed.
- Click on your desire TensorRT version. (If you don’t know which version to install, latest TensorRT version is recommended).
- Then, check «I Agree to the Terms…».
- Click on your desire TensorRT sub-version. (If you don’t know which version to install, latest version is recommended).
Windows
- Download «TensorRT 7.x.x for Windows10 and CUDA xx.x ZIP package» that matches CUDA version.
- Unzip the downloaded archive.
- Copy the DLL files from
<extractpath>/libto your CUDA installation directoryC:Program FilesNVIDIA GPU Computing ToolkitCUDAvx.xbin
Then install the uff, graphsurgeon and onnx_graphsurgeon wheel packages.
pip install <extractpath>graphsurgeongraphsurgeon-x.x.x-py2.py3-none-any.whl
pip install <extractpath>uffuff-x.x.x-py2.py3-none-any.whl
pip install <extractpath>onnx_graphsurgeononnx_graphsurgeon-x.x.x-py2.py3-none-any.whl
Linux
Download «TensorRT 7.x.x for Ubuntu xx.04 and CUDA xx.x DEB local repo package» that matches your OS version, CUDA version and CPU architecture.
Then install with:
os="ubuntuxx04"
tag="cudax.x-trt7.x.x.x-ga-yyyymmdd"

sudo dpkg -i nv-tensorrt-repo-${os}-${tag}_1-1_amd64.deb
sudo apt-key add /var/nv-tensorrt-repo-${tag}/7fa2af80.pub

sudo apt update
sudo apt install -y tensorrt
If you plan to use TensorRT with TensorFlow, install this also:
sudo apt install uff-converter-tf
Verify the Installation
For Linux,
You should see packages related with TensorRT.
Upgrading TensorRT
Download and install the new version as if you didn’t install before. You don’t need to uninstall your previous version.
Uninstalling TensorRT
sudo apt purge "libvinfer*"
sudo apt purge graphsurgeon-tf onnx-graphsurgeon
sudo apt autoremove
sudo pip3 uninstall tensorrt
sudo pip3 uninstall uff
sudo pip3 uninstall graphsurgeon
sudo pip3 uninstall onnx-graphsurgeon
PyCUDA
PyCUDA is used within Python wrappers to access NVIDIA’s CUDA APIs.
Install PyCUDA with:
If you want to upgrade PyCUDA for newest CUDA version or if you change the CUDA version, you need to uninstall and reinstall PyCUDA.
For that purpose, do the following:
- Uninstall the existing PyCUDA.
- Upgrade CUDA.
- Install PyCUDA again.
References
- Official CUDA Toolkit Installation
- Official cuDNN Installation
- Official TensorRT Installation
В очередной раз после переустановки Windows осознал, что надо накатить драйвера, CUDA, cuDNN, Tensorflow/Keras для обучения нейронных сетей.
Каждый раз для меня это оказывается несложной, но времязатратной операцией: найти подходящую комбинацию Tensorflow/Keras, CUDA, cuDNN и Python несложно, но вспоминаю про эти зависимости только в тот момент, когда при импорте Tensorflow вижу, что видеокарта не обнаружена и начинаю поиск нужной страницы в документации Tensorflow.
В этот раз ситуация немного усложнилась. Помимо установки Tensorflow мне потребовалось установить PyTorch. Со своими зависимостями и поддерживаемыми версиями Python, CUDA и cuDNN.
По итогам нескольких часов экспериментов решил, что надо зафиксировать все полезные ссылки в одном посте для будущего меня.
Краткий алгоритм установки Tensorflow и PyTorch
Примечание: Установить Tensorflow и PyTorch можно в одном виртуальном окружении, но в статье этого алгоритма нет.
Подготовка к установке
- Определить какая версия Python поддерживается Tensorflow и PyTorch (на момент написания статьи мне не удалось установить PyTorch в виртуальном окружении с Python 3.9.5)
- Для выбранной версии Python найти подходящие версии Tensorflow и PyTorch
- Определить, какие версии CUDA поддерживают выбранные ранее версии Tensorflow и PyTorch
- Определить поддерживаемую версию cuDNN для Tensorflow – не все поддерживаемые CUDA версии cuDNN поддерживаются Tensorflow. Для PyTorch этой особенности не заметил
Установка CUDA и cuDNN
- Скачиваем подходящую версию CUDA и устанавливаем. Можно установить со всеми значениями по умолчанию
- Скачиваем cuDNN, подходящую для выбранной версии Tensorflow (п.1.2). Для скачивания cuDNN потребуется регистрация на сайте NVidia. “Установка” cuDNN заключается в распакове архива и заменой существующих файлов CUDA на файлы из архива
Устанавливаем Tensorflow
- Создаём виртуальное окружение для Tensorflow c выбранной версией Python. Назовём его, например,
py38tf - Переключаемся в окружение
py38tfи устанавливаем поддерживаемую версию Tensorflowpip install tensorflow==x.x.x - Проверяем поддержку GPU командой
python -c "import tensorflow as tf; print('CUDA available' if tf.config.list_physical_devices('GPU') else 'CUDA not available')"
Устанавливаем PyTorch
- Создаём виртуальное окружение для PyTorch c выбранной версией Python. Назовём его, например,
py38torch - Переключаемся в окружение
py38torchи устанавливаем поддерживаемую версию PyTorch - Проверяем поддержку GPU командой
python -c "import torch; print('CUDA available' if torch.cuda.is_available() else 'CUDA not available')"
В моём случае заработала комбинация:
- Python 3.8.8
- Драйвер NVidia 441.22
- CUDA 10.1
- cuDNN 7.6
- Tensorflow 2.3.0
- PyTorch 1.7.1+cu101
Tensorflow и PyTorch установлены в разных виртуальных окружениях.
Итого
Польза этой статьи будет понятна не скоро: систему переустанавливаю я не часто.
Если воспользуетесь этим алгоритмом и найдёте какие-то ошибки – пишите в комментарии
Если вам понравилась статья, то можете зайти в мой telegram-канал. В канал попадают небольшие заметки о Python, .NET, Go.

In this post, you will learn how to install TensorFlow and Keras with GPU support on windows. We will go through step by step to download and install required software like CUDA Toolkit, cuDNN, GPU Drivers, etc. so that you can utilize your GPU for training neural networks faster.
Let’s get started.
1. Install Nvidia GPU Drivers –
First, you need to install Nvidia GPU drivers. Go to this Nvidia downloads page here – https://www.nvidia.com/download/index.aspx? and then choose the GPU that is installed on your machine and the version of the windows operating system.

Then click on search.

Then click on download.
You can also download the drivers directly from the GEFORCE EXPERIENCE APP on your machine.

Then double click the .exe file and install.

Then Agree and continue. Accept all the default settings Express (Recommended) and click NEXT to install.

2 Install Microsoft Visual Studio –
You also have to install C++ libraries from Microsoft visual studio as CUDA is based on C++ and Windows does not come with C++ by default as Linux and Mac do. So go to this link – https://visualstudio.microsoft.com/ and download the latest community 2022 edition.

Double click the .exe file and start the installation. Here, you need to select the components that you want. Select the Desktop and Mobile development with C++ and click Install. It’s a big file so make sure that you are on Wi-Fi instead of the cellular network.

Next, you need to install the CUDA Toolkit. CUDA is a parallel computing platform and programming model invented by NVIDIA. It enables dramatic increases in computing performance by harnessing the power of the graphics processing unit (GPU). And the CUDA Toolkit installs the CUDA driver and tools needed to create, build and run a CUDA application as well as libraries, header files, and other resources.
3.1. First, make sure that you have Cuda enabled GPU by going into this link – https://developer.nvidia.com/cuda-gpus
You can find the GPU that is installed on your machine inside Device Manager in the control panel or just search for it in the windows search bar.

3.2. Next go to this link – https://developer.nvidia.com/cuda-downloads and download the CUDA Toolkit 11.2 or later version of it.
select the options based on your machine and download the exe(local) file.

Then run the .exe file and follow the instructions to install it.

3. 3. Install Zlib –
Go to this link – https://docs.nvidia.com/deeplearning/cudnn/install-guide/index.html#install-zlib-windows
And download the file and extract it. Then copy the zlibwapi.dll file inside the dll_x64 folder and paste it in the bin folder inside the CUDA Toolkit folder. You can find the CUDA toolkit path in the C Drive. On my machine, the path looks like this – C:Program FilesNVIDIA GPU Computing ToolkitCUDAv11.6bin
4. Install cuDNN –
Next, we need to install cuDNN. The NVIDIA CUDA Deep Neural Network library (cuDNN) is a GPU-accelerated library of primitives for deep neural networks. cuDNN provides highly tuned implementations for standard routines such as forward and backward convolution, pooling, normalization, and activation layers.
Go to the following link and download cuDNN, you will be asked to create an account first. It’s completely free, so need to worry about it. –
https://developer.nvidia.com/cudnn

Download the exe file and then double click to install it.

Set Environment Variables –
Next, we need to set up Environment Variable.
Go to control panel > System and Security > System > Advanced System Settings. Then click on environment variables.

Now, we need to add 4 paths to the system variables. First, go to the C drive where Nvidia Cuda Toolkit is installed. In my system it’s inside – C:Program FilesNVIDIA GPU Computing Toolkit. And the cuDNN is installed inside – C:Program FilesNVIDIACUDNN . Please check yours, it probably will be the same but still, make sure.
Select path inside System variable and click on edit.

Then click on new and add the following paths one by one. Some of them are already added when you installed them. So, add the remaining that is left.
C:Program FilesNVIDIA GPU Computing ToolkitCUDAv11.6bin
C:Program FilesNVIDIA GPU Computing ToolkitCUDAv11.6extrasCUPTIlib64
C:Program FilesNVIDIA GPU Computing ToolkitCUDAv11.6include
C:Program FilesNVIDIACUDNNv8.3bin
Once all added. click ok and exit all dialog boxes.
5 . Install Miniconda / Anaconda (optional)-
You might already have Miniconda or Anaconda installed on your machine. But I still put it here in case if you don’t. Miniconda is the lighter version of Anaconda.
Go to the Miniconda website – https://docs.conda.io/en/latest/miniconda.html
Then download the latest Python 3.9 64-bit windows version.

In the Advanced options, select both the options then install. By default, only the second option is selected and the first option is not recommended. But if you will not select it then you won’t able to run python commands from PowerShell or Git Bash, it will not recognize it and you have to always run commands from Anaconda prompt. So, select both options.

Next, install a jupyter notebook. Run the following command in PowerShell.
pip install notebookAnd to run jupyter notebook, type
jupyter notebookFinally, we will install TensorFlow. Keras gets installed automatically when you install TensorFlow so there is no need to install it separately. Keras is a high-level deep learning API to build and train all kinds of neural networks which uses TensorFlow as a backend to perform the heavy computations required by neural networks. There are two ways to install TensorFlow. Either you install it in your global environment or in a virtual environment. When you install a new library, it is always advisable to install it in a virtual environment. But I like to install TensorFlow in my global environment as I use it very frequently and I don’t want to activate and deactivate the environment every time I want to use it. It’s a matter of personal choice, so I will show both ways.
Install in the Global Environment –
pip install tensorflowYou can also install it using conda but conda does not give you the latest version of TensorFlow. So, it is better to use pip.
Install in the Virtual Environment –
First, create the virtual environment.
conda create --name tf_venv python=3.9Type y when asked to proceed. tf_venv is the name of the environment and we are telling conda to use python version 3.9.
Next, you need to activate the virtual environment.
conda activate tf_venvIf after running the command environment is not get activated then it means that anaconda is not configured in the command prompt. So, run
conda initto initialize conda. Close the command prompt or PowerShell and re-open it and then activate the virtual environment.

Once the environment gets activated, you will see the name of it (tf_venv) in front of the windows path.
Next, install TensorFlow as usual.
pip install tensorflowYou also have to install a jupyter notebook in this new environment.
pip install notebookNext, you need to activate the virtual environment for the jupyter notebook so that the jupyter notebook can find this new environment.
python -m ipykernel install --user --name=tf_venvto launch jupyter notebook, type
jupyter notebookNow, when you create a new jupyter notebook, you will see the name of the virtual environment. Using this kernel will use the tf_venv libraries and settings that are specific for this environment.

To deactivate the virtual environment when you are done working, you can use the command.
conda deactivate7. Test the Installation –
Now, let’s test the installation to make sure that everything is running properly and TensorFlow can find the GPU that is installed in your machine.
First import TensorFlow.
import tensorflow as tfThe run the following command.
print(f"Tensorflow version: {tf.__version__}")
print(f"Keras Version: {tf.keras.__version__}")
print("GPU is", "available" if tf.config.list_physical_devices('GPU') else "NOT AVAILABLE")
TensorFlow can successfully find the GPU. Now, you can use this GPU to train the Deep Learning model faster.
We learned a lot of things in this post. If you like this post then please share it with others and also subscribe to our blog below.
This is an how-to guide for someone who is trying to figure our, how to install CUDA and cuDNN on windows to be used with tensorflow.
It should be noted that at the time of writing this, tensor flow is supporting only upto CUDA version 9.0 and corresponding cuDNN libraries so please don’t download CUDA 9.2.
Installing CUDA 9.0 on windows.
Pre requisites :
- NVIDIA GPU with compute capability of > 2.0 . Check your GPU here
- Download CUDA version 9.0
Please note if your connection permits, please download the local version. That saves you from sitting around waiting for download to finish at the installation time.
The download should be ~ 1.4 G. Once the download finishes, launch the installer and follow the defaults. It takes around 10-15 mins for installation to finish.
Pleasy verify the files at the default install location after the installation finishes: C:Program FilesNVIDIA GPU Computing ToolkitCUDAv9.0
Installing cuDNN from NVIDIA
First of all, register yourself at NVIDIA Developer site. Its an free registration and takes only a couple of mins. From there, the installation is a breeze
Once registered, goto the download page and accept the terms and conditions. POst this download cuDNN v7.1.4 for CUDA 9.0
Once the files are downloaded locally, unzip them. Installing cuDNN is pretty straight forward. You just have to copy three files from the unzipped directory to CUDA 9.0 install location.
For reference, NVIDIA team has put them in their own directory. So all you have to do is to copy file from :
{unzipped dir}/bin/—>C:Program FilesNVIDIA GPU Computing ToolkitCUDAv9.0bin{unzipped dir}/include/—>C:Program FilesNVIDIA GPU Computing ToolkitCUDAv9.0include{unzipped dir}/lib/—>C:Program FilesNVIDIA GPU Computing ToolkitCUDAv9.0lib
That’s it.
Testing it with tensor flow
Install tensorflow-gpu using pip3 install tensorflow-gpu. Once that is done, fire up a python console do a from tensorflow import *. If you don’t see any errors, we are good.
Another way you know that your GPU is being used by executing a keras model and having it use tensorflow as its backend. So at the runtime, you should see a message like this :
2018-08-05 23:43:32.091733: I T:srcgithubtensorflowtensorflowcoreplatformcpu_feature_guard.cc:141] Your CPU supports instructions that this TensorFlow binary was not compiled to use: AVX2
2018-08-05 23:43:33.288310: I T:srcgithubtensorflowtensorflowcorecommon_runtimegpugpu_device.cc:1392] Found device 0 with properties:
name: GeForce GTX 1050 Ti major: 6 minor: 1 memoryClockRate(GHz): 1.62
pciBusID: 0000:01:00.0
totalMemory: 4.00GiB freeMemory: 3.29GiB
2018-08-05 23:43:33.289799: I T:srcgithubtensorflowtensorflowcorecommon_runtimegpugpu_device.cc:1471] Adding visible gpu devices: 0
2018-08-05 23:43:35.537890: I T:srcgithubtensorflowtensorflowcorecommon_runtimegpugpu_device.cc:952] Device interconnect StreamExecutor with strength 1 edge matrix:
2018-08-05 23:43:35.538772: I T:srcgithubtensorflowtensorflowcorecommon_runtimegpugpu_device.cc:958]      0
2018-08-05 23:43:35.539309: I T:srcgithubtensorflowtensorflowcorecommon_runtimegpugpu_device.cc:971] 0:   N
2018-08-05 23:43:35.540537: I T:srcgithubtensorflowtensorflowcorecommon_runtimegpugpu_device.cc:1084] Created TensorFlow device (/job:localhost/replica:0/task:0/device:GPU:0 with 3020 MB memory) -> physical GPU (device: 0, name: GeForce GTX 1050 Ti, pci bus id: 0000:01:00.0, compute capability: 6.1)
Happy coding