About
As of March 2018 Debian is available for Windows users through the Windows store as an app for the Windows Subsystem for Linux (WSL).
The app gives you a Debian stable command line environment running on the Windows kernel (WSL1) or Hyper-V with the new WSL2 interface depending on your Windows 10 release version. Most of the packages in Debian stable should «just work».
Install
To use the store app you have to enable the WSL subsystem first by following the guide.
Afterwards just install the Debian app from the Microsoft Store.
You will be asked to define a user and password upon first start. This user will also be given sudo rights.
There is a way to install the Debian WSL distro offline & without using Microsoft Market.
Further information about the ongoing development of WSL can be found in the WSL tag of the Microsoft blog.
Advanced Usage
To activate the new GUI application support you have to update your WSL2 environment to Debian bookworm or later.
After that you need to install mesa-utils this will install all the necessary packages for th GUI app support to work.
Most of the GUI apps in Debian should now just work out-of-the-box (e.g., try firefox).
Feedback
Please use the Microsoft Store review/feedback to report bugs or feature requests for now.
There is a IRC channel on OFTC to discuss WSL related stuff: #debian-wsl
You can also leave patches and issues at the WSL repo on Salsa.
Known Issues
Any software relying on systemd or low-level hardware accessibility might fail due to missing support from the current Windows kernel or virtualization interface. As WSL is a pretty new project from Microsoft improvement can be expected to happen with every new Windows stable channel release (approx. every 6 months). The app launcher will be updated to support stable release features continuously.
FAQ
- How do I keep my Debian environment up-to-date
-
as with any other Debian installation use apt/apt-get to install and update software from the official Debian mirrors (e.g., apt update && apt dist-upgrade)
- How do I install a newer release?
- You can install the app, change your sources.list and upgrade your install as with every other Debian installation.
- How many people are using Debian via WSL?
- Approximately 1,021,740 at last count (unique installs according to the Microsoft Partner Center dashboard).
Code & Issues
The full app code and all build dependencies can be found in the WSL repo on salsa.
This brief tutorial shows students and new users how to install and run Debian Linux on Windows Subsystem for Linux 2 (WSL2).
Back in 2017, Windows released Windows Subsystem for Linux that lets developers run a GNU/Linux environment, including most command-line tools, utilities, and applications directly in Windows without setting up a virtual machine or dual-boot.
WSL2 has since been released, and it’s an improvement over version 1. The new and improved version comes with a performance boost, and full system call compatibility, and is built with a new architecture that delivers features that make WSL an amazing way to run a Linux environment in Windows.
To install WSL 2 on Windows 10, these two requirements must be met:
- Windows 10 May 2020 (2004), Windows 10 May 2019 (1903), or Windows 10 November 2019 (1909) or later
- A computer with Hyper-V Virtualization support
Since you can now install Linux systems, including Debian directly in Windows, let’s go ahead and install Debian. Before you can do that, you must first enable WSL or WSL2 in Windows.
When you’re ready to enable WSL 2 on Windows 10, follow the steps below:
Enable WSL in Windows
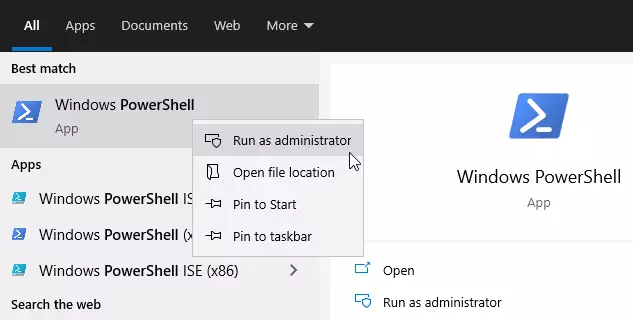
To enable WSL in Windows, you will want to open the PowerShell terminal as administrator. Click on Start then begin typing PowerShell.
Next, right-click the Windows PowerShell app and choose to run as administrator.
When the console opens, run the commands below:
dism.exe /online /enable-feature /featurename:Microsoft-Windows-Subsystem-Linux /all /norestart
After installing, you should get a success message similar to the lines below:
Deployment Image Servicing and Management tool
Version: 10.0.19041.844

Image Version: 10.0.19042.844

Enabling feature(s)
[==========================100.0%==========================]
The operation completed successfully.
Enable Virtual Machine Platform
WSL 2 requires Windows 10 Virtual Machine Platform to be enabled. This is not Hyper-V. To enable the VM platform feature in Windows, run the commands below from the same PowerShell administrator’s console.
dism.exe /online /enable-feature /featurename:VirtualMachinePlatform /all /norestart
If you’re using Windows 10 version lower than 2004, then use the commands below:
Enable-WindowsOptionalFeature -Online -FeatureName VirtualMachinePlatform -NoRestart
When you’re done running the commands above, restart your computer for all the configuration changes to apply. If you don’t restart, the below command might not be recognized.
After restarting your computer, login back in and launch PowerShell as administrator. Then run the commands below to configure WSL 2 as the default version of WSL.
wsl --set-default-version 2
If you get an error about not having Linux kernel installed, get it from the link below and run it in Windows, then try the command above again.
https://wslstorestorage.blob.core.windows.net/wslblob/wsl_update_x64.msi
Install Debian in Windows 10
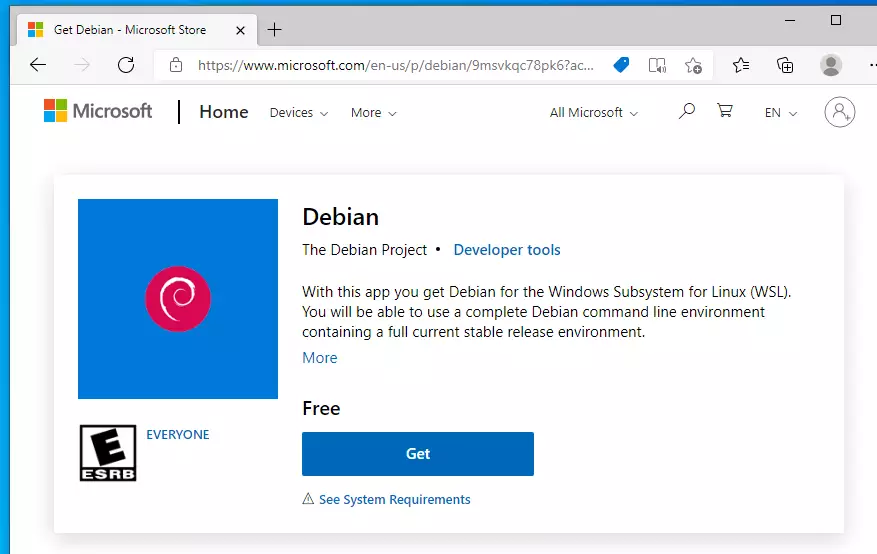
Now that WSL 2 is installed and ready to be used, open the link below to download and install a copy of Debian from the Windows store.
Get Debian – Microsoft Store
Debian on Windows allows you to use Debian Terminal and run Debian command line utilities including bash, ssh, git, apt, and many more.
Click the Get button and install. After installing Debian, you’ll want the option to launch Debian from the Windows WSL environment.
After downloading and installing, you will get a Launch button.
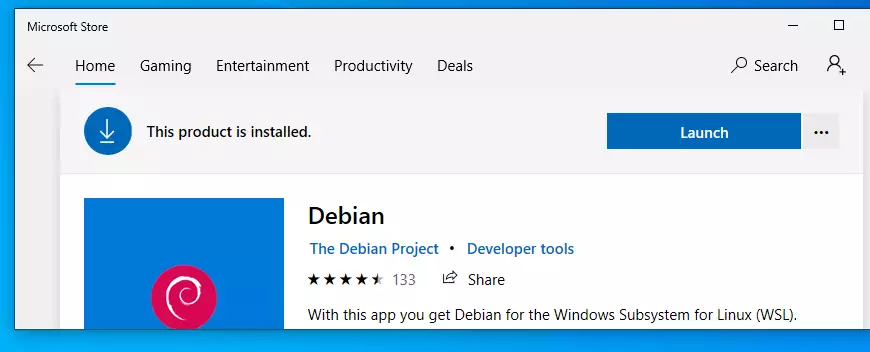
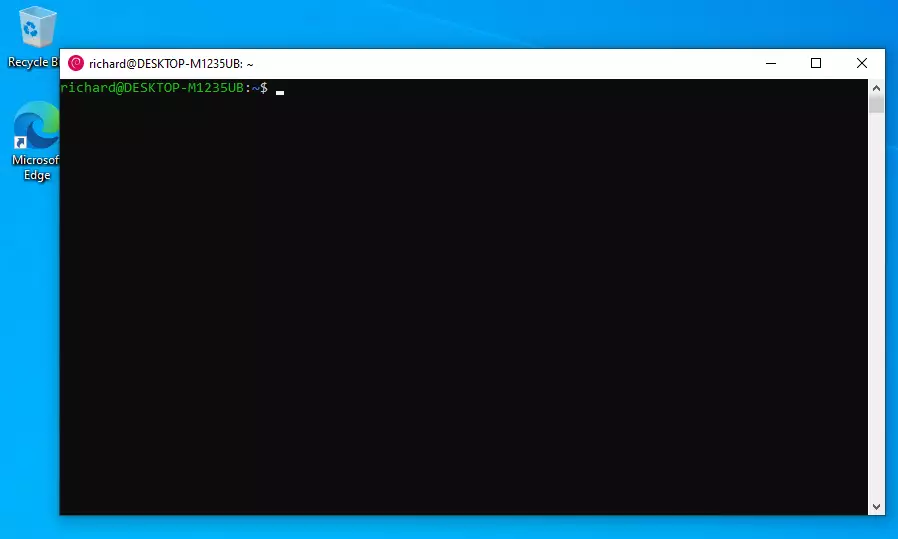
After launching Debian, it should install and prompt you to create your account.
Installing, this may take a few minutes…
Please create a default UNIX user account. The username does not need to match your Windows username.
For more information visit: https://aka.ms/wslusers
Enter new UNIX username: richard
New password:
Retype new password:
passwd: password updated successfully
Installation successful!
richard@DESKTOP-M1235UB:~$
That should do it!
Some troubleshooting commands to run when you run into issues.
wsl --set-default-version 1
bcdedit /set hypervisorlaunchtype auto start
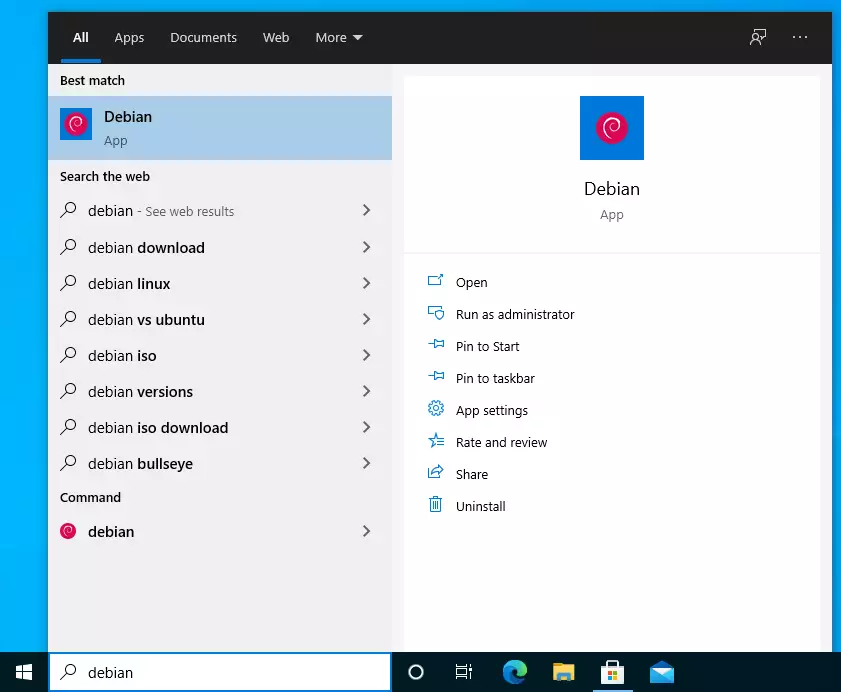
Now simply launch Debian from Windows and start by searching for it. You can also pin it to the taskbar and always have it launch from there.
That should do it!
Conclusion:
This post showed you how to install WSL 2 on Windows 10 and install Debian. If you find any error above please use the comment form below to report.
When it comes to installing Debian server on Window 10 first thing which comes in our mind is Virtual Machne running on VirtualBox or VMware Workstation Player. However, with continuous proliferating love of Microsoft towards the Linux and open-source software, let us do this without any third-party tool.
Yes, with the deployment of Windows subsystem for Linux, it is possible to install Debian, Ubuntu, Kali Linux and OpenSUSE Server or command line edition on Windows 10 in just few click.
Furthermore, with May feature Windows 10 update, the Microsoft has introduced WSL 2 version out of the box for the users. Over WSL 1, the WSL 2 is much reliable because of full fledge implementation of Linux kernel. This let’s run few commands over Windows subsystem for Linux which was not possible earlier.
After installing Debian server command line edition on WSL, you can use it as a standard Linux system. We can configure webserver, Mysql database, PHP etc. type of software over it including third-party server applications such as Nextcloud, PLEX server and more…
Here in this tutorial first we enable WSL on Windows 10 and after that will show how to install and use Debian Linux on that.
requirements
- Windows 10 with admin rights
- WSL
- Internet connection to download Debian Linux App
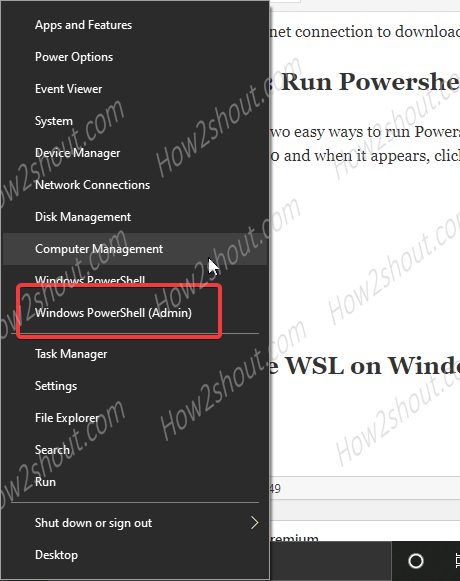
Step 1: Run Powershell as Admin
There are two easy ways to run Powershell with administrator rights. First is, type “PowerShell” in the search box of Windows 10 and when it appears, click on “Run as Administrator“.
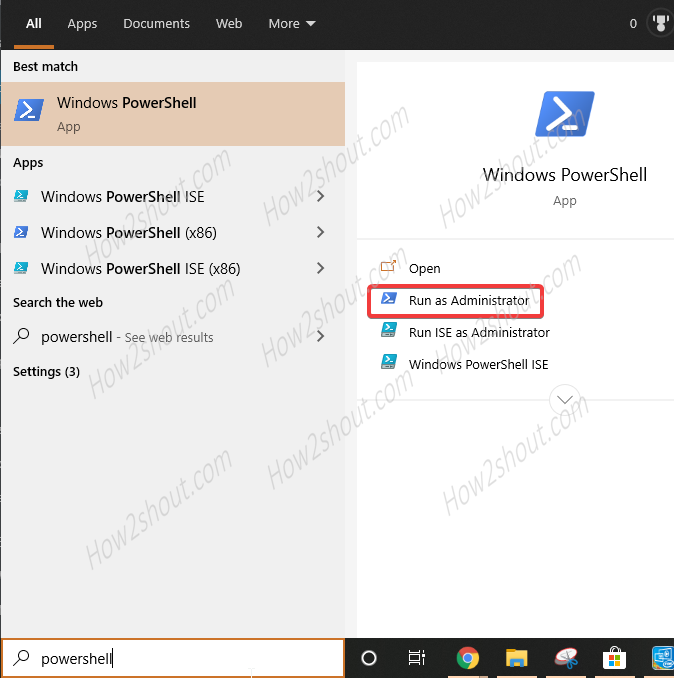
The second way is simply right click on the Windows 10 start button and select Windows Powershell (Admin) option.
Step 2: Enable WSL on Windows 10
Well, to enable WSL we can use the “Turn Window feature on or off” feature of the Windows 10. However, here we are using the Command Line, thus copy paste the below command in the Powershell open in the above step.
Enable-WindowsOptionalFeature -Online -FeatureName Microsoft-Windows-Subsystem-Linux
After running the above command restart your system.
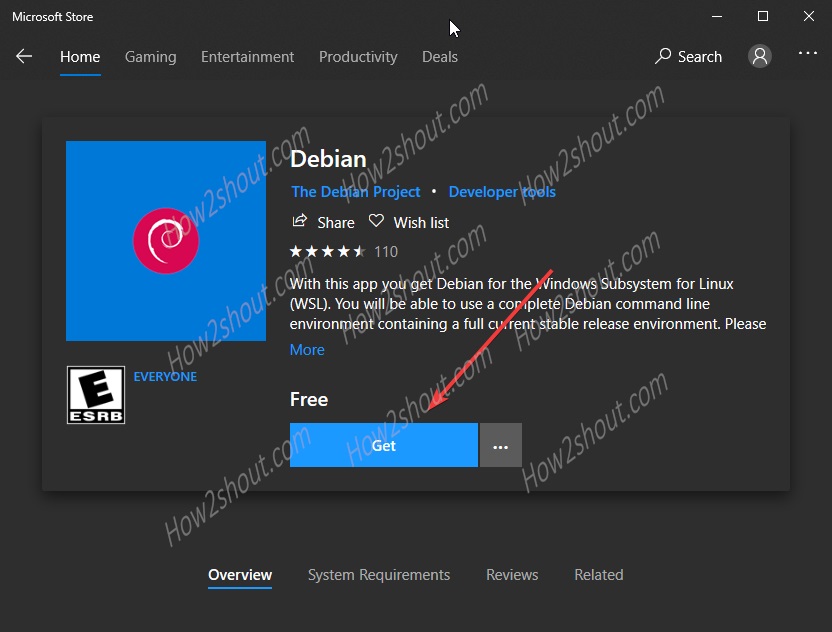
Step 3: Download and install Debian Linux app on WSL
Now, again in the Windows 10 search type, Microsoft store and open it when appears. There click on the search button and type Debian. When it appears, click on the GET button to install on your system.
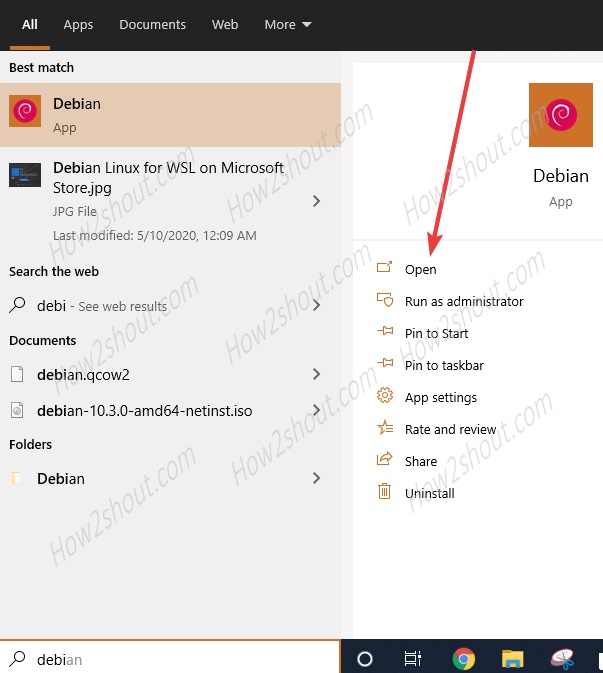
Step 4: Launch Debian App
Once it installed, again in the Windows 10 search box type “Debian“, the logo of its will appear, click to open it.
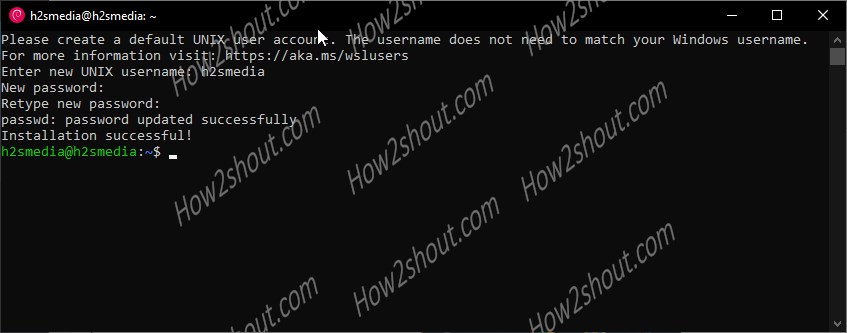
Step 4: Set username and password
Now the WSL app of Debian would be opened, it will take it a few minutes to install the base system. After that, the app will ask you to set the username (with sudo rights) and password for the Linux.
From, here you can run the command to set up different server applications on Debian Linux running on WSL 1 under Windows 10 by default. If you want to run it under WSL2, see this tutorial: How to enable and run Linux on WSL 2 in Windows 10.
Обновление от 08.03.2020
Теперь установка образа linux производится только через Microsoft Store
Перед тем как продолжить я крайне рекомендую обновить windows 10 до версии 20H2, а уже потом устанавливать WSL2! О том, как обновить windows 10 до версии 20H2 написано в этой статье.
Не так давно Windows представила новый функционал для Windows – Windows Subsystem for Linux (WSL) – подсистему linux для windows. Она позволяет нативно запускать приложения для linux под windows.
Это подсистема не является виртуальной машиной в обычном смысле этого слова, вместо этого происходит трансляция системных вызовов. Более подробно вы можете почитать на странице проекта.
Новая версия WSL 2 принесла много нового и теперь появилось полнофункциональное ядро linux, благодаря которому, стало возможно запускать практически любые программы написанные для linux.
Сегодня мы рассмотрим установку WSL2 на Windows 10.
Установка возможна только на Windows 10, не важно какой редакции, главное, чтобы версия была 2004 сборки 19041 или выше, хотя всё должно работать и на 1903 сборка 18362, но все же рекомендую поставить всё поселение обновления, во избежание проблем.
Проверим версию windows
winver
Если у вас уже установлен любая версия Docker, то нужно предварительно его удалить, во избежание проблем. Если вам не нужен для других целей Hyper-V вы его тоже можете удалить, нам он не понадобиться.
Установка Windows Subsystem Linux
Для начала установим Microsoft-Windows-Subsystem-Linux
Запустим PowerShell с правами администратора
dism.exe /online /enable-feature /featurename:Microsoft-Windows-Subsystem-Linux /all /norestartДождитесь окончания установки.
PS C:WINDOWSsystem32> dism.exe /online /enable-feature /featurename:Microsoft-Windows-Subsystem-Linux /all /norestart

Cистема DISM
Версия: 10.0.19041.329

Версия образа: 10.0.19041.508

Включение функций
[==========================100.0%==========================]
Операция успешно завершена.
Обновим до версии 2
dism.exe /online /enable-feature /featurename:VirtualMachinePlatform /all /norestartCистема DISM
Версия: 10.0.19041.329
Версия образа: 10.0.19041.508
Включение функций
[==========================100.0%==========================]
Операция успешно завершена.Теперь обязательно нужно перезагрузить ваш ПК.
Скачаем и установим обновление ядра Linux для WSL2
https://wslstorestorage.blob.core.windows.net/wslblob/wsl_update_x64.msi
Произведем настройку WSL2 укажем всегда использовать версию 2
LОткройте cmd.exe и запустите
wsl --set-default-version 2Установка Debian в WSL2
Запустите Microsoft Store из меню Пуск

Введите в поиск debian и нажмите Enter

В следующем окне выберите Debian:

Нажмите «Установить»

Ждите окончания скачивания и установки.
Запуск Debian в WSL2
Если вы откроете меню Пуск, вы найдете новый ярлык с установленной операционной системой, в нашем случае это Debian.

При запуске, откроется консоль с предложением ввести пароль.
Введите имя пользователя мы укажем user
Введите пароль пользователя.

Теперь вы можете работать с консолью, как будто у вас установлен обычный Linux.
Обновим пакеты:
sudo apt update && sudo apt upgrade

 sudo apt update && sudo apt upgrade

We trust you have received the usual lecture from the local System
Administrator. It usually boils down to these three things:

    #1) Respect the privacy of others.
    #2) Think before you type.
    #3) With great power comes great responsibility.

[sudo] password for user:
Get:1 http://security.debian.org/debian-security stretch/updates InRelease [53.0 kB]
Ign:2 http://deb.debian.org/debian stretch InRelease
Get:3 http://deb.debian.org/debian stretch-updates InRelease [93.6 kB]
Get:4 http://security.debian.org/debian-security stretch/updates/main amd64 Packages [579 kB]
Get:5 http://deb.debian.org/debian stretch Release [118 kB]
Get:6 http://deb.debian.org/debian stretch-updates/main amd64 Packages [2,596 B]
Get:7 http://deb.debian.org/debian stretch-updates/main Translation-en [2,176 B]
Get:8 http://security.debian.org/debian-security stretch/updates/main Translation-en [258 kB]
Get:9 http://deb.debian.org/debian stretch Release.gpg [2,410 B]
Get:10 http://deb.debian.org/debian stretch/main amd64 Packages [7,080 kB]
Get:11 http://deb.debian.org/debian stretch/main Translation-en [5,377 kB]
Fetched 13.6 MB in 6s (2,122 kB/s)
Reading package lists... Done
Building dependency tree
Reading state information... Done
37 packages can be upgraded. Run 'apt list --upgradable' to see them.
Reading package lists... Done
Building dependency tree
Reading state information... Done
Calculating upgrade... Done
The following packages will be upgraded:
  apt apt-utils base-files debian-archive-keyring e2fslibs e2fsprogs gnupg gnupg-agent gpgv libapt-inst2.0
  libapt-pkg5.0 libc-bin libc-l10n libc6 libcomerr2 libdns-export162 libgnutls30 libidn11 libisc-export160 libseccomp2
  libsqlite3-0 libss2 libssl1.0.2 libsystemd0 libudev1 locales multiarch-support perl-base sudo systemd systemd-sysv
  tzdata udev vim-common vim-tiny wget xxd
37 upgraded, 0 newly installed, 0 to remove and 0 not upgraded.
Need to get 26.5 MB of archives.
After this operation, 93.2 kB of additional disk space will be used.
Do you want to continue? [Y/n]
Пакеты ставятся довольно шустро.
Давайте попробуем поставить mc
sudo apt install mc
Reading package lists... Done
Building dependency tree
Reading state information... Done
The following additional packages will be installed:
  bzip2 file libgdbm3 libglib2.0-0 libglib2.0-data libgpm2 libicu57 libmagic-mgc libmagic1 libperl5.24 libssh2-1
  libxml2 mc-data mime-support perl perl-modules-5.24 rename sgml-base shared-mime-info unzip xdg-user-dirs xml-core
  xz-utils
Suggested packages:
  bzip2-doc gpm arj catdvi | texlive-binaries dbview djvulibre-bin genisoimage gv imagemagick libaspell-dev links
  | w3m | lynx odt2txt poppler-utils python python-boto python-tz xpdf | pdf-viewer zip perl-doc
  libterm-readline-gnu-perl | libterm-readline-perl-perl make sgml-base-doc debhelper
The following NEW packages will be installed:
  bzip2 file libgdbm3 libglib2.0-0 libglib2.0-data libgpm2 libicu57 libmagic-mgc libmagic1 libperl5.24 libssh2-1
  libxml2 mc mc-data mime-support perl perl-modules-5.24 rename sgml-base shared-mime-info unzip xdg-user-dirs
  xml-core xz-utils
0 upgraded, 24 newly installed, 0 to remove and 0 not upgraded.
Need to get 24.0 MB of archives.
After this operation, 108 MB of additional disk space will be used.
Do you want to continue? [Y/n]
Запустим mc

Обратите внимание, в папке /mnt уже примонтированы диски вашего ПК.
И в конце, проверим версию linux
uname -aLinux DESKTOP 4.19.128-microsoft-standard #1 SMP Tue Jun 23 12:58:10 UTC 2020 x86_64 GNU/LinuxЗаключение
Сегодня мы рассмотрели установку новой подсистемы WSL2 на Windows 10.
Установили все необходимые модули и скачали образ debian.
Установили образ, запустили консоль и задали имя пользователя и пароль.
Обновили дистрибутив и установили пакет mc
Проверили версию linux.
In our previous post, we’ve shown you the installation process of Ubuntu Linux on Oracle VirtualBox and VMware Workstation in Windows 10. Meanwhile, in this post, you are going to learn how to install Debian 10.7 on VirtualBox in Windows 10.
When it comes Linux operating system then both the Ubuntu Linux and Debian Linux are the most used and important Linux versions. However, due to some reasons, we have decided to install Debian 10.7, (which is the latest version) on Oracle VirtualBox.
Meanwhile, there are different types of Virtual Machines (VM) like VMware Workstation and Parallels Desktop. Since VirtualBox is a free virtual machine and light at the same then it’s better to install Debian Linux on VirtualBox instead of Parallels Desktop and VMware Workstation.
Requirements:
- VirtualBox installed on your computer.
- At least 4-8GB of RAM installed on your computer.
- At least 20GB of free disk space on your computer.
- Internet connectivity.
- Hardware virtualization VT-x/VT-d or AMD-v enabled from the BIOS of your motherboard.
So, without further ado, here’s how to install Debian Linux on Windows 10 via VirtualBox virtual machine:
Step 1. Download & Install VirtualBox on Windows 10
Oracle VM VirtualBox has been developed by Oracle Corporation as a free and open-source virtualization framework. Using Windows, macOS and Linux, Solaris, as well as OpenSolaris you can mount the VirtualBox. This allows users to build virtual machines to run other operating systems. “It supports guest development and management of Windows and Linux running virtual machines and restricted virtualization on Apple hardware of macOS guests.” For certain guest operations, there is also a bundle of guest add-ons, which is typical of improving performance, especially graphics.” “Guest Additions”
A virtual machine is a virtual system or program that offers the same features as physical machines (eg, a computer system with its own CPU, memory, network interfaces, and storage capacity). A virtual machine like a real device is used to run applications or OS.
- First, download the latest version of VirtualBox for Windows. Click Windows Hosts and the download will begin automatically.

Download VirtualBox
- Navigate the folder where you have downloaded your VirtualBox and double-click on the downloaded “VirtualBox” file to install it.
- Oracle VM VirtualBox 6.1.16 Setup” window will appear on the screen and click on the “Next” button to continue.
- Choose the location where you want to install the VirtualBox and click on the “Next” button to continue.
- Click Next.
- Click Yes and then click the Install button to start the installation process.

Install VirtualBox
Step 2. Download Debian Linux ISO File
The Debian Project is an association of people who have found common ground for the development of a free operating system. The operating system we’ve developed is called Debian. The operating system is a collection of simple programs and applications that make your machine work. The kernel is at the heart of the operating system. The kernel is the most simple program on your computer, it does all the basic housekeeping, and it lets you launch other programs.
Debian machines are currently operating the Linux kernel or the FreeBSD kernel. Linux is a piece of software released by Linus Torvalds and sponsored by thousands of programmers worldwide. FreeBSD is an operating system that contains a kernel and other applications.
Research is in progress, however, to include Debian for other kernels, mainly for the Hurd. The Hurd is a series of servers operating on top of a microkernel (such as Mach) to introduce various functions. The Hurd is a free software product of the GNU project. A large part of the basic resources that fill the operating system come from the GNU project; thus the names: GNU/Linux, GNU/kFreeBSD, and GNU/Hurd. These tools are online, too. For more info about Debian, click here.
The first thing you need to do is to download the Debian 10 ISO image from the official website of Debian 10. From here, you can download Debian 10 Live ISO images for the different desktop environments (i.e. GNOME, KDE, LXDE, LXQT, MATE, Cinnamon, Xfce) depending on your preference.
- Click here to go to the Debian download page. For the purpose of this guide, the network installer disk image was: the network installer disk image was: debian-live-10.7.0-amd64-gnome.iso.

Download Debian Linux ISO File
- Once you click on the link, your browser should prompt you to download the Debian 10.7 Live ISO image. Select Save.
- The download should start. It may take a while to complete as the file size is around 2.47 GB.
Step 3. Creating a New Virtual Machine to Install Debian
Once you have downloaded and installed both the Debian ISO and VirtualBox, open-up the virtual machine and click on the “New” option.

New
Now, type in a Name for the virtual machine, make sure the Type is set to Linux, and the Version is set to Debian (64-bit). Once you’re done, click on Next.

Type in a Name for the virtual machine
Now, set the RAM size to at least 4 GB (4096 MB) and click on Next. 1024 MB is recommended.

Set the RAM size
Select the “Create a virtual hard disk now” option and click on the “Create” button to continue.

Create a virtual hard disk now
Select the VDI (VirtualBox Disk Image) option and click Next.

VDI (VirtualBox Disk Image)
On the next screen, if you want a faster setup, select Dynamically allocated. If you want faster performance (which we recommend), select Fixed size, and then click Next. If you don’t know which one to choose from then leave it as it is.

Select the amount of space for your virtual machine and click the Create button.

Select the amount of space
Step 4. Installing Debian on Windows 10 via VirtualBox
Now, your virtual machine has been successfully created and it is time to install Debian on it.
Go back to VirtualBox, and then click Start.

Start
A new window opens so you can do this manually. Click the folder with the green up arrow to choose the Debian ISO file.

Click the folder with the green up arrow
Click the Add button and locate the Debian ISO file and then click Open.

Choose Debian ISO file
Make sure that the Debian ISO is selected and click Choose.

Choose
Now, you are ready to install Debian Linux via VirtualBox on your Windows 10 PC, click Start.

Start
Now, select Debian GNU/Linux Live (kernel 4.19.0-13-amd64) and press Enter.

Debian GNU/Linux Live (kernel 4.19.0-13-amd64)
Once it’s booted, click on Activities from the top left corner and click on the Debian installer icon.

Activities > Debian installer
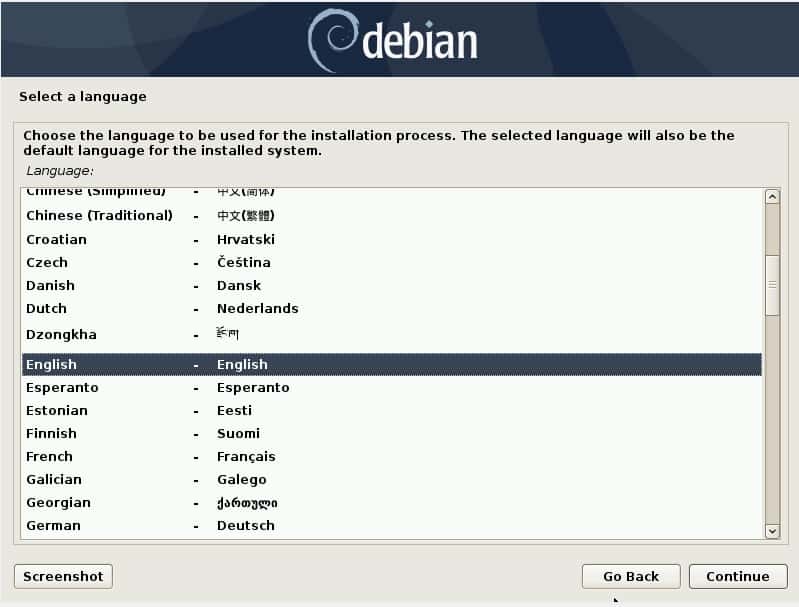
Now, select your language and click on Next.

Select your language
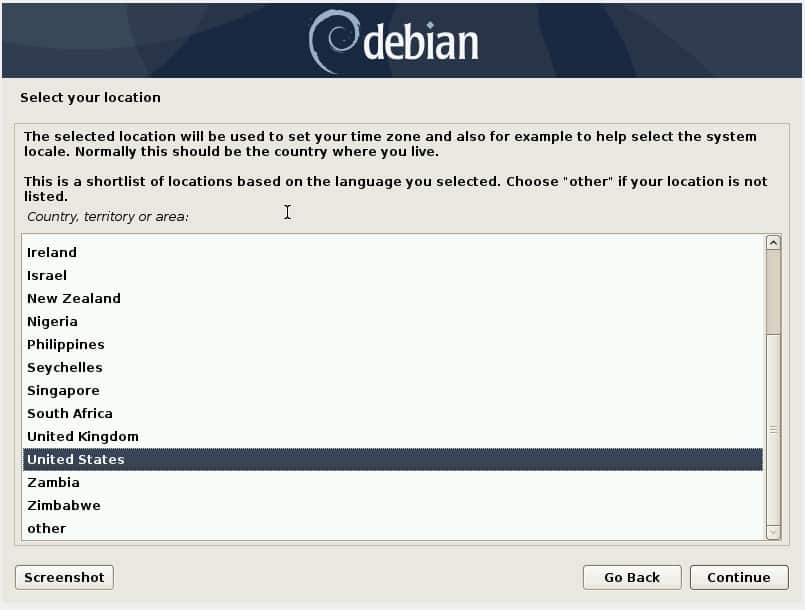
Now, select your location and click on Next.

Select your location
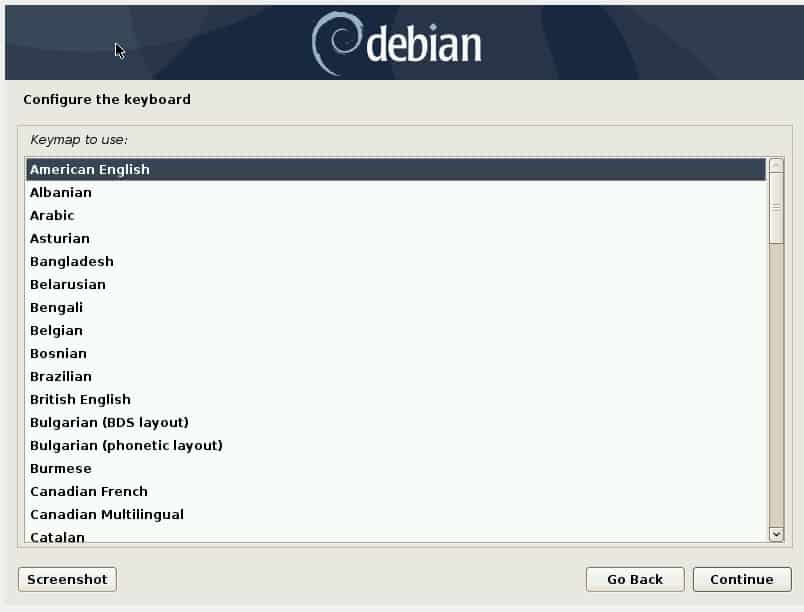
Now, select your keyboard layout and click on Next.

Select your keyboard layout
Now, select Erase disk and click on Next.

Erase disk
Set up your user account and select Next.

Set up your user account
Now, review all the details. If everything looks good, then click on Install.

Install
The installation should start. Once the installation is complete, click on Done.

Done
Your virtual machine should reboot. It may boot the Debian 10 ISO image on the next boot. So, to boot from the hard drive, all you have to do is remove the ISO image from the virtual CD/DVD ROM. To do that, click on Devices > Optical Drives > Remove disk from virtual drive.

Devices > Optical Drives > Remove disk from virtual drive
Now, click on Machine > Reset to reset the virtual machine.

Machine > Reset
Now, click on Reset.

Reset
Now, you can log in to your Debian 10.7 virtual machine.
")
Log in to your Debian 10.7 virtual machine
Now, you have successfully installed Debian on your Windows 10 via VirtualBox.
")
Install Debian on VirtualBox
Wrapping Up
That’s it. This is how you can install Debian 10.7 on Windows 10 via VirtualBox virtual machine. Meanwhile, the process is very easy and it might seem a bit tricky while following the above-mentioned steps but that’s not the case. If you faced any kind of problem feel free to contact us in the comment section below.
Related Posts:
-
How to Install Ubuntu using VMware Workstation 16 in Windows 10
-
How to Install Ubuntu on VirtualBox in Windows 10

ShaadLife Team
We are professional How-to content writers. As a tech enthusiast and geek, we love to write and share articles about different operating systems such as Android, Windows, macOS, iOS, and some other products like a smartwatch and smart TV.
Hello and welcome to my blog.
We use Windows in our workstations at my current job (it was not my choice 🙊), but there is a lot of tasks that are easier to do in a Linux environment. Some days ago I needed to manipulate a huge CSV and just thought: “This would be a lot simple with cat, grep, sort, etc.”.
So, I remember that I have read something about running Linux inside Windows using WSL and, well, why not give a try?

Setting up the environment
Some considerations:
- WSL 2 is only available in Windows 10, Version 2004, Build 19041 or higher. Check your Windows version by selecting the Windows logo key + R, type
winver, select OK. - All Windows commands should be typed in a PowerShell session with administrative privileges unless otherwise specified (right-click in the PowerShell icon and choose “Run as administrator”).
Here we go! Since I’m a command-line lover and do not have a Microsoft account to access Microsoft Store, I’ll do this from there as much as possible. First, let’s install a decent terminal emulator and Microsoft is doing a good job with Windows Terminal. I have downloaded v1.1.2021.0 and renamed it to WindowsTerminal.msixbundle. This is the latest version at the time of writing. The installation is pretty straight forward, just open a PowerShell instance, navigate to the directory where the executable was downloaded and type:
.WindowsTerminal.msixbundle
Now, click in Instal and wait a few seconds to the windows of Windows Terminal show up. Close this window for now, we need to open it as Administrator soon.
The next step is to enable WSL. Use the same method stated at the top of the article to launch an instance of Windows Terminal with administrative privileges (damn, I wish that there was a “sudo” for this. Maybe Microsoft can launch an “addo” 🙃). Observe that should have a “PS” before your prompt, this indicates that you are in a PowerShell session. Now type:
dism.exe /online /enable-feature /featurename:Microsoft-Windows-Subsystem-Linux /all /norestart
The ‘Virtual Machine Platform’ is needed to run WSL 2. To enable it, just type:
dism.exe /online /enable-feature /featurename:VirtualMachinePlatform /all /norestart
You should see “The operation completed successfully.” to both commands. Now reboot your computer.
Once rebooted, open Windows Terminal again and set WSL2 as default:
wsl —set-default-version
If you already have a distribution installed and like to convert it to use WSL2, this is possible. First, check the current status.
wsl —list —verbose
The above command will show a list of installed distributions separated by NAME, STATE, and VERSION. For instance, if you have an Ubuntu installation that is running at version 1 you can type:
wsl —set-version Ubuntu 2
You also can revert it to WSL 1 if you are not satisfied with the result, just change the version number.
Download and installation
Now it is time to download the distribution that you wish to install. I chose Debian because it is very light and stable. Since Windows 10 Spring 2018 Update, curl.exe is present, so let’s use it.
curl.exe -L -o debian.appx https://aka.ms/wsl-debian-gnulinux
The installation step is also quite simple.
Add-AppxPackage .debian.appx
A strange progress bar will be displayed. Once it disappears, it is done. Now Debian should be available in your applications menu, but don’t click there, use the Windows Terminal do open a Debian session. On the right side of the tab, there is an arrow that hides all the possible sessions.
Clicking on Debian will lead you to the user configuration screen. Choose your username and password and you are done.
Configuration
Now, I recommend that you update installation:
sudo apt update && sudo apt upgrade
Verify the version of Debian that was installed.
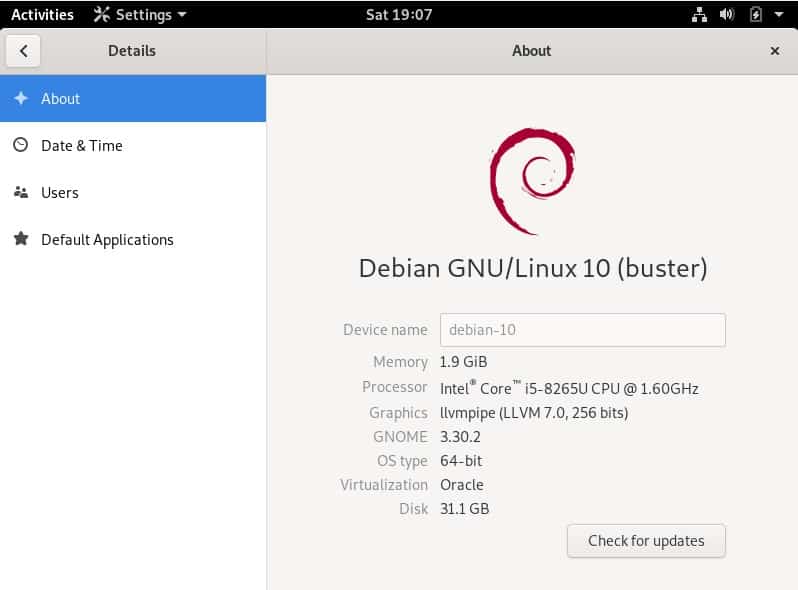
cat /etc/os-release
For an unknown reason by me, the downloaded image was still the Stretch version of Debian. No problem, let’s update it to Debian Buster. First, make a backup of your sources.list file.
sudo cp /etc/apt/sources.list /etc/apt/sources.list.bak
Now, replace every “stretch” entry with “buster”. You can do this with nano or vi or directly with sed.
sudo sed -i ’s/stretch/buster/g’ /etc/apt/sources.list
Then update the system again.
sudo apt update && sudo apt upgrade && sudo apt full-upgrade
Now get rid of obsolete packages in your system.
sudo apt autoremove
Close the Debian tab and open another one to check if you have installed Debian Buster with success.
cat /etc/os-release
You should see something like the below:
PRETTY_NAME="Debian GNU/Linux 10 (buster)"
NAME="Debian GNU/Linux"
VERSION_ID="10"
VERSION="10 (buster)"
VERSION_CODENAME=buster
ID=debian
HOME_URL="https://www.debian.org/"
SUPPORT_URL="https://www.debian.org/support"
BUG_REPORT_URL="https://bugs.debian.org/"
Final considerations
For a better file system performance, make sure to store your Linux project files in the Linux file system (not the Windows file system).
It is probable that when you open a Debian session your prompt show something like: username@hostname:/mnt/c/Users/username$ This is why WSL exposes the Windows file system through mount points placed in /mnt like /mnt/c and /mnt/d just type cd ~ to go to your real home.
Not only the file system of Windows is exposed by WSL, but you can use Windows applications too, try to type explorer.exe . As you can see, Windows Explorer will open with the files of your current directory loaded.
That is it, everything is set up and ready to use.
In this article, we will examine how to set up and configure the Debian 11 (Bullseye) Linux distribution on a new virtual machine using Oracle VM VirtualBox 6.1 virtualization software on the Windows 10 operating system.

How to Set Up Debian 11 on a Virtual Machine using Oracle VM VirtualBox 6.1.34
Debian is a Linux-based operating system and uses the Linux kernel or FreeBSD kernel. Also, it is an open-source project and has more than 59,000 applications.
After the base version of Debian 11 distribution was released on August 14, 2021, the updated version 11.3 was released on March 26, 2022.
You can install this Linux operating system on your physical computer, or you can install and use it virtually on your computer using virtualization programs. Thus, you can quickly start using the Linux distribution without deleting or restarting the Windows or other operating systems installed on your host computer.
Using Debian in a virtual machine is recommended for Linux entry-level users. Because after installing a clean system on their computers, users can create snapshot backups and quickly get back their systems that crashed due to a faulty code or software later on.
How to Create a New Virtual Machine for Debian
When you choose to use the Debian Linux operating system via a VM on your host, you must configure its settings correctly. Because if you do not configure some settings of virtual hardware correctly, you may affect the performance and system stability of the VM.
Step 1
After installing the Oracle VirtualBox software on your host computer, run it and when the program opens, click the New button from the options on the main screen and start the virtual machine creation wizard.
As soon as you type the name of the system you will install in the Name and Operating System window, the Type and Version fields will be automatically configured by VirtualBox. If the settings of the system you will install cannot be determined at this stage, you must select it manually.
For example, if you are going to install one of the x86 (32 Bit) or x64 (64 Bit) versions of the Debian system, you should check that this architecture type is set correctly in the version section.
After selecting the architecture type of the Debian system and configuring the location to be installed, click Next.

Step 2
In the Memory Size window, configure an appropriate virtual memory size for the virtual machine according to the RAM capacity of your host PC.
For Debian, a minimum memory size of 4 GB or 8 GB may be sufficient, but you can increase this value according to the work you will do on your guest system and the programs you will use.

Step 3
Since you will be installing a Debian from scratch in the Hard Disk configuration window, you must create a new virtual disk. If you have a VM installed before, you can add the VDI virtual disk file from this window.

Step 4
If you are not going to use the virtual machine you prepared later with other virtualization programs, select the VDI (VirtualBox Disk Image) disk type recommended by Oracle and click Next.
")
Step 5
You can choose to dynamically or permanently store the VM on your host’s physical storage device. When you choose Fixed Size, space will be allocated from your host disk as much as the size of the virtual disk.
If you are using an SSD or NVMe disk, it is useful to choose the Dynamically Allocated storage method as there will be no performance loss.

Step 6
Leave the location of the virtual machine disk file at the default and choose a suitable disk size according to the work you will do on the guest machine.

Step 7
After preparing the Debian VM, click Settings from the tool menu to make more advanced settings.

Step 8
In General / Advanced virtual hardware settings, change Shared Clipboard and Drag and Drop properties to Bidirectional to transfer files or copy text from the host machine to VM.

Step 9
Disable Floppy from the devices in the Boot Order section of the System / Motherboard settings and set Optical to the primary order.

Step 10
Open the settings of the Processor virtual hardware and increase the number of virtual processors according to the capacity of your host CPU. You can configure the minimum number of virtual processor cores to 2 or 4 for system stability.

Step 11
Open Display / Screen device settings and enable 3D Acceleration for a better graphics experience in the virtual machine. Next, set your virtual system’s graphics memory to 128 MB or higher.

Step 12
Select IDE Controller from Storage settings and delete it.

Step 13
To add a SATA optical drive, click the icon next to the SATA Controller and click the Leave Empty button in the Optical Disk Selector window.

Step 14
Select SATA Controller and enable Host I/O Cache from Attributes for virtual PC performance.

Step 15
Select the Debian 11.vdi virtual disk file and likewise enable Solid-State Drive (SSD) feature to improve disk performance.

Step 16
To add a Debian 11 ISO file to the virtual PC, select the Empty disk drive, then click the CD/DVD icon and click Choose a disk file from the options that appear.

Step 17
Visit the link here and select the Debian 11 ISO file you downloaded to your host computer and open it.

Step 18
Finally, select the USB 3.0 (xHCI) Controller type and close the settings of the virtual computer in order to be able to transfer files faster using your USB 3.x devices in your virtual system or to quickly back up your documents with very large file sizes.

Step 19
After setting the Debian 11 virtual computer’s settings correctly, click Start from the tool menu.

How to Install Debian 11
After preparing and running the Debian guest system, you can now start the system setup and install it virtually on your host PC.
Step 1
After running your Debian virtual PC, you will see the Installer Menu as in the image below. On this screen, press Enter in the Graphical Install option and continue.
")
Step 2
Select the language of your Linux virtual system and click the Continue button.

Step 3
Select the region you live in and click the Continue button to continue.

Step 4
Select your keyboard layout for the Debian guest operating system and click Continue.

Step 5
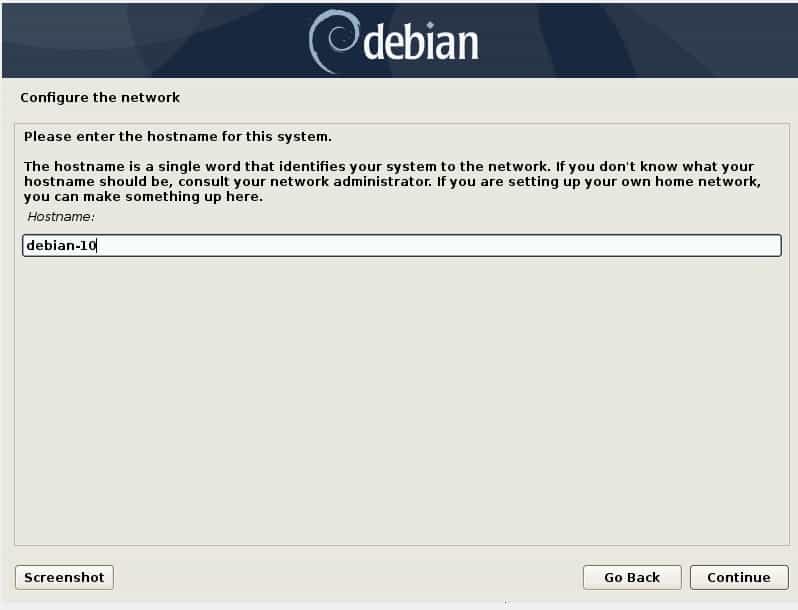
Type a unique hostname that identifies your virtual PC in your network environment and continue.

Step 6
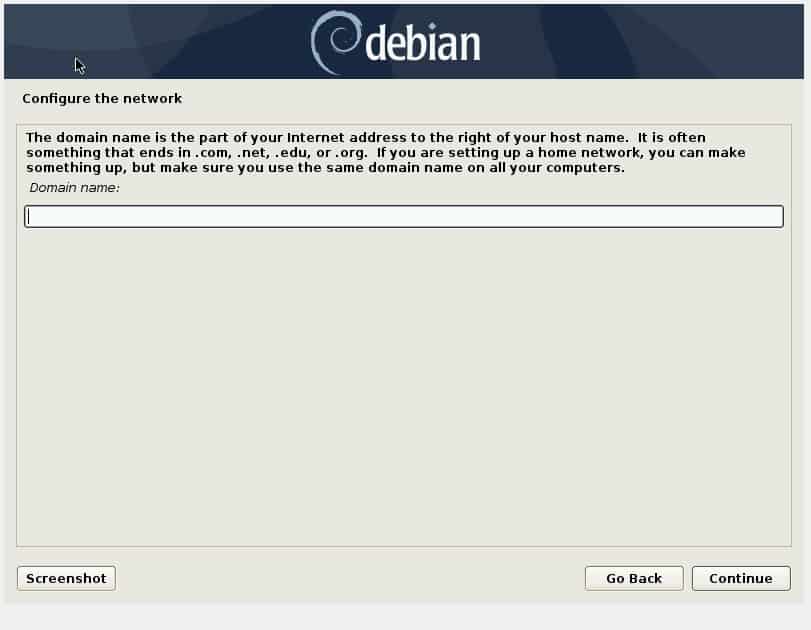
If there is no Active Directory server in the environment where you use your VM, leave the domain name blank.

Step 7
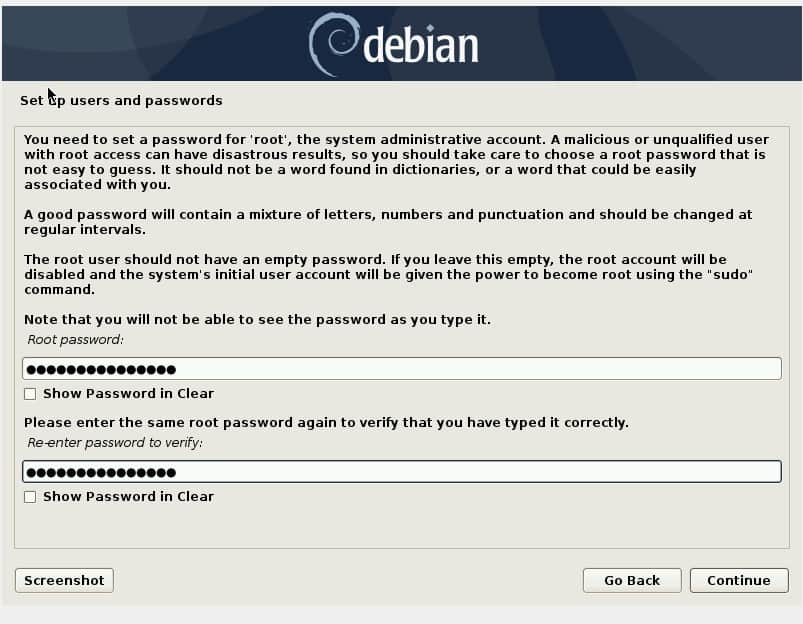
Create a strong root password to prevent unauthorized users from damaging your Linux system.

Step 8
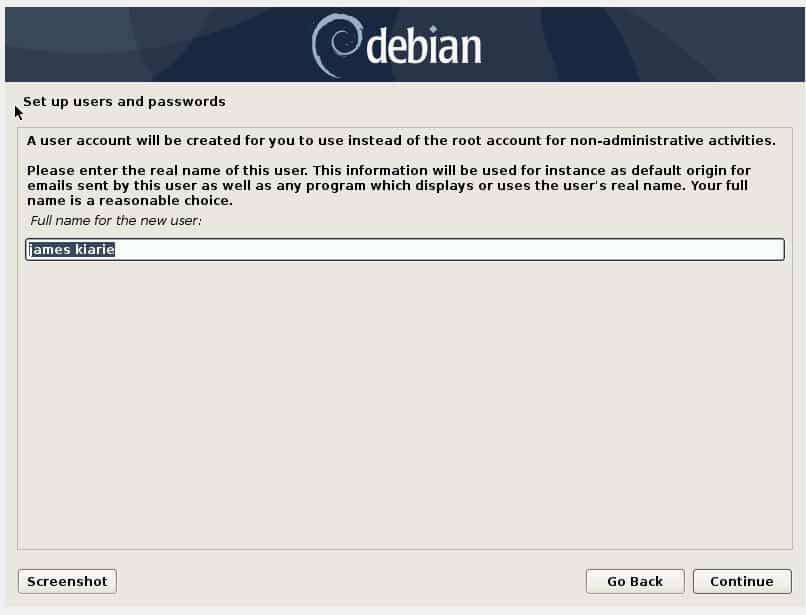
For non-administrative activities, a normal user account is used instead of the root account. Type your full name for the local user account and click Continue.

Step 9
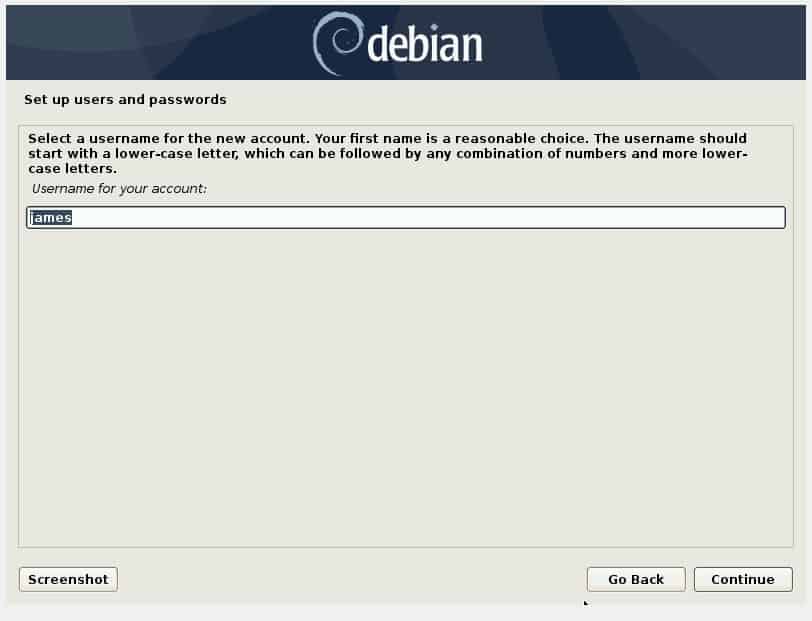
Your user account name is set automatically because it contains your first name, but you can change it as you wish. After making sure that your username is typed in lowercase letters, click Continue.

Step 10
Create a strong password for your user account, consisting of lowercase or uppercase letters and numbers.

Step 11
In order for your system time to be displayed correctly, select your time zone and click Continue.

Step 12
Select the Guided – use entire disk option from the disk configuration options and continue.

Step 13
Select the VBOX HARDDISK virtual disk for partition configuration.

Step 14
You can install the system using different disk schemes, or if you are not sure, you can choose the first option, All files in one partition.

Step 15
To complete the disk configuration, select Finish partitioning and write changes to disk and click Continue.

Step 16
After checking the operations on the disk, select Yes to confirm the changes to the disk.

Step 17
If you do not have any additional installation media and want to continue without scanning an extra media, continue with the No option.

Step 18
When you want to download a program from the Internet after installing the system from a DVD image, the current addresses must be defined in the repository list. Therefore, select Yes to add a network mirror and click Continue.

Step 19
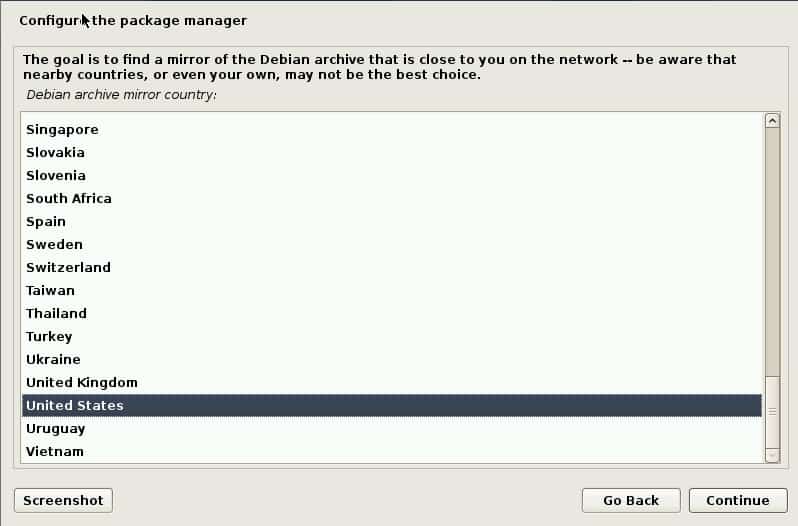
For the Debian archive mirror, select the location where you live or the country closest to you.

Step 20
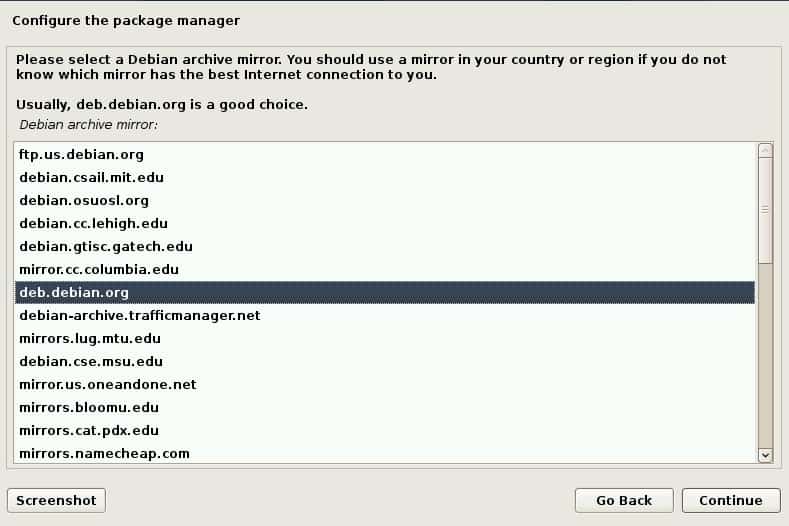
For the Debian archive mirror, continue with deb.debian.org suggested.

Step 21
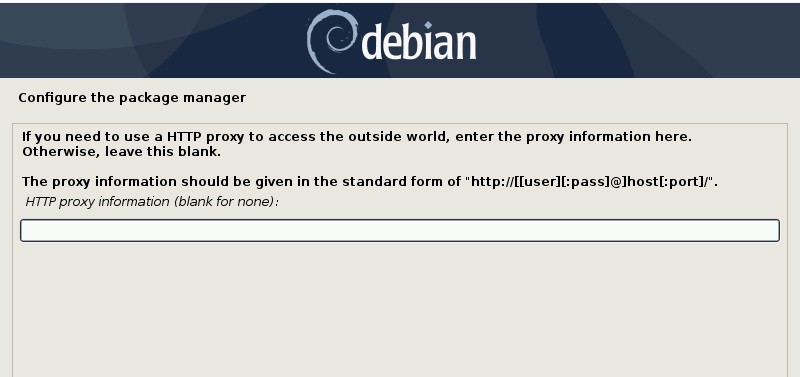
If you do not want to configure a proxy address, leave the relevant option blank.

Step 22
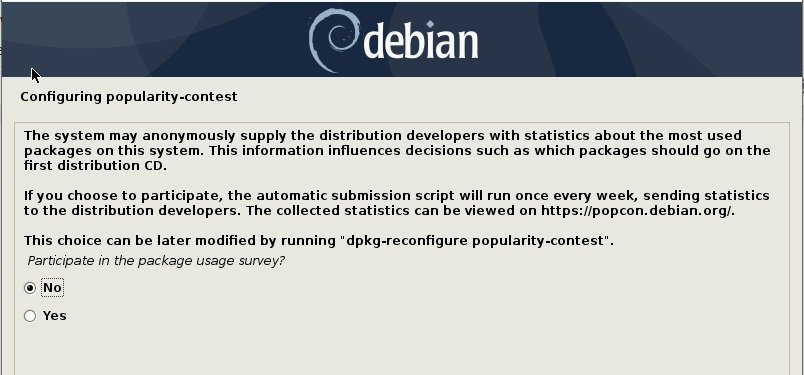
You can select Yes if you want to send your statistics to Debian developers. If you don’t want it, select No and click Continue.

Step 23
On the software selection screen, select your preferred Debian desktop environment.

Step 24
Select Yes to confirm installing the GRUB Boot Loader on the primary partition and click Continue.

Step 25
Select the /dev/sda device to install the GRUB Boot Loader.

Step 26
When the installation is complete, first remove the installation media and restart your system to boot your new system.

Step 27
When your Debian guest machine is turned on, press Enter on Debian GNU/Linux from the GRUB menu or wait for the specified time for the selected entry to occur automatically.

Step 28
Type your Debian user account and password and log in.

Step 29
When the Debian 11 desktop opens, find the terminal from the start menu and open it. Execute the “lsb_release -a” command in the terminal to check your system version.
lsb_release -a
How to Install Guest Additions
The first thing you need to do after installing Debian with VirtualBox is to install Guest Additions. In this way, you can adjust the screen resolution of your virtual computer and transfer files between the host and your VM. Additionally, you can enable the Shared Folder feature and start using your USB devices.
Step 1
When you try to put your Debian guest system in full-screen mode, you can see that it is not adapted to full screen as in the image below.

Step 2
Click Devices / Insert Guest Additions CD Image from the VirtualBox tool menu.

Step 3
Before installing Guest Additions, you need to install Linux kernels, otherwise, you will get an error during compilation. Open the terminal on your Debian system and execute the “sudo apt install build-essential dkms” command.
sudo apt install build-essential dkms
Step 4
After checking the packages to be installed, press Y and Enter to confirm the additional disk space usage of 258 MB.

Step 5
To install Guest Additions using the terminal, you must first go to the cdrom location and run the .run file. To do this, navigate to the image location with the “cd /media/cdrom” command and execute the “sudo sh ./VBoxLinuxAdditions.run” command.
cd /media/cdrom
ls
sudo sh ./VBoxLinuxAdditions.run
Step 6
When the VirtualBox Guest Additions Installer starts, you can see that the Linux kernels are compiled from the outputs in the terminal. When the installation is complete, execute the “sudo reboot” command to restart your computer for the changes to take effect.
sudo reboot
Step 7
After restarting your virtual PC, execute the “sudo /usr/sbin/modinfo vboxguest” command in the terminal to check the Guest Additions version.
sudo /usr/sbin/modinfo vboxguest
Step 8
When you check the screen resolution of the virtual machine, you can see that it is adapted to the full screen.

How to Configure Shared Folder
When you want to copy a file from your host PC to your virtual computer, you can activate the Shared Folder feature so that you can do this easily. In this way, you can quickly transfer documents from your host to your VM.
Step 1
Click Devices / Shared Folders / Shared Folders Settings from the VirtualBox tool menu.

Step 2
After clicking the Add icon in the Shared Folders window, in the Add Share window that opens, expand the drop-down menu in the Folder Path section and click Other.

Step 3
In the Select Folder window, create a new folder in any location of your host and select it.

Step 4
After selecting the shared folder, check the Auto-Mount and Make Permanent options and click OK.

Step 5
Open Files from your Debian VM and click sf_DebianSharedFolder in the Bookmark section to view the contents of the sharing folder. If you get an error like the image below, you need to edit the user permissions.

Step 6
Open the terminal and execute the “sudo adduser $USER vboxsf” command to allow your local user account access to Shared Folder.
sudo adduser $USER vboxsf
Step 7
Restart your virtual system and check whether you can access Shared Folder again, and this time you can see that the process is smooth.

How to Use a USB Flash Memory
You can use your USB storage devices to quickly copy or backup your documents with very large file sizes between your host and your VM. For example, you can connect a USB 3.0/3.1 supported external SSD to your virtual computer and easily back up your files.
Step 1
Insert a flash memory into the empty USB 3.x port of your host and create a folder named Backup in it.

Step 2
Click Devices / USB / Name of your USB from the tool menu to mount your USB flash drive in your Debian VM.

Step 3
After your USB disk is automatically mounted to your virtual machine, you can see the folder named Backup that you created when you view its contents.

Video
Installing Old Versions
Debian Version
YouTube Video
Slide
Related Articles
♦ How to Run Kali with VirtualBox
♦ How to Take Snapshot a Virtual Machine with VirtualBox
♦ How to Run Linux Mint with VirtualBox
♦ How to Run Ubuntu with VirtualBox
♦ How to Install Windows 10 using VirtualBox
Всем привет! Сегодня мы подробно рассмотрим установку дистрибутива Linux Debian 10 на компьютер с UEFI рядом с Windows 10. В результате на компьютере у нас будут две операционные системы, Windows 10 + Debian 10, а при загрузке мы будем выбирать, в какую систему загружаться.
Содержание
- Вводная информация
- Исходные данные и цель
- Почему в экспертном режиме?
- Пошаговая установка Debian 10 рядом с Windows 10 в экспертном режиме
- Шаг 1 – Скачивание установочного образа Debian 10
- Шаг 2 – Создание установочного носителя
- Шаг 3 – Создание резервной копии данных и подготовка места для Debian
- Шаг 4 – Загрузка с установочного носителя и запуск экспертного режима
- Шаг 5 – Выбор языка
- Шаг 6 – Выбор местоположения
- Шаг 7 – Установка региональных настроек
- Шаг 8 – Настройка клавиатуры
- Шаг 9 – Поиск и монтирование CD-ROM
- Шаг 10 – Загрузка компонентов программы установки
- Шаг 11 – Определение сетевой карты и настройка сети
- Шаг 12 – Настройка учетных записей пользователей и паролей
- Шаг 13 – Настройка времени
- Шаг 14 – Определение и разметка дисков
- Шаг 15 – Установка базовой системы
- Шаг 16 – Настройка менеджера пакетов
- Шаг 17 – Выбор и установка программного обеспечения
- Шаг 18 – Установка системного загрузчика GRUB на жесткий диск
- Шаг 19 – Завершение установки
- Загрузка системы
Вводная информация
Исходные данные и цель
В этой статье я рассмотрю один из самых распространённых случаев, когда на компьютере с UEFI, например, на ноутбуке, установлена операционная система Windows 10, в которой есть два раздела, т.е. диск C и D, и Вы захотели установить Linux, в частности дистрибутив Debian 10, второй операционной системой, таким образом, чтобы при включении компьютера у Вас была возможность выбора системы, в которую необходимо загрузиться.
Сразу хотелось бы отметить, что, для того чтобы установить Debian рядом с Windows 10 на компьютере с UEFI, не нужно выполнять никаких особых предварительных действий с существующими параметрами компьютера, в частности нет необходимости отключать UEFI Secure Boot. Debian, начиная с 10 версии, поддерживает безопасную загрузку, о том, что еще нового появилось в этой версии, можете почитать в материале – Обзор Debian 10.
Примечание! У всех конфигурация компьютеров разная, так же как и разный опыт администрирования операционных систем, поэтому я не могу гарантировать, что все, что описано в этой статье, поможет именно Вам выполнить установку Debian, поэтому я настоятельно рекомендую Вам сделать резервную копию всех важных данных перед тем, как приступать к установке Debian, для того чтобы в случае возникновения непредвиденных ситуаций избежать потери этих данных.
Почему в экспертном режиме?
В связи с тем, что по умолчанию установщик Debian устанавливает загрузчик в область UEFI согласно всем спецификациям, а Windows нет, это не позволяет Debian загружаться даже после успешной установки, так как UEFI просто не будет запускать загрузчик Debian. Как результат, Вы успешно установили Debian, но по умолчанию загружается все равно Windows 10, загрузчик GRUB просто не запускается.
Поэтому установку Debian 10 необходимо производить в экспертном режиме, чтобы принудительно установить загрузчик в нужную область (removable media path), так же как это делает Windows и некоторые другие дистрибутивы Linux, например, Ubuntu, но такой подход создает предпосылки конфликта с любыми другими установщиками, что плохо и неправильно. Вот почему в Debian не делают этого по умолчанию.
Заметка! Если Вы все-таки установили Debian рядом с Windows 10, но только не в экспертном режиме, и у Вас, как я и описал выше, Debian не запускается, а запускается Windows 10 точно так же как до установки Debian, то это можно исправить, в следующих материалах я покажу, как это делается, поэтому подписывайтесь в наших группах во всех популярных социальных сетях: ВКонтакте, Facebook, Одноклассники, Твиттер и следите за выходом новых материалов.
Дополнительная информация! Установка Ubuntu рядом с Windows 10 на компьютер с UEFI – в материале подробно рассмотрен процесс установки дистрибутива Linux Ubuntu на один компьютер рядом с Windows 10.
Сейчас мы рассмотрим все шаги, которые необходимо выполнить, для того чтобы установить Linux Debian 10 на компьютер рядом с Windows 10, учитывая, что на компьютере используется прошивка UEFI.
Сразу скажу, что процесс установки Debian 10 в экспертном режиме мало чем отличается от обычной установки, у него такой же графический установщик, просто у него есть несколько дополнительных шагов, которые необходимы для более тонкой настройки операционной системы.
На заметку! Linux для обычных пользователей – книга про основы операционной системы Linux для начинающих
Шаг 1 – Скачивание установочного образа Debian 10
Для того чтобы установить дистрибутив Linux Debian 10, нужен установочный ISO образ, поэтому сначала необходимо скачать этот установочный ISO файл. Это можно сделать со страницы загрузки официального сайта Debian — https://www.debian.org/distrib
После перехода на страницу необходимо выбрать подходящий ISO образ и способ загрузки. Я обычно загружаю полный установочный образ, который содержит большое количество пакетов, что упрощает процесс установки на машины без соединения с Интернет. Однако размер такого образа около 4 гигабайт.
Образ можно скачать как с помощью браузера, так и с помощью торрента.
Вот прямая ссылка на скачивание торрент файла полного ISO образа – Скачать Debian 10 (64 bit, DVD).
Шаг 2 – Создание установочного носителя
После того как Вы загрузили установочный ISO образ Debian 10, его необходимо записать на DVD диск или USB флешку, для того чтобы создать загрузочный установочный носитель, с которого и будет производиться установка.
Для этого существует много различных программ, например, в нашем случае отлично подойдет программа Rufus. Пример того, как можно записать ISO образ на флешку с помощью этой программы, можете посмотреть в статье – Создание загрузочной USB флешки в Windows с помощью Rufus.
Шаг 3 – Создание резервной копии данных и подготовка места для Debian
Для установки Debian 10 необходимо свободное место на жестком диске, самый лучший вариант – это создать отдельный раздел для Debian.
Если у Вас такая конфигурация, которую я описал выше, т.е. у Вас два диска: C и D, то Вам необходимо на диске D выделить свободное место достаточного размера. Если Вы не планируете использовать Debian в качестве основной системы и хранить там много данных, то достаточно будет и 50 гигабайт.
Однако все данные (важные!), которые есть на диске D, лучше предварительно сохранить, например, на флешке или на внешнем жестком диске. Так как для создания отдельного раздела для Debian необходимо от диска D «отсоединить», иногда эту процедуру называют «отрезать», свободное незанятое место, так скажем, нужно физически уменьшить диск D и создать неразмеченное пространство, а именно эта процедура и может привести к потере данных.
После того как Вы сделаете резервную копию всех важных данных, Вы можете переходить к процедуре сжатия диска D. Это можно сделать как стандартной программой Windows «Управление дисками», так и сторонними приложениями для работы с жесткими дисками, которые имеют такой функционал (Acronis и т.д.). Если у Вас есть опыт сжатия дисков такими программами, то Вы можете сразу уменьшить диск D, и создать неразмеченное пространство.
Однако в этой статье я покажу способ, который подразумевает сжатие диска D стандартными средствами самой программы установки Debian, иными словами, никакие сторонние программы мы использовать не будем.
Таким образом, на текущий момент у меня есть копия важных данных и свободное место на диске D, больше ничего дополнительного я пока не делаю.
Единственное, обязательно нужно запомнить размер диска D, так как хоть в системе вроде как и два раздела, но скрытых разделов, которые в системе не отображаются, на самом деле больше, поэтому чтобы ничего не перепутать, запоминаем общий размер диска D, чтобы четко идентифицировать его в процессе создания разделов для Debian.
Шаг 4 – Загрузка с установочного носителя и запуск экспертного режима
После того как установочный носитель мы подготовили, сделали резервную копию всех важных данных, высвободили необходимое место на диске D, можно переходить к самому процессу установки Debian.
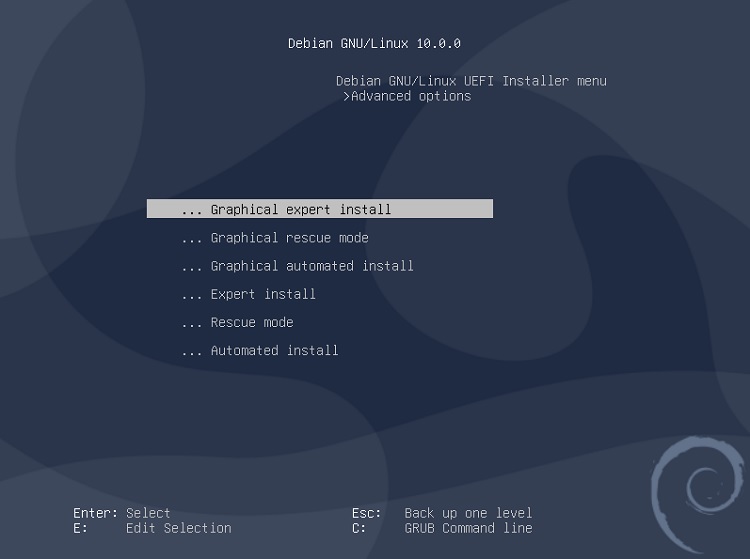
Сначала загружаемся с установочного носителя и попадаем в меню. Для того чтобы запустить установку в экспертном режиме, выбираем пункт «Advanced options».
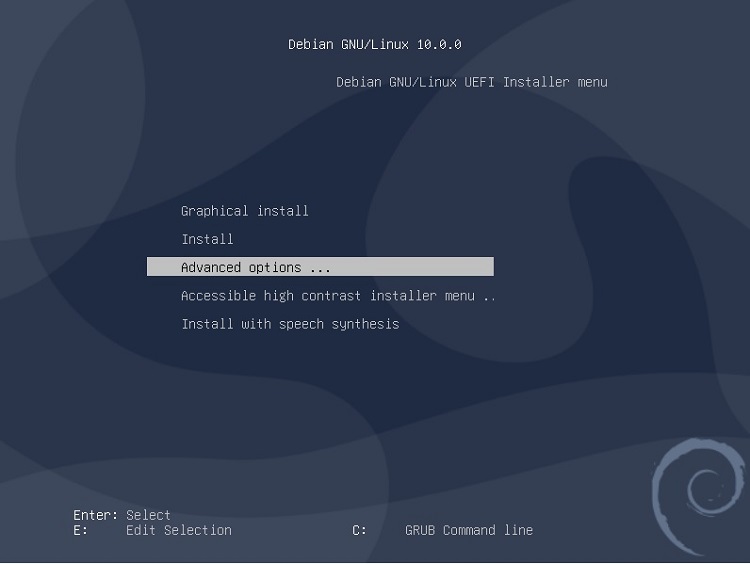
Затем нажимаем на пункт «Graphical expert install».
Шаг 5 – Выбор языка
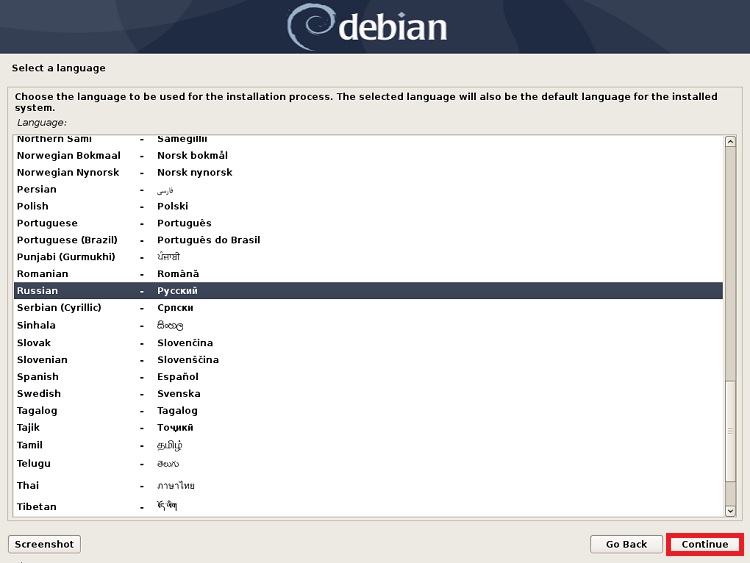
В результате установщик запустится в экспертном режиме, сначала нам нужно выбрать язык, для этого мы выбираем «Choose language», нажимаем «Continue».
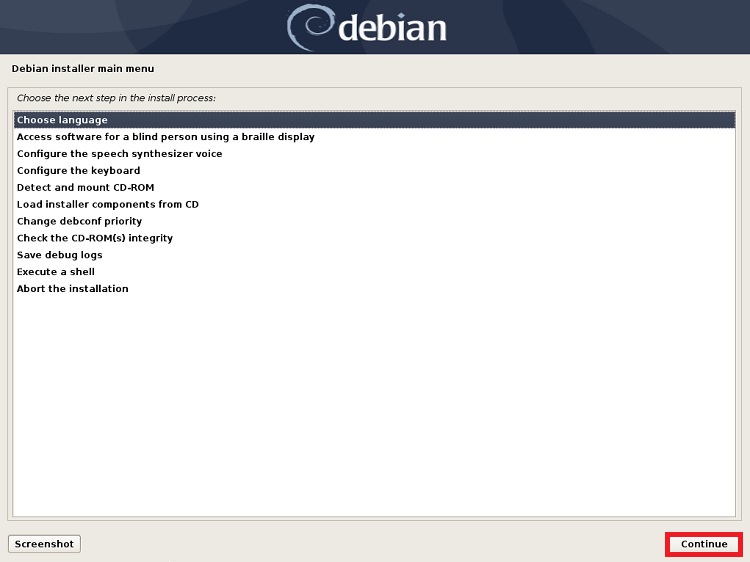
После этого ищем нужный язык и снова нажимаем «Continue».
Шаг 6 – Выбор местоположения
Далее нам нужно выбрать страну, в которой мы находимся, это будет влиять на некоторые дальнейшие параметры установки.
Нажимаем «Продолжить».

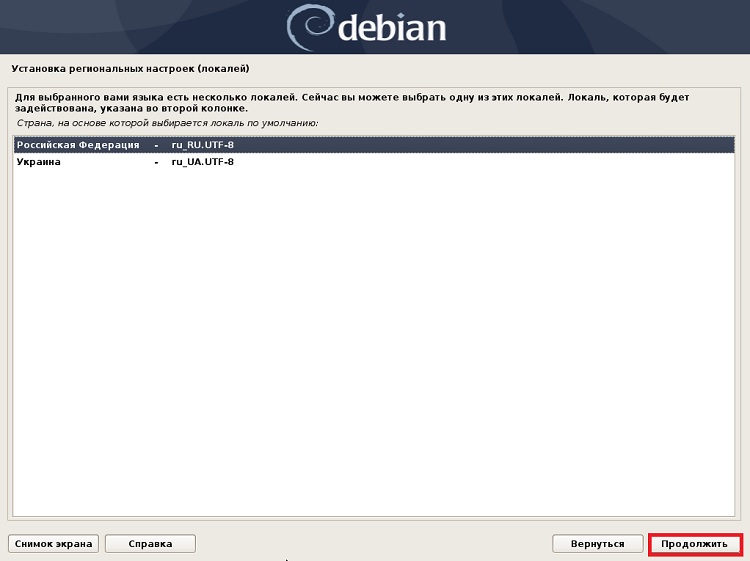
Шаг 7 – Установка региональных настроек
На этом шаге мы можем настроить несколько региональных параметров, в частности выбрать локаль. Я оставлю по умолчанию.
Нажимаем «Продолжить».
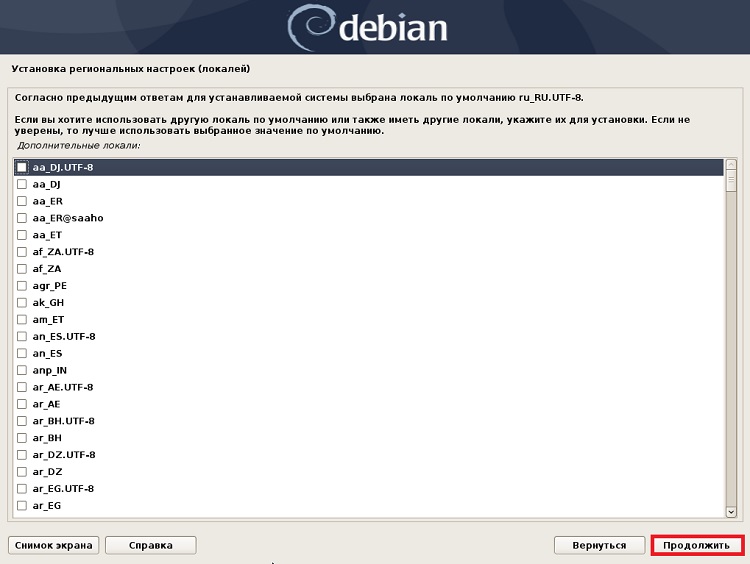
В следующем окне в случае необходимости Вы можете отметить дополнительные локали.
Нажимаем «Продолжить».
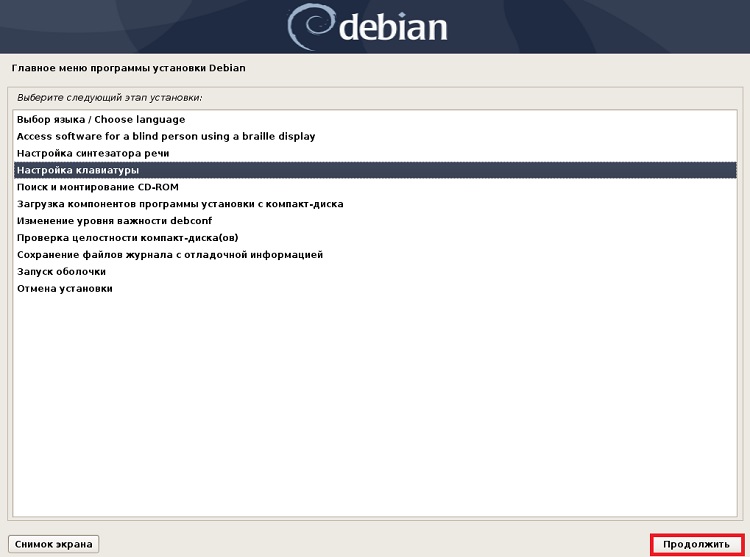
Шаг 8 – Настройка клавиатуры
После этого мы вернемся в основное меню программы установки. Теперь можем переходить к настройке клавиатуры. Для этого выбираем соответствующий пункт и нажимаем «Продолжить».
Сначала выбираем раскладку.
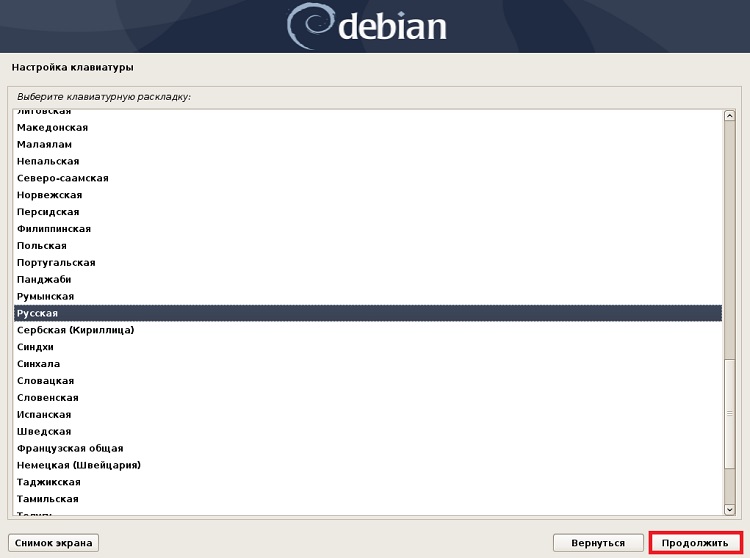
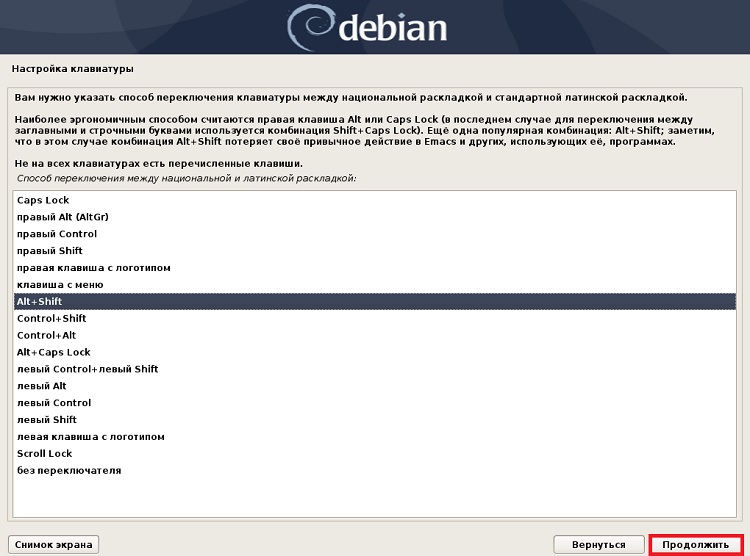
Затем способ переключения, т.е. каким сочетанием клавиш мы будем переключать раскладку клавиатуры.
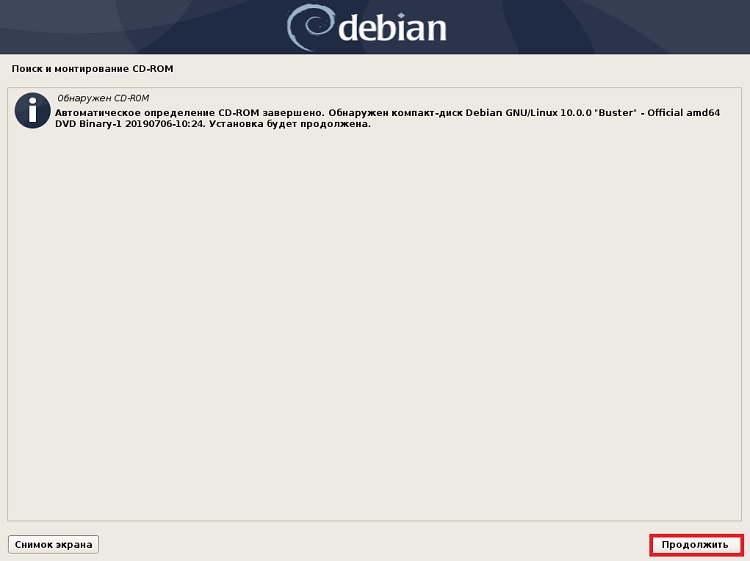
Шаг 9 – Поиск и монтирование CD-ROM
После этого, для того чтобы определить устройство, с которого будет производиться копирование всех файлов, выбираем пункт «Поиск и монтирование CD-ROM» и нажимаем «Продолжить».
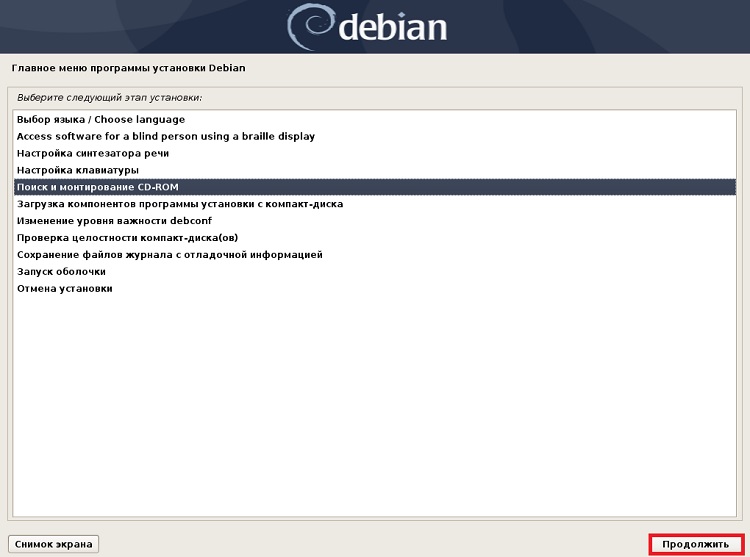
Затем снова нажимаем «Продолжить».
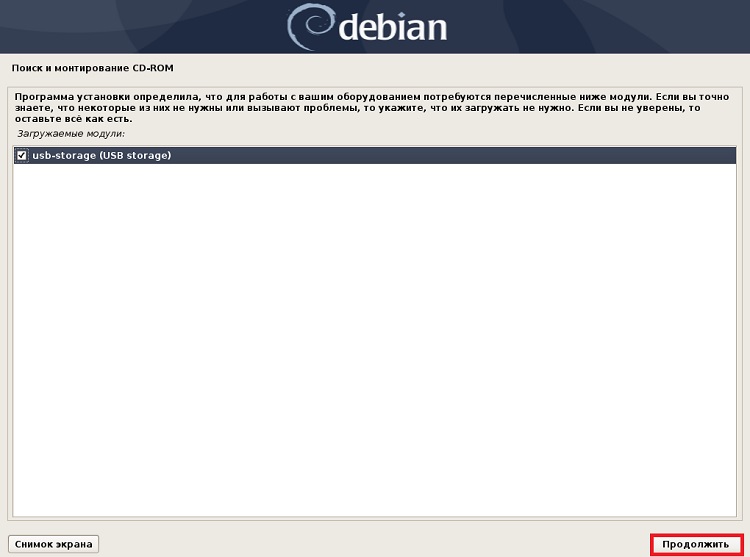
В результате диск будет найден и примонтирован. Нажимаем «Продолжить».
Шаг 10 – Загрузка компонентов программы установки
Выбираем данный пункт и нажимаем «Продолжить».
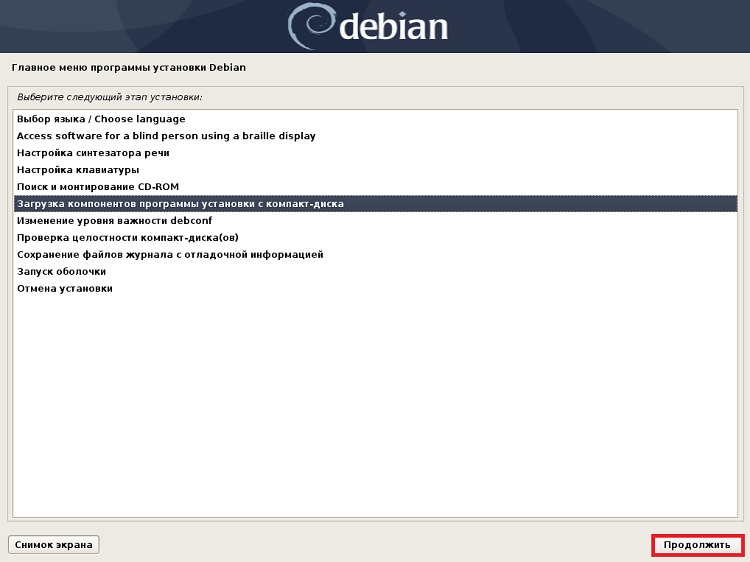
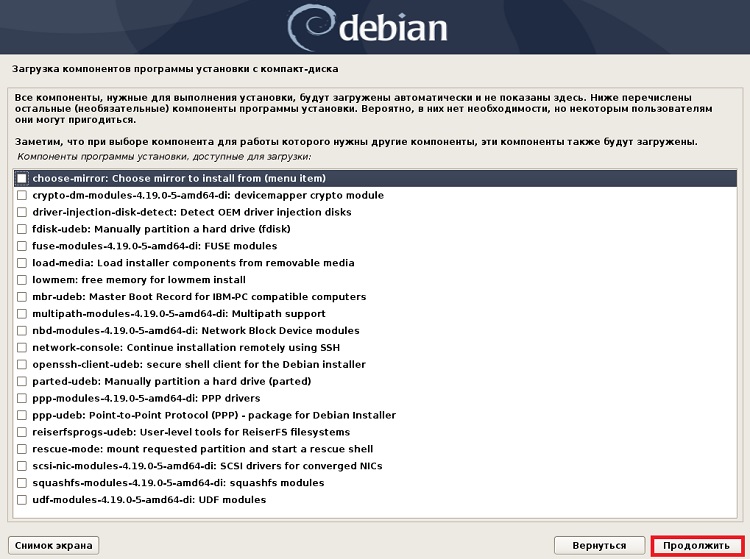
В случае необходимости Вы можете выбрать дополнительные компоненты для установки, однако если Вам ничего не требуется, то можете смело нажимать «Продолжить», так как все обязательные компоненты уже выбраны автоматически, и здесь они даже не отображаются.
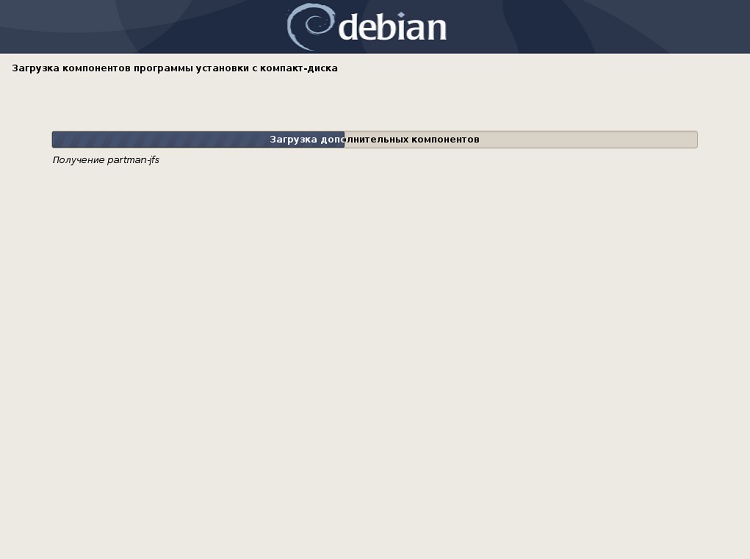
После того как Вы нажмете «Продолжить», начнется загрузка всех компонентов.
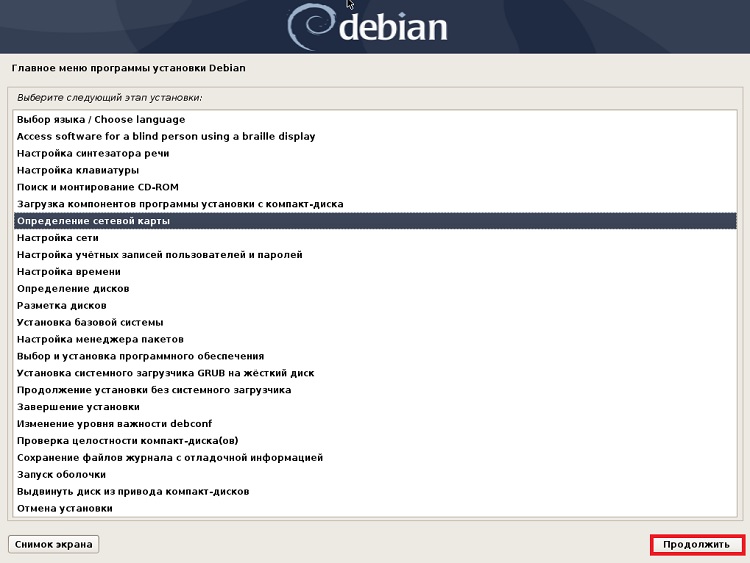
Шаг 11 – Определение сетевой карты и настройка сети
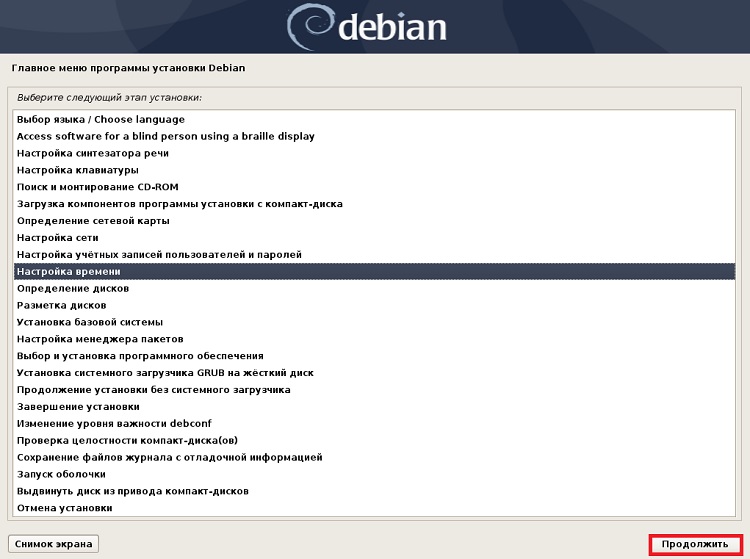
Затем нас снова вернет в основное меню программы установки, где, как мы видим, добавилось достаточно много новых пунктов.
Сначала выбираем пункт «Определение сетевой карты» и нажимаем «Продолжить».
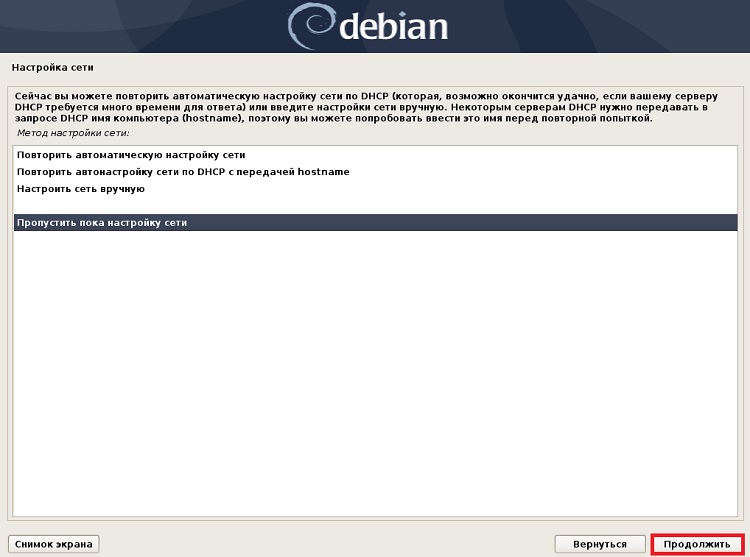
Сетевая карта будет автоматически определена и настроена. Затем нам нужно настроить сеть. Для этого выбираем соответствующий пункт.
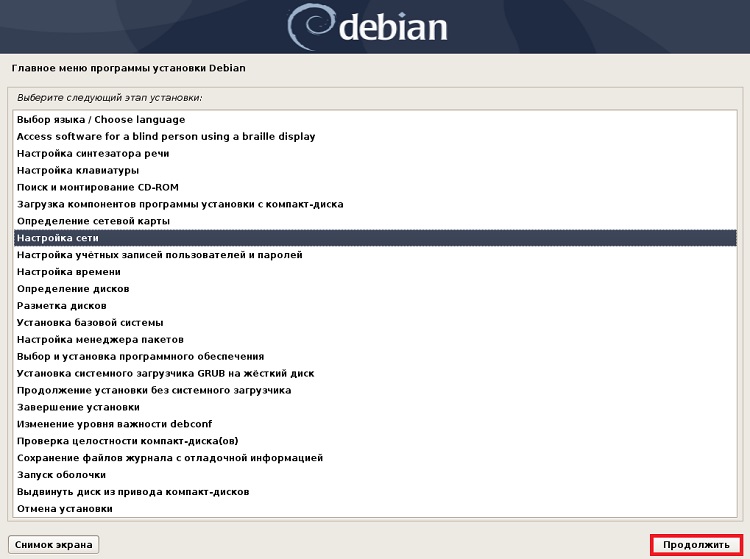
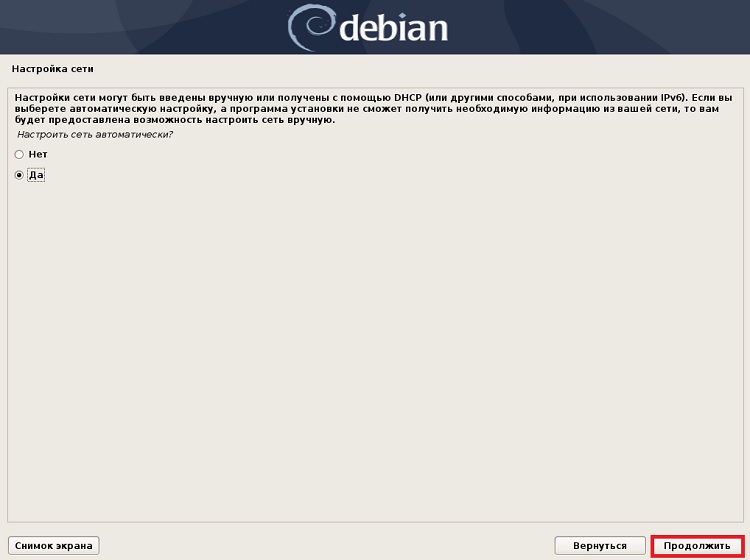
Программа установки предлагает настроить сеть автоматически, отвечаем «Да», так как в большинстве случаев, если у Вас подключен кабель, сеть будет настроена автоматически, однако Вы можете настроить сеть и вручную.
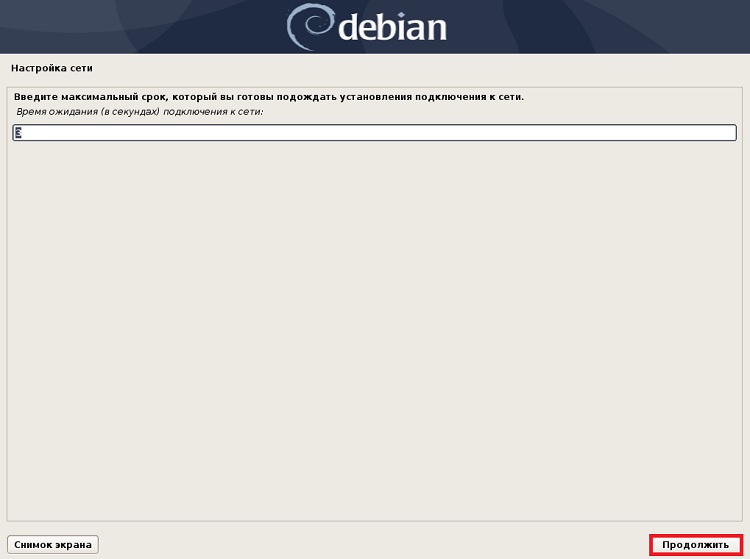
В следующем окне мы можем задать время ожидания подключения к сети, я оставляю по умолчанию и сразу жму «Продолжить».
В результате программа установки попытается настроить сеть автоматически и получить все параметры от DHCP сервера.
Однако, если ей этого не удастся сделать, Вы можете получить следующее сообщение.

Тогда нажимайте «продолжить» и выбирайте предпочтительное для Вас действие, например, Вы можете указать эти параметры вручную или просто пропустить настройку сети на данном этапе, и настроить сеть уже после установки Debian.
Нажимаем «Продолжить».
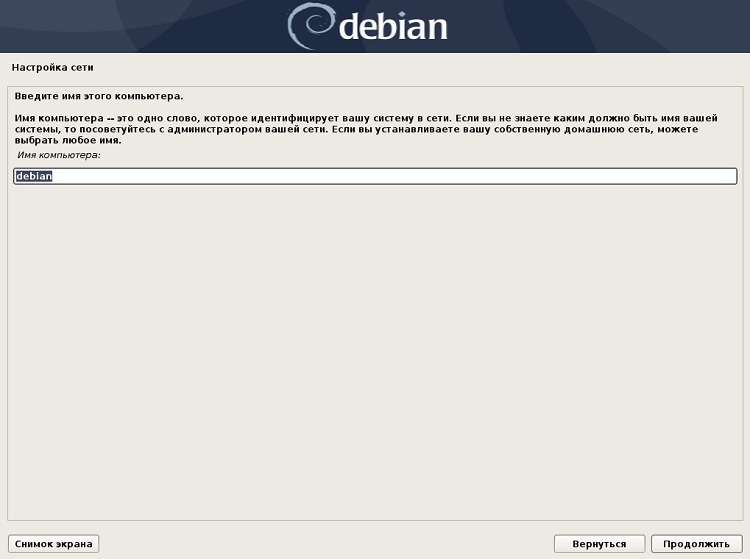
Теперь указываем имя компьютера и нажимаем «Продолжить».
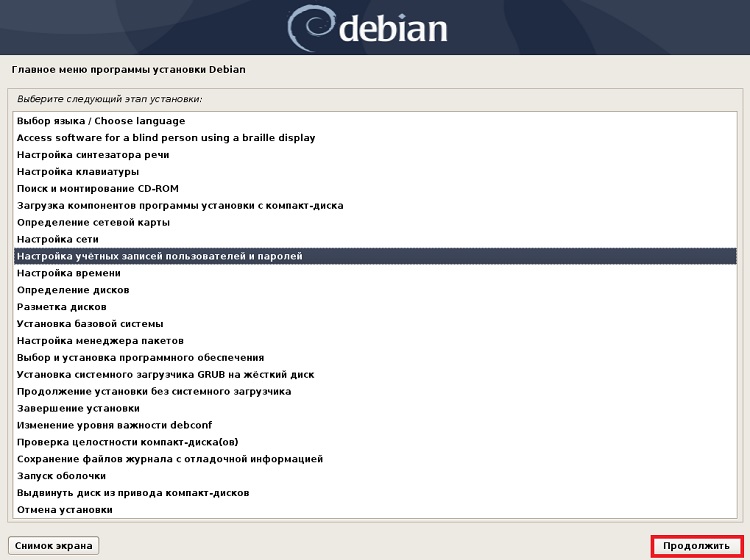
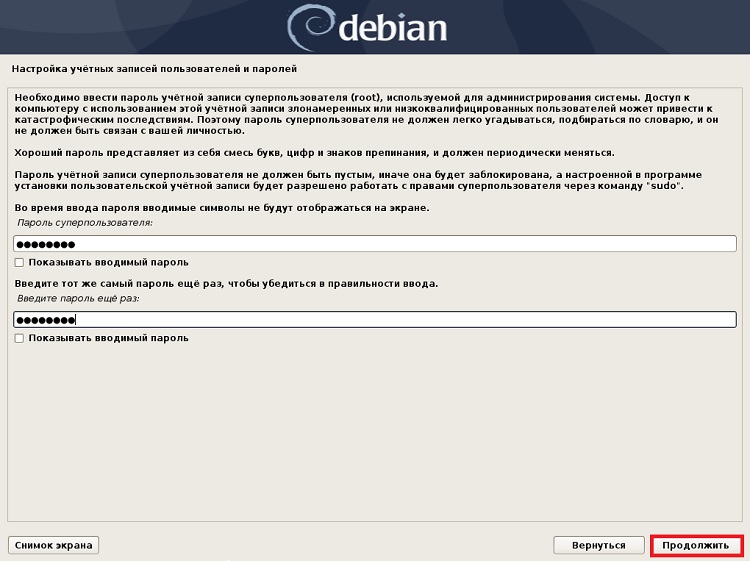
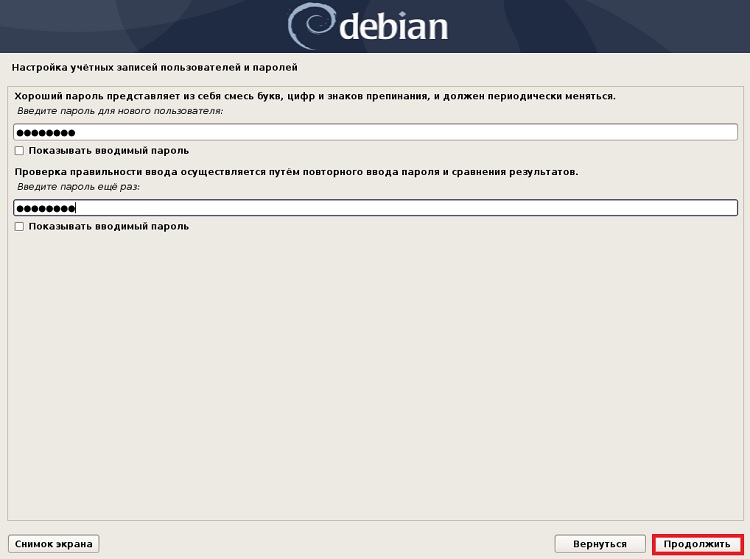
Шаг 12 – Настройка учетных записей пользователей и паролей
Переходим к настройке учетных записей, для этого выбираем соответствующий пункт в главном меню и нажимаем «Продолжить».
Далее мы можем включить поддержку теневых копий и разрешить вход в систему от имени root, я оставлю по умолчанию, Вы, если хотите, можете изменить данные параметры.
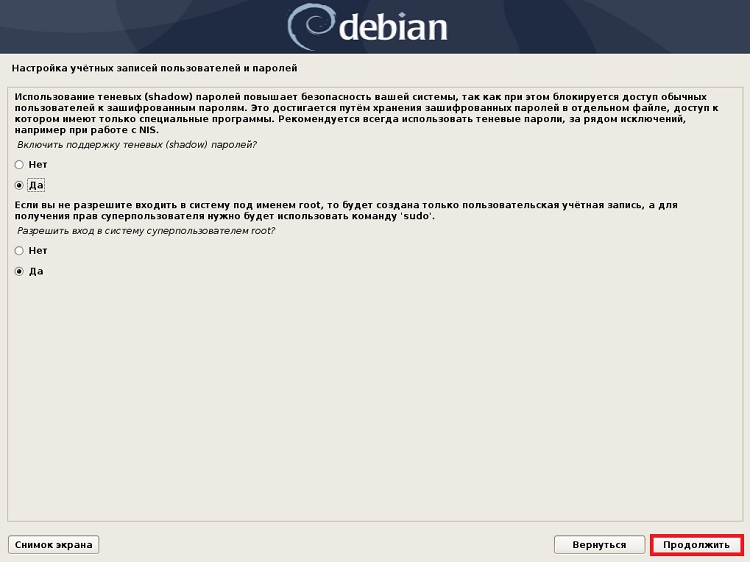
Потом придумываем и вводим пароль суперпользователя root (он должен быть сложный).
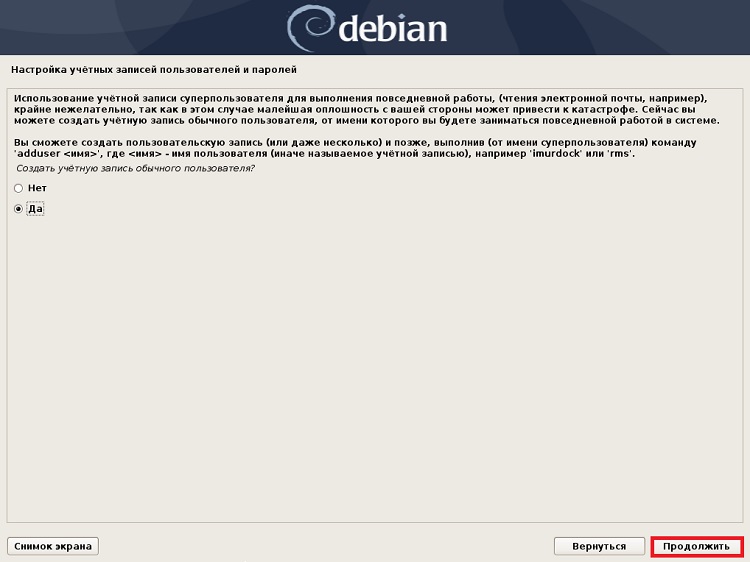
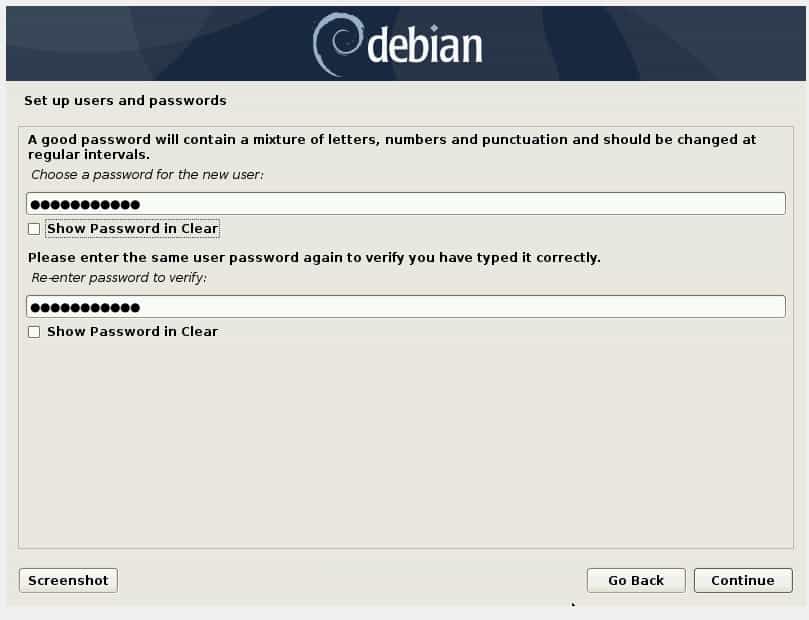
Затем нам предлагают создать учетную запись обычного пользователя, это, конечно же, нужно сделать, так как работать от имени администратора не рекомендуется.

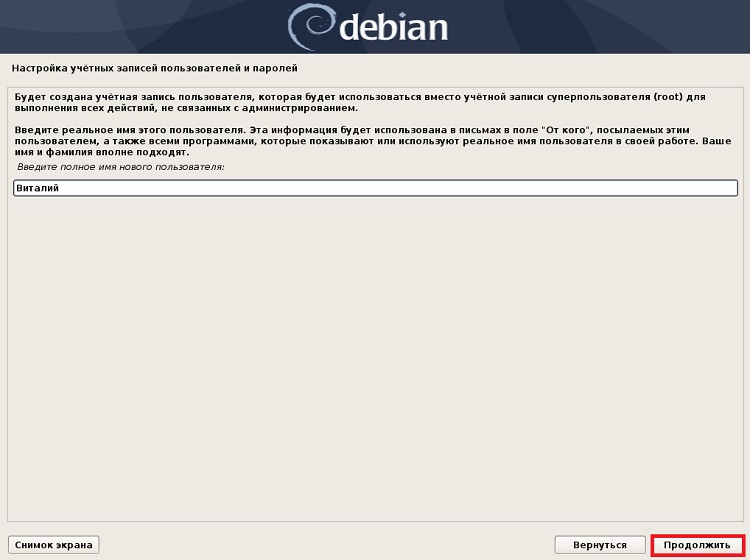
Сначала вводим имя пользователя.
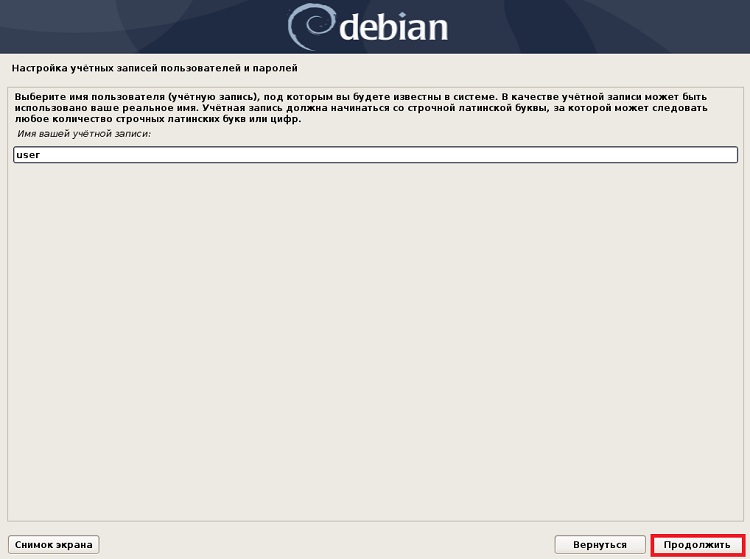
Затем придумываем имя учетной записи.
И пароль.
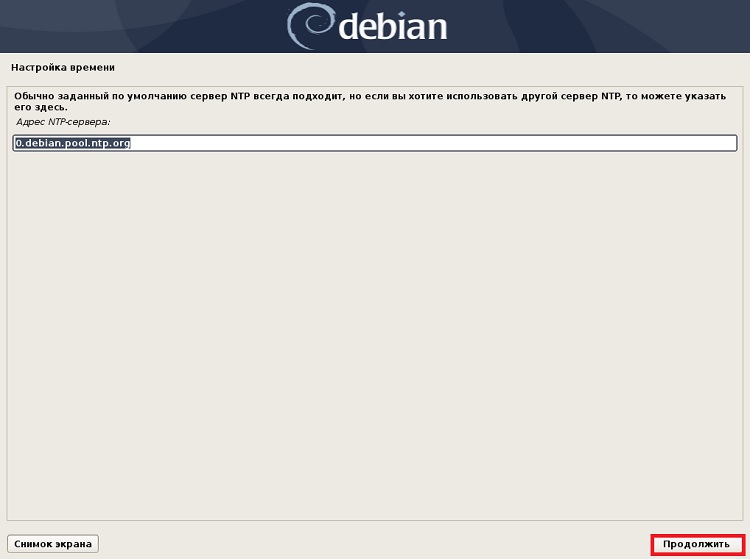
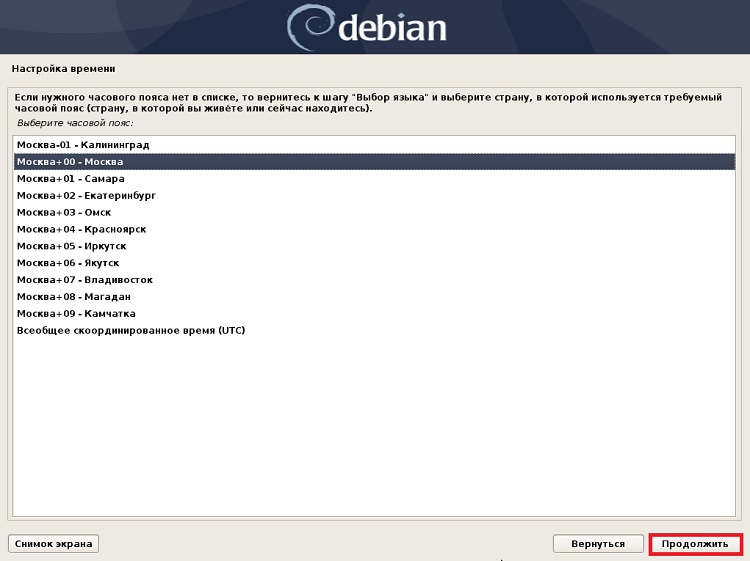
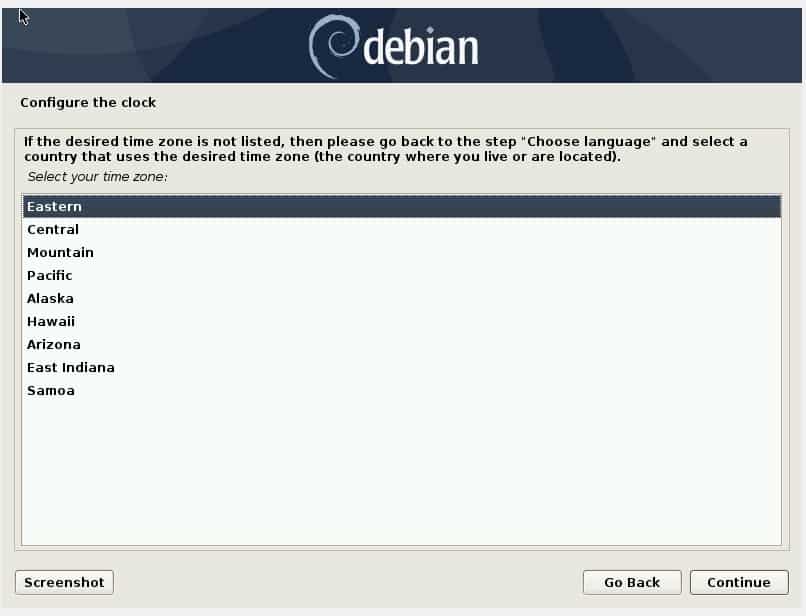
Шаг 13 – Настройка времени
Идем дальше, переходим к настойке времени.
Сначала нам предлагают настроить время по протоколу NTP, оставляем по умолчанию.

Потом снова ничего не меняем без особой на то необходимости.
Затем выбираем часовой пояс.
Шаг 14 – Определение и разметка дисков
Теперь нам предстоит выполнить разметку жесткого диска. Для этого сначала выбираем пункт «Определение дисков» и нажимаем «Продолжить».
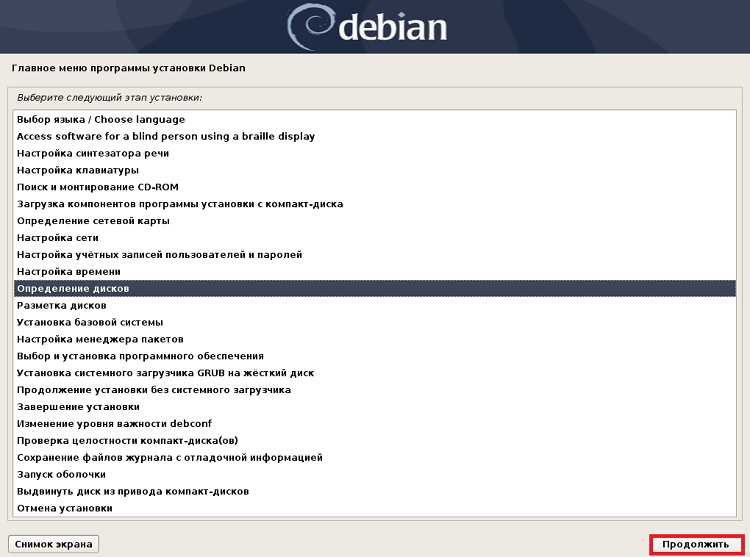
Диски автоматически будут определены. Затем выбираем «Разметка дисков».
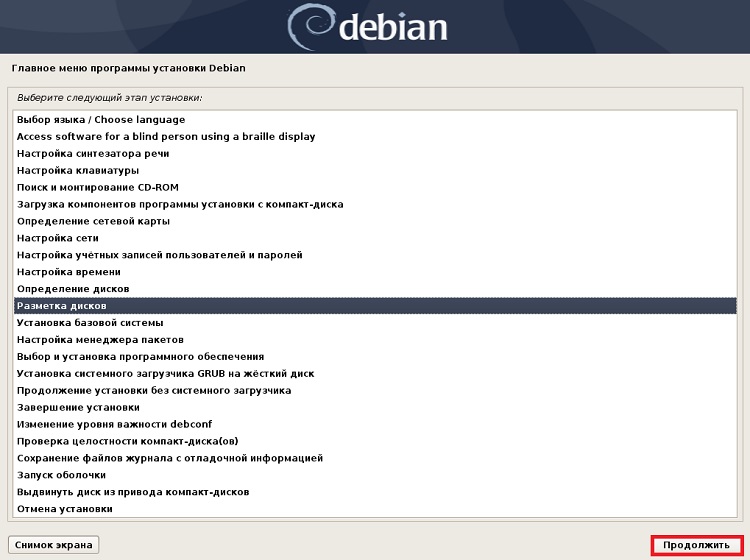
Так как мы устанавливаем Debian 10 рядом с Windows 10, разметку жесткого диска нам нужно выполнить вручную, поэтому выбираем соответствующий пункт и нажимаем «Продолжить».

Потом первое, что нам нужно сделать, это «отрезать» свободное место от диска D (если конечно Вы этого не сделали ранее), для того чтобы использовать это место для создания разделов под Linux.
Чтобы это сделать, ищем нужный раздел, т.е. диск D, как я и говорил, ориентироваться можно по размеру диска.
Выбираем нужный раздел и нажимаем «Продолжить».
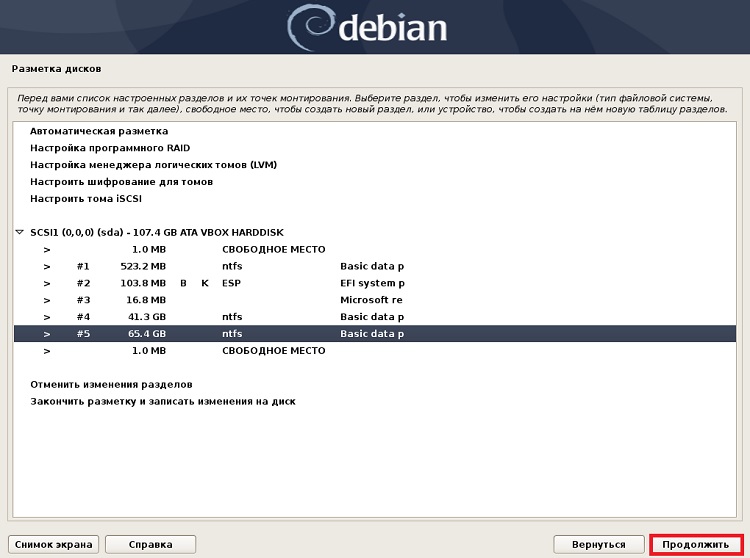
Далее, нам нужно уменьшить этот раздел, чтобы у нас образовалось неразмеченное пространство. Для этого выбираем пункт «Изменить размер раздела» и нажимаем «Продолжить».
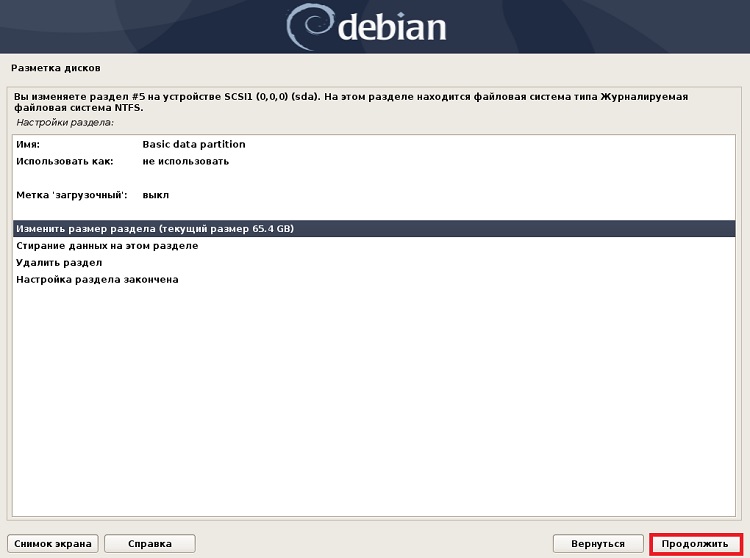
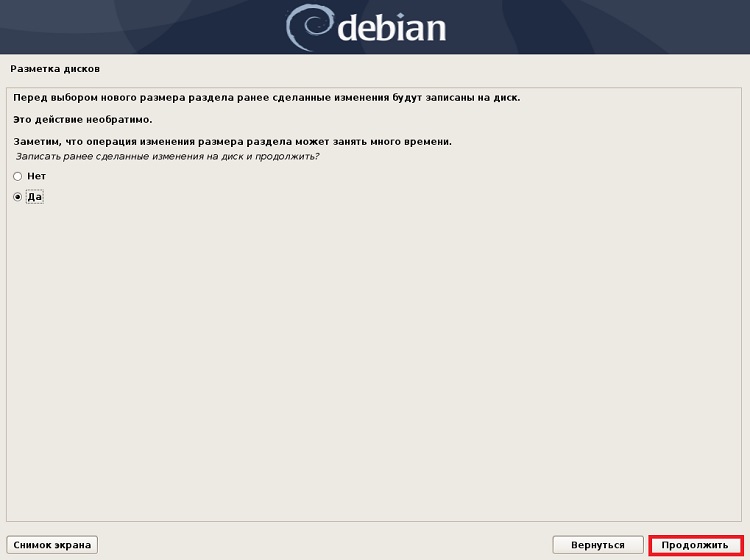
В следующем окне соглашаемся с тем, что ранее сделанные изменения будут записаны на диск, т.е. отвечаем «Да» и нажимаем «Продолжить».
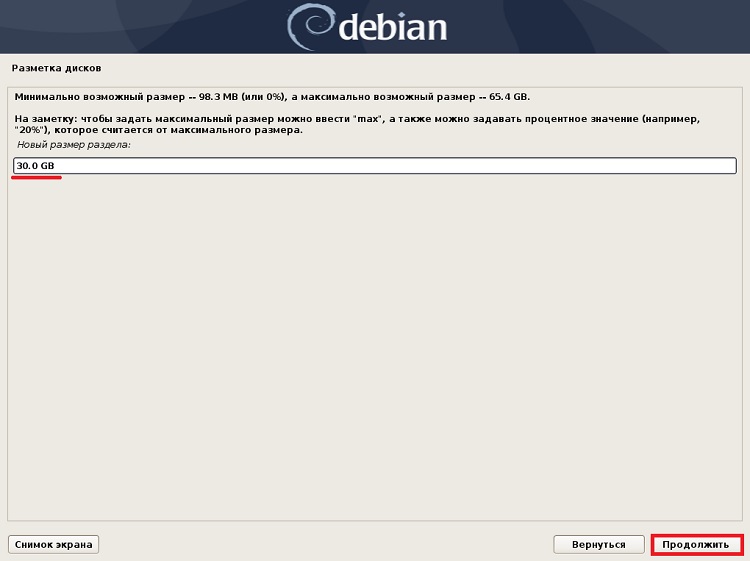
Здесь указываем новый размер диска D, при этом он должен быть в пределах допустимых значений (на экране будет отображено минимальное и максимальное значение). У меня тестовый диск небольшой, поэтому я оставляю 30 гигабайт под диск D на Windows, а все оставшееся место, у меня это около 35 гигабайт, останется под Linux Debian 10.
Нажимаем «Продолжить».
В результате размер раздела изменится и образуется свободное место, которое теперь мы можем использовать под Debian.
Выбираем его и нажимаем «Продолжить».

Разделы мы можем создавать вручную, один за другим, а можем просто выбрать автоматический режим, при котором программа установки сама выполнит всю разметку, при этом это будет достаточно хорошая разметка.
Я выбираю пункт «Автоматически разметить свободное место».
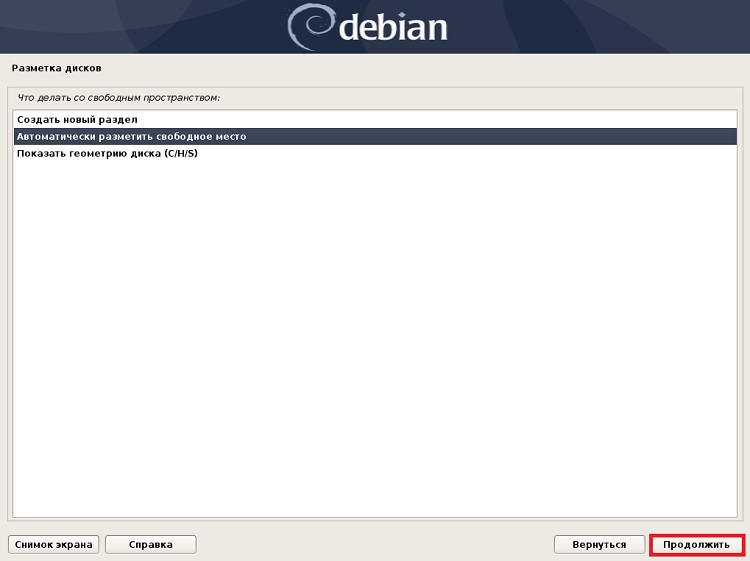
Затем программа предлагает по умолчанию хранить все файлы на одном разделе, но лучше все-таки создать отдельный раздел для личных файлов, т.е. раздел home, я так и поступаю, выбираю соответствующий пункт и нажимаю «Продолжить».

В итоге будут созданы все необходимые разделы:
- Раздел для подкачки (swap);
- Корневой раздел для системы (/);
- Раздел для пользовательских данных (home).
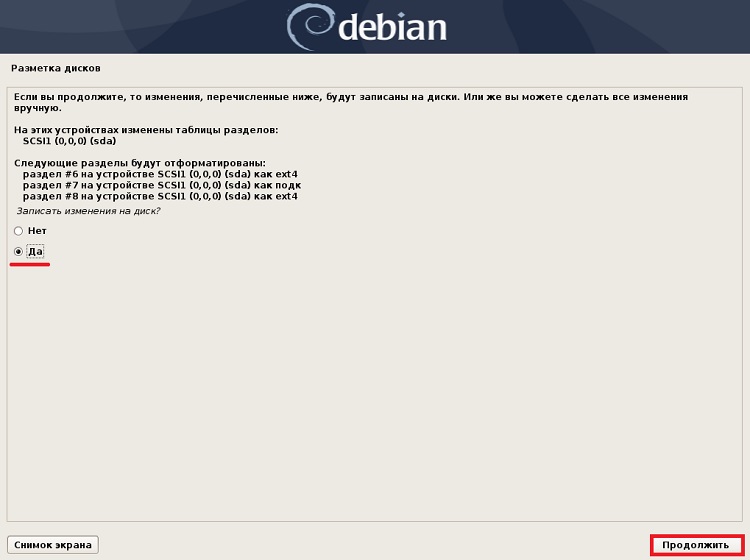
На этом разметка закончена. Выбираем пункт «Закончить разметку» и нажимаем «Продолжить».
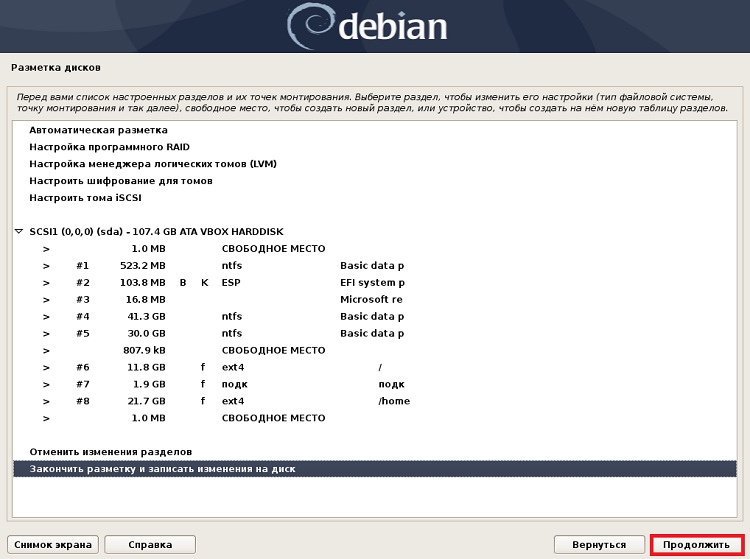
Соглашаемся с внесением изменений на диск, отвечаем «Да», и нажимаем «Продолжить».
Шаг 15 – Установка базовой системы
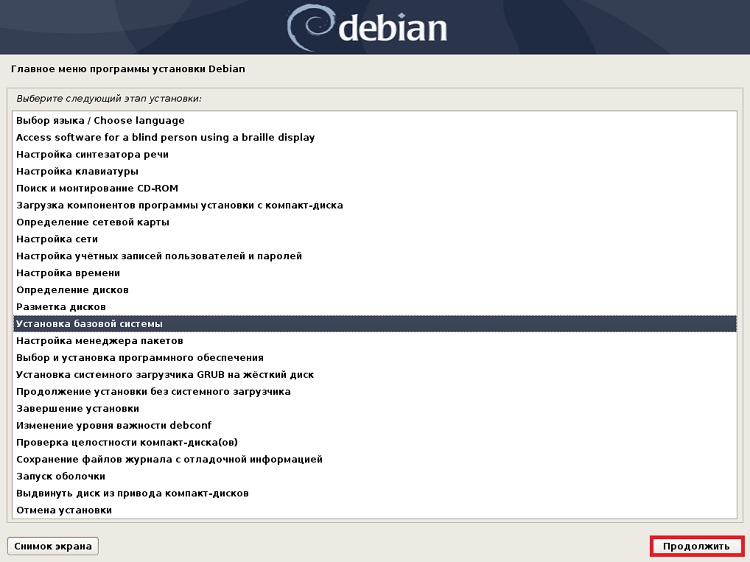
После того как все необходимые мероприятия, связанные с разметкой диска, будут выполнены, мы снова попадаем в основное меню, теперь нам нужно установить базовую систему, для этого выбираем пункт «Установка базовой системы», и нажимаем «Продолжить».
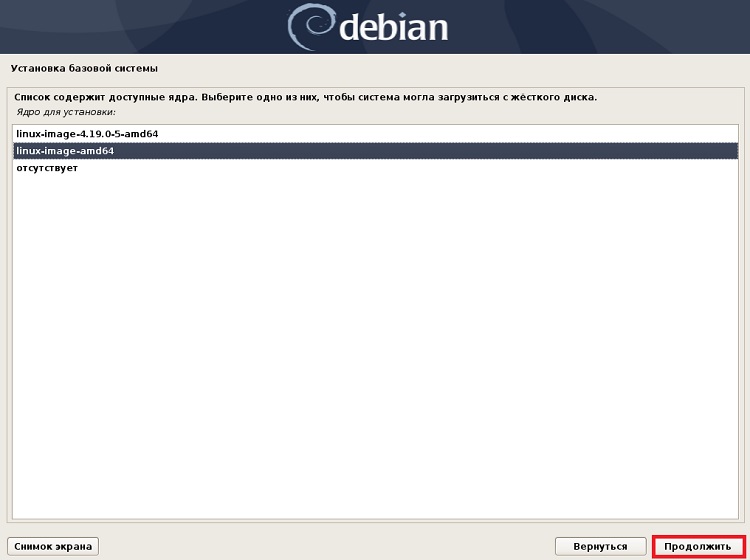
Начнётся установка базовой системы. В процессе у нас спросят, какое ядро Linux мы хотим установить, выбираем нужное и продолжаем (можно оставить по умолчанию).
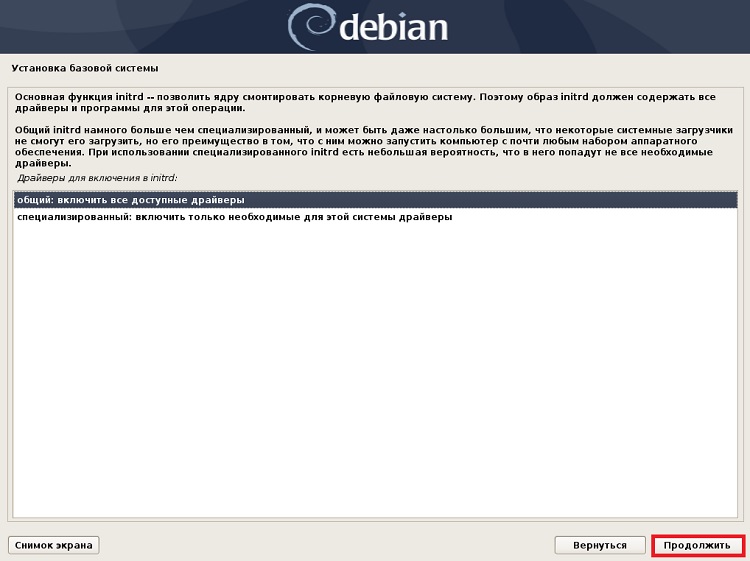
Далее оставляем по умолчанию, т.е. включить все доступные драйвера, и нажимаем «Продолжить».
Шаг 16 – Настройка менеджера пакетов
После установки базовой системы переходим к настройке менеджера пакетов. Для этого выбираем нужный пункт и нажимаем «Продолжить».
У нас спросят, хотим ли мы просканировать дополнительный диск, у нас его нет, поэтому отвечаем «Нет», и продолжаем.
Затем, если мы не хотим использовать зеркало архива в сети, отвечаем «Нет», но это по Вашему усмотрению, можете ответить и «Да».
В следующем окне оставляем все по умолчанию.
Шаг 17 – Выбор и установка программного обеспечения
Переходим к настройке и установке ПО, нажимаем «Продолжить».

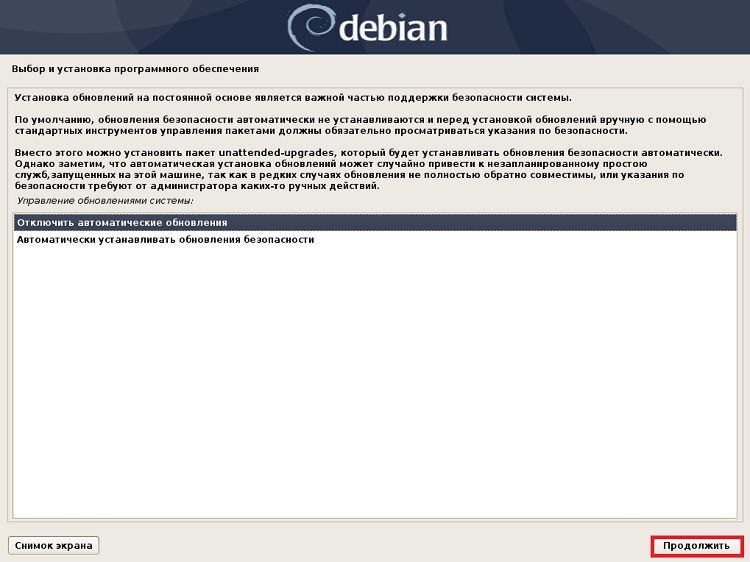
Здесь мы можем настроить автоматическую установку обновлений безопасности, хотя по умолчанию данная возможность отключена, я оставляю по умолчанию, и нажимаю «Продолжить».
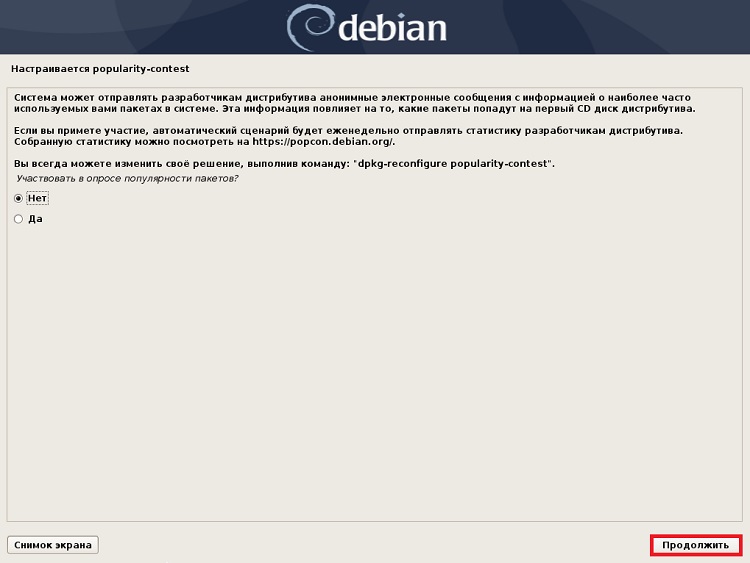
Далее нам предложат участвовать в опросе популярности пакетов, если хотите, то участвуйте, если нет, то, соответственно, нет. Продолжаем.
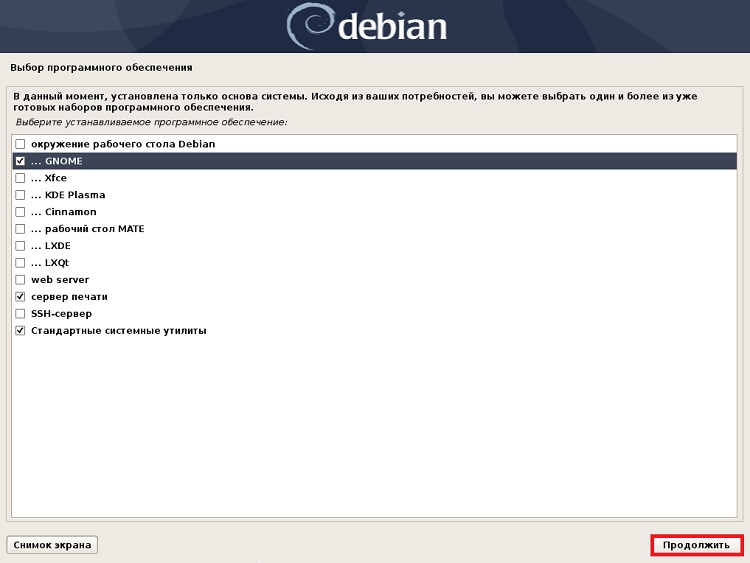
Теперь мы можем выбрать графическую оболочку, с которой у нас будет установлен Debian, я для примера выберу классическую для Debian среду GNOME.
Выбираем и нажимаем «Продолжить».
Начнётся установка ПО, данный процесс будет длиться где-то минут 10.
Шаг 18 – Установка системного загрузчика GRUB на жесткий диск
После того как установка ПО закончится, переходим к установке загрузчика, нажимаем «Продолжить».
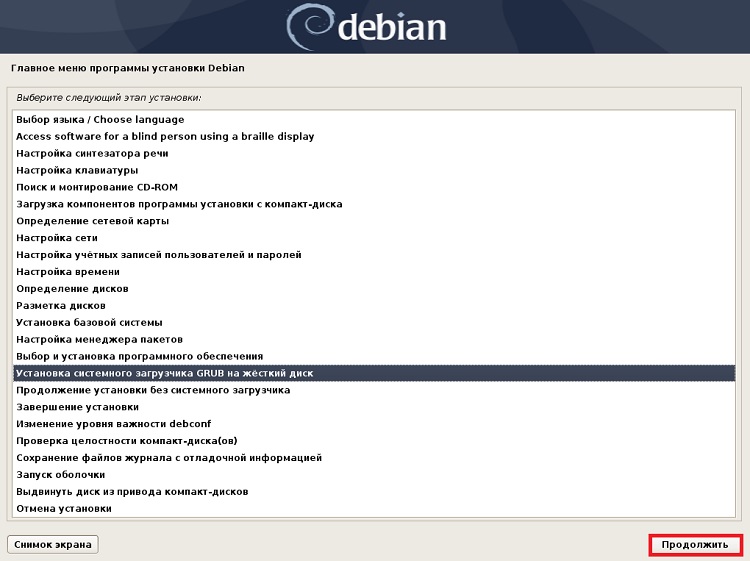
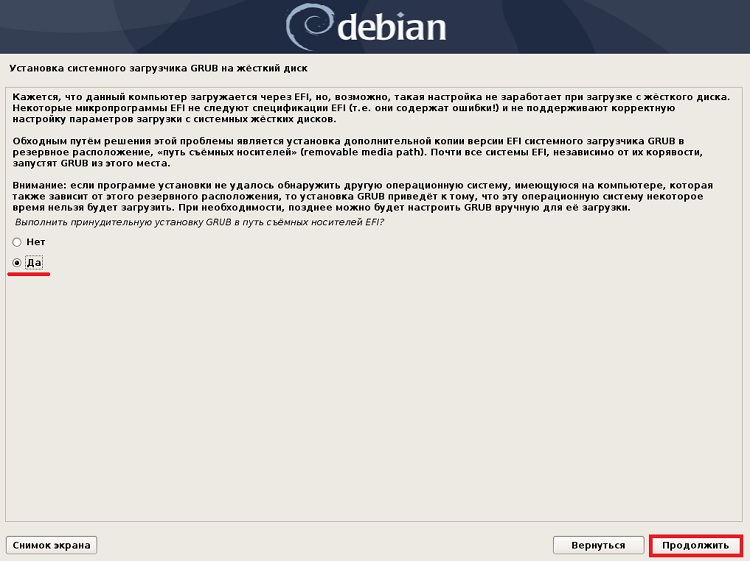
Вот мы и дошли до самого важного пункта, ради которого мы и затеяли установку Debian 10 в экспертном режиме. Здесь нам нужно отметить «Да» для того, чтобы установить загрузчик GRUB в так называемый «путь съемных носителей» (removable media path), это позволит UEFI запускать GRUB в качестве основного загрузчика на компьютере.
Ставим «Да», и нажимаем «Продолжить».
Шаг 19 – Завершение установки
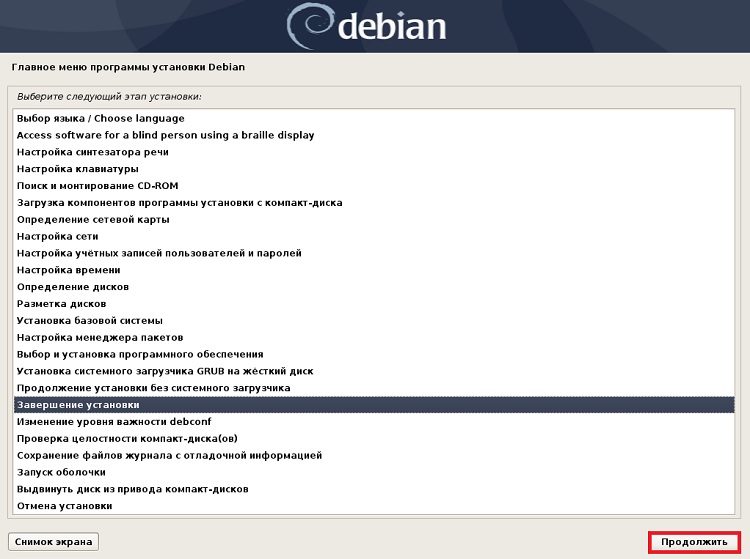
На этом процесс установки закончен, нам осталось его завершить, выбираем пункт «Завершение установки», и нажимаем «Продолжить».
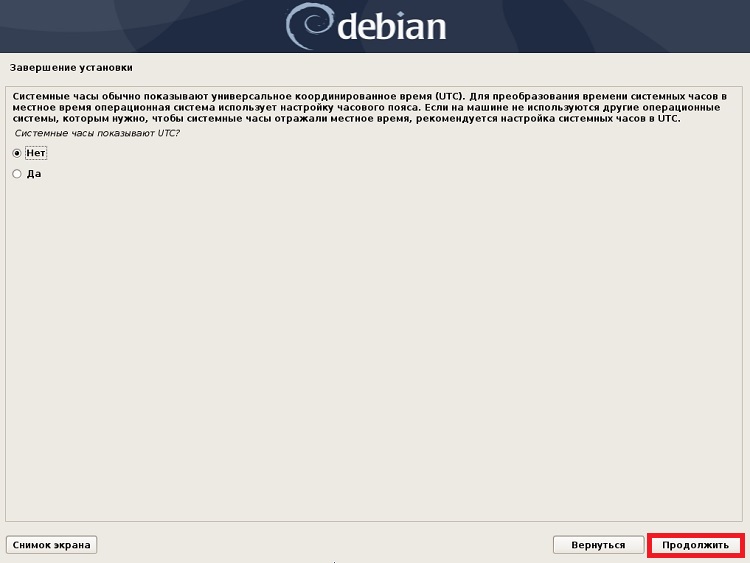
Единственное, нас еще спросят про системные часы UTC.
Нажимаем «Продолжить».
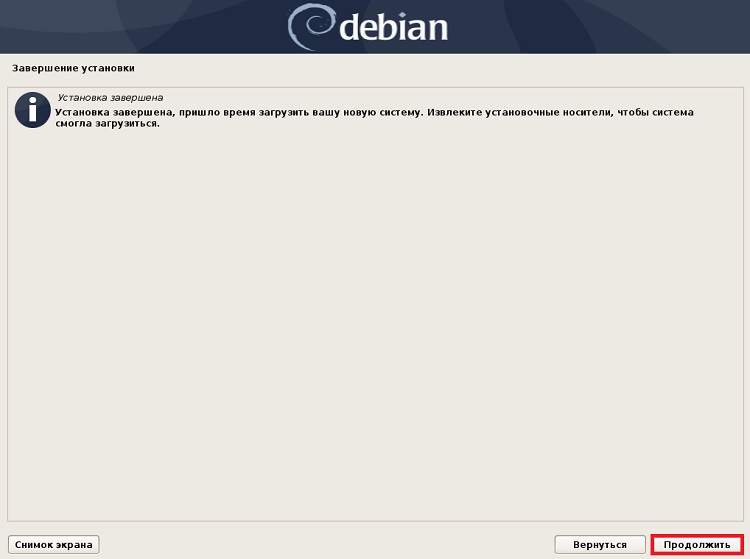
На этом точно все, нажимаем «Продолжить».
Загрузка системы
Теперь, когда компьютер будет загружаться, у Вас будет появляться окно загрузчика GRUB, в котором Вы можете выбрать, в какую операционную систему Вам нужно загрузиться.
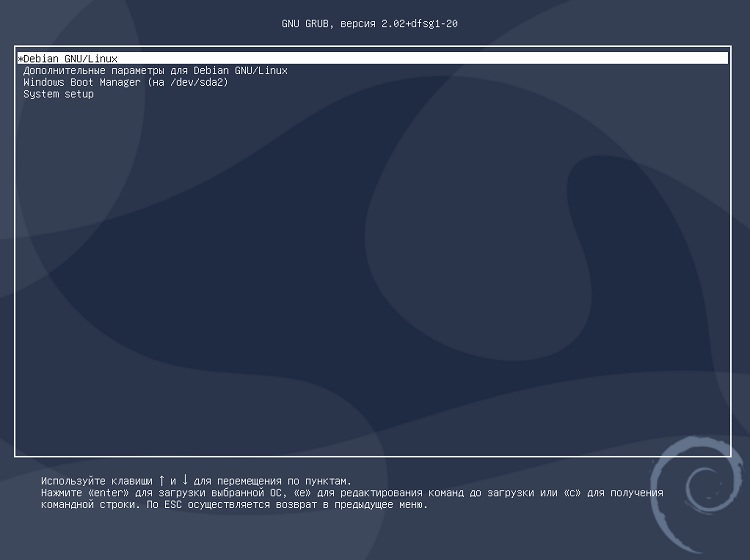
В моем случае:
- Debian GNU/Linux – это операционная система Linux Debian 10;
- Windows Boot Manager (на /dev/sda2) – это Windows 10.
Если ничего не выбрать, то через несколько секунд по умолчанию будет загружаться Debian. Однако можно сделать и так, чтобы по умолчанию загружалась Windows 10, и даже переименовать пункты меню для удобства, об этом я уже рассказывал в материале – Как изменить порядок загрузки операционных систем (Linux, Windows) в GRUB.
Самое главное то, что при таком способе установки Debian 10 система будет запускать загрузчик GRUB, который позволяет выбирать операционную систему.
На этом все, надеюсь, материал был Вам полезен, пока!
So, you finally made the bold decision to try out Linux after much convincing. However, you do not want to let go of your Windows 10 operating system yet as you will still be needing it before you learn the ropes on Linux. Thankfully, you can easily have a dual boot setup that allows you to switch to either of the operating systems upon booting your system. In this guide, you will learn how to dual boot Windows 10 alongside Debian 10.
Prerequisites
Before you get started, ensure you have the following:
- A bootable USB or DVD of Debian 10
- A fast and stable internet connection ( For installation updates & third party applications)
Additionally, it worth paying attention to how your system boots (UEFI or Legacy) and ensure both the operating systems boot using the same boot mode.
Step 1: Create a free partition on your hard drive
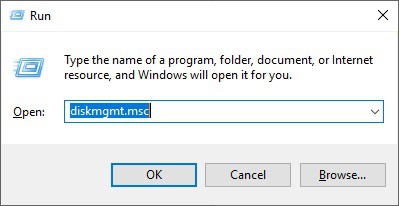
To start off, you need to create a free partition on your hard drive. This is the partition where Debian will be installed during the installation process. To achieve this, you will invoke the disk management utility as shown:
Press Windows Key + R to launch the Run dialogue. Next, type diskmgmt.msc and hit ENTER
This launches the disk management window displaying all the drives existing on your Windows system.
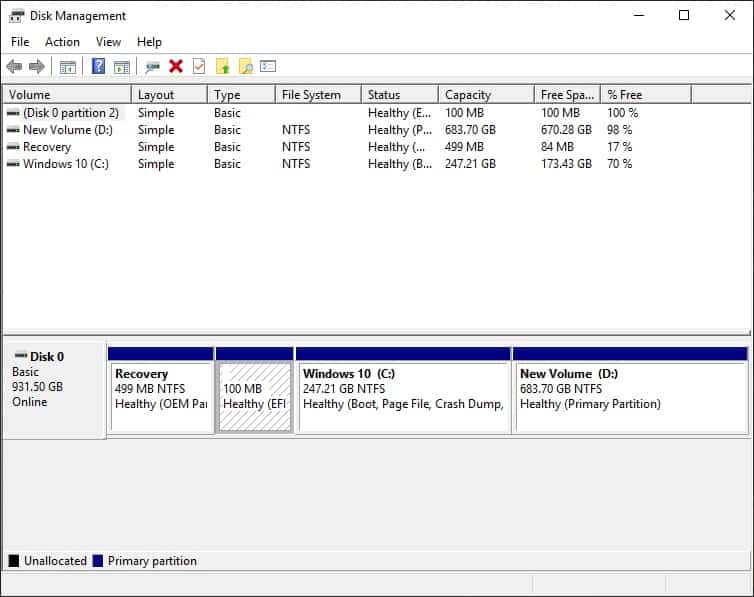
Next, you need to create a free space for Debian installation. To do this, you need to shrink a partition from one of the volumes and create a new unallocated partition. In this case, I will create a 30 GB partition from Volume D.
To shrink a volume, right-click on it and select the ‘shrink’ option
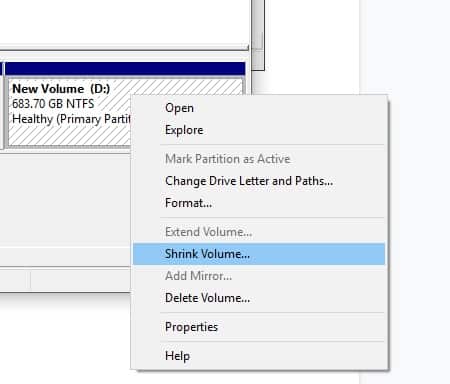
In the pop-up dialogue, define the size that you want to shrink your space. Remember, this will be the disk space on which Debian 10 will be installed. In my case, I selected 30000MB ( Approximately 30 GB). Once done, click on ‘Shrink’.
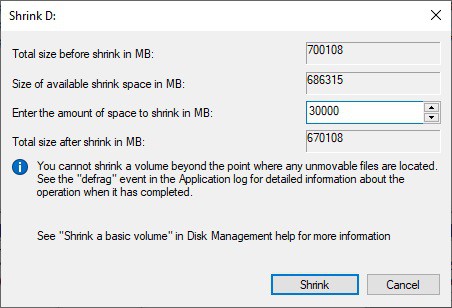
After the shrinking operation completes, you should have an unallocated partition as shown:
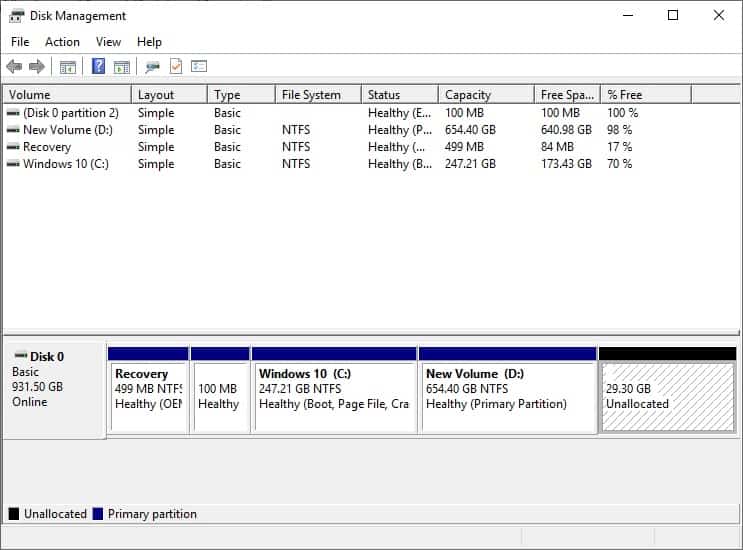
Perfect! We are now good to go and ready to begin the installation process.
Step 2: Begin the installation of Debian 10
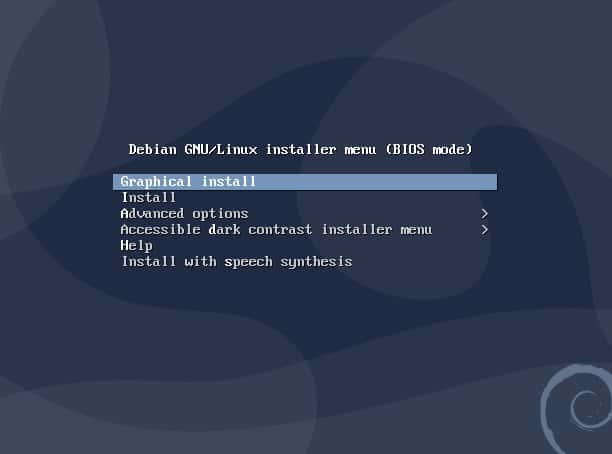
With the free partition already created, plug in your bootable USB drive or insert the DVD installation medium in your PC and reboot your system. Be sure to make changes to the boot order in the BIOS set up by pressing the function keys (usually, F9, F10 or F12 depending on the vendor). This is crucial so that the PC boots into your installation medium. Saves the BIOS settings and reboot.
A new grub menu will be displayed as shown below: Click on ‘Graphical install’
In the next step, select your preferred language and click ‘Continue’
Next, select your location and click ‘Continue’. Based on this location the time will automatically be selected for you. If you cannot find you located, scroll down and click on ‘other’ then select your location.
Next, select your keyboard layout.
In the next step, specify your system’s hostname and click ‘Continue’
Next, specify the domain name. If you are not in a domain environment, simply click on the ‘continue’ button.
In the next step, specify the root password as shown and click ‘continue’.
In the next step, specify the full name of the user for the account and click ‘continue’
Then set the account name by specifying the username associated with the account
Next, specify the username’s password as shown and click ‘continue’
Next, specify your timezone
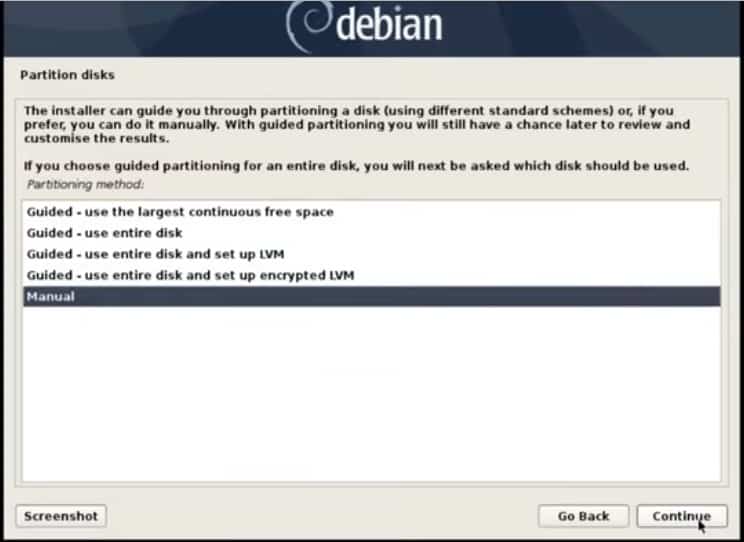
At this point, you need to create partitions for your Debian 10 installation. If you are an inexperienced user, Click on the ‘Use the largest continuous free space’ and click ‘continue’.
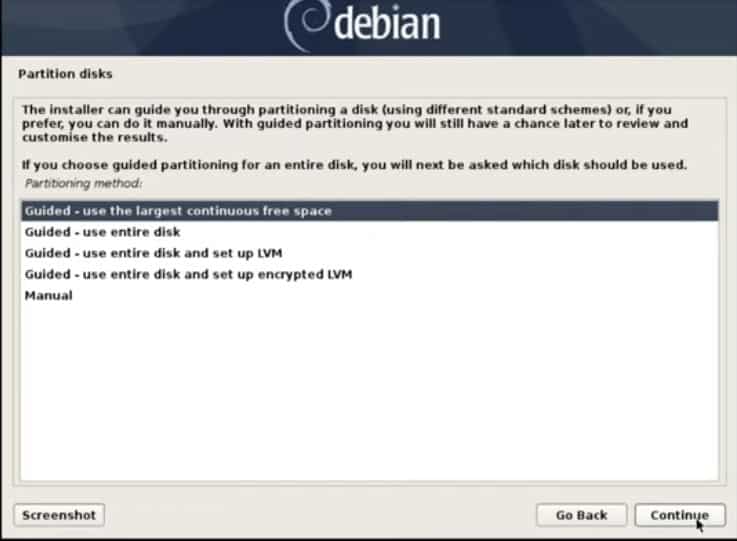
However, if you are more knowledgeable about creating partitions, select the ‘Manual’ option and click ‘continue’
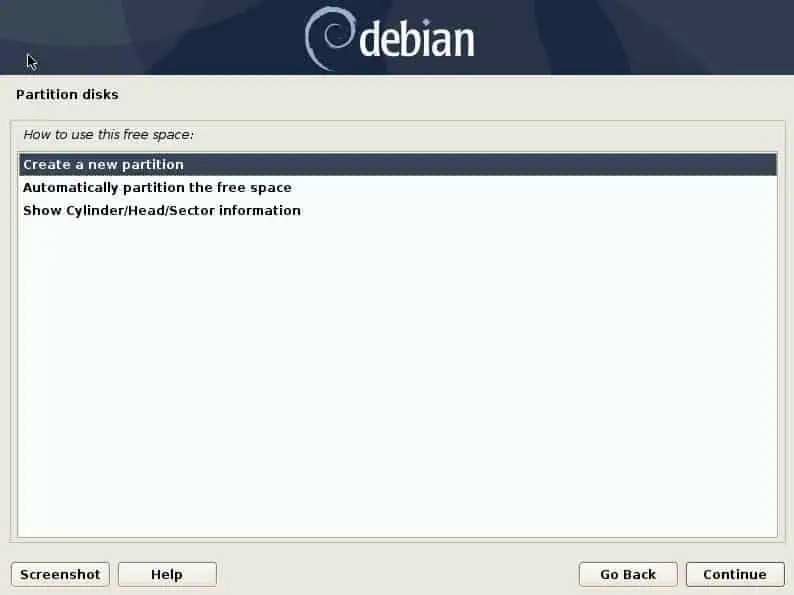
Thereafter, select the partition labeled ‘FREE SPACE’ and click ‘continue’ . Next click on ‘Create a new partition’.
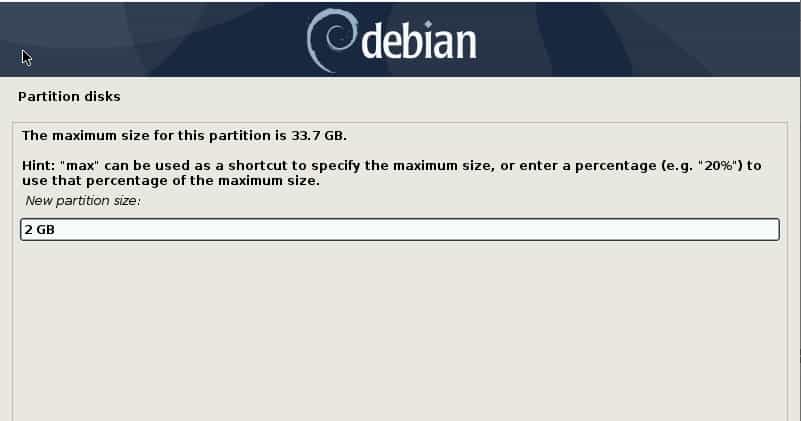
In the next window, first, define the size of swap space, In my case, I specified 2GB. Click Continue.
Next, click on ‘’Primary’ on the next screen and click ‘continue’

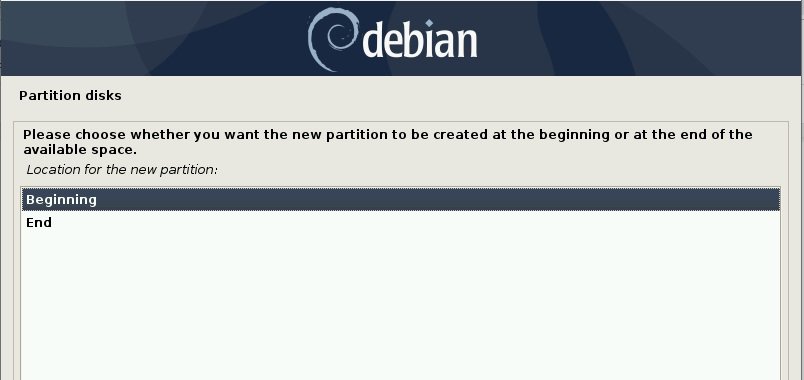
Select the partition to start at the beginning and click continue.
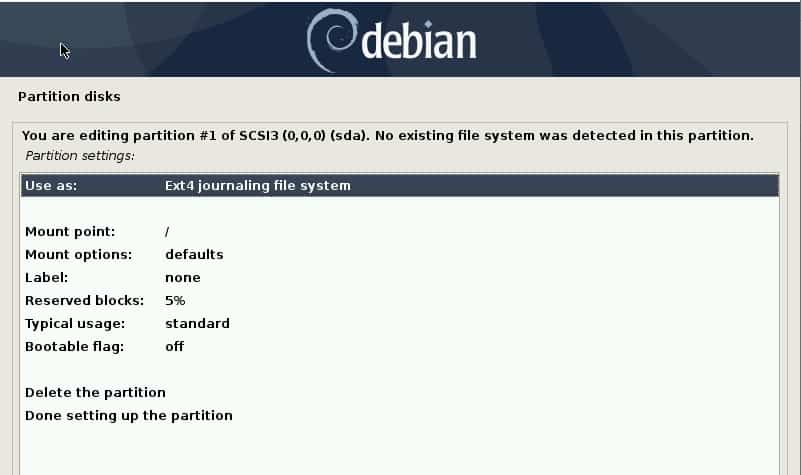
Next, click on Ext 4 journaling file system and click ‘continue’
On the next window, select swap and click continue
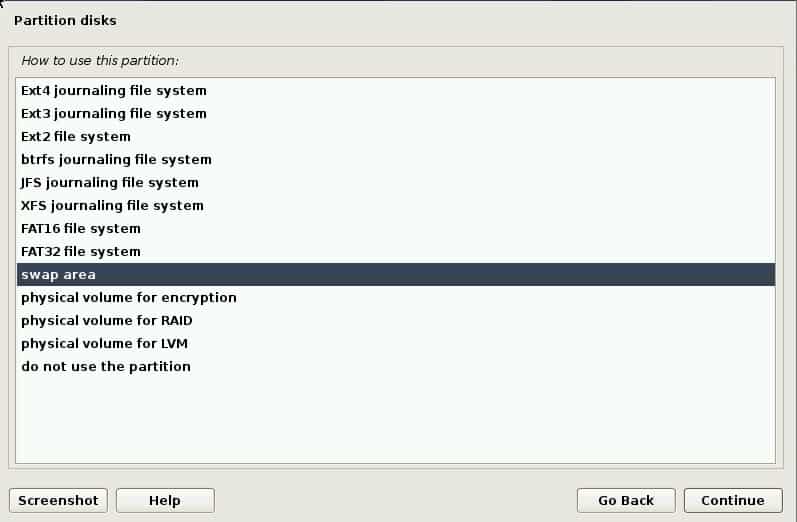
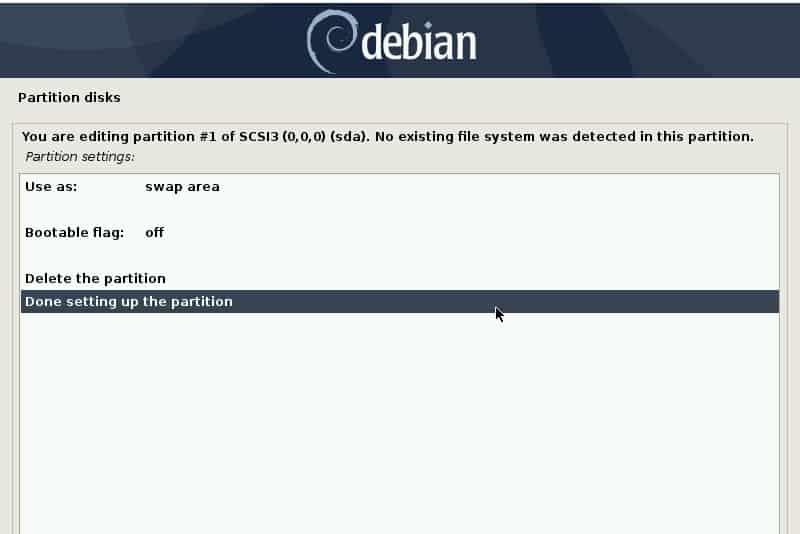
Next, click on done setting the partition and click continue.
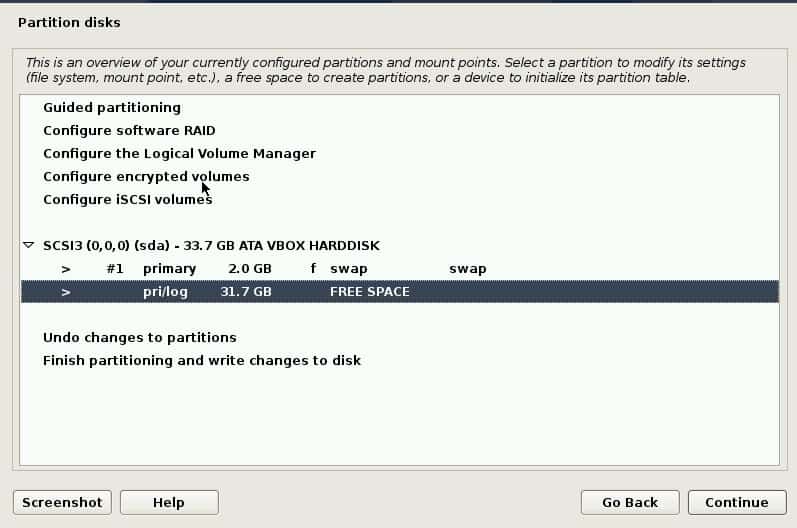
Back to the Partition disks page, click on FREE SPACE and click continue
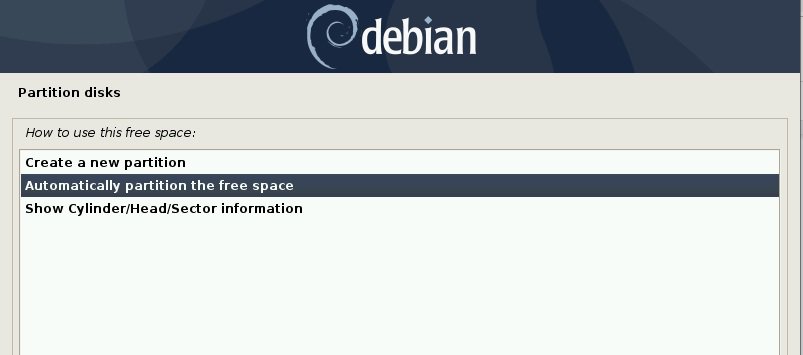
To make your life easy select Automatically partition the free space and click continue.
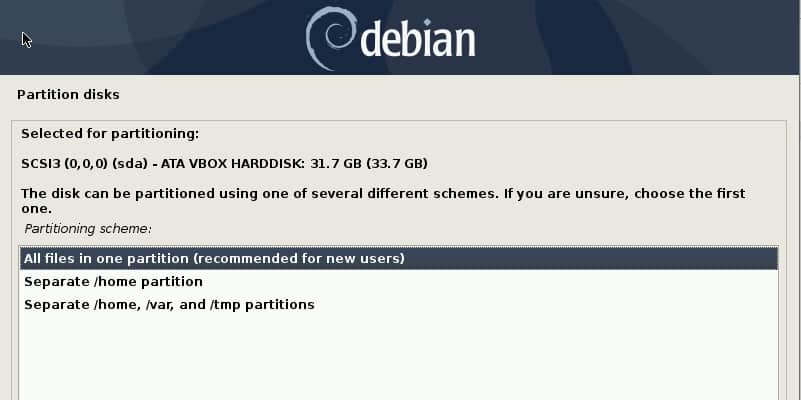
Next click on All files in one partition (recommended for new users)
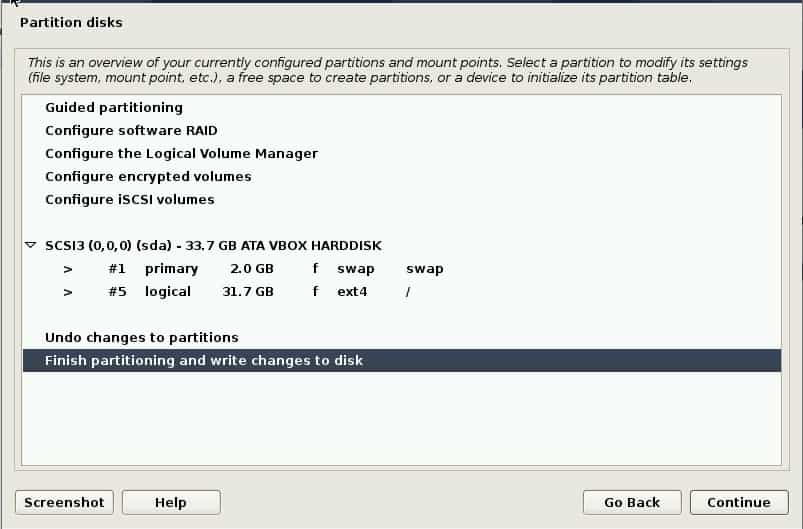
Finally, click on Finish partitioning and write changes to disk and click continue.
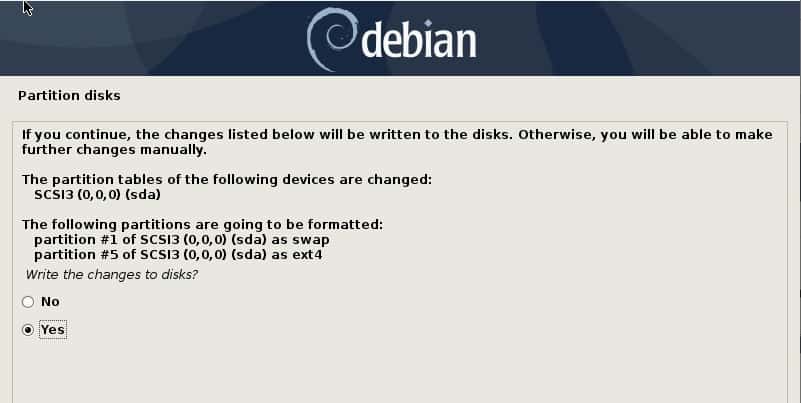
Confirm that you want to write changes to disk and click ‘Yes’
Thereafter, the installer will begin installing all the requisite software packages.
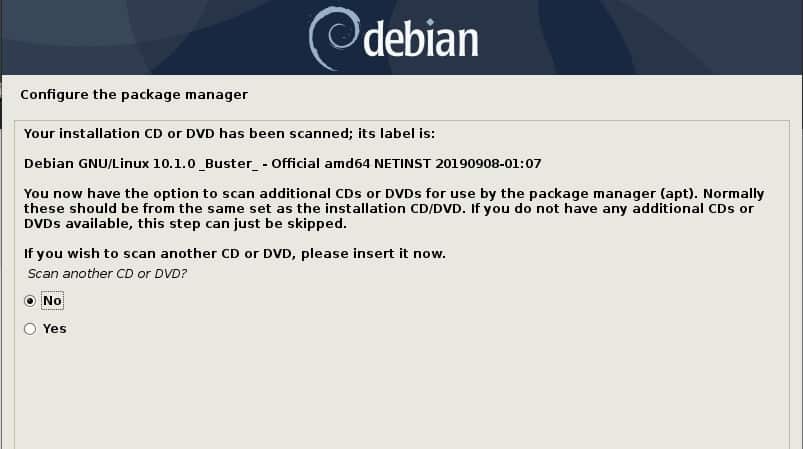
When asked if you want to scan another CD, select No and click continue
Next, select the mirror of the Debian archive closest to you and click ‘Continue’
Next, select the Debian mirror that is most preferable to you and click ‘Continue’
If you plan on using a proxy server, enter its details as shown below, otherwise leave it blank and click ‘continue’
As the installation proceeds, you will be asked if you would like to participate in a package usage survey. You can select either option and click ‘continue’ . In my case, I selected ‘No’
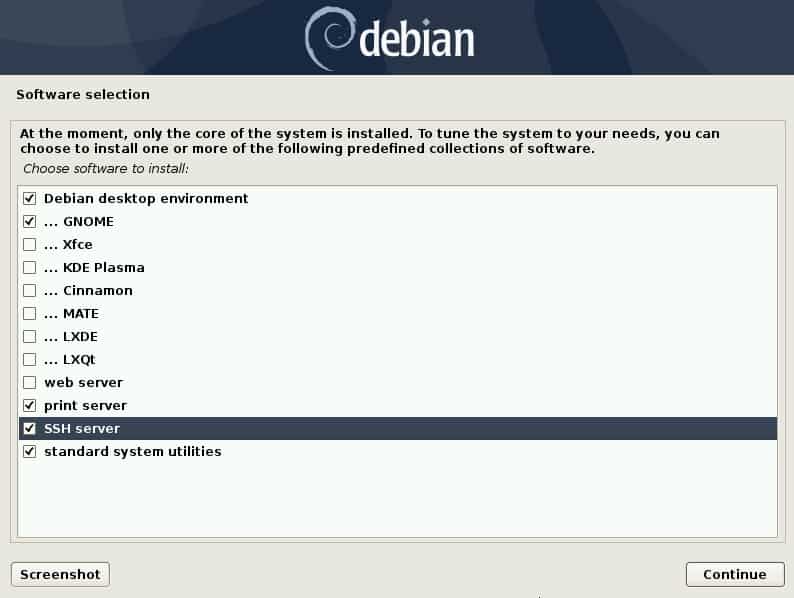
Next, select the packages you need in the software selection window and click continue.
The installation will continue installing the selected packages. At this point, you can take a coffee break as the installation goes on.
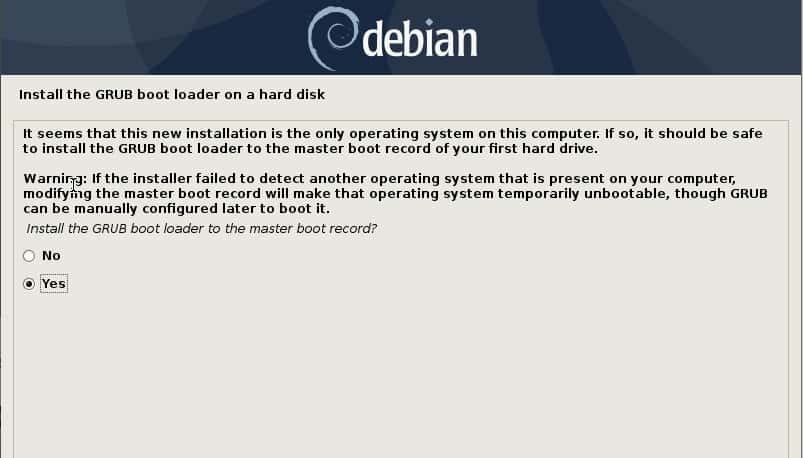
You will be prompted whether to install the grub bootloader on Master Boot Record (MBR). Click Yes and click Continue.
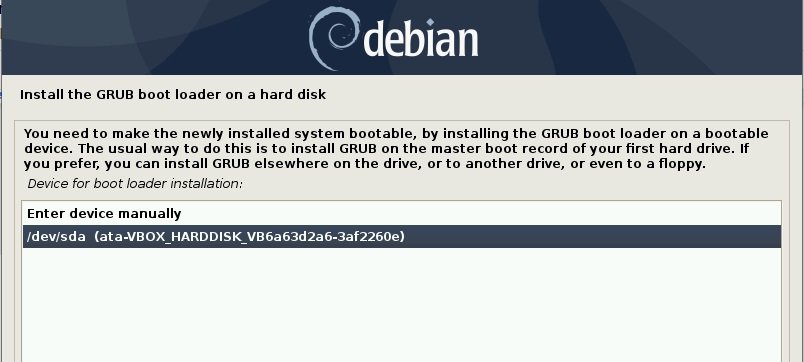
Next, select the hard drive on which you want to install grub and click Continue.
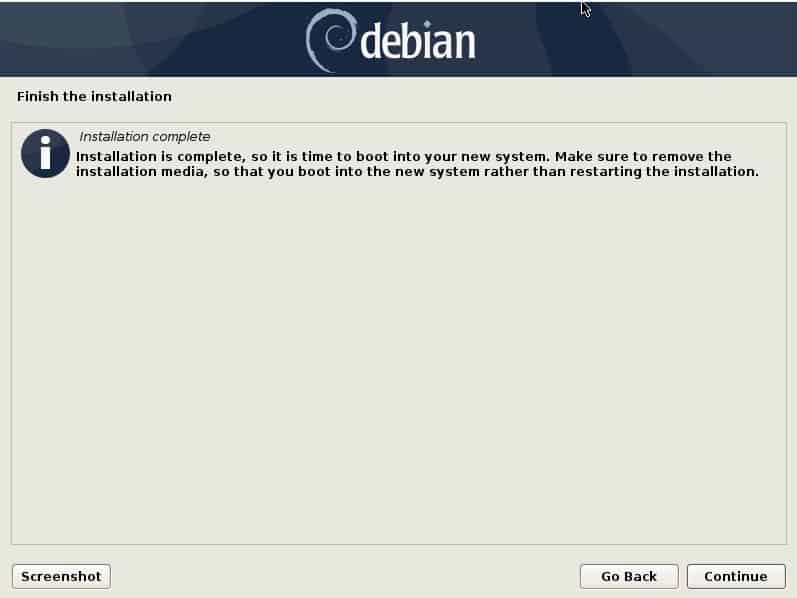
Finally, the installation will complete, Go ahead and click on the ‘Continue’ button
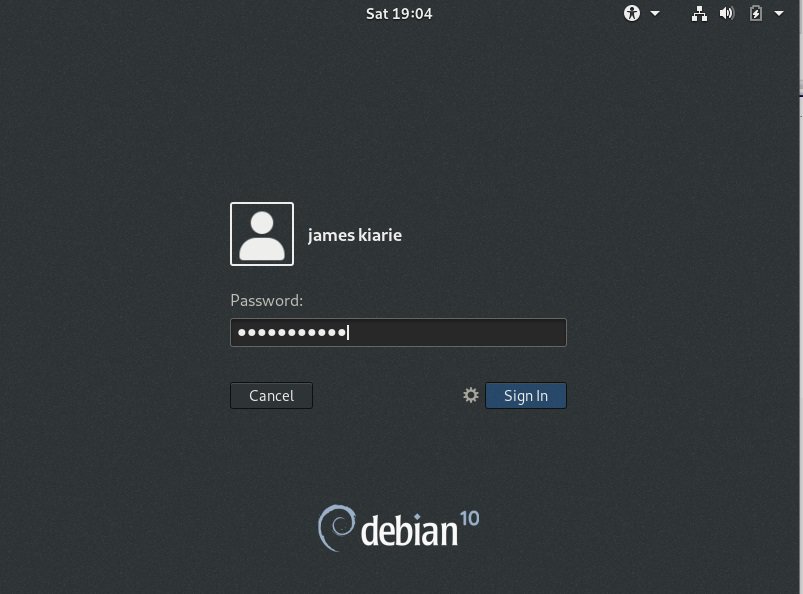
You should now have a grub menu with both Windows and Debian listed. To boot to Debian, scroll and click on Debian. Thereafter, you will be prompted with a login screen. Enter your details and hit ENTER.
And voila! There goes your fresh copy of Debian 10 in a dual boot setup with Windows 10.